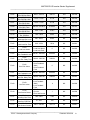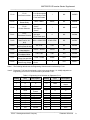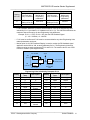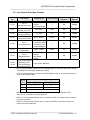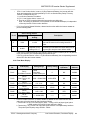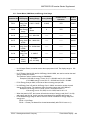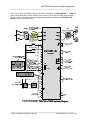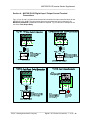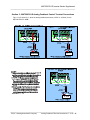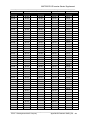
1
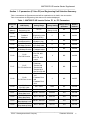
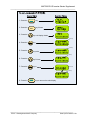
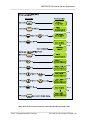
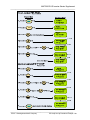
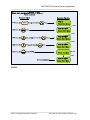
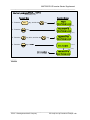
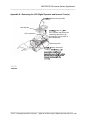
MA7200 PLUS INVERTER
SERIES Supplement
For Fan and Pump Applications
speed
time
Rev. 1.02 – AUG. 5th 2008
MA7200 PLUS Inverter Series Supplement
__________________________________________________________________
TABLE OF CONTENTS
Introduction
Page
Section 1 - P parameters (P1 thru P5) and Engineering Unit Selection Summary................ 1 - 3
Table 1 - MA7200 PLUS Inverter Series P1 to P5 Parameters.........................................
Table 2 - Engineering Units Selection by Parameter P1-01.................................
Section 2 - P Parameter specifications………………………………………………………………
2.1 - Scaled Feedback and Engineering units......................................................
2.2 - Programmable Local / Remote Switch.........................................................
2.3 - PID Sleep Functions.....................................................................................
2.4 - External PID Functions (Input / Output Terminal).........................................
2.5 - External PID Functions (Gain Setting and Monitoring).................................
2.6 - Load Loss Detection Function......................................................................
2.7 - Over Feedback Function for PID Feedback Signal......................................
2.8 - Low Feedback Function for PID Feedback Signal.......................................
2.9 - Low Suction Detection Function...................................................................
2.10 - Flow Meter Display.......................................................................................
2.11 - Power Meter, KWh Meter, and Energy Cost Usage......................................
1-3
3
4 - 22
4-5
6
6-8
8 - 10
11 - 12
12 - 14
14 - 15
15 - 16
17 - 19
19 - 21
22
Section 3 - MA7200 PLUS Block Diagrams................................................................................. 23 - 24
Fig. 3.1 – MA7200 PLUS 1 – 2 HP........................................................................ 23
Fig. 3.2 – MA7200 PLUS 3 – 75 HP...................................................................... 24
Section 4 – MA7200 PLUS Digital Input / Output Control Terminal Connections....................
Fig. 4.1a Start / Stop Switch Connection 1 – 2 HP................................................
Fig. 4.1b External Fault Contact Connection 1 - 2 HP...........................................
Fig. 4.1c Fault Reset Switch Connection 1 – 2 HP................................................
Fig. 4.1d Fault Output Contacts 1 – 2 HP..............................................................
Fig. 4.2a Start / Stop Switch Connection 3 - 75 HP...............................................
Fig. 4.2b External Fault Contact Connection 3 - 75 HP.........................................
Fig. 4.2c Fault Reset Switch Connection 3 - 75 HP...............................................
Fig. 4.2d Fault Output Contacts 3 - 75 HP.............................................................
25 - 28
25
25
25
25
26
26
26
26
Section 5 - MA7200 PLUS Analog Feedback Control Terminal Connections..........................
Fig. 5.1a 0 - +10V Analog Feedback 1 - 2 HP......................................................
Fig. 5.1b 4 - 20 mA Analog Feedback 1 - 2 HP....................................................
Fig. 5.1c 4 - 20 mA Pressure Transducer Analog Feedback Example 1 – 2 HP.
Fig. 5.2a 0 - +10V Analog Feedback 3 - 75 HP....................................................
Fig. 5.2b 4 - 20 mA Analog Feedback 3 - 75 HP .................................................
Fig. 5.2c 4 - 20 mA Pressure Transducer Analog Feedback Example 3 – 75HP.
27 - 28
27
27
27
28
28
28
Section 6 - Initial power up and operational check....................................................................
Step 1 Before Starting the Inverter........................................................................
Step 2 Apply Power to the Drive............................................................................
Step 3 Set Drive to Run mode...............................................................................
Step 4 Check for Fan or Pump Motor Operation...................................................
Step 5 Start / Stop Control Method........................................................................
Step 6 Setting Minimum Speed in Pump Applications...........................................
29 - 33
29
29
30
30 - 31
31 - 32
32 - 33
________________________________________________________________
TECO – Westinghouse Motor Company
Index
MA7200 PLUS Inverter Series Supplement
__________________________________________________________________
Section 7 - Setting up a simple Main PID Loop...........................................................................
Step 7 Connect a 0-10V Feedback Device ...........................................................
Step 8 Setting up the Main PID Control Loop and Feedback Input........................
Step 9 Select Feedback Engineering Units (P1-01) and Scaling (P1-02)..............
Step 10 Setting PID Parameters; Proportional Gain (Bn-17) and..........................
Integral Time (Bn-18)
Step 11 Setting Parameters Acceleration (Bn-01) and..........................................
Deceleration (Bn-02) times
Step 12 Setting PID Sleep Function Parameters (P1-04), (P2-01), (P2-02),.........
(P2-03) and (P2-04)
Step 13 Testing the System...................................................................................
34 - 47
34
34 - 36
36 - 37
38 - 39
40 - 41
42 - 47
47
Appendix A - Removing the LCD Digital Operator and Inverter Cover(s)................................. 48
Appendix B – Inverter Parameter Setting List.............................................................................. 49 - 50
NOTES
________________________________________________________________
TECO – Westinghouse Motor Company
Index
MA7200 PLUS Inverter Series Supplement
__________________________________________________________________
MA7200 PLUS Parameters for Fan and Pump Applications
Introduction
This supplement is used in conjunction with the MA7200 Manual and describes the parameters
that were added mainly for fan and pump applications. All of the features and modes of
operation, such as vector, CT and PG feedback for the MA7200 remain unchanged.
The following features are provided by the MA7200 PLUS Inverter Series.
•
Scaled PID Feedback Signal and Engineering Units.
•
Programmable Local/Remote Switch with single key in keypad.
•
PID Sleep Function (Sleep based on PID output frequency or digital input, Wake-up based on
feedback).
•
External PID Function (Using terminal AO1 or AO2 as output).
•
Load Loss Detection function with programmable shutdown.
•
Over Feedback for PID Feedback Signal with programmable shutdown.
•
Low Feedback for PID Feedback Signal with programmable shutdown.
•
Low Suction Detection function with programmable shutdown and restart.
•
Flow Meter Display (Input via analog input or pulse train).
•
Power Meter, kWh Meter, and Energy Cost Usage.
Each of the parameters affecting the above listed features will be described in some detail in this
supplement. Although the parameters covered herein are mainly for fan and pump applications, they
can be used in other applications as well.
As can be seen, the features listed mainly have to do with closed loop PID operations, although
display functions and energy monitoring are also covered. There are two PID loops available, the
main PID loop and the external PID loop. The main PID loop is used for applications directly
affecting the operation of the inverter with the motor. The external PID loop, which is a new feature of
the MA7200 PLUS, is available to control a non drive function. An example of an external PID loop
may be a temperature controller that needs to regulate temperature in a particular process
independently from the main drive and motor functions. Note that some of the control inputs and
parameters when used by the main PID loop are not available for the external PID loop. This will be
covered more in detail in Section 2.
Sections 3, 4, and 5 show block diagrams and control wiring diagrams for the 1 - 2 HP and 3 - 75 HP
inverters. These diagrams are used to show the terminal connections and are referred to in the
various sections of this supplement.
Section 6 covers the initial drive start up. It will allow the user to get the motor up and running and to
set certain parameters through the keypad .
In Section 7, a step by step example for a simple PID loop will be given. This will familiarize the user
with the implementation of some of the parameters covered in Sections 1 and 2. The parameters will
be set via the keypad which will give the user some familiarity with keypad navigation. Although the
parameters and control of the inverter can also be set via serial communication, it is beyond the
scope of this guide. However, Modbus addresses are given for the parameters in Sections 1 and 2.
For further information on serial communication control or special external control, the user is referred
to the MA7200 Installation and Operating Manual.
________________________________________________________________
TECO – Westinghouse Motor Company
Introduction
MA7200 PLUS Inverter Series Supplement
__________________________________________________________________
Section 1 - P parameters (P1 thru P5) and Engineering Unit Selection Summary.
Table 1 summarizes the P parameters and will be explained more in detail in the next section.
Table 2 summarizes the Engineering Units that can be used and displayed.
Table 1 - MA7200 PLUS Inverter Series P1 to P5 Parameters
Parameter
No.
P1-01
(Note 1)
P1-02
(Note 2)
P1-03
P1-04
P1-05
P1-06
P1-07
P1-08
P1-09
P1-10
P2-01
P2-02
P2-03
P2-04
LCD Display
P1-01
Engineering Unit
P1-02
Feedback
Maximum
P1-03
Local/Remote Key
P1-04
PID Sleep Function
P1-05
PID Wakeup Direction
Setting Range
Factory Setting
Change During
Operation
Modbus
Address
00 - 25
00
(Set by Cn-28)
NO
0x0600
0
NO
0x0601
0
NO
0x0602
0
NO
0x0603
1
NO
0x0604
0
NO
0x0605
0
NO
0x0606
3
NO
0x0607
100%
NO
0x0608
0.0s
NO
0x0609
000.00%
YES
0x0700
0001.0 s
YES
0x0701
000.00%
YES
0x0702
001.0 s
YES
0x0703
10 - 9999
(Engineering Units
set by P1-01)
0: Enabled
1: Disabled (Jog)
0: PID Sleep Invalid
1: PID Sleep Valid
0: Feedback above
1: Feedback below
0: Ext. PID Invalid
1: Ext. PID, AO1
P1-06
output
Ext. PID Function
2:Ext. PID, AO2
output
0: Set Point
Parameter
P1-07
1: Terminal VIN
Ext. PID Set Source 2: Terminal AIN
3: Terminal AUX
4: Set Point RS-485
1: Feedback Term.
VIN
P1-08
2: Feedback Term.
Ext. PID Fbk. Source
AIN
3: Feedback Term.
AUX
P1-09
001 - 100%
Ext. PID I Limit
Ext. PID Filter
0.0 - 2.5s
P2-01
000.00 - 100.00%
Sleep Start Level
P2-02
000.1 - 600.0 s
Sleep Start Delay
P2-03
000.00 - 099.99%
Sleep Wakeup Level
P2-04
000.1 - 600.0 s
Sleep Wakeup Delay
________________________________________________________________
TECO – Westinghouse Motor Company
Parameter Overview
1
MA7200 PLUS Inverter Series Supplement
__________________________________________________________________
P2-05
P2-06
P2-07
P2-08
P2-09
P2-10
P3-01
P3-02
P3-03
P3-04
P3-05
P3-06
P3-07
P3-08
P3-09
P3-10
P3-11
P3-12
P3-13
P2-05
Ext. PID Set Point
P2-06
Ext. PID Fbk. Gain
P2-07
Ext. PID P Gain
P2-08
Ext. PID I Time
P2-09
Ext. PID D Time
P2-10
Ext. PID Bias
P3-01
Load Loss Det. Level
P3-02
Load Loss Det. Time
P3-03
Load Loss Action
P3-04
Over Feedback Level
P3-05
Over Fbk. Delay Time
P3-06
Over Fbk. Action
P3-07
Low Feedback Level
P3-08
Low Fbk. Delay Time
000.0 - 100.0%
000.0%
YES
0x0704
00.01 - 10.00
01.00
YES
0x0705
00.01 - 10.00
01.00
YES
0x0706
000.00 - 100.00 s
010.00 s
YES
0x0707
0.00 - 1.00s
0.00 s
YES
0x0708
-100 - 100%
000%
YES
0x0709
000 - 200%
030%
NO
0x0800
00.0 - 25.5s
05.0s
NO
0x0801
0
NO
0x0802
000.00 - 099.99%
000.00%
NO
0x0803
0000.0 - 6000.0s
0003.0s
NO
0x0804
0
NO
0x0805
000.00 - 099.99%
000.00%
NO
0x0806
0000.0 - 6000.0s
0003.0s
NO
0x0807
0
NO
0x0808
1
NO
0x0809
100s
NO
0x080A
10%
NO
0x080B
001.0 A
NO
0x080C
0: None
1: Load Loss Alarm
2: Load Loss Fault
0: None
1: Over Feedback
Alarm
2: Over Feedback
Fault
0: None
1: Low Feedback
P3-09
Alarm
Low Fbk. Action
2: Low Feedback
Fault
1: PID Error
P3-10
2: Current
Low Suction Detect
3: Error and Current
P3-11
000 - 300s
Low Suc. Det. Time
P3-12
01 - 30%
Low Suc. PID Error
P3-13
000.1 - 200.0A
Low Suction Current
________________________________________________________________
TECO – Westinghouse Motor Company
Parameter Overview
2
MA7200 PLUS Inverter Series Supplement
__________________________________________________________________
P3-14
P3-14
Low Suction Action
0:None
1: Low Suction Alarm
2: Low Suction Fault
3: Fault and Restart
1
NO
0x080D
P3-15
P3-15
Restart Delay
0005 – 6000s
0300s
NO
0x080E
1
NO
0x080F
0
NO
0x0880
01000 GPM
NO
0x0881
0.0V
NO
0x0882
100.00
NO
0x0883
0.00
YES
0x0884
0.000$
YES
0x08C0
0
YES
0x08C1
0: With Speed
P3-16
Search
Restart Selection 1: W/O Speed
Search
0: None
P4-01
1: Aux Input
Flow Meter Function
2: Pulse Train Input
P4-02
Max Flow for 10V 00000 – 50000 GPM
AUX
P4-03
0.0 - 5.0V
No Flow Point for Aux
P4-04
000.01 – 500.00
Pulse Multiplier
P4-05
0.00 - 0.99
Flow Meter Offset
P5-01
0.000 - 5.000$
Energy Cost per kWh
P5-02
0: No
Reset Energy Usage 1: Reset
P3-16
P4-01
P4-02
P4-03
P4-04
P4-05
P5-01
P5-02
Note 1 - The following table shows the Engineering Units that can be selected by P1-01.
Note 2 - Parameter P1-02 may be assigned a value in the range shown (10 – 9999) only when an
Engineering Unit from 2 to 24 is selected for parameter P1-02.
Setting
0
1
2
3
4
5
6
7
8
9
10
11
12
Table 2 - Engineering Units Selection by Parameter P1-01
Engineering
Engineering
Description
Setting
Description
Unit
Unit
Set by Cn - 28
13
MPM
meter / minute
meter3 /
%
%
14
CMM
minute
PSI
PSI
15
W
W
GPH
gallon / hour
16
kW
kW
gallon /
17
°C
°C
GPM
minute
inW
Inch water
18
m
meter
FPM
feet / minute
19
A
A
CFM
feet3 / minute
20
RPM
RPM
in
inch
21
SPM
stroke/minute
ft
feet
22
/s
unit / s
HP
HP
23
/m
unit / m
°F
°F
24
/h
unit / h
meter /
25
none
m/s
second
________________________________________________________________
TECO – Westinghouse Motor Company
Parameter Overview
3
MA7200 PLUS Inverter Series Supplement
__________________________________________________________________
Section 2 - P Parameter Specifications
The P parameters, together with interacting parameters from other groups, are used to set and
control the following eleven categories.
1.
2.
3.
4.
5.
6.
7.
8.
9.
10.
11.
Scaled Feedback and Engineering units
Programmable Local / Remote Switch
PID Sleep Functions
External PID Functions (Input / Output Terminal)
External PID Functions (Gain Setting and Monitoring)
Load Loss Detection Function
Over Feedback Function for PID Feedback Signal
Low Feedback Function for PID Feedback Signal
Low Suction Detection Function
Flow Meter Display
Power Meter, KWh Meter, and Energy Cost Usage.
Although only the P parameters are explained in detail in this supplement, the user can refer to the
MA7200 Drive manual for further detailed information on the other parameters covered.
2.1 - Scaled Feedback and Engineering Units
Parameter
No.
P1-01
(Note 1)
P1-02
(Note 2)
Un-34
LCD Display
P1-01
Engineering Unit
P1-02
Feedback
Maximum
Un-34
PID Feedback
Display
Setting Range
Factory Setting
Change During
Operation
Modbus
Address
00 - 25
00
(Set by Cn-28)
NO
0x0600
10 - 9999
(Engineering Units
set by P1-01)
0
NO
0x0601
----
----
----
0x0035
Note 1 - The table at the end of this section shows the Engineering Units that can be selected by
P1-01.
Note 2 - Parameter P1-02 may be assigned a value in the range shown (10 – 9999) only when an
Engineering Unit from 2 to 24 is selected by parameter P1-02.
•
P1-01Engineering Unit is used to setup engineering units for normal and PID operation. It
also sets the display format and maximum value of the following parameters.
1 - Set point frequency command (An)
2 - The parameters for the engineering units.
3 - PID feedback monitor point Un-34.
• When P1-01 is set to 00, parameter Cn-28 can be used to set the display format of the
frequency commands (see MA7200 Drive manual for more details). When P1-01 is set to a
value of 01 to 25, parameter Cn-28 is ineffective.
•
The following table shows the display format and maximum value according to the setting of
P1-01.
________________________________________________________________
TECO – Westinghouse Motor Company
Parameter Specifications, Scaled Feedback
4
MA7200 PLUS Inverter Series Supplement
__________________________________________________________________
Setting
of P1-01
0
1
2 - 25
•
Display Format
PID Feedback
Set Point and
Monitor and
Freq. Command
Engineering
parameters
Follow the
XXX.XX %
Setting of Cn-28
XXX.XX %
XXXX
Maximum Value
PID Feedback
Set Point and
Monitor and
Freq. Command
Engineering
parameters
Follow the
100.00%
Setting of Cn-28
100.00%
Parameter P1-02
P1-02 Feedback Maximum is used to set the maximum value of the Engineering Units
selected by P1-01, provided P1-01 is not set to 00 or 01 (%). This value then becomes the
maximum that can be set by all other Engineering Unit parameters.
Example: P1-01 = 2 (PSI), P1-02 = 300, then the PID Feedback Signal
(0 – 10V / 4-20mA) = 0 - 300PSI.
•
P1-01 must be set first and P1-02 must be set second before any other Engineering Units
related parameters can be set.
•
Monitor point Un-34, PID Feedback Display, is used to monitor the PID feedback signal
applied to terminal AIN or VIN, as set by parameter Sn-24. The Engineering Units and
maximum value are set by parameters P1-01 and P1-02. The monitor value is zero if PID
function is disabled. (See diagram below)
PID Feedback
Signal
Gain and Bias
VIN
(0-10V)
Bn-05
Bn-06
AIN
(4-20 mA)
Bn-07
Bn-08
Gain and Bias
Setting
0
PID Feedback
Monitor (Un-34)
P1-01
P1-02
Sn-24
Set
Engineering
Units and Max.
value
Engineering Units Selection by Parameter P1-01
Engineering
Engineering
Description
Setting
Unit
Unit
Set by Cn - 28
13
MPM
Description
1
%
%
14
CMM
2
3
PSI
GPH
15
16
W
kW
4
GPM
17
°C
°C
5
6
7
8
9
10
11
inW
FPM
CFM
in
ft
HP
°F
18
19
20
21
22
23
24
m
A
RPM
SPM
/s
/m
/h
meter
A
RPM
stroke/minute
unit / s
unit / m
unit / h
12
m/s
PSI
gallon / hour
gallon /
minute
Inch water
feet / minute
feet3 / minute
inch
feet
HP
°F
meter /
second
meter / minute
meter3 /
minute
W
kW
25
-
none
________________________________________________________________
TECO – Westinghouse Motor Company
Scaled Feedback
5
MA7200 PLUS Inverter Series Supplement
__________________________________________________________________
2.2 - Programmable Local/Remote Switch
Parameter
No.
LCD Display
P1-03
Setting Range
P1-03
0: Enabled
Local / Remote Key 1: Disabled
Factory Setting
0
Change During
Operation
Modbus
Address
NO
0x0602
•
P1-03 is used to set the function of the Local / Remote key.
0: Local / Remote key is enabled.
1: Local / Remote key is disabled. (When disabled this key is used as a JOG key)
•
When P1-03 is enabled, the local / remote function is effective when the inverter is in stop
mode. Below is a list of Run Source, Frequency Source, SEQ LED Status, and REF LED
Status during Remote Mode and Local Mode.
Status
Remote
Local
Run command source
and frequency command source
Set by parameters Sn-04, Run
Source Selection and Sn-05,
Frequency Source Selection.
From keypad
SEQ LED Status
REF LED Status
ON if Sn-04 is not 0
(Run source is
not from keypad)
ON if Sn-05 is not 0
(Frequency source is
not from keypad)
OFF
OFF
•
When P1-03 is enabled, the inverter is in remote mode after power-on and the
Local / Remote switch is effective only when the inverter is in stop mode.
•
Generally, the local / remote switch is used when Sn-04 and Sn-05 = 0 at the same time
(either the RUN source or Frequency source is controlled by the keypad). The local / remote
function is disabled if both Sn-04 and Sn-05 are set to 0.
•
When P1-03 is disabled, the Local / Remote key operates as a JOG key. The JOG function
is effective if:
1 -The inverter is in stop mode and
2 - Sn-04 = 0 (Run source is from the keypad).
2.3 - PID Sleep Function
Parameter
No.
P1-04
P1-05
P2-01
P2-02
Factory Setting
Change During
Operation
Modbus
Address
0
NO
0x0603
1
NO
0x0604
000.00 - 100.00%
000.00%
YES
0x0700
000.1 - 600.0 s
0001.0 s
YES
0x0701
LCD Display
Setting Range
P1-04
PID Sleep Function
P1-05
PID Wakeup Direction
P2-01
Sleep Start Level
P2-02
Sleep Start Delay
0: PID Sleep Invalid
1: PID Sleep Valid
0: Feedback above
1: Feedback below
________________________________________________________________
TECO – Westinghouse Motor Company
Local / Remote Switch, PID Sleep Mode
6
MA7200 PLUS Inverter Series Supplement
__________________________________________________________________
P2-03
P2-04
Un-35
Sn-25
-Sn-28
-30
- Sn-32
P2-03
Sleep Wakeup Level
P2-04
Sleep Wakeup Delay
Un-35
During PID Sleep
Multi-Function Input
Terminal 5, 6, 7,8
Function Selection
Multi-Function Output
(RA-RB-RC, DO1,
R2A-R2C) Function
Selection
000.00 - 099.99%
000.1 - 600.0 s
000.00%
YES
0x0702
001.0 s
YES
0x0703
----
----
0x0041
---33: PID Sleep
0x0119 –
0x011C
27: During PID Sleep
0x011E0x0120
• If the PID function is disabled, Sn-64 = 0, and the parameter P1-04 PID Sleep Function is
set to 1 (PID Sleep Valid), a "PID Sleep Setting Error" will occur.
• Below is a block diagram and graph illustrating the PID sleep function.
Feedback
PID output
P2-01= 0 –100%
sleep level
( Motor Off)
P2-02= 0.1 – 600 s
sleep level delay
Set Point
PID output
P2-03 = (E.U.)
wakeup level
P2-04= 0.1 – 600 s
wakeup level delay
0 PID output
Normal Operation
Sleep Active
Normal Operation
________________________________________________________________
TECO – Westinghouse Motor Company
PID Sleep Mode
7
MA7200 PLUS Inverter Series Supplement
__________________________________________________________________
•
When the PID output falls below the Sleep Start Level P2-01 for a time exceeding the Sleep
Start Delay P2-02 setting, the sleep function will be activated.
•
The PID Sleep function can also be activated using a digital input. When the corresponding
digital input Sn-25 –28 = 33 is ON for a time exceeding Sleep Start Delay P2-02 setting, the
sleep function will be activated.
•
If the sleep start level P2-01 is less than the minimum output frequency set by Cn-07, and
none of the multi-functional input terminals Sn-25-28 are set to =33 (PID Sleep), the sleep
function will be disabled.
•
A "DI PID Sleep Setting Error" will occur if any of Sn-25-28 is set to =33 (PID Sleep) and:
1.The PID function is disabled, Sn-64 = 0 or,
2.The PID sleep function is disabled, P1-04 = 0.
•
The PID Wakeup Direction P1-05 is used to set the condition for PID Wakeup Check.
0: PID Wakeup while the PID feedback rises above the wakeup level.
1: PID Wakeup while the PID feedback falls below the wakeup level.
While the PID sleep function is valid, the PID wakeup direction also affects the PID function.
•
Sleep Wakeup Level P2-03 and Sleep Wakeup Delay P2-04, are used for PID Wakeup
Check. When the inverter is in the PID sleep mode, and the PID feedback falls below or
rises above (direction set by P1-05 PID Wakeup Direction) the sleep wakeup level P2-03 for
a time exceeding the programmed wakeup delay time P2-04, the inverter will exit the sleep
mode and resume run.
•
If PID sleep is enabled and the inverter is in PID sleep mode, the During PID Sleep Monitor
Un-35 will be 1. If any of Multi-Function Output Functions Sn-30 -32 is set as "During PID
Sleep", the corresponding output will be ON.
•
If the inverter is in PID sleep mode, the accumulated integration error of the PID function will
be cleared.
2.4 - External PID Function (Input and Output Terminal)
Parameter
No.
P1-06
P1-07
P1-08
LCD Display
Setting Range
0: Ext. PID Invalid
1: Ext. PID, AO1
P1-06
output
Ext. PID Function
2: Ext. PID, AO2
output
0: Set Point
Parameter
P1-07
1: Terminal VIN
Ext. PID Set Source 2: Terminal AIN
3: Terminal AUX
4: Set Point RS-485
1: Feedback Term.
VIN
P1-08
2: Feedback Term.
Ext. PID Fbk. Source
AIN
3: Feedback Term.
AUX
Factory Setting
Change During
Operation
Modbus
Address
0
NO
0x0605
0
NO
0x0606
3
NO
0x0607
________________________________________________________________
TECO – Westinghouse Motor Company
PID Sleep Mode, External PID Function I/O
8
MA7200 PLUS Inverter Series Supplement
__________________________________________________________________
Sn-29
Sn-33
- Sn-34
18: External PID Set Point
Multi-Function Analog
(Set Automatically while P1-07 = 3)
Input (AUX) Function
19: External PID Feedback
Selection
(Set Automatically while P1-08 = 3)
Multi-Function Analog
14: External PID Output 2
Output (AO1, AO2)
(Set Automatically when P1-06 = 1 or 2)
Function Selection
•
External PID Function P1-06, is used to activate the external PID function and to set output
terminal AO1or AO2 to external PID output signal.
0: External PID Disabled
1: External PID Enabled. Terminal AO1 is the output signal of the external PID function.
2: External PID Enabled. Terminal AO2 is the output signal of the external PID function.
•
External PID Function is enabled when P1-06 is set to a nonzero value and the inverter is in
the DRIVE mode, independent of the RUN / STOP status of the inverter.
•
If the External PID Function P1-06 is set to select output AO1 or AO2, the corresponding
parameter Sn-33 or Sn-34 will be set to = 14 (Ext. Output 2) automatically, and cannot
be changed until P1-06 is set = 0 (Invalid).
•
External PID Set Point Source P1-07 and External PID Feedback Source P1-08, are used
to select the input source of the set point and feedback of the external PID function as
shown in the following table.
Value
Parameter P1-07
(External PID Set Point Source)
Parameter P1-08
(External PID Feedback Source)
0
Keypad (Parameter P2-05)
--------
1
Terminal VIN
Terminal VIN
2
Terminal AIN
Terminal AIN
3
Terminal AUX
Terminal AUX
4
RS-485 Communication
(0x0009, 1000/100.0%)
--------
• If P1-07 and P1-08 set to the same source, the "Ext PID Setting Error" message will be
displayed.
• Generally, each of the analog input terminals AIN (0/4-20mA), VIN (0-10V), and AUX (0-10V),
can be used for the following provided that certain conditions are met :
1- Frequency Command Source, when Sn-05=1
2- Main PID function, when SN-64=1 for both set point and feedback.
3- External PID, when P1-06= 1 or 2 for both set point and feedback.
When selected by a given function, that analog input is not available for any other
function, and must be considered when planning for a particular application. If any of the
unavailable terminals are selected as the External PID Function set point or feedback source,
an "Ext PID Setting Error" message will occur.
________________________________________________________________
TECO – Westinghouse Motor Company
External PID Function I/O
9
MA7200 PLUS Inverter Series Supplement
__________________________________________________________________
The following tables serve to further illustrate the terminals that are available to the external PID
loop under the conditions specified.
Terminals available for external PID while (main) PID is DISABLED (Sn-64 = 0)
Sn-05
Setting
Sn-24
Setting
Sn-29
Setting
0
1
1
0, 2 or 3
0
Terminals
Available to Ext.
PID
Comment
AIN, AUX
VIN (0-10V) is used as the Frequency
command
VIN, AUX
AIN (0/4-20mA) is used as the
Frequency command
2 or 3
AUX (0-10V)
-----
VIN, AIN, & AUX
VIN & AIN are used as the Frequency
command
-------
Terminals available for external PID while (main) PID is ENABLED (Sn-64 ≠ 0)
Sn-05
Setting
Sn-24
Setting
Sn-29
Setting
Terminals
Available to Ext.
PID
0
9*
AIN (0/4-20mA)
9
VIN (0-10V)
≠9
AUX (0-10V)
1
1
None
2 or 3
9*
0
0, 2, or 3
1
-----
2 or 3
Comment
VIN is used as main PID feedback
AUX is used as main PID set point
AIN is used as main PID feedback
AUX is used as main PID set point
AIN is used as main PID feedback
VIN is used as main PID set point
(External PID is
unavailable)
VIN and AIN are used as main PID
feedback
AUX is used as main PID set point
AIN, AUX
VIN is used as main PID feedback
VIN, AUX
AIN is used as main PID feedback
AUX
VIN and AIN are used as main PID
feedback
* Terminal VIN is used as the main PID feedback and Sn-29 must equal 9 to set terminal AUX as
the main PID set point, otherwise an error message will be displayed.
•
If the AUX input is selected for use by the External PID Functions (P1-07=3) or (P1-08=3),
Sn-29 will be set to 18 (Ext PID Set point) or 19 (Ext PID Feedback) automatically, and can
not
• be edited until input AUX is not selected as an External PID Function Source.
________________________________________________________________
TECO – Westinghouse Motor Company
External PID Function I/O
10
MA7200 PLUS Inverter Series Supplement
__________________________________________________________________
2.5 - External PID Function (Gain Setting and Monitor)
Parameter
No.
P1-09
P1-10
P2-05
P2-06
P2-07
P2-08
P2-09
P2-10
Un-42
Un-43
Un-44
Un-45
Sn-25
- Sn-28
Sn-33
- Sn-34
LCD Display
P1-09
Ext. PID I Limit
P1-10
Ext. PID Filter
P2-05
Ext. PID Set Point
P2-06
Ext. PID Fbk. Gain
P2-07
Ext. PID P Gain
P2-08
Ext. PID I Time
P2-09
Ext. PID D Time
P2-10
Ext. PID Bias
Un-42
Ext. PID Feedback
Un-43
Ext. PID Input
Un-44
Ext. PID Output
Un-45
Ext. PID Output 2
Multi-Function Input
Terminal 5, 6, 7,8
Function Selection
Multi-Function Analog
Output (AO1, AO2)
Function Selection
Setting Range
Factory
Setting
Change During Modbus
Operation
Address
1 - 100%
100%
NO
0x0608
0.0 - 2.5s
0.0s
NO
0x0609
0.0 - 100.0%
0.0%
YES
0x0704
0.01 - 10.00
1.00
YES
0x0705
0.01 - 10.00
1.00
YES
0x0706
0.00 - 100.00 s
10.00 s
YES
0x0707
0.00 - 1.00s
1.00 s
YES
0x0708
-100 -100%
0%
YES
0x0709
----
----
----
0x0048
----
----
----
0x0049
----
----
----
0x004A
----
----
----
0x004B
31: External PID Invalid
32: External PID Integrator Reset
12: External PID Input
13: External PID Output
Set Point
Source
0 – 100%
P1-07
(Offset)
P2-10
P2-07
(P Gain)
0 – Keypad
P2-05
Integral Limit
Limit
(+/- 100 %)
Limit
(0 - 100 %)
% value set by
P2-08
1 - VIN
2 - AIN
3 - AUX
4 - RS485
Filter
P1-06
P1-10
0 – PID Disable
1 – AO1
2 – AO2
(I Time)
P1-09
P2-09
P1-08
1 - VIN
2 - AIN
3 - AUX
Feedback
Source
P2-06
Feedback
Gain
Ext PID Input
(Un-43)
Ext PID Feedback
(Un-42)
(D Time)
Ext PID Output
(Un-44)
Ext PID Output 2
(Un-45)
External PID Functional Diagram
________________________________________________________________
TECO – Westinghouse Motor Company
External PID Function Tuning 11
MA7200 PLUS Inverter Series Supplement
__________________________________________________________________
• When the External PID Set Point Source P1-07 is set to 0 (keypad), P2-05 is used to set the
value of the set point in percent.
• External PID Feedback Gain P2-06 is used to set the feedback gain for the External PID
Feedback Source P1-08.
Note: If the Set Point Source P1-07 and Feedback Source P1-08 are set to the same
input an ERROR MESSAGE will occur.
• External PID P Gain P2-07 is used to set the proportion gain (01 – 10).
• External PID I Time P2-08 is used to set the integral time (0 – 100 sec.). Setting I to= 0,
disables the integral function.
• External PID D Time P2-09 is used to set the differential time (0 – 1 sec.). Setting D to =0,
disables the differential function.
• External PID Bias P2-10 is used to set the offset (-100 to +100%).
• External PID I Limit P1-09 is used to set the integral limit (1 – 100%).
• External PID Filter P1-10 is used to set the filter time constant (0 – 2.5 sec.).
• External PID Feedback Un-42, is used to monitor the feedback of the External PID Function.
• External PID Input, External PID Output, and External PID Output 2 are monitored by Un-43,
Un-44, and Un-45 respectively.
• The PID Input and Output 2 can be accessed through Analog Output Terminal AO1 or AO2 by
setting the corresponding parameter Sn-33 and Sn-34 to =12 (External PID Input) or to =13
(External PID Output)
• By setting one of the digital inputs Sn25-28 to =31 (External PID Invalid), the External PID
function can be disabled by activating that input. During the External PID Invalid mode, the
PID feedback, Input, Output 1, and Output 2 are equal to zero.
• By setting one of the digital inputs Sn25-28 to =32 (External PID Integration Reset), the
accumulated integration error can be reset by activating that input.
2.6 - Load Loss Detection Function
Parameter
No.
P3-01
P3-02
P3-03
Sn-29
Sn-30
- Sn-32
LCD Display
P3-01
Load Loss Det. Level
P3-02
Load Loss Det. Time
P3-03
Load Loss Action
Setting Range
Factory Setting
Change During
Operation
Modbus
Address
000 - 200%
030%
NO
0x0800
00.0 - 25.5s
05.0s
NO
0x0801
0
NO
0x0802
0: None
1: Load Loss Alarm
2: Load Loss Fault
Multi-Function Analog
Input (AUX) Function 16: Load Loss Level
Selection
Multi-Function Output
(RA-RB-RC, DO1,
24: Load Loss Detect
DO2) Function
Selection
________________________________________________________________
TECO – Westinghouse Motor Company
External PID Function Tuning, Load Loss Detection 12
MA7200 PLUS Inverter Series Supplement
__________________________________________________________________
• The Load Loss Detection Level can be set by Multi –function Analog Input parameter Sn-29
(AUX Function) when it is set to 16 or by P3-01 Load Loss Det. Level, when Sn-29 is ≠ 16.
Note: When Sn-29 is set to =16 (Aux Function), the load loss level is determined by the
analog value applied to the AUX input terminal and parameter P3-01Load Loss Detect Level
is invalid.
• P3-01 Load Loss Detect Level is set as a percentage of inverter rated current. When Sn-29 =
16, the Load Loss Detect Level is determined by the voltage applied to the AUX input
terminal as shown below.
200%
Inverter Rated
Output Current
0%
0V
10V
Multi-function
Analog Input
• When the inverter output current falls below the Load Loss Detect Level for a time exceeding
the programmed Load Loss Detect Time P3-02, the inverter status will be as set by
parameter P3-03 Load Loss Action as shown in the following table. Also, if any of the MultiFunction Outputs Sn-30 (Relay), Sn-31 (DO1), or Sn-32 (DO2) are set to =24 (Load Loss
Detect), that output will be turned ON.
P3-03
Value
Inverter Status while
Load Loss
Message
while Load Loss
0
Continue Running
----
1
Continue Running
Load Loss Alarm
2
Shut Down
Load Loss Fault
________________________________________________________________
TECO – Westinghouse Motor Company
Load Loss Detection 13
MA7200 PLUS Inverter Series Supplement
__________________________________________________________________
• Below a block diagram and graph illustrating the Load Loss Detection Function.
2.7 - Over Feedback Function for PID Feedback Signal
Parameter
No.
LCD Display
Setting Range
Factory Setting
P3-04
*000.00 - 099.99%
000.00%
Over Feedback Level
P3-05
P3-05
0000.0 - 6000.0s
0003.0s
Over Fbk. Delay Time
0: None
1: Over Feedback
P3-06
P3-06
Alarm
0
Over Fbk. Action
2: Over Feedback
Fault
Multi-Function Output
Sn-30
(RA-RB-RC, DO1,
25: Over Feedback
- Sn-32
DO2 or R2 Relay)
Function Selection
* The engineering units and range are set by parameter P1-01
P3-04
Change During
Operation
Modbus
Address
NO
0x0803
NO
0x0804
NO
0x0805
________________________________________________________________
TECO – Westinghouse Motor Company
Load Loss Detection, Over Feedback Detection 14
MA7200 PLUS Inverter Series Supplement
__________________________________________________________________
• If PID is enabled (Sn-64 ≠ 0), Over Feedback Detection is enabled if P3-06 Over Feedback
Action is set to =1 or 2 or at least one of Multi-Function Outputs Sn-30 (Relay), Sn-31 (DO1),
or Sn-32 (DO2 or R2 Relay) is set to =25 (Over Feedback)
• When PID feedback rises above the Over Feedback Level set via P3-04 for the time
exceeding the programmed Over Feedback Delay Time P3-05, the inverter status will be
controlled by parameter P3-06 Over Feedback Action as shown in the following table. Also if
any of the Multi-Function Outputs Sn-30 (Relay), Sn-31 (DO1), or Sn-32 (DO2 or R2 Relay)
are set to =25 (Over Feedback), that output will be turned ON.
•
P3-06
Value
Inverter Status while Over
Feedback
Message
while Over Feedback
0
Continue Running
No Message
1
Continue Running
Over Feedback Alarm
2
Shut Down
Over Feedback Fault
Below a block diagram illustrating the Over Feedback Detection Function.
Relay
P3 – 04
Over Feedback
Level
(Sn-30=25)
P3 – 05
Over Feedback
Delay Time
PID Feedback
Over Feedback
Detect Digital
output select
DO1
(Sn-31=25)
DO2 or
R2 Relay
(Sn-32=25)
Sn-64 ≠ 0
PID Enabled
P3 – 06
Over Feedback
Action
=1 Load Loss
Alarm
=2 Load Loss
Fault
2.8 - Low Feedback Function for PID Feedback Signal
Parameter
No.
P3-07
P3-08
LCD Display
P3-07
Low Feedback Level
P3-08
Low Fbk. Delay Time
Setting Range
Factory Setting
Change During
Operation
Modbus
Address
*000.00 - 099.99%
000.00%
NO
0x0806
0000.0 - 6000.0s
0003.0s
NO
0x0807
NO
0x0808
0: None
Low Fbk. Action P3- 1: Low Feedback
P3-09
09
Alarm
0
2: Low Feedback
Fault
Multi-Function Output
Sn-30
(RA-RB-RC, DO1,
26: Low Feedback
DO2 or R2A –R2B)
- Sn-32
Function Selection
*1 The engineering units and range are set by parameter P1-01
________________________________________________________________
TECO – Westinghouse Motor Company
Over Feedback Detection, Low Feedback Detection
15
MA7200 PLUS Inverter Series Supplement
__________________________________________________________________
•
Below is a diagram of the Low Feedback Detection Function.
Relay
P3 – 07
Low Feedback
Level
(Sn-30=26)
P3 – 08
Low Feedback
Delay Time
PID Feedback
Low Feedback
Detect Digital
Output Select
P3 – 09
Low Feedback
Action
•
DO2 or
R2 Relay
(Sn-32=26)
Sn-64 ≠ 0
PID Enabled
•
DO1
(Sn-31=26)
=1 Load Loss
Alarm
=2 Load Loss
Fault
If PID is enabled (Sn-64 ≠ 0), Low Feedback Detection is enabled if P3-09 Low
Feedback Action is set to =1 or 2 or at least one of Multi-Function Outputs Sn-30
(Relay), Sn-31 (DO1), or Sn-32 (DO2 or R2 Relay) is set to =26 (Low Feedback)
When the PID Feedback falls below the Low Feedback Level set via P3-07 for the time
exceeding the programmed Low Feedback Delay Time P3-08, the inverter status will be
controlled by parameter P3-09 Low Feedback Action as shown in the following table. Also if
any of the Multi-Function Outputs Sn-30 (Relay), Sn-31 (DO1), or Sn-32 (DO2 or R2 Relay)
are set to =26 (Low Feedback), that output will be turned ON.
P3-09
Value
Inverter Status while
Low Feedback
Message
while Low Feedback
0
Continue Running
No Message
1
Continue Running
Low Feedback Alarm
2
Shut Down
Low Feedback Fault
________________________________________________________________
TECO – Westinghouse Motor Company
Low Feedback Detection 16
MA7200 PLUS Inverter Series Supplement
__________________________________________________________________
2.9 - Low Suction Detection Function
Parameter
No.
P3-10
P3-11
P3-12
P3-13
P3-14
P3-15
P3-16
Sn-30
- Sn-32
LCD Display
Setting Range
Factory Setting
1: PID Error
P3-10
2: Current
1
Low Suction Detect
3: Error and Current
P3-11
000 - 300s
100s
Low Suc. Det. Time
P3-12
01 - 30%
10%
Low Suc. PID Error
P3-13
000.1 - 200.0A
001.0 A
Low Suction Current
0: None
P3-14
1: Low Suction Alarm
1
Low Suction Action 2: Low Suction Fault
3: Fault and Restart
P3-15
0005 – 6000s
0300s
Restart Delay
0: With Speed
P3-16
Search
1
Restart Selection 1: W/O Speed
Search
Multi-Function Output
(RA-RB-RC, DO1,
28: Low Suction Detection
DO2 or R2 Relay)
Function Selection
Change During
Operation
Modbus
Address
NO
0x0809
NO
0x080A
NO
0x080B
NO
0x080C
NO
0x080D
NO
0x080E
NO
0x080F
• The Low suction detection function is for pump applications. It can detect the break in suction
or the absence of the supply medium (e.g. water).
•
P3-10 Low Suction Detect is used to select which signal is used for low suction detection as
shown in the following table.
Detection Signal
P3-10
Value
PID Error (PID Input)
Output Current
1
1
0
2
0
1
3
BOTH
•
When P3-10 Low Suction Detect is set to =1, (Detect PID Error), the PID Error (PID
Input, Un-15) is used for low suction detection.
•
When P3-10 Low Suction Detect is set to =2, (Detect Current), the output current is used for
low suction detection.
•
When P3-10 Low Suction Detect is set to =3, both the PID Error and Output Current are
used for low suction detection.
________________________________________________________________
TECO – Westinghouse Motor Company
Low Suction Detection 17
MA7200 PLUS Inverter Series Supplement
__________________________________________________________________
•
In order to generate a Low Suction Detection output, the following conditions must be
satisfied for the time specified by P3-11Low Suction Det. Time.
1. Sn-64 ≠ 0 (PID is enabled) and the Un-15 PID Input (PID Error) is higher than P3-12 Low
Suc. PID Error set level.
2. The output frequency is > Cn-01 (Max. Output Frequency) - Cn-31(Frequency Agree
Detection Width)
•
P3-14 Low Suction Action, is used to set the inverter action after low suction detection has
occurred per the following table.
P3-14
Inverter Status
Message
Fault Contact Output
0
Continue Running
No Message
No operation
1
Continue Running
Over Feedback Alarm
No operation
2
Shut Down
Over Feedback Fault
Operation
3
Shut Down and Restart
Over Feedback Fault
(before restart)
Operation
(before restart)
Relay
(Sn-30=26)
Low Feedback
Detect Digital
Output Select
P3-11 Low
Suction
Detection Time
DO1
(Sn-31=26)
DO2 or
R2 Relay
(Sn-32=26)
P3 –14
Low Suction
Action
=1 Low Suction
Alarm
=2 Low Suction
Fault
=3 Low Suction
Fault w/ Restart
P3 –15
Low Suction
Retry Delay
Restart
Low Suction Output Function
________________________________________________________________
TECO – Westinghouse Motor Company
Low Suction Detection 18
MA7200 PLUS Inverter Series Supplement
__________________________________________________________________
•
If P3-11 Low Suction Action, is set to =3 (Shut Down and Restart), the inverter will shut
down and restart after the time specified by P3-15 Low Suction Retry Delay. This retry
function is enabled as long as:
1- Low Suction Detection is enabled
2- P3-11, Low Suction Action, is set to =3.
3- There is no STOP command during the low suction retry delay time.
Note -The setting of parameter Cn-24 (Number of Auto Restart Attempts) is independent
of the retry function of low suction detection.
•
P3-16 Low Suction Restart Selection, determines the action while the inverter restarts as
per the following table.
Action during Restart
P3-16
Description
Speed Search
DC-injection
braking
0
Valid
Invalid
This setting is used when the restart delay time is
short and the motor is still running because of
inertia.
1
Invalid
Depends on the
setting of Cn-17
This setting is used when the restart delay time is
long enough to stop the motor before restart.
•
If low suction is detected and any of the Multi-Function Output Functions (Sn-30 -32) are set
to 28 (Low Suction), the corresponding terminal will be ON.
If P3-11Low Suction Action is set to =3 (Shut Down and Restart), the corresponding terminal
will be OFF after the inverter restarts.
2.10- Flow Meter Display
Parameter
No.
LCD Display
Setting Range
0: None
P4-01
1: Aux Input
Flow Meter Function
2: Pulse Train Input
P4-02
Max Flow for 10V 00000 – 50000 GPM
AUX
P4-03
0.0 - 5.0V
No Flow point for AUX
P4-04
000.01 – 500.00
Pulse Multiplier
P4-05
0.00 - 0.99
Flow Meter Offset
Un-41
0 - 50000 GPM
Flow Meter
P4-01
P4-02
P4-03
P4-04
P4-05
Un-41
•
Factory Setting
Change During
Operation
Modbus
Address
0
NO
0x0880
01000 GPM
NO
0x0881
0.0V
NO
0x0882
100.00
NO
0x0883
0.00
YES
0x0884
----
----
0x0047
P4-01Flow Meter Selection, is used to enable or disable the flow meter function and to
select one of two the inputs for this function as follows.
1. Terminal Aux: 0-10V or 4-20mA signal. (Note – If using a 4-20 mA input signal, place
a 500Ω resistor from the AUX input terminal to GND).
2. Terminal A(+) / A(-): Pulse Train Input with open-collector or complementary interface.
The pulse input frequency range is 50Hz - 32kHz.
________________________________________________________________
TECO – Westinghouse Motor Company
Low Suction Detection, Flow Meter Display
19
MA7200 PLUS Inverter Series Supplement
__________________________________________________________________
The following table shows the P4-01 function and the parameters used with selection
1 or 2.
P4-01
0
1
2
Flow Meter
Function
Disabled
Enabled
Enabled
Flow Meter
Signal
---AUX Input
Pulse Train Input
Flow Meter Parameters
---P4-02, P4-03 (P4-04, P4-05 is fixed)
P4-04, P4-05 (P4-02, P4-03 is fixed)
•
Flow Meter monitor point Un-41 is used to display the output of the flow meter function in
GPM. If the P4-01 is set to 0, the Flow Meter is zero.
•
Below is a diagram of the flow meter function when Flow Meter Selection P4-01 is set to
=1 (AUX input).
P4-01=1
AUX Input
0 – 10V >
or
4 – 20 mA
(with resistor) 500Ω
>
AUX
P4-02
Set Max.
GPM (10V)
P4-03
Set Zero
GPM
Un-41
Monitor Point
GPM
GND
Flow Meter (AUX Input)
•
When P4-01 is set to =1(AUX Input), the Flow Meter signal is input to terminal AUX and
parameters P4-02 (Max Flow for 10V AUX) and P4-03 (AUX for No Flow) are used to set
flow meter functions. Also, the parameters below will be set automatically.
1. Parameters P4-04 and P4-05.
2. AUX Function Selection (Sn-29)
3. Terminal AUX Gain and Bias (Bn-09 and Bn-10).
These parameters can not be edited until the setting of P4-01 is changed. Also when P4-01
is set to =1 any previous AUX Function (Sn-29) setting will become invalid.
•
An error message "Flow Meter Setting Error" will be displayed if P4-01 is set to 1 and one of
the conditions below is satisfied.
1. Sn-29 (AUX Function Selection) =9 (PID Target).
2. P1-07 (External PID Set Source) =3 (AUX Function).
3. P1-08 (External PID Feedback Source) =3 (AUX Function).
•
P4-02 Max Flow for 10V AUX, is used to set the maximum flow level in GPM, which
corresponds to a 10 V input to the Aux input.
Example:
•
P4-02 is set to = 2500 GPM (max flow level).
Aux input 0 – 10 V = 0 - 2500GPM.
P4-03 Aux for No Flow, is used to offset the input signal to terminal AUX, which corresponds
to zero flow. An example of this would be if the input flow signal is 4-20mA, where 4mA = 0
GPM, and a 500Ω resistor is used between AUX and GND. The input voltage to the AUX
terminal would be 4mA x 500Ω = 2V. P4-03 would then be set to =2V so that 4 mA would
represent zero flow. The max. flow would be as set in the previous example by P4-02.
________________________________________________________________
TECO – Westinghouse Motor Company
Flow Meter Display 20
MA7200 PLUS Inverter Series Supplement
__________________________________________________________________
•
Below is a diagram of the flow meter function while Flow Meter Selection P4-01 is set to 2
(Pulse Train Input).
P4-01=2
Pulse
Train Input
+12V >
(External
Supply)
IP12
>
IG12
>
A(+)
CN2
1
2
3
Pulse Train
Circuit
TP1
OPEN
>
A(-)
4
P4-04
Pulse
Multiplier
P4-05
Flow Meter
Offset
Un-41
Monitor Point
GPM
PULL UP
Flow Meter (Pulse Train Input)
•
When P4-01 is set to 2 (Pulse Train Input), the Flow Meter signal is input to terminals A(+)
and A(-) and the parameters P4-04 (Pulse Multiplier) and P4-05 (Flow Meter Offset) are
used to set the flow meter functions. In this case, parameters P4-02 and P4-03 will be set
automatically and can not be edited until the setting of P4-01 is changed.
•
The input to terminals A(+) and A(-) allows for open-collector or complementary interface by
setting jumper TP1 to PULL-UP position for open-collector interface or to OPEN position for
complementary interface.
•
An error message "Flow Meter Setting Error" will be displayed if P4-01 is set to 2 and one of
the conditions below is satisfied.
1. Sn-40 (PG Speed Control Settings) ≠ 0 (Speed Control Enabled).
2. Sn-05 (Frequency Command Setting) = 3 (Pulse Input).
•
P4-04 Flow Multiplier is used to scale the flow meter monitor value, while P4-05 Flow Offset
is used to calibrate the flow meter.
Output GPM = Input Pulse Train Frequency (Hz) x (P4-04 + P4-05).
Example: Input Pulse Train Frequency = 60Hz, P4-04 = 500.1 and P4-05 = 0.20
Flow Meter Monitor = 60 x (500.1 + 0.2) = 30018 GPM.
________________________________________________________________
TECO – Westinghouse Motor Company
Flow Meter Display 21
MA7200 PLUS Inverter Series Supplement
__________________________________________________________________
2.11 - Power Meter, KWh Meter, and Energy Cost Usage
Parameter No. LCD Display
P5-01
P5-02
Un-36
Un-37
Un-38
Un-39
Un-40
P5-01
Energy Cost
per kWh
P5-02
Reset Energy
Usage
Un-36
Output Power
Un-37
Energy Used
in kWh
Un-38
Energy Used
in MWh
Un-39
Energy Cost
in $
Un-40
Cost in
10000$
Setting Range
Factory Setting
Change During
Operation
Modbus
Address
0.000 - 5.000$
0.000$
YES
0x08C0
0
YES
0x08C1
0.0 - 999.9 kW
----
----
0x0042
0.0 - 999.9 kWh
----
----
0x0043
0.0 - 50000 MWh
----
----
0x0044
0 - 9999 $
----
----
0x0045
0 - 25000
(0$ - 250 Mil$)
----
----
0x0046
0: No
1: Reset
•
Un-36 Output Power, is used to monitor the output power in kW. The display range is 0.0 999.9kW.
•
Un-37 Energy Used in kWh and Un-38 Energy Used in MWh, are used to monitor the total
energy used by the inverter.
The maximum value of monitor energy is 50000MWh.
Example: If 800 kWh of energy is used, Un-37 = 800 kWh and Un-38 = 0 MWh.
If 32.3 MWh energy is used, Un-37 = 300 kWh and Un-38 = 32 MWh.
•
P5-01 Energy Cost per kWh, is used to set the unit energy cost per kWh.
•
Un-39 Energy Cost in $ and Un-40 Energy Cost in 10000, are used to monitor the total
energy cost of inverter. The maximum value of monitor energy cost is 250 Million $
Example: If the energy cost is 2,000$, Un-39 = 2000$ and Un-40 = 0.
If the energy cost is 123,200$, Un-39 = 3200$ and Un-40 = 12.
•
When the power is OFF, the inverter will retain the values of energy used (Un-37, Un-38)
and energy cost (Un-39, Un-40), and the stored data will be available after power up.
P5-02 Reset Energy Usage is used to clear the monitor variables for energy usage and
energy cost.
P5-02 = 0: No Reset
P5-02 = 1: Reset (The data will be cleared automatically after P5-02 is set to =1)
•
________________________________________________________________
TECO – Westinghouse Motor Company
Power Meter Display
22
MA7200 PLUS Inverter Series Supplement
__________________________________________________________________
Section 3 - MA7200 PLUS Block Diagrams
Fig. 3.1 below is an overall basic electrical connection diagram for the MA7200 PLUS 1 – 2 HP. It is
used in conjunction with the other sections of this guide to give the user the ability to successfully
start up a Fan or Pump application. More detailed information is available in the MA7200 PLUS
Manual to which the user may refer.
________________________________________________________________
TECO – Westinghouse Motor Company
Block Diagram, 1 - 2 HP 23
MA7200 PLUS Inverter Series Supplement
__________________________________________________________________
Fig. 3.2 below is an overall basic electrical connection diagram for the MA7200 PLUS 3 – 75 HP. It is
used in conjunction with the other sections of this guide to give the user the ability to successfully
start up a Fan or Pump application. More detailed information is available in the MA7200 PLUS
Manual to which the user may refer.
________________________________________________________________
TECO – Westinghouse Motor Company
Block Diagram, 3 - 75 HP 24
MA7200 PLUS Inverter Series Supplement
__________________________________________________________________
Section 4 – MA7200 PLUS Digital Input / Output Control Terminal
Connections
Fig’s 4.1a, 4.1b and 4.1c below show the terminal connections for input control functions for the
MA7200 PLUS 1 - 2 HP. The connections shown are typical and the user is referred to the
MA7200 PLUS Manual if additional information is required. Fig.4.1d shows an example for the
use of the Fault Output Relay.
________________________________________________________________
TECO – Westinghouse Motor Company
Digital I / O Terminal Connections, 1 – 2 HP 25
MA7200 PLUS Inverter Series Supplement
__________________________________________________________________
Fig’s 4.2a, 4.2b and 4.2c below show the terminal connections for input control functions for the
MA7200 PLUS 3 – 75 HP. The connections shown are typical and the user is referred to the
MA7200 PLUS Manual if additional information is required. Fig.4.2d shows an example for the
use of the Fault Output Relay.
STOP
RUN
________________________________________________________________
TECO – Westinghouse Motor Company
Digital I / O Terminal Connections, 3 – 75HP 26
MA7200 PLUS Inverter Series Supplement
__________________________________________________________________
Section 5 - MA7200 PLUS Analog Feedback Control Terminal Connections
Fig’s 5.1a,5.1b and 5.1c, show the analog feedback schemes (10VDC or 4-20mA) for the
MA7200 PLUS 1- 2 HP.
________________________________________________________________
TECO – Westinghouse Motor Company
Analog Feedback Terminal Connections, 1 –2 HP 27
MA7200 PLUS Inverter Series Supplement
__________________________________________________________________
Fig’s 5.2a,5.2b and 5.2c, show the analog feedback schemes (10VDC or 4-20mA) for the
MA7200 PLUS 3 - 75 HP.
________________________________________________________________
TECO – Westinghouse Motor Company
Analog Feedback Terminal Connections, 3 –75 HP
28
MA7200 PLUS Inverter Series Supplement
__________________________________________________________________
Section 6 – Initial Power up and Operational check
In this section the inverter will be powered up and the Fan or Pump motor operation will be initially
tested for direction and function.
SAFETY FIRST!
Step 1 - Before Starting the Inverter
• Referring to the MA7200 Instruction Manual, please review and verify that the correct inverter size
for the motor was received free of damage. To ensure personnel safety and to avoid equipment
damage, follow the precautions and the installation procedures for mounting, wiring, and operating
environment.
CAUTION - To avoid damage to the inverter when removing the inverter cover
and/or LCD Operator, refer to Appendix A for the proper procedure.
• In accordance applicable codes make electrical connections to the motor and input power
terminals. (Refer to the block diagram Fig. 3.1 for 1- 2 HP, or Fig.3.2 for 3 - 75 HP). No other
external connections should be made at this time, as the initial control will be from the Keypad.
Step 2 - Apply Power to the Drive
• Apply AC power to the Inverter and observe the LCD Display Line 1; it should read
“Freq. Cmd 000.00Hz”. Line 2 should read “TECO”. The red LED on the STOP key should be ON.
The DRIVE and FWD LED’s should be ON. (See Fig. 6.1 below)
________________________________________________________________
TECO – Westinghouse Motor Company
Start Up Procedures 29
MA7200 PLUS Inverter Series Supplement
__________________________________________________________________
Step 3 - Set Drive to Run Mode
• If the red DRIVE LED is not on with AC power up, press the PGRM / DRIVE key until the red
Drive LED is on. The Inverter is now in the RUN mode.
Step 4 - Check Fan or Pump Motor Operation
Enter 10.00Hz for the frequency reference and set parameter Sn-08 = 1 to disable Reverse
Direction operation. Note: The output from the inverter is displayed in Hz as factory default. If
desired, the output may be displayed in other units such as (%) of full speed, or engineering
units such as PSI etc.
•
NOTES
________________________________________________________________
TECO – Westinghouse Motor Company
Start Up Procedures 30
MA7200 PLUS Inverter Series Supplement
__________________________________________________________________
(Inhibit reverse operation)
1 - Press the
key
2 - Press the
key twice
3 - Press the
key until display shows
Flashing
4 - Press the
0
key
1
5 - Press the
key
6 - Press the
key to
2 Seconds
1
7 - Press the
•
Flashing
Flashing
Key to return to the main display.
Press the RUN key, and check the fan or pump direction of rotation. If the direction is not correct,
press the STOP key and wait until the fan or pump has come to a complete stop. Next, Power
Down the inverter.
Danger
After the power has been turned OFF, wait at least 5 minutes until the charge
indicator extinguishes completely before touching any wiring, circuit boards or
components.
•
Reverse any two of the fan or pump motor connections at the inverter ( U(T1),V(T2), or W(T3) ).
Next, following STEP 2, Power-up the inverter; the motor direction should now be correct.
Step 5 - Start / Stop Control Method
•
The start / stop method of control is set by parameter (Sn – 04) and is initially set to = 0
(keypad), as factory default. If External contact control is desired then power down the drive
and make the connections to the control terminals following the wiring diagram 4.1a or 4.2a in
________________________________________________________________
TECO – Westinghouse Motor Company
Start Up Procedures 31
MA7200 PLUS Inverter Series Supplement
__________________________________________________________________
Section 4. After power-up, set Sn-01 = 1 (External Contact) following the keypad navigation
procedure below.
(Run Source Select)
1 - Press the
key
2 - Press the
key twice
3 - Press the
key until display shows
Flashing
4 - Press the
0
key
5 - Press the
key
6 - Press the
key to
1
.
2 Seconds
1
7 - Press the
Flashing
Flashing
key to return to the main display.
Step 6 – Setting Minimum Speed in Pump Applications
•
•
In the case of pump applications, it is normally required to limit the minimum speed that the
pump will operate regardless of the input speed command. The pump minimum speed is
usually specified either by the pump manufacturer or the application. Once this value has
been established, the minimum output frequency of the inverter and thus the minimum
motor (pump) speed can be set by parameter Cn-19. This parameter sets the minimum
inverter frequency output, and thus a minimum motor (pump) speed to a percentage of the
maximum output command frequency.
The following is an example of setting the minimum motor (pump) speed to 1800 RPM,
which is 50% of the maximum pump speed, 3600 RPM.
________________________________________________________________
TECO – Westinghouse Motor Company
Start Up Procedures 32
MA7200 PLUS Inverter Series Supplement
__________________________________________________________________
(Minimum motor speed)
1 - Press the
key
2 - Press the
key 3 times
3 - Press the
key until display shows
Flashing
4 - Press the
0
key
Flashing
5 - Press the
key twice
0
Flashing
6 - Press the
key 5 times
7 - Press the
key to
5
2 Seconds
Flashing
5
8 - Press the
key to return to the main display.
________________________________________________________________
TECO – Westinghouse Motor Company
Start Up Procedures 33
MA7200 PLUS Inverter Series Supplement
__________________________________________________________________
Section 7 – Setting up a simple Main PID Loop
In this section the setting up of a simple PID loop will be covered. The purpose here, is to familiarize
the user with the various parameters that are used in the PID set up. The PID method of control
covered will consist basically of a set-point (operating point, e.g. Flow, Pressure etc.) entered
through the keypad (Sn-05=0 Factory Default) and a 0-10V analog transducer feedback signal
(Sn-24=0) connected to the control terminals. These two signals are then compared, and through
PID processing, correct for any load or environmental changes to maintain the set-point. Only the
(P) proportional and (I) integral parameters will be set and adjusted through the keypad to optimize
performance. The parameter (D) derivative will not be discussed or used in this guide as the factory
setting is usually sufficient for Fan and Pump applications.
Step 7 – Connect a 0-10V Feedback Device
In this step the external wiring connections will be made for the analog feedback device.
•
Before removing any covers or making any external control connections, Power Down the
inverter.
Danger
After the power has been turned OFF, wait at least 5 minutes until the charge
indicator extinguishes completely before touching any wiring, circuit boards or
components.
•
•
Remove the cover from the inverter and following the analog feedback diagrams 5.1a or 5.2a
covered in Section 5. Make the connections for the feedback device to the control terminals.
Power -up the drive and proceed to the next Step.
NOTES
________________________________________________________________
TECO – Westinghouse Motor Company
PID Loop Set Up Procedure Example 34
MA7200 PLUS Inverter Series Supplement
__________________________________________________________________
Step 8 - Setting up the Main PID control loop, and Feedback input.
•
•
•
Before selecting the parameter(s), ensure the inverter is in the STOP mode.
To activate the main PID control parameter (Sn-64) must be set to 1.
The Feedback Input parameter (Sn –24) is set to 1 (AIN, 4-20 mA), as factory default. To select
(VIN, 0-10 Vdc), (Sn-24) must be set to 0. To set the parameter(s), follow the navigation
procedure below.
________________________________________________________________
TECO – Westinghouse Motor Company
PID Loop Set Up Procedure Example 35
MA7200 PLUS Inverter Series Supplement
__________________________________________________________________
To set parameter Sn-24 = 0
(Feedback Point VIN)
Keypad Steps
1 - Press the
PRGM
DRIVE
2 - Press the
DSPL
3 - Press the
key
key twice
key until display shows
Resulting Display
An – 01 Freq. Cmd. 1
Sn-01Inverter Capacity
Sn-24
External Input
Flashing
4 - Press the
EDIT
ENTER
Sn-24 = 1
CMD. AIN
key
Flashing
5 - Press the
6 - Press the
Sn-24 = 0
CMD. VIN
key
EDIT
ENTER
key to save
Entry Accepted
2 Seconds
Flashing
Sn-64 =01
Normal PID 1
7 - Press the
PRGM
DRIVE
key to return to the main display.
Step 9 - Select Feedback Engineering Units (P1-01) and Scaling (P1-02)
•
Initially the display will read output frequency in (Hz) as the factory default and is set by
parameter (Cn-28=0). If (Cn-28) is changed to (1), then the display will read out in (%). The
setting of (Cn-28) is only valid if (P1-01=0), which is the factory default. Other engineering units
may be selected by parameter setting (P1-01) as described on the following page.
•
In this step, the feedback engineering units that the system is controlling such as CFM in Fan
applications or PSI in the case of Pumps can be selected by parameter (P1-01). (See Section 1
for additional selections). The maximum value that the engineering units will be in any given
application is set by parameter (P1-02). These selections will now be displayed on the digital
operator.
Example: A pump application that has a feeedback transducer with a maximum value of
150 PSI i.e 150 PSI = 10 Vdc, can be set as follows.
________________________________________________________________
TECO – Westinghouse Motor Company
PID Loop Set Up Procedure Example 36
MA7200 PLUS Inverter Series Supplement
__________________________________________________________________
Note: Once P1-01 is set to a non-zero value, then Cn-28 is no longer valid.
________________________________________________________________
TECO – Westinghouse Motor Company
PID Loop Set Up Procedure Example 37
MA7200 PLUS Inverter Series Supplement
__________________________________________________________________
Step 10 – Setting PID Parameters; Proportional Gain (Bn-17) and Integral Time (Bn-18)
A Word About PID Control-
•
Proportional Gain Bn-17 = 2.0 and the Integral Time Bn-18 = 5.0s. To change these
parameters, follow the keypad navigation procedure on the next page.
NOTES
________________________________________________________________
TECO – Westinghouse Motor Company
PID Loop Set Up Procedure Example 38
MA7200 PLUS Inverter Series Supplement
__________________________________________________________________
________________________________________________________________
TECO – Westinghouse Motor Company
PID Loop Set Up Procedure Example 39
MA7200 PLUS Inverter Series Supplement
__________________________________________________________________
Step 11 – Setting Parameters Acceleration (Bn-01) and Deceleration (Bn-02) Times
•
Acceleration and Deceleration times as well as the PID control [(P) Proportional Gain
and/or the (I) Integral Time (see STEP 10) directly control the system dynamic response. In
general, the longer the acceleration and deceleration time, the slower the system response,
and the shorter time, the faster the response. An excessive amount of time can result in
sluggish system performance while too short of a time may result in system instability.
The starting values suggested by this guide normally result in good system performance for
the majority of Fan and Pump applications. If the values need to be adjusted, caution
should be exercised, and the changes should be in small increments to avoid system
instability.
•
Parameters Bn-01 (Acceleration) and Bn-02 (Deceleration) are both set at the factory for
10.0 seconds. For Fan and Pump applications, the recommended starting values are 30
seconds. To change these parameters, follow the keypad navigation procedure on the
next page.
NOTES
________________________________________________________________
TECO – Westinghouse Motor Company
PID Loop Set Up Procedure Example 40
MA7200 PLUS Inverter Series Supplement
__________________________________________________________________
To set parameter Bn-01 = 30.0 S
(Acceleration)
Keypad Steps
1 - Press the
PRGM
DRIVE
key
2 - Press the
DSPL
key
Resulting Display
An – 01 Freq. Cmd. 1
Bn-01Acc. Time 1
Flashing
3 - Press the
EDIT
ENTER
Bn-01=0010.0 S
Acc. Time 1
key
Flashing
4 - Press the
key 3 times, then the
key twice
RESET
5 - Press the
EDIT
ENTER
key to save
Bn-01=0030.0 S
Acc. Time 1
Entry Accepted
2 Seconds
Flashing
Go to next step
Bn-17 = 02.00
PID P_Gain
Next to set parameter Bn-02 = 30.0 S
(Deceleration)
1 - Press the
DSPL
key, then the
Bn-02Dec. Time 1
key
Flashing
2 - Press the
Bn-02=0010.0 S
EDIT
ENTER
Dec. Time 1
Flashing
3 - Press the
4 - Press the
RESET
EDIT
ENTER
key 3 times, then the
Key twice
key to save
Bn-02=0030.0 S
Dec. Time 1
Entry Accepted
2 Seconds
Flashing
Bn-02=0030.0 S
5 - Press the
PRGM
DRIVE
key to return to the main display.
Dec. Time 1
________________________________________________________________
TECO – Westinghouse Motor Company
PID Loop Set Up Procedure Example 41
MA7200 PLUS Inverter Series Supplement
__________________________________________________________________
Step 12 – Setting PID Sleep Function Parameters (P1-04), (P2-01),
(P2-02), (P2-03) and (P2-04).
(NOTE: In the case of a Fan application skip this step and go to Step13)
•
The PID Sleep function is turned on by parameter (P1-04) when set to (=1). This allows the
system to turn off the PID and thus the inverter output so that the pump does not run when
the system level (PSI) is above the set-point. This sleep start level is set by parameter (P201) in a range from 0 – 100% of the maximum inverter output. When the system level drops
below a value (the units are selected by Step 9) set by parameter (P2-03), the sleep
wakeup level, the output of the inverter will turn on. Parameters (P2-02) and (P2-04)
provide delay times in seconds for sleep start level and sleep wakeup level respectively.
The following diagram will serve to illustrate this.
•
To further cover the PID Sleep function, the following is an example of the various
parameter settings that could be used. In this example the system will have the following
specifications:
- Max. Pump Motor Speed: 3600 RPM.
- Set Point: 150 PSI.
- Feedback Transducer Range: 0 – 200 PSI.
- Pump System Sleep Level: 2160RPM or 60% of max. speed set by
(P21-01=060.00).
Sleep Level Delay Time: 10 sec. set by (P2-02=010.0 ).
- Pump System Wakeup Level: 100 PSI set by (P2-03=0100).
Wakeup Time: 5 sec. set by (P2-04=005.0).
•
Referring to Step 9, set the engineering units to PSI (P1-01=02) and then the range to 200
(P1-02=0200).
________________________________________________________________
TECO – Westinghouse Motor Company
PID Loop Set Up Procedure Example 42
MA7200 PLUS Inverter Series Supplement
__________________________________________________________________
•
On the following pages the keypad navigation sequence is shown in setting the PID
parameters.
NOTE: The inverter must be in the Stop mode in order to turn on the sleep function.
Set parameter P1-04 = 1
(Turn on Sleep function)
Keypad Steps
1 - Press the
PRGM
DRIVE
2 - Press the
DSPL
3 - Press the
Resulting Display
An – 01 Freq. Cmd. 1
key
P1-01-
Key 4 times
Engineering Units
P1-04 PID Sleep Function
key 3 times
Flashing
4 - Press the
EDIT
ENTER
P1-04 = 0
PID Sleep Invalid
key
Flashing
5 - Press the
6 - Press the
P1-04 = 1
PID Sleep Valid
key
EDIT
ENTER
key to save
Entry Accepted
2 Seconds
Flashing
Go to next step
P1-04 = 1
PID Sleep Valid
NOTES
________________________________________________________________
TECO – Westinghouse Motor Company
PID Loop Set Up Procedure Example 43
MA7200 PLUS Inverter Series Supplement
__________________________________________________________________
NOTES
________________________________________________________________
TECO – Westinghouse Motor Company
PID Loop Set Up Procedure Example 44
MA7200 PLUS Inverter Series Supplement
__________________________________________________________________
NOTES
________________________________________________________________
TECO – Westinghouse Motor Company
PID Loop Set Up Procedure Example 45
MA7200 PLUS Inverter Series Supplement
__________________________________________________________________
(Sleep Wakeup Level)
1 - Press the
key, and the the
key
Flashing
2 - Press the
0
key
Flashing
3 - Press the
key twice, and then the
4 - Press the
key to
key
1
2 Seconds
Flashing
1
NOTES
________________________________________________________________
TECO – Westinghouse Motor Company
PID Loop Set Up Procedure Example 46
MA7200 PLUS Inverter Series Supplement
__________________________________________________________________
Finally set parameter P2-04 = 5.0 sec
(Sleep Wakeup Delay)
Keypad Steps
1 - Press the
key and the the
DSPL
Resulting Display
P2-04-
key
Sleep Wakeup Delay
Flashing
2 - Press the
EDIT
ENTER
P2-04=000.0 s
key
Sleep Wakeup Delay
Flashing
3 - Press the
key 3 times and then the
RESET
4 - Press the
EDIT
ENTER
key 5 times
key to save.
P2-04=005.0 s
Sleep Wakeup Delay
2 Seconds
Entry Accepted
Flashing
5 - Press the
PRGM
DRIVE
key to return to the main display.
P2-04=005.0 s
Sleep Wakeup Delay
Step 13 – Testing The System
•
•
The system can now be tested for performance. To do this, set the set-point through the
keypad and run the drive at some low level and check that the motor is operating properly
and that the feedback signal level and polarity are correct.
Check the system for dynamic operation and make any adjustments necessary for optimum
performance. This may require making adjustments to parameters Bn-17 proportional
gain and Bn-18 Integral Time. (Refer to Step 10)
NOTE: Parameters Bn-17 and Bn-18 may be changed through the keypad while the
system is operating.
A word of CAUTION ! - the parameter changes should be made in small increments
and the results checked to avoid highly unstable and possibly damaging
conditions.
•
This should complete the example installation of a system with a PID loop.
________________________________________________________________
TECO – Westinghouse Motor Company
PID Loop Set Up Procedure Example 47
MA7200 PLUS Inverter Series Supplement
__________________________________________________________________
Appendix A - Removing the LCD Digital Operator and Inverter Cover(s)
Remove the (2) screws
LCD Operator
RJ11 connector
Gently Lift
the
LCD Operator and remove the
connecting cable (RJ11) by
unplugging it from the back of
the LCD Operator.
Connecting cable
Gently remove the
cover(s).
NOTES
________________________________________________________________
TECO – Westinghouse Motor Company
Appendix A-Removing the Digital Operator and Cover 48
MA7200 PLUS Inverter Series Supplement
__________________________________________________________________
Appendix B – Inverter Parameter Setting List
Customer:
MA7200 PLUS Model No.
Site:
Equipment:
An
Para
An-01
An-02
An-03
An-04
An-05
An-06
An-07
An-08
An-09
An-10
An-11
An-12
An-13
An-14
An-15
An-16
An-17
Bn
Setting
Para
Setting
Bn-01
Bn-02
Bn-03
Bn-04
Bn-05
Bn-06
Bn-07
Bn-08
Bn-09
Bn-10
Bn-11
Bn-12
Bn-13
Bn-14
Bn-15
Bn-16
Bn-17
Bn-18
Bn-19
Bn-20
Bn-01
Bn-02
Bn-03
Bn-04
Bn-05
Bn-06
Bn-07
Bn-08
Bn-09
Bn-10
Bn-11
Bn-12
Bn-13
Bn-14
Bn-15
Bn-16
Para
Bn-17
Bn-18
Bn-19
Bn-20
Bn-15
Bn-16
Bn-17
Bn-18
Bn-19
Bn-20
Bn-15
Bn-16
Bn-17
Bn-18
Bn-19
Bn-20
Bn-21
Bn-22
Bn-23
Bn-24
Bn-25
Bn-26
Bn-27
Bn-28
Bn-29
Bn-30
Bn-31
Bn-32
Bn-33
Bn-34
Bn-35
Bn-36
Bn-37
Bn-38
Bn-39
Bn-40
Cn
Setting
Para
Bn-41
Bn-42
Bn-43
Bn-44
Bn-45
Bn-46
Setting
Para
Setting
Cn-01
Cn-02
Cn-03
Cn-04
Cn-05
Cn-06
Cn-07
Cn-08
Cn-09
Cn-10
Cn-11
Cn-12
Cn-13
Cn-14
Cn-15
Cn-16
Cn-17
Cn-18
Cn-19
Cn-20
Cn-21
Cn-22
Cn-23
Cn-24
Cn-25
Cn-26
Cn-27
Cn-28
Cn-29
Cn-30
Cn-31
Cn-32
Cn-33
Cn-34
Cn-35
Cn-36
________________________________________________________________
TECO – Westinghouse Motor Company
Appendix B-Parameter Setting List
49
MA7200 PLUS Inverter Series Supplement
__________________________________________________________________
Cn
Para
Cn-37
Cn-38
Cn-39
Cn-40
Cn-41
Cn-42
Cn-43
Cn-44
Cn-45
Cn-46
Cn-47
Cn-48
Cn-49
Cn-50
Cn-51
Cn-52
Cn-53
Cn-54
Cn-55
Cn-56
Cn-57
Cn-58
Cn-59
Cn-60
Cn-61
Cn-62
Cn-63
Cn-64
Cn-65
Sn
Setting
Para
Sn-03
Sn-04
Sn-05
Sn-06
Sn-07
Sn-08
Sn-09
Sn-10
Sn-11
Sn-12
Sn-13
Sn-14
Sn-15
Sn-10
Sn-11
Sn-12
Sn-13
Sn-14
Sn-15
Sn-16
Sn-17
Sn-18
Sn-19
Sn-20
Sn-21
Sn-22
Sn-23
Sn-24
Sn-25
Sn-26
Sn-27
Sn-28
Sn-29
Sn-30
Sn-31
Sn-32
Sn-33
Sn-34
Sn-35
Sn-36
Sn-37
Sn-38
Setting
P
Para
Sn-39
Sn-40
Sn-41
Sn-42
Sn-43
Sn-44
Sn-45
Sn-46
Sn-47
Sn-48
Sn-49
Sn-50
Sn-51
Sn-52
Sn-53
Sn-54
Sn-55
Sn-56
Sn-57
Sn-58
Sn-59
Sn-60
Sn-61
Sn-62
Sn-63
Sn-64
Sn-65
Sn-66
Sn-67
Sn-68
Sn-69
Sn-70
Setting
Para
P1-01
P1-02
P1-03
P1-04
P1-05
P1-06
P1-07
P1-08
P1-09
P1-10
P2-01
P2-02
P2-03
P2-04
P2-05
P2-06
P2-07
P2-08
P2-09
P2-10
P3-01
P3-02
P3-03
P3-04
P3-05
P3-06
P3-07
P3-08
P3-09
P3-10
P3-11
P3-12
P3-13
P3-14
P3-15
P3-16
P4-01
P4-02
P4-03
P4-04
P4-05
P5-01
P5-02
Un
Setting
Monitor
Setting
Un-01
Un-02
Un-03
Un-04
Un-05
Un-06
Un-07
Un-08
Un-09
Un-10
Un-11
Un-12
Un-13
Un-14
Un-15
Un-16
Un-17
Un-18
Un-19
Un-20
Un-21
Un-22
Un-23
Un-24
Un-25
Un-26
Un-27
Un-28
Un-29
Un-30
Un-31
Un-32
Un-33
Un-34
________________________________________________________________
TECO – Westinghouse Motor Company
Appendix B-Parameter Setting List
50