1
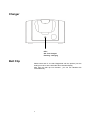
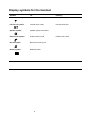
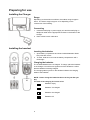
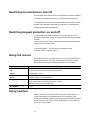
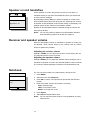
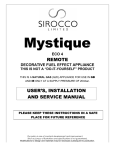
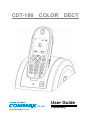
CDT-180 COLOR DECT
.in.ua
www.commax.in.ua
User Guide
Preliminary
Quick guide
!"Switch Handset On / Off
Press END key
!"Keypad Lock
Press # key
!"Unlock the Keypad
Press 1 and then 9 key
!"Making an External Call
Enter the number, then press TALK key
!"Answering a Call
Press any key except END key
!"Muting the ringing during an Incoming Call
Press Mute key
!"Redialing a Number
Press Redial key and then find the redial number
using UP / DOWN key and then press TALK key
!"Dialing using Phonebook
Press DOWN key, and select entry with number key
(if necessary, use UP / DOWN key), and then press
TALK key
!"Adjusting the Earpiece Volume / Speaker
Volume
Use UP / DOWN key during a call
2
Safety Precautions
!" For the Handset charging, use only approved rechargeable batteries (Battery 1.2V 600mAh Ni-MH
AAA size). Never use other batteries or conventional alkaline batteries.
They could lead a short circuit or destroy the battery casing.
!" Replace only with the same or equivalent type recommended by the manufacturer.
!" Rechargeable batteries became warm during loading (charging the handset); this is a normal process
and harmless.
!" Do not try to use any power supply except the one provided.
!" Do not use in the rain, near a bath or with wet hands.
!" Do not allow the charging contacts to come into contact with conductive materials.
!" It is recommended that you disconnect the base unit from the mains power and telephone line socket
during a thunderstorm.
!" This is a rechargeable product and it is normal that a certain amount of heat will be generated in its day
to day operation. While this is safe, it is recommended that this product is not placed on antique,
veneered or wooden surfaces.
!" To clean the product, use a damp (not wet) cloth or antistatic wipe. Never use a dry cloth as this may
cause a static shock. Never spray cleaning fluid directly onto the handset and base unit.
!" Note for emergency calls:
Telephone calls are impossible if the main power fails.
3
Contents
Quick guide ................................................................................................................... 2
Safety Precautions ....................................................................................................... 3
Getting Started ……………………………………………………………………………….. 6
Outline ....................................................................................................................................................
Display symbols for handset ..................................................................................................................
Preparing for use ....................................................................................................................................
Switching the handset on and off ..........................................................................................................
Switching keypad protection on and off ................................................................................................
Using the menus ..................................................................................................................................
Using headset .......................................................................................................................................
6
8
9
10
10
10
10
General functions ....................................................................................................... 11
Making and answering an external call .................................................................................................
Speaker on and handsfree ...................................................................................................................
Receiver and speaker volume .............................................................................................................
Notebook ..............................................................................................................................................
Out of range warning ............................................................................................................................
Paging ...................................................................................................................................................
11
12
12
13
13
13
Redialing ...................................................................................................................... 14
Dialing a number from the redialing list .................................................................................................
Pre-dialing using the redial list .............................................................................................................
Copying a number to the phone book ...................................................................................................
Deleting a number from the redialing list ..............................................................................................
Deleting the redialing list ......................................................................................................................
14
14
14
15
15
Phone book .................................................................................................................. 16
Storing an entry .....................................................................................................................................
Dialing a number from the phone book .................................................................................................
Displaying a number from the phone book ...........................................................................................
Editing an entry .....................................................................................................................................
Deleting an entry ..................................................................................................................................
Deleting the phone book ......................................................................................................................
Displaying the memory status ...............................................................................................................
Copy from SIM card ( Option ) ...............................................................................................................
16
17
17
17
18
18
18
18
Registering handsets ..................................................................
32
Registering handsets ............................................................................................................................ 32
Operating several handsets ........................................................................................ 33
Making and answering an internal call .................................................................................................
Answering a waiting call ........................................................................................................................
Transferring a call ..................................................................................................................................
Call brokering ........................................................................................................................................
Conference call .....................................................................................................................................
33
33
34
34
34
Handset settings .......................................................................................................... 35
Ringer volume .......................................................................................................................................
Ringer melody .......................................................................................................................................
Key click ................................................................................................................................................
Alarm clock ...........................................................................................................................................
4
35
35
35
35
Contrast ................................................................................................................................................
Wall Paper .............................................................................................................................................
Automatic answering ............................................................................................................................
Selecting another Charger .............................................................................................................
Entering the handset name ...................................................................................................................
Language ..............................................................................................................................................
Changing the handset PIN ...................................................................................................................
Factory settings for the handset ............................................................................................................
36
36
37
37
37
37
38
38
Reference ...................................................................................................................... 44
Troubleshooting ..................................................................................................................................... 44
Technical specifications ......................................................................................................................... 45
Menu Table ................................................................................................................... 46
5
Getting Started
Outline
Handset
Earpiece
Status LED
- Flashes at incoming call
Color Display
Function display
Menu / OK / Option
Function display
Redial / Back / Clear
UP / DOWN key
- Open phone book
(Down key)
LEFT / RIGHT key
- Open redialing list
(RIGHT key)
- Move cursor
- Open “Option Mene”
- Scroll menu
Function key
Menu / OK / Option
Function key
Redial / Back / Clear
Headset Socket
TALK key
- Make a call
- Handsfree
- Speaker phone
END key
- End call
- One menu level back
- Return to standby mode
(hold down)
- Handset on/off
(hold down)
Asterisk key
Ringer on/off
Door Open
Microphone
Keypad protection
- Hold down to protect
the keypad
- Alphabet size change
Recall and Pause key
- Recall (press shortly)
- Pause (press more than 3 seconds)
6
Charger
LED :
ON : Full Charged
Flashing : Charging
Belt Clip
Please insert and fix the belt Clip(packed with the product) into the
small groove to be at the both side above handset display.
After fixing the belt clip into Handset , you can use Handset with
comfortable way.
7
Display symbols for the handset
Symbols
On
Flashing
Communication symbol
Connected to a Charger
Finding a Charger
Internal call symbol
Internal call is made
Internal call is held
Speaker symbol
Speaker phone is activated
External call symbol
External call is made
Bell off symbol
Bell off of incoming call
Battery symbol
Batteries status
8
External call is held
Preparing for use
Installing the Charger
Range
Depending on the ambient conditions, the outdoor range is approx.
300 m. The indoor range is approx. 50 m depending on the
construction of the building.
Connecting
1. Insert the small plug on power supply unit and the small plug on
telephone cable into the appropriate sockets on the bottom of the
Charger
2. Place cables in each cable duct
.
Installing the handset
Inserting the batteries
1. Open battery compartment and insert included batteries. Make
sure poles are correct.
2. To close, slide the cover onto the battery compartment until it
closes tight.
Charging the batteries
The included batteries are not charged. To charge, place the handset
in the Charger. You will hear a signal tone of the handset to confirm
that the batteries are being charged.
The charging status symbol on the handset indicates the charging
status of the batteries:
NOTE : Please charge the batteries 8hours at list just after you
buy.
The time of full charging is 8 hours at list.
Batteries empty
Batteries 1/3 charged
Batteries 2/3 charged
Batteries full
9
Switching the handset on and off
The handset is activated as soon as the batteries have been installed.
To switch on/off, press the end key - you will hear the beep sound.
The handset also is switched on automatically when it is placed in the
Charger. If the handset is switched on by placing in the Charger the
charging status symbol is displayed.
Switching keypad protection on and off
You can protect the handset keypad if you are going to carry the
handset in your pocket or bag. This prevents numbers being dialed by
accident.
If there is an incoming call, the keypad is automatically unlocked and
locked after the call has ended.
To lock, press # key - you will hear the confirmation beep.
To unlock, press 1 and then 9 keys.
Using the menus
Your telephone can be operated via menu. The menu offers access to
all setting procedures and many of the telephone functions. Some
menu items open a sub-menu after the selection of menu item.
Keys
Executed function
MENU
OK
Option
Call the menu or sub-menu.
Confirm menu item function and select menu item.
Call the option menu
Back
Clear
Back to the previous menu or state..
Delete the digit ( use the edit state )
END
Cancel.
Press shortly: Back to the previous menu or state.
Hold down: Back to the standby state.
UP / DOWN
Scroll.
Using headset
With the headset, you can talk without using your hands. When you
connect the headset to the headset jack on the right side of the
handset, the headset operates in same way as the handset’s earpiece
and microphone. The button on the headset allows you to answer or
end a call on the headset.
10
General functions
Making and answering an external call
Making an external call
Dialing with pre-dialing
When you make a call, you can enter the number and then press
TALK key. This is called pre-dialing.
1.
Clear: delete the digit one by one.
END: The phone number entry is aborted.
LEFT: move left the cursor.
RIGHT: move right the cursor.
2. Press END to end the call.
number entry.
!" Insert Pause
Attach Pause( P ) to number by press R key more than 2 seconds.
!" Insert Pause
Attach Flash( R ) to number by press R key shortly.
!" Using the phone book list
1.
2.
3.
4.
Press MENU
Select the menu item Phonebook List.
Press OK to confirm.
If not empty, you can see entries to be entered in the phone book
5. Press OK, the number of the selected entry is attached with
manually entered number.
6. Press TALK. The number is dialed.
7. Press END to end the call.
Dialing without pre-dialing
1. Press TALK and wait for the dial tone.
2. Dial the number.
3. Press END to finish the call.
Answering an external call
Your handset rings.
1. To answer the call, press any key except Silent soft key or remove
the handset from the Charger (Automatic answering function).
<<<<->>>>
External
2. Press END to end the call.
If you do not want to answer the call, you can switch off the ringing of
the handset by pressing Silent soft key. You can press TALK if you
still want to answer the call.
Mute
Displaying the call time
During an external call, the handset displays the call time.
11
Speaker on and handsfree
On the speaker on mode, other persons in the room can listen, in
handsfree mode you put down the handset and have your hands free
to make notes for example.
Speaker On
By repeatedly pressing TALK you switch to speaker on mode (once)
and handsfree (twice) and back during the call. Switching from normal
to speaker on and handsfree mode is shown briefly on the display. The
speaker symbol is also visible in both operation modes.
Speaker on and handsfree mode are possible during an external call
and internal call also.
Notes: You can only switch to speaker on and handsfree operation
when the battery symbol has at least one segment.
Receiver and speaker volume
Receiver and speaker volume (in handsfree or speaker on mode) can
be adjusted. Three volume levels for the receiver and six volume
levels for speaker are possible.
Adjusting the receiver volume
With UP / DOWN you can adjust the receiver volume during the call.
The selected receiver volume is stored.
Adjusting the speaker volume
With UP / DOWN you can adjust the speaker volume during the call in
handsfree or speaker on mode. The selected speaker volume is stored.
The volume is stored separately in speaker on and handsfree mode.
Notebook
Notebook
12|
Menu
Clear
You can note with number in the redial memory during the call.
1. Press MENU.
2. Select the menu item Notebook.
3. Press OK to confirm. The input field is opened with the selected
number.
4. Enter the number. Correct the number if necessary.
Clear: delete the digit.
LEFT: move left the cursor.
RIGHT: move right the cursor.
5. Press Option.
6. Select Save and press OK to store.
Notes: You can see the entered number of using Notebook by using
redial function.
12
Out of range warning
If the handset is out of range from the Charger during the call, the
handset warns you with short beeping sounds.
Redialing
The handset automatically saves the last ten phone numbers dialed.
Dialing a number from the redialing list
Redial
9P123456
1234567890
01697330516
1. Press Redial or RIGHT to open the redialing list. If not empty, last
number is displayed.
2. Select the desired phone number using UP / DOWN key.
3. Press TALK to dial the selected number.
You can also open the redialing list during an external call by pressing
RIGHT.
Option
Back
Pre-dialing using the redial list
The selected number is displayed with pre-dialing mode.
1. Press Redial or RIGHT to open the redialing list in standby mode.
If not empty, last number is displayed.
2. Select the desired phone number.
3. Press Option to open sub-menu.
4. Select Display Number.
5. Press TALK key to display the selected number with pre-dialing
mode.
Copying a number to the phone book
Redial
Display Number
Copy to PB
Delete Entry
Delete List
OK
Back
1. Press Redial or RIGHT to open the redialing list. If not empty, last
number is displayed.
2. Select the desired phone number.
3. Press Option to open sub-menu.
4. Select Copy To PB.
5. Press OK to confirm. The input field is opened in which you can
enter a name.
6. Enter the name.
Clear: delete the digit.
LEFT: move left the cursor.
RIGHT: move right the cursor.
7. Correct the number if necessary.
Clear: delete the digit.
LEFT: move left the cursor.
13
RIGHT: move right the cursor.
8. Press Option
9. Select Save and Press OK to Store.
Deleting a number from the redialing list
Redial
Display Number
Copy to PB
Delete Entry
Delete List
OK
1. Press Redial or RIGHT to open the redialing list. If not empty, last
number is displayed.
2. Select the desired phone number.
3. Press Option to open sub-menu.
4. Select Delete Entry.
5. Press OK to delete.
Back
Deleting the redialing list
Redial
Display Number
Copy to PB
Delete Entry
Delete List
OK
1. Press Redial or RIGHT to open the redialing list. If not empty, last
number is displayed.
2. Select the desired phone number.
3.
4.
5.
6.
Back
14
Press Option to open sub-menu.
Select Delete List and press OK.
Displayed “Delete All Entries ?”
Press OK to delete all entries.
Phone book
You can store up to 100 telephone numbers. One entry in the phone
book consists of the name of 15 characters and the number of 30
digits.
Phonebook List
hykim
abc
Eidicom
Option
The entries are sorted in the following sequence:
1. Space:
2. Digits: 0 – 9
3. Letters (alphabetical)
4. Other characters
Back
Entering names
Use the numeric keys to enter names
To insert lower letters, press the # key. To revert to upper case letters,
press the # key again.
Press the corresponding key repeatedly:
1x
2x
3x
4x
5x
6x
7x
8x
9x
10x
11x
12x
13x
0
SP
0
?
!
¿
¡
.
,
“
‘
:
;
|
1
1
@
€
£
$
¥
¤
&
§
!
°
÷
2
A
B
C
2
"
Á
à
Å
Æ
Ä
Ç
a
b
c
2
#
á
à
å
æ
ä
Ç
D
E
F
3
$
É
È
Ê
Ë
d
e
f
3
%
é
è
ê
ë
G
H
I
4
&
Í
ì
'
î
Ï
g
h
I
4
(
í
ì
'
î
Ï
J
K
L
5
)
j
k
l
5
*
M
N
O
6
+
Ñ
Ó
Ö
Ò
Ô
Ø
m
n
o
6
,
ñ
ó
ö
ò
ô
ø
P
Q
R
S
7
-
.
ß
p
q
r
S
7
/
0
ß
T
U
V
8
Ü
Ú
ù
û
t
u
v
8
ü
ú
ù
û
W
X
Y
Z
9
Ý
1
2
w
x
y
z
9
ý
3
4
*
#
+
-
/
%
=
(
)
<
>
3
4
5
6
7
8
9
*
Storing an entry
1.
2.
3.
4.
15
Press MENU.
Select Phonebook and press OK.
Press Option to open sub menu.
Select Add Entry and press OK.
\
_
Add Entry
|
Name
Number
Option #
5. Input name up to 15 letters and then press down key to input
telephone number.
Clear: delete the digit.
LEFT: move left the cursor.
RIGHT: move right the cursor.
6. Press Option.
7. Select Save and press OK to store.
Back
Dialing a number from the phone book
1. Press DOWN in standby mode, the phone book is opened directly.
2. Select entry.
3. Press TALK. The number is dialed.
Displaying a number from the phone book
The number of the entry is displayed with pre-dialing mode.
1. Press MENU in standby mode
( If you press DOWN in standby mode, the phone book is opened
directly. )
2. Select Phonebook and press OK.
3. Select entry.
4. Press Option to open sub menu.
5. Select Display Number.
6. Press OK to display the number with pre-dialing mode.
Editing an entry
Edit Entry
Hykim|
1234567
Option $ Clear
1. Press MENU.
( If you press DOWN in standby mode, the phone book is opened
directly. )
2. Select entry.
3. Press Option to open sub menu.
4. Select Edit Entry and press OK.
5. Edit the name and press Down.
LEFT: move left the cursor.
RIGHT: move right the cursor.
6. Edit the number.
Clear: delete the digit.
LEFT: move left the cursor.
RIGHT: move right the cursor.
7. Press Option.
8. Select Save and Press OK to store.
16
Deleting an entry
1. Press MENU.
( If you press DOWN in standby mode, the phone book is opened
directly. )
2. Select Phonebook and press OK.
3. Select entry.
4. Press Option to open sub menu.
5. Select Delete Entry.
6. Press OK to delete.
Deleting the phone book
Phonebook
Display Number
Add Entry
Edit Entry
Delete Entry
Delete List
OK
Back
1. Press MENU.
( If you press DOWN in standby mode, the phone book is opened
directly. )
2.
3.
4.
5.
6.
Select Phonebook and press OK.
Press Option to open sub menu.
Select Delete List and press OK.
Display “Delete All Entries ?”
Press OK to delete all entries.
Displaying the memory status
Memory Status
2.
3.
4.
5.
000/100
OK
1. Press MENU.
( If you press DOWN in standby mode, the phone book is opened
directly. )
Select Phonebook and press OK.
Press Option to open sub menu.
Select Memory Status.
Press OK. The number of phone book entries is displayed.
Back
Registering handsets
Registering handsets
In order to connect a handset to a Charger, the handset must be
Register
Base 1
OK
%
Back
registered to that Charger. Press MENU.
1. Select Handset and press OK.
2. Select Register and press OK.
3. Press OK.
4. Enter the Charger PIN and press OK. (Factory setting for PIN:
0000).
5. Press MENU button on Wall PAD.
6. Search RF Register Mode and then press OK on Wall PAD.
7. Wait until the free handset numbers are displayed.
17
8. Select the handset number with the appropriate numeric keys.
Now, the handset is registered to Wall PAD.
Operating several handsets
You can operate up to 4 handsets on your Charger.
In addition to an internal call between 2 handsets an external call can
be held simultaneously with a third handset.
Making and answering an internal call
Making an internal call
1. Press MENU.
2. Select INT Call and press OK.
3. Enter the handset number.
If you want to call all handset, press All.
2 3 4 5 6
All
Answering an internal call
Your handset rings.
1. To answer the call, press any key except END or remove the
handset from the Charger (Auto Talk function).
2. Press END to end the call.
INT 2
Menu
Answering a waiting call
If an external call is received during an internal call, the call waiting
tone is heard in both handsets.
To answer the call, press Accept. The internal call is put on hold. Your
handset is connected to the external caller.
You can make conference call during this state. Please see
INT 2
Menu
Conference call section.
Accept
18
Transferring a call
You can transfer an external call to another handset.
1. Press MENU.
2. Select INT Call and press OK.
Calling
All
3. Enter the handset number.
If you want to call all handset, press the All key
4. When the called party answers, press END to transfer the call
All
Note:
Instead of announcing the call, you can immediately press
END. If the called party does not answer the call goes
automatically back to you.
Conference call
A conference call is possible between one external and two internal
parties.
Making a conference call
You must make an external call first.
INT 2
Menu
Conf.
1. Press MENU.
2. Select INT Call and press OK.
3. Enter the handset number.
If you want to call all handset, press All.
4. Press the Conf. to make a conference call.
Ending a conference call
If you press C.End to end the conference call, the connection to the
external party is maintained and the internal call is placed on hold.
--Menu
C.End
If you press END to end the conference call, your handset returns to
the standby mode and the connection to the external party is
maintained with the other internal party.
19
Handset settings
Ringer volume
Five ringer volumes are possible for the handset. Ringer off also is
available.
1.
2.
3.
4.
5.
Press MENU.
Select Handset Set and press OK.
Select Ringer Set and press OK.
Select Ringer Volume and press OK.
Select the desired volume (Off, 1~5).
6. Press OK to save.
Ringer melody
1.
2.
3.
4.
5.
Press MENU.
Select Handset Set and press OK.
Select Ringer Set and press OK.
Select Ringer Melody and press OK.
Select the desired melody (From 1~17).
6. Press OK to save.
Key click
Key Click
%
On
Off
OK
Back
Key click is the sound you hear each time you press a key. This
feature can be enabled or disabled.
1.
2.
3.
4.
5.
6.
Press MENU.
Select Handset Set and press OK.
Select Ringer Set and press OK.
Select Key Beep and press OK.
Select On or Off.
Press OK to confirm.
Contrast
Adjustment LCD contrast.
1. Press MENU.
2. Select Handset Set and press OK.
3. Select Contrast and press OK.
4. Scroll with UP / DOWN.
5. Press OK to save.
Notes: The illumination of the handset can be only lighted up when
the battery symbol has at least one segment.
Wall Paper
You can select the wall paper.
1. Press MENU.
2. Select Handset Set and press OK.
20
3. Select Contrast and press OK.
4. Scroll with UP / DOWN.
Automatic answering
Auto Answer
%
On
Off
OK
Back
When this function is activated you can remove the handset from the
Charger to receive a call.
1.
2.
3.
4.
5.
Press MENU.
Select Handset Set and press OK.
Select Auto Answer and press OK.
Select On or Off.
Press OK to save.
Entering the handset name
Handset Name
You can assign a name of 8 characters for the handset. If the name is
entered, the name is displayed on standby mode.
1.
2.
3.
4.
Hy|
OK
Press MENU.
Select Handset Set and press OK.
Select Handset Name and press OK.
Enter the name.
Clear: delete the digit.
LEFT: move left the cursor.
RIGHT: move right the cursor.
Clear
#: Select capital letter or small letter
5. Press OK to store.
Language
1. Press MENU.
2. Select Handset Set and press OK.
3. Select Language and press OK.
4. Select the desired language and press OK to confirm.
Note: Depending on the country version of this unit.
The display languages are different.
Changing the handset PIN
Enter PIN
***
To protect the handset settings from unauthorized access you should
change the handset PIN (factory setting: 0000) to a PIN that only you
know.
1. Press MENU.
21
Clear
2.
3.
4.
5.
6.
Select Handset Set and press OK.
Select Handset PIN and press OK.
Enter the current handset PIN (factory setting: 0000).
Enter the new handset PIN (4 digits).
Reenter the new handset PIN to verify. If match the new handset
PIN is saved.
Factory settings for the handset
Reset All
Setting ?
The phone book and the handset name are not deleted when you
reset the handset.
1.
2.
3.
4.
Press MENU.
Select Handset Set and press OK.
Select Default Set and press OK.
Enter the handset PIN (factory setting: 0000).
5. Press OK to confirm.
OK
Back
Function
Factory Setting
Receiver volume
2
Group listening volume
4
Handsfree volume
4
Ringer volume
4
Ringer melody
12
Key click
On
Back light
On
Automatic answering
On
Language
Local
Handset PIN
0000
22
Special Funtion with Wall PAD
This DECT Phone work with Home Automation Device especially
some of Commax products. Therefore some fuctions are different with
normal DECT phone.
On line with Door phone
1. When visitor call with Door Phone, your handset rings.
2. To answer the call, press any key except Silent soft key or
remove the handset from the Charger (Automatic answering
function).
3. Press END to end the call.
NOTE : The time of talk is for 1minute. After 1 minute, you can hear
the beep of end the call.
Open the Door
1. During the on line with Door Phone, press ‘0” button.
2. “Open Relay” on Door works, and then the Door is opened.
Answering an Inter-phone
1. When someone call with at the other room, your handset rings.
2. To answer the call, press any key except Silent soft key or
remove the handset from the Charger (Automatic answering
function).
NOTE : The time of talk is for 3minute. After 3 minute, you can hear
the beep of end the call. It’s not available to call other room units whit
handset.
On line with Door Phone & Inter-phone
1. During on line with Door phone & Inter-phone, you can hear
beep sound
2. If you want to answer the external call, press END key to end
of on line with Door phone & Inter-phone, and untill wait to
hear beep sound and then press TALK button.
NOTE : DECT need the time to detecting a ring signal, so reaction is
little late than Wall PAD.
23
Reference
Trouble shooting
Symptom
Cause
Remedy
No display.
#" Handset not switched on.
#" Handset switches on.
#" Battery empty.
#" Put handset on the base unit
for charging batteries.
#" The telephone connection
cable is not correctly put.
#" Plug in the telephone line
cable into the base unit and
also check the wall socket
connection.
No allocation of the
switched line.
#" The power connection cable is
not correctly put.
#" The switched line is occupied
by another handset.
#" Plug in the power ADAPTOR
into the base unit.
#" Wait until the switched line is
free.
#" Handset not registered at
Base-station.
#" Handset Have to be
registered at base unit.
#" The power connection cable is
not correctly put into base.
#" Plug in the power ADAPTOR
into the base unit.
Handset is not ringing the
bell.
#" Ringing volume is too low.
#" Set the ringing volume high
on the handset.
When dialing, the switched
line disconnected.
#" Lock mode enable
#" Check lock mode, and set
lock mode disable.
No radio communication to
the base unit or handset is
not ringing the bell.
24
Technical specifications
Wall PAD and handset
Standard
DECT/GAP
Number of channels
120 duplex channels
Channel spacing
1.728 MHz
Bit rate
1152 kbit/ sec
Duplex procedure
TDMA (time division multiple access procedure)
Voice coding
ADPCM (32kbit/s)
Modulation
GFSK
Radio frequency range
1.880 GHz to 1.900 GHz
Average transmission power
Approx. 10 mW (per channel)
Range
Up to 300 m outdoors
Up to 50 m indoors
Power supply
Charger
Input: 100/110/120/220/230/240V, 50/60Hz
Output: AC 9V, 300mA
Handset
Rechargeable Ni-MH 1.2V, 600mAh, AAA(x 3)
Handset operating time with full battery
Talk time: up to 10 hours
Standby time: up to 100 hours
Permissible ambient temperature
0°C to 40°C
Permissible storage temperature
-20°C to 60°C
Dimensions (length x width x height)
Handset
(D) 28.0 x (W) 46.5 x (H) 115.0 mm
Charger
(D) 133.0 x (W) 81.5 x (H) 52.5 mm
Weight
Handset
111 g (Battery included)
Charger
148 g
Dialling procedure
DTMF and Pulse
Recall key function
Flash
Line cord
7 Feet Tel-line cord
25
Menu table
Standby mode
Phonebook
On-line Menu
Display Number
Insert Pause
Add Entry
Edit Entry
Phonebook
Delete Entry
Delete List
INT Call
Memory Status
Tone
Handset Set
Ringer Set
Notebook
Contrast
Wall Paper
Auto Answer
Handset Name
Language
Register
Handset PIN
Default Set
INT Call
26