1
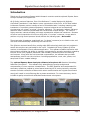
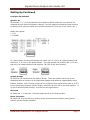
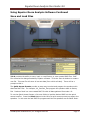
Equator Room Analysis User Guide v2.0 Equator Q Series User Guide Q8 | Q10 | Q12 | Q15 Equator Room Analysis Automated RRC & SRC Software ©2008 Equator Audio Research, LLC. All Rights Reserved. Page 1 Equator Room Analysis User Guide v2.0 Important Safety Instructions 1. Read these instructions. 2. Keep these instructions. 3. Heed all warnings. 4. Follow all instructions. 5. Do not use this apparatus near water. 6. Clean only with dry cloth. 7. Do not block any ventilation openings. Install in accordance with manufacturer’s instructions. 8. Do not install near any heat sources such as radiators, heat registers, stoves, or other apparatus (including amplifiers) that produce heat. 9. Do not defeat the safety purpose of the polarized or grounding type plug. A polarized plug has two blades with one wider than the other. A grounding type plug has two blades and a third grounding prong. The wide blade or the third prong are provided for your safety. If the provided plug does not fit into your outlet, consult an electrician for replacement of the obsolete outlet. 10. Protect the power cord from being walked on or pinched particularly at plugs, convenience receptacles, and the point where they exit from the apparatus. 11. Only use attachments/accessories provided by the manufacturer. 12. Use only with the cart, stand, tripod, bracket, or table specified by the manufacturer, or sold with the apparatus. When a cart is used, use caution when moving the cart/apparatus combination to avoid injury from tip-over. 13. Unplug this apparatus during lightning storms or when unused for long periods of time. 14. Refer all servicing to qualified personnel. Servicing is required when the apparatus has been damaged in any way, such as power-supply cord or plug is damaged, liquid has been spilled or objects have fallen into the apparatus, the apparatus has been exposed to rain or moisture, does not operate normally, or has been dropped. 15. To reduce the risk of fire or electric shock, do not expose this apparatus to rain or moisture. 16. Where the mains plug or an appliance coupler is used as the disconnect device, the disconnect device shall remain readily operable. 17. These servicing instructions are for use by qualified personnel only. To reduce the risk of electric shock, do not perform any servicing other than that contained in the operating instructions unless you are qualified to do so. ©2008 Equator Audio Research, LLC. All Rights Reserved. Page 2 Equator Room Analysis User Guide v2.0 18. Do not install this equipment in a confined space such as a book case or similar unit. Maintain minimum 10cm free space around the apparatus for sufficient ventilation. The ventilation should not be impeded by covering the ventilation openings with items, such as newspapers, table-cloths, curtains, etc. 19. No naked flame sources should be used in moderate climate. 20. The apparatus shall not be exposed to dripping or splashing and that no objects filled with liquids, such as vases, shall be placed on the apparatus. 21. Due to the mains switch being located on the rear panel, the apparatus must be located in the open area with no obstructions to access the mains switch. 22. The apparatus shall be connected to the mains socket with a protective earthing connection. Explanation of Graphic Symbols The exclamation point within an equilateral triangle is intended to alert the users of the presence of important operating and maintenance (servicing) instructions in the literature accompanying the product. The lightning flash with the arrowhead symbol, within an equilateral triangle, is to alert the user to the presence of insulated “dangerous voltage” within the products enclosure that may be of sufficient magnitude to constitute a risk of electric shock to humans. CAUTION: TO REDUCE THE RISK OF ELECTRIC SHOCK, DO NOT REMOVE COVER. THERE ARE NO USER SERVICEABLE PARTS INSIDE. REFER ALL SERVICING TO QUALIFIED PERSONNEL. ©2008 Equator Audio Research, LLC. All Rights Reserved. Page 3 Equator Room Analysis User Guide v2.0 Introduction Thank you for purchasing Equator Audio Research monitors and the optional Equator Room Analysis software/microphone kit. All Q Series monitors feature a Zero-Point Reference™ coaxial design with DigitallyControlled Transducers™ that feature a true compression driver/horn. A CPU that resides inside each Equator monitor handles a host of formidable tasks, including matching each transducer to a perfectly matched frequency response output as well as seamlessly incorporating our unique “no-slope” crossover approach. This approach reduces midrange distortion that is commonly associated with conventional coaxial designs. The result is highly accurate, natural sounding mid-range reproduction without the harshness. Because we use a real compression driver/horn along with a “no-slope” crossover, we are able to achieve very high sound pressure levels without the midrange pain. Be careful! These two tasks (transducer matching & our “no-slope” crossover) are invisible to the enduser and are automatically handled by the internal CPU. The Q Series monitors benefit from cutting-edge DSP technology that helps mix engineers ensure the monitors are optimized for the room. Included with every Equator Q Series monitor is the Equator Control software application. This software enables interaction with the monitors providing the ability to manually compensate for acoustic anomalies created by the size of the room, speaker placement, and boundary conditions within the listening environment. Along with the environmental compensation, the software also provides extraordinary control over the monitors—including equalization, mute, solo, phase, and save/recall of user created settings. The optional Equator Room Analysis software/microphone kit features SecondaryReflection Correction™. This software fully automates the precise analysis and compensation of room response characteristics. The SRC identifies and compensates for secondary reflections created by sound waves bouncing off of mixing consoles, computer screens and other reflective surfaces which when combined with the original direct sound energy will result in comb-filtering due to phase cancellation. To ensure accuracy, the kit includes a quality-controlled & calibrated measurement microphone. ©2008 Equator Audio Research, LLC. All Rights Reserved. Page 4 Equator Room Analysis User Guide v2.0 Monitor Features Digitally-Controlled Transducers™ An on-board CPU digitally adjusts the driver components to exacting specifications. Other benefits include a continuously adjusting crossover (no preset filter slope) and the ability to perfectly match every transducer in the system at our factory for use with 2.0, 2.1, 5.1, 6.1, 7.1, and 8.2. Zero-Point Reference™ Coaxial Design Two drivers, one sonic point source, allowing for perfect audio alignment between the low and high frequency transducer on the X, Y, and Z axis. The result: superb imaging, enhanced off-axis response, and exceptional midrange clarity. High Definition Titanium Compression Horn Driver The custom titanium compression driver delivers exceptionally precise, detailed, and accurate high frequency response as well as providing high SPL. The horn’s uniquely designed throat section creates an extended horizontal high frequency dispersion pattern, and provides superior off-axis response in both the vertical and horizontal planes. Fiberglass-Impregnated Low Frequency Driver Fashioned from a blended fiberglass/pulp mixture, the woofer cone material was chosen for its’ strength and damping characteristics. Multi-Function Status Display The multi-segment LED allows you to monitor power protection, network communication, volume, and compression/limiting. Cast Aluminum CAD Coaxial Driver Basket A performance-enhancing top plate for the woofer’s magnet assembly cools the voice coil and provides a significant increase in midrange performance. The driver basket also serves as a heat sink, allowing the speaker to run cooler at high power levels. 13-Ply Baltic Birch Resonant Damping Cabinet The enclosures sides and back are constructed from 13-Ply Baltic Birch; the sculptured front baffle is 1” HDF. Together they provide the optimum combination of acoustic damping and enclosure strength. All are equipped with rubber pads and OmniMount™ compatible mounting holes: Q8 & Q10 use OmniMount™ model 60.0WBB. Q12 & Q15 use OmniMount™ model 120.0WBW The Q12 and Q15 are also equipped with side-mounted handles for easy transportation. ©2008 Equator Audio Research, LLC. All Rights Reserved. Page 5 Equator Room Analysis User Guide v2.0 Monitor Features Continued Continuous-Flow Low Turbulence Bass Ports Two large, long, low air-restriction bass ports provide turbulence-free, quiet operation resulting in a dramatic low-end punch. Their Look is as Refined as their Performance Serious attention was spent developing not only the sound of the Q Series monitors, but their look and feel as well. Their perfect cubed shape and symmetry delivers the biggest possible sound in the smallest possible foot print. As unique on the outside as they are inside, the Q’s size, shape and rich durable finish make them the perfect complement to any studio environment. Includes Equator Control Application The Q Series DSP allows control over the speaker’s accuracy and response in the mixing environment. Enter the room’s dimensions into the software and the monitors digitally compensate for three major standing waves (front to back wall, left to right wall, & floor to ceiling). Optional Equator Room Analysis Application/Microphone Kit The optional Equator Room Analysis software/microphone kit featuring Secondary-Reflection Correction™, fully automates the precise analysis and compensation of existing sonic conditions at the microphone position. It also identifies and compensates for secondary reflections created by sound waves bouncing off of mixing consoles, computer screens and other reflective surfaces which when combined with the original direct sound energy will result in comb-filtering due to phase cancellation. ©2008 Equator Audio Research, LLC. All Rights Reserved. Page 6 Equator Room Analysis User Guide v2.0 Unpack the Monitor The Q Series shipping carton was designed to protect the monitor during transport. Do Not Discard these Materials. Inspect Carefully If there is any damage, immediately report it to the dealer or contact Equator Audio Research directly by emailing [email protected] or by calling 1-888-772-0087. Monitor Package Contents Q Monitor AC Power Cord CDROM (Instruction Manual/Equator Control Software Installer) Optional Room Analysis Package Contents Equator Teak Wood Protective Case Equator USB Flash Drive (Contains Instruction Manual/Equator Room Analysis Software Installer) Equator Calibrated Measurement Microphone Equator Microphone Clip Microphone Windscreen Equator Room Analysis Software/Microphone Kit ©2008 Equator Audio Research, LLC. All Rights Reserved. Page 7 Equator Room Analysis User Guide v2.0 Setting Up Stereo Setup There is not a visual left or right distinction between the monitors as all speakers within a model group are physically identical. Following the equilateral triangle rule, position the monitors so that each monitor and the listener form a perfect equilateral triangle. Angle them inwards so that the horn is facing the ears of listener while seated at the mix position. They should be positioned at a height so that the center of the horn is at the same height as the ears of the user. The optional Room Analysis software is capable of distinguishing and compensating for placement variances and boundary conditions. It is, however, advised to start the basic speaker placement setup adhering to the equilateral triangle rule as outlined above. ©2008 Equator Audio Research, LLC. All Rights Reserved. Page 8 Equator Room Analysis User Guide v2.0 Setting Up Continued The Q8 and Q10 models have a universal power transformer which allows them to be used at either 100-120v or 200-240v. The Q12, Q15, and Q18 are set internally at the factory for use with 100-120v or 200-240v and are labeled as such on the back panel of the amplifier for reference. Do not attempt to change these settings or the factory warranty will be void. Connect AC Power Cable Connect each monitor to a power source using supplied AC power cable. ON MONITOR YET DO NOT POWER OS Compatibility (for use with Equator Control Software & Equator Room Analysis) Mac OS X 10.4 or higher Windows XP Connect USB Cable Create a USB connection between a computer and the USB port on the back of any Q monitor. DO NOT POWER ON MONITOR YET Connect CAT5 Network Cable(s) Plug a CAT5 network cable into the THRU port on the Q monitor that is connected to the computer via USB and plug the other end of the CAT5 cable into the IN port on the next Q monitor within the system. If there are additional Q monitors within the system, “DaisyChain” from monitor to monitor from THRU to IN. ©2008 Equator Audio Research, LLC. All Rights Reserved. Page 9 Equator Room Analysis User Guide v2.0 Setting Up Continued Configure ID Switches Speaker ID ID switches 1, 2, 3, & 4 correspond to the speaker position within the room and will be reflected as such within the Equator software. Use the legend on the back of each monitor to determine ID positions based upon speaker placement (Front Left, Front Center, etc…) Within the Legend: 1 = UP 0 = DOWN In a stereo setup, the front left speaker ID switch (No. 1) is set in an upward position and switches 2, 3, & 4 are in the down position. The right speaker ID switches (No. 1 & 2) are both set in an upward position and switches 3 & 4 are in the down position. System Groups ID Switches 5 & 6 determines the System Group. These two switches allow up to four separate groups of monitors to be networked together and called up independently within Equator software. Each of these groups can be configured from stereo all the way up to 8.2. In the stereo setup example (above image), switches 5 & 6 are set to the down position (0 0) which reflects System Group 1 as shown on the legend above. Reserved ID Switch No. 7 is reserved. It should always be set to the down position. Room Correction ID Switch No. 8 in the active up position allows communication between each Q Series monitor and the Equator software. ©2008 Equator Audio Research, LLC. All Rights Reserved. Page 10 Equator Room Analysis User Guide v2.0 Setting Up Continued To bypass room compensation without using Equator software, power down the monitor and set ID Switch No. 8 to the down position. Power the monitor back on. This will restore the factory defaults with the exception of user-applied tone contour. Previously programmed tone contour data stays resident within the monitor until new tone contour values are loaded from within Equator software. DO NOT POWER ON MONITORS YET Connect Audio Cables Connect the outputs of the playback device or mixing console to the appropriate analog audio input on the back of each monitor. Q Series monitors can accommodate both XLR and ¼” cables that are wired for either balanced or unbalanced operation. For balanced operation consult the Input Connector Wiring diagram located on the back panel of a Q monitor. DO NOT POWER ON MONITORS YET ©2008 Equator Audio Research, LLC. All Rights Reserved. Page 11 Equator Room Analysis User Guide v2.0 Installing Equator Room Analysis Software Mac OS X 10.4 (or higher) Users Browse the included CDROM and locate a file called SLAB_USB to UART Installer. Doubleclick the file and follow the on-screen prompts. After rebooting your computer, continue the installation by double-clicking the Equator Room Analyzer file. Follow the on-screen prompts to finish installing the software. ©2008 Equator Audio Research, LLC. All Rights Reserved. Page 12 Equator Room Analysis User Guide v2.0 Installing Equator Room Analysis Software Continued ©2008 Equator Audio Research, LLC. All Rights Reserved. Page 13 Equator Room Analysis User Guide v2.0 Installing Equator Room Analysis Software Continued Software installation complete. Windows XP Users It should be noted that Windows based installations do not require an additional install of a USB specific driver. Simply insert the included CDROM and locate the folder named Equator Room Analyzer. Double-click on the file named setup.exe and follow the onscreen prompts. After the installation is complete, you can power on the monitors. ©2008 Equator Audio Research, LLC. All Rights Reserved. Page 14 Equator Room Analysis User Guide v2.0 Using Equator Room Analysis Software Mac OS X 10.4 (or higher) Users Browse to your applications folder and select APPLICATIONS > EQUATOR ROOM ANALYSIS to launch the software. Windows XP Users Go to START > ALL PROGRAMS > EQUATOR ROOM ANALYSIS to launch the software. Upon launching the Equator application, the software will initialize and interrogate the system looking for all networked Q Series monitors. As long as the ID Switches and cable connections on the back the monitors are correct, Equator software will populate the screen with all monitors identified within Speaker Group 1 or however Speaker Group 1 was last titled from within the software. In the example below, Speaker Group 1 had been renamed Stereo Setup. After the software has been launched, alternate speaker groups are selectable from the speaker group drop-down menu at the top center portion of this screen. Selecting a new speaker group repopulates the software screen with the data of the newly selected monitor group. Example: Switching to a 5.1 speaker group would populate the screens with six speakers, each with Solo, Mute, and Select buttons. As well as all other appropriate data within each tab. Global Controls Compare, Solo, Mute, Select, Bypass ALL, Mute ALL and Group Selection are available on every tab and will be explained in more detail throughout this user guide. ©2008 Equator Audio Research, LLC. All Rights Reserved. Page 15 Equator Room Analysis User Guide v2.0 Using Equator Room Analysis Software Continued Tab 1 Before You Begin Tab 1 displays the software version installed. Latest versions can be downloaded at http://www.equatoraudio.com/software.htm ©2008 Equator Audio Research, LLC. All Rights Reserved. Page 16 Equator Room Analysis User Guide v2.0 Using Equator Room Analysis Software Continued System Configuration Which speaker is connected to USB? Select the speaker that is connected to the computer’s USB port. Which Speaker Group? Select the Speaker Group that the USB connected speaker belongs to. Scan for Speakers: The Scan for Speakers button is used to interrogate the system searching for all speakers that are “Daisy-Chained” (networked) together with CAT5 cable. Speaker Group Names: This allows for naming Speaker Groups 1 – 4. Group 1 was renamed Stereo Setup. Distance Units: Values throughout the software can be displayed in either Feet or Meters. Speaker LED Brightness: Allows control over the brightness of the volume LEDs on the speakers themselves. ©2008 Equator Audio Research, LLC. All Rights Reserved. Page 17 Equator Room Analysis User Guide v2.0 Using Equator Room Analysis Software Continued Audio Configuration The software addresses issues created by speaker placement, boundary conditions, and secondary reflections by examining the chosen position with the calibrated microphone. It then automatically feeds each speaker’s internal CPU the acquired data, which then, in turn, compensates the Digitally Controlled Transducers™ adjusting for any and all sonic anomalies that might exist at that position. Placing the Microphone Select an area in the room to be analyzed. A good first choice is the engineer’s mix position. Place the supplied measurement microphone vertically at ear level where the engineer would sit. Multiple locations can be measured, compensated, titled, stored, and recalled so the engineer can monitor properly at the mix position, the producer can hear it accurately at his desk, and the band can listen from the control room couch by recalling the appropriate RMC file (explained later). ©2008 Equator Audio Research, LLC. All Rights Reserved. Page 18 Equator Room Analysis User Guide v2.0 Using Equator Room Analysis Software Continued All enabled computer DAW input devices connected to the computer will automatically appear within the Microphone Input Device drop-down menu. Select the appropriate Microphone Input Device that the Equator measurement microphone is connected to Select the microphone input channel as well. In this case channel 1. The software automatically displays and enables the Equator model speaker networked. By default, Speaker Group 1 is displayed upon launch. Speaker Groups are determined by ID Switches No. 5 & 6. In this case, a pair of Q8’s networked together with ID Switch No. 5 & 6 set to the down position (Group 1, renamed Stereo Setup). If multiple groups are networked within a system, use the speaker group drop-down menu at the top of the screen to switch to an alternative group. The speaker model number for any selected group will be displayed in its appropriate speaker location (determined by ID Switch No. 1–6). If the anticipated speaker does not appear, there is likely an error in the ID Switch settings and/or network cable connections. Select the DAW Audio Output Device that is connected to the audio input on the back of the speakers and select Channel 1 for the left speaker, channel 2 for the right speaker. Click the test button and adjust the audio output device so there is a significant amount of pink noise being heard through the monitors. Now adjust the microphone preamp input level and make sure it is not clipping. Confirm that the microphone input meter within our software has registered well into the green. If not, increase the output of the DAW device until our meters do register well into the green, almost hitting red. ©2008 Equator Audio Research, LLC. All Rights Reserved. Page 19 Equator Room Analysis User Guide v2.0 Using Equator Room Analysis Software Continued Automated RRC The Automated RRC tab is used to send a noise-blast and frequency sweep through each speaker for the microphone to gather sonic conditions at that location. Determine the longest dimension within your room and enter no less than that value into the cell marked Longest Room Dimension. In this case, it is 15 feet. This dimension determines the length of the Auto RRC test/measurement procedure. The larger the “longest room dimension” is, the longer the test will run. It is recommended to round up to next whole number. If the room dimension for instance is 14’ 5”, the test will register accurately when rounded up to 15’. Rounding the number down to 14’ is not recommended and could compromise results as the test was not allocated enough time to provide an accurate assessment. The intent of the Countdown is to clear the room of unwanted personnel that can alter the room response and to maintain a clear path between the speakers and the microphone. The Announce Test announces an additional five second notice to stand clear. It can be defeated by clicking on the green button. Tutorial: www.equatoraudio.com/rrc.mov ©2008 Equator Audio Research, LLC. All Rights Reserved. Page 20 Equator Room Analysis User Guide v2.0 Using Equator Room Analysis Software Continued Selected Speakers There are three buttons next to each displayed monitor. The select button chooses which speaker’s compensation data will be displayed. In this case, the right speaker is selected and its compensation data is displayed. Selecting the left speaker will display its data. The compensation data was generated by the automated RRC calculation. Visual compensation is to the lower left and the actual compensation values can be seen to the lower right. Each value is user-editable either by double-clicking inside a cell and typing in a new value, or by mouse-clicking the up/down arrows. This automated RRC data is resident within each speaker, but has not been permanently saved and programmed. Turning the speaker off at this point will negate this compensation. The saving & programming process resides within Tab 9. The Global Compare button at the top left corner of the screen allows an A/B comparison between the newly generated RRC calculation data and the previous data that was programmed into the speakers. There’s also a Phase Invert switch that reverses the phase of the selected speaker. ©2008 Equator Audio Research, LLC. All Rights Reserved. Page 21 Equator Room Analysis User Guide v2.0 Using Equator Room Analysis Software Continued Secondary Reflections Secondary reflections are created by sound waves bouncing off of mixing consoles, computer screens and other reflective surfaces which when combined with the original direct sound energy, results in comb-filtering due to phase cancellation. The software identifies these secondary reflections, and the selected speaker (in this case the right speaker) is what is displayed to the bottom left of the screen. The reflection impulses are displayed in both milliseconds and size relative to the initial incident wave. The Reflection Threshold drop-down settings determine the sensitivity of the compensation. Reducing the threshold to -12dB for example will correct for less reflections. -24dB is the default setting. ©2008 Equator Audio Research, LLC. All Rights Reserved. Page 22 Equator Room Analysis User Guide v2.0 Using Equator Room Analysis Software Continued All Speakers The All Speakers tab allows you to view all of the automated room response calculation data in a linear view. With a little patience and steadfast determination, in-depth voicing’s are achievable. Double-clicking inside of any cell allows access to that cell for editing capability. Individual voicing’s can be named, saved, and recalled at anytime from within Tab 9. There is also the ability to Bypass Room Response Compensation to the bottom right. ©2008 Equator Audio Research, LLC. All Rights Reserved. Page 23 Equator Room Analysis User Guide v2.0 Using Equator Room Analysis Software Continued Tone Contour Tone contour allows tone adjustments to be made to the Front speakers, the Surrounds, the Subwoofers, or All Speakers. Use the drop-down menu to the left hand side of the screen to choose the desired set of speakers to be adjusted. Tone Contour provides additional voicing control that is independent of the RRC settings. A particular producer might want to have personal voicing’s resident within the system, regardless of the room he/she is working in. A hip-hop producer for example might want to add some extra low end. Double-clicking a knob returns it to its default value. These settings can be named, saved, and recalled from within Tab 9. RRC can be bypassed without using Equator software by setting ID Switch No. 8 on the back of each speaker to the down position and recycling their power. Upon powering back on, the speaker ignores room compensation data, but the tone contour voicing’s (producer curves) will still be resident. To the right, there is the ability to Bypass Tone Contour for the Fronts, Subs, Surrounds, or All. ©2008 Equator Audio Research, LLC. All Rights Reserved. Page 24 Equator Room Analysis User Guide v2.0 Using Equator Room Analysis Software Continued Save and Load Files Tab 9 provides the ability to save, load, or recall factory or user-created RMC files. RMC files contains the data generated by Equator software. Click the Save As button to create a new file. This new file will store all current data (from within all tabs). There will be a prompt to title it. The Quick Access Presets provide an easy way to select and program the speakers with alternate RMC files. For example, All_Controls_Flat program the speakers back to factory flat. Producer Desk is a user-created RMC file with all data gathered from tabs 1-8. To use the Quick Access Presets, click on a folder to load the desired RMC into the quick access location. Press the Select button to the left of a quick access preset to program the speakers. In this case the last RMC file programmed into the speakers was Producer Desk. ©2008 Equator Audio Research, LLC. All Rights Reserved. Page 25 Equator Room Analysis User Guide v2.0 Speaker Specifications Description: Q8: Powered 8” 2-way Reference Monitor Q10: Powered 10” 2-way Reference Monitor Q12: Powered 12” 2-way Reference Monitor Q15: Powered 15” 2-way Reference Monitor Frequency Response: Q8: 38Hz-22kHz (-3dB/2∏) Q10: 32Hz-22kHz (-3dB/2∏) Q12: 30Hz-22kHz (-3dB/2∏) Q15: 29Hz-22kHz (-3dB/2∏) Continuous Amplifier Power (LF/HF): Q8: 200w/200w Q10: 200w/200w Q12: 500w/200w Q15: 1000w/200w Amplifier Peak Power (LF/HF): Q8: 400w/400w Q10: 400w/400w Q12: 1000w/400w Q15: 2000w/400w Max SPL (per pair): Q8: ≥110dB Q10: ≥112dB Q12: ≥117dB Q15: ≥121dB L.F. Driver VC Size: Q8: 2.5” Q10: 3.0” Q12: 3.0” Q15: 4.0” L.F. Driver (4- ohm): Q8: 8” Q10: 10” Q12: 12” Q15: 15” H.F. Driver (8-ohm): Q8: 1.0” Titanium Dome Forward Firing Compression Driver Q10: 1.0” Titanium Dome Forward Firing Compression Driver Q12: 1.5” Titanium Dome Forward Firing Compression Driver Q15: 1.5” Titanium Dome Forward Firing Compression Driver Crossover Center Frequency: Q8: 2kHz Q10: 1.8kHz Q12: 1.5kHz Q15: 1.2kHz ©2008 Equator Audio Research, LLC. All Rights Reserved. Page 26 Equator Room Analysis User Guide v2.0 Speaker Specifications Continued Dimensions H x W x D (in.): Q8: 13 x 13 x 13 Q10: 15 x 15 x 15 Q12: 17 x 17 x 17 Q15: 21 x 21 x 21 Shipping Weight (lbs.): Q8: 34 Q10: 54 Q12: 65 Q15: 92 Carton dim.(in): Q8: 19 x 19 x 19 Q10: 21 x 21 x 21 Q12: 24 x 24 x 24 Q15: 27 x 27 x 27 Inputs (All Models): XLR, USB, RS485 in/thru, ¼” phone jack Protection (All Models): Compression (LF & HF), thermal, short circuit, under voltage Magnetic Shielding (All Models) Enclosure Alignment (All Models): Bass-Reflex Enclosure Construction (All Models): 1” HDF baffle & 3/4” 13-layer Baltic Birch Finish (All Models): Black/Micro-Metallic gray Specifications subject to change without notice. Patents filed. ©2008 Equator Audio Research, LLC. All Rights Reserved. Page 27 Equator Room Analysis User Guide v2.0 Equator Audio Research, LLC. Warranty Information Equator Audio Research, LLC. Limited Warranty Equator Audio Research, LLC. warrants this product to be free of defects in material and workmanship for a period of 1 year from the date of original retail purchase. This warranty is enforceable only by the original retail purchaser. To be protected by this warranty, the purchaser must complete the online warranty form at http://www.equatoraudio.com/register.htm or by calling customer service at 1-888-7720087. During the warranty period, Equator Audio Research, LLC. shall, at its sole and absolute option, either repair or replace free of charge any product that proves to be defective on inspection by Equator Audio Research, LLC or its authorized service representative. To obtain warranty service, the purchaser must first call Equator Audio Research, LLC. at 1888-772-0087 or by emailing [email protected] to obtain a Return Authorization Number and instructions concerning where to return the unit for service. All inquiries must be accompanied by a description of the problem. All authorized returns must be sent to Equator Audio Research, LLC. or an authorized Equator Audio Research, LLC. repair facility postage prepaid, insured, and properly packaged. Proof of purchase must be presented in the form of a bill of sale, canceled check or some other positive proof that the product is within the warranty period. Equator Audio Research, LLC. reserves the right to change or improve the design of the product at any time without prior notice. This warranty does not cover claims for damage due to abuse, neglect, alteration or attempted repair by unauthorized personnel, and is limited to failures arising during normal use that are due to defects in material or workmanship in the product. ANY IMPLIED WARRANTIES, INCLUDING IMPLIED WARRANTIES OF MERCHANTABILITY AND FITNESS FOR A PARTICULAR PURPOSE, ARE LIMITED IN DURATION TO THE LENGTH OF THIS LIMITED WARRANTY. Some states do not allow limitations on how long an implied warranty lasts, so the limitation above may not apply to you. Equator Audio Research, LLC. WILL NOT BE LIABLE FOR INCIDENTAL, CONSEQUENTIAL OR OTHER DAMAGES RESULTING FROM THE BREACH OF ANY EXPRESSED OR IMPLIED WARRANTY, INCLUDING, AMONG OTHER THINGS, DAMAGE TO PROPERTY, DAMAGE BASED ON INCONVENIENCE OR ON LOSS OF USE OF THE PRODUCT, AND, TO THE EXTENT PERMITTED BY LAW, DAMAGES FOR PERSONAL INJURY. Some states do not allow the exclusion or limitation of incidental or consequential damages, so the above limitation or exclusion may not apply to you. This warranty gives you specific legal rights, and you may also have other rights, which vary, from state to state. This warranty only applies to products sold and used in the United States of America. For warranty information in all other countries please refer to your local distributor. ©2008 Equator Audio Research, LLC. All Rights Reserved. Page 28