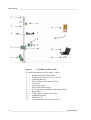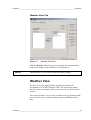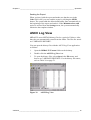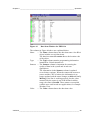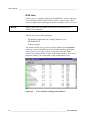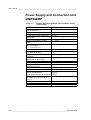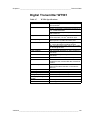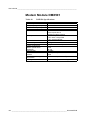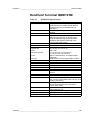
1
TACMET Weather Station MAWS201MP USER'S GUIDE M210455EN-B October 2003 PUBLISHED BY Vaisala Oyj P.O. Box 26 FIN-00421 Helsinki Finland Phone (int.): +358 9 8949 1 Fax: +358 9 8949 2227 Visit our Internet pages at http://www.vaisala.com/ © Vaisala 2003 No part of this manual may be reproduced in any form or by any means, electronic or mechanical (including photocopying), nor may its contents be communicated to a third party without prior written permission of the copyright holder. The contents are subject to change without prior notice. Please observe that this manual does not create any legally binding obligations for Vaisala towards the customer or end user. All legally binding commitments and agreements are included exclusively in the applicable supply contract or Conditions of Sale. ________________________________________________________________________________ Table of Contents CHAPTER 1 GENERAL INFORMATION............................................................................ 7 About This Manual ................................................................... 7 Contents of This Manual ....................................................... 7 Feedback............................................................................... 8 Safety......................................................................................... 8 General Safety Considerations ............................................. 8 Product Related Safety Precautions ..................................... 9 ESD Protection.................................................................... 11 Trademarks ............................................................................. 11 License Agreement ................................................................ 12 Warranty.................................................................................. 12 CHAPTER 2 PRODUCT OVERVIEW................................................................................ 13 Introduction to TACMET MAWS ........................................... 13 MAWS Operating Software.................................................... 15 Radiation Shield ..................................................................... 15 AWS Logger QML102T........................................................... 16 Power Supply and Connection Unit QMP202MP ................ 17 Backup Battery.................................................................... 17 Battery Regulator QBR101 ................................................. 17 Power Supply Unit BWC15SXZ .......................................... 17 Power Supply Unit BWT36SXZ .......................................... 18 Power Strip QPS101 ........................................................... 18 Transmitter WT501 ............................................................. 19 Modem Module DMX501 .................................................... 19 Ultrasonic Wind Sensor WS425............................................ 20 Air Temperature and Relative Humidity Sensor QMH101M ............................................................................... 21 Pressure Sensor PMT16A ..................................................... 22 Rain Gauge QMR101M ........................................................... 23 Ceilometer CT25KAM............................................................. 23 Present Weather Detector PWD11A ..................................... 24 Lightning Detector SA20M .................................................... 25 Tiltable Pole Mast ................................................................... 26 Foundation Set.................................................................... 27 Guy Wires............................................................................ 28 Lightning Rod ...................................................................... 29 Winch .................................................................................. 29 Obstruction Light ................................................................. 30 Workstation with MIDAS IV Software ................................... 31 VAISALA ________________________________________________________________________ 1 User's Guide ______________________________________________________________________ Communication Accessory Enclosure QCA101..................32 Handheld Terminal QMD101M...............................................32 Radio Modem ..........................................................................33 VHF Antennas .....................................................................34 UHF Antennas .....................................................................35 Mains Power Supply Module QMP211 ...............................36 Product Nomenclature ...........................................................37 CHAPTER 3 OPERATION.................................................................................................39 Communication Connections................................................39 Handheld Terminal .................................................................40 Turning the Terminal On/Off................................................40 Keypad ................................................................................41 Shift Key .........................................................................41 Caps Lock Key ...............................................................41 Function Key F1 .............................................................41 Cursor Keys....................................................................42 Backspace Key...............................................................42 Enter Key........................................................................42 Ctrl Key...........................................................................42 On/Off Key......................................................................42 Sequence of the Screens ....................................................43 Accessing the Screens........................................................43 Main................................................................................44 Wind ...............................................................................45 Statistics .........................................................................45 Enh/1 ..............................................................................47 Enh/2 ..............................................................................49 Alarms ............................................................................50 Status .............................................................................52 Setup ..............................................................................53 Terminal Connection ...........................................................55 MIDAS IV Software .................................................................56 MIDAS IV TACMET Configuration Wizard ..........................56 System Parameters Tab.................................................58 Weather View Tab..........................................................59 Weather View ......................................................................59 Screen 1 .........................................................................60 Screen 2 .........................................................................62 Screen 3 .........................................................................64 Changing Graphic Scales ..............................................65 Menu Options .................................................................65 Toolbar ...........................................................................67 Status Bar.......................................................................67 METAR/SPECI Template ....................................................68 METAR/MET REPORT Manager...................................71 METAR/SPECI Editing Procedure .................................72 Checking and Editing Data Fields .............................72 Adding Remarks........................................................74 Building the Report....................................................74 Sending the Report ...................................................75 ASCII Log View ...................................................................75 2 ___________________________________________________________________ M210455EN-B ________________________________________________________________________________ Event Monitor ...................................................................... 77 Menu Options................................................................. 78 Toolbar ........................................................................... 79 Display Modes................................................................ 80 Viewing Events............................................................... 81 Acknowledging Events................................................... 81 Checking New Events.................................................... 82 Event Messages............................................................. 83 Diagnostics Monitor............................................................. 84 Statuses Tab .................................................................. 85 ROA Object .................................................................... 86 Data Item Window.......................................................... 88 ROA User....................................................................... 90 SensorIO Monitor ................................................................ 91 Sensor Status Monitor Window...................................... 92 Event Log Window ......................................................... 95 CHAPTER 4 MAINTENANCE ........................................................................................... 97 Tilting the Mast ....................................................................... 97 Ultrasonic Wind Sensor WS425.......................................... 102 Present Weather Detector PWD11A ................................... 102 Cleaning Transmitter and Receiver Lenses and Hoods ... 102 Cleaning DRD Rain Detector ............................................ 103 Storage.............................................................................. 103 Lightning Detector SA20M .................................................. 103 Obstruction Light ................................................................. 104 Antenna ................................................................................. 104 Temperature and Relative Humidity Probe QMH101M ..... 104 Replacing QMH101M Probe ............................................. 104 Rain Gauge QMR101M ......................................................... 105 Pressure Sensor PMT16A ................................................... 106 Calibration ......................................................................... 106 Ceilometer CT25KAM........................................................... 107 Window Cleaning .............................................................. 107 Storage.............................................................................. 108 Logger Enclosure QME101M .............................................. 108 Power Supply and Connection Unit QMP202MP .............. 108 Mains Power Supply QMP211 ............................................. 108 Communication Accessory Enclosure QCA101 ............... 109 Handheld Terminal QMD101M ............................................ 109 Cable Maintenance............................................................... 109 CHAPTER 5 TROUBLESHOOTING ............................................................................... 111 Software Operation .............................................................. 111 CT25KAM .............................................................................. 112 Warnings ........................................................................... 112 Failure Diagnosis .............................................................. 112 VAISALA ________________________________________________________________________ 3 User's Guide ______________________________________________________________________ PWD11A.................................................................................112 SA20M....................................................................................113 Handheld Terminal ...............................................................114 Technical Support ................................................................114 Return Instructions ..............................................................115 CHAPTER 6 TECHNICAL DATA ....................................................................................117 Polling/Reporting Times ......................................................117 Specifications .......................................................................118 Weather Station MAWS201MP .........................................118 Logger QML102T ..............................................................119 Power Supply and Connection Unit QMP202MP..............120 Digital Transmitter WT501.................................................123 Modem Module DMX501...................................................124 Handheld Terminal QMD101M..........................................125 Heated Ultrasonic Wind Sensor WS425 ...........................126 Pressure Sensor PMT16A.................................................127 Air Temperature and Relative Humidity Sensor QMH101M ........................................................................127 Rain Gauge QMR101M.....................................................127 Ceilometer CT25KAM .......................................................128 Present Weather Detector PWD11A .................................129 Lightning Detector SA20M ................................................130 Obelux Obstruction Light...................................................130 Tiltable Pole Mast ..............................................................131 TM32 Radio Modem ..........................................................133 List of Figures Figure 1 Figure 2 Figure 3 Figure 4 Figure 5 Figure 6 Figure 7 Figure 8 Figure 9 Figure 10 Figure 11 Figure 12 Figure 13 Figure 14 Figure 15 Figure 16 Figure 17 Figure 18 Figure 19 Figure 20 Figure 21 Figure 22 TACMET MAWS System..........................................................14 Radiation Shield .......................................................................15 Logger QML102T .....................................................................16 Power Strip QPS101 ................................................................18 Transmitter WT501...................................................................19 Modem Module DMX501..........................................................19 Ultrasonic Wind Sensor WS425 ...............................................20 Installation Adapter for Ultrasonic Wind Sensors .....................21 QMH101M with Radiation Shield..............................................21 Pressure Sensor PMT16A........................................................22 Rain Gauge QMR101M ............................................................23 Ceilometer CT25KAM...............................................................23 Present Weather Detector PWD11A ........................................24 Lightning Detector SA20M........................................................25 Tiltable Pole Mast DKP210AV-T ..............................................26 Foundation Set for DKP206AV.................................................27 Guy Wires Set...........................................................................28 Passive Lightning Rod and the Holders ...................................29 Winch........................................................................................29 Obstruction Light with the Power Cable ...................................30 MIDAS IV Workstation and QCA101........................................31 QMD101M Handheld Terminal.................................................32 4 ___________________________________________________________________ M210455EN-B ________________________________________________________________________________ Figure 23 Figure 24 Figure 25 Figure 26 Figure 27 Figure 28 Figure 29 Figure 30 Figure 31 Figure 32 Figure 33 Figure 34 Figure 35 Figure 36 Figure 37 Figure 38 Figure 39 Figure 40 Figure 41 Figure 42 Figure 43 Figure 44 Figure 45 Figure 46 Figure 47 Figure 48 Figure 49 Figure 50 Figure 51 Figure 52 Figure 53 Figure 54 TM32 Radio Modem................................................................. 33 VHF Antenna on the Tripod ..................................................... 34 VHF Antenna on the Mast ........................................................ 34 UHF Antenna on the Tripod ..................................................... 35 UHF Antenna on the Mast........................................................ 35 Mains Power Supply Module QMP211 .................................... 36 Handheld Terminal ................................................................... 40 Time Zones .............................................................................. 55 Configuration Wizard................................................................ 57 Weather View Tab.................................................................... 59 Weather View Screen 1: Basic System Data ........................... 60 Weather View Screen 2: Enhancement Data .......................... 62 Weather View Screen 3: Graphic Display ................................ 64 Changing the Scales ................................................................ 65 US METAR Template............................................................... 68 METAR/MET REPORT Manager............................................. 72 ASCII Log View ........................................................................ 75 Event Monitor Screen............................................................... 77 Event Monitor Icon Showing Unacknowledged Events............ 80 Diagnostic Monitor Statuses Tab ............................................. 85 Objects Window in Diagnostic Monitor..................................... 86 Data Item Window for PWD11A............................................... 89 Users Window in Diagnostic Monitor ....................................... 90 Sensor Status Monitor Window................................................ 93 Sensor Details in Field Device Status Window ........................ 94 Event Log Window ................................................................... 95 MAWS201MP Mast Tilted ........................................................ 97 Mast Orientation ....................................................................... 99 Bolts and Washers for Securing the Hinge ............................ 100 Tilted Mast with Tilting Support .............................................. 101 Present Weather Detector (Arrow Pointing to DRD).............. 102 QMH101 Probe Maintenance................................................. 105 List of Tables Table 1 Table 2 Table 3 Table 4 Table 5 Table 6 Table 7 Table 8 Table 9 Table 10 Table 11 Table 12 Table 13 Table 14 Table 15 Table 16 Table 17 Table 18 TACMET MAWS201MP Nomenclature ................................... 37 Cables Provided ....................................................................... 38 Main Screen Information .......................................................... 44 Wind Screen Information.......................................................... 45 Statistics Screen Information ................................................... 46 Reset Times for Precipitation Statistics.................................... 46 First Enhancement Screen Information.................................... 47 SYNOP Codes Used by PWD11A (Number Codes Not Seen on QMD101M) .............................. 48 Second Enhancement Screen Information .............................. 49 List of Possible Alarms ............................................................. 51 Status Screen Information........................................................ 52 Station Dependent Settings ..................................................... 54 Explanation of Configuration Wizard Buttons .......................... 58 Explanation of System Parameters tab.................................... 58 Parameters in Basic System Data Screen ............................... 61 Parameters in Enhancement Data Screens............................. 63 Present Weather Codes (Qualifiers) ........................................ 63 Present Weather Codes (Phenomena) .................................... 63 VAISALA ________________________________________________________________________ 5 User's Guide ______________________________________________________________________ Table 19 Table 20 Table 21 Table 22 Table 23 Table 24 Table 25 Table 26 Table 27 Table 28 Table 29 Table 30 Table 31 Table 32 Table 33 Table 34 Table 35 Table 36 Table 37 Table 38 Table 39 Table 40 Table 41 Table 42 Table 43 Table 44 Table 45 Table 46 Table 47 Table 48 Table 49 Table 50 Table 51 Table 52 Table 53 Table 54 Table 55 Table 56 Table 57 Table 58 Table 59 Table 60 Parameters in Graphic Display.................................................64 Thresholds That Initiate Automatic SPECI Report ...................69 Buttons in US METAR Template ..............................................69 US METAR: Report Menu ........................................................70 US METAR: Edit Menu.............................................................70 US METAR: View Menu ...........................................................70 US METAR: Settings Menu ......................................................70 US METAR: Help Menu............................................................71 US METAR: Toolbar Buttons....................................................71 Data Fields in METAR/SPECI Template ..................................73 History File Names and Content...............................................76 History File Column Indicators..................................................76 Event Messages .......................................................................83 Existence Column in Objects Window......................................87 Color of Object Status Icon Explained......................................88 Explanation of Connection Status Icon ....................................93 Explanation of Status Column ..................................................94 Some Common Problems and Their Remedies.....................111 Troubleshooting Ceilometer ...................................................112 Troubleshooting SA20M .........................................................113 Troubleshooting the Handheld Terminal ................................114 Sensor Polling/Reporting Times .............................................117 MAWS201MP Specifications..................................................118 QML102T Specifications ........................................................119 Battery Regulator QBR101 Specifications (Inside QMP202MP) ..............................................................120 Power Supply Unit BWT36SXZ Specifications (Inside QMP202MP) ..............................................................121 Power Supply Unit BWC15SXZ Specifications (Inside QMP202MP) ..............................................................122 12 Ah Backup Battery Specifications .....................................122 WT501 Specifications.............................................................123 DMX501 Specifications ..........................................................124 QMD101M Specifications .......................................................125 WS425 Specifications.............................................................126 PMT16A Specifications ..........................................................127 QMH101M Specifications .......................................................127 QMR101M Specifications .......................................................127 CT25KAM Specifications........................................................128 PWD11A Present Weather Detector Specifications...............129 SA20M Specifications.............................................................130 Obelux Obstruction Light Specifications.................................130 DKP210AV-T Specifications...................................................131 DKP206AV-T Specifications...................................................132 TM32 Radio Modem Specifications........................................133 6 ___________________________________________________________________ M210455EN-B Chapter 1 ________________________________________________________ General Information CHAPTER 1 GENERAL INFORMATION This chapter provides important safety, revision history, and warranty information on the product. About This Manual This manual provides operation and maintenance information on MAWS201MP Automatic Weather Station for Pole Mast installations (also referred to as TACMET MAWS). Contents of This Manual This manual consists of the following chapters: - Chapter 1, General Information, provides important safety, revision history, and warranty information on the product. - Chapter 2, Product Overview, introduces TACMET MAWS features, advantages, and the product nomenclature. - Chapter 3, Operation, contains information that is needed to operate TACMET MAWS with the handheld terminal and MIDAS IV software. - Chapter 4, Maintenance, provides information that is needed in the basic maintenance of the product. - Chapter 5, Troubleshooting, consists of some common problems, their probable causes, and remedies. - Chapter 6 Technical Data, provides the technical data of the TACMET Weather Station for Pole Mast Installations. VAISALA ________________________________________________________________________ 7 User's Guide ______________________________________________________________________ Feedback Vaisala Customer Documentation Team welcomes your comments and suggestions on the quality and usefulness of this publication. If you find errors or have other suggestions for improvement, please indicate the chapter, section, and page number. You can send comments to us by e-mail: [email protected] Safety General Safety Considerations Throughout the manual, important safety considerations are highlighted as follows: WARNING Warning alerts you to a serious hazard. If you do not read and follow instructions very carefully at this point, there is a risk of injury or even death. CAUTION Caution warns you of a potential hazard. If you do not read and follow instructions carefully at this point, the product could be damaged or important data could be lost. NOTE Note highlights important information on using the product. 8 ___________________________________________________________________ M210455EN-B Chapter 1 ________________________________________________________ General Information Product Related Safety Precautions The following are general safety precautions that are not related to any specific procedures and therefore do not appear elsewhere in this publication. They are recommended precautions that personnel must understand and apply during many phases of installations, operations and maintenance. WARNING For safety reasons, do not install the mast alone. WARNING For safety reasons, do not install the mast when wind speed is over 7 m/s (14 knots). WARNING Always wear a safety helmet during mast installation. WARNING Be careful when erecting or tilting the mast. See that there are no power lines or other obstacles above or behind the mast. WARNING Secure the mast properly with guy wires to prevent it from falling. Tighten all the adjustment screws securely. WARNING Be sure that there are no persons under the mast during erecting or tilting the mast. WARNING When erecting the mast with the winch, avoid touching the wire with bare hands. Do not try to guide the wire. VAISALA ________________________________________________________________________ 9 User's Guide ______________________________________________________________________ WARNING To minimize shock hazard, the instrument chassis and cabinet must be properly grounded. The power cable must either be plugged into an approved electrical outlet or the instrument must be carefully grounded to a low-resistance safety ground. WARNING Do not operate in an explosive atmosphere. Do not operate the equipment in the presence of flammable gases or fumes. Operation of any electrical instrument in such an environment constitutes a serious safety hazard. WARNING Do not attempt to service the product or make any internal adjustment unless another person, capable of rendering first aid and resuscitation, is present. WARNING Do not service alone. Under no circumstances should any person reach into parts and assemblies that are AC powered. WARNING Operating personnel must not remove instrument covers. Component replacement or internal adjustments must be made by qualified maintenance personnel. Do not replace components with the power cable connected. Under certain conditions, dangerous voltages may exist for some time even with the power cable disconnected. To avoid injuries, disconnect power and discharge circuits before touching them. WARNING Do not service a live system outdoors. Do not open the units outdoors when the enclosure contains line voltage levels. CAUTION Do not install substitute parts or modify the unit. Improper modification can damage the product or lead to malfunction. Contact Vaisala for repairs to ensure that safety features are maintained. 10 __________________________________________________________________ M210455EN-B Chapter 1 ________________________________________________________ General Information CAUTION Be careful not to damage the sensors when tilting the mast. NOTE Send old batteries to secondary lead smelter for recycling. Place neutralized slurry into sealed containers and handle in accordance to local, state, and federal regulations. Large water-diluted spills, after neutralization and testing, should be managed in accordance with approved local, state, and federal requirements. Consult state environmental agency and/or federal EPA (Environmental Protection Agency). ESD Protection Electrostatic Discharge (ESD) can cause immediate or latent damage to electronic circuits. Vaisala products are adequately protected against ESD for their intended use. However, it is possible to damage the product by delivering electrostatic discharges when touching, removing, or inserting any objects inside the equipment housing. To make sure you are not delivering high static voltages yourself: - Handle ESD sensitive components on a properly grounded and protected ESD workbench. When this is not possible, ground yourself with a wrist strap and a resistive connection cord to the equipment chassis before touching the boards. When neither of the above is possible, touch a conductive part of the equipment chassis with your other hand before touching the boards. - Always hold the boards by the edges and avoid touching the component contacts. Trademarks Microsoft, Windows, Windows NT, and Windows 2000 are registered trademarks of Microsoft Corporation in the United States and/or other countries. VAISALA _______________________________________________________________________ 11 User's Guide ______________________________________________________________________ License Agreement All rights to any software are held by Vaisala or third parties. The customer is allowed to use the software only to the extent that is provided by the applicable supply contract or Software License Agreement. Warranty For certain products Vaisala normally gives a limited one-year warranty. Please observe that any such warranty may not be valid in case of damage due to normal wear and tear, exceptional operating conditions, negligent handling or installation, or unauthorized modifications. Please see the applicable supply contract or Conditions of Sale for details of the warranty for each product. 12 __________________________________________________________________ M210455EN-B Chapter 2 __________________________________________________________ Product Overview CHAPTER 2 PRODUCT OVERVIEW This chapter introduces TACMET MAWS features, advantages, and the product nomenclature. Introduction to TACMET MAWS TACMET MAWS is an automatic weather station designed for permanent installation. TACMET MAWS accesses and processes data from its sensors, performs data quality control, as well as formats data for output in application specific formats. Figure 1 on page 14 shows the components of the TACMET MAWS system. The AWS logger QML102T is located in the tube and is encased to protect the circuit board and the battery. VAISALA _______________________________________________________________________ 13 User's Guide ______________________________________________________________________ Figure 1 TACMET MAWS System The following numbers refer to Figure 1 above: 1 2 3 4 5 6 7 8 9 10 11 12 13 = = = = = = = = = = = = = Heated Ultrasonic Wind Sensor Tiltable 6 m (20 ft) or 10 m (33 ft) mast Lightning Detector Power Supply and Connection Unit Ceilometer Obstruction Light Present Weather Detector Air Temperature and Relative Humidity Sensor Rain Gauge AWS Logger with Pressure Sensor Handheld Terminal MIDAS IV PC Communication Accessory Enclosure 14 __________________________________________________________________ M210455EN-B Chapter 2 __________________________________________________________ Product Overview MAWS Operating Software The embedded operating software runs in the AWS logger QML102T. Access to the limited set of commands can be gained using the Handheld Terminal QMD101M or using MIDAS IV PC. Radiation Shield 0306-009 Figure 2 Radiation Shield The radiation shield protects the QME101M logger tube, which is the same as with the mobile TACMET system, and the Power Supply and Connection Unit QMP202MP. VAISALA _______________________________________________________________________ 15 User's Guide ______________________________________________________________________ AWS Logger QML102T 0306-010 Figure 3 Logger QML102T QML102T is a complete AWS logger designed on just one printed board. This board contains a 32 bit Motorola CPU for data processing and 10 differential (20 single ended) analog sensor inputs, that can also be used as digital inputs. Moreover, there are two frequency sensor interfaces, a 16 bit A/D converter, 1.7 Mbytes of secure Flash memory for data logging, and a charger for the internal backup battery. The board uses the latest SMD (Surface Mount Device) technology and is conformal coated for improved protection also in high humidity. Each sensor input has a varistor (VDR) protection against induced transients. The maintenance terminal connection (RS-232, COM0) has transzorb diodes in its inputs. In MAWS201MP the QML102T logger is located inside the logger tube QME101M and is further encased to protect the circuit board and the internal battery. The cover of this protective housing can be removed for installation of the battery and for maintaining MAWS. Optional modules under the housing include, for example, various communication modules and a built-in pressure transducer. 16 __________________________________________________________________ M210455EN-B Chapter 2 __________________________________________________________ Product Overview Power Supply and Connection Unit QMP202MP MAWS201MP (see Figure 2 on page 15) is a low-power system. When AC (mains) power (230 or 115 VAC) is available on the installation site, an AC (mains) power supply is used to charge the battery. QMP202MP includes the following modules: the backup battery, the battery regulator, AC (mains) power supply units, and the communication device. The unit is easily mounted under the radiation shield. Backup Battery QMP202MP houses a sealed and maintenance-free 12 Ah battery. The battery is charged with QBR101 Battery Regulator that is connected to the AC (mains) power supply. Battery Regulator QBR101 Battery Regulator QBR101 is a charging and supervising instrument for 12/24 Volts lead acid and nickel-cadmium batteries. QBR101 allows input from AC (mains) power. The maximum charging current can be set by the internal jumper settings either 0.5 A, 1.0 A, 2.0 A, or 2.5 A. QBR101 is applicable to a battery capacity of 4 to 72 Ah. Self-consumption from the battery is very low, less than 0.2 mA. The LED lamps indicate battery regulator conditions. In order to maximize autonomy time, the LED lamps are activated only while pressing the ON button. QBR101 is a rail-mountable unit allowing for easy maintenance. Power Supply Unit BWC15SXZ The AC (mains) power supply unit BWC15SXZ is a switching power supply, which operates from the universal AC input of 85 to 264 VAC and 47 to 440 Hz. The output voltage is 15 VDC, which is used for powering the MAWS201MP system, and as an input to the battery regulator QBR101 for charging the backup battery. BWC15SXZ is installed inside QMP202MP on a standard DIN-rail enabling easy maintenance of the unit. VAISALA _______________________________________________________________________ 17 User's Guide ______________________________________________________________________ Power Supply Unit BWT36SXZ The AC (Mains) power supply unit BWT36SXZ is a switching power supply, which operates from the universal AC input of 85 to 264 VAC and 47 to 440 Hz. The output voltage is 36 VDC, which is used for supplying heating power to Vaisala Ultrasonic Wind Sensor WS425. BWT36SXZ is installed inside QMP202MP on a standard DIN-rail enabling easy maintenance of the unit. Power Strip QPS101 0306-011 Figure 4 Power Strip QPS101 Power Strip QPS101 is a safety switch, which is used in connecting the QMP202MP to AC (mains) power outlet. QPS101 has two buttons: the test button for the circuit breaker and the current switch. The circuit breaker activates when the leakage is over 30 mA. 18 __________________________________________________________________ M210455EN-B Chapter 2 __________________________________________________________ Product Overview Transmitter WT501 0306-012 Figure 5 Transmitter WT501 The WT501 composes the digital transmitter PCB with connectors enclosed into an anodized aluminum profile with DIN-rail mounting. The unit is installed as such in an equipment enclosure designed to withstand the environmental conditions in question. The data is provided via the onboard opto-isolated serial interface of the transmitter unit. For long distance communication in MAWS201MP, the transmitter is equipped with an isolated Modem Module DMX501. Modem Module DMX501 0306-013 Figure 6 Modem Module DMX501 The DMX501 module is used for providing a long distance fixed-line connection between MAWS201MP and MIDAS IV PC, which has an RS-232 serial connection to a similar module installed inside the QCA101 unit. VAISALA _______________________________________________________________________ 19 User's Guide ______________________________________________________________________ Through this module, MAWS201MP sends reports and data or the MIDAS IV PC sends new settings to the logger. The modem module DMX501 is configured at the factory to use the communication standard V.22, 1200 bps DPSK Ultrasonic Wind Sensor WS425 0306-018 Figure 7 Ultrasonic Wind Sensor WS425 Ultrasonic Wind Sensor WS425 uses ultrasound to determine wind speed and wind direction. The sensor has no moving parts and it is resistant to corrosion and contamination The sensor has a built-in heater. The elements have a built-in thermostat to switch the heaters on when the transducer head needs it. The sensor needs 36 VDC to power the heater elements. When connected to MAWS201MP, the sensor uses the analog signal output providing wind speed and direction data. An adapter for the Ultrasonic Wind Sensor is included in the mast delivery. It has a clamp for mast attachment and two holes for sensor attachment. See Figure 8 on page 21. 20 __________________________________________________________________ M210455EN-B Chapter 2 __________________________________________________________ Product Overview 0306-018 Figure 8 Installation Adapter for Ultrasonic Wind Sensors Air Temperature and Relative Humidity Sensor QMH101M 0105-015 Figure 9 QMH101M with Radiation Shield Air Temperature and Relative Humidity Sensor QMH101 is based on Vaisala's field-proven HMP45D probe and comes with a special cable and connector. For humidity measurements, the HUMICAP® sensor is highly accurate and offers excellent long-term stability in a wide range of environments. Temperature measurements are taken by an accurate Pt-100 IEC751, 1/3 Class B. Replacement is simple; the probe head containing the electronics can be quickly removed from the probe body, while a replacement is VAISALA _______________________________________________________________________ 21 User's Guide ______________________________________________________________________ installed and the measurement continues. Meanwhile the other probe head can be calibrated. The probe is installed in a naturally aspirated shield made of injection molded UV stabilized plastic. The shield has a multiplate design providing the necessary shielding from solar radiation and precipitation. Pressure Sensor PMT16A 9901-020 Figure 10 Pressure Sensor PMT16A The silicon capacitive pressure sensor PMT16A has excellent accuracy, repeatability, and long-term stability over a wide range of operating temperatures. It maintains its accuracy and calibration for long periods of time, thus reducing the need for field calibrations. The fine adjustment and calibration of the sensor at the factory are handled according to the electronic working standards, which are based on international standards. 22 __________________________________________________________________ M210455EN-B Chapter 2 __________________________________________________________ Product Overview Rain Gauge QMR101M 0306-019 Figure 11 Rain Gauge QMR101M Rain Gauge QMR101M is an economical and accurate rain gauge made of plastic, which is frostproof and highly resistant to UVradiation. QMR101M has a self-emptying tipping spoon of 0.2 millimeters capacity. QMR101M comes with a ready-made cable and connector. Ceilometer CT25KAM 0306-020 Figure 12 Ceilometer CT25KAM VAISALA _______________________________________________________________________ 23 User's Guide ______________________________________________________________________ CT25KAM employs pulsed diode laser LIDAR (Light Detection and Ranging) technology for cloud detection, precipitation, and other obstructions to vision, and accurate cloud heights and vertical visibility determination. The standard measurement range of CT25KAM extends up to 25 000 feet (7.5 km) covering most heights where dense clouds appear. The instrument is capable of reporting up to three cloud layers simultaneously. It detects the cloud base reliably in fog, rain, snow, and haze. If the cloud base is obscured, CT25KAM measures and reports vertical visibility. Extensive internal monitoring is supported by a comprehensive set of user commands that can be given locally or remotely. Internal monitoring includes a sensor measuring the outgoing laser pulse energy, circuitry checking the receiver sensitivity, a sensor monitoring window contamination, and two sensors measuring the tilt angle. These and other internal measurements are used by the diagnostics software and the detection algorithm for maximum reliability and ease of use. A special additional tilt sensor is provided as standard for automatically compensating uneven terrain. Installation is made easy and fast when no exact leveling is required. The cloud coverage algorithm in the CT25KAM is a further development of the algorithm specified by FAA. Cloud coverage (amount) is reported in 0 to 8 octas, according to WMO regulations. Present Weather Detector PWD11A 0306-021 Figure 13 Present Weather Detector PWD11A Present Weather Detector PWD11A is an intelligent multivariable sensor for automatic weather observing systems. The sensor combines the functions of a forward scatter visibility meter and a present 24 __________________________________________________________________ M210455EN-B Chapter 2 __________________________________________________________ Product Overview weather sensor. In addition, PWD11A can measure the intensity and amount of both liquid and solid precipitation. The versatility of PWD11A is achieved with a unique operating principle. PWD11A measures an estimate of the precipitation water content with a capacitive device and combines this information with optical scatter and temperature measurements. These three independent measurements together sufficiently provide data for an accurate evaluation of the prevailing visibility and weather type. PWD11A is calibrated with reference to a highly accurate transmissometer. An extensive self-diagnostic procedure continuously monitors the sensor status. Dirt and foreign particles on the lens are detected automatically, minimizing the risk of false high values. A special calibration kit is provided as an option for conducting field calibration under practically all weather conditions. PWD11A is small and lightweight, thus being easy to install on the sensor cross arm. In addition to the standard sensor operation, the MAWS software adds extra features such as reporting of coded weather type identifications as plain text in the output reports. Lightning Detector SA20M 0306-022 Figure 14 Lightning Detector SA20M Lightning Detector SA20M detects the position of lightning activity and reports lightning and thunderstorm positions with respect to the location of SA20M. A stand-alone thunderstorm sensor is selfcontained and weather-tight. The SA20M sensor detects cloud-to-cloud, cloud-to-air and cloud-toground lightning activity to a range of 90 km (50 nmi.). The ability to detect inter-cloud activity allows SA20M to report lightning during VAISALA _______________________________________________________________________ 25 User's Guide ______________________________________________________________________ the building stages of a thunderstorm, before sufficient charge buildup has occurred that would generate a ground strike. Consequently, SA20M provides early warnings of potentially fatal single-event ground strikes. Tiltable Pole Mast 0310-043 Figure 15 Tiltable Pole Mast DKP210AV-T DKP206AV-T and DKP210AV-T tiltable pole masts can be easily operated by one person when installing and maintaining the devices installed on the mast. Also special attention has been paid to easiness and quickness of the mast installation. The height of DKP206AV-T is 6 m (20 ft) and DKP210AV-T is 10 m (33 ft). 26 __________________________________________________________________ M210455EN-B Chapter 2 __________________________________________________________ Product Overview Foundation Set The foundation set includes all the necessary installation accessories both for a new and an existing concrete pad. 0303-021 Figure 16 Foundation Set for DKP206AV The following numbers refer to Figure 16 above: 1 2 3 4 5 6 7 8 9 = = = = = = = = = Nuts and washers for foundation bolts Orientation plate for the mast base The eye nuts for guy wires Wedge bolts for existing concrete block Plates with the nut for guy wire blocks Square plate for the mast base Foundation bolts Bar for the wedge bolts Key piece for the wedge bolts VAISALA _______________________________________________________________________ 27 User's Guide ______________________________________________________________________ Guy Wires The DKP206AV-T mast is delivered with one set of guy wires, whereas DKP210AV-T is delivered with two sets. Figure 17 below shows the contents of one set of guy wires and the accessories. The top fastener of the guy wires is mounted to the uppermost tube of the mast during installation. Figure 17 Guy Wires Set The following numbers refer to Figure 17 above. 1 2 3 4 5 = = = = = Top fastener Upper mast tube Guy wires Installation accessories Cable shrouds 28 __________________________________________________________________ M210455EN-B Chapter 2 __________________________________________________________ Product Overview Lightning Rod The mast is delivered with a passive lightning rod made from copper. The lightning rod holders are made of non-conductive material to protect the mast devices from overvoltage when lightning occurs. Refer to Figure 18 below. An active type of lightning rod is available as an option for areas where heavy lightning activity occurs frequently. 0303-022 Figure 18 Passive Lightning Rod and the Holders Winch The winch is easily installed to the pedestal tube. After erecting the mast, the winch should be removed from the pedestal tube and stored in a dry and warm place. 0310-056 Figure 19 Winch VAISALA _______________________________________________________________________ 29 User's Guide ______________________________________________________________________ Obstruction Light An obstruction light is included in the mast delivery. Obelux Obstruction Light is a very low power obstruction light utilizing LED technology with a typical intensity of 17 cd. The obstruction light is supplied with 12 VDC nominal supply voltage. The stabilized output of the light makes it possible that the variations of the supply voltage do not affect to the light output. 0305-024 Figure 20 Obstruction Light with the Power Cable Obelux Obstruction Light meets the specifications defined by ICAO. The obstruction light is provided with a mounting set for mast installation. The cabling and installation principles are similar to those of conventional obstacle lights, the only exception being the correct polarity required by the DC feed. Also, the power supply cable is included in the delivery by default. 30 __________________________________________________________________ M210455EN-B Chapter 2 __________________________________________________________ Product Overview Workstation with MIDAS IV Software The workstation software MIDAS IV is installed onto a laptop PC. The MIDAS IV software operates in the Microsoft® Windows 2000® operating system, providing multi-tasking operation and connectivity. The workstation displays numerical and graphical data, codes METAR/SPECI aviation weather reports, as well as archives and transmits data for further processing. The Windows 2000® environment is user-friendly and provides great flexibility. MIDAS IV uses the standard Windows® user interface and features, and is therefore straightforward and easy to learn. The workstation software facilitates editing METAR/SPECI reports by easy-to-use templates. Aviation special weather reports (SPECI) are generated automatically whenever selected criteria are met, or at any time initiated by the operator. Report transmission can also be fully automated, if necessary. In addition, the software provides real-time graphical data display in multiple windows. Stored data can be viewed in ASCII format. The operator can monitor system performance and sensor alarms with Event Monitor. Data is archived for 30 days on hard disk and sent to other systems via serial port or as an FTP transfer via LAN. 0306-025 Figure 21 MIDAS IV Workstation and QCA101 VAISALA _______________________________________________________________________ 31 User's Guide ______________________________________________________________________ Communication Accessory Enclosure QCA101 Communication Accessory Enclosure QCA101 houses Transmitter WT501 equipped with Modem Module DMX501. Additionally, AC (mains) power supply, lightning protection device, and surge arresters are located in the enclosure. In Figure 21 on page 31 the QCA101 enclosure is shown beside the MIDAS IV PC. The maximum communication range with Modem Module DMX501 is up to 20 km (12 mi.) with a 22 AWG standard cable. Handheld Terminal QMD101M 9906-009 Figure 22 QMD101M Handheld Terminal QMD101M is a lightweight, rugged and easy-to-read handheld display device for viewing measured and calculated parameters and systems alarms, as well as for setting station-specific parameters. 32 __________________________________________________________________ M210455EN-B Chapter 2 __________________________________________________________ Product Overview Radio Modem 0310-065 Figure 23 TM32 Radio Modem Radio modems provide wireless data communication between MAWS201MP and MIDAS IV PC. TM32 Radio modem features a watertight design for operation in unprotected environments common in field applications. TM32 features a fully synthesized multi-channel radio that allows operation on all frequencies in the supported VHF or UHF bands. VAISALA _______________________________________________________________________ 33 User's Guide ______________________________________________________________________ VHF Antennas The VHF antenna can be installed on the tripod (see Figure 24 below) or on the pole mast (see Figure 25 below). The frequency range is from 150 to 174 MHz. 0306-069 Figure 24 VHF Antenna on the Tripod 0306-016 Figure 25 VHF Antenna on the Mast 34 __________________________________________________________________ M210455EN-B Chapter 2 __________________________________________________________ Product Overview UHF Antennas The UHF antenna can be installed on the tripod (see Figure 26 below) or on the pole mast (see Figure 27 below). The frequency range is from 410 to 470 MHz. 0310-066 Figure 26 UHF Antenna on the Tripod 0310-067 Figure 27 UHF Antenna on the Mast VAISALA _______________________________________________________________________ 35 User's Guide ______________________________________________________________________ Mains Power Supply Module QMP211 The AC (mains) power supply module QMP211 is a switching power supply, which operates from the universal AC input of 100 to 240 VAC and 50/60 Hz. The output voltage is 12 VDC (2500 mA), which is used for powering the radio modem when it is connected to the MIDAS IV PC for configuring. 0306-026 Figure 28 Mains Power Supply Module QMP211 36 __________________________________________________________________ M210455EN-B Chapter 2 __________________________________________________________ Product Overview Product Nomenclature Table 1 TACMET MAWS201MP Nomenclature Code QML102T PMT16A QME101M QMA102M WS425 QMH101M QMR101M DKP206AV-T DKP210AV-T DKW200 QMD101M TM32 QMX102SET-2 QMX101MSET-1 QMX101MSET-2 QMX101MSET-3 QMP211 QPS101 Laptop PC MIDAS IV CT25KAM PWD11A SA20M OBL10-12 QMP202MP QCA101 WT501+DMX501 Common Name Logger Pressure sensor Logger tube Sensor arm and radiation shield Heated wind direction and speed sensor Air temperature and relative humidity sensor Rain gauge Tiltable pole mast and accessories (6 m, 20 ft) Tiltable pole mast and accessories (10 m, 30 ft) Winch for mast Handheld terminal Radio modem VHF Antenna Set (150 ... 174 MHz) UHF Antenna Set (410 ... 430 MHz) UHF Antenna Set (430 ... 450 MHz) UHF Antenna Set (450 ... 470 MHz) Mains power supply for radio modem Outdoor power strip MIDAS IV PC NT software for the MIDAS IV PC Ceilometer Present weather detector Lightning detector Obstruction light Power supply and connection unit Communication accessory enclosure for PC end Communication module VAISALA _______________________________________________________________________ 37 User's Guide ______________________________________________________________________ Table 2 Cables Provided Code ZZ45202 ZZ212024 ZZ212915 ZZ45214 CT45300 CT45298 ZZ45215 ZZ45123 ZZ212026 ZZ212025 ZZ45114 212019 ZZ213068SPEC ZZ212027 Common Name PC/Handheld connection cable with DC connector, 5 m (15 ft) WS425 Data/power cable for DKP206AV-T WS425 Data/power cable for DKP210AV-T AC cable, 5 m (15 ft) AC supply cable for CT25KAM DC/data cable for CT25KAM SA20M connection cable Data cable from QMP202MP to QME101M Data cable from QME101M to QMP202MP DC power cable between QMP202MP and QME101M Landline cable (3 pcs) Grounding cable Communication cable (length varies) Cable from QCA101 to TacLap PC 38 __________________________________________________________________ M210455EN-B Chapter 3 ________________________________________________________________ Operation CHAPTER 3 OPERATION This chapter contains information that is needed to operate TACMET MAWS with the handheld terminal and MIDAS IV software. Communication Connections There are four options for communication connections: 1. Hardwire connection between TACMET MAWS and the handheld terminal. - Connect the handheld terminal cable to the Hand Terminal connector (marked with a yellow arrow) on the upper base of TACMET MAWS. See section Handheld Terminal on page 40 for information on using the handheld terminal. 2. Hardwire connection between TACMET MAWS and the MIDAS IV PC. - Connect the landline cable to the PC Connector connector (marked with a yellow arrow) on the lower base of TACMET MAWS and to the MIDAS IV PC. See section MIDAS IV Software on page 56 for information on using the MIDAS IV software. 3. Modem connection between TACMET MAWS and the MIDAS IV PC. - See Installation Manual 4. RF connection between TACMET MAWS and the MIDAS IV PC. - See Installation Manual VAISALA _______________________________________________________________________ 39 User's Guide ______________________________________________________________________ Handheld Terminal This chapter contains information that is needed for using the Handheld Terminal QMD101M. The handheld terminal provides the following main functions: - Paged screens for measurement and calculation results produced by the TACMET MAWS logger. - Alarm screen, that shows active alarms. - Setup screen for setting environmental variables such as time and altitude. 9906-009 Figure 29 Handheld Terminal Turning the Terminal On/Off The terminal is powered by TACMET MAWS. To turn on the terminal, press and release the On/Off key. After a few seconds, the terminal stays on the Status screen. After startup, there might be some error messages. Ignore all of the error messages that come within the first five minutes. To turn off the terminal, press and hold the On/Off key for a second. 40 __________________________________________________________________ M210455EN-B Chapter 3 ________________________________________________________________ Operation Keypad Shift Key The alphabetic/numeric Shift mode key is used to shift the QMD101M keypad between the alphabetic and numeric modes. Pressing and releasing the Shift key before pressing any other key, places the keypad in either numeric mode (the shift mode indicator displays a) or alphabetic mode (the shift mode indicator displays a or a). Use numeric mode for numbers and symbols (- and .), and alphabetic mode for symbols and letters located in the upper half of the keys. For example, when the shift mode indicator displays a, press key 1 to write a letter C. To write a letter D, change the shift mode to a and press key 1. Caps Lock Key Press the Caps lock key to place QMD101M in upper case mode (The shift mode indicator is an upper case "A"). While in upper case mode, pressing and releasing the Shift key will continue to place QMD101M in and out of alphabetic and numeric modes (the shift mode indicator will change between A, A and A). Press the Caps lock key again to place QMD101M in lower case mode. Function Key F1 NOTE The terminal mode is for maintenance purposes only. The function key F1 can be used to access terminal mode. The terminal mode can only be accessed from the Setup screen. The terminal mode is used to communicate with TACMET MAWS using written commands. Turn the power off and on again to exit the terminal mode. VAISALA _______________________________________________________________________ 41 User's Guide ______________________________________________________________________ Cursor Keys The down and up cursor keys ( ) are used to move through the various menu screens. The left and right cursor keys ( ) are used to move the cursor to the left and to the right. Backspace Key The Backspace key deletes the character to the left of the cursor and moves the cursor one step to the left. Enter Key The Enter key is used to accept information (for example a command) currently entered in an input field. In addition, it is used to scroll through the fields on the setup screen. Ctrl Key The Ctrl key is used in conjunction with other keys to perform special tasks (see section Status on page 52). On/Off Key To turn on QMD101M, press and release the On/Off key. To turn off QMD101M, press and hold down the On/Off key for a second. NOTE At any time, the key sequence CTRL + ESC terminates the current function or program and returns control of QMD101M to the FLOS (handheld terminal's embedded software) main menu system. To return to normal display, turn QMD101M off and on again. 42 __________________________________________________________________ M210455EN-B Chapter 3 ________________________________________________________________ Operation Sequence of the Screens The display has eight different screens in the following order: 1. Main 2. Wind 3. Stat 4. Enh/1 5. Enh/2 6. Alarms 7. Status 8. Setup Accessing the Screens The screens are organized in a sequential manner, in the order explained in section Sequence of the Screens on page 43. The following keys are used for accessing the screens: - Down arrow (load next screen) - Up arrow (load previous screen) When you turn the QMD101M power on you will see the Status screen (after the Welcome screen). Press the key six times to get the Main screen. VAISALA _______________________________________________________________________ 43 User's Guide ______________________________________________________________________ Main MAWS1 WD WS T RH DT P a p QFE QFF QNH PA DA ↓a : : : : : : : : : : : : : Main 259 12 28.0 89 25.0 29.2 0.0 0.0 29.3 1 0.2 0.0 0.0 13:10* Deg m/s °C % °C hPa hPa hPa hPa hPa m m ↓=Next The Main screen shows the key values of the standard measurements and calculations. Table 3 Main Screen Information Screen text MAWS1 Main 13:10 * Measurement Unit SI (US) WD WS T RH DT P a Wind direction Wind speed Air temperature Relative humidity Dew point Barometric pressure Pressure tendency Deg m/s (kt) °C (°F) % °C (°F) hPa (inHg) code 0 ... 8 p Pressure trend (3 h) hPa (inHg) QFE QFF QNH Field pressure Sea-level pressure Altimeter setting hPa (inHg) hPa (inHg) hPa (inHg) PA DA Pressure altitude Density altitude m (ft) m (ft) Note Station name Screen name Current time The handheld terminal receives data when the asterisk is seen. Available after 3 hours Available after 3 hours Available after 5 minutes 44 __________________________________________________________________ M210455EN-B Chapter 3 ________________________________________________________________ Operation Wind Press ↓ on the Main screen to get to the Wind screen: MAWS1 Wind WD : WS : 259 12 Min WD2 : 255 WS2 : 9 Avg 270 11 Max 275 12 Deg m/s WD10: 250 WS10: 8 270 11 280 12 Deg m/s Gust: SQ : 0 0 ↓a 13:10 Deg m/s m/s m/s ↓↑=Next/Prev The Wind screen shows instant and statistical wind information. Table 4 Screen label WD WS Min Avg Max WD2 WS2 WD10 WS10 Gust SQ Wind Screen Information Measurement Wind direction Wind speed Minimum values Average values Maximum values Wind direction, 2-minute values Wind speed, 2-minute values Wind direction, 10-minute values Wind speed, 10-minute values Wind gust speed Wind squall speed Unit SI (US) Deg m/s (kt) Deg m/s (kt) Deg m/s (kt) m/s (kt) m/s (kt) Statistics Press ↓ on the Wind screen to get to the Statistics screen: VAISALA _______________________________________________________________________ 45 User's Guide ______________________________________________________________________ MAWS1 Rain 1h: 3h: 6h: 24h: Stat 0 0 0 0 13:10 mm mm mm mm Prec 0.0 0.0 0.0 0.0 0 0 0 0 mm mm mm mm mm mm mm mm 1h: 3h: 6h: 24h: Snow 1h: 3h: 6h: 24h: ↓a ↓↑=Next/Prev The Statistics screen shows statistic values of liquid and solid precipitation. Table 5 Statistics Screen Information Screen label Rain 1h Rain 3h Rain 6h Rain 24h Prec 1h Prec 3h Prec 6h Prec 24h Snow 1h Snow 3h Snow 6h Snow 24h Measurement Last one-hour floating precipitation sum from QMR101M Last three-hour precipitation sum from QMR101M Last six-hour precipitation sum from QMR101M 24-hour precipitation sum from QMR101M (starting at 00:00 am) Last one-hour precipitation sum from PWD11A Last three-hour precipitation sum from PWD11A Last six-hour precipitation sum from PWD11A Last 24-hour precipitation sum from PWD11A Last one-hour snow sum from PWD11A Last three-hour snow sum from PWD11A Last six-hour snow sum from PWD11A Last 24-hour snow sum from PWD11A Unit SI (US) mm (in) mm (in) mm (in) mm (in) mm (in) mm (in) mm (in) mm (in) mm (in) mm (in) mm (in) mm (in) Precipitation statistics (water and snow sums) are synchronized to UTC. Reset times for statistics are shown in Table 6 below: Table 6 Statistic 3h 6h 24h Reset Times for Precipitation Statistics Reset Times 02:55, 05:55, 08:55, 11:55, 14:55, 17:55, 20:55, and 23:55 05:55, 11:55, 17:55, and 23:55 11:55 46 __________________________________________________________________ M210455EN-B Chapter 3 ________________________________________________________________ Operation NOTE If precipitation is snow, Prec 1h to 24h values show the liquid equivalent and Snow 1h to 24h values show the snow thickness. The values are updated once per hour. Enh/1 Press ↓ on the Statistics screen to get to the first Enhancement screen (Enh/1): MAWS1 Enh/1 Condition: Mist 13:10 METAR PW : BR Prec. Int: 0.1 mm/h Lightning 15 min: Count : 2 Nearest : 2 Bearing : 170 RfNoise : N ↓a km deg ↓↑=Next/Prev Table 7 First Enhancement Screen Information Screen Label Condition METAR PW Prec. Int. Lightning 15 min Count Nearest Bearing RfNoise Measurement Textual representation of the present weather code from PWD11A. Table 8 on page 48 lists present weather codes. METAR message present weather code (see Table 17 on page 63 and Table 18 on page 63). Precipitation intensity from PWD11A Last 15 min lightning values Number of lightning strikes in 15 minutes Distance to nearest lightning strike Direction to nearest lightning strike SA20M skinmap information: N (None), L (Low), M (Medium), and H (High). Unit SI (US) mm/h (in/h) /min km (sm) deg VAISALA _______________________________________________________________________ 47 User's Guide ______________________________________________________________________ Table 8 PW Code 00 04 05 10 20 21 23 24 25 30 31 32 33 34 40 41 42 50 51 52 53 54 55 56 60 61 62 63 64 65 66 67 68 70 71 72 73 74 75 76 80 81 82 83 84 85 86 87 90 SYNOP Codes Used by PWD11A (Number Codes Not Seen on QMD101M) Textual Representation Clear Haze or smoke (vis ≥ 1 km) Haze or smoke (vis < 1 km) Mist Fog 1) Precipitation 1) Rain (not freezing) 1) Snow 1) Freezing rain or freezing drizzle Fog 2) Fog or ice fog, in patches 2) Fog or ice fog, has become thinner during past hour 2) Fog or ice fog, no appreciable change during past hour 2) Fog or ice fog, has begun or become thicker during past hour 2) Precipitation Precipitation, slight or moderate Precipitation, heavy Drizzle Drizzle, not freezing, light Drizzle, not freezing, moderate Drizzle, not freezing, heavy Drizzle, freezing, light Drizzle, freezing, moderate Drizzle, freezing, heavy Rain Rain, light Rain, moderate Rain, heavy Rain, freezing, light Rain, freezing, moderate Rain, freezing, heavy Rain (or drizzle) and snow, light Rain (or drizzle) and snow, moderate or heavy Snow Snow, light Snow, moderate Snow, heavy Ice pellets, light Ice pellets, moderate Ice pellets, heavy Showers or intermittent precipitation Rain showers, light Rain showers, moderate Rain showers, heavy Rain showers, violent Snow showers, light Snow showers, moderate Snow showers, heavy Thunderstorm 48 __________________________________________________________________ M210455EN-B Chapter 3 ________________________________________________________________ Operation PW Code 91 92 94 95 Textual Representation Thunderstorm, slight or moderate, no precipitation Thunderstorm, slight or moderate, rain/snow Thunderstorm, heavy, no precipitation Thunderstorm, heavy, rain/snow 1) Codes are used if precipitation or fog was observed during the preceding hour but not at the time of observation. 2) Codes are used if precipitation or fog is observed at the time of observation. Enh/2 Press ↓ on the first Enhancement screen (Enh/1) to get to the second Enhancement screen (Enh/2): MAWS1 Enh/2 H Vis 10A: Cloud L1 L2 L3 L4 L5 V Vis ↓a NOTE 13:10 5400 Octas 3 5 8 / / Height 640 880 1040 ///// ///// m m ↓↑=Next/Prev Vertical visibility (V Vis) is available only when the sky is clear of clouds. If any clouds are detected, the vertical visibility measurement is not available. Table 9 Second Enhancement Screen Information Screen Label Measurement H Vis 10A 10-minute average horizontal visibility measured by PWD11A Cloud Cloud bases L1 to L5. L1 is the lowest cloud base. Octas Sky condition categories. Height Height of the cloud base. ///// The cloud base does not exist. V Vis Vertical visibility measured by CT25KAM. Unit SI (US) m (sm) 1 to 8 octas m (ft) m (ft) VAISALA _______________________________________________________________________ 49 User's Guide ______________________________________________________________________ Alarms Press ↓ on the Enh/2 screen to get to the Alarms screen: MAWS1 Alarms 13:10 PVD11A: Comm. failure ↓a ↓↑=Next/Prev The Alarms screen shows active alarms. If an alarm is triggered, the Alarms screen will appear automatically. Press ESC key to return to the previous screen, or press Enter to acknowledge the alarm message. 50 __________________________________________________________________ M210455EN-B Chapter 3 ________________________________________________________________ Operation Table 10 List of Possible Alarms Alarm CT25KAM: Comm. failure Explanation and Possible Remedy Communication failure. Verify correct cable connections or replace sensor. CT25KAM: HW alarm/warning Hardware error on CT25KAM. CT25KAM: Optics contamin. CT25KAM optics contaminated. Clean the optics. QMP202MP: Battery low QMP202MP battery low. Connect QMP202MP to an AC outlet. AC (mains): Off QMP202MP is not connected to AC outlet. PMT16: Air press. misg. Air pressure value missing. Not user serviceable. PWD11A: Comm. failure Communication failure. Verify correct cable connections or replace sensor. QMP202MP battery empty or hardware failure. PWD11A: HW alarm/warning Hardware error on PWD11A. PWD11A: Optics contamin. PWD11A optics contaminated. Clean the optics. QMD101M: Comm. failure Communication failure. Verify correct cable connections or replace handheld terminal. QMH101M: Air temp. misg. Air temperature value missing. Verify correct cable connections or replace sensor. QMH101M: Humidity misg. Humidity value missing. Verify correct cable connections or replace sensor. QMR101M: Rain gauge misg. Rain gauge missing. Verify cable connections. SA-20: Comm. failure Communication failure. Verify correct cable connections or replace sensor. SA-20: HW alarm/warning Hardware error on SA20M. SA-20: Skinmap rate high Too much electrical interference. Remove interfering equipment. WS425: Wind dir. misg. Wind direction value missing. Verify correct cable connections or replace sensor. VAISALA _______________________________________________________________________ 51 User's Guide ______________________________________________________________________ Status Press ↓ on Alarms screen to get to the Status screen: MAWS1 Status Int. Batt : Int. Temp : QMP202MP : AC (mains): Al. Limit : 6.8 25 11.3 On 10.8 CTRL 1 CTRL 2 CTRL 3 Reset Sleep Restart ↓a 13:10 V °C V V ↓↑=Next/Prev The Status screen shows voltage information and internal temperature of the TACMET MAWS logger. Table 11 Status Screen Information Screen label Int. Batt Int. temp Explanation Internal battery voltage of MAWS (V) Internal temperature of MAWS (°C or °F) QMP202MP AC (mains) Al Limit Battery voltage of QMP202MP (V) AC power to MAWS (ON/OFF) MAWS sends an alarm to the handheld terminal when the QMP202MP voltage drops below the set limit. Press CTRL+1 to reset MAWS Press CTRL+2 to put MAWS into sleep mode. MAWS wakes up when you connect the handheld terminal and turn it on. Press CTRL+3 to restart MAWS from sleep mode. CTRL 1 CTRL 2 CTRL 3 Limit value 5.5 ... 7.6 V -40 ... +80 °C -40 ... +176 °F 10 ... 16 V 52 __________________________________________________________________ M210455EN-B Chapter 3 ________________________________________________________________ Operation Setup Press ↓ on the Status screen to get to the Setup screen. Setup Name Time Timez Alt Pslev WindC Rf-HT Rf-PC Sys.T Enh. Units ↓a . : MAWS1 : hh mm ss YY MM DD 13 10 00 03 10 29 : 2.0 : 21.7 m : 1.1 m : 0.0 : 1 : 1 : 1 : 1 : 0 ↑=Prev NOTE When taking TACMET MAWS into use for the first time or upon connecting the battery, the station dependent settings must be checked. All the settings (excluding Name) are mandatory. NOTE When changing the station dependent settings, connect the handheld terminal to TACMET MAWS with a hard wire. To change the station dependent settings do as follows: 1. Press Enter to move to the desired field. 2. When the cursor is on the desired field, press Space to get the input field. 3. Wait until the square brackets appear and type a value (use shift modes as explained in section Shift Key on page 41). 4. After typing a value, press Enter to accept the new value. If you do not type a new value and you press Enter the value remains unchanged. 5. Reset the station (see section Status on page 52) after you have changed station dependent settings. VAISALA _______________________________________________________________________ 53 User's Guide ______________________________________________________________________ NOTE If you are not able to get the input field, it means that there is a communication problem between TACMET MAWS and the handheld terminal. See section troubleshooting the Handheld Terminal on page 114. Table 12 Screen label Name Time Timez Alt Pslev WindC Rf-HT Rf-PC Sys.T Enh Units Station Dependent Settings Setting Select a desired station name (max. 8 characters). The station name is a static parameter and will remain after power off. Time and date. Set the time according to the example. To set only the time, type for example 13 15 00 (hh mm ss). Time zone sets the time difference from UTC. For example, enter -5 in the eastern USA (New York, for example). For details, see Figure 30 on page 55. Station altitude from sea level. Use the same unit as selected in the Units-field. Pressure sensor altitude from the ground (station level). Use the same unit as selected in the Units-field. Should always be set to 0 in mast installations. Select the desired radio channel (0 ... 15) for the radio connected to the Hand Terminal connector on the upper base of the logger tube. This may take up to 1 min. Set channel to -1 to pause radio transmission. Select the desired radio channel (0 ... 15) for the radio connected to the PC connector on the lower base of the logger tube. This may take up to 1 min. Set channel to -1 to pause radio transmission. System Type: 0 = deployable, 1 = mast installation Enhancement sensors included in configuration. 0 = Not included, 1 = Included. Set to 1 in mast installations. Display unit: 0 = SI units, 1 = US units. Display unit will change when a value is logged the next time. 54 __________________________________________________________________ M210455EN-B Chapter 3 ________________________________________________________________ Operation 9908-001 Figure 30 Time Zones Terminal Connection NOTE The terminal mode is for maintenance purposes only. When you are on the Setup screen, press F1 to start a terminal connection. To close the terminal connection, turn the power off and on again. VAISALA _______________________________________________________________________ 55 User's Guide ______________________________________________________________________ MIDAS IV Software This section contains detailed information on operating TACMET MAWS with the MIDAS IV software. The MIDAS IV software collects measured and calculated data from the TACMET MAWS systems. In addition, it automatically generates METAR reports, archives data for 30 days on the hard disk or any other selected storage media, and distributes data further to other systems. MIDAS IV allows the user to edit the METAR reports with easy-to-use templates. Moreover, MIDAS IV provides the Event Monitor option, with which the operator can monitor the system and sensor alarms. MIDAS IV data can be accessed through four workstation applications. These applications are: - Weather View for data display - US METAR Template for sending a METAR/SPECI message - Event Monitor for viewing and acknowledging events - ASCII Log View for viewing stored history data. MIDAS IV TACMET Configuration Wizard Double-click the Configuration Wizard icon on the desktop to open the Configuration Wizard application. 56 __________________________________________________________________ M210455EN-B Chapter 3 ________________________________________________________________ Operation Figure 31 Configuration Wizard The Configuration Wizard includes two menus: File and Settings. From the File menu, you can browse log files, exit Configuration Wizard, or read the version information. The Settings menu has two menu items: Radio modem and Dial-up. The Radio modem sub-menu has three items: Use radio modem, Radio modem channel, and Configuration software. Use radio modem -item is used to enable/disable radio modem. Radio modem channel -item is used to select the pre-configured radio channel. Configuration software -item is used to select an application for configuration of the radio modem. The optional Dial-up sub-menu has two items: Use Dial-up and Configuration software. Use Dial-up-item is used to enable/disable dial-up connection, for example, satellite connection. Configuration software -item is used to select an application for configuration of the dial-up connection. Table 13 on page 58 lists the Configuration Wizard buttons. VAISALA _______________________________________________________________________ 57 User's Guide ______________________________________________________________________ Table 13 Explanation of Configuration Wizard Buttons Button Radio Modem Dial-up Silence MAWS/ Enable MAWS Sensor Terminal M4 Services M4 Diagnostics Start M4 Stop M4 Apply Cancel Locations... Explanation Opens Radio Modem Configuration program Opens optional Dial-up Manager Silences MAWS Asks which radio channel to use and then enables MAWS Opens Sensor Terminal application Opens MIDAS IV Service Manager Opens Diagnostics Monitor Starts MIDAS IV applications Stops MIDAS IV applications Accepts configuration changes Cancels configuration changes Opens METAR/SPECI Manager application System Parameters Tab From the System Parameters tab (see Figure 31 on page 57), you can configure the parameters described in Table 14 below. Table 14 Item Configuration Units Station identifier Runway direction Magnetic correction Enable METAR Enable AUTOMETAR Show AUTO text METAR type METAR interval METAR observation time METAR edit time Explanation of System Parameters tab Description Select your system configuration: 1 Basic station, 1 Enhancement station, Basic and Basic stations, Enhancement and Basic stations, Enhancement and Enhancement stations, or Fixed Station (mast installation). Select the units you want to use: SI or US The unique ICAO identifier with 4 characters when the METAR message is sent to AFTN. Otherwise, give the station ID, for example, airfield name. Give the Runway direction in degrees, for example, 20 Give the difference between magnetic north and true north Check only if you want the system to generate METAR/SPECI messages Check only if you want to enable automatic METAR/SPECI sending feature Check only if you want the AUTO text to appear in the header of METAR/SPECI message Select METAR/SPECI type: US or ICAO Select METAR/SPECI sending interval in minutes: 30 or 60 Select METAR/SPECI editing start time: 00, 05, 10, 15, 20, 25, 30, 35, 40, 45, 50, or 55 minutes past the hour Select the desired METAR/SPECI editing time in minutes, for example 3. 58 __________________________________________________________________ M210455EN-B Chapter 3 ________________________________________________________________ Operation Weather View Tab 0310-033 Figure 32 Weather View Tab With the Weather View tab, you can configure the amount and the order of the displays in the Weather View application. NOTE Normally there is no need to modify the display settings. Weather View Weather View is an application for graphical and numerical presentation of TACMET MAWS values. The application updates real-time values constantly as the system receives new data from the sensors. The various Weather View screens, available in the application, make it easier for the user to follow the Basic system and Enhancement data. VAISALA _______________________________________________________________________ 59 User's Guide ______________________________________________________________________ NOTE The number and content of the screens depends on the configuration of your system and may differ from the ones presented in this manual. Screen 1 The Weather View application is composed of several screens. When one TACMET MAWS is connected to MIDAS IV PC, the screen 1 shows basic system data. NOTE The order of the screens depends on the settings made with the configuration wizard program. Figure 33 NOTE Weather View Screen 1: Basic System Data The values marked with a red color after a startup are updated after 10 minutes. 60 __________________________________________________________________ M210455EN-B Chapter 3 ________________________________________________________________ Operation Table 15 Parameters in Basic System Data Screen Field TACMET MAST Mains ON/OFF MAWS Btry DC Voltage DATE TIME Runway direction Instant Wind direction 2-minute variation 10-minute variation WD 10Max WS 10Max Rectangle in the middle of the wind rose WD 10Mnm WS 10Mnm T RH Td Rain 1h Rain 24h Max Avg Mnm WD WS QNH QFE QFF PA DA 3h App Type Gusts Squall Description Weather station identification AC power to MAWS (ON [1] / OFF [0]) Internal battery voltage of MAWS (V) Battery voltage of QMP202MP (V) Current date Current time Black line shows runway direction Blue arrow shows instant wind direction Light green area shows 2-minute variation Dark green area shows 10-minute variation Shows 10-minute wind direction maximum Shows 10-minute wind speed maximum Shows instant wind speed value Shows 10-minute wind direction minimum Shows 10-minute wind speed minimum Air temperature Relative humidity Dew point 1-hour precipitation value (QMR101M) 24-hour precipitation value (QMR101M) Maximum wind values (2-min) Average wind values (2-min) Minimum wind values (2-min) Wind direction Wind speed Altimeter setting Station pressure Sea-level pressure Pressure altitude Density altitude Pressure trend (3-hour difference) Pressure type 0 ... 8 Shows gusts speed Shows squall speed Follow the instructions in section Changing Graphic Scales on page 65 to change the scales of the temperature diagram. VAISALA _______________________________________________________________________ 61 User's Guide ______________________________________________________________________ Screen 2 Screen 2 shows Enhancement data from TACMET MAWS. Figure 34 NOTE Weather View Screen 2: Enhancement Data If lightning values show slashes (/////), check the cable connections of the SA20M Lightning Detector. 62 __________________________________________________________________ M210455EN-B Chapter 3 ________________________________________________________________ Operation Table 16 Parameters in Enhancement Data Screens Field TACMET MAST DATE TIME Cloud Cover and Base CL1 ... CL5 CB1 ... CB5 RAIN 1h ... 24h Rate In/Hr SNOW 1h ... 24 h PW Lightning (15 min) Distance SM Direction º Count RfNoise Visibility 1A (SM) Visibility 10A (SM) Table 17 Description Weather station identification Current date Current time Cloud covers CL1 to CL5 and cloud bases CB1 to CB5. CL1 is the lowest cloud base (unit is Octa). Height of the cloud base. Precipitation values from PWD11A Last 1 (and 3, 6, 24) -hour precipitation sum Rain intensity SNOW values from PWD11A Last 1 (and 3, 6, 24) -hour snow sum Present weather code (see Table 17 below and Table 18 below) Lightning values (last 15 minutes) Distance to nearest lightning strike Direction to nearest lightning strike Number of lightning strikes in 15 minutes SA20M skinmap information: N (None), L (Low), M (Medium), and H (High) 1-minute average visibility values 10-minute average visibility values Present Weather Codes (Qualifiers) Intensity Light (-) 1) Moderate 1) (no qualifier) Heavy (+)1) VC In the vicinity 2) Descriptor BC Patches 1) SH Showers 1) TS Thunderstorm 2) FZ Freezing 1) 1) Codes from the PWD11A sensor 2) Codes generated by MAWS using data also from other sensors than PWD11A Table 18 Precipitation DZ Drizzle RA Rain SN Snow IC Ice crystals PL Ice pellets Present Weather Codes (Phenomena) 1) Obscuration BR Mist 1) FG Fog 1) DU Widespread dust 1) HZ Haze or dust 3) Other SQ Squalls 2) 1) Codes from the PWD11A sensor 2) Codes generated by MAWS using data also from other sensors than PWD11A 3) Codes generated using PWD11A and MAWS data VAISALA _______________________________________________________________________ 63 User's Guide ______________________________________________________________________ If present weather information for a specific group does not exist, this group is omitted. Example: -RA: "Light rain" Follow the instructions in section Changing Graphic Scales on page 65 to change the scales of the visibility diagram. Screen 3 Screen 3 is a graphic display, which shows pressure, cloud base, and wind speed data. Figure 35 Weather View Screen 3: Graphic Display Table 19 Parameters in Graphic Display Field TACMET MAST DATE TIME QNH CB WS 2A Description Weather station identification Current date Current time QNH (altimeter setting) graph Cloud base graph Wind speed 2-minute average graph Follow the instructions in section Changing Graphic Scales on page 65 to change the scales of the diagrams. 64 __________________________________________________________________ M210455EN-B Chapter 3 ________________________________________________________________ Operation Changing Graphic Scales To change the scale of a diagram (for example temperature diagram in screen 1), do the following: 1. Move the cursor over the temperature diagram. 2. Click the right mouse button. 3. Change the scales as desired (see Figure 36 below) and click OK. Figure 36 Changing the Scales Menu Options The Weather View application contains five menus: Display, Edit, View, Window, and Help. VAISALA _______________________________________________________________________ 65 User's Guide ______________________________________________________________________ Display The Display menu contains the following options: - Screen 1 to 3 displays a Weather View screen - Refresh updates all display items - Open displays the screen description files - Close shuts the active window - Print prints the data shown on the active display - Print Setup displays printer and connection options Edit The Edit menu contains the following command: - Copy As Bitmap copies the current display to the clipboard as bitmap picture View The View menu contains the following commands: - Toolbar shows/hides the toolbar - Status Bar shows/hides the status bar 66 __________________________________________________________________ M210455EN-B Chapter 3 ________________________________________________________________ Operation Window The Window menu contains the following commands: - Arrange Icons arranges icons of minimized windows - Close All closes all open windows - Screen 1 to 3 displays a Weather View screen Help The Help menu includes the following command: - About Weather View shows version and copyright information. Toolbar The toolbar contains the following shortcut icons for the most frequently used menu options: = Screen 1 opens the first Weather View screen (Basic data). = Screen 2 opens the second Weather View screen (Enhancement data). Screen 3 opens the third Weather View screen (Graphical view). Print prints the active document. = = Status Bar The status bar (at the bottom of the screen) displays information on the current state of the application. VAISALA _______________________________________________________________________ 67 User's Guide ______________________________________________________________________ METAR/SPECI Template The METAR/SPECI template (referred to as US METAR template) generates a METAR observation report at the intervals specified in the system configuration. Sensor data is automatically updated onto the template. The observation follows the format specified by WMO. The observations can be edited or augmented by the operator and are not distributed until approved by the operator. Special observations are generated when weather parameters reach the threshold specified in the system configuration and as required by ICAO Annex III. There is also support for corrected and retarded messages. The template window appears on your screen (see Figure 37 below) when it is time to send a METAR/SPECI report. This window is also displayed when you open the application yourself. The template is similar for both METAR and SPECI reports; the only difference is the Type field. Figure 37 US METAR Template METAR/SPECI service starts automatically at system startup. When you do not need to use the application, you can minimize the window. NOTE The thresholds listed in Table 20 on page 69 are country specific and must be confirmed. 68 __________________________________________________________________ M210455EN-B Chapter 3 ________________________________________________________________ Operation Table 20 Thresholds That Initiate Automatic SPECI Report Measured Parameter Wind direction Wind speed Gust Air pressure Cloud layer Vertical visibility Threshold 60 deg 5 m/s (9.7 kt) 5 m/s (9.7 kt) Changes by 0.3 hPa (0.01 inches Hg) from the previous METAR When a cloud layer with an octa of 5 ... 8 (BKN/OVC) goes below 100 ft (30.48m), 200 ft (60.96m), 300 ft (91.44m), 500 ft (152.40m), 700 ft (213.36m), 1000 ft (304.80m), 1500 ft (457.20m), or 3000 ft (914.41m). When the visibility goes below: 100 ft (30.48m), 200 ft (60.96m), 300 ft (91.44m), 500 ft (152.40m), 700 ft (213.36m), 1000 ft (304.80m), or 1500 ft (457.20m). The buttons in the US METAR template are described in Table 21 below. Table 21 Button BUILD SEND WIND SHEAR Old Buttons in US METAR Template Description Builds and validates the report Saves the report to hard disk, or sends the report to the external interface Opens the Wind Shear Data window for selecting the runways with wind shear Enters the previous TREND in the TREND field The US METAR template functions can be selected from the menu bar. The typical menus and menu commands are presented in the following tables. Depending on the system configuration, all options may not be available. VAISALA _______________________________________________________________________ 69 User's Guide ______________________________________________________________________ Table 22 US METAR: Report Menu Command BUILD TREND SEND Description Builds and validates the report Sends a TREND request to forecaster Saves the report to hard disk, or sends the report to the external interface Displays a template for a corrected METAR with the data from the previously sent METAR report filled in. Displays a new SPECI template for editing Prints the template screenshot Displays the preview of the print Opens a window for changing the printer and paper settings CORR SPECI Print Print Preview Print Setup Table 23 US METAR: Edit Menu Command Undo Cut Copy Paste Copy to Clipboard Table 24 US METAR: View Menu Command Toolbar Status bar Table 25 Description Cancels the last action Removes the selected text Copies the selected text Adds the copied or cut text at the cursor location Copies the template as a bitmap image to the Clipboard Description Shows/hides the toolbar Shows/hides the status bar US METAR: Settings Menu Command Automated METAR Automated SPECI Minimize After Send No consistency check Description Turns the automated METAR function on. The system sends the METAR report without user intervention. Turns the automated SPECI function on. The system sends the SPECI reports without user intervention. Minimizes the template to the task bar after the report has been sent. Turns the consistency check off. When selected, the system does not display validation error messages when building the report. Defines that observer provides the TREND forecast. Trend field from observer METAR/MET Opens the METAR/MET REPORT Manager REPORT Manager application. Select font Opens a window for changing the font used in data fields. 70 __________________________________________________________________ M210455EN-B Chapter 3 ________________________________________________________________ Operation Table 26 Command About METAR/MET REPORT Template US METAR: Help Menu Description Displays software version and copyright information The METAR/MET REPORT toolbar typically contains the buttons described in Table 27 below. Depending on the system configuration, some options may not be available. Table 27 Button US METAR: Toolbar Buttons Name and Description CORRECTED displays a template for a corrected METAR with the data from the previously sent METAR filled in. SPECI displays a new SPECI template for editing. TREND request sends a TREND request to Forecaster. Cut removes the selected text. Copy copies the selected text. Paste adds the copied or cut text at the cursor location. Print prints the template. No consistency check turns the consistency check off. When selected, the system does not display validation error messages when building the report. Trend field from observer, defines that observer provides the TREND report. Automated METAR turns the automated METAR function on; the system sends the METAR reports without user intervention. Automated SPECI turns the automated SPECI function on; the system sends the SPECI reports without user intervention. METAR/MET REPORT Manager opens the application for defining the source of data in the data fields. METAR/MET REPORT Manager With the METAR/MET REPORT Manager, you can define the measurement site from which US METAR template data comes. If you choose, for example, MAWS1, the data comes automatically from MAWS1 to the US METAR template. If you choose manual, you have to add the value manually to the US METAR template. VAISALA _______________________________________________________________________ 71 User's Guide ______________________________________________________________________ 0310-035 Figure 38 METAR/MET REPORT Manager METAR/SPECI Editing Procedure The steps of producing a METAR/SPECI report are: - Checking and editing data fields - Adding remarks - Building the report - Sending the report. Checking and Editing Data Fields When the US METAR template window appears on your screen, several fields are already filled with sensor data. These fields are called automatic data fields, because the system automatically fills them in for you. The template also includes manual data fields. They are called manual because they are not filled in automatically. You need to fill them in yourself by clicking the field and entering the value. When the template appears, the manual fields have slashes (////) in them or they are empty. 72 __________________________________________________________________ M210455EN-B Chapter 3 ________________________________________________________________ Operation To be able to notice a problem situation in the system, it is important to understand which fields are automatic and which are manual. Table 28 below lists automatic and manual fields and the special conditions related to them. Table 28 Parameter Data Fields in METAR/SPECI Template WIND, 1st field WIND, 2nd field GUST VRB, 1st field Automatic/ Manual Automatic Automatic Automatic Automatic VRB, 2nd field Automatic VIS, value VIS, direction code VIS 2, value VIS 2, direction code Automatic Manual RVR fields Manual RVR 2 fields Manual PRESENT WEATHER, 1st field PRESENT WEATHER, 2nd field PRESENT WEATHER, 3rd field CLOUDS , 1st row, 1st field Automatic Direction of visibility (N, NE, E, SE, S, SW, W, NW, or /) Runway Visual Range: minimum, average, maximum, tendency. Runway Visual Range: minimum, average, maximum, tendency. Automatic value from PWD11A. Manual Second present weather code Manual Third present weather code SKC and VV automatic, other values manual. Automatic Cloud amount (VV, SKC, FEW, SCT, BKN, OVC). Manual Manual CLOUDS, 1st row, 2nd field Manual CLOUDS, 1st row, 3rd field CLOUDS, all other rows Manual T DP QNH Automatic Automatic Automatic REWX WIND SHEAR Manual Manual TREND REMARK CODE Automatic Manual Automatic Comment Wind direction in degrees. Wind speed in m/s or knots. Maximum wind speed during the last 10 minutes. Lower limit of wind direction variation in degrees during the last 10 minutes Upper limit of wind direction variation in degrees during the last 10 minutes Visibility, 10-minute average from the selected site Direction of visibility (N, NE, E, SE, S, SW, W, NW, or /) Visibility, 10-minute average from the selected site Cloud height in meters, feet, or hundreds of feet. Cloud type (CB, TCU) Like the fields in the first row of the Clouds group, except the cloud amount options are: FEW, SCT, BKN, OVC. The 1st row is for the lowest cloud layer, the last row for the highest layer. Temperature in Celsius degrees. Dew point in Celsius degrees. Pressure reduced to the mean sea level in hectopascals or inHg. Recent weather code. Wind shear alerting system is not a standard part of the system, so this is a manual field. The field is a special data field. The field is for additional information. Shows the data to be sent VAISALA _______________________________________________________________________ 73 User's Guide ______________________________________________________________________ NOTE Slashes in manual fields are normal. When you see slashes in manual fields, enter data in the field. Adding Remarks You can add remarks to the METAR report whenever necessary. A remark is any comment you consider important; it could be related, for instance, to runway conditions. Building the Report Build the report by clicking the BUILD button. The system validates the report. If the system displays error messages, do one of the following: - If you click Yes, the report is built. Some data may be marked with slashes. - If you click No, the system does not continue building the report. You can correct the values in the data fields and click the BUILD button again. When you click the BUILD button, the system performs a set of validations, depending on the configuration. The system checks that certain values, for example, temperature, dew point, and pressure fall within the normal range. The system also checks that present weather codes and numeric data are consistent and that you have entered cloud amount data together with the cloud height data. If the values are valid, the system builds the report and you can send it. If the system finds invalid values, it informs you about them with error messages. CAUTION If the No consistency check option in the Settings menu is selected, the system will not display the error messages. Instead, it replaces the incorrect values by slashes in the final report code. The system displays the final report text in the CODE field. Check the report code. If there are errors in the code, correct the values in the template data fields and click BUILD again. 74 __________________________________________________________________ M210455EN-B Chapter 3 ________________________________________________________________ Operation Sending the Report When you have built the report and made sure that the text in the Code field is OK, you can send the report by clicking the SEND button. The system adds the abbreviated header lines automatically in the beginning of the report and sends it. If the Minimize after send option is selected from the Settings menu, the system automatically minimizes the template window. ASCII Log View MIDAS IV stores METAR history files for a period of 30 days. After that, they are automatically erased from the folder. The files are stored on C:\MIDASIV\HISTORY\. You can open the history files with the ASCII Log View application as follows: 1. Open the MIDAS IV Tacmet folder on the desktop. 2. Double-click the ASCII Log View icon. 3. To open the history files, select Open in the File menu, and browse to C:\MIDASIV\HISTORY\. For the history file names, refer to Table 29 on page 76. Figure 39 ASCII Log View VAISALA _______________________________________________________________________ 75 User's Guide ______________________________________________________________________ Table 29 Stored data Weather parameters Events METAR/SPECI reports File name x_SENSOR_date x_THUNDER_date EVENTS_1.HIS REPORTS_1.HIS Table 30 Column BASE1 ... BASE5 CH1INS COUNT15, COUNT60 CREATEDATE DA DIRNEAREST DP OCTA1 ...OCTA5 MOR_10A MOR_10M MOR_10X PA PAINS PTEND PTREND PW1 PW2 PW3 PWTXT QFE QFF QNH RAIN_SUM1H RAIN_SUM3H RAIN_SUM6H RAIN_SUM24H RANGENEAREST RATE RAW_MESSAGE RH SKINMAP SNOW_SUM1H SNOW_SUM3H SNOW_SUM6H SNOW_SUM24H TAINS THUNDER_REMARK VERVIS VISINS WATER_SUM1H WATER_SUM3H History File Names and Content Explanation Data from all MAWS x (1 or 2) sensors. Data from SA20M sensors Data from the 1st day of the month. Data from reports sent in the 1st day of the month. History File Column Indicators Explanation [unit] 1st ... 5th cloud base [m] 1st cloud height [m] Lightning count within last 15 or 60 min. Date and time when the data is logged. Density altitude [m] Nearest lightning direction [Deg] Dew point [°C] 1st ... 5th octa [Octa] 10 minute average visibility 10 minute minimum visibility 10 minute maximum visibility Pressure altitude [m] 1-minute barometric pressure average [hPa]. Pressure tendency [hPa] Pressure trend (3-hour difference) [hPa] Metar present weather code 1 by PWD11A Metar present weather code 2 by PWD11A Metar present weather code 3 by PWD11A Metar present weather text by PWD11A and SA20M Field level pressure [hPa] Sea level pressure [hPa] Altimeter setting [hPa] 1-hour rain sum [mm] by QMR101M 3-hour rain sum [mm] by QMR101M 6-hour rain sum [mm] by QMR101M 24-hour rain sum [mm] by QMR101M Nearest lightning range [km] Precipitation rate SA20M raw message 1-minute relative humidity average [%]. Electrical interference 1-hour snow sum [mm] 3-hour snow sum [mm] 6-hour snow sum [mm] 24-hour snow sum [mm] 1-minute temperature average [°C]. Metar present weather code by SA20M Vertical visibility Instant visibility [m] 1-hour water sum [mm] by PWD11A 3-hour water sum [mm] by PWD11A 76 __________________________________________________________________ M210455EN-B Chapter 3 ________________________________________________________________ Operation Column WATER_SUM6H WATER_SUM24H WD2A WD10M WD10A WD10X WIND_SQUALL WS2A WS10A WS10M WS10X WSGUST Explanation [unit] 6-hour water sum [mm] by PWD11A 24-hour water sum [mm] by PWD11A 2-minute wind direction average [Deg] 10-minute wind direction minimum [Deg] 10-minute wind direction average [Deg] 10-minute wind direction maximum [Deg] Wind squall 2-minute wind speed average [m/s] 10-minute wind speed average [m/s] 10-minute wind speed minimum [m/s] 10-minute wind speed maximum [m/s] Wind gust Event Monitor Event Monitor is an application for viewing and acknowledging events, warnings, and alarms in the system. Events are divided into three categories: operational, technical, and internal events. Operational events are notifications about changed meteorological conditions. Technical events are related to the functioning of the sensors and to the communication between the sensors and MIDAS IV Computer. Internal Events concern the internal operation of the system, normally the operation of the system services. The system creates an event when technical or meteorological conditions change. Double-click the Event Monitor icon on the desktop to open the Event Monitor. 0310-036 Figure 40 Event Monitor Screen VAISALA _______________________________________________________________________ 77 User's Guide ______________________________________________________________________ Menu Options The Event Monitor application contains three menus: Event, View, and Help. Event The Event menu contains the following options: - Save As saves the Event Monitor screen to a file with a name specified by the user. - Acknowledge marks the active event as noticed. - Voice activates the optional Midas IV voice alarm function. This application is not available with the TACMET system. - Print prints the active window. - Print Setup displays printer and connection options. View The View menu contains the following options: - Bottom Line minimizes the Event Monitor application into a single line that displays only the first unacknowledged event at the bottom of the screen. Double-click the event line to restore Full Event Monitor window. 78 __________________________________________________________________ M210455EN-B Chapter 3 ________________________________________________________________ Operation - All Events displays active events, that is, events that have not yet been acknowledged. - Internal Events displays internal events. - Technical Events displays technical events. - Operational Events displays operational events. - Ice Detection Events. This application is not available with the TACMET system. - Message Notifications displays information related to weather reports. - Toolbar shows/hides the toolbar. - Status Bar shows/hides the status bar. - Hide when minimized removes the Event Monitor window button (program icon and name) from the Windows taskbar (on the bottom of the screen) when the window is minimized. The application window can be returned by double-clicking the Event Monitor icon ( ) on the Windows status area (on the right corner of the taskbar). Help The Help menu includes the following command: - About Event Monitor shows version and release information. Toolbar The toolbar contains the following shortcut icons for the most frequently used menu options: = Save saves the current window to a file. = Copy copies the selected lines to the clipboard. = Acknowledge marks the active event as noticed. = Bottom Line minimizes the application window and displays it at the bottom of the screen. Voice switches the voice alarm function on or off. This application is not available with the TACMET system. Print prints the active window. = = VAISALA _______________________________________________________________________ 79 User's Guide ______________________________________________________________________ NOTE It is recommended to leave Event Monitor running whenever you use the system. This is indicated by the Event Monitor icon ( ) on the Windows status area. Display Modes Normally the Event Monitor application opens in a full-size window. You can also display the application as a single event line on the bottom of the screen by selecting Bottom Line from the View menu. In the single-line display mode, only the first unacknowledged event is shown. You can restore the Event Monitor to a full-size window by double-clicking the Event Line. NOTE Do not use the Auto hide option (Windows Taskbar Settings) with the Bottom Line command. When the application is minimized, the window button (program icon and name) is displayed on the Windows taskbar. Additionally, an indicator of current event status is displayed on the status area (on the right corner of the taskbar). The color of the indicator changes depending on the current state of events. Yellow indicates that all events are acknowledged; red color reminds you of unacknowledged events. Figure 41 Event Monitor Icon Showing Unacknowledged Events You can hide the Event Monitor window button from the taskbar by selecting Hide when minimized from the View menu. You can restore the application icon by double-clicking the Event Monitor icon on the status area. 80 __________________________________________________________________ M210455EN-B Chapter 3 ________________________________________________________________ Operation Viewing Events In the View menu, you can select different event categories for viewing. For each message, the following information is displayed: - Time stamp (Time). The time stamp is updated when the message is acknowledged. The time stamp column also includes an alarm status icon. The color of the icon changes from red to yellow when the event is acknowledged. - Message text (Message) - Location of the event (Site) - Category of the event (Type) - Status of the event (Status). Each event can have one of the following statuses: OVER = ACKED ALARM = = WARNING = INFO = The event is not currently active. This status never exists in the active event view. Operator has acknowledged the event. A serious condition exists (for example, one of the sensors is not responding). A warning condition exists (for example, one of the sensors requires service). Connection to event server is not correctly established. The alarm monitor locally generates this alarm. Acknowledging Events You can acknowledge the first unacknowledged event with the toolbar icon menu. or by selecting the Acknowledge option from the Event When you acknowledge an event, the icon of that event changes from red to yellow. When all events are acknowledged, the Event Monitor icon on the taskbar changes from red to yellow. VAISALA _______________________________________________________________________ 81 User's Guide ______________________________________________________________________ Checking New Events To check new events, do the following: 1. In the Windows status area, double-click the Event Monitor icon ( ). The Event Monitor window opens. 2. In the View menu, select the event types you want to see. 3. Check the latest unacknowledged event in the list (the topmost with red icon). 4. When you have checked the latest unacknowledged event, click the 5. icon. The event is now acknowledged. Minimize the application window. You can also use the Bottom Line command to minimize the window to a line showing the latest event. Double-click the event line to restore the full application window. 82 __________________________________________________________________ M210455EN-B Chapter 3 ________________________________________________________________ Operation Event Messages The event messages are explained in Table 31 below. Table 31 Event Messages Event Message 1_MAWS_SENSOR_MISSING_DATA Explanation The system has received no PTU data (Pressure Sensor PMT16A or Air Temperature and Relative Humidity Sensor QMH101M) within a specified time. 1_RAIN_SENSOR_MISSING_DATA The system has received no data from Rain Gauge QMR101M within a specified time. 1_SA20_METAR DATA MISSING Lightning Detector SA20M cannot provide all the needed data for METAR. 1_TB_SENSOR_MISSING_DATA The system has received no data from Lightning Detector SA20M within a specified time. CEILO DATA MISSING The system has received no data from Ceilometer CT25KAM within a specified time. FD_MISSING_DATA The system has received no data from Visibility and Present Weather Sensor PWD11A within a specified time. MOR_LEVEL_DOWN MOR = Meteorological Optical Range = visibility. The system reports you between which SPECI limit MOR_LEVEL_UP values the 10-minute average is changing. Limits used are 0 ... 800, 800 ... 1500, 1500 ... 3000, 3000 ... 5000, and 5000 ... 8000. MSG_SRV METAR: METAR delegator started MSG_SRV service is ready to handle METAR requests. MSG_SRV METAR: SENT TO AFTN METAR report was sent to the output line. MSG_SRV SPECI: Observer Triggered SPECI report was triggered by the observer. MSG_SRV SPECI: Temperature changing Temperature has risen 2 °C or more compared to the last sent METAR. MIDAS IV METAR service notices the temperature difference and proposes SPECI. OBJECT INFORMATION CONFLICT The system has detected an incorrect number of DETECTED BY SERVER A ROA objects. One of the following has occurred: 1) A service is not running. 2) End user has closed an obligatory application. 3) METAR/SPECI template has not been opened. RVR_BACKGROUND_LUM To be ignored. WAD DATA MISSING The system has received no data from Wind Sensor WS425 within a specified time. WIND SPEED -999.0 Instant wind speed data missing. WIND DIRECTION -999 Instant wind direction data missing. VAISALA _______________________________________________________________________ 83 User's Guide ______________________________________________________________________ Diagnostics Monitor The Diagnostic Monitor (ROA Diagnostics) application is a tool for monitoring the status of the MIDAS IV system. In Diagnostic Monitor, you can view the status of a CDU (Central Data Unit), ROA (Remote Object Architecture) objects and ROA users. You can also check the location of a sensor. When you get an Internal Event message in Event Monitor, there may be a problem with the CDU. In such a situation, you need to use Diagnostic Monitor to view the system status more closely. When there is a Technical Event message in Event Monitor, you need to use Diagnostic Monitor to look up the location of the sensor causing the event. CAUTION Diagnostic Monitor is also an installation tool used by Vaisala personnel. For this reason, it contains some functions you must not use. Incorrect use of these functions can result in serious system problems. This manual includes instructions only for those functions that you can safely use in your troubleshooting tasks. Do not use functions that are not covered in this manual. When starting troubleshooting with Diagnostic Monitor, you need to connect to the system in question. 1. Select System - Connect. 2. The Connect window appears. 3. Select the CDU (for example MIDAS IV TACMET) and click OK. 4. The Statuses tab appears. 84 __________________________________________________________________ M210455EN-B Chapter 3 ________________________________________________________________ Operation Statuses Tab Figure 42 below shows the Diagnostic Monitor main window/Statuses tab for a duplicated system. Figure 42 Diagnostic Monitor Statuses Tab The Statuses tab is the most important tab for troubleshooting tasks. NOTE The System, Servers, and Database tabs are mainly intended for Vaisala internal use. In single-CDU systems, the Cluster B column in the Statuses tab is not used. Cluster A column shows when the CDU is working properly (OnLine) and when it is out of order (Missing). In a single-CDU system, the Statuses tab includes three icons: Server Objects Users = = = Shows the status of the primary CDU. Shows the status of ROA data objects in the system. Shows the status of ROA users in the system. The color of the Server icon indicates the status of a CDU. - Green color indicates that the CDU is running correctly. - Red and yellow colors indicate problems in physical connections, network configuration, or ROA core services. VAISALA _______________________________________________________________________ 85 User's Guide ______________________________________________________________________ ROA Object A ROA object is a runtime data container used by the remote object architecture. The data set it contains can be one of the following: - Measured weather parameter values produced by a sensor - Calculated values produced by meteorological services - Alarm messages produced by the Alarm Service - Weather report data. The status of ROA objects in your system is indicated in the Statuses tab by the color of the Objects icon. In a normal situation, the Objects icon is green. If it is red or yellow, you need to open the Objects window by selecting View - Objects. In the Objects window, you can see the name, status, and value of the problem object and open a data item window for it. Figure 43 below shows the Objects window. The window is similar for all system types. You can display the Objects window by selecting Objects from the View menu. Figure 43 Objects Window in Diagnostic Monitor 86 __________________________________________________________________ M210455EN-B Chapter 3 ________________________________________________________________ Operation The columns in Figure 43 on page 86 are explained below: Name = The Name column shows the ROA object name. By double-clicking the name (of objects having Access type Application), you can open a data item window for this object and view data items belonging to it. Existence = In the Existence column, the system shows the status of the ROA object in question. In single-CDU systems, the normal status is Obligatory. In error situations, the status can be either Missing or Unknown. A Missing status is also shown by the red object status icon. When the existence of a ROA object is Missing, the system sends an Internal message Object information conflict to Event Monitor. A Missing object status means that the object is not running properly in the system or, in rare situations, that the object is missing from the system altogether. If the existence of a ROA object is Unknown (yellow), it usually means that there is an application running for which you do not have a proper license. See also Table 32 below. Access = Objects are divided into two groups by their access type: Application and System. If an object has the access type Application, you can open a data item window for that object by double-clicking its name. Objects with the access type System are internal system objects, and you cannot open a data item window for them; they are only intended for system internal use. Types = The Types column contains programming information intended for Vaisala internal use. Table 32 Existence Column in Objects Window Existence Obligatory (green icon) Unknown (yellow icon) Missing (red icon) Explanation A system program running in the CDU. An unlicensed application. Close the application and contact Vaisala for more licenses if necessary. The object is missing. You may need to reboot the system. The object status icon is in the leftmost column. This icon shows the status of the ROA object. The icon can be green, red, or yellow. The green icon indicates normal status. VAISALA _______________________________________________________________________ 87 User's Guide ______________________________________________________________________ Red and yellow colors indicate missing objects, license violations, or other irregularities related to ROA objects. When the Objects icon is red or yellow, you need to view further object details in the data item window related to each object. Table 33 below explains the meaning of the status icon colors in the Objects window and gives troubleshooting instructions. Table 33 Color of Object Status Icon Explained Color of Object Status Icon Green Yellow Red Explanation Action Object is running correctly. There is a non-configured program running in the system (usually a Vaisala internal tool). An object is missing, or a non-licensed application is running in the system. No action needed. Stop the non-configured program in Windows Control Panel. Restart the missing object in Windows Control Panel, or close the non-licensed application in the program and contact Vaisala for more licenses if necessary. Data Item Window Figure 44 on page 89 shows the data item window. You can display the data item window by double-clicking the icon of an object in the Objects window. The data item window can be displayed for objects that have Application access type. The following figure shows the data item window for ROA object 1_PWD_SENSOR. 88 __________________________________________________________________ M210455EN-B Chapter 3 ________________________________________________________________ Operation Figure 44 Data Item Window for PWD11A The columns in Figure 44 above are explained below: Name = The Name column shows the data item name. One ROA object includes several data items. The data item named Location shows the location code of the object. Type = The Type column contains programming information intended for Vaisala internal use. Statuses = The Statuses column is important for ensuring the quality of data in the system and in end-user applications. The information in the Statuses column is updated several times a minute. When the connection between a sensor and the CDU is broken, the information is no longer updated, and the status changes to Old and finally Missing. If the line is working properly, but the value measured by the sensor is out of the defined validity range, the status is Invalid. These statuses correspond with the ones used in end user applications, for example Weather View. Value = The Value column shows the data item value. VAISALA _______________________________________________________________________ 89 User's Guide ______________________________________________________________________ ROA User A ROA user is a program running in the MIDAS IV system. The term "user" should be understood from the system’s point of view: ROA users are applications and programs that are using the CDU’s services. NOTE In this context, the word user does not refer to the end user of MIDAS IV workstation. A ROA user is one of the following: - Workstation application (for example Weather View, METAR/SPECI) - System program. The status of ROA users in your system is indicated in the Statuses tab by the color of the Users icon. In a normal situation, the Users icon is green. If it is red or yellow, you need to open the Users window by selecting View - Users. In the Users window, you can see the name, address, port, and status of the problem ROA user. Figure 45 Users Window in Diagnostic Monitor 90 __________________________________________________________________ M210455EN-B Chapter 3 ________________________________________________________________ Operation The columns in Figure 45 on page 90 are explained below: Software = The Software column shows the name of the ROA user. Address = The Address column shows the IP address of the computer running the software in question. Port = The Port column shows the TCP/IP port of the computer running the software in question. Host = The Host column contains information intended for Vaisala internal use. Network = The Network column shows the version number of the ROA network library used in the application. The version number consists of three groups separated by a dot (for example 1.43.03). The first two groups should be the same for each ROA user. If they are not, an old version of the ROA user in question is running in the system. Existence = The Existence column shows the status of the ROA user. A ROA user can be Obligatory, Violation/Unknown, or Missing. The normal status is Obligatory. If the system cannot find a ROA user, the status turns Missing. This means that a system program has stopped running, or that an end user has inadvertently closed an application that needs to be constantly open in a workstation (METAR/SPECI). If the ROA user status is Violation/Unknown, it means that there is a non-licensed or non-configured ROA user running in the system. You might also see the statuses Floating and Inactive in the Existence column. These statuses are mainly intended for Vaisala internal use. SensorIO Monitor SensorIO Monitor is a remote maintenance application. It is used for monitoring the communication port, the field devices, and the field device network communication. SensorIO Monitor contains two windows: the Sensor Status Monitor window for showing the status of field devices, and the Event Log window for monitoring the communication from field devices. VAISALA _______________________________________________________________________ 91 User's Guide ______________________________________________________________________ CAUTION SensorIO Monitor is also an installation tool used by Vaisala personnel. For this reason, it contains some functions you must not use. Incorrect use of these functions can result in serious system problems. This manual includes instructions only for the functions that you can safely use in your troubleshooting tasks. Do not use functions that are not covered in this manual. You can hide and show the toolbar and status bar by selecting the corresponding View menu options. Toolbar and status bar are shown on the screen by default. Sensor Status Monitor Window In SensorIO Monitor, you can monitor the status of sensor communication in the Sensor Status Monitor window. The window shown in Figure 46 on page 93 appears by default when you open the SensorIO Monitor application. You can also display it by selecting View - Status View. The Sensor Status Monitor window shows a list of all sensors configured in your MIDAS IV system. 92 __________________________________________________________________ M210455EN-B Chapter 3 ________________________________________________________________ Operation 0310-040 Figure 46 Sensor Status Monitor Window The columns in Figure 46 above are explained below: Icon Port Status = The connection status icon is the leftmost column on the window. The LED icons in the column display the status of each field device configured in the system. The status information is updated several times a minute. See Table 34 below for details. = The Port column shows the number of the port to which the sensor is connected. = The Status column shows the sensor status. See Table 35 on page 94 for details. The colors and text in the connection status icon are explained in Table 34 below. Table 34 Explanation of Connection Status Icon Icon color and text Green ON Yellow Yellow TMIT Red ER Gray OFF Blue CMD Explanation Normal situation. Connection OK. Active connection. A lengthy data transfer is on the process. Problems in communication between sensors and CDU. Sensor is not in use. Sensor is in maintenance mode. Table 35 on page 94 explains the different statuses. VAISALA _______________________________________________________________________ 93 User's Guide ______________________________________________________________________ Table 35 Explanation of Status Column Status OK Error Command Mode Explanation Communication between sensors and CDU is running correctly. Problems in communication between sensors and CDU. Sensor is in maintenance mode. When you right-click a sensor name, you can view more information on the sensor by selecting Sensor Details from the context menu. The Field Device Status window appears, see Figure 47 below. Figure 47 Sensor Details in Field Device Status Window 94 __________________________________________________________________ M210455EN-B Chapter 3 ________________________________________________________________ Operation Event Log Window The Event Log window contains detailed information on sensor communications. It displays the latest sensor events received from the system. 0310-041 Figure 48 Event Log Window The Event Log window shows the time of the event, the name of the sensor, the event number, and the sensor message text (for example "message missing!"). You can adjust the amount of details displayed in the Event Log window with the Trace Level buttons. The higher the trace level is, the more details are shown in the Event Log. You can select a trace level from two to nine. When you click the Toggle Logging icon on the toolbar, the contents of the event log are stored in a log file on your hard disk. VAISALA _______________________________________________________________________ 95 User's Guide ______________________________________________________________________ This page intentionally left blank. 96 __________________________________________________________________ M210455EN-B Chapter 4 ______________________________________________________________ Maintenance CHAPTER 4 MAINTENANCE This chapter provides information that is needed in the basic maintenance of the product. Under normal conditions, MAWS201MP Weather Station needs only a minimum amount of maintenance. In general, it is not advisable to repair sensors in the field. Tilting the Mast The MAWS201MP mast is easy to tilt for maintenance purposes. Figure 49 MAWS201MP Mast Tilted VAISALA _______________________________________________________________________ 97 User's Guide ______________________________________________________________________ WARNING For safety reasons, do not tilt the mast when wind speed is over 7 m/s (14 kt). WARNING See that there are no power lines or other obstacles near the mast. WARNING Be sure that there are no persons under the mast when the mast is tilted. WARNING Avoid touching the wire with bare hands. Do not try to guide the wire. CAUTION Be careful not to damage the sensors when tilting the mast. Follow the procedure below to tilt the mast. 1. Open the shackle to disconnect the guy wire 1 (circled in Figure 50 on page 99) that is on the opposite side to the tilting direction. 98 __________________________________________________________________ M210455EN-B Chapter 4 ______________________________________________________________ Maintenance 0303-046 Figure 50 2. CAUTION Mast Orientation Open the 4 securing bolts in the hinge (see Figure 51 on page 100). Do not open the horizontal hinge bolt. After erecting the mast, secure the hinge with the provided accessories as illustrated in Figure 51 on page 100. NOTE Always assemble the washers under the spring washers to prevent the paint from being damaged. VAISALA _______________________________________________________________________ 99 User's Guide ______________________________________________________________________ 0303-045 Figure 51 Bolts and Washers for Securing the Hinge The following numbers refer to Figure 51 above: 1 2 3 3. CAUTION = = = Allen bolt Spring washer Washer Lower the mast slowly by turning the winch counter-clockwise. You should always have a good grip on the handle. 4. Install the tilting support to the end of the mast (see Figure 52 on page 101). 5. Lower the mast slowly with the winch so that the mast finally rests on the tilting support. 100 _________________________________________________________________ M210455EN-B Chapter 4 ______________________________________________________________ Maintenance 0303-052 Figure 52 Tilted Mast with Tilting Support Follow the procedure below to erect the mast: 1. CAUTION Turn the winch handle clockwise so that the mast does not rest on the tilting support. Be careful not to damage sensors or accessories with the tilting support. 2. Remove the tilting support. 3. Fully erect the mast with the winch. 4. Screw back the 4 securing bolts in the hinge (see Figure 51 on page 100). 5. Connect the guy wire. The maintenance of the following sensors and accessories should be carried out when the mast is tilted: - Ultrasonic Wind Sensor WS425 - Present Weather Detector PWD11A - Lightning Detector SA20M - Obstruction Light - Antenna VAISALA ______________________________________________________________________ 101 User's Guide ______________________________________________________________________ Ultrasonic Wind Sensor WS425 Ultrasonic Wind Sensor requires a minimum amount of maintenance. If the sensor fails, replace it with a known good unit. Present Weather Detector PWD11A PWD11A is designed to operate continuously for several years without maintenance other than cleaning of the lenses and the DRD sensing surface (see Figure 53 below). No initial calibration of PWD11A is needed, because the sensor has been calibrated at the factory. Periodic maintenance of the PWD11A Present Weather Detector includes: - Cleaning of the transmitter and receiver lenses and hoods - Cleaning of the DRD Rain Detector. 0105-054 Figure 53 NOTE Present Weather Detector (Arrow Pointing to DRD) Some erroneous data may be generated due to cleaning the sensor. Cleaning Transmitter and Receiver Lenses and Hoods The lenses of the PWD11A transmitter and receiver units should be relatively clean to get reliable results. With dirty lenses, the shown visibility values are not reliable. Cleaning should be done every six months or more often depending on the conditions (for example, if there are roads nearby, more cleaning will be necessary). 102 _________________________________________________________________ M210455EN-B Chapter 4 ______________________________________________________________ Maintenance 1. Clean the lenses with a lens-cleaning wipe. Be careful not to scratch the lens surfaces. Lenses should dry up indicating that the lens heating is functioning. 2. Check that the hoods and lenses are free of condensed water or ice and snow deposits. 3. Wipe the dust from the inner and outer surfaces of the hoods. Cleaning DRD Rain Detector The capacitive rain detector DRD should be cleaned every six months or more often depending on the conditions. CAUTION The measuring principle does not allow for proper ESD protection of the DRD electronics, carefully follow the instructions below. 1. Ground your hand by touching grounded metallic parts of the installation to remove excessive static charges from your body. 2. Clean the DRD rain detector carefully with a soft, lint-free cloth moistened with mild detergent. Be careful not to scratch the surface. 3. Check that the detector is free of ice and snow deposits. Storage Store PWD11A in its transit case in dry conditions, not in the open air. Storage conditions are: - Temperature -40 to 70 °C (-40 to 158 °F) - Relative humidity up to 95 % Lightning Detector SA20M There are no customer serviceable components in SA20M. If the sensor fails, replace it with a known good unit. VAISALA ______________________________________________________________________ 103 User's Guide ______________________________________________________________________ Obstruction Light If the obstruction light gets dirty, clean it with water and mild soap only. If the obstruction light fails, replace the whole unit. Antenna Antennas require a minimum amount of maintenance. Field repairs are accomplished by changing the complete antenna. Temperature and Relative Humidity Probe QMH101M Calibration and maintenance of the air temperature and relative humidity probe should be performed at regular intervals, depending on the conditions of use and desired accuracy. The validity of the readings should be checked annually. Replacing QMH101M Probe To replace the QMH101M probe with a calibrated probe, perform the following steps: 1. Disconnect the Temp/Humidity cable (red-coded) from the TACMET MAWS. 2. Remove the sensor from the radiation shield by pulling gently. 3. After the sensor is detached from the radiation shield, pull the probe head out of the handle (see Figure 54 on page 105). 104 _________________________________________________________________ M210455EN-B Chapter 4 ______________________________________________________________ Maintenance 0201-001 Figure 54 QMH101 Probe Maintenance The following numbers refer to Figure 54 above. 1 2 = = Handle with cable Probe head 4. Attach the calibrated probe into the handle. 5. Push the sensor carefully back into the radiation shield. 6. Reconnect the cable. Rain Gauge QMR101M To ensure reliable and accurate measurements, we recommend that the following checks be carried out at each visit to the rain gauge. NOTE If the gauge is still connected to the data logger and logger is operating, be careful not to tip the spoon/bucket when carrying out the following operations. 1. Inspect the funnel for any damage or blockage. At certain times of year, leaves may have accumulated into the funnel. Dirt and dust can also block the grille preventing or reducing the flow rate to a slow drip to the buckets beneath. Remove all obstacles from the funnel. 2. Check that the gauge is still level. It is surprisingly easy for an apparently immovable gauge to become tilted as a result of VAISALA ______________________________________________________________________ 105 User's Guide ______________________________________________________________________ small ground movements, vandalism, or just an inquisitive finger. 3. Clean the spoon from dust and dirt once or twice a year to ensure precise measuring. Pressure Sensor PMT16A PMT16A requires no maintenance. Calibration The TACMET MAWS software provides a means for one-point calibration of Pressure Sensor PMT16A. Required equipment: - Laptop PC with a terminal software (for example, HyperTerminal) - Reference pressure sensor - TACMET MAWS PC cable ZZ45202 Calibration procedure of PMT16A is the following: 1. NOTE Place the reference pressure sensor at the same level with PMT16A (located inside the tripod enclosure). Make sure the wind does not interfere with the reading of the reference barometer. 2. Connect the MIDAS IV PC to TACMET MAWS with the ZZ45202 cable. 3. If the MIDAS IV software is running shut it down using TACMET Wizard. 4. Establish terminal connection to TACMET MAWS by launching the terminal software. The correct communication parameters are: - 4800 bps 8 data bits 1 stop bit No parity No handshaking 106 _________________________________________________________________ M210455EN-B Chapter 4 ______________________________________________________________ Maintenance 5. When data messages appear in the terminal software, type open and press ENTER. 6. Read the reference barometer reading. 7. Give the reference reading to TACMET MAWS. Type PMT16CAL 1003.7 (where 1003.7 hPa is the reference reading) and press ENTER. 8. Check the readings given by TACMET MAWS: - Value = reference reading - Measured value = measured by TACMET MAWS - Offset = measured value - reference reading 9. Wait for a couple of minutes. 10. Check the pressure reading with the handheld terminal. It should be the same as the reference reading. 11. Repeat the calibration, if necessary. 12. Type close and press ENTER to close the terminal connection. 13. Shut down the terminal software. 14. Restart MIDAS IV using TACMET Wizard. Ceilometer CT25KAM Periodic maintenance is normally limited to window cleaning. In addition, alarms should be checked regularly with the handheld terminal. CAUTION Ceilometer should never be opened by unauthorized personnel. Opening it will void the warranty. Window Cleaning The ceilometer lens and window should always be free of any dirt or particles during operation. Data messages include a warning if the window is contaminated. After the system has detected contamination, it starts the blower, which removes contamination. VAISALA ______________________________________________________________________ 107 User's Guide ______________________________________________________________________ In case of the "Optics Contamin" alarm (see Table 10 on page 51) the window has to be cleaned. To clean the window: CAUTION 1. Flush the window with water to remove coarse grains. 2. Clean the window with a lens-cleaning wipe. Particles between the towel and the window may damage the antireflection coating. Therefore, instead of circular rubbing, the window should be wiped once across the window. If additional wiping is needed, a clean part of the towel should be used. Storage Place caps on all external connectors if stored unpacked for extended periods of time in an unconditioned area. Also, maintain a dust cover on the window during long periods of storage. Logger Enclosure QME101M Logger tube QME101M requires a minimal amount of maintenance. Field repairs are accomplished by replacing the complete module. Power Supply and Connection Unit QMP202MP QMP202MP requires a minimal amount of maintenance. Field repairs are accomplished by replacing the complete module. The expected battery life expectancy is 4 to 5 years. Mains Power Supply QMP211 QMP211 requires a minimal amount of maintenance. Field repairs are accomplished by changing the complete module. NOTE Do not open the mains power supply unit. 108 _________________________________________________________________ M210455EN-B Chapter 4 ______________________________________________________________ Maintenance Communication Accessory Enclosure QCA101 QCA101 requires a minimal amount of maintenance. Repairs are accomplished by replacing the complete module. Handheld Terminal QMD101M Under normal conditions, QMD101M needs only a minimal amount of maintenance. In general, it is not advisable to repair QMD101M in the field. Field preventive maintenance is limited to cleaning the display periodically, if necessary. Field repairs are accomplished by changing the complete terminal. Cable Maintenance Inspect cables for breaks, cracks in the protective coating or cable connectors, and bent, damaged, or misaligned pins. Also wipe off or remove excess dirt, dust, sand, and leaves. VAISALA ______________________________________________________________________ 109 User's Guide ______________________________________________________________________ This page intentionally left blank. 110 _________________________________________________________________ M210455EN-B Chapter 5 ___________________________________________________________ Troubleshooting CHAPTER 5 TROUBLESHOOTING This chapter consists of some common problems, their probable causes, and remedies. Software Operation Table 36 Some Common Problems and Their Remedies. Problem TACMET MAWS will not open for commands. Probable Cause The terminal connection is not open. MAWS is not receiving power. MAWS is not sending anything (nothing is seen on the handheld terminal or PC screen). MIDAS IV shows Cable connection slashes (/////) instead of problem. measured values. Remedy Check the cable connection. Check connections and power supply. Reset MAWS. Check the cable connections and the condition of the cables (see section Cable Maintenance on page 109). VAISALA ______________________________________________________________________ 111 User's Guide ______________________________________________________________________ CT25KAM Warnings Table 37 Troubleshooting Ceilometer Status Message Info Optics contaminated warning (on handheld terminal). Probable Cause Bird droppings, leaves, dust, or the like has contaminated the window. Remedy Clean the window. Failure Diagnosis In case of malfunction, do the following: 1. Check the cable connections. 2. Check the presence and correctness of line voltage. 3. Check the operational states of the LEDs in the unit. 4. At the data line, check that the connection is correct. The diagnosis is made based on the information given in the status message. PWD11A CAUTION Servicing the equipment must be performed by qualified personnel. If PWD11A is not working properly: 1. The lenses may be excessively contaminated. Alarm is received. - Clean the lenses. 2. One of the hoods has been filled with snow, leaves, or other things. Alarm is received. - Clean the hoods. 3. Check that there are no foreign objects in the sample volume. 112 _________________________________________________________________ M210455EN-B Chapter 5 ___________________________________________________________ Troubleshooting - Tree branches, loose cables, or any other moving objects in the sample volume may cause sudden changes in the scatter signal. 4. Check the power supply voltage and cable connections. 5. Check that all the connectors are properly inserted. 6. Check that there are no flashing lights close to PWD11A. - Flashing lights may cause PWD11A to detect peaks in the optical signal. SA20M Table 38 Troubleshooting SA20M Problem No data transfer from SA20M SA20M appears to be reporting lightning data in the opposite direction of the expected location (180 degrees off). Probable Cause Bad connection. Remedy Check that all cables are properly connected to SA20M. Cable failure. Check cable integrity. No power. Restore power to SA20M. Poor siting of SA20M. Remove any Too close to obstruction obstructions. (such as metal fences) that is causing signal degradation. The sensor is not Check the grounding properly grounded. connection wire. VAISALA ______________________________________________________________________ 113 User's Guide ______________________________________________________________________ Handheld Terminal Table 39 Troubleshooting the Handheld Terminal Problem The handheld terminal does not power up normally. Probable Cause The handheld terminal is not connected to a power outlet. The backlight is not on. After a certain time, the lights will go off to maintain low power consumption. The "Not Available" text Your system does not appears on the screen. have the Enhancement sensors connected. You are trying to A communication change station problem between dependent settings, but MAWS and the you cannot access the handheld terminal. input field. Remedy Check the cable connections. Press any key on the keypad. Connect the sensors. If you have the Basic system, ignore the text. Check the cable connections. The handheld terminal must be connected to MAWS with a hard wire, when changing the station dependent settings. Technical Support For technical questions, contact the Vaisala technical support: E-mail [email protected] Phone (int.) +358 9 8949 2789 Fax +358 9 8949 2790 114 _________________________________________________________________ M210455EN-B Chapter 5 ___________________________________________________________ Troubleshooting Return Instructions If the product needs repair, please follow the instructions below to speed up the process and avoid extra costs. 1. Read the warranty information. 2. Write a Problem Report with the name and contact information of a technically competent person who can provide further information on the problem. 3. On the Problem Report, please explain: - What failed (what worked / did not work)? - Where did it fail (location and environment)? - When did it fail (date, immediately / after a while / periodically / randomly)? - How many failed (only one defect / other same or similar defects / several failures in one unit)? - What was connected to the product and to which connectors? - Input power source type, voltage and list of other items (lighting, heaters, motors etc.) that were connected to the same power output. - What was done when the failure was noticed? 4. Include a detailed return address with your preferred shipping method on the Problem Report. 5. Pack the faulty product using an ESD protection bag of good quality with proper cushioning material in a strong box of adequate size. Please include the Problem Report in the same box. 6. Send the box to: Vaisala Oyj VSO Service Vanha Nurmijärventie 21 FIN-01670 Vantaa Finland VAISALA ______________________________________________________________________ 115 User's Guide ______________________________________________________________________ This page intentionally left blank. 116 _________________________________________________________________ M210455EN-B Chapter 6 ____________________________________________________________ Technical Data CHAPTER 6 TECHNICAL DATA This chapter provides the technical data of the TACMET Weather Station for Pole Mast Installations. Polling/Reporting Times Table 40 Sensor Polling/Reporting Times Parameter Wind direction (WS425) Wind speed (WS425) Air temperature (QMH101M) Relative humidity (QMH101M) Air pressure (PMT16A) Precipitation (QMR101M) Lightning (SA20M) Sky condition (CT25KAM) Present weather (PWD11A) Polling 1s 1s 10 s 10 s 10 s 1 min 5s 30 s 30 s Reporting 5s 5s 1 min 1 min 1 min 1 min 5s 30 s 30 s VAISALA ______________________________________________________________________ 117 User's Guide ______________________________________________________________________ Specifications Weather Station MAWS201MP Table 41 MAWS201MP Specifications Property AC power consumption Description/Value 260 VA, max. 2.3 A @ 115 VAC 1.15 A @ 230 VAC Battery backup time 4 h, at minimum (excluding PC equipment; optional UPS for PC equipment) Communication range with the 20 km (12 mi.) with AWG 22 cable QCA101 unit equipped with WT501+DMX501 Temperature -40 ... +55 °C (-40 ... 131 °F) Humidity 5 ... 100 %RH Wind 0 ... 50 m/s (0 ... 100 knots) 118 _________________________________________________________________ M210455EN-B Chapter 6 ____________________________________________________________ Technical Data Logger QML102T Table 42 QML102T Specifications Property Processor A/D conversion Data logging memory Sensor inputs Typical accuracy across measured temperature range -50 °C ... +80 °C Maximum error across measured temperature range -35 °C ... +50 °C Maximum error at 0 °C Voltage measurement ±2.5V range ±250 mV range ±25 mV range ±6.5 mV range Frequency measurements Common mode range Real-time clock Standard Serial communication Standard Optional Voltage (external powering) Standard internal battery Temperature (operating) Temperature (storage) Humidity Emissions ESD immunity RF field immunity EFT immunity Surge (lightning pulse) Conducted RF immunity Description/Value 32-bit Motorola 16-bit 1.7 Mbytes internal Flash memory 10 Analog inputs (20 single ended inputs) 2 counter / frequency inputs Internal channel for PMT16A pressure transducer Better than ± 0.06 °C Less than ± 0.12 °C Less than ± 0.06 °C Better than 0.08 % F.S. ± 150 µV Better than 0.18 % F.S. ± 15 µV Better than 0.18 % F.S. ± 3 µV Better than 0.18 % F.S. ± 3 µV 0.003 % + resolution 241 ns (up to 2 kHz) +5 V / -4 V Better than 20 sec/month RS-232 for maintenance 2 pcs RS-232 for handheld display and laptop PC (max. distance 70 m) 2 pcs RS-485 for smart sensors and remote displays, speed 300 ... 4800 bps (max. distance 2.5 km) 8 ... 14 VDC recommended (30 V max) 1.2 Ah/6 V -40 ... +55 °C (-31 ... 131 °F) -50 ... +70 °C (-58 ... 158 °F) 0 ... 100 %RH CISPR 22 class B (EN55022) IEC 61000-4-2 IEC 61000-4-3 IEC 61000-4-4 IEC 61000-4-5 IEC 61000-4-6 VAISALA ______________________________________________________________________ 119 User's Guide ______________________________________________________________________ Power Supply and Connection Unit QMP202MP Table 43 Battery Regulator QBR101 Specifications (Inside QMP202MP) Property Maximum input voltage (SMPS and Solar Panel inputs) Maximum input current (SMPS) Solar panel input Recommended input voltage from SMPS input Max. load current (backup output) Recommended battery capacity range Battery charge current for 4 Ah battery (selections 0.5 / 1.0 / 2.0 / 2.5 A) Max. battery discharge current Battery charge voltage selection (with external resistor) Battery charge temp. comp. Coefficient Load disconnection threshold voltage (with Lo Btry Switch) Load reconnection threshold voltage Battery Low signal threshold voltage Self consumption from battery (with LEDs disconnected) Ground connection Reverse voltage protection Wire terminals - battery and load wires - solar panel, DC input, and controls MTBF (parts stress method, MIL.HDBK 271F ground benign Ta +25 °C) Housing Dimensions w × d × h Weight Description/Value 30 VDC 6A 55 W max. 16 VDC 3.5 A 4 … 72 Ah 0.5 A 3.5 A 13.7 V -20 mV/°C, typical 10.0 V, typical 12.0 V, typical 11.5 V, typical 0.2 mA max. @ +25 °C Negative Battery, solar panel Screw terminals, removable 2.5 mm2 1.5 mm2 > 150 000 hours Anodized aluminum, gray 90 × 80 × 25 mm (3.5 × 3.1 × 1 in) 0.1 kg (3.5 oz) 120 _________________________________________________________________ M210455EN-B Chapter 6 ____________________________________________________________ Technical Data Table 44 Power Supply Unit BWT36SXZ Specifications (Inside QMP202MP) Property Output power Operating principle Input voltage range Frequency range Input current on full load: 100 VAC 230 VAC Output voltage Output current Efficiency Noise and ripple Input regulation Load regulation Temperature coefficient Output voltage rise time Hold-up time Over current protection Switching frequency (110VAC/230VAC) Electrical strength/ isolation: Input - Output Input - Chassis Output - Chassis Input - Output - Chassis resistance Leakage current Operating temperature range Weight with chassis Approvals Description/Value 30 W SMPS 85 … 264 VAC 47 … 440 Hz 0.6 A 0.4 A +36 V, adjustable ± 10% 0.9 A 81 % (Output V × 0.01) + 50 mVp-p, max. 0.8 % max. 0.9 % max. ± 0.03 %/°C 200 ms max. at +25 °C 20 ms min. at +25 °C Foldback, automatic recover 50 kHz/80 kHz 3 kV AC, 1 minute 2.5 kV AC, 1 minute 500 V AC, 1 minute 50 MΩ minimum 0.75 mA max. -40 ... +60 °C (-40 ... 140 °F) 250 g (8.8 oz) UL 1950 CSA 234 (IEC 950) VDE0805 EN 60959 (IEC 950) CE - EMC 89/336 EEC - LVD 73/23 EEC VAISALA ______________________________________________________________________ 121 User's Guide ______________________________________________________________________ Table 45 Power Supply Unit BWC15SXZ Specifications (Inside QMP202MP) Property Output power Operating principle Input voltage range Frequency range Input current on full load: 100 VAC 230 VAC Output voltage Output current Efficiency Noise and ripple Input regulation Load regulation Temperature coefficient Output voltage rise time Hold-up time Over current protection Switching frequency (110VAC/230VAC) Electrical strength/ isolation: Input - Output Input - Chassis Output - Chassis Input - Output - Chassis resistance Leakage current Operating temperature range Weight with chassis Approvals Table 46 Description/Value 75 W SMPS 85 … 264 VAC 47 … 440 Hz 1.7 A 0.9 A +15 V, adjustable ± 10% 5A 84 % (Output V × 0.01) + 100 mVp-p, max. 0.8 % max. 0.9 % max. ± 0.03 %/°C 300 ms max. at +25 °C 20 ms min. at +25 °C Current limiting 135 kHz 3 kV AC, 1 minute 2.5 kV AC, 1 minute 500 V AC, 1 minute 50 MΩ minimum 0.75 mA max. -40 ... +60 °C (-40 ... 140 °F) 300 g (10.6 oz) UL 1950 CSA 234 (IEC 950) VDE805 EN 60959 (IEC 950) CE - EMC 89/336 EEC - LVD 73/23 EEC 12 Ah Backup Battery Specifications Property Type Nominal voltage Nominal capacity Self discharge Expected lifetime Dimensions w × d × h Weight Description/Value Sealed, Lead-acid 12 V 12 Ah (provides minimum of 4-hour service length without AC power) 3%/month 4 … 5 years 151 × 98 × 94 mm (5.9 × 3.9 × 3.7 in) 4 kg (8.8 lb.) 122 _________________________________________________________________ M210455EN-B Chapter 6 ____________________________________________________________ Technical Data Digital Transmitter WT501 Table 47 WT501 Specifications Property Type Features Plug-in connectors Start-up voltage Power consumption Modem module Power isolation RS-485 isolation On board Optional Modem and power Mounting Weight Operating temperature Storage temperature Humidity operating and storage EMC Vibration Description/Value Low Power Digital Transmitter running 16-bit CPU and ADC IP30/Nema 1 housing with screw terminals Online configurable, parameters stored into a non-volatile EEPROM Separately isolated power input, serial input and RS485 I/O 46 pcs on PCB, removable connectors with screw terminals, 1.5 mm2 maximum wire 12 to 50 VDC. Shut down level ≤ 10 VDC, start-up level ≥ 10 VDC 50 V abs. max With default configuration 15 mA @ 12 VDC in; 7.5 mA @ 24VDC including sensors With extreme configuration 50 mA @ 12 VDC in; 25 mA @ 24 VDC 25 mA @ 12 VDC in; 12.5 mA @ 24VDC 100 VDC peak (limited by a 100 V varistor to unit case) 100 VDC peak (limited by a 100 V varistor to unit case) Opto-isolated RS-485 (2-and 4-wire) I/O Communication module interface for nonisolated RS-232, isolated RS-485, leased-line modem Possibility to use modem connection where power and modem data are on the same 2wire line. 30 mm DIN-rail 0.4 kg (14.1 oz) -40 ... +60 °C (-40 ... 140 °F) -50 ... +70 °C (-58 ... 158 °F) 2 ... 95 %RH CE compliant According to MIL-STD-167-1 VAISALA ______________________________________________________________________ 123 User's Guide ______________________________________________________________________ Modem Module DMX501 Table 48 DMX501 Specifications Property Modem chip Modem chip crystal frequency USART clock frequency Register access Connection Modem protocols Line interface TxControl signal Supply voltage Current consumption Reset / power-down Operation Transmit level Maximum distance between modules Operating and storage temperature Humidity Description/Value 73K324L 11.0592 MHz 11.0592 MHz / 2 Operated through an 8-bit bus interface 2-wire Point-to-point line or multidrop modem network V.21, 300 bps FSK V.23, 1200 / 75 bps FSK V.22, 1200 bps DPSK Matched to 600 Ω Configurable 5 V (+4.75 ... +5.50 V) 9 mA 26 mA -10 dBm 20 km (~12 mi.) with 22 AWG standard cable -50 ... +70 °C (-58 ... 158 °F) 0 ... 100 %RH, non condensing 124 _________________________________________________________________ M210455EN-B Chapter 6 ____________________________________________________________ Technical Data Handheld Terminal QMD101M Table 49 QMD101M Specifications Property CPU Power management Clock speed System integration System RAM FLASH storage Display Physical size Pixels Character cell size CG set LCD type Option for display Keyboard Size Type Feedback Real time clock Interface Data transfer rate Handshaking External power Current Size Weight Operating temperature Operating humidity Description/Value MC68EC000 24-Bit external and 32-Bit internal address 16-Bit on-chip bus for MC68EC000 bus operations Static Design allows processor clock to be stopped 16.54 MHz 16 programmable peripheral chip selects. Interrupt controller with 13 flexible inputs. Programmable interrupt vector generator. Hardware and software watchdog timer. Lower power mode control. 256 Kbytes or 1 MB SRAM 512 Kbytes, 1 MB, or 2 MB Graphics LCD 89 x 91 mm (3.5 x 3.57 in) 160 x 160 8 x 16 (10 rows x 20 columns) or 6 x 10 (16 rows x 26 columns) 256 PC character set & 16 programmable characters Reflective LCD with programmable contrast EL Backlight 25 KEYS 5 columns x 5 rows Elastomer (Rubber Dome) Audio speaker 24 Hour plus battery backed Month/Day/Year 14 pin quick connect micro connector or internal Programmable to 38.4 Kb/s RTS/CTS, Xon/Xoff by the processor 5 ... 14 VDC unregulated, via RS-232 interface (Pin 1 on the 9 pin RS232 D-Sub via pins 13 & 14 Micro Connector). 17 mA @ 6 VDC typical. 80 mA worst case during FLASH write. 0.6 mA sleep mode 191 x 102 x 33 mm (7.5 x 4.0 x 1.3 in) without case expansion ring 450 g (1 lb) -20 ... +70 °C (-4 ... 158 °F) Max. 90 %RH non-condensing VAISALA ______________________________________________________________________ 125 User's Guide ______________________________________________________________________ Heated Ultrasonic Wind Sensor WS425 Table 50 WS425 Specifications Property Sensor type Description/Value Ultrasonic 100 kHz Fully compensated for temperature, humidity, and altitude. Measuring range 0 ... 56 m/s (0 ... 125 mph, 0 ... 107 knots) 0 … 130 m/s (survival) Delay distance Virtually zero Starting threshold Virtually zero Response Maximum reading rate: 1 per second characteristics Sonic measurement time: 0.2 second Signal processing time: 0.15 second Response time: 0.35 second Accuracy (wind speed) ±0.135 m/s (0.3 mph, 0.26 knots) or 3 % of reading, whichever is greater Accuracy (wind direction) ±2 degrees Resolution (wind speed) 0.1 m/s (0.1 mph, 0.1 knots, 0.1 km/h) Resolution (wind direction) 1 degree Power (operating) 10 ... 15 VDC, 12 mA (analog) Power (heating) 36 VDC ± 10 %, 0.7 A Heater Thermostatically controlled heaters in the transducer heads prevent freezing rain or snow build up. Output (analog wind 10 Hz/0.894 m/s (0 ... 625 Hz at 0 ... 55.88 speed) m/s) (frequency) 10 mV/0.558 (0 ... 1.0 volt at 0 ... 55.88 m/s) (voltage) Output (analog wind (0 to Vref at 0 to 359°) (simulated direction) potentiometer) 1.0 ... 4.0 VDC, for 5.0 VDC reference an additional -2° error occurs for angles greater than 291° (reference voltage) Available averages 1 ... 9 seconds (RS-232) Dead band (wind direction) None Material Stainless steel body and sensor arms Silicone rubber and PVC transducer heads Operating temperature -50 ... +50 °C (-58 ... -122 °F) Dimensions w × d × h 250 × 286 × 355 mm (9.8 × 11.2 × 13.9 in) Weight 1.7 kg (3.7 lb) Mean time between failure 26 years calculated per the standard (MTBF) assumptions of MIL-HDBK-217, Revision E. EMC compliance EMC standard EN61326-1:1997 + Am1: 1998; Generic Environment 126 _________________________________________________________________ M210455EN-B Chapter 6 ____________________________________________________________ Technical Data Pressure Sensor PMT16A Table 51 PMT16A Specifications Property Accuracy Pressure range Operating temperature Description/Value ± 0.3 hPa incl. one year drift (with factory calibration) 600 ... 1100 hPa -40 ... +60 °C (-40 ... 140 °F) Air Temperature and Relative Humidity Sensor QMH101M Table 52 QMH101M Specifications Property Range (Temperature) Range (RH) Accuracy (Temperature) Accuracy (RH) Description/Value -40 ... +60 °C (-40 ... 140 °F) 0 ... 100 % Better than ± 0.3 °C ± 2 %, 0 ... 90 % ± 3 %, 90 ... 100 % Rain Gauge QMR101M Table 53 QMR101M Specifications Property Sensor/transducer type Funnel diameter Orifice (opening area) Sensitivity Capacity Accuracy < 24 mm/h < 120 mm/h Material Cable Weight Description/Value Self-emptying tipping spoon/magnet 159.6 mm (6.28 in) 200 cm2 (31 in2) 0.2 mm (1/128 in) 144 mm/h (5.7 in/h) <±5% < ± 10 % UV stabilized plastic Included 380 g (13.4 oz) VAISALA ______________________________________________________________________ 127 User's Guide ______________________________________________________________________ Ceilometer CT25KAM Table 54 CT25KAM Specifications Property Measurement range 25 000 ft acquisition time Accuracy (against hard target) Resolution Number of layers Range gates Laser Wavelength Eye safety Measurement cycle Microprocessor DC power consumption total measurement unit window blower AC power Interfaces Data messages Dimensions w × d × h Weight Tilt correction sensor Window conditioner Temperature range Humidity Protection class Vibration during operation EMC/EMI Static Electrical safety Description/Value 0 ... 25 000 ft (0 ... 7.5 km) 15 s ± 2 % ± 1/2 × [resolution] 50 ft Up to 5 500 Pulsed diode, InGaAs MOCVD 905 nm ±5 nm at 25 °C (77°F) In compliance with IEC825 and 21CFR1040 Programmable 15 ... 120 s Intel 16-bit CMOS 80C188EB 20 W 15 W 5W 115 or 230 VAC, 45 ... 65 Hz max. 240 W including heating, ± 15 % RS-485 Cloud hits and status only. Cloud hits, status, internal monitoring data, and full backscatter profile. 316 × 256 × 710 mm (12 × 10 × 28 in) 14.5 kg (32 lb.) Correction 0 ... 60° Automatic window blower and protection shield. -50 ... +60 °C (-58 ... 140 °F) 0 ... 100 % RH IP65 0.5 G, 10 ... 500 Hz (IEC68-2-6 FC) CISPR 22B/FCC 15 Part J or IEC801-5 (2 kV), 3 V/m 14 kHz-1 GHz IEC801-3 IEC 801-4 Level 3 8 kV (IEC801-2 Level 4) EN60950 128 _________________________________________________________________ M210455EN-B Chapter 6 ____________________________________________________________ Technical Data Present Weather Detector PWD11A Table 55 PWD11A Present Weather Detector Specifications Property Measurement range of MOR Accuracy Description/Value 10 ... 20 000 m (32 ... 65 600 feet) ±10 %, range 10 ... 10 000 m (<32800 ft) ±15 %, range 10 ... 20 km (32800 ... 65600 ft) 15 W without heating, max 20 W 10 ... 50 VDC 60 seconds 15 seconds 0.05 mm/h or less, within 10 minutes Maximum power consumption Time constant Update interval Precipitation detection sensitivity Weather type identification 7 different types of precipitation (rain, freezing rain, drizzle, freezing drizzle, mixed rain/snow, snow, ice pellets) Precipitation (unknown type) Fog (mist), haze (smoke, sand) or clear Weather type reporting WMO code table 4680 Code letters for precipitation, NWS (National Weather Service, USA) Precipitation intensity Range 0.00 ... 999 mm/h measurement Accuracy ±30 % (range 0.5 ... 20 mm/h, liquid precipitation) Sun orientation Sunlight into the light receiver must be avoided Material Anodized aluminum, black Wind speed Up to 60 m/s (116 knots) Operating temperature -40 ... +55 °C (-40 ... 131 °F) range Operating humidity range Up to 100 %RH Dimensions w × d × h 720 × 320 × 220 mm (28.3 × 12.6 × 8.66 in) Weight 2.8 kg (6.17 lb.) VAISALA ______________________________________________________________________ 129 User's Guide ______________________________________________________________________ Lightning Detector SA20M Table 56 SA20M Specifications Parameter Types of strikes detected Maximum processing rate Operational Limits Range Bearing Resolution: Range Bearing Ranging accuracy Directional accuracy Power Transient voltage surge protection Weight Dimensions w × d × h Temperature Humidity Standards Description/Value Cloud-to-cloud Cloud-to-ground 5 000 strikes per minute 0 ... 90 km (0 ... 50 nmi.) 0º ... 360º 2 km (1 nmi.) 1 degree ± 1 km (0 ... 28 km); ± 0.5 nmi. (0 ... 15 nmi.) ± 2.4 km (28 ... 55 km); ± 1.3 nmi. (15 ... 30 nmi.) ± 5º 10 ... 18 VDC, 7 W, 0.5 A (typ) @ 13.8 VDC All lines 3.6 kg (8 lb.) 310 x 310 x 130 mm (16 x 16 x 5 in) -35 ... +55 °C (-30 ... 130 °F) 5 ... 100 %RH condensing FAA Advisory Circular 150/5220-16 RTCA/DO-191 TSO-C110a Obelux Obstruction Light Table 57 Obelux Obstruction Light Specifications Property Intensity Radiation pattern Illumination threshold RF-radiation LEDs Power consumption Current consumption Height Diameter Glass cover thickness Operating temperature range Description/Value 17 cd typical 360° horizontal 50° vertical 200 lux (adjustable) None 14 separate groups <2W < 0.17 A 235 mm (9.25 in) 120 mm (4.72 in) 5 mm (0.2 in) -55 ... +55 °C (-67 ... 130 °F) 130 _________________________________________________________________ M210455EN-B Chapter 6 ____________________________________________________________ Technical Data Tiltable Pole Mast Table 58 DKP210AV-T Specifications Property Height Maximum wind speed with two sets of guy wires Diameter Lowest section (0 ... 1.9 m) Second section (1.9 ... 4.9 m) Third section Highest section Top of the mast Mast tubes and lifting rod Pedestal tube and hinge Other parts, e.g., bolts Guy wires Material Breaking strength Marking Foundation set Material Thread of foundation bolts Length of foundation bolts Wedge bolts Coating/Painting Pedestal tube and hinge Aluminum parts Steel parts Stainless steel parts Mast concrete base Weight (pole with winch) Description/Value 10 m (32.8 ft) 67 m/s (130 knots) 100 mm (3.94 in) 75 mm (2.95 in) 63 mm (2.48 in) 50 mm (1.97 in) 60 mm (2.36 in) Aluminum alloy Stainless steel Stainless steel Stainless steel 28 kN (6 295 lbf) Black and yellow colored cable shrouds to the height of 2 meters from the ground Galvanized steel M20 300 mm (11.8 in) M20, cast or drilled into concrete using the provided orientation plate as a guide Corrosion-resistant powder coating Anodized and painted Galvanized Uncoated Soil bearing capacity must exceed 45 kPa 125 kg (276 lb) VAISALA ______________________________________________________________________ 131 User's Guide ______________________________________________________________________ Table 59 DKP206AV-T Specifications Property Height Maximum wind speed With one set of guy wires Diameter Lowest section (0 ... 1.9 m) Second section (1.9 ... 4.9 m) Highest section Top of the mast Mast tubes and lifting rod Pedestal tube and hinge Other parts, e.g., bolts Guy wires Material Breaking strength Marking Foundation set Material Thread of foundation bolts Length of foundation bolts Wedge bolts Coating/Painting Pedestal tube and hinge Aluminum parts Steel parts Stainless steel parts Mast concrete base Weight (pole with winch) Description/Value 6 m (19.7 ft) 65 m/s (126 knots) 100 mm (3.94 in) 75 mm (2.95 in) 63 mm (2.48 in) 60 mm (2.36 in) Aluminum alloy Stainless steel Stainless steel Stainless steel 28 kN (6 295 lbf) Black and yellow colored cable shrouds to the height of 2 meters from the ground Galvanized steel M20 300 mm (11.8 in) M20, cast or drilled into concrete using the provided orientation plate as a guide Corrosion-resistant powder coating Anodized and painted Galvanized Uncoated Soil bearing capacity must exceed 45 kPa 105 kg (231 lb) 132 _________________________________________________________________ M210455EN-B Chapter 6 ____________________________________________________________ Technical Data TM32 Radio Modem Table 60 TM32 Radio Modem Specifications Property Interface Power Link rate Transmission protocols Modulation FEC protocol General radio specifications Transmitter Receiver RF connector Type acceptance Operating temperature Storage temperature Vibration/Shock Enclosure Dimensions w × d × h Weight Description/Value RS-232 compatible interface. User configurable for common baud rates to 38,400 and parity. Interface does not require hardware handshake control. External power supply range of 10 ... 26 VDC. RF - 1.2W, 10.2W during TX. 2400 or 4800 baud (optionally 9600 baud) Fast asynchronous, transparent, packet switched, digipeater, or TDMA. Gaussian Minimum Shift Keying (GMSK) baseband modulation with programmable transmit BT of 0.5 or 0.3. Hamming code (12,8) with data interleave for burst error correction up to 20 consecutive bits in transparent and packet modes of operation. Synthesized frequency control. Channel spacing resolution of 6.25, 12.5 kHz, or 25kHz depending on model. Frequency stability of 5 ppm. Modulation distortion <5%. Duty cycle 100%. Transmitter attack time 10 ms. Spurious and harmonic FM -55 dBc. FM hum and noise -40 dB. Sensitivity -114 dBm (12 dB SINAD). Adjacent channel selectivity -60 dB (25 kHz). Spurious and image rejection -60 dB. Intermodulation -60 dB. FM hum and noise -40 dB. Conducted spurious -57 dBm. Environmentally sealed BNC (50 W) All models are type accepted and certified for operation in the U.S. and Canada. -22 ... 140 °F (-30 ... +60 °C) -67 ... 185 °F (-55 ... +85 °C) IEC 68-2-55 IEC 144/855420 IP 66 Dust-tight and watertight. 70 × 23 × 132 mm (2.75 × 0.9 × 5.2 in) 255 g (9 oz) excluding cable VAISALA ______________________________________________________________________ 133