1
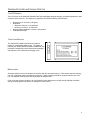
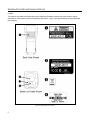
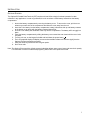
METROLOGIC INSTRUMENTS, INC. SP5600 OptimusR User’s Guide Copyright © 2008 by Metrologic Instruments, Inc. All rights reserved. No part of this work may be reproduced, transmitted, or stored in any form or by any means without prior written consent, except by reviewer, who may quote brief passages in a review, or provided for in the Copyright Act of 1976. Trademarks Metrologic is a registered trademark of Metrologic Instruments, Inc. Products identified in this document are hereby acknowledged as trademarks, registered or otherwise, of Metrologic Instruments, Inc. or their respective TABLE OF CONTENTS Introduction Product Overview .................................................................................................................................................. 1 Scanner and Accessories ..................................................................................................................................... 1 General Features and Characteristics Scanner Features.................................................................................................................................................. 2 Cradle Features..................................................................................................................................................... 3 Multifunctional Keypad .......................................................................................................................................... 4 LCD Screen........................................................................................................................................................... 5 Lithium Battery ...................................................................................................................................................... 5 Maintenance.......................................................................................................................................................... 5 Labels.................................................................................................................................................................... 6 Installation Getting Started ...................................................................................................................................................... 7 Basic Operation..................................................................................................................................................... 8 Communication and Data Collection Setup .......................................................................................................... 9 Data Upload ........................................................................................................................................................ 10 System Menu ...................................................................................................................................................... 11 Application........................................................................................................................................................... 15 Programming the Terminal.................................................................................................................................. 15 Programming the Communication Cable ............................................................................................................ 15 Troubleshooting ....................................................................................................................................................... 16 Specifications........................................................................................................................................................... 17 Limited Warranty...................................................................................................................................................... 19 Safety Notices.......................................................................................................................................................... 20 Patents..................................................................................................................................................................... 21 Index ........................................................................................................................................................................ 22 Contact Information and Office Locations ............................................................................................................... 23 ii INTRODUCTION PRODUCT OVERVIEW The SP5600 OptimusR Portable Data Terminals are robust and versatile scanning devices designed to provide exceptional performance, while enduring the demands of everyday use. The rugged exterior of the OptimusR makes the Optimus the ideal PDT for applications that take place in more rigorous environments. The lithium-ion rechargeable battery provides the Optimus with more than 200 hours of operation. The Optimus is supported by a resourceful set of development tools, including a Windows-based program builder, ‘C’ compiler, and ‘BASIC’ compiler. The OptimusR has a fully integrated laser for scanning all 1D bar code symbologies, completely enclosed by the protective ergonomic housing. The built-in functionality makes the Optimus an excellent choice for numerous applications. In addition, when combined with the optional Wi-Fi module the Optimus is the ideal solution for real time applications such as inventory control, shop floor management, warehousing operations, and distribution operations. Key Product Features • • • • • • • Up to 8 MB RAM capable of storing over 400,000 records Easy to use Optimizer program builder and download software Auto-backlit LCD display Audible and visual indications Built-in laser bar code scan engine capable of scanning all 1-D bar code symbologies Powered by rechargeable Lithium-ion battery Upload/download data via RS232, USB, and Wi-Fi interfaces SCANNER AND ACCESSORIES METROLOGIC PART NUMBERS PART DESCRIPTION SP5602 OptimusR laser batch unit with 2MB RAM SP5604 OptimusR laser batch unit with 4MB RAM SP5608 OptimusR laser batch unit with 8MB RAM SP5650 OptimusR laser Wi-Fi standard unit SP5652 OptimusR laser Wi-Fi unit with 2MB RAM SP5654 OptimusR laser Wi-Fi unit with 4MB RAM SP5658 OptimusR laser Wi-Fi unit with 8MB RAM MI5600-614 OptimusR standard cradle MI5600-6107 OptimusR modem cradle 52-52860A RS232 Cradle Cable 52-52861A USB cradle cable * For information on additional accessories and scanner kits, contact your local Metrologic Instruments representative. 1 GENERAL FEATURES AND CHARACTERISTICS SCANNER FEATURES Figure 1. Scanner Features ITEM NO. 2 DESCRIPTION 1 Multi-functional Keypad 2 Scan Button 3 LCD display 4 Red Output Window (Laser Aperture) 5 Speaker for audible indicators 6 Protective rubber bumpers 7 Battery Compartment 8 Communication Ports (RS232 and IrDA), Power Adapter Port, and Battery Contacts 9 Comfort Strap 10 Battery Compartment Release GENERAL FEATURES AND CHARACTERISTICS CRADLE FEATURES Figure 2. Cradle Features ITEM NO. DESCRIPTION 1 LED Transmission Indicator 2 LED Power indicator 3 Battery Contacts 4 IR communication port 5 Rubber Footpads 6 RS232 Communication Port and Power Adapter Port 3 GENERAL FEATURES AND CHARACTERISTICS MULTIFUNCTIONAL KEYPAD Figure 3. Keypad Features ITEM NO 4 KEY NAME 1 ALPHA() 2 ALPHANUMERIC 3 ARROW 4 ESC 5 SCAN 6 ENTER 7 BS 8 FUNCTION(FN) 9 POWER DESCRIPTION The toggle key for Alphabet/Numeral input. When the system is in alpha-mode, a small icon will be shown in the lower right corner of the display. Each numeric key can be used to generate one of the three capital letters located on that number key. For example, number 2 can be used to produce A, B, or C. Pressing the same key twice within one second, will produce the letter B. Pressing the same key without halting longer than one second will allow the user to toggle through the three letters. When the key has been depressed for longer than one second or another key has been pressed, the unit will send the real key code to the application program. Alphanumeric. These 10 keys can be used for either alpha characters or numerical input. (See Item 8 for further description of key operation) Arrow. The four arrow keys located below the Scan key are used to toggle up and down between menu selections. Escape. This key is used to stop and exit current operation. Scan a bar code. Pressing this button will trigger the scanner to read a bar code. Enter. There are two enter keys on the side of the scan key. Normally the enter keys are used for command execution or input confirmation. Back Space. This key can be used to toggle back one space or if pressed down longer than one second, a clear code will be sent. The function key. This key cannot be activated alone; it must be pressed with one of the numeric keys at the same time. For example, FN + 1 generates function #1, FN + 2 generates function #2, etc (up to 9 functions). Also, this key can be combined with the UP/DOWN arrow keys to adjust the contrast of the LCD. And when this key is combined with the ENTER key, it will turn ON/OFF the backlight. Power On/Off. To prevent an accidental power down, it requires about 1.5 seconds of continuous pressing to turn On/Off the power. GENERAL FEATURES AND CHARACTERISTICS THE LCD SCREEN The LCD screen of the OptimusR Portable Data Terminal displays program settings, operational parameters, data collected, and much more. The display is a graphical LCD with the following characteristics: Display area of 64 pixels x 100 pixels Resolution: y Maximum of 8 lines x 16 characters y Minimum of 4 lines x 12 characters y Displays alpha-characters, numbers, and symbols y Automated back light y y THE LITHIUM BATTERY The OptimusR Portable Data Terminal includes a lithium-ion rechargeable battery pack. The battery is inserted (see Getting Started for battery installation) into the battery compartment of the Optimus and recharges with Optimus in the cradle and in charging mode. Figure 4. Lithium-Ion Battery MAINTENANCE Smudges and dirt on the unit's window can interfere with the unit's performance. If the window requires cleaning, use only a mild glass cleaner containing no ammonia. When cleaning the window, spray the cleaner onto a lint free, non-abrasive cleaning cloth then gently wipe the window clean. If the unit's case requires cleaning, use a mild cleaning agent that does not contain strong oxidizing chemicals. Strong cleaning agents may discolor or damage the unit's exterior. 5 GENERAL FEATURES AND CHARACTERISTICS LABELS The scanner and cradle have labels that provide important information including the model number, date of manufacture, serial number, safety and regulatory information. Figure 5 provides examples of these labels and their locations. Figure 5. Label Sample and Location 6 INSTALLATION GETTING STARTED The OptimusR Portable Data Terminal (PDT) requires minimal effort to begin functional operation for data collection in any application. In order to get started, the unit must have a fresh battery inserted into the battery compartment. 1. Access the battery compartment by removing the battery cover. To remove the cover, pull the cover release up on each side of the compartment and slide the cover away form the unit. 2. Insert the Li-ion battery into the battery compartment, battery information side up and battery contacts to the bottom, at an angle with the battery contacts inserted first. 3. Push the Li-ion battery the remainder of the way into the compartment. The battery will fit snuggly into place. 4. Close the battery compartment by sliding the battery cover toward the scan head until the cover locks into place. 5. Turn the unit over, so the keypad is visible and hold down the power button . 6. The LCD graphical display will display a menu and an audible indicator will sound to signify that the Optimus has been powered up properly. 7. Using the arrow keys select the Run Program option. 8. Scan a bar code. Note: The OptimusR comes with a default program loaded that allows users to scan items and enter their quantity. For information on how to create these programs, please refer to the Optimizer manual. 7 INSTALLATION BASIC OPERATION In order for the Optimus to operate properly, an application program must be loaded onto the PDT. It is possible for the Optimus to power up without at active application. On power up if the Optimus has no application program loaded, then the following Program Manager menu options will appear on the display. MENU OPTIONS Download DESCRIPTION This option allows the user to download application programs (*.SHX), BASIC run-time (bas.ops.shx), BASIC programs (*.SYN) or font files to the terminal. There are six resident locations and one Active Memory. A maximum of seven programs can be downloaded to the terminal. The application program downloaded to the Active Memory will be the only activate program running. In order to activate one of the other programs, immediately after downloading, input a name for the program desired or just press the enter key to keep its current name if one is applicable. This will enable the user to download the program. The application file’s type, name, and size will be shown on the list of programs when entering the Download or Activate menu of the Program Manager. The file type is a small letter that follows the program number (01~06), it can be either ‘b’, ‘c’ or ‘f’ which represents BASIC program, C program or font file respectively. The program name is up to 12 characters and the program size is in units of K bytes. NOTE: In order to delete a program, select the program designated for deletion. From the program information screen, press the Alpha/Function key, then zero. Activate This option will enable the user to activate one of the resident programs. In order to accomplish this, the user must copy one of the six resident programs to the Active Memory. Upon activation of the new program, the original program in the Active Memory will be replaced. NOTE: A font file cannot be activated, and a BASIC program cannot be activated if the BASIC run-time does not exist. Upload The Upload option gives the user additional method for retrieving an application program. It allows a user to transmit the application programs to a host PC or another terminal. This function also allows a terminal to be cloned without going through a PC. Selecting and successfully completing one of these three menu options will enable the OptimusR to begin functional operation. 8 INSTALLATION COMMUNICATION AND DATA COLLECTION SETUP The OptimusR Series has various ways of communicating with a host device. Depending on the model of Optimus, it can communicate via RS232, USB, or Wi-Fi connection. The OptimusR can store data in the unit or send data real time via a Wi-Fi connection. The OptimusR has the ability to utilize a RS232 or USB connection to communicate to a host device for both application program downloads and data uploads. The OptimusR includes either a USB or RS232 cable. In order to begin an application download or data transfer the following steps would need to be followed. 1. Remove the Optimus cradle, the power supply, and either the USB or the RS232 cable from the box. 2. Plug the power supply into a power outlet and insert the other end into the cradle. The red LED on the cradle will illuminate if the power supply is connected correctly. 3. Follow steps a, b, or c a. For the RS232 cable, plug the 9 pin serial connector into a serial port on the host device. Plug the opposite end into the communication port of the cradle. b. For the USB cable, plug the USB end of the cable into an appropriate communication port on the host device and the opposite end of the cable into the communication port of the cradle*. c. For the Wi-Fi, connection to communicate with the host device the settings on OptimusR and the host device must be configured correctly. 4. Power up the Optimus and select the Utilities option. This will open additional menu options. 5. Select the Transfer Files option. 6. Select Get Program on the next menu. The unit is now ready to download an application program. 7. Place unit in cradle and download the appropriate application program. 8. Once the Optimus has received the application program, the unit is ready for scanning and collecting data. Note: There are OptimusR models available that do not include the cradle. Models that do not include a cradle as an accessory can have the power supply and the communication cable connected directly to the unit. * A software driver is required for proper installation. The driver is included with the installation CD provided with each Optimus. In addition, the driver can be downloaded from http://www.metrologic.com. 9 INSTALLATION DATA UPLOAD 1. To transfer the data collected select the Utilities option. 2. Select the Download Method option on the next menu and then select the appropriate method for downloading files to the host device. 3. The Wi-Fi can send data in real time, however, if cradle options (Cradle-IR or IrDA) are selected re-insert the Optimus unit into the cradle and upload the data to the host device. To change the download method select the Utilities option from the main menu and then select the Download Method from the list of available options. This allows the user to alter the method by which data is transferred to the host device. Note: Plugging the Optimus into a serial port or USB port on the host device does not guarantee communication with the Optimus. Ensure that the communication port on the host device is not populated by another device. Confirm that the communication settings on both the host device and the Optimus correspond prior to a program download or data upload. The OptimusRW is similarly connected to the host device and programmed however, there is a key difference in the data collection process. The OptimusRW supports transmission of data wirelessly and as such has the capability of communicating that data in real time. The unit needs to be setup to communicate with the network as follows: 1. With the Optimus powered off, press and hold the 7, 9, and power keys. The System Module menu will appear on screen. 2. Using the arrow keys select the Wi-Fi Menu option. 3. The list of settings that appears is the settings that require configuration in order for the Wi-Fi to function effectively. 4. Select Information option to view the current configuration settings on the Optimus. 5. Select the Network Set option to configure the network settings. This is similar to enabling the network settings on a PC. 6. Select WLAN Setting to select and configure the Optimus for the appropriate network available to connect to the host device. 7. Select Security to setup any security/authentication settings that match the host device. 8. Select the Echo Test to test the settings and verify that the network settings on the Optimus are configured correctly and that the Optimus is communicating with the host device. 9. Power off the Optimus. Upon completion of the configuration process, and depending on the active application program, the user will be able to begin data transmission via Wi-Fi communication. Note: Contact a Metrologic Instruments representative if assistance is required when integrating a Metrologic device into a network. 10 INSTALLATION THE SYSTEM MENU The system menu on the Optimus is another useful tool included with the Optimus. The system menu provides information about the Optimus and access to the system menu for configuring the Optimus. In order to access the system module, follow the instructions below: 1. With the Optimus powered off press down and hold the 7, 9, and power button. 2. An audible indicator will sound to indicate that the Optimus is powered on. 3. The Optimus will display the system menu. System Menu Options • • • • • • • • Information Settings Tests Memory Power Load Program Wi-Fi Menu Serial PPP Menu INFORMATION The Information option provides information about the Optimus including: • • • • Hardware Version Serial Number Manufacturing Date Application Program Version Depending on the application program that is active on the Optimus, there are number of settings and options that may be selected for both setup and testing. The tables on page 12 show a number of those settings and their descriptions. 11 INSTALLATION SETTINGS SETTING Clock Backlight ON Period CPU Speed Auto Off Power On Options Key Click System Password Font Reset to Default DESCRIPTION Set date and time for the system. Set the duration for the keyboard/LCD backlight Set CPU running speed. There are five speeds available: Full speed, half speed, quarter speed, eighth speed and sixteenth speed. Set time threshold for automatically power off when no operation is taking place during that specified period. If this value is set to zero, this function will be disabled. There are two possible selections: Program Resume, which starts from the program being used during the last session before the last power-off; and Program Restart, which starts with a new program. Select a tone for the beeper or disable the beeper when the user presses a key button. Set a password to protect the user from entering the system menu. Current font displayed on the Optimus display Resets the system settings to the default settings DEFAULT N/A the light goes off after 20 seconds Full speed 10 minutes Program Resume Enable no password is set System Font N/A TESTS The OptimusR has numerous tests available to the user for both operation and diagnostics. Depending on the application program that is in the active memory will determine which tests can be performed and are available to the user. The following table provides a description of the available tests. SETTING Reader Buzzer LCD & LED Keyboard Memory DESCRIPTION To test the reading performance of the scanner. The following symbologies are enabled for the Reader test. All other symbologies will need to be enabled via programming. Default bar codes: Code 39, Industrial 25, Interleave 25, Codabar, Code 93, Code 128, UPCE, UPCE with ADDON 2, UPCE with ADDON 5, EAN8, EAN8 with ADDON 2 EAN8 with ADDON 5, EAN13, EAN13 with ADDON 2, and EAN13 with ADDON 5 To test the buzzer with different Frequency/Duration. Press ENTER key to start and then press any key to stop the test. To test LCD display and LED indicator. Press ENTER key to start and then press any key to stop the test. To test the rubber keys. Press a key and the result will be shown on the LCD display. Note that the FN key should be used in conjunction with numeral keys. To test the data memory (SRAM). Note after the test, the contents of the memory space will be wiped out. Warning: This test erases any data stored in the terminal. Echo Test 12 Echo Test is used to test the communication between the cradle and the PC. Perform Echo test from the host device that the cradle is connected. INSTALLATION MEMORY The menu option provides the user with the ability to gather information on the amount of memory available on the Optimus, as well as the ability to initialize the memory. This is accomplished by choosing one of the two available selections: 1. Size Info. 2. Initialize Size Info The Optimus contains three types of memory: Base RAM, SRAM and Flash memory. These three types of memory allow the Optimus to perform operational tasks at an optimal level. Base RAM: The Base RAM is the primary memory in the Optimus and is the location where application is stored and accessed. Memory Card: The Memory Card is basically SRAM and is memory that retains data as long as power is being supplied. SRAM does not have to be periodically refreshed and provides quick access to data. This is the location that the data collected will be stored. Flash memory: Flash memory is a type of constantly powered nonvolatile memory that can be erased and reprogrammed easily. This allows users to program the Optimus effortlessly. Initialize This selection enables the user of the Optimus to initialize the memory (SRAM). Warning: Initializing the memory will erase the current data in memory. POWER Selecting the Power option allows the user to view the actual voltages of the main battery and the backup battery. LOAD PROGRAM The selection of Load Program enables the user to download an application program to the Optimus. Note: For further information on application program downloads see the Optimizer User’s guide (MLPN 00-02052). 13 INSTALLATION WI-FI MENU The Wi-Fi Menu will configure the OptimusR with the appropriate network and security settings for Wi-Fi communication. 1. 2. 3. 4. 5. Information Network Set WLAN Setting Security Echo Test Modifying TCP/IP settings can affect the performance of certain devices. Contact an IT professional to ensure that modifying these settings Information The information setting lists the current network settings of the OptimusR. Network Set These are the network settings for the OptimusR. 1. SubNet Mask 2. IP Address 3. Gateway 4. DHCP 5. SSID 6. Server IP 7. Server Port 8. Echo Test WLAN Setting These are the Wireless Local Area Network settings. 1. Local Name 2. SSID 3. System Scale 4. Power Saving 5. Preamble 6. Ad-Hoc Security The security settings provide network authentication configuration settings to provide secure data transfer. 1. Authentications 2. WEP (Wired Equivalent Privacy) Menu 3. EAP (Extensible Authentication Protocol) Menu Echo Test Test to verify that the network settings are correct and communication from Optimus to host device is functioning. 14 INSTALLATION APPLICATION The Application module runs on top of the System module. The OptimusR Series Portable Data Terminals are preloaded with the Optimizer’s run-time program and the following menu will be shown upon powering the unit up: 1. Run Program 2. Utilities* Utilizing the arrow keys select the menu option and execute it by pressing the ENTER key. For certain models of the OptimusR series the Data Optimizer program may need to be used in order to handle the in-coming and outgoing data to and from a host device. For detailed information, please refer to Optimizer User’s Guide (MLPN 0002052) and DataOptimizer User’s Guide. Note: If the Application Generator is used to create the application program, it will be necessary to download it to the terminal. PROGRAMMING THE TERMINAL There are three software tools available for developing application programs for the terminal. • • • The Optimizer Program Builder The ‘BASIC’ Compiler The ‘C’ Compiler For detailed information, please consult the appropriate manual or contact Metrologic Instruments, Inc. PROGRAMMING THE COMMUNICATION CRADLE The communication cradle of the OptimusR Portable Data Terminal supports serial IR interface only. If a customized PC application has been developed for communication with the terminal via the cradle, it will be necessary to first configure the cradle through programming. There is a DLL available for this purpose. For more information, please contact Metrologic Instruments, Inc. * To configure the wireless settings of the Optimus, see page 16 and the Wi-Fi menu options available in the system menu. 15 TROUBLESHOOTING SYMPTOM DESCRIPTION Make sure the battery is inserted and charged. The scanner does not power up after pressing POWER key. Charge the battery and check the charging status. If no charging information is shown on the display, reload the battery and check if the battery is properly installed then try again. Call for service if problem persists. Check if the cable is plugged tightly into host device and cradle. The scanner cannot transmit data or programs to/from the terminal. The keypad does not work properly. Perform Echo test to confirm communication. Check if host communication parameters (COM port, baud rate, data bits, parity, and stop bit) match with the terminals. Verify that the communication port on the host device is not in use by another device. Turn off the power then enter the system menu. From the system menu, select Test and then its sub-item KBD. Perform the key-in test. Call for service if problem persists. Check if the bar codes used are enabled. The scanner does not scan. Check if battery-low indicator is shown on the LCD display. If yes, charge the battery. Call for service if problem persists. Open the battery cap and re-load the battery. Abnormal responses. Enter system menu. Run diagnostic test. Call for service if problem persists. 16 SPECIFICATIONS OPTIMUSR SERIES OPERATIONAL Light Source: Normal Depth of Field: Width of Scan Field: Visible Laser Diode (VLD) @ 650 nm 51 mm - 381 mm (2"-15") 0.33 mm (13 mil) bar code 305mm (12") @ 381 mm (15") Single-Line Scan Speed: No. of Scan Lines: Min Bar Width: Decode Capability: Print Contrast: No. Characters Read: Beeper Operation: CPU: Program Memory: Data Memory: Display: Display Resolution: Communication (Unit): 42 scan lines per second 1 0.127 mm (5.0 mil) All standard 1-D bar codes including RSS-14, RSS-Expanded, and RSS-14 Limited 35% minimum reflectance difference Up to 80 data characters Maximum number will vary based on symbology and density. 7 tones or no beep 16-bit CMOS, low power consumption 2 MB Flash ROM 2 MB SRAM, expandable to 8 MB LCD 128 x 64 pixels, back-lit 8 lines x 20 Characters (max), 4 Lines x 15 characters (min) RS232, USB, IrDA, CradleIR or Wi-Fi Communication (Cradle): RS232 or USB Application Development: Windows-based Optmizer; optional C & BASIC compilers 17 SPECIFICATIONS OPTIMUSR SERIES MECHANICAL Width (Unit): 81 mm (3.2") Depth (Unit): 46 mm (1.8") Height (Unit): 172 mm (6.77") Weight (Unit): 10.6 oz (300 g) – including battery Width (Cradle): 96 mm (3.8") Depth (Cradle): 106 mm (4.17") Height (Cradle): 80 mm (3.15") ELECTRICAL Battery Operation: Battery Backup: Operation: Laser Class: EMC: Li-ion 3.7V, 7.0mA hours, rechargeable lithium battery Over 200 hours, Over 16 hours (Wi-Fi) CDHR and IEC Class 2 in accordance with IEC 60825 – 1:1993 + A1:1997 + A2:2001 FCC Class B ENVIRONMENTAL Operating Temperature: Storage Temperature: Humidity: Shock Resistance: 18 0°C to 50°C (32°F to 122°F) -20°C to 60°C (-4°F to 140°F) 5% to 95% relative humidity, non-condensing 1.2 m (4') drop onto concrete LIMITED WARRANTY The OptimusR scanners are manufactured in Taipei, Taiwan. The OptimusR scanners have a one (1) year limited warranty from the date of manufacture. Metrologic warrants and represents that all OptimusR scanners are free of all defects in material, workmanship and design, and have been produced and labeled in compliance with all applicable U.S. Federal, state and local laws, regulations and ordinances pertaining to their production and labeling. This warranty is limited to repair, replacement of product or refund of product price at the sole discretion of Metrologic. Faulty equipment must be returned to one of the following Metrologic repair facilities: Blackwood, New Jersey, USA; Madrid, Spain; or Suzhou, China. To do this, contact the appropriate Metrologic Customer Service/Repair Department to obtain a Returned Material Authorization (RMA) number. In the event that it is determined the equipment failure is covered under this warranty, Metrologic shall, at its sole option, repair the Product or replace the Product with a functionally equivalent unit and return such repaired or replaced Product without charge for service or return freight, whether distributor, dealer/reseller, or retail consumer, or refund an amount equal to the original purchase price. This limited warranty does not extend to any Product which, in the sole judgment of Metrologic, has been subjected to abuse, misuse, neglect, improper installation, or accident, nor any damage due to use or misuse produced from integration of the Product into any mechanical, electrical or computer system. The warranty is void if: (i) the case of the Product is opened by anyone other than Metrologic's repair department or authorized repair centers; or (ii) any software is installed on the Product other than a software program approved by Metrologic. THIS LIMITED WARRANTY, EXCEPT AS TO TITLE, IS IN LIEU OF ALL OTHER WARRANTIES OR GUARANTEES, EITHER EXPRESS OR IMPLIED, AND SPECIFICALLY EXCLUDES, WITHOUT LIMITATION, WARRANTIES OF MERCHANTABILITY AND FITNESS FOR A PARTICULAR PURPOSE UNDER THE UNIFORM COMMERCIAL CODE, OR ARISING OUT OF CUSTOM OR CONDUCT. THE RIGHTS AND REMEDIES PROVIDED HEREIN ARE EXCLUSIVE AND IN LIEU OF ANY OTHER RIGHTS OR REMEDIES. IN NO EVENT SHALL METROLOGIC BE LIABLE FOR ANY INDIRECT OR CONSEQUENTIAL DAMAGES, INCIDENTAL DAMAGES, DAMAGES TO PERSON OR PROPERTY, OR EFFECT ON BUSINESS OR PROPERTY, OR OTHER DAMAGES OR EXPENSES DUE DIRECTLY OR INDIRECTLY TO THE PRODUCT, EXCEPT AS STATED IN THIS WARRANTY. IN NO EVENT SHALL ANY LIABILITY OF METROLOGIC EXCEED THE ACTUAL AMOUNT PAID TO METROLOGIC FOR THE PRODUCT. METROLOGIC RESERVES THE RIGHT TO MAKE ANY CHANGES TO THE PRODUCT DESCRIBED HEREIN. CORPORATE HEADQUARTERS, NORTH AMERICA Metrologic Instruments, Inc. 90 Coles Rd. Blackwood, NJ 08012-4683 Customer Service Department Tel: 1-800-ID-METRO Fax: 856-228-6673 Email: [email protected] METROLOGIC EUROPEAN REPAIR CENTER (MERC) Metrologic Eria Ibérica, SL C/Alfonso Gomez, 38-40, 1D 28037 Madrid Tel: +34 913 751 249 Fax: +34 913 270 437 MTLG AUTO ID INSTRUMENTS (SHANGHAI) CO., LTD Suzhou Sales Office BLK A, Room# 03/03-04 No.5 Xinghan Street, Xinsu Industrial Square China-Singapore Suahou Industrial Park, Suzhou, PRC Tel: 86-512-67622550 Fax: 86-512-67622560 Email: [email protected] 19 SAFETY NOTICES This equipment has been tested and found to comply with the limits for a Class B digital device, pursuant to Part 15 of the FCC Rules. These limits are designed to provide reasonable protection against harmful interference in a residential installation. This equipment generates, uses, and can radiate radio frequency energy and, if not installed and used in accordance with the instructions, may cause harmful interference to radio communications. However, there is no guarantee that interference will not occur in a particular installation. If this equipment does cause harmful interference to radio or television reception, which can be determined by turning the equipment off and on, the user is encouraged to try to correct the interference by one of the following measures: • • • • Reposition or relocate the receiving antenna. Increase the separation between the equipment and receiver. Connect the equipment into an outlet on a circuit different from that to which the receiver is connected. Consult the dealer or an experienced radio/TV technician for help. This device complies with Part 15 of the FCC Rules. Operation is subject to the following two conditions: (1) This device may not cause harmful interference, and (2) this device must accept any interference received, including interference that may cause undesired operation. Any changes or modifications not expressly approved by the manufacturer for compliance could void the user's authority to operate this equipment. 20 PATENTS For patent information, please refer to www.honeywellaidc.com/patents. 21 INDEX A M activate .....................................................................8 alpha .........................................................................4 alphanumeric ............................................................4 arrow.........................................................................4 maintenance ............................................................ 5 memory .................................................................. 13 B backspace.................................................................4 battery.......................................................1, 2, 3, 5, 7 BS ......................................................See backspace C cable .........................................................................9 RS232...................................................................9 USB ......................................................................9 Wi-Fi .....................................................................9 cradle ........................................................3, 9, 10, 15 D depth of field ...........................................................17 download ..................................................................8 E EMC ........................................................................18 enter..........................................................................4 ESC .........................................................See escape escape ......................................................................4 F Flash memory .........................................................13 FN ...........................................................See function function .....................................................................4 I information ..............................................................11 IR port ...................................................................2, 3 K keypad ..................................................................2, 4 L label ..........................................................................5 LCD screen...........................................................2, 5 LED .......................................................................3, 9 red ........................................................................9 lithium-ion ................................................ See battery load programs.........................................................13 22 N notices.................................................................... 20 O Optimizer.................................................................. 1 P patents ................................................................... 21 power ............................................................. 4, 7, 13 power adapter ...................................................... 2, 3 R RAM ....................................................................... 13 RS232 port........................................................... 2, 3 run time .................................................................. 15 S scan button .............................................................. 2 scan field................................................................ 17 scanner .................................................................... 2 settings................................................................... 12 specifications electrical ............................................................ 18 environmental .................................................... 18 mechanical ........................................................ 18 operational......................................................... 17 system menu options............................................. 11 T temperature............................................................ 18 terminal .................................................................. 15 tests ....................................................................... 12 troubleshooting ...................................................... 16 U upload ...................................................................... 8 V VLD ........................................................................ 17 W warranty ................................................................. 19 Wi-Fi....................................................................... 10 Wi-Fi menu............................................................. 14 window ................................................................. 2, 5 23 NOTES NOTES NOTES June 2008 00 - 02064B