1
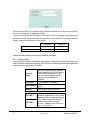
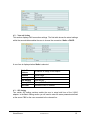
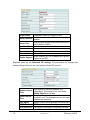
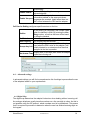
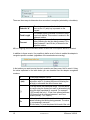
ANALOGUE
ADAPTER
VOISPEED V-6016
1
VOISPEED V-6016
User Manual
© 2007 VOIspeed Ltd. – All rights reserved.
Total or partial reproduction of this document is prohibited without prior written consent of
the publisher. Such consent will only be granted in those instances when the source of
the document is clearly stated.
Revision: 1.0
Released on: 22/08/2007
Declaration of conformity can been found at this internet address:
http://www.voispeed.com/products/conformity/V-6016_DDC.pdf
USER MANUAL
© VOISPEED LTD.
2
1 - Index
1-
Index .......................................................................................................................1
2-
Introduction............................................................................................................5
3-
Security information..............................................................................................5
3.1 - How to use the device correctly ........................................................................ 5
3.2 - Qualified personnel ............................................................................................ 5
3.3 - Accessories ........................................................................................................ 5
3.4 - Waterproof guidelines........................................................................................ 5
3.5 - Connecting other devices.................................................................................. 5
3.6 - Device position ................................................................................................... 5
3.7 - Connecting to power supply ............................................................................. 5
3.8 - Cleaning the device............................................................................................ 6
3.9 - Product Disposal ................................................................................................ 6
3.10 - Product Warranty.............................................................................................. 6
4-
General Information ..............................................................................................8
4.1 - General specifications ....................................................................................... 8
4.2 - Main functionalities ............................................................................................ 8
4.3 - List of components in the package................................................................... 9
4.4 - Getting started .................................................................................................... 9
4.5 - Installation........................................................................................................... 9
4.6 - LEDs .................................................................................................................... 9
5-
Basic operations..................................................................................................10
5.1 - Manual configuration ....................................................................................... 10
6-
Configuration using the web interface ..............................................................10
6.1 - Current status ................................................................................................... 11
6.2 - Network Setting ................................................................................................ 12
6.3 - SIP Setting......................................................................................................... 12
6.4 - Advanced settings............................................................................................ 14
6.4.1
Digital Map .................................................................................................. 14
6.4.2
DSP config .................................................................................................. 16
6.4.3
Account config ........................................................................................... 18
3
© VOISPEED LTD.
VOISPEED V-6016
6.4.4
Time config ................................................................................................. 18
6.5
System manage ......................................................................................... 19
6.5.1
Web update ................................................................................................. 19
6.5.2
FTP Update ................................................................................................. 19
6.5.3
Auto Update ................................................................................................ 20
6.5.4
Clear Config ................................................................................................ 20
6.5.5
Backup config............................................................................................. 20
6.5.6
Reboot ......................................................................................................... 20
USER MANUAL
© VOISPEED LTD.
4
2 - Introduction
We would like to thank you for your purchase and for having chosen one our products.
This manual provides general guidelines for a correct use of the product. In case you
require further information on this product or to receive technical assistance please visit
our website: www.voispeed.com.
3 - Security information
Please read the security rules below that you should follow when using this device.
Please comply with these guidelines to avoid taking unnecessary risks.
3.1 - How to use the device correctly
Use the device only in the standard working position.
3.2 - Qualified personnel
Any installations or repairs on the product should be carried out only by qualified and fully
trained personnel.
3.3 - Accessories
Use only accessories that are fully approved by The Manufacturer. Do not connect to any
non compatible products.
3.4 - Waterproof guidelines
The device is not waterproof. Avoid contact with liquids.
3.5 - Connecting other devices
If you connect the device to other devices please read the user guide of the new
equipment first. Do not connect the device to any non compatible products.
3.6 - Device position
Avoid prolonged exposure to direct sunlight. Do not place the device near sources of
intense heat (e.g. radiators, fire, etc.) and near electronic equipment producing strong
magnetic fields (speakers, microwaves ovens, etc.). Do not install the device in humid
rooms and avoid contact with liquids. Do not expose the device to aggressive gas and do
not use it in too dusty environments. Never use the device in presence of any explosive
gas (e.g. methane). Refrain from opening any parts of the product and do not touch the
plugs with metal or sharp objects.
3.7 - Connecting to power supply
Please make sure that the power supply complies with the voltage setting of your
equipment. If you have any doubts about the voltage setting, please call the technical
support. Do not remove any security devices. Always disconnect the telephone from the
5
© VOISPEED LTD.
VOISPEED V-6016
power supply during storms. All maintenance work should be carried out by qualified
personnel.
3.8 - Cleaning the device
We suggest cleaning the equipment only using a slightly dump cloth.
3.9 - Product Disposal
Our products are compliant with the European Directives 2002/95/CE, 2002/96/CE
and 2003/108/CE regarding the limitation of use of lead, mercury, cadmium,
chromium (VI) as well as some flame retardants and hazardous material within
electric and electronic equipment and disposal.
The sign above representing a crossed waste bin indicates that the product, once no
longer utilised, must be disposed of by separating it from any normal waste. The user
must ensure that the product, once reached its end-life, is given to qualified organisations
responsible for the collection of electronic and electrical waste. The user may otherwise
choose to return the equipment to the manufacturer when purchasing a new equivalent
device. In this case the product returned must correspond to the one being purchased.
Suitable disposal of the equipment in accordance with relevant recycling guidelines helps
the environment and fosters sustainable development. Unlawful disposal of this
equipment is an offence and may lead to prosecution in accordance with the Country’s
laws in which the disposal takes place.
Correct disposal benefits us and the environment.
3.10 - Product Warranty
The Manufacturer (Harpax Srl.) warrants its products to be free from defects in material
and workmanship during the warranty period. The product is covered by warranty only if it
is used in compliance with the guidelines contained in this manual. This warranty will be
invalidated in case of manumission, wrong use of the product or accidental damage. This
product is compliant with CE regulations.
The warranty period starts from the date the product has been purchased (stated on the
invoice) and will last for twelve (12) months thereafter. If a product proves to be defective
USER MANUAL
© VOISPEED LTD.
6
in material or workmanship during the warranty period, The Manufacturer will, at its sole
discretion, repair or replace the product with a similar one (new or re-conditioned). The
replacement unit will be covered by a new warranty period that will last the remaining time
on the customer's original limited warranty. The old equipment substituted will
automatically become property of Harpax Srl.
In order to have access to the warranty the user must fill out the online form that can be
found on www.prontopbx.com or www.voispeedltd.com (please also contact the
customer support department on 01727 848186). The user must provide a valid invoice to
claim warranty on the product.
Exclusions.
The warranty will be invalidated in the following cases:
•
•
7
Damages to any parts that are meant to ware out with time. No support,
maintenance or replacement will be provided for these components.
Damages resulting from using a wrong power supply.
•
Damages resulting from misuse or actions that do not comply with the
guidelines of this manual.
•
Damages resulting from lack of maintenance as advised by The
Manufacturer.
•
Damages resulting from installing or using the product without
complying with the relevant standards (legal, health and safety,
technical, etc.) that are in place in the Country where the product is
utilised.
•
Damages resulting from misuse, negligence, unauthorized product
modification, repair or attempted repair by anyone not authorized by The
Manufacturer (including the user) or failure to follow instructions
supplied with the product.
•
Damages caused during product transportation or delivery due to
insufficient or inappropriate packaging.
•
Damages caused by accident, fire, water, any acts of nature, insufficient
ventilation or other causes that don not fall under the control of The
Manufacturer.
•
Damages caused from any unintentional or deliberate human acts.
•
Damages caused from manumission or in conjunction with warranty
labels being broken.
© VOISPEED LTD.
VOISPEED V-6016
•
Damages to Software or any Hardware component not supplied by The
Manufacturer with the product.
This warranty is only valid within the European Community.
4 - General Information
The V-6016 is a stand-alone device that needs to be connected to the local area network.
It is provided of two RJ11 ports to connect standard analogue telephone devices
(telephones or faxes). These devices will be controlled by the PBX as traditional SIP
extensions. The V-6016 is also provided of a switch that is particularly useful in case of
multiple installations.
4.1 - General specifications
Power supply
Ports
IN
110-220V AC
OUT
12V DC 2A
PC
1 10/100Base T RJ-45
LAN
1 10/100Base T RJ-45
FXS
2 RJ11 for telephones
Power
2.8W/1.9W
Operating temperature
0~60
Operating humidity
5~95%
Dimensions
103mm*113mm*40mm
Weight
840g
4.2 - Main functionalities
•
•
•
•
•
•
•
Network protocols: TCP/UDP/IP, HTTP, DHCP Client, FTP, TFTP.
Switch port (PC).
VoIP protocols: SIP (RFC3261, RFC3262, RFC3264, RFC3265).
Voice Codec: G.711 (A-law/U-law), G.723.1, G.729A/B.
The system supports standard voice functions such as Caller ID, On Hold,
Call Transfer, Do Not Disturb, DTMS Tones, Hot Keys (Hotline Autodial: to
dial a number as soon as the handset is lifted).
Manual configuration (through web interface) or automatic (through TFTP o
HTTP).
Remote firmware update through TFTP/FTP e HTTP.
USER MANUAL
© VOISPEED LTD.
8
Pass-through fax and T.38 fax.
•
4.3 - List of components in the package
•
•
•
•
•
One V-6016 SIP adapter.
One power supply.
One Ethernet UTP5 cable with RJ-45 connectors.
One RJ-11 telephone cable.
User manual.
4.4 - Getting started
Before connecting the V-6016 adapter to the network, please make sure that both your
network and VOIspeed server are working correctly.
NB: before you can use any analogue devices connected to the V-6016 adapter you will
need to create additional users at the server PBX.
4.5 - Installation
Connections
• Connect the device’s LAN Ethernet port to a switch/router/hub using an UTP5
Ethernet cable (not cross cable).
• Connect any devices or additional V-6016 adapters to the PC Ethernet port using an
UTP5 Ethernet cable (not cross cable).
• Connect any analogue devices (telephone/fax) to the FXS1 and FXS2 ports.
• Connect the power supply to the Power plug
This device is provided with a ground connection. Use the device only in a fully earthed
electric system, with Residual Current Device (RCD) and relevant safety measures as
prescribed by law. Please also make sure that the voltage complies with that required by
the device. Contact technical support if in any doubts.
4.6 - LEDs
There are four LEDs mounted on the V-6016. They display the status of the resources
connected to the device. The table below reports the colours associated to each resource
status:
LAN
PC
FXS1
FXS2
9
Green
Off
Flashing green
Local network UP
Connection UP
Registered user
Registered user
Local network DOWN
Connection DOWN
Inactive line
Unregistered user
Data flow
Data flow
Active call
Active call
© VOISPEED LTD.
VOISPEED V-6016
5 - Basic operations
5.1 - Manual configuration
It is possible to send commands to the V-6016 adapter by entering a sequence of keys on
the keypad of the device connected to the adapter. The list of commands is reported in
the table below:
Keys
Description
#****#
#*000#
Restarts the adapter.
Resets network configuration.
Setup a static IP address (default
address: 192.168.1.179.)
Requests an IP address from the
DHCP server.
A recorded message will notify the
adapter’s IP address.
Manual configuration of the adapter’s
IP address (with * as a separator). For
example to configure 192.168.0.113
you will need to enter:
#50192*168*0*113#
Manual configuration of the Gateway’s
IP address (as above).
Manual configuration of the primary
DNS IP address (as above).
To setup the Sub-net mask.
#*100#
#*101#
#*111#
#50+IP#
#51+IP#
#52+IP#
#53+NETMASK#
As default, once connected to the network, the device requests a valid IP address to the
DHCP server. It is possible to verify this IP address by typing #*111#. In case the
recorded message provides a null address (0.0.0.0) it means that the procedure has been
unsuccessful. In this case you will first need to enter the command #*100# (to allocate the
standard IP address 102.168.1.179). On a web browser, you will then need to access the
following web page to reconfigure the system: http://192.168.1.179/
6 - Configuration using the web interface
It is possible to display the web interface by accessing the following web-page on a web
browser: http://IP_ADDRESS/
The IP address is the address of the V-6016 adapter. This address is generally allocated
by the DHCP server. Alternatively, you need to associate a static IP address to the
adapter.
USER MANUAL
© VOISPEED LTD.
10
Please consult section 5 to retrieve the IP address allocated to the device by the DHCP
server or to assign the IP address manually.
In order to access the web interface you will need to enter a username and password. As
default the V-6016 offers two levels of access of the web interface. The highest level will
allow a complete configuration of the device.
High level access
Low level access
Username
Password
admin
guest
admin
guest
Username and password can be easily changed if needed.
6.1 - Current status
In this status the system summarises the adapter’s configuration settings and its internal
status (network connection and server PBX interface). Extension number and registration
status are also displayed for both ports.
Determines whether the IP address
was allocated by the DHCP server or
Connect
it was configured manually (in the
Mode
latter case the IP address will not
change when the adapter is
restarted).
IP Address
V-6016 adapter’s IP address.
V-6016 adapter’s physical address
MAC Address
(MAC).
Gateway
Network gateway’s IP address.
SIP LINE 1
SIP LINE 2
11
It shows if the line was correctly
registered (Registered) or not (Failed,
followed by the error signalled by the
PBX). It also shows the extension
number associated to that line.
NB: Line 1 relates to port FXS1 and
Line 2 to port FXS2.
© VOISPEED LTD.
VOISPEED V-6016
6.2 - Network Setting
This section displays LAN connection settings. The first table shows the actual settings
whilst the second table enables the user to choose the connection: Static or DHCP.
A new form is displayed when Static is selected.
Static IP
Address
Netmask
Gateway
DNS Domain
Primary DNS
Alter DNS
IP address to assign to the adapter.
Subnet Mask.
Gateway IP address.
DNS domain.
Primary DNS IP address
Alternative DNS IP address
6.3 - SIP Setting
Two similar SIP setting sections enable the user to setup both lines of the V-6016
adapter. In the Basic Setting section you will need to enter the same parameters defined
at the server PBX for the user connected to the relevant line.
USER MANUAL
© VOISPEED LTD.
12
Regist status
Registration status (at the server PBX).
IP address of the server PBX connected to the
Server Address
adapter.
Allocated port number on the server PBX for SIP
Server Port
traffic (default is 5060).
Acc./User Name User name for server authentication.
Password
Password for server authentication .
Phone Number Extension number for that line.
Domain Realm
Server PBX domain.
When enabled, the V-6016 adapter will regularly
Enable Register
register at the PBX.
Reported below are the Advanced SIP settings. We recommend not changing the
default settings unless you are very familiar with the SIP protocol.
Register Expire
Time
Detect Interval
Time
User Agent
DTMF Mode
RTP Initial Port
13
Time interval (in seconds) between two
registrations. This setting is only used when
Enable Register is activated.
The adapter regularly checks whether the server
is active or not. This setting determines the delay
between two detections.
Adapter’s name as recognised by the server PBX.
DTMF mode of operation during an active call.
Port used by the adapter to negotiate the initial
© VOISPEED LTD.
VOISPEED V-6016
audio setting.
Enables SIP signalling for message
Enable PRACK
acknowledgment.
When enabled, it signals the server to send
information packets on the same port where
Enable Via rport
messages are received. Useful when there is a
NAT server between the PBX and the adapter.
Call Service Setting configures specific services on the line.
In this setting you can specify the number called
when the handset is lifted. By entering the Line
Hotline
Busy number, a line-free dial tone will be heard
by lifting the handset.
No Disturb
Incoming calls are rejected.
Ban Outgoing
No outgoing calls are allowed.
All incoming calls are accepted. This setting is
used when the PBX routes to the adapter a call
Accept Any Call
initially directed to an extension other than that
assigned to the line in question.
Ringing time (in seconds) after which the adapter
No Answer Time
rejects an incoming call.
6.4 - Advanced settings
In advanced settings you will find a comprehensive list of settings to personalise the use
of the adapters based on your requirements.
6.4.1 Digital Map
The digital map determines the adapter’s behaviour when dealing with an incoming call.
An analogue telephone usually transfers numbers on a line one digit at a time. As this is
not possible using the SIP protocol, whole numbers need to be transferred. This means
that it is required a procedure to determine when the user has finished entering digits on
the keypad.
USER MANUAL
© VOISPEED LTD.
14
There are three ways to determine when a number is complete (selected by a checkbox):
End with “#”
Fixed Length
Time out
The adapter starts a call to the dialled number as
soon as the “#” (ash) key is pressed on the
keypad.
The adapter starts a call after a number of keys
have been dialled. This number is entered in the
adjacent textbox.
The adapter starts a call after a predetermined
delay following the last key being pressed. This
delay (between 3 and 30 sec) is entered in the
adjacent textbox.
NB: no outgoing calls are allowed unless at least one of the options above is selected.
In addition to these events, it is possible to define a set of rules to enable the adapter to
recognise specific numbers (regardless of the events above occurring).
In the textbox you need to enter the rule in question and then press ‘Add’ to save it. Using
the sintax explained in the table below you can describe how the adapter recognises
numbers.
x
. (dot)
[]
Tn
15
It is any digit between 0 and 9.
It is any number of variable length. It must be used in
conjunction with Tn (to setup the timeout following the
last digit) or otherwise the call will never start.
It is a digit within the predefined range. You can define
this range using the syntax [min-max] or alternatively by
listing the digits separated by commas. For example
[1,5,9] means that only 1, 5 and 9 are allowed whereas
[1-5] means that all numbers between 1 and 5 are
allowed (namely 1,2,3,4 and 5).
It determines the delay of time after which a call is
started following the last key being pressed. The value
(n) is expressed in seconds.
NB: this value (Tn) must be placed at the end of the rule.
© VOISPEED LTD.
VOISPEED V-6016
Some examples:
• 365
• [1-8]xxx
• 9xxxxxxx
• 30x.T4
By dialling 365 the adapter will start a call to this number without waiting
any delay. This means that it will not be possible to make any calls to
numbers starting with 365. It is therefore recommended to add a delay
when specifying any rules similar to this (in this case of 2 sec): 365T2.
Any four digit numbers between 1000 and 8999.
Any 8 digit numbers starting with 9.
Any 3 digit numbers starting with 30. It is also important to add a timeout
at the end so that the adapter will start a call if no digits are entered
within the next 4 seconds.
All rules entered are displayed in the Digital Map Table.
To delete a rule you can simply select it from the drop down menu and press Del.
6.4.2 DSP config
Here you can configure the advanced settings relating to the devices connected to either
lines and the protocols used.
Select first the port whose advanced settings you want to modify and then click Load
(Port1 is FXS1 and Port2 is FXS2). Below are the advanced settings for each port:
Audio Codec used:
Coding Rule
Input Volume
Output Volume
Fax Mode
USER MANUAL
•
•
•
g711Alaw64k
g711Ulaw64k
g729
Incoming audio volume level (sent to the device
connected to the port).
Outgoing volume level (sent to the PBX).
When a fax is connected to the port here you can
define the standard used:
• Bypass-A
• Bypass-U
© VOISPEED LTD.
16
Fax TCF Mode
CallerID Tx
Mode
Polarity
Reversal
Echo Canceller
Enable
• Relay-T38
If no fax is connected you can select Disable.
In case you have selected Relay-T38 in the
setting above, here you can define how to use
TCF. These are possible values:
• LocalTCF
• TrasferredTCF
It specifies the standard used for CallerID on
incoming calls.
This checkbox needs to be selected only if a POS
device is connected to the port in question.
It enables echo cancellation on an analogue line.
You should disable this option only if a FAX is
connected to the port.
There are some additional DSP settings that do not relate to the individual ports but affect
some main functionalities of the adapter.
When choosing the G729 codec, here you can
select the payload length. Below are the possible
values:
• 10ms
• 20ms
Signal Standard It determines the standard of analogue signalling.
Possible values are:
G729 Payload
Length
17
© VOISPEED LTD.
VOISPEED V-6016
Hook Flash
Timer Min/Max
DTMF Payload
Type
• United States
• China
It is the delay of time (between replacing and
lifting the handset) that determines a ‘Flash’
event. This event places the active call on hold
and allows the user to start a second call.
Identification code for DTMF tones in compliance
with the RFC 2833 standard. It is recommended
not to change it.
6.4.3 Account config
Here it is possible to modify username and password to access the adapter’s web
interface.
To modify username or password simply click on ‘Modify’.
6.4.4 Time config
Here you can specify a SNTP server that the adapter can use to sync its internal clock.
In ‘timeout’ you should specify the sync time (in seconds) with the SNTP server.
Alternatively, it is possible to enter the time manually:
USER MANUAL
© VOISPEED LTD.
18
6.5 - System manage
In this section are gathered all those functionalities useful to the administrator to configure
the adapter. They are devided into cathegories that are easily accessible.
6.5.1 Web update
Using this function it is possible to upload a configuration file that was previously saved.
As there are no cotrols on the file format you should take extra care in not uploading
config files of other adapters.
You can use this option to upload firmware updates provided by the manufacturer.
6.5.2 FTP Update
It is possible to use a FTP or TFTP server (connected to the same network) to update
configuration files and firmware of the adapter. You simply need to fill in the fields below
and specify the operation you would like the server to perform:
• “Application update” to update the adapter’s internal firmware.
• “Config file export” to export the adapter’s configuration file into a text file.
• “Config file import” to upload a new configuration file.
19
© VOISPEED LTD.
VOISPEED V-6016
6.5.3 Auto Update
It is possible to setup the adapter so that it will regularly check for updates by connecting
to an external FTP or TFTP server. In Update Mode you can choose whether to enable or
disable this option. You can otherwise configure the adapter to check for updates on a
regular basis (in this case you need to enter the delay in hours in Update Interval Time) or
only when the system restarts. The latest version is displayed in Current Version. Based
on this version the adapter will decide whether to update to a new version or not.
6.5.4 Clear Config
By pressing ‘Clear’ the adapter will reset to its default settings.
6.5.5 Backup config
This function creates a backup copy of the configuration file. Here you simply need to
right-click on the link and save the file.
6.5.6 Reboot
By pressing ‘Reboot’ the adapter will restart.
USER MANUAL
© VOISPEED LTD.
20