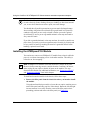
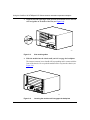
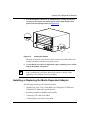
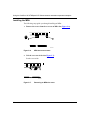
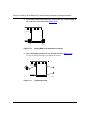
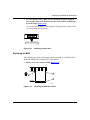
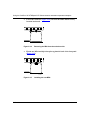
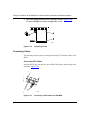
1
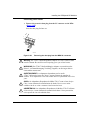
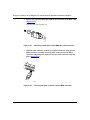
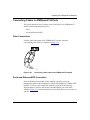
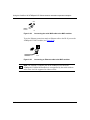
Using the Centillion 100
ATMSpeed/155 Switch
Modules and Media
Dependent Adapters
Part No. 893-01047-A
October 1997
4401 Great America Parkway
Santa Clara, CA 95054
8 Federal Street
Billerica, MA 01821
Copyright © 1997 Bay Networks, Inc.
All rights reserved. Printed in the USA. October 1997.
The information in this document is subject to change without notice. The statements, configurations, technical data,
and recommendations in this document are believed to be accurate and reliable, but are presented without express or
implied warranty. Users must take full responsibility for their applications of any products specified in this document.
The information in this document is proprietary to Bay Networks, Inc.
Trademarks
Bay Networks, is a registered trademark of Bay Networks, Inc.
System 5000, Centillion, Centillion 100, ATMSpeed, SpeedView, and Bay Networks Press are trademarks of Bay
Networks, Inc.
Windows is a registered trademark of Microsoft Corporation.
All other trademarks and registered trademarks are the property of their respective owners.
Statement of Conditions
In the interest of improving internal design, operational function, and/or reliability, Bay Networks, Inc. reserves the
right to make changes to the products described in this document without notice.
Bay Networks, Inc. does not assume any liability that may occur due to the use or application of the product(s) or
circuit layout(s) described herein.
USA Requirements Only
Federal Communications Commission (FCC) Compliance Notice: Radio Frequency Notice
Note: This equipment has been tested and found to comply with the limits for a Class A digital device, pursuant to
Part 15 of the FCC rules. These limits are designed to provide reasonable protection against harmful interference
when the equipment is operated in a commercial environment. This equipment generates, uses, and can radiate radio
frequency energy. If it is not installed and used in accordance with the instruction manual, it may cause harmful
interference to radio communications. Operation of this equipment in a residential area is likely to cause harmful
interference, in which case users will be required to take whatever measures may be necessary to correct the
interference at their own expense.
European Requirements Only
EN 55 022 Statement
This is to certify that the Bay Networks ATMSpeed/155 Switch Module, ATMSpeed/155 MCP Switch Module,
ATMSpeed/155S Switch Module, ATMSpeed/155 MMF Switch Modules, ATMSpeed/155 MDA Switch Module, and
ATMSpeed/155 MDA Switch Module are shielded against the generation of radio interference in accordance with the
application of Council Directive 89/336/EEC, Article 4a. Conformity is declared by the application of EN 55 022
Class A (CISPR 22).
Warning: These are Class A products. In a domestic environment, this product may cause radio interference, in which
case, the user may be required to take appropriate measures.
ii
893-01047-A
EC Declaration of Conformity
These products conform to the provisions of Council Directive 89/336/EEC and 73/23/EEC. The Declaration of
Conformity is available on the Bay Networks World Wide Web site at www.baynetworks.com.
Japan/Nippon Requirements Only
Voluntary Control Council for Interference (VCCI) Statement
Voluntary Control Council for Interference (VCCI) Statement
This is a Class A product based on the standard of the Voluntary Control Council for Interference by Information
Technology Equipment (VCCI). If this equipment is used in a domestic environment, radio disturbance may arise.
When such trouble occurs, the user may be required to take corrective actions.
Canada Requirements Only
Canadian Department of Communications Radio Interference Regulations
This digital apparatus (ATMSpeed/155 Switch Module, ATMSpeed/155 MCP Switch Module, ATMSpeed/155S
Switch Module, ATMSpeed/155 MMF Switch Modules, ATMSpeed/155 MDA Switch Module, and ATMSpeed/155
MDA Switch Module) does not exceed the Class A limits for radio-noise emissions from digital apparatus as set out in
the Radio Interference Regulations of the Canadian Department of Communications.
Règlement sur le brouillage radioélectrique du ministère des Communications
Cet appareil numérique (ATMSpeed/155 Switch Module, ATMSpeed/155 MCP Switch Module, ATMSpeed/155S
Switch Module, ATMSpeed/155 MMF Switch Modules, ATMSpeed/155 MDA Switch Module, and ATMSpeed/155
MDA Switch Module) respecte les limites de bruits radioélectriques visant les appareils numériques de classe A
prescrites dans le Règlement sur le brouillage radioélectrique du ministère des Communications du Canada.
Bay Networks, Inc. Software License Agreement
NOTICE: Please carefully read this license agreement before copying or using the accompanying software or
installing the hardware unit with pre-enabled software (each of which is referred to as “Software” in this Agreement).
BY COPYING OR USING THE SOFTWARE, YOU ACCEPT ALL OF THE TERMS AND CONDITIONS OF THIS
LICENSE AGREEMENT. THE TERMS EXPRESSED IN THIS AGREEMENT ARE THE ONLY TERMS UNDER
WHICH BAY NETWORKS WILL PERMIT YOU TO USE THE SOFTWARE. If you do not accept these terms and
conditions, return the product, unused and in the original shipping container, within 30 days of purchase to obtain a
credit for the full purchase price
1. License Grant. Bay Networks, Inc. (“Bay Networks”) grants the end user of the Software (“Licensee”) a personal,
nonexclusive, nontransferable license: a) to use the Software either on a single computer or, if applicable, on a single
authorized device identified by host ID, for which it was originally acquired; b) to copy the Software solely for backup
purposes in support of authorized use of the Software; and c) to use and copy the associated user manual solely in
iii
893-01047-A
support of authorized use of the Software by Licensee. This license applies to the Software only and does not extend
to Bay Networks Agent software or other Bay Networks software products. Bay Networks Agent software or other
Bay Networks software products are licensed for use under the terms of the applicable Bay Networks, Inc. Software
License Agreement that accompanies such software and upon payment by the end user of the applicable license fees
for such software.
2. Restrictions on use; reservation of rights. The Software and user manuals are protected under copyright laws.
Bay Networks and/or its licensors retain all title and ownership in both the Software and user manuals, including any
revisions made by Bay Networks or its licensors. The copyright notice must be reproduced and included with any
copy of any portion of the Software or user manuals. Licensee may not modify, translate, decompile, disassemble, use
for any competitive analysis, reverse engineer, distribute, or create derivative works from the Software or user
manuals or any copy, in whole or in part. Except as expressly provided in this Agreement, Licensee may not copy or
transfer the Software or user manuals, in whole or in part. The Software and user manuals embody Bay Networks’ and
its licensors’ confidential and proprietary intellectual property. Licensee shall not sublicense, assign, or otherwise
disclose to any third party the Software, or any information about the operation, design, performance, or
implementation of the Software and user manuals that is confidential to Bay Networks and its licensors; however,
Licensee may grant permission to its consultants, subcontractors, and agents to use the Software at Licensee’s facility,
provided they have agreed to use the Software only in accordance with the terms of this license.
3. Limited warranty. Bay Networks warrants each item of Software, as delivered by Bay Networks and properly
installed and operated on Bay Networks hardware or other equipment it is originally licensed for, to function
substantially as described in its accompanying user manual during its warranty period, which begins on the date
Software is first shipped to Licensee. If any item of Software fails to so function during its warranty period, as the sole
remedy Bay Networks will at its discretion provide a suitable fix, patch, or workaround for the problem that may be
included in a future Software release. Bay Networks further warrants to Licensee that the media on which the
Software is provided will be free from defects in materials and workmanship under normal use for a period of 90 days
from the date Software is first shipped to Licensee. Bay Networks will replace defective media at no charge if it is
returned to Bay Networks during the warranty period along with proof of the date of shipment. This warranty does not
apply if the media has been damaged as a result of accident, misuse, or abuse. The Licensee assumes all responsibility
for selection of the Software to achieve Licensee’s intended results and for the installation, use, and results obtained
from the Software. Bay Networks does not warrant a) that the functions contained in the software will meet the
Licensee’s requirements, b) that the Software will operate in the hardware or software combinations that the Licensee
may select, c) that the operation of the Software will be uninterrupted or error free, or d) that all defects in the
operation of the Software will be corrected. Bay Networks is not obligated to remedy any Software defect that cannot
be reproduced with the latest Software release. These warranties do not apply to the Software if it has been (i) altered,
except by Bay Networks or in accordance with its instructions; (ii) used in conjunction with another vendor’s product,
resulting in the defect; or (iii) damaged by improper environment, abuse, misuse, accident, or negligence. THE
FOREGOING WARRANTIES AND LIMITATIONS ARE EXCLUSIVE REMEDIES AND ARE IN LIEU OF ALL
OTHER WARRANTIES EXPRESS OR IMPLIED, INCLUDING WITHOUT LIMITATION ANY WARRANTY OF
MERCHANTABILITY OR FITNESS FOR A PARTICULAR PURPOSE. Licensee is responsible for the security of
its own data and information and for maintaining adequate procedures apart from the Software to reconstruct lost or
altered files, data, or programs.
4. Limitation of liability. IN NO EVENT WILL BAY NETWORKS OR ITS LICENSORS BE LIABLE FOR ANY
COST OF SUBSTITUTE PROCUREMENT; SPECIAL, INDIRECT, INCIDENTAL, OR CONSEQUENTIAL
DAMAGES; OR ANY DAMAGES RESULTING FROM INACCURATE OR LOST DATA OR LOSS OF USE OR
PROFITS ARISING OUT OF OR IN CONNECTION WITH THE PERFORMANCE OF THE SOFTWARE, EVEN
IF BAY NETWORKS HAS BEEN ADVISED OF THE POSSIBILITY OF SUCH DAMAGES. IN NO EVENT
SHALL THE LIABILITY OF BAY NETWORKS RELATING TO THE SOFTWARE OR THIS AGREEMENT
EXCEED THE PRICE PAID TO BAY NETWORKS FOR THE SOFTWARE LICENSE.
5. Government Licensees. This provision applies to all Software and documentation acquired directly or indirectly
by or on behalf of the United States Government. The Software and documentation are commercial products, licensed
on the open market at market prices, and were developed entirely at private expense and without the use of any U.S.
Government funds. The license to the U.S. Government is granted only with restricted rights, and use, duplication, or
iv
893-01047-A
disclosure by the U.S. Government is subject to the restrictions set forth in subparagraph (c)(1) of the Commercial
Computer Software––Restricted Rights clause of FAR 52.227-19 and the limitations set out in this license for civilian
agencies, and subparagraph (c)(1)(ii) of the Rights in Technical Data and Computer Software clause of DFARS
252.227-7013, for agencies of the Department of Defense or their successors, whichever is applicable.
6. Use of Software in the European Community. This provision applies to all Software acquired for use within the
European Community. If Licensee uses the Software within a country in the European Community, the Software
Directive enacted by the Council of European Communities Directive dated 14 May, 1991, will apply to the
examination of the Software to facilitate interoperability. Licensee agrees to notify Bay Networks of any such
intended examination of the Software and may procure support and assistance from Bay Networks.
7. Term and termination. This license is effective until terminated; however, all of the restrictions with respect to
Bay Networks’ copyright in the Software and user manuals will cease being effective at the date of expiration of the
Bay Networks copyright; those restrictions relating to use and disclosure of Bay Networks’ confidential information
shall continue in effect. Licensee may terminate this license at any time. The license will automatically terminate if
Licensee fails to comply with any of the terms and conditions of the license. Upon termination for any reason,
Licensee will immediately destroy or return to Bay Networks the Software, user manuals, and all copies. Bay
Networks is not liable to Licensee for damages in any form solely by reason of the termination of this license.
8. Export and Re-export. Licensee agrees not to export, directly or indirectly, the Software or related technical data
or information without first obtaining any required export licenses or other governmental approvals. Without limiting
the foregoing, Licensee, on behalf of itself and its subsidiaries and affiliates, agrees that it will not, without first
obtaining all export licenses and approvals required by the U.S. Government: (i) export, re-export, transfer, or divert
any such Software or technical data, or any direct product thereof, to any country to which such exports or re-exports
are restricted or embargoed under United States export control laws and regulations, or to any national or resident of
such restricted or embargoed countries; or (ii) provide the Software or related technical data or information to any
military end user or for any military end use, including the design, development, or production of any chemical,
nuclear, or biological weapons.
9. General. If any provision of this Agreement is held to be invalid or unenforceable by a court of competent
jurisdiction, the remainder of the provisions of this Agreement shall remain in full force and effect. This Agreement
will be governed by the laws of the state of California.
Should you have any questions concerning this Agreement, contact Bay Networks, Inc., 4401 Great America Parkway,
P.O. Box 58185, Santa Clara, California 95054-8185.
LICENSEE ACKNOWLEDGES THAT LICENSEE HAS READ THIS AGREEMENT, UNDERSTANDS IT, AND
AGREES TO BE BOUND BY ITS TERMS AND CONDITIONS. LICENSEE FURTHER AGREES THAT THIS
AGREEMENT IS THE ENTIRE AND EXCLUSIVE AGREEMENT BETWEEN BAY NETWORKS AND
LICENSEE, WHICH SUPERSEDES ALL PRIOR ORAL AND WRITTEN AGREEMENTS AND
COMMUNICATIONS BETWEEN THE PARTIES PERTAINING TO THE SUBJECT MATTER OF THIS
AGREEMENT. NO DIFFERENT OR ADDITIONAL TERMS WILL BE ENFORCEABLE AGAINST BAY
NETWORKS UNLESS BAY NETWORKS GIVES ITS EXPRESS WRITTEN CONSENT, INCLUDING AN
EXPRESS WAIVER OF THE TERMS OF THIS AGREEMENT.
893-01047-A
v
vi
893-01047-A
Contents
Preface
Purpose ........................................................................................................................... xv
Audience .......................................................................................................................... xv
Conventions ..................................................................................................................... xv
Special Message Formats .........................................................................................xvi
Two-tiered Procedure Format ....................................................................................xvi
Use of Enter, Type, and Press ...................................................................................xvi
Other Conventions ....................................................................................................xvi
Related Publications .......................................................................................................xvii
Ordering Bay Networks Publications ..............................................................................xvii
Bay Networks Customer Service ................................................................................... xviii
How to Get Help ............................................................................................................ xviii
Chapter 1
Overview of the ATMSpeed/155 Modules and Media Dependent Adapters
About the ATMSpeed/155 Modules ................................................................................1-2
ATMSpeed/155 Switch Module ................................................................................1-4
ATMSpeed/155S Switch Module ..............................................................................1-4
ATMSpeed/155 MMF Switch Module .......................................................................1-5
ATMSpeed/155 MCP Switch Module .......................................................................1-5
ATMSpeed/155 MDA Switch Module .......................................................................1-5
ATMSpeed/155 MDA MCP Switch Module ..............................................................1-6
Model 5720-x ATM Media Dependent Adapters ......................................................1-7
Features .........................................................................................................................1-8
ATMSpeed/155 Module Ports and Connectivity .......................................................1-8
Fault Tolerance .........................................................................................................1-9
Network Management ..............................................................................................1-9
893-01047-A
vii
Chapter 2
Installing the ATMSpeed/155 Modules
Preparing for Installation .................................................................................................2-1
Installing the ATMSpeed/155 Module .............................................................................2-2
Installing or Replacing the Media Dependent Adapter ...................................................2-5
Installing the MDA ....................................................................................................2-6
Replacing an MDA ...................................................................................................2-9
Connecting Cables .................................................................................................2-12
Connecting UTP Cables ..................................................................................2-12
Connecting Fiber Cables .................................................................................2-13
Connecting Cables to ATMSpeed/155 Ports ................................................................2-15
Fiber Connections ..................................................................................................2-15
Serial and Ethernet MCP Connection ....................................................................2-15
Verifying the Installation ................................................................................................2-17
Interpreting ATMSpeed/155 Module LEDs .............................................................2-17
LED Sequence at Startup ......................................................................................2-20
Removing and Replacing a Module ..............................................................................2-21
Removing a Module ...............................................................................................2-21
Replacing a Module ...............................................................................................2-23
Chapter 3
Applications and Default Configuration
Connecting Centillion 100 Switches Directly ............................................................3-1
Connecting Centillion 100 Switches through an Intermediate ATM Switch ..............3-2
Connecting an ATM LAN Emulation Station to a Centillion 100 Switch ...................3-3
Default Configuration ......................................................................................................3-3
Parameter Descriptions ............................................................................................3-4
Loop Timing .......................................................................................................3-4
Network Timing ..................................................................................................3-4
Scrambling .........................................................................................................3-4
Predefined Configurations ........................................................................................3-4
viii
893-01047-A
Appendix A
Technical Specifications
Appendix B
Cables
10BASE-T Ethernet MCP Connections ......................................................................... B-1
Serial MCP Connections ............................................................................................... B-2
Male Mini DIN 8 to Male DB-25 Cable .................................................................... B-2
Female DB-25 to Female DB-9 Adapter ................................................................. B-3
Model 5720-x MDA Connections ................................................................................... B-4
Index
893-01047-A
ix
x
893-01047-A
Figures
Figure 1-1.
Figure 1-2.
Hardware features of the ATMSpeed/155 module with two MMF or
SMF ports ................................................................................................1-3
Hardware features of the ATMSpeed/155 switch module with four
MMF ports and the 10BASE-T and serial MCP ports ..............................1-3
Figure 1-3.
Hardware features of the ATMSpeed/155 module with two MDA slots for
two-port SMF, MMF, and UTP MDAs, one 10BASE-T Ethernet port
(RJ-45), and one serial port (Mini DIN 8) .................................................1-4
Figure 2-1.
Figure 2-2.
Figure 2-3.
Figure 2-4.
Figure 2-5.
Figure 2-6.
Figure 2-7.
Figure 2-8.
Figure 2-9.
Figure 2-10.
Figure 2-11.
Figure 2-12.
Removing the filler panel .........................................................................2-3
Inserter/extractor levers ready for installation ..........................................2-3
Slot module guides ..................................................................................2-4
Inserting the module until it engages the backplane ................................2-4
Seating the module ..................................................................................2-5
MDA slot cover screws .............................................................................2-6
Removing an MDA slot cover ...................................................................2-6
Installing the MDA ....................................................................................2-7
Aligning the MDA connector ....................................................................2-7
Seating MDA in the baseboard connector ...............................................2-8
Tightening screws ....................................................................................2-8
Attaching product label ............................................................................2-9
Figure 2-13.
Figure 2-14.
Figure 2-15.
Figure 2-16.
Figure 2-17.
Figure 2-18.
Figure 2-19.
Figure 2-20.
Figure 2-21.
Figure 2-22.
Preparing the MDA for removal ................................................................2-9
Removing the MDA from the switch module ..........................................2-10
Installing the new MDA ..........................................................................2-10
Aligning the MDA connector ..................................................................2-11
Seating the connector ............................................................................2-11
Tightening screws ..................................................................................2-12
Connecting a UTP cable to an ATM MDA ..............................................2-12
Removing the dust plug from the MDA SC connector ...........................2-13
Removing a dust cap from the MDA fiber cable connector ....................2-14
Inserting the cable connector into the MDA connector ..........................2-14
893-01047-A
xi
Figure 2-23.
Figure 2-24.
Figure 2-25.
Figure 2-26.
Figure 2-27.
Figure 2-28.
Figure 2-29.
Figure 2-30.
Connecting a fiber cable to the ATMSpeed/155 module ........................2-15
Connecting the serial MCP cable to the MCP modules .........................2-16
Connecting an Ethernet cable to the MCP modules ..............................2-16
ATMSpeed/155 and ATMSpeed/155 MCP module LEDs for
ATM ports ...............................................................................................2-17
ATMSpeed/155 MDA and MDA MCP module LEDs for ATM ports ........2-17
ATMSpeed/155 MCP module LEDs for the 10BASE-T MCP port .........2-18
ATMSpeed/155 MDA MCP module LEDs for the 10BASE-T
MCP port ...............................................................................................2-18
Two-port ATMSpeed/155 module LEDs .................................................2-19
Figure 2-31. Disengaging the module ........................................................................2-22
Figure 2-32. Removing the module from the Centillion 100 chassis ..........................2-22
Figure B-1.
Figure B-2.
Figure B-3.
xii
RJ-45 connector pin numbers ................................................................. B-1
10BASE-T Ethernet UTP crossover cable .............................................. B-2
Mini DIN 8 connector pin numbers .......................................................... B-2
893-01047-A
Tables
Table 1-1.
Types of ATMSpeed/155 media dependent adapters ..............................1-7
Table 2-1.
ATMSpeed/155, ATMSpeed/155 MCP, and ATMSpeed/155 MDA and
MDA MCP module LED definitions for ATM ports ..................................2-18
Table 2-2.
Table 2-3.
ATMSpeed/155 MDA MCP module LED definitions for the 10BASE-T
MCP port ................................................................................................2-19
Two-port ATMSpeed/155 LED definitions ..............................................2-19
Table 3-1.
Factory defaults .......................................................................................3-3
Table B-1.
Table B-2.
Table B-3.
Male Mini DIN 8 to male DB-25 cable ..................................................... B-3
Female DB-25 to female DB-9 adapter ................................................... B-3
Model 5720-x 10BASE-T port pin assignments ...................................... B-4
893-01047-A
xiii
xiv
893-01047-A
Preface
Congratulations on your purchase of a Bay Networks® Centillion™ ATMSpeed™/
155 switch module. The family of ATMSpeed/155 switch modules provide
asynchronous transfer mode (ATM) connectivity for the Centillion 100™ switch.
The switch modules incorporate Bay Networks and System 5000™ ATMSpeed
technologies. In addition, the ATMSpeed/155 MCP Switch Module and the
ATMSpeed/155 MDA Switch Module can provide the master control processing
functions for the Centillion 100 switch.
Purpose
This guide provides information about installing and using the ATMSpeed/155
modules. Configuration of the ATMSpeed/155 modules is covered in Using
SpeedView 2.1 for Windows. For more information on these guides, see “Related
Publications.”
Audience
This guide is intended for local area network administrators with the following
background:
893-01047-A
•
Familiarity with ATM network administration
•
SpeedView™ for Windows®: working knowledge of Windows
xv
Using the Centillion 100 ATMSpeed/155 Switch Modules and Media Dependent Adapters
Conventions
This section describes the conventions used in this guide.
Special Message Formats
This guide uses the following formats to highlight special messages:
Note: This format is used to highlight information of importance or special
interest.
Caution: This format is used to highlight information that will help you prevent
equipment failure or loss of data.
Warning: This format is used to highlight material involving possibility of injury
or equipment damage.
Two-tiered Procedure Format
The procedural steps in this guide are presented in a two-tiered format. The first
tier describes the step briefly but precisely and is printed in bold type. An
experienced user may need to read only the first tier to complete the task. The
second tier describes the step in more detail and includes results of performing the
step.
Use of Enter, Type, and Press
This guide uses “enter,” “type,” and “press” to describe the following actions:
xvi
•
When you read “enter,” type the text and press the Enter key.
•
When you read “type,” type the text, but do not press the Enter key.
•
When you read “press,” press only the alphanumeric or named key.
893-01047-A
Preface
Other Conventions
This guide uses the following additional conventions:
italics
Book titles and UNIX file, command, and directory
names.
courier font
Screen text, user-typed command-line entries.
Initial Caps
Menu titles and window and button names.
[Enter]
Named keys in text are shown enclosed in square
brackets. The notation [Enter] is used for the Enter key
and the Return key.
[Ctrl]+C
Two or more keys that must be pressed simultaneously
are shown in text linked with a plus (+) sign.
ALL CAPS
DOS file and directory names.
Left mouse button
Click the left mouse button to select an object on a map
or an item from a menu or list.
Right mouse button
Click the right mouse button to select an object to
display a pop-up menu.
Related Publications
For more information about using the ATMSpeed/155 modules, refer to the
following publications:
893-01047-A
•
Installation and Reference for the Centillion 100 Chassis (Bay Networks part
number 893-894-B)
•
Using SpeedView 2.1 for Windows (Bay Networks part number 893-891-B)
•
Reference Guide for the Centillion Command Line Interface (Bay Networks
part number 893-00985-A)
•
Release Notes for the Centillion Platform Release 2.2 (Bay Networks part
number 896-00165-C)
xvii
Using the Centillion 100 ATMSpeed/155 Switch Modules and Media Dependent Adapters
Ordering Bay Networks Publications
To purchase additional copies of this document or other Bay Networks
publications, order by part number from Bay Networks Press™ at the following
numbers:
•
Phone--U.S./Canada: 888-422-9773
•
Phone--International: 510-490-4752
•
Fax--U.S./Canada and International: 510-498-2609
The Bay Networks Press catalog is available on the World Wide Web at
support.baynetworks.com/Library/GenMisc. Bay Networks publications are
available on the World Wide Web at support.baynetworks.com/Library/tpubs.
Bay Networks Customer Service
You can purchase a support contract from your Bay Networks distributor or
authorized reseller, or directly from Bay Networks Services. For information
about, or to purchase, a Bay Networks service contract, either call your local Bay
Networks field sales office or one of the following numbers:
Region
Telephone number
Fax number
United States and
Canada
800-2LANWAN; then enter Express Routing
Code (ERC) 290, when prompted, to
purchase or renew a service contract
978-916-3514
978-916-8880 (direct)
Europe
33-4-92-96-69-66
33-4-92-96-69-96
Asia/Pacific
61-2-9927-8888
61-2-9927-8899
Latin America
561-988-7661
561-988-7550
Information about customer service is also available on the World Wide Web at
support.baynetworks.com.
xviii
893-01047-A
Preface
How to Get Help
If you purchased a service contract for your Bay Networks product from a
distributor or authorized reseller, contact the technical support staff for that
distributor or reseller for assistance.
If you purchased a Bay Networks service program, call one of the following Bay
Networks Technical Solutions Centers:
893-01047-A
Technical Solutions Center
Telephone number
Fax number
Billerica, MA
800-2LANWAN
978-916-5314
Santa Clara, CA
800-2LANWAN
408-495-1188
Valbonne, France
33-4-92-96-69-68
33-4-92-96-69-98
Sydney, Australia
61-2-9927-8800
61-2-9927-8811
Tokyo, Japan
81-3-5402-0180
81-3-5402-0173
xix
Chapter 1
Overview of the ATMSpeed/155 Modules and
Media Dependent Adapters
This chapter introduces the ATMSpeed/155 modules and covers the following
topics:
•
A summary of module and media dependent adapter (MDA) physical
description, functionality, and capability, page 1-2
•
A summary of module and MDA features, page 1-8
In this guide, the ATMSpeed/155 MMF Switch Modules (two-port and four-port
models), ATMSpeed/155S Switch Module, ATMSpeed/155 MDA Switch
Module, ATMSpeed/155 MCP Switch Module, and ATMSpeed/155 MDA MCP
Switch Module are referred to collectively as the ATMSpeed/155 modules. Each
model is referred to specifically when features and functions are unique to that
particular model.
893-01047-A
1-1
Using the Centillion 100 ATMSpeed/155 Switch Modules and Media Dependent Adapters
About the ATMSpeed/155 Modules
An ATMSpeed/155 module inserts into one slot of a Centillion 100 chassis
providing ATM ports and, optionally, an integrated master control processor
(MCP). The ATMSpeed/155 module comes in the following configurations:
•
An ATMSpeed/155S switch module with two single-mode (SMF) ports
•
An ATMSpeed/155 switch module with two multimode (MMF) ports
•
An ATMSpeed/155 switch module with four MMF ports
•
An ATMSpeed/155 MCP switch module with four MMF ports, a serial port,
and a 10BASE-T port
•
An ATMSpeed/155 MDA switch module with two MDA slots and three
flavors of two port MDAs: MMF, SMF, and UTP
•
An ATMSpeed/155 MDA MCP switch module with two MDA slots and three
flavors of two port MDAs: MMF, SMF, and UTP; a serial port, and a
10BASE-T port
These modules offer identical functional features for ATM connectivity; the only
difference is the type of connectors on the front panel. In this guide, the switch
modules for the Centillion 100 chassis are referred to collectively as the
ATMSpeed switch modules. Each model is referred to specifically when features
and functions are unique to that particular model.
The ATMSpeed/155 switch module is an assembly that consists of a printed
circuit board with a metal module faceplate. The module includes inserter/
extractor levers and captive retaining screws on each side of the module front
panel. The module occupies a single slot in the Centillion 100 chassis.
1-2
893-01047-A
Overview of the ATMSpeed/155 Modules and Media Dependent Adapters
Figure 1-1 shows the ATMSpeed/155 switch module with two MMF or SMF
ports (SC connectors).
Backplane connector
Power supply
connector
Captive retaining
screws
Inserter/extractor
levers
LEDs
Printed circuit
board
SC ports (2)
6492
Figure 1-1.
Hardware features of the ATMSpeed/155 module with two
MMF or SMF ports
Figure 1-2 shows an ATMSpeed/155 switch module with four MMF ports
(SC connectors), one 10BASE-T Ethernet port (RJ-45), and one serial port
(Mini DIN 8).
Backplane connector
Power supply
connector
Captive retaining
screws
Inserter/extractor
levers
LEDs
10BASE-T RJ-45 port (MCP only)
Serial port (MCP only)
Printed circuit
board
155 Mb/s SC ports
6551PFC
Figure 1-2.
Hardware features of the ATMSpeed/155 switch module with
four MMF ports and the 10BASE-T and serial MCP ports
Note: The 10BASE-T Ethernet port on the ATMSpeed/155 MCP switch
module is not supported by the switch software at this time. It will be
supported in a future release.
893-01047-A
1-3
Using the Centillion 100 ATMSpeed/155 Switch Modules and Media Dependent Adapters
Figure 1-3 shows an ATMSpeed/155 MDA module with two MDA slots for
two-port SMF, MMF, and UTP MDAs, one 10BASE-T Ethernet port (RJ-45), and
one serial port (Mini DIN 8).
MDA
MDA
Backplane connector
Power supply
connector
Captive retaining
screws
Inserter/extractor
levers
MDA slots
10BASE-T RJ-45 port (MCP only)
Serial port (MCP only)
Printed circuit
board
LEDs
7881PFA
Figure 1-3.
Hardware features of the ATMSpeed/155 module with two
MDA slots for two-port SMF, MMF, and UTP MDAs, one
10BASE-T Ethernet port (RJ-45), and one serial port (Mini
DIN 8)
Note: The 10BASE-T Ethernet port on the ATMSpeed/155 MCP switch
module is not supported by the switch software at this time. It will be
supported in a future release.
ATMSpeed/155 Switch Module
The ATMSpeed/155 Switch Module (Figure 1-1) provides two ATM ports on
each module. Onboard connectors include OC-3 ports with SC connectors for
multimode fiber (MMF) interfaces.
ATMSpeed/155S Switch Module
The ATMSpeed/155S Switch Module (Figure 1-1) provides two ATM ports on
each module. Onboard connectors include OC-3 ports with SC connectors for
single-mode fiber (SMF) interfaces.
1-4
893-01047-A
Overview of the ATMSpeed/155 Modules and Media Dependent Adapters
ATMSpeed/155 MMF Switch Module
The ATMSpeed/155 MMF Switch Module (Figure 1-2) provides four ATM ports
on each module. Onboard connectors include four OC-3 ports with SC connectors
for multimode fiber (MMF) interfaces.
ATMSpeed/155 MCP Switch Module
In addition to connectivity provided by four ATM ports, the ATMSpeed/155 MCP
Switch Module (Figure 1-2) manages the Centillion 100 switch. One (and only
one) MCP module is required for each Centillion 100 chassis; however, a
TokenSpeed/MCP or an EtherSpeed/MCP module could also be used to meet this
requirement.
Onboard connectors include OC-3 ports with SC connectors for multimode fiber
(MMF) ATM interfaces. The ATMSpeed/155 MCP module has both a serial port
(Mini DIN 8) and a 10BASE-T port (RJ-45) to connect a network management
station.
Note: The 10BASE-T Ethernet port on the ATMSpeed/155 MCP module is
not supported by the switch software at this time. It will be supported in a
future release.
ATMSpeed/155 MDA Switch Module
The ATMSpeed/155 MDA Switch Module (Figure 1-3) provides two slots for
installing MDAs to provide ATM port connections. Each MDA provides two
OC-3 ports; a fully equipped MDA switch module therefore has four ports for
making ATM connections. You can install different MDAs in one MDA host
module as needed to obtain maximum flexibility of connection types.
The MDA switch module provides different types of ATM connectivity through
the following MDAs:
893-01047-A
•
A multimode fiber optic MDA (Model 5720-14 MDA) provides synchronous
optical network/synchronous digital hierarchy (SONET/SDH) synchronous
transport signal-3c (STS-3c/OC-3c) connectivity over 62.5/125 µm or 50/125
µm multimode fiber cable.
•
An unshielded twisted pair (UTP) MDA (Model 5720-15 MDA) provides
SONET/SDH STS-3c/OC-3c connectivity over Category 5 UTP cable.
1-5
Using the Centillion 100 ATMSpeed/155 Switch Modules and Media Dependent Adapters
•
A single-mode fiber optic MDA (Model 5720-17 MDA) provides SONET/
SDH STS-3c connectivity over 8.5/125 µm single-mode fiber cable.
ATMSpeed/155 MDA MCP Switch Module
The ATMSpeed/155 MDA MCP Switch Module (Figure 1-3) manages the
Centillion 100 switch. One (and only one) MCP module is required for each
Centillion 100 chassis; however, a TokenSpeed/MCP or an EtherSpeed/MCP
module could also be used to meet this requirement.
The ATMSpeed/155 MDA MCP module has both a serial port (Mini DIN 8) and a
10BASE-T port (RJ-45) to connect a network management station.
Note: The 10BASE-T Ethernet port on the ATMSpeed/155 MCP module is
not supported by the switch software at this time. It will be supported in a
future release.
In addition to Centillion 100 chassis management, the MDA MCP switch module
has two slots for installing MDAs provide ATM port connection. Each MDA
provides two OC-3 ports; a fully equipped MDA MCP switch module therefore
has four ports for making ATM connections. You can install different MDAs in
one MDA MCP switch module as needed to obtain maximum flexibility of
connection types.
The MDA MCP switch module provides different types of ATM connectivity
through the following MDAs:
1-6
•
A multimode fiber optic MDA (Model 5720-14 MDA) provides synchronous
optical network/synchronous digital hierarchy (SONET/SDH) synchronous
transport signal-3c (STS-3c/OC-3c) connectivity over 62.5/125 µm or 50/125
µm multimode fiber cable.
•
An unshielded twisted pair (UTP) MDA (Model 5720-15 MDA) provides
SONET/SDH STS-3c connectivity over Category 5 UTP cable.
•
A single-mode fiber optic MDA (Model 5720-17 MDA) provides
SONET/SDH STS-3c/OC-3c connectivity over 8.5/125 µm single-mode fiber
cable.
893-01047-A
Overview of the ATMSpeed/155 Modules and Media Dependent Adapters
Model 5720-x ATM Media Dependent Adapters
The 5720-x ATM Media Dependent Adapters (Figure 1-3) are adapters that you
install on the ATMSpeed/155 MDA and ATMSpeed/155 MDA MCP switch
modules. Each MDA provides two ports for connections to an ATM network. You
can mix types of the Model 5720 ATM MDAs on the 5000BH and Centillion
switch modules to achieve flexibility in connectivity types. Table 1-1 shows the
available types of the Model 5720 ATM MDAs.
Table 1-1.
Model
number
893-01047-A
Types of ATMSpeed/155 media dependent adapters
Port type
Connector
type
Cable type
5720-14
SONET/SDH
STS-3c/OC-3c
SC
Multimode fiber
5720-15
SONET/SDH
STS-3c/OC-3c
RJ-45
Unshielded twisted
pair (UTP)
5720-17
SONET/SDH
STS-3c/OC-3c
SC
Single-model fiber
1-7
Using the Centillion 100 ATMSpeed/155 Switch Modules and Media Dependent Adapters
Features
This section provides a summary of the features of the ATMSpeed/155 modules,
including the following topics:
•
ATMSpeed/155 module ports and connectivity
•
Fault tolerance
•
Network management
ATMSpeed/155 Module Ports and Connectivity
ATMSpeed/155 module ports have the following features:
•
155 megabit per second (Mb/s) full-duplex OC-3 ATM ports on each module
•
Onboard connectors
— The ATMSpeed/155 switch module (two-port and four-port versions)
offers multimode fiber support with SC connectors.
— The ATMSpeed/155S switch module offers single-mode fiber support
with SC connectors.
— The ATMSpeed/155 MCP switch module offers multimode fiber with SC
connectors. It also offers one serial port with a Mini DIN 8 connector and
one 10BASE-T port (configured as MDI-X) with an RJ-45 connector for
network management.
— The ATMSpeed/155 MDA and ATMSpeed/155 MDA MCP switch
modules offer field installable two-port MDAs for MMF, SMF, and UTP
connectivity. The ATMSpeed/155 MDA MCP module also offers one
serial port with a Mini DIN 8 connector and one 10BASE-T port
(configured as MDI-X) with an RJ-45 connector for network
management.
•
Per-port features
— LEDs to indicate operational status of each port
— Wirespeed port-to-port switching for local traffic without using any ATM
backplane bandwidth
1-8
893-01047-A
Overview of the ATMSpeed/155 Modules and Media Dependent Adapters
•
The following ATM connectivity is currently supported by the switch
software:
— ATM connectivity between two Centillion 100 switches with or without
intermediate ATM switches
— ATM Forum UNI 3.0 and 3.1 compliance (release 2.0 or later)
— Connectivity to another manufacturer’s ATM switch or to carrier services
through PVC/PVP or Interim Inter-switch Signaling Protocol (IISP)
(release 2.0 or later)
— Connectivity to ATM adapters or ATM routers and other UNI devices
through UNI 3.x (release 2.0 or later)
Fault Tolerance
The following fault tolerance features are supported on the Centillion 100
modules:
•
Ability to install, remove, and replace a module in an operational chassis
(hot-swapping)
•
Software update and management access over the network or a serial
connection on the ATMSpeed/155 MCP and ATMSpeed/155 MDA MCP
modules
Network Management
You can manage and configure the ATMSpeed/155 module through access to the
MCP module with the following network management features:
•
Simple Network Management Protocol (SNMP) agent with Centillion 100
management information base (MIB) extensions
•
Bootstrap Protocol (BootP) and Trivial File Transport Protocol (TFTP)
support
•
SpeedView™ application for configuration management and monitoring.
SpeedView for Windows runs over SNMP or serial port connection.
For additional information on SpeedView, refer to Using SpeedView 2.1 for
Windows.
893-01047-A
1-9
Chapter 2
Installing the ATMSpeed/155 Modules
This chapter explains how to install and connect ATMSpeed/155 modules and
includes the following information and procedures:
•
Preparing for installation, next
•
Installing the ATMSpeed/155 module (page 2-2)
•
Installing the 5720-x ATM MDA (page 2-5)
•
Connecting cables to ATMSpeed/155 ports (page 2-15)
•
Verifying the installation (page 2-17)
•
Removing and replacing a module (page 2-21)
Preparing for Installation
Before you install the ATMSpeed/155 module, make sure that the Centillion 100
chassis is assembled and ready to accept modules. For more information, refer to
Installation and Reference for the Centillion 100 Chassis.
You need the following tools and materials for installation:
893-01047-A
•
Medium flat-tip screwdriver for the captive retaining screws
•
#1 Phillips screwdriver
•
Grounded antistatic mat and wrist strap
2-1
Using the Centillion 100 ATMSpeed/155 Switch Modules and Media Dependent Adapters
Caution: Centillion 100 modules use electronic components that are sensitive
to static electricity. Static discharge from your clothing or other items around
you, even at levels that do not create a spark, can cause damage.
You should take all possible precautions to prevent static discharge damage
when working with printed circuit boards. Keep each board in its protective
conductive bag until you are ready to install it. Before you touch a printed
circuit board, be sure to put on a grounded antistatic wrist strap and leash to
free yourself of static.
If you lack a grounded antistatic wrist strap and mat, be careful to stand in one
place where you work (so you do not generate static electricity by friction) and
to free yourself of static by touching the metal of a grounded chassis before
handling a printed circuit board.
Installing the ATMSpeed/155 Module
You can insert or remove an ATMSpeed/155 module from a chassis while the
power is on without interrupting service in the other modules. This ability is
referred to as “hot-swapping.”
Note: ATMSpeed/155 modules can be hot inserted in a chassis at any time.
However, before removing an active module from the Centillion 100 chassis,
either unplug all port cables or disable all ports on the module. This step
deactivates the module. For additional information, see “Removing a Module”
and “Replacing a Module” later in this chapter.
To install and secure the module in the chassis, follow these steps:
1.
Remove the filler panel from the chassis slot where you intend to install
the module.
Using the medium flat-tip screwdriver, loosen the two captive retaining screws
on the filler panel until they pop free of the chassis. Rotate the left and right
inserter/extractor levers away from the center of the filler panel to their
protruding positions and remove the filler panel (see Figure 2-1).
2-2
893-01047-A
Installing the ATMSpeed/155 Modules
6463
Figure 2-1.
2.
Removing the filler panel
Extend the module’s inserter/extractor levers forward (see Figure 2-2).
6464
Figure 2-2.
893-01047-A
Inserter/extractor levers ready for installation
2-3
Using the Centillion 100 ATMSpeed/155 Switch Modules and Media Dependent Adapters
3.
Align the left and right edges of the printed circuit board carrier with the
slot card guides on each side of the slot (see Figure 2-3).
6465
Figure 2-3.
4.
Slot module guides
Slide the module into the chassis until you feel it engage the backplane.
The inserter/extractor levers should still be protruding and in contact with the
front of the chassis. Do not push the module all the way into the chassis (see
Figure 2-4).
6466
Figure 2-4.
2-4
Inserting the module until it engages the backplane
893-01047-A
Installing the ATMSpeed/155 Modules
5.
Seat the backplane connectors by simultaneously rotating the inserter/
extractor levers inward toward the center of the switch module front
panel to the horizontal position (see Figure 2-5).
6537
Figure 2-5.
Seating the module
When the front panel of the module is flush with the front of the chassis, the
module backplane connectors are properly seated.
6.
Use the flat-tip screwdriver to tighten the captive retaining screws at both
ends of the module front panel.
Note: The captive retaining screws on the module must be tightened to at
least 2 inch-pounds, but no more than 4 inch-pounds, of torque. Finger
tightening is also adequate. Do not overtighten.
Installing or Replacing the Media Dependent Adapter
The following section provides information about:
893-01047-A
•
Installing any of the 5720-x ATM MDAs on a ATMSpeed/155 MDA and
ATMSpeed/155 MDA MCP switch modules
•
Replacing an MDA on an MDA switch module
•
Connecting UTP cables to the MDA
•
Connecting fiber optic cables to the MDA
2-5
Using the Centillion 100 ATMSpeed/155 Switch Modules and Media Dependent Adapters
Installing the MDA
The following steps guide you through installing an MDA:
1.
Remove the screws from the cover on an MDA slot (Figure 2-6).
7873PEA
Figure 2-6.
2.
MDA slot cover screws
Lift the cover out of the slot (Figure 2-7).
Set the cover aside.
7874PEA
Figure 2-7.
2-6
Removing an MDA slot cover
893-01047-A
Installing the ATMSpeed/155 Modules
3.
Tilt the MDA and slip it into place against the back of the front panel
(Figure 2-8).
7875PEA
Figure 2-8.
4.
Installing the MDA
Align the connector on the MDA with the connector on the baseboard
(Figure 2-9).
7876PEA
Figure 2-9.
893-01047-A
Aligning the MDA connector
2-7
Using the Centillion 100 ATMSpeed/155 Switch Modules and Media Dependent Adapters
5.
Press firmly on the board at the ends of the connector to seat the MDA in
the connector on the baseboard (Figure 2-10).
7877PEA
Figure 2-10.
6.
Seating MDA in the baseboard connector
Insert the Phillips pan-head screws through the holes (Figure 2-11).
Use the #1 Phillips screwdriver to tighten the screws.
7878PEA
Figure 2-11.
2-8
Tightening screws
893-01047-A
Installing the ATMSpeed/155 Modules
7.
For each Model 5720-17 MDA you have installed, attach the supplied
laser product label to the front panel of the switch module, immediately
below the MDA (Figure 2-12).
Use the label that is printed in the appropriate language for the country where
you are installing the equipment.
1
2
CLASS 1 LASER PRODUCT
CLASS 1 LASER PRODUCT
5718EC
Figure 2-12.
Attaching product label
Replacing an MDA
The following steps guide you through replacing an MDA on an ATMSpeed/155
MDA and ATMSpeed/155 MDA MCP switch module:
1.
Remove the screws from the MDA (Figure 2-13).
7878PEA
Figure 2-13.
893-01047-A
Preparing the MDA for removal
2-9
Using the Centillion 100 ATMSpeed/155 Switch Modules and Media Dependent Adapters
2.
Loosen the connector (Figure 2-14). Then tilt the MDA and lift it away
from the baseboard.
7879PEA
Figure 2-14.
3.
Removing the MDA from the switch module
Tilt the new MDA and slip it into place against the back of the front panel
(Figure 2-15).
7875PEA
Figure 2-15.
2-10
Installing the new MDA
893-01047-A
Installing the ATMSpeed/155 Modules
4.
Align the connector on the MDA with the connector on the baseboard
(Figure 2-16).
7876PEA
Figure 2-16.
5.
Aligning the MDA connector
Press firmly on the board at the ends of the connector to seat the MDA in
the connector on the baseboard (Figure 2-17).
7877PEA
Figure 2-17.
893-01047-A
Seating the connector
2-11
Using the Centillion 100 ATMSpeed/155 Switch Modules and Media Dependent Adapters
6.
Insert the Phillips pan-head screws through the holes (Figure 2-18).
Use the #1 Phillips screwdriver to tighten the screws.
7878PEA
Figure 2-18.
Tightening screws
Connecting Cables
The following sections guide you through connecting UTP and fiber cables to the
MDA.
Connecting UTP Cables
Align the RJ-45 plug with the jack on the MDA. Push gently until the plug clicks
into place (Figure 2-19).
6108FB
Figure 2-19.
2-12
Connecting a UTP cable to an ATM MDA
893-01047-A
Installing the ATMSpeed/155 Modules
Connecting Fiber Cables
1.
Remove the protective dust plug from the SC connector on the MDA
(Figure 2-20).
Store the dust plug for later use.
6101FB
Figure 2-20.
Removing the dust plug from the MDA SC connector
Warning: The 5720-17 Media Dependent Adapters use Class 1 lasers as data
transfer element. Be careful to avoid exposing your eyes to laser beams.
WARNUNG: Das 5720-17 Media Abhängige Adaptors verwendet laser der
Klasse 1 zur Datenübertragung. Vorsichtig vorgehen, um die Augen keinen
Laserstrahlen auszusetzen.
AVERTISSEMENT: Les adaptateurs dependants aus les media
5720-17 utilisent des lasers de Classe 1 comme éléments de transfert de
données. Il est important d’éviter tout contact entre le rayonnement laser et les
yeux.
AVISO: Os Adaptadores Dependente de Mídia 5720-17 usam o laser do tipo
Class 1 como elemento de transferimento de dados. Deve-se ter o maior
cuidado a fim de se evitar o contacto visual com raios laser.
ADVERTENCIA: Los Adaptadores Dependentes de Medios 5720-17 utiliazan
el láser de tipo 1 como elemento de transmisión de datos. Como precaución,
evite exponer la vista a la radiación láser.
893-01047-A
2-13
Using the Centillion 100 ATMSpeed/155 Switch Modules and Media Dependent Adapters
2.
Remove the protective dust caps from the SC connector on the fiber cable
(Figure 2-21).
Store the dust caps for later use.
6105
Figure 2-21.
3.
Removing a dust cap from the MDA fiber cable connector
Hold the cable connector so the keyed surface will insert easily into the
MDA connector. Carefully insert the cable connector into the MDA
connector and push gently until you hear the cable connector snap into
place (Figure 2-22).
6106FB
Figure 2-22.
2-14
Inserting the cable connector into the MDA connector
893-01047-A
Installing the ATMSpeed/155 Modules
Connecting Cables to ATMSpeed/155 Ports
This section describes how to connect cables to the ports on an ATMSpeed/155
module with the following connections:
•
Fiber
•
Serial and Ethernet MCP
Fiber Connections
For fiber cable connections to the ATMSpeed/155 module, attach the
corresponding cable with SC connectors (Figure 2-23).
6538
Figure 2-23.
Connecting a fiber cable to the ATMSpeed/155 module
Serial and Ethernet MCP Connection
Serial and Ethernet connections are provided for a SpeedView network
management station on the ATMSpeed/155 MCP and ATMSpeed/155 MDA MCP
modules. To use the serial connection, attach the serial MCP cable that was
shipped with the Centillion 100 chassis to the Mini DIN 8 port on the MCP
modules (Figure 2-24). Attach the other side of the MCP cable to the serial port of
your PC.
893-01047-A
2-15
Using the Centillion 100 ATMSpeed/155 Switch Modules and Media Dependent Adapters
MCP
6468
Figure 2-24.
Connecting the serial MCP cable to the MCP modules
To use the Ethernet connection, attach an Ethernet cable to the RJ-45 port on the
ATMSpeed/155 MCP module (see Figure 2-25).
5634M
Figure 2-25.
Connecting an Ethernet cable to the MCP modules
Note: The 10BASE-T Ethernet port on the ATMSpeed/155 MCP and
ATMSpeed/155 MDA MCP modules is not supported by the switch software
at this time. It will be supported in a future release.
2-16
893-01047-A
Installing the ATMSpeed/155 Modules
Verifying the Installation
When the ATMSpeed/155 module is installed and the cables are connected to the
ports, the module is ready for operation. All connected ports are enabled, unless
they have been disabled by SpeedView. Enabling and disabling ATMSpeed/155
module ports is described in Using SpeedView 2.1 for Windows.
You can verify the installation of an ATMSpeed/155 module by observing the
LEDs on the module while the module is operating and at system startup. This
section describes the ATMSpeed/155 module LEDs and the LED sequence at
startup.
Interpreting ATMSpeed/155 Module LEDs
The four-port version of the ATMSpeed/155 module, the ATMSpeed/155 MCP
module, and the ATMSpeed/155 MDA and MDA MCP modules have six LEDs
for each ATM port, as shown in Figure 2-26. Table 2-1 lists the meaning of each
LED.
En
FERF
En
RX
LOF
RX
TX
LOS
TX
6542
Figure 2-26.
ATMSpeed/155 and ATMSpeed/155 MCP module LEDs for
ATM ports
The ATMSpeed/155 MDA and MDA MCP modules have six LEDs for each ATM
port, as shown in Figure 2-27. Table 2-1 lists the meaning of each LED.
1
2
3
4
En/FERF
RX/LOF
TX/LOS
7883PEA
Figure 2-27.
893-01047-A
ATMSpeed/155 MDA and MDA MCP module LEDs for ATM
ports
2-17
Using the Centillion 100 ATMSpeed/155 Switch Modules and Media Dependent Adapters
Table 2-1.
ATMSpeed/155, ATMSpeed/155 MCP, and ATMSpeed/155
MDA and MDA MCP module LED definitions for ATM ports
LED name
Meaning
En
Remains on while port is enabled from network management.
RX
Turns on as calls are received on the port.
TX
Turns on as cells are transmitted on the port.
FERF
Turns on for far end receiver fault (FERF), also known as remote
defect indication (RDI).
LOF
Turns on to indicate loss of frame.
LOS
Turns on to indicate loss of signal.
The ATMSpeed/155 MCP module also has three LEDs for the 10BASE-T
Ethernet MCP port, as shown in Figure 2-28. Table 2-2 lists the meaning of each
LED.
TX
RX
L
6728.1
Figure 2-28.
ATMSpeed/155 MCP module LEDs for the 10BASE-T MCP
port
The ATMSpeed/155 MDA MCP module also has three LEDs for the 10BASE-T
EThernet MCP port, as shown in Figure 2-29. Table 2-2 lists the meaning of each
LED.
Diag
Activity
Link
7882PEA
Figure 2-29.
2-18
ATMSpeed/155 MDA MCP module LEDs for the 10BASE-T
MCP port
893-01047-A
Installing the ATMSpeed/155 Modules
Table 2-2.
ATMSpeed/155 MDA MCP module LED definitions for the
10BASE-T MCP port
LED name
Meaning
RX
Turns on as packets are received on the port.
TX
Turns on as packets are transmitted on the port.
L
Turns on when the 10BASE-T link is functioning correctly.
Two-port versions of the ATMSpeed/155 module have three LEDs on each
module, as shown in Figure 2-30. Table 2-3 lists the meaning of each LED.
In Service
Enabled
Activity
6728
893-01047-A
Figure 2-30.
Two-port ATMSpeed/155 module LEDs
Table 2-3.
Two-port ATMSpeed/155 LED definitions
LED name
Meaning
In Service
Turns on when the receive fiber receives valid SONET framing.
Turns off to indicate loss of signal, loss of frame, or out of frame.
Enabled
Remains on while port is enabled from network management.
Activity
Turns on when the port is engaged in non-idle cell transfer.
2-19
Using the Centillion 100 ATMSpeed/155 Switch Modules and Media Dependent Adapters
LED Sequence at Startup
At startup, all ATMSpeed/155 module LEDs turn on for 2 or 3 seconds. Then they
turn on and off in the following sequences, depending on the type of module.
On the four-port version of the ATMSpeed/155 module, the ATMSpeed/155 MCP
module, and the ATMSpeed/155 MDA and MDA MCP modules with six LEDs
per port, the following sequence occurs:
•
The En LED turns on when the port is enabled through network management
software.
•
The LOS, LOF, and FERF LEDs turn off when valid SONET framing is
received on the port.
On ATMSpeed/155 modules with three LEDs per port, the following sequence
occurs:
2-20
•
The Enabled LED turns on when the port is enabled through network
management software.
•
The In Service LED turns on when valid SONET framing is received on the
receive port.
893-01047-A
Installing the ATMSpeed/155 Modules
Removing and Replacing a Module
This section describes how to remove and replace an ATMSpeed/155 module
described in the following procedures:
•
Removing a module
•
Replacing a module
Removing a Module
ATMSpeed/155 modules can be hot-inserted in a chassis at any time. However, to
remove an active module from the Centillion 100 chassis, follow these steps:
1.
Disable all ports on the module using SpeedView, or disconnect the cables
from each port.
Disabling the ports on a module is described in Using SpeedView 2.1 for
Windows.
Note: If the power for the Centillion 100 chassis is off, this step is not
necessary.
2.
Wait 45 seconds.
Waiting allows the system software to process the requests to disable the
ports.
Caution: If you remove a module without waiting 45 seconds after
disabling the ports, you must power cycle the Centillion 100 chassis.
When you turn off the power on the Centillion 100 chassis, you must wait
15 to 20 seconds before turning the power back on. The Centillion 100
modules begin switching an additional 15 to 20 seconds after power is
resumed.
3.
Using the medium flat-tip screwdriver, loosen the two captive retaining
screws on the module until they pop free of the chassis.
4.
Rotate the left and right inserter/extractor levers away from the center of
the module to their protruding positions (see Figure 2-31).
The module is disengaged from the backplane.
893-01047-A
2-21
Using the Centillion 100 ATMSpeed/155 Switch Modules and Media Dependent Adapters
6470
Figure 2-31.
5.
Disengaging the module
Slide the module out of the chassis (see Figure 2-32).
6471
Figure 2-32.
2-22
Removing the module from the Centillion 100 chassis
893-01047-A
Installing the ATMSpeed/155 Modules
Replacing a Module
Note: To minimize configuration conflicts, you should replace a module with
another identical module.
The configuration of the new module is the same as the previously installed
module in that slot. If the module you replace is not identical to the module
previously in that slot, the module remains inoperative until you reconfigure it
from the SpeedView application.
To install a new ATMSpeed/155 module, follow the instructions in “Installing the
ATMSpeed/155 Module” on page 2.
To install a new ATMSpeed/155 MCP or MDA MCP module, follow these steps:
1.
Save the current configuration in a file on your SpeedView station.
2.
Disable all ports and remove the module, following the instructions in
“Removing a Module” on page 2-21.
3.
Install the new module, following the instructions in “Installing the
ATMSpeed/155 Module” on page 2-2.
4.
Load the saved configuration file on the new ATMSpeed/155 MCP or
MDA MCP module.
Caution: Installing the ATMSpeed/155 MCP or MDA MCP module
resets the switch and loads the default configuration, thus interrupting
network connectivity. To minimize network disruption, load the saved
configuration on the new ATMSpeed/155 MCP or MDA MCP module
using an additional chassis; then replace the old module.
For module configuration instructions and for help with saving and loading
configuration files, refer to Using SpeedView 2.1 for Windows.
893-01047-A
2-23
Chapter 3
Applications and Default Configuration
This chapter provides connection instructions for typical ATMSpeed/155
applications. The chapter also describes the factory-set default configuration for
the ATMSpeed/155 module.
ATMSpeed/155 Port Applications
You can connect the ATMSpeed/155 module for optimal LAN performance. This
section provides instructions for the following types of ATM connections:
•
Connecting Centillion 100 switches directly
•
Connecting Centillion 100 switches through an intermediate ATM switch
•
Connecting an ATM LAN emulation station to a Centillion 100 switch
Connecting Centillion 100 Switches Directly
To connect two Centillion 100 switches directly, follow these steps:
1.
Configure each ATMSpeed/155 module port.
To configure ATM ports, refer to Using SpeedView 2.1 for Windows. Both
switches must have the same kind of virtual port configured.
2.
Connect one end of the fiber cable to the first switch.
Note that the SC connector of the fiber cable is keyed.
3.
Connect the other end of the fiber cable to the other switch.
The In Service LED for the ATM port turns on when the switch recognizes the
physical connection. You can view the LED on the switch itself or through the
SpeedView application by selecting the Switch menu and choosing View.
893-01047-A
3-1
Using the Centillion 100 ATMSpeed/155 Switch Modules and Media Dependent Adapters
Connecting Centillion 100 Switches through an Intermediate ATM
Switch
Two Centillion 100 switches can communicate through an intermediate ATM
switch if each switch is connected to a port on the intermediate ATM switch.
To connect two Centillion 100 switches through an intermediate ATM switch,
follow these steps:
1.
Configure the ATMSpeed/155 module ports.
To configure ATM ports, refer to Using SpeedView 2.1 for Windows. Both
switches must have the same kind of virtual port configured.
Configure the intermediate ATM switch and the Centillion 100 switch with
matching VPI and VCI values.
2.
Connect one end of the fiber cable to the ATMSpeed/155 port.
The SC connector of the fiber cable is keyed.
3.
Connect the other end of the fiber cable to the other ATM switch.
On an ATMSpeed/155 module with six LEDs per port, the LOS, LOF, and
FERF LEDs for the ATM port turn off when the switch recognizes the
physical connection.
On an ATMSpeed/155 module with three LEDs per port, the In Service LED
for the ATM port turns on when the switch recognizes the physical
connection.
You can view LEDs on the switch itself or through the SpeedView application
by selecting the Switch menu and choosing View.
4.
3-2
Repeat steps 1 through 3 to install and configure the other Centillion 100
switch.
893-01047-A
Applications and Default Configuration
Connecting an ATM LAN Emulation Station to a Centillion 100 Switch
To connect an ATM LAN emulation station to a Centillion 100 switch, follow
these steps:
1.
Configure the ATMSpeed/155 ports.
To configure ATM ports, refer to Using SpeedView 2.1 for Windows.
2.
Connect one end of the fiber cable to the ATMSpeed/155 module port.
The SC connector of the fiber cable is keyed.
3.
Connect the other end of the fiber cable to the other ATM switch.
4.
Repeat steps 1 through 3 to install and configure the other switch.
Default Configuration
The Centillion 100 switch supports “plug-and-play” operation. Table 3-1 lists the
factory defaults for the ATMSpeed/155 module ports.
Table 3-1.
893-01047-A
Factory defaults
Parameter
Factory default
Configurable option
Physical type
SONET/SDH
Auto-sensing, not configurable
Physical media type
Multimode fiber or
single-mode fiber
Fixed at factory, not configurable
Speed
155 Mb/s full duplex
Fixed at factory, not configurable
State
Enabled
Enabled, disabled
Loop timing
Disabled
Enabled, disabled
Scrambling
Enabled
Enabled, disabled
Network timing
Disabled
Enabled, disabled
3-3
Using the Centillion 100 ATMSpeed/155 Switch Modules and Media Dependent Adapters
Parameter Descriptions
The physical type, networks timing, physical media type and speed of the ATM
ports are not configurable. They are fixed at the factory for each model type. You
can use SpeedView to enable or disable the state of an ATM port.
The loop timing, networks timing, scrambling, and physical loop parameters are
configurable, as described in this section.
Loop Timing
When loop timing is disabled, the local clock generates transmit timing. When
loop timing is enabled, timing is derived from the receive side of the port.
Network Timing
When network timing is enabled, the clock is derived from an input port and can
be distributed to any of the output ports on a module (it may not be distributed to
other modules across the backplane).
Scrambling
SONET uses a scrambling algorithm to prevent long strings of zeros or ones from
being transmitted. Most ATM equipment has scrambling enabled. Although you
can disable scrambling, the destination port must also have scrambling disabled.
Predefined Configurations
SpeedView does not offer predefined configurations for ATM. Configuration
instructions appear in Using SpeedView 2.1 for Windows.
3-4
893-01047-A
Appendix A
Technical Specifications
This section provides technical specifications for the ATMSpeed/155 MMF
Switch Modules (two and four-port models), ATMSpeed/155 MCP Switch
Module, ATMSpeed/155 MDA Switch Module, and ATMSpeed/155 MDA MCP
Switch Module.
Network Protocol and Standards Compatibility
OC-3
SONET
SDH
ATM Forum UNI 3.0 and 3.1
STS-3c
IISP
LANE version 1.0
Data Rate
155 Mb/s full-duplex mode per port
Microprocessors
ATMSpeed/155 MCP and
ATMSpeed/155 MDA MCP
baseboard:
64-bit MIPS 4000 series processor,
133 MHz (MIPS)
Memory
893-01047-A
Processor:
16 MB expandable to 32 MB (ATMSpeed/155
MCP and ATMSpeed/155 MDA MCP switch
modules)
Packet buffer:
4 MB (ATMSpeed/155 MCP and ATMSpeed/155
MDA MCP modules)
A-1
Using the Centillion 100 ATMSpeed/155 Switch Modules and Media Dependent Adapters
Flash:
2.5 MB (ATMSpeed/155 MCP and ATMSpeed/155
MDA MCP modules)
Cell buffers:
16,384 cells (ATMSpeed/155 MCP and
ATMSpeed/155 MDA MCP switch modules;
4 port ATMSpeed/155 MMF switch module)
4096 cells (2 port ATMSpeed/155 MMF)
Electrical Specifications
Power Consumption:
40 W
Physical specifications
Dimensions:
10.5 (L) x 12.5 (W) x 1.0 (H) inches
26.7 (L) x 31.7 (W) x 2.5 (H) cm
Weight:
2.5 lbs (1.1 kg)
Environmental specifications
Operating temperature:
41° to 104° F (0° to 40° C)
Storage temperature:
–13° to 158° F (–25° to 70° C)
Operating altitude:
Up to 10,000 ft. (3,000 m) maximum
Operating humidity:
85% maximum relative humidity, noncondensing
Storage humidity:
95% maximum relative humidity
Storage altitude:
Up to 10,000 ft. (3,000 m) maximum
Free fall/drop:
ISO 4180-s, NSTA 1A
Vibration:
IEC 68-2-6/34
Shock/bump:
IEC 68-2-27-29
Electromagnetic Susceptibility
Electrostatic discharge (ESD):
EC 801-2, Level 2
Radiated electromagnetic field:
EC 801-2, Level 2
Electrical fast transient/burst:
EC 801-4, Level 2
Electrical surge:
IEC 801-5, Level 1/2
Interface Options
SC connectors for multimode and single-mode fiber optic interface (MDA or base
configuration)
A-2
893-01047-A
Technical Specifications
RJ-45 connector for network administration (ATMSpeed/155 MCP and
ATMSpeed/155 MDA MCP switch modules)
Mini DIN 8 serial connector for network administration (ATMSpeed/155 MCP and
ATMSpeed/155 MDA MCP switch modules)
Performance Specifications
Cell switching rates
(64-byte packets):
350,000 packets per second per port maximum,
full-duplex mode
1.4 million packets per second per module
maximum with four ports, local or backplane
switched
Optical specifications (multimode fiber)
155.52 Mb/s NRZ line code
1310 nm LED
Duplex 62.5/125 micron fiber, 500 Mhz km minimum bandwidth
Duplex SC connector
Mean launched power:
–20 to –14 dBm
Minimum receive sensitivity:
–30 dBm
Link budget:
10 dB
Maximum run length:
2 km
Optical specifications (single-model fiber)
155.52 Mb/s, NRZ line code
1310 nm Class 1 Laser
Duplex 9/125 micron fiber
Mean launched power:
–15 to –8 dBm
Minimum receive sensitivity:
.28 dBm
Unshielded twisted pair specifications
155.52 Mb/s, NRZ line code
Category 5 unshielded twisted pair; two pairs
RJ-45 connector
Up to 100 meters
Electromagnetic Emissions
Meets requirements of:
893-01047-A
FCC Part 15, Subpart B, Class A
VCCI Class 1 ITE
EN 55022 (CISPR22:1985), Class A
A-3
Using the Centillion 100 ATMSpeed/155 Switch Modules and Media Dependent Adapters
Safety Agency Approvals
UL listed (UL 1950)
CSA certified (CSA 22.2 #950)
TUV licensed (EN 60 950)
UL-94-V1 flammability requirements for all PC boards
The following section provides technical specifications information for the
5720-14 ATM MDA, 5720-15 ATM MDA, and 5720-17 ATM MDA.
5720-14 ATM media dependent adapter
Port connector type:
SC duplex interface
Cable type:
62.5/125 µm multimode fiber
Transmit average power range:
Minimum –20 dBm
Maximum –14 dBm
Receiver average power range:
Minimum –30 dBm
Optical power budget:
10 dB
5720-17 ATM media dependent adapter
Port connector type:
SC duplex interface
Cable type:
8.5/125 µm single-mode fiber
Transmit average power range:
Minimum –15 dBm
Maximum –8 dBm
Receiver average power range:
Minimum –28 dBm
Optical power budget:
13 dB
5720-15 ATM media dependent adapter
A-4
Port connector type:
Shielded RJ-45 modular jack
Cable type:
EIA Category 5 UTP
Maximum cable run:
328 ft (100 m) including all patch cables, panels,
and connectors
893-01047-A
Appendix B
Cables
This appendix provides cable wiring information for ATMSpeed/155 MCP and
ATMSpeed/155 MDA MCP module port connections. The following connections
are described:
•
10BASE-T Ethernet MCP connections: UTP crossover cable
•
Serial MCP connections: male Mini DIN 8 to male DB-25 cable and
female DB-25 to female DB-9 adapter
Either port can be used to manage a Centillion 100 switch.
10BASE-T Ethernet MCP Connections
Figure B-1 provides pin numbers for an RJ-45 connector.
12345678
4026
Figure B-1.
893-01047-A
RJ-45 connector pin numbers
B-1
Using the Centillion 100 ATMSpeed/155 Switch Modules and Media Dependent Adapters
Figure B-2 shows a 10BASE-T Ethernet UTP crossover cable used for a direct
Ethernet connection to the MCP modules.
TD+ 1
1 TD+
TD- 2
2 TD-
RD+ 3
3 RD+
Unused 4
4 Unused
Unused 5
5 Unused
RD- 6
6 RD-
Unused 7
7 Unused
Unused 8
8 Unused
6740.1
Figure B-2.
10BASE-T Ethernet UTP crossover cable
Serial MCP Connections
The Centillion 100 chassis package includes a male Mini DIN 8 to male DB-25
cable and a female DB-25 to female DB-9 adapter for serial MCP connections.
These cables are described in this section.
Male Mini DIN 8 to Male DB-25 Cable
Figure B-3 shows the pin numbers for a Mini DIN 8 connector.
7
6
8
4
3
5
1
2
6741.1
Figure B-3.
B-2
Mini DIN 8 connector pin numbers
893-01047-A
Cables
Table B-1 shows the connections for a male Mini DIN 8 to male DB-25 cable.
Table B-1.
Male Mini DIN 8 to male DB-25 cable
Male Mini DIN 8
pin numbers
Signal
Male DB-25
pin numbers
2
Data terminal ready
20
3
Transmit data
3
4
Signal ground
7
5
Receive data
2
Signal ground
7
1 - Not connected
6 - Not connected
7 - Not connected
8
Female DB-25 to Female DB-9 Adapter
Table B-2 shows the connections for a female DB-25 to female DB-9 adapter.
Table B-2.
893-01047-A
Female DB-25 to female DB-9 adapter
Female DB-25
pin numbers
Signal
Female DB-9
pin numbers
8
Data carrier detect
1
3
Receive data
2
2
Transmit data
3
20
Data terminal ready
4
7
Signal ground
5
6
Data set ready
6
4
Request to send
7
5
Clear to send
8
22
Ring indicator
9
B-3
Using the Centillion 100 ATMSpeed/155 Switch Modules and Media Dependent Adapters
Model 5720-x MDA Connections
The connector and pin assignments for an MDA 10BASE-T port are listed in
Table B-3.
Table B-3.
Model 5720-x 10BASE-T port pin assignments*
RJ-45 connector port
12345678
4026
Pin #
Signal
1
RX +
2
RX –
3
Not used
4
Not used
5
Not used
6
Not used
7
TX +
8
TX -
* Legend:RX = Receive Data InputTX = Transmit Data Output
B-4
893-01047-A
Index
Numbers
10BASE-T port, 1-8, 2-18
A
applications, examples, 3-1
ATM
applications, 3-1
backplane, 1-8
connectivity, 1-8, 1-9
standards compatibility, A-1
B
backplane
Centillion ATM, 1-8
connecting a module, 2-4
disengaging a module, 2-21
seating connectors, 2-5
Bay Networks Press, xvii
BootP, 1-9
C
cables
crossover, UTP, 2-16, B-1
serial MCP, 2-16, B-2
compliance, UNI 3.0 and 3.1, 1-9
configuration, default, 3-3
connecting
cables to MDA, 2-12
cables to SC ports, 1-8
Ethernet ports, 1-8
serial ports, 1-8
connecting Centillion 100 switches, 3-1
connectors
Mini DIN 8, 1-5, 1-6, B-2
OC-3, 1-4, 1-5
RJ-45, 1-3, 1-4, 1-7, 2-12, 2-16
RJ–45, B-1
SC, 1-3, 1-4, 1-7, 1-8, 2-13, 2-15, 3-2
conventions, xv
customer support
programs, xviii
Technical Solutions Centers, xviii
D
data rate, A-1
default configuration, ports, 3-4
dimensions, module, A-2
E
electrical specifications, A-2
electromagnetic emissions, A-3
environmental specifications, A-2
Ethernet port, 1-5, 1-6, 1-8, 2-18
Ethernet port connection
pin assignments, B-1
F
fault tolerance, 1-9
features
ATM standard support, 1-8
fault tolerance, 1-9
hot-swapping, 1-9
network management support, 1-9
flash memory, A-2
893-01047-A
Index-1
H
interface options, A-2
module
connectors, 1-4, 1-5, 1-8, 3-2
dimensions, A-2
features, 1-8
functional description, 1-2
installing, 2-2
LED display, 1-8, 2-17
MDA installing, 2-5
physical description, 1-2
port connectivity features, 1-8
removing and replacing, 2-21
types, 1-2, 1-4
verifying installation, 2-17
intermediate ATM switches, 3-2
multimode fiber ports, 1-4, 1-5
L
N
LAN emulation station, 3-3
network management
BootP, 1-9
SNMP, 1-9
SpeedView, 1-9
TFTP, 1-9
hot-swapping, 1-9, 2-2
I
IISP, 1-9
In Service LED, 2-20, 3-1, 3-2
installation, verifying, 2-17
installing
MDA, 2-5
switch module, 2-2
LED display
definitions, 2-18, 2-19
description, 1-8, 2-17
In Service, 2-20, 3-1, 3-2
startup sequence, 2-20
network management station, 1-5, 1-6
loop timing parameter, 3-3, 3-4
network timing parameter, 3-4
M
P
MCP
Ethernet connection, 1-5, 1-6, 2-16, B-1
functions, 1-2
physical description, 1-5, 1-6
serial connection, 1-5, 1-6, 1-8, 2-15, B-2
performance specifications, A-3
MDAs
cable connection, 2-12
combining, 1-7
installing, 2-5
on an MDA host module, 1-5
physical description, 1-7
replacing, 2-9
types, 1-7
media dependent adapter. See MDA
memory
DRAM, A-1
flash, A-2
technical specifications, A-1
Index-2
physical specifications, A-2
pin assignments
female DB-9 adapter, B-3
Mini DIN 8 connector, B-2
RJ-45 connector, B-1
port
10BASE-T, 1-5, 1-6, 1-8, 2-18
default configuration, 3-3
Ethernet, 1-5, 1-6, 1-8, 2-18
features, 1-8
multimode fiber, 1-4, 1-5
serial, 1-5, 1-6
single-mode fiber, 1-4
port-to-port switching, 1-8
power consumption, A-2
893-01047-A
protocol
BootP, 1-9
IISP support, 1-9
TFTP, 1-9
publications
ordering, xvii
related, xvii
R
related publications, xvii
removing
module, 2-21
replacing
MDA, 2-9
module, 2-23
S
safety agency approvals, A-4
SC connectors, 1-8, 2-15, 3-2
scrambling, 3-4
scrambling parameter, 3-4
serial port connection
MCP description, 1-5, 1-6
pin assignments, B-2
single-mode fiber port, 1-4
SNMP agent, 1-9
SpeedView
description, 1-9
enabling/disabling ports, 2-17
management station connection, 2-15
standards, ATM, A-1
T
Technical Solutions Centers, xix
TFTP, 1-9
U
UNI 3.0 and 3.1 compliance, 1-9
V
verifying installation, 2-17
893-01047-A
Index-3