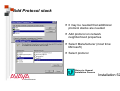
1
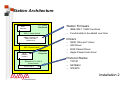
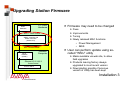
Module contents Upgrading Station Firmware Driver installation - overview Installation of Client Manager Client station installation ISA adapter installation PCI adapter installation PC Card installation USB Client installation PC Card parameter settings Adding protocol stack Operating the diagnostic tools Installation 1 Station Architecture Radio Radio Hardware Hardware PC-Card PC-Card Hardware Hardware 802.11 frame format WMAC controller with WMAC controller with Station Firmware Station Firmware (WNIC-STA) (WNIC-STA) 802.3 frame format Driver Driver Software Software (STADr) (STADr) Platform Platform Computer Computer Ethernet V2.0 / 802.3 frame format Protocol Stack Protocol Stack Station Firmware – IEEE 802.11 MAC functions – Functionality to be added over time Drivers – – – – NDIS “Mini-port” driver ODI Driver DOS Packet Driver Apple Power book driver Protocol Stacks – TCP/IP – NETBEUI – IPX/SPX Installation 2 Upgrading Station Firmware Radio Radio Hardware Hardware PC-Card PC-Card Hardware Hardware 802.11 frame format WMAC controller with WMAC controller with Station Firmware Station Firmware (WNIC-STA) (WNIC-STA) 802.3 frame format Driver Driver Software Software (STADr) (STADr) Platform Platform Computer Computer Ethernet V2.0 / 802.3 frame format Protocol Stack Protocol Stack Firmware may need to be changed Fixes Improvements Tuning Newly released MAC functions • Power Management • IBSS User can perform update using socalled “WSU” utility Made available via web site, to allow field upgrades Products leaving factory always upgraded to most recent version Downgrading possible if previous version of Utility has been kept Installation 3 Upgrading Station Firmware Download “WSU.EXE” Utility from web-site Execute WSU Utility (e.g. double click the Icon in the Windows explorer) Network connection will be lost; system may need re-boot, or PC Card may need to be ejected and re-inserted Installation 4 Module contents Upgrading Station Firmware Driver installation - overview Installation of Client Manager Client station installation ISA adapter installation PCI adapter installation PC Card installation USB Client installation PC Card parameter settings Adding protocol stack Operating the diagnostic tools Installation 5 Driver Installation / configuration Windows 95, Windows/NT Install Hardware (ISA card, PCI card, PC Card) PC Card is recognized when inserted Parameters to be changed in Network Neighborhood properties Uses Miniport driver NOVELL Uses ODI driver (also used by Windows for Workgroup) Parameters in NET.CFG DOS Packet driver Installation 6 Installation for non- windows based systems For example: Novell clients, Windows for Workgroup Edit (if needed) configuration and ini files such as: Autoexec.bat Config.sys Net.cfg (for Novell Netware users) protocol.ini (for Windows for Workgroups) For details consult the Avaya Wireless PC Card manual or quick installation manual Installation 7 Module contents Upgrading Station Firmware Driver installation - overview Installation of Client Manager Client station installation ISA adapter installation PCI adapter installation PC Card installation USB Client installation PC Card parameter settings Adding protocol stack Operating the diagnostic tools Installation 8 Installing the Client Manager As of release 6.2 New software will be delivered on CD-ROM using browser to navigate CD-ROM contains: Driver software (PC Card, PCI, ISA) for Win 95/98/NT/2000, CE, MSDOS, Linux, MAC Utility software (AP Manager, EC Manager, Client Manager, RG Setup utility) PC Card firmware Install Client Manager by selecting the appropriate button Installation 9 Client Manager Icon (also displays RF status) Former CQI (release 6.0) is integrated in the Client Manager. When started Client Manager displays itself by Icon on the task bar, indicating RF status: Color Number of columns Right-click on icon presents Client Manger menu Starting the client manager Selecting/changing a profile Asking for version data Installation 10 Module contents Upgrading Station Firmware Driver installation - overview Installation of Client Manager Client station installation ISA adapter installation PCI adapter installation PC Card installation USB Client installation PC Card parameter settings Adding protocol stack Operating the diagnostic tools Installation 11 PC Card Installation Preparations Radio Radio Hardware Hardware PC-Card PC-Card Hardware Hardware 802.11 frame format WMAC controller with WMAC controller with Station Firmware Station Firmware (WNIC-STA) (WNIC-STA) 802.3 frame format Driver Driver Software Software (STADr) (STADr) Platform Platform Computer Computer Ethernet V2.0 / 802.3 frame format Protocol Stack Protocol Stack Obtain PC Card Hardware Make sure manual is available Make sure Windows CAB files are accessible CD-ROM On hard-disk in “options” sub-directory Obtain values for advanced parameter from Network administrator: Network name Distance between APs Transmit rate Installation 12 PC Card Installation General process Install PC-Card converter module Desktop PC Laptop PC ISA adapter Win/95/98 Win/NT4 USB Client PCI adapter Win/95 Win/98 Win/NT4 Install PC-Card and driver Win/95/98 Win/NT4 Set PC-Card parameters Click on the boxes to jump to installation details Add protocol stack Proceed to diagnostics Installation 13 Module contents Upgrading Station Firmware Driver installation - overview Installation of Client Manager Client station installation ISA adapter installation PCI adapter installation PC Card installation USB Client installation PC Card parameter settings Adding protocol stack Operating the diagnostic tools Installation 14 Install ISA adapter Windows 95/98 Install the ISA card without the Avaya Wireless PC Card inserted, in an available slot The ISA card itself is not “plug and play” Activate “Control Panel” and select “Add New Hardware” Do not let Windows detect the presence of new hardware but select “no” Installation 15 Install ISA adapter Windows 95/98 In the device list select PCMCIA socket From the manufacturers list select Intel Select the Intel PCIC compatible PCMCIA controller Complete the installation of the ISA card and check the device manager for resource conflicts Change board strapping if needed to avoid IO-Base conflict Return to General Installation Process Installation 16 Install ISA adapter Windows NT4 Install the ISA card without the Avaya Wireless PC Card inserted, in an available slot The ISA card itself is not “plug and play” Activate “Control Panel” and select “Add New Hardware” Installation 17 Install ISA adapter Windows NT4 Insert ISA Card adapter in your PC Introduce ISA Card to the OS of your system Double click “devices” select PCMCIA set startup type “boot” Restart PC Return to General Installation Process Installation 18 Module contents Upgrading Station Firmware Driver installation - overview Installation of Client Manager Client station installation ISA adapter installation PCI adapter installation PC Card installation USB Client installation PC Card parameter settings Adding protocol stack Operating the diagnostic tools Installation 19 PCI Adapter installation General considerations Requires installation of the “PCI-to-PC Card” converter card (sometimes referred to as “PCI-PCMCIA Bridge” or “PCI Swapbox”) Once the PCI Swapbox is installed the Avaya Wireless PC Card can be inserted in the PCMCIA slot (similar to ISA installation) Success of installation of the PCI Swapbox depends on: Type of PC Hardware Operating System Version level of BIOS Installation 20 PCI Adapter installation Success factors for PCI swapbox installation Type of Hardware: New desktops with only PCI slots: • no incompatibility issues to be expected (exception for systems that have only PCI slots for reasons of size limitations) Desktops with mixture of PCI and ISA slots: • BIOS needs to be of certain level (see below) BIOS level: Needs to be PCI version 2.2 compliant List of certified Hardware will be compiled throughout life-cycle based on tests and customer feedback Installation 21 PCI Adapter installation Success factors for PCI swapbox installation Operating system: Windows 98 and Windows ME, will recognize the card and installation is straightforward Windows 95 requires the use of a different PCMCIA.INF file (provided separately by Agere Systems). Windows 2000 requires Service Pack 1 to be installed, plus the addition of an entry in the registry and Windows NT4 require installation of Enabler programs (provided by Agere Systems) or the use of 3rd part software such as Softex Installation 22 PCI Adapter installation System assessment chart for PCI Swapbox Assess Assess Hardware Hardware Mix of ISA and PCI slots Assess Assess BIOS BIOS version versionlevel level PCI slots Only Windows 98 Windows ME Swapbox Swapbox autodetected autodetected Assess Assess Operating Operating System System Windows 2000 Run RunSP1 SP1&& add addnew newkey key totoregistry registry Version 2.2 or higher Windows 95 Lower then Version 2.2 No Nosuccess success expected expected Windows NT4 Use Useenabler enabler ororSoftex Softex Use Usenew new PCMCIA.INF PCMCIA.INF file file Installation 23 PCI Adapter installation List of PCs that are tested for compliance Brand Desktop PC Model Compaq Presario 5547 Compaq Presario 5600i Compaq Deskpro 200 Dell Dimension L 500 C Dell Dimension XPS 350 Dell Dimension XPS 450 Dell Dimension XPS 500 Dell Dimension XPS 600 Hitachi FLORA Prius 330 Fujitsu FMV-6450CL3 No name (motherboard) Intel 440 BX No name (motherboard) Intel 440 GX Siemens Nixdorf Scenic 800 IBM 300PL 6862-340 Fujitsu Myrica HP Vectra Vli8 MT AOpen Operating System Win 98 Win 98 Win 98 Win 98/NT4 Win 98/NT4 Win 98/NT4 Win 98/NT4 Win 98/NT4 Win NT4 JP Win NT4 JP Win 98 Win 98 Win 98 Win NT4 Win 98 Win NT4 Linux 2.2.13 List of certified PCs is expected to grow Readme.txt file will contain up to date list of certified PCs Return to General Installation Process Installation 24 PCI Adapter Installation Windows 98 Install the PCI card without the Avaya Wireless PC Card inserted, in an available slot The PCI card itself is “plug and play” Windows 98 will detect the adapter and start the installation Follow instructions on the screen and re-boot when advised Verify the settings in the device Manager (see capture left) Return to General Installation Process Installation 25 PCI Adapter Installation Windows 95 Install the PCI card without the Avaya Wireless PC Card inserted, in an available slot The PCI card itself is “plug and play” and will auto-detect the card, and the driver for the generic PCIC controller is installed Copy the file PCMCIA.INF provided by Agere Systems to the sub-directory windows\inf Installation 26 PCI Adapter Installation Windows 95 Reboot the PC Proceed to Device Manager, select the PCIC controller and update the driver (Windows will locate the new .INF file) Restart the PC Windows now installed the correct TI1410 Cardbus controller Return to General Installation Process Installation 27 PCI Adapter Installation Windows/NT 4.0 - Hardware & PCI-Enabler If possible use a 3rd part Card Manager such as Softex. Alternatively install the Enabler as provided by Agere Systems: Verify that Service Pack 4.0 is installed Install the PCI card without the Avaya Wireless PC Card inserted, in an available slot Start the system and log in as “Administrator” Insert installation diskette in a the floppy disk drive. Execute the “Setup.exe” program that is on the installation diskette Follow the instructions on the screen and restart the system Installation 28 PCI Adapter Installation Windows/NT 4.0 - Card and Socket Services On the Control Panel select “Devices” From the device list select “PCMCIA” Click the “Startup” button on the right side of the list Set the Start-up type for the PCMCIA device to “Boot” Close the window (select OK) and reboot Return to General Installation Process Installation 29 Module contents Upgrading Station Firmware Driver installation - overview Installation of Client Manager Client station installation ISA adapter installation PCI adapter installation PC Card installation USB Client installation PC Card parameter settings Adding protocol stack Operating the diagnostic tools Installation 30 Install PC Card and driver Windows 95/98 Remove a previous version of the Avaya Wireless PC Card driver (I.e. older PC Card driver) Remove from network configuration Delete any Avaya Wireless related driver files left in the “System” and “Inf” subdirectories (no longer needed for release 5.0 and higher) Insert the Avaya Wireless PC Card in PCMCIA slot Switch on PC, if not already switched on PC Card is “plug and play” Windows 95/98 will report PC Card as new hardware detected. If not activate “Control Panel” and select “Add New Hardware” Do not prematurely cancel process as an entry for the card is made in the registry before the driver is installed. Installation 31 Install PC Card and driver Windows 95/98 Windows reports detection of PC Card Follow instructions on screen When asked for the Avaya Wireless PC Card driver please insert diskette (or CD-ROM) and follow instructions If the driver has been downloaded and stored on disk, browse to the subdirectory on the disk Installation 32 Install PC Card and driver Windows 95/98 After driver installation Windows will install network software System will ask for CAB files Please insert CD ROM or browse to the directory with the CAB files Return to General Installation Process Installation 33 Install PC Card and driver Windows NT4 Verify IRQ setting Windows NT diagnostics screen Resources screen select IRQ and find free value Installation 34 Install PC Card and driver Windows NT4 Verify I/O port Setting Windows NT diagnostics screen Resources screen select I/O ports and find free value Installation 35 Install PC Card and driver Windows NT4 Verify PC Card Memory Windows NT diagnostics screen Resources screen select memory and check values • Avaya Wireless default 000D8000 - 000D8FFF • For alternative values check Avaya Wireless PC Card manual Installation 36 Install PC Card and driver Windows NT4 Insert PC Card in PCMCIA slot Switch on PC, if not already on System will automatically detect card Follow instruction If system does not detect the card select control panel select devices follow instructions as above Installation 37 Install PC Card and driver Windows NT4 Windows reports detection of PC Card Follow instructions on screen When asked for the Avaya Wireless driver please insert diskette and follow instruction If the driver has been downloaded and stored on disk, browse to the sub-directory on the disk Note: when installing newer version of the driver assure to remove the old driver files from the “windows/system sub-directory” to assure that Windows selects the new driver and not the old one (see readme.txt file) Return to General Installation Process Installation 38 Module contents Upgrading Station Firmware Driver installation - overview Installation of Client Manager Client station installation ISA adapter installation PCI adapter installation PC Card installation USB Client installation PC Card parameter settings Adding protocol stack Operating the diagnostic tools Installation 39 Avaya Wireless USB Client Have the USB Client Driver software accessible by the OS Connect the Avaya Wireless USB Client to the PC Windows will detect the Avaya Wireless USB Client as new hardware and start its wizard Alternatively select Add New hardware from the Control Panel Direct the wizard to the location of the driver files Installation 40 Avaya Wireless USB Client Follow the instructions on the screen: Provide the requested driver parameters Restart the computer if requested After Installation USB Client is available in the network configuration Return to General Installation Process Installation 41 Module contents Upgrading Station Firmware Driver installation - overview Installation of Client Manager Client station installation ISA adapter installation PCI adapter installation PC Card installation USB Client installation PC Card parameter settings Adding protocol stack Operating the diagnostic tools Installation 42 Set PC Card parameters Profiles Up to four driver profiles can be defined each having their profile specific parameters Activating a profile is done by clicking the associated button Three basic modes of operation: Access Point Residential Gateway Peer-to-Peer (IBSS) Switching between profiles is dynamic (no re-boot required) Installation 43 Set PC Card parameters Basic Network name (SSID) needs to be the same for all AP’s that make out the network If “ANY” is entered, station will associate to the AP with best communications link, if that AP is not “closed” Installation 44 Set PC Card parameters Encryption Enable/disable WEP encryption using tick box Identify up to four WEP keys: ASCII string • Max. 5 characters for Silver Cards • Max 13 characters for Gold Cards Hexadecimal string • Max 10 characters for Silver Cards • Max 26 characters for Gold Cards Identify the transmit key by selecting it from the drop-down list Installation 45 Set PC Card parameters Advanced Enable/disable Card Power Management, by selecting the appropriate radio button Enable/disable Interference Robustness (Microwave Robustness), by selecting the appropriate radio button Enable Medium reservation (RTS/CTS), by selecting the appropriate radio button (has to match setting in the AP) Installation 46 Set PC Card parameters Admin Distance between Access Points: large for low bandwidth requirement small for high bandwidth requirement Parameters needs to match the setting on the APs Select factory installed (default) MAC address or user assigned Installation 47 Parameter settings for RG mode Basic For Residential Gateway profiles just one tab is present: Network name (ID on the back of the RG-1000); pre-set in the RG1000, cannot be altered Encryption key (default being the last 5 digits of the ID); can be altered on the RG-1000 Installation 48 Parameter settings for IBSS mode Basic name (SSID) of the network that needs to be joined or created Encryption can be switched on but only one key can be selected. Installation 49 Set PC Card parameters Re-setting the parameters Control Panel Applet Configuration window activated from “Avaya Wireless applet” on Control Panel Client Manager Icon Resides on System Tray in task bar Right-click pops up menu; selecting Configuration Profile displays configuration window Return to General Installation Process Installation 50 Module contents Upgrading Station Firmware Driver installation - overview Installation of Client Manager Client station installation ISA adapter installation PCI adapter installation PC Card installation USB Client installation PC Card parameter settings Adding protocol stack Operating the diagnostic tools Installation 51 Add Protocol stack It may be needed that additional protocol stacks are needed Add protocol on network neighborhood properties Select Manufacturer (most time: Microsoft) Select protocol Return to General Installation Process Installation 52 Module contents Upgrading Station Firmware Driver installation - overview Installation of Client Manager Client station installation ISA adapter installation PCI adapter installation PC Card installation USB Client installation PC Card parameter settings Adding protocol stack Operating the diagnostic tools Installation 53 New Client Manager Icon (also displays RF status) Former CQI (release 6.0) is integrated in the Client Manager. When started Client Manager displays itself by Icon on the task bar, indicating RF status: Color Number of columns Right-click on icon presents Client Manger menu Starting the client manager Selecting/changing a profile Connecting an modem line on the RG-1000 Asking for version data Installation 54 New Client Manager Icon Interpreting the Icon The Client Manager Icon on the task bar can take different shapes and colors Use “help” to obtain information on how to interpret the icon Installation 55 New Client Manager (version information) Version information important for diagnostic purposes. Identifies version of Client Manager Utility SW PC Card driver PC Card Hardware PC Card Firmware Installation 56 Avaya Wireless Client Manager Windows 95/NT/98/2000 Can be started from the Start Menu or via task-bar Icon Integrates diagnostic functions and PC Card configuration setting Welcome screen shows general status: Network name Link Qualification AP name (if applicable) Channel Encryption status Installation 57 Avaya Wireless Client Manager (profile selection) Current profile is identified on welcome screen Other profile can be selected from the drop down list that holds available profiles Installation 58 Avaya Wireless Client Manager (profile selection) Alternatively profiles can be selected from the “Actions” item on the menu bar “Actions” item also holds capability to add or change a configuration profile Installation 59 Avaya Wireless Client Manager (Diagnostic functions) Diagnostic functions are available via the “Advanced” item on the menu bar: PC Card diagnostics RF Link test Site Monitor Installation 60 Avaya Wireless Client Manager (Diagnostic functions) Card Diagnostics runs a series of tests on different elements of the communication HW and SW to check the integrity of the device For support purposes a report can be generated Installation 61 Avaya Wireless Client Manager (Diagnostic functions) RF link test is the single most important test to verify the quality of the wireless link between two stations In AP mode link test is always between client station and AP In peer to peer mode link test is executed between client station and another client to be selected from a list of explored stations Test results show snapshot readings of SNR, Signal and Noise and indication of attainable data-rate Installation 62 Avaya Wireless Client Manager (Diagnostic functions) History test shows selected values over time Values to be displayed can be selected from drop list: SNR Signal and Noise (two separate lines) Ranges for Noise, Signal or SNR Very useful to detect noise spikes Installation 63 Avaya Wireless Client Manager (Diagnostic functions) Test results can be logged to disk for later analysis User identified file Manual logging (on user command) Automatic logging (after every x seconds) Continuous logging Installation 64 Avaya Wireless Client Manager (Diagnostic functions) Site monitor allows a user to “see” all APs with the same network name, from a location. Display to be configured by the user by selecting items to show from drop down list AP names can be assigned to locate APs easily. Names are maintained in file aplist.txt in association with the MAC address of the PC Card in the AP Can be created by editing or using AP names discovery function Installation 65 Module Summary Upgrading Station Firmware Driver installation - overview Installation of Client Manager Client station installation ISA adapter installation PCI adapter installation PC Card installation USB Client installation PC Card parameter settings Adding protocol stack Operating the diagnostic tools Installation 66