1
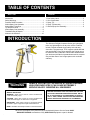
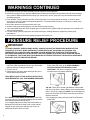
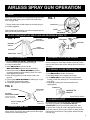
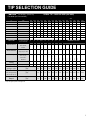
®
AIRLESS Spray Gun
SERVICE/OPERATION
MANUAL
AIRLESSCO
Prolight Contractor Series
Flat Handle Spray Gun
001-664 OCT 08
TABLE OF CONTENTS
SECTION
FIGURE
Introduction
Safety Warnings ................................................................ 1
Pressure Relief Procedure ................................................ 2
Airless Spray Gun Operation ............................................ 3
Airless Spray Technique.................................................... 4
Tip Selection Guide ........................................................... 6
Airless Spray Gun Assembly............................................. 8
Troubleshooting & Repairs ................................................ 9
Airlessco Accessories ......................................................10
1. Gun Safety Latch........................................................... 3
2. Gun Components .......................................................... 3
3. Spray Tip ....................................................................... 3
4. Spray Tip Assembly ...................................................... 3
5. Airless Spray Gun Assembly......................................... 8
INTRODUCTION
The Airlessco Prolight Contractor Series gun is designed
to be very light-weight for all day user comfort. Features
include a thumb actuated trigger safety lock and easyclean filter. The extra large, 3/16” tungsten carbide ball and
seat provide BOTH long wear and allow the Prolight gun to
be used with heavy materials. Uses durable stainless steel
(not aluminum) threads for tip attatchments and its compact
size provides ease of use in tight spaces such as inside
cabinetry.
WARNING
HANDLE THIS UNIT AS YOU WOULD A LOADED FIREARM!
HIGH PRESSURE SPRAY CAN CAUSE EXTREMELY
SERIOUS INJURY. OBSERVE ALL WARNINGS!
MANUAL NOTATIONS
WARNING - Alerts user to avoid or correct conditions that
could cause bodily injury.
CAUTION - Alerts user to avoid or correct conditions that
could cause damage to or destruction of equipment.
BEFORE OPERATING THIS UNIT, READ AND FOLLOW
ALL SAFETY WARNINGS AND INSTRUCTIONS RELATED TO THE USAGE OF THIS EQUIPMENT ON PAGES 1
AND 2. READ, LEARN, AND FOLLOW THE PRESSURE
RELIEF PROCEDURE ON PAGE 2 OF THIS MANUAL.
IMPORTANT - Alerts users to steps or procedures that are
essential to proper equipment repair and maintenance.
NOTE - Identifies essential procedures or extra information.
All Service Procedures to be performed by an Authorized Airlessco Service Center ONLY.
NO MODIFICATIONS or alterations of any AIRLESSCO Equipment or part is allowed.
2
WARNINGS
INJECTION HAZARD
Fluids under high pressure from spray or leaks can
penetrate the skin and cause extremely serious injury,
including the need for amputation.
NEVER point spray gun at anyone or at any body part.
NEVER put hand or fingers over the spray tip. Do not use
rag or other materials over your fingers. Paint will penetrate
through material and into the hand.
NEVER try to stop or deflect leaks with your hand or body.
NEVER wipe off build up around the spray tip.
ALWAYS remove the tip from the gun to clean it, after
following the PRESSURE RELIEF PROCEDURE!
NEVER operate spray gun under pressure without spray tip
ALWAYS remove tip from the gun to clean it.
NEVER try to "blow back" paint, it’s not an air sprayer.
MEDICAL TREATMENT
If any fluid appears to penetrate your skin, get
EMERGENCY CARE AT ONCE.
DO NOT TREAT AS A SIMPLE CUT.
• Go to an emergency room immediately.
• Tell the doctor you suspect an injection injury.
• Tell him what kind of material you were spraying with
and have him call for instructions at NATIONAL POISON
CENTER NETWORK (412) 681-6669
SPRAY GUN SAFETY
ALWAYS set safety lock on the gun in "LOCKED" position
when not in use and before servicing or cleaning.
DO NOT remove or modify any part of gun.
CHECK operation of gun safety devices before each use.
NEVER work on gun when connected to hose.
Be very careful when removing hose or spray tip from gun.
A plugged line contains fluid under pressure. If tip or line
is plugged, follow the Pressure RELIEF PROCEDURE for
the pump you’re using
CLEANING
Refer to pump manufacturer’s recommendation for
cleaning system. Release pressure from pump and hose,
remove spray tip and flush with lowest possible pressure.
GENERAL PRECAUTION
NEVER alter equipment in any manner.
NEVER use around children.
NEVER allow another person to use sprayer.
ALWAYS wear a spray mask while spraying.
NEVER LEAVE SPRAYER UNATTENDED WITH
PRESSURE IN THE SYSTEM. FOLLOW PRESSURE
RELIEF PROCEDURES ON PAGE 2.
TIP GUARD
NEVER operate gun without tip guard attached.
NEVER modify or alter tip guard.
NEVER use Airlessco tip guard on other attachments.
Airlessco’s tip guard is designed for use with standard
spray tips only. When using other than standard spray tips,
consult manufacturer of such attachment for recommended
tip guard & safety instructions.
SPRAY TIP SAFETY
Use extreme caution when cleaning or changing spray tips.
If spray tip clogs while spraying, engage gun safety latch.
ALWAYS follow PRESSURE RELIEF PROCEDURE
before removing spray tip to clean it.
FIRE EXPLOSION WARNING
SPRAYING VAPORS + STATIC SPARKING = FIRE/EXPLOSION
PREVENT FIRE AND EXPLOSION BY REDUCING STATIC SPARKING AND ELIMINATING VAPORS
ALWAYS be sure all equipment, paint bucket and object
being sprayed are properly grounded. ALWAYS ground
sprayer, gun, paint bucket and object being sprayed. Be
sure gun is grounded through hose connection.
NEVER spray in closed area. Ventilation must be
adequate to remove vapors.
NEVER keep flammable materials in spray area.
NEVER spray highly flammable liquids.
ALWAYS use high pressure conductive hoses with static
wire approved for 3000 psi. Never exceed 500 ft. of hose.
NEVER SMOKE IN SPRAYING AREA.
ALWAYS ensure properly maintained fire extinguishing
equipment is available.
NEVER spray in vicinity of open flame or other sources of
ignition such as water heaters and furnaces.
ALWAYS locate the sprayer and electrical outlets in use at
least 25 feet away from spray area in well ventilated area.
Do not plug in any electrical cords in spray area. Follow
the coating and solvent manufacture’s safety precautions
and warnings.
HALOGENATED HYDROCARBON WARNING:
NEVER use halogenated hydrocarbon (HHC) solvents
or paints that contain them in this system. Some of the
most common of these solvents are: Carbontetrachloride,
Chlorobenzene, Dichloroethane, Dichloroethyl Ether, Ethyl
bromide, Ethylchloride, Tetrachloethane.
FLUSHING AND CLEANING CAN CREATE STATIC SPARKING IF DONE IMPROPERLY!
NEVER spray solvents under pressure through spray tip.
Follow PRESSURE RELIEF PROCEDURE and
remove spray tip for cleaning.Use LOWEST POSSIBLE
PRESSURE when flushing and cleaning.
Hold gun against metal container to reduce spark chance.
NEVER use cleaning solvents with flash points below 140
degrees F. Some of these are: acetone, benzene, ether,
gasoline, naphtha. Consult your supplier to be sure.
1
WARNINGS CONTINUED
● High pressure spray can cause extremely serious injuries such as amputation.
● Handle the spray gun as you would a loaded firearm!! Read and understand all instruction manuals, tags, warnings,
users guides & labels supplied with the spray gun, airless pump, hoses, spray tips & any other attachments before
operating equipment.
● Learn & follow “Pressure Relief Procedure” of the equipment in use. Never attempt to change or clean the spray
tip or service unit & gun without first releasing pressure. If “Pressure Relief Procedure” is not known, contact pump
manufacturer for instruction.
● Never leave pressure in the system while not in use.
● Airlessco spray guns are designed for use with Airlessco spray tips only.
● If any other attachments are used, the spray gun is considered to be modified and safe operation is now limited to the
safety of the attachment.
● For safe renting of airless equipment, use rental instructions, warnings and forms supplied by airless pump
manufacturer.
● Be sure that all safety devices are operating properly before each use.
PRESSURE RELIEF PROCEDURE
!
IMPORTANT!
TO AVOID POSSIBLE SERIOUS BODY INJURY, ALWAYS FOLLOW THIS PROCEDURE WHENEVER THE
SPRAYER IS SHUT OFF, WHEN CHECKING IT, WHEN INSTALLING, CHANGING OR CLEANING TIPS,
WHENEVER YOU STOP SPRAYING, OR WHEN YOU ARE INSTRUCTED TO RELIEVE THE PRESSURE.
RELIEVING PRESSURE WILL BE DIFFERENT FOR EVERY BRAND OF AIRLESS PAINT SPRAYER, REFER
TO THE MANUAL THAT CAME WITH YOUR MACHINE TO RELIEVE PRESSURE. FOR AIRLESSCO BRANDED
MACHINES, USE THE PROCEDURE BELOW.
1. Engage the gun safety latch. Refer to the separate
instruction manual provided with your gun on its safety
features and how to engage safety latch.
2. Turn the unit off.
3. Disengage the gun safety latch and trigger the gun to
relieve residual fluid pressure.
4. On Airlessco Model Paint Sprayers turn Prime/Pressure
Relief Valve (PR Valve) to the OPEN (PRIMING)
POSITION TO RELIEVE RESIDUAL FLUID
PRESSURE. (PR Valves on sprayers made by other
manufacturers may operate differently.)
HOLD METAL PART OF THE GUN IN CONTACT WITH
GROUNDED METAL PAIL. USE MINIMUM PRESSURE !
100-180
119-083
100-180: There will be a wider gap between valve handle
and cam body when in open position. In the closed position
there is only a very slight gap. NOTE: The valve handle can
move both clockwise and counter clockwise and can face
different directions.
If the SPRAY TIP OR HOSE IS CLOGGED, follow Step
1 through 5 above. Expect paint splashing into the bucket
while relieving pressure during Step 4.
If you suspect that pressure hasn't been relieved due to
damaged Prime/Pressure Relief Valve or other reason,
engage the gun safety latch and take your unit to an
authorized Airlessco Service Center.
5. Re-engage gun safety latch and close Prime/Pressure
Relief Valve.
100-180
2
119-083
AIRLESS SPRAY GUN OPERATION
SPRAY
Attach spray gun to airless unit and tighten fittings securely.
Set the gun safety latch. (Also may be called gun safety
lock, or trigger lock)
* The gun safety latch should always be set when the gun
is not being triggered.
Read all warnings and safety precautions supplied with the
spray gun and in product manual.
FIG. 1
TRIGGER LOCK
LOCK
UNLOCK
MAJOR COMPONENTS OF SPRAY GUN AND REVERSIBLE SPRAY TIP
FIG. 2
GUN SAFETY
LATCH OR LOCK
FIG. 3
REV-TIP™
O-RING GASKET
REV-GUARD™
REVERSIBLE
SPRAY TIP
TIP GUARD
HANDLE
(FILTER INSIDE)
METAL SEAT
TRIGGER GUARD
SPRAY TIP ASSEMBLY
CLEANING FILTER IN GUN HANDLE
1. Be sure PRESSURE RELIEF PROCEDURE is followed
before assembling tip and housing to the gun.
2. Lock gun safety latch.
3. Insert REV-TIP™ cylinder into the
REV-GUARD™ (guard housing assembly).
4. Guide metal seat into REV-GUARD™ (guard
housing assembly) through retaining nut & turn until it
seats against the cylinder.
5. Insert O-Ring gasket on metal seat so it fits in the
grooves.
6. Finger tighten REV-GUARD™ retaining nut on gun.
7. Turn guard in the desired position.
8. Completely tighten the retaining nut.
FIG. 4
RETAINING NUT
TO REMOVE CLOGS FROM SPRAY TIP
1. Lock gun safety latch.
2. Turn REV-TIP™ handle 180 degrees.
3. Disengage trigger lock & trigger gun into pail.
4. If the REV-TIP™ handle appears locked (resists
turning), loosen the retaining nut. The handle will now
turn easily.
5. Engage gun safety latch & return handle to the
spray position.
RETAINING NUT
O-RING GASKET
Part # 561-026
REV-GUARD™
GUARD HOUSING ASSEMBLY
G Thread 7/8" 561-002
F Thread 11/16" 561-001
REV-TIP™ CYLINDER
Part # 561-XXX
To clean the filter, use a brush dipped in an appropriate
solvent. Change or clean filters at least once a day. Some
types of latex may require a filter change after four hours of
operation.
REVERSE TO
UNPLUG
Spray Position Shown
CLOGGED FLAT TIP
METAL SEAT
Part # 561-029
CLEANING SPRAY GUN
Immediately after the work is finished, flush the gun out
with a solvent. Brush pins with solvent and oil them lightly
so they will not collect dried paint.
Should the spray tip become clogged, relieve pressure
from hose by following the PRESSURE RELIEF
PROCEDURE. Secure gun with the safety latch, take
off guard, take out the tip, soak in appropriate solvent &
clean with a brush. (Do not use a needle or sharp pointed
instrument to clean the tip. The tungsten carbide is brittle
and can chip.)
3
SPRAY TECHNIQUE
Good Spray Gun Technique is at the core of any spray
paint operation. Operator skill and efficiency is as important
as good equipment and good paint. Good spray technique
is a skill that can be quickly learned by following these
simple instructions.
If you are not familiar with spraying techniques, we
recommend that you study this section of your manual and
practice the proper technique on pieces of cardboard or a
suitable surface.
Hold the spray gun 12 - 15 inches away from the work surface and keep it perpendicular (straight) to the surface. Move
the spray gun parallel to the work and at a right angle to the surface.
O FA
R
D ISTAN
E TO
C E TO O
FA R
ANC
D IST
CORRECT DISTANCE
KEEP PARALLEL TO SURFACE
Move the gun at a steady rate in order to apply a good
coverage. The wet coat should be just under the thickness
at which a run or sag will occur. Slow gun movement or
gun held too close will result in an overly wet or thick wet or
thick coat coverage that is likely to run or sag.
Do not wave the spray gun. This waving is called arching.
Instead, hold the spray gun at a 12 to 15 inch distance
perpendicular from the work.
4
The closer the spray gun is held to the work, the thicker the
paint is deposited and the faster the gun must be moved
to prevent sags and runs. Holding the gun too far from the
work will cause excessive fog, overspray, and a thin and
grainy coat.
SPRAY TECHNIQUE
TOTAL GUN MOVEMENT- ARM MOVEMENT - FULL SWEEP
TRIGGER
POINT
TRIGGER
POINT
THE ACTUA
It is important to “trigger” the gun after gun movement
(arm movement) has started and release trigger (shut gun
off) before gun movement ends. Gun movement is always
longer than actual paint (spray) stroke. In that manner, even
blending and uniform paint coat thickness is achieved over
the entire surface. When the gun is in motion as the trigger
is pulled, it deposits an even amount of paint.
Overlap the previous pass by half the width of the spray
pattern. Aim at the bottom of the previous pass.
TAILING
OK E
FOR EVEN PAINT COAT,OVERLAP
HALF THE WIDTH OF EACH PAINT STROKE
Spray with uniform strokes from left to right and from
right to left, holding stroke speed, distance, lapping, and
triggering as uniform as possible.
GOOD PATTERN
Adjust pressure control knob so that paint is completely
atomized from the spray gun. Insufficient pressure will
result in “tailing. Too much pressure will result in excessive
BAD
PATTERN
L PAINT STR
FOG, OVERSPRAY
fog and overspray, excessive tip wear, and increased
sprayer wear and tear.
GOOD
PATTERN
INSIDE CORNER
Always use the lowest pressure possible to obtain desirable
results.
Test the spray pattern on a piece of cardbord or other
surface.
OUTSIDE CORNER
“Inside” and “outside” corners can be sprayed.
Aim the spray gun toward the center of the corner. The
spray pattern is divided in half andthe edges of the spray
pattern on both walls are the same.
5
TIP SELECTION GUIDE
Your airless spray gun can be used to spray a wide
range of coatings. These coatings fall into three general
catagories: architectural/industrial, line striping, and fine
finishing. Each of these catagories uses a different style of
tip. The line striping tips differ from standard tips as they
are machined to spray heavier on the edges of the pattern
to create crisper lines. The fine finish tips have double
orifices to better atomize light-weight coatings, such as
lacquers. All three styles of REV-TIPTM tips use the
same REV-GUARDTM base. Each REV-TIPTM style
is color coded to ease identification, with standard rev-tips
being blue, line striping, orange, and fine finish, green.
TIP IDENTIFICATION
1ST 3-DIGITS identifies it as a REV-TIPTM for airless
paint spraying (P.N. 560-xxx), a REV-TIPTM for airless
line striping (P.N. 562-xxxST), or a REV-TIPTM for fine
finishing (P.N. 571-xxx)
4TH DIGIT is the fan width - the number is half the
fan width, e.g., 5 means a 10” fan, when 12” from the
substrate. Exception are the“W” prefix tips which indicate a
wide spray pattern.
5TH AND 6TH DIGITS are for the orifice size, which is
measured in thousandths of an inch, e.g., 17 = 0.017 inch
- The higher the number, the larger the tip. Orifice size is
important as it is matched up to the type of coating to be
sprayed, e.g. 11 for clear coats, 17 for latex paints, and 25
for some elastomerics.
NOTE: Tips are a wear item. For example, a .017 tip
spraying latex paint can wear to a .019 orifice in as little as
50 gallons, then to a .021 after another 50 gallons. As this
happens, the fan pattern starts to become more circular,
until the edges start to finger. On smaller volume (GPM)
airless paint sprayers, a tip can become so large that the
unit can no longer maintain good spray pressure.
6
REV-TIPTM FOR STRIPING 562-XXXST
FAN WIDTH
(6” FROM SURFACE)
Inches
ORIFICE SIZE (INCHES)
Millimeters
.013
1-2
25-51
113ST
115ST
117ST
2-4
51-102
215ST
4-6
102-152
6-8
152-203
Striping paint
Oil Base
.015
.017
.019
.021
217ST
219ST
221ST
315ST
317ST
319ST
321ST
415ST
417ST
419ST
421ST
Oil Base
Latex
Latex
Latex
FINE FINISH REV-TIPTM 571-XXX
FAN WIDTH
(6” FROM SURFACE)
ORIFICE SIZE (INCHES)
Inches
Millimeters
.012
.014
4-6
102-152
212
214
6-8
152-203
312
314
8-10
203-254
412
414
TIP SELECTION GUIDE
SPRAY TIP - ORIFICE SIZE (INCHES)
REV-TIPTM for Painting (560-XXX)
Fan Width (12” from surface)
in.
mm
.007
4-6
102-152
.011
.013
.015
.017
.019
.021
.023
.025
.027
.029
.031
209
211
213
215
217
219
221
223
225
227
229
309
311
313
315
317
319
321
323
325
327
409
411
413
415
417
419
421
423
425
427
431
511
513
515
517
519
521
523
525
527
531
535
613
615
617
619
621
623
625
627
631
635
717
6-8
152-203
8-10
203-254
10-12
254-305
12-14
305-356
14-16
356-406
715
16-18
406-457
815
819
821
20-24
508-610
NEW WIDE TIPS:
W21
W23
Gun Filter
C=course-60 mesh
C
C
Wood Interior
Lacquer, Varnish,
•
•
•
•
•
•
•
F=Fine-100 mesh
Stain, Sealer,
Enamel
Wood Exterior
Masonry
307
.009
F
F
F
•
•
•
•
•
Exterior Stain,
Vinyl, Acrylic, Latex
F,C
C
•
•
•
•
•
•
Vinyl, Oil Base, Alkyd,
Latex, Acrylic,
Block Filler,
C
•
•
Elastomer
Ceiling
Hi Build, Mil White
Structural Steel
Heaviy Coatings
Water Flow Rate
@ 2000psi, 138 bar
Paint Flow Rate
latex paint @ 2000psi,
•
•
.039
.041
639
641
739
741
335
721
C
•
•
.035
831
W25
W28
W29
W31
REMOVE FILTER
•
•
•
•
•
•
•
•
•
•
•
•
•
•
•
•
•
•
•
(gpm)
(lpm)
.12
.49
.18
.69
.24
.91
.31
1.17
.38
1.47
.47
1.79
.57
2.15
.67
2.54
.77
2.96
1.03
3.90
1.31
4.98
1.63
6.17
1.80
6.81
(gpm)
(lpm)
.10
.38
.15
.57
.21
.79
.27
1.02
.33
1.25
.40
1.51
.49
1.85
.58
2.20
.66
2.50
.88
3.33
1.12
4.24
1.39
5.26
1.54
5.83
(gpm)
(lpm)
.25
1.0
.25
1.0
.33
1.25
.40
1.5
.50
1.9
.60
2.3
.75
2.8
.88
3.3
1.0
3.8
1.25
4.7
1.5
5.7
2.0
8.2
2.2
8.2
138 bar/1.36 spec. gr.
Pump Minimum
Output*
*Pump will support tip worn to next larger size.
7
AIRLESS SPRAY GUN
FIG. 5
6
4
1*
2*
7
8
10*
9
5
3*
11
12
13
14
19
PARTS LIST FIGURE 5
Item No.
Part No.
1
120-530
Gun Seat Assembly
2
120-535
Gasket-Seat
3
120-520
Needle Assembly
4
120-529
Gun Seat Adapter
5
120-562
Trigger Guard
6
120-539
Trigger Pin
7
120-109
Gun Head
8
120-540
Actuator Pin (2)
9
120-536
Gun Plate
10*
120-038
Nut
8
16
Description
11
120-056
Plastic Washer
12
120-538
Gun Trigger Lock
13
120-055
Wave Washer
14
120-049
Retaining Ring
15
120-082
Handle Seal
16
15
120-090CX Gun Filter-Coarse
120-090FX Gun Filter-Fine
17
120-088
Spring
18
120-548
Flat Handle
19
120-542
2 Finger Gun Trigger
*
120-534
Gun Repair Kit
17
18
TROUBLESHOOTING & REPAIRS
DEFECTS
CAUSE
CORRECTION
Coarse spray
Low pressure
Increase the pressure
Excessive fogging
(overspray)
High pressure
Material too thin
Reduce the pressure to satisfactory pattern distribution
Use less thinner
Patten too wide
Spray angle too large
Use smaller spray angle tip
Pattern too narrow
Spray angle too small
Use wider spray angle tip
Too much material
Nozzle too large
Material too thin
Pressure too high
Use smaller orifice
Too little material
Nozzle too small
Use next larger orifice
Material too thick
Thin distribution in center of pattern
“horns”
Worn tip
Wrong tip
Change to new tip
Use nozzle with narrow spray angle
Thick skin on work
Material too viscous
Application too heavy
Thin cautiously
Reduce pressure and/or use tip in next smaller nozzle group
Coating fails to close & smooth over
Material too viscous
Thin cautiously
Spray pattern irregular, deflected
Orifice clogged
Tip damaged
Clean carefully
Replace with new tip
Clogged screens
Extraneous material in paint
Course pigments
Clean screen
Use coarse screen
Excess paint builds on tip guard
Spray gun too close to surface
Pressure setting too high
Hold gun further from surface sprayed
Reduce pressure setting
Drips, spits from tip
Valve seat and/or ball in gun head damaged
or worn
Service spray gun, replace valve assembly
Tip clogs continually
Debris in paint
Gun filter missing
Coarse filter mesh
Thouroughly strain the paint before use
Do not operate without inlet strainer
!
Reduce pressure
IMPORTANT NOTE: Whenever working on Airless Equipment, be sure to follow the Pressure Relief Procedure
found in your manual. If the gun is attached to a sprayer, engage the gun trigger lock (which may be called the
gun safety latch). The gun trigger lock should always be set when the gun is not being triggered.
REPLACING THE VALVE SPRING UNIT
DISMANTLING:
1. Unscrew REV-GUARD™ and remove spray tip & seal.
2. Pulling the trigger, unscrew the Valve Seat using a 5/8”
socket wrench.
3. Unscrew the retainer nut, remove the retainer and
retainer pins then push the shaft of the valve spring unit
out of the gun head.
4. Clean the Gun Head bore with solvent and a small brush.
Do not use any sharp objects to scrape away dried paint;
doing so may cause damage to the gun head, causing a
leak around the seal.
REASSEMBLING:
1. Apply grease to the O-Ring then push valve spring unit
firmly into gun head by hand.
2. Reinstall the retainer pins, retainer, and the retainer nut
on valve spring unit, tighten the nut until one thread is
showing out of the back of the nut.
3. Pull the trigger and install the valve seat by hand until
you feel a positive stop.
4. With the trigger locked, and using a feeler gauge (feeler
gauge must be placed between the retainer and gun
body), tighten the retainer nut so that you have .020”
spacing between retainer and gun body.
5. Unlock and depress the trigger, then torque the valve
seat to 30 ft. pounds.
REMOVING THE FILTER
1. Push up on the trigger guard, unlocking it from the
swivel, then pull away from the gun handle.
2. Grasp the handle of the gun, then turn counter clockwise
to loosen from the gun head.
3. Remove the filter from the gun handle and clean or
replace as necessary.
4. Re-insert the filter into the gun handle (it will only fit in
the proper direction).
5. Re-thread the handle into the gun head until you come to
a positive stop. It should be hand tightened only.
9
ACCESSORIES
AIRLESSCO
Quick Flush
STAY CLEAN™
™
Spray protectant for machine
to prevent paint from sticking
to it. Keeps your sprayer
looking new for years!
■ The only clean water flushing system
■ Cuts sprayer clean-up time in half!
■ Connects to standard garden hose
to backflush sprayer through gun
114-030
■ Includes "F" and "G" adapters to
work with all brands of gun
20 oz. can
Case quantity: 12 cans
Part # 170-005
THROAT SEAL OIL
Used in the wet cup of a piston pump
to prevent paint from drying on the piston & causing damage to the upper
packing. Use with all piston pumps.
PAINT HOPPER
For use on small jobs where paint is
kept in smaller than 5 gallon containers.
Threads onto pick-up tube of carry or
LoBoy framed Airlessco sprayers.
331-775
6 Liter Paint Hopper
PUMP CONDITIONER
188-187
188-392
XTEND-A-POLE SYSTEM
Standard Tip Extension
Should be used on piston pumps
between uses to prevent paint from
drying on the piston & causing packing wear.
010-001
010-009
010-019
Display of 48 - 1 oz. bottles
1 quart bottle
1 Gallon bottle
Case quantity: 12 on quarts, 4 on gallons
PAINT STRAINERS
Pre-filter your paint using strainer
bags. One dozen per pack.
100-064
100-065
Used to cover suction filter
5 Gallon strainer
HOSE COVER
4 mil poly protects your
airless hose from paint and
abrasion damage. Comes in 1000'
roll with perforations each 50'.
100-219
100-426
Hose Cover Roll
Case of 6 Rolls
HIGH PRESSURE AIRLESS HOSE
Strong yet flexible, for airless sprayers up to 3300 PSI
Part No:
100-012
100-040
100-204
100-199
Hose Description
3/16” Whip Hose, 4 Ft.
1/4” Whip Hose, 3 Ft.
1/4” Whip Hose, 5 Ft.
3/8” Whip Hose, 6 Ft.
100-011 1/4” Hose, 50 Ft.
100-023 3/8” Hose, 50 Ft.
100-037 1/2” Hose, 50 Ft.
100-010 1/4" Hose Connector
100-009 3/8" Hose Connector
6 oz. Bottle
1 qt. Bottle
Swivel Extension
Bare Pole
STANDARD TIP EXTENSION, “G” Thread
6” Long
12” Long
18” Long
24” Long
032-170
032-171
032-172
032-173
SWIVEL EXTENSION, “G” Thread
36” Long
032-184
BARE POLE
Add Tip Extension or Swivel Extension to
create desired length
032-053
24” Long
032-054
36” Long
SWIVEL “G” THREAD
032-035-55 7/8" x 14 Swivel
ADAPTERS
90° Pole to Gun Adapter
032-042
Gun Nut “F” Thread 11/16-16
032-010
Gun Nut “G” Thread 7/8-14
032-011
"F to G" Gun adapter to attach
Graco tips to Airlessco guns.
®
032-012