1
DVD HOME ENTERTAINMENT SYSTEM
S-102
Owner‘s Manual
Bedienungsanleitung
Manuel de l‘Utilisateur
Manuale delle istruzioni
Manual del usuario
Gebruiksaanwijzing
Bruksanvisning
ENGLISH
DEUTSCH FRANCAIS ITALIANO ESPAÑOL NEDERLANDS SVENSKA
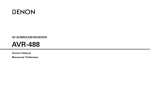
nSAFETY PRECAUTIONS
CAUTION
RISK OF ELECTRIC SHOCK
DO NOT OPEN
CAUTION:
TO REDUCE THE RISK OF ELECTRIC SHOCK, DO NOT REMOVE
COVER (OR BACK). NO USER-SERVICEABLE PARTS INSIDE.
REFER SERVICING TO QUALIFIED SERVICE PERSONNEL.
• DECLARATION OF CONFORMITY
We declare under our sole responsibility that this product, to which this
declaration relates, is in conformity with the following standards:
EN60065, EN55013, EN55020, EN61000-3-2 and EN61000-3-3.
Following the provisions of 2006/95/EC and 2004/108/EC Directive.
• ÜBEREINSTIMMUNGSERKLÄRUNG
Wir erklären unter unserer Verantwortung, daß dieses Produkt, auf das
sich diese Erklärung bezieht, den folgenden Standards entspricht:
EN60065, EN55013, EN55020, EN61000-3-2 und EN61000-3-3.
Entspricht den Verordnungen der Direktive 2006/95/EC und 2004/108/EC.
• DECLARATION DE CONFORMITE
The lightning flash with arrowhead symbol, within an equilateral
triangle, is intended to alert the user to the presence of
uninsulated “dangerous voltage” within the product’s enclosure
that may be of sufficient magnitude to constitute a risk of electric
shock to persons.
Nous déclarons sous notre seule responsabilité que l’appareil, auquel se
réfère cette déclaration, est conforme aux standards suivants:
EN60065, EN55013, EN55020, EN61000-3-2 et EN61000-3-3.
D’après les dispositions de la Directive 2006/95/EC et 2004/108/EC.
The exclamation point within an equilateral triangle is intended
to alert the user to the presence of important operating
and maintenance (servicing) instructions in the literature
accompanying the appliance.
Dichiariamo con piena responsabilità che questo prodotto, al quale la
nostra dichiarazione si riferisce, è conforme alle seguenti normative:
EN60065, EN55013, EN55020, EN61000-3-2 e EN61000-3-3.
In conformità con le condizioni delle direttive 2006/95/EC e 2004/108/EC.
QUESTO PRODOTTO E’ CONFORME
AL D.M. 28/08/95 N. 548
WARNING:
TO REDUCE THE RISK OF FIRE OR ELECTRIC SHOCK, DO NOT
EXPOSE THIS APPLIANCE TO RAIN OR MOISTURE.
CLASS 1 LASER PRODUCT
LUOKAN 1 LASERLAITE
KLASS 1 LASERAPPARAT
• DICHIARAZIONE DI CONFORMITÀ
• DECLARACIÓN DE CONFORMIDAD
Declaramos bajo nuestra exclusiva responsabilidad que este producto al
que hace referencia esta declaración, está conforme con los siguientes
estándares:
EN60065, EN55013, EN55020, EN61000-3-2 y EN61000-3-3.
Siguiendo las provisiones de las Directivas 2006/95/EC y 2004/108/EC.
• EENVORMIGHEIDSVERKLARING
$-"44
-"4&3 130%6$5
Wij verklaren uitsluitend op onze verantwoordelijkheid dat dit produkt,
waarop deze verklaring betrekking heeft, in overeenstemming is met de
volgende normen:
EN60065, EN55013, EN55020, EN61000-3-2 en EN61000-3-3.
Volgens de bepalingen van de Richtlijnen 2006/95/EC en 2004/108/EC.
• ÖVERENSSTÄMMELSESINTYG
ADVARSEL:
VAROITUS!
VARNING:
USYNLIG LASERSTRÅLING VED ÅBNING, NÅR
SIKKERHEDSAFBRYDERE ER UDE AF FUNKTION.
UNDGÅ UDSAETTELSE FOR STRÅLING.
LAITTEEN KÄYTTÄMINEN MUULLA KUIN TÄSSÄ
KÄYTTÖOHJEESSA MAINITULLA TAVALLA SAATTAA
ALTISTAA KÄYTTÄJÄN TURVALLISUUSLUOKAN 1
YLITTÄVÄLLE NÄKYMÄMTTÖMÄLLE LASERSÄTEILYLLE.
OM APPARATEN ANVÄNDS PÅ ANNAT SÄTT ÄN I DENNA
BRUKSANVISNING SPECIFICERATS, KAN ANVÄNDAREN
UTSÄTTAS FÖR OSYNLIG LASERSTRÅLNING SOM
ÖVERSKRIDER GRÄNSEN FÖR LASERKLASS 1.
ATTENZIONE: QUESTO APPARECCHIO E’ DOTATO DI
DISPOSITIVO OTTICO CON RAGGIO LASER.
L’USO IMPROPRIO DELL’APPARECCHIO PUO’ CAUSARE
PERICOLOSE ESPOSIZIONI A RADIAZIONI!
I
Härmed intygas helt på eget ansvar att denna produkt, vilken detta intyg
avser, uppfyller följande standarder:
EN60065, EN55013, EN55020, EN61000-3-2 och EN61000-3-3.
Enligt stadgarna i direktiv 2006/95/EC och 2004/108/EC.
DENON EUROPE
Division of D&M Germany GmbH
An der Landwehr 19, Nettetal,
D-41334 Germany
CAUTION:
To completely disconnect this product from the mains, disconnect
the plug from the wall socket outlet.
The mains plug is used to completely interrupt the power supply to
the unit and must be within easy access by the user.
VORSICHT:
Um dieses Gerät vollständig von der Stromversorgung abzutrennen,
ziehen Sie bitte den Stecker aus der Wandsteckdose.
Der Netzstecker wird verwendet, um die Stromversorgung zum
Gerät völlig zu unterbrechen; er muss für den Benutzer gut und
einfach zu erreichen sein.
PRECAUTION:
Pour déconnecter complètement ce produit du courant secteur,
débranchez la prise de la prise murale.
La prise secteur est utilisée pour couper complètement
l’alimentation de l’appareil et l’utilisateur doit pouvoir y accéder
facilement.
ATTENZIONE:
Per scollegare completamente questo prodotto dalla rete di
alimentazione elettrica, scollegare la spina dalla relativa presa a muro.
La spina di rete viene utilizzata per interrompere completamente
l’alimentazione all’unità e deve essere facilmente accessibile
all’utente.
PRECAUCIÓN:
Para desconectar completamente este producto de la alimentación
eléctrica, desconecte el enchufe del enchufe de la pared.
El enchufe de la alimentación eléctrica se utiliza para interrumpir por
completo el suministro de alimentación eléctrica a la unidad y debe
de encontrarse en un lugar al que el usuario tenga fácil acceso.
WAARSCHUWING:
Om de voeding van dit product volledig te onderbreken moet de
stekker uit het stopcontact worden getrokken.
De netstekker wordt gebruikt om de stroomtoevoer naar het toestel
volledig te onderbreken en moet voor de gebruiker gemakkelijk
bereikbaar zijn.
FÖRSIKTIHETSMÅTT:
Koppla loss stickproppen från eluttaget för att helt skilja produkten
från nätet.
Stickproppen används för att helt bryta strömförsörjningen till
apparaten, och den måste vara lättillgänglig för användaren.
CAUTION:
USE OF CONTROLS OR ADJUSTMENTS OR PERFORMANCE OF
PROCEDURES OTHER THAN THOSE SPECIFIED HEREIN MAY RESULT IN
HAZARDOUS RADIATION EXPOSURE.
THIS PRODUCT SHOULD NOT BE ADJUSTED OR REPAIRED BY ANYONE
EXCEPT PROPERLY QUALIFIED SERVICE PERSONNEL.
SVENSKA NEDERLANDS ESPAÑOL ITALIANO FRANCAIS DEUTSCH ENGLISH
nNOTE ON USE / HINWEISE ZUM GEBRAUCH / OBSERVATIONS RELATIVES A L’UTILISATION / NOTE SULL’USO /
NOTAS SOBRE EL USO / ALVORENS TE GEBRUIKEN / OBSERVERA ANGÅENDE ANVÄNDNINGEN
CAUTION:
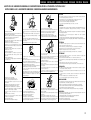
•The ventilation should not be impeded by covering the ventilation openings with items,
such as newspapers, tablecloths, curtains, etc.
• No naked flame sources, such as lighted candles, should be placed on the unit.
• Observe and follow local regulations regarding battery disposal.
• Do not expose the unit to dripping or splashing fluids.
• Do not place objects filled with liquids, such as vases, on the unit.
ACHTUNG:
• Do not let foreign objects into the unit.
• Keep the unit free from moisture, water, and dust.
• Lassen Sie keine fremden Gegenstände in das Gerät kommen.
•
Halten
Sie
das
Gerät
von
Feuchtigkeit,
Wasser
und
Staub
• Ne pas laisser des objets étrangers dans l’appareil.
• Avoid high temperatures.
fern.
• Non inserite corpi estranei all’interno dell’unità.
Allow for sufficient heat dispersion when installed in a rack.
• Protéger l’appareil contre l’humidité, l’eau et la poussière.
• No deje objetos extraños dentro del equipo.
• Vermeiden Sie hohe Temperaturen.
Beachten Sie, dass eine ausreichende Belüftung gewährleistet • Tenete l’unità lontana dall’umidità, dall’acqua e dalla • Laat geen vreemde voorwerpen in dit apparaat vallen.
polvere.
• Se till att främmande föremål inte tränger in i apparaten.
wird, wenn das Gerät auf ein Regal gestellt wird.
• Mantenga el equipo libre de humedad, agua y polvo.
• Eviter des températures élevées.
Tenir compte d’une dispersion de chaleur suffisante lors de • Laat geen vochtigheid, water of stof in het apparaat
binnendringen.
l’installation sur une étagère.
• Utsätt inte apparaten för fukt, vatten och damm.
• Evitate di esporre l’unità a temperature elevate.
Assicuratevi che vi sia un’adeguata dispersione del calore
quando installate l’unità in un mobile per componenti audio.
• Evite altas temperaturas.
Permite la suficiente dispersión del calor cuando está
instalado en la consola.
• Vermijd hoge temperaturen.
Zorg er bij installatie in een audiorack voor, dat de door
• Do not let insecticides, benzene, and thinner come in
het toestel geproduceerde warmte goed kan worden
contact with the unit.
afgevoerd.
• Lassen Sie das Gerät nicht mit Insektiziden, Benzin oder
• Unplug the power cord when not using the unit for long
• Undvik höga temperaturer.
Verdünnungsmitteln in Berührung kommen.
periods of time.
Se till att det finns möjlighet till god värmeavledning vid
• Ne pas mettre en contact des insecticides, du benzène et
• Wenn das Gerät längere Zeit nicht verwendet werden soll,
montering i ett rack.
un diluant avec l’appareil.
trennen Sie das Netzkabel vom Netzstecker.
• Assicuratevi che l’unità non entri in contatto con insetticidi,
• Débrancher le cordon d’alimentation lorsque l’appareil n’est
benzolo o solventi.
pas utilisé pendant de longues périodes.
• No permita el contacto de insecticidas, gasolina y diluyentes
• Scollegate il cavo di alimentazione quando prevedete di non
con el equipo.
utilizzare l’unità per un lungo periodo di tempo.
• Voorkom dat insecticiden, benzeen of verfverdunner met dit
• Desconecte el cordón de energía cuando no utilice el equipo
toestel in contact komen.
por mucho tiempo.
• Se till att inte insektsmedel på spraybruk, bensen och
• Neem altijd het netsnoer uit het stopkontakt wanneer het
thinner kommer i kontakt med apparatens hölje.
apparaat gedurende een lange periode niet wordt gebruikt.
• Koppla loss nätkabeln om apparaten inte kommer att
användas i lång tid.
• Handle the power cord carefully.
Hold the plug when unplugging the cord.
• Gehen Sie vorsichtig mit dem Netzkabel um.
Halten Sie das Kabel am Stecker, wenn Sie den Stecker
herausziehen.
• Manipuler le cordon d’alimentation avec précaution.
Tenir la prise lors du débranchement du cordon.
• Manneggiate il cavo di alimentazione con attenzione.
Tenete ferma la spina quando scollegate il cavo dalla presa.
• Never disassemble or modify the unit in any way.
* (For apparatuses with ventilation holes)
• Maneje el cordón de energía con cuidado.
• Versuchen Sie niemals das Gerät auseinander zu nehmen
Sostenga el enchufe cuando desconecte el cordón de • Do not obstruct the ventilation holes.
oder zu verändern.
energía.
• Ne jamais démonter ou modifier l’appareil d’une manière ou
• Decken Sie den Lüftungsbereich nicht ab.
• Hanteer het netsnoer voorzichtig.
d’une autre.
• Ne pas obstruer les trous d’aération.
Houd het snoer bij de stekker vast wanneer deze moet • Non coprite i fori di ventilazione.
• Non smontate né modificate l’unità in alcun modo.
worden aan- of losgekoppeld.
• Nunca desarme o modifique el equipo de ninguna manera.
• No obstruya los orificios de ventilación.
• Hantera nätkabeln varsamt.
• Dit toestel mag niet gedemonteerd of aangepast worden.
• De ventilatieopeningen mogen niet worden beblokkeerd.
Håll i kabeln när den kopplas från el-uttaget.
• Ta inte isär apparaten och försök inte bygga om den.
• Täpp inte till ventilationsöppningarna.
•Die Belüftung sollte auf keinen Fall durch das Abdecken der Belüftungsöffnungen durch
Gegenstände wie beispielsweise Zeitungen, Tischtücher, Vorhänge o. Ä. behindert
werden.
•Auf dem Gerät sollten keinerlei direkte Feuerquellen wie beispielsweise angezündete
Kerzen aufgestellt werden.
•Bitte beachten Sie bei der Entsorgung der Batterien die örtlich geltenden
Umweltbestimmungen.
•Das Gerät sollte keiner tropfenden oder spritzenden Flüssigkeit ausgesetzt werden.
•Auf dem Gerät sollten keine mit Flüssigkeit gefüllten Behälter wie beispielsweise Vasen
aufgestellt werden.
ATTENTION:
•La ventilation ne doit pas être gênée en recouvrant les ouvertures de la ventilation avec des
objets tels que journaux, rideaux, tissus, etc.
• Aucune flamme nue, par exemple une bougie, ne doit être placée sur l’appareil.
• Veillez à respecter les lois en vigueur lorsque vous jetez les piles usagées.
• L’appareil ne doit pas être exposé à l’eau ou à l’humidité.
• Ne pas poser d’objet contenant du liquide, par exemple un vase, sur l’appareil.
ATTENZIONE:
•Le aperture di ventilazione non devono essere ostruite coprendole con oggetti, quali
giornali, tovaglie, tende e così via.
• Non posizionate sull’unità fiamme libere, come ad esempio candele accese.
•Prestate attenzione agli aspetti legati alla tutela dell’ambiente nello smaltimento delle
batterie.
• L’apparecchiatura non deve essere esposta a gocciolii o spruzzi.
•Non posizionate sull’unità alcun oggetto contenente liquidi, come ad esempio i vasi.
PRECAUCIÓN:
•La ventilación no debe quedar obstruida por haberse cubierto las aperturas con objetos
como periódicos, manteles, cortinas, etc.
•No debe colocarse sobre el aparato ninguna fuente inflamable sin protección, como velas
encendidas.
•A la hora de deshacerse de las pilas, respete la normativa para el cuidado del medio
ambiente.
• No exponer el aparato al goteo o salpicaduras cuando se utilice.
• No colocar sobre el aparato objetos llenos de líquido, como jarros.
WAARSCHUWING:
•De ventilatie mag niet worden belemmerd door de ventilatieopeningen af te dekken met
bijvoorbeeld kranten, een tafelkleed, gordijnen, enz.
• Plaats geen open vlammen, bijvoorbeeld een brandende kaars, op het apparaat.
• Houd u steeds aan de milieuvoorschriften wanneer u gebruikte batterijen wegdoet.
• Stel het apparaat niet bloot aan druppels of spatten.
• Plaats geen voorwerpen gevuld met water, bijvoorbeeld een vaas, op het apparaat.
OBSERVERA:
•Ventilationen bör inte förhindras genom att täcka för ventilationsöppningarna med föremål
såsom tidningar, bordsdukar, gardiner osv.
• Inga blottade brandkällor, såsom tända ljus, får placeras på apparaten.
• Tänk på miljöaspekterna när du bortskaffar batterier.
• Apparaten får inte utsättas för vätska.
• Placera inte föremål fyllda med vätska, t.ex. vaser, på apparaten.
II
ENGLISH
DEUTSCH FRANCAIS ITALIANO ESPAÑOL NEDERLANDS SVENSKA
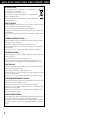
A NOTE ABOUT RECYCLING:
This product’s packaging materials are recyclable and can be reused. Please dispose of any materials
in accordance with the local recycling regulations.
When discarding the unit, comply with local rules or regulations.
Batteries should never be thrown away or incinerated but disposed of in accordance with the local
regulations concerning battery disposal.
This product and the supplied accessories, excluding the batteries, constitute the applicable product
according to the WEEE directive.
HINWEIS ZUM RECYCLING:
Das Verpackungsmaterial dieses Produktes ist zum Recyceln geeignet und kann wieder verwendet werden. Bitte
entsorgen Sie alle Materialien entsprechend der örtlichen Recycling-Vorschriften.
Beachten Sie bei der Entsorgung des Gerätes die örtlichen Vorschriften und Bestimmungen.
Die Batterien dürfen nicht in den Hausmüll geworfen oder verbrannt werden; bitte entsorgen Sie die Batterien gemäß
der örtlichen Vorschriften.
Dieses Produkt und das im Lieferumfang enthaltene Zubehör (mit Ausnahme der Batterien!) entsprechen der WEEEDirektive.
UNE REMARQUE CONCERNANT LE RECYCLAGE:
Les matériaux d’emballage de ce produit sont recyclables et peuvent être réutilisés. Veuillez disposer des matériaux
conformément aux lois sur le recyclage en vigueur.
Lorsque vous mettez cet appareil au rebut, respectez les lois ou réglementations en vigueur.
Les piles ne doivent jamais être jetées ou incinérées, mais mises au rebut conformément aux lois en vigueur sur la
mise au rebut des piles.
Ce produit et les accessoires inclus, à l’exception des piles, sont des produits conformes à la directive DEEE.
NOTA RELATIVA AL RICICLAGGIO:
I materiali di imballaggio di questo prodotto sono riutilizzabili e riciclabili. Smaltire i materiali conformemente alle
normative locali sul riciclaggio.
Per lo smaltimento dell’unità, osservare le normative o le leggi locali in vigore.
Non gettare le batterie, né incenerirle, ma smaltirle conformemente alla normativa locale sui rifiuti chimici.
Questo prodotto e gli accessori inclusi nell’imballaggio sono applicabili alla direttiva RAEE, ad eccezione delle batterie.
ACERCA DEL RECICLAJE:
Los materiales de embalaje de este producto son reciclables y se pueden volver a utilizar. Disponga de estos materiales
siguiendo los reglamentos de reciclaje de su localidad.
Cuando se deshaga de la unidad, cumpla con las reglas o reglamentos locales.
Las pilas nunca deberán tirarse ni incinerarse. Deberá disponer de ellas siguiendo los reglamentos de su localidad
relacionados con los desperdicios químicos.
Este producto junto con los accesorios empaquetados es el producto aplicable a la directiva RAEE excepto pilas.
EEN AANTEKENING MET BETREKKING TOT DE RECYCLING:
Het inpakmateriaal van dit product is recycleerbaar en kan opnieuw gebruikt worden. Er wordt verzocht om zich van
elk afvalmateriaal te ontdoen volgens de plaatselijke voorschriften.
Volg voor het wegdoen van de speler de voorschriften voor de verwijdering van wit- en bruingoed op.
Batterijen mogen nooit worden weggegooid of verbrand, maar moeten volgens de plaatselijke voorschriften
betreffende chemisch afval worden verwijderd.
Op dit product en de meegeleverde accessoires, m.u.v. de batterijen is de richtlijn voor afgedankte elektrische en
elektronische apparaten (WEEE) van toepassing.
OBSERVERA ANGÅENDE ÅTERVINNING:
Produktens emballage är återvinningsbart och kan återanvändas. Kassera det enligt lokala återvinningsbestämmelser.
När du kasserar enheten ska du göra det i överensstämmelse med lokala regler och bestämmelser.
Batterier får absolut inte kastas i soporna eller brännas. Kassera dem enligt lokala bestämmelser för kemiskt avfall.
Denna apparat och de tillbehör som levereras med den uppfyller gällande WEEE-direktiv, med undantag av
batterierna.
III
ENGLISH
Contents
Getting Started
Accessories·······················································································2
Cautions on Handling······································································2
System Configuration·····································································2
Cautions on Installation··································································3
Other Cautions················································································3
Discs··································································································4
Discs usable on the S-102·······························································4
Holding Discs··················································································4
Loading Discs··················································································4
Cautions on Loading Discs······························································5
Cautions on Handling······································································5
Cautions on Storing Discs·······························································5
Cleaning Discs················································································5
About the Remote Control Unit·····················································5
Inserting the Batteries·····································································5
Operating Range of the Remote Control Unit·································5
Part Names and Functions······························································6
Front Panel······················································································6
Display····························································································6
Rear Panel·······················································································7
Bottom Panel (Subwoofer)······························································7
Remote Control Unit·······································································8
Connections
Preparations·····················································································9
Cables Used for Connections·························································9
Connecting the System································································ 10
Connecting the Monitor································································ 11
Connecting Equipment with HDMI connectors···················· 11, 12
Connecting the Playback Components······································· 12
Control Dock for iPod···································································· 12
TV Tuner························································································ 12
Satellite Receiver·········································································· 12
Connections to Other Devices······················································ 13
Antenna Terminals········································································· 13
Once Connections are Completed··············································· 13
Menu Operations
Operations······················································································ 14
Example of Display of Default Values·········································· 14
Menu Map······················································································ 14
Setup
LANGUAGE SETUP······································································· 15
a OSD LANGUAGE······································································ 15
Setup
s DIALOG···················································································· 15
d SUBTITLE················································································· 15
f DISC MENU············································································· 15
VIDEO SETUP················································································· 16
a HDMI SETUP············································································ 16
s TV ASPECT··············································································· 16
d TV TYPE···················································································· 16
f PROGRESSIVE MODE····························································· 16
g SQUEEZE MODE····································································· 16
AUDIO SETUP················································································ 17
a SPEAKER SETUP····································································· 17
s INPUT MODE··········································································· 17
RATINGS························································································· 18
a RATING LEVEL········································································· 18
s PASSWORD·············································································· 18
d REGISTRATION CODE····························································· 18
OTHER SETUP················································································ 18
a CAPTIONS················································································ 18
s WALL PAPER··········································································· 18
d DISPLAY··················································································· 18
f SLIDE SHOW··········································································· 18
g AUTO POWER MODE······························································ 18
h SCREEN SAVER······································································· 18
TIMER SETUP················································································· 19
a ONCE TIMER············································································ 19
s EVERY TIMER··········································································· 19
d CLOCK SETUP········································································· 19
Playback
Preparations···················································································20
Turning the Power On···································································20
Loading Discs·················································································20
Input source switching·································································20
Adjusting the Master Volume·······················································20
Playing a DVD/Video CD/Music CD Disc·····································21
Using the Top Menu/DVD Menu (DVD Video)·······························21
Switching the Audio Language, Subtitle Language and Angle
(DVD Video)···················································································22
Using the Playback Control Function (DVD Video)·························22
Playing Frame by Frame (DVD Video/Video CD)····························22
Slow Playback (DVD Video/Video CD)···········································22
Playing in the Zoom Mode (DVD Video/Video CD)························22
Playing Repeatedly <Repeat playback>
(DVD Video/Video CD/Music CD)··················································23
Playing Tracks in the Desired Order <Program>
(Video CD/Music CD)····································································23
Playing Random Order <Random playback>
(Video CD/Music CD)····································································23
Playing Music Files········································································23
Before Playing MP3 or WMA Files················································23
Creating MP3 and WMA Files Compatible with the S-102···········23
Playing MP3 or WMA Files·····················································23, 24
Playing Still Picture Files (JPEG format)······································24
Creating JPEG Files Compatible on the S-102······························24
Playing JPEG Files········································································25
Playing Picture CD/Fujicolor CD····················································25
Playing Moving Picture File···························································25
Creating DivX® Files Compatible on the S-102·····························25
Playing DivX® Files·······································································25
Enjoying Surround Sound····························································26
Set the Input Mode·······································································26
Selecting Surround Mode·····························································26
Set the Surround Parameter·························································27
Playing Dolby Digital/DTS Multi-Channel Sources
(Digital input only)·········································································27
Playing Dolby Digital/PCM/Analog 2-Channel Sources·················27
Listening in the Dolby Headphone Mode·····································27
Listening to Radio Broadcasts······················································28
Tuning in Broadcast Stations·························································28
Naming the Currently Tuned in Broadcast Station and
Presetting it·············································································28, 29
Automatically Presetting FM Stations (Auto preset)·····················29
Listening to Preset Stations··························································29
RDS (Radio Data System)·····························································29
RDS Search···················································································29
PTY Search····················································································30
TP Search······················································································30
RT (Radio Text)···············································································30
iPod® Playback··············································································31
Listening to Music········································································31
Viewing Still Pictures
(Only for iPods Equipped with the Photo Function)······················31
Disconnecting the iPod·································································31
Playing a Portable Audio·······························································31
ENGLISH
Getting Started
Connections
Setup
Playback
Advanced Operation
On-Screen Display·········································································32
Using the Disc Information Screen
(DVD Video/Video CD/Music CD)··················································32
Using the Multi-Function Screen (DVD Video)·······························32
Setting the Sleep Timer································································33
Other Functions·············································································33
Adjusting the Tone·········································································33
Turning the Sound Off Temporarily (Muting)··································33
Convenient Functions···································································33
Personal Memory Plus Function···················································33
Last Function Memory··································································33
Backup Memory············································································33
Auto Power On··············································································33
Resetting the Microprocessor·······················································33
Remote Control Information
Remote Control Unit Operations
Setting the preset memory function·············································34
Operating a component stored in the preset memory·················34
Setting the punch through function·········································34, 35
Other Information·································································36 ~ 38
Troubleshooting····································································39 ~ 41
Specifications················································································ 42
List of preset codes············································ End of this manual
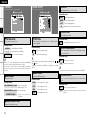
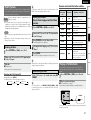
Cautions on Handling
•Before turning the power switch on
Check once again that all connections are correct and that there are
no problems with the connection cables.
Getting Started
Thank you for purchasing this DENON product. To ensure proper
operation, please read these owner’s manual carefully before using
the product.
After reading them, be sure to keep them for future reference.
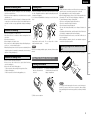
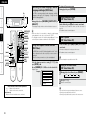
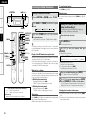
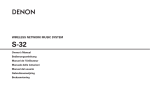
Accessories
Check that the following parts are supplied with the product.
qRemote control (RC-1073)........................................................ 1
wR6P/AA batteries...................................................................... 2
eSystem cable (D-SUB25P) (Cord length: Approx. 3 m)............. 1
rSpeaker cable (Cord length: Approx. 5 m)................................ 2
tVideo cable (Cord length: Approx. 1.5 m)................................. 1
yAM loop antenna...................................................................... 1
uFM indoor antenna................................................................... 1
iSpeaker stand........................................................................... 2
oScrew....................................................................................... 4
Q0Hex wrench.............................................................................. 1
Q1Anti slip pads............................................................................ 4
Q2Owner’s manual (with Quick setup sheet ).............................. 1
Q3Service station list.................................................................... 1
Troubleshooting
w
q
e
•Power is supplied to some of the circuitry even when the unit is
set to the standby mode. When traveling or leaving home for long
periods of time, be sure to unplug the power cord from the power
outlet.
•Sufficiently ventilate the place of installation
If the unit is left in a room full of the smoke from cigarettes, etc., for
long periods of time, the surface of the optical pickup could get dirty,
in which case it will not be able to read the signals properly.
•About condensation
If there is a major difference in temperature between the inside of
the unit and the surroundings, condensation (dew) may form on
the operating parts inside the unit, causing the unit not to operate
properly.
If this happens, let the unit sit for an hour or two with the power
turned off and wait until there is little difference in temperature
before using the unit.
•Cautions on using mobile phones
Using a mobile phone near this unit may result in noise. If so, move
the mobile phone away from this unit when it is in use.
•Moving the unit
Turn off the power and unplug the power cord from the power
outlet.
Next, disconnect the connection cables to other system units before
moving the unit.
•Note that the illustrations in these instructions may differ from the
actual unit for explanation purposes.
r
t
y
u
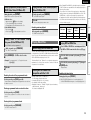
System Configuration
Speaker
Unit name : SC-S102
i
o
Q0
DVD surround receiver
Unit name : ADV-S102
Sub woofer
Unit name : DSW-S102
ENGLISH
Cautions on Installation
Note:
For proper heat dispersal, do not install this unit in a confined
space, such as a bookcase or similar enclosure.
b
b Note
b
Wall
b
Other Cautions
b
b
Wall
•Switching the input function when input terminals are not
connected.
A clicking noise may be produced if the input function is switched
when nothing is connected to the input terminals. If this happens,
either turn down the VOLUME control knob or connect components
to the input terminals.
•When watching TV broadcasts with the S-102’s power turned on,
depending on the conditions of the TV broadcast's signals, striped
patterns may appear on the picture. This is not a malfunction of the
S-102 or the TV. Turn the S-102’s power off when watching TV.
•Note that if a magnet or a piece of furniture or equipment using
magnets is placed nearby, interaction with the S-102 could result in
color blotching on the TV.
Remote Control Information
Troubleshooting
DThe quality of the sound produced from the speaker is affected
by the size and type of the room, as well as by the method of
installation. Consider the points listed below before installing the
speaker.
• Placing speakers on the same stand or shelf as the record player
could result in howling.
• If there is a wall, glass door, etc., behind or to the sides of the
speakers, resonance and reflections can be prevented by using a
thick curtain, etc.
• The speakers are of the shielded type. With some TVs, however,
placing the speakers near the TV could cause color blotching on the
TV's picture. If this happens, turn the TV’s power off, move it away,
wait 15 to 30 minutes, then turn the TV’s power back on. If the color
blotching persists, move the speakers further away.
• Mount on a wall sufficiently sturdy to bear the weight of the
speaker. Note that DENON will except no responsibility whatsoever
for damages or accidents caused by the speaker falling.
• To ensure safety, have a specialist install the speakers on the wall.
• Be sure to fasten the speaker connection cables to the wall, etc.,
so that you do not get your feet or hands caught in them, causing
the set to fall.
• Place the subwoofer on a flat floor to prevent accidents due to the
subwoofer tipping over.
• Do not place a record player, CD player or other such device on top
of the subwoofer.
• Do not set the subwoofer with the baffle surface against the
floor. Doing so will prevent you from achieving satisfactory sound
effects.
Playback
b
b Note
Setup
(DSW-S102)
Connections
(ADV-S102)
Getting Started
CAUTION
•Be sure to fasten the speaker cords to a wall, etc., to
prevent people from tripping over them or otherwise
pulling on them accidentally, causing the speaker
systems to fall.
•Be sure to check for safety after installing the speaker systems.
Afterwards, perform safety inspections at regular intervals to be
sure there is no danger that the speaker systems will fall. DENON
will accept no responsibility for damages or accidents caused by
inappropriate choice of the place of installation or improper installation
procedures.
NOTE
•This product uses a semiconductor laser. To ensure stable operation,
it is recommended to use the product indoors at a temperature of 5
°C (41 °F) ~ 35 °C (95 °F).
ENGLISH
Getting Started
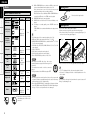
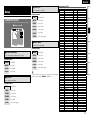
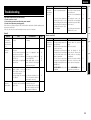
Discs
Discs usable on the S-102
Connections
Usable discs
Mark (logo)
Recorded
Signals
Disc size
DVD video
Setup
DVD-R/DVD+R
(z1) (z2)
Playback
%7%3
Digital audio
+
digital video
(MPEG2)
12cm
Remote Control Information
DVD-RW/
DVD+RW
(z1) (z3)
%7%3F8SJUBCMF
Video CD
t
CD
r
Troubleshooting
CD-R
(z4)
CD-RW
(z4)
Digital audio
+
digital video
(MPEG1)
12cm / 8cm
Digital audio
MP3
Digital picture
(JPEG)
12cm / 8cm
The following types of discs cannot be played on the S-102:
•DVD videos with region numbers other than “2” or “ALL”
•DVD-ROM/RAM (For DVD ROM discs, data files in DivX® 3.11 / 4.x /
5.x / 6 format can be played)
•CD-ROMs (Only JPEG / MP3 / WMA / DivX® 3.11 / 4.x / 5.x / 6 file
can be played)
•VSDs / CVD /SVCD
•CDV (only the audio portion can be played)
•CD-Gs (only the audio portion can be played)
•Photo CDs (NEVER play such discs on the S-102)
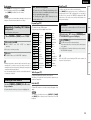
Holding Discs
Do not touch the signal surface.
Loading Discs
•Set the disc with the labeled side facing up.
•Make sure the disc tray is fully open when inserting the disc.
•Place the discs flatly, 12 cm discs in the outer tray guide (Figure 1), 8
cm discs in the inner tray guide (Figure 2).
Figure 1
Picture CD
Digital picture
(JPEG)
12cm
Fujicolor CD
Digital picture
(JPEG)
12cm
WMA
Digital audio
12cm
DivX®
Digital audio
+
digital video
(MPEG4)
12cm
DVD players and DVD video discs have region
numbers (numbers assigned for different regions of
the world).
The numbers must match or the discs cannot be
played.
The Region number for this DVD video player is 2.
Figure 2
Outer tray guide
Inner tray guide
12 cm disc
8 cm disc
NOTE
•Place 8 cm discs in the inner tray guide without using an adapter.
NOTE
bPlaying discs with special shapes
could damage the set. Do not use
such discs.
z1 : DVD ± R/DVD ±RW discs recorded on a DVD recorder in the
video mode and finalized can be played on the S-102.
Note, however, that in some cases the discs may not play
properly, depending on their recording conditions.
Discs that have not been finalized or DVD ± R/DVD ±RW discs
recorded in the VR mode or in CPRM cannot be played.
z2 : DVD+R DL.(Dual Layer) cannot be played.
z3 : DVD-RW discs recorded in the VR mode and finalized can be
played.
z4 : According to recording quality, some CD-R/RW cannot be
played.
CD-R/CD-RW discs recorded and finalized can be played on the
S-102.
•Recordings you have made should only be used for your personal
enjoyment, and as per copyright laws may not be used in other ways
without permission of the copyright holder.
•Do not play CD-R/CD-RW discs containing files in formats other than
music CD (CD-DA format), MP3, WMA, JPEG or DivX. Depending on
the type of file, the set may malfunction or be damaged.
•“STOP” is displayed if a disc that cannot be played is loaded.
•“0h00m00s” is displayed if the disc is loaded upside-down or if no
disc is loaded.
NOTE
Do not push the disc tray in by hand when the power is turned off.
Doing so could damage the set.
ENGLISH
•If there are fingerprints or dirt on discs, wipe them off before using
the disc. Fingerprints and dirt can impair sound quality and cause
interruptions in playback.
•Use a commercially available disc cleaning set or a soft cloth to clean
discs.
NOTE
Do not use record spray, antistatic agents, or benzene, thinner or other
solvents.
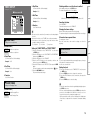
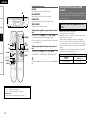
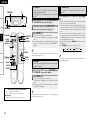
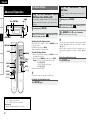
Operating Range of the Remote Control
Unit
Point the remote control unit at the remote sensor when operating it.
About the Remote Control Unit
Inserting the Batteries
q Slide the rear lid in the
direction of the arrow and
remove it.
Troubleshooting
•Be sure to remove discs after using them.
•Be sure to store discs in their cases to protect them from dust,
scratches, warping, etc.
•Do not store discs in the following places:
1.Places exposed to direct sunlight for long periods of time
2.Dusty or humid places
3.Places exposed to heat from heating appliances, etc.
Do not wipe with a circular
motion.
Approx. 7 m
w Load the two batteries properly
as indicated by the marks in the
battery compartment.
Remote Control Information
Cautions on Storing Discs
Gently wipe the disc from the
inside towards the outside.
Playback
•Do not get fingerprints, oil or dirt on discs.
•Take special care not to scratch discs when removing them from
their cases.
•Do not bend or heat discs.
•Do not enlarge the hole at the center.
•Do not write on the labeled (printed) surface with ball-point pens,
pencils, etc., or stick new labels on discs.
•Water droplets may form on discs if they are moved suddenly from a
cold place (outdoors for example) to a warm place, but do not try to
dry them off using a hairdryer, etc.
Setup
Cautions on Handling
•Replace the batteries with new ones if the set does not operate even
when the remote control unit is operated close to the unit.
•The supplied batteries are only for verifying operation.
•When inserting the batteries, be sure to do so in the proper direction,
following the “q” and “w” marks in the battery compartment.
•To prevent damage or leakage of battery fluid:
•Do not use a new battery together with an old one.
•Do not use two different types of batteries.
•Do not attempt to charge dry batteries.
•Do not short-circuit, disassemble, heat or dispose of batteries in
flames.
•If the battery fluid should leak, carefully wipe the fluid off the inside
of the battery compartment and insert new batteries.
•Remove the batteries from the remote control unit if it will not be in
use for long periods.
•When replacing the batteries, have the new batteries ready and
insert them as quickly as passible.
Connections
•Only load one disc at a time. Loading two or more discs can damage
the unit or scratch the discs.
•Do not use cracked or warped discs or discs that have been repaired
with adhesive, etc.
•Do not use discs on which the sticky part of cellophane tape or labels
is exposed or on which there are traces of where labels have been
removed. Such discs can get caught inside the player and damage
it.
NOTE
Cleaning Discs
Getting Started
Cautions on Loading Discs
30°
30°
NOTE
The set may function improperly or the remote control unit may not
operate if the remote control sensor is exposed to direct sunlight,
strong artificial light from an inverter type fluorescent lamp or infrared
light.
e Put the rear cover back on.
ENGLISH
Getting Started
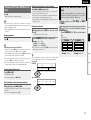
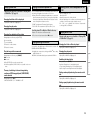
Part Names and Functions
Display
For buttons not explained here, see the page indicated in parentheses ( ).
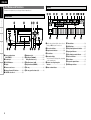
Front Panel
Connections
Q3
Q2
Q1 Q0
Q6 Q5
Q4 Q3
q
w
Q1
Q2
Q1
Q0 oi u y
o
Setup
Playback
Remote Control Information
q1 (the play indicator) lights when a disc is
playing, and 3 (the pause mode) is set.
q w
e
r
qPower operation button
(ON/STANDBY)············································ (20)
Troubleshooting
wPortable jack················································ (20)
eFUNCTION button······································· (20)
rDisplay
tRemote control sensor·································· (5)
yAudyssey Dynamic EQ indicator················ (38)
uVOLUME control knob································ (20)
ty u
i
iHeadphones jack········································· (27)
oSkip buttons (8, 9)····························· (21)
Tuning/Preset buttons (+, –)······················· (28)
Q0Play/Pause button (1 3)····························· (21)
Q1Stop/band button (2 BAND)······················ (21)
Q2Disc tray·························································· (4)
Q3Disc tray open/close button (5)··················· (4)
wDisc section indicator·································· (21)
eReception mode indicator·························· (28)
rTone indicator·············································· (33)
tInformation display
Various information is displayed here, depending
on the operation mode.
yRemote control signal reception
indicator························································· (5)
uMaster volume indicator····························· (20)
e
r
t
iTimer indicator············································ (19)
oHDCD indicator············································ (38)
Q0Dolby Virtual Speaker mode indicator········· (27)
Q1Input signal indicators································ (27)
Q2Dolby Headphone mode indicator············· (27)
Q3Play mode indicator···································· (23)
Q4Disc indicator················································· (4)
Q5Progressive output indicator·······················(11)
Q6HDMI output indicator·································(11)
ENGLISH
Bottom Panel (Subwoofer)
Getting Started
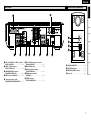
Rear Panel
o
Connections
Setup
Playback
q
q
w
(VIDEO/S-VIDEO IN)···································· (12)
wVIDEO / S-VIDEO connectors
(VIDEO/S-VIDEO OUT)·································(11)
r
t
(ANALOG AUDIO IN)··································· (12)
uDOCK CONTROL jack·································· (12)
iAUX1 Digital audio connectors
oFM/AM antenna terminals
rHDMI connectors (HDMI OUT)····················(11)
t Video output selector switch
(HDMI/PROGRESSIVE/INTERLACED)……… (11)
u
i
yAUX1 / AUX2 Analog audio connectors
eCOMPONENT VIDEO connectors
(COMPONENT VIDEO OUT)·························(11)
y
(OPTICAL DIGITAL IN)································· (12)
qSYSTEM CONNECTOR································ (10)
wPROTECTION indicator······························· (10)
eSPEAKER SYSTEMS connector·················· (10)
rPower cord··················································· (10)
(ANTENNA)·················································· (13)
Q0SYSTEM connector
(SYSTEM CONNECTOR)······························ (10)
Troubleshooting
qAUX1 / AUX2 VIDEO / S-VIDEO connectors
e
Remote Control Information
w
e
r
ENGLISH
Getting Started
Remote Control Unit
nFront
nRear
Connections
Setup
Playback
Remote Control Information
Q6
qSignal transmission indicator···················· (34)
wExternal device power button···················· (35)
eTV input selector button····························· (34)
rFunction button··········································· (20)
tPLAY (1) button·········································· (21)
ySTILL/PAUSE (3) button····························· (21)
uSKIP (8, 9) buttons···························· (21)
Q7
iSEARCH (6, 7) buttons······················· (21)
Q8
oTOP MENU button······································· (21)
Q0Cursor buttons (uio p)·························· (14)
Q1DISPLAY button··········································· (32)
Q2HOME button··············································· (14)
Q3Remote control signal transmitter··············· (5)
Q4ON/STANDBY button·································· (20)
Q5SUB WOOFER LEVEL button
q
Q3
w
e
r
t
y
u
i
Q4
Q5
Q9
W0
W1
Troubleshooting
W2
o
W3
Q0
Q1
Q2
W4
W5
CHANNEL +, – buttons································ (29)
TUNING +, – buttons··································· (28)
Adjust the subwoofer volume level.
Q6SLEEP button··············································· (33)
Q7HDMI button················································ (12)
Q8STOP (2) button·········································· (21)
Q9Dolby virtual speaker/STEREO button······· (26)
W0Master volume control buttons
(VOLUME)···················································· (20)
W1Muting button (MUTE)································ (33)
W2MENU/GUIDE button·································· (21)
W3ENTER button·············································· (14)
W4RETURN button··········································· (14)
W5SOURCE CONTROL switch························· (34)
bTo operate the S-102, set to the “DVD / CD /
FM/AM / iPod” position.
NOTE
If buttons on the front or rear are pressed strongly, the button on the opposite side will be activated too.
q
o
w
Q0
e
Q1
r
Q2
t
y
Q3
Q4
Q5
Q6
u
i
Q7
Q8
qSUBTITLE/PTY button·························· (22, 30)
wAUDIO/RDS button······························· (22, 29)
eCharacter/Number································ (21, 28)
rCLEAR button·············································· (23)
tCALL button················································· (23)
ySTATUS button············································ (19)
uSURROUND button····································· (26)
iSURROUND PARAMETER button·············· (27)
oANGLE/CT button································· (22, 29)
Q0ZOOM/RT button··································· (22, 30)
Q1RANDOM button········································· (23)
Q2REPEAT button············································· (23)
Q3PROGRAM button······································· (23)
Q4TONE button················································ (33)
Q5Cursor buttons (uio p)·························· (14)
Q6ENTER button·············································· (14)
Q7RETURN button··········································· (14)
Q8MEMO button·············································· (28)
ENGLISH
Connections
Cables Used for Connections
Select the cables according to the equipment being connected.
Audio cables
Video cables
Optical digital connections
Component video connections
(Green)
Analog connections (stereo)
(White)
(Red)
(PB/CB)
(Red)
(PR/CR)
Component video cable
L
L
R
R
S-Video connections
Remote Control Information
(Blue)
Playback
•Do not plug in the power supply cord until all connections have been
completed.
•When making connections, also refer to the owner’s manual of the
other components.
•Be sure to connect the left and right channels properly (left with left,
right with right).
•Do not bundle power supply cords together with connection cables.
Doing so can result in humming or noise.
(Y)
Setup
Optical transmission cable
NOTE
Connections
Connections for all compatible audio and video signal formats are
described in these operating instructions. Please select the types
of connections suited for the equipment you are connecting.
With some types of connections, certain settings must be made
on the S-102. For details, refer to the instructions for the respective
connection items below.
Stereo pin-plug cable
S-Video cable
Video connections
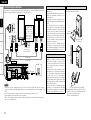
To change the speaker cable
Refer to the procedure below if you want to switch to a different
speaker cable. This example describes how to mount the “+” side
cable to the connector. Mount the “–“ side cable in the same way.
Insert the included hexagonal wrench into the hole at
(Yellow)
75Ω / ohms pin-plug video cable
Signal direction
Audio signal:
the top of the connector’s “+” side. (Arrow A)
Audio and video cables
Video signal:
Input
Output
Input
Output
Troubleshooting
1
2
3
Getting Started
Preparations
HDMI connections
Turn the hexagonal wrench in the direction of arrow
19-pin HDMI cable
B to loosen the cable.
Pull out the old cable. (Arrow C)
Input
Output
Input
Output
bBe careful not to leave any broken wire parts inside the
connector.
4
5
Peel off the cable’s sheath and insert the new cable.
(Arrow D)
Turn the hexagonal wrench in the direction of Arrow
E and tighten securely so that the cable cannot be
E
pulled out.
bIf the polarities are inverted, the phase
may be off and the bass sound may
be missing, resulting in an unnatural
sound.
B
A
C
D
ENGLISH
Getting Started
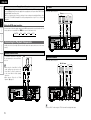
Connecting the System
Protector circuit
A home theater can be achieved easily using the included cables to connect the DVD surround receiver
(ADV-S102), subwoofer (DSW-S102), speakers (SC-S102) and your TV set.
DSW-S102
Connections
The set includes
a built-in clock
function. Connect
the set’s power
cord to a wall
power outlet to
which power is
always supplied.
Setup
Playback
Remote Control Information
System cable
SC-S102
White
Red
Power cord
-
3
White
Red
To household
power outlet
(AC 230 V, 50 Hz)
The protection circuit will be activated in the
following cases:
•When the speaker output is short-circuited
•When the temperature around the set is
extremely high
•When the set is used for long periods of time
with a high output and the internal temperature
rises
When the protection circuit is activated, the
speaker output is cut off and the power supply
indicator flashes. Should this occur, please follow
these steps: be sure to switch off the power of
this unit, check whether there are any faults with
the wiring of the speaker cables or input cables,
and wait for the unit to cool down if it is very hot.
Improve the ventilation condition around the unit
and switch the power back on.
If the protection circuit is activated again even
though there are no problems with the wiring
or the ventilation around the unit, switch off the
power and contact a DENON service center.
Note on speaker impedance
Speaker cable
Troubleshooting
ADV-S102
Speaker cable
TV
7*%&0
*/
Video cable
NOTE
•Connect the set’s video output directly to the TV. Do not connect it via a VCR (video cassette recorder).
Some discs contain copy prohibit signals, and the picture could be disturbed if such discs are played via
a VCR.
•Insert the plugs securely. Incomplete connections will result in the generation of noise.
•Do not unplug the power cord while the set is operating.
•When connecting system cables and speaker cables, first lay them out sideways. When laying them out
take care not to damage them.
10
If speakers with an impedance below the specified
impedance (4 Ω/ohms) are used (for example,
speakers with an impedance of 3 Ω/ohms) with
the volume turned up high for long periods of
time, the temperature may rise, activating the
protective circuit.
When the protection circuit is activated, the output
to the speakers is cut off and the power indicator
blinks. If this happens, unplug the power supply
cord, wait for the set to cool off and improve
ventilation around the unit. Also check the wiring
of the input cables and the speaker cables. After
doing this, plug the power supply cord back in and
turn the unit’s power back on.
If the protection circuit is activated again even
though there are no problems with the wiring
or the ventilation around the unit, switch off the
power and contact a DENON service center.
Mounting the speaker stand and bracket
bBe sure to tighten the screws completely.
bAlso be careful when installing.
Screws
(included)
Speaker Stand
(included)
Wall
Stick the cushion pad here. (Included)
bWhen placing the speaker system (SC-S102) on a
stand, etc., stick the included cushion pads at the
two corners of the bottom surface.
(Refer to the illustration above.)
ENGLISH
Connecting Equipment with HDMI Connectors
Select and connect using one of the video cables below according to the TV's terminals. The terminals
provide playback with different picture qualities, in the following order (from highest to lowest):
qHDMI terminals, wComponent video terminals, eS-Video terminals, rVideo terminals
7*%&0
47*%&0
*/
7*%&0
*/
$0.10/&/57*%&0
*/
:
1# 13
)%.*
*/
NOTE
Playback
If the connected TV is only compatible with DVI-D terminals, use an HDMI/DVI conversion cable.
•HDMI video signals are theoretically compatible with the DVI format.
When connecting to a TV, etc., equipped with a DVI-D terminal, connection is possible using an HDMI/
DVI converter cable, but depending on the combination of components in some cases the video signals
will not be output.
•When connecting using an HDMI/DVI converter adapter, the video signals may not be output properly
due to poor connections with the connected cable, etc.
bBe sure to turn the power off before operating the switch.
•The component video terminals may be indicated differently on your TV. For details, see the TV’s operating
instructions.
•When PROGRESSIVE is set, picture cannot be output from VIDEO OUT/S-VIDEO OUT.
Condition of signals
from the S-102’s HDMI
output terminal
DVI-D-compatible
monitor
(HDCP compatible)
DVI-D-compatible
monitor
(HDCP non
compatible)
Both video and audio
output
Only video outputz
Neither video nor audio
output
z: Only output when video signals are of RGB format.
11
Troubleshooting
Set the HDMI/PROGRESSIVE/INTERLACED switch on the rear panel according to the video output format
of the TV connected to the set.
HDMI-compatible
monitor
Remote Control Information
When connecting with an HDMI/DVI converter cable (adapter)
Switching the video output format
Setup
•When playing multichannel sources, the audio output is downmixed to two channels for output. In
addition, the sampling frequency is lowered to 48 kHz.
•Video signals are not output properly when using devices that are not HDCP-compatible.
•Use a cable on which the HDMI logo is indicated (a certified HDMI product) for connection to the HDMI
connector. Normal playback may not be possible when using a cable other than one on which the HDMI
logo is indicated (a non-HDMI-certified product).
•The audio signals output from the HDMI connector (sampling frequency, bit rate, etc.) may be restricted
by the connected device.
Connections
Monitor
Digital video and digital audio can both be connected using a single HDMI cable.
Getting Started
Connecting the Monitor
ENGLISH
Getting Started
Copyright protection system
Connections
Setting the HDMI output resolution
Setup
In order to play the digital video and audio signals of a DVD Video disc using HDMI connections, both the
connected DVD player and TV must be equipped for a copyright protection system called “HDCP” (Highbandwidth Digital Content Protection).
HDCP is a copy protection technology consisting of data encoding and mutual identification of the
devices. The S-102 is HDCP-compatible. Check the operating instructions of your TV to see if they are
compatible.
Set the resolution of the video signals output from the HDMI output terminal to a resolution with which the
connected devices are compatible. Press HDMI on the remote control unit to select.
Playback
480p/576p
720p
1080i
1080p
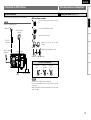
TV Tuner
Connect the cables to be used.
TV tuner
7*%&0
47*%&0
065
7*%&0
065
AUTO
"6%*0
015*$"065
"6%*0
065
3
L
R
L
R
Remote Control Information
Connecting the Playback Components
Carefully check the left (L) and right (R) channels and the inputs and outputs, and be sure to interconnect
correctly.
Control Dock for iPod
Use a DENON Control Dock for iPod (ASD1R, sold separately) to connect the iPod to
the S-102.
iPod
Satellite Receiver
Connect the cables to be used.
Troubleshooting
DBS / BS tuner
7*%&0
•When using the Control Dock for iPod,
certain settings must be made on the
Control Dock for iPod. For details, refer
to the Control Dock for iPod’s operating
instructions.
•When using an iPod, refer to “iPod®
Playback” (vpage 31).
7*%&0
065
47*%&0
065
"6%*0
"6%*0
065
3
L
R
L
R
015*$"065
Connect to “AUX1” when using the OPTICAL terminal for the digital audio input.
12
ENGLISH
Once Connections are Completed
Antenna Terminals
Turning the Power On (vpage 20)
AM loop antenna assembly
Connections
An F-type FM antenna cable plug can be connected directly.
Getting Started
Connections to Other Devices
Remove the vinyl tie and take out the connection
line.
AM/FM
Direction of broadcasting station
Connect to the AM antenna terminals.
Setup
FM antenna
AM loop antenna
(Supplied)
Playback
Bend in the reverse direction.
a.With the antenna on top any stable
surface.
Mount
FM indoor antenna
(Supplied)
Remote Control Information
75 Ω/ ohms
Coaxial cable
Black
b.With the antenna attached to a wall.
White
Installation hole Mount on wall, etc.
Ground
2.Insert the
conductor.
Troubleshooting
Connection of AM antennas
1.Push the
lever.
3.Return the
lever.
AM outdoor antenna
NOTE
•Do not connect two FM antennas simultaneously.
•Even if an external AM antenna is used, do not disconnect the AM
loop antenna.
•Make sure the AM loop antenna lead terminals do not touch metal
parts of the panel.
13
ENGLISH
Getting Started
Menu Map
Menu Operations
Connections
With the S-102, settings and operations for most functions can be
performed by operating while looking at the menus displayed on the
monitor screen.
Setup
Operations
The same operation is possible on the remote control unit.
Playback
Remote Control Information
1
2
3
4
PressHOME.
The menu is displayed.
Press ui to select the item you want to set, then
pressENTER.
Press o p again to select the item you want to set,
thenpressENTER.
Tochangethesetting:
Pressuitoselecttheitemyouwanttochange,then
presstheop buttontochangethesetting.
Troubleshooting
b To return to the previous item, press RETURN.
“CHANNEL LEVEL”, “DISTANCE” and “TIMER SETUP” only.
5
6
LANGUAGE SETUP
(vpage 15)
n OSD LANGUAGE
n DIALOG
n SUBTITLE
n DISC MENUS
AUDIO SETUP
(vpage 17)
n SPEAKER SETUP
n INPUT MODE
OTHER SETUP
(vpage 18)
n CAPTIONS
n WALL PAPER
n DISPLAY
n SLIDE SHOW
n AUTO POWER MODE
n SCREEN SAVER
PressENTERtoenterthesetting.
PressHOME tofinish.
VIDEO SETUP
Example of Display of Default
Values
In lists of selectable items or adjustable ranges, the item
surrounded by a border is the default value.
[Selectable items]
A
B A+B
(vpage 16)
n HDMI SETUP
n TV ASPECT
n TV TYPE
n PROGRESSIVE MODE
n SQUEEZE MODE
RATINGS
(vpage 18)
n RATING LEVEL
n PASSWORD
n REGISTRATION CODE
TIMER SETUP
(vpage 19)
n ONCE TIMER
n EVERY TIMER
n CLOCK SETUP
ENGLISH
Select language for subtitles.
Setup
[Selectable items]
LANGUAGE SETUP
Make settings for OSD language, DVD subtitle/dialog language etc.
F Menu screen F
:Turn subtitles off.
FRENCH
:Select French.
SPANISH
:Select Spanish.
GERMAN
:Select German.
ITALIAN
:Select Italian.
OTHERS
:Select other language.
Select disc menu language.
[Selectable items]
ENGLISH
:Select English.
Select the language displayed on the screen.
FRENCH
:Select French.
SPANISH
:Select Spanish.
ENGLISH :Select English.
GERMAN
:Select German.
FRANÇAIS :Select French.
ITALIAN
:Select Italian.
ESPAÑOL :Select Spanish.
OTHERS
:Select other language.
[Selectable items]
DEUTSCH :Select German.
sDIALOG
Select language for dialog.
[Selectable items]
ENGLISH
:Select English.
FRENCH
:Select French.
SPANISH
:Select Spanish.
GERMAN
:Select German.
ITALIAN
:Select Italian.
OTHERS
:Select other language.
If “Other” was selected, refer to the “Language code list” and input
the code number using the NUMBER (0 ~ 9) buttons.
7079
7082
7089
7165
7168
7176
7178
7185
7265
7273
7282
7285
7289
7365
7378
7383
7384
7387
7465
7473
7487
7565
7575
7576
7577
7578
7579
7583
7585
7589
7665
8375
8376
8377
8378
8379
8381
8382
8385
8386
8387
8465
8469
8471
8472
8473
8475
8476
8479
8482
8484
8487
8575
8582
8590
8673
8679
8779
8872
8979
9072
9085
Language
Faroese
French
Frisian
Irish
Scots Gaelic
Galician
Guarani
Gujarati
Hausa
Hindi
Croatian
Hungarian
Armenian
Interlingua
Indonesian
Icelandic
Italian
Hebrew
Japanese
Yiddish
Javanese
Georgian
Kazakh
Greenlandic
Cambodian
Kannada
Korean
Kashmiri
Kurdish
Kirghiz
Latin
Slovak
Slovenian
Samoan
Shona
Somali
Albanian
Serbian
Sundanese
Swedish
Swahili
Tamil
Telugu
Tajik
Thai
Tigrinya
Turkmen
Tagalog
Tonga
Turkish
Tatar
Twi
Ukrainian
Urdu
Uzbek
Vietnamese
Volapük
Wolof
Xhosa
Yoruba
Chinese
Zulu
Troubleshooting
aOSD LANGUAGE
Code
Remote Control Information
fDISC MENU
Language
Afar
Abkhazian
Afrikaans
Ameharic
Arabic
Assamese
Aymara
Azerbaijani
Bashkir
Byelorussian
Bulgarian
Bihari
Bengali; Bangla
Tibetan
Breton
Catalan
Corsican
Czech
Welsh
Danish
German
Bhutani
Greek
English
Esperanto
Spanish
Estonian
Basque
Persian
Finnish
Fiji
Lingala
Laothian
Lithuanian
Latvian, Lettish
Malagasy
Maori
Macedonish
Malayalam
Mongolian
Moldavian
Marathi
Malay
Maltese
Burmese
Nauru
Nepali
Dutch
Norwegian
Oriya
Panjabi
Polish
Pashto, Pushto
Portuguese
Quechua
Rhaeto-Romance
Romanian
Russian
Sanskrit
Sindhi
Serbo-Croatian
Singhalese
Playback
:Select English.
6565
6566
6570
6577
6582
6583
6589
6590
6665
6669
6671
6672
6678
6679
6682
6765
6779
6783
6789
6865
6869
6890
6976
6978
6979
6983
6984
6985
7065
7073
7074
7678
7679
7684
7686
7771
7773
7775
7776
7778
7779
7782
7783
7784
7789
7865
7869
7876
7879
7982
8065
8076
8083
8084
8185
8277
8279
8285
8365
8368
8372
8373
Setup
ENGLISH
Code
Connections
OFF
Language code list
Getting Started
dSUBTITLE
15
ENGLISH
Getting Started
HDMI AUDIO OUT
VIDEO SETUP
Make video output settings to match connected monitor.
F Menu screen F
Connections
TV ASPECT
WIDE(16:9)
gSQUEEZE MODE
Select whether to output audio via HDMI. (DVD only)
Select display method of 4:3 material on 16:9 screen.
[Selectable items]
OFF
:Enable audio output via HDMI.
ON
:Disable audio output via HDMI.
[Selectable items]
OFF
:4:3 material is stretched to fill 16:9 screen.
ON
:4:3 material is shown in center of 16:9 screen.
sTV ASPECT
There is no effect with interlaced video outputs.
Setup
Select monitor aspect ratio.
[Selectable items]
Playback
Remote Control Information
aHDMI SETUP
Make settings for HDMI video/audio output.
4:3PS
:4:3 monitor is used (For pan & scan sources).
4:3LB
:4:3 monitor
letterboxed.
is
used
16:9
material
is
shown
WIDE(16:9) :16:9 monitor is used.
HDMI SELECT
Make settings for output color space.
[Selectable items]
Y Cb Cr :Output using YCbCr format.
RGB
:Output using RGB format.
Troubleshooting
HDMI AUTO FORMAT
Make settings for resolution of HDMI video output signal.
[Selectable items]
PANEL RES. :Detect monitor panel resolution and automatically set
output resolution.
MAX RES.
:Detect monitor max. resolution and automatically set
output resolution.
With the “4:3PS” setting, 16:9 pictures are displayed with the left and
right sides cut off. Sources not compatible with panning and scanning
are displayed with black bands at the top and bottom.
dTV TYPE
Select video signal format for monitor.
[Selectable items]
NTSC :NTSC monitor is used.
PAL
:PAL monitor is used.
MULTI :NTSC/PAL compatible monitor is used.
HDMI BLACK LEVEL
fPROGRESSIVE MODE
Make settings for RGB output range.
Select optimum progressive mode for video material.
[Selectable items]
NORMAL
:Use video range from 16 (black) to 235 (white).
ENHANCED :Video range from 0 (black) to 255 (white) Use this
setting to avoid black washout.
[Selectable items]
AUTO1 :Select mode suitable for film material playback.
AUTO2 :Select mode suitable for 30-frame film material playback .
VIDEO1 :Select mode suitable for video playback.
VIDEO2 :Select this for video sources with little motion.
VIDEO3 :Select this for motion-intensive video sources.
16
ENGLISH
Make settings for audio playback.
F Menu screen F
Getting Started
DISTANCE
AUDIO SETUP
Set distance from listening position to speakers.
[Selectable items]
:Select unit for distance.
FRONT LCH
:Set distance from listening position to front left
speaker.
FRONT RCH
:Set distance from listening position to front right
speaker.
Connections
DISTANCE
DEFAULT
CHANNEL LEVEL
Listening to the test tones at the listening position, adjust the level
of the speakers for the different channels so that the volume level
sounds the same from all speakers.
[Selectable items]
:Output test tone.
FRONT LCH
:Output test tone from front left speaker.
FRONT RCH
:Output test tone from front right speaker.
Make input mode and decode mode settings for this
source.
[Selectable items]
AUTO
:Detect type of digital input signal and decode and play
automatically.
DTS
:Decode and play only DTS input signals.
PCM
:Decode and play only PCM input signals.
Troubleshooting
TEST TONE
sINPUT MODE
Remote Control Information
Make detailed speaker settings.
:Press the ENTER button to return to the default.
Playback
aSPEAKER SETUP
Setup
SUBWOOFER :Set distance from listening position to subwoofer.
ANALOG :Play only signals from analog input.
SUBWOOFER :Output test tone from subwoofer.
•The volume can be adjusted between the range of –12dB to +12dB.
•When “TEST TONE” was selected, the test tones are output in
intervals of 4 seconds for the first two cycles, 2 seconds from the
third cycle on, in the order shown below.
Front right
Front left
Subwoofer
17
ENGLISH
Getting Started
RATINGS
OTHER SETUP
Make viewer restriction related settings.
Make various other settings.
F Menu screen F
F Menu screen F
dDISPLAY
Adjust display brightness of the receiver.
[Selectable items]
Connections
BRIGHT :Normal display brightness.
MEDIUM :Reduced display brightness.
REGISTRATION CODE
DIM
:Very low display brightness.
OFF
:Display is off unless controls are operated.
Setup
Playback
fSLIDE SHOW
Make slideshow settings.
Remote Control Information
aRATING LEVEL
aCAPTIONS
Select viewer restriction level.
Make settings for closed-caption info on DVD (separate
decoder required).
[Selectable items]
0 (LOCK ALL)
[Selectable items]
:Prohibit playback of all DVDs.
1~7
:Prohibit playback of adult DVDs.
OFF
:Disable closed-caption display.
8 (NO LIMIT)
:Do not use viewer restrictions.
ON
:Enable closed-caption display.
Troubleshooting
[Selectable items]
[Selectable items]
PICTURE :Set the background to a picture.
OLD PASSWORD (0000 ~ 9999) :Enter current password.
Default setting is “0000”.
NEW PASSWORD (0000 ~ 9999) :Enter new password.
:Re-enter new
confirmation.
dREGISTRATION CODE
Display DivX registration code.
gAUTO POWER MODE
Control auto power-off 30 min. afte DVD playback stop
(power saver mode).
password
for
OFF
: Disable power saver mode.
ON
:Enable power saver mode.
This function only works when the input source is set to “DVD/CD”.
Change the OSD background.
Change password.
18
DVDs including closed caption signals are indicated by the
,
and
marks.
Subtitles are not displayed for DVDs not containing closed caption
signals.
sWALL PAPER
sPASSWORD
CONFIRM PASSWORD
5SEC :Set the playback time per image. (5 ~ 15 sec)
[Selectable items]
When “1 – 7” is selected, viewing cannot be restricted for adult DVDs
on which no viewer restriction level has been recorded.
However, when “0 (LOCK ALL)” is selected, playback is prohibited
for all discs, even discs on which no viewer restriction level has been
recorded.
[Selectable items]
BLUE
:Set the background to blue.
GRAY
:Set the background to gray.
BLACK
:Set the background to black.
hSCREEN SAVER
Use the screen saver to prevent burn-in on the monitor
screen.
[Selectable items]
OFF
: Turn the screen saver function off.
ON
:Activate the screen saver if there is no activity for about 5
minutes.
ENGLISH
Settings for Timer.
F Menu screen F
nStart Time
Set Timer Start Time. (24-hour display)
Example: 12:35
Checking whether or not the timer is enabled
In the standby mode, press the STATUS button.
The status is displayed on the S-102’s display.
nEnd Time
Example: 13:00
nFunction
Canceling the timer
Select “DISABLE”.
To turn the timer back on, select “ENABLE”.
Changing the timer settings
[Selectable items]
DISABLE :Disable once-only timer.
ENABLE :Enable once-only timer.
nStart Time
Set Timer Start Time. (24-hour display)
nEnd Time
Set Timer End Time. (24-hour display)
Example: 13:00
nFunction
Select Timer Function.
qPress the o p button to select “TIMER SETUP” icon, then press
the ENTER button.
wPress the ui button to select “ONCE TIMER” or “EVERY TIMER”,
then press the ENTER button.
ePress the ui button to select “ENABLE”.
rPress the uio p button to select start time, end time, and
function, then press the ENTER button.
tPress the ui button to select “EXIT SETUP”, then press the ENTER
button.
The timer is turned on and the timer standby indicator “ ” lights.
yPress the ON/STANDBY button.
The power indicator turns orange.
The settings are cleared.
Reset the current time, then make the settings over from the
beginning.
dCLOCK SETUP
Set Current Time.
The clock is synchronized with the power supply frequency. It may be
off by about 2 to 3 minutes per month.
In such cases, reset the time.
Setting the clock
qPress the o p button to select “TIMER SETUP” icon, then press
the ENTER button.
wPress the ENTER button twice to change the current time.
ePress the uio p button to set the current time, then press the
ENTER button.
rPress the ENTER button to enter the setting.
sEVERY TIMER
Settings for Everyday Timer.
[Selectable items]
DISABLE : Disable Everyday Timer.
ENABLE :Enable Everyday Timer.
•To check the current time when the regular display is displayed, press
the STATUS button once.
•The time can be displayed by pressing the STATUS button when the
power is in the standby mode. (When this is done, the set is no
longer in the low power consumption standby mode.)
When pressed twice while the time is displayed, the display turns
off and the set is put back in the low power consumption standby
mode.
19
Troubleshooting
Example: 12:35
Setting the “ONCE TIMER” and “EVERY TIMER”
If there has been a power failure
Remote Control Information
Settings for once-only timer.
Redo the timer setting operation from the beginning.
The previous settings are cleared and replaced with the new settings.
Playback
aONCE TIMER
•Be sure to set the current time if you want to use the timer playback
function.
•When the function is set to “TUNER”, also set the preset number.
•If the times set for the sleep timer, every timer and once timer
overlap, the priority is as follows:
q sleep timer w once timer
e every timer
Setup
Select Timer Function.
1 on/Eoff
(When the once timer is on and the everyday timer is off)
Connections
Set Timer End Time. (24-hour display)
Getting Started
TIMER SETUP
ENGLISH
Getting Started
<5> <FUNCTION>
89
2 13
Input source switching
Playback
Press <FUNCTION> or [DVD/CD], [FM/AM] or [AUX].
When <FUNCTION> is pressed
IN DVD/CD
IN TUNER
IN Front IN
IN iPod
b
b (Portable)
Connections
Preparations
Setup
ON/STANDBY
Turning the Power On
<VOLUME>
Press ON/STANDBY.
Playback
When no disc is loaded, “0h00m00s” is displayed.
When a disc is loaded, playback starts automatically. (DVD only)
ON/STANDBY
Remote Control Information
[DVD/CD], [FM/AM],
[AUX]
2
1
[VOLUME]
[3]
89
[6 7]
[MENU/GUIDE]
Setting the power to the standby mode:
[NUMBER]
Press ON/STANDBY.
Turning the power off:
[CALL]
Unplug the power cord from the wall outlet.
Troubleshooting
[TOP MENU]
[ENTER]
[uio p]
Power indicator
Standby ∙∙∙∙∙∙∙∙∙∙∙∙∙∙∙∙∙∙∙∙Red
Power on ∙∙∙∙∙∙∙∙∙∙∙∙∙∙∙∙∙∙∙∙Blue
When the timer is set ∙∙∙∙∙∙∙∙∙∙∙∙∙∙∙∙∙∙∙∙Orange
AUX1
In the stop mode, press <5> to open the disc tray.
b“Loading discs” (vpage 4).
bAs long as the menu is displayed on the TV screen, the disc is still
turning. Be sure to stop the disc first, then open the disc tray.
About the button names in these explanations
< > : Buttons on the main unit
[
] : Buttons on the remote control unit
Button name only:
Buttons on the main unit and remote control unit
AUX2
Front In
(Portable)
b“IN iPod” and “IN Front IN” are only displayed when the
corresponding device is connected.
bWhen using a Control Dock for iPod, “AUX2” is not displayed.
[Selectable items]
DVD/CD
: You can view/listen to DVDs or CDs.
TUNER
: You can listen to AM or FM broadcasts.
AUX1, 2
: You can listen to the sound or view the picture of an
external device.
FRONT IN : You can listen to the sound of a portable player.
iPod
: You can listen to the music of an iPod or view photo
data.
NOTE
Be sure to stop playback before turning the power off.
Loading Discs
To close the disc tray
Press <5> again.
NOTE
Do not place any foreign objects in the disc tray. Doing so could
damage it.
20
When [AUX] is pressed
[uio p]
[ENTER]
IN AUX1
IN AUX2
Adjusting the Master Volume
Either turn <VOLUME> or press [VOLUME df].
The volume level is displayed.
bThe volume can be adjusted within the range of –60 to 0 to +18dB.
Depending on the input signal, surround mode, speaker settings
and channel level settings, however, it may not be possible to
adjust the volume up to +18dB.
ENGLISH
Press 1.
The “1” indicator lights and playback begins.
Stopping playback temporarily
2
mode.
[CALL] to select the search
During playback, use
.
Use uio p to select the desired title, then press
or 1.
Or, use
title.
For DVD video discs: Title ↔ Chapter
Press [NUMBER] (0 ~ 9, +10) to select the track.
Example : Track 4 : [4]
Example : Track 12: [+10] [2]
Example : Track 20: [+10] [+10] [0]
bThe search mode set by pressing [CALL] is stored in the memory
until the power is turned off.
[TOP MENU] or [MENU/
( ~ 9, +10) to select the desired
Playback starts.
TOP MENU
DVD MENU
Apple
Banana
Orange
Strawberry
2. AUDIO
Peach
Pineapple
3. ANGLE
Example : Top menu
1. SUBTITLE
Example : DVD menu
Discs are divided into a number of large sections (Title) and small
sections (Chapter). Each of these sections is assigned a number.
For example:
DVD Video
Title 1
Title 2
Troubleshooting
bThe resume play memory function is canceled if the disc tray is
opened or the 2 button is pressed a second time.
bThe resume play memory function only works for discs for which
the elapsed time is shown on the display during playback.
1
During playback, use
1 GUIDE]
[
]
2 [ENTER]
[NUMBER] 0
Remote Control Information
•Resume play memory function (DVD only)
With the S-102, when the 2 button is pressed, that position is stored
in the memory. (At this time, “1” flashes on the display.)
When the 1 button is pressed after pressing the 2 button, playback
resumes from the position at which it was stopped.
Finding tracks directly
On DVDs containing multiple titles, it is possible to select
and play the desired title from the top menu. Some DVDs
include a special menu called the “DVD menu”.
Chapter 1 Chapter 2 Chapter 3 Chapter 1 Chapter 2
Press <13> or [3].
The “3” indicator lights.
bTo resume playback, press <13> or [1].
Fast-forwarding and fast-reversing (searching)
Video CD/Music CDs
Track 1
Track 2
Track 3
Track 4
Playback
Press 2.
•The disc is skipped the number of chapters or tracks equal to the
number of times the button is pressed.
•When pressed once in the return direction, playback returns to the
beginning of the currently playing chapter or track.
•If pressed within 3 seconds after playback has started, the previous
chapter is selected.
Using the Top Menu/DVD Menu (DVD
Video)
Setup
Stopping playback
Press 9 or 8 during playback.
Connections
•For details, refer to the respective disc's instructions. Some discs
may be intentionally designed by their authors to work in ways other
than described in this manual.
•Before playing DVD video discs and video CDs, switch the connected
TV's input.
Moving to the beginning of tracks (skipping)
Getting Started
Playing a DVD/Video CD/Music CD
Disc
Track 5
During playback, press [6] or [7].
The fast-forward/fast-reverse speed increases each time the button
is pressed.
bTo return to normal playback, press [1].
21
ENGLISH
Getting Started
Switching the Audio Language, Subtitle
Language and Angle (DVD Video)
1
Connections
For DVDs containing multiple audio languages, subtitle
languages and angles, the language or angle can be
switched during playback.
During playback, use [AUDIO/RDS], [SUBTITLE/PTY] or
[ANGLE/CT].
The language or angle switches each time the button is pressed.
Setup
Playback
[SUBTITLE/PTY]
[ANGLE/CT]
[ZOOM/RT]
[AUDIO/RDS]
Remote Control Information
[3]
[6 7]
[uio p]
[DISPLAY]
Troubleshooting
[ENTER]
[RETURN]
[REPEAT]
[RANDOM]
[ENTER]
[uio p]
[RETURN]
[PROGRAM]
[CALL]
[CLEAR]
During playback, press [RETURN].
Playing Frame by Frame
(DVD Video/Video CD)
In the still mode, press [3] on the remote control unit.
The picture moves forward one frame each time the button is
pressed.
bPress 1 to return to normal playback.
•With some discs it is not possible to change the audio language
during playback. In such cases, select from the “SETUP”.
•The language selected in the default settings (vpage 15) is set
when the power is turned on and when the disc is replaced.
[NUMBER]
1
To return to the menu screen
Using the Playback Control Function
(DVD Video)
For DVD Video on which “Includes playback control” or the
like is indicated on the disc or jacket, a menu screen is
displayed.
Select the item you want to see, then start playback.
Select the item you want to see using [uio p], then
press [ENTER] or 1.
Or, use [NUMBER] (0 ~ 9, +10) to select the desired title.
Playback starts.
Example :
1. Opening
2. 1st movement
Slow Playback
(DVD Video/Video CD)
In the still mode, press [6] or [7] on the remote
control unit.
When pressed again, the slow play speed increases.
bPress 1 to return to normal playback.
Reverse slow play is not possible on video CDs.
Playing in the Zoom Mode
(DVD Video/Video CD)
1
During playback or still mode, press [ZOOM/RT].
OFF
A1.5
A2
A4
3. 2nd movement
4. 3rd movement
5. Ending
About the button names in these explanations
< > : Buttons on the main unit
[
] : Buttons on the remote control unit
Button name only:
Buttons on the main unit and remote control unit
22
2
Press [uio p].
Move the zoomed picture.
•The zoom function may not work properly at some scenes.
•Zooming is not possible with some discs.
•Zooming is not possible at the top menu or the menu screen.
ENGLISH
During playback, press [REPEAT].
Playback in the respective repeat mode starts.
The “RAND” indicator lights.
Press 1.
The tracks start playing in random order.
Canceling random playback
In the stop mode, press [RANDOM].
The “PROG” indicator lights.
Use [NUMBER] (0 ~ 9, +10) to select the traks.
bExample :To program tracks 3, 12, 7 to play in that order:
[3] [+10] [2] [7]
3
Playing Music Files
Before Playing MP3 or WMA Files
There are many music distribution sites on the Internet allowing you
to download music files in MP3 or WMA (Windows Media® Audio)
format. The music (files) downloaded from such sites can be stored on
CD-R or CD-RW discs and played on the S-102.
“Windows Media” and “Windows” are registered trademarks or
trademarks in the United States and other countries of Microsoft
Corporation of the United States.
Press 1.
Checking the order of the programmed tracks
In the stop mode, press [CALL] repeatedly.
The track numbers are displayed in the programmed order each time
the button is pressed.
Clearing programmed tracks one track at a time
MP3
32, 44.1, 48
WMA
32, 44.1, 48
Creating MP3 and WMA Files
Compatible with the S-102
•Writing software format: “ISO9660 level 1”.
See the writing software’s instructions.
•Compatible: ID3-Tag (Ver.1 or 2), meta-tag.
•Incompatible: Packet write, playlists.
•Displayable characters: “Hankaku” English letters and numbers,
capital letters and _ (underscore).
No. characters displayable: 256
Extension
32 ~ 320
.MP3
64 ~ 160
.WMA
Playing MP3 or WMA Files
1
Load a CD-R or CD-RW disc containing music files in
the MP3 or WMA format into the disc tray (vpage
4).
2 [ENTER]
3 [ENTER]
Select the folder you want to play using [ui], then
press
.
Select the file you want to play using [ui], then press
or 1.
Playback starts.
Switching the time display
During playback, press [DISPLAY].
bSINGLE ELAPSED (Elapsed time of currently playing track)
→ SINGLE REMAIN (Remaining time of currently playing track) →
In the stop mode, press [CLEAR].
The last track programmed is cleared each time the button is
pressed.
Clearing the last programmed track
In the stop mode, press [PROGRAM].
The “PROG” indicator turns off.
23
Troubleshooting
Bit rate
(kbps)
Remote Control Information
1
2
File format
The “RAND” indicator turns off.
Up to 20 tracks can be programmed.
In the stop mode, press [PROGRAM].
Playable MP3/WMA file
Sampling
frequency
(kHz)
Playback
Playing Tracks in the Desired Order
<Program> (Video CD/Music CD)
In the stop mode, press [RANDOM].
Setup
bVideo CD/Music CD discs:
Track repeated (
)
→ Disc repeated ( ) → Repeat playback cancelled →
1
2
•When Playing MP3 or WMA Files, the digital output is converted to
PCM. The signals are output with the same sampling frequency as
when they were written.
•The positions of the folders or files may have been changed by the
writing software when burning the MP3/WMA files onto the CDR/CD-RW disc, so the files may not play in the expected order.
•Copyright-protected files cannot be played. Note that depending on
the software used for burning and other conditions, some files may
not play or display correctly.
Connections
bDVD video discs:
Chapter repeated (“
” lights on the display)
→ Title repeated (“ ” lights on the display)
→ Repeat playback cancelled (indicator turns off) →
Playing Random Order <Random playback>
(Video CD/Music CD)
Getting Started
Playing Repeatedly <Repeat playback>
(DVD Video/Video CD/Music CD)
ENGLISH
Getting Started
Changing the play mode
FOLDER:
Playing Still Picture Files (JPEG
format)
FOLDER REPEAT:
Still picture files in JPEG format recorded on CD-R/CD-RW
discs, picture CDs and Fujicolor CDs can be played as slide
shows on the S-102.
Playing all the files in the selected folder in order
2
Playing all the files in the selected folder repeatedly
Connections
RANDOM ON:
Playing all the files in the selected folder in random order
TRACK REPEAT:
Playing only the selected file repeatedly
Setup
Playback
Setting random playback using the remote control
unit
[ZOOM/RT]
Remote Control Information
[1]
2
[6 7]
[uiop]
[CALL]
[REPEAT]
[RANDOM]
[uio p]
[ENTER]
[DISPLAY]
Troubleshooting
[ENTER]
About the button names in these explanations
< > : Buttons on the main unit
[
] : Buttons on the remote control unit
Button name only:
Buttons on the main unit and remote control unit
24
In the stop mode, press [RANDOM] , then press [1] or [ENTER].
The “RAND” indicator lights and random playback begins.
bThe way in which the files are played in random order depends on
the selected play mode.
Setting repeat playback using the remote control
unit
During playback, press [REPEAT], then press [1] or [ENTER].
Creating JPEG Files Compatible on the
S-102
•Writing software format: “ISO9660 level 1”.
See the writing software’s instructions.
•Displayable characters: “Hankaku” English letters and numbers,
capital letters and _ (underscore).
•JPEG files written on Macintosh computers cannot be played.
•The order in which the JPEG files are played may differ from the
order you expect because the writing software may change the
position of the folders or files when writing them on the CD-R/CDRW disc.
•Depending on the writing conditions and software, it may not be
possible to play or properly display some files.
bTRACK REPEAT → FOLDER REPEAT → FOLDER (Repeat off)
Programmed playback is not possible on discs containing MP3/WMA
files.
Playable JPEG file
Resolution
(pixel)
Extension
0000×0000 ~ 2048×1536
.JPG/.JPE
ENGLISH
Operate in the same way as described at “Playing MP3
or WMA Files” (vpage 23).
“Playing MP3 or WMA Files” (vpage 23)
Changing the play mode
Play the image in the zoom mode
During playback or still mode, press [ZOOM/RT].
6: zoom out
7: zoom in
The way of switching to the next image during
continuous JPEG image playback (SLIDE SHOW)
can be selected
During playback, press [CALL].
SLIDE SHOW MODE: 1 to 11 → RANDOM → OFF
Playback of the still pictures starts automatically.
bThe pictures are played repeatedly until 2 is pressed.
Playing Moving Picture File
It is possible to play digital images in DivX® format recorded on CDR/CD-RW or DVD ± R/DVD ±RW discs.
bA digital video compression technology with DivX® video coding
by DivX Networks Inc.
DivX, DivX Certified and related logos are trademarks of DivX Inc.
Playing DivX® Files
Operate in the same way as described at “Playing MP3
or WMA Files” (vpage 23).
Changing the folder or file to be played
“Playing MP3 or WMA Files” (vpage 23)
Changing the play mode
“Playing MP3 or WMA Files” (vpage 24)
Switching the time display
During playback, press [DISPLAY].
Single time (Elapsed time of currently playing track).
→ Single remain (Remaining time of currently playing track)
Only the Single Time and Single Remain times are displayed.
Setting random playback using the remote control
unit
“Playing MP3 or WMA Files” (vpage 24)
Setting repeat playback using the remote control
unit
“Playing MP3 or WMA Files” (vpage 24)
25
Troubleshooting
bPress [uio p] (to move the zoomed picture).
bContinuous playback (SLIDE SHOW) is not possible in the zoom
mode.
Load the picture CD or Fujicolor CD in the disc tray.
Remote Control Information
During playback or still mode, press [uio p].
u: Invert vertically
i: Invert horizontally
o: Rotate 90° counterclockwise
p: Rotate 90°clockwise
“KODAK” is a trademark of Eastman Kodak Company.
“FUJICOLOR CD” is a trademark of Fuji Photo Film Co, Ltd.
•Max. no. playable files: 1000
Max. folders: 255
•Sampling frequencies (fs): 8 kHz to 48 kHz
•Note that depending on the software used for burning and other
conditions, some files may not play or display correctly.
•The S-102 is not compatible with movement compensation
technology (GMC) or PCM audio
Playback
Changing the orientation of the picture
bPicture CDs are CDs containing photographs taken on conventional
silver film cameras which have been converted into digital data.
For details on Kodak Picture CDs and Fujicolor CDs, please contact
a store offering film development services.
Setup
“Playing MP3 or WMA Files” (vpage 24)
The S-102 can play Kodak Picture CDs and Fujifilm Fujicolor CDs so you
can view the photographs stored on them on a TV screen.
Creating DivX® Files Compatible on the
S-102
Connections
Changing the folder or file to be played
Playing Picture CD/Fujicolor CD
Getting Started
Playing JPEG Files
ENGLISH
Getting Started
Enjoying Surround Sound
Dolby Digital, DTS and other multi-channel sources, CD,
video and other 2-channel sources can be played with
similar atmospherics to the cinema.
Connections
[Connection procedure]
<PHONES>
Setup
Playback
Remote Control Information
[DVS/STEREO]
[STATUS]
[o p]
[op]
[SURROUND
PARAMETER]
[SURROUND]
qTurn on the power of the S-102 and TV.
(“Turning the Power On” (vpage 20), TV operating
instructions)
wSwitch the TV’s input.
(TV operating instructions)
eSwitch the input source (vpage 20).
rSet the input mode.
tSelect the surround mode.
yPlay the source.
uSet the surround parameter (vpage 27).
iAdjust the volume (vpage 20).
Set the Input Mode
When the input source is set to “DVD/CD” or “AUX”, the
input mode can be switched (“Audio setup”, “Input mode”
vpage 17, 20).
Troubleshooting
•When playing CDs containing live recordings, etc., in the “auto”
mode, the sound may be slightly broken when starting playback. If
so, play in the “PCM” mode.
•When playing DTS sources in the “AUTO” mode, there may be noise
when starting playback or searching. If so, play in the “DTS” mode.
•When playing DTS-compatible CDs in the “PCM” mode, noise is
output. When playing DTS-compatible sources, be sure to do so in
the “auto” or “DTS” mode.
About the button names in these explanations
< > : Buttons on the main unit
[
] : Buttons on the remote control unit
Button name only:
Buttons on the main unit and remote control unit
Selecting Surround Mode
Press [SURROUND] to select the surround mode.
DOLBY VS REF.
DOLBY VS WIDE
JAZZ CLUB
ROCK ARENA
STEREO
bThe “DOLBY VS REF. (WIDE)” and “STEREO” modes can also be
selected by pressing [DVS/STEREO].
[Selectable items]
DOLBY VS REF.
(Dolby Virtual Speaker reference mode):
This is the standard mode for experiencing 5.1-channel surround sound
with only speakers for the two front channels.
DOLBY VS WIDE
(Dolby Virtual Speaker wide mode):
The Dolby Virtual Speaker mode's front channel sound field is expanded.
DOLBY H/P
(Dolby Headphone mode):
This is the surround mode for playing with headphones.
A surround sound field is played with regular headphones.
DOLBY H BYPAS (Dolby Headphone bypass mode):
The sound is played in the normal stereo mode rather than the surround mode when playing with headphones.
STEREO
:
Sound is played in the direct or stereo mode.
ROCK ARENA
:
This is an original DENON surround mode.
It achieves the atmosphere of a live concert in an arena with reverberations circling in from the sides.
JAZZ CLUB
:
This is an original DENON surround mode.
This achieves the atmosphere of a live concert hall with a low ceiling
surrounded by hard walls, as if the artist were playing very close to
you.
The “ROCK ARENA” and “JAZZ CLUB” modes may not achieve very
strong effects, depending on the source being played. In this case,
try other surround modes, without worrying too much about their
names.
26
ENGLISH
Use [SURROUND PARAMETER] to display the various
surround parameters, then select with [o p].
[Selectable items]
D.COMP
“DOLBY VS WIDE”.
or
mark sources.
The “
” or “
” indicator lights, depending on the playback
source's signal format.
Use [SURROUND PARAMETER] to display the various
surround parameters, then select with [o p].
[Selectable items] D.COMP
LFE
Playing Dolby Digital/PCM/Analog 2Channel Sources
1
2
Switch the input source (vpage 20).
Use [SURROUND] to select the “DOLBY VS REF” or
3
“DOLBY VS WIDE”.
The “
The sound from the speakers is automatically cut off.
2
3
4
Press [SURROUND] to select the “DOLBY H/P”.
The “
” indicator lights.
Play the source.
Use [SURROUND PARAMETER] to display the various
surround parameters, then select with [o p].
[Selectable items]
D.COMP
LFE
CINEMA
MUSIC
NOTE
Be careful not to set the volume too high when using headphones.
” indicator lights.
Play sources with the
4
Plug the headphones (sold separately) into the
jack.
mark.
The “
” indicator lights, depending on the playback source’s
signal format.
Use [SURROUND PARAMETER] to display the various
surround parameters, then select with [o p].
[Selectable items]
D.COMP
LFE
27
Troubleshooting
When the Dolby Headphone mode is selected, analog, PCM or other
2-channel sources are decoded in the Dolby Pro Logic g Music mode
and transformed into multiple channels for playback.
Play sources with the
4
1 <PHONES>
Switch the input source (vpage 20).
” indicator lights.
Remote Control Information
:
3
Listening in the Dolby Headphone Mode
Playback
:
When the Dolby Headphone mode is selected, analog, PCM or other
2-channel sources are decoded in the Dolby Pro Logic g Cinema mode
and transformed into multiple channels for playback.
MUSIC
Use [SURROUND] to select the “DOLBY VS REF” or
Setup
(Low Frequency Effect):
This sets the level of the subwoofer reproducing the low bass signals.
bRecommended level
When playing Dolby Digital software: 0 dB
When playing DTS movie software: 0 dB
When playing DTS music software: –10 dB
CINEMA
(DVD and AUX1 digital input)
The “
In the stop mode, press [STATUS].
bThe playback source and the various surround settings are shown
on the display each time the button is pressed.
Switch the input source (vpage 20).
(Dynamic range compression):
Optimized setting for late-night listening.
D.COMP only works when playing program sources record in Dolby
Digital or DTS.
LFE
1
2
To check the currently playing source and various
settings
Connections
After several seconds, the display returns to normal and the
parameters you have set are entered automatically.
Playing Dolby Digital/DTS MultiChannel Sources (Digital input only)
Getting Started
Set the Surround Parameter
ENGLISH
Getting Started
<FUNCTION>
<1 3> <+/–>
Listening to Radio Broadcasts
To stop the auto tuning
Tuning in Broadcast Stations
Manual tuning
Connections
1
2
Press <FUNCTION> or [FM/AM] to select “TUNER”.
Use
Setup
<BAND>
FM AUTO
Playback
[SUBTITLE/PTY]
[ANGLE/CT]
[FM/AM]
<BAND> or [FM/AM] to select the reception
band.
Remote Control Information
[ZOOM/RT]
[AUDIO/RDS]
3
FM MONO
AM
<+/–>, [TUNING +/–] or [o p] to select the
reception frequency.
Use
When a station is received, the “TUNED” indication will light.
[CHANNEL +/–]
[TUNING +/–]
[uio p]
[uio p]
[ENTER]
[MEMO]
Troubleshooting
[ENTER]
A humming sound may be heard when using a TV nearby while
receiving AM programs. If this happens, move the system as far from
the TV as possible.
Display of the FM broadcast reception status
•When the reception band mode is set to “FM AUTO” and a stereo
broadcast is tuned in, the “ST” indicator lights.
•If the signal is weak and stable stereo reception is not possible, set
the reception band mode to “FM MONO” and receive the program
in monaural. The “MONO” indicator lights.
There are two, switchable modes fo <+/–> the tuning mode for setting
the reception frequency (setting upon purchase), and the preset mode
for selecting the preset broadcast station.
nSwitching the preset mode
Pressing <+> while pressing in <BAND>.
“PRESET” is flashes for approximately 5 seconds.
nSwitching the tuning mode
28
Naming the Currently Tuned in Broadcast
Station and Presetting it
Up to 60 stations (total for AM and FM) can be preset.
Names of up to 8 characters can be input.
1
2 [MEMO]
3 [ENTER][
Tune in the broadcast station
twice.
The name input mode is set.
Main unit <+/–> button
About the button names in these explanations
< > : Buttons on the main unit
[
] : Buttons on the remote control unit
Button name only:
Buttons on the main unit and remote control unit
The reception frequency changes each time [TUNING +/–] or [o p] is
pressed.
Press
[NUMBER]
[CALL]
Press [TUNING +/–] or [o p].
Pressing <–> while pressing in <BAND>.
“TUNING” is flashes for approximately 5 seconds.
Auto tuning
When [TUNING +/–] or [o p] is pressed and held in, the set automatically
starts searching for a broadcast station.
bStations whose signal is weak cannot be tuned in.
Use
ui] to select the character, then press
.
bCharacters that can be input.
A to Z, 0 to 9 + [CALL] for small letters
! “ # $ % & ’ ( ) * + , – . / : ; < = > ? @ [ \ ] ˆ _ { ¦ } (space)
bPress [o p] to move the cursor.
Use this to correct input characters.
bTo cancel character input, press [MEMO].
Everything that has been input is canceled.
4
5
Once you are finished inputting, press [ENTER].
“P0 –” flashes on the preset number display.
Use [ui] to select the number, then press
[ENTER].
Or use [NUMBER] (0 ~ 9, +10) to select the number.
The preset number, reception band and reception frequency are
displayed, then the name of the broadcast station appears.
Changing the broadcast station name
qCall out the preset name you want to change, then press [MEMO]
twice.
wPerform steps 3 and 4 at “Naming the currently tuned in broadcast
station and presetting it”.
ENGLISH
RDS (Radio Data System)
qPress [MEMO] while the broadcast station is tuned in.
wSelect the number using [ui], then press [ENTER].
Or use [NUMBER] (0 ~ 9, +10) to select the number.
NOTE
Use this to correct the time of the clock on the this unit.
Press [ANGLE/CT] button when the time service of an RDS station is
being properly received. “TIME” is displayed for 2 seconds and the
this units clock is corrected. “NO TIME DATA” is displayed if the RDS
station does not offer a time service and when the broadcast is not
being received properly.
Program Type (PTY)
Press and hold in <13>.
“AUTO PRESET?”
alternately.
and
“–NO/
+START”
are
displayed
bPress <–> to cancel auto presetting.
3
Press <+>.
“SEARCH” flashes, then “COMPLETED” is displayed.
EASY M
Listening to Preset Stations
Use <+/–>, [CHANNEL] or [NUMBER] (0 ~ 9, +10) to select
the preset number.
bOperate <+/–> after switching to the preset mode vpage 28).
LIGHT M
CLASSICS
OTHER M
Weather
Finance
Children’s
CHILDREN
programmes
SOCIAL
Social Affairs
RELIGION
Religion
PHONE IN
Phone In
TRAVEL
Travel
LEISURE
Leisure
JAZZ
Jazz Music
COUNTRY
Country Music
NATION M
National Music
OLDIES
Oldies Music
FOLK M
Folk Music
DOCUMENT Documentary
WEATHER
FINANCE
1
2
Set the band to “FM”, then press
[AUDIO/RDS] until
“RDS SEARCH” appears on the display.
Press [TUNING +/–].
The RDS search operation starts automatically.
When a broadcast station is found, that station’s name appears
on the display.
bIf no RDS station is found when all the frequencies are searched,
“NO PROGRAM” is displayed.
When the [o p] is pressed during the RDS search operation, all
frequencies are searched once.
Troubleshooting
•Broadcast stations whose antenna signal is weak cannot be preset
automatically. If you wish to preset such stations, tune them in
manually, then perform the operation at “Naming the currently tuned
in broadcast station and presetting it”.
•Once auto presetting starts, it cannot be canceled (it takes about 60
seconds to be completed).
News
Current Affairs
Information
Sports
Education
Drama
Culture
Science
Varied
Pop Music
Rock Music
Easy Listening
Music
Light Classical
Serious Classical
Other Music
Remote Control Information
1
2
Press <FUNCTION> or [FM/AM] to select “TUNER”.
NEWS
AFFAIRS
INFO
SPORT
EDUCATE
DRAMA
CULTURE
SCIENCE
VARIED
POP M
ROCK M
Use this function to automatically tune to FM stations that
provide the RDS service.
Playback
Up to 60 stations can be preset.
RDS Search
PTY identifies the type of RDS program.
The program types and their displays are as follows:
Setup
Automatically Presetting FM Stations
(Auto preset)
Connections
If a station is preset at a number that has already been preset, the old
settings are deleted and replaced with the new settings.
RDS (works only on the FM band) is a broadcasting service
which allows a station to send additional information along
with the regular radio program signal.
The following three types of RDS information can be
received with this unit:
Clock Time (CT)
Getting Started
To only preset
Traffic Program (TP)
TP identifies programs that carry traffic announcements.
This allows you to easily find out the latest traffic conditions in your
area before leaving home.
Radio Text (RT)
RT allows RDS stations to send text messages that appear on the
display.
NOTE
The operations described below using [SUBTITLE/PTY], [ZOOM/RT]
and [ANGLE/CT] will not function in areas in which there are no RDS
broadcasts.
29
ENGLISH
Getting Started
<FUNCTION>
1
Connections
Setup
Playback
Remote Control Information
[DVD/CD],
[FM/AM],
[AUX], [iPod]
RT (Radio Text)
Use this function to find RDS stations broadcasting a
designated program type (PTY).
For a description of each program type, refer to “Program
Type (PTY)”.
“RT” appears on the display when radio text data is
received.
1
2
3
Set the band to “FM”, then press
[AUDIO/RDS] until
“PTY SEARCH” appears on the display.
Watching the display, press
ON/STANDBY
ON/STANDBY
PTY Search
[SUBTITLE/PTY] to call
out the desired program type (vpage 29).
Press [TUNING +/–].
[SUBTITLE/PTY]
[ZOOM/RT]
[AUDIO/RDS]
1
The PTY search operation starts automatically.
The station name is displayed on the display after searching
stops.
bIf no station broadcasting the designated program type is found
when all the frequencies are searched, “NO PROGRAM” is
displayed.
Set the input source to “TUNER”, then press [ZOOM/
RT].
When the station currently tuned in is offering a radio text message
service, the message scrolls on the display.
bWhen the RT mode is turned on while an RDS radio station not
offering an RT service is tuned in, “NO TEXT DATA” is displayed
on the display, then the mode automatically switches to the PS
mode.
bIn the same way, the mode automatically switches to the PS
mode when the RT service is finished. In this case, the mode
automatically switches from the PS mode back to the RT mode
when an RT broadcast is resumed.
bTo turn the RT mode off, press [ZOOM/RT] and switch to the desired
display mode.
bPress [ZOOM/RT] on the remote control unit to select.
PS
[ENTER]
[TUNING +/–]
[uio p]
Troubleshooting
Use this function to find RDS stations broadcasting traffic
programs (TP stations).
[ENTER]
1
2
Set the band to “FM”, then press
[AUDIO/RDS] until
“TP SEARCH” appears on the display.
Press [TUNING +/–].
30
FREQUENCY
The RT mode cannot be set in the AM band or for FM stations not
offering RDS broadcasts.
TP Search
[DISPLAY]
About the button names in these explanations
< > : Buttons on the main unit
[
] : Buttons on the remote control unit
Button name only:
Buttons on the main unit and remote control unit
PTY
When the [o p] is pressed during the PTY search operation, all
frequencies are searched once.
[RETURN]
[uio p]
[RETURN]
RT
The TP search operation starts automatically.
The station name is displayed on the display after searching
stops.
bIf no TP station is found when all the frequencies are searched,
“NO PROGRAM” is displayed.
When the [o p] is pressed during the TP search operation, all
frequencies are searched once.
ENGLISH
bThe iPod may only be used to copy or play contents that are not
copyrighted or contents for which copying or playback is legally
permitted for your private use as an individual. Be sure to comply
with applicable copyright legislation.
NOTE
1
2
3
4
5
Play the track.
3
13
Pause the track.
8, 9
8, 9
Play the track from the beginning/
Play the next track.
6, 7
6, 7
Fast-reverse the track/Fast-forward the track.
o, p, u, i
Click Wheel
ENTER
Select
RETURN
–
Switch between the browse
mode and the remote mode.
REPEAT
–
Switch the repeat function.
RANDOM
–
Switch the shuffle function.
Press <FUNCTION> or [iPod] to select “iPod”.
Turn on the TV’s power. Set the TV’s input function
to the S-102 input.
Press [RETURN] to select the “Remote iPod”.
The iPod’s display menu is displayed.
Watching the iPod’s display, press [ui] to select the
“Photos”.
Press [ENTER].
Turn on the TV’s power. Set the TV’s input function
13
MENU/GUIDE
The iPod’s photographs are displayed on the TV monitor.
to the S-102 input.
Press 1.
Playback starts.
bAlso read the iPod’s operating instructions.
Switching the S-102’s display (FL)
During playback, press [DISPLAY].
The display switches each time the button is pressed.
When an iPod is connected and a slide show is playing, the iPod is not
charged. Charge it ahead of time.
Disconnecting the iPod
Set the S-102’s power to the standby mode using ON/
STANDBY.
MENU
b Play/Pause in remote mode.
Select an item.
Enter the selection or plays the
track.
Display the menu or return to the
previous menu.
b In remote mode, the iPod backlight
goes off when you press Play/Pause
for an extended period.
Troubleshooting
1
2
3
Press <FUNCTION> or [iPod] to select “iPod”.
1
Viewing Still Pictures
(Only for iPods Equipped with the Photo
Function)
Operation on the S-102
Playing a Portable Audio
Your portable audio player can be connected to the S102’s portable jack to play tracks on the portable audio
player.
1
2
Press <FUNCTION> or [AUX] to select “Front in”.
Play the portable audio player.
Title name
Album title
Artist name
Remaining time
Elapsed time
It is also possible to use <FUNCTION>, [DVD/CD], [FM/AM] or [AUX]
to switch the input source to something other than “iPod” then
disconnect the iPod.
Remote Control Information
Listening to Music
iPod buttons
Playback
•DENON will accept no responsibility whatsoever for any loss of iPod
data.
•Depending on the type of iPod and the software version, some
functions may not operate.
Remote control unit buttons
Setup
iPod is a trademark of Apple Inc., registered in the U.S.
and other countries.
In the browse mode, when “Songs” is selected from the “TOP
MENU” while a track is playing, the track stops.
Connections
With the S-102, you can listen to music or view photo data
on an iPod. It is also possible to operate the iPod from the
main unit or remote control unit.
Remote control and iPod button relations
Getting Started
iPod® Playback
The Portable Audio are output.
bAlso read the portable audio player’s operating instructions.
Portable
"6%*0-*/&
065
Connect the S-102 and portable audio player using a separately sold
mini-stereo audio cable.
31
ENGLISH
Getting Started
On-Screen Display
Advanced Operation
Connections
<5> <FUNCTION>
<8>
<1>
Using the Disc Information Screen
(DVD Video/Video CD/Music CD)
It is possible to display information on the disc (titles,
chapters, tracks and times) and to specify the position to
be played.
Setup
1
2
During playback, [DISPLAY].
Playback
”, then use [ui] to
select the item you wish to change.
Use
<ON/STANDBY>
VOLUME
[o p] to select the “
Remote Control Information
Specifying the title, chapter or track
After selecting “Title”, “Chapter” or “Track“, use [NUMBER] (0 ~ 9, +10)
to select the number.
For DVD Video discs, also press [ENTER].
•Playback starts from the specified position.
ON/STANDBY
[SLEEP]
Troubleshooting
VOLUME
[MUTE]
[DISPLAY]
[NUMBER]
[STATUS]
[TONE]
[ENTER]
[uio p]
[ENTER]
[uio p]
To specify the elapsed time
qAfter selecting the elapsed time display, use [DISPLAY] to select the
time display to be specified.
wInput the time using [NUMBER] (0 ~ 9, +10), then press [ENTER].
Example :To specify 1 hour, 32 minutes and 47 seconds
Press [1] [3] [2] [4] [7].
To specify 1 minutes and 26 seconds
Press [0] [0] [1] [2] [6].
•Playback starts from that tracks.
For some discs it may not be possible to specify the time.
Closing the disc information screen
Press [DISPLAY] again.
About the button names in these explanations
< > : Buttons on the main unit
[
] : Buttons on the remote control unit
Button name only:
Buttons on the main unit and remote control unit
32
Using
the
(DVD Video)
Multi-Function
Screen
The audio language, subtitle language and angle can be
switched.
1
2
3
During playback, [DISPLAY].
[o p] to select the “
”, then use [ui] to
select the item you wish to change.
Use
Use [NUMBER] (0 ~ 9, +10) to select the number.
Playback starts with the specified settings.
•For some discs, it may not be possible to switch the audio or subtitle
language during playback. In this case select “Audio” or “Subtitle”
(vpage 22).
•When the power is turned on or the disc is changed, the disc is
played with the languages set at “Audio” or “Subtitle” (vpage
22).
Closing the multi-function screen
Press [DISPLAY] again.
ENGLISH
Use this function to automatically switch the power to the
standby mode after a specific amount of time (minutes).
During playback, use [SLEEP] to select the time.
30
20
10
amount of time.
BASS
TREBLE
DEFEAT
With the name of the item to be adjusted selected,
press [o p] to adjust the level.
[Selectable mode]
BASS
:
Adjusts the bass sound (–10 dB to +10 dB).
TREBLE
:
Last Function Memory
This stores the settings as they were directly before the
standby mode was set.
When the power is turned back on, the settings are
restored to as they were directly before the standby mode
was set.
Backup Memory
The various settings are backed up for about 1 week,
even if the power is turned off or the power cord is
disconnected.
Adjusts the treble sound (–10 dB to +10 dB).
Canceling the sleep timer
Press [SLEEP] until the “SLEEP” indicator turns off.
bThe sleep timer can also be canceled by setting the S-102’s power
to the standby mode using ON/STANDBY.
In the stop mode, press [STATUS].
The time is displayed.
bThe time can be displayed by pressing [STATUS] when the power is
in the standby mode. (When this is done, the set is no longer in the
low power consumption standby mode.)
When pressed twice while the time is displayed, the display turns
off and the set is put back in the low power consumption standby
mode.
If the sleep timer and everyday timer settings overlap, the sleep
timer has priority.
:
Auto Power On
When the power is in the standby mode, the power turns
on simply by pressing <5> or <1>.
If no operation is performed within 4 seconds, the display switches
back to what was previously displayed.
Resetting the Microprocessor
Turning the Sound Off Temporarily
(Muting)
Press [MUTE].
Perform this procedure if the display is abnormal or if
operations cannot be performed.
When the microprocessor is reset, all the settings are
reset to their default values.
1
Set the standby mode using <ON/STANDBY>.
bSet to the standby mode and wait 5 seconds.
To cancel, either press [MUTE] again or adjust the volume using
VOLUME.
Convenient Functions
Personal Memory Plus Function
This function sets the settings (input mode, surround
mode, etc.) last selected for the individual input sources.
When you switch to an input source, the settings are
automatically set to the ones that were set the last time
that input source was used.
<ON/STANDBY>
2 <FUNCTION>
<8>
3
Press
and
while simultaneously pressing
.
Release the three buttons when “INITIALIZE” is
displayed.
If in step 3 the display does not flash at intervals of about 1 second,
start over from step 1.
33
Troubleshooting
Checking the time remaining until the sleep timer
starts
DEFEAT
The tone adjustment circuitry can be bypassed to achieve high sound
quality. ”0dB“
Remote Control Information
3
The power is set to the standby mode after the set
2
Select the adjustment mode using [TONE].
Playback
bAfter about 4 seconds, the “SLEEP” indicator stops flashing,
remaining lit, and the settings are automatically entered.
1
Setup
The “SLEEP” indicator flashes.
120
90 60
50
40
Turns off
Adjusting the Tone
Connections
1
2
Set the current time (vpage 19).
The surround parameters, tone adjustment and the volumes of the
different speakers are stored for the individual surround modes.
Getting Started
Other Functions
Setting the Sleep Timer
ENGLISH
Getting Started
Setting the preset memory function
Remote Control Unit Operations
Connections
Signal transmission
indicator
[AUDIO/RDS]
[TV INPUT]
Setup
[ZOOM/RT]
Playback
[NUMBER]
[REPEAT]
Remote Control Information
[CALL]
DENON and other makes of components can be operated
by setting the preset memory.
This remote control unit can be used to operate components
of other manufacturers without using the learning function
by registering the manufacturer of the component as
shown in the list of preset codes (vEnd of this manual).
1
2
Set
[SOURCE CONTROL] to the component to be
registered.
Press
3
time.
The indicator starts flashing.
Referring to the included list of preset codes (vEnd
4
Troubleshooting
About the button names in these explanations
< > : Buttons on the main unit
[
] : Buttons on the remote control unit
Button name only:
Buttons on the main unit and remote control unit
34
1
2
Set
[SOURCE CONTROL] to the component you want
to operate.
Operate the component.
bFor details, refer to the component’s operating instructions.
bSome models cannot be operated with this remote control unit.
[AUDIO/RDS] and [ZOOM/RT] at the same
of this manual), press [NUMBER] (0 ~ 9) to input the
preset code (a 3-digit number) for the manufacturer
of the component whose signals you want to store in
the memory.
To store the codes of another component in the
[SOURCE
CONTROL]
Operating a component stored in the
preset memory
memory, repeat steps 2 to 3.
Setting the punch through function
“Punch Through” is a function allowing you to operate
[SOURCE CONTROL] and [TV INPUT] on “TV”, “SAT/CABLE”
or “VCR” components when in the “DVD / CD / FM/AM /
iPod” mode. By default, nothing is set.
1
2
3
[SOURCE CONTROL] to the component to be
registered (DVD / CD / FM/AM / iPod).
Set
Press [CALL] and [REPEAT] at the same time.
The indicator starts flashing.
Input the number of the component you want to set.
•The signals for the pressed buttons are emitted while setting the
preset memory. To avoid accidental operation, cover the remote
control unit’s transmitting window while setting the preset memory.
• Depending on the model and year of manufacture, this function
cannot be used for some models, even if they are of makes listed in
the list of preset codes.
• Some manufacturers use more than one type of remote control code.
Refer to the included list of preset codes to change the number and
verify correct operation.
• Operation is not possible for some models.
TV
SAT/CABLE
VCR
No setting
Number
1
2
3
0
ENGLISH
[Front]
[SOURCE POWER]
[TV INPUT]
[ENTER]
DVD/CD
iPod
TUNER
TV
Satellite Receiver,
Cable TV
Video cassette
recorder
SOURCE CONTROL
DVD / CD / FM/AM /
iPod / NET/USB
DVD / CD / FM/AM /
iPod / NET/USB
DVD / CD / FM/AM /
iPod / NET/USB
TV
SAT/CABLE
VCR
SOURCE POWER
Punch through
Punch through
Punch through
Power on / off
Power on / off
Power on / off
TV INPUT
Punch through
Punch through
Punch through
Input mode selection
Input mode selection
Input mode selection
DISPLAY
Display
Display
–
Display
Display
–
1
Playback
Playback
DVD/CD Playback
Auto Preset (Hold)
–
–
Playback
[RETURN]
2
Stop
–
–
–
–
Stop
STILL / PAUSE 3
Still / Pause
Still / Pause
–
–
–
Pause
8 9,
CHANNEL + / –
Auto search (cue)
Auto search (cue)
Switch channels
Switch channels
Switch channels
Switch channels
6 7,
TUNING + / –
Manual search (fastreverse/fast-forward)
Manual search (fastreverse/fast-forward)
Tuning
–
–
Search (reverse, forward)
MENU/GUIDE
Menu / Guide
Menu
–
Menu / Guide
Menu
–
u i o p
Cursor
Cursor
Cursor
Cursor
Cursor
–
ENTER
Enter
Enter
Enter
Enter
Enter
–
RETURN
–
Browse/Remote
–
–
Return
–
Special remarks
q, w
q, w
q, w
q
q
q
Device operated
DVD/CD
iPod
TUNER
TV
Satellite Receiver,
Cable TV
Video cassette
recorder
SOURCE CONTROL
DVD / CD / FM/AM /
iPod / NET/USB
DVD / CD / FM/AM /
iPod / NET/USB
DVD / CD / FM/AM /
iPod / NET/USB
TV
SAT/CABLE
VCR
0 ~ 9, +10
Number input / Track
selection
–
Channel selection
Channel selection
Channel selection
Channel selection
u i o p
Cursor
Cursor
Cursor
Cursor
Cursor
–
ENTER
Enter
Enter
Enter
Enter
Enter
–
RETURN
–
Browse/Remote
–
–
Return
–
Special remarks
q
q
q
q
q
q
Playback
[uio p]
Setup
[Rear]
Remote Control Information
[uio p]
[DISPLAY]
[ENTER]
[RETURN]
[SOURCE
CONTROL]
[0 ~ 9, +10]
Device operated
Connections
[2]
[1]
[STILL/PAUSE 3]
[CANNEL +/–,
8 9]
[TUNING +/–,
6 7]
[MENU/GUIDE]
Getting Started
Functions of Buttons by Component
Troubleshooting
GSpecial RemarksH
qOnly one component can be preset for each mode. If a new code is preset, the previous code is automatically cleared.
wThe TV, SAT/CABLE or VCR buttons can be assigned to a DVD, CD, TUNER or iPod (v page 36).
35
ENGLISH
Getting Started
bSources recorded in Dolby Surround
Other Information
Connections
Surround
Setup
The S-102 is equipped with a digital signal processing circuit that lets
you play program sources in the surround mode to achieve the same
sense of presence as in a movie theater.
Playback
Dolby Surround
Remote Control Information
Dolby Digital
Troubleshooting
Dolby Digital is a multichannel digital signal format developed by Dolby
Laboratories.
A total of 5.1-channels are played: 3 front channels (“FL” , “FR” and
“C”), 2 surround channels (“SL” and “SR”) and the “LFE” channel for
low frequencies.
Because of this, there is no crosstalk between channels and a realistic
sound field with a “three-dimensional” feeling (sense of distance,
movement and positioning) is achieved.
A real, overpowering sense of presence is achieved when playing
movie sources in AV rooms as well.
Dolby Pro Logic g
Dolby Pro Logic g is a matrix decoding technology developed by Dolby
Laboratories.
Regular music such as that on CDs is encoded into 5-channels to
achieve an excellent surround effect.
The surround channel signals are converted into stereo and full band
signals (with a frequency response of 20 Hz to 20 kHz or greater)
to create a “three-dimensional” sound image offering a rich sense of
presence for all stereo sources.
36
Sources recorded in Dolby Surround are indicated with the following
logo marks.
Dolby Surround support mark :
Manufactured under license from Dolby Laboratories.
“Dolby”, “Pro Logic” and the double-D symbol are trademarks of
Dolby Laboratories.
DTS Surround
DTS Digital Surround
DTS Digital Surround is the standard digital surround format of DTS,
Inc., compatible with a sampling frequency of 44.1 or 48 kHz and up
to 5.1-channels of digital discrete surround sound.
Manufactured under license under U.S. Patent #’s: 5,451,942;
5,956,674; 5,974,380; 5,978,762; 6,487,535 & other U.S. and
worldwide patents issued & pending. DTS is a registered
trademark and the DTS logos, Symbol and DTS Virtual are
trademarks of DTS, Inc. © 1996-2007 DTS, Inc. All Rights
Reserved.
Dolby Virtual Speaker
Dolby Virtual Speaker technology uses proprietary technology of Dolby
Laboratories to create a virtual surround sound field using only two
speakers for the front channels, allowing the user to experience sound
as if surround speakers were actually being used.
Features of Dolby Virtual Speaker sound
Accurate surround sound field positioning
The virtual surround speakers are positioned at 105° to the left and
105° to the right.
Multi-channel programs played according to the producer’s
intentions
Sound set at the rear left is heard from the rear left.
Stereo programs played in surround
The Dolby Pro Logic g circuit is used together with the Dolby Virtual
Speaker circuitry to create a rich virtual surround sound field with
stereo programs as well.
Selecting the listening mode
Two listening modes are provided: Reference and Wide.
Reference mode
Dolby Headphone
Dolby Headphone is a 3D sound technology developed jointly by Dolby
Laboratories and Lake Technology of Australia achieving surround
sound with regular headphones.
Dolby Headphone simulates speaker playback in a room and positions
the sound sources to the front or the sides, outside of the head,
achieving a powerful sound similar to that of a movie theater or home
theater.
Wide mode
: 2 front channels
: Virtual sound field created with the Dolby Virtual Speaker mode
ENGLISH
Presence/absence of signals and controllability in the various modes
Channel output
FRONT
L/R
DHP
STEREO
ROCK ARENA
JAZZ CLUB
DVS
DHP
Source
REFERENCE
WIDE
DOLBY H/P
Multich
2ch
BYPASS
STEREO
ROCK ARENA
JAZZ CLUB
DTS
Multi channel
S
S
S
S D.MIX
S D.MIX
S
S
Surround parameter (default)
Cinema/
D.COMP
LFE
DOLBY DIGITAL/DTS only
Music
A
S (OFF)
S (0dB)
A
S (OFF)
S (0dB)
A
S (OFF)
S (0dB)
S (0dB)
S (CINEMA) S (OFF)
A
S (OFF)
S (0dB)
A
S (OFF)
S (0dB)
A
S (OFF)
S (0dB)
A
S (OFF)
S (0dB)
2-channel
F PLg
F PLg
F PLg
S
S
S
S
Multi channel
S
S
S
S D.MIX
S D.MIX
S
S
PCM
ANALOG
2-channel
F PLg
F PLg
F PLg
S
S
S
S
2-channel
F PLg
F PLg
F PLg
S
S
S
S
TONE
CONTROL
S (OFF)
S (OFF)
S (OFF)
S (OFF)
S (OFF)
S (OFF)
S (OFF)
S (OFF)
Remote Control Information
Surround Mode
S
S
A
A
S
S
S
DOLBY DIGITAL
2-channel
F PLg
F PLg
F PLg
S
S
S
S
Playback
S
S
A
A
S
S
S
AUX1, 2 / TUNER
/ iPod / Portable
DVD / AUX1
Setup
REFERENCE
WIDE
DOLBY H/P
BYPASS
DVS
SUB
WOOFER
Input signal per input source
Connections
Surround Mode
DVS:
Dolby Virtual Speaker
DHP:
Dolby Headphone
(H/P only)
Getting Started
Surround Modes and Parameters
S :Signal present or controllable.
F :Can be selected with 2-channel decode mode.
A :No signal or not controllable.
D.MIX:Compatible with down-mixing.
PLg :Compatible with PLg processing.
OUTPUT VIDEO
INPUT
DVD/CD
TUNER
AUX1
AUX2
Front in
iPod
Interlaced
Progressive
HDMI
VIDEO
S-video
VIDEO
S-video
S
A
S
A
S
A
S
A
A
S
S-video
S
A
S
A
A
S
A
S
A
S
Component
480i/576i 480p/576p
S
A
A
S
A
A
A
A
A
A
A
A
A
A
A
A
A
A
A
A
Troubleshooting
Video output table
HDMI
A
A
S
A
A
A
A
A
A
A
37
ENGLISH
Getting Started
Progressive Scan Circuit “DCDi™”
Connections
“DCDi™” is trademark of Faroodja, a division of Genesis Microchip
Inc.
The S-102 is equipped with a high precision Progressive Scan circuit
“DCDi™” allowing it to reproduce movies and other images on DVDs
with a quality near that of the original.
Setup
AL24 Processing (Stereo mode only)
Playback
Remote Control Information
AL24 Processing has inherited the technology of the original ALPHA
Processing that was used in DENON’s highly-successful referenceclass audio components.
AL24 Processing further reduces quantization distortion and represents
the ultimate analog waveform reproduction technology designed to
support the higher numbers of bits and higher sampling.
AL24 Processing senses the nature of the digital data being input and
interpolates the data so that it faithfully replicates the original analog
waveform. AL24 processing operates when CD, MP3 or WMA data
is inputted.
HDCD®
(High Definition Compatible Digital®)
(Stereo mode only)
Troubleshooting
HDCD® is an encoding/decoding technology that greatly reduces
the distortion that occurs upon digital recording while maintaining
compatibility with the conventional CD format, thus expanding the
dynamic range and achieving a high resolution.
Conventional CDs and HDCD compatible CDs are identified
automatically to select the optimum digital processing.
®, HDCD®, High Definition Compatible Digital® and
Microsoft® are either registered trademarks or trademarks of
Microsoft Corporation, Inc. in the United States and/or other
countries. HDCD system manufactured under license from
Microsoft Corporation, Inc. This product is covered by one or more
of the following: In the USA: 5,479,168, 5,638,074, 5,640,161,
5,808,574, 5,838,274, 5,854,600, 5,864,311, 5,872,531, and in
Australia: 669114. Other patents pending.
38
Audyssey Dynamic EQ.
Audyssey Dynamic EQ. is a technology that automatically corrects the
tonal balance of an audio system when the volume is changed. It
is based on psychoacoustic research that better matches to human
perception than other loudness compensation that was used before.
The tonal balance is adjusted continuously with variation in both
program material and volume setting.
Audyssey BassXT
Audyssey BassXT is a solution to extend bass performance to lower
frequencies without increasing cabinet size, driver size or weight.
BassXT actively monitors the incoming low frequency signal and
drives subwoofers to their maximum capability at all volumes, thereby
producing deeper bass at all volume levels. This allows the subwoofer
to play low bass content when it can and protects it only for the few
times when it can’t. It is not like simple bass boost or tone control
as the system is fully customized for each speaker design by DSP
processing and works in real time.
Manufactured under license from Audyssey Laboratories, Inc.
U.S. and foreign patents pending.
Audyssey BassXT™ and Audyssey Dynamic EQ™ are trademarks
of Audyssey Laboratories, Inc.
ENGLISH
Troubleshooting
Page
10
10
9, 10
Connections
Setup
If a problem should arise, first check the following:
1. Are the connections correct?
2. Is the set being operated as described in the owner’s manual?
3. Are the other components operating properly?
If this unit does not operate properly, check the items listed in the table below. Should the problem persist,
there may be a malfunction.
In this case, disconnect the power immediately and contact your store of purchase.
Cause
Countermeasure
•Protection circuit activated due •Turn off the power, wait for the
to rise of internal temperature.
set to fully cool down, then turn
the power back on.
•Place the set in a well-ventilated
place.
•Core wires of two speakers are •First unplug the power cord,
touching each other or a core then twist the core wires tightly
wire is sticking out of the terminal or terminate the speaker cables,
and touching the set’s rear panel, then reconnect.
activating the protection circuit.
•Set is damaged.
•Turn off the power and contact a
DENON service center.
Getting Started
Symptom
Power turns off
suddenly and
power indicator
flashes red.
–
When the
subwoofer
indicator has lit.
Countermeasure
in •Check the insertion of the power
cord plug.
•Speaker cables not securely
connected.
•Device you want to play and set
input source do not match.
•Volume control set to minimum.
•MUTING is on.
•Digital signals not input Digital
input selected.
•Connect securely.
•Select an appropriate input
source.
•Turn volume up to suitable level.
•Switch off MUTING.
•Input digital signals or select
input terminal to which digital
signals are being input.
•Connections between the video •Check whether the connections
output terminal of this unit are correct.
and the input connector of the
monitor are incomplete.
•The input setting of the monitor •Set the input switching of the
TV is different.
TV to the terminal to which the
video input is connected.
•The subwoofer and main unit are •Check whether or not the cable
not properly connected with the is properly connected.
system cable.
If the indicator lights even though
the cable is properly connected,
there may be a malfunction.
Page
10
10
20
20
33
12
11
GRemote Control UnitH
Symptom
Cause
Set does not work •Batteries are worn.
properly when
•You are operating outside of the
remote control
specified range.
unit operated.
•Obstacle between main unit and
remote control unit.
•The batteries are not inserted in
the proper direction, as indicated
by the polarity marks in the
battery compartment.
•The set’s remote control sensor
is exposed to strong light (direct
sunlight, inverter type fluorescent
bulb light, etc.).
•SOURCE CONTROL switch position
is different.
Countermeasure
•Replace with new batteries.
•Operate within the specified
range.
•Remove the obstacle.
Page
5
5
•Insert the batteries in the
proper direction, following the
polarity marks in the battery
compartment.
•Move the set to a place in which
the remote control sensor will
not be exposed to strong light.
5
•Set the SOURCE CONTROL switch
for the device you wish to use.
8
5
5
Troubleshooting
Monitor does not
display an image.
Cause
•Power cord not plugged
securely.
Remote Control Information
Symptom
Display not lit
and sound not
produced when
power switch set
to on.
Display lit but
sound not
produced.
Playback
GGeneralH
12
10
39
ENGLISH
Getting Started
GDVDH
Connections
Setup
Playback
Remote Control Information
Symptom
Playback does
not start when 1
button is pressed.
Playback stops
immediately.
Menu playback of
video CD’s is not
possible.
Picture is
disturbed during
the search
operation.
Buttons do not
operate.
No subtitles are
displayed.
Audio (or subtitle)
language does
not switch.
Countermeasure
•Is there condensation on the disc or player ? (Let stand for 1 or 2
hours.)
•Discs other than DVDs, video CDs and music CDs cannot be played.
•Disc is dirty. Wipe off the dirt.
Page
–
•Menu playback is not possible with anything but video CDs with
playback control.
–
•Some disturbance is normal.
–
•Some operations are disabled for some discs.
–
Countermeasure
•Check the default setting for the disc language’s menu language.
Page
15
Cause
Countermeasure
•HDMI audio signal output •Set to “VIDEO SETUP” – “HDMI
SETUP” – “HDMI AUDIO OUT”–
destination setting is wrong.
“ON”.
Page
16
GAudioH
Troubleshooting
•Subtitles are not displayed for DVDs not containing subtitles.
•Subtitles are turned off. Turn the subtitles setting on.
•The audio (or subtitle) language does not switch for discs which do
not include multiple audio (or subtitle) languages.
•For some discs the audio (or subtitle) language cannot be switched
when the operation to switch it is performed, but can be switched on
the menu screens.
Angle does not
•The angle cannot be switched for DVDs which do not contain multiple
switch.
angles. In some cases multiple angles are only recorded for specific
scenes.
Playback does not •Check the “RATINGS” setting.
start when the
title is selected.
The password for •Initialize using the procedure described at “Resetting the
rating level has
Microprocessor”.
been forgotten.
Reset all the DVD
setting to Factory
Preset.
The disc is not
•The disc does not play with the selected audio or subtitle language if
played with the
that audio or subtitle language is not included on that DVD.
audio or subtitle
language set
as the default
setting.
•At the menu’s “TV ASPECT” setting, select “4:3LB/4:3PS/WIDE
Picture is not
displayed in 4:3
16:9” and set according to the TV you are using.
(or 16:9).
40
4
5
Symptom
Menu screen
messages for the
desired language
do not display.
–
15
–
–
–
18
33
–
16
Symptom
No sound is
output from
the monitor
connected
with HDMI
connections.
GTunerH
Symptom
Continuous noise
is heard when
receiving FM
programs
Hissing or
continuous noise
is heard when
receiving AM
programs
Cause
Countermeasure
Page
•Antenna cable is not properly •Connect the antenna cable
connected.
properly.
•Connect an outdoor antenna.
13
•This may be noise from a TV or •Turn off the TV.
interference from a radio station. •Change the position and direction
of the AM loop antenna.
3
ENGLISH
Symptom
iPod cannot be
played.
Countermeasure
Page
31
12
–
Connections
–
Setup
iPod slide show
is not output to
the TV.
Cause
•The input source assigned to •Switch to the input source
“iPod Assign” is not selected.
assigned at “iPod”.
•Cable is not properly connected. •Reconnect.
•Control Dock for iPod’s AC •Plug the Control Dock for iPod’s
adapter is not connected to AC adapter into a power outlet.
power outlet.
•Set the iPod slide show correctly.
See your iPod user’s manual for
–
more details on how to operate.
Getting Started
GiPodH
No picture
appears
with HDMI
connections.
Page
16
•The connections between the S- •Check the connections.
102 and monitor are faulty.
•The monitor’s input setting is •Set properly.
wrong.
11
•The connections to the HDMI •Check the connections.
connectors are faulty.
•The monitor is not compatible •Connect a monitor that is
with
copyright
protection compatible
with
copyright
(HDCP).
protection (HDCP).
•This is not a malfunction. Most
movie software includes copy
–
prevention signals and cannot be
copied.
11
–
11
Troubleshooting
DVDs cannot be
copied on a VCR.
Cause
Countermeasure
•The format of the TV (NTSC or •Match the format of the TV.
PAL) do not match.
Remote Control Information
Symptom
The on-screen
display does not
appear.
No picture
appears.
Playback
GVideoH
–
41
ENGLISH
Getting Started
Specifications
Connections
nAudio section
Setup
Reception frequency range:
Receiving sensitivity:
FM stereo separation:
Playback
nVideo section
• Analog
Input sensitivity / Input impedance:
nGeneral
140 mV / 47 kΩ/kohms
nTuner section
Remote Control Information
• Standard video connectors
Input / output level and impedance:
• S-Video connectors
Input / output level and impedance:
• Color component video connector
Input / output level and impedance:
FM: 87.50 MHz ~ 108.00 MHz
FM: 1.5 μV/75 Ω/ohms
35 dB (1 kHz)
AM: 522 kHz to 1611 kHz
AM: 20 μV
1 Vp-p, 75 Ω/ohms
Y (brightness) signal — 1 Vp-p, 75 Ω/ohms
C (color) signal — 0.3 Vp-p, 75 Ω/ohms
Y (brightness) signal — 1 Vp-p, 75 Ω/ohms
PB / CB signal — 0.7 Vp-p, 75 Ω/ohms
PR / CR signal — 0.7 Vp-p, 75 Ω/ohms
Pin connector : 1 set/S-Video connector : 1 set/
Component video connector : 1 set
nDVD section
Troubleshooting
Signal format:
NTSC/PAL
(1)DVD-VIDEO discs
Supported discs:
12 cm single side 1 layer, 12 cm single side 2 layers,
12 cm both sides 2 layers (single side 1 layer),
8 cm single side 1 layer, 8 cm single side 2 layers,
8 cm both sides 2 layers (single side 1 layer)
(2)Compact Disc (CD-DA, VIDEO CD)
12 cm discs, 8 cm discs
nClock/Timer section
Clock method:
Timer:
42
Power line frequency synchronized method
Everyday/Once timer: One system each
Sleep timer: 120 minutes, maximum
Power supply:
Power consumption:
Maximum external dimensions:
Weight:
230 V AC, 50 Hz
51 W
0.3 W (standby)
380 (W) x 93 (H) x 293 (D) mm (ADV-S102) (including system cable)
3.8 kg (ADV-S102)
nRemote control unit (RC-1073)
Remote control method:
Power supply:
Maximum external dimensions:
Weight:
IR pulse method
R6/AA Type (two batteries)
52 (W) x 243 (H) x 19 (D) mm
175 g (including batteries)
nSpeakers
• Speaker system
Type:
Maximum external dimensions:
Weight:
• Subwoofer
Type:
Maximum external dimensions:
Weight:
SC-S102
2-way, 2-speakers, Closed box / Low-leakage-flux
8 cm cone bass-mid x 1 / 2.5 cm high range x 1
103 (W) x 258 (H) x 76 (D) mm
2.0 kg (per unit)
DSW-S102
1-way, 1-speaker, Reflex box / Low-leakage-flux / Built-in amplifier
16 cm cone x 1
212 (W) x 378 (H) x 408 (D) mm (including foot)
10.5 kg (including base)
bFor purposes of improvement, specifications and design are subject to change without notice.
bThis product incorporates copyright protection technology that is protected by method claims of certain U.S. patents
and other intellectual property rights owned by Macrovision Corporation and other rights owners. Use of this copyright
protection technology must be authorized by Macrovision Corporation, and is intended for home and other limited
viewing uses only unless otherwise authorized by Macrovision Corporation. Reverse engineering or disassembly is
prohibited.
List of preset codes / Liste von voreingestellten Codes / Liste de codes préréglés / Lista dei codici pre-regolati /
Lista de códigos pre-ajustados / Lijst van vooringestelde codes / Förteckning över förinställda koder
DVD Player
A
D
H
J
K
M
P
S
T
Z
Aiwa
Denon
Hitachi
JVC
Konka
Magnavox
Mitsubishi
Panasonic
Philips
Pioneer
Sanyo
Sony
Toshiba
Zenith
Citizen
009
014, z[111]
010
006, 011
012, 013
005
004
014
005, 015, 016, 017
003, 008
018
002, 019, 020
001, 021, 022
023
VDP
D
M
P
R
S
Denon
Magnavox
Mitsubishi
Panasonic
Philips
Pioneer
RCA
Sony
028, 029, 112
026
028
029, 030
026
028, 031
032
033, 034, 035, 036
Craig
Curtis Mathes
Cybernex
D
E
Daewoo
Daytron
DBX
Dumont
Dynatech
Electrohome
Electrophonic
Emerson
F
Fisher
G
GE
H
Go Video
Goldstar
Gradiente
Grundig
Harley Davidson
Harman Kardon
Hi-Q
Hitachi
VCR
A
Admiral
Aiko
Aiwa
Akai
B
C
Alba
Amstrad
ASA
Asha
Audio Dynamic
Audiovox
Beaumark
Broksonic
Calix
Candle
Canon
Capehart
Carver
CCE
081
095
009
026, 027, 070, 072, 082, 083,
084
055
009
042
087
005, 085
088
087
086, 093
088
006, 087, 088, 089, 090
049, 057
025, 055, 056, 071
015
095
J
JC Penny
Jensen
JVC
K
L
M
Kenwood
Kodak
Lloyd
LXI
Magnavox
Magnin
Marantz
Marta
MEI
Memorex
Metz
MGA
MGN Technology
Midland
Minolta
006, 007, 087, 088, 089, 090,
095
007, 087, 088, 091, 115
006, 049, 073, 080, 087, 090,
092
087
025, 055, 059, 074, 089, 093,
095, 096
025, 055
005, 085
053
009
001, 088, 097
088
001, 009, 017, 027, 086, 088,
089, 092, 093, 097, 100, 101,
102, 103, 104, 117
009, 028, 031, 053, 054, 091,
099, 115
007, 011, 049, 050, 051, 052,
073, 080, 087
047, 048
000, 006, 012, 062, 088
094
042
094
040, 062
091
009, 013, 023, 026, 058,
z[108], 109, 110, 111
004, 005, 007, 023, 028, 049,
062, 085, 087, 088
013, 026
004, 005, 006, 026, 029, 043,
044, 045, 046, 085
004, 005, 006, 026, 029, 033,
045, 085, 090
088
009, 094
088
015, 016, 042, 049, 063, 106
087
004, 005, 006, 015, 042, 049,
085, 090
088
049
009, 033, 049, 053, 060, 081,
087, 088, 091, 094, 115
123, 124, 125, 126, 127, 128
001, 017, 027, 041, 097
087
011
013, 023
Mitsubishi
Motorola
Montgomery Ward
N
MTC
Multitech
NAD
NEC
O
P
Nikko
Noblex
Optimus
Optonica
Panasonic
Perdio
Pentax
Philco
Philips
Pilot
Pioneer
Q
R
Portland
Proscan
Pulsar
Quartz
Quasar
Radio Shack
Radix
Randex
RCA
Realistic
S
Ricoh
Salora
Samsung
Sanky
Sansui
Sanyo
SBR
Scott
Sears
Sentra
Sharp
001, 003, 008, 013, 014, 017,
027, 029, 039, 040, 041, 045,
097
081
001, 002, 007, 009, 049, 063,
081, 115, 117
009, 087, 094
007, 009, 011, 087, 090, 094
038
004, 005, 006, 018, 026, 029,
045, 061, 062, 085
088
087
081, 088
021
024, 049, 064, 066, 067,
068, 069, 107
009
009, 013, 023, 058, 090
015, 016, 049
015, 021, 042, 049, 105
088
005, 013, 029, 036, 037, 038,
045, 085
025, 055, 090
063, 080
060
033
034, 035, 049
001, 002, 021, 081, 087, 088,
091, 094, 097, 098, 115
088
088
007, 013, 019, 023, 058, 063,
064, 065, 073, 080, 082, 087
009, 021, 031, 033, 049, 053,
081, 087, 088, 091, 094, 097,
098
055
033, 041
007, 011, 051, 059, 070, 083,
087, 089, 113
081
005, 026, 029, 045, 061, 085,
114
032, 033, 053, 087, 091, 115,
116
042
017, 020, 086, 089, 093, 117
013, 023, 028, 031, 033, 053,
054, 088, 091, 098, 099, 115
055
001, 002, 021, 097
Shogun
Sony
STS
Sylvania
T
Symphonic
Tandy
Tashiko
Tatung
Teac
Technics
Teknika
TMK
Toshiba
U
V
W
X
Y
Z
Totevision
Unirech
Vecrtor Research
Victor
Video Concepts
Videosonic
Wards
XR-1000
Yamaha
Zenith
087
075, 076, 077, 078, 079, 121,
122
023
009, 015, 016, 017, 041, 049,
094
009, 094
009
009, 088
004, 026, 030
004, 009, 026, 094
024, 049
009, 010, 022, 049, 088, 094
087, 092
013, 017, 020, 041, 059, 089,
098, 099, 117
007, 087, 088
087
005, 062, 085, 089, 090
005, 045, 046, 085
005, 027, 085, 089, 090
007, 087
013, 021, 023, 087, 088, 089,
091, 094, 097, 118, 119, 120
094
004, 005, 006, 026, 062, 085
060, 078, 079
Celebrity
Circuit City
Citizen
Concerto
Colortyme
Contec
Cony
Craig
Crown
Curtis Mathes
D
E
Admiral
Adventura
Aiko
Akai
Alleron
A-Mark
Amtron
Anam
Anam National
AOC
B
C
Archer
Audiovox
Bauer
Belcor
Bell & Howell
Bradford
Brockwood
Candle
Capehart
045, 121
122
054
016, 027, 046
062
007
061
006, 007, 036
061, 147
003, 007, 033, 038, 039, 047,
048, 049, 133
007
007, 061
155
047
045, 118
061
003, 047
003, 030, 031, 032, 038, 047,
049, 050, 122
003
Daytron
Dimensia
Dixi
Electroband
Electrohome
Elta
Emerson
F
Television
A
Daewoo
G
Envision
Etron
Fisher
Formenti
Fortress
Fujitsu
Funai
Futuretech
GE
Goldstar
Grundy
H
Hitachi
I
J
Hitachi Pay TV
Infinity
Janeil
JBL
JC Penny
JCB
JVC
K
Kawasho
Kenwood
Kloss
Kloss Novabeam
KTV
046
003
029, 030, 031, 032, 034, 038,
047, 049, 050, 054, 061, 095,
122, 123
031, 047, 049
003, 047, 049, 135
013, 051, 052, 061
051, 052, 061
004, 061
029
029, 034, 038, 044, 047, 049,
053, 095, 118
027, 029, 039, 048, 049, 054,
055, 106, 107, 137
003, 049
044
007, 015, 027
046
029, 056, 057, 058, 147
027
029, 051, 059, 060, 061, 062,
118, 123, 124, 139, 148
038
027
014, 021, 063, 064, 065, 118
155
012
004, 062
004, 062
004
020, 036, 037, 040, 044, 058,
066, 088, 119, 120, 125, 147
000, 015, 029, 031, 039, 048,
051, 056, 057, 067, 068, 069,
116
062
029, 031, 051, 052, 070, 111,
112, 113, 124, z[134]
151
017, 071
122
017, 071
020, 034, 039, 040, 041, 044,
048, 050, 058, 066, 069, 076,
088, 090, 095, 125, 136, 159
046
019, 051, 052, 072, 073, 091,
117, 126
018, 046
038, 056, 057
010, 032
005, 122, 127, 131
074, 123
PRESET CODE
L
Loewe
Logik
Luxman
LXI
M
Magnavox
Marantz
Matsui
Memorex
Metz
MGA
Midland
Minutz
Mitsubishi
N
Montgomery Ward
Motorola
MTC
NAD
National
National Quenties
NEC
O
Nikko
NTC
Optimus
Optonica
Orion
P
Panasonic
Philco
Philips
Q
R
Pioneer
Portland
Price Club
Proscan
Proton
Pulsar
Quasar
Radio Shack
RCA
S
Realistic
Saisho
Samsung
Sansui
Sanyo
SBR
071
144
031
008, 014, 017, 024, 040, 044,
063, 071, 075, 076, 077, 118,
125
005, 010, 017, 030, 033, 038,
050, 056, 071, 078, 079, 085,
089, 108, 109, 110, 127, 131,
132, 145
015, 017, 071, 080
027
014, 027, 045, 083, 118, 144
160, 161, 162, 163
001, 039, 048, 056, 057, 058,
065, 081, 083
125
066
001, 016, 039, 048, 056, 057,
058, 065, 081, 082, 083, 105
011, 020, 144, 145, 146
121, 147
031, 034, 039, 048, 095
008, 075, 076, 128
002, 036, 061, 147
002
031, 038, 039, 048, 057, 084,
086, 135, 147
054
054
128
011, 012, 093, 121
004, 139
002, 009, 017, 036, 037, 071,
141, 143, 147
005, 010, 030, 050, 051, 056,
079, 085, 127, 131, 132, 145,
147
005, 015, 017, 050, 051, 056,
078, 087, 088, 089, 131, 132,
147
124, 128, 142
054
095
040, 044, 125
035, 051, 092, 129
042
036, 037, 074, 141
011, 044, 063, 093, 118
040, 044, 125, 130, 137, 151,
152
014, 063, 093, 118
027
003, 015, 034, 053, 055, 057,
094, 095, 136, 153
139
013, 014, 021, 022, 063, 064,
081, 096
015
PRESET CODE
Schneider
Scott
Sears
Sharp
Siemens
Signature
Simpson
Sony
Soundesign
Spectricon
Squareview
Supre-Macy
Supreme
Sylvania
T
Symphonic
Tandy
Tatung
Technics
Teknika
Tera
THOMSON
Toshiba
U
V
Universal
Victor
Video Concepts
Viking
W
Wards
Z
Zenith
Zonda
015
062
008, 014, 021, 022, 023, 024,
025, 040, 052, 057, 062, 063,
064, 065, 073, 075, 076, 097,
098, 125, 159
011, 012, 013, 026, 093, 099,
100, 104, 121
013
045, 144
050
043, 046, 138, 146, 150
030, 050, 062
007, 033
004
032, 122
046
005, 010, 017, 030, 078, 079,
085, 089, 101, 127, 131, 132,
145, 155
004, 148
012, 121
036, 124
037
001, 030, 032, 034, 052, 054,
078, 083, 095, 144, 156, 157
035, 129
165, 166
008, 014, 034, 063, 075, 076,
095, 097, 136, 158, 159
020, 066, 088
019, 073, 126
016
032, 122
005, 045, 066, 078, 085, 088,
089, 093, 102, 103, 131, 132,
148
042, 114, 115, 140, 144,149
007
CABLE
A
C
E
G
H
J
M
ABC
Archer
Century
Citizen
Colour Voice
Comtronic
Eastern
Garrard
Gemini
General Instrument
Hytex
Jasco
Jerrold
Magnavox
006, z[007], 008, 009
010, 011
011
011
012, 013
014
015
011
030, 033, 034
030, 031, 032
006
011
009, 016, 017, 026, 032
018
N
O
P
R
S
T
U
V
Z
Movie Time
NSC
Oak
Panasonic
Philips
Pioneer
RCA
Regency
Samsung
Scientific Atlanta
Signal
SL Marx
Starcom
Stargate
Teleview
Tocom
TV86
Unika
United Artists
Universal
Viewstar
Zenith
019
019
000, 006, 020
001, 005
011, 012, 013, 018, 021
002, 003, 022
029
015
014, 023
004, 024, 025
014
014
009
014
014
007, 016
019
011
006
010, 011
018, 019
027, 028
Satellite Receiver
A
C
D
E
G
H
J
K
M
N
P
R
S
Alphastar
Chaparral
Dishnet
Drake
Echostar Dish
GE
General Instruments
Grundig
Hitachi
Hughes Network
JVC
Kathrein
Magnavox
Nokia
Philips
Primestar
Proscan
RCA
Realistic
Sierra I
Sierra II
Sierra III
Sony
STS1
STS2
STS3
SRS4
054
035, 036
053
037, 038
062, 066
048, 055, 056
039, 040, 041
070, 071, 072, 073
058, 059
063, 064, 065, 069
057
074, 075, 076, 083
060
070, 080, 084, 085, 086
060
051
048, 055, 056
048, 055, 056, 068
042
036
036
036
049, 067
043
044
045
046
T
U
Technisat
Toshiba
Uniden
077, 078, 079, 081, 082
047, 050
061
CD Player
A
B
C
D
E
F
J
K
M
O
P
S
T
W
Y
Z
Aiwa
Burmster
Carver
Denon
Emerson
Fisher
JVC
Kenwood
Magnavox
Marantz
MCS
Onkyo
Optimus
Philips
Pioneer
Sears
Sony
Teac
Technics
Wards
Yamaha
Zenith
001, 035, 043
002
003, 035
z[111], 044
004, 005, 006, 007
003, 008, 009, 010
018, 019
011, 012, 013, 014, 017
006, 015, 035
016, 028, 035
016, 024
025, 027
017, 020, 021, 022, 023
014, 032, 033, 035
006, 022, 030
006
023, 031
002, 009, 028
016, 029, 036
035, 037
038, 039, 040, 041
042
CD Recorder
D
P
Denon
Philips
z[111],
112
112
Denon
Kenwood
Onkyo
Sharp
Sony
113
003, 004
007
005
006
TAPE
A
C
D
H
J
K
M
O
Aiwa
Carver
Denon
Harman/Kardon
JVC
Kenwood
Magnavox
Marantz
Onkyo
S
T
V
W
Y
Optimus
Panasonic
Philips
Pioneer
Sony
Technics
Victor
Wards
Yamaha
001, 002
002
z[111]
002, 003
004, 005
006
002
002
016, 018
007, 008
012
012
007, 008, 009
013, 014, 015
012
004
007
010, 011
[ ]z: Preset codes set upon shipment
from the factory.
: Sie Voreinstellungscodes wurden
vor der Auslieferung werkseitig
eingestellt.
: Les codes préréglés diffèrent en
fonctiom des livraison de l’usine.
: I codici di presettaggio sono
impostati in fabbrica prima della
consegna.
: Los códigos vienen preprogramados
de fábrica.
: Vooringestelde codes bij hey
verlaten van de fabriek.
: Förinställda koder har ställts in vid
transporten från fabriken.
DVD preset codes
DVD-Voreinstellungscodes
Codes préréglés DVD
Codici di preselezione DVD
Códigos de preajuste de DVD
DVD-voorkeuzecodes
Förinställda DVD-koder
e
MD
D
K
O
S
P
Model No.
Modellnr
Modéle numéro
Modello No
Nº de modelo
Modelnr
Modellnr
111
DVD-550
DVD-700
DVD-900
DVD-1000
DVD-1400
DVD-1500
DVD-1710
DVD-1910
DVD-2200
DVD-2800
DVD-2800g
DVD-2900
DVD-2910
DVD-3800
DVD-3910
DVD-A11
DVD-A1
DVD-A1XV
014
DVD-800
DVD-1600
DVD-2000
DVD-2500
DVD-3000
DVD-3300
www.denon.com
Denon Brand Company, D&M Holdings Inc.
Printed in China 00D 511 4645 000