1
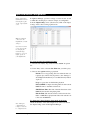
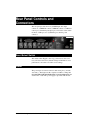
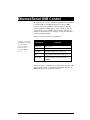
Light Cue Pro Hardware and Software Reference Manual Every effort has been made to assure the accuracy of the information contained in this manual, and the reliability of the Alcorn McBride Light Cue Pro. Errors can sometimes go undetected, however. If you find one, please bring it to our attention so that we can correct it for others. Alcorn McBride welcomes comments and suggestions on the content and layout of its documentation. Applications described herein are for illustrative purposes only. Alcorn McBride Inc. assumes no responsibility or liability for the use of these products, and makes no representation or warranty that the use of these products for specific applications will be suitable without further testing or modification. Alcorn McBride products are not intended for use in applications where a malfunction can reasonably be expected to result in personal injury. Customers using or selling Alcorn McBride products for use in such applications do so at their own risk, and agree to fully indemnify Alcorn McBride for any damages resulting from such improper use or sale. LightCuePro™ is a trademark of Alcorn McBride Inc., all rights reserved. Copyright 2010 Alcorn McBride, Inc. All rights reserved. Hardware Design: Jim Carstensen, Joy Burke, Scott Harkless and Steve Alcorn Firmware Design: Joy Burke, Adam Rosenberg, and Scott Harkless Mechanical Design: Martin Chaney Documentation: Joy Burke Alcorn McBride Inc. 3300 S. Hiawassee, Suite 105 Orlando, Florida 32835 (407) 296-5800 FAX: (407) 296-5801 Internet: http://www.alcorn.com e-mail: [email protected] Table of Contents Features 5 Getting Started 6 LightCue Manager Software Connecting the Unit Storage Media Recording Playback Show Controller Connection 6 6 6 7 8 8 LightCue Manager Software 9 LightCuePro Connection Cue Names and DMX Files Recording Cues in LightCue Manager Channel Sets Playback Cues in LightCue Manager Monitor DMX Channels Control DMX Input and Button Configuration Settings 9 9 10 11 13 13 14 15 16 Front Panel Controls and Indicators 17 Front Panel Menu Buttons LED Indicators LCD Display 17 17 18 18 Rear Panel Controls and Connectors 19 Reset Select Switch Power RS-232C Controller Input DMX Input DMX Output SMPTE Input 19 19 20 21 21 21 Parallel Control 22 Parallel Inputs Parallel Outputs 22 23 Ethernet/Serial/USB Control 24 Select Cue Play Loop Play Still Still Cue Chase Play Record Now Arm Recording Record with SMPTE Arm Recording with SMPTE Pile-On Cue Pile-On Cue and Loop at end Clear Cue Feedthrough Force Value Force DMX Clear Forces SMPTE Status DMX File Query Reset Pile-On Priority Longitude Latitude Reboot IP address Subnet Mask number Gateway IP Address Date Time User Name PW Get/Set Password DST Enable DST Type Time Zone NTP IP Address NTP Enable Ethernet Port for NTP DHCP Enable HTTP Ethernet Port HTTP WEB Page 25 25 26 26 27 28 28 29 30 30 31 31 33 33 34 34 34 34 35 35 35 35 36 36 36 36 37 37 37 37 38 38 38 38 38 39 39 39 39 40 MIDI Control 40 Start a Cue with SYSEX “GO CUE” Pile on a Cue with "NOTE ON" Clear Cue with "NOTE OFF" 40 40 41 Specifications 42 DMX Control Interface Front Panel: Physical 42 42 42 43 Index 44 Welcome Thanks for purchasing The Alcorn McBride Light Cue Pro™. The Light Cue Pro is intended to replace SMPTE-controlled lighting consoles in permanent show installations, eliminating the need to use an expensive lighting console to run your lighting. The Light Cue Pro Records 4 Universes of DMX in Real Time. Either one stream (or cue as it is called in this manual) synchronized to SMPTE timecode can be played back, or up to forty cues not synchronized with SMPTE can be simultaneously “piled-on”. The LightCue Pro comes standard with 100 hours of storage, but larger capacities are available from the factory. The Light Cue Pro can be controlled serially, Etherent (UDP), MIDI or with parallel inputs to output the DMX data beginning at any SMPTE timecode. From this absolute timecode, the DMX data can be "jam-synched" to the incoming timecode and will pause or skip forward or backward frames as necessary in order to maintain perfect synchronization. The unit will also record and output DMX in the absence of SMPTE for non-synchronized applications. The Light Cue Pro can also 'crossfade' between two 'looks' over a period of time from one frame to 24 hours. After the crossfade is complete, the DMX cue can continue from the look that was faded to. Up to 40 simultaneous cues can be “piled-on” to one another. The pile-on can either use the highest values of the 512 channels or the last cue piled on. Front panel pushbuttons are provided for manual control. Features The Light Cue Pro offers a wide range of features including: • Records Four Channels in Real Time. • Records the Output of Any DMX-512 Lighting Board. • Stores 100 hours of Continuous DMX Data • Stand-Alone or PC-Driven Operation. • Parallel Input, Ethernet or RS-232 Serial Control. • Can “Pile-On” up to 40 simultaneous cues • Switchable between “live” DMX input and recorded material • Cue management software included Alcorn McBride Light Cue Pro User’s Guide • July 15, 2010 Page 5 Getting Started This section will teach you how to begin using your Light Cue Pro. More detailed information is contained in the rest of this manual. LightCue Manager Software Free software to control/monitor/edit lighting cues can be downloaded from our website (www.alcorn.com) under the "software" page. This software is the preferred method for recording and playback of lighting cues. See the section "LightCue Manager" for more detail on it's use. Connecting the Unit Note: SMPTE is only required if it is necessary to synchronize lighting cues to other SMPTE equipment. 1. Connect the DMX Out from your Lighting Console to the DMX In on the rear of the Light Cue Pro. 2. Connect the DMX Out from the Light Cue Pro to the DMX Input of your Dimmer Rack. 3. Optionally, connect the SMPTE Out from your SMPTE generator (e.g. Alcorn McBride SMPTE Machine) to the SMPTE In on the rear of the Light Cue Pro. Storage Media The LightCue Pro uses Compact Flash Card media to store DMX data. The media is included with the unit, and is removable for backup to a laptop or desktop PC equipped with a card reader. The flash card is located on the back panel behind a plate which is fastened with two screws. To remove the media, remove the screws holding the cover plate and press the eject button located at the right side of the socket. When reinstalling the media, be sure that it is fully seated. Page 6 Alcorn McBride Light Cue Pro User’s Guide • July 15, 2010 Recording Note: The Start Time of the SMPTE can be adjusted with external commands or front panel knob before playback. The LightCue Pro is capable of recording DMX data with or without being locked to SMPTE timecode. If you want to have your DMX playback jam-synced to SMPTE so that it will pause or skip forward or backward frames as necessary in order to maintain perfect synchronization with incoming timecode, be sure to have SMPTE connected and active while recording. The recording will be time-stamped with the SMPTE timecode corresponding to the first frame of recorded DMX. The LightCuePro can ititiate a record using the front panel, serial, USB or Ethernet commands, OR using the LightCue Manager software. The LightCueManager software makes it easy to record multiple universes, while the front panel is designed primarily for single universe record. From the Cue Manger Software (See LightCue Manager section) Note: A change in DMX values after pressing “Arm Recording” will start immediate recording. Otherwise, pressing “Record Now” is required. 1. Click "Edit" from the top toolbar 2. Type in a Cue Name into the "Record" window 3. Click “Arm Recording” Or From the Front Panel 1. Press in on the knob to bring up to the Main Menu 2. Select “Record” 3. Select the Universe you wish to record 4. Adjust record settings by selecting “Record Config” 5. Press the “Arm Recording” selection Alcorn McBride Light Cue Pro User’s Guide • July 15, 2010 Page 7 Playback Note: Playback can also be accomplished using a Serial, USB, or Ethernet command from a PC or other device. See the “Serial/Ethernet/USB Control” section. From the Cue Manger Software (See LightCue Manager section) 1. Click "Edit" from the top toolbar 2. Select the Cue Name or DMX File you wish to play 3. Press “Play Now” From the Front Panel 1. Press in on the knob to bring up to the Main Menu 2. Select “Play” and press in 3. Select the Universe you wish to play and press in on knob 4. Select the Cue Number by Highlighting the number and pressing in on the knob to cause the number to blink. 5. Turn the knob as needed to get the appropriate cue number 6. Press the knob again to accept the cue number 7. Highlight and Press the “Play Now” Show Controller Connection Page 8 1. Connect the output port on your Show Controller (e.g. Alcorn McBride V16Pro, V4Pro) to the Controller Input on the rear of the Light Cue Pro using serial or ethernet connection. 2. Use the Controller Software (e.g. WinScriptLive) to configure and operate the Light Cue Pro. Alcorn McBride Light Cue Pro User’s Guide • July 15, 2010 LightCue Manager Software LightCueManager is availble for free at www.alcorn.com This software is designed for setup, record, playback, and monitor of a LightCuePro. It currently runs on Windows XP, Vista or 7. The primary screens of the Light Cue Manager Software are: The "Edit" screen is the primary screen for Record/Playback. More information regarding each section is described in more detail in the chapters below. LightCuePro Connection All functions of the software require a connection. When the software is first launched, you will be prompted to connect to a LightCuePro. Tip: to quickly put the LightCuePro on your network, push in on the front panel knob to select "Network" from the main menu. Then, set your ethernet jack to enable "DHCP". 1. Click "Search" to find a LightCuePro on your network. 2. Hightlight the LightCuePro for connection and click "Connect." 3. Click "Close" to close the dialog. Your connection is now complete. Cue Names and DMX Files Cue Name: A group of one or more dmx files that were recorded from multiple universes and may be played back on multiple universes. Alcorn McBride Light Cue Pro User’s Guide • July 15, 2010 Page 9 DMX File: A file containing DMX and timing information for a single universe. Cue Names and DMX Files that are present on the compact flash card are viewable in the "Cue Names" and "DMX Files" windows. These windows appear in the lower left corner of the "Edit" screen. Cue Names and DMX File names may be edited in this view. Play a cue name by selecting the line and clicking "Play." Remove a cue name by clicking "Delete." More Cue Names are populated when a new Cue Name is recorded. (See the "Recording" section in this chapter for more detail) Recording Cues in LightCue Manager In LightCue Manager, the "Record" window is present when the top toolbar is in the "Edit" view. Page 10 Alcorn McBride Light Cue Pro User’s Guide • July 15, 2010 Individual DMX Files may be recorded without a Cue Name if the a filename with .dmx extension is typed in To record a cue name: Note: Non-SMPTE recorded cues may be played back later with SMPTE; however, recording with SMPTE is recommended for most accurate playback. 2. Check "Save SMPTE Start Time" if you would like the cue files to use the incoming SMPTE timecode as the first frame of playback. This time may be adjusted later if needed for playback. Arm Recording: Waits for change in DMX data 5. Click "Arm Recording" or "Record Now" to begin recording DMX data. (Lights on the Front Panel will turn Amber for "Armed" or Red for "Recording") Record Now: Starts recording DMX immediately 1. Type the desired Cue Name into the "Cue Name" box. This name will associate all recorded DMX Files for each universe to a single name. 3. Check the "Enable" boxes to select which universes and channels to record. 4. Type in specific channels or click the "..." button to specify a specific range of channels. "Channel Sets" may be recalled by pressing "Load" (see Channel Sets section) 6. Click "Stop" to complete the recording. Channel Sets Channel Sets are an easy way to recall a certain set of DMX Channels that are associated with a specific DMX Universe. These Sets are used both in the "Record" window and in the "Status" windows. . The "Record" window is shown below: In the image above, Universes 1,2 and 3 will be recorded, with the select channels specified in the "Channels" column. Clicking on the "..." brings up the "Channel Picker" dialog (below). Alcorn McBride Light Cue Pro User’s Guide • July 15, 2010 Page 11 To Select multiple DMX Channels, use the "CTRL" & "SHIFT" keys along with the mouse drag Channel Sets are stored on the user PC but can be transfered to the LightCuePro's compact flash card To save a channel set: 1. Type the desired name into the "Channel Set" box 2. Check the "Enable" boxes to select which universes and channels to record. 3. Type in specific channels or click the "..." button to specify a specific range of channels. 4. Click "Save" To recall a saved channel set: 1. Select the desired name in the "Channel Set" box 2. Click "Load" Channel Sets can later be recalled to highlight a specific set of channels on a specific area in the 'Monitor' screen. (shown below) Change the "Highlight Channel Set" combo in the top right corner of the screen to cause certain channels to be highlighted in yellow. Page 12 Alcorn McBride Light Cue Pro User’s Guide • July 15, 2010 Playback Cues in LightCue Manager Files can also be played back using the "Cue Names" or "DMX Files" window's "Play" button. To Play an individual file on 1 universe only, select the "Individual File" radio button. In LightCue Manager, the "Play" window is present when the top toolbar is in the "Edit" view and the bottom tab "Play" is clicked. To Play a Cue Name: 1. Type the Cue Name into the "Cue Name or Cue List" box. 2. Select from the following options: Pile On: Do not stop playing other cues when the new cue is played. Up to 40 cues may be piled on. (See "Settings" to select Highest Takes Priority or Last Takes Priority method of pile on) Loop: Loop cue after cue file finishes playback Follow SMPTE: Compare incoming timecode with current DMX File time to determine current look. SMPTE Start Time: The time of that the first frame of the DMX File data should start playing back. Fade-In Time: The amount of time to fade before the Cue Name or DMX File is played back. Fades from current look to first look in DMX File. Monitor DMX Channels Hint: Go to the menu: Tools-->Options to display a DMX channel value in percent or 0255 value In LightCue Manager, DMX channels on all 4 universes can be easily watched from the "Monitor Screen" (shown below). Alcorn McBride Light Cue Pro User’s Guide • July 15, 2010 Page 13 Channels that match the "Highlight Channel Set" will be displayed in Yellow. See Section on "Channel Sets" for more details on creating a specific set of DMX Channels for Record or Monitoring Channels that are being "Forced" are displayed in Red. To force a channel, use the "Control DMX" screen or front panel to set a DMX channel to a specific value. Control DMX Hint: Go to the menu: Tools-->Options to display a DMX channel value in percent or 0255 value In LightCue Manager, DMX channels on all 4 universes can be forced to a specific value using sliders. Hint: You can use sliders combined with the "Record" screen to record a certain DMX File for playback. Once a slider is moved by a user, a checkbox at the bottom of the slider will automatically be checked indicating that the user is forcing the DMX channel to a specific value. The monitoring screens will now show that channel in red. To remove the force, uncheck the box at the bottom of the slider. Page 14 Alcorn McBride Light Cue Pro User’s Guide • July 15, 2010 Input and Button Configuration Input configuration information is stored in the inputs.cfg file on the compact flash card In LightCue Manager, options for voltage or contact closure, as well as which files should play on a button or input, are configurable from the "Input Config" screen. (shown below) Click on the "Input Config" on the toolbar to bring up this screen. Hints: You must be connected to the LightCuePro to make changes. If for any reason the screen does not fill, try changing the Contact/Voltage buttons to create an inputs.cfg file on your LightCuePro To create an action for an input or button: 1. Select the action (Play, Stop, Still) from the "Action" dropdown list. 2. For the "Play" action, select the Cue Name that you wish to play. 3. Select an other options relating to playback: Pile On: Do not stop playing other cues when the new cue is played. Up to 40 cues may be piled on. (See "Settings" to select Highest Takes Priority or Last Takes Priority method of pile on) Loop: Loop cue after cue file finishes playback Follow SMPTE: Compare incoming timecode with current DMX File time to determine current look. SMPTE Start Time: The time of that the first frame of the DMX File data should start playing back. Fade-In Time: The amount of time to fade before the Cue Name or DMX File is played back. Fades from current look to first look in DMX File. To change the Voltage\Contact closure mode of the input: Note: The input configuration for voltage/cc may also be configured from Check the checkbox of the desired input mode on the lower half of the "Input Config" screen in the LightCue Manager. Alcorn McBride Light Cue Pro User’s Guide • July 15, 2010 Page 15 the front panel Settings Settings are stored in the non-volitile memory (EEPROM) of the LightCuePro In LightCue Manager, settings for the Ethernet configuration, as well as real time clock, can be setting by clicking the "Settings" button on the toolbar. Settings can also be changed from the front panel or by serial/ethernet control. If you are connected to a LightCuePro, the current settings will fill in the boxes automatically. If you wish to refresh the settings, click "Refresh All" to retrieve the current settings from the box. To change a setting: 1. Type in the field or check the box appropriately 2. Click "Set" next to the item box. 3. The setting changed on the LightCuePro and retrieved for verification back into the item box. Important Settings: Last Takes Priority (Yes or No): when set to "yes", the last cue "Piled-On" for a specific channel will be the value of that DMX channel. Otherwise, the highest takes priority (HTP) will be in effect. Page 16 Alcorn McBride Light Cue Pro User’s Guide • July 15, 2010 Front Panel Controls and Indicators The Light Cue Pro provides controls that can accommodate a wide variety of installations. The front panel incorporates a row of twelve (12) pushbuttons that are fully programmable to control the operation of the unit, six (6) indicator lights, a VFD display, and front panel knob. Front Panel Menu Pushing in on the font panel knob displays a menu.This menu contains options for configuring network settings, status monitoring, button configuration, and playback. All of the settings on the front panel can also be configured using the LightCue Manager software (See LightCue Manager Software for more detail) System Menu Firmware, version information and serial number are present on this screen. Options: Last Takes Priority (Yes or No): when set to "yes", the last cue "Piled-On" for a specific channel will be the value of that DMX channel. Otherwise, the highest takes priority (HTP) will be in effect. Buttons The buttons on the front of the LightCue Pro are able to be programmed to start any Cue Name or to perform another action (such as record). Using the Front Panel knob, select “Buttons” from the Main Menu to configure the button’s use. Or, use the LightCueManager software to easily configure an action for the buttons. The buttons function is stored in the "inputs.cfg" file on the compact flash card. Alcorn McBride Light Cue Pro User’s Guide • July 15, 2010 Page 17 LED Indicators Two (2) LED indicators on the left side of the front panel: LED LED Meaning LTC Steady Green – Linear Time Code (LTC/SMPTE) is being received Power Steady Blue – Unit has power Four (4) status indicators on the right of the front panel correspond to the 4 Universes of DMX data. The table below shows the LED’s meaning: Status (green, yellow or red) LED Behavior LED Meaning Steady Green Media is being accessed and DMX data is being played back. Flashing Green DMX data is paused or stilled Steady Yellow DMX data information has been searched Steady Red Light Cue Pro is recording. Amber Recording is armed, waiting for DMX data changes to begin. Flashing Red Search Error or other command error LCD Display The LCD Display will indicate which cue(s) are playing on each universe. SMPTE Status Universe Page 18 Frame Rate SMPTE Time/Mode SMPTE: Reading at 30fps 00:01:02:03 1: Stopped 2: Playing dmx00001.dmx 3: Stopped (FT) 4: Stilled MyCueName Alcorn McBride Light Cue Pro User’s Guide Current Operation Feedthrough • July 15, 2010 Cue Name or DMX File Rear Panel Controls and Connectors The rear panel provides the four (4) DMX input and output connectors, a SMPTE In connector, MIDI In connector, an RS-232 control port, a Parallel input/output port, a 4 Position select switch for Reset, a USB port, two (2) Ethernet ports and the power connector. Reset Select Switch This switch, when flipped to the “Up” position next to the word reset, will restore the factory default settings for IP Address, front panel buttons, and other non-volitile stored settings. Power The power input is a barrel connector with center pin (+) and the outer rim (-). The Light Cue Pro requires 9.0 VDC at 1 Amp. DO NOT EXCEED THE SPECIFIED INPUT VOLTAGE RANGE. An external 115 or 230 VAC power supply is provided with the unit. Alcorn McBride Light Cue Pro User’s Guide • July 15, 2010 Page 19 RS-232C Controller Input This input is a standard DB-9 male RS-232C connector, intended to be connected to an Alcorn McBride V16/V4 or other controller using a straight-through (not null-modem) 9-pin cable. The pinout appears below. Pin Function No . Page 20 1 not used 2 TXD (data from Light Cue Pro) 3 RXD (data to Light Cue Pro) 4 not used 5 GND 6 not used 7 not used 8 not used 9 not used Alcorn McBride Light Cue Pro User’s Guide • July 15, 2010 DMX Input The DMX input is a standard 5-pin XLR male connector. The pinout appears below: Pin No. Function 1 Shield 2 - (low) 3 + (high) 4 not used 5 not used DMX Output The DMX output is a standard 5-pin XLR female connector. The pinout appears below. Pin No . Function 1 Shield 2 - (low) 3 + (high) 4 not used 5 not used SMPTE Input The SMPTE input is a standard 3-pin XLR female connector. Input signal level range is -10 dbu to +4 dbu. Impedance is 600 ohms. The pinout appears below. Pin No . Function 1 Shield 2 + (high) 3 - (low) Alcorn McBride Light Cue Pro User’s Guide • July 15, 2010 Page 21 Parallel Control Parallel Inputs Configuration is done using the LightCueManager software. The Light Cue Pro can be controlled using either contact closures or voltage inputs on the female DB-37 Control Connector. Up to 12 individual cues can be selected and played, looped, paused, or stopped. The configuration is stored on an xml formatted file on the compact flash card with the name "inputs.cfg." Voltage or Contact configuration, as well as what cues or cue names are played, is done via the LightCueManger software. Pin Connection Pin Connection 1 Input 1 20 Input 1 Return 2 Input 2 21 Input 2 Return 3 Input 3 22 Input 3 Return 4 Input 4 23 Input 4 Return 5 Input 5 24 Input 5 Return 6 Input 6 25 Input 6 Return 7 Input 7 26 Input 7 Return 8 Input 8 27 Input 8 Return 9 Input 9 28 Input 9 Return 10 Input 10 29 Input 10 Return 11 Input 11 30 Input 11 Return 12 Input 12 31 Input 12 Return 13 Input 13 32 Input 13 Return 14 Input 14 33 Input 14 Return 15 Input 15 34 Input 15 Return 16 Input 16 35 Input 16 Return 17 N/C 36 N/C 18 N/C 37 N/C 19 N/C Parallel inputs should be left disconnected during recording. Page 22 Alcorn McBride Light Cue Pro User’s Guide • July 15, 2010 Parallel Outputs Two status outputs are provided. They are dry contact closures rated at 24 VDC and 1 amp max. Their function is described below. Function Pin No’s. Description Playing Universe 1 1,20 Closed when the unit is playing DMX data from a Cue Name on this Universe. Playing Universe 2 2,21 " Playing Universe 3 3,22 " Playing Universe 4 4,23 " Fault Universe 1 5,24 Closed when the unit detects an invalid file for playback or other error on that Universe. Fault Universe 1 6,25 " Fault Universe 1 7,26 " Fault Universe 1 8,27 " Alcorn McBride Light Cue Pro User’s Guide • July 15, 2010 Page 23 Ethernet/Serial/USB Control The Light Cue Pro may be controlled using Ethernet using UDP on port 2639, USB, or serial RS-232 messages via the rear DB-9 Control Connector or the DB-37 Control Connector. The data format is 9600,N,8,1: 9600 baud, no parity, 8 bits/byte, with one stop bit. The protocol is ASCII-based, and many commands are identical to Pioneer Disc protocol. Upper or lower case characters can be used interchangeably. The most commonly used serial commands are: “Jam-sync” means that the DMX data will jump ahead, backward, or pause to maintain synchronization to incoming SMPTE timecode. Command Function Select Cue Select a cue Play Play the selected cue. Loop Play Play the selected cue over and over Still Stop output and hold the current "look." Chase Play Play the selected cue and "jam-sync" to SMPTE The details of these commands follow. Throughout the table <CR> means carriage return, a byte with the hexadecimal value 0D. Do not include the quotes around the command. Page 24 Alcorn McBride Light Cue Pro User’s Guide • July 15, 2010 Select Cue Description: This command causes the Light Cue Pro to select the specified cue number for play. Once this command is sent, the next Play command causes the specified cue to play from the beginning of the file. The unit defaults to cue #1 at power-up. Command Bytes: nnnUuSE<CR> where nnn is the cue number in ASCII. u is the universe number – use * for all Message Response: R<CR> Examples: Select cue 215 on Universe 1. Select cue 4 on all Universes. "215U1SE"<CR> "4U*SE"<CR> Play Description: This command causes the Light Cue Pro to play a cue. If no cue number is given, the cue number is used that was specified with the “Select Cue” command. Bytes are included for crossfade time from the current look to the first look of the selected cue. This command is used when no SMPTE synchronization is required. Command bytes: hhmmssffnnnUuPL<CR> where hhmmssff is the crossfade time in hours, minutes, seconds, and frames. (optional). nnn is the cue number (optional) u is the universe number – use * for all Message Response: R<CR> Examples: 1. 2. 3. Play cue 2 with crossfade time of 00:00:03.15 to Universe 1 "000003152U1PL" <CR> Play with previously searched cue withcrossfade time of 00:01:10.20 to Universe 3 "00011020U3PL" <CR> Play cue 2 to Universe 4 with no crossfade "2U4PL"<CR> Alcorn McBride Light Cue Pro User’s Guide • July 15, 2010 Page 25 Loop Play Description: This command causes the Light Cue Pro to play the cue specified by the Select Cue command and loop back to the first look and continue playing when the end of the cue is reached. Bytes are included for crossfade time from the current look to the first look of the selected cue. Command bytes: hhmmssffnnnUuLP<CR> hhmmssff - the crossfade time in hours, minutes, seconds, and frames. (optional) nnn – the Cue number to play (optional – can use previously searched cue instead) u – the Universe number. Use * for all. Message Response: R<CR> Examples: 1. 2. 3. Loop Play cue 2 on all Universes "2U*LP"<CR> Loop Play a previously searched cue on Universe 1 "U1LP"<CR> Loop Play with crossfade time of 00:00:10.15 on Universe 2 "00001015U2LP" <CR> 4. Loop Play Cue 12 with crossfade time of 00:01:30.10 on Universe 3 "0001301012U3LP" <CR> Still Description: This command causes the Light Cue Pro to hold the current "look" of DMX data. Play will resume from where it left off whenever another Play command is issued unless a Select Cue command is issued, in which case the selected cue will play from the beginning. Command bytes: UuST<CR> u – the Universe number. Use * for all. Message Response: R<CR> Example: Still all Universes "U*ST" <CR> Page 26 Alcorn McBride Light Cue Pro User’s Guide • July 15, 2010 Still Cue Description: This command causes the Light Cue Pro to hold the specified cue's "look" of DMX data ONLY on the specified cue number. Play will resume from where it left off whenever another Play command is issued for that specific cue number. Command bytes: nnnUuSC<CR> where "nnn" is the cue number and "u" is the universe number ('*' for all) Message Response: R<CR> Example: "3U2ST" <CR> Alcorn McBride Light Cue Pro User’s Guide • July 15, 2010 Page 27 Chase Play Description: This command causes the Light Cue Pro to play the cue specified starting at the SMPTE time specified and “jam-syncing" (following incoming timecode forward or backwards) from that point in time. Command bytes: ohomosofhhmmssffnnnUuCP<CR> ohomosof - the starting SMPTE time of hours, minutes, seconds, and frames. (optional) hhmmssff - the crossfade time in hours, minutes, seconds, and frames. (optional) nnn – the Cue number to play (optional – can use previously searched instead) u – the Universe number. Use * for all. Message Response: R<CR> Comments: The starting time is the SMPTE frame at which the first frame of DMX data will be played from after the crossfade has completed. Examples: 1. Chase play a previously searched cue on Universe 2 "U2CP"<CR> 2. Chase play cue 3 on Universe 1 "3U1CP"<CR> 3. Chase play a previously searched cue with first frame of cue at Start Time 01:00:03.15 and crossfade time of 00:00:20.00 on all Universes. "0100031500002000U*CP" <CR> 2. Chase play a previously searched cue with first frame of cue at Start Time 02:01:04.10 and crossfade time of 00:01:05.02 on Universe 1. "0201041000010502U1CP" <CR> Record Now Description: Page 28 This command is useful for when you want to command the Light Cue Pro into record mode using a serial controller. Recording begins as soon as DMX is detected. (ie. No arming or “changedetection” takes place.) Alcorn McBride Light Cue Pro User’s Guide • July 15, 2010 Command bytes: |vvv-vvv|vvv-vvv|vvv-vvv|vvv-vvv|nnnUuRR<CR> |vvv…vvv|– the channels to record separated by commas. ie: 1512. (optional) nnn – the Cue number, filename or Cue name to record u – the Universe number (optional) Message Response: R<CR> Examples: Record to cue file dmx00001.dmx from Universe 1: 001U1RR <CR> Record to cue file dmx00001.dmx from channels 5-8 onUniverse 2: |5-8|U2RR <CR> Record channels 1-512 on universe1, no other universes: |1-512|0|0|0|"myCueName"RR<CR> Record channels 1-12,81 and 89 on universe2, channel 41 on universe 3 to cue name "myCueName": |0|1-12,81,89|41|0|"myCueName"RR<CR> Arm Recording Description: This command is useful for when you want to command the Light Cue Pro into record mode using a serial controller. Recording begins as soon as a DMX change is detected. Command bytes: |vvv-vvv|vvv-vvv|vvv-vvv|vvv-vvv|nnnUuRA<CR> |vvv…vvv|– the channels to record separated by commas. ie: 1512. (optional) nnn – the Cue number to record u – the Universe number. Message Response: R<CR> Examples: Record to cue file dmx00001.dmx from Universe 1: 001U1RR <CR> Record to cue file dmx00001.dmx from channels 5-8 onUniverse 2: |5-8|U2RR <CR> Record channels 1-512 on universe1, no other universes: |1-512|0|0|0|"myCueName"RR<CR> Record channels 1-12,81 and 89 on universe2, channel 41 on universe 3 to cue name "myCueName": Alcorn McBride Light Cue Pro User’s Guide • July 15, 2010 Page 29 |0|1-12,81,89|41|0|"myCueName"RR<CR> Record with SMPTE Description: This command is useful for when you want to command the Light Cue Pro into record mode using a serial controller. Recording begins as soon as DMX is detected. (ie. No arming or “changedetection” takes place.) The file is timestamped with the values of the incoming SMPTE timecode. Command bytes: |vvv-vvv|vvv-vvv|vvv-vvv|vvv-vvv|nnnUuRS<CR> |vvv…vvv|– the channels to record separated by commas. ie: 1512. (optional) nnn – the filename, cuename or cue number to record u – the Universe number. Message Response: R<CR> Examples: Record to cue file dmx00001.dmx from Universe 1: 001U1RR <CR> Record to cue file dmx00001.dmx from channels 5-8 onUniverse 2: |5-8|U2RR <CR> Record channels 1-512 on universe1, no other universes: |1-512|0|0|0|"myCueName"RR<CR> Record channels 1-12,81 and 89 on universe2, channel 41 on universe 3 to cue name "myCueName": |0|1-12,81,89|41|0|"myCueName"RR<CR> Arm Recording with SMPTE Description: This command is useful for when you want to command the Light Cue Pro into record mode using a serial controller. Recording begins as soon as a DMX change is detected. The file is timestamped with the values of the incoming SMPTE timecode. Command bytes: |vvv-vvv|vvv-vvv|vvv-vvv|vvv-vvv|nnnUuRE<CR> |vvv…vvv|– the channels to record separated by commas. ie: 1512. (optional) u – the Universe number. Message Response: R<CR> Examples: Record to cue file dmx00001.dmx from Universe 1: Page 30 Alcorn McBride Light Cue Pro User’s Guide • July 15, 2010 001U1RR <CR> Record to cue file dmx00001.dmx from channels 5-8 onUniverse 2: |5-8|U2RR <CR> Record channels 1-512 on universe1, no other universes: |1-512|0|0|0|"myCueName"RR<CR> Record channels 1-12,81 and 89 on universe2, channel 41 on universe 3 to cue name "myCueName": |0|1-12,81,89|41|0|"myCueName"RR<CR> Pile-On Cue Description: This command causes the Light Cue Pro to play a cue simultaneously with other cues currently playing, like a lighting console would do when it does a “pile-on” of cues. Up to 6 cues may be piled-on at one time. Each of the 512 channel values of each cue that is playing is compared against the corresponding channel in the other playing cues, and the highest value is output. Command bytes: nnnUuPO<CR> nnn – the Cue number to play u – the Universe number. Use * for all. Message Response: R<CR> Comments: When the end of a piled-on cue is reached, the last look of the cue is held and used in the comparison of other piled-on cues, playing or not. Example: "001U2PO" <CR> “3U4PO”<CR> Pile-on cue number 1 on Universe 2 Pile-on cue number 3 on Universe 4 Pile-On Cue and Loop at end Description: This command is the same as the Pile-On Cue command above, except that when the end of the cue is reached, it loops back to the first look and continues. Command bytes: nnnUuLO<CR> nnn – the Cue number to play u – the Universe number. Use * for all. Message Response: R<CR> Example: "001U2LO" <CR> Alcorn McBride Light Cue Pro User’s Guide Pile-on cue number 1 and • July 15, 2010 Page 31 “3U1LO”<CR> Page 32 loop at end on Universe 2 Pile-on cue number 3 and loop at end on Universe 1 Alcorn McBride Light Cue Pro User’s Guide • July 15, 2010 Clear Cue Description: This command causes the Light Cue Pro to clear a cue which is currently being piled-on. The cue will be taken out of the comparison. Command bytes: nnnUuCL<CR> nnn – the Cue number to remove u – the Universe number. Use * for all. Message Response: R<CR> Example: "001U*CL" <CR> Clear Cue Number 1 from all Universes “3U1CL”<CR> Clear Cue Number 3 from Universe 1 Feedthrough Description: This command causes the Light Cue Pro to pass the data from the input DMX connector to the output, bypassing the data recorded in the unit. Playback of recorded data will continue if it was in progress when this command was received, however the data will not be output. Command bytes: nUuFT<CR> If n=1 feedthrough is actvated If n=0 feedthrough is deactivated u – the Universe number. Use * for all. Message Response: R<CR> Comments: "Feedthrough" will display on the main front LCD screen for the corresponding universe when activated. Example: "1U*FT" <CR> feedthrough is activated on all Universes “0U1FT”<CR> feedthrough is deactivated on Universe 1 Alcorn McBride Light Cue Pro User’s Guide • July 15, 2010 Page 33 Force Value Description: Force a DMX channel to specified value. Command bytes: cccvvvUuFV<CR> ccc - ASCII representation of the channel number 1 to 512. vvv - ASCII representation of the channel value 000 to 255. u – the Universe number. Use * for all. Message Response: R<CR> Example: "255128U*FV" <CR> forces channel 255 to value 128 on all Universes Force DMX Description: Force an entire set of DMX channels to specified value. Command bytes: nvvv....vvvUuFD<h0D> n - 0 for first 128 channels, 1 for second 128 channels, 2 for the third 128 channels, 3 for forth vvv.....vvvvvv - the ASCII representation of the channel value 000 to 255 listed 128 times. u – the Universe number. Use * for all. Message Response: R<CR> Clear Forces Description: Clear any forces that are in place Command bytes: UuFC<h0D> u – the Universe number. Use * for all. Message Response: R<CR> SMPTE Status Description: This command causes the Light Cue Pro to respond with the current status time and state of the SMPTE interface. Command bytes: SS<CR> Message Response: status hh:mm:ss.ff<CR> Page 34 Alcorn McBride Light Cue Pro User’s Guide • July 15, 2010 status is either: "Awaiting SMPTE", "Running", "Paused", "Idle" or "Error" Example: Running 01:00:20.30 <CR> DMX File Query Description: This command causes the Light Cue Pro to respond with the dmx files currently playing. The word "none" is returned if no cues are playing. Command bytes: UuCC<CR> u – the Universe number. Message Response: "ccccccc.ccc" , "ccccccc.ccc" <CR> where "ccccccc.ccc" is the ASCII representation of the file currently playing on that Universe separated by commas Example: "dmx00001.dmc","dmx00002.dmc" <CR> 1, & 2 are playing None<CR> no cues are playing (unit is idle) Cue numbers Reset Description: This command causes the LightCue Pro to stop the playback of all active cues and hold the current look. Command bytes: UuRJ<CR u – the Universe number. Use * for all. Message Response: R<CR> Pile-On Priority Description: When set to 1, the LightCue Pro is in "Last Takes Priority" mode. Regardless of whether the DMX Value is higher or not, the last piled on value for that channel will be applied. Command bytes: nPP<CR n = 1 – Last Takes Priority n = 0 – Highest Takes Priority Message Response: R<CR> Longitude Description: This command will get or set the longitude coordinates. Alcorn McBride Light Cue Pro User’s Guide • July 15, 2010 Page 35 Get command: Message Response: LN<0D> current value<0D> Example: Send Command: Response: LN<0D> 81.0<0D> Set command: Message Response: 81.0LN<0D> R<0D> Latitude Description: This command will get or set the latitude coordinates. Get command: Message Response: LA<0D> current value<0D> Example: Send Command: Response: LA<0D> 28.0<0D> Set command: Message Response: 28.0LA<0D> R<0D> Reboot Description: Comments: This command will perform a hard reboot of the system. The V16Pro will reload and run the selected script. The normal power on response will apply Command: Message Response: XX<0D> K<0D> (after reboot complete) IP address Description: Comments: This command will get or set the selected port IP address. Port A or B may be selected Where xxx is a decimal number in the range of 0 – 255. Get command: Message Response: (A or B)IP<0D> xxx.xxx.xxx.xxx<0D> Set command: Message Response: xxx.xxx.xxx.xxx(A or B)IP<0D> R<0D> Subnet Mask number Description: Comments: Page 36 This command will get or set the number used to isolate the subnet. xxx is a decimal number in the range of 0 – 255. Alcorn McBride Light Cue Pro User’s Guide • July 15, 2010 Get command: Message Response: SM<0D> xxx.xxx.xxx.xxx<0D> Set command: xxx.xxx.xxx.xxxSM<0D> R<0D> Message Response: Gateway IP Address Description: Comments: This command will get or set the IP address of the gateway the unit will connect through. xxx is a decimal number in the range of 0 – 255. GW<0D> Get command: Message Response: xxx.xxx.xxx.xxx<0D> Set command: Message Response: R<0D> xxx.xxx.xxx.xxxGW<0D> Date Description: Comments: This command will get or set the calendar date. mm/dd/yyyy Month/Day/Year. Get command: Message Response: DA<0D> mm/dd/yyyy<0D> Set command: Message Response: mm/rr/yyyyDA<0D> R<0D> Time Description: Comments: This command will get or set the time of day. hh:mm:ss Hours/Minutes/Seconds. Get command: Message Response: TI<0D> hh:mm:ss<0D> Set command: Message Response: R<0D> hh:mm:ssTI<0D> User Name Description: Comments: This command will get or set the user login name. The default name is admin. Get command: Message Response: US<0D> (current login)<0D> Set command: Message Response: (new login)US<0D> R<0D> Alcorn McBride Light Cue Pro User’s Guide • July 15, 2010 Page 37 PW Get/Set Password Description: Comments: This command will get or set the password. The default password is password. Get command: Message Response: PW<0D> password<0D> Set command: Message Response: passwordPW<0D> R<0D> DST Enable Description: Comments: This command will get or set the status of the daylight saving time parameter. 0 = Standard Time, 1 = using DST. Get command: Message Response: SD<0D> current setting<0D> Set command: Message Response: 1SD<0D> R<0D> DST Type Description: Comments: This command will get or set the status of the daylight saving time Type. Example are: 1 = US, 2 = Universal, 3 = Australia, 4 = Europe. Get command: Message Response: DT<0D> current setting<0D> Set command: Message Response: 1DT<0D> R<0D> Time Zone Description: Comments: This command will get or set the Time Zone. The time zone 0 is the Greenwich Mean Time GMT. Time zones going west are given –1 numbers and +1 going east from GMT 0 until the International Date Line is reached. Eastern TZ in the USA is -5 Get command: Message Response: TZ<0D> current timezone<0D> Set command: Message Response: -5TZ<0D> R<0D> NTP IP Address Description: This command will get or set the NTP IP address needed to contact the timeserver. Get command: NI<0D> Page 38 Alcorn McBride Light Cue Pro User’s Guide • July 15, 2010 Message Response: Example: (current NTP address)<0D> Send Command: NI<0D> Response: ntp.org<0D> Set command: Message Response: "NTP IP address"NI<0D> R<0D> NTP Enable Description: Comments: This command will enable or disable the NTP function and will get the current status. 0 = disable, 1 = enable Get command: Message Response: Set command: Message Response: NE<0D> (current status)<0D> (0 or 1)NE<0D> R<0D> Ethernet Port for NTP Description: Comments: This command will get or set the V16Pro Ethernet port used to contact the NTP server. A = port A, B = port B. The default port is A Get command: Message Response: NJ<0D> (current port)<0D> Set command: Message Response: (port A or B)NJ<0D> R<0D> DHCP Enable Description: Comments: This command will enable or disable the DHCP function and will get the current status. x is 0 = disable, 1 = enable p is A = port A, B = port B Get command: Message Response: pDH<0D> x<0D> Set command: Message Response: xpDH<0D> R<0D> HTTP Ethernet Port Description: Comments: This command will get or set the Ethernet port that will be used in connecting to the Internet p = A/B Ethernet jack locations on the V16Pro Alcorn McBride Light Cue Pro User’s Guide • July 15, 2010 Page 39 Get command: Message Response: HJ<0D> x<0D> Set command: Message Response: (A or B)HJ<0D> R<0D> HTTP WEB Page Description: Comments: This command will get or set the default HTTP WEB address. The default WEB page is index.html Get command: Message Response: HP<0D> (currentwebpage)<0D> Set command: Message Response: (myWebPage.html)HP<0D> R<0D> MIDI Control The LightCuePro can be controlled with standard "Go Cue", "NoteOn" and "NoteOff" MIDI commands. Start a Cue with SYSEX “GO CUE” The SYSEX “GO CUE” message can be used to start a cue. Here is the general form: 0xF0 0x7F <Universe Number> 0x02 0x7F 0x01 <data #1> <data #2> <data #3> 0xF7 The <Universe Number> is starting at 1. So 0x01 will start cues on Universe 1. Use 0x00 to start on ALL universes. The <data #1> byte is the ASCII hundreds digit of the sequence number (sequence index + 1). For example, if you were starting sequence #104, the <data #1> byte is 0x31 (or “1”). The <data #2> byte is the ASCII tens digit of the sequence number (sequence index + 1). For example, if you were starting sequence #104, the <data #2> byte is 0x30 (or “0”). The <data #3> byte is the ASCII ones digit of the sequence number (sequence index + 1). For example, if you were starting sequence #104, the <data #3> byte is 0x34 (or “4”). Here is an example to start Cue #4 message sent from an PC (address 0xFF) to a LightCuePro on All Universes: 0xF0 0x7F 0x00 0x02 0x7F 0x01 0x30 0x30 0x34 0xF7 Pile on a Cue with "NOTE ON" The NOTE ON message can be used to "Pile On" and play a Cue: Page 40 Alcorn McBride Light Cue Pro User’s Guide • July 15, 2010 <universe number + 0x90> <output index + 0x3C> 0x40 The universe number starts at 1. Use 0x00 for ALL universes. Here is an example “Pile On Cue #1” message sent from an PC (address 0xFF) to a LightCuePro on Universe 1. 0x91 0x3C 0x40 Clear Cue with "NOTE OFF" The NOTE OFF message can be used clear (stop) a specific cue that has been piled on. If this cue number is the only cue, all playback stops. <universe number+ 0x80> <output index + 0x3C> 0x40 The universe number starts at 1. Use 0x00 for ALL universes. Here is an example “Pile On Cue #1” message sent from an PC (address 0xFF) to a LightCuePro on Universe 1. 0x81 0x3C 0x40 Alcorn McBride Light Cue Pro User’s Guide • July 15, 2010 Page 41 Specifications DMX Input: Male 5-Pin XLR Output: Female 5-Pin XLR Signal: Fully DMX-512/1990 Compliant Recorded Channels: 512 x 4 Control Interface Serial: RS-232C at 9600 Baud, n 8, 1 Ethernet (UDP): 2 Ethernet Jacks A & B Parallel Opto-Inputs: 12 Voltage or Contact Inputs: configurable for Play, Stop, or Loop of any file on any Universe Still Parallel Contact Outputs: 4x Running, 4x Fault SMPTE Input: Female 3-Pin XLR, transformer coupled 600 ohm Balanced -10 dbu to +4 dbu Supported Frame Rates: 24,25,29.97,29.97drop,30 MIDI: MIDI Command Control Media: CF Media included Rear accessible, security cover plate Pushbuttons: 2 configurable for Play, Stop, Still or Loop of any file on any Universe Indicators: Power, SMPTE Lock LCD Display: 8 lines, 42 characters per line, backlit Front Panel: Page 42 Alcorn McBride Light Cue Pro User’s Guide • July 15, 2010 Physical Power: 115 or 220 VAC, 50/60 Hz, 30 watts or 12.0 VDC, 3A Max UL, CSA, CE Class 2 Supply Provided Size and Weight: 19” W x 3.5” H x 10.6” D (48.3 cm W x 8.8 cm H x 26.9 cm D) Environment: 0°C (32°F) to 60°C (140°F), free air circulation, 0-90% relative humidity, noncondensing Alcorn McBride Light Cue Pro User’s Guide • July 15, 2010 Page 43 Index A Arm Recording, 4, 7, 11, 31 C Channel Picker, 11 Channel Set, 14 Channel Sets, 3, 11, 12, 14 Chase Play, 25, 29 Clear Cue, 34 Contact Closure, 20–21 Control DMX, 3, 14 crossfade, 5, 26–29 Cue Names, 9 D DMX Files, 3, 9, 10, 11, 13 DMX-512, 43 F Feedthrough, 34, 35, 36 forcing, 14 Front Panel Menu, 3, 17 I Input Config, 15 L LCD Display, 17, 19, 43 LED indicators, 18 LightCue Manager, 3, 6, 9, 17 Loop Play, 25, 27 M Monitor, 3, 12, 14 O offset, 5 P Parallel, 20, 23–24, 43 Page 44 Alcorn McBride Light Cue Pro User’s Guide • July 15, 2010 Parallel Outputs, 24 Pile-On Cue, 32 Pile-On Cue and Loop at end, 32, 36 Play, 37, 38, 39, 40 Playback, 3, 8, 9, 13, 34 protocol, 25 R Record, 29, 30, 31 Record Now, 4, 7, 11 Recording Cues, 3, 10 RS-232, 5–17, 25 S Save SMPTE Start Time, 11 Select Cue, 25–27 Serial Control, 25, 37 Settings, 3, 13, 15, 16 SMPTE, 5–18, 22, 25–43 Still, 25, 27–43, 27–43 Alcorn McBride Light Cue Pro User’s Guide • July 15, 2010 Page 45