1
FOR MODELS:
SHI
4302
6802
6806
4306
6805
SHU 3032
3036
3035
3302
3306
3326
3305
3322
3336
4302
4312
4322
5302
5305
5307
5314
5316
6802
6806
4306
4316
4326
5304
5306
5312
5315
5317
6805
9902
9906
9915
9922
9926
9905
9912
9916
9925
4303
4803
SHV
H
SHU/SHI/SHV Dishwasher
Troubleshooting Tips
For:
B
Effective May 18, 2001
B
BSH Home Appliances
5551 McFadden Avenue
Huntington Beach, California 92649
1st Edition/Rev. 2
CL
Page 1
TABLE OF CONTENTS
Measuring resistances from the front of SHU/SHI 43/53/68 dishwashers…… A-1
Measuring resistances from the front of SHU 99 & SHV 43/48 dishwashers.. A-2
Measuring resistances from the front of SHU 33 dishwashers….....…………. A-3
Measuring resistances from the front of SHU 303x dishwashers.……………. A-4
Installing jumper for control modules for SHU 53x dishwashers.……………..A-5
Using the test program to troubleshoot the heater, flow switch and Hi-Limit
thermostat from the front of SHI/U 43/53/68 dishwashers……….……………...B-1
Key parts changes for SHU/SHV/SHI UC/11 dishwashers for softer bearing..B-2
Using front cover to replace SHU 43/53/68 control module buttons…………..B-3
Soldering SHU 43/53/68 control module heater relays………………………….. B-4
SHU Dishwasher Quick Check Chart…………………………………………..……C-1
SHU Dishwasher Troubleshooting Chart…………….……………………………. D-1
SHU 43/53/68 Schematic Diagram #36 (reprinted from Tech Manual)..………. E-1
SHV 43/48 Schematic Diagram #48 (reprinted from Tech Manual)……………. E-2
SHU 43/53/68 Dishwasher Test Programs…………………………………………. F-1
SHV 43/48 Dishwasher Test Program………………………………………………. F-2
SHU 99 Dishwasher Test Programs………………………………………………….F-3
SHU 33 Dishwasher Test Program…………………………………………………...F-4
Using Dishwasher Serial Number to find Date of Manufacture…....….………. G-1
Dishwasher Notes……………………………………………………………………… H-1
1st Edition/Revision 2
Thursday, May 17, 2001
B
Page A-1
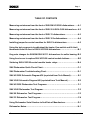
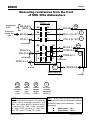
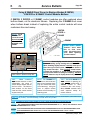
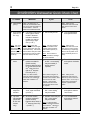
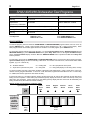
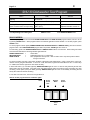
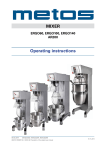
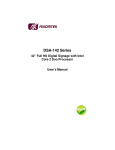
Measuring resistances from the front
of SHU/SHI 43/53/68 dishwashers
.7
I2.
.1
.2
3 2 1
2 1
.4
Control Module -- I2
1 2
.8
8 7 6 5 4 3 2 1
.6
2 1
.5
7 6 5 4 3 2 1
.9
X1
to neutral
line
measure
water
level
switch
(open
circuit)
measure
circulation
motor
(~10 W)
measure
drain
motor
(~16.5 W)
1st Edition/Revision 2-A
BN-I5-5
BN-I5-6
BN-I5-7
YE-e3
YE-e3
BN-I5-1
BN-I5-2
measure
NTC
measure rinse
(~ 55 kW @
agent sensor
72ºF )
(SHU/I 53/68)
(~.4 W)
to Aqua Sensor
to heater, Hi-Limit & flow switch
BU-I6-6
BU-I6-7
BU-I6-8
BU-I6-9
BK-I2.1-2
GYBK-a1-3
RD-I6-1
WH-a1-6
WH-I6-3
BU-A2
BU-A2
measure
dispenser
actuator
(~2150 W)
measure
top rack
only
actuator
(SHU/I 68-only)
(~2150 W)
to hot line
to hot line
resets control module & starts test program
WH-a1-5
BK-I2.7-1
WHRD-e0-1
(SHU/I
43/53)
NOTE:
Symbols (WH-I6-3) refer to wire
colors and terminal/part symbols. See schematic
diagram # 36 for terminal/part symbols. Wire
colors: WH = white, BK = black, WHRD = white/
red, BU = blue, GYBK = gray/black, RD = red,
YE = yellow, BN = brown.
HINT: Water valve and drain motor can be
measured from front of dishwasher without
accessing control module wire harnesses.
Resistances are:
n
n
Water valve ~ 1 kW
Drain motor ~ 16.5 W
Thursday, March 2, 2000
B
Page A-2
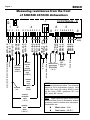
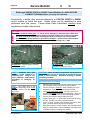
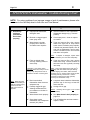
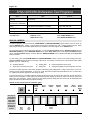
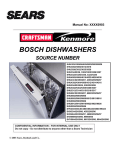
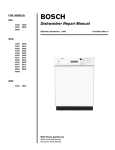
Measuring resistances from the front
of SHU 99 & SHV 43/48 dishwashers
1 2
1 2 3
.6
to
neutral
measure
drain
motor
(~16.5 W)
measure water
level switch
(open circuit)
measure top rack only
actuator (SHV 48 only)
(~2150 W)
to hot line
to water valve & float switch
measure
dispenser
actuator
(~2150 W)
measure
circulation
motor (with
door closed)
(~10 W)
1 2
.8
1 2 3 4
measure
rinse agent
sensor
(SHV 48)
(~.4 W)
measure
NTC
(~ 55 kW
@ 72ºF)
NOTE:
Symbols (WH-I6-7) refer to wire
colors and terminal/part symbols. See schematic
diagram # 48 for terminal/part symbols. Wire
colors: WH = white, WHRD = white/red, GY =
gray, BU = blue, GYBK = gray/black, RD = red,
YE = yellow, BN = brown.
HINT: Water valve and drain motor can be
measured from front of dishwasher without
accessing control module wire harnesses.
Resistances are:
n
n
1st Edition/Revision 1-A
.7
YE-e3
YE-e3
BN-I6-3
BN-I6-2
WH-I6-6
WH-I6-5
WH-I6-4
WHRD-e0-1
GY-e0-4
1 2 3
1 2 3
.4
.3
to heater, Hi-Limit & flow switch
.2
2 1
GYBK-a1-3
RD-I6-1
.1
WH-I6-9
WH-I6-8
WH-I6-7
I2.
.5
BU-A2
BU-A2
Control Module -- I2
Water valve ~ 1 kW
Drain motor ~ 16.5 W
Thursday, March 2, 2000
B
Page A-3
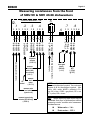
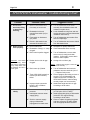
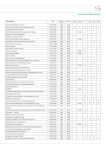
Measuring resistances from the front
of SHU 33 dishwashers
measure water
level switch
(open circuit)
measure
circulation
motor
(~10 W)
NOTE:
measure
drain
motor
(~16.5 W)
Symbols (WH-a1-5) refer to wire
colors and terminal/part symbols. See schematic
diagram # 60 for terminal/part symbols. Wire
colors: WH = white, WHRD = white/red, BU =
blue, GYBK = gray/black, RD = red, YE = yellow.
1st Edition/Revision 0-A
2 1
7 6 5 4 3 2 1
BU-I6-4
BU-I6-5
.5
WH-a1-5
WHRD-a1-1
BU-I6-6
BU-I6-7
BU-I6-8
BU-I6-9
BU-a1-6
to water valve & float switch
measure
dispenser
actuator
(~2150 W)
.8
.1
resets control module
& starts test program
2 1
to hot line
2 1
1 2
RD-I6-1
GYBK-a1-3
.2
to heater, Hi-Limit & flow switch
.6
.4
8 7 6 5 4 3 2 1
.7
YE-A2
YE-A2
I2.
Control Module -- I2
measure
NTC
(~ 55 kW
@ 72ºF)
to neutral
HINT: Water valve and drain motor can be
measured from front of dishwasher without
accessing control module wire harnesses.
Resistances are:
n
n
Water valve ~ 1 kW
Drain motor ~ 16.5 W
Thursday, March 2, 2000
B
Page A-4
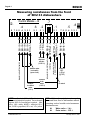
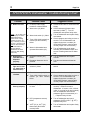
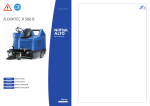
Measuring resistances from the front
of SHU 303x dishwashers
Timer -- u
GN-I6-6
GN-f3
to thermostats
f3 & f4
to water level
switch & inlet
valve
BU-I6-4
5b
3b
5a
3a
5
GY-I6-1
to float switch
6b
WH-b-5
WH-I6-3
6a
to flow switch
6
WHVT-a1-3
RD-A2
YE-b-1 (to b1)
4b
2b
4a
2a
4
2
1
BK-m2-1
GYRD-I6-8
m3
A2
1
measure
circulation
motor
(~10 W)
measure
drain
motor
(~16.5 W)
measure
detergent
actuator
(~2150 W)
see circuit /
schematic
diagram # 62
for b1 & b3
NOTE:
Symbols (WH-I6-3) refer to wire
colors and terminal/part symbols. See schematic
diagram # 62 for terminal/part symbols. Wire
colors: WH = white, WHRD = white/red, WHVT
= white/violet, BU = blue, GYBK = gray/black,
BK = black, GYRD = gray/red, GY = gray, GN =
green, RD = red, VT = violet, YE = yellow.
1st Edition/Revision 0-A
m2
GYBK-e5-1
m3
to flow switch
M
~
WHRD-A2
Timer motor m1
m2
1
VT-b-3 (to b3) 1
3
to hot line
A2
to neutral
HINT: Water valve and drain motor can be
measured from front of dishwasher without
accessing timer wire harnesses. Resistances are:
n
n
Water valve ~ 1 kW
Drain motor ~ 16.5 W
Monday, March 6, 2000
B
Page A-5
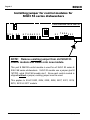
Installing jumper for control modules for
SHU/I 53 series dishwashers
Control Module Part # 266746
1 2
3 2 1
2 1
8 7 6 5 4 3 2 1
2 1
7 6 5 4 3 2 1
NOTE: Remove existing jumper from old SHU/I 53
control module and install onto new module.
This part # 266746 control module is used for all SHU/I 53 series &
SHU/I 68 series dishwashers. SHU/I 53 models use a jumper (part #
167782), while SHU/I 68 models dont. Since each control module is
shipped without a jumper, existing jumper must be used.
This applies to SHU/I 5302, 5304, 5305, 5306, 5307, 5312, 5314,
5315, 5316 & 5317 models.
1st Edition/Revision 1
Wednesday, May 16, 2001
B
Page B-1
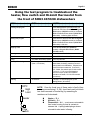
Using the test program to troubleshoot the
heater, flow switch and Hi-Limit thermostat from
the front of SHU/I 43/53/68 dishwashers
123456789012345678901234567890121234567890123456789012345678901212345678901234567890123456789012
123456789012345678901234567890121234567890123456789012345678901212345678901234567890123456789012
123456789012345678901234567890121234567890123456789012345678901212345678901234567890123456789012
123456789012345678901234567890121234567890123456789012345678901212345678901234567890123456789012
TEST
TIME
NOTES
123456789012345678901234567890121234567890123456789012345678901212345678901234567890123456789012
Entering test program
-----
Press On/Off button at the same time you
press both the Power Scrub Plus & Regular
Wash buttons (SHU/I 43 models) or the Scrub
Wash & Delicate/Econo buttons (SHU/I 53 &
68 models). Indicating lights will flash.
Starting test program
-----
Press both the Power Scrub Plus & Regular
Wash buttons (SHU/I 43 models) or the Scrub
Wash & Delicate/Econo buttons (SHU/I 53 &
68 models) a 2nd time.
Skipping a test
-----
Press Scrub Wash button (SHU/I 43
models) or Regular Wash button (SHU/I
53 & 68 models).
Draining
30 seconds
Allow dishwasher to drain.
Aqua Sensor calibration
65 seconds
Not on SHU/I 43 models. Skip this test.
Filling
Until water level switch closes
Cant skip this test
Heating & Circulating
Until water reaches 150ºF
(rises ~ 2ºF/minute)
Dont run entire test (to save time) -- when
water starts circulating, measure current in
main power line to dishwasher. Skip test once
current has been measured. If current is ~
11A, heater, flow switch and Hi-Limit are OK.
If current ~ 1.5-2A, turn off dishwasher,
remove or block up tank and measure
resistance of heater, Hi-Limit & flow switch
(see below).
Draining
60 seconds
185ºF
High
Limit
Heater
F
Flow
switch
1st Edition/Revision 0-B
Last test. To end test program, press
On/Off button (all models).
NOTE: Once its found one of these parts is faulty (from
incoming current being 1.5 - 2A), check each part (once tank
has been removed or blocked up) by measuring its
resistance at its terminals:
n
n
n
Heater ~ 11 W
Hi-Limit ~ .3 W
Flow switch ~ .4 W -- must remove microswitch
from heater housing & close its contacts to
measure this. A spring loaded plunger closes
microswitch when water is flowing.
Tuesday, May 11, 1999
Page B-2
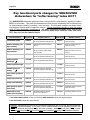
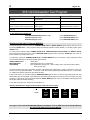
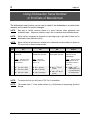
Key functional parts changes for SHU/SHV/SHI
dishwashers for “softer bearing” index UC/11
Key SHU/SHV/SHI dishwasher parts have been changed for the “softer bearing” upgrade for index #
UC/11 for all models. This made the dishwashers quieter through suspending the circulation pump
by flexible bands instead of mounting it onto the base. The key parts changes are shown below,
including part #’s and model #’s parts are used on. Please note these changes to order the correct
parts for each dishwasher model/index #. All other component assembly parts and part #’s
(drain pump, circulation pump impeller, circulation pump motor capacitor, water inlet valve,
NTC, base, etc.) are the same as before.
Part description
Old part #
Models used on
New part #
Models used on
Circulation pump
263835
All models (index #’s UC/06 &
UC/10, except SHV 43/48 UC/10)
266511
All models (index #’s UC/07,
UC/11 & UC/12)
Heater assembly (for
aqua sensor)
263869
SHU 53/68 (index #’s UC/06 &
UC/10)
480317
SHU 43**/53/68 (index #’s
UC/11 & UC/12)
Heater assembly (no
aqua sensor)
264462
SHU/SHI 33/43*/99 (index #’s
UC/06, & UC/10) & SHV 43/48
index # UC/06
480316
SHU/SHV/SHI 33/43*/48/99
(index #’s UC/07, UC/11 &
UC/12)
Sump
263103
All models (index #’s UC/06 &
UC/10, except SHV 43/48 UC/10)
266158
All models (index #’s UC/07,
UC/11 & UC/12)
Pump support
bushings
167244
All models (index #’s UC/06 &
UC/10, except SHV 43/48 UC/10)
--------
Pump support straps
Gasket (pump to
sump)
Pipe clamp (pump to
sump)
-------165268
171596
All models (index #’s UC/06 &
UC/10, except SHV 43/48 UC/10)
--------
All models (index #’s UC/07,
UC/11 & UC/12)
-------172272
All models (index #’s UC/07,
UC/11 & UC/12)
Pump rear housing
263314
All models (index #’s UC/06 &
UC/10, except SHV 43/48 UC/10)
267739
All models (index #’s UC/07,
UC/11 & UC/12)
Pump front housing
263838
All models (index #’s UC/06 &
UC/10, except SHV 43/48 UC/10)
266514
All models (index #’s UC/07,
UC/11 & UC/12)
Seal (pump to water
inlet hose)
165269
All models (index #’s UC/06 &
UC/10, except SHV 43/48 UC/10)
171598
All models (index #’s UC/07,
UC/11 & UC/12)
Hose with O-ring
(water inlet to pump)
298556
All models (index #’s UC/06,
UC/07, UC/10 & UC/11)
361113
All models (index # UC/12)
* SHU 4302/4306/4312/4316 models (not including SHU 4322/4326 models with digital displays).
** SHU 4322/4326 models with digital displays.
CAUTION: Although the new base can be used interchangeably with new or old parts, the parts themselves
cannot be used interchangeably. A new pump, sump or heater assembly must be replaced by new parts and
cannot be used with the old pump, sump and heater assembly. Similarly, the old pump, sump or heater
assembly must be replaced by old parts and cannot be used with the new pump, sump and heater assembly.
1st Edition/Revision 0
Friday, September 22, 2000
B/G
Service Bulletin
Page B-3
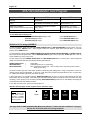
Using # 264946 Front Cover to Replace Broken # 266746,
# 263832 or # 264461 Control Module Buttons
# 266746, # 263832 or # 264461 control modules are often replaced when
buttons break, not for electronic failures. Replacing the # 264946 front cover
when buttons break instead of replacing the entire control module will save
customers time and money.
266746,
263832 or
264461
NOTE: The #
264946 front
cover fits on all
three modules - the # 266746,
# 263832 and #
264461.
264946
Broken control module
“buttons” occur when
tabs on front cover
break. Use plastic front
cover when replacing
“broken buttons”.
Top of front cover
Top tab
Bottom of front cover
Note cracks in plastic locking tabs.
HINT:
When customers
report broken buttons on their
dishwashers, the cause is
almost always broken tabs on
the front cover. The white or
black buttons on the fascia
panel and the control module
keypad rarely fail.
CAUTION: Insert display module board carefully to
prevent breaking spring locking tabs on front cover.
When installing display module, carefully slide top of
board into top of front cover, making sure board is
fully seated into tabs. Then, carefully rotate bottom
of board into position so spring locking tabs spring
back and lock without cracking or breaking. DO NOT
FORCE bottom or top of display board into position.
NOTE: The # 264946 front
cover has a short lead time
while control modules have
long four month lead times
(from Germany). Using the
cover to replace broken
buttons will avoid delays in
obtaining parts.
HINT: Use the # 264946 front
cover instead of replacing an
older 263832 module with a
266746 module to save
customers time and money.
Many 263832 modules have
been replaced merely for
broken buttons.
CAUTION: Some pc board components are sensitive to static electricity and can be damaged by personnel through
touch or close proximity. Personnel handling pc boards should be grounded.
NOTE: To determine which control module you have, check the model #’s on the following list:
266746 -- SHU 5302/5304/5305/5306/5312/5314/5315/5316/6802/6805/6806 UC 11 - UC/12, SHU 5307/5317 UC/12
and SHI 6802/6805/6806 UC/11 - UC/12.
263832 -- SHU 5302/5304/5305/5306/5312/5314/5315/5316/6802/6805/6806 UC 06 and SHI 6802/6805/6806 UC/06.
264461 -- SHU 4302/4306/4312/4316 UC 06 - UC/11 - UC/12 and SHI 4302/4306 UC/06 - UC/11 - UC/12.
1st Edition/Revision 3
Wednesday, May 9, 2001
Page B-4
Service Bulletin
B/G
Soldering # 266746, 263832 or 264461 Control Modules for SHU/I 43/53/68
& GM 915-710 Dishwashers (excepting SHU 4322/4326)
Occasionally, a heater relay terminal soldered to a # 266746, 263832 or 264461
control module pc board can burn. Heater relays can be resoldered to save
customers time and money. Please follow these instructions carefully when
resoldering a heater relay terminal.
CAUTION:
þ
þ
þ
þ
Do not overheat solder joint -- pc board can be damaged by excessive heat. Make sure
soldering iron is fully heated before soldering and keep heating time as short as possible.
Use rosin core 60/40 solder when soldering pc boards as acid core can etch pc boards.
Do NOT resolder if relay terminal or pc board is damaged -- replace entire control module.
To avoid overheating pc board, use a moderately sized soldering iron (~ 25W).
Burned board -- showing burned
terminal on back of pc board.
Good board -- showing proper soldering
on back of pc board.
HINT:
Soldering irons give
superior results compared to
soldering guns - using an iron
with a small tip (~ 25W) reduces
possibility of damaging pc
board.
CAUTION: Some pc board components are sensitive to
static electricity and can be damaged by personnel through
touch or close proximity. Personnel handling pc boards
should be grounded.
DETAILED INSTRUCTIONS:
1.
HINT: The heater relay is the
largest of three relays in the center
of the pc board & can be one of
two colors:
Orange
2.
3.
4.
5.
6.
Black
1st Edition/Rev. 1
7.
Carefully clean burned terminal with a small piece of extra
fine sandpaper, taking care not to scratch pc board.
Use an iron with a small tip. Heat soldering iron up to
temperature. Coat tip with small amount of solder.
Using rosin core 60/40 solder, hold tip of hot iron to
terminal and briefly touch terminal with solder. Don’t use
excessive amount of solder to avoid damaging pc board.
Pull iron from terminal and let solder joint cool.
Inspect solder joint -- a good solder joint should be shiny,
not dull. If solder joint is dull, carefully resolder.
If joint is sound, carefully clean finished joint with a clean
cloth. Carefully remove any lint from pc board.
Reinstall pc board to control module, then reinstall control
module to dishwasher. Check dishwasher and make sure
it operates properly, including how it heats.
Wednesday, May 9, 2001
B
Page C-1
SHU/SHI/SHV Dishwasher Quick Check Chart
Use this chart to quickly identify problems from front of dishwasher without removing it.
For a complete troubleshooting chart when symptoms are known, please refer to the
SHU/SHI/SHV Dishwasher Troubleshooting Chart.
NOTE:
Use a multimeter with temperature, voltage/resistance and current (ampere) probes.
Do all resistance checks with power turned off. Identify each wire color and location
at the control module before looking at this chart. For a quick reference for
measuring resistances from the front of the dishwasher, please refer to the one page
diagram Measuring Resistances from the Front of any SHU or SHI Dishwasher.
NOTE:
To access wire harnesses, open door and remove outer door panel (by removing
three T20 Torx screws on each side of inner door, starting from bottom -- the top six
screws hold the fascia panel to the door). Once screws are out, close door, lift outer
door panel up and pull bottom of panel out – door panel will drop out.
NOTE:
Please see schematic diagram #36 for SHU/I 43/53/68 model dishwashers and
diagram #48 for SHV 43/48 model dishwashers in the Major Appliance Technical
Manual.
NOTE:
An "F" fault code in the display for SHU/I 53/68 dishwashers shows there's a filling
problem (not filling, overfilling, underfilling or water in the base). The fault code can't
be reset manually – it will reset itself 15 minutes after the dishwasher has been
turned on (after testing how it fills).
To check
Measure
If yes
If no
ü Water valve
ü Resistance through
water valve terminals
(≈ 1000 Ω).
ü Valve may be OK –
more testing may be
needed.
ü Turn off dishwasher
and replace water
valve.
ü Drain motor
ü Lift plastic terminal
cover and measure
resistance through
drain motor terminals
(≈ 16.5 Ω).
ü Drain motor may be
OK – more testing
may be needed.
ü Turn off dishwasher
and replace drain
motor.
HINT: Locking type terminals
are used – push a small (#1)
blade screwdriver into each
terminal notch and slide
terminal off at same time.
HINT: The drain motor is not
a bilge pump – it won't
remove water from the
dishwasher base.
HINT: Start test program,
start any wash cycle or reset
dishwasher to run drain motor
-- see if water drains.
1st Edition/Revision 0-A
Tuesday, May 11, 1999
B
Page C-2
SHU/SHI/SHV Dishwasher Quick Check Chart
To check
Measure
If yes
ü Heater / flow
switch / HiLimit
thermostat
o
(185 F)
ü Current through hot
wire into dishwasher –
should be 10.5-11 A
(amps).
ü Heater/flow switch/HiLimit thermostat are
OK.
ü
HINT: The resistance of
heater is ≈ 11 Ω, Hi-Limit
thermostat is ≈ .3 Ω & flow
switch is ≈ .4 Ω. To measure
flow switch resistance,
remove microswitch & close
its contacts.
HINT: Don't pull out
dishwasher and remove tub
for initial checking – only
when you're certain one of
these parts has failed.
HINT: Must pull out
dishwasher and remove or
tilt/block up tub to replace
parts. Bring all three parts
before disassembling
dishwasher and test each
part separately.
HINT: The NTC and Hi-Limit
o
(185 F thermostat) are
changed as a unit. Must pull
out dishwasher and remove
or block up tub to replace it.
ü NTC
(temperature
probe)
ü
At control module,
measure resistance
between two brown
wires at left of right
harness (≈ 55 kΩ at
room temperature
(72oF)).
HINT: Start test program
(SHU/I models) and skip
"draining" and "Aqua Sensor
Calibration" until water has
finished filling. When heater
comes on, measure current.
Skip "heating & circulating"
once you've measured
current to save time.
ü NTC probably is OK.
HINT: Make sure water in
sump has cooled to room
temperature before
measuring resistance.
ü Water level
switch
ü Float switch
1st Edition/Revision 0-A
ü
ü
If no
Test each part, turn off
dishwasher and
replace defective part.
HINT: The Hi-Limit
o
thermostat (185 F) is a bimetal self-resetting
thermostat.
ü Turn off dishwasher
and replace NTC.
HINT: The NTC and Hi-Limit
o
(185 F thermostat) are
changed as a unit. Must pull
out dishwasher and remove
or block up tub to replace it.
After water fills, turn off
dishwasher and
measure (SHU/I
models) between white
wire at left of 3rd
harness from left and
2nd blue wire from left of
4th harness from left (≈
.4 Ω).
ü Water level switch is
OK.
ü Turn off dishwasher
and replace water
level switch.
HINT: For SHV models,
measure between white wire
st
at right of 1 harness & white
th
wire at left of 4 harness.
HINT: Must pull out
dishwasher and remove left
side panel to access water
level switch.
Resistance between
white wire to water
valve and white wire
either at right of on/off
switch harness (SHU/I
models) or at left of 4th
harness (SHV models)
(≈ 4Ω).
ü Float switch and water
valve probably are OK.
ü Test float switch and
water valve, turn off
dishwasher and
replace whatever part
was defective.
Tuesday, May 11, 1999
B
Page C-3
SHU/SHI/SHV Dishwasher Quick Check Chart
To check
Measure
ü Float switch
(cont.).
HINT: Any debris (e.g. a
cable tie) in dishwasher base
can move under float and turn
on float switch. Clean all
debris from dishwasher base.
ü Aqua sensor
ü Find three brown wires
at far right of control
module. Measure
resistance between
middle wire and left
(preferred) or right
wire (≥ 1 MΩ).
ü Sensor may be OK.
ü Turn off dishwasher
and replace sensor.
HINT: The aqua
sensor does not
affect washability
and should not be
replaced (unless a
leak has occurred
around it).
HINT: Don't check this
unless customer has brought
up long wash times (and has
measured them). The sensor
checks water clarity and adds
a wash/rinse cycle only when
the rinse water is still dirty.
HINT: Can also measure
resistance between inner
terminal (light) and either
outer terminal (sensor) of
sensor itself.
HINT: Must pull out
dishwasher and remove left
side panel to access sensor
(for measuring or replacing).
Sensor can be pulled out of
sensor assembly at rear of
sump.
ü Circulation
motor
ü At control module,
measure resistance
(SHU/I models)
between white/red wire
st
on 1 harness from left
nd
& 2 blue wire from
th
right on 4 harness
from left (≈ 10 Ω).
ü Circulation motor may
be OK – more testing
may be needed (if
debris entered
impeller).
ü Turn off dishwasher
and replace circulation
motor.
HINT: For SHV models,
measure between white/red
nd
wire at left of 2 harness &
th
white wire at middle of 4
harness.
HINT: Debris can get in if
filter basket wasn't properly
screwed in and locked. Don't
remove motor to clean
impeller – remove filter
basket/screen and reach
through right side of sump
into impeller.
HINT: Must pull out
dishwasher and remove or
tilt/block up tub to remove or
replace motor – do so only if
certain motor has failed or
impeller is jammed with
debris.
ü Detergent
dispenser
actuator
ü Resistance through
"wax" motor terminals
(≈ 2150 Ω).
ü Actuator motor may be
OK – more testing
may be needed.
ü Turn off dishwasher
and replace actuator
"wax" motor.
ü Top rack
only actuator
(SHU/I 68-& SHV 48-models
only).
ü At control module,
measure resistance
(SHU/I models)
between white wires of
rd
3 harness (from left) - (≈ 2150 Ω).
ü Actuator motor may be
OK – more testing
may be needed.
ü Turn off dishwasher
and replace actuator
"wax" motor.
(SHU 53-- &
68—only)
1st Edition/Revision 0-A
If yes
If no
HINT: Must pull out
dishwasher and remove left
side panel to access float
switch.
HINT: Due to nature of
sensor, resistance readings
can be inconsistent.
HINT: For SHV models,
measure between white/red
nd
wire at left of 2 harness &
th
white wire at middle of 4
harness.
Tuesday, May 11, 1999
B
Page C-4
SHU/SHI/SHV Dishwasher Quick Check Chart
To check
Measure
If yes
If no
ü Control
module
ü Run test program
(SHU/I models) and
check if indicator
lights/displays come
on and all buttons click
(and resist a bit when
pressed).
ü Module may be OK –
more testing may be
needed.
ü Go to troubleshooting
chart and check
whether module or
another part is faulty.
ü Rinse aid
dispenser
level switch
ü At control module,
measure resistance
between two yellow
nd
wires (2 harness
from right) -- (≈ .4 Ω).
ü Level switch probably
is OK.
ü Check to see if rinse
aid dispenser is
empty. If not, turn off
dishwasher and
replace level switch.
(SHU 53/68 &
SHV 48—
models only)
NOTE:
The following parts can't be serviced from the front of the dishwasher (the dishwasher
must be pulled out and the tank removed or tilted/blocked up to replace them):
•
Heater
•
Circulation motor
•
Aqua sensor ("Sensotronic")
•
NTC (temperature probe)/Hi-Limit (185oF) thermostat
NOTE:
You will need a T20 Torx screwdriver and may need #1/ #2 flat blade screwdrivers
and a pair of needlenose pliers. Many parts can be snapped out without using tools.
NOTE:
On SHU/I 43/53/68 models, run test program to identify dishwasher problems (please
see page F-1). The test can run more than one hour (to get temperature up to
150oF), but tests can be cancelled to greatly shorten testing time. The test program
allows draining, filling, circulating and heating to be checked more quickly than
running a standard wash cycle.
To use test program for troubleshooting, measure voltages/currents as parts come
on. For example, run heating test and measure current coming into dishwasher – if
current ≈ 11A, Hi-Limit, heater and flow switch are OK. If not, check each part to see
which one failed. This test saves time since you can't get to these parts without
removing the tank and can't run resistance checks from front of dishwasher because
flow switch stays open. Please see page B-1 on using test program to troubleshoot
heater, flow switch and Hi-Limit.
1st Edition/Revision 0-A
Tuesday, May 11, 1999
B
Page C-5
SHU/SHI/SHV Dishwasher Quick Check Chart
NOTE:
To cancel/drain dishwasher while it's cycling, press and hold the following
buttons (until dishwasher starts to drain):
G
SHU/I 43-- & SHV 43/48
G
Press and hold "Regular Wash" & "Power
Scrub Plus" buttons
G
SHU/I 53/68
G
Press and hold "Scrub Wash" &
"Delicate/Economy" buttons until "CL"
shows on display
▲
WARNING!
ELECTRICAL SHOCK HAZARD (120 VAC)
•
TURN OFF ELECTRICAL POWER AT THE CIRCUIT BREAKER OR FUSE BOX BEFORE
DISASSEMBLING OR REPAIRING THE DISHWASHER.
•
MAKE SURE THE DISHWASHER IS ELECTRICALLY GROUNDED.
•
USE COPPER CONDUCTORS ONLY FOR ALL WIRING OR REWIRING. FAILURE TO
FOLLOW THESE INSTRUCTIONS COULD RESULT IN SERIOUS INJURY OR DEATH.
1st Edition/Revision 0-A
Tuesday, May 11, 1999
B
Page D-1
SHU/SHI/SHV Dishwasher Troubleshooting Chart
NOTE: For minor problems from improper usage or lack of maintenance, please refer
customer to the Self-Help chart in their Use and Care Manual.
Problem
ü Washability
problems
(dishwasher
won't clean
properly)
Possible Cause
Suggested Action
ü Inappropriate dishwasher
detergent used.
ü Instruct customer to use a powdered
dishwasher detergent (e.g. Cascade
powder).
ü Blocked or clogged upper/
lower spray arms.
ü Check spray arms – clean or replace
as needed.
ü Water doesn't circulate
properly due to debris in
circulation motor impeller.
ü Twist and remove filter, then remove
debris from right side of sump where
water enters circulation pump impeller.
If debris has jammed impeller, turn off
and pull out dishwasher, remove tank,
remove circulation motor and unscrew
and clean out impeller.
HINT: If impeller is damaged, replace entire
impeller assembly or it won't seal adequately.
HINT: Water level will
not affect washability as
water fill is measured by
pressure, not time –
water level cannot be
adjusted.
1st Edition/Revision 0-A
ü Filter not locked down
securely, allowing debris to
enter sump.
ü Twist and remove filter, then remove
debris from sump. Instruct customer to
twist and lock filter (cylinder) securely
into sump.
CAUTION: Use caution when
removing debris from sump to avoid
being cut by sharp debris such as
aluminum can tabs or broken glass.
HINT: Due to high temperature rinse (161 F)
breaking down food debris and triple filtering
system trapping food debris, filters shouldn't
normally clog up. Problem often caused by filter
not being securely locked down. Instruct
customer to twist and lock filter (cylinder)
securely into dishwasher sump.
ü Drain hose behind
dishwasher doesn't have an
adequate loop.
ü Loop drain hose behind the dishwasher
(with the top of the loop) at least 20"
above the floor.
ü Partially clogged air gap,
allowing wastewater from
prior washes to circulate in
dishwasher.
ü Unclog sink air gap.
o
NOTE: Cleaning sink air gaps is not covered
under warranty.
ü Water doesn't drain properly
ü See Water doesn't drain properly on
page D-4.
ü Soap doesn't enter
dishwasher due to dispenser
actuator (A 2) failure.
ü Turn off dishwasher and test actuator –
replace if faulty.
Tuesday, May 11, 1999
B
Page D-2
SHU/SHI/SHV Dishwasher Troubleshooting Chart
Problem
Possible Cause
Suggested Action
HINT: Must pull out dishwasher and
remove left side panel to access float
switch.
HINT:
One "wax" motor operates both the
detergent and rinse aid dispensers through a
mechanical linkage. The system always resets
when door closes. Check linkage by moving it
manually. Check "wax" motor by running a
continuity check on its terminals.
ü Too much detergent used.
ü Instruct customer to use less.
ü Improper detergent used
(other than powdered
dishwasher detergent).
ü Instruct customer to use a powdered
dishwasher detergent (e.g. Cascade
powder).
ü Dishwasher doesn't drain
properly.
ü See Water doesn't drain properly on
page D-4.
ü Dishes won't dry
properly.
ü Rinse aid not used.
ü Instruct customer on using rinse aid –
dishes won't dry without it.
ü Dishwasher has
an odor.
ü Standing water in dishwasher
sump.
ü Unclog air gap. Make sure top of drain
hose loop (behind dishwasher) is at
least 20" above floor (add a loop in
hose if there isn't one).
ü Washability
problems
(dishwasher
won't clean
properly) (cont.)
ü Suds or foam
remains in
dishwasher.
HINT: Water level in sump should
be at or below drain motor cover.
ü Standing water in dishwasher
base.
ü Minerals in customer water
supply.
ü Dishwasher
won't run or
indicator lights
won't come on.
ü Food debris in dishwasher
filters.
ü Clean dishwasher filters.
ü Dishwasher not turned on.
ü No power to dishwasher.
ü Turn on/off switch on.
ü Check customer circuit breaker, fuse
box or power connections.
ü Door ajar or on/off switch
failed.
ü Turn off dishwasher and check door or
on/off switch -- adjust or replace them.
ü Door latch has broken.
ü Turn off dishwasher and replace door
latch – instruct customer to not pull on
door without pulling latch.
ü Run test program to see if light failed
(for SHU/I 43/53/68 models only – see
page F-1). If so, turn off dishwasher
and replace indicator light.
ü Indicator light failed.
1st Edition/Revision 0-A
ü Turn off dishwasher, drain water
manually from dishwasher base and
correct source of water leakage.
ü Recommend customer to get water
tested and use an appropriate water
softener.
Tuesday, May 11, 1999
B
Page D-3
SHU/SHI/SHV Dishwasher Troubleshooting Chart
Problem
ü Dishwasher
won't stop filling
or won't stop
draining.
ü Water doesn't
drain properly.
CAUTION: Use caution
when removing debris
from sump to avoid being
cut by sharp debris such
as aluminum can tabs or
broken glass.
Possible Cause
ü Water in dishwasher base
from leaky or loose hose.
ü Dishwasher isn't level,
causing float switch (e 6) to
operate.
ü Float switch or diaphragm
(e6) failed.
ü Turn off dishwasher, drain water
manually from dishwasher base and
reinstall or replace hose.
ü Level dishwasher using front and rear
leveling legs (see customer dishwasher
installation instructions).
ü Turn off dishwasher and replace float
switch or diaphragm.
ü Debris in dishwasher base
activated float switch (e6).
ü Turn off dishwasher and remove debris
from dishwasher base
ü Kink in drain hose.
ü Dishwasher filter(s) or sump
clogged.
ü Straighten or replace drain hose.
ü Clean dishwasher filters or sump.
ü Drain motor impeller clogged.
ü Turn off dishwasher, remove drain
motor cover (in sump) and clean
impeller. If necessary, remove drain
motor to clean impeller.
ü Kitchen sink or sink air gap
clogged.
ü Unclog sink or sink air gap.
NOTE: Cleaning sink air gaps or sinks are not
covered under warranty.
ü Drain motor (m 3) failed.
ü Timer (SHU 30/40 models) or
module (all other models)
failed.
ü Improper drain connection
height (< 20" or 508mm
above floor).
ü Water fills too
slowly.
ü Low customer water supply
pressure.
ü Inadequate customer water
supply piping.
ü Scale in customer supply
piping or dishwasher
piping/parts from hard water.
1st Edition/Revision 0-A
Suggested Action
ü Turn off dishwasher and measure
resistance at motor terminals (≈ 16.5
Ω). Replace faulty motor.
ü Check voltage at and wiring to timer or
module. Turn off dishwasher and
replace faulty timer or module (for
SHU/I 43/53 models, install existing
module jumper onto new module).
ü Install drain height and sink air gap
according to local codes.
ü Adjust customer water supply pressure
(to 5-20 psi or 0.3-8.27 bars).
ü Install appropriate piping to dishwasher
(minimum 3/8" copper tanking)
according to local codes.
ü Clean or replace clogged piping/parts
and have customer get water tested
and use appropriate water softener.
Tuesday, May 11, 1999
B
Page D-4
SHU/SHI/SHV Dishwasher Troubleshooting Chart
Problem
Possible Cause
Suggested Action
ü Water won't fill.
ü Customer water supply
turned off or disconnected.
ü Water valve (s2) failed.
ü Reconnect and turn on customer water
supply.
ü Check resistance @ water valve
terminals (≈ 1000 Ω). Turn off
dishwasher and replace faulty valve.
NOTE: An "F" fault code
in the display for SHU/I
53/68 dishwashers
shows there's a filling
problem (not filling, over-
ü Water level switch (f 1) failed.
ü Turn off dishwasher and replace faulty
level switch.
ü Check voltage at and wiring to timer or
module. Turn off dishwasher and
replace faulty timer or module (for
SHU/I 43/53 models, install existing
module jumper onto new module).
ü Turn off dishwasher, drain water
manually from dishwasher base, find
source of leaking water and fix water
leak.
filling, underfilling or water in
the base). The fault code
ü Timer (SHU 30/40 models) or
module (all other models)
failed.
can't be reset manually –
it will reset itself 15
minutes after the
dishwasher has been
turned on (after testing
how it fills).
ü Water in dishwasher base
operated float switch (e 6).
ü Detergent or
rinse aid won't
dispense
properly.
ü Dispenser actuator (A 2)
failed.
ü Detergent dispenser door is
jammed.
ü Turn off dishwasher and replace
actuator.
ü Free jammed detergent dispenser
door.
ü Refill rinse aid
light won't come
on (SHU/I 53/68 &
SHV 48 models).
ü Rinse aid level switch (reed
switch e 3) failed.
ü Turn off dishwasher and replace reed
switch.
ü Water doesn't
circulate.
ü Circulation motor (m2) failed.
ü Timer (SHU 30/40 models) or
module (all other models)
failed.
ü Turn off dishwasher and replace motor.
ü Check voltage at and wiring to timer or
module. Turn off dishwasher and
replace faulty timer or module (for
SHU/I 43/53 models, install existing
module jumper onto new module).
ü Water doesn’t
heat up properly.
ü Hi-Limit (f5) tripped and failed
to reset.
ü Run test program (SHU/I 43/53/68
models) – measure current to
dishwasher. If current ≈ 11A, Hi-Limit
is OK. If not (and for all other models),
turn off dishwasher and measure
resistance @ Hi-Limit terminals (≈ .3
Ω). Replace faulty Hi-Limit.
ü NTC (temperature sensor)
failed.
ü Turn off dishwasher and check
o
resistance of NTC (≈ 55 kΩ @ 72 F).
Replace faulty NTC.
o
o
ü 140 F (f 3) or 161 F (f4)
thermostat (SHU 30/40
models) failed.
1st Edition/Revision 0-A
ü Turn off dishwasher and replace faulty
thermostat.
Tuesday, May 11, 1999
B
Page D-5
SHU/SHI/SHV Dishwasher Troubleshooting Chart
Problem
ü Water doesn’t
heat up properly
(cont.).
Possible Cause
Suggested Action
ü Heater (r 1) failed.
ü Run test program (SHU/I 43/53/68
models – see page B-1) – measure
current to dishwasher. If current ≈
11A, heater is OK. If not (and for all
other models), turn off dishwasher and
measure heater resistance (≈ 11 Ω).
Replace faulty heater.
ü Water flow switch (e 5) failed.
ü Run test program (SHU/I 43/53/68
models – see page B-1) – measure
current to dishwasher. If current ≈
11A, flow switch is OK. If not, remove
flow switch microswitch, close its
contacts & measure its resistance (≈ .4
Ω). Replace faulty flow switch.
ü Check voltage at and wiring to timer or
module. Turn off dishwasher and
replace faulty timer or module (for
SHU/I 43/53 models, install existing
module jumper onto new module).
ü Timer (SHU 30/40 models) or
module (all other models)
failed.
ü Dishwasher cycle
runs too long, yet
dishwasher
washes, rinses
and shuts off OK.
ü Customer hot water supply
o
isn't hot enough (< 140 F/
o
60 C).
ü Adjust hot water supply according to
local codes.
ü Water leaks from
front of
dishwasher.
ü Blocked or clogged upper or
lower spray arms.
ü Excessive foaming.
ü Check spray arms – clean or replace
as needed.
ü See Suds or foam remains in
dishwasher on page D-2.
ü Damaged door gasket.
ü Install new door gasket, providing an
extra 1" – 1-1/4" on each side to cover
bottom of tank (for a dam to prevent
leaking from splashing water at bottom
corners of tank).
HINT: Original gasket was longer to provide a
dam for tank corners. Do not trim gasket flush
with sides of tank or leaking may occur.
NOTE:
Use a multimeter with temperature, voltage/resistance and current (ampere) probes.
Do all resistance checks with power turned off. Identify each wire color and location
at the control module before looking at this chart. For a quick reference for
measuring resistances from the front of the dishwasher, please refer to the one page
diagram Measuring Resistances from the Front of any SHU or SHI Dishwasher.
1st Edition/Revision 0-A
Tuesday, May 11, 1999
B
Page D-6
SHU/SHI/SHV Dishwasher Troubleshooting Chart
NOTE:
You will need a T20 Torx screwdriver and may need #1/ #2 flat blade screwdrivers
and a pair of needlenose pliers. Many parts can be snapped out without using tools.
HINT:
Symbols for parts (e.g. " f3" or " e6 " ) refer to schematic diagram #36 on page E-1
and #48 on page E-2.
NOTE:
The following parts can't be serviced from the front of the dishwasher (the dishwasher
must be pulled out and the tank removed or tilted/blocked up to replace them):
NOTE:
•
Heater
•
Circulation motor
•
Aqua sensor ("Sensotronic")
•
NTC (temperature probe)/Hi-Limit (185oF) thermostat
On SHU/I 43/53/68 models, run test program to identify dishwasher problems (see
test program guide on page F-1). The test can run more than one hour (to get
temperature up to 150oF), but tests can be cancelled to greatly shorten testing time.
The test program allows draining, filling, circulating and heating to be checked more
quickly than running a standard wash cycle.
To use test program for troubleshooting, measure voltages/currents as parts come
on. For example, run heating test and measure current coming into dishwasher – if
current ≈ 11A, Hi-Limit, heater and flow switch are OK. If not, check each part to see
which one failed. This test saves time since you can't get to these parts without
removing the tank and can't run resistance checks from front of dishwasher because
flow switch stays open. Please see page B-1 on using test program to troubleshoot
heater, flow switch and Hi-Limit.
NOTE:
To cancel/drain dishwasher while it's cycling, press and hold the following buttons
(until dishwasher starts to drain):
G
SHU/I 43-- & SHV 43/48
G
Depress and hold "Regular Wash" & "Power
Scrub Plus" buttons
G
SHU/I 53/68
G
Depress and hold "Scrub Wash" &
"Delicate/Economy" buttons until "CL"
shows on display
NOTE:
Jumpers aren't included with replacement modules. For SHU/I 43/53 models, take
jumper off old module and put it on new module.
NOTE:
An "F" fault code in the display for SHU/I 53/68 dishwashers shows there's a filling
problem (not filling, overfilling, underfilling or water in the base). The fault code can't
be reset manually – it will reset itself 15 minutes after the dishwasher has been
turned on (after testing how it fills).
1st Edition/Revision 0-A
Tuesday, May 11, 1999
B
Page D-7
SHU/SHI/SHV Dishwasher Troubleshooting Chart
NOTE:
The customer hot water supply should meet or exceed the minimum requirements
below for the dishwasher to operate efficiently. Installations not meeting these
requirements should be reinstalled according to local codes.
•
20-60 psi (1.4 - 4.1 bars) water pressure
•
140oF (60oC) water temperature (recommended)
•
minimum 3/8" (9.5 mm) flexible stainless steel or copper tanking inlet line
▲
WARNING!
ELECTRICAL SHOCK HAZARD (120 VAC)
•
TURN OFF ELECTRICAL POWER AT THE CIRCUIT BREAKER OR FUSE BOX BEFORE
DISASSEMBLING OR REPAIRING THE DISHWASHER.
•
MAKE SURE THE DISHWASHER IS ELECTRICALLY GROUNDED.
•
USE COPPER CONDUCTORS ONLY FOR ALL WIRING OR REWIRING. FAILURE TO
FOLLOW THESE INSTRUCTIONS COULD RESULT IN SERIOUS INJURY OR DEATH.
1st Edition/Revision 0-A
Tuesday, May 11, 1999
A2
1
I2.2
1
2
1
1
4
f1
3
2
1
4
4
e6
s2
Control Module
2
1
I2.7-2
m2
dependent on equipment
1M
I2.4-2
I2.7-1
I2.1-3
I2.1-2
I2.1-1
contacts 5–6 are momentary – they reset the control module & actuate the test program
e5
F
r1
f5
185˚F
I2.8
X2
2
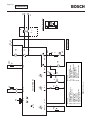
AQUA SENSOR
CIRCULATION MOTOR
DRAIN MOTOR
TEMPERATURE SENSOR
HEATING ELEMENT
WATER SOLENOID
JUMPER
SERVICE CONNECTOR
m3
1M
I2.4-1
I2.9
X1
1
1
ON/OFF SWITCH
ACTUATOR (Upper Basket)
ACTUATOR (Dispenser)
DOOR SWITCH
REED SWITCH
FLOW SWITCH
FLOAT SWITCH
WATER LEVEL SWITCH
HIGH LIMIT 185˚F
Symbol Key
I2.4
I2.5
3
1
l4
m2
m3
NTC
r1
s2
X1
X2
A1
6
1
l4
4
6
3
5
2
SHI/U 43/53/68
2
1
e0 a1
N
L
1M
capacitor motor
L1
N
1 739 911 198
a1
A1
A2
e0
e3
e5
e6
f1
f5
1
7
f2-f4
7
NTC
DIAGRAM #36
Symbol Key
8
I2.6-1/2
1
e3
Page E–1
A B
A2
I2.3-1/2
1
e6
1
1 SHV 4803 only
ON/OFF SWITCH
ACTUATOR (Upper Basket)
ACTUATOR (Dispenser)
DOOR SWITCH
REED SWITCH
FLOW SWITCH
FLOAT SWITCH
WATER LEVEL SWITCH
HIGH LIMIT 185˚F
s2
4
2
2
1M
I2.4-3
I2.8
2
f2-f4
d
1
AQUA SENSOR
CIRCULATION MOTOR
DRAIN MOTOR
TEMPERATURE SENSOR
HEATING ELEMENT
WATER SOLENOID
JUMPER
SERVICE CONNECTOR
l4
m2
m3
NTC
r1
s2
X1
X2
f1
Symbol Key
A1
3
a1
A1
A2
e0
e3
e5
e6
f1
f5
1
1
I2.1
Control Module
I2.7-1/2
1
m3
NTC
I2.5-1
d
I2.4-2
d
e5
P
r1
f5
1
e1
SHV 43/48
I2.5-2
I2.2-3
I2.2-2
m2
185˚F
1M
4
2
5
3
1
N
L
1M
capacitor motor
6
4
2
a1
L1
N
DIAGRAM #48
Symbol Key
I2.4-1
I2.6
X2
e3
Page E–2
A B
B
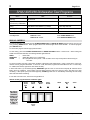
Page F-1A
SHI/U 43/53/68 Dishwasher Test Programs
TEST*
TIME
NOTES
Draining
30 seconds
Aqua Sensor
65 seconds
Not on SHI/U 43-- models
Filling
Until Water Level Switch (f1) closes
Can't skip this test
Heating & Circulating
Until water temperature reaches 150 F (65 C)
Draining
60 seconds
("Sensotronic") Calibration
º
* To skip a test:
SHI/U 43 models
SHI/U 53/ 68 models
º
Dispenser actuator comes on
Press SCRUB WASH button.
Press REGULAR WASH button.
SHI/U 43—MODELS
To start test program, press and hold both POWER SCRUB PLUS and REGULAR WASH program buttons, then turn unit
on by pressing ON/OFF button. When program buttons are released, lights above them will flash. To end test program,
press ON/OFF button.
To check each program indicator light, press its button.
To start testing, press both POWER SCRUB PLUS and REGULAR WASH buttons a second time. When testing has
ended and a fault was detected, the following indicator lights will be lit:
WASH
RINSE/DRY
CLEAN
=
=
=
Heater fault
Water filling fault (over or under filling)
NTC (temperature sensor) fault – note circulation motor stops shortly after it started during an
NTC fault
To check for heater, high limit or flow switch problems, start testing until heating starts. Using a meter with a current coil,
measure current going into dishwasher. If current is ~ 11 A, then heater, high limit and flow switch are OK. If current stays
at ~ 1.5-2 A, then heater, high limit or flow switch are faulty.
If water level switch (f 1 ) has failed (opened), RINSE/DRY light will come on and unit will continually fill and drain where
º
testing won't be completed. If flow switch (e 5 ) has failed (opened), water won't heat (to 150 F) and water won’t stop
circulating. If NTC probe (f 2 / f 4 ) has failed (opened), CLEAN light will come on immediately and testing will end shortly
after water has started circulating.
If more than one fault occurs, more than one light will be lit.
SHU 43 models program buttons & indicator lights:
See page F1B for SHU
4322/4326
models, F-1C
for SHU 53
models and
page F-1D
for SHI/U 68
models
1st Edition/Revision 2
Power
Scrub
Plus
Scrub
Wash
Regular
Wash
Rinse
& Hold
Wash
Rinse/
Dry
Clean
¢
¢
¢
¢
¢
¢
¢
l
l
Cancel
Drain
Tuesday, June 27, 2000
B
Page F-1B
SHI/U 43/53/68 Dishwasher Test Programs
TEST*
TIME
NOTES
Draining
30 seconds
Aqua Sensor
65 seconds
Not on SHI/U 43-- models
Filling
Until Water Level Switch (f1) closes
Can't skip this test
Heating & Circulating
Until water temperature reaches 150 F (65 C)
Draining
60 seconds
("Sensotronic") Calibration
º
* To skip a test:
º
SHI/U 43 models
SHI/U 53/ 68 models
Dispenser actuator comes on
Press SCRUB WASH button.
Press REGULAR WASH button.
SHU 4322 & 4326 MODELS
To start test program, press and hold both REGULAR WASH and RINSE & HOLD program buttons, then turn unit on by
pressing ON/OFF button. Initially, control module version # will be displayed (e.g./ “20” = version 0 without jumper). When
wash program buttons are released, lights above them will flash. To end test program, press ON/OFF button.
To check each program indicator light, press its button. To check Cycle Countdown display, Refill Rinse Agent light and
REGULAR WASH light, press REGULAR WASH button (press Delay Start button to test Cycle Countdown display
alone). Cycle Countdown display will show "88" when REGULAR WASH button is pressed and "8h" when Delay Start
button is pressed.
To start testing, press both the REGULAR WASH and RINSE & HOLD buttons a second time. When testing has ended,
Cycle Countdown display will show a fault using codes below. If more than one fault occurs, code numbers will be added
together, (e.g./ “6” = faults 2 + 4).
0 = No faults detected
1 = Aqua Sensor ("Sensotronic") fault
2 = Heating fault
4 = Filling fault
8 = NTC (temperature sensor) fault
F = Filling fault (display occurs during wash, not test)
To check for heater, high limit or flow switch problems, start testing until heating starts. Using a meter with a current coil,
measure current going into dishwasher. If current is ~ 11 A, then heater, high limit and flow switch are OK. If current stays
at ~ 1.5-2 A, then heater, high limit or flow switch are faulty.
If water level switch (f 1 ) has failed (opened), display will show fault code "4" and unit will continually fill and drain where
º
testing won't be completed. If flow switch (e 5 ) has failed (opened), display will show "0", water won't heat (to 150 F) and
water won’t stop circulating. If NTC probe (f 2 / f 4 ) has failed (opened), display will show fault code "8" immediately and
testing will end shortly after water has started circulating.
SHU 4322/4326 models program buttons & indicator lights:
Cycle Countdown
20
See page F1A for SHI/U
43 models, F1C for SHU
53 models
and page F1D for SHI/U
68 models
1st Edition/Revision 2
Power
Scrub
Plus
Regular
Wash
Delicate
/Econo
Rinse
& Hold
Refill
Rinse
Agent
¢
¢
¢
¢
¢
l
l
Cancel
Drain
Tuesday, June 27, 2000
B
Page F-1C
SHI/U 43/53/68 Dishwasher Test Programs
TEST*
TIME
NOTES
Draining
30 seconds
Aqua Sensor
65 seconds
Not on SHI/U 43-- models
Filling
Until Water Level Switch (f1) closes
Can't skip this test
Heating & Circulating
Until water temperature reaches 150 F (65 C)
Draining
60 seconds
("Sensotronic") Calibration
º
* To skip a test:
º
SHI/U 43 models
SHI/U 53/ 68 models
Dispenser actuator comes on
Press SCRUB WASH button.
Press REGULAR WASH button.
SHU 53 MODELS
To start test program, press and hold both SCRUB WASH and DELICATE/ECONO program buttons, then turn unit on by
pressing ON/OFF button. Initially, control module version # will be displayed (e.g./ “21” = version 1 with jumper). When
wash program buttons are released, lights above them will flash. To end test program, press ON/OFF button.
To check each program indicator light, press its button. To check Cycle Countdown display, Refill Rinse Agent light and
REGULAR WASH light, press REGULAR WASH button (press Delay Start button to test Cycle Countdown display
alone). Cycle Countdown display will show "88" when REGULAR WASH button is pressed and "8h" when Delay Start
button is pressed.
To start testing, press both the SCRUB WASH and DELICATE/ECONO buttons a second time. When testing has ended,
Cycle Countdown display will show a fault using codes below. If more than one fault occurs, code numbers will be added
together, (e.g./ “6” = faults 2 + 4).
0 = No faults detected
1 = Aqua Sensor ("Sensotronic") fault
2 = Heating fault
4 = Filling fault
8 = NTC (temperature sensor) fault
F = Filling fault (display occurs during wash, not test)
To check for heater, high limit or flow switch problems, start testing until heating starts. Using a meter with a current coil,
measure current going into dishwasher. If current is ~ 11 A, then heater, high limit and flow switch are OK. If current stays
at ~ 1.5-2 A, then heater, high limit or flow switch are faulty.
If water level switch (f 1 ) has failed (opened), display will show fault code "4" and unit will continually fill and drain where
º
testing won't be completed. If flow switch (e 5 ) has failed (opened), display will show "0", water won't heat (to 150 F) and
water won’t stop circulating. If NTC probe (f 2 / f 4 ) has failed (opened), display will show fault code "8" immediately and
testing will end shortly after water has started circulating.
SHU 53 models program buttons & indicator lights:
Cycle Countdown
21
See page F-1A
for SHI/U 43
models, F-1B
for SHU
4322/4326
models and
page F-1D for
SHI/U 68
models
1st Edition/Revision 2
Power
Scrub
Plus
Scrub
Wash
Regular
Wash
Delicate
/Econo
Rinse
& Hold
Refill
Rinse
Agent
¢
¢
¢
¢
¢
¢
l
Delay
Start
Hours
l
Cancel
Drain
Tuesday, June 27, 2000
B
Page F-1D
SHI/U 43/53/68 Dishwasher Test Programs
TEST*
TIME
NOTES
Draining
30 seconds
Aqua Sensor
65 seconds
Not on SHI/U 43-- models
Filling
Until Water Level Switch (f1) closes
Can't skip this test
Heating & Circulating
Until water temperature reaches 150 F (65 C)
Draining
60 seconds
("Sensotronic") Calibration
º
* To skip a test:
SHI/U 43 models
SHI/U 53/ 68 models
º
Dispenser actuator comes on
Press SCRUB WASH button.
Press REGULAR WASH button.
SHI/U 68-- MODELS
To start test program, press and hold both SCRUB WASH and DELICATE/ECONO program buttons, then turn unit on by
pressing ON/OFF button. Initially, control module version # will be displayed (e.g./ “20” = version 0 without jumper). When
wash program buttons are released, lights above them will flash. To end test program, press ON/OFF button.
To check each program indicator light, press its button. To check Cycle Countdown display, Refill Rinse Agent light and
REGULAR WASH light, press REGULAR WASH button (press Delay Start button to test Cycle Countdown display
alone). Cycle Countdown display will show "88" when REGULAR WASH button is pressed and "8h" when Delay Start
button is pressed.
To start testing, press both SCRUB WASH and DELICATE/ECONO buttons a second time. When testing has ended,
Cycle Countdown display will show a fault using codes below. If more than one fault occurs, code numbers will be added
together, (e.g./ “6” = faults 2 + 4).
0 = No faults detected
1 = Aqua Sensor ("Sensotronic") fault
2 = Heating fault
4 = Filling fault
8 = NTC (temperature sensor) fault
F = Filling fault (display occurs during wash, not test)
To check for heater, high limit or flow switch problems, start testing until heating starts. Using a meter with a current coil,
measure current going into dishwasher. If current is ~ 11 A, then heater, high limit and flow switch are OK. If current stays
at ~ 1.5-2 A, then heater, high limit or flow switch are faulty.
If water level switch (f 1 ) has failed (opened), display will show fault code "4" and unit will continually fill and drain where
º
testing won't be completed. If flow switch (e 5 ) has failed (opened), display will show "0", water won't heat (to 150 F) and
water won’t stop circulating. If NTC probe (f 2 / f 4 ) has failed (opened), display will show fault code "8" immediately and
testing will end shortly after water has started circulating.
SHU 68 models program buttons & indicator lights:
Cycle Countdown
20
See page F1A for SHI/U
43 models, F1B for SHU
4322/4326
models and
page F-1C
for SHU 53
models
¢
Power
Scrub
Plus
Scrub
Wash
Regular
Wash
Delicate
/Econo
Quick
Wash
Rinse
& Hold
Refill
Rinse
Agent
¢
¢
¢
¢
¢
¢
¢
l
Delay
Start
Hours
1st Edition/Revision 2
Top
Rack
Only
l
Cancel
Drain
Tuesday, June 27, 2000
B
Page F-2
SHV 43/48 Dishwasher Test Program
TEST*
TIME
NOTES
Draining
30 seconds
Filling
Until Water Level Switch (f1) closes
Input current < 1 A
Heating & Circulating
(water circulates before unit stops filling)
Until water temperature reaches
º
º
150 F (65 C)
Input current ~ 11 A and
dispenser actuator comes on
Draining
60 seconds
* To skip Heating & Circulating test:
SHV 43/48 models
Press SCRUB WASH button.
SHV 43/48 MODELS
To start test program, press and hold both POWER SCRUB PLUS and REGULAR WASH program buttons, then turn unit
on by pressing ON/OFF button. When program buttons are released, lights above them will flash. To end test program,
press ON/OFF button. NOTE: TO ENABLE LIGHTS TO COME ON, DOOR MUST BE OPENED.
To check program indicator lights (POWER SCRUB PLUS, SCRUB WASH, REGULAR WASH and RINSE & HOLD),
press and hold each program button. When SCRUB WASH program button is pressed, CLEAN and REFILL RINSE
AGENT lights also come on (for SHV 4803 models) or CLEAN light also comes on (for SHV 4303 models). NOTE: TO
ENABLE LIGHTS TO COME ON, DOOR MUST BE OPENED.
To start testing, press both POWER SCRUB PLUS and REGULAR WASH buttons a second time. When testing has
ended and a fault was detected, the following indicator lights will be lit:
POWER SCRUB PLUS
SCRUB WASH
REGULAR WASH
=
=
=
Heater fault
Water filling fault (over or under filling)
NTC (temperature sensor) fault – note circulation motor stops shortly after it started
during an NTC fault
To check for heater, high limit or flow switch problems, start testing until heating starts. Using a meter with a current coil,
measure current going into dishwasher. If current is ~ 11 A, then heater, high limit and flow switch are OK. If current stays
at ~ 1.5-2 A, then heater, high limit or flow switch are faulty.
If water level switch (f 1 ) has failed (opened), SCRUB WASH light will come on and unit will continually fill and drain where
º
testing won't be completed. If flow switch (e 5 ) has failed (opened), water won't heat (to 150 F) and water won’t stop
circulating. If NTC probe (f 2 / f 4 ) has failed (opened), REGULAR WASH light will come on immediately and testing will
end shortly after water has started circulating. NOTE: TO ENABLE LIGHTS TO COME ON, DOOR MUST BE OPENED.
If more than one fault occurs, more than one light will be lit.
SHV 4303 models program buttons & indicator lights:
¢
¢
¢
¢
¢
Clean
Power
Scrub
Plus
Scrub
Wash
Regular
Wash
Rinse
& Hold
SHV 4803 models program buttons & indicator lights:
¢
¢
¢
¢
¢
¢
¢
Clean
Refill
Rinse
Agent
Top
Rack
Only
Power
Scrub
Plus
Scrub
Wash
Regular
Wash
Rinse
& Hold
1st Edition/Revision 0-A
Monday, April 24, 2000
B
Page F-3A
SHU 99 Dishwasher Test Program
TEST*
TIME
NOTES
Draining
30 seconds
Filling
Until Water Level Switch (f1) closes
Input current < 1 A
Heating & Circulating
(water circulates before unit stops filling)
Until water temperature reaches
º
º
150 F (65 C)
Input current ~ 11 A and
dispenser actuator comes on
Draining
60 seconds
*To skip Heating & Circulating test:
SHU 9902/9905/9906 (Millennium) models
SHU 991x (Integra) models
SHU 992x (Integra) models
Press SCRUB WASH button.
Press REGULAR WASH button.
Press REGULAR WASH button.
SHU 9902/9905/9906 (Millennium) MODELS
To start test program, press and hold both POWER SCRUB PLUS and REGULAR WASH program buttons, then turn unit
on by pressing ON/OFF button. When program buttons are released, lights above them will flash. To end test program,
press ON/OFF button.
To check program indicator lights (POWER SCRUB PLUS, SCRUB WASH, REGULAR WASH and RINSE & HOLD),
press and hold each program button. When SCRUB WASH program button is pressed, CLEAN light also comes on.
To start testing, press both POWER SCRUB PLUS and REGULAR WASH buttons a second time. When testing has
ended and a fault was detected, the following indicator lights will be lit:
POWER SCRUB PLUS
SCRUB WASH
REGULAR WASH
=
=
=
Heater fault
Water filling fault (over or under filling)
NTC (temperature sensor) fault – note circulation motor stops shortly after it started
during an NTC fault
To check for heater, high limit or flow switch problems, start testing until heating starts. Using a meter with a current coil,
measure current going into dishwasher. If current is ~ 11 A, then heater, high limit and flow switch are OK. If current stays
at ~ 1.5-2 A, then heater, high limit or flow switch are faulty.
If water level switch (f 1 ) has failed (opened), SCRUB WASH light will come on and unit will continually fill and drain where
º
testing won't be completed. If flow switch (e 5 ) has failed (opened), water won't heat (to 150 F) and water won’t stop
circulating. If NTC probe (f 2 / f 4 ) has failed (opened), REGULAR WASH light will come on immediately and testing will
end shortly after water has started circulating.
If more than one fault occurs, more than one light will be lit.
SHU 9902/9905/9906 (Millennium) models program buttons & indicator lights:
¢
¢
¢
¢
¢
Clean
Power
Scrub
Plus
Scrub
Wash
Regular
Wash
Rinse
& Hold
See page F-3B for SHU 991x UC/06-UC/11 (Integra) Models, F-3C for SHU 991x UC/12 (Integra) Models
& F-3D for SHU 992x UC/12 (Integra) Models
1st Edition/Revision 1
Monday, November 20, 2000
B
Page F-3B
SHU 99 Dishwasher Test Program
TEST*
TIME
NOTES
Draining
30 seconds
Filling
Until Water Level Switch (f1) closes
Input current < 1 A
Heating & Circulating
(water circulates before unit stops filling)
Until water temperature reaches
º
º
150 F (65 C)
Input current ~ 11 A and
dispenser actuator comes on
Draining
60 seconds
*To skip Heating & Circulating test:
SHU 9902/9905/9906 (Millennium) models
SHU 991x (Integra) models
SHU 992x (Integra) models
Press SCRUB WASH button.
Press REGULAR WASH button.
Press REGULAR WASH button.
SHU 991x UC/06 & UC/11 (Integra) MODELS
To start test program, press and hold both POWER SCRUB PLUS and QUICK WASH program buttons, then turn unit on
by pressing ON/OFF button. When program buttons are released, lights above them will flash. To end test program, press
ON/OFF button.
To check program indicator lights (POWER SCRUB PLUS, REGULAR WASH, QUICK WASH and RINSE & HOLD),
press and hold each program button. When REGULAR WASH program button is pressed, CLEAN light also comes on
and an audible tone (“beep”) also occurs.
To start testing, press both POWER SCRUB PLUS and QUICK WASH buttons a second time. When testing has ended
and a fault was detected, the following indicator lights will be lit:
POWER SCRUB PLUS
REGULAR WASH
QUICK WASH
=
=
=
Heater fault
Water filling fault (over or under filling)
NTC (temperature sensor) fault – note circulation motor stops shortly after it started
during an NTC fault
To check for heater, high limit or flow switch problems, start testing until heating starts. Using a meter with a current coil,
measure current going into dishwasher. If current is ~ 11 A, then heater, high limit and flow switch are OK. If current stays
at ~ 1.5-2 A, then heater, high limit or flow switch are faulty.
If water level switch (f 1 ) has failed (opened), REGULAR WASH light will come on and unit will continually fill and drain
º
where testing won't be completed. If flow switch (e 5 ) has failed (opened), water won't heat (to 150 F) and water won’t stop
circulating. If NTC probe (f 2 / f 4 ) has failed (opened), QUICK WASH light will come on immediately and testing will end
shortly after water has started circulating.
If more than one fault occurs, more than one light will be lit.
SHU 991x UC/06 & UC/11 (Integra) models program buttons & indicator lights:
¢
¢
¢
¢
¢
Clean
Power
Scrub
Plus
Regular
Wash
Quick
Wash
Rinse
& Hold
See page F-3A for SHU 9902/9905/9906 (Millennium) Models, F-3C for SHU 991x UC/12 (Integra) Models
& F-3D for SHU 992x UC/12 (Integra) Models
1st Edition/Revision 1
Thursday, October 12, 2000
B
Page F-3C
SHU 99 Dishwasher Test Program
TEST*
TIME
NOTES
Draining
30 seconds
Filling
Until Water Level Switch (f1) closes
Input current < 1 A
Heating & Circulating
(water circulates before unit stops filling)
Until water temperature reaches
º
º
150 F (65 C)
Input current ~ 11 A and
dispenser actuator comes on
Draining
60 seconds
*To skip Heating & Circulating test:
SHU 9902/9905/9906 (Millennium) models
SHU 991x (Integra) models
SHU 992x (Integra) models
Press SCRUB WASH button.
Press REGULAR WASH button.
Press REGULAR WASH button.
SHU 991x UC/12 (Integra) MODELS
To start test program, press and hold both POWER SCRUB PLUS and DELICATE/ECONO program buttons, then turn
unit on by pressing ON/OFF button. When program buttons are released, lights above them will flash. To end test
program, press ON/OFF button.
To check program indicator lights (POWER SCRUB PLUS, REGULAR WASH, DELICATE/ECONO and RINSE & HOLD),
press and hold each program button. When REGULAR WASH program button is pressed, CLEAN light also comes on
and an audible tone (“beep”) also occurs.
To start testing, press both POWER SCRUB PLUS and DELICATE/ECONO buttons a second time. When testing has
ended and a fault was detected, the following indicator lights will be lit:
POWER SCRUB PLUS
REGULAR WASH
DELICATE/ECONO
=
=
=
Heater fault
Water filling fault (over or under filling)
NTC (temperature sensor) fault – note circulation motor stops shortly after it started
during an NTC fault
To check for heater, high limit or flow switch problems, start testing until heating starts. Using a meter with a current coil,
measure current going into dishwasher. If current is ~ 11 A, then heater, high limit and flow switch are OK. If current stays
at ~ 1.5-2 A, then heater, high limit or flow switch are faulty.
If water level switch (f 1 ) has failed (opened), REGULAR WASH light will come on and unit will continually fill and drain
º
where testing won't be completed. If flow switch (e 5 ) has failed (opened), water won't heat (to 150 F) and water won’t stop
circulating. If NTC probe (f 2 / f 4 ) has failed (opened), DELICATE/ECONO light will come on immediately and testing will
end shortly after water has started circulating.
If more than one fault occurs, more than one light will be lit.
SHU 991x UC/12 (Integra) models program buttons & indicator lights:
NOTE: All Integra
UC/12 models use
the same control
module # 481055
and have the same
wash programs.
¢
¢
¢
¢
¢
Clean
Power
Scrub
Plus
Regular
Wash
Delicate
/Econo
Rinse
& Hold
See page F-3A for SHU 9902/9905/9906 (Millennium) Models, F-3B for SHU 991x UC/06-UC/11 (Integra)
Models & F-3D for SHU 992x UC/12 (Integra) Models
1st Edition/Revision 1
Monday, November 20, 2000
B
Page F-3D
SHU 99 Dishwasher Test Program
TEST*
TIME
NOTES
Draining
30 seconds
Filling
Until Water Level Switch (f1) closes
Input current < 1 A
Heating & Circulating
(water circulates before unit stops filling)
Until water temperature reaches
º
º
150 F (65 C)
Input current ~ 11 A and
dispenser actuator comes on
Draining
60 seconds
*To skip Heating & Circulating test:
SHU 9902/9905/9906 (Millennium) models
SHU 991x (Integra) models
SHU 992x (Integra) models
Press SCRUB WASH button.
Press REGULAR WASH button.
Press REGULAR WASH button.
SHU 992x UC/12 (Integra) MODELS
To start test program, press and hold both POWER SCRUB PLUS and DELICATE/ECONO program buttons, then turn
unit on by pressing ON/OFF button. When program buttons are released, lights above them will flash. To end test
program, press ON/OFF button.
To check program indicator lights (POWER SCRUB PLUS, REGULAR WASH, DELICATE/ECONO and RINSE & HOLD),
press and hold each program button. When REGULAR WASH program button is pressed, CLEAN light also comes on
and an audible tone (“beep”) also occurs.
To start testing, press both POWER SCRUB PLUS and DELICATE/ECONO buttons a second time. When testing has
ended and a fault was detected, the following indicator lights will be lit:
POWER SCRUB PLUS
REGULAR WASH
DELICATE/ECONO
=
=
Heater fault
Water filling fault (over or under filling)
NTC (temperature sensor) fault – note circulation motor stops shortly after it started
during an NTC fault
=
To check for heater, high limit or flow switch problems, start testing until heating starts. Using a meter with a current coil,
measure current going into dishwasher. If current is ~ 11 A, then heater, high limit and flow switch are OK. If current stays
at ~ 1.5-2 A, then heater, high limit or flow switch are faulty.
If water level switch (f 1 ) has failed (opened), REGULAR WASH light will come on and unit will continually fill and drain
º
where testing won't be completed. If flow switch (e 5 ) has failed (opened), water won't heat (to 150 F) and water won’t stop
circulating. If NTC probe (f 2 / f 4 ) has failed (opened), DELICATE/ECONO light will come on immediately and testing will
end shortly after water has started circulating.
If more than one fault occurs, more than one light will be lit.
SHU 992x UC/12 (Integra) models program buttons & indicator lights:
NOTE: All Integra
UC/12 models use
the same control
module # 481055
and have the same
wash programs.
¢
¢
¢
¢
¢
¢
¢
Clean
Refill
Rinse
Agent
Top
Rack
Only
Power
Scrub
Plus
Regular
Wash
Delicate
/Econo
Rinse
& Hold
See page F-3A for SHU 9902/9905/9906 (Millennium) Models, F-3B for SHU 991x UC/06-UC/11 (Integra)
Models & F-3C for SHU 991x UC/12 (Integra) Models
1st Edition/Revision 1
Thursday, October 12, 2000
B
Page F-4
SHU 33 Dishwasher Test Program
TEST*
TIME
NOTES
Draining
30 seconds
Filling
Until Water Level Switch (f1) closes
Input current < 1 A
Heating & Circulating
(water circulates before unit stops filling)
Until water temperature reaches
º
º
150 F (65 C)
Input current ~ 11 A and
dispenser actuator comes on
Draining
60 seconds
* To skip Heating & Circulating test:
SHU 33 models
Press REGULAR WASH button.
SHU 33 MODELS
To start test program, press and hold both POWER SCRUB PLUS and RINSE & HOLD program buttons, then turn unit on
by pressing ON/OFF button. When program buttons are released, lights above them will flash. To end test program, press
ON/OFF button.
To check program indicator lights (POWER SCRUB PLUS, REGULAR WASH and RINSE & HOLD), press and hold each
program button. When REGULAR WASH program button is pressed, CLEAN light also comes on.
To start testing, press both POWER SCRUB PLUS and RINSE & HOLD buttons a second time. When testing has ended
and a fault was detected, the following indicator lights will be lit:
POWER SCRUB PLUS
REGULAR WASH
RINSE & HOLD
=
=
=
Heater fault
Water filling fault (over or under filling)
NTC (temperature sensor) fault – note circulation motor stops shortly after it started
during an NTC fault
To check for heater, high limit or flow switch problems, start testing until heating starts. Using a meter with a current coil,
measure current going into dishwasher. If current is ~ 11 A, then heater, high limit and flow switch are OK. If current stays
at ~ 1.5-2 A, then heater, high limit or flow switch are faulty.
If water level switch (f 1 ) has failed (opened), REGULAR WASH light will come on and unit will continually fill and drain
º
where testing won't be completed. If flow switch (e 5 ) has failed (opened), water won't heat (to 150 F) and water won’t stop
circulating. If NTC probe (f 2 / f 4 ) has failed (opened), RINSE & HOLD light will come on immediately and testing will end
shortly after water has started circulating.
If more than one fault occurs, more than one light will be lit.
SHU 33 models program buttons & indicator lights:
Clean
Power
Scrub
Plus
Regular
Wash
Rinse
& Hold
¢
¢
¢
¢
l
l
Cancel
Drain
1st Edition/Revision 0-A
Monday, April 24, 2000
B
Page G-1
Using Dishwasher Serial Number
to find Date of Manufacture
The dishwasher serial number can be used to check if the dishwasher is covered under
warranty and to check for product changes.
NOTE:
Best way to confirm warranty status is to have customer show paperwork with
installation date. Whenever possible, keep a file of customers and installation dates.
NOTE:
Serial number is stamped or fastened to inside edge (top or right side) of door and to
dishwasher base (behind toe kick).
NOTE:
Serial number format (shown in smaller print underneath model number) is shown as
FD xxxx xx xxxx, where number means:
FD
XX
XX
FD
Shows year dishwasher
was built.
Shows month
dishwasher was built.
HINT: Add "20" to this
number to find year of
manufacture.
HINT: This is the
number of the month
(from 1-12).
ü 77 + 20 = 1997
ü 01 = January
ü 78 + 20 = 1998
ü 02 = February
ü 79 + 20 = 1999
ü 12 = December
XX
Shows day
dishwasher was built.
XXXX
Shows specific serial
number for this
dishwasher.
HINT: These numbers
are sequential for all
dishwashers built on
each day.
st
ü 01 = 1 day of
month
th
ü 30 = 30 day of
month
nd
ü 0142 = 142
dishwasher built
on particular day
of manufacture.
NOTE:
To remove toe kick you will need a T20 Torx screwdriver.
NOTE:
The number after "/" in the model number (e.g. U06) shows an engineering (product)
change.
1st Edition/Revision 0-A
Tuesday, May 11, 1999
Page H-1
DISHWASHER NOTES
1st Edition/Revision 0-A
Tuesday, May 11, 1999