1
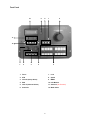
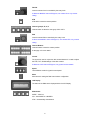
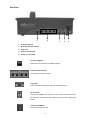
CCU Control Box
RMC-180
Quick Start Guide
www.datavideo-tek.com
Table of Contents
Warnings and Precautions ........................................................................................................... 2
Warranty ....................................................................................................................................... 3
Disposal ........................................................................................................................................ 3
Packing List .................................................................................................................................. 4
Introduction ................................................................................................................................... 4
Features........................................................................................................................................ 4
Front Panel ................................................................................................................................... 5
Step by step to save camera position .......................................................................................... 7
Menu Setup .................................................................................................................................. 7
Rear Panel .................................................................................................................................... 9
Firmware upgrade procedure ..................................................................................................... 10
Service & Support....................................................................................................................... 12
1
Warnings and Precautions
1. Read all of these warnings and save them for later reference.
2. Follow all warnings and instructions marked on this unit.
3. Unplug this unit from the wall outlet before cleaning. Do not use liquid or aerosol cleaners. Use a damp
cloth for cleaning.
4. Do not use this unit in or near water.
5. Do not place this unit on an unstable cart, stand, or table. The unit may fall, causing serious damage.
6. Slots and openings on the cabinet top, back, and bottom are provided for ventilation. To ensure safe and
reliable operation of this unit, and to protect it from overheating, do not block or cover these openings. Do
not place this unit on a bed, sofa, rug, or similar surface, as the ventilation openings on the bottom of the
cabinet will be blocked. This unit should never be placed near or over a heat register or radiator. This unit
should not be placed in a built-in installation unless proper ventilation is provided.
7. This product should only be operated from the type of power source indicated on the marking label of the
AC adapter. If you are not sure of the type of power available, consult your Datavideo dealer or your local
power company.
8. Do not allow anything to rest on the power cord. Do not locate this unit where the power cord will be
walked on, rolled over, or otherwise stressed.
9. If an extension cord must be used with this unit, make sure that the total of the ampere ratings on the
products plugged into the extension cord do not exceed the extension cord’s rating.
10. Make sure that the total amperes of all the units that are plugged into a single wall outlet do not exceed
15 amperes.
11. Never push objects of any kind into this unit through the cabinet ventilation slots, as they may touch
dangerous voltage points or short out parts that could result in risk of fire or electric shock. Never spill
liquid of any kind onto or into this unit.
12. Except as specifically explained elsewhere in this manual, do not attempt to service this product yourself.
Opening or removing covers that are marked “Do Not Remove” may expose you to dangerous voltage
points or other risks, and will void your warranty. Refer all service issues to qualified service personnel.
13. Unplug this product from the wall outlet and refer to qualified service personnel under the following
conditions:
a. When the power cord is damaged or frayed;
b. When liquid has spilled into the unit;
c. When the product has been exposed to rain or water;
d. When the product does not operate normally under normal operating conditions. Adjust only
those controls that are covered by the operating instructions in this manual; improper adjustment
of other controls may result in damage to the unit and may often require extensive work by a
qualified technician to restore the unit to normal operation;
e. When the product has been dropped or the cabinet has been damaged;
f. When the product exhibits a distinct change in performance, indicating a need for service.
2
Warranty
Datavideo warrants that the equipment it manufactures shall be free from defects in material and workmanship for
a period of 12 months from the date of product purchased. If equipment fails due to such defects, Datavideo will,
at its option, repair or provide a replacement for the defective part or product.
Equipment that fails after the warranty period, has been operated or installed in a manner other than that
specified by Datavideo, or has been subjected to abuse or modification, will be repaired for time and material
charges at the Buyer’s expense.
This warranty does not affect your statutory rights within the Country of purchase.
Disposal
For EU Customers only - WEEE Marking.
This symbol on the product indicates that it will not be treated as household waste. It must be handed over to the
applicable take-back scheme for the recycling of electrical and electronic equipment. For more detailed
information about the recycling of this product, please contact your local Datavideo office.
3
Packing List
1
x
USB cable USB A-USB A L:1.8M
1
x
Switching adaptor DC 12V / 0.5A
1
x
RMC-180 Instruction Manual
Introduction
The RMC-180 is special designed for remote controlling the Panasonic PTZ Camera AW-HE100 with the video
calibration functions with it. One of RMC-180 can connect up to four of AW-HE100 by RJ-45 connection and up to
1,000 Meter distant away. To combine the Datavideo HD Switcher SE-2000 will be a turn key and affordable HD
multi-Camera system for the application of big conference, church and surveillance market.
* RMC-180 supports 3 kinds of protocol:
1. PELCO
2. Panasonic AW-series protocol
3. Canon BU-45 Non-proprietary protocol
Features
-
Connects up to four of Panasonic PTZ camera AW-HE100
-
Pan-Tile-Zoom with speed control by Joystick
-
Remote calibrates the RB Balance, Iris, Focus, Gain, NR … and more
-
Presetting the PTZ and video calibration up to four camera
-
RS422 remote control protocol by RJ45 connector can connect camera up to 1,000 meter away.
-
Tally input interface is fully compatible with Datavideo tally connection standard
-
Small side can mount on the studio table with switcher
4
Front Panel
10
9
8
7
6
11
12
1
2
3
4
5
1. Focus
7. Lock
2. STR
8. Speed
3. CH A~D (Group Select)
9. MENU
4. IRIS
10. LCD Monitor
5. Ch A~D (Channel Select)
11. Selectors (No Function)
6. Controller
12. Mode Select
5
FOCUS
Controls camera focus is controlled by the rotary knob.
# When the MANUAL switch LED light on, the camera focus is by manual
setting.
STR
STR switch is save the camera position.
Channel group A, B, C, D
Channel switch is select the save group CH A~CH D.
IRIS
Controls camera IRIS is controlled by the rotary knob.
# When the MANUAL switch LED light on, the camera IRIS is by manual
setting.
Channel Buttons
Channel buttons is save the camera position.
# See page.7 for more details.
Control
The joystick is used in conjunction with several features. It is used to adjust
the PAN, TILT, ZOOM settings of the video camera.
# When the LOCK switch LED light on, the joystick function disable.
Speed
Three different modes for joystick control speed.
Menu
Menu button is setting the RMC-180 functions configuration.
LCD Display
The status of the RMC-180 is displayed within the LCD Display.
Mode Select
MODE – Color bar
A,B – Save MODE A or MODE B
ATW – Automatically white balance
6
Step by step to save camera position
1. Select group on CH A or CH B or CH C or CH D.
2. Push STR button
, at same time you selected group will light on.
3. Push 1 of 4 light on button to save the camera position.
Menu Setup
1. POWER CONTROL
Control camera power ON / OFF.
3. WHITE BALANCE STR
Save white balance status of mode A or mode B.
(Please selected mode A or mode B before you into this setting)
7. SHUTTER SET
Setting camera shutter mode
8. VOUT FORMAT SELECT
Setting video output format
9. PAN DIRECTION SET
Setting the camera pan direction control is normal or reversed (LEFT / RIGHT).
10. TILT DIRECTION SET
Setting the camera tilt direction control is normal or reversed (UP / DOWN).
11. ZOOM DIRECTION
Setting the camera zoom direction control is normal or reversed (ZOOM IN / ZOOM OUT).
Turn the joystick left or right is control camera zoom in or zoom out.
7
12. FOCUS DIRECTION SET
Setting the camera focus direction control is normal or reversed (LEFT / RIGHT).
FOCUS setting has 4 kinds speed let you select:
Step 1 - Push
button, at same time the button LED will light on.
button, the
Step 2 - Push
Step 3 - Push
button will twinkling.
button select FOCUS control speed.
Step 4 - Push and turn
button control the camera focus.
13. IRIS DIRECTION SET
Setting the camera direction control is normal or reversed (LEFT / RIGHT).
IRIS setting has 4 kinds speed let you select:
Step 1 - Push
button, at same time the button LED will light on.
button, the
Step 2 - Push
Step 3 - Push
button will twinkling.
button select IRIS control speed.
Step 4 - Push and turn
button control the camera iris.
14. JOYSTICK SENSITIVITY
Setting the joystick controls sensitivity.
18. RMC-180 FW VERSION
Display the RMC-180 firmware version.
19. AW-HE100 FW VERSION
Display the AW-HE100 firmware version.
20. EXIT
Exit the set up menu mode.
8
Rear Panel
1
2
3
4
5
1. Firmware Upgrade
2. RJ-45 Connect (To Camera)
3. Tally Input
4. Power input 12V 0.5A
5. Power On / Off switch
Firmware Upgrade
USB connect to computer for firmware upgrade.
Camera connect (RJ-45)
4 RJ-45 ports connect to camera.
Tally Input
Send in red color tally signal to tally LED. Red means on-air.
DC In Socket
Connect the supplied 12V 0.5A PSU to this socket. The connection can
be secured by screwing the outer fastening ring of the DC In plug to the
socket.
Power On/Off Switch
Switches the power On / Off
9
Firmware upgrade procedure
to computer.
1. Power on RMC-180, and then connect USB port
2. Push (FOCUS AUTO / MANUAL, IRIS AUTO / MANUAL, CHA-1, CHC-4 KEY) at same time.
3. Reset RMC-180 Power.
4. RMC-180 LCD will display as below:
RMC-180 Boot Loader
Version 0.4
5. “RMC-180_U38 “ will display on the computer monitor.
10
6. Into the ”RMC-180_U38”, and then delete ” bootcode.bin” file.
7. Paste “RMC180_PCBB_0v1c.bin” on the same place.
8. Reset Power, the RMC-180 LCD will display as below:
CHANNEL A :
CAMERA: Failed !
Datavideo
RMC-180 for AW-HE100
11
Service & Support
It is our goal to make your products ownership a satisfying experience. Our supporting staff is
available to assist you in setting up and operating your system. Please refer to our web site
www.datavideo-tek.com for answers to common questions, support requests or contact your
local office below.
Datavideo Global Website: www.datavideo-tek.com
Datavideo Corporation
Tel: +1 562 696 2324
Fax: +1 562-698-6930
E-Mail: [email protected]
Datavideo Technologies Europe BV
Tel: +31-30-261-96-56 Fax: +31-30 261-96-57
E-Mail: [email protected]
Datavideo UK Limited
Tel: +44 1457 851 000
E-Mail: [email protected]
Fax: +44 1457 850 964
Datavideo Technologies Co., Ltd
Tel: +886 2 8227 2888 Fax: +886-2-8227-2777
E-mail: [email protected]
Datavideo Technologies China Co., Ltd
Tel: +86 21-5603 6599 Fax:+86 21-5603 6770
E-mail: [email protected]
Datavideo Technologies (S) PTE LTD
Tel: +65-6749 6866
Fax: +65-6749 3266
E-mail: [email protected]
Datavideo HK Ltd
Tel: +852 2833 1981
E-mail: [email protected]
Fax: +852-2833-9916
All the trademarks are the properties of their respective owners.
Datavideo Technologies Co., Ltd. All rights reserved 2018
G082060542B1
12