1
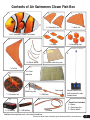
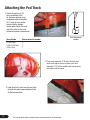
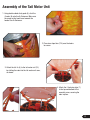
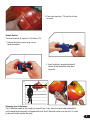
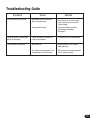
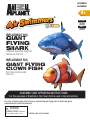
#5F5E8C8
#5F5E809
8+
AAAx1
INCLUDED
INCLUIDAS
9Vx1
INCLUDED
INCLUIDAS
INFLATABLE R/C
GIANT
FLYING
SHARK
TIBURÓN VOLADOR GIGANTE
INFLABLE CON R/C
INFLATABLE R/C
GIANT FLYING
CLOWN FISH
PEZ PAYASO VOLADOR
CON R/C
ASSEMBLY AND OPERATING INSTRUCTIONS
For the purposes of illustration, the Clown Fish is used in the instructions.
For easy-to-follow video instructions on assembling and flying your Air Swimmer go to
www.wowstuff.co.uk/airswimmers
WARNING:
CHOKING HAZARD-Small parts.
Not for children under 3 years.
* Helium tank not included.
Contents of Air Swimmers Shark Box
2.
1.
3.
2 x Underbelly fins
1 x Back fin
6.
7.
1 x Air Swimmers Shark balloon
4.
5.
4 x Fastening clips
4 x Hooks
8.
4 x Elastic bands
10.
Controller color may vary
12 x Double-sided sticky pads
11.
1 x Tail fin
9.
A
C
18 x Clear
tape tabs
B
12.
End of pod
Mouth for putty
1 x Tail motor unit
13.
1 x 9V battery
1
1 x Pod track
14.
1 x AAA battery
Remote control with
putty enclosed in side
compartment.
15.
1 x Ribbon
Additional tool required: small cross-head screwdriver
Spare Parts included:
4 x Hooks
4 x Fastening clips
2 x Elastic bands
Contents of Air Swimmers Clown Fish Box
2.
1.
3.
2 x Underbelly fins
1 x Back fin
6.
7.
1 x Air Swimmers Clown Fish balloon
5.
4.
4 x Fastening clips
4 x Hooks
Controller color may vary
8.
4 x Elastic bands
10.
12 x Double-sided sticky pads
11.
1 x Tail fin
9.
A
C
18 x Clear
tape tabs
B
12.
End of pod
Mouth for putty
1 x Tail motor unit
13.
1 x 9V battery
1 x Pod track
14.
Remote control with
putty enclosed in side
compartment.
15.
1 x AAA battery
1 x Ribbon
Spare Parts included:
4 x Hooks
4 x Fastening clips
2 x Elastic bands
Additional tool required: small cross-head screwdriver
For easy-to-follow video instructions go to www.wowstuff.co.uk/airswimmers
2
IMPORTANT: PLEASE READ FULLY BEFORE ASSEMBLY.
THIS PRODUCT IS ONLY TO BE USED INDOORS.
Filling with Helium
To fill your Air Swimmer at home, you can buy your own helium tank from
your local Toys“R”Us. Otherwise you can have it filled at most party shops
or florists.
NOTE: It is recommended to have an adult help fill the helium into the balloon.
Before using your helium tank, please consult any instruction manuals provided.
It is recommended two people carry out the assembly below.
1. Tie the enclosed ribbon (15) to the loop indicated at
the bottom of the Air Swimmer and attach the other
end to the flap hole on the packaging.
This will prevent the Air Swimmer from floating away
when inflated.
Tie ribbon here
2. To fill the Air Swimmer
with helium, lay the
Air Swimmer balloon
(1) out flat on the
ground and insert
the helium tank nozzle
into the valve at the
back of the balloon.
3. Release the helium slowly so that the balloon
starts to inflate and increase it gradually until the
balloon is full and firm.
Warning: Do not overinflate the balloon.
The balloon’s valve does not require sealing
after inflating.
3
For easy-to-follow video instructions go to www.wowstuff.co.uk/airswimmers
NOTE: After a few days you may find that the Air Swimmer may lose some of its buoyancy; therefore
you may need to top off the balloon occasionally. After several top offs the helium inside the
balloon may become too mixed with air and may need to be fully emptied and then refilled.
To empty your Air Swimmer, insert a narrow drinking straw (maximum 6mm / 0.24in.) into the
valve by at least 7 inches. (Inserting a thicker diameter straw may damage the one-way valve.)
Warning: Do not inhale helium. Use only in a well-ventilated area. Never use in closed spaces.
Helium reduces and can eliminate oxygen necessary for breathing. Inhaling helium can result in
serious personal injury or death.
Warning: DO NOT OVERINFLATE THE BALLOON.
Only inflate with helium. Do not use any other type of gas.
Do not use any other inflation devices such as a foot pump.
You can store
your Air Swimmer
by attaching the
ribbon to the
box or using
the hook on
the controller.
Tie balloon to box flap
Assembling Your Air Swimmer
After filling the Air Swimmer balloon, you are ready for assembly. It is recommended two people carry
out this assembly.
Inserting the batteries:
Pod Track
The pod track (12) requires 1 x AAA battery (14).
1. Unscrew the battery cover using a crosshead screwdriver.
-
+
2. Insert the battery according to polarity
shown. Screw the battery cover back
into place.
4
Attaching the Pod Track
1. Attach the pod track (12)
to the underside of the
Air Swimmer balloon using
the double-sided sticky pads
(8). It helps to have another
person hold the balloon
upside down. Adjust the back
end of the track to the track
placement number shown below.
Your altitude
Track placement number
0-1,000 feet
1,000-2,000 feet
2,000+ feet
3
2
1
1
2
3
Track placement
number
2. Place clear tape tabs (11B) over the front and
back track tabs to secure in place. Use clear
tape tabs (11C) for the middle track tab, placing
one either side to secure.
3. Loop the electric wire from the pod track
through the cable hoops underneath the
Air Swimmer balloon.
5
For easy-to-follow video instructions go to www.wowstuff.co.uk/airswimmers
Assembly of the Tail Motor Unit
1. Using double-sided sticky pads (8), stick the
4 hooks (6) onto the Air Swimmer. Make sure
the arrow on the hook faces towards the
head of the Air Swimmer.
2. Place clear tape tabs (11A) over the hooks
to secure.
3. Attach the tail fin (4) to the tail motor unit (10)
by slotting the rods into the tail motor unit arms,
as shown.
Clip 1
Clip 3
4. Attach the 4 fastening clips (7)
to the top and bottom of the
assembly arms, securing the
rods in place.
Clip 2
Clip 4
6
5. Place the tail motor unit on the back of the
Air Swimmer balloon and attach to the four
hooks using the elastic bands (5). Make
sure the plug connection on the tail motor
unit faces downwards.
Plug connection
6. Plug the electric wire into the tail motor
unit as shown.
Note: Ensure the electric wire has the correct
orientation to the tail motor unit, as pins on
tail motor unit can become bent and damaged.
Attaching the fins
7
1. Remove the liner of the double-sided sticky pads
(8). Attach each fin in place on the Air
Swimmer balloon (marked ‘place fin here’),
as shown.
For easy-to-follow video instructions go to www.wowstuff.co.uk/airswimmers
2. Place clear tape tabs (11A) over the fin tabs
to secure.
Remote Control
The remote control (9) requires 1 x 9V battery (13).
1. Unscrew the battery cover using a crosshead screwdriver.
2. Insert the battery according to polarity
shown. Screw the battery cover back
into place.
+
-
feet
6
5
4
3
2
1
0
Balancing your Air Swimmer
The Air Swimmer needs to float roughly at around 5 feet (1.5m). Untie the ribbon tether and balance
out the weight by placing putty in the pod mouth until the Air Swimmer neither rises nor falls. If it starts
to descend, remove some of the putty.
8
Flying Your Air Swimmer
When flying your Air Swimmer:
1. Choose an indoor environment with calm air movement. Avoid air conditioners and electric fans which
could affect flying and control.
2. There should be no lamps, candles or open flames, or other items that could damage the Air Swimmer.
3. It is recommended to use a space larger than 10ft wide x 16.5ft long x 8ft high (3.4m x 5m x 2.4m).
4. Always turn off both the pod and the handset when finished playing.
1. Turn the power
switch to “ON”
on the pod
track (12).
Dive
Tail fin
2. To activate the
controller - press
any button
on the unit.
Climb
3. To move the Air Swimmers tail left, press left on the
remote. To move the tail right, press right on the
remote.
4. To get your Air Swimmer moving, you will need to move
the tail from left to right by pressing left, right, left, right
in a constant rhythm. Experiment with faster and slower
rhythms to find the best speed.
5. To turn your Air Swimmer, press the button once in the direction you wish to turn. This will give you a tight
turning circle, but the Air Swimmer will move slowly. To find out different ways of turning your Air Swimmer visit
www.wowstuff.co.uk/airswimmers.
6. To make your Air Swimmer climb, the pod must
move backwards on the track. By pressing the
climb button, the nose will point upward. Then
using the left/right button, swim the Air swimmer
forward.
9
7. To make the Air Swimmer dive, move the pod forward
using the dive button so the nose points down. Then
using the left/right button, swim the Air Swimmer
forward.
For easy-to-follow video instructions go to www.wowstuff.co.uk/airswimmers
Troubleshooting Guide
Symptom
Cause
Solution
Not enough helium or too much
putty in the pod mouth.
Refill with helium or, remove putty
so Air Swimmer balances around
5 feet in height.
Wrong altitude setting.
Check your altitude and adjust
the pod track accordingly.
(See page 5).
The Air Swimmer is too light and
bumps on the ceiling.
The Air Swimmer is too light and
needs to be weighted.
Try adding putty into the pod mouth.
Tail or pod does not operate.
Weak batteries.
Replace batteries in the handset
and/or pod track.
The cable from the pod track is not
connected to the tail sufficiently.
Refit and ensure the plug connection
is fully inserted correctly.
The Air Swimmer will not float.
10
Warning! Never deliberately inhale balloon gas. Inhaling helium can result in serious
lung injuries and/or suffocation. Do not inhale helium from a balloon or helium tank
under any circumstances. Always use in a well-ventilated area.
This product is strictly for use INDOORS ONLY. Do not use this product outside.
BATTERY INFORMATION:
• 1 x 9V BATTERY for remote controller (Included)
• 1 x 1.5V AAA for pod motor (Included)
• Non-rechargeable batteries are not to be recharged.
• Rechargeable batteries are only to be charged under adult supervision.
• Rechargeable batteries are to be removed from the toy before being charged.
• Do not mix old and new batteries.
• Do not mix alkaline, standard (carbon-zinc), or rechargeable batteries.
• Exhausted batteries are to be removed from the toy.
• The supply terminals are not to be short-circuited.
• Make sure battery compartments are secure.
• Only use batteries of the correct size and type.
• Fit batteries correctly observing the plus and minus marks on the battery and
compartment.
• Replace all batteries at the same time.
• Remove batteries from toy when it will not be played with for a long period of time.
• All batteries should be kept away from young children as they could be easily
swallowed. Seek medical advice if you believe a cell has been swallowed.
• Do not dispose of batteries in fire.
Consumers have a significant role to play in reducing the impact of waste electrical and
electronic equipment on the environment, you can help by re-using or recycling such
equipment.
www.wowstuff.co.uk
USA, EU and international patents and
designs pending.
Designed and Developed by: William
Mark Corporation,
Claremont, California.
Distrubuted by: China Industries Ltd. T/A
Wow! Stuff,
Creative Industries Centre,
Wolverhampton Science Park,
Wolverhampton, WV10 9TG, UK,
www.wowstuff.co.uk
FCC ID : YCR-AR-1001 (Shark)
Operates on 27 MHz frequency
FCC ID : YCR-AR-1002 (Clown Fish) Operates on 49 MHz frequency
This device complies with Part 15 of the FCC Rules.
Operation is subject to the following two conditions:
(1) This device may not cause harmful interference, and
(2) This device must accept any interference received, including interference that may
cause undesired operation.
Warning: Changes or modifications to this unit not expressly approved by the party
responsible for compliance could void the users authority to operate the equipment.
NOTE: This equipment has been tested and found to comply with the limits for a Class
B digital device, pursuant to Part 15 of the FCC Rules. These limits are designed to
provided reasonable protection against harmful interference in a residential
installation. This equipment generates, uses and can radiate radio frequency energy
and, if not installed and used in accordance with the instructions, may cause harmful
interference to radio communications. However. there is no guarantee that
interference will not occur in a particular installation. If this equipment does cause
harmful interference to radio or television reception, which can be determined by
turning the equipment off and on, the user is encouraged to try to correct the
interference by one or more of the following measures:
• Reorient or relocate the receiving antenna.
• Increase the separation between the equipment and receiver.
• Connect the equipment into an outlet on a circuit different from that to which the
receiver is connected.
• Consult the dealer or an experienced radio/TV technician for help.
The manufacturer is not responsible for any radio or TV interference caused by
unauthorized modifications to this equipment. Such modifications could void the
user’s authority to operate the equipment.
The antenna used for this transmitter must be installed to provide a separation
distance of at least 20 cm from all persons and must not be co-located or operated in
conjunction with any other antenna or transmitter.
Do not mix old and new batteries.
Do not mix alkaline, standard (carbon-zinc),
or rechargeable batteries.
Non-rechargeable batteries are not to be
recharged.
Remove exhausted batteries from the toy.
Supply terminals are not to be short
circuited.
CONFORMS TO THE SAFETY
REQUIREMENTS OF ASTM F963.
Contents and colors may vary.
CAUTION:
Remove all twist-ties and plastic
loops before giving toy to child.
US
© 2011 Discovery Communications, LLC.
Animal Planet and the Animal Planet logo
are trademarks of Discovery
Communications, LLC,
used under license. All rights reserved.
www.animalplanet.com
© 2011 Geoffrey, LLC, a subsidiary of
Toys“R”Us, Inc.
Made in China
Distributed in the United States by
Toys“R”Us, Inc., Wayne, NJ 07470
Distributed in Australia by Toys“R”Us
(Australia) Pty Ltd.,
Regents Park NSW 2143
www.toysrus.com
12