1
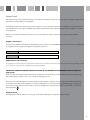
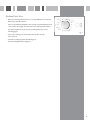
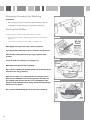
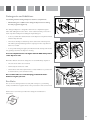
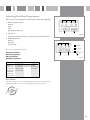
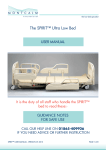
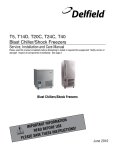
CI240 Freestanding Washing Machine
Manual for Installation, Use and Maintenance
Passionate about style
1
Customer Care Department • The
Group Ltd. • Harby Road • Langar • Nottinghamshire • NG13 9HY
T : 01949 862 012 F : 01949 862 003 E : [email protected] W : www.cda.eu
Contents
2
Page 1
Important information
Page 2
Warnings
Page 3
Washing machine specifications
Page 4
Unpacking the washing machine and removing the transit bolts
Page 5
Connecting to the mains water supply
Page 6-7
Levelling and electrical information
Page 8
Before first use
Page 9
Preparing garments for washing
Page 10
Detergents and additives
Page 11-12
Selecting the wash programme
Page 13-14
Programmes
Page 15
Spin speed and anti-crease
Page 16
Time delay
Page 17
Starting up
Page 18
Wash programme phases and power cuts
Page 19-20
Maintenance and cleaning
Page 21-22
Troubleshooting
Important
This appliance must only be used for the purpose for which it is intended, i.e. domestic use. Any other use could be dangerous and
may lead to premature failure of the appliance.
The CDA Group Ltd cannot be held responsible for injuries or losses caused by incorrect use or installation of this product. Please
note that CDA reserve the right to invalidate the guarantee supplied with this product following incorrect installation or misuse
of the appliance.
Under no circumstances should any external covers be removed for servicing or maintenance except by suitably qualified
personnel.
Appliance information:
Please enter the details on the appliance rating plate below for reference, to assist CDA Customer Care in the event of a fault with
your appliance and to register your appliance for guarantee purposes.
Appliance Model
Serial Number
CE Declarations of Conformity:
This appliance has been designed, constructed and marketed in compliance with safety requirements of EEC Directive 2006/95/EEC
(Low voltage) and requirements of EMC Directive 2004/108/EEC.
IMPORTANT INFORMATION FOR CORRECT DISPOSAL OF THE PRODUCT IN ACCORDANCE WITH EC DIRECTIVE
2002/96/EC.
At the end of its working life, the product must not be disposed of as urban waste. It must be taken to a special local authority
differentiated waste collection centre or to a dealer providing this service.
Disposing of a household appliance separately avoids possible negative consequences for the environment and health deriving
from inappropriate disposal and enables the constituent materials to be recovered to obtain significant savings in energy and
resources. As a reminder of the need to dispose of household appliances separately, the product is marked with a crossed-out
wheeled dustbin.
Display Contrast
The display dims after 20 minutes to save energy. To activate the display, press any button or turn the dial.
3
Warnings
To avoid the risk of fire, electric shocks, injury or damage when using your washing machine, please take the following
precautions:
• Please read all the instructions before using the washing machine.
• Do not wash items that have previously been cleaned, washed, soaked or treated with petrol, solvents for dry cleaning, other inflammable substances or explosives, as they produce fumes that could catch fire or explode.
• Do not add petrol, solvents for dry cleaning or other inflammable or explosive substances to the wash water as they produce fumes that could catch fire or explode.
• Do not repair or replace any part of the washing machine or try to carry out any type of servicing unless it is recommended in the maintenance instructions in the manual.
• Do not climb onto the machine or stand on the open porthole door.
• Do not use an extension lead or adaptor to connect your washing machine to the mains supply.
• Follow the washing instructions recommended by the manufacturer of the garment to be washed.
• Do not turn your washing machine on until you are sure that:
It has been installed in accordance with the installation instructions.
washing machine
All the water, drainage, mains electricity and earth connections meet the local regulations and/or other applicable regulations.
specifications
Important: Ensure that the transit bolts have been removed prior to using the machine.
Power
cord
Washing Machine Specifications
Work top
Control
panel
Detergent
dispenser
Drain hose
Hatch
Stainless
steel
drum
Porthole door
Filter
Kickplate
Levelling
feet
ACCESSORIES LOCATED
INSIDE THE DRUM
Accessories
Rear plugs
4
Drain pipe bender
71
Water inlet hose
washing machine
installation and assembly
washing machine
washing
washing
washingmachine
machine
machine
AND
1 UNPACKING
UNBLOCKING THE
installation
WASHING MACHINE
a
AND
Unpacking the Washing
Machine
1 UNPACKING
UNBLOCKING
UNPACKINGTHE
and assembly
a
• Remove the base, corner protectors
and top cover
(Figure 1).
WASHING
MACHINE
a Remove the base, corner protectors and
installation
and
installation
installation
and
andassembly
assembly
assembly
top cover.the Transit Bolts
Removing
UNPACKING
a Remove
thecovers
base, corner
• Remove the screws holding
the plastic
to the protectors
back of theand
washing machine (Figure 2 and 3).
top cover.
UNPACKING
AND
ANDAND
11UNPACKING
1 UNPACKING
UNBLOCKING
UNBLOCKING
THE
• Loosen and remove the 3 transit
bolts
(Figure 3). THETHE
UNBLOCKING
•
a aa
WASHING
WASHING
MACHINE
MACHINE
WASHING
MACHINE
Cover the holes with the plastic plugs supplied.
UNPACKING
UNPACKING
Do not throw the transit bolts away. If you need to move
the
UNPACKING
fig. 1
washing machine after installation you should first replace the
transit bolts.
a aRemove
Remove
thethe
base,
base,
corner
corner
protectors
protectors
and
and
top
cover.
cover.corner protectors and
a Removetop
the
base,
UNBLOCKING
UNBLOCKING
top cover.
a There are 3 blocking screws on the back
a There are 3 blockingof screws
onmachine.
the back
the washing
of the washing machine.
b To loose and completely remove the 3
screws together with the metal washer
b To loose and completely
remove
the
and the black
rubber
and3plastic tubes
that the
makemetal
up the washer
blocking system.
screws together with
UNBLOCKING
UNBLOCKING
and the black rubber
and plastic tubes
c Fit the 3 plastic plugs supplied in the
a aThere
There
areare
3 blocking
3 blocking
screws
screws
onon
thethe
back
back
that make up the blocking
system.
UNBLOCKING
holes
you
removed
the
screws
from.
of of
thethe
washing
washing
machine.
machine.
Therebare
blocking
on the
backthethe
bTo3To
loose
loose
and
and
completely
completely
remove
remove
33
c Fit the 3 plastica plugs
supplied
inscrews
the
of the washing
machine.
screws
screws
together
together
with
with
thethe
metal
metal
washer
washer
holes you removed the and
screws
from.
and
thethe
black
black
rubber
rubber
and
and
plastic
plastic
tubes
tubes
fig. 2
b To loosethat
and
completely
remove
the
3
that
make
make
upup
thethe
blocking
blocking
system.
system.
screws together with the metal washer
c
c
Fit
Fit
the
the
3
plastic
3
plastic
plugs
plugs
supplied
supplied
in
thethe
and the black rubber and plastic tubesin
holes
holes
you
removed
removed
the
the
screws
screws
from.
from.
that make
up you
the
blocking
system.
c
Important
Important
Do not throw the blocking screws away.
You may need to move the washing
machine at a later date.
c
DoDo
notnot
throw
throw
thethe
blocking
blocking
screws
screws
away.
away.
You
You
may
may
need
need
toto
move
move
thethe
washing
washing
Do not throw the blocking
screws
machine
machine
at at
a later
aaway.
later
date.
date.
cc
fig. 3
72 c
You may need to move the washing
machine at a later
Dodate.
not throw the blocking screws away.
Important
Important
Important
c Fit the 3 plastic plugs supplied in the
holes you removed the screws from.
You may need to move the washing
machine at a later date.
7272
fig. 4
72
72
5
Connecting to the Mains Water Supply
The water supply hose is located inside the drum.
• Connect the bent end of the hose to the threaded inlet of the electrovalve located at the rear of the washing machine.
• Connect the other end of the hose to the water intake. Then securely tighten the connecting nut.
fig. 5
The drain hose must be securely fastened to the outlet to prevent
any risk of the drain hose becoming detached and causing flooding.
The washing machine must be connected to the mains water supply,
using the new supply hoses supplied with the appliance. Do not use
water supply hoses that have been used previously.
For your washing machine to work properly, the mains water
pressure must be between 0.05 and 1MPa (0.1 - 10 bar).
fig. 6
Drainage Connection
• It is recommended that you have a fixed drainage outlet 50 to 70 cm from the floor.
• Avoid the drain hose being too tight, kinked or restricted.
• The water outlet can either be connected to a water drain or to a sink outlet spigot. This connect should be a minimum of 50cm and a maximum of 110cm from the floor. The drain hose should be no longer than 4m in length to ensure good performance from the washing machine.
• After connecting the water supply, check to ensure there are no leaks.
6
Levelling
• To reduce the noise level from the washing machine and to prevent unnecessary movement during use, you should ensure the washing machine is level using the adjustable feet.
• First, fix and level the rear feet. When they are properly fixed, secure the metal locknut tightly against the underside of the washing machine.
• Put the washing machine into its required position.
• Then level the front feet in the same way as the front feet.
fig. 7
Please note: Raising the washing machine too high can affect the
stability of the appliance.
Electrical Connection
• Check the rating plate located on the porthole door of the washing machine before connecting the appliance to the power supply. Ensure that the voltage reaching the plug is the same as that on the plate.
Do not remove the rating plate. The information on it is important.
fig. 8
Do not plug the washing machine plug into the socket with wet or
damp hands.
To remove the power cord, pull on the body of the plug, not the cable.
7
Electrical information
Warning! This appliance must be earthed.
The mains lead of this appliance has been fitted with a BS 1363A 13 amp fused plug. To change a fuse in this type of plug, follow
the steps below:
1. Remove the fuse cover and fuse.
2. Fit replacement 13A fuse, ASTA approved to BS 1362 type, into the fuse cover.
3. Replace fuse cover.
Important: Do not use the appliance without the fuse cover in position.
How to connect an alternative plug
If the fitted plug is not suitable for your socket outlet, then it should be cut off and disposed of safely to avoid the risk of electric
shock. A suitable alternative plug of at least 13 Amp rating to BS 1363 should be used.
As the colours of the wires in the mains lead of this appliance may not correspond with the
coloured markings identifying the terminals in your plug, proceed as follows:• The wire which is coloured GREEN and YELLOW must be connected to the terminal which is marked with letter (E) or by the Earth symbol
or coloured GREEN and YELLOW.
• The wire which is coloured BLUE must be connected to the terminal which is marked with the letter (N), or coloured BLACK.
• The wire which is coloured BROWN must be connected to the terminal which is marked with the letter (L) or coloured RED or BROWN.
If in doubt regarding the electrical connection of this appliance, consult a qualified electrician. Do not shorten the supply cable, the appliance may require removing for servicing.
N.B. Ensure that the plug socket is situated in an easily accessible place.
8
Before First Use
• When your washing machine has been correctly installed, we recommend that you pre-clean the machine.
This is to check that the installation, the connections and the drainage are all correct, and to thoroughly clean the inside of the washing machine before any wash programmes are run (see the operating instructions on the following pages).
• Prior to pre-cleaning you should ensure the transit bolts have fig. 9
been removed.
• Select the normal programme at 60ºC (Figure 9).
• Press the Start/Pause button (Figure 9).
9
Preparing Garments for Washing
Preparation
• Before placing the clothes in the drum, make sure all the pockets are
empty (Figure 10). Any small objects may block the drain pump.
Sorting the Clothes
Sort the clothes according to fabric and how they are made:
fig. 10
• We recommend using the delicate programmes for sensitive fabrics (Figure 11).
• Sort clothes according to how soiled they are (Figure 12).
Wash lightly soiled garments using a short programme.
Use a programme without prewash for medium-soiled garments.
Wash heavily soiled garments using a long programme with
prewash.
fig. 11
Sort your clothes according to colour (Figure 13).
Wash white and coloured loads separately.
We recommend loading the washing machine to its full capacity for
best water and energy efficiency.
Whenever possible, we recommend that you wash garments of
different sizes within the same wash programme. This improves
the washing action and also aids the correct distribution of the
garments in the drum when spin-drying, and the washing machine
will therefore be quieter.
fig. 12
We recommend that small garments are placed in a wash bag.
fig. 13
10
2 USING DETERGENT AND ADDITIVES
using the appliance and practical tips
DETERGENT
AND ADDITIVES
2 USING DETERGENT
AND ADDITIVES
Detergents and Additives
using the appliance and practical tips
a
DETERGENT
AND ADDITIVES
2 USING
a Your washing
machine’s detergent
using the appliance and practical tips
Your washing machine’s detergent dispenser
dispenserhas
hasthree
threecompartments.
compartments.
DETERGENT
• Add the detergent or additive
before
starting
b toIf the
youdetergent
are goingdispenser
to use
liquid
detergent
AND
ADDITIVES
you
must
close
the
wash
compartment
the wash programme (Figure 14).
DETERGENT
the blue
tab protruding
a flap.
Your Take
washing
machine’s
detergentfrom
the
bottomhas
of the
compartment
between
dispenser
three
compartments.
AND
ADDITIVES
2 fingers and pull outwards as far as it
will
go.
Release
the
flap
and
it
will
remain
b
If
you
are
going
to
use
liquid
detergent
a
Your
washing
machine’s
detergent
The detergent dispenser is designed to allow the use of liquid detergents
in
the
vertical
position
andcompartment
prevent the
you
must
close
the wash
dispenser
has
three
compartments.
rather than adding them to the drum.
should
ensure
that you
the
liquid
detergent
fromtab
getting
out. close
It from
must
flap.You
Take
the blue
protruding
be
open
for
Put it
thegoing
bottom
the compartment
between
If you
are
toofpowdered
use
liquid detergent.
detergent
wash compartment flap bbefore
adding
thehorizontal
liquid
detergent.
pressing
in
the
position,
the
2
fingers
and
pull
outwards
as
far
as
it
you must close the wash compartment
top
tabRelease
with your
anditpushing
it
will go.
thefinger
flap and
will remain
flap.atTake
theas
blue
tab
protruding
from
• To do so, hold the blue tab
the
of
dispenser
andprevent
pull
it forwards
back
farthe
as
it will
go.and
in back
the
vertical
position
the
the bottom
ofdetergent
the compartment
between
liquid
from
getting
out.
It
must
until it is fully extended. 2 fingers and pull outwards as far as it
c Put
the detergent,
either detergent.
liquid or powder,
be open
for powdered
Put it
will go. or
Release
the
flap
and
it willpressing
remain
additive
into
the
detergent
dispenser
in
the
horizontal
position,
the
• Then release the flap sointhat
drops
down
the
back
of
the
dispenser.
theitvertical
position
and
prevent
the
before
starting
the
wash
programme.
top tab
with at
your
finger
and
pushing
it
liquid
detergent
from
getting
out.
It
must
back
as
far
as
it
will
go.
This will stop the liquid detergent from escaping from the compartment Important
be open for powdered detergent. Put it
before it is needed.
The
liquid
level must
never
higher
c horizontal
Put the
detergent,
either
liquid be
orthe
powder,
in the
position,
pressing
the
MAX
mark
printed
on
the
orwith
additive
into
theand
detergent
dispenser
top tabthan
your
finger
pushing
it
wall.
before
starting
the wash
programme.
back
asdispenser
far
it will
go.
• To use powder detergents
again,
thenaslift
the
blue
tab back
up and relocate
it by pushing it back into the dispenser housing.
c Put the detergent, either liquid or powder,
thatthe
the
amount
ofdispenser
detergent
to
The into
liquid
level
must never
be higher
orRemember
additive
detergent
The level of liquid must never
be
higher
than
the printed
MAX
be used
willthe
always
depend
on: mark
than
MAX
mark
on theprinted
before
starting
the
wash
programme.
Thedispenser
amount ofwall.
clothes to be washed.
on the dispenser wall.
a
b
Important
WASH
FABRIC SOFTENER
PREWASH
FABRIC SOFTENER
PREWASH
fig. 14
b
b
c
c
fig. 15
c
Important
The amount of clothes to be washed.
How (Information
heavily the clothes
arehardness
soiled. in your area can • The hardness of the water
on water
We
recommend the useabout
of a
The
water
hardness
be obtained from your
local
water
board). (information
decalcifying
product
if the
water
water hardness
is available
from the
relevant
hardness
is
high
in
your
area.
eco-note
We recommend thelocal
useauthorities).
of a decalcifying product if the water
PREWASH
WASH
Important
How heavily the clothes are soiled.
The water hardness (information about
The
liquid
level
neverfrom
bedetergent
higher
water
hardness
is
available
the relevant
Remember
thatmust
the
amount
of
to
than
the
MAX
mark depend
printedon:
on the
local
authorities).
be
used
will always
Remember that the amountdispenser
of detergent
to
be
used
will
always
depend on:
wall. of clothes to be washed.
The amount
How heavily the clothes are soiled.
• The amount of clothes to beThe
washed.
We
recommend
use of a about
water
hardnessthe
(information
decalcifying
product
if thethe
water
waterthat
hardness
is available
from
relevant
Remember
the amount
of detergent
to
• How heavily the clothes
are
soiled.
hardness
is highon:
in your area.
local
authorities).
be used
will
always
depend
FABRIC SOFTENER
a
Important
WASH
Eco Note
money it will have a negative effect on
the preservation of the environment.
Important
Remember that concentrated detergents
hardness is high in your area.
exist which are more environment- and
We
recommend the use of a
nature-friendly.
decalcifying
eco-noteproduct if the water
hardness is high in your area.
We therefore recommend you follow
the detergent manufacturer’s
money it will have a negative effect on
instructions.
the preservation of the environment.
The use of more detergent than
Remember that concentrated detergents
necessary will not improve your
exist
which are
environmentand
The use of more detergent than
necessary
willmore
not apart
improve
your
washing
washing
results,
and
from
costing
you
nature-friendly.
fig. 16
results, and will have a negative effect on the preservation of the environment.
eco-note
The use of more detergent than
necessary will not improve your
Remember thatresults,
concentrated
detergents
and apart
from costing you
We therefore recommend youwashing
follow the detergent
manufacturer’s
exist which are more environment- and
instructions.
nature-friendly.
77
The use of more detergent than
necessary will not improve your
washing results, and apart from costing you
77
We therefore recommend you follow
the detergent manufacturer’s
instructions.
money it will have a negative effect on
the preservation of the environment.
We therefore recommend you follow
the detergent manufacturer’s
instructions.
77
11
Selecting the Wash Programme
Start/Pause
button
Programme selector
Time delay button
Spin/Anti-crease
button
Additional
function button
fig. 17
To select a wash programme:
• Turn the programme selector dial clockwise to the desired function.
• The display on the control panel will light up.
• Press the Start/Pause button to begin the programme.
12
ng the appliance and practical tips
1
Selecting the Wash Programme
1
When you select the programme, the following information will be displayed:
1. Wash programme phases:
Prewash
Wash
Rinse
2
3
Spin-drying and draining
1
2. Spin speed
2
3
fig. 18
3. Programme number (for a few seconds) and then programme duration.
4.
Additional functions:
Easy iron
Extra rinse
Intensive2wash
3
1
There are four types of programme:
Normal programmes
Delicate programmes
Wool programme
Auxiliary programmes
PROGRAMMES
Normal
Delicate
Wool
1 Normal cold
2 Quick 30ºC
3 Normal 30ºC
4 Normal 40ºC
5 Normal 60ºC
6 Normal 90ºC
7 Prewash 60ºC
8 Delicate cold 12 Wool cold 14 Rinses
9 Delicate 30ºC 13 Wool 35ºC 15 Spin-drying
10 Delicate 40ºC
16 Drain/End
11 Delicate 60ºC
2
3
4
fig. 19
Auxiliary
Eco Note
We recommend you choose a wash programme without prewash whenever
possible. This will save you money and help protect the environment.
79
13
Washing Machine Programmes
1
Normal programmes
2
3
4
Auxiliary prog.
Wool prog.
Delicate programmes
7
30
Cotton/Linen
delicate colours
light soil
YES
40
Cotton/Linen
fast colours
light soil
YES
60
Cotton/Linen
fast colours
medium soil
YES
90
Cotton/Linen
whites
heavy soil
YES
60
Cotton/Linen
whites/fast colours
heavy soil
YES
Synthetic/mix
cotton delicate colours
very light soil
YES
30
Synthetic/mix cotton
delicate colours
light soil
YES
40
Synthetic/mix cotton
delicate colours
medium soil
YES
Synthetic/mix cotton
white/fast colours
medium soil
YES
Normal 40ºC
Normal 90ºC
Prewash 60ºC
9
Delicate 30ºC
10
Delicate 40ºC
11
Delicate 60ºC
12
Wool cold
13
Wool 35ºC
Cold
30
40
60
YES NO
YES
WOOL 35
YES NO
YES
YES NO
YES
NO
_
15
Spin-drying
_
Cotton/cotton mix
Synthetic/Delicate
Wool/wool mix
_
Cotton/cotton mix
Synthetic/Delicate
Wool/wool mix
Programme for wash and energy consumption assessment in
accordance with standard EN60456, press intensive wash button.
80
YES
NO
NO
Anti-crease
No spin
Spin speed
selection
YES
Wool/wool mix
white/colour
light soil
Rinses
(*)
YES NO
Wool/wool mix
white/colour
very light soil
14
Drain /End
YES
WOOL Cold
Cotton/cotton mix
Synthetic/Delicate
Wool/wool mix
16
Intensive
wash
30
Cotton/Linen
whites/colours
very light soil
Normal 30ºc
Delicate cold
Easy-iron
Cotton/Linen
delicate colours
very light soil
Quick 30ºC
8
Possible option buttons
Fabric type
Cold
5 (*) Normal 60ºC
6
14
Normal cold
Recommended
temperature
Extra
rinse
Programme
Max.
load of
clothes (Kg)
Anti-crease
Washing Machine Programmes
Max.
load of
clothes (Kg)
Wash
product
compartment
TURBO TIME PLUS
Programme
description
Total
consumption
KWh/litres
Approx.
duration
(minutes)
8
Normal wash, rinses,
automatic additive absorption
if desired and long final spin
0,10/59
50
2
SHORT wash, rinses,
automatic additive absorption
if desired and final long spin
0,25/30
30
0,30/59
52
0,60/59
57
1,52/59
80
2,20/64
110
1,50/64
100
0,10/45
50
0,20/45
50
0,40/45
55
1,00/45
70
0,05/55
30
0,45/55
40
Rinses, automatic
additive absorption if
desired and long final spin
0,05/25
23
_
Drain and final long spin
0,05/0
10
_
Drain and end of programme.
Takes programme to
final position
0,00/0
2
8
Normal wash, rinses,
automatic additive
absorption if desired
and long final spin
8
8
8
Prewash, normal wash, rinses,
automatic additive absorption
if desired and long final spin
8
3,5
3,5
Delicate wash, rinses,
automatic additive
absorption if desired
and gentle final spin
3,5
3,5
2
WOOL wash, rinses,
automatic additive
absorption if desired
and gentle final spin
2
8
8
8
NOTE: the KWh and litre consumptions and programme durations may vary depending
on the type and amount of clothes, mains water pressure, etc.
81
15
N SPEED SELECTION
SPIN SPEED SELECTION
4
using the appliance
andappliance
practicaland
tipspractica
using the
SPIN DRYING
SPIN DRYING
a
Theselected
washSelection
options
always
be selected
after
must always
after mustand
Spin be
Speed
Anti-Crease
choosing
the wash programme. Any programme
h programme.
Any
programme
You should
first select
the wash
programme
and then
select
the wash options
change
during
selection
cancels
the
previously
ection cancels
previously
(Changingthe
the programme
cancels the preset selected options).
ab
b
selected options.
a Spin speed selection and anti-crease
Nd SPEED
SELECTION
selection
and
anti-crease
Each selected programme has its own preset spin speed.
button.
PIN SPEED 4
SELECTION
SPIN SPEED SELECTION
using the appliance and practical tips
The programme selected is associated
amme selected
is associated
using
the appliance
practical
tips
with certain
spin revolutions,
as shown
Spin speed
SPIN
using and
the appliance
and
n spin revolutions, on
as the
shown
display.
•
You
can
reduce
the
spin
speed
or
remove
it
completely
by
pressing
the
play.
spin button
b (Figure
It can20).
be
modified by pressing the spin
SPIN
DRYING
drying
button
and the number
of
SPIN
DRYING
modified•byThepressing
the
spin
spin speed
will
gradually
reduce each time
the spinDRYING
button is SPIN
revolutions
will
be
reduced
by
100
on
and
the
number
of
pressed
at
100
r.p.m.
intervals
to
a
minimum
of
400
r.p.m
(Figure a
mustmust
always
be selected
after
tions
always
be revolutions
selected
afterat a time to 400.
The wash
options must
always be selected
after
c
21).
will
be
reduced
by
100
programme.
Any
programme
hwash
programme.
Any
programme
choosing
the wash programme. Any programme
at
a
time
to
400.
g selection
cancels
ection
cancels
the
previously
c the
Nopreviously
spin
ons.
practica
fig. 20
cb
b
a
d
d
b
change during selection cancels the previously
Press
the spin
No spin selected
options.
button again to get to the
no
spin option. A programme without a
speed
selection
and
anti-crease
Nspin
SELECTION
d SPEED
selection
and
anti-crease
• Press
the
button
again
to get
to the no spin
and the display a spin
selection
andoption
anti-crease
PIN
SPEED
SELECTION
button
again
toSpin
getspeed
to the
final spin. It is used to prevent creasing
n.
will show “0”button.
(Figure 22). when
washing
tion. A programme
a special fabrics.
rogramme
selected The
iswithout
associated
programme selected is associated
amme
selected
is
associated
• to
Arevolutions,
programme
without
a final spin is used to prevent creasing when spin
as
shown
tertain
is used
prevent
creasing
with
certain spin
revolutions, as shown
n display.
spin
revolutions,
asfabrics.
shown
dspecial
Anti-crease
option
ehing
washing
special
fabrics.
on
display.
play.
Thethe
wash
programme stops on the last
rinse,the
with
the clothes left in water.
modified by bpressing
spin
ebeoption
ItWhen
can
be
modified
pressing the the
spin
option
SPIN
DRYING
SPIN
DRYING
the
function by
is deactivated,
gprogramme
button Anti-crease
and
the
number
of
modified
by pressing
the
spin
stops drying
on
the
last
button
and
the
number
of
washing
machine
continues
tions
will•the
be
reduced
by
100again
Pressing
the
spin
button
willbe
select
the anti-crease
option
on
and
number
of
acbythe100
tions
must
always
be
selected
afterwill
revolutions
reduced
the
clothes
left
in
water.
must
always
be
selected
after
programme,
draining
and spin-drying.
tions
at
a
time
to
400.
(Figure
23).
c
will
be
reduced
by
100
wash
programme.
revolutions
a time towhen
400. you are not
is deactivated,
the foratexample,
hunction
programme.
AnyAny
programme
It isprogramme
used,
a time
towash
400.
gatselection
cancels
the
•continues
The
stops
on the
last rinse,
with the
machine
the
ection
cancels
theprogramme
previously
atpreviously
home
and
want
to delay
theclothes
spin-left in pin
ons.
c spin-drying.
No
spin
drying
until
you get home, to prevent the
e,
and
again
thedraining
spinwater.
button
to
get
to
the
the spin button
to get and
to the
speed
selection
andPress
anti-crease
clothes
after again
spin-drying
in
option.
A programme
without
orselection
example,
when
you
arecreasing
nota theAwashing
d
and
anti-crease
• When
the option
is deactivated,
machine continues
no
spin
option.
programme
withoutthe
a
spin
button
again
to
get
to
the
n.
being
left
in
the
drum
to
be
removed.
pin.want
It is used
to prevent
creasing
nd
toprogramme,
delay
the
spindraining
and
spin-drying.
final
spin.
It
is
used
to
prevent
creasing
rogramme
selected
is
associated
tion.
A programme
without
a
washing
special
fabrics.
a
you get
home,
to
prevent
the
when
special
fabrics.
amme
selected
• to
Itrevolutions,
is prevent
used,is
forassociated
example,
when you are
not at home
and want to delay the spin
as washing
shown
tertain
is used
creasing
easing
after
spin-drying
and
spin fabrics.
drying until
get home, to prevent the clothes creasing after spin-
n display.
spin
revolutions,
asyoushown
ehing
crease
option
special
OPENING
n the drum
to and
be
removed.
d being
Anti-crease
option
drying
left
inthe
the last
drum
to be removed.
play.
wash
programme
stops
on
THE
HATCH
The
wash
programme
stops
on
the last
be
modified
by
pressing
the
spin
SPIN
the clothes
left rinse,
inDRYING
water.
ewith
option
with the clothes left in water.
g
button
and
the
number
of
the
function
is
deactivated,
the
modified
by pressing
the
spin
programme
stops
on
the
last
Depending
on the model,
youa
When
the
function
is deactivated,
the the
ccan open
must
always
beaOPENING
selected
after
tions
will
be continues
reduced
by
100
ng
machine
the
on
and
the
number
of
hatch
by
pressing
hatch opening
washing
machinethe
continues
the button.
the
clothes
left
in
water.
atdraining
a time Any
toand
400.
htions
programme.
programme
amme,
spin-drying.
c
will be reduced
by
100the draining and spin-drying.
programme,
THE
HATCH
unction
is deactivated,
If you
cannot
open the hatch due to a
ection
cancels
the
previously
sed,
fortime
example,
you
arefor
not
bwhen
at
a
to
400.
It
is
used,
example,
when
you are not
machine
continues
the
pin
breakdown
or a power cut, proceed as follows:
me and want to delayat
the
spinhome
and
want to delayathe spinon
the
model,
you
can
open
the
the
spin
button
again
to
get
to
the
e,
draining
and
spin-drying.
remove
the the
dispenser by pulling the handle
until you get home, drying
to prevent
until
you get home, to prevent the
d
and
anti-crease
n selection
option.
programme
essing
theAafter
hatch
opening
button.
or
example,
when
you without
are
not
outwards
andapressing the blue lever with your
es
creasing
spin-drying
and
clothes
creasing
after spin-drying and
spin
button
again
to
get
to
the
pin.
It
is
used
to
prevent
creasing
finger.
A
button
with a slot will appear on the
leftwant
in theto
drum
to be
removed.
nd
delay
the
spinbeing
left ina the drum to be removed.
ot
open
the
hatchis
due
to
a
washing
special
fabrics.
amme
selected
associated
tion.
A
programme
without
Turnthe
the button to the left
a
you
get home,
to right.
prevent
b with the aid of
a used
power
proceed
asand
follows:
ntoris
spin
revolutions,
shown
tocut,
prevent
creasing
aas
coin
the hatch will open.
easing
after
spin-drying
and
For added
safety, the
the porthole
dispenser
byfabrics.
pulling
handledoor does not open immediately at
crease
option
play.
hing
special
OPENING
nash
the
drum
to be
removed.
Iflever
your
model
does not
the end
programme.
There
isofa Washing
time delaymachine
ofOPENING
approximately
two
programme
stops
onwith
the
last
nd
pressing
theofblue
your
have
remote
opening
THE
HATCH
minutes
before
you
can
open the
door. you have to await about
with
the
clothes
left
in
water.
tton
withby
a slot
will appear
on the
THE HATCH
modified
pressing
the spin
ethe
option
2 minutes
from the end of the programme
function
is deactivated,
the
he
button
to the
left before
with
the
aid able
of to open the hatch.
16
on
and
the
number
of
programme
stops
on
the
last
being
nding
on the model,
you can
ng machine
continues
the openonthe
Depending
the model, youccan open the
the
hatch
will
open.
aOPENING
will
be reduced
100 button.
the
clothes
left
inby
water.
by
pressing
the
hatch
opening
using
andpractical
practical
tips
usingthe
the appliance
appliance and
tips
N SPEED SELECTION
SPIN
fig. 21
d
bb
c
d
d
a
using the appliance and practical tips
SPIN
fig. 22
d b
d
b
a
SPIN
fig. 23
d
using the appliance and practical tips
DELAY SECTION AND
5 TIME
ADDITIONAL FUNCTIONS
using the appliance
SPIN DRYING
a
h options must always be selected after
TIME DELAY
g the wash programme. Any programme
Time Delay
during selection
cancels theTime
previously
delay selection button
A delay of up to 24 hours can be selected.
options.Time delay selection button
b
EASY IRON
The delay must be selected after choosing the
programme.
pin speed
selection and wash
anti-crease
• A delay of up to 24 hours
canthe
be delay
selected.
delay
selected after To select
time,The
press
the must
clock be
button.
utton. choosing the wash programme.
Each time the button is pressed the start will
he programme selected isbeassociated
put back 1 hour.
EXTRA RINSE
Select
• To
select
the hours ofCancelling
delay,
thedelay
time delay button (Figure 24). Each ith certain
spin
revolutions,
as press
shown
the
time the button is pressed the delayed start of washing is increased by n the display.
To cancel the delay you have to press the
one hour.
SPIN
SELECTION
fig. 24
clock button successively. The delay will be
cancelled
can be modified by pressing
thewhen
spin24 hours have been reached
and the button is pressed once more. If the
ying button and the number
of is changed the delay is also
programme
Cancelling
delay cancelled.
SPIN
SPEED
volutions
will
be the
reduced
by 100SELECTIONc
volutions
timethetodelay,
400.
• at
To a
cancel
press the time delay button repeatedly to cycle 4
DELAY TIME
d
using the appliance and practical tips
ADDITIONAL FUNCTIONS
through the full 24-hours, and then press again.
Additional function selection button depending
o spin
on programmes.
TIME
DELAY
SECTION
Thebutton
delay willagain
be cancelled
when
24 hours
have been
reached and AND
the ress the •spin
to 5
get
Thereto
arethe
3 options: easy-iron, extra rinse
ADDITIONAL
FUNCTIONS
button
pressed once more.
the programme
the delay is andIf
intensive
o spin option.
A isprogramme
without
a wash. is changed
the select
button to display the
SPIN
DRYING
alsoused
cancelled.
nal spin. It is
to prevent Press
creasing
option required.
hen
washing
special
fabrics.
By
pressing
the
button
The wash options must always be selected afterseveral times you a
using the appliance
b Select
can choose between several combinations
TIME DELAY
choosing
the wash
programme.
Anytwo
programme
Additional
functions
of one,
and up to three additional
nti-crease
option
at the same
time depending on
change during
selection cancels
theselection
previously
Time functions
delay
button
function
selection
button
depending
on
programmes.
selected.
heselected
washAdditional
programme
stops
onthe
the
A delay
ofprogramme
uplast
to 24 hours
can be selected.
options.
4 SPIN SPEED SELECTION
using the appliance and practical tips
Important
The
delay
must
selected
after choosing
the
nse, with•the
clothes
left in
water.
There
are 3 options:
easy
iron,
extraberinse
and
intensive
wash.
Button:
Easy-iron
(
)
wash programme.
speed
selection
and
anti-crease
hena theSpin
function
is
deactivated,
the
Thisthe
option
prevents
garments
select
delay
time,
press
the clockfrom
button.
• Press the button andTothe
desired
option
will
be
displayed
(Figure 25).
means
of carrying
time the by
button
is pressed
the out
starta will
ashing button.
machine continuesEach
thecreasing
special
with
special
turns to
•
By
pressing
the
button
times
you
can
choose
between
several
The
programme
selected
is
associated
be several
put
back
1programme
hour.
ogramme, draining and spin-drying.
DELAY
SECTION
fluffTIME
out the garments
after
spin-drying AND
with
certain
spin
revolutions,
as
shown
combinations
of
one,
two
and
up
to
three
additional
functions
at the
5
Cancelling
the
delay
is used, for example, when you
are
not
andADDITIONAL
make
them easier toFUNCTIONS
iron.
on
the
display.
same
timetodepending
on
the
programme
selected
(Figure
26).
home and
want
delayTothe
spincancel
the
delay
you
have
to
press
the
SPIN
DRYING
Button:
Extrasuccessively.
rinse
(
) The delay will be
button
a
ying until you get home, toclock
prevent
the
Increases
level
ofhave
the final
cancelled
whenthe
24the
hoursspin
beenrinse
reached
b
It
can
be
modified
by
pressing
a
obtained
inisthe
clothes;
suitable
for
large
The wash
options
must
always
be
selected
after
othes
creasing
after
spin-drying
and
and
the
button
pressed
once
more.
If the
Option 1:
Easy-iron
button
the
number
of thebelonging
loads
and
garments
to people
TIME
is programme
changed
delay
is DELAY
also
choosing
Any
eing
leftdrying
in the
thewash
drumprogramme.
toand
beprogramme
removed.
with
sensitive
skin.
c
cancelled.
will be
reduced
by
100
This
option
prevents
garments
from
creasing
byIncreases
means ofwater
carrying out a
changerevolutions
during
selection
cancels
theselection
previously
Time consumption!
delay
button
revolutions
at
a
time
to
400.
special
programme
with
special
turns
to
fluff
out
the be
garments
after A
delay
of
up
to
24
hours
can
selected.
selected options.
ADDITIONAL
FUNCTIONS
The delay
must
bewash
selected
the
Button:
Intensive
( after
) choosing
spin-drying and make them
easier
to iron.
Select
Select
using the appliance
b
d
If during the additional function selection, the
programme is changed or the ON/OFF button
is pressed, all the functions selected until then
are cancelled.
wash
programme.
This
option,
specially
for
Spin
speed selection
and
anti-crease
OPENING
Additional
function
selectionrecommended
button depending
No spin
To
the delay
time,
pressclothes,
the clockachieves
button.
heavily
soiled,
stained
on select
programmes.
button.
THE
EachHATCH
time
the
button
is
pressed
the
start
will
Press the spin button
again
to
get
to
the
better
results
by extending
normal
There are
3 options:
easy-iron, extra
rinse
The
programme
is
be put
back
1 associated
hour.
Option
2:option.
Extra rinse
wash
cycle.
and
intensive
wash. a
no
spin
Aselected
programme
without
with
certain
spin
revolutions,
as
shown
Press
the
select
button
to
display
the
the
delay
83
epending
on spin.
thethe
model,
can
open
the
final
Itlevel
is used
to option
prevent
creasing
Increases
ofyou
theCancelling
final
rinse
obtained
required. in the clothes; suitable for large
on
thewashing
display.
atch by pressing
the hatch
opening
button.
when
special
fabrics.
To cancel
the
delay
you
haveseveral
to press
the you this
By
the
button
loads and
garments
belonging
topressing
people
with
sensitive
skin.times
However,
ac
Select
Select
clock can
button
successively.
The delay
will be
choose
between several
combinations
option
will increase
yourcancelled
waterto
consumption.
when
hours
have
been
reached
youbcannot
open
hatch
due
a two24and
of one,
upspin
to
three
additional
can
be the
modified
by
pressing
the
d It
Anti-crease
optionand
the
button
is pressed
bIf theon
functions
at
the sameonce
time more.
depending
eakdown
or a power
cut,
proceed
as
follows:
drying
button
and
the
number
of
programme
is changed
the
delay is also
the
programme
selected.
The wash programme
stops
on the
last
move the
dispenser
by
pulling
the
handle
c
cancelled.
revolutions
will clothes
bewash
reduced
100
Optionwith
3: Intensive
rinse,
the
left
inby
water.
Button:
Easy-iron
(
)
utwards revolutions
and pressingatthe
blue
lever
with your
a
time
to
400.
When
the function
is deactivated,
the
This option,
recommended
for heavily
soiled
or stained
clothes,
This option
prevents
garments
from
ADDITIONAL
FUNCTIONS
nger. A button
withspecially
a slot will
appear
on
the
creasing
by
means wash
of carrying
out a
washing
machine
continues
the
achieves
better
by
extending
the
normal
cycle.
Additional
function
selection
button
depending
ght.cTurnNo
thespin
button
toresults
the left
with
the
aid
of
special programme with special turns to
programme, draining
and
spin-drying.
on programmes.
fluff out
the garments after spin-drying
coin andPress
the hatch
will open.
the spin
button again
get toeasy-iron,
the extra rinse
There areto3 options:
It is used, for example,and
when
not
makeyou
themare
easier
to iron.
no
spin
option.
A programme
without
If during
the
additional
selection,
theaprogramme is
at
home
and
want
tofunction
delay
the
spinyour model
of Washing
machine
does
not
Press
therinse
select
to display the
Button:
Extra
( button
)
final
spin.
isStart/Stop
used
to
prevent
creasing
changed
or It
the
button
is
allfinal
therinse
functions
drying
until
you
get home,
to
prevent
ave remote
opening
you
have
to Increases
await
about
option
required.
thepressed,
level of the
the
when
washing
special
fabrics.
By
pressing
the clothes;
button
you
selected
are
cancelled.
obtained
in the
suitabletimes
for large
creasing
after
spin-drying
and several
minutesclothes
from theuntil
endthen
of the
programme
can
choose
between
several
combinations
loads and garments belonging to people
being
left
the the
drum
to
be
removed.
efore being
able
toin
open
hatch.
of
one,
two
and
up
to
three
additional
with sensitive skin. Increases water
d Anti-crease option functions
at the same time depending on
consumption!
and intensive wash.
fig. 26
d
Select
a
Select
ortant
programme
selected.
The wash programme the
stops
on the
last82
Button:
Intensive
wash (
)
rinse, with the clothes
left
in water.
Button: Easy-iron (
)
fig. 25
If during the additional function selection, the
programme is changed or the ON/OFF button
is pressed, all the functions selected until then
17
UP AND
6 STARTING
BLOCK FUNCTION SELECTION
using the appliance
STARTING UP
Starting Up
a
Start/pause button
Start/Pause button
a To start up the washing machine you
to press the start / pause button.
• To start up the washing machine youhave
have
to press
the Start/Pause
The
display
will constantly
show the minutes left until the wash is over.
button (Figure 27).
• The time remaining (in minutes) until the end of the programme will appear on the display at all times.
Lock Function
UP AND
6 STARTING
BLOCK FUNCTION SELECTION
Lock function selection
•
•
a
Block function selection STARTING UP
Theprogramme
various buttonswill
can not
be blocked
to prevent
The lock function ensures that the
be affected
if any them from being pressed and affecting the
Start/pause
button
buttons are pressed. It is used when
children
could press
the
buttons,
selected
wash programme
and
options.
This etc.
a
To
start
up
the
washing
machine
you
can be used to stop children playing with the
have
to press the start / pause button.
buttons,
etc.
The lock function should be activated
after
the wash
programme
has The
display
constantly
show the
The block
functionwill
should
be activated
after
minutes
left until has
the wash
is over.
theoptions.
wash
programme
been selected
been selected together with all its
together with all its options.
a
Activating the block function
a The block function is activated by
STARTING
UPbutton
ANDand
b
pressing
the start/pause
holding
it downFUNCTION
for at least 3 seconds.
BLOCK
The lock function is activated by pressing
the
Start/Pause
buttonSELECTION
and The display will show if it is activated.
Activating the lock function
6
•
holding it down for at least 3 seconds (Figure 28).
Deactivating the block function
BLOCK FUNCTION
b The
function is cancelled when
• The display will show the lock symbol
if itblock
is activated.
STARTING
UP
wash selection
programme comes
to an end.
Block the
function
If youbuttons
want tocan
deactivate
the to
block
The various
be blocked
prevent
function
before
the end
the
them from
being
pressed
and of
affecting
the
Start/pause
button
programme,
you haveand
to hold
the start
wash programme
options.
This
Deactivating the lock function selected
a To startdown
up the
washing
machine
you
again
for atplaying
least
3 seconds.
can bebutton
used to stop
children
with the
have
to
press the the
startblock
/ pause
button.
After
3
seconds,
function
buttons, etc.
The
display
will
constantly comes
show
the
• The lock function is cancelled when
the
wash
to
indicator
willprogramme
disappear
the display,
The block
function
should befrom
activated
after
minutes
the
wash is over.
andprogramme
it willleft
gountil
intohas
pause
the wash
beenstatus.
selected
an end (Figure 29).
Thewith
ON/OFF
button does not cancel
together
all its options.
the block function.
• If you want to deactivate the lock
function
the end of the
Activating
thebefore
block function
a
The
block function
activated
by for at programme, you have to hold the Start/Pause
buttonis down
again
pressing the start/pause button and
least 3 seconds.
holding it down for at least 3 seconds.
The display will show if it is activated.
a
b
fig. 29
84
a
Blockthe
function
selection comes to an end.
wash programme
Thecancel
various
buttons
be blocked
to prevent
If youthe
wantlock
tocan
deactivate
the block
• The Start/Pause button does not
function.
them from
being
pressed
and of
affecting
the
function
before
the end
the
selected
wash programme
options.
This
programme,
you haveand
to hold
the start
can bebutton
used down
to stop
children
with the
again
for at playing
least 3 seconds.
buttons,
etc.
After 3 seconds, the block function
The block
function
should befrom
activated
after
indicator
will disappear
the display,
the wash
been
selected
andprogramme
it will go intohas
pause
status.
together
all its options.
Thewith
ON/OFF
button does not cancel
the block function.
Activating the block function
a The block function is activated by
pressing the start/pause button and
holding it down for at least 3 seconds.
The display will show if it is activated.
Deactivating the block function
b The block function is cancelled when
the wash programme comes to an end.
If you want to deactivate the block
function before the end of the
programme, you have to hold the start
button down again for at least 3 seconds.
After 3 seconds, the block function
indicator will disappear from the display,
and it will go into pause status.
The ON/OFF button does not cancel
the block function.
using the appliance fig. 28
a
• After 3 seconds, the lock function indicator will disappear
from the BLOCK FUNCTION
Deactivating the block function
display, and it will go into pause status.
b The block function is cancelled when
18
using the appliance fig. 27
BLOCK FUNCTION
b
84
7 WASH PROGRAMME PHASES AND POWER CUTS
using the appliance
PROGRAMME
PHASES
Wash Programme Phases and Power Cuts
Programme Phases
When the programme is running you can see
which phase it is at on the display, as well as
how long there is to the end of the programme.
• When the programme is running, the programme phase and the time The active phases will appear successively at
remaining will appear onthe
the
display
top
of the(Figure
display 30).
as the programme
progresses. The time remaining until the end of
•
The active phases will appear
successively
theappear
top ofon
thethe
display
as the the programme
willat
also
display.
It updates
at The
regular
intervals,
but not
minute
by of programme progresses (Figure
30).
time
remaining
until
the end
minute.
the programme will also appear on the display. It updates at regular button can be selected provided the
intervals, but not minuteAny
byoption
minute.
takes effect has not been passed and when the programme accepts Pressing the delay button during the wash has
the option.
no effect on the washing machine.
fig. 30
Important
wash phase in which it takes effect has not been
passed and when the programme accepts the
• Any option button can be selected provided the wash phase in which it option.
Pressingduring
the start/pause
during
the wash
• Pressing the time delay button
washing button
will have
no effect
on the activates the PAUSE function.
wash programme.
• Pressing the Start/Pause button during the wash activates the PAUSE function.
If you change the wash programme during
the wash using the selector, the PAUSE
function is activated and the programme is
cancelled.
If you need to add or remove a garment,
press the start/pause button and make sure
that the water level is not above the door
overflow level and that the temperature
inside is not high. Press the start/pause
button again to restart the wash from the
same cycle phase it had stopped at.
POWER CUTS
If the programme is changed on the selector dial during the washing
POWER
and drying process, the washer will go onto PAUSE
statusCUTS
and the
programme will be cancelled.
If there is a power cut, when the electricity
comes back on the washing machine will
continue to run from where it left off (it has
severalahours
of memory).
will happen
If you need to add or remove
garment,
pressThe
thesame
Start/Stop
if the
ON/OFF
is pressed.
button and make sure that
the
waterbutton
level is
not above the door
overflow level and that the temperature inside is not high. Press the
Start/Stop button again to restart the wash from the same cycle
phase it had stopped at.
warnings
Level the washing machine by adjusting the
feet to reduce the noise caused by spin-drying.
Try and wash clothes of different sizes in the
same wash programme to favour the distribution
• If there is a power cut, when
electricity
comes
onspin-drying.
the washing of the the
clothes
inside the
drumback
during
Power Cuts
machine will continue to run from where it left off (it has several hours of memory).
Warnings and Advice
All the models have a safety system for spin-drying
that prevents spin-drying from being carried out if the
distribution of the clothes inside the drum is too
concentrated. This prevents the appliance from
vibrating too much.
If you find that the clothes are not properly wrung out,
try spin-drying them again after having distributed the
clothes more evenly in the drum.
85
• Try to wash clothes of different sizes in the same wash programme to favour the distribution of the clothes inside the drum during spin-drying.
•
All the models have a safety system for spin-drying that prevents spin drying from being carried out if the distribution of the clothes inside the drum is too concentrated. This prevents the appliance from vibrating
too much.
• If you find that the clothes are not properly wrung out, try spin-drying them again after having distributed the clothes more evenly in the drum.
19
washing
machine
washing machine
maintenance and cleaning
MAINTENANCE
maintenance and cleaning
After each wash, leave the door open
for a while to allow the air to circulate
MAINTENANCE
freely inside the machine.
Maintenance
From
time
to time,
depending
on the
After
each
wash,
leaveMAINTENANCE
the door open
hardness
yourthe
water,
is
for
a while toofallow
air toitcirculate
recommendable
to run a full wash cycle
freely
inside the machine.
After each wash, leave the door open
using
a decalcifying
product.
for a while
to allow the air
to circulate
Important Important
time
to the
time,
depending
on
the
This
will
extend
the
life
of your
washing
• After each wash, leaveFrom
the
door
open
for machine.
a while
to allow
the
air to freely
inside
hardness
of your water, it is
machine.
circulate freely inside the
machine.
recommendable
to
run
a
full
wash
cycle
From time to time, depending on the
• From time to time, depending
the
hardness
ofityour
using
a on
decalcifying
product.
hardness
of your
water,
is water, it is extend
of
your
washing
recommendable
to life
run
a full
wash
cycle
recommendable to runThis
aThe
fullwill
wash
cycle the
using
a decalcifying
washing
machine
shouldproduct.
be This machine.
using
a decalcifying
product.
will extend the life of your
washing
machine.
disconnected
from the mains electricity
Important
This will extend the life of your washing
supply
machine.before any cleaning or
maintenance
is carried
out.
The
washing machine
should
be
Cleaning the Detergent
Dispenser
disconnected from the mains electricity
The washing
machine
supply
before
any
cleaning
orbe product • Clean the detergent dispenser
whenever
there
isshould
any washing
disconnectedisfrom
the mains
electricity
maintenance
carried
out.
residue left inside.
supply before any cleaning or
maintenance
is carried
out.it completely • Pull outwards on the detergent
dispenser
to remove
(Figure 32).
1 CLEANING THE DETERGENT DISPENSER
1
• Use warm water and a brush
clean
the compartments
(Figure
33).
CLEANING
THE
DETERGENT
Cleantothe
detergent
dispenser
whenever
there1is any
washing
product
residue
CLEANING
THE
DETERGENT
• Also clean the additive compartment
siphons,
having
removed
them left
first. inside.
Clean
the detergent dispenser whenever
Once they have been cleaned, put them back making sure that they fit there
is the
anydetergent
washing dispenser
product residue
left
Clean
whenever
right in to the back (Figure
33). any washing product residue left
there
inside.
a isPull
outwards on the handle and
inside.
• Put the dispenser back into thepress
washing
themachine.
blue lever with your finger
a Pull
on detergent
the handle dispenser
and
to outwards
remove the
a press
Pull outwards
on the
handle
and
the blue lever
with
your finger
completely.
press
the
blue
lever
with
your
finger
remove
the detergent
dispenser
The washing machine shouldto
be
disconnected
from
the
Use
warm
and
amains
brush to
to
remove
the water
detergent
dispenser
completely.
electricity supply before any cleaning
or maintenance
is carried out.
completely.
clean
the
compartments.
Use warm water and a brush to
Use warm water and a brush to
clean the
compartments.
compartments.
b clean
Also the
clean
the additive
A dirty or incorrectly fitted
siphon
will
prevent
the detergents
from
compartment
siphon.
To remove
b b Also
clean
Also cleanthe
the additive
additive
being taken in and leave water
inside
the
compartment
at
the
end
it,
pull
the
flap
at
the
back
out.
compartment
siphon.
To
remove
compartment siphon. To remove
it,it,Once
pull
the back
back
out. put it
of the wash.
it flap
has
been
cleaned,
pullthe
the
flap at
at
out.
Once
itithas
put
Once
hasbeen
been cleaned,
cleaned,
itit sure
back
pressing
down
toput
make
back
pressing
down
sure
back
down
to make
make
sure
thatpressing
it fits right
in. Put
the dispenser
thatititfits
fitsright
rightin.
in. Put
Put the dispenser
that
dispenser
backinto
into
the
washing
machine.
backinto
the washing
washing machine.
back
the
machine.
Important
Important
Important
a
fig. 31
a
fig. 32
bb
Adirty
dirty
incorrectly
fitted
siphon
dirty
incorrectly
fitted
siphon
AA
ororor
incorrectly
fitted
siphon
will prevent
the additives
fromfrom
will
prevent
additives
will
prevent
thethe
additives
from
being taken in and leave water
being
taken
in and
leave
water
being
in and
leave
insidetaken
the compartment
at water
the end
inside
compartment
at the
inside
the
compartment
at end
the end
of thethe
wash.
ofofthe
thewash.
wash.
86
b
fig. 33
86
20
DISPENSER
DISPENSER
a
86
THE ACCESSIBLE FILTER AND
2 CLEANING
THE OUTSIDE
maintenance and cleaning
CLEANING THE FILTER
CLEANING THE ACCESSIBLE FILTER AND
Cleaning the Filter 2 THE OUTSIDE
a
Clean the accessible filter if the drain pump
maintenance and cleaning
• Clean theisaccessible
if theforeign
drain pump
is blocked by any blockedfilter
by any
objects.
•
•
•
•
2 CLEANING THE ACCESSIBLE FILTER AND
foreign objects.
a Open the kickplateTHE
coverOUTSIDE
with
the aid of
CLEANING
THE FILTER
maintenance
Open the kickplate
cover
with
aid ofgently
a coinon
andit.by gently pulling a coin
and
by the
pulling
a
Clean the accessible filter if the drain pump
open (Figure 34).
is blocked
by any
foreign
objects.
CLEANING
THE
ACCESSIBLE
FILTER
AND
b Place a container
under
the
drain
pipe
2pump
Place a container
theany
drain
filter
to collect
water
that CLEANING
THE
FILTER
to under
collect
that
comes
out any
of
THE
OUTSIDE
a water
Open
the kickplate
cover
with the aid of
maintenance
comes out of itit.
(Figure 35).
a
coin
and by pulling
on it.pump
Cleanathe
accessible
filter gently
if the drain
Remove the drain pipe,
place
it on
the
by
any
foreign
objects.
b
Remove the drainpipe, placeis itblocked
on
the
container
and
open
the
cover.
Placethe
a container
under the
container andbopen
cover. Water
will drain pipe
to collect
anyCLEANING
watercover
that comes
out
Water will startstart
to come
out. a out.
THE
Open
the kickplate
with
theFILTER
aidofof
to come
it.
a coin and by pulling gently on it.
a
Remove
the
drain
pipe,
place
it
on
the
Half- or quarter-turn the filter
to
the
left
(Figure
36).
b
Clean
thehas
accessible
if the
c When all the
water
come filter
out of
thedrain pump
and cleaning
and cleaning
fig. 34
container
andforeign
openunder
the
cover.
Water
will
b Place
a container
the drain
pipe
is blocked
by
any
objects.
start
to several
come
out.
turn the
times
• Water will startmachine,
to come out.
to filter
collect
any water
thatuntil
comes out of
it can be completely
removed,
bycover
pulling
it.
a Open
the kickplate
with the aid of
When
all
the
water
has
come
the • When all the water
hason
drained
of the
washing
machine,
turn
the
Remove
the
pipe,
place
itit.onofthe
a coin
and
bydrain
pulling
gently
onout
gently
it. c out
b
machine, turn the filter several times until
andremoved
open the by
cover.
Water
will filter several times until it can be container
gently
pulling
itcompletely
can be completely
removed,
by pulling
start to
out.under
b Place
a come
container
the drain pipe
Remove the objects
or
in the
gently
onfluff
it. caught
on it (Figured36).
to collect
any
water that comes out of
filter or the drain
pump.
c When
all
the
water
has
come
out of the
it.
d
the
objects
orseveral
fluff
caught
Put the
filter,caught
theRemove
drain
and
cover
• Remove the objects
or fluff
in thepipe
filter
orfilter
the
drain
pump
the
machine,
turn
the
times
until
Remove
the
drain
pipe,
place
it oninthe
filter
or
the
drain
pump.
it can be completely
removed,
by pulling
container
and open the
cover. Water
will
(Figure 37). back in place again.
Put
the
filter,
the
drain
pipe
and
cover
gentlytoon
it. out.
start
come
back in place again.
c
b
c
fig. 35
• Put the filter and the filter cap back in place.
d When
Remove
or fluff
caught
in the
c
all the
theobjects
water has
come
out of
filter or theturn
drain
machine,
thepump.
filter several times until
To avoid risk of scalding, do not carry
out this
operation
when the
c
Put
the
the drain
pipe and
it can
befilter,
completely
removed,
bycover
pulling
back
inon
place
gently
it. again.
wash water is at a temperature of
over
30ºC.
d Remove the objects or fluff caught in the
filter or the drain pump.
Cleaning the OutsidePutofthethe
Washing
filter, the
drain pipe and cover
back in place again.
Machine
c
d
d
Important ImportantImportant
Important
We recommend that you clean the filter
• The outside of the
machine
should
cleaned
with warm soapy Wewashing
recommend
that
you be
clean
the filter
at least once a year.
To
avoid
burns,
do not
carry out
this atcleaning
least once
year.
water or a gentle
agent.aDo
not use
abrasive
cleaning
products
or solvents.
d
when the
To avoid burns,operation
do not carry
outwash
thiswater is at a
of over
30ºC.
We
that is
you
operation whentemperature
therecommend
wash water
atclean
a the filter
least30ºC.
a year.
• It should then be
thoroughly dried
with
a once
soft cloth.
temperature
of at
over
fig. 36
d
To avoid burns, do not carry out this
operation
the wash
water
is at a
Wipe any detergent spills immediately
towhen
minimise
the
risk
of
LIMPIEZA
EXTERIOR
CLEANING
THE
OUTSIDE
temperature of over 30ºC.
damage to the cabinet of your washing
machine.
We recommend
that you clean the filter
Important ImportantImportant
Important
When there have been spillages of
The
outside
theTHE
washing
machine should
LIMPIEZA
EXTERIOR
CLEANING
OUTSIDE
at leastofonce
a year.
detergent or additives from the
be cleaned
withburns,
warm soapy
a gentle
To avoid
do notwater
carryorout
this
dispenser onto the washing machine
cleaning
agent.
Do
not
use
abrasive
cleaning
LIMPIEZA
EXTERIOR
CLEANING
THE
OUTSIDE
operation when the wash water is at a
When
there
have
of as
The outside of the
washing
machine
should
cabinet,
cleanbeen
themspillages
up right away
products
or solvents.
temperature
of over 30ºC.
they
are
corrosive.
It
should
then
be
thoroughly
dried
with
a
soft
detergent
or
additives
fromspillages
the of
be cleaned with warm
soapyofwater
or a gentle
When
there
have been
The outside
the washing
machine should
cloth.
onto or
the
washing
machine
cleaning agent. Do
not usewith
abrasive
cleaning
detergent
additives
from
the
be cleaned
warm soapy
water or a gentle dispenser
dispenser
onto the
machine
cleaning agent. Do not use abrasive cleaning cabinet,
clean them
upwashing
right away
as
products or solvents.
87
LIMPIEZATHE
EXTERIOR
CLEANING
OUTSIDE
cabinet,
clean them up right away as
or solvents.
they are
corrosive.
It should then beproducts
thoroughly
dried with a soft
they are corrosive.
It should then be thoroughly dried with a soft
cloth.
When there have been spillages of
cloth.outside of the washing machine should
The
be cleaned with warm soapy water or a gentle
87
cleaning agent. Do not use abrasive cleaning
products or solvents.
It should then be thoroughly dried with a soft
cloth.
fig. 37
detergent or additives from the
87 dispenser onto the washing machine
cabinet, clean them up right away as
they are corrosive.
87
21
Safety and Troubleshooting
• If you detect any problems with your washing machine, you will probably be able to rectify them yourself by consulting the following instructions.
• If this is not the case, unplug the appliance and contact the technical assistance number.
Do not open up the washing machine. It does not contain any fuses or similar components than can be replaced.
Indicator
Problems
F01
No water coming in
F02
C03
F04
Does not drain or spin-dry
Does not spin-dry
Does not start
F05 - F10
Call the Technical Assistance Team
Problems
Why won’t the washing machine start?
This may be due to the following:
•
Check the door is properly shut.
• The washing machine is not plugged into the mains or there is no voltage in the mains supply.
• The Start/Pause button has not been pressed.
• If the washing machine door is not properly shut, F04 will appear on the display.
Why is the washing machine vibrating or making too much noise?
This may be due to the following:
•
•
•
The blocking and transport screws have not been removed.
The washing machine has not been correctly levelled.
On spin-drying, the motor makes a kind of whistling noise. This is due to the mechanical action of the motor itself and is perfectly normal.
Why doesn’t the washing machine take in water?
• If F01 shows on the display this may be caused by a cut in the water supply, a tap turned off or a blocked water inlet filter.
• The possible solutions are as follows: wait for the water supply to be reconnected, turn on the tap, or remove the water inlet hose and clean the filter.
22
Problems
Why doesn’t the washing machine drain or spin-dry?
• If this failure is detected, F02 will appear on the display.
The reasons for the F02 indicator may be the following: • The washing machine drain pump blocked, building drainage pipes blocked, or incorrect pump electrical connection.
• Solution: if the pump is blocked, gain access to it as described in section 2, maintaining and cleaning the appliance.
Why doesn’t the washing machine spin-dry?
This may be due to the following:
• If this failure is detected, C03 will appear on the display.
• This may be due to an uneven distribution of clothes in the drum and may cause an excessive level of vibrations.
• The solution is to select a spin-drying programme.
Why can’t I see any water in the drum during the wash?
• This is due to the fact that the washing machine is provided with a system which is able to adapt to the load and type of
abrics, adjusting the levels of water and energy used, in order to preserve the environment. So, although the water level you c
an see through the hatch may look low, there is no cause for concern as washing and rinsing efficiency will still be optimum.
Why is there still some water in the dispenser?
• This may be because the dispenser needs cleaning. This simple operation is described in Maintaining and cleaning the appliance.
Why can’t I open the porthole door immediately after the wash has finished?
• Washing machines today are provided with safety systems for users. One of these is that the washing machine cannot be opened until it is certain that the drum is quite still. This is why the hatch cannot be opened for 2 minutes.
Other indications
• The washing machine can detect other indications. When this happens a number of other indicators appear on the display: F05, F06..., F10. If this happens, call CDA Customer Care.
23
To contact our Customer Care Department, or for Service,
please contact us on the details below.
Passionate about style
24
Customer Care Department • The
Group Ltd. • Harby Road • Langar • Nottinghamshire • NG13 9HY
T : 01949 862 012 F : 01949 862 003 E : [email protected] W : www.cda.eu