1
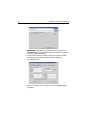
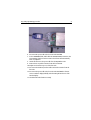
Ray240 VHF
Radio
Service
Programming Kit
Document Number: 83175_1
Date: July 2004
Trademarks and registered trademarks
Autohelm, HSB, Raymarine, RayTech, Raymarine H6, Sail Pilot, SeaTalk and Sportpilot are
registered trademarks of Raymarine Limited. Apelco is a registered trademark of Raymarine
Holdings Limited (Registered in all major marketing territories).
AST, Autoadapt, Auto GST, Autoseastate, Autotrim, Bidata, Marine Intelligence, Maxiview,
On Board, Raychart, Raynav, Raypilot, Raystar, ST40, ST60, Seaclutter, Smart Route, Tridata
and Waypoint Navigation are trademarks of Raymarine Limited.
Windows, Word and Excel are registered trademarks of Microsoft Inc.
All other product names mentioned are trademarks or registered trademarks (if applicable) of
their respective companies.
Copyright: ©Raymarine 2004
Important information
3
Important information
Introduction
The Ray 240 service programming kit provides the hardware to program a Ray240 base unit.
The PE68HC12BDM software on the supplied CD-ROM is compatible with a PC running any of
the following:
•
•
•
•
Windows 98.
Windows 2000.
Windows XP.
Windows ME.
Safety notices
WARNING: Electrical safety
Make sure that the power supply to the Ray240 base unit is
switched off before removing the cover.
WARNING: Product installation
This equipment must be installed and operated in accordance
with the Raymarine instructions provided. Failure to do so could
result in poor product performance, personal injury, and or
damage to the boat.
EMC conformance
All Raymarine equipment and accessories are designed to the best industry
standards for use in he recreational marine environment. Their design and
manufacture conforms to the appropriate Electromagnetic Compatibility (EMC)
standards, but correct installation is required to ensure that performance is not
compromised.
Handbook information
To the best of our knowledge, the information contained in this handbook was
correct as it went to press. However, our policy of continuous product
improvement ad updating may change specifications without prior notice. As a
result unavoidable differences between the product and handbook may occur
from time to time. Raymarine cannot accept any responsibility for any
inaccuracies or omissions it may contain.
4
Ray240 - Service Programming Kit
Programming kit contents
The Ray240 Service Programming Kit, Part No. E46025, contains the following
items:
Part No.
Description
15508
PROG12Z - Programmer software CD-ROM
1509
USB-ML-12 Programming dongle and cable
83715_1
Ray240 Service Programming Handbook
Programming software installation
5
Programming software installation
Introduction
The CD-ROM in this kit contains the software required to operate the
programming dongle.
This section deals how to install the programming software onto your PC.
Installation
To install the programming software using the CD-ROM:
1. Insert the CD into the computer’s CD-ROM drive. After a few moments the
Install Shield Wizard Welcome screen is displayed.
2. Click Next, and follow the on-screen instructions.
If the Install Shield Wizard does not automatically run;
1. Select Start/Run from the computer taskbar and type e:\setup.exe
(substitute the drive letter of your CD-ROM drive for ‘e’ if it is different). After
a few moments the Install Shield Wizard Welcome screen is displayed.
2. Click Next, and follow the on-screen instructions.
6
Ray240 - Service Programming Kit
IMPORTANT: Do NOT change the destination folder from the default of
C:\PEMICRO\PROG12Z. If this default is changed, the installation of software
into the Ray 240 base unit will fail.
3. After the software has been installed, complete the registration and click
Send Registration. This will ensure that any software updates are
automatically received.
4. Restart your computer. It is now ready for you to use the PE68HC12BDM
programmer.
Ray 240 software files
7
Ray 240 software files
Introduction
Before programming a Ray 240 base unit, the software files mst be downloaded
and installed into the directory C:\PEMICRO on the PC that the programming
software was installed on. These files will have the following formats:
• 49129XYY.PHY
• 49129XYY.CFG
• 49129XYY.LNK
49129 X YY .PHY
indicates RAY 240 software
Software release number
Software version number
File type
Downloading software files
The latest version of software for the Ray 240 should be downloaded from:
www.raymarine.com
You must have Dealer sign-in privileges to access the software site.
To download files:
1. Log- in using your User name and Password via the Dealer Log-in page. A new
Dealer button appears.
2. Click the Dealer button and navigate to the Software downloads page.
3. Navigate to the Ray 240 page and download the latest issue of software files.
These should be unzipped into the C:\pemicro directory on the computer that
contains your programmer software.
8
Ray240 - Service Programming Kit
Ray 240 programming procedure
Introduction
This section details the programming procedure for the Ray 240 base unit after
successful download of the latest software files.
Programming the base unit
To program the Ray240 base unit:
1. Plug the programming dongle into the USB port of your PC.
2. Switch off and remove the power cable from the Ray240 base unit.
3. Disconnect the handsets, interface cables and aerial connection from the base
unit.
4. Remove the top cover of the unit.
The top cover is removed by pressing and hold in the tab on the side of the
unit and lifting the top cover up and to the left to clear the heatsink.
5. Connect the 6-way cable from the programming dongle into the Ray 240 base
unit PCB ensuring correct orientation and alignment.
Progamming
dongle connector
Top cover
release clip
Ray 240 programming procedure
9
6. Re-connect the power cable to the base unit and switch ON.
7. In the C:\PEMICRO folder, double-click the 49129XYY.LNK shortcut icon. The
programming of the base unit now starts. The software will automatically
close on completion.
8. Switch off and remove the power cable from the Ray240 base unit.
9. Remove the 6-way cable connection from the base unit PCB.
10. Replace and secure the top cover of the base unit.
11. Re-connect the handsets, interface cables and aerial connection from the
base unit.
12. Re-connect the power cable to the base unit and switch ON.The software
version number is displayed briefly at the bottom right-hand corner of the
handset display.
13. Check that the radio functions correctly.
10
Ray240 - Service Programming Kit