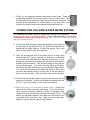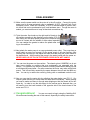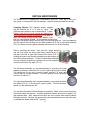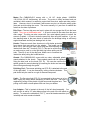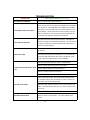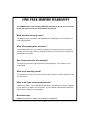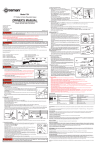
1
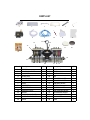
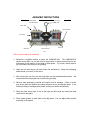
INSTRUCTION
MANUAL
READ FIRST
SAFETY GUIDLINES
The following guidelines must be observed to ensure proper usage and
safety.
⇒ READ ALL THE INSTRUCTIONS
⇒ Make sure that the electrical outlet you plug the machine into is securely grounded and away from the machine. Do not use any extension cord without a ground. Connect the motor power cord to a surge
protected outlet or preferably a GFCI (Ground Fault Circuit Interrupter)
outlet. While not necessary, a GFCI is recommended to prevent electric shock and can be purchased at your local hardware store. Though
the motor is sealed, you must make sure to keep all electrical connections dry. Never disconnect the motor or pump with wet hands and
avoid touching the pump when connected to the power.
⇒ Wear the enclosed safety goggles to protect from any debris that may
fly out while grinding. Do not wear loose clothing or clothing that can
become entangled with the wheels.
⇒ Some rocks contain poisonous elements such as uranium, mercury,
lead, arsenic, etc. Be certain you are not grinding material that exhibits this trait.
⇒ Make sure there is adequate water used while grinding so that rock
dust is not formed. This dust can be hazardous to your lungs if inhaled.
⇒ Avoid contact with the motor housing when in use. The motor is totally enclosed and lubricated which results in a high temperature.
⇒ You must be focused and alert when grinding. It is possible for stones
to catch on the wheels and be ejected out of the grinding area.
2
TABLE OF CONTENTS
PARTS LIST……………………………………………………………….. 4
ASSEMBLY INSTRUCTIONS…………………………………………. 5
CONNECTING THE SINGLE-PASS WATER SYSTEM………… 6
FINAL ASSEMBLY……………………………………………………….. 7
MACHINE USAGE………………………………………………………. 8
THE ART OF CABBING……………………………………………….. 9
PARTS & MAINTENANCE……………………………………………. 10
TROUBLESHOOTING………………………………………………….. 14
WARRANTY INFO………………………………………………………. 15
3
PARTS LIST
1
2
7
3
8
4
9
5
10
6
11
12
15
16
14
13
26
17
28
18
27
25
Part #
1
2
3
4
5
6
7
8
9
10
11
12
13
14
24 23
Description
GOGGLE
PAN SPLASH GUARD
HAND REST
STONE TRAY
FLANGE WRENCH
FLANGE KEY
PUMP
DRIP TUBE
INTAKE TUBE
DIAMOND PASTE
APRON
HOOD SPLASH GUARD
WHEEL SPLASH GUARD
HOOD
21
22
QTY
Part #
1
4
2
2
1
1
1
2
1
1
1
2
2
2
15
16
17
18
19
20
21
22
23
24
25
26
27
28
4
20 19
Description
SPOT LIGHT
MOTOR
POLISHING PAD
PAN
3000# RESIN WHEEL
1200# RESIN WHEEL
600# RESIN WHEEL
BASEBOARD
280# RESIN WHEEL
220# DIAMOND WHEEL
80# DIAMOND WHEEL
FULL FACE LAP - 360#
LAP ADAPTER
BOOK
QTY
1
1
1
2
1
1
1
1
1
1
1
1
1
1
ASSEMBLY INSTRUCTIONS
WATER FLOW
CONTROL KNOBS
SPOT LIGHT
STONE TRAY
SPLASH GUARDS
SIDE PANEL
HAND REST
ON/OFF SWITCH
DRIP PAN
FIG. A
Refer to picture above for assembly.
1. Determine a suitable location to place the CABKING-6V3. The CABKING-6V3
weighs about 45lbs. so you will need a sturdy table or stable surface that has approximately 3 feet width by 2 feet depth of clear space. Try to find a well lit area so
you can clearly see what you are grinding.
2. Open the box and remove all loose foam and accessories. Keep this packaging
aside should you need it in the future.
3. Next remove the unit from the box and place on the predetermined location. We
recommend that two people help in performing this step.
4. Remove foam packaging material and inspect unit for damage. Check to make
sure all the parts are present according the parts list on the opposite page. If you
find any missing or damage parts please contact your dealer immediately.
5. Place the clear stone trays on top of the right and left hoods and insert the hand
rests into the drip pans.
6. Place splash guards on both sides of the drip pans. You can adjust their position
according to the splash.
5
7. Finally, you can optionally attach the side panels to the hoods. These are
magnetically attached to the hood to make it easy to remove them. Twist
the side spray tubing upwards to easily attach and remove the panels. The
purpose of the side panels is to control splash, so you may prefer not to
use them for easier access to the diamond lap and polishing pad.
FIG. B
CONNECTING THE SINGLE-PASS WATER SYSTEM
The CABKING-6V3 water system is single-pass meaning non-recirculating. Do not
setup the machine as a re-circulating system. Please read further about it in the Parts
& Maintenance section after finishing the set up. Also, note that the color of the tubing
may vary from the pictures.
8. Connect the water drainage system by attaching the clear tubing to
the rear spout of the drip pans (FIG. C). Secure the connection by
positioning the spring clasp so it covers the spouts. Tug on the
tubes to make sure they are firmly attached.
FIG. C
9. Place the unconnected ends of the clear tubes in a large (5gal)
empty bucket (FIG. D) (not included), or drain hole, or wherever
you would like the dirty water from the pans to drain out. It is important that you have the drainage tube pointing as downward as
possible from the machine. This will allow gravity to drain the water from the drip pans. If you notice the pans filling up with water,
most likely the clear drain tubes are not sufficiently angled down.
You can tilt the drip pans up and shake the tubing to drain. Once
you have this properly set-up you may want to cut the tubing so
there is no excess slack. This will further help to drain the pans.
FIG. D
10. Connect the water intake system by pushing the blue tube into the
open hole of the black T-junction on the base just behind the motor
(FIG. E). Tug on this tubing to verify a secure connection.
FIG. E
11. Make sure pump is not connected to power supply. Connect the
other end of the blue tube to the water pump. Tug on this tubing to
verify a secure connection. Place the pump in a separate large
(5gal) bucket (not included) filled fully with clean water (FIG. F). To
ensure enough water pressure, the length from the bucket to the
unit should not be more than 6 feet. Once you have found a good
length you can cut the blue tubing to this distance.
6
FIG. F
FINAL ASSEMBLY
12. Make sure the power switch on the motor is in the off position. Connect the motor
power cord to a surge protected outlet or preferably a GFCI (Ground Fault Circuit
Interrupter) outlet. While not necessary, a GFCI is recommended to prevent electric shock and can be purchased at your local hardware store. Though the motor is
sealed, you must make sure to keep all electrical connections dry.
13. Twist the water flow knobs on the right and left hoods to the
off position according to the directions on the knobs (FIG. G).
Also, swing out the clear splash guards on the hoods so they
are not in contact with the wheels of either wheel assembly.
You can readjust the guards to reduce the splash after turning on the machine.
FIG. G
14. Next attach the water pump to a surge protected power outlet. The pump has no
on/off switch so once you connect it to the power supply it will start working. After
following the next step you can adjust the water flow rate using the control knobs to
the desired level. Avoid touching the pump in the water bucket with the power on.
NEVER UNPLUG OR TOUCH THE POWER CORDS WITH WET HANDS.
15. You can turn the power on the machine. The wheels spin at 1800RPM, so do not
wear loose clothing or anything that may accidentally get entangled with the
wheels. It is typical for the motor to produce a winding sound when starting up and
a mild humming sound after. On some occasions the motor may make a high pitch
sound. This is most likely caused by the space between the unit and the table surface. You can try to reduce the sound by putting cloth or cardboard under the unit.
16. Now you can start the water drip by adjusting the water knobs, see FIG. G. Our
unique system allows you to drip water on each wheel individually. When grinding
you want to make sure there is enough water dripping so that the wheels do not become dry. In order to use the side spray for the canvas pad or diamond disc, you
will need to turn the knob located on the opposite side of the hood closest to the
motor see FIG. H.
You are now ready to begin using the CabKing-6V3.
17. Congratulations!
We recommend reading the rest of this manual, especially the safety instructions.
7
MACHINE USAGE
The CABKING-6V3 is an universal grinder/polisher for gemstones. It is configured with
2 hard diamond electroplated wheels, 4 resin diamond wheels, 1 full face diamond flat
lap, and 1 canvas polishing disc for use with the included diamond compound. The
motor on the CABKING-6V3 is direct drive which means a smaller, compact unit with
no belts or other parts to maintain or replace. The water system on the CABKING-6V3
is unique and allows you to independently control water spray on the wheels. Make
sure you use adequate water when grinding and monitor the pump
bucket to avoid running dry. If the wheels become covered with
stone residue you should increase the water flow. Another advantage to our water system is that you can adjust the spray angle
on the wheels. This will allow you to use wheels of various widths.
You can adjust the nozzles located at the end of the Y-SPLIT under the hood see FIG H. While you can use the CABKING-6V3 to
grind all kinds of shapes and designs, the general process of makFIG. H
ing a cabochon is described below.
To make the cabochon start with the hard diamond wheels on the left which will allow
you to create a domed shape from your rough stone. You can choose to hold your
stone free hand or on a dop stick. Begin with the 80 grit diamond wheel and be sure to
completely grind the surface of the stone using adequate water coolant. If the stone is
not ground thoroughly scratching will occur. Making sure that all scratches are removed is the most important part of grinding the cabochon. Repeat this process for the
220 grit wheel. Next move onto the resin wheel sequence, which will sand and smooth
the stone resulting in a pre-polished cab. Note: New resin wheels may bleed some of
their pigment. This is entirely normal and will not affect your stones.
Start with the 280 grit and grind thoroughly, moving onto the next wheel when finished.
After you finish the sequence of 600, 1200, to 3000 grit, the stone will be ready for polishing. Make sure you are adjusting the spot light as you are grinding to provide additional light. This light will be adequate for most situations, but you may require a separate light source for additional brightness.
8
Note: The supplied resin wheels are designed to work exclusively together in sequence
To avoid scratching or other problems, you should change all the resin wheels if you
plan on using different brands.
Using diamond paste for polishing will finish the process for most
stones, resulting in a bright shiny cabochon, however there are
many other polishing powders and pastes available. To polish
your stone, attach the enclosed polishing pad by screwing it into
the end of the right wheel assembly while the machine is turned
off. Then use the enclosed 14,000 mesh diamond paste syringe
and apply to the canvas polishing pad, by spreading small drops
randomly over the surface. Then using circular motions with your
finger rub the diamond compound thoroughly across the surface
of the pad. Now its ready for use. Most polishing compounds do
not require water so you can turn the machine back on and begin
FIG. K
use. If you want to use with water then make sure to aim the
spray tube to center of the disc (FIG. L). Aiming at the center will allow the spinning
motion of the disc to spread the water evenly over the surface. The spray can be
aimed by appropriately twisting and turning the tube as well as the nozzle (FIG K).
This will allow the water to spread over the disc when spinning. Make sure to use a
separate polishing pad for each different kind of polishing compound.
Now that you have domed and polished your stone you can put a flat on
the backside using the full face diamond flat lap (FIG. Z) Attach the lap
by screwing it into the end of the right wheel assembly, while the machine is off. Again, make sure the water spray is aimed to the center of
the disc. Simply hold the back of your cab on the surface of the diamond
lap until the back flattens evenly. Both the canvas and full face lap can
only be used on the right shaft.
FIG. L
THE ART OF CABBING
The art of cabbing involves experimentation since every stone is different. As you progress in your cabbing ability, you may find that different grits are necessary depending
on your stone and application. Ask your dealer about the other available grits for both
electroplated and resin wheels.
Again, this is a very brief and simple introduction to the cabbing process. The enclosed
book (FIG. L) should help you out further in your understanding as well as searching
the internet and talking with your dealer.
We also recommend trying to find a local
lapidary club to further your knowledge. As with all stone cutting and cab making, practice and experimentation are the keys to success.
9
PARTS & MAINTENANCE
The CABKING-6V3 is designed as a maintenance free unit. There are no belts, pulleys, gears, or other parts to actively maintain. All parts should be cleaned manually.
Changing Wheels—The diamond wheels supplied
with the machine are 6” x 1.5” with a 1” arbor. The
CabKing works with any style of wheel that is 1” arbor.
Please note that our resin wheels are designed to
work exclusively together in sequence. For best results, you should change all the resin wheels if you
FIG. M
FIG. N
plan on using different brands. All the wheels will last you a
long time with proper usage, however they will eventually wear out. Once this happens
you will need to twist off either the left shaft assembly (FIG. M) or right shaft assembly
(FIG. N). Before removing either assembly make sure to turn off the machine.
Start by removing the hoods. Next, take the flange wrench
and use it to secure the shiny metal flange located on the inside part of the left or right shaft closest to the motor (FIG. U).
Holding the wrench will prevent the shafts from spinning as you
take off the wheel assembly. To take off either wheel assembly
turn the assembly towards you clockwise for the left assembly,
counter-clockwise for the right (FIG. O).
FIG. O
The left wheel assembly can be disassembled by removing the brass
adapter by twisting it clockwise (FIG V.) with a pair of pliers (not included).
The slotted bolt on the end is used to attach optional 1/2” arbor laps
(remove bolt by turning clockwise). The three spacers on this assembly
are two 3/4” and one 1”.
LOOSEN
LOOSEN
The right wheel assembly can be disassembled by unscrewing clockwise
the washer (FIG V.) on the end with a pair of pliers. The two aluminum
spacers on this assembly are 3/4”.
FIG. V
You can slide the wheels off and change as necessary. Make sure to correctly position
the wheels using the spacers. Correctly positioned wheels should have roughly 3/4”
gap between them. Also, make sure the grits are in the correct order and the wheels
are tightly secured. Reverse the process to put the assemblies back on and make sure
to re-attach the intake tubes to the T-junction.
10
CABKING WATER SYSTEM PARTS
NEEDLE
TUBING. 1/4”
VALVE
OUTER DIAMETER
BY 1/8” INNER
Y-SPLIT
THREADED–T
THREADED–L
NOZZLE (2pc)
DIAMETER
PARTS AND TUBING CAN BE REMOVED BY EITHER PULLING APART OR UNSCREWING.
CONTACT YOUR DEALER FOR ADDITIONAL PARTS AND TUBING.
Water System—One of the key features to the CABKING-6V3 is the single pass, contamination free water system. All parts of the water system will remain trouble free as
long as you use a fresh, clean supply of water. Do this by using a separate intake water bucket from the drainage bucket. Most importantly, a fresh supply of water will protect you from cross-contamination of grit which can occur in re-circulating systems that
use a bubbler or geyser. With fresh water the pump and intake tubes will stay clean
and unobstructed so there will be enough water pressure. The pump is rated at
30watts, 605GPH, 8.2ftHmax. We recommend using a minimum 5 gallon bucket for
both the pump and drainage. You will typically go through an average of 1-2 gallons of
water per hour, with the water control knob on a light to medium drip. You want to
monitor the water level in the bucket to make sure the pump is always submerged. The
pump is not designed to run dry, so be vigilant.
All parts of the water system can be disassembled by pulling off or unscrewing, then
cleaned with soapy water. For routine maintenance it is a good idea to clean the nozzles, Y-SPLIT, and tubing with a small wire brush or pipe cleaner, like the one supplied.
DO NOT SET UP AS A RE-CIRCULATING SYSTEM, meaning putting the drip pan
tubes into the same bucket of water as your pump. Doing so will void your warranty.
Setting up this way will also mean you will risk cross contamination of grit, resulting in
scratches on your stone. Grit will eventually build up in the water control valve, nozzles, and tubing to restrict water flow.
11
Motor—The CABKING-6V3 comes with a 1/4 HP, single phase, 1800RPM,
110/115Volt, 60 HZ, ball bearing, AC motor. The motor is totally enclosed and non
ventilated, which means it is sealed to protect itself from dust, water and other particulates. However, since it is enclosed it will become very hot, so follow the safety guidelines and avoid touching the motor. The motor warranty is 1 year free of material defects from the date of purchase.
Drip Pans—The two drip pans are kept in place with two prongs that fit into the base
board. They are not dishwasher safe. It is best to drain all the water from the pans
after usage. The drip pan also comes with four metal splash guards to reduce the
amount of splash. It is best to drain the pans fully after using the machine. If you notice standing water in the pans check to make sure the drainage tubing is sufficiently
angled downward and the pan drainage hole is clear.
Hoods—These are made from aluminum to offer better protection
from stones that may catch on the wheels. The hoods can be
taken off by removing the side panels and then disconnecting the
intake tubes from the T-Junction (FIG. P) This can be a little tricky,
so make sure to push in on the light blue ring before pulling out the
tube. Then lift up out of the drip pans. Make sure to reconnect the
intake tube after putting the hoods back on.
Guards—The CABKING-6V3 comes with two clear, adjustable splash
guards attached to the hoods. These splash guards can be tightened
using the side knob on the hood (FIG. Q). You can also remove the
splash guards for manual cleaning by loosening the knobs and removing
the rod that goes through the guard.
FIG. P
FIG. Q
Polishing Pad—The canvas polishing pad (FIG. R) is attached to the end
of the right shaft. It can be removed by turning counter-clockwise. This
pad should only be used for one grit of diamond compound.
FIG. R
Light— The flex stem light (FIG. S) is connected to the motor, so to be
safe, unplug the motor before attempting to switch the bulb. The bulb is
replaced by pulling off the plastic ring that surrounds the glass lens. Then
pulling out the bulb out and replace with one from your dealer.
FIG. S
Lap Adapter—This is located at the end of the left wheel assembly. You
can use this to add a 1/2” arbor diamond lap to the end of the left wheel assembly. To remove the slotted bolt (FIG. T), use a flat head screwdriver (not
included) and twist counter-clockwise.
12
FIG. T
Flange— The flange is located on the inside of the left shaft closest to the
motor. The flange is used to hold the shaft while removing and securing
wheel assemblies. If the flange becomes loose, use the included flange key
to tighten it (FIG. U).
FIG. U
Knobs—These knobs can be removed by unscrewing the brass screw located on the side.
Spacers—These are aluminum rings supplied on the wheel assemblies to
create proper distance between wheels. See Changing Wheels for more
info. Spacers are available in 1/2”, 3/4”, 1”.
Stems—The stems are located behind the motor used for attaching optional
accessories like a light or magnifier.
FIG. I
Stone Trays—These are the two clear trays on the hoods for you to place
stones as you are grinding.
FIG. J
Resin Diamond Wheels—Our resin wheels (FIG. N) are formulated to be
used exclusively together. When ordering replacement wheels, make
sure not to mix and match with other brands of wheels. Doing so will most
likely result in scratching and improper grinding/polishing. If you plan on
using other types of resin wheels, make sure to replace all the wheels.
FIG. N
Diamond Laps— The CABKING-6V3 is configured to accept a standard 1/2”
arbor hole lap (FIX. Y) with base to be used on the brass adapter located on
the left shaft or a full face lap (FIG. Z) with 1/4”-20 thread to be used on the
end of the right shaft. The CABKING-6V3 comes standard with a 360# diamond full face lap for use on the right shaft only. Full face laps are useful for
putting flats on larger cabs.
FIG. Y
FIG. Z
Replacement Parts— All the wheels, polishing pads, diamond laps, diamond
compound , spacers and other CABKING-6V3 accessories can be purchased directly
from your dealer.
Optional Accessories— The CABKING-6V3 can be fitted with many optional accessories. Some of them are: sintered grinding wheels, concave grinding wheels, polishing
buffs and polishing wheels. Please contact your dealer for more information.
13
TROUBLESHOOTING
PROBLEM
RECOMMENDED SOLUTION
PARTS MISSING OR DAMAGED
CONTACT YOUR DEALER FOR REPLACEMENTS
MOTOR MAKES A HIGH PITCH SOUND
THIS IS TYPICALLY DUE TO THE TABLE OR PLATFORM THAT THE CABKING6V3 IS PLACED ON. THE BASEBOARD OF THE CABKING-6V3 CAN SOMETIMES VIBRATE THE PLATFORM, WHICH ACTS AS AN AMPLIFIER OF THE
MOTOR SOUND. THE BEST SOLUTION IS TO FIND A SURFACE THAT ABSORBS THE VIBRATION. YOU CAN ALSO PLACE SOME CARDBOARD OR
CLOTH UNDER THE MACHINE TO ABSORB THE VIBRATION.
MOTOR VIBRATES OR SHAKES
MAKE SURE THE WHEELS ARE PROPERLY BALANCED. SOMETIMES IN
SHIPPING THE WHEELS WILL BECOME UNBALANCED. THIS CAN BE FIXED
BY TAKING THE WHEELS OFF AND REALIGNING THEM. MAKE SURE TO
TIGHTEN THE SHAFT PROPERLY.
MAKE SURE POWER IS CONNECTED AND MACHINE IS TURNED TO THE
ON POSITION
WHEELS DON'T TURN
MAKE SURE THE WHEELS ARE NOT OBSTRUCTED. IF THE WHEELS ARE
CAUGHT ON SOMETHING BEFORE YOU TURN ON THE MOTOR, THERE
WILL NOT BE ENOUGH MOMENTUM TO START SPINNING.
TURN WATER CONTROL KNOB SO IT WON’T TURN ANYMORE
CHECK IF THERE IS WATER IN THE BUCKET WITH PUMP
WATER FLOW IS WEAK OR DOESN’T FLOW CHECK IF PUMP IS CONNECTED TO POWER SUPPLY
AT ALL
CHECK ALL TUBING IS CONNECTED PROPERLY
CLEAN NOZZLES AND Y--SPLITS WITH PIPE CLEANER OR SMALL BRUSH.
SHAKE THE DRIP PAN TUBING. WATER SHOULD BE FLOWING OUT OF
THE DRIP PAN TUBES, IF NOT THEN SHAKE THE TUBES TO START THE
FLOW WHILE TILTING THE PANS UPWARD.
DRIP PANS DO NOT DRAIN
MAKE SURE CLEAR TUBING ATTACHED TO DRIP PAN IS ANGLED DOWNWARD. THE TUBING SHOULD ALSO BE CUT TO LENGTH AFTER SETTING
UP THE UNIT.
CLEAN THE DRIP PAN OUTSPOUT
RESIN WHEELS BLEED COLOR
THIS IS NOT A PROBLEM. IT IS NORMAL FOR THE PIGMENT ON THE
WHEELS TO COME OFF WITH USAGE. IT WILL NOT DAMAGE YOUR
STONES.
14
ONE YEAR LIMITED WARRANTY
The CABKING-6V3 is warranted by REENTEL International Inc. to be free from defect for the period of one year from the date of purchase.
What does this warranty cover?
This warranty covers all parts of the CABKING-6V3, including the motor and pump, excluding the light bulb.
What this warranty does not cover?
Your warranty does not cover problems resulting from any abuse, misuse, intentional
damage, incorrect usage, failure to adequately take care of the machine, or improperly
following the instructions.
Who is covered under this warranty?
The warranty covers the original purchaser of the equipment. This warranty is nontransferrable.
What is the warranty period?
The warranty is in force for one year from the date of purchase. Please retain this book
for your records.
What to do if you need warranty service?
Contact your dealer. They will determine how best to deal with your problem. Shipping
to your dealer or us will be at your expense. If your problem is determined to be under
warranty, we will pay for return shipping.
Manufactured by:
REENTEL International Inc., 802 Burr Oak Dr., Westmont, IL 60559, USA
15
16