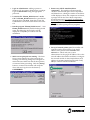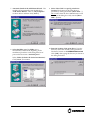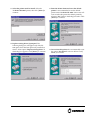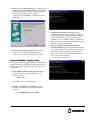
1
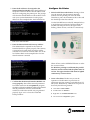
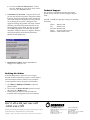
Windows® NT 4.0 Driver Installation: EP-1000™ Technical Brief Overview Configuring the EP-1000 The Codonics® EP-1000™ Print Driver for Windows® NT 4.0 allows users to print directly from Windows applications to the EP-1000 printer over a network. This document describes the procedure to install the EP-1000 Print Driver on Windows NT. The following instructions describe how to configure the EP-1000 printer for proper operation with the Windows NT 4.0 Operating System. The installation of the EP-1000 Print Driver is unlike most other print drivers, so be sure to follow the steps in this document carefully. The installation steps are summarized below: 1. Unzip the self-extracting archive file. This will automatically create the special EP-1000 printer port and allow you to set the printer’s IP address. 2. Add Printer Wizard will automatically launch. Add the printer as a local printer on the special port, EPR1. 3. Manually launch the network module configuration tool to set the IP address at the printer. 4. Select Parallel interface at the printer. (The network interface module connects to the parallel port) Release Notes The currently released Windows driver requires the Network Interface Module and does not work with a direct connection to the Parallel or USB Ports. Preparation The following items are required to complete this installation procedure: ◆ An EP-1000 printer with a loaded paper cassette and a ribbon installed. A or A4 size paper can be used. ◆ An Ethernet connection between the host PC and the Network Interface Module on the EP-1000. ◆ The EP-1000 Windows Print Drivers CD. ◆ The host PC administrator password. Contact your system administrator if help is needed. 1. Unpack the EP-1000. Unpack the EP-1000 according to the instructions shipped with the printer. Remove all retaining clips, plastic wrap, tape and foam. Note: The EP-1000 power should be turned off before connecting any cables or external devices to the printer. 2. Connect the EP-1000 to the PC. Connect the EP1000 printer to a PC with Ethernet using the Network Interface Module. The recommended PC configuration is at least a 500MHz Pentium III class processor, 256MB of memory and 10 MB of free disk space. 3. Load media into the EP-1000. The EP-1000 imager must have media loaded and the top cover closed before sending any print jobs to the imager. Load A-size or A4-size ChromaVista® paper into the cassette as shown in the User’s Manual, and insert the cassette into the printer. Be sure there is a ribbon installed. 4. Power-on the printer. After the printer has been connected to the PC and media has been loaded, power-on the printer and connect the Network Interface Module using the provided transformer. Wait for the front panel indicators to show POWER and MEDIA with steady green lights. This will take about 10 seconds. If the printer is cold, the poweron time will be longer. Windows Driver Installation The Windows NT 4.0 Print Driver is distributed on a CD-ROM as a single file named EP1000_WinDriver.exe. This file will automatically unzip the necessary driver files into a temporary directory and start the Windows “Add Printer Wizard.” The following instructions describe the print driver installation procedure. 1. Login as Administrator. Adding a printer to Windows NT 4.0 requires administrator privileges. Login as administrator using the appropriate password. 2. Locate the file “EP1000_WinDriver.exe” on the CD. The EP1000_WinDriver.exe file is provided on the print driver CD-ROM. Insert the CD into the CD-ROM drive of the PC and locate the file on the CD. 5. Remove any old EP-1000 Print Driver components. The installer will automatically check for older EP-1000 print driver components and delete them. A dialog box similar to one below will be displayed. If any old components are found, a prompt will ask the user if these components should be removed. It is strongly recommended that all old print driver components be removed by typing: Y <Enter>. If no components are found, the dialog box will not prompt for any response. 3. Run the program “EP1000_WinDriver.exe”. Start EP1000_WinDriver.exe by double-clicking the file name. The dialog box shown below will be displayed. Click [ OK ] to continue with the installation. 4. Make sure no print jobs are running. The Print Driver cannot install if any other print jobs are running. The following dialog box will appear to remind the user. Make sure that all other printers are inactive before proceeding. Click the [ Setup ] button to continue. The installer will unzip the driver files and copy them to the directory: C:\CODONICS 6. Set-up of network printer port. The installer will open the window shown below. Type the IP address of the printer in the Hostname or IP address box. Check with your system administrator for the proper IP address. This is the same IP address that will be used later to configure the network module. In the example below an IP address of 192.168.1.200 has been entered. Click [ OK ] to continue with the installation. 7. Automatic launch of the Add Printer Wizard. The installer will automatically start the Windows “Add Printer Wizard.” Click on “My Computer” as shown below and then click [ Next> ]. 8. Select the EPR1: port. The EPR1: port is automatically created at the beginning of the installation procedure. Scroll through the list of ports under the section “Available ports:”. 9. Select “Have Disk” to specify print driver location. The location of the print driver is specified by clicking the button [ Have Disk… ]. Do not select from the list of Manufacturer’s and Printers in the dialog box. Only use the [ Have Disk…] button. 10. Enter the location of the print driver. Type the directory name that contains of the print driver. The driver location is: C:\CODONICS\driver\nt4. Click [ OK ] after typing the directory as shown in the dialog box below. Select “EPR1: (Codonics EP-Series Port Monitor)”. Click [ Next> ] to continue. 11. Select the printer model to install. Select the “Codonics EP-1000” printer, then click [ Next>] to continue. 12. Replace existing driver if prompted. The following dialog box will appear only if the EP1000 print driver has been previously installed on this PC. Select option “Replace existing driver” if this dialog box appears. Click [ Next> ] to continue. 13. Enter the Printer Name and set as the default printer. It is recommended to use the default printer name “Codonics EP-1000”. Most users will want to make this printer the default printer by selecting “Yes”. Refer to the dialog box below. Click [ Next> ] to continue. 14. Do not share this printer. It is recommended to use the option “Not shared” as shown below. Click [ Next> ] to continue. 15. Select “No” to print a test page. Select “No” to the option: Do you want to print a test page? as shown in the dialog box below. The test print will be made later after the printer network module is configured. Click [ Finish] to complete the driver installation. 3. Online help is available if needed. The setep1000.exe program has basic help to explain the terminology and parameters needed to configure the network address on the Network Interface Module. Type “Y” < Enter > if help is needed. The instructions in this document will explain the steps needed to configure the module. 16. Driver Installation Complete. When the printer driver has successfully installed, remaining windows on the screen will clean-up and close. 4. Enter the Ethernet address of the Network Interface Module. Each Network Interface module has a unique Ethernet address assigned to it at the factory. This address is printed on a label on the back of the module. Enter the Ethernet address as shown in the example below: E/N: 00-40-17-XX-XX-XX Network Module Configuration It is important when configuring the Network Module that the printer and computer are on the same network subnet. This usually means that they share the same network hub. 1. Open a DOS command prompt window. Open a command prompt using the Windows “start” button sequence: start -> Run... Type “cmd” in the box and click [ OK ] 2. Run the “set-ep1000.exe” command. Type the following command in the Command Prompt window: C:\CODONICS\bin\set-ep1000 5. Enter the IP address to be assigned to the Network Interface Module. Enter the IP address of the printer. This must be the same IP address used above for configuring the printer port. The prompt will show the default address of the module. Check with your system administrator for the proper address. In the example below, the IP address has Configure the Printer 1. Select Parallel Port at the Printer. Printing is done over the network, but the network interface module uses the parallel port of the EP-1000. Therefore to print, the EP-1000 must be on-line and the Parallel port must be selected. Use the ONLINE button on the EP-1000 (see below) to toggle between on-line and off-line. When offline, the selected port LED to the right will be flashing. When on-line, it will be on continuously. been set to 192.168.1.200. 6. Enter the Subnet Mask and Gateway Address. The Subnet Mask is required for the Network Interface Module to operate properly. The Gateway is optional and is used when the imager will be accessed from a network location that is not on the local subnet. Refer to the example below for how this information is entered. When off-line, use the INTERFACE button to select the correct interface. For Windows printing to an EP-1000, the parallel interface must be selected and the printer must be on-line. The upper interface LED must be lighted continuously as shown above. 7. Confirm that the Network Interface Module was set up properly. After all the network parameters have been entered in the set-ep1000.exe program, the Network Interface Module will be programmed and the parameters will be re-read from the module to confirm the module was programmed properly. Type “exit” to close the Command Prompt window. 2. Create a Test Print. The best way to test the operation of the EP-1000 is to print from an application program running on the Windows NT 4.0 system. Alternatively, a Windows test print can be sent by the following method: ◆ Click start ->Control Panel. ◆ Double-Click on “Printers.” ◆ Right click on “Codonics EP-1000” icon. ◆ Left click on the “Properties” option. ◆ From the “Codonics EP-1000 Properties” window, select the “General” tab along the top of the window and click on the “Test Print” button. 3. Confirmation of Test Print. The print driver will process and send the test print to the printer within 1 minute. The front panel lights on the printer will flash while the data is being received. If a problem occurs during the test print, a dialog box will appear describing the problem. The most common problem is the Network Interface Module or the network settings of the EPR1: Port are not correct. Click [ OK ] regardless of whether the test print completes. If the print does not complete, check the network parameters of the Network Interface Module and the EPR1: port. Technical Support For questions or problems with this print driver, please contact Codonics Technical Support department. 8:30AM - 5:30PM EST, Monday-Friday (U.S. Holidays Excluded) Phone: 440-243-1198 Fax: 440-243-1334 Toll Free: 800-444-1198 Email: [email protected] Website: www.codonics.com 4. Installation Complete. The EP-1000 Medical Imager is now ready for use. Deleting the Printer If the EP-1000 printer is removed or is no longer needed on the host Windows system, it can be deleted from the Printers Folder as follows. This procedure works regardless of how the printer was installed. 1. Click Start -> Settings -> Printers to open the printers folder. 2. Click on the “Codonics EP-1000” printer icon and then press the < Delete > key. 3. If more than one instance of the EP-1000 was installed, delete each printer in the same manner. Get it all with just one call 1-800-444-1198 All registered and unregistered trademarks are the property of their respective owners. Specifications subject to change without notice. Patents pending. Copyright © 1994-2005 by Codonics, Inc. Printed in the U.S.A. Part No. 901-136-001 Rev. A. 17991 Englewood Drive Middleburg Heights, OH 44130 USA (440) 243-1198 (440) 243-1334 Fax Email [email protected] www.codonics.com Codonics Limited KK New Shibaura Bldg. F1 1-3-11, Shibaura Minato-ku, Tokyo, 105-0023 JAPAN Phone: 81-3-5730-2297 Fax: 81-3-5730-2295