1
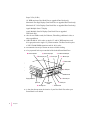
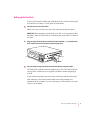
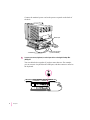
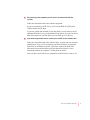
PowerBook Dock User’s Guide Includes setup and troubleshooting information for the PowerBook Dock and PowerBook Dock Plus K Apple Computer, Inc. © 1995 Apple Computer, Inc. All rights reserved. Under the copyright laws, this manual may not be copied, in whole or in part, without the written consent of Apple. The Apple logo is a trademark of Apple Computer, Inc., registered in the U.S. and other countries. Use of the “keyboard” Apple logo (Option-Shift-K) for commercial purposes without the prior written consent of Apple may constitute trademark infringement and unfair competition in violation of federal and state laws. Every effort has been made to ensure that the information in this manual is accurate. Apple is not responsible for printing or clerical errors. Apple Computer, Inc. 1 Infinite Loop Cupertino, CA 95014-2084 (408) 996-1010 Apple, the Apple logo, AppleTalk, EtherTalk, LocalTalk, Macintosh, MacTCP, PowerBook, and PowerBook Duo are trademarks of Apple Computer, Inc., registered in the U.S. and other countries. Adobe, Adobe Illustrator, Adobe Photoshop, and PostScript are trademarks of Adobe Systems Incorporated, which may be registered in certain jurisdictions. ExposurePro is a registered trademark of Baseline Publishing, Inc. Helvetica and Times are registered trademarks of Linotype-Hell AG and/or its subsidiaries. NuBus is a trademark of Texas Instruments. QMS is a registered trademark of QMS, Inc. QuarkXPress is a registered trademark of Quark, Inc. SuperPaint is a trademark of Aldus Corporation, a subsidiary of Adobe Systems Incorporated, which may be registered in certain jurisdictions. Tektronix is a registered trademark of Tektronix, Inc. Simultaneously published in the United States and Canada. Mention of third-party products is for informational purposes only and constitutes neither an endorsement nor a recommendation. Apple assumes no responsibility with regard to the performance or use of these products. Contents Communications regulation information 1 Using the PowerBook Duo Dock Building a PowerBook Duo system Duo Dock features v 1 2 3 Setting up the Duo Dock 5 Inserting the PowerBook Duo into the Duo Dock Trouble? 8 Turning on the PowerBook Duo System Trouble? 9 9 Working with the PowerBook Duo System Your preferences 10 Power conservation Hard disks 10 10 Battery recharging 10 11 SCSI devices 11 Virtual memory Networking Modem 8 12 12 12 If you have system problems 13 iii Using security features 13 Ejecting the PowerBook Duo from the Duo Dock A useful shortcut Trouble? 15 15 16 2 Using Your Duo Dock on an EtherTalk Network Connecting your Duo Dock to Ethernet 17 19 Connecting the Duo Dock between two devices on an Ethernet network 20 Connecting the Duo Dock to the end of an Ethernet network Connecting the Duo Dock directly to your printer Checking your networking software Installing networking system software Selecting a network connection 3 Installing a NuBus card Getting ready 28 Installing the card iv Contents 28 27 26 22 24 22 21 Communications regulation information FCC statement This equipment has been tested and found to comply with the limits for a Class B digital device in accordance with the specifications in Part 15 of FCC rules. See instructions if interference to radio or television reception is suspected. Radio and television interference The equipment described in this manual generates, uses, and can radiate radio-frequency energy. If it is not installed and used properly—that is, in strict accordance with Apple’s instructions—it may cause interference with radio and television reception. This equipment has been tested and found to comply with the limits for a Class B digital device in accordance with the specifications in Part 15 of FCC rules. These specifications are designed to provide reasonable protection against such interference in a residential installation. However, there is no guarantee that interference will not occur in a particular installation. You can determine whether your computer system is causing interference by turning it off. If the interference stops, it was probably caused by the computer or one of the peripheral devices. If your computer system does cause interference to radio or television reception, try to correct the interference by using one or more of the following measures: m Turn the television or radio antenna until the interference stops. m Move the computer to one side or the other of the television or radio. m Move the computer farther away from the television or radio. m Plug the computer into an outlet that is on a different circuit from the television or radio. (That is, make certain the computer and the television or radio are on circuits controlled by different circuit breakers or fuses.) If necessary, consult the service and support information that came with your computer for instructions on how to contact an Apple-authorized service provider or Apple for assistance. Or consult an experienced radio/television technician for additional suggestions. You may find helpful the following booklet, prepared by the Federal Communications Commission: Interference Handbook (stock number 004-000-00345-4). This booklet is available from the U.S. Government Printing Office, Washington, DC 20402. IMPORTANT Changes or modifications to this product not authorized by Apple Computer, Inc., could void the FCC Certification and negate your authority to operate the product. This product was tested for FCC compliance under conditions that included the use of shielded cables and connectors between system components. It is important that you use shielded cables and connectors to reduce the possibility of causing interference to radios, television sets, and other electronic devices. For Apple peripheral devices, you can obtain the proper shielded cables through an Apple-authorized Apple dealer. For non-Apple peripheral devices, contact the manufacturer or dealer for assistance. Communications Regulation Information v DOC statement DOC Class B Compliance This digital apparatus does not exceed the Class B limits for radio noise emissions from digital apparatus set out in the radio interference regulations of the Canadian Department of Communications. Observation des normes—Classe B Le présent appareil numérique n’émet pas de bruits radioélectriques dépassant les limites applicables aux appareils numériques de la Classe B prescrites dans les règlements sur le brouillage radioélectrique édictés par le Ministère des Communications du Canada. VCCI statement vi Communications Regulation Information 1 Using the PowerBook Duo Dock The PowerBook Duo Dock and Duo Dock Plus are the most versatile expansion options for the PowerBook Duo. A Duo Dock itself is not a computer—you need a PowerBook Duo to use it. But the dock and the PowerBook together provide the video, storage, and input/output capabilities available on most desktop Macintosh computers. This guide explains how to set up a Duo Dock or Duo Dock Plus and connect other components to it to create a PowerBook Duo System. Although the illustrations in this guide show the Duo Dock Plus, all explanations and instructions are correct for the Duo Dock, Duo Dock Plus, and Duo Docks that have been upgraded to a Duo Dock Plus (except where specifically noted). In this guide the term Duo Dock is used to refer to the three configurations of Duo Dock, Duo Dock Plus, and an upgraded Duo Dock. For information about using the Macintosh system software or the PowerBook Duo, consult the documentation that came with your PowerBook. 1 Building a PowerBook Duo System The Duo Dock is the desktop “base” you can use to add components to your PowerBook Duo. For example, your system might include m a color or monochrome monitor m a keyboard, mouse, and specialized input device, such as a graphics tablet m an external storage device, such as a CD-ROM drive m an external modem m a hard disk (optional on the Duo Dock Plus) m connection to a shared printer on an AppleTalk network m connection to a specialized network (with installation of a NuBus™ card that supports EtherTalk or TokenTalk, for example, or with a direct EtherTalk connection using the Duo Dock Plus Ethernet port) The drawing shows one of many possible PowerBook Duo Systems. The Duo Dock can accommodate any Macintosh-compatible monitor, keyboard, mouse, printer, hard disk drive, CD-ROM drive, scanner, or other device. The following sections include information about m the features of the Duo Dock m how to set it up m how to use it with the PowerBook Duo m how to install a NuBus card in the Duo Dock 2 Chapter 1 Duo Dock features The Duo Dock comes with many features built in, and several optional features are also available. These features include: m an internal 1.4 MB floppy disk drive ( For information about using your floppy disk drive, see the documentation that came with your PowerBook Duo.) m an optional internal SCSI hard disk drive (any available capacity that meets Apple’s specifications: up to 1" high. An optional 500 megabyte hard disk is available for the Duo Dock Plus.) m standard ports including SCSI (with an HDI-30 connector), monitor, printer, modem, Apple Desktop Bus (ADB), sound in, and sound out. An EtherTalk port is also provided on the Duo Dock Plus or upgraded Duo Dock. m a separate mouse and optional microphone Manual eject hole Key lock Eject button m built-in video support for the following monitors: Macintosh 12" Monochrome Display Macintosh 12" RGB Display AppleColor High-Resolution RGB Monitor (13") Macintosh Color Display (14") Apple Macintosh Portrait Display (15") Macintosh 16" Color Display VGA monitors Using the PowerBook Duo Dock 3 Super VGA (56 Hz) 19" RGB monitors (Duo Dock Plus or upgraded Duo Dock only) Macintosh Two-Page Display (Duo Dock Plus or upgraded Duo Dock only) Macintosh 21" Color Display (Duo Dock Plus or upgraded Duo Dock only) Apple Multiple Scan 17 Display Apple Multiple Scan 20 Display (Duo Dock Plus or upgraded Duo Dock only) m slots for two NuBus cards (for Ethernet, Token Ring, additional video, or other capabilities) m 1MB VRAM for 16-bit color on Apple 13" and 16" RGB monitors, and 8-bit grayscale on the Apple 15" portrait monitor. The Duo Dock requires a 512K VRAM SIMM expansion card for 16-bit color. m an automatic insert/eject feature to ensure reliable docking m a key-operated lock to prevent theft of the docked PowerBook Duo - Sound output port Q Internal modem ≈ Sound input port W External modem port [ Printer port ™ Monitor port I Power button V ADB port NuBus slots G Ethernet port Floppy disk drive Monitor power g SCSI port socket ≤ Power socket Ç Security slot Eject hole m A slot door that protects the interior of your Duo Dock Plus when your PowerBook is not docked 4 Chapter 1 Setting up the Duo Dock If you need to install a NuBus card inside the dock, do it before following the steps below. See Chapter 3 in this guide for instructions. 1 Place the dock on a hard, flat surface. While you set up, you’ll need access to the connectors on the back panel. IMPORTANT Don’t attempt to use the dock on its side, or in any position other than those pictured. Don’t block the ventilation slots on the sides or bottom of the dock. 2 Plug one end of the dock’s power cord into the power receptacle (≤) on the back of the dock, and the other end into an electrical outlet or power strip. 3 Put your monitor on top of the dock, and connect the monitor and power cables. The Duo Dock can hold a monitor weighing up to 55 lb. The Duo Dock Plus (or Duo Dock with the top cover upgrade) can hold a monitor weighing up to 85 lb. If you installed a monitor card in the dock, connect the monitor cable to the card. Otherwise, connect the monitor cable to the dock’s monitor port (marked with the icon ™). If you are connecting a VGA monitor, you need a 15-pin to 9-pin adapter. Using the PowerBook Duo Dock 5 Connect the monitor’s power cord to the power receptacle on the back of the dock. Monitor port Monitor card connector (if card is installed) 4 Connect your mouse, keyboard, or other input device to the Apple Desktop Bus (ADB) port. You can chain devices together if you have more than one. For example, you can connect a keyboard to the ADB port, and then connect a mouse to the keyboard. 6 Chapter 1 5 Now connect any other equipment you have, such as an external hard disk drive or printer. Follow the instructions that came with the equipment. If you are connecting a SCSI device, you’ll need an HDI-30 SCSI System Cable to attach it to the dock. If you have a hard disk installed in your Duo Dock, you can chain up to five additional SCSI devices to your PowerBook Duo System. If you do not have a hard disk installed in your Duo Dock, you can chain up to six devices. 6 If you will be using network services, connect your LocalTalk (or other network) cable. Follow the instructions that came with the cable, or check with your network administrator. If you will be connecting your Duo Dock Plus (or upgraded Duo Dock) to an Ethernet network, you need to connect the dock to the Ethernet network and check that your PowerBook Duo has the correct networking software. See Chapter 2 of this guide for details. Once you have connected all your equipment, the Duo Dock is ready to use. Using the PowerBook Duo Dock 7 Inserting the PowerBook Duo into the Duo Dock 1 Shut down the PowerBook Duo by choosing Shut Down from the Special menu. 2 Close the display. 3 Open the door that covers the docking connector on the back panel of the PowerBook. 4 If the elevation feet are down, flip them up. 5 Hold the PowerBook with its latch toward you, and slide it into the Duo Dock as shown. Don’t force the PowerBook into the dock. When the PowerBook is in most of the way, the dock pulls it in the rest of the way. Trouble? m The dock won’t accept the PowerBook. Power to the dock may be off. Make sure the dock is plugged in. If it is plugged into a power strip, make sure the power strip is turned on. The docking connector may not be accessible. Make sure you have opened the connector door on the back panel of the PowerBook. The dock may be locked. Unlock it by turning the key to the vertical (unlocked) position, and insert the PowerBook again. You can use only the PowerBook Duo with the Duo Dock. Other PowerBook models cannot be docked. m The dock ejects the PowerBook. The PowerBook may not be shut down. Open the display, respond to any messages on the screen, and choose Shut Down from the Special menu. Then wait a moment to make sure the PowerBook is really shut down, close the display, and try again. 8 Chapter 1 Turning on the PowerBook Duo System To turn on the docked PowerBook, press the Power On key on your external keyboard. On Apple keyboards, the key is marked with a triangle pointing left. Once the PowerBook is on, you have access to all equipment connected to the Duo Dock. Trouble? m Nothing happens when you press the Power On key. Review the setup instructions and make sure everything is plugged in correctly. Then try pressing the Power On key again. If you still get no results, press the power button on the back of the dock. Power button m You hear sounds that suggest the PowerBook is working, but you can’t see anything on the monitor. Make sure the monitor cable is plugged in correctly. Make sure the monitor’s power cord is plugged in and make sure that its power switch is on. Then adjust the brightness and contrast controls as necessary. Using the PowerBook Duo Dock 9 Working with the PowerBook Duo System This section summarizes m how your PowerBook Duo behaves when it is docked, or when it is moved from one Duo Dock to another m how to take advantage of the Duo Dock’s features Your preferences The PowerBook Duo uses your preferences—including desktop pattern, window views, and so forth—when you dock it. This means that your PowerBook will be customized the way you like it no matter where you work. The PowerBook Duo can also remember certain selections that apply only when you are docked (such as an Ethernet network setting). Each time you dock, these settings take effect again without any action on your part. Battery recharging A docked PowerBook Duo draws power from the Duo Dock, not from its own battery. The battery recharges while the PowerBook is in the dock. You can remove the battery before docking if you want to recharge it in a recharger. You can also remove the battery from the PowerBook while it is docked if you want to recharge a second battery inside the PowerBook. Power conservation A docked PowerBook Duo does not sleep. You cannot put the PowerBook to sleep as long as it remains docked. The microprocessor in a docked PowerBook Duo does not cycle on and off, because there is no drain of power from the battery. 10 Chapter 1 Hard disks The PowerBook Duo starts up from its internal hard disk automatically. If you have a hard disk installed in or connected to your Duo Dock, that disk’s icon also appears when you start up. You may prefer to start up from the Duo Dock’s hard disk when the PowerBook Duo is docked. If so, use system software version 7.1 or later to install a System Folder on that disk, and select it in the Startup Disk control panel. See the instructions on installing system software in the documentation that came with your PowerBook. If you start up from the Duo Dock’s hard disk, the preferences selected on that disk override those selected on your PowerBook Duo. When you use the PowerBook away from the dock, the PowerBook uses the preferences associated with its own hard disk. Startup disk surprise? If you select the hard disk in the Duo Dock as your startup disk, your PowerBook Duo will also start up from the internal hard disk of any other Duo Dock you use. (This is because all Duo Dock internal hard disks have the SCSI ID number 1.) SCSI devices If you have a hard disk installed in your Duo Dock, you can chain up to five additional SCSI devices to your PowerBook Duo System. If you do not have a hard disk installed in your Duo Dock, you can chain up to six devices. Using the PowerBook Duo Dock 11 Virtual memory The PowerBook Duo can borrow space on a hard disk to increase the memory available for using programs. The disk space is called virtual memory. You can set aside virtual memory space on the hard disk belonging to either the PowerBook Duo or the Duo Dock. If you set aside virtual memory space on the dock’s hard disk, virtual memory will not be on when you use the PowerBook outside the dock. The next time you dock, virtual memory is turned back on automatically. If you set aside virtual memory space on the PowerBook’s hard disk, virtual memory is always available. Networking In addition to using your PowerBook’s built-in LocalTalk port to access a LocalTalk network, you can also access another network type—such as Ethernet or Token Ring—if you have a Duo Dock Plus, which has a built-in EtherTalk port, or you have installed the appropriate NuBus card in your dock. The first time you use the other network, you must open the Network control panel and select that network type. Once you have made a selection, the PowerBook remembers it whenever the PowerBook Duo is docked. Whenever the PowerBook is not docked, LocalTalk is the network type. For more information about setting up and using your dock with an Ethernet network, see Chapter 2 of this guide. Modem If you want to use an external modem with your PowerBook Duo System, connect the modem cable to the Duo Dock port marked with this icon: W If your PowerBook has an internal modem, select the Internal Modem in the PowerBook control panel before opening your telecommunications program. 12 Chapter 1 If you have system problems If your docked PowerBook crashes (the screen goes blank or fills with gibberish) or freezes (the pointer doesn’t move and input devices don’t work), press the power button on the back of the dock once. Pressing once turns the PowerBook off. Use the Power On key on your external keyboard to turn the PowerBook on again. Pressing the power button erases any information you did not save, but it allows you to restart the system and continue working. See the troubleshooting information in the documentation that came with your PowerBook for more information about handling system problems. Using security features The Duo Dock has a key-operated mechanical lock to prevent theft of a docked PowerBook Duo. You can also lock PowerBooks out of the dock—for example, to protect information on the dock’s hard disk or to limit access to a network. You can lock the dock when the PowerBook is inside or outside the dock. You can lock the PowerBook inside the dock when the PowerBook is on or off. To lock or unlock the dock, turn the key as shown in the illustration. Locked Unlocked Using the PowerBook Duo Dock 13 Each Duo Dock comes with two keys. If you lose both of them, you can: m Contact the lock vendor for a replacement set of keys. Write to Fort Lock Corporation, 3000 N. River Road, River Grove, IL 60171, USA, or call 708-456-1100 (in Illinois). Be prepared to supply the code number printed on the tag that came with the keys. m Have a locksmith make a replacement set of keys. m Have your Apple-authorized service provider replace the entire lock assembly. The new assembly comes with two new keys. All these procedures may be expensive and time-consuming. It’s a good idea to take precautions not to lose the keys. The Duo Dock also has a security slot in the back panel to which you can connect an optional locking cable, to prevent theft of the dock. See an Appleauthorized dealer for more information. 14 Chapter 1 Ejecting the PowerBook Duo from the Duo Dock 1 Shut down the PowerBook Duo by choosing Shut Down from the Special menu. If a system problem prevents you from using the menu, you can shut down by pressing the power button on the back of the dock (but you’ll lose work you haven’t saved). 2 Unlock the dock (if it is locked). Turn the key to the vertical (unlocked) position. 3 Press the eject button. Eject button The dock ejects the PowerBook far enough so you can pull it out. A useful shortcut You can shut down the PowerBook Duo and eject it by simply pressing the eject button (if the dock is not locked). When you do this, the system will m remind you to save your work, if you haven’t done so m close any open programs m terminate your network or modem connections m shut down the system m eject the PowerBook Duo from the dock If you press the eject button while the dock is locked, a message reminds you to unlock it. Using the PowerBook Duo Dock 15 Trouble? m The dock doesn’t eject the PowerBook. The dock may be locked. Unlock it by turning the key to the vertical (unlocked) position, and press the eject button again. There may be no power to the dock. To eject the PowerBook manually, insert the dock’s key, a small screwdriver, or a similar object into the square hole on the side of the dock and press firmly. The dock is released, and you can gently pull the PowerBook from the slot. Manual eject hole When the dock is locked, you can’t use the square hole. WARNING Manually ejecting the PowerBook Duo when it is running can damage your system. Check that your PowerBook is turned off before manually ejecting it. 16 Chapter 1 2 Using Your Duo Dock on an EtherTalk Network The Duo Dock Plus comes with a built-in Apple EtherTalk port. You can also purchase and install an EtherTalk network card in your Duo Dock. If you have a Duo Dock Plus, or have installed an EtherTalk network card, you can use the dock to connect to Ethernet networks to access a variety of networking capabilities. Ethernet is a widely used communication standard that supports very high transmission speeds for information. With Ethernet, you can m gain access to information on other computers m allow access to information on your own PowerBook m print documents on network printers m link your programs to programs on other computers and share the features between those programs m update files over the network automatically m designate specific information on your PowerBook as “shared files” that other users can access over the network 17 You can connect the Duo Dock Plus to one or more computers with an Apple Ethernet connector and any standard Ethernet cable. Attach an Ethernet transceiver to the Ethernet port on the Duo Dock. Ethernet transceivers To set up your Duo Dock Plus (or upgraded Duo Dock) to use Ethernet, you must m connect the dock to the Ethernet network m check that you have the Ethernet software installed on your PowerBook Duo, and install the software, if you do not. See “Checking Your Networking Software” in the section “Connecting Your Duo Dock to Ethernet” later in this chapter. m open the Network control panel and select Ethernet as the network you want to use After setting up your dock, you may need to contact your network administrator for additional information. 18 Chapter 2 Connecting your Duo Dock to Ethernet Before you can use your dock on a network, you must connect it to the Ethernet network by connecting an Ethernet adapter and cable to the Ethernet port on the dock. After connecting the dock, you must put the PowerBook Duo in the dock and make sure your PowerBook can communicate with the network. With the appropriate Apple Ethernet adapter (or other compatible adapter), you can connect your Duo Dock to an existing Ethernet network using thin coax, 10BASE-T twisted pair, thick coax, or other standard cables. (See an Apple-authorized dealer for more information on Apple Ethernet adapters for your Duo Dock.) Apple Ethernet thin coax transceiver Apple Ethernet AUI adapter Apple Ethernet twisted-pair transceiver Using Your Duo Dock on an EtherTalk Network 19 Note: The Ethernet illustrations in this chapter show the thin coaxial connector type. The connector you use may be different. IMPORTANT The built-in Ethernet capabilities of your Duo Dock allow you to connect to any standard Ethernet network. The built-in Ethernet supports EtherTalk Phase 2 (AppleTalk Phase 2 protocols for Ethernet networks). There are also Apple and non-Apple products that you can use to communicate over Ethernet using other protocols, such as MacTCP. The built-in Ethernet does not support EtherTalk Phase 1 (AppleTalk Phase 1 protocols for Ethernet networks). There are two ways to connect the Duo Dock to an Ethernet network: m connect the dock between other devices in a network m connect the dock to the end of an existing network An EtherTalk network consists of a group of devices, called nodes, linked together by Ethernet cables. Individual nodes on a network can include a variety of devices, such as computers, printers, or other equipment. Connecting the Duo Dock between two devices on an Ethernet network When you connect the Duo Dock between two devices on a network, you’ll need to briefly interrupt communication between network users on both sides of the connection, unless they are linked through some other network route. Be sure to notify users before adding the Duo Dock to the network. 1 Plug the short cable extending from an Apple Ethernet adapter into the Ethernet port on the dock. The Ethernet port is at the center of the connector panel on the back of the Duo Dock. 20 Chapter 2 2 Disconnect one Ethernet cable from the adapter of the network device immediately to the left or right side of the dock. 3 Plug one end of an Ethernet cable into the socket you have just freed and the other end into one of the sockets of the dock’s Ethernet adapter. 4 Plug the Ethernet cable you disconnected in step 2 into the remaining socket of the dock’s Ethernet connector box. Connecting the Duo Dock to the end of an Ethernet network Connecting the Duo Dock to the end of a network will not interrupt communication among network users. You do not need to shut down any computers or notify users before adding the dock to the network. 1 Plug the short cable extending from an Apple Ethernet adapter into the Ethernet port on the dock. The Ethernet port is at the center of the connector panel on the back of the dock. 2 Use an Ethernet cable to connect the adapter to the network as shown. Using Your Duo Dock on an EtherTalk Network 21 Connecting the Duo Dock directly to your printer The Ethernet port is used most often to connect the dock to a network. However, if you are using the dock and PowerBook Duo as a stand-alone computer, you can use this port to create a direct, high-speed connection to a printer that also has an Ethernet port (this creates a small Ethernet network consisting of the workstation and printer). 1 Plug the short cable extending from an Apple Ethernet adapter into the Ethernet port on the dock. The Ethernet port is at the center of the connector panel on the back of the dock. 2 Plug an Ethernet connector into the Ethernet port on your printer. 3 Connect the two Ethernet adapters with an Ethernet cable, as shown. Checking your networking software If you have the EtherTalk and networking software already installed on your PowerBook Duo, you can select a network connection and begin using the network. If you don’t have EtherTalk or networking software installed on your PowerBook, you can install it using the Installer program on the system software disks that came with your PowerBook Duo (or with a system software upgrade kit that you purchased). To check for networking software: 22 Chapter 2 1 Insert the PowerBook Duo into the dock and turn on the PowerBook. 2 Choose Control Panels from the Apple (K) menu. 3 Double-click the Network icon to open the Network control panel. (Depending on your system version, your Network control panel may look different from the one pictured here.) If you can’t find the Network control panel: If no Network control panel appears in the Control Panels folder, go to “Installing Networking System Software” in the next section and install the networking software. If the name “EtherTalk” is displayed in the Network control panel, then the Ethernet software is installed. Follow step 4 and then go to “Selecting a Network Connection” later in this chapter. If “EtherTalk” does not appear, the EtherTalk software is not installed. Follow step 4 and then go to “Installing Networking System Software” in the next section. 4 Click the close box to close the Network control panel. Using Your Duo Dock on an EtherTalk Network 23 Installing networking system software You use the Installer program and the system software disks that came with your PowerBook Duo (or that you purchased as a separate system software upgrade kit) to install networking software on your PowerBook. The following instructions describe how to install the networking software you need. 1 Insert the PowerBook Duo into the dock. 2 With the PowerBook turned off, insert the first system software disk into the internal floppy disk drive. 3 Turn on your PowerBook Duo. The Installer program opens automatically. 4 Click OK. You see the Easy Install dialog box. (If you have System 7.5, this dialog box looks slightly different.) Make sure that the hard disk indicated in the box is the one on which you want to install networking software. If a different disk appears, click the Switch Disk button until the correct disk name appears. Depending on the version of your installation disks, you may see slightly different information in this dialog box. 24 Chapter 2 5 Click Customize, or if you have System 7.5, choose Custom Install from the pop-up menu. You see the Customize dialog box. (If you have System 7.5, this dialog box looks slightly different.) 6 Click the EtherTalk item to select it. (You may need to scroll through the list to find EtherTalk.) Information about the item you select appears in the box. 7 Click Install. The Installer begins to install networking software on your PowerBook Duo. 8 Follow the instructions that appear on screen. If a disk is ejected and you see a message instructing you to insert another system software disk, insert the specified disk. 9 When you see a message that the installation was successful, click Quit to quit the Installer program. If a message reports that installation was not successful, follow the instructions on screen to try installing again. 10 Click Restart in the dialog box that appears when you quit the Installer. The PowerBook Duo restarts with the new networking software installed. Using Your Duo Dock on an EtherTalk Network 25 Selecting a network connection Once you have installed EtherTalk networking software on your PowerBook, you must select the appropriate connection type in the Network control panel before you can use it. You can switch to a different network connection type at any time. For example, if you have access to both a LocalTalk and an Ethernet network (using EtherTalk), you can switch between the two connection types. 1 Insert the PowerBook Duo into the dock and turn on the PowerBook. 2 Choose Control Panels from the Apple (K) menu. 3 Double-click the Network icon to open the Network control panel. When the Network control panel opens, EtherTalk and any other installed network connection software is displayed. 4 Click the EtherTalk network connection. A dialog box warns you that you may lose any network services that you are using with your current network connection. This means that you may need to reconnect to the network services later. 5 Click OK. 6 Close the Network control panel. You can now use the network connection you selected. 26 Chapter 2 3 Installing a NuBus Card Installing a NuBus card in the Duo Dock is a technically challenging procedure. We recommend that you attempt it only if you are comfortable working with electronic equipment. You should read all of the following instructions before you begin. If the procedure sounds like something you don’t want to do yourself, any Apple-authorized service provider can install a NuBus card for you. WARNING To avoid damaging your computer and expansion card, do not attempt to install any expansion card without first checking the documentation for that card. If the documentation specifies that an Apple-certified technician must install the card (usually because the installation requires special training or tools), consult the service and support information that came with your computer for instructions on how to contact an Apple-authorized service provider or Apple for assistance. If you attempt to install the card yourself, any damage you may cause to the computer or card will not be covered by the limited warranty on your computer. If the card is not an Apple-labeled product, check with an Apple-authorized dealer or service provider to see if you can install it yourself. 27 Getting ready You need the Duo Dock, a NuBus card, and either a flat-slot or Phillips screwdriver (depending on the type of screws you see in step 5 under “Installing the Card”). If your system is already set up: Turn off, disconnect, and remove all equipment attached to the dock, but do not unplug the power cord that connects the dock to an electrical outlet or power strip. Installing the card 1 Unlatch the top cover of the dock by pinching the grooved surface just inside the front opening. 2 When the latches release, tilt the cover upward slightly (to about a 30° angle) and then lift the angled cover straight up to remove it. This 28 Chapter 3 Not This 3 Touch the power supply case to discharge any static electricity that might be on your clothes or body Power supply case 4 Disconnect the power supply cable by pinching its release clip and pulling straight up. If there is a hard disk drive in your Duo Dock, you may need to move its ribbon cable aside to reach the clip on the power supply cable. Pinch clip and then pull up. Installing a NuBus Card 29 5 Loosen the two screws connecting the central part of the dock to the base. (In the rest of these instructions, the central part of the dock is called the subassembly.) Check the screws to determine whether they are slot or Phillips screws and then select the appropriate screwdriver. Turn the screws counterclockwise. The screws don’t come out all the way, so you can’t remove them completely. Screws 30 Chapter 3 6 Pull the subassembly toward you until you feel it come to a stop. It will move only a short distance. You’ll be able to feel a small gap under the front ledge of the dock. If the subassembly doesn’t seem to move, or if you can’t feel a gap under the front ledge, the screws may not be loose enough. Turn them a few more times and try again. The subassembly is heavy, so before you continue with step 7, make sure that you have enough room to put it down nearby after you lift it off the base. Installing a NuBus Card 31 7 Lift the subassembly back and up to remove it. Metal fingers Pull the subassembly back and up in a curved motion, being careful not to bend the small metal fingers around the port openings. 32 Chapter 3 8 Turn the subassembly over and put it down with the disk drive(s) facing up. Floppy disk drive Hard disk drive (optional) Push out either cover plate. 9 Push out the plastic cover plate behind one of the NuBus slots and set the plate aside. Use your thumb to push out the cover plate. About NuBus slots and cards: The two NuBus slots in the Duo Dock are stacked vertically. The slots are identical, so you can install your card in either one. If you install your card in the upper slot (which is the lower slot when the dock is right side up), you’ll have to remove it and reinstall it if you want to add a second card later. NuBus cards come in different shapes and sizes. All properly designed cards will fit into the Duo Dock. You may find it easier to install a large card in the upper slot rather than the lower one. Installing a NuBus Card 33 10 Remove the plastic NuBus card guide next to the floppy disk drive by pulling it straight out. NuBus card guide The next four steps describe how to insert the card. IMPORTANT Handle a NuBus card by its edges only, and be careful not to touch the pins inside the connector. 11 Lower the card into the slot. NuBus cards have all or most of their chips on one side. Hold the card so its chips are facing up, and the connectors on the card and the slot are aligned. You may need to tilt the card as you lower it into the slot. Connector 34 Chapter 3 12 Adjust the card so its connector lines up with the connector on the slot. Don’t press the connectors together yet. Align connectors 13 Insert the two pins on the dock bracket into the slot and hole on the card bracket. Pin Slot Pin Hole Installing a NuBus Card 35 14 Press together the connectors on the card and the slot. You can push against the plastic part of the connector, as shown, or against the top of the card. If you push against the top of the card, make sure the connectors stay properly aligned. 15 36 Chapter 3 Repeat steps 10–13 to install a second NuBus card, if you have one; otherwise go to step 16. 16 Replace the NuBus card guide by sliding it back into position. Your card is now installed. 17 Turn over the subassembly and carefully put it back into the base of the dock. Metal fingers Be careful not to bend the small metal fingers around the port openings. Installing a NuBus Card 37 18 Push the subassembly toward the back of the dock to close the gap (the reverse of step 6). Gap 19 Tighten the screws you loosened in step 5. The screws are spring-loaded. You’ll need to exert strong downward pressure while you turn them clockwise. 20 38 Chapter 3 Reconnect the power supply cable you disconnected in step 4. 21 Replace the dock cover. Align the cover over the base so that the corners align with the back edge of the base. Press down firmly on the rear corners and then press down on the front corners until the latches click. WARNING Never turn on your computer unless all of its internal and external parts are in place. Operating the computer when it is open or missing parts can be dangerous, and can damage your computer. See the information that came with your NuBus card for information about its accompanying software (if any) and use. Installing a NuBus Card 39 The Apple Publishing System This Apple manual was written, edited, and produced on a desktop publishing system using Apple Macintosh computers and QuarkXPress. Technical illustrations were drawn in Adobe™ Illustrator; screen shots were created and modified with system software, ExposurePro, Aldus SuperPaint, and Adobe Photoshop. Proof pages were created on Apple LaserWriter printers and on QMS and Tektronix color printers. Final pages were output directly to separated film on a PostScript™-driven imagesetter. Text type is Times®, display type is Helvetica® Narrow, and cover type is Apple Garamond, Apple’s corporate font. Ornaments are custom symbols designed for Apple Computer. PostScript, the LaserWriter page-description language, was developed by Adobe Systems Incorporated.