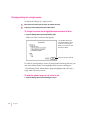
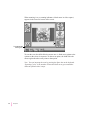
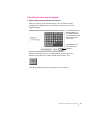
1
WiggleWorks ™ User’s guide for Macintosh and Windows K Apple Computer, Inc. © 1995 Apple Computer, Inc. All rights reserved. Under the copyright laws, this manual may not be copied, in whole or in part, without the written consent of Apple. Your rights to the software are governed by the accompanying software license agreement. The Apple logo is a trademark of Apple Computer, Inc., registered in the U.S. and other countries. Use of the “keyboard” Apple logo (Option-Shift-K) for commercial purposes without the prior written consent of Apple may constitute trademark infringement and unfair competition in violation of federal and state laws. Every effort has been made to ensure that the information in this manual is accurate. Apple is not responsible for printing or clerical errors. Apple Computer, Inc. 1 Infinite Loop Cupertino, CA 95014-2084 (408) 996-1010 Apple, the Apple logo, Macintosh, and QuickTime are trademarks of Apple Computer, Inc., registered in the U.S. and other countries. Sound Manager is a trademark of Apple Computer, Inc. WiggleWorks is a trademark of Scholastic, Inc. Adobe, Adobe Illustrator, Adobe Photoshop, and PostScript are trademarks of Adobe Systems Incorporated, which may be registered in certain jurisdictions. ExposurePro is a registered trademark of Baseline Publishing, Inc. Helvetica and Times are registered trademarks of Linotype-Hell AG and/or its subsidiaries. IBM is a trademark of International Business Machines Corporation. Microsoft and MS-DOS are registered trademarks, and Windows is a trademark, of Microsoft Corporation. 486 is a trademark of Intel Corporation. Sound Blaster is a trademark of Creative Technology, Ltd. QMS is a registered trademark of QMS, Inc. QuarkXPress is a registered trademark of Quark, Inc. SuperPaint is a trademark of Aldus Corporation, a subsidiary of Adobe Systems, Incorporated which may be registered in certain jurisdictions. Tektronix is a registered trademark of Tektronix, Inc. Mention of third-party products is for informational purposes only and constitutes neither an endorsement nor a recommendation. Apple assumes no responsibility with regard to the performance or use of these products. Contents 1 Installing WiggleWorks 1 Installing WiggleWorks on your Macintosh computer 1 What you need 1 How to install WiggleWorks on your Macintosh computer Installing WiggleWorks on your Windows computer 4 What you need 4 How to install WiggleWorks on your Windows computer 2 Getting Started 3 4 7 Opening the WiggleWorks program 7 Opening WiggleWorks on a Macintosh computer Opening WiggleWorks on a Windows computer Introduction to WiggleWorks 8 8 9 iii 3 Reading 13 Read Aloud cover page 13 Read Aloud inside page 14 Read cover page 14 Read inside page 15 Using the My Words list 15 To add a word to the My Words list 16 To remove a word from the My Words list To print the My Words list 16 Recording in Read 17 4 Writing and Drawing Write activity area 16 19 20 Using the painting and drawing tools My Book cover page 21 My Book inside page 21 20 Using words from the My Words list 22 To add a word from the My Words list to your work in Write or in My Book 22 Starting over in My Book Recording in Write 23 23 Printing your work 24 Putting together sheets printed in book format 5 Using the Magnet Board 25 Magnet Board activity area 25 Using the Magnet Board 26 Framing letters together 26 Scattering framed letters 26 Hearing a word or letter 26 Deleting a letter 26 Replacing a letter 27 Copying a letter 27 Typing a letter 27 iv Contents 24 6 Changing the Program for Your Child 29 Changing settings for a single session 30 To change how much text is highlighted and read aloud in Read To make the point larger so it is easier to see 30 To make the text larger and easier to read 31 If the child has trouble manipulating the mouse 31 If the child has trouble using the keyboard 33 To change how colors are used in text 34 To have the names of buttons and other options read aloud 34 To have letters read aloud as they are typed 34 Entering a password for the Parent menu To make the full Parent menu available 35 35 Changing settings with the Parent menu 35 To change the settings for a particular child Recording or deleting messages for children To record a message 39 To delete a message 40 To delete all messages 40 30 35 39 Adding story starters 40 To add a story starter 40 Changing the synthesized voice that the computer uses Adding or removing names To add a name 42 To remove a name 42 42 Suggested activities 43 To see the suggested activities 7 Menu Commands 45 The Edit menu 46 46 The Settings menu The Parent menu Index 43 45 The File menu The Go menu 41 47 49 51 Contents v CHAPTER 1 Installing WiggleWorks If you are installing WiggleWorks on a Macintosh computer, see the next section, “Installing WiggleWorks on Your Macintosh Computer.” If you are installing WiggleWorks on an IBM-compatible computer running Windows, see “Installing WiggleWorks on Your Windows Computer,” later in this chapter. Note: Even if you’ve already installed a WiggleWorks story pack on your computer, you’ll need to complete the steps in this chapter to install the story pack you’ve just purchased. Any settings that you previously made for users will be carried over to this story pack. Installing WiggleWorks on your Macintosh computer What you need The WiggleWorks CD-ROM disc An Apple Macintosh computer with m at least 4 megabytes of memory (RAM) if your computer is running system software version 7.0 or 7.1, or at least 5 megabytes of memory (RAM) if your computer is running system software version 7.5 m system software version 7.0 or later 1 m a color monitor that displays at least 256 colors and measures at least 12 inches diagonally m a CD-ROM drive m a hard disk with up to 10 megabytes of space available Note: If your system does not have all of the following programs, the WiggleWorks Installer will install them along with the WiggleWorks program: m QuickTime m Sound Manager m Text to Speech You do not need the following as part of your computer system, but you may find them useful: m a printer m a microphone If you have what you need, go to “How to Install WiggleWorks on Your Macintosh Computer,” the next section in this chapter. If you’re not sure that you have what you need, continue reading this section. If you don’t know how much memory your computer has and which version of system software it’s using: 1 Click the hard disk icon near the upper-right corner of the screen. 2 Pull down the Apple (K) menu and choose About This Macintosh. In the box that appears, Total Memory needs to be 4096K or more and the number after the words “System Software” in the upper right needs to be 7.0 or higher. If you don’t know how much space your hard disk has available: m Open the hard disk icon. In the window that appears (showing the contents of the hard disk), look near the upper-right corner, below the title bar, for a number followed by “MB available.” The space available should be at least 10 MB. (Depending on the software that is already installed on your computer, the WiggleWorks software may require less than 10 MB.) 2 Chapter 1 If you don’t know how many colors your monitor displays: 1 Pull down the Apple (K) menu and choose Control Panels. 2 Open the Monitors control panel to see how many colors your monitor displays. How to install WiggleWorks on your Macintosh computer 1 Insert the WiggleWorks CD-ROM disc into the CD-ROM drive. Make sure you use a CD caddy if your drive requires that you use one. 2 Open the Install WiggleWorks icon in the WiggleWorks CD-ROM disc window. Do not open the icon labeled “WiggleWorks” before you install WiggleWorks. Opening the WiggleWorks icon opens the program only after you’ve installed the WiggleWorks software on your computer. 3 Click OK in the Installer program’s opening screen. 4 If your computer has more than one hard disk, you can choose which disk you want WiggleWorks installed on. Click Switch Disk until the correct disk’s name appears under the phrase “on the hard disk named” in the Installer dialog box. 5 Click Install. The Installer program puts the WiggleWorks program and related files on your hard disk. 6 Click Restart or Quit in the box that appears when WiggleWorks has been installed. The WiggleWorks program should be in a folder on your hard disk. After you’ve installed the program, you can open either the WiggleWorks icon on your hard disk or the WiggleWorks icon on the CD-ROM disc when you want to open a book (see the next chapter for instructions). You always need to insert the CD-ROM disc to run WiggleWorks. Installing WiggleWorks 3 Installing WiggleWorks on your Windows computer What you need The WiggleWorks CD-ROM disc A 486 or faster IBM-compatible computer with m DOS 5.0, MS-DOS 6.0 or 6.2 m Windows 3.1 or later m 100% Windows-compatible sound card (Sound Blaster or other make) m at least 4 megabytes of memory (RAM) m 640 by 480 or higher video card with 256 colors m a CD-ROM drive m a hard disk with up to 10 megabytes of space available Note: Your computer may require 3 to 10 megabytes of hard disk space, depending on how you choose to install the WiggleWorks program. You’ll find out more about this in the next section, “How to Install WiggleWorks on Your Windows Computer.” You do not need the following as part of your computer system, but you may find them useful: m a printer m a microphone How to install WiggleWorks on your Windows computer 1 Insert the WiggleWorks CD-ROM disc into the CD-ROM drive. Make sure you use a CD caddy if your drive requires that you use one. 2 In the Windows Program Manager window, double-click the Main icon to open it. You’ll see a window titled Main. 3 Double-click the File Manager icon to open it. You’ll see the window titled File Manager. 4 4 Chapter 1 At the top of the File Manager window, click the CD-ROM drive icon to open its window. 5 Double-click the file titled SETUP.EXE to open it. You see a message telling you that the WiggleWorks setup is initializing. Then you’ll see a window titled WiggleWorks. 6 Click Continue to install WiggleWorks. You’ll now see the window titled Installation Options. You have the option of installing the WiggleWorks program on the hard disk or leaving it on the CD-ROM disc. Installing WiggleWorks on your hard drive will increase its performance. If you choose to install it on the hard disk, you’ll need 10 MB of free hard disk space. The installation will place the WiggleWorks program on your hard disk. If you choose to leave WiggleWorks on the CD-ROM, the installation will install only certain files on the hard disk but will leave the WiggleWorks program on the CD-ROM. 7 Choose the option you want and click OK. You’ll now see a window titled WiggleWorks Installation. 8 Click Install to install the files on the designated disk, or click Set Location to change the destination disk. You now see a screen that says “Installing WiggleWorks.” When installation is complete, you’ll see a window that offers you three choices: m Click View Read Me to read late-breaking information about WiggleWorks. m Click Run WiggleWorks to run the WiggleWorks program. m Click Return to Windows to return to Windows. Installing WiggleWorks 5 CHAPTER 2 Getting Started WiggleWorks is designed, of course, to be so easy that a child could use it. Still, a parent, guardian, or older sibling should m help the child get started (described in this chapter) m introduce the child to what she or he can do in the program (Chapters 3 through 5) m change program settings to better suit the child (Chapter 6) All WiggleWorks storypacks work the same way. If you’ve already used a different WiggleWorks storypack, you already know how to use WiggleWorks. You may want simply to skim this guide as a way to refresh your memory about the program. Opening the WiggleWorks program If you are running WiggleWorks on a Macintosh computer, start with the section “Opening WiggleWorks on a Macintosh Computer.” If you are running WiggleWorks on a Windows computer, start with the section “Opening WiggleWorks on a Windows Computer.” 7 Opening WiggleWorks on a Macintosh computer IMPORTANT If your computer is running system software version 7.0 or 7.1 and it has no more than 4 megabytes of memory, make sure that no other programs are running while you’re using WiggleWorks. If your computer is running system software version 7.5, and it has no more than 5 megabytes of memory, make sure that no other programs are running while you’re using WiggleWorks. 1 Insert the WiggleWorks CD-ROM disc into the CD-ROM drive. 2 Open the WiggleWorks icon in the WiggleWorks CD-ROM disc window or in the WiggleWorks folder on your hard disk. Opening WiggleWorks on a Windows computer 8 Chapter 2 1 Insert the WiggleWorks CD-ROM disc into the CD-ROM drive. 2 In the Program Manager window, double-click the WiggleWorks window icon. 3 Double-click the WiggleWorks program icon to open it. Introduction to WiggleWorks After you have opened the WiggleWorks icon an animation sequence introduces you to the WiggleWorks character. Tip You can cut an animation sequence short by clicking the mouse at any time during the sequence. At the end of the sequence, the character tells the child, “Sign in!” 1 Click Add Your Name. 2 Type the child’s name. Then click OK. You only need to do this the first time each child opens a WiggleWorks storypack. Subsequently, you or the child needs only to click the child’s name on the list. 3 Click Go. Another animation sequence leads you to the Library screen, where you choose which book you want to open. Getting Started 9 6 On the Library screen, click the book you want to open. This illustration summarizes what you can do on the Library screen. Click a book to select it. Click here if you don’t know what to do on a screen. Click here to go to a book after you’ve selected it. Click here to leave WiggleWorks. Click here to see the list where readers sign in. 7 Click here for a quick look at all the pages of a book after you’ve selected it. Click Go. A third animation sequence leads you to the Activity Choices screen. 10 Chapter 2 8 On the Activity Choices screen, choose what you want to do in a book. This illustration summarizes what you can do on the Activity Choices screen. Click here to have the book read aloud. Click here to read the book on your own. Click here to write on your own. Click here to use the Magnet Board. Click here to go back to the Library screen. Click here to write your own version of the book. Go to the next chapters for more information on each activity area. Getting Started 11 CHAPTER 3 Reading WiggleWorks lets children read a book in two activity areas: m Read Aloud, where the program reads the text aloud and highlights the text as it does so m Read, where children can read the text on their own The next few pages summarize the features of each activity area. Read Aloud cover page Click here to hear the text again. Click here to go back to the Activity Choices screen. Click here to go to the next page. Click here for a message about what you’ll learn in this book. 13 Read Aloud inside page Click here to hear the text again. You can also click any word to hear it. Click here to go to the next page. Click here to go to the previous page. Click here to go back to the Activity Choices screen. Read cover page Click here to hear the text read aloud. If a microphone is connected to your computer, click here to make a recording. (To delete a recording, open the Settings menu and choose Delete Recording.) Click here for a message about what you’ll learn in this book. Click here to go back to the Activity Choices screen. After you’ve made a recording, click here to hear it. 14 Chapter 3 Read inside page Click here to hear the text read aloud. You can also click any word to hear it. Click here to add words from the book to your My Words list. See the next section for instructions. Click here to go to the previous page. Click here to go to the next page. Using the My Words list Click here to put away the list. Click the word that you want to remove from the list, then click the minus sign. Click the word that you want to add to your list, then click the plus sign. Click here to remove a word that you’ve clicked on the list. This is the My Words button. Click here to add a word that you’ve clicked in the book. Reading 15 Children can use the My Words list to collect words used in a book. They can use the words later in the Write, My Book, or Magnet Board activity areas. To add a word to the My Words list: 1 Click the My Words button. The My Words list appears. 2 Click the word in the book that you want to add to the list. 3 Click + (the plus sign) in My Words to add the word to the list. To remove a word from the My Words list: 1 Click the word that you want to remove from the list. 2 Click – (the minus sign) in My Words to remove the word. Children can print their My Words list either as a list or on individual cards (one word to a page) that they can draw on, decorate, and arrange to make sentences. To print the My Words list: 1 Move the pointer to the top of the screen to view the menu bar. The menu bar is hidden in WiggleWorks until you move the pointer to the top of the screen. 16 Chapter 3 2 Open the File menu and choose Print My Words. 3 In the box that appears, click Print List or Print Cards. Recording in Read If a microphone is attached to the computer, children can create a recording in Read. To create a recording: 1 Click the microphone button to create the recording. 2 To record your voice, use the controls in the box that appears. To delete a recording: 1 Move the pointer to the top of the screen to view the menu bar. The menu bar is hidden in WiggleWorks until you move the pointer to the top of the screen. 2 Open the Settings menu and choose Delete Recording. Reading 17 CHAPTER 4 Writing and Drawing WiggleWorks has two activity areas for writing and drawing: m Write, where children can write and draw their reactions and responses to the book m My Book, where children can create their own version of the book by coloring and changing the illustrations and by revising the text of the book In both areas, you use the keyboard and the Cut, Copy, and Paste commands in the Edit menu to type and edit text. You can also use the painting and drawing tools. The next few pages summarize the features of each activity area. 19 Write activity area Click here to use words in the My Words list. Click here to hear the text you’ve written. Click here to move up and down the text. You can write up to eight lines. Click here to go back to the Activity Choices screen. Click here if you need help getting started. The program will suggest a first sentence. If a microphone is connected to your computer, click here to make a recording. After you’ve made a recording, click here to hear it. Using the painting and drawing tools Erase parts of your drawing with this tool. Draw circles and ellipses with this tool. Pour the selected color into closed shapes with the paint bucket. Click here to sweep the drawing area clean. Draw lines and curves with the pencil (shown selected). Draw squares and rectangles with this tool. Choose a rubber stamp and add its design to your drawing. Click here to undo the last thing you did. The color you select is shown here. Click a color to select it. All tools use the selected color. 20 Chapter 4 Click here to use drawing and painting tools. If a printer is connected to your computer, click here to print what you’ve written and drawn. My Book cover page If a printer is connected to your computer, click here to print what you’ve written and drawn. If a microphone is connected to your computer, click here to make a recording. Click here to go back to the Activity Choices screen. After you’ve made a recording, click here to hear it. Click here to use drawing and painting tools. These are described on the previous page. My Book inside page To change the text, select it by clicking or dragging. Then type new text to replace it. Click these buttons to hear the text read aloud. To hear specific words, select the words and then click the button. Click here to go to the next page. Click here to go to he previous page. Click here to use words in the My Words list. (If Screen Keyboard is active, this button looks like alphabet blocks.) Writing and Drawing 21 Using words from the My Words list Click a word, then click the plus sign to add it to your composition. Click the minus sign to remove it from the list. Click here to use words in the My Words list. (If Screen Keyboard is active, this button looks like alphabet blocks.) To add a word from the My Words list to your work in Write or in My Book: 1 Make sure the blinking insertion point is where you want to add the word. 2 Click the My Words button. The My Words list appears. 3 Click the word on the list that you want to use. 4 Click + (the plus sign) to add the word to your composition. Starting over in My Book In My Book, you can undo everything you’ve done on a page and start over. Follow these steps to start over: 22 Chapter 4 1 Move the pointer to the top of the screen to view the menu bar. 2 Open the Edit menu and choose Start Over. Recording in Write If a microphone is attached to the computer, children can create a recording. 1 Click the microphone button to create the recording. 2 To record your voice, use the controls in the box that appears. To delete a recording: 1 Move the pointer to the top of the screen to view the menu bar. The menu bar is hidden in WiggleWorks until you move the pointer to the top of the screen. 2 Open the Settings menu and choose Delete Recording. Printing your work In Write and My Book, you can print your work by following these steps: m Click the printer button at the bottom of the screen. If you are in My Book, you’ll see three choices. Click your choice. m Or, you can move the pointer to the top of the screen to view the menu bar. Then open the File menu and choose one of the following commands: In Write, choose Print Writing. In My Book, choose Print My Book. Then click one of the choices in the box that appears. Hint Print My Book in book format to get a coloring book for children to color, before they change the book on the computer. Putting together sheets printed in book format 1 Two pages of the book are on each sheet. Fold each sheet in half crosswise (so that the fold is at the top of each page). 2 Arrange the folded sheets in order. Every page has its page number in the bottom right, and every odd-numbered page has a copyright notice in the bottom left. 3 Staple the sheets together along the left side. Writing and Drawing 23 CHAPTER 5 Using the Magnet Board The Magnet Board activity area gives children a place to play with words and letters. This section summarizes the features of the Magnet Board. Magnet Board activity area Click here to switch between capital letters and lowercase letters. Click a letter or drag it to the board. This triangle points to the place where letters you click or type will appear. Click here to use words in the My Words list. Click here, then click a letter on the board to make it black. Click here to sweep the board clean. Click here to hear suggested activities. Click here to go back to the Activity Choices screen. Click here to frame a group of letters together. (See the next page for instructions.) Click here, then click letters on the board to scatter them. (See the next page for instructions.) Click here to print the words on the Magnet Board. 25 Using the Magnet Board Framing letters together After you enter a group of letters, you can frame them to keep them together. 1 Click the button labeled “cat.” 2 Hold down the mouse button as you drag the pointer from the upper-left corner of the first letter to the lower-right corner of the last letter. A red border surrounds the letters you have framed. Scattering framed letters To scatter letters: m Click the Volcano button, then click a group of letters. When you click the Volcano button and click a group of letters, the letters are scattered all over the board. They become the same color to make it easier to put the word back together. Scattering a word is also a good way to discover other words made from the same letters as the original word. Hearing a word or letter To hear a word or a letter: m Click any word or letter on the board to hear it. Deleting a letter To delete a letter: m Drag the letter off the edge of the Magnet Board, or click the square to its right (to position the triangle there), then press the Delete key (the Backspace key on a Windows computer.) 26 Chapter 5 Replacing a letter To replace a letter: m Drag another letter over it. Copying a letter To copy a letter: m Hold down the Option key (the Ctrl key on a Windows computer) as you click the letter and drag the copy to another square. Typing a letter You can type letters onto the Magnet board. To type a letter: m Just type the letter on the keyboard and it will appear on the magnet board. Using the Magnet Board 27 CHAPTER 6 Changing the Program for Your Child You can change how a child uses WiggleWorks by m changing the program settings while the child is using the book (the changes apply only during that session) m changing the settings for the child (the new settings are in effect whenever the child uses the program) By adjusting the settings, you can make WiggleWorks easier for children who are just beginning to read or who have trouble manipulating the mouse or using the keyboard. You can customize the program further for a child by m recording messages that the child can play back in different activity areas m adding story starters used in Write m changing the synthesized voice the computer uses in Write and in My Book (in the Macintosh version) m adding or removing children’s names on the Sign In screen 29 Changing settings for a single session To change the settings for a single session: 1 Move the cursor to the top of the screen to view the menu bar. 2 Change any of the settings discussed in this section. To change how much text is highlighted and read aloud in Read: m Open the Settings menu and choose Reading Style. Make your choices in the box that appears. Your Windows screen may look slightly different. To turn sound on, click Sound On in Read. To turn sound off, click Sound Off in Read. When you are done, click OK. If a child is just beginning to read or is having trouble following the story, you may want smaller chunks of text highlighted and a slower reading pace. “Click Word-by-Word” means that the program highlights and reads only a single word each time you click. To make the pointer larger so it is easier to see: m Open the Settings menu and choose Bigger Cursors. 30 Chapter 6 To make the text larger and easier to read: m Open the Settings menu and choose Large Text. When Large Text is checked, a magnifying glass appears on the page in Read Aloud and Read. Click the magnifying glass to go back and forth between normal-size text and large-size text. (In My Book and Write, you cannot switch between text sizes.) Click here to switch between normal-size and large-size text. If the child has trouble manipulating the mouse: m Open the Settings menu and choose Scanning. Make your choices in the box that appears. Your Windows screen may look slightly different. To turn Scanning on, click inside the box next to Scanning On. Then click OK. On the Macintosh, click OK to turn Scanning on. Changing the Program for Your Child 31 When scanning is on, a scanning indicator (a black arrow in a blue square) appears in the lower-left corner of the screen. This indicates that scanning is on. To start the scan, the child clicks the mouse once. A black arrow points to the options on the screen in sequence. To choose an option, the child clicks the mouse again when the arrow points to that option. Note: You can interrupt the scan by pressing the Space bar on the keyboard. “Scanning Cycles” is the number of times the black arrow goes around the different options before it stops. 32 Chapter 6 If the child has trouble using the keyboard: m Open the Settings menu and choose Screen Keyboard. Make your choices in the box that appears. You can have the letters arranged either alphabetically or according to frequency of use in the English language. Your Windows screen may look slightly different. To turn the screen keyboard on, click inside the box next to Screen Keyboard On. Then click OK. On the Macintosh, click OK to turn the screen keyboard on. When Screen Keyboard is on, an alphabet block button replaces the buttons for My Words in the Write and My Book activity areas. Click the alphabet block button to open the screen keyboard. Changing the Program for Your Child 33 To change how colors are used in text: m Open the Setting menu and choose Custom Colors. Make your choices in the box that appears. Your Windows screen may look slightly different. To turn custom colors on, click the box next to Custom Colors On. On the Macintosh, click OK to turn Custom Colors on. To have the names of buttons and other options read aloud: m Open the Settings menu and choose Talking Buttons. With Talking Buttons checked, the name of a button or option is read aloud when you position the pointer over it. This feature is helpful for children who are just beginning to read. To have letters read aloud as they’re typed: m Open the Settings menu and choose Talk and Type. With Talk and Type checked, each letter is read aloud as you type it (whether you’re using the computer keyboard or the screen keyboard). This feature is helpful for children who are just beginning to read. 34 Chapter 6 Entering a password for the Parent menu Only one item (Enter Password) appears in the Parent menu until you choose that item and enter the password in the box that appears. To make the full Parent menu available: 1 Move the pointer to the top of the screen to view the menu bar. 2 Choose Enter Password from the Parent menu. 3 In the box that appears, type the password parent. After you type the password, the full menu becomes available and remains available until you quit WiggleWorks or until you choose Exit Parent Mode from the menu. Changing settings with the Parent menu To change the settings for a particular child: 1 Move the pointer to the top of the screen to view the menu bar. 2 Open the Parent menu and choose Edit Settings. If the item isn’t in the menu of your Macintosh version, see “Entering a Password for the Parent Menu” earlier in this chapter. Note: The Windows version does not have this command. Instead, you change each setting by choosing its own menu command from the Parent menu. For example, to change Activities, choose the Activities menu command. Explanations for each of these settings are in this section of the user’s guide. The Edit Settings command allows you to make changes to the settings for the child who is signed in. Changes you make for a particular child using the Edit Settings item take effect whenever that child signs in. Changing the Program for Your Child 35 3 In the box that appears, you can change the following settings. Activities In your Windows version, you see this window when you choose Activities in the Parent menu. You can make an activity area unavailable to a child by clicking the area to remove the X. You may not want beginning readers, for example, to wander into the Write or My Book areas. Reading Style In your Windows version, you see this window when you choose Reading Style in the Parent menu. For beginning readers, you may want to set the read-aloud pace slower and have the text highlighted in smaller chunks. For more advanced readers, you may want the read-aloud narration off. 36 Chapter 6 Access Options In your Windows version, you see this window when you choose Access Options in the Parent menu. For beginning readers, you may want to check the Large Text, Talking Buttons, Bigger Cursors, and Type and Talk options. For children with limited motor skills who may have a hard time using the mouse and the keyboard, you may want to check Scanning and Screen Keyboard. For color-blind readers, you may have to make adjustments by checking Custom Colors. This option is also fun to personalize the program for children who have strong preferences for certain colors. Changing the Program for Your Child 37 Audio Options In your Windows version, you see this window when you choose Audio Options in the Parent menu. More advanced readers may prefer to have the sound off, and some children may prefer not to hear the computer’s synthesized voice (used in the Write and My Book activity areas). Saving Options In your Windows version, you see this window when you choose Saving Options in the Parent menu. You can determine in which activity areas children can save their work. (Saved work is stored in the WiggleWorks folder on your hard disk.) 38 Chapter 6 Recording or deleting messages for children If a microphone is connected to your computer, you can leave recorded messages to help children get what you want out of a book. You can record one message on each page of a book in Read Aloud, Read, and My Book, and one message for each book in Write and Magnet Board. To record a message 1 Go to the page where you want to leave a message. 2 Move the pointer to the top of the screen to view the menu bar. 3 Open the Parent menu and choose Record Parent Message. If the item isn’t in the menu, see “Entering a Password for the Parent Menu” earlier in this chapter. 4 In the box that appears, click Record, record your message, click Stop, and then click OK. When you’ve recorded a message on a page, a comics balloon button appears near the lower-right corner of the page. The message is played back (in your own voice) when children click the button. This button appears when you’ve left a message. Click it to hear the message. Changing the Program for Your Child 39 To delete a message 1 Go to the page that has the message you want to delete. 2 Move the pointer to the top of the screen to view the menu bar. 3 Open the Parent menu and choose Delete Parent Message. If the item isn’t in the menu, see “Entering a Password for the Parent Menu” earlier in this chapter. To delete all messages m Open the Parent menu and choose Delete All Parent Messages. If the item isn’t in the menu, see “Entering a Password for the Parent Menu” earlier in this chapter. Adding story starters You can add your own story starters that can be personalized for a child. The story starters appear when the child clicks the light bulb button in the Write activity area. To add a story starter: 1 Move the pointer to the top of the screen to view the menu bar. 2 Open the Parent menu and choose Edit Story Starters. If the item isn’t in the menu, see “Entering a Password for the Parent Menu” earlier in this chapter. 3 Click New to add a new story starter. To edit or delete a story starter that you’ve created, click the story starter to select it and click Edit or Delete. 40 Chapter 6 Changing the synthesized voice that the computer uses In the Macintosh version, you may change the synthesized voice if the selected voice does not appeal to you or if the computer has difficulty producing the selected voice because not enough memory is available. 1 Move the pointer to the top of the screen to view the menu bar. 2 Open the Settings menu or the Parent menu and choose Computer Voice. If the item isn’t in the Parent menu, see “Entering a Password for the Parent Menu” earlier in this chapter. 3 In the box that appears, open the pop-up menu to choose another voice. Click here and hold down the mouse button to see a list of available computer voices. The computer uses the voice you select in Write and in My Book. (In Read Aloud and Read, the program plays back a recorded voice that’s stored on the WiggleWorks CD-ROM disc.) 4 Click OK. Changing the Program for Your Child 41 Adding or removing names You can add or remove the names of the children that are listed as your WiggleWorks readers. To add a name: 1 Move the pointer to the top of the screen to view the menu bar. 2 Go to the Sign In screen by opening the File menu and choosing Sign In or by clicking the clipboard button, if it’s available. 3 Click Add Your Name. In the box that appears, add the name. To remove a name: 1 Move the pointer to the top of the screen to view the menu bar. 2 Go to the Sign In screen by opening the File menu and choosing Sign In or by clicking the clipboard button at the bottom of the screen, if it’s available. 3 Make sure the name that you want to remove is checked. 4 Choose Delete Name from the Parent menu. If the item isn’t in the menu, see “Entering a Password for the Parent Menu” earlier in this chapter. 42 Chapter 6 Suggested activities Each book has suggested activities that you can do with the child or that the child can do alone. To see the suggested activities: 1 Move the pointer to the top of the screen to view the menu bar. 2 Open the Parent menu and choose Suggestions. If the item isn’t in the menu, see “Entering a Password for the Parent Menu” earlier in this chapter. Changing the Program for Your Child 43 CHAPTER 7 Menu Commands The File menu Sign In Choose this to go to the Sign In screen, where readers sign in by checking their names or adding their names to the list (see Chapter 2). Library Choose this to go to the Library screen, where you can choose which WiggleWorks book you want to open (see Chapter 2). Open Other Book Choose this to open any WiggleWorks book you may have on your computer system. New Work Choose this to start a file in which children can save their work. Open Work Choose this to open an existing file of a child’s work. Save Work Choose this to save the work that a child is currently doing. The first time you save a child’s work, a box appears where the program asks what to name the file and where to store it on your computer system. (The box appears with a name and a place—the WiggleWorks folder on your hard disk—already suggested.) Save Work As Choose this to save an existing file as a new file with another name, so you can save different versions of a child’s work. Page Setup Choose this to set paper size and printing orientation. 45 Print Choose this to print what you have on screen. This command changes depending on which activity area you are in. Print My Words Choose this to print the contents of the My Words list. Quit or Exit Choose this to leave WiggleWorks. (Choose Quit in the Macintosh version; choose Exit in the Windows version.) The Edit menu Undo Choose this in Write and in My Book to undo the last thing you did. This command applies only to drawing and painting, not typing. Cut Choose this to remove selected text in Write and in My Book and store the text temporarily in the computer’s memory. You can then insert the text in a different place by moving the text insertion point, going to the Edit menu, and choosing Paste. (If you want to cut text and not paste it back, you can select the text and then press the Delete key.) Copy Choose this to copy selected text in Write and in My Book and store the copy temporarily in the computer’s memory. (The original text remains where it is in your writing.) You can insert the copy in a different place by moving the text insertion point, going to the Edit menu, and choosing Paste. Paste Choose this to insert text you’ve cut or copied in Write and in My Book. Select All Choose this in Write and in My Book to select all the text. Start Over Choose this when you’re in My Book to restore the page you’re working on to its original state. The Go menu Turn to page Choose this while you’re in Read Aloud, Read, or My Book to go to a different page in the book. A box appears showing all the pages in the book in reduced size (called thumbnails). Click the page that you want. The rest of the items in this menu (Read Aloud, Read, Write, My Book, Magnet Board) take you to different activity areas without having to go to the Activity Choices screen. 46 Chapter 7 The Settings menu Changes you make to WiggleWorks settings using the items in this menu remain in effect only during the session in which you make them. (To make changes that are in effect whenever a particular child is using the program, use the Edit Settings command in the Parent menu in the Macintosh version. In the Windows version, choose the appropriate menu command in the Parent menu.) For instructions on how to use each of these items, see Chapter 6. Reading Style Choose this in Read to set how the story is read and highlighted. Computer Voice Choose this to set which voice you want the computer to use when it reads text aloud in Write and in My Book. (This is only available in the Macintosh version.) Delete Recording Choose this to erase a recording from a page in Read, My Book, or Write. Bigger Cursors Choose this to use bigger pointers (such as the arrow and the I-beam used to set the text insertion point). Large Text Choose this to make the text size larger. In Read Aloud and in Read, a magnifying glass button appears in the lower-right corner of the page when Large Text is checked. Click the magnifying glass to shrink the text (giving you a clear view of the illustration), and click the magnifying glass again to enlarge the text. The magnifying glass is not available in My Book and in Write. Scanning Choose this to enable a child to select program options without having to move the mouse. When scanning is checked, a scanning indicator (a black arrow in a blue square) appears in the lower-left corner of the screen. To start the scan, the child clicks the mouse once. A black arrow points to the options on a screen in sequence. To choose an option, the child clicks the mouse again when the arrow points to that option. You can interrupt the scan by pressing the Space bar on the keyboard. Screen Keyboard Choose this to use an on-screen keyboard instead of the computer keyboard. Menu Commands 47 Custom Colors Choose this to select the colors you want the program to use for text, background, and text highlighting. Talking Buttons Choose this to hear the program options and names of buttons read aloud when you point to them on the screen. Type and Talk Choose this to hear each letter spoken as you type it in Write, My Book, and Magnet Board. The Parent menu Only one item (Enter Password) appears in the Parent menu until you choose that item and enter the password in the box that appears. After you enter the password, the full menu becomes available and remains available until you quit WiggleWorks or until you choose Exit Parent Mode from the menu. For instructions on how to use each of these items, see Chapter 6. Enter Password You need to enter your password before the rest of the items in this menu become available. Choose this and then type parent in the box that appears. Delete Name Choose this to remove a child’s name from the Sign In screen. Computer Voice Choose this to set which voice you want the computer to use when it reads text aloud in Write and in My Book. (This is only available in the Macintosh version.) Edit Settings Choose this to change WiggleWorks settings for a particular child. This command is only available in the Macintosh version. (In the Windows version, you see the following menu items instead: Activities, Reading Style, Access Options, Audio Options, and Saving Options.) Edit Story Starters Choose this to change, add, or remove the story starters that appear when you click the lightbulb button in Write. 48 Chapter 7 Suggestions Choose this to read suggested activities you can do with a child or a child can do alone. Who’s Signed In Choose this to find out who is signed in to read a book. Record Parent Message Choose this to record a message for children. You can record one message on each page of a book in Read Aloud, Read, and My Book, and one message for each book in Write and Magnet Board. Play Parent Message Choose this to play the message from the page that you’re on. This command is only available in the Windows version. Delete Parent Message Choose this to erase the message from the page that you’re on. Delete All Parent Messages Choose this to erase all the messages that you’ve recorded for a book. Exit Parent Mode Choose this to remove all the items (except Enter Password) from the Parent menu. You will have to enter your password again to make the items available. Help This command is only available in the Windows version. Choose this command to find out more about who created this program. Menu Commands 49 Index + (plus sign) for adding a word to My Words list 16 for adding a word from My Words list to your writing 22 - (minus sign) for deleting a word from My Words list 16, 22 A About This Macintosh (Apple menu), checking memory with 2 access options, changing for a particular child 37, 48 Access Options (Parent menu) (Windows only) 37, 48 activities, suggested. See suggested activities Activities (Parent menu) (Windows only) 36, 48 activity areas. See also specific activity areas making unavailable for a particular child 36, 48 Activity Choices screen 11 changing options on 36, 48 going back to from Magnet Board 25 from My Book activity area 21 from Read activity area 14 from Read Aloud activity area 13 from Write activity area 20 Help button on 10 adding a parent message 40 a reader’s name 42 a story starter 40, 48 a word to My Words list 15, 16 a word from My Words list to your writing 22 Add Your Name button 9 alphabet block button 33 animation sequences, cutting short 8 Apple menu About This Macintosh, checking memory with 2 Control Panels, checking monitor colors with 3 arrow buttons, in Write activity area 20 arrow indicator, for mouse scanning 32, 47 51 audio. See computer voice; hearing; recording; talk and type; talking buttons Audio Options (Parent menu) (Windows only) 38, 48 B background color, changing for a particular child 37 for a single session 34, 48 bigger cursors option setting for a particular child 37 setting for a single session 30, 47 Bigger Cursors (Settings menu) 30, 47 blackening letters on Magnet Board 25 broom tool. See sweep tool bucket tool 20 buttons. See talking buttons; specific buttons C capital letters, switching to or from 25 CD-ROM disc inserting in Macintosh computers 3 inserting in Windows computers 4 requirement for 3 changing text Edit menu commands for 46 on Magnet Board 26–27 in My Book activity area 21, 46 in Write activity area 46 changing the WiggleWorks program 29–42 adding or changing a story starter 40, 48 adding or deleting a parent message 39–40, 49 adding or deleting a reader’s name 42, 48 52 Index overview of 29 for a particular child 29, 35–38, 48 changing access options 37, 48 changing audio options 38, 48 changing available activity areas 36, 48 changing colors 37 changing computer voice 41, 48 changing mouse scanning 37 changing reading style 36, 48 changing saving options 38, 48 changing screen keyboard 37 defined 29 enlarging pointer 37 enlarging text 37 Talk and Type 37 Talking Buttons 37 using Parent Menu 35–38, 48–49 for a single session 29, 30–34, 47–48 changing colors 34, 48 changing computer voice 41, 47 changing mouse scanning 31–32, 47 changing reading style 30, 47 changing screen keyboard 33, 47 defined 29 enlarging pointer 30, 47 enlarging text 31, 47 Talk and Type 34, 48 Talking Buttons 34, 48 checking for system requirements, on Macintosh computers 2–3 choosing. See selecting circles, drawing 20 clipboard button, adding or removing a reader’s name with 42 color-blind readers, changing display for 37 coloring book, printing 24 color monitor. See monitor colors changing for a particular child 37 for a single session 34, 48 checking number displayed on Macintosh computers 3 for drawing or painting 20 number required for monitor for Macintosh computers 2 for Windows computers 4 comics balloon button 39 commands 45–49 Edit menu 23, 46 File menu. See File menu Go menu 46 Parent menu. See Parent menu Settings menu. See Settings menu computer voice. See also hearing; recording; talk and type; talking buttons changing for a particular child (Macintosh only) 41, 48 changing for a single session (Macintosh only) 41, 47 turning on or off for a particular child 38 Computer Voice (Parent menu) (Macintosh only) 41, 48 Computer Voice (Settings menu) (Macintosh only) 41, 47 Control Panels (Apple menu), checking monitor colors with 3 Copy (Edit menu) 46 copying a letter on Magnet Board 27 text in Write or My Book activity areas 46 cover page in My Book activity area 21 in Read activity area 14 in Read Aloud activity area 13 cursor. See bigger cursors option, pointer curves, drawing 20 custom colors for a particular child 37 for a single session 34, 48 Custom Colors (Settings menu) 34, 48 customizing. See changing the WiggleWorks program Cut (Edit menu) 46 D Delete All Parent Messages (Parent menu) 40, 49 Delete Name (Parent menu) 42, 48 Delete Parent Message (Parent menu) 40, 49 Delete Recording (Settings menu) 14, 17, 23, 47 deleting. See erasing drawing in My Book activity area 21, 46 printing drawings 20 in Write activity area 20 drawing tools, using 20 E editing. See entries beginning with changing Edit menu 23, 46 Edit Settings (Parent menu) (Macintosh only) 35–38, 48 Edit Story Starters (Parent menu) 40, 48 ellipses, drawing 20 enlarging the pointer 30, 37, 47 text 31, 37, 47 Enter Password (Parent menu) 35, 48 Index 53 erasing a drawing 20 a drawing part 20 entire Magnet Board 25 a letter from Magnet Board 26 a parent message 40, 49 a reader’s name 42, 48 a recording in My Book activity area 47 a parent message 40, 49 in Read activity area 14, 17, 47 in Write activity area 23, 47 a story starter 40, 48 text in My Book activity area 46 in Write activity area 46 a word from Magnet Board 26 from My Words list 15, 16, 22 Exit (File menu) (Windows only) 46 exiting. See stopping Exit Parent Mode (Parent menu) 35, 49 F File menu 45–46 Exit (Windows only) 46 Library 45 New Work 45 Open Other Book 45 Open Work 45 Page Setup 45 Print 46 in My Book activity area 24 in Write activity area 24 Print My Book 24 Print My Words 16, 46 Print Writing 24 Quit (Macintosh only) 46 Save Work 45 Save Work As 45 Sign In 42, 45 framing letters on Magnet Board 25, 26 54 Index G Go button, on Library screen 10 going to a book 10 a page 46 Go menu 46 H hard disk drive checking available space on Macintosh computers 2 installing WiggleWorks on on Macintosh computers 3 on Windows computers 4–5 space requirements for on Macintosh computers 2 on Windows computers 4 hardware requirements for Macintosh computers 1, 2 for Windows computers 4 hearing about a book 13, 14 a button name 34, 48 a letter on Magnet Board 26, 48 a letter as you type it 34, 48 a parent message 39, 49 a program option 34, 48 suggested activities on Magnet Board 25 text in My Book activity area 21 in Read activity area 14 in Read Aloud activity area 13 in Write activity area 20 a word on Magnet Board 26 in My Book activity area 21 in Read activity area 15 in Read Aloud activity area 14 your recording in My Book activity area 21 in Read activity area 14 in Write activity area 20 Help (Parent menu) (Windows only) 49 Help button on Library or Activity Choices screen 10 in Write activity area 20 highlighting text changing color for a particular child 37 changing color for a single session 34, 48 changing how much is highlighted 30, 36, 47 I IBM-compatible computers. See Windows computers inserting text. See changing text inside page in My Book activity area 21 in Read activity area 15 in Read Aloud activity area 14 installing WiggleWorks on Macintosh computers 1–3 on Windows computers 4–5 interrupting mouse scanning 32, 47 L large text option setting for a particular child 37 setting for a single session 31, 47 Large Text (Settings menu) 31, 47 letters hearing a letter as you type it 34, 48 on Magnet Board blackening 25 copying 27 deleting 26 framing 25, 26 hearing 26 hearing a letter as you type it 48 printing 25 replacing 27 scattering 25, 26 selecting 25 typing 27 Library (File menu) 45 Library screen 10 accessing from Activities screen 11 accessing from File menu 45 light bulb button, changing options for 40, 48 lines, drawing 20 listening. See hearing looking through a book quickly 10 lowercase letters, switching to or from 25 J, K keyboard (screen), changing appearance of for a particular child 37 for a single session 33, 47 Index 55 M Macintosh computers changing computer voice on 41, 47, 48 installing WiggleWorks on 1–3 opening WiggleWorks on 3, 8 Magnet Board 25–27 blackening a letter on 25 copying a letter on 27 deleting a letter from 26 framing letters on 25, 26 hearing a letter or word on 26 hearing a letter as you type it on 48 printing the words on 25 replacing a letter on 27 scattering framed letters on 25, 26 selecting a letter on 25 typing a letter on 27 Magnet Board (Go menu) 46 Magnet Board activity area 25–27 My Words list usage in 25 recording a parent message in 39, 49 Magnet Board button, on Activity Choices screen 11 magnifying glass button 31, 47 memory, checking amount on Macintosh computers 2 memory requirements for computer voice (Macintosh only) 41 for Macintosh computers 1, 8 for Windows computers 4 menu bar, finding 16 menu commands 45–49 Edit menu 23, 46 File menu. See File menu Go menu 46 Parent menu. See Parent menu Settings menu. See Settings menu 56 Index Message button comics balloon for parent message 39 hearing about a book 13, 14 on Read Aloud cover page 13 on Read cover page 14 messages from parent comics balloon button for 39 deleting 40, 49 recording 39, 49 microphone on Macintosh computers 2 recording a parent message with 39 recording with 14, 17 on Windows computers 4 Microphone button in My Book activity area 21 in Read activity area 14, 17 in Write activity area 20, 23 minus sign (-) for deleting a word from My Words list 16, 22 monitor. See also screen display on Macintosh computers checking number of colors displayed on 3 number of colors required on 2 on Windows computers, number of colors required on 4 mouse scanning interrupting 32, 47 for a particular child 37 for a single session 31–32, 47 moving around on screen, in Write activity area 20 My Book (Go menu) 46 My Book activity area 21, 22 changing computer voice in 38, 41, 47, 48 changing screen keyboard in 33 changing text in 21, 46 cover page 21 deleting a recording in 47 deleting text in 46 drawing and painting in 21, 46 going to a page in 46 hearing a recording in 21 hearing a word in 21 hearing a letter as you type it in 34, 48 hearing text in 21 inside page 21 My Words list usage in 21, 22 printing in 21, 24 recording in 21 recording a parent message in 39, 49 selecting all the text in 46 starting over in 23, 46 My Book button, on Activity Choices screen 11 My Words list adding a word to 15, 16 adding a word to your writing from 22 printing 16, 46 purpose of 16 putting away 15 removing a word from 15, 16 using in Magnet Board activity area 25 in My Book activity area 21, 22 in Read activity area 15–16 in Write activity area 20, 21, 22 My Words list button on Magnet Board 25 in My Book activity area 22 in Read activity area 15 in Write activity area 22 N names of readers adding 42, 48 adding when opening a new WiggleWorks volume 9 removing 42, 48 narration, turning on and off 30, 36 New Work (File menu) 45 Next Page button in My Book activity area 21 in Read activity area 15 in Read Aloud activity area 13 O oops! tool 20 opening a book 8–11, 45 a child’s work file 45 WiggleWorks on Macintosh computers 3, 8 on Windows computers 5, 8 Open Other Book (File menu) 45 Open Work (File menu) 45 options, hearing 34, 48 orientation, setting for printing 45 P page of book going to 46 printing 21, 24 Page Setup (File menu) 45 painting in My Book activity area 21 in Write activity area 20 painting tools, using 20 paper size, setting for printing 45 Index 57 Parent menu 35–38, 48–49 Access Options (Windows only) 37, 48 Activities (Windows only) 36, 48 Audio Options (Windows only) 38, 48 Computer Voice (Macintosh only) 41, 48 Delete All Parent Messages 40, 49 Delete Name 42, 48 Delete Parent Message 40, 49 Edit Settings (Macintosh only) 35–38, 48 Edit Story Starters 40, 48 Enter Password 35, 48 Exit Parent Mode 35, 49 Help (Windows only) 49 Play Parent Message (Windows only) 49 Reading Style (Windows only) 36, 48 Record Parent Message 39, 49 Saving Options (Windows only) 38, 48 Suggestions 43, 49 using 35, 48 Who’s Signed In 49 parents. See also Parent menu tasks to be performed by 7 particular child, changing settings for a. See changing the WiggleWorks program, for a particular child password for parents 35, 48 Paste (Edit menu) 46 pencil tool 20 playing recordings. See hearing Play Parent Message (Parents menu) (Windows only) 49 plus sign (+) for adding a word to My Words list 16 for adding a word from My Words list to your writing 22 58 Index pointer enlarging 30, 37, 47 triangle 25 Previous Page button in My Book activity area 21 in Read activity page 15 in Read Aloud activity area 14 Print (File menu) 46 in My Book activity area 24 in Write activity area 24 printer on Macintosh computers 2 on Windows computers 4 Printer button in My Book activity area 24 in Write activity area 24 printing coloring book 24 Magnet Board 25 in My Book activity area 21, 24 My Words list 16, 46 putting together printed sheets in book format 24 setting orientation for 45 setting paper size for 45 in Write activity area 20, 24 your own book 21, 24 Print My Book (File menu) 24 Print My Words (File menu) 16, 46 Print Writing (File menu) 24 program options, hearing 34, 48 program settings, changing. See changing the WiggleWorks program Q Quick Look button 10 Quit (File menu) (Macintosh only) 46 Quit box (Macintosh computers), installation process and 3 Quit button 10 quitting. See stopping R Read (Go menu) 46 Read activity area 13, 14–15 changing reading style in 30, 36, 47, 48 cover page 14 deleting a recording in 14, 17, 47 enlarging text in 31, 47 going to a page in 46 hearing a word in 15 hearing a recording in 14 hearing text in 14 inside page 15 My Words list usage in 15–16 recording in 14, 17 recording a parent message in 39, 49 Read Aloud (Go menu) 46 Read Aloud activity area 13–14 cover page 13 enlarging text in 31, 47 going to a page in 46 inside page 14 recording a parent message in 39, 49 Read Aloud button, on Activity Choices screen 11 read-aloud narration, turning on and off 30, 36 read-aloud pace, changing 30, 36 Read button, on Activity Choices screen 11 reading 13–17 reading on your own. See Read activity area reading style, changing for a particular child 36, 48 for a single session 30, 47 Reading Style (Parent menu) (Windows only) 36, 48 Reading Style (Settings menu) 30, 47 recording 14, 17 deleting in My Book activity area 47 a parent message 39, 49 in Read activity area 14, 17, 47 in Write activity area 23, 47 hearing 14, 20, 21 in My Book activity area 21 a parent message 39, 49 in Read activity area 14, 17 in Write activity area 20, 23 Record Parent Message (Parent menu) 39, 49 rectangles, drawing 20 removing. See erasing replacing a letter on Magnet Board 27 replacing text. See changing text Restart box (Macintosh computers), installation process and 3 Return to Windows option (Windows computers) 5 Revert Page. See Start Over (Edit menu) rubber stamp designs, adding to drawings 20 Run WiggleWorks option (Windows computers) 5 S Save Work (File menu) 45 Save Work As (File menu) 45 saving, changing options for a particular child 38, 48 Saving Options (Parent menu) (Windows only) 38, 48 scanning interrupting 32, 47 for a particular child 37 for a single session 31–32, 47 Scanning (Settings menu) 31–32, 47 “Scanning Cycles” 32 scanning indicator 32, 47 Index 59 scattering (scrambling) framed letters on Magnet Board 25, 26 screen display. See also monitor Activity Choices screen 11 changing colors on 34, 37, 48 changing keyboard on 33, 37, 47 changing for a particular child 37 enlarging pointer on 30, 37, 47 enlarging text on 31, 37, 47 Library screen 10 moving around on, in Write activity area 20 Sign In screen 9 screen keyboard changing for a particular child 37 changing for a single session 33, 47 Screen Keyboard (Settings menu) 33, 47 Select All (Edit menu) 46 selecting all text 46 a book on Library screen 10 a color in Write activity area 20 a letter on Magnet Board 25 settings changes. See changing the WiggleWorks program Settings menu 47–48 Bigger Cursors 30, 47 Computer Voice (Macintosh only) 41, 47 Custom Colors 34, 48 Delete Recording 14, 17, 23, 47 Large Text 31, 47 Reading Style 30, 47 Scanning 31–32, 47 Screen Keyboard 33, 47 Talk and Type 34, 48 Talking Buttons 34, 48 shrinking text 31, 37, 47 Sign In (File menu) 42, 45 Sign-in button 10 signing in 9, 45 sign-in list, viewing 10, 49 60 Index Sign-In screen 9, 45 adding a reader’s name 42 removing a reader’s name 42, 48 single session, changing settings for. See changing the WiggleWorks program, for a single session slowing down reading pace 30, 36 software requirements for Macintosh computers 1, 2, 8 for Windows computers 4 sound. See computer voice; hearing; recording; talk and type; talking buttons sound card requirements, for Windows computers 4 speed of reading, changing 30, 36 squares, drawing 20 starting over. See erasing; undoing starting WiggleWorks. See also opening on Macintosh computers 3, 8–11 on Windows computers 5, 8–11 Start Over (Edit menu) 23, 46 “Step Word-by-Word” reading style 30 stopping animation sequences 8 mouse scanning 32 parent mode 35, 49 WiggleWorks 10, 46 story packs, using additional 7 story starter, adding, changing, or deleting a 40, 48 suggested activities hearing 25 viewing 43, 49 Suggested Activities button, on Magnet Board 25 Suggestions (Parent menu) 43, 49 sweeping clean. See erasing; undoing sweep tool for drawing area 20 for Magnet Board 25 synthesized voice. See computer voice system requirements checking for Macintosh computers 2–3 for Macintosh computers 1, 8 for Windows computers 4 system software, checking version on Macintosh computers 2 T talk and type for a particular child 37 for a single session 34, 48 Talk and Type (Settings menu) 34, 48 talking buttons for a particular child 37, 38 for a single session 34, 48 Talking Buttons (Settings menu) 34, 48 text changing Edit menu commands for 46 on Magnet Board 26–27 in My Book activity area 21, 46 in Write activity area 46 changing color for a particular child 37 changing color for a single session 34, 48 changing reading style for 30, 36, 47, 48 deleting in My Book activity area 46 in Write activity area 46 enlarging 31, 37, 47 hearing in My Book activity area 21 in Read activity area 14 in Read Aloud activity area 13 selecting all 46 shrinking 31, 37, 47 thumbnail 46 Tools box, in Write activity area 20 triangle pointer 25 Turn to Page (Go menu) 46 Type and Talk. See Talk and Type typing a letter on Magnet Board 27 letter read aloud when typed 34 new text in My Book activity area 21 U Undo (Edit menu) 46 Undo button, on Tool menu 20 undoing drawing and painting 20, 46 a page in My Book activity area 23, 46 V version of system software, checking on Macintosh computers 2 video card requirements, for Windows computers 4 View ReadMe option (Windows computers) 5 voice. See computer voice; hearing; recording; talk and type; talking buttons Volcano button, on Magnet Board 26 Index 61 W, X, Y, Z Who’s Signed In (Parent menu) 49 WiggleWorks CD-ROM disc inserting in Macintosh computers 3 inserting in Windows computers 4 requirement for 3 Windows computers Edit Settings command and 35, 48 installing WiggleWorks on 4–5 opening WiggleWorks on 5, 8 word adding to My Words list 15, 16, 22 from My Words list to your writing 22 changing reading style for for a particular child 36, 48 for a single session 30, 47 deleting from Magnet Board 26 from My Words list 15, 16, 22 hearing on Magnet Board 26 in My Book activity area 21 in Read activity area 15 in Read Aloud activity area 14 Write (Go menu) 46 62 Index Write activity area 20 adding or changing a story starter in 40 changing computer voice in 38, 41, 47, 48 changing screen keyboard in 33 changing text in 46 deleting a recording in 23, 47 deleting text in 46 drawing and painting in 20, 46 hearing a recording in 20 hearing a letter as you type it in 34, 48 hearing text you’ve written in 20 moving around on screen in 20 My Words list usage in 20, 21, 22 printing in 20, 24 recording in 20, 23 recording a parent message in 39, 49 selecting all the text in 46 Write button, on Activity Choices screen 11 writing 19–24 writing on your own. See Write activity area writing your own version of a book. See My Book activity area The Apple Publishing System This Apple manual was written, edited, and produced on a desktop publishing system using Apple Macintosh computers and QuarkXPress. Technical illustrations were drawn in Adobe™ Illustrator; screen shots were created and modified with system software, ExposurePro, Aldus SuperPaint, and Adobe Photoshop. Proof pages were created on Apple LaserWriter printers and on QMS and Tektronix color printers. Final pages were output directly to separated film on a PostScript™-driven imagesetter. Text type is Times®, display type is Helvetica® Narrow, and cover type is Apple Garamond, Apple’s corporate font. Ornaments are custom symbols designed for Apple Computer. PostScript, the LaserWriter page-description language, was developed by Adobe Systems Incorporated.