1
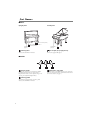
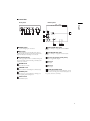
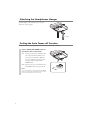
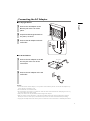
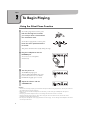
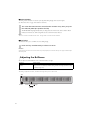
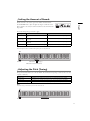
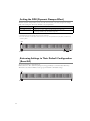
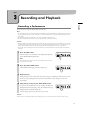
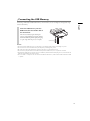
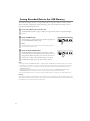
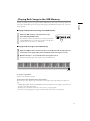
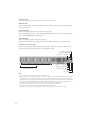
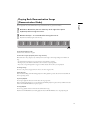
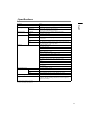
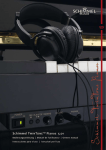
SILENT_Piano_SG2_all.book Page 1
Friday, May 25, 2012
10:22 AM
English
SG2
Owner’s manual
SILENT_Piano_SG2_all.book Page 2
Friday, May 25, 2012
10:22 AM
SPECIAL MESSAGE SECTION
This product utilizes an external power supply (adaptor). DO NOT connect this product to any power supply or adaptor other
than one described in the manual, on the name plate, or specifically recommended by Yamaha.
WARNING:
IMPORTANT:
Do not place this product in a position where anyone could
The louder the sound, the shorter the time period before
walk on, trip over, or roll anything over power cords or other
damage occurs.
connecting cords. The use of an extension cord is not
recommended! If you must use an extension cord, the
Some Yamaha products may have benches and/or accessory
minimum wire size for a 25’ cord (or less) is 18 AWG.
mounting fixtures that are either supplied as a part or the
product or as optional accessories. Some of these items are
NOTE:
designed to be dealer assembled or installed. Please make
The smaller the AWG number, the larger the current
sure that benches are stable and any optional fixtures (where
handling capacity. For longer extension cords, consult a
applicable) are well secured BEFORE using. Benches
local electrician.
supplied by Yamaha are designed for seating only. No other
uses are recommended.
This product should be used only with the components
supplied or; a cart, rack, or stand that is recommended by
NOTICE:
Yamaha. If a cart, etc., is used, please observe all safety
Service charges incurred due to lack of knowledge relating to
markings and instructions that accompany the accessory
how a function or effect works (when the unit is operating
product.
as designed) are not covered by the manufacturer’s warranty,
and are therefore the owners responsibility. Please study this
SPECIFICATIONS SUBJECT TO CHANGE:
manual carefully and consult your dealer before requesting
The information contained in this manual is believed to be
service.
correct at the time of printing. However, Yamaha reserves
the right to change or modify any of the specifications
without notice or obligation to update existing units.
ENVIRONMENTAL ISSUES:
Yamaha strives to produce products that are both user safe
and environmentally friendly. We sincerely believe that our
Do not attempt to service this product beyond that
products and the production methods used to produce
described in the user-maintenance instructions. All other
them, meet these goals. In keeping with both the letter and
servicing should be referred to qualified service personnel.
the spirit of the law, we want you to be aware of the
following:
This product, either alone or in combination with an
amplifier and headphones or speaker/s, may be capable of
Disposal Notice:
producing sound levels that could cause permanent hearing
Should this product become damaged beyond repair, or for
loss. DO NOT operate for a long period of time at a high
some reason its useful life is considered to be at an end,
volume level or at a level that is uncomfortable. If you
please observe all local, state, and federal regulations that
experience any hearing loss or ringing in the ears, you
relate to the disposal of products that contain lead, batteries,
should consult an audiologist.
plastics, etc. If your dealer is unable to assist you, please
contact Yamaha directly.
PLEASE KEEP THIS MANUAL
2
SILENT_Piano_SG2_all.book Page 3
Friday, May 25, 2012
10:22 AM
Chapter
1
Getting Started
English
Contents
Chapter 1 Getting Started .........................3
Chapter 3 Recording and Playback.......... 13
Accessories .........................................................3
Recording a Performance ................................. 13
Installation .........................................................3
Playing Back the Song Recorded in the Internal
Part Names ........................................................4
Memory .......................................................... 14
Attaching the Headphones Hanger ....................6
Connecting the USB Memory ......................... 15
Setting the Auto Power-off Function ..................6
Saving Recorded Data to the USB Memory..... 16
Connecting the AC Adaptor ..............................7
Playing Back Songs in the USB Memory ......... 17
Chapter 2 To Begin Playing .......................8
Playing Back Demonstration Songs
Using the Silent Piano Function.........................8
(Demonstration Mode).................................... 19
Selecting Voices..................................................9
Chapter 4 Connecting to Other Devices .. 21
Adjusting the Brilliance....................................10
Connecting to Other Audio Devices................ 21
Setting the Amount of Reverb..........................11
Connecting to Other MIDI Devices................ 23
Adjusting the Pitch (Tuning)............................11
Chapter 5 Appendix ............................... 24
Setting the DDE (Dynamic Damper Effect) ....12
Troubleshooting............................................... 24
Returning Settings to Their Default
The Error Chime............................................. 25
Configuration (Reset All) .................................12
Preset Voice List............................................... 26
Demonstration Song List................................. 27
MIDI Data Format (Program Change)............ 28
MIDI File Playback Sequence.......................... 28
Specifications................................................... 29
Accessories
• AC adaptor (PA-150 or an equivalent recommended by Yamaha) × 1
• Headphones × 1
• Headphones hanger × 1
• Attachment screws for headphones hanger × 2
• Owner’s manual × 1
Installation
• Avoid placing this instrument in direct sunlight, in close proximity to heating equipment or other hightemperature areas, or in locations with a high degree of humidity.
• Avoid placing this instrument in dusty or dirty areas.
• Do not expose this instrument to spray or fumes.
• Use only the specified AC adaptor. Use of other AC adaptors may result in damage, overheating, or fire.
3
SILENT_Piano_SG2_all.book Page 4
Friday, May 25, 2012
10:22 AM
Part Names
■ Piano
Upright piano
Grand piano
2 (on the rear of the piano)
1 (for models equipped with a
sostenuto pedal)
Control box
(page 5)
Control box
(page 5)
1 Silencing lever
1
2 DC12V jack (for upright pianos)
Activates the Silent Piano™ function.
Connect the supplied AC adaptor.
■ Pedals
3
1 Damper pedal
Sustains notes even after you release the keys. While
performing with the piano voice, this recreates a
sympathetic resonance occurs in adjacent strings on an
acoustic piano (Dynamic Damper Effect).
2 Silencing pedal
(For models not equipped with a sostenuto pedal)
Activates the Silent Piano™ function.
4
2
1
3 Shift pedal / soft pedal
Softens the piano sound. While using the voices other than
piano, you can use this pedal to switch between the normal
voice and a variation (see page 9).
SILENT_Piano_SG2_all.book Page 5
Friday, May 25, 2012
10:22 AM
■ Control box
Front panel
Bottom panel
English
USB
7
OFF
2
3
4
5
6
13
ON
1
AUTO OFF MODE
MIDI IN
8
MIDI OUT
DC IN 12V
IN
AUX
OUT
1 POWER switch
2 REC button
Places the instrument in record standby mode. This is a
combination lamp and button. The manner in which the
lamp is lit indicates the recording state of the unit.
3 PLAY/STOP button
Starts and stops playback. This is a combination lamp and
button. The manner in which the lamp is lit indicates the
current state of the unit.
4 REVERB knob
Adjusts the amount of reverb.
5 VOLUME knob
Adjusts the volume for both headphones simultaneously.
6 PHONES jacks
You can connect two stereo headphones, allowing you to
share your playing with another person.
KEY
10
Used to turn the digital piano on and off.
PDL
9
11 12
8 MIDI IN/MIDI OUT jacks
Connect to the input / output jacks of external MIDI
devices.
9 AUX IN/AUX OUT jacks
Connect to the input / output jacks of external audio
devices.
10 DC IN 12V jack (for grand pianos)
Connect the supplied AC adaptor.
11 KEY jack
Key sensor jack.
12 PDL jack
Pedal sensor jack.
13 AUTO OFF MODE switch
Activates or inactivates the auto power-off function. Set this
switch to ON to turn the power off automatically if you do
not operate the unit for 30 minutes.
7 USB terminal
Insert USB memory here.
5
SILENT_Piano_SG2_all.book Page 6
Friday, May 25, 2012
10:22 AM
Attaching the Headphones Hanger
Attach the hanger to the underside of the control box
with the two screws supplied.
AU
TO
DE
ON F
OF
OF
F MO
MIDI
MIDI
AU
IN
B
US
IN
OU
T
X OUT
Screwdriver
Setting the Auto Power-off Function
You can turn the power off automatically if you do not operate the unit for 30 minutes.
Set the AUTO OFF MODE switch at
the bottom of the control box.
ON:
Activates the auto power-off function. The
unit is automatically turned off if you do
AU
TO
OF
DE
ON F
OF
F MO
MIDI
MIDI
B
US
IN
not operate it for 30 minutes. While the
OU
T
X OUT
the power off and on again with the
POWER switch.
OFF: Inactivates the auto power-off function. Use
the POWER switch to turn the power off.
If you turn the power on while the AUTO OFF MODE
switch is set to OFF, the PLAY/STOP lamp on the front
of the control box lights up for 2 seconds.
6
ON FF
O
Note
AU
IN
auto power-off function is activated, turn
SILENT_Piano_SG2_all.book Page 7
Friday, May 25, 2012
10:22 AM
Connecting the AC Adaptor
■ For Upright Pianos
Connect the AC adaptor to the
DC12V jack at the rear of the
piano.
2
Loop the cord through the hook on
the piano, as shown.
3
Connect the AC adaptor to the AC
wall outlet.
English
1
DC12V
1
3
2
■ For Grand Pianos
1
Connect the AC adaptor to the DC
IN 12V jack at the rear of the
control box.
DC IN 12V
IN
AU
X
OU
T
AU
MIDI
TO
OF
OU
T
F MO
DE
ON
OF
F
MIDI
IN
US
B
2
Connect the AC adaptor to the AC
wall outlet.
Caution
• Use the Yamaha PA-150 AC adaptor, or an equivalent recommended by Yamaha. Use of other AC adaptors may
result in damage, overheating, or fire.
• Do not stretch the cord or bend its ends.
• Do not attempt to use the cord if it is stretched or if the ends of the cord have been bent. Attempting to do so may
cause interruptions to the power supply.
• Always turn off the main unit power before disconnecting the AC adaptor.
• When you wish to move the Silent Piano, unplug the AC adaptor from the AC outlet and disconnect it from the
DC12V jack at the rear of the piano, or the DC IN 12V jack at the rear of the control box before proceeding.
• Unplug the AC adaptor from the AC outlet if you do not intend to use the instrument for an extended period of time.
7
SILENT_Piano_SG2_all.book Page 8
Friday, May 25, 2012
10:22 AM
Chapter
2
To Begin Playing
Using the Silent Piano Function
1
(For models equipped with a sostenuto pedal)
Pull the silencing lever towards
you until you hear a click and feel
the mechanism catch.
(For models not equipped with a sostenuto pedal)
Press the center pedal and slide it
to the left.
This prevents the hammers from actually striking the strings.
2
Plug the headphones into the
PHONES jack.
You can use two sets of headphones
simultaneously.
0
E-17
HP
3
Turn the power on.
The POWER lamp lights green.
When the AUTO OFF MODE switch on the
bottom of the control box is set to OFF, the
PLAY/STOP lamp lights up for 2 seconds.
4
Adjust the volume with the
VOLUME knob.
Caution
• The sound is not output properly if you hold down the keyboard while turning the power on. Remove your hand from
the keyboard when turning the power on.
• When you connect two sets of headphones simultaneously, use the same type of headphones for optimum
performance.
• The keying sound of the keyboard remains even though the Silent Piano function is activated.
• To prevent damage to your hearing, refrain from raising the volume to excessive levels, and do not use the
headphones for extended periods of time.
• Do not pull the headphone cord or apply excessive force on the plug. This can damage the headphone and lead to
sound output malfunction.
8
SILENT_Piano_SG2_all.book Page 9
Friday, May 25, 2012
10:22 AM
Selecting Voices
When using the Silent Piano function, you can use the internal voices of this unit to perform with voices other
Voice name
Setting method
Piano (default setting)
Hold down the A-1, A#-1, and B-1 keys and press C4.
Harpsichord
Hold down the A-1, A#-1, and B-1 keys and press D4.
Vibraphone
Hold down the A-1, A#-1, and B-1 keys and press E4.
Pipe organ
Hold down the A-1, A#-1, and B-1 keys and press F4.
Celesta
Hold down the A-1, A#-1, and B-1 keys and press G4.
Strings
Hold down the A-1, A#-1, and B-1 keys and press A4.
Electric piano 1
Hold down the A-1, A#-1, and B-1 keys and press C#4.
Electric piano 2
Hold down the A-1, A#-1, and B-1 keys and press D#4.
Jazz organ
Hold down the A-1, A#-1, and B-1 keys and press F#4.
Choir
Hold down the A-1, A#-1, and B-1 keys and press G#4.
English
than that of a piano.
Note
•
•
•
•
Select voices with the unit turned on.
Turning the instrument off resets voice selection, which returns to piano the next time you turn the unit on.
See “Preset Voice List” on page 26 for details on voices.
You can also select two voices simultaneously for performance. See “Dual voice” on page 10.
Caution
• You can change voices while performing. This function is not available for songs that are being played back.
• For voices other than piano, the shift/soft pedal alters the voice variation rather than dampening the tone.
• For voices other than piano, the volume of the sound for the three lowest keys has been lowered intentionally.
A#-1
A-1 B-1
C4–A4
9
SILENT_Piano_SG2_all.book Page 10 Friday, May 25, 2012
10:22 AM
■ Voice variation
This unit provides variations on voices for your enjoyment when playing other voices than piano.
See “Preset Voice List” on page 26 for details on variations.
The voice alternates between normal and a variation every time you press
the shift/soft pedal (the pedal at far left).
The PLAY/STOP lamp lights briefly when you change between a normal voice and its variation. Green
indicates the normal voice, while orange indicates that a variation has been selected.
Note
There are variations available for each voice. Turning off the unit resets variation selection.
■ Dual voice
This function allows you to combine two voices while playing.
Press two keys simultaneously to select two voices.
Caution
As the dual voice function uses two voices for every note played, the number of notes you can play simultaneously is
reduced by half.
Adjusting the Brilliance
You can adjust the timbre brilliance of the sound from mellow to bright.
Operation
Setting method
Adjusting the brilliance
(5 levels)
Hold down the A-1, A#-1, and B-1 keys and press C1, D1, E1, F1 or G1. (The normal
setting is E1. C1 is the mellowest brilliance setting and G1 is the brightest brilliance setting.
The default setting is E1.)
Note
This setting is applied to all voices, and does not change when you turn the unit off.
A#-1
A-1 B-1
Mellow Normal Bright
Brilliance
C1–G1
10
SILENT_Piano_SG2_all.book Page 11 Friday, May 25, 2012
10:22 AM
Setting the Amount of Reverb
Reverb adds echo to the sound to give it more fullness and reverberation.
English
Use the REVERB knob to adjust the depth (the degree to which the reverb
effect is applied to the sound). To turn the reverb off, set the control in the far
left position.
You can also change the type of reverb to apply.
Reverb type
Effect
Setting method
Room
Reverberation similar to that heard in a normal Hold down the A-1, A#-1, and B-1 keys and press C2.
room
Hall 1
(default setting)
Reverberation similar to that heard in a small
concert hall
Hold down the A-1, A#-1, and B-1 keys and press D2.
Hall 2
Reverberation similar to that heard in a large
concert hall
Hold down the A-1, A#-1, and B-1 keys and press E2.
Stage
Reverberation similar to that heard on a stage
Hold down the A-1, A#-1, and B-1 keys and press F2.
Note
The reverb type reverts to its default setting when you turn the power off.
A#-1
A-1 B-1
C2 (Room)
F2 (Stage)
D2 (Hall 1)-default E2 (Hall 2)
Adjusting the Pitch (Tuning)
The pitch of this instrument is set so that A3=440Hz. You can fine tune the pitch up or down 65 cents (100 cents
is equal to 1 semitone).
Operation
Setting method
Raise the pitch
Hold down the A-1 and B-1 keys and press any one of the keys between C3 and B3.
Lower the pitch
Hold down the A-1 and A#-1 keys and press any one of the keys between C3 and B3.
Return to default tuning
Hold down the A-1, A#-1, and B-1 keys and press any one of the keys between C3 and B3.
Note
The pitch setting is stored when you turn the instrument off.
A#-1
A-1 B-1
C3–B3
11
SILENT_Piano_SG2_all.book Page 12 Friday, May 25, 2012
10:22 AM
Setting the DDE (Dynamic Damper Effect)
The DDE (Dynamic Damper Effect) recreates the subtle resonances that occur when you depress the damper
pedal on an acoustic piano. You can set the DDE to suit your preferences.
Operation
Setting method
Turn the DDE off
Hold down the A-1, A#-1, and B-1 keys and press C6.
Turn the DDE on (5 levels)
Hold down the A-1, A#-1, and B-1 keys and press D6, E6, F6, G6 or A6.
(A6 is the deepest DDE setting. The default setting is E6)
Note
• The DDE setting does not change when you turn the power off.
• Even when the DDE is turned off, the sound continues as if you had pressed the damper pedal, but without any
resonating effect.
A#-1
A-1 B-1
C6 D6–A6
Returning Settings to Their Default Configuration
(Reset All)
You can reset all settings to their default state.
Hold down the A-1, A#-1, and B-1 keys and press C7 for approximately 1 second, then release all the keys.
This returns voice variation, brilliance, reverb type, pitch, and DDE to their default settings.
A#-1
A-1 B-1
12
C7
SILENT_Piano_SG2_all.book Page 13 Friday, May 25, 2012
10:22 AM
Chapter
3
Recording and Playback
English
Recording a Performance
You can record one song in the internal memory of this unit.
Note
• The recording function can store approximately 65 kilobytes (equal to approximately 21,000 notes), which equates
to a song approximately 25 minutes in length, or 5 minutes in length for a song with a high tempo that contains
many notes.
• The recording also stores information on the voice selected during performance.
• The data recorded is preserved even if you turn the power off or reset all parameters.
Caution
• Starting recording will delete the previously recorded song (the previous recording is not deleted if you cancel the
recording without playing anything when the unit is in record standby mode). Please back up any data you do not
want to delete to USB memory. See “Saving Recorded Data to the USB Memory” on page 16 for details.
• You cannot use the recording function when USB memory is connected. Please remove the USB memory before
recording.
1
Press the REC button.
The unit changes to record standby mode, the REC lamp lights red,
and the PLAY/STOP lamp blinks green.
Note
Press the REC button again to cancel record standby mode and return
the unit to its normal state.
2
Press the PLAY/STOP button.
The PLAY/STOP lamp lights green and recording starts.
3
Begin playing.
During recording, a chime sounds when there is little storage space remaining in internal memory. As the
amount of storage remaining decreases, the chime becomes faster, and the unit begins to write data
automatically.
4
Stop playing, and press the PLAY/STOP button.
You can also press the REC button to stop recording. The REC lamp
blinks quickly, and the unit begins to write data. The REC lamp stops
flashing when the unit finishes writing data.
The data writing operation may take a few tens of seconds.
Caution
Do not turn this unit off while the REC lamp is flashing as this may corrupt the data or damage internal memory.
13
SILENT_Piano_SG2_all.book Page 14 Friday, May 25, 2012
10:22 AM
Playing Back the Song Recorded in the Internal
Memory
This unit can playback demonstration songs and recorded data.
Press the PLAY/STOP button.
The PLAY/STOP lamp lights green and playback starts.
To stop playback
Press the PLAY/STOP button during playback.
To pause playback
Press C7 during playback. The PLAY/STOP lamp blinks.
Press C7 or the PLAY/STOP button to restart playback.
To fast-forward
Press A#6 while holding down G#6 during playback or while playback is paused. Playback fast-forwards and the
PLAY/STOP lamp blinks while you press A#6.
Release A#6 to return the unit to its previous state (playback, or with playback paused).
G#6, A#6
C7
Note
• The REC button does not function during playback or while playback is paused.
• When USB memory is connected to the unit, the data stored in USB memory is played back. See “Playing Back
Songs in the USB Memory” on page 17.
• The chime sounds three times in succession if there is no song present.
14
SILENT_Piano_SG2_all.book Page 15 Friday, May 25, 2012
10:22 AM
Connecting the USB Memory
Connecting commercially available USB memory to the unit allows you save recording data, and playback songs
English
stored on the memory.
Insert the USB memory into the
USB terminal at the bottom left of
the control box.
DE
ON F
F MO
OF
OF
MIDI
MIDI
AU
IN
B
US
contents of the USB memory. During checking
TO
AU
The unit automatically begins checking the
IN
OU
T
X OUT
the PLAY/STOP lamp blinks rapidly, changing
to a pale orange when the process is complete.
USB memory
Caution
•
•
•
•
•
Do not remove the USB memory or turn the power on or off during data transfer, as breakage may result.
Do not insert and remove the USB memory too frequently as breakage may result.
Be careful not to bump the USB memory with your legs when it is connected to the unit.
Do not insert any objects other than the USB memory into the USB terminal, as it may become unusable.
Check that the USB memory is free of memory and software protection before attempting to use it, as these kinds of
protection will prohibit access to the memory.
• This unit is USB 1.1 compliant. You can also connect USB 2.0 devices to it, however data will be transferred at USB
1.1 speeds.
15
SILENT_Piano_SG2_all.book Page 16 Friday, May 25, 2012
10:22 AM
Saving Recorded Data to the USB Memory
You should back up important data to a storage medium such as a computer, in addition to saving it on USB
memory. Saving data to USB memory without backing it up other storage media means that there is a risk of
losing the data through jarring and shocks.
1
Insert the USB memory into the unit.
The PLAY/STOP lamp flashes orange, and lights pale orange when the unit has completed checking the
memory.
2
Press the REC button.
The unit changes to transfer standby mode, the REC lamp lights red,
and the PLAY/STOP lamp blinks orange.
Note
Press the REC button once more to cancel transfer standby mode and
return the unit to its normal state.
3
Press the PLAY/STOP button.
The PLAY/STOP lamp flashes rapidly, and data begins to transfer
from internal memory to the USB memory. As the data format is also
changed during transfer, the transfer process may take some time (3 to
4 minutes for a 65 kilobyte file). The REC lamp goes out and the
PLAY/STOP lamp lights pale orange when transfer is complete.
Note
• The data is stored as “USERSONG**.MID” in a folder named “USER FILES” on the USB memory. You can store up
to 50 songs in this manner. “**” can be any number from 00 to 49, and increases sequentially as files are saved.
• The unit will inform you that it cannot save any further songs when songs accumulate and the filenames reach
“USERSONG49.MID”.
• Attempting to save files when there are one or more files with the file names “USERSONG50.MID” through
“USERSONG99.MID” in the folder will result in an error, and you will be unable to save the data.
• You cannot delete files from this unit. Please connect the USB memory to a computer if you want to delete a file.
Caution
When transferring data from the USB memory to a computer, previously saved files may be overwritten if they have the
same file names as the files being transferred. If you do not want to overwrite these files, take measures to prevent this
from happening, such as changing the names of the files.
16
SILENT_Piano_SG2_all.book Page 17 Friday, May 25, 2012
10:22 AM
Playing Back Songs in the USB Memory
Carrying out playback operations (see page 14) when the USB memory is inserted into this unit plays back the last
English
saved song in the USB memory. You can also play back all songs in the USB memory from the start, or select the
song for playback.
■ To play back the last saved song in the USB memory
With the USB memory inserted into this unit,
press the PLAY/STOP button.
If no saved file is found in the USB memory, and another playable file
(Standard MIDI File) exists, the unit begins playback of that file. If no
such file exists, the unit returns to its normal state.
■ To play back all songs in the USB memory
1
With the USB memory inserted into this unit, hold down B6 and C7 (the two
white keys at far right of the piano keyboard) while turning the unit on.
2
Release the keys 1 to 2 seconds after turning the unit on.
Playback automatically begins at the song first saved to the USB memory.
B6 C7
To quit the song playback
Switch the unit off and then on again.
To select the song for playback (direct song selection)
Hold down the A-1 key, and press any of the keys from C0 through to C#4 corresponding to the number of a
song.
• “USERSONG**.MIDI” files in the “USER FILES” folder in the USB memory are assigned to the keys from C0
through to C#4, starting from the left.
• Pressing any key other than those listed above does not select a song for playback.
• If you select a song when playback is stopped, it will be selected the next time you start playback.
17
SILENT_Piano_SG2_all.book Page 18 Friday, May 25, 2012
10:22 AM
To change songs
To move to the previous song press F#6. To move to the next song press A#6.
To fast-forward
Press A#6 while holding down G#6 during playback or while playback is paused. You can fast forward while the
unit is outputting sound.
To pause playback
You can pause playback and restart it from where the song was paused.
Press C7 during playback. Press C7 to start playback again. While playback is paused, no keys will function other
than C7 and the PLAY/STOP button (play or pause).
To stop playback
You can stop playback and start it from the first saved song.
Press B6 or the PLAY/STOP button during playback. Press the PLAY/STOP button to start playback again.
To set the unit in repeat mode
Press F6 to repeat playback of a single song, G6 to repeat playback of all songs, or A6 to repeat playback of all
songs in random order. The default setting is to repeat playback of all songs.
Advance one song (A#6)
Fast-forward (G#6, A#6)
Return one song (F#6)
A-1
C0~C#4
Direct song selection
Repeat one song (F6)
Repeat all songs (G6)
Random repeat (A6)
Stop (B6)
Pause (C7)
Note
• The unit plays back a maximum of 50 songs in the USB memory.
• Playback occurs in order of the number (00 – 99) in the “**” section of the “USERSONG**.MIDI” files stored in the
“USER FILES” folder in the USB memory, beginning with the lowest numbered file (usually this will mean that songs
are played back in the order data was transferred to the USB memory). When the USB memory contains less than 50
songs, the unit looks for MIDI files contained in the “USER FILES” folder, the root directory, and other folders (up to
two levels deep), and plays them back in the order they were transferred to the USB memory.
• The chime sounds three times in succession if there is no song present in the USB memory.
• See “MIDI File Playback Sequence” on page 28 for details on playback order.
• To record to this unit or save recording data to the USB memory, switch the unit off and then on again.
18
SILENT_Piano_SG2_all.book Page 19 Friday, May 25, 2012
10:22 AM
Playing Back Demonstration Songs
(Demonstration Mode)
1
Hold down B6 and C7 (the two white keys at far right of the piano
keyboard) while turning the unit on.
2
Release the keys 1 to 2 seconds after turning the unit on.
English
You can play back any of the demonstration songs stored in this unit (50 greats for the Piano).
Playback automatically begins at the first song.
B6 C7
To exit demonstration mode
Switch the unit off and then on again.
To select the song for playback (direct song selection)
Hold down the A-1 key, and press any of the keys from C0 through to C#4 corresponding to the number of a
song.
• See “Demonstration Song List” on page 27 for the songs assigned to each key.
• Pressing any key other than those listed above does not select a song for playback.
• If you select a song when playback is stopped, it will be selected the next time you start playback.
To change songs
To move to the previous song press F#6. To move to the next song press A#6.
To fast-forward
Press A#6 while holding down G#6 during playback or while playback is paused. You can fast forward while the
unit is outputting sound.
To pause playback
You can pause playback and restart it from where the song was paused.
Press C7 during playback. Press C7 to start playback again. While playback is paused, no keys will function other
than C7 and the PLAY/STOP button (play or pause).
To stop playback
You can stop playback and start it from the first demonstration song.
Press B6 or the PLAY/STOP button during playback. Press the PLAY/STOP button to start playback again.
19
SILENT_Piano_SG2_all.book Page 20 Friday, May 25, 2012
10:22 AM
To set the unit in repeat mode
Press F6 to repeat playback of a single song, G6 to repeat playback of all songs, or A6 to repeat playback of all
songs in random order. The default setting is to repeat playback of all songs.
Advance one song (A#6)
Fast-forward (G#6, A#6)
Return one song (F#6)
A-1
C0~C#4
Direct song selection
Repeat one song (F6)
Repeat all songs (G6)
Random repeat (A6)
Stop (B6)
Pause (C7)
Note
• You can use the PLAY/STOP button on the control box to start and stop playback.
• The unit may sometimes fail to enter demonstration mode, depending on the timing with which you released the
keys.
• You cannot record to this unit or save recording data to the USB memory in demonstration mode. To record or save,
switch the unit off and then on again.
• You cannot transfer the demonstration songs to the USB memory.
20
SILENT_Piano_SG2_all.book Page 21 Friday, May 25, 2012
10:22 AM
Chapter
4
Connecting to Other Devices
English
Connecting to Other Audio Devices
Caution
Be sure to turn off the power to both devices before attempting to
connect this unit to another device.
Note
The AUX IN/AUX OUT jack on this unit is a stereo mini jack. If your connection cable is not compatible, you will need
to use an adaptor. Please use a nonresistant cable and adaptor.
■ Using AUX OUT
When connected to a compo system or IC recorder:
You can record performances played using this unit’s Silent Piano function.
When connected to powered speakers or a stereo system:
You can listen to performances played using this unit’s Silent Piano function. The signal output from this jack is
the same sound as that heard when listening through headphones.
Control box bottom panel
USB
OFF
ON
Compo system
IC recorder
AUTO OFF MODE
MIDI IN
OR
MIDI OUT
PDL
KEY
DC IN 12V
IN
Powered speakers
Stereo system
AUX
OUT
To AUX OUT
(stereo mini jack)
Audio cable
21
SILENT_Piano_SG2_all.book Page 22 Friday, May 25, 2012
10:22 AM
■ Using AUX IN
When connected to other sound modules or playback devices (such as CD players):
You can use the Silent Piano function together with the sound received from the connected devices.
You can use the VOLUME knob on this unit to simultaneously adjust the volume of its electronic sound and the
sound received through its AUX IN jack. Adjust the output volume on the connected device to balance the
sounds.
Control box bottom panel
USB
OFF
ON
AUTO OFF MODE
MIDI IN
Other sound modules
OR
MIDI OUT
PDL
KEY
DC IN 12V
IN
CD player
etc.
AUX
OUT
To AUX IN
(stereo mini jack)
Audio cable
Caution
Do not connect the output jack of an analog recording device to this unit’s AUX IN jack if you have connected this
unit’s AUX OUT jack to the input jack of the same recording device. Doing so will cause feedback of the audio signal
which may damage both components.
22
SILENT_Piano_SG2_all.book Page 23 Friday, May 25, 2012
10:22 AM
Connecting to Other MIDI Devices
■ Using MIDI OUT
English
When connected to other MIDI device:
You can reproduce this unit’s Silent Piano performances using sound modules such as synthesizers and other MIDI
devices.
Control box bottom panel
USB
OFF
ON
AUTO OFF MODE
To MIDI OUT
MIDI IN
Other MIDI device
MIDI OUT
PDL
KEY
DC IN 12V
IN
AUX
OUT
MIDI cable
■ Using MIDI IN
When connected to a sequencer:
You can use the sound module of this unit to reproduce performance data received from connected devices.
Control box bottom panel
USB
OFF
To MIDI IN
ON
AUTO OFF MODE
Sequencer
etc.
MIDI IN
MIDI OUT
PDL
KEY
DC IN 12V
IN
AUX
OUT
MIDI cable
Note
In addition to performance data for the keyboard and pedals, information on voice changes, and reverb depth is also
exchanged. MIDI data is transmitted on channel 1, and received on both channel 1 and 2.
23
SILENT_Piano_SG2_all.book Page 24 Friday, May 25, 2012
10:22 AM
Chapter
5
Appendix
Troubleshooting
If you have problems with your Silent Piano, here are a few troubleshooting tips. If you cannot solve the problem
easily yourself, consult your Yamaha piano dealer. DO NOT attempt to repair the piano or the AC adaptor
yourself.
☞ The unit is turned on but does not emit sound.
- The AC adaptor may not be plugged in correctly. Insert the AC adaptor firmly into the DC12V jack or the
DC IN 12V jack and AC outlet.
- The VOLUME knob may be turned to the far left position. Adjust the setting to an optimal level. The unit
outputs standard volume when the volume control is set to the 3 o’clock position.
☞ The power lamp lights but the instrument does not emit any sound, and the pedal has no
effect.
- The key sensor or the pedal sensor on the rear panel of the control box may not be connected correctly. Insert
the KEY and PDL plugs firm into their respective jacks on the control box (labeled KEY and PDL on the
bottom of the control box).
☞ The acoustic piano emits sound when I am using the Silent Piano function to play.
- Playing with extreme force may result in sound being emitted from the acoustic piano. Please moderate the
strength of your playing.
☞ The balance varies when listening through commercially available headphones.
- Headphone properties differ depending on their type, so different headphones may have different balance
characteristics.
☞ The volume varies when listening through commercially available headphones.
- Headphone properties differ depending on their type, so different headphones may have different volume
characteristics.
☞ I can hear a rattling sound from the piano body when using it in Silent Piano mode.
- This is not a fault. This is the sound of the acoustic piano’s keystroke.
☞ When I play a rapid series of notes in Silent Piano mode, a loud sound is emitted that is not
part of the performance.
- This is not a fault. The structure of the Silent Piano causes this to occur in some cases.
☞ No reverb effect is applied to the sound.
- The REVERB knob may be set to the extreme left. Rotate the knob to the right to apply an appropriate
amount of reverb (see page 11).
☞ The sound lingers excessively (There is too much reverb applied to the sound).
- The reverb and DDE may be set at an excessive level. Set these parameters to an appropriate level (see pages
11 and 12).
☞ The pitch of this instrument is different to that of other instruments.
- You can adjust the pitch of this unit to match that of other instruments (see page 11).
☞ Panel buttons are lit when I am not playing or recording.
- The buttons light dimly when USB memory is connected in the USB terminal (see pages 15 and 17).
24
SILENT_Piano_SG2_all.book Page 25 Friday, May 25, 2012
10:22 AM
☞ The USB memory does not respond.
- Remove the USB memory from the unit and then reinsert it.
- Check that the PLAY/STOP lamp blinks orange when you insert the USB memory. If the lamp does not
flash, the USB memory may be broken (see page 15).
English
☞ When I turn the power on with the instrument in demonstration mode and USB memory
inserted into the USB terminal, the internal demonstration songs play for a short while before
playback of the songs in stored in the USB memory begins.
- This is not a fault. This unit may take some time to recognize certain kinds of USB memory. The internal
demonstration songs play during the recognition process.
☞ USB data does not play back.
- This is not a fault. In some cases the MIDI file for the song may be too large for the unit to load, resulting in
an error.
☞ The unit is not turned on even though the POWER switch is set to ON.
- The auto power-off function is activated. Turn the power off and on again with the POWER switch (see page
6).
The Error Chime
In the event of the following errors occurring, the REC and PLAY/STOP lamps blink rapidly and a chime sounds
3 times in succession. Press the REC or PLAY/STOP buttons to stop the error chime.
• The USB memory is damaged and cannot be accessed.
• Song data is damaged.
• A file is too big for the unit to read.
• The power was turned off while the unit was processing information, resetting internal memory to its default
settings. Any song you recorded and stored in the internal memory of this unit has been erased. You cannot stop
the error chime during the reset.
• The USB memory has insufficient space remaining and cannot save your song.
• The USB memory is write-protected.
25
SILENT_Piano_SG2_all.book Page 26 Friday, May 25, 2012
10:22 AM
Preset Voice List
26
Voice name
Assigned key
Explanation
Variation
Piano
C4
A sample taken from the Yamaha concert grand There is no variation setting for piano.
piano. This voice offers a broad range of
The left pedal provides a soft (shifted)
expression, from a delicate pianissimo to an
pedal effect.
intense fortissimo, and reproduces the
expansive feeling produced by the reverberation
of the strings when you use the damper pedal.
Harpsichord
D4
This voice is often used in baroque music.
Volume and tone do not respond to changes in
touch. This voice also provides a realistic
reproduction of the sound produced when a
key is released on a real harpsichord.
Sound from strings an octave above
those you are playing is blended into
the overall mix, for a brighter, more
effusive sound.
Vibraphone
E4
A vibraphone struck with relatively light
mallets.
A vibraphone with vibrato induced by
rotating fans.
Pipe organ
F4
The magnificent pipe organ made famous by
Bach’s “Toccata and Fugue”.
A relaxed principal-style organ of the
type often used in church music from
the Baroque era.
Celesta
G4
The keyboard-style glockenspiel renowned for Voice with a register adjusted to the
its appearances in works such as “The Dance of same as the piano.
the Sugar-Plum Fairy” from Tchaikovsky’s
“Nutcracker Suite”. Its delicate music-box like
sound is charming, and with a register one
octave higher than that of a piano, the celesta
allows you to enjoy the pleasures of the treble
register.
Strings
A4
A string section, redolent with atmosphere.
This voice is very effective when used in dual
mode together with the piano voice.
Electric piano 1
C#4
An electric piano voice from an FM synthesizer, A chorus effect adds an increased
of the kind often used in popular music. This feeling of spaciousness to the sound.
voice is also effective when used in dual mode
together with the piano voice.
Electric piano 2
D#4
A hammer-and-metal style piano voice, which Adds a phaser effect to the tone for an
responds dynamically to the player’s touch
increased feeling of spaciousness.
from a soft tone when played gently to a lightly
distorted tone when played with more force.
This is used extensively in pop and jazz.
Jazz organ
F#4
A rotary organ voice used widely in jazz and
rock.
Press the left pedal to switch the speed
of the rotary speaker (vibrato) to high.
Choir
G#4
The sound of a choir singing in a large space.
This voice is also effective when used in dual
mode together with the piano voice.
This variation reduces the attack of the
sound slightly.
This variation reduces the attack of the
sound slightly.
SILENT_Piano_SG2_all.book Page 27 Friday, May 25, 2012
10:22 AM
Demonstration Song List
No. (Key) Title / Composer
1 (C0)
26 (C#2) Etude op. 10-12 “Revolutionary” / F. F. Chopin
Invention No. 1 / J. S. Bach
2 (C#0)
Invention No. 8 / J. S. Bach
27 (D2)
3 (D0)
Gavotte / J. S. Bach
28 (D#2) Valse op. 64-2 / F. F. Chopin
4 (D#0)
Prelude (Wohltemperierte Klavier I No. 1) / J. S. Bach 29 (E2)
Valse op. 69-1 “L’adieu” / F. F. Chopin
5 (E0)
Menuett G dur BWV. Anh. 114 / J. S. Bach
30 (F2)
Nocturne op. 9-2 / F. F. Chopin
6 (F0)
Le Coucou / L-C. Daquin
31 (F#2)
7 (F#0)
Piano Sonate No. 15 K. 545 1st mov. / W. A. Mozart 32 (G2)
Valse op. 64-1 “Petit chien” / F. F. Chopin
Träumerei / R. Schumann
Fröhlicher Landmann / R. Schumann
8 (G0)
Turkish March / W. A. Mozart
33 (G#2) La Prière d’une Vierge / T. Badarzewska
9 (G#0)
Menuett G dur / W. A. Mozart
34 (A2)
10 (A0)
Little Serenade / J. Haydn
35 (A#2) Arabesque / J. F. Burgmuller
Dolly’s Dreaming and Awakening / T. Oesten
11 (A#0) Perpetuum mobile / C. M. v. Weber
36 (B2)
Pastorale / J. F. Burgmuller
12 (B0)
Ecossaise / L. v. Beethoven
37 (C3)
La chevaleresque / J. F. Burgmuller
13 (C1)
Für Elise / L. v. Beethoven
38 (C#3) Liebesträume Nr. 3 / F. Liszt
14 (C#1) Marcia alla Turca / L. v. Beethoven
15 (D1)
English
No. (Key) Title / Composer
39 (D3)
Blumenlied / G. Lange
Piano Sonate op. 13 “Pathétique” 2nd mov. / L. v. Beethoven 40 (D#3) Barcarolle / P. I. Tchaikovsky
16 (D#1) Piano Sonate op. 27-2 “Mondschein” 1st mov. / L. v. Beethoven 41 (E3)
Melody in F / A. Rubinstein
17 (E1)
Humoresque / A. Dvorak
Piano Sonate op. 49-2 1st mov. / L. v. Beethoven
42 (F3)
18 (F1)
Impromptu op. 90-2 / F. P. Schubert
43 (F#3)
Tango (España) / I. Albeniz
19 (F#1)
Moments Musicaux op. 94-3 / F. P. Schubert
44 (G3)
The Entertainer / S. Joplin
20 (G1)
Frühlingslied op. 62-2 / J. L. F. Mendelssohn
45 (G#3) Maple Leaf Rag / S. Joplin
21 (G#1) Jägerlied op. 19b-3 / J. L. F. Mendelssohn
46 (A3)
22 (A1)
47 (A#3) Arabesque 1 / C. A. Debussy
Fantaisie-Impromptu / F. F. Chopin
23 (A#1) Prelude op. 28-15 “Raindrop” / F. F. Chopin
La Fille aux Cheveux de Lin / C. A. Debussy
48 (B3)
Clair de lune / C. A. Debussy
Rêverie / C. A. Debussy
24 (B1)
Etude op. 10-5 “Black keys” / F. F. Chopin
49 (C4)
25 (C2)
Etude op. 10-3 “Chanson de l’adieu” / F. F. Chopin
50 (C#4) Cakewalk / C. A. Debussy
C#0 D#0
F#0 G#0 A#0
C#1 D#1
F#1 G#1 A#1
C#2 D#2
F#2 G#2 A#2
C#3 D#3
F#3 G#3 A#3
C#4
C0 D0 E0 F0 G0 A0 B0 C1 D1 E1 F1 G1 A1 B1 C2 D2 E2 F2 G2 A2 B2 C3 D3 E3 F3 G3 A3 B3 C4
C0
A-1
C1
C2
C3
C4
C0~C#4
After switching to the demonstration mode (page 19), hold down the A-1 key and press the key
corresponding to the number you want to select.
27
SILENT_Piano_SG2_all.book Page 28 Friday, May 25, 2012
10:22 AM
MIDI Data Format (Program Change)
Voice name
Piano
Harpsichord
Harpsichord (Variation)
Vibraphone
Electric piano 1
Electric piano 2
Pipe organ
Pipe organ (Variation)
Celesta
Celesta (Variation)
Jazz organ
Strings
Strings (Variation)
Choir
Choir (Variation)
MSB
0
0
0
0
0
0
0
0
0
0
0
0
0
0
0
LSB
112
112
113
112
112
112
112
113
112
113
112
112
113
112
113
P.C.#
1
7
7
12
6
5
20
20
9
9
17
49
49
53
53
MSB, LSB (Bank Select), 0-127
P.C.# = Program Change Number, 1-128
MIDI File Playback Sequence
The illustration below shows the playback order when no “USERSONG**.MID” files are present, or the unit
finds less than 50 songs after searching in the “USER FILES” folder. This unit looks for the MIDI files contained
in root directory or other folders (up to two levels deep) in the order they were transferred to the USB memory.
A
A
A
B
A
B
T
B
USER FILES
No playback occurs.
V
Z
A
B
Z
28
A
A
A
A×
SILENT_Piano_SG2_all.book Page 29 Friday, May 25, 2012
10:22 AM
Specifications
88 keys
Pedals
Damper pedal, Sostenuto/silencing pedal, Shift/soft pedal
Sensor System
Silencing System
Internal Tone
Key Sensor
Noncontact continuous detection optical sensor
Pedal Sensors
Damper pedal: continuous detection sensor
Shift/soft pedal: ON/OFF detection sensor
Mechanism
Hammer shank stopper operated by silencing lever/pedal
Action
Quick Escape mechanism
Type
Advanced Wave Memory (AWM)
Polyphony*
64-note / 32-note stereo sampling / 16-note with the damper pedal
resonance effect
Number of Voices
10
Voices
Piano, Harpsichord, Vibraphone, Pipe organ, Celesta, Strings, Electric
piano 1, Electric piano 2, Jazz organ, Choir
Functions
English
Keyboard
Headphone volume control
Voice switch (10 voices)
Voice variation switch
Dual voice selection
Brilliance adjustment (5 steps)
Reverb type switch (Room, Hall 1, Hall 2, Stage)
Reverb adjustment
Pitch adjustment (–65 to +65 cent)
DDE (damper pedal resonance effect) adjustment (5 steps)
All reset
Recording
Playback
Auto power-off
Demonstration Songs
Connectors
50 greats for the Piano (preset)
Audio
PHONES × 2, AUX IN, AUX OUT
MIDI
MIDI IN, MIDI OUT
Others
USB TO DEVICE, DC12V (upright), DC IN 12V (grand)
Power Consumption
DC 12 V 8W (when used with PA-150)
Supplied Accessories
AC adaptor (PA-150 or an equivalent recommended by Yamaha),
Headphones, Headphones hanger, Attachment screws for headphones
hanger, Owner’s manual
* 64-note: Electric piano 2, Jazz organ
16-note: Pipe organ (excluding variation), Harpsichord (variation)
32-note: Voices other than the above
29