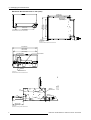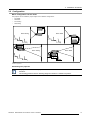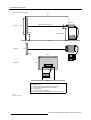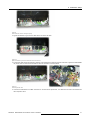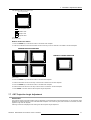
1
BarcoReality 909 Split Pack
Installation Manual
R9040040
R5976397/01
27/02/2003
Barco nv Simulation Products
600 Bellbrook Ave, Xenia OH 45385
Phone: +1 (937) 372 7579
Fax: +1 (937) 372 8645
E-mail: [email protected]
Visit us at the web: www.eis.barco.com
Barco nv Simulation Products
Noordlaan 5, B-8520 Kuurne
Phone: +32 56.36.82.11
Fax: +32 56.36.84.86
E-mail: [email protected]
Visit us at the web: www.barco.com
Printed in Belgium
Copyright ©
All rights reserved. No part of this document may be copied, reproduced or translated. It shall not otherwise be recorded, transmitted or
stored in a retrieval system without the prior written consent of Barco.
Changes
Barco provides this manual ’as is’ without warranty of any kind, either expressed or implied, including but not limited to the implied warranties or merchantability and fitness for a particular purpose. Barco may make improvements and/or changes to the product(s) and/or the
program(s) described in this publication at any time without notice.
This publication could contain technical inaccuracies or typographical errors. Changes are periodically made to the information in this
publication; these changes are incorporated in new editions of this publication.
Trademarks
Brand and product names mentioned in this manual may be trademarks, registered trademarks or copyrights of their respective holders.
All brand and product names mentioned in this manual serve as comments or examples and are not to be understood as advertising for
the products or their manufactures.
Federal Communications Commission (FCC Statement)
This equipment has been tested and found to comply with the limits for a class A digital device, pursuant to Part 15 of the FCC rules.
These limits are designed to provide reasonable protection against harmful interference when the equipment is operated in a commercial
environment. This equipment generates, uses, and can radiate radio frequency energy and, if not installed and used in accordance with
the instruction manual, may cause harmful interference to radio communications. Operation of this equipment in a residential area may
cause harmful interference, in which case the user will be responsible for correcting any interference.
Table of contents
TABLE OF CONTENTS
1. Safety Instructions . . . . . . . . . . . . . . . . . . . . . . . . . . . . . . . . . . . . . . . . . . . . . . . . . . . . . . . . . . . . . . . . . . . . . . . . . . . . . . . . . . . . . . . . . . . . . . . . . . 3
1.1
Safety Instructions . . . . . . . . . . . . . . . . . . . . . . . . . . . . . . . . . . . . . . . . . . . . . . . . . . . . . . . . . . . . . . . . . . . . . . . . . . . . . . . . . . . . . . . . . . . . . . . . . . . . . . . . . . . . . . . . . . . . 3
2. Packaging and Dimensions . . . . . . . . . . . . . . . . . . . . . . . . . . . . . . . . . . . . . . . . . . . . . . . . . . . . . . . . . . . . . . . . . . . . . . . . . . . . . . . . . . . . . . . 7
2.1
2.2
2.3
Projector Packaging. . . . . . . . . . . . . . . . . . . . . . . . . . . . . . . . . . . . . . . . . . . . . . . . . . . . . . . . . . . . . . . . . . . . . . . . . . . . . . . . . . . . . . . . . . . . . . . . . . . . . . . . . . . . . . . . . . . 7
Box Content . . . . . . . . . . . . . . . . . . . . . . . . . . . . . . . . . . . . . . . . . . . . . . . . . . . . . . . . . . . . . . . . . . . . . . . . . . . . . . . . . . . . . . . . . . . . . . . . . . . . . . . . . . . . . . . . . . . . . . . . . . . 7
Dimensions . . . . . . . . . . . . . . . . . . . . . . . . . . . . . . . . . . . . . . . . . . . . . . . . . . . . . . . . . . . . . . . . . . . . . . . . . . . . . . . . . . . . . . . . . . . . . . . . . . . . . . . . . . . . . . . . . . . . . . . . . . . . 7
3. Installation Guidelines. . . . . . . . . . . . . . . . . . . . . . . . . . . . . . . . . . . . . . . . . . . . . . . . . . . . . . . . . . . . . . . . . . . . . . . . . . . . . . . . . . . . . . . . . . . . . 13
3.1
3.2
3.3
3.4
General Installation Guidelines . . . . . . . . . . . . . . . . . . . . . . . . . . . . . . . . . . . . . . . . . . . . . . . . . . . . . . . . . . . . . . . . . . . . . . . . . . . . . . . . . . . . . . . . . . . . . . . . . . . . . . 13
Configuration . . . . . . . . . . . . . . . . . . . . . . . . . . . . . . . . . . . . . . . . . . . . . . . . . . . . . . . . . . . . . . . . . . . . . . . . . . . . . . . . . . . . . . . . . . . . . . . . . . . . . . . . . . . . . . . . . . . . . . . . . 15
Lens Formulas. . . . . . . . . . . . . . . . . . . . . . . . . . . . . . . . . . . . . . . . . . . . . . . . . . . . . . . . . . . . . . . . . . . . . . . . . . . . . . . . . . . . . . . . . . . . . . . . . . . . . . . . . . . . . . . . . . . . . . . . 18
Batteries . . . . . . . . . . . . . . . . . . . . . . . . . . . . . . . . . . . . . . . . . . . . . . . . . . . . . . . . . . . . . . . . . . . . . . . . . . . . . . . . . . . . . . . . . . . . . . . . . . . . . . . . . . . . . . . . . . . . . . . . . . . . . . 18
3.4.1 Battery installation . . . . . . . . . . . . . . . . . . . . . . . . . . . . . . . . . . . . . . . . . . . . . . . . . . . . . . . . . . . . . . . . . . . . . . . . . . . . . . . . . . . . . . . . . . . . . . . . . . . . . . . . . . . . . 18
4. Installation Setup. . . . . . . . . . . . . . . . . . . . . . . . . . . . . . . . . . . . . . . . . . . . . . . . . . . . . . . . . . . . . . . . . . . . . . . . . . . . . . . . . . . . . . . . . . . . . . . . . . . 19
4.1
4.2
Connecting the Optical and Electronic Block together . . . . . . . . . . . . . . . . . . . . . . . . . . . . . . . . . . . . . . . . . . . . . . . . . . . . . . . . . . . . . . . . . . . . . . . . . . . . . . 19
Scan Adaptation. . . . . . . . . . . . . . . . . . . . . . . . . . . . . . . . . . . . . . . . . . . . . . . . . . . . . . . . . . . . . . . . . . . . . . . . . . . . . . . . . . . . . . . . . . . . . . . . . . . . . . . . . . . . . . . . . . . . . . 24
5. AC Power . . . . . . . . . . . . . . . . . . . . . . . . . . . . . . . . . . . . . . . . . . . . . . . . . . . . . . . . . . . . . . . . . . . . . . . . . . . . . . . . . . . . . . . . . . . . . . . . . . . . . . . . . . . . 29
5.1
5.2
5.3
AC Power Cord Connection . . . . . . . . . . . . . . . . . . . . . . . . . . . . . . . . . . . . . . . . . . . . . . . . . . . . . . . . . . . . . . . . . . . . . . . . . . . . . . . . . . . . . . . . . . . . . . . . . . . . . . . . . 29
AC Power Voltage . . . . . . . . . . . . . . . . . . . . . . . . . . . . . . . . . . . . . . . . . . . . . . . . . . . . . . . . . . . . . . . . . . . . . . . . . . . . . . . . . . . . . . . . . . . . . . . . . . . . . . . . . . . . . . . . . . . . 29
Switching on the projector . . . . . . . . . . . . . . . . . . . . . . . . . . . . . . . . . . . . . . . . . . . . . . . . . . . . . . . . . . . . . . . . . . . . . . . . . . . . . . . . . . . . . . . . . . . . . . . . . . . . . . . . . . . 30
6. Source Connections . . . . . . . . . . . . . . . . . . . . . . . . . . . . . . . . . . . . . . . . . . . . . . . . . . . . . . . . . . . . . . . . . . . . . . . . . . . . . . . . . . . . . . . . . . . . . . . 33
6.1
6.2
6.3
6.4
6.5
6.6
6.7
6.8
Input Locations . . . . . . . . . . . . . . . . . . . . . . . . . . . . . . . . . . . . . . . . . . . . . . . . . . . . . . . . . . . . . . . . . . . . . . . . . . . . . . . . . . . . . . . . . . . . . . . . . . . . . . . . . . . . . . . . . . . . . . . 33
RGB Analog Source to Port 3 . . . . . . . . . . . . . . . . . . . . . . . . . . . . . . . . . . . . . . . . . . . . . . . . . . . . . . . . . . . . . . . . . . . . . . . . . . . . . . . . . . . . . . . . . . . . . . . . . . . . . . . 34
RGB Analog Source with Composite Sync to Port 4/5. . . . . . . . . . . . . . . . . . . . . . . . . . . . . . . . . . . . . . . . . . . . . . . . . . . . . . . . . . . . . . . . . . . . . . . . . . . . . . 38
Component Video Source to Port 4/5 . . . . . . . . . . . . . . . . . . . . . . . . . . . . . . . . . . . . . . . . . . . . . . . . . . . . . . . . . . . . . . . . . . . . . . . . . . . . . . . . . . . . . . . . . . . . . . . 38
RGB Analog Source with Tri Level Sync to Port 4/5 (Optional) . . . . . . . . . . . . . . . . . . . . . . . . . . . . . . . . . . . . . . . . . . . . . . . . . . . . . . . . . . . . . . . . . . . . 39
Component Video Source with Tri Level Sync to Port 4/5 (Optional) . . . . . . . . . . . . . . . . . . . . . . . . . . . . . . . . . . . . . . . . . . . . . . . . . . . . . . . . . . . . . . 39
RS232 Connection . . . . . . . . . . . . . . . . . . . . . . . . . . . . . . . . . . . . . . . . . . . . . . . . . . . . . . . . . . . . . . . . . . . . . . . . . . . . . . . . . . . . . . . . . . . . . . . . . . . . . . . . . . . . . . . . . . . 39
Communication Port for Communication With Peripherals . . . . . . . . . . . . . . . . . . . . . . . . . . . . . . . . . . . . . . . . . . . . . . . . . . . . . . . . . . . . . . . . . . . . . . . . . 40
7. Installation Adjustment Mode . . . . . . . . . . . . . . . . . . . . . . . . . . . . . . . . . . . . . . . . . . . . . . . . . . . . . . . . . . . . . . . . . . . . . . . . . . . . . . . . . . . . 41
7.1
7.2
7.3
7.4
7.5
7.6
7.7
7.8
Starting up the Installation Adjustment Mode . . . . . . . . . . . . . . . . . . . . . . . . . . . . . . . . . . . . . . . . . . . . . . . . . . . . . . . . . . . . . . . . . . . . . . . . . . . . . . . . . . . . . . . 41
Password Protection . . . . . . . . . . . . . . . . . . . . . . . . . . . . . . . . . . . . . . . . . . . . . . . . . . . . . . . . . . . . . . . . . . . . . . . . . . . . . . . . . . . . . . . . . . . . . . . . . . . . . . . . . . . . . . . . . 41
Overview flowchart of the Installation Adjustment Mode. . . . . . . . . . . . . . . . . . . . . . . . . . . . . . . . . . . . . . . . . . . . . . . . . . . . . . . . . . . . . . . . . . . . . . . . . . . . 42
Projector Position . . . . . . . . . . . . . . . . . . . . . . . . . . . . . . . . . . . . . . . . . . . . . . . . . . . . . . . . . . . . . . . . . . . . . . . . . . . . . . . . . . . . . . . . . . . . . . . . . . . . . . . . . . . . . . . . . . . . 43
Optical Lens Focusing . . . . . . . . . . . . . . . . . . . . . . . . . . . . . . . . . . . . . . . . . . . . . . . . . . . . . . . . . . . . . . . . . . . . . . . . . . . . . . . . . . . . . . . . . . . . . . . . . . . . . . . . . . . . . . . 44
Raster Centering . . . . . . . . . . . . . . . . . . . . . . . . . . . . . . . . . . . . . . . . . . . . . . . . . . . . . . . . . . . . . . . . . . . . . . . . . . . . . . . . . . . . . . . . . . . . . . . . . . . . . . . . . . . . . . . . . . . . . 46
CRT Projection Angle Adjustment . . . . . . . . . . . . . . . . . . . . . . . . . . . . . . . . . . . . . . . . . . . . . . . . . . . . . . . . . . . . . . . . . . . . . . . . . . . . . . . . . . . . . . . . . . . . . . . . . . . 47
Scheimpflug Adjustment (Diagonal Image Focusing). . . . . . . . . . . . . . . . . . . . . . . . . . . . . . . . . . . . . . . . . . . . . . . . . . . . . . . . . . . . . . . . . . . . . . . . . . . . . . . 49
8. Messages, Warnings and Failures . . . . . . . . . . . . . . . . . . . . . . . . . . . . . . . . . . . . . . . . . . . . . . . . . . . . . . . . . . . . . . . . . . . . . . . . . . . . . . 51
8.1
8.2
8.3
Messages. . . . . . . . . . . . . . . . . . . . . . . . . . . . . . . . . . . . . . . . . . . . . . . . . . . . . . . . . . . . . . . . . . . . . . . . . . . . . . . . . . . . . . . . . . . . . . . . . . . . . . . . . . . . . . . . . . . . . . . . . . . . . 51
Warnings. . . . . . . . . . . . . . . . . . . . . . . . . . . . . . . . . . . . . . . . . . . . . . . . . . . . . . . . . . . . . . . . . . . . . . . . . . . . . . . . . . . . . . . . . . . . . . . . . . . . . . . . . . . . . . . . . . . . . . . . . . . . . . 51
Failures . . . . . . . . . . . . . . . . . . . . . . . . . . . . . . . . . . . . . . . . . . . . . . . . . . . . . . . . . . . . . . . . . . . . . . . . . . . . . . . . . . . . . . . . . . . . . . . . . . . . . . . . . . . . . . . . . . . . . . . . . . . . . . . 52
A. Gamma Corrections . . . . . . . . . . . . . . . . . . . . . . . . . . . . . . . . . . . . . . . . . . . . . . . . . . . . . . . . . . . . . . . . . . . . . . . . . . . . . . . . . . . . . . . . . . . . . . . . 53
A.1
Gamma Corrections. . . . . . . . . . . . . . . . . . . . . . . . . . . . . . . . . . . . . . . . . . . . . . . . . . . . . . . . . . . . . . . . . . . . . . . . . . . . . . . . . . . . . . . . . . . . . . . . . . . . . . . . . . . . . . . . . . 53
B. Material Safety Data Sheet . . . . . . . . . . . . . . . . . . . . . . . . . . . . . . . . . . . . . . . . . . . . . . . . . . . . . . . . . . . . . . . . . . . . . . . . . . . . . . . . . . . . . . . . 57
B.1
Material Safety Data Sheet . . . . . . . . . . . . . . . . . . . . . . . . . . . . . . . . . . . . . . . . . . . . . . . . . . . . . . . . . . . . . . . . . . . . . . . . . . . . . . . . . . . . . . . . . . . . . . . . . . . . . . . . . . 58
Index. . . . . . . . . . . . . . . . . . . . . . . . . . . . . . . . . . . . . . . . . . . . . . . . . . . . . . . . . . . . . . . . . . . . . . . . . . . . . . . . . . . . . . . . . . . . . . . . . . . . . . . . . . . . . . . . . . . . . . 61
R5976397 BARCOREALITY 909 SPLIT PACK 27/02/2003
1
Table of contents
2
R5976397 BARCOREALITY 909 SPLIT PACK 27/02/2003
1. Safety Instructions
1. SAFETY INSTRUCTIONS
Overview
•
Safety Instructions
1.1 Safety Instructions
Notice on Safety
This equipment is built in accordance with the requirements of the international safety standards EN60950, UL 1950 and CSA C22.2
No.950, which are the safety standards of information technology equipment including electrical business equipment. These safety
standards impose important requirements on the use of safety critical components, materials and isolation, in order to protect the
user or operator against risk of electric shock and energy hazard, and having access to live parts. Safety standards also impose
limits to the internal and external temperature rises, radiation levels, mechanical stability and strength, enclosure construction and
protection against the risk of fire. Simulated single fault condition testing ensures the safety of the equipment to the user even when
the equipment’s normal operation fails.
Installation Instructions
Before operating this equipment please read this manual thoroughly, and retain it for future reference. Installation and preliminary
adjustments should be performed by qualified BARCO personnel or by authorized BARCO service dealers.
Owner’s Record
The part number and serial number are located at the back side of the projector. Record these numbers in the spaces provided
below. Refer to them whenever you call upon your BARCO dealer regarding this product.
Part Number:
Ser. Number:
Dealer:
Safety Indication on the Product
CAUTION
RISK OF ELECTRIC SHOCK
DO NOT OPEN
!
CAUTION/ TO REDUCE THE RISK OF ELECTRIC SHOCK
DO NOT REMOVE COVER (OR BACK)
NO USER-SERVICEABLE PARTS INSIDE
REFER SERVICING TO QUALIFIED SERVICE PERSONNEL
The lightning flash with an arrowhead within a triangle
is intended to tell the user that parts inside this product
may cause risk of electrical shock to persons.
!
The exclamation point within a triangle is intended to tell
the user that important operating and/or servicing instructions
are included in the technical documentation for this equipment.
Image 1-1
Safety Indication
Safety Warning
TO PREVENT FIRE OR ELECTRICAL SHOCK HAZARD, DO NOT EXPOSE THIS EQUIPMENT TO RAIN OR MOISTURE !
Federal Communication Commission (FCC Statement)
This equipment has been tested and found to comply with the limits of a class A digital device, pursuant to Part 15 of the FCC
Rules. These limits are designed to provide reasonable protection against harmful interference when the equipment is operated in
a commercial environment. This equipment generates, uses and can radiate radio frequency energy and, if not installed and used
R5976397 BARCOREALITY 909 SPLIT PACK 27/02/2003
3
1. Safety Instructions
in accordance with the instruction manual, may cause harmful interference to radio communications. Operation of this equipment
in a residential area is likely to cause harmful interference in which case the user will be required to correct the interference at his
own expense.
The use of shielded cables is required to comply within the limits of Part 15 of FCC rules and EN55022.
•
All the safety and operating instructions should be read before using this unit.
•
The safety and operating instructions manual should be retained for future reference.
•
All warnings on the equipment and in the documentation manuals should be adhered to.
•
All instructions for operating and use of this equipment must be followed precisely.
On Safety
•
This product should be operated from an AC power source. Power input is autoranging from 90 V to 230V.
•
All equipment in the system is equipped with a 3-wire grounding plug, a plug having a third (grounding) pin. This plug will only
fit into a grounding-type power outlet. This is a safety feature. If you are unable to insert the plug into the outlet, contact your
electrician to replace your obsolete outlet. Do not defeat the purpose of the grounding-type plug.
•
Do not allow anything to rest on the power cord. Do not locate this product where persons will walk on the cord. To disconnect
the cord, pull it out by the plug. Never pull the cord itself.
•
If an extension cord is used with this product, make sure that the total of the ampere ratings on the products plugged into the
extension cord does not exceed the extension cord ampere rating.
•
Never push objects of any kind into this product through cabinet slots as they may touch dangerous voltage points or short out
parts that could result in a risk of fire or electrical shock.
•
Never spill liquid of any kind on the product. Should any liquid or solid object fall into the cabinet, unplug the set and have it
checked by qualified service personnel before resuming operations.
•
Lightning - For added protection for this video product during a lightning storm, or when it is left unattended and unused for
long periods of time, unplug it from the wall outlet. This will prevent damage to the projector due to lightning and AC power-line
surges.
•
The wires of the main lead are colored in accordance with the following code.
CEE 7 Plug
Green and yellow : Ground
Blue : Neutral
Brown : Line
ANSI 73.11 Plug
Green and yellow : Ground
White : Neutral
Black : Line
Image 1-2
Power cord plugs
WARNING: This apparatus must be grounded (earthed) via the supplied 3 conductor AC power cable. If the
supplied power cable is not the correct one, consult your dealer.
Caution on Fire Hazard
DO NOT PLACE FLAMMABLE OR COMBUSTIBLE MATERIALS NEAR THE PROJECTOR !
BARCO large screen projection products are designed and manufactured to meet the most stringent safety regulations. This projector radiates heat on its external surfaces and from ventilation ducts during normal operation, which is both normal and safe.
Exposing flammable or combustible materials to the close proximity of this projector could result in the spontaneous ignition of that
material, resulting in a fire. For this reason, it is absolutely necessary to leave an "exclusion zone" around all external surfaces of the
projector whereby no flammable or combustible materials are present. The exclusion zone must be not less that 10 cm (4") for Barco
Retro Projectors. Do not cover the projector with any material while the projector is in operation. Keep flammable and combustible
materials away from the projector at all times. Mount the projector is a well ventilated area away from sources of ignition and out
of direct sun light. Never expose the projector to rain or excessive moisture. In the event of fire, use sand, CO 2, or dry powder fire
extinguishers; never use water on an electrical fire. Always have service performed on this projector by authorized BARCO service
personnel. Always insist on genuine BARCO replacement parts. Never use non-BARCO replacement parts as they may degrade
the safety of this projector.
4
R5976397 BARCOREALITY 909 SPLIT PACK 27/02/2003
1. Safety Instructions
On Installation
•
Do not place this equipment on an unstable cart, stand, or table. The product may fall, causing serious damage to it.
•
Do not use this equipment near water.
•
Slots and openings in the cabinet and the back or bottom are provided for ventilation; to ensure reliable operation of the product
and to protect it from overheating, these openings must not be blocked or covered. The openings should never be blocked by
placing the product on a bed, sofa, rug, or other similar surface. This product should never be placed near or over a radiator or
heat register. The projector should not be placed in a built-in installation or enclosure unless proper ventilation is provided.
•
Do not block the projector cooling fans or free air movement under and around the projector. Loose papers or other objects
may not be nearer to the projector than 4" on any side.
On Servicing
Do not attempt to service this product yourself, as opening or removing covers may expose you to dangerous voltage potentials and
risk of electric shock!
Refer all servicing to qualified service personnel.
Unplug this product from the wall outlet and refer servicing to qualified service personnel under the following conditions:
•
When the power cord or plug is damaged or frayed.
•
If liquid has been spilled into the equipment.
•
If the product has been exposed to rain or water.
•
If the product does not operate normally when the operating instructions are followed. Adjust only those controls that are
covered by the operating instructions since improper adjustment of the other controls may result in damage and will often
require extensive work by a qualified technician to restore the product to normal operation.
•
If the product has been dropped or the cabinet has been damaged.
•
If the product exhibits a distinct change in performance, indicating a need for service.
•
Replacement parts: When replacement parts are required, be sure the service technician has used original BARCO replacement parts or authorized replacement parts which have the same characteristics as the BARCO original part. Unauthorized
substitutions may result in degraded performance and reliability, fire, electric shock or other hazards. Unauthorized substitutions may void warranty.
•
Safety check: Upon completion of any service or repairs to this projector, ask the service technician to perform safety checks
to determine that the product is in proper operating condition.
On Cleaning
Unplug this product from the wall outlet before cleaning. Do not use liquid cleaners or aerosol cleaners. Use a damp cloth for
cleaning. To keep the cabinet looking brand-new, periodically clean it with a soft cloth. Stubborn stains may be removed with a cloth
lightly dampened with mild detergent solution. Never use strong solvents, such as thinner or benzine, or abrasive cleaners, since
these will damage the cabinet. To ensure the highest optical performance and resolution, the projection lenses are specially treated
with an anti-reflective coating, therefore, avoid touching the lens. To remove dust on the lens, use a soft dry cloth. Do not use a
damp cloth, detergent solution, or thinner.
On Repacking
Save the original shipping carton and packing material; they will come in handy if you ever have to ship your equipment. For maximum protection, repack your set as it was originally packed at the factory.
On Illumination
In order to obtain the best quality for the projected image, it is essential that the ambient light which is allowed to fall on the screen be
kept to an absolute minimum. When installing the projector and screen, care must be taken to avoid exposure to ambient light directly
on the screen. Avoid adverse illumination on the screen from direct sunlight or fluorescent lighting fixtures. The use of controlled
ambient lighting, such as incandescent spot light or a dimmer, is recommended for proper room illumination. Where possible, care
should also be taken to ensure that the floors and walls of the room in which the projector is to be installed are non-reflecting, dark
surfaces. Brighter surfaces will tend to reflect and diffuse the ambient light and hence reduce the contrast of the projected image on
the screen.
R5976397 BARCOREALITY 909 SPLIT PACK 27/02/2003
5
1. Safety Instructions
6
R5976397 BARCOREALITY 909 SPLIT PACK 27/02/2003
2. Packaging and Dimensions
2. PACKAGING AND DIMENSIONS
Overview
•
Projector Packaging
•
Box Content
•
Dimensions
2.1 Projector Packaging
Way of Packaging
The projector is packed in a carton box. To provide protection during transportation, the projector is surrounded with foam. The
package is secured with banding and fastening clips.
To unpack
1. Release the fastening clips.
2. Remove the banding. Handle as shown in the drawing.
PULL
TO OPE
Image 2-1
3. Take the projector out of its shipping carton and place it on a table.
Save the original shipping carton and packing material, they will be necessary if you ever have to ship your
projector. For maximum protection, repack your projector as it was originally packed at the factory.
2.2 Box Content
Content
•
1 Barco Reality 909 Electronic Block (Weight: 35 kg / 77 lbs)
•
1 Barco Reality 909 Optical Block (Weight: 51 kg / 112 lbs)
•
1 Cable Tube
•
1 Remote Control Unit + 2 batteries (1.5 V)
•
1 Power Cord with outlet plug type CEE7
•
1 Power Cord with outlet plug ANSI 73.11
•
1 Installation Manual
•
1 Owner’s Manual
2.3 Dimensions
All drawings show a projector with the standard lens type HFQ900.
R5976397 BARCOREALITY 909 SPLIT PACK 27/02/2003
7
2. Packaging and Dimensions
Electronic Block dimensions in mm (inch)
533,5 mm
(21.0 inch)
Image 2-2
Electronic Block rear View Dimensions
440 mm
(17.3 inch)
447,5 mm
(17 6 inch)
520 mm
(20.5 inch)
Ø8 mm (x6)
(0.3 inch)
8 mm
(0 3 inch)
Image 2-3
Electronic Block bottom view dimensions
577,58 mm
(22.7 inch)
561,5 mm
(22.1 inch)
On/Off Button
Input Zone
Mains Input
RS232
IR Receiver
Airflow
Electronics
594 mm
(23 4 inch)
Image 2-4
Electronic Block front view dimensions
Airflow
Convergence
250,75 mm
(9 9 inch)
Image 2-5
Electronic block right view dimensions
8
R5976397 BARCOREALITY 909 SPLIT PACK 27/02/2003
2. Packaging and Dimensions
305 mm
(12 0 inch)
17,5 mm
(0.7 inch)
80° +100°
-80°
75,5 mm
(3.0 inch)
Gravity Point (Aproximative)
111,1 mm
(4.4 inch)
235 mm
(9.3 inch)
549,5 mm
(21.6 inch)
5 mm
(0.2 inch)
529,5 mm
(20.8 inch)
92,5 mm
(3.6 inch)
106,5 mm
(4.2 inch)
Image 2-6
Electronic Block right view dimensions
Corner connector or straight connector is possible
Input signals from tube unit
Removable safety cable protection
Can be used either this side or the other side
Can be rotated from 0 ° to ±90°
Local Control
Image 2-7
Electronic Block top view dimensions
783,07 mm
(30 8 inch)
R5976397 BARCOREALITY 909 SPLIT PACK 27/02/2003
9
2. Packaging and Dimensions
Optical Block dimensions in mm (inch)
68 mm
(2.7 inch)
190 mm
(7.5 inch)
178 mm
(7.0 inch)
105 mm
(4.1 inch)
98,5 mm
(3 9 inch)
42,5 mm
(1.7 inch)
445 mm
(17.5 inch)
15 mm
(0.6 inch)
Ø 7 mm 20x
(0.3 inch)
244,13 mm
(9.6 inch)
234,37 mm
(9.2 inch)
Iris build in
position
IR Reciever
258,5 mm
(10.2 inch)
26,49 mm
(1.0 inch)
Image 2-8
Optical Block bottom view dimensions
Image 2-9
Optical Block front view dimensions
650 mm
(25 6 inch)
Fixation plate
68,65 mm
(2.7 inch)
100 mm
(3.9 inch)
Airflow through cabinet
Image 2-10
Optical Block left view dimensions
10
Gravity point
(5.2 inch)
131 mm
Variable
between 0 ° en -90°
CRT point
R5976397 BARCOREALITY 909 SPLIT PACK 27/02/2003
101,25 mm
(4.0 inch)
2. Packaging and Dimensions
98,59 mm
(3.9 inch)
447,5 mm
(17.6 inch)
7°
90° Angled connection
Straight connection in option
Connection can be placed on this side
or on other side
215,55 mm
(8.5 inch)
532 mm
(20.9 inch)
234,03 mm
(9.2 inch)
93,5 mm
(3.7 inch)
Image 2-11
Optical Block top view dimensions
R5976397 BARCOREALITY 909 SPLIT PACK 27/02/2003
11
2. Packaging and Dimensions
12
R5976397 BARCOREALITY 909 SPLIT PACK 27/02/2003
3. Installation Guidelines
3. INSTALLATION GUIDELINES
Overview
•
General Installation Guidelines
•
Configuration
•
Lens Formulas
•
Batteries
3.1 General Installation Guidelines
Ambient temperature check
Careful consideration of things such as image size, ambient light level, projector placement and type of screen to use are critical to
the optimum use of the projection system.
Max. ambient temperature : 40 °C or 104 °F
Min. ambient temperature : 0 °C or 32 °F
The projector will not operate if ambient air temperature falls outside this range (0°C- 40°C or 32°F-104°F).
Humidity Conditions
Storage: 0 to 98 % RH Non-condensing
Operation: 0 to 95 % RH Non-condensing
Environment
Do not install the projection system in a site near heat sources such as radiators or air ducts, or in a place subject to direct sunlight,
excessive dust or humidity. Be aware that room heat rises to the ceiling; check that temperature near the installation site is not
excessive.
WARNING:
Harmful Environmental Contamination Precaution.
Environment condition check
A projector must always be mounted in a manner which ensures the free flow of clean air into the projectors ventilation inlets. For
installations in environments where the projector is subject to airborne contaminants such as that produced by smoke machines or
similar (these deposit a thin layer of greasy residue upon the projectors internal optics and imaging electronic surfaces, degrading
performance), then it is highly advisable and desirable to have this contamination removed prior to it reaching the projectors clean
air supply. Devices or structures to extract or shield contaminated air well away from the projector are a prerequisite, if this is not a
feasible solution then measures to relocate the projector to a clean air environment should be considered.
Only ever use the manufactures recommended cleaning kit which has been specifically designed for cleaning optical parts, never
use industrial strength cleaners on a projectors optics as these will degrade optical coatings and damage sensitive optoelectronics
components. Failure to take suitable precautions to protect the projector from the effects of persistent and prolonged air contaminants will culminate in extensive and irreversible ingrained optical damage. At this stage cleaning of the internal optical units will be
non-effective and impracticable. Damage of this nature is under no circumstances covered under the manufactures warranty and
may deem the warranty null and void. In such a case the client shall be held solely responsible for all costs incurred during any
repair. It is the clients responsibility to ensure at all times that the projector is protected from the harmful effects of hostile airborne
particles in the environment of the projector. The manufacture reserves the right to refuse repair if a projector has been subject to
willful neglect, abandon or improper use.
What about Ambient Light ?
The ambient light level of any room is made up of direct or indirect sunlight and the light fixtures in the room. The amount of ambient
light will determine how bright the image will appear. So, avoid direct light on the screen. Windows that face the screen should be
covered by opaque drapery while the set is being viewed. It is desirable to install the projection system in a room whose walls and
floor are of non-reflecting material. The use of recessed ceiling lights and a method of dimming those lights to an acceptable level
is also important. Too much ambient light will ‘wash out’ of the projected image. This appears as less contrast between the darkest
and lightest parts of the image. With bigger screens, the ‘wash out’ becomes more important. As a general rule, darken the room to
the point where there is just sufficient light to read or write comfortably. Spot lighting is desirable for illuminating small areas so that
interference with the screen is minimal.
Which Screen Type ?
There are two major categories of screens used for projection equipment. Those used for front projected images and those for rear
projection applications.
R5976397 BARCOREALITY 909 SPLIT PACK 27/02/2003
13
3. Installation Guidelines
Screens are rated by how much light they reflect (or transmit in the case of rear projection systems) given a determined amount
of light projected toward them. The ‘GAIN’ of a screen is the term used. Front and rear screens are both rated in terms of gain.
The gain of screens range from a white matte screen with a gain of 1 (x1) to a brushed aluminized screen with a gain of 10 (x10)
or more. The choice between higher and lower gain screens is largely a matter of personal preference and another consideration
called the Viewing angle. In considering the type of screen to choose, determine where the viewers will be located and go for the
highest gain screen possible. A high gain screen will provide a brighter picture but reduce the viewing angle. For more information
about screens, contact your local screen supplier.
Lens Type (Image Sizing)
Following lens types are available for the Barco Reality 909 Split Pack:
Lens Type
Projected Width in mm (inch)
HFQ900
1400mm (55.1inch) to 6000mm (236.2inch)
Each lens type will correspond with an available image width that can be projected. The lens type can be found on the lens type
label located on the lenshead.
Image 3-1
Lens type label located on the lenshead
Screen Height
The projector leaves the BARCO factory, adjusted as a Front/Table projector for a screen width of 2400 mm (94.5 inch) with an
aspect ratio of 4 to 3 (The projector can be factory aligned in other configurations if ordered).
Screen Width
Screen size ratio 4 to 3
Image 3-2
Image Sizing
Changing the image size from the projector preset size requires a realignment of the projector.
14
R5976397 BARCOREALITY 909 SPLIT PACK 27/02/2003
3. Installation Guidelines
3.2 Configuration
Which configuration can be used?
The projector can be installed to project images in four different configurations:
•
Front/table
•
Rear/table
•
Front/ceiling
•
Rear/ceiling
Rear / Ceiling
Rear / Table
Front / Ceiling
Front / Table
Image 3-3
Possible Configurations
Positioning the projector
The projector should be installed perpendicular with the screen on a distance PD and water leveled in both
directions.
The mounting positions shown in following images are shown for a nominal lens position.
R5976397 BARCOREALITY 909 SPLIT PACK 27/02/2003
15
3. Installation Guidelines
Table/Top side facing ceiling
PD
Projector
Side view
Optical axis projection lens
SH
A
Screen
CD=SH/2+B-A
B
Floor
Top view
SW
Screen
SW
Back view
SH
Floor
Definitions on the abbreviation on the drawings:
A = Correction value.
B = Distance between ceiling and bottom of the screen.
CD = Total distance between projector and ceiling.
SW = Screen Width.
SH = Screen Height (Image height).
PD = Projector Distance, distance between screen and projector.
Image 3-4
Front/Table Positioning
16
R5976397 BARCOREALITY 909 SPLIT PACK 27/02/2003
3. Installation Guidelines
Ceiling/Top side facing floor
Ceiling
B
CD=SH/2+B-A
Screen
Side view
A
SH
Optical axis projection lens
Projector
PD
Top view
SW
Screen
Ceiling
Back view
SH
SW
Definitions on the abbreviation on the drawings:
A = Correction value.
B = Distance between ceiling and bottom of the screen.
CD = Total distance between projector and ceiling.
SW = Screen Width.
SH = Screen Height (Image height).
PD = Projector Distance, distance between screen and projector.
Image 3-5
Front/Ceiling Positioning
R5976397 BARCOREALITY 909 SPLIT PACK 27/02/2003
17
3. Installation Guidelines
3.3 Lens Formulas
Lens Formulas
The lens formulas should be used to calculate the ideal projector distance:
Lens type HFQ900
PD[meter] = 1.269 x SW[meter] + 0.3345
PD[inch] = 1.269 x SW[inch] + 13.17
3.4 Batteries
Overview
•
3.4.1
Battery installation
Battery installation
How to install the battery
Two batteries are packed together with the RCU. Before using your RCU, install first these batteries.
1. Remove the battery cover on the backside by pushing the handle a little towards the bottom of the RCU.
2. Lift up the top side of the cover at the same time.
3. Insert the batteries as indicated in the RCU.
4. Put the battery cover on its place.
18
R5976397 BARCOREALITY 909 SPLIT PACK 27/02/2003
4. Installation Setup
4. INSTALLATION SETUP
Overview
•
Connecting the Optical and Electronic Block together
•
Scan Adaptation
WARNING: RISK OF ELECTRIC SHOCK! TURN OFF THE PROJECTOR AND UNPLUG THE POWER CORD!
This installation should only be done by BARCO authorized service personnel.
4.1 Connecting the Optical and Electronic Block together
Preparation to connect the cable tube
1. Loosen both indicated screws on the back of the electronic block.
Electronic block
Image 4-1
Loosen both indicated screws on the back of the electronic block
2. Remove the protection plate on the back.
Electronic block
Image 4-2
Remove the protection plate on the back
3. Loosen both indicated screws on the back of the optical block.
Optical block
Image 4-3
Loosen both indicated screws on the back of the optical block
4. Remove the protection plate on the back.
Optical block
Image 4-4
Remove the protection plate on the back
5. Loosen the 4 indicated screws on each side of the optical block.
R5976397 BARCOREALITY 909 SPLIT PACK 27/02/2003
19
4. Installation Setup
Optical block
Image 4-5
Loosen the 4 indicated screws on each side of the optical block
6. Loosen the 4 indicated screws on the back of the optical block.
Optical block
Image 4-6
Loosen the 4 indicated screws on the back of the optical block
7. Remove the protection plate on the top.
Optical block
Image 4-7
Remove the protection plate on the top
Connecting the cable tube to the optical block
The cable tube contains 6 cables, each with his own connector. Make sure to connect the side with the longest EHT cable to the
optical block. There is an opening to mount the cable tube in on the right and left side of the block. The unused opening is closed
with a protection plate.
1. Loosen the fastener ring on the side off the cable tube with the longest EHT cable.
Image 4-8
Loosen the fastener ring on the side off the cable tube with the longest EHT cable
1
1’
2
3
EHT connector (longest cable) to Optical Block
EHT connector (shortest cable) to Electronic Block
RGB BNC connectors
Signal/Data connectors
2. Put the cable tube connector through the opening, the cable tube can be connected on the right or the left side
20
R5976397 BARCOREALITY 909 SPLIT PACK 27/02/2003
4. Installation Setup
Image 4-9
Put the cable tube connector through the opening
3. Tighten the fastener ring so that the cable tube is secured to the block.
Image 4-10
Tighten the fastener ring so that the cable tube is secured to the block
4. Put the EHT cable through the opening at the back of the optical block, inside the projector make sure to guide the cable UNDER
the picture tube unit and connect this cable to the EHT connection on the EHT block.
Image 4-11
Connecting the EHT cable
5. Connect the RGB cables to the BNC connectors on the back of the optical block , the cables and connectors are marked with
their respective colors.
R5976397 BARCOREALITY 909 SPLIT PACK 27/02/2003
21
4. Installation Setup
Image 4-12
Connecting the RGB cables
6. Connect the Signal and Data cables to the corresponding connectors on the back of the optical block. Interchanging of the two
36 pin connectors is prevented by a build_in key in the female connectors. (When these cables need to be unplugged, push the
tabs on the sides of the connector and pull backwards)
Image 4-13
Connecting the Data and Signal cables
J1 36 pin connector with white wires
J2 36 pin connector with green wires
J3 24 pin connector with grey wires
7. Put the protection plates back in place.
Connecting the cable tube to the electronic block
1. Loosen the fastener ring on the cable tube.
Image 4-14
Loosen the fastener ring on the cable tube
1
1’
2
3
EHT connector (longest cable) to Optical Block
EHT connector (shortest cable) to Electronic Block
RGB BNC connectors
Signal/Data connectors
2. Put the cable tube connector through the opening, the cable tube can be connected on the right or the left side.
22
R5976397 BARCOREALITY 909 SPLIT PACK 27/02/2003
4. Installation Setup
Image 4-15
Put the cable tube connector through the opening
3. Tighten the fastener ring so that the cable tube is secured to the block.
Image 4-16
Tighten the fastener ring so that the cable tube is secured to the block
4. Connect the EHT cable to the EHT connection on the back of the electric block.
Image 4-17
Connecting the EHT cable
5. Connect the RGB cables to the BNC connectors on the back of the electric block, the cables and connectors are marked with
their respective colors.
R5976397 BARCOREALITY 909 SPLIT PACK 27/02/2003
23
4. Installation Setup
Image 4-18
Connecting the RGB cables
6. Connect the Signal and Data cables to the corresponding connectors on the back of the electric block.
Image 4-19
Connecting the Data and Signal cables
J1 36 pin connector with white wires
J2 36 pin connector with green wires
J3 24 pin connector with grey wires
7. Put the protection plate back in place.
4.2 Scan Adaptation
Scan Connectors
The scan connectors must be placed in the correct position which correspond to the desired scanning configuration.
Access to the Scan Connectors
The get access to the scan connectors it is necessary to lift up the protection plate on the top/back of the electric block.
1. Loosen the indicated bolts, 3 on each side and 2 on top.
24
R5976397 BARCOREALITY 909 SPLIT PACK 27/02/2003
4. Installation Setup
3 blots on the right
2 blots on top
3 blots on the left
Image 4-20
Loosen the indicated bolts
2. Lift up the protection plate.
Image 4-21
Lift up the protection plate
3. The connectors are located at the top/back of the electronic block.
Scan Connector Settings
When changing the horizontal and/or vertical scan, insure that all three connectors are set in the same position. The configuration
of each connector is depending on its orientation i.e. on the position of the reference side of the connector. The position of the scan
connectors for the different mounting configurations can be summarized as follows:
R5976397 BARCOREALITY 909 SPLIT PACK 27/02/2003
25
4. Installation Setup
Image 4-22
Scan Connectors Settings
J15 1
J25 1
J35 1
J15 2
J25 2
J35 2
Red Horizontal Scan connector
Green Horizontal Scan connector
Blue Horizontal Scan connector
Red Vertical Scan connector
Green Vertical Scan connector
Blue Vertical Scan connector
Putting back the protection plate
1. After setting the scan connectors, put the protection plate back in place and secure it with the bolts.
The following procedure can only be done after power (mains) connection. So, first continue with the projector
setup and the connections and then return to this procedure.
Scan position check
To check the scan position i.e. the orientation of the scan connectors proceed as follows:
1. Switch on the projector.
The projector starts up on the last selected source.
2. Press the ADJUST key on the RCU.
The Adjustment Mode menu will be displayed.
26
R5976397 BARCOREALITY 909 SPLIT PACK 27/02/2003
4. Installation Setup
3. Push the ↑ or ↓ keys to highlight Service.
ADJUSTMENT MODE
Select a path from below :
RANDOM ACCESS
INSTALLATION
SERVICE
Select with ↑ or ↓
then <ENTER>
<EXIT> to return
Menu 4-1
4. Press ENTER to select.
The Service Mode menu will be displayed.
5. Push the ↑ or ↓ keys to highlight Projector Set-Up and press ENTER.
SERVICE MODE
PROJECTOR SET-UP
MEMORY MANAGEMENT
COMMON SETTINGS
I2C DIAGNOSTICS
VOLTAGE DIAGNOSTICS
PROJECTOR DIAGNOSTICS
Select with ↑ or ↓
then <ENTER>
<EXIT> to return
Menu 4-2
The Projector Set-Up menu will be displayed.
6. Push the ↑ or ↓ keys to highlight Identification.
PROJECTOR SET-UP
IDENTIFICATION
TOTAL RUN TIME
CHANGE PASSWORD
CHANGE PROJECTOR ADDRESS
CHANGE BAUDRATE
PROJECTOR WARM UP
POWER UP MODE: operating
COMMON ADDRESS: 0
ABL CONTROLLER
Select with ↑ or ↓
then <ENTER>
<EXIT> to return
Menu 4-3
7. Press ENTER to select.
The identification screen will be displayed. This screen gives the current information about the projector configuration in the line
entitled Config.
All projectors leave the factory set with a ceiling/front configuration.
R5976397 BARCOREALITY 909 SPLIT PACK 27/02/2003
27
4. Installation Setup
28
R5976397 BARCOREALITY 909 SPLIT PACK 27/02/2003
5. AC Power
5. AC POWER
Overview
•
AC Power Cord Connection
•
AC Power Voltage
•
Switching on the projector
5.1 AC Power Cord Connection
How to connect the AC Power Cord?
Use the supplied power cord to connect your projector to the wall outlet.
Plug the female power connector into the male connector at the front side of the electronic block.
X-POS
Y-POS
PORT 4 / 5
DEFOCUS
ON - OFF
OFF - ON
OFF - ON
75 Ohm
75 Ohm
green: operation
red: standby
PORT 2
75 Ohm
DEFOCUS
X-POS
V-Sync Comp / H-Sync
Comp / H-Sync V-Sync
Y-POS
R
G
B
B
PORT 1
G
ON - OFF
R
75 Ohm
POWER MAINS
800 periphals
OFF ON
800 periphals
This device complies with part 15 of the FCC rules.
Operation is subject to following two conditions (1).
This device may not cause harmful interference,
and (2) this device must accept any interference that
may cause undesired operation.
PROJECTOR MODE
See installation instructions before connecting to the supply.
Voir la notice d' installation avont de raccorder
éseau.
au r
See installation instructions before connecting to the supply.
Voir la notice d' installation avont de raccorder
éseau.
au r
This device complies with part 15 of the FCC rules.
Operation is subject to following two conditions (1).
This device may not cause harmful interference,
and (2) this device must accept any interference that
may cause undesired operation.
1.
PORT 3
COMM. PORT
OFF ON
green: operation
red: standby
IR
RS 232 OUT
RS 232 OUT
IR
REMOTE
PORT 3
PORT 4 / 5
PORT 2
PORT 1
PROJECTOR MODE
RS 232 IN
RS 232 IN
POWER MAINS
COMM. PORT
REMOTE
Image 5-1
AC Power Cord Connection
How to prepare the AC Power Cord?
As the colors of the wires in the mains lead of this apparatus may not correspond with the colored markings identifying the terminals
in your plug, proceed as follows:
•
The yellow/green wire is ground and must be connected to the terminal in the plug which is marked by the letter E or colored
yellow and green.
•
The blue (white) wire is neutral and must be connected to the terminal marked with the letter N or colored black.
•
The brown (black) wire is the line and must be connected to the terminal marked with the letter L or colored red.
CEE 7 Plug
Green and yellow : Ground
Blue : Neutral
Brown : Line
ANSI 73.11 Plug
Green and yellow : Ground
White : Neutral
Black : Line
Image 5-2
Power cord plugs
5.2 AC Power Voltage
What is the AC Power Voltage?
The power input voltage is autoranging between 100V (-10%) and 240V (+6%).
Which Fuses are used?
Following fuses are used:
•
2x T10A (Order number R314521)
•
1x F10A (Order number R314155)
R5976397 BARCOREALITY 909 SPLIT PACK 27/02/2003
29
5. AC Power
For continued protection against fire hazard: replace with the same type of fuse and refer replacement to
qualified service personnel.
5.3 Switching on the projector
How to switch on the projector?
1. Press the mains ON/OFF switch to switch on the projector.
Pressed
ON
Not Pressed
OFF
Table 5-1
Mains Power Switch
This device complies with part 15 of the FCC rules.
Operation is subject to following two conditions (1).
This device may not cause harmful interference,
and (2) this device must accept any interference that
may cause undesired operation.
X-POS
Y-POS
DEFOCUS
ON - OFF
OFF - ON
OFF - ON
75 Ohm
75 Ohm
PORT 4 / 5
V-Sync Comp / H-Sync
R
G
B
800 periphals
PORT 3
POWER MAINS
OFF ON
COMM. PORT
OFF ON
green: operation
red: standby
PORT 2
75 Ohm
DEFOCUS
X-POS
Comp / H-Sync V-Sync
Y-POS
B
PORT 1
G
ON - OFF
R
75 Ohm
800 periphals
This device complies with part 15 of the FCC rules.
Operation is subject to following two conditions (1).
This device may not cause harmful interference,
and (2) this device must accept any interference that
may cause undesired operation.
PROJECTOR MODE
See installation instructions before connecting to the supply.
Voir la notice d' installation avont de raccorder
éseau.
au r
See installation instructions before connecting to the supply.
Voir la notice d' installation avont de raccorder
éseau.
au r
green: operation
red: standby
IR
RS 232 OUT
RS 232 OUT
IR
REMOTE
COMM. PORT
PORT 3
PORT 4 / 5
PORT 2
PORT 1
PROJECTOR MODE
RS 232 IN
RS 232 IN
POWER MAINS
REMOTE
Image 5-3
The Stand by indication lamp will show the status of the projector:
No light up
Switched OFF
Green color
Operational mode
Red color
Stand By mode
Table 5-2
Status lamp
The switching on modes
When switching on with the power switch, the projector can start in 2 different modes depending on the “Power Up” setting in the
Service mode:
•
Operational mode (Picture displayed).
•
Stand By mode.
Starting up in Operational Mode
The projector can start up with the selected source or the projector can start up with a warm up cycle message.
PROJECTOR WARM UP
A FULL WHITE PATTERN WILL BE
GENERATED FOR x MIN.
FOR IMMEDIATE USE OF THE
PROJECTOR, PRESS <EXIT>
WARNING: SKIPPING THIS
PROCEDURE CAN REDUCE THE
INITIAL PICTURE QUALITY OF THE
PROJECTED IMAGE;
YOU CAN ADJUST THE IMAGE
DIMENSIONS WITH THE ARROW
KEYS TO AVOID SCANNING ON
THE EDGES OF THE CRT’S;
THIS OPTION CAN BE DISABLED IN
THE SERVICE MENU
with <ENTER>
<EXIT> to return
Menu 5-1
When this warm up cycle message appears on the screen, the menu offers the possibility to start with a x minutes taking warm up
period (press ENTER) or to skip this cycle (press EXIT). The x minutes and the horizontal frequency can be programmed in the
’Service mode’ under the item ’Projector Set Up’.
30
R5976397 BARCOREALITY 909 SPLIT PACK 27/02/2003
5. AC Power
This warm up period is built in so that the projector can reach its maximum specifications and minimize all
distortions.
When starting this warm up period, a full white image is shifted on the CRT faceplate to avoid a burn in. Every 30 seconds a text
box will be displayed on another place on the screen with the remaining time to go. The image dimensions can be adjusted with the
cursor keys to avoid scanning on the edges of the CRT’s.
How to interrupt the warm up period?
1. Press EXIT on the RCU.
The warm up menu will be displayed with the remaining time indication.
2. Press EXIT again to quit the warm up cycle and to display the source.
Starting up in Stand By Mode
The projector starts up in stand by. Press a digit key corresponding to the desired source or press STBY key. The projector displays
the selected source or the warm up cycle message. When this warm up message appears on the screen, handle as described in
’Start up in Operational Mode’.
WARNING:
Do not display a stationary image with full brightness and contrast for longer than 20 min., otherwise you risk damage to the CRT’s.
How to switch off the projector?
1. Use the same power switch to switch off the projector.
R5976397 BARCOREALITY 909 SPLIT PACK 27/02/2003
31
5. AC Power
32
R5976397 BARCOREALITY 909 SPLIT PACK 27/02/2003
6. Source Connections
6. SOURCE CONNECTIONS
Overview
•
Input Locations
•
RGB Analog Source to Port 3
•
RGB Analog Source with Composite Sync to Port 4/5
•
Component Video Source to Port 4/5
•
RGB Analog Source with Tri Level Sync to Port 4/5 (Optional)
•
Component Video Source with Tri Level Sync to Port 4/5 (Optional)
•
RS232 Connection
•
Communication Port for Communication With Peripherals
6.1 Input Locations
Input Facilities
RGBS or RG SB
DEFOCUS
X-POS
Y-POS
OFF - ON
OFF - ON
75 Ohm
75 Ohm
green: operation
red: standby
PORT 4 / 5
V-Sync Comp / H-Sync
Comp / H-Sync V-Sync
DEFOCUS
R
G
B
B
PORT 2
G
ON - OFF
R
75 Ohm
800 periphals
POWER MAINS
OFF ON
800 periphals
This device complies with part 15 of the FCC rules.
Operation is subject to following two conditions (1).
This device may not cause harmful interference,
and (2) this device must accept any interference that
may cause undesired operation.
X-POS
See installation instructions before connecting to the supply.
Voir la notice d' installation avont de raccorder
éseau.
au r
See installation instructions before connecting to the supply.
Voir la notice d' installation avont de raccorder
éseau.
au r
Y-POS
(R-Y)Y(B-Y)3S or (R-Y)Y 3S(B-Y) [Component Input]
PORT 1
•
ON - OFF
(R-Y)Y(B-Y)S or (R-Y)Y S(B-Y) [Component Input]
75 Ohm
RGB3S or RG 3SB
•
PROJECTOR MODE
•
This device complies with part 15 of the FCC rules.
Operation is subject to following two conditions (1).
This device may not cause harmful interference,
and (2) this device must accept any interference that
may cause undesired operation.
•
PORT 3
COMM. PORT
OFF ON
green: operation
red: standby
IR
RS 232 OUT
RS 232 OUT
IR
REMOTE
COMM. PORT
PORT 3
PORT 4 / 5
PORT 2
PORT 1
PROJECTOR MODE
RS 232 IN
RS 232 IN
POWER MAINS
REMOTE
Image 6-1
Input Facilities
Which source to which input
This table gives an overview of the relation between Input Port #, Source Type and Selection Keys on the RCU:
Input Port #
Source Type
Selection Keys on the RCU
1
For future expansion
—
2
For future expansion
—
3
RGB1
3
4/5
RGB1
4 or 5
4/5
Component video2
6
4/5
RGB with tri level sync3
7
4/5
Component video with tri level sync4
8
Table 6-1
Input Port #, Source type and Selection Keys on the RCU
1.
2.
3.
4.
Input signal :
Input signal :
Input signal :
Input signal :
R, G and B with automatic sync detection between seperate sync (separate composite sync or with separate hor and vert. sync) or sync on green (composite sync).
R-Y, Y and B-Y with separate composite sync or with separate hor and vert. sync or with composite sync on Y.
R, G and B with separate tri level sync or with tri level sync on green.
R-Y, Y and B-Y with separate tri level sync or with composite tri level sync.
R5976397 BARCOREALITY 909 SPLIT PACK 27/02/2003
33
6. Source Connections
6.2 RGB Analog Source to Port 3
Which signal to Port 3?
Connect your RGB source with sync on green, composite or separate sync via an interface to Port 3. Always use an interface (e.g.
Barco Magik Interface R9828120) when a computer and local monitor have to be connected to the projector as the signal cable
coming from the computer is limited to 60 cm due to interferences. The RGB analog input accepts only sources with a horizontal
frequency of 32 kHz and higher.
To connect a source lower than 32 kHz, an Optional Decoder + Limo Pro (R9828631) has to be installed.
Computer
Magik Interface
(R9828120)
Port on projector
PORT 3
to computer
to monitor
Image 6-2
Port 3
Pin configuration D9 connector of Port 3
Pin #
Signal
1
Not Connected
2
Ground RGBS
3
Red
4
Green
5
Blue
6
Ground RGBS
7
Ground RGBS
8
Hor. / Comp. Sync.
9
Vert. Sync.
Table 6-2
Pin configuration D9 connector of Port 3
Port 3 Input Selection
1. Press digit button 3 on the RCU.
Settings on module level
In the case of this second RGB input there are three different settings:
34
•
75Ω Termination Resistor.
•
Blue in Green Switch.
•
Force Negative Sync Switch.
R5976397 BARCOREALITY 909 SPLIT PACK 27/02/2003
6. Source Connections
Image 6-3
Second RGB Module
S1 Force Negative Sync (ON = Yes)
S2 Blue in Green (ON = Yes)
R1 Red
R21Green
R41Blue
R81Horizontal Sync.
R101 Vertical Sync.
WARNING: When removing the second RGB module, turn off the projector and unplug the power cord from
the wall outlet.
How to remove the second RGB module?
1. Loosen the two bolts on each side of the projector.
Image 6-4
Loosen the two bolts on each side of the projector
2. Lift up the protection plate.
R5976397 BARCOREALITY 909 SPLIT PACK 27/02/2003
35
6. Source Connections
Image 6-5
Lift up the protection plate
3. The second RGB module is located in the slot 4 of the main frame.
Image 6-6
Location of the second RGB module
4. Press the module locks A and lift up the module handles B on both sides of the module.
Image 6-7
Press the module locks A and lift up the module handles B on both sides of the module
5. Disconnect the mini-connector J3 on the printed circuit board in slot 2, for easy handling, repeat step 4 to lift up this printed circuit
board.
36
R5976397 BARCOREALITY 909 SPLIT PACK 27/02/2003
6. Source Connections
Image 6-8
Disconnect the mini-connector J3
Note:
When an optional Limo Plus is installed, the mini-connector is connected to the Limo Plus Print in slot 3.
6. Extract the second RGB module out of the main frame.
Image 6-9
Extract the module out of the main frame
7. When finished, reconnect mini-connector J3, secure the printed circuit boards and put back the protection plate.
75Ω Termination Resistors
In case of chaining (loop-through) the projectors, the 75Ω line termination resistors must be removed from the second RGB Input
Module when the projector is NOT the last unit in the chain.
In case of a stand-alone projector, do not remove the 75Ω Termination Resistors.
75Ω Resisters on module
Line Terminated
75Ω Resisters removed
Line Not Terminated
Table 6-3
75Ω Termination Resistors
How to remove the 75Ω Termination Resistors
1. Turn Off the projector and unplug the projector power cord.
2. Remove the protection plate on top of the electric block.
3.
Remove the RGB Input Module from the main frame.
4. Unsolder and remove the resistors.
Blue in Green Switch
Blue characters are difficult to read, therefore the blue text will be displayed as cyan so that the readability becomes better.
R5976397 BARCOREALITY 909 SPLIT PACK 27/02/2003
37
6. Source Connections
Blue in Green Switch in the ON position
Blue in Green Active
Blue in Green Switch in the OFF position
Blue in Green Disabled
Table 6-4
Blue in Green Switch
Leaving the switch in the ON position will result in abnormal color balance of the projected image.
Force Negative Sync Switch
Force Negative Sync Switch in the ON position
The Sync Pulses must be Negative
Force Negative Sync Switch in the OFF position
The Sync Polarity will be Automatically Detected
6.3 RGB Analog Source with Composite Sync to Port 4/5
Which signal to Port 4/5?
RGB analog input terminals with separate H and V sync inputs, composite sync input or with sync on green (BNC terminals). The
projector detects automatically where the sync signal is located.
Always use an interface (e.g. Barco Magik Interface R9828120) when a computer and local monitor have to be
connected to the projector as the signal cable coming from the computer is limited to 60 cm due to interferences.
The RGB analog input accepts only sources with a horizontal frequency of 32 kHz and higher. To connect a
source lower than 32 kHz, an Optional Decoder + Limo Pro (R9828631) has to be installed.
Computer
Magik Interface
(R9828120)
Port on projector
R
G
B
Comp / H-Sync
V-Sync
PORT 4 / 5
to computer
to monitor
Image 6-10
Port 4/5
RGB Analog Video with Composite Sync Input Selection
1. Press digit button 4 or 5 on the RCU.
Button 4 on the RCU
Sync. on Green
Button 5 on the RCU
Separate Sync.
Table 6-6
Port 4/5
6.4 Component Video Source to Port 4/5
Which signal to Port 4/5?
R-Y)Y(B-Y) analog input terminals with sync input or with sync on the luminance (Y) input (BNC terminals). The projector detects
automatically where the sync signal is located.
38
R5976397 BARCOREALITY 909 SPLIT PACK 27/02/2003
6. Source Connections
Always use an interface (e.g. Barco Magik Interface R9828120) when a computer and local monitor have to be
connected to the projector as the signal cable coming from the computer is limited to 60 cm due to interferences.
RGB Component Video Port 4/5 Selection
1. Press digit button 6 on the RCU.
6.5 RGB Analog Source with Tri Level Sync to Port 4/5 (Optional)
Which signal to Port 4/5?
RGB analog input terminals with tri level sync input or with tri level sync on green (BNC terminals). The projector detects automatically where the sync signal is located. This feature requires a optional tri level sync module (Order number: R9828040).
RGB Analog Source with Tri Level Sync on Port 4/5 Selection
1. Press digit button 7 on the RCU.
6.6 Component Video Source with Tri Level Sync to Port 4/5 (Optional)
Which signal to Port 4/5?
Component video with tri level sync input can be connected to the projector via port 4/5. The projector detects automatically where
the sync signal is located. This feature requires a optional tri level sync module (Order number: R9828040).
Component Video Source with Tri Level Sync on Port 4/5 Selection
1. Press digit button 8 on the RCU.
6.7 RS232 Connection
RS232 Input and RS232 Output of the projector
The projector is equipped with a RS232 port that allows them to communicate with a computer.
•
Easy adjustment of the projector via a computer.
•
Allow storage of multiple projector configurations and set ups.
•
Wide range of control possibilities.
•
Address range from 0 to 255.
•
Sending data to the projector or copying the data from the projector to a hard memory device.
Computer
Port on projector
RS 232 OUT
Image 6-11
RS232 Connector
RS 232 IN
RS 232 IN
RS 232 OUT
to computer
How to set up the baud rate for the communication with a computer?
See changing the baud rate in the chapter Service Mode of the Owner’s Manual.
R5976397 BARCOREALITY 909 SPLIT PACK 27/02/2003
39
6. Source Connections
6.8 Communication Port for Communication With Peripherals
Connecting a RCVDS 05 switcher to the projector
•
Up to 10 inputs (20 inputs when video and S-video) with the RCVDS 05 switcher (R9827880) and up to 90 inputs when 10
RCVDS switchers are linked via the 5-cable output modules.
•
Serial communication with the projector.
•
Remote control buttons on the RCVDS to control the projector (source selection and analog settings).
•
The selected source number will be displayed on a 2 digit display and the selected input modules will be indicated with a LED
on the rear.
RCVDS 05 switcher
(R9827880)
Port on projector
800 periphals
COMM. PORT
Image 6-12
Connecting a RCVDS 05 switcher to the projector
40
R5976397 BARCOREALITY 909 SPLIT PACK 27/02/2003
7. Installation Adjustment Mode
7. INSTALLATION ADJUSTMENT MODE
Overview
•
Starting up the Installation Adjustment Mode
•
Password Protection
•
Overview flowchart of the Installation Adjustment Mode
•
Projector Position
•
Optical Lens Focusing
•
Raster Centering
•
CRT Projection Angle Adjustment
•
Scheimpflug Adjustment (Diagonal Image Focusing)
7.1 Starting up the Installation Adjustment Mode
How to Start Up the Installation Adjustment Mode?
1. Press the ADJUST key to start up the Adjustment Mode.
The main Adjustment Mode menu will be displayed.
2. Push the ↑ or ↓ keys to select Installation and press ENTER to select.
ADJUSTMENT MODE
Select a path from below :
RANDOM ACCESS
INSTALLATION
SERVICE
Select with ↑ or ↓
then <ENTER>
<EXIT> to return
Menu 7-1
A warning will be displayed on the screen.
WARNING RISK OF ELECTRICAL
SHOCK NO USER ADJUSTABLE PARTS
INSIDE
THE FOLLOWING INSTALLATION
MENUS ARE RESERVED TO, AND
TO BE PERFORMED ONLY BY
BARCO PERSONNEL, OR BARCO
AUTHORIZED DEALERS
If qualified, press
<ENTER> to continue, or
if not, <EXIT> to return
Menu 7-2
3. In case you are a qualified and authorized service person.
If yes, Press ENTER to start up the first step of the installation mode: Projector Position.
When entering the installation mode the projector will automatically switch to the internal pattern.
When the password mode is active you will be requested to enter the 4 digit password.
If no, Press EXIT to return.
7.2 Password Protection
Password Protection
Some items in the Adjustment Mode are password protected. While selecting such an item, the projector asks to enter your password.
R5976397 BARCOREALITY 909 SPLIT PACK 27/02/2003
41
7. Installation Adjustment Mode
Password Protection is only available when the password strap on the controller module is on. Contact a
Barco authorized technician when no password is requested during the adjustment procedure and Password
Protection is desired.
Entering the Password
The Password contains 4 digits, when the projector asks to enter your password:
1. Enter the digits with the numeric keys on the RCU (e.g.: 2319).
For each digit entered, a ’X’ appears on the screen under the displayed text ’enter password’
enter password
XXXX
Menu 7-3
When the password is correctly entered, all other password protected items are accessible without reentering
the password. When reentering the adjustment mode, it will be necessary to enter your password again when
selecting a password protected item.
When the password is wrong, the error message “Wrong Password !!!” will be displayed.
7.3 Overview flowchart of the Installation Adjustment Mode
Overview flowchart of the Installation Adjustment Mode
ADJUSTMENT MODE
INSTALLATION
PROJECTOR POSITION
OPTICAL LENS FOCUSING
RASTER CENTERING
CRT PROJECTION ANGLE ADJUSTMENT
SHEIMPFLUG ADJUSTMENT
Image 7-1
Overview flowchart of the Installation Adjustment Mode
42
R5976397 BARCOREALITY 909 SPLIT PACK 27/02/2003
7. Installation Adjustment Mode
7.4 Projector Position
How to change the Projector Position?
When entering the Installation Adjustment mode a drawing will be displayed (the Projector Position 1 menu) together with 3 position
parameters (Projector Distance: PD, Screen Width: SW and a Correction Value: A) indicating a correct position.
1. Push the ← or → keys to highlight an item e.g. SW in the Projector Position 1 menu and then press the TEXT key on the RCU.
ceiling
PD
B
A
projector
screen
A = Correction value
PD = Perpendicular distance between screen and projector
SW = Screen width
SW = 2.6 m
PD = 3.64 m
A = 12 cm
Select with arrow keys; <TEXT> to reprogram
<ENTER> to continue; <EXIT> to return.
WARNING: ONLY FOR STANDARD PROJECTORS !!
Image 7-2
Projector Position 1 menu
The Projector Position 2 menu will be displayed on the screen. It allows the user to change the Screen Width.
2. Push the ← or → keys to highlight the digit needed to be changed, and enter the desired setting with the numeric keys on the
RCU.
SCREENWIDTH = 3 .64 m
Select with arrow keys; reprogram with numeric keys and
then <ENTER> to confirm.
Maximum screenwidth = 6 m
Maximum proj. distance = 8.1 m
Image 7-3
Projector Position 2 menu
3. Press ENTER to confirm the changes, the projector will redisplay the Projector Position 1 menu with the updated values for the
3 parameters.
4. Use the same above-mentioned procedure to change the setting for Projector Distance (PD) or the Correction Value (A).
R5976397 BARCOREALITY 909 SPLIT PACK 27/02/2003
43
7. Installation Adjustment Mode
PROJECTOR POSITION
PROJECTOR POSITION 1
A
?
PD
SW
PD / SW / A
EXIT
?
ENTER
TEXT
PROJECTOR POSITION 2
EXIT
?
ENTER
OPTICAL LENS FOCUSING
Image 7-4
Projector Position Flowchart
5. When the desired settings are reached press ENTER to continue with the Optical Lens Focusing.
7.5 Optical Lens Focusing
Introduction
The optical focusing procedure is performed separately for each lens, the appropriate CRT will be switched on as the user proceeds
through the optical focusing adjustment sequence, following screen will be displayed for each lens:
OPTICAL LENS FOCUSING
1.LOOSEN THE NUT ON THE
REAR OF THE GREEN LENS,
ROTATE THE LENS BARREL TO
FOCUS THE CENTER OF THE
IMAGE THEN TIGHTEN THE NUT.
2.LOOSEN THE NUT ON THE
FRONT OF THE GREEN LENS,
ROTATE THE FRONT SECTION
OF THE LENS TO FOCUS THE
CORNERS OF THE IMAGE
THEN TIGHTEN THE NUT.
<ENTER> to continue
<EXIT> to return
Menu 7-4
How to focus adjusting the lens?
1. Loosen the wing nut at the rear end of the lens.
44
R5976397 BARCOREALITY 909 SPLIT PACK 27/02/2003
7. Installation Adjustment Mode
Image 7-5
Loosen the wing nut at the rear end of the lens
2. Rotate the lens barrel until the center of the image is clearly focused.
Image 7-6
Rotate the lens barrel until the center of the image is clearly focused
3. Loosen the wing nut at the front end of the lens.
Image 7-7
Loosen the wing nut at the front end of the lens
4. Rotate the lens barrel until the corners of the image are clearly focused.
R5976397 BARCOREALITY 909 SPLIT PACK 27/02/2003
45
7. Installation Adjustment Mode
Image 7-8
Rotate the lens barrel until the corners of the image are clearly focused
5. Repetition of step 1 to step 4 may be necessary to optimize optical focusing.
6. When finished tighten the wing nuts and press ENTER to continue with the next lens.
7. After finishing focusing of the 3 lenses, press ENTER to continue with the Raster Centering.
7.6 Raster Centering
Introduction
The raster must be centered on the CRT faceplate of each tube, therefore, it is necessary to look into the lenses. Following screen
will be displayed:
RASTER CENTERING
CONTRAST LEVEL IS REDUCED
AND BRIGHTNESS INCREASED
TO MAKE THE RASTER VISIBLE
ON THE FACE PLATE OF EACH
CRT
USE THE ARROW KEYS TO
CENTER THE RASTER ON THE
GREEN, RED AND BLUE CRT
RESPECTIVELY
<ENTER> to continue
<EXIT> to return
Menu 7-5
To avoid eye discomfort while performing these adjustments, reduce the contrast setting and gradually increase the brightness level until the raster becomes visible behind the image.
WARNING:
In order to ensure maximum CRT longevity and to avoid CRT damage, do not shift the raster
outside the phosphor area or the CRT.
CRT Phosphor Width
Following phosphor width is used for the green color:
46
R5976397 BARCOREALITY 909 SPLIT PACK 27/02/2003
7. Installation Adjustment Mode
CRT phosphor width for the green color
11,5 cm (4.5 inch)
CRT Faceplate holder
Forbidden area
Phosphor area
Projected raster
Image 7-9
CRT Phosphor Width
How to center the raster?
1. Press the ENTER key to activate the raster on the Green CRT faceplate.
2. Look into the Green lens and shift the raster with the cursor keys until it is centered in the middle of the CRT faceplate.
WRONG RASTER POSITIONS
PERFECT RASTER POSITION
Image 7-10
Raster Positions
3. Press the ENTER key to activate the raster on the Red CRT faceplate.
4. Shift the Red raster with the cursor keys until the raster is centered on the CRT faceplate.
5. Press the ENTER key to activate the raster on the Blue CRT faceplate.
6. Shift the Blue raster with the cursor keys until the raster is centered on the CRT faceplate.
7. Press ENTER to continue with the CRT Projection Angle Adjustment.
7.7 CRT Projection Angle Adjustment
Introduction
The projection angle of the Red and Blue CRT’s is dependent on the desired size of the projected image. A new projection angle
adjustment is required whenever a new screenwidth SW is adopted. If the centers of green, blue and red do not coincide, the CRT
projection angle must be adjusted.
Following screen will be displayed when starting this CRT Projection Angle Adjustment:
R5976397 BARCOREALITY 909 SPLIT PACK 27/02/2003
47
7. Installation Adjustment Mode
CRT PROJECTION ANGLE
ADJUSTMENT
CRT PROJECTION ANGLE IS THE
FIRST STEP OF STATIC
CONVERGENCE ADJUSTMENT
IT IS CRITICAL THAT THE
RASTERS ARE CENTERED ON
THE CRT FACE PLATES PRIOR
TO PERFORMING THIS STEP
<ENTER> to continue
<EXIT> to return
Menu 7-6
Never try to correct this misalignment with the shift correction or the static convergence controls. These shift
correction controls may only be applied to correct small errors which cannot be corrected by the CRT angle
adjustment. The Horizontal Shift and Vertical Shift for Red and Blue should be set near 50%.
Be sure that the rasters are centered on the CRT faceplate.
How to adjust the CRT Projection Angle?
1. Press ENTER to continue with the crosshair alignment.
Following screen will be displayed:
CRT PROJECTION ANGLE
ADJUSTMENT
DURING THIS PROCEDURE?
ON GREEN AND THEN BLUE
GREEN CROSSHAIRS WILL
ALIGNED WITH THE GREEN
RED
ON
BE
CRT
LOOSEN BOLTS A, B, C AND D TO
PIVOT THE RED CRT AND BOLTS
E, F, G AND H TO PIVOT THE
BLUE CRT
<ENTER> to continue
<EXIT> to return
Menu 7-7
2. Press ENTER to begin with the angle adjustment of the Red CRT.
3. Loosen bolts A + B, on the top of the optical block and C + D, on the bottom of the optical block to pivot the Red CRT until the
center of the red image and the center of the green image coincide.
Action on CRT: Move the Red CRT
towards the Green CRT
Image 7-11
Loosen bolts A + B
Red
crosshair
Case 1: Red crosshair on the
Right of the Green crosshair
Green
crosshair
Green
crosshair
Red
crosshair
Case 1: Red crosshair on the
Left of the Green crosshair
Action on CRT: Move the Red CRT away
(to the outside) from the Green CRT
Image 7-12
Red CRT Projection Angle Adjustment
4. When the angle of the Red CRT is corrected, tighten the four bolts.
5. Press ENTER to continue with the angle adjustment of the Blue CRT.
6. Loosen bolts E + F, on the top of the optical block and G + H, on the bottom of the optical block to pivot the blue CRT until the
center of the blue image and the center of the green image coincide.
48
R5976397 BARCOREALITY 909 SPLIT PACK 27/02/2003
7. Installation Adjustment Mode
Image 7-13
Loosen bolts E + F
Action on CRT: Move the blue CRT away
(to the ouside) from the green CRT
Image 7-14
Red CRT Projection Angle Adjustment
Blue
crosshair
Case 1: Blue crosshair on the
right of the green crosshair
Green
crosshair
Green
crosshair
Blue
crosshair
Case 1: Blue crosshair on the
left of the green crosshair
Action on CRT: Move the blue CRT
towards the green CRT
7. When the angle of the blue CRT is corrected, tighten the four bolts.
8. Press ENTER to continue with the Scheimpflug Adjustment (Diagonal Image Focusing) menu.
7.8 Scheimpflug Adjustment (Diagonal Image Focusing)
Introduction
With the diagonal image focusing corrections, it is possible to obtain uniform focus for the total projected image. These corrections
must be repeated for each color. The diagonal image focusing is repeated 3 times, first for green, then for red and then for blue.
Following screen will be displayed:
DIAGONAL IMAGE FOCUSING
1.TURN THE SCREW MARKED 01
TO FOCUS THE IMAGE
DIAGONALLY FROM LEFT
(BOTTOM) TO RIGHT (TOP).
2.TURN THE SCREW MARKED 00
TO FOCUS THE IMAGE
DIAGONALLY FROM LEFT (TOP)
TO RIGHT (BOTTOM).
<ENTER> to continue
<EXIT> to return
Menu 7-8
First, be sure that the CRT projection angle is correctly adjusted, otherwise it is not possible to obtain proper
overall focus of the image.
Scheimpflug Adjustment Preparation
1. Loosen the 6 bolts on the front of the optical block.
Image 7-15
Loosen the 6 bolts on the front of the optical block
How to adjust the Scheimpflug for the Green CRT?
1. Equalize now diagonally the focus from left (bottom) to right (top) by turning bolt 01.
R5976397 BARCOREALITY 909 SPLIT PACK 27/02/2003
49
7. Installation Adjustment Mode
Image 7-16
Scheimpflug Adjustment
2. Equalize diagonally the focus from left (top) to right (bottom) by turning bolt 00 of the projected color.
3. Repeat step 1 to 2 for each color.
4. After finishing the Installation Adjustment Procedure, the main menu returns on the screen.
5. Tighten the 6 bolts on the front of the optical block.
To optimize the image focusing, repeat the Optical Lens Focusing.
50
R5976397 BARCOREALITY 909 SPLIT PACK 27/02/2003
8. Messages, Warnings and Failures
8. MESSAGES, WARNINGS AND FAILURES
Overview
•
Messages
•
Warnings
•
Failures
8.1 Messages
Messages
INPUT 01 RGB2 Fh=064kHz Fv=060Hz
When selecting a new source, following information about this source
will be displayed on the screen: Source number, horizontal and
vertical frequencies of the displayed source.
SOURCE 01 RGB2
Announcement of the selected source.
enter password XXXX
Message to enter your password, password contains 4 digits.
WRONG PASSWORD !!!
Message when the entered password is wrong
TEXT on SOURCE 01 RGB2 xxxkHz xxHz
These messages will be displayed on the screen when pushing the
TEXT key.
TEXT On
TEXT On: the ’bar scale indication’ will be enabled during the change
of an analog control in the ’operational mode’ + all warnings and
failures will be displayed.
TEXT Off
Text OF: the ’bar scale indication’ will be disabled during the change
of an analog control in the ’operational mode’ + all warnings and
failures will not be displayed.
PROJECTOR ADDRESS: 003
Indication of the projector address when activating the ’ADDRESS’
button on the RCU with a pencil or other small object.
8.2 Warnings
Warnings
WARNING: Input not available
When using the projector with the RCVDS, this warning will be displayed when
selecting an input slot of an RCVDS where the input board is missing.
WARNING: Source not available
The input is a valid input but the source is not connected to the input terminals or
the input source is switched off.
WARNING: Invalid key intro
When a wrong key is pressed on the RCU.
WARNING: End of adjust range
End of adjustment range.
WARNING: Input no longer available
The input source is no longer available.
WARNING: RCVDS not available
The input source selector is not available.
WARNING: invalid frequency input
The entered frequency or applied frequency of the source is out of the projector’s
range.
WARNING: permanent BOOST mode in
use !!!
The CRT drive mode is switched to permanent boost.
WARNING: Option not installed !
Option not installed. e.g. Video selected but no decoder installed.
R5976397 BARCOREALITY 909 SPLIT PACK 27/02/2003
51
8. Messages, Warnings and Failures
8.3 Failures
Failures
52
FAILURE I2C error addr.: 7FH3
Hardware failure. Call a qualified service technician for repair.
FAILURE short circuit on I2C bus
Hardware failure. Call a qualified service technician for repair.
FAILURE RCVDS communication error
Serial communication error between the RCVDS and the
projector.
FAILURE invalid input
Input not valid
FAILURE PC communication error
Error in the communication between the projector and the PC.
FAN FAILED Projector will switch off
Projector switched off due to a fan fail.
R5976397 BARCOREALITY 909 SPLIT PACK 27/02/2003
A. Gamma Corrections
A. GAMMA CORRECTIONS
Overview
•
Gamma Corrections
A.1 Gamma Corrections
WARNING:
The Gamma Corrections are factory adjusted using an ACTAS color analyser. Therefore, only
qualified installation or service personnel should perform these adjustments, as there is a risk of incorrect
adjustment of the projector.
How to Start Up Gamma Correction?
1. Press the ADJUST key to start up the Adjustment Mode.
The main Adjustment Mode menu will be displayed.
2. Push the ↑ or ↓ keys to select Service and press ENTER to select.
ADJUSTMENT MODE
Select a path from below :
RANDOM ACCESS
INSTALLATION
SERVICE
Select with ↑ or ↓
then <ENTER>
<EXIT> to return
Menu A-1
The Service Mode menu will be displayed.
3. Push the ↑ or ↓ keys to select Common Settings and press ENTER to select.
SERVICE MODE
PROJECTOR SET-UP
MEMORY MANAGEMENT
COMMON SETTINGS
I2C DIAGNOSTICS
VOLTAGE DIAGNOSTICS
PROJECTOR DIAGNOSTICS
Select with ↑ or ↓
then <ENTER>
<EXIT> to return
Menu A-2
The Common Settings menu will be displayed.
4. Push the ↑ or ↓ keys to select Gamma Correction and press ENTER to select.
COMMON SETTINGS
DYNAMIC ASTIGMATISM
GAMMA CORRECTIONS
CRT RUN IN CYCLE
CRT DRIVE MODE
MEMORYBANKS: ON
FLYBACK TURNOVER POINT
MENU POSITION: STANDARD
OPTION 1: OFF
REAL TIME CLOCK
Select with ↑ or ↓
then <ENTER>
<EXIT> to return
Menu A-3
R5976397 BARCOREALITY 909 SPLIT PACK 27/02/2003
53
A. Gamma Corrections
The following warning will be displayed:
WARNING RISK OF INCORRECT
ADJUSTMENT OF THE PROJECTOR
THE GAMMA CORRECTIONS ARE
FACTORY ADJUSTED USING AN
ACTAS COLOR ANALYSER!
THEREFORE? ONLY QUALIFIED
INSTALLATION OR SERVICE
PERSONNEL SHOULD PERFORM
THESE ADJUSTMENTS!
<ENTER> to continue
<EXIT> to return
Menu A-4
Gamma Warning
1. In case you are a qualified and authorized service person.
If yes, Press ENTER to continue.
The Gamma Correction menu will be displayed, there are 3 settings within the gamma correction menu:
-
Blue Gamma Correction
-
R&B Midlights
-
Factory Preset
If no, Press EXIT to return to the Common Settings menu.
How to perform a Blue Gamma Correction?
1. Push the ↑ or ↓ keys to select Blue Gamma Correction and press ENTER.
GAMMA CORRECTIONS
BLUE GAMMA CORRECTION
Adjust slope with ↑ or ↓
breakpoint with ← or →
R&B MIDLIGHTS
Adjust red with ↑ or ↓
blue with ← or →
FACTORY PRESET
Select with ↑ or ↓
then <ENTER>
<EXIT> to return
Menu A-5
A text box Adjust With Arrow Key will be displayed on the screen.
2. Push the ↑ or ↓ keys to adjust the slope.
A text box Blue Gamma Slope with a bar scale will be displayed to visualize the magnitude of the correction.
3. Push the ← or → keys to adjust the break point.
A text box Blue Gamma Breakpoint with a bar scale will be displayed to visualize the magnitude of the correction.
4. Press ENTER to return to the Gamma Corrections menu.
How to perform a Red & Blue Midlight Correction?
1. Push the ↑ or ↓ keys to select R&B Midlights and press ENTER.
GAMMA CORRECTIONS
BLUE GAMMA CORRECTION
Adjust slope with ↑ or ↓
breakpoint with ← or →
R&B MIDLIGHTS
Adjust red with ↑ or ↓
blue with ← or →
FACTORY PRESET
Select with ↑ or ↓
then <ENTER>
<EXIT> to return
Menu A-6
A text box Adjust With Arrow Key will be displayed on the screen.
2. Push the ↑ or ↓ keys to adjust the Red Midlights.
A text box Red Midlights with a bar scale will be displayed to visualize the magnitude of the correction.
54
R5976397 BARCOREALITY 909 SPLIT PACK 27/02/2003
A. Gamma Corrections
3. Push the ↑ or ↓ keys to adjust the Blue Midlights.
A text box Blue Midlights with a bar scale will be displayed to visualize the magnitude of the correction.
4. Press ENTER to return to the Gamma Corrections menu.
How to perform a Factory Preset?
1. Push the ↑ or ↓ keys to select Factory Preset and press ENTER.
GAMMA CORRECTIONS
BLUE GAMMA CORRECTION
Adjust slope with ↑ or ↓
breakpoint with ← or →
R&B MIDLIGHTS
Adjust red with ↑ or ↓
blue with ← or →
FACTORY PRESET
Select with ↑ or ↓
then <ENTER>
<EXIT> to return
Menu A-7
This will set the parameters back to the factory preset values.
R5976397 BARCOREALITY 909 SPLIT PACK 27/02/2003
55
A. Gamma Corrections
56
R5976397 BARCOREALITY 909 SPLIT PACK 27/02/2003
B. Material Safety Data Sheet
B. MATERIAL SAFETY DATA SHEET
Overview
•
Material Safety Data Sheet
R5976397 BARCOREALITY 909 SPLIT PACK 27/02/2003
57
B. Material Safety Data Sheet
B.1 Material Safety Data Sheet
Material Safety Data Sheet
The following data sheet shows all specifications of the liquid that is used in the liquid lens coupling.
Form Approved
Bureau Budget No. 45-R0338
MATERIAL SAFETY DATA SHEET
(Federal Supply Code for Manufacturer's)
MANUFACTURER'S NAME AND FSCM
:
BARCO N.V.
EMERGENCY PHONE NO.
32-56-368211
SECTION I
ADDRESS (Number, Street, City, State and ZIP code):
Noordlaan 5 B-8520 KUURNE
TRADE NAME AND SYNONYMS:
Cooling Liquid 512334
CHEMICAL NAME AND SYNONYMS:
Ethylenglycol & Glycerol
FORMULA:
C2H6O2+C 3H8O3
CHEMICAL FAMILY:
Polyalcohols
FEDERAL STOCK NUMBER (FSN):
GROSS WEIGHT (LBS):
OUTSIDE PACKAGE DIMENSIONS
(Inches) :
MIL-STD-1341/NATIONAL FIRE PROTECTION ASSOCIATION STD 704M SIGNAL:
FLAMMABILITY.........
HEALTH.........
REACTIVITY.........
SPECIFIC HAZARD.........
SECTION III
PHYSICAL DATA
SECTION II - HAZARDOUS INGREDIENTS
PAINTS, PRESERVATIVES
AND SOLVENTS
%
SECTION IV - FIRE AND
ALLOYS AND
METALLIC COATINGS
PIGMENTS
BASE METAL
CATALYST
ALLOYS
VEHICLE
METALLIC COATINGS
%
TRESHOLD LIMIT
VALUE (Units)
%
TRESHOLD LIMIT
VALUE (Units)
FILLER METAL
SOLVENTS
PLUS COATING ON CORE FLUX
ADDITIVES
OTHERS
OTHERS
HAZARDOUS MIXTURES OF OTHER LIQUIDS, SOLIDS OR GASES
BOILING POINTS ( °C)
201°C
VAPOR PRESSURE (mm Hg.)
3 mm HG
VAPOR DENSITY (AIR=1)
2.2
SPECIFIC GRAVITY (H 2O=1)
1.15
PRECENT VOLATILE BY VOLUME (%)
EVAPORATION RATE (.....=1)
SOLUBILITY IN WATER
APPEARANCE AND ODOR
FLASH POINT (Method Used)
EXPLOSION HAZARD DATA
TRESHOLD LIMIT
VALUE (Units)
FLAMMABLE LIMITS
LOWER
EXPLOSIVE LIMIT
UPPER
EXPLOSIVE LIMIT
EXTINGUISHING MEDIA
SPECIAL FIRE FIGHTING PROCEDURES
UNUSUAL FIRE AND EXPLOSION HAZARDS
DD FORM
1813 * GPO 794/043/30
1 jun 71
S/N 0102-026-1080
Image B-1
58
R5976397 BARCOREALITY 909 SPLIT PACK 27/02/2003
SECTION V
HEALTH HAZARD DATA
B. Material Safety Data Sheet
TRESHOLD LIMIT VALUE
EFFECTS OF OVEREXPOSURE
EMERGENCY AND FIRST AID PROCEDURES
STABILITY
SECTION VI
REACTIVITY DATA
100ppm
UNSTABLE
CONDITIONS TO AVOID
STABLE
X
INCOMPATABILITY (Materials to avoid)
HAZARDOUS DECOMPOSITION PRODUCTS
HAZARDOUS
POLYMERIZATION
MAY
OCCUR
X
CONDITIONS TO AVOID
WILL NOT
OCCUR
PROTECTION INFORMATION
SECTION VII
SPECIAL
Rinse with water
WASTE DISPOSAL METHOD
RESPIRATORY PROTECTION (Specific Type)
SECTION IX
SPECIAL
PRECAUTIONS
SECTION VIII-
SPILL OR LEAK PROCEDURES
STEPS TO BE TAKEN IN CASE MATERIAL IS RELEASED OR SPILLED
VENTILATION
LOCAL EXHAUST
SPECIAL
MECHANICAL (General)
OTHER
EYE PROTECTION
PROTECTIVE GLOVES
OTHER PROTECTIVE EQUIPMENT
PRECAUTIONS TO BE TAKEN IN HANDLING AND STORING
Harmful if swallowed
Keep out of reach of children
To avoid from oxidants
OTHER PRECAUTIONS
THE INFORMATION CONTAINED HEREIN IS BASED ON DATA CONSIDERED ACCURATE.
HOWEVER, NO WARRANTY IS EXPRESSED OR IMPLIED REGARDING THE ACCURACY OF
THESE DATA OR THE RESULTS TO BE OBTAINED FROM THE USE THEREOF.
VENDOR ASSUMES NO RESPONSABILITY FOR INJURY TO VENDEE OR THIRD PERSONS
PROXIMATELY CAUSED BY THE MATERIAL IF REASONABLE SAFETY PROCEDURES ARE NOT
ADHERED TO AS STIPULATED IN THE DATA SHEET. ADDITIONALLY, VENDOR ASSUMES NO
RESPONSABILITY FOR INJURY TO VENDEE OR THIRD PERSONS PROXIMATELY CAUSED BY
ABNORMAL U SE OF THE MATERIAL EVEN REASONABLE SAFETY PROCEDURES ARE FOLLOWED. FUTHERMORE, VENDEE ASSUMES THE RISK IN HIS USE OF THE MATERIAL.
Image B-2
R5976397 BARCOREALITY 909 SPLIT PACK 27/02/2003
59
B. Material Safety Data Sheet
60
R5976397 BARCOREALITY 909 SPLIT PACK 27/02/2003
Index
INDEX
A
AC Power 29
Fuses 29
Power Cord 29
Connection 29
Power Voltage 29
Ambient Light 13
Ambient temperature check
13
B
Battery 18
Installation 18
Box Content 7
C
Cleaning 5
Communication Port 40
Peripherals 40
Component Video 38–39
Port 4/5 38
Tri Level Sync (Optional) 39
Port 4/5 39
Condition check 13
Configuration 15
Positioning the projector 15
Which Configurations 15
Connecting 19
Electronic Block 19
Optical Block 19
Connection 39
RS232 39
CRT 47
Projection Angle 47
Adjustment 47
Image Sizing 14
Input 33
Locations 33
Source Connections 33
Installation 5, 13, 19, 41
Adjustment Mode 41
Guidelines 13
Setup 19
Installation Adjustment Mode 41–42
Overview flowchart 42
Starting up 41
Installation Guidelines 13–15
Ambient Light 13
Ambient temperature check 13
Condition check 13
Configuration 15
Environment 13
General 13
Humidity Conditions 13
Image Sizing 14
Lens Type 14
Screen Type 13
Installation Instructions 3
Installation Mode 41
L
Lens 18
Formulas 18
Lens Type 14
M
Material Safety Data Sheet 57–58
Messages 51
Messages, Warnings and Failures 51
D
N
Diagonal Image 49
Focusing 49
Dimensions 7–8, 10
Electronic Block 8
Optical Block 10
Projector 7
O
Notice on Safety
Operational Mode 30
Start up 30
Optical Lens 44
Focusing 44
Owner’s Record 3
E
Environment
13
P
F
Failures 52
FCC Statement
Fire Hazard 4
Fuses 29
3
G
Gamma 53
Corrections 53
Gamma Corrections
53
H
Humidity Conditions
13
I
Illumination
3
5
R5976397 BARCOREALITY 909 SPLIT PACK 27/02/2003
Packaging 7
Projector 7
Password 41
Protection 41
Peripherals 40
Communication 40
Port 40
Port 3 34
Pin configuration 34
Port 4/5 38–39
Component Video 38–39
Tri Level Sync (Optional)
RGB Analog 38
Composite Sync 38
RGB Analog Source 39
Tri Level Sync (Optional)
Positioning the projector 15
Projector 7, 30–31, 43
Packaging 7
unpack 7
39
39
61
Index
Position 43
Switch off 31
Switch on 30
Raster 46
Centering 46
RCU 18
Battery 18
Remove 35
Second RGB module 35
Repacking 5
RGB Analog 34, 38
Composite Sync 38
Port 4/5 38
Port 3 34
RGB Analog Source 39
Tri Level Sync (Optional) 39
Port 4/5 39
RS232 Connection 39
Scan 24
Adaptation 24
Scheimpflug 49
Adjustment 49
Screen Type 13
Second RGB module 35
Remove 35
Servicing 5
Source 33–34, 38–39
Component Video 38–39
Tri Level Sync (Optional) 39
Connections 33
RGB Analog 34, 38
Composite Sync 38
RGB Analog Source 39
Tri Level Sync (Optional) 39
Stand By Mode 31
Start up 31
Stationary Image Warning 31
Switch off 31
Switch on 30
S
W
R
Safety 4
Safety Indication 3
Safety Instructions 3
Safety Warning 3
62
Warm up period 31
Interrupt 31
Warnings 51
Which Configurations
15
R5976397 BARCOREALITY 909 SPLIT PACK 27/02/2003
Revision Sheet
To:
Barco nv Simulation Products
Noordlaan 5, B-8520 Kuurne
Phone: +32 56.36.82.11, Fax: +32 56.36.84.86
E-mail: [email protected], Web: www.barco.com
From:
Date:
Please correct the following points in this documentation (R5976397/01):
page
R5976397
wrong
BARCOREALITY 909 SPLIT PACK
correct
27/02/2003