1
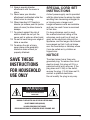
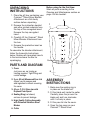
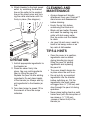
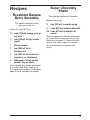
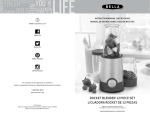
INSTRUCTION & RECIPE BOOKLET
For use with
SM-55C & SM-70C
Stand Mixers
Blender Attachment
SM-BLC
'PSZPVSTBGFUZBOEDPOUJOVFEFOKPZNFOUPGUIJTQSPEVDUBMXBZTSFBEUIFJOTUSVDUJPOCPPLDBSFGVMMZCFGPSFVTJOH
IMPORTANT
SAFEGUARDS
When using an electrical appliance,
basic safety precautions should
always be followed, including the
following:
1. READ ALL INSTRUCTIONS
BEFORE USING.
2. Switch off and unplug your
Cuisinart™ Stand Mixer before
fitting or removing the Blender
Attachment or contents from the
blender jar.
3. Close supervision is necessary
when any appliance is used by
or near children. Cuisinart does
not recommend the use of this
appliance by children.
4. BLADES ARE VERY SHARP.
HANDLE CAREFULLY.
Store out of reach of children.
5. WARNING: Never put hands
into the blender jar or handle
the blades with the appliance
plugged in.
6. Avoid contact with moving parts
and fitted attachments. To
reduce the chances of bodily
injury and/or damage to the
7.
8.
9.
10.
11.
12.
13.
stand mixer or blender
attachment, keep hands clothing,
cooking utensils, etc., away from
the moving parts during
operation.
The use of attachments, including
canning jars, not recommended
by the manufacturer, may cause
a risk of injury to persons.
Do not use more than one
attachment or function at a time.
Do not exceed the maximum
capacities listed in these use
and care instructions.
Do not use the stand mixer or
attachment if it is damaged or
if the cord is damaged. Have it
checked and serviced before
resuming use.
Do not use outdoors.
Do not use this attachment for
anything other than its intended
use.
Keep hands and utensils out
of blender jar during use, to
reduce the risk of severe injury
to persons or damage to blender
itself. A rubber or plastic spatula
may be used but must be used
only when the stand mixer is
turned off.
(continues next page)
WARNING: RISK OF FIRE OR ELECTRIC SHOCK
The lightning flash with arrowhead symbol within an equilateral triangle
is intended to alert the user to the presence of uninsulated dangerous
voltage within the product’s enclosure that may be of sufficient
magnitude to constitute a risk of fire or electric shock to persons.
The exclamation point within an equilateral triangle is intended to alert
the user to the presence of important operating and maintenance
(servicing) instructions in the literature accompanying the appliance.
1
14. Always operate blender
attachment with the cover in
place.
15. Never leave your blender
attachment unattended while the
stand mixer is running.
16. When blending HOT liquids in
blender jar remove pour lid (centre
piece of cover) to allow steam to
escape.
17. To protect against the risk of
electric shock do not put the
power unit in water or other liquid.
18. Do not let cord hang over edge of
table or counter.
19. To reduce the risk of injury,
never place cutter-assembly
blades on base without jar
properly attached.
SAVE THESE
INSTRUCTIONS
FOR HOUSEHOLD
USE ONLY
SPECIAL CORD SET
INSTRUCTIONS
A short power-supply cord is provided
with the stand mixer to reduce the risks
resulting from becoming entangled in
or tripping over a longer cord.
Longer extension cords are available
and may be used if care is exercised
in their use.
If a long extension cord is used,
the marked electrical rating of the
extension cord must be at least as
great as the electrical rating of the
appliance, and the longer cord should
be arranged so that it will not drape
over the countertop or tabletop where
it can be pulled on by children or
tripped over.
NOTICE
The stand mixer has a three wire
grounded plug. To reduce the risk of
electric shock, this plug will fit in a
polarized outlet only one way. If the
plug does not fit fully in the outlet,
reverse the plug. If it still does not fit,
contact a qualified electrician.
Do not modify the plug in any way.
WARNING
RISK OF FIRE OR ELECTRIC SHOCK
DO NOT OPEN
WARNING: TO REDUCE THE RISK OF FIRE OR ELECTRIC SHOCK,
DO NOT REMOVE COVER (OR BACK)
NO USER-SERVICEABLE PARTS INSIDE
REPAIR SHOULD BE DONE BY AUTHORIZED SERVICE PERSONNEL ONLY
2
UNPACKING
INSTRUCTIONS
1. Place the gift box containing your
Cuisinart™ Stand Mixer Blender
Attachment on a flat sturdy
surface before unpacking.
2. Remove the instruction booklet
and other printed materials from
the top of the corrugated insert.
Remove the top corrugated
insert.
3. Carefully lift the Cuisinart™ Stand
Mixer Blender Attachment from
the box.
4. Remove the protective insert on
the handle.
To assemble the blender attachment,
follow the Assembly Instructions
below. Replace all corrugated inserts
in the box and save the box for
repackaging.
Before using for the first time:
Wash all parts according to the
Cleaning and Maintenance section on
page 4 of this booklet.
2
1
5
3
PARTS AND DIAGRAM
1. Cover
Just press on, no turning or
twisting required. Tight-fitting seal
resists leakage.
2. 2-oz. (60 ml) Measured Pour Lid
Allows you to measure and
add ingredients without removing
the cover.
3. 40-oz. (1.2 L) Glass Jar with
Dripless Pour Spout
4. Sealing Ring (not shown)
on base to prevent leakage.
5. High Quality Cutting Assembly
with Patented Stainless Steel
Blades
6. Collar
3
6
ASSEMBLY
INSTRUCTIONS
1. Make sure the sealing ring is
in place on the blade unit.
2. Fit the blade unit inside the collar.
Carefully place the jar over the
blade unit and turn clockwise
until it is firmly in place.
3. Fit the pour lid into the cover.
4. Open the top cover on your
Cuisinart™ Stand Mixer.
5. Attach blender to the high speed
outlet by matching the marked
line on the collar to the marked
line on the stand mixer and turning the collar clockwise until it is
firmly in place. (See diagram.)
CLEANING AND
MAINTENANCE
• Always disconnect blender
attachment from your Cuisinart™
stand mixer and disassemble
before cleaning.
• Empty the jar fully before
unscrewing the blade unit.
• Blade unit and collar: Remove
and wash the sealing ring and
collar with hot soapy water.
Run tap water over the blades
to clean.
• Jar, pour lid and cover: wash by
hand in hot soapy water or on
top rack of dishwasher.
TIPS & HINTS
OPERATION
1. Add all appropriate ingredients to
the blender jar.
2. Press the cover firmly into
place. You may add ingredients
later by lifting the pour lid.
Replace the pour lid after adding
ingredients. Do not place hands
in the blender jar. Always add liquid ingredients to the blender jar
first.
3. Turn stand mixer to speed 12 for
the amount of time the recipe
indicates.
• Once the cover is in position,
ingredients can be added
during blending by simply
lifting the pour lid, adding
ingredients and replacing
the pour lid.
• The cover should always be
in place when the unit is on.
• Do not put dry or oversized
ingredients into the blender
before switching on. Cut the
ingredients into small cubes
no bigger than ¾" (1.90 cm) and
drop through the pour lid during
operation.
• Never place boiling liquid or solid
frozen food (with the exception of
ice cubes or ½" (1.25 cm)
-pieces of frozen fruit) in the
blender jar.
4
• Follow the cleaning and
maintenance instructions that
follow prior to your first use.
• Bread, Cookie or Cracker
Crumbs: Break or cut bread,
cookies or crackers into pieces
½ inch (1.25 cm) or less in size.
For best bread results, use dayold bread (drier bread works
best). Place bread, cookie or
cracker pieces in blender jar. Set
stand mixer to speed 12 to chop,
then blend continuously until
desired texture of crumbs is
achieved. For best results process 1 cup (250 ml) or less at a
time.
• Crushing Ice: Add up to 1 cup
(250 ml) of standard ice cubes to
the blender jar. Cover. Turn stand
mixer to speed 12 until cubes are
the consistency of snow. Turn
stand mixer off. Press Fold a few
times if coarsely chopped
ice is desired.
• Grating Fresh Citrus Zest: For
best results, blender jar and cutting assembly must be clean and
dry. Remove zest from fruit in
strips, using a vegetable peeler;
use a sharp knife to remove the
bitter white pith from the underside of the zest. Process no more
than 8 strips at a time (zest of 1
medium lemon). Cut strips in
half. Add strips and 1 teaspoon
(5 ml) sugar or coarse salt (from
recipe) to the blender jar. Cover
blender jar. Set stand mixer to
speed 12; blend for 15 to 20 seconds. Turn stand mixer off.
• Baby Food: Combine ½ cup
(125 ml) cooked vegetables, fruit
or meat with 3 to 4 tablespoons
5
•
•
•
•
(45-60 ml) liquid (water, milk, fruit
juice, broth, or cooking liquid) in
the blender jar. Set stand mixer
to speed 12. Blend for 15 to 20
seconds until a smooth purée is
reached. Add more liquid as necessary and process further until
desired texture is reached. For
“junior” type foods, set on speed
12 and use the Fold button.
Always consult with your pediatrician / family physician concerning the best foods for your
baby and when to introduce new
foods to his/her diet.
When using the blender to purée
hot mixtures such as creamed
soups and baby foods, strain the
solids from the liquid, reserving
the cooking liquid. Then place
the cooked solids in the blender
jar along with ½ to 1 cup
(125-250 ml) of the reserved
cooking liquid. Blend until
desired consistency/purée is
reached.
Allow hot foods to cool slightly
before blending to prevent steam
buildup, which may cause the lid
to lift up from the blender jar.
To make smoothies and frosty
beverages without diluting them,
keep ice cubes made of juices,
yogurt, milk or fruit purées on
hand to substitute for plain ice.
For quick cleaning, add 1 cup
(250 ml) of warm water and a
drop of liquid dish soap to the
blender jar. Cover and blend on
speed 10 for 30 to 40 seconds.
Discard the soapy water and
rinse blender thoroughly before
the next use.
Super Chocolaty
Shake
Recipes
Breakfast Banana
Berry Smoothie
The perfect breakfast when
you are on the run.
Makes 31⁄2 cups (875 ml)
1⁄
12
cups (375 ml) orange juice or
soy milk
12
⁄
cup (125 ml) fat free vanilla
yogurt
1
frozen banana
1
cup (250 ml) fresh
strawberries
1
cup (250 ml) frozen berries
(raspberry or strawberry)
1
tablespoon (15 ml) protein
powder (soy or whey)
The ultimate chocolate milkshake.
Makes 6 servings
½
cup (125 ml) chocolate syrup
2
cups (500 ml) chilled lowfat milk
2¾ cups (675 ml) chocolate ice
cream
Place all ingredients in blender attachment
jar in order listed. Place cover on jar. Turn
stand mixer to speed 12. Blend until thick,
smooth, and creamy, about 45 seconds.
Serve immediately in tall glasses with
straws.
Place ingredients in blender attachment
jar in order listed. Place cover on jar.
Turn stand mixer to speed 12. Blend for
about 35 to 45 seconds until smooth.
6
Tropical Colada
Mango, Strawberry
& Pomegranate
Smoothie
A refreshing cocktail with a taste
of the tropics.
Makes 5 cups (1.25 L)
Full of vitamin C and antioxidants,
this smoothie is a great way to start
the day, or provide a pick-up later
in the day.
1¾ cups (425 ml) orange peach
mango juice (orange juice may
be substituted)
¾
cup (175 ml) rum
Makes about 3½ cups (875 ml)
(4 servings)
2
tablespoons (30 ml) cream of
coconut
1
2
cups (500 ml) frozen
pineapple
cup (250 ml) pomegranate
juice*
1
1
cup (500 ml) frozen mango
pound (500 g) ¾-inch (2 cm)
mango cubes (about 2
mangoes)
1
frozen banana
6
ounces (170 g) frozen
strawberries (for variety try
frozen peaches)
½
teaspoon (2 ml) pure vanilla
extract (optional)
Place ingredients in blender attachment
jar in order listed. Place cover on jar. Turn
stand mixer to speed 12. Blend for about
35 to 45 seconds until smooth.
Place all ingredients in blender attachment
jar in the order listed. Place cover on jar.
Turn stand mixer to speed 12 and press
ON. Blend for about 35 to 45 seconds
until smooth.
*You may use either freshly made
pomegranate juice or purchased
pomegranate juice. To prepare fresh
pomegranate juice in your Cuisinart™ Stand
Mixer Blender Attachment, remove the arils
(seeds) from a fresh pomegranate. Place
in blender jar. Blend on speed 12 until
completely puréed. Press purée through a
fine mesh strainer to remove seed particles.
One average size pomegranate will yield
about ½ cup (125 ml) fresh pomegranate
juice.
7
Creamy Feta &
Yogurt Dressing
*May be found in most well-stocked
grocery stores and in specialty grocery
stores.
This is a great dressing to serve on
sliced fresh summer tomatoes and
cucumbers. Garnish with kalamata
olives to complete the salad.
Makes 1¼ cups (300 ml)
(can be doubled)
1
clove garlic, peeled
and crushed
1
teaspoon (5 ml) oregano
½
teaspoon (2 ml) basil
½
teaspoon (2 ml) kosher salt
¼
teaspoon (1 ml) freshly ground
pepper
¹⁄³
cup (75 ml) white balsamic
vinegar*
¼
cup (50 ml) extra virgin
olive oil
1
tablespoon (15 ml) fresh
lemon juice
1
teaspoon (5 ml) honey
4
ounces (115 g) crumbled feta
cheese
¼
cup (50 ml) lowfat or fat free
plain yogurt
Place garlic, oregano, basil, salt and
pepper in the blender attachment jar and
cover jar. Set stand mixer on speed 12.
Press Fold 5 times to chop garlic and blend
with herbs. Add remaining ingredients in
order listed. Blend for 15 to 20 seconds.
Scrape blender jar. Blend 15 to 20 seconds
longer. Let dressing stand for 20 to 30
minutes to allow flavours to blend. Transfer
to a resealable container and refrigerate
until ready to use.
8
Basic Vinaigrette
This basic vinaigrette is perfect
for a crisp green salad.
Makes about 1½ cups (375 ml); can be
doubled or tripled
Quick & Easy
Raspberry Sauce
Serve this sauce over ice cream,
as a topping for waffles, or with the
Ultimate Flourless Chocolate Cake or
Sour Cream Cheesecake made with
recipes accompanying your Cuisinart™
Stand Mixer.
1
clove garlic, peeled
2
tablespoons (30 ml)
Dijon-style mustard
Makes 2½ cups (625 ml)
½
cup (125 ml) wine vinegar
1
teaspoon (5 ml) kosher salt
12 ounces (340 g) fresh or
frozen, thawed strawberries
or raspberries
½
teaspoon (2 ml) freshly ground
pepper
1
cup (250 ml) red berry
preserves
²⁄³
cup (150 ml)extra virgin
olive oil
1
tablespoon (15 ml) sugar
²⁄³
cup (150 ml) vegetable oil
1
tablespoon (15 ml) fresh lemon
juice
1
tablespoon (15 ml) Chambord®
or Kirschwasser (optional)
Place the garlic in the blender attachment
jar. Place cover on jar. Turn stand mixer
to speed 12 and chop for 15 seconds.
Add the mustard, vinegar, salt and pepper.
Process for 10 to 15 seconds. Add the oils,
then process for about 60 seconds, until
completely emulsified.
You may change the Basic Vinaigrette by
using a different flavour of vinegar, mustard
or oil. Try using fresh lemon juice and a
little honey for a honey-mustard vinaigrette.
Add fresh herbs, sun-dried tomatoes, or
pesto for other flavour changes.
9
Place all ingredients in blender attachment
jar in the order listed; cover jar. Set stand
mixer on speed 12. Blend until smooth and
completely puréed, 35 to 45 seconds. If
desired, strain mixture through a fine mesh
sieve to remove seeds; discard seeds.
Store sauce in an airtight container in
refrigerator for up to one week.
Chocolate Morsel
Bread Pudding
Makes 8 to 12 servings
1
tablespoon (15 ml) unsalted
butter
6
cups (1.5 L) firm bread cubes*
6
ounces (170 g) chopped
semisweet chocolate or
chocolate morsels
6
large eggs
1
can (340 g [12 ounce]) fat free
evaporated milk
²⁄³
cup (150 ml) sugar
1
tablespoon (15 ml) vanilla
extract
½
cup (125 ml) heavy cream
be set. Remove from oven and allow the
pudding to rest for 20 to 30 minutes on
a wire rack to cool before serving. Serve
with vanilla ice cream, softly whipped
cream and Quick & Easy Raspberry Sauce
if desired.
*Bread pudding is best made from day-old
or slightly stale bread. Challah bread is a
good choice for bread pudding.
Butter a 2-quart (1.9 L) shallow baking dish
(9" x 9" [23 x 23 cm] square or equivalent)
with unsalted butter. Layer half the bread
cubes in the dish, top evenly with the
chopped chocolate, then the remaining
bread cubes.
Place the eggs, evaporated milk, sugar, and
vanilla extract in the blender attachment jar.
Blend for 1 minute. Add heavy cream, and
blend 30 seconds longer. Pour the mixture
slowly over the bread cubes. Gently press
all bread cubes to submerge them. Let the
mixture stand for 30 minutes, or cover and
refrigerate up to 12 hours (if refrigerated, let
come to room temperature for 30 minutes
before proceeding). Ten minutes before
baking, preheat oven to 325°F (160°C).
Place the filled pan in a larger shallow
baking pan. Place the baking pans in the
oven and carefully pour hot water into the
larger, outer pan until the water comes
1 inch (2.5 cm) up the sides of the inner
dish. Bake for 55 to 60 minutes. Bread
pudding will be puffed and custard will
10
Butternut Squash
and Leek Soup
Makes 5 cups (1.25 L)
1
tablespoon (15 ml) unsalted
butter
5
ounces (145 g) leeks (about
2 medium), white and light
green parts only, washed and
chopped
1
small garlic clove, smashed
4
cups (1 L) butternut squash
(about 1 medium squash),
peeled and cubed
1
tablespoon (15 ml) sherry or
white wine
½
teaspoon (2 ml) kosher salt
3½ cups (875 ml) chicken or
vegetable stock
Place the butter in a 2-quart (1.9 L) sauté
pan over medium-low heat. When the
butter has melted, stir in the leeks and
garlic and cook over low heat until very
soft, about 10 minutes. Be careful not to
pick up any colour on the vegetables.
Once the leek/garlic mixture is soft, stir in
the butternut squash. Increase the heat of
the pan slightly and stir in the sherry. The
sherry will evaporate immediately; when
it does stir in the salt and chicken stock.
Increase the heat and bring the soup to a
boil. Once it comes to a boil turn the heat
down so that the soup remains a constant
simmer. After about 40 to 50 minutes the
squash should be very soft. Carefully place
ingredients into blender attachment jar.
Place cover on jar. Turn stand mixer to
speed 12. Blend until soup is completely
homogenous, about 45 seconds. Adjust
seasoning according to taste and serve
immediately.
11
WARRANTY
Limited Three-Year
Warranty
This warranty supersedes all previous
warranties on this Cuisinart® product. This
warranty is available to consumers only. You
are a consumer if you own a Cuisinart® product
that was purchased at retail for personal, family
or household use. This warranty is not available
to retailers or other commercial purchasers or
owners.
We warrant that this Cuisinart® product will be
free of defects in material or workmanship
under normal home use for three years from
the date of original purchase.
For warranty purposes, we would like to
suggest that you register your product on-line
at www.cuisinart.ca to facilitate verification of
the date of original purchase. However, should
you not wish to register on-line we recommend
the consumer to maintain original receipt
indicating proof of purchase. In the event that
you do not have proof of purchase date, the
purchase date for purposes of this warranty
will be the date of manufacture.
When calling our Authorized Service Centre for
in warranty service please make reference to
your model number and the manufacturing
date code. This information can be found in
the rating area on the body or underneath the
base of your unit. The model number will follow
the word Model: SMBLC. The manufacturing
date code is a 4 or 5 digit number. Example,
70630 would designate year, month & day
(2007, June 30th).
To facilitate the speed and accuracy of your
return, please also enclose $10.00 for shipping
and handling of the product. Please also be
sure to include a return address, description of
the product defect, product serial number, and
any other information pertinent to the product’s
return. Please pay by cheque or money order.
NOTE: For added protection and secure
handling of any Cuisinart® product that is being
returned, we recommend you use a traceable,
insured delivery service.
Cuisinart cannot be held responsible for in
transit damage or for packages that are not
delivered to us. Lost and/or damaged products
are not covered under warranty.
Your Cuisinart® product has been
manufactured to strict specifications and has
been designed for use with Cuisinart®
authorized accessories and replacement parts
for your model.
These warranties expressly exclude any
defects or damages caused by accessories,
replacement parts or repair service other than
those that have been authorized by Cuisinart.
These warranties exclude all incidental or
consequential damages.
BEFORE RETURNING YOUR
CUISINART™ PRODUCT
Important: If the nonconforming product is to
be serviced by someone other than Cuisinart’s
Authorized Service Centre, please remind the
servicer to call our Consumer Service Centre to
ensure that the problem is properly diagnosed,
the product serviced with the correct parts,
and to ensure that the product is still under
warranty.
If your Cuisinart® product should prove to be
defective within the warranty period, we will
repair it or, if we think it necessary, replace it.
To obtain warranty service, please call our
Consumer Service Centre toll-free at
1-800-472-7606 or write to:
Cuisinart Canada
100 Conair Parkway
Woodbridge, Ont. L4H 0L2
12
Coffeemakers
Food
Processors
Toasters
Rice Cookers
Cookware
Grills
Cuisinart offers an extensive assortment of top quality products to make life in the
kitchen easier than ever. Try some of our other countertop appliances and
cookware, and Savor the Good Life™.
www.cuisinart.ca
©2007 Cuisinart
Cuisinart® is a registered
trademark of Cuisinart
100 Conair Parkway,
Woodbridge, Ont.
L4H 0L2
Printed in China
Any trademarks or service marks
of third parties used herein are the
trademarks or service marks of
their respective owners.
06CC25067
IB-6388-CAN