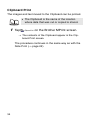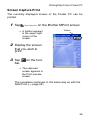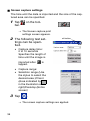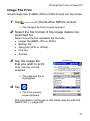
1
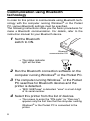
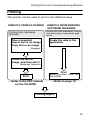
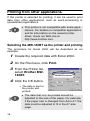
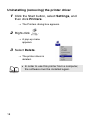
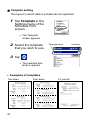
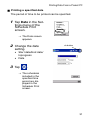
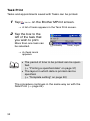
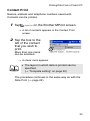
Software Guide
MW-140BT
Mobile Printer
l Before using this printer, be sure to read this User's Guide.
l We suggest that you keep this manual in a handy place for future
reference.
! Microsoft® and Windows® are registered trademarks of
Microsoft Corporation in the United States and other countries.
! The Bluetooth® word mark and logos are owned by the
Bluetooth® SIG, Inc. and any use of such marks by Brother
Industries, Ltd. under license.
! Portion of graphics filter software are based in part on the
work of Group 42,Inc.
! Portion of graphics filter software are based in part on the
work of the Independent JPEG group.
! VS-FlexGrid Pro Copyright(C) 1999 VideoSoft Corporation.
! All other software and product names mentioned are trademarks or registered trademarks of their respective companies.
! PrintPocketCE for Brother MW-100 by FieldSoftware Products.
For additional Pocket PC printing utilities, visit
'http://www.fieldsoftware.com'.
CONTENTS
CONTENTS
1 Operating Environment .................................. 2
2 Printing Data from a Computer Running
Windows .......................................................... 4
Communication using Bluetooth technology ............. 6
Installing the software ............................................... 8
Printing .................................................................... 15
Printing from other applications .............................. 16
Uninstalling the software ......................................... 17
3 Printing Data From a Pocket PC .................. 19
Installing the software ............................................. 20
Printing .................................................................... 23
Printing procedures ................................................. 24
Uninstalling the software ......................................... 39
4 Changing Printer Settings ............................ 40
Changing the settings ............................................. 40
5 PrintPocketCE for Brother ........................... 43
1
1 Operating Environment
This mobile printer can print data from a computer running
Windows® or a Pocket PC (PDA running Pocket PC).
Computer running Windows®
In order to use this printer, make sure that your system configuration meets the following requirements.
" PC operating environment
Processor
Pentium 266 MHz or higher recommended
®
®
Operating system Microsoft Windows 98, 98 SE, Me,
2000 Professional or XP
Compliant with USB Ver. 1.1
Compliant with Bluetooth ver.1.1 class 2
Interface
serial port profile supports as standard*1
Available Memory 64 MB or more recommended
Hard disk free
Minimum 20 MB
space
*1 For information on computers running Windows® and Bluetooth adapters whose operation have already been verified, check our Web
site at http://www.brother.com.
To print data from a computer running Windows® → Refer to page 4.
2
Operating Environment
Pocket PC (PDA running Pocket PC)
In order to use this printer, make sure that your Pocket PC
meets the following requirements.
" Pocket PC operating environment
Processor
Operating system
Interface
Support profile
ARM or MIPS
(Not compatible with SH; Pocket PC 2002
is compatible only with ARM.)
Microsoft® Pocket PC
Microsoft® Pocket PC 2002
Compliant with USB Ver. 1.1
Compliant with Bluetooth ver.1.1 class 2
serial port profile supports as standard*1
Serial Port
• When installing the software, a computer running Windows® that can connect to the Pocket PC will be
needed.
To print data from a Pocket PC → Refer to page 19.
*1 For information on Pocket PCs whose operation has already been verified, check our Web
site at http://www.brother.com.
3
2 Printing Data from a Computer
Running Windows
In order to use this printer to print data from a computer running Windows®, the software must be installed on the computer.
" Printing data via Bluetooth communication
1 Before installing the Brother’s software, install
Bluetooth connection software to a computer
running Windows®.
For details on the Bluetooth device operation, refer to the
instruction manual for the device with Bluetooth technology,
such as computer, the adapter for Bluetooth connection, or
the software managing the Bluetooth connection.
2 Install the software and printer driver on the
computer installed Bluetooth technology.
→ Refer to pages 8 to 11.
Enclosed CD-ROM
Computer running
Windows®
3 Make a connection between the computer and
printer.
→ Refer to page 6.
4
Printing Data from a Computer Running Windows
4 Print out.
MW-140BT (this printer)
Computer running
Windows®
" Printing data via USB communication
1 Install the software and printer driver on the
computer running Windows®.
→ Refer to pages 8 to 10, and pages 12 to 14.
2 Print out.
5
Communication using Bluetooth
technology
In order for this printer to communicate using Bluetooth technology with the computer running Windows® or the Pocket
PC, various Bluetooth settings must be specified.
The following instructions show you the basic procedures for
make a Bluetooth communication. For details, refer to the
instruction manual for your Bluetooth device.
1 Set the Bluetooth
switch to ON.
Bluetooth
communication ON
→ The status indicator
light will be blue.
2 Run the Bluetooth connection software on the
computer running Windows® or the Pocket PC.
3 The computer running Windows® or the Pocket
PC searches for Bluetooth devices and the
printer is detected.
→ “MW-140BTxxxx” is detected. “xxxx” is a last 4 digit
of its serial number.
4 Select this printer from the list of devices.
→ The screen to enter the “PIN code” (or “Pass key”)
appears only the first time that the computer running
Windows® or the Pocket PC is connected to the
printer.
6
Printing Data from a Computer Running Windows
5 Enter the “PIN code” (or “Pass key” at the time
of shipment, the PIN code is set to the last four
digits of the serial number of the printer) and
click/tap the Enter button.
→ “Connected device Yes” appears on the Device
information screen.
6 Click/tap Connect Serial Port in the Operations menu.
→ “Connected to serial port” appears on the Device
information screen.
→ Note the COM port number when it appears (The
COM port number may be required when printing depending on the type of the computer or
the pocket PC).
7
Installing the software
• Do not connect this printer to the computer
until you are instructed to do so.
1 Insert the enclosed CD-ROM into the CD-ROM
drive of the computer running Windows®.
→ The installer automatically starts up and the Brother
Select Language dialog box appears.
→ If the installer does not automatically start up, double-click “My Computer”, and then choose the “CD
drive”
and double-click the “setup.exe” file.
2 Select the language, and then
click the OK button.
→ The Brother Mobile
Software screen
appears.
3 Click the top button
(Windows).
→ A dialog box
appears, allowing
you to select what
to install.
8
Windows button
Printing Data from a Computer Running Windows
4 Click the button for
Spotsnap software
the software that you
wish to install.
Here, click the button for
the Spotsnap software.
→ The Driver Setup
dialog box appears.
" Software packages that are installed
Software
Spotsnap
Operator
Description
Software for editing imported data
Software for grabbing images, text or
copied data from the PC screen into
Spotsnap Operator
Templates Samples of pre-formatted layouts
Help
On-screen operating guide
Printer Driver
(The MW-140BT Util- Software for printing with this printer
ity software will be
or changing the settings for this
installed at the same printer
time.)
Spotsnap Snapper
Software
9
5 Follow the instructions that appear to finish the
installation.
Next, the printer driver is installed.
The installation procedure for the printer
driver differs depending
on the operating system being used.
Select “USB” or “Bluetooth,” and then click the
OK button.
For Bluetooth
communication
10
→
Continue with the procedure on
the next page.
For Windows® 98, 98SE,
2000 or Me with USB
→
Go directly to the procedure on
page 12.
For Windows® XP with
USB
→
Go directly to the procedure on
page 13.
Printing Data from a Computer Running Windows
For computer running Windows® (Bluetooth connection)
6 Check the “Install”,
and then click the
next button.
→ Installing the
printer driver is
started.
7 Select the COM
number you are
using as Bluetooth
connection, and
then click the next
button.
→ Follow the instructions appeared on the screen, and
finish installing.
11
For Windows® 98, 98 SE, 2000 Professional, or
Me (USB connection)
6 When the message
“Connect Brother
MW-140BT, and
then turn it on.”
appears, use the
enclosed USB cable
to connect this
printer to the computer running Windows®, and
then turn on the printer.
Enclosed USB cable
→ The printer driver is installed.
→ Continue with “Printing” on page 15.
12
Printing Data from a Computer Running Windows
For Windows® XP (USB connection)
6 When the message
“Connect Brother
MW-140BT, and
then turn it on.”
appears, use the
enclosed USB cable
to connect this
printer to the computer running Windows, and then turn on the
printer.
Enclosed USB cable
→ The Found New Hardware Wizard dialog box
appears.
• If a dialog box allowing you to select a model
appears, make sure that MW-140BT is
selected, and then click the Next button.
13
7 Select Install the
software automatically (Recommended), and then
click the Next button
→ A dialog box
appears, warning
that the software
has not passed
Windows Logo testing.
8 Click the Continue
Anyway button.
• Since this driver has been tested thoroughly by
Brother, no problem should be found during
normal operation.
Follow the instructions that appear to finish the installation.
14
Printing Data from a Computer Running Windows
Printing
This printer can be used to print in two different ways.
DIRECTLY FROM PC SCREEN
Printing from Spotsnap
Operator
DIRECTLY FROM WINDOWS
SOFTWARE PACKAGES
Printing from other applications, such as
word-processing or spreadsheet applications
Take a snapshot
Import text or an image
Copy text or an image
Create the data in the
application
(Snapper)
Check the text or
image, and then edit it.
(Spotsnap Operator)
Print
Select the MW-140BT as
the printer
Print
→ Refer to the PDF manual
on the CD-ROM.
→ Refer to page 16.
Printing begins
15
Printing from other applications
If this printer is selected for printing, it can be used to print
data from other applications, such as word-processing or
spreadsheet applications.
• This printer is not compatible with some applications. For details on compatible applications
and for information on the newest printer
driver, check our Web site at
http://www.brother.com.
Selecting the MW-140BT as the printer and printing
The procedure for Excel 2000 will be described as an
example.
1 Create the required data with Excel 2000.
2 On the File menu, click Print.
3 From the Printer list,
select Brother MW140BT.
4 Click the OK button.
→ The data is sent to
the printer and
printed.
• The data that is to be printed should be
adjusted to the size of the paper. For example,
if the paper size is changed from A4 to A7, the
data must be adjusted to fit in the A7-size
page.
16
Printing Data from a Computer Running Windows
Uninstalling the software
If this printer will no longer be used on the computer, the
Spotsnap software and the printer driver can be uninstalled.
Uninstalling (removing) the Spotsnap software
The procedure for Windows® 98 will be described as an
example.
1 Click the Start button, select Settings, click
Control Panel, and then double-click
in
Control Panel.
→ The Add/Remove Programs Properties dialog box
appears.
2 Select Spotsnap
Software, and then
click the
Add/Remove button.
Follow the instructions
that appear to finish the
uninstallation.
17
Uninstalling (removing) the printer driver
1 Click the Start button, select Settings, and
then click Printers.
→ The Printers dialog box appears.
2 Right-click
.
→ A pop-up menu
appears.
3 Select Delete.
→ The printer driver is
deleted.
• In order to use this printer from a computer,
the software must be installed again.
18
Printing Data From a Pocket PC
3 Printing Data From a Pocket PC
In order to use this printer to print data from a Pocket PC
(PDA running Pocket PC), a computer running Windows®
must be used to install the software onto the Pocket PC.
• For details on ActiveSync®, Bluetooth, or on connecting the
Pocket PC to a computer running Windows®, refer to the
instruction manual for the Pocket PC.
• Install Bluetooth connection software to the Pocket PC
before attempting to communicate using Bluetooth.
" Installing the software onto a Pocket PC
Enclosed CD-ROM
Computer running
Windows®
Pocket PC
" Connecting the printer to the Pocket PC using
Bluetooth/Printing
(→ Refer to page 6)
MW-140BT (this printer)
Pocket PC
19
Installing the software
1 Insert the enclosed CD-ROM into the CD-ROM
drive of the computer running Windows®.
→ The installer automatically starts up and the Brother
Select Language dialog box appears.
→ If the installer does not automatically start up, double-click “My Computer”, and then choose the “CD
drive”
and double-click the “setup.exe” file.
2 Select the language, and then
click the OK button.
→ The Brother Mobile
Software screen
appears.
3 Click the second
button (Pocket PC).
→ The PocketPC
Setup dialog box
appears.
20
Pocket PC button
Printing Data From a Pocket PC
4 Click the button for
installing the Brother
mobile printing software.
→ A dialog box
appears, allowing
you to select either
“Pocket PC” or
“Pocket PC 2002”.
5 Click the button for
the operating system that you are
using.
→ The InstallShield
Wizard starts.
6 Click either the Yes
or No button.
Follow the instructions
that appear to finish the
installation.
Next button
21
" Software packages that are installed
Software
Common
modules
(The “MprintUtility” will be
installed at the
same time.)
Description
Basic components of the
software (The settings for
this printer can be
changed.)
Prints memos saved with
Notes
Schedule Print Prints schedules saved
with Schedule
Prints tasks and appointTask Print
ments saved with Tasks
Prints names, addresses
and telephone numbers
Contact Print
saved with Contact
Clipboard Print Prints images and text
moved to the Clipboard
Prints the currently disScreen
played screen of the
Capture Print
Pocket PC
Image File
Prints saved image files
Print
E-mail Print
Prints saved e-mails
Operating guide that can
Help files
be viewed on the screen of
the Pocket PC
Note Print
Setup Method
Standard Compact
!
!
!
!
!
!
!
!
!
!
!
!
!
!
* For information on future updates, check our Web site at
http://www.brother.com.
22
Printing Data From a Pocket PC
Printing
This printer has eight different printing functions.
1 Tap
on the Program screen.
→ The Brother MPrint screen appears.
2 Check that
,
,
,
,
,
,
and
appear in the
screen.
,
" Refer to the pages indicated below for more details on
the corresponding printing function.
Note Print → page 24
Schedule Print → page 29
Task Print → page 32
Contact Print → page 33
Clipboard Print → page 34
Screen Capture Print → page 35
Image File Print → page 37
E-mail Print → page 38
MPrint Utility → page 41
23
Printing procedures
First, we will describe the procedure for using the Note Print.
This procedure contains the basic steps for printing.
Note Print
Memos saved with Notes can be printed.
1 Tap
on the Brother MPrint screen.
→ A list of memos appears in the Note Print screen.
2 Tap the memo that
Folder list
you wish to print.
Only one memo can be
selected.
→ The selected
memo is highlighted.
• To display the memos in each previously categorized folder, tap the folder list.
24
Printing Data From a Pocket PC
3 Tap Preview in the
Printer menu.
→ The Print preview
screen appears.
• If Print was tapped, printing will begin without
the Print preview screen being displayed.
4 Tap the Print button.
→ After the Pocket PC
detects this printer,
printing begins.
• The printed layout may differ depending on the
size of paper selected with Printer setting.
• The Print preview screen allows you to view an
image of the data as it will be printed. Text may
be difficult to read.
• At first time using Bluetooth communication,
set a port as “COM x” for using Bluetooth connection referring next page.
25
Advanced settings
Precise print settings can be specified.
" Printer settings
1 Tap Printer setting in the Print preview
screen.
→ The Printer setting screen appears.
2 The following set-
ok button
tings can be specified.
• Printer:
MW-140BT (this
printer)
• Port*1:
COM1, COM2,
COM3.../FILE/USB
• Paper size:
A7/Cut labels (4
Labels)/Cut labels (2
Labels)
The setting is
adjusted according to the paper cassette that is
loaded into the printer.
• Printing orientation: Portrait/Landscape
• Print mode: Normal/Global
• Number of copies: 1 through 50/Collate
*1 Set a “COM x” as using Bluetooth
connection.
26
Printing Data From a Pocket PC
3 Tap
.
→ The printer settings are applied.
" Graphics-processing settings
1 Tap Graphics in the Print preview screen.
→ The Graphics processing screen appears.
2 The following set-
ok button
tings can be specified.
• Half-tone:
Dithering/Error Diffusion/None
• Image processing:
Full-size printing/Fit
to paper
3 Tap
.
→ The graphics-processing settings are applied.
27
" Text format settings
The font and size of the printed text can be changed.
1 Tap Font in the Settings menu of the
Note Print screen.
→ The Font setting
screen appears.
2 The following text
settings can be
specified.
• Font name:
Tahoma/Courier
New/Frutiger Linotype/Bookdings
• Size:
Largest/Larger/Standard/Smaller/Smallest
• Effects:
Bold/Underline/Italic/
Strikethrough
3 Tap
.
→ The text format settings are applied.
28
ok button
Printing Data From a Pocket PC
Schedule Print
Schedules saved with Schedule can be printed.
1 Tap
on the Brother MPrint screen.
→ A list of schedules appears in the Schedule Print
screen.
2 Tap the box to the
Category list
left of the schedule
that you wish to
print.
More than one schedule
can be selected.
→ A check mark
appears.
• The period of time to be printed can be specified.
(→ “Printing a specified date” on page 31)
• To display the schedules in each previously
specified category, tap the category list.
3 Tap Preview in the Printer menu.
The procedure continues in the same way as with the
Note Print (→ page 24).
29
" Template setting
The layout in which data is printed can be specified.
1 Tap Template in the
Settings menu of the
Schedule Print
screen.
→ The Template
screen appears.
2 Select the template
Template menu
that you wish to use.
3 Tap
.
→ The selected template is applied.
• Examples of templates
Two down
30
Four down
A7 portrait
ok button
Printing Data From a Pocket PC
" Printing a specified date
The period of time to be printed can be specified.
1 Tap Date in the Settings menu of the
Schedule Print
screen.
→ The Date screen
appears.
2 Change the date
ok button
setting.
• Start date/End date/
Inprogress
• Date
3 Tap
.
→ The schedules
included in the
specified time
period are displayed in the
Schedule Print
screen.
31
Task Print
Tasks and appointments saved with Tasks can be printed.
1 Tap
on the Brother MPrint screen.
→ A list of tasks appears in the Task Print screen.
2 Tap the box to the
left of the task that
you wish to print.
More than one task can
be selected.
→ A check mark
appears.
• The period of time to be printed can be specified.
(→ “Printing a specified date” on page 31)
• The layout in which data is printed can be
specified.
(→ “Template setting” on page 30)
The procedure continues in the same way as with the
Note Print (→ page 24).
32
Printing Data From a Pocket PC
Contact Print
Names, address and telephone numbers saved with
Contacts can be printed.
1 Tap
on the Brother MPrint screen.
→ A list of contacts appears in the Contact Print
screen.
2 Tap the box to the
left of the contact
that you wish to
print.
More than one name
can be selected.
→ A check mark appears.
• The layout in which data is printed can be
specified.
(→ “Template setting” on page 30)
The procedure continues in the same way as with the
Note Print (→ page 24).
33
Clipboard Print
The images and text moved to the Clipboard can be printed.
• The Clipboard is the name of the location
where data that was cut or copied is stored.
1 Tap
on the Brother MPrint screen.
→ The contents of the Clipboard appear in the Clipboard Print screen.
The procedure continues in the same way as with the
Note Print (→ page 24).
34
Printing Data From a Pocket PC
Screen Capture Print
The currently displayed screen of the Pocket PC can be
printed.
1 Tap
on the Brother MPrint screen.
→ A toolbar appears
in the upper-right
corner of the
screen.
Toolbar
2 Display the screen
that you wish to
print.
3 Tap
on the tool-
bar.
→ The captured
screen appears in
the Print preview
screen.
The procedure continues in the same way as with the
Note Print (→ page 24).
35
" Screen capture settings
The time until the data is imported and the size of the captured area can be specified.
1 Tap
on the tool-
bar.
→ The Screen capture print
settings screen appears.
2 The following text set-
ok button
tings can be specified.
• Capture delay time:
0 to 10 seconds
Specifies the length of
time until the image is
imported after
tapped.
is
• Capture range:
• Selection range (Use
the stylus to select the
desired area.)/Client
(Area indicated by
in the illustration at the
right)/Desktop (Entire
screen)
3 Tap
.
→ The screen capture settings are applied.
36
Printing Data From a Pocket PC
Image File Print
Saved image files (in BMP, JPEG or PNG format) can be printed.
1 Tap
on the Brother MPrint screen.
→ The Image File Print screen appears.
2 Select the file format of the image data to be
searched for.
Select from the five available file formats.
• Image file (BMP, JPG or PNG)
• Bitmap file
• Jpeg file (JPG or JPEG)
• Png file
• All files
3 Tap the image file
ok button
that you wish to print.
Only one file can be
selected.
→ The selected file is
highlighted.
4 Tap
.
→ The Print preview
screen appears.
The procedure continues in the same way as with the
Note Print (→ page 24).
37
E-mail Print
Saved e-mails can be printed.
1 Tap
on the Brother MPrint screen.
→ A list of e-mails appears in the Email Print screen.
2 Tap the e-mail that
you wish to print.
Only one e-mail can be
selected.
→ The selected
e-mail is highlighted.
• The layout in which data is printed can be
specified.
(→ “Template setting” on page 30)
The procedure continues in the same way as with the
Note Print (→ page 24).
38
Printing Data From a Pocket PC
Uninstalling the software
Uninstall (remove) the software using the Pocket PC functions. For details on uninstalling the software, refer to the
instruction manual for the Pocket PC.
39
4 Changing Printer Settings
The following settings for this printer can be specified using
the MW-140BT Utility “MPrintUtility” on the both Pocket PC
and Windows PC.
• Auto power-off time
• Auto sleep time
• Auto sleep/power-off time
• Power-saving setting
• Device name
• Pass key (PIN code)
• Initialize settings (resets all parameters to their
default settings)
Changing the settings
With a computer running Windows®:
1 Click the Start button, select Settings, and
then click Printers.
→ The Printers dialog box appears.
2 Right-click
.
→ A pop-up menu appears.
3 Select Properties.
→ The Properties screen appears.
4 Click the MW-140BT Utility button.
→ The Brother MW-140BT Utility screen appears.
40
Changing Printer Settings
With a Pocket PC:
1 Tap
on the Brother MPrint screen.
→ The Brother MW-140BT Utility screen appears.
Screens
! General
The length of time [auto poweroff time] until the printer automatically powers off can be
specified. If “0” is specified, the
printer will not automatically
power off.
! Bluetooth (1)
When the Bluetooth switch is
set to ON, the length of time
[auto sleep time] until the
printer automatically enters the
sleep mode and the length of
time [auto sleep/power-off time]
until the printer powers off after
entering the sleep mode can be
specified. If “0” is specified for
the auto sleep time, the unit will
not enter the sleep mode.
The power-saving setting can
be specified.
41
" Bluetooth (2)
The device name and the PIN
code (or Passkey) can be
changed.
For the device name, specify a
name that contains 1-12 alphanumeric characters.
For the PIN code, specify a
four-digit number only if “Activate PIN code” has been
selected.
Closing the MW-140BT Utility
1 Tap the OK button.
→ The MW-140BT Utility closes.
42
PrintPocketCE for Brother
5 PrintPocketCE for Brother
What is this software?
PrintPocketCE enables you to print out the following data from
your PDA running Microsoft® Pocket PC/Pocket PC2002.
•
•
•
•
Pocket Excel spreadsheets
Pocket Word documents
E-mail
Pocket RTF (rich text format) & Plain text (txt)
Installing the software
1 Insert the enclosed CD-ROM into the CD-ROM
driver of the computer running Windows®.
→ The installer automatically starts up and Brother
Mobile Printing Software dialog box appears.
2 Click the second button
(Pocket PC).
→ The PocketPC Setup
dialog box appears.
3 Click the second button
(Bonus software).
→ A dialog box appears
asking you to select
either “Print Pocket CE
for Pocket PC” or “Print
Pocket CE for Pocket
PC2002”.
Bonus software
43
4 Click the button for the operating system that you
are using.
→ The installation program will run automatically. The computer
connects with the PDA
via ActiveSync and the
installation is complete.
• For details on using Print Pocket CE for Brother,
refer to the Help file in your PDA installed Print
Pocket CE for Brother.
44