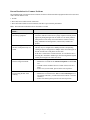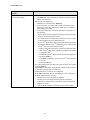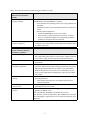
1
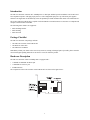
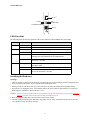
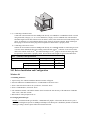
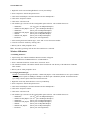
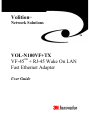
Volition
TM
Network Solutions
TM
VOL-N100VF+TX
TM
VF-45 + RJ-45 Wake On LAN
Fast Ethernet Adapter
User Guide
Table of Contents
Introduction
Package Checklist
Hardware Description
LED Functions
Installing the Hardware
NIC Driver Installation and Configuration
Windows 98
A. Installing the driver
B. Changing the media type
Windows Millennium
A. Installing the driver
B. Changing the media type
Windows 2000
A. Installing the driver
B. Changing the media type
For Further Customization
Remote LAN Wakeup
Instructions for Using the WOL (Wake On LAN) Features
Using 3M NIC Diagnostics
Getting Started
Instructions for Running the “Internal Tests”
Instructions for Running the “Network Test”
Planned Drivers
Troubleshooting
PCI Compatibility
Known Resolutions for Common Problems
Recommendations
EMI Certification
FCC Class B Certification
Specifications
1
1
1
2
2
3
3
3
3
4
4
4
5
5
5
5
6
6
7
7
7
8
8
8
8
9
12
12
12
13
Introduction
The 3M VOL-N100VF+TX WOL PCI 100Mbps NIC is a dual-port and dual-speed Fast Ethernet card for PCI local
bus compliant computers. This plug-n-play device is auto-configurable upon power up. The RJ-45 port supports
NWAY Auto Negotiation to automatically select the optimum speed and communication mode of an attached device.
The VOL-N100VF+TX WOL NIC is capable of advanced Wake On LAN functions. It is also PCI 2.2 compliant and
complies with the WfM 2.0 standard.
The following WOL features are supported:
• Wake On Magic Packet
• Wake On Ping
• Wake On Link
Package Checklist
The 3M VOL-N100VF+TX package includes:
• One 3M VOL-N100VF+TX PCI WOL NIC
• One Wake On LAN cable
• One 3M Driver CD-ROM
Immediately inform your dealer in the event of any incorrect, missing or damaged parts. If possible, please retain the
carton and original packing materials in case there is a need to return the product.
Hardware Description
The 3M VOL-N100VF+TX PCI 100Mbps NIC is equipped with :
• 1 10BASE-T/100BASE-TX RJ-45 port
• 1 100BASE-FX VF-45TM port
• 4 LED indicators
The components of the VOL-N100VF+TX PCI WOL NIC are shown in the figure below:
1
VOL-N100VF+TX
VF-45TM
Activity
Link
100/10 Mbps
Full Duplex/Collision
RJ-45
LED Functions
The following table describes the operation of the VOL-N100VF+TX PCI 100Mbps NIC status LEDs:
LED
Status
Description
LNK
Solid Green
Indicates a valid network connection.
Off
Indicates no valid network connection.
Flashing Amber
Indicates incoming and outgoing network traffic.
Off
Indicates that there is no network traffic.
Green
Indicates that the adapter is operating at
100 Mbps (for both 100BASE-TX and 100BASE-FX).
Off
Indicates that the adapter is operating at 10 Mbps. (will also be Off
when there is no Link)
Flashing Amber
Indicates a collision occurred on the port when operating in
half-duplex mode
Solid Amber
Indicates that the adapter is operating in full-duplex mode.
Off
Indicates that the adapter is operating in half-duplex mode. (will
also be Off when there is no Link)
Act
SPEED
FD
Installing the Hardware
Warnings:
• Network cards are sensitive to static electricity. To protect the card, avoid touching its electrical components and
always touch the metal chassis of your computer before handling the card.
• Backup your driver CD and use the copy as the working CD to protect the original from accidental damage.
1. Power the PC off, unplug the power cord, and then depress the power button for approximately 6 seconds (this
drains all power completely). Remove the PC’s cover.
Caution: Failure to properly shut down the PC in accordance with the steps outlined above may result in permanent
damage to the NIC and/or the PC when the NIC is installed/removed.
2. Select an unused PCI bus-master slot and remove its protective bracket.
3. Carefully insert the card and press until all the edge connectors are firmly seated inside the slot. Then, screw the
card’s bracket securely into the PC’s chassis
2
4. a) Connecting to the RJ-45 Port.
Connect the VOL-N100VF+TX PCI 100Mbps NIC directly to a 10BASE-T or 100BASE-TX hub or switch
using UTP cable (Category 3, 4, 5e or 5 for 10BASE-T; Category 5e/5 for 100BASE-TX). The maximum
allowable length of UTP cable connections is 100 meters (328 ft). This connection can be made directly to the
device, or indirectly via a wall outlet that has the proper wiring for an RJ-45 connector. When inserting an
RJ-45 plug, be sure the tab on the plug clicks into position to ensure that it is properly seated.
b) Connecting to the VF-45TM Port.
Connect the VOL-N100VF+TX PCI 100Mbps NIC directly to a 100BASE-FX hub or switch using 62.5/125
or 50/125 micron multimode fiber optic cabling. Attach the male VF-45TM connector on one end of a fiber
cable to the network card’s VF-45TM port. When inserting a VF-45TM plug, be sure the tab on the plug clicks
into position to ensure that it is properly seated. The maximum cable lengths are given in the table below.
VF-45TM (1300 nm) Cable Specifications
Type
Max. Length
Connector
Half duplex
412 m (1,351.4 ft)
VF-45TM
Full duplex
2 km (1.24 miles)
VF-45TM
50/125 or 62.5/125 micron core multimode fiber
NIC Driver Installation and Configuration
Windows 98
A. Installing the driver:
1. Upon boot-up, the “Add New Hardware Wizard” window will appear.
2. Insert the 3M Driver CD-ROM into the PC’s CD-ROM drive and click “Next.”
3. Select “Search for the best driver for your device”, then click “Next.”
4. Select “CD-ROM drive”, then click “Next.”
5. The “Hardware Wizard” will find the 3M NIC driver located in the root directory of the 3M Driver CD-ROM.
Click “Next”, then click “Finish”.
6. Reboot the PC when prompted to do so.
B. Changing the media type:
Defaults: The default media type should be “100BaseFX Full_Duplex.” This means that the VF-45TM port is
enabled and configured to operate at 100Mbps, Full Duplex. The RJ-45 port is disabled by default. If a different
media type setting is desired, please follow the instructions below:
3
VOL-N100VF+TX
1. Right click on the “Network Neighborhood” icon on your Desktop.
2. Select “Properties” from the drop-down menu.
3. Click on the listed adapter “3M VOL-N100VF+TX PCI 100Mbps NIC.”
4. Click on the “Properties” button.
5. Click on the “Advanced” tab.
6. The “Media Type” selector is the first configurable option in the list. The available choices are:
•
•
•
•
•
•
•
100BaseFX
100Base FX Full_Duplex
100BaseTX
100BaseTX Full_Duplex
10BaseT
10BaseT Full_Duplex
AutoSense
(VF-45TM port: 100 Mbps Half Duplex)
(VF-45TM port: 100 Mbps Full Duplex)
(RJ-45 port: 100 Mbps Half Duplex)
(RJ-45 port: 100 Mbps Full Duplex)
(RJ-45 port: 10 Mbps Half Duplex)
(RJ-45 port: 10 Mbps Full Duplex)
(RJ-45 port: Auto Negotiation)
7. After selecting the desired “Media Type”, click “OK” to close the current window.
8. Close the “Network” window by clicking “OK.”
9. Reboot your PC when prompted to do so.
Note: The media type change will not take effect until the PC is rebooted.
Windows Millennium
A. Installing the driver:
1. Upon boot-up, the “Add New Hardware Wizard” window will appear.
2. Insert the 3M Driver CD-ROM into the PC’s CD-ROM drive.
3. Select “Automatic Search for a better driver”, then click “Next.”
4. The “Hardware Wizard” will find the 3M NIC driver located in the root directory of the 3M Driver CD-ROM.
Click “Finish.”
5. Reboot your PC when prompted to do so.
B. Changing the media type:
Defaults: The default media type should be “100FX Full_Duplex.” This means that the VF-45TM port is enabled
and configured to operate at 100Mbps, Full Duplex. The RJ-45 port is disabled by default. If a different media
type setting is desired, please follow the instructions below:
1. Right click on the “My Network Places” icon on your Desktop.
2. Select “Properties” from the drop-down menu.
3. Click on the listed adapter “3M VOL-N100VF+TX PCI 100Mbps NIC.”
4. Click on the “Properties” button.
5. Click on the “Advanced” tab.
6. The “Media Type” selector is the first configurable option in the list. The available choices are:
•
•
•
•
•
•
•
100BaseFX
100Base FX Full_Duplex
100BaseTX
100BaseTX Full_Duplex
10BaseT
10BaseT Full_Duplex
AutoSense
(VF-45TM port: 100 Mbps Half Duplex)
(VF-45TM port: 100 Mbps Full Duplex)
(RJ-45 port: 100 Mbps Half Duplex)
(RJ-45 port: 100 Mbps Full Duplex)
(RJ-45 port: 10 Mbps Half Duplex)
(RJ-45 port: 10 Mbps Full Duplex)
(RJ-45 port: Auto Negotiation)
4
7. After selecting the desired “Media Type”, click “OK” to close the current window.
8. Close the “Network” window by clicking “OK.”
9. Reboot your PC when prompted to do so.
Note: The media type change will not take effect until the PC is rebooted.
Windows 2000
A. Installing the driver:
1. Upon boot-up, the “Found New Hardware Wizard” window will appear.
2. Insert 3M Driver CD-ROM into the PC’s CD-ROM drive and click “Next.”
3. Select “Search for a suitable driver for my device”, then click “Next.”
4. Select “CD-ROM drives”, then click “Next.”
5. The “Hardware Wizard” will find 3M NIC driver located in the root directory of 3M Driver CD-ROM. Click
“Next”, and then click “Finish.”
Note: Rebooting is NOT necessary in Windows 2000.
B. Changing the media type:
Defaults: The default media type should be “100BaseFX Full_Duplex.” This means that the VF-45TM port is
enabled and configured to operate at 100Mbps, Full Duplex. The RJ-45 port is disabled by default. If a different
media type setting is desired, please follow the instructions below:
1. Right click on the “My Network Places” icon on your Desktop.
2. Select “Properties” from the drop-down menu.
3. Right click on “Local Area Connection (x)” (note: the “x” is a number that will vary depending on how many NICs
are/were installed in the PC).
4. Select “Properties” from the pull-down menu.
5. Confirm that the adapter listed is “3M VOL-N100VF+TX PCI 100Mbps NIC.”
6. Click on the “Configure” button.
7. Click on the “Advanced” tab.
8. The “Media Type” selector is the first configurable option in the list. The available choices are:
•
•
•
•
•
•
•
100BaseFX
100Base FX Full_Duplex
100BaseTX
100BaseTX Full_Duplex
10BaseT
10BaseT Full_Duplex
AutoSense
(VF-45TM port: 100 Mbps Half Duplex)
(VF-45TM port: 100 Mbps Full Duplex)
(RJ-45 port: 100 Mbps Half Duplex)
(RJ-45 port: 100 Mbps Full Duplex)
(RJ-45 port: 10 Mbps Half Duplex)
(RJ-45 port: 10 Mbps Full Duplex)
(RJ-45 port: Auto Negotiation)
9. After selecting the desired “Media Type”, click “OK” to close the current window. Click “OK” again.
10.Close the “Network and Dial-up Connections” window.
Note: Rebooting is NOT necessary in Windows 2000.
For Further Customization
You can modify network settings via the “Network” applet.
5
VOL-N100VF+TX
Remote LAN Wakeup
Remote LAN Wakeup capability is a key feature of a centrally managed PC environment. This technology enables
networked PCs to be “woken up” from a sleep or powered-off state so they can be managed from a central location, at
any time of the day or night.
To employ Remote LAN Wakeup, three elements are required:
• Desktop management software that can send a “wake-up” frame to a PC.
• A Wake On LAN enabled PC motherboard that can supply low-level auxiliary power to a network card when the
PC is powered off. The PC must be either PCI 2.1 or PCI 2.2 compliant.
• A Wake On LAN network card that can recognize a wake-up frame and signal the PC to power up.
A Wake On LAN enabled PC is never completely powered off, it maintains a low-level auxiliary power supply to the
motherboard. The three-wire Wake On LAN cable provides one line for the network card auxiliary power and one
line for the card wake-up signal, the other line is ground. Even if the PC is powered off, the network card is always
active and monitoring the network. When a wake-up frame is detected, the card signals the motherboard to power up
the PC. With the PC powered on, maintenance and other support tasks can be performed.
Instructions for Using the WOL (Wake On LAN) Features:
The VOL-N100VF+TX NIC’s WOL functionality is DISABLED by default. To enable WOL, the following steps
must be taken:
•
•
•
•
•
•
•
•
•
Navigate to the “Network Properties” of the NIC, then select the “Advanced” tab.
From the list of available configurable options, choose “PME.”
Select the PME option and change it to “ENABLED” (it is DISABLED by default).
From the list of available configurable options, locate “Wake On Magic Packet.”
• “Wake On Magic Packet” is ENABLED by default. Leave it enabled if this is the desired wake up event.
From the list of available configurable options, locate “Wake On PING.”
• ENABLE “Wake on PING” if this is the desired wake up event.
From the list of available configurable options, locate “Wake On Link.”
• ENABLE “Wake On Link” if this is the desired wake up event.
Reboot your PC for any changes to take effect.
If your PC is PCI 2.1 compliant, you must use the 3-wire WOL cable (included with your 3M NIC). Both ends of
the cable are identical. Plug one end of the cable into the 3-pin slot on the NIC and the other end into a similar
looking 3-pin slot on your PC’s motherboard.
If your PC is PCI 2.2 compliant, the WOL cable is not needed.
Note: Power off your PC and unplug the power cable prior to connecting the cable.
6
Using 3M NIC Diagnostics
The 3M Diagnostics program, “DIAG.EXE”, is a MS-DOS program that verifies the basic functions and components
of the 3M VOL-N100VF+TX PCI 100Mbps NIC. This program can be found in the “\DIAGS” subdirectory of the
3M Driver CD-ROM. It is highly recommended that this useful program be run before placing a call into the 3M
Helpdesk.
The 3M NIC Diagnostics program must be run under these conditions:
• The 3M VOL-N100VF+TX NIC must be physically inserted into any PCI slot in the PC
• You MUST boot the PC from a bootable floppy disk. It will not run properly if running from a DOS window.
• The bootable floppy can be made from any of these operating systems:
• MS-DOS
• Windows 98
• Windows ME
• The 3M NIC Diagnostics will only work with the 3M VOL-N100VF NIC.
Getting Started
• Copy “\Diags\DIAG.EXE” from the 3M Driver CD-ROM to the root directory of a MS-DOS, Win98, or WinME
bootable floppy disk.
• Connect a patch cable from the NIC to a network device, such as a hub or a switch.
• Insert the bootable floppy disk in the PC with the VOL-N100VF+TX NIC installed.
• Reboot your PC.
• From the “A:\>” command prompt, type “DIAG.EXE” and press <ENTER>.
• Using the arrow keys on your keyboard, select the media type that you wish to use. If you have any doubts on which
media type to choose, select “Auto Sense.”
Note: If there are multiple VOL-N100VF+TX NICs installed in the system, you will be prompted to select which of
the NICs you want to test.
Instructions for Running the “Internal Tests”
After selecting the Media Type, press <Enter> to begin the Internal Test suite.
The following “Internal Tests” will begin immediately:
• Configuration Test: (Pass/Fail)
• This test verifies if the CPU in the test computer is equal to or higher than Intel 80386, and if the test computer
has a PCI bus in it.
• I/O Test: (Pass/Fail)
• This test verifies if the assigned I/O base address can be successfully used by the 3M VOL-N100VF+TX PCI
100Mbps NIC.
• ID Test: (Pass/Fail)
• This test verifies if the Ethernet Node ID (MAC Address) of the adapter is in correct format.
• Internal Loopback Test: (Pass/Fail)
• With this test, the test signals are intercepted and reflected at the MAC level without actually reaching the
physical media.
• Link Status Test: (Pass/Fail)
• This test verifies if the connection between the NIC and the network is physically established.
• Interrupt Test: (Pass/Fail)
• This test verifies if the IRQ value assigned to the adapter works properly. The program generates and sends a
packet, then waits for the “transmit complete” interrupt. If the interrupt is received, it indicates the IRQ number
is a good one.
After the Internal Tests have completed, you can manually start the “Network Test”:
7
VOL-N100VF+TX
Instructions for Running the “Network Test”
• The Network Test requires a minimum of two (2) PCs in order to both send and receive data.
• Press <F2> to start the test on two (2) PC’s installed with 3M VOL-N100VF+TX NICs
• Once the test has begun, the following statistics can be observed on the screen:
• Frames transmitted
• Frames received
• Transmit Throughput
• Receive Throughput
• Collisions
• Allignment errors
• Press <F2> again to stop the Network Test.
• Press <F1> to clear all counters.
Planned Drivers
The drivers for these supported operating systems were still under development at the time of printing. Please check
3M’s website periodically for new released drivers.
•
•
•
•
MS-DOS
Windows NT 4.0
Novell Netware 3.x. 4.x, 5.x, DOS ODI
Macintosh 8.x, 9.x, 10.x
Website: www.3m.com/volition/
Troubleshooting
Please consult this Troubleshooting section before contacting Technical Service. If you are still experiencing
problems after consulting the Troubleshooting section, 3M Volition Network Solutions Technical Service can be
reached at: 1-800-426-8688.
PCI Compatibility
Some PCI computers are not self-configuring and require you to perform some or all of the following functions by
motherboard jumper changes and/or BIOS Setup configuration:
• Make sure your BIOS correctly supports the PCI Local Bus Specification v2.1 or later and upgrade your computer
BIOS to the latest version.
• Verify that the PCI slot is an enabled bus-master slot and not a slave PCI slot. In some computers the PCI slot must
be configured to enable bus mastering. Refer to your PC’s manual and check the PCI BIOS Setup program to be
sure the PCI slot is an enabled bus-master slot.
• In some computers, you may be required to disable Plug ‘n Play (PnP) in the BIOS Setup program if resources are
not properly assigned between installed cards.
• Some computers may require you to reserve interrupts and memory addresses for installed ISA cards to prevent PCI
cards from using the same settings. Refer to your PC’s manual and check the PCI BIOS Setup program configuration
options for ISA cards.
• Make sure the PCI slot is configured to support INTA.
• Be sure that INTA for the slot is assigned to a free IRQ.
8
Known Resolutions for Common Problems
The troubleshooting section below shows solutions for three well known Problem Symptoms that can be associated
with a network interface card:
1. No link
2. Have link, but no usable network connection
3. Have link AND a usable network connection, but there is poor network performance
Note: The Link LED on should not be lit when there is no link
Possible causes of a “No Link”
problem…
Solutions…
1. Dust particles on fiber optic
networking equipment
• Dust particles located on the VF-45TM ports of switches and media
converters, and also on the VF-45TM plugs of patch cords can prevent
light from passing through. This can result in a “No Link” problem.
Dust particles can be safely removed from these sensitive areas by
using “HFE-Based Cleaning Fluid” (VOL-0570A), another 3M
product.
2. The Media Type of the NIC and
the NIC’s link partner may not
match.
For example:
• The NIC may be configured for 100Mbps and the corresponding
switch port may be configured for 10Mbps. Ensure the media types on
the NIC and the NIC’s link partner are the same.
• If the NIC is connected to a media convertor, be sure that the NIC is
not using the “AutoSense” Media Type (the Auto Negotiation signals
cannot pass through most media converters).
3. The NIC may have been damaged • Run the 3M NIC Diagnostics.
and is no longer functional.
• Monitor the test result for the: Internal Loopback test and the ID
test.
• Call 3M Volition Technical Service if either of these tests are a
FAIL.
• If these two (2) tests PASS, proceed to the next step below...
4. A resource conflict in the PC may • Run the 3M NIC Diagnostics
be preventing the NIC from
• Monitor the test results for the: I/O test and the Interrupt test. If
working.
any of these tests FAIL, you will need to resolve the PC’s resource
conflict(s).
• If these tests PASS, please proceed to the next step below...
9
VOL-N100VF+TX
Possible causes of a “No Link”
problem…
Solutions…
5. There might be a problem with
the network cabling.
• View the Link LED.
• The Link LED will be solid green if the NIC is currently linked to
another network device.
• Run the 3M NIC Diagnostics
• Monitor the test results for the: Link Test
• If this test FAILs, first ensure that you have selected the proper
Media Type. Chose the “Auto Select” media type if in doubt of
what media type to select.
• If the proper media type was selected and the test still FAILs, do
the following:
• Ensure the patch cable being used is inserted correctly in the NIC
and the corresponding hub or switch.
• If a media converter is being used, ensure that a cross-over cable
is connecting the NIC to the media converter.
• If a VF-45TM patch cable is being used, ensure that the fiber is not
misaligned within the VF-45TM plug (this is prone to happen if the
VF-45TM plug is over-inserted into a port).
• Remove each end of the VF-45TM patch cord. Strike the white/
black VF-45TM plug sharply against a hard object in an attempt
to realign the fiber.
• Reinstall the VF-45TM patch cord into the network equipment.
• Re-run the Link test.
• If the Link test still fails, replace the VF-45TM patch cord with
a new one.
• Rerun the Link test.
• If a copper cable (RJ-45) is being used, replace it with a new one and
rerun the Link test.
• If the Link test still FAILS: inspect the hub, switch, media converter,
or other device that the NIC is connected to.
Perhaps that device is faulty or mis-configured.
• If the Link test PASSes: the NIC and cabling are correct. The Link
problem might instead be caused by:
• The NIC drivers not being properly installed.
• The NIC’s network settings not being properly configured.
• A Resource Conflict in the PC that only occurs when Microsoft
Windows is loaded.
• Use the Device Manager to locate the source of the conflict.
10
Note: The Link LED on the NIC should be lit green when there is link.
Possible causes of a “Link, but no Solutions…
usable network connection”
problem...
1. The NIC drivers may not be
properly installed.
Note: There will be “Link, but no usable network connection” only when
the Link LED is lit and the Link test is a PASS.
• First ensure that the operating system you are using Windows 98/
ME/2000.
• Install the NIC drivers per the installation instructions of this User
Guide.
• Run the 3M NIC Diagnostics.
• Execute the Network test (two PCs are needed)
• If the two NICs can both send and receive frames on this low
level, it is evident that a higher-level configuration problem is
probably preventing the network connection.
2. The network settings may not be
properly configured.
• Review your network settings to ensure that they are properly
configured. Also ensure that the network address and computer name
are unique to the LAN.
Possible causes of a “Link and
network connection, but poor
performance” problem...
Solutions…
1. There may be a duplex mismatch. • Ensure that the duplex setting on the NIC and the duplex setting on the
NIC’s link partner (hub, switch, etc.) are the same. A duplex mismatch
will result in a faulty network connection and poor performance.
2. There may be cabling issues.
• Badly terminated and damaged cables can cause severe network
performance.
3. Dust particles on fiber optic
networking equipment.
• Dust particles located on the VF-45TM ports of switches and media
converters, and also on the VF-45TM plugs of patch cords, can prevent
light from passing through. This can result in a poor performance
problem. Dust particles can be safely removed from these sensitive
areas by using “HFE-Based Cleaning Fluid” (VOL-0570A), another
3M product.
4. Network congestion and bottle
necking
• Network congestion and bottlenecking can definitely result in poor
network performance.
• More switches and routers may be needed on the network to
resolve this problem
5. Mis-configured or over-burdened • A mis-configured or over-burdened network server can also cause
network server
performance issues on a network
6. Using IPX/SPX as the primary
protocol
• Ensure that IPX/SPX is not the primary protocol being used on a
Windows 98/ME/2K server.
Note: The IPX/SPX throughput of the NDIS5 driver for the
VOL-N100VF+TX NIC is comparable to that of NDIS5 drivers for other
NICs. Throughput is typically about 33% less than when using the TCP/
IP protocol.
11
VOL-N100VF+TX
Recommendations
Recommendation
Reason for the Recommendation
If multiple NICs are needed in the
same PC, multiple
VOL-N100VF+TX NICs should be
used
This will rule out the possibility of a NIC compatibility problem existing
between different types of NICs.
EMI Certification
FCC Class B Certification
This device complies with Part 15 of the FCC Rules. Operation is subject to the following conditions:
1. This device may not cause harmful interference, and
2. This device must accept any interference received, including interference that may cause undesired operation.
Warning! This equipment has been tested and found to comply with the limits for a Class B digital device, pursuant
to Part 15 of the FCC Rules. These limits are designed to provide reasonable protection against harmful
interference in a residential installation. This equipment generates, uses and can radiate radio frequency
energy and, if not installed and used in accordance with the instructions, may cause harmful interference
to radio communications. However, there is no guarantee that interference will not occur in a particular
installation. If this equipment does cause harmful interference to radio or television reception, which can
be determined by turning the equipment off and on, the user is encouraged to try to correct the interference
by one or more of the following measures:
•
•
•
•
Reorient or relocate the receiving antenna.
Increase the distance between the equipment and receiver.
Connect the equipment into an outlet on a circuit different from the one which the receiver is connected to.
Consult the dealer or an experienced radio/TV technician for help.
You are cautioned that changes or modifications not expressly approved by the party responsible for compliance
could void your authority to operate the equipment.
Note: In order to maintain compliance with the limits of a Class B digital device, 3M requires that you use a quality
interface cable when connecting to this device. Changes or modifications not expressly approved by 3M could
void the user's authority to operate this equipment.
12
Specifications
Network Interface
10BASE-T
RJ-45 (UTP cable; Categories 3, 4, 5e or 5)
100BASE-TX
RJ-45 (UTP cable; Category 5e/5)
100BASE-FX
VF-45TM (62.5/125 or 50/125 micron multimode fiber cable)
Bus Interface
32-bit PCI Bus Master
PCI Interrupt Channel
INTA
LED Indicators
Link, Activity, Speed, Duplex/Collision
Size
121.5 x 120 mm (4.8 x 4.7 in.)
Weight
66 g (2.3 oz)
Operating Voltage
3.3 VDC, 330 mA (typical)
400 mA (maximum)
Environmental
Temperature
0 ~ 55 °C / 32 ~131 °F (Standard Operating)
-20 ~ 65 °C / -4 ~ 149 °F (Storage)
Humidity
10 ~ 90% (noncondensing)
Standards Conformance IEEE 802.3, IEEE 802.3u, IEEE 802.3x
PCI bus V 2.2
ACPI
On Now/PC 98, PC99
Wired for Management 2.0
Certification
CE Mark
EN50081-1, EN55022 Class B
EN50082-1, EN 61000-3-2/3,
EN 61000-4-2/3/4/5/6/8/11
Emissions
FCC Class B, CISPR Class B
Safety
UL (U.S. and Canada)
Software Drivers
Released
Microsoft drivers
Windows 98/ME/2000
*Under Development
Microsoft
MS-DOS, Windows NT
Macintosh
8.x, 9.x, 10.x
Novell
3.x, 4.x, 5.x
* The drivers for these operating systems were still under development at the time of printing. Please visit the 3M
Volition Network Solutions website periodically for new released drivers: www.3m.com/volition/
13
3M, Volition, VF-45TM, and the “dot wave” symbol are trademarks of 3M
Important Notice
Before using this product, you must evaluate it and determine if it is suitable for your intended application. You assume all risks and
liability associated with such use.
Warranty; Limited Remedy; Limited Liability
This product will be free from defects in material and manufacture for a period of one year from the date of purchase. 3M MAKES NO
OTHER WARRANTIES INCLUDING, BUT NOT LIMITED TO, ANY IMPLIED WARRANTY OF MERCHANTABILITY OR
FITNESS FOR A PARTICULAR PURPOSE. If this product is defective within the warranty period stated above, your exclusive
remedy shall be, at 3M’s option, to replace or repair the 3M product or refund the purchase price of the 3M product. Except where
prohibited by law, 3M will not be liable for any loss or damage arising from this 3M product, whether direct, indirect, special,
incidental or consequential regardless of the legal theory asserted.
3
Telecommunications
6801 River Place Blvd.
Austin, TX 78726-9000
800/695-0447
www.3m.com/volition/
© 3M IPC 2001