1
Instructions
M80
Mode d’emploi for
de l’appareil
photo numérique
GameSpy
M80
GameSpy
Digital
Camera
THANK YOU for your purchase of the M80 GameSpy Digital Camera. Please
NOUS
VOUS
REMERCIONS
d’avoir
l’appareil
photo have
numérique
GameSpy about
modèlethis
M80.
read this
booklet
before using
theacheté
unit. If
you should
any questions
Veuillez lire le présent livret avant d’utiliser l’appareil. Si vous avez des questions sur ce produit ou sur
product or any other Moultrie product, please contact us using the information on
tout autre produit Moultrie, veuillez nous contacter à l’aide des coordonnées qui figurent à l’arrière de ce
the back
of this
booklet.
Pleasephoto
register
your camera at www.moultriefeeders.com
livret.
Veuillez
inscrire
votre appareil
sur www.moultriefeeders.com
afin d’activer votre garantie.
to activate your warranty.
I
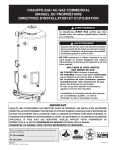
APERÇU DE L’APPAREIL GAMESPY
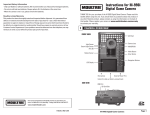
FRONT
VUE DEVIEW
FACE
Flash
LED DEL
Flash
Light
Sensor
Capteur
de lumière
Objectif
Camera
Lens
Voyant DEL
de visée
Aim
LED
ON/OFF/AIM
ON/OFF/AIM
(marche/arrêt/visée)
Touche
Mode
Mode Button
Touche
Enter (entrée)
Enter Button
Touches
de navigation
Navigation
Buttons
Afficheur ACL
LCD
Display
Microphone
Microphone
Port PowerPanel
Power
Panel Port
Unlock
slide-out battery
Verrou
dufor
compartiment
descompartment
piles coulissant
SIDE
VIEW
VUE LATÉRALE
Port USB
Sortie pour la télé
USB Port
TV Out
Fente pour
SD
Card Slot
la carte
SD
Notre service à la clientèle répondra à vos questions avec
plaisir. Composez le 205-664-6700 ou le 800-653-3334,
du lundi au vendredi, entre 8 h et 17 h HNC.
www.moultriefeeders.com
12222010R1/ MFH-DGS-M80
Appareil
photo
numérique
GameSpy
M80
M80
GameSpy
Digital
Camera
I
APERÇU DE L’APPAREIL PHOTO GAMESPY (suite)
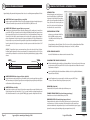
INTERRUPTEUR ON/OFF/AIM (marche/arrêt/visée)
OFF /l’appareil
AIM photo,
SWITCH
IlON
sert à/ allumer
à l’éteindre ou à viser. À la position AIM (visée), le voyant DEL rouge à l’avant de l’appareil
Useds’illuminera.
for turning
On, turning
Aiming
the camera.
When devant
in AIM
position
the
photo
Pour trouver
le centre duOff,
champorangulaire
de l’appareil
photo, tenez-vous
l’appareil,
puis déplacezred vers
LED
lightouonla droite
the front
of thele VOYANT
camera
illuminate.
Tovoyant
helpdevrait
finds’atténuer
the center
field
vous
la gauche
en observant
DELwill
DE VISÉE.
La lumière du
à mesure
que
vous
vous éloignez
du centre
direct.stand
À mesure
quein
vous
vous rapprochez
du centre,and
le voyant
DEL sera
of view
for the
camera,
out
front
of the camera
move
leftplus
or lumineux.
right as you
observe the AIM LED - as you walk away from direct center the LED light will be
TOUCHE
MODE
less bright.
As you walk towards center the LED will appear brighter.
La touche Mode sert à sélectionner les trois modes de l’appareil : réglages de l’appareil, lecture des images ou écran principal.
MODE
BUTTON
Quand
un mode
est sélectionné, les touches HAUT et BAS permettent de naviguer dans les options des menus. La touche Mode
sert
à réactiver
l’appareil
photo Camera
et à allumerSetup
l’afficheur
l’appareil
est enWhen
mode d’camera
économie d’mode
énergie.is selected,
Theaussi
Mode
Button
selects
orquand
Main
Screen.
the UP and DOWN buttons navigate through the menu options. The Mode Button is
TOUCHES
ENTER,
HAUT/BAS
et GAUCHE/DROITE
also used to
wake-up
the camera
and turn on the display when the camera is in a power
La
touche mode.
ENTER (entrée) permet de sélectionner l’élément à modifier. Les touches HAUT/BAS et GAUCHE/DROITE servent
saving
à accéder aux options des menus. En appuyant de nouveau sur la touche ENTER, vous sélectionnez l’option qui apparaît sur
l’afficheur.
La touche
ENTER sert aussi
une photo manuellement.
ENTER,
UP/DOWN
andà prendre
LEFT/RIGHT
BUTTONS
The ENTER button selects the item to be changed. The UP/DOWN and LEFT/RIGHT
LECTURE
DES
IMAGES
buttons are
used
to step through the menu options. Pressing the ENTER button again,
Pour
visionner
les
images,
utilisez les touches
DROITE
ou GAUCHE
pourENTER
passer à la photo
ou vidéo
suivante
ou à to
la photo ou viselects the option indicated
on the
display.
The
button
is also
used
déo précédente. L’afficheur du menu de l’appareil photo indique le numéro de l’image actuellement visionnée. Pour supprimer
manually take a picture.
la photo ou vidéo actuelle, appuyez sur la touche BAS.
BATTERY COMPARTMENT
COMPARTIMENT
DES PILES
The Camera is powered
by four(4) or eight(8) AA size alkaline or lithium batteries.
L’appareil
photo
est alimenté
par quatre
(4) ou
huit (8)
alcalines
au lithium
de format
AA. Poussez
le verroutovers la
Slide the
Unlock
switch
to the
right
andpiles
grab
the ou
small
handle
under
the switch
droite et saisissez la petite poignée sous le verrou pour sortir le compartiment des piles en le faisant glisser.
slide-out the battery compartment tray.
REMARQUE : Pour optimiser la performance de l’appareil, il est recommandé d’utiliser des piles au lithium.
NOTE: It is recommended to use lithium batteries for best performance.
FENTE
POURSLOT
CARTE SD
SD CARD
Elle
accepte
une
carte
dont la SD
mémoire
peutfor
atteindre
32 Go
pourvideo
le stockage
des photos
et desAn
vidéos.
Accepts up to aSD32GB
Card
photo
and
storage.
Note:
SDRemarque
Card : Il faut
qu’une carte SD (vendue séparément) soit installée pour que l’appareil fonctionne.
must be installed for the camera to operate (sold separately).
PORT
USB
USB PORT
En
connectant lestill
câble pictures
fourni, vous and
pourrez
télécharger
photoscomputer
et les vidéos dans
ordinateur. provided cable.
Download
video
ontolesyour
by votre
connecting
POWERPANEL
PORT
PORT
POWERPANEL
IlAccepts
est compatible
avecPowerPanel
l’accessoire PowerPanel
de Moultrie
(vendu
séparément).only.
Consultez
le site to
theseulement
Moultrie
accessory
(sold
separately)
Refer
www.moultriefeeders.com
pour plus d’informations.
www.moultriefeeders.com
for more information.
TV OUT
JACKDE SORTIE POUR LA TÉLÉ
PRISE
DU CÂBLE
View
still
pictures
videos
on séparément),
your TV by
2.5mm
cable
En connectant un
câble vidéoand
de 2,5
mm (vendu
vousconnecting
pourrez visionnera les
photos etvideo
les vidéos
sur votre télé.
(separately).
C
PLOTSTALKER – ENREGISTREMENT
DE FICHIERS
PLOTSTALKER
SAVE FILE
SAVINGDEFILES
OVERVIEWDE FICHIERS
APERÇU
L’ENREGISTREMENT
Utilisez
la fonction
enregistrement
logiciel
Use the
Save d’File
featuresdeoffichier
the du
PlotStalker
PlotStalker
une aseule
photo,photo,
réduire lareduce
taille globale
softwarepour
to créer
create
single
the
du
fichier .mlt,
des.mlt
photosfile,
du début
ou créerunwanted
une vidéo
overall
sizeexclure
of the
exclude
qu’il
sera possible
visionner
moyen ad’un
lecteurthat
multimédia
photos
in thedefront,
oraucreate
video
can
standard.
be viewed using a standard media player.
EXPORTATION D’UNE IMAGE/PHOTO
EXPORTING AN IMAGE/PHOTO
1 À l’écran principal, choisissez l’image/photo de début à l’aide
main screen,
a starting
image/
barrethe
de défilement
dans le choose
bas de l’écran
ou au moyen
1de la On
byimage
using
scroll bar on the
de la photo
fonction(frame)
de recherche
parthe
image.
bottom
of theSAVE
display
or the frame-by-frame
2 Appuyez
sur le bouton
(enregistrer).
search
feature.
3 Choisissez
le bouton
d’option Current Image (*.jpg)
Press
the SAVE button
2(image
actuelle).
Select
the Current
Image
(*.jpg)et radio
43Appuyez
sur Change...
pour saisir
le répertoire
le nom button
Press
to enter
the directory and
pourChange...
l’enregistrement
de l’image.
4de fichier
filename
topour
save
the image
5 Appuyez
sur Export
enregistrer
le fichier.
5
Press Export to save the file
EXPORTATION D’UN FICHIER MLT
EXPORTING MLT FILE
1 Sélectionnez le bouton d’option approprié (vidéo de 50, 100 ou 200 images). Vous créerez ainsi un fichier en
Select
appropriate
video clip
radio button.
1format
MLT quithe
contiendra
l’image de 50,
début100,
suivie or
des 200
50, 100images
ou 200 prochaines
images.
This
will
create
a
MLT
format
file
from
the
starting
frame
plusd’ethe
2 Sélectionnez le bouton Change pour choisir l’emplacement où vous désirez enregistrer le fichier
xportation.
next
50,
100,
or
200
frames.
3 Saisissez le répertoire et le nom de fichier pour l’enregistrement du fichier.
2 Select the Change button to select the desired location to save the export file.
4 Sélectionnez le bouton Export pour enregistrer le fichier. Ces fichiers peuvent être visionnés à l’aide du logiciel PlotStalker.
Enter the directory and filename to save the file
the file. These files are viewable with
Plot
Stalker
Software.
1 Sélectionnez le bouton d’option approprié (vidéo de 50, 100 ou 200 images). Vous créerez ainsi un fichier en format WMV
3
Export
buttonWMV
to save
4 Select the D’UN
EXPORTATION
FICHIER
qui contiendra l’imageWMV
de début FILE
suivie des 50, 100 ou 200 prochaines images.
EXPORTING
2 Sélectionnez le bouton Change pour choisir l’emplacement où vous désirez enregistrer le fichier d’exportation.
Select the appropriate 50, 100, or 200 images video clip radio button. This will
1
3 Saisissez le répertoire et le nom de fichier pour l’enregistrement du fichier.
create a .wmv format file of the starting frame plus the next 50, 100, or 200 frames.
4 Sélectionnez le bouton Export pour enregistrer le fichier. Le programme convertira les images en vidéo selon les réglages
Select the Change button to select the desired location to save the export file.
2
choisis. Un lecteur multimédia standard permet de visionner le fichier .wmv.
3
Enter the directory and filename to save the file
Select
the Export
button to sur
save
theoufile.
The
4 option
Cette
est idéale
pour le téléchargement
Internet
l’envoi
dansprogram
un courriel. will convert the images
to video based on the chosen settings. The .wmv file can be viewed using a
standard media player.
Great for uploading to the internet or emailing.
Page 2
M80 GameSpy
Digital GameSpy
Camera M80
Appareil
photo numérique
PlotStalker
LogicielSoftware
PlotStalker
Page 15
B
B
PLOTSTALKER
– RECHERCHE
D’ACTIVITÉ SEARCH
PLOTSTALKER
ACTIVITY
ACTIVITY SEARCH
RECHERCHE D’ACTIVITÉ
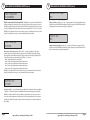
The Search Feature will scan through your photos and automatically
La fonction de recherche parcourra vos photos afin de repérer automatiquement des modifications
look
for changes
dans
les zones
déterminéesinlorsregions
du réglage.that you identify in Setup.
search
mode,
the PlotStalker
PlotStalker
software
.mlt
photo
stops
EnInmode
recherche,
le logiciel
parcourt
le fichier descans
photos through
.mlt, s’arrêtethe
sur une
photo
quandfile,
la région
déterminée
on a photo
when changes
are
in your
identified
and then
comporte
des changements,
puis montre
cesfound
changements
en bleu.
Vous pouvezregion,
cliquer n’importe
où danshighlights
la zone de
visionnement
vidéoin
pour
supprimer
marques
bleues.
the changes
blue.
Youlescan
click
anywhere in the video viewing area to remove
the blue highlights.
RÉGLAGE DE LA
RECHERCHE D’ACTIVITÉ
ACTIVITY
SETUP
Cliquez
sur le boutonSEARCH
Settings (réglages)
pour
Clicklesthe
Settings
to activate
activer
réglages
de zonebutton
et de sensibilité
pour
lathe
recherche
d’activité.
Region
and Sensitivity settings
for the Activity Search
DEFINE SEARCH REGION
DÉFINITION
LA ZONE
Provides theDE
ability
to search for
DE RECHERCHE
changes in the photo in a specific
Cette fonction permet de chercher sur la photo les
region rather than the entire photo.
changements dans une zone précise plutôt que dans
toute la photo.
1 Cliquez sur le bouton Set Motion Search Area (définir la zone de recherche de mouvement).
Set Motion
Search
Arearouge
Button.
1 Click
2 Utilisez
la sourison
pourthe
sélectionner
et faire glisser
le contour
autour de la zone où vous désirez rechercher du
mouvement. Vous pouvez ainsi concentrer la recherche sur une zone très précise, au besoin.
mouse
select
and drag
the(réglages)
red outline
aroundvosthe
areaetyou
to
2 Use
3 Cliquez
sur lethe
bouton
OK de latofenêtre
contextuelle
Settings
pour confirmer
réglages
quitterwant
le menu.
search for movement. This allows you to focus on a very precise area if
required.
SENSIBILITÉ
1 Réglez la sensibilité à High, Medium ou Low (haute, moyenne ou faible) afin de régler le degré de changement de pixels
que
détecter.on
Remarque
: Un changement
de pixel
surviendra
d’un changement
de couleur,and
d’intensité
Click OKdoitbutton
the Settings
Popup
window
to lors
confirm
your settings
3 le programme
ou d’éclairage
ou lors
d’un mouvement. Ce réglage est donc crucial afin d’obtenir les résultats désirés.
exit the
menu.
RÉGLAGES
PAR DÉFAUT
SENSITIVITY
1 Cliquez sur le bouton Default (par défaut) pour revenir aux valeurs par défaut des réglages de zone de recherche et
Set to High, Medium or Low - This sets the level of pixel change the program
1
de
sensibilité.
will detect. Note; a pixel change will occur with a color, intensity, lighting or
movement so this setting is critical to obtain the desired results.
DEFAULT SETTINGS
Click on Default button to return to the default values for Search Area and
1
Sensitivity settings
Page 14
PlotStalker
Software
Logiciel
PlotStalker
II
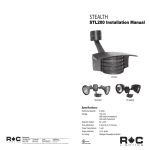
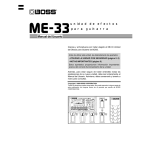
INSTRUCTIONS DE DÉMARRAGE RAPIDE
Slide the UNLOCK switch on the bottom of Camera and use the knob to pull
Glissez le VERROU, situé sous l’appareil photo, puis utilisez la poignée pour tirer le compartiment des piles coulissant.
1 the
slide-out
Install
four(4)
orformat
eight(8)
AA sizelesalkaline
or
Installez
quatre (4)Battery
ou huit (8)Tray.
piles alcalines
ou au
lithium de
AA en respectant
polarités indiquées
dans le
compartiment
des piles.with
Remettez
le compartiment
des piles. in the Battery Tray. Re-install the
lithium
batteries
polarities
as indicated
Battery Tray.
Faites passer la courroie de fixation fournie à travers les œillets au dos de l’appareil photo, puis fixez l’appareil à un
2 Thread
provided
Mounting
arbre ou àthe
un poteau,
à environ
90 cm du sol,Strap
comme through
illustré. the Eyelets on the back of the
3
camera and secure to a tree or pole approximately 36" from the ground as
Mettez l’appareil photo sous tension en faisant glisser l’interrupteur
shown.
ON/OFF/AIM à la position ON.
Turn
Camera on by sliding ON/OFF/AIM switch to
the ON position.
Œillet
Eyelet
Appuyez sur la touche MODE une fois pour accéder au menu des réglages
4 Press
de l’appareil
Réglez
l’heure et
la date
en appuyant
sur ENTER;
the photo.
MODE
button
one
time
to get to
the utilisez
5
les touchesSetup
HAUT/BAS
pour régler
champ sélectionné,
Camera
Menu.
SetleTime
and DateGAUCHE/DROITE
by pressingpour
accéder au prochain champ, puis ENTER quand vous avez fini.
ENTER, using UP/DOWN to adjust selected field,
LEFT/RIGHT to move to the next field and ENTER
Appuyez sur la touche MODE jusqu’à ce que l’écran MENU SELECTION
when
done.
(sélection
des menus) soit affiché. Utilisez les touches HAUT/BAS jusqu’à
6
ce que l’MODE
option MAINbutton
SCREEN (écran
surlignée en jaune.
Press
untilprincipal)
MENUsoitSELECTION
Appuyez sur ENTER.
screen is displayed. Use the UP/DOWN buttons
until the MAIN SCREEN option is highlighted
Votre appareil photo prendra maintenant des photos automatiquement
yellow.
PressunENTER.
dès qu’il détectera
animal dans son champ de vision, selon les réglages
III
Mounting
Courroie
de fixation
Strap
par défaut
indiquéswill
ci-dessous.
Your
Camera
now automatically take pictures
whenever an animal is detected in range -based on
the default settings below.
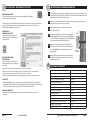
RÉGLAGES PAR DÉFAUT
Capture Mode (mode d’enregistrement)
TRAIL CAM (photos)
Photo Quality (qualité d’image photo)
HIGH (élevée)
Photo Quality
Multi Shot Count (compteur de prises multiples)
Photo Delay after each photo is taken
1-SHOT (1 prise)
Capture
Mode
Photo
Delay (délai
après la prise d’une photo)
Video Resolution (résolution des vidéos)
Multi Shot Count
Video length (longueur des vidéos)
Digital Zoom
Video Audio (son des vidéos)
Video Resolution
Camera Name (nom de l’appareil photo)
Video Length
Temperature
(température)
Video Audio
TRAIL CAM (Still)
1 MIN
HIGH
1 MIN
HIGH (élevée)
Strip
photos
PlotInfo
Duration
(duréeprinted
des priseson
de photos
vue par vue)
1-SHOT
NO ZOOM
ON (activé)
HIGH
MYCAMERA
5 SEC
Fahrenheit
ON
ONMYCAMERA
(activée)
15 Fahrenheit
SECONDS
ON(3 heures)
3 HOUR
PlotSetting
Frequency
Default
(réglages par défaut)
NO15
(non)SECONDS
Plot
Delete
All?Duration
(Tout supprimer?)
HOUR
NO3(non)
InfoCamera
Strip (bandeName
d’informations imprimée sur les photos)
PlotTemperature
Frequency (fréquence de prises de photos vue par vue)
Default Setting
Delete All?
5 SEC
NO
NO
M80 GameSpy
DigitalGameSpy
Camera M80
Appareil
photo numérique
Page 3
The GameSpy offers four capture modes as described below. The default capture
mode is Trail Cam.
IV
MODES D’ENREGISTREMENT
CAPTURE
MODES
TRAIL CAM MODE
The GameSpy
offers
four capture
asisdescribed
below.
The default
capture
Still
photos
are taken
anmodes
animal
detected.
The
number
of
L’appareil
GameSpy
offre quatre
modes d’when
enregistrement,
décrits ci-dessous.
Le mode
d’enregistrement
parphotos
défaut esttaken
Trail Cam.
modewhen
is Trail
Cam.
an animal is detected is configurable in Settings. Photos are stored in
the in the DCIM/100_MDGC folder on the SD card.
MODE
TRAIL
(mode
appareil photo pour gibier)
TRAIL
CAM
MODE
PLOT
CAM
Des
photos
sont
prises
quand
un when
animal est
Les réglages
permettent
de configurer
nombre
de photos
prises
Still
photos
areMODE
taken
andétecté.
animal
is detected.
The
numberle of
photos
taken
àThe
la détection
d’untakes
animal.
Les
photosat
sont
dans leinterval
dossier
DCIM/100_MDGC
de la carte
camera
a stockées
specified
during the
day
and
combines
when
an animal
isphotos
detected
is
configurable
in Settings.
Photos
are SD.
stored
in
them
to create a Plot Video
file)
which can be viewed on the
the intogether
the DCIM/100_MDGC
folder (*.MLT
on the SD
card.
MODE
PLOT
CAM (mode
appareil
photo vue
vue) takes a Plot Video twice
supplied
Moultrie
Plot Stalker
software.
Thepar
camera
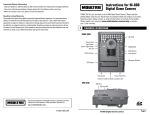
Pendant la journée, l’appareil prend des photos à intervalles déterminés, puis il les combine pour créer une vidéo vue
aPLOT
day; once
inMODE
the morning and once in the evening. The morning Plot Video
CAM
par vue (fichier *.MLT), que vous pouvez visionner à l’aide du logiciel PlotStalker de Moultrie fourni. L’appareil crée une
begins
30 min
before sunrise.
The evening
Plot during
Video ends
30 and
min after
The
camera
takes
at afoisspecified
interval
day
vidéo vue par vue deux foisphotos
par jour : une
le matin et une
fois le soir.
La vidéothe
du matin
démarrecombines
30 minutes avant
sunset.
See
chart
below
as
a
reference.
The
length
of
each
Plot
Video
ison
them
together
to
create
a
Plot
Video
(*.MLT
file)
which
can
be
theles
le lever du soleil. La vidéo du soir se termine 30 minutes après le coucher du soleil. Le graphiqueviewed
ci-dessous
illustre
determined
by the Plot
Duration
setting
in
theest
camera
menu.
TheVideo
camera
will
supplied
Moultrie
Stalker
software.
The
camera
takes
Plot
twice
périodes
d’enregistrement.
La durée
de chaque
vidéo
vue par
vue
déterminée
par lea réglage
Plot
duration
(durée
detect
correct
sunrise
and
times
adjustPlot
itself
des
prises the
de photos
vue) du menu
deonce
l’appareil
L’appareil détectera
automatiquement
les
heures du
a day;
once
in vue
thepar
morning
andsunset
inphoto.
the automatically
evening.
Theand
morning
Video
accordingly.
The
Plot
Videos
invidéos
:/PLOT
themin
SD
card.
lever
et du 30
coucher
du
soleil,
et s’ajustera
en are
conséquence.
Les
parfolder
vueends
sonton
stockées
dansafter
le
dossier : /PLOT
begins
min
before
sunrise.
Thestored
evening
Plotvue
Video
30
de
la carte SD.
sunset.
See chart below as a reference. The length of each Plot Video is
IMPORTANT:
It Plot
will take
the camera
properly
adjust
to camera
the correct
determined by the
Duration
setting24hrs
in thetocamera
menu.
The
will
IMPORTANT
: L’appareil
photo
s’ajustera
correctement
aux
du lever
et du
coucher
dumorning
soleil aprèsPlot
24 heures.
sunrise
and
sunset
times.
As
defaulttimes
theheures
camera
will
start
theadjust
detect the
correct
sunrise
andasunset
automatically
and
itself
Par défaut, l’appareil commencera la vidéo vue par vue du matin à 5 h 30 et terminera la vidéo du soir à 18 h 30. Pour
Video
at 5:30am
the evening
video
at 6:30pm.
Toon
reset
accordingly.
The and
Plotend
Videos
are stored
in :/PLOT
folder
the the
SD sunrise
card.
revenir aux heures par défaut du lever et du coucher du soleil, utilisez l’option Default Settings (réglages par défaut)
and sunset times back to the default times, use the Default Settings option in
du menu.
the
menu.
IMPORTANT:
It will take the camera 24hrs to properly adjust to the correct
30 minutes
30 minutes
sunrise
and sunset times. As a default the camera will start the morning
Plot
Lever duand
soleil end the evening video at 6:30pm. To
Coucher
du soleil
Video at 5:30am
reset
the sunrise
and sunset times back to the default times, use the Default Settings option in
the menu.
1
2
{
{
Vidéo
vue par
vueVideo
du matin
Morning
Plot
Vidéo
vue par
vueVideo
du soir
Evening
Plot
{
{
HYBRID CAM MODE
Camera
operates
in (mode
Plot Cam
modephoto
duringhybride)
the day and Trail Cam Mode during
MODE
HYBRID
CAM
appareil
the night.
Thirty
minutes
camera
will Evening
enter
the
Trail
Campour
mode
Morning
Plotappareil
Videoafter
Plot
Videophoto
L’appareil
fonctionne
en mode
photodusk
vue parthe
vue durant
la journée
et
en mode
appareil
gibier la
andTrente
takeminutes
nightaprès
photos
whenl’appareil
the PIR
sensor
is triggered.
nuit.
le crépuscule,
passera
au mode
appareil photo pour gibier et prendra des photos
au
déclenchement
du détecteur
infrarouge passif.
CAM
MODE
HYBRID
VIDEO operates
MODE in Plot Cam mode during the day and Trail Cam Mode during
4 Camera
MODE
VIDEO
(mode
vidéo)
Camera
records
aminutes
video
when
animal
is detected
thethe
motion
night.
Thirty
after an
dusk
the camera
will by
enter
Trail sensor.
Cam mode
the
L’appareil
photo
enregistre
une
le détecteur
de mouvement
Pendant la in
journée,
During
hoursvidéo
the lorsque
camera
will
record
a videodétecte
5, 15unoranimal.
30 seconds
and
takedaylight
night photos
when
the PIR
sensor
is triggered.
l’appareil enregistrera une vidéo d’une durée de 5, 15 ou 30 secondes. Pendant la nuit, l’appareil enregistrera une
length. During night the camera will record a video with a maximum length
vidéo d’une durée maximale de 10 secondes. L’option SETTINGS (réglages) permet de configurer la durée de la vidéo.
The video length is configurable in SETTINGS.
VIDEO
MODE
4 of 10 seconds.
Camera records a video when an animal is detected by the motion sensor.
During daylight hours the camera will record a video 5, 15 or 30 seconds in
length. During night the camera will record a video with a maximum length
Page 4 of 10 seconds. The video length is configurable in SETTINGS.
3
4
M100 GameSpy Digital Camera
Page 4
Appareil
numérique
M100 photo
GameSpy
DigitalGameSpy
Camera M80
INTRODUCTION
In time-lapse photography a series
PLOTSTALKER
–SOFTWARE
INTRODUCTION INTRO
PLOTSTALKER
of still LOGICIEL
photos
are taken
at regular
time intervals. The PlotStalker
Software
allows you to load the
INTRODUCTION
INTRODUCTION
time
lapse filephotography
that
captured
En
unewas
série de
photos
sont
Inchronophotographie,
time-lapse
a series
from
your
Moultrie
Game
Camera
prises
à intervalles
réguliers.
Le
logiciel
PlotStalker
of still
photos
are taken
at regular
vous
debackward
charger
le fichier
de chronophotogand
scroll
and
forward
timepermet
intervals.
The
PlotStalker
raphie
créé par
votrephotos,
appareil
Moultrie
through
your
single
step,
Software
allows
youphoto
to
load
thepour la
chasse,
et
de
faire
reculer
et
avancer
les
photos,
search
for activity
a designated
time lapse
file that in
was
captured une
photo
à
la
fois,
de
rechercher
de
l’activité
dans une
area,
the files.
from and
yoursave
Moultrie
Game Camera
zone déterminée et de conserver les fichiers.
and scroll backward
and forward
SYSTEM
REQUIREMENTS
through
your
photos,
single step,
CONFIGURATION SYSTÈME
Computer:
Intel®
Pentium® 4 or AMD Athlon® 64 processor or above; 1GB
>
search
for
activity
in
a
designated
Ordinateur
: processeur
Pentium®
4 d’Intel®
RAM
minimum;
100
MB ou
hard disk space minimum.
area,
and64save
the
files. au moins
Athlon®
d’AMD,
ou
supérieur;
Operating
System:
Microsoft®
Windows® 32 bit - XP with Service Pack 2 or
>
1 Go de RAM;REQUIREMENTS
au moins 100 Mo d’espace libre
SYSTEM
later; Windows Vista® Home Premium, Business, Ultimate, or Enterprise with
sur le disque dur.
Service Pack
1; or Pentium®
Windows 74 or AMD Athlon® 64 processor or above; 1GB
Computer:
Intel®
>
RAM
minimum;
100Windows®
MB hard
space
minimum.
Système
d’exploitation
: Microsoft®
32 bitdisk
- XP avec
Service
Pack 2 ou ultérieur; Windows Vista® Édition
SOFTWARE
INSTALLATION
Operating
System: Microsoft®
Windows®
bit Pack
- XP
Service Pack 2 or
Premium, Professionnel,
Édition Intégrale ou
Entreprise avec32
Service
1; ouwith
Windows
> Familiale
>
Insert
the PlotStalker
CDHome
into your
computer
and follow
on-screen
instructions.
later; Windows
Vista®
Premium,
Business,
Ultimate,
or Enterprise
with
Service Pack
1; or Windows 7
INSTALLATION
DU
LOGICIEL
LOADING PLOT FILES
Insérez le CD PlotStalker dans votre ordinateur et suivez les instructions à l’écran.
SOFTWARE
INSTALLATION
Using standard
Microsoft utilities (ex. File Explorer – My Computer),
1
copy the
(extension
.MLT)
from the
oninstructions.
the
>
Insert
thePlotFiles
PlotStalker
CD intoisyour
computer
andPLOT
followdirectory
on-screen
CHARGEMENT
FICHIERS
VUEdrive
PAR VUE
SD card DE
to the
hard disk
in your computer. Note the location stored
LOADING
PLOT
FILES
ondesthe
hardMicrosoft
disk
drive.
1 À l’aide
utilitaires
standards (par ex., Explorateur Windows – Poste de travail), copiez les fichiers vue par
2
Open
the
PlotStalker
software
the
Start
Button
Using
standard
utilities
(ex.SDFile
Explorer
–votre
Myordinateur.
Computer),
extension
est .MLT)Microsoft
du répertoire
PLOT
deapplication
la carte
sur lefrom
disque
dur deWindows
Prenez
note de
1vue (leur
menu.the
Once
in the
PlotStalkerissoftware,
clickthe
onPLOT
the File
Button on the
l’emplacement
sur PlotFiles
le disque
dur. (extension
copy
.MLT) from
directory
3
Browse
which
saved the
Plot
SD
card to
to the
the location
hard diskindrive
inyou
yourhave
computer.
Note
thefile(s)
location stored
le logiciel
PlotStalker
l’aide du menu
Démarrer
de Windows.
Une foisand
le logiciel
PlotStalker
(.MLT)
in
step
above,
select
the file
of interest
click
Open.démarré,
2 Ouvrez
on
the hard
disk1àdrive.
cliquez
sur
le
bouton
File
(fichier).
2
Open the PlotStalker software application from the Windows Start Button
menu. Once in the PlotStalker software, click on the File Button
BEGIN/END
3 Accédez à l’emplacement où vous avez enregistré le ou les fichiers vue par vue (.MLT) à l’étape
3 to
Browse
thelast
location
in which
have saved the Plot file(s)
Goes
theSélectionnez
firsttoor
photo
thecliquez
Plotyou
File.
1 ci-dessus.
le fichier
désiré, puis
sur
Open (ouvrir).
(.MLT) in step 1 above, select the file of interest and click Open.
FRAME BY FRAME SEARCH
Individually step forward or backward through each photo.
BEGIN/END
BEGIN/END (début/fin)
Permettent
d’accéder
ou dernière
photoPlot
du fichier
Goes
to the
firstà laorpremière
last photo
in the
File.vue par vue.
REWIND/PAUSE/PLAY
A
Play photos
inFRAME
sequence,SEARCH
pause, or play the photos in reverse order.
FRAME
FRAME BYBY
FRAME
SEARCH (recherche image par image)
These
functions
simulate
aorvideo
are
for manually
Permet d’avancer ou
de reculer
en faisant
défiler and
une photo
àuseful
la fois. each
Individually
step
forward
backward
through
photo. searching
changes in the photos. When a sequence is being played, press
fast-forward
or fast-rewind
multiple times to increase speed. (1x-5x)
REWIND/PAUSE/PLAY
REWIND/PAUSE/PLAY
(rembobinage/pause/lecture)
Permettent
de
visionner
les
photos
en
les
faisant
fairephotos
une pauseinoureverse
de visionner
les photos
Play photos in sequence, pause,
orreculer,
playdethe
order.
en
les
faisant
avancer.
Ces
fonctions
correspondent
à
celles
d’un
magnétoscope.
Elles
sont
utiles
pour
These functions simulate a video and are useful for manually searching
PlotStalker
Software
rechercher
manuellement
des
changements
sur
les
photos.
Lors
du
visionnement
d’une
séquence,
appuyez
changes in the photos. When a sequence is being played, press
plusieurs
fois
sur
avance
rapide
ou
rembobinage
rapide
pour
augmenter
la
vitesse
(1x-5x).
fast-forward or fast-rewind multiple times to increase speed. (1x-5x)
Logiciel PlotStalker
PlotStalker
Software
Page 13
Page 13
Photo Quality
Photo
Quality
LOW
X 832
(1.3MP)
CARACTÉRISTIQUES
TECHNIQUES DE L’APPAREIL1480
PHOTO
GAMESPY
Photo
LOW Quality
1480 xX1040
832 (1.3MP)
MEDIUM
1848
(3.2 MP)
LOW
1480
X
832 (1.3MP)
MEDIUM
1848 x
x 1472
1040
(3.2 MP)
MP)
HIGH
2616
(4.0
Photo
Quality
MEDIUM
1848
1040
(3.2
Qualité
d’image
photo
HIGH
2616 xx 1824
1472 (6.0
(4.0 MP)
MP)
ENHANCED
3248
LOW
1480
X
832
(1.3MP)
HIGH
2616
x
1472
(4.0
MP)
ENHANCED
3248
x
1824
(6.0
MP)
Video
LOW
(faible)Quality
744 x 416
MEDIUM
1848
x
1040
(3.2
MP)
ENHANCED
3248
x
1824
(6.0
MP)
Video(moyenne)
Quality
HIGH
720x 832
x 400
@ 24fps
MEDIUM
1480
(1,3 Mpx)
HIGH
2616
1472
MP)
Video
HIGH Quality
720 xxx192
400
@(4.0
24fps
LOW
352
@
24fps
HIGH
(élevée)
2368
x 1328
(3,2 Mpx)
ENHANCED
3248
x
1824
(6.0
MP)
HIGH
720
x
400
@
24fps
LOW
352 x 192 @ 24fps
Approximate
photos stored 1GB SD card
ENHANCED
(améliorée)
2984
x
1680
(5,0
Mpx)
Video
Quality
LOW
352
x
192
@
24fps
Approximate photos stored 1GB SD card
3779
HIGH
720
x 400 @ 24fps
Approximate
photos stored 1GB SD card
Qualité
LOWd’image vidéo
3779
MEDIUM
1784
LOW
352
x 192 @ 24fps
LOW
3779
MEDIUM
1784
HIGH
890
HIGH
(élevée)
720
x 400 @ 24 images par seconde
Approximate
photos
stored
1GB
SD
card
MEDIUM
1784
HIGH
890
ENHANCED
578
LOW
(faible)
352
x 192 @ 24 images par seconde
LOW
3779
HIGH
890
ENHANCED video time stored 1GB SD card
578
Approximate
Nombre
approximatif de photos que peut stocker une carte SD de 1 Go
MEDIUM
1784
ENHANCED
578
Approximate video time stored 1GB SD card
HIGH
20min
HIGH
890
LOW
(faible)
12500
Approximate
video time stored 1GB SD card
HIGH
20min
LOW
60min
ENHANCED
578
HIGH
20min
MEDIUM
2600
LOW(moyenne)
60min
32
GB Max
Optional
SD Memory Card
Approximate
video
time
stored
1GB
SD
card
LOW
60min
32
GB Max
Optional
SD
Memory
Card
55
Optical
Field
of
View
HIGH (élevée)
1100 degrees
HIGH
20min
32
GB
Max
Optional
SD
Memory
Card
55
degrees
Optical
Field
of
View
Alkaline
AA-cells
Batteries
ENHANCED
(améliorée)
800
LOW
60min
55
degrees
Optical
Field
of
View
Alkaline
AA-cells
Batteries
45 +/-5 feet
Approximate
Detection Range
Durée
approximative
des vidéosCard
que peut stocker une carte SD de 1 Go
32
GB
Max
Optional
SD
Memory
Alkaline
AA-cells
Batteries
45 +/-5 feet
Approximate Detection Range
HIGH
(élevée)Field of
2055
mindegrees
Optical
View Range
45
+/-5 feet
Approximate
Detection
Alkaline
AA-cells
Batteries
LOW (faible)
60 min
45
+/-5
feet
Approximate
Detection
Range
Carte mémoire SD en option
32 Go max
VII
Champ angulaire
55 degrés
Piles
Piles alcalines AA
Portée de détection approximative
13,7 m +/- 1,5 m
Page 12
Page 12
Page 12
Page 12
M80 GameSpy Digital Camera
M80 GameSpy Digital Camera
M80 GameSpy Digital Camera
M80 GameSpy
Digital GameSpy
Camera M80
Appareil
photo numérique
V
Setup Menu - The UP/DOWN buttons are used to navigate through the available
Setup
Menu
- The
buttons
used
to navigate
through
theselects
available
setting
choices.
UP/DOWN
moves
toPHOTO
theare
next
menu
item, and
ENTER
the
RÉGLAGES
DEUP/DOWN
L’APPAREIL
Setup
- The
UP/DOWN
buttons
arenext
used
toavailable
navigate
the
available
setting
choices.
UP/DOWN
moves
tochoices
the
menu
item, and
ENTER
the
item
toMenu
be
changed.
Additional
menu
are
bythrough
hitting
theselects
setting
UP/DOWN
moves
to the
next
menu
and
ENTERthe
selects the
item tochoices.
be changed.
Additional
menu
choices
are
available
by hitting
UP/DOWN
button
when
either
the
first/last
option
isitem,
highlighted.
Menu
des
réglages
– Les UP/DOWN
touches
HAUT/BAS
servent
à naviguer
dans
réglages
disponibles;
ellesthe
permettent
Setup
- The
are used
navigate
through
available
item
toMenu
be
changed.
Additional
menu
choices
aretoles
available
by
hitting
the
UP/DOWN
button
when
eitherbuttons
the
first/last
option
is highlighted.
d’accéder
au
prochain
élément
du
menu.
La
touche
ENTER
permet
de
sélectionner
l’
é
lément
à
modifier.
D’autres choix
setting
choices.
UP/DOWN
moves
the next
menuisitem,
and ENTER selects
the
UP/DOWN
button
when either
the to
first/last
option
highlighted.
deSETUP
menu
si vousAdditional
appuyez sur lesmenu
touches HAUT/BAS
la première ouby
la dernière
item
to apparaîtront
be changed.
choicesquand
are available
hittingoption
the est surlignée.
DATE/TIME
SETUPbutton
DATE/TIME
UP/DOWN
when
either the first/last option is highlighted.
MM.DD/YY
HH:MMAM
SETUP
DATE/TIME
MM.DD/YY
HH:MMAM
MM.DD/YY
HH:MMAM
Date/Time
- Set Date
/Time - on the SETUP DATE/TIME screen, use the
SETUP DATE/TIME
Date/Time -buttons
Set Date
/Time - the
on the
SETUP
DATE/TIME
screen,
usetothe
UP/DOWN
to modify
month.
Press
LEFT/RIGHT
buttons
move to
Heure/date
– Pour
régler
laHH:MMAM
date
etENTER
l’heure
àthe
l’ébutton
cran
SETUP
DATE/TIME
(réglage
date/heure),
appuyez
sur
lesmove
MM.DD/YY
Date/Time
-buttons
Set
Date
- on
the
SETUP
DATE/TIME
screen,
useThe
the
UP/DOWN
to/Time
modify
month.
Press
buttons
to
the
next field.
Press
the
again
to LEFT/RIGHT
save
your
selections.
Time to
touches HAUT/BASbuttons
pour changer
mois. Appuyez
sur les touches
GAUCHE/DROITE
passer
au champtosuivant.
UP/DOWN
thebutton
month.
Press
LEFT/RIGHT
buttons
move
the next
Press to
thelemodify
ENTER
again
to
saveisyour
selections.
The
Timeto
and
Datefield.
is retained
between
battery
changes.
Time
notpour
automatically
adjusted
Appuyez de nouveau
surDate
la touche
ENTER pour
enregistrer
vos sélections.
L’heure et la date
sont conservées
entre
Date/Time
Set
/Time
on
the
SETUP
DATE/TIME
screen,
use
the
the
next
field.
Press
the
ENTER
button
again
to
save
your
selections.
The
Time
anddaylight
Date is retained
for
savings. between battery changes. Time is not automatically adjusted
chaque changement de piles. L’heure ne sera pas automatiquement modifiée lors des passages à l’heure avancée et
UP/DOWN
buttons
to modify the month. Press LEFT/RIGHT buttons to move to
and
Date
is
retained
for
daylight
à l’heure normale. savings.between battery changes. Time is not automatically adjusted
the
field.savings.
Press the ENTER button again to save your selections. The Time
for next
daylight
and
Date is retained
between battery changes. Time is not automatically adjusted
CAPTURE
MODE
forCAPTURE
daylight savings.
MODE
TRAIL
CAM
CAPTURE
TRAIL CAMMODE
TRAILMode
CAM
Capture
- (default Trail Cam) Press the UP/DOWN buttons to highlight
CAPTURE
MODE
Mode
d’enregistrement
(par défaut
:ENTER
TrailCam)
cam, c.-à-d.
appareil
photo
gibier)
– Appuyez
sur
Capture
Press
thesave
UP/DOWN
buttons
to highlight
the
desiredMode
mode.- (default
Press
theTrail
button
to
thepour
mode
and
return
tolesthe
touches
HAUT/BAS
pour-surligner
le mode
désiré.
Appuyez
sur lathe
touche
ENTER pour enregistrer
le mode
et retourner
TRAIL
CAM
Capture
Mode
(default
Trail
Cam)
Press
UP/DOWN
buttons
to
highlight
the desired
mode.
Press
the are
ENTER
button tomode
savesettings
the mode
and return
to the
Camera
Setup
Menu.
There
four capture
–TRAIL
CAM,
PLOT
au menu des réglages de l’appareil photo. L’appareil offre quatre modes d’enregistrement : TRAIL CAM (appareil
the
desired
mode.
Press
theVIDEO.
ENTER
button
save
the
mode–TRAIL
and return
to the
Camera
Setup
Menu.
There
are fourRefer
capture
mode
settings
CAM,
PLOT
CAM,
HYBRID
CAM
or
to to
the
CAPTURE
MODE
section
of
this
photo pour gibier), PLOT CAM (appareil photo vue par vue), HYBRID CAM (appareil photo hybride) et VIDEO. Consultez
Capture
Mode
(default
Trail
Cam)
Press
the
UP/DOWN
buttons
to
highlight
Camera
Setup
Menu.
There
are
four
capture
mode
settings
–TRAIL
CAM,
PLOT
CAM,
HYBRID
CAM
or
VIDEO.
Refer
to
the
CAPTURE
MODE
section
of
this
manual
for
details.
la section MODE D’ENREGISTREMENT du présent mode d’emploi pour de plus amples renseignements.
the
desired
Press or
theVIDEO.
ENTERRefer
buttontotothe
save
the modeMODE
and return
to the
CAM,
HYBRID
CAM
CAPTURE
section
of this
manual
formode.
details.
Camera
Menu. There are four capture mode settings –TRAIL CAM, PLOT
manual Setup
for details.
PHOTO
QUALITY
CAM,
HYBRID
CAM or VIDEO. Refer to the CAPTURE MODE section of this
PHOTO
QUALITY
manual
for
details.
HIGH
PHOTO
HIGH QUALITY
HIGH
Qualité
d’image
(par- défaut
: High,
c.-à-d.-The
élevée)
– Pour les
commeofpour
vidéos, plus la qualité
Photo
Quality
(default
High)
higher
thephotos
quality
thelesphoto/image
the
PHOTO
QUALITY
d’image
estQuality
élevée, plus
la(default
quantité deHigh)
mémoire
utiliséehigher
est grande.
Parquality
contre,
si of
la qualité
d’image
est élevée,the
alors
Photomemory
-The
the
thehave
photo/image
more
it-consumes.
However,
higher
quality
images
higher
les
images
ont une
résolution
plus haute
et sont
donc
plus
claires,
en
particulier
siofle zoom
est utilisé.
Il existe
quatreare
HIGH
Photo
Quality
-The
higher
the
quality
the
photo/image
the
more
memory
it- (default
consumes.
However,
higher
quality
images
have
higher
resolution
which
results
inHigh)
clearer
images
-especially
when
zooming
in.
There
réglages
de qualité
d’image
pour lesin
photos
: LOW-ENHANCED,
(faible),
MEDIUM
(moyenne),
HIGH
(élevée)
ENHANCED
(améliorée).
more
memory
it consumes.
However,
higher
quality
images
haveethigher
resolution
which
results
clearer
images
-especially
when
zooming
in. There
are
four
photo/image
quality
settings
HIGH,
MEDIUM,
and
LOW.
Appuyez
sur
les
touches
HAUT/BAS
pour
surligner
le
réglage
désiré.
Appuyez
sur
la
touche
ENTER
pour
enregistrer
Photo
Quality
- (default
High)
higherthe
thedesired
quality
of MEDIUM,
thezooming
photo/image
the leare
resolution
which
results
in
clearer
images
-especially
when
in.
There
four photo/image
quality
settings
-ENHANCED,
HIGH,
and
LOW.
Press
the
UP/DOWN
buttons
to-The
highlight
setting.
Press the
ENTER
réglage et retourner au menu des réglages de l’appareil photo. La section CARACTÉRISTIQUES TECHNIQUES du présent
more
memory
itthe
consumes.
However,
higher
quality
images
have
higher
four
quality
settings
-ENHANCED,
HIGH,
MEDIUM,
and
LOW.
Pressd’photo/image
UP/DOWN
buttons
to
highlight
setting.
Press
the
button
to save
setting
and
return
to
the the
Camera
Setup
Menu.
Refer
toENTER
mode
ethe
mploi
indique
le nombre
d’images
stockées
en fonction
dedesired
la qualité
d’image.
resolution
whichtheresults
inand
clearer
images
when
zooming
There are
Press
buttons
highlight
the
desired
setting.
Press
the
ENTER
buttonthe
to UP/DOWN
save
setting
return
to the-especially
Camera
Setup
Refer
to
SPECIFICATIONS
section
ofto
this
document
for
details
onMenu.
number
ofin.images
four
photo/image
quality
settings
-ENHANCED,
andto
LOW.
button
to saveonthe
setting
andofreturn
to the Camera
SetupMEDIUM,
Menu.
Refer
SPECIFICATIONS
section
this
document
for HIGH,
details
on
number
of
images
stored
based
Photo
Quality.
PHOTO
DELAY
Press
UP/DOWN
buttons
highlight
the desired
setting.
Press the
ENTER
SPECIFICATIONS
section
oftothis
document
for details
on number
of images
storedthe
based
on Photo
Quality.
button
to
saveon
thePhoto
setting
and return to the Camera Setup Menu. Refer to
1 MIN
stored
based
Quality.
SPECIFICATIONS section of this document for details on number of images
Photo
Delayon- (default
1 minute)
-The
delay determines
the
number
of
stored
based
Photo
Quality.
Délai
d’enregistrement
(par défaut
: 1 minute)
– Lephoto
délai d’enregistrement
détermine le
nombre
de minutes
minutes
whenestandétecté
animal
detected
remains
range.
entre
chaquebetween
prise d’imagepictures
lorsqu’un animal
et qu’ilisdemeure
dans and
le champ
de visionin
de l’appareil.
Pour
changer le délai,
appuyeztime,
sur les touches
afin de surligner
le réglage
Appuyezthe
sur ladesired
touche
To change
the delay
pressHAUT/BAS
the UP/DOWN
buttons
todésiré.
highlight
ENTER
pour Press
enregistrer
réglage
et retourner
auto
menu
des
réglages
de
l’appareil
choix
de menu
setting.
thele ENTER
button
save
the
setting
and photo.
returnD’autres
to the
Camera
Setup
M80
GameSpy
Digital
Camera
Page
5
apparaîtront
si vous appuyez
surM80
les choices
touches
HAUT/BAS
quand
la première
ou la dernière
option est surlignée.
Le délai5
Menu. Additional
menu
are available
byCamera
hitting
the UP/DOWN
button
GameSpy
Digital
Page
d’
enregistrement
peut être option
régléM80
à 15 is
ouGameSpy
30 secondes ainsiDigital
qu’à
1, 5, 10,
30 ou 60can
minutes.
Camera
when
the first/last
highlighted.
Photo
Delays
be set to 15 andPage
30 5
seconds, 1, 5, 10, 30 and 60 minutes.
M80 GameSpy
Digital GameSpy
Camera M80
Page 5
Appareil
photo numérique
MULTI SHOT
V
To change the delay time, press the UP/DOWN buttons to highlight the desired
Menu. Additional menu choices are available by hitting the UP/DOWN button
setting. Press the ENTER button to save the setting and return to the Camera Setup
when the first/last option is highlighted. Photo Delays can be set to 15 and 30
Menu. Additional menu choices are available by hitting the UP/DOWN button
seconds,
1, 5, 10, 30 and
60 minutes. PHOTO (suite)
RÉGLAGES
L’APPAREIL
when
the first/lastDE
option
is highlighted. Photo Delays can be set to 15 and 30
seconds, 1, 5, 10, 30 and 60 minutes.
MULTI SHOT
PHOTO
DELAY
1-SHOTSHOT
MULTI
1
MIN
1-SHOT
Multi-Shot - (default 1-Shot) -When the Game Spy Camera is configured for
STILL
in the(par
Capture
Mode
screen,
the photo
camera
can determines
take
2, orthe
3estpictures
each
Photo
Delay
- (default
1 minute)
number
ofphotos
Prises
multiples
défaut :1-Shot)
1-Shot,
c.-à-d.
1-The
prise)
Quanddelay
l’appareil
photo1,GameSpy
réglé
en mode
Multi-Shot
- (default
-When
the–Game
Spy Camera
is configured
for
time
is detected.
There
isanimal
5 second
delay
between
àminutes
l’écranan
du animal
mode
d’enregistrement,
il peut
prendre
1,an
2 ouapproximate
3 photos
chaque fois
qu’il détecte
un animal.
Le délai entre
between
pictures
when
an
is
detected
and
remains
in
range.
STILL in the Capture Mode screen, the camera can take 1, 2, or 3 pictures each
chaque
photobased
estthe
d’environ
5 secondes,
selon la the
charge
des
piles. Pour
le nombre
de prises, appuyez
surpress
les
pictures
on
battery
To
change
thechanger
number
pictures
taken,
To change
delay
time,strength.
press
UP/DOWN
buttons
toofhighlight
the
desired
time
an
animal
issurligner
detected.
There
isAppuyez
an
approximate
5 second
delaylebetween
touches
HAUT/BAS
pour
letoréglage
désiré.
sur lasetting
touche
ENTER
pour
enregistrer
réglage
et retourner
the
UP/DOWN
buttons
highlight
the desired
setting.
Press
the
ENTER
button
setting.
Press
the
ENTER
button
to
save
the
and
return
to
the
Camera
Setup
pictures
based
on
batteryphoto.
strength. To change the number of pictures taken, press
au
menu
réglages
de l’appareil
to
savedes
the
setting
and
return
to the
Camera
Setup
Menu.the UP/DOWN button
Menu.
Additional
menu
choices
are
available
by
hitting
the UP/DOWN buttons to highlight the desired setting. Press the ENTER button
when
option
is highlighted.
Photo
Delays
can be set to 15 and 30
to
savethe
thefirst/last
setting and
return
to the Camera
Setup
Menu.
seconds,
1,
5,
10,
30
and
60
minutes.
VIDEO RESOLUTION
LOW RESOLUTION
VIDEO
MULTI SHOT
LOW
Video
Resolution
(default
High)
can be set to LOW or HIGH.
Résolution
de vidéo (par-défaut
: High,
c.-à-d.-Video
élevée) –resolution
La résolution des
1-SHOT
vidéoshigher
peut être réglée
à LOW (faible)
ou à video,
HIGH (élevée).
Plus la qualité
d’imageit consumes. However,
The
the quality
of the
the more
memory
Video
Resolution
- (default
High)
-Video
resolution
be d’image
set toest
LOW
HIGH.
vidéo
est
élevée,
plus
la
quantité
de
mémoire
utilisée
est
grande.
Toutefois,
si lacan
qualité
élevée,or
alors
la
higher quality
videos have
higher
resolution.
Multi-Shot
- (default
1-Shot)
-When
themore
Game
Spy Camera
is configured
for
The
higher
the
quality
of the video,
the
memory
it consumes.
However,
résolution
de la vidéo
est
plus haute.
Low:
192
@par
24fps
High:the
720camera
x 400 @
STILL
in
the@xCapture
Mode
screen,
can24fps
take 1, 2, or 3 pictures each
Low
: 352quality
x352
192
24videos
images
seconde
higher
have
higher
resolution.
Press
the
UP/DOWN
buttons
to
highlight
the
desired
ENTER
High
:
720
x
400
@
24
images
par
seconde
time
an animal
is detected.
is an
approximate
5 setting.
second Press
delay the
between
Low:
352 x 192
@ 24fpsThere
High:
720
x 400 @ 24fps
button
to
save
the
setting
and
return
to
the
Camera
Setup
Menu.
Appuyez
sur
les
touches
HAUT/BAS
pour
surligner
le
réglage
désiré.
Appuyez
sur
la
touche
ENTER
pour
enregistrer
le
pictures
on battery
strength.
To change
the number
of pictures
taken,
press
Press thebased
UP/DOWN
buttons
to highlight
the desired
setting.
Press the
ENTER
réglage
et
retourner
au
menu
des
réglages
de
l’appareil
photo.
the
UP/DOWN
buttons
highlight
desired
setting.
the ENTER button
button
to save the
settingtoand
return the
to the
Camera
SetupPress
Menu.
to VIDEO
save the setting
and return to the Camera Setup Menu.
LENGTH
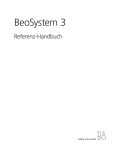
Temp.
Moon
Date
Time
Camera Name
Moon Phase
INFORMATIONS
AVANCÉES
(suite)
ADVANCED
INFORMATION
(cont.)
VI
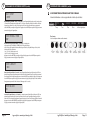
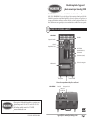
The icons for the moon phase are as follows:
Moon Phase
The icons for the moon phase are as follows:
INFORMATION
ON PICTURE
3
INFORMATIONS
APPARAISSANT SUR L’IMAGE
3
The
info d’informations
strip below will
appear apparaîtra
at the bottom
La
bande
ci-dessous
dansofle the
bas photo/video:
des photos/vidéos :
75oF
Temp.
Temp.
01/01/11 12:00 AM
Lune
Moon
Date
Date
Heure
Time
MYCAMERA
Nom
de l’appareil
photo
Camera
Name
Moon Phase
Phase lunaire
The icons for the moon phase are as follows:
Les icônes des phases lunaires sont les suivantes :
Nouvelle
lune
Premier
croissant
Premier
quartier
Gibbeuse
ascendante
Pleine
lune
Gibbeuse
descendante
Dernier
quartier
Dernier
croissant
5 SEC LENGTH
VIDEO
VIDEO
RESOLUTION
5 SEC
Video
Length(default 5 seconds) -When the Game Spy Camera is configured
LOW
for VIDEO in the Capture Mode screen, the camera will record video for a
Video
seconds)
-When
thephoto
Game
Spy est
Camera
is configured
Durée desLengthvidéos (par(default
défaut : 55secondes)
– Quand
GameSpy
réglé en mode
vidéo à l’écran
designated
amount
of(default
time each
time
anl’appareil
animal
is detected.
change
the amount
Video
-l’appareil
High)
-Video
canrecord
beTo
setfois
toqu’il
LOW
for
VIDEO
in the Capture
Mode
screen,
theresolution
camera
will
video
foror
aunHIGH.
du mode
d’Resolution
enregistrement,
enregistre
une
vidéo d’une
durée
déterminée
chaque
détecte
animal.
of
time
recorded,
press
the
UP/DOWN
buttons
to
highlight
the
desired
setting.
The
higher
the
quality
of
the
video,
the
more
memory
it
consumes.
However,
Pour changer la durée
d’enregistrement,
appuyez
sur lesantouches
HAUT/BAS
pour surligner
réglage désiré.
sur
designated
amount
of time each
time
animal
is detected.
Tolechange
the Appuyez
amount
Press
the
ENTER
button
tohigher
save
the
setting
returndetol’appareil
the CameraLa Setup
Menu.
higher
quality
resolution.
la touche
pourvideos
enregistrer
lethe
réglage
et retourner
aubuttons
menuand
desto
réglages
maximale
of
timeENTER
recorded,
presshave
UP/DOWN
highlight thephoto.
desireddurée
setting.
The
maximum
video
for
aavec
nighttime
IR
video
is 10 seconds.
d’enregistrement
pour
unebutton
vidéo
filmée
nuit
est de
10 24fps
secondes.
Low:
x 192
@ length
24fps
High:
720 x 400
@
Press
the352
ENTER
to lasave
thel’infrarouge
setting
and
return
to the Camera Setup Menu.
Press
the UP/DOWN
buttonsfor
toahighlight
Press the ENTER
The maximum
video length
nighttimethe
IRdesired
video issetting.
10 seconds.
Pagebutton
6
M80and
GameSpy
Digital
Camera
to
save
the
setting
return
to
the
Camera
Setup
Menu.
VIDEO AUDIO
Page 6
M80 GameSpy Digital Camera
ON
VIDEO LENGTH
Video
Audio
(default
- This
allows
thed’activer
user (ON)
to turn
audio
during
Son
vidéos
(par- défaut
: On,On)
c.-à-d.
activé)option
– Cette option
permet
ou dethe
désactiver
(OFF)
le son
5desSEC
M80 GameSpy Digital Camera
Page 11
M80 GameSpy Digital Camera
Page 11
pendant
enregistrementON
des vidéos.
Quand cette
fonction
est activéeand
et quethe
l’appareil
photoSpy
GameSpy
est régléisen
video l’recording
or OFF.
When
selected
Game
Camera
mode
vidéo
à l’écran
mode d’enregistrement,
l’appareil
enregistre
le son avec
lacamera
vidéo
chaque
qu’ilrecord
détecte un
animal.
configured
forduVIDEO
in5 the
Capture
Mode
screen;
the
will
audio
Video
Length(default
seconds)
-When
the
Game
Spy
Camera
is
configured
Appuyez
sur les touches
GAUCHE/DROITE
pouran
surligner
le réglage
désiré. Appuyez
sur
lathe
touche
ENTERfor
pouraenregistrer
along
with
the
video
each time
animal
is detected.
Press
LEFT/RIGHT
for
VIDEO
in the
Capture
Mode
screen,
the
camera
will
record
video
le
réglage ettoretourner
au menu
desdesired
réglages
l’appareil
buttons
highlight
Press
to save
designated
amount
ofthetime
eachdesetting.
time
an photo.
animalthe
is ENTER
detected.button
To change
thethe
amount
setting
return press
to thethe
Camera
Setup Menu.
of
time and
recorded,
UP/DOWN
buttons to highlight the desired setting.
Press the ENTER button to save the setting and return to the Camera Setup Menu.
The maximum video length for a nighttime IR video is 10 seconds.
CAMERA NAME
Appareil
photo numérique
Page 6MYCAMERA
M80 GameSpy
Digital GameSpy
Camera M80
M80 GameSpy
Digital GameSpy
Camera M80
Appareil
photo numérique
Page 11
VI
VI
1
2
DCIM/100_MDGC
DCIM/100_MDGC directory;
directory; video
video files
files are
are located
located in
in the
the DCIM
DCIM directory.
directory.
4.
To
exit
USB
mode,
follow
Windows’
instructions
for
properly
4. To exit USB mode, follow Windows’ instructions for properly disconnecting
disconnecting
aa removable
removable drive
drive and
and then
then unplug.
unplug.
ADVANCEDAVANCÉES
INFORMATION
INFORMATIONS
VIEWING
VIEWING PICTURES
PICTURES -- TV
TV OUT
OUT
VIEWINGDES
PICTURES
COMPUTER
VIA
USB
VISIONNEMENT
IMAGES Mode,
SUR UNON
ORDINATEUR
AU MOYEN
D’UN
CÂBLE
USB in the SETUP mode.
1.
To
TV
turn on
the
camera
and
place
1. Plug
To enter
enter
TV Out
Out
Mode,
camera
placeWindows
in the SETUP
mode.
1.
provided
USB
cableturn
intoon
thethe
USB
port and
on your
7/Vista/XP
1.2.Branchez
le câble USB
fourni
dans
le port USB
d’unAdapter
ordinateur Cable
Windowsinto
7/Vista/XP.
Plug
RCA
jack
on
provided
TV
2. Plug RCA jack on provided TV Adapter Cable into aa VIDEO
VIDEO IN
IN port
port on
on aa
computer.
or
VCR.
2.TV
Branchez
l’autre bout du câble USB dans le port USB de l’appareil photo.
TV
or VCR.
2.
Plug
other end of USB cable into the camera's USB port.
Plug
other
end
of
TV
Cable
into
the
TV
Pictures
are
3.3.
accéder
aux fichiers
d’images
JPG et de vidéos
AVI, naviguez
Poste Jack.
de travail,
puis double-cliquez
3.Pour
Plug
other
end pictures
of
TV Adapter
Adapter
Cable
into
thejusqu’au
TV Out
Out
Jack.
Pictures
are now
now
3.
To
access
JPG
and AVI
movie
files,
navigate
to "My
Computer"
and
sur le dossier on
« Moultrie
CAM ». Le répertoire DCIM/100_MDGC contiendra les fichiers de photos; le répertoire DCIM
presented
the
TV.
presented
onthe
the"Moultrie
TV.
double
click
CAM"
drive.
Picture
files
will
be
stored
In
the
contiendra
les fichiers de vidéos.
4.
use
or LEFT
button
sequence to
the
4. To
To view
view pictures
pictures directory;
use the
the RIGHT
RIGHT
LEFT
button to
to
the
DCIM/100_MDGC
video or
files
are located
insequence
the DCIMtodirectory.
4.next/previous
Pour quitter le modecaptured
USB, suivez picture
les instructions
de Windows
pour
le débranchement
correct d’un
lecteur amovible,
or
video
clip.
The
camera’s
menu
display
next/previous
captured
pictureWindows’
or video clip.
The camera’s
menu disconnecting
display shows
shows
4.
To
exit
USB
mode,
follow
instructions
for
properly
puispicture
débranchez
le câble. being viewed.
the
number
picture number
being
athe
removable
drive and
thenviewed.
unplug.
5. To delete current picture or video, press the DOWN button.
5. To deleteDEScurrent
or video,
press the DOWN button.
VISIONNEMENT
IMAGES
–picture
SORTIE POUR
LATV
TÉLÉAdapter
6.
To
exit
TV
mode,
unplug
the
Cable
from
the
Jack and
6.
To
exit
TV
mode,
unplug
the
TV
Adapter
Cable
from
the TV
TVleOut
Out
and
1.TV
Pouror
visionner
les images sur une télé, mettez l’appareil photo sous
tension
et sélectionnez
modeJack
des réglages.
VCR.
VIEWING
TV or VCR.PICTURES - TV OUT
2. Branchez le connecteur RCA du câble adaptateur pour la télé (fourni) à la prise VIDEO IN de la télé ou du magnétoscope.
1. To enter TV Out Mode, turn on the camera and place in the SETUP mode.
3.
l’autre bout
câbleprovided
adaptateur pour
télé dans laCable
prise du câble
pour laIN
téléport
(TV Out)
2.Branchez
Plug RCA
jackduon
TVlaAdapter
intodea sortie
VIDEO
on a
de l’appareil. Les images s’afficheront à l’écran de la télévision.
TV or VCR.
4.
visionner
images,
les touches DROITE
GAUCHE
photo Pictures
ou vidéo suivante
ou à
3.Pour
Plug
otherlesend
ofutilisez
TV Adapter
Cableouinto
thepour
TVpasser
Outà laJack.
are now
la photo ou vidéo précédente. L’afficheur du menu de l’appareil photo indique le numéro de l’image actuellement
presented on the TV.
visionnée.
4. To view MFH-M80
pictures use the RIGHT or LEFT button to sequence to the
MFH-M80
5. Pour supprimer la photo ou vidéo actuelle, appuyez sur la touche BAS.
next/previous captured picture or video clip. The camera’s menu display shows
6. Pour quitter le mode télé, débranchez le câble adaptateur de l’appareil ainsi que de la télé ou du magnétoscope.
the picture number being viewed.
5. To delete current picture or video, press the DOWN button.
6. To exit TV mode, unplug the TV Adapter Cable from the TV Out Jack and
TV or VCR.
Moultrie Products, LLC
MFH-DGS-M80
Déclarations relatives à la FCC
MFH-M80
REMARQUE : Toute modification qui n’a pas été expressément approuvée par la partie responsable peut annuler le droit de l’utilisateur de
faire fonctionner l’appareil.
Ce produit est conforme à la section 15 des règlements de la FCC. Son fonctionnement est assujetti aux deux conditions suivantes : (1) cet
appareil ne doit pas causer de brouillage nuisible, et (2) cet appareil doit pouvoir accepter tout brouillage reçu, y compris le brouillage
susceptible
un fonctionnementM80
anormal.GameSpy Digital Camera
Page
10
Page
10de: LEcauser
M80
GameSpy
Digital RADIO
Camera
REMARQUE
FABRICANT NE PEUT ÊTRE
TENU RESPONSABLE
DU BROUILLAGE
OU TÉLÉ QU’ENTRAÎNE TOUTE MODIFICATION NON
AUTORISÉE DE CET ÉQUIPEMENT. UNE TELLE MODIFICATION PEUT ANNULER LE DROIT DE L’UTILISATEUR DE FAIRE FONCTIONNER L’ÉQUIPEMENT.
REMARQUE : Cet appareil a été testé et jugé conforme aux limitations relatives à un appareil numérique de classe B, conformément à la section
15 des règlements de la FCC. Ces limites visent à fournir une protection raisonnable contre le brouillage nuisible pouvant survenir dans un
environnement résidentiel. Cet appareil génère, utilise et peut émettre de l’énergie de fréquence radio et risque, s’il n’est pas installé ni
utilisé conformément aux instructions, de causer du brouillage qui nuira aux communications radiophoniques. Il est toutefois impossible de
garantir qu’il ne se produira pas de brouillage dans une installation particulière. Si cet appareil cause du brouillage qui nuit à la réception
radio ou télévisuelle, ce qui peut être déterminé en mettant l’appareil hors tension, puis sous tension, nous encourageons l’utilisateur à
essayer d’éliminer le brouillage à l’aide d’une ou de plusieurs des mesures suivantes :
• Réorienter ou déplacer l’antenne réceptrice.
• Augmenter la distance entre l’appareil et le récepteur.
• Brancher l’appareil dans une prise de courant faisant partie d’un circuit autre que celui sur lequel est branché le récepteur.
• Consulter le détaillant ou un technicien d’expérience en radio/télévision pour obtenir de l’assistance.
Page 10
M80 GameSpy
Digital GameSpy
Camera M80
Appareil
photo numérique
configured
configured for
for VIDEO
VIDEO in
in the
the Capture
Capture Mode
Mode screen;
screen; the
the camera
camera will
will record
record audio
audio
along
with
the
video
each
time
an
animal
is
detected.
Press
the
LEFT/RIGHT
along with the video each time an animal is detected. Press the LEFT/RIGHT
buttons
buttons to
to highlight
highlight the
the desired
desired setting.
setting. Press
Press the
the ENTER
ENTER button
button to
to save
save the
the
RÉGLAGES
DE
L’APPAREIL
PHOTO
(suite)
setting
and
return
to
the
Camera
Setup
Menu.
setting and return to the Camera Setup Menu.
V
CAMERA
NAME
VIDEO
AUDIO
CAMERA
NAME
MYCAMERA
ON
MYCAMERA
Camera
Name
-- (par
(default
MYCAMERA)
The
Camera
Name
is
on
the
Video
Audio
- (default
On)
- This option
allows
thephoto
user
turn
thelesaudio
during
Camera
Name
(default
MYCAMERA)
The
Camera
Name
is imprinted
imprinted
Nom d’appareil
photo
défaut
: MYCAMERA)
– Le nom
d’appareil
estto
imprimé
sur
photos. on
Il sertthe
de
photos
and
provides
a
point
of
reference
when
multiple
cameras
are
used.
To
change
video
recording
OFF.
When
and
thelecameras
Game
Spy
Camera
issur les
code de référence
lorsqueON
plusieurs
appareils
photo sontselected
utilisés.
changer
nom d’appareil
photo,
appuyez
photos
and provides
aor
point
of reference
whenPour
multiple
are used.
To change
the
Camera
Name,
use
the
LEFT/RIGHT
buttons
to
highlight
the
character
to
touches
GAUCHE/DROITE
pour
surligner
le caractère
à modifier.
Appuyez
sur
les
touches
HAUT/BAS
pour
sélectionner
configured
for
VIDEO
in
Capture
Mode
screen;
camera
will
record
audio
the
Camera
Name,
use
thethe
LEFT/RIGHT
buttons
to the
highlight
the
character
to be
be
modified.
Press
the
UP/DOWN
button
to
select
the
desired
character
(A
to
Z,
le
caractère
désiré
(de
A
à
Z,
de
0
à
9,
tiret
ou
espace).
Appuyez
sur
GAUCHE/DROITE
pour
passer
au
caractère
suivant.
along
withPress
the video
each time an
animal
is detected.
Presscharacter
the LEFT/RIGHT
modified.
the UP/DOWN
button
to select
the desired
(A to Z, 00 to
to 9,
9,
dash
LEFT/RIGHT
to
the
next
character.
Press
the
ENTER
Appuyezorsurspace).
lahighlight
touchePress
ENTERthe
pour
enregistrersetting.
le nouveau
nom
detol’appareil
et retourner
au menu
réglages
de
buttons
desired
Press
button
todes
save
dash
or to
space).
Press
LEFT/RIGHT
to move
move
tothe
the ENTER
next
character.
Press
thethe
ENTER
l’appareil photo.
button
the
new
name
and
return
setting
andsave
return
thecamera
Camera
Setup
button to
to
save
the to
new
camera
name
andMenu.
return to
to the
the Camera
Camera Setup
Setup Menu.
Menu.
IR
CAMERA
IR TEST
TEST NAME
OFF
MYCAMERA
OFF
IR
Test(default
On)
When
IR
is ON,
the
red
AIM
LED
on
the
front
of
Camera
Name
- (default
MYCAMERA)
The
Camera
Name
islight
on
the
IR
(default
On)
IR Test
Test
the
red
AIM
light
onDEL
the
front
EssaiTestd’infrarouge
(par
défautWhen
: On,
c.-à-d.
activé)is –ON,
Quand
cette
fonction
estLED
activée,
leimprinted
voyant
rouge
de of
the
camera
will
illuminate.
To
help
find
the
center
field
of
view
for
the
camera,
photos
anddeprovides
a point
ofTo
reference
when
multiple
cameras
used.
To
change
visée camera
à l’avant
l’appareil
photo
s’illuminera.
Pour trouver
lethe
centre
du champ
angulaire
deare
l’appareil
photo,
tenez-vous
the
will
illuminate.
help
find
center
field
of view
for
the
camera,
stand
out
front
of
and
left
or
as
observe
AIM
devant
l’appareil,
puis
déplacez-vous
vers
la gauche
la droite
en observant
le VOYANT
DEL
DEcharacter
VISÉE. Lathe
lumière
du
the
Camera
usethe
thecamera
LEFT/RIGHT
buttons
highlight
the
to
be
stand
out in
inName,
front
of
the
camera
andoumove
move
left
ortoright
right
as you
you
observe
the
AIM
LED
as
you
walk
away
from
direct
center
the
LED
light
will
be
less
bright.
voyant
devrait
s’atténuer
à
mesure
que
vous
vous
éloignez
du
centre
direct.
À
mesure
que
vous
vous
rapprochez
modified.
the UP/DOWN
selectthe
theLED
desired
(A tobright.
Z, 0duto 9,
LED - as Press
you walk
away from button
direct to
center
lightcharacter
will be less
centre,
le voyant
sera plusLEFT/RIGHT
lumineux.
As
you
walk
center
will
brighter.
dash
or
space).
Press
to move
to the next
character. Press the ENTER
As
you
walkDELtowards
towards
center the
the LED
LED
will appear
appear
brighter.
button to save the new camera name and return to the Camera Setup Menu.
TEMPERATURE
TEMPERATURE
IR
TEST
FAHRENHEIT
FAHRENHEIT
OFF
Temperature
-- (default
Fahrenheit)
-- The
temperature
is
on each
photo
Temperature
(default
Fahrenheit)
The est
temperature
is imprinted
imprinted
each
photo
Température
(par
défaut
: Fahrenheit)
– La or
température
imprimée
sur chaque
photo. Vous on
pouvez
choisir
and
can
be
in
degrees
Fahrenheit
Celsius.
To
change
the
temperature
units,
IR
Test(default
On)
IR Test
isl’unité
ON,dethe
AIM
LED
on the
front of
and
can be
in degrees
Fahrenheit
or Celsius.
Tored
change
the
temperature
units,
l’impression
en
Fahrenheit
ou enWhen
Celsius. Pour
changer
température,
appuyez
surlight
les touches
HAUT/BAS
press
the
buttons
highlight
the
desired
setting.
Press
the
will
illuminate.
Toto
help
findENTER
the
center
field
view
forthe
theENTER
press
the UP/DOWN
UP/DOWN
buttons
to
highlight
thepour
desired
setting.
Press
the
ENTER
afin camera
de surligner
le réglage
désiré.
Appuyez
sur
la touche
enregistrer
leof
réglage
et retourner
aucamera,
menu des
button
to
save
the
setting
and
return
to
the
Camera
Setup
Menu.
stand
in
front
of
the camera
and move
or right
as Menu.
you observe the AIM
réglagesout
detol’appareil
photo.
button
save
the
setting
and return
to the left
Camera
Setup
LED - as you walk away from direct center the LED light will be less bright.
As you walk towards center the LED will appear brighter.
INFO STRIP
ON
M80
Page
TEMPERATURE
M80 GameSpy
GameSpy Digital
Digital Camera
Camera
Page 77
FAHRENHEIT
Info
Strip - (default On) -When the Info Strip is turned ON, the information strip,
Bande d’informations (par défaut : On, c.-à-d. activée) – Quand cette option est activée, une bande
as described
in the
Advanced
Setup
section
of this
manual,
is imprinted
on the
d’informations,
décrite
à la section
Réglages
avancés -du
présent
mode
d’emploi,
imprimée
sur les
Temperature
- (default
Fahrenheit)
The
temperature
isestimprinted
onphotos.
each
photo
photos.
Thela Barometer,
phase,
Name,
La
température,
phase lunaire, la Temperature,
date, l’heure, le nomMoon
de l’appareil
photoDate,
et le logoTime,
MoultrieCamera
apparaissent
au
and
can
be
in
degrees
Fahrenheit
or
Celsius.
To
change
the
temperature
units,
& de
Moultrie
logo
arelaimprinted
on theestbottom
each
picture.
When the
Info
Strip
bas
chaque image.
Quand
bande d’informations
désactivéeof(OFF),
les photos
ne contiennent
aucune
bande
press
the UP/DOWN
highlight
the desired
setting.
Press
the Info
ENTER
d’informations.
Pour changer
lebuttons
réglage
deto
la bande
appuyez
sur
les
GAUCHE/DROITE
pour
is turned
OFF,
the photo
contains
nod’informations,
information
strip.
Totouches
change
the
Strip
button
to
save désiré.
the
setting
and
return
to the
Menu.
surligner
le réglage
Appuyez sur
la touche
ENTER
pour
enregistrer
leSetup
réglage
et retourner
au menu Press
des réglages
setting,
press
the LEFT/RIGHT
buttons
toCamera
highlight
the desired
setting.
de
l’appareil
photo.
the ENTER button to save the setting and return to the Camera Setup Menu.
PLOT FREQUENCY
M80 GameSpy Digital Camera
Appareil photo numérique GameSpy M80
15 SECONDS
Page 7
&
are
on
picture.
When
the
Strip
Thelogo
Barometer,
Temperature,
Moon of
phase,
Time,
Camera
Name,
&Moultrie
Moultrie
logo
areimprinted
imprinted
onthe
thebottom
bottom
ofeach
eachDate,
picture.
When
theInfo
Info
Strip
&photos.
Moultrie
logo
are
imprinted
on
the
bottom
of
each
picture.
When
the
Info
Strip
is
turned
OFF,
the
photo
contains
no
information
strip.
To
change
the
Info
Strip
&
Moultrie
logo
are
imprinted
on
the
bottom
of
each
picture.
When
the
Info
Strip
is
turned
OFF,
the
photo
contains
no
information
strip.
To
change
the
Info
Strip
is turned OFF, the photo contains no information strip. To change the Info Strip
setting,
press
the
LEFT/RIGHT
buttons
to
highlight
the
desired
setting.
Press
is
turned
OFF,
the
photo
contains
no
information
strip.
To
change
the
Info
Strip
setting,
press
the
LEFT/RIGHT
buttons
to
highlight
the
desired
setting.
Press
setting, press the LEFT/RIGHT buttons to highlight the desired setting. Press
L’APPAREIL
PHOTO
(suite)
the
ENTER
button
to
and
to
Camera
Menu.
setting,
press
the DE
LEFT/RIGHT
buttons
toreturn
highlight
the
desiredSetup
setting.
Press
theRÉGLAGES
ENTER
button
savethe
thesetting
setting
and
return
the
Camera
Setup
Menu.
the
ENTER
button
totosave
save
the
setting
and
return
totothe
the
Camera
Setup
Menu.
the ENTER button to save the setting and return to the Camera Setup Menu.
V
PLOT
FREQUENCY
INFO
PLOTSTRIP
FREQUENCY
PLOT
FREQUENCY
PLOT
FREQUENCY
15
ON
15SECONDS
SECONDS
15
SECONDS
15 SECONDS
Info
Strip
- (default
On)
the défaut
Info
Strip
istoset
turned
ON,
the
information
strip,
Plot
15
seconds)
-- -Used
to
time
frequency
between
PlotFrequency
Frequency
-(default
(default
15vue
seconds)
Used
setthe
time
frequency
between
Fréquence
de prises
de--photos
vue-When
par
(par
: 15 secondes)
–the
Cette
option
permet
d’établir
l’intervalle
Plot
Frequency
(default
15
seconds)
Used
to
set
the
time
frequency
between
as
described
in
the
Advanced
Setup
section
of
this
manual,
is
imprinted
on
the
each
photo
in
plot
mode.
To
change
the
plot
frequency,
press
the
UP/DOWN
de
tempsphoto
entre
chaque
photo
enmode.
mode prises
dechange
photos vue
vue.frequency,
Pour
changer
fréquence,
appuyez
surbetween
les touches
Plot
Frequency
- (default
15
seconds)
-par
Used
to set
thelatime
frequency
each
photo
plot
Tochange
the
plot
frequency,
press
the
UP/DOWN
each
ininplot
mode.
To
the
plot
press
the
UP/DOWN
photos.
The
Barometer,
Temperature,
phase,
Date,
Time,
Camera
Name,
buttons
to
light
the
desired
setting.
Press
the
ENTER
button
the
HAUT/BAS
pour
surligner
lelight
réglage
désiré.
Appuyez
sur laMoon
touche
ENTER
pour
enregistrer
le
réglage
etsave
retourner
au menu
each
photo
in plot
mode.
To
change
the
plot
frequency,
press
theto
UP/DOWN
buttons
highthe
desired
setting.
Press
the
ENTER
button
save
the
buttons
totohighhighlight
the
desired
setting.
Press
the
ENTER
button
toto
save
the
des
réglages
de
l’appareil
photo.
La
fréquence
de
prises
de
photos
vue
par
vue
peut
être
réglée
à
5,
10,
15,
30
ou
60
secondes.
&
Moultrie
logo
are
imprinted
on
the
bottom
of
each
picture.
When
the
Info
Strip
setting
and
return
to
the
Camera
Setup
Menu.
Plot
frequency
can
be
set
to
5,
10,
buttons
to return
highthe
desiredSetup
setting.
Press
thefrequency
ENTER button
save
the
settingand
and
returnlight
the
Camera
Setup
Menu.
Plot
frequency
canbe
beto
set
10,
setting
totothe
Camera
Menu.
Plot
can
set
toto5,5,
10,
is
turned
the photo
contains
no de
information
strip.
change
theset
Info
15,
30,
60
seconds.
setting
to the
Camera
Setup
Menu.
Plot
canla durée
be
to Strip
5, piles
10, de
15,
30,or
or
60return
seconds.
15,
30,
or
60
seconds.
REMARQUE
: and
SiOFF,
vous
augmentez
la fréquence
de prises
photos
vue par
vue,frequency
vousTo
diminuerez
de vie
des
setting,
press
the
LEFT/RIGHT
buttons
to
highlight
the
desired
setting.
Press
NOTE:
Increasing
the
Plot
Frequency
will
decrease
the
battery
life
of
the
15,
30,Pour
or
60 seconds.
NOTE:
Increasing
thePlot
Plot
Frequency
willdecrease
decrease
the
battery
lifeofofthe
thecamera.
camera.
l’appareil.
prendre
des vidéos
vue
par
vue, il est recommandé
d’utiliser des
piles
au lithium.
NOTE:
Increasing
the
Frequency
will
the
battery
life
camera.
the
button to
save
the
setting
and
to the
Camera
Setup
It
recommended
lithium
batteries
for
taking
plot
videos.
Increasing
Plot
Frequency
willreturn
decrease
the
battery
life ofMenu.
the camera.
Itis
recommended
touse
use
lithium
batteries
for
taking
plot
videos.
ItNOTE:
isisENTER
recommended
tothe
use
lithium
batteries
for
taking
plot
videos.
It is recommended to use lithium batteries for taking plot videos.
PLOT
DURATION
PLOTFREQUENCY
DURATION
PLOT
DURATION
PLOT
DURATION
15
SECONDS
3
HOURS
33HOURS
HOURS
3 HOURS
Durée
prises de photos
vue par3
(par
défaut
: 3 heures)
– Cette
durée
serttime
àto
les the
périodes
durant
Plot
Frequency
-(default
(default
15
seconds)
-Duration
Used
to set
the
frequency
between
Plot
Duration
-- -(default
–––Plot
is
periods
Plotdes
Duration
3hours)
hours)
Plot
Duration
used
tolimit
limit
thetime
time
periods
Plot
Duration
(default
3vue
hours)
Plot
Duration
isisused
used
tolimiter
limit
the
time
periods
lesquelles
l’appareil
sera
actif.
Pour
changer
la
durée,
appuyez
sur
les
touches
HAUT/BAS
afin
de
surligner
le
réglage
each
photo
in
plot
mode.
To
change
the
plot
frequency,
press
the
UP/DOWN
that
the
camera
will
be
active.
To
change
the
plot
duration,
press
the
UP/DOWN
Plot
Duration
-will
(default
3 hours)
– Plot Duration
is used topress
limitthe
time periods
thatthe
the
camerawill
beactive.
active.
Tochange
change
theplot
plotduration,
duration,
press
theUP/DOWN
UP/DOWN
that
camera
be
To
the
désiré.
Appuyez
sur la touche
ENTER
pour
enregistrer
le réglage
et retourner
au menu button
desbutton
réglages
de
l’appareil
photo.
buttons
toto
highlight
thedesired
desired
setting.
Press
the
ENTER
save
the
buttons
highlight
setting.
Press
the
ENTER
to
save
the
that
theto
camera
willthe
be
active.
To
change
the
plot
duration,
press
UP/DOWN
buttons
highlight
the
desired
setting.
Press
the
ENTER
button
toto
save
the
buttons
to
highlight
the
desired
setting.
Press
the
ENTER
button
tothe
save
the
La
durée
des
prises
de
photos
vue
par
vue
peut
être
réglée
à
All
Day,
1,
2,
3
ou
4
heures.
setting
and
to
Camera
Setup
setting
and
return
totothe
the
Camera
Setup
Menu.
frequency
can be
5, 10,
buttons
to return
highlight
desired
setting.
PressPlot
the ENTER
button
to set
savetothe
setting
and
return
the
Camera
SetupMenu.
Menu.
setting
return
to
the
Camera
Menu.
•
All Day –and
L’appareil
prend
des
photos
toute laSetup
journée.
Plot
duration
can
be
set
to
All
Day,
1,
2,
3,
or
4
hours.
15,
30,
or
60
seconds.
setting
and
return
to
the
Camera
Setup
Menu.
Plot
duration
can
beset
settotoAll
All
Day,
hours.
Plot
duration
be
Day,
1,1,2,2,pendant
3,3,oror414heure.
hours.
•
1 Hour
– Deux foiscan
par jour,
l’appareil
prend
des photos
••2 •Hour
All
–
cam
takes
photos
all
day
NOTE:
Increasing
the
Plot
Frequency
will
the battery life of the camera.
Plot
duration
can
be
set
to All
Day,
1,
2,pendant
3,decrease
or24heures.
hours.
All
Dayfois
Plot
cam
takes
photos
all
day
All
Day
––Plot
Plot
cam
takes
photos
all
day
•
–Day
Deux
par
jour,
l’appareil
prend
des photos
•
1
Hour
–
Plot
cam
takes
photos
for
1
hour
twice
a
It
is
recommended
to
use
lithium
batteries
for
taking
videos.
•
All
Day
–
Plot
cam
takes
photos
all
day
–Plot
Plot
cam
takes
photos
for1pendant
1hour
hour3twice
twiceaplot
aday.
day.
• •3 Hour
–Hour
Deux–fois
par jour,
l’appareil
prend
des photos
heures.
11Hour
cam
takes
photos
for
day.
2
Hour
–
Plot
cam
takes
photos
for
2
hours
twice
a
day.
1
Hour
–
Plot
cam
takes
photos
for
1
hour
• ••4 •Hour
–
Deux
fois
par
jour,
l’appareil
prend
des
photos
pendant
4
heures.
hourstwice
twiceaaday.
day.
22Hour – Plot cam takes photos for 22hours
•• • 3
–
photos
for
3332hours
day.
REMARQUE
: Si vous
augmentez
durée
prises de
photos
vue partwice
vue,
vousaaadiminuerez
Hour
Plotcam
camlatakes
takesdes
photos
for
hours
twice
day. la durée de vie des piles de
332Hour
Hour
––Plot
Plot
cam
takes
photos
for
hours
twice
day.
l’appareil.
Pour
prendre
des
vidéos
vue
par
vue,
il
est
recommandé
d’utiliser
des
piles
•• • 4
Hour
–
Plot
cam
takes
photos
for
4
hours
twice
a
day.
PLOT
DURATION
3
Hour
–
Plot
cam
takes
photos
for
3
hours
twice
a
day.
44Hour – Plot cam takes photos for 44hours twice a day.au lithium.
NOTE:
Increasing
the
Duration
will
the
4 Hour
– Plot cam
takes
photos for
4decrease
hours
twice
abattery
day. life
NOTE:
Increasing
thePlot
Plot
Duration
will
decrease
thebattery
lifeof
thecamera.
camera.
NOTE:
Increasing
the
Plot
Duration
will
decrease
the
battery
life
ofofthe
the
camera.
3is• recommended
HOURS
It
to
use
lithium
batteries
for
taking
plot
videos.
NOTE:
Increasing
the
Plot
Duration
will
decrease
the
battery
life
of
recommendedtotouse
uselithium
lithiumbatteries
batteriesfor
fortaking
takingplot
plotvideos.
videos. the camera.
ItItisisrecommended
It is recommended to use lithium batteries for taking plot videos.
Plot
Duration - LIFE
(default 3 hours) – Plot Duration is used to limit the time periods
BATTERY
that the camera will be active. To change the plot duration, press the UP/DOWN
67 DAYS
Page
8
M80
GameSpy
Camera
Page
M80
GameSpy
Digital
Camera
Page
88
M80
GameSpy
Digital
Camera
buttons
to highlight the
desired
setting.Digital
Press the
ENTER button to save the
Page
8
M80
GameSpy
Digital
setting and return to the Camera Setup Menu. Camera
Battery
LifeThisCette
feature
provides
an estimateddesbattery
life ofLathe
Theainsi
Durée
calculée
des piles
fournit la durée
piles de l’appareil.
duréecamera.
de vie apparaît
Plot
duration
can –be
setoption
to All
Day, 1, de2,vie3,estimée
or 4 hours.
is expressed
as “###
Pressing
theauMODE
return
:battery
« ### Dayslife
» (c.-à-d.
#### jours). Appuyez
sur laDays”.
touche MODE
pour retourner
menu des button
réglages dewill
l’appareil
photo.to
• All Day – Plot cam takes photos all day
the Camera Setup menu.
REMARQUE
: Le nombre
jours affiché
basé sur l’utilisation
de 8twice
piles alcalines
AA avec 5 photos prises le jour et
• 1 Hour
– Plotdecam
takesestphotos
for 1 hour
a day.
The
number
of days La
shown
isdurée
based
using
8 AA alkaline batteries with
5NOTE:
photos
prises
la–nuit,
quotidiennement.
véritablefor
de vieondestwice
piles dépendra
• 2 Hour
Plot
cam takes photos
2 hours
a day.du type de piles, des conditions
5 day and
5 l’utilisation
night photos
per day.
Actualla performance
battery life
will vary
depending on type
climatiques
et de
de l’appareil.
Pour optimiser
de l’appareil,
• 3 Hour
– Plot cam
takes photos
for 3 hours twice
a day. il est recommandé d’utiliser des
of
battery,
weather
conditions
and
camera
usage.
It
is
recommended
to use lithium
piles au lithium.
• 4 Hour – Plot cam takes photos for 4 hours twice a day.
batteries for best performance.
NOTE: Increasing the Plot Duration will decrease the battery life of the camera.
It is recommended to use lithium batteries for taking plot videos.
DEFAULT SETTINGS
Page 8NO
M80 GameSpy Digital Camera
Appareil photo numérique GameSpy M80
Default Settings - (default No) -To restore all the settings back to the factory
NOTE:
The
of
the
Camera
Setup
menu.
NOTE:
Thenumber
number
daysshown
shownis
basedon
onusing
using8
AAalkaline
alkalinebatteries
batterieswith
with
NOTE:
The
number
ofofdays
days
shown
isisbased
based
on
using
88AA
AA
alkaline
batteries
with
55NOTE:
and
5
night
photos
per
day.
Actual
battery
life
will
vary
depending
on
type
The
number
of
days
shown
is
based
on
using
8
AA
alkaline
batteries
with
5day
day
and
5
night
photos
per
day.
Actual
battery
life
will
vary
depending
on
type
day and 5 night photos per day. Actual battery life will vary depending on type
of
battery,
weather
conditions
and
camera
usage.
It
is
recommended
to
use
lithium
5
day
and
5
night
photos
per
day.
Actual
battery
life
will
vary
depending
on
type
of
battery,
weather
conditions
and
camera
usage.
It
is
recommended
to
use
lithium
of battery, weather conditions and camera usage. It is recommended to use lithium
RÉGLAGES
DE
L’APPAREIL
PHOTO
batteries
for
best
of
battery,
conditions
and camera
usage.(suite)
It is recommended to use lithium
batteries
forweather
bestperformance.
performance.
batteries
for
best
performance.
batteries for best performance.
V
BATTERY
LIFE
DEFAULT
DEFAULTSETTINGS
SETTINGS
DEFAULT
SETTINGS
DEFAULT
SETTINGS
NO
67
DAYS
NO
NO
NO
Default
Settings
-- -(default
No)
restore
all
settings
back
to
factory
Battery
Lifefeature
estimated
life
of défaut
the
camera.
The
Default
Settings
(default
No)-To
-To–an
allthe
thebattery
settings
back
the
factory
Réglages par
défautThis
(par
défaut
: No, provides
c.-à-d.
non)
Sirestore
vous
désirez
rétablir
les réglages
par
définis
en usine,
Default
Settings
(default
No)
-To
restore
all
the
settings
back
totothe
the
factory
default,
press
the
LEFT/RIGHT
buttons
to
highlight
the
YES
setting.
Press
the
battery
life
is
expressed
as
“###
Days”.
Pressing
the
MODE
button
will
return
Default
Settings
-LEFT/RIGHT
(default No)
-To
restore
all
settings
back
to the
factory
default,
press
theGAUCHE/DROITE
buttons
highlight
the
YES
setting.
Press
the
appuyez surpress
les touches
pour surligner
le réglage
YES.the
Appuyez
surYES
la
touche
ENTER
pour
rétablir
lesto
default,
the
LEFT/RIGHT
buttons
totohighlight
the
setting.
Press
the
ENTER
button
to
restore
the
default
settings
and
return
to
the
Camera
Setup
Menu.
the
Camera
Setup
menu.
réglages
par
défaut
et
retourner
au
menu
des
réglages
de
l’appareil
photo.
default,
press
LEFT/RIGHT
buttons
to highlight
the
YES
setting.Setup
PressMenu.
the
ENTERbutton
buttonthe
restorethe
thedefault
default
settings
andreturn
return
theCamera
Camera
Setup
Menu.
ENTER
totorestore
settings
and
totothe
NOTE:
number
of days
based on
using
8 AA
alkaline
batteries
with
ENTERThe
button
to restore
theshown
defaultissettings
and
return
to the
Camera
Setup Menu.
5 day and 5 night photos per day. Actual battery life will vary depending on type
ofDELETE
battery, weather
conditions and camera usage. It is recommended to use lithium
ALL?
DELETE
ALL?
DELETE
ALL?
batteries
for
best
performance.
DELETE ALL?
NO
NO
NO
NO
Delete
DeleteAll
AllPhotos
Photos-- -(default
(defaultNo)
No)-- -To
Toremove
removeall
allcontent
contenton
onthe
theSD
SDcard,
card,press
pressthe
the
Delete
All
Photos
(default
No)
To
remove
all
content
on
the
SD
card,
press
the
DEFAULT
SETTINGS
LEFT/RIGHT
buttons
to
highlight
the
YES
setting.
Press
the
ENTER
button
to
Delete
All
Photos
(default
No)
To
remove
all
content
on
the
SD
card,
press
the
LEFT/RIGHT
buttons
to
highlight
the
YES
setting.
Press
the
ENTER
button
to
LEFT/RIGHT
buttons
to
highlight
the
YES
setting.
Press
the
ENTER
button
to
Suppression de toutes les photos (par défaut : No, c.-à-d. non) – Pour éliminer tout le contenu de la carte SD,
erase
photos
and
return
to
the
Camera
Setup
Menu.
NO
LEFT/RIGHT
buttons
highlight
the
YES
setting.
Press
the
ENTER
button
to
erase
photos
and
return
to
the
Camera
Setup
Menu.
erase
photos
and
return
to
the
Camera
Setup
Menu.
appuyez sur les touches GAUCHE/DROITE pour surligner le réglage YES. Appuyez sur la touche ENTER pour effacer les
erase
return
to thedeCamera
Setup Menu.
photos etphotos
retournerand
au menu
des réglages
l’appareil photo.
Default Settings - (default No) -To restore all the settings back to the factory
default, press the LEFT/RIGHT buttons to highlight the YES setting. Press the
ENTER button to restore the default settings and return to the Camera Setup Menu.
DELETE ALL?
NO
Delete All Photos - (default No) - To remove all content on the SD card, press the
LEFT/RIGHT buttons to highlight the YES setting. Press the ENTER button to
erase photos and return to the Camera Setup Menu.
M80
M80GameSpy
GameSpyDigital
DigitalCamera
Camera
M80
GameSpy
Digital
Camera
M80 GameSpy Digital Camera
M80 GameSpy
Digital Camera
Appareil
photo numérique
numérique
GameSpy M100
M80
Appareil
photo
GameSpy
Page
Page999
Page
Page 9
Page 9