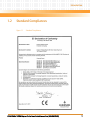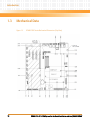
1
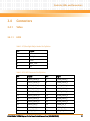
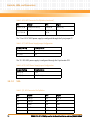
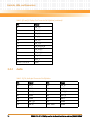
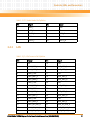
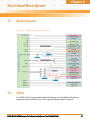
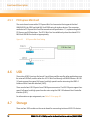
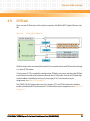
Embedded Computing for Business-Critical ContinuityTM COMX-CAR-610 COM Express Carrier Board Installation and Use P/N: 6806800K26D August 2011 © 2011 Emerson All rights reserved. Trademarks Emerson, Business-Critical Continuity, Emerson Network Power and the Emerson Network Power logo are trademarks and service marks of Emerson Electric Co. © 2011 Emerson Electric Co. All other product or service names are the property of their respective owners. Intel® is a trademark or registered trademark of Intel Corporation or its subsidiaries in the United States and other countries. Java™ and all other Java-based marks are trademarks or registered trademarks of Sun Microsystems, Inc. in the U.S. and other countries. Microsoft®, Windows® and Windows Me® are registered trademarks of Microsoft Corporation; and Windows XP™ is a trademark of Microsoft Corporation. PICMG®, CompactPCI®, AdvancedTCA™ and the PICMG, CompactPCI and AdvancedTCA logos are registered trademarks of the PCI Industrial Computer Manufacturers Group. UNIX® is a registered trademark of The Open Group in the United States and other countries. Notice While reasonable efforts have been made to assure the accuracy of this document, Emerson assumes no liability resulting from any omissions in this document, or from the use of the information obtained therein. Emerson reserves the right to revise this document and to make changes from time to time in the content hereof without obligation of Emerson to notify any person of such revision or changes. Electronic versions of this material may be read online, downloaded for personal use, or referenced in another document as a URL to a Emerson website. The text itself may not be published commercially in print or electronic form, edited, translated, or otherwise altered without the permission of Emerson, It is possible that this publication may contain reference to or information about Emerson products (machines and programs), programming, or services that are not available in your country. Such references or information must not be construed to mean that Emerson intends to announce such Emerson products, programming, or services in your country. Limited and Restricted Rights Legend If the documentation contained herein is supplied, directly or indirectly, to the U.S. Government, the following notice shall apply unless otherwise agreed to in writing by Emerson. Use, duplication, or disclosure by the Government is subject to restrictions as set forth in subparagraph (b)(3) of the Rights in Technical Data clause at DFARS 252.227-7013 (Nov. 1995) and of the Rights in Noncommercial Computer Software and Documentation clause at DFARS 252.227-7014 (Jun. 1995). Contact Address Emerson Network Power - Embedded Computing 2900 South Diablo Way, Suite 190 Tempe, AZ 85282 USA Contents About this Manual . . . . . . . . . . . . . . . . . . . . . . . . . . . . . . . . . . . . . . . . . . . . . . . . . . . . . . . . . . . . . . . . . . . . . . . 11 1 Introduction . . . . . . . . . . . . . . . . . . . . . . . . . . . . . . . . . . . . . . . . . . . . . . . . . . . . . . . . . . . . . . . . . . . . . . . . . 15 1.1 1.2 1.3 1.4 1.5 2 Hardware Preparation and Installation . . . . . . . . . . . . . . . . . . . . . . . . . . . . . . . . . . . . . . . . . . . . . . . . . 21 2.1 2.2 2.3 2.4 3 Features . . . . . . . . . . . . . . . . . . . . . . . . . . . . . . . . . . . . . . . . . . . . . . . . . . . . . . . . . . . . . . . . . . . . . . . . . . . 15 Standard Compliances . . . . . . . . . . . . . . . . . . . . . . . . . . . . . . . . . . . . . . . . . . . . . . . . . . . . . . . . . . . . . . 17 Mechanical Data . . . . . . . . . . . . . . . . . . . . . . . . . . . . . . . . . . . . . . . . . . . . . . . . . . . . . . . . . . . . . . . . . . . 18 Ordering Information . . . . . . . . . . . . . . . . . . . . . . . . . . . . . . . . . . . . . . . . . . . . . . . . . . . . . . . . . . . . . . . 19 Product Identification . . . . . . . . . . . . . . . . . . . . . . . . . . . . . . . . . . . . . . . . . . . . . . . . . . . . . . . . . . . . . . . 20 Environmental and Power Requirements . . . . . . . . . . . . . . . . . . . . . . . . . . . . . . . . . . . . . . . . . . . . . . 21 2.1.1 Environmental Requirements. . . . . . . . . . . . . . . . . . . . . . . . . . . . . . . . . . . . . . . . . . . . . . . . . . 21 2.1.2 Power Requirements . . . . . . . . . . . . . . . . . . . . . . . . . . . . . . . . . . . . . . . . . . . . . . . . . . . . . . . . . 22 Unpacking and Inspecting the Board . . . . . . . . . . . . . . . . . . . . . . . . . . . . . . . . . . . . . . . . . . . . . . . . . . 23 Installation and Removal of the COM Express Module . . . . . . . . . . . . . . . . . . . . . . . . . . . . . . . . . . . 24 Replacing the Onboard Battery . . . . . . . . . . . . . . . . . . . . . . . . . . . . . . . . . . . . . . . . . . . . . . . . . . . . . . . 26 Controls, LEDs, and Connectors . . . . . . . . . . . . . . . . . . . . . . . . . . . . . . . . . . . . . . . . . . . . . . . . . . . . . . . . 27 3.1 3.2 3.3 3.4 Carrier Board Layout . . . . . . . . . . . . . . . . . . . . . . . . . . . . . . . . . . . . . . . . . . . . . . . . . . . . . . . . . . . . . . . . 27 COM Express Board-to-Board Connector . . . . . . . . . . . . . . . . . . . . . . . . . . . . . . . . . . . . . . . . . . . . . . 28 LEDs . . . . . . . . . . . . . . . . . . . . . . . . . . . . . . . . . . . . . . . . . . . . . . . . . . . . . . . . . . . . . . . . . . . . . . . . . . . . . . 32 Connectors . . . . . . . . . . . . . . . . . . . . . . . . . . . . . . . . . . . . . . . . . . . . . . . . . . . . . . . . . . . . . . . . . . . . . . . . 33 3.4.1 Video . . . . . . . . . . . . . . . . . . . . . . . . . . . . . . . . . . . . . . . . . . . . . . . . . . . . . . . . . . . . . . . . . . . . . . . 33 3.4.1.1 LVDS . . . . . . . . . . . . . . . . . . . . . . . . . . . . . . . . . . . . . . . . . . . . . . . . . . . . . . . . . . . . . . 33 3.4.1.2 VGA . . . . . . . . . . . . . . . . . . . . . . . . . . . . . . . . . . . . . . . . . . . . . . . . . . . . . . . . . . . . . . . 34 3.4.1.3 HDMI . . . . . . . . . . . . . . . . . . . . . . . . . . . . . . . . . . . . . . . . . . . . . . . . . . . . . . . . . . . . . . 35 3.4.1.4 Display Port . . . . . . . . . . . . . . . . . . . . . . . . . . . . . . . . . . . . . . . . . . . . . . . . . . . . . . . . 35 3.4.2 Audio . . . . . . . . . . . . . . . . . . . . . . . . . . . . . . . . . . . . . . . . . . . . . . . . . . . . . . . . . . . . . . . . . . . . . . 36 3.4.3 LAN . . . . . . . . . . . . . . . . . . . . . . . . . . . . . . . . . . . . . . . . . . . . . . . . . . . . . . . . . . . . . . . . . . . . . . . . 37 3.4.4 PCI Express . . . . . . . . . . . . . . . . . . . . . . . . . . . . . . . . . . . . . . . . . . . . . . . . . . . . . . . . . . . . . . . . . . 38 3.4.5 USB . . . . . . . . . . . . . . . . . . . . . . . . . . . . . . . . . . . . . . . . . . . . . . . . . . . . . . . . . . . . . . . . . . . . . . . . 39 3.4.5.1 USB 2.0 . . . . . . . . . . . . . . . . . . . . . . . . . . . . . . . . . . . . . . . . . . . . . . . . . . . . . . . . . . . . 39 3.4.5.2 USB 3.0 . . . . . . . . . . . . . . . . . . . . . . . . . . . . . . . . . . . . . . . . . . . . . . . . . . . . . . . . . . . . 40 3.4.6 Storage . . . . . . . . . . . . . . . . . . . . . . . . . . . . . . . . . . . . . . . . . . . . . . . . . . . . . . . . . . . . . . . . . . . . . 41 COMX-CAR-610 COM Express Carrier Board Installation and Use (6806800K26D) 3 Contents Contents 3.4.7 3.5 4 Super I/O. . . . . . . . . . . . . . . . . . . . . . . . . . . . . . . . . . . . . . . . . . . . . . . . . . . . . . . . . . . . . . . . . . . . 41 3.4.7.1 Fan . . . . . . . . . . . . . . . . . . . . . . . . . . . . . . . . . . . . . . . . . . . . . . . . . . . . . . . . . . . . . . . . 41 3.4.7.2 PS/2 . . . . . . . . . . . . . . . . . . . . . . . . . . . . . . . . . . . . . . . . . . . . . . . . . . . . . . . . . . . . . . . 42 3.4.7.3 LPT Port . . . . . . . . . . . . . . . . . . . . . . . . . . . . . . . . . . . . . . . . . . . . . . . . . . . . . . . . . . . 42 3.4.7.4 Serial Ports . . . . . . . . . . . . . . . . . . . . . . . . . . . . . . . . . . . . . . . . . . . . . . . . . . . . . . . . . 43 3.4.8 Power . . . . . . . . . . . . . . . . . . . . . . . . . . . . . . . . . . . . . . . . . . . . . . . . . . . . . . . . . . . . . . . . . . . . . . 44 Headers . . . . . . . . . . . . . . . . . . . . . . . . . . . . . . . . . . . . . . . . . . . . . . . . . . . . . . . . . . . . . . . . . . . . . . . . . . . 44 3.5.1 LPC . . . . . . . . . . . . . . . . . . . . . . . . . . . . . . . . . . . . . . . . . . . . . . . . . . . . . . . . . . . . . . . . . . . . . . . . . 44 3.5.2 Trusted Platform Module (TPM). . . . . . . . . . . . . . . . . . . . . . . . . . . . . . . . . . . . . . . . . . . . . . . . 45 3.5.3 GPIO . . . . . . . . . . . . . . . . . . . . . . . . . . . . . . . . . . . . . . . . . . . . . . . . . . . . . . . . . . . . . . . . . . . . . . . 45 3.5.4 Miscellaneous I/O . . . . . . . . . . . . . . . . . . . . . . . . . . . . . . . . . . . . . . . . . . . . . . . . . . . . . . . . . . . . 46 3.5.5 SPI Flash . . . . . . . . . . . . . . . . . . . . . . . . . . . . . . . . . . . . . . . . . . . . . . . . . . . . . . . . . . . . . . . . . . . . 47 3.5.6 EEPROM . . . . . . . . . . . . . . . . . . . . . . . . . . . . . . . . . . . . . . . . . . . . . . . . . . . . . . . . . . . . . . . . . . . . 48 Functional Description . . . . . . . . . . . . . . . . . . . . . . . . . . . . . . . . . . . . . . . . . . . . . . . . . . . . . . . . . . . . . . . . 49 4.1 4.2 Block Diagram . . . . . . . . . . . . . . . . . . . . . . . . . . . . . . . . . . . . . . . . . . . . . . . . . . . . . . . . . . . . . . . . . . . . . 49 Video . . . . . . . . . . . . . . . . . . . . . . . . . . . . . . . . . . . . . . . . . . . . . . . . . . . . . . . . . . . . . . . . . . . . . . . . . . . . . 49 4.2.1 LVDS . . . . . . . . . . . . . . . . . . . . . . . . . . . . . . . . . . . . . . . . . . . . . . . . . . . . . . . . . . . . . . . . . . . . . . . 50 4.2.2 VGA . . . . . . . . . . . . . . . . . . . . . . . . . . . . . . . . . . . . . . . . . . . . . . . . . . . . . . . . . . . . . . . . . . . . . . . . 50 4.2.3 HDMI . . . . . . . . . . . . . . . . . . . . . . . . . . . . . . . . . . . . . . . . . . . . . . . . . . . . . . . . . . . . . . . . . . . . . . . 50 4.2.4 Display Port . . . . . . . . . . . . . . . . . . . . . . . . . . . . . . . . . . . . . . . . . . . . . . . . . . . . . . . . . . . . . . . . . 50 4.3 Audio . . . . . . . . . . . . . . . . . . . . . . . . . . . . . . . . . . . . . . . . . . . . . . . . . . . . . . . . . . . . . . . . . . . . . . . . . . . . . 50 4.4 LAN . . . . . . . . . . . . . . . . . . . . . . . . . . . . . . . . . . . . . . . . . . . . . . . . . . . . . . . . . . . . . . . . . . . . . . . . . . . . . . . 51 4.5 PCI Express . . . . . . . . . . . . . . . . . . . . . . . . . . . . . . . . . . . . . . . . . . . . . . . . . . . . . . . . . . . . . . . . . . . . . . . . 51 4.5.1 PCI Express Mini Card . . . . . . . . . . . . . . . . . . . . . . . . . . . . . . . . . . . . . . . . . . . . . . . . . . . . . . . . . 52 4.6 USB . . . . . . . . . . . . . . . . . . . . . . . . . . . . . . . . . . . . . . . . . . . . . . . . . . . . . . . . . . . . . . . . . . . . . . . . . . . . . . . 52 4.7 Storage . . . . . . . . . . . . . . . . . . . . . . . . . . . . . . . . . . . . . . . . . . . . . . . . . . . . . . . . . . . . . . . . . . . . . . . . . . . 52 4.8 Super I/O . . . . . . . . . . . . . . . . . . . . . . . . . . . . . . . . . . . . . . . . . . . . . . . . . . . . . . . . . . . . . . . . . . . . . . . . . . 53 4.8.1 Voltage and Thermal Monitoring. . . . . . . . . . . . . . . . . . . . . . . . . . . . . . . . . . . . . . . . . . . . . . . 53 4.8.2 Fan Control. . . . . . . . . . . . . . . . . . . . . . . . . . . . . . . . . . . . . . . . . . . . . . . . . . . . . . . . . . . . . . . . . . 54 4.8.3 PS/2 . . . . . . . . . . . . . . . . . . . . . . . . . . . . . . . . . . . . . . . . . . . . . . . . . . . . . . . . . . . . . . . . . . . . . . . . 54 4.8.4 LPT . . . . . . . . . . . . . . . . . . . . . . . . . . . . . . . . . . . . . . . . . . . . . . . . . . . . . . . . . . . . . . . . . . . . . . . . . 54 4.8.5 RS-232 and RS-422/485 Ports . . . . . . . . . . . . . . . . . . . . . . . . . . . . . . . . . . . . . . . . . . . . . . . . . 54 4.9 SPI Flash . . . . . . . . . . . . . . . . . . . . . . . . . . . . . . . . . . . . . . . . . . . . . . . . . . . . . . . . . . . . . . . . . . . . . . . . . . . 55 4.10 Watchdog Timer . . . . . . . . . . . . . . . . . . . . . . . . . . . . . . . . . . . . . . . . . . . . . . . . . . . . . . . . . . . . . . . . . . . 56 4 COMX-CAR-610 COM Express Carrier Board Installation and Use (6806800K26D) Contents 4.11 Real Time Clock (RTC) . . . . . . . . . . . . . . . . . . . . . . . . . . . . . . . . . . . . . . . . . . . . . . . . . . . . . . . . . . . . . . . 56 4.12 Wake Events . . . . . . . . . . . . . . . . . . . . . . . . . . . . . . . . . . . . . . . . . . . . . . . . . . . . . . . . . . . . . . . . . . . . . . . 57 A Related Documentation . . . . . . . . . . . . . . . . . . . . . . . . . . . . . . . . . . . . . . . . . . . . . . . . . . . . . . . . . . . . . . . 59 A.1 A.2 Emerson Network Power—Embedded Computing Documents . . . . . . . . . . . . . . . . . . . . . . . . . . . 59 Manufacturers’ Documents . . . . . . . . . . . . . . . . . . . . . . . . . . . . . . . . . . . . . . . . . . . . . . . . . . . . . . . . . . 59 Safety Notes . . . . . . . . . . . . . . . . . . . . . . . . . . . . . . . . . . . . . . . . . . . . . . . . . . . . . . . . . . . . . . . . . . . . . . . . . . . . . 61 Sicherheitshinweise . . . . . . . . . . . . . . . . . . . . . . . . . . . . . . . . . . . . . . . . . . . . . . . . . . . . . . . . . . . . . . . . . . . . . . 65 Index . . . . . . . . . . . . . . . . . . . . . . . . . . . . . . . . . . . . . . . . . . . . . . . . . . . . . . . . . . . . . . . . . . . . . . . . . . . . . . . . . . . 71 COMX-CAR-610 COM Express Carrier Board Installation and Use (6806800K26D) 5 Contents Contents 6 COMX-CAR-610 COM Express Carrier Board Installation and Use (6806800K26D) List of Tables Table 1-1 Table 1-2 Table 2-1 Table 2-2 Table 2-3 Table 3-1 Table 3-2 Table 3-3 Table 3-4 Table 3-5 Table 3-6 Table 3-7 Table 3-8 Table 3-9 Table 3-10 Table 3-11 Table 3-12 Table 3-13 Table 3-14 Table 3-15 Table 3-16 Table 3-17 Table 3-18 Table 3-19 Table 3-20 Table 3-21 Table 3-22 Table 3-23 Table 3-24 Table 3-25 Table 3-26 Table 3-27 Table 3-28 Table 3-29 Table 3-30 Table 3-31 Carrier Board Features . . . . . . . . . . . . . . . . . . . . . . . . . . . . . . . . . . . . . . . . . . . . . . . . . . . . . . . 15 Ordering Information . . . . . . . . . . . . . . . . . . . . . . . . . . . . . . . . . . . . . . . . . . . . . . . . . . . . . . . . 19 Environmental Requirements . . . . . . . . . . . . . . . . . . . . . . . . . . . . . . . . . . . . . . . . . . . . . . . . . 21 Carrier Board Power Consumption . . . . . . . . . . . . . . . . . . . . . . . . . . . . . . . . . . . . . . . . . . . . 22 Current Requirements from the Power Supply . . . . . . . . . . . . . . . . . . . . . . . . . . . . . . . . . . 22 COM Express Connector Pin Definition . . . . . . . . . . . . . . . . . . . . . . . . . . . . . . . . . . . . . . . . . 28 LEDs . . . . . . . . . . . . . . . . . . . . . . . . . . . . . . . . . . . . . . . . . . . . . . . . . . . . . . . . . . . . . . . . . . . . . . . 32 P8, Backlight Wafer Header Pin Definition . . . . . . . . . . . . . . . . . . . . . . . . . . . . . . . . . . . . . . 33 P6, LVDS Connector Pin Definition . . . . . . . . . . . . . . . . . . . . . . . . . . . . . . . . . . . . . . . . . . . . 33 P7, LVDS Power Supply Jumper Configuration . . . . . . . . . . . . . . . . . . . . . . . . . . . . . . . . . . . 34 P35, LVDS Power Supply Jumper Configuration . . . . . . . . . . . . . . . . . . . . . . . . . . . . . . . . . 34 J5, VGA Connector Pin Definition . . . . . . . . . . . . . . . . . . . . . . . . . . . . . . . . . . . . . . . . . . . . . . 34 J5, HDMI Connector Pin Definition . . . . . . . . . . . . . . . . . . . . . . . . . . . . . . . . . . . . . . . . . . . . 35 J3 and J4, Display Port Connector Pin Definition . . . . . . . . . . . . . . . . . . . . . . . . . . . . . . . . . 35 J16, Audio Jack Connector Pin Definition . . . . . . . . . . . . . . . . . . . . . . . . . . . . . . . . . . . . . . . 36 P11, Audio Header Pin Definition . . . . . . . . . . . . . . . . . . . . . . . . . . . . . . . . . . . . . . . . . . . . . . 37 J1, LAN Connector Pin Definition . . . . . . . . . . . . . . . . . . . . . . . . . . . . . . . . . . . . . . . . . . . . . . 37 P9 Jumper Setting . . . . . . . . . . . . . . . . . . . . . . . . . . . . . . . . . . . . . . . . . . . . . . . . . . . . . . . . . . . 38 P24 Jumper Setting . . . . . . . . . . . . . . . . . . . . . . . . . . . . . . . . . . . . . . . . . . . . . . . . . . . . . . . . . . 38 P25 Jumper Setting . . . . . . . . . . . . . . . . . . . . . . . . . . . . . . . . . . . . . . . . . . . . . . . . . . . . . . . . . . 38 P2, USB 2.0 Header Pin Definition . . . . . . . . . . . . . . . . . . . . . . . . . . . . . . . . . . . . . . . . . . . . . 39 P1, USB 2.0 Header Pin Definition . . . . . . . . . . . . . . . . . . . . . . . . . . . . . . . . . . . . . . . . . . . . . 39 P39, USB 2.0 Header Pin Definition . . . . . . . . . . . . . . . . . . . . . . . . . . . . . . . . . . . . . . . . . . . . 39 P10, Jumper Settings for Configuring USB Multiplexed Devices . . . . . . . . . . . . . . . . . . . 40 J14 and J15, USB 3.0 Connector Pin Definition . . . . . . . . . . . . . . . . . . . . . . . . . . . . . . . . . . 40 P10—P13, SATA Socket Pin Definition . . . . . . . . . . . . . . . . . . . . . . . . . . . . . . . . . . . . . . . . . . 41 P3 and P27, Fan Header Pin Definition . . . . . . . . . . . . . . . . . . . . . . . . . . . . . . . . . . . . . . . . . 41 P26, PS/2 (Keyboard and Mouse) Connectors Pin Definition . . . . . . . . . . . . . . . . . . . . . . 42 P32, LPT Header Pin Definition . . . . . . . . . . . . . . . . . . . . . . . . . . . . . . . . . . . . . . . . . . . . . . . . 42 P18—P23, RS-232 Headers Pin Definition . . . . . . . . . . . . . . . . . . . . . . . . . . . . . . . . . . . . . . . 43 P37 and P33, RS-422/RS-485 Headers Pin Definition . . . . . . . . . . . . . . . . . . . . . . . . . . . . 43 Set Jumpers P34 and P41 . . . . . . . . . . . . . . . . . . . . . . . . . . . . . . . . . . . . . . . . . . . . . . . . . . . . . 43 P40 PS_ON Select Jumper . . . . . . . . . . . . . . . . . . . . . . . . . . . . . . . . . . . . . . . . . . . . . . . . . . . . 44 ATX Power Supply Connector Pin Definition . . . . . . . . . . . . . . . . . . . . . . . . . . . . . . . . . . . . 44 P29, Low Pin Count (LPC) Header Pin Definition . . . . . . . . . . . . . . . . . . . . . . . . . . . . . . . . . 44 P28, Trusted Platform Module (TPM) Header Pin Definition . . . . . . . . . . . . . . . . . . . . . . . 45 COMX-CAR-610 COM Express Carrier Board Installation and Use (6806800K26D) 7 List of Tables Table 3-32 Table 3-33 Table 3-34 Table 3-35 Table 3-36 Table 3-37 Table 3-38 Table 4-1 Table A-1 8 P30, GPIO Header Pin Definition . . . . . . . . . . . . . . . . . . . . . . . . . . . . . . . . . . . . . . . . . . . . . . 45 P16, Miscellaneous I/O Header Pin Definition . . . . . . . . . . . . . . . . . . . . . . . . . . . . . . . . . . . 46 P13, SPI Flash Header Pin Definition . . . . . . . . . . . . . . . . . . . . . . . . . . . . . . . . . . . . . . . . . . . 47 P12 and P14, Jumper Settings for SPI Flash SF100 header . . . . . . . . . . . . . . . . . . . . . . . . . 47 P15 and P38, Jumper Configuration to Enable/Disable BIOS . . . . . . . . . . . . . . . . . . . . . . . 47 P17 Case Open Select Header . . . . . . . . . . . . . . . . . . . . . . . . . . . . . . . . . . . . . . . . . . . . . . . . . 48 P31, EEPROM Header Pin Definition . . . . . . . . . . . . . . . . . . . . . . . . . . . . . . . . . . . . . . . . . . . 48 Wake Events . . . . . . . . . . . . . . . . . . . . . . . . . . . . . . . . . . . . . . . . . . . . . . . . . . . . . . . . . . . . . . . . 57 Emerson Network Power, Embedded Computing Publications . . . . . . . . . . . . . . . . . . . . 59 COMX-CAR-610 COM Express Carrier Board Installation and Use (6806800K26D) List of Figures Figure 1-1 Figure 1-2 Figure 1-3 Figure 1-4 Figure 3-1 Figure 4-1 Figure 4-2 Figure 4-3 Figure 4-4 Figure 4-5 Figure 4-6 Standard Compliances . . . . . . . . . . . . . . . . . . . . . . . . . . . . . . . . . . . . . . . . . . . . . . . . . . . COMX-CORE Series Mechanical Dimensions (Top View) . . . . . . . . . . . . . . . . . . . . . . COMX-CORE Series Mechanical Dimensions (SideView) . . . . . . . . . . . . . . . . . . . . . . Location of Product Serial Number . . . . . . . . . . . . . . . . . . . . . . . . . . . . . . . . . . . . . . . . COMX-CAR-610 COM Express Carrier Board Component Layout . . . . . . . . . . . . . . . COM Express Type 6 Block Diagram . . . . . . . . . . . . . . . . . . . . . . . . . . . . . . . . . . . . . . . PCI Express Block Diagram . . . . . . . . . . . . . . . . . . . . . . . . . . . . . . . . . . . . . . . . . . . . . . . PCI Express Mini Card Setting . . . . . . . . . . . . . . . . . . . . . . . . . . . . . . . . . . . . . . . . . . . . . Super I/O Block Diagram . . . . . . . . . . . . . . . . . . . . . . . . . . . . . . . . . . . . . . . . . . . . . . . . . SPI Flash Block Diagram . . . . . . . . . . . . . . . . . . . . . . . . . . . . . . . . . . . . . . . . . . . . . . . . . . Watchdog Timer Block Diagram . . . . . . . . . . . . . . . . . . . . . . . . . . . . . . . . . . . . . . . . . . COMX-CAR-610 COM Express Carrier Board Installation and Use (6806800K26D) 17 18 19 20 27 49 51 52 53 55 56 9 List of Figures 10 COMX-CAR-610 COM Express Carrier Board Installation and Use (6806800K26D) About this Manual Overview of Contents This manual is divided into the following chapters and appendices: Introduction provides an overview of the product’s features. Hardware Preparation and Installation provides instructions on installing and removing the module. Controls, LEDs, and Connectors provides information on the pin assignments of the various connectors on the board. Functional Description discusses the functions of various components on the board. BIOS discusses the functions that are available on the Setup Utility. Related Documentation lists various documentation relevant to the product. Safety Notes provides a summary of the safety notices applicable to the product. Sicherheitshinweise is a German version of the Safety Notes. Abbreviations This document uses the following abbreviations: Abbreviation Definition ACPI Advanced Configuration Power Interface AMC Alarm Management Controller ARP Address Resolution Protocol BDS Boot Device Selection DDR Double Data Rate DXE Driver Execution Environment EEPROM Electrically Erasable Programable Read-Only Memory eUSB Embedded Universal Serial Bus GbE Gigabit Ethernet GPIO General Purpose Input Output HDMI High-Definition Multimedia Interface COMX-CAR-610 COM Express Carrier Board Installation and Use (6806800K26D) 11 About this Manual About this Manual 12 Abbreviation Definition I2C Inter-Integrated Circuit I/O Input/Output IDE Integrated Device Electronics LED Light Emitting Diode LIN Line In LFM Linear Feet per Minute LPT Line Print Terminal LOUT Line Out LDVS Low Voltage Differential Signaling MICIN Microphone In NVRAM Non-volatile RAM OEM Original Equipment Manufacturer PCI Peripheral Component Interconnect PCI-E Peripheral Component Interconnect Express POST Power-on Self Test RTC Real Time Clock SATA Serial AT Attachment SCSI Small Computer System Interface SPD Serial Presence Detect SPI Serial Peripheral Interface SODIMM Small Outline Dual In-line Memory Module Super I/O Super Input/Output TPM Trusted Platform Module USB Universal Serial Bus VGA Video Graphics Adapter WDT Watchdog Timer COMX-CAR-610 COM Express Carrier Board Installation and Use (6806800K26D) About this Manual Conventions The following table describes the conventions used throughout this manual. Notation Description 0x00000000 Typical notation for hexadecimal numbers (digits are 0 through F), for example used for addresses and offsets 0b0000 Same for binary numbers (digits are 0 and 1) bold Used to emphasize a word Screen Used for on-screen output and code related elements or commands in body text Courier + Bold Used to characterize user input and to separate it from system output Reference Used for references and for table and figure descriptions File > Exit Notation for selecting a submenu <text> Notation for variables and keys [text] Notation for software buttons to click on the screen and parameter description ... Repeated item for example node 1, node 2, ..., node 12 . Omission of information from example/command that is not necessary at the time being . . .. Ranges, for example: 0..4 means one of the integers 0,1,2,3, and 4 (used in registers) | Logical OR COMX-CAR-610 COM Express Carrier Board Installation and Use (6806800K26D) 13 About this Manual About this Manual Notation Description Indicates a hazardous situation which, if not avoided, could result in death or serious injury Indicates a hazardous situation which, if not avoided, may result in minor or moderate injury Indicates a property damage message No danger encountered. Pay attention to important information Summary of Changes This manual has been revised and replaces all prior editions.6806800K26B Part Number Publication Date Description 6806800A36C January 2006 First edition 6806800K26B March 2010 GA Version 6806800K26C November 2010 GA version: Updated Section 3.4.4 PCI Express 6806800K26D September 2011 Updated Table "P12 and P14, Jumper Settings for SPI Flash SF100 header" on page 47, Table "P15 and P38, Jumper Configuration to Enable/Disable BIOS" on page 47. Added Table "P17 Case Open Select Header" on page 48 and Table "P40 PS_ON Select Jumper" on page 44. 14 COMX-CAR-610 COM Express Carrier Board Installation and Use (6806800K26D) Chapter 1 Introduction 1.1 Features The COMX-CAR-610 COM Express Carrier Board is a Type 6 carrier board. This board is designed to support the COM Express Type 6 Specification and is compatible with COM Express Type 1 Specification. This board supports the following COM Express form factors: compact, basic, and extended. Table 1-1 Carrier Board Features Feature Description Form factor MicroATX (9.6'' x 9.6'') Video One backlight header for powering a backlight One LVDS connector Two Display Port connectors One VGA and HDMI connector One audio jack: MICIN,LOUT,LIN One audio header: MICIN, LOUT 33 MHz clock buffer: ICS9112AM-16 100 MHz clock buffer: ICS9DB108BFLF Audio Clock buffer LPT One LPT header from Super I/O KBMS One keyboard and mouse header COM Four RS-232 ports (COM1—COM4) Two RS-232/RS-422/RS-485 ports (COM5 and COM6) LAN1—GbE from COM Express module LAN2—GbE from carrier board (WG82574L) Four USB3.0 ports Three USB 2.0 ports (in header) One eUSB flash (maximum of 8 GB) One PCI-E x16 slot Two PCI-E x4 slots One PCI-E x1 slot LAN USB PCI-E Slots PCI-E Minicard One PCI-E Mini-Card for WiFi or WiMax Serial ATA Four SATA II ports COMX-CAR-610 COM Express Carrier Board Installation and Use (6806800K26D) 15 Introduction Table 1-1 Carrier Board Features (continued) Feature Description Trusted Platform Module One onboard TPM header Power supply One 24-pin ATX power header One 4-pin ATX_12V header One battery socket Three-channel voltage sensors: 5 V, 3.3 V and 12 V Two-channel temperature sensors: module and system Two-channel Fan speed Control: Module and system Compact Basic Extended Power Button: S0, S3, S4, S5 KB: S0, S3 Mouse: S0, S3 PME: S0, S3, S4, S5 USB: S0, S3 Wake on LAN support Hardware Monitor and Controller Supported COM Express Form Factors Wake-Up Events 16 COMX-CAR-610 COM Express Carrier Board Installation and Use (6806800K26D) Introduction 1.2 Standard Compliances Figure 1-1 Standard Compliances COMX-CAR-610 COM Express Carrier Board Installation and Use (6806800K26D) 17 Introduction 1.3 Mechanical Data Figure 1-2 18 COMX-CORE Series Mechanical Dimensions (Top View) COMX-CAR-610 COM Express Carrier Board Installation and Use (6806800K26D) Introduction Figure 1-3 1.4 COMX-CORE Series Mechanical Dimensions (SideView) Ordering Information Table 1-2 Ordering Information Orderable Number Description COMX-CAR-610 Type 6 COM express carrier board UATX COMX-CAR-610 COM Express Carrier Board Installation and Use (6806800K26D) 19 Introduction 1.5 Product Identification The following figure shows the location of the board’s serial number. Figure 1-4 20 Location of Product Serial Number COMX-CAR-610 COM Express Carrier Board Installation and Use (6806800K26D) Chapter 2 Hardware Preparation and Installation 2.1 Environmental and Power Requirements You must make sure that the board, when operated in your particular system configuration, meets the environmental requirements specified below. Operating temperatures refer to the temperature of the air circulating around the board and not to the component temperature. Product Damage 2.1.1 High humidity and condensation on surfaces cause short circuits. Do not operate the system outside the specified environmental limits. Make sure the product is completely dry and there is no moisture on any surface before applying power. Environmental Requirements Table 2-1 Environmental Requirements Environmental Factor Operating Non-Operating Temperature 0 to +55°C -40 to +85°C Shock 20 g 11 ms sine or saw Vibration 0.01g ^2/Hz at 5-500 Hz Random Vibration Air Flow 400 LFM at 0 to 55°C Humidity 10-90% (non-condensing) COMX-CAR-610 COM Express Carrier Board Installation and Use (6806800K26D) 21 Hardware Preparation and Installation 2.1.2 Power Requirements The following table shows the power consumption of the carrier board without a COM Express module installed. Table 2-2 Carrier Board Power Consumption Item +5.0V POWER +3.3V POWER +12V POWER 5V SB POWER TOTAL POWER Power 50W 6W 160W 10W 240W Max Note: Including 120W power dissipation for COM-E module. The following table lists the onboard voltages that the DC input generates. The table also provides an estimate of the typical and maximum current required from the power supply. Table 2-3 Current Requirements from the Power Supply Supply Voltage Source Voltage Maximum Current VCC12 ATX power 12 V 13 A VCC5 ATX power 5V 10 A VCC3 ATX power 3V 2A VCC1_5 VCC3 1.5 V 0.5 A 5VSB ATX power 5V 2A 5VDual VCC1_5 and 5VSB 5V 10 A 3VDual VCC3 and 5VSB 3V 1A VCC1_8 VCC3 1.8 V 0.5 A 22 COMX-CAR-610 COM Express Carrier Board Installation and Use (6806800K26D) Hardware Preparation and Installation 2.2 Unpacking and Inspecting the Board Damage of Circuits Electrostatic discharge and incorrect installation and removal of the product can damage circuits or shorten its life. Before touching the product make sure that you are working in an ESD-safe environment or wearing an ESD wrist strap or ESD shoes. Hold the product by its edges and do not touch any components or circuits. 1. Verify that you have received all items of your shipment: Printed Quick Start Guide and Safety Notes COMX-CAR-610 COM Express Carrier Board Accessories: — Cable, URAT, 2X5PIN housing to DB9PIN connector, with I/O panel, 300MM length — Cable, USB, 2X5PIN housing to USB X 2 connector, with I/O panel, 300MM length — Cable, LPT, 2X13PIN housing to DB25 PIN connector, with I/O panel, 300MM length — Cable, PS/2, MINI DIN6P to PS/2 connector, 300MM length — COMX-CAR-610 Carrier Board I/O Shield COMX-CAR-610 COM Express Carrier Board Installation and Use (6806800K26D) 23 Hardware Preparation and Installation 2. Check for damage and report any damage or differences to customer service. 3. Remove the desiccant bag shipped together with the product. Environmental Damage 2.3 Improper disposal of used products may harm the environment. Always dispose of used products according to your country’s legislation and manufacturer’s instructions. Installation and Removal of the COM Express Module The assembled COM Express module with the attached heat spreader is attached to a carrier board. Installing the COM Express Module on the Carrier Board 1. Line up the board-to-board connector of the COM Express module with the boardto-board connector of the COMX-CAR-610. 2. Make sure that the interconnectors are properly aligned and that the seven standoffs have contact with the top of the COMX-CAR-610. 3. Turn over the COM Express module and the COMX-CAR-610. 4. From the backside of the COMX-CAR-610, locate the screw holes. 5. Use the screws to fasten the COM Express module assembly to the COMX-CAR610. 24 COMX-CAR-610 COM Express Carrier Board Installation and Use (6806800K26D) Hardware Preparation and Installation Removing the COM Express Module from the Carrier Board 1. Turn over the COM Express module and the COMX-CAR-610. 2. On the back of the COMX-CAR-610, locate the seven screws that connect the COM Express module to the COMX-CAR-610. 3. Loosen and remove the screws. 4. While holding the edges, pull the COM Express module from the COMX-CAR-610. COMX-CAR-610 COM Express Carrier Board Installation and Use (6806800K26D) 25 Hardware Preparation and Installation 2.4 Replacing the Onboard Battery Product Damage Incorrect replacement of lithium batteries can result in a hazardous explosion. When exchanging the on-board lithium battery, make sure that the new and the old battery are exactly the same battery models. If the respective battery model is not available, contact your local Emerson sales representative for the availability of alternative officially approved battery models. PCB and Battery Holder Damage Removing the battery with a screw driver may damage the PCB or the battery holder. Do not use a screw driver to remove the battery from its holder. Data Loss Installing another battery type than the one that is mounted at product delivery may cause data loss since other battery types may be specified for other environments or may have a shorter lifetime. Only use the same type of lithium battery as is already installed. 1. Remove the old battery. 2. Install the new battery with the plus sign (+) facing up. 3. Dispose of the old battery according to your country’s legislation and in an environmentally safe way. 26 COMX-CAR-610 COM Express Carrier Board Installation and Use (6806800K26D) Chapter 3 Controls, LEDs, and Connectors 3.1 Carrier Board Layout Figure 3-1 COMX-CAR-610 COM Express Carrier Board Component Layout COMX-CAR-610 COM Express Carrier Board Installation and Use (6806800K26D) 27 Controls, LEDs, and Connectors 3.2 COM Express Board-to-Board Connector This section details the pin assignments on the COM Express connector based on the Type 6 Specification. Table 3-1 COM Express Connector Pin Definition Row A B C D 1 GND(FIXED) GND (FIXED) GND (FIXED) GND (FIXED) 2 GBE0_MDI3- GBE0_ACT# GND GND 3 GBE0_MDI3+ LPC_FRAME# USB0_SSRX- USB0_SSTX- 4 GBE0_LINK100# LPC_AD0 USB0_SSRX+ USB0_SSTX+ 5 GBE0_LINK1000# LPC_AD1 GND GND 6 GBE0_MDI2- LPC_AD2 USB1_SSRX- USB1_SSTX- 7 GBE0_MDI2+ LPC_AD3 USB1_SSRX+ USB1_SSTX+ 8 GBE0_LINK# LPC_DRQ0# GND GND 9 GBE0_MDI1- LPC_DRQ1# USB2_SSRX- USB2_SSTX- 10 GBE0_MDI1+ LPC_CLK USB2_SSRX+ USB2_SSTX+ 11 GND(FIXED) GND(FIXED) GND(FIXED) GND(FIXED) 12 GBE0_MDI0- PWRBTN# USB3_SSSRX- USB3_SSTX- 13 GBE0_MDI0+ SMB_CK USB3_SSRX+ USB3_SSTX+ 14 GBE0_CTREF SMB_DAT GND GND 15 SUS_S3# SMB_ALERT# DDI1_PAIR6+ DDI1_AUX+ 16 SATA0_TX+ SATA1_TX+ DDI1_PAIR6- DDI1_AUX- 17 SATA0_TX- SATA1_TX- RSVD RSVD 18 SUS_S4# SUS_STAT# RSVD RSVD 19 SATA0_RX+ SATA1_RX+ PCIE_RX6+ PCIE_TX6+ 20 SATA0_RX- SATA1_RX- PCIE_RX6- PCIE_TX6- 21 GND(FIXED) GND(FIXED) GND(FIXED) GND(FIXED) 22 SATA2_TX+ SATA3_TX+ PCIE_RX7+ PCIE_TX7+ 23 SATA2_TX- SATA3_TX- PCIE_RX7- PCIE_TX7- 28 COMX-CAR-610 COM Express Carrier Board Installation and Use (6806800K26D) Controls, LEDs, and Connectors Table 3-1 COM Express Connector Pin Definition (continued) Row A B C D 24 SUS_S5# PWR_OK DDI1_HPD RSVD 25 SATA2_RX+ SATA3_RX+ DDI1_PAIR4+ RSVD 26 SATA2_RX- SATA3_RX- DDI1_PAIR4- DDI1_PAIR0+ 27 BATLOW# WDT RSVD DDI1_PAIR0- 28 ATA_ACT# AC/HDA_SDIN2 RSVD RSVD 29 AC/HDA_SYNC AC/HDA_SDIN1 DDI1_PAIR5+ DDI1_PAIR1+ 30 AC/HDA_RST# AC/HDA_SDIN0 DDI1_PAIR5- DDI1_PAIR1- 31 GND(FIXED) GND(FIXED) GND(FIXED) GND(FIXED) 32 AC/HDA_BITCLK SPKR DDI2_AUX+ DDI1_PAIR2+ 33 AC/HDA_SDOUT I2C_CK DDI2_AUX- DDI1_PAIR2- 34 BIOS_DISABLE# I2C_DAT DDI2_CTRLCLK DDI2_CTRLDATA 35 THRMTRIP# THRM# RSVD RSVD 36 USB6- USB7- DDI3_AUX+ DDI1_PAIR3+ 37 USB6+ USB7+ DDI3_AUX- DDI1_PAIR3- 38 USB_6_7_OC# USB_4_5_OC# DDI3_CTRLCLK DDI3_CTRLDATA 39 USB4- USB5- DDI3_PAIR0+ DDI2_PAIR0+ 40 USB4+ USB5+ DDI3_PAIR0- DDI2_PAIR0- 41 GND(FIXED) GND(FIXED) GND(FIXED) GND(FIXED) 42 USB2- USB3- DDI3_PAIR0+ DDI2_PAIR1+ 43 USB2+ USB3+ DDI3_PAIR0- DDI2_PAIR1- 44 USB_2_3_OC# USB_0_1_OC# DDI3_HPD DDI2_HPD 45 USB0- USB1- RSVD RSVD 46 USB0+ USB1+ DDI3_PAIR2+ DDI2_PAIR2+ 47 VCC_RTC EXCD1_PERST# DDI3_PAIR2- DDI2_PAIR2- 48 EXCD0_PERST# EXCD1_CPPE# RSVD RSVD 49 EXCD0_CPPE# SYS_RESET# DDI3_PAIR3+ DDI2_PAIR3+ 50 LPC_SERIRQ CB_RESET# DDI3_PAIR3- DDI2_PAIR3- COMX-CAR-610 COM Express Carrier Board Installation and Use (6806800K26D) 29 Controls, LEDs, and Connectors Table 3-1 COM Express Connector Pin Definition (continued) Row A B C D 51 GND(FIXED) GND(FIXED) GND(FIXED) GND(FIXED) 52 PCIE_TX5+ PCIE_RX5+ PEG_RX0+ PEG_TX0+ 53 PCIE_TX5- PCIE_RX5- PEG_RX0- PEG_TX00- 54 GPI0 GPO1 TYPE0# PEG_LANE_RV# 55 PCIE_TX4+ PCIE_RX4+ PEG_RX1+ PEG_TX1+ 56 PCIE_TX4- PCIE_RX4- PEG_RX1- PEG_TX1- 57 GND GPO2 TYPE1# TYPE2# 58 PCIE_TX3+ PCIE_RX3+ PEG_RX2+ PEG_TX2+ 59 PCIE_TX3- PCIE_RX3- PEG_RX2- PEG_TX2- 60 GND(FIXED) GND(FIXED) GND(FIXED) GND(FIXED) 61 PCIE_TX2+ PCIE_RX2+ PEG_RX3+ PEG_TX3+ 62 PCIE_TX2- PCIE_RX2- PEG_RX3- PEG_TX3- 63 GPI1 GPO3 RSVD RSVD 64 PCIE_TX1+ PCIE_RX1+ RSVD RSVD 65 PCIE_TX1- PCIE_RX1- PEG_RX4+ PEG_TX4+ 66 GND WAKE0# PEG_RX4- PEG_TX4- 67 GPI2 WAKE1# RSVD GND 68 PCIE_TX0+ PCIE_RX0+ PEG_RX5+ PEG_TX5+ 69 PCIE_TX0- PCIE_RX0- PEG_RX5- PEG_TX5- 70 GND(FIXED) GND(FIXED) GND(FIXED) GND(FIXED) 71 LVDS_A0+ LVDS_B0+ PEG_RX6+ PEG_TX6+ 72 LVDS_A0- LVDS_B0- PEG_RX6- PEG_TX6- 73 LVDS_A1+ LVDS_B1+ DDI1_CTRLDATA DDI1_CTRLCLK 74 LVDS_A1- LVDS_B1- PEG_RX7+ PEG_TX7+ 75 LVDS_A2+ LVDS_B2+ PEG_RX7- PEG_TX7- 76 LVDS_A2- LVDS_B2- GND GND 77 LVDS_VDD_EN LVDS_B3+ RSVD IDE_CBLID# 30 COMX-CAR-610 COM Express Carrier Board Installation and Use (6806800K26D) Controls, LEDs, and Connectors Table 3-1 COM Express Connector Pin Definition (continued) Row A B C D 78 LVDS_A3+ LVDS_B3- PEG_RX8+ PEG_TX8+ 79 LVDS_A3- LVDS_BKLT_EN PEG_RX8- PEG_TX8- 80 GND(FIXED) GND(FIXED) GND(FIXED) GND(FIXED) 81 LVDS_A_CK+ LVDS_B_CK+ PEG_RX9+ PEG_TX9+ 82 LVDS_A_CK- LVDS_B_CK- PEG_RX9- PEG_TX9- 83 LVDS_I2C_CK LVDS_BKLT_CTRL RSVD RSVD 84 LVDS_I2C_DAT VCC_5V_SBY GND GND 85 GPI3 VCC_5V_SBY PEG_RX10+ PEG_TX10+ 86 KBD_RST# VCC_5V_SBY PEG_RX10- PEG_TX10- 87 KBD_A20GATE VCC_5V_SBY GND GND 88 PCIE0_CK_REF+ RSVD PEG_RX11+ PEG_TX11+ 89 PCIE0_CK_REF- VGA_RED PEG_RX11- PEG_TX11- 90 GND(FIXED) GND(FIXED) GND(FIXED) GND(FIXED) 91 SPI_CS0# VGA_GRN PEG_RX12+ PEG_TX12+ 92 SPI_MISO VGA_BLU PEG_RX12- PEG_TX12- 93 GPO0 VGA_HSYNC GND GND 94 SPI_CLK VGA_VSYNC PEG_RX13+ PEG_TX13+ 95 SPI_MOSI VGA_I2C_CK PEG_RX13- PEG_TX13- 96 GND VGA_I2C_DAT GND GND 97 VCC_12V RSVD RSVD PEG_ENABLE# 98 VCC_12V RSVD PEG_RX14+ PEG_TX14+ 99 VCC_12V RSVD PEG_RX14- PEG_TX14- 100 GND(FIXED) GND(FIXED) GND(FIXED) GND(FIXED) 101 VCC_12V VCC_12V PEG_RX15+ PEG_TX15+ 102 VCC_12V VCC_12V PEG_RX15- PEG_TX15- 103 VCC_12V VCC_12V GND GND 104 VCC_12V VCC_12V VCC_12V VCC_12V COMX-CAR-610 COM Express Carrier Board Installation and Use (6806800K26D) 31 Controls, LEDs, and Connectors Table 3-1 COM Express Connector Pin Definition (continued) Row A B C D 105 VCC_12V VCC_12V VCC_12V VCC_12V 106 VCC_12V VCC_12V VCC_12V VCC_12V 107 VCC_12V VCC_12V VCC_12V VCC_12V 108 VCC_12V VCC_12V VCC_12V VCC_12V 109 VCC_12V VCC_12V VCC_12V VCC_12V 110 GND(FIXED) GND(FIXED) GND(FIXED) GND(FIXED) 3.3 LEDs Table 3-2 LEDs 32 States Location Description S0 D20 ON: System is full on S3 D22 ON: System is suspended to memory S4 D24 ON: System is hybernating S5 D23 ON: System is off System PWROK D21 ON: All system power is OK Type6 Error D34 ON: Module does not comply with Type 6 spec Thermal Trip D26 ON: CPU is hot; system needs to be shut down Suspend Status D28 ON: Suspend Status Mini-CD SW OK D37 ON: USB and PCI-E have both switched to mini PCI-E slot COMX-CAR-610 COM Express Carrier Board Installation and Use (6806800K26D) Controls, LEDs, and Connectors 3.4 Connectors 3.4.1 Video 3.4.1.1 LVDS Table 3-3 P8, Backlight Wafer Header Pin Definition Pin Signal 1 12V 2 BKLT_EN 3 GND 4 BKLT_CTRL 5 5V Table 3-4 P6, LVDS Connector Pin Definition Pin Signal Pin Signal 1 LVDSA_DATA0_P 2 LVDSB_DATA0_P 3 LVDSA_DATA0_N 4 LVDSB_DATA0_N 7 LVDSA_DATA1_P 8 LVDSB_DATA1_P 9 LVDSA_DATA1_N 10 LVDSB_DATA1_N 13 LVDSA_DATA2_P 14 LVDSB_DATA2_P 15 LVDSA_DATA2_N 16 LVDSB_DATA2_N 19 LVDSA_DATA3_P 20 LVDSB_DATA3_P 21 LVDSA_DATA3_N 22 LVDSB_DATA3_N 25 LVDSA_CLK_P 26 LVDSB_CLK_P 27 LVDSA_CLK_N 28 LVDSB_CLK_N 31 LVDS_I2C_CLK 32 LVDS_I2C_DATA COMX-CAR-610 COM Express Carrier Board Installation and Use (6806800K26D) 33 Controls, LEDs, and Connectors Table 3-4 P6, LVDS Connector Pin Definition (continued) Pin Signal Pin Signal 33,35,37,39 VDD (3.3V OR 5V) 36,38,40 VDD (12V) 5, 11,17,23,29 GND 6,12,18,24,3 0,34 GND The 3 V or 5 V DC LVDS power supply is configured through the 3-pin jumper P7. Table 3-5 P7, LVDS Power Supply Jumper Configuration Jumper Setting Configuration P7 (1-2) 3.3V (Default) P7 (2-3) 5V The 12 V DC LVDS power supply is configured through the 3-pin header P35 Table 3-6 P35, LVDS Power Supply Jumper Configuration 3.4.1.2 Jumper Setting Configuration P35 (1-2) 12V P35 (2-3) NC (Default) VGA Table 3-7 J5, VGA Connector Pin Definition 34 Pin Signal Pin Signal V1 CRT_R V2 CRT_G V3 CRT_B V4 NC V5 GND V6 GND V7 GND V8 GND V9 5V V10 GND COMX-CAR-610 COM Express Carrier Board Installation and Use (6806800K26D) Controls, LEDs, and Connectors Table 3-7 J5, VGA Connector Pin Definition (continued) 3.4.1.3 Pin Signal Pin Signal V11 NC V12 DDCDATA V13 HSYNC V14 VSYNC V15 DDCCLK HDMI Table 3-8 J5, HDMI Connector Pin Definition 3.4.1.4 Pin Signal Pin Signal H1 OUT_D2+ H2 GND H3 OUT_D2- H4 OUT_D1+ H5 GND H6 OUT_D1- H7 OUT_D0+ H8 GND H9 OUT_D0- H10 TLC H11 GND H12 TLC- H13 NC H14 NC H15 SCL_IN H16 SDA_IN H17 GND H18 5V H19 HPD_IN Display Port Table 3-9 J3 and J4, Display Port Connector Pin Definition Pin Signal 1 DP_0_P 3 DP_0_N COMX-CAR-610 COM Express Carrier Board Installation and Use (6806800K26D) 35 Controls, LEDs, and Connectors Table 3-9 J3 and J4, Display Port Connector Pin Definition (continued) 3.4.2 Pin Signal 4 DP_1_P 6 DP_1_N 7 DP_2_P 9 DP_2_N 10 DP_3_P 12 DP_3_N 13 DP_AUX_EN_N 15 DP_AUX_P 17 DP_AUX_N 18 DP_HPD 20 VCC_3 2,5,8,11,14,16,19 GND Audio Table 3-10 J16, Audio Jack Connector Pin Definition 36 Pin Signal Pin Signal A1 LIN_L A2 LIN_JD A3 AGND A4 LIN_R B1 LOUT_L B2 LOUT_JD B3 AGND B4 LOUT_R C0 AGND C1 MIC1L C2 MIC1_JD C3 AGND C4 MIC1R MH1~MH4 AGND COMX-CAR-610 COM Express Carrier Board Installation and Use (6806800K26D) Controls, LEDs, and Connectors Table 3-11 P11, Audio Header Pin Definition 3.4.3 Pin Signal Pin Signal 1 MIC2_L 2 GND 3 MIC2_R 4 NC 5 LOUT2_R 6 MIC2_JD 7 GND 8 KEY 9 LOUT2_L 10 LOUT2_JD LAN Table 3-12 J1, LAN Connector Pin Definition Pin Signal Pin Signal 1 NC 14 1.8V 2 LAN1_MID3_N 15 LAN2_MID0_P 3 LAN1_MID2_P 16 LAN2_MID1_N 4 GBE0_CTREF 17 1.8V 5 LAN1_MID1_N 18 LAN2_MID2_P 6 LAN1_MID0_P 19 LAN2_MID3_N 7 GBE0_CTREF 20 GND 8 LAN1_MID3_P 21 LAN2_MID0_N 9 GBE0_CTREF 22 1.8V 10 LAN1_MID2_N 23 LAN2_MID1_P 11 LAN1_MID1_P 24 LAN2_MID2_N 12 GBE0_CTREF 25 1.8V 13 LAN1_MID0_N 26 LAN2_MID3_P 31 LAN1_LED_LINK_N 27 LAN2_LED_LINK_N 32 LAN1_LED_LINK_P 28 LAN2_LED_LINK_P 33 LAN1_LED_ACT_N 29 LAN2_LED_ACT_N COMX-CAR-610 COM Express Carrier Board Installation and Use (6806800K26D) 37 Controls, LEDs, and Connectors Table 3-12 J1, LAN Connector Pin Definition (continued) 3.4.4 Pin Signal Pin Signal 34 LAN1_LED_ACT_P 30 LAN2_LED_ACT_P PCI Express Jumpers P9, P24, and P25 are used to configure PCI Express multiplexed devices. Table 3-13 P9 Jumper Setting Jumper Setting Configuration P9 (1-2) x4 PCI-E slot P9 (2-3) x1 PCI-E slot (Default) Table 3-14 P24 Jumper Setting Jumper Setting Configuration P24 (1-2) x4 PCI-E slot P24 (2-3) PCI-E Mini Card (Default) Table 3-15 P25 Jumper Setting 38 Jumper Setting Configuration P25 (1-2) x4 PCI-E slot P25 (2-3) LAN (Default) COMX-CAR-610 COM Express Carrier Board Installation and Use (6806800K26D) Controls, LEDs, and Connectors 3.4.5 USB 3.4.5.1 USB 2.0 Table 3-16 P2, USB 2.0 Header Pin Definition Pin Signal Pin Signal 1 5VDUAL 2 5VDUAL 3 USB1 _N 4 USB2_N 5 USB1_P 6 USB2_P 7 GND 8 GND 9 NC 10 Key P1, a USB 2.0 header could be used for eUSB flash applications. Table 3-17 P1, USB 2.0 Header Pin Definition Pin Signal Pin Signal 1 5VDUAL 2 5VDUAL 3 USB _N 4 NC 5 USB_P 6 NC 7 GND 8 GND 9 NC 10 Key P39, another USB 2.0 header could be used for PCI Express Mini Card applications. Table 3-18 P39, USB 2.0 Header Pin Definition Pin Signal Pin Signal 1 5VDUAL 2 NC 3 USB _N 4 NC COMX-CAR-610 COM Express Carrier Board Installation and Use (6806800K26D) 39 Controls, LEDs, and Connectors Table 3-18 P39, USB 2.0 Header Pin Definition (continued) Pin Signal Pin Signal 5 USB_P 6 NC 7 GND 8 GND 9 NC 10 Key You need to set a 3-pin jumper (P10) if you want to configure USB multiplexed devices. Table 3-19 P10, Jumper Settings for Configuring USB Multiplexed Devices 3.4.5.2 Jumper Setting Configuration P10 (1-2) USB 2.0 onboard P10 (2-3) Mini Card (Default) USB 3.0 Table 3-20 J14 and J15, USB 3.0 Connector Pin Definition 40 Pin Signal Pin Signal 1 5V 2 USB_P0 _N 3 USB_P0 _P 4 GND 5 USB0_SSRX _N 6 USB0_SSRX _P 7 GND 8 USB0_SSTX _N 9 USB0_SSTX _P 10 5V 11 USB_P1 _N 12 USB_P1 _P 13 GND 14 USB1_SSRX_N 15 USB1_SSRX _P 16 GND 17 USB1_SSTX _N 18 USB1_SSTX _P COMX-CAR-610 COM Express Carrier Board Installation and Use (6806800K26D) Controls, LEDs, and Connectors 3.4.6 Storage Table 3-21 P10—P13, SATA Socket Pin Definition Pin Signal 1 GND 2 SATA_TX_P 3 SATA_TX_N 4 GND 5 SATA_RX_N 6 SATA_RX_P 7 GND 3.4.7 Super I/O 3.4.7.1 Fan Table 3-22 P3 and P27, Fan Header Pin Definition Pin Signal 1 GND 2 12V 3 TACH 4 PWM COMX-CAR-610 COM Express Carrier Board Installation and Use (6806800K26D) 41 Controls, LEDs, and Connectors 3.4.7.2 PS/2 Table 3-23 P26, PS/2 (Keyboard and Mouse) Connectors Pin Definition 3.4.7.3 Pin Signal 1 5V 2 KB_DATA 3 KB_CLK 4 MS_DATA 5 MS_CLK 6 GND LPT Port Table 3-24 P32, LPT Header Pin Definition 42 Pin Signal Pin Signal 1 STB_N 2 PD0 3 PD1 4 PD2 5 PD3 6 PD4 7 PD5 8 PD6 9 PD7 10 ACK_N 11 BUSY_N 12 PE_N 13 SLCT_N 14 AFD_N 15 ERR_N 16 INIT_N 17 SLIN_N 18—25 GND 26 Key COMX-CAR-610 COM Express Carrier Board Installation and Use (6806800K26D) Controls, LEDs, and Connectors 3.4.7.4 Serial Ports Table 3-25 P18—P23, RS-232 Headers Pin Definition Pin Signal Pin Signal 1 DCD_N 2 RXD 3 TXD 4 DTR 5 GND 6 DSR_N 7 RTS_N 8 CTS_N 9 RI_N 10 Key Table 3-26 P37 and P33, RS-422/RS-485 Headers Pin Definition Pin Signal 1 RS422_RX_N 2 RS422_RX_P 3 RS422_TX_N/RS485_N 4 RS422_TX_P/RS485_P You need to set jumpers P34 and P41 to configure the serial ports defined above as RS-232 or RS-422/485 ports. Table 3-27 Set Jumpers P34 and P41 Jumper Setting Configuration P34/P41 (1-2) RS232 (Default) P34/P41 (3-4) RS422 P34/P41 (5-6) RS485 COMX-CAR-610 COM Express Carrier Board Installation and Use (6806800K26D) 43 Controls, LEDs, and Connectors Table 3-28 P40 PS_ON Select Jumper 3.4.8 Jumper Setting Configuration P40 (1-2) Powe on through SIO (Default) P40 (2-3) S3 and Type VI Power Table 3-29 ATX Power Supply Connector Pin Definition Pin Signal 1 GND 2 GND 3 +12V 4 +12V 3.5 Headers 3.5.1 LPC Table 3-30 P29, Low Pin Count (LPC) Header Pin Definition 44 Pin Signal 1 CLK_33M 2 AD1 3 RST_N 4 AD0 5 FRAME_N 6 3.3V COMX-CAR-610 COM Express Carrier Board Installation and Use (6806800K26D) Controls, LEDs, and Connectors Table 3-30 P29, Low Pin Count (LPC) Header Pin Definition (continued) 3.5.2 Pin Signal 7 AD3 8 GND 9 AD2 Trusted Platform Module (TPM) Table 3-31 P28, Trusted Platform Module (TPM) Header Pin Definition 3.5.3 Pin Signal Pin Signal 1 CLK_33M 2 GND 3 FRAME_N 4 NC 5 RST_N 6 5V 7 AD3 8 AD2 9 3.3V 10 AD1 11 AD0 12 GND 13 SMB_CLK 14 SMB_DATA 15 3VDUAL 16 INT_SERIRQ 17 GND 18 CLKRUN_N 19 3.3V 20 DRQ0_N GPIO Table 3-32 P30, GPIO Header Pin Definition Pin Signal 1 GPO0 COMX-CAR-610 COM Express Carrier Board Installation and Use (6806800K26D) 45 Controls, LEDs, and Connectors Table 3-32 P30, GPIO Header Pin Definition (continued) 3.5.4 Pin Signal 2 GPI0 3 GPO1 4 GPI1 5 GPO2 6 GPI2 7 GPO3 8 GPI3 9 3.3V 10 GND Miscellaneous I/O Table 3-33 P16, Miscellaneous I/O Header Pin Definition 46 Pin Signal Pin Signal 1 HD_LED 2 POWER_LED 3 HD_LED# 4 POWER_LED# 5 GND 6 EXT_PWRBTN_N 7 PM_SYSRST_N 8 GND 9 NC 10 Key COMX-CAR-610 COM Express Carrier Board Installation and Use (6806800K26D) Controls, LEDs, and Connectors 3.5.5 SPI Flash Table 3-34 P13, SPI Flash Header Pin Definition Pin Signal 1 3.3V DUAL 2 GND 3 SPI_CS_N 4 SF_SPI_CLK 5 SF_SPI_SO 6 SF_SPI_SI 7 NC 8 NC You must set the jumper defined below if you want to configure how the SPI flash is accessed. Table 3-35 P12 and P14, Jumper Settings for SPI Flash SF100 header P12 Jumper Setting Configuration P12 (1-2) To PCH (Default) P12 (2-3) To SF100 header P14 Jumper Setting Configuration P14 (1-2) Enable SPI flash chip U9 and disable U10 (Default) P14 (2-3) Enable SPI flash chip U10 and disable U9 Use Jumper P15 to enable or disable the BIOS on the COM Express module Table 3-36 P15 and P38, Jumper Configuration to Enable/Disable BIOS P15 Jumper Setting Configuration P15 (1-2) Enable BIOS on the module (Default) COMX-CAR-610 COM Express Carrier Board Installation and Use (6806800K26D) 47 Controls, LEDs, and Connectors Table 3-36 P15 and P38, Jumper Configuration to Enable/Disable BIOS (continued) P15 Jumper Setting Configuration P15 (2-3) Disable BIOS on the module P38 Jumper Setting Configuration P38 (1-2) Enable CS1 of BIOS on the module (Default) P38 (2-3) Disable CS1 of BIOS on the module Table 3-37 P17 Case Open Select Header 3.5.6 P17 Setting Configuration P17 (1-2) Disable the case open select header (Default) P17 (2-3) Enable the case open select header EEPROM Table 3-38 P31, EEPROM Header Pin Definition 48 Pin Signal 1 I2C_CLK 2 I2C_DATA 3 GND COMX-CAR-610 COM Express Carrier Board Installation and Use (6806800K26D) Chapter 4 Functional Description 4.1 Block Diagram Figure 4-1 4.2 COM Express Type 6 Block Diagram Video The COMX-CAR-610 supports dual-independent displays using the Mobile Intel processor Integrated Graphics Controller. This carrier supports following graphic interfaces: COMX-CAR-610 COM Express Carrier Board Installation and Use (6806800K26D) 49 Functional Description 4.2.1 LVDS The graphic controller supports up to 24-bit colors per pixel so the COMX-CAR-610 could support 24-bit LCD panels using different cables. The board provides an LVDS and backlight header. The LVDS header is a 40 pin, dual-row header, while the backlight is a 5 pin wafer header. For information on pin assignments, Table 3-4 on page 33 4.2.2 VGA The carrier board supports VGA output from the COM Express connector. The VGA signals come from the same connector as the HDMI signals. For information on pin assignments, Table 3-7 on page 34. 4.2.3 HDMI The COMX-CAR-610 supports an HDMI interface from DDI1 of the COM Express connector. For information on pin assignments, Table 3-8 on page 35. 4.2.4 Display Port The COMX-CAR-610 supports two Display Ports from DDI2 and DDI3 of the COM Express connector. For information on pin assignments, see Table 3-9 on page 35. 4.3 Audio The COMX-CAR-610 supports line output, microphone output, and line input using industry standard 3.5 mm mini-jack connectors. The board also provides a two-channel HD audio as part of the integrated High-Definition Multimedia Interface (HDMI). The integrated HDMI requires a 1.5 V CODEC. For information on pin assignments, see Table 3-10 on page 36 and Table 3-11 on page 37. 50 COMX-CAR-610 COM Express Carrier Board Installation and Use (6806800K26D) Functional Description 4.4 LAN There are two Gigabit Ethernet ports: one is routed from the COM Express connector, and the other from WG82574L. The RJ-45 connectors are located on the board and both support 100/1000 Base T. The LAN connectors have two integrated LEDs. When the green LED is OFF, it indicates that LAN link is not established. When it is ON, it indicates that a LAN link is established. When it "blinks," it indicates LAN link activity. A second green LED shall BLINK indicating the activity state of 100Mbps or 1000Mbps LAN. For information on pin assignments, see Table 3-12 on page 37. 4.5 PCI Express The board has one x1 PCI-E slot and and one x16 PCI-E slot. The x16 PCI-E slot can be used for PCI Express Graphics (PEG). There are also two x4 PCI-E slots. One of the x4 slots can be used for other applications by using PCI-E multiplexer devices. For information on pin assignments, see Table 3-13 on page 38. Figure 4-2 PCI Express Block Diagram COMX-CAR-610 COM Express Carrier Board Installation and Use (6806800K26D) 51 Functional Description 4.5.1 PCI Express Mini Card The carrier board comes with a PCI Express Mini Card connector that supports the Intel WiMAX/WiFi Link 5050 and Intel WiFi Link 5000 series of wireless devices. The connector conforms to PCI Express Mini Card Electromechanical Specification 1.1, implementing both PCI Express and USB interfaces. The PCI-E Mini Card is available only when the related PCI-E MUX and USB MUX are both set appropriately. Figure 4-3 4.6 PCI Express Mini Card Setting USB The are four USB 2.0 ports on the board. Two of them could be used for other applications: one for external USB flash, and the other for a PCI-E Mini Card through a USB MUX device. All USB 2.0 ports support low-speed, full-speed, and high-speed transfer rates using the USB 2.0 Enhanced Host Controller Interface (EHCI). There are also four USB 3.0 ports from COM Express connector. The USB 3.0 ports support lowspeed, full-speed, and high-speed transfer rates using the USB 3.0 Enhanced Host Controller Interface (EHCI). For information on pin assignments, see Table 3-20 on page 40. 4.7 Storage There are four SATA sockets on the carrier board for connecting to internal SATA 2.0 devices. 52 COMX-CAR-610 COM Express Carrier Board Installation and Use (6806800K26D) Functional Description For information on pin assignments, see Table 3-21 on page 41. 4.8 Super I/O The COMX-CAR-610 provides a Super I/O for extending several function modules. For information on pin assignments, see Super I/O on page 41. Figure 4-4 4.8.1 Super I/O Block Diagram Voltage and Thermal Monitoring The COMX-CAR-610 provides voltage monitoring capabilities on 3 V, 5 V, and 12 V rails, and also provides thermal monitoring capabilities for the COM Express module and its environment. Voltage and thermal values are read by the management engine, and alerts are reported to the management engine. COMX-CAR-610 COM Express Carrier Board Installation and Use (6806800K26D) 53 Functional Description 4.8.2 Fan Control There are two 4-wire fan headers on the COMX-CAR-610 for module fan and system fan. Fans support fan TACH input and PWM fan speed control. The board uses a 4-pin locking connector equivalent to Molex 47053-1000. For information on pin assignments, see Table 3-22 on page 41. 4.8.3 PS/2 There is a 6-pin wafer PS/2 header for keyboard and mouse. For information on pin assignments, see Table 3-23 on page 42. 4.8.4 LPT There is a 2 x 13 pin header for the LPT interface on the COMX-CAR-610. For information on pin assignments, see Table 3-24 on page 42. 4.8.5 RS-232 and RS-422/485 Ports The COMX-CAR-610 implements up to six RS-232 ports, two of which can be switched to RS422 or RS-485 ports by setting two jumpers on the 2 x 3 pin header. All the RS-232 ports are implemented as 2 x 5 pin, dual-row headers, and the RS-422/485 ports as 1 x 4 pin, single-row headers. Two of the six COM ports from the Super I/O can be configured as RS-232 ports, or as RS-422 or RS-485 ports by setting a 6-pin, dual-row jumper. For information on pin assignments, see Table 3-25 on page 43 and Table 3-26 on page 43. 54 COMX-CAR-610 COM Express Carrier Board Installation and Use (6806800K26D) Functional Description 4.9 SPI Flash There are two SPI flash chips. Each chip has a capacity of 4 MB for BIOS, Gigabit Ethernet, and ME. Figure 4-5 SPI Flash Block Diagram The flash chips can be accessed either by the PCH or external devices with SPI interface through a 2 x 4 pin SF100 header. A 3-pin jumper (P12) is supplied to configure how SPI flash is accessed, and when the SPI flash is set to be accessed by external devices through the SF100 header. Each of the SPI flash chips can be enabled or disabled by setting a 3-pin jumper (P14). For information on pin assignments, see Table 3-35 on page 47. The COMX-CAR-610 also provides two 3-pin jumpers (P15 and P38) to determine whether enable or disable the BIOS on the module. For information on pin assignments, see Table 3-36 on page 47. COMX-CAR-610 COM Express Carrier Board Installation and Use (6806800K26D) 55 Functional Description 4.10 Watchdog Timer The COMX-CAR-610 provides a watchdog timer (WDT), which is a combination of two watchdog timers coming from COM Express connector and Super I/O. Figure 4-6 Watchdog Timer Block Diagram A valid WDT output signal resets the COMX-CAR-610. The BIOS disables the device at boot (software is enabled when the watchdog application loads). The WDT is disabled before entering S3 state, and re-enabled upon exiting S3. 4.11 Real Time Clock (RTC) There is an onboard SMT battery holder. The battery holder allows for the quick and easy replacement of a 3 V button cell lithium battery which provides backup power to the onboard RTC. The RTC supports two lockable memory ranges. By setting bits in the configuration space, two 8-byte ranges can be locked to read and write accesses. This prevents unauthorized reading of passwords or other system security information. 56 COMX-CAR-610 COM Express Carrier Board Installation and Use (6806800K26D) Functional Description The RTC also supports a data alarm that allows for scheduling a wake up event up to 30 days in advance rather than just 24 hours in advance. 4.12 Wake Events The COMX-CAR-610 awakes from sleep states S3 and S4 when one of the following conditions occur: Table 4-1 Wake Events Wake Events Description PCI Express Through PE_WAKE_N LAN The management engine supports Wake-on-LAN (WOL) using wired LAN. USB - Power button If the power button is pressed for more than four seconds, it causes an unconditional transition to the S5 state. COMX-CAR-610 COM Express Carrier Board Installation and Use (6806800K26D) 57 Functional Description 58 COMX-CAR-610 COM Express Carrier Board Installation and Use (6806800K26D) Appendix A A Related Documentation A.1 Emerson Network Power—Embedded Computing Documents The publications listed below are referenced in this manual. You can obtain electronic copies of Emerson Network Power, Embedded Computing publications by contacting your local Emerson sales office. For released products, you can also visit our Web site for the latest copies of our product documentation. 1. Go to www.emersonnetworkpower.com/embeddedcomputing. 2. Under Resources, click Technical Documentation. 3. Enter the manual you are looking for in the search field. Use either the publication number or the complete name of the product to search for available manuals. Table A-1 Emerson Network Power, Embedded Computing Publications A.2 Document Title Publication Number COMX-CAR-610 COM Express Carrier Board Quick Start Guide 6806800A13 COMX-CAR-610 COM Express Carrier Board Release Notes TBD COMX-CAR-610 COM Express Carrier Board Safety Notes 6806800A12 COMX-CAR-610 Installation and Use 6806800K26 COMX-CAR-610 Quick Start Guide 6806800K27 COMX-CAR-610 Safety Notes 6806800K28 Manufacturers’ Documents You can also get additional information from manufacturers’ documentation. Note that the information in these documents are subject to change without prior notice. COMX-CAR-610 COM Express Carrier Board Installation and Use (6806800K26D) 59 Related Documentation 60 COMX-CAR-610 COM Express Carrier Board Installation and Use (6806800K26D) Safety Notes This section provides warnings that precede potentially dangerous procedures throughout this manual. Instructions contained in the warnings must be followed during all phases of operation, service, and repair of this equipment. You should also employ all other safety precautions necessary for the operation of the equipment in your operating environment. Failure to comply with these precautions or with specific warnings elsewhere in this manual could result in personal injury or damage to the equipment. Emerson intends to provide all necessary information to install and handle the product in this manual. Because of the complexity of this product and its various uses, we do not guarantee that the given information is complete. If you need additional information, ask your Emerson representative. The product has been designed to meet the standard industrial safety requirements. It must only be used in its specific area of office telecommunication industry, industrial control, and development. It must not be used in safety critical components, life supporting devices or on aircraft. Only personnel trained by Emerson or persons qualified in electronics or electrical engineering are authorized to install, remove or maintain the product. The information given in this manual is meant to complete the knowledge of a specialist and must not be used as replacement for qualified personnel. Keep away from live circuits inside the equipment. Operating personnel must not remove equipment covers. Only factory authorized service personnel or other qualified service personnel is allowed to remove equipment covers for internal subassembly or component replacement or any internal adjustment. Do not install substitute parts or perform any unauthorized modification of the equipment or the warranty may be voided. Contact your local Emerson representative for service and repair to make sure that all safety features are maintained. Emerson and our suppliers take significant steps to make sure that there are no bent pins on the backplane or connector damage to the boards prior to leaving the factory. Bent pins caused by improper installation or by inserting boards with damaged connectors could void the Emerson warranty for the backplane or boards. This product operates with dangerous voltages that can cause injury or death. Use extreme caution when handling, testing, and adjusting this equipment and its components. COMX-CAR-610 COM Express Carrier Board Installation and Use (6806800K26D) 61 Safety Notes EMC FCC Class A This equipment has been tested and found to comply with the limits for a Class A digital device, pursuant to Part 15 of the FCC Rules, EN55022. These limits are designed to provide reasonable protection against harmful interference when the equipment is operated in a commercial environment. This equipment generates, uses, and can radiate radio frequency energy and, if not installed and used in accordance with the instruction manual, can cause harmful interference to radio communications. Operation of this equipment in a residential area is likely to cause harmful interference in which case the user is required to correct the interference at his own expense. Use only shielded cables when connecting peripherals to assure that appropriate radio frequency emissions compliance is maintained. Installed blades must have the face plates installed and all vacant slots in the shelf must be covered. 62 COMX-CAR-610 COM Express Carrier Board Installation and Use (6806800K26D) Safety Notes For applications where this product is provided without a face plate, or where the face plate has been removed, your system chassis/enclosure must provide the required electromagnetic interference (EMI) shielding to maintain EMC compliance. Board products are tested in a representative system to show compliance with the above mentioned requirements. A proper installation in a compliant system maintains the required performance. As soon as you modify the product or change the default configuration you are responsible for complying with all relevant regulatory standards. VCCI This is a Class A product based on the standard of the Voluntary Control Council for Interference by Information Technology Interference (VCCI). If this equipment is used in a domestic environment, radio disturbance can arise. When such trouble occurs, the user is required to take corrective actions. Installation Damage of Circuits Electrostatic discharge and incorrect installation and removal of the product can damage circuits or shorten their life. Before touching the product make sure that your are working in an ESD-safe environment or wear an ESD wrist strap or ESD shoes. Hold the product by its edges and do not touch any components or circuits. COMX-CAR-610 COM Express Carrier Board Installation and Use (6806800K26D) 63 Safety Notes Operation Product Damage High humidity and condensation on surfaces cause short circuits. Do not operate the product outside the specified environmental limits. Make sure the product is completely dry and there is no moisture on any surface before applying power. Battery Data Loss Installing another battery type than the one that is mounted at product delivery may cause data loss since other battery types may be specified for other environments or may have a shorter lifetime. Only use the same type of lithium battery as is already installed. PCB and Battery Holder Damage Removing the battery with a screw driver may damage the PCB or the battery holder. Do not use a screw driver to remove the battery from its holder. Product Damage Incorrect replacement of lithium batteries can result in a hazardous explosion. When exchanging the on-board lithium battery, make sure that the new and the old battery are exactly the same battery models. If the respective battery model is not available, contact your local Emerson sales representative for the availability of alternative officially approved battery models. Environment Environmental Damage Improperly disposing of used products may harm the environment. Always dispose of used products according to your country’s legislation and manufacturer’s instructions. 64 COMX-CAR-610 COM Express Carrier Board Installation and Use (6806800K26D) Sicherheitshinweise Dieses Kapitel enthält Hinweise, die potentiell gefährlichen Prozeduren innerhalb dieses Handbuchs vorrangestellt sind. Beachten Sie unbedingt in allen Phasen des Betriebs, der Wartung und der Reparatur des Systems die Anweisungen, die diesen Hinweisen enthalten sind. Sie sollten außerdem alle anderen Vorsichtsmaßnahmen treffen, die für den Betrieb des Systems innerhalb Ihrer Betriebsumgebung notwendig sind. Wenn Sie diese Vorsichtsmaßnahmen oder Sicherheitshinweise, die an anderer Stelle diese Handbuchs enthalten sind, nicht beachten, kann das Verletzungen oder Schäden am System zur Folge haben. Emerson ist darauf bedacht, alle notwendigen Informationen zum Einbau und zum Umgang mit dem System in diesem Handbuch bereit zu stellen. Da es sich jedoch bei dem System um ein komplexes Produkt mit vielfältigen Einsatzmöglichkeiten handelt, können wir die Vollständigkeit der im Handbuch enthaltenen Informationen nicht garantieren. Falls Sie weitere Informationen benötigen sollten, wenden Sie sich bitte an die für Sie zuständige Geschäftsstelle von Emerson. Das Produkt erfüllt die für die Industrie geforderten Sicherheitsvorschriften und darf ausschließlich für Anwendungen in der Telekommunikationsindustrie, im Zusammenhang mit Industriesteuerungen und in der Entwicklung verwendet werden. Es darf nicht in sicherheitskritischen Anwendungen, lebenserhaltenden Geräten oder in Flugzeugen verwendet werden. Einbau, Wartung und Betrieb dürfen nur von durch Emerson ausgebildetem oder im Bereich Elektronik oder Elektrotechnik qualifiziertem Personal durchgeführt werden. Die in diesem Handbuch enthaltenen Informationen dienen ausschließlich dazu, das Wissen von Fachpersonal zu ergänzen, können dieses jedoch nicht ersetzen. Halten Sie sich von stromführenden Leitungen innerhalb des Systems fern. Entfernen Sie auf keinen Fall die Systemabdeckung. Nur werksseitig zugelassenes Wartungspersonal oder anderweitig qualifiziertes Wartungspersonal darf die Systemabdeckung entfernen, um Systemkomponenten zu ersetzen oder andere Anpassungen vorzunehmen. Installieren Sie keine Ersatzteile oder führen Sie keine unerlaubten Veränderungen am System durch, sonst verfällt die Garantie. Wenden Sie sich für Wartung oder Reparatur bitte an die für Sie zuständige Geschäftsstelle von Emerson. So stellen Sie sicher, dass alle sicherheitsrelevanten Aspekte beachtet werden. COMX-CAR-610 COM Express Carrier Board Installation and Use (6806800K26D) 65 Sicherheitshinweise Emerson und unsere Zulieferer unternehmen größte Anstrengungen um sicherzustellen, dass sich Pins und Stecker von Boards vor dem Verlassen der Produktionsstätte in einwandfreiem Zustand befinden. Verbogene Pins, verursacht durch fehlerhafte Installation oder durch Installation von Boards mit beschädigten Steckern kann die durch Emerson gewährte Garantie für Boards und Backplanes erlöschen lassen. Dieses Produkt wird mit gefährlichen Spannungen betrieben, die zu Verletzungen und Tod führen können. Seien Sie im Umgang mit dem Produkt und beim Testen und Anpassen des Produktes und seiner Komponenten äußerst vorsichtig. EMV FCC Class A Das Produkt wurde getestet und erfüllt die für digitale Geräte der Klasse A gültigen Grenzwerte gemäß den FCC-Richtlinien Abschnitt 15 bzw. EN 55022 Klasse A. Diese Grenzwerte sollen einen angemessenen Schutz vor Störstrahlung beim Betrieb des Produkts in Geschäfts-, Gewerbe- sowie Industriebereichen gewährleisten. Das Produkt arbeitet im Hochfrequenzbereich und erzeugt Störstrahlung. Bei unsachgemäßem Einbau und anderem als in diesem Handbuch beschriebenen Betrieb können Störungen im Hochfrequenzbereich auftreten. Diese Einrichtung kann im Wohnbereich Funkstörungen verursachen; in diesem Fall kann vom Betreiber verlangt werden, angemessene Maßnahmen durchzuführen und dafür aufzukommen. Benutzen Sie zum Anschließen von Peripheriegeräten ausschließlich abgeschirmte Kabel. So stellen Sie sicher, dass ausreichend Schutz vor Störstrahlung vorhanden ist. Die Blades müssen mit der Frontblende installiert und alle freien Steckplätze müssen mit Blindblenden abgedeckt sein. Änderungen, die nicht ausdrücklich von Emerson erlaubt sind, können Ihr Recht das System zu betreiben zunichte machen. 66 COMX-CAR-610 COM Express Carrier Board Installation and Use (6806800K26D) Sicherheitshinweise Wenn dieses Produkt ohne Frontblende ausgeliefert wird oder wenn die Frontblende entfernt wird, muss Ihr System die notwendigenSchutzmechnismen gegen elektromagnetische interferenzen bereitstellen, um die Einhaltung der eletromagnetischen Verträglichkeit des Systems zu gewährleisten. Boardprodukte werden in einem repräsentativen System getestet, um zu zeigen, dass das Board den oben aufgeführten EMV-Richtlinien entspricht. Eine ordnungsgemäße Installation in einem System, welches die EMV-Richtlinien erfüllt, stellt sicher, dass das Produkt gemäß den EMV-Richtlinien betrieben wird. Sobald Sie das Produkt oder seine Standardkonfiguration verändern, müssen Sie dafür sorgen, dass alle relevanten Richtlinien eingehalten werden. VCCI Das Produkt ist eine Einrichtung der Klasse A gemäß dem Standard des Voluntary Control Council for Interference von Information Technology Interference (VCCI). Wird das Produkt in Wohngegenden betrieben, können Störungen im Hochfrequenzbereich auftreten. In einem solchen Fall ist der Benutzer verpflichtet, entsprechende Gegenmaßnahmen zu ergreifen. System Installation Beschädigung von Schaltkreisen Elektrostatische Entladung und unsachgemäßer Ein- und Ausbau des Produktes kann Schaltkreise beschädigen oder ihre Lebensdauer verkürzen. Bevor Sie das Produkt oder elektronische Komponenten berühren, vergewissern Sie sich, daß Sie in einem ESD-geschützten Bereich arbeiten. COMX-CAR-610 COM Express Carrier Board Installation and Use (6806800K26D) 67 Sicherheitshinweise Betrieb Beschädigung des Systems Hohe Luftfeuchtigkeit und Kondensat auf den Oberflächen der Produkte kann zu Kurzschlüssen führen. Betreiben Sie die Produkte nur innerhalb der angegebenen Grenzwerte für die relative Luftfeuchtigkeit und Temperatur und stellen Sie vor dem Einschalten des Stroms sicher, dass sich auf den Produkten kein Kondensat befindet. Batterie Datenverlust Wenn Sie einen anderen Batterietyp installieren als der, der bei Auslieferung des Produktes installiert war, kann Datenverlust die Folge sein, da die neu installierte Batterie für andere Umgebungsbedingungen oder eine andere Lebenszeit ausgelegt sein könnte. Verwenden Sie daher den gleichen Batterietyp, der bei Auslieferung des Produktes installiert war. Beschädigung des PCBs und der Batteriehalterung Wenn Sie die Batterie mit einem Schraubendreher ausbauen, können das PCB und die Batteriehalterung beschädigt werden. Benutzen Sie keinesfalls einen Schraubendreher, um die Batterie aus der Halterung zu nehmen. Beschädigung des Produktes Fehlerhafter Austausch von Lithium-Batterien kann zu gefährlichen Explosionen führen. Wenn SIe die Lithium-Batterie auf dem Produkt austauschen, stellen Sie sicher, dass die alte und die neue Batterie vom gleichen Typ sind. Ist der Batterietyp nicht verfügbar, wenden Sie sich an Emerson um herauszufinden, welcher Batterietyp offiziell alternativ verwendet werden darf. 68 COMX-CAR-610 COM Express Carrier Board Installation and Use (6806800K26D) Sicherheitshinweise Umweltschutz Umweltverschmutzung Falsche Entsorgung der Produkte schadet der Umwelt. Entsorgen Sie alte Produkte gemäß der in Ihrem Land gültigen Gesetzgebung und den Empfehlungen des Herstellers. COMX-CAR-610 COM Express Carrier Board Installation and Use (6806800K26D) 69 Sicherheitshinweise 70 COMX-CAR-610 COM Express Carrier Board Installation and Use (6806800K26D) Index A abbreviations 11 B block diagram carrier board type 6 49 box contents 23 C conventions 13 E environmental requirements 21 I Installation Module 24 installing COM Express module 24 installing COM Express module 24 P power requirements 22 R removing COM Express module 24 onboard battery 26 removing COM Express module 24 removing onboard battery 26 requirements environmental 21 power 22 S shipment contents 23 COMX-CAR-610 COM Express Carrier Board Installation and Use (6806800K26D) 71 Index 72 COMX-CAR-610 COM Express Carrier Board Installation and Use (6806800K26D) HOW TO REACH LITERATURE AND TECHNICAL SUPPORT: For literature, training, and technical assistance and support programs, visit www.emersonnetworkpower.com/embeddedcomputing Emerson Network Power. The global leader in enabling Business-Critical Continuity™ AC Power Systems Connectivity DC Power Systems Embedded Computing Embedded Power Integrated Cabinet Solutions www.emersonnetworkpower.com/embeddedcomputing Outside Plant Power Switching & Control Precision Cooling Services Site Monitoring Surge & Signal Protection Emerson, Business-Critical Continuity, Emerson Network Power and the Emerson Network Power logo are trademarks and service marks of Emerson Electric Co. All other product or service names are the property of their respective owners. © 2011 Emerson Electric Co.