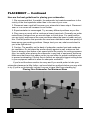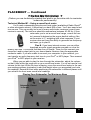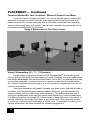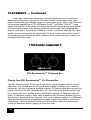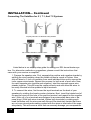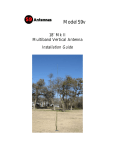
1
Compression Guidetm Series Owners Manual CG4, CG24 Monitor, Speedwoofertm 10 Written By People With Short Attention Spans Who Hate Manuals WAIT!! We know what you are thinking. This manual has a bunch of pages. Why not just ignore it and tear into the speakers? Relax! You don’t have to read the whole manual. As we are unfamiliar with your level of expertise, we have tried to cover all the bases. If you are just starting out, you will find a wealth of information oozing from these pages. If you are experienced in installing Audio/Video, feel free to skim the manual. Our feelings won’t be hurt. We’ll even suggest which sections you can skip. Designing speakers is an art form and so is setting them up correctly. We’ve gone to great lengths to make this manual clear and easy to read. Trust us; a little reading will go a long way! ▼You Can Skip This Section▼ INTRODUCTION This is the part of the manual where companies normally make you feel warm and fuzzy for choosing their products. And, as much as we’d like to point out what an intelligent and insightful person you are for choosing our speakers, we would rather let our products do the talking. Seriously though, you are about to be thrilled, not just now, but for years to come. This manual will show you, that by setting up your system correctly, you will get the maximum potential that we designed these speakers to deliver. We want you to enjoy listening to them as much as we enjoyed designing them. We will only be happy when we know you are. WE WOULD LIKE TO GET TO KNOW YOU BETTER As some of you may know, Rogersound Labs sold RSL Speaker Systems through its retail locations in Southern California. We always enjoyed the opportunity to get to know our customers personally. In these days of the digital age and the Internet, we miss that type of personal relationship. We haven’t forgotten the importance of you, our customer. Therefore, if it’s not too much trouble, after your speakers are set up, email us a photo or two of you in front of your RSL Speakers. We promise that we will only use them here at our headquarters. That way, when you call for any help, or just to say hello, we’ll have a better idea of who you are. Also, everybody these days asks you to fill out surveys and reviews. Frankly, it drives us nuts! However, if you can possibly email your comments to us, we would be appreciate it very much. 1 ARE YOU A PREVIOUS RSL CUSTOMER? If you are a previous RSL customer we would love to hear from you! Since 1970, we have enjoyed the chance to establish relationships with many loyal customers, many of whom are still in touch with us today. If you are a previous customer or RSL speaker owner, we would love to hear about your RSL experience. Please write or email us with your comments (photos are always appreciated). ▼You Can Skip This Section▼ BACKGROUND OF YOUR RSL SPEAKERS After producing RSL Speaker Systems for many years, we were enjoying our retirement. About 5 years ago, we began building our ultimate home theater. Our friends asked us whose speakers we planned on using. We thought about it and came to the conclusion that since we’ve been making speakers for all of our adult lives, we couldn’t bring ourselves to use anybody else’s. For years, we’ve been thinking about what we would do if we had an opportunity to build the best possible speakers regardless of cost. We would use some improvements on our patented Compression Guide Technology. We could combine them with the finest parts available and some other innovative ideas we’ve been thinking about over the years. Frankly, the results blew our socks off! Although RSL Speakers have enjoyed a solid reputation over the years with the public, as well as the recording and broadcast industries, these new hand-built prototypes were the best RSL speakers to date. Not only in terms of musical accuracy, but by actually having the performers image outside the speaker box and into the room. Some of our “golden-eared” audiophile friends who heard these speakers urged us to sell them. Unfortunately, these speakers were expensive to produce and would have to sell for a high price. Although our friends felt they would be worth the price, RSL Speaker Systems has always stood for the best possible sound at a great value. We’ve always preferred to keep great sound affordable to make many people happy, rather than catering only to a select few. So, we decided to use these speakers as our new standard and see how close we could come using parts that were more reasonable. After two years of work, to our astonishment, what emerged actually exceeded the original hand-built prototypes. These are the same speakers you are about to unpack! Please Note :The first 30 – 40 hours of use is break-in time for the speakers. They will not sound their best until after that time. This is critical. 2 IMPORTANT SAFETY INSTRUCTIONS READ THIS SECTION CAREFULLY BEFORE PROCEEDING! CAUTION 1. Read Instructions – All the safety and operating instructions should be read before the product is operated RISK OF ELECTRIC SHOCK DO NOT OPEN 2. Retain Instructions – The safety and operating instructions should be retained for future reference. CAUTION: To reduce the risk of electric shock, do not remove the cover (or back). No user serviceable parts inside. Please refer all servicing to licensed service technicians. WARNING: To reduce the risk of fire or electric shock, do not expose this appliance to rain or moisture. Objects filled with liquids, such as vases, should not be placed on this appliance. CAUTION: To prevent electric shock, match the wide blade of the AC power plug to the wide slot of the wall plug and insert it fully. WARNING: This device generates a fair amount of heat. Do not place near a heat source or in spaces that can restrict ventilation. CAUTION: For continued protection against risk of fire, replace the fuse only with the same amperage and voltage type. Refer replacement to qualified service personnel. The lightning flash with arrowhead, within an equilateral triangle, is intended to alert user to the presence of uninsulated “dangerous voltage” within the product’s enclosure that may be of sufficient magnitude to constitute a risk of electrical shock to persons. The exclamation point within an equilateral triangle in intended to alert the user to the presence of important operating maintenance (servicing) instructions in the literature accompanying the appliance. 3. Heed Warnings – All warnings on the product and in the operating instructions should be adhered to. 4. Follow Instructions – All operating and use instructions should be followed. 5. Cleaning – Unplug this product from the wall outlet before cleaning. Do not use liquid cleaners or aerosol cleaners. Use a damp, soft cloth for cleaning. 6. Water and Moisture – Do not use this product near water-for example, near a bath tub, wash bowl, kitchen sink, or laundry tub; in a wet basement; or near a swimming pool; and the like. 7. Accessories – Only use attachments or accessories specified by the manufacturer. Do not place this product on an unstable cart, stand, tripod, racket or table. The product may fall, causing serious injury to a child or adult and serious damage to the product. Use only with a cart, stand, tripod, racket or table recommended by the manufacturer, or sold with the product. Any mounting of the product should follow manufacturer’s instructions and should use a mounting accessory recommended by the manufacturer. When a cart is used, use caution when moving the cart/ apparatus combination to avoid injury from tipover. 3 IMPORTANT SAFETY INSTRUCTIONS — Continued 8. Ventilation – Slots and openings into the cabinet are provided for ventilation and to ensure reliable operation of the product and to protect it from overheating, and these openings must not be blocked or covered. The openings should never be blocked by placing the product on a bed, sofa, rug, or other similar surface. This product should not be placed in a built-in installation such as a bookcase or rack unless proper ventilation is provided or the manufacturer’s instructions have been adhered to. 12. Lightning – For added protection for this product during a lightning storm, or when it is left unattended and unused for long periods of time, unplug it from the wall outlet and disconnect the antenna or cable systems. This will prevent damage to the product due to lightning and power-line surges. 9. Power Sources – This product should be operated only from the type of power source indicated on the marking label. If you are not sure of the type of power supply to your home, consult your product dealer or local power company. For products intended to operate from batter power, or other sources, refer to the operating instructions. 14. Object and Liquid Entry – Never push objects of any kind into this product through openings as they may touch dangerous voltage points or short-out parts that could result in a fire or electric shock. Do not expose this apparatus to dripping or splashing, and ensure that no objects filled with water, such as vases, are placed on the apparatus. 10. Grounding and Polarization – This product may be equipped with a polarized alternating-current line plug (a plug having one blade wider than the other). This plug will fit into the power outlet only one way. This is a safety feature. If you are unable to insert the plug fully into the outlet, try reversing the plug. If the plug should still fail to fit, contact your electrician to replace your obsolete outlet. Do not defeat the safety purpose of the polarized plug. A grounding-type plug has two blades and a third grounding prong. The wide blade or the third prong are provided for your safety. If the provided plug does not fit into your outlet, consult an electrician for replacement of the obsolete outlet. 15. Servicing – Do not attempt to service this product yourself as opening or removing covers may expose you to dangerous voltage or other hazards. Refer all servicing to qualified service personnel. 11. Power-Cord Protection – Power supply cords should be routed so that they are not likely to be walked on or pinched by items placed upon or against them, paying particular attention to cords at plugs, convenience receptacles, and the point where they exit from the product. 4 13. Overloading – Do not overload wall outlets, extension cords, or integral convenience receptacles as this can result in a risk of fire or electric shock. 16. Damage Requiring Service – Unplug this product from wall outlet and refer servicing to qualified personnel under the following conditions: When power supply cord or plug is damaged; If liquid has been spilled, or objects have fallen onto product; If the product has been exposed to rain or water; If the product does not operate normally by following the operating instructions. Adjust only those controls that are covered by the operating instructions as an improper adjustment of other controls may result in damage and will require extensive work by a qualified technician to restore the product to its normal operation; If the product has been dropped or damaged in any way; IMPORTANT SAFETY INSTRUCTIONS — Continued 17. Replacement Parts – When replacement parts are required be sure the technician has used replacement parts specified by the manufacturer or have the same characteristics as the original part. Unauthorized substitutions may result in fire, electric shock, or other hazards. 23. WARNING: The 115V~/230V~ voltage selector must be set to the correct local voltage with the proper Fuse installed. 18. Safety Check – Upon completion of any service or repairs to this product, ask the service technician to perform safety checks to determine that the product is in proper operating condition. 25. Lifting - Be careful when lifting heavy objects, such as the subwoofer. Be sure to take adequate precautions to prevent injury. If necessary, have someone assist you. 19. Wall or Ceiling Mounting – The product should be mounted to a wall or ceiling only as recommended by the manufacturer. 24. Plastic Bags – Be sure to keep all plastic bags away from infants and small children to prevent the risk of choking or suffocation. 26. Important Notice About Remote Control Battery WARNING 20. Heat – The product should be situated away from heat sources such as radiators, heat registers, stoves, or other products (including amplifiers) that produce heat. 21. Where the AC wall outlet or an appliance coupler is used as the disconnect device, the disconnect device shall remain readily operable. 22. WARNING: The Class I apparatus shall be connected to an AC outlet with a protective ground Connection. Do not use a 2 prong adapter to defeat the ground prong of the 3 prong plug. DO NOT INGEST BATTERY, CHEMICAL HAZZARD BURN The remote control supplied with this product contains a coin/button cell battery. If the coin/button battery is swallowed, it can cause severe internal burns in just 2 hours and can lead to death. Keep new and used batteries away from children. If the battery compartment does not close securely, stop using the product and keep it away from children. If you think batteries might have been swallowed or placed inside any part of the body, seek immediate medical attention. Do not connect the included Category 5 Ethernet cable to a computer or network! WARNING: SHOCK HAZARD - DO NOT OPEN AVIS: RISQUE DE CHOC ELECTRIQUE - NE PAS OUVRIR CAUTION: DISCONNECT POWER CORD BEFORE CHANGING FUSE. REPLACE WITH SAME TYPE OF FUSE. ATTENTION: DEBRANCHER AVANT DE REMPLACER LE FUSIBLE. UTILIZER UN FUSIBLE DE RECHANGE APPLICABLE FOR USA CANADA OR WHERE APPROVED FOR USAGE CAUTION: TO PREVENT ELECTRIC SHOCK MATCH WIDE BLADE PLUG TO WIDE SLOT INSERT FULLY. ATTENTION: POUR EVITER LES CHOCS ELECTRIQUES INTRODUIRE LA LAME LA PLUS LARGE DE LA FICHE DANS LA BORNE CORRESPONDANTE DE LA PRISE ET POUSSER JUSQU AU FOND 5 TABLE OF CONTENTS Introduction..................................................................... ...............................................1 Getting to Know You Better…………………………………………………………......…...1 Previous RSL Customer?…………………………………………………………….…........2 Background of Your Speakers........................................................................................2 Important Safety Instructions....…………………………………………………….…….. ..3 Features of the RSL CG4, CG24 Monitor ……………………………………….……...…7 Features of the RSL Speedwoofertm 10.................…....................................................8 First Steps......................................................................................................................9 Record of Purchase…………………………………………………………......................10 Room Acoustics………………………………………………………………………....…..11 Home Theater Placement……………………………………………………………...…...12 Front Speakers………………………………………………………………….........13 Center Channel…………………………………………………………………........14 Rear Speakers 5.1 Systems…………………………………………………..….…14 Side/Rear Speakers 7.1, 7.2 Systems…………………......................................15 Subwoofer Placement 5.1, 7.1 Systems………………………………...........................15 Placing 2 Subwoofers 5.1, 7.1, 7.2 Systems…............................................................18 Placing RSL Speedwoofertm10 Remote Box…............................................................20 Installation…….............................................................................................................21 Connecting Satellite Speakers 5.1, 7.1, 7.2 Systems........................................22 5.1, 7.1, 7.2 Systems and Subwoofer Installation….…………………..…………23 Installing The RSL Speedwoofer Remote Box………………………………..…..26 Stereo Installation……………………………………………………………............27 Settings and Operation................................................................................................33 Protecting the Satellite Speakers......................................................................33 How Much Volume is Enough?.........................................................................33 Setting Up Your A/V Receiver………………………..........................................34 Using a Sound Level Meter...............................................................................35 Tone Controls and Equalization.........................................................................34 Other A/V Receiver Gadgetry............................................................................36 RSL Speedwoofer 10tm Settings........................................................................37 Protecting Your Speedwoofertm................................................................36 Remote Receiver Box and Remote Control………………………….…....38 Setting the Subwoofer Volume................................................................38 Setting the Crossover..............................................................................39 Phase Control……………………………………………….………….....….39 Power…………………………………………………………………........….39 Auto/On...................................................................................................39 High Level In/Out.....................................................................................39 230V/115V……………………………………………………………......…..39 Care and Maintenance……………………………………………………………….……..40 Specifications..............................................................................................................41 Troubleshooting...........................................................................................................43 Warranty Information………………………………………………………….………........46 . 6 ▼You Can Skip This Section ▼ (you already know how incredible your RSL Speakers are) FEATURE PAGE We designed the RSL Compression Guidetm home theater/stereo speaker system to deliver life-like three-dimensional sound that will enable you to “hear outside the box”. In other words, we have designed our speakers to create the sensation that the sound is actually originating from inside your room, rather than from some small speaker boxes. To accomplish this, we combined our patented Compression Guide Technology with some new ideas and 40 years of speaker experience. Compression Guide Technology allows us to make the speaker smaller for superior imaging, yet provide the bass output that is normally required by a larger cabinet. We know there are a lot of great-sounding speakers out there, but few truly escape the boundaries of the box. RSL CG4 The RSL CG4 stereo/home theater speaker systems are equipped with a 4” woofer/midrange complemented by a 1” soft dome tweeter. The woofer features a powerful ferrite magnet, polypropylene cone and cast frame. These components are mounted in a dense MDF enclosure with a quality high-gloss piano finish. The durable metal speaker grill is magnetically-mounted and easily-detachable. Each enclosure is specially tuned using our patented RSL Compression Guide technology to ensure precise and realistic sound. A threaded insert in the back of the cabinet accommodates brackets for wall or ceiling mounting . The internal damping material we use is a high quality natural blend with cotton and exhibits much better acoustical properties than the purely synthetic stuffing used in most speakers. A speaker’s crossover network is the heart of the speaker. The quality of RSL CG4’s crossover parts is unheard of for speakers in this price range. Please note: your stereo/surround speakers are intended for use only with a quality subwoofer, such as the RSL Speedwoofertm 10. RSL CG24 MONITOR The RSL CG24 Monitors are designed for use not only as a center channel speaker, but also for an audiophile home theater system as both the left and right speakers. They can also be used as the left and right speakers in an audiophile quality stereo system. For professional applications, two RSL CG24 Monitors, along with the RSL Speedwoofertm 10 can be used for monitoring purposes in recording and broadcasting studios. The RSL CG24 Monitor is equipped with two 4” woofer/ midranges and one 1” soft dome tweeter. The woofers feature powerful ferrite magnets, polypropylene cones and cast frames. They are mounted in a dense MDF enclosure with a quality, high-gloss piano finish. The metal speaker grill is magnetically-mounted and easily-detachable. The RSL CG24 Monitor enclosure is specially tuned using our patented pending RSL Compression Guidetm technology. 7 RSL CG24 MONITOR — Continued Two threaded inserts in the back of the cabinet accommodate brackets for wall or ceiling mounting . They allow for both vertical and horizontal mounting. The internal damping material we use is a quality natural blend with cotton and exhibits much better acoustical properties than the purely synthetic stuffing used in most speakers. A speaker’s crossover network is the heart of the speaker. The quality of RSL CG24 Monitor’s crossover parts is unheard of for a speaker in this price range. Please note: your stereo/surround speakers are intended for use only with a quality subwoofer, such as the RSL Speedwoofertm 10. RSL SPEEDWOOFERtm 10 We designed the RSL Speedwoofertm 10 to solve a problem that plagues most subwoofers. In order to reproduce deep bass out of a small box, current tuning methods such as bass reflex (vented or ported) or air-suspension (sealed box) are utilized along with a heavy woofer cone. In this design, the cone movement is very difficult to start and stop as it responds to the sound. Resonance in these designs is a problem which further inhibits speaker cone movement. This sluggish performance creates false bass that can intrude on the rest of the sound and be very fatiguing. Most subwoofers stand out from the rest of the sound, reminding you that there is a separate subwoofer operating. Some manufacturers employ a ‘servo control’ in an effort to correct this shortcoming. When the servo detects the woofer doing something it shouldn’t, it sends a correction signal back to the woofer to stop it from happening. The trouble is that there has to be a problem occurring for the correction to take place. Compression Guide tm Technology makes sure the woofer always does what it’s supposed to in the first place. The result is lighting fast response. You don’t hear a separate subwoofer. You just hear and feel completely true and natural bass as if it were coming from your satellite speakers. The RSL SPEEDWOOFERtm 10 FEATURES: Precision 10” woofer with heavy die-cast aluminum frame, massive magnet struc- ture and motor assembly. This allows the cone along with its surround to achieve high excursions with complete control and linearity. Powerful 375 Watt Class A/B analog amplifier. Because power rating standards are not strictly enforced, most manufacturers would rate this amplifier at 500 watts or a lot more if they use peak power ratings. The RSL Speedwoofertm 10’s amplifier is pure class A/B analog. We feel that Class D or H digital amplifiers, although less costly to manufacture cannot provide the bass impact of our pure analog amplifier. 8 RSL SPEEDWOOFERtm 10 — Continued Wireless Remote Control for Volume and crossover frequency. One thing is cer- tain; the bass you hear and feel will not be the same with different source material. That’s why we provide you with a wireless remote control so you can adjust the subwoofer from the convenience your seating position, without having to walk up to the subwoofer. This can be especially disrupting and irritating if you have to do it in the middle of a movie. Other high end subwoofers may offer a remote control; however the sensor for the remote is always located somewhere in the subwoofer cabinet. If your subwoofer is hidden or anywhere outside of direct sight, the remote will not work (kind of ridiculous isn’t it?). Our remote sensor is located in a separate remote receiver box that connects directly to the Speedwoofer. You can place this stylish, little box in any convenient place where the remote can communicate with it. This will allow you to keep your RSL Speedwoofer concealed without sacrificing the remote control. (Please note that when using an A/V receiver with the LFE input on the rear of the subwoofer, you bypass the RSL Speedwoofertm 10’s built-in crossover. Therefore the remote control of crossover frequency will be deactivated). Dense MDF wooden cabinet with high-gloss quality piano finish. Unlike most sub- woofers, we completely fill the enclosure with damping material to further reduce unwanted resonances. Choice of mounting spikes for carpeting or feet to protect wooden and other hard surfaces. FIRST STEPS 1. Be careful when using sharp objects to open boxes. The insertion of a long and/or sharp object such as a blade can damage the components inside. Use of chainsaws, machetes, samurai swords, power tools, explosives, phasers, and most kitchenware is not recommended. 2. When unpacking, be careful as the grills are not mounted to the speaker; therefore, the woofers and tweeters are exposed and can be easily damaged. 3. Please take a moment to inspect each speaker for damage. If you find any damage that you did not specifically request, please contact us or the shipping company immediately. All components have been inspected when leaving our factory; however damage can occur during shipping. 4. Included are metal grills that mount to the speakers using powerful magnets embedded in the cabinet allowing for easy application and removal. Please exercise dietary caution as high consumptions of iron may cause cabinets to stick to you. 9 FIRST STEPS — Continued 5. Grills can be attached by positioning the magnetic tips over the appropriate insertion points and gently releasing. The magnetic points will sufficiently keep the grill attached while allowing for easy removal and re-application. 6. The first 30 – 40 hours of use is break-in time for the speakers. They will not sound their best until after that time. This is critical. 7.If possible, we recommend saving all packaging, including boxes, as a convenient means of re-packaging for moving or for sending your speakers in for service (in the unlikely event they need it). We have provided space for you to record your purchase information. RECORD OF PURCHASE Date of Purchase: Invoice Number: Model: Serial #: Model: Serial #: Model: Serial #: Model: Serial #: Model: Serial #: Model: Serial #: Model: Serial #: Model: Serial #: Model: Serial #: Are you are viewing this on your computer? Don’t write on your monitor! 10 FIRST: ACTIVATE THE REMOTE CONTROL’S BATTERY Your Speedwoofer 10 includes a handy remote control that allows you to adjust the subwoofer’s volume and crossover frequency from your listening position. If you’re using an A/V receiver, the crossover frequency will be controlled by your receiver instead of the remote. You may notice a clear plastic tab at the bottom of the remote. Pull this tab out to activate the remote’s battery. ▼You Can Skip This Section ▼ (if you either are satisfied with your room’s acoustics or are unable to do anything about it) MORE THAN YOU PROBABLY WANT TO KNOW ABOUT ROOM ACOUSTICS Room acoustics have a major effect on sound quality. If your room has good acoustical qualities, even mediocre speakers can sound pretty good. In turn, if your room has poor acoustics, high-end speakers can sound lacking. Acoustical qualities are determined by the dimensions of your room and the amount of sound-absorbing material present. Room dimensions primarily affect bass response. A room with ideal dimensions will have evenly distributed bass throughout the room. The quality of the bass will be natural; not sloppy. Obviously, you can’t do a heck of a lot about the dimensions of your room. Don’t worry; few rooms are close to perfect. We will share some methods to help with acoustical problems later in this manual (see: Placing Your Subwoofer). The amount of absorptive material in your room affects middle and treble frequencies. Hard surfaces, such as wood or tile floors, walls, can degrade middle and treble frequencies; making them sound harsh, tinny, or hollow. A harsh room; however, can be easily fixed. Materials such as carpet, upholstered furniture, pillows, drapes, and wall treatments are all excellent at absorbing unwanted sound reflections. Therefore, the solution to a harsh room is to add more absorptive materials. If you can’t do that, why not invite a lot of friends over and tell them to wear thick jackets or heavy sweaters. Many acoustical problems can often be minimized by the careful placement of your speakers and subwoofer. In addition, many of today’s Audio/Video Receivers provide room correction circuitry, which can provide a dramatic improvement in sound quality. In our opinion the best such circuitry is made by Audyssey. Audyssey room correction can be found in several different brands of A/V receivers and processors. 11 ▼This Section Is Important▼ (Please read it, unless you’re already experienced in doing this or you don’t have a choice of where your speakers can be placed.) PLACEMENT Correct speaker placement is essential in achieving the best sound. It’s surprising how much impact even a small adjustment to a speaker’s location can make. We have recommended the locations that generally produce the best results. Remember that every room is acoustically different; affected by its contents, size and shape. While using our guidelines can be helpful; always trust your ears as the final authority. Because every room is unique, there is no single rule that suits every one. If you find yourself having any difficulties, always feel free to contact us for advice. Please Note: Even though our diagrams show the speakers on stands, there are other placement options including wall-mounting. Home Theater Placement General Information RSL CG4s and CG24s can be placed on speaker stands, shelves, or furniture. They include threaded inserts in the back of their cabinets for wall or ceiling brackets. Please note: when using the threaded inserts, do not over-tighten the mounting stud from the bracket! If you are going to place the speakers on shelves, or furniture; they should be placed at the front edge of the surface instead of rearward. The sound should be able to travel freely in all directions without being obstructed by large surfaces. Putting speakers inside a cabinet can degrade sound quality. Making sure to place them at the front edge of the enclosure should help. If you still hear degraded sound, stuff the open areas surrounding the speaker with objects such as books or acoustical absorbing material. When concealing the speakers behind cloth, make sure the cloth is acoustically transparent. Also, remove each speaker’s grill and place the speaker as forward as possible without actually touching the cloth. 12 PLACEMENT — Continued Front Left and Right Speakers (5.1, 7.1, 7.2 Systems) Both the RSL CG4 and RSL CG24 Monitors can be used as the left and right speakers. One speaker should be placed on each side of your television constituting a “right channel” and “left channel”. These speakers should be positioned vertically, roughly 6 – 8 feet apart (the fact that you’re using a center channel speaker can allow for slightly more space between left and right speakers), and should be as close in height to your seated ear level as possible. If the speakers cannot be placed at ear level, they should be angled up or down so they point toward the listener’s ears. To ensure the most accurate sound and best imaging, if possible try to place the front speakers at least two feet away from the front walls, side walls, and corners. You may also prefer to slightly angle the right and left channels inward towards the primary listening position. This can increase the sound detail and be especially useful if your front channels are far apart. If mounting to the wall, try not to place the right and left channel too close to the side walls or corners of the room. Mounting the right and left channels too close to the side walls or corners can add excess emphasis to the bass and lower midrange and decrease the three-dimensional effect of the sound. Typical 5.1 Placement Subwoofer Left Front Right Front Center Channel Left Rear Right Rear 13 PLACEMENT — Continued Center Channel Speaker (5.1, 7.1, 7.2 Systems) Placement of your center channel is the most self-explanatory. Either the RSL CG4 or the RSL CG24 Monitor can be used as a center channel. The CG4 should stand vertically when used as a center channel while the CG24 should lie horizontally. This speaker needs to be centered between the left and right channels and above or below your television. Try to position the center channel as close to your seated ear level as possible. Just as before, it is always a good idea to tilt the center channel up or down to point towards the listening position. If mounting to the wall, try to position the center channel as close to the center of your TV screen as possible and make sure to tilt it so that it points to your listening position. Be careful if placing the center channel directly on top of your TV as many TV’s are not designed for this. Side/Rear Channel Speakers Placement (5.1 Systems) In a 5.1 system the two surround channels should be placed on your side walls slightly behind the listener’s seating position. The job of these speakers is to reproduce the sound that would occur along side and behind you. Merely placing them directly along side of the listener will not allow them to create a rear image. These speakers should face inward, toward your seating position. For best results, try to position the speakers at your seated ear level or higher (roughly 5 – 7 ft from the floor). If they are higher than ear level, make sure to angle them down towards the listener. Typical 7.1 Placement 14 PLACEMENT — Continued Side/Rear Channel Speakers Placement (7.1, 7.2 Systems) 7.1 or 7.2 surround sound systems consist of 4 surround channels; two side and two rear channels. In this scenario, the side channels should be well spread out and placed to the sides of your seating position. They should face inward, toward your ears. We suggest positioning them to the sides of your seating position as in our diagram. As for the rear channels, these should be positioned several feet behind your seating position if possible. These speakers should face forward towards your television. They should be spaced roughly a few feet apart; not as far apart as the side channels (refer to diagram). The rear channels should be ear level or elevated a few feet above your seated listening position; approximately 5 – 7 feet from the floor. It is not as critical to angle them down as it is with the other channels. Typical 7.1 Placement Right Front Left Front Center Channel Subwoofer Left Side Right Side Left Rear Right Rear Placing Your Subwoofer (5.1, 7.1 Systems) Your subwoofer is responsible for all of the low frequency sounds in your movies and music. These low bass frequencies are non-directional. This means that the subwoofer can be placed in a variety of positions and the human ear will perceive the bass as coming from the satellite speakers. Ultimately, the subwoofer can be placed virtually anywhere in the room. As usual though, we have some placement suggestions that will enhance the performance of your subwoofer. As mentioned in the section on acoustics, bass characteristics are largely determined by your room dimensions. The goal is to have an even distribution of bass at all seating positions. The bass should not be sloppy or muddy, but clearly defined (for example, you should hear the skin of a kick drum, not just the boom). In a problematic room the, bass can be almost non-existent in certain sitting positions, and overwhelming in others. 15 PLACEMENT — Continued Here are the best guidelines for placing your subwoofer: 1. We recommend that, if possible, the subwoofer be located somewhere in the vicinity of the front speakers rather than in the rear of your room. 2. Placement near a wall will increase your subwoofer’s bass output. Placement near or in a corner will increase it even further. 3. Experimentation is encouraged. Try as many different positions as you like. 4. Play a song or movie with a continuous heavy bass track. Generally we prefer natural bass, perhaps from an acoustic bass or a kick drum. For each position you are trying, walk around the room and hear where the bass is louder and quieter. Pick the position that provides the most even distribution and best quality of bass among your seating positions. Always trust your ear; what sounds best to you is the right choice. 5. Caution: The amplifier on the back of subwoofer creates heat and needs ample ventilation. Do not place the woofer directly against a wall; make sure that there is always a few inches of air space behind the woofer for cooling purposes. Also, be careful when placing the subwoofer in any kind of equipment enclosure. Make sure that there is air space on the top and sides for proper ventilation and to prevent overheating. If the air flow is limited, we strongly suggest cutting holes in your equipment cabinet to allow for adequate ventilation. If you found the above section too easy and if you would prefer to take your subwoofer placement a little further, we have listed two methods below you may wish to try (if you’re not technically inclined, be sure to have MacGyver standing by): Placing Your Subwoofer For Maximum Bass Subwoofer Placed in Corner 16 PLACEMENT — Continued ▼You Can Skip This Section ▼ (Unless you are technically oriented and wish to go the extra mile to maximize subwoofer performance) Technical Method #1 - Using a sound level meter You’ll need a reasonably-priced sound level meter (available at Radio Shacktm or other electronics stores). It should set you back $50 or less. You’ll also need a test tone source. This can usually be found in many audio/video receivers (consult your receiver’s manual). The test tone should be somewhere between 40–60 Hz. If your meter asks you to set a sound level range, consult the meter’s manual to determine the proper decibel setting. Also, set the meter to ‘C’ weighting with a fast response. If your receiver does not have the ability to generate low frequency test tones, go to plan B. Plan B: If you have internet access, you can either download an audio signal generator program or a low frequency test tone. You should find them free of charge. Then you can connect your computer’s audio output jack to your home theater receiver using the appropriate connector cable. If you are unable to connect your computer to your receiver, you can transfer an audio frequency test tone to your iPodtm or MP3 player. Then connect your iPodtm or MP3 player to your receiver. When you are able to play the tone through the subwoofer, adjust the volume so that it falls within the range set on your sound level meter. You do not need a loud volume for this test. While the tone is playing, move the sound level meter to the various seating positions (equivalent to ear level height when you are seated) and note the readings. Repeat this test while positioning the subwoofer in different places until you achieve the most even sound level readings. Placing Your Subwoofer For Maximum Bass Subwoofer Placed in Corner 17 PLACEMENT — Continued Technical Method #2: Less Technical - Without A Sound Level Meter If you don’t have a sound level meter, you can still use the above method with test tones. Although you won’t have the exact measurements that the sound level meter can provide, you ears should be able to tell areas of extreme bass (standing waves) and minimal bass (null points). You can then reposition the subwoofer for the most even bass distribution in your room. Using 2 Subwoofers In The Same Corner Using 2 Subwoofers (5.1, 7.1, 7.2 Systems) A high quality subwoofer such as the RSL Speedwoofertm 10 should be sufficient to give you the smile-inspiring impact you want. However, using two subwoofers has certain advantages that we have listed below. This is NOT our attempt just to sell you another subwoofer; (unless of course you want a system that will revolutionize your idea of sound and introduce your ear to true harmonic enlightenment) we do not resort to such tactics. Using two subwoofers will greatly increase your bass output and also provide a smoother, more consistent bass response pattern. Basically, you will increase the quantity of bass with less effort from each subwoofer. Two subwoofers also help if you have a problematic room that has uneven bass distribution; a second subwoofer in a different position can actually fill in those areas of bass deficiency (null points). A second subwoofer also helps if you have a very large room, where you play movies or music very loud and need more bass to fill the room. To maximize the effect of using two subwoofers, we have provided the following suggestions. 18 PLACEMENT — Continued 1. Place both subwoofers towards the front of the room rather than the back. 2. Try placing the subwoofers asymmetrically in the room to reduce room resonances that can occur when subwoofers are placed symmetrically. 3. Also try positioning both subwoofers in the same side of the room. This can be an effective way of creating smoother bass in some rooms. 4. Place and install (see installation) one subwoofer. Play a movie or song with consistent, repetitive bass. Walk around the room and determine where the bass sounds the weakest and place the second subwoofer at that location. 5. If possible, put the subwoofers in locations that will allow both of their control modules to be stacked or positioned next to each other. That way, you can control both subwoofers at the same time with only one remote. 6. Experiment. The goal is achieving the most even bass distribution through out your room. Trial and error is never a bad idea. Let your ears be your guide; they know your room better than this manual does. Placing 2 Subwoofers Asymmetrically There are two scenarios in which you can use two subwoofers in a home theater system. You can use two subwoofers in your 5.1/7.1 system. In this case both subwoofers will use the same connection, via a “Y” adapter, to reproduce the same bass sounds but with more power and smoothness. On the other hand, in a 7.2 setup, your audio/video receiver may have a separate left bass and right bass output for the two subwoofers. 19 PLACEMENT — Continued Years ago, when music came from vinyl record albums, the extremely low bass had to be limited on the record. If it wasn’t limited, certain bass notes could make the turntable stylus literally jump out of the record grove. Today, with CDs and the incredible capabilities of DTS-HD Master Audio tm and Dolby True HDtm, there seems to be no limit to the amount of bass power that movies and music can deliver. We have never heard a home theater subwoofer that couldn’t be overloaded with bass at some point. The quantity of bass is a matter of personal taste, and for some people, a second subwoofer is a good idea. For them, it takes some of the load off one subwoofer and extends the bass capability of the system before it is likely to be overloaded with distortion. ▼This Section Is Important▼ RSL Speedwoofertm 10 Remote Box Placing Your RSL Speedwoofertm 10’s Remote Box The RSL Speedwoofertm 10 includes a remote box and a handheld remote control transmitter. The remote box can be conveniently placed anywhere on or near the subwoofer. We have included a shielded category 5 Ethernet cable that connects the remote module to the RSL Speedwoofertm 10. Just make sure that the remote module is visible from your seating position and that the category 5 Ethernet cable will reach. If a different length or color cable is desired, they are easily obtained at most electronics or computer stores (Caution: only use a shielded category 5 or 6 Ethernet cable and be advised that exceedingly long cable lengths may result in noise from interference). With the handheld remote, you’ll be able to control the volume and crossover frequency without getting up from your seat. 20 ▼This Section Is Important▼ INSTALLATION Before You Start… Take a moment to read these brief recommendations. 1.Always shut off the power to all components before installing! 2. Use quality speaker wire. We recommend two-conductor wire with high quality copper. You’ll also want to make sure that there is a means of determining polarity (identifying the positive and negative strands). 3. All wire has resistance in it. The thicker the wire, the less resistance it has. The less resistance, the better your speakers will sound. The thickness of the wire should be determined by the length of the wire you are using. For longer lengths, heavier wire should be used. See our table below: Length of Speaker Wire (each speaker) Recommended Minimum Thickness Up to 15 feet 16 AWG 15 to 30 feet 14 AWG Over 30 feet 12 AWG 4. When connecting wire to a terminal, twist the wire strands together so that they all can be neatly inserted into the terminal. If strands are left loose and make contact with the terminal or a wire of the opposite polarity, they will cause a short and can severely damage your speakers and equipment. Phasing It’s critically important that the speakers all work together. To accomplish this, all speakers must be wired in phase. This means that for each speaker and for your receiver, every positive wire is correctly connected to a positive (+) terminal, and every negative wire is properly connected to a negative (-) terminal. When this is the case, all of your speakers are considered to be “in phase”. On our speakers the positive (+) input terminal is identified with a red band, while the negative (-) input terminal is labeled with a black band. Your receiver or amplifier will provide identification by plus (+) and minus (-) symbols or by colors also (commonly red for positive and black for negative). If you are human like us, and you inadvertently connect some wires backwards, you will hear the results. Having a speaker out of phase significantly degrades sound quality. In a stereo system, out of phase speakers will sound as if there is a hole in the imaging between the speakers. Voices can sound as if they are far away from you; coming from behind your speakers. Incorrect phasing can also significantly diminish bass response. Therefore, it is important to make sure that the polarity of every connection is consistent. 21 INSTALLATION— Continued Connecting The Satellites for 5.1, 7.1, And 7.2 Systems Properly twist wire to eliminate stray strands Do not allow strands to cause a short Listed below is our step-by-step guide for wiring your RSL home theater system. For alternative methods or suggestions, please consult the instructions that came with your receiver or amplifier. 1. Prepare the speaker wire. First, separate the positive and negative strands by splitting the wire insulation down the middle at least a couple of inches. Now strip off about a ½ inch of insulation from each individual wire end to expose the inner copper wire strands. Repeat this process for both ends of each wire. Now, for each separate wire (positive and negative), twist the exposed copper wire strands together. This will keep the copper strands neat and allow the wires to be easily inserted into the speaker’s input terminals. 2. To connect the wires, first loosen the input terminals on the back of your speakers by rotating the heads counter clockwise. Next, insert the twisted end of the positive wire into the hole of the positive terminal, and repeat for the negative wire. (Note; all of our terminals are designed to accommodate bare wire or banana plugs.) With both wires inserted, tighten both terminals by rotating each head clockwise until the wires are well secured. Be absolutely certain that there are no loose wire strands making contact with the wires or terminals of the opposite polarity. This will cause a short that can severely damage your components. 22 INSTALLATION— Continued 3. With the wires already connected to your speakers, now connect each wire to the appropriate output terminal on your receiver or amplifier. Repeat this step for each channel to be hooked up. Your receiver or amplifier will specify which terminals are for which channels. Remember that the left and right front channels are the speakers on your left and right when you are facing them. As before, make sure that there are no loose wire strands that can make contact with another wire or terminal. 4. Double check your wiring. In home theater systems there is a lot of wiring necessary, making it easy to make a mistake (this happens to the best of us). We highly suggest taking an extra moment to check each connection to make sure all channels are in phase (see Phasing above). 5.1 And 7.1 System Installation The illustration above shows the rear of a typical 5.1 A/V receiver. Many current receivers have 7.1 capability. You can use either a 5.1 or 7.1 A/V receiver with your 5.1 system. We suggest you refer to your A/V receiver’s owners manual. It will show you your receiver’s layout for your speaker connections. Some people will ask: “What does the .1 mean in 5.1 and 7.1?” The number after the decimal place indicates the number of subwoofers. A 5.1 system has 5 speakers plus one subwoofer. A 7.1 system has 7 speakers plus 1 subwoofer. Taken further, a 7.2 system has 7 speakers plus 2 subwoofers. With a 5.1 system, you will connect your front speakers to the left, right, and center speakers to the appropriate speaker connectors. Obviously, the surround speakers will be connected to the surround terminals. With a 7.1 system, you’ll connect 2 additional speakers to the back or rear terminals. 23 INSTALLATION— Continued So, one question that is often asked: “I have a 7.1 or 7.2 receiver. It has 7 amplifiers, but I only have a 5.1 system. What can I use the extra 2 amplifiers for?” Most 7.1 receivers allow you to use the extra 2 amplifiers to power and control a set of stereo speakers either outside or in another room. In addition some receivers have connections for additional speakers in your home theater. These speaker connections are for height and width enhancement speakers. So, if you have a 5.1 system and wish to add a pair of speakers, you can make your system into a 7.1 system with rear speakers or you can choose to have them enhance either the height or the width of the sound (keeping your system a 5.1). Also, even though your receiver can accommodate 2 subwoofers, it will work just fine with one. Some people wish to use a 7.1 receiver with a 7.1 system. However, in addition, they wish to have speakers in another location or they wish to add width or height enhancement speakers. Most receivers allow you to add stereo amplifiers for the additional speakers. Some of the higher end models are 9.2 meaning that they contain 9 amplifiers giving you more choices for additional speakers. We hope that the above has not been too confusing for you. The bottom line is that a 5.1, 7.1, 7.2, or even a 9.2 A/V receiver will work perfectly with your 5.1 system. It’s The Subwoofer Installation Section! Look no further. (Unless you plan to read this section; then look further) In a home theater installation, the crossover for the subwoofer will be controlled by your receiver rather than the crossover in your subwoofer. Therefore, the crossover frequency control on the RSL Speedwoofer remote will be disabled as your receiver will control the crossover frequency. Normal Subwoofer LFE Hookup With Audio/Video Receiver 24 INSTALLATION— Continued . Note About RCA Cables In a home theater system, you will use RCA cables to connect your subwoofer. You’ll use one cable for each subwoofer in your system that will plug into the LFE (LFE stands for “Low Frequency Effects”) input of the Speedwoofer. These RCA cables do not have to be expensive. This is because the frequency range that goes through the cable is very narrow. Just make sure the cable is built well enough to be reliable. Do not use cables with oversized RCA plugs. They may not be able to be pushed all the way in, causing an improper connection. Single Subwoofer, 5.1 or 7.1 To setup a single subwoofer, you will need a single RCA cable. Connect one end of the RCA cable to the LFE input terminal on your subwoofer amplifier (commonly located on the back of your subwoofer). Then connect the other end to the LFE or subwoofer output of your receiver. Dual Subwoofers, 5.1 or 7.1 There are two different methods of installing two subwoofers; both produce the exact same result. So, use the method that is most convenient for you. To hook up two subwoofers you will need two high quality RCA cables and a “Y” adaptor (if your receiver doesn’t have 2 subwoofer output jacks). Method 1. First, locate the LFE output terminal on your receiver or amplifier. Now plug the “Y” adaptor directly into that LFE terminal; in essence turning the one LFE output terminal into two. Connect an RCA cable to each of the two LFE output terminals on the “Y” adaptor. Then run one of the cables to each subwoofer so that both subwoofers are receiving the same signal. Method 2. In this method connect a “Y” adaptor to the LFE input on the subwoofer that is closest to your receiver. Then, from the “Y” adapter, connect one RCA cable to the LFE input of the second subwoofer and another RCA cable to the LFE output of your receiver. You may prefer this method if one of your subwoofers is particularly far from your receiver. In such cases, this method allows you use shorter cable lengths. Dual Subwoofers, 7.2 Setting up both subwoofers for your 7.2 system is also easy. You will need two RCA cables. First, locate the two LFE output terminals on your 7.2 receiver. The terminals may be designated left and right. Using the RCA cables, connect the left subwoofer to the left LFE output terminal and repeat for the right subwoofer. Make sure the cables are connected to each subwoofer’s LFE input terminals. 25 INSTALLATION— Continued Connecting Your RSL Speedwoofer And Remote Receiver Box Your RSL Speedwoofertm 10 connects to your receiver exactly the same way any other subwoofer does, so please refer to the appropriate section above. The RSL Speedwoofertm comes equipped with a separate remote receiver box and wireless remote control transmitter. This receiver box is responsible for your Speedwoofer’s volume and crossover frequency controls (the Speedwoofer’s frequency control is not used in a home theater system). The wireless remote allows you to adjust the volume and crossover frequency from the convenience your seating position. The receiver box will need to be connected to the Speedwoofer’s amplifier with the shielded Category 5 Ethernet cable we have provided. Simply plug one end into the “Remote Out” terminal on the back of the box, and the other to the “Remote In” terminal on the Speedwoofer amplifier (on the back of the Speedwoofer’s enclosure). Just make sure the cable plugs always click into place. If you prefer a cable of different length or color, you can find shielded category 5 Ethernet cables at virtually any electronics store. (In the event that you wish to purchase a different cable, make sure that you purchase a shielded category 5 or a category 6 Ethernet cable. To minimize the possibility of interference, we recommend cable lengths that are less than twelve feet.) It is not uncommon for a quality subwoofer to come with a remote control. Unfortunately, the sensors for the remotes are always placed somewhere in the subwoofer cabinet itself; rendering the remote completely useless if your subwoofer is hidden or out of direct sight. Our remote receiver box was designed to be placed in any convenient location where the remote can easily communicate with it. This way, you can feel free to hide your RSL Speedwoofertm 10 and just place the receiver box on furniture, shelves, or anywhere the remote can see it. THE REMOTE BOX MUST BE CONNECTED FOR YOUR SPEEDWOOFER TO OPERATE. 26 INSTALLATION— Continued Installing The RSL Speedwoofertm 10’s Feet Also included with your RSL Speedwoofer are two sets of feet, one for carpeted floors and one for hard floors. The pointed feet are designed to acoustically couple your RSL Speedwoofertm 10 to a carpeted floor. The feet are to be screwed into the threaded inserts at the bottom of your Speedwoofer enclosure. Each foot has an adjustable height setting so you can make sure your RSL Speedwoofertm 10 sits level. Select the height you want by tightening or loosing the foot from the Speedwoofer enclosure. Once you’ve achieved the proper height setting, secure it in place by tightening the nut included on each foot (PLEASE BE CAREFUL TO NOT OVER TIGHTEN!). In the event that you don’t have carpet, the four non-pointed feet are to protect hard surfaces, such as wood, tile, or marble. Please remember; that attaching the pointed feet-spikes to your RSL Speedwoofer enclosure does not enable the RSL Speedwoofer to be used as a weapon (in that case the spikes would need to be sharpened first). ▼You Can Skip This Section ▼ (if yours is a home theater installation) The Easiest Stereo Installation Section You Will Find! (in this manual) And now for something completely different… Welcome to the stereo installation section of this manual. Below we have listed some different ways of setting up your CG4s or CG24s along with an RSL Speedwoofertm 10 for stereo use. You can quickly scan these various methods and just focus on the one that seems most appropriate for your equipment. Rest assured that all three methods will give you the kind of sound that beats silence hands down! 27 INSTALLATION— Continued Before You Start… Take a brief moment to read these recommendations: 1.Always shut off the power to all components before installing! 2. To achieve best sound we always suggest using the highest quality RCA cables and speaker wire possible. 3. If your cables are not individually identified (ex. red or black bands ), you may wish to mark the RCA cables at both ends to designate right and left cables. If you lose track of which cable is which, this will save you the trouble of tracing each the all the way back to the terminal. 4. When running speaker wire over long distances, use heaver (lower gauge) high quality wire. 5. Always double check wire polarity before and after connecting. Accidentally connecting the positive wire to the negative terminal and vice versa will result in noticeably reduced sound quality and poor imaging. If you have trouble indentifying the polarity, remember that the positive wire is usually labeled; commonly by color, writing or rib on the wire jacket, or a thread within the wire strands. 6. Before connecting speaker wire to a terminal; twist the uncovered, copper wire strands together so that they all can be neatly inserted into the terminal. If strands are left loose and make contact with the terminal or wire of the opposite polarity, they will cause a short that could damage your equipment. 7. The main point about stereo hookup is to make sure that low bass frequencies are properly directed to the subwoofer only, and not to the satellite speakers. Choose The Wiring Method That Best Suits Your Equipment 1. Utilizing the RSL Speedwoofer’s Built-in High Pass Filters Separate Preamplifier and Power Amplifier Required For this method you will be sending the sound from your preamplifier to your RSL Speedwoofertm where it will then be sent to your power amplifier with the bass filtered out. This is the preferred method if your audio components are in reasonably close proximity to your Speedwoofer. If your Speedwoofer is a considerable distance away, be aware that long RCA cables can pick up interference, especially if they are not high quality. This hookup method requires four RCA cables and two speaker cables. 28 INSTALLATION— Continued Utilizing the RSL Speedwoofer’s Built-in High Pass Filters — Continued 1. You’ll need one pair of RCA cables that will reach from your preamplifier to your RSL Speedwoofertm 10 and another pair that can reach from your Speedwoofer back to your power amplifier. 2. Connect an RCA cable to the right and left output terminals on your preamplifier. 3. Next, connect each cable to the right and left “low level in” input terminals on your RSL Speedwoofer (located on the back of the enclosure). Don’t use the LFE input. 4. Now, use the two remaining RCA cables and plug one end of each into the right and left “low level out” terminals of the RSL Speedwoofertm 10. 5. Run these cables to your power amplifier and connect them to the right and left input terminals. 6. Now, connect the both speaker wires to the right and left “speaker outputs” on your power amplifier. Remember to double check the polarity. Utilizing the RSL Speedwoofer’s Built-in High Pass Filters 29 INSTALLATION— Continued 7. Connect the speaker wire from to the right output of the power amplifier to the input terminals on the right speaker. The right speaker is the one you see to the right when you are facing your speakers in your listening position. 8. Repeat the previous step for the left speaker and enjoy! One word of caution here: In home theater applications, using a single RCA cable from your home theater receiver’s subwoofer output to the LFE input on the RSL Speedwoofertm 10 is recommended. Some people may reason that a “Y” adapter could be used to combine two outputs of your preamplifier into a signal cable that could connect to the LFE input on the RSL Speedwoofertm 10. DO NOT DO THIS!! It will cause your stereo system to become a mono system. Do Not Do This! 2. Utilizing High Level Filters With Your Power Amplifier Separate Preamplifier and Power Amplifier Required This scenario involves wiring your preamplifier directly to your power amplifier using optional high pass filters while feeding the subwoofer separately. This method requires only one longer pair of RCA cables and may be better suited for situations where your audio components and your Speedwoofer are a good distance away from each other. To use this wiring method, your preamplifier needs to have two sets of stereo outputs (four total) or you will need two “Y” adaptors. In addition, you will need two 100 Hz high pass filters (available separately from us), four RCA cables and two speaker cables. 30 INSTALLATION— Continued 1. You will need two RCA cables that will reach from your preamplifier to your subwoofer. 2. If your preamplifier does not have four stereo outputs you will need to plug “Y” adapters (available at most any electronics stores) into the two stereo outputs to create four. 3. Plug an RCA stereo cable into one set of left and right left stereo outputs on the preamplifier or the “Y” adapters. 4. Connect the other ends of this cable to the right and left “low level in” input terminals on your Speedwoofer amplifier (located on the back of the enclosure). 5. Connect a stereo RCA cable to the remaining set of left and right stereo outputs on your preamplifier or “Y” adapters. 6. Next, plug the other ends of this RCA stereo cable into two 100 Hz high pass filters. 7. With the stereo cable attached, plug the 100 Hz high pass filters directly into the left and right input terminals on your power amplifier 8. Attach both speaker wires to the right and left “speaker outputs” on your power amplifier. Remember to double check the polarity. 9. Connect the other end of speaker wire from to the right output of the power amplifier to the positive and negative input terminals on the right speaker. The right speaker is the one you see to the right when you are facing your speakers in your listening position. Repeat for the left speaker and enjoy! 31 INSTALLATION— Continued 3. Utilizing a Stereo Receiver or Integrated Amplifier Must Be Capable of Pre-Amp, Power Amp Separation This method is a slight variation of sections #1 and #2 above. The only difference here is that your pre-amplifier and power amplifier are not separate units, they are both included in your stereo receiver or integrated amplifier. Once the pre-amp and power amp sections are separated, you will be able resume setup with either method #1 or #2. For this scenario, you will need four RCA cables, and two speaker cables. 1.First, you will need to disconnect the pre-amp section of your stereo receiver from the power amp portion. Do this by removing the U-shaped rods that connect the “pre- amp out” to the “power-amp in” jacks. If you can’t find these Ushaped rods, your receiver or integrated amplifier may use switches to separate the sections instead of rods. (Consult the receiver’s owners manual for additional help.) 2. Now, see step 2 of section #1. “Utilizing RSL Speedwoofertm ’s Built-in High Pass Filters”, or step 2 of section #2 “Utilizing High Level Filters With Your Power Amplifier”(For this scenario, you will need two 100 Hz high pass filters available separately) and two “Y” adapters. 4. Utilizing The High Level Connections Of The RSL Speedwoofertm 10 . 32 INSTALLATION— Continued This method is for those with a stereo receiver or integrated amplifier where there is no provision to separate the pre-amplifier from the power amplifier sections. In this case all connections to the RSL Speedwoofertm will be done with speaker wire only. 1.Using a quality speaker wire, connect the left (-) speaker output of your amplifier or receiver to the left (-) Hi Level In on your RSL Speedwoofertm. Next, connect the left (+) speaker output from your amplifier or receiver to the left (+) Hi Level In on your RSL Speedwoofertm 2. Repeat step #1 for the right speaker output of your receiver or integrated amplifier. 3. Using a quality speaker wire, connect the left (-) Hi Level Out of your RSL Speedwoofertm to the left (-) speaker terminal of your RSL satellite speaker (CG4 or CG24 Monitor) . Next, connect the left (+) Hi Level out of your RSL Speedwoofertm to the left (+) speaker terminal of your RSL satellite speaker. 4. Repeat step #3 for the right Hi Level Out of the Speedwoofertm and your right satellite speaker. In this method the internal hi level filters of the RSL Speedwoofertm offer slightly less protection for the satellite speakers than the low level filters. However, if you exercise reasonable care and do not use excessive sound volume you should be fine. This is The End of The Stereo Section. Home Theater Owners Can Resume Reading. ▼This Section Is Important▼ HOME THEATER SETTINGS AND OPERATION (This section is not a substitute for reading your A/V receiver’s manual. We’ve been through a few of these ourselves and you have our sympathy.) Protecting your Satellite Speakers As we’ve mentioned above it is essential to make sure that bass frequencies are properly routed to the subwoofer, not to the satellite speakers. Virtually all A/V receivers provide for this in their setup menu. Some A/V receivers ask you to select the size of your satellite speakers and give you a choice of small or large. In the case of RSL CG4s or RSL CG24 Monitors, you must choose the “small” setting in order to correctly protect the speakers. Some A/V receivers will have you choose a crossover frequency as well. The recommended crossover frequency is 90-100 Hz or slightly higher. Do not choose a frequency below 90 Hz. Also, set the impedance of all speakers to 6-8 ohms if given the choice. This is correct for your RSL Speakers. The auto setup using a microphone is useful, however it gets the crossover frequencies wrong and you’ll need to set them to 90-100 HZ after you run the auto setup. How Much Volume is Enough? When matched with the appropriate components, your RSL Speaker Systems can play at a very loud volume. Your A/V Receiver or amplifier needs to be capable 33 SETTINGS AND OPERATION — Continued of delivering a sufficient amount of undistorted power. Strange as it may seem, too low of a power rating on your A/V Receiver or amplifier is more likely to damage speakers than one with a higher power rating. That’s because when an amplifier is called on to deliver more power than it was designed for, it will produce distortion called clipping. This distortion is very harmful for speakers. Using Your A/V Receiver’s Setup Now that you have your system placed and connected it is to setup up your system with the setup menu in your A/V receiver. Please refer to your owner’s manual. One setting you may need to set is speaker impedance. If given the choice, set all speakers to 6-8 ohms. This is correct for your RSL Speakers. All of your RSL’s are eager to pour out their little hearts for your viewing and listening enjoyment. All they ask in return is for you to provide them with the opportunity by properly balancing them. There are several methods of balancing your speakers. Almost all A/V receivers have the ability to play a test tone through each individual speaker. Usually this noise is either white or pink noise, which sounds like a bunch of hiss. This sound is very handy if you wish to balance the sound manually. Using your A/V Receiver’s Auto Setup Most current A/V receivers have some sort of automatic setup. They supply a microphone that you place at your main listening positions. Then, they play test tones through each speaker individually (while advising you to maintain silence during this process). Based upon these measurements, the receiver will automatically calculate speaker distance, individual speaker and subwoofer volume, and crossover points. In addition, most receivers employ room correction equalization. The most popular form is AudysseyTM . In many cases this room correction can improve the sound where the acoustics of the room are less than ideal. However, we have found some cases where the sound is better if the room correction equalizer is turned off. You should experiment with it on and off to determine which setting sounds best to you. Please refer to your A/V receiver’s manual and how to use its auto setup feature. As handy as this is, we need to caution you about a few things. First, it will often set the crossover to the wrong frequency. After you do run auto setup, we recommend going into your setup menu and setting every crossover including the subwoofer’s to either 90 or 100 Hz. When balancing your speakers, keep the following in mind: 1. The goal is to create a 3 dimensional sound environment all around you. For this you may need to increase the volume of your surround speakers anywhere between 2 and 4 db. 2. We recommend setting the center channel speaker volume an extra db or 2 higher than the auto-setup. This will help the clarity of dialog. 3. Set the subwoofer strictly by ear. Set the volume control on the subwoofer’s remote box so that it points to the 12 o’clock position. Play some music with a constant bass track. Then set the subwoofer level in your receiver according to 34 SETTINGS AND OPERATION — Continued Balancing Your System with a Sound Level Meter taste. This will give you flexibility later when you need to adjust the subwoofer’s volume by remote control. 4. When you are done balancing your speakers, play some movie samples to help you make any final adjustments. 5. Trust your ears above all else. Double Check Speaker Distances The auto setup will calculate speaker distances to the main listening position. Usually, these measurements will be fairly accurate. However, we suggest getting out the old measuring tape to double check them. Occasionally, we have found them to be inaccurate, especially when wireless speakers or subwoofers are used in the system. Using a Sound Level Meter If you have a sound level meter, you can use it to balance your speakers. You will need to choose the appropriate decibel range on the meter (see the owner’s manual for help with this). If your meter allows you to choose the weighting, set it to ‘C weighting’. Use the meter at your preferred seating position as close to ear level as possible. Make sure to point the meter towards the ceiling. Then, play a test tone through each speaker, one at a time, and note the reading on the meter. Adjust the volume on each speaker so that they are all similar, with the surround and rear speakers being slightly louder front speakers. The center channel speaker should be about 2 db louder than the right and left speakers. In the end, a little experimentation will yield the best results. Trust your ears to make the final judgment. 35 SETTINGS AND OPERATION — Continued Tone Controls and Equalization on Your A/V Receiver We recommend that you set the bass and treble controls on your A/V receiver to the flat or neutral position. Your RSL Speakers were designed to sound best this way. If you must use your tone controls, use the least amount possible.. Your RSL Speedwoofer has been engineered to reproduce the entire bass range that is contained in movies and music. If your A/V receiver has a built-in equalizer to boost the bass, please either use it sparingly or avoid it all together. Doing this places an enormous load on the subwoofer amplifier, resulting in a limit on how loud the bass can be played. If you need more bass, please use the volume control on the RSL Speedwoofer instead. Other Audio/Video Receiver Gadgetry You don’t need us to tell you that today’s A/V receivers are rather complex devices that contain loads of built-in features. And the list just keeps growing. We’d like to caution you about the overuse of the features that alter the sound. If misused they could do more harm than good. It is always better to listen to sound in a more natural state than overly processed. Again, we encourage you to experiment by comparing the sound with these features turned off and on. If you don’t wish to read the entire owner’s manual of your Audio/Video receiver, you’re not alone. However, we think it is valuable is to learn about the different surround modes such as DolbyTM PL (Pro-Logic), Dolby Digital, Dolby True HD, DTSTM, DTS HD Master Audio, etc. Sometime a DVD or Blu-Ray disc will present you with choices. Knowing these modes and selecting the best one will give you the best sound. Many Audio/Video receivers also include simulated modes, which artificially simulate acoustical environments of concert halls, night clubs, or churches. We do not recommend using these artificial modes. RSL SPEEDWOOFERtm SETTINGS The goal of a well setup subwoofer is to produce tight, controlled bass without sacrificing the teeth chattering impact some of you enjoy. The most common mistake people make is setting the subwoofer to play too loudly. The subwoofer should always blend seamlessly with the satellite speakers rather than being intrusive. Your RSL Speedwoofertm 10 is powered by a conservatively-rated 375 watt amplifier. Combined with its Compression Guide tuning, your Speedwoofer should be more than capable of providing an abundance of clean, powerful bass. In addition, the RSL Speedwoofertm 10 contains circuitry that helps prevent distortion in the case of excessively loud volume. However, all subwoofers can be played loud enough to be overdriven; regardless of size, power, or price. In the unlikely event that you desire more bass, try placing the RSL Speedwoofer in a corner. 36 SETTINGS AND OPERATION — Continued The RSL Speedwoofertm 10 is equipped with high quality, built-in protection circuitry. Unfortunately, no protection circuitry is full proof. The best protection is always to prevent the subwoofer from being over driven in the first place. Here are a couple of indications of trouble to watch out for. If you notice the following taking place, reduce your subwoofer’s volume until these symptoms disappear. 1. Noise that doesn’t sound natural. In movie scenes or music with heavy bass, listen for any noise that doesn’t sound like it should be there. In some cases this can sound like a rattling or a very muddy rumble. 2. Clipping. A good indication of clipping is if your subwoofer sounds excessively sloppy; as if it is flopping back and forth. This will produce some pretty ugly sounds. The RSL Speedwoofertm 10 uses high quality protection designed to keep clipping to a minimum. Therefore, if you have an RSL Speedwoofertm 10 this may be a difficult indication to listen for. If you’re not sure if your subwoofer is being overdriven, remove the grill and look at the woofer itself. See if it appears to moving back-and-forth excessively. The woofer should always move with tight, controlled precision. If you suspect the woofer’s movement is excessive, try reducing your subwoofer’s volume until it appears to move appropriately. 37 SETTINGS AND OPERATION — Continued Using the Remote Receiver Box and Remote Transmitter The volume and crossover frequency controls can be accessed wirelessly with the remote transmitter, or manually on the remote receiver box itself. The crossover frequency control will only operate when you are using the low or high level inputs on the Speedwoofer amplifier. It will not operate when you use the LFE input with an A/V receiver, because your receiver will control that function. When the frequency control is functional, experiment with it; set it between 90-120 Hz. You want the setting that best blends the subwoofer with the satellite speakers. You should never hear the subwoofer separately; the bass should sound as if it comes from the satellites. The red indicators on the control knobs indicate that the subwoofer is in standby mode. The blue indicators mean that the amplifier is on and operating. If you set the auto/on switch to ‘On’, the indicators will always be blue. In the ‘Auto’ position they will be red until they receive sound and the amplifier turns on and then they will change to blue. In the ‘Auto’ mode, If there is no sound for approximately 20 minutes, the amplifier will go into standby and the indicators will change back to red. Setting the Subwoofer Volume The volume of your subwoofer is controlled in three ways. First, most A/V Receivers offer bass output (or LFE) level controls in their setup menu. Second, the volume control of your A/V Receiver will control the bass output to your subwoofer. Third is the volume control for the RSL Speedwoofer, which is located on the remote box. To set the volume on your RSL Speedwoofer 10tm, begin by setting the volume control on the remote box to the straight up (the 12 o’clock position). Then, go into the setup menu on your A/V receiver and set its subwoofer volume to suit your tastes. After that, final adjustments can be made with your remote receiver box. Setting the Crossover Frequency In a home theater system, your A/V receiver will be hooked to the LFE input of the RSL Speedwoofer. This will utilize the crossover function in your A/V receiver instead of the one in your Speedwoofer. If your A/V receiver has a menu choice for the subwoofer’s crossover frequency, set it to 100 Hz. In rooms where a little more warmth in the sound may be desired, you can set the subwoofer crossover a little higher. However, we don’t recommend setting it much higher than 120 Hz. The goal of a subwoofer should be that it doesn’t intrude. This means your system shouldn’t sound as if there is a separate subwoofer operating. Setting the crossover at too high of a frequency will cause the Speedwoofer to become distinguishable. 38 SETTINGS AND OPERATION — Continued Phase Control Please refer to our poignant and thought-provoking discussion of phasing at the beginning of the installation section. Normally, the phase switch will be set to the 0o setting. However, some situations call for using the 180o setting. The best way to determine this is with the help of a friend (if you don’t have one, just wait until everyone finds out what kind of home theater system you just bought!). Play some music over your system that has a good full range sound including bass content. Have your friend stay at the back of your Speedwoofer and switch the phase control back and forth while you listen from your seating position. The proper position of the switch will yield a smooth transition from the bass to the midrange along with the proper amount of warmth to the sound. Conversely, the wrong switch position will result in a hole in the upper bass and a lack of warmth and bass sloppiness in the sound. Power The master power switch turns the RSL Speedwoofer amplifier on and off and overrides all other settings. Auto/On In the auto position, the RSL Speedwoofer will immediately turn itself on when it senses bass frequencies from your A/V receiver or amplifier. It will shut itself off after 20 minutes of no signal. In the on position, the RSL Speedwoofertm will always stay on unless the master power switch is turned off. High Level In and High Level Out Refer to the Installation section. The High Level In and Out connections are used as an alternative connection methods where it is not possible for a direct connection from the preamplifier. Using the Low Level connections is preferred. 230V/115V This is normally set to 115V, which is the voltage in the U.S.A. and in Canada. Do not remove the cover and switch to 230 volts unless you are outside the U.S., and absolutely sure the voltage in your area is 230! If you are in a country that uses 230 volts, be sure to set the switch to 230 volts and replace the fuse with one of proper value before plugging the RSL Speedwoofer into the wall. The required 115 volt fuse is a T8AL/250 8 amp fuse. The required 230 volt fuse is a T4AL/250 4 amp fuse. Failing to operate the RSL Speedwoofer at the proper voltage or with the correct fuse, will blow the fuse and/or cause severe damage to your subwoofer amplifier. Sadly, this is not covered under our usually liberal warranty. 39 CARE AND MAINTENANCE This is the section where speaker manufacturers attempt to persuade you to take care of your speakers. We don’t think we need to do that, because we’re certain you’ll become very attached to them and want the best for them. Caring for your RSL Speakers and Speedwoofer is relatively easy. They do not require much on your part. We have listed the most important dos and don’ts below. 1. Clean your speakers using a soft, moist cloth, preferably microfiber or something lint-free. Do not put speakers in the washing machine or dish washer. Scratches can sometimes be buffed out using a mild car polish. 2. Be very gentle when cleaning the front of your speakers, especially the woofers and tweeters. Try not to exert any pressure on them. 3. Liquid and speakers don’t mix. Be careful with liquids or beverages near your speakers. We do not recommend placing any flowers or plants that require watering on top of the speakers. 4. Please keep your speakers away from direct sunlight and heat sources to protect their finish. 5. If you operate the speakers with the grilles off, please make sure that the woofers and tweeters do not come in contact with anything as they can be damaged. 6. RSL speakers are not designed for use in applications such as sound reinforcement, public address, or musical instruments (these are not covered under the warranty). So the next time you hire a DJ for your party, make sure our speakers will not be used (don’t worry, our feelings won’t be hurt). 7. Over time, wires connected to speakers and other components can loosen. If a wire loosens and touches the wire of opposite polarity, your system will short and your audio components could be damaged. Periodically check to make sure all connections are sufficiently tight. 8. Just about every owner’s manual tells you to save your boxes. We know it’s a hassle, but the boxes can come in handy if you move or your speakers need service. 9. Do not expose your speakers to extremely hot or cold temperatures. We know it can be difficult to part from your RSL speakers when its vacation time, but please refrain from subjecting them to beach activities, water sports, treacherous hikes, skiing (especially with moguls), or arctic cruises etc… 10. Your RSL Speedwoofertm can NOT be used as a floatation device. 40 SPECIFICATIONS — Continued RSL CG4 Woofer: 4” with Ferrite Magnet, Polypropylene Cone, and Cast aluminum frame Tweeter: 1” Silk Dome, Ferrite Magnet Frequency Response: 100-25,000 Hz ± 3db Nominal Impedance: 8 ohms Sensitivity: 88 db SPL @ 1 watt, 1 meter distance Recommended Power: 25-125 watts (Please note the following: this rating is for use above 100 HZ. Amplifiers up to 150 watts can be used if care is taken not to operate them at maximum volume) Crossover Frequency: 2,500 Hz Crossover Slope: 12 db/octave Crossover Parts: Air core coil, Polypropylene capacitors, Gold Plated binding posts Tuning Method: Compression Guidetm System Resonance: 72 Hz Weight: 9 lbs. Dimensions: H: 10 1/2” W: 6” D: 6 3/8 “(Without grille 6 1/8”) RSL CG24 Monitor Woofers (2 are used) Woofer: 4” with Ferrite Magnet, Polypropylene Cone, Cast aluminum frame Tweeter: 1” Silk Dome, Ferrite Magnet Frequency Response: 85-25,000 Hz ± 3db Nominal Impedance: 4 ohms Sensitivity: 90 db SPL @ 1 watt, 1 meter distance Recommended Power: 25-125 watts (Please note the following: this rating is for use above 100 HZ. Amplifiers up to 150 watts can be used if care is taken not to operate them at maximum volume) Crossover Frequency: 2,500 Hz Crossover Slope: 6 db/octave (First Order) Crossover Parts: Air core coil, Polypropylene capacitor, Gold Plated binding posts Tuning Method: Compression Guidetm System Resonance: 68 Hz Weight: 13 lbs. Dimensions: H: 16” W: 6” D: 6 3/8 “(Without grille 6 1/8”) 41 SPECIFICATIONS — Continued RSL Speedwoofertm 10 Frequency Response: 24-180 Hz ± 3db Woofer: 10” Cast Aluminum Frame, Massive Ferrite Magnet Structure, rubber surround Nominal Impedance: 4 ohms System resonance: 18 Hz Weight: 64 lbs Dimensions: H: 16 1/2” W: 16 1/2” D: 17 1/4” (Not including spikes) Feet and Spikes: 4 spikes for carpeted floors and 4 plastic feet for hard floors supplied. RSL Speedwoofertm 10 Amplifier Power: 375 W RMS @ 4 ohms Distortion: <1% at rated power Class A/B Full analog amplifier and power supply Volume and Crossover Frequency: 40-170 Hz-variable by wireless remote control Crossover slope: 12 db Crossover Low Level Out: 100 Hz 12 db/Octave Crossover Hi Level Out: 100 Hz 6db/Octave Auto On: Activated by audio signal, shuts off after 20 minutes with no signal Phase control – 0o or 180 o Switchable Power draw auto on (no signal input): 20 watts Power draw standby mode: 14 watts Power Input: 115V, 60Hz, 230V 50/60Hz AC Fuse 115V: T8.0AL Fuse 230V: T4.0AL Note: Fuse must be changed when changing voltage or damage could result (which is sadly not covered under the warranty). 42 TROUBLESHOOTING Here we will address some of the most commonly occurring problems that can occur when installing and using a home theater system. Remember we at RSL are always available to answer questions and offer support. Feel free to contact us. SPEAKERS No Sound from Speakers 1, Double check all wire connections. Make sure all wires, cables, and power cords are securely attached to their terminals. 2. Confirm that your home theater receiver or amplifier is turned on. 3. Determine the following: if the volume control is set to the minimum, if your system has been muted, or if headphones are plugged in. 4. Double check all wire connections. If a loose wire strand is touching another wire strand or terminal of opposite polarity, you will hear significant distortion or no sound at all. 5. Check any settings or features in your receiver that you may have inadvertently activated. 6. Make sure no foreign objects or liquids have made their way into the speaker. 7. In a stereo setting, be sure the subwoofer is turned on or set to standby. No Sound from One Speaker If all wires and cables are properly and securely attached, your receiver is turned on, the volume is ample, but one or more speakers have no sound, try substituting the wire from a working speaker. This will determine if the source of the problem is the speaker, or elsewhere. Distorted Sound from Speakers 1.Check to see if the volume control has been set too high. Your speakers were designed to play loudly, however all speakers have limits. Too much volume can create distortion. If the volume is lowered and you still hear distortion, the speaker may be damaged and require service. 2. Double check all wire connections. If a loose wire strand is touching another wire strand or terminal of opposite polarity, you will hear significant distortion or no sound at all. Weak Stereo Imaging (A Hole in the Middle) or Weak Bass Make sure that all speakers are in phase. Check to be sure that all positive (+) wires are properly connected to positive (+) terminals and that all negative (-) wires are correctly connected to negative (-) terminals. One wrong connection can adversely affect the sound. Trust us, we know (we’ve made this mistake ourselves). 43 TROUBLESHOOTING — Continued RSL SPEEDWOOFER Please read our captivating “More Than You Want to Know about Bass Management” section. It describes how to avoid abuse and distortion, and how to get the best performance from your Speedwoofer. No Sound from Your RSL Speedwoofertm / Subwoofer Power indicator not lit 1. Check to confirm that your subwoofer is set to the “on” or “standby” position and that the master power switch is “on” 2. Inspect the power cord. Make sure it is securely plugged in to the wall outlet and subwoofer and that it has not been damaged. 3. Be sure the wall outlet is active. 4. Make sure the RSL Speedwoofer’stm control box is attached and that the shielded Category 5 Ethernet cable is properly attached (it will click into place). 5. Your RSL Speedwoofer amplifier contains a removable fuse designed to protect it from overheating, short circuits, and other potentially damaging occurrences. This fuse should be checked and is located in the power cord socket on the amplifier. Make sure the Speedwoofertm amplifier is unplugged when accessing the fuse. A.You will need to insert a flat-head screwdriver (or appropriate object) in the horizontal slot located on the power cord socket, just below where the cord plugs in. This is the piece that contains the fuse. B. Gently pry the fuse housing open until it detaches. Do not try to completely remove the fuse housing. Extract the housing from the power cord socket, remove the fuse and inspect it. If the wire inside the cylinder is severed or displays a gap; the fuse is bad and needs to be replaced. C. A spare fuse is provided and can be found in the small compartment in the fuse housing. When replacing the fuse, always use a fuse of the same value. D. If the new fuse blows, the amplifier requires service. 6. The RSL Speedwoofertm 10 has an internal circuit protection that could be tripped. If you suspect this, turn down the subwoofer’s volume and turn off the power. Wait 5 minutes before turning it on again. 44 TROUBLESHOOTING — Continued No sound – power indicator is lit 1.Check the Auto/on switch. If the auto/on switch is in the auto position, there must be an audio signal present for the amplifier to work. 2. Check the audio cable from your audio/video receiver. If necessary, try a different cable. Frequency Control Doesn’t Seem to Work Check to see if you connected your receiver to the RSL Speedwoofer’s LFE input (this is preferred in home theater installations). If so, your receiver’s crossover is being used rather than your Speedwoofer’s, resulting in deactivation of your Speedwoofer’s frequency control. Hum Hum can be caused by a variety of sources. We have listed a few common sources and solutions. 1.A poorly shielded or defective audio cable from your receiver to the subwoofer can create hum. Try replacing the cable and see if the hum goes away. 2. Excessively long audio cables can be another cause. If you have to use a cable longer than 20 feet, you may need to use a line driver (available from Audio/ Video dealers). 3. Hum can also be caused if an audio cable is routed near interferenceproducing appliances or other AC devices and power cords. Try re-routing the audio cable to see if the hum vanishes. 4. Sometimes you can reduce hum by increasing the subwoofer output of your receiver and decreasing the volume of the subwoofer itself (consult your receiver’s manual). 5. Try plugging your subwoofer’s AC cord into the same circuit as your A/V receiver. 6. Turn off the subwoofer and disconnect the RCA cable from the input(s). Turn on the subwoofer. If there’s no hum, then you have a ground loop. This is not the fault of the subwoofer, but the electrical relationship of the subwoofer to the other components in your system. The solution is to purchase an inexpensive ground loop isolator, which is easy to find online. The RCA cable carrying the signalwill plug in to it and the output of the isolator will plug into the subwoofer’s input. 45 WARRANTY Simply Stated: If it breaks and it’s our fault we’ll fix it for free. Speakers are warranted for 5 years; electronics are warranted for 2 years. Here are the terms: We warranty our speakers for a period of 5 years from the date of purchase. We warranty our subwoofer amplifiers for a period of 2 years from the date of purchase. Our products are warranted to be free of defects in original materials and workmanship. Our warranties apply to the original purchaser. To obtain warranty service we need your cooperation in the following: 1. Be able to furnish a copy of your sales invoice. 2. The serial numbers must be intact and match those on your sales invoice. Return authorization must first be obtaining by contacting us prior to sending your speakers to us. Speakers must be properly packed. Our speakers were designed for residential stereo or home theater use and must be used in this manner. They were not specifically designed for public address, musical instrument amplification, or other commercial or high intensity application. Such use is not covered under warranty. Speakers returned under the terms of the warranty will be repaired or replaced at our option. We will pay for shipping the repaired product back to you if you live in the continental U.S. You are responsible for prepaying the shipping to us. Speakers that have been abused, operated improperly, improperly packed, tampered with or opened (without our prior permission) will not be repaired under warranty. This warranty does not cover damage caused by the use of faulty or improper audio/video components. This is the total warranty. There are no other warranties, expressed or implied. No responsibility is assumed for any incidental or consequential damages. This warranty gives you specific legal rights, and you may have other rights which vary from state to state. If you require service please contact us through our website or by phone: 26500 W. Agoura Road Suite 571 Calabasas, CA 91302 (800)905-5485 www.rslspeakers.com 46