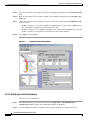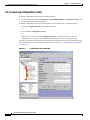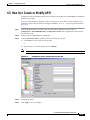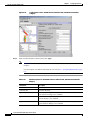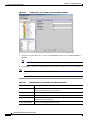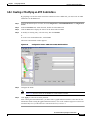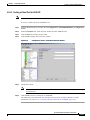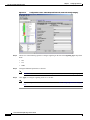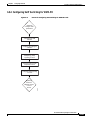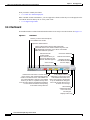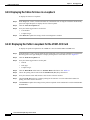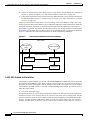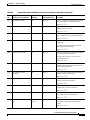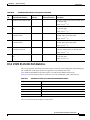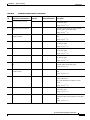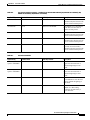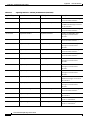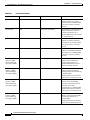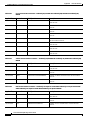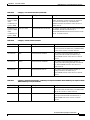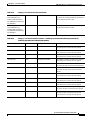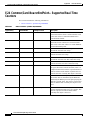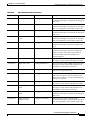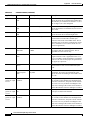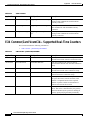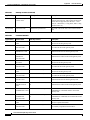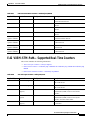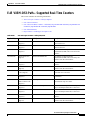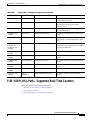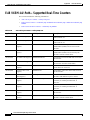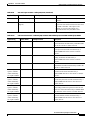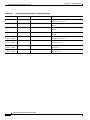
1
Cisco Media Gateway Manager 5.0
User Guide
Corporate Headquarters
Cisco Systems, Inc.
170 West Tasman Drive
San Jose, CA 95134-1706
USA
http://www.cisco.com
Tel: 408 526-4000
800 553-NETS (6387)
Fax: 408 526-4100
Text Part Number: OL-5461-02
THE SPECIFICATIONS AND INFORMATION REGARDING THE PRODUCTS IN THIS MANUAL ARE SUBJECT TO CHANGE WITHOUT NOTICE. ALL
STATEMENTS, INFORMATION, AND RECOMMENDATIONS IN THIS MANUAL ARE BELIEVED TO BE ACCURATE BUT ARE PRESENTED WITHOUT
WARRANTY OF ANY KIND, EXPRESS OR IMPLIED. USERS MUST TAKE FULL RESPONSIBILITY FOR THEIR APPLICATION OF ANY PRODUCTS.
THE SOFTWARE LICENSE AND LIMITED WARRANTY FOR THE ACCOMPANYING PRODUCT ARE SET FORTH IN THE INFORMATION PACKET THAT
SHIPPED WITH THE PRODUCT AND ARE INCORPORATED HEREIN BY THIS REFERENCE. IF YOU ARE UNABLE TO LOCATE THE SOFTWARE LICENSE
OR LIMITED WARRANTY, CONTACT YOUR CISCO REPRESENTATIVE FOR A COPY.
The Cisco implementation of TCP header compression is an adaptation of a program developed by the University of California, Berkeley (UCB) as part of UCB’s public
domain version of the UNIX operating system. All rights reserved. Copyright © 1981, Regents of the University of California.
NOTWITHSTANDING ANY OTHER WARRANTY HEREIN, ALL DOCUMENT FILES AND SOFTWARE OF THESE SUPPLIERS ARE PROVIDED “AS IS” WITH
ALL FAULTS. CISCO AND THE ABOVE-NAMED SUPPLIERS DISCLAIM ALL WARRANTIES, EXPRESSED OR IMPLIED, INCLUDING, WITHOUT
LIMITATION, THOSE OF MERCHANTABILITY, FITNESS FOR A PARTICULAR PURPOSE AND NONINFRINGEMENT OR ARISING FROM A COURSE OF
DEALING, USAGE, OR TRADE PRACTICE.
IN NO EVENT SHALL CISCO OR ITS SUPPLIERS BE LIABLE FOR ANY INDIRECT, SPECIAL, CONSEQUENTIAL, OR INCIDENTAL DAMAGES, INCLUDING,
WITHOUT LIMITATION, LOST PROFITS OR LOSS OR DAMAGE TO DATA ARISING OUT OF THE USE OR INABILITY TO USE THIS MANUAL, EVEN IF CISCO
OR ITS SUPPLIERS HAVE BEEN ADVISED OF THE POSSIBILITY OF SUCH DAMAGES.
CCSP, the Cisco Square Bridge logo, Follow Me Browsing, and StackWise are trademarks of Cisco Systems, Inc.; Changing the Way We Work, Live, Play, and Learn, and iQuick
Study are service marks of Cisco Systems, Inc.; and Access Registrar, Aironet, ASIST, BPX, Catalyst, CCDA, CCDP, CCIE, CCIP, CCNA, CCNP, Cisco, the Cisco Certified
Internetwork Expert logo, Cisco IOS, Cisco Press, Cisco Systems, Cisco Systems Capital, the Cisco Systems logo, Cisco Unity, Empowering the Internet Generation,
Enterprise/Solver, EtherChannel, EtherFast, EtherSwitch, Fast Step, FormShare, GigaDrive, GigaStack, HomeLink, Internet Quotient, IOS, IP/TV, iQ Expertise, the iQ logo, iQ
Net Readiness Scorecard, LightStream, Linksys, MeetingPlace, MGX, the Networkers logo, Networking Academy, Network Registrar, Packet, PIX, Post-Routing, Pre-Routing,
ProConnect, RateMUX, ScriptShare, SlideCast, SMARTnet, StrataView Plus, SwitchProbe, TeleRouter, The Fastest Way to Increase Your Internet Quotient, TransPath, and VCO
are registered trademarks of Cisco Systems, Inc. and/or its affiliates in the United States and certain other countries.
All other trademarks mentioned in this document or Website are the property of their respective owners. The use of the word partner does not imply a partnership relationship
between Cisco and any other company. (0501R)
Cisco Media Gateway Manager 5.0 User Guide
Copyright © 1998-2005 Cisco Systems, Inc. All rights reserved.
C O N T E N T S
Preface
xxvii
Changes to the User Guide
Audience
xxvii
xxvii
Documentation xxvii
Technical Manual Order of Use xxvii
Technical Manual Titles and Descriptions
xxviii
Obtaining Documentation xxviii
Cisco.com xxix
Ordering Documentation xxix
Documentation Feedback
xxix
Obtaining Technical Assistance xxix
Cisco Technical Support Website xxx
Submitting a Service Request xxx
Definitions of Service Request Severity xxx
Obtaining Additional Publications and Information
CHAPTER
1
Introduction
xxxi
1-1
1.1 What Is Cisco Media Gateway Manager?
1-1
1.2 What Are the NE Modules Supported by Cisco MGM?
1.3 What Are the Key Features of Cisco MGM?
1-4
1.4 A Typical Workflow in Cisco MGM 1-5
1.4.1 Starting and Stopping the Cisco MGM Server
1.4.2 Adding a User 1-7
1.4.3 Adding a New Group 1-7
1.4.4 Adding a Network Element 1-8
CHAPTER
2
Basic Concepts
1-2
1-6
2-1
2.1 How Do I Navigate within Cisco MGM? 2-1
2.1.1 Using the Domain Explorer 2-2
2.1.1.1 Management Domain Properties 2-2
2.1.1.2 Group Properties 2-4
2.1.1.3 Network Element Properties 2-5
2.1.2 Navigating Physical Views 2-6
2.1.3 Using Network Maps 2-6
Cisco Media Gateway Manager 5.0 User Guide
OL-5461-02
iii
Contents
2.1.4 Using Control Panel 2-7
2.1.5 Using Wizards 2-8
2.1.6 Paging through Data 2-9
2.1.7 Finding Data 2-9
2.1.7.1 Finding Data in the Domain Explorer 2-9
2.1.7.2 Finding Data in the Diagnostic Center, Statistics Report, Chassis View, and Configuration
Center 2-9
2.1.8 Navigating the Client Desktop 2-9
2.1.8.1 Using Popup Menus 2-10
2.1.9 Using Mnemonics 2-10
2.1.10 Using the Online Help 2-10
2.1.11 Using the Pin Tool 2-11
2.2 What Basic Functions Can I Perform in Cisco MGM? 2-11
2.2.1 Launching Context-Sensitive Information 2-11
2.2.2 Filtering Data 2-12
2.2.3 Exporting Data 2-12
2.2.4 Exporting Alarms and Events 2-12
2.2.5 Refreshing Data 2-13
2.2.6 Pruning the Database 2-13
2.3 What Are the General Features of Cisco MGM? 2-14
2.3.1 What is FCPS? 2-14
2.3.2 Understanding Fault Management 2-15
2.3.2.1 Defining Events and Alarms 2-17
2.3.3 Understanding Configuration Management 2-17
2.3.3.1 Configuration Center Overview 2-17
2.3.3.2 Managing Devices with Chassis View 2-18
2.3.3.3 Understanding Inventory Management 2-18
2.3.3.4 NE Release Management 2-19
2.3.4 Understanding Performance Management 2-20
2.3.4.1 Statistics Report 2-20
2.3.5 Understanding Security Management 2-21
2.3.5.1 Logging into the Client 2-22
2.3.5.2 Login Advisory Message 2-22
2.3.5.3 Understanding Network Partitioning 2-22
2.3.5.4 User Management and Profiles 2-23
2.3.5.5 NE Access Control 2-24
2.3.5.6 Audit Log 2-24
2.3.6 Using the Diagnostic Center 2-25
2.3.6.1 Diagnostic Operations for Network Elements 2-25
2.3.6.2 Diagnostic Operations for Network Manageability 2-25
Cisco Media Gateway Manager 5.0 User Guide
iv
OL-5461-02
Contents
2.3.6.3 Diagnostic Operations for Connections 2-25
2.3.7 Managing Cisco MGM CORBA Interfaces 2-26
CHAPTER
3
Planning the Network
3.1 Network Planning
3-1
3-1
3.2 What Network Elements Are Available to a Network Planner?
3.2.1 Cisco MGX 8880 Media Gateway 3-2
3.2.2 Cisco MGX 8850 Multiservice Switch 3-2
3.2.3 Cisco PXM-45 Processor Switch Module 3-2
3.2.4 Cisco Voice Switch Service Module 3-3
3.2.5 Cisco Voice Interworking Service Module 3-4
3.2.6 Cisco Route Processor Module 3-4
3.2.7 Cisco AXSM Broadband ATM Switch Module 3-5
3.2.8 Cisco MGX Service Resource Module 3-6
CHAPTER
4
Building the Network
3-1
4-1
4.1 What Network Elements Are Available?
4-1
4.2 How Do I Add and Delete Network Elements? 4-1
4.2.1 Prerequisites for Adding Network Elements 4-2
4.2.1.1 Enabling the NE Service 4-2
4.2.1.2 Hostnames and IP Addresses 4-2
4.2.2 Enabling Performance Monitoring 4-2
4.2.3 Adding Network Elements 4-3
4.2.3.1 Adding a Single Network Element 4-3
4.2.3.2 Adding Multiple Network Elements 4-5
4.2.4 Network Element Discovery 4-7
4.2.5 Copying a Network Element from One Group to Another 4-8
4.2.6 Moving a Network Element from One Group to Another 4-8
4.2.7 Deleting Network Elements 4-9
4.2.7.1 Deleting a Single Network Element 4-9
4.2.7.2 Deleting Multiple Network Elements 4-9
4.2.7.3 Removing a Deleted Network Element 4-10
4.2.8 Restoring a Deleted Network Element 4-11
4.3 How Do I Build Groups? 4-11
4.3.1 Adding Groups 4-11
4.3.2 Copying Groups 4-12
4.3.3 Moving Groups 4-12
4.3.4 Deleting Groups 4-13
4.3.4.1 Deleting a Single Group
4-13
Cisco Media Gateway Manager 5.0 User Guide
OL-5461-02
v
Contents
4.3.4.2 Deleting Multiple Groups
4-14
4.4 How Do I Configure the SNMP Community String? 4-14
4.4.1 Setting Up Nonstandard Community Strings 4-15
4.4.2 Changing Community Strings Using the Domain Explorer 4-16
4.4.3 Changing Community Strings Using the CLI 4-16
4.4.4 Changing Service Level Passwords Using the Domain Explorer 4-17
4.4.5 Changing the Service Level Passwords Using the CLI 4-17
4.5 How Do I Build Network Maps? 4-18
4.5.1 Customizing a Network Map 4-18
4.5.2 Viewing a Node in the Network Map 4-20
4.5.2.1 Adjusting the Zoom Level or Pan Position 4-21
4.5.3 Modifying a Node Icon or a Map Background Image 4-21
4.5.3.1 Modifying a Node Icon 4-21
4.5.3.2 Modifying a Map Background 4-22
4.5.4 Saving Changes to the Network Map 4-22
4.6 How Do I Discover the Network?
4.6.1 Discovering NEs 4-24
4-23
4.7 How Do I Synchronize the Network? 4-24
4.7.1 Viewing Clocking Sources 4-24
4.7.1.1 Configuring Global Clocking 4-24
4.7.1.2 Displaying the List of Available Clock Sources 4-25
4.7.1.3 Displaying the List of Manual Clock Sources 4-26
4.7.1.4 Creating a Manual Clock Source 4-26
CHAPTER
5
4.8 How Do I Test Connectivity?
4-27
Maintaining an Efficient Network
5-1
5.1 How Do I Manage the Database? 5-1
5.1.1 Viewing and Modifying Database Properties 5-2
5.1.2 Importing and Exporting Data to and from the Oracle Database
5.1.3 Backing Up and Restoring the Database 5-7
5.1.3.1 Overview of the Oracle Logical Backup 5-8
5.1.3.2 Oracle Export Utility 5-8
5.1.3.3 Performing a Logical Backup (Export) 5-9
5.1.3.4 Oracle Import Utility 5-9
5.1.3.5 Restoring with a Logical Backup (Import) 5-9
5.1.3.6 Backing Up the Database 5-10
5.1.3.7 Restoring the Database 5-11
5.1.3.8 Configuring Manual NE Backup Parameters 5-11
5.1.3.9 Configuring Automatic NE Backup Parameters 5-12
5-7
Cisco Media Gateway Manager 5.0 User Guide
vi
OL-5461-02
Contents
5.1.4 Pruning the Database 5-13
5.1.4.1 Setting the Time and Date for Automatic Pruning 5-13
5.1.4.2 Using Pruning Scripts 5-14
5.1.5 Using the SQL*PLUS Client to Manage the Database 5-16
5.1.6 Basic SQL Commands for Cisco MGM Schema Objects 5-17
5.1.7 Enhancing Database Performance 5-18
5.1.8 Removing an Old Version of the Cisco MGM Database 5-18
5.2 How Do I Monitor the Network? 5-19
5.2.1 Establishing a Telnet Session to a Node 5-19
5.2.2 Connecting to Nodes Through Secured Shell 5-20
5.2.3 Monitoring a Network Element 5-20
5.2.4 Monitoring a Card with Chassis View 5-21
5.2.5 Monitoring a Line or Port with Chassis View 5-22
5.2.6 Monitoring Scheduled Tasks 5-23
5.2.6.1 Viewing the Job Monitor Table 5-23
5.2.6.2 Viewing the Job Monitor Filter Dialog Box 5-24
5.2.6.3 Canceling a Scheduled Job or Task 5-26
5.2.6.4 Job Monitor Notes 5-26
5.2.7 Monitoring Service Status 5-26
5.2.8 Searching for a Network Element 5-27
5.2.9 Monitoring Cisco MGM Client/Server Configuration Details 5-27
5.2.10 Monitoring Network Manageability Statistics 5-28
5.2.10.1 Running a Diagnostic Check at the Network Level 5-29
5.2.10.2 Running a Diagnostic Check at the Node Level 5-30
5.2.10.3 Statistics Entries for Network Manageability 5-31
5.2.10.4 Sending a Trouble Ticket 5-32
5.2.11 Managing the VSI Controllers 5-33
5.2.11.1 Creating a VSI Controller 5-33
5.2.11.2 Displaying a VSI Controller 5-34
5.2.11.3 Deleting a VSI Controller 5-34
5.3 How Do I Modify the Network? 5-34
5.3.1 Changing the Operational State of an NE 5-35
5.3.2 Backing Up and Restoring Memory 5-36
5.3.2.1 Backing Up Memory 5-36
5.3.2.2 Restoring Memory 5-38
5.3.3 Changing IP Addresses for NEs 5-39
5.3.4 Viewing and Modifying the Server Configuration 5-39
5.3.5 Setting Up Session Recovery 5-40
5.3.6 Changing the Server IP Address when Cisco MGM and Oracle Are on the Same Server
5-41
Cisco Media Gateway Manager 5.0 User Guide
OL-5461-02
vii
Contents
5.3.6.1 Updating the Configuration Files after Changing the Cisco MGM Server IP
Address 5-42
5.3.7 Viewing and Modifying Server Configuration Information 5-43
5.3.8 Restoring Server Configuration Files 5-43
5.3.9 Initializing the Node Resync Process 5-44
5.3.10 Configuring Application-Specific Parameters 5-45
5.3.11 Using UNIX-Level Scripts 5-45
5.4 How Do I Manage the Network Software? 5-46
5.4.1 Downloading Software Images 5-47
5.5 How Do I Manage Redundancy and Failover? 5-49
5.5.1 Configuring Card Redundancy 5-49
5.5.1.1 Adding Redundancy 5-49
5.5.1.2 Modifying a Card for Redundancy 5-50
5.6 Which Ports Are Reserved in Cisco MGM? 5-51
5.6.1 Client-Server Communication Protocols 5-51
5.6.2 Ports between the Cisco MGM Server and Clients 5-52
5.6.3 Ports between the Cisco MGM Server and MGX Switches
5.6.4 Changing the Cisco MGM Server Port 5-53
5-53
5.7 How Do I Export Information in Tables? 5-53
5.7.1 Exporting Data to a Text File 5-54
5.7.2 Generating an HTML Report 5-54
5.7.3 Printing an HTML Report 5-55
CHAPTER
6
Configuring Hardware
6-1
6.1 How Do I Manage My Network with the Chassis View?
6.1.1 Launching Chassis View 6-2
6.1.2 Navigating with Chassis View 6-3
6.1.2.1 Accessing Network Elements 6-4
6.1.2.2 Chassis View LED Colors 6-5
6-1
6.2 How Do I Manage My Network with the Configuration Center?
6.2.1 Launching Configuration Center 6-6
6.2.2 Navigating with Configuration Center 6-7
6.2.2.1 Accessing Network Elements 6-9
6.2.3 Navigating Within Tables 6-9
6.3 How Do I Manage Templates for Network Elements? 6-11
6.3.1 Saving Templates for Network Elements 6-11
6.3.2 Loading or Deleting Templates for Network Elements
6.4 How Do I Configure Cisco MGX 8880 and 8850 Nodes?
6.4.1 Configuring a Node 6-13
6-5
6-12
6-13
Cisco Media Gateway Manager 5.0 User Guide
viii
OL-5461-02
Contents
6.4.2 Displaying Cards Within a Node 6-15
6.4.3 Verifying a Specific Card for the Node 6-16
6.4.4 Managing Node Peripherals 6-19
6.4.4.1 Displaying IP Interfaces 6-19
6.4.4.2 Configuring Serial Interfaces 6-20
6.4.4.3 Displaying Sensors 6-23
6.4.5 Viewing Node Controllers 6-25
6.4.6 Managing Node Clocking 6-26
6.4.6.1 Configuring Global Clocking 6-26
6.4.6.2 Viewing Available Clock Sources 6-27
6.4.6.3 Viewing or Creating Manual Clock Sources
6.5 How Do I Create or Modify APS?
6-28
6-31
6.6 How Do I Configure AXSM Cards? 6-33
6.6.1 Enabling SONET Lines for AXSM 6-34
6.6.1.1 Configuring Sonet Medium Config 6-36
6.6.1.2 Configuring the Sonet Line Alarm 6-38
6.6.1.3 Configuring the Sonet Section Alarm 6-40
6.6.1.4 Configuring the Sonet Path Alarm 6-42
6.6.1.5 Configuring the ATM Cell Layer 6-44
6.6.2 Enabling DS1 Lines for AXSM 6-45
6.6.3 Enabling DS3 Lines for AXSM 6-47
6.6.3.1 Setting Up Statistical Alarm Severity 6-49
6.6.3.2 Setting Up the DSX3 24 Hour Alarm 6-50
6.6.3.3 Setting Up the ATM Cell Layer 6-51
6.6.3.4 Setting Up the Plcp Statistical Alarm Severity 6-52
6.6.4 Creating or Modifying AXSM Sonet Line APSs 6-53
6.6.5 Creating a Port for AXSM 6-55
6.6.6 Creating a Resource Partition for AXSM 6-57
6.6.6.1 Modifying ILMI Configuration 6-60
6.7 How Do I Configure VXSM Cards? 6-61
6.7.1 Creating a Resource Partition for VXSM 6-63
6.7.2 Enabling the Mapping Mode for VXSM 6-65
6.7.3 Creating and Assigning an IP Address for the Connection 6-66
6.7.4 Configuring the Time-Division Multiplexing Interface for VXSM 6-67
6.7.4.1 Changing the VXSM Line Type to SDH 6-67
6.7.4.2 Enabling SONET Lines and Paths for VXSM 6-69
6.7.4.3 Enabling SDH Lines and Paths for VXSM 6-73
6.7.5 Configuring Voice Interfaces 6-74
6.7.5.1 Checking for Existing VIFs for VXSM 6-74
Cisco Media Gateway Manager 5.0 User Guide
OL-5461-02
ix
Contents
6.7.5.2 Creating a VIF for VXSM 6-74
6.7.5.3 Viewing or Modifying VIF Configuration 6-76
6.7.6 Configuring MG-MGC Interfaces 6-77
6.7.6.1 Setting Up MGCs and MGC Groups 6-79
6.7.6.2 Configuring H.248 Protocol and Profiles 6-87
6.7.6.3 Configuring XGCP Protocol 6-96
6.7.6.4 Configuring MGC XGCP Profiles 6-98
6.7.6.5 Configuring MGC Redundancy 6-101
6.7.7 How Do I Configure VXSM Features? 6-101
6.7.7.1 Creating a RUDP Session 6-102
6.7.7.2 Configuring Voiceband Data 6-108
6.7.7.3 Creating PRI-BH 6-111
6.7.7.4 Configuring Announcements 6-113
6.8 How Do I Configure RPM Cards? 6-116
6.8.1 Creating a Resource Partition for RPM 6-117
6.8.2 Creating or Modifying an ATM Subinterface 6-119
6.8.3 Saving the Run-Time Configuration for RPM 6-120
6.9 How Do I Configure VISM-PR Cards? 6-121
6.9.1 Setting Up a VISM-PR Card 6-122
6.9.1.1 Creating a Virtual Port for VISM-PR 6-123
6.9.1.2 Creating a Resource Partition for VISM-PR 6-124
6.9.1.3 Viewing VISM-PR CODEC Templates 6-125
6.9.1.4 Viewing VISM-PR Card Configuration Settings 6-128
6.9.2 Configuring TDM for VISM-PR 6-130
6.9.2.1 Configuring T1 and E1 Lines for VISM-PR 6-131
6.9.2.2 Placing T1 or E1 Lines In or Out of Service 6-139
6.9.2.3 Adding Bulk Distribution Using SRME 6-139
6.9.2.4 Configuring ECAN for VISM-PR 6-141
6.9.3 Configuring Jitter on VISM-PR Cards 6-141
6.9.4 Configuring VoIP Switching for VISM-PR 6-143
6.9.4.1 Configuring VoIP Parameters for VISM-PR 6-144
6.9.4.2 Configuring the ATM Network for VISM-PR 6-146
6.9.4.3 Configuring the Call Agent Interface for VISM-PR 6-146
6.9.4.4 Configuring TDM Signaling for CCS on VISM-PR 6-173
6.9.4.5 Adding and Configuring DS0 Endpoints on Lines 6-175
6.9.4.6 Configuring TDM Signaling for CAS on VISM-PR 6-180
6.9.4.7 Placing the VISM-PR Card In or Out of Service 6-183
Cisco Media Gateway Manager 5.0 User Guide
x
OL-5461-02
Contents
CHAPTER
7
Provisioning Connections
7-1
7.1 What Is Connection Provisioning?
7-1
7.2 What Types of Connection Are Available? 7-1
7.2.1 What Are the Supported Connection Service Types?
7-2
7.3 Where Do I Find Information About Connections? 7-2
7.3.1 Finding Information in the Connection List Tab 7-2
7.3.2 Displaying All Existing Connections 7-4
7.3.3 Displaying Connections of the Same Type 7-4
7.3.4 Editing the Filter Settings 7-5
7.4 How Do I Create, Modify and Delete Voice Connections? 7-6
7.4.1 Creating a VISM-RPM Connection in Connection Mode 7-6
7.4.1.1 Creating a VISM-RPM Connection in Advanced Mode 7-7
7.4.1.2 Creating a VISM-RPM Connection in Quick Mode 7-8
7.4.2 Modifying a Connection in Connection Mode 7-9
7.4.2.1 Modifying a Connection in Advanced Mode 7-9
7.4.2.2 Modifying a Connection in Quick Mode 7-9
7.4.3 Deleting Connections 7-10
7.4.4 Removing Incomplete Connections and Unused Connection Descriptors from the
Network 7-10
7.5 How Do I Configure Connection Templates? 7-12
7.5.1 Creating Connection Templates 7-12
7.5.2 Displaying Connection Templates 7-14
7.5.3 Modifying Connection Templates 7-14
7.5.4 Deleting Connection Templates 7-15
7.6 How Can I Test the Connections? 7-15
7.6.1 Up a Connection 7-15
7.6.2 Down a Connection 7-16
7.6.3 Loopback a Connection 7-17
CHAPTER
8
Managing Security
8-1
8.1 What Is Security Management?
8-1
8.2 How Do I Customize the Login Advisory Message?
8-2
8.3 How Do I Manage User Security? 8-2
8.3.1 Restricting User Access 8-2
8.3.2 Viewing the Audit Trail File 8-4
8.3.3 User Profiles 8-5
8.3.3.1 Viewing User Profiles 8-6
8.3.3.2 Adding a Custom User Profile 8-7
8.3.3.3 Modifying a User Profile 8-11
Cisco Media Gateway Manager 5.0 User Guide
OL-5461-02
xi
Contents
8.3.3.4 Deleting a User Profile 8-12
8.3.3.5 Duplicating a User Profile 8-12
8.3.4 Performing User Administration 8-13
8.3.4.1 Managing the Cisco MGM Default User Profiles 8-13
8.3.4.2 Viewing the Cisco MGM Users Table 8-17
8.3.4.3 Creating a Cisco MGM User 8-18
8.3.4.4 Modifying a Cisco MGM User’s Properties 8-20
8.3.4.5 Deleting a Cisco MGM User 8-23
8.3.4.6 Viewing Logged In Cisco MGM Users 8-23
8.3.4.7 Ending an Active Cisco MGM User Session 8-23
8.3.4.8 Using the Cisco MGM Locked Window 8-24
8.3.4.9 Unlocking a User Account 8-24
8.3.4.10 Changing Your User Password 8-25
8.3.4.11 Setting User Preferences 8-26
8.3.4.12 Enabling or Disabling the Continuous Audible Alarm 8-27
8.3.4.13 Configuring Cisco MGM Security Parameters 8-28
8.3.4.14 Sending Messages to Other Users 8-30
8.3.4.15 Viewing User Notification Messages 8-30
8.4 How Do I Manage the Audit Log? 8-31
8.4.1 Viewing the Audit Log 8-32
8.4.2 Filtering Audit Log Data 8-32
CHAPTER
9
Managing Faults
9-1
9.1 What Is Fault Management? 9-1
9.1.1 What the NE Provides 9-2
9.1.2 Fault Notification and Maintenance
9.1.2.1 Proactive Maintenance 9-3
9.1.2.2 Reactive Maintenance 9-3
9.1.3 Root Cause Analysis 9-3
9-2
9.2 Where Can I Get Information on Affected Services and Customers?
9.2.1 Dashboard 9-4
9.2.2 Tooltips 9-5
9.2.3 Domain Explorer 9-5
9.2.4 Alarm Browser 9-7
9.2.5 Network Map 9-9
9.2.6 Diagnostic Center 9-10
9.3 What Fault Information Can I See?
9.3.1 How Are Alarms Displayed?
9.3.2 Suppressing Alarms 9-13
9-3
9-11
9-12
Cisco Media Gateway Manager 5.0 User Guide
xii
OL-5461-02
Contents
9.4 Is the Service Working? 9-13
9.4.1 Viewing Service Status 9-14
9.4.2 Viewing Alarms 9-15
9.4.3 Setting Up and Viewing Alarm Configuration Parameters 9-15
9.4.4 Displaying the Status of all Nodes in the Network 9-18
9.4.5 Displaying the Status of a Node 9-19
9.4.6 Displaying the Status of a Card 9-19
9.4.7 Displaying the Status for Lines or Ports 9-20
9.4.8 Displaying the Status for Paths in a Loopback for the VXSM-OC3 Card 9-21
9.4.9 Displaying the Status for Lines in a Loopback 9-22
9.4.10 Displaying the Paths in Loopback for the VXSM-OC3 Card 9-22
9.4.11 Displaying the Status for a Bit Error Rate Test for the Voice Cards 9-23
9.4.12 Displaying the Lines in Loopback for the Voice Cards 9-24
9.4.13 Managing the Status for the VXSM Features 9-25
9.4.13.1 Displaying the Status for Media Gateway Links for the Voice Cards 9-25
9.4.13.2 Displaying the Status for Reliable User Datagram Protocol for the Voice Cards 9-26
9.4.13.3 Displaying the Status for Xternal Gateway Control Protocol for the Voice Cards 9-27
9.4.14 Managing the Status for the VISM-PR Features 9-28
9.4.14.1 Displaying the Status for the Simple Resource Coordination Protocol Peers 9-28
9.4.15 Diagnosing Connections 9-29
9.4.15.1 Polling a Connection for an SPVC 9-29
9.4.16 Bit Error Rate Test 9-30
9.4.17 Configuring Bit Error Rate Test 9-30
9.4.17.1 Stopping Bit Error Rate Test 9-32
9.4.17.2 Modifying Bit Error Rate Test 9-32
9.4.18 Displaying Bit Error Rate Test 9-33
9.5 Where Is the Fault? 9-33
9.5.1 Sources of Information 9-34
9.5.2 Identifying and Monitoring Alarms 9-34
9.5.3 Using Visual and Audible Alarm Notifications 9-35
9.5.4 Sources of EMS Raised Alarms 9-36
9.5.5 Viewing Fault Management Data for a Set of NEs 9-37
9.6 How Can I Use Advanced Debugging to Find the Cause of the Fault?
9.6.1 Setting an EMS Process as Critical 9-38
9.6.2 Setting Up and Viewing Error Logs 9-39
9.6.3 Setting Debug Options 9-42
9-38
9.7 What Is the Fault Priority? 9-45
9.7.1 Alarm Severity Levels 9-46
9.7.2 Filtering the Alarm Log 9-46
Cisco Media Gateway Manager 5.0 User Guide
OL-5461-02
xiii
Contents
9.7.3 Filtering Data by Time
9-47
9.8 Who Is Responsible for Managing the Fault? 9-48
9.8.1 Configuring Alarm Acknowledgement and Alarm Notes
9.8.2 Acknowledging and Unacknowledging Alarms 9-49
9.9 How Did You Manage the Fault? 9-50
9.9.1 Archiving Alarm Log 9-50
9.9.2 Exporting Alarms and Events to a Text File
CHAPTER
10
Managing Performance
9-48
9-52
10-1
10.1 What Is Performance Management?
10-1
10.2 What Performance Data Is Available? 10-2
10.2.1 Types of Report 10-3
10.2.1.1 Raw Data Report 10-4
10.2.1.2 Utilization Data Report 10-4
10.2.1.3 Performance Data Report 10-4
10.3 How Is Performance Data Collected? 10-5
10.3.1 Enabling or Disabling Performance Monitoring 10-5
10.3.2 Self Monitor Table 10-5
10.3.2.1 Filtering the Self Monitor Table 10-6
10.3.3 Activating or Deactivating Performance Monitoring 10-7
10.4 Where Can I See the Performance Data?
10.4.1 Using the Statistics Report 10-8
10-8
10.5 What Types of Data Reports Are Available? 10-9
10.5.1 Viewing Raw Data Reports 10-10
10.5.1.1 Generating a Raw Data Report 10-10
10.5.1.2 Exporting the Raw Data Report 10-11
10.5.1.3 Generating a Raw Data Report for Connection Endpoints 10-11
10.5.2 Viewing Utilization Data 10-13
10.5.2.1 Calculating the Percent Utilization for Top Utilization Reports 10-13
10.5.2.2 Generating a Utilization Data Report 10-14
10.5.2.3 Exporting the Utilization Data Report 10-15
10.5.2.4 Generating a Utilization Data Report for Connection Endpoints 10-15
10.5.3 Viewing Performance Data Reports 10-16
10.5.3.1 Calculating the Statistics Percentages for the Performance Data Report
10.5.3.2 Generating the Performance Data Report for a Port 10-18
10.5.3.3 Displaying Performance Data Report for a Port 10-19
10.5.3.4 Generating the Performance Data Report for Connections 10-19
10.5.3.5 Displaying Performance Data Report for Connections 10-20
10.5.4 Exporting the Data Report 10-21
10-17
Cisco Media Gateway Manager 5.0 User Guide
xiv
OL-5461-02
Contents
10.6 How Is Performance Data Stored? 10-21
10.6.1 Importing and Exporting Data to and from the Oracle Database
CHAPTER
11
Managing Inventory
11-1
11.1 What is Inventory Management?
CHAPTER
12
10-22
11-1
11.2 Domain NE Tables 11-2
11.2.1 Viewing a Domain NE Table 11-2
11.2.2 Filtering Results in a Domain NE Table
11-3
11.3 Equipment Inventory Tables 11-4
11.3.1 Viewing an Equipment Inventory Table
11-4
Managing CORBA Interfaces
12-1
12.1 What is Cisco MGM GateWay/CORBA? 12-1
12.1.1 Viewing the Cisco MGM GateWay/CORBA Properties Pane 12-2
12.1.1.1 Global Tab 12-2
12.1.1.2 OSS Clients Tab 12-3
12.1.2 Viewing the Cisco MGM GateWay/CORBA Client Configuration Table
12.2 Using a Static CORBA Listener Port on the Cisco MGM Server
12.3 Configuring the CORBA Timeout
APPENDIX
A
Icons and Menus
12-4
12-4
12-4
A-1
A.1 Launching Applications
A.2 Toolbar Options
A-1
A-2
A.3 Menu Options A-7
A.3.1 File Menu A-7
A.3.2 Edit Menu A-10
A.3.3 Fault Menu A-13
A.3.4 Performance Menu A-13
A.3.5 Configuration Menu A-13
A.3.6 Administration Menu A-14
A.3.7 Window Menu A-15
A.3.8 Help Menu A-15
A.4 Hierarchy Pane Icons A-16
A.4.1 Object Icons A-16
A.4.2 Communication State Icons A-17
A.4.3 Operational State Icons A-17
A.4.4 Severity Icons A-18
A.4.5 Hierarchy Pane Navigation Icons A-18
Cisco Media Gateway Manager 5.0 User Guide
OL-5461-02
xv
Contents
A.5 Inspector View Icons
A-19
A.6 Network Map Icons A-20
A.6.1 Icon States A-20
A.6.2 Icon Colors A-21
A.6.3 Operational and Communication State Icons
A.6.4 Network Map Edit Menu A-23
APPENDIX
B
Error Messages
B-1
B.1 Cisco MGM Client Error and Warning Messages
APPENDIX
C
B.2 Cisco MGM Server Error Messages
B.2.1 Critical Server Error Messages
B.2.2 Major Server Error Messages
B.2.3 Minor Server Error Messages
B.2.4 Debug Server Error Messages
B-61
B.3 Cisco MGM Server Audit Messages
B-104
Troubleshooting
A-22
B-1
B-61
B-68
B-87
B-104
C-1
C.1 Server Problems C-2
C.1.1 Cisco MGM Server Does Not Respond C-2
C.1.2 Cannot Connect to the Cisco MGM Server C-3
C.1.3 NE Connection State Is Listed as Unavailable C-5
C.1.4 Launching Tables Results in Database Errors C-5
C.1.5 SNMP Traps Are Not Forwarded from NEs C-6
C.1.6 Trap Port Is Unavailable C-6
C.1.7 NE Is Not Discovered C-6
C.1.8 NE Is Not Reachable C-6
C.1.9 NE Model Type Appears as Unknown C-7
C.1.10 Memory Backup, Memory Restore, or Software Download Fails C-7
C.1.11 Memory Autobackup, Software Commit, or Software Revert Fails C-7
C.2 Client Connectivity Problems C-8
C.2.1 Database Is Not Available C-8
C.2.2 Database Timeout Occurred C-8
C.2.3 Are the Cisco MGM Client and the Cisco MGM Server Connected?
C.2.4 Cannot Log In as Provisioner or Operator C-9
C.2.5 “Cannot Authenticate User” Message Appears C-10
C.3 Client Operational Problems C-10
C.3.1 Cannot Delete an NE C-10
C.3.2 Added a New Software Version to the Wrong NE
C.3.3 Cannot Schedule Jobs C-11
C-9
C-10
Cisco Media Gateway Manager 5.0 User Guide
xvi
OL-5461-02
Contents
C.3.4
C.3.5
C.3.6
C.3.7
Cannot Customize the Network Map C-11
Color Settings when the Cisco MGM Client Is Run on a Sun Ultra 5 Workstation?
How Do I Collect Thread Dumps? C-12
Launching Help on a Solaris Client C-13
C-11
C.4 Topology Problems C-14
C.4.1 Discovery Mechanism C-14
C.4.2 Discovery Issues at Startup C-14
C.4.2.1 No Nodes Are Discovered C-14
C.4.2.2 Node Name Is Incorrect in Database C-15
C.4.2.3 Node IP Is Incorrect in Database C-15
C.4.2.4 Node Alarm Shown Incorrectly in Database C-16
C.4.2.5 Reachable Node Is Shown as Unreachable C-16
C.4.2.6 Cisco MGM State Is Incorrect C-17
C.4.3 Discovery Issues at Runtime C-18
C.4.3.1 Node Added Not Shown in Cisco MGM Configuration Center, Chassis View, Diagnostic
Center or Statistics Report GUIs C-18
C.4.3.2 Node Name Change Not Getting Updated in Cisco MGM Configuration Center, Chassis
View, Diagnostic Center or Statistics Report GUIs C-19
C.4.3.3 Node IP Address Change Not Getting Updated in Cisco MGM Configuration Center,
Chassis View, Diagnostic Center or Statistics Report GUIs C-19
C.5 Equipment Management Problems C-20
C.5.1 Sync Up Issues C-20
C.5.1.1 EM Declares Successful Node Re-sync When Node Mode Is 3 C-20
C.5.1.2 Network Setup and Configuration Required for OOEMC Sync Up Process C-21
C.5.1.3 Node Mode Remains in 1 C-22
C.5.1.4 Node Mode Remains in 2 C-22
C.5.1.5 Node Resync Mode is 5 C-24
C.5.1.6 Cisco MGM DB Inconsistent With Switch Data After Successful Coldstart (Cisco MGM
Server stop/start) or Periodic Resync C-26
C.5.1.7 Cisco MGM CM GUI Shows Incomplete Connections After Successful Node Resync and
Dbroker Sync Up C-26
C.5.1.8 Cisco MGM GUI Shows Mismatched Information Between GUI Views and DB
Data C-27
C.5.2 Cisco MGM DB and Switch Data Inconsistency Issues After Node Provisioning for MGX C-29
C.5.2.1 DB Table Population Through Traps and SNMP Upload C-29
C.5.2.2 Switch Data Does Not Match With Cisco MGM DB Table After Node Provisioning C-29
C.6 Configuration Center, Chassis View, Diagnostic Center and Statistics Report Problems C-33
C.6.1 Cisco MGM Configuration Center, Chassis View, Diagnostic Center or Statistics Report
Basics C-33
C.6.2 Basic Issues C-35
Cisco Media Gateway Manager 5.0 User Guide
OL-5461-02
xvii
Contents
C.6.2.1 Configuration Center, Chassis View, Diagnostic Center or Statistics Report GUIs Do Not
Show Any Nodes C-35
C.6.2.2 Configuration Center, Chassis View, Diagnostic Center or Statistics Report GUIs Are
Unable to Connect to Server C-36
C.6.2.3 Configuration Center, Chassis View, Diagnostic Center or Statistics Report GUIs Do Not
Show a Newly Added Node C-36
C.6.3 Topology Discovery Issues C-37
C.6.3.1 Configuration Center, Chassis View, Diagnostic Center or Statistics Report GUIs Do Not
Show a Node C-37
C.6.3.2 Node Information Incorrect on Configuration Center, Chassis View, Diagnostic Center or
Statistics Report GUIs C-38
C.6.3.3 Configuration Center, Chassis View, Diagnostic Center or Statistics Report GUI Shows a
Node That Is Not in the Network C-38
C.6.3.4 Configuration Center, Chassis View, Diagnostic Center or Statistics Report GUI Shows
Incorrect SyncState for a Node C-39
C.6.3.5 Duplicate Nodes Are Displayed on Configuration Center, Chassis View, Diagnostic
Center or Statistics Report GUIs C-39
C.6.4 Network Element Discovery Issues C-40
C.6.4.1 All the Cards Under a Node Are Missing C-40
C.6.4.2 Configuration Center, Chassis View, Diagnostic Center or Statistics Report GUIs Do Not
Show a Card/Line/Port for a Node C-41
C.6.4.3 Card/Line/Port Information Incorrect on Configuration Center, Chassis View, Diagnostic
Center or Statistics Report GUIs C-42
C.6.4.4 Configuration Center, Chassis View, Diagnostic Center or Statistics Report GUI Shows a
Card/Line/Port That Is Not Present in a Node C-42
C.6.5 Configuration Center, Chassis View, Diagnostic Center or Statistics Report GUI Alarm
Issues C-43
C.6.5.1 Alarm Processing Basics C-43
C.6.5.2 XML Schema for Alarm Rules C-44
C.6.5.3 Alarm Severity and Object Severity C-46
C.6.5.4 Severity Shown on Tree View Does Not Match Severity Shown on Platform C-47
C.6.5.5 Alarm List Shows Alarm That Does not Exist on Platform C-48
C.6.5.6 Transient Event Has Disappeared Unexpectedly C-49
C.6.5.7 Port in Tree View Displays an Aggregate Alarm, However No Children Exist Under
Port C-50
C.7 Chassis View Problems C-50
C.7.1 Chassis View Basics C-51
C.7.2 Lines Not Displayed in MGX Nodes C-51
C.7.3 Card Not Displayed in MGX Nodes C-52
C.7.4 DCA/DCB Status Not Displayed in PXM Cards C-52
C.7.5 Ethernet Status Not Updated in PXM Cards C-52
C.7.6 HIST, CBRX, CBTX Status Not Updated in MGX Nodes
C-52
Cisco Media Gateway Manager 5.0 User Guide
xviii
OL-5461-02
Contents
C.7.7 RPM Card Status not Updated C-53
C.7.8 RPM Secondary Card Status Is Blue C-53
C.7.9 Lines Not Displayed in Secondary Card C-53
C.7.10 Lines Not Selectable C-53
C.7.11 Wrong Tooltip Is Displayed C-53
C.8 Configuration Management - Elements C-54
C.8.1 Configuration Center Framework C-54
C.8.1.1 Cannot Launch Configuration Center C-55
C.8.1.2 Cannot Launch Other Application from Configuration Center C-55
C.8.1.3 Exception Raised When Configuration Center Is Launched C-56
C.8.1.4 Exception Raised When Configuration Center Launches Other Application C-56
C.8.1.5 Element Tab—Double Click In Tree View Does not Launch An Internal Frame C-56
C.8.1.6 Element Tab—Drag and Drop Does not Launch An Internal Frame C-57
C.8.1.7 Element Tab—Create/Details/Modify/Refresh Button Issues C-57
C.8.1.8 Element Management—Drag and Drop Within Configuration Center C-57
C.8.1.9 Cross Application—Configuration Center as Drag Source C-58
C.8.1.10 Cross Application—Configuration Center Element Tab as Drop Target C-58
C.8.1.11 Element Tab—Internal Frame Displays Incorrect Object or Object Data C-59
C.8.1.12 Configuration Center's Element Tab Does Not Respond (GUI Is Grayed-Out) C-59
C.8.2 Configuration Center; Element Management C-59
C.8.2.1 XML Parsing Error C-60
C.8.2.2 SNMP No Data Error C-61
C.8.2.3 Details/Create/Delete/Refresh Buttons Are Not Enabled (highlighted) C-62
C.8.2.4 SNMP Timeout Error C-62
C.8.2.5 SNMP Set Error C-63
C.8.2.6 Object Not Found In Tree View Error C-63
C.8.2.7 Element Data Inconsistent With Switch C-64
C.8.2.8 Config Server Reported Error Messages C-65
C.9 Connection Management Problems C-66
C.9.1 Configuration Center GUI; Framework Issues C-66
C.9.1.1 Connections Tab—Double Click on a Tree View Does not Launch Connection's Internal
Frame C-67
C.9.1.2 Connections Tab—Drag and Drop Does Not Launch Connection's Internal Frame C-68
C.9.1.3 Connection List Tab—Cannot Launch Internal Frame To Modify An Existing Connection
(Using the Modify Button) C-68
C.9.1.4 Advanced Mode Tab—Cannot Launch Connection Details Dialog (Using the 'Detail'
Button) C-69
C.9.1.5 Advanced Mode Tab—Cannot Launch Template Details Dialog (Using the 'Template
Details' Button) C-69
C.9.1.6 Cross Application—Cannot Launch Other Application from Connection List C-69
Cisco Media Gateway Manager 5.0 User Guide
OL-5461-02
xix
Contents
C.9.1.7 Cross Application—Connection List as Drag Source C-70
C.9.1.8 Cross Application—Connection Tab's Content Pane as Drop Target C-70
C.9.1.9 Configuration Center's Connection Tab Does Not Respond (GUI Is Grayed-Out) C-71
C.9.2 Configuration Center GUI; CM Server Reported Errors C-71
C.9.2.1 Connection Creation/Modification/Deletion/Retrieval Errors C-71
C.9.2.2 Connection Template Creation/Modification/Deletion/Retrieval Errors C-73
C.9.3 Cmsvr Errors C-74
C.9.3.1 End to End Type Cannot Be PVC for Connections with PNNI Segment C-74
C.9.3.2 Unsupported Service Type for the Foresight Connections for PNNI/SPVC
Endpoints C-75
C.9.3.3 Ce-Ce Connection Port Speed Should Be Same on Both C-75
C.9.3.4 Cannot Create One Segment Hybrid C-75
C.9.3.5 Cannot Add Connection Between -byte Port Header and -byte Port Header for chan type
NIW and NIW-replace C-76
C.9.3.6 Unsupported Service Type - General node-slot-port-version C-76
C.9.3.7 End Point Not Present in One of the Connection Tables During Modify C-76
C.9.3.8 Cmsvr—Connection Diagnostics Issues C-77
C.9.3.9 TestConn or TestDelay Failed With Switch Error C-77
C.9.3.10 Connection Up/Down/Reroute Failed C-78
C.9.3.11 Connection Trace Failures C-78
C.9.4 CMGRD C-79
C.9.4.1 High Level Connection Subsystem Architecture C-79
C.9.4.2 Cmgrd - Sdbroker Errors C-80
C.9.4.3 Cmgrd Errors C-84
C.9.4.4 Cmgrd—Switch Errors C-88
C.10 Diagnostics Center Problems C-92
C.10.1 Diagnostics Center Framework C-94
C.10.1.1 Cannot Launch Diagnostic Center C-94
C.10.1.2 Cannot Launch Other Applications from Diagnostics Center C-95
C.10.1.3 Exception Raised When Diagnostics Center Is Launched C-95
C.10.1.4 Double Click Operation In Diagnostics Center Tree View Does not Launch An Internal
Frame C-95
C.10.1.5 Drag and Drop Within Diagnostics Center C-96
C.10.1.6 DnD from/to Diagnostics Center to/from Other Applications C-96
C.10.1.7 Drop Target Displays Incorrect Object or Object Data C-97
C.10.1.8 Diagnostics Center Does Not Respond (GUI Is Grayed-Out) C-97
C.10.2 11.2 Diagnostic Server (DCServer) Specific Issues C-98
C.10.2.1 XML Parser Error C-98
C.10.2.2 SNMPCOMM_TIMEOUT Error While Polling mib Objects C-99
C.10.2.3 Node Syncup Status Are Not Shown in the Diagnostic Center GUI C-100
Cisco Media Gateway Manager 5.0 User Guide
xx
OL-5461-02
Contents
C.10.2.4 Node Resync Fails C-100
C.10.2.5 Polling of Real Time Counters Fails C-100
C.10.2.6 Some Real Time Counters Are Not Shown C-101
C.10.2.7 Unable to Start/Stop/Modify BERT Operations C-101
C.10.2.8 Unable to Start/Stop IMA Link Test Patterns C-102
C.10.2.9 Cannot Perform Connection Diagnostics C-102
C.10.2.10 Miscellaneous Issues / Problems in Diagnostics Center
C-103
C.11 Performance Management Collection and Parsing Problems C-103
C.11.1 PM Collection Issues C-103
C.11.1.1 pmcollector—Generic Troubleshooting C-104
C.11.1.2 PM Collection Fails for the Node - Logfile Shows "Node not discovered" C-104
C.11.1.3 PM Collection Fails for the Node - Logfile Shows "Card not discovered" C-105
C.11.1.4 PM Collection Fails for the Node - Logfile Shows "Time not synchronized" C-105
C.11.1.5 PM Collection Fails for the Node - Logfile Shows "Snmp failed" C-105
C.11.1.6 PM Collection Fails for the Node - Logfile Shows "Ftp failed" C-106
C.11.1.7 PM Collection Fails for the Node - Logfile Shows "Polling failed and wait for major
retry" or "Major retry failed and wait for critical retry" or "Critical retry failed and wait for history
retry" or "History retry failed and wait for next retry" or "No more retry" C-106
C.11.2 PM Parsing Issues C-107
C.11.2.1 StatsParser—Generic Troubleshooting C-107
C.11.2.2 StatsParser—Files Are Parsed But the Files Are Listed in the BadFileList C-107
C.12 Statistics Report Problems C-108
C.12.1 Statistics Report C-108
C.12.2 If You Collected Data and You See No Data Available C-108
C.12.3 If You Generate Report and Don't See Data for a Long Time C-108
C.12.4 You See FDNs for Other Entities When You Generate Report C-109
C.12.5 You See Wrong FDN for Raw Report C-109
C.12.6 The Utilization Report Value Is Greater Than 100% C-109
C.13 Service Agent Problems C-110
C.13.1 RtmProxy C-110
C.13.1.1 Registration with RtmProxy Failed C-110
C.13.1.2 Not Receiving Any Traps C-111
C.13.1.3 Manager Gets Deregistered C-112
C.13.1.4 Nodal Community Strings Do Not Work C-112
C.14 Audit Trail Log Problems C-113
C.14.1 Audit Trail Logging Mechanism C-113
C.14.1.1 AuditLogger.conf Usage C-113
C.14.1.2 Audit Trail Log File Naming Convention C-113
C.14.1.3 Open a Dialog Box in a Cisco MGM GUI, There Is No Record in the Audit Trail Log
File C-113
Cisco Media Gateway Manager 5.0 User Guide
OL-5461-02
xxi
Contents
C.15 Miscellaneous Problems C-114
C.15.1 NTS C-114
C.15.1.1 Nodes Stay in Mode 1 After Cold Start C-114
C.15.1.2 Config Change or Provisioning Activity Not Reflected on Cisco MGM C-115
C.15.1.3 How To Interpret NTS Log C-115
C.15.2 Data Inconsistency C-116
C.15.2.1 Connection Inconsistency Between the Switch and GUI C-116
C.15.2.2 Inconsistent Connection Status C-119
C.15.2.3 Inconsistent Connection Secondary Status C-120
C.15.2.4 Incomplete Connections C-120
C.15.3 Cisco MGM FTP Daemon C-121
C.15.3.1 FTP Daemon Overview C-121
C.15.3.2 Generic Troubleshooting C-121
C.15.3.3 FTP Username and Password C-122
C.15.3.4 cwmftpd—Files Are Not Transferred Due to Wrong Username/Password C-122
C.15.3.5 cwmftpd—File Not Available On Switch C-122
C.15.3.6 FTP Sessions in Switch C-123
C.15.3.7 421 Session Limit Reached C-123
C.15.3.8 499 Session Limit Reached C-124
C.15.3.9 Acquiring a Session With Switch C-124
C.15.3.10 Failed to Acquire Session After All Retries C-125
C.15.3.11 General Log Information C-125
APPENDIX
D
Statistics Summary
D-1
D.1 Data Transmission Process Overview
D-2
D.1 Connection Statistics D-3
D.1.1 AXSM Connection D-3
D.1.2 AXSM-E Connection D-5
D.1.3 VXSM ATM Connection Statistics
D-7
D.2 Service Line Statistics D-8
D.2.1 CESM, FRSM, SRM, and SRME T3/E3 Service
D.2.2 SRM and SRME SONET Service Line D-13
D.2.3 AXSM Line D-14
D.2.4 AXSM-E Line D-17
D.3 Port Statistics D-19
D.3.1 AXSM Port D-19
D.3.2 AXSM-E Port D-22
D.3.3 VXSM Port Statistics
D.4 Card Statistics
D-9
D-29
D-30
Cisco Media Gateway Manager 5.0 User Guide
xxii
OL-5461-02
Contents
D.4.1 AXSM Card Statistics
D-30
D.5 Path Statistics D-32
D.5.1 VXSM STS Path Statistics D-32
D.5.2 VXSM DS3 Path Statistics D-34
D.5.3 VXSM DS1 N DS3 Path Statistics D-35
D.5.4 VXSM DS1 VT Path Statistics D-38
D.6 PNNI Network Statistics D-41
D.6.1 PNNI Nodal Statistics D-41
D.6.2 PNNI Port Statistics D-42
D.7 Protocol Statistics D-43
D.7.1 VXSM Megaco Statistics D-43
D.7.2 VXSM Megaco Physical Termination Protocol Statistics D-46
D.7.3 VXSM Megaco Ephemeral Termination Protocol Statistics D-47
D.7.4 VXSM LAPD Protocol Statistics D-48
D.8 Physical Line Statistics D-50
D.8.1 AXSM-E T1/E1 Physical Line D-51
D.8.2 AXSM-E T3/E3 Physical Line D-53
D.8.3 AXSM-E SONET Physical Line D-59
D.8.4 VXSM SONET Physical Line D-63
D.8.5 VXSM T1E1 Physical Line Statistics D-65
APPENDIX
E
Real-Time Counters
E-1
E.1 AXSM-Card—Supported Real-Time Counters
E-2
E.2 AXSM-DS1-Line—Supported Real-Time Counters
E-2
E.3 AXSM-DS3-Line—Supported Real-Time Counters
E-5
E.4 AXSM-EndPoint-Connection—Supported Real-Time Counters
E.5 AXSM-Port—Supported Real-Time Counters
E-14
E.6 AXSM-SONET-Line—Supported Real-Time Counters
E.7 AXSME-Card—Supported Real-Time Counters
E-22
E-29
E.8 AXSME-DS1-Line—Supported Real-Time Counters
E-29
E.9 AXSME-DS3-Line—Supported Real-Time Counters
E-32
E.10 AXSME-EndPoint-Connection—Supported Real-Time Counters
E.11 AXSME-ImaGroup—Supported Real-Time Counters
E.12 AXSME-ImaLink—Supported Real-Time Counters
E.13 AXSME-Port—Supported Real-Time Counters
E-13
E-38
E-39
E-41
E-43
E.14 AXSME-SONET-Line—Supported Real-Time Counters
E.15 MGX2-RPM-Card—Supported Real-Time Counters
E-50
E-55
Cisco Media Gateway Manager 5.0 User Guide
OL-5461-02
xxiii
Contents
E.16 RPM-EndPoint-Connection—Supported Real-Time Counters
E.17 RPM-ETHERNET-Line—Supported Real-Time Counters
E.18 RPM-Port—Supported Real-Time Counters
E-56
E-56
E-60
E.19 RPM-SONET-Line—Supported Real-Time Counters
E-60
E.20 RPM-VirtualPort—Supported Real-Time Counters
E-64
E.21 MGX2-SRM-Card—Supported Real-Time Counters
E-64
E.22 MGX2-SRM-DS3-Line—Supported Real-Time Counters
E-65
E.23 MGX2-SRM-SONET-Line—Supported Real-Time Counters
E-70
E.24 Common/Card-BearerEndPoint—Supported Real-Time Counters
E-76
E.25 Common/Card-RudpSession—Supported Real-Time Counters
E.26 Common/Card-SrcpPeer—Supported Real-Time Counters
E-79
E.27 Common/Card-XgcpPeer—Supported Real-Time Counters
E-80
E.28 VISM-Card—Supported Real-Time Counters
E-82
E.29 VISM-DS1-Line—Supported Real-Time Counters
E-83
E.30 VISM-EndPoint-Connection—Supported Real-Time Counters
E.31 VISM-VirtualPort—Supported Real-Time Counters
E-87
E.33 Common/Card-VxsmXgcp—Supported Real-Time Counters
E.34 Common/Card-VxsmCid—Supported Real-Time Counters
E-89
E-90
E.35 Common/Card-RudpSession—Supported Real-Time Counters
E.36 Common/Card-MGMGLink—Supported Real-Time Counters
E.37 VXSM-VT-Path—Supported Real-Time Counters
E-96
E-96
E.41 VXSM-STS-Path—Supported Real-Time Counters
E-97
E.42 VXSM-STM-Path—Supported Real-Time Counters
E-99
E.43 VXSM-SONET-Line—Supported Real-Time Counters
E-102
E.44 VXSM-EndPoint-Connection—Supported Real-Time Counters
F
E.45 VXSM-DS3-Path—Supported Real-Time Counters
E-109
E.46 VXSM-DS1-Path—Supported Real-Time Counters
E-115
E.47 VXSM-DS1-Line—Supported Real-Time Counters
E-118
Open Source License Acknowledgement
F.1 OpenSSL
E-93
E-96
E.40 VXSM-TUG3-Path—Supported Real-Time Counters
E.48 VXSM-AU-Path—Supported Real-Time Counters
E-92
E-95
E.38 VXSM-VirtualPort—Supported Real-Time Counters
E.39 VXSM-TU-Path—Supported Real-Time Counters
E-85
E-87
E.32 Common/Card-MGMGLink—Supported Real-Time Counters
APPENDIX
E-78
E-107
E-120
F-1
F-1
Cisco Media Gateway Manager 5.0 User Guide
xxiv
OL-5461-02
Contents
F.2 Bouncy Castle
F.3 jacORB
F-3
F-4
GLOSSARY
INDEX
Cisco Media Gateway Manager 5.0 User Guide
OL-5461-02
xxv
Contents
Cisco Media Gateway Manager 5.0 User Guide
xxvi
OL-5461-02
Preface
The Cisco Media Gateway Manager 5.0 User’s Guide describes how to use the Cisco Media Gateway
Manager (Cisco MGM) 5.0 software.
Changes to the User Guide
This User Guide is updated as follows:
•
Part numbers for VXSM Front and Back cards updated. See Table 1-1.
Audience
This guide is designed for system administrators and users who are responsible for the operation of the
Cisco MGM application.
Documentation
A Guide to Cisco Multiservice Switch Documentation ships with your product. That guide contains
general information about how to locate Cisco MGX and Cisco MGM documentation online.
Technical Manual Order of Use
Use the technical manuals in the following order:
Step 1
Refer to the documents that ship with your product. Observe all safety precautions.
Step 2
Refer to the release notes for your product.
Step 3
Refer to this manual for planning information.
Step 4
Refer to the manuals for information about installing cards and cables in the MGX chassis.
Step 5
Refer to the manuals that help you configure your MGX switch and processor cards.
Step 6
Refer to the manual that supports the additional cards you intend to install in your switch. For example,
the VISM book can help you set up your switch as a voice gateway, and the RPM book can help you
implement IP on the switch.
Cisco Media Gateway Manager 5.0 User Guide
OL-5461-02
xxvii
Preface
Obtaining Documentation
Step 7
Additional books, such as command reference guides and error message books, can help with the daily
operation and maintenance of your switch.
Technical Manual Titles and Descriptions
Table 1 lists the technical manuals and release notes that support this release.
Table 1
Technical Manuals and Release Notes for Cisco Media Gateway Manager
Document Title and Part Number
Part Number
Description
Release Notes for Cisco Media Gateway Manager 5.0
OL-5464-01
Provides new feature and compatibility
information, as well as information about
known and resolved anomalies.
Cisco Media Gateway Manager 5.0 Installation Guide
OL-5460-01
Provides procedures for installing Release 5.0
of the Cisco MGM element management
system.
Cisco Media Gateway Manager 5.0 User Guide
OL-5461-01
Describes how to use the Cisco MGM 5.0
software, which consists of user applications
and tools for network discovery, network
configuration, connection management, fault
management, system administration, and
security management.
Note
The Cisco MGM interface has built-in
documentation support in the form of
Online Help. On a PC, press F1 to
access Help; on a UNIX workstation,
press the Help key. Alternatively, on
either system you can select Help from
the main or popup menu.
Cisco Media Gateway Manager 5.0 GateWay/CORBA User
Guide and Programmer Manual
OL-5465-01
Describes the Cisco MGM GateWay/Common
Object Request Broker Architecture (CORBA)
Northbound Interface Release 5.0 product that
is available for Cisco MGM 5.0.A reference for
developers of operations support system (OSS)
applications that work with the Cisco MGM
GateWay/CORBA interface.
High Availability Installation Guide for Cisco Media
Gateway Manager 5.0
OL-5462-01
Explains how to install Cisco Media Gateway
Manager 5.0 (Cisco MGM) in a high
availability (HA) environment.
Obtaining Documentation
Cisco documentation and additional literature are available on Cisco.com. Cisco also provides several
ways to obtain technical assistance and other technical resources. These sections explain how to obtain
technical information from Cisco Systems.
Cisco Media Gateway Manager 5.0 User Guide
xxviii
OL-5461-02
Preface
Documentation Feedback
Cisco.com
You can access the most current Cisco documentation at this URL:
http://www.cisco.com/univercd/home/home.htm
You can access the Cisco website at this URL:
http://www.cisco.com
You can access international Cisco websites at this URL:
http://www.cisco.com/public/countries_languages.shtml
Ordering Documentation
You can find instructions for ordering documentation at this URL:
http://www.cisco.com/univercd/cc/td/doc/es_inpck/pdi.htm
You can order Cisco documentation in these ways:
•
Registered Cisco.com users (Cisco direct customers) can order Cisco product documentation from
the Ordering tool:
http://www.cisco.com/en/US/partner/ordering/index.shtml
•
Nonregistered Cisco.com users can order documentation through a local account representative by
calling Cisco Systems Corporate Headquarters (California, USA) at 408 526-7208 or, elsewhere in
North America, by calling 1 800 553-NETS (6387).
Documentation Feedback
You can send comments about technical documentation to [email protected].
You can submit comments by using the response card (if present) behind the front cover of your
document or by writing to the following address:
Cisco Systems
Attn: Customer Document Ordering
170 West Tasman Drive
San Jose, CA 95134-9883
We appreciate your comments.
Obtaining Technical Assistance
For all customers, partners, resellers, and distributors who hold valid Cisco service contracts, Cisco
Technical Support provides 24-hour-a-day, award-winning technical assistance. The Cisco Technical
Support Website on Cisco.com features extensive online support resources. In addition, Cisco Technical
Assistance Center (TAC) engineers provide telephone support. If you do not hold a valid Cisco service
contract, contact your reseller.
Cisco Media Gateway Manager 5.0 User Guide
OL-5461-02
xxix
Preface
Obtaining Technical Assistance
Cisco Technical Support Website
The Cisco Technical Support Website provides online documents and tools for troubleshooting and
resolving technical issues with Cisco products and technologies. The website is available 24 hours a day,
365 days a year, at this URL:
http://www.cisco.com/techsupport
Access to all tools on the Cisco Technical Support Website requires a Cisco.com user ID and password.
If you have a valid service contract but do not have a user ID or password, you can register at this URL:
http://tools.cisco.com/RPF/register/register.do
Note
Use the Cisco Product Identification (CPI) tool to locate your product serial number before submitting
a web or phone request for service. You can access the CPI tool from the Cisco Technical Support
Website by clicking the Tools & Resources link under Documentation & Tools. Choose Cisco Product
Identification Tool from the Alphabetical Index drop-down list, or click the Cisco Product
Identification Tool link under Alerts & RMAs. The CPI tool offers three search options: by product ID
or model name; by tree view; or for certain products, by copying and pasting show command output.
Search results show an illustration of your product with the serial number label location highlighted.
Locate the serial number label on your product and record the information before placing a service call.
Submitting a Service Request
Using the online TAC Service Request Tool is the fastest way to open S3 and S4 service requests. (S3
and S4 service requests are those in which your network is minimally impaired or for which you require
product information.) After you describe your situation, the TAC Service Request Tool provides
recommended solutions. If your issue is not resolved using the recommended resources, your service
request is assigned to a Cisco TAC engineer. The TAC Service Request Tool is located at this URL:
http://www.cisco.com/techsupport/servicerequest
For S1 or S2 service requests or if you do not have Internet access, contact the Cisco TAC by telephone.
(S1 or S2 service requests are those in which your production network is down or severely degraded.)
Cisco TAC engineers are assigned immediately to S1 and S2 service requests to help keep your business
operations running smoothly.
To open a service request by telephone, use one of the following numbers:
Asia-Pacific: +61 2 8446 7411 (Australia: 1 800 805 227)
EMEA: +32 2 704 55 55
USA: 1 800 553-2447
For a complete list of Cisco TAC contacts, go to this URL:
http://www.cisco.com/techsupport/contacts
Definitions of Service Request Severity
To ensure that all service requests are reported in a standard format, Cisco has established severity
definitions.
Severity 1 (S1)—Your network is “down,” or there is a critical impact to your business operations. You
and Cisco will commit all necessary resources around the clock to resolve the situation.
Cisco Media Gateway Manager 5.0 User Guide
xxx
OL-5461-02
Preface
Obtaining Additional Publications and Information
Severity 2 (S2)—Operation of an existing network is severely degraded, or significant aspects of your
business operation are negatively affected by inadequate performance of Cisco products. You and Cisco
will commit full-time resources during normal business hours to resolve the situation.
Severity 3 (S3)—Operational performance of your network is impaired, but most business operations
remain functional. You and Cisco will commit resources during normal business hours to restore service
to satisfactory levels.
Severity 4 (S4)—You require information or assistance with Cisco product capabilities, installation, or
configuration. There is little or no effect on your business operations.
Obtaining Additional Publications and Information
Information about Cisco products, technologies, and network solutions is available from various online
and printed sources.
•
Cisco Marketplace provides a variety of Cisco books, reference guides, and logo merchandise. Visit
Cisco Marketplace, the company store, at this URL:
http://www.cisco.com/go/marketplace/
•
The Cisco Product Catalog describes the networking products offered by Cisco Systems, as well as
ordering and customer support services. Access the Cisco Product Catalog at this URL:
http://cisco.com/univercd/cc/td/doc/pcat/
•
Cisco Press publishes a wide range of general networking, training and certification titles. Both new
and experienced users will benefit from these publications. For current Cisco Press titles and other
information, go to Cisco Press at this URL:
http://www.ciscopress.com
•
Packet magazine is the Cisco Systems technical user magazine for maximizing Internet and
networking investments. Each quarter, Packet delivers coverage of the latest industry trends,
technology breakthroughs, and Cisco products and solutions, as well as network deployment and
troubleshooting tips, configuration examples, customer case studies, certification and training
information, and links to scores of in-depth online resources. You can access Packet magazine at
this URL:
http://www.cisco.com/packet
•
iQ Magazine is the quarterly publication from Cisco Systems designed to help growing companies
learn how they can use technology to increase revenue, streamline their business, and expand
services. The publication identifies the challenges facing these companies and the technologies to
help solve them, using real-world case studies and business strategies to help readers make sound
technology investment decisions. You can access iQ Magazine at this URL:
http://www.cisco.com/go/iqmagazine
•
Internet Protocol Journal is a quarterly journal published by Cisco Systems for engineering
professionals involved in designing, developing, and operating public and private internets and
intranets. You can access the Internet Protocol Journal at this URL:
http://www.cisco.com/ipj
•
World-class networking training is available from Cisco. You can view current offerings at
this URL:
http://www.cisco.com/en/US/learning/index.html
Cisco Media Gateway Manager 5.0 User Guide
OL-5461-02
xxxi
Preface
Obtaining Additional Publications and Information
Cisco Media Gateway Manager 5.0 User Guide
xxxii
OL-5461-02
C H A P T E R
1
Introduction
This chapter describes Cisco Media Gateway Manager, and gives a basic sequence of tasks to get started.
It contains the following sections:
•
1.1 What Is Cisco Media Gateway Manager?
•
1.2 What Are the NE Modules Supported by Cisco MGM?
•
1.3 What Are the Key Features of Cisco MGM?
•
1.4 A Typical Workflow in Cisco MGM
1.1 What Is Cisco Media Gateway Manager?
Cisco Media Gateway Manager (Cisco MGM) is the element management system for the
Cisco MGX 8880 Media Gateway and voice enabled Cisco MGX 8850 Multiservice Switch for voice
solutions based on VoIP technologies. Cisco MGM supports fault, configuration, performance, and
security management functional areas. Cisco MGM also serves as a foundation for integration into a
larger overall operations support system (OSS) environment by providing northbound gateway interfaces
to higher layer management systems.
Cisco MGM 5.0 includes the following components:
•
Cisco MGM 5.0
•
Cisco MGM CORBA/GateWay
•
Cisco MGM High Availability
Cisco MGM GateWay is an architectural component that provides EMS-to-network management system
(NMS) interface mediation. Cisco MGM GateWay enables service providers to integrate Cisco MGM
with their Operations Support Systems (OSSs) by using open, standard TMF interfaces. Cisco MGM
offers Common Object Request Broker Architecture (CORBA) interface options for alarm forwarding.
The Cisco MGM high availability solution provides automatic failover for specific software and single
hardware failures without the need to reconfigure IP addresses on your switched/router network.
Note
In Cisco MGM, the GateWay/CORBA and high availability functionalities are sold separately.
Cisco Media Gateway Manager 5.0 User Guide
OL-5461-02
1-1
Chapter 1
Introduction
What Are the NE Modules Supported by Cisco MGM?
1.2 What Are the NE Modules Supported by Cisco MGM?
Table 1-1 lists the modules in the MGX8880 chassis and the MGX8850 chassis that can be managed by
the element management functions provided by Cisco MGM Release 5.0.
Table 1-1
MGX8880 and MGX8850 Modules and Cards
Module
Front Card
Back Card
PXM45
PXM45/B
PXM-UI-S3
PXM-HD
PXM45/C
PXM-UI-S3/B
PXM-HD
RPM-PR
MGX-RPM-PR-256
MGX-RJ45-4E/B
MGX-RJ45-FE
MGX-MMF-FE
RPM-XF
MGX-RPM-XF-512
MGX-1OC12POS-IR
MGX-1GE
MGX-2GE
MGX-2OC12POS
AXSM/B
AXSM-16-T3E3/B
SMB-8-T3
SMB-8-E3
AXSM-16-155/B
MMF-8-155-MT/B
SMFIR-8-155-LC/B
SMFLR-8-155-LC/B
SMB-4-155
AXSM-4-622/B
SMFIR-2-622/B
SMFLR-2-622/B
AXSM-1-2488/B
SMFSR-1-2488/B
SMFLR-1-2488/B
AXSME
AXSM-32-T1E1-E
MCC-16-E1
RBBN-16-T1E1
VXSM
VXSM redundant backcard
MGX-VXSM-4-155
VXSM-BC-4-155
MGX-VXSM-T1E1
VXSM-BC-24T1E1
VXSM-R-BC
RCON-1TO5-8850
Cisco Media Gateway Manager 5.0 User Guide
1-2
OL-5461-02
Chapter 1
Introduction
What Are the NE Modules Supported by Cisco MGM?
Table 1-1
MGX8880 and MGX8850 Modules and Cards (continued)
Module
Front Card
Back Card
VISM-PR
MGX-VISM-PR-8T1
AX-RJ48-8T1
AX-R-RJ48-8T1
MGX-VISM-PR-8E1
AX-RJ48-8E1
AX-R-RJ48-8E1
AX-SMB-8E1
AX-R-SMB-8E1
SRME/B
MGX-SRME/B
MGX-SMFIR-1-155
MGX-STM1-EL-1
MGX-BNC-3T3-M
SRME
MGX-SRME
MGX-SMFIR-1-155
MGX-STM1-EL-1
Cisco MGM provides a comprehensive management solution as illustrated in Figure 1-1.
Cisco Media Gateway Manager 5.0 User Guide
OL-5461-02
1-3
Chapter 1
Introduction
What Are the Key Features of Cisco MGM?
Figure 1-1
Cisco MGM Comprehensive Management Solution
Cisco Media Gateway Manager
Fault Management System
EMS
CIC
HA
Traditional
Multiservice
Switch Controller
Class 5
GK
Softswitch
Mobility
Network
Cisco MGX
V Media Gateway
CSR
Cisco MGX
Media Gateway
PSTN
V
IP/MPLS Network
Radio
V
IP
IP
113776
Mobility
Applications
Hosted and Managed
IP Telephony
Broadband Local Infrastructure Solutions
(Cable, Ethernet, T1, E1)
1.3 What Are the Key Features of Cisco MGM?
Cisco MGM provides the following key features:
•
An intuitive Java-based graphical user interface (GUI) that provides a native “look-and-feel” on both
Microsoft Windows and Sun Solaris client platforms
•
User-defined domain explorer network views with “bubble-up” alarm severity propagation and
drill-down capabilities to isolate fault conditions and service-delivery impact
•
Geographic Network Maps and explorer views that reflect the physical layout and configuration of
the network
•
Alarm Browser and Alarm Log views that provide a listing of all current and historical alarms and
events
•
A desktop-resident dashboard that provides alarm status for the Cisco MGM user’s entire span of
control with quick access to the Domain Explorer and the Alarm Browser
Cisco Media Gateway Manager 5.0 User Guide
1-4
OL-5461-02
Chapter 1
Introduction
A Typical Workflow in Cisco MGM
•
Diagnostic capabilities using the Diagnostic Center
•
Real-time network surveillance with configurable popup alarm and event notifications
•
Real-time shelf views with full alarm and operational status indicators
•
Automated configuration backup with manual restore capabilities, plus remote software download
capability across the entire network domain
•
GUI-based NE configuration
•
Extensive performance monitoring (PM) statistics collected for display or export
•
Custom profiles that can be used to grant separate permissions for various Cisco MGM operation
•
Comprehensive security management providing flexible user access
•
High-availability solution includes seamless client re-connect on switch over, database and disk
redundancy, and automatic reconnection to the network elements
•
Cisco MGM 5.0 supports northbound integration (based on SNMP) with Cisco Info Center
•
Northbound CORBA gateway for fault and inventory management
•
Northbound SNMP-based integration with Cisco Info Center
1.4 A Typical Workflow in Cisco MGM
The following sections give brief details of the steps needed to get started with Cisco MGM. More
details are available in the other chapters in this User Guide.
A typical workflow in Cisco MGM is:
•
1.4.1 Starting and Stopping the Cisco MGM Server
•
1.4.2 Adding a User
•
1.4.3 Adding a New Group
•
1.4.4 Adding a Network Element
The element management functions of Cisco MGM are divided into the following categories.
•
Network elements—Manages the network nodes and their components.
•
Fault management—Detects, isolates, corrects, and reports faults for the NE and service.
•
Configuration management—Configures and controls NEs, identifies resources, collects
information about a resource, and manages intra-chassis connections between NEs.
•
Performance management—Gathers and reports the behavior of NEs, network, and services,
including quality assurance, monitoring, management control, and analysis.
•
Security management—Prevents and detects any improper use of network resources and services as
well as recovery from security violations.
•
Connections—Manages the connections within the nodes.
By managing network elements with the Configuration Center, you can:
•
Configure numerous managed device objects, such as configuration settings, interface status,
counter values, and so forth in a Cisco network.
•
Display and modify the values for the objects.
•
Perform tasks, such as supporting connections, displaying statistics, and setting up controllers and
partitions.
Cisco Media Gateway Manager 5.0 User Guide
OL-5461-02
1-5
Chapter 1
Introduction
A Typical Workflow in Cisco MGM
Table 1-2 describes the tools you will use to get started:
Table 1-2
Item
Getting Started Tools
Tool
Description
Create a New
User
Displays the Create New Cisco Media Gateway Manager User wizard,
which allows you to add a new user.
Add a New
Group
Displays the New Group dialog box. From here, you can add a new user
group, give the group a name, and provide a brief description of the group.
Add Network
Element(s)
Displays the Add Network Element(s) wizard, which allows you to add a
new network element.
1.4.1 Starting and Stopping the Cisco MGM Server
A complete set of administrative command scripts is added to the application during installation. One
command automatically starts the Cisco MGM server processes every time the server is started. The
server processes can also be started or stopped manually as necessary; the scripts are located in the
/opt/CiscoMGMServer/bin directory.
Note
The default directory /opt/CiscoMGMServer may have been changed during installation of the
Cisco MGM server.
The mgms-start command sets the appropriate environment variables and starts the Cisco MGM server.
The amount of time it takes for the Cisco MGM server to start varies based on the number of network
elements (NEs) in the configuration and the size of the database. Use mgms-start only when the
Cisco MGM server has stopped.
To start the Cisco MGM server:
Step 1
Log into the Cisco MGM server workstation as the root user.
Step 2
On the command line, enter the following:
mgms-start
Note
Use the showmgm command from the CLI to view processes or services that are running in the
Cisco MGM server.
The mgms-stop command stops the Cisco MGM server. The stop procedure shuts down the server and
cleans all memory and connections. The overall process takes less than five minutes.
Cisco Media Gateway Manager 5.0 User Guide
1-6
OL-5461-02
Chapter 1
Introduction
A Typical Workflow in Cisco MGM
To stop the Cisco MGM server:
Step 1
Log into the Cisco MGM server workstation as the root user.
Step 2
On the command line, enter the following:
mgms-stop
1.4.2 Adding a User
When Cisco MGM is installed, the System Administrator must create users, who can then perform tasks
such as adding network elements.
To add a new Cisco MGM user, go to the Domain Explorer window and choose
Administration > Cisco MGM Users. In the Cisco Media Gateway Manager Users window, click the
Create a New User tool, or choose Edit > Create. Follow the prompts to create a new user.
Note
You must set the appropriate user privilege for each new user.
1.4.3 Adding a New Group
Groups are a collection of groups or collection of NEs. NEs are often grouped geographically or by
domain. Groups can be used to organize the domain into a hierarchy. A Network Map can be opened for
a group.
After installing the Cisco MGM server and client, complete the following steps:
Step 1
Log into the Cisco MGM client with the appropriate user access profile.
Step 2
In the Domain Explorer window, click the Add a New Group tool, or choose File > New Group and
add one or more groups to the tree:
a.
Enter a group ID.
b.
Enter a group location.
c.
Enter a group description.
d.
Click OK.
Cisco Media Gateway Manager 5.0 User Guide
OL-5461-02
1-7
Chapter 1
Introduction
A Typical Workflow in Cisco MGM
1.4.4 Adding a Network Element
To add a network element (NE):
Step 1
In the Domain Explorer window, click the Add Network Element(s) tool, or choose File > Add
Network Element(s).
Step 2
Enter the requested information.
Change the operational state for the NE to In Service.
Make sure you entered the IP address correctly.
Step 3
Click Finish.
Step 4
(Optional) Add more network elements.
Note
Step 5
Wait two to five minutes while the Cisco MGM server completes the node discovery.
Check to see if the connectivity state is correct. If Cisco MGM cannot connect to the network element,
the network element displays an unavailable connectivity state in the Domain Explorer topology tree. If
there is a connectivity problem, try to diagnose the connectivity configuration.
Cisco Media Gateway Manager 5.0 User Guide
1-8
OL-5461-02
C H A P T E R
2
Basic Concepts
This chapter covers the details the basic concepts of Cisco MGM, including the following topics:
•
2.1 How Do I Navigate within Cisco MGM?
•
2.2 What Basic Functions Can I Perform in Cisco MGM?
•
2.3 What Are the General Features of Cisco MGM?
2.1 How Do I Navigate within Cisco MGM?
This section helps you understand Cisco MGM navigation tools and actions, including:
Note
•
2.1.1 Using the Domain Explorer
•
2.1.2 Navigating Physical Views
•
2.1.3 Using Network Maps
•
2.1.4 Using Control Panel
•
2.1.5 Using Wizards
•
2.1.6 Paging through Data
•
2.1.7 Finding Data
•
2.1.8 Navigating the Client Desktop
•
2.1.9 Using Mnemonics
•
2.1.10 Using the Online Help
•
2.1.11 Using the Pin Tool
When you switch to a different program and then return to Cisco MGM, the Cisco MGM dialog boxes
might be hidden behind another Cisco MGM window or dialog box. The Cisco MGM client might
appear frozen because the hidden dialog box requires user action. On a Windows workstation, press
Alt-Tab to display all running processes. Continue to press Tab (while keeping Alt depressed) to select
the icon for the Java process. This will position the Cisco MGM dialog box as the top active window.
On a Solaris workstation, minimize the open windows until the Cisco MGM dialog box is visible.
Cisco Media Gateway Manager 5.0 User Guide
OL-5461-02
2-1
Chapter 2
Basic Concepts
How Do I Navigate within Cisco MGM?
2.1.1 Using the Domain Explorer
The Domain Explorer is the Cisco MGM home window and provides a logical view of the network plus
alarm, connectivity, and operational status.
The Domain Explorer displays a hierarchical view of all NEs and groups currently being monitored by
Cisco MGM. Domain Explorer windows are divided into two sections: a tree (at left) and a pane (at
right). The tree organizes the resources (domain, groups, and NEs), which are displayed in a hierarchical
format. The top level of the hierarchy is the management domain, followed by groups and NEs. You can
access information about each resource by browsing the tree section. The pane provides specific
information about the selected object.
Tip
The Domain Explorer only provides a high-level view of the network. To view the entire managed
network, access the Physical View hierarchy tree from the Configuration Center, Chassis View,
Statistics Report, or Diagnostic Center.
To check the connection status of a selected NE, run a diagnostic check at the node level in the
Diagnostic Center. See 5.2.10.2 Running a Diagnostic Check at the Node Level.
Note
You can drag and drop NEs to reposition them in the topology tree.
The Domain Explorer has three properties panes:
Tip
•
2.1.1.1 Management Domain Properties, page 2-2
•
2.1.1.2 Group Properties, page 2-4
•
2.1.1.3 Network Element Properties, page 2-5
See Appendix A, “Icons and Menus” for an explanation of the Domain Explorer legend and icons.
2.1.1.1 Management Domain Properties
The Management Domain Properties pane displays information about the management domain that is
currently selected in the Domain Explorer tree. The Cisco MGM management domain consists of all the
NEs managed by the Cisco MGM server where the Cisco MGM client connects.
The management domain can also contain groups that give you the flexibility to subdivide the domain
you are monitoring. For example, a group can represent all NEs within a geographical location.
To display all of the first-level nodes under the management domain, click the expand icon (+) next to
the management domain name in the topology tree. If any of the groups or NEs have an alarm condition,
an icon representing that condition is displayed next to the management domain name.
The Management Domain Properties pane has two tabs: Status and Identification.
Cisco Media Gateway Manager 5.0 User Guide
2-2
OL-5461-02
Chapter 2
Basic Concepts
How Do I Navigate within Cisco MGM?
2.1.1.1.1 Status Tab
Table 2-1 describes the Status tab fields.
Table 2-1
Field Descriptions for the Status Tab
Field
Description
Domain Name
User-defined name of the management domain.
Description
User-defined description of the management domain.
Total NEs
Total number of NEs within the management domain.
Unavailable NEs
Number of NEs within the management domain that Cisco MGM cannot currently connect to.
NEs in Alarm
Total number of NEs within the management domain that have an active alarm.
Unmanaged NEs
Total number of unmanaged NEs within the management domain.
Alarm Status
Total number of NE and EMS alarms by severity. In addition, this field lists how many of the total NEs
with active alarms are experiencing a critical, major, minor, or warning alarm.
If the same NE is experiencing more than one type of alarm simultaneously, that NE is counted
for each severity level.
Note
NE Count by
Operational State
Total number of NEs within the management domain according to operational state:
•
In Service: The NE is currently deployed and requires monitoring.
•
Out of Service: The NE has been marked out of service and does not require monitoring.
•
NEs In Initialization: The NE is initializing, and you can perform the following actions:
– Open the Alarm Browser and Alarm Log.
– Open the PM tables.
•
Under Maintenance: The NE is temporarily under maintenance but requires monitoring.
•
NEs in Sync Configuration: The NE is in Sync Configuration state, and you can perform the
following actions:
– Open the Alarm Browser and Alarm Log.
– Open the PM tables.
2.1.1.1.2 Identification Tab
Table 2-2 describes the Identification tab fields.
Table 2-2
Field Descriptions for the Identification Tab
Field
Description
Domain Name
Name of the management domain.
Description
Description of the management domain.
EMS ID
EMS ID (Cisco Media Gateway Manager).
Server
Name or IP address of the Cisco MGM server to which the user is connected.
Vendor Name
Vendor name (Cisco Systems).
Software Version
Cisco MGM release that is running.
Cisco Media Gateway Manager 5.0 User Guide
OL-5461-02
2-3
Chapter 2
Basic Concepts
How Do I Navigate within Cisco MGM?
2.1.1.2 Group Properties
The Group Properties pane displays information about the group that is currently selected in the topology
tree.
A group consists of other groups or NEs. Groups give you the flexibility of subdividing the management
domain you are monitoring. For example, a group can represent all NEs within a geographical location.
Click the expand icon (+) next to a group in the topology tree to view the objects that are assigned to
that group. The same group can have multiple instances in the topology tree. The contents of all instances
of a group are always the same. Any changes to one instance of a group will be reflected in all instances
of that group.
You can add and delete groups; however, the option to delete a group is not available until all objects
are removed from the group. If the group has multiple instances in the topology tree, you can delete all
but the last instance of the group.
The Group Properties pane has two tabs: Status and Identification.
2.1.1.2.1 Status Tab
Table 2-3 describes the Status tab fields.
Table 2-3
Field Descriptions for the Status Tab
Field
Description
Group ID
User-defined name of the selected group.
Description
User-defined description of the selected group.
Total NEs
Total number of NEs within the selected group.
Unavailable NEs
Number of NEs within the selected group that the Cisco MGM server cannot currently reach.
NEs in Alarm
Total number of NEs within the selected group that currently have an active alarm.
Unmanaged NEs
Number of NEs within the selected group that are currently unmanaged.
Alarm Status
Total number of alarms within the selected group, by severity. In addition, this field lists how many
of the total NE alarms have a critical, major, minor, or warning status. If the same NE experiences
more than one type of alarm simultaneously, that NE is included in the count for each severity level.
NE Count by
Operational State
Total number of NEs within the selected group according to operational state. Values are In Service,
Under Maintenance, and Out of Service. Also shows the number of NEs within the selected group that
are initializing or synchronizing their configuration.
2.1.1.2.2 Identification Tab
Table 2-4 describes the Identification tab fields. Only users with the appropriate user access profile can
edit these fields.
Table 2-4
Field Descriptions for the Identification Tab
Field
Description
Group ID
Unique user-defined name of the selected group.
Description
User-defined description of the selected group.
Location Name
User-defined geographic location of the selected group.
Cisco Media Gateway Manager 5.0 User Guide
2-4
OL-5461-02
Chapter 2
Basic Concepts
How Do I Navigate within Cisco MGM?
2.1.1.3 Network Element Properties
The Network Element Properties pane displays information about the NE that is currently selected in the
tree. An NE represents a Cisco MGX 8880 or a Cisco MGX 8850.
The same NE can have multiple instances in the tree. The contents of all instances of the same NE are
always the same. Any changes to one NE instance are reflected in all instances of that NE. Regardless
of the number of instances an NE has in the tree, you can delete one or all instances of that NE. When
the final instance of an NE is deleted, the deleted NE moves to the Deleted NEs group.
The Network Element Properties panes for most NEs have the following tabs: Status, Identification, and
NE Authentication.
2.1.1.3.1 Status Tab
Table 2-5 describes the Status tab fields.
Table 2-5
Field Descriptions for the Status Tab
Field
Description
NE ID
Name of the selected NE.
Description
Information that a user entered to describe the NE.
NE Model
Model of the selected NE.
Alarm Status
Total number of critical, major, minor, and warning alarms currently existing on the selected NE.
Communication
State
Current communication state of the selected NE (Available or Unavailable).
Operational State
Current operational state of the selected NE. You can change the operational state.
PM Collection
You can enable or disable PM data collection.
2.1.1.3.2 Identification Tab
Table 2-6 describes the fields in the Identification tab.
Table 2-6
Field Descriptions for the Identification Tab
Field
Description
NE ID
Name of the selected NE.
Description
Information that a user entered to describe the NE. You can edit this field.
NE Model
Model of the selected NE.
NE Type
Type of NE. You can edit this field.
Vendor Name
Vendor name.
Software Version
Software version that is running on the NE.
Active IP Address
Active IP address of the selected NE.
Cisco Media Gateway Manager 5.0 User Guide
OL-5461-02
2-5
Chapter 2
Basic Concepts
How Do I Navigate within Cisco MGM?
2.1.1.3.3 NE Authentication Tab
The NE Authentication tab allows you to specify usernames and passwords for Cisco MGM server.
Table 2-7 describes the fields in the NE Authentication tab. Fields shown depend on the type of NE
selected.
Table 2-7
Field Descriptions for the NE Authentication Tab
Field
Subfield
Description
MGM Server NE Connection
NE Service
Username that the Cisco MGM server uses to connect to NEs.
Level Username
NE Service
Level Password
Password to use for Cisco MGM server-to-NE connections.
Confirm NE
Service Level
Password
Re-enter the password to confirm it.
SNMP
Community
String
Community string name used in SNMP messages. You must
provide the community string name to give the user SNMP read
access to the device.
This field is unavailable if it does not apply to the selected NE.
SNMP Set Only
Community
String
Community string used in SNMP messages for setting the
attributes on the device.
2.1.2 Navigating Physical Views
The Physical View is a hierarchical tree that can be found in certain Cisco MGM applications; namely,
the Chassis View, Statistics Report, Configuration Center, and Diagnostic Center (for details about these
applications, see section 2.3 What Are the General Features of Cisco MGM?, page 2-14.)
The Physical View shows the entire managed network. To expand or minimize the hierarchy, click the
looking glass icon next to any node. Nodes are color-coded to represent the highest severity alarm on
each node.
2.1.3 Using Network Maps
The Network Map window allows you to display how the network is partitioned graphically. It is
organized into a multilevel hierarchy that corresponds to the structure of the Domain Explorer trees. The
Network Map hierarchy consists of management domains, groups, and NEs, which are displayed
graphically.
You can launch the Network Map either by clicking on the Open Network Map tool in the Domain
Explorer toolbar, or by choosing File > Network Map. A map appears with individual groups and NE
icons.
Double-clicking a group expands that group to show its contents. Clicking Show Parent Network Map
returns you to the parent map. When you launch the Network Map from a particular group in the Domain
Explorer, the Network Map opens with the contents of the group displayed.
Cisco Media Gateway Manager 5.0 User Guide
2-6
OL-5461-02
Chapter 2
Basic Concepts
How Do I Navigate within Cisco MGM?
After zooming in on a region on the map, scroll bars at the bottom and right side of the screen allow you
to pan the view to a different region. You can also use the focus box in the top left panel to pan and zoom
the view. All groups are shown on a single map, and it is the zoom level and pan position that determine
what groups are visible at any time. Depending on the selected layer rate, certain NEs are shown. You
can open multiple map windows to compare different views.
Note
Sometimes one node can overlap another in the maps. This occurs when a new node is added and other
existing nodes have already been assigned a location. The solution is to change the layout to make sure
that no two nodes are overlapping.
All groups, NEs, and labels are zoomed when you zoom in or zoom out. Cisco MGM allows you to save
the zoom level and framing of the map. Also, you can specify a fixed pixel size for icons so that
regardless of the zoom level, the map icon size does not change. By default, the icon size is variable
based on the zoom level. The icon size setting is saved with the other map settings.
When you open the Network Map from an NE in the Domain Explorer, the selected NE is centered on
the map.
Note
The Refresh Data tool in the Network Map toolbar flashes when updates are available.
The following scenarios describe the actions of the Refresh Data tool in the Network Map toolbar.
•
The Refresh Data tool flashes when:
– The map background is changed
– The topology structure changes (a node is added or deleted) in a group or area
– A node is forced invalid
•
The Refresh Data tool does not flash when:
– The alarm counts change on the node
– The node connectivity state changes
– The node admin state changes
– The node name changes
– The node data properties change
– The discovery state changes
– The data reference changes
2.1.4 Using Control Panel
Most client and server configuration parameters are viewed and modified in the Control Panel window.
To view the Control Panel, choose Administration > Control Panel in the Domain Explorer. The left
side of the window displays the tree, which contains the following Cisco MGM functions and services:
•
UI Properties—for Fault Management and Domain Management
•
Security Properties—for Password Aging, Maximum Retries, Login Disable Period and Client
Inactivity Timer Settings
•
Recovery Properties—for Session Recovery and Process Monitoring using High Availability
Cisco Media Gateway Manager 5.0 User Guide
OL-5461-02
2-7
Chapter 2
Basic Concepts
How Do I Navigate within Cisco MGM?
•
Database Properties—for Configuration, Pruning and Database Backup
•
Alarm Properties—for Threshold EMS Alarms and Non Threshold EMS Alarms
•
Error Log Properties—for the Cisco MGM Server and Gateway/SNMP, SM Service and SNMP
Trap Service
•
NE Service—for NE Poller, NE AutoBackup and NE Manual Backup
•
PM Service—for PM Status and Properties
•
Gateway CORBA Service—for Global and OSS Clients
The right side of the window displays the property sheet that corresponds to the selected client or server
component. See Figure 2-1.
Figure 2-1
Control Panel
2.1.5 Using Wizards
Wizards are used to guide users through complex operations. Each wizard presents a sequence of dialog
boxes which the user can move forward and backward through, filling in the details required by choosing
radio buttons, checking boxes and entering information by keyboard.
In Cisco MGM, wizards are used to simplify involved configuration management tasks such as:
•
NE user access administration
•
Broadcast software download
•
Native equipment/facility provisioning
Cisco Media Gateway Manager 5.0 User Guide
2-8
OL-5461-02
Chapter 2
Basic Concepts
How Do I Navigate within Cisco MGM?
•
Topology management
•
Automatic NE memory backup, on-demand restoration
•
General operation on multiple NEs
2.1.6 Paging through Data
Some Cisco MGM tables return large numbers of rows. To support large tables, Cisco MGM provides a
paging feature. If more than 1,000 rows of data are returned, data is grouped in pages of up to 1,000
rows. You can page forward and page back to view the entire set of data.
2.1.7 Finding Data
There are two methods of finding data in Cisco MGM:
•
2.1.7.1 Finding Data in the Domain Explorer, page 2-9
•
2.1.7.2 Finding Data in the Diagnostic Center, Statistics Report, Chassis View, and Configuration
Center, page 2-9
2.1.7.1 Finding Data in the Domain Explorer
In the Domain Explorer window, use the Edit > Find dialog box to search for NEs or groups. To search
for a particular NE or group, specify the NE or group name, IP address, or description. The search always
starts from the root node and returns to the root node after reaching the last node.
2.1.7.2 Finding Data in the Diagnostic Center, Statistics Report, Chassis View, and Configuration
Center
In the Diagnostics Center, Statistics Report, Chassis View, and Configuration Center, enter the object
name or the IP address in the text box at the left side of the window above the Hierarchy tree. The object
name or IP address can be entered in full or partially. Click the Find button. If found, the Hierarchy Tree
displays the node or the trunk. If there are multiple matches, click the Find Next or Find Previous
button to show the next node or trunk.
2.1.8 Navigating the Client Desktop
The client desktop provides a menu bar and a toolbar that correspond to the principal Cisco MGM
applications. You click on a particular icon to launch the corresponding application you need for element
management, monitoring, report generation, and administrative tasks. You can launch all applications
from the menu bar or you can right-click a specific object and choose the popup menu option.
All objects can be moved from one application to another.
Appendix A, “Icons and Menus” describes the icons and menus used in Cisco MGM.
Cisco Media Gateway Manager 5.0 User Guide
OL-5461-02
2-9
Chapter 2
Basic Concepts
How Do I Navigate within Cisco MGM?
2.1.8.1 Using Popup Menus
The popup menus are available from any application.
The popup menu options are enabled based on your security profile. To display the popup menus, you
can right-click from the following options:
•
Away from the network in Graphical View.
•
A network from the Hierarchical Tree or Graphical View.
•
A node from the Hierarchical Tree or Graphical View.
•
A card, line, path, or port from the Hierarchical Tree or Graphical View.
Table 2-8 describes the popup menu options available in Configuration Center, Diagnostic Center,
Chassis View, and Statistics Report applications.
Table 2-8
Popup Menu Options in Configuration Center, Diagnostic Center, Chassis View, and
Statistics Report applications
Option
Description
Chassis View
Launches Chassis View after you select a node from the Hierarchical Tree.
Configuration Center
Launches Configuration Center with or without selecting an object.
Diagnostics Center
Launches Diagnostics Center. You must select an object from the
Hierarchical Tree.
Statistics Report
Launches the Statistics Report Tool with or without selecting an object.
Administration
Cisco MGM Audit
Trail
Launches Cisco MGM Audit Trail to view the audit trail viewer.
Telnet
Establishes a telnet session with the switch.
SSH1
Connects to a node by using a secured shell.
View Management
Sort
Sorts the tree.
1. SSH = secured shell
2.1.9 Using Mnemonics
All Cisco MGM menus and menu options have a uniquely assigned mnemonic to support keyboard
access to menu items in addition to the mouse. For example, to exit the Cisco MGM application, enter
Alt+f (for the File menu); then, enter x (Exit).
2.1.10 Using the Online Help
The online help provides a detailed explanation of each Cisco MGM GUI window and dialog box.
To view the online help for the current Cisco MGM window, you have two options:
•
Choose Help > Current Window
•
Click the Help tool.
Cisco Media Gateway Manager 5.0 User Guide
2-10
OL-5461-02
Chapter 2
Basic Concepts
What Basic Functions Can I Perform in Cisco MGM?
To view the online help for any Cisco MGM dialog box, click the Help tool within the dialog box.
Tip
Use the print option in the browser that displays the online help to print the selected page.
2.1.11 Using the Pin Tool
The Dashboard, Configuration Center, Diagnostic Center, Chassis View, and Statistics Report
applications have a pin tool. The pin point is up when the tool in pinned up, and down when the tool is
pinned down. The function of the pin tool differs depending on where it is used:
•
If you click the pin tool in the Dashboard window, the window is pinned down, meaning that it is
not brought to the foreground by default. If you click the pin tool again, the Dashboard window is
pinned up, meaning that it is brought to the foreground each time an update occurs (alarm counts
change, NE count changes, and so on).
•
If you click the pin tool in the Configuration Center, Diagnostic Center, Chassis View, and Statistics
Report windows, that instance of the application window is pinned down, and another instance of
that application can be opened (for example from the Tools menu). If the pin tool is pinned up, then
another instance of the application cannot be opened.
•
If you click the pin tool in the Configuration pane in the Configuration Center, Diagnostic Center,
Chassis View, and Statistics Report applications, that pane is pinned down, and an additional
Configuration pane can be opened without overwriting the open pane.
2.2 What Basic Functions Can I Perform in Cisco MGM?
This section outlines basic functions that you can perform within Cisco MGM, including:
•
2.2.1 Launching Context-Sensitive Information
•
2.2.2 Filtering Data
•
2.2.3 Exporting Data
•
2.2.4 Exporting Alarms and Events
•
2.2.5 Refreshing Data
•
2.2.6 Pruning the Database
2.2.1 Launching Context-Sensitive Information
Many Cisco MGM views have a specific selection context, meaning that the same window will have a
different look depending on where it was launched.
For example, if you launch the Alarm Browser from the management domain node, the browser shows
all NE and EMS alarms (if you have permission to see EMS alarms). If you launch the Alarm Browser
from a group or NE node, the browser shows only NE alarms. If you launch the Alarm Browser from the
Dashboard, the browser shows all NE alarms for the Cisco MGM domain.
Cisco Media Gateway Manager 5.0 User Guide
OL-5461-02
2-11
Chapter 2
Basic Concepts
What Basic Functions Can I Perform in Cisco MGM?
2.2.2 Filtering Data
Filter dialog boxes filter user-specified data. Many Cisco MGM tables have Filter dialog boxes that
enable you to filter data in different ways and display the results in a table.
2.2.3 Exporting Data
Most Cisco MGM tables support an export function to export the table contents to a flat file. The Export
dialog box allows you to export the data as comma-separated values (CSVs) or tab-separated values
(TSVs), which are formats commonly used to import data into spreadsheet and database applications for
further analysis and manipulation. Click the Other radio button if you want to separate the Cisco MGM
data values with a different character. If you specify a character as a separator and your data contains
the same character, the character in the data is automatically enclosed in double quotes. This allows the
spreadsheet or database application to understand that the character is part of your data. Regardless of
whether you select Comma-Separated, Tab-Separated, or Other, Cisco MGM automatically encloses text
in double quotes if it has a separator.
Note
If you export data to Microsoft Excel, save the exported file with “.csv” as the filename extension.
To export only the selected row(s), click the Selected row(s) radio button. To export all rows in the page,
click the All rows in current page radio button.
By default, exported data is stored in the C:\Cisco\CiscoMGMClient<version_number>\exports or
/opt/CiscoMGM<version_number>/exports directory under the name that you provide in the “Export
data to file” text box. Click Browse to change the file location.
Note
The default directory /opt/CiscoMGMServer may have been changed during installation of the
Cisco MGM server.
2.2.4 Exporting Alarms and Events
In addition to exporting directly from the Alarm Browser or the Alarm Log, Cisco MGM provides an
Event Export Manager that allows you to export alarms and events as they occur to the file of your
choice. You can also set various export parameters to refine the export. You can choose to export events
continuously or to export a specific number of events.
To export events continuously, in the Diagnostic Center, choose Fault > Event Export Manager, then
click Start Export.
The Event Export Manager will export events continuously until you click Stop Export, or until the
current Cisco MGM session ends, whichever occurs first.
To export a specific number of events, check the Stop export when check box, enter a number of
records, and click Start Export. The export will stop after the specified number of events are logged.
Table 2-9 describes the fields in the Event Export window.
Cisco Media Gateway Manager 5.0 User Guide
2-12
OL-5461-02
Chapter 2
Basic Concepts
What Basic Functions Can I Perform in Cisco MGM?
Table 2-9
Field Descriptions for the Event Export Manager
Field
Description
Network
Elements
Allows you to export alarms (NE alarms and Cisco MGM-specific EMS alarms) and
events for selected NEs. Choose from the list of available NEs and add them to the
Selected list. If you have the appropriate user permission and you want to export
EMS alarms and events, check the Export MGM EMS Alarms/Events check box.
Severity
Allows you to export events that have a severity of Critical, Major, Minor, Warning,
Indeterminate, and/or Cleared.
Export To
Allows you to export the file to a given destination. Click Browse to browse for a
particular destination. You can also overwrite or append the file.
Export Options
Allows you to specify the field separator type. Types include Comma, Tab,
Semicolon, or Other, an option you use to specify a different separator. You can also
check the Stop export when check box and enter a number of records to instruct the
Event Export Manager to stop exporting after the user-specified number of records
are logged.
2.2.5 Refreshing Data
Many Cisco MGM windows have a Refresh Data tool that refreshes all data being displayed by Cisco
MGM. There are two versions of the Refresh Data tools, and both refresh data from either the server or
the database.
Note
•
The Refresh Data tool flashes when updates are available. This tool has two modes: manual refresh
and autorefresh.
•
The Refresh Data tool does not notify you that updates are available. You must click the tool to
retrieve updated data.
Clicking Refresh Data in the Domain Explorer window refreshes all data for the entire Cisco MGM
client. Depending on the number of NEs in your network, you might experience a delay while the data
refreshes.
2.2.6 Pruning the Database
Cisco MGM automatically prunes various categories of Cisco MGM data that tend to accumulate over
time and would otherwise exhaust the available disk space. See 5.1.4 Pruning the Database. You can
configure the following categories of data for automatic pruning:
•
PM data
•
FM data
•
Audit log data
•
Error log data
•
Self-monitor data
•
Job monitor data
Cisco Media Gateway Manager 5.0 User Guide
OL-5461-02
2-13
Chapter 2
Basic Concepts
What Are the General Features of Cisco MGM?
The following options are provided to control the pruning for each category of data:
•
Enable/disable
•
Retention period
•
Time of day to perform the pruning
2.3 What Are the General Features of Cisco MGM?
This section describes some of the general Cisco MGM features, including:
•
2.3.1 What is FCPS?
•
2.3.2 Understanding Fault Management
•
2.3.3 Understanding Configuration Management
•
2.3.4 Understanding Performance Management
•
2.3.5 Understanding Security Management
•
2.3.6 Using the Diagnostic Center
•
2.3.7 Managing Cisco MGM CORBA Interfaces
2.3.1 What is FCPS?
Cisco MGM's strategy is to provide a carrier-class fault, configuration, performance, and security
(FCPS) EMS.
FCPS refers to the different types of information handled by management systems. A fifth area,
accounting, is often included, making the acronym FCAPS. However, Cisco MGM does not support
accounting management currently. Table 2-10 describes the FCPS functions.
Table 2-10
FCPS Framework Functionality
Function
Description
For More Information, See
Fault
management
Detects, isolates, corrects, and reports faults for the network and service.
Fault management tracks the correlation of related services; for example,
reliability, availability, survivability, quality assurance, alarm surveillance,
alarm management, fault localization, fault correction, testing, and trouble
administration.
Chapter 9, “Managing
Faults”
Fault management in Cisco MGM can be performed in the Diagnostic Center
or in the Configuration Center. The Alarm Browser, Alarm Log, and
Dashboard also provide information on fault management.
Configuration
management
Configures and controls NEs, identifies resources, collects information about Chapter 6, “Configuring
Hardware”
a resource, and manages intra-chassis connections. Configuration
management deals not only with the state of NEs, but also with the
provisioning of resources and services. Generally, configuration management
involves network planning, installation, service planning and negotiation,
service provisioning, equipment provisioning, status and control, and
network topology.
The Configuration Center is your primary resource for configuration
management.
Cisco Media Gateway Manager 5.0 User Guide
2-14
OL-5461-02
Chapter 2
Basic Concepts
What Are the General Features of Cisco MGM?
Table 2-10
FCPS Framework Functionality (continued)
Function
Description
For More Information, See
Performance
management
Gathers and reports the behavior of NEs, network, and services, including
quality assurance, monitoring, management control, and analysis.
Chapter 10, “Managing
Performance”
Performance management can be performed in the Configuration Center or in
the Statistics Report.
Security
management
Prevents and detects any improper use of network resources and services as
well as recovery from security violations. Aspects of security management
include prevention, detection, containment, and recovery.
Chapter 8, “Managing
Security”
2.3.2 Understanding Fault Management
Fault management enables the network administrator to avoid catastrophic conditions through alarms
and early warnings. The primary basis for fault management is provided by real-time messages (traps)
generated by network elements when a change in status occurs.
The fault management tools for Cisco MGM are described in Table 2-11.
Table 2-11
Fault Management Tools
Name
Description
Alarm Management
Identifies network problems and failures by using alarm management. For more information, see
Chapter 9, “Managing Faults.”
Device Management
with Chassis View
Provides a graphical view of equipment status for the operational and alarm status of each card, port,
line, or trunk, which is represented with a predefined color.
For more information, see 2.3.3.2 Managing Devices with Chassis View, page 2-18.
Diagnostic Center
Generates real-time displays of element performance and utilization using system counters repeatedly
polled with SNMP, and facilitates the monitoring of activity and error rates of individual ports, lines,
and trunks.
By periodically polling each network element through SNMP, real-time counters detect and display
hardware failures at the card, interface, port, line, and trunk level.
Monitors statistics events to identify problems with Cisco MGM to effectively manage the network.
For more information, see section 2.3.6 Using the Diagnostic Center, page 2-25.
Alarm Browser
Displays standing alarms and conditions in the managed domain. The Alarm Browser window lists the
conditions that are assigned a severity level of critical, major, minor, or warning. It also shows cleared
alarms that are not acknowledged.
For more information, see Chapter 9, “Managing Faults.”
Alarm Log
The Alarm Log window contains alarms that have transitioned from the Alarm Browser. Cleared
alarms are transitioned when you acknowledge them or when automatic acknowledgment has been
enabled (in the Control Panel > User Interface Properties pane). In addition, the Alarm Log shows a
history of cleared and acknowledged alarms and all transient conditions (also known as events or
autonomous nonalarmed messages).
For more information, see Chapter 9, “Managing Faults.”
Dashboard
The Cisco MGM Dashboard shows useful alarm and NE information in one easily accessible location.
See Figure 2-1.
Cisco Media Gateway Manager 5.0 User Guide
OL-5461-02
2-15
Chapter 2
Basic Concepts
What Are the General Features of Cisco MGM?
Figure 2-2
Dashboard
1
8
7
2
3
6
5
4
113455
172.16.0.0
Cisco Media Gateway Manager on 172.16.0.0
16
15
14
13
12
11
10
9
1
Layers the Domain Explorer window as the top active
9
window. The Domain Explorer is the Cisco MGM home
window1.
2
Opens the Alarm Browser window; this highlights
NE-specific critical, major, minor, and warning alarms.
Displays online help for the Dashboard.
10 Indicates a change in Cisco MGM status, including:
•
New alarms have occurred on NEs in the domain
•
New NEs have been added to the domain
•
Connectivity status has changed
When a change in Cisco MGM status occurs, a blue
outline appears around the affected EMS alarms icon, NE
count box, or alarm count box(es). Click the Cisco MGM
Status has Changed tool to acknowledge the status
change. The tooltip toggles to No Change in Cisco MGM
Status and the blue outline disappears, which indicates
that you acknowledged the status change.
11 If you click the pin tool, the Dashboard window is pinned
down, meaning that it is not brought to the foreground by
default. If you click the pin tool again, the Dashboard
window is pinned up, meaning that it is brought to the
foreground each time an update occurs (alarm counts
change, NE count changes, and so on).
3
Opens the Alarm Browser window, filtered to show all
EMS alarms in the domain. This tool is enabled only if
you have read/write permission for the Show
Cisco MGM EMS Alarms/Events operation.
4
12 Lists the number of unacknowledged alarms in the
Lists the total number of NEs in the domain. Click the
domain. The alarm count includes unacknowledged
counter to open the Domain NE table, which provides an
alarms on NEs and on the EMS. Click the counter to open
inventory of NEs within the selected management
the Alarm Browser window, filtered to show all
domain.
unacknowledged alarms.
5
Displays the server IP address.
13 Lists the number of warning alarms in the domain. The
alarm count includes warning alarms on NEs and on the
EMS. Click the counter to open the Alarm Browser
window, filtered to show all warning alarms.
Cisco Media Gateway Manager 5.0 User Guide
2-16
OL-5461-02
Chapter 2
Basic Concepts
What Are the General Features of Cisco MGM?
6
Minimizes all Cisco MGM windows, except for the
Dashboard window itself.
14 Lists the number of minor alarms in the domain. The
alarm count includes minor alarms on NEs and on the
EMS. Click the counter to open the Alarm Browser
window, filtered to show all minor alarms.
7
Restores all minimized Cisco MGM windows.
15 Lists the number of major alarms in the domain. The
alarm count includes major alarms on NEs and on the
EMS. Click the counter to open the Alarm Browser
window, filtered to show all major alarms.
8
Closes the Dashboard.
16 Lists the number of critical alarms in the domain. The
alarm count includes critical alarms on NEs and on the
EMS. Click the counter to open the Alarm Browser
window, filtered to show all critical alarms.
1. For a legend of Domain Explorer icons, see Appendix A, “Icons and Menus.”
2.3.2.1 Defining Events and Alarms
Events and alarms are different with the following requirements:
•
Events are network-generated entities that do not have any state or duration.
•
Alarms are Cisco MGM generated entities that do have state and duration.
•
Alarms and states are changed based on Cisco MGM receiving certain events.
•
Only a subset of all events results in alarm state changes.
2.3.3 Understanding Configuration Management
Note
For detailed information on configuration management, see Chapter 6, “Configuring Hardware.”
Configuration management in Cisco MGM includes both the configuration of individual network
elements at the port and line level, and the provisioning of user services, for example, network elements
and connections.
These topics describe configuration management for Cisco MGM:
•
2.3.3.1 Configuration Center Overview, page 2-17
•
2.3.3.2 Managing Devices with Chassis View, page 2-18
•
2.3.3.3 Understanding Inventory Management, page 2-18
•
2.3.3.4 NE Release Management, page 2-19
2.3.3.1 Configuration Center Overview
The Configuration Center enables internal chassis connection configurations into one application.
The Configuration Center window has three main areas:
•
Hierarchy Pane—Displays the network hierarchy as a tree of objects with real-time alarms. The tree
is used to navigate the networks from the network level down to the port level.
•
Configuration Pane—Displays the elements of the selected object. If an object is not selected, the
configuration window is empty.
Cisco Media Gateway Manager 5.0 User Guide
OL-5461-02
2-17
Chapter 2
Basic Concepts
What Are the General Features of Cisco MGM?
•
Inspector View—Provides a list of detailed information for the selected network element from the
hierarchy view. Click the Show static data button to update the information in the Inspector View.
2.3.3.1.1 Network Elements Overview
By performing network element configuration tasks, you can:
•
Communicate with individual network elements, for example, a switch or a concentrator, using
Simple Network Management Protocol (SNMP).
•
Obtain a list of inventory data, for example, ports under a line or cards in a node.
•
Create templates for all network elements.
2.3.3.1.2 Connections Overview
Configuration Center creates new connections, displays, modifies, and deletes existing connections.
You select the desired connection end-points and configure the connection type and class of service. The
end-to-end connection is automatically established between two cards in the switch. In addition, the
status for each connection is viewed from one endpoint to the other.
By performing connection configuration tasks, you can:
•
Provision SPVC connections for VISM, ATM and RPM.
•
Configure the traffic parameters and other parameters for each end of the connection.
•
Configure the connection parameters for the end-to-end connection.
•
Add Descriptors to the connections.
2.3.3.2 Managing Devices with Chassis View
The front and rear panel displayed within the Chassis View provide a real-time indication of the status
of individual cards, lines, and ports for the network device. Both card and line alarms (LEDs) are
provided for all platforms and service modules.
By managing the graphical representations of the network nodes and device objects with Chassis View,
you can:
•
Provide status updates for nodes, cards, and lines.
•
Display the front or rear view of the node.
•
Perform provisioning tasks, such as, shelf, card, and line levels by quickly navigating to the
Configuration Center.
•
Display the LED status for each card reflecting both standby and active states.
2.3.3.3 Understanding Inventory Management
Inventory information is another component of configuration management. Cisco MGM provides two
levels of inventory reports:
•
Domain NE table—A complete list of all the NEs that belong to a specific group or to the entire
domain.
•
Equipment Inventory table—A detailed list of cards and modules installed on a specific NE. For
detailed information about inventory reports, see Chapter 11, “Managing Inventory.”
Cisco Media Gateway Manager 5.0 User Guide
2-18
OL-5461-02
Chapter 2
Basic Concepts
What Are the General Features of Cisco MGM?
2.3.3.3.1 Adding New NEs to the Cisco MGM Domain
The Add New NE wizard allows you to add a new NE, or to add several new NEs at once. The wizard
allows you to enter multiple NE IP addresses one at a time, or enter a beginning and ending IP address
and automatically add a range of NEs.
2.3.3.3.2 NE Connectivity and Operational States
The operational state of an NE can have the following values:
•
Under Maintenance—The NE is temporarily under maintenance but requires monitoring. This state
is the same as In Service except that Cisco MGM does not report alarms or events for
under-maintenance NEs.
•
In Service—The NE is currently deployed and requires monitoring. Cisco MGM collects polling,
FM, configuration management, and PM data from in-service NEs and stores the data in the
database.
•
Out of Service—The NE has been marked Out of Service by a network administrator and does not
require monitoring. The Cisco MGM database records the last known state of the NE when it was
in service.
•
In Service–Initializing—The NE is marked as In Service–Initializing when Cisco MGM connects to
the NE (Communication State is marked as Available) and the discovery process starts. The
initialization process is completed when fault and inventory have been synchronized. The
operational state changes from In Service–Initializing to In Service–Synch Configuration.
•
In Service–Sync Configuration—The NE is marked as In Service–Sync Configuration when Cisco
MGM uploads a configuration for that NE. You can change the operational state of an NE from In
Service–Sync Configuration to Out of Service.
The communication state of an NE can have the following values:
•
Not Applicable—The NE is Out of Service. The connection to the NE has not been established or
has been dropped.
•
Available—The NE is In Service or Under Maintenance and Cisco MGM is connected to the NE.
The NE is declared Available when the NE is reachable and supported by Cisco MGM (as defined
in the Administration > Supported NE table).
•
Unavailable—The NE is In Service or Under Maintenance but Cisco MGM cannot establish a
connection to the NE. When Cisco MGM loses the connection to the NE, an EMS alarm with a
probable cause of “Connection loss” is generated.
2.3.3.4 NE Release Management
An NE added to the Cisco MGM domain is discovered and managed by Cisco MGM only if the NE
software version is defined in the Supported NE table.
Note
See Cisco Media Gateway Manager 5.0 Release Notes for the NE software versions that are supported
in Cisco MGM 5.0. The Cisco MGM release notes are available on the product CD and online at
http://www.cisco.com/univercd/cc/td/doc/product/rtrmgmt/optnet/mgm/mgmreln/index.htm.
Caution
Before updating the software image on an NE, check the Cisco MGM release notes to verify whether the
NE software version is supported in this Cisco MGM release.
Cisco Media Gateway Manager 5.0 User Guide
OL-5461-02
2-19
Chapter 2
Basic Concepts
What Are the General Features of Cisco MGM?
The following NE administration features are available for the Cisco MGX 8880 and Cisco MGX 8850:
•
Software download
•
Memory backup and restore
•
Job monitoring
•
NE Software table (used to commit or revert software images)
2.3.3.4.1 Software Download Dialog Box
Use the Software Download dialog box to download software to NEs. After the download is complete
you can use the NE Software table to activate the software. The downloaded software becomes the active
version, and the active version becomes the standby version. Cisco MGM stores two software versions,
active and standby.
2.3.3.4.2 Memory Backup Dialog Box
Use the Memory Backup dialog box to back up configuration and provisioning information that resides
in the flash memory of an NE. By default, the local Cisco MGM server automatically backs up the
memory of NEs once a day for seven days and stores the backup files on the Cisco MGM server. After
seven days, the oldest backup file is replaced by the current backup.
2.3.3.4.3 Memory Restore Dialog Box
Use the Memory Restore dialog box to restore provisioning and configuration information stored in the
flash memory of an NE.
2.3.3.4.4 Job Monitor Table
The Job Monitor table provides information about scheduled administrative tasks such as task type, task
owner, task status, task start and end time, and so on.
2.3.3.4.5 NE Software Table
The NE Software table displays the active and standby software versions for the NE. From this table,
you can activate new software or revert software on NEs.
2.3.4 Understanding Performance Management
The performance management function in Cisco MGM involves the system’s ability to collect and store
massive amounts of statistical data for network activity.
Note
For detailed information on performance management and the Statistics Report, see Chapter 10,
“Managing Performance.”
2.3.4.1 Statistics Report
You can use the Statistics Report to view reports of statistics data that are collected from the switch.
You can launch the Statistics Report from various Cisco MGM applications, such as the Diagnostic
Center, Configuration Center, or Chassis View. The Statistics Report appears in the toolbar.
Cisco Media Gateway Manager 5.0 User Guide
2-20
OL-5461-02
Chapter 2
Basic Concepts
What Are the General Features of Cisco MGM?
To launch Statistics Report, choose Performance > MGX 8880/8850MG > Statistics Report.
Depending upon the report selected, you can identify certain criteria, such as network object, type of
statistics, granularity, report interval, and graphical format.
Note
VISM cards are supported for the Statistics Report.
Table 2-12 lists the report types that are supported for each network element from the Hierarchical Tree.
Table 2-12
Report Types for Each Network Element
Network Element Report Types
Network
Node
Card
Port
Line
Supports the following report types:
•
Raw Data Report for cards, lines, ports, and trunks in the network.
•
Utilization Data Report for ports and trunks in the network.
Supports the following report types:
•
Raw Data Report for all cards, lines, ports, PNNI, trunks, and paths on the
node.
•
Utilization Data Report for ports and trunks on the node.
Supports the following report types:
•
Raw Data Report for all cards1, lines, ports, PNNI, trunks, and paths on the
card.
•
Utilization Data Report for connections, ports, and trunks on the card.
Supports the following report types:
•
Raw Data Report for ports and connections on the selected port.
•
Performance Data Report for ports and connections on the selected port.
•
Utilization Data Report for ports and connections on the selected port.
Supports the following report types:
•
Paths
Raw Data Report for the line. If applicable, additional statistics are shown for
physical lines.
Supports the Raw Data Report for paths and other elements.
1. Card support is used only for AXSM cards.
2.3.5 Understanding Security Management
Security management protects the revenue-generating assets in the network. Examples of security
management include:
•
Controlling access to element management functions
•
Controlling access to network logical resources
Security for the Cisco MGM system can be divided into the following areas:
•
Cisco MGM security domain: To log into the Cisco MGM client, a username and password are
required. A user profile defines the access privileges. Cisco MGM passwords are stored using MD5
one-way encryption.
Cisco Media Gateway Manager 5.0 User Guide
OL-5461-02
2-21
Chapter 2
Basic Concepts
What Are the General Features of Cisco MGM?
•
OSS security domain: OSS-to-Cisco MGM sessions are configured by the Cisco MGM GateWay
EMS-to-NMS interface architectural component.
•
NE security domain: At the NE level, a username and password are configured to enable the user to
connect directly through the console port (EIA/TIA-232), through the management port
(10BASE-T), or remotely through an SSH or Telnet session. NE passwords are stored using base-64
two-way encryption.
•
Cisco MGM server login: You must have root user privileges to log into the Cisco MGM server
workstation for debugging or changing the Cisco MGM server program. A username and password
are required.
•
Oracle database access: Access to the Oracle database requires Oracle root user authentication, as
well as Cisco MGM database access authentication. The Oracle username and password are
encrypted in the server configuration file.
Cisco MGM supports the following security features:
•
2.3.5.1 Logging into the Client, page 2-22
•
2.3.5.2 Login Advisory Message, page 2-22
•
2.3.5.4 User Management and Profiles, page 2-23
•
2.3.5.5 NE Access Control, page 2-24
•
2.3.5.6 Audit Log, page 2-24
2.3.5.1 Logging into the Client
See Cisco Media Gateway Manager 5.0 Installation Guide for the procedure to log into the Cisco MGM
client on a Windows or Solaris workstation.
2.3.5.1.1 Locking and Unlocking the Client
A Cisco MGM client is locked automatically after a defined period of inactivity.
•
To manually lock the Cisco MGM client, select File > Lock Cisco MGM Client in the Domain
Explorer. The Cisco MGM Locked window opens, indicating that the Cisco MGM client is locked.
•
To unlock the Cisco MGM client, enter your password in the MGM Locked window; then, click
Unlock.
2.3.5.2 Login Advisory Message
The following is the default advisory message after logging into the Cisco MGM client:
NOTICE: This is a private computer system. Unauthorized access or use may lead to
prosecution.
You can customize the default advisory message, or disable it altogether. For more details, see Chapter 8,
“Managing Security.”
2.3.5.3 Understanding Network Partitioning
You can configure for network partitioning by dividing the network into logical areas. You can then
access only the areas that are specified under your security profile. The nodes and elements must fall
under the area or areas that fit your security profile for each Cisco MGM application.
Cisco Media Gateway Manager 5.0 User Guide
2-22
OL-5461-02
Chapter 2
Basic Concepts
What Are the General Features of Cisco MGM?
You can:
•
Define the network partitions from the associated list of nodes.
•
Define, modify, and view the areas within your network.
•
Manage only the areas under your security profile.
•
Manage connections that originate and terminate within the assigned area(s). The domain can
include multiple areas.
2.3.5.4 User Management and Profiles
Cisco MGM user management includes the ability to:
•
Manage predefined default user profiles with different access privileges, also known as network
partitioning, which allows you to define user types and levels of access to the network. The default
user types are:
– SuperUser—Users who have access to all operations associated with the Cisco MGM server and
client.
– SysAdmin—System administrators who manage Cisco MGM access. They can perform limited
tasks associated with the Cisco MGM server and client. This privilege is primarily used as the
main profile when Cisco MGM has been initially installed.
– NetworkAdmin—Typically, network operations center (NOC) supervisors who perform daily
network surveillance, provisioning, and PM activities on any group or NE.
– Provisioner—Users who perform daily network surveillance, provisioning, and PM activities
on specific NEs. Each Provisioner can have only one active session. Provisioners cannot access
administrative information.
– Operator—Users who perform daily network surveillance and PM activities on specific NEs.
Each Operator can have only one active session. Operators cannot access administrative
information.
Note
•
Create, delete, modify, and duplicate custom user profiles with certain privileges. Custom user
profiles are grouped into categories and each category has a set of operations.
•
Create, delete, or modify Cisco MGM users; lock or unlock user accounts; view logged-in users;
and end active user sessions.
•
Regulate user logins, including password aging, number of failed login attempts before an account
lockout, login disable period, lockout time, and logout time.
•
Configure the username and password used by the Cisco MGM server and Cisco MGM
GateWay/CORBA to access NEs.
•
View, add, modify, and delete NE user accounts on one or more NEs.
For detailed information about user management, see Chapter 8, “Managing Security.”
2.3.5.4.1 Configuring Cisco MGM User Access
You can configure user access by using the Administration menu, which provides controlled access
(network partitioning) to multiple users of Cisco MGM, based on the user’s UNIX user-ID and
password. The Administration menu is launched from the Domain Explorer window.
Cisco Media Gateway Manager 5.0 User Guide
OL-5461-02
2-23
Chapter 2
Basic Concepts
What Are the General Features of Cisco MGM?
By configuring user access, you can:
•
Provide user-access profiles that can be customized for each user. The user-access profile is a list
of operations or actions a user can perform coupled with assigned access privileges for each action.
•
Assign access privileges to read, create (write), modify, and delete profiles.
By default, only the root user can start and stop the Cisco MGM core processes. The root user has
sufficient access privileges to launch all Cisco MGM applications and administer security.
Other users are assigned access privileges that enable them to perform operations within
security-controlled applications. Depending on the setting of access privileges by those who administer
security management, the operations are limited. Without the proper access privileges, users cannot
launch security-controlled applications.
Note
For detailed information about user access, see Chapter 8, “Managing Security.”
2.3.5.5 NE Access Control
NE access control includes the ability to:
•
Configure the username and password used by the Cisco MGM server and Cisco MGM
GateWay/CORBA to access NEs and retrieve alarms, configuration, and inventory information.
Note
Each username and password specified must exist on the selected NE in order for Cisco
MGM to manage it. A new or modified password takes effect at the next reconnection.
•
Configure the username and password on multiple NEs by using the bulk NE authentication feature.
With a single operation, you can specify the same username and password for NEs that belong to
the same group or are assigned to the same user.
•
Manage NE user accounts by using the NE User Access Administration table. This feature supports
the ability to view, add, modify, and delete NE user accounts on one or more NEs.
•
Monitor active NE users and log out selected users.
•
Add predefined users on a selected NE.
2.3.5.6 Audit Log
The Audit Log contains information about significant events (user-initiated changes and activities) that
occurred on the Cisco MGM server during a specific time period for the purposes of establishing
accountability. It also helps in identifying remedial actions to correct an improper activity. The Audit
Log is implemented in the Cisco MGM database, where each record has a time stamp, record type, and
message string.
Tip
See Chapter 8, “Managing Security” for a list of runtime-affecting operations that the Audit Log records
for monitoring purposes.
Cisco Media Gateway Manager 5.0 User Guide
2-24
OL-5461-02
Chapter 2
Basic Concepts
What Are the General Features of Cisco MGM?
2.3.6 Using the Diagnostic Center
Note
For detailed information about using the Diagnostic Center, see Chapter 9, “Managing Faults.”
You can launch the Diagnostic Center from various Cisco MGM applications, such as the Statistics
Report, Configuration Center, or Chassis View. The Diagnostic Center tool appears in the toolbar.
To launch the Diagnostic Center, you can:
•
Choose Fault > MGX 8880/8850MG > Diagnostic Center.
The Diagnostic Center consolidates all the following diagnostic operations:
•
2.3.6.1 Diagnostic Operations for Network Elements, page 2-25
•
2.3.6.2 Diagnostic Operations for Network Manageability, page 2-25
•
2.3.6.3 Diagnostic Operations for Connections, page 2-25
2.3.6.1 Diagnostic Operations for Network Elements
You can diagnose network elements, for example, networks, nodes, cards, lines, ports, paths, or trunks.
By diagnosing network elements, you can:
•
Monitor real-time counters.
•
Extend support for the Node Resync process to allow for two different levels.
•
Configure bit error rate test (BERT) to verify the integrity of a network element by measuring error
statistics.
2.3.6.2 Diagnostic Operations for Network Manageability
You can monitor statistic events for network manageability to collect element management
health-related statistics. In addition, you can:
•
Verify that all the nodes in the network are managed correctly by Cisco MGM.
•
Identify general network problems.
•
Provide success rates, failure rates, and throughput of Cisco MGM to protocols such as FTP and
SNMP.
•
Create a trouble ticket that extracts all the information from the History Panel.
2.3.6.3 Diagnostic Operations for Connections
By diagnosing connections, you can:
•
Access fault management capabilities in the form of diagnostic tests for connections, which include
continuity (integrity) facility for PNNI soft permanent virtual connection (SPVC).
•
Perform general test operations such as up and down connections, and connection loopback.
Cisco Media Gateway Manager 5.0 User Guide
OL-5461-02
2-25
Chapter 2
Basic Concepts
What Are the General Features of Cisco MGM?
2.3.7 Managing Cisco MGM CORBA Interfaces
Chapter 12, “Managing CORBA Interfaces.” describes the management of Cisco MGM
GateWay/CORBA, which allows another program or application to communicate with the Cisco MGM
server, and also about CORBA management, which allows communication between the Cisco MGM
client and server.
Cisco Media Gateway Manager 5.0 User Guide
2-26
OL-5461-02
C H A P T E R
3
Planning the Network
This chapter describes the basics of planning a network and identifies some of the resources available to
the network planner using Cisco MGM:
•
3.1 Network Planning
•
3.2 What Network Elements Are Available to a Network Planner?
3.1 Network Planning
Network planning is the process of deciding the topology and capacity of a network. Network planning
can achieve the business return on investment (ROI) by enabling high-performance networks and
communications applications.
It is important to take the time to review and plan your network before you build and configure it. During
network planning, remember to keep future needs in mind as well as present requirements, so that the
topology and capacity of the networks can be changed, if required.
Adequate network planning is needed for a number of reasons, including to:
•
Satisfy key business drivers such as low operating costs or rapid return on investment
•
Respond to network growth and traffic distribution changes in the future
•
Identify and satisfy the needs of customers
•
Anticipate and provide protection in the event of a catastrophe
•
Centralize management, resulting in lower administration costs
•
Support many and varied company requirements quickly and efficiently
•
Identify hardware requirements
The key stages are planning, analyzing, and reviewing a network. Network planning may be required for
a new network, or you may be analyzing an existing network before upgrading the existing
infrastructure.
3.2 What Network Elements Are Available to a Network
Planner?
The following sections detail the switches and cards that are available:
•
3.2.1 Cisco MGX 8880 Media Gateway
Cisco Media Gateway Manager 5.0 User Guide
OL-5461-02
3-1
Chapter 3
Planning the Network
What Network Elements Are Available to a Network Planner?
•
3.2.2 Cisco MGX 8850 Multiservice Switch
•
3.2.3 Cisco PXM-45 Processor Switch Module
•
3.2.4 Cisco Voice Switch Service Module
•
3.2.5 Cisco Voice Interworking Service Module
•
3.2.6 Cisco Route Processor Module
•
3.2.7 Cisco AXSM Broadband ATM Switch Module
•
3.2.8 Cisco MGX Service Resource Module
3.2.1 Cisco MGX 8880 Media Gateway
The Cisco MGX 8880 Media Gateway hardware has the same slot configuration as the Cisco MGX 8850
Multiservice Switch, but with a smaller chassis. The Cisco MGX 8880 fits in a 19-inch or a 23-inch rack.
It is optimized for voice applications, and supports two types of voice service modules; Cisco Voice
Switch Service Module (VXSM) and Cisco Voice Interworking Service Module (VISM). It also features
the following:
•
The DC version of the Cisco MGX 8880, with its low profile cooling system, enables three gateways
to fit in a 7-foot rack.
•
The MGX 8880 uses the PXM-45/C controller card only.
•
The MGX 8880 uses an integrated redundancy connector (RCON).
3.2.2 Cisco MGX 8850 Multiservice Switch
The Cisco MGX 8850 Multiservice Switch is designed for service providers deploying narrowband
and/or broadband services. It can be voice enabled with VXSM and VISM modules. The Cisco MGX
8850 scales from DS0 to OC-48c/STM-16 and supports any combination of the following services:
•
Frame Relay
•
ATM
•
Voice over ATM
•
Voice over IP
•
Circuit emulation
•
IP
•
Wireless aggregation
•
DSL aggregation
•
ATM service backbones
3.2.3 Cisco PXM-45 Processor Switch Module
The Cisco PXM-45 Processor Switch Module for the Cisco MGX 8880 and Cisco MGX 8850 IP + ATM
Multiservice Switch is a combination ATM switching fabric and processor card. The switching fabric
provides 45 Gbps of nonblocking switching capacity, while the processor provides the control plane that
delivers IP+ATM networking software, diagnostics, and performance monitoring.
Cisco Media Gateway Manager 5.0 User Guide
3-2
OL-5461-02
Chapter 3
Planning the Network
What Network Elements Are Available to a Network Planner?
The Cisco PXM-45 provides the following features:
•
45-Gbps nonblocking switching
•
Hot card insertion/removal
•
1:1 hot-standby redundancy
•
User-selectable primary and secondary clock sources with graceful switchover
•
Internal Stratum-3, external building integrated timing supply (BITS), or inband clock sources
•
Inband or out-of-band management via EIA/TIA-232 or 10BaseT control ports
•
Support for narrowband and broadband service modules scaling from DS0 to OC-48c/STM-16
3.2.4 Cisco Voice Switch Service Module
The Cisco Voice Switch Service Module (VXSM) is a high-density voice module that enables
compatibility with the Cisco MGX 8880 Media Gateway and the Cisco MGX 8850 Multiservice Switch.
The Cisco VXSM provides high availability, scalable, and robust voice features for wireless, wireline,
and cable applications.
The Cisco VXSM has time-division multiplexing (TDM) interfaces ranging from T1/E1 to channelized
OC-3/STM-1. It provides service providers with carrier-class capabilities for high capacity and
reliability for Voice over IP (VoIP) services. The Cisco VXSM supports up to 8064 DS-0s and can
protect active voice calls if scheduled or unscheduled outages occur.
The Cisco VXSM architecture combines a high-performance voice services engine with onboard digital
signal processors (DSPs) to provide advanced voice processing and features that allow quick
development and deployment of VoIP services. The Cisco VXSM offers carrier-grade voice quality with
voice, modem, and fax features. Together with a softswitch, it provides deployment flexibility for
various packet voice networks based on the MGCP, PacketCable Trunking Gateway Control Protocol
(TGCP), H.248, H.323, and the session initiation protocol (SIP). Cisco VXSM architecture allows new
functions and services to be easily added through software upgrades.
•
The VXSM provides the following high density features:
– Scales up to 8064 VoIP DS-0s per service module
– Reduces costs by maximizing density per platform
– Allows 40,320 VoIP DS-0s per chassis and 120,960 VoIP DS-0s per rack, with echo cancellation
•
TDM interfaces provide:
– Scalable optical interfaces; available with 2- or 4-port OC-3/STM-1 interfaces per service
module
– Scalable electrical interfaces; up to 48 T1/E1 interfaces per service module
•
VXSM high availability—Ensures carrier-class reliability by providing active call preservation
•
VXSM integrated nonblocking architecture—Lowers costs by integrating TDM, network
processing, and DSP technology onto a single module
Cisco Media Gateway Manager 5.0 User Guide
OL-5461-02
3-3
Chapter 3
Planning the Network
What Network Elements Are Available to a Network Planner?
3.2.5 Cisco Voice Interworking Service Module
The Cisco Voice Interworking Service Module (VISM-PR) is a packet voice module for the Cisco
MGX 8880 Media Gateway and the Cisco MGX 8000 Series multiservice switches. The Cisco VISM-PR
offers robust packet voice functions for service providers and enterprise customers, and supports full 8
T-1s/E-1s capacity for G.711, G.726 and G.729ab codecs.
The VISM-PR provides high quality voice, fax, and modem services. The VISM-PR can be deployed in
standalone configurations or with softswitches to enable a variety of packet voice services in network
architectures using MGCP, PacketCable TGCP, H.323, and SIP.
The VISM-PR allows you to easily add packet voice services to existing Cisco MGX 8000 Series
multiservice networks.
The VISM-PR provides the following features:
•
High density voice aggregation:
– Up to 20 VISM-PR per MGX 8880 MG chassis
– 1: N redundancy
– Channelized T3/OC-3/STM-1 via SRME Module
•
Distributed card architecture:
– Dedicated high-performance DSP resources
– Dual control processors to eliminate processing bottlenecks
– No loss of DS0 Density under any configuration (ECAN, codec)
•
Dynamic DSP allocation:
– G.711, G.726, G.729ab, G.723.1, T.38 Fax, clear channel
– VAD and comfort noise generation
– Programmable 24, 32, 64, 128 ms echo cancellation
– DTMF / MF detection / generation
3.2.6 Cisco Route Processor Module
The Cisco Route Processor Module-Premium (RPM-PR) is a high-performance route processor module
for the Cisco MGX 8000 Series of multiservice switches, which allows service providers to quickly
enable new, high-margin IP services using Cisco IOS Software. The Cisco RPM-PR provides
high-quality, scalable, IP and ATM integration using Multiprotocol Label Switching (MPLS) technology
to create scalable Internet solutions. The Cisco RPM-PR allows the addition of an MPLS control plane
for use by the Cisco Virtual Switch Architecture. The MPLS control plane can be used concurrently with
the PNNI and Media Gateway Control Protocol (MGCP) control planes on the Cisco MGX 8000 series
of multiservice switches.
The Cisco RPM-PR brings enhanced performance and functionality to the RPM module’s router blades
for the Cisco MGX 8880 and Cisco MGX 8850. Improvements include a high-performance, NPE-400
processor capable of processing more than 350,000 packets per second (pps), greater DRAM and Flash
capacity, and hardware-based error checking and correction (ECC).
The Cisco RPM-PR enables functionality such as Point-to-Point Protocol (PPP) aggregation, IP VPNs,
IP QoS, and IP routing.
Cisco Media Gateway Manager 5.0 User Guide
3-4
OL-5461-02
Chapter 3
Planning the Network
What Network Elements Are Available to a Network Planner?
The Cisco RPM-PR is a double-height line card, which connects to the MGX midplane through an
internal OC-6 ATM cell bus. The Cisco RPM-PR supports up to two single-height back cards: four-port
Ethernet and one-port Fast Ethernet.
The RPM-PR provides the following features:
•
High performance
– Over 350,000 pps forwarding
– Up to 512 MB DRAM
– 32 MB Flash memory
– Support for 2000 virtual interfaces
– Single bit repair and double/triple bit detection ECC support for DRAM
– 1:N redundancy
•
Robust IP support
– Border Gateway Protocol Version 4 (BGP4)
– Open Shortest Path First (OSPF) Protocol
– Routing Information Protocol (RIP) Versions 1 and 2
– Interior Gateway Routing Protocol (IGRP)
– Enhanced IGRP (EIGRP)
– Intermediate System-to-Intermediate System (IS-IS)
– Static routes
3.2.7 Cisco AXSM Broadband ATM Switch Module
The Cisco AXSM Broadband ATM Switch Module in combination with the high-capacity PXM-45
processor and XM-60 switching module delivers connectivity from T3/E3 to OC-48c/STM-16. The
Cisco MGX 8880 and Cisco MGX 8850 Multiservice Switch can accommodate a total of 12 AXSM
modules to provide the high broadband densities required by service providers.
The AXSM architecture, combined with PXM-45 and RPM, provides ATM networking features such as
such as Private Network-Network Interface (PNNI), switched virtual circuit/path (SVC/SVP), soft
permanent virtual circuit/path (SPVC/SPVP), and MPLS.
The AXSM module gives carrier-class availability by providing hot-standby 1:1 card redundancy with
Y-cable as well as redundancy with SONET/SDH automatic protection switching (APS). The AXSM
module with its large connection count is highly scalable for aggregation applications.
The AXSM Broadband ATM Switching Module provides the following features:
•
ATM capability up to OC-48c/STM-16.
•
High scalability in interface speeds with T3/E3 ports, OC-3c/STM-1, OC-12c/STM-4, and OC-48c/
STM-16 AXSM modules. Each port on the AXSM can be configured for either trunk or access
applications.
•
Module port densities of 16 T3/E3 ports, 16 OC-3c/STM-1 ports, 4 OC-12c/STM-4 ports, and 1
OC-48c/ STM-16 port that can scale up to 12 OC-48c/STM-16 modules in each Cisco MGX 8880
and Cisco MGX 8850 Multiservice Switch. Each OC-48c/STM-16 provides nonblocking, full
duplex throughput, in which a connection can occupy the entire line rate.
Cisco Media Gateway Manager 5.0 User Guide
OL-5461-02
3-5
Chapter 3
Planning the Network
What Network Elements Are Available to a Network Planner?
•
Support for all ATM service classes, with up to 16 classes of service (CoS). Supports carrier-class
implementation of standards-based PNNI, SVC/SVP, SPVC/SPVP, and MPLS services.
•
Large cell buffers (one million cells), which help to maximize performance during congestion,
reducing the number of retransmits; the buffers are allocated dynamically, depending on connection
resource needs, thereby optimizing use of system resources.
•
High reliability with hot-standby 1:1 AXSM card redundancy, and 1:1 and 1+1 line redundancy
using APS.
3.2.8 Cisco MGX Service Resource Module
The Cisco MGX Service Resource Module (SRM) provides three major functions for service modules:
•
Bulk distribution of T1 and E1 traffic
•
Bit error rate testing of T1 and E1 lines and ports
•
1:N redundancy
The Cisco MGX-SRM operates at line speeds of OC-3 rather than DS3. The Cisco MGX SRM provides
the existing functionality of the SRM-3T3, such as bulk distribution, 1:N redundancy, and bit error rate
tester (BERT). It supports one SONET or Synchronous Digital Hierarchy (SDH) interface using
SMFIR-155 (optical) and SMB-155 (electrical) back cards.
The Cisco MGX SRM architecture is similar to that of the current SRM-3T3/C, with the following
additional features:
•
Bulk distribution of T1 or E1 traffic to all 12 service module slots using one SONET or SDH
OC3/STM1 interface
•
1:1 SRM Hot-Standby Router Protocol (HSRP) redundancy
•
Card-to-card linear (1+1) APS support for optical interfaces
•
No back card requirement for SRM operation when bulk distribution is not required
Cisco Media Gateway Manager 5.0 User Guide
3-6
OL-5461-02
C H A P T E R
4
Building the Network
Once you have planned your network (see Chapter 3, “Planning the Network”), you can begin building
network elements and their related aspects, such as groups, network partitions, and Network Maps.
This chapter contains the following sections:
•
4.1 What Network Elements Are Available?
•
4.2 How Do I Add and Delete Network Elements?
•
4.3 How Do I Build Groups?
•
4.4 How Do I Configure the SNMP Community String?
•
4.5 How Do I Build Network Maps?
•
4.6 How Do I Discover the Network?
•
4.7 How Do I Synchronize the Network?
•
4.8 How Do I Test Connectivity?
4.1 What Network Elements Are Available?
The Cisco MGM management domain contains and lists network elements (NEs) and groups of NEs.
The management domain can be found as the top-level root node in the topology tree of the Domain
Explorer. In the management domain, you can add, delete, and modify the following NE:
•
Groups—Collection of groups or collection of NEs. NEs are often grouped geographically or by
domain.
•
Network partitions—Groups of users who have access to groups of NEs.
•
Network Maps—Geographic representation of the NEs which displays the NEs in a map, and the
number of alarms associated with the NE.
4.2 How Do I Add and Delete Network Elements?
This section contains the following information:
•
4.2.1 Prerequisites for Adding Network Elements
•
4.2.2 Enabling Performance Monitoring
•
4.2.3 Adding Network Elements
Cisco Media Gateway Manager 5.0 User Guide
OL-5461-02
4-1
Chapter 4
Building the Network
How Do I Add and Delete Network Elements?
•
4.2.4 Network Element Discovery
•
4.2.5 Copying a Network Element from One Group to Another
•
4.2.6 Moving a Network Element from One Group to Another
•
4.2.7 Deleting Network Elements
•
4.2.8 Restoring a Deleted Network Element
4.2.1 Prerequisites for Adding Network Elements
You must enable the NE service before you can add an NE. You must also meet certain other specific
prerequisites depending on the type of NE you are adding. The following aspects must be configured
before adding NEs:
•
Hostnames and IP addresses
•
SNMP community strings
•
Topology setup
•
Performance monitoring (optional)
4.2.1.1 Enabling the NE Service
Before adding a new NE, you must enable the NE service for that NE.
The NE Service is enabled by default. However, if you need to enable the NE service:
Step 1
In the Domain Explorer window, choose Administration > Control Panel. The Control Panel appears.
Step 2
In the tree view of the Control Panel, expand NE Service.
Step 3
Select an NE type.
Step 4
In the property sheet of the Control Panel, click Activate in the Service Control field.
Note
The service is not started as a process unless you activate an NE for that particular service.
4.2.1.2 Hostnames and IP Addresses
All NEs must be configured with unique hostnames and IP addresses.
4.2.2 Enabling Performance Monitoring
Performance monitoring is optional, but you must enable it if you want to collect performance
parameters:
Step 1
In the Domain Explorer window, choose Administration > Control Panel. The Control Panel appears.
Step 2
In the tree view of the Control Panel, expand PM Service.
Cisco Media Gateway Manager 5.0 User Guide
4-2
OL-5461-02
Chapter 4
Building the Network
How Do I Add and Delete Network Elements?
Step 3
Select an NE type.
Step 4
In the property sheet of the Control Panel, click Activate in the Service Status field.
Step 5
In Error Level, choose the error level for alarms on the selected NE to include in the Error Log (Critical,
Major, Minor, Informational, Debug, or Trace). Critical, major, minor, and informational errors are
logged to the database; trace and debug information is logged to a log file.
Caution
Cisco MGM performance will degrade significantly if the trace or debug option is left on. All
operations will slow down and you may lose alarm and event notifications. Use trace or debug
only when troubleshooting with a customer support engineer.
Threshold displays the number of NEs that will be serviced by one instance of the NE service.
Note
The service is not started as a process unless you activate an NE for that particular service.
4.2.3 Adding Network Elements
From the Domain Explorer, you can add a single or multiple NEs using the Add Network Element(s)
wizard:
•
4.2.3.1 Adding a Single Network Element
•
4.2.3.2 Adding Multiple Network Elements
4.2.3.1 Adding a Single Network Element
From the Domain Explorer, you can add a single NE:
Step 1
Select a node in the Domain Explorer; then, choose File > Add Network Element(s). You can also click
the Add Network Element(s) tool. The Add Network Element(s) wizard appears. See Figure 4-1.
Note
Step 2
Step 3
You cannot add a new NE to the Discovered Network Elements or Deleted Network Elements
group.
Enter the following information (see Table 4-1 for more details):
a.
NE Model
b.
NE Type
c.
NE Addition—Click the Single NE Addition radio button
d.
IP address
Click Next.
Note
If you click Finish in this window, default values will be assigned to the remaining fields.
Cisco Media Gateway Manager 5.0 User Guide
OL-5461-02
4-3
Chapter 4
Building the Network
How Do I Add and Delete Network Elements?
Step 4
Enter the following information:
a.
NE ID
Note
Do not use “MGM” as an NE ID because the Alarm Browser might contain Cisco MGM
alarms with the source ID “MGM.” It will be difficult to distinguish between NE alarms and
Cisco MGM alarms if they both have the same source ID (“MGM”). For the same reason,
do not cause Cisco MGM to automatically populate an NE whose NE ID is “MGM.”
If the NE ID field is left blank, it will default to the IP address. After communication is
established, Cisco MGM discovers the NE ID from the NE.
b.
Operational state
c.
SNMP Community String
d.
SNMP Community String (Set)
e.
NE Service Level User Name
f.
NE Service Level Pass Word
g.
Description
Step 5
Click Finish to add the new NE to the Domain Explorer tree.
Step 6
Wait two to five minutes while the Cisco MGM server completes the node discovery.
Step 7
Check to see if the communication state is correct. If Cisco MGM cannot connect to the NE, the NE
displays an unavailable communication state icon in the Domain Explorer tree.
Figure 4-1
Add Network Elements Window
Cisco Media Gateway Manager 5.0 User Guide
4-4
OL-5461-02
Chapter 4
Building the Network
How Do I Add and Delete Network Elements?
4.2.3.2 Adding Multiple Network Elements
From the Domain Explorer, you can add multiple NEs
Step 1
Select a node in the Domain Explorer; then, choose File > Add Network Element(s). You can also click
the Add Network Element(s) tool. The Add Network Element(s) wizard appears. See Figure 4-1.
Note
Step 2
Step 3
Enter the following information (see Table 4-1 for more details):
a.
NE Model
b.
NE Type
c.
NE Addition—(not available with Not Managed/Other Vendor NEs)—Click the Bulk NE Addition
radio button
d.
IP Address Range—Enter the IP addresses in the From and To fields of the NE and click Add
e.
IP Address Selection—Add or remove IP addresses using the Add and Remove buttons.
Click Next.
Note
Step 4
You cannot add a new NE to the Discovered Network Elements or Deleted Network Elements
group.
If you click Finish in this window, default values will be assigned to the remaining fields.
Enter the following information:
a.
NE ID—Display only.
b.
Operational state
c.
SNMP community string
d.
NE Service Level User Name
e.
NE Service Level Pass Word
f.
Description
Step 5
Click Finish.
Step 6
Select the grouping option for the NEs.
Step 7
Click Finish to add the NEs to the Domain Explorer tree.
Wait two to five minutes while the Cisco MGM server completes the node discovery.
Cisco Media Gateway Manager 5.0 User Guide
OL-5461-02
4-5
Chapter 4
Building the Network
How Do I Add and Delete Network Elements?
Table 4-1
Field Descriptions for the Add Network Element(s) Wizard
Screen
Field
Description
NE
Addition
NE Model
Allows you to select the NE model (Cisco MGX 8880/Cisco MGX 8850).
NE Type
The NE Type is not available.
NE Addition
Select Single NE Addition to add only one NE. Select Bulk NE Addition to add several
NEs simultaneously. The available fields will change, depending on which item you
select.
IP Address (for single
NE additions)
Allows you to enter a unique IP address for the NE. It must be in the form
ddd.ddd.ddd.ddd, where ddd is a decimal octet expressed as an integer between 0 and
255. The first octet cannot be a zero.
From IP Address (for
bulk NE additions)
Note
Prior to the NE ID discovery, Cisco MGM uses the NE IP address as a
temporary NE ID.
Note
The IP address field is unavailable when adding Not Managed/Other Vendor
NEs.
Enter the beginning IP address for the range of NEs you want to add.
To IP Address (for bulk Enter the ending IP address for the range of NEs you want to add. Click Add to add the
NE additions)
range to the Select IP field.
IP Address Selection
Select one or more IPs in the Deleted IP field and click Add to add them to the Selected
IP field. Select one or more IPs in the Selected IP field and click Remove to remove
them from the Selected IP field. Only the IPs in the Selected IP fields are affected by
clicking Next.
Cisco Media Gateway Manager 5.0 User Guide
4-6
OL-5461-02
Chapter 4
Building the Network
How Do I Add and Delete Network Elements?
Table 4-1
Screen
Field Descriptions for the Add Network Element(s) Wizard (continued)
Field
Description
NE
NE ID
Properties
Allows you to enter a unique name for the NE in the form of an ASCII text string.
Apostrophes (') and quotation marks (“) are not accepted. The NE ID you enter should
be the same as the NE ID that is configured on the NE itself. If it is not the same, this
field will be updated with the NE hostname.
Operational State
Note
Do not use “MGM” as an NE ID because the Alarm Browser might contain
Cisco MGM alarms with the source ID “MGM.” It will be difficult to
distinguish between NE alarms and Cisco MGM alarms if they both have the
same source ID (“MGM”). For the same reason, do not cause Cisco MGM to
automatically populate an NE whose NE ID is “MGM.”
Note
If the NE ID field is left blank, it will default to the IP address. After
communication is established, Cisco MGM discovers the NE ID from the NE.
Allows you to specify the operational state of the NE. There are three states:
•
Under Maintenance—The NE is temporarily under maintenance but requires
monitoring.
•
In Service—The NE is currently deployed and requires monitoring.
•
Out of Service—The NE has been marked Out of Service and does not require
monitoring.
SNMP Community
String
Allows you to enter the SNMP community string for the NE. By default, the SNMP get
community string is public and SNMP set community string is private.
NE Service Level User
Name
Allows you to enter the user name. The default is cisco.
NE Service Level Pass
Word
Allows you to enter the password. The default is cisco.
Description
Allows you to enter a description of the NE.
Note
Errors encountered while adding NEs are listed in the Error Log.
4.2.4 Network Element Discovery
The Cisco MGM discovery service collects information from individual NEs; discovers new NEs;
updates network-level information (such as physical topology); and updates device-level information
(such as inventory and alarms).
Note
The Discovered Network Elements group can only be viewed by SuperUsers and NetworkAdmins in
cases where all NEs are assigned to them.
The discovery process starts when a new NE is added to Cisco MGM. When discovery completes, all
information associated with the NE (such as inventory, configuration, and physical topology) is collected
and updated in Cisco MGM. By default, periodic, routine discovery occurs every 24 hours, beginning
from the time the Cisco MGM server starts.
Cisco Media Gateway Manager 5.0 User Guide
OL-5461-02
4-7
Chapter 4
Building the Network
How Do I Add and Delete Network Elements?
4.2.5 Copying a Network Element from One Group to Another
Groups for multiple NEs can easily be created in Cisco MGM. For information about creating groups,
see Section 4.3 How Do I Build Groups? The same NE can be copied into different groups.
Step 1
In the Domain Explorer Hierarchy pane, select the NE to be copied.
Step 2
Choose Edit > Copy (or click the Copy tool). This copies the NE to the clipboard. (Notice that the NE
ID now appears in italics).
Step 3
Select the group or management domain node where the NE will be pasted and choose Edit > Paste (or
click the Paste tool). This pastes the contents of the clipboard under the selected node.
Note
Tip
An NE cannot be pasted into the Discovered Network Elements or Deleted Network Elements
group. Also, it cannot be pasted into a group where the same instance of the NE already exists.
The drag-and-drop feature can also be used to copy NEs. Hold down the Ctrl key on the keyboard and
use the mouse to drag and drop the NE to a new location.
Topology modification using drag and drop or copy, cut and paste is not allowed for users with Assign
NEs property (Provisioner, Operator, and custom user profile) since they cannot see the entire domain.
Note
Since they cannot see the entire domain, users with the Assign NEs property (Provisioner, Operator, and
some custom user profiles) are not allowed to modify topology using copy, cut, paste, or drag and drop.
4.2.6 Moving a Network Element from One Group to Another
Cisco MGM provides drag-and-drop capabilities to allow you to easily move NEs from one group to
another.
Step 1
In the Domain Explorer Hierarchy pane, select the NE to be moved.
Step 2
Choose Edit > Cut, then Edit > Paste. You can also use the mouse to drag and drop the selected NE to
a new location.
Note
Note
You are not allowed to copy or move NEs into the Discovered Network Elements group.
Topology modification using drag and drop or copy, cut and paste is not allowed for users with Assign
NEs property (Provisioner, Operator, custom user profile) since they cannot see the entire domain.
Cisco Media Gateway Manager 5.0 User Guide
4-8
OL-5461-02
Chapter 4
Building the Network
How Do I Add and Delete Network Elements?
4.2.7 Deleting Network Elements
From the Domain Explorer Hierarchy pane, you can delete a single NE, multiple NEs, or out-of-service
NEs:
•
4.2.7.1 Deleting a Single Network Element
•
4.2.7.2 Deleting Multiple Network Elements
•
4.2.7.3 Removing a Deleted Network Element
4.2.7.1 Deleting a Single Network Element
To delete a single NE:
Step 1
In the Domain Explorer Hierarchy pane, select the NE that will be deleted. The Network Element
Properties sheet appears.
Step 2
There are two options to place an NE Out of Service:
•
In the Status tab of the Network Element Properties sheet, set the Operational State field to
Out of Service; then, click Save.
•
In the Domain Explorer, right click on the node and choose Mark Out of Service.
Step 3
In the Domain Explorer Hierarchy pane, select the NE to be deleted again.
Step 4
You can delete either a selected instance of the NE or all instances of the NE:
•
Deleting the selected instance of the NE—Only the specific NE that you selected in the Domain
Explorer Hierarchy pane is deleted. To delete the selected instance of the NE, choose Edit > Delete;
then, click Yes. If this is the last instance of the NE, the NE is placed in the Deleted Network
Elements group.
•
Deleting all instances of the NE—All NEs in the user domain that have the same NE ID are deleted.
To delete all instances of the selected NE, choose Edit > Delete All; then, click OK. The NE is
placed in the Deleted Network Elements group.
No client views for an NE can be opened in the Deleted Network Elements group. Also, no properties
of a deleted NE can be modified. The deleted NE and its associated data are removed from all client
views except the Domain Explorer.
Note
Only out-of-service NEs can be placed in the Deleted Network Elements group.
4.2.7.2 Deleting Multiple Network Elements
To delete multiple NEs:
Step 1
For each NE that will be deleted:
a.
In the Domain Explorer Hierarchy pane, select the NE that will be deleted. The Network Element
Properties sheet appears.
b.
Place the NE Out of Service. There are two options:
Cisco Media Gateway Manager 5.0 User Guide
OL-5461-02
4-9
Chapter 4
Building the Network
How Do I Add and Delete Network Elements?
– In the Status tab of the Network Element Properties sheet, set the Operational State field to
Out of Service; then, click Save.
– In the Domain Explorer, right click on the node and choose Mark Out of Service.
Step 2
In the Domain Explorer Hierarchy pane, select again all the NEs that will be deleted. To select multiple
NEs, press and hold down the Ctrl button; then, click each NE that will be deleted.
Step 3
You can delete the selected instance of the NEs or all instances of the NEs:
•
Deleting the selected instance of the NE—Only the specific NEs that you selected in the Domain
Explorer Hierarchy pane will be deleted. To delete the selected instance of the NEs, choose Edit >
Delete; then, click Yes on the confirmation dialog box. If the selected NEs are the last instance of
the NE, the NEs are placed in the Deleted Network Elements group.
•
Deleting all instances of the NEs—All NEs in the user domain that have the same NE ID as the NE
being deleted will be deleted. To delete all instances of the selected NEs, choose Edit > Delete All;
then, click OK in the confirmation dialog box. The NEs are placed in the Deleted Network Elements
group.
Note
Both the Delete and Delete All menu options are enabled if at least one of the selected NEs can be
deleted. The confirmation dialog box lists the NEs that can and cannot be deleted.
Note
You can use the mouse to drag and drop the selected NEs to the Deleted Network Elements group only
if all the selected NEs can be deleted.
4.2.7.3 Removing a Deleted Network Element
A deleted NE is placed in the Deleted Network Elements group.
Step 1
In the Domain Explorer Hierarchy pane, click the Deleted Network Elements group.
Step 2
Click the NE that will be removed from the Cisco MGM domain.
Step 3
Choose Edit > Delete; then, click Yes. This removes the NE from the client view and deletes all records
associated with the NE from the database.
Note
•
Wait until all records associated with the NE are deleted from the database before adding them back
again. Pruning operation takes about 5 minutes.
•
The Deleted Network Elements group is seen by users who have add_delete_NE_group operation
permission. You can purge or undelete an NE that is in the Deleted Network Elements group only if
that NE was assigned to you.
Cisco Media Gateway Manager 5.0 User Guide
4-10
OL-5461-02
Chapter 4
Building the Network
How Do I Build Groups?
4.2.8 Restoring a Deleted Network Element
You can restore an NE to its previous location in the Domain Explorer Hierarchy pane from the Deleted
Network Elements group.
Step 1
In the Domain Explorer Hierarchy pane, click the Deleted Network Elements group.
Step 2
Click the NE that will be restored.
Step 3
Choose Edit > Undelete.
All instances of the NE are restored to their previous locations in the Domain Explorer Hierarchy pane.
Note
If the original parent group no longer exists, Cisco MGM does not recreate the group. Instead,
Cisco MGM restores the NE under the management domain node.
The Deleted Network Elements group is seen by users who have add_delete_NE_group operation
permission. You can purge or undelete an NE that is in the Deleted Network Elements group only if that
NE was assigned to you.
4.3 How Do I Build Groups?
A group is a collection of objects which are related in some way; for example, they may all be the same
type of equipment or all belong to the same customer.
NEs in the Domain Explorer are organized in groups, which are comprised of NEs and/or other groups.
NEs are often grouped geographically or by domain. The same NE or group can be assigned to different
groups.
The Group Properties pane displays information about the group that is currently selected in the Domain
Explorer Hierarchy pane. Table 2-1 describes the Status tab fields. Table 2-2 describes the Identification
tab fields.
This section contains the following information:
•
4.3.1 Adding Groups
•
4.3.2 Copying Groups
•
4.3.3 Moving Groups
•
4.3.4 Deleting Groups
4.3.1 Adding Groups
Step 1
Select a node or group in the Domain Explorer Hierarchy pane.
Note
Step 2
Adding a new group to the Discovered NEs or Deleted NEs group is not allowed.
Choose File > New Group (or click the Add a New Group tool). The New Group dialog box appears.
Cisco Media Gateway Manager 5.0 User Guide
OL-5461-02
4-11
Chapter 4
Building the Network
How Do I Build Groups?
Step 3
Enter the following information in the New Group dialog box.
Table 4-2
Step 4
Field Descriptions for the New Group Dialog Box
Field
Description
Group ID
Enter a unique name for the group.
Location Name
Enter a geographic location for the group.
Description
Enter a description of the group.
Click OK.
4.3.2 Copying Groups
Domains for multiple users can easily be created in Cisco MGM. Just copy the same groups in different
domains, so that users who work different shifts can use the same group.
Step 1
In the Domain Explorer Hierarchy pane, select the group to be copied.
Step 2
Choose Edit > Copy (or click the Copy tool). This copies the group to the clipboard. (Notice the group
name now appears in italics.)
Step 3
Select the location where the group will be pasted and choose Edit > Paste (or click the Paste tool). This
pastes the contents of the clipboard under the selected group.
Note
Tip
A group cannot be pasted into the Discovered NEs or Deleted NEs group.
The drag and drop feature can also be used to copy groups. Hold down the Ctrl key and use the mouse
to drag and drop the group to a new location.
Since they cannot see the entire domain, users with the Assign NEs property (Provisioner, Operator, and
some custom user profiles) are not allowed to modify topology using copy, cut, paste, or drag and drop.
4.3.3 Moving Groups
Cisco MGM provides drag-and-drop capabilities to easily move groups in the Domain Explorer
Hierarchy pane.
Step 1
In the Domain Explorer Hierarchy pane, select the group to be moved.
Step 2
Use the mouse to drag and drop the selected group to a new location.
Cisco Media Gateway Manager 5.0 User Guide
4-12
OL-5461-02
Chapter 4
Building the Network
How Do I Build Groups?
Note
Tip
Groups cannot be moved into the Discovered NEs or Deleted NEs groups.
The Cut and Paste tools can also be used to move groups.
Since they cannot see the entire domain, users with the Assign NEs property (Provisioner, Operator, and
some custom user profiles) are not allowed to modify topology using copy, cut, paste, or drag and drop.
4.3.4 Deleting Groups
Cisco MGM allows you to delete a single group or multiple groups:
•
4.3.4.1 Deleting a Single Group
•
4.3.4.2 Deleting Multiple Groups
4.3.4.1 Deleting a Single Group
Step 1
In the Domain Explorer Hierarchy pane, select the group to be deleted.
Step 2
You can delete either the selected instance of the group or all instances of the group:
•
To remove the selected instance of the group, choose Edit > Delete; then, click Yes in the
confirmation dialog box.
•
To remove all instances of the selected group, choose Edit > Delete All; then, click Yes in the
confirmation dialog box.
Note
Before deleting the last instance of a group, the group must be empty. Move all of the NEs and
groups that the group contains to a different group.
Cisco Media Gateway Manager 5.0 User Guide
OL-5461-02
4-13
Chapter 4
Building the Network
How Do I Configure the SNMP Community String?
4.3.4.2 Deleting Multiple Groups
Step 1
In the Domain Explorer Hierarchy pane, select the group to be deleted. Select multiple groups by
pressing and holding down the Ctrl key, then click each group that will be deleted.
Step 2
You can delete either the selected instance of the groups or all instances of the groups:
Note
•
To remove the selected instance of the groups, choose Edit > Delete; then, click Yes in the
confirmation dialog box.
•
To remove all instances of the selected groups, choose Edit > Delete All; then, click Yes in the
confirmation dialog box.
Before deleting the last instance of a group, the group must be empty. Move all of the NEs and groups
that the group contains to a different group.
4.4 How Do I Configure the SNMP Community String?
Cisco MGM configures the community strings for SNMP management and supports various
multi-service-switching devices.
Caution
The community strings on the devices and the community strings used by Cisco MGM do not sync up
automatically (except at the initial stage when the community strings on the devices are at default).You
have to explicitly change them on both sides (using the Network Element Property pane in the Domain
Explorer on Cisco MGM and the command line interface (CLI) on the switch). See 4.4.2 Changing
Community Strings Using the Domain Explorer and 4.4.3 Changing Community Strings Using the CLI.
If this is not done, all SNMP requests fail, and the Cisco MGM database is inconsistent with the network.
To configure the SNMP community string, you must change the community strings on the devices
through the CLI. SSH or Telnet to the switch to configure the community strings at the switches. The
community strings are configured for the Cisco MGX PXM45-based products (Cisco MGX 8880, and
Cisco MGX 8850 (PXM45)).
Table 4-3 describes the various options involved in configuring the SNMP.
Cisco Media Gateway Manager 5.0 User Guide
4-14
OL-5461-02
Chapter 4
Building the Network
How Do I Configure the SNMP Community String?
Table 4-3
SNMP Configuration Options
Option
Description
Domain Explorer,
Network Element
Property pane, NE
Authentication tab
After saving the community strings information, the Cisco MGM processes
use the new community strings for SNMP accesses.
Since users must configure the community strings on both the devices
through CLI, and at the Cisco MGM stations through the Domain Explorer,
there is a possibility of typing in mismatched community strings. This results
in the node with the mismatched community strings either not discovered or
unreachable to Cisco MGM.
Note
SNMP access security
Configured community strings cannot contain underscore ( _ ) or at
(@) signs. Also, spaces are not allowed in community strings and
Service Level passwords.
Enter the cnfsnmp command on Cisco MGM by using a secured shell to
change the community strings and passwords.
These tasks are used to configure the SNMP community string:
•
4.4.1 Setting Up Nonstandard Community Strings
•
4.4.2 Changing Community Strings Using the Domain Explorer
•
4.4.3 Changing Community Strings Using the CLI
•
4.4.4 Changing Service Level Passwords Using the Domain Explorer
•
4.4.5 Changing the Service Level Passwords Using the CLI
4.4.1 Setting Up Nonstandard Community Strings
The standard community strings are defined as default community strings. If you configure the standard
community strings to a different value, the standard community strings are then defined as nonstandard
community strings.
To set up nonstandard community strings or to change an Service Level password, use the NE
Authentication tab in the Domain Explorer.
Note
This method will affect only Cisco MGM. You must make sure that community strings and passwords
within Cisco MGM are in agreement with those on the switches.
Cisco Media Gateway Manager 5.0 User Guide
OL-5461-02
4-15
Chapter 4
Building the Network
How Do I Configure the SNMP Community String?
4.4.2 Changing Community Strings Using the Domain Explorer
To change the SNMP get and set community strings for selected nodes:
Step 1
In the Domain Explorer Hierarchy pane, select the node.
Step 2
In the NE Authentication tab, you can change the SNMP Community String to change the SNMP get
community string, or change the SNMP Set Only Community String.
Step 3
Click Save.
4.4.3 Changing Community Strings Using the CLI
To change the SNMP get community strings for selected nodes:
Step 1
Open a terminal window and SSH or Telnet to the switch.
Step 2
Enter the cnfsnmp command to change the SNMP get community string for the selected nodes as
follows:
xxyyzz% cnfsnmp community [ro|rw]
where ro is the SNMP get community string and rw is the SNMP set only community string
Step 3
Configure the SNMP get community string for the selected switch as follows:
xxyyzz%cnfsnmp community public ro
xxyyzz%
Then check that the community string has changed. Enter:
dspsnmp
You will see output similar to the following example:
xxyyzz.7.PXM.a > dspsnmp
xxyyzz System Rev: 05.00 Dec. 14, 2004 20:04:14 GMT
MGX8850 Node Alarm: MAJOR
Community (rw): private
Community (ro): public
System Location: building 3
System Contact:
To change the SNMP set community strings for a node or switch:
Note
Step 1
The following procedure changes the SNMP set community string for the node that you SSH or Telnet
to, not for all instances of that node. You must change the SNMP set community string on all instances
of the node.
Open a terminal window and SSH or Telnet to the switch.
Cisco Media Gateway Manager 5.0 User Guide
4-16
OL-5461-02
Chapter 4
Building the Network
How Do I Configure the SNMP Community String?
Step 2
Enter the cnfsnmp command to change the SNMP set community string for all nodes as follows:
xxyyzz% cnfsnmp community private rw
xxyyzz%
Then check that the community string has changed. Enter:
dspsnmp
You will see output similar to the following example:
xxyyzz.7.PXM.a > dspsnmp
xxyyzz System Rev: 05.00 Dec. 14, 2004 20:04:14 GMT
MGX8850 Node Alarm: MAJOR
Community (rw): private
Community (ro): public
System Location: building 3
System Contact:
4.4.4 Changing Service Level Passwords Using the Domain Explorer
To change the Service Level password for the current Service Level user for all nodes:
Step 1
In the Domain Explorer Hierarchy pane, select the node.
Step 2
In the NE Authentication tab, change the NE Service Level Password. Confirm the change, enter the
password in the Confirm NE Service Level Password field.
Step 3
Click Save.
4.4.5 Changing the Service Level Passwords Using the CLI
To change the Service Level password for the current Service Level user:
Note
The following procedure changes the Service Level Password for the node that you SSH or Telnet to, not
for all instances of that node. You must change the Service Level Password on all instances of the node.
Step 1
Open a terminal window and SSH or Telnet to the switch.
Step 2
Enter the cnfpasswd command to change the Service Level password for all nodes. The following
example is shown:
xxyyzz.7.PXM.a >
xxyyzz.7.PXM.a > cnfpasswd
Enter existing password:
Enter new password:
Re-enter new password:
Local password for user cisco changed.
Cisco Media Gateway Manager 5.0 User Guide
OL-5461-02
4-17
Chapter 4
Building the Network
How Do I Build Network Maps?
Step 3
When you are prompted for a password, you must:
a.
Enter the existing password.
b.
Enter the new password.
c.
Reenter the new password for confirmation.
4.5 How Do I Build Network Maps?
Network map backgrounds are provided by default as part of Cisco MGM, and are used to display a
geographical layout of the network.
The Network Map consists of three areas:
•
The right side displays a map with the individual groups, NEs, and link icons.
•
The upper left side displays the position of the map on the right side with respect to a larger world
map.
•
The lower left side displays the domain, or group properties, including the number of alarms and ID.
This section contains the following information:
•
4.5.1 Customizing a Network Map
•
4.5.2 Viewing a Node in the Network Map
•
4.5.3 Modifying a Node Icon or a Map Background Image
•
4.5.4 Saving Changes to the Network Map
4.5.1 Customizing a Network Map
Step 1
In the Domain Explorer Hierarchy pane, click a node and choose File > Network Map (or click the
Open Network Map tool). See Figure 4-2.
Note
Step 2
There is no Network Map for the Discovered NEs or Deleted NEs groups.
Use the Edit menu in the Network Map window to customize the Network Map. The Edit menu options
are detailed in Edit Menu OptionsTable 4-4.
Table 4-4
Edit Menu Options
Edit Menu Option
Description
Enable Drag
Enables the drag-and-drop functionality.
Enable Offview
Enables the display of off-view icons in the selected Network Map
window. If an NE has a link to an NE on a different map, the off-view NE
is represented by an off-view icon.
Note
The off-view icon serves as a hyperlink to the map that contains
the NE at the opposite end of the link.
Cisco Media Gateway Manager 5.0 User Guide
4-18
OL-5461-02
Chapter 4
Building the Network
How Do I Build Network Maps?
Table 4-4
Step 3
Step 4
Step 5
Edit Menu Options (continued)
Edit Menu Option
Description
Change Map Background
Choose a different geographic background image for the selected view.
Choose one of the image files packaged with Cisco MGM, or use another
image file (not packaged with Cisco MGM).
Change Node Icon
Choose a new icon for the selected node.
Zoom In
Choose to change the magnification of the icons.
Zoom Out
Choose to make all nodes visible.
Zoom Area
Selects the area that you want to view. When selected, the pointer changes
to a cross mark in the Network Map and allows you to select the area that
you want to view.
Circular Layout
Arranges and displays the nodes in a circle.
Spring Layout
Arranges and displays the nodes according to the links that connect the
NEs.
Table Layout
Arranges and displays the nodes in such a way that the nodes are arranged
in a grid, or table. The nodes are arranged as close together as possible.
Declutter Layout
Arranges the existing nodes so that they do not overlap. This layout is used
to handle nodes that appear on top of each other when you zoom out.
The off-view icons in the Network Map can be enabled or disabled. To enable or disable the off-view
icons:
a.
Choose Edit > User Preferences.
b.
Click the Map Preferences tab.
c.
Check the Show Off View Icons check box to show off-view icons in the Network Map, or leave
the check box unchecked to hide off-view icons.
d.
Click OK.
Choose whether Cisco MGM truncates long map node names by the first characters or by the ending
characters:
a.
Return to the Domain Explorer window and choose Administration > Control Panel.
b.
Click UI Properties.
c.
In the Domain Management area, specify the truncation preference and click Save.
Choose whether to use multiple windows or a single window for navigation:
a.
Choose Edit > User Preferences.
b.
Click the Map Preferences tab.
c.
Check the Open Network Map in New Window check box to open a new window for subsequent
map views, or uncheck the check box to open subsequent map frames in the same window.
d.
Click OK.
Cisco Media Gateway Manager 5.0 User Guide
OL-5461-02
4-19
Chapter 4
Building the Network
How Do I Build Network Maps?
Figure 4-2
Network Map Window
4.5.2 Viewing a Node in the Network Map
Icons in the Network Map are displayed based on the nodes you select in the Domain Explorer.
Launching the Network Map from the following nodes displays different results:
•
From the Cisco MGM domain in the Domain Explorer—Displays all the groups in the Cisco MGM
Domain. If you double-click on a group in the Network Map, another Network Map window appears
and all the NEs that belong to that group are displayed.
•
From a particular group in the Domain Explorer—Displays all NEs that belong to that group.
•
From a specific NE in the Domain Explorer—Displays the selected NE.
When the Network Map is launched from the Cisco MGM domain, it displays a world map with the
individual groups, network partition, or NEs icons. To view a particular region or icon, adjust the zoom
level or pan position.
Cisco Media Gateway Manager 5.0 User Guide
4-20
OL-5461-02
Chapter 4
Building the Network
How Do I Build Network Maps?
4.5.2.1 Adjusting the Zoom Level or Pan Position
Step 1
In the Domain Explorer Hierarchy pane, click a node and choose File > Network Map. The Network
Map appears and the node is preselected. See Figure 4-2.
Step 2
In the Network Map, choose Edit > Zoom In, Edit > Zoom Out, or Edit > Zoom Area to adjust the
zoom level. You can also click the Zoom In, Zoom Out, or Zoom Area tool.
Step 3
To adjust the pan position, click the box in the upper-left side of the Network Map and use the mouse to
drag and drop it to the desired region. Use the scroll bars to pan the view to a different region.
Step 4
To adjust the pan position area, use the mouse to click the corner of the box, and drag to include the
required area.
4.5.3 Modifying a Node Icon or a Map Background Image
Appendix A, “Icons and Menus” details the icons which are used in Cisco MGM.
The icons in the Network Map can be customized. Images smaller than 640 x 480 pixels by default
appear surrounded by blank space in the upper-left corner of the window. Images larger than 1024 x 768
pixels by default appear with scroll bars. Icon images are 32 x 32 pixels. Cisco MGM supports
nonanimated GIF and shapefile format icons and maps. Shapefile is a universal standard for data file that
allows users to zoom in and zoom out without losing details.
Note
The size of the map file should not exceed 100 KB.
This section contains the following information:
•
4.5.3.1 Modifying a Node Icon
•
4.5.3.2 Modifying a Map Background
4.5.3.1 Modifying a Node Icon
Step 1
In the Domain Explorer Hierarchy pane, click a node and choose File > Network Map. See Figure 4-2.
Step 2
In the Network Map window, click a node and choose Edit > Change Node Icon. The Select Node Icon
File dialog box appears.
Step 3
Select a node icon from within the default file system at
C:\Cisco\MediaGatewayManagerClient\images\mapicons for Windows systems or at
/opt/CiscoMGMClient/images/mapicons for Unix systems.
Step 4
After choosing an icon, click Open. The new icon appears in the Network Map.
Step 5
Choose File > Save to save the changes.
Cisco Media Gateway Manager 5.0 User Guide
OL-5461-02
4-21
Chapter 4
Building the Network
How Do I Build Network Maps?
4.5.3.2 Modifying a Map Background
Step 1
In the Domain Explorer Hierarchy pane, click a node and choose File > Network Map. See Figure 4-2.
Step 2
In the Network Map window, click in the map background and choose Edit > Change Map Background
or right-click in the map background and choose Change Map Background. The Select Background
Map dialog box appears.
Step 3
Select a background image from within the default file system at
C:\Cisco\MediaGatewayManagerClient\images\mapbkgnds for Windows systems or at
/opt/CiscoMGMClient/images/mapbkgnds for Unix systems. Add user-defined images in this file
system, or click Create New Folder and save user-defined images in a customized folder within this
directory.
Step 4
After choosing a map background, click Open. The new map background appears in the Network Map.
Step 5
Choose File > Save to save the changes.
Note
When you add NEs or groups to a group or to the top-level domain, the coordinates of those objects on
the related Network Map are initially null, so Cisco MGM automatically positions the objects. If you
move an object manually and save the map, the object has fixed coordinates. Therefore, if you open a
map and find an icon in an unexpected position, the object most likely was never positioned manually
and saved and was therefore positioned automatically. To fix the icon location, manually move the object
to the correct position and save the map.
4.5.4 Saving Changes to the Network Map
Step 1
In the Domain Explorer Hierarchy pane, click a node and choose File > Network Map. See Figure 4-2.
Step 2
After making the necessary changes to the map background, node icon, and node coordinates in the
Network Map window, you can save your settings by using one of the following methods:
•
Save—Choose File > Save (or click the Save Changes tool) to save your settings. Your settings
become a custom map that does not affect the default map for the nodes currently displayed in the
Network Map. Users who have not saved their custom map will still see the default map for those
nodes.
•
Save As Default—Choose File > Save As Default to save your settings as the default settings. Your
settings become the default map for the nodes under subgroups currently displayed in the Network
Map and this default map is seen by users who have not saved their custom map for those nodes.
There can only be one default setting per group of nodes in the Network Map.
Note
The Save As Default menu option is disabled on the Cisco MGM Management Domain
node.
Save As Default is only available for nodes under sub-groups.
Cisco Media Gateway Manager 5.0 User Guide
4-22
OL-5461-02
Chapter 4
Building the Network
How Do I Discover the Network?
•
Note
Revert To Default—Choose File > Revert to Default to cancel your settings and revert to previous
settings. Any custom map you created for the nodes under subgroups currently displayed in the
Network Map will be erased. The Network Map reverts to the default map assigned to these nodes.
Revert to Default is only available for nodes under sub-groups.
4.6 How Do I Discover the Network?
The Cisco MGM discovery service:
•
Collects information from individual MGX8880 and MGX8850 NEs
•
Discovers new NEs
•
Updates device-level information (such as inventory and alarms).
Cisco MGM supports discovery for MGX8880 and MGX8850 chassis and sub-chassis components
using IP addresses, address list, or IP address range as input.
The specific NE components to be discovered and displayed in the EMS GUI are:
•
PXM45 card
•
VXSM card
•
VISM-PR card
•
RPM-XF card
•
RPM-PR card
•
AXSM/B card
•
AXSME card
•
SRME card
•
SRME/B card
•
Connections
Cisco MGM provides sub-chassis component discovery (configuration upload and parse) and sync up,
as well as, autonomous traps processing of configuration changes. Sync up is initiated periodically.
Note
The Discovered Network Elements group can only be viewed by SuperUsers and NetworkAdmins in
cases where all NEs are assigned to them. Therefore, in the Add Network Element(s) wizard, the
grouping option “Group the Discovered NE(s) in the Discovered Network Elements Group” is not
available.
This section contains the following information:
•
4.6.1 Discovering NEs
Cisco Media Gateway Manager 5.0 User Guide
OL-5461-02
4-23
Chapter 4
Building the Network
How Do I Synchronize the Network?
4.6.1 Discovering NEs
The network discovery service in Cisco MGM collects information from individual NEs, discovers new
NEs added to the network, and computes network-level information, such as physical topology, and
discrepancies.
When you add a new NE to Cisco MGM, the discovery process starts. When the process finishes, all of
the NE information (such as inventory, configuration, physical topology, and discrepancies) is collected
and Cisco MGM is updated.
4.7 How Do I Synchronize the Network?
The Cisco MGM server and managed nodes must be synchronized with the same date and time. If the
Cisco MGM server and managed nodes do not have the same date and time, there might be
inconsistencies in retrieving time-sensitive data.
This section contains the following information:
•
4.7.1 Viewing Clocking Sources
4.7.1 Viewing Clocking Sources
Cisco MGM supports manual clock configuration. This configures both a primary and secondary clock
source, which are distributed throughout the network. The secondary clock source takes over if the
primary clock source fails. You can configure a network setup with one master clock source, and a
secondary to ensure network clock stability.
On Cisco MGX 8850 (PXM45) switches, clock source configuration is done on a PXM45 card, and clock
sourcing information is passed to other nodes over AXSM lines.
Clock synchronization is done directly on the Cisco MGM8880 using the CLI.
These topics are used to manage and configure clocking sources:
•
4.7.1.1 Configuring Global Clocking
•
4.7.1.2 Displaying the List of Available Clock Sources
•
4.7.1.3 Displaying the List of Manual Clock Sources
•
4.7.1.4 Creating a Manual Clock Source
4.7.1.1 Configuring Global Clocking
To configure global clocking:
Step 1
In the Domain Explorer Hierarchy pane, right-click the node and choose Configuration >
MGX8880/8850 MGX > Configuration Center.
Step 2
Drag and drop the node from the Hierarchy pane to the right hand pane.
Step 3
Click the Elements tab to display the Configuration Window for Elements.
Step 4
Click the Clocking tab to display Global Clocking Configuration window. See Figure 4-3.
Step 5
Choose Global Clocking Configuration from the Category drop-down arrow.
Cisco Media Gateway Manager 5.0 User Guide
4-24
OL-5461-02
Chapter 4
Building the Network
How Do I Synchronize the Network?
Step 6
The Distribution Method is manual. This specifies that the network clock source is statically
configured in the device.
Step 7
Enter the maximum network diameter, measured in hops, in the Max Diameter field.
The range is from 3-20. The default value is 20.
Note
Step 8
Change Time—The time when the global clocking was configured.
Clock Source—The clock source from the list of available clocking source
Click Apply to apply the global clocking configuration settings.
Figure 4-3
Configuration Center—Clocking Tab
4.7.1.2 Displaying the List of Available Clock Sources
To display the available clock sources:
Step 1
In the Domain Explorer, right-click the PNNI node from the Hierarchy pane and choose Configuration
Center.
Step 2
Click the Elements tab to display the Configuration Window for Elements.
Cisco Media Gateway Manager 5.0 User Guide
OL-5461-02
4-25
Chapter 4
Building the Network
How Do I Synchronize the Network?
Step 3
Click the Clocking tab to display Clocking Configuration window. See Figure 4-3.
Step 4
Choose Available Clock Sources to display the list of available clock sources from the Category
drop-down arrow.
4.7.1.3 Displaying the List of Manual Clock Sources
To display a list of manual clock sources:
Step 1
In the Domain Explorer, right-click the PNNI node from the Hierarchy pane and choose Configuration
Center.
Step 2
Click the Elements tab to display the Configuration Window for Elements.
Step 3
Click the Clocking tab to display Clocking Configuration window. See Figure 4-3.
Step 4
Choose Manual Clock Sources from the Category drop-down arrow.
4.7.1.4 Creating a Manual Clock Source
To create a manual clock source:
Step 1
In the Domain Explorer, right-click the PNNI node from the Hierarchy pane and choose Configuration
Center.
Step 2
Click the Elements tab to display the Configuration Window for Elements.
Step 3
Click the Clocking tab to display Clocking Configuration window. See Figure 4-3.
Step 4
Choose Manual Clock Sources from the Category drop-down arrow.
Step 5
Click Create to display the Manual Clock Source Configuration Window.
Step 6
Choose one of the following clock source options from the Priority drop-down arrow:
•
primary— Configures an available network clock source to be the primary manual clock source.
•
secondary—Configures an available network clock source to be the secondary manual clock source.
•
default—Configures an available network clock source to be the default manual clock source.
Step 7
Enter the index value that is used to identify the primary, secondary, or default manual clock source in
the Clock Source Index field.
Step 8
Enter the description of the clock source in the Clock Source field.
Step 9
Ensure that the health of the clock source is correct from the Health drop-down arrow.
Step 10
Click Apply to create a manual clock source.
Cisco Media Gateway Manager 5.0 User Guide
4-26
OL-5461-02
Chapter 4
Building the Network
How Do I Test Connectivity?
4.8 How Do I Test Connectivity?
Note
A diagnostic check can be run at the node level to verify that selected nodes are being managed correctly
by Cisco MGM. See “5.2.10.2 Running a Diagnostic Check at the Node Level”.
Testing NE connectivity occurs at the management protocol level (SNMP, or CORBA).
Step 1
In the Domain Explorer Hierarchy pane, select the NE and choose Fault > Diagnostic Center.
Step 2
Click the Manageability tab to display the Node Login Information.
Step 3
Enter the Service Level username and password.
Step 4
Click Check Manageability. The following Manageability Check Results are displayed:
•
Node ID
•
Node Name
•
IP Reachability
•
FTP Configuration
•
Community String Configuration
•
Trap IP Configuration
Cisco Media Gateway Manager 5.0 User Guide
OL-5461-02
4-27
Chapter 4
Building the Network
How Do I Test Connectivity?
Cisco Media Gateway Manager 5.0 User Guide
4-28
OL-5461-02
C H A P T E R
5
Maintaining an Efficient Network
This chapter contains the following information to help you maintain an efficient network:
Note
•
5.1 How Do I Manage the Database?
•
5.2 How Do I Monitor the Network?
•
5.3 How Do I Modify the Network?
•
5.4 How Do I Manage the Network Software?
•
5.5 How Do I Manage Redundancy and Failover?
•
5.6 Which Ports Are Reserved in Cisco MGM?
•
5.7 How Do I Export Information in Tables?
For information on configuring users and user-related parameters, creating and modifying advisory
messages, and accessing various logs, please refer to Chapter 8, “Managing Security”.
Maintaining your network focuses on tasks that will keep your network running smoothly, for example:
•
Backing up and restoring memory and/or the database
•
Restoring default settings when necessary
•
Monitoring tasks and jobs
•
Modifying basic server and NE information
•
Finding modules or boards
•
Updating software images and versions
•
Exporting data and generating reports
•
Performing administrative database operations
5.1 How Do I Manage the Database?
This section describes procedures for managing the Oracle database and deals specifically with
Cisco MGM data stored in the database. For a complete description, refer to the Oracle
documentation—specifically the Oracle9i Server Administrator’s Guide.
Cisco Media Gateway Manager 5.0 User Guide
OL-5461-02
5-1
Chapter 5
Maintaining an Efficient Network
How Do I Manage the Database?
A useful tool for managing the database is the Oracle Enterprise Manager, part of the Oracle9i Client
CD. The Oracle Enterprise Manager provides an integrated solution for managing heterogeneous
environment and combines a graphical console, agents, common services, and tools to provide a
comprehensive systems-management platform for managing Oracle products.
This section contains the following information:
•
5.1.1 Viewing and Modifying Database Properties
•
5.1.2 Importing and Exporting Data to and from the Oracle Database
•
5.1.3 Backing Up and Restoring the Database
•
5.1.4 Pruning the Database
•
5.1.5 Using the SQL*PLUS Client to Manage the Database
•
5.1.6 Basic SQL Commands for Cisco MGM Schema Objects
•
5.1.7 Enhancing Database Performance
•
5.1.8 Removing an Old Version of the Cisco MGM Database
5.1.1 Viewing and Modifying Database Properties
The Database Properties pane shows and defines database pruning parameters and configuration that the
Cisco MGM server uses to connect to the Oracle database. It contains the following tabs:
•
Note
•
Note
•
Note
Configuration Tab—The Configuration tab fields define the values used by the Cisco MGM server
to log into the Oracle database. Fields are grouped into two columns: Active and After Restart. The
Active column displays the values used by the Cisco MGM server. The After Restart column shows
the values that the Cisco MGM server uses after the server is restarted.
Table 5-1 describes the fields within the Database Properties Configuration tab.
Pruning Tab—The Pruning tab defines the Cisco MGM database pruning frequency. Pruning
frequency changes take effect as soon as you save them. You do not need to reboot the Cisco MGM
server.
Table 5-2 describes the fields within the Database Properties Pruning tab.
Database Backup Tab—The Database Backup tab allows you to start a database backup from the
Control Panel. After entering the password, click Start to begin the database backup. This tab is
disabled if the database is not installed in ARCHIVELOG mode. The ARCHIVELOG mode is
stored in the MGM_config_table by the server installer.
Table 5-3 describes the fields within the Database Properties Database Backup tab.
To view and modify the database properties:
Step 1
In the Domain Explorer window, choose Administration > Control Panel.
Step 2
Click Database Properties to open the Database Properties pane. See Figure 5-1.
Cisco Media Gateway Manager 5.0 User Guide
5-2
OL-5461-02
Chapter 5
Maintaining an Efficient Network
How Do I Manage the Database?
Step 3
(Optional) Click the Configuration tab. Table 5-1 describes the fields within the Database Properties
Configuration tab.
Step 4
(Optional) Click the Pruning tab. Table 5-2 describes the fields within the Database Properties Pruning
tab.
Note
Step 5
Step 6
For more details, see section 5.1.4 Pruning the Database, page 5-13.
(Optional) Click the Database Backup tab. Table 5-3 describes the fields within the Database Properties
Database Backup tab.
Note
For more information on database backups, see section 5.1.3 Backing Up and Restoring the
Database, page 5-7.
Note
Fields in the Database Backup tab are disabled if the database is not installed with the
ARCHIVELOG mode option equal to true (see the Configuration tab for details).
Click Save.
Cisco Media Gateway Manager 5.0 User Guide
OL-5461-02
5-3
Chapter 5
Maintaining an Efficient Network
How Do I Manage the Database?
Figure 5-1
Table 5-1
Control Panel—Database Properties Pane
Field Descriptions for the Database Properties—Configuration Tab
Field
Description
Database Server
Configuration
Displays the size of the database server.
Server Installed in
ARCHIVELOG
If set to True, Cisco MGM supports automatic pruning of the /db05 partition when the database is
in ARCHIVELOG mode.
Cisco Media Gateway Manager 5.0 User Guide
5-4
OL-5461-02
Chapter 5
Maintaining an Efficient Network
How Do I Manage the Database?
Table 5-1
Field Descriptions for the Database Properties—Configuration Tab (continued)
Field
Description
Configuration Mode
Configuration Mode tells the Cisco MGM server the values to use to log into the Oracle database.
When set to Auto, the Cisco MGM server uses the configuration that was set when Cisco MGM was
installed. When set to Manual, the After Restart fields can be edited, and the Cisco MGM server
will use the edited values when the server is rebooted.
Note
If you change the configuration mode to Manual, enter the following commands to set the
ORACLE_HOME and ORACLE_SID environment variables before logging into
Cisco MGM again:
setenv ORACLE_HOME Oracle home directory
setenv ORACLE_SID MGM5_0
setenv LD_LIBRARY_PATH $ORACLE_HOME/lib
setenv PATH $PATH:$ORACLE_HOME/bin
Restart the Cisco MGM server after setting these environment variables.
Caution
If you set the configuration mode to Auto and restart the Cisco MGM server, the
MGMServer.cfg file is overwritten with the default values for username, password,
location, port, system ID, and SQL network alias.
Username
Displays the username that the Cisco MGM server uses to access the Oracle database.
Password
Displays the password that gives the username access to the Oracle database.
Location
Displays the IP address that the Cisco MGM server uses to connect to the database.
Port
Displays the port number that is used to connect to the database.
System ID
Displays the Oracle system ID. The ORACLE_SID specifies the system identifier (SID) value of
the database instance that you create with the Cisco MGM installer. For a single-instance database,
the SID value should be the same as the name of the database it manipulates (initialization
parameter DB_NAME), and no more than four characters.
Note
SQL Network Alias
During Cisco MGM installation, the default system ID is MGM5_0.
Displays the SQL*Net listener alias set in the system listener.ora file. When the listener is running,
entering the ps command displays the following output (not all systems display listener_alias):
tnslsnr [listener_alias] [-inherit]
Shadow processes (dedicated servers) spawned by the SQL*Net listener have the following syntax:
oracleSID [(LOCAL=NO)]
Cisco Media Gateway Manager 5.0 User Guide
OL-5461-02
5-5
Chapter 5
Maintaining an Efficient Network
How Do I Manage the Database?
Table 5-2
Field Description for the Database Properties—Pruning Tab
Field
Description
PM Data
Specifies the number of days to save performance monitoring (PM) data before Cisco MGM runs the
database pruning script. The default value is 7. You can also specify the time of day when the PM data
will be saved by choosing the hour and minute from the HH, MM, and AM/PM fields. Minutes are
listed in 5-minute intervals. Click Enable to activate the PM data pruning.
FM Data
Specifies the number of days to save FM data before Cisco MGM runs the database pruning script.
The default value is 7. You can also specify the time of day when the FM data will be saved by
choosing the hour and minute from the HH, MM, and AM/PM fields. Minutes are listed in 5-minute
intervals. Click Enable to activate the FM data pruning.
Audit Log Data
Specifies the number of days to save audit log data before Cisco MGM runs the database pruning
script. The default value is 7. You can also specify the time of day when the audit log data will be
saved by choosing the hour and minute from the HH, MM, and AM/PM fields. Minutes are listed in
5-minute intervals. Click Enable to activate the audit log data pruning.
Error Log Data
Specifies the number of days to save Error Log data before Cisco MGM runs the database pruning
script. The default value is 7. You can also specify the time of day when the Error Log data will be
saved by choosing the hour and minute from the HH, MM, and AM/PM fields. Minutes are listed in
5-minute intervals. Click Enable to activate the Error Log data pruning.
Audit Trail Data
Specifies the number of days to save audit trail data before Cisco MGM runs the database pruning
script. The default value is 7. You can also specify the time of day when the audit trail data will be
saved by choosing the hour and minute from the HH, MM, and AM/PM fields. Minutes are listed in
5-minute intervals. Click Enable to activate the audit trail data pruning.
Self Monitor Data
Specifies the number of days to save self-monitoring data before Cisco MGM runs the database
pruning script. The default value is 7. You can also specify the time of day when the self monitoring
data will be saved by choosing the hour and minute from the HH, MM, and AM/PM fields. Minutes
are listed in 5-minute intervals. Click Enable to activate the self monitoring data pruning.
Job Monitor Data
Specifies the number of days to save job monitoring data before Cisco MGM runs the database
pruning script. The default value is 7. You can also specify the time of day when the job monitoring
data will be saved by choosing the hour and minute from the HH, MM, and AM/PM fields. Minutes
are listed in 5-minute intervals. Click Enable to activate the job monitoring data pruning.
Table 5-3
Field Descriptions for the Database Properties—Database Backup Tab
Field
Description
Password
The password for the system user.
Backup Status
The status of the database backup.
Archive Log
Pruning
Parameters
Displays the archive log pruning parameters.
Cisco Media Gateway Manager 5.0 User Guide
5-6
OL-5461-02
Chapter 5
Maintaining an Efficient Network
How Do I Manage the Database?
5.1.2 Importing and Exporting Data to and from the Oracle Database
Use the Oracle Export utility to write data from an Oracle database to an operating system file in binary
format. The file is stored outside the database and read to another Oracle database by using the Import
utility. For more information about using Oracle Import and Export utilities, refer to the Oracle9i
Utilities document. Alternatively, use the Oracle Enterprise Manager to import and export data.
The Export utility provides a simple way to transfer data objects between Oracle databases. The Export
utility extracts the object definitions and table data from an Oracle database and stores them in an Oracle
binary-format export dump file located on disk or on tape.
The export dump file is sent by using FTP—or, if on tape, physically transported—to a different site. By
using the Import utility, the export dump file is transferred between databases that reside on machines
not connected through a network.
Note
Only the Oracle Import utility can read export dump files.
5.1.3 Backing Up and Restoring the Database
This section describes how to back up and restore Cisco MGM data and how to use basic Oracle backup
and recovery tools:
•
5.1.3.1 Overview of the Oracle Logical Backup
•
5.1.3.2 Oracle Export Utility
•
5.1.3.3 Performing a Logical Backup (Export)
•
5.1.3.4 Oracle Import Utility
•
5.1.3.5 Restoring with a Logical Backup (Import)
•
5.1.3.6 Backing Up the Database
•
5.1.3.7 Restoring the Database
•
5.1.3.8 Configuring Manual NE Backup Parameters
This section also explains the structure of /opt/CiscoMGMServer, a directory that is created
automatically when you install Cisco MGM 5.0.
Note
The default directory /opt/CiscoMGMServer may have been changed during installation of the
Cisco MGM server.
Cisco MGM uses an Oracle database. It is recommended that you protect your data by backing it up
regularly. Backups can be stored on a local or network-mounted, disk-based file system; on a local tape
drive; or on a remote tape drive.
Commercially available tools for Oracle and system-level backup include:
•
Legato Networker (or “Solstice Backup” when purchased from Sun Microsystems)
•
VERITAS NetBackup
•
BMC Software SQL Backtrack
•
GNU Oraback.sh
Cisco Media Gateway Manager 5.0 User Guide
OL-5461-02
5-7
Chapter 5
Maintaining an Efficient Network
How Do I Manage the Database?
Caution
Whenever a back up is done, it must include both the database and all other Cisco MGM directories.
Likewise, whenever a restore is done, it must include both the database and all other Cisco MGM
directories.
5.1.3.1 Overview of the Oracle Logical Backup
It is recommended to backup the Oracle database using a logical backup. A logical backup involves
reading a set of database records and writing them to a file. These records are read independently of their
physical location. Oracle uses the Export (exp) and Import (imp) utilities to perform a logical database
backup.
A logical backup has the following advantages:
•
Checks for corrupted data blocks and verifies database consistency
•
Eliminates database fragmentation
•
Allows incremental export and import to store only tables that have changed since the last export
•
Is portable to another machine or database
A logical backup has the following disadvantages:
•
Cannot recover transactions
•
Takes longer than a physical backup
•
Lacks referential integrity (export is done one table at a time)
5.1.3.2 Oracle Export Utility
The Oracle Export utility reads the database, including the data dictionary, and writes the output to a
binary file called an export dump file. The created file contains all of the commands necessary to recreate
the selected database objects.
The Oracle Export utility permits three types of exports:
•
Complete—A full database export including the data dictionary for all tables
•
Incremental—Includes all of the tables that have changed since the last full export
•
Cumulative—Includes all of the tables that have changed since the last full cumulative or the last
full export
Note
Exporting directly to a Network File System (NFS)-mounted file system is not recommended due to the
unusually large amount of data transfer required. The export dump file may be moved to an
NFS-mounted system after exporting to a local file system.
Tip
Save the export dump file on a file system independent from the one used by the Cisco MGM database.
Cisco Media Gateway Manager 5.0 User Guide
5-8
OL-5461-02
Chapter 5
Maintaining an Efficient Network
How Do I Manage the Database?
5.1.3.3 Performing a Logical Backup (Export)
Complete the following steps to perform a full export of the entire database:
Note
Step 1
The export command is located in the /oraclesw9i/product/9.2/bin directory.
Enter the following commands:
# su - oracle
% echo $ORACLE_SID
Note
Step 2
Make sure that the value of the ORACLE_SID environment variable matches the system identifier (SID)
of the database instance to export. During Cisco MGM installation, the default SID for Cisco MGM 5.0
is MGM5_0. If the SID is changed during Cisco MGM installation, the new SID becomes the default
SID of the system.
Enter the following commands to begin the export:
% exp userid=system/manager full=Y constraints=Y file=export_filename buffer=2800000
log=/oraclesw9i/MGM-exp.log
5.1.3.4 Oracle Import Utility
The Oracle Import utility reads the binary export dump file created by the Export utility and executes
the embedded commands.
Note
The import command is located in the /oraclesw9i/product/9.2/bin directory.
The exported data does not need to be imported to the same database used to generate it. Also, it is not
required that you import all the exported data. Upon a full import, the Oracle Import utility creates all
the database objects, including tablespaces, data files, and users.
5.1.3.5 Restoring with a Logical Backup (Import)
This procedure assumes that the Cisco MGM database has already been created.
Note
Refer to the Cisco Media Gateway Manager 5.0 Installation Guide to create a Cisco MGM database, if
one does not already exist.
Complete the following steps:
Step 1
Insert the Cisco MGM server installation CD.
Cisco Media Gateway Manager 5.0 User Guide
OL-5461-02
5-9
Chapter 5
Maintaining an Efficient Network
How Do I Manage the Database?
Step 2
Enter the following commands to create the mgmanager user:
%sqlplus /nolog << EOF
SVRMGR> connect sys/change_on_install as sysdba
SVRMGR> @/cdrom/cdrom0/mgms/create_user.sql
SVRMGR> exit
>EOF
Step 3
Enter the following command to import the mgmanager schema:
% imp system/manager file=export_filename fromuser=ctmanager touser=ctmanager commit=y
ignore=y buffer=1000000 log=mgm-imp.log
Step 4
Enter the following commands to recompile all invalid database objects:
% cd $ORACLE_HOME/rdbms/admin
% sqlplus internal
SQL> @utlrp.sql
SQL> exit
5.1.3.6 Backing Up the Database
Note
Create a directory named /mgm_backup for storage of the database backup. This directory must be
created before starting the backup.
To back up the database:
Step 1
In the Domain Explorer window, choose Administration > Control Panel.
Step 2
In the Control Panel window, click Database Properties to open the Database Properties pane. See
Figure 5-1.
Step 3
In the Database Properties pane, click the Database Backup tab.
Note
This option is only available if ARCHIVELOG mode was selected during the Cisco MGM
installation process.
Step 4
Enter the sys Oracle user password. The password is change_on_install.
Step 5
Click Start.
Note
The database backup files are stored in /mgm_backup.
The backup log files can be viewed at oraclesw9i/admin/ORACLE_SID/udump/backup_db.log.
Cisco Media Gateway Manager 5.0 User Guide
5-10
OL-5461-02
Chapter 5
Maintaining an Efficient Network
How Do I Manage the Database?
5.1.3.7 Restoring the Database
To restore the database:
Caution
Do not restore the database unless it is corrupted and inaccessible. If your database is inaccessible, your
Cisco MGM server will not be running. The restore will overwrite the existing data files and restore the
database from the backup files.
Step 1
If the Cisco MGM server is running, log into it as the root user and enter the following command to shut
down the server:
mgms-abort
Step 2
Log into the database server.
Step 3
Enter the following commands:
cd /opt/CiscoMGMServer/bin
./restore_db.sh /mgm_backup /tmp
Step 4
Note
The default directory /opt/CiscoMGMServer may have been changed during installation of the
Cisco MGM server.
Note
The restore log file can be viewed at /tmp/restore_db.log
Log into the Cisco MGM server as the root user and enter the following command to start the server:
mgms-start
Step 5
Start your Cisco MGM client(s).
5.1.3.8 Configuring Manual NE Backup Parameters
Use the NE Service Properties pane to set manual NE backup parameters.
Step 1
In the Domain Explorer window, choose Administration > Control Panel.
Step 2
In the Control Panel window, click NE Service to open the NE Service Properties pane. Click the
NE Manual Backup tab. Table 5-4 describes the fields in the NE Manual Backup tab.
Step 3
Click Save. Changes take effect immediately; however, the backup already scheduled for the next
24 hours remains in effect. A backup with the new parameters will occur after the previously scheduled
backup runs.
Cisco Media Gateway Manager 5.0 User Guide
OL-5461-02
5-11
Chapter 5
Maintaining an Efficient Network
How Do I Manage the Database?
Table 5-4
NE Service—NE Manual Backup Tab
Field
Subfield
Description
Select Modify
Mode
—
Allows you to specify whether the manual backup should apply
to a specific NE model or to all applicable NE models.
Configuration
Parameters
Number of
Backup Copies
Allows you to specify the number of backup copies to keep (the
default is 7).
Each time Cisco MGM creates a new backup file it checks the
existing number of backup copies. Cisco MGM deletes files as
needed, beginning with the oldest file, so as not to exceed the
specified number of backup copies to keep.
5.1.3.9 Configuring Automatic NE Backup Parameters
Use the NE Service Properties pane to set automatic NE backup parameters.
Step 1
In the Domain Explorer window, choose Administration > Control Panel.
Step 2
In the Control Panel window, click NE Service to open the NE Service Properties pane. Click the
NE AutoBackup tab. Table 5-5 describes the fields in the NE AutoBackup tab.
Step 3
Click Enable Auto Backup.
Step 4
Click Save. Changes take effect immediately; however, the backup already scheduled for the next
24 hours remains in effect. A backup with the new parameters will occur after the previously scheduled
backup runs.
Table 5-5
NE Service—NE AutoBackup Tab
Field
Subfield
Description
Select Modify
Mode
—
Allows you to specify whether the manual backup should apply
to a specific NE model or to all applicable NE models.
Configuration
Parameters
NE Model
If NE Model is selected under Select Modify Mode, this field
allows you to specify the NE model that will be backed up
manually.
Backup
Frequency
Default value that defines the backup frequency.
Number of
Backup Copies
Allows you to specify the number of backup copies to keep (the
default is 7).
Each time Cisco MGM creates a new backup file it checks the
existing number of backup copies. Cisco MGM deletes files as
needed, beginning with the oldest file, so as not to exceed the
specified number of backup copies to keep.
Backup Time
—
Time when the backup is scheduled to begin.
Cisco Media Gateway Manager 5.0 User Guide
5-12
OL-5461-02
Chapter 5
Maintaining an Efficient Network
How Do I Manage the Database?
5.1.4 Pruning the Database
Cisco MGM provides features to prune the database. Pruning is the removal of information that is
deemed old or less significant, and can include the following data:
•
Fault Management data
•
Performance data
•
Audit Trail data
•
Audit Log data
•
System Log Error Log
•
Self Monitor data
•
Job Monitor data
You can change the pruning settings using the Control Panel. You can select when exactly the pruning
has to occur daily (at non-peak hours like 00:00 hrs), and can also select the pruning period (like prune
all data except data for the last 7 days).
Note
Pruned data is entirely lost from the database.
5.1.4.1 Setting the Time and Date for Automatic Pruning
Choosing to prune the database automatically prunes daily all PM data, FM data, audit log data, audit
trail data, and Error Log data older than the specified retention period. To configure automatic database
pruning:
Step 1
In the Domain Explorer window, choose Administration > Control Panel.
Step 2
In the Control Panel window, click Database Properties to open the Database Properties pane. See
Figure 5-1.
Step 3
In the Database Properties pane, click the Pruning tab. Table 5-2 describes the fields in the Database
Properties Pruning tab. The following information is displayed:
•
PM data
•
FM data
•
Audit Log data
•
Error Log data
•
Audit Trail data
•
Self Monitor data
•
Job Monitor data
Step 4
Click Enable for each field as desired, and set the number of days and time of pruning.
Step 5
After making the selections, click Save. Changes take effect immediately.
Cisco Media Gateway Manager 5.0 User Guide
OL-5461-02
5-13
Chapter 5
Maintaining an Efficient Network
How Do I Manage the Database?
5.1.4.2 Using Pruning Scripts
Running database pruning scripts allows you to prune Cisco MGM data from the Oracle database at any
given time. Pruning scripts allows you to prune the following types of data:
Note
•
Audit log data
•
Audit trail data
•
Error log data
•
Event data
•
All PM data
•
NEs and all related information
•
Server monitoring data
For information about pruning NEs in a high availability environment, refer to the Cisco Media Gateway
Manager 5.0 High Availability Installation Guide.
To use a pruning script:
Step 1
Log in as the root user on the Sun Solaris workstation where the Cisco MGM server is installed.
Step 2
Enter the following command to change to the Cisco MGM server bin directory:
cd /opt/CiscoMGMServer/bin
Note
Step 3
The default directory /opt/CiscoMGMServer may have been changed during installation of the
Cisco MGM server.
Enter the following command to see a list of pruning scripts:
ls -al prune*
Step 4
Select a script and a parameter (based on database pruning) and enter the corresponding command on
the UNIX shell.
For example, to prune Error Log data older than 25 days, enter the following command:
./prune_errlog.sh 25
Table 5-6 describes parameters that can be passed to each script and the tables that are affected.
Table 5-6
Database Pruning
What to Prune
(Script Name)
Tables Affected
Input Parameters
Remarks
Prune audit log data
(prune_auditlog.sh)
transaction_log_table
Number of days
1–31
Removes all audit log entries that
were created before n days.
Prune error log data
(prune_errlog.sh)
error_log_table
Number of days
1–31
Removes all transaction log entries
that were created before n days.
Cisco Media Gateway Manager 5.0 User Guide
5-14
OL-5461-02
Chapter 5
Maintaining an Efficient Network
How Do I Manage the Database?
Table 5-6
Database Pruning (continued)
What to Prune
(Script Name)
Tables Affected
Input Parameters
Remarks
Prune alarm and event data
(prune_fm.sh)
alarm_event_table
Number of days
1–31
Removes all alarm and event entries
that were created before n days.
Prune admin job table
(prune_admin_job_table.sh)
admin_job_table
Number of days
1–31
Removes all admin job entries that
were created before n days.
Prune server monitor table
(prune_server_monitor.sh)
server_monitor_table
Number of days
1–31
Removes all server monitor entries
that were created before n days.
Prune PM data (prune_pm.sh)
all_data tables
Number of days
1–31
Removes all PM entries that were
created before n days.
Remove an NE (prune_ne.sh)
active_alarm_table
NE SYS ID
Removes all information about the
NE from the database. Use this script
with extreme caution.
active_alarm_table
additional_device_info
Caution
Before running the
script, shut down all
Cisco MGM clients
and the Cisco MGM
server. See the
“1.4.1 Starting and
Stopping the
Cisco MGM Server”
section on page 1-6.
admin_job_table
alarm_count_table
alarm_event_table
aps_group_table
audit_log_table
circuit_dest_tbl
circuit_span_tbl
circuit_tbl
circuit_vcg_tbl
domain_table
eqpt_info_table
eqpt_relationship_table
if_cross_connect
if_dwdm_channel_group
if_optical_phy_config_table
interface_aps_info
interface_dwdm_frequency
interface_stack_table
managed_et_tab
map_cust_table
mib2_interface_table
ne_inventory_table
ne_port_status_table
ne_swimage_table
Cisco Media Gateway Manager 5.0 User Guide
OL-5461-02
5-15
Chapter 5
Maintaining an Efficient Network
How Do I Manage the Database?
Table 5-6
Database Pruning (continued)
What to Prune
(Script Name)
Remove an NE (prune_ne.sh)
(continued)
Tables Affected
Input Parameters
Remarks
???_table
NE SYS ID
Removes all information about the
NE from the database. Use this script
with extreme caution.
Number of days
1–31
Removes all server monitoring data.
????_tableoss_alarm_fltr_tid_d
eny_tbl
pm_historical_appointments
proxy_server_table
server_monitor_table
sway_user_port_table
tca_event_table
transaction_log_table
unmanaged_ne_inventory_table
user_map_table
circuit_dest_tbl
circuit_span_tbl
link_table
ne_info_table
Prune server monitoring data
(prune_server_monitor.sh)
server_monitor_table
5.1.5 Using the SQL*PLUS Client to Manage the Database
To access the database and Cisco MGM schema objects, use the SQL*PLUS client that ships with Oracle
products. The SQL*PLUS client is available for Microsoft Windows 2000 or NT 4.0 PCs or
Sun Solaris 8 workstations. Refer to the Oracle documentation to install and run the SQL*PLUS client
on a Windows 2000 or NT 4.0 PC.
On a Sun Solaris workstation, the SQL*PLUS client is installed as part of the Oracle server installation.
The following guidelines are for logging into SQL*PLUS as a Cisco MGM user and managing
Cisco MGM schema objects and data. Refer to the SQL*PLUS User Guide for a complete description.
Step 1
On the Sun Solaris machine running Oracle, log in as the Oracle owner user. Use the username that was
used when installing Oracle9i.
Note
Step 2
To verify the username, enter the id command on the shell.
Verify that the following UNIX environment variables for the Oracle user are set correctly:
•
ORACLE_HOME
•
ORACLE_SID
•
PATH variable has $ORACLE_HOME/bin in the path
•
LD_LIBRARY_PATH
Cisco Media Gateway Manager 5.0 User Guide
5-16
OL-5461-02
Chapter 5
Maintaining an Efficient Network
How Do I Manage the Database?
Step 3
On the command line, enter the following command:
sqlplus ctmanager/mgm123!
The message “Connected to: Oracle9i...” and the SQL> prompt should appear. If not, enter the username
and password again.
Step 4
Enter any SQL command supported by Oracle upon connection to SQL*PLUS. For a list of SQL
commands supported by Oracle, refer to the SQL*PLUS User Guide.
5.1.6 Basic SQL Commands for Cisco MGM Schema Objects
Table 5-7 lists commands that display, update, or modify Cisco MGM schema objects. Run each
command in SQL*PLUS by entering the command at the SQL> prompt.
Table 5-7
SQL Commands for Cisco MGM Schema Objects
SQL Command
Description
select table_name from
user_tables;
Returns a list of all table names owned by the mgmanager
user.
select view_name from user_views;
Returns a list of all views owned by the Cisco MGM user.
describe table_name;
Takes a table_name as a parameter (valid table names are
those returned by the previous two commands) and lists the
name, type, and size of columns in the table.
describe view_name;
Takes a view_name as a parameter (valid view names are
those returned by the previous two commands) and lists the
name, type, and size of columns in the view.
select col1, col2… coln from
table_name;
Takes col1….coln and table_name as parameters and
displays data for all the columns listed. To display data for
all columns, use an asterisk (*) instead of col1, col2, and so
on.
select col1, col2... coln from
table_name where col1 = value1 and
col2 = value2...
Takes col1...coln and table_name as parameters and
displays data for all the columns listed that meet the
condition specified in the “where” clause. For example, the
command:
select nedbaccessid from ne_info_table where
nesysid = 'ANGEL';
returns the value of column nedbaccessid from table
ne_info_table for all rows for which nesysid = ANGEL.
select col1, col2... coln from
view_name where col1 = value1 and
col2 = value2...
Takes col1...coln and view_name as parameters and
displays data for all the columns listed that meet the
condition specified in the “where” clause.
delete table_name;
Takes table_name as a parameter and deletes the entire
contents of the table. To make the change permanent, enter
commit; at the SQL> prompt.
Cisco Media Gateway Manager 5.0 User Guide
OL-5461-02
5-17
Chapter 5
Maintaining an Efficient Network
How Do I Manage the Database?
Step 5
Enter the following command to start the Cisco MGM server:
mgms-start
5.1.7 Enhancing Database Performance
To improve database performance when Cisco MGM clients access Cisco MGM data, tune the Oracle
database as outlined in “Part IV: Optimizing Oracle Instance Performance” in the Oracle9i Tuning
Guide.
5.1.8 Removing an Old Version of the Cisco MGM Database
If necessary, remove all Cisco MGM schema objects from the database. However, all Cisco MGM
information from the database will be deleted. An example of when to remove all Cisco MGM schema
objects from the database is during reinstallation of the Cisco MGM server when data from a previously
installed version is irrelevant.
To remove all Cisco MGM schema objects from the database:
Step 1
Shut down the Cisco MGM server and all Cisco MGM clients.
Step 2
On the Sun Solaris workstation running Oracle, log in as the Oracle owner user. Use the username that
was used when installing Oracle9i.
Note
Step 3
To verify the username, enter the id command on the shell.
Enter the following commands to shut down the Cisco MGM database:
%sqlplus /nolog << EOF
SVRMGR> connect sys/change_on_install as sysdba
SVRMGR> shutdown abort;
SVRMGR> EOF
Step 4
Enter the following commands:
cd /db01
/bin/rm -rf ORACLE_SID
Step 5
Change the directory to the location of the Cisco MGM Data1 tablespace (/db02).
Step 6
At the UNIX shell prompt, enter the following command:
ls -alR mgmdata1
Step 7
Enter the following commands:
/bin/rm -rf ORACLE_SID
/bin/rm -rf mgmdata1/ORACLE_SID*
Step 8
Change the directory to the location of the Cisco MGM Data2 tablespace (/db03).
Step 9
Enter the following command:
/bin/rm -rf mgmdata2/ORACLE_SID*
Cisco Media Gateway Manager 5.0 User Guide
5-18
OL-5461-02
Chapter 5
Maintaining an Efficient Network
How Do I Monitor the Network?
Step 10
Change the directory to the location of the Cisco MGM Index tablespace. This was the third directory
specified during the Cisco MGM server installation. The default location is /db04.
Step 11
Enter the following command:
/bin/rm -rf mgmindex/ORACLE_SID*
5.2 How Do I Monitor the Network?
Note
For specific fault monitoring informationoracle9oracle9, see Chapter 9, “Managing Faults.”
This section contains the following information:
•
5.2.1 Establishing a Telnet Session to a Node
•
5.2.2 Connecting to Nodes Through Secured Shell
•
5.2.3 Monitoring a Network Element
•
5.2.4 Monitoring a Card with Chassis View
•
5.2.5 Monitoring a Line or Port with Chassis View
•
5.2.6 Monitoring Scheduled Tasks
•
5.2.7 Monitoring Service Status
•
5.2.8 Searching for a Network Element
•
5.2.9 Monitoring Cisco MGM Client/Server Configuration Details
•
5.2.10 Monitoring Network Manageability Statistics
•
5.2.11 Managing the VSI Controllers
By managing the graphical representations of the network nodes and device objects with Chassis View,
you can:
•
Provide status updates for nodes, cards, and lines
•
Display the front or rear view of the node
•
Perform provisioning tasks, such as, shelf, card, and line levels by quickly navigating to the
Configuration Center
•
Display the LED status for each card reflecting both standby and active states
5.2.1 Establishing a Telnet Session to a Node
To establish a telnet session to a node:
Step 1
In the Chassis View, Diagnostic Center, Configuration Center or Statistics Report tree, select the source
node from the Hierarchy pane and choose Tools > Administration > Telnet. Or, right-click the source
node and choose Administration > Telnet.
Cisco Media Gateway Manager 5.0 User Guide
OL-5461-02
5-19
Chapter 5
Maintaining an Efficient Network
How Do I Monitor the Network?
Step 2
When the login prompt appears in the Telnet window, you must:
a.
Enter the Service Level name.
b.
Enter the Service Level password.
You have successfully established a telnet session to a node.
5.2.2 Connecting to Nodes Through Secured Shell
When you connect as an Operator to an MGX node through Cisco MGM, or when Cisco MGM connects
to MGX, secured shell (SSH) enhances the security.
Note
To use SSH through the Cisco MGM client, the SSH secured shell must be installed and the path to the
executable must be set in the environmental variable PATH. For more information, refer to the SSH
Communications Security Corporation at the following URL: http://www.ssh.com
To connect to a node using SSH:
Step 1
Step 2
Step 3
In the Configuration Center, to choose the node in the Hierarchy pane, you can:
a.
Choose the node.
b.
Enter the node name or IP address into the text box.
To use SSH, you can:
a.
Right-click the source node and choose Administration > SSH.
b.
Select the source node and choose Tools > Administration > SSH.
Enter the default switch username cisco into the text box.
Note
If you decide not to use ssh by choosing telnet, you do not need to enter a username.
Step 4
Click OK to open the SSH secure shell window.
Step 5
At the prompt, enter the password to log on the node through SSH.
5.2.3 Monitoring a Network Element
You can monitor the status of the NEs through Chassis View. Alarm Browser also provides up-to-date
information that can be used for managing faults. See Chapter 9, “Managing Faults.”
To monitor an NE:
Step 1
In the Chassis View tree, to choose the NE, you can:
a.
Choose the NE.
b.
Enter the node name or IP address into the text box.
Cisco Media Gateway Manager 5.0 User Guide
5-20
OL-5461-02
Chapter 5
Maintaining an Efficient Network
How Do I Monitor the Network?
Step 2
Press Enter.
The chosen NE is displayed along with the current status for each card.
Step 3
Click the Front View tab or Rear View tab of the NE. The default is the front view.
Step 4
Check the status of the NE from Inspector View.
5.2.4 Monitoring a Card with Chassis View
You can select a card to monitor when the objects are associated with a particular card. The following
settings are monitored using the objects:
•
SONET interface settings
•
Interface partition settings
•
Revision numbers of hardware, software, and firmware installed on the card
•
Lines, interfaces, and ports on the card
To monitor a card:
Step 1
In Chassis View, there are two ways to choose the card:
•
Choose the card from the Hierarchy pane, or
•
Click the slot that you want to display from the node view. A yellow border highlights the chosen
slot in the node view.
Step 2
Click the Front View tab or Rear View tab of the node. The default is the front view. See Figure 5-2.
Step 3
Check the status of the card from Inspector View.
Step 4
Right-click the slot and choose the corresponding application. If you want to configure the settings for
the card, choose Configuration Center.
The Configuration Center is launched with a view of the network elements.
Cisco Media Gateway Manager 5.0 User Guide
OL-5461-02
5-21
Chapter 5
Maintaining an Efficient Network
How Do I Monitor the Network?
Figure 5-2
Chassis View - Front View
5.2.5 Monitoring a Line or Port with Chassis View
You can select a port if managed objects are associated with a particular port, line, or interface.
To monitor a line or port:
Step 1
Step 2
In Chassis View, there are two ways to choose the line or port:
•
Choose the line or port from the Hierarchy pane, or
•
Click the line or port that you want to display from the node view. A yellow border highlights the
chosen line or port in the node view.
Click the Front View tab or Rear View tab of the node. The default is the front view.
Check the status of the line or port from Inspector View.
Step 3
Right-click the line or port and choose the corresponding application. If you want configure the settings
for the line or port, choose Configuration Center.
The Configuration Center is launched with a view of the network elements.
Cisco Media Gateway Manager 5.0 User Guide
5-22
OL-5461-02
Chapter 5
Maintaining an Efficient Network
How Do I Monitor the Network?
5.2.6 Monitoring Scheduled Tasks
The Job Monitor table provides information about scheduled administrative tasks—memory backup,
memory restore, and software download. For example, you can see the system username of the person
who entered a specific task, the time that the task began, and the time that the task ended.
Note
A job consists of multiple tasks.
Each entry consists of the following:
•
Task Owner—User ID used during login.
•
NE ID—NE ID on which the operation is executed.
•
Task Creation Time—Server time when the request was made.
After these requests are executed, the job’s status is updated accordingly in the Job Monitor table.
5.2.6.1 Viewing the Job Monitor Table
To view the Job Monitor table:
Step 1
Choose Administration > Job Monitor in the Domain Explorer window. The Job Monitor table appears
and displays the fields described in Table 5-8.
Note
Some fields in the Job Monitor Table apply only to certain tasks, NEs, or NE versions.
Cisco Media Gateway Manager 5.0 User Guide
OL-5461-02
5-23
Chapter 5
Maintaining an Efficient Network
How Do I Monitor the Network?
Table 5-8
Job Monitor Table Descriptions
Column Name
Description
Job ID
ID number corresponding to the selected job.
Task ID
ID number corresponding to the task. If a job includes more than one NE, each
NE has a separate task ID for the job.
Task Type
Indicates the type of task:
•
Automatic memory backup
•
Memory backup
•
Memory restore
•
Software download
Task Owner
System username of the person who entered the task.
NE ID
Name of the NE on which the task is scheduled to run.
Task Status
Current status of the task: Queued, Running, Canceled, Failed, Succeeded, or
Waiting:
•
Queued—The task is scheduled but has not yet begun.
•
Running—The task is in progress.
•
Canceled—The task has been canceled.
•
Succeeded—The task succeeded.
•
Failed—The task failed.
•
Waiting: The node manager must be initialized before a task can begin.
If the node manager is not initialized, the status of the task is Waiting.
After the node manager becomes initialized, the task status changes to
Queued.
Task Creation Time
Date and time when the task was entered into the system.
Task Scheduled Time
Date and time when the task is scheduled to begin.
Task Start Time
Date and time when the task began.
Task End Time
Date and time when the task ended.
Display Information
Displays information related to the Task Type column.
User Comments
Displays any user-entered comments relating to the task.
Additional
Information
Displays any additional information.
5.2.6.2 Viewing the Job Monitor Filter Dialog Box
Use the Job Monitor Filter dialog box to filter job data according to criteria that you select and to display
the results in the Job Monitor Table. Table 5-9 provides descriptions:
Cisco Media Gateway Manager 5.0 User Guide
5-24
OL-5461-02
Chapter 5
Maintaining an Efficient Network
How Do I Monitor the Network?
Table 5-9
Job Monitor Filter Dialog Box Descriptions
Tab
Description
Creation Time
(time zone)
Allows you to filter job monitor data for a specified time period, ranging from the
past hour to the past 180 days. Additionally, you can click the User Specified radio
button to specify an exact filter starting and ending time by month, day, year, and
hour. The time zone can be Greenwich mean time (GMT), a user-defined offset
from GMT, or local time, depending on what is specified in the User Preferences
dialog box. Click No Time Specified if you want to filter events and the time
period is not important.
NE ID
Allows you to select network elements (NEs) back and forth between the list of
available NE IDs and selected NE IDs. The filter runs on the NEs in the Selected
NE ID list.
Task Owner
Allows you to move owners back and forth between the list of available owners and
selected owners. The filter runs on the owners in the Selected Task Owner list.
Job/Task ID
Allows you to filter jobs by job and task IDs. Jobs consist of multiple tasks. For
example, if you perform a memory backup for multiple NEs, the backup operation
is a job, and each NE is a task.
Task Type
•
If you specify a start and end ID range in the job ID field but leave the task ID
field blank, the filter runs on the job ID range.
•
If you specify a start and end ID range in the task ID field but leave the job ID
field blank, the filter runs on the task ID range.
•
If you specify a start and end ID range in both the job ID and task ID fields,
the filter first applies the values in the job ID field, then narrows the filter
according to the values in the task ID field. For example, if you specify that
job ID Start = 1, job ID End = 3, task ID Start = 1, and task ID End = 2, the
returned value is all entries with a job ID of 1, 2 or 3 and a task ID of 1 or 2.
Allows you to move task types back and forth between the list of available task
types and selected task types. Task types include:
•
Automatic memory backup
•
Memory backup
•
Memory restore
•
Software download
The filter runs on the tasks in the Selected Task Type list.
Task Status
Allows you to filter tasks by status:
•
Queued—The task is scheduled but has not yet begun.
•
Running—The task is in progress.
•
Canceled—The task has been canceled.
•
Failed—The task failed.
•
Succeeded—The task succeeded.
•
Waiting—The node manager must be initialized before a task can begin. If the
node manager is not initialized, the status of the task is Waiting. After the node
manager becomes initialized, the task status changes to Queued.
Cisco Media Gateway Manager 5.0 User Guide
OL-5461-02
5-25
Chapter 5
Maintaining an Efficient Network
How Do I Monitor the Network?
5.2.6.3 Canceling a Scheduled Job or Task
To cancel a scheduled job or task from the Job Monitor table list:
Step 1
In the Domain Explorer window, choose Administration > Job Monitor.
Step 2
Select a task to cancel; then, click the Cancel Task or Cancel Job tool (or choose Edit > Cancel Task,
or Edit > Cancel Job).
Note
Step 3
Cancel is enabled only for jobs and tasks with a Queued status. When a job contains more than
one task in a Queued status, choosing Cancel Job cancels all tasks with the same job ID.
Click OK in the confirmation dialog box.
5.2.6.4 Job Monitor Notes
The Job Monitor Note dialog box allows you to view and add notes to jobs displayed in the Job Monitor
window. If a job has a note, a Job Monitor Note tool appears under the User Comments column. To view,
add, or delete a note, select a job and click the tool. Comments are visible to all users.
The following table provides descriptions:
Table 5-10
Field Descriptions for the Job Monitor Note Dialog Box
Field
Description
Note
Provides space for you to type your comments about the selected job. To add
comments to the previous comments, click the Append radio button. To overwrite the
previous comments, click Replace. To delete the comments, click Delete.
History
Displays comments entered by previous users.
To edit a Job Monitor user note:
Step 1
In the Domain Explorer window, choose Administration > Job Monitor.
Step 2
Select a task and choose Edit > User Note.
You can export the information in the Job Monitor Table to a file (see 5.7.1 Exporting Data to a Text
File), or you can generate an HTML file (see 5.7.2 Generating an HTML Report).
5.2.7 Monitoring Service Status
The Service Monitor Table allows you to view the status of the services that are running on the
Cisco MGM server. Table 5-11 provides descriptions:
Cisco Media Gateway Manager 5.0 User Guide
5-26
OL-5461-02
Chapter 5
Maintaining an Efficient Network
How Do I Monitor the Network?
Table 5-11
Note
Column Name Descriptions for the Service Monitor Table
Column Name
Description
Service Name
Displays the name of the selected service.
Logged In At
Displays the last time the user logged in.
IP Address
Displays the IP address of the selected service.
Session ID
Displays the unique session ID.
The showmgm command is an alternate way of viewing processes or services that are running in the
Cisco MGM server.
You can export the information in the Service Monitor Table to a file (see 5.7.1 Exporting Data to a Text
File), or you can generate an HTML file (see 5.7.2 Generating an HTML Report).
5.2.8 Searching for a Network Element
Cisco MGM allows you to search for a specific NE in the network. The search always starts from the
root node and returns to the root node after reaching the last node.
Step 1
In the Domain Explorer, choose Edit > Find.
Step 2
In the Find dialog box, from the Object Type drop-down list, select Network Element/Group.
Step 3
In the Object Properties section, search for an NE using one of the following methods:
•
Name—Click this radio button and enter the name of the NE you are searching for.
•
IP Address—Click this radio button and enter the IP address of the NE you are searching for.
•
Description—Click this radio button and enter a description of the NE that you are searching for.
Step 4
Check the Ignore Case check box to make the search noncase-sensitive.
Step 5
Click OK. In the Domain Explorer, the NE is highlighted in the tree section and the NE properties are
displayed in the properties section.
Note
In the Domain Explorer, you can also choose Edit > Find Next to find the next object that matches the
initial Find specification.
5.2.9 Monitoring Cisco MGM Client/Server Configuration Details
The Cisco MGM Properties pane displays information about the Cisco MGM server and client
configuration. In the Control Panel, choose Cisco MGM from the Hierarchy pane to display the
Cisco MGM Properties pane. This pane has two tabs; Server Configuration and Client Configuration.
Table 5-12 provides descriptions:
Cisco Media Gateway Manager 5.0 User Guide
OL-5461-02
5-27
Chapter 5
Maintaining an Efficient Network
How Do I Monitor the Network?
Table 5-12
Cisco MGM Properties Descriptions
Tab
Field
Description
Server
Configuration
Server Name
Displays the workstation name where the Cisco MGM server
application resides.
IP Address
Displays the IP address of the Cisco MGM server.
Server Port
Displays TCP port number of the Cisco MGM server.
Software Version Shows the Cisco MGM software version that is running.
Client
Configuration
Note
Host Name
Displays the workstation name where the Cisco MGM client
application resides.
IP Address
Displays the IP address of the Cisco MGM client.
Version
Shows the Cisco MGM software version that is running.
Username
Displays the name that was used to log into the Cisco MGM
client.
The Server and Client configuration details cannot be edited.
5.2.10 Monitoring Network Manageability Statistics
These tasks are used in the Diagnostic Center to monitor statistics events for network manageability:
•
5.2.10.1 Running a Diagnostic Check at the Network Level
•
5.2.10.2 Running a Diagnostic Check at the Node Level
•
5.2.10.3 Statistics Entries for Network Manageability
•
5.2.10.4 Sending a Trouble Ticket
By monitoring network manageability, you can:
•
Collect element management health-related statistics.
•
Browse over detailed information about past element management health statistics.
•
Provide statistics about the success rates, failure rates, and throughput of Cisco MGM to network
interfacing protocols, such as FTP, and SNMP.
•
Report the number of successes and failures that happened in the last hour.
•
Retrieve statistics for a given time period.
•
Identify problems with Cisco MGM and the ability to effectively manage the network.
•
Identify the root causes for problems that can occur due to general network problems.
•
Display information about all the nodes at the network level.
•
Display information at the node level.
Cisco Media Gateway Manager 5.0 User Guide
5-28
OL-5461-02
Chapter 5
Maintaining an Efficient Network
How Do I Monitor the Network?
5.2.10.1 Running a Diagnostic Check at the Network Level
In the Diagnostic Center, you can verify that all the nodes in the network are being managed correctly
by Cisco MGM.
To run a diagnostic check at the network level:
Step 1
In the Diagnostic Center, double-click or drag and drop the network from the Hierarchy pane to the right
hand pane, to display the diagnostics at the network level.
Step 2
Click the Manageability tab. See Figure 5-3.
Step 3
In the From Period area:
a.
Choose the date to start from the Date drop-down arrow.
b.
Choose the time from the Time drop-down arrow.
The default time is 12:00 a.m (0000).
Step 4
In the To Period area:
a.
Choose the date to end from the Date drop-down arrow.
The maximum number of days to keep data is 30 days. The minimum number of days is 1.
b.
Choose the time from the Time drop-down arrow.
The default time is 12:00 a.m (0000).
Step 5
Click Refresh to refresh the health data for the network.
Step 6
Verify the statistics values for each node ID and node name from the Protocols Statistics area.
For parameter definitions, see Table 5-13.
Step 7
Verify the manageability data results for the node from the Manageability Check Results area.
For parameter definitions, see Table 5-14.
Step 8
Click Refresh to retrieve all check result entries in the manageability table for every node in the
network.
Cisco Media Gateway Manager 5.0 User Guide
OL-5461-02
5-29
Chapter 5
Maintaining an Efficient Network
How Do I Monitor the Network?
Figure 5-3
Diagnostic Center—Manageability Tab
5.2.10.2 Running a Diagnostic Check at the Node Level
In the Diagnostic Center, you can verify that selected nodes are being managed correctly by
Cisco MGM.
To run a diagnostic check at the node level:
Step 1
In the Diagnostic Center, double-click or drag and drop the node from the Hierarchy pane to the right
hand pane, to display the diagnostics at the node level.
Step 2
Click the Manageability tab. See Figure 5-3.
Step 3
In the From Period area:
a.
Choose the date to start from the Date drop-down arrow.
b.
Choose the time from the Time drop-down arrow.
The default time is 12:00 a.m (0000).
Step 4
In the To Period area:
a.
Choose the date to end from the Date drop-down arrow.
The maximum number of days to keep data is 30 days. The minimum number of days is 1.
b.
Choose the time from the Time drop-down arrow.
The default time is 12:00 a.m (0000).
Step 5
Click Refresh to retrieve all statistics entries for the node.
Cisco Media Gateway Manager 5.0 User Guide
5-30
OL-5461-02
Chapter 5
Maintaining an Efficient Network
How Do I Monitor the Network?
For parameter definitions, see Table 5-13.
Step 6
In the Node Login Information area:
a.
Enter the user name in the User Id field.
b.
Enter password in the Password field.
Step 7
Click Check Manageability to run a diagnostic check for the node.
Step 8
Verify the check results from the Manageability Check Results area.
For parameter definitions, see Table 5-14.
5.2.10.3 Statistics Entries for Network Manageability
The statistics entries that are used for network manageability are described in Table 5-13 and Table 5-14.
Table 5-13 lists the parameters for the protocol statistics that are health-related.
Table 5-13
Health Related Parameters
Name
Description
Node Id
Identifies the ID for the configured node.
Node Name
Identifies the configured name of the node.
Protocol
Specifies the protocol for either FTP or SNMP.
Average Throughput
Measures the average FTP throughput performance in bytes per second for the
switch during the specified time period. The average SNMP throughput is
measured in seconds per request for the switch during the specified time period.
Min Throughput
Measures the minimum throughput performance for FTP, and SNMP on a per
node basis. The minimum throughput is calculated for FTP, and SNMP
operations.
Max Throughput
Measures the maximum throughput performance for FTP, and SNMP on a per
node basis. The maximum throughput is calculated for FTP, and SNMP
operations. The value is the maximum rate achieved in bytes per second for any
one FTP request to complete.
Success
Specifies the number of successful FTP, or SNMP operations for the node
during the specifies time period.
Session Failure
Specifies the number of network failures for the session.
Transfer Failure
Specifies the number of network failures for the transfer.
Retry Exceeded
Provides information about the number of times for retries that exceeded the
maximum set limit.
File Size Mismatch
Specifies that the file transfer is considered a success if the local file size
matches with the remote file size. For a mismatch, an error is reported.
Throttle Error
Determines the maximum limit for the number of pending Get, Set, and
GetNext operations reached for the switch.
Session Timeout
Specifies the session timeout period where the FTP request remains in the
request queue.
Cisco Media Gateway Manager 5.0 User Guide
OL-5461-02
5-31
Chapter 5
Maintaining an Efficient Network
How Do I Monitor the Network?
Table 5-13
Health Related Parameters (continued)
Name
Description
Transfer Timeout
Specifies the transfer timeout is the estimated period when the transfer is
completed. The transfer is done by FTP from the previous transfer of the
throughput data for a node.
If the file transfer fails to complete within the period, transfer is aborted and an
error is reported.
Queue Full
Accommodates a finite number of concurrent TFTP requests and if the queue
is fully any new request can trigger a report error.
Generic Error
Displays any generic error returned by the node.
Table 5-14 lists the check results parameters for network manageability.
Table 5-14
Network Manageability Parameters
Name
Description
Node Id
Identifies the ID for the configured node.
Node Name
Identifies the configured name of the node.
IP Reachability
Specifies the results of the IP reachability test.
FTP Configuration
Specifies the results of the FTP reachability test.
Community String Configuration
Specifies the results of the SNMP community string.
Trap IP Configuration
Specifies the results of the trap IP configuration test.
Trap Manager Configuration
Verifies if the Cisco MGM workstation is registered as a trap
manager.
Time Stamp
Specifies the time stamp when the manageability check was
requested.
5.2.10.4 Sending a Trouble Ticket
The Diagnostic Center collects the output and results of all the diagnostic operations and logs them into
the History Panel. You can send a trouble ticket that includes all the data from the History Panel.
To send a trouble ticket:
Step 1
In the Diagnostic Center, drag and drop the network or node from the Hierarchy pane to the right hand
pane, to display the diagnostics at either the network level or the node level.
Step 2
Click the Manageability tab to display the Manageability Configuration window at the node level.
Step 3
Click Trouble Ticket to display the Trouble Ticket window.
Automatically, the entire content from the History Panel is extracted into the Trouble Ticket window.
Step 4
Enter the email address that you want to send the trouble ticket to in the To field.
Step 5
Enter the title of the trouble ticket in the Subject field.
Step 6
Click Attach to include an Element or Connection file with the trouble ticket, if required.
Cisco Media Gateway Manager 5.0 User Guide
5-32
OL-5461-02
Chapter 5
Maintaining an Efficient Network
How Do I Monitor the Network?
Step 7
Click Send to send the trouble ticket to recipient.
Step 8
Click Save to save the trouble ticket in the directory.
5.2.11 Managing the VSI Controllers
These tasks are used to work with VSI controllers:
•
5.2.11.1 Creating a VSI Controller
•
5.2.11.2 Displaying a VSI Controller
•
5.2.11.3 Deleting a VSI Controller
5.2.11.1 Creating a VSI Controller
A VSI controller must be added when a new node is added. There is one controller per node.
To create a VSI controller, complete the following procedure:
Step 1
In the Domain Explorer, right-click the node from the Hierarchy pane and choose Configuration >
MGX8880/8850 MG > Configuration Center.
Step 2
Click the Elements tab to display the Configuration Window for Elements.
Step 3
Click the Controllers tab to display the Controllers Table.
Step 4
Click Create to display the Controllers Create window.
Step 5
Enter the ID for the VSI controller in the Controller ID field.
Step 6
Choose one of the following controller options from the Controller Type drop-down arrow:
•
par—Portable Auto Route (PAR). The par option is a VSI Master controller that implements a
Cisco proprietary protocol for network routing and topology in a network, which contains only
Cisco switches.
•
pnni—Private Network-to-Network Interface (PNNI) controller. The PNNI protocol is used
between private ATM Switches and between groups of ATM switches. PNNI is defined for
distributing topology information between switches and clusters of switches.
•
lsc—Label Switch Controller (LSC). The LSC implements the MPLS protocol. The LSC is a router
which is capable of controlling the operation of a separate ATM switch, so that both of them
function as a single ATM-LSR (ATM Label Switch Router).
Step 7
Enter the name for the controller in the Controller Name field.
Step 8
Choose one of the following shelf location options from the Controller Shelf Location drop-down
arrow:
•
internal—specifies that the controller resides on the same shelf as the switch.
•
external—specifies that the controller resides on the external platform. The controller shelf is
connected to the switch by an ATM link.
Step 9
Enter the slot number that the VSI controller is plugged into in the Controller Location field.
Step 10
Click Apply to create a VSI controller.
Cisco Media Gateway Manager 5.0 User Guide
OL-5461-02
5-33
Chapter 5
Maintaining an Efficient Network
How Do I Modify the Network?
5.2.11.2 Displaying a VSI Controller
To display a VSI controller, complete the following procedure:
Step 1
In the Domain Explorer, right-click the node from the Hierarchy pane and choose Configuration >
MGX8880/8850 MG > Configuration Center.
Step 2
Click the Elements tab to display the Configuration Window for Elements.
Step 3
Click the Controllers tab to display the Controllers Table.
Step 4
Select the controller entry from the Controllers Table.
Step 5
Click Details to display the Controllers Configuration window.
5.2.11.3 Deleting a VSI Controller
To delete a VSI controller, complete the following procedure:
Step 1
In the Domain Explorer, right-click the node from the Hierarchy pane and choose Configuration >
MGX8880/8850 MG > Configuration Center.
Step 2
Click the Elements tab to display the Configuration Window for Elements.
Step 3
Click the Controllers tab to display the Controllers Table.
Step 4
Select the controller entry from the Controllers Table.
Step 5
Click Delete to delete the controller entry.
5.3 How Do I Modify the Network?
This section contains the following information:
•
5.3.1 Changing the Operational State of an NE
•
5.3.2 Backing Up and Restoring Memory
•
5.3.3 Changing IP Addresses for NEs
•
5.3.4 Viewing and Modifying the Server Configuration
•
5.3.5 Setting Up Session Recovery
•
5.3.6 Changing the Server IP Address when Cisco MGM and Oracle Are on the Same Server
•
5.3.7 Viewing and Modifying Server Configuration Information
•
5.3.8 Restoring Server Configuration Files
•
5.3.9 Initializing the Node Resync Process
•
5.3.10 Configuring Application-Specific Parameters
•
5.3.11 Using UNIX-Level Scripts
Cisco Media Gateway Manager 5.0 User Guide
5-34
OL-5461-02
Chapter 5
Maintaining an Efficient Network
How Do I Modify the Network?
5.3.1 Changing the Operational State of an NE
You need to change the operational state of a NE to carry out certain tasks. For example, the operational
state field of an NE must be changed to Out of Service before the NE can be deleted.
To change the operational state of an NE:
Step 1
In the Domain Explorer tree, select the NE that will be changed. The Network Element Properties pane
appears.
Step 2
In the Operational State field, choose one of the following operational states:
Tip
•
In Service—The NE is deployed and requires monitoring. Cisco MGM collects polling, fault
management (FM), configuration management (CM), and PM data from in-service NEs and stores
the data in the database.
•
Out of Service—The NE has been marked Out of Service by a network administrator and does not
require monitoring. The Cisco MGM database records the last known state of the NE when it was
In Service.
•
Under Maintenance—The NE is temporarily Under Maintenance but requires monitoring. This state
is the same as In Service except that Cisco MGM does not report alarms or events for Under
Maintenance NEs.
You can also right-click an NE in the Domain Explorer tree and choose Mark Under Maintenance,
Mark In Service, or Mark Out of Service from the shortcut menu.
Two additional operational states cannot be chosen by the user. These operational states are changed by
Cisco MGM based on the initialization tasks that are completed:
Step 3
Timesaver
Note
•
In Service–Initializing—The NE is marked as In Service–Initializing when Cisco MGM reaches
connectivity of the NE (Communication State is marked as Available) and the discovery process
starts. The initialization process is completed when fault and inventory have been synchronized. The
operational state changes from In Service–Initializing to In Service–Synch Configuration.
•
In Service–Synch Configuration—The NE is marked as In Service–Synch Configuration when
Cisco MGM uploads a configuration for that NE. You can change the operational state of an NE
from In Service–Synch Configuration to Out of Service.
Click Save.
If an NE is brought down, mark it as Out of Service to prevent unnecessary polling traffic on the data
communications network (DCN).
When you mark an NE as Out of Service and then mark it as In Service, the Cisco MGM alarm time
stamp in the Alarm Browser window is resynchronized with the time stamp when the NE is put back In
Service.
Cisco Media Gateway Manager 5.0 User Guide
OL-5461-02
5-35
Chapter 5
Maintaining an Efficient Network
How Do I Modify the Network?
5.3.2 Backing Up and Restoring Memory
Cisco MGM allows you to backup and restore memory for selected NEs. For example, if you wanted to
save your settings for a particular NE, you can backup the memory for just that NE.
Cisco MGM backs up configuration and provisioning information residing in the flash memory of an
NE.Cisco MGM provides three methods by which to perform the configuration backup operation:
•
Manually on demand
•
Scheduling (one time only)
•
Periodic, automatic scheduling based on a configurable time set by the operator
The operator can specify the number of backup configurations that should be kept at any given time. The
default number is seven.
Note
The maximum number of copies that can be saved is fundamentally dictated by the amount of disk space
available.
The oldest configuration that was backed up is replaced by the current backup depending on the
(configured) number of copies the user wishes to retain at any given time. The memory restore function
in Cisco MGM can then be used to rollback to any one of the previous configurations that was saved.
Once the configuration is downloaded, the operator will need to issue CLI commands to activate the new
configuration.
Note
This restore operation would be service affecting as the node will be re-booted to reflect the restored
configuration.
Follow the procedures described in these sections to backup and restore memory (configuration data) on
NEs within the following products:
•
MGX8880
•
MGX8850
5.3.2.1 Backing Up Memory
Note
Step 1
Table 5-15 describes the fields in the Memory Backup dialog box.
In the Domain Explorer tree, select a management domain or group that contains NEs that are assigned
an In Service or Under Maintenance operational state. Alternatively, select an NE that is assigned an In
Service or Under Maintenance state.
Note
Memory backup is not allowed for out-of-service NEs.
Step 2
Choose Administration > Memory Backup.
Step 3
The Memory Backup dialog box appears. Enter the following information (see Table 5-15 for details):
•
NE Model
Cisco Media Gateway Manager 5.0 User Guide
5-36
OL-5461-02
Chapter 5
Maintaining an Efficient Network
How Do I Modify the Network?
•
Available NEs
•
(Optional) Job Comments
•
Tag Name
•
Time (time zone)
The time zone can be Greenwich mean time (GMT), a user-defined offset from GMT, or local
time, depending on what is specified in the User Preferences dialog box.
Note
Click Finish to initiate the memory backup procedure.
The configuration file is copied to the
/opt/CiscoMGMServer/admin/nodename/MGX-timestamp-bkp.cfg file.
Note
If User Specified is chosen and hello is entered for the tag name, the filename is
MGX-hello-YYYYMMDDHHMM-backup.cfg where YYYYMMDDHHMM is the backup
date, consisting of:
YYYY—Four-digit year
MM—Two-digit month
DD—Two-digit day
HH—Two-digit hour (in 24-hour format)
MM—Two-digit minute
The length of a filename including a user specified name should not exceed 40 characters.
If a long filename is chosen, it will be truncated to 15 characters.
After scheduling the backup, look at the Job Monitor Table (Administration > Job Monitor) to see the
job status. If the job fails, the Additional Information field in the Job Monitor Table provides extra
information.
If a memory backup job fails, it raises an EMS alarm. All prior memory backup failure EMS alarms on
an NE are cleared under the following conditions:
•
After a successful memory backup operation on the NE
•
When the operational state of the NE changes to Out of Service
Table 5-15
Memory Backup Dialog Box Descriptions
Field
Description
NE Model
Select the NE type that you want to back up. The type you select determines the NEs
that are displayed in the Network Elements area.
Available NEs
Use the Add and Remove buttons to move the NEs that you want to back up to the
Selected NEs list, or to remove NEs from the list.
Job Comments
(Optional)
Enter comments about the backup, if needed.
Cisco Media Gateway Manager 5.0 User Guide
OL-5461-02
5-37
Chapter 5
Maintaining an Efficient Network
How Do I Modify the Network?
Table 5-15
Memory Backup Dialog Box Descriptions (continued)
Field
Description
Tag Name
Add a tag to the system-generated filename. If you select System Default, no tag
name is added. If you select User Specified, you can enter a tag name.
The length of a filename including a user specified name should not exceed 40
characters. If a long filename is chosen, it will be truncated to 15 characters.
Time (time zone) Set a time for the backup. Click Now to begin backup immediately, or click At Time
and specify when to begin backup, in 5-minute increments.
Note
The time zone can be Greenwich mean time (GMT), a user-defined offset
from GMT, or local time, depending on what is specified in the User
Preferences dialog box.
5.3.2.2 Restoring Memory
Note
Table 5-16 describes the fields in the Memory Restore dialog box.
Use the Memory Restore dialog box to restore provisioning and configuration information stored in the
flash memory of an NE. (This information is backed up by using the Memory Backup dialog box.)
Step 1
In the Domain Explorer tree, select an MGX8880, or an MGX 8850 NE that is assigned an In Service or
Under Maintenance operational state.
Note
Run the Memory Restore procedure one NE at a time.
Step 2
With the NE selected, choose Administration > Memory Restore.
Step 3
The Memory Restore dialog box appears. Enter the following information (see Table 5-16 for more
details):
Step 4
•
NE Model
•
Network Elements (select only one)
•
(Optional) Job Comments
•
Source
•
Time (time zone)
Click Finish to initiate the memory restore procedure.
To view the results of the memory restore operation, open the Job Monitor Table. For information about
the Job Monitor Table, see section 5.2.6 Monitoring Scheduled Tasks, page 5-23.
Cisco Media Gateway Manager 5.0 User Guide
5-38
OL-5461-02
Chapter 5
Maintaining an Efficient Network
How Do I Modify the Network?
Table 5-16
Memory Restore Dialog Box Descriptions
Field
Description
NE Model
Select the NE model that you want to restore. The model you select determines
the NEs that are displayed in the Network Elements field.
Network Elements
Use the Add and Remove buttons to move the NE that you want to restore to
the Selected NE list. You can run the Memory Restore procedure for only one
NE at a time.
Job Comments
(Optional)
Enter comments about the restore procedure, if needed.
Source
Specify the location of the backup file that you want to use to restore the NE:
•
Click Local to browse a local client directory for the backup file.
•
Click Server to restore the file from the Cisco MGM server. The files
shown are in the directory /opt/CiscoMGMServer/admin/nodename.
Note
•
Time (time zone)
The Server radio button is not active unless a file exists in that directory.
Remote option is grayed out
Set a time for memory restore. Click Now to begin memory restore
immediately, or click At Time and specify when to begin memory restore, in
5-minute increments.
Note
The time zone can be Greenwich mean time (GMT), a user-defined
offset from GMT, or local time, depending on what is specified in the
User Preferences dialog box.
5.3.3 Changing IP Addresses for NEs
In Cisco MGM, the IP address field for an NE is read-only, and cannot be modified. If a user changes
the IP address on the MGX switch, Cisco MGM receives traps and updates the IP address on the clients
and in the database.
5.3.4 Viewing and Modifying the Server Configuration
The Control Panel window shows the Cisco MGM client and server configuration and allows
modification of the configuration. Certain modifications take effect immediately and change the active
server configuration. Other changes take effect when the server is restarted.
The different property sheets within the Control Panel window allow you to start or stop performance
monitoring services and NE services by NE type. Also use the Control Panel to start or stop
Cisco MGM GateWay/CORBA services. Only Cisco MGM users who are logged in as SuperUser or
SysAdmin can access the Control Panel. In the Domain Explorer, choose Administration > Control
Panel to view the Control Panel.
The following are listed in the Control Panel:
•
UI Properties—Configure application-specific parameters.
•
Security Properties—Configure Cisco MGM security parameters and specify usernames and
passwords for all the NEs.
Cisco Media Gateway Manager 5.0 User Guide
OL-5461-02
5-39
Chapter 5
Maintaining an Efficient Network
How Do I Modify the Network?
Note
•
Recovery Properties—View a list of servers that clients will log into if access to the primary server
is disrupted and view a list of critical services that the server monitors.
•
Database Properties—View database configuration, pruning time periods, and information that the
server uses to log into the Oracle database.
•
Alarm Configuration Properties—View threshold and non-threshold parameters.
•
Error Log Properties—View configuration parameters about error information that the server
records.
•
NE Service—Select an NE type and view and update server configuration, which includes port
information, timing parameters, maximum number of administrative tasks, and NE backup
parameters.
•
PM Service—Select an NE type and view and modify PM Configuration settings and PM Collection
Parameters for the particular NE.
•
GateWay/CORBA Service—Stop, start, or configure parameters for the GateWay/CORBA service.
The NE Service and GateWay/CORBA services can take up to 60 seconds to initialize after the GUI
status has changed to indicate that the service is up. The status is an indication of the successful initiation
of the service startup, not successful initialization.
5.3.5 Setting Up Session Recovery
Administrators can list the servers that clients will log into if access to the primary server is disrupted.
To set up session recovery:
Step 1
In the Domain Explorer window, choose Administration > Control Panel.
Step 2
Click Recovery Properties to open the Recovery Properties sheet.
Step 3
Click the Session Recovery tab. Table 5-17 describes the fields within the Session Recovery tab.
Step 4
In the Session Recovery area, specify the following:
•
Wait Time—Enter the number of seconds that the client waits before attempting to log into a backup
server.
•
No. of Retries—If the first backup server is not available, enter the number of times that the client
should retry logging back before connecting to the next server on the list.
Step 5
In the Server List area is a list of servers that client will log into if access to the primary server is
disrupted. Click Add if you want to add a server to the list. Click Remove if you want to remove a server
from the list.
Note
If access to the primary server is disrupted, the client tries to log back into the primary server by default.
If the client cannot log back into the primary server, and if the server list contains server names, the
client tries to log into each backup server in the order listed until the last server in the list is reached, or
until the client successfully logs into a server.
Cisco Media Gateway Manager 5.0 User Guide
5-40
OL-5461-02
Chapter 5
Maintaining an Efficient Network
How Do I Modify the Network?
Table 5-17
Recovery Properties—Session Recovery Tab
Field
Description
Wait Time
If disruption to the primary Cisco MGM server occurs, the Wait Time field
provides the number of seconds the client waits before attempting to log into the
backup server.
No. of Retries
If the first backup Cisco MGM server is not available, this field provides the
number of times the client should retry logging in before moving to the next
server on the list.
Server List
Lists the Cisco MGM servers that Cisco MGM clients will log into if access to
the primary Cisco MGM server is disrupted. The Add button adds a Cisco MGM
server to the Cisco MGM server list. The Remove button removes a Cisco MGM
server from the list.
If access to the primary Cisco MGM server is disrupted, the Cisco MGM client
tries to log back into the primary server by default. If the Cisco MGM client
cannot log back into the primary server, and if the server list contains server
names, the client tries to log into each backup server in the order listed until the
last server in the list is reached, or until the client successfully logs into a server.
5.3.6 Changing the Server IP Address when Cisco MGM and Oracle Are on the
Same Server
Note
You will need to update the configuration files after changing the server IP address, see 5.3.6.1 Updating
the Configuration Files after Changing the Cisco MGM Server IP Address.
To change the IP address of a standalone Cisco MGM server with a single IP interface when Cisco MGM
and Oracle are on the same server:
Step 1
Log into the Cisco MGM server as the root user.
Step 2
Enter the following command to shut down the Cisco MGM server:
mgms-stop
Step 3
Enter the following commands to shut down Oracle:
su - oracle
sqlplus ctmanager/mgm123!
SQL> connect sys/change_on_install as sysdba
SQL> shutdown immediate;
SQL>exit
Step 4
Complete the following:
a.
Enter the following command to change the IP address in the /etc/netmasks file:
#vi /etc/netmasks
b.
Enter the following command to change the IP address in the /etc/hosts file:
# vi /etc/hosts
Cisco Media Gateway Manager 5.0 User Guide
OL-5461-02
5-41
Chapter 5
Maintaining an Efficient Network
How Do I Modify the Network?
c.
Enter the following command to change the IP address in the etc/hostname.xxx file, where xxx is the
IP interface that is defined in the Solaris server:
# vi /etc/hostname.xxx
d.
Enter the following command to change the default router file, if required:
# vi /etc/defaultrouter
e.
Enter the following command to change the subnet mask on the Cisco MGM server:
# vi /etc/netmasks
Step 5
Complete the following application-level steps:
a.
Enter the following command to change the IP address in the Oracle listener file:
# vi /oraclesw9i/producl/9.2/network/admin/listener.ora
b.
Enter the following command to change the IP address in the Oracle tnsnames file:
# vi /oraclesw9i/producl/9.2/network/admin/tnsnames.ora
c.
Enter the following command to change the IP address in the Cisco MGM server configuration file:
# vi /opt/CiscoMGMServer/cfg/CTMServer.cfg
Step 6
Note
The default directory /opt/CiscoMGMServer may have been changed during installation of
the Cisco MGM server.
Note
Make sure to change all IP addresses where they are referenced.
Enter the following commands to halt and reboot the Cisco MGM server:
# sync:sync;halt
OK boot -r
5.3.6.1 Updating the Configuration Files after Changing the Cisco MGM Server IP Address
If you change the Cisco MGM server IP address (as shown in section 5.3.6 Changing the Server IP
Address when Cisco MGM and Oracle Are on the Same Server, page 5-41) you must replace the old IP
address with the new IP address in the configuration files shown in Table 5-18. Use a standard UNIX
text editor such as vi to update the files. Changes in the configuration files take effect after rebooting the
server.
Table 5-18
Configuration Files that Require Updating
Filename
Location
UNIX Configuration Files
hosts
/etc
netmasks
/etc
defaultrouter
/etc
Cisco Media Gateway Manager 5.0 User Guide
5-42
OL-5461-02
Chapter 5
Maintaining an Efficient Network
How Do I Modify the Network?
Table 5-18
Configuration Files that Require Updating (continued)
Filename
Location
Oracle Configuration Files
tnsnames.ora
/oraclesw9i/product/9.2/network/admin
listener.ora
/oraclesw9i/product/9.2/network/admin
Cisco MGM Server Configuration File
MGMServer.cfg
Note
/opt/CiscoMGMServer/cfg
The default directory /opt/CiscoMGMServer may have been changed during installation of the
Cisco MGM server.
5.3.7 Viewing and Modifying Server Configuration Information
The NE Service Properties pane allows you to view and update Cisco MGM server configuration
information, which includes port information, timing parameters, and network element (NE) backup
parameters. All server configuration changes take effect when you save them, with the exception of
changes to the Cisco MGM server port. Port information changes require that you restart the
Cisco MGM server before the change takes effect. The NE Service Properties pane has three tabs:
•
NE AutoBackup—Allows you to configure automatic NE backup parameters (See
5.1.3.9 Configuring Automatic NE Backup Parameters)
•
NE Manual Backup—Allows you to configure manual NE backup parameters (See
5.1.3.8 Configuring Manual NE Backup Parameters)
5.3.8 Restoring Server Configuration Files
To restore the server configuration files:
Step 1
Log into the server workstation as the root user.
Step 2
On the command line, enter the following:
cd/opt/CiscoMGMServer/bin
/.restore_config.sh <backup file doc> <log dir> <ISHA>
Note
The default directory /opt/CiscoMGMServer may have been changed during installation of the
Cisco MGM server.
Note
If the server is an HA server, the ISHA value is 1. If the server is not an HA server, the ISHA
value is 0.
Cisco Media Gateway Manager 5.0 User Guide
OL-5461-02
5-43
Chapter 5
Maintaining an Efficient Network
How Do I Modify the Network?
Table 5-19
Field Description for the NE Service Properties
Field
Description
Service Status
Displays the current status of the service: Active or Not Active.
Service Control
Allows you to stop or start a process. Notice that the Service Control
button toggles between Activate and Deactivate, and that the Service
Status field changes accordingly.
Error Level
Allows you to choose the error level for alarms on the selected NE to
include in the Error Log (Critical, Major, Minor, Informational, Debug,
or Trace). Critical, major, minor, and informational errors are logged to
the database; trace and debug information is logged to a log file.
Caution
Threshold
Cisco MGM performance will degrade significantly if the
trace or debug option is left on. All operations will slow down
and you may lose alarm and event notifications. Use trace or
debug only when troubleshooting with a customer support
engineer.
Displays the number of NEs that will be serviced by one instance of the
NE service.
5.3.9 Initializing the Node Resync Process
To initialize the node resync process for a node, complete the following procedure:
Step 1
In the Diagnostic Center, from the Hierarchy pane:
•
Double-click or drag the network to the right-hand pane to display the diagnostics at the node level
and select a node.
•
Double-click or drag the node to the right-hand pane to display the diagnostics at the node level.
By default, the Diagnostics tab is selected. The Node Diagnostics window is displayed.
Step 2
Choose Level 1 or Level 2 options from the Node Resync pane:
•
Level 1—Resolves inconsistencies between the switch and equipment manager as well as between
equipment manager and segment tables.
•
Level 2—Retrieves the full connection file from the switch and resolves inconsistencies between
the equipment manager and equipment manager caches as well as between equipment caches and
databroker caches. It also resolves inconsistencies between equipment manager and segment tables.
This option is automatically used if the number of inconsistencies is large.
Step 3
Click Resync to begin the node resync process.
Step 4
Verify the results of the node resync process from the Node Resync Result area.
Cisco Media Gateway Manager 5.0 User Guide
5-44
OL-5461-02
Chapter 5
Maintaining an Efficient Network
How Do I Modify the Network?
5.3.10 Configuring Application-Specific Parameters
Note
Table 5-20 describes the fields in the User Interface Properties pane.
The User Interface (UI) Properties pane allows you to configure application-specific parameters.
Specifically, you can do the following:
•
Fault Management—Specify automatic or manual alarm acknowledgement, overwrite alarm notes,
and un-acknowledge alarms (for more details, see Chapter 9, “Managing Faults”.)
•
Domain Management—Specify how long node names are truncated within Network Maps (for more
details, see Chapter 4, “Building the Network”.)
From the Domain Manager, choose Administration > Control Panel. In the Control Panel window,
click UI Properties to open the User Interface Properties pane.
Table 5-20
User Interface Properties Field Descriptions
Field
Fault Management
Description
•
Note
Domain Management
Alarm Acknowledgement—Allows you to specify automatic or manual
alarm acknowledgement in the Alarm Browser window. If you choose
manual alarm acknowledgment, you must manually acknowledge
alarms. Cleared alarms move from the Alarm Browser to the Alarm Log.
If you choose automatic alarm acknowledgment, the Cisco MGM server
automatically acknowledges alarms when they are cleared and moves
them from the Alarm Browser to the Alarm Log. Before alarms move to
the Alarm Log, they must be both cleared and acknowledged.
You can still manually acknowledge alarms in automatic
acknowledgement mode.
•
Overwrite Alarm Notes—Enables or disables the ability to overwrite
alarm notes created by another user.
•
Alarm Un-Acknowledgement—Enables or disables the ability to
unacknowledge alarms that have been acknowledged.
Allows you to specify how node names longer than 25 characters are
truncated in the Network Map. If a string is longer than 25 characters, the
first 22 characters display followed by an ellipsis (...).You can choose to
truncate the first or last characters of the node name.
5.3.11 Using UNIX-Level Scripts
The following UNIX shell scripts are provided to perform administrative functions from the command
line on the Cisco MGM server:
•
mgms-start
•
mgms-abort
•
mgms-stop
•
mgms-stop-service
•
showmgm
Cisco Media Gateway Manager 5.0 User Guide
OL-5461-02
5-45
Chapter 5
Maintaining an Efficient Network
How Do I Manage the Network Software?
•
getinfo.sh
•
prune_auditlog.sh
•
prune_errlog.sh
•
prune_audittrail.sh
•
prune_fm.sh
•
prune_pm.sh
•
prune_ne.sh
•
prune_server_monitor.sh
These scripts should normally be run as root. However, Cisco MGM facilitates running these scripts as
non-root users using sudo. During the Cisco MGM server installation, the setup program prompts you
to specify the name of the UNIX group to which you want to assign administrator privileges. By default,
this group is set to root. If you specify a group other than root, the setup program verifies that the UNIX
group exists on the system and adds entries to the /etc/sudoers file for each of the commands listed
above. As such a UNIX user who is a member of the specific group can run the commands using sudo.
Sudo is bundled with Cisco MGM and is located in /opt/CiscoMGMServer/admin/sudo/. In order to use
the sudo bundled with Cisco MGM the following command should first be run.
Note
The default directory /opt/CiscoMGMServer may have been changed during installation of the
Cisco MGM server.
Further details about the use and configuration of sudo are provided in the Cisco MGM Installation
Guide.
5.4 How Do I Manage the Network Software?
Cisco MGM provides a mechanism to download software image from the Cisco MGM server onto the
MGX8880 switch. When the software download is scheduled, an FTP connection is opened to the switch
using the IP address, User ID and password. The software image is downloaded to the FW directory. The
FTP connection is closed and Cisco MGX processes resume.
Note
There is no support for downloading images from an external TFTP server. Software images can be
downloaded only if they are locally present on the Cisco MGM server.
When the software image is downloaded, you can use the following commands at the CLI:
•
dsprev to display the image on the switch
•
loadrev to load the image on the switch
•
setrev to set the image on the switch
•
runrev command to activate the image on the switch.
Follow the procedures described in this section to download new or modified images to NEs:
•
5.4.1 Downloading Software Images
Cisco Media Gateway Manager 5.0 User Guide
5-46
OL-5461-02
Chapter 5
Maintaining an Efficient Network
How Do I Manage the Network Software?
5.4.1 Downloading Software Images
Note
Table 5-21 describes the fields in the Download Software Dialog.
Note
If a software download has a status of Queued, and if it has a task in the running list, the download cannot
be canceled.
Caution
If you mark an NE as an Out of Service while a software download is in progress on that NE, the software
download might not complete successfully.
To download software images to NEs, Cisco recommends that DCN bandwidth be 56 kbps or higher. If
DCN bandwidth is less than 56 kbps, software download might take an extended period of time.
Performing software downloads in parallel increases the length of time by a multiple of the number of
NEs targeted.
Step 1
In the Domain Explorer tree, select a management domain or group that contains NEs that are assigned
an In Service or Under Maintenance operational state. Alternatively, select an NE that is assigned an In
Service or Under Maintenance state.
Only one software download can occur on a specific NE at any given time.
Note
Step 2
Choose Administration > Software Download. The Software Download dialog box appears. See
Figure 5-4.
Step 3
Enter the following information:
•
NE Model
•
Network Elements
•
Job Comments
•
Source
•
Time
Caution
If the Cisco MGM client and server run on the same machine and thus the Local source
directory is the same as the default destination directory, an error message is generated. To
retrieve the software image selected from the Local source directory, navigate to the
appropriate path and restore it from the <software image name>.old file.
Cisco Media Gateway Manager 5.0 User Guide
OL-5461-02
5-47
Chapter 5
Maintaining an Efficient Network
How Do I Manage the Network Software?
Step 4
Click Finish to initiate the software download to the standby memory on the NE.
Step 5
Cisco MGM stores two software versions: active and standby. When you download software, it is saved
as the standby version.
Figure 5-4
Table 5-21
Software Download Window
Field Description for the Software Download Dialog
Field
Description
NE Model
Select the NE type to which you want to download software. The type you
select determines the NEs that are displayed under Network Elements.
Network Elements
Use the Add and Remove buttons to move NEs to the Selected NEs list or
remove NEs from the list. Software will be downloaded to NEs in the
Selected NEs list.
Job Comments
Enter comments about the software download (optional).
Cisco Media Gateway Manager 5.0 User Guide
5-48
OL-5461-02
Chapter 5
Maintaining an Efficient Network
How Do I Manage Redundancy and Failover?
Table 5-21
Field Description for the Software Download Dialog (continued)
Field
Description
Source
Specify the location of the software:
Time (time zone)
•
Local allows you to select an image on the current client system.
•
Server allows you to select an image on the Cisco MGM server to which
your client is connected.
•
Remote option is grayed out.
Set a time for the download. Click Now to begin download immediately, or
click At Time and specify when to begin download, in 5-minute increments.
Note
The time zone can be Greenwich mean time (GMT), a user-defined
offset from GMT, or local time, depending on what is specified in the
User Preferences dialog box.
5.5 How Do I Manage Redundancy and Failover?
This section contains the following information:
•
5.5.1 Configuring Card Redundancy
5.5.1 Configuring Card Redundancy
These tasks are used to configure card redundancy:
•
5.5.1.1 Adding Redundancy
•
5.5.1.2 Modifying a Card for Redundancy
Card redundancy uses a secondary card of the same type to serve as a standby card and takes over if the
active card fails Automatic protection switching (APS) on a SONET line can be combined with front
card redundancy. The ATM link is protected from both line and card failures.
You can setup card redundancy at the shelf level.
5.5.1.1 Adding Redundancy
By adding redundancy, you can link two slots to support card-level redundancy for a pair of service
modules. A redundant pair consists of a primary slot and a secondary slot. Both cards must be in the
active state for you to configure redundancy. After configuration, the secondary service module goes
into the standby state.
To add redundancy:
Step 1
In the Domain Manager, select the node and choose Configuration > MGX880/8850 MG >
Configuration Center to display the Configuration Window for Elements.
Step 2
Click the Cards tab to display a summary report of all the cards that are installed on the node.
Step 3
Choose Redundancy Info from the Category drop-down arrow to display the redundancy status for the
node.
Step 4
Click Create to display the Redundancy Configuration window. See Figure 5-5.
Cisco Media Gateway Manager 5.0 User Guide
OL-5461-02
5-49
Chapter 5
Maintaining an Efficient Network
How Do I Manage Redundancy and Failover?
Step 5
Enter the slot number of the Primary module in the redundant configuration in the Primary Slot Num
field.
Step 6
Enter the slot number of the Secondary module in the redundant configuration in the Secondary Slot
Num field.
Step 7
Choose one of the following redundancy options for the Primary module from the Redundancy Type
drop-down arrow:
Step 8
•
yCable—specifies a 1:1 (y cable) redundancy configuration for a yCable. For the yCable option,
only one module is used and acts as the backup for the other.
•
oneToN—specifies a a 1:N redundancy configuration for oneToN. For the oneToN option, only one
module (secondary) is used and acts as the backup for other primary modules.
Click Apply to add redundancy.
Figure 5-5
Redundancy Information Window
5.5.1.2 Modifying a Card for Redundancy
To modify a card for redundancy:
Step 1
In the Domain Manager, select the node and choose Configuration > MGX880/8850 MG >
Configuration Center to display the Configuration Window for Elements.
Step 2
Click the Cards tab to display a summary report of all the cards that are installed on the node.
Cisco Media Gateway Manager 5.0 User Guide
5-50
OL-5461-02
Chapter 5
Maintaining an Efficient Network
Which Ports Are Reserved in Cisco MGM?
Step 3
Choose Redundancy Info from the Category drop-down arrow to display the redundancy status for the
node.
Step 4
Select the card from the list of redundant cards.
Step 5
Click Details to display the Redundancy Configuration window. See Figure 5-5.
Step 6
Enter the slot number of the Secondary module in the redundant configuration in the Secondary Slot
Num field.
Step 7
Choose one of the following redundancy options for the Primary module from the Redundancy Type
drop-down arrow:
Step 8
•
yCable—specifies a 1:1 (y cable) redundancy configuration for a yCable. For the yCable option,
only one module is used and acts as the backup for the other.
•
oneToN—specifies a a 1:N redundancy configuration for oneToN. For the oneToN option, only one
module (secondary) is used and acts as the backup for other primary modules.
Click Apply to modify the card for redundancy.
5.6 Which Ports Are Reserved in Cisco MGM?
The Cisco MGM server communicates with the managed network via the data communication network
(DCN) using the CORBA protocol.
Note
If there a firewall between the Cisco MGM server and the NE, a static CORBA port needs to be assigned
manually. This port can then be opened on the firewall.
Caution
Reserved ports are required for the Cisco MGM server to communicate with NEs, the GUI, or other
northbound gateways. Care must be taken when changing any reserved port in Cisco MGM, as a change
could mean that communication is lost.
This section includes the following information:
•
5.6.1 Client-Server Communication Protocols
•
5.6.2 Ports between the Cisco MGM Server and Clients
•
5.6.3 Ports between the Cisco MGM Server and MGX Switches
•
5.6.4 Changing the Cisco MGM Server Port
5.6.1 Client-Server Communication Protocols
Cisco MGM uses the following protocols for client-server communication:
•
CORBA
•
JMOCO (Cisco Proprietary TCP/IP-based request/response protocol)
•
SSH or Telnet
•
Java Database Connectivity (JDBC)
Cisco Media Gateway Manager 5.0 User Guide
OL-5461-02
5-51
Chapter 5
Maintaining an Efficient Network
Which Ports Are Reserved in Cisco MGM?
5.6.2 Ports between the Cisco MGM Server and Clients
Table 5-22 lists the ports that the Cisco MGM server uses to communicate with the Cisco MGM clients.
Table 5-22
Cisco MGM Server and Client Ports
Module or Protocol
Port
Apache HTTP port
8051
CORBA IIOP listener port on CTM
server
Dynamic
CORBA naming service
14005
CORBA notification service
Dynamic
Database listener port
1521 (configurable)
Internal process-to-process
communication ports
9000 to 9011
JMOCO port
27613 (configurable)
JMS web server
8033
JNDI port
1099
Orbix ports
3075, 3079, 3094
RMI Registry port
19999
RTM Proxy port
8161
SNMP command port
161
Note
Port 161 is used only for communication between
SNMP-managed NEs and the CTM server, not for
communication between the CTM client and server.
SNMP trap forwarding port
8765 (configurable)
SNMP trap port
162
Note
SSH port
22
Telnet port
23
UDP port to receive traps
2500
Web services port
1551
Port 162 is used only for communication between
SNMP-managed NEs and the CTM server, not for
communication between the CTM client and server.
Cisco Media Gateway Manager 5.0 User Guide
5-52
OL-5461-02
Chapter 5
Maintaining an Efficient Network
How Do I Export Information in Tables?
5.6.3 Ports between the Cisco MGM Server and MGX Switches
Table 5-22 lists the ports that the Cisco MGM server uses to communicate with the Cisco MGX
switches.
Table 5-23
Cisco MGM Server and MGX Switches
Module or Protocol
Port
Daytime port
13
SSH port
22
Telnet port
23
UDP port to receive traps
2500
5.6.4 Changing the Cisco MGM Server Port
Use the NE Service Properties pane to change the TCP port number of the Cisco MGM server. All
Cisco MGM clients use the JMOCO port to connect to the Cisco MGM server. See Table 5-22 for
detailed information on the JMOCO port.
Step 1
In the Domain Explorer window, choose Administration > Control Panel.
Step 2
In the Control Panel window, click NE Service to open the NE Service Properties pane. Click the
NE Poller tab.
Step 3
Change the server port in the Cisco MGM Server Port field. The server port in the Active column
displays the current port. The server port in the After Restart column displays the port that is active after
the server is restarted.
Step 4
Click Save. Changes to this parameter take effect only after the server is restarted.
5.7 How Do I Export Information in Tables?
You can export fault, performance, configuration or administration information from a table within
Cisco MGM to a flat file. The options to export information in tables to a text file or an HTML file are
available from the following windows:
•
Alarm Browser
•
Alarm Log
•
Audit Log
•
Cisco MGM Users
•
Domain NE Table
•
Equipment Inventory Table
•
Error Log
•
Job Monitor
Cisco Media Gateway Manager 5.0 User Guide
OL-5461-02
5-53
Chapter 5
Maintaining an Efficient Network
How Do I Export Information in Tables?
•
Service Monitor
•
Supported NE Table
Most Cisco MGM tables support an export function to export the table contents to a flat file. It is possible
to select the separator as comma, tab, or a user specified character. Other options include the ability to
check for the separator in the exported data. All rows in the active page of the selection can be exported
or only selected rows.
Some Cisco MGM tables can return large numbers of rows. To support large tables Cisco MGM
provides a paging feature. If more than 1000 rows of data are returned, data is grouped in pages of up to
1000 rows. It then possible to page forward and back to view the entire set of data.
The following sections discuss how to export information in tables to a text file or an HTML file:
•
5.7.1 Exporting Data to a Text File
•
5.7.2 Generating an HTML Report
•
5.7.3 Printing an HTML Report
5.7.1 Exporting Data to a Text File
To export data to a text file:
Step 1
In the Domain Explorer tree, select the management domain, group, or NE node.
Step 2
Open a window under the File, Fault, or Administration menu for the selected node. See the options
listed in 5.7 How Do I Export Information in Tables?
Step 3
Within the table, click the Export Data to File tool (or choose File > Export). The Export dialog box
appears.
Step 4
In the Export dialog box, specify whether to export data in comma-separated value format, tab-separated
value format, or another user-specified form.
Step 5
(Optional) To export only the selected row(s), check the Export selected row(s) only check box.
Step 6
Specify a location for the file in the Export to file text box. Or, click Browse to browse for a destination
location. (The default directory is C:\Cisco\MediaGatewayManagerClient\exports or
/opt/CiscoMGMClient/exports.)
Step 7
Enter a filename and click OK to export the data to the file.
5.7.2 Generating an HTML Report
Many Cisco MGM tables have an HTML Report tool for generating an HTML report on selected fault,
performance, configuration, or administrative data. To generate an HTML report:
Step 1
In the Domain Explorer tree, select the management domain, group, or NE node.
Step 2
Open a window under the File, Fault, or Administration menu for the selected node. See the options
listed in 5.7 How Do I Export Information in Tables?
Step 3
In the table, click the Generate HTML Report tool (or choose File > HTML Report). The HTML
Report dialog box appears.
Cisco Media Gateway Manager 5.0 User Guide
5-54
OL-5461-02
Chapter 5
Maintaining an Efficient Network
How Do I Export Information in Tables?
Step 4
In the HTML Report dialog box, select either of the following:
•
Selected row(s)—Export only the selected rows.
•
All rows in current page—Export all rows in the table.
A maximum of 1000 rows per page can be exported.
Note
Step 5
To save more than 1000 rows of data, export them to a text file. For information about exporting
to a text file, see section 5.7 How Do I Export Information in Tables?, page 5-53.
Click OK to generate the HTML report. The report is saved automatically on the client system. (The
default directory is C:\Cisco\MGMClient\reports or /opt/CiscoMGMClient/reports.)
5.7.3 Printing an HTML Report
To print a Cisco MGM HTML report, use the default browser Print option. To print a Cisco MGM
HTML report:
Step 1
Generate the HTML report. See section 5.7.2 Generating an HTML Report, page 5-54.
Step 2
Navigate to the directory where the HTML report is saved on the client system. (The default directory
is C:\Cisco\MGMClient\reports or /opt/CiscoMGMClient/reports.) Double-click the report to be
printed.
Step 3
The default browser displays the HTML report. Use the browser Print option to print the report.
Cisco Media Gateway Manager 5.0 User Guide
OL-5461-02
5-55
Chapter 5
Maintaining an Efficient Network
How Do I Export Information in Tables?
Cisco Media Gateway Manager 5.0 User Guide
5-56
OL-5461-02
C H A P T E R
6
Configuring Hardware
This chapter helps you configure your hardware using the Cisco MGM Configuration Center and Chassis
View, and contains the following sections:
•
6.1 How Do I Manage My Network with the Chassis View?, page 6-1
•
6.2 How Do I Manage My Network with the Configuration Center?, page 6-5
•
6.3 How Do I Manage Templates for Network Elements?, page 6-11
•
6.4 How Do I Configure Cisco MGX 8880 and 8850 Nodes?, page 6-13
•
6.5 How Do I Create or Modify APS?, page 6-31
•
6.6 How Do I Configure AXSM Cards?, page 6-33
•
6.7 How Do I Configure VXSM Cards?, page 6-61
•
6.8 How Do I Configure RPM Cards?, page 6-116
•
6.9 How Do I Configure VISM-PR Cards?, page 6-121
6.1 How Do I Manage My Network with the Chassis View?
The Chassis View provides a graphical view of equipment status for the operational and alarm status of
each card, port, or line, which is represented with a predefined color. By default, the front view appears
(click the Rear View tab to switch views).
These tasks can be performed using Chassis View:
•
6.1.1 Launching Chassis View, page 6-2
•
6.1.2 Navigating with Chassis View, page 6-3
Cisco Media Gateway Manager 5.0 User Guide
OL-5461-02
6-1
Chapter 6
Configuring Hardware
How Do I Manage My Network with the Chassis View?
6.1.1 Launching Chassis View
To launch Chassis View from the Domain Explorer:
•
Click on a node, then choose Configuration > MGX 8880/8850 MG > Chassis View.
To launch Chassis View from the Diagnostic Center, Configuration Center, or Statistics Report:
•
Click the Chassis View tool from the toolbar
or
•
Choose Tools > Chassis View
or
•
Right-click on an NE in the Hierarchy pane and choose Chassis View from the pop-up menu. Once
the Chassis View opens, the corresponding window appears in the Configuration pane.
Figure 6-1
Chassis View—Front View
Cisco Media Gateway Manager 5.0 User Guide
6-2
OL-5461-02
Chapter 6
Configuring Hardware
How Do I Manage My Network with the Chassis View?
6.1.2 Navigating with Chassis View
The Chassis View main window contains the following components:
•
Menu bar—See Table 6-1
•
Toolbar—See Table 6-2
•
Hierarchy, Configuration, and Inspector panes—See Table 6-3
Table 6-1
Chassis View—Menu Bar Options
Menu Bar Options
Task
File
Close
Closes the current Chassis View main window when you are running multiple
sessions of the Chassis View. If you are running only one session, that single
session is closed.
Exit
Exits the Chassis View instance and the other sessions. This option works only
on the window in which the option is selected. When you have started other
Chassis Views, they continue to run.
Exits the Chassis View instance and the other sessions. This option will close
all the Chassis View windows launched in this Cisco MGM session.
Edit
Copy
Copies the selected object and puts it into the Clipboard.
Paste
Pastes the object into the Clipboard and inserts it to the target area.
Tools
Chassis View
Launches the Chassis View for the selected object. For more information, see
section 6.1 How Do I Manage My Network with the Chassis View?, page 6-1
Configuration
Center
Launches the Configuration Center for the selected object.
Diagnostic
Center
Launches the Diagnostic Center for the selected object. For more information,
see Chapter 9, “Managing Faults.”
Statistics Report
Launches the Statistics Report for the selected object. For more information,
see Chapter 10, “Managing Performance.”
Administration
Allows you to perform adminstration-type tasks, such as:
•
Cisco MGM Audit Trail—Allows you to access audit trail files for
specified days.
•
Telnet—(Only available when a NE is selected) Opens a command line
tool to telnet to MGX switches.
•
SSH—(Only available when a NE is selected) Opens a command line tool
to gain secure shell access to MGX switches.
Help
Color Legend
Displays the Cisco MGM color legend.
Contents
Displays the contents for online help.
Cisco Media Gateway Manager 5.0 User Guide
OL-5461-02
6-3
Chapter 6
Configuring Hardware
How Do I Manage My Network with the Chassis View?
Table 6-2
Chassis View—Toolbar Buttons
Option
Task
Chassis View
Launches Chassis View for the selected object.
If no object is selected, Chassis View launches, and the right hand area is
empty.
Configuration Center
Launches Configuration Center for the selected object.
If no object is selected, Configuration Center launches, and the right hand
area is empty.
Diagnostics Center
Launches Diagnostics Center for the selected object.
If no object is selected, Diagnostics Center launches, and the right hand
area is empty.
Statistics Report
Launches the Statistics Report.
Administration
Launches the Cisco MGM Audit Trail Viewer. For more information, see
section 8.3.2 Viewing the Audit Trail File, page 8-4.
Table 6-3
Chassis View—Hierarchy, Configuration, and Inspector Pane Descriptions
Options
Task
Hierarchy pane
Navigates and displays objects for selection and configuration. For more
information, see Chapter 2, “Basic Concepts.”
Inspector pane
Provides a list of detailed status information for the NE selected in the
Hierarchy pane. For more information, see Chapter 2, “Basic Concepts.”
Configuration pane
Displays the chassis view for the selected object. If no object is selected, the
Configuration pane will be empty.
Within the Configuration pane, there are two tabs:
•
Front View—Shows the front view configuration.
•
Rear View—Shows the rear view configuration.
6.1.2.1 Accessing Network Elements
To view the chassis view for a NE in the Hierarchy pane:
•
Drag-and-drop the NE from the Hierarchy pane to the Configuration pane
or
•
Double-click on the NE in the Hierarchy pane
The corresponding view opens or is highlighted in the Configuration pane.
Tip
Any window within the Hierarchy pane can be “pinned” down by clicking on the pin tool, located in the
bottom right corner of each window. This means that when you open other windows, the tacked down
window will remain open. For more information on this feature, see Chapter 2, “Basic Concepts.”
Cisco Media Gateway Manager 5.0 User Guide
6-4
OL-5461-02
Chapter 6
Configuring Hardware
How Do I Manage My Network with the Configuration Center?
6.1.2.2 Chassis View LED Colors
The following LED colors are used in the Chassis View:
Table 6-4
LED Colors for Chassis View
Color
State
Red
Critical
Orange
Major
Yellow
Minor
Green
Up, OK, and Clear
Purple
Self-test (loopback)
Gray
Down (unmanaged)
Blue
Unknown
Cyan
Not defined
6.2 How Do I Manage My Network with the Configuration
Center?
By managing network elements with the Configuration Center, you can:
•
Configure numerous managed device objects, such as configuration settings, interface status, and so
forth in a media gateway.
•
Display and modify the values for almost all of the objects.
•
Perform tasks, such as element configuration and connection management.
These tasks are used to manage the NE configurations through the Configuration Center:
•
6.2.1 Launching Configuration Center, page 6-6
•
6.2.2 Navigating with Configuration Center, page 6-7
•
6.2.3 Navigating Within Tables, page 6-9
Cisco Media Gateway Manager 5.0 User Guide
OL-5461-02
6-5
Chapter 6
Configuring Hardware
How Do I Manage My Network with the Configuration Center?
6.2.1 Launching Configuration Center
To launch Configuration Center from the Domain Explorer:
•
Click on a node, then choose Configuration > MGX 8880/8850 MG > Configuration Center. The
Configuration pane for that node appears.
To launch Configuration Center from the Diagnostic Center, Chassis View, or Statistics Report:
•
Click the Configuration Center tool within the toolbar
or
•
Choose Tools > Configuration Center
or
•
Right-click on an NE and choose Configuration Center from the pop-up menu. Once the
Configuration Center opens, the corresponding window appears in the Configuration pane.
After the Configuration Center application is launched, the Configuration Center main window appears.
For information about the main window components, see section 6.2.2 Navigating with Configuration
Center, page 6-7.
Figure 6-2
Configuration Center—Node Tab
Cisco Media Gateway Manager 5.0 User Guide
6-6
OL-5461-02
Chapter 6
Configuring Hardware
How Do I Manage My Network with the Configuration Center?
6.2.2 Navigating with Configuration Center
The Configuration Center main window contains the following components:
•
Menu bar—See Table 6-5
•
Toolbar—See Table 6-6
•
Hierarchy, Configuration, and Inspector panes—See Table 6-7
Table 6-5
Configuration Center—Menu Bar Options
Menu Bar Options
Task
File
Save
Saves the content.
Print
Displays the Print window to process printing.
Close
Closes the current Configuration Center main window when you are running
multiple sessions of the Configuration Center. If you are running only one
session, that single session is closed.
Exit
Exits the Configuration Center instance and the other sessions. This option
works only on the window in which the option is selected. When you have
started other Configuration Centers, they continue to run.
Exits the Configuration Center instance and the other sessions. This option will
close all the Configuration windows launched in this Cisco MGM session.
Edit
Cut
Removes the selection from the text field.
Copy
Copies the selected object and puts it into the Clipboard.
Paste
Pastes the object into the Clipboard and inserts it to the target area.
Connection
Templates
(Only applicable from the Connections tab) Displays connection templates.
Show Unused
Descriptors
(Only applicable from the Connections tab) Shows unused descriptors.
Tools
Chassis View
Launches the Chassis View for the selected object. For more information, see
section 6.1 How Do I Manage My Network with the Chassis View?, page 6-1
Configuration
Center
Launches the Configuration Center for the selected object.
Diagnostic
Center
Launches the Diagnostic Center for the selected object. For more information,
see Chapter 9, “Managing Faults.”
Statistics Report
Launches the Statistics Report for the selected object. For more information,
see Chapter 10, “Managing Performance.”
Cisco Media Gateway Manager 5.0 User Guide
OL-5461-02
6-7
Chapter 6
Configuring Hardware
How Do I Manage My Network with the Configuration Center?
Table 6-5
Configuration Center—Menu Bar Options (continued)
Menu Bar Options
Administration
Task
Allows you to perform adminstration-type tasks, such as:
•
Cisco MGM Audit Trail—Allows you to access audit trail files for
specified days.
•
Telnet—(Only available when a NE is selected) Opens a command line
tool to telnet to MGX switches.
•
SSH—(Only available when a NE is selected) Opens a command line tool
to gain secure shell access to MGX switches.
Help
Color Legend
Displays the Cisco MGM color legend.
Contents
Displays the contents for online Help.
Table 6-6
Configuration Center—Toolbar Buttons
Option
Task
Chassis View
Launches Chassis View for the selected object.
If no object is selected, Chassis View launches, and the right hand area is
empty.
Configuration Center
Launches Configuration Center for the selected object.
If no object is selected, Configuration Center launches, and the right hand
area is empty.
Diagnostics Center
Launches Diagnostics Center for the selected object.
If no object is selected, Diagnostics Center launches, and the right hand
area is empty.
Statistics Report
Launches the Statistics Report
Administration
Launches the Cisco MGM Audit Trail Viewer. For more information, see
section 8.3.2 Viewing the Audit Trail File, page 8-4.
Table 6-7
Configuration Center—Hierarchy, Configuration and Inspector Pane Descriptions
Options
Task
Hierarchy pane
Navigates and selects objects for configuration. For more information, see
Chapter 2, “Basic Concepts.”
Within the Hierarchy pane, there are two tabs:
•
Elements—Configures the node, card, line, and port.
•
Connections—Configures the connections.
Cisco Media Gateway Manager 5.0 User Guide
6-8
OL-5461-02
Chapter 6
Configuring Hardware
How Do I Manage My Network with the Configuration Center?
Table 6-7
Configuration Center—Hierarchy, Configuration and Inspector Pane Descriptions
(continued)
Options
Task
Configuration pane
Depending on the active tab (Elements or Connections), the configuration
details for the selected object appear. If an object is not selected, the
Configuration pane is empty.
Fields within the Configuration pane with a * indicate required fields. Fields
that have been modified appear blue.
Inspector pane
Provides a list of detailed status information for the network element selected
from the Hierarchy pane. For more information, see Chapter 2, “Basic
Concepts.”
6.2.2.1 Accessing Network Elements
To perform configuration tasks, you can open any NE in the Hierarchy pane, either:
•
Drag-and-drop the NE from the Hierarchy pane to the Configuration pane
or
•
Double-click on the NE in the Hierarchy pane
The corresponding configuration window opens in the Configuration pane.
Tip
Any window within the Hierarchy pane can be “pinned” down by clicking on the pin tool, located in the
bottom right corner of each window. This means that when you open other windows, the tacked down
window will remain open. For more information on this feature, see Chapter 2, “Basic Concepts.”
6.2.3 Navigating Within Tables
Many tabs within the Configuration pane contain tables. Within each table, there are four buttons:
Note
Some of these buttons may be grayed out, depending on availability.
•
Create—Allows you to create a new table entry (opens a new window)
•
Details—Allows you to view or modify detailed information about a selected entry (opens a new
window)
•
Delete—Allows you to delete an entry
•
Refresh—Refreshes the table
For example, see Figure 6-3.
Cisco Media Gateway Manager 5.0 User Guide
OL-5461-02
6-9
Chapter 6
Configuring Hardware
How Do I Manage My Network with the Configuration Center?
Figure 6-3
Configuration Center—Peripherals Tab, Serial Interfaces Category
If you select the Create or Details button, a new window appears. This window contains five buttons:
Note
Some of these buttons may be grayed out, depending on availability.
•
Apply—Applies any modifications or additions
•
Save As—Allows you to save the current parameters as a named template
•
Load From—Provides a list of templates to load parameters from
•
Delete—Deletes the information
•
Refresh—Refreshes the data
For example, see Figure 6-4.
Cisco Media Gateway Manager 5.0 User Guide
6-10
OL-5461-02
Chapter 6
Configuring Hardware
How Do I Manage Templates for Network Elements?
Figure 6-4
Configuration Center—Peripherals Tab, Serial Interface Details
6.3 How Do I Manage Templates for Network Elements?
•
6.3.1 Saving Templates for Network Elements, page 6-11
•
6.3.2 Loading or Deleting Templates for Network Elements, page 6-12
6.3.1 Saving Templates for Network Elements
For any specified network element (such as a node, card, line, port, or connection), you can save the
current parameters as a template.
Note
Step 1
For details on creating connection templates, see section Chapter 7, “Provisioning Connections.”
From the Configuration Center main window, under the Elements tab, double-click the node, card, line,
port, or connection whose parameters you want to save, then click Save As to display the Save Template
window.
Cisco Media Gateway Manager 5.0 User Guide
OL-5461-02
6-11
Chapter 6
Configuring Hardware
How Do I Manage Templates for Network Elements?
Figure 6-5
Save Template Window
Step 2
Enter the new name for the template in the Save As field.
Step 3
Enter a description for the template in the Description field.
Step 4
Ensure that the listed categories are correct in the Selected Categories area.
Step 5
Click Save to save the current network element template, or Cancel to exit without saving.
6.3.2 Loading or Deleting Templates for Network Elements
Step 1
From the Configuration Center main window, under the Elements tab, double-click the node, card, line,
port or connection you want to load or delete a template on.
Step 2
Under the appropriate subtab, click Load From to display a list of available templates.
Step 3
Select the template name from the list of templates.
Step 4
Click Load to load the template for a particular category group
or
Click Delete to delete an existing template
or
Click Cancel to exit without saving
or
Click Refresh to refresh the window.
Cisco Media Gateway Manager 5.0 User Guide
6-12
OL-5461-02
Chapter 6
Configuring Hardware
How Do I Configure Cisco MGX 8880 and 8850 Nodes?
6.4 How Do I Configure Cisco MGX 8880 and 8850 Nodes?
•
6.4.1 Configuring a Node, page 6-13
•
6.4.2 Displaying Cards Within a Node, page 6-15
•
6.4.4 Managing Node Peripherals, page 6-19
•
6.4.5 Viewing Node Controllers, page 6-25
•
6.4.6 Managing Node Clocking, page 6-26
6.4.1 Configuring a Node
Step 1
From the Domain Explorer window, select the node from the Hierarchy pane and choose
Configuration > MGX 8880/8850 MG > Configuration Center. The Configuration window for the
selected node opens. The Node tab appears by default.
Figure 6-6
Note
Configuration Center—Node Tab
Table 6-8 describes the fields in the Node tab.
Cisco Media Gateway Manager 5.0 User Guide
OL-5461-02
6-13
Chapter 6
Configuring Hardware
How Do I Configure Cisco MGX 8880 and 8850 Nodes?
Step 2
Check or configure each field, as applicable.
Note
Step 3
Some fields are grayed out, meaning they are not configurable.
Click Apply to apply the current node configuration settings.
Note
For a description of all buttons within this tab, see section 6.2.3 Navigating Within Tables, page
6-9.
Table 6-8
Field Descriptions for the Node Tab
Field Name
Description
Description
Description of the managed node.
Up Time
System up time of the current node.
Contact
Contact person for the managed node.
Location
Physical location of the node.
Node Name
Administratively assigned name for the node.
Integrated Alarm Status
(read-only)
Integrated alarm status of the shelf. The following options are valid:
Filtered Alarm Status
(read-only)
•
Clear
•
Minor
•
Major
•
Critical
Filtered alarm status of the shelf. The following options are valid:
•
Clear
•
Minor
•
Major
•
Critical
Date and Time
Current local date and time for the system.
Clock Lost on Reboot (if
applicable)
Indicates whether the system can preserve knowledge of current
date and time across a system reboot.
System Country
Country where the system is physically located.
Descriptor
Node descriptor.
Cisco Media Gateway Manager 5.0 User Guide
6-14
OL-5461-02
Chapter 6
Configuring Hardware
How Do I Configure Cisco MGX 8880 and 8850 Nodes?
6.4.2 Displaying Cards Within a Node
Displaying cards within a node allows you to verify that the correct cards are installed in the correct
slots, and that the back cards installed are indeed compatible with the front cards they serve.
Step 1
From the Domain Explorer window, select the node from the Hierarchy pane and choose
Configuration > MGX 8880/8850 MG > Configuration Center. The Configuration window for the
selected node opens.
Step 2
Click the Cards tab to display a summary report of all the cards installed on the node. The Cards
category appears by default in the drop-down arrow.
Note
For detailed information on the Redundancy Info option, see Chapter 5, “Maintaining an
Efficient Network.”
Figure 6-7
Configuration Center—Cards Tab
Cisco Media Gateway Manager 5.0 User Guide
OL-5461-02
6-15
Chapter 6
Configuring Hardware
How Do I Configure Cisco MGX 8880 and 8850 Nodes?
6.4.3 Verifying a Specific Card for the Node
You can verify a card when the objects to be managed are associated with a particular card.
Step 1
Within the Cards tab (see 6.4.2 Displaying Cards Within a Node, page 6-15) select the card from the
summary report, then click Details.
or
Within the Configuration Center Hierarchy pane, double-click the card you want to view details for.
The Card tab appears (for example, Figure 6-8 displays the AXSM card tab).
Figure 6-8
Note
Step 2
Configuration Center—AXSM Card Tab
Table 6-9 describes fields in the Card tab.
Choose one the following card configurations from the Category drop-down arrow:
•
Front Card Configuration
•
Back Card Configuration
•
Sec Back Card Configuration (optional)
•
System Information (RPM only)
•
Entity Sensors (VXSM only)
•
Card Information (VISM-PR only)
•
Daughter Card Information (VISM-PR only)
Cisco Media Gateway Manager 5.0 User Guide
6-16
OL-5461-02
Chapter 6
Configuring Hardware
How Do I Configure Cisco MGX 8880 and 8850 Nodes?
Note
Step 3
The Back Card Configuration or Sec Back Card Configuration options are read-only.
(Optional) Within the Front Card Configuration option, enter the card descriptor in the Descriptor
field.
Note
The Descriptor field is valid for the whole Card Configuration, but is available only from the
first category of that card configuration, in this case the Front Card Configuration.
Step 4
(Optional) Within the System Information option, enter the Node Name.
Step 5
Click Apply to modify the card descriptor and to verify the information for the card is valid.
Note
For a description of all buttons within this tab, see section 6.2.3 Navigating Within Tables, page
6-9.
Table 6-9
Field Descriptions for the Cards Tab
Category
Field Name
Description
Front, Back, and
Sec Back Card
Configuration
(applicable fields
vary for each)
(Operational)
Status
Operational state of the module.
Card Description
Front card description.
Admin Status
Administrative control of the module.
Type
Textual description of physical entity.
Slot Number
Number of the physical entity.
Hardware (HW)
Revision
Vendor-specific hardware description string.
Firmware (FW)
Revision
Vendor-specific firmware description string.
SW Revision
Vendor-specific software description string.
Serial Number
Vendor-specific serial number string.
Orderable Part No
Name of the manufacturer.
Reset Reason
Reason for last reset.
Descriptor
Card descriptor.
Cisco Media Gateway Manager 5.0 User Guide
OL-5461-02
6-17
Chapter 6
Configuring Hardware
How Do I Configure Cisco MGX 8880 and 8850 Nodes?
Table 6-9
Field Descriptions for the Cards Tab (continued)
Category
Field Name
Description
Front, Back, and
Sec Back Card
Configuration
(continued)
Secondary
Description (RPM
only)
Secondary back card description.
Secondary Serial
Number (RPM
only)
Secondary back card serial number.
Secondary
Secondary back card hardware revision.
Hardware Revision
(RPM only)
Secondary
Firmware Revision
(RPM only)
Secondary back card firmware revision.
Secondary
Operational Status
(RPM only)
Secondary back card operational status.
Save Running
Config button
(RPM only)
Allows you to save any configuration changes on the router,
in order to keep those changes after a reboot.
Sys Description
System
Information (RPM Up Time
only)
Textual description of the system entity.
Time (in hundredths of a second) since the network
management portion of the system was last re-initialized.
Contact
ID and contact information of the contact person for this
managed node.
Node Name
Administratively assigned name for the managed node.
Location
Physical location of the node.
Services
Indicates a set of services that the system offers.
Entity Sensors,
Sensor Description
Entity Sensors Tab Sensor Type
Textual description of the sensor.
Type of data reported by the entSensorValue. This variable
is set by the agent at startup and the value does not change
during operation.
Sensor Scale
Indicates the exponent to apply to sensor values reported by
entSensorValue. This variable is set by the agent at startup
and the value does not change during operation.
Sensor Value
Reports the most recent measurement detected by the
sensor.
Sensor State
Indicates the present operational state of the sensor.
Cisco Media Gateway Manager 5.0 User Guide
6-18
OL-5461-02
Chapter 6
Configuring Hardware
How Do I Configure Cisco MGX 8880 and 8850 Nodes?
Table 6-9
Field Descriptions for the Cards Tab (continued)
Category
Field Name
Description
Entity Sensors,
Sensor Threshold
Tab
Threshold Index
Index that uniquely identifies an entry in the
entSensorThreshold table. This index permits the same
sensor to have several different thresholds.
Threshold Severity
Severity of this threshold.
Threshold Relation Relation between sens or value and threshold value,
required to trigger the alarm.
Card Information
(VISM-PR only)
Daughter Card
Information
(VISM-PR only)
Threshold Value
Value of the threshold.
Threshold
Evaluation
Result of the most recent evaluation of the threshold.
Threshold
Notification
Controls generation of entSensorThresholdNotification for
this threshold.
Slot Number
Slot number of the card.
Card Type
This object holds the type of the card, for processor module
as well as service module.
Card Change Type
Type of card change.
Daughter Card
Serial Number
The serial number is on the non-volatile RAM on the P
daughter card, entered by the manufacturer.
Daughter Card
Description
Describes the VISM-PR daughter card.
Daughter Card
Hardware (HW)
Revision
Hardware revision number for the daughter card.
6.4.4 Managing Node Peripherals
These tasks are used to manage peripherals:
•
6.4.4.1 Displaying IP Interfaces, page 6-19
•
6.4.4.2 Configuring Serial Interfaces, page 6-20
•
6.4.4.3 Displaying Sensors, page 6-23
6.4.4.1 Displaying IP Interfaces
Step 1
From the Domain Explorer window, select the node from the Hierarchy pane and choose
Configuration > MGX 8880/8850 MG > Configuration Center. The Configuration window for the
selected node opens.
Step 2
Click the Peripherals tab. The IP Interfaces option appears by default in the Category drop-down
arrow.
Cisco Media Gateway Manager 5.0 User Guide
OL-5461-02
6-19
Chapter 6
Configuring Hardware
How Do I Configure Cisco MGX 8880 and 8850 Nodes?
Figure 6-9
Step 3
Configuration Center—Peripherals Tab, IP Interfaces Category
(Optional) Click Refresh to refresh the table.
Note
For a description of all buttons within this tab, see section 6.2.3 Navigating Within Tables, page
6-9.
6.4.4.2 Configuring Serial Interfaces
Step 1
From the Domain Explorer window, select the node from the Hierarchy pane and choose
Configuration > MGX 8880/8850 MG > Configuration Center. The Configuration window for the
selected node opens.
Step 2
Click the Peripherals tab.
Step 3
Choose the Serial Interfaces option from the Category drop-down arrow.
Cisco Media Gateway Manager 5.0 User Guide
6-20
OL-5461-02
Chapter 6
Configuring Hardware
How Do I Configure Cisco MGX 8880 and 8850 Nodes?
Figure 6-10
Step 4
Configuration Center—Serial Interfaces Category
(Optional) Click Details to view or modify information about a selected controller. The Serial Interface
tab appears.
Note
For a description of all buttons within this table, see section 6.2.3 Navigating Within Tables,
page 6-9.
Cisco Media Gateway Manager 5.0 User Guide
OL-5461-02
6-21
Chapter 6
Configuring Hardware
How Do I Configure Cisco MGX 8880 and 8850 Nodes?
Figure 6-11
Configuration Center—Peripherals Tab, Serial Interface Tab
a.
Enter the Speed, and configure the Stop Bits and Parity, if applicable.
b.
Click Apply.
Note
Table 6-10 describes the fields in the Serial Interfaces tab.
For a description of all buttons within this tab, see section 6.2.3 Navigating Within Tables, page
6-9.
Cisco Media Gateway Manager 5.0 User Guide
6-22
OL-5461-02
Chapter 6
Configuring Hardware
How Do I Configure Cisco MGX 8880 and 8850 Nodes?
Table 6-10
Field Descriptions for the Serial Interfaces Tab
Field Name
Description
Port Index
Interface index of the port.
Speed (Bits Per Second)
The input speed of the port.
Stop bits
The number of stop bits on the port:
Parity
•
NA
•
one
•
two
•
oneAndHalf
•
dynamic
The port’s sense of a character parity bit:
•
NA
•
none
•
odd
•
even
•
mark
•
space
6.4.4.3 Displaying Sensors
Step 1
From the Domain Explorer window, select the node from the Hierarchy pane and choose
Configuration > MGX 8880/8850 MG > Configuration Center. The Configuration window for the
selected node opens.
Step 2
Click the Peripherals tab.
Step 3
Choose the Sensors option from the Category drop-down arrow.
Cisco Media Gateway Manager 5.0 User Guide
OL-5461-02
6-23
Chapter 6
Configuring Hardware
How Do I Configure Cisco MGX 8880 and 8850 Nodes?
Figure 6-12
Note
Step 4
Configuration Center—Peripherals Tab, Sensors Category
Table 6-11 describes the fields in the Sensors table.
(Optional) Click Refresh to refresh the table.
Note
For a description of all buttons within this tab, see section 6.2.3 Navigating Within Tables, page
6-9.
Table 6-11
Field Descriptions for the Sensors Table
Field Name
Description
Description
Specifies the type of environmental state, such as temperature, DC voltage,
bottom fan tray, and so forth.
Value
Reports the most recent measurement seen by the sensor.
Type
Indicates the type of data reported by the Value parameter. The variable is set
by the agent at start-up and the value does not change during operation.
Value Last Updated
Indicates the status of the value.
Value TimeStamp
Indicates the date and time of the value reported in the Value parameter.
Update Rate
Indicates the rate that the agent updates the Value parameter.
Cisco Media Gateway Manager 5.0 User Guide
6-24
OL-5461-02
Chapter 6
Configuring Hardware
How Do I Configure Cisco MGX 8880 and 8850 Nodes?
6.4.5 Viewing Node Controllers
Step 1
From the Domain Explorer window, select the node from the Hierarchy pane and choose
Configuration > MGX 8880/8850 MG > Configuration Center. The Configuration window for the
selected node opens.
Step 2
Click the Controllers tab.
Figure 6-13
Note
Step 3
Configuration Center—Controllers Tab
Table 6-12 describes fields in the Controllers table.
(Optional) Click any one of the following buttons:
•
Create to create a new controller
•
Details to view or modify information about a selected controller
•
Delete to delete a controller
•
Refresh to refresh the table
Cisco Media Gateway Manager 5.0 User Guide
OL-5461-02
6-25
Chapter 6
Configuring Hardware
How Do I Configure Cisco MGX 8880 and 8850 Nodes?
Table 6-12
Field Descriptions for the Controllers Table
Field Name
Description
Controller ID
Unique value for VSI controller (VSI master).
Controller Type
Identifies the controller type.
Controller Name
Name chosen by the user for the VSI controller.
Controller Shelf
Location
Identifies the location of the controller shelf.
Controller Location
Identifies the location of the controller.
6.4.6 Managing Node Clocking
On Cisco MGX 8850 (PXM1E) switches, clock source configuration is done on the PXM1E card and
passed to other nodes over PXM1E lines.
On Cisco MGX 8850 (PXM45) switches, clock source configuration is done on a PXM45 card, and clock
sourcing information is passed to other nodes over AXSM lines.
Cisco MGM supports the manual clock configuration method of network clock synchronization for the
Cisco MGX switches. Manual clock configuration configures both a primary and secondary clock
source, which are distributed throughout the network. The secondary clock source takes over if the
primary clock source fails. You can configure a network setup with one master clock source, and a
secondary to ensure network clock stability.
You can manage three types of node clocking:
•
6.4.6.1 Configuring Global Clocking, page 6-26
•
6.4.6.2 Viewing Available Clock Sources, page 6-27
•
6.4.6.3 Viewing or Creating Manual Clock Sources, page 6-28
6.4.6.1 Configuring Global Clocking
Step 1
From the Domain Explorer window, select the node from the Hierarchy pane and choose
Configuration > MGX 8880/8850 MG > Configuration Center. The Configuration window for the
selected node opens.
Step 2
Click the Clocking tab. The Global Clocking Configuration option appears by default in the Category
drop-down arrow.
Cisco Media Gateway Manager 5.0 User Guide
6-26
OL-5461-02
Chapter 6
Configuring Hardware
How Do I Configure Cisco MGX 8880 and 8850 Nodes?
Figure 6-14
Note
Configuration Center—Clocking Tab, Global Clocking Configuration Category
Table 6-13 describes fields in the Clocking tab.
Step 3
(Optional) Modify the fields as desired.
Step 4
(Optional) Click any one of the following buttons:
•
Apply—Applies any modifications or additions
•
Save As—Allows you to save the current parameters as a named template
•
Load From—Provides a list of templates to load parameters from
•
Refresh—Refreshes the data
6.4.6.2 Viewing Available Clock Sources
Step 1
From the Domain Explorer window, select the node from the Hierarchy pane and choose
Configuration > MGX 8880/8850 MG > Configuration Center. The Configuration window for the
selected node opens.
Step 2
Click the Clocking tab.
Step 3
Choose the Available Clock Sources option from the Category drop-down arrow.
Cisco Media Gateway Manager 5.0 User Guide
OL-5461-02
6-27
Chapter 6
Configuring Hardware
How Do I Configure Cisco MGX 8880 and 8850 Nodes?
Figure 6-15
Note
Step 4
Configuration Center—Clocking Tab, Available Clock Sources Category
Table 6-13 describes fields in the Clocking tab.
(Optional) Click Refresh to reload the table data.
Note
For a description of all buttons within this tab, see section 6.2.3 Navigating Within Tables, page
6-9.
6.4.6.3 Viewing or Creating Manual Clock Sources
Step 1
From the Domain Explorer window, select the node from the Hierarchy pane and choose
Configuration > MGX 8880/8850 MG > Configuration Center. The Configuration window for the
selected node opens.
Step 2
Click the Clocking tab.
Step 3
Choose the Manual Clock Sources option from the Category drop-down arrow.
Cisco Media Gateway Manager 5.0 User Guide
6-28
OL-5461-02
Chapter 6
Configuring Hardware
How Do I Configure Cisco MGX 8880 and 8850 Nodes?
Figure 6-16
Note
Step 4
Configuration Center—Clocking Tab, Manual Clock Sources Category
Table 6-13 describes fields in the Clocking tab.
To create a new clock source, proceed as follows:
a.
Click Create. Complete the following fields:
– Priority
– Clock Source Index
b.
Note
Click Apply.
For a description of all buttons within this tab, see section 6.2.3 Navigating Within Tables, page
6-9.
Cisco Media Gateway Manager 5.0 User Guide
OL-5461-02
6-29
Chapter 6
Configuring Hardware
How Do I Configure Cisco MGX 8880 and 8850 Nodes?
Table 6-13
Field Descriptions for the Clocking Tab
Category
Field Name
Description
Global Clocking
Configuration
Distribution Method
Method used to distribute the network
clock for the device.
Stratum
This variable contains the stratum level of
the node.
Max Diameter
The maximum possible height of a
network clock distribution tree in the
network.
Change Reason
Reason for the most recent change of a
source of network clock, as indicated by
the change in the value of
“ciscoWanChangeTimeStamp.”
Change Time
Value of sysUpTime when the most recent
change of a source of network clock
occurred.
Clock Source
Description of the clock source associated
with this entry.
Clock Index
Clock index number.
Clock Source
Description of the clock source associated
with this entry.
Type
Type of clock.
Available Clock
Sources
Manual Clock Sources Clock Source
table
Description of the clock source associated
with this entry.
Manual Clock Index
Manual clock index number.
Manual Source Priority
Manual source priority.
Health
Health of the clock source.
Manual Clock Sources Priority
Create window
Value used to configure an available
network clock source to be primary,
secondary, or default manual clock source.
Clock Source Index
An index value used to identify the
primary, secondary, or default manual
clock source.
Clock Source
Description of the clock source associated
with this entry.
Health
Health of the clock source.
Cisco Media Gateway Manager 5.0 User Guide
6-30
OL-5461-02
Chapter 6
Configuring Hardware
How Do I Create or Modify APS?
6.5 How Do I Create or Modify APS?
Automatic Protection Switching (APS) can be configured on SONET lines within SRME or AXSM and
VXSM OC-type cards.
If you are setting up APS on multiple cards, you must first set up an APS connector and then set up
redundancy on the node (for details on setting up redundancy, see 5.5.1 Configuring Card Redundancy,
page 5-49.)
Step 1
From the Domain Explorer window, select the node from the Hierarchy pane and choose
Configuration > MGX 8880/8850 MG > Configuration Center. The Configuration window for the
selected node opens.
Step 2
Double-click an AXSM, SRME or VXSM card.
Step 3
Click the Sonet Line APS tab. Within the Sonet Line APS tab, you can:
a.
Click Create to create a new Sonet Line APS
or
b.
Note
Select the line you want to modify, then click Details
The AXSM card is used in Figure 6-17 as an example.
Figure 6-17
Configuration Center—AXSM Sonet Line APS Tab
Step 4
Configure the fields.
Step 5
Click Apply to save any changes.
Cisco Media Gateway Manager 5.0 User Guide
OL-5461-02
6-31
Chapter 6
Configuring Hardware
How Do I Create or Modify APS?
Note
Table 6-27 describes fields in the Sonet Line APS tab.
For a description of all buttons within this tab, see section 6.2.3 Navigating Within Tables, page
6-9.
Table 6-14
Field Descriptions for the Sonet Line APS Tab
Field Name
Description
Working Bay
Working bay number.
Working Line
Working line number.
Protection Slot
Protection slot number.
Protection Bay
Protection bay number.
Protection Line
Protection line number.
APS Mode
Configures APS architecture mode on the working/protection line pairs.
Active Line
Indicates which line is active.
Signal Fault BER
Contains the bit error rate threshold for signal fault detection on the working
line.
Signal Degrade BER
Contains the bit error rate threshold for signal degrade detection on the
working line.
Switch Back Time
(minutes)
Contains interval (in minutes) to wait before attempting to switch back to the
working line.
Switching Direction
Configures the switching direction supported by this APS line.
APS Revertive
Configures the APS revertive or non-revertive option.
APS Operational
Direction
Shows the actual APS direction that is implemented on the Near End terminal.
APS Operational
Mode
Shows the actual APS architecture mode that is implemented on the Near End
terminal.
Channel Protocol
Allows configuration of APS channel protocol to be implemented at the Near
End terminal.
Line Failure Status
APS line failure status.
Line Switch Reason
APS line switch reason.
Working Section
Indicates which working section is the APS primary section.
Cisco Media Gateway Manager 5.0 User Guide
6-32
OL-5461-02
Chapter 6
Configuring Hardware
How Do I Configure AXSM Cards?
6.6 How Do I Configure AXSM Cards?
Figure 6-18
Process for Configuring AXSM Cards
Enable the
AXSM line
(Optional) Create or
modify APS
Create a port
Create a resource
partition
130001
Create
a connection
ATM Switch Service Module, or AXSM cards, can be configured in Cisco MGM by performing the
following steps:
Step 1
Enable the AXSM line—See the following sections:
•
For an OC-type AXSM card, see 6.6.1 Enabling SONET Lines for AXSM, page 6-34
or
•
For a T1-type AXSM card, see 6.6.2 Enabling DS1 Lines for AXSM, page 6-45
or
•
Step 2
For a T3-type AXSM card, see 6.6.3 Enabling DS3 Lines for AXSM, page 6-47
(Optional) Create or modify APS—See 6.6.4 Creating or Modifying AXSM Sonet Line APSs, page
6-53.
Cisco Media Gateway Manager 5.0 User Guide
OL-5461-02
6-33
Chapter 6
Configuring Hardware
How Do I Configure AXSM Cards?
Step 3
Create a port—See 6.6.5 Creating a Port for AXSM, page 6-55.
Step 4
Create a resource partition—See 6.6.6 Creating a Resource Partition for AXSM, page 6-57.
Step 5
Create a connection—For information on creating connections, see Chapter 7, “Provisioning
Connections.”
6.6.1 Enabling SONET Lines for AXSM
Step 1
From the Domain Explorer window, select the node from the Hierarchy pane and choose
Configuration > MGX 8880/8850 MG > Configuration Center. The Configuration window for the
selected node opens.
Step 2
Within the Elements tab, expand the node, then double-click an AXSM (OC) card.
Step 3
Click the Lines tab. Click on the line you want to enable, then click Details. The Line Config tab
appears, with the Sonet Line Config category selected by default.
Note
For details on the Ports tab, see section 6.6.5 Creating a Port for AXSM, page 6-55.
Figure 6-19
Configuration Center—AXSM Sonet Line Config Tab, Sonet Line Config Category
Cisco Media Gateway Manager 5.0 User Guide
6-34
OL-5461-02
Chapter 6
Configuring Hardware
How Do I Configure AXSM Cards?
Step 4
Choose the Up option from the Enable drop-down arrow.
Step 5
(Optional) Verify or modify additional fields, as desired.
Note
Table 6-15 describes fields in the AXSM Line Config tab, Sonet Line Config category.
For a description of all buttons within this tab, see section 6.2.3 Navigating Within Tables, page
6-9.
Table 6-15
Field Descriptions for the AXSM Line Config Tab, Sonet Line Config Category
Field Name
Description
Speed (Mbps)
An estimate of the interface’s current bandwidth in units of 1,000,000 bits per
second.
Enable
Desired state of the interface:
Loopback Type
•
up—enables the line
•
down—disables the line
Desired loopback mode configuration of the line:
•
noLoopback—Specifies no loopback state.
•
lineLocal—Signal sent at the line is looped back through the device.
•
lineRemote—Signal sent does not go through the device but is looped
back out.
Clock Source
Specifies the source of the transmit clock.
Frame Scramble
Enables or disables the scrambling option in the line.
Line Type
Configured line type.
Descriptor
Line descriptor.
Cisco Media Gateway Manager 5.0 User Guide
OL-5461-02
6-35
Chapter 6
Configuring Hardware
How Do I Configure AXSM Cards?
6.6.1.1 Configuring Sonet Medium Config
Step 1
Within the Line Config tab (see 6.6.1 Enabling SONET Lines for AXSM, page 6-34) choose the Sonet
Medium Config option from the Category drop-down arrow.
Figure 6-20
Note
Configuration Center—AXSM Sonet Line Config Tab, Sonet Medium Config Category
Table 6-16 describes fields in the AXSM Line Config tab, Sonet Medium Config category.
Step 2
Choose the appropriate option from the Medium Type drop-down arrow.
Step 3
Click Apply.
Note
For a description of all buttons within this tab, see section 6.2.3 Navigating Within Tables, page
6-9.
Cisco Media Gateway Manager 5.0 User Guide
6-36
OL-5461-02
Chapter 6
Configuring Hardware
How Do I Configure AXSM Cards?
Table 6-16
Field Descriptions for the AXSM Line Config Tab, Sonet Medium Config Category
Field Name
Description
Medium Type
Identifies whether a SONET or SDH signal is used across the interface.
Time Elapsed
Number of seconds (including partial seconds) elasped since the beginning of
the current measurement period.
Valid Intervals
Number of previous 15 minute intervals for which data was collected.
Line Coding
Describes the line coding for the interface signals:
•
sonetMediumOther
•
sonetMediumB3ZS
•
sonetMediumCMI
•
sonetMediumNRZ
•
sonetMediumRZ
Note
Line Type
Describes the line type for this interface:
•
sonetOther
•
sonetShortSingleMode
•
sonetLongSingleMode
•
sonetMultimode
•
sonetCoax
•
sonetUTP
Note
Circuit ID
The B3ZS and CMI are used for electrical SONET/SDH signals
(STS-1 and STS-3). The NRZ is used for the optical SONET/SDH
signals.
The line types are short-and long-range single-mode fiber or
multi-mode fiber interfaces, coax, and UTP for electrical interfaces.
The transmission vendor’s circuit identifier, for the purpose of facilitating
troubleshooting.
Note
The circuit identifier, if available, is also represented by
ifPhysAddress.
Cisco Media Gateway Manager 5.0 User Guide
OL-5461-02
6-37
Chapter 6
Configuring Hardware
How Do I Configure AXSM Cards?
6.6.1.2 Configuring the Sonet Line Alarm
Step 1
Within the Line Config tab (see 6.6.1 Enabling SONET Lines for AXSM, page 6-34) choose the Sonet
Line Alarm option from the Category drop-down arrow.
Figure 6-21
Note
Configuration Center—AXSM Line Config Tab, Sonet Line Alarm Category
Table 6-17 describes fields in the AXSM Line Config tab, Sonet Line Alarm category.
Step 2
Choose the appropriate option from the Alarm Severity drop-down arrow. Input the other fields with
data as desired.
Step 3
Click Apply.
Note
For a description of all buttons within this tab, see section 6.2.3 Navigating Within Tables, page
6-9.
Cisco Media Gateway Manager 5.0 User Guide
6-38
OL-5461-02
Chapter 6
Configuring Hardware
How Do I Configure AXSM Cards?
Note
The following thresholds are the same for Far End and Near End.
Table 6-17
Field Descriptions for the AXSM Line Config Tab, Sonet Line Alarm Category
Field Name
Description
Alarm Severity
Setting this option to major or minor raises a corresponding severity alarm
when any statistical threshold is exceeded.
Note
For alarm severity definitions, see Chapter 9, “Managing Faults.”
ESs Threshold
Threshold value for Errored Seconds detection for the current 15 minute
interval, above which an alarm is generated.
Total ESs Threshold
Threshold value for Errored Seconds detection for the 24 hour interval, above
which an alarm is generated.
SESs Threshold
Severely Errored Seconds threshold for the current 15 minute interval, above
which an alarm is generated.
Total SESs Threshold
Severely Errored Seconds threshold for the 24 hour interval, above which an
alarm is generated.
CVs Threshold
Coding Violations threshold for the current 15 minute interval, above which
an alarm is generated.
Total CVs Threshold
Coding Violations threshold for the 24 hour interval, above which an alarm is
generated.
UASs Threshold
Unavailable Seconds threshold for the current 15 minute interval, above which
an alarm is generated.
Total UASs Threshold Unavailable Seconds threshold for the 24 hour interval, above which an alarm
is generated.
Line Alarm State
Current alarm status of the line.
Line Stat Alarm State
Indicates the line stat alarm status.
Cisco Media Gateway Manager 5.0 User Guide
OL-5461-02
6-39
Chapter 6
Configuring Hardware
How Do I Configure AXSM Cards?
6.6.1.3 Configuring the Sonet Section Alarm
Step 1
Within the Line Config tab (see 6.6.1 Enabling SONET Lines for AXSM, page 6-34) choose the Sonet
Section Alarm option from the Category drop-down arrow.
Figure 6-22
Note
Configuration Center—AXSM Line Config Tab, Sonet Section Alarm Category
Table 6-18 describes fields in the AXSM Line Config tab, Sonet Section Alarm category.
Step 2
Choose the appropriate option from the Alarm Severity drop-down arrow. Input the other fields with
data as desired.
Step 3
Click Apply.
Note
For a description of all buttons within this tab, see section 6.2.3 Navigating Within Tables, page
6-9.
Cisco Media Gateway Manager 5.0 User Guide
6-40
OL-5461-02
Chapter 6
Configuring Hardware
How Do I Configure AXSM Cards?
Note
The following thresholds are the same for Far End and Near End.
Table 6-18
Field Descriptions for the AXSM Line Config Tab, Sonet Section Alarm Category
Field Name
Description
Alarm Severity
Setting this option to major or minor raises a corresponding severity alarm
when any statistical threshold is exceeded.
Note
For alarm severity definitions, see Chapter 9, “Managing Faults.”
ESs Threshold
Threshold value for Errored Seconds detection for the current 15 minute
interval, above which an alarm is generated.
Total ESs Threshold
Threshold value for Errored Seconds detection for the 24-hour interval, above
which an alarm is generated.
SESs Threshold
Severely Errored Seconds threshold for the current 15 minute interval, above
which an alarm is generated.
Total SESs Threshold
Severely Errored Seconds threshold for the 24 hour interval, above which an
alarm is generated.
SEFSs Threshold
Severely Errored Framing Seconds threshold for the current 15 minute
interval, above which an alarm is generated.
Total SEFSs
Threshold
Severely Errored Framing Seconds threshold for the 24 hour interval, above
which an alarm is generated.
CVs Threshold
Coding Violations threshold for the current 15 minute interval, above which
an alarm is generated.
Total CVs Threshold
Coding Violations threshold for the 24 hour interval, above which an alarm is
generated.
Section Alarm State
Current alarm status of the section.
Section Stat Alarm
State
Indicates the section stat alarm status of the interface.
Cisco Media Gateway Manager 5.0 User Guide
OL-5461-02
6-41
Chapter 6
Configuring Hardware
How Do I Configure AXSM Cards?
6.6.1.4 Configuring the Sonet Path Alarm
Step 1
Within the Line Config tab (see 6.6.1 Enabling SONET Lines for AXSM, page 6-34) choose the Sonet
Path Alarm option from the Category drop-down arrow.
Figure 6-23
Note
Configuration Center—AXSM Line Config Tab, Sonet Path Alarm Category
Table 6-19 describes fields in the AXSM Line Config tab, Sonet Path Alarm category.
Step 2
Choose the appropriate option from the Alarm Severity drop-down arrow. Input the other fields with
data as desired.
Step 3
Click Apply.
Note
For a description of all buttons within this tab, see section 6.2.3 Navigating Within Tables, page
6-9.
Cisco Media Gateway Manager 5.0 User Guide
6-42
OL-5461-02
Chapter 6
Configuring Hardware
How Do I Configure AXSM Cards?
Note
The following thresholds are the same for Far End and Near End.
Table 6-19
Field Descriptions for the AXSM Line Config Tab, Sonet Path Alarm Category
Field Name
Description
Alarm Severity
Setting this option to major or minor raises a corresponding severity alarm
when any statistical threshold is exceeded. By default, TCA crossing does not
raise any alarm.
For alarm severity definitions, see Chapter 9, “Managing Faults.”
ESs Threshold
Threshold value for Errored Seconds (ES) detection for the current 15 minute
interval, above which an alarm is generated. This threshold is the same for Far
End and Near End.
Total ESs Threshold
Threshold value for Errored Seconds detection for the 24-hour interval, above
which an alarm is generated.
SESs Threshold
Severely Errored Seconds threshold for the current 15 minute interval, above
which an alarm is generated.
Total SESs Threshold
Severely Errored Seconds threshold for the 24 hour interval, above which an
alarm is generated.
CVs Threshold
Coding Violations threshold for the current 15 minute interval, above which
an alarm is generated.
Total CVs Threshold
Coding Violations threshold for the 24 hour interval, above which an alarm is
generated.
UASs Threshold
Unavailable Seconds threshold for the current 15 minute interval, above which
an alarm is generated.
Total UASs Threshold Unavailable Seconds threshold for the 24 hour interval, above which an alarm
is generated.
Path Alarm State
Current alarm status of the path.
Path Stat Alarm State
Indicates the path stat alarm status of the interface.
Cisco Media Gateway Manager 5.0 User Guide
OL-5461-02
6-43
Chapter 6
Configuring Hardware
How Do I Configure AXSM Cards?
6.6.1.5 Configuring the ATM Cell Layer
Step 1
Within the Line Config tab (see 6.6.1 Enabling SONET Lines for AXSM, page 6-34) choose the ATM
Cell Layer option from the Category drop-down arrow.
Figure 6-24
Note
Configuration Center—AXSM Line Config Tab, ATM Cell Layer Category
Table 6-20 describes fields in the AXSM Line Config tab, ATM Cell Layer category.
Step 2
Choose the appropriate options from the HEC Coset Enable and Payload Scrambling drop-down
arrows.
Step 3
Click Apply.
Note
For a description of all buttons within this tab, see section 6.2.3 Navigating Within Tables, page
6-9.
Cisco Media Gateway Manager 5.0 User Guide
6-44
OL-5461-02
Chapter 6
Configuring Hardware
How Do I Configure AXSM Cards?
Table 6-20
Field Descriptions for the AXSM Line Config Tab, ATM Cell Layer Category
Field Name
Description
Cell Layer Description This string should include the name of the manufacturer, the product name,
and the version of the hardware interface.
Status
Current operational state of the interface. The testing state indicates that no
operational packets can be passed.
Null Cell Header
The first four bytes of the ATM header to be used for null cells.
Null Cell Payload
Null cell payload definition. The default value is 106 (0x6A).
HEC Coset Enable
If enabled, the algorithm of Coset Polynomial Addition is applied to do header
error check calculations. It applies to transmitted as well as received cells.
Payload Scrambling
Indicates whether payload scrambling is enabled.
6.6.2 Enabling DS1 Lines for AXSM
Step 1
From the Domain Explorer window, select the node from the Hierarchy pane and choose
Configuration > MGX 8880/8850 MG > Configuration Center. The Configuration window for the
selected node opens.
Step 2
Within the Elements tab, expand the node, then double-click an AXSM (T1E1) card.
Step 3
Click the Lines tab. Click on the line you want to enable, then click Details. The Line Config tab
appears.
Note
For details on the Ports tab, see section 6.6.5 Creating a Port for AXSM, page 6-55.
Cisco Media Gateway Manager 5.0 User Guide
OL-5461-02
6-45
Chapter 6
Configuring Hardware
How Do I Configure AXSM Cards?
Figure 6-25
Configuration Center—AXSM DS1 Line Config Tab
Step 4
Choose the Up option from the Admin Status drop-down arrow.
Step 5
(Optional) Verify or modify additional fields, as desired.
Note
Table 6-21 describes fields in the AXSM DS1 Line Config tab.
For a description of all buttons within this tab, see section 6.2.3 Navigating Within Tables, page
6-9.
Table 6-21
Field Descriptions for the AXSM DS1 Line Config Tab
Field Name
Description
Admin Status
Desired state of the interface.
Time Elapsed
Number of seconds that have elapsed since the beginning of the near end
current error measurement period.
Valid Intervals
Number of previous near end intervals for which data was collected.
Line Type
Configured line type.
Line Coding
Type of zero code suppression used on this interface.
Loopback Config
Desired loopback configuration.
Line Status
Line status of interface.
Transmit Clock
Source
Source of transmit clock.
Cisco Media Gateway Manager 5.0 User Guide
6-46
OL-5461-02
Chapter 6
Configuring Hardware
How Do I Configure AXSM Cards?
Table 6-21
Field Descriptions for the AXSM DS1 Line Config Tab (continued)
Field Name
Description
Line Length (meters)
Length of the DS1 line. Only useful if the interface has configurable line build
out circuitry.
Loopback Status
Current state of loopback on the DS1 interface.
Descriptor
Line descriptor.
6.6.3 Enabling DS3 Lines for AXSM
Step 1
From the Domain Explorer window, select the node from the Hierarchy pane and choose
Configuration > MGX 8880/8850 MG > Configuration Center. The Configuration window for the
selected node opens.
Step 2
Within the Elements tab, expand the node, then double-click an AXSM (T3E3) card.
Step 3
Click the Lines tab. Click on the line you want to enable, then click Details. The Line Config tab
appears, with the Line Config category selected by default.
Note
For details on the Ports tab, see section 6.6.5 Creating a Port for AXSM, page 6-55.
Figure 6-26
Configuration Center—AXSM DS3 Line Config Tab, Line Config Category
Cisco Media Gateway Manager 5.0 User Guide
OL-5461-02
6-47
Chapter 6
Configuring Hardware
How Do I Configure AXSM Cards?
Step 4
Choose the Up option from the Interface Status drop-down arrow.
Step 5
(Optional) Verify or modify additional fields, as desired.
Note
Table 6-22 describes fields in the AXSM DS3 Line Config tab, Line Config category.
For a description of all buttons within this tab, see section 6.2.3 Navigating Within Tables, page
6-9.
Table 6-22
Field Descriptions for the AXSM DS3 Line Config Tab, Line Config Category
Field Name
Description
CDSX3 Line Type
Type of DS3 C-bit or E3 application implementing this interface.
DSX3 Line Type
Type of DS3 C-bit or E3 application implementing this interface.
Interface Status
State of the interface.
Alarm Indication
Signal Bits
When check is set, the Alarm Indication Signal (AIS) is declared when
“1010...”b is found and C-bits are all zero. When ignore is set, an AIS
condition is declared when “1010...”b is detected irrespective of the state of
the C-bits.
Rcv FEAC Validation
Specifies the Far End Alarm and Control (FEAC) code validation criteria.
Out of Frame Criteria
Specifies the Out of Frame decision criteria.
Time Elapsed Seconds Number of seconds that have elapsed since the beginning of the near end
current error measurement period.
Valid Intervals
Number of previous near end intervals for which data was collected. This
value will be 96 unless the interface was brought online within the last 24
hours, in which case the value will be the number of complete 15 minute near
end intervals since the interface has been online.
Line Coding
Type of zero code suppression used on this interface.
Send Code Type
Type of code that is being sent across the DS3/E3 interface by the device.
Circuit Identifier
Variable contains the transmission vendor’s circuit identifier, to facilitate
troubleshooting.
Loopback
Configuration
Represents the desired loopback configuration of the DS/E3 interface.
dsx3NoLoop means not in the loopback state. Additional values include:
•
dsx3PayLoadLoop
•
dsx3LineLoop
•
dsx3OtherLoop
•
dsx3InwardLoop
•
dsx3DualLoop
Interface Line Status
Line status of the interface.
Transmit Clock
Source
Source of the transmit clock.
Cisco Media Gateway Manager 5.0 User Guide
6-48
OL-5461-02
Chapter 6
Configuring Hardware
How Do I Configure AXSM Cards?
Table 6-22
Field Descriptions for the AXSM DS3 Line Config Tab, Line Config Category
(continued)
Field Name
Description
Invalid Intervals
Number of intervals in the range from 0 to dsx3ValidIntervals for which no
data is available.
Line Length (meters)
Length of the DS3 line.
Descriptor
Line descriptor.
6.6.3.1 Setting Up Statistical Alarm Severity
Step 1
Within the AXSM DS3 Line Config tab (for details, see 6.6.3 Enabling DS3 Lines for AXSM, page
6-47) select the 15 Min Alarm Config option in the Category drop-down arrow.
Step 2
Choose the Statistical Alarm Severity level from the drop-down arrow. Values include:
Step 3
•
none
•
minor
•
major
Configure additional fields as desired.
Note
Step 4
Table 6-23 describes fields in the AXSM DS3 Line Config tab, 15 Min Alarm Config category.
Click Apply to set up the statistical alarm severity.
Note
For a description of all buttons within this tab, see section 6.2.3 Navigating Within Tables, page
6-9.
Table 6-23
Field Descriptions for the AXSM DS3 Line Config Tab, 15 Min Alarm Config Category
Field Name
Description
Statistical Alarm
Severity
Sets up the severity of any of the statistical alarms.
DS3 Line Statistics
Alarm
Bitmap of the DS3 line statistical alarms.
Cisco Media Gateway Manager 5.0 User Guide
OL-5461-02
6-49
Chapter 6
Configuring Hardware
How Do I Configure AXSM Cards?
Table 6-23
Field Descriptions for the AXSM DS3 Line Config Tab, 15 Min Alarm Config Category
(continued)
Field Name
Description
15 Min LCV
Threshold
If this value is exceeded in a 15 minute window, a statistical alarm will be
declared.
15 Min LES Threshold
15 Min PCV
Threshold (only for
T3)
15 Min PES Threshold
(only for T3)
15 Min PSES
Threshold (only for
T3)
15 Min SEFS
Threshold
15 Min UAS
Threshold
15 Min CCV
Threshold (only for
T3)
15 Min CES
Threshold (only for
T3)
15 Min CSES
Threshold (only for
T3)
6.6.3.2 Setting Up the DSX3 24 Hour Alarm
Step 1
Within the AXSM DS3 Line Config tab (for details, see 6.6.3 Enabling DS3 Lines for AXSM, page
6-47) choose the Dsx3 24 Hr Alarm Config option from the Category drop-down arrow.
Step 2
Configure fields as desired.
Note
Step 3
Table 6-24 describes fields in the AXSM DS3 Line Config tab, Dsx3 24 Hr Alarm Config
category.
Click Apply to set up the DSX3 24 hour alarm configuration.
Note
For a description of all buttons within this tab, see section 6.2.3 Navigating Within Tables, page
6-9.
Cisco Media Gateway Manager 5.0 User Guide
6-50
OL-5461-02
Chapter 6
Configuring Hardware
How Do I Configure AXSM Cards?
Table 6-24
Field Descriptions for the AXSM DS3 Line Config Tab, Dsx3 24 Hr Alarm Config
Category
Field Name
Description
24 Hr LCV Threshold If this value is exceeded in a sliding 24 hour window, a statistical alarm will
24 Hr LES Threshold be declared. The threshold is checked every 15 minutes for the preceding 24
hour interval.
24 Hr PCV Threshold
(only for T3)
24 Hr PES Threshold
(only for T3)
24 Hr PSES Threshold
(only for T3)
24 Hr SEFS Threshold
24 Hr UAS Threshold
24 Hr CCV Threshold
(only for T3)
24 Hr CES Threshold
(only for T3)
24 Hr CSES Threshold
(only for T3)
6.6.3.3 Setting Up the ATM Cell Layer
Step 1
Within the AXSM DS3 Line Config tab (for details, see 6.6.3 Enabling DS3 Lines for AXSM, page
6-47) choose the ATM Cell Layer option from the Category drop-down arrow.
Step 2
Configure fields as desired.
Note
Step 3
Table 6-25 describes fields in the AXSM DS3 Line Config tab, ATM Cell Layer category.
Click Apply to set up the ATM cell layer configuration.
Note
For a description of all buttons within this tab, see section 6.2.3 Navigating Within Tables, page
6-9.
Cisco Media Gateway Manager 5.0 User Guide
OL-5461-02
6-51
Chapter 6
Configuring Hardware
How Do I Configure AXSM Cards?
Table 6-25
Field Descriptions for the AXSM DS3 Line Config Tab, ATM Cell Layer Category
Field Name
Description
Cell Layer Description This string should include the name of the manufacturer, the product name and
the version of the hardware interface.
Status
Current operational state of the interface. The testing state indicates that no
operational packets can be passed.
Null Cell Header
First four bytes of the ATM header to be used for null cells.
Null Cell Payload
Null cell payload definition. Default value is 0x6A.
HEC Coset Enable
If set to true, the algorithm of Coset Polynomial Addition is applied to perform
header error check calculations. Applies to transmitted and received cells.
Payload Scrambling
Indicates whether payload scrambling is enabled or not.
6.6.3.4 Setting Up the Plcp Statistical Alarm Severity
Step 1
Within the AXSM DS3 Line Config tab (for details, see 6.6.3 Enabling DS3 Lines for AXSM, page
6-47) choose the Plcp Alarm option from the Category drop-down arrow.
Step 2
Choose the Plcp Statistical Alarm Severity level from the drop-down arrow. Values include:
Step 3
•
none
•
minor
•
major
Configure additional fields as desired.
Note
Step 4
Table 6-26 describes fields in the AXSM DS3 Line Config tab, Plcp Alarm category.
Click Apply to set up the Plcp statistical alarm severity.
Note
For a description of all buttons within this tab, see section 6.2.3 Navigating Within Tables, page
6-9.
Cisco Media Gateway Manager 5.0 User Guide
6-52
OL-5461-02
Chapter 6
Configuring Hardware
How Do I Configure AXSM Cards?
Table 6-26
Field Descriptions for the AXSM DS3 Line Config Tab, Plcp Alarm Category
Field Name
Description
Plcp Statistical Alarm Severity of PLCP statistical alarm.
Severity
15 Min BIP8Cv
Threshold
If this value is exceeded in a 15 minute or sliding 24 hour window, a statistical
alarm will be declared.
24 Hr BIP8Cv
Threshold
15 Min BIP8ES
Threshold
24 Hr BIP8ES
Threshold
15 Min BIP8SES
Threshold
24 Hr BIP8SES
Threshold
15 Min BIP8SEFS
Threshold
24 HR BIP8SEFS
Threshold
15 Min BIP8UAS
Threshold
24 Hr BIP8UAS
Threshold
Plcp Line Alarm
Status
Bitmap of the DS3 line alarms.
Plcp Line Stat Alarm
State
Bitmap of the DS3 Plcp line statistical alarms.
6.6.4 Creating or Modifying AXSM Sonet Line APSs
You can configure the SONET line to have Automatic Protection Switching (APS). SRM or AXSME
cards can be configured for APS.
If you are setting up APS on multiple cards, you must first set up an APS connector and then set up
redundancy on the node (for details on setting up redundancy, see 5.5.1 Configuring Card Redundancy,
page 5-49.)
Note
This tab is only applicable for OC-type AXSM cards, and not T3 or T1-type AXSM cards.
Step 1
From the Domain Explorer window, select the node from the Hierarchy pane and choose
Configuration > MGX 8880/8850 MG > Configuration Center. The Configuration window for the
selected node opens.
Step 2
Double-click an AXSM card.
Cisco Media Gateway Manager 5.0 User Guide
OL-5461-02
6-53
Chapter 6
Configuring Hardware
How Do I Configure AXSM Cards?
Step 3
Click the AXSM Sonet Line APS tab. Within the Sonet Line APS tab, you can:
a.
Click Create to create a new Sonet Line APS
or
b.
Select the line you want to modify, then click Details
Figure 6-27
Configuration Center—AXSM Sonet Line APS Tab
Step 4
Configure the fields.
Step 5
Click Apply to save any changes.
Note
Table 6-27 describes fields in the AXSM Sonet Line APS tab.
For a description of all buttons within this tab, see section 6.2.3 Navigating Within Tables, page
6-9.
Table 6-27
Field Descriptions for the AXSM Sonet Line APS Tab
Field Name
Description
Working Bay
Working bay number.
Working Line
Working line number.
Protection Slot
Protection slot number.
Protection Bay
Protection bay number.
Protection Line
Protection line number.
Cisco Media Gateway Manager 5.0 User Guide
6-54
OL-5461-02
Chapter 6
Configuring Hardware
How Do I Configure AXSM Cards?
Table 6-27
Field Descriptions for the AXSM Sonet Line APS Tab (continued)
Field Name
Description
APS Mode
Configures APS architecture mode on the working/protection line pairs.
Active Line
Indicates which line is active.
Signal Fault BER
Contains the bit error rate threshold for signal fault detection on the working
line.
Signal Degrade BER
Contains the bit error rate threshold for signal degrade detection on the
working line.
Switch Back Time
(minutes)
Contains interval (in minutes) to wait before attempting to switch back to the
working line.
Switching Direction
Configures the switching direction supported by this APS line.
APS Revertive
Configures the APS revertive or non-revertive option.
APS Operational
Direction
Shows the actual APS direction that is implemented on the Near End terminal.
APS Operational
Mode
Shows the actual APS architecture mode that is implemented on the Near End
terminal.
Channel Protocol
Allows configuration of APS channel protocol to be implemented at the Near
End terminal.
Line Failure Status
APS line failure status.
Line Switch Reason
APS line switch reason.
Working Section
Indicates which working section is the APS primary section.
6.6.5 Creating a Port for AXSM
Step 1
From the Domain Explorer window, select the node from the Hierarchy pane and choose
Configuration > MGX 8880/8850 MG > Configuration Center. The Configuration window for the
selected node opens.
Step 2
Within the Elements tab, expand the node, and expand the AXSM card. Double-click the line you want
to create a port under.
Step 3
Click the Ports tab, then click Create. The Port Config tab appears.
Cisco Media Gateway Manager 5.0 User Guide
OL-5461-02
6-55
Chapter 6
Configuring Hardware
How Do I Configure AXSM Cards?
Figure 6-28
Step 4
Complete the active fields as desired.
Note
Step 5
Configuration Center—AXSM Port Config Tab
Table 6-28 describes fields in the AXSM Port Config tab.
Click Apply.
Note
For a description of all buttons within this tab, see section 6.2.3 Navigating Within Tables, page
6-9.
Table 6-28
Field Descriptions for the AXSM Port Config Tab
Field Name
Description
Virtual Port
Unique value for the ATM virtual interface.
Row Status
Status of the row.
Max Cell Rate
ATM virtual interface’s max cell rate.
Min Cell Rate
ATM virtual interface’s guaranteed cell rate.
SCT ID
ID of the file that holds module-specific configuration parameters for this
ATM virtual interface.
Cisco Media Gateway Manager 5.0 User Guide
6-56
OL-5461-02
Chapter 6
Configuring Hardware
How Do I Configure AXSM Cards?
Table 6-28
Field Descriptions for the AXSM Port Config Tab (continued)
Field Name
Description
Interface Type
Type of ATM virtual interface that can be configured within a physical
interface. Values include:
•
uni
•
nni
•
vnni
•
vuni
•
evuni
•
evnni
Vpi No (VUNI/VNNI) Vpi number.
Min Vpi No
(EVUNI/EVNNI)
Minimum Vpi number.
Max Vpi No
(EVUNI/EVNNI)
Maximum Vpi number.
Descriptor
Port descriptor.
6.6.6 Creating a Resource Partition for AXSM
Step 1
From the Domain Explorer window, select the node from the Hierarchy pane and choose
Configuration > MGX 8880/8850 MG > Configuration Center. The Configuration window for the
selected node opens.
Step 2
Within the Elements tab, expand the node, the AXSM card, and the AXSM line. Double-click the port
you want to create a resource partition on.
Step 3
Click the Resource Partitions tab, then click Create.
Cisco Media Gateway Manager 5.0 User Guide
OL-5461-02
6-57
Chapter 6
Configuring Hardware
How Do I Configure AXSM Cards?
Figure 6-29
Step 4
Configuration Center—AXSM Resource Partitions Tab, ATM Resource Partition
Category
Input or modify the data as desired, then click Apply.
Note
Table 6-29 describes fields in the AXSM Resource Partitions tab, ATM Resource Partition
category.
For a description of all buttons within this tab, see section 6.2.3 Navigating Within Tables, page
6-9.
Table 6-29
Field Descriptions for the AXSM Resource Partitions Tab, ATM Resource Partition
Category
Field Name
Description
Resource Partition ID
Resource partition identifier.
Controller ID
Controller identifier.
Egress Guaranteed BW
Guaranteed percentage bandwidth reserved for the resource partition in
egress direction. Range is 0 to 1000000.
Egress Max BW
Maximum percentage bandwidth for the resource partition in egress
direction. Range is 0 to 1000000.
Ingress Guaranteed BW
Guaranteed percentage bandwidth reserved for the resource partition in
ingress direction. Range is 0 to 1000000.
Cisco Media Gateway Manager 5.0 User Guide
6-58
OL-5461-02
Chapter 6
Configuring Hardware
How Do I Configure AXSM Cards?
Table 6-29
Field Descriptions for the AXSM Resource Partitions Tab, ATM Resource Partition
Category (continued)
Field Name
Description
Ingress Max BW
Maximum percentage bandwidth for the resource partition in ingress
direction. Range is 0 to 1000000.
Min VPI
Beginning of the VPI range for this partition.
Max VPI
End of the VPI range for this partition.
Min VCI
Beginning of the VCI range for this partition.
Max VCI
End of the VCI range for this partition.
Min Connections
Guaranteed number of connections that can be configured on this
partition.
Max Connections
Maximum number of connections that can be configured on this
partition.
Egress BW Used
Percentage bandwidth used by the resource partition in egress direction.
Egress BW Avail
Percentage bandwidth available on the resource partition in egress
direction.
Ingress BW Used
Percentage bandwidth used by the resource partition in ingress
direction.
Ingress BW Avail
Percentage bandwidth available on the resource partition in ingress
direction.
Used Connections
Number of connections currently in use on this partition.
Avail Connections
Number of connections available that can be added on this partition.
Cisco Media Gateway Manager 5.0 User Guide
OL-5461-02
6-59
Chapter 6
Configuring Hardware
How Do I Configure AXSM Cards?
6.6.6.1 Modifying ILMI Configuration
Step 1
Within the AXSM Resource Partitions tab (see 6.6.6 Creating a Resource Partition for AXSM, page
6-57) choose the ILMI Configuration option from the Category drop-down arrow.
Figure 6-30
Step 2
Configuration Center—AXSM Resource Partitions Tab, ILMI Configuration Category
Choose the appropriate options from the ILMI Enabled and ILMI Trap Enable drop-down arrows, and
modify data as desired. Click Apply.
Note
Table 6-30 describes fields in the AXSM Resource Partitions tab, ILMI Configuration category.
For a description of all buttons within this tab, see section 6.2.3 Navigating Within Tables, page
6-9.
Table 6-30
Field Descriptions for the AXSM Resource Partitions Tab, ILMI Configuration
Category
Field Name
Description
ILMI Enabled
Indicates if ILMI signalling is enabled or disabled.
Signalling Vpi
Vpi on which signalling cells arrive.
Signalling Vci
Vci on which signalling cells arrive.
ILMI Trap Enable
Indicates if ILMI trap generation is enabled or disabled.
Cisco Media Gateway Manager 5.0 User Guide
6-60
OL-5461-02
Chapter 6
Configuring Hardware
How Do I Configure VXSM Cards?
Table 6-30
Field Descriptions for the AXSM Resource Partitions Tab, ILMI Configuration Category
(continued)
Field Name
Description
ILMI Est Conn Poll
Intervals
Time S between successive transmissions of ILMI messages on this interface
for the purpose of detecting establishment of ILMI connectivity.
ILMI Connect Poll
Intvl
Time T between successive transmissions of ILMI messages on this interface
for the purpose of detecting loss of ILMI connectivity.
ILMI Poll Conn Inact
Factor
Number K of consecutive polls on this interface for which no ILMI response
message is received before ILMI connectivity is declared lost.
6.7 How Do I Configure VXSM Cards?
Tip
For more detailed information on VXSM configuration, refer to the Cisco Voice Switch Services (VXSM)
Configuration Guide and Command Reference for MGX Switches and Media Gateways, Release 5.
The Cisco MGX 8880 and 8850 support the Voice Switch Service Module (VXSM) card, which
functions as a media gateway (MG) and can be configured to meet the requirements of a variety of
applications. For Voice over IP (VoIP) switching applications, the voice Time Division Multiplexed
(TDM) interface, packet network interface, and the interface to the media gateway controller (MGC or
call agent must be configured.
Cisco Media Gateway Manager 5.0 User Guide
OL-5461-02
6-61
Chapter 6
Configuring Hardware
How Do I Configure VXSM Cards?
Figure 6-31
Process for Configuring VXSM Cards
Create
a resource partition
Create AAL5+control
connections
(Optional) Enable the
mapping mode
Create and assign an IP
address for the connection
Configure voice interfaces
Check for existing
VIFs
Create a VIF
View or modify VIF
configuration
Configure the TDM interface
Enable SONET/SDH
lines and paths
(Optional) Change
the line type to SDH
Configure the MG and MGC
interfaces
130014
Configure
VXSM features
Cisco Media Gateway Manager 5.0 User Guide
6-62
OL-5461-02
Chapter 6
Configuring Hardware
How Do I Configure VXSM Cards?
To configure VXSM cards, you must perform the following steps:
Step 1
Create a resource partition—See 6.7.1 Creating a Resource Partition for VXSM, page 6-63.
Step 2
Create AAL5+control VXSM connections—See Chapter 7, “Provisioning Connections.”
Step 3
(Optional, for OC3 cards only) Enable the mapping mode—See 6.7.2 Enabling the Mapping Mode for
VXSM, page 6-65
Step 4
Create and assign an IP address for the connection—See 6.7.3 Creating and Assigning an IP Address
for the Connection, page 6-66.
Step 5
Configure the TDM interface—See 6.7.4 Configuring the Time-Division Multiplexing Interface for
VXSM, page 6-67.
Step 6
Configure voice interfaces (VIs)—See 6.7.5 Configuring Voice Interfaces, page 6-74.
Step 7
Configure the Media Gateway (MG) and Media Gateway Controller (MGC) interface using H.248 or
XGCP protocol—See 6.7.6 Configuring MG-MGC Interfaces, page 6-77.
Step 8
(Optional) Configure VXSM features—See 6.7.7 How Do I Configure VXSM Features?, page 6-101.
6.7.1 Creating a Resource Partition for VXSM
Step 1
From the Domain Explorer window, choose Configuration > MGX 8880/8850 MG > Configuration
Center.
Step 2
Under the Elements tab, within the node, double-click the VXSM card.
Step 3
Click the Port tab to display the entries of the port table.
Step 4
Select the port entry.
Step 5
Click Details.
Step 6
Click the Resource Partitions tab to display the resource partitions table.
Step 7
Click Create. The Create Resource Partitions window appears.
Cisco Media Gateway Manager 5.0 User Guide
OL-5461-02
6-63
Chapter 6
Configuring Hardware
How Do I Configure VXSM Cards?
Figure 6-32
Step 8
Configure the fields.
Note
Step 9
Configuration Center—VXSM Create Resource Partitions Window
Table 6-31 describes fields in the VXSM Create Resource Partitions window.
Click Apply to create the resource partition.
Table 6-31
Field Descriptions for the VXSM Create Resource Partitions Window
Field Name
Description
Resource Partition ID
Value for the resource partition identifier. The range is from 1-10. The value
1 is reserved for PNNI.
Controller ID
Value for the controller identifier. The range is from 2-255. The value 2 is
reserved for PNNI.
Egress Guaranteed
BW
Guaranteed percentage bandwidth reserved for the resource partition in egress
direction. The range is from 0-1000000.
Egress Max BW
Maximum percentage bandwidth for the resource partition in egress direction.
The range is from 0-1000000.
Ingress Guaranteed
BW
Guaranteed percentage bandwidth reserved for the resource partition in
ingress direction. The range is from 0-1000000.
Ingress Max BW
Maximum percentage bandwidth for the resource partition in ingress
direction. The range is from 0-1000000.
Cisco Media Gateway Manager 5.0 User Guide
6-64
OL-5461-02
Chapter 6
Configuring Hardware
How Do I Configure VXSM Cards?
Table 6-31
Field Descriptions for the VXSM Create Resource Partitions Window (continued)
Field Name
Description
Min VPI
Beginning of the VPI range for this partition. For RPM VCC partitions, the
range is 0-0. For RPM VPC partitions, the range is 1-255. For VXSM, the
range is 0-255.
Max VPI
End of the VPI range for this partition. For RPM VCC partitions, the range is
0-0. For RPM VPC partitions, the range is 1-255. For VXSM, the range is
0-255.
Min VCI
Beginning of the VCI range for this partition. For VXSM, the range is
1-65535.
Max VCI
End of the VCI range for this partition. For VXSM, the range is 1-65535.
Min Connections
Guaranteed number of connections that can be configured on this partition.
For VXSM, the range is 1-8100.
Max Connections
Maximum number of connections that can be configured on this partition. For
VXSM, the range is 1-8100.
Egress BW Used
Percentage bandwidth used by the resource partition in egress direction.
Egress BW Avail
Percentage bandwidth available on the resource partition in egress direction.
Ingress BW Used
Percentage bandwidth used by the resource partition in ingress direction.
Ingress BW Avail
Percentage bandwidth available on the resource partition in ingress direction.
Used Connections
Number of connections currently in use on this partition.
Avail Connections
Number of connections available that can be added on this partition.
6.7.2 Enabling the Mapping Mode for VXSM
Step 1
From the Domain Explorer window, choose Configuration > MGX 8880/8850 MG > Configuration
Center.
Step 2
Under the Elements tab, within the node, double-click the VXSM card.
Step 3
Click the Media Gateway tab. The Gateway Capabilities category appears by default.
Step 4
Set the VT Mapping Mode to standard or titan.
Note
Table 6-33 describes fields in the VXSM Media Gateway tab, Gateway Capabilities category.
For additional information on this field, refer to the Cisco Voice Switch Services (VXSM)
Configuration Guide and Command Reference for MGX Switches and Media Gateways, Release
5.
Step 5
Click Apply to enable the mapping mode.
Note
For a description of all buttons within this tab, see section 6.2.3 Navigating Within Tables, page
6-9.
Cisco Media Gateway Manager 5.0 User Guide
OL-5461-02
6-65
Chapter 6
Configuring Hardware
How Do I Configure VXSM Cards?
Table 6-32
Field Descriptions for the VXSM Media Gateway Tab, Gateway Capabilities Category
Field Name
Description
Gateway Domain
Name
Domain name under which the media gateway could also be registered in a
DNS name server.
VT Mapping Mode
Represents the VT mapping mode, which can be either:
•
standard—standard mapping mode
•
titan—Titan 5500 mapping mode. Only valid if SONET line medium type
is SONET and SONET path payload type is VT1.5.
Total Number of DSPs Total number of DSPs in the card.
6.7.3 Creating and Assigning an IP Address for the Connection
Step 1
From the Domain Explorer window, select the node from the Hierarchy pane and choose
Configuration > MGX 8880/8850 MG > Configuration Center. The Configuration window for the
selected node opens.
Step 2
Within the Elements tab, expand the node, then double-click the VXSM card that contains the
connection you created.
Step 3
Click the Media Gateway tab.
Step 4
Choose the PVC IP Address option from the Category drop-down arrow.
Step 5
Click Create to display the Create PVC IP Address window.
Step 6
Complete the fields. Make sure to use the same VPI/VCI combination entered when you created the
connection.
Note
Step 7
Table 6-33 describes fields in the VXSM Create PVC IP Address window.
Click Apply to add the IP address for the connection.
Note
For a description of all buttons within this tab, see section 6.2.3 Navigating Within Tables, page
6-9.
Table 6-33
Field Descriptions for the VXSM Create PVC IP Address Window
Field Name
Description
Index
A unique index to identify each media gateway IP address.
Interface
Virtual port associated to the media gateway IP address.
VPI
Represents the VPI of the PVC associated to the IP address.
VCI
Represents the VCI of the PVC associated to the IP address.
IP Address
Configured IP address of the media gateway.
Cisco Media Gateway Manager 5.0 User Guide
6-66
OL-5461-02
Chapter 6
Configuring Hardware
How Do I Configure VXSM Cards?
Table 6-33
Field Descriptions for the VXSM Create PVC IP Address Window (continued)
Field Name
Description
Prefix Length
Specifies the number of leading one bits which from the mask to be logical
and-ed with the media gateway address before being compared to the value in
the cmgwIpCofigAddress.
IP Address Type
IP address type.
Default Gateway IP
Specifies the IP address of the entry will become the default gateway address.
6.7.4 Configuring the Time-Division Multiplexing Interface for VXSM
The TDM network consists of a number of DS1s that each contain DS0 voice circuits, which interface
with the VXSM card either through the 4-port OC-3 back card or the 24-port T1/E1 back card.
These tasks describe how to configure the TDM interface:
Step 1
(Optional) Change the line type to SDH (by default, the line type is set to SONET)—See
6.7.4.1 Changing the VXSM Line Type to SDH, page 6-67.
Step 2
Enable SONET lines and paths—See 6.7.4.2 Enabling SONET Lines and Paths for VXSM, page 6-69
or
Enable SDH lines and paths—See 6.7.4.3 Enabling SDH Lines and Paths for VXSM, page 6-73.
6.7.4.1 Changing the VXSM Line Type to SDH
Step 1
From the Domain Explorer window, choose Configuration > MGX 8880/8850 MG > Configuration
Center.
Step 2
Under the Elements tab, within the node, expand the VXSM card, and double-click on the first VXSM
line. The Line Config tab appears.
Step 3
Choose the Sonet Medium Config option from the Category drop-down arrow.
Cisco Media Gateway Manager 5.0 User Guide
OL-5461-02
6-67
Chapter 6
Configuring Hardware
How Do I Configure VXSM Cards?
Figure 6-33
Step 4
In the Medium Type field, click on the drop-down arrow to choose SDH.
Note
Step 5
Configuration Center—VXSM Line Config Tab, Sonet Medium Config Category
Table 6-34 describes fields in the VXSM Line Config tab, Sonet Medium Config category.
Click Apply to change the line type to SDH.
Note
Changing the line type to SDH on the first line trickles down to the other lines.
For a description of all buttons within this tab, see section 6.2.3 Navigating Within Tables, page
6-9.
Table 6-34
Field Descriptions for the VXSM Line Config Tab, Sonet Medium Config Category
Field Name
Description
Medium Type
Identifies whether a SONET or SDH signal is used across the interface.
Time Elapsed
Number of seconds (including partial seconds) elasped since the beginning of
the current measurement period.
Cisco Media Gateway Manager 5.0 User Guide
6-68
OL-5461-02
Chapter 6
Configuring Hardware
How Do I Configure VXSM Cards?
Table 6-34
Field Descriptions for the VXSM Line Config Tab, Sonet Medium Config Category
(continued)
Field Name
Description
Valid Intervals
Number of previous 15 minute intervals for which data was collected.
Circuit ID
The transmission vendor’s circuit identifier, for the purpose of facilitating
troubleshooting.
Note
The circuit identifier, if available, is also represented by
ifPhysAddress.
6.7.4.2 Enabling SONET Lines and Paths for VXSM
If you are using SONET, you must enable the lines and paths in the following order:
1.
SONET line
2.
STS path
3.
DS1/E1 line
Perform the following steps:
Step 1
Enable the SONET line:
a.
From the Domain Explorer window, choose Configuration > MGX 8880/8850 MG >
Configuration Center.
b.
Under the Elements tab, within the node, double-click the VXSM OC3 card.
c.
Click the Lines tab.
d.
Click the SONET line that you want to enable, then click Details. The Line Config tab appears, with
the Sonet Line Config category selected by default.
e.
From the Enable drop-down arrow, choose the up option to enable the SONET line.
Note
f.
Click Apply.
Note
Step 2
Table 6-35 describes fields in the VXSM Line Config tab, Sonet Line Config category.
For a description of all buttons within this tab, see section 6.2.3 Navigating Within Tables,
page 6-9.
Enable the STS path:
a.
Under the Elements tab, within the node, expand the VXSM OC3 card, then double-click on the
SONET line that contains the STS path you want to enable.
b.
Click the STS Paths tab.
c.
Click the STS path that you want to enable, then click Details. The Path Config tab appears, with
the Paths category selected by default.
d.
(Optional) Change the channelization type to DS3, DS1, or E1 in the Path Payload field.
e.
From the Enable drop-down arrow, choose the up option to enable the STS path.
Cisco Media Gateway Manager 5.0 User Guide
OL-5461-02
6-69
Chapter 6
Configuring Hardware
How Do I Configure VXSM Cards?
Note
f.
Click Apply.
Note
Step 3
Table 6-36 describes fields in the VXSM Path Config tab, Paths category.
For a description of all buttons within this tab, see section 6.2.3 Navigating Within Tables,
page 6-9.
Enable the DS1/E1 line:
a.
Under the Elements tab, within the node, expand the VXSM OC3 card and expand the SONET line,
STS path, and VT path that contain the DS1/E1 line you want to enable. Double-click on the DS1/E1
line. The DS1/E1 Path tab appears, with the DS1/E1 Line Info option selected by default.
b.
From the Admin Status drop-down arrow, choose the up option to enable the STS path.
Note
c.
Table 6-37 describes fields in the VXSM DS1/E1 Path tab, DS1/E1 Line Info category.
Click Apply.
Note
For a description of all buttons within this tab, see section 6.2.3 Navigating Within Tables,
page 6-9.
Table 6-35
Field Descriptions for the VXSM Line Config Tab, Sonet Line Config Category
Field Name
Description
Speed (Mbps)
An estimate of the interface’s current bandwidth in units of 1,000,000 bits per
second.
Enable
Desired state of the interface:
Loopback Type
•
up—enables the line
•
down—disables the line
Desired loopback mode configuration of the line:
•
noLoopback—Specifies no loopback state.
•
lineLocal—Signal sent at the line is looped back through the device.
•
lineRemote—Signal sent does not go through the device but is looped
back out.
Clock Source
Specifies the source of the transmit clock.
Frame Scramble
Enables or disables the scrambling option in the line.
Line Type
Configured line type.
Descriptor
Line descriptor.
Cisco Media Gateway Manager 5.0 User Guide
6-70
OL-5461-02
Chapter 6
Configuring Hardware
How Do I Configure VXSM Cards?
Table 6-35
Field Descriptions for the VXSM Line Config Tab, Sonet Line Config Category
(continued)
Field Name
Description
RDIV Type
Specifies the type of Remote Defect Indication - Virtual Tributary/Container
(RDI-V) sent by this NE to the remote NE. Values include:
RDIP Type
Table 6-36
•
onebit—(Default) specifies 1-bit RDIV
•
threebit—Specifies 3-bit enhanced RDIV
Specifies the type of Remote Defect Indication - Path (RDI-P) sent by this NE
to the remote NE. Values include:
•
onebit—(default) specifies 1-bit RDIP
•
threebit—Specifies 3-bit enhanced RDIP
Field Descriptions for the VXSM Path Config Tab, Paths Category
Field Name
Description
Path Number
Path number.
Enable
Desired state of the interface:
•
up—enables the path
•
down—disables the path
Path Width
Value that indicates the type of SONET/SDH path. For SONET, the assigned
types are the STS-Nc SPEs, where N=1, 3, 12, 24, 48, 192 and 768. STS-1 is
equal to 51.84 Mbps. For SDH, the assigned types are the STM-Nc VCs,
where N=1, 4, 16, 64, and 256.
Path Payload
Specifies the payload carried by the SONET/SDH path. Values are:
Path Status
Table 6-37
•
ds3
•
vt15vc11 (DS1)
•
vt2vc12 (E1)
Indicates the status of the interface.
Field Descriptions for the VXSM DS1/E1 Path Tab, DS1/E1 Line Info Category
Field Name
Description
Admin Status
Desired state of the interface.
Time Elapsed
Number of seconds that have elapsed since the beginning of the near end
current error measurement period.
Valid Intervals
Number of previous near end intervals for which data was collected.
Cisco Media Gateway Manager 5.0 User Guide
OL-5461-02
6-71
Chapter 6
Configuring Hardware
How Do I Configure VXSM Cards?
Table 6-37
Field Descriptions for the VXSM DS1/E1 Path Tab, DS1/E1 Line Info Category
(continued)
Field Name
Description
Line Type
Indicates the variety of DS1 line implementing this circuit. Values include:
•
For T1 interfaces only:
– dsx1ESF—Extended SuperFrame DS1 (T1.107)
– dsx1D4—AT&T D4 format DS1 (T1.107)
•
For E1 interfaces only:
– dsx1E1—ITU-T Recommendation G.704 (Table 4a).
– dsx1E1CRC—ITU-T Recommendation G.704 (Table 4b).
– dsx1E1MF—G.704 (Table 4a) with TS16 multiframing enabled.
– dsx1E1CRCMF—G.704 (Table 4b) with TS16 multiframing
enabled.
– dsx1Unframed—DS1 with No Framing
– dsx1E1Unframed—E1 with No Framing (G.703)
– dsx1E1Q50—ITU-T G.704, Table 14.
– dsx1E1Q50CRC—E1Q50 with CRC.
Loopback Config
Desired loopback configuration of the DS1/E1 interface.
Line Status
Status of the line.
Transmit Clock
Source
Source of transmit clock.
Loopback Status
Current loopback state on the DS1/E1 interface.
Send Code
Indicates what type of code is being sent across the DS1/E1 interface. Setting
this variable causes the interface to send the code requested.
Signal Mode
Signal options used by the DS1 line for the media gateway. Values include:
•
none—indicates no bits are reserved for signaling on this channel.
•
robbedBit—indicates the DS1 Robbed Bit Signaling is in use. This
option applies only to the T1 interface.
•
messageOriented—indicates that Common Channel Signaling (CCS) is
used either on channel 16 of an E1 link or channel 24 of a DS1 link.
cds1 Loopback
CodeDetection
Enables or disables the detection of far end loopback requests (inband or
out-of-band ESF).
cds1 Repetition
Used to repeatedly apply the writable objects of dsx1ConfigTable and
cds1ConfigTable specified in the same SNMP PDU starting from the row
indicated by the index of the instance for the number of rows specified in this
object.
Cisco Media Gateway Manager 5.0 User Guide
6-72
OL-5461-02
Chapter 6
Configuring Hardware
How Do I Configure VXSM Cards?
6.7.4.3 Enabling SDH Lines and Paths for VXSM
If you are using SDH, you must enable the lines and paths in the following order:
1.
SDH line
2.
STM path
3.
DS1/E1 line
Perform the following steps:
Step 1
Step 2
Enable the SDH line:
a.
From the Domain Explorer window, choose Configuration > MGX 8880/8850 MG >
Configuration Center.
b.
Under the Elements tab, within the node, expand the VXSM OC3 card and double-click on the SDH
line. The Line Config tab appears.
c.
From the Enable drop-down arrow, choose the up option to enable the SDH line.
Enable the STM path:
a.
From the Domain Explorer window, choose Configuration > MGX 8880/8850 MG >
Configuration Center.
b.
Under the Elements tab, within the node, expand the VXSM OC3 card and double-click on the AU-3
path. The Path Config tab appears.
c.
From the Enable drop-down arrow, choose the up option to enable the STS path.
d.
(Optional) From the Tributary Grouping Type drop-down arrow, choose one of the following
options:
e.
Step 3
•
au3Grouping—Channelization appears as follows: AU-3 > TU > DS1
•
au4Grouping—Channelization appears as follows: AU-3 > TUG3 >TU > DS1
Click Apply to enable the STM path.
Enable the DS1/E1 line:
a.
From the Domain Explorer window, choose Configuration > MGX 8880/8850 MG >
Configuration Center.
b.
Under the Elements tab, within the node, expand the VXSM OC3 card and double-click on the
DS1/E1 line. The DS1/E1 Path tab appears.
c.
From the Admin Status drop-down arrow, choose the up option to enable the DS1/E1 line.
Cisco Media Gateway Manager 5.0 User Guide
OL-5461-02
6-73
Chapter 6
Configuring Hardware
How Do I Configure VXSM Cards?
6.7.5 Configuring Voice Interfaces
A voice interface (VIF) is a set of parameters applied to a group of DS0s within a DS1 in the TDM voice
network. To configure voice interfaces, proceed as follows:
Step 1
Check to see if there are existing VIFs—See 6.7.5.1 Checking for Existing VIFs for VXSM, page 6-74.
If there are no existing VIFs, proceed to Step 2
or
if there are existing VIFs, skip Step 2.
Step 2
(Optional) Create a VIF—See 6.7.5.2 Creating a VIF for VXSM, page 6-74.
Step 3
(Optional) View or modify VIF configuration—See 6.7.5.3 Viewing or Modifying VIF Configuration,
page 6-76.
6.7.5.1 Checking for Existing VIFs for VXSM
Step 1
From the Domain Explorer window, choose Configuration > MGX 8880/8850 MG > Configuration
Center.
Step 2
Under the Elements tab, within the node, expand the VXSM card until you see the DS1 path you want
to view VIFs under. Double-click the DS1 path. The DS1 Path tab appears.
Step 3
Choose DSX0 Group from the Category drop-down arrow. Any available VIFs appear in the table. To
proceed, follow the steps in 6.7.5 Configuring Voice Interfaces, page 6-74.
6.7.5.2 Creating a VIF for VXSM
Step 1
From the Domain Explorer window, choose Configuration > MGX 8880/8850 MG > Configuration
Center.
Step 2
Under the Elements tab, within the node, expand the VXSM card until you see the DS1 path you want
to view VIFs under. Double-click the DS1 path. The DS1 Path tab appears.
Step 3
Choose DSX0 Group from the Category drop-down arrow.
Step 4
Click Create. The Create DSX0 Group window appears.
Cisco Media Gateway Manager 5.0 User Guide
6-74
OL-5461-02
Chapter 6
Configuring Hardware
How Do I Configure VXSM Cards?
Figure 6-34
Step 5
Configure the fields.
Note
Step 6
Configuration Center—VXSM Create DSX0 Group Window
Table 6-38 describes the fields in the VXSM Create DSX0 Group window.
Click Apply to add the VIF.
Note
For a description of all buttons within this tab, see section 6.2.3 Navigating Within Tables, page
6-9.
Table 6-38
Field Descriptions for the VXSM Create DSX0 Group Window
Field Name
Description
DSX0 Grp Index
Value that identifies the DS0 group in the T1/E1 interface. T1 range is 0-23;
E1 range is 0-30.
DS0 Channels
Bitmap of the selected DS0 channels to be added into this group. T1 range is
1-24; E1 range is 1-31.
DSX0 Service Type
Specifies the service type of the CAS/DS0 group. Values include:
•
xgcp—specifies the xgcp (tgcp) protocol.
•
h248—specifies the ITU H2.48 protocol media gateway control service
type that is used when the DS0 is configured for null signaling.
Cisco Media Gateway Manager 5.0 User Guide
OL-5461-02
6-75
Chapter 6
Configuring Hardware
How Do I Configure VXSM Cards?
6.7.5.3 Viewing or Modifying VIF Configuration
Step 1
From the Domain Explorer window, choose Configuration > MGX 8880/8850 MG > Configuration
Center.
Step 2
Under the Elements tab, within the node, expand the VXSM card until you see the DS1 path you want
to view VIFs under. Double-click the DS1 path. The DS1 Path tab appears.
Step 3
Choose DSX0 Voice Parameters or Extended DSX0 Voice Parameters from the Category drop-down
arrow.
Step 4
Click on a VIF, then click Details.
Step 5
View or modify the fields.
Note
Step 6
Table 6-39 describes the fields in the VXSM DS1 Path, DSX0 Voice Parameters category;
Table 6-40 describes the fields in the VXSM DS1 Path, Extended DSX0 Voice Parameters
category.
(Optional) Click Apply to save any changes.
Note
For a description of all buttons within this tab, see section 6.2.3 Navigating Within Tables, page
6-9.
Table 6-39
Field Descriptions for the VXSM DS1 Path, DSX0 Voice Parameters Category
Field Name
Description
DSX0 Grp Index
Index that uniquely identifies a DS0 group in a T1/E1.
Noise Reg Enable
Indicates whether or not the background noise should be played to fill silence
gaps if VAD is activated.
Non Linear Proc
Enable
Indicates whether or not nonlinear processing is enabled for this interface.
Music On Hold
Threshold
Music on hold threshold for this interface.
In Gain
Amount of gain inserted at the receiver side of the interface.
Tx Attenuation
Amount of attenuation inserted at the transmit side of the interface.
Echo Cancel Enable
Specifies whether or not echo cancellation is enabled for the interface.
Echo Cancel Coverage Echo canceller coverage for the interface.
Initial Digit Time Out Initial digit timeout that indicates the amount of time the managed system
waits for an initial input digit from the caller.
Inter Digit Time Out
Inter-digit timeout that indicates the amount of time the managed system waits
for a subsequent input digit from the caller.
Cisco Media Gateway Manager 5.0 User Guide
6-76
OL-5461-02
Chapter 6
Configuring Hardware
How Do I Configure VXSM Cards?
Table 6-40
Field Descriptions for the VXSM DS1 Path, Extended DSX0 Voice Parameters
Category
Field Name
Description
DSX0 Grp Index
Index that uniquely identifies a DS0 group in a T1/E1.
LIF Number
Logical InterFace number associated with this voice interface.
Call Control Profile
Index of call control profile used by this DS0 group.
VAD Enable
Indicates whether or not Voice Activity Detection is enabled for the
compression DSPs of this interface.
CoT 1
First frequency tone to be sent between the terminating and originating
gateways in the continuity test.
CoT 2
Second frequency tone to be sent between the terminating and originating
gateways in the continuity test.
Repetition
Used to repeatedly apply the writable objects of ccasIfExtVoiceCfgTable
specified in the same SNMP PDU starting from the row specified by the index
of the instance for the number of rows specified in this object.
VAD Timer
Hangover time for VAD.
ICS Enable
Specifies whether or not the Idle Channel Suppression is enabled for an AAL2
connection.
ICS Integration Timer Specifies a timeout value for the ICS integration timer.
Tone Plan
Specifies which tone plan the DS0 group is using for playing the tones.
Gateway Link ID
Specifies the H.248 media gateway link that this DS0 group belongs to. This
object is applicable only if the value of Service Type is h248.
H.248 Pkg IDs
H.248 packages supported in this DS0 group.
Event Mapping Index
Specifies the actions of the voice band data signal events handling in this DS0
group.
6.7.6 Configuring MG-MGC Interfaces
VXSM cards support both the ITU H.248 and the XGCP protocols. Depending upon which protocol you
are using, the procedure to configure the MG-MGC interface differs.
For each protocol type, the procedure consists of two phases. The first phase configures MGC and MGC
Groups. The second phase configures the protocol and protocol profile details that are used for the
VXSM and the MGC to communicate.
Cisco Media Gateway Manager 5.0 User Guide
OL-5461-02
6-77
Chapter 6
Configuring Hardware
How Do I Configure VXSM Cards?
Figure 6-35
Process for Configuring MG-MGC Interfaces
1. Prerequisites:
Create a
resource partition
Create AAL5+control
connections
2. To configure MG-MGC interfaces:
Set up MGC
and MGC groups
Configure H.248 or XGCP
protocol
Configure the MGC profile
Create and
assign an IP
address for the
connection
130005
Configure MGC
redundancy
Before you can configure MG-MGC interfaces, be sure you have completed the following steps:
Step 1
Add a resource partition to the node—See 6.7.1 Creating a Resource Partition for VXSM, page 6-63.
Step 2
Add an AAL5+control VXSM connection—See Chapter 7, “Provisioning Connections.”
Step 3
Create and assign an IP address for the connection—See 6.7.3 Creating and Assigning an IP Address
for the Connection, page 6-66.
To configure the interface between the Media Gateway (MG) and the Media Gateway Controller (MGC)
for either protocol, complete the following steps:
Step 1
Setup MGC and MGC groups—See 6.7.6.1 Setting Up MGCs and MGC Groups, page 6-79.
Step 2
Configure H.248 or XGCP protocol— See 6.7.6.2 Configuring H.248 Protocol and Profiles, page 6-87
or 6.7.6.3 Configuring XGCP Protocol, page 6-96.
Step 3
Configure the MGC profile—See 6.7.6.2 Configuring H.248 Protocol and Profiles, page 6-87 or
6.7.6.4 Configuring MGC XGCP Profiles, page 6-98.
Step 4
(Optional) Configure MGC redundancy—See 6.7.6.5 Configuring MGC Redundancy, page 6-101.
Cisco Media Gateway Manager 5.0 User Guide
6-78
OL-5461-02
Chapter 6
Configuring Hardware
How Do I Configure VXSM Cards?
6.7.6.1 Setting Up MGCs and MGC Groups
Figure 6-36
Process for Setting Up MGCs and MGC Groups
Create a
domain name for
the MGC
Change the IP address
resolution and (optionally)
create an IP address for the
domain
(XGCP only) Configure the
MGC group for XGCP
130006
Add a MGC
to a MGC group
Step 1
Create an MGC by assigning it a domain name, and specify how the domain name is to be resolved:
a.
From the Domain Explorer window, choose Configuration > MGX 8880/8850 MG >
Configuration Center.
b.
Under the Elements tab, within the node, double-click the VXSM card.
c.
Click on the MG Controller tab. The Domain Names category appears by default.
d.
Click Create. The Create MGC Domain Names window appears.
Cisco Media Gateway Manager 5.0 User Guide
OL-5461-02
6-79
Chapter 6
Configuring Hardware
How Do I Configure VXSM Cards?
Figure 6-37
e.
Configure the fields.
Note
f.
Step 2
Configuration Center—VXSM Create MGC Domain Names Window
Table 6-41 describes fields in the VXSM Create MGC Domain Name window.
Click Apply to create the domain name.
Change the IP address resolution and (optionally) create an IP address for the domain:
a.
Under the Elements tab, within the node, double-click the VXSM card.
b.
Click on the MG Controller tab.
c.
From the Category drop-down arrow, choose the Media Gateway Controllers option.
d.
Click on a MGC entry, then click Details. The Media Gateway Controllers tab appears.
Cisco Media Gateway Manager 5.0 User Guide
6-80
OL-5461-02
Chapter 6
Configuring Hardware
How Do I Configure VXSM Cards?
Figure 6-38
e.
Configuration Center—VXSM Media Gateway Controllers Tab
Configure the IP Address Resolution field.
Note
Table 6-42 describes fields in the VXSM Media Gateway Controllers tab.
f.
Click Apply to configure the IP address resolution.
g.
If you selected internalOnly, proceed to step h to create an IP address for the domain. If you selected
externalOnly, skip the rest of these steps and proceed to step 3.
h.
Within the MG Controller tab, from the Category drop-down arrow, choose the MGC IP
Addresses option.
i.
Click Create. The Create MGC IP Addresses window appears.
Cisco Media Gateway Manager 5.0 User Guide
OL-5461-02
6-81
Chapter 6
Configuring Hardware
How Do I Configure VXSM Cards?
Figure 6-39
j.
Configure the fields.
Note
k.
Step 3
Configuration Center—VXSM Create MGC IP Addresses Window
Table 6-43 describes fields in the VXSM Create MGC IP Addresses window.
Click Apply to create the MGC IP address.
(XGCP only, skip to step 4 if you are using H.248) Configure the MGC group for XGCP:
a.
Under the Elements tab, within the node, double-click the VXSM card.
b.
Click on the XGCP tab.
c.
From the Category drop-down arrow, choose the XGCP MGC Association option.
Cisco Media Gateway Manager 5.0 User Guide
6-82
OL-5461-02
Chapter 6
Configuring Hardware
How Do I Configure VXSM Cards?
Figure 6-40
d.
Configure the fields.
Note
e.
Step 4
Configuration Center—XGCP Tab, XGCP MGC Association Category
Table 6-44 describes fields in the VXSM XGCP tab, XGCP MGC Association category.
Click Apply to configure the MGC group for XGCP.
Add a MGC to a MGC group:
a.
Under the Elements tab, within the node, double-click the VXSM card.
b.
Click on the MG Controller tab.
c.
From the Category drop-down arrow, choose the MGC Groups option.
d.
Click Create. The Create MGC Groups window appears.
Cisco Media Gateway Manager 5.0 User Guide
OL-5461-02
6-83
Chapter 6
Configuring Hardware
How Do I Configure VXSM Cards?
Figure 6-41
e.
Complete the fields.
Note
f.
Configuration Center—VXSM Create MGC Groups Window
Table 6-45 describes fields in the VXSM Create MGC Groups window.
Click Apply to add a specific MGC to a particular MGC group.
Note
For a description of all buttons within this tab, see section 6.2.3 Navigating Within Tables,
page 6-9.
Cisco Media Gateway Manager 5.0 User Guide
6-84
OL-5461-02
Chapter 6
Configuring Hardware
How Do I Configure VXSM Cards?
Table 6-41
Field Descriptions for the VXSM Create MGC Domain Name Window
Field Name
Description
Domain Index
Enter an integer to identify a MGC domain name. The following values are
valid:
Domain Name Type
Domain Name
Table 6-42
•
For MGC, The range is from 1-4.
•
For a gateway, the value is 13.
•
For dnsServer, the value is 14.
Choose from the following types to indicate the entity for the domain name:
•
gateway
•
dnsServer
•
mgc
Enter the domain name. The maximum amount of characters is 64.
Field Descriptions for the VXSM Media Gateway Controllers Tab
Field Name
Description
MGC Index
Unique index to identify each MGC which will communicate with this MG.
Domain Name
Contains the same name as the one in the cMgcDomainName object of the
associated entry in cMediaGwDomainNameConfigTable.
Number of MGC
Groups
Number of MGC group with which this MGC is associated. A zero value
means this MGC is not associated with any MGC group.
Number of IP
Addresses
Indicates the number of IP addresses associated with this MGC. A zero value
means there is no IP address associated with this MGC. The MGC cannot be
deleted if the value of this object is non-zero and if the IP Address Resolution
field is set to internalOnly.
IP Address Resolution Determines the type of resolution applied to this MGC. Values are:
Table 6-43
•
internalOnly (default)—Specifies the internal resolution. If the
internalOnly option is chosen, the IP address associated with the file
server is determined according to the IP address of the server.
•
externalOnly—Specifies the external resolution.
Field Descriptions for the VXSM Create MGC IP Address Window
Field Name
Description
MGC Index
Unique index value to identify each MGC that will communicate with this
media gateway. The range is 1-4.
IP Address Index
Unique index value to identify the address of a specific MGC. The MGC is
represented by cMgcIndex. The range is 1-4.
IP Address
Configured IP address.
Cisco Media Gateway Manager 5.0 User Guide
OL-5461-02
6-85
Chapter 6
Configuring Hardware
How Do I Configure VXSM Cards?
Table 6-43
Field Descriptions for the VXSM Create MGC IP Address Window (continued)
Field Name
Description
IP Address Type
IP address type for the MGC (call agent):
unknown
ipv4
ipv6
ipv4z
ipv6z
dns
Preference
Table 6-44
Preference value of the IP address for the specific MGC (call agent). If the
value is lower, the preference of the IP address is higher. For example, the
value 1 has a higher preference than the value 2. If several IP addresses have
the same preference value, the media gateway selects them one at a time. The
range is from 1-4. The default value is 1.
Field Descriptions for the VXSM XGCP Tab, XGCP MGC Association Category
Field Name
Description
MGC Group Number
Specifies which MGC redundant group will be used in XGCP. The value of
this object refers to the object cMgcGrpIndex from MGC Redundant Group
Table, cMgcGrpParamTable.
MGC IP Addr Type
Specifies the address type of MGC (object cXgcpMgcConfigAddress) either
ipv4 or ipv6.
MGC IP Address
Specifies the address of MGC (call agent) the gateway used to communicate
within call setup.
Protocol Index
Specifies which protocol the MG should use to communicate with MGC when
it attempts to set up the call.
cXgcpMgcConfigGate The UDP port of the MG which is used to communicate with the call agent in
wayUdpPort
MGCP.
Cisco Media Gateway Manager 5.0 User Guide
6-86
OL-5461-02
Chapter 6
Configuring Hardware
How Do I Configure VXSM Cards?
Table 6-45
Field Descriptions for the VXSM Create MGC Groups Window
Field Name
Description
MGC Grp Index
Unique index value to identify the particular MGC group. The range is 1-12.
MGC Index
Unique index value to identify each MGC (call agent) that communicates with
the media gateway. The range is 1-4.
Preference value of the IP address for the specific MGC (call agent). If the
value is lower, the preference of the IP address is higher. For example, the
value 1 has a higher preference than the value 2. If several IP addresses have
the same preference value, the media gateway selects them one at a time. The
range is from 1-12. The default value is 1.
Value to represent the UDP port of the MGC in the MGC group. A value of 0
means that no UDP port is specified. Therefore, the UDP port that is already
in the protocol table is used. The range is 1024-65535.
Preference
UDP Port
6.7.6.2 Configuring H.248 Protocol and Profiles
A Media Gateway (MG) communicates with a group of MGCs through a MG link. Both the MG and
MGC group form an H.248 association.
Once you have completed the steps in 6.7.6.1 Setting Up MGCs and MGC Groups, page 6-79, perform
the following steps to configure H.248 protocol and profiles:
Cisco Media Gateway Manager 5.0 User Guide
OL-5461-02
6-87
Chapter 6
Configuring Hardware
How Do I Configure VXSM Cards?
Figure 6-42
Process for Configuring H.248 Protocol and Profiles
Add an
MG and MGC
association
Configure a port for the
MG-MGC link
Add an H.248 profile
Configure terminations for
the SCN side of VXSM
130004
Configure
terminations for
the PDN side
of VXSM
Step 1
Add an MG and MGC Association:
a.
From the Domain Explorer window, select the node from the Hierarchy pane and choose
Configuration > MGX 8880/8850 MG > Configuration Center. The Configuration window for
the selected node opens.
b.
Within the Elements tab, expand the node, then double-click the VXSM card that contains the
connection you created.
c.
Click the H.248 tab.
d.
Choose the MG-MGC Association option from the Category drop-down arrow.
e.
Click Create to display the Create MG-MGC Association window.
Cisco Media Gateway Manager 5.0 User Guide
6-88
OL-5461-02
Chapter 6
Configuring Hardware
How Do I Configure VXSM Cards?
Figure 6-43
f.
Complete the fields.
Note
g.
Step 2
Configuration Center—VXSM Create MG-MGC Association Window
Table 6-46 describes fields in the VXSM Create MG-MGC Association window.
Click Apply to add an H.248 association between the MG and MGC. Once you have created an
MG-MGC association, an entry will appear in the H.248 tab, Extended Association category.
Configure a port for the MG-MGC link:
a.
Within the Elements tab, expand the node, then double-click the VXSM card that contains the
connection you created.
b.
Click the H.248 tab.
c.
Choose the Extended Association option from the Category drop-down arrow.
d.
Click on a link entry, then click Details. The Extended Association tab appears.
Cisco Media Gateway Manager 5.0 User Guide
OL-5461-02
6-89
Chapter 6
Configuring Hardware
How Do I Configure VXSM Cards?
Figure 6-44
e.
Configure the Gateway Port, and other fields as desired.
Note
f.
Step 3
Configuration Center—VXSM Extended Association Tab
Table 6-47 describes fields in the VXSM Extended Association tab.
Click Apply to configure the port for the MG-MGC link.
Add an H.248 profile:
a.
Within the H.248 tab, choose the Profile Properties option from the Category drop-down arrow.
b.
Click Create. The Create H.248 Profile Properties window appears.
Cisco Media Gateway Manager 5.0 User Guide
6-90
OL-5461-02
Chapter 6
Configuring Hardware
How Do I Configure VXSM Cards?
Figure 6-45
c.
Configure the fields.
Note
d.
Step 4
Step 5
Configuration Center—VXSM Create H.248 Profile Properties Window
Table 6-48 describes fields in the VXSM Create H.248 Profile Properties window.
Click Apply to create the H.248 profile.
Configure terminations for the switch circuit network (SCN) side of VXSM:
a.
Add a voice interface (VIF)—See 6.7.5 Configuring Voice Interfaces, page 6-74.
b.
Associate the Gateway Link ID and H.248 Pkg ID by completing the Gateway Link ID and H.248
Pkg IDs fields—See 6.7.5.3 Viewing or Modifying VIF Configuration, page 6-76).
Configure terminations for the packet data network (PDN) side of VXSM:
a.
Within the H.248 tab, choose the Termination Types option from the Category drop-down arrow.
b.
Click Create. The Create H.248 Termination Types window appears.
Cisco Media Gateway Manager 5.0 User Guide
OL-5461-02
6-91
Chapter 6
Configuring Hardware
How Do I Configure VXSM Cards?
Figure 6-46
c.
Configure the fields.
Note
d.
Configuration Center—VXSM Create H.248 Termination Types Window
Table 6-49 describes fields in the VXSM Create H.248 Termination Types window.
Click Apply to create the H.248 termination type.
Note
For a description of all buttons within this tab, see section 6.2.3 Navigating Within Tables,
page 6-9.
Table 6-46
Field Descriptions for the VXSM Create MG-MGC Association Window
Field Name
Description
Gateway Link ID
Unique link ID that identifies the signalling link this gateway uses to
communicate with the Gateway Controllers to form an H.248 association.
Enter the value of 1 to identify the MG to MGC link in the Gateway Link ID
field. Only one link is supported.
MGC Group Index
Unique index value to identify the particular MGC group. The range is 1-12.
Gateway IP Address
Index
Index value for the IP address of the media gateway. The range is 1-16.
Association ID
Unique identification of the H.248 association assigned by the H.248 stack.
Cisco Media Gateway Manager 5.0 User Guide
6-92
OL-5461-02
Chapter 6
Configuring Hardware
How Do I Configure VXSM Cards?
Table 6-46
Field Descriptions for the VXSM Create MG-MGC Association Window (continued)
Field Name
Description
Transport Protocol
Choose one of the following options that is used for the signaling traffic
associated with the H.248 protocol from the Transport Protocol drop-down
arrow:
•
tcp (default)—Transport Control Protocol (TCP)
•
udp—User Datagram Protocol (UDP)
Active MGC Address
Address of the currently active MGC in this media gateway link.
Active MGC Port
Number
Transport layer port number of the currently active MGC in this media
gateway link.
Gateway Link Admin
State
Desired state of the gateway.
Gateway Link
Operational State
Current operational state of the gateway.
Table 6-47
Field Descriptions for the VXSM Extended Association Tab
Field Name
Description
Gateway Link ID
Unique link ID which identifies the signaling link this gateway is uses to
communicate with the gateway controllers to form an H.248 association.
Gateway IP Address
Index
MG IP address index.
Gateway IP Address
IP address that the MGC uses to communicate with the MG.
Gateway Port
TCP/UDP port number that the MGC uses to communicate with the MG.
Encoding Scheme
Used to encode the H.248 messages that are sent/received to/from the gateway
controller.
Control Protocol
Control protocol type in use.
Maximum Contexts
Maximum number of contexts allowed in this media gateway link.
Maximum
Terminations
Maximum number of terminations per context in this media gateway link.
Gateway Execution
Time
Interval within which the MGC expects a response to any transaction from the
MG (exclusive of network delay specified by the object
cmedxGatewayInitialRtt).
MGC Execution Time Interval within which the MG expects a response to any transaction from the
MGC (exclusive of network delay specified by the object
cmedxGatewayInitialRtt).
Pending Response
Time
Time within which to expect a pending response if a transaction cannot be
completed in the MG and in the MGCs of the media gateway link.
Retries Before
Disconnect
Number of times the MG retries to connect to the MGC before it sends out a
disconnect command
Max Waiting Delay
When a MG is powered on, it should initiate a restart timer to a random value,
uniformly distributed between zero and the value specified in this object.
Cisco Media Gateway Manager 5.0 User Guide
OL-5461-02
6-93
Chapter 6
Configuring Hardware
How Do I Configure VXSM Cards?
Table 6-47
Field Descriptions for the VXSM Extended Association Tab (continued)
Field Name
Description
Restart Delay
Time delay before the MG accepts any call from MGC after it sends the
command “service change” with a “restart.”
Response Retention
Time
Time till the responses should be retained before they are sent if they receive
a repetition of a transaction that is still being executed.
Initial Round Trip
Time
Initial round-trip time for the H.248 transaction to be responded. Reflects the
network delay time.
Inactivity Time
Period of silence between messages from the MGC.
H.248 Header IP
Address Type
Address type in the H.248 message header.
Grace Period for
Service Down
Grace period before the media gateway link is taken out of service.
Active MGC Domain
Name
Domain name of the currently active MGC in this media gateway link.
Operational State
Change Reason
Reason for the operational state change (cmedGatewayOperStatus) in the
media gateway link.
Operational State
Change Method
Method for the operational state change (cmedGatewayOperStatus) in the
media gateway link.
Gateway Link Service Actions to modify media gateway link service state.
State
Gateway Link
Operational State
Table 6-48
Operational status of media gateway link.
Field Descriptions for the VXSM Create H.248 Profile Properties Window
Field Name
Description
H.248 Profile Index
Unique identifier for the H.248 profile.
Inter CP Tone
Duration
(milliseconds)
Duration for playing a list of call progressing tones between two call
progressing signals.
Digit On Duration
(milliseconds)
Duration of the active DTMF digit during DTMF playout from the gateway.
Digit Pause Duration
(milliseconds)
Duration of the pause after an active DTMF digit during DTMF playout from
the gateway.
Transmit COT
Frequency
Tone frequency to be transmitted between gateways in the continuity test.
Receive COT
Frequency
Tone frequency to be received between gateways in the continuity test.
COT Duration
(milliseconds)
Duration for the continuity test tone to be played when the gateway initiates a
COT (continuity test tone).
Response COT
Method
Method for responding to COT (continuity test tone) when the gateway detects
the continuity test signal.
Cisco Media Gateway Manager 5.0 User Guide
6-94
OL-5461-02
Chapter 6
Configuring Hardware
How Do I Configure VXSM Cards?
Table 6-48
Field Descriptions for the VXSM Create H.248 Profile Properties Window (continued)
Field Name
Description
Detect Long CP Tone
Duration
(milliseconds)
Duration for detecting a long call progressing tone.
Detect Long Digit
Duration
(milliseconds)
Duration for detecting a long digit tone signal.
Echo Cancellation
Specifies whether or not the echo cancellation is enabled.
Echo Canceller Tail
Echo canceller coverage.
Input Gain
Amount of gain inserted at the receiver side of the interface.
Output Attenuation
Amount of attenuation inserted at the transmit side of the interface.
VoIP VAD
VAD (Voice Activity Detection) is enabled for the compression DSPs of this
interface when the application is VoIP.
VoIP VAD Timer
(milliseconds)
Hangover time for VAD in the VoIP application.
AAL2 VAD Timer
(milliseconds)
Hangover time for VAD in the VoATM over AAL2 application.
ATM Bearer Type
ATM bearer type.
AAL Partial Fill
Fill level of cells in case of AAL adaptation.
AAL Type
Adaption layer of ATM.
Suppress Bearer Digit Controls if the digits should be suppressed from the voice media stream.
Transmitted COT,
Originating
Specifies the COT tone to be transmitted from the originating gateway in the
continuity test.
Received COT,
Originating
Specifies the COT tone to be received from the originating gateway in the
continuity test.
Table 6-49
Field Descriptions for the VXSM Create H.248 Termination Types Window
Field Name
Description
Termination Type ID
Unique identification number that is assigned to the termination type by the
manager.
H.248 Packages
Applied
H.248 packages applied to this termination type.
Termination Type
Type of a group of ephemeral terminations.
Profile ID
Property profile identifier with which the terminations within this termination
type will be associated.
Cisco Media Gateway Manager 5.0 User Guide
OL-5461-02
6-95
Chapter 6
Configuring Hardware
How Do I Configure VXSM Cards?
6.7.6.3 Configuring XGCP Protocol
Once you have completed the steps in 6.7.6.1 Setting Up MGCs and MGC Groups, page 6-79, perform
the following steps to configure XGCP (TGCP) protocol:
Step 1
From the Domain Explorer window, select the node from the Hierarchy pane and choose
Configuration > MGX 8880/8850 MG > Configuration Center. The Configuration window for the
selected node opens.
Step 2
Under the Elements tab, within the node, double-click the VXSM card.
Step 3
Click on the XGCP tab. The Media Gateway XGCP Configuration option appears by default in the
Category drop-down arrow.
Figure 6-47
Step 4
Configure the fields.
Note
Step 5
Configuration Center—VXSM XGCP Tab, Media Gateway XGCP Configuration
Category
Table 6-50 describes fields in the VXSM XGCP tab, Media Gateway XGCP Configuration
category.
Click Apply to configure XGCP (TGCP) protocol.
Cisco Media Gateway Manager 5.0 User Guide
6-96
OL-5461-02
Chapter 6
Configuring Hardware
How Do I Configure VXSM Cards?
Table 6-50
Field Descriptions for the VXSM XGCP Tab, Media Gateway XGCP Configuration
Category
Field Name
Description
Request Timeout
(milliseconds)
Period that the XGCP (TGCP) protocol waits before re-transmitting an
unacknowledged message. It is the responsibility of the requesting entity to
provide suitable timeouts for all outstanding commands, and to retry
commands when timeouts exceeded.
MG Max Exp Retry
Timeout
(milliseconds)
Specifies the maximum timeout for exponential command retry by the media
gateway.
Max Waiting Delay
Timeout
(milliseconds)
Value used for the media gateway to send the first restart in progress to the
MGC in an implementation-dependent manner by the MGCP functionality
based on the call volume of the system.
Restart Delay
(seconds)
Specifies the restart delay timeout for the restart process for a gateway to send
out RestartInProgress when it is powered on or has been reset.
Default Package
Represents the default capability package supported in the gateway.
Supported Packages
Represents the bit map of MGCP supported packages.
Simple SDP Enabled
Used to enable or disable building of s, t, and o lines in the Sessions
Description Protocol (SDP) message. The o field indicates the owner/creator
and session identifier. The s field indicates the session name field. The t field
indicates the duration while a session is valid. A value of true (enabled) means
that SDP will NOT include the fields s, t, and o. A value of false (disabled)
means that the o, s, and t lines will be built before sending SDP.
AckSDP Enabled
Specifies if the ACK SDP is enabled or disabled. If the value is true (enabled)
it sends ADP with ACK when CODEC or reportable NTE delta changed, or an
attempt is made to change CODEC, VAD, packet-period, echo cancellation
during FAX/modem mode.
Undotted Notation
Enabled
Enables or disables the undotted notation for CODEC. This object is used to
set CODEC notation to dotted or undotted in SDP between the gateway and
the call agent.
Process Quarantine
Events
Determines how to handle persistent events. If the value is true, the
quarantined events should be processed, otherwise the quarantined events are
discarded.
Quarantine Loop
Enabled
Controls the default quarantine mode. If the value is true, the default
quarantine mode is loop and not step. The gateway is expected to generate
multiple notifications (loop) not at most one notification
Bypass Quarantine
Buffer
Specifies how the persistent events will be handled in quarantine processing.
If the value is true, the persistent events bypass quarantine buffer. If the value
is set to false, this object will be ignored.
Piggyback Message
Enabled
Enables or disables the piggyback message generation. If the value is true, a
call agent can send several MGCP messages in the same UDP packets to the
gateway.
Max XGCP Msg Size
(bytes)
Specifies the maximum allowed XGCP (TGCP) message size which is used
for checking if the size will be supported by the call agent via (AuditEndPoint)
response. A value of zero means there is no limit to the size of the XGCP
message.
Cisco Media Gateway Manager 5.0 User Guide
OL-5461-02
6-97
Chapter 6
Configuring Hardware
How Do I Configure VXSM Cards?
Table 6-50
Field Descriptions for the VXSM XGCP Tab, Media Gateway XGCP Configuration
Category (continued)
Field Name
Description
Dtmf Relay
When the value is true, the digits will be sent as peer-to-peer packet in the
bearer. When the value is false, the digits will be sent as regular voice packets
in the bearer.
Calea Enabled
CALEA, or Communication Assistance for Law Enforcement Act, is a feature
that allows for a lawful intercept of a call’s details and call contents
originating or terminating on specific terminals. A value of true indicates that
CALEA is enabled; a value of false indicates that CALEA is disabled.
Gateway Service State Defines the service state of the media gateway.
Gateway Admin State
Defines the administrative state of the media gateway.
Grace Time (seconds) Represents the grace period (restart delay in RSIP message) which is
expressed in a number of seconds. It indicates how soon the gateway will be
taken out of service. The value -1 indicates that the grace period time is
disabled.
6.7.6.4 Configuring MGC XGCP Profiles
To configure MGC XGCP profiles, you must create a call control profile.
Step 1
From the Domain Explorer window, select the node from the Hierarchy pane and choose
Configuration > MGX 8880/8850 MG > Configuration Center. The Configuration window for the
selected node opens.
Step 2
Under the Elements tab, within the node, double-click the VXSM card.
Step 3
Click on the XGCP tab.
Step 4
Choose the XGCP Call Control Profile Configuration option from the Category drop-down arrow.
Step 5
Click Create. The Create XGCP Call Control Profile window appears.
Cisco Media Gateway Manager 5.0 User Guide
6-98
OL-5461-02
Chapter 6
Configuring Hardware
How Do I Configure VXSM Cards?
Figure 6-48
Step 6
Configure the fields.
Note
Step 7
Configuration Center—VXSM Create XGCP Call Control Profile Window
Table 6-51 describes fields in the VXSM Create XGCP Call Control Profile window.
Click Apply to create the XGCP (TGCP) call control profile.
Note
For a description of all buttons within this tab, see section 6.2.3 Navigating Within Tables, page
6-9.
Table 6-51
Field Descriptions for the VXSM Create XGCP Call Control Profile Window
Field Name
Description
Profile Index
Uniquely identifies the call control profile.
Profile Name
Unique name for the profile. This cannot be modified once it is created.
Total VIFs Associated Total number of voice interfaces (DS0 group) associated with this call control
profile. A value of zero means there are no voice interfaces associated with
the profile.
Protocol Index
Specifies the protocol that the MG should use to communicate with the MGC
during call setup.
Suspicious Error
Threshold
Contains the suspicious error threshold for signaling messages.
Cisco Media Gateway Manager 5.0 User Guide
OL-5461-02
6-99
Chapter 6
Configuring Hardware
How Do I Configure VXSM Cards?
Table 6-51
Field Descriptions for the VXSM Create XGCP Call Control Profile Window
(continued)
Field Name
Description
Max1 DNS Lookup
Enabled
Enables or disables the Max1 domain name server (DNS) query operation
when Max1 expires.
Disconnect Error
Threshold
Contains the disconnect error threshold for signaling messages.
Max2 DNS Lookup
Enabled
Enables or disables the Max2 domain name server (DNS) query operation
when Max2 expires.
Message Waiting
Indicator Timeout
(milliseconds)
Timeout value for the message waiting indicator (MWI) tone. The MWI tone
is used with message waiting services, and indicates that the MG is not ready
to accept address information or other information from an access line.
Retransmission
Removal Timeout
(seconds)
Timeout value for re-transmission removal.
Initial Waiting Delay
Timeout (seconds)
The voice interface (DS0 group) becomes disconnected when the MG tries to
communicate with the call agent and the re-transmission procedure times out
after re-trying.
Min Waiting Delay
Timeout (seconds)
The DS0 group (voice interface) becomes disconnected when the MG tries to
communicate with the call agent and the re-transmission procedure times out
after re-trying
Max Waiting Delay
Timeout (seconds)
Maximum waiting delay (Tdmax) timeout value used by the MG to send the
restart in progress with the restart method as RM:disconected to the call agent
when the voice interface associated ds0-group disconnection condition
occurs.
Critical Timer
Timeout (seconds)
Represents the timeout value for the critical timer.
Partial Dial Timeout
(seconds
Represents the partial dial timeout and is used along with a digit map as the
inter-digit timer.
History Timeout
(seconds)
The MGCP protocol is organized as a set of transactions, each of which is
composed of a command and a response. In the absence of a timely response,
commands are repeated. The MG must keep in memory a list of the responses
it sent to recent transactions, and a list of the transactions that are currently
being executed. Recent is here defined by the value of
cxeCcProfileThistTimeout that specifies the number of seconds that responses
to old transactions must be kept for.
Local Ring Back Tone The time for which the local ring back tone (towards the TDM) will be
Timeout (seconds)
generated unless interrupted. A value of zero indicates that the tone will be
generated indefinitely unless interrupted.
Remote Ring Back
Tone Timeout
(seconds)
Specifies the time for which the remote ring back tone (towards the packet
network) will be generated unless interrupted. A value of zero indicates that
the tone will be generated indefinitely unless interrupted.
Congestion Tone
Timeout (seconds)
Specifies the time for network congestion tone to be generated. A value of
zero indicates that the tone will be generated indefinitely unless interrupted.
Busy Tone Timeout
(seconds)
Specifies the time for which the busy tone will be generated unless
interrupted. A value of zero indicates that the tone will be generated
indefinitely unless interrupted.
Cisco Media Gateway Manager 5.0 User Guide
6-100
OL-5461-02
Chapter 6
Configuring Hardware
How Do I Configure VXSM Cards?
Table 6-51
Field Descriptions for the VXSM Create XGCP Call Control Profile Window
(continued)
Field Name
Description
Dial Tone Timeout
(seconds)
Specifies the time for which the dial tone will be generated unless interrupted.
A value of zero indicates that the tone will be generated indefinitely unless
interrupted.
Confirmation Dial
Tone Timeout
(seconds)
Specifies the time for which the stutter or confirmation dial tone will be
generated unless interrupted. A value of zero indicates that the tone will be
generated indefinitely unless interrupted.
Ringing Cadence Tone Specifies the time for which the ringing cadence will be generated towards the
Timeout (seconds)
basic PBX unless interrupted. A value of zero indicates that the cadence will
be generated indefinitely unless interrupted.
Reorder Tone Timeout Specifies the time for which the reorder tone or fast busy tone will be
(seconds)
generated unless interrupted. A value of zero indicates that the tone will be
generated indefinitely unless interrupted.
COT1 Timeout
(seconds)
Specifies time for which the continuity test tone 1 will be generated unless
interrupted. A value of zero indicates that the tone will be generated
indefinitely unless interrupted.
COT2 Timeout
(seconds)
Specifies time for which the continuity test tone 1 will be generated unless
interrupted. A value of zero indicates that the tone will be generated
indefinitely unless interrupted.
6.7.6.5 Configuring MGC Redundancy
MGCs configured in an MGC group form a set of redundant MGCs, up to a maximum of 4. The order
in which MGCs are added to the group is the order of preference for selecting the MGC to use. Besides
having up to 4 MGCs in a group, each MGC can have up to 4 IP addresses.
To configure MGC redundancy:
Step 1
Create an MGC by assigning it a domain name, and specify how the domain name is to be resolved (see
Step 1 in section 6.7.6.1 Setting Up MGCs and MGC Groups, page 6-79).
Step 2
Change the IP address resolution and (optionally) create an IP address for the domain (see Step 2 in
section 6.7.6.1 Setting Up MGCs and MGC Groups, page 6-79).
Step 3
Add another MGC to a MGC group (see Step 4 in section 6.7.6.1 Setting Up MGCs and MGC Groups,
page 6-79).
6.7.7 How Do I Configure VXSM Features?
This section contains the following information:
•
6.7.7.1 Creating a RUDP Session, page 6-102
•
6.7.7.2 Configuring Voiceband Data, page 6-108
•
6.7.7.3 Creating PRI-BH, page 6-111
•
6.7.7.4 Configuring Announcements, page 6-113
Cisco Media Gateway Manager 5.0 User Guide
OL-5461-02
6-101
Chapter 6
Configuring Hardware
How Do I Configure VXSM Cards?
6.7.7.1 Creating a RUDP Session
Figure 6-49
Process for Creating a RUDP Session
1. Prerequisites:
Create a
resource partition
Create AAL5+control
connections
2. To create a RUDP session
Create a
MGC session set
Create a MGC session
group
Create and assign an IP
address for the connection
Create a
RUDP session
Create an MGC domain
name
130008
Create an
MGC IP address
Before you can create a RUDP session, be sure you have completed the following steps:
Step 1
Create a resource partition on the node—See 6.7.1 Creating a Resource Partition for VXSM, page 6-63.
Step 2
Create an AAL5+control VXSM connection—See Chapter 7, “Provisioning Connections.”
Step 3
Create and assign an IP address for the connection—See 6.7.3 Creating and Assigning an IP Address
for the Connection, page 6-66.
Step 4
Create an MGC domain name—See 6.7.6.1 Setting Up MGCs and MGC Groups, page 6-79.
Step 5
Create an MGC IP address—See 6.7.6.1 Setting Up MGCs and MGC Groups, page 6-79.
Cisco Media Gateway Manager 5.0 User Guide
6-102
OL-5461-02
Chapter 6
Configuring Hardware
How Do I Configure VXSM Cards?
To proceed with the creation of a RUDP session, complete the following steps:
Step 1
Create a MGC session set—See 6.7.7.1.1 Creating a MGC Session Set, page 6-103.
Step 2
Create a MGC session group—See 6.7.7.1.2 Creating a MGC Session Group, page 6-104.
Step 3
Create a RUDP session—See 6.7.7.1.3 Creating a RUDP Session, page 6-106.
6.7.7.1.1 Creating a MGC Session Set
Step 1
From the Domain Explorer window, select the node from the Hierarchy pane and choose
Configuration > MGX 8880/8850 MG > Configuration Center. The Configuration window for the
selected node opens.
Step 2
Within the Elements tab, expand the node, then double-click the VXSM card that contains the
connection you created.
Step 3
Click the MG Controller tab.
Step 4
Choose the Session Set option from the Category drop-down arrow.
Step 5
Click Create to display the Create Session Set window.
Figure 6-50
Configuration Center—VXSM Create Session Set Window
Cisco Media Gateway Manager 5.0 User Guide
OL-5461-02
6-103
Chapter 6
Configuring Hardware
How Do I Configure VXSM Cards?
Step 6
Complete the fields.
Note
Step 7
Table 6-52 describes fields in the VXSM Create Session Set window.
Click Apply to add a MGC session set.
Note
For a description of all buttons within this tab, see section 6.2.3 Navigating Within Tables, page
6-9.
Table 6-52
Field Descriptions for the VXSM Create Session Set Window
Field Name
Description
Session Set Number
Logical index of this table. Currently only set 1 is used and all the signalling
channels are implicitly mapped to set 1.
Session Set State
Denotes the state this set is in.
Total Session Groups
Keeps track of the number of session groups that has been added to a session
set.
Current Active Group
Current active group number.
Number of Failed
Switch Between
Groups
Keeps track of failed attempts to switch between session groups in this set.
Number of Successful Keeps track of successful attempts to switch between session groups in this
Switch Between
set.
Groups
Fault Tolerant
Indicates whether the set configuration is fault tolerant or not.
6.7.7.1.2 Creating a MGC Session Group
Step 1
From the Domain Explorer window, select the node from the Hierarchy pane and choose
Configuration > MGX 8880/8850 MG > Configuration Center. The Configuration window for the
selected node opens.
Step 2
Within the Elements tab, expand the node, then double-click the VXSM card that contains the
connection you created.
Step 3
Click the MG Controller tab.
Step 4
Choose the Session Group option from the Category drop-down arrow.
Step 5
Click Create to display the Create Session Group window.
Cisco Media Gateway Manager 5.0 User Guide
6-104
OL-5461-02
Chapter 6
Configuring Hardware
How Do I Configure VXSM Cards?
Figure 6-51
Step 6
Complete the fields.
Note
Step 7
Configuration Center—VXSM Create Session Group Window
Table 6-53 describes fields in the VXSM Create Session Group window.
Click Apply to add a MGC session group.
Note
For a description of all buttons within this tab, see section 6.2.3 Navigating Within Tables, page
6-9.
Table 6-53
Field Descriptions for the VXSM Create Session Group Window
Field Name
Description
Session Group
Number
Index for this table. One set can have up to two groups.
Session Set Number
Session set number to which this session group belongs.
MGC Name
Denotes the name of the media gateway controller. This corresponds to a
domain name under which the MGC could also be registered in a DNS.
Group State
State the session group is in.
Current Active
Session
Indicates the current session that is open to communication with the MGC.
There is only one action session per session group.
Total Number of
Sessions
Keeps track of the total number of sessions that have been added to this group.
Cisco Media Gateway Manager 5.0 User Guide
OL-5461-02
6-105
Chapter 6
Configuring Hardware
How Do I Configure VXSM Cards?
Table 6-53
Field Descriptions for the VXSM Create Session Group Window (continued)
Field Name
Description
Number of Fail
Attempts
Keeps track of failed attempts to switch between sessions in this group.
Number of Success
Attempts
Keeps track of successful attempts to switch between sessions in this group.
6.7.7.1.3 Creating a RUDP Session
Step 1
From the Domain Explorer window, select the node from the Hierarchy pane and choose
Configuration > MGX 8880/8850 MG > Configuration Center. The Configuration window for the
selected node opens.
Step 2
Within the Elements tab, expand the node, then double-click the VXSM card that contains the
connection you created.
Step 3
Click the MG Controller tab.
Step 4
Choose the RUDP Session option from the Category drop-down arrow.
Step 5
Click Create to display the Create RUDP Session window.
Figure 6-52
Configuration Center—VXSM Create RUDP Session Window
Cisco Media Gateway Manager 5.0 User Guide
6-106
OL-5461-02
Chapter 6
Configuring Hardware
How Do I Configure VXSM Cards?
Step 6
Complete the fields.
Note
Step 7
Table 6-54 describes fields in the VXSM Create RUDP Session window.
Click Apply to add a RUDP session.
Note
For a description of all buttons within this tab, see section 6.2.3 Navigating Within Tables, page
6-9.
Table 6-54
Field Descriptions for the VXSM Create RUDP Session Window
Field Name
Description
Session Number
Index for this table. One group can have a maximum of four sessions.
Session Group
Number
A mandatory parameter if session type is backhaul, indicates the session group
that this session belongs to.
Session Priority
When a session fails, it indicates which session the session manager should try
to bring active. A lower number means higher priority.
Local Port Number
Port number of gateway for this session. The port number should be unique
across other sessions and XGCP/SRCP.
Remote Port Number
Port number of MGC for this session. The port number should be unique
across other sessions and XGCP/SRCP.
Session State
State this session is in.
Current Session
Indicates which session has received an active message from MGC.
Local IP Address
IP address of gateway.
Remote IP Address
IP addressof the media gateway controller. It is resolved by using
vismSessionGrpMgcNamein vismSessionGrpTable.
Max Window Size
Max size of the receive window in segments, used for flow control.
Max Attempts to
Synchronize
Max number of attempts to synchronize with other side (MGC).
Max Segment Size
Max number of octets that can be received by the peer sending the SYN
segment.
Max Auto Resets
Max number of consecutive auto reset that will be performed before a
connection is reset.
Retransmission
TimeOut (ms)
(in milliseconds) Timeout value for retransmission of unacknowledged
packets.
Max Retransmits
Max number of times consecutive transmission will be attempted before the
connection is considered broken.
Max
Acknowlegements
Accumulated
Indicates the maximum number of acknowledgments that will be accumulated
before sending an acknowledgment if another segment is not sent.
Cisco Media Gateway Manager 5.0 User Guide
OL-5461-02
6-107
Chapter 6
Configuring Hardware
How Do I Configure VXSM Cards?
Table 6-54
Field Descriptions for the VXSM Create RUDP Session Window (continued)
Field Name
Description
Accumulated
Acknowledgement
TimeOut (ms)
(in milliseconds) Timeout value for sending an acknowledgment segment if
another segment is not sent.
Max Number Of Out
Of Sequence Packets
Max number of out of sequence packets that will be accumulated before an
EACK segment is sent. The EACK segment is used to acknowledge segments
received out of sequence.
Send Null Segment
Timeout (ms)
Number of milliseconds of idle time before sending a null segment.
Auto Reset Timeout
(ms)
Number of milliseconds to wait for transfer state before an auto reset occurs.
6.7.7.2 Configuring Voiceband Data
Step 1
From the Domain Explorer window, select the node from the Hierarchy pane and choose
Configuration > MGX 8880/8850 MG > Configuration Center. The Configuration window for the
selected node opens.
Step 2
Within the Elements tab, expand the node, then double-click the VXSM card.
Step 3
Click the VBD tab.
Step 4
Create a profile:
a.
Choose the Profile option from the Category drop-down arrow.
b.
Click Create. The Create VBD Profile window appears.
Cisco Media Gateway Manager 5.0 User Guide
6-108
OL-5461-02
Chapter 6
Configuring Hardware
How Do I Configure VXSM Cards?
Figure 6-53
c.
Configure the fields.
Note
d.
Step 5
Configuration Center—VXSM Create VBD Profile Window
Table 6-55 describes the fields in the VXSM Create VBD Profile window.
Click Apply to create the VBD profile.
Create two event mapping indexes:
a.
Choose the Event Mapping option from the Category drop-down arrow.
b.
Click Create. The Create Event Mapping window appears.
Cisco Media Gateway Manager 5.0 User Guide
OL-5461-02
6-109
Chapter 6
Configuring Hardware
How Do I Configure VXSM Cards?
Figure 6-54
c.
Configure the fields. Make sure to create one Event Index as ced, and a second Event Index as
v21Tone.
Note
d.
Note
Configuration Center—VXSM Create Event Mapping Window
Table 6-56 describes the fields in the VXSM Create Event Mapping window.
Click Apply to create one event mapping index. Perform Step 5 again, and create a second index.
For a description of all buttons within this tab, see section 6.2.3 Navigating Within Tables, page
6-9.
Table 6-55
Field Descriptions for the VXSM Create VBD Profile Window
Field Name
Description
Event Mapping Index
Index that uniquely identifies a set of voice data events supported and how
they will be handled in the media gateway.
Event Index
Index that uniquely identifies the voice band data event.
Event Handle Type
Specifies the type of the handle function in response to this event detection.
Event Profile Index
Specifies the index of the profile which defines the handling attributes in
response to the event detection.
Event Handle Mode
Specifies the handling mode of the event.
Cisco Media Gateway Manager 5.0 User Guide
6-110
OL-5461-02
Chapter 6
Configuring Hardware
How Do I Configure VXSM Cards?
Table 6-56
Field Descriptions for the VXSM Create Event Mapping Window
Field Name
Description
Profile Index
This object uniquely identifies the VBD profile.
Upspeed CODEC
Type
Specifies the CODEC type to use for upspeed.
Jitter Buffer Delay
Mode
Specifies the jitter buffer mode applied to the VBD call connection.
Jitter Maximum Delay Specifies the maximum jitter buffer size in the VBD connection.
Jitter Nominal Delay
Specifies the nominal jitter buffer size in the VBD connection.
Inactivity Timeout
Specifies the maximum jitter buffer size in the VBD connection.
6.7.7.3 Creating PRI-BH
Step 1
From the Domain Explorer window, select the node from the Hierarchy pane and choose
Configuration > MGX 8880/8850 MG > Configuration Center. The Configuration window for the
selected node opens.
Step 2
Within the node, expand the VXSM OC3 card and expand the SONET line, STS path, and VT path that
contain the DS1/E1 line you want to enable. Double-click on the DS1/E1 line. The DS1/E1 Path tab
appears, with the DS1/E1 Line Info option selected by default
Step 3
Within the Elements tab, within the node, expand the VXSM card, and double-click on the DS1/E1 line
you want to create PRI-BH under.
Step 4
Click the PRI-BH tab.
Step 5
Click Create. The VXSM PRI-BH Create window appears.
Cisco Media Gateway Manager 5.0 User Guide
OL-5461-02
6-111
Chapter 6
Configuring Hardware
How Do I Configure VXSM Cards?
Figure 6-55
Step 6
Configure the fields.
Note
Step 7
Configuration Center—VXSM PRI-BH Create Window
Table 6-57 describes the fields in the VXSM PRI-BH Create window.
Click Apply to create PRI-BH.
Table 6-57
Field Descriptions for the VXSM PRI-BH Create Window
Field Name
Description
DS0 Number
DS0 number.
Application Type
Specifies the application type for the corresponding LAPD D channel. After
the LAPD is added, this object can not be modified.
Side
Specifies whether the LAPD stack is at the user or network side.
Oper Status
Operational status of this interface.
If Type
Specifies the type of interface in which the LAPD stack resides.
DS0 Format
Specifies the DS0 format. 56k is robbed-bit for T1.
Hdlc Profile
Specifies the HDLC profile which contains a list of HDLC attributes for the
PRI backhaul connection.
Win Size
Specifies the maximum number of sequentially numbered l-frames that may
be outstanding.
N200
Specifies the maximum number of retransmissions of a frame.
Cisco Media Gateway Manager 5.0 User Guide
6-112
OL-5461-02
Chapter 6
Configuring Hardware
How Do I Configure VXSM Cards?
Table 6-57
Field Descriptions for the VXSM PRI-BH Create Window (continued)
Field Name
Description
T200
Specifies the maximum time to wait for acknowledgment of a transmit frame.
T203
Specifies the maximum time in milliseconds allowed without frames being
exchanged. This value should be greater than the value for T200.
6.7.7.4 Configuring Announcements
In switching mode, VXSM delivers prerecorded announcements in either direction, for example, a
calling party or called party, under the control of the MGC. These announcements are played during a
call setup and after the call is established. The announcement files are available in VXSM memory to be
played out. If the file does not reside in VXSM memory, VXSM uses TFTP to obtain the file from an
external announcement server, caches it, and plays it out.
A media gateway is a network element. It provides an electrical conversion between audio signals carried
on telephone circuits and data packets carried over the Internet or over other packet data networks. To
setup an announcement system, the media gateway plays prerecorded audio files. These files are played
bidirectionally over existing connections, for example, calls, or the audio files are directed toward a
TDM network to a TDM endpoint that is terminated on a media gateway.
To configure the announcement control parameters:
Step 1
From the Domain Explorer window, choose Configuration > MGX 8880/8850 MG > Configuration
Center.
Step 2
Under the Elements tab, within the node, double-click the VXSM card.
Step 3
Click the VOICE Features tab.
Step 4
Choose the Announcement Controls option from the Category drop-down arrow.
Step 5
Configure the fields.
Note
Step 6
Table 6-58 describes fields in the VXSM Voice Features tab, Announcement Controls category.
Click Apply to configure the announcement controls.
Cisco Media Gateway Manager 5.0 User Guide
OL-5461-02
6-113
Chapter 6
Configuring Hardware
How Do I Configure VXSM Cards?
Table 6-58
Field Descriptions for the VXSM Voice Features Tab, Announcement Controls
Category
Field Name
Description
Announcement Server Specifies the domain name of an announcement file server that resides in an
Domain Name
IP network and is reachable from the media gateway. The default value of this
object is NULL string (size is 0). Before using any object in this table, this
object should be configured to non-NULL.
Domain Name
Resolution
Specifies the domain name resolution for the domain name of the
announcement file server which is specified by the Audio File Name object. If
this object is set to internalOnly, the IP address associated with the file server
(Audio File Name) will be determined by the cannoIpAddress object. Values
include:
•
internalOnly (default)—Specifies the internal resolution of the domain
name for the announcement file server. If the internalOnly option is
chosen, the IP address associated with the file server is determined
according to the IP address of the server.
•
externalOnly—Specifies the external resolution of the domain name for
the announcement file server.
Server IP Address
Type
Specifies the IP address type of cannoIpAddress. This object is not applicable
when Domain Name Resolution is set to externalOnly.
Server IP Address
Specifies the IP address type associated with the Audio File Name. This object
is not applicable when Domain Name Resolution is set to externalOnly.
Specifies the maximum life span of the dynamic announcement files in the
cache. A value of 0 indicates that the age time is disabled. The range is from
0-1440 min. The default value is 1440 min.
Ann File Age
(minutes)
Directory Path
Specifies the directory path under the default TFTP directory in the
announcement file server for announcement files. The characters can be
alphanumeric characters, forward slashes, backward slashes, periods, dashes,
and underscores. No embedded spaces are allowed. The subdirectory path can
have up to 64 characters in length.
Request TimeOut
(seconds)
Specifies the time for a play announcement request to be serviced. The range
is from 1-50 sec. The default value is 5 sec.
Specifies the maximum number of permanent announcement files that can be
added to the media gateway. A value of 0 indicates that the media gateway
supports only dynamic announcement files. The range is from 0-136. The
default value is 41.
Max Announcement
Number
Cisco Media Gateway Manager 5.0 User Guide
6-114
OL-5461-02
Chapter 6
Configuring Hardware
How Do I Configure VXSM Cards?
To map an announcement name number to the announcement filename:
Step 1
Within the VOICE Features tab, choose the Announcement Files option from the Category
drop-down arrow.
Step 2
Click Create to display the Announcement Files Configuration window.
Step 3
Configure the fields.
Note
Step 4
Table 6-58 describes fields in the VXSM Voice Features tab, Announcement Files category.
Click Apply to map the announcement name number to the announcement filename.
Table 6-59
Field Descriptions for the VXSM Voice Features Tab, Announcement Files Category
Field Name
Description
File Number
Index value to identify the announcement file that is used by the media
gateway. The range is from 1-1024.
Name of a valid announcement that is stored in the media gateway
announcement table. The announcement file name is composed of up to 64
characters, and can incorporate path or subdirectory information. The
characters can be alphanumeric characters, forward slashes, backward slashes,
periods, dashes, and underscores. No embedded spaces are allowed. The last
character of the filename cannot have a dash or forward slash.
File Name
File Status
Status of the audio file.
Number of Play
Cycles
Number of times that the announcement file is played. The range is from
0-65535 cycles. The default is one cycle. The value zero indicated that an
announcement file is played or looped continuously.
The Number of Play Cycles parameter is used only when the play
announcement signal from the MGC does not incorporate a parameter,
which specifies the number of cycles that the announcement is played.
Duration that the announcement file is played during an announcement cycle.
The range is from 0-65535 ms. The default value is zero. The value zero
indicates that the duration of the announcement is a variable, and the Number
of Cycles parameter determines the time.
Note
Play Duration (10
milliseconds)
Note
The Play Duration (10 milliseconds) field is applicable only for
playing a fixed announcement.
To play a fixed announcement, the Number of Cycles parameter and
the Play Duration parameter are used together to determine how long
the announcement is played.
Cisco Media Gateway Manager 5.0 User Guide
OL-5461-02
6-115
Chapter 6
Configuring Hardware
How Do I Configure RPM Cards?
Table 6-59
Field Descriptions for the VXSM Voice Features Tab, Announcement Files Category
(continued)
Field Name
Description
File Type
Announcement file type. Values include:
•
dynamic (default)—specifies the dynamic file is removed from the cache
when the age of the file reaches a specified limit or in accordance with a
Least Replaceable Unit (LRU) algorithm when the cache is full.
•
permanent—specifies the permanent file is stored in the cache until it is
deliberately deleted.
Aging Time (minutes) Announcement file age in cache, only for dynamic files.
6.8 How Do I Configure RPM Cards?
Figure 6-56
Process for Configuring RPM Cards
Create a resource
partition
Create an ATM
subinterface
130007
(Optional)
Save the runtime
configuration
To configure RPM-PR or RPM-XF cards, complete the following steps:
Step 1
Create a resource partition—See 6.8.1 Creating a Resource Partition for RPM, page 6-117.
Step 2
Create an ATM subinterface—See 6.8.2 Creating or Modifying an ATM Subinterface, page 6-119.
Step 3
(Optional) Save the run-time configuration—See 6.8.3 Saving the Run-Time Configuration for RPM,
page 6-120.
Cisco Media Gateway Manager 5.0 User Guide
6-116
OL-5461-02
Chapter 6
Configuring Hardware
How Do I Configure RPM Cards?
6.8.1 Creating a Resource Partition for RPM
Step 1
From the Domain Explorer window, choose Configuration > MGX 8880/8850 MG > Configuration
Center.
Step 2
Under the Elements tab, within the node, double-click the RPM card.
Step 3
Click the Resource Partitions tab.
Step 4
Click Create. The Create Resource Partitions window appears.
Figure 6-57
Step 5
Configure the fields.
Note
Step 6
Configuration Center—RPM Create Resource Partitions Window
Table 6-60 describes fields in the RPM Create Resource Partitions window.
Click Apply to create the resource partition.
Table 6-60
Field Descriptions for the RPM Create Resource Partitions Window
Field Name
Description
Partition Type
(RPM-PR only)
Partition type, can be VCC or VPC.
Resource Partition ID
Value for the resource partition identifier. The range is from 1-10. The value
1 is reserved for PNNI.
Cisco Media Gateway Manager 5.0 User Guide
OL-5461-02
6-117
Chapter 6
Configuring Hardware
How Do I Configure RPM Cards?
Table 6-60
Field Descriptions for the RPM Create Resource Partitions Window (continued)
Field Name
Description
Controller ID
Value for the controller identifier. The range is from 2-255. The value 2 is
reserved for PNNI, the others are for LSC.
Egress Guaranteed
BW
Guaranteed percentage bandwidth reserved for the resource partition in egress
direction. The range is from 0-1000000.
Egress Max BW
Maximum percentage bandwidth for the resource partition in egress direction.
The range is from 0-1000000.
Ingress Guaranteed
BW
Guaranteed percentage bandwidth reserved for the resource partition in
ingress direction. The range is from 0-1000000.
Ingress Max BW
Maximum percentage bandwidth for the resource partition in ingress
direction. The range is from 0-1000000.
Min VPI
Beginning of the VPI range for this partition.
Max VPI
Min VCI
Max VCI
•
For RPM-PR VCC partitions, the range is 0-0.
•
For RPM-PR VPC partitions, the range is 1-255.
•
For RPM-XF, the range is 0-240.
•
For VXSM, the range is 0-255.
End of the VPI range for this partition.
•
For RPM-PR VCC partitions, the range is 0-0.
•
For RPM-PR VPC partitions, the range is 1-255.
•
For RPM-XF, the range is 0-240.
•
For VXSM, the range is 0-255.
Beginning of the VCI range for this partition.
•
For RPM-PR VCC partitions, the range is 32-3808.
•
For RPM-PR VPC partitions, the range is 0-0.
•
For RPM-XF, the range is 32-65535.
End of the VCI range for this partition.
•
For RPM-PR VCC partitions, the range is 32-3808.
•
For RPM-PR VPC partitions, the range is 65535-65535.
•
For RPM-XF, the range is 32-65535.
Min Connections
Guaranteed number of connections that can be configured on this partition.
Max Connections
Maximum number of connections that can be configured on this partition.
Egress BW Used
Percentage bandwidth used by the resource partition in egress direction.
Egress BW Avail
Percentage bandwidth available on the resource partition in egress direction.
Ingress BW Used
Percentage bandwidth used by the resource partition in ingress direction.
Ingress BW Avail
Percentage bandwidth available on the resource partition in ingress direction.
Used Connections
Number of connections currently in use on this partition.
Avail Connections
Number of connections available that can be added on this partition.
Cisco Media Gateway Manager 5.0 User Guide
6-118
OL-5461-02
Chapter 6
Configuring Hardware
How Do I Configure RPM Cards?
6.8.2 Creating or Modifying an ATM Subinterface
By preparing to create the master end of the connection to the VXSM card, you must create an ATM
subinterface on the RPM card.
Step 1
From the Domain Explorer window, choose Configuration > MGX 8880/8850 MG > Configuration
Center.
Step 2
Under the Elements tab, within the node, double-click the RPM card.
Step 3
Click the Ports tab to display the entries for the Ports Table for RPM.
Step 4
To modify an existing entry, select the entry, then click Details
or
To create a new ATM subinterface, click Create.
The Ports Create/Details window appears.
Figure 6-58
Step 5
Configure the fields.
Note
Step 6
Configuration Center—RPM Ports Create/Details Window
Table 6-61 describes fields in the RPM Ports Create/Details window.
Click Apply to create the resource partition.
After creating the ATM subinterface, you must create a gigabit Ethernet interface to the network. For
information about creating the gigabit Ethernet interface, refer to the VXSM Configuration Guide and
Command Reference for MGX Switches and Media Gateways, Release 5.
Cisco Media Gateway Manager 5.0 User Guide
OL-5461-02
6-119
Chapter 6
Configuring Hardware
How Do I Configure RPM Cards?
Table 6-61
Field Descriptions for the RPM Ports Create/Details Window
Field Name
Description
Main Interface
Specifies the main interface.
Subinterface Num
Specifies the subinterface.
Adapter IF
Maps to the RPMs port adapter interface. Currently only one port adapter
interface (switch 1) is supported.
IfType
Specifies the link type of this subinterface.
IP Address
Specifies the 4-octet IP address of this subinterface. The IP address is the same
as the one used to set up the slave end of the connection on the VXSM card.
Subnet Mask
Specifies the 4-octet subnet mask of this subinterface. An example subnet
mask is 255.255.255.0.
Admin Status
Specifies the administrative status of this subinterface.
Oper Status
Current operational state of the subinterface.
Descriptor
Port descriptor.
6.8.3 Saving the Run-Time Configuration for RPM
Once you make any changes to the RPM card, such as creating or modifying a resource partition or an
ATM subinterface, or adding connections to the RPM card, to make your changes permanent and survive
after a reboot, you must save the run-time configuration on the RPM card.
Note
For details on adding connections, see Chapter 7, “Provisioning Connections.”
Step 1
From the Domain Explorer window, choose Configuration > MGX 8880/8850 MG > Configuration
Center.
Step 2
Under the Elements tab, within the node, double-click the RPM card. The Card tab appears, with the
Front Card Configuration category selected by default.
Step 3
Click the Save Running Config button. The status of the operation appears in the lower left of the
window.
Cisco Media Gateway Manager 5.0 User Guide
6-120
OL-5461-02
Chapter 6
Configuring Hardware
How Do I Configure VISM-PR Cards?
6.9 How Do I Configure VISM-PR Cards?
Figure 6-59
Process for Configuring VISM-PR Cards
Set up the
VISM-PR card
Configure Time Division
Multiplexing (TDM)
Configure jitter
130012
Configure
VoIP switching
In order to configure Voice Inter-working Service Module Premium (VISM-PR) cards, you must perform
the following steps:
Step 1
Set up the VISM-PR card—See 6.9.1 Setting Up a VISM-PR Card, page 6-122.
Step 2
Configure Time Division Multiplexing (TDM)—See 6.9.2 Configuring TDM for VISM-PR, page
6-130.
Step 3
Configure jitter—See 6.9.3 Configuring Jitter on VISM-PR Cards, page 6-141.
Step 4
Configure VoIP switching—See 6.9.4 Configuring VoIP Switching for VISM-PR, page 6-143.
Cisco Media Gateway Manager 5.0 User Guide
OL-5461-02
6-121
Chapter 6
Configuring Hardware
How Do I Configure VISM-PR Cards?
6.9.1 Setting Up a VISM-PR Card
Figure 6-60
Process for Setting Up a VISM-PR Card
Create a virtual port
Create a resource
partition
(Optional) View the
CODEC templates
130009
(Optional)
View the
current configuration
settings
In order to set up a VISM-PR card, you must perform the following steps:
Step 1
Create a virtual port—See 6.9.1.1 Creating a Virtual Port for VISM-PR, page 6-123.
Step 2
Create a resource partition—See 6.9.1.2 Creating a Resource Partition for VISM-PR, page 6-124.
Step 3
(Optional) View the CODEC templates—See 6.9.1.3 Viewing VISM-PR CODEC Templates, page
6-125.
Step 4
(Optional) View the current configuration settings—See 6.9.1.4 Viewing VISM-PR Card Configuration
Settings, page 6-128.
Cisco Media Gateway Manager 5.0 User Guide
6-122
OL-5461-02
Chapter 6
Configuring Hardware
How Do I Configure VISM-PR Cards?
6.9.1.1 Creating a Virtual Port for VISM-PR
Note
Only one virtual port is allowed on a VISM-PR card.
To create a virtual port for the VISM-PR card:
Step 1
From the Domain Explorer window, choose Configuration > MGX 8880/8850 MG > Configuration
Center.
Step 2
Under the Elements tab, within the node, double-click the VISM-PR card.
Step 3
Click the Port tab to display the port table.
Step 4
Click Create to display the Create Port window.
Figure 6-61
Step 5
Complete the fields.
Note
Step 6
Configuration Center—VISM-PR Create Port Window
When you create an ATM port on a VISM-PR card, the bandwidth, VPI range, and VCI range
are determined.
Click Create to create a virtual port for VISM-PR.
The added port is not detected by the controller until you create a resource partition. For more
information, see section 6.9.1.2 Creating a Resource Partition for VISM-PR, page 6-124.
Cisco Media Gateway Manager 5.0 User Guide
OL-5461-02
6-123
Chapter 6
Configuring Hardware
How Do I Configure VISM-PR Cards?
Table 6-62
Field Descriptions for the VISM-PR Create Port Window
Field Name
Description
Port Number
Virtual port number for the VISM-PR card.
Port Type
Indicates the network port. Value of this object is always set to VoIP.
Port Speed
Advertises virtual port bandwidth to the controller, SVC and PVC connection
admission control, and aggregate traffic clipping.
Port State
Current state of the port.
Descriptor
Port descriptor.
6.9.1.2 Creating a Resource Partition for VISM-PR
Step 1
From the Domain Explorer window, choose Configuration > MGX 8880/8850 MG > Configuration
Center.
Step 2
Under the Elements tab, within the node, double-click the VISM-PR card.
Step 3
Click the Port tab to display the entries of the port table.
Step 4
Select the port entry.
Step 5
Click Details.
Step 6
Click the Resource Partition tab to display the resource partition table for VISM-PR.
Step 7
Click Create to display the Create Resource Partitions window.
Figure 6-62
Configuration Center—VISM-PR Create Resource Partitions Window
Cisco Media Gateway Manager 5.0 User Guide
6-124
OL-5461-02
Chapter 6
Configuring Hardware
How Do I Configure VISM-PR Cards?
Step 8
Complete the fields.
Note
Step 9
Table 6-63 describes fields in the VISM-PR Create Resource Partitions window.
Click Apply to create the resource partition.
Note
For a description of all buttons within this tab, see section 6.2.3 Navigating Within Tables, page
6-9
Table 6-63
Field Descriptions for the VISM-PR Create Resource Partitions Window
Field Name
Description
Logical Port Num
Index to this table.
Controller Num
Index for the controller using the port. In MGX release 1.0, the value par
should be used.
LCNs Available
Number of LCNs available for this controller and this port.
Low End of LCN
Low end of reserved LCN. Currently SET is not allowed on this object.
High End of LCN
High end of reserved LCN.
Total Ingress BW
Percentage of total ingress bandwidth reserved. Since we have only one LCN
for VoIP, the value is 100.
Total Egress BW
Percentage of total egress bandwidth reserved. Since we have only one LCN
for VoIP, the value is 100.
Controller Identifier
Controller identifier of the PNNI controller.
6.9.1.3 Viewing VISM-PR CODEC Templates
Viewing VISM-PR CODEC templates in Cisco MGM can be done in two ways:
You can view a list of all possible CODEC templates on the VISM-PR card
or
You can view the current CODEC template being used on the VISM-PR card.
Note
To change the CODEC templates, you must use the CLI. For details, refer to the Cisco Voice
Interworking Services (VISM) Configuration Guide & Command Reference, Release 3.3.
Cisco Media Gateway Manager 5.0 User Guide
OL-5461-02
6-125
Chapter 6
Configuring Hardware
How Do I Configure VISM-PR Cards?
To view a list of all possible CODEC templates on the VISM-PR card:
Step 1
From the Domain Explorer window, choose Configuration > MGX 8880/8850 MG > Configuration
Center.
Step 2
Under the Elements tab, within the node, double-click the VISM-PR card.
Step 3
Click the CODECs tab. The CODECs Supported category appears by default. All supported CODEC
templates are listed in the table.
Note
To view and configure VoIP CODECs, see section 6.9.1.3.1 Configuring VoIP CODECs, page
6-127.
For a description of all buttons within this tab, see section 6.2.3 Navigating Within Tables, page
6-9.
To view the current CODEC template in use on the VISM-PR card:
Step 1
From the Domain Explorer window, choose Configuration > MGX 8880/8850 MG > Configuration
Center.
Step 2
Under the Elements tab, within the node, double-click the VISM-PR card.
Step 3
Click the Media Gateway tab. The Gateway Capabilities option appears by default in the Category
drop-down arrow. The Codec Template field lists the number of the current CODEC template in use on
the VISM-PR card.
Figure 6-63
Configuration Center—VISM-PR Media Gateway Tab, Gateway Capabilities Category
Cisco Media Gateway Manager 5.0 User Guide
6-126
OL-5461-02
Chapter 6
Configuring Hardware
How Do I Configure VISM-PR Cards?
Note
Table 6-65 describes fields in the VISM-PR Media Gateway tab, Gateway Capabilities category.
For a description of all buttons within this tab, see section 6.2.3 Navigating Within Tables, page
6-9.
6.9.1.3.1 Configuring VoIP CODECs
Step 1
From the Domain Explorer window, choose Configuration > MGX 8880/8850 MG > Configuration
Center.
Step 2
Under the Elements tab, within the node, double-click the VISM-PR card.
Step 3
Click the CODECs tab. Choose the VoIP CODECs option from the Category drop-down arrow.
Step 4
Click on the CODEC you want to configure, then click Details. The Codec Configuration window
appears.
Figure 6-64
Configuration Center—VISM-PR Codec Configuration Window
Cisco Media Gateway Manager 5.0 User Guide
OL-5461-02
6-127
Chapter 6
Configuring Hardware
How Do I Configure VISM-PR Cards?
Step 5
Complete the fields.
Note
Table 6-64 describes the fields in the VISM-PR Codec Configuration window.
For a description of all buttons within this tab, see section 6.2.3 Navigating Within Tables, page
6-9.
Step 6
Click Apply to configure the VoIP CODEC.
Table 6-64
Field Descriptions for the VISM-PR Codec Configuration Window
Field Name
Description
Index
Index to this table.
Codec Name
Name of the codec (for example, index 1 will have G.711u as the codec name;
index 2 will have G.711a as the codec name, etc.).
Packetization Period
Packetization period for a particular CODEC in milliseconds.
Preference
User configured preference for each CODEC.
Codec String
Local connection option or SDP descriptor string that VISM-PR obtains from
the call agent for the CODEC.
IANA Type
Contains a number assigned by IANA.
6.9.1.4 Viewing VISM-PR Card Configuration Settings
The Gateway Capabilities option allows you to view VISM-PR card configuration details, such as the
VISM mode, ECAN encoding, and current CODEC templates.
Step 1
From the Domain Explorer window, choose Configuration > MGX 8880/8850 MG > Configuration
Center.
Step 2
Under the Elements tab, within the node, double-click the VISM-PR card.
Step 3
Click the Media Gateway tab. The Gateway Capabilities option appears by default in the Category
drop-down arrow (see Figure 6-63).
Note
Table 6-65 describes fields in the VISM-PR Media Gateway tab, Gateway Capabilities category.
For a description of all buttons within this tab, see section 6.2.3 Navigating Within Tables, page
6-9.
Cisco Media Gateway Manager 5.0 User Guide
6-128
OL-5461-02
Chapter 6
Configuring Hardware
How Do I Configure VISM-PR Cards?
Table 6-65
Field Descriptions for the VISM-PR Media Gateway Tab, Gateway Capabilities
Category
Field Name
Description
Features Enabled
Features enabled on this VISM-PR card.
Available Ds0
EndPoints
Number of DS0s available for new connections on VISM-PR. This is modified
by the VISM-PR firmware after each connection is setup.
Codec Template
Number of the CODEC template currently configured on the VISM-PR card.
Max Num of MGCs
Maximum number of MGCs that the MG can be configured with. If the value
is 0, there is no limitation.
Ecan Encoding
Voice encoding type, can be either:
•
Mu-law—Value returned for T1 lines.
•
A-law—Value returned for E1 lines.
VISM Mode
Operating mode of the VISM-PR card.
TFTP Server Domain
Domain name of the TFTP server from where the CAS module will download
the CAS files.
External DNS Name
Refers to the domain name of the external DNS server that will be used to
resolve other domain name.
Cisco Media Gateway Manager 5.0 User Guide
OL-5461-02
6-129
Chapter 6
Configuring Hardware
How Do I Configure VISM-PR Cards?
6.9.2 Configuring TDM for VISM-PR
Figure 6-65
Process for Configuring TDM for VISM-PR
Configure
T1/E1 lines
(Optional) Place T1/E1
lines in or out of service
(Optional) Add bulk
distribution
130011
Configure Echo
Cancellation (ECAN)
In order to configure the Time Division Multiplexing (TDM) on a VISM-PR card, you must perform the
following steps:
Step 1
Configure T1/E1 lines—See 6.9.2.1 Configuring T1 and E1 Lines for VISM-PR, page 6-131).
Step 2
(Optional) Place T1/E1 lines in or out of service—See 6.9.2.2 Placing T1 or E1 Lines In or Out of
Service, page 6-139.
Step 3
(Optional) Add bulk distribution—See 6.9.2.3 Adding Bulk Distribution Using SRME, page 6-139.
Step 4
Configure Echo Cancellation (ECAN)—See 6.9.2.4 Configuring ECAN for VISM-PR, page 6-141.
Cisco Media Gateway Manager 5.0 User Guide
6-130
OL-5461-02
Chapter 6
Configuring Hardware
How Do I Configure VISM-PR Cards?
6.9.2.1 Configuring T1 and E1 Lines for VISM-PR
You can have eight physical T1 or E1 ports on the VISM-PR back card.
For detailed information on how to configure CAS signaling for the TDM side of the network
application, refer to the Cisco Voice Interworking Services (VISM) Configuration Guide and Command
Reference, Release 3.3
To configure T1 and E1 lines on VISM-PR, complete the following steps:
Step 1
Add a T1 or E1 line—See 6.9.2.1.1 Adding a T1 or E1 Line, page 6-131.
Step 2
Configure signaling on the T1 or E1 line—See 6.9.2.1.2 Configuring Signaling on the T1 or E1 Line,
page 6-133.
Step 3
Configure alarm conditioning handling on the T1 or E1 line—See 6.9.2.1.3 Configuring Alarm
Conditioning Handling on the T1 or E1 Line, page 6-136.
6.9.2.1.1 Adding a T1 or E1 Line
Step 1
From the Domain Explorer window, choose Configuration > MGX 8880/8850 MG > Configuration
Center.
Step 2
Under the Elements tab, within the node, double-click the DS1 line under the VISM-PR card. The Line
Config tab appears by default, with the Physical Line Config (DSX1) option selected in the Category
drop-down arrow.
Figure 6-66
Configuration Center—VISM-PR Line Config Tab, Physical Line Config (DSX1)
Category
Cisco Media Gateway Manager 5.0 User Guide
OL-5461-02
6-131
Chapter 6
Configuring Hardware
How Do I Configure VISM-PR Cards?
Step 3
Step 4
Choose one of the following options to enable or disable the line in the Line Enable drop-down arrow:
•
disable
•
enable
•
modify
Configure additional parameters as desired.
Note
Step 5
Table 6-66 describes fields in the VISM-PR Line Config tab, Physical Line Config (DSX1)
category.
Click Apply to add the T1 or E1 line.
Note
For a description of all buttons within this tab, see section 6.2.3 Navigating Within Tables, page
6-9.
Table 6-66
Field Descriptions for the VISM-PR Line Config Tab, Physical Line Config (DSX1)
Category
Field Name
Description
Line Num
Identifier of a DS1/E1 interface on a managed device. Should have the same
value as ifIndex, if any entry for this interface exists in ifTable.
Connector Type
Indicates the connector as well as the backcard type. Has no significance for
VHS.
Line Enable
Disables, enables or modifies a line.
Line Type
Indicates the variety of DS1 line implementing this circuit. Values include:
•
dsx1ESF—Extended SuperFrame DS1 (T1.107)
•
dsx1D4—AT&T D4 format DS1 (T1.107)
•
dsx1E1
•
dsx1E1CRC
•
dsx1E1MF
•
dsx1E1CRC-MF
•
dsx1E1clearchannel
•
dsx1E1Q50
•
dsx1E1Q50CRC
Line Coding
Describes the variety of zero code suppression used on the link.
Line Length
This is not a standard RFC 1407 variable, it is specific to BASIS
implementation.
Tx Clock Source
Source of transmit clock. Values include:
•
localTiming
•
loopTiming
Cisco Media Gateway Manager 5.0 User Guide
6-132
OL-5461-02
Chapter 6
Configuring Hardware
How Do I Configure VISM-PR Cards?
Table 6-66
Field Descriptions for the VISM-PR Line Config Tab, Physical Line Config (DSX1)
Category (continued)
Field Name
Description
Loopback Command
Loopback configuration of the DS1 interface. Values include:
Code Sent
•
dsx1NoLoop
•
dsx1RemoteLoop
•
dsx1LocalLoop
•
dsx1PayloadLoop
Indicates the type of code being sent across the DS1 interface by the device.
Values include:
•
dsx1SendNoCode
•
dsx1SendLineCode
•
dsx1SendPayloadCode
•
dsx1SendResetCode
Ds0 BitMap
Bit map of used DS0 for this line.
Loopback Code
Detect
Disable or enable detection of line loopback codes.
Descriptor
Line descriptor.
6.9.2.1.2 Configuring Signaling on the T1 or E1 Line
Step 1
From the Domain Explorer window, choose Configuration > MGX 8880/8850 MG > Configuration
Center.
Step 2
Under the Elements tab, within the node, double-click the DS1 line under the VISM-PR card.
Step 3
Click the VISM Specific DS1 tab. The VISM Line Config option appears by default in the Category
drop-down arrow.
Cisco Media Gateway Manager 5.0 User Guide
OL-5461-02
6-133
Chapter 6
Configuring Hardware
How Do I Configure VISM-PR Cards?
Figure 6-67
Step 4
Step 5
Choose one of the following options to configure signaling on the line in the Signaling Type drop-down
arrow:
•
cas
•
ccs
•
none
Configure additional parameters as desired.
Note
Step 6
Configuration Center—VISM-PR Specific DS1 Tab, VISM Line Config Category
Table 6-67 describes fields in the VISM-PR Specific DS1 tab, VISM Line Config category.
Click Apply to configure signaling on the T1 or E1 line.
Note
For a description of all buttons within this tab, see section 6.2.3 Navigating Within Tables, page
6-9.
Cisco Media Gateway Manager 5.0 User Guide
6-134
OL-5461-02
Chapter 6
Configuring Hardware
How Do I Configure VISM-PR Cards?
Table 6-67
Field Descriptions for the VISM-PR Specific DS1 Tab, VISM Line Config Category
Field Name
Description
Line Number
T1/E1 line number.
Ecan Enable
Indicates whether the echo cancellation feature is enabled or disabled.
Maximum tail. Should be set just higher than the worst rount trip delay
anticipated. Convergence times might increase for longer tails, and more
resources are used.
vismEcanTail
(milliseconds)
The range is from 24-128. The following discrete values are allowed:
•
24
•
32
•
48
•
64
•
80
•
96
•
112
•
128
Residual Echo Control Residual Echo Control (REC) instructs the canceller how to treat echo
remaining after cancellation. Values include:
•
cancelOnly—disables REC.
•
suppressResidual—specifies that the residual echo is replaced with
silence.
•
reserved—results in a bad value error.
•
comfortNoise (default)—specifies that the noise is injected in place of
residual echo at the same level as the ambient noise at the near end.
VAD Compression
Indicates whether Voice Activity Detection (VAD) is enabled or disabled on
the compression DSPs.
Signaling Type
Indicates the type of signaling used on the line. Values include:
•
cas— defines Channel Associated Signaling (CAS).
•
ccs—defines Common Channel Signaling (CCS).
•
none—specifies that no signaling is used
Ccs Channels
Describes the CCS signaling channels or DS0s (also referred to as D-channel).
Cadence Time
(milliseconds)
Describes the cadence time for CAS signals.
Trunk Condition
Enable
Determines if the trunk conditioning should be enabled or disabled on this
line.
Circuit Identifier
Identifier of a T1/E1 line. Contains alphanumeric description of a line for the
purpose of better identification.
Tx Digit Order
Indicates the order in which ANIs and DNIs will be dialed out from this
outgoing interface.
Cisco Media Gateway Manager 5.0 User Guide
OL-5461-02
6-135
Chapter 6
Configuring Hardware
How Do I Configure VISM-PR Cards?
Table 6-67
Field Descriptions for the VISM-PR Specific DS1 Tab, VISM Line Config Category
(continued)
Field Name
Description
Sa4 Byte
Spare bit on T1/E1 framer reserved for international standardization.
Sa5 Byte
Sa6 Byte
Sa7 Byte
Sa8 Byte
Line State
Allows the line administrative state (in service and out of service) to be
persistent.
Admin State Control
This control object is used to change the service state of the line from is to coos
or from coos to is. The resulting service state of the line is represented by
vismDsx1State. inService: transition vismDsx1State to is. In the course, the
MGs MGCs may get notified of this transition, e.g. in the case of MGCP
through emission of RSIPs to registered call agents according to policy.
forcefulOutOfService: Take the line out of service forcefully. This releases
any resources at the line. In the course, the MGCs may get notified of this
transition, e.g in the case of MGCP through emission of RSIPs to registered
call agents according to policy. gracefulOutOfService: Take the line out of
service gracefully. If there are no resources existing, vismDsx1State
transitions to coos immediately. If resources exist, vismDsx1State transitions
to poos thus initiating a graceful shutdown. In the course, the MGs MGCs may
get notified of this transition, e.g. in the case of MGCP through emission of
RSIPs to registered call agents according to policy.
Bearer Busy Code
Used when vismTrunkConditionEnable is enabled on a line. It is a
configurable busy pattern sent out on the “Bearer” on the channels, which are
receiving remote ATM channel ID (CID) alarms. If this object is not set, it
assumes a default value of 255 for E1 and 127 for T1.
6.9.2.1.3 Configuring Alarm Conditioning Handling on the T1 or E1 Line
Step 1
From the Domain Explorer window, choose Configuration > MGX 8880/8850 MG > Configuration
Center.
Step 2
Under the Elements tab, within the node, double-click the DS1 line under the VISM-PR card. The Line
Config tab appears by default.
Step 3
Choose the Physical Line Alarm Config (DSX1) option from the Category drop-down arrow.
Cisco Media Gateway Manager 5.0 User Guide
6-136
OL-5461-02
Chapter 6
Configuring Hardware
How Do I Configure VISM-PR Cards?
Figure 6-68
Step 4
Configure the parameters as desired.
Note
Step 5
Configuration Center—VISM-PR Line Config Tab, Physical Line Alarm Config (DSX1)
Category
Table 6-68 describes fields in the VISM-PR Line Config tab, Physical Line Alarm Config
(DSX1) category.
Click Apply to configure alarm conditioning handling on the T1 or E1 line.
Note
For a description of all buttons within this tab, see section 6.2.3 Navigating Within Tables, page
6-9.
Cisco Media Gateway Manager 5.0 User Guide
OL-5461-02
6-137
Chapter 6
Configuring Hardware
How Do I Configure VISM-PR Cards?
Table 6-68
Field Descriptions for the VISM-PR Line Config Tab, Physical Line Alarm Config (DSX1)
Category
Field Name
Description
Setup Red Alarm
Severity
Allows you to set up the severity of a RED alarm, so that when a LOS alarm
is detected, VISM-PR will send the alarm with the appropriate severity status.
Values include:
Setup RAI Alarm
Severity
Alarm State
•
minor
•
major
Allows you to set up the severity of a RAI alarm, so that when a LOS alarm is
detected, VISM-PR will send the alarm with the appropriate severity status.
Values include:
•
minor
•
major
Bitmap of the DSX1 line alarms on the VISM-PR card.
Statistical Alarm State Bitmap of the DSX1 line statistical alarms on the VISM-PR card.
Statistical Alarm
Severity
Allows you to set up the severity of statistical alarms, so that when any
statistical alarm is detected, VISM-PR will send the alarm with the
appropriate severity status. Values include:
•
minor
•
major
•
inhibit
NE Alarm Up Count
Specifies the integration counter. The local alarms are LOS and LOF. Update
the counter every 10 minutes to reach the threshold.
NE Alarm Down
Count
Specifies the integration counter. The near-end alarms are LOS and LOF.
Update the counter every 10 minutes to reach 0.
NE Alarm Threshold
Determines the value to declare near-end alarm. A count of 1500 gives 2.5
seconds to declare LOS with an up count value of six.
FE Alarm Up Count
Specifies the integration counter. The far-end alarms are AIS and YEL.
Update counter every 10 minutes to reach the threshold.
FE Alarm Down
Count
Specifies the integration counter. The far-end alarms are AIS and YEL.
Update counter every 10 minutes to reach 0.
FE Alarm Threshold
Determines the value to declare far-end alarm. A count of 1500 gives 2.5
seconds to declare LOS with an up count value of six.
Cisco Media Gateway Manager 5.0 User Guide
6-138
OL-5461-02
Chapter 6
Configuring Hardware
How Do I Configure VISM-PR Cards?
6.9.2.2 Placing T1 or E1 Lines In or Out of Service
Step 1
From the Domain Explorer window, choose Configuration > MGX 8880/8850 MG > Configuration
Center.
Step 2
Under the Elements tab, within the node, double-click the DS1 line under the VISM-PR card.
Step 3
Click the VISM Specific DS1 tab. The VISM Line Config option appears by default in the Category
drop-down arrow.
Note
Step 4
For a detailed description of the VISM Line Config option, see section 6.9.2.1.2 Configuring
Signaling on the T1 or E1 Line, page 6-133.
Choose the appropriate option from the Admin State Control drop-down arrow.
Note
Table 6-67 describes fields in the VISM Specific DS1 tab, VISM Line Config category.
6.9.2.3 Adding Bulk Distribution Using SRME
Step 1
From the Domain Explorer window, choose Configuration > MGX 8880/8850 MG > Configuration
Center.
Step 2
Under the Elements tab, within the node, double-click the SONET line under the SRME card.
Step 3
Click the Line Distribution tab.
Step 4
Click Create. The Create Line Distribution window appears.
Cisco Media Gateway Manager 5.0 User Guide
OL-5461-02
6-139
Chapter 6
Configuring Hardware
How Do I Configure VISM-PR Cards?
Figure 6-69
Step 5
Complete the fields.
Note
Step 6
SRME Create Line Distribution Window
Table 6-69 describes fields in the SRME Create Line Distribution window.
Click Apply to add bulk distribution.
Note
For a description of all buttons within this tab, see section 6.2.3 Navigating Within Tables, page
6-9.
Table 6-69
Field Descriptions for the SRME Create Line Distribution Window
Field Name
Description
Source VT
Source VT for creation.
Target Slot
Target slot.
Target Line
Target line.
cilTargetModuleFrami Identifies the framing type of the target interface. The default value is Not
ngType
Applicable.
Cisco Media Gateway Manager 5.0 User Guide
6-140
OL-5461-02
Chapter 6
Configuring Hardware
How Do I Configure VISM-PR Cards?
6.9.2.4 Configuring ECAN for VISM-PR
Step 1
From the Domain Explorer window, choose Configuration > MGX 8880/8850 MG > Configuration
Center.
Step 2
Under the Elements tab, within the node, double-click the DS1 line under the VISM-PR card.
Step 3
Click the VISM Specific DS1 tab. The VISM Line Config option appears by default in the Category
drop-down arrow.
Note
Step 4
For a detailed description of the VISM Line Config option, see section 6.9.2.1.2 Configuring
Signaling on the T1 or E1 Line, page 6-133.
Choose the appropriate option from the Ecan Enable drop-down arrow.
Note
Table 6-67 describes fields in the VISM Specific DS1 tab, VISM Line Config category.
For a description of all buttons within this tab, see section 6.2.3 Navigating Within Tables, page
6-9.
6.9.3 Configuring Jitter on VISM-PR Cards
Step 1
From the Domain Explorer window, choose Configuration > MGX 8880/8850 MG > Configuration
Center.
Step 2
Under the Elements tab, within the node, double-click the VISM-PR card.
Step 3
Click the CODECs tab.
Step 4
Choose the Generic CODEC Parameters option from the Category drop-down arrow.
Step 5
Click on a CODEC entry, then click Details. The Jitter Buffer window appears.
Cisco Media Gateway Manager 5.0 User Guide
OL-5461-02
6-141
Chapter 6
Configuring Hardware
How Do I Configure VISM-PR Cards?
Figure 6-70
Step 6
Complete the fields.
Note
Step 7
Configuration Center—VISM-PR Jitter Buffer Window
Table 6-70 describes fields in the VISM-PR Jitter Buffer window.
Click Apply to configure the jitter parameters.
Note
For a description of all buttons within this tab, see section 6.2.3 Navigating Within Tables, page
6-9.
Table 6-70
Field Descriptions for the VISM-PR Jitter Buffer Window
Field Name
Description
Codec Name
Index to this table.
Jitter Delay Mode
Provisions the jitter buffer mode to be applied to a call connection. Values
include:
Jitter Initial Delay
•
fixed
•
adaptive
•
fixedWithTimeStamp
Defines the jitter buffer size in milliseconds.
Cisco Media Gateway Manager 5.0 User Guide
6-142
OL-5461-02
Chapter 6
Configuring Hardware
How Do I Configure VISM-PR Cards?
6.9.4 Configuring VoIP Switching for VISM-PR
Figure 6-71
Process for Configuring VoIP Switching for VISM-PR Cards
(Optional)
Configure VoIP
parameters
Configure the ATM
network
Configure the call agent
interface
Configure Time Division
Multiplexing (TDM)
signaling for CCS
Add and configure DS0
endpoints on lines
(Optional)
Place the
VISM-PR card in
or out of
service
130013
Configure TDM sign aling
for CAS
Cisco Media Gateway Manager 5.0 User Guide
OL-5461-02
6-143
Chapter 6
Configuring Hardware
How Do I Configure VISM-PR Cards?
To configure VoIP switching for VISM-PR cards, complete the following steps:
Step 1
(Optional) Configure VoIP parameters—See 6.9.4.1 Configuring VoIP Parameters for VISM-PR, page
6-144.
Step 2
Configure the ATM network—See 6.9.4.2 Configuring the ATM Network for VISM-PR, page 6-146.
Step 3
Configure the call agent interface—See 6.9.4.3 Configuring the Call Agent Interface for VISM-PR,
page 6-146.
Step 4
Configure Time Division Multiplexing (TDM) signaling for CCS—See 6.9.4.4 Configuring TDM
Signaling for CCS on VISM-PR, page 6-173.
Step 5
Add and configure DS0 endpoints on lines—See 6.9.4.5 Adding and Configuring DS0 Endpoints on
Lines, page 6-175.
Step 6
Configure TDM signaling for CAS—See 6.9.4.6 Configuring TDM Signaling for CAS on VISM-PR,
page 6-180.
Step 7
(Optional) Place the VISM-PR card in or out of service—See 6.9.4.7 Placing the VISM-PR Card In or
Out of Service, page 6-183.
6.9.4.1 Configuring VoIP Parameters for VISM-PR
To configure AAL5 PVCs on a VISM-PR card:
Step 1
From the Domain Explorer window, select the node from the Hierarchy pane and choose
Configuration > MGX 8880/8850 MG > Configuration Center. The Configuration window for the
selected node opens.
Step 2
Within the Elements tab, expand the node, then double-click the VISM-PR card.
Step 3
Click the Media Gateway tab.
Step 4
Choose the VoIP Parameters option from the Category drop-down arrow.
Step 5
Complete the fields.
Note
Step 6
Table 6-71 describes fields in the Media Gateway tab, VoIP Parameters option.
Click Apply to configure the VoIP parameters.
Table 6-71 Field Descriptions for the VISM-PR Media Gateway Tab, VoIP Parameters Option
Field Name
Description
BitMask for TOS
(XGCP)
Provisions the bitmask used for the Type Of Service octet for cells carrying
the control (XGCP) traffic.
BitMask for TOS
(RTP)
Provisions the bitmask used for the Type Of Service octet for cells carrying
VoIP bearer (RTP) traffic.
RTCP Report Interval
RTCP report interval (defined in RFC 1889)
Cisco Media Gateway Manager 5.0 User Guide
6-144
OL-5461-02
Chapter 6
Configuring Hardware
How Do I Configure VISM-PR Cards?
Table 6-71 Field Descriptions for the VISM-PR Media Gateway Tab, VoIP Parameters Option
(continued)
Field Name
Description
RTP Receive Timer
Defines whether the RTP packets receive timer on the VISM needs to be
enabled or not.
DTMF Relay
Defines whether the Dual Tone, Multi-Frequency digits need to be transported
to the other endpoint via Named Signal Event (NSE) packets.
CAS Transport
Defines whether the CAS (ABCD) bits need to be transported to the other
endpoint via NSE packets.
Triple Redundancy
Enable
Indicates whether triple redundancy is enabled or disabled.
NTE Negotiation
Enable
Defines whether VISM has the capability to negotiate the list of events either
NSE or NTE (Named Telephony Events) using rtp map and fmtpmap in the
SDP.
Payload Type of RTP
Packet
Sets the payload type of a RTP packet carrying SID which is sent to the other
end when silence is detected.
Dual PVC OAM Cell
Gap
Defines the inter cell gap for dual PVC OAM cells in milliseconds.
PVC Failure
Threshold
Threshold for failure of a PVC. If the number of consecutive OAM cells sent
for which no ack was received equals this number, then the connection is
considered to be failed.
PVC Recovery
Threshold
Threshold for recovery of a PVC. If the number of consecutive OAM cells sent
for which no ack was received equals this number, then the connection is
considered to be recovered from failure.
RTCP Interval
Multiplier
Defines how many times the RTCP reports may fail before exception
condition activity may be done.
LAPD Trunk PVC
Used for VoIP trunking applications, only if the signalling type is CCS. By
default, the PRI-D channel information will be sent on the control channel. If
the control network is totally separated from the bearer network, then you
need to set this object to “bearer” to send LAPD trunk messages to the remote
VISM.
VAD Timer
Hangover time for VAD in milliseconds. Once voice inactivity is detected, the
gateway waits for this duration before activating silence suppression.
Cisco Media Gateway Manager 5.0 User Guide
OL-5461-02
6-145
Chapter 6
Configuring Hardware
How Do I Configure VISM-PR Cards?
6.9.4.2 Configuring the ATM Network for VISM-PR
To configure the ATM network for VISM-PR cards by adding and configuring connections, please see
Chapter 7, “Provisioning Connections.”
6.9.4.3 Configuring the Call Agent Interface for VISM-PR
Figure 6-72
Process for Configuring the Call Agent Interface for VISM-PR
Specify the
domain name,
IP address, and
subnet mask
Set up call agents and
protocols
Configure the gateway
control protocol port
130002
Configure ISDN
PRI backhaul
To configure the call agent interface, complete the following steps:
Step 1
Specify the domain name, IP address, and subnet mask—See 6.9.4.3.1 Specifying the Domain Name,
IP Address and Subnet Mask for VISM-PR, page 6-147.
Step 2
Set up call agents and protocols—See 6.9.4.3.2 Setting Up Call Agents and Protocols for VISM-PR,
page 6-149.
Step 3
Configure the gateway control protocol port—See 6.9.4.3.3 Configuring the Gateway Control Protocol
Port for VISM-PR, page 6-158.
Step 4
Configure ISDN PRI backhaul—See 6.9.4.3.4 Configuring ISDN PRI Backhaul for VISM-PR, page
6-167.
Cisco Media Gateway Manager 5.0 User Guide
6-146
OL-5461-02
Chapter 6
Configuring Hardware
How Do I Configure VISM-PR Cards?
6.9.4.3.1 Specifying the Domain Name, IP Address and Subnet Mask for VISM-PR
Step 1
From the Domain Explorer window, choose Configuration > MGX 8880/8850 MG > Configuration
Center.
Step 2
Under the Elements tab, within the node, double-click the VISM-PR card.
Step 3
Click the Media Gateway tab.
Step 4
Choose the Gateway IP Address option from the Category drop-down arrow.
Figure 6-73
Configuration Center—VISM-PR Media Gateway Tab, Gateway IP Address Category
Cisco Media Gateway Manager 5.0 User Guide
OL-5461-02
6-147
Chapter 6
Configuring Hardware
How Do I Configure VISM-PR Cards?
Step 5
Complete the fields.
Note
Step 6
Table 6-72 describes fields in the VISM-PR Media Gateway tab, Gateway IP Address category.
Click Apply to configure the parameters.
Note
For a description of all buttons within this tab, see section 6.2.3 Navigating Within Tables, page
6-9.
Table 6-72
Field Descriptions for the VISM-PR Media Gateway Tab, Gateway IP Address
Category
Field Name
Description
IP Address
IP address of the VISM-PR card.
Subnet Mask
Subnet mask for the VISM-PR card.
Bearer IP Address
Bearer’s IP address.
Bearer Subnet Mask
Bearer’s subnet mask.
Media Gateway Name Name of the media gateway as identified by media gateway controllers.
Cisco Media Gateway Manager 5.0 User Guide
6-148
OL-5461-02
Chapter 6
Configuring Hardware
How Do I Configure VISM-PR Cards?
6.9.4.3.2 Setting Up Call Agents and Protocols for VISM-PR
Figure 6-74
Process for Setting Up Call Agents and Protocols for VISM-PR
Configure the
domain name
server
Create a domain name
for the call agent and set
the resolution type
If the Resolution Type
is set to externalOnly:
If the Resolution Type is
NOT set to externalOnly:
Add the call agent/MGC
domain name
Add the IP address for the
domain name you created
Add the MGC to a
redundancy group
Associate
a call agent
redundancy group
with a gateway
control
protocol
130010
Change the parameters
of the MGC group
Cisco Media Gateway Manager 5.0 User Guide
OL-5461-02
6-149
Chapter 6
Configuring Hardware
How Do I Configure VISM-PR Cards?
To set up call agents and protocols for VISM-PR, complete the following steps:
Step 1
Configure the domain name server for the external domain name resolution:
a.
From the Domain Explorer window, choose Configuration > MGX 8880/8850 MG >
Configuration Center.
b.
Under the Elements tab, within the node, double-click the VISM-PR card.
c.
Click the Media Gateway tab. The Gateway Capabilities option appears by default in the
Category drop-down arrow (see Figure 6-63).
d.
Complete the External DNS Name field.
Note
e.
Step 2
Table 6-65 describes fields in the VISM-PR Media Gateway tab, Gateway Capabilities category.
Click Apply.
Create a domain name for the call agent:
a.
Click the MG Controller tab. The Domain Names option appears by default in the Category
drop-down arrow.
b.
Click Create. The VISM-PR Create Domain Names window appears.
Figure 6-75
c.
Note
d.
Configuration Center—VISM-PR Create Domain Names Window
Complete the fields. Note the value of the Resolution Type field.
Table 6-73 describes fields in the VISM-PR MG Controller tab, Domain Names category.
Click Apply.
Cisco Media Gateway Manager 5.0 User Guide
6-150
OL-5461-02
Chapter 6
Configuring Hardware
How Do I Configure VISM-PR Cards?
Step 3
If you have not set the Resolution Type to externalOnly in Step 2, proceed to Step 4
or
If you have set the Resolution Type to externalOnly in Step 2, proceed to Step 5.
Step 4
(Optional, see Step 3) Add the IP address for the Domain Name you created in Step 2:
a.
Within the MG Controller tab, choose the IP Address Resolution option from the Category
drop-down arrow.
b.
Click Create. The VISM-PR Create IP Address Resolution window appears.
Figure 6-76
c.
Note
d.
Step 5
Configuration Center—VISM-PR Create IP Address Resolution Window
Complete the fields.
Table 6-73 describes fields in the VISM-PR MG Controller tab, IP Address Resolution category.
Click Apply.
Add the call agent/MGC domain name:
a.
Within the MG Controller tab, choose the Media Gateway Controllers option from the Category
drop-down arrow.
b.
Click Create. The VISM-PR Create Media Gateway Controllers window appears.
Cisco Media Gateway Manager 5.0 User Guide
OL-5461-02
6-151
Chapter 6
Configuring Hardware
How Do I Configure VISM-PR Cards?
Figure 6-77
c.
Note
d.
Step 6
Configuration Center—VISM-PR Create Media Gateway Controllers Window
Complete the fields.
Table 6-73 describes fields in the VISM-PR MG Controller tab, Media Gateway Controllers
category.
Click Apply.
Add the MGC to a redundancy group:
a.
Within the MG Controller tab, choose the MGC Group option from the Category drop-down
arrow.
b.
Click Create. The VISM-PR Create MGC Group window appears.
Cisco Media Gateway Manager 5.0 User Guide
6-152
OL-5461-02
Chapter 6
Configuring Hardware
How Do I Configure VISM-PR Cards?
Figure 6-78
c.
Note
d.
Step 7
Configuration Center—VISM-PR Create MGC Group Window
Complete the fields.
Table 6-73 describes fields in the VISM-PR MG Controller tab, MGC Group category.
Click Apply.
Change the parameters of the MGC group:
a.
Within the MG Controller tab, choose the MGC Group Params option from the Category
drop-down arrow.
b.
Click on the MG group entry you want to modify, then click Details. The VISM-PR MGC Group
Params window appears.
Cisco Media Gateway Manager 5.0 User Guide
OL-5461-02
6-153
Chapter 6
Configuring Hardware
How Do I Configure VISM-PR Cards?
Figure 6-79
c.
Note
d.
Step 8
Configuration Center—VISM-PR MGC Group Params Window
Complete the fields.
Table 6-73 describes fields in the VISM-PR MG Controller tab, MGC Group Params category.
Click Apply.
Associate a call agent redundancy group with a gateway control protocol:
a.
Within the MG Controller tab, choose the MGC Group Protocols option from the Category
drop-down arrow.
b.
Click Create. The VISM-PR Create MGC Group Protocols window appears.
Cisco Media Gateway Manager 5.0 User Guide
6-154
OL-5461-02
Chapter 6
Configuring Hardware
How Do I Configure VISM-PR Cards?
Figure 6-80
c.
Note
d.
Configuration Center—VISM-PR Create MGC Group Protocols Window
Complete the fields.
Table 6-73 describes fields in the VISM-PR MG Controller tab, MGC Group Protocols category.
Click Apply.
Once you have created the MGC group protocol, Cisco MGM automatically adds an SRCP peer. For
details on configuring SRCP peers, see Step 7 in section 6.9.4.3.3 Configuring the Gateway Control
Protocol Port for VISM-PR, page 6-158.
Note
For a description of all buttons within this tab, see section 6.2.3 Navigating Within Tables, page
6-9.
Cisco Media Gateway Manager 5.0 User Guide
OL-5461-02
6-155
Chapter 6
Configuring Hardware
How Do I Configure VISM-PR Cards?
Table 6-73
Field Descriptions for the VISM-PR MG Controller Tab
Category
Field Name
Description
Domain Names
Index
Index to this table.
Domain Name
Domain name of MGCs, tftp server, external DNS
server, or announcement server.
Resolution Type
Type of DNS resolution to be applied for a particular
domain name. Values include:
IP Address
Resolution
•
internalOnly—Specifies the gateway will not try
to resolve the IP address for the domain name of
the MGC by using the external Domain Name
Service (DNS) name server.
•
externalOnly—Specifies the IP address for the
domain name of the MGC is resolved externally
by using the DNS name server.
•
internalFirst
•
externalFirst
Index
Index to this table.
Domain Name
Domain name of MGCs, tftp server, external DNS
server, or announcement server.
IP Address
IP address of the entity. To change the IP address, you
need to remove an entry then add a new entry.
Comm State
Indicates whether the address is currently applied for
communications with the system of that name.
Preference
Allows you to optionally configure primaries and
secondaries. The lower the number, the higher the
preference.
DNS Resolution Flag
Type of DNS resolution.
Media Gateway
Controllers
MGC Number
Index to this table.
Controller Domain Name
Name of the MGC. Corresponds to a domain name
under which the MGC could also be registered in a
DNS.
MGC Group
MGC Group Num
MGC group number. A group can contain more than
one MGC.
MGC Number
MGC number.
MGC Preferred
Allows you to optionally configure primaries and
secondaries. The lower the number, the higher the
preference.
Active MGC
Denotes the MGC within a MGC redundancy group
that is currently active or controlling the GW.
Cisco Media Gateway Manager 5.0 User Guide
6-156
OL-5461-02
Chapter 6
Configuring Hardware
How Do I Configure VISM-PR Cards?
Table 6-73
Field Descriptions for the VISM-PR MG Controller Tab (continued)
Category
Field Name
Description
MGC Group
Params
MGC Group Num
MGC group number. A group can contain more than
one MGC.
Association State Control Enables or disables sending state change notifications
to the call agent.
MGC Group
Protocols
State of Association
Represents the state of the communication between
the MG and the MGC (call agent) groups.
MGC Group Priority
Determines priority among the MGC redundancy
groups within the GW.
MGC Group Num
MGC group number. A group can have more than one
MGC.
Protocol Number
Protocol number.
Persistent Event Policy
Determines how the persistent events are notified.
Quarantine Policy
Determines the quarantine policy when the call agent
does not explicity specify one.
Signal Events Policy
Enables you to provision the way signalled events
from CA are handled by the gateway. This is
configurable on a per MGC redundancy group, per
protocol basis.
Provisional Response
Enables or disables sending provisional responses to
the CA when processing a request received from the
CA.
Response ACK Attribute
List of transaction IDs that are acknowledged by the
call agent.
Disconnect Procedure
Describes whether disconnected procedure has to be
enabled or disabled per protocol per MGC group
configured.
Cancel Graceful
Describes whether notification of RSIP cancel
graceful has to be enabled or disabled per protocol per
MGC group configured.
Cisco Media Gateway Manager 5.0 User Guide
OL-5461-02
6-157
Chapter 6
Configuring Hardware
How Do I Configure VISM-PR Cards?
6.9.4.3.3 Configuring the Gateway Control Protocol Port for VISM-PR
Figure 6-81
Process for Configuring the Gateway Control Protocol Port for VISM-PR
Configure a
port number for
a specific call agent
and protocol
Specify the maximum
waiting time before a
restart in progress
message is sent
Specify the minimum and
maximum wait time for a
call agent message
acknowledgment
Specify the number of
retries for a call agent
message
acknowledgment
Specify the bearer
channel type
Designate XGCP events
as persistent
Configure
the SRCP
heartbeat interval
and maximum
UDP size
130003
Specify the SRCP
parameters
Cisco Media Gateway Manager 5.0 User Guide
6-158
OL-5461-02
Chapter 6
Configuring Hardware
How Do I Configure VISM-PR Cards?
To configure the gateway control protocol port for VISM-PR, complete the following steps:
Step 1
Configure a port number for a particular call agent and protocol:
a.
From the Domain Explorer window, choose Configuration > MGX 8880/8850 MG >
Configuration Center.
b.
Under the Elements tab, within the node, double-click the VISM-PR card.
c.
Click the XGCP tab.
d.
Choose the XGCP Peers option from the Category drop-down arrow.
e.
Click on a peer entry, then click Details. The XGCP Peers window appears.
Figure 6-82
Note
f.
Step 2
Configuration Center—VISM-PR XGCP Peers Window
Table 6-74 describes fields in the VISM-PR XGCP tab, XGCP Peers option.
Click Apply.
Specify the maximum waiting time before a Restart in Progress (RSIP) message is sent to the call agent:
a.
Within the XGCP tab, choose the XGCP Parameters option from the Category drop-down arrow.
Cisco Media Gateway Manager 5.0 User Guide
OL-5461-02
6-159
Chapter 6
Configuring Hardware
How Do I Configure VISM-PR Cards?
Figure 6-83
b.
Note
c.
Step 3
Configuration Center—VISM-PR XGCP Tab, XGCP Parameters Category
Configure the Restart in Progress MWD field.
Table 6-74 describes fields in the VISM-PR XGCP tab, XGCP Parameters category.
Click Apply.
Specify the VISM-PR minimum and maximum wait time for a call agent message acknowledgment:
a.
Within the XGCP tab, choose the XGCP Enhancement Parameters option from the Category
drop-down arrow.
Cisco Media Gateway Manager 5.0 User Guide
6-160
OL-5461-02
Chapter 6
Configuring Hardware
How Do I Configure VISM-PR Cards?
Figure 6-84
b.
Note
c.
Step 4
Configure the fields.
Table 6-74 describes fields in the VISM-PR XGCP tab. XGCP Enhancement Parameters
category.
Click Apply.
Specify the VISM-PR number of retries for a call agent message acknowledgment:
a.
Within the XGCP tab, choose the XGCP Parameters option from the Category drop-down arrow
(see Figure 6-83).
b.
Configure the Request Retries field.
Note
c.
Step 5
Configuration Center—VISM-PR XGCP Tab, XGCP Enhancement Parameters Category
Table 6-74 describes fields in the VISM-PR XGCP tab, XGCP Parameters category.
Click Apply.
Specify the bearer channel type VISM-PR uses (if one is not specified by the call agent in protocol local
connection options):
a.
Click the Media Gateway tab.
b.
Choose the Bearer Traffic option from the Category drop-down arrow.
Cisco Media Gateway Manager 5.0 User Guide
OL-5461-02
6-161
Chapter 6
Configuring Hardware
How Do I Configure VISM-PR Cards?
Figure 6-85
c.
Note
d.
Step 6
Configuration Center—VISM-PR Media Gateway Tab, Bearer Traffic Category
Configure the Bearer N/W Type, Bearer VC Type, and Bearer Connection Type fields.
Table 6-75 describes fields in the VISM-PR Media Gateway tab, Bearer Traffic category.
Click Apply.
Designate XGCP events as persistent:
a.
Within the XGCP tab, choose the XGCP Persistent Events option from the Category drop-down
arrow.
b.
Click Create. The Create XGCP Persistent Events window appears.
Cisco Media Gateway Manager 5.0 User Guide
6-162
OL-5461-02
Chapter 6
Configuring Hardware
How Do I Configure VISM-PR Cards?
Figure 6-86
c.
Note
d.
Step 7
Configuration Center—VISM-PR Create XGCP Persistent Events Window
Configure the Event Number and Event Name fields.
Table 6-74 describes fields in the VISM-PR XGCP tab, XGCP Persistent Events category.
Click Apply.
Specify the SRCP parameters for communication between VISM-PR and the call agent:
a.
Within the XGCP tab, choose the SRCP Peers option from the Category drop-down arrow.
b.
Click on a peer entry, then click Details. The SRCP Peers tab appears.
Cisco Media Gateway Manager 5.0 User Guide
OL-5461-02
6-163
Chapter 6
Configuring Hardware
How Do I Configure VISM-PR Cards?
Figure 6-87
c.
Note
d.
Step 8
Configuration Center—VISM-PR SRCP Peers Tab
Complete the fields.
Table 6-74 describes fields in the VISM-PR XGCP tab, SRCP Peers category.
Click Apply.
Configure the SRCP heartbeat interval and maximum UDP size for a specified call agent redundancy
group:
a.
Within the XGCP tab, choose the SRCP Peer Group Parameters option from the Category
drop-down arrow.
b.
Click on a peer entry, then click Details. The SRCP Peer Group Parameters tab appears.
Cisco Media Gateway Manager 5.0 User Guide
6-164
OL-5461-02
Chapter 6
Configuring Hardware
How Do I Configure VISM-PR Cards?
Figure 6-88
c.
Note
d.
Note
Configuration Center—VISM-PR SRCP Peer Group Parameters Tab
Complete the fields.
Table 6-74 describes fields in the VISM-PR XGCP tab, SRCP Peer Group Parameters category.
Click Apply.
For a description of all buttons within this tab, see section 6.2.3 Navigating Within Tables, page
6-9.
Table 6-74
Field Descriptions for the VISM-PR XGCP Tab
Category
Field Name
Description
XGCP Peers
Peer
Value of this object is the same as mgcNumber from
MGMIB.
Protocol Number
Value of this object is the same as
mgcProtocolNumber from MGMIB.
UDP Port
Configures the local UDP port on VISM-PR used by
the SGCP and MGCP protocols to communicate with
the call agent.
Cisco Media Gateway Manager 5.0 User Guide
OL-5461-02
6-165
Chapter 6
Configuring Hardware
How Do I Configure VISM-PR Cards?
Table 6-74
Field Descriptions for the VISM-PR XGCP Tab (continued)
Category
Field Name
Description
XGCP Parameters
Bad Versions
Total number of incoming messages that were
delivered to the protocol entity and were for an
unsupported protocol version.
Unrecognized Packets
Request Retries
Specifies the number of retries for a request that
exceeds timeout.
Restart in Progress MWD Maximum waiting delay (MWD) timeout value is
used for the MG to send the restart in progress to the
MGC.
Default Package
Contains the default package name for the
MGCP/SGCP protocol. Should have the same value
as xgcpCapabilityPackageName.
Initial Delay (secs)
Initial waiting delay (Tdinit) timeout value defined
by this MIB object.
Min Wait Delay (secs)
Minimum waiting delay (Tdmin) timeout value used
by the MG to send the restart in progress with the
restart method as RM:disconnected to the MGC if
there is any local user activity is defined by this
object.
Max Wait Delay (secs)
Maximum waiting delay (Tdmax) timeout value used
by the MG to send the restart in progress with the
restart method as RM:disconnected to the MGC when
the endpoint has become disconnected is defined by
this object.
XGCP Persistent
Events
Event Number
Event number.
Event Name
Name of the event (for example, t/hd or t/hu).
SRCP Peers
Peer ID
Identifies the SRCP peer and serves as an index to the
table. If MGMIB is supported, this is the same as the
mgcNumber from the mgcTable.
Peer Name
Denotes the name of the SRCP peer. If MGMIB is
supported, this is the same as the mgcName from the
mgcTable.
Peer Port Number
Used to configure the UDP port used of the SRCP
peer.
MGC Redundancy Group
Number
MGC redundancy group number.
Heartbeat Interval
(milliseconds)
Configures the length of the heartbeat interval.
Time Since Heartbeat
(milliseconds)
Time since the last heartbeat was received.
Max PDU Size (octets)
Configures the maximum UDP PDU size.
XGCP
Enhancement
Parameters
SRCP Peer Group
Parameters
Cisco Media Gateway Manager 5.0 User Guide
6-166
OL-5461-02
Chapter 6
Configuring Hardware
How Do I Configure VISM-PR Cards?
Table 6-75
Configuration Center—VISM-PR Media Gateway Tab, Bearer Traffic Category
Field Name
Description
Bearer N/W Type
Network type to transport bearer traffic. Values are IP or ATM.
Bearer VC Type
VC type to transport bearer traffic. Values are PVC or SVC.
Bearer Connection Type
Connection type used to transport bearer traffic. If the Bearer N/W Type
is set to IP, then the value of this object must be set to not applicable.
Bearer Continuity Test
Defines whether the bearer continuity test for a connection will be
performed or not at the time of call setup.
Bearer Continuity Timer
CO4 (bearer continuity) timer in milliseconds.
Aggregate Traffic Clipping Enables or disables the aggregate traffic clipping policy applicable to all
bearer traffic generated at the VISM-PR card.
Aggregate SVC Bandwidth Used for AAL2 SVC aggregate SVC Connection Admission Control
(cells per second)
(CAC) and also for aggregate traffic clipping at VISM-PR card when
Aggregate Traffic Clipping is enabled.
6.9.4.3.4 Configuring ISDN PRI Backhaul for VISM-PR
Step 1
Create a session set:
a.
From the Domain Explorer window, choose Configuration > MGX 8880/8850 MG >
Configuration Center.
b.
Under the Elements tab, within the node, double-click the VISM-PR card.
c.
Click the MG Controller tab.
d.
Choose the RUDP Session Set option from the Category drop-down arrow.
e.
Click Create. The Create RUDP Session Set window appears.
Cisco Media Gateway Manager 5.0 User Guide
OL-5461-02
6-167
Chapter 6
Configuring Hardware
How Do I Configure VISM-PR Cards?
Figure 6-89
f.
Note
g.
Step 2
Configuration Center—VISM-PR Create RUDP Session Set Window
Complete the fields.
Table 6-76 describes fields in the VISM-PR MG Controller tab, RUDP Session Set category.
Click Apply to add a RUDP session set.
Create a session group for a session set and a call agent:
a.
Within the MG Controller tab, choose the RUDP Session Group option from the Category
drop-down arrow.
b.
Click Create. The Create RUDP Session Group window appears.
Cisco Media Gateway Manager 5.0 User Guide
6-168
OL-5461-02
Chapter 6
Configuring Hardware
How Do I Configure VISM-PR Cards?
Figure 6-90
c.
Note
d.
Step 3
Configuration Center—VISM-PR Create RUDP Session Group Window
Complete the fields.
Table 6-76 describes fields in the VISM-PR MG Controller tab, RUDP Session Group category.
Click Apply to add a session group.
Create an ISDN PRI backhaul RUDP session within a specified group:
a.
Within the MG Controller tab, choose the RUDP Session option from the Category drop-down
arrow.
b.
Click Create. The Create RUDP Session window appears.
Cisco Media Gateway Manager 5.0 User Guide
OL-5461-02
6-169
Chapter 6
Configuring Hardware
How Do I Configure VISM-PR Cards?
Figure 6-91
c.
Note
d.
Note
Configuration Center—VISM-PR Create RUDP Session Window
Complete the fields.
Table 6-76 describes fields in the VISM-PR MG Controller tab, RUDP Session category.
Click Apply to add a session group.
For a description of all buttons within this tab, see section 6.2.3 Navigating Within Tables, page
6-9.
Cisco Media Gateway Manager 5.0 User Guide
6-170
OL-5461-02
Chapter 6
Configuring Hardware
How Do I Configure VISM-PR Cards?
Table 6-76
Configuration Center—VISM-PR MG Controller Tab
Category
Field Name
Description
RUDP Session Set
Session Set Number
Logical index of this table. Currently only set 1 is used,
and all the signaling channels are implicity mapped to
set 1.
Session Set State
Denotes the state the set is in.
Total Session Groups
Keeps track of the number of session groups that has
been added to a session set.
Current Active Group
Current active group number.
No. Of Failed Switch
Between Groups
Number of failed attempts to switch between session
groups in this set.
No. Of Successful
Number of successful attempts to switch between
Switch Between Groups session groups in this set.
RUDP Session
Group
Fault Tolerant
Indicates whether the set configuration is fault tolerant
or not.
Session Group Number
Index for this table. One set can have up to two groups.
Session Set Number
Session set number to which this session group
belongs.
MGC Name
Name of the media gateway controller, which
corresponds to a domain name under which the MGC
could also be registered in a DNS.
Group State
State this session group is in.
Current Active Session
Indicates the current session that is open to
communication with the MGC. There is only one
active session per group.
Total No. of Sessions
Total number of session that have been added to this
group.
No. of Fail Attempts
Number of failed attempts to switch between sessions
in this group.
No. of Success
Attempts
Number of successful attempts to switch between
sessions in this group.
Cisco Media Gateway Manager 5.0 User Guide
OL-5461-02
6-171
Chapter 6
Configuring Hardware
How Do I Configure VISM-PR Cards?
Table 6-76
Configuration Center—VISM-PR MG Controller Tab (continued)
Category
Field Name
Description
RUDP Session
Session Number
Index for this table. One group can have a maximum of
four sessions.
Session Group Number
A mandatory parameter if session type is backhaul,
indicates the session group that this session belongs to.
Session Type
Indicates if the session is configured for trunking or
PRI backhaul.
Session Priority
When a session fails, it indicates which session the
session manager should try to bring active. A lower
number means higher priority.
Local Port Number
Port number of gateway (VISM-PR) for this session.
The port number should be unique across other
sessions and XGCP/SRCP.
Remote Port Number
Port number of MGC for this session. The port number
should be unique across other sessions and
XGCP/SRCP.
Remote VISM IP
Address
IP address of the remote VISM-PR (a mandatory
parameter if the session type is lapd trunking).
Session State
State this session is in.
Current Session
Indicates which session has received an active message
from MGC.
Local IP Address
IP address of gateway (VISM-PR).
Remote IP Address
IP addressof the media gateway controller. It is
resolved by using vismSessionGrpMgcNamein
vismSessionGrpTable.
Max Window Size
Max size of the receive window in segments, used for
flow control.
Cisco Media Gateway Manager 5.0 User Guide
6-172
OL-5461-02
Chapter 6
Configuring Hardware
How Do I Configure VISM-PR Cards?
Table 6-76
Configuration Center—VISM-PR MG Controller Tab (continued)
Category
Field Name
Description
RUDP Session
(continued)
Max Attempts to
Synchronize
Max number of attempts to synchronize with other side
(MGC).
Max Segment Size
Max number of octets that can be received by the peer
sending the SYN segment.
Max Auto Resets
Max number of consecutive auto reset that will be
performed before a connection is reset.
Retransmission
TimeOut (ms)
(in milliseconds) Timeout value for retransmission of
unacknowledged packets.
Max Retransmits
Max number of times consecutive transmission will be
attempted before the connection is considered broken.
Max Acknowlegements Indicates the maximum number of acknowledgments
Accumulated
that will be accumulated before sending an
acknowledgment if another segment is not sent.
Accumulated
Acknowledgement
TimeOut (ms)
(in milliseconds) Timeout value for sending an
acknowledgment segment if another segment is not
sent.
Max Number Of Out Of Max number of out of sequence packets that will be
Sequence Packets
accumulated before an EACK segment is sent. The
EACK segment is used to acknowledge segments
received out of sequence.
Send Null Segment
Timeout (ms)
Number of milliseconds of idle time before sending a
null segment.
Auto Reset Timeout
(ms)
Number of milliseconds to wait for transfer state
before an auto reset occurs.
6.9.4.4 Configuring TDM Signaling for CCS on VISM-PR
Configuring TDM signaling for CCS involves creating a LAPD channel. To create a LAPD channel,
complete the following steps:
Step 1
From the Domain Explorer window, choose Configuration > MGX 8880/8850 MG > Configuration
Center.
Step 2
Under the Elements tab, within the node, double-click the DS1 line under the VISM-PR card.
Step 3
Click on the LAPD Channel Parameters tab.
Step 4
Click Create. The Create LAPD Channel Parameters window appears.
Cisco Media Gateway Manager 5.0 User Guide
OL-5461-02
6-173
Chapter 6
Configuring Hardware
How Do I Configure VISM-PR Cards?
Figure 6-92
Step 5
Configure the fields.
Note
Step 6
Configuration Center—VISM-PR Create LAPD Channel Parameters Window
Table 6-77 describes fields in the VISM-PR Create LAPD Channel Parameters window.
Click Apply to create a LAPD channel.
Note
For a description of all buttons within this tab, see section 6.2.3 Navigating Within Tables, page
6-9.
Table 6-77
Field Descriptions for the VISM-PR Create LAPD Channel Parameters Window
Field Name
Description
DS0 Number
DS0 number.
Interface Type
Type of LAPD interface.
Window Size
Maximum number of sequencially numbered l-frames that may be
outstanding.
N200 Retries
Maximum number of re-transmissions of a frame.
T200 TimeOut
Maximum number of time (in milliseconds) to wait for acknowledgement for
a transmit frame.
T203 Time Outs
Maximum time (in milliseconds) allowed without frames being exchanged.
LAPD Stack Interface Specifies which type of interface the LAPD stack will be used with.
Cisco Media Gateway Manager 5.0 User Guide
6-174
OL-5461-02
Chapter 6
Configuring Hardware
How Do I Configure VISM-PR Cards?
Table 6-77
Field Descriptions for the VISM-PR Create LAPD Channel Parameters Window
(continued)
Field Name
Description
LAPD Side (User or
N/W)
Specifies whether the LAPD stack is on the user or network side. This object
can be set when the row is created, but cannot be modified for an existing row.
LAPD Trunk Type
Indicates if the line is configured for trunking or PRI-BH.
6.9.4.5 Adding and Configuring DS0 Endpoints on Lines
To add and configure DS0 endpoints on lines, complete the following steps:
Step 1
Add DS0 endpoints to lines—See 6.9.4.5.1 Adding DS0 Endpoints to Lines for VISM-PR, page 6-175.
Step 2
(Optional) View DS0 endpoints—See 6.9.4.5.2 Viewing DS0 Endpoints, page 6-177.
Step 3
Configure DS0 parameters—See 6.9.4.5.3 Configuring DS0 Parameters, page 6-177.
6.9.4.5.1 Adding DS0 Endpoints to Lines for VISM-PR
To add DS0 endpoints to lines for VISM-PR T1 or E1 lines:
Step 1
From the Domain Explorer window, choose Configuration > MGX 8880/8850 MG > Configuration
Center.
Step 2
Under the Elements tab, within the node, double-click the DS1 line under the VISM-PR card.
Step 3
Click the EndPoints Config tab.
Step 4
Click Create to display the Create Endpoints Config window.
Cisco Media Gateway Manager 5.0 User Guide
OL-5461-02
6-175
Chapter 6
Configuring Hardware
How Do I Configure VISM-PR Cards?
Figure 6-93
Step 5
Complete the fields.
Note
Step 6
Configuration Center—VISM-PR Create Endpoints Config Window
Table 6-78 describes fields in the VISM-PR Create Endpoints Config window.
Click Apply to add the DS0 endpoint to the line.
Note
For a description of all buttons within this tab, see section 6.2.3 Navigating Within Tables, page
6-9.
Cisco Media Gateway Manager 5.0 User Guide
6-176
OL-5461-02
Chapter 6
Configuring Hardware
How Do I Configure VISM-PR Cards?
Table 6-78
Field Descriptions for the VISM-PR Create Endpoints Config Window
Field Name
Description
Endpoint Number
Identifies endpoint as it is known by the NE. Index to this table. The range is
from 1-248.
DS0 Number
Bitmap of DS0s used by the endpoint. Bit positions set to 1 represent DS0s
used by the endpoint. The position corresponds to the DS0 number. The
following are possible ranges:
•
1-24 for T1 lines
•
1-31 for non-CAS E1 lines
•
1-15, 17-31 for CAS E1 lines
Name
Identifies endpoint as it is known by the MGC. If MG and MGC use a
mutually agreed upon convention, this may be supplied by the agent, for
example, it may be read-only.
Speed (kilo bits per
second)
Indicates the endpoint’s bandwidth, in Kbps. Typically, this will be 64 times
the number of channels terminated by the endpoint.
State
Indicates the state of the endpoint.
6.9.4.5.2 Viewing DS0 Endpoints
Step 1
From the Domain Explorer window, choose Configuration > MGX 8880/8850 MG > Configuration
Center.
Step 2
Under the Elements tab, within the node, double-click the DS1 line under the VISM-PR card.
Step 3
Click the DSX0 tab. A table appears listing the DS0 endpoints.
6.9.4.5.3 Configuring DS0 Parameters
Step 1
From the Domain Explorer window, choose Configuration > MGX 8880/8850 MG > Configuration
Center.
Step 2
Under the Elements tab, within the node, double-click the DS1 line under the VISM-PR card.
Step 3
Click the DSX0 tab. A table appears listing the DS0 endpoints.
Step 4
Click on a DS0 entry and then click Details. The DSX0 Parameters window appears, with the DSX0
Parameters category selected by default.
Cisco Media Gateway Manager 5.0 User Guide
OL-5461-02
6-177
Chapter 6
Configuring Hardware
How Do I Configure VISM-PR Cards?
Figure 6-94
Step 5
Complete or modify the fields.
Note
Step 6
Configuration Center—VISM-PR DSX0 Parameters Window, DSX0 Parameters
Category
Table 6-79 describes fields in the VISM-PR DSX0 Parameters window, DSX0 Parameters
category.
Click Apply to configure the DSX0 parameters.
Note
For a description of all buttons within this tab, see section 6.2.3 Navigating Within Tables, page
6-9.
Table 6-79
Field Descriptions for the VISM-PR DSX0 Parameters Window, DSX0 Parameters
Category
Field Name
Description
DS0 Number
DS0 number.
Robbed Bit Signalling Indicates if robbed bit signalling is turned on or off for a given DS0. This only
applies to DS0s on a DS1 link.
Idle Code
Contains the code transmitted in the ABCD bits when the DS0 is not
connected and DS0TransmitCodesEnable is disabled. Possible values are
0-15.
Seized Code
Contains the code transmitted in the ABCD bits when the DS0 is connected
and DS0TransmitCodesEnable is enabled. Possible values are 0-15.
Cisco Media Gateway Manager 5.0 User Guide
6-178
OL-5461-02
Chapter 6
Configuring Hardware
How Do I Configure VISM-PR Cards?
Table 6-79
Field Descriptions for the VISM-PR DSX0 Parameters Window, DSX0 Parameters
Category (continued)
Field Name
Description
Received Code
Contains the code being received in the ABCD bits.
Bundle Mapped
Indicates endpoint number as specified by mgEndpointNumber of endpoint
table. If it is not associated with any endpoint, then it is set to -1.
ds0IfType
Indicates the interface type associated with the DS0.
CAS Variant Name
Indicates the index to the CAS variant table.
CAS Cadence On
Time
Describes the duration during which the digit tone is generated.
CAS Cadence Off
Time
Corresponds to the silence between the digit tones.
Insert Local CAS
Tells the framer whether or not to force the CAS bits to a value defined by
ds0LocalCasPattern.
Local CAS Pattern
Contains the pattern that the CAS (ABCD) bits will have when
ds0InsertLocalCas is enabled.
Loopback Command
Represents the loopback type at the DS0 level. The DS0 configuration
overrides the line level configuration.
CAS Parameter
Source
Indicates to VISM-PR whether to read the CAS related timer parameters from
the casAppl file downloaded for that endpoint or to read from this mib.
Min Time On Hook
Minimum time in milliseconds for which the on hook pattern should be present
in order for it to be recognized else the signal will be considered to be spurious
and will be ignored.
Min Time Off Hook
Minimum time in milliseconds for which the off hook pattern should be
present in order for it to be recognized else the signal will be considered to be
spurious and will be ignored.
Min Time Off Hook
With Wink
Minimum duration for which the off hook part of wink signal should persist.
Max Time Off Hook
With Wink
Maximum duration for which the off hook part of wink signal should persist.
If it exceeds this time limit, the signal will be considered spurious and will be
ignored.
Min Time On Hook
With Wink
Minimum duration for which the on hook part of wink signal should persist.
Glare Time
Programmable timer, used to resolve the glare condition.
Guard Time
Duration between the end of one call and the start of the next call.
Delay for Immed Start Indicates the time that VISM-PR should wait before outpulsing digits to the
Protocol
PBX after sending an off hook event. This applies only to immediate start
protocol.
ds0SignalingType
Type of signaling on the line to which this DS0 belongs.
CAS Incoming MGCP Controls (in conjunction with the card level persistentXgcpEventsTable) how
Package
persistent CAS events (like seize, disconnect, etc.) related to an incoming call
observed on this DS0 are notified to the MGC.
Cisco Media Gateway Manager 5.0 User Guide
OL-5461-02
6-179
Chapter 6
Configuring Hardware
How Do I Configure VISM-PR Cards?
Table 6-79
Field Descriptions for the VISM-PR DSX0 Parameters Window, DSX0 Parameters
Category (continued)
Field Name
Description
CAS Outgoing MGCP Controls (in conjunction with the card level persistentXgcpEventsTable) how
Package
persistent CAS events (like answer, disconnect, etc.) related to an outgoing
call observed on this DS0 are notified to the MGC.
Music Threshold
Music on hold threshold in dBm.
Sid Package
Specifies whether the Silence Indication Detection packet should be generated
when silence suppression is in active mode.
DSP Channel Level
RAS
Status of DSP channel level RAS on the VISM-PR. When it is enabled,
VISM-PR will configure the DSP through a HOST-DSP message on the
individual channel.
Companding Law
Indicates whether input from or output to the TDM side of DS0 is u-law or
a-law stream. Setting of this object does not take effect unless the
corresponding DSP channel is closed and re-opened.
6.9.4.6 Configuring TDM Signaling for CAS on VISM-PR
To configure time-division multiplexing signaling for CAS, complete the following steps:
Step 1
Add a CAS variant to the VISM-PR card—See 6.9.4.6.1 Adding a CAS Variant to a VISM-PR Card,
page 6-180.
Step 2
Configure the CAS variant and timing parameters—See 6.9.4.6.2 Configuring the CAS Variant and
Timing Parameters, page 6-182.
Step 3
Associate an endpoint with the CAS variant—See 6.9.4.6.3 Associating an Endpoint With a CAS
Variant, page 6-183.
6.9.4.6.1 Adding a CAS Variant to a VISM-PR Card
Step 1
From the Domain Explorer window, choose Configuration > MGX 8880/8850 MG > Configuration
Center.
Step 2
Under the Elements tab, within the node, double-click the VISM-PR card.
Step 3
Click the CAS tab. The CAS Parameters category is selected by default.
Step 4
Click Create. The Create CAS Parameters window appears.
Cisco Media Gateway Manager 5.0 User Guide
6-180
OL-5461-02
Chapter 6
Configuring Hardware
How Do I Configure VISM-PR Cards?
Figure 6-95
Step 5
Complete the fields.
Note
Step 6
Configuration Center—VISM-PR Create CAS Parameters Window
Table 6-80 describes fields in the VISM-PR Create CAS Parameters window.
Click Apply to add the CAS variant to the card.
Note
For a description of all buttons within this tab, see section 6.2.3 Navigating Within Tables, page
6-9.
Table 6-80
Field Descriptions for the VISM-PR Create CAS Parameters Window
Field Name
Description
Variant Name
String identifier for the CAS variant. Used as index to the table. Valid ranges
are 1-64.
File Name
Name of the file which contains the signal definition and the Finite State
Machine definition for the CAS variant.
Digit Method
Default digit method used for digit collection.
Partial Dial Timing
Partial dial timing in seconds, used along with a digit map as the inter-digit
timer.
Critical Timing
Critical timing in seconds.
Time Out Value
Interdigit timeout value in seconds for MF digits.
Cisco Media Gateway Manager 5.0 User Guide
OL-5461-02
6-181
Chapter 6
Configuring Hardware
How Do I Configure VISM-PR Cards?
Table 6-80
Field Descriptions for the VISM-PR Create CAS Parameters Window (continued)
Field Name
Description
Config Status
Configuration status of the CAS variant.
Variant Source
Specifies where the file defining this CAS variant resides.
6.9.4.6.2 Configuring the CAS Variant and Timing Parameters
Step 1
From the Domain Explorer window, choose Configuration > MGX 8880/8850 MG > Configuration
Center.
Step 2
Under the Elements tab, within the node, double-click the VISM-PR card.
Step 3
Click the CAS tab. Choose the CAS Backhaul Extension option from the Category drop-down arrow.
Step 4
Within the variant table, click on the variant you want to configure, then click Details.
Step 5
Click Create. The CAS Backhaul Management tab appears.
Figure 6-96
Step 6
Complete the fields.
Note
Step 7
Configuration Center—VISM-PR CAS Backhaul Management Tab
Table 6-81 describes fields in the VISM-PR CAS Backhaul Management tab.
Click Apply to configure the CAS variant and timing parameters.
Cisco Media Gateway Manager 5.0 User Guide
6-182
OL-5461-02
Chapter 6
Configuring Hardware
How Do I Configure VISM-PR Cards?
Note
For a description of all buttons within this tab, see section 6.2.3 Navigating Within Tables, page
6-9.
Table 6-81
Field Descriptions for the VISM-PR CAS Backhaul Management Tab
Field Name
Description
Variant Name
String identifier for the CAS variant, used as an index to the table.
File Name
Name of the fiel that contains the signal definition and the Finite State
Machine definition for the CAS variant.
Max TimeOut
Maximum timeout value in milliseconds, used for re-transmitting
unacknowledged XGCP messages at the call agent CAS/PBX interface.
Init TimeOut
Initial timeout value in milliseconds, used for re-transmitting
unacknowledged XGCP messages at the call agent CAS/PBX interface.
Retries
Specifies the number of retries for a message that exceeds
vismCasXgcpMaxReXmitTime or vismCasXgcpInitialReXmitTime.
6.9.4.6.3 Associating an Endpoint With a CAS Variant
For details, refer to section 6.9.4.5.3 Configuring DS0 Parameters, page 6-177.
6.9.4.7 Placing the VISM-PR Card In or Out of Service
Placing the VISM-PR card out of service informs the call agent to not send any call requests to the
VISM-PR card.
Step 1
From the Domain Explorer window, choose Configuration > MGX 8880/8850 MG > Configuration
Center.
Step 2
Under the Elements tab, within the node, double-click the VISM-PR card.
Step 3
Click the Media Gateway tab.
Step 4
Choose the Gateway State option from the Category drop-down arrow.
Cisco Media Gateway Manager 5.0 User Guide
OL-5461-02
6-183
Chapter 6
Configuring Hardware
How Do I Configure VISM-PR Cards?
Figure 6-97
Step 5
Configuration Center—VISM-PR Media Gateway Tab, Gateway State Category
Set the Admin State Control to the desired state.
Note
Table 6-82 describes fields in the VISM-PR Media Gateway tab, Gateway State category.
For a description of all buttons within this tab, see section 6.2.3 Navigating Within Tables, page
6-9.
Table 6-82
Field Descriptions for the VISM-PR Media Gateway Tab, Gateway State Category
Field Name
Description
Admin State
Current admin state of the media gateway.
Admin State Control
Changes the service state of the media gateway. Options include:
•
inService
•
forcefulOutOfService
•
gracefulOutofService
Shutdown Grace Time Indicates the time in seconds after which an MG will transition from shutting
down to locked.
Cisco Media Gateway Manager 5.0 User Guide
6-184
OL-5461-02
C H A P T E R
7
Provisioning Connections
This chapter details the tasks required to create new connections, and display, modify, and delete
existing connections, and includes the following information:
•
7.1 What Is Connection Provisioning?
•
7.2 What Types of Connection Are Available?
•
7.3 Where Do I Find Information About Connections?
•
7.4 How Do I Create, Modify and Delete Voice Connections?
•
7.5 How Do I Configure Connection Templates?
•
7.6 How Can I Test the Connections?
7.1 What Is Connection Provisioning?
Cisco MGM supports device level provisioning of the Cisco MGX Media Gateway cards, lines, ports
and connections, and the task of creating these connections is called connection provisioning.
Cisco MGM uses the Configuration Center to create new intra-chassis connections, and display, modify,
and delete existing connections. You select the desired connection end-points and configure the
connection type and class of service.
Connections in a switched voice applications are AAL-5 connections for bearer and control paths. A
Media Gateway Controller or Call Agent is required for these switching applications.
By managing connections using the Configuration Center, you can create and maintain soft permanent
virtual circuits (SPVCs).
7.2 What Types of Connection Are Available?
The type of connection available on each card is listed in Table 7-1.
Table 7-1
Supported Connection and Card Types
Connection Type
Card
ATM
AXSM (T3, E3)
AXSM/B (T3, E3)
AXSM-E (T1, E1)
Cisco Media Gateway Manager 5.0 User Guide
OL-5461-02
7-1
Chapter 7
Provisioning Connections
Where Do I Find Information About Connections?
Table 7-1
Supported Connection and Card Types (continued)
Connection Type
Card
RPM
RPM-PR
RPM-XF
VISM
VISM-PR-8T1E1
VXSM 48T1E1
7.2.1 What Are the Supported Connection Service Types?
Connections can be made between:
•
VISM- RPM
•
VISM- ATM
When adding a new connection from the Configuration Center application, the service type and protocol
is SPVC.
For information about preparing a node for connection, see Chapter 4, “Building the Network”.
7.3 Where Do I Find Information About Connections?
Configuration Center is used to create new connections, and to display, modify, and delete existing
connections. In addition, the status for each connection is viewed from one endpoint to the other.
Note
6.2 How Do I Manage My Network with the Configuration Center? gives full details of launching
Configuration Center, and describes the main window components.
These tasks are used to monitor connections with Connection Browser:
•
7.3.1 Finding Information in the Connection List Tab
•
7.3.2 Displaying All Existing Connections
•
7.3.3 Displaying Connections of the Same Type
•
7.3.4 Editing the Filter Settings
7.3.1 Finding Information in the Connection List Tab
Open the Configuration Center, choose Configuration > MGX 8880/8850 MG > Configuration
Center. Click the Connections tab to display the Connections Hierarchy pane. See Figure 7-1. Select the
NE, and double-click, or drag and drop the NE into the right-hand pane to display the New Connection
details. Table 7-2 details the information in each tab.
Cisco Media Gateway Manager 5.0 User Guide
7-2
OL-5461-02
Chapter 7
Provisioning Connections
Where Do I Find Information About Connections?
Table 7-2
Configuration Center—New Connection Tabs
Access Tab
Task
Advanced Mode
Configures the following tasks for connections in Advanced Mode:
Quick Mode
Creates and modifies connections.
•
Saves connection templates.
•
Changes and applies all the parameters listed in the Connection Category
pane.
•
Displays and modifies local end parameters, remote end parameters, and
connection parameters.
Configures the following tasks for connections in Quick Mode:
Connection List
Figure 7-1
•
•
Creates and modifies connections.
•
Retrieves the connection templates.
•
Adds the connection descriptor.
Displays a list of all connections under an element (node, card, line, port.)
Configuration Center—Advanced ModeTab
Cisco Media Gateway Manager 5.0 User Guide
OL-5461-02
7-3
Chapter 7
Provisioning Connections
Where Do I Find Information About Connections?
7.3.2 Displaying All Existing Connections
To display all existing connections:
Step 1
In the Configuration Center, click the Connections tab to display the Connections Hierarchy pane. Select
the NE, and double-click, or drag and drop the NE into the right-hand pane to display the New
Connection details.
Step 2
Move the objects, for example, node, card, line, or port from the Hierarchy pane on the Connection tab
to the Local End ID field on the Advanced Mode tab or Quick Mode tab.
Note
The Local End ID field must be completed in order to retrieve connection information.
Step 3
Click the Connection List tab to display the Connection List details.
Step 4
Enter the number of connections that you want to retrieve in the Connection Count to be retrieved
field. To retrieve all the connections, enter *. By default, * is displayed.
Note
Step 5
Filters setting can also be applied before retrieving connections, see 7.3.4 Editing the Filter
Settings.
Click Get to retrieve the connections. For example, you can retrieve connections for both local and
remote endpoints.
The Connection Browser window appears with the number of connections matching the filtering criteria.
A list of connections that have local or remote endpoints are displayed in the connection list.
7.3.3 Displaying Connections of the Same Type
To display connections of the same type, for example, a VISM-RPM connection for VXSM and
VISM-PR cards:
Step 1
In the Configuration Center, click the Connections tab to display the Connections Hierarchy pane. Select
the NE, and double-click, or drag and drop the NE into the right-hand pane to display the New
Connection details.
Step 2
Click the Connection List to display the Connection Browser window.
Step 3
Move the node along with the active port to the Local End ID or Remote End ID field.
Step 4
Click More Filters to display the Filter Settings window.
Step 5
Check VISM-RPM check box in the Type area.
Step 6
Check SPVC check box in the Service Type area.
Step 7
Click OK to apply the selected filter settings.
Step 8
Click Get to list all VISM-RPM connections for the SPVC service type.
Cisco Media Gateway Manager 5.0 User Guide
7-4
OL-5461-02
Chapter 7
Provisioning Connections
Where Do I Find Information About Connections?
7.3.4 Editing the Filter Settings
In the Configuration Center, the filtering scheme defines the types of connections displayed in the
Connection Browser window. By default, all connections for the selected device are displayed.
To edit the filter settings:
Step 1
In the Configuration Center, click the Connections tab to display the Connections Hierarchy pane. Select
the NE, and double-click, or drag and drop the NE into the right-hand pane to display the New
Connection details.
Step 2
Move the objects, for example, node, card, line, or port from the Hierarchy pane on the Connection tab
to the Local End ID or Remote End ID field.
Note
The Local End ID field must be completed in order to retrieve connection information.
Step 3
Click the Connection List tab to display the Connection List details.
Step 4
Click More Filters to display the Filter Settings window. See Figure 7-2.
Step 5
Check or uncheck the check boxes to configure the settings for a specific filter category.
Note
Step 6
By default, all the filter settings are checked.
To retrieve connections that have the same connection descriptor, enter the description in the
Connection Descriptor field.
Table 7-3 defines the areas for the filter settings.
Table 7-3
Configuration Center—Filter Setting Definitions
Name
Definition
Enabling Filter Categories
Enables or disables the filters based on one of the five categories.
Connection Descriptor
Enables filtering on the Connection Descriptor text string.
Feeder Connections
Defines whether local and feeder connections are displayed in addition
to the connections that terminate at the selected node. Also, remote
feeders can filter down to the port level for the remote endpoint.
Type
Defines one or more of the eighteen basic connection types.
Service Type
Defines the connection service types:
•
VISM - RPM—vbr3-nrt, rt-vbr3(RPM-XF only), ubr1
•
VXSM - RPM—vbr3-nrt, rt-vbr3(RPM-XF only), ubr1
•
VISM - ATM—cbr1, vbr1-rt, vbr3-rt, vbr1-nrt, vbr3-nrt, ubr1
•
VXSM - ATM—cbr1, vbr1-rt, vbr3-rt, vbr1-nrt, vbr3-nrt, ubr1
Status
Specifies the connection status, for example, OK, Down, Failed,
Incomplete, Pending, or Error.
Multicast
This option is not used in Cisco MGM.
End to End Type
Defines the type of end to end statistics collection as SPVC,
Cisco Media Gateway Manager 5.0 User Guide
OL-5461-02
7-5
Chapter 7
Provisioning Connections
How Do I Create, Modify and Delete Voice Connections?
Step 7
Click OK to apply the selected filter settings.
Figure 7-2
Filter Settings Window
7.4 How Do I Create, Modify and Delete Voice Connections?
These tasks describe how to create and manage voice connections for VXSM and VISM-PR cards:
•
7.4.1 Creating a VISM-RPM Connection in Connection Mode
•
7.4.2 Modifying a Connection in Connection Mode
•
7.4.3 Deleting Connections
•
7.4.4 Removing Incomplete Connections and Unused Connection Descriptors from the Network
7.4.1 Creating a VISM-RPM Connection in Connection Mode
You have two options to create a VISM-RPM connection for VXSM and VISM-PR cards:
•
7.4.1.1 Creating a VISM-RPM Connection in Advanced Mode
•
7.4.1.2 Creating a VISM-RPM Connection in Quick Mode
Cisco Media Gateway Manager 5.0 User Guide
7-6
OL-5461-02
Chapter 7
Provisioning Connections
How Do I Create, Modify and Delete Voice Connections?
7.4.1.1 Creating a VISM-RPM Connection in Advanced Mode
To create a VISM-RPM connection in Advanced Mode for VXSM and VISM-PR cards:
Step 1
In the Configuration Center, click the Connections tab to display the Connections Hierarchy pane. Select
the NE, and double-click, or drag and drop the NE into the right-hand pane to display the New
Connection details.
Step 2
Click the Advanced Mode tab.
Step 3
Choose one of the following options to move the node along with its active ports from the Hierarchy
pane to the Advanced Mode Configuration window:
•
Move the node along with the active ports to the Local End ID or Remote End ID field.
•
Select the port for Local End ID and Remote End ID fields in the Hierarchy pane. In the New
Connection window, click Set adjacent to the local-end ID and remote-end ID for the selected port.
•
Enter the local-end ID and remote-end ID manually in the Local End ID and Remote End ID fields.
After endpoints are successfully committed, the VISM-RPM connection type is automatically entered in
the Connection field
Step 4
Enter the Vpi.Vci/Channel values for the local endpoints. These values depend on the resource partition
set up by the user for the VXSM card. See Chapter 7, “Provisioning Connections.”
•
Vpi is the slot number.
•
Vci is the resource partition.
Note
You can see the valid ranges for the Vpi.Vci values, click the button ( ... ) next to the Local and
Remote Vpi.Vci field. This opens the VpiVci Selector dialog box. Enter the correct values in the
fields, and click OK.
Step 5
Enter the Vpi.Vci/Channel values for the remote endpoints for the RPM-XF or RPM-PR card.
Step 6
Choose the service type from the Service drop-down arrow.
Step 7
Click Get Parameters to display the default values for the local and remote endpoints to create a
connection.
Step 8
Choose the following adaptation option from the Adaptation Type drop-down arrow:
•
Step 9
aal-5—Supports VXSM and VISM-PR cards a control connection.
Choose one of the following channel options for the Logical Channel Number (LCN) from the Channel
Application drop-down arrow:
•
bearer (default)—Supports VXSM and VISM-PR cards. The bearer channel carries only voice
payload traffic.
•
control—Supports VXSM and VISM-PR cards. The control channel carries only control traffic.
Step 10
Click Details to display the Connection Details window for the VISM-RPM connection type.
Step 11
Ensure that the attributes for the local endpoints, remote endpoints, and connections are correct in the
Connection Details window.
Step 12
Click OK to set the attributes in the Connection Details window.
Cisco Media Gateway Manager 5.0 User Guide
OL-5461-02
7-7
Chapter 7
Provisioning Connections
How Do I Create, Modify and Delete Voice Connections?
Step 13
Optional: Enter the text in the Connection Descriptor field. For example, for a VISM to RPM
connection, enter:
vism-rpm-dallas-washington
Step 14
Click Create to create a new VISM-RPM connection for the node in Advanced Mode.
7.4.1.2 Creating a VISM-RPM Connection in Quick Mode
Note
You must have a predefined template set up to create connections in Quick Mode. See 7.5.1 Creating
Connection Templates.
To create a VISM-RPM connection in Quick Mode for VXSM and VISM-PR cards:
Step 1
In the Configuration Center, click the Connections tab to display the Connections Hierarchy pane. Select
the NE, and double-click, or drag and drop the NE into the right-hand pane to display the New
Connection details.
Step 2
Click the Quick Mode tab to display the Quick Mode Configuration window.
Step 3
Choose one of the following options to move the node along with its active ports from the Hierarchy
pane to the Quick Mode Configuration window:
•
Move the node along with the active ports to the Local End ID or Remote End ID field.
•
Select the port for Local End ID and Remote End ID fields in the Hierarchy pane. In the New
Connection window, click Set adjacent to the local-end ID and remote-end ID for the selected port.
•
Enter the local-end ID and remote-end ID manually in the Local End ID and Remote End ID fields.
After endpoints are successfully committed, the VISM-RPM connection type is automatically entered in
the Connection field
Step 4
Enter the Vpi.Vci/Channel values for the local endpoints.These values depend on the resource partition
set up by the user for the VXSM card. See Chapter 7, “Provisioning Connections.”
•
Vpi is the slot number.
•
Vci is the resource partition.
Step 5
You can see the valid ranges for the Vpi.Vci values, click the button ( ... ) next to the Local and Remote
Vpi.Vci field. This opens the VpiVci Selector dialog box. Enter the correct values in the fields, and click
OK.
Step 6
Enter the Vpi.Vci/Channel values for the remote endpoints for the RPM-XF or RPM-PR card.
Step 7
Click Get Template List to retrieve the templates for both local and remote endpoints from the
Connection Template List window.
Step 8
Optional: Enter the text in the Connection Descriptor field. For example, for a VISM to RPM
connection, enter:
vism-rpm-dallas-washington
Step 9
Click Create to create a new VISM-RPM connection for the Cisco MGX 8850 node in Quick Mode.
Cisco Media Gateway Manager 5.0 User Guide
7-8
OL-5461-02
Chapter 7
Provisioning Connections
How Do I Create, Modify and Delete Voice Connections?
7.4.2 Modifying a Connection in Connection Mode
You have two options to modify a connection for VXSM and VISM-PR cards:
•
7.4.2.1 Modifying a Connection in Advanced Mode
•
7.4.2.2 Modifying a Connection in Quick Mode
7.4.2.1 Modifying a Connection in Advanced Mode
To modify a connection in Advanced Mode:
Step 1
In the Configuration Center, click the Connections tab to display the Connections Hierarchy pane. Select
the NE, and double-click, or drag and drop the NE into the right-hand pane to display the New
Connection details.
Step 2
Click the Connection List tab to display the list of connections.
Step 3
Move the node along with the active port to the Local End ID field.
Step 4
Enter the number of connections you want to retrieve in the Connection Count to be retrieved field.
To retrieve all connections, enter *. By default, * is displayed.
Step 5
Click Get to display all connections and the status of connections for the selected node.
Step 6
Select a VISM-RPM connection type from the list of connections. Note that connections with a status of
incomplete or error cannot be selected.
Step 7
Click Details. The Connection Details window for the connection type opens.
Step 8
Change to the values you require or use a template for the local endpoints, remote endpoints. Ensure the
connections are correct in the Connection Details window.
Step 9
Click OK to modify the attributes in the Connection Details window.
Step 10
Click Modify to modify the parameters.
7.4.2.2 Modifying a Connection in Quick Mode
To modify a connection in Quick Mode:
Step 1
In the Configuration Center, click the Connections tab to display the Connections Hierarchy pane. Select
the NE, and double-click, or drag and drop the NE into the right-hand pane to display the New
Connection details.
Step 2
Click the Connection List tab to display the list of connections.
Step 3
Move the node along with the active port to the Local End ID or Remote End ID field.
Step 4
Enter the number of connections you want to retrieve in the Connection Count to be retrieved field.
To retrieve all connections, enter *. By default, * is displayed.
Step 5
Click Get to display all connections and the status of connections for the selected node.
Step 6
Select a VISM-RPM connection type from the list of connections. Note that connections with a status of
incomplete or error cannot be selected.
Step 7
Click Details. The Connection Details window for the connection type opens.
Cisco Media Gateway Manager 5.0 User Guide
OL-5461-02
7-9
Chapter 7
Provisioning Connections
How Do I Create, Modify and Delete Voice Connections?
Step 8
Click the Quick Mode tab to display all the values for each parameter for the selected VISM-RPM
connection type.
Step 9
Choose the template from the Select Template drop-down arrow.
Step 10
Click Get Template List to retrieve the templates for local and remote endpoints from the Connection
Template List window.
Step 11
Click Modify to modify the parameters.
7.4.3 Deleting Connections
To delete a connection:
Step 1
In the Configuration Center, click the Connections tab to display the Connections Hierarchy pane. Select
the NE, and double-click, or drag and drop the NE into the right-hand pane to display the New
Connection details.
Step 2
Move the objects, for example, node, card, line, or port from the Hierarchy pane on the Connection tab
to the Local End ID or Remote End ID field.
Note
The Local End ID field must be completed in order to retrieve connection information.
Step 3
Click the Connection List tab to display the Connection List details. Enter the number of connections
you want to retrieve in the Connection Count to be retrieved field. To retrieve all the connections, enter
*. By default, * is displayed.
Step 4
Click Get.
Step 5
Select one or more connections from the list of connections.
Step 6
Click Delete to delete the selected connections.
If a successful deletion is confirmed, the notation “d” appears next to the connection number in the
display table.
7.4.4 Removing Incomplete Connections and Unused Connection Descriptors
from the Network
You can remove incomplete connections, and unused connection descriptors from the network.
To remove incomplete connections from the network:
Step 1
In the Configuration Center, click the Connections tab to display the Connections Hierarchy pane. Select
the NE, and double-click, or drag and drop the NE into the right-hand pane to display the New
Connection details.
Step 2
Move the objects, for example, node, card, line, or port from the Hierarchy pane on the Connection tab
to the Local End ID field.
Cisco Media Gateway Manager 5.0 User Guide
7-10
OL-5461-02
Chapter 7
Provisioning Connections
How Do I Create, Modify and Delete Voice Connections?
Note
The Local End ID field must be completed in order to retrieve connection information.
Step 3
Click the Connection List tab to display the Connection List details.
Step 4
Enter the number of connections you want to retrieve in the Connection Count to be retrieved field.
To retrieve all the connections, enter *. By default, * is displayed.
Step 5
Click Get.
Step 6
Select one or more connections from the list of connections.
Step 7
Click Force Delete to forcefully delete the connections from the network.
Step 8
Click OK to proceed with the force delete for the selected connections.
If successful, the following message appears:
Successfully Deleted the Connection(s).
Click OK to close the success window.
If some network segments failed to get deleted, you are prompted with the following error message:
Can’t Delete the Connection(s):
Some segments may be on the network.
Click OK to acknowledge the forced delete error message.
Note
You can delete the failed endpoints from the switch command line interface (CLI).
Unused connection descriptors are in the database but are not associated with any connection.
To remove the unused connection descriptors:
Step 1
In Configuration Center, choose Edit > Show Unused Descriptors to display the Unused Descriptor
List window. (See Figure 7-3.)
Step 2
Select one or more connection descriptor entries.
Step 3
Click Delete to remove the unused connection descriptors from the database.
Cisco Media Gateway Manager 5.0 User Guide
OL-5461-02
7-11
Chapter 7
Provisioning Connections
How Do I Configure Connection Templates?
Figure 7-3
Unused Descriptor List Dialog
7.5 How Do I Configure Connection Templates?
These tasks are used to configure connection templates:
•
7.5.1 Creating Connection Templates
•
7.5.2 Displaying Connection Templates
•
7.5.3 Modifying Connection Templates
•
7.5.4 Deleting Connection Templates
You can configure templates for new or modified connection parameters. A template is a set of
connection parameters for a specified connection. Cisco MGM provides default parameters that can be
used to create a template. This template can be modified and saved with a new name. When using the
template with the default parameters, the Unchanged button is not available.
7.5.1 Creating Connection Templates
To create connection templates:
Step 1
In the Configuration Center, click the Connections tab to display the Connections Hierarchy pane. Select
the NE, and double-click, or drag and drop the NE into the right-hand pane to display the New
Connection details.
Step 2
Click the Advanced Mode tab to display the Advanced Mode Configuration window.
Step 3
Move the object, for example, node, card, line, or port from the Hierarchy pane to the Local End ID or
Remote End ID field.
Step 4
Enter the value for the Local Vpi.Vci/Channel field.
Step 5
Enter the value for the Remote Vpi.Vci/Channel field.
Step 6
Click Get Parameters to display local-end, remote-end, and connection parameters.
Step 7
Click Template Details or choose Edit > Connection Templates to display the Template Configuration
window. (See Figure 7-4.)
Cisco Media Gateway Manager 5.0 User Guide
7-12
OL-5461-02
Chapter 7
Provisioning Connections
How Do I Configure Connection Templates?
Note
Step 8
VISM and VXSM endpoints are shown as VISM endpoints. See Table 7-1 details the types of
connections.
Enter values in the following fields for the connection parameters:
•
Local End Parameters
•
Remote End Parameters
•
Connection Parameters
Note
Tooltips provide descriptions of the fields within the Template Configuration window.
Step 9
Enter the description for the connection template in the Description field.
Step 10
Enter the new name for the connection template in the Save As field.
Step 11
Click OK to create the new connection template.
Figure 7-4
Template Configuration Dialog
Cisco Media Gateway Manager 5.0 User Guide
OL-5461-02
7-13
Chapter 7
Provisioning Connections
How Do I Configure Connection Templates?
7.5.2 Displaying Connection Templates
To display connection templates:
Step 1
In the Configuration Center, click the Connections tab to display the Connections Hierarchy pane. Select
the NE, and double-click, or drag and drop the NE into the right-hand pane to display the New
Connection details.
Step 2
Choose one of the following options to display Connection Template List:
•
Click Get Templates to display the Connection Template List.
•
Choose Edit > Connection Templates to display the Connection Template List.
You can sort the following columns in ascending and descending order:
•
Template ID
•
Connection Type
•
Service Type
•
Owner ID
Step 3
Click Refresh to refresh the Template List window.
Step 4
Click Cancel to close the Template List window.
7.5.3 Modifying Connection Templates
To modify connection templates:
Step 1
In the Configuration Center, click the Connections tab to display the Connections Hierarchy pane. Select
the NE, and double-click, or drag and drop the NE into the right-hand pane to display the New
Connection details.
Step 2
Choose one of the following options to display Connection Template List:
•
Click Get Templates.
•
Choose Edit > Connection Templates.
Step 3
Select the entry from the Connection Template List.
Step 4
Click Details to display the Template Configuration window for the selected template entry.
Note
Step 5
Step 6
VISM and VXSM endpoints are shown as VISM endpoints. See Table 7-1 details the types of
connections.
Modify the following connection parameters:
•
Local End Parameters
•
Remote End Parameters
•
Connection Parameters
Enter the description for the connection template in the Description field.
Cisco Media Gateway Manager 5.0 User Guide
7-14
OL-5461-02
Chapter 7
Provisioning Connections
How Can I Test the Connections?
Step 7
Rename the current connection template in the Save As field. Or save the template under the same name.
Step 8
Click OK to save the connection template with the changed configuration settings.
7.5.4 Deleting Connection Templates
To delete templates:
Step 1
In the Configuration Center, click the Connections tab to display the Connections Hierarchy pane. Select
the NE, and double-click, or drag and drop the NE into the right-hand pane to display the New
Connection details.
Step 2
Click the Advanced Mode tab to display the Advanced Mode Configuration window.
Step 3
Move the object, for example, node, card, line, or port from the Hierarchy pane to the Local End ID or
Remote End ID field.
Step 4
Choose one of the following options to display the Connection Template List:
•
Click Get Templates.
•
Choose Edit > Connection Templates.
Step 5
Select the entry from the Connection Template List.
Step 6
Click Delete to delete the connection template entry.
7.6 How Can I Test the Connections?
These tasks are described for miscellaneous test operations that are used to test connections:
•
7.6.1 Up a Connection
•
7.6.2 Down a Connection
•
7.6.3 Loopback a Connection
7.6.1 Up a Connection
You can up a connection. An SPVC connection is used as an example.
Note
Before you can up a connection, ensure that the connection is disabled first.
To up an SPVC connection:
Step 1
In the Configuration Center, click the Connections tab to display the Connections Hierarchy pane. Select
the NE, and double-click, or drag and drop the NE into the right-hand pane to display the New
Connection details.
Step 2
Click the Connection List tab.
Cisco Media Gateway Manager 5.0 User Guide
OL-5461-02
7-15
Chapter 7
Provisioning Connections
How Can I Test the Connections?
Step 3
Click More Filters to display the Filter Settings window.
Step 4
Choose the filter settings from the Filter Settings window. For example, check both the Status check
box and the OK check box if you want to retrieve only active connections.
Step 5
Click OK to apply the filter settings.
Step 6
Enter the number of connections that you want to retrieve in the Connection Count to be retrieved
field. To retrieve all the connections, enter *.
Step 7
Click Get to retrieve the connections. For example, you can retrieve connections for both local and
remote endpoints.
The Connection Browser window appears with the number of connections matching the filtering criteria.
A list of connections that have either local or remote endpoints are displayed in the connection list.
Step 8
Right-click the SPVC connection from the list of connections and choose Diagnostic Center.
Step 9
Click the Miscellaneous Operations tab to display the Miscellaneous Operation window.
Step 10
Click the Up Connection radio button.
Step 11
Click Start Operation to up the connection.
If successful, the Up Connection window appears.
7.6.2 Down a Connection
You can down a connection. An SPVC connection is used as an example.
Note
Before you can down a connection, ensure that the connection is up first.
To down an SPVC connection:
Step 1
In the Configuration Center, click the Connections tab to display the Connections Hierarchy pane. Select
the NE, and double-click, or drag and drop the NE into the right-hand pane to display the New
Connection details.
Step 2
Click the Connection List tab.
Step 3
Click More Filters to display the Filter Settings window.
Step 4
Choose the filter settings from the Filter Settings window. For example, check both the Status check
box and the OK check box if you want to retrieve only active connections.
Step 5
Click OK to apply the filter settings.
Step 6
Enter the number of connections that you want to retrieve in the Connection Count to be retrieved
field. To retrieve all the connections, enter *.
Step 7
Click Get to retrieve the connections. For example, you can retrieve connections for both local and
remote endpoints.
The Connection Browser window appears with the number of connections matching the filtering criteria.
A list of connections that have either local or remote endpoints are displayed in the connection list.
Step 8
Click the Miscellaneous Operations tab to display the Miscellaneous Operation window.
Cisco Media Gateway Manager 5.0 User Guide
7-16
OL-5461-02
Chapter 7
Provisioning Connections
How Can I Test the Connections?
Step 9
Click the Down Connection radio button.
Step 10
Click Start Operation to up the connection.
If successful, the Down Connection window appears.
7.6.3 Loopback a Connection
You can test a connection by creating a loopback on the connection. All types of connections in
Cisco MGM support loopback. An SPVC connection is used as an example.
Note
Before you can down a connection, ensure that the connection is up first.
To loopback an SPVC connection:
Step 1
In the Configuration Center, click the Connections tab to display the Connections Hierarchy pane. Select
the NE, and double-click, or drag and drop the NE into the right-hand pane to display the New
Connection details.
Step 2
Click the Connection List tab.
Step 3
Click More Filters to display the Filter Settings window.
Step 4
Choose the filter settings from the Filter Settings window. For example, check both the Status check
box and the OK check box if you want to retrieve only active connections.
Step 5
Click OK to apply the filter settings.
Step 6
Enter the number of connections that you want to retrieve in the Connection Count to be retrieved
field. To retrieve all the connections, enter *.
Step 7
Click Get to retrieve the connections. For example, you can retrieve connections for both local and
remote endpoints.
The Connection Browser window appears with the number of connections matching the filtering criteria.
A list of connections that have either local or remote endpoints are displayed in the connection list.
Step 8
Click the Miscellaneous Operations tab to display the Miscellaneous Operation window.
Step 9
Click the Loopback Connection radio button.
Step 10
Click Start Operation to up the connection.
If successful, the Loopback Connection window appears.
Step 11
Click Abort Operation to stop the operation.
Cisco Media Gateway Manager 5.0 User Guide
OL-5461-02
7-17
Chapter 7
Provisioning Connections
How Can I Test the Connections?
Cisco Media Gateway Manager 5.0 User Guide
7-18
OL-5461-02
C H A P T E R
8
Managing Security
This chapter describes Cisco MGM security and how to manage users. This includes an overview of
security domains and a description of the user security and NE security features available in Cisco
MGM.
This chapter contains the following sections:
•
8.1 What Is Security Management?
•
8.2 How Do I Customize the Login Advisory Message?
•
8.3 How Do I Manage User Security?
•
8.4 How Do I Manage the Audit Log?
8.1 What Is Security Management?
Why create a security policy?
•
To create a baseline of your current security posture
•
To set the framework for security implementation
•
To define allowed and disallowed behaviors
•
To help determine necessary tools and procedures
•
To communicate consensus and define roles
•
To define how to handle security incidents
The following security domains govern Cisco MGM networks:
•
Cisco MGM client—A Cisco MGM client must be created with one of the existing default user
profiles or with a new custom user profile with appropriate access privileges. This new user profile
should be created and assigned to a user.
•
Cisco MGM OSS users—OSS-to-Cisco MGM sessions are configured by the Cisco MGM CORBA
GateWay EMS-to-NMS interface architectural component. For more information about Cisco MGM
CORBA GateWay, see Chapter 12, “Managing CORBA Interfaces.”
Cisco Media Gateway Manager 5.0 User Guide
OL-5461-02
8-1
Chapter 8
Managing Security
How Do I Customize the Login Advisory Message?
8.2 How Do I Customize the Login Advisory Message?
After logging into the Cisco MGM client, a login advisory message is shown. By default, the advisory
message reads:
NOTICE: This is a private computer system. Unauthorized access or use may lead to
prosecution.
You can customize the default advisory message as follows:
Step 1
Log into the Cisco MGM server as the root user.
Step 2
Use a text editor to edit or create the advisory.txt file in the /opt/CiscoMGMServer/cfg directory. The
new advisory message can contain up to 1,600 characters. The advisory.txt file does not exist by default.
Note
Step 3
Note
The default directory /opt/CiscoMGMServer may have been changed during installation of the
Cisco MGM server.
Save the changes. All subsequent users who log into the Cisco MGM client will see the new advisory
message.
You can also disable the advisory message altogether. See 8.3.4.13 Configuring Cisco MGM Security
Parameters, page 8-28.
8.3 How Do I Manage User Security?
This section describes user security and management. This includes procedures on how to add a new
user, modify a user’s properties, delete a user, and end an active user session. It also includes procedures
on how to add, modify, and delete custom profiles and how to perform NE user administration.
The following topics are covered:
•
8.3.1 Restricting User Access, page 8-2
•
8.3.2 Viewing the Audit Trail File, page 8-4
•
8.3.3 User Profiles, page 8-5
•
8.3.4 Performing User Administration, page 8-13
8.3.1 Restricting User Access
The Administration > Cisco MGM Users menu launched from the Domain Explorer window manages
user security. Cisco MGM administration allows restricted access logins to enable users to perform tasks
based on detailed access privileges.
For each action, a user is given privileges to read to read/write. For definitions of the access privileges,
see Table 8-1.
Cisco Media Gateway Manager 5.0 User Guide
8-2
OL-5461-02
Chapter 8
Managing Security
How Do I Manage User Security?
Table 8-1
Configuration Center Access Privileges
Access Privilege
Operation
Read
Enables the following read operations:
Read/Write
•
Reads the element attributes.
•
Reads the templates and loads the template parameters into the configuration internal frame.
Enables the following create operations:
•
Changes the attribute values in a create internal frame.
•
Commits changes on the switch.
•
Saves the attribute values into a new template.
Enables the following modify operations:
•
Changes the attribute values in a details internal frame.
•
Commit changes on the switch.
•
Saves the attribute values into an existing template.
•
Selects and modifies the template with the new attribute values.
Enables the Delete button in both the details and create internal frame only after the element is created.
Also in the tabular view listing, when more than one element is selected and if you click Delete, an
extra check verifies if the multiple delete permission is enabled, If not, you are blocked from
attempting the operation and prompted to delete one element at a time.
Specifies that the tabular view listing allows more than one element decision. The multiple delete
operation means that the single delete operation is also enabled. The other delete permissions are also
applicable.
No Access
User has no access permissions.
Table 8-2 lists the access privileges required to perform security-controlled operations within the
Diagnostic Center application.
Table 8-2
Diagnostic Center Access Privileges
Access Privilege
Operation
Read
Enables get connections, test connections, connection trace, and trouble tickets
attachment.
Read/Write
Enables up connections, and saves trouble tickets.
Enables the following operations at different levels:
No Access
•
Node—Specifies node resync and checks manageability.
•
Line and path—Applies loopback and starts and modifies BERT1.
•
Port—Starts and modifies BERT and grooming functions.
•
Connections—Specifies loopback connections.
User has no access permissions.
1. BERT = Bit Error Rate Test
Cisco Media Gateway Manager 5.0 User Guide
OL-5461-02
8-3
Chapter 8
Managing Security
How Do I Manage User Security?
To perform security-controlled operations within Chassis View and Statistics Reporting Tool
applications, Read is the only access privilege allowed. The Read access privilege enables all operations
that are supported by the application.
8.3.2 Viewing the Audit Trail File
The Cisco MGM Audit Trail Viewer records activities across the four applications (Configuration Center,
Chassis View, Statistics Reporting Tool, and Diagnostic Center) in a persistent file.
Note
Audit trail logging is done per Cisco MGM workstation and each workstation performs an independent
audit trail file. There is no communication or synchronization between workstations regarding an audit
trail.
Using the Audit Trail Viewer, you can access audit trail files for specified days, and you can sort, filter,
and search for specific log entries. All readand write activities are monitored and logged to a file. To
open the Audit Trail Viewer, complete the following procedure:
Step 1
From the Cisco MGM Domain Explorer window, choose Administration > MGX 8880/8850 MG >
Audit Trail.
If no NE is selected in the Domain Explorer, the Audit Trail option will be grayed out.
Note
or
from the Configuration Center, Statistics Reporting Tool, Chassis View, or Diagnostic Center:
Step 2
•
Choose Tools > Administration > Cisco MGM Audit Trail
•
Right-click on any object in the Hierarchy pane and choose Administration > Cisco MGM Audit
Trail
Enter the fields.
Note
Table 8-3 describes fields in the Cisco MGM Audit Trail Viewer.
Step 3
Click Submit to submit the specified criteria for the log file.
Step 4
Click Reset All to reset all the fields to the default state.
Table 8-3
Field Descriptions for the Cisco MGM Audit Trail Viewer
Name
Description
Date
Specifies the days to view the audit trail for. Click in the Date field to populate the
current date. If the Date field is not checked, all files in the directory are checked. The
format is MMDDYYYY.
Time
Specifies the start and end times. The format is HH:MM:SS. If the Time field is not
checked, time is not set as a filter.
Cisco Media Gateway Manager 5.0 User Guide
8-4
OL-5461-02
Chapter 8
Managing Security
How Do I Manage User Security?
Table 8-3
Field Descriptions for the Cisco MGM Audit Trail Viewer (continued)
Name
Description
Host Name
Specifies the host workstation name where the audit trail record is generated. If the Host
Name field is not checked, all host names are displayed. This field corresponds to the
Terminal column in the table.
The exact hostname must be specified.
Note
User Id
Specifies the user ID used to log into the Cisco MGM desktop. If the User Id field is not
checked, all user IDs are used.
Application Specifies the application name. If the Application field is not checked, all applications
are used. You have the following application choices:
Event Type
•
All
•
Chassis View
•
Configuration Center
•
Diagnostics Center
•
Statistics Reporting Tool
Displays the type of user activity:
•
Write (Initial, Failed, Successful, Timeout, and Abort)
•
Read
•
Read and Write
This field corresponds to the Status column in the table.
Max entries Specifies the maximum entries displayed per page in the table. The maximum is 50.
per page
Total
Displays the total entries found and the number of entries on the current page.
<<
Displays the previous page entries.
>>
Displays the next page entries.
8.3.3 User Profiles
By default, Cisco MGM contains the following user profiles:
•
NetworkAdmin—Typically, NOC supervisors who perform daily network surveillance,
provisioning, and performance monitoring activities on any group or NE.
•
Operator—Users who perform daily network surveillance and performance monitoring activities on
specific NEs. Each operator can have only one active session. Operators cannot access
administrative information.
•
Provisioner—Users who perform daily network surveillance, provisioning, and performance
monitoring activities on specific NEs. Each provisioner can have only one active session.
Provisioners cannot access administrative information.
•
SuperUser—Users who have access to all operations.
•
SysAdmin—System administrators who manage Cisco MGM access.
Cisco Media Gateway Manager 5.0 User Guide
OL-5461-02
8-5
Chapter 8
Managing Security
How Do I Manage User Security?
The following sections describe how to view, add, modify, delete, and duplicate a user profile:
•
8.3.3.1 Viewing User Profiles
•
8.3.3.2 Adding a Custom User Profile
•
8.3.3.3 Modifying a User Profile
•
8.3.3.4 Deleting a User Profile
•
8.3.3.5 Duplicating a User Profile
8.3.3.1 Viewing User Profiles
The Cisco MGM User Profiles table displays basic information about Cisco MGM user profiles. Use the
menu options to manage user profiles.
Step 1
In the Domain Explorer window, choose Administration > Cisco MGM Users.
Step 2
In the Cisco MGM Users table, choose Administration > Cisco MGM User Profiles (or click the
Launch User Profiles Table tool). Table 8-4 describes the fields in the Cisco MGM User Profiles table.
Table 8-4
Field Descriptions for the Cisco MGM User Profiles Table
Field
Description
User Profile Name Name of the existing Cisco MGM user profiles.
NE Assignment
NE assignment for the selected user profile. NE assignments are:
•
Assign all NEs—SuperUser, NetAdmin
•
Assign NEs—Operator, Provisioner
•
Assign no NEs—SysAdmin
When you create a new profile, only Assign NEs is available for the new profile,
meaning that NEs or groups must always be assigned to the new profile.
Login Sessions
Description
Number of permitted simultaneous logins assigned to the user profile:
•
1—Only one user with a given profile can log into a specific Cisco MGM
server at a time.
•
2 to 10—The specified number of users (2 to 10) with a given profile can log
into a specific Cisco MGM server simultaneously.
•
Unlimited—An unlimited number of users with a given profile can log into a
specific Cisco MGM server simultaneously.
Description of the user profile.
Cisco Media Gateway Manager 5.0 User Guide
8-6
OL-5461-02
Chapter 8
Managing Security
How Do I Manage User Security?
8.3.3.2 Adding a Custom User Profile
Cisco MGM allows SuperUsers and SysAdmins to generate custom user profiles with certain privileges.
Custom user profiles are grouped into categories and each category has a set of operations (see
Table 8-6). After the user profiles are generated, they can be assigned to new Cisco MGM users. This
functionality, also known as network partitioning, allows you to control how much access particular
users have to the network.
Use the Create New User Profile wizard to add Cisco MGM user profiles. Table 8-5 describes the fields
in the wizard.
Step 1
In the Domain Explorer window, choose Administration > Cisco MGM Users.
Step 2
In the Cisco MGM Users table, choose Administration > Cisco MGM User Profiles (or click the
Launch User Profiles Table tool).
Step 3
In the Cisco MGM User Profiles table, choose Edit > Create (or click the Create a New User Profile
tool).
Step 4
In the Create New Cisco MGM User Profile wizard, specify the following:
•
User profile name
•
NE assignment (read only)
•
Default user login sessions allowed
•
Description
Step 5
Click Next.
Step 6
Select a user profile category from the Categories area. Operations for each category are displayed on
the right side of the Categories area. See Table 8-6 for a complete list of Cisco MGM profile categories
and operations.
Step 7
Specify user capabilities by setting permission or privileges for one or all operations. When setting
privileges for each operation, select one of the following radio buttons:
•
Read Only
•
Read/Write
•
No Access
When setting privileges for all operations, select one of the following buttons:
•
Set All Read Only
•
Set All Read/Write
•
Set All No Access
Note
The user profile operations displayed on the right side of the Create New Cisco MGM User
Profile wizard depend on the category selected. You can select the root node to see all the
operations for all categories.
Step 8
Click Finish.
Step 9
Click Yes in the message box. The message box will not be displayed if it is disabled in the User
Preferences dialog box. See 8.3.4.11 Setting User Preferences, page 8-26 for more information.
Cisco Media Gateway Manager 5.0 User Guide
OL-5461-02
8-7
Chapter 8
Managing Security
How Do I Manage User Security?
Table 8-5
Field Descriptions for the Create New User Profile Wizard
Field
Description
User Profile Name
Enter the name of the new user profile. The profile name must contain between six and twenty
alphanumeric characters (A-Z, a-z, 0-9). Alphabetic characters are case-sensitive. The profile name
must be unique in Cisco MGM and cannot contain a space or any special characters.
NE Assignment
(Read only) The NE assignment for the new user profile. Values are:
•
Assign All NEs—SuperUser, NetworkAdmin
•
Assign NEs—Operator, Provisioner
•
Assign No NEs—SysAdmin
When you create a new profile, only Assign NEs is available for the new profile, meaning that NEs or
groups must always be assigned to the new profile.
Default User Login
Sessions
Choose to allow single or multi-user sessions.
Description
Enter a description of the new user profile.
User Profile
Privileges
Set user privileges for specific Cisco MGM categories. Select a category in the left panel to display that
category’s available operations. Select an operation from the Operations column; then, select a user
privilege for the selected operation from the radio buttons in the Privileges column.
•
Set All Read Only—Specifies that the user can only view information related to all the operations
with Read Only privilege listed under the specified category. All other operations will be set to No
Access.
•
Set All Read/Write—Specifies that the user can view and perform any of the operations with
Read/Write privilege listed under the specified category. All other operations will be set to Read
Only.
•
Set All No Access—Specifies that the user is not allowed to perform any of the operations with No
Access privilege listed under the specified category. All other operations will be set to Read Only.
The Warning column lists the dependencies between various operations. After you click Finish to
create the new user profile, a warning dialog box lists all of the warning messages. If you check the
Don’t Display User Profile Creation Warning Messages check box, the warning dialog box does not
appear for subsequent user profile creations in the current client session. If you check the Don’t
Display User Profile Creation Warning Messages check box in the User Preferences dialog box, the
warning dialog box is disabled as specified for the current user or as a template for new users.
Cisco Media Gateway Manager 5.0 User Guide
8-8
OL-5461-02
Chapter 8
Managing Security
How Do I Manage User Security?
Table 8-6
Cisco MGM Custom User Profiles
Category
Operations
Description
Privileges
Administration
Audit/Error Log
Launch the Audit Log and Error Log.
Read Only or
No Access
Control Panel
Launch the Control Panel and related tables.
Read/Write or
No Access
Logged In MGM Users
Launch the Logged In MGM Users Table.
Read Only,
Read/Write, or
No Access
MGM User Profiles
Launch the Cisco MGM User Profiles Table and
add, delete, or modify user profiles.
Read Only,
Read/Write, or
No Access
MGM Users
Launch the MGM Users Table and add, delete, or Read Only,
modify users and user preferences.
Read/Write, or
No Access
Save Map As Default
Save map customizations as default.
Read/Write or
No Access
Add or Delete NE or Group
Add or delete NEs or groups from the domain.
Not assigned
Audit Trail
Launch the Audit Trail Table.
Read Only,
Read/Write, or
No Access
Edit Domain Node Properties
Edit properties on the property sheet associated
with the root node in the Domain Explorer tree.
Read/Write or
No Access
Edit NE or Group Properties
Edit NE or group properties.
Read/Write or
No Access
SSH Secure Shell
Command line tool to gain secure shell access to
MGX switches.
Read/Write, or
No Access
Supported NE Table
Launch the Supported NE Table.
Read Only,
Read/Write, or
No Access
Telnet session
Command line tool to telnet to MGX switches.
Read/Write, or
No Access
Topology Modification
Drag, drop, cut, copy, and paste NEs in the
Domain Explorer.
Not assigned
User Preferences
Edit the user preferences.
Read/Write or
No Access
NE Administration
Cisco Media Gateway Manager 5.0 User Guide
OL-5461-02
8-9
Chapter 8
Managing Security
How Do I Manage User Security?
Table 8-6
Cisco MGM Custom User Profiles (continued)
Category
NE CM
Operations
1
Description
Privileges
Audit Logging in Chassis View Activates or deactivates the Audit Trail in Chassis Read Only,
View.
Read/Write, or
No Access
NE FM2
NE Management
NE PM
Audit Logging in Configuration Activates or deactivates the Audit Trail in
Center
Configuration Center.
Read Only,
Read/Write, or
No Access
Chassis View
Launches the Chassis View application.
Read Only,
Read/Write, or
No Access
Configuration Center
Launches the Configuration Center application.
Read Only,
Read/Write, or
No Access
Equipment Inventory
Launches the Equipment Inventory Table.
Read Only or
No Access
Alarm Browser/Log
Launches the Alarm Browser, Alarm Log, or
Event Export Manager, acknowledge alarms, and
show alarm notes.
Read Only,
Read/Write, or
No Access
Audit Logging In Diagnostics
Center
Activates or deactivates the Audit Trail in the
Diagnostics Center.
Read Only,
Read/Write, or
No Access
Diagnostics Center
Launches the Diagnostic Center application.
Read Only,
Read/Write, or
No Access
Show MGM EMS
Alarms/Events
Read/Write or
Show MGM-specific EMS alarms and events
count in the Dashboard, show MGM specific EMS No Access
alarms in the Alarm Browser, and show MGM
specific EMS alarms and events-related pop-ups.
Audit Trail Table
Launches the Audit Trail table.
Read Only or
No Access
Job Monitor
Launch the Job Monitor Table and cancel job,
cancel task, add user notes, or view user notes.
Read Only,
Read/Write, or
No Access
Audit Logging in Statistics
Reporting Tool
Activates or deactivates the Audit Trail in the
Statistics Reporting Tool.
Read Only,
Read/Write, or
No Access
Statistics Reporting Tool
Launches the Statistics Reporting Tool
application.
Read Only,
Read/Write, or
No Access
1. NE Configuration Management
2. NE Fault Management
Cisco Media Gateway Manager 5.0 User Guide
8-10
OL-5461-02
Chapter 8
Managing Security
How Do I Manage User Security?
8.3.3.3 Modifying a User Profile
Use the Modify User Profile wizard to modify Cisco MGM user profiles. Table 8-5 describes the fields
in the wizard.
Note
Users created with a certain profile cannot be changed to another profile. To change profiles, the user
must be deleted, then recreated with the new profile.
Modifying a profile will log out all users who are logged in with that profile.
Step 1
In the Domain Explorer window, choose Administration > Cisco MGM Users.
Step 2
In the Cisco MGM Users table, choose Administration > Cisco MGM User Profiles (or click the
Launch User Profiles Table tool).
Step 3
In the table, click the user profile name to modify; then, choose Edit > Modify (or click the Modify User
Profile Properties tool).
Step 4
In the Modify Cisco MGM User Profile wizard, modify the following:
•
Default user login sessions allowed
•
Description
Step 5
Click Next.
Step 6
Select a user profile category from the Categories area. Operations for each category are displayed on
the right side of the Categories area. See Table 8-6 for a list of Cisco MGM profile categories and
operations.
Step 7
Specify user capabilities by setting permission or privileges on one or all operations. When setting
privileges for each operation, select one of the following radio buttons:
•
Read Only
•
Read/Write
•
No Access
When setting privileges for all operations, select one of the following buttons:
•
Set All Read Only
•
Set All Read/Write
•
Set All No Access
Note
The user profile operations displayed on the right side of the Create New Cisco MGM User
Profile wizard depend on the category selected. You can select the root node to see all the
operations for all categories.
Step 8
Click Finish.
Step 9
Click Yes in the message box. The message box will not be displayed if it is disabled in the User
Preferences dialog box. See 8.3.4.11 Setting User Preferences, page 8-26 for more information.
Cisco Media Gateway Manager 5.0 User Guide
OL-5461-02
8-11
Chapter 8
Managing Security
How Do I Manage User Security?
8.3.3.4 Deleting a User Profile
Step 1
In the Domain Explorer window, choose Administration > Cisco MGM Users.
Step 2
In the Cisco MGM Users table, choose Administration > Cisco MGM User Profiles (or click the
Launch User Profiles Table tool).
Step 3
In the Cisco MGM User Profiles table, select the profile you want to delete; then, choose Edit > Delete
(or click the Delete User Profile tool).
Step 4
In the confirmation dialog box, click OK.
Note
The default user profiles (SuperUser, SysAdmin, NetworkAdmin, Provisioner, and Operator) cannot be
deleted. Custom user profiles cannot be deleted if they are assigned to any user. Delete the user with the
custom user profile before deleting the user profile. See 8.3.4.5 Deleting a Cisco MGM User, page 8-23.
8.3.3.5 Duplicating a User Profile
Use the Create Duplicate Profile window to duplicate an existing Cisco MGM user profile.
Step 1
In the Domain Explorer window, choose Administration > Cisco MGM Users.
Step 2
In the Cisco MGM Users table, choose Administration > Cisco MGM User Profiles (or click the
Launch User Profiles Table tool).
Step 3
In the Cisco MGM User Profiles table, select the profile you want to duplicate; then, choose Edit >
Duplicate (or click the Duplicate User Profile tool).
Step 4
In the Create Duplicate Profile dialog box, enter the duplicate profile name. See Table 8-7 for name
constraints.
Step 5
Click OK.
Table 8-7
Field
Field Descriptions for the Create Duplicate Profile Window
Description
Duplicate Profile The name of the duplicate user profile must contain between six and twenty
Name
alphanumeric characters (A-Z, a-z, 0-9). Alphabetic characters are case-sensitive.
The profile name must be unique in Cisco MGM and cannot contain a space or any
special characters.
Cisco Media Gateway Manager 5.0 User Guide
8-12
OL-5461-02
Chapter 8
Managing Security
How Do I Manage User Security?
8.3.4 Performing User Administration
This section describes how to perform user administration, including:
•
8.3.4.1 Managing the Cisco MGM Default User Profiles
•
8.3.4.2 Viewing the Cisco MGM Users Table
•
8.3.4.3 Creating a Cisco MGM User
•
8.3.4.4 Modifying a Cisco MGM User’s Properties
•
8.3.4.5 Deleting a Cisco MGM User
•
8.3.4.6 Viewing Logged In Cisco MGM Users
•
8.3.4.7 Ending an Active Cisco MGM User Session
•
8.3.4.8 Using the Cisco MGM Locked Window
•
8.3.4.9 Unlocking a User Account
•
8.3.4.10 Changing Your User Password
•
8.3.4.11 Setting User Preferences
•
8.3.4.12 Enabling or Disabling the Continuous Audible Alarm
•
8.3.4.13 Configuring Cisco MGM Security Parameters
•
8.3.4.14 Sending Messages to Other Users
•
8.3.4.15 Viewing User Notification Messages
8.3.4.1 Managing the Cisco MGM Default User Profiles
Table 8-8 lists the Cisco MGM default user profiles and the privileges associated with each profile.
Note
The SuperUser profile has access to all operations, and is not specifically listed in a separate column.
The NetworkAdmin profile has access to all NEs and groups. The SysAdmin profile has access to no
NEs or groups.
Cisco Media Gateway Manager 5.0 User Guide
OL-5461-02
8-13
Chapter 8
Managing Security
How Do I Manage User Security?
Table 8-8
Cisco MGM Default User Profiles
Functional Area
Operation
SysAdmin
NetworkAdmin Provisioner Operator
Domain Explorer
File > New Group
Deny
Allow
Deny
Deny
File > Add Network Element(s)
Deny
Allow
Deny
Deny
File > Dashboard
Allow
Allow
Allow
Allow
File > Network Map
Deny
Allow
Allow
Allow
File > Domain NE table
Deny
Allow
Allow
Allow
File > Notify Users
Allow
Allow
Allow
Allow
File > Refresh Data
Allow
Allow
Allow
Allow
File > Debug Options
Allow
Allow
Allow
Allow
File > Lock Cisco MGM Client
Allow
Allow
Allow
Allow
Edit > Cut
Deny
Allow
Deny
Deny
Edit > Copy
Deny
Allow
Deny
Deny
Edit > Paste
Deny
Allow
Deny
Deny
Edit > Delete
Deny
Allow
Deny
Deny
Edit > Delete All
Deny
Allow
Deny
Deny
Edit > Undelete
Deny
Allow
Deny
Deny
Edit > Expand
Deny
Allow
Allow
Allow
Edit > Collapse
Deny
Allow
Allow
Allow
Edit > Find
Deny
Allow
Allow
Allow
Edit > Find Next
Deny
Allow
Allow
Allow
Edit > User Preferences
Allow
Allow
Allow
Allow
Edit > Change Password
Allow
Allow
Allow
Allow
Fault > Alarm Browser
Allow
Allow
Allow
Allow
Fault > Alarm Log
Allow
Allow
Allow
Allow
Cisco Media Gateway Manager 5.0 User Guide
8-14
OL-5461-02
Chapter 8
Managing Security
How Do I Manage User Security?
Table 8-8
Cisco MGM Default User Profiles (continued)
Functional Area
Operation
SysAdmin
NetworkAdmin Provisioner Operator
Domain Explorer
(continued)
Fault > Event Export Manager
Allow
Allow
Allow
Allow
Fault > Ping NE (not applicable)
Deny
Deny
Deny
Deny
Fault > Test NE Connectivity (not
applicable)
Deny
Deny
Deny
Deny
Fault > Stop Continuous Beep
Deny
Allow
Allow
Allow
Fault > MGX 8880/8850 MG >
Diagnostic Center
Deny
Allow
Allow
Deny
Performance > MGX 8880/8850 MG >
Statistics Reporting Tool
Deny
Allow
Allow
Deny
Configuration > MGX 8880/8850 MG >
Equipment Inventory Table
Deny
Allow
Allow
Allow
Configuration > MGX 8880/8850 MG >
Chassis View
Deny
Allow
Allow
Deny
Configuration > MGX 8880/8850 MG >
Configuration Center
Deny
Allow
Allow
Deny
Administration > Job Monitor
Deny
Allow
Allow
Deny
Administration > Service Monitor
Allow
Deny
Deny
Deny
Administration > Self Monitor
Allow
Deny
Deny
Deny
Administration > Memory Backup
Deny
Deny
Deny
Deny
Administration > Memory Restore
Deny
Deny
Deny
Deny
Administration > Software Download
Deny
Deny
Deny
Deny
Administration > Image Upload (not
applicable)
Deny
Deny
Deny
Deny
Administration > NE Software table (not Deny
applicable)
Deny
Deny
Deny
Administration > Cisco MGM Users
Allow
Deny
Deny
Deny
Administration > Control Panel
Allow
Deny
Deny
Deny
Administration > Audit Log
Allow
Allow
Deny
Deny
Administration > Error Log
Allow
Allow
Deny
Deny
Administration > Supported NE table
Allow
Allow
Deny
Deny
Allow
Deny
Deny
Administration > MGX 8880/8850 MG > Deny
Audit Trail
Cisco Media Gateway Manager 5.0 User Guide
OL-5461-02
8-15
Chapter 8
Managing Security
How Do I Manage User Security?
Table 8-8
Cisco MGM Default User Profiles (continued)
Functional Area
Operation
SysAdmin
NetworkAdmin Provisioner Operator
Network Map
File > Open
Deny
Allow
Allow
Allow
File > Parent
Deny
Allow
Allow
Allow
File > Save
Deny
Allow
Allow
Allow
File > Save As Default
Deny
Allow
Deny
Deny
File > Revert To Default
Deny
Allow
Allow
Allow
File > Notify Users
Deny
Allow
Allow
Allow
File > Refresh Data
Deny
Allow
Allow
Allow
File > Debug Options
Deny
Allow
Allow
Allow
Edit > Enable Drag
Deny
Allow
Allow
Allow
Edit > Enable Offview
Deny
Allow
Allow
Allow
Edit > Change Map Background
Deny
Allow
Allow
Allow
Edit > Change Node Icon
Deny
Allow
Allow
Allow
Edit > Zoom In
Deny
Allow
Allow
Allow
Edit > Zoom Out
Deny
Allow
Allow
Allow
Edit > Zoom Area
Deny
Allow
Allow
Allow
Edit > Circular Layout
Deny
Allow
Allow
Allow
Edit > Spring Layout
Deny
Allow
Allow
Allow
Edit > Table Layout
Deny
Allow
Allow
Allow
Edit > Declutter Layout
Deny
Allow
Allow
Allow
Edit > User Preferences
Deny
Allow
Allow
Allow
Edit > Change Password
Deny
Allow
Allow
Allow
Fault > Acknowledge Alarms
Allow
Allow
Allow
Allow
Fault > Acknowledge All Alarms
Allow
Allow
Allow
Allow
Fault > Clear Alarm(s)
Allow
Allow
Allow
Allow
Fault > Show Alarm Note
Allow
Allow
Allow
Allow
Fault > Hide Cleared Alarms
Allow
Allow
Allow
Allow
Fault > Hide Acknowledged Alarms
Allow
Allow
Allow
Allow
Fault > Reset All Alarms
Allow
Allow
Allow
Allow
Edit > Cancel Task
—
Allow
—
—
Edit > Cancel Job
—
Allow
—
—
Edit > User Note
—
Allow
—
—
Deny
—
—
Alarm Browser
Job Monitor
Edit > NE Software table (not applicable) —
Cisco Media Gateway Manager 5.0 User Guide
8-16
OL-5461-02
Chapter 8
Managing Security
How Do I Manage User Security?
Table 8-8
Cisco MGM Default User Profiles (continued)
Functional Area
Operation
SysAdmin
NetworkAdmin Provisioner Operator
Cisco MGM Users
Edit > Create
Allow
—
—
—
Edit > Modify
Allow
—
—
—
Edit > Delete
Allow
—
—
—
Edit > Unlock
Allow
Deny
Deny
Deny
Administration > Cisco MGM User
Profiles
Allow
Deny
Deny
Deny
Administration > Logged In Cisco MGM Allow
Users
Deny
Deny
Deny
Edit > Create
Allow
Deny
Deny
Deny
Edit > Modify
Allow
Deny
Deny
Deny
Edit > Delete
Allow
Deny
Deny
Deny
Edit > Duplicate
Allow
Deny
Deny
Deny
Logged In Cisco
MGM Users table
Administration > Log Out User
Allow
Deny
Deny
Deny
Supported NE table
Edit > Add
Allow
Allow
—
—
Edit > Delete
Allow
Allow
—
—
Cisco MGM User
Profiles
8.3.4.2 Viewing the Cisco MGM Users Table
The MGM Users table displays basic information about Cisco MGM users. The table menu options
allow you to create new users, modify users, delete users, and unlock user accounts.
To view the MGM Users table, choose Administration > Cisco MGM Users in the Domain Explorer
window. Table 8-9 describes the fields in the table.
Table 8-9
Field Descriptions for the MGM Users Table
Field
Description
Username
Username of the selected MGM user.
User Privilege
User privilege level (SuperUser, SysAdmin, NetworkAdmin, Provisioner, Operator, or a custom profile).
User Domain
Name of the management domain where the username belongs.
Password Set Time Last time the password was set.
(time zone)
Locked State
Whether the user’s account is locked or unlocked. If the user repeatedly attempts unsuccessfully to log
into the Cisco MGM client (the default maximum is 5 attempts), the user’s account is locked
automatically.
You can set the maximum number of login attempts a user is allowed before being locked out in the
Control Panel > Security Properties pane.
Last Login Time
(time zone)
Last time the user logged in.
Failed Attempts
Number of times the user tried to log in, but failed.
Login State
Administrative state (Enabled or Disabled) of the user.
Cisco Media Gateway Manager 5.0 User Guide
OL-5461-02
8-17
Chapter 8
Managing Security
How Do I Manage User Security?
Table 8-9
Field Descriptions for the MGM Users Table (continued)
Field
Description
Description
Description of the user.
Password Change
Current state (Enabled or Disabled) of the password change option.
Multiple Login
Whether this user is allowed to perform multiple logins simultaneously.
8.3.4.3 Creating a Cisco MGM User
Use the Create New MGM User wizard to add new Cisco MGM users to the domain. Table 8-10
describes the fields in the wizard.
Step 1
In the Domain Explorer window, choose Administration > Cisco MGM Users.
Step 2
In the MGM Users table, choose Edit > Create (or click the Create a New User tool).
Step 3
In the Create New MGM User wizard, enter the following information:
•
Username
•
User password (and confirm password)
•
User privilege
•
Domain name
•
Login state
•
Password change
•
Description
•
Use Global Settings check box
•
Enable check box
•
Period
•
User login sessions
Step 4
Click Next. When you finish adding a new SuperUser, NetworkAdmin, or SysAdmin, click Finish.
Step 5
When adding a new Provisioner, Operator, or custom user profile, select the groups and NEs that the
Provisioner or Operator will monitor. Selected groups and NEs appear in the Assigned Objects list.
(SuperUsers and NetworkAdmins monitor the entire management domain, so there is no need to select
groups or NEs when adding one of these users. SysAdmin users do not access any of the NEs.)
a.
To assign groups, click the Groups radio button. In the Available Objects list, select the groups that
will be assigned to the new user and click Add.
b.
To assign NEs, click the Network Elements radio button. In the Available Objects list, select the
NEs that will be assigned to the new user and click Add.
Note
When individual NEs are assigned, these NEs will appear directly under the top level domain
for the user in the Domain Explorer. It is possible that a given NE may have already been
assigned as part of a group assignment to the user. In such a case, the same NE will appear
directly under the top level domain and also within the assigned group. This behavior is
consistent with the Domain Explorer’s ability to represent the same group or NE within
multiple locations of the hierarchy.
Cisco Media Gateway Manager 5.0 User Guide
8-18
OL-5461-02
Chapter 8
Managing Security
How Do I Manage User Security?
Step 6
c.
To remove groups or NEs from the Assigned Objects list, select the group or NE from the Assigned
Objects list and click Remove.
d.
Click Next (or Finish).
Click Finish.
The new user is listed in the MGM Users table.
Table 8-10 Field Descriptions for the Create New MGM User Wizard
Screen
Field
User Properties Username
Description
Name that the user will use to access the system. The Cisco MGM username must
contain between six and twelve alphanumeric characters (A-Z, a-z, 0-9). Alphabetic
characters are case-sensitive. The username must be unique in Cisco MGM and cannot
contain a space or a special character.
Note
User Password
After the username is set, it cannot be changed without deleting the user.
Login password that the user will use to access the system. The password complexity
is configurable in the Control Panel > Security Properties pane. By default, the user
password must:
•
Contain at least six characters, but not more than 12 characters.
•
Contain at least two alphabetic characters (A-Z, a-z). Of the alphabetic characters,
at least one must be uppercase and one must be lowercase.
•
Contain at least one numeric character (0-9).
•
Contain at least one special character (+ # % , . ; & !).
•
Not contain the username or any circular shift of the username. An uppercase letter
and its corresponding lowercase letter are considered equivalent. For example, if
the username is Arthur, the password cannot contain the string arthur, rthura,
thurar, hurart, urarth, or rarthu.
•
Differ from the old password by at least three characters. For example, if the old
password is MikeBrady5!, the new password cannot be mikebrady5% because
only the last character is different. However, the new password MikeBrady2!99 is
acceptable because it differs from MikeBrady5! by three characters.
Note
By default, the minimum time between password changes is 20 days. The new
password must differ from the previous password by 3 characters, and the new
password is compared against the previous 5 passwords.
Confirm Password
Retype the password to confirm it.
User Privilege
User privilege level.
Note
After the user privilege is set, it cannot be changed without deleting the user.
Cisco Media Gateway Manager 5.0 User Guide
OL-5461-02
8-19
Chapter 8
Managing Security
How Do I Manage User Security?
Table 8-10 Field Descriptions for the Create New MGM User Wizard (continued)
Screen
Field
User Properties Domain Name
(continued)
Description
Domain name. When the user logs into the system, he or she sees all of the devices
contained within this domain.
Login State
Permit (enable) or prevent (disable) the user from logging into the system.
Password Change
Permit (enable) or prevent (disable) the user from changing his or her password.
Description
Description of the new user.
Use Global
Lockout—Cisco MGM automatically locks the current session after the period in the
Settings/
Period field. Click Use Global Settings to use the settings from the Security window.
Enable check boxes If you do not select Use Global Settings, click Enable to activate lockout for the
selected user. Enter a lockout length in the Period field.
Logout—Cisco MGM automatically logs the user out of the Cisco MGM session after
the period in the Period field. Click Use Global Settings to use the settings from the
Security window. If you do not select Use Global Settings, click Enable to activate
logout for the selected user. Enter a logout length in the Period field.
User Login
Sessions
Select whether to allow single or multiple user logins.
Assign Objects Select Object Type Assign groups or NEs to the new user.
to User
Note
The Discovered NEs and Deleted NEs groups cannot be assigned to a
(for
Provisioner, Operator, or custom user profile.
Provisioner
Select Objects
Select from the list of available objects that can be assigned to the new user. By
and Operator
clicking the Add and Remove buttons, you can move objects back and forth between
users only)
the Available Objects list and the Assigned Objects list.
8.3.4.4 Modifying a Cisco MGM User’s Properties
Use the Modify MGM User Properties wizard to modify the properties of an existing Cisco MGM user.
Table 8-11 describes the fields in the wizard.
Step 1
In the Domain Explorer window, choose Administration > Cisco MGM Users.
Step 2
In the Cisco MGM Users table, select the user whose properties will be modified.
Step 3
Choose Edit > Modify (or click the Modify User Properties tool). The Modify MGM User Properties
wizard opens.
Step 4
Modify the following information, as needed; then, click Next:
•
Username
•
User password (and confirm password)
•
User privilege
•
Domain name
•
Login state
•
Password change
•
Description
•
Use Global Settings check box
Cisco Media Gateway Manager 5.0 User Guide
8-20
OL-5461-02
Chapter 8
Managing Security
How Do I Manage User Security?
•
Enable check box
•
Period
•
User login sessions
Step 5
(Optional) For Provisioner, Operator, and custom user profiles, modify the list of assigned objects by
adding groups or NEs to the Assigned Objects list or removing groups or NEs from the list. Click Next.
Step 6
Click Finish. The user whose properties were modified is listed in the MGM Users table.
Table 8-11 Field Descriptions for the Modify MGM User Properties Wizard
Screen
Field
Cisco Media
Username
Gateway Manager
User Properties
Description
(Read-only) Active username for accessing the system. The Cisco MGM username must
contain between six and twelve alphanumeric characters (A-Z, a-z, 0-9). Alphabetic
characters are case-sensitive. The username must be unique in Cisco MGM and cannot
contain a space or a special character.
Note
User
Password
Once the username is set, it cannot be changed without deleting the user.
Login password used to access the system. The password complexity is configurable in
the Control Panel > Security Properties pane. By default, the user password must:
•
Contain at least six characters, but not more than 12 characters.
•
Contain at least two alphabetic characters (A-Z, a-z). Of the alphabetic characters, at
least one must be uppercase and one must be lowercase.
•
Contain at least one numeric character (0-9).
•
Contain at least one special character (+ # % , . ; & !).
•
Not contain the username or any circular shift of the username. An uppercase letter
and its corresponding lowercase letter are considered equivalent. For example, if the
username is Arthur, the password cannot contain the string arthur, rthura, thurar,
hurart, urarth, or rarthu.
•
Differ from the old password by at least three characters. For example, if the old
password is MikeBrady5!, the new password cannot be mikebrady5% because only
the last character is different. However, the new password MikeBrady2!99 is
acceptable because it differs from MikeBrady5! by three characters.
Note
By default, the minimum time between password changes is 20 days. The new
password must differ from the previous password by 3 characters, and the new
password is compared against the previous 5 passwords.
Cisco Media Gateway Manager 5.0 User Guide
OL-5461-02
8-21
Chapter 8
Managing Security
How Do I Manage User Security?
Table 8-11 Field Descriptions for the Modify MGM User Properties Wizard (continued)
Screen
Field
Description
Cisco Media
Gateway Manager
User Properties
(continued)
Confirm
Password
Retype the password to confirm it.
User
Privilege
(Read-only) User’s privilege level.
Note
The user privilege level cannot be modified without deleting the user.
Domain
Name
Domain name. When the user logs into the system, he or she sees all the devices contained
within this domain.
Login State
Permit (enable) or prevent (disable) the user from logging into the system.
Password
Change
Permit (enable) or prevent (disable) the user from changing his or her password.
Description
User description.
Autodisable
Account
Number of days of non-use that will prompt the account to be automatically disabled. The
range is 0 to 365 days in 1-day increments. The default is 0 days, meaning the account will
not be disabled automatically as a result of non-use.
Use Global
Settings/
Enable check
boxes
Lockout—Cisco MGM automatically locks the current session after the number of
minutes in the Period field. Click Use Global Settings to use the settings from the
Security window. If you do not select Use Global Settings, click Enable to activate
lockout for the selected user. Enter a lockout length in the Period field.
Logout—Cisco MGM automatically logs the user out of the Cisco MGM session after the
number of minutes in the Period field. Click Use Global Settings to use the settings from
the Security window. If you do not select Use Global Settings, click Enable to activate
logout for the selected user. Enter a logout length in the Period field.
User Login
Sessions
Whether to allow single or multiple user login.
Assign Objects to Select Object Assign specific groups and NEs to operator and provisioner users.
Type
User
(for Provisioner
and Operator
users only)
Select
Objects
Modify the objects that are assigned to operators and provisioners. Click Add and
Remove to move objects back and forth between the Available Objects list and the
Assigned Objects list.
Cisco Media Gateway Manager 5.0 User Guide
8-22
OL-5461-02
Chapter 8
Managing Security
How Do I Manage User Security?
8.3.4.5 Deleting a Cisco MGM User
Step 1
In the Domain Explorer window, choose Administration > Cisco MGM Users.
Step 2
In the Cisco MGM Users table, select the user to be deleted.
Note
A user cannot be deleted from the database until that user logs out. However, an active user
session can be ended. See 8.3.4.7 Ending an Active Cisco MGM User Session, page 8-23.
Step 3
Choose Edit > Delete (or click the Delete User tool).
Step 4
Click OK to remove the user from the database.
8.3.4.6 Viewing Logged In Cisco MGM Users
The Logged In Cisco MGM Users table allows you to view the users who are currently logged into the
Cisco MGM application.
Step 1
In the Domain Explorer window, choose Administration > Cisco MGM Users.
Step 2
In the Cisco MGM Users table, choose Administration > Logged In Cisco MGM Users. Table 8-12
describes the fields in the table.
Table 8-12 Field Descriptions for the Logged In Cisco MGM Users Table
Field
Description
Username
Name of the user who is currently logged in.
Logged in At
Date and time when the user logged in.
IP Address
User’s IP address.
Session ID
Unique session ID number that the Cisco MGM server assigns to each Cisco MGM
user during login.
8.3.4.7 Ending an Active Cisco MGM User Session
Step 1
In the Domain Explorer window, choose Administration > Cisco MGM Users.
Step 2
In the Cisco MGM Users table, choose Administration > Logged In Cisco MGM Users.
Step 3
In the Logged In Cisco MGM Users table, select the user whose session will be ended and choose
Administration > Log Out User (or click the Log Out User tool).
Cisco Media Gateway Manager 5.0 User Guide
OL-5461-02
8-23
Chapter 8
Managing Security
How Do I Manage User Security?
Step 4
Click Yes at the following prompt:
This operation will log out the selected Cisco MGM user. It will take approximately
a minute and this Cisco MGM client will be unusable until then. Do you wish to continue?
Wait while the Cisco MGM server logs out the selected Cisco MGM client. The Cisco MGM GUI is
frozen for approximately 1 minute until the request is complete.
8.3.4.8 Using the Cisco MGM Locked Window
You can use the Cisco MGM Locked window to lock the current Cisco MGM session:
From the Domain Explorer window, choose:
File > Lock Cisco MGM Client
or
File > Lock Cisco MGM Users
Once the session is locked, the Domain Explorer disappears, and the Cisco MGM Locked window
prompts you to enter your password to unlock the Cisco MGM session. You can attempt login up to the
configured maximum login attempts to unlock the session. If the threshold is exceeded, Cisco MGM will
terminate. Table 8-13 describes the field in the Cisco MGM Locked window.
Table 8-13 Field Descriptions for the Cisco MGM Locked Window
Field
Description
Password
Enter your password; then, click Unlock to unlock the Cisco MGM session.
8.3.4.9 Unlocking a User Account
By default, Cisco MGM allows users a maximum of five login attempts; the user account is locked after
the fifth unsuccessful login attempt. The lockout duration is configurable and can be from 0 to 600
seconds or infinite.
Step 1
In the Domain Explorer window, choose Administration > Cisco MGM Users.
Step 2
In the Cisco MGM Users table, select the locked user.
Step 3
Choose Edit > Unlock (or click the Unlock User tool).
Cisco Media Gateway Manager 5.0 User Guide
8-24
OL-5461-02
Chapter 8
Managing Security
How Do I Manage User Security?
8.3.4.10 Changing Your User Password
Cisco MGM users can use the Change Password dialog box to change their Cisco MGM passwords at
any time. The password change applies to the Cisco MGM user who is currently logged in. There is an
enforced password change request when the default user logs in for the first time. If the user does not
change the password, the Cisco MGM session is canceled.
Note
The password complexity is configurable in the Control Panel > Security Properties pane.
Table 8-14 describes the fields in the Change Password dialog box.
Step 1
In the Domain Explorer window, choose Edit > Change Password.
Step 2
To change the Cisco MGM password:
a.
In the Cisco MGM Password area, enter the current Cisco MGM password in the Old Password field.
b.
Enter the new password in the New Password field. For Cisco MGM password constraints, see
Table 8-14.
c.
Confirm the new password.
d.
Click OK.
Table 8-14 Field Descriptions for the Change Password Dialog Box
Field
Subfield
Description
Cisco
MGM
Password
Old
Password
Enter the old Cisco MGM user password.
New
Password
Enter the new login password. The password complexity is configurable in the Control Panel >
Security Properties pane. By default, the new password must:
•
Contain at least six characters, but not more than 12 characters.
•
Contain at least two alphabetic characters (A-Z, a-z). Of the alphabetic characters, at least
one must be uppercase and one must be lowercase.
•
Contain at least one numeric character (0-9).
•
Contain at least one special character (+ # % , . ; & !).
•
Not contain the username or any circular shift of the username. An uppercase letter and its
corresponding lowercase letter are considered equivalent. For example, if the username is
Arthur, the password cannot contain the string arthur, rthura, thurar, hurart, urarth, or rarthu.
•
Differ from the old password by at least three characters. For example, if the old password is
MikeBrady5!, the new password cannot be mikebrady5% because only the last character is
different. However, the new password MikeBrady2!99 is acceptable because it differs from
MikeBrady5! by three characters.
Note
Confirm
Password
By default, the minimum time between password changes is 20 days. The new password
must differ from the previous password by 3 characters, and the new password is
compared against the previous 5 passwords.
Retype the password to confirm it.
Cisco Media Gateway Manager 5.0 User Guide
OL-5461-02
8-25
Chapter 8
Managing Security
How Do I Manage User Security?
Note
Do not change the Cisco MGM passwords at the same time in the Change Password dialog box.
It is possible to set up the user account such that the change password function is disabled. See the
description of the Password Change field in 8.3.4.3 Creating a Cisco MGM User, page 8-18.
8.3.4.11 Setting User Preferences
Use the User Preferences dialog box to configure the Cisco MGM user interface.
Step 1
In the Domain Explorer window, choose Edit > User Preferences. The User Preferences dialog box
opens. Table 8-15 describes the fields in the dialog box.
Step 2
After specifying the settings, check the Save current settings check box to preserve the current settings
even after logging out. Users with the appropriate privileges can check the Save as the default user
template check box to save the current settings as the default for new users who are added in the future.
Current users who have not altered their default settings adopt the new default settings when they log
out.
Step 3
Click OK to save the settings. After you save the selections, all subsequent views use the saved
preferences.
Table 8-15 Field Descriptions for the User Preferences Dialog Box
Tab
Field
Description
Event
Notification
Show Notification
Dialog For
Select whether an alert popup displays when a specific alarm or event occurs on
NEs in your management domain or on the EMS. You can specify the alarm
severity that will generate an alert popup, and whether to include cleared alarms.
Note
Play Audible
Notification For
Selections that apply to NEs are allowed only if you have NEs assigned to
you. Selections that apply to the EMS are allowed only if you have the
appropriate user privilege.
Select whether an audible alert sounds when a specific alarm or event occurs on
an NE or on the Cisco MGM application. You can specify the alarm severity that
will generate an audible alert, and whether to include cleared alarms. Check the
Continuous Alarm for Dashboard Notifications check box to enable
continuous audible notification whenever a new update occurs in the Dashboard
window. Uncheck this check box to disable continuous audible notifications.
Note
Selections that apply to NEs are allowed only if you have NEs assigned to
you. Selections that apply to the EMS are allowed only if you have the
appropriate user privilege.
Cisco Media Gateway Manager 5.0 User Guide
8-26
OL-5461-02
Chapter 8
Managing Security
How Do I Manage User Security?
Table 8-15 Field Descriptions for the User Preferences Dialog Box (continued)
Tab
Field
Description
Miscellaneous
Time Zone for
Date/Time Display
Change the time zone selection. You can select one of the following:
Display Log/15-min
PM Data
•
Local—Displays time information adjusted for the time zone that is
configured on the PC or workstation where the Cisco MGM client is running.
•
GMT—Displays time information (for example, alarm time stamps)
according to the GMT time zone.
•
User Defined—Specify a fixed offset from GMT. The offset range is –12 to
+13 hours from GMT, in one-hour increments. For offsets other than zero,
specify a display string of four characters maximum (to indicate the time
zone, for example).
Change the time period used to display time-sensitive data in 15-minute
increments.
Note
Display 1 Day PM
Data
Don’t Display User
Profile Creation
Warning Messages
Map Preferences
This field is visible only if you have read permission for the Performance
Monitor operation.
Change the time period used to display time-sensitive data in 24-hour increments.
Note
This field is visible only if you have read permission for the Performance
Monitor operation.
Enable or disable the warning dialog box that pops up when you click Finish after
creating or modifying a user profile. The warnings are still visible in the User
Profile table.
Open Network Map in Within network map views, this setting specifies whether to open subsequent
New Window
frames in the same window, or open a new window for subsequent map views.
Show Off View Icons This option is available in the GUI, but is not used by Cisco MGM.
FM Preferences
Color Entire Row in
Table View
Set the Alarm Browser or Alarm Log to full background color for the entire
selected row. The color corresponds to the alarm status and severity.
8.3.4.12 Enabling or Disabling the Continuous Audible Alarm
You can enable or disable the continuous audible alarm, which can be enabled to sound when a specific
alarm or event of a specific severity occurs on an NE or on the system.
Step 1
In the Domain Explorer window, choose Edit > User Preferences. The User Preferences dialog box
opens.
Step 2
In the Event Notification tab > Play Audible Notification For area, check the Continuous Alarm For
Dashboard Notifications check box.
Step 3
Click OK.
Step 4
To disable the continuous audible alarm, choose Fault > Stop Continuous Beep in the Domain Explorer
window.
Cisco Media Gateway Manager 5.0 User Guide
OL-5461-02
8-27
Chapter 8
Managing Security
How Do I Manage User Security?
8.3.4.13 Configuring Cisco MGM Security Parameters
Use the Security Properties pane to configure Cisco MGM security parameters and password complexity
rules. You can also specify usernames and passwords.
Note
Passwords that are already in the system are not affected by modification(s) to the password complexity
rules. The password complexity rules are checked when:
•
A privileged user adds a new user to the system
•
A privileged user modifies an existing user’s password
•
A user changes his or her own existing password
Step 1
In the Domain Explorer window, choose Administration > Control Panel.
Step 2
Click Security Properties and set the parameters described in Table 8-16.
Step 3
Click Save.
Cisco Media Gateway Manager 5.0 User Guide
8-28
OL-5461-02
Chapter 8
Managing Security
How Do I Manage User Security?
Table 8-16 Field Descriptions for the Security Properties Pane
Tab
Field
Description
Cisco MGM
Security
Password Aging
Number of days before the password expires. The user is prompted to change the
password after the specified number of days. The range is 0 to 999 days; the default is 30
days. A value of 0 disables this feature.
Max Retries
Maximum number of login attempts a user is allowed before being denied access. The
range is 0 to 10 retries; the default is 5 retries. A value of 0 disables this feature.
Note
When the number of login attempts is exceeded for a given user, Cisco MGM
generates an alarm. Alarm information includes the username and IP address of
the client workstation where the final login attempt was made.
Infinite
Enable or disable infinite user lockout. If checked, Cisco MGM does not automatically
re-enable the account, but always requires the intervention of a user with the appropriate
user profile to re-enable.
Login Disable
Period
Number of seconds a user’s login is disabled after the maximum login retries value is
exceeded. The range is 0 to 600 seconds; the default is 30 seconds. A value of 0 disables
this feature and the Max Retries feature.
For example, if the maximum number of retries is 5 and the login disable period is 30
seconds, the user account will be disabled for 30 seconds after the fifth failed login
attempt.
Note
If you check the Infinite check box, the Login Disable Period field is grayed out.
The user will not be allowed to log in until that user’s login state is re-enabled
from the Cisco MGM Users table.
Enable Cisco
MGM Security
Advisory
Message
If checked, the advisory message that appears on login is enabled. Uncheck to disable the
login advisory message.
Lockout Enable
If checked, Cisco MGM automatically locks the current session after the period in the
Lockout Period field.
Note
If both Lockout Enable and Logout Enable are checked, logout only occurs after
the lockout period.
Lockout Period
Number of minutes a user’s Cisco MGM session is inactive before Cisco MGM
automatically locks the user out. The range is 0 to 120 minutes in 1-minute increments;
the default is 30 minutes. A value of 0 disables this feature.
Logout Enable
If checked, Cisco MGM automatically logs the user out of the Cisco MGM session after
the period in the Logout Period field.
Logout Period
Number of minutes a user’s Cisco MGM session is inactive before Cisco MGM
automatically logs the user out. The range is 0 to 1440 minutes in 1-minute increments.
A value of 0 disables this feature.
Cisco Media Gateway Manager 5.0 User Guide
OL-5461-02
8-29
Chapter 8
Managing Security
How Do I Manage User Security?
8.3.4.14 Sending Messages to Other Users
Use the Notify Users dialog box to type and send a message to all Cisco MGM users, or to all Cisco
MGM users with the same user privileges. For example, you might want to use the Notify Users dialog
box to alert all Cisco MGM users before shutting down the Cisco MGM server.
Table 8-17 describes the fields in the dialog box.
Step 1
In the Domain Explorer window, choose File > Notify Users. The Notify Users dialog box opens.
Step 2
In the Message Targets area, select the recipients of the message.
Step 3
Type the message in the Message area.
Step 4
To send the message to the specified recipients, click Send. To cancel the message and close the dialog
box, click Cancel. To launch the online help for the Notify Users dialog box, click Help.
Table 8-17 Field Descriptions for the Notify Users Dialog Box
Field
Description
Message Targets
Select recipients for your message. This list includes the default SuperUser,
SysAdmin, NetworkAdmin, Provisioner, and Operator profiles, as well any
custom user profile that has been generated. You can select custom and multiple
profiles by using the Shift and Control keys while clicking the profile, or click the
All Cisco MGM Users radio button to send your message to all users, regardless
of user type.
Message
Type your message. The maximum length is 512 characters. If you enter a
message that is longer than 512 characters, only the first 512 characters are sent.
8.3.4.15 Viewing User Notification Messages
The User Notification dialog box pops up on your screen when another user sends a message to a certain
user profile or to all Cisco MGM users, and you belong to one of those groups. Table 8-18 describes the
fields in the dialog box.
Table 8-18 Field Descriptions for the User Notification Dialog Box
Field
Subfield
Description
Message
Received
From
Username of the user who sent you the message.
Time
Date and time when you received the message.
Message
—
Text of the message. The maximum message length is 512 characters.
Cisco Media Gateway Manager 5.0 User Guide
8-30
OL-5461-02
Chapter 8
Managing Security
How Do I Manage the Audit Log?
8.4 How Do I Manage the Audit Log?
The Audit Log table contains information about significant events (user-initiated changes and activities)
that occurred on the Cisco MGM server during a specified time period. By default, the Audit Log
displays information about significant events that occurred during the last four hours. You can change
the default time period in the User Preferences dialog box. Each record has a time stamp, record type,
and message string.
There are two types of audit log available in Cisco MGM:
•
Audit logs for the Diagnostic Center, Configuration Center, Statistics Reporting Tool and Chassis
View. These audit logs are accessed directly from the log directory on the server at /opt/svplus/log.
•
Audit logs for the other applications in Cisco MGM. Choose Administration > Audit Log to view
these Audit logs.
Audit Log data can be filtered, see section 8.4.2 Filtering Audit Log Data, page 8-32.
The Audit Log records the following runtime-affecting operations for monitoring purposes:
•
Cisco MGM client logins, logouts, and security violations (including successful/unsuccessful client
user logins and forced logouts)
•
NE or group location changes in the Domain Explorer tree
•
Domain Explorer group operations (add, delete, or modify a group)
•
Changes in the Domain Explorer properties of an NE
•
NE Service, PM Service, and Cisco MGM GateWay Service start or stop operations
•
Cisco MGM user administration (add, delete, or modify user profile)
•
Changes in:
– UI properties
– Security settings
– High availability settings
– Recovery settings
– Database configuration
– Error log configuration
– NE autobackup parameters
– NE service parameters
•
Job or task cancellation in the Job Monitor table
•
Manual memory backup
•
Memory restore
•
Software download
•
OSS profile changes (CORBA)
•
Cisco MGM GateWay/CORBA client logins/logouts
The following topics are covered:
•
8.4.1 Viewing the Audit Log
•
8.4.2 Filtering Audit Log Data
Cisco Media Gateway Manager 5.0 User Guide
OL-5461-02
8-31
Chapter 8
Managing Security
How Do I Manage the Audit Log?
8.4.1 Viewing the Audit Log
To view the Audit Log, choose Administration > Audit Log in the Domain Explorer window.
Table 8-19 describes the fields in the Audit Log.
Table 8-19 Field Descriptions for the Audit Log
Field
Description
Source ID
Source of the event. Events performed by the Cisco MGM server show Cisco
MGM as the source ID.
Username
Name of the user performing the logged event. Events performed by the Cisco
MGM server are logged under the username Internal.
Service
Name of the service that generated the audit log entry.
Cisco MGM Time
Stamp (time zone)
Date and time when the event occurred on the Cisco MGM server.
Category
Name of the category in which the event occurred. Events belong to one of the
following categories: Cisco MGM server administration, Cisco MGM server
connectivity, Cisco MGM server security, Cisco MGM server topology, Cisco
MGM server network, or NE provisioning.
Message
Description of the significant event that occurred.
8.4.2 Filtering Audit Log Data
Use the Audit Log Filter dialog box to filter data according to criteria that you select and to display the
results in the Audit Log table. To access the Audit Log Filter dialog box, in the Cisco MGM Audit Log
window, choose File > Filter. Table 8-20 describes the fields in the filter dialog box.
Table 8-20
Field Descriptions for the Audit Log Filter Dialog Box
Tab
Description
Time Stamp
(time zone)
Filter audit log data for a specified time period, ranging from the past hour to the
past 6 months. You can click the User Specified radio button to specify an exact
filter starting and ending time by month, day, year, and hour. The time zone can be
GMT, a user-defined offset from GMT, or local time, depending on what is
specified in the User Preferences dialog box. If you want to filter audit log data and
the time period is not important, click No Time Specified.
Source ID
Move NEs back and forth between the list of available NEs and selected NEs and
then run the filter.
Category
Filter audit log data by task.
Username
Move users back and forth between the list of available users and selected users
and then run the filter. Events performed by the Cisco MGM server are logged
under the username Internal.
Service
Move services back and forth between the list of available services and selected
services and then run the filter.
Cisco Media Gateway Manager 5.0 User Guide
8-32
OL-5461-02
C H A P T E R
9
Managing Faults
This chapter describes the process of fault management, and details the options available in Cisco MGM
to locate, diagnose and correct network problems. This chapter includes the following information:
•
9.1 What Is Fault Management?
•
9.2 Where Can I Get Information on Affected Services and Customers?
•
9.3 What Fault Information Can I See?
•
9.4 Is the Service Working?
•
9.5 Where Is the Fault?
•
9.6 How Can I Use Advanced Debugging to Find the Cause of the Fault?
•
9.7 What Is the Fault Priority?
•
9.8 Who Is Responsible for Managing the Fault?
•
9.9 How Did You Manage the Fault?
9.1 What Is Fault Management?
Fault management (FM) is the process of locating, diagnosing, and correcting network problems. This
is important for increasing network reliability and effectiveness, and for increasing the productivity of
network users. Fault management is more than just handling emergencies. It is the detection, isolation,
and correction of abnormal conditions in the network and its environment. It provides functions for
managing problems with services and handling customer-facing service problems.
Efficient fault management can:
•
Reduce repair costs through efficient fault detection, location, and correction.
•
Improve customer care through efficient trouble administration.
•
Improve service availability and equipment reliability through proactive maintenance and through
measurement, review, and corrective action.
One responsibility of fault management is to detect faults. A piece of equipment, a transmission medium,
a software module, or a database is said to be in a fault state if it cannot perform its intended function
and meet all of the requirements placed on that function. The onset of a fault is called a failure event and
is usually signaled by one or more alarm reports. The termination of a fault state is called a clear event.
Fault management is responsible for determining, from a variety of information sources, the root cause
of a fault, and for its repair. In certain cases, the root cause of a fault may be in a connecting network.
In such cases, fault management is responsible for reporting the problem through appropriate channels.
Cisco Media Gateway Manager 5.0 User Guide
OL-5461-02
9-1
Chapter 9
Managing Faults
What Is Fault Management?
Service assurance is the overall process of ensuring that the purchased level of service is delivered. The
Element Management System (EMS) plays a key role in maintaining the health of both network elements
and transmission facilities. This is done in conjunction with other systems, typically at the network
management layer and service management layer. The EMS can be the primary repository of detailed
history of NE-specific faults and events, technician action, and performance data.
The steps for successful fault management are:
1.
Identify a problem by gathering data about the state of the network (polling and trap generation).
2.
Restore any services that have been lost.
3.
Isolate the cause, and decide if the fault should be managed.
4.
Correct the fault if possible.
9.1.1 What the NE Provides
NEs can provide the following information that is required for effective fault management:
Currently deployed, intelligent NEs provide the management system with the following, which are
required for effective fault management:
•
Detection of the four main types of failure:
– Equipment failure—Detected through failure detection mechanisms built into the hardware, and
through routine exercises and diagnostics.
– Software failure—Detected through failure of software checks, and through routine audits.
– Communications failure—Detected through defects in the incoming signal or communicated
from the distant end of a trail in an embedded operations channel by the signal processing chip
sets, and through continuous or periodic measurements of incoming and outgoing signal
characteristics. Defects include line coding errors, framing bit errors, parity errors, cyclic
redundancy check errors, and addressing errors. Signal characteristics include, optical or
electrical power, analog signal to noise ratio, and deviation from required voltage or
wavelength.
– Environmental failure—Defects could include power faults such as overheating.
•
Notification of failure—NEs notify Cisco MGM when a failure occurs by generating an alarm
report. The NE can also report a summary of current fault states, or replay its log of historical
failures and clears.
•
Notification of changes in the operational state of the NE's components—If a component of the NE
is in the fault state, then Cisco MGM should not receive (or expect to receive) further alarms, alerts,
or scheduled performance data from that component if the alarm is not cleared.
Cisco MGM forwards information northbound and integrates with other third party management
systems to give options not directly available in Cisco MGM.
9.1.2 Fault Notification and Maintenance
Fault notification and maintenance can be proactive or reactive:
•
Proactive notification—Where X notifies Y of a problem regarding a service delivered from X to Y.
•
Reactive maintenance—Where Y contacts X to query X on potential problems in X’s domain.
Cisco Media Gateway Manager 5.0 User Guide
9-2
OL-5461-02
Chapter 9
Managing Faults
Where Can I Get Information on Affected Services and Customers?
9.1.2.1 Proactive Maintenance
Automated detection tests and surveillance software enable rapid initiation of the repair process,
sometimes even before customers have noticed a problem. This is called proactive maintenance and
promotes customer satisfaction.
Proactive maintenance consists of functions and processes associated with the detection, analysis,
isolation, and resolution of problems by means that are independent of customer trouble reports. The
problems may be faults or degradations in equipment or transmission media.
The goals of proactive maintenance are to:
•
Detect and fix service quality problems before the customer calls to establish a trouble report
(ideally), or at least to start the repair process before the customer calls, thereby minimizing the
time, as perceived by the customer, before service is restored.
•
Maintain the transport network at a high level of quality by identifying the facilities that perform
relatively poorly and rehabilitating them.
9.1.2.2 Reactive Maintenance
Reactive maintenance is required when a failure occurs. This type of problem can be time-consuming
and costly. It requires accurate administration of trouble reports, rapid analysis and repair of service
affecting faults, and notifications to customers of restoration of service, all of which also promote
customer satisfaction.
9.1.3 Root Cause Analysis
The root cause is the most basic reason for an undesirable condition or problem that, if eliminated or
corrected, would have prevented the problem from existing or occurring. The outcome of the root cause
analysis is not a restatement of the most obvious symptom, but is the result of a methodical analysis of
the problem situation, leading to the most basic cause.
Root cause analysis captures additional information about defects for the purpose of identifying
preventive actions.
Cisco MGM includes advanced debugging features which capture additional information about defects.
9.2 Where Can I Get Information on Affected Services and
Customers?
The first thing to do in fault management is to identify what services and which customers are affected
by the fault. Cisco MGM provides a number of options for viewing this information, including:
•
9.2.1 Dashboard
•
9.2.2 Tooltips
•
9.2.3 Domain Explorer
•
9.2.4 Alarm Browser
•
9.2.5 Network Map
•
9.2.6 Diagnostic Center
Cisco Media Gateway Manager 5.0 User Guide
OL-5461-02
9-3
Chapter 9
Managing Faults
Where Can I Get Information on Affected Services and Customers?
Then you need to identify the alarms:
•
9.3.1 How Are Alarms Displayed?
When a module is under maintenance, you can suppress the alarms so that they are not displayed on the
Cisco MGX Alarm or History tab or on any other client:
•
9.3.2 Suppressing Alarms
9.2.1 Dashboard
The Dashboard shows useful alarm and NE information in one easily accessible location. See Figure 9-1.
Figure 9-1
Dashboard
Returns you to the Domain Explorer,
Cisco MGM home window.
Opens the Alarm Browser.
Opens a filtered Alarm Browser that shows EMS
generated alarms in the domain. Enabled only if the user
has Read/Write permission on the "Show Cisco MGM
EMS Alarms/Events" operation.
Indicates the total
number of NEs
in the domain. When you
click on the NE count, the
Domain NE Table appears.
Server number
Closes the dashboard.
Restores the windows.
Minimizes all other
Cisco MGM windows
from the display.
120694
Cisco MGM Dashboard on 172.16.0.0
Indicates the total number of critical, major,
minor, warning, and unacknowledged alarms
on NEs in the domain and on Cisco MGM. The
box outline indicates a change in Cisco MGM
status. If you click on a specific severity alarm
count, the alarm browser is displayed and filtered
to show alarm information corresponding
to the alarm severity selected.
If the pushpin is down, the
dashboard is not brought in front
of all windows when there is an
alarm count change. If the pushpin
is up, the dashboard is brought in
front of all windows when there is
an alarm count change.
When blinking,
indicates that alarm
count or NE count
has changed.
Displays online help.
Cisco Media Gateway Manager 5.0 User Guide
9-4
OL-5461-02
Chapter 9
Managing Faults
Where Can I Get Information on Affected Services and Customers?
Note
If you click an alarm count box in the Dashboard, the Alarm Browser appears (see Figure 9-3),
prefiltered for the selected alarm severity.
If there is a change in the alarm count, and the pushpin is up, the Dashboard is moved to the front of the
other windows.
9.2.2 Tooltips
A tooltip appears with the actual alarm counters when the cursor is positioned over a managed object
(domain, group, NE, or board). The tooltip displays a count for each of the following severities:
•
CR—Critical
•
MJ—Major
•
MN—Minor
•
WR—Warning
•
UA—Total number of alarms unacknowledged
9.2.3 Domain Explorer
The Domain Explorer is the home window and provides a logical view of the network plus alarm,
connectivity, and operational status. (See Figure 9-2.) It is divided into two sections:
•
Hierarchy pane—Consists of the different components, which appear in a hierarchical format. The
top level of the hierarchy is the management domain, followed by groups, and then NEs. Groups and
NEs may be repositioned in the hierarchy using either cut/paste or drag and drop operation. Groups
and NEs can exist in multiple locations in the tree.
•
Property sheet—Displays information about the component selected in the Hierarchy pane. There
are three property sheets: Management Domain Properties, Group Properties, and Network Element
Properties.
Cisco Media Gateway Manager 5.0 User Guide
OL-5461-02
9-5
Chapter 9
Managing Faults
Where Can I Get Information on Affected Services and Customers?
Figure 9-2
Domain Explorer
SuperUsers or Network Administrators use the Domain Explorer to create groups of NEs and to organize
the domain in a hierarchy. By default, the Domain Explorer contains the following groups that are visible
to SuperUsers and Network Administrators only:
•
Discovered NEs—Contains NEs that have been automatically discovered by the server. Discovered
NEs are added to the Discovered NEs group by default and then managed automatically. Refer to
the “4.2.4 Network Element Discovery” section on page 4-7 for more information on discovery
service.
•
Deleted NEs—Contains NEs that have been deleted. An NE appears in this group only when the last
instance of that NE has been deleted.
•
Lost and Found—The client performs a minimal check at initialization to verify that the tree
representation for the administrator’s domain is valid. If there are any mismatches between the
groups and NEs in the domain and those in the administrator’s domain, the mismatched NEs or
groups are shown in the Lost and Found group in the Domain Explorer Hierarchy pane. If the
administrator moves the NEs or groups in the Lost and Found group to another group and then clicks
Refresh Data or restarts the client, the Lost and Found group disappears.
Note
The Discovered NEs, Deleted NEs, or Lost and Found groups may not be deleted or renamed.
Note
The server time is displayed on the lower right side of the Domain Explorer.
Cisco Media Gateway Manager 5.0 User Guide
9-6
OL-5461-02
Chapter 9
Managing Faults
Where Can I Get Information on Affected Services and Customers?
Note
Clicking Refresh Data in the Domain Explorer window refreshes all data for the entire client and closes
all open windows (except the Domain Explorer window). Depending on the number of NEs in the
network, there might be some delay while the data refreshes. The status bar shows the status after the
Domain Explorer refreshes. It will show “Refresh Data Complete.”
The Fault menu and associated toolbar tools are listed next to their corresponding menu options in
A.3.3 Fault Menu.
9.2.4 Alarm Browser
The Alarm Browser displays standing alarms and conditions in the managed domain that are assigned a
severity level of critical, major, minor, or warning. It also shows cleared alarms that are not
acknowledged. See Figure 9-3. The Alarm Browser and Alarm Log views provide a robust listing of all
current and historical alarms and events. See the “9.9.1 Archiving Alarm Log” section on page 9-50 for
more information about the Alarm Log.
To display the Alarm Browser, select an NE, group, or domain node from the Domain Explorer, or
Network Map; then, choose Fault > Alarm Browser (or click the Open Alarm Browser tool from the
Dashboard). Use the toolbar buttons to manage the alarm display. These buttons are described in
“A.3.1 File Menu” section on page A-7.
Figure 9-3
Alarm Browser
Table 9-1 provides descriptions of the fields in the Alarm Browser.
Cisco Media Gateway Manager 5.0 User Guide
OL-5461-02
9-7
Chapter 9
Managing Faults
Where Can I Get Information on Affected Services and Customers?
Table 9-1
Field Descriptions for the Alarm Browser Window
Column Name
Description
Alarm ID
Indicates the unique number that the system uses to identify a particular alarm.
Perceived Severity
Displays the perceived severity of the selected alarm (critical, major, minor, or
warning). The background color also indicates the severity, where:
•
Red = Critical
•
Orange = Major
•
Yellow = Minor
•
Cyan (blue-green) = Warning
•
Green = Cleared
Acknowledged
Indicates whether the selected alarm has been acknowledged by the user. Values
are Yes and No.
Note
Displays any notes that were entered for the selected alarm. This field also
shows the login name of the user who entered the note and the time when the
note was entered.
Source ID
Displays the name of the network element where the selected alarm occurred.
Probable Cause
Displays the probable cause of the selected alarm. Displays Not
Applicable/Unknown if no additional information is available.
Affected Object
Displays the name of the object where the selected alarm occurred.
Module Name
Displays the name of the module where the selected alarm occurred.
Physical Location
Displays the physical location of the equipment where the selected alarm
occurred, such as slot, and port numbers.
Alarm Time Stamp
Displays the date and time when the alarm occurred on the server.
NE Alarm Time
Stamp
Displays the date and time when the alarm occurred on the NE.
Service Affecting
Indicates whether the alarm condition is service affecting (SA); values are Yes
and No.
Clear Time Stamp
Displays the date and time when the alarm was cleared on the server.
NE Clear Time
Stamp
Displays the date and time when the alarm was cleared on the NE.
Acknowledged Time Displays the date and time when the user acknowledged the selected alarm.
Stamp
Acknowledged
Username
Displays the login name of the user who acknowledged the selected alarm.
Alarm Status
Displays the status of the selected alarm (active or cleared).
Description
Displays additional information about the selected alarm. If there is no
additional information, this field is blank.
Cisco Media Gateway Manager 5.0 User Guide
9-8
OL-5461-02
Chapter 9
Managing Faults
Where Can I Get Information on Affected Services and Customers?
9.2.5 Network Map
The Network Map window displays a geographical layout of the network. (See Figure 9-4.) It consists
of three areas:
•
The right side displays a map with the individual groups and NEs icons.
•
The upper left side displays the position of the map on the right side with respect to a larger world
map.
•
The lower left side displays the NE, or group properties, including the number of alarms and ID.
A Network Map window can be opened for an NE, group, or the domain. Select a node in the Domain
Explorer Hierarchy pane and choose File > Network Map (or click the Open Network Map tool).
The Network Map is organized into a multilevel hierarchy that corresponds to the structure of the
Domain Explorer when launched from the respective window. The Network Map hierarchy consists of
management domains, groups, and NEs, that are represented by icons plotted automatically in a map.
Zooming capabilities are provided and the node positions, node icons, and background map images can
be customized.
Figure 9-4
Network Map
Cisco Media Gateway Manager 5.0 User Guide
OL-5461-02
9-9
Chapter 9
Managing Faults
Where Can I Get Information on Affected Services and Customers?
9.2.6 Diagnostic Center
The Diagnostic Center provides a hierarchical representation of network elements, which include
networks, nodes, cards, lines and ports displayed in tree format in the Hierarchy pane of the Diagnostic
Center’s main window. Associated information about a selected network element is displayed in table
format in the right panel of the Diagnostic Center window (See Figure 9-5).
Each network element managed by Cisco MGM has its own attributes and fits into the network’s
physical or logical hierarchy. The Diagnostic Center presents the network elements that are discovered,
managed, and controlled in a hierarchical view for all networks populated in the tables by Cisco MGM
processes.
The Diagnostic Center displays the network elements in a hierarchical format based on either a physical
or logical relationship among the various network elements. Networks are displayed at the root level of
the component tree; nodes are displayed beneath the networks in a parent/child relationship.
The Diagnostic Center also displays informational messages in a multiline text display; other types of
messages can be displayed in response to user actions.
The Diagnostic Center can be opened for an NE, group, or the domain. Select a node in the Domain
Explorer Hierarchy pane and choose Fault > MGX8880/8850 MG > Diagnostic Center.
The Diagnostic Center has two access tabs:
•
Diagnostic—Displays the diagnostic status and test results for the network elements.
•
Manageability—Monitors the statistics events for network manageability
The Diagnostic Center allows users to:
•
Diagnose network elements, for example, networks, nodes, cards, lines, ports, or paths. By
diagnosing network elements, you can:
– Monitor real-time counters.
– Extend support for the Node Resync process to allow for two different levels.
– Configure bit error rate test (BERT) to verify the integrity of a network element by measuring
error statistics.
•
Monitor statistic events for network manageability to collect element management health-related
statistics. In addition, you can:
– Verify that all the nodes in the network are managed correctly by Cisco MGM.
– Identify general network problems.
– Provide success rates, failure rates, and throughput of Cisco MGM to protocols such as FTP,
and SNMP.
– Create a trouble ticket that extracts all the information from the History Panel.
•
Diagnose connections to:
– Access fault management capabilities in the form of diagnostic tests for connections, which
include continuity (integrity) facility for PNNI soft permanent virtual connection (SPVC).
– Perform general test operations such as up and down connections, and connection loopback.
Cisco Media Gateway Manager 5.0 User Guide
9-10
OL-5461-02
Chapter 9
Managing Faults
What Fault Information Can I See?
Figure 9-5
Diagnostic Center
9.3 What Fault Information Can I See?
An alarm is represented by a notification from a managed NE that a certain condition has just occurred.
These alarms usually represent error conditions on NEs. Each alarm is associated with the NE for which
it provides notification, and an NE can have a number of alarms related to itself at any time.
Each NE shown in the Domain Explorer Hierarchy pane has a corresponding alarm icon that indicates
the highest severity alarm that affects the NE. Management domain nodes and group nodes have alarm
icons that reflect the highest alarm condition of the NEs contained in the domain or group.
The user-defined Domain Explorer Network views have “bubble-up” alarm severity propagation and
drill-down capabilities to isolate fault conditions and to identify service-delivery impact.
In Cisco MGM you can see:
•
9.3.1 How Are Alarms Displayed?
There are occasions when it is useful to control the alarm display:
•
9.3.2 Suppressing Alarms
Cisco Media Gateway Manager 5.0 User Guide
OL-5461-02
9-11
Chapter 9
Managing Faults
What Fault Information Can I See?
9.3.1 How Are Alarms Displayed?
Each node displays an icon, which uses an industry-standard color scheme that indicates the current
alarm status. The multicolor displays are updated in real-time in response to events occurring in the
network. Icons representing network nodes change color dynamically to reflect the status of the node,
which allows rapid recognition of network faults as they occur.
In the Diagnostic Center, Configuration Center, Chassis View, and Statistics Report, you can display the
color legend for alarms, choose Help > Color Legend.
Table 9-2 lists the color legend for alarms.
Table 9-2
Color Legend for Alarms for Diagnostic Center, Configuration Center, Chassis View,
and Statistics Report
Color
Alarm State
Green
Clear
Yellow
Minor
Orange
Major
Red
Critical
Grey
Unmanaged
Blue
Unknown
Purple
LineHasLoopback
You can set the Alarm Browser or Alarm Log to display full background color for the entire selected
row. The color corresponds to the alarm status and severity. In the Domain Explorer window, choose
Edit > User Preferences. The User Preferences dialog box appears. On the FM Preferences tab, check
the Color Entire Row in Table View check box.
In the Dashboard, Map Viewer, Alarm Browser, and the Domain Explorer, the color of the border
surrounding a component, or the background color, indicates the operational status of the component.
When status changes, the border or the background color changes as indicated in Table 9-3.
Table 9-3
Dashboard, Map Viewer, Alarm Browser, and Domain Explorer Alarm Severity Color Descriptions
Color
Severity
Meaning
Description
Green
Cleared
Component is active.
The component is operating normally.
Yellow
Minor
Minor failure.
The component is down; both administrative and operational
values are down. This does not necessarily indicate a fault
condition; the component might be disabled.
Orange
Major
Component is down.
Administrative status is up and operational value is down.
Red
Critical
Component failed.
Physical hardware failure.
Cyan (blue-green)
Warning
Interface is dormant.
The interface cannot pass packets, but is in a pending state
waiting for some external event to place it in the up state. The
interface might have packets to transmit before establishing a
connection to a remote system, or a remote system might be
establishing a connection to the interface.
When the pending event occurs, the interface changes to the up
state.
Cisco Media Gateway Manager 5.0 User Guide
9-12
OL-5461-02
Chapter 9
Managing Faults
Is the Service Working?
9.3.2 Suppressing Alarms
Suppressing alarms prevents alarms from appearing on the Cisco MGX Alarm or History tab or on any
other clients. Alarms are suppressed when the NE is under maintenance. See 5.3.1 Changing the
Operational State of an NE.
9.4 Is the Service Working?
Network devices will report symptoms of problems by generating events. An event in this context is a
message indicating that a device or application in your network has discovered something of note. The
network devices will generate many types of events automatically.
In addition, you can use thresholds to define or modify the conditions under which events are generated.
A threshold is a trigger, set up on a continuous data stream, that is a point of interest that generates events
when that point is satisfied.
The events generated need to be analyzed to determine whether they represent a fault condition or
problem in your network.
It is important to generate events when there is a problem in the EMS. It is also important to limit the
number of events generated to prevent an excessive load on the network. The EMS performs a number
of self-monitoring tasks where threshold limits can be set. The threshold limits are set in the Self
Monitor Table. If one of these thresholds is crossed, then an EMS alarm will be generated.
The user can obtain information regarding how the system is performing and how long certain tasks are
taking to complete by selecting Administration > Control Panel then Alarm Configuration >
Threshold EMS Alarms or Alarm Configuration > Non-Threshold EMS Alarms. (See 9.4.3 Setting
Up and Viewing Alarm Configuration Parameters.) By monitoring this data, you can identify potential
system problems before they become critical in the operation of the EMS. Associated with each
parameter that is monitored are three alarm thresholds. The administrator can set a minor, major, and
critical threshold value for each parameter. If any of these thresholds are crossed, then an alarm will be
raised to provide notification of the situation.
Threshold alarms are raised when their limit exceeds the value set for Critical, Major, Minor, or Warning
thresholds. For example, you can set threshold alarms for disk usage for 90%, 80%, 70%, and 60%,
meaning a warning alarm is raised when the disk becomes 61% full and a critical alarm is raised when
the disk becomes 91% full. The server checks these parameters at every polling interval that is set in the
Poll Frequency field.
Non-threshold alarms do not have an alarm threshold. Instead, non-threshold alarms occur when a
condition occurs, such as loss of connectivity to an NE. Use the Non-Threshold EMS Alarms tab to set
the severity level (critical, major, minor, or warning) for which a non-threshold alarm should be raised
when that condition occurs.
Caution
Changing the EMS alarm severities can affect the alarm status seen by listeners on the EMS's OSS
interfaces.
The following sections provide information on network elements:
•
9.4.1 Viewing Service Status
•
9.4.2 Viewing Alarms
•
9.4.3 Setting Up and Viewing Alarm Configuration Parameters
Cisco Media Gateway Manager 5.0 User Guide
OL-5461-02
9-13
Chapter 9
Managing Faults
Is the Service Working?
These tasks are used to diagnose network elements with the Diagnostic Center:
•
9.4.4 Displaying the Status of all Nodes in the Network
•
9.4.5 Displaying the Status of a Node
•
9.4.6 Displaying the Status of a Card
•
9.4.7 Displaying the Status for Lines or Ports
•
9.4.8 Displaying the Status for Paths in a Loopback for the VXSM-OC3 Card
•
9.4.9 Displaying the Status for Lines in a Loopback
These tasks are used to diagnose the voice cards for both Voice Service Module (VXSM) and Voice
Interworking Service Module (VISM-PR):
•
9.4.10 Displaying the Paths in Loopback for the VXSM-OC3 Card
•
9.4.11 Displaying the Status for a Bit Error Rate Test for the Voice Cards
•
9.4.12 Displaying the Lines in Loopback for the Voice Cards
•
9.4.13 Managing the Status for the VXSM Features
•
9.4.14 Managing the Status for the VISM-PR Features
This task is used to diagnose connections:
•
9.4.15 Diagnosing Connections
These tasks describe the Bit Error Rate Test (BERT) used to verify the integrity of a network element:
•
9.4.16 Bit Error Rate Test
•
9.4.17 Configuring Bit Error Rate Test
•
9.4.18 Displaying Bit Error Rate Test
9.4.1 Viewing Service Status
You can monitor the different services that run on the server. To view service status, choose
Administration > Service Monitor in the Domain Explorer window. The Service Monitor Table
appears and displays the status of the services that are currently running on the server. The table displays
the following information:
Note
•
Service Name—Name of the service
•
Logged In At—Time that the user last logged in
•
IP Address—IP address of the service
•
Session ID—Unique session ID
The showmgm command from the CLI is an alternate way of viewing processes or services that are
currently running on the server.
Cisco Media Gateway Manager 5.0 User Guide
9-14
OL-5461-02
Chapter 9
Managing Faults
Is the Service Working?
9.4.2 Viewing Alarms
The Alarm Browser has a specific selection context, which means that it displays alarm information that
corresponds to the view where it was launched. If you launch the Alarm Browser from the management
domain node, the browser shows all NE alarms, and all EMS alarms (if you have permission to see EMS
alarms). If you launch the Alarm Browser from a group, or NE node, the browser shows only NE alarms
for that group, or NE node. If you launch the Alarm Browser from the Dashboard, the browser shows all
NE alarms for the domain.
The Alarm Log window shows alarms that have transitioned from the Alarm Browser. Cleared alarms
are transitioned when you acknowledge them or when automatic acknowledgment has been enabled. In
addition, the Alarm Log shows a history of cleared and acknowledged alarms and all transient conditions
(also known as events or autonomous nonalarmed messages).
You can locate the equipment for an existing alarm in the Domain Explorer, choose Fault > Alarm
Browser or Fault > Alarm Log (or click the Open Alarm Browser or Open Alarm Log tool).
9.4.3 Setting Up and Viewing Alarm Configuration Parameters
The Alarm Configuration property sheet allows you to configure alarm severities for system parameters.
The Self Monitor Table displays information about threshold parameters. These parameters are collected
and evaluated based on the NE model types. To set up and view alarm configuration parameters:
Step 1
In the Domain Explorer window, choose Administration > Control Panel.
Click Alarm Configuration to open the Alarm Configuration property sheet. The Threshold EMS
Alarms tab displays the information detailed in Table 9-4:
Cisco Media Gateway Manager 5.0 User Guide
OL-5461-02
9-15
Chapter 9
Managing Faults
Is the Service Working?
Table 9-4
Alarm Configuration—Threshold EMS Alarms Tab
Field
Description
Poll Frequency
Displays the polling interval, in minutes, at which the Cisco MGM server
checks parameters.
Parameter Name
This column displays the name of the parameter as follows:
•
CPU Usage (%): Percentage of CPU time utilized for executing user,
system, and I/O tasks.
•
Config Resynch Time (seconds): Time it takes for Cisco MGM to
collect alarm and inventory information from the NE.
•
Disk Usage (%): Percentage of disk space used in a particular partition.
Cisco MGM database and partitions are monitored separately.
•
Memory Usage RAM (%): Percentage of RAM memory used for all
processes of the system.
•
Memory Usage SWAP (%): Percentage of SWAP memory used for all
processes of the system.
•
NE Synch Time (seconds): Time it takes to synchronize Cisco MGM
server with the NEs.
•
PM Collection Time (seconds): Time it takes to collect PM data for an
NE. It is the sum of the time it takes to read the PM data and the time
it takes to update the database.
•
Prune Time Audit Log (seconds): Time it takes to prune audit log data.
•
Prune Time Audit Trail Log (seconds): Time it takes to prune audit trail
log data.
•
Prune Time Error Log (seconds): Time it takes to prune Error Log data.
•
Prune Time FM (seconds): Time it takes to prune FM data.
•
Prune Time Job Monitor (seconds): Time it takes to prune job monitor
data.
•
Prune Time PM (seconds): Time it takes to prune PM data.
•
Prune Time Purge NE (seconds): Time it takes to prune NE purge data.
•
Prune Time Server Monitor (seconds): Time it takes to prune server
monitor data.
Enable
This column displays whether or not the corresponding parameter in the
Parameter Name column is enabled (checked) or disabled (unchecked).
When checked, it enables monitoring for the selected parameter. If an EMS
threshold alarm is outstanding when you disable monitoring, the EMS
clears the alarm.
Critical
This column displays the amount of time, in minutes, that must elapse
before triggering a critical alarm.
Major
This column displays the amount of time, in minutes, that must elapse
before triggering a major alarm.
Minor
This column displays the amount of time, in minutes, that must elapse
before triggering a minor alarm.
Cisco Media Gateway Manager 5.0 User Guide
9-16
OL-5461-02
Chapter 9
Managing Faults
Is the Service Working?
Note
Step 2
If an alarm is outstanding when you disable it, the system clears the alarm.
In the Non-Threshold EMS Alarms tab, you can select the severity level that will be assigned to the
non-threshold alarm parameter. See Table 9-5 for details.
Table 9-5
Alarm Configuration—Non-Threshold EMS Alarm Tab
Field
Description
Parameter Name
The Parameter Name column displays the following parameters:
•
Loss of Communication
•
Memory Auto or Manual Backup Failure
•
Maximum Login Attempts Exceeded
•
Alarm Resync Unsuccessful
•
Cisco MGM failed authentication by NE
•
A critical process is hanging, Cisco MGM will shut down in 5 minutes
•
Communication through Secondary IP Address
•
Sync-Up has not Started yet
•
Currently in Sync-Up
•
Partial Sync-Up
•
Sync-Up Failed
•
Server in Partial Sync-Up
•
Server Sync-Up Failed
•
FTP Transfer failure
•
FTP file size mismatch
•
FTP transfer failed
•
Upload File Error
•
Minus 2 Trap
•
Card Lost Trap
•
SNMP Retry exceeded
•
FTP Retry exceeded
Cisco Media Gateway Manager 5.0 User Guide
OL-5461-02
9-17
Chapter 9
Managing Faults
Is the Service Working?
Table 9-5
Alarm Configuration—Non-Threshold EMS Alarm Tab (continued)
Field
Parameter Name
(continued)
Severity
Step 3
Description
•
Sync-up Failed
•
Stats File Error
•
Stats File Transfer Error
•
SNMP Throttle Error
•
Backoff failed
•
SNMP timeout
•
FTP Session timeout
•
FTP Transfer timeout
•
Unknown Error
•
Initialization Error
•
Configuration Error
•
Communication Error in ILOG
•
Communication Error in shared memory
•
Communication Error in CORBA
•
NTS Registration failed
•
NTS Trap loss
•
DataBroker Sync-Up Complete
•
Process Restarted
•
PM Fail EMS Alarm
•
PM Lost EMS Alarm
Allows you to click in the appropriate cell and select the alarm severity level
from the available options (Critical, Major, Minor, or Warning) for each of
the corresponding parameters listed in the Parameter Name column. If an
EMS alarm is outstanding when you change its severity, the outstanding EMS
alarm's severity remains the same. The next time the alarm is raised, the
severity changes to the new setting.
Click Save.
9.4.4 Displaying the Status of all Nodes in the Network
To display the status of all nodes in the network:
Step 1
In the Diagnostic Center, click the Elements tab, and double-click or drag the network to the right hand
pane to display the diagnostics at the network level. By default, the Diagnostics tab is selected in the
right hand pane.
Cisco Media Gateway Manager 5.0 User Guide
9-18
OL-5461-02
Chapter 9
Managing Faults
Is the Service Working?
Step 2
The status of the following attributes at the network level are displayed:
•
Node ID
•
Node Name
•
Current sync status of all the nodes of the network
•
All out-of-sync nodes in the network
•
A total of partially synced and failed synced nodes
9.4.5 Displaying the Status of a Node
To display the status of a node:
Step 1
In Diagnostic Center, click the Elements tab, and double-click or drag the node to the right hand pane to
display the diagnostics at the node level. By default, Diagnostics tab is selected in the right hand pane.
Step 2
Verify the status of the following attributes at the node level:
•
Current sync status of the node
•
All out-of-sync cards in the node
•
Node level statistics if applicable
9.4.6 Displaying the Status of a Card
Depending on the type of card, you can perform one or all of the functions from the following tabs:
•
Paths in Loopback—Displays the paths in the loopback. (See 9.4.10 Displaying the Paths in
Loopback for the VXSM-OC3 Card.)
•
Lines in Loopback—Displays all lines that currently have loopback running. (See 9.4.12 Displaying
the Lines in Loopback for the Voice Cards.)
•
VXSM Features—Displays details of the Media Gateway Links, CIDs, RUDP Sessions, and XGCP
MGC. (See 9.4.13 Managing the Status for the VXSM Features.)
•
VISM-PR Features—Displays details of the XGCP Peers, SRCP Peers, and RUDP Sessions. (See
9.4.14 Managing the Status for the VISM-PR Features.)
•
Running Berts—Display all lines that currently have a Bit Error Rate Test (BERT) running. (See
9.4.11 Displaying the Status for a Bit Error Rate Test for the Voice Cards.)
To display the status of a card:
Step 1
In the Diagnostic Center, click the Elements tab, and double-click or drag the card from the Hierarchy
pane to the right hand pane to display the diagnostics at the card level.
Step 2
Verify the status of the attributes at the card level.
Step 3
Click Refresh to update the Card Diagnostics window.
Cisco Media Gateway Manager 5.0 User Guide
OL-5461-02
9-19
Chapter 9
Managing Faults
Is the Service Working?
9.4.7 Displaying the Status for Lines or Ports
To display the status for lines or ports:
Step 1
In the Diagnostic Center, click the Elements tab, and double-click or drag the line or port from the
Hierarchy pane to the right hand pane to display the diagnostics at the line or port level. See Figure 9-6.
Depending upon the card type, you can also configure Bit Error Rate Test (BERT). For more information,
see 9.4.17 Configuring Bit Error Rate Test.
You can also see if a line is in loopback. See 9.4.9 Displaying the Status for Lines in a Loopback.
Step 2
Click the Delta Mode radio button or Absolute Mode radio button. See Table 9-6.
Step 3
Choose the polling interval time from the Poll Interval (Sec) drop-down arrow.
Step 4
Verify the statistics name and statistics value.
Appendix E, “Real-Time Counters” gives details of the real-time counters displayed in the Diagnostic
Center.
Appendix D, “Statistics Summary” gives details of the statistics that are collected from the Cisco MGX
8880 and Cisco MGX 8850.
Step 5
Check the Poll All check box to initiate polling for the statistics. To select individual counters for
polling, check the counter check box.
Table 9-6
Diagnostic Center—Delta Mode and Absolute Mode Radio Buttons
Radio Button
Description
Delta Mode
Resets the counters and displays only the delta differences. Delta mode restarts
the timer and takes the current values of the counters as base values, which are
subtracted from the polled values for all the subsequent polls. The delta report is
always the base values and the timer, which indicates the time lapsed since
entering the delta mode. If you switch between delta to absolute mode, the timer
is reset again.
Absolute Mode
(default) Provides the raw data shelved at the current counter state for the switch.
Cisco Media Gateway Manager 5.0 User Guide
9-20
OL-5461-02
Chapter 9
Managing Faults
Is the Service Working?
Figure 9-6
Diagnostic Center—Line Status
9.4.8 Displaying the Status for Paths in a Loopback for the VXSM-OC3 Card
To display the paths for a loopback for the VXSM-OC3 card:
Step 1
In the Diagnostic Center, click the Elements tab, and double-click or drag the card from the Hierarchy
pane to the right hand pane to display the diagnostics at the path level.
Step 2
Click the Paths In Loopback tab.
Step 3
Verify the following parameters for the path:
Step 4
•
Path Id
•
Path Type
•
Loopback Type
Click Refresh to update the settings for the Path Diagnostics window.
Cisco Media Gateway Manager 5.0 User Guide
OL-5461-02
9-21
Chapter 9
Managing Faults
Is the Service Working?
9.4.9 Displaying the Status for Lines in a Loopback
To display the lines for a loopback:
Step 1
In the Diagnostic Center, click the Elements tab, and double-click or drag the card from the Hierarchy
pane to the right hand pane to display the line in the loopback.
Step 2
Click the Lines In Loopback tab.
Step 3
Verify the following parameters for the line:
Step 4
•
Line Number
•
Loopback Type
Click Refresh to update the settings for the Line Diagnostics window.
9.4.10 Displaying the Paths in Loopback for the VXSM-OC3 Card
To display the paths in loopback for the VXSM-OC3 card for both SONET and SDH lines:
Step 1
In the Diagnostic Center, click the Elements tab, and double-click or drag the VXSM-OC3 card from the
Hierarchy pane to the right hand pane to display the diagnostics at the card level. See Figure 9-7.
Step 2
Click the Paths In Loopback tab.
Step 3
Verify the following parameters for the path:
•
Path Id
•
Path Type
•
Loopback Type
Step 4
Click the Delta Mode radio button or Absolute Mode radio button. See Table 9-6.
Step 5
Choose the polling interval time from the Poll Interval (Sec) drop-down arrow.
Step 6
Verify the statistics name and statistics value for the real-time counters.
Step 7
Check the Poll All check box to initiate polling for the statistics. To select individual counters for
polling, check the counter check box.
Step 8
Click Refresh to update the settings for the paths in loopback for the VXSM-OC3 card for both SONET
and SDH lines.
Cisco Media Gateway Manager 5.0 User Guide
9-22
OL-5461-02
Chapter 9
Managing Faults
Is the Service Working?
Figure 9-7
Diagnostic Center—Paths in Loopback
9.4.11 Displaying the Status for a Bit Error Rate Test for the Voice Cards
You can setup BERT options on the looped back connection and use the available test patterns displayed
in the BERT Configuration window. See 9.4.17 Configuring Bit Error Rate Test
To display the status for a BERT for the VXSM card for a T1E1 line and VISM-PR cards:
Step 1
In the Diagnostic Center, click the Elements tab, and double-click or drag the VXSM-48T1E1 card or
VISM-PR card from the Hierarchy pane to the right hand pane to display the diagnostics at the card level.
See Figure 9-8.
Step 2
Click the Running Berts tab.
Step 3
Verify the following parameters for the BERT test:
•
Entity Id
•
Entity Type
•
Operation Status
•
Bits Received
•
Bits Received (Wrap Count)
•
Bits Received In Error
•
Bits Received In Error (Wrap Count)
Cisco Media Gateway Manager 5.0 User Guide
OL-5461-02
9-23
Chapter 9
Managing Faults
Is the Service Working?
Step 4
Click the Delta Mode radio button or Absolute Mode radio button. See Table 9-6.
Step 5
Choose the polling interval time from the Poll Interval (Sec) drop-down arrow.
Step 6
Verify the statistics name and statistics value for the real-time counters.
Step 7
Check the Poll All check box to initiate polling for the statistics. To select individual counters for
polling, check the counter check box.
Step 8
Click Refresh to update the settings for the lines in loopback for VXSM.
Figure 9-8
Diagnostic Center—Bit Error Rate Test
9.4.12 Displaying the Lines in Loopback for the Voice Cards
To display the lines in loopback for the VXSM card for both SONET and T1E1 lines and the VISM-PR
cards:
Step 1
In the Diagnostic Center, click the Elements tab, and double-click or drag the VXSM or VISM-PR card
from the Hierarchy pane to the right hand pane to display the diagnostics at the card level. See
Figure 9-7.
Step 2
Click the Lines In Loopback tab.
Cisco Media Gateway Manager 5.0 User Guide
9-24
OL-5461-02
Chapter 9
Managing Faults
Is the Service Working?
Step 3
Verify the following parameters for the path:
•
Line Number
•
Loopback Type
Step 4
Click the Delta Mode radio button or Absolute Mode radio button. See Table 9-6.
Step 5
Choose the polling interval time from the Poll Interval (Sec) drop-down arrow.
Step 6
Verify the statistics name and statistics value for the real-time counters.
Step 7
Check the Poll All check box to initiate polling for the statistics. To select individual counters for
polling, check the counter check box.
Step 8
Click Refresh to update the settings for the lines in loopback for VXSM.
9.4.13 Managing the Status for the VXSM Features
These tasks are used to manage the status for the VXSM features:
•
9.4.13.1 Displaying the Status for Media Gateway Links for the Voice Cards
•
9.4.13.2 Displaying the Status for Reliable User Datagram Protocol for the Voice Cards
•
9.4.13.3 Displaying the Status for Xternal Gateway Control Protocol for the Voice Cards
9.4.13.1 Displaying the Status for Media Gateway Links for the Voice Cards
Note
A session of the type of object must be available before it can be polled.
To display the Media Gateway Links (MGL) for voice cards for both SONET and T1E1 lines:
Step 1
In the Diagnostic Center, click the Elements tab, and double-click or drag the VXSM card from the
Hierarchy pane to the right hand pane to display the diagnostics at the card level.
Step 2
Click the VXSM Features tab and choose Media Gateway Links from the drop-down box.
Step 3
Verify the following parameters for the path:
•
Gateway Link ID
•
Gateway IP Address
•
Gateway Port
•
Control Protocol
•
Gateway Link Operational State
Step 4
Click the Delta Mode radio button or Absolute Mode radio button. See Table 9-6.
Step 5
Choose the polling interval time from the Poll Interval (Sec) drop-down arrow.
Cisco Media Gateway Manager 5.0 User Guide
OL-5461-02
9-25
Chapter 9
Managing Faults
Is the Service Working?
Step 6
Verify the statistics name and statistics value for the real-time counters.
Step 7
Check the Poll All check box to initiate polling for the statistics. To select individual counters for
polling, check the counter check box.
Step 8
Click Refresh to update the settings for the Media Gateway Links for VXSM.
9.4.13.2 Displaying the Status for Reliable User Datagram Protocol for the Voice Cards
Note
A session of the type of object must be available before it can be polled.
To display the Reliable User Datagram Protocol (RUDP) for VXSM card for both SONET and T1E1
lines:
Step 1
In the Diagnostic Center, click the Elements tab, and double-click or drag the VXSM card from the
Hierarchy pane to the right hand pane to display the diagnostics at the card level. See Figure 9-9.
Step 2
Click the VXSM Features tab and choose the RUDP Sessions option from the drop-down arrow.
Step 3
Verify the following RUDP session parameters:
•
RUDP Session Number—Specifies the session group where the group belongs. One group has a
maximum of four sessions. The range is from 1-64.
•
State—Specifies the following RUDP session states:
– oos—Out of Service. When an RUDP session is created, the session state is oos.
– Is—In Service. The state is changes to Is after the VXSM sent a start message to the MGC. The
message is sent after a channel is created between the VXSM and the MGC.
– unknown
•
Local IP—Specifies the IP address of the local VXSM.
•
Remote IP—Specifies the IP address of the remote VXSM.
Step 4
Click the Delta Mode radio button or Absolute Mode radio button. See Table 9-6.
Step 5
Choose the polling interval time from the Poll Interval (Sec) drop-down arrow.
Step 6
Verify the statistics name and statistics value for the real-time counters.
Step 7
Check the Poll All check box to initiate polling for the statistics. To select individual counters for
polling, check the counter check box.
Appendix E, “Real-Time Counters” gives details of the real-time counters displayed in the Diagnostic
Center.
Appendix D, “Statistics Summary” gives details of the statistics that are collected from the Cisco MGX
8880 and Cisco MGX 8850.
Step 8
Click Refresh to update the settings for the RUDP sessions for VXSM.
Cisco Media Gateway Manager 5.0 User Guide
9-26
OL-5461-02
Chapter 9
Managing Faults
Is the Service Working?
Figure 9-9
Diagnostic Center—Reliable User Datagram Protocol for Voice Card
9.4.13.3 Displaying the Status for Xternal Gateway Control Protocol for the Voice Cards
Note
A session of the type of object must be available before it can be polled.
To display the Xternal Gateway Control Protocol (XGCP) for VXSM card for both SONET and T1E1
lines:
Step 1
In the Diagnostic Center, click the Elements tab, and double-click or drag the VXSM card from the
Hierarchy pane to the right hand pane to display the diagnostics at the card level. See Figure 9-9.
Step 2
Click the VXSM Features tab.
Step 3
Choose the XGCP MGC option from the drop-down arrow.
Step 4
Verify the following XGCP peer group parameters:
Step 5
•
MGC Group Number—Specifies the media gateway controller number. The range is from 1-8.
•
Gateway IP Address—The Gateway IP Address Index parameter defines the media gateway
address that relates to the PVC control type. The range is from 1-16.
•
Protocol Index—Specifies the media gateway protocol number. The range is from 1-3.
•
Gateway UDP Port—Specifies the Gateway User Datagram Protocol (UDP) port.
Click the Delta Mode radio button or Absolute Mode radio button. See Table 9-6.
Cisco Media Gateway Manager 5.0 User Guide
OL-5461-02
9-27
Chapter 9
Managing Faults
Is the Service Working?
Step 6
Choose the polling interval time from the Poll Interval (Sec) drop-down arrow.
Step 7
Verify the statistics name and statistics value for the real-time counters.
Step 8
Check the Poll All check box to initiate polling for the statistics. To select individual counters for
polling, check the counter check box.
Appendix E, “Real-Time Counters” gives details of the real-time counters displayed in the Diagnostic
Center.
Appendix D, “Statistics Summary” gives details of the statistics that are collected from the Cisco MGX
8880 and Cisco MGX 8850.
Step 9
Click Refresh to update the settings for the XGCP peer group for VISM-PR.
9.4.14 Managing the Status for the VISM-PR Features
This task is used to manage the status for the VISM-PR features:
•
9.4.14.1 Displaying the Status for the Simple Resource Coordination Protocol Peers
9.4.14.1 Displaying the Status for the Simple Resource Coordination Protocol Peers
To display the status for the Simple Resource Coordination Protocol (SRCP) peer group for both
VISM-PR cards:
Step 1
In the Diagnostic Center, click the Elements tab, and double-click or drag the VISM-PR card from the
Hierarchy pane to the right hand pane to display the diagnostics at the card level.
Step 2
Click the VISM Features tab.
Step 3
Choose the SRCP Peers option from the drop-down arrow.
Step 4
Verify the following SRCP peer group parameters:
•
SRCP Peer Number—Specifies the media gateway controller number. The range is from 1-8.
•
SRCP Peer Name—Specifies the name of the SRCP peer. The range is from 1-64 characters.
Step 5
Click the Delta Mode radio button or Absolute Mode radio button. See Table 9-6.
Step 6
Choose the polling interval time from the Poll Interval (Sec) drop-down arrow.
Step 7
Verify the statistics name and statistics value for the real-time counters.
Step 8
Check the Poll All check box to initiate polling for the statistics. To select individual counters for
polling, check the counter check box.
Step 9
Click Refresh to update the settings for the SRCP peer group for VISM-PR.
Cisco Media Gateway Manager 5.0 User Guide
9-28
OL-5461-02
Chapter 9
Managing Faults
Is the Service Working?
9.4.15 Diagnosing Connections
The Diagnostic Center is used to diagnose connections.The key functions are the ability to test status,
delay and integrity of SPVC connections.
This task is used to test SPVC connection:
•
9.4.15.1 Polling a Connection for an SPVC
You can test the integrity of any existing connection that is nondisruptive to user traffic. The operation
is similar to the tstcon command. For more information on the tstcon command, refer to the Cisco WAN
Switching Command Reference, Release 9.3.30.
9.4.15.1 Polling a Connection for an SPVC
To poll a connection:
Step 1
In the Domain Explorer, select the node and choose Configuration > MGX8880/8850 MG >
Configuration Center.
Step 2
Click the Connections tab to display the Connection Browser window.
Step 3
Drag the node from the Hierarchy pane to the right hand pane to display the connection details. Click
the Connection List tab. See Figure 7-1.
Step 4
Click More Filters to display the Filter Settings window. See Figure 7-2.
Step 5
Choose the filter settings from the Filter Settings window. For example, check both the Status check
box and the OK check box if you want to retrieve only active connections.
Step 6
Click OK to apply the filter settings.
Step 7
Enter the number of connections that you want to retrieve in the Connection Count to be retrieved
field. To retrieve all the connections, enter *.
Step 8
Click Get to retrieve the connections. For example, you can retrieve both local and remote endpoints.
The Connection Browser window appears with the number of connections matching the filtering criteria.
A list of connections that have either local or remote endpoints are displayed in the connection list.
Step 9
You now test the connection. Right-click the SPVC connection from the list of connections and choose
Diagnostic Center.
Step 10
In the Diagnostic Center, click the Test Connection tab.
Step 11
There are three radio button options:
•
Click the Test Conn radio button to initiate an end-to-end integrity test of the selected connection.
•
Click the Test Delay radio button to initiate an end-to-end measurement of round-trip delay.
Step 12
Check the Poll Local or Poll Remote Endpoint check box to initiate polling for the statistics. To select
individual counters for polling, check the counter check box.
Step 13
Click the Delta Mode radio button or Absolute Mode radio button. See Table 9-6.
Step 14
Choose the polling interval time from the Poll Interval (Sec) drop-down arrow.
Cisco Media Gateway Manager 5.0 User Guide
OL-5461-02
9-29
Chapter 9
Managing Faults
Is the Service Working?
Step 15
Verify the statistics name and statistics value for the real-time counters.
Step 16
Click Start Test Connection to proceed with testing.
Step 17
Click Abort Test Connection to stop the test.
9.4.16 Bit Error Rate Test
Bit Error Rate Test (BERT) verifies the integrity of a network element by measuring error statistics that
result from sending known bit patterns, analyzing a remote interface, and analyzing the pattern that is
returned. BERT is used on DS3, DS1, and DS0/DS0 bundle interfaces.
BERT generates a known data sequence into a transmission device, and examines the received sequence
at the same device or a remote device for errors. Tests are run on a full T1E1 line or a fractional T1E1,
for example, single DS0 or a group of DS0s. BERT tests the quality of links by directly comparing a
pseudo-random or repetitive test pattern with an identical, local-generated test pattern.
Note
SRME, SRME/B, VXSM, VISM-PR, and AXSME card types support BERT.
BERT includes the following functions:
•
Configures a local loopback on a line or port, or specifies a remote loopback be used instead.
•
Defines the bit pattern.
•
Specifies a duration for the BERT session after the session automatically terminates.
•
Specifies BERT can start on a designated line or port.
•
Lists BERT tests that are initiated from Cisco MGM.
•
Refreshes the display to update the output for the current BERT.
•
Stops a BERT started from Cisco MGM.
9.4.17 Configuring Bit Error Rate Test
You can setup BERT options on the looped back connection and use the available test patterns displayed
in the BERT Configuration window. Before you configure the BERT options in the BERT Configuration
window, make sure a line or port is selected from a BERT-supported service module.
In Cisco MGM, BERTs are only applicable on:
•
AXSME 32 T1E1 (on DS1 Line)
•
VXSM 48 T1E1 (on DS1 Line)
•
VXSM OC3 (on DS1 Paths)
•
VISM PR 8T1E1 (accompanied by an SRM Card, on DS1 Line)
This section also includes the following details:
•
9.4.17.1 Stopping Bit Error Rate Test
•
9.4.17.2 Modifying Bit Error Rate Test
Cisco Media Gateway Manager 5.0 User Guide
9-30
OL-5461-02
Chapter 9
Managing Faults
Is the Service Working?
To configure a BERT session:
Step 1
In the Diagnostic Center, double-click or drag the line or port that is supported by BERT from the
Hierarchy pane to the right hand pane to display the Line and Port Configuration window.
Step 2
Click the Bert tab to display the BERT Configuration window. See Figure 9-10.
Note
Step 3
Not all the BERT configuration parameters are applicable for all card types.
Choose the test pattern options from the Test Pattern drop-down arrow.
The default option is allZeros.
Step 4
Step 5
Choose one of the following Invert Rx Test options from the Invert Rx Test Pattern drop-down arrow:
•
Not Inverted
•
Inverted
Choose one of the following Invert Rx Test options from the Invert Tx Test Pattern drop-down arrow:
•
Not Inverted
•
Inverted
Step 6
Ensure that the type of end device and loopback device option is correct from the Device To Loop
drop-down arrow.
Step 7
Choose the error insertion option from the Error Insertion drop-down arrow.
The insert constant-rate error option verifies that the transmitted pattern is being properly received and
errors are properly detected. Once set to send continuous errors, errors are inserted at the configured rate
until set to no Error option.
If you set the value to insert errors while the test is not running, the test is not affected. However, when
the test is started again, errors are inserted at the configured rate.
Step 8
Click Start Bert to initiate the BERT session. Note that once BERT is started, you can restart it with the
modified options.
Cisco Media Gateway Manager 5.0 User Guide
OL-5461-02
9-31
Chapter 9
Managing Faults
Is the Service Working?
Figure 9-10
Diagnostic Center—BERT Options
9.4.17.1 Stopping Bit Error Rate Test
While the BERT session is running, you can stop the session from the BERT Configuration window that
is applicable to your selected line or port. From the BERT Configuration window, click Stop Bert to
stop the session.
9.4.17.2 Modifying Bit Error Rate Test
After you stop a BERT session, you can modify the session.
To modify a BERT:
Step 1
Step 2
Choose one of the following single-bit error options from the Insert Single Bit Error drop-down arrow:
•
No Error
•
Insert Error
Click Modify Bert to modify the BERT line by inserting a single-bit error in the transmitted BERT
pattern.
Cisco Media Gateway Manager 5.0 User Guide
9-32
OL-5461-02
Chapter 9
Managing Faults
Where Is the Fault?
9.4.18 Displaying Bit Error Rate Test
After initiating a BERT session, you can view the status of all initiated BERT sessions at once. To display
BERT status:
Step 1
In the Diagnostic Center, double-click or drag the line or port that is supported by BERT from the
Hierarchy pane to the right hand pane to display the Line and Port Configuration window.
Step 2
Click the Monitored BERTs tab to display the Monitored BERTs window. See Figure 9-10.
Table 9-7 describes the parameters for the BERT statistics.Select the BERT entry to update the statistics,
and click Refresh.
Table 9-7
Bit Error Rate Test Statistics Parameters
Name
Definition
Start Date and Time
Specifies the start date and time.
Operation Status
Specifies the current operation status of BERT.
Failed Reason
Defines the reason for the BERT failure. If the Operation
Status parameter is set to BERT Failed, more information is
available.
Bits Transmitted
Specifies the total number of bits.
Bits Received In Error
Receives the total number of bit errors.
Error Inject Count
Specifies the total number of injected bit errors.
9.5 Where Is the Fault?
You need to be able to quickly troubleshoot problems on the network, identify when network capacity
is being reached, and provide information to management on the number and types of devices being used
on the network. If the network goes down, one of the first things you will need to know is what devices
are running on the network. You will want to know the types of devices you are dealing with as well as
the names, addresses, and interfaces associated with each device in order to begin troubleshooting the
problem. The more information you have about all your devices in one central place, the easier it is to
locate necessary information, resolve problems quickly, and provide detailed information to interested
parties.
9.5.1 Sources of Information
9.5.2 Identifying and Monitoring Alarms
9.5.3 Using Visual and Audible Alarm Notifications
9.5.4 Sources of EMS Raised Alarms
9.5.5 Viewing Fault Management Data for a Set of NEs
Cisco Media Gateway Manager 5.0 User Guide
OL-5461-02
9-33
Chapter 9
Managing Faults
Where Is the Fault?
9.5.1 Sources of Information
Fault management receives and processes information from the following sources:
•
Autonomous reports of failures from NEs
•
Trouble reports from customers and peer systems
•
Results of diagnostics, exercises and audits from NEs
•
Impairment indications from performance management
•
Network configuration data from configuration management.
Cisco MGM constantly updates the alarm status of the network based on the alarm and event
notifications sent by the monitored NEs and generated by the EMS itself. It performs alarm
synchronization with the NE each time the connection to the NE is established or re-established and the
NE is in service.
9.5.2 Identifying and Monitoring Alarms
There are a number of options available to identify and monitor alarms on the entire domain or in a group
of NEs:
•
In the Domain Explorer Hierarchy pane, select the management domain node or a group node. If it
shows a critical, major, minor, or warning alarm icon, it means that one or more NEs within the
management domain or group are experiencing an alarm.
•
Select the management domain node or group node and choose Fault > Alarm Browser (or
right-click the node and choose Alarm Browser in the popup menu). This opens the Alarm Browser
window, which shows all the NEs in the management domain or group that are experiencing a
critical, major, minor, or warning alarm. See Figure 9-3.
•
Click an alarm count box in the Dashboard, the Alarm Browser appears, prefiltered for the selected
alarm severity.
•
Click the Open Alarm Browser tool from the Dashboard to show Cisco MGM specific EMS alarms
in the Alarm Browser.
•
Click the Open Cisco MGM EMS Alarm Browser tool from the Dashboard to show alarms on
Cisco MGM in the Alarm Browser.
To identify and monitor alarms on specific NEs:
Step 1
Select an in-service NE in the Domain Explorer Hierarchy pane that shows an alarm icon.
Step 2
Choose Fault > Alarm Browser, or right-click and choose Alarm Browser in the popup menu.
Note
Alarms relating to PM collection indicate that the load on the system is high. Reduce the load on the
system before proceeding.
Cisco Media Gateway Manager 5.0 User Guide
9-34
OL-5461-02
Chapter 9
Managing Faults
Where Is the Fault?
Note
No alarms or events will be generated in the Alarm Browser if Oracle shuts down.
9.5.3 Using Visual and Audible Alarm Notifications
To use visual and audible alarm notifications:
Step 1
In the Domain Explorer window, choose Edit > User Preferences.
Step 2
The User Preferences dialog box appears. On the Event Notification tab, in the Show Notification Dialog
area, select whether or not an alert popup opens when a specific alarm or informational event occurs on
NEs in the management domain or in the application.
The Event Notification dialog box opens whenever a new alarm or event occurs. According to your User
Preferences selection, you will receive popup notification about alarms by severity and information on
events from the network element (NE) or from Cisco MGM. The Event Notification popup remains open
until one of the following occurs:
•
You click OK to close the dialog box.
•
It is replaced by an Event Notification dialog box with a higher severity.
•
You click Disable to disable all event notifications.
The Event Notification displays the information shown in Table 9-8.
Step 3
In the Play Audible Notification area, select whether or not an audible alert is sounded when a specific
alarm or informational event occurs on the NE or in the application. You can also select whether or not
a continuous audible alert is sounded when there is an update in the Dashboard. Check the Continuous
Alarm for Dashboard notifications check box.
Note
Step 4
Tip
To stop the continuous audible alert, choose Fault > Stop Continuous Beep in the Domain
Explorer.
Check the Save current settings check box and click OK.
Click Disable on the popup window itself to disable additional popups.
Table 9-8
Event Notification Dialog Box Descriptions
Field
Description
Source
Displays the name of the source where the alarm or event originated.
Time
Displays the date and time that you received the Event Notification popup.
Category
Indicates the category of alarm or event; alarm categories include Critical, Major,
Minor, or Cleared. Event categories include NE Event (if the event occurred on a NE)
or EMS Event (if the event occurred on Cisco MGM).
Probable Cause Identifies the probable cause of the alarm or event.
Affected Object Identifies the object that is affected by the alarm or event.
Cisco Media Gateway Manager 5.0 User Guide
OL-5461-02
9-35
Chapter 9
Managing Faults
Where Is the Fault?
Table 9-8
Event Notification Dialog Box Descriptions (continued)
Field
Description
Description
Displays a brief description of the alarm or event.
Service
Affecting
Indicates whether the alarm or event affects service.
9.5.4 Sources of EMS Raised Alarms
In addition to reporting NE-generated alarms, the EMS monitors and reports alarms on the EMS itself;
for example, loss of connectivity to NE, and so forth.
The EMS monitors and reports the NE-specific alarms (see Table 9-9) and non-NE-specific alarms (see
Table 9-10).
See Appendix F, “Cisco MGM CORBA Gateway Events” for details of the Cisco MGM CORBA
Gateway events.
Note
Table 9-9
NE-specific alarms can be viewed and accessed by users who are assigned to the particular NE.
EMS-NE-Specific Alarms
NE-Specific Alarms
Description
Loss of communication to an NE
When the system detects loss of connectivity to an NE, an EMS alarm is generated in the
Alarm Browser. This EMS alarm is cleared when the system reestablishes connectivity
to the NE or when the NE is marked Out of Service.
Automatic or manual memory
backup failure
If an automatic or manual memory backup job fails, an EMS alarm is generated in the
Alarm Browser. An individual EMS alarm is generated for each memory backup failure
that occurs. All instances of the backup-related EMS alarms are cleared (for that
particular NE) when the memory backup succeeds or when the NE is marked Out of
Service.
Switching IP addresses
When an active IP address switches from the primary to the secondary IP address, an
alarm will be generated. It is only cleared when the address is switched back to the
primary IP address or when communication to the NE is lost.
Failed PM data retrieval
An alarm will be generated for every PM data retrieval failure. PM 15-min Retrieval Fail
Alarms are generated if the system has not retrieved 15-min PM data after the number of
times to retrieve PM data has been reached. These alarms can be cleared manually or
cleared automatically if a Lost PM alarm is generated or if PM data is retrieved.
Lost PM data
An alarm will be generated for all lost PM data. PM lost alarm 15-minute is generated
when:
•
The EMS is not able to collect PM data for 15 minutes and the NE’s PM collection
is set to 15 Min.
•
The EMS is not able to collect 15-minute PM data after 8 hours. If there are
outstanding PM 15-min Retrieval Fail Alarms, these alarms will be cleared and the
PM 15-min Lost PM Bucket Alarm is generated.
These alarms can be cleared manually. Lost PM data alarms are generated only if the PM
collection is set to 15-Min.
Cisco Media Gateway Manager 5.0 User Guide
9-36
OL-5461-02
Chapter 9
Managing Faults
Where Is the Fault?
Table 9-10
Non-NE-Specific Alarms
Non-NE-Specific Alarms
Description
Maximum number of login attempts By default, users have a maximum of five login attempts. The user account is locked
exceeded
after the fifth unsuccessful login attempt and an EMS alarm is generated in the Alarm
Browser. The alarm is cleared once the user account is unlocked or the account is
deleted.
System self-monitor alarm
Threshold parameters such as CPU usage, memory usage, disk usage, circuit creation
time, PM collection time, and resynch time are collected and evaluated to monitor the
server performance.
An alarm is generated if any of these parameters cross their threshold values with their
corresponding severity level. The alarms are cleared only after the corresponding
parameter value falls below the minor threshold. Subsequent threshold crossings for
the same parameter will not generate further alarms. Only the severity level is changed
to indicate the current severity level for the specific parameter.
Note
Alarms associated with circuit creation, configuration resynchronization, NE
synchronization, and PM collection indicate that the load on the system is high.
Reduce the load on the system before proceeding.
Alarms associated with pruning times also indicate that the load on the system
is high. Reschedule pruning at a time when the system has less activity.
9.5.5 Viewing Fault Management Data for a Set of NEs
To view fault management data for an NE:
Step 1
In the Domain Explorer Hierarchy pane, select the management domain, group, or NE node for which
to view the data.
Step 2
Open an Alarm Browser, choose Fault > Alarm Browser.
Note
A preliminary filter is always applied based on the object selected in the tree view or map.
Step 3
In the table, click the Filter Data tool (or choose File > Filter). The Filter dialog box appears.
Step 4
Most fault management tables (for example, the Alarm Browser and Alarm Log tables) have a filter tool
for filtering data for a set of NEs. In the Filter dialog box, select the NEs that will be included in the
filter. Specify other filter parameters, as needed. See 9.7.2 Filtering the Alarm Log.
Step 5
Click OK to show the results in a table.
Cisco Media Gateway Manager 5.0 User Guide
OL-5461-02
9-37
Chapter 9
Managing Faults
How Can I Use Advanced Debugging to Find the Cause of the Fault?
9.6 How Can I Use Advanced Debugging to Find the Cause of the
Fault?
Advanced debugging captures additional information about defects.
The EMS should correlate events and determine the faults that exist in the network. To correlate events
means to look for relationships between them.
Advanced debugging can be carried out using information from the following sources:
•
9.6.1 Setting an EMS Process as Critical
•
9.6.2 Setting Up and Viewing Error Logs
•
9.6.3 Setting Debug Options
9.6.1 Setting an EMS Process as Critical
You can mark an EMS service as critical for process monitoring purposes. To set a process as critical:
Step 1
In the Domain Explorer window, choose Administration > Control Panel.
Step 2
Click Recovery Properties to open the Recovery Properties sheet.
Step 3
Click the Process Monitoring tab. Table 9-11 describes the fields within the Process Monitoring tab. The
system services listed are:
Step 4
•
Service Manager
•
Oracle Service
•
OS Agent
•
GateWay/CORBA Service
•
MGX8880/8850 NE Service
•
MGX8880/8850 PM Service
Check the Critical check box beside each service to indicate that the service is critical.
Note
Note
The Service Manager, Oracle Service, and OS Agent are permanently critical. You cannot
uncheck the Critical check boxes for these services.
If a critical process stops running or it fails to poll monitoring services for a long time, the server will
be shut down and the client will generate an alarm.
Cisco Media Gateway Manager 5.0 User Guide
9-38
OL-5461-02
Chapter 9
Managing Faults
How Can I Use Advanced Debugging to Find the Cause of the Fault?
Table 9-11
Recovery Properties—Process Monitoring Tab
Field
Description
Service Name
Displays the process monitoring service name.
Critical
If checked, the selected service is designated as critical for process monitoring.
Service Manager, Oracle Service, and OS Agent cannot be unchecked.
9.6.2 Setting Up and Viewing Error Logs
The Error Log tables display server error information that is useful for debugging Cisco MGM
processes. In most cases, the Error Log is requested by service personnel for debugging a problem on
the Cisco MGM server. The Error Log captures abnormal and significant events based on severity level.
Critical, major, minor, and informational errors are saved in the database.
There are two types of Error Log available in Cisco MGM:
•
Error logs for the Diagnostic Center, Configuration Center, Statistics Report and Chassis View.
These Error Logs are accessed directly from the log directory on the server at /opt/root/log.
•
Error logs for the other applications in Cisco MGM. Choose Administration > Error Log to view
these Error Logs.
As the default, the Error Log displays information about significant events that occurred during the last
four hours. You can change the default time period in the User Preferences dialog box.
The Error Log Configuration property sheet allows the user to control the volume of messages that are
created by the server. All changes take effect immediately and do not require restart of the server. To
reduce the amount of information logged to the database, turn off entire components. To set up and view
Error Logs:
Step 1
In the Domain Explorer window, choose Administration > Control Panel.
Click Error Log Properties to open the Error Log Configuration property sheet. The Error Log property
sheet displays the information in Table 9-12:
Cisco Media Gateway Manager 5.0 User Guide
OL-5461-02
9-39
Chapter 9
Managing Faults
How Can I Use Advanced Debugging to Find the Cause of the Fault?
Table 9-12
Field Descriptions for the Error Log Properties
Field
Description
Cisco MGM
Server and
GateWay/SNMP
Allows you to choose the error level to include in the Error Log for services
related to the Cisco MGM server and GateWay/SNMP. Critical, major, minor, and
informational errors are logged to the database; trace and debug information is
logged to a log file.
Caution
Note
SM Service
Trace and debug information does not appear in the Error Log table.
Allows you to choose the error level to include in the Error Log for the SM
service. Critical, major, minor, and informational errors are logged to the
database; trace and debug information is logged to a log file.
Caution
Note
SNMP Trap
Service
Cisco MGM performance will degrade significantly if the trace or
debug option is left on. All operations will slow down and you may lose
alarm and event notifications. Use trace or debug only when
troubleshooting with a customer support engineer.
Cisco MGM performance will degrade significantly if the trace or
debug option is left on. All operations will slow down and you may lose
alarm and event notifications. Use trace or debug only when
troubleshooting with a customer support engineer.
Trace and debug information does not appear in the Error Log table.
Allows you to choose the error level to include in the Error Log for the SNMP
Trap service. Critical, major, minor, and informational errors are logged to the
database; trace and debug information is logged to a log file.
Caution
Note
Cisco MGM performance will degrade significantly if the trace or
debug option is left on. All operations will slow down and you may lose
alarm and event notifications. Use trace or debug only when
troubleshooting with a customer support engineer.
Trace and debug information does not appear in the Error Log table.
Step 2
In the Error Level field, choose the error level that will be included in the Error Log (Critical, Major,
Minor, Informational, Debug, or Trace). Critical, major, minor, and informational errors are logged to
the database; trace and debug information are logged to a log file.
Caution
When the trace or debug option is left on, it can lead to an insufficient disk space situation. Use these
options only when troubleshooting with a customer support engineer.
Step 3
Click Save.
To open the Error Log, choose Administration > Error Log in the Control Panel window menu bar.
The Error Log displays the information shown in Table 9-13.
Cisco Media Gateway Manager 5.0 User Guide
9-40
OL-5461-02
Chapter 9
Managing Faults
How Can I Use Advanced Debugging to Find the Cause of the Fault?
Table 9-13
Column Name
Description
Cisco MGM Time
Stamp
Displays the date and time when the error occurred on the Cisco MGM server.
Module
Displays the name of the module where the error occurred.
Severity
Displays the severity level of the error (see Table 9-15 for a description of the
severity levels).
Submodule
Displays the name of the submodule where the error occurred.
Filename
Displays the name of the file where the error occurred. Cisco technical support
engineers use this information for troubleshooting.
Line
Describes the exact line where the error occurred. Cisco technical support
engineers use this information for troubleshooting.
Message
Displays the text of the error message.
Note
Step 4
Error Log Descriptions
Each NE service and PM service has an error level selection. For example, choose Control
Panel > NE Service or PM Service > MGX8850 or MGX8880. In the Error Level drop-down
list, choose the error level to include in the Error Log for the selected NE service or PM service.
Click Save.
You can filter the Error Log data according to criteria that you select and to display the results in the
Error Log table. Table 9-14 details the options available:
Table 9-14
Error Log Filter Dialog Box Descriptions
Tab
Description
Time Stamp (time
zone)
Allows you to filter Error Log data for a specified time period, ranging from the
past hour to the past 6 months. You can click the User Specified radio button to
specify an exact filter starting and ending time by month, day, year, and hour. The
time zone can be Greenwich mean time (GMT), a user-defined offset from GMT,
or local time, depending on what is specified in the User Preferences dialog box.
If you want to filter Error Log data and the time period is not important, click No
Time Specified.
Modules
Allows you to filter Error Log data by Cisco MGM module.
Submodules
Allows you to select Cisco MGM server submodules to filter Error Log data.
Severity
Allows you to filter Error Log data based on severity level: Critical, Major,
Minor, and Informational.
Cisco Media Gateway Manager 5.0 User Guide
OL-5461-02
9-41
Chapter 9
Managing Faults
How Can I Use Advanced Debugging to Find the Cause of the Fault?
The Error Log window shows Cisco MGM server error information that is useful for debugging
purposes. The Error Log captures abnormal and significant events based on severity. Table 9-15 shows
the severity levels.
Table 9-15
Severity Levels and Error Log
Severity Level
Description
critical
When set to any of these severity levels, all messages corresponding to critical,
major, and minor severity levels are logged to the database and all
informational messages are stored in the log file.
major
minor
informational
debug
trace
When set to debug or trace, all informational and higher messages are logged
to the database. All debug and trace messages are logged to the log files.
All messages are logged to the following files in the /opt/CiscoMGMServer/log directory:
Note
•
MGMTL1FWDerror.log
•
MGX8880NEService-number.log
•
MGX8880NEService-numberError.log
•
MGX8880PMService-number.log
•
MGX8880PMService-numberError.log
•
UnmanagedNEService-number.log
•
UnmanagedNEService-numberError.log
•
SnmpTrapService.log
•
SnmpTrapServiceError.log
•
CORBAGWService.log
•
CORBAGWServiceError.log
The default directory /opt/CiscoMGMServer may have been changed during installation of the
Cisco MGM server.
After resetting the Error Log level to critical, major, minor, or informational, remove the log files to free
disk space. Each time a new log file is started, a backup of the previous file is kept in the log-file.bak
file. Remove the backup file at any time.
9.6.3 Setting Debug Options
In Cisco MGM, the debug option gives you information to investigate, diagnose and fix a problem.
Note
If required, set the debug levels for specific Cisco MGX NE backend processes by updating the debug
parameter in the configuration file for that process in the /opt/svplus/config directory. See Table 9-16.
When the changes are made, stop, then restart the Cisco MGM server.
Cisco Media Gateway Manager 5.0 User Guide
9-42
OL-5461-02
Chapter 9
Managing Faults
How Can I Use Advanced Debugging to Find the Cause of the Fault?
Table 9-16
Cisco MGM Processes and Configuration Files
Process
ConfigFile
Parameter
Range
Default
AuditLogger
AuditLogger.conf
DB_LEVEL
[1..5]
5
cmgrd
-none-
-none-
cmsvr
cmsvr.conf
LOG_LEVEL
[1..7]
7
configserver
configserver.conf
LOG_LEVEL
[1..7]
7
cwmftpd
cwmftpd.conf
LOG_LEVEL
[1..7]
7
cwmsmap
-none-
-none-
DCServer
DCServer.conf
LOG_LEVEL
[1..7]
7
dmd
dmd.conf
LOG_LEVEL
[1..7]
7
SYNCUP_LOG_LEVEL
[1..7]
4
eventd
-none-
-none-
ILMITopoc
ILMITopoc.conf
Debug Level
[1..5]
2
NMServer
NMServer.conf
LOG_LEVEL
[1..7]
7
STARTUP_LOG_LEVEL
[1..7]
7
nts
nts.conf
DEBUG_LEVEL
[1..5]
5
ooemc
emd.conf
OODebug Level
[1..7]
6
pmcollector
pmcollector.conf
LOG_LEVEL
[1..7]
7
RtmProxy
SNMPProxy.conf
-none-
sdbroker
sdbroker.conf
LOG_LEVEL
[1..7]
7
SYNCUP_LOG_LEVEL
[1..7]
4
snmpcomm
snmpcomm.conf
DEBUG_LEVEL
[1..5]
4
srtserver
srtserver.conf
LOG_LEVEL
[1..7]
7
statsparser
statsparser.conf
LOG_LEVEL
[1..7]
7
topod
Topod.conf
Debug Level
[1..5]
2
Specifying the debug options allows you to choose the parameters that will be displayed in the debug
log.
To set the debug options:
Step 1
In the Domain Explorer, choose File > Debug Options.
Step 2
Specify the debug options. The options available in the Debug Options dialog box are described in
Table 9-17.
Step 3
Click Apply.
Cisco Media Gateway Manager 5.0 User Guide
OL-5461-02
9-43
Chapter 9
Managing Faults
How Can I Use Advanced Debugging to Find the Cause of the Fault?
Table 9-17
Field Descriptions for the Debug Options Dialog Box
Field
Subfield
Description
Modules
—
Select modules that will display debug messages. Use the Add and
Remove buttons to move modules to the Selected list or remove
modules from the list.
Debug Level
Fatal
Instructs the Debug Log to display messages with a severity level of at
least Fatal.
Warning
Instructs the Debug Log to display messages with a severity level of at
least Warning.
Info
Instructs the Debug Log to display messages with a severity level of at
least Info.
Debug
Instructs the Debug Log to display messages with a severity level of at
least Debug.
Caution
Trace
Cisco MGM performance will degrade significantly if the
Debug option is left on. All operations will slow down and
you may lose alarm and event notifications. Use Debug only
when troubleshooting with a Cisco customer support
engineer.
Instructs the Debug Log to display messages with a severity level of at
least Trace.
Caution
Cisco MGM performance will degrade significantly if the
Trace option is left on. All operations will slow down and
you may lose alarm and event notifications. Use Trace only
when troubleshooting with a Cisco customer support
engineer.
Cisco Media Gateway Manager 5.0 User Guide
9-44
OL-5461-02
Chapter 9
Managing Faults
What Is the Fault Priority?
Table 9-17
Field Descriptions for the Debug Options Dialog Box (continued)
Field
Subfield
Description
Display Options
File
Check the File check box to write the Debug Log to a specific file. You
can click Browse to browse for a local client directory for the Debug
Log. After you specify the filename, the log is stored at
<filename>0.log and <filename>1.log when <filename>0.log is filled
to its maximum size.
By default, the Debug Log is saved at
C:\Cisco\MediaGatewayManagerClient<version_number>\debug\
MGMC-debug0.log or
/opt/CiscoMGMClient<version_number>/debug/MGMC-debug0.log.
The dialog box shows the filename without the number 0 or 1, which
is appended by default by the Java debugging APIs.
Note
<version_number> is replaced by the version number of the
installed Cisco MGM client.
Max File
Size
Enter the maximum file size for the Debug Log, in bytes.
Telnet
Check the Telnet check box to write the Debug Log to a Telnet port.
Note
Console
Telnet to the IP address of the Cisco MGM client workstation,
not the Cisco MGM server.
Check the Console check box to write the Debug Log to the console.
9.7 What Is the Fault Priority?
After you have gathered information about the faults, it is then important to prioritize that information.
There are several ways to determine the priority of a fault. You can simply assign a priority to an NE or
group, or you can try to derive this information from a knowledge of the network.
The priority of a fault can vary depending on a variety of factors, such as:
•
Influences outside of the network (for example, the time of day an outage occurs)
•
Amount and type of traffic that will be affected
•
Who specifically is affected by the fault
•
Potential financial consequences
You can decide to filter events. Filtering means to identify events that do not need to be processed
immediately, or might never need to be processed. Because the volume of events to be processed can be
high, it is important to filter unwanted events as soon as possible.
You can get information for prioritizing faults in the following sections:
•
9.7.1 Alarm Severity Levels
•
9.7.2 Filtering the Alarm Log
•
9.7.3 Filtering Data by Time
Cisco Media Gateway Manager 5.0 User Guide
OL-5461-02
9-45
Chapter 9
Managing Faults
What Is the Fault Priority?
9.7.1 Alarm Severity Levels
Cisco MGM supports the following alarm severities in the Alarm Browser:
•
Critical (CR)—Red
•
Major (MJ)—Orange
•
Minor (MN)—Yellow
•
Warning (WR)—Cyan (blue-green)
9.7.2 Filtering the Alarm Log
By default, the Alarm Log shows alarm and event information that occurred during the last 4 hours. Use
the drop-down menu to the right of the time-based filter tool to filter event data for the past 4 hours, past
8 hours, past 12 hours, past day, or past week.
Step 1
In the Domain Explorer Hierarchy pane, select a domain, group, or NE and choose Fault > Alarm Log.
Step 2
To set the filter time to start immediately, choose Fault > Reset All Events.
To filter the data in the log, click the Filter Data tool (or choose File > Filter). The Alarm Log Filter
dialog box contains the information detailed in Table 9-18.
Step 3
When all filter criteria have been specified, click OK to run the filter.
Table 9-18
Field Descriptions for the Alarm Log Filter Dialog Box
Tab
Description
Cisco MGM
Time Stamp
(time zone)
Allows you to filter alarm and event data for a specified time period, ranging from the
past hour to the past 6 months. Additionally, you can click the User Specified radio
button to specify an exact filter starting and ending time by month, day, year, and hour.
The time zone can be Greenwich mean time (GMT), a user-defined offset from GMT,
or local time, depending on what is specified in the User Preferences dialog box. If you
want to filter alarms and events and the time period is not important, click No Time
Specified. Click From Now Onward to set the filter time to start immediately and
continue until you change filter parameters.
Source ID
Allows you to move network elements (NEs) back and forth between the list of
Available Source IDs and Selected Source IDs and then run the Alarm Log Filter. If you
have the appropriate user permission, you can filter Cisco MGM EMS alarms and
events by selecting MGM and adding it to the Selected Source ID list.
If more than 100 NEs are selected, the Source ID tab becomes gray and all devices are
included in the filter criteria you specify.
Module Name Allows you to specify which module types you want to include in the filter. The
modules displayed depend on the NE selection in the Domain Explorer Hierarchy pane
when the Alarm Log is opened. Use the Add and Remove buttons to filter the display
to specific modules. The Alarm Log displays events for modules listed under Selected
Module Name.
Cisco Media Gateway Manager 5.0 User Guide
9-46
OL-5461-02
Chapter 9
Managing Faults
What Is the Fault Priority?
Table 9-18
Field Descriptions for the Alarm Log Filter Dialog Box (continued)
Tab
Description
Affected
Object
Allows you to specify which objects you want to include in the filter. The objects
displayed depend on the NE selection in the Domain Explorer Hierarchy pane when the
Alarm Log is opened. Use the Add and Remove buttons to filter the display to specific
objects. The Alarm Log displays events for entities listed under Selected Affected
Object.
To filter NE-specific EMS alarms, select MGM and add it to the Selected Affected
Object list.
PS
Allows you to filter data based on the perceived severity (PS) of the alarm or event.
Additionally, you can filter service affecting alarms and events, non-service affecting
alarms and events, and/or not-available alarms and events (alarms and events where the
service affecting status is not known).
Physical
Location
Allows you to filter data based on the physical location of an NE or its components. To
view the tab, an NE must be selected in the Domain Explorer Hierarchy pane. The
filters that are available depend on the NE selected.
ID
Allows you to filter data based on alarm or event ID. Enter a starting ID and an ending
ID; then, run the filter to see only the alarms or events that occurred within the specified
range of IDs. Check the Disregard All The Other Filter Criteria check box to ignore
all other filter specifications. In addition, you can filter the view to only alarms, only
events, or both alarms and events.
NE Alarm
Time (time
zone)
Allows you to filter alarm data for a specified time period, ranging from the past hour
to the past 6 months. Additionally, you can click the User Specified radio button to
specify an exact filter starting and ending time by month, day, year, and hour. The time
zone can be Greenwich mean time (GMT), a user-defined offset from GMT, or local
time, depending on what is specified in the User Preferences dialog box. If you want to
filter alarms and the time period is not important, click No Time Specified. Click From
Now Onward to set the filter time to start immediately and continue until you change
filter parameters.
9.7.3 Filtering Data by Time
Most fault management tables (for example, the Alarm Browser and Alarm Log tables) have a filter tool
for filtering data for a set of NEs. A preliminary filter is always applied based on the object selected in
the tree view or map.
To filter data by time:
Step 1
In the Domain Explorer Hierarchy pane, select the node for which to filter time-based fault management
data. Choose Fault > Alarm Browser.
Step 2
In the Alarm Browser, click the Filter Data tool (or choose File > Filter). The Filter dialog box appears.
Cisco Media Gateway Manager 5.0 User Guide
OL-5461-02
9-47
Chapter 9
Managing Faults
Who Is Responsible for Managing the Fault?
Step 3
Step 4
Note
In the Filter dialog box, click the NE Alarm Time tab. Click one of the following radio buttons:
•
Past Hour to Past Month—Filters data for a specified time period, ranging from the past hour to the
past month.
•
From Now Onward—Sets the filter time to start immediately and continue until filter parameters are
changed.
•
No Time Specified—Filters data without specifying a time period.
•
User Specified—Allows you to specify an exact filter starting and ending time by month, day, year,
and hour. The time zone can be local time, GMT, or an offset from GMT, depending on what is
specified in the User Preferences dialog box.
Click OK to show the results in the table.
Clicking Refresh Data resets the time-based filter. The filter retrieves data for the specified interval,
beginning when the Refresh Data tool is clicked. For example, if the specified interval is Past Hour and
Refresh Data is clicked at 3:02 P.M., the filter retrieves data that occurred between 2:02 P.M. and
3:02 P.M. If the specified interval is From Now Onward at 8:00 P.M., data is retrieved beginning at
8:00 P.M. and the time is reset only after From Now Onward is clicked again.
9.8 Who Is Responsible for Managing the Fault?
To manage faults effectively, you must know who is taking responsibility for managing each case.
Cisco MGM offers the following options:
•
9.8.1 Configuring Alarm Acknowledgement and Alarm Notes
•
9.8.2 Acknowledging and Unacknowledging Alarms
9.8.1 Configuring Alarm Acknowledgement and Alarm Notes
To configure alarm acknowledgment, and enable or disable the alarm note feature:
Step 1
In the Domain Explorer window, choose Administration > Control Panel and click UI Properties.
Step 2
Under fault management, select either Manual or Automatic Alarm Acknowledgement.
•
If you choose Manual Alarm Acknowledgment, alarms must be acknowledged manually. Cleared
alarms move from the Alarm Browser to the Alarm Log once they are acknowledged.
•
If you choose Automatic Alarm Acknowledgment, the server automatically acknowledges alarms
when they are cleared and moves them from the Alarm Browser to the Alarm Log.
Cisco Media Gateway Manager 5.0 User Guide
9-48
OL-5461-02
Chapter 9
Managing Faults
Who Is Responsible for Managing the Fault?
Note
Active alarms are not automatically acknowledged.
If the alarms are initially set to Manual Alarm Acknowledgement, and then you switch to
Automatic Alarm Acknowledgement, all the alarms in the Alarm Browser will be cleared
and acknowledged automatically. This might take a while, depending on the number of
alarms in the database that have not been acknowledged manually.
You can still acknowledge alarms manually even if Automatic Alarm Acknowledgment is
set.
Step 3
Use the Overwrite Alarm Notes option to enable or disable the ability to overwrite alarm notes created
by another user.
Step 4
Select either Enable or Disable Alarm Un-Acknowledgement.
Step 5
•
If you choose Enable Alarm Un-Acknowledgement, you can unacknowledge alarms in the Alarm
Browser.
•
If you choose Disable Alarm Un-Acknowledgment, alarms can only be acknowledged in the
Alarm Browser.
Click Save.
9.8.2 Acknowledging and Unacknowledging Alarms
If you enable automatic alarm acknowledgment in the Control Panel > User Interface Properties sheet,
the server automatically acknowledges alarms when they are cleared and transitions the alarms to the
Alarm Log. If you enable manual alarm acknowledgment, you manually acknowledge a cleared alarm;
then, the alarm transitions to the Alarm Log.
The alarm acknowledgement feature acknowledges selected alarms or all alarms with a single click. See
Appendix A, “Icons and Menus” for more information about alarm acknowledgment tools.
To acknowledge or unacknowledge alarms:
Step 1
In the Domain Explorer window, select an NE and choose Fault > Alarm Browser. This opens the
Alarm Browser window for the selected NE.
The Alarm Browser window lists critical, major, minor, and warning alarms that have not been cleared
or cleared alarms that have not been acknowledged.
Step 2
Select the alarms to be acknowledged and choose Fault > Acknowledge Alarms (or click the
Acknowledge Selected Alarm(s) tool). Click Yes in the confirmation dialog box. Click the Refresh
Data tool to see the changes. A check mark icon provides a visual indication of acknowledged alarms.
When cleared alarms are acknowledged, they transition from the Alarm Browser to the Alarm Log. For
more information about the Alarm Log, see the “9.9.1 Archiving Alarm Log” section on page 9-50.
Cisco Media Gateway Manager 5.0 User Guide
OL-5461-02
9-49
Chapter 9
Managing Faults
How Did You Manage the Fault?
Step 3
Click the Acknowledge Selected Alarm(s) tool again to unacknowledge the selected alarms. Click Yes
in the confirmation dialog box. Click Refresh Data to see the changes. The check mark will be removed,
indicating that the alarm has been unacknowledged.
Note
Step 4
Alarm unacknowledgement is disabled by default. Make sure to enable the alarm
unacknowledgement feature in the Control Panel before unacknowledging an alarm. See the
“9.8.1 Configuring Alarm Acknowledgement and Alarm Notes” section on page 9-48 for more
information.
To acknowledge all alarms in the view, choose Fault > Acknowledge All Alarms (or click the
Acknowledge All Alarms tool). Click Yes in the confirmation dialog box.
Choose Fault > Show Alarm Note (or click the Show Alarm Note tool) to read any comments that have
been entered for the selected alarm and to enter additional comments. You can add comments to the
previous comments, click the Append radio button. To overwrite the previous comments, click Replace.
To delete the comments, click Delete.
Note
You can enable and disable the Replace and Delete functions in the Control Panel > User
Interface Properties sheet.
9.9 How Did You Manage the Fault?
Alarm information can be useful to evaluate the actions taken, for a number of reasons:
•
How sure are you that the problem cannot recur?
•
What other devices need the same fix?
•
Do you know the root cause of the problem?
•
What can you do to prevent this problem from reoccurring?
•
What new problems could occur when you apply this fix?
In Cisco MGM, you can get information to make this assessment by doing the following:
•
9.9.1 Archiving Alarm Log
•
9.9.2 Exporting Alarms and Events to a Text File
9.9.1 Archiving Alarm Log
The Alarm Log window contains alarms that have transitioned from the Alarm Browser. In order for an
alarm to transition from the Alarm Browser to the Alarm Log, it must be cleared and acknowledged. In
addition, the Alarm Log shows all transient conditions (also known as events). Events have a single
possible severity of Indeterminate and do not have associated clear messages. Events are placed directly
into the Alarm Log. They do not appear in the Alarm Browser.
Cisco Media Gateway Manager 5.0 User Guide
9-50
OL-5461-02
Chapter 9
Managing Faults
How Did You Manage the Fault?
By default, the Alarm Log shows alarm and event information that occurred during the last 4 hours. To
view the Alarm Log:
Step 1
In the Domain Explorer Hierarchy pane, select a domain, group, or NE.
Step 2
Choose Fault > Alarm Log. The Alarm Log appears and displays the information detailed in
Table 9-19.
:
Table 9-19
Field Descriptions for the Alarm Log Window
Field
Description
ID
Unique number that the system uses to identify a particular alarm or
event.
Source ID
NE or EMS where the selected alarm or event occurred.
Affected Object
Object where the selected alarm or event occurred. For NE-specific
alarms, the affected object fields will display “MGM”. For the non-NE
specific alarms:
•
Maximum number of login attempts exceeded alarm—The affected
object field displays the user ID associated with the alarm.
•
Cisco MGM self monitor alarm—The affected object field displays
the threshold parameter associated with the alarm.
Module Name
Name of the module where the selected alarm or event occurred.
Physical Location
Physical location of the equipment where the selected alarm or event
occurred.
Probable Cause
Probable cause of the selected alarm or event.
PS
Perceived severity of the alarm before it was cleared. Severity can be
Critical, Major, Minor, Warning, or Indeterminate. The background color
of the column indicates the alarm status. A green background indicates
that the alarm is cleared.
SA
Indicates whether the alarm or event is service affecting. Values are:
•
Yes if its service affecting
•
No if its not service affecting
•
N/A if no information is provided by the NE
MGM Time Stamp (GMT)
Date and time when the alarm or event occurred on the server.
MGM Clear Time
Date and time when the alarm was cleared on the server.
MGM Duration
Amount of time required to clear an alarm
(MGM Clear Time Stamp – MGM Time Stamp) in dddd:hh:mm:ss
format.
NE Time Stamp
Date and time when the alarm or event occurred on the NE.
NE Clear Time
Date and time when the alarm or event was cleared on the NE.
Description
Brief description of the selected alarm or event. If no description is
entered, this field is blank.
Cisco Media Gateway Manager 5.0 User Guide
OL-5461-02
9-51
Chapter 9
Managing Faults
How Did You Manage the Fault?
Table 9-19
Field Descriptions for the Alarm Log Window (continued)
Field
Description
Acknowledged Username
Login name of the user who acknowledged the alarm or event.
Note
Acknowledged Time
Date and time when the alarm or event was acknowledged.
Note
Note
MGM is the username registered for alarms that are automatically
acknowledged. Automatic acknowledgement does not overwrite
the username of manually acknowledged alarms.
If the alarm acknowledgement is set to Automatic and you can
manually acknowledge an alarm, the Acknowledged Time is not
overwritten when the alarm clears.
Any notes that were entered for the selected alarm or event. This field
also shows the login name of the user who entered the note and the time
stamp when the note was entered.
9.9.2 Exporting Alarms and Events to a Text File
Use the Event Export Manager to export alarms and events to a text file as they occur. In addition, you
can use the Event Export Manager to set various export parameters to refine the export.
Step 1
In the Domain Explorer window, choose Fault > Event Export Manager.
Step 2
The Event Export Manager appears. In the Available Network Elements list, select the NEs that you
want to export and click Add. In the Selected Network Elements list, select the NEs that you do not want
to export and click Remove.
Step 3
To export Cisco MGM-specific alarms and events, check the Export Cisco MGM EMS Alarms/Events
check box.
Step 4
In the Severity area, check the Critical, Major, Minor, Warning, Indeterminate, and/or Cleared
check boxes. Alarms and events with a corresponding severity level will be exported.
Step 5
Specify a destination for the file in the Export To area. Click Browse to browse for a particular
destination. The files can also be overwritten or appended.
Step 6
Select a field separator type in the Export Options area. In addition, check the Stop Export when check
box, and enter a number of records. The Event Export Manager will stop exporting after the
user-specified number of records are exported.
Step 7
Click the Start Export tool. The Event Export Manager exports alarms and events to the specified file
until Stop Export is selected, or until the current Cisco MGM session ends.
Cisco Media Gateway Manager 5.0 User Guide
9-52
OL-5461-02
C H A P T E R
10
Managing Performance
Cisco MGM collects performance data which is used to manage and improve the performance of the
network. This chapter includes the following information:
•
10.1 What Is Performance Management?
•
10.2 What Performance Data Is Available?
•
10.3 How Is Performance Data Collected?
•
10.4 Where Can I See the Performance Data?
•
10.5 What Types of Data Reports Are Available?
•
10.6 How Is Performance Data Stored?
10.1 What Is Performance Management?
Performance management (PM) in a network is the configuration and measurement of network traffic
for the purpose of providing a consistent and predictable level of service. Performance management
involves monitoring the network activity and adjusting the design and/or the configuration of the
network in order to improve its performance and traffic handling. It provides network and system
performance reporting for determining acute and chronic problems, service level reporting and
performance optimization.
Measuring performance can identify:
•
Normal baseline network performance, which can then be compared to perceived abnormal network
behavior.
•
Current or potential utilization problems
Performance data is useful for capacity reporting when drafting budgets or considering network
redesigns. It can be used to identify congestion and trouble areas in the network that need to be relieved,
either through additional equipment or through network reconfiguration. It can also be used to identify
devices that are being underutilized or have available chassis slots.
Performance measurement includes:
•
Performance monitoring—The collection of performance-related data from network devices. This
data is useful for fine-tuning the performance of the device and for monitoring potentially service
affecting problems.
•
Performance reporting—The presentation of the collected data, which can then be used to analyze
faults, growth, and capacity of the network.
Cisco Media Gateway Manager 5.0 User Guide
OL-5461-02
10-1
Chapter 10
Managing Performance
What Performance Data Is Available?
The performance management process is as follows:
1.
Gather network data and statistics
2.
Analyze network performance and identify network critical issues
3.
Optimize network performance
4.
Plan customer capacity
5.
Plan network capacity
10.2 What Performance Data Is Available?
The following areas of performance are useful for measurement:
•
Availability—The amount of time for which a network system or application is available to the user.
From a network perspective, availability is the reliability of the individual components in the
network. Accurately measuring availability of a distributed network is difficult and not very
practical.
•
Accuracy—The amount of interface traffic that does not result in error. Accuracy can be expressed
in terms of a percentage that compares the success rate to the total packet rate over a period of time.
A decreased accuracy rate should be used to trigger a closer investigation of the network.
•
Utilization—Measures the use of a particular resource over time. Utilization is usually expressed as
a percentage of a resource's maximum operational capacity. It can be used to identify congestion or
potential congestion throughout the network, as well as underutilized resources. Sudden jumps in
resource utilization can indicate a fault condition.
With Cisco MGM, you can view performance management data sorted by:
•
NE model
•
Performance management type
•
Performance management category
Note
An alarm is generated for every piece of lost performance management data for the Cisco MGX8880, or
Cisco MGX8850. A PM Lost Alarm 15 Min is generated when Cisco MGM is unable to collect
performance management data for 15 minutes when the NE’s performance management collection is
enabled. If there are outstanding performance management 15 Min Retrieval Fail Alarms, these alarms
are manually cleared and the performance management 15 Min Lost performance management Bucket
Alarm is generated.
Note
Make sure that the NE and the Cisco MGM server are synchronized. The NE generates performance
management statistics at 15-minute intervals.
Cisco MGM also collects statistics which can be viewed using the Statistics Report. Statistics are
numerical values derived from the contents of event counters that are located on the service modules in
the switch. The counters record the number of occurrences for a particular network event. A single
switch contains separate counters for hundreds of discrete network events.
The event counters on the service modules continue to accumulate the counts of network events whether
or not the counters are ever read by an Operator or collected by the Cisco MGM station. If the content
of a counter is read by you or by another application, the counter value is defined as a statistic. A single
Cisco Media Gateway Manager 5.0 User Guide
10-2
OL-5461-02
Chapter 10
Managing Performance
What Performance Data Is Available?
statistic refers to a counter value for a single entity, for example, a line. If you enable statistics on an NE
that has 100 lines, you are dealing with 100 entities that are associated with separate sets of counters. If
you requested Cisco MGM to collect statistics for that NE, this will collect all the counter values for all
the lines under that NE. If each line has 10 counters, this results in the collection of 1000 statistic values
from that NE alone on every collection cycle.
Table 10-1 lists the types of statistics.
Table 10-1
Statistics Types
Name
Description
Summary Statistics
Specifies that the summary statistics are accessible through the command line interface (CLI), for
example, the dspchancnt command on the Cisco MGX nodes. See Appendix D, “Statistics
Summary.”
Summary statistics, which is also referred as real-time statistics, can also be accessed using SNMP
through the Diagnostic Center. Summary or real-time statistics are not collected by Cisco MGM.
Note
Interval Statistics
The statistics name and statistics value for the real-time counters are also used for fault
management. See Chapter 9, “Managing Faults,” and Appendix E, “Real-Time Counters.”
Provides a record of the number of events over the previous 15 minutes.
Interval statistics are also known as history statistics, and are derived from the same event counters as
summary statistics.
Note
Interval statistics are collected by Cisco MGM using FTP.
The following subtypes are supported:
The following statistic examples are used:
•
Performance monitoring at network and element levels
•
Resource and capacity planning
•
Threshold crossing alerts, for example, alarms
•
Usage records for billing
•
Traffic management
This section includes the following information:
•
10.2.1 Types of Report
10.2.1 Types of Report
Reports of the statistics data that are collected from the switch are viewed in the Statistics Report.
Choose Performance MG8880/8850 MG > Statistics Report. Drag the NE to the right-hand pane to
display the statistics. The following report functions are available in the drop down list:
•
10.2.1.1 Raw Data Report
•
10.2.1.2 Utilization Data Report
•
10.2.1.3 Performance Data Report
Cisco Media Gateway Manager 5.0 User Guide
OL-5461-02
10-3
Chapter 10
Managing Performance
What Performance Data Is Available?
10.2.1.1 Raw Data Report
Raw Data Report selects and displays statistics data from the database:
•
Lines
•
Cards
•
Ports
•
PhysLine (physical lines)
•
IMA
•
Paths
•
Connections
•
Protocol
•
PNNI Statistics
By using the Raw Data Report, you can:
•
Select the statistics for the report and time period.
•
Display statistics information by viewing the object description, for example, port, line, and card,
time period for the statistics collected, statistics type, statistics value, and peak value.
•
Generate a report for multiple objects, for example, ports of different cards with different statistics.
•
Export data into .csv format file.
•
Modify the report parameters and regenerate the report.
•
List the endpoint for the selected port for the Raw Data Report on connections.
10.2.1.2 Utilization Data Report
Depending on the selected object, the Utilization Data Report lists the top utilized connections, and
ports.
The Utilization Data Report supports Port Utilization Reports and VXSM Connection Reports.
You can use the utilization of an object to display a list of top utilized objects. The utilization for any
object is calculated as a sum of percent bytes from the network and the percent bytes are transmitted to
the network.
10.2.1.3 Performance Data Report
The Performance Data Report provides performance numbers for ports in a graphical format. Port Traffic
Summary performance report types are supported.
All the performance numbers are given as an average over the time period. The following performance
percentages are plotted:
•
Total number of cells received
•
Total number of cells transmitted
•
Time in service
Cisco Media Gateway Manager 5.0 User Guide
10-4
OL-5461-02
Chapter 10
Managing Performance
How Is Performance Data Collected?
10.3 How Is Performance Data Collected?
Performance data collection is the process of collecting performance-related data from network devices
and storing them in a database or data file. This information can then be used for locating, diagnosing,
and correcting network problems to increase network reliability and effectiveness, and to ensure that
fault management can be more than just handling emergencies. The data can also be used to increase the
productivity of network users.
This section includes the following information:
•
10.3.1 Enabling or Disabling Performance Monitoring
•
10.3.2 Self Monitor Table
•
10.3.3 Activating or Deactivating Performance Monitoring
10.3.1 Enabling or Disabling Performance Monitoring
Performance monitoring is optional, but you must enable it if you want to collect performance
parameters.
Note
Performance management data collection is resource intensive in terms of CPU, disk space, and data
communications network (DCN) utilization, so you should exercise proper planning and resource
monitoring when you are using the performance management collection feature of Cisco MGM.
PM data collection for individual NEs can be enabled or disabled as follows:
Step 1
In the Domain Explorer window, select the NE node for which to stop or start PM data collection. The
Network Element Properties sheet appears.
Step 2
In the PM Collection area of the Status tab of the Network Element Properties sheet, set the PM data
collection state to 15 Min. Check this box to enable collection of PM data every 15 minutes. Uncheck to
disable PM collection.
Step 3
Click Save to save changes to the database. The changes take effect immediately.
10.3.2 Self Monitor Table
When Cisco MGM comes close to or exceeds the limits of its performance, it might result in a reduction
in the response time of the system. In this case, error messages are displayed to inform the user to restore
normal operation. The Self Monitor Table allows users to monitor parameters that help in determining
when Cisco MGM is close to the limit of its performance. See Figure 10-1.
Self monitoring can be used for CPU usage, memory usage, and disk usage. You can filter the Self
Monitor Table on the collection time, and/or the parameter name.
To view the Self Monitor Table, at the top level of the Hierarchy pane in the Domain Explorer, choose
Administration > Self Monitor. The Self Monitor Table appears, see Table 10-2 for details.
Cisco Media Gateway Manager 5.0 User Guide
OL-5461-02
10-5
Chapter 10
Managing Performance
How Is Performance Data Collected?
Figure 10-1
Table 10-2
Self Monitor Table
Self Monitor Table Descriptions
Column Name
Description
NE ID
Displays the name of the EMS (MGM).
Parameter Name
Displays the name of the parameter. See the Alarm Configuration
property sheet in the Control Panel for a list of monitored parameters.
Model Type
As NE model types are not applicable, “System” is displayed as the model
type.
Collection Time
Displays the time in Greenwich Mean Time, a user-defined offset from
Greenwich Mean Time (GMT), or local time, depending on what is
specified in the User Preferences dialog box when Cisco MGM collected
the parameter data.
Note
Value
Cisco MGM automatically updates the time display for daylight
saving time.
Displays the value of the selected parameter.
10.3.2.1 Filtering the Self Monitor Table
The Self Monitor Table Filter allows you to filter the information displayed on the Self Monitor Table.
It consists of the following tabs: Collection Time, Model Type, and Parameter Name. Table 10-3
describes the tabs within the Self Monitor Table Filter.
Cisco Media Gateway Manager 5.0 User Guide
10-6
OL-5461-02
Chapter 10
Managing Performance
How Is Performance Data Collected?
Table 10-3
Self Monitor Table Filter Descriptions
Tab
Description
Collection Time
(time zone)
Allows you to filter data for a specified time period, ranging from the past hour to
the past 180 days. Additionally, you can click the User Specified radio button to
specify an exact filter starting and ending time by month, day, year, and hour. The
time zone can be Greenwich Mean Time (GMT), a user-defined offset from GMT,
or local time, depending on what is specified in the User Preferences dialog box.
If you want to filter data and the time period is not important, click No Time
Specified.
Note
Cisco MGM automatically updates the time display for daylight saving
time.
Model Type
As NE model types are not applicable, “System” is displayed as the model type.
Parameter Name
Allows you to move parameters back and forth between the list of available
parameter names and selected parameter names. The filter runs on the parameters
in the Selected Parameter Names list.
10.3.3 Activating or Deactivating Performance Monitoring
The PM Service property sheet allows users to activate or deactivate global performance management
data collection and change NE performance management collection parameters.
To activate or deactivate PM Services for an NE model:
Step 1
In the Domain Explorer window, choose Administration > Control Panel.
Step 2
In the Control Panel window, expand PM Service.
Step 3
Select an NE type to open the PM Service property sheet. Choose MGX 8880/8850 MG.
Step 4
All the NEs monitored by the server stop collecting performance management data if the Deactivate
button is clicked in the Status area. (Notice that the service status toggles to Not Active.) Click Activate
to resume performance management data collection. The Activate or Deactivate button is in the PM
Service property sheet of the MGX8850, and MGX8880 NEs.
Note
Step 5
If you need to activate or deactivate the PM Service again, go to the Service Monitor Table
(choose Administration > Service Monitor in the Domain Explorer) to verify that the service
has stopped or started before clicking the Activate or Deactivate button again.
Ensure that the PM Service has started. In the Domain Explorer, choose Administration >
Service Monitor. The Service Monitor Table should include an entry for the relevant PM Service.
Cisco Media Gateway Manager 5.0 User Guide
OL-5461-02
10-7
Chapter 10
Managing Performance
Where Can I See the Performance Data?
10.4 Where Can I See the Performance Data?
Cisco MGM gives you the power to collect large amounts of performance data, so it is important that
you be able to display only the required data. Data can be displayed in normal mode, where all
performance data is collected and displayed in the PM data tables.
To optimize the usefulness of the performance data, you can filter it to view just the data for a set of NEs
or a particular NE model, or to view data by performance category; for example, SONET.
PM data collection is every 15 minutes. You can also specify the PM data collection viewing interval.
For example, you may choose to view the PM data that was collected every 15 minutes for the past four
hours.
PM Services is activated by default. Refer to 10.3.3 Activating or Deactivating Performance Monitoring
to activate PM Services in Cisco MGM. Before viewing PM data, make sure that PM data collection is
enabled in Cisco MGM. See 10.3.1 Enabling or Disabling Performance Monitoring.
This section includes the following information:
•
10.4.1 Using the Statistics Report
10.4.1 Using the Statistics Report
To launch the Statistics Report, you can:
•
In the Domain Explorer, choose Performance > MGX 8880/8850 MG > Statistics Report.
•
Click the Statistics Report icon from the Diagnostic Center, Chassis View, or Configuration
Center.
•
Choose Tools > Statistics Report from the Diagnostic Center, Chassis View, or Configuration
Center.
•
Right-click an NE and choose Tools > Statistics Report from the Diagnostic Center, Chassis View,
or Configuration Center.
The Statistics Report window has two panes:
•
Report Parameters—Displays the name for each statistic along with the time period parameters in
GMT, a user-defined offset from GMT, or local time, depending on what is specified in the User
Preferences dialog box.
Note
•
Cisco MGM automatically updates the time display for daylight saving time.
Report Data—Displays the parameters for the report data.
You can use the Statistics Report to view reports of statistics data that are collected from the switch.
Note
RPM cards are not supported for the Statistics Report.
Table 10-4 lists the report types that are supported for each network element from the Hierarchy pane.
Cisco Media Gateway Manager 5.0 User Guide
10-8
OL-5461-02
Chapter 10
Managing Performance
What Types of Data Reports Are Available?
Table 10-4
Report Types for Each Network Element
Network Element
Report Types
Network
Supports the following report types:
Node
Card
•
Raw Data Report for cards, lines, ports, physical lines, protocol, and PNNI, in
the network.
•
Performance Data Report for ports in the network.
•
Utilization Data Report for ports in the network.
Supports the following report type:
•
Raw Data Report for cards, lines, ports, physical lines, protocol, and PNNI, on
the node.
•
Performance Data Report for ports on the node.
•
Utilization Data Report for ports on the node.
Supports the following report type:
•
Port
Line
Supports the following report types:
•
Raw Data Report for ports and connections on the selected port.
•
Performance Data Report for connections on the selected port.
•
Utilization Data Report for connections on the selected port.
Supports the following report types:
•
Paths
Raw Data Report for all ports, protocol, and physical lines on the card.
Raw Data Report for the line. If applicable, additional statistics are shown for
physical lines.
Supports the Raw Data Report for paths.
10.5 What Types of Data Reports Are Available?
When performance data has been collected, the next step is to generate reports to present the data in the
most useful form; for example, as a summary for an at-a-glance indication of the health of the network,
or as an in-depth detailed report for analysis.
An at-a-glance report can provide quick information on any fault or failure on the network.
A more detailed report can be generated to help you understand traffic flows and how traffic changes
over time.
Performance data stored in the database can be plotted using a maximum of three PM parameters on
three consecutive graphs. The graphs can be printed using the PM table’s Print option.
This section includes the following information:
•
10.5.1 Viewing Raw Data Reports
•
10.5.2 Viewing Utilization Data
•
10.5.3 Viewing Performance Data Reports
•
10.5.4 Exporting the Data Report
Cisco Media Gateway Manager 5.0 User Guide
OL-5461-02
10-9
Chapter 10
Managing Performance
What Types of Data Reports Are Available?
10.5.1 Viewing Raw Data Reports
The Raw Data Report Parameters pane in the Statistics Report displays the history statistics data for the
selected statistics and the time period parameters. You can select the statistics from the different cards,
for example, service lines, and physical lines, which are applicable for a line type.
These tasks are used to configure the Raw Data Reports:
•
10.5.1.1 Generating a Raw Data Report
•
10.5.1.2 Exporting the Raw Data Report
•
10.5.1.3 Generating a Raw Data Report for Connection Endpoints
For more information on the supported objects for each report type, see Table 10-4.
10.5.1.1 Generating a Raw Data Report
Multiple Raw Data Reports can be generated at the same time.
To generate the Raw Data Report at the node level:
Step 1
In the Statistics Report, move the node from the Hierarchy pane to the right hand pane.
Step 2
Choose Raw Data Report from the drop-down arrow. See Figure 10-2.
Step 3
Choose the Raw Data Report types from the drop-down arrow.
Step 4
Choose the Report Parameter type from the drop-down arrow.
Step 5
Check the check box to activate the selected statistics for the chosen report parameter. To activate all the
statistics, check the Select check box.
Note
Step 6
If you choose a different report parameter type and did not uncheck the statistics from the
previous report parameter, the previous checked statistics are also reported. You must uncheck
all the statistics before you choose a different report parameter.
From the Time Period Parameters area:
a.
Choose one of the following time period schedules:
– TOD (Time of Day). This value is specified by the user.
– Prev Hour
– Prev Day
– Prev Week
Step 7
b.
Enter the start date in dd/mm/yyyy in the Start Date field.
c.
Enter the start time in h:mm in the Start Time field.
d.
Enter the end date in dd/mm/yyyy in the End Date field.
e.
Enter the start time in h:mm in the End Time field.
Click Generate Report to generate the Raw Data Report with the given parameters.
After receiving all the data, you can verify that the report is completely generated from the status bar. If
no data is available, the status bar reports that the Raw Data Report has no data to report.
Cisco Media Gateway Manager 5.0 User Guide
10-10
OL-5461-02
Chapter 10
Managing Performance
What Types of Data Reports Are Available?
Note
If you want to stop generating the Raw Data Report, click Stop Report Generation.
Figure 10-2
Statistics Report Window—Raw Data Report
10.5.1.2 Exporting the Raw Data Report
After generating the Raw Data Report, you can verify that the report is exported. To export the Raw Data
Report at the node level, see the “10.5.4 Exporting the Data Report” section on page 10-21.
10.5.1.3 Generating a Raw Data Report for Connection Endpoints
You can also select a port in the Statistics Report and retrieve all the connections for the port. All the
connection data reports are retrieved for the Raw Data Report, Utilization Data Report, and Performance
Data Report at the same time.
To generate the Raw Data Report for connection endpoints:
Step 1
In the Domain Explorer, choose Configuration > MGX 8880/8850 MG > Configuration Center to
open the Configuration Center.
Step 2
Click the Connections tab.
Step 3
Drag the node from the hierarchy to the right hand pane to display Connection Browser window.
Cisco Media Gateway Manager 5.0 User Guide
OL-5461-02
10-11
Chapter 10
Managing Performance
What Types of Data Reports Are Available?
Step 4
Click the Connection List tab, enter the number of connections you want to retrieve in the Connection
Count to be retrieved field. To retrieve all the connections, enter *.
Step 5
Click Get to retrieve the connections. For example, you can retrieve connections for both local and
remote endpoints for the node.
The Connection Browser window appears with the number of connections matching the filtering criteria.
A list of connections that have either local or remote endpoints are displayed in the connection list.
Step 6
Right-click the connection type from the list of connections and choose Statistics Report.
Step 7
Choose Raw Data Report from the drop-down arrow.
Step 8
Choose Raw Data Report for Conn from the drop-down arrow.
Step 9
Choose the Report Parameter Connection type from the drop-down arrow.
Step 10
Check the check box to activate the selected statistics. To activate all the statistics, check the Select
check box.
Note
Step 11
If you choose a different report parameter type and did not uncheck the statistics from the
previous report parameter, the previous checked statistics are also reported. You must uncheck
all the statistics before you choose a different report parameter.
From the Time Period Parameters area:
a.
Choose one of the following time period schedules:
– TOD (Time of Day). This value is specified by the user.
– Prev Hour
– Prev Day
– Prev Week
Step 12
b.
Enter the start date in dd/mm/yyyy in the Start Date field.
c.
Enter the start time in h:mm in the Start Time field.
d.
Enter the end date in dd/mm/yyyy in the End Date field.
e.
Enter the start time in h:mm in the End Time field.
Click Generate Report to generate connection end point reports with the given parameters.
After receiving all the data, you can verify that the connection endpoint list for the selected port is
displayed.
If no data is available, the status bar reports that the Raw Data Report has no data to report.
Note
If you want to stop generating the Raw Data Report, click Stop Report Generation.
Cisco Media Gateway Manager 5.0 User Guide
10-12
OL-5461-02
Chapter 10
Managing Performance
What Types of Data Reports Are Available?
10.5.2 Viewing Utilization Data
The Utilization Data Report verifies all ports, and connections. Utilization is based on percentage of
total bits received in seconds and total bits transmitted in seconds. You specify the parameters listed that
crosses the threshold value.
These tasks are used to configure Utilization Data Reports:
•
10.5.2.1 Calculating the Percent Utilization for Top Utilization Reports
•
10.5.2.2 Generating a Utilization Data Report
•
10.5.2.3 Exporting the Utilization Data Report
•
10.5.2.4 Generating a Utilization Data Report for Connection Endpoints
For more information on the supported objects for each report type, see Table 10-4.
10.5.2.1 Calculating the Percent Utilization for Top Utilization Reports
For percent utilization, the data is aggregated over a time period specified in the report.
Table 10-5 lists the calculations for the ports, and connections.
Table 10-5
Percent Utilization Calculations for Top Utilization Reports
Type
Calculation
Ports
Percent bytes received from the network (number of packets or cells) received per
second or port speed) * 100
Percent bytes transmitted to the network (number of packets or cells) transmitted
per second or port speed) * 100
Percent utilization of the port = percent bytes received from the network +
percent bytes transmitted to the network
Table 10-6 lists the method conversion that are used to convert to bps.
Table 10-6
Method Conversion for Endpoints
Endpoint
Method Conversion
ATM
Convert cells received to bps by using the conversion formula, for example, each cell
has a 48 B payload.
bps = (number cells received / (bucket interval * 60)) * 48 * 8
Voice and Data
Convert packets to bits per second (each packet has 24 bytes)
bps = ((number packets received / (bucket interval * 60)) * 24 * 8
Cisco Media Gateway Manager 5.0 User Guide
OL-5461-02
10-13
Chapter 10
Managing Performance
What Types of Data Reports Are Available?
10.5.2.2 Generating a Utilization Data Report
Multiple Utilization Data Reports can be generated at the same time.
To generate a Utilization Data Report at the node level:
Step 1
In the Statistics Report, move the node from the Hierarchy pane to the right hand pane.
Step 2
Choose Utilization Data Report from the drop-down arrow. See Figure 10-3.
Step 3
Choose Utilization Report for Port from the drop-down arrow.
Step 4
Enter the threshold percentage in the Utilization Threshold Percentage field.
Note
Step 5
The threshold is the minimum utilization percentage after which you want to report, for example,
a 90% threshold report details data of >90%.
From the Time Period Parameters area:
a.
Choose one of the following time period schedules:
– TOD (Time of Day) This value is specified by the user.
– Prev Hour
– Prev Day
– Prev Week
Step 6
b.
Enter the start date in dd/mm/yyyy in the Start Date field.
c.
Enter the start time in h:mm in the Start Time field.
d.
Enter the end date in dd/mm/yyyy in the End Date field.
e.
Enter the start time in h:mm in the End Time field.
Click Generate Report to generate the Utilization Data Report for the threshold percentage.
Note
If the Utilization Data Report lists more than 100 results, you must change the parameters and
narrow the query.
After receiving all the data, you can verify the data by using the formula conversions (see Table 10-5 and
Table 10-6). If no data is available, the status bar reports that the Utilization Data Report has no data to
report.
Note
If you want to stop generating the Utilization Data Report, click Stop Report Generation.
Cisco Media Gateway Manager 5.0 User Guide
10-14
OL-5461-02
Chapter 10
Managing Performance
What Types of Data Reports Are Available?
Figure 10-3
Statistics Report Window—Utilization Report
10.5.2.3 Exporting the Utilization Data Report
After generating the Utilization Data Report, you can verify that the report is exported. To export the
Utilization Data Report at the node level, see the “10.5.4 Exporting the Data Report” section on
page 10-21.
10.5.2.4 Generating a Utilization Data Report for Connection Endpoints
You can also select a port in the Statistics Report and retrieve all the connections for the port. All the
connection data reports are retrieved for the Raw Data Report, Utilization Data Report, and Performance
Data Report at the same time.
To generate the Utilization Data Report for connection endpoints:
Step 1
In the Domain Explorer, click the node and choose Configuration > MGX 8880/8850
MG >Configuration Center.
Step 2
In Configuration Center, click the Connections tab.
Step 3
Drag the node to the right hand pane to display the Connection Browser window. Click the Connection
List tab.
Step 4
Enter the number of connections you want to retrieve in the Connection Count to be retrieved field.
To retrieve all the connections, enter *.
Cisco Media Gateway Manager 5.0 User Guide
OL-5461-02
10-15
Chapter 10
Managing Performance
What Types of Data Reports Are Available?
Step 5
Click Get to retrieve the connections. For example, you can retrieve connections for both local and
remote endpoints for the node.
The Connection Browser window appears with the number of connections matching the filtering criteria.
A list of connections that have either local or remote endpoints are displayed in the connection list.
Step 6
Right-click the connection type from the list of connections and choose Statistics Report.
Step 7
Choose Utilization Data Report from the drop-down arrow.
The Utilization Data Report Connections window is displayed.
Step 8
Choose Utilization Data Report from the drop-down arrow:
Step 9
Choose Utilization Report for Conn from the drop-down arrow.
Step 10
Enter the threshold percentage in the Utilization Threshold Percentage field.
Step 11
From the Time Period Parameters area:
a.
Choose one of the following time period schedules:
– TOD (Time of Day) This value is specified by the user.
– Prev Hour
– Prev Day
– Prev Week
Step 12
b.
Enter the start date in dd/mm/yyyy in the Start Date field.
c.
Enter the start time in h:mm in the Start Time field.
d.
Enter the end date in dd/mm/yyyy in the End Date field.
e.
Enter the start time in h:mm in the End Time field.
Click Generate Report to generate the Utilization Data Report for the threshold percentage.
Note
If the Utilization Data Report lists more than 100 results, you must change the parameters and
narrow the query.
The Utilization Data Report shows the connections that have crossed the specified threshold. After
receiving all the data, you can verify the data by using the formula conversions (see Table 10-5 and
Table 10-6). If no data is available, the status bar reports that the Utilization Data Report has no data to
report.
10.5.3 Viewing Performance Data Reports
Table 10-7 lists the performance data information in a given time period for the selected object.
Table 10-7
Performance Data Report Information
Object Type
Description
Ports
Displays both receive percentage and transmit percentage.
Connections
Displays both local and remote endpoints for receive percentage and transmit
percentage along with service in sec.
Cisco Media Gateway Manager 5.0 User Guide
10-16
OL-5461-02
Chapter 10
Managing Performance
What Types of Data Reports Are Available?
For more information on the supported objects for each report type, see Table 10-4.
These tasks are used to configure Performance Data Reports:
•
10.5.3.1 Calculating the Statistics Percentages for the Performance Data Report
•
10.5.3.2 Generating the Performance Data Report for a Port
•
10.5.3.3 Displaying Performance Data Report for a Port
•
10.5.3.4 Generating the Performance Data Report for Connections
•
10.5.3.5 Displaying Performance Data Report for Connections
10.5.3.1 Calculating the Statistics Percentages for the Performance Data Report
You can calculate the statistics percentages for the Performance Data Report.
Table 10-8 lists the statistics for the port performance.
Table 10-8
Port Performance Statistics
Port Type
Percentage Bytes Received (Stats ID)
Percentage Bytes Transmitted (Stats ID)
Cisco MGX 8880 (VXSM)
ING CLP0 tramsmitted (0) + ING CLP1 EGR CLP0 tramsmitted(6) + EGR CLP1
transmitted (1)
transmitted (7)
Cisco MGX 8850 (PXM45) ATM
(AXSM)
Egress CLP0 Cells From backplane (6) + Ingress CLP0 Cells to backplane (4) +
Egress CLP1 Cells From backplane (7)
Ingress CLP1 Cells to backplane (5)
Cisco MGX 8850 (PXM45) ATM
(AXSM-E)
CLP0 cells transmitted (Ingress) (61) +
CLP1 cells transmitted (Ingress) (62)
CLP0 cells transmitted(0) + CLP1 cells
transmitted(1)
Cisco MGX 8850 (PXM45)
Bytes Received (1)
Bytes Transmitted (10)
Table 10-9 lists the statistics for connection performance.
Table 10-9
Connection Performance Statistics
Percentage Bytes Received (Stats Percentage Bytes Transmitted
ID)
(Stats ID)
Percentage of Time in
Service (Stats ID)
Cisco MGX 8880
(VXSM)
No. ingress cells to network (0)
No. egress cells to network (5)
—
Cisco MGX 8880
(VISM-PR)
Total num cells recieved (1)
Total num cells Tx (0)
—
Cisco MGX 8850
(PXM45) AXSM
Ingress CLP0 Cells From Port +
Ingress
Egress CLP0 Cells to Port(7) + —
Egress
Endpoint Type
CLP1 Cells From Port) - (Ingress CLP1 Cells to Port(8)
CLP0+1 cells discarded)
Cisco MGX 8850
(PXM45) AXSM-E
CLP0 cells from port (5)+ CLP1
cells from port (6)
CLP1 cells to the port(19) +
CLP1 cells to the port (20)
—
Cisco Media Gateway Manager 5.0 User Guide
OL-5461-02
10-17
Chapter 10
Managing Performance
What Types of Data Reports Are Available?
10.5.3.2 Generating the Performance Data Report for a Port
Multiple Performance Data Reports can be generated at the same time.
To generate the Performance Data Report at the port level:
Step 1
In the Statistics Report Tool, drag the port from the Hierarchy pane to the right hand pane.
Step 2
Choose Performance Data Report from the drop-down arrow. See Figure 10-4.
Step 3
Choose Performance Data Report for Port from the drop-down arrow.
Step 4
From the Time Period Parameters area:
a.
Choose one of the following time period schedules:
– TOD (Time of Day) This value is specified by the user.
– Prev Hour
– Prev Day
– Prev Week
Step 5
Note
b.
Enter the start date in dd/mm/yyyy in the Start Date field.
c.
Enter the start time in h:mm in the Start Time field.
d.
Enter the end date in dd/mm/yyyy in the End Date field.
e.
Enter the start time in h:mm in the End Time field.
Click Generate Report to generate the Performance Data Report for the port. If no data is available, the
status bar reports that the Performance Data Report has no data to report.
I f you want to stop generating the Performance Data Report, click Stop Report Generation.
Cisco Media Gateway Manager 5.0 User Guide
10-18
OL-5461-02
Chapter 10
Managing Performance
What Types of Data Reports Are Available?
Figure 10-4
Statistics Report Window—Performance Data Report
10.5.3.3 Displaying Performance Data Report for a Port
After you finished generating the Performance Data Report (see 10.5.3.2 Generating the Performance
Data Report for a Port), you must ensure that the graphical information is correct. For example, you must
verify that the report shows the correct port object identifier according to the entity label specifications.
To display the graphical representation of the Performance Data Report at the port level:
Step 1
Verify the performance data information by using the formulas. For information about the formulas for
a port, see Table 10-8.
The performance data information for the port is displayed.
Step 2
Click Close to close the report summary.
10.5.3.4 Generating the Performance Data Report for Connections
You can also select a port in the Statistics Report and retrieve all the connections for the port. All the
connection data reports are retrieved for the Raw Data Report, Utilization Data Report, and Performance
Data Report at the same time.
To generate the Performance Data Report for connection endpoints:
Step 1
In Domain Explorer, select the node and choose Configuration > MGX 8880/8850 MG >
Configuration Center.
Step 2
In Configuration Center, click the Connections tab.
Cisco Media Gateway Manager 5.0 User Guide
OL-5461-02
10-19
Chapter 10
Managing Performance
What Types of Data Reports Are Available?
Step 3
Drag the node to the right hand pane to display the Connection Browser window.
Step 4
Click the Connection List tab.
Step 5
Enter the number of connections you want to retrieve in the Connection Count to be retrieved field.
To retrieve all the connections, enter *.
Step 6
Click Get to retrieve the connections. For example, you can retrieve connections for both local and
remote endpoints for the node.
The Connection Browser window appears with the number of connections matching the filtering criteria.
A list of connections that have either local or remote endpoints are displayed in the connection list.
Step 7
Right-click the connection type from the list of connections and choose Statistics Report. The Statistics
Report opens.
Step 8
Choose Performance Data Report from the drop-down arrow.
Step 9
Choose Performance Data Report for Conn from the drop-down arrow.
Step 10
From the Time Period Parameters area:
a.
Choose one of the following time period schedules:
– TOD (Time of Day) This value is specified by the user.
– Prev Hour
– Prev Day
– Prev Week
b.
Enter the start date in dd/mm/yyyy in the Start Date field.
c.
Enter the start time in h:mm in the Start Time field.
d.
Enter the end date in dd/mm/yyyy in the End Date field.
e.
Enter the start time in h:mm in the End Time field.
Step 11
Click Select Connection(s) to view the available connections.
Step 12
Select the connection.
Step 13
Click Next.
Step 14
Click Generate Report to generate the report for connection endpoints.
Note
If you want to stop generating the Performance Data Report, click Stop Report Generation.
10.5.3.5 Displaying Performance Data Report for Connections
After you finished generating the Performance Data Report, you must ensure that the report displays one
chart for the connection local endpoint performance data and the other chart for the connection remote
endpoint performance data.
To display the graphical representation of the Performance Data Report for connection endpoints:
Step 1
Verify the performance data information by using the formulas. For information about the formulas for
a port, see Table 10-8.
The performance data information for connection endpoints is displayed.
Cisco Media Gateway Manager 5.0 User Guide
10-20
OL-5461-02
Chapter 10
Managing Performance
How Is Performance Data Stored?
Step 2
Click Close to close the report summary.
10.5.4 Exporting the Data Report
After generating the Data Report, you can verify that the report is exported.
To export the Data Report at the node level:
Step 1
After generating a raw data report, click Export Report to export the report data.
Step 2
Choose one of the following radio buttons in the Format area:
•
CSV—Specifies the format of the file that is defined as a comma-separated value (CSV).
•
Tab—Specifies the format of the file that is tab separated.
Step 3
Click Browse to select the filename and location to save the results of the query.
Step 4
Click Export to export the report data to the file.
10.6 How Is Performance Data Stored?
Performance data is stored in the Oracle9i database.
Regular collection of performance data for all traffic-bearing facilities within the network can use up a
lot of space in the database. In order to conserve disk space, you can enable and disable the collection
of performance data on a per NE basis, as well as select the performance parameters that are of interest.
You can also choose to prune the database. Cisco MGM automatically performs daily pruning of all PM
data, FM data, audit log data, audit trail data, and Error Log data older than the specified retention
period. To configure automatic database pruning:
Step 1
In the Domain Explorer window, choose Administration > Control Panel.
Step 2
In the Control Panel window, click Database Properties to open the Database Properties sheet.
Step 3
In the Database Properties sheet, click the Pruning tab. See Figure 10-5.
Choose PM Data. This specifies the number of days to save PM data before Cisco MGM runs the
database pruning script. You can save from 1 to 1000 days of data. The default value is 7 days. You can
also specify the time to prune the PM data by choosing the hour and the minute from the HH, MM, and
AM/PM fields. Minutes are listed in 5-minute intervals. Click Enable to activate PM data pruning.
Step 4
After making the selection, click Save. Changes take effect immediately.
You can also run database pruning scripts to prune Cisco MGM data from the Oracle database at any
given time. Pruning scripts allows users to prune all PM data. See “5.1.4 Pruning the Database” section
on page 5-13.
Cisco Media Gateway Manager 5.0 User Guide
OL-5461-02
10-21
Chapter 10
Managing Performance
How Is Performance Data Stored?
Figure 10-5
Database Properties—Pruning Tab
10.6.1 Importing and Exporting Data to and from the Oracle Database
You can use the Oracle Export utility to write data from an Oracle database to an operating system file
in binary format. The file is stored outside the database and read to another Oracle database by using the
Import utility. For more information about using Oracle Import and Export utilities, refer to the Oracle9i
Utilities document. Alternatively, use the Oracle Enterprise Manager to import and export data.
The Export utility provides a simple way to transfer data objects between Oracle databases. The Export
utility extracts the object definitions and table data from an Oracle database and stores them in an Oracle
binary-format export dump file located on disk or on tape.
The export dump file is sent by using FTP—or, if on tape, physically transported—to a different site. By
using the Import utility, the export dump file is transferred between databases that reside on machines
not connected through a network.
Note
Only the Oracle Import utility can read export dump files.
Cisco Media Gateway Manager 5.0 User Guide
10-22
OL-5461-02
C H A P T E R
11
Managing Inventory
This chapter describes inventory management, and how to use Cisco MGM to provide the required
information. This chapter contains the following sections:
•
11.1 What is Inventory Management?
Cisco MGM provides two levels of inventory reports:
•
A complete list of all the NEs that belong to a specific group or to the entire domain (see
11.2 Domain NE Tables.)
•
A detailed list of cards and modules installed on the NEs (see 11.3 Equipment Inventory Tables.)
11.1 What is Inventory Management?
Managing inventory involves maintaining a record of all of the NE resources installed in the network to
support the provisioning of services. It should include collecting information about locations, quantities
of equipment, model numbers, serial numbers, versions, installation dates and so on.
Inventory management is one of the fundamental network management functions. When forecasting
service growth or even attempting to provision a new service, it is necessary to know the current network
inventory. Can the existing inventory support the forecast growth or new service request, or must
additional equipment be ordered and installed onsite? Can your hardware support a new software
release? You will need to check the type and revision of hardware to determine the answer. Has a recall
been issued by the vendor for a certain hardware revision of a board? Are you affected? You will need
to check the inventory again.
Cisco MGM allows you to add NEs, and it discovers the details about the NE itself and the physical
inventory. Cisco MGM remains automatically synchronized with changes relating to inventory that may
occur in the network. All inventory information is stored in the Cisco MGM (Oracle) database and is
available at any time from the Cisco MGM database.
Inventory management includes the discovery of the NEs from the Element Management System (EMS),
and ongoing synchronization with the NEs. It also includes the ability to provide the inventory to a
higher level network management system (NMS) through a northbound interface.
Cisco MGM can quickly capture, display, and store an inventory of the NEs on your network. It allows
you to view information about the NEs, installed software, and software licenses. Cisco MGM also
allows you to edit the inventory information for the NEs on your network.
You can add Not Managed/Other Vendor NEs in the Domain Explorer through the Add New NE wizard,
and the NE is then represented in the Network Map.
Cisco Media Gateway Manager 5.0 User Guide
OL-5461-02
11-1
Chapter 11
Managing Inventory
Domain NE Tables
Cisco MGM allows you to export inventory reports to a flat text file with a user specified delimiter
character. This file can then be easily imported into a spreadsheet application for further analysis.
11.2 Domain NE Tables
The Domain NE tables displays an inventory of all the NEs in the Cisco MGM domain or group selected.
Based on your selection criteria, the Domain NE Table tells you which NEs are in or out of service,
available or unavailable, and so on.
11.2.1 Viewing a Domain NE Table
The Domain NE Table shows the summary information of the NEs in the domain or group.
Step 1
In the Domain Explorer, select the domain or an NE or group.
Step 2
Choose File > Domain NE Table.
Note
The Dashboard displays an NE counter icon. This counter displays the total number of NEs in
the domain. Click the counter to open the Domain NE Table, which provides an inventory of NEs
within the selected management domain.
The Domain NE Table displays an inventory of all the NEs in the domain or group selected. Based on
your selection criteria, the Domain NE Table shows which NEs are in or out of service, available or
unavailable, and so on.
Table 11-1 provides descriptions of the information displayed in the table.
Figure 11-1
Domain NE Table
Cisco Media Gateway Manager 5.0 User Guide
11-2
OL-5461-02
Chapter 11
Managing Inventory
Domain NE Tables
Table 11-1
Field Descriptions for the Domain NE Table
Field
Description
NE ID
Displays the name of the selected NE.
NE Model
Displays the NE model:Cisco MGX 8880/8850
Active IP Address
Displays the active IP address of the selected NE.
Communication State
Displays the connectivity state between Cisco MGM and the selected NE
(either Available or Unavailable).
Operational State
Displays the current operational state of the system: In Service, Under
Maintenance, or Out of Service.
PM Collection State
Indicates whether performance monitoring collection is enabled or disabled.
Values are 15 Min Enabled and 15 Min Disabled. You can configure the PM
collection state in the Domain Explorer > NE Properties sheet > Status
tab.
Version
Displays the NE software version that is running.
NE Type
Displays the type of NE.
Location Name
Displays the geographic location of the NE.
Description
Displays any information that a user entered to describe the selected NE.
11.2.2 Filtering Results in a Domain NE Table
Step 1
In the Domain Explorer Hierarchy pane, select a domain or an NE or group.
Step 2
Choose File > Domain NE Table. The Domain NE Table appears.
Step 3
Choose File > Filter or click the Filter tool. The Domain NE Table Filter dialog box appears.
Step 4
In the Domain NE Table Filter dialog box specify the criteria to display the results in the Domain NE
Table. Table 11-2 provides descriptions of the fields displayed in the window.
Step 5
Click OK. The filtered data is displayed in the Domain NE Table.
Cisco Media Gateway Manager 5.0 User Guide
OL-5461-02
11-3
Chapter 11
Managing Inventory
Equipment Inventory Tables
Table 11-2
Domain NE Table Filter Dialog Box Descriptions
Tab
Field
Description
NE ID
Available NE
ID/Selected NE ID
Displays the list of available NE IDs. Click Add and Remove to move NE IDs
to and from the Selected NE ID list.
Inventory
Communication
State
Allows you to filter NEs according to their communication state (Unavailable or
Available).
Operational State
Allows you to filter NEs according to their operational state (In Service, Out of
Service, or Under Maintenance).
PM Collection State Allows you to filter NEs according to their PM collection state (Enabled, 15 Min
Collection, Disabled).
NP ID
GNE
Allows you to filter domain inventory data based on GNE IDs. You can select
<ALL> to filter all GNE IDs, or you can choose a particular GNE ID from the
pull-down menu.
Available Network
Partitions/Selected
Network Partitions
Allows you to filter domain inventory data based on network partition. Use the
Add and Remove buttons to move network partitions to and from the Selected
Network Partitions list.
11.3 Equipment Inventory Tables
The Equipment Inventory Table displays a complete inventory of the components of the selected NE or
of the NEs in a group.
11.3.1 Viewing an Equipment Inventory Table
The Equipment Inventory Tables display a complete inventory of the components of the selected NE or
of the NEs in a selected group.
Step 1
In the Domain Explorer, select the NE or group for which you want to view inventory data, and choose
Configuration > MGX8880/8850 MG > Equipment Inventory Table. The Equipment Inventory Table
for the selected NE model appears. See Figure 11-2.
The Equipment Inventory Table displays a complete list of the Cisco MGX 8880/8850 system inventory.
Table 11-3 provides descriptions.
Cisco Media Gateway Manager 5.0 User Guide
11-4
OL-5461-02
Chapter 11
Managing Inventory
Equipment Inventory Tables
Table 11-3
Equipment Inventory Table Descriptions—Cisco MGX8880/8850
Column
Description
NE ID
Displays the name of the selected NE.
Physical Location
Displays the name of the location where the NE is installed.
MODULENAME
Displays the name of the module.
MODULEDESCRIPTION Displays any information that was previously entered to describe the
selected NE.
FCSERIALNUM
Displays the serial number of the front card.
FCHWREV
Specifies the hardware revision number of the front card.
FCSWREV
Specifies the software revision number of the front card.
FCRESETREASON
Displays the reason for resetting the front card.
MODULESTATE
Displays the state of the module.
BCNAME
Displays the name of the back card.
BCSERIALNUM
Displays the serial number of the back card.
BCHWREV
Specifies the hardware revision number of the back card.
BCSTATE
Displays the state of the back card.
SECBCNAME
Displays the name of the secondary back card.
SECBCSERIALNUM
Displays the serial number of the secondary back card.
SECBCHWREV
Specifies the hardware revision number of the secondary back card.
SECBCSTATE
Displays the state of the secondary back card.
SYNCMODE
Specifies the synchronization mode.
LOGICALSLOT
Specifies the logical slot.
SCTID
Displays the ID of the Service Class Template file identifier
SCTVERSION
Displays the version of the Service Class Template file identifier
UNITNUM
Displays the number of the unit.
GROUPNUM
Displays the group number
NEDBACCESSID
Displays the database access ID
IFINDEX
Displays the ID index.
Cisco Media Gateway Manager 5.0 User Guide
OL-5461-02
11-5
Chapter 11
Managing Inventory
Equipment Inventory Tables
Figure 11-2
Equipment Inventory Table
Cisco Media Gateway Manager 5.0 User Guide
11-6
OL-5461-02
C H A P T E R
12
Managing CORBA Interfaces
This chapter contains the following information:
Note
•
12.1 What is Cisco MGM GateWay/CORBA?
•
12.2 Using a Static CORBA Listener Port on the Cisco MGM Server
•
12.3 Configuring the CORBA Timeout
Cisco MGM GateWay/CORBA is only mentioned briefly here. For more information about Cisco
MGM GateWay/CORBA, including how to enable username and password encryption, set the heartbeat
event, and create OSS clients, refer to the Cisco Media Gateway Manager 5.0 GateWay/CORBA User
Guide and Programmer Manual.
12.1 What is Cisco MGM GateWay/CORBA?
Cisco MGM GateWay is an architectural component that provides northbound EMS-to-NMS interface
mediation. Cisco MGM GateWay allows service providers to integrate Cisco MGM with their OSSs by
using open standard interfaces.
Note
Cisco offers the CORBA (sold separately) option for Cisco MGM GateWay.
The Cisco MGM GateWay/CORBA option is a CORBA-based interface that provides higher-layer
management systems with fault, and inventory information for each NE that Cisco MGM manages. The
Cisco MGM GateWay/CORBA option is based on the TeleManagement Forum (TMF) standards for the
NMS-to-EMS interface. Cisco MGM GateWay/CORBA supports up to eight simultaneous sessions with
higher-layer management systems.
Note
For more information about Cisco MGM GateWay/CORBA, including how to enable username and
password encryption, set the Cisco MGM GateWay/CORBA heartbeat event, and create OSS clients for
Cisco MGM GateWay/CORBA, refer to the Cisco Media Gateway Manager GateWay/CORBA User
Guide and Programmer Manual.
Figure 12-1 illustrates the Cisco MGM GateWay/CORBA communications architecture within a service
provider’s OSS environment.
Cisco Media Gateway Manager 5.0 User Guide
OL-5461-02
12-1
Chapter 12
Managing CORBA Interfaces
What is Cisco MGM GateWay/CORBA?
Figure 12-1 Cisco MGM GateWay/CORBA Communications Architecture
Service provider's OSS
83273
CORBA
GIOP
IIOP
TCP
IP
Ethernet
10BASE-T
Cisco Media Gateway Manager
Cisco MGM GateWay/CORBA is based on the following TMF standards:
•
TMF513 v2.0 (October 2001): Multi-Technology Network Management Business Agreement
•
TMF608 v2.0 (October 2001): Multi-Technology Network Management Information Agreement
•
TMF814 v2.0 (October 2001): Multi-Technology Network Management Solution Set
12.1.1 Viewing the Cisco MGM GateWay/CORBA Properties Pane
Use the GateWay/CORBA Service Properties pane to stop, start, or configure Cisco MGM
GateWay/CORBA service parameters. To view the Cisco MGM GateWay/CORBA Properties pane,
from the Domain Explorer window, choose Administration > Control Panel, then choose
GateWay/CORBA Service from the hierarchy pane at left. The pane contains two tabs, Global and OSS
Clients.
12.1.1.1 Global Tab
Use the Global tab to start and stop Cisco MGM GateWay/CORBA service.
Table 12-1
Field Descriptions for GateWay/CORBA Service—Global Tab
Field
Description
Service Status
Displays the current status of the service: Active, Not Active, or Not Installed.
Service Control
Allows you to stop or start a process. Notice that the Service Control button
toggles between Stop and Start, and the Service Status field changes accordingly.
This field is not available if the Service Status is Not Installed.
Enable Encryption
for Username and
Password
When checked, usernames and passwords are transmitted between the EMS
server and the OSS in encrypted format. The maximum encryption length is 53
bytes. If this check box is unchecked, Cisco MGM GateWay/CORBA usernames
and passwords are transmitted without encryption. By default, encryption is
disabled at installation.
Cisco Media Gateway Manager 5.0 User Guide
12-2
OL-5461-02
Chapter 12
Managing CORBA Interfaces
What is Cisco MGM GateWay/CORBA?
Table 12-1
Field Descriptions for GateWay/CORBA Service—Global Tab (continued)
Field
Description
Heartbeat for
Notification
Channel
Notifies the OSS if a failure in the notification service has occurred. The
heartbeat is measured in minutes ranging from 0 to 1440 minutes. A zero value
implies that the heartbeat is disabled.
Error Level
Allows you to select the error level for the Cisco MGM GateWay/CORBA
service. Error levels are:
•
Critical
•
Major
•
Minor
•
Informational
•
Debug
•
Trace
12.1.1.2 OSS Clients Tab
Use the OSS Clients tab to view current Operations Support System (OSS) client configuration
information or to add a new OSS client. The OSS Clients tab is not displayed if the Service Status is Not
Installed.
Table 12-2
Field Descriptions for GateWay/CORBA Service—OSS Clients Tab
Field
Description
OSS Profile Name
The name of the OSS profile.
Password
The password that the OSS client uses to log into the Cisco MGM server. If you
are adding a new OSS client, the password must contain 1 to 53 characters,
including one special character (, . ; % & ! + #), at least two letters (A - Z, a z), and at least one number (0 - 9).
Confirm Password
The reconfirmed password.
OSS IP Address
The OSS IP address.
Delete button
Deletes an OSS profile from the Cisco MGM database. If a profile is deleted,
the OSS using this profile cannot connect to Cisco MGM. If the OSS is
connected to Cisco MGM when the profile is deleted, Cisco MGM will not
terminate the OSS session.
Cisco Media Gateway Manager 5.0 User Guide
OL-5461-02
12-3
Chapter 12
Managing CORBA Interfaces
Using a Static CORBA Listener Port on the Cisco MGM Server
12.1.2 Viewing the Cisco MGM GateWay/CORBA Client Configuration Table
The Cisco MGM GateWay/CORBA Client Configuration Table displays information about Operations
Support System (OSS) CORBA client properties. To view the Cisco MGM GateWay/CORBA Client
Configuration table, from the Domain Explorer window, choose Administration > Control Panel, then
choose Administration > Cisco MGM GW/CORBA Client Configuration Table.
Table 12-3 Field Descriptions for Cisco MGM GateWay/CORBA Client Configuration Table
Column Name
Description
OSS Name
Displays the name of the selected OSS client.
IP Address
Displays the IP address of the OSS client.
12.2 Using a Static CORBA Listener Port on the Cisco MGM
Server
To use a static CORBA listener port on the Cisco MGM server, proceed as follows.
Step 1
Log into the Cisco MGM server workstation as the root user.
Step 2
Change the directory to /opt/CiscoMGMServer/bin.
Note
Step 3
The default directory /opt/CiscoMGMServer may have been changed during installation of the
Cisco MGM server.
Edit the jne454.sh file by inserting a new line before the -Xbootclasspath line:
-Dong.orb.iioplistenerport=Port Number \
For example, if the port number is 5555, enter:
-Dong.orb.iioplistenerport=5555 \
Step 4
Start the Cisco MGM server.
12.3 Configuring the CORBA Timeout
The CORBA timeout determines the number of seconds that the Cisco MGM server has to process a
CORBA call and return it to the Cisco MGM client. If the Cisco MGM server does not return a response
in time, CORBA automatically times out.
Step 1
Open the ems-client.cfg file.
By default, the ems-client.cfg file is located in the C:\Cisco\MediaGatewayManagerClient\config
directory for Windows platforms and in the /opt/CiscoMGMClient/config directory for Sun Solaris
platforms.
Cisco Media Gateway Manager 5.0 User Guide
12-4
OL-5461-02
Chapter 12
Managing CORBA Interfaces
Configuring the CORBA Timeout
Step 2
Set the CORBA_Call_Timeout_Seconds parameter to the desired value. The default timeout is
120 seconds; the recommended range is 120 to 300 seconds.
Note
Step 3
If the NE is busy or if the Cisco MGM server is processing many requests, you might need to
increase the CORBA timeout parameter accordingly.
Save and close the ems-client.cfg file.
Cisco Media Gateway Manager 5.0 User Guide
OL-5461-02
12-5
Chapter 12
Managing CORBA Interfaces
Configuring the CORBA Timeout
Cisco Media Gateway Manager 5.0 User Guide
12-6
OL-5461-02
A P P E N D I X
A
Icons and Menus
This appendix describes the icons and menus used in Cisco MGM, and contains the following sections:
•
A.1 Launching Applications
•
A.2 Toolbar Options
•
A.3 Menu Options
•
A.4 Hierarchy Pane Icons
•
A.5 Inspector View Icons
•
A.6 Network Map Icons
A.1 Launching Applications
Applications in Cisco MGM can be launched from the toolbar and dashboard, as well as from menu
options. Table A-1 list the icons.
Table A-1
Cisco MGM Applications Icons
Application
Icon
Alarm Browser
Chassis View
Configuration Center
Diagnostic Center
Cisco Media Gateway Manager 5.0 User Guide
OL-5461-02
A-1
Appendix A
Icons and Menus
Toolbar Options
Table A-1
Cisco MGM Applications Icons (continued)
Application
Icon
Domain Explorer
EMS Alarm Browser
Statistics Report
A.2 Toolbar Options
The various Cisco MGM toolbar tools are described in .
Table A-2
Toolbar Tools Description
Tool
Item
Description
Acknowledge Alarms
Acknowledge the selected alarm(s). Click again to
unacknowledge the selected alarm(s). To enable alarm
unacknowledgement, go to Control Panel > UI
Properties.
Acknowledge All Alarms
Acknowledges all alarms. Click again to unacknowledge all
alarms.
Add Network Element(s)
Opens the Add New Network Element wizard, which
allows you to add a new NE or add several new NEs at once.
Alarm Browser
Opens the Alarm Browser window.
Alarm Log
Opens the Alarm Log window.
Audit Log
Opens the Audit Log window.
Cisco Media Gateway Manager 5.0 User Guide
A-2
OL-5461-02
Appendix A
Icons and Menus
Toolbar Options
Table A-2
Toolbar Tools Description (continued)
Tool
Item
Description
Cancel Job
Allows you to cancel a scheduled job. Cancel is enabled
only for jobs with a Queued status.
Cancel Task
Allows you to cancel a task.
Clear Selected Alarm(s)
Clear selected alarms. A message displays, informing you
that only PM failed and PM lost alarms on NEs in your
domain will be cleared.
Collapse
Collapses the management domain or group to hide all
groups or NEs in that management domain or group.
Commit
The Commit operation makes the standby software version
the active version if it is a later version than the active
software.
Copy
Copies the selected NE to the clipboard. The selected NE
now appears in italics.
Create a New User
Opens the Create New Cisco MGM User wizard.
Create a New User Profile
Opens the Create New User Profile wizard.
Cut
Copies the selected NE to the clipboard. The selected item
now appears in italics. The NE is not removed from its
current location until the Paste action is performed.
Delete
Deletes the selected item.
Deletes the selected user.
Duplicate User Profile
Opens the Create Duplicate Profile window, which allows
you to duplicate an existing Cisco MGM user profile.
Cisco Media Gateway Manager 5.0 User Guide
OL-5461-02
A-3
Appendix A
Icons and Menus
Toolbar Options
Table A-2
Toolbar Tools Description (continued)
Tool
Item
Description
Enable Drag
Enables drag and drop functionality for all nodes within the
Network Map window.
Enable Offview
Enables the display of off-view icons within the Network
Map window.
Error Log
Opens the Error Log window.
Expand
Expands the management domain or group to display all
groups or NEs in that management domain or group.
Export Data To File
Opens the Export dialog box.Exports data, such as alarms,
events, and error logs. Data is exported in comma-separated
values (CSV) or tab separated values (TSV) formats.
Filter
Opens a filter dialog box, which allows you to filter for
information found in the table or window.
Note
Filter Time Period
Use the percent sign (%) as a wildcard character for
filtering on substrings.
Allows you to filter using time as a parameter. As the
default, Cisco MGM displays alarm and event information
that occurred during the last four hours.
To quickly filter the time period, select the Filter Time
Period (4h) tool. You can change the default time period by
using the User Preferences dialog box. The icon displayed
in the tool bar changes according to the time period
selected.
Generate HTML Report
Allows you to generate an HTML report based on the data
in the table. You can generate a report for selected rows or
for all rows. After you have made your selection, the
browser window appears with the HTML report. Use your
browser's Print option to print the HTML report.
Help
Displays online help for the current window.
Hide Acknowledged Alarms
Hides all alarms that have been acknowledged.
Cisco Media Gateway Manager 5.0 User Guide
A-4
OL-5461-02
Appendix A
Icons and Menus
Toolbar Options
Table A-2
Toolbar Tools Description (continued)
Tool
Item
Description
Hide Cleared Alarms
Hides all alarms that have been cleared.
Launch User Profiles Table
Opens the Cisco MGM User Profiles Table.
Log Out User
Logs out the selected user from the Cisco MGM
application.
Logged in Cisco MGM Users Opens the Logged In Cisco MGM Users Table, which lists
the Cisco MGM users who are currently logged into the
Cisco MGM application.
Modify User
Opens the Modify User wizard.
Modify User Profile
Properties
Opens the Modify Cisco MGM User Profile Properties
wizard.
Network Map
Opens the Network Map window for the selected node.
New Group
Opens the New Group dialog box. From here, you can add
a new group, give the group a name, specify the group's
geographic location, and provide a brief description of the
group.
Page Back
Moves the table backward by one page if there is more than
one page of data.
Page Forward
Moves the table forward by one page if there is more than
one page of data.
Parent (also Show Parent
Network Map)
If the Network Map is open to a specific NE, clicking
Parent or Show Parent Network Map shifts the view back to
the main Network Map view.
Cisco Media Gateway Manager 5.0 User Guide
OL-5461-02
A-5
Appendix A
Icons and Menus
Toolbar Options
Table A-2
Toolbar Tools Description (continued)
Tool
Item
Description
Paste
Pastes the NE on the clipboard into the selected group.
Print Graph
Prints the graphical display.
Refresh Data
Refreshes all data being displayed by Cisco MGM. There
are two icons, and both refresh data from either the server
or the database. The Refresh Data icon with blue and red
arrow (as seen in Circuit Table) flashes when updates are
available. This icon has two modes: manual refresh and
autorefresh.
The Refresh Data icon with the “hockey puck” and red
arrow does not notify you that updates are available. You
must click the button in order to retrieve updated data.
Note
Clicking Refresh Data in the Domain Explorer
window refreshes all data for the entire
Cisco MGM client. Depending on the number of
NEs in your network, you might experience a delay
while the data refreshes.
Note
It takes longer to refresh data from the NE than
from the server.
Reset All Alarms/Events
Clears (resets) all alarms or events from the current view.
Clears all alarms from the Alarm Browser window and
fetches the alarms from now (current time on the server
machine) onward.
Reset to Default Size
Resets the current window to its default size.
Save
Saves changes made in the current window.
Show Alarm Note
Opens the Alarm Note dialog box for the selected alarm.
Shows any comments that were entered for the selected
alarm and adds additional comments.
Table A-11 provides descriptions of the fields in the Alarm
Note Dialog Box.
Show Cleared Alarms
Shows all alarms that have been cleared.
Cisco Media Gateway Manager 5.0 User Guide
A-6
OL-5461-02
Appendix A
Icons and Menus
Menu Options
Table A-2
Toolbar Tools Description (continued)
Tool
Item
Description
Show Parent Network Map
See Parent.
Unlock User
Allows you to unlock a user account.
Zoom Area
Allows you to pan and zoom the view to a different region.
Zoom In
Allows you to zoom in on the Network Map.
Zoom Out
Allows you to zoom out on the Network Map.
A.3 Menu Options
The various Cisco MGM menu options are described below, in the order they appear on each menu.
This section includes the following information:
•
A.3.1 File Menu
•
A.3.2 Edit Menu
•
A.3.3 Fault Menu
•
A.3.4 Performance Menu
•
A.3.5 Configuration Menu
•
A.3.6 Administration Menu
•
A.3.7 Window Menu
•
A.3.8 Help Menu
A.3.1 File Menu
This section describes the tools within the File menu in each application:
•
Domain Explorer—File Menu Tools Description
•
Network Map—File Menu Tools Description
•
Alarm Browser, Alarm Log, Domain NE Table, Equipment Inventory Table, and Control
Panel—File Menu Tools Description
Cisco Media Gateway Manager 5.0 User Guide
OL-5461-02
A-7
Appendix A
Icons and Menus
Menu Options
Table A-3
Domain Explorer—File Menu Tools Description
Item
Description
New Group
Opens the New Group dialog box. From here, you can add a new group,
give the group a name, specify the group's geographic location, and
provide a brief description of the group.
Add Network Element(s)
Opens the Add New Network Element wizard, which allows you to add
a new NE or add several new NEs at once.
Dashboard
Opens the Cisco MGM Dashboard, which shows the number of NEs in
the management domain, and the number of critical, major, minor,
warning, or unacknowledged alarms. In addition, the dashboard
contains an Alarm Browser tool, which allows you to launch the Alarm
Browser window, and an Open Domain Explorer tool, which layers the
Domain Explorer window as the top active window.
Network Map
Opens the Network Map window for the selected node.
Domain NE Table
Opens the Domain NE Table window for the selected node.
Notify Users
Opens the Notify Users dialog box.
Refresh Data
Refreshes all data being displayed by Cisco MGM. There are two icons,
and both refresh data from either the server or the database. The Refresh
Data icon with blue and red arrow (as seen in Circuit Table) flashes
when updates are available. This icon has two modes: manual refresh
and autorefresh.
The Refresh Data icon with the “hockey puck” and red arrow does not
notify you that updates are available. You must click the button in order
to retrieve updated data.
Note
Clicking Refresh Data in the Domain Explorer window
refreshes all data for the entire Cisco MGM client. Depending
on the number of NEs in your network, you might experience a
delay while the data refreshes.
Note
It takes longer to refresh data from the NE than from the server.
Debug Options
Opens the Debug Options dialog box. Use this dialog box to select
parameters for the Debug Log, which contains data that is useful for
debugging purposes.
Lock Cisco MGM Client
Prevents the Cisco MGM client from being used and opens the
Cisco MGM Locked window.
Exit
Exits the program.
Table A-4
Network Map—File Menu Tools Description
Item
Description
Open
Parent (also Show Parent
Network Map)
If the Network Map is open to a specific NE, clicking Parent or Show
Parent Network Map shifts the view back to the main Network Map
view.
Save
Saves changes made in the current window.
Cisco Media Gateway Manager 5.0 User Guide
A-8
OL-5461-02
Appendix A
Icons and Menus
Menu Options
Table A-4
Network Map—File Menu Tools Description (continued)
Item
Description
Save as Default
Saves your customizations (map background, node icons, and x and y
coordinates) as the default map view.
Revert to Default
Reverts your map customizations.
Notify Users
Opens the Notify Users dialog box.
Refresh Data
Refreshes all data being displayed by Cisco MGM. There are two icons,
and both refresh data from either the server or the database. The Refresh
Data icon with blue and red arrow (as seen in Circuit Table) flashes
when updates are available. This icon has two modes: manual refresh
and autorefresh.
The Refresh Data icon with the “hockey puck” and red arrow does not
notify you that updates are available. You must click the button in order
to retrieve updated data.
Note
Clicking Refresh Data in the Domain Explorer window
refreshes all data for the entire Cisco MGM client. Depending
on the number of NEs in your network, you might experience a
delay while the data refreshes.
Note
It takes longer to refresh data from the NE than from the server.
Debug Options
Opens the Debug Options dialog box. Use this dialog box to select
parameters for the Debug Log, which contains data that is useful for
debugging purposes.
Close
Closes the current window.
Table A-5
Alarm Browser, Alarm Log, Domain NE Table, Equipment Inventory Table, and Control
Panel—File Menu Tools Description
Item
Description
Page Back
Moves the table backward by one page if there is more than one page of
data.
Page Forward
Moves the table forward by one page if there is more than one page of
data.
Filter
Opens a filter dialog box, which allows you to filter for information
found in the table or window.
Note
Use the percent sign (%) as a wildcard character for filtering on
substrings.
Export
Opens the Export dialog box.Exports data, such as alarms, events, and
error logs. Data is exported in comma-separated values (CSV) or tab
separated values (TSV) formats.
HTML Report
Allows you to generate an HTML report based on the data in the table.
You can generate a report for selected rows or for all rows. After you
have made your selection, the browser window appears with the HTML
report. Use your browser's Print option to print the HTML report.
Cisco Media Gateway Manager 5.0 User Guide
OL-5461-02
A-9
Appendix A
Icons and Menus
Menu Options
Table A-5
Alarm Browser, Alarm Log, Domain NE Table, Equipment Inventory Table, and Control
Panel—File Menu Tools Description (continued)
Item
Description
Refresh Data
Refreshes all data being displayed by Cisco MGM. There are two icons,
and both refresh data from either the server or the database. The Refresh
Data icon with blue and red arrow (as seen in Circuit Table) flashes
when updates are available. This icon has two modes: manual refresh
and autorefresh.
The Refresh Data icon with the “hockey puck” and red arrow does not
notify you that updates are available. You must click the button in order
to retrieve updated data.
Note
Clicking Refresh Data in the Domain Explorer window
refreshes all data for the entire Cisco MGM client. Depending
on the number of NEs in your network, you might experience a
delay while the data refreshes.
Note
It takes longer to refresh data from the NE than from the server.
Debug Options
Opens the Debug Options dialog box. Use this dialog box to select
parameters for the Debug Log, which contains data that is useful for
debugging purposes.
Close
Closes the current window.
A.3.2 Edit Menu
This section describes the tools within the Edit menu in each application:
•
Domain Explorer Edit Menu Tools Descriptions
•
Network Map Edit Menu Tools Descriptions
•
Cisco MGM User Edit Menu Tools Descriptions
•
Job Monitor Edit Menu Tools Descriptions
Table A-6
Domain Explorer Edit Menu Tools Descriptions
Item
Description
Cut
Copies the selected NE to the clipboard. The selected item now appears
in italics. The NE is not removed from its current location until the
Paste action is performed.
Copy
Copies the selected NE to the clipboard. The selected NE now appears
in italics.
Paste
Pastes the NE on the clipboard into the selected group.
Cisco Media Gateway Manager 5.0 User Guide
A-10
OL-5461-02
Appendix A
Icons and Menus
Menu Options
Table A-6
Domain Explorer Edit Menu Tools Descriptions (continued)
Item
Description
Delete
Deletes the selected instance of the NE or group.
If this is the last instance of the NE, the NE is placed in the Deleted
NEs group. Only out-of-service NEs can be placed in the Deleted NEs
group.
To delete the NE from the database, select the NE in the Deleted NEs
group and choose Edit > Delete; then, click OK. This removes the NE
from the client view and deletes all records associated with the NE
from the database.
If this is the last instance of the group, the group must be empty before
you can delete it.
Delete All
Deletes all instances of the selected NE or group.
The NE is placed in the Deleted Network Elements group.
Only out-of-service NEs can be placed in the Deleted NEs group.
The group must be empty before you can delete it.
Undelete
Undeletes the selected object.
Restores all instances of an NE in the Deleted Network Elements group
to their previous locations in the Domain Explorer Hierarchy pane.
If the original parent group no longer exists, Cisco MGM does not
recreate the group. Instead, Cisco MGM restores the NE under the
management domain node.
Expand
Expands the management domain or group to display all groups or NEs
in that management domain or group.
Collapse
Collapses the management domain or group to hide all groups or NEs
in that management domain or group.
Find
Opens the Find dialog box, which allows you to search the tree by node
name, IP address, or description.
Find Next
Searches for the next occurrence of the entry that was searched for
using the Find command.
User Preferences
Opens the User Preferences dialog box.
Change Password
Opens the Change Password dialog box, which allows you to change
your Cisco MGM user password.
Table A-7
Network Map Edit Menu Tools Descriptions
Item
Description
Enable Drag
Enables drag and drop functionality for all nodes within the Network
Map window.
Enable Offview
Enables the display of off-view icons within the Network Map window.
Change Map Background
Opens the Select Map Background dialog box, which allows you to
choose a different geographic background for the selected view.
Cisco Media Gateway Manager 5.0 User Guide
OL-5461-02
A-11
Appendix A
Icons and Menus
Menu Options
Table A-7
Network Map Edit Menu Tools Descriptions (continued)
Item
Description
Change Node Icon
Opens the Select Node Icon File dialog box, which allows you to select
a new icon for the selected node.
Zoom In
Allows you to zoom in on the Network Map.
Zoom Out
Allows you to zoom out on the Network Map.
Zoom Area
Allows you to pan and zoom the view to a different region.
User Preferences
Opens the User Preferences dialog box.
Change Password
Opens the Change Password dialog box, which allows you to change
your Cisco MGM user password.
Circular Layout
Arranges the NE on the Network Map in a circular formation.
Spring Layout
Arranges the icons on the Network Map in a coiled spring formation.
Table Layout
Arranges the icons on the Network Map in rows and columns.
Declutter Layout
Rearranges the icons on the Network Map so that they do not overlap.
Table A-8
Cisco MGM User Edit Menu Tools Descriptions
Item
Description
Create
Opens the Create New Cisco MGM User wizard.
Modify
Opens the Modify NE User wizard.
Delete
Deletes the selected instance of the NE or group.
If this is the last instance of the NE, the NE is placed in the Deleted
NEs group. Only out-of-service NEs can be placed in the Deleted NEs
group.
To delete the NE from the database, select the NE in the Deleted NEs
group and choose Edit > Delete; then, click OK. This removes the NE
from the client view and deletes all records associated with the NE
from the database.
If this is the last instance of the group, the group must be empty before
you can delete it.
Unlock
Table A-9
Allows you to unlock a user account.
Job Monitor Edit Menu Tools Descriptions
Item
Description
Cancel Task
Allows you to cancel a task.
Cancel Job
Allows you to cancel a scheduled job. Cancel is enabled only for jobs
with a Queued status.
User Note
Allows you to add a note to the job.
NESoftware Table
Cisco Media Gateway Manager 5.0 User Guide
A-12
OL-5461-02
Appendix A
Icons and Menus
Menu Options
A.3.3 Fault Menu
Table A-10 describes the tools within the Fault menu.
Table A-10 Fault Menu Tools Description
Item
Description
Alarm Browser
Opens the Alarm Browser window.
Alarm Log
Opens the Alarm Log window.
Event Export Manager
Opens the Event Export Manager window.
MGX8880/8850 MG >
Diagnostic Center
Launch Diagnostic Center.
Table A-11 Field Descriptions for the Alarm Note Dialog Box
Field
Description
Note
Provides space to type comments about the selected alarm. To add your comments to the
previous comments, click the Append radio button. To overwrite the previous
comments, click Replace. To delete the comments, click Delete.
Note
History
You can enable and disable the Replace and Delete functions in the Control
Panel > User Interface Properties sheet.
Displays comments that were entered by previous users.
A.3.4 Performance Menu
Table A-12 describes the option within the Performance menu.
Table A-12 Performance Menu Tools Description
Item
Description
MGX8880/8850 MG >
Statistics Report
Launch Statistics Report.
A.3.5 Configuration Menu
Table A-13 describes the tools within the Configuration menu.
Table A-13 Configuration Menu Tools Description
Item
Description
MGX8880/8850 MG >
Equipment Inventory Table
Launch Equipment Inventory Table.
Cisco Media Gateway Manager 5.0 User Guide
OL-5461-02
A-13
Appendix A
Icons and Menus
Menu Options
Table A-13 Configuration Menu Tools Description (continued)
Item
Description
MGX8880/8850 MG >
Chassis View
Launch Chassis View
MGX8880/8850 MG >
Configuration Center
Launch Configuration Center.
A.3.6 Administration Menu
This section describes the tools within the Administration menu in each application:
•
Domain Explorer Administration Menu Tools Description
•
Cisco MGM Users Administration Menu Tools Description
•
Control Panel Administration Menu Tools Description
Table A-14 Domain Explorer Administration Menu Tools Description
Item
Description
Job Monitor
Opens the Job Monitor window.
Service Monitor
Opens the Service Monitor Table window.
Self Monitor
Opens the Self Monitor window, where you can view information
about Cisco MGM threshold parameters.
Memory Backup
Opens the Memory Backup dialog box.
Memory Restore
Opens the Memory Restore dialog box.
Software Download
Opens the Software Download dialog box.
Cisco MGM Users
Opens the Cisco MGM Users window.
Control Panel
Opens the Control Panel window.
Audit Log
Opens the Audit Log window.
Error Log
Opens the Error Log window.
Supported NE Table
Opens the Supported NE Table window.
MGX8880/8850 MG > Audit Launch Audit Trail.
Trail
Table A-15 Cisco MGM Users Administration Menu Tools Description
Item
Description
User Profiles
Logged in Cisco MGM Users
Opens the Logged In Cisco MGM Users Table, which lists the
Cisco MGM users who are currently logged into the Cisco MGM
application.
Cisco Media Gateway Manager 5.0 User Guide
A-14
OL-5461-02
Appendix A
Icons and Menus
Menu Options
Table A-16 Control Panel Administration Menu Tools Description
Item
Description
Audit Log
Opens the Audit Log window.
Error Log
Opens the Error Log window.
Supported NE Table
Opens the Supported NE Table window.
GW/CORBA Client
Configuration Table
Opens the Cisco MGM GateWay/CORBA Client Configuration Table
window.
A.3.7 Window Menu
Table A-17 describes the tools within the Window menu.
Table A-17 Window Menu Tool Description
Item
Description
Arrange Horizontally
When multiple Cisco MGM windows are open, this option displays the
windows side-by-side horizontally.
Arrange Vertically
When multiple Cisco MGM windows are open, this option displays the
windows side-by-side vertically.
Cascade
When multiple Cisco MGM windows are open, this option positions the
active window in the upper left-hand corner, and all other windows are
layered on top of the active window in cascading order.
Close All
Closes all Cisco MGM windows except the Domain Explorer.
Minimize All
Minimizes all Cisco MGM windows.
Restore All
Restores all minimized Cisco MGM windows.
Reset to Default Size
Resets the current window to its default size.
A.3.8 Help Menu
Table A-18 describes the tools within the Help menu.
Table A-18 Help Menu Tools Description
Item
Description
Color Legend
Displays the Alarm Color Legend.
Contents and Index
Displays the contents and index for the online help.
Current Window
Displays online help for the current window.
About Cisco MGM
Opens the About Cisco MGM dialog box, which lists the Cisco MGM
release you are running.
Cisco Media Gateway Manager 5.0 User Guide
OL-5461-02
A-15
Appendix A
Icons and Menus
Hierarchy Pane Icons
A.4 Hierarchy Pane Icons
The following tables describe the icons shown in the Hierarchy pane:
•
A.4.1 Object Icons
•
A.4.2 Communication State Icons
•
A.4.3 Operational State Icons
•
A.4.4 Severity Icons
•
A.4.5 Hierarchy Pane Navigation Icons
A.4.1 Object Icons
Table A-19 describes the object icons in the Hierarchy pane.
Table A-19 Object Icons
Object
Icon
Card
Folder
Group
Line
Network
Path
Peripheral
Port
Route Node
Routing Node
Cisco Media Gateway Manager 5.0 User Guide
A-16
OL-5461-02
Appendix A
Icons and Menus
Hierarchy Pane Icons
Table A-19 Object Icons (continued)
Object
Icon
RPM Subinterface
Sensor
Unknown NE
Virtual Port
A.4.2 Communication State Icons
Table A-20 describes the communication state icons within the Domain Explorer Hierarchy pane.
Table A-20 Communication State Icons
State
Icon
Available
Unavailable
Not Applicable
A.4.3 Operational State Icons
Table A-21 describes the operational state icons within the Domain Explorer Hierarchy pane.
Table A-21 Operational State Icons
State
Icon
In Service
In Service - Initializing
Cisco Media Gateway Manager 5.0 User Guide
OL-5461-02
A-17
Appendix A
Icons and Menus
Hierarchy Pane Icons
Table A-21 Operational State Icons (continued)
State
Icon
In Service - Synch Configuration
In Service - Undiscovered
Under Maintenance
Out of Service
A.4.4 Severity Icons
Table A-22 describes the severity icons in the Domain Explorer Hierarchy pane.
Table A-22 Severity Icons
Severity
Color
Critical
Red
Major
Orange
Minor
Yellow
Warning
Light Blue
Cleared
Green
Unknown
Gray
Icon
A.4.5 Hierarchy Pane Navigation Icons
Table A-23 lists the icons that are used to navigate through the hierarchy pane in the Configuration
Center, Statistics Report and Diagnostic Center.
Cisco Media Gateway Manager 5.0 User Guide
A-18
OL-5461-02
Appendix A
Icons and Menus
Inspector View Icons
Table A-23 Hierarchy Pane Navigation Icons
Item
Icon
Find
Find Next
Find Previous
Expand One Level
Expand Two Levels
Expand Three Levels
Sort Ascending/Descending
A.5 Inspector View Icons
In the Configuration Center and Statistics Report, the Inspector View provides a list of detailed
information for the selected network element from the hierarchy view. Click the Show static data button
to update the information in the Inspector View.
Table A-24 Inspector View Icons
Icon
Example
Show static date
Refresh static data
Cisco Media Gateway Manager 5.0 User Guide
OL-5461-02
A-19
Appendix A
Icons and Menus
Network Map Icons
A.6 Network Map Icons
The Network Map allows you to visualize the structure of your network. Table A-25 gives examples of
the icons that appear in the Network Map. When you open the Network Map from a selected NE in the
Domain Explorer, the selected NEs is pre-selected on the map. The icon has white text displayed on a
black background. This allows you to distinguish the previously selected NE from the other NEs in the
same map.
This section includes the following information:
•
A.6.1 Icon States
•
A.6.2 Icon Colors
•
A.6.3 Operational and Communication State Icons
•
A.6.4 Network Map Edit Menu
Table A-25 Network Map Icons
Icon
Example
MGX8880/MGX8850
Not Managed/Other Vendor
Note
The Not Managed/Other Vendor
icon is customizable.
A.6.1 Icon States
Table A-26 describes the icon states for the icons displayed on the Network Map. Icon states are
displayed according to condition priority. If two or more of the following states occur simultaneously on
an icon, only the state with the highest priority is displayed:
•
Loss of communications
•
Under maintenance
•
Unacknowledged alarms
Cisco Media Gateway Manager 5.0 User Guide
A-20
OL-5461-02
Appendix A
Icons and Menus
Network Map Icons
Table A-26 Icon States
State
Icon Color
Overlay
Loss of communications
Icon color indicates whether the
NE is reachable
Red and white border
Under maintenance
Icon color indicates whether the
NE is under maintenance
Yellow and black
border
Unacknowledged alarms
Icon color indicates whether an
unacknowledged alarm is present
on the NE
Cream border
Initializing
Icon color indicates that the NE is Blue and white
initializing
border
Synch configuration
Icon color indicates that the NE is Blue and black
in the synchronization
border
configuration state
Out of service
Gray
None
Unknown NE model
Gray
None
Off-view icon
Icon color indicates the last know
alarm status of the NE that the
off-view icon represents.
None
Example
A.6.2 Icon Colors
Table A-27 displays map icons with the following colors:
Cisco Media Gateway Manager 5.0 User Guide
OL-5461-02
A-21
Appendix A
Icons and Menus
Network Map Icons
Table A-27 Icon Colors
Status
Colors
Critical
Red
Major
Orange
Minor
Yellow
Warning
Light blue
Clear
Green
Out of service
Gray
Example
A.6.3 Operational and Communication State Icons
Table A-28 describes the operational and communication state map representation icons in the Network
Map pane.
Cisco Media Gateway Manager 5.0 User Guide
A-22
OL-5461-02
Appendix A
Icons and Menus
Network Map Icons
Table A-28 Operational and Communication State Map Representation Icons
State
Icon
Icon Color Border Color
Loss of Communication (Communication State is
Unavailable)
Red
Red/White
In Service
Orange
None
In Service - Initializing
Gray
Blue/White
In Service - Synch Configuration
Red
Blue/Black
Under Maintenance
Red
Black/Yellow
Out of Service
Gray
None
A.6.4 Network Map Edit Menu
Use the Edit menu and toolbar buttons to customize your Network Map. Choose the Enable Drag
toolbar button to enable drag and drop functionality and easily display network partitioning. Other Edit
menu options allow you to enable the display of off-view icons, change geographic backgrounds for the
selected view, select a layout format for the icons, adjust the zoom level, or choose icons to represent
specific nodes.
Cisco Media Gateway Manager 5.0 User Guide
OL-5461-02
A-23
Appendix A
Icons and Menus
Network Map Icons
Note
Use the File > Save as Default menu option to save your customizations (map background, node icons,
and x and y coordinates) as the default map view. The Save as Default option is disabled for the root or
Cisco MGM domain node. By default, the customized map background and node icons are saved on your
local workstation under <client_install_directory>/images/mapbkgnds/custom/default and
<client_install_directory>/images/mapicons/custom/default.
Note
Use the File > Revert to Default menu option to revert your map customizations.
You can choose whether multiple windows or a single window are used for navigation:
Step 1
In the Network Map window, choose Edit > User Preferences.
Step 2
In the Map Preferences tab, check the Open Network Map in New Window check box to open a new
window for subsequent map views, or leave the check box unchecked to open subsequent map frames in
the same window.
Step 3
Click OK.
If an NE has a link defined to an NE on a different map, the off-view NE is represented by an off-view
icon. The off-view icon serves as a hyperlink to the map that contains the NE at the opposite end of the
link. Off-view icons are used only for links that terminate on an NE; off-view icons are not used for
groups. You can enable or disable the display of off-view icons in the Network Map, as follows:
Note
Link colors and NE alarm colors are identical.
Step 1
Choose Edit > User Preferences.
Step 2
In the Map Preferences tab, check the Show Off View Icons check box to show off-view icons in the
Network Map, or leave the check box unchecked to hide off-view icons.
Step 3
Click OK.
The names that display under graphics on the map are truncated if they are too long to fit. By default,
the end characters are truncated. If you want beginning characters truncated:
Step 4
Choose Administration > Control Panel in the Domain Explorer window.
Step 5
Click the UI tool to open the UI Properties sheet.
Step 6
Click the Truncate Network Map Node Name First Characters radio button.
Step 7
Click Save.
Step 8
Click Yes to confirm the change.
Step 9
In the Network Map window, click the Refresh Data tool.
Cisco Media Gateway Manager 5.0 User Guide
A-24
OL-5461-02
A P P E N D I X
B
Error Messages
This appendix describes the error messages and recommends solutions. It contains the following
sections:
•
B.1 Cisco MGM Client Error and Warning Messages, page B-1
•
B.2 Cisco MGM Server Error Messages, page B-61
– B.2.1 Critical Server Error Messages, page B-61
– B.2.2 Major Server Error Messages, page B-68
– B.2.3 Minor Server Error Messages, page B-87
– B.2.4 Debug Server Error Messages, page B-104
•
B.3 Cisco MGM Server Audit Messages, page B-104
B.1 Cisco MGM Client Error and Warning Messages
Error and warning messages are categorized by message type and are listed in ascending numeric order
within each category.
Note
Because error and warning messages are grouped in number ranges, they are not listed in exact numeric
order.
Error Message EID-100: Fatal error: Cannot connect to EMS server. Check the
configuration and retry.
Recommended Action Check your configuration in the install_directory/config/ems-client.cfg file
and log in again.
Error Message EID-102: Fatal error: This service is currently disabled. If the
problem persists, contact your service provider.
Recommended Action Retry later. If the problem persists, contact your service provider.
Cisco Media Gateway Manager 5.0 User Guide
OL-5461-02
B-1
Appendix B
Error Messages
Cisco MGM Client Error and Warning Messages
Error Message EID-103: Fatal error: Connection to the EMS server was lost. The
application will be shut down.
Recommended Action Restart the application after verifying that the Cisco MGM server is
operational and available from the client LAN.
Error Message EID-104: Cisco MGM internal error: Invalid help URL.
Recommended Action Contact your service provider or Cisco technical support.
Error Message EID-105: This user is currently logged in. Second connection to the
EMS server is not allowed.
Recommended Action If you know where you are logged in currently, close that session. If you do not
know where you are logged in, ask the administrator to end the session. After the session ends, start
a new session.
Error Message EID-106: Fatal error: Cannot initialize database connection. Verify
that the EMS database is operational.
Recommended Action Ask the administrator to check the database configuration. Contact Cisco
technical support if the you cannot find problems with the database.
Error Message EID-107: Cannot launch a JVM for help.
Recommended Action Xterm is missing from the Sun Solaris path. Edit the ems-client.cfg file and
provide the correct xterm path.
Alternately, there might not be enough memory to launch a separate help process. Shut down some
applications to free memory.
Error Message EID-108: The administrator has logged out your session. The MGM client
will be closed.
Recommended Action Try relogging into Cisco MGM client.
Error Message EID-109: Could not log back into MGM server. Cannot start server.
Recommended Action Run the showmgm command to see what Cisco MGM server processes are
running. Restart the Cisco MGM server using the mgms-start command.
Error Message EID-110: Could not log back into MGM standby server(s).
Recommended Action Cisco MGM client cannot connect to the servers listed in Control Panel >
Recovery Properties > Server Lists. Ping the IP address of the server that you are trying to connect
to.
Cisco Media Gateway Manager 5.0 User Guide
B-2
OL-5461-02
Appendix B
Error Messages
Cisco MGM Client Error and Warning Messages
Error Message EID-111: Your password has expired. You need to set a new password. Do
you want to continue?
Recommended Action Enter a new password.
Error Message EID-112: You are entering a protected Cisco domain. Do you want to
continue?
Recommended Action Click OK to continue.
Error Message EID-113: Invalid password: The password cannot contain the same
characters as the user ID, even in a different order.
Recommended Action Choose a different password, one that does not contain the same characters as
your username.
Error Message EID-114: Invalid password: The new password must differ from the old
password by at least three characters.
Recommended Action Choose a different password, one that differs from your old password by at
least three characters.
Error Message EID-115: Cannot save Auto Refresh state in User Preferences database
table.
Recommended Action Check your database. Cannot update Auto Refresh Mode in the
USER_PREFERENCES_TABLE.
Error Message EID-116: Cannot launch a browser. Verify that a browser is installed
on your system and that the browser path in ems-client.cfg is set correctly.
Recommended Action Use the following procedure to correct the error:
Step 1
Verify that the browser path is correct in the ems-client.cfg file.
Step 2
Check the browser version. Cisco MGM 5.0 supports Internet Explorer 5.5 and later, and Netscape 4.79
and later.
Step 3
Ensure that the browser is Javascript-enabled in Windows.
Step 4
If Steps 1 to 3 do not correct the error, install a new browser.
Cisco Media Gateway Manager 5.0 User Guide
OL-5461-02
B-3
Appendix B
Error Messages
Cisco MGM Client Error and Warning Messages
Error Message EID-117: Cannot launch a browser. MGM uses the default browser to
display the online help. If you want to use a specific browser to launch MGM online
help, make the default browser for your workstation “javascript:scrollTo(0,3400)
Scroll down to Save Issue.
Recommended Action Check your $PATH variable and make sure that “netscape” is included in the
PATH. Also run the netscape command from your command prompt and make sure that the browser
comes up.
Error Message EID-118: Your password has been set by the administrator. You need to
set a new password. Do you want to continue?
Recommended Action Continue setting a new password.
Error Message EID-120: This session has logged out. MGM client will be closed.
Recommended Action The logout timer has logged you out of this session. Log back into Cisco MGM
client and modify client inactivity timer settings in Control Panel > Security Properties.
Error Message EID-121: Client application cannot be restarted because the required
port is not available.
Recommended Action Restart Cisco MGM client.
Error Message EID-126: The table view has changed. You must refresh the table before
performing this operation.
Recommended Action Click the Refresh Data tool.
Error Message EID-127: An error occurred while scheduling the SNTP configuration.
Recommended Action Error occurred while scheduling Simple Network Time Protocol (SNTP). Try
performing the task again.
Error Message EID-130: Cannot authenticate user. Try again.
Recommended Action Enter your username and password and retry.
Error Message EID-131: Cannot connect to the specified EMS server. Check IP
connectivity and try again.
Recommended Action Ping the server workstation to see if you have IP connectivity. If there is no
connectivity, contact the administrator to verify that connectivity is established.
Cisco Media Gateway Manager 5.0 User Guide
B-4
OL-5461-02
Appendix B
Error Messages
Cisco MGM Client Error and Warning Messages
Error Message EID-132: User disabled due to a security violation. Contact
administrator to enable user account.
Recommended Action Contact the administrator to re-enable the user account.
Error Message EID-133: Specify a username.
Recommended Action Enter the username.
Error Message EID-134: Enter or select an IP address.
Recommended Action Enter the IP address.
Error Message EID-136: No Undeleted NEs in the Selection Context.
Recommended Action The NEs are no longer available. Relaunch the window.
Error Message EID-137: No Finish Action defined for the Selected Model.
Recommended Action No action was defined to complete operation on the NE. Select a different NE.
Error Message EID-140: Select at least one NE or select Export EMS Alarms.
Recommended Action Select at least one NE or select Export EMS Alarms.
Error Message EID-141: Specify the alarm severity.
Recommended Action Select at least one alarm severity from the list provided.
Error Message EID-142: Specify the export destination file.
Recommended Action Specify the export destination file.
Error Message EID-143: Cannot write to specified export file.
Recommended Action Verify that the user has the required permission in the directory where the
export file is being created. Verify that there is enough disk space available; then, retry.
Error Message EID-144: Cannot create directory: directory_name.
Recommended Action Verify that the user has the required permission in the directory where the
export file is being created. Verify that there is enough disk space available; then, retry. Verify that
there is no existing directory with the name directory_name.
Cisco Media Gateway Manager 5.0 User Guide
OL-5461-02
B-5
Appendix B
Error Messages
Cisco MGM Client Error and Warning Messages
Error Message EID-145: Illegal record count. Enter a positive integer.
Recommended Action Enter a positive integer.
Error Message EID-146: Event Export Manager - Cannot create or append to filename.
Check access rights and disk space.
Recommended Action Check access rights and disk space.
Error Message EID-147: Event Export Manager - Cannot write to filename. Check access
rights and disk space.
Recommended Action Check access rights and disk space.
Error Message EID-148: Enter the message to be sent.
Recommended Action No message is specified. Enter the message you want to send.
Error Message EID-149: Message is too long. Only the first 512 bytes will be sent.
Recommended Action The maximum message size allowed is 512 bytes. If you entered more than 512
bytes, only the first 512 bytes will be sent.
Error Message EID-150: Illegal threshold value. Enter a number between 0 and 100.
Recommended Action Enter a number between 0 and 100.
Error Message EID-152: No MGM server to NE connection username. Username is a
mandatory field. Specify a username.
Recommended Action Enter a username.
Error Message EID-154: The ML-series card to NE connection username is a mandatory
field. Specify a username.
Recommended Action Enter an ML-series card username.
Error Message EID-155: The MGM server to NE connection username is a mandatory field.
Specify a username.
Recommended Action Enter a username.
Cisco Media Gateway Manager 5.0 User Guide
B-6
OL-5461-02
Appendix B
Error Messages
Cisco MGM Client Error and Warning Messages
Error Message EID-159: Selected NEs for software download are of different model
types.
Recommended Action Reselect the NEs. All NEs selected for software download must be the same
model type.
Error Message EID-160: Year entered is before the current year. Enter a year greater
than or equal to the current year.
Recommended Action Enter a year that is equal to or greater than the current year.
Error Message EID-161: Month entered is before the current month. Enter a month
greater than or equal to the current month.
Recommended Action Enter a month that is equal to or greater than the current month.
Error Message EID-162: Date entered is before the current date. Enter a date greater
than or equal to the current date.
Recommended Action Enter a day of the month that is equal to or greater than the current day of the
month. The day should be a valid day for the month and year selected.
Error Message EID-163: Hour entered is before the current hour. Enter an hour greater
than or equal to the current hour.
Recommended Action Enter an hour that is greater than or equal to the current hour.
Error Message EID-164: Minute entered is before the current minute. Enter a minute
greater than or equal to the current minute.
Recommended Action Enter a minute that is greater than or equal to the current minute.
Error Message EID-165: Source filename is empty. Enter a valid filename.
Recommended Action Enter a source filename, which is required for the software download or
memory restore operation.
Error Message EID-166: Source filename does not exist. Enter a valid filename.
Recommended Action The source filename specified for the software download or memory restore
operation does not exist. Specify a valid source filename.
Cisco Media Gateway Manager 5.0 User Guide
OL-5461-02
B-7
Appendix B
Error Messages
Cisco MGM Client Error and Warning Messages
Error Message EID-167: Selected NE list is empty. Select NEs from the Available NEs
list.
Recommended Action Select at least one NE for the memory backup or software download operation.
Note
You can run the memory restore operation for only one NE at a time.
Error Message EID-168: An error occurred while scheduling the software download
operation.
Recommended Action The software download operation could not be scheduled. Restart the Cisco
MGM client and retry the software download operation.
Error Message EID-169: An error occurred while scheduling the memory restore
operation.
Recommended Action The memory restore operation could not be scheduled. Restart the Cisco MGM
client and retry the memory restore operation.
Error Message EID-170: An error occurred while scheduling the memory backup
operation.
Recommended Action The memory backup operation could not be scheduled. Restart the Cisco MGM
client and retry the memory backup operation.
Error Message EID-173: An error occurred while sending the message.
Recommended Action The message could not be delivered. Restart the Cisco MGM client, retype the
message, and resend.
Error Message EID-174: Cannot retrieve the list of existing configuration files for
the NE.
Recommended Action Restart the Cisco MGM client and retry.
Error Message EID-176: An error occurred while reading the global MGM configuration.
Recommended Action A database error occurred during this operation. Verify that the Cisco MGM
database is up and running properly. Restart the Cisco MGM client and retry.
Error Message EID-177: An error occurred while modifying the global MGM
configuration. Changes might not take effect.
Recommended Action A database error occurred during this operation. Verify that the Cisco MGM
database is up and running properly. Restart the Cisco MGM client and retry.
Cisco Media Gateway Manager 5.0 User Guide
B-8
OL-5461-02
Appendix B
Error Messages
Cisco MGM Client Error and Warning Messages
Error Message EID-178: An error occurred while modifying the global MGM
configuration. Changes might not be communicated to other MGM clients.
Recommended Action Restart the Cisco MGM client and retry.
Error Message EID-180: An error occurred while starting this service. Verify that
this service is installed on the MGM server and retry.
Recommended Action Use the following procedure to verify that the Cisco MGM processes are
running:
Step 1
Log into the Cisco MGM server as the root user and enter the following command:
showmgm
Step 2
Contact Cisco technical support with the results of the showmgm command.
Error Message EID-181: An internal state error occurred. Do you want to continue
using a default standard configuration?
Recommended Action Click Yes or No; then, continue accordingly. Alternately, reopen the Control
Panel window.
Error Message EID-182: An internal state denied the request to read the
configuration. Do you want to continue using a default standard configuration?
Recommended Action Click Yes or No; then, continue accordingly. Alternately, reopen the Control
Panel window.
Error Message EID-183: An I/O error occurred. Do you want to continue using a default
standard configuration?
Recommended Action Click Yes or No; then, continue accordingly. Alternately, reopen the Control
Panel window.
Error Message EID-184: An internal protocol error occurred. Do you want to continue
using a default standard configuration?
Recommended Action Click Yes or No; then, continue accordingly. Alternately, reopen the Control
Panel window.
Error Message EID-185: An internal error prevented the current configuration file
from being opened.
Recommended Action An incorrect server configuration appears on the Control Panel window.
Reopen it and verify that the server parameters are correct.
Cisco Media Gateway Manager 5.0 User Guide
OL-5461-02
B-9
Appendix B
Error Messages
Cisco MGM Client Error and Warning Messages
Error Message EID-186: The request to open the current configuration file was denied.
Recommended Action An incorrect server configuration appears on the Control Panel window.
Reopen it and verify that the server parameters are correct.
Error Message EID-187: There is a problem opening the current configuration file.
Recommended Action An incorrect server configuration appears on the Control Panel window.
Reopen it and verify that the server parameters are correct.
Error Message EID-188: An exception occurred while opening the current configuration
file.
Recommended Action An incorrect server configuration appears on the Control Panel window.
Reopen it and verify that the server parameters are correct.
Error Message EID-189: There is an input character problem in the current
configuration file.
Recommended Action An incorrect server configuration appears on the Control Panel window.
Reopen it and verify that the server parameters are correct.
Error Message EID-190: Error detected in the server configuration file at line
line_number.
Recommended Action The server configuration file contains an invalid entry (or is missing a
mandatory entry) at the line specified. If the line number specified is one more than the last line in
the file, invalid data exists on the last line, or some mandatory field values are missing after the last
line.
Error Message EID-191: Error occurred while writing the changes to the server
configuration file. The previous changes made to the server configuration have
been lost.
Recommended Action Refresh the Control Panel window. Redo the changes and click Save.
Error Message EID-192: Server configuration has been modified by another user since
it was last read. You must refresh this view before any changes can be made to the
server configuration file.
Recommended Action To proceed with the save, click the Refresh Data tool, change the selected
Control Panel property sheet, and click Save.
Error Message EID-193: This IP address was already added as an {0}.
Recommended Action Enter a different IP address.
Cisco Media Gateway Manager 5.0 User Guide
B-10
OL-5461-02
Appendix B
Error Messages
Cisco MGM Client Error and Warning Messages
Error Message EID-194: A maximum of n can be configured. You must remove an existing
host if you want to add another host.
Recommended Action Remove an existing Simple Network Management Protocol (SNMP) host;
then, add a new host.
Error Message EID-196: An error occurred while sending the truncate queue event to
the server.
Recommended Action Error while sending event to the server. Restart client.
Error Message EID-198: An error occurred while scheduling the Alarm Profile
Management operation.
Recommended Action Reschedule the job.
Error Message EID-199: An error occurred while scheduling the Disclaimer Message
Management operation.
Recommended Action Reschedule the job.
Error Message EID-200: An error occurred while scheduling the NE Defaults Management
operation.
Recommended Action Reschedule the job.
Error Message EID-201: An error has occurred while scheduling the configure node
operation.
Recommended Action Make sure that the node is reachable and in service. Try again.
Error Message EID-206: Duplicate server address. Enter a unique address.
Recommended Action Enter a unique server address.
Error Message EID-207: A maximum of n servers can be configured. You must remove an
existing server to add another server.
Recommended Action Remove an existing server; then, configure another server.
Error Message EID-208: Could not cancel selected task(s). Action failed.
Recommended Action The selected task or job is already running or has already been cancelled. Click
the Refresh Data tool to see the current status.
Cisco Media Gateway Manager 5.0 User Guide
OL-5461-02
B-11
Appendix B
Error Messages
Cisco MGM Client Error and Warning Messages
Error Message EID-209: Could not cancel selected job(s). Action failed.
Recommended Action The selected task or job is already running or has already been cancelled. Click
the Refresh Data tool to see the current status.
Error Message EID-210: Could not activate selected task(s). Action failed.
Recommended Action Activate (Commit) fails when the active software version is newer than the
standby software version. Only the reactivate (Revert) operation is allowed in this case.
Reactivate (Revert) fails when the active software version is older than the standby software version.
Only the activate (Commit) operation is allowed in this case.
Activate or reactivate might fail because a similar administrative operation (such as backup, restore,
download, or commit/revert) occurs on the NE. Wait several minutes and try again.
Error Message EID-211: Could not reactivate job(s). Action failed.
Recommended Action Activate (Commit) fails when the active software version is newer than the
standby software version. Only the reactivate (Revert) operation is allowed in this case.
Reactivate (Revert) fails when the active software version is older than the standby software version.
Only the activate (Commit) operation is allowed in this case.
Activate or reactivate might fail because a similar administrative operation (such as backup, restore,
download, or commit/revert) occurs on the NE. Wait several minutes and try again.
Error Message EID-212: Software image download failed for NE_ID.
Recommended Action The software image file might be empty or corrupt. Or, the problem might be
the communication link between Cisco MGM and the NE; the NE might not perform the correct
handshake response with the Cisco MGM. Retry the software download.
Error Message EID-215: There are no reachable or known model NEs.
Recommended Action The NE you chose is unreachable or the NE model type does not support the
operation. Choose a different NE.
Error Message EID-216: No partitions for NEs.
Recommended Action Initial discovery might still be in progress. Try again after some time.
Error Message EID-217: Selected NEs do not have a partition selected to download the
image file.
Recommended Action The selected NE does not have a partition selected for downloading the image.
Select a partition to which the image will be downloaded.
Cisco Media Gateway Manager 5.0 User Guide
B-12
OL-5461-02
Appendix B
Error Messages
Cisco MGM Client Error and Warning Messages
Error Message EID-218: Some NEs have no associated partitions to download the image
file. Proceed anyway?
Recommended Action One or more of the selected NEs have no partition selected for downloading the
image. Select appropriate Flash partitions for all NEs. If you proceed anyway, those NEs will not be
scheduled for image download.
Error Message EID-219: Some selected NE Flash partitions do not have enough space
for the image.
Recommended Action Clean up the space on the Flash partition before job execution time or the job
will fail.
Error Message EID-220: This operation will only append the new commands to the
already running configuration. It will not replace the existing running
configuration. Proceed anyway?
Recommended Action Restoring the configuration file as running configuration will only append to
the existing running configuration and will not delete the commands that are now present in the new
configuration file. This is not a replacement of the running configuration.
Error Message EID-221: Add at least one NE and a Flash bank in Selected Downloads to
download the image file.
Recommended Action Add at least one NE and a Flash bank to the Selected Downloads list.
Error Message EID-225: OSS Client Name is a required field. Specify a unique name
for this OSS client and retry.
Recommended Action Enter a unique OSS client name and retry.
Error Message EID-226: An EFD has not been associated with this OSS client. Choose
an existing EFD or create a new one for this OSS client and retry.
Recommended Action Choose an EFD or create a new EFD; then, retry.
Error Message EID-227: IP Address is a required field. Specify a unique IP address
for this OSS client and retry.
Recommended Action Enter a unique IP address and retry.
Error Message EID-228: An OSS client with the same name already exists. Specify a
unique OSS client name and retry.
Recommended Action Enter a unique OSS client name and retry.
Cisco Media Gateway Manager 5.0 User Guide
OL-5461-02
B-13
Appendix B
Error Messages
Cisco MGM Client Error and Warning Messages
Error Message EID-229: An EFD with the same name already exists. Specify a unique
EFD name and retry.
Recommended Action Enter a unique EFD name and retry.
Error Message EID-230: An OSS IP address with the same name already exists. Specify
a unique IP address and retry.
Recommended Action Enter a unique IP address and retry.
Error Message EID-231: An error occurred while reading the database. Restart the MGM
client and retry.
Recommended Action Restart the Cisco MGM client and retry.
Error Message EID-232: An error occurred while creating a new EFD. Try to add the
EFD again.
Recommended Action A database error occurred during this operation. Add the EFD again.
Error Message EID-233: Unable to delete the user from the database. Check whether
the user is already logged in.
Recommended Action Check if the user is logged in.
Error Message EID-234: EFD Name is a required field. Specify a unique name for this
EFD and retry.
Recommended Action Enter a unique EFD name and retry.
Error Message EID-235: The password confirmation does not match the actual password.
Try again.
Recommended Action Reenter the password.
Error Message EID-236: An error occurred while saving the OSS client properties to
the database. Make the changes again and retry.
Recommended Action Redo the EFD changes; then, retry.
Error Message EID-237: The Password field is mandatory. Enter the password.
Recommended Action Enter a password that is at least four characters in length.
Cisco Media Gateway Manager 5.0 User Guide
B-14
OL-5461-02
Appendix B
Error Messages
Cisco MGM Client Error and Warning Messages
Error Message EID-238: At least one network element should be allowed.
Recommended Action Add at least one NE to the EFD.
Error Message EID-239: At least one access element should be allowed.
Recommended Action Add at least one access element to the EFD.
Error Message EID-241: An error occurred while logging out a MGM user.
Recommended Action Retry.
Error Message EID-242: The OSS client name cannot be <NEW>. Enter another name.
Recommended Action Enter an OSS client profile name other than “<NEW>.”
Error Message EID-243: An error occurred while stopping this service.
Recommended Action Use the following procedure to verify that the Cisco MGM processes are
running:
Step 1
Log into the Cisco MGM server as the root user and enter the following command:
showmgm
Step 2
Contact Cisco technical support with the results of the showmgm command.
Error Message EID-244: Unable to retrieve model or service type for this service.
Recommended Action Try again.
Error Message EID-245: Modified OSS client was not found in the database.
Recommended Action Database user data missing. Recreate the OSS user.
Error Message EID-246: An error occurred while sending events to other clients.
Recommended Action JMOCO notification error. Restart the Cisco MGM client.
Error Message EID-247: Cannot delete a new client.
Recommended Action Error deleting selected OSS client. Select another OSS client with an OSS
name length greater than 0 characters.
Cisco Media Gateway Manager 5.0 User Guide
OL-5461-02
B-15
Appendix B
Error Messages
Cisco MGM Client Error and Warning Messages
Error Message EID-248: TID/SID for MGM is mandatory. Enter a value.
Recommended Action Enter a target identifier (TID) or source identifier (SID) value.
Error Message EID-249: Threshold values must follow the order Critical > Major >
Minor. Enter valid values.
Recommended Action Enter threshold values where the critical value is greater than the major value,
which is greater than the minor value.
Error Message EID-250: In the Time Period selection, the start time is greater than
the end time.
Recommended Action Enter a start time that is before the end time.
Error Message EID-253: The selection list contains only the deleted NE.
Recommended Action Relaunch the window.
Error Message EID-254: The deleted NE was removed from the selection list.
Recommended Action One or more NEs has been deleted. Relaunch the window.
Error Message EID-255: Tag can have only alphanumeric, underscore (_), and period
(.) characters.
Recommended Action Add a tag that contains only alphanumeric characters, an underscore, or a
period.
Error Message EID-256: This username is being used by another MGM user. Choose a
different username.
Recommended Action Choose a different username.
Error Message EID-257: The new password does not match the confirmation password.
Retype the password.
Recommended Action Reenter the password.
Error Message EID-258: An error occurred while scheduling the job related to NE user
management.
Recommended Action Error occurred while scheduling the job. Try doing the task again.
Cisco Media Gateway Manager 5.0 User Guide
B-16
OL-5461-02
Appendix B
Error Messages
Cisco MGM Client Error and Warning Messages
Error Message EID-259: Select a user to modify.
Recommended Action Select a user.
Error Message EID-260: Select an NE for the user.
Recommended Action Select an NE.
Error Message EID-261: This user is already defined on some or all of your selected
NEs.
Recommended Action Select a different user.
Error Message EID-262: Select at least one user.
Recommended Action Select at least one user.
Error Message EID-263: Change the user attributes.
Recommended Action Change the user attributes.
Error Message EID-264: Selected user has been deleted from the NE.
Recommended Action Select a different user.
Error Message EID-265: Fatal error occurred while notifying the product_name server
of this change. Restart the server and all the clients.
Recommended Action Restart the Cisco MGM server and clients.
Error Message EID-266: Old MGM User Password field cannot be empty. Enter the old
password and retry.
Recommended Action Enter the old user password and retry.
Error Message EID-267: The MGM password you entered does not match the MGM user
password. Try again.
Recommended Action Reenter the user password.
Error Message EID-268: The new password does not match confirmation password. Try
again.
Recommended Action Reenter the confirmation password.
Cisco Media Gateway Manager 5.0 User Guide
OL-5461-02
B-17
Appendix B
Error Messages
Cisco MGM Client Error and Warning Messages
Error Message EID-269: Database error: Cannot change the user password.
Recommended Action A database error occurred during this operation. Verify that the Cisco MGM
database is up and running properly. Restart the Cisco MGM client and retry.
Error Message EID-273: The change password feature has been disabled by the
administrator for this user.
Recommended Action Contact the Cisco MGM administrator to enable the change password feature
for this user.
Error Message EID-274: All the fields are blank. Enter valid entries.
Recommended Action Enter valid entries.
Error Message EID-284: The lockout period must be between 1 and 120.
Recommended Action Enter a lockout period between 1 and 120.
Error Message EID-285: The logout period must be between 1 and 1440.
Recommended Action Enter a logout period between 1 and 1440.
Error Message EID-286: Enter a valid profile name. You did not enter a profile name,
or you chose 'Default' or 'Inherited' as the profile name.
Recommended Action Enter a valid profile name.
Error Message EID-286: Enter a rate value when IP priority queuing is enabled.
Recommended Action Enter a rate value.
Error Message EID-288: Accept operation failed or is not allowed.
Recommended Action Entry does not exist.
Error Message EID-290: The logout period must be greater than the lockout period.
Changes will not take effect.
Recommended Action Enter a logout period that is greater than the lockout period.
Error Message EID-297:EID-300: Cannot open file filename. Privileges to write data
are not available.
Recommended Action You have read access only; this operation requires read/write access. Log out
and log in again with a username and password that have read/write access.
Cisco Media Gateway Manager 5.0 User Guide
B-18
OL-5461-02
Appendix B
Error Messages
Cisco MGM Client Error and Warning Messages
Error Message EID-301: Export data error: Table not instantiated.
Recommended Action You cannot export data before the table is fully open. Wait until the table opens
fully; then, click the Export tool.
Error Message EID-302: Export data: Error in opening file filename to export data.
Recommended Action The file could not be opened for writing the data. This could be due to
insufficient permission in the selected directory. Choose a directory with write permission or change
the permission to allow writing data in the selected directory.
Error Message EID-303: Resync Time (1530x only): Value should be in the range 30 to
2147483647.
Recommended Action Enter a value from 30 to 2147483647.
Error Message EID-304: Enter a filename for export.
Recommended Action Enter a filename for the exported file.
Error Message EID-305: File filename already exists. Do you want to overwrite it?
Recommended Action The file that you have provided already exists. Verify that you want to
overwrite the file before clicking OK.
Error Message EID-306: Cannot write to filename. Check if you have sufficient disk
space and permissions to write. Check if another application is using the file.
Recommended Action Change the permission on the specified file or choose a different filename. If
there is insufficient disk space, delete some files to make space on the disk.
Error Message EID-307: Filename: Path does not exist or there is no write permission.
Verify that the path to the file exists and you have write permission.
Recommended Action A directory that is part of the path that you specified to the file does not exist
or has no permissions to read or write. Create the directory structure to store the file with read/write
permissions; then, specify the path. Or, specify a valid path.
Error Message 308: Directory_name is a directory. Enter a filename.
Recommended Action Enter a filename instead of a directory name.
Error Message EID-309: Enter a character for separating fields during export.
Recommended Action You clicked the Other radio button but did not specify a separation character.
Specify the character that you want to use as the separation character.
Cisco Media Gateway Manager 5.0 User Guide
OL-5461-02
B-19
Appendix B
Error Messages
Cisco MGM Client Error and Warning Messages
Error Message EID-310: Graph is not available at this time.
Recommended Action The graph could not be started because the NE could not be contacted. Verify
that the NE is available and retry.
Error Message EID-311: BER statistics are not available at this time.
Recommended Action The bit error rate (BER) window could not be opened because the NE could not
be contacted. Verify that the NE is available and retry.
Error Message EID-312: The table will be sorted on the Time Stamp column to show new
rows. Press OK to sort. You can cancel and sort the table by time stamp later to
see the new rows.
Recommended Action If you click Cancel, the rows are not sorted in chronological order. If you click
OK, the rows are sorted in chronological order and the latest rows appear on top.
Error Message EID-313: Cannot get system information from the NE. Check IP
connectivity to the NE and restart the Node View.
Recommended Action The SNMP query for system contact and location is not reaching the NE. After
IP connectivity to the NE is restored, reopen the Node View window. The correct system contact and
location information will appear.
Error Message EID-314: Cannot retrieve NE data from the server.
Recommended Action Restart the Cisco MGM client.
Error Message EID-315: Error retrieving data from the database.
Recommended Action Restart the Cisco MGM client and retry. Also, check the available memory on
the server workstation.
Error Message EID-316: Error while setting filter criteria in the database.
Recommended Action Restart the Cisco MGM client and retry.
Error Message EID-317: Error while adding filter criteria in the database.
Recommended Action Restart the Cisco MGM client and retry.
Error Message EID-318: Error while retrieving the total number of rows from the
database.
Recommended Action Restart the Cisco MGM client and retry.
Cisco Media Gateway Manager 5.0 User Guide
B-20
OL-5461-02
Appendix B
Error Messages
Cisco MGM Client Error and Warning Messages
Error Message EID-319: Error while sorting data in the database.
Recommended Action Restart the Cisco MGM client and retry.
Error Message EID-320: Error while attempting read/write to the database.
Recommended Action Restart the Cisco MGM client and retry.
Error Message EID-321: Error while sending request for alarm changed.
Recommended Action Restart the Cisco MGM client and retry.
Error Message EID-322: Error while initializing table.
Recommended Action Restart the Cisco MGM client and retry.
Error Message EID-323: You cannot delete an EFD profile that is used by an OSS client.
Recommended Action Verify that the EFD profile you want to delete is not being used by an OSS
client.
Error Message EID-324: Cannot add an EFD profile.
Recommended Action A database error occurred during this operation. Verify that the Cisco MGM
database is up and running properly. Restart the Cisco MGM client and retry.
Error Message EID-325: Cannot modify an EFD profile wizard.
Recommended Action A database error occurred during this operation. Verify that the Cisco MGM
database is up and running properly. Restart the Cisco MGM client and retry.
Error Message EID-326: Error occurred while deleting the selected EFD profile.
Recommended Action A database error occurred during this operation. Verify that the Cisco MGM
database is up and running properly. Restart the Cisco MGM client and retry.
Error Message EID-327: Error in event notification while deleting the selected EFD
profile.
Recommended Action Restart the Cisco MGM client and retry.
Error Message EID-330: Cannot launch table.
Recommended Action Restart the Cisco MGM client and retry.
Cisco Media Gateway Manager 5.0 User Guide
OL-5461-02
B-21
Appendix B
Error Messages
Cisco MGM Client Error and Warning Messages
Error Message EID-331: Error occurred. Table will be closed.
Recommended Action Restart the Cisco MGM client and retry.
Error Message EID-332: Exception while creating metadata for object.
Recommended Action Restart the Cisco MGM client and retry.
Error Message EID-333: Database timeout occurred. Reduce the scope of the query or
increase the timeout.
Recommended Action Your database query is too broad. Reduce the scope of the query or increase the
timeout by editing the DB_Query_Timeout_Seconds parameter in the config/ems-client.cfg file.
The default timeout is 60 seconds.
Error Message EID-340: The end ID must be greater than the start ID. Enter an end ID
value that is greater than the start ID value.
Recommended Action Enter an end ID value that is greater than the start ID value; then, click OK to
filter the data.
Error Message EID-341: The start/end IDs must be valid values. Enter valid values.
Recommended Action Enter valid values for starting and ending IDs.
Error Message EID-343: This network partition is not associated with a network
element.
Recommended Action Restart the Cisco MGM client and retry.
Error Message EID-344: Cannot delete the last network partition.
Recommended Action At least one network partition must be present. Do not delete this last network
partition.
Error Message EID-345: The exported data contains the separator character. Select
another separator or check the check box to enclose text in double quotes if it
includes the separator.
Recommended Action Choose another separator or check the Enclose text in double quotes check
box.
Error Message EID-350: Database error: Cannot unlock the user.
Recommended Action Retry the unlock operation.
Cisco Media Gateway Manager 5.0 User Guide
B-22
OL-5461-02
Appendix B
Error Messages
Cisco MGM Client Error and Warning Messages
Error Message EID-353: This operation will result in deleting the selected user(s)
from the database. Press 'OK' to continue and 'Cancel' to abort the operation.
Recommended Action Click OK to delete the selected user(s), or click Cancel.
Error Message EID-354: This operation will result in deleting the selected user
profile(s) from the database. Press ‘OK’ to continue and ‘Cancel’ to abort
operation.
Recommended Action Click OK to delete the selected user profile(s), or click Cancel.
Error Message EID-400: This number is invalid. Enter a valid number to continue.
Recommended Action Enter a valid number.
Error Message EID-402: System name for this network element is inconsistent.
Recommended Action No action is required.
Error Message EID-403: Error occurred while reading the STS-1 configuration from the
database. The data shown may be inconsistent with the network element's actual
configuration.
Recommended Action Wait for a few minutes; then, click the Refresh Data tool to refresh the view.
Error Message EID-404: Error occurred while reading the VT configuration from the
database. The data shown may be inconsistent with the network element's actual
configuration.
Recommended Action Wait for a few minutes; then, click the Refresh Data tool to refresh the view.
Error Message EID-405: Error occurred while reading the serial interface
configuration from the database. The data shown may be inconsistent with the
network element's actual configuration.
Recommended Action Wait for a few minutes; then, click the Refresh Data tool to refresh the view.
Error Message EID-406: Error occurred while reading the multilink configuration from
the database. The data shown may be inconsistent with the network element's actual
configuration.
Recommended Action Wait for a few minutes; then, click the Refresh Data tool to refresh the view.
Error Message EID-407: Error occurred while reading the Ethernet port configuration
from the database. The data shown may be inconsistent with the network element's
actual configuration.
Recommended Action Wait for a few minutes; then, click the Refresh Data tool to refresh the view.
Cisco Media Gateway Manager 5.0 User Guide
OL-5461-02
B-23
Appendix B
Error Messages
Cisco MGM Client Error and Warning Messages
Error Message EID-408: Error occurred while reading the DS1 port configuration from
the database. The data shown may be inconsistent with the network element's actual
configuration.
Recommended Action Wait for a few minutes; then, click the Refresh Data tool to refresh the view.
Error Message EID-409: Error occurred while reading the OC-3 configuration from the
database. The data shown may be inconsistent with the network element's actual
configuration.
Recommended Action Wait for a few minutes; then, click the Refresh Data tool to refresh the view.
Error Message EID-410: Error occurred while reading the cross-connect configuration
from the database. The data shown may be inconsistent with the network element's
actual configuration.
Recommended Action Wait for a few minutes; then, click the Refresh Data tool to refresh the view.
Error Message EID-411: Error occurred while specifying filter parameters for DS1
ports on the Cross-Connect Table.
Recommended Action Wait for a few minutes; then, click the Refresh Data tool to refresh the view.
Error Message EID-412: Error occurred while specifying filter parameters for
Ethernet ports on the Cross-Connect Table.
Recommended Action Wait for a few minutes; then, click the Refresh Data tool to refresh the view.
Error Message EID-414: Error occurred while connecting to the remote console.
Recommended Action The NE is not available. Verify that the client can reach the NE and retry.
Error Message EID-420: Error occurred while reading the STM-1 configuration from the
database. The data shown may be inconsistent with the network element’s actual
configuration.
Recommended Action Wait for a few minutes; then, click the Refresh Data tool to refresh the view.
Error Message EID-421: Error occurred while reading the VC4 configuration from the
database. The data shown may be inconsistent with the network element’s actual
configuration.
Recommended Action Wait for a few minutes; then, click the Refresh Data tool to refresh the view.
Cisco Media Gateway Manager 5.0 User Guide
B-24
OL-5461-02
Appendix B
Error Messages
Cisco MGM Client Error and Warning Messages
Error Message EID-422: Error occurred while reading the VC3 configuration from the
database. The data shown may be inconsistent with the network element’s actual
configuration.
Recommended Action Wait for a few minutes; then, click the Refresh Data tool to refresh the view.
Error Message EID-423: Error occurred while reading the VC2 configuration from the
database. The data shown may be inconsistent with the network element’s actual
configuration.
Recommended Action Wait for a few minutes; then, click the Refresh Data tool to refresh the view.
Error Message EID-424: Error occurred while reading the VC12 configuration from the
database. The data shown may be inconsistent with the network element’s actual
configuration.
Recommended Action Wait for a few minutes; then, click the Refresh Data tool to refresh the view.
Error Message EID-429: DCC/GCC was created successfully but the set of AdminState
failed.
Recommended Action The port could not be set. Go to the property sheet of the related card and try
to set the Admin State in the Line Config tab.
Error Message EID-448: Deletion of Default and Inherited Alarm Profile is not
allowed.
Recommended Action Default and Inherited Alarm Profiles cannot be deleted.
Error Message EID-449: Default and Inherited Alarm Profiles cannot be changed.
Recommended Action Default and Inherited Alarm Profiles cannot be changed or deleted.
Error Message EID-450: Alarm Profile by this name already exists. Please use another
name.
Recommended Action The selected name is already in use. Choose a different name.
Error Message EID-451: Enter a valid SNTP server IP address.
Recommended Action Enter a valid SNTP server IP address.
Error Message EID-452: Enter a valid DHCP server IP address.
Recommended Action Enter a valid Dynamic Host Configuration Protocol (DHCP) server IP address.
Cisco Media Gateway Manager 5.0 User Guide
OL-5461-02
B-25
Appendix B
Error Messages
Cisco MGM Client Error and Warning Messages
Error Message EID-453: Protection group must have working card(s).
Recommended Action Select a protection group that contains at least one working card.
Error Message EID-454: Enter valid values for the protection group name, type,
protect module, and working entities.
Recommended Action Enter valid values.
Error Message EID-455: Enter a valid value for Protection Group Name.
Recommended Action Enter a valid protection group name.
Error Message EID-456: Enter a valid value for Protect Module.
Recommended Action Enter a valid protect module value.
Error Message EID-457: Enter a valid value for Working Entities.
Recommended Action Enter a valid working entities value.
Error Message EID-458: Enter a valid value for Protection Type.
Recommended Action Enter a valid protection type value.
Error Message EID-459: Protection group name is too long. Maximum length is
32 characters.
Recommended Action Enter a protection group name that does not exceed 32 characters.
Error Message EID-460: Enter a valid SNMP trap destination IP address.
Recommended Action Enter a valid SNMP trap destination IP address.
Error Message EID-461: Enter a valid SNMP community name.
Recommended Action Enter a valid SNMP community name.
Error Message EID-462: 0.0.0.0 is not a valid DHCP server IP address. Enter a valid
IP address.
Recommended Action Enter a valid IP address.
Cisco Media Gateway Manager 5.0 User Guide
B-26
OL-5461-02
Appendix B
Error Messages
Cisco MGM Client Error and Warning Messages
Error Message EID-463: 0.0.0.0 is not a valid SNTP server IP address. Enter a valid
IP address.
Recommended Action Enter a valid IP address.
Error Message EID-464: Cannot create Ethernet thresholds on the following ports:
port_number(s).
Recommended Action Try creating the thresholds again.
Error Message EID-465: The change was not saved successfully. Data will be reset to
the previous value.
Recommended Action Some attributes were not saved successfully. Check documentation to see any
conditions that must be set up before setting the attributes.
Error Message EID-469: Error occurred while creating the service provisioner.
Recommended Action The server service is not ready. Wait several minutes and try again.
Error Message EID-500: Searched item not found.
Recommended Action No item in the Domain Explorer Hierarchy pane matches the search criteria
you specified. Redefine the search criteria and run a new search.
Error Message EID-501: Cannot launch a remote console to the selected NE.
Recommended Action Xterm is missing from the Sun Solaris path. Edit the ems-client.cfg file and
provide the correct xterm path.
Or, there is not enough memory to launch a separate Telnet process. Shut down some applications
to free up memory.
Error Message EID-502: Group Name is a mandatory field. Enter a unique group name
and retry.
Recommended Action Enter a unique name for the new group.
Error Message EID-503: A group with the same name already exists. Specify a unique
group name and retry.
Recommended Action Enter a unique name for the new group.
Error Message EID-504: A group name cannot be the same as a domain name. A domain
with the same name already exists. Specify a unique group name and retry.
Recommended Action Enter a unique name for the new group.
Cisco Media Gateway Manager 5.0 User Guide
OL-5461-02
B-27
Appendix B
Error Messages
Cisco MGM Client Error and Warning Messages
Error Message EID-505: Database error: Error occurred while adding the new group to
the database.
Recommended Action A database error occurred while adding the new group. Verify that the Cisco
MGM database is up and running properly. Restart the Cisco MGM client and retry adding a new
group.
Error Message EID-506: Group name is too long. Restrict the name to 32 characters.
Recommended Action Enter a unique group name that does not exceed 32 characters.
Error Message EID-507: Group description is too long. Restrict the description to
256 characters.
Recommended Action Enter a group description that does not exceed 256 characters.
Error Message EID-511: NE ID is a mandatory field. Enter a unique NE ID and retry.
Recommended Action Enter a unique ID for the NE.
Error Message EID-512: An NE or GNE with the same ID already exists in the database.
Enter a unique NE ID and retry.
Recommended Action Enter a unique ID for the NE.
Error Message EID-513: An NE with the same IP address already exists in the database.
Enter a unique IP address and retry.
Recommended Action Enter a unique ID for the NE that does not exceed 128 alphanumeric characters.
Error Message EID-514: IP Address is a mandatory field. Enter a unique IP address
and retry.
Recommended Action Enter a unique IP address for the NE.
Error Message EID-515: An NE or GNE with the same IP address already exists. Enter
a unique IP address and retry.
Recommended Action Enter a unique IP address and retry.
Error Message EID-516: Invalid IP address. Enter a valid IP address in four decimal
bytes (for example, 196.100.200.300) and retry.
Recommended Action Enter a unique IP address that uses the specified format.
Cisco Media Gateway Manager 5.0 User Guide
B-28
OL-5461-02
Appendix B
Error Messages
Cisco MGM Client Error and Warning Messages
Error Message EID-520: Database error: Error occurred while adding the new NE to the
database.
Recommended Action A database error occurred while adding the new NE. Verify that the Cisco
MGM database is up and running properly. Restart the Cisco MGM client and retry adding a new
NE.
Error Message EID-521: Network element description is too long. Restrict the
description to 256 characters.
Recommended Action Enter a description that does not exceed 256 characters.
Error Message EID-524: Database error: Cannot set the In-Service time stamp in the
database.
Recommended Action A database error occurred while storing the NE’s in-service time stamp in the
database. Verify that the Cisco MGM database is up and running properly. Restart the Cisco MGM
client and retry.
Error Message EID-525: Database error: Cannot set the Config Mode in the database.
Recommended Action A database error occurred while setting the NE type in the database. Verify that
the Cisco MGM database is up and running properly. Restart the Cisco MGM client and retry.
Error Message EID-526: Invalid tree node selected. You cannot perform this operation
with the current selection. Select a group or domain node and retry.
Recommended Action Select a group or domain node and retry.
Error Message EID-527: Error occurred while registering with the Cisco MGM event
notification subsystem. Exit and restart the application.
Recommended Action Restart the Cisco MGM server and all of the clients. Contact Cisco technical
support if the problem persists.
Error Message EID-528: Fatal error occurred while notifying the server_name server
of this change. Restart the server and all the clients.
Recommended Action Restart the Cisco MGM server and all of the clients. Contact Cisco technical
support if the problem persists.
Error Message EID-529: An error occurred while writing data to the database.
Recommended Action Exit and restart the Cisco MGM client.
Cisco Media Gateway Manager 5.0 User Guide
OL-5461-02
B-29
Appendix B
Error Messages
Cisco MGM Client Error and Warning Messages
Error Message EID-530: An error occurred while reading data from the database.
Recommended Action Exit and restart the Cisco MGM client.
Error Message EID-531: A domain with the same name already exists. Specify a unique
domain name and retry.
Recommended Action Specify a unique domain name.
Error Message EID-532: Database error: Cannot modify the domain description.
Recommended Action A database error occurred during this operation. Verify that the Cisco MGM
database is up and running properly. Restart the Cisco MGM client and retry.
Error Message EID-533: Database error: Cannot modify the domain name.
Recommended Action A database error occurred during this operation. Verify that the Cisco MGM
database is up and running properly. Restart the Cisco MGM client and retry.
Error Message EID-534: Domain Name is a mandatory field. Specify the domain name and
retry.
Recommended Action Enter a name for the domain.
Error Message EID-535: Group Name is a mandatory field. Specify the group name and
retry.
Recommended Action Enter a name for the group.
Error Message EID-536: Database error: Cannot modify the group name.
Recommended Action A database error occurred during this operation. Verify that the Cisco MGM
database is up and running properly. Restart the Cisco MGM client and retry.
Error Message EID-537: Database error: Cannot modify the group description.
Recommended Action A database error occurred during this operation. Verify that the Cisco MGM
database is up and running properly. Restart the Cisco MGM client and retry.
Error Message EID-538: Database error: Cannot modify the group location.
Recommended Action A database error occurred during this operation. Verify that the Cisco MGM
database is up and running properly. Restart the Cisco MGM client and retry.
Cisco Media Gateway Manager 5.0 User Guide
B-30
OL-5461-02
Appendix B
Error Messages
Cisco MGM Client Error and Warning Messages
Error Message EID-539: Database error: Cannot modify the network element name.
Recommended Action A database error occurred during this operation. Verify that the Cisco MGM
database is up and running properly. Restart the Cisco MGM client and retry.
Error Message EID-540: Database error: Cannot modify the network element IP address.
Recommended Action A database error occurred during this operation. Verify that the Cisco MGM
database is up and running properly. Restart the Cisco MGM client and retry.
Error Message EID-541: Database error: Cannot modify the network element NSAP
address.
Recommended Action A database error occurred when you tried to modify the NE Network Service
Access Point (NSAP) address. Verify that the Cisco MGM database is up and running properly.
Restart the Cisco MGM client and retry.
Error Message EID-542: Database error: Cannot modify the network element state.
Recommended Action A database error occurred during this operation. Verify that the Cisco MGM
database is up and running properly. Restart the Cisco MGM client and retry.
Error Message EID-543: Database error: Cannot modify the network element
description.
Recommended Action A database error occurred during this operation. Verify that the Cisco MGM
database is up and running properly. Restart the Cisco MGM client and retry.
Error Message EID-544: Database error: Cannot modify the network element community
string.
Recommended Action A database error occurred during this operation. Verify that the Cisco MGM
database is up and running properly. Restart the Cisco MGM client and retry.
Error Message EID-545: Database error: Cannot modify the network element location
name.
Recommended Action A database error occurred during this operation. Verify that the Cisco MGM
database is up and running properly. Restart the Cisco MGM client and retry.
Error Message EID-546: Database error: Cannot modify the network element GNE ID.
Recommended Action A database error occurred during this operation. Verify that the Cisco MGM
database is up and running properly. Restart the Cisco MGM client and retry.
Cisco Media Gateway Manager 5.0 User Guide
OL-5461-02
B-31
Appendix B
Error Messages
Cisco MGM Client Error and Warning Messages
Error Message EID-549: Database error: Cannot set the NE type in the database.
Recommended Action A database error occurred during this operation. Verify that the Cisco MGM
database is up and running properly. Restart the Cisco MGM client and retry.
Error Message EID-550: Database error: Cannot set the NE PM collection state in the
database.
Recommended Action A database error occurred during this operation. Verify that the Cisco MGM
database is up and running properly. Restart the Cisco MGM client and retry.
Error Message EID-551: Database error: Cannot set the model type in the database.
Recommended Action A database error occurred during this operation. Verify that the Cisco MGM
database is up and running properly. Restart the Cisco MGM client and retry.
Error Message EID-552: Database error: Cannot set the NE username in the database.
Recommended Action This error occurs when there is a database exception while setting the username
for the NE in the NE Authentication tab. Perform the operation again.
Error Message EID-553: Database error: Cannot set the NE user password in the
database.
Recommended Action This error occurs when there is a database exception while setting the username
for the NE in the NE Authentication tab. Perform the operation again.
Error Message EID-554: Database error: Cannot create the new user.
Recommended Action Perform the operation again.
Error Message EID-555: Username is a mandatory field. Enter a unique username and
retry.
Recommended Action Enter a unique username.
Error Message EID-556: Username is a mandatory field. Enter a username and retry.
Recommended Action Enter a unique username.
Error Message EID-557: A MGM user with the same name already exists. Enter a unique
username and retry.
Recommended Action Enter a unique username.
Cisco Media Gateway Manager 5.0 User Guide
B-32
OL-5461-02
Appendix B
Error Messages
Cisco MGM Client Error and Warning Messages
Error Message EID-559: User Password is a mandatory field. Enter a unique user
password and retry.
Recommended Action Enter a unique user password.
Error Message EID-560: Enter a username with at least 6 characters.
Recommended Action Enter a username that contains at least 6 characters.
Error Message EID-561: Username must start with an alphabetic character (A - Z,
a - z). Enter a valid username and retry.
Recommended Action Enter a valid username.
Error Message EID-563: User Password is mandatory to create a MGM user. Enter a
unique user password and retry.
Recommended Action Enter a unique user password.
Error Message EID-564: The Add User wizard has been closed because the user
privileges list has changed. Launch the wizard again.
Recommended Action Relaunch the Create User Profile wizard.
Error Message EID-565: User Password is a mandatory field. Enter a unique user
password and retry.
Recommended Action Enter a unique password for the user. The user password must contain at least
six characters. Of those six characters, at least one must be a nonalphanumeric character (*, -, &, %,
and so on).
Error Message EID-566: Database error: Cannot modify user properties.
Recommended Action A database error occurred during this operation. Verify that the Cisco MGM
database is up and running properly. Restart the Cisco MGM client and retry.
Error Message EID-567: The password confirmation does not match the actual password.
Try again.
Recommended Action Reenter the password.
Error Message EID-568: The domain name cannot be the same as a group name. A group
with the same name already exists. Specify a unique domain name and retry.
Recommended Action Specify a unique domain name.
Cisco Media Gateway Manager 5.0 User Guide
OL-5461-02
B-33
Appendix B
Error Messages
Cisco MGM Client Error and Warning Messages
Error Message EID-569: No objects are assigned to the user. Assign at least one
object to the user.
Recommended Action Assign an object to the user.
Error Message EID-570: Database error: Cannot create the new user type.
Recommended Action This error occurs when a new user profile is being created or if an existing
profile is being modified. If it occurs while creating a user profile, delete the newly created user
profile and try recreating the user profile again. If it occurs while modifying an existing user profile,
perform the operation again.
Error Message EID-571: User Type Name is a mandatory field. Enter a unique name and
retry.
Recommended Action Enter a unique user type name.
Error Message EID-572: Database error: Cannot modify user properties.
Recommended Action A database error occurred during this operation. Verify that the Cisco MGM
database is up and running properly. Restart the Cisco MGM client and retry.
Error Message EID-573: The password confirmation does not match the actual password.
Reconfirm the password.
Recommended Action Reconfirm the password.
Error Message EID-574: A MGM user type with the same name already exists. Enter a
unique name and retry.
Recommended Action Enter a unique user type name.
Error Message EID-574: One or more selected users are currently logged in. The users
cannot be deleted until they log out.
Recommended Action Ask the selected users to log out from all of the clients and retry.
Error Message EID-575: No objects are assigned to the user. Assign at least one
object to the user.
Recommended Action Assign at least one object to the user and retry.
Error Message EID-576: Enter a user type name that contains at least 6 characters.
Recommended Action Enter a user type name that contains at least 6 characters.
Cisco Media Gateway Manager 5.0 User Guide
B-34
OL-5461-02
Appendix B
Error Messages
Cisco MGM Client Error and Warning Messages
Error Message EID-576: Database error: Cannot assign ports to the user.
Recommended Action A database error occurred during this operation. Verify that the Cisco MGM
database is up and running properly. Restart the Cisco MGM client and retry.
Error Message EID-577: Enter a user type name that contains at least 6 characters.
Recommended Action Enter a user type name that contains at least 6 characters.
Error Message EID-577: No ports are assigned to the user. Assign at least one port
to the user.
Recommended Action Assign one or more ports to the user.
Error Message EID-578: Database error: Cannot delete one or more users.
Recommended Action Perform the operation again.
Error Message EID-579: Fatal error: Restart the server_name server and all the
clients.
Recommended Action Restart the Cisco MGM server and all of the clients.
Error Message EID-580: One or more selected users are currently logged in. The users
cannot be deleted until they log out.
Recommended Action Ask the selected users to log out from all of the clients and retry.
Error Message EID-581: User(s) with this profile already exist(s). The profile cannot
be deleted until you delete the user(s) from the MGM User Table.
Recommended Action Delete the user(s) from the Cisco MGM User Table.
Error Message EID-582: This is a default user profile. It cannot be deleted.
Recommended Action Select a different user profile to delete. You cannot delete the default user
profile.
Error Message EID-583: A GNE or NE with the same name already exists. Specify a unique
GNE name and retry.
Recommended Action Enter a unique GNE name.
Cisco Media Gateway Manager 5.0 User Guide
OL-5461-02
B-35
Appendix B
Error Messages
Cisco MGM Client Error and Warning Messages
Error Message EID-585: The “to” IP Address is lower than the “from” IP Address.
Recommended Action This error occurs during the addition of bulk NEs. Make sure that the To IP
Address is greater than the From IP Address.
Error Message EID-586: The selected GNE ID is no longer present. Select another GNE
ID.
Recommended Action This error occurs while adding an NE. If a selected GNE has been deleted by
another user, this error message appears. Select a different GNE.
Error Message EID-587: Database error: Cannot delete one or more user profiles.
Recommended Action Database error occurred while checking for uniqueness of the user type name
or deleting the user from the USER_TYPE_TABLE. It also occurred while writing rows in the
OPERATIONS_PERMISSION_TABLE. Check your database connection.
Error Message EID-587: The selected network partition ID is no longer present. Select
another network partition ID.
Recommended Action This error occurs while adding an NE. If a selected network partition has been
deleted by another user, this error message appears. Select a different network partition under a
different network partition.
Error Message EID-590: Encountered database error after persisting privilege values.
Recommended Action This error occurs when the privilege for the operation “Add Delete NE or
Group” in the Add User Profile wizard or Modify User Profile wizard is changed from Read/Write
to No Access or from No Access to Read/Write. Use the following procedure to correct the error:
Step 1
Change the privilege back to either Read/Write or No Access.
Step 2
Click Finish.
Step 3
Relaunch the wizard and set the privilege to the desired privilege.
Step 4
If the error shows again, check the database connectivity.
Error Message EID-597: The last reference of a group can be deleted only after
removing all the network elements it contains. Remove all the network elements
this group contains and retry.
Recommended Action Copy or move all of the NEs in this group to another group; then, retry.
Cisco Media Gateway Manager 5.0 User Guide
B-36
OL-5461-02
Appendix B
Error Messages
Cisco MGM Client Error and Warning Messages
Error Message EID-598: A database error occurred while deleting the selected group
from all references of its parent. The group might not be deleted completely.
Recommended Action Restart the Cisco MGM client. Check if the deleted group still exists under all
references of its parents. If it does, select each reference in the Domain Explorer Hierarchy pane and
choose Edit > Delete.
Error Message EID-600: Internal error: Cannot register with the event notification
subsystem for events. You might not receive updates from other users.
Recommended Action Restart the Cisco MGM client.
Error Message EID-601: The Node View cannot be invoked for Out of Service network
elements.
Recommended Action This is an informational message. The Node View can be invoked only for
in-service and under-maintenance NEs. No action is required.
Error Message EID-602: The Alarm Browser cannot be invoked for the selected node.
Recommended Action This is an informational message. No active alarm information is available for
the selected node. No action is required.
Error Message EID-603: An error occurred while subscribing to EMS events.
Recommended Action Restart the Cisco MGM client.
Error Message EID-604: An error occurred while unsubscribing from the
Cisco Media Gateway Manager event notification subsystem.
Recommended Action Restart the Cisco MGM client.
Error Message EID-607: A GNE or NE with the same IP address already exists. Enter a
unique IP address and retry.
Recommended Action Enter a unique IP address.
Error Message EID-621: Community String is a mandatory field. Enter the community
string and retry.
Recommended Action Enter the community string.
Error Message EID-622: A fatal error occurred while requesting the topology change.
Recommended Action Restart the Cisco MGM server and all of the clients.
Cisco Media Gateway Manager 5.0 User Guide
OL-5461-02
B-37
Appendix B
Error Messages
Cisco MGM Client Error and Warning Messages
Error Message EID-623: An error occurred in response to a topology change. Refresh
the view.
Recommended Action Close, then reopen the topology window.
Error Message EID-628: MGM initialization failed. Cannot connect to the MGM database.
Recommended Action The Cisco MGM client cannot read a required table from the database. Restart
the application and start the Debug Log (choose File > Debug Options). If the problem persists,
contact Cisco technical support with the Debug Log trace.
Error Message EID-629: A fatal error occurred while trying to retrieve new
assignments from the server. The application will be shut down. Restart the
application.
Recommended Action Restart the Cisco MGM server and all of the clients.
Error Message EID-630: The selected NE is not found in the database; the database
might be corrupted.
Recommended Action Restart the Cisco MGM client.
Error Message EID-631: A user with administrator privileges has changed your
password. The application will be closed. Log in again with the new password.
Recommended Action Log in with the revised user password.
Error Message EID-632: A user with administrator privileges has disabled this user.
The application will be closed.
Recommended Action The administrator disabled the selected user’s access. Contact the
administrator to re-enable user access.
Error Message EID-633: The administrator has deleted this user. The application will
be closed.
Recommended Action The administrator deleted the selected user. Contact the administrator to create
a new user account.
Error Message EID-637: One or more NEs are missing from the domain. Those NEs will
be added to the Lost and Found group in the MGM domain.
Recommended Action No action is required. The missing NE has been added to the Lost and Found
group in the Cisco MGM domain.
Cisco Media Gateway Manager 5.0 User Guide
B-38
OL-5461-02
Appendix B
Error Messages
Cisco MGM Client Error and Warning Messages
Error Message EID-638: A MGM administrator has modified the MGM domain. As a result,
your request to modify the MGM topology is invalid. Try again.
Recommended Action While you were adding an NE or group to an existing group, another
administrator deleted the existing group. Consequently, your request to add an NE or group is now
invalid. Reselect the node and retry.
Error Message EID-639: One or more groups are missing from the domain. Those groups
will be added to the Lost and Found group in the MGM domain.
Recommended Action No action is required. The missing group has been added to the Lost and Found
group in the Cisco MGM domain.
Error Message EID-640: Searched item not found.
Recommended Action Repeat the search with new search criteria.
Error Message EID-642: Database error: Cannot paste the requested node.
Recommended Action Try the paste action again. If the problem persists, contact Cisco technical
support.
Error Message EID-643: Database error: Cannot delete the requested node.
Recommended Action Delete the node again. If the problem persists, contact Cisco technical support.
Error Message EID-644: Database error: Cannot undelete the requested node.
Recommended Action Undelete the node again. If the problem persists, contact Cisco technical
support.
Error Message EID-645: Cannot purge the requested NE. Action failed.
Recommended Action An NE can be purged only if it is out of service. If the operational state of the
NE is not out of service, undelete the NE, mark it out of service, and delete it again. Try to purge
the NE again.
Error Message EID-646: Cannot add the new NE. An NE with the same name or IP address
still exists in the MGM domain. Contact Cisco TAC for support.
Recommended Action Contact Cisco technical support.
Error Message EID-647: Object cannot be copied because the source and destination
are the same.
Recommended Action Specify a different source and destination.
Cisco Media Gateway Manager 5.0 User Guide
OL-5461-02
B-39
Appendix B
Error Messages
Cisco MGM Client Error and Warning Messages
Error Message EID-649: A duplicate target is not allowed.
Recommended Action Specify a target that has not been used before.
Error Message EID-650: Specify a target.
Recommended Action Specify a target.
Error Message EID-651: Target cannot contain string.
Recommended Action Specify a target that does not contain this string.
Error Message EID-652: Target must contain 4 dot-separated integers.
Recommended Action Specify a target that contains 4 dot-separated integers.
Error Message EID-653: Target is invalid.
Recommended Action Specify a valid target.
Error Message EID-654: Retry values must be integers between 0 and 5.
Recommended Action Specify the retry value as an integer between 0 and 5.
Error Message EID-655: Timeout values must be integers between 1 and 60.
Recommended Action Specify the timeout as an integer between 1 and 60.
Error Message EID-656: Specify a write string.
Recommended Action Specify a write string.
Error Message EID-657: Error retrieving Flash partition files.
Recommended Action Contact the system administrator.
Error Message EID-658: Rediscover request has been accepted.
Recommended Action Your rediscover request was accepted; no action is required.
Error Message EID-662: Power level refresh failed.
Recommended Action Connection to the device might have timed out. Contact your system
administrator.
Cisco Media Gateway Manager 5.0 User Guide
B-40
OL-5461-02
Appendix B
Error Messages
Cisco MGM Client Error and Warning Messages
Error Message EID-663: Circuit ID length cannot exceed 64 characters.
Recommended Action Enter a circuit ID that does not exceed 64 characters.
Error Message EID-664: Circuit description cannot exceed 256 characters.
Recommended Action Enter a circuit description that does not exceed 256 characters.
Error Message EID-665: Config exception: Cannot change EMS identification.
Recommended Action Enter an EMS ID that has between 1 and 64 characters and does not contain an
apostrophe (‘), a semicolon (;), a colon (:), or a comma (,).
Error Message EID-667: Network Partition ID is a mandatory field. Enter a unique
network partition ID and retry.
Recommended Action Enter a unique network partition ID.
Error Message EID-668: A network partition with the same ID already exists. Specify
a unique network partition ID and retry.
Recommended Action Enter a unique network partition ID.
Error Message EID-671: An error occurred while changing the network partition.
Recommended Action This error occurs while changing the name of the network partition. Retry
changing the network partition name.
Error Message EID-672: Invalid browser path.
Recommended Action Verify that a browser is installed on your system and that the browser path in
ems-client.cfg is set correctly.
Error Message EID-673: Network Partition Description is a mandatory field. Enter a
unique network partition description and retry.
Recommended Action Enter a unique network partition description.
Error Message EID-675: Cannot export data on {0}.
Recommended Action A critical malfunction occurred on the property sheet; the data cannot be
exported. Contact Cisco technical support.
Cisco Media Gateway Manager 5.0 User Guide
OL-5461-02
B-41
Appendix B
Error Messages
Cisco MGM Client Error and Warning Messages
Error Message EID-676: Some of the data was not exported correctly. See the file
filename for details.
Recommended Action A malfunction occurred while displaying data in the property sheet. A
parameter cannot be exported, but the export operation will continue processing other parameters.
Contact Cisco technical support.
Error Message EID-677: Cannot execute the operation. Another NE configuration report
is in progress.
Recommended Action Wait until the report is finished and repeat the operation.
Error Message EID-678: Error: Cannot export some of the data in the tab_name tab.
Recommended Action A malfunction occurred while displaying data in the property sheet. A
parameter cannot be exported, but the export operation will continue processing other parameters.
Contact Cisco technical support.
Error Message EID-690: A similar job is currently in progress. Wait for the job to
finish; then, try again.
Recommended Action No action is required.
Error Message EID-691: Cannot add the new GNE. A GNE with the same name or IP address
still exists in the MGM domain. Contact Cisco TAC for support.
Recommended Action Contact Cisco technical support.
Error Message EID-692: No circuit sizes are assigned to the user. Assign at least
one circuit size to the user.
Recommended Action Assign at least one circuit size to the user.
Error Message EID-693: Cannot purge the requested NE because it is connected to
another node with a link.
Recommended Action This error occurs when you purge an NE that has links to other NEs. Delete all
links associated with this NE and retry the purge operation.
Error Message EID-694: Cannot move the requested NE because it is connected to
another node in the same network partition with a link. Delete all links before
changing the partition.
Recommended Action Delete all of the links before moving the NE to another partition.
Cisco Media Gateway Manager 5.0 User Guide
B-42
OL-5461-02
Appendix B
Error Messages
Cisco MGM Client Error and Warning Messages
Error Message EID-700: An error occurred while saving node coordinates to the
database. Refresh the view and retry.
Recommended Action Click the Refresh Data tool to refresh the view and recustomize the
coordinates.
Error Message EID-701: An error occurred while saving the node icon to the database.
Refresh the view and retry.
Recommended Action Click the Refresh Data tool to refresh the view and recustomize the node
icons.
Error Message EID-703: An error occurred while creating the new link between the
selected nodes. Recreate the link.
Recommended Action Recreate the link.
Error Message EID-704: Links must be created between two distinct nodes of compatible
type on the same network map. Recreate the link.
Recommended Action Recreate the link between two distinct nodes.
Error Message EID-705: An error occurred while deleting selected link(s). Check the
communication status of the source and destination nodes.
Recommended Action Click the Refresh Data tool to refresh the view and attempt to delete the link
again.
Error Message EID-709: An error occurred while opening the selected image file at
the specified file path.
Recommended Action The selected image file does not exist in the selected file path. Select an image
file from the file list in the selected subdirectory.
Error Message EID-710: An error occurred while loading the node icon image. Retry.
Recommended Action The image could not be loaded from the file you selected. Check the size of the
file and reload the icon image. The size of the map file should not exceed 100 KB.
Error Message EID-711: An error occurred while loading the default background map
image.
Recommended Action Exit the Cisco MGM client and retry. If the error persists, some map images
were deleted. Reinstall the Cisco MGM client.
Cisco Media Gateway Manager 5.0 User Guide
OL-5461-02
B-43
Appendix B
Error Messages
Cisco MGM Client Error and Warning Messages
Error Message EID-712: An error occurred while loading the link from the database.
Recommended Action Restart the Network Map. If the error persists, exit the Cisco MGM client and
retry.
Error Message EID-713: An error occurred while opening the node.
Recommended Action Restart the Network Map. If the error persists, exit the Cisco MGM client and
retry.
Error Message EID-714: An error occurred while opening the parent node.
Recommended Action Restart the Network Map. If the error persists, exit the Cisco MGM client and
retry.
Error Message EID-715: An error occurred while loading the background map image file.
Retry.
Recommended Action The image could not be loaded from the file you selected. Check the size of the
file and reload the background image. The size of the map file should not exceed 100 KB.
Error Message EID-716: An error occurred while deleting a node from the map. Refresh
the view and retry.
Recommended Action Click the Refresh Data tool to refresh the view.
Error Message EID-717: An error occurred while saving the map background image file.
Refresh the view and retry.
Recommended Action The image could not be saved to the database. Click the Refresh Data tool to
refresh the view and recustomize the background image. If the problem persists on a Solaris
workstation, check the file permissions for the map background and map icon subdirectories under
your installed subdirectory.
Error Message EID-718: You cannot delete the selected link(s) because they are
autodiscovered link(s). Action failed.
Recommended Action You selected an autodiscovered link that is not in an “Invalid” state, and
therefore cannot be deleted. You can delete only manual or invalid links.
Error Message EID-721: Links must be created between two nodes that are in service
and available. Recreate the link.
Recommended Action Recreate the link.
Cisco Media Gateway Manager 5.0 User Guide
B-44
OL-5461-02
Appendix B
Error Messages
Cisco MGM Client Error and Warning Messages
Error Message EID-722: Circuits must be created between two nodes that are in service
and available. Recreate the circuit.
Recommended Action Recreate the circuit.
Error Message EID-723: Links cannot be created between two offview nodes. Recreate
the link.
Recommended Action Recreate the link.
Error Message EID-724: Exception occurred while launching the Circuit Table.
Recommended Action An error occurred while launching the Circuit Table. Try to relaunch the
Circuit Table.
Error Message EID-725: Enter a valid link name with 1 to 256 characters.
Recommended Action Enter a valid link name that contains 1 to 256 characters.
Error Message EID-726: Enter a valid link description with 1 to 256 characters.
Recommended Action Enter a valid link description that contains 1 to 256 characters.
Error Message EID-727: Enter a valid link name with 1 to 64 characters and a link
description with 1 to 256 characters.
Recommended Action Enter a valid link name and link description.
Error Message EID-728: There is no support for this model yet.
Recommended Action The network element software version is not supported. Contact Cisco’s
Technical Support for more information.
Error Message EID-731: Action was not completed or was partially completed.
Recommended Action A link already exists with the same name. Create a link with a unique name.
Error Message EID-732: Source and destination nodes cannot be the same. Choose a
different destination node.
Recommended Action Choose a different destination node.
Cisco Media Gateway Manager 5.0 User Guide
OL-5461-02
B-45
Appendix B
Error Messages
Cisco MGM Client Error and Warning Messages
Error Message EID-733: The node is not available or there are no available physical
termination points for the given link size.
Recommended Action All link termination points have links for the specified link size. Delete existing
links and perform the operation again.
Error Message EID-735: Create link action was not completed or was partially
completed for link: link_ID.
Recommended Action A link already exists with the same name. Create a link with a unique name.
Error Message EID-736: Modify link action was not completed or was partially
completed for link: link_ID.
Recommended Action A link already exists with the same name. Create a link with a unique name.
Error Message EID-738: Cannot create a link with link name name. Verify that both
source and destination NEs are in the same network partition.
Recommended Action Verify that both the source and destination NEs belong to the same network
partition.
Error Message EID-739: Cannot retrieve possible link sizes or link protection
information.
Recommended Action Cannot retrieve possible link sizes on the node. Check if the node is In Service.
Error Message EID-740: A link is already created with this PTP. Enter a different
PTP value to proceed.
Recommended Action Enter a different Physical Termination Point (PTP) value.
Error Message EID-741: Error occurred while retrieving PTP information through CORBA
for the unmanaged NE.
Recommended Action CORBA exception occurred. Check if the node is In Service. For more
information, contact Cisco’s Technical Support.
Error Message EID-742: The Link Rate/Protection Type selected is not supported by
UnmanagedNE. Choose ‘Not Applicable’ and recreate the link.
Recommended Action Select Not Applicable as the link rate or protection type and retry. If the
problem persists, contact Cisco technical support.
Cisco Media Gateway Manager 5.0 User Guide
B-46
OL-5461-02
Appendix B
Error Messages
Cisco MGM Client Error and Warning Messages
Error Message EID-800: Selected NEs are invalid or unreachable.
Recommended Action This error occurs because all NEs under a group are in service or under
maintenance but are not reachable, or because the NEs are reachable but in different network
partitions. Make sure that the selected NEs are in the same network partition.
Error Message EID-801: None of the NEs contain ML cards or all ML cards are used for
L2 topology.
Recommended Action This error occurs if there are no ML cards with both POS ports available for
the NEs selected during Resilient Packet Ring (RPR) circuit creation. Make sure that all ML cards
used for topology creation are available.
Error Message EID-806: A topology with the same name already exists. Enter a unique
topology name.
Recommended Action Enter a unique topology name.
Error Message EID-807: A circuit with the same name already exists. Enter a unique
circuit name.
Recommended Action Enter a unique circuit name.
Error Message EID-811: Topology name is empty. Enter a topology name.
Recommended Action Enter a topology name.
Error Message EID-812: Topology between ports on the same card is not allowed.
Recommended Action Create a topology between ports on different cards.
Error Message EID-813: Select at least two NEs.
Recommended Action Select at least two NEs.
Error Message EID-814: Select at least two cards.
Recommended Action Select at least two cards.
Error Message EID-815: Select at least one card per NE.
Recommended Action Select at least one card per NE.
Error Message EID-816: Select a topology to modify.
Recommended Action Select a topology to modify.
Cisco Media Gateway Manager 5.0 User Guide
OL-5461-02
B-47
Appendix B
Error Messages
Cisco MGM Client Error and Warning Messages
Error Message EID-817: Select a topology to delete.
Recommended Action Select a topology to delete.
Error Message EID-833: Invalid source or destination selected for routing.
Recommended Action Select a valid source or destination.
Error Message EID-834: Error retrieving topology segments from server.
Recommended Action This error occurs because the server is still initializing. Close the wizard and
perform the operation again after some time.
Error Message EID-835: Invalid topology segment.
Recommended Action Select a valid topology segment.
Error Message EID-836: Segment is already provisioned.
Recommended Action Select an unprovisioned segment.
Error Message EID-853: For L2 Service Creation on RPR Topology - Please select
minimum two drops on two different M-cards.
Recommended Action Select at least two drops on two different ML-series cards that are in RPR
topology.
Error Message EID-854: For L2 Service Creation on Point-to-Point Topology - Please
select at least one drop per M-card.
Recommended Action Select at least one drop per ML-series card that is in a point-to-point topology.
Error Message EID-855: No front ports exist for the selected topology.
Recommended Action All of the front ports are used up. Delete drops or L2 services that are not used
to free up some front ports.
Error Message EID-856: Error in retrieving front ports for the selected topology.
Recommended Action All of the front ports are used. Delete drops or L2 services that are not used to
free up some front ports.
Cisco Media Gateway Manager 5.0 User Guide
B-48
OL-5461-02
Appendix B
Error Messages
Cisco MGM Client Error and Warning Messages
Error Message EID-857: Failed to provision L2 service.
Recommended Action If the topology is not synchronized, close the L2 service wizard and try again
after the topology synchronization is complete. If there is an invalid username or password, make
sure that the username and password configured in the ML-series card are synchronized with the NE
username and password. Close the L2 service wizard and try again. Check the command-line
interface (CLI) configuration on all ML-series cards in the topology and retry the operation. If the
problem persists, contact Cisco technical support.
Error Message EID-859: Failed to modify L2 service.
Recommended Action If the topology is not synchronized, close the L2 service wizard and try again
after the topology synchronization is complete. If there is an invalid username or password, make
sure that the username and password configured in the ML-series card are synchronized with the NE
username and password. Close the L2 service wizard and try again. Check the CLI configuration on
all ML-series cards in the topology and retry the operation. If the problem persists, contact Cisco
technical support.
Error Message EID-860: Failed to add drops to L2 service.
Recommended Action If the topology is not synchronized, close the L2 service wizard and try again
after the topology synchronization is complete. If there is an invalid username or password, make
sure that the username and password configured in the ML-series card are synchronized with the NE
username and password. Close the Add/Delete Drops wizard and try again. Check the CLI
configuration on all ML-series cards in the topology and retry the operation.
Error Message EID-861: Failed to add drops to L2 service.
Recommended Action If the topology is not synchronized, close the L2 service wizard and try again
after the topology synchronization is complete. If there is an invalid username or password, make
sure that the username and password configured in the ML-series card are synchronized with the NE
username and password. Close the Add/Delete Drops wizard and try again. Check the CLI
configuration on all ML-series cards in the topology and retry the operation.
Error Message EID-862: No L2 service is selected to modify drops. Select an L2
service.
Recommended Action Select an L2 service.
Error Message EID-863: Select only one L2 service from the table.
Recommended Action Select one L2 service.
Error Message EID-865: No L2 service is selected to modify. Select an L2 service.
Recommended Action Select one L2 service.
Cisco Media Gateway Manager 5.0 User Guide
OL-5461-02
B-49
Appendix B
Error Messages
Cisco MGM Client Error and Warning Messages
Error Message EID-866: Select only one L2 service from the table.
Recommended Action Select one L2 service.
Error Message EID-868: No L2 service is selected to show drops. Select an L2 service.
Recommended Action Select one L2 service.
Error Message EID-869: Select only one L2 service from the table.
Recommended Action Select one L2 service.
Error Message EID-871: PIR should be greater than or equal to CIR.
Recommended Action Enter a PIR value that is greater than or equal to CIR.
Error Message EID-872: Max PIR burst should be greater than or equal to max CIR burst.
Recommended Action Enter a PIR that is greater than or equal to the maximum CIR burst.
Error Message EID-873: Failed to modify drops on the L2 service.
Recommended Action If the topology is not synchronized, close the L2 service wizard and try again
after the topology synchronization is complete. If there is an invalid username or password, make
sure that the username and password configured in the ML-series card are synchronized with the NE
username and password. Close the Add/Delete Drops wizard and try again. Check the CLI
configuration on all ML-series cards in the topology and retry the operation.
Error Message EID-874: Failed to modify these drops on the L2 service.
Recommended Action If the topology is not synchronized, close the L2 service wizard and try again
after the topology synchronization is complete. If there is an invalid username or password, make
sure that the username and password configured in the ML-series card are synchronized with the NE
username and password. Close the Add/Delete Drops wizard and try again. Check the CLI
configuration on all ML-series cards in the topology and retry the operation.
Error Message EID-875: Please select at least one drop to delete.
Recommended Action Select at least one drop to delete to complete the delete drop port operation.
Otherwise, cancel the delete drop port operation.
Error Message EID-876: Please select at least one new drop to add.
Recommended Action Select at least one drop to add to complete the add drop port operation.
Otherwise cancel the add drop port operation.
Cisco Media Gateway Manager 5.0 User Guide
B-50
OL-5461-02
Appendix B
Error Messages
Cisco MGM Client Error and Warning Messages
Error Message EID-878: Failed to Reset General attributes of L2 Service.
Recommended Action Close the modify L2 service window and try again.
Error Message EID-879: Failed to Reset QoS values for L2 Service.
Recommended Action Close the modify L2 service window and try again.
Error Message EID-880: Failed to Reset Enable/Disable value for the drops in the L2
Service.
Recommended Action Close the modify L2 service window and try again.
Error Message EID-883: L2 Topology is undergoing Resync. Please wait until the L2
Topology Resync is completed.
Recommended Action Wait until the topology resync has completed before starting the operation.
Error Message EID-884: L2 Topology is in Incomplete state.
Recommended Action Selected topology is incomplete. Complete the topology by creating missing
circuits. Try the operation again after completing the topology.
Error Message EID-885: There are no Mcards in the topology.
Recommended Action Add the ML-series cards to the topology and wait until the topology is
completed. Wait until the topology resynchronization status becomes complete. If the problem
persists, contact Cisco technical support.
Error Message EID-902: Failed to set the circuit attributes.
Recommended Action Cisco MGM enforces the uniqueness of the circuit ID. Change the circuit name
and retry.
Error Message EID-903: Circuit Name is a mandatory field. Enter a valid circuit name
with 1 or more characters and retry.
Recommended Action Enter a circuit name.
Error Message EID-904: Failed to set the circuit end points for circuit creation.
Recommended Action The server service is not ready. Wait several minutes and try again.
Error Message EID-905: Source is not fully specified.
Recommended Action Specify the source NE and connection termination points (CTPs).
Cisco Media Gateway Manager 5.0 User Guide
OL-5461-02
B-51
Appendix B
Error Messages
Cisco MGM Client Error and Warning Messages
Error Message EID-906: Destination is not fully specified.
Recommended Action Specify the destination NE and CTPs.
Error Message EID-907: Slot selection is mandatory. Select the slot and retry.
Recommended Action Select a slot and retry.
Error Message EID-908: Port selection is mandatory. Select the port and retry.
Recommended Action Select a port and retry.
Error Message EID-909: STS/VT selection is mandatory. Select the STS or VT and retry.
Recommended Action Select an STS or VT and retry.
Error Message EID-910: Sec. slot selection is mandatory. Select the slot and retry.
Recommended Action Select a secondary slot and retry.
Error Message EID-911: Sec. port selection is mandatory. Select the port and retry.
Recommended Action Select a secondary port and retry.
Error Message EID-912: Sec. STS/VT selection is mandatory. Select the STS or VT and
retry.
Recommended Action Select a secondary STS or VT and retry.
Error Message EID-913: Failed to retrieve slots.
Recommended Action The server service is not ready. Wait several minutes and try again.
Error Message EID-914: Failed to retrieve ports.
Recommended Action Verify that there are available in-service ports on the selected slot.
Error Message EID-915: Failed to retrieve STSs.
Recommended Action The server service is not ready. Wait several minutes and try again.
Error Message EID-916: Failed to retrieve VTs.
Recommended Action Verify that there are available in-service VTs on the selected STS.
Cisco Media Gateway Manager 5.0 User Guide
B-52
OL-5461-02
Appendix B
Error Messages
Cisco MGM Client Error and Warning Messages
Error Message EID-917: Sources cannot be the same.
Recommended Action You cannot select the same CTPs for the source and secondary source. Select
a different source or secondary source and retry.
Error Message EID-918: Destinations cannot be the same.
Recommended Action You cannot select the same CTPs for the destination and secondary destination.
Select a different destination or secondary destination and retry.
Error Message EID-919: Source and destination CTPs cannot be identical.
Recommended Action You cannot select the same CTPs for the source and destination.
Error Message EID-920: Failed to retrieve adjacent nodes for the current nodes.
Recommended Action Verify that there is at least one link between the selected nodes.
Error Message EID-921: Failed to retrieve links between the current node and the
adjacent node.
Recommended Action Verify that there is at least one link between the selected nodes.
Error Message EID-927: Failed to provision circuit manually.
Recommended Action The selected link does not exist. The link might have been deleted. Reopen the
Circuit wizard and create the circuit.
Error Message EID-928: Span already added for the selected link.
Recommended Action A span has been added for the current hop. If you want to add a new span,
remove the existing span and add the new one.
Error Message EID-929: Select a span in the current hop.
Recommended Action Select a span in the current hop.
Error Message EID-930: No available object.
Recommended Action All of the objects are in use for the selected link.
Error Message EID-931: Failed to provision circuit.
Recommended Action The underlying circuit is not in the correct state. The circuit must be in a
Creating or Active state. Reopen the Circuit wizard and try again.
Cisco Media Gateway Manager 5.0 User Guide
OL-5461-02
B-53
Appendix B
Error Messages
Cisco MGM Client Error and Warning Messages
Error Message EID-932: Failed to route circuit.
Recommended Action The server is not ready. Wait several minutes; then, reopen the Circuit wizard
and try again.
Error Message EID-934: Failed to add drops.
Recommended Action The underlying circuit might have been deleted. Reopen the Circuit wizard and
try again.
Error Message EID-935: Failed to set the circuit end points for editing.
Recommended Action Source or destination end points are already in use. Reopen the Circuit wizard
and try again.
Error Message EID-936: Failed to retrieve the connection information.
Recommended Action Verify that there is at least one link between the selected nodes.
Error Message EID-937: Failed to retrieve the nodes in the working and protect paths.
Recommended Action Verify that the nodes are in service in the Domain Explorer.
Error Message EID-938: Failed to retrieve the links in the working path.
Recommended Action Verify that there are links in the working path and that the nodes are in service.
Error Message EID-939: Failed to retrieve the links in the protect path.
Recommended Action Verify that there are links in the protect path and that the nodes are in service.
Error Message EID-940: Invalid circuit attributes. Select a circuit with valid
attributes.
Recommended Action Select a circuit with a valid source and destination and an active state.
Error Message EID-941: Cannot launch trace report because the source and destination
are the same.
Recommended Action The trace report shows both the primary and the secondary routes that are taken
by the circuit. Because the source and destination are the same, there is no route.
Cisco Media Gateway Manager 5.0 User Guide
B-54
OL-5461-02
Appendix B
Error Messages
Cisco MGM Client Error and Warning Messages
Error Message EID-942: Delete job already in progress on the selected circuit(s).
Wait until the job completes.
Recommended Action You cannot delete this circuit because the delete request has been submitted on
this circuit already.
Error Message EID-943: Circuit deletion failure.
Recommended Action Cisco MGM reports this error message if any associated cross-connections
from the NEs could not be deleted. Cisco MGM places the circuit in an Incomplete state. Try to
delete this circuit again or take the appropriate action described by the failure event.
Error Message EID-943: Circuits involving ML cards cannot be deleted. Delete
associated topologies.
Recommended Action Delete the associated topologies.
Error Message EID-944: Delete drop failure.
Recommended Action Click the Refresh Data tool to refresh the list of existing drops. Wait for the
circuit to change to the ACTIVE or DROP_PENDING state and try again. Alternately, the node
might be down or initializing. Wait for the node to come up or finish its initialization and try again.
Error Message EID-945: No adjacent nodes for the selected node.
Recommended Action Verify that there is at least one link from the selected node to the other nodes.
Error Message EID-946: No available links between the selected nodes.
Recommended Action Verify that there is at least one link between the selected nodes.
Error Message EID-947: Editing the UPSR attributes failed.
Recommended Action No action is required.
Error Message EID-947: Editing the SNCP attributes failed.
Recommended Action Contact your system administrator.
Error Message EID-948: Change the circuit name and retry.
Recommended Action Enter a unique circuit name.
Cisco Media Gateway Manager 5.0 User Guide
OL-5461-02
B-55
Appendix B
Error Messages
Cisco MGM Client Error and Warning Messages
Error Message EID-949: Number of circuits must be greater than or equal to 1. Enter
a valid number and retry.
Recommended Action Enter a value that is greater than or equal to 1.
Error Message EID-950: Failed to upgrade the selected circuit(s).
Recommended Action Select another circuit. Only circuits that are in an upgradable state can be
upgraded. Wait for the source node to be discovered.
Error Message EID-951: Cannot upgrade the selected circuit because it is not in an
upgradeable state.
Recommended Action Select another circuit that is in an upgradeable state.
Error Message EID-952: Failed to delete stitched nodes.
Recommended Action Circuit is not complete or not in an active state. Wait for each node involved in
the circuit to be discovered.
Error Message EID-953: Failed to add nodes.
Recommended Action Circuit is not complete or not in an active state. Wait for each node involved in
the circuit to be discovered.
Error Message EID-954: Failed to retrieve the circuit provisioner.
Recommended Action The server service is not ready. Wait several minutes and try again.
Error Message EID-955: Failed to retrieve the possible Ethernet nodes.
Recommended Action Wait for each node involved in the circuit to be discovered.
Error Message EID-958: Failed to change the circuit name.
Recommended Action Check if the Cisco MGM server is up and running. The Cisco MGM server
service might not be available for some time. Try again. You should also verify that the circuit name
is unique.
Error Message EID-959: Failed to change the circuit description.
Recommended Action Check if the Cisco MGM server is up and running. Try again when the server
is available.
Cisco Media Gateway Manager 5.0 User Guide
B-56
OL-5461-02
Appendix B
Error Messages
Cisco MGM Client Error and Warning Messages
Error Message EID-960: Failed to change the circuit state.
Recommended Action Check if the Cisco MGM server is up and running. Try again when the server
is available.
Error Message EID-961: The circuit name already exists. Enter a unique circuit name.
Recommended Action Enter unique circuit name.
Error Message EID-962: No active NEs are available.
Recommended Action Launch the Circuit Table only on NEs available for circuit creation.
Error Message EID-963: Circuit is incomplete cannot be traced.
Recommended Action Launch a circuit trace for active circuits only.
Error Message EID-964: The requested search criteria did not return any data.
Recommended Action Modify the search criteria.
Error Message EID-967: Failed to change the customer ID.
Recommended Action Verify that the Cisco MGM server is up and running.
Error Message EID-968: Failed to change the service ID.
Recommended Action Verify that the Cisco MGM server is up and running.
Error Message EID-969: The source NE of this circuit is not in the user domain.
Recommended Action Verify that the source NE is in the user domain.
Error Message EID-971: Failed to retrieve TUG2s.
Recommended Action Verify that there are available in-service TUG2s on the selected VC3.
Error Message EID-971: When 'Ignore All Circuit Names' is not selected, at least one
circuit name must be added to the Selected Names list.
Recommended Action Add at least one circuit name to the Selected Names list.
Error Message EID-972: Failed to retrieve VC12s.
Recommended Action Verify that there are available in-service VC12s on the selected object.
Cisco Media Gateway Manager 5.0 User Guide
OL-5461-02
B-57
Appendix B
Error Messages
Cisco MGM Client Error and Warning Messages
Error Message EID-972: When 'Ignore All Customer IDs' is not selected, at least one
customer ID must be added to the Selected Names list.
Recommended Action Add at least one customer ID to the Selected Names list.
Error Message EID-973: When 'Ignore All Service IDs' is not selected, at least one
service ID must be added to the Selected Names list.
Recommended Action Add at least one service ID to the Selected Names list.
Error Message EID-976: No NEs selected or the selected NEs are not in service.
Recommended Action Select valid NEs.
Error Message EID-977: Error occurred while retrieving NE data provider.
Recommended Action Contact your system administrator.
Error Message EID-981: Failed to change the circuit parameters.
Recommended Action Contact your system administrator.
Error Message EID-982: Failed to retrieve the monitor source points.
Recommended Action Contact your system administrator.
Error Message EID-983: Cannot create monitor circuits on a port grouping circuit.
Recommended Action No action.
Error Message EID-984: Error occurred while retrieving the circuit drop points.
Recommended Action Contact your system administrator.
Error Message EID-985: Error occurred while retrieving the circuit drop nodes.
Recommended Action Contact your system administrator.
Error Message EID-986: Cannot create drops on the circuit. Additional drops are not
available.
Recommended Action No action.
Cisco Media Gateway Manager 5.0 User Guide
B-58
OL-5461-02
Appendix B
Error Messages
Cisco MGM Client Error and Warning Messages
Error Message EID-987: There are no possible Ethernet nodes to add.
Recommended Action No action.
Error Message EID-988: Cannot create monitor circuits on this termination point.
Recommended Action No action.
Error Message EID-1001: Failed to retrieve circuit service provider object.
Recommended Action Verify that the Cisco MGM server and the database is up and running.
Error Message EID-1002: Failed to retrieve Sys ID for the NE.
Recommended Action The NEs are not present in the system. Make the NE active and try again.
Error Message EID-1003: Both old and new MAC addresses are mandatory.
Recommended Action Enter both values.
Error Message EID-1004: Failed to retrieve circuit manager object.
Recommended Action Verify that the Cisco MGM server is up and running.
Error Message EID-1011: Failed to retrieve network manager object.
Recommended Action Verify that the Cisco MGM server is up and running.
Error Message EID-1012: Failed to retrieve path trace mode.
Recommended Action Verify that the Cisco MGM server is up and running. Check the NE
connectivity.
Error Message EID-1013: Failed to retrieve transmit text.
Recommended Action Verify that the Cisco MGM server is up and running. Check the NE
connectivity.
Error Message EID-1014: Failed to retrieve expected text.
Recommended Action Verify that the Cisco MGM server is up and running. Check the NE
connectivity.
Cisco Media Gateway Manager 5.0 User Guide
OL-5461-02
B-59
Appendix B
Error Messages
Cisco MGM Client Error and Warning Messages
Error Message EID-1015: Failed to retrieve received text.
Recommended Action Verify that the Cisco MGM server is up and running. Check the NE
connectivity. Verify that the provisioned card is present in the slot.
Error Message EID-1016: Failed to set transmit text.
Recommended Action Verify that the Cisco MGM server is up and running. Check the NE
connectivity.
Error Message EID-1017: Failed to set expected text.
Recommended Action Verify that the Cisco MGM server is up and running. Check the NE
connectivity.
Error Message EID-1018: Failed to set path trace mode.
Recommended Action Verify that the Cisco MGM server is up and running. Check the NE
connectivity.
Error Message EID-1019: No circuit selected for J1 path trace. Select a circuit.
Recommended Action Select an active STS (for SONET) or active LOP/HOP/VCT (for SDH).
Error Message EID-1020: Select only one circuit from the table.
Recommended Action Select only one active STS (for SONET) or active LOP/HOP/VCT (for SDH).
Error Message EID-1021: Failed to retrieve the record from the database.
Recommended Action Verify that Cisco MGM server and database is up and running.
Error Message EID-1022: Circuit is not active.
Recommended Action Select an active STS (for SONET) or active LOP/HOP/VCT (for SDH).
Error Message EID-1065: Error creating ring Provisioner: Could get data for the
selected ring.
Recommended Action Check the connectivity for all NEs in the BLSR. Mark the NEs in the ring as
Out of Service and In Service.
Cisco Media Gateway Manager 5.0 User Guide
B-60
OL-5461-02
Appendix B
Error Messages
Cisco MGM Server Error Messages
B.2 Cisco MGM Server Error Messages
Cisco MGM server error messages appear in the Error Log and have the following syntax:
Date time: filename(line number): module-severity-error_ID: error_message
Example:
01/01/03 09:56:01 PM: cliroutines.c(80): CONFIG-DEBUG-1201: Unknown_ETHERNET_PORT 0
The following error messages are categorized by severity (critical, major, minor, and debug) and are
listed in ascending numeric order within each category.
Note
Because error messages are grouped in number ranges, they are not listed in exact numeric order.
B.2.1 Critical Server Error Messages
Error Message EID-104: Service service_name failed to initialize.
Recommended Action Look for previous error messages from the service that failed to determine the
cause and fix for the problem. Verify that the Oracle database is running and that there are enough
free resources (memory, sockets, and so on) on the server workstation.
Error Message EID-316: Error connecting to the database.
Recommended Action The application failed to log into the Oracle database. Verify that the database
and the listeners are running.
Error Message EID-401: Failed to initialize UDP socket pool.
Recommended Action There were not enough sockets available for the server to start. Check the
/etc/system file on the server workstation for the following lines:
set rlim_fd_max=XXX
set rlim_fd_cur=YYY
The value of XXX should be greater than or equal to 4096. The value of YYY should be greater than
or equal to 2048. Adjust the value; then, restart the server workstation.
Error Message EID-402: Failed to initialize work queue.
Recommended Action Restart the server.
Error Message EID-403: Failed to initialize semaphores.
Recommended Action Restart the server.
Cisco Media Gateway Manager 5.0 User Guide
OL-5461-02
B-61
Appendix B
Error Messages
Cisco MGM Server Error Messages
Error Message EID-404: Unable to connect to database.
Recommended Action The application failed to log into the Oracle database. Verify that the database
and the listeners are running. There might be a license problem. Also, verify that the username and
password are correct.
Error Message EID-405: Failed to start main poller thread.
Recommended Action Restart the server.
Error Message EID-601: Failed to open trap listener socket.
Recommended Action The UDP socket 162 should not be taken by another program. If another
program is using UDP socket 162, stop that program. Also, verify that the Cisco MGM server is
running as root.
Error Message EID-602: Failed to bind trap listener socket.
Recommended Action There is a conflict for the UDP socket. Stop the conflicting UNIX process or
reboot the Cisco MGM server.
Error Message EID-701: Failed to get memory for SNMP packet.
Recommended Action Restart the Cisco MGM server. If the problem persists, add memory to the
workstation.
Error Message EID-702: Failed to open SNMP port.
Recommended Action There is a conflict for the UDP socket. Stop the conflicting UNIX process or
reboot the Cisco MGM server.
Error Message EID-703: Failed to bind SNMP socket.
Recommended Action There is a conflict for the UDP socket. Stop the conflicting UNIX process or
reboot the Cisco MGM server.
Error Message EID-805: Failed to open a disk file filename
errno=error_number_from_file /usr/include/sys/errno.h.
Recommended Action Cisco MGM could not open SpoolFile in the MGMSHOME directory. Check
for file permissions and verify that the Cisco MGM server is running with SuperUser privileges. The
file system containing SpoolFile must be installed on a local file system.
Error Message EID-1024: Failed to retrieve trace data from the server.
Recommended Action Try again after some time. If the problem persists, contact your system
administrator.
Cisco Media Gateway Manager 5.0 User Guide
B-62
OL-5461-02
Appendix B
Error Messages
Cisco MGM Server Error Messages
Error Message EID-1025: Could not get access to one of the circuit nodes. Verify that
you have user privileges for all of the nodes in this circuit. Contact the
administrator if the problem persists.
Recommended Action Verify that you have user privileges for all the nodes in the circuit. If the
problem persists, contact your system administrator.
Error Message EID-1026: This circuit has been deleted from another interface. This
window will close.
Recommended Action No action.
Error Message EID-1026: Roll creation request failed.
Recommended Action Try again. Contact system administrator for more information.
Error Message EID-1027: Error: Cannot proceed with roll creation.
Recommended Action Close the wizard and try again.
Error Message EID-1028: Error occurred while setting the roll-to-point. Try again.
Recommended Action Perform the operation again.
Error Message EID-1029: Roll-to-point is not fully specified. Choose available
points.
Recommended Action Choose available points.
Error Message EID-1030: Select the circuit termination point.
Recommended Action Select the circuit termination point.
Error Message EID-1031: The selected roll path is invalid.
Recommended Action Choose a valid circuit termination point as the roll path.
Error Message EID-1032: Failed to complete the roll.
Recommended Action Contact your system administrator.
Error Message EID-1033: Failed to delete the roll.
Recommended Action Contact your system administrator.
Cisco Media Gateway Manager 5.0 User Guide
OL-5461-02
B-63
Appendix B
Error Messages
Cisco MGM Server Error Messages
Error Message EID-1034: Failed to cancel the roll.
Recommended Action Contact your system administrator.
Error Message EID-1035: Failed to finish the roll.
Recommended Action Contact your system administrator.
Error Message EID-1036: Failed to retrieve LAP spans.
Recommended Action Contact your system administrator.
Error Message EID-1037: Failed to retrieve LO options.
Recommended Action Contact your system administrator.
Error Message EID-1038: Failed to set LO options.
Recommended Action Contact your system administrator.
Error Message EID-1039: Failed to set the LAP destination.
Recommended Action Contact your system administrator.
Error Message EID-1040: Error occurred while setting the nodes.
Recommended Action Contact your system administrator.
Error Message EID-1050: This port is already assigned. The east and west ports must
be different.
Recommended Action Choose another port.
Error Message EID-1051: You cannot create a BLSR with these attributes. This means
that all nodes and spans in your network have been excluded. Click the “Excluded
nodes” button to see a list of nodes and why they cannot be included in the BLSR
you are creating.
Recommended Action To correct this error:
Step 1
Click Ok in the warning dialog box. The Working Span Selection dialog box appears with an empty map.
Step 2
Click Excluded Nodes. The Excluded Nodes dialog box appears. It lists all the nodes excluded from the
ring creation and the reasons for excluding them.
Cisco Media Gateway Manager 5.0 User Guide
B-64
OL-5461-02
Appendix B
Error Messages
Cisco MGM Server Error Messages
Step 3
Correct the problem and perform the operation again.
Step 4
If the problem persists, contact the system administrator.
Error Message EID-1052: Error occurred while adding the span.
Recommended Action Click the Details button to view the reason why the span was not added. If
reason is “not sufficient,” contact your system administrator.
Error Message EID-1053: Error occurred while removing the span.
Recommended Action The Details button shows the reason for not removing the span. Review the
reasons. If the problem persists, contact Cisco technical support.
Error Message EID-1054: Error occurred while reversing the span.
Recommended Action The Details button shows the reason for not reversing the span. Review the
reasons. If the problem persists, contact Cisco technical support.
Error Message EID-1055: Error occurred while setting the protect ports.
Recommended Action Click the Details button to view the reason for the failure. Correct the error and
retry or contact your system administrator.
Error Message EID-1056: Error occurred while retrieving the working spans for the
map update.
Recommended Action The ring model might not exist in the server. Close the table; then, relaunch it
and try to upgrade again.
Error Message EID-1057: Error provisioning.
Recommended Action Click the Details button to view the reason why provisioning failed. Correct
the problem and retry. If the problem persists, contact your system administrator.
Error Message EID-1058: Error updating.
Recommended Action Click the Details button to view the reason why the update failed. Correct the
problem and retry. If the problem persists, contact your system administrator.
Error Message EID-1059: Error editing.
Recommended Action Click the Details button to view the reason why the edit failed. Correct the
problem and retry. If the problem persists, contact your system administrator.
Cisco Media Gateway Manager 5.0 User Guide
OL-5461-02
B-65
Appendix B
Error Messages
Cisco MGM Server Error Messages
Error Message EID-1060: Error deleting.
Recommended Action Click the Details button to view the reason why the deletion failed. For more
information, contact Cisco technical support.
Error Message EID-1061: Error creating ring provisioner: Could get data for the
selected ring.
Recommended Action Mark the NEs in the ring as out of service (OOS) and in service (IS).
Error Message EID-1062: Error occurred while retrieving protect port details.
Recommended Action Click the Details button to view the reason for failure. For more information,
contact Cisco technical support.
Error Message EID-1063: Cannot have a four-fiber ring on location.
Recommended Action The current topology does not support 4-fiber rings. Click Details button to
view reasons why the 4-fiber ring is not supported. Contact your system administrator.
Error Message EID-1701: Cannot allocate memory for: value.
Recommended Action The MGMServer.cfg file has been corrupted. Reinstall the Cisco MGM server.
Error Message EID-1704: Error connecting to the database.
Recommended Action The MGMServer.cfg file has been corrupted. Reinstall the Cisco MGM server.
Error Message EID-2002: Bad category value in JMOCO event.
Recommended Action If you are having operational problems, contact Cisco technical support with
this error message. Otherwise, ignore this error message; no action is required.
Error Message EID-2003: JMOCO event is null.
Recommended Action If you are having operational problems, contact Cisco technical support with
this error message. Otherwise, ignore this error message; no action is required.
Error Message EID-2025: Cannot initialize the NE Service. Trying to stop the service.
Recommended Action Restart the Cisco MGM server. If the problem persists, contact Cisco technical
support with the output from the getinfo script.
Cisco Media Gateway Manager 5.0 User Guide
B-66
OL-5461-02
Appendix B
Error Messages
Cisco MGM Server Error Messages
Error Message EID-2026: Exception string occurred while initializing the NE Service.
Trying to stop the service.
Recommended Action Restart the Cisco MGM server. If the problem persists, contact Cisco technical
support with the output from the getinfo script.
Error Message EID-3101: init: Exception value occurred while initializing trap
service. The snmpTrapDispatcher or snmpTrapHandler could not be started.
Recommended Action The SNMP Trap Service could not start worker threads. Restart the
Cisco MGM server.
Error Message EID-3105: createSnmpTrapHandler: Snmp Exception
Recommended Action This message might indicate a conflict in binding to the trap listener port.
Remove any other UNIX process that is using this port.
Error Message EID-3106: createSnmpTrapHandler: Exception string.
Recommended Action Report the exception string to Cisco technical support.
Error Message EID-3107: createSnmpTrapHandler: run Exception string.
Recommended Action Report the exception string to Cisco technical support.
Error Message EID-3110: Exception: string occurred while creating Snmp trap queue.
Recommended Action This is a fatal error with the Cisco MGM initialization. Restart the Cisco MGM
server.
Error Message EID-3111: Main exception: string occurred while creating Snmp Trap
Service.
Recommended Action This is a fatal error with the Cisco MGM initialization. Restart the Cisco MGM
server.
Error Message EID-4235: Exception: No node exists with NEDB ID string.
Recommended Action Contact Cisco technical support.
Error Message EID-4237: Exception: Network Manager creating links from DB rows
generated an exception.
Recommended Action Contact Cisco technical support.
Cisco Media Gateway Manager 5.0 User Guide
OL-5461-02
B-67
Appendix B
Error Messages
Cisco MGM Server Error Messages
Error Message EID-6050: Exception. This method is not implemented for this network
element.
Recommended Action Contact Cisco technical support.
Error Message EID-6051: Exception occurred while retrieving NE information.
Recommended Action Contact Cisco technical support.
B.2.2 Major Server Error Messages
Error Message EID-202: Error destroying thread.
Recommended Action The MGMServer.cfg file has been corrupted. Reinstall the Cisco MGM server.
Error Message EID-203: Invalid thread ID.
Recommended Action If the Cisco MGM server starts, ignore this internal error. If the server does not
start, increase the memory or swap space on the server workstation. If the problem persists, contact
Cisco technical support.
Error Message EID-204: Error creating work queue.
Recommended Action If the Cisco MGM server starts, ignore this internal error. If the server does not
start, increase the memory or swap space on the server workstation. If the problem persists, contact
Cisco technical support.
Error Message EID-206: Error scheduling work.
Recommended Action If the Cisco MGM server starts, ignore this internal error. If the server does not
start, increase the memory or swap space on the server workstation. If the problem persists, contact
Cisco technical support.
Error Message EID-208: Work queue/work was destroyed.
Recommended Action If the Cisco MGM server starts, ignore this internal error. If the server does not
start, increase the memory or swap space on the server workstation. If the problem persists, contact
Cisco technical support.
Error Message EID-209: Worker thread is exiting.
Recommended Action If you receive this error during normal operation, restart the server. This error
is normal during shutdown.
Cisco Media Gateway Manager 5.0 User Guide
B-68
OL-5461-02
Appendix B
Error Messages
Cisco MGM Server Error Messages
Error Message EID-212: Error waiting on a semaphore.
Recommended Action If the Cisco MGM server starts, ignore this internal error. If the server does not
start, increase the memory or swap space on the server workstation.
Error Message EID-218: Memory corruption: bad header.
Recommended Action Restart the Cisco MGM server.
Error Message EID-219: Memory corruption: bad footer.
Recommended Action Restart the Cisco MGM server.
Error Message EID-226: Error creating socket.
Recommended Action If the Cisco MGM server starts, ignore this internal socket-related error. If the
server does not start, check the /etc/system file on the server workstation for the following lines:
set rlim_fd_max=XXX
set rlim_fd_cur=YYY
The value of XXX should be greater than or equal to 4096. The value of YYY should be greater than
or equal to 2048. The value of rlim_fd_max should be greater than the value of rlim_fd_cur. Adjust
the values; then, restart the server workstation.
Error Message EID-227: Error in socket bind.
Recommended Action If the Cisco MGM server starts, ignore this internal socket-related error. If the
server does not start, check the /etc/system file on the server workstation for the following lines:
set rlim_fd_max=XXX
set rlim_fd_cur=YYY
The value of XXX should be greater than or equal to 4096. The value of YYY should be greater than
or equal to 2048. Adjust the value; then, restart the server workstation.
Error Message EID-228: Error in socket listen.
Recommended Action This is an internal error. If the Cisco MGM server is not operating normally,
restart the server.
Error Message EID-229: Invalid socket.
Recommended Action This is an internal error; no action is required.
Error Message EID-232: Error establishing connection.
Recommended Action The MGMServer.cfg file has been corrupted. Reinstall the Cisco MGM server.
Cisco Media Gateway Manager 5.0 User Guide
OL-5461-02
B-69
Appendix B
Error Messages
Cisco MGM Server Error Messages
Error Message EID-237: Timer thread exiting.
Recommended Action If the timer thread exits, the software and configuration upload/download will
not work properly. Restart the server.
Error Message EID-238: Unable to schedule timer work.
Recommended Action This is an internal error; no action is required.
Error Message EID-313: Length of request is more than expected.
Recommended Action This is an internal protocol error. The Cisco MGM client will display the
appropriate message.
Error Message EID-314: Cisco MGM server port not specified in configuration file.
Recommended Action This is an internal protocol error. The Cisco MGM client will display the
appropriate message.
Error Message EID-321: Unable to set up database entry for NE #NE_ID.
Recommended Action This is an internal protocol error. The Cisco MGM client will display the
appropriate message.
Error Message EID-325: Error encoding arguments.
Recommended Action This is an internal protocol error. The Cisco MGM client will display the
appropriate message.
Error Message EID-326: Error disabling the user login for username.
Recommended Action This is an internal protocol error. The Cisco MGM client will display the
appropriate message.
Error Message EID-327: Maximum number of client connections exceeded for
IP_address:socket_number.
Recommended Action This is an internal protocol error. The Cisco MGM client will display the
appropriate message.
Error Message EID-425: The EMS server may require a restart.
Recommended Action Restart the Cisco MGM server. If the error persists, capture a LAN trace from
the Cisco MGM server to help debug the problem.
Cisco Media Gateway Manager 5.0 User Guide
B-70
OL-5461-02
Appendix B
Error Messages
Cisco MGM Server Error Messages
Error Message EID-606: Active alarm recovery looping for NE ID.
Recommended Action The Cisco MGM server cannot recover the active or standing alarms on the NE
because of a loop in the SNMP agent on the NE. Restart the NE.
Error Message EID-801: Failed to connect to a socket.
Recommended Action The MGMServer.cfg file has been corrupted. Reinstall the Cisco MGM server.
Error Message EID-803: Invalid write errno = error_number_from_file
/usr/include/sys/errno.h, size_to_write = size, wrote number bytes.
Recommended Action This is an internal socket error. Data to the OSS overflowed, but the error will
be corrected automatically.
Error Message EID-803: Error while getting card list from server.
Recommended Action This error is shown because the selected NEs do not have ML-series cards
available for topology creation or because the ML-series cards are out of service. Check whether the
ML-series cards in the selected NEs are active or not.
Error Message EID-804: Invalid read errno = error_number_from_file
/usr/include/sys/errno.h, size_to_read = size.
Recommended Action This is an internal socket error. Check network connectivity.
Error Message EID-808: Selected NEs/Group NEs are in different network partition.
Recommended Action You are not allowed to create an L2 topology with NEs in different network
partitions. Move the NEs to the same network partition.
Error Message EID-809: Circuit creation failed between endpoints.
Recommended Action Create circuits using Cisco MGM Circuit Creation wizard.
Error Message EID-810: RPR got created partially because creation of some member
circuit failed.
Recommended Action Create the member circuits using the L2 topology point-to-point Circuit
Creation wizard.
Error Message EID-818: Please select a topology to view the circuits in the topology.
Recommended Action Select a different topology.
Cisco Media Gateway Manager 5.0 User Guide
OL-5461-02
B-71
Appendix B
Error Messages
Cisco MGM Server Error Messages
Error Message EID-819: Selected topology is undergoing Resync. Please wait until the
L2 Topology Resync is completed.
Recommended Action Wait until the topology resynchronization is completed.
Error Message EID-820: Some of the selected L2 topologies is undergoing Resync.
Please wait until the L2 Topology Resync is completed. Please click details to see
the list of L2 topologies undergoing resync.
Recommended Action Wait until all the selected topologies complete the resynchronization or select
the topologies that have completed resynchronization and then perform the operation.
Error Message EID-821: Select a row and then click on Create L2 service button.
Recommended Action Select a row in the topology table before clicking on the Create L2 Service
button.
Error Message EID-822: Selected topology is undergoing Resync. Please wait until the
L2 Topology Resync is completed.
Recommended Action Wait until the topology resynchronization is completed.
Error Message EID-823: Access Violation. Check if you have user privileges to perform
this operation on this L2 topology.
Recommended Action Verify that you have the privileges to perform the operation.
Error Message EID-824: NEs in the topology are not in User domain.
Recommended Action Verify that the source NE is in the user domain.
Error Message EID-825: Failed to update the description of the topology.
Recommended Action Close the Modify L2 Topology window and try again. If the problem persists,
contact Cisco technical support.
Error Message EID-826: No ports available for modification.
Recommended Action Close the Modify Ports window and try again. If the problem persists, contact
Cisco technical support.
Error Message EID-827: Failed to modify ports.
Recommended Action Close the Modify Ports window and wait until topology resynchronization is
complete before trying again. If the problem persists, contact Cisco technical support.
Cisco Media Gateway Manager 5.0 User Guide
B-72
OL-5461-02
Appendix B
Error Messages
Cisco MGM Server Error Messages
Error Message EID-828: There are no M-cards in the topology.
Recommended Action Check whether all the ML-series cards are present and try again. If the problem
persists, contact Cisco technical support.
Error Message EID-902: Cannot allocate memory.
Recommended Action Increase the available memory or swap space on the server workstation and
restart the application.
Error Message EID-903: Cannot find table element.
Recommended Action This is an internal CLI parser error; no action is required.
Error Message EID-904: Entry already present in the table.
Recommended Action This is an internal CLI parser error; no action is required.
Error Message EID-905: Invalid type in cfg_find_or_add.
Recommended Action This is an internal CLI parser error; no action is required.
Error Message EID-1101: Database_error_string.
Recommended Action The database error string describes the error in detail. If the Cisco MGM server
fails to come up, check the Oracle username and password. For more information, refer to the
Oracle’s documentation.
Error Message EID-1301: Error_string.
Recommended Action This is a generic internal error used for debugging purposes.
Error Message EID-1302: System error: error_string.
Recommended Action This is a generic internal error used for debugging purposes.
Error Message EID-1401: The OSI daemon osiamxd is not present.
Recommended Action The MGMServer.cfg file has been corrupted. The Open System
Interconnection (OSI) daemon osiamxd is missing. Reinstall the Cisco MGM server.
Error Message EID-2008: Exception string occurred while notifying main.
Recommended Action The internal TCP/IP communication channel has gone down. The Cisco MGM
server will restart the service automatically.
Cisco Media Gateway Manager 5.0 User Guide
OL-5461-02
B-73
Appendix B
Error Messages
Cisco MGM Server Error Messages
Error Message EID-2014: Exception: string.
Recommended Action If you are having operational problems, contact Cisco technical support with
this error message. Otherwise, ignore this error message; no action is required.
Error Message EID-2015: Null NetElement for NE: NE_ID.
Recommended Action If you are having operational problems, contact Cisco technical support with
this error message. Otherwise, ignore this error message; no action is required.
Error Message EID-2016: Null NodeModel for NE: NE_ID.
Recommended Action If you are having operational problems, contact Cisco technical support with
this error message. Otherwise, ignore this error message; no action is required.
Error Message EID-2017: Exception: string for NE ID while string.
Recommended Action If you are having operational problems, contact Cisco technical support with
this error message. Otherwise, ignore this error message; no action is required.
Error Message EID-2018: Null pointer: exception_string for NE: NE_ID.
Recommended Action If you are having operational problems, contact Cisco technical support with
this error message. Otherwise, ignore this error message; no action is required.
Error Message EID-2019: Operation failed: exception_string for NE: NE_ID.
Recommended Action If you are having operational problems, contact Cisco technical support with
this error message. Otherwise, ignore this error message; no action is required.
Error Message EID-2021: Inventory collection was not completed for NE: NE_ID.
Recommended Action If you are having operational problems, contact Cisco technical support with
this error message. Otherwise, ignore this error message; no action is required.
Error Message EID-2028: NetCircuitWatchDog is null.
Recommended Action If you are having operational problems, contact Cisco technical support with
this error message. Otherwise, ignore this error message; no action is required.
Error Message EID-2029: TopologyClientImpl is null.
Recommended Action If you are having operational problems, contact Cisco technical support with
this error message. Otherwise, ignore this error message; no action is required.
Cisco Media Gateway Manager 5.0 User Guide
B-74
OL-5461-02
Appendix B
Error Messages
Cisco MGM Server Error Messages
Error Message EID-2030: EventDispatcher received is null.
Recommended Action If you are having operational problems, contact Cisco technical support with
this error message. Otherwise, ignore this error message; no action is required.
Error Message EID-2031: CerentCMService is null.
Recommended Action If you are having operational problems, contact Cisco technical support with
this error message. Otherwise, ignore this error message; no action is required.
Error Message EID-2032: Exception string occurred while reading NE NE_ID from the
NE_Info_Table.
Recommended Action If you are having operational problems, contact Cisco technical support with
this error message. Otherwise, ignore this error message; no action is required.
Error Message EID-2033: Exception string occurred while reading GNE GNE_ID from the
GNE_Table.
Recommended Action If you are having operational problems, contact Cisco technical support with
this error message. Otherwise, ignore this error message; no action is required.
Error Message EID-2034: Cannot find matching GNE in the GNE_Table. The database might
be inconsistent.
Recommended Action Check the GNE information; then, restart the Cisco MGM server.
Error Message EID-2041: Network is null.
Recommended Action If you are having operational problems, contact Cisco technical support with
this error message. Otherwise, ignore this error message; no action is required.
Error Message EID-2042: Circuit main thread has been interrupted.
Recommended Action If you are having operational problems, contact Cisco technical support with
this error message. Otherwise, ignore this error message; no action is required.
Error Message EID-2043: Exception_string occurred while initializing the circuit
database tables.
Recommended Action If you are having operational problems, contact Cisco technical support with
this error message. Otherwise, ignore this error message; no action is required.
Error Message EID-2044: Exception_string occurred while deleting from Circuit Table.
Recommended Action If you are having operational problems, contact Cisco technical support with
this error message. Otherwise, ignore this error message; no action is required.
Cisco Media Gateway Manager 5.0 User Guide
OL-5461-02
B-75
Appendix B
Error Messages
Cisco MGM Server Error Messages
Error Message EID-2045: Exception_string occurred while deleting from Circuit
Destination Table.
Recommended Action If you are having operational problems, contact Cisco technical support with
this error message. Otherwise, ignore this error message; no action is required.
Error Message EID-2046: Exception_string occurred while deleting from Circuit Span
Table.
Recommended Action If you are having operational problems, contact Cisco technical support with
this error message. Otherwise, ignore this error message; no action is required.
Error Message EID-2048: Exception_string occurred while adding to Circuit Table.
Recommended Action If you are having operational problems, contact Cisco technical support with
this error message. Otherwise, ignore this error message; no action is required.
Error Message EID-2049: Exception_string occurred while adding to Circuit
Destination Table.
Recommended Action If you are having operational problems, contact Cisco technical support with
this error message. Otherwise, ignore this error message; no action is required.
Error Message EID-2050: Exception_string occurred while adding to Circuit Span
Table.
Recommended Action If you are having operational problems, contact Cisco technical support with
this error message. Otherwise, ignore this error message; no action is required.
Error Message EID-2056: Exception_string occurred while sending circuit update
event.
Recommended Action The internal TCP/IP communication channel has gone down. Restart the Cisco
MGM server.
Error Message EID-2057: Cannot instantiate Circuit Manager. Network instance is
null.
Recommended Action If you are having operational problems, contact Cisco technical support with
this error message. Otherwise, ignore this error message; no action is required.
Error Message EID-2059: Cannot add discovered NE. Hostelem is null.
Recommended Action If you are having operational problems, contact Cisco technical support with
this error message. Otherwise, ignore this error message; no action is required.
Cisco Media Gateway Manager 5.0 User Guide
B-76
OL-5461-02
Appendix B
Error Messages
Cisco MGM Server Error Messages
Error Message EID-2060: Cannot add discovered NE. Error occurred while converting
the IP address to a long value.
Recommended Action If you are having operational problems, contact Cisco technical support with
this error message. Otherwise, ignore this error message; no action is required.
Error Message EID-2061: Cannot add discovered node. NE information for GNE is null.
Recommended Action If you are having operational problems, contact Cisco technical support with
this error message. Otherwise, ignore this error message; no action is required.
Error Message EID-2062: Exception_string occurred while adding discovered NE.
Recommended Action If you are having operational problems, contact Cisco technical support with
this error message. Otherwise, ignore this error message; no action is required.
Error Message EID-2063: Null database row returned while adding a discovered NE.
Recommended Action If you are having operational problems, contact Cisco technical support with
this error message. Otherwise, ignore this error message; no action is required.
Error Message EID-2064: Null NE ID returned while adding a discovered NE.
Recommended Action If you are having operational problems, contact Cisco technical support with
this error message. Otherwise, ignore this error message; no action is required.
Error Message EID-2065: Exception_string occurred while getting tree node string for
parent.
Recommended Action If you are having operational problems, contact Cisco technical support with
this error message. Otherwise, ignore this error message; no action is required.
Error Message EID-2066: Exception string occurred while adding discovered NE to the
area tree table.
Recommended Action If you are having operational problems, contact Cisco technical support with
this error message. Otherwise, ignore this error message; no action is required.
Error Message EID-2067: Error occurred while adding discovered NE to the database.
Recommended Action If you are having operational problems, contact Cisco technical support with
this error message. Otherwise, ignore this error message; no action is required.
Error Message EID-2068: Exception string occurred while initializing discovered NE.
Recommended Action If you are having operational problems, contact Cisco technical support with
this error message. Otherwise, ignore this error message; no action is required.
Cisco Media Gateway Manager 5.0 User Guide
OL-5461-02
B-77
Appendix B
Error Messages
Cisco MGM Server Error Messages
Error Message EID-2069: Exception string occurred while updating NE IP address.
Recommended Action If you are having operational problems, contact Cisco technical support with
this error message. Otherwise, ignore this error message; no action is required.
Error Message EID-2070: Exception string occurred while initializing discovered NE
that exists in the database.
Recommended Action If you are having operational problems, contact Cisco technical support with
this error message. Otherwise, ignore this error message; no action is required.
Error Message EID-2074: Invalid instance in topology update.
Recommended Action If you are having operational problems, contact Cisco technical support with
this error message. Otherwise, ignore this error message; no action is required.
Error Message EID-2077: Cannot add discovered NE to the database. JMOCO session is
null.
Recommended Action The internal TCP/IP communication channel has gone down. The Cisco MGM
server will restart the service automatically.
Error Message EID-2081: Exception: string occurred while retrieving network links
from the database.
Recommended Action If you are having operational problems, contact Cisco technical support with
this error message. Otherwise, ignore this error message; no action is required.
Error Message EID-2082: Exception: string occurred while reading
snmp-trap-queue-size parameter value from the MGMServer.cfg file.
Recommended Action Check the MGMServer.cfg file for possible corruption. If the problem persists,
contact Cisco technical support with this error message.
Error Message EID-2083: Exception: value occurred while reading snmp-trap-drop-size
parameter value from the MGMServer.cfg file.
Recommended Action Check the MGMServer.cfg file for possible corruption. If the problem persists,
contact Cisco technical support with this error message.
Error Message EID-2084: Exception: string occurred while reading
snmp-trap-forwarding-port parameter value from the MGMServer.cfg file.
Recommended Action Check the MGMServer.cfg file for possible corruption. If the problem persists,
contact Cisco technical support with this error message.
Cisco Media Gateway Manager 5.0 User Guide
B-78
OL-5461-02
Appendix B
Error Messages
Cisco MGM Server Error Messages
Error Message EID-2086: Exception: value occurred while reading the
ons15454-callback-iiop-listen-port parameter value from the MGMServer.cfg file.
Recommended Action If you are having operational problems, contact Cisco technical support with
this error message. Otherwise, ignore this error message; no action is required.
Error Message EID-2104: Exception string occurred while adding discovered NE with IP
address IP_address.
Recommended Action Exception needs to be analyzed. Contact Cisco technical support.
Error Message EID-2105: Adding operation for discovered NE with IP address IP_address
not completed.
Recommended Action Exception needs to be analyzed. Contact Cisco technical support.
Error Message EID-2200: Software download operation failed on NE ID.
Recommended Action Retry the download operation. The cause of the software download operation
failure is unknown.
Error Message EID-2202: Software download operation failed on NE ID because of a
Flash read/write problem.
Recommended Action The agent version transfer from the master Control and Monitoring Processor
(CMP) to the slave CMP has failed. Use the following procedure to correct the error:
Step 1
Check the configuration of the master and slave CMPs.
Step 2
Check the status of the network between the master CMP and the slave CMP and verify that the CMP
slaves are reachable.
Error Message EID-2203: Software download operation failed on NE ID because of a
problem during transfer from the TFTP server to the Master CMP.
Recommended Action Transfer from the TFTP boot server to the master CMP has failed. Use the
following procedure to correct the error:
Step 1
Verify that the TFTP boot server is running.
Step 2
Verify that the TFTP server address is correct.
Step 3
Check the status of the network between the TFTP server and the master CMP.
Step 4
Verify that the path name that lists where the catalog.txt file is located is correct.
Step 5
Verify that all files listed in the catalog.txt file are present in the same directory that contains the
catalog.txt file.
Cisco Media Gateway Manager 5.0 User Guide
OL-5461-02
B-79
Appendix B
Error Messages
Cisco MGM Server Error Messages
Error Message EID-2204: Software download operation failed on NE ID because the
standby agent version is running.
Recommended Action The standby agent version is running. A download operation is allowed only
when the active agent version is running. There are two options to correct the error:
– Reset the NE to run the active agent version; then, overwrite the standby agent version by using
the download operation.
– Swap the active and standby agent versions through the commit operation; then, overwrite the
new standby agent version by using the download operation.
Error Message EID-2205: Software revert operation failed on NE ID.
Recommended Action The cause of the software revert operation failure is unknown. Retry the revert
operation.
Error Message EID-2207: Software revert operation failed on NE ID because the standby
agent version is corrupted.
Recommended Action The standby agent version is corrupted. Use the following procedure to correct
the error:
Step 1
Execute a new download operation to replace the current standby agent version with the valid one.
Step 2
Execute the revert operation again; then, verify that the new downloaded version works correctly.
Error Message EID-2208: Software commit operation failed on NE ID.
Recommended Action The software commit operation failure cause is unknown. Retry the commit
operation.
Error Message EID-2210: Software commit operation failed on NE ID because the standby
agent version is corrupted.
Recommended Action The standby agent version is corrupted. Use the following procedure to correct
the error:
Step 1
Execute a new download operation to replace the current standby agent version with the valid one.
Step 2
Execute a revert operation and verify that the new downloaded version works correctly.
Step 3
Execute the commit operation again.
Error Message EID-2211: Exception during NE ID reset.
Recommended Action Reset the NE again.
Cisco Media Gateway Manager 5.0 User Guide
B-80
OL-5461-02
Appendix B
Error Messages
Cisco MGM Server Error Messages
Error Message EID-2212: Software download operation failed because of invalid path
parameter.
Recommended Action Verify that the path name (representing the path on the TFTP server where the
catalog.txt file is located) has the correct format.
Error Message EID-2214: NE User Management failed - Selected user doesn’t exist on
NE ID.
Recommended Action None.
Error Message EID-2217: NE User Management failed - Duplicated username for NE ID.
Recommended Action Retry the operation and verify that the username is not already present in the
NE User Access Administration table.
Error Message EID-2218: NE User Management failed - Super user cannot be modified or
deleted on NE ID.
Recommended Action You tried to delete or modify a SuperUser that had an active connection open.
Use the following procedure to correct the error:
Step 1
Open the NE Active Users Table and disconnect the SuperUser connection.
Step 2
Retry the operation.
Note
You cannot delete a SuperUser.
Error Message EID-2219: Performance Monitoring Task (date and time) not completed
because of Agent busy on NE ID.
Recommended Action This error occurs when the agent on the NE is busy. Make sure that the agent
on the NE is not overloaded.
Error Message EID-2221: Performance Monitoring task failed to connect to NE ID.
Recommended Action Make sure that the log in information is correct. If the problem persists, contact
Cisco technical support.
Error Message EID-3015: Cannot start collector.
Recommended Action Open the Control Panel. Expand MGM and PM Service. Stop and restart the
PM service. If the problem persists, contact the Cisco MGM administrator.
Cisco Media Gateway Manager 5.0 User Guide
OL-5461-02
B-81
Appendix B
Error Messages
Cisco MGM Server Error Messages
Error Message EID-3016: Cannot register for events.
Recommended Action Open the Control Panel. Expand MGM and PM Service. Stop and restart the
PM service. If the problem persists, contact the Cisco MGM administrator.
Error Message EID-3017: Cannot open tables.
Recommended Action Open the Control Panel. Expand MGM and PM Service. Stop and restart the
PM service. If the problem persists, contact the Cisco MGM administrator.
Error Message EID-3019: Cannot retrieve information for new NE value.
Recommended Action Delete the NE from Cisco MGM. Add the NE again; then, enable PM after the
NE is reachable. If the problem persists, contact the Cisco MGM administrator.
Error Message EID-3021: Cannot collect PM information from value. Value Retries
failed (HTTP error: string).
Recommended Action Wait for the next PM cycle. If the problem persists, open the MGMServer.cfg
file and change the pm-wait-period value from 10000 to 30000. If the problem still persists, contact
the Cisco MGM administrator.
Error Message EID-3022: Cannot collect PM information from string. Data format error.
Received Data= string.
Recommended Action Contact the Cisco MGM administrator.
Error Message EID-3024: Error in parsing ETM XML.
Recommended Action If you are having operational problems, contact Cisco technical support with
this error message. Otherwise, ignore this error message; no action is required.
Error Message EID-3025: Error in parsing ETM XML.
Recommended Action If you are having operational problems, contact Cisco technical support with
this error message. Otherwise, ignore this error message; no action is required.
Error Message EID-3028: Error in parsing time XML.
Recommended Action If you are having operational problems, contact Cisco technical support with
this error message. Otherwise, ignore this error message; no action is required.
Error Message EID-3030: Error in getting tick rate. XML received is null.
Recommended Action If you are having operational problems, contact Cisco technical support with
this error message. Otherwise, ignore this error message; no action is required.
Cisco Media Gateway Manager 5.0 User Guide
B-82
OL-5461-02
Appendix B
Error Messages
Cisco MGM Server Error Messages
Error Message EID-3031: Error in parsing tick rate XML.
Recommended Action If you are having operational problems, contact Cisco technical support with
this error message. Otherwise, ignore this error message; no action is required.
Error Message EID-3033: Error in getting time zone. XML received is null.
Recommended Action If you are having operational problems, contact Cisco technical support with
this error message. Otherwise, ignore this error message; no action is required.
Error Message EID-3034: Error in parsing time zone XML.
Recommended Action If you are having operational problems, contact Cisco technical support with
this error message. Otherwise, ignore this error message; no action is required.
Error Message EID-3036: Error in getting date. XML received is null.
Recommended Action If you are having operational problems, contact Cisco technical support with
this error message. Otherwise, ignore this error message; no action is required.
Error Message EID-3037: Error in parsing date XML.
Recommended Action If you are having operational problems, contact Cisco technical support with
this error message. Otherwise, ignore this error message; no action is required.
Error Message EID-3104: Exception: value occurred while reading
ne-service-thread-pool-size parameter value from the MGMServer.cfg file.
Recommended Action Check the MGMServer.cfg file for possible corruption. If the problem persists,
contact Cisco technical support with this error message.
Error Message EID-3108: Exception: value occurred while reading snmp-trap-port
parameter value from the MGMServer.cfg file.
Recommended Action Check the MGMServer.cfg file for possible corruption. If the problem persists,
contact Cisco technical support with this error message.
Error Message EID-3109: Exception: value occurred while reading snmp-trap-queue-size
parameter value from the MGMServer.cfg file.
Recommended Action Check the MGMServer.cfg file for possible corruption. If the problem persists,
contact Cisco technical support with this error message. Or, reinstall the Cisco MGM server.
Cisco Media Gateway Manager 5.0 User Guide
OL-5461-02
B-83
Appendix B
Error Messages
Cisco MGM Server Error Messages
Error Message EID-4001: Exception: string occurred while connecting the CORBA object
to the Object Request Broker (ORB).
Recommended Action Restart the Cisco MGM server. If the problem persists, contact Cisco technical
support with this error message.
Error Message EID-4002: Exception: string occurred while creating the ConfigManager
Interoperable Object Reference (IOR).
Recommended Action Restart the Cisco MGM server. If the problem persists, contact Cisco technical
support with this error message.
Error Message EID-4003: Error in creating the ConfigManager IOR file.
Recommended Action Restart the Cisco MGM server. If the problem persists, contact Cisco technical
support with this error message.
Error Message EID-4004: Exception: string occurred while writing the IOR to the file.
Recommended Action Restart the Cisco MGM server. If the problem persists, contact Cisco technical
support with this error message.
Error Message EID-4005: Exception: string occurred while waiting for a CORBA client
connection.
Recommended Action If you are having operational problems, contact Cisco technical support with
this error message. Otherwise, ignore this error message; no action is required.
Error Message EID-4006: Error in creating the SessionManager.
Recommended Action Restart the Cisco MGM server. If the problem persists, contact Cisco technical
support with this error message.
Error Message EID-4007: Exception: string occurred while creating the NodeManager
for NE_ID.
Recommended Action If you are having operational problems, contact Cisco technical support with
this error message. Otherwise, ignore this error message; no action is required.
Error Message EID-4008: Exception: string occurred while connecting the NodeManager
for NE_ID to ORB.
Recommended Action If you are having operational problems, contact Cisco technical support with
this error message. Otherwise, ignore this error message; no action is required.
Cisco Media Gateway Manager 5.0 User Guide
B-84
OL-5461-02
Appendix B
Error Messages
Cisco MGM Server Error Messages
Error Message EID-4018: Exception: string while registering for the internal Cisco
MGM events with the main server.
Recommended Action Restart the Cisco MGM server. If the problem persists, contact Cisco technical
support with this error message.
Error Message EID-4020: Exception: string while configuring the Internet Inter Orb
Protocol (iiop) listen port in CORBA ORB.
Recommended Action Restart the Cisco MGM server. If the problem persists, contact Cisco technical
support with this error message.
Error Message EID-4023: Exception: string while reading the list of logged users
using JMOCO.
Recommended Action If you are having operational problems, contact Cisco technical support with
this error message. Otherwise, ignore this error message; no action is required.
Error Message EID-4026: Exception: string while disconnecting the NodeManager for
NE_ID to ORB.
Recommended Action If you are having operational problems, contact Cisco technical support with
this error message. Otherwise, ignore this error message; no action is required.
Error Message EID-4027: Exception: string ConfigManager Init. Failed.
Recommended Action If you are having operational problems, contact Cisco technical support with
this error message. Otherwise, ignore this error message; no action is required.
Error Message EID-4233: Failed to get available termination points.
Recommended Action Retry after some time. If the problem persists, contact Cisco technical support.
Error Message EID-4239: Exception: NetworkManager.setPathTrace APIs raised
exception.
Recommended Action Retry after some time. If the problem persists, contact Cisco technical support.
Error Message EID-4241: Exception: NetworkManager.getPathTrace APIs raised
exception.
Recommended Action Retry after some time. If the problem persists, contact Cisco technical support.
Cisco Media Gateway Manager 5.0 User Guide
OL-5461-02
B-85
Appendix B
Error Messages
Cisco MGM Server Error Messages
Error Message EID-4242: Exception: deletelink () unable to delete manual link. Link
ID is string.
Recommended Action Review the reason for failure stated in the error message. Retry after some
time. If the problem persists, contact Cisco technical support.
Error Message EID-5000: Exception: string occurred while initializing
ServiceManager.
Recommended Action If you are having operational problems, contact Cisco technical support with
this error message. Otherwise, ignore this error message; no action is required.
Error Message EID-5001: Exception: string occurred while connecting the CORBA object
to the ORB.
Recommended Action If you are having operational problems, contact Cisco technical support with
this error message. Otherwise, ignore this error message; no action is required.
Error Message EID-5002: Exception: string occurred while creating the ServiceManager
IOR.
Recommended Action If you are having operational problems, contact Cisco technical support with
this error message. Otherwise, ignore this error message; no action is required.
Error Message EID-5003: Error in creating the ServiceManager IOR file.
Recommended Action If you are having operational problems, contact Cisco technical support with
this error message. Otherwise, ignore this error message; no action is required.
Error Message EID-5006: Exception: string occurred while initializing CORBA.
Recommended Action If you are having operational problems, contact Cisco technical support with
this error message. Otherwise, ignore this error message; no action is required.
Error Message EID-5007: Exception: string occurred while getting POA reference.
Recommended Action If you are having operational problems, contact Cisco technical support with
this error message. Otherwise, ignore this error message; no action is required.
Error Message EID-5013: Exception: string occurred while notifying main.
Recommended Action If you are having operational problems, contact Cisco technical support with
this error message. Otherwise, ignore this error message; no action is required.
Cisco Media Gateway Manager 5.0 User Guide
B-86
OL-5461-02
Appendix B
Error Messages
Cisco MGM Server Error Messages
Error Message EID-5031: Exception: string occurred while launching service process.
Recommended Action Verify that the server has adequate RAM and swap space as listed in the
Cisco Media Gateway Manager 5.0 Installation Guide. Do not run other unapproved software on
the server.
Error Message EID-5041: Exception: string occurred while trying to connect to Service
Manager.
Recommended Action Run the showmgm command to see what Cisco MGM server processes are
running. Restart the Cisco MGM server using the mgms-start command.
Error Message EID-5042: Exception: string occurred while trying to disconnect from
Service Manager.
Recommended Action Run the showmgm command to see what Cisco MGM server processes are
running. Restart the Cisco MGM server using the mgms-start command.
Error Message EID-6055: ML series card provisioning operation failed for NE: string
- slot: NE_ID Reason: string.
Recommended Action Check the ML card setting (telnet information) and if problem persists, contact
Cisco technical support.
Error Message EID-7002: Cannot retrieve wavelength values.
Recommended Action Force a “Refresh from NE” operation on both ends of the link.
B.2.3 Minor Server Error Messages
Error Message EID-408: Poller low on worker threads or poll frequency too fast.
Recommended Action The application cannot communicate with all configured NEs during the
allotted poll-frequency time. Use the following procedure to correct the error:
Step 1
Log into the Cisco MGM client with the appropriate user profile.
Step 2
Choose Administration > Control Panel.
Step 3
Click NE Service. In the NE Poller tab, decrease the poll frequency in the NE Health Poll Frequency
field in 30-second increments.
Step 4
Click Save.
Error Message EID-411: Invalid return of UDP sockets.
Recommended Action This is an internal error; no action is required.
Cisco Media Gateway Manager 5.0 User Guide
OL-5461-02
B-87
Appendix B
Error Messages
Cisco MGM Server Error Messages
Error Message EID-412: No free UDP sockets in pool.
Recommended Action This is an internal error. Restart Cisco MGM if the application is not
communicating with any NEs.
Error Message EID-413: Invalid SNMP type in packet.
Recommended Action This is an internal error. Restart Cisco MGM if the application is not
communicating with any NEs.
Error Message EID-414: Failed to open SNMP session.
Recommended Action This is an internal error. Restart Cisco MGM if the application is not
communicating with any NEs.
Error Message EID-416: Error in SNMP packet: error_string.
Recommended Action This is an internal SNMP protocol error; no action is required.
Error Message EID-417: Mangled SNMP response packet.
Recommended Action This is an internal SNMP protocol error; no action is required.
Error Message EID-423: The EMS failed to recover missed alarms from NE ID.
Recommended Action Cisco MGM could not recover all alarms from the NE. Data might be missing
from the Alarm Log due to connectivity problems or mangled packets. In the Domain Explorer
window, choose Fault > Alarm Browser to view the current alarms.
Error Message EID-501: Incorrect parse of PM bulk string header for PM_data_type from
NE ID.
Recommended Action This is an internal parsing error. If the error persists, capture a LAN trace from
the Cisco MGM server to help debug the problem.
Error Message EID-502: Unknown type number in PM bulk variable for PM_data_type from
NE ID.
Recommended Action This is an internal parsing error. If the error persists, capture a LAN trace from
the Cisco MGM server to help debug the problem.
Error Message EID-503: Incorrect parse of PM bulk string for PM_data_type from NE ID.
Recommended Action This is an internal parsing error. If the error persists, capture a LAN trace from
the Cisco MGM server to help debug the problem.
Cisco Media Gateway Manager 5.0 User Guide
B-88
OL-5461-02
Appendix B
Error Messages
Cisco MGM Server Error Messages
Error Message EID-603: Incorrect trap recvfrom with errno = value.
Recommended Action This is an internal processing error. If the problem persists, contact Cisco
technical support with this error message.
Error Message EID-604: Failed to parse SNMP trap definition file filename.
Recommended Action The traps.lst file in the bin directory where the Cisco MGM server was
installed is corrupted. Delete the traps.lst file and restart the application.
Error Message EID-605: Failed to recover alarm sequence #number to #number for NE ID.
Recommended Action Cisco MGM could not recover all alarms from the NE. There might be events
missing in the Alarm Log due to connectivity problems or mangled packets. However, the Alarm
Browser will reflect the correct alarm information. In the Domain Explorer window, choose
Fault > Alarm Browser to view the current alarms.
Error Message EID-704: Invalid SNMP recvfrom with errno = value.
Recommended Action This is an internal processing error. If the problem persists, contact Cisco
technical support with this error message.
Error Message EID-705: Invalid SNMP sendto with errno = value.
Recommended Action This is an internal processing error. If the problem persists, contact Cisco
technical support with this error message.
Error Message EID-706: SNMP trap received from unknown NE ID.
Recommended Action SNMP traps are being received from an NE that is not configured on the Cisco
MGM server. Check the configured IP addresses for all NEs by viewing the configuration files
(startup-config). The IP addresses should match the IP address of the interface used in the
“snmp-server trap-source IF” CLI in the NE configuration.
Error Message EID-1402: The OSI daemon lockfile value is missing.
Recommended Action This is an internal processing error. If the problem persists, contact Cisco
technical support with this error message.
Error Message EID-1403: The OSI daemon lockfile does not contain the PID.
Recommended Action This is an internal processing error. If the problem persists, contact Cisco
technical support with this error message.
Cisco Media Gateway Manager 5.0 User Guide
OL-5461-02
B-89
Appendix B
Error Messages
Cisco MGM Server Error Messages
Error Message EID-1404: The ping to the OSI daemon failed.
Recommended Action This is an internal processing error. If the problem persists, contact Cisco
technical support with this error message.
Error Message EID-1405: Failed to start the OPS daemon for logging.
Recommended Action This is an internal processing error. If the problem persists, contact Cisco
technical support with this error message.
Error Message EID-1501: Maximum number of Telnet sessions has been reached.
Recommended Action This is an internal processing error. If the problem persists, contact Cisco
technical support with this error message.
Error Message EID-1502: No more threads available for Telnet sessions.
Recommended Action This is an internal processing error. If the problem persists, contact Cisco
technical support with this error message.
Error Message EID-2001: Bad event JMOCO PDU value.
Recommended Action If you are having operational problems, contact Cisco technical support with
this error message. Otherwise, ignore this error message; no action is required.
Error Message EID-2004: Exception string occurred while notifying listeners.
Recommended Action If you are having operational problems, contact Cisco technical support with
this error message. Otherwise, ignore this error message; no action is required.
Error Message EID-2005: Bad severity value in JMOCO event.
Recommended Action If you are having operational problems, contact Cisco technical support with
this error message. Otherwise, ignore this error message; no action is required.
Error Message EID-2006: Event is not an instance of known VWEvents.
Recommended Action If you are having operational problems, contact Cisco technical support with
this error message. Otherwise, ignore this error message; no action is required.
Error Message EID-2007: Event is not an instance of EMSEvent.
Recommended Action If you are having operational problems, contact Cisco technical support with
this error message. Otherwise, ignore this error message; no action is required.
Cisco Media Gateway Manager 5.0 User Guide
B-90
OL-5461-02
Appendix B
Error Messages
Cisco MGM Server Error Messages
Error Message EID-2009: Null object is passed in.
Recommended Action If you are having operational problems, contact Cisco technical support with
this error message. Otherwise, ignore this error message; no action is required.
Error Message EID-2010: Invalid object type is passed in.
Recommended Action If you are having operational problems, contact Cisco technical support with
this error message. Otherwise, ignore this error message; no action is required.
Error Message EID-2011: Null module type for slot number.
Recommended Action If you are having operational problems, contact Cisco technical support with
this error message. Otherwise, ignore this error message; no action is required.
Error Message EID-2012: JDAQ external exception: string.
Recommended Action If you are having operational problems, contact Cisco technical support with
this error message. Otherwise, ignore this error message; no action is required.
Error Message EID-2013: JDAQ internal exception: string.
Recommended Action If you are having operational problems, contact Cisco technical support with
this error message. Otherwise, ignore this error message; no action is required.
Error Message EID-2020: Invalid argument value: string, NE: NE_ID.
Recommended Action This is an internal processing error. If the problem persists, contact Cisco
technical support with this error message.
Error Message EID-2021: Inventory collection was not completed for NE NE_ID.
Recommended Action If you are having operational problems, contact Cisco technical support with
this error message. Otherwise, ignore this error message; no action is required.
Error Message EID-2022: Exception string occurred while reading the
corba-request-timeout parameter value from the MGMServer.cfg file.
Recommended Action If you are having operational problems, contact Cisco technical support with
this error message. Otherwise, ignore this error message; no action is required.
Error Message EID-2023: Exception string occurred while setting the
corba-request-timeout parameter value for the ORB.
Recommended Action If you are having operational problems, contact Cisco technical support with
this error message. Otherwise, ignore this error message; no action is required.
Cisco Media Gateway Manager 5.0 User Guide
OL-5461-02
B-91
Appendix B
Error Messages
Cisco MGM Server Error Messages
Error Message EID-2024: Exception string occurred while reading the
ne-service-thread-pool-size parameter value from the MGMServer.cfg file.
Recommended Action If you are having operational problems, contact Cisco technical support with
this error message. Otherwise, ignore this error message; no action is required.
Error Message EID-2029: Exception: string for NE: exception_string while
exception_string.
Recommended Action If you are having operational problems, contact Cisco technical support with
this error message. Otherwise, ignore this error message; no action is required.
Error Message EID-2035: GNE next hop IP address value does not match the NE IP address
value for NEDBAccessID value. The GNE_Table or NE_INFO_Table information might be
inconsistent in the database.
Recommended Action Check the GNE next hop IP addresses; then, restart the Cisco MGM server.
Error Message EID-2036: Exception string for NE ID occurred while polling for the
discovered node.
Recommended Action If you are having operational problems, contact Cisco technical support with
this error message. Otherwise, ignore this error message; no action is required.
Error Message EID-2037: Unsupported model type or null version string for NE_ID.
Recommended Action Check the software version of the NE listed in the error message. You might
need to upgrade Cisco MGM.
Error Message EID-2038: No entry found in the version table for NE_ID.
Recommended Action Check the software version of the NE listed in the error message. You might
need to upgrade Cisco MGM.
Error Message EID-2039: Exception string occurred while finding time offset for
NE_ID.
Recommended Action Check the software version of the NE listed in the error message. You might
need to upgrade Cisco MGM.
Error Message EID-2040: Cannot find time or time zone information for NE_ID.
Recommended Action Check the system time and time zone settings. You might have to adjust the
settings.
Cisco Media Gateway Manager 5.0 User Guide
B-92
OL-5461-02
Appendix B
Error Messages
Cisco MGM Server Error Messages
Error Message EID-2052: Invalid object passed to Circuit Module work.
Recommended Action If you are having operational problems, contact Cisco technical support with
this error message. Otherwise, ignore this error message; no action is required.
Error Message EID-2053: Exception string occurred while adding circuit.
Recommended Action If you are having operational problems, contact Cisco technical support with
this error message. Otherwise, ignore this error message; no action is required.
Error Message EID-2054: Exception string occurred while deleting circuit.
Recommended Action If you are having operational problems, contact Cisco technical support with
this error message. Otherwise, ignore this error message; no action is required.
Error Message EID-2055: Exception string occurred while updating circuit.
Recommended Action If you are having operational problems, contact Cisco technical support with
this error message. Otherwise, ignore this error message; no action is required.
Error Message EID-2071: Exception string occurred while invoking addNetLink.
Recommended Action If you are having operational problems, contact Cisco technical support with
this error message. Otherwise, ignore this error message; no action is required.
Error Message EID-2072: CORBA exception string occurred while retrieving topology
information.
Recommended Action If you are having operational problems, contact Cisco technical support with
this error message. Otherwise, ignore this error message; no action is required.
Error Message EID-2073: Exception string occurred while retrieving topology
information.
Recommended Action If you are having operational problems, contact Cisco technical support with
this error message. Otherwise, ignore this error message; no action is required.
Error Message EID-2075: Exception string occurred while retrieving NE information.
Recommended Action If you are having operational problems, contact Cisco technical support with
this error message. Otherwise, ignore this error message; no action is required.
Error Message EID-2076: Null NE information.
Recommended Action If you are having operational problems, contact Cisco technical support with
this error message. Otherwise, ignore this error message; no action is required.
Cisco Media Gateway Manager 5.0 User Guide
OL-5461-02
B-93
Appendix B
Error Messages
Cisco MGM Server Error Messages
Error Message EID-2082: Exception: value occurred while reading snmp-trap-queue-size
parameter value from the MGMServer.cfg file.
Recommended Action Check the MGMServer.cfg file for possible corruption. If the problem persists,
contact Cisco technical support with this error message.
Error Message EID-2084: Exception: value occurred while reading
snmp-trap-forwarding-port parameter value from the MGMServer.cfg file.
Recommended Action Check the MGMServer.cfg file for possible corruption. If the problem persists,
contact Cisco technical support with this error message.
Error Message EID-2089: InitialPoll to NE: string is failed, maybe username and
password are wrong or string.
Recommended Action Verify that the NE is up and that the software loaded on the NE is supported.
Wait for two or three polling cycles. If the problem persists, mark the NE as out of service and then
back in service.
Error Message EID-2090: Connection with NE: string is lost because string.
Recommended Action This problem can occur if the NE is reset or if the NE is not reachable on the
network. Wait for two or three polling cycles. If the problem persists, mark the NE as out of service
and then back in service.
Error Message EID-2091: HTTP request failed to get software version from node string
and reason is string.
Recommended Action Obtain the NE software version with a web browser using the URL
http://IP_address_of_NE/getSwVersion. If the connection times out, the web server on the NE might
be down. Contact technical support for the NE.
Error Message EID-3001: Cannot start collection for value.
Recommended Action If you are having operational problems, contact Cisco technical support with
this error message. Otherwise, ignore this error message; no action is required.
Error Message EID-3002: Nothing was found value.
Recommended Action If you are having operational problems, contact Cisco technical support with
this error message. Otherwise, ignore this error message; no action is required.
Error Message EID-3003: Ignoring TCA.
Recommended Action A threshold crossing alert (TCA) is being ignored. If you are having
operational problems, contact Cisco technical support with this error message. Otherwise, ignore
this error message; no action is required.
Cisco Media Gateway Manager 5.0 User Guide
B-94
OL-5461-02
Appendix B
Error Messages
Cisco MGM Server Error Messages
Error Message EID-3004: Incorrect IP address passed in IPADDR_CHANGED Event value.
Recommended Action Check the newly changed IP address and modify it if you entered the wrong
information.
Error Message EID-3005: Cannot write DS-1 PM for value.
Recommended Action If you are having operational problems, contact Cisco technical support with
this error message. Otherwise, ignore this error message; no action is required.
Error Message EID-3006: Cannot write DS-3 PM for value.
Recommended Action If you are having operational problems, contact Cisco technical support with
this error message. Otherwise, ignore this error message; no action is required.
Error Message EID-3007: Cannot write SONET PM for value.
Recommended Action If you are having operational problems, contact Cisco technical support with
this error message. Otherwise, ignore this error message; no action is required.
Error Message EID-3008: Cannot write STS PM for value.
Recommended Action If you are having operational problems, contact Cisco technical support with
this error message. Otherwise, ignore this error message; no action is required.
Error Message EID-3009: Cannot write VT PM for value.
Recommended Action If you are having operational problems, contact Cisco technical support with
this error message. Otherwise, ignore this error message; no action is required.
Error Message EID-3010: Cannot collect PM information from value.
Recommended Action If you are having operational problems, contact Cisco technical support with
this error message. Otherwise, ignore this error message; no action is required.
Error Message EID-3011: Cannot read PM information from value.
Recommended Action If you are having operational problems, contact Cisco technical support with
this error message. Otherwise, ignore this error message; no action is required.
Error Message EID-3013: Cannot collect PM information from value. HTTP Error: value.
Recommended Action If you are having operational problems, contact Cisco technical support with
this error message. Otherwise, ignore this error message; no action is required.
Cisco Media Gateway Manager 5.0 User Guide
OL-5461-02
B-95
Appendix B
Error Messages
Cisco MGM Server Error Messages
Error Message EID-3014: Cannot collect PM. Writer creation failed.
Recommended Action If you are having operational problems, contact Cisco technical support with
this error message. Otherwise, ignore this error message; no action is required.
Error Message EID-3047: PM Comm Session is null for NE_name.
Recommended Action Verify that the NE has available connections.
Error Message EID-3049: Exception during PM collection for NE_name:
exception_string.
Recommended Action Verify that the NE has available connections.
Error Message EID-3050: Cannot write PM data for NE_name: exception_string.
Recommended Action Verify that the database is operating correctly.
Error Message EID-3100: args == null.
Recommended Action This message is used for system logging only; no action is required.
Error Message EID-3102: Initialized service:
Recommended Action This message is used for system logging only and is normal at initialization; no
action is required.
Error Message EID-3103: Stopped service.
Recommended Action This message is for system logging only and is normal when the system is
stopped; no action is required.
Error Message EID-4009: NEInfo is null.
Recommended Action If you are having operational problems, contact Cisco technical support with
this error message. Otherwise, ignore this error message; no action is required.
Error Message EID-4010: Invalid input parameter for the operation.
Recommended Action If you are having operational problems, contact Cisco technical support with
this error message. Otherwise, ignore this error message; no action is required.
Cisco Media Gateway Manager 5.0 User Guide
B-96
OL-5461-02
Appendix B
Error Messages
Cisco MGM Server Error Messages
Error Message EID-4011: The Configuration resync operation cannot be completed
because of the non-working operational state of the network element.
Recommended Action If you are having operational problems, contact Cisco technical support with
this error message. Otherwise, ignore this error message; no action is required.
Error Message EID-4012: The Configuration resync is already in progress for this
network element. Try after some time.
Recommended Action If you are having operational problems, contact Cisco technical support with
this error message. Otherwise, ignore this error message; no action is required.
Error Message EID-4013: Failed to authenticate the Cisco MGM user for performing this
operation.
Recommended Action If you are having operational problems, contact Cisco technical support with
this error message. Otherwise, ignore this error message; no action is required.
Error Message EID-4014: This Interface Data Language (IDL) operation is not supported
by the network element.
Recommended Action Ignore this internal error message.
Error Message EID-4015: Exception: string while reading configuration resync
frequency from the MGMServer.cfg file. Using the default resync frequency.
Recommended Action Restart the Cisco MGM server. If the problem persists, contact Cisco technical
support with this error message.
Error Message EID-4016: Exception: string while reading configuration poll frequency
from the MGMServer.cfg file. Using the default poll frequency.
Recommended Action Restart the Cisco MGM server. If the problem persists, contact Cisco technical
support with this error message.
Error Message EID-4017: Exception: string while reading configuration thread pool
size from the MGMServer.cfg file. Using the default poll frequency.
Recommended Action Restart the Cisco MGM server. If the problem persists, contact Cisco technical
support with this error message.
Error Message EID-4019: Exception: string while reading the iiop-listen-port from
the MGMServer.cfg file. Using the default port.
Recommended Action Restart the Cisco MGM server. If the problem persists, contact Cisco technical
support with this error message.
Cisco Media Gateway Manager 5.0 User Guide
OL-5461-02
B-97
Appendix B
Error Messages
Cisco MGM Server Error Messages
Error Message EID-4021: Exception: string while reading configuration request queue
size from the MGMServer.cfg file. Using the default request queue size.
Recommended Action Restart the Cisco MGM server. If the problem persists, contact Cisco technical
support with this error message.
Error Message EID-4022: Cisco MGM server is busy syncing the configuration
information for this network element. Retry after some time.
Recommended Action This error message is used for internal protocols between the Cisco MGM
client and server. The client will display the appropriate error message.
Error Message EID-4024: Exception: string received from the model layer.
Recommended Action This error message is used for internal protocols between the Cisco MGM
client and server. The client will display the appropriate error message.
Error Message EID-4025: Exception: string while sending event about this change to
other clients.
Recommended Action Restart the Cisco MGM server. If the problem persists, contact Cisco technical
support with this error message.
Error Message EID-4201: Failed to auto back up memory for NE_name: Value.
Recommended Action Manually back up the configuration.
Error Message EID-4202: Failed to back up memory for NE_name: Value.
Recommended Action Retry this operation later. If the problem persists, reboot the NE and retry.
Error Message EID-4203: Failed to restore memory for NE_name: Value.
Recommended Action If you specify a source directory that is the same as the default destination for
memory restore or software download, you will receive EID-4203 because the source file size
becomes zero.
To retrieve the file, navigate to the appropriate path and restore the file x from x.old.
Error Message EID-4204: Failed to download software for NE_name: Value.
Recommended Action If you specify a source directory that is the same as the default destination for
memory restore or software download, you will receive EID-4204 because the source file size
becomes zero.
To retrieve the file, navigate to the appropriate path and restore the file x from x.old.
Cisco Media Gateway Manager 5.0 User Guide
B-98
OL-5461-02
Appendix B
Error Messages
Cisco MGM Server Error Messages
Error Message EID-4205: Failed to {activate | revert} for NE_name:
Detailed_error_message.
Recommended Action Follow the instructions given in the detailed error message.
Error Message EID-4206: Exception: The node is not managed by the NEService.
Recommended Action If you are having operational problems, contact Cisco technical support with
this error message. Otherwise, ignore this error message; no action is required.
Error Message EID-4207: Exception: The node is not available.
Recommended Action If you are having operational problems, contact Cisco technical support with
this error message. Otherwise, ignore this error message; no action is required.
Error Message EID-4208: Exception: Chassis is null for the node.
Recommended Action If you are having operational problems, contact Cisco technical support with
this error message. Otherwise, ignore this error message; no action is required.
Error Message EID-4209: Exception: No terminations available for the given link size.
Recommended Action If you are having operational problems, contact Cisco technical support with
this error message. Otherwise, ignore this error message; no action is required.
Error Message EID-4210: Exception: NetworkManager raises exception.
Recommended Action If you are having operational problems, contact Cisco technical support with
this error message. Otherwise, ignore this error message; no action is required.
Error Message EID-4211: Exception: NetworkManager fails to modify Database Link
Table.
Recommended Action If you are having operational problems, contact Cisco technical support with
this error message. Otherwise, ignore this error message; no action is required.
Error Message EID-4212: Exception: CreateLinkWithName called with null name.
Recommended Action If you are having operational problems, contact Cisco technical support with
this error message. Otherwise, ignore this error message; no action is required.
Error Message EID-4213: Exception: Failed to add link in database.
Recommended Action If you are having operational problems, contact Cisco technical support with
this error message. Otherwise, ignore this error message; no action is required.
Cisco Media Gateway Manager 5.0 User Guide
OL-5461-02
B-99
Appendix B
Error Messages
Cisco MGM Server Error Messages
Error Message EID-4214: Exception: Failed to get link in database.
Recommended Action If you are having operational problems, contact Cisco technical support with
this error message. Otherwise, ignore this error message; no action is required.
Error Message EID-4215: Exception: Failed to modify link in database.
Recommended Action If you are having operational problems, contact Cisco technical support with
this error message. Otherwise, ignore this error message; no action is required.
Error Message EID-4216: Exception: No link exists with Link ID string.
Recommended Action The links have not yet uploaded to the database. Wait several minutes; then, try
again. If the problem persists, check the link connectivity.
Error Message EID-4217: Exception: Failed to get info. for link ID string from NCP.
Recommended Action The links have not yet uploaded to the network. Wait several minutes; then, try
again. If the problem persists, check the link connectivity.
Error Message EID-4218: Exception: Accessing/Updating Database during processing of
Auto. Discovered links failed.
Recommended Action If you are having operational problems, contact Cisco technical support with
this error message. Otherwise, ignore this error message; no action is required.
Error Message EID-4219: Exception: NetworkManager.getExpectedPathTrace raised
exception.
Recommended Action If you are having operational problems, contact Cisco technical support with
this error message. Otherwise, ignore this error message; no action is required.
Error Message EID-4220: Exception: NetworkManager.getPossibleLinkSizes raises
exception.
Recommended Action If you are having operational problems, contact Cisco technical support with
this error message. Otherwise, ignore this error message; no action is required.
Error Message EID-4223: Exception: Failed to get info. for link ID string from
Database.
Recommended Action The links have not yet uploaded to the database. Wait several minutes; then, try
again. If the problem persists, check the link connectivity.
Cisco Media Gateway Manager 5.0 User Guide
B-100
OL-5461-02
Appendix B
Error Messages
Cisco MGM Server Error Messages
Error Message EID-4224: Exception: deleteLink() Cannot Delete an Auto. Discovered
Link. Link ID is string.
Explanation If you are having operational problems, contact Cisco technical support with this error
message. Otherwise, ignore this error message; no action is required.
Error Message EID-4225: Exception: getNetLinks() DBException Raised while getting
Network Links from DB.
Recommended Action If you are having operational problems, contact Cisco technical support with
this error message. Otherwise, ignore this error message; no action is required.
Error Message EID-4226: Exception: getNetLinksForNode() DBException Raised while
getting Network Links from DB for Node Id.
Recommended Action If you are having operational problems, contact Cisco technical support with
this error message. Otherwise, ignore this error message; no action is required.
Error Message EID-4227: Exception: getDbLinksBetweenSrcAndDest() DBException Raised
while getting Network Links from DB.
Recommended Action If you are having operational problems, contact Cisco technical support with
this error message. Otherwise, ignore this error message; no action is required.
Error Message EID-4228: Exception: deleteLink() DBException raised while executing
deleteRow() for Link ID string.
Recommended Action If you are having operational problems, contact Cisco technical support with
this error message. Otherwise, ignore this error message; no action is required.
Error Message EID-4229: Exception: deleteLink() Invalid Link ID string.
Recommended Action If you are having operational problems, contact Cisco technical support with
this error message. Otherwise, ignore this error message; no action is required.
Error Message EID-4236: Exception: NetworkManager.getPathTrace APIs raised
exception. J1 Path Trace is not supported for this card.
Recommended Action No action is required.
Error Message EID-4238: Exception: NetworkManager.getPathTrace APIs raised
exception. J1 Path Trace is supported only for XTC(DS1).
Recommended Action No action is required.
Cisco Media Gateway Manager 5.0 User Guide
OL-5461-02
B-101
Appendix B
Error Messages
Cisco MGM Server Error Messages
Error Message EID-4500: Exception: Invalid model type for this operation.
Recommended Action If you are having operational problems, contact Cisco technical support with
this error message. Otherwise, ignore this error message; no action is required.
Error Message EID-4501: Exception: Backup/Restore internal exception.
Recommended Action If you are having operational problems, contact Cisco technical support with
this error message. Otherwise, ignore this error message; no action is required.
Error Message EID-4502: Error: string cannot be cancelled since they are waiting in
the running list to be executed.
Recommended Action Wait until the job or task completes, or restart the Cisco MGM server.
Error Message EID-4503: Error: Unable to read database table: string.
Recommended Action Restart the Cisco MGM server and retry.
Error Message EID-4504: Error: Unable to process NE purge event for NEDBID: string.
Recommended Action No action is required.
Error Message EID-5011: Cannot register to listen for events.
Recommended Action If you are having operational problems, contact Cisco technical support with
this error message. Otherwise, ignore this error message; no action is required.
Error Message EID-5012: Exception: string while processing CORBA requests.
Recommended Action If you are having operational problems, contact Cisco technical support with
this error message. Otherwise, ignore this error message; no action is required.
Error Message EID-5022: Exception: string occurred while trying to get managed NE
list.
Recommended Action If you are having operational problems, contact Cisco technical support with
this error message. Otherwise, ignore this error message; no action is required.
Error Message EID-5023: Exception: string occurred while trying to get service ID.
Recommended Action If you are having operational problems, contact Cisco technical support with
this error message. Otherwise, ignore this error message; no action is required.
Cisco Media Gateway Manager 5.0 User Guide
B-102
OL-5461-02
Appendix B
Error Messages
Cisco MGM Server Error Messages
Error Message EID-5024: Exception: string occurred while trying to purge NE.
Recommended Action If you are having operational problems, contact Cisco technical support with
this error message. Otherwise, ignore this error message; no action is required.
Error Message EID-5025: The MGM Service is currently connected to Service Manager.
Recommended Action Wait until the AUD-5004 message is displayed; then, click the Activate button
again.
Error Message EID-5026: The MGM Service is not connected to Service Manager.
Recommended Action Wait until the AUD-5003 message is displayed; then, click the Deactivate
button again.
Error Message EID-5030: Exception: string occurred while performing DB operations.
Recommended Action Check the database (DB) configurations. Verify that you can connect to the
database and perform a structured query language (SQL) query.
Error Message EID-6052: Exception: source and destination termination points are not
valid. Cannot create Managed-Unmanaged link.
Recommended Action Review the reason for failure stated in the error message.
Error Message EID-6053: Link cannot be created due to presence of conflicting links.
Recommended Action Review the reason for failure stated in the error message.
Error Message EID-6054: Link not valid between the specified end points in the
specified layer.
Recommended Action Review the reason for failure stated in the error message.
Error Message EID-7000: Source PTP is supporting wavelength string while sink PTP is
supporting NE_ID: The wavelength don’t match.
Recommended Action Select PTPs that support the same wavelength.
Error Message EID-7001: DWDM links can only be created between
transponders/muxponders and DWDM cards.
Recommended Action Select PTPs such that an end of the link is on a transponder or muxponder and
the other end is on a DWDM card.
Cisco Media Gateway Manager 5.0 User Guide
OL-5461-02
B-103
Appendix B
Error Messages
Cisco MGM Server Audit Messages
B.2.4 Debug Server Error Messages
Error Message EID-4028: String communication state: NE_ID; string = NESysID,
NE_ID = NE connection state.
Recommended Action Try and restore the connection to the NE.
Note
Detailed actions are NE-dependent.
Error Message EID-4029: String operational state: NE_ID; string = NESysID,
NE_ID = NE operational state.
Recommended Action Set the NE state to In Service.
Error Message EID-4030: The NE resync operation cannot be completed because of the
non-working operational state of the network element.
Recommended Action NE is already in synchronization state. Retry after some time.
Error Message EID-4031: The NE resync is already in progress for this network
element. Try after some time.
Recommended Action NE is already in synchronization state. Retry after some time.
Error Message EID-4032: Invalid initial poll status.
Recommended Action NE’s initial poll is in progress. Retry after some time.
B.3 Cisco MGM Server Audit Messages
Cisco MGM server audit messages appear in the Audit Log and include the following information:
Note
•
Date and time
•
Module
•
Filename
•
Line number
•
Audit ID
•
Audit message text
Server audit messages are informational only and do not require any action, unless noted.
Audit Message
AUD-101: Cisco MGM user username logged in from location.
Cisco Media Gateway Manager 5.0 User Guide
B-104
OL-5461-02
Appendix B
Error Messages
Cisco MGM Server Audit Messages
Audit Message
AUD-102: Cisco MGM user username logged out from location.
Audit Message
AUD-105: Job# number succeeded for NE: NE_name.
Audit Message
error_message.
AUD-106: Job# number failed for NE: NE_name with the error:
Recommended Action The job can fail to start if the NE is unavailable or if the configured SNMP
community string does not have write privileges. Verify that the NE is available and that the
community string has write privileges.
Audit Message AUD-107: Failed to recover changed configuration from NE: NE_name.
Error: error_message.
Recommended Action This error might occur if there are network problems or if the Flash device on
the NE is busy. The Cisco MGM server automatically tries to recover the changed configuration
information. No action is required.
Audit Message
AUD-108: Job# number cancelled for NE: NE_name.
Audit Message
AUD-109: Job# number started for NE: NE_name.
Audit Message
AUD-110: Job# number failed to start for NE: NE_name.
Recommended Action The job can fail to start if the NE is unavailable or if the configured SNMP
community string does not have write privileges. Verify that the NE is available and that the
community string has write privileges.
Audit Message
AUD-111: Failed to recover changed configuration from NE: NE_name.
Recommended Action This error might occur if there are network problems or if the Flash device on
the NE is busy. The Cisco MGM server automatically tries to recover the changed configuration
information. No action is required.
Audit Message
IP_address.
AUD-112: Security violation for Cisco MGM user username from
Audit Message
AUD-113: Cisco MGM user username_type_of_profile_change.
Audit Message
AUD-114: Topology changed:
type_of_topology_change_from_Domain_Explorer.
Audit Message
Note
AUD-115: State for NE_ID changed from state to state.
In Service, In Maintenance, and Out of Service are examples of states.
Cisco Media Gateway Manager 5.0 User Guide
OL-5461-02
B-105
Appendix B
Error Messages
Cisco MGM Server Audit Messages
Audit Message
state.
AUD-116: State for port number of NE_ID changed from state to
Audit Message
AUD-117: GNE for NE_ID changed from old_GNE_name to new_GNE_name.
Audit Message
AUD-118: Cisco MGM server started.
Audit Message
AUD-119: Cisco MGM server stopped.
Audit Message
AUD-120: The NE configured as NE_ID is actually NE_ID.
Audit Message
AUD-121: Administrative task number deleted.
Audit Message
AUD-122: The MGM service service has been stopped.
Audit Message
AUD-123: The MGM service service has been started.
Audit Message
AUD-124: MGM subnet subnet.
Audit Message
AUD-125: Alarm acknowledged for NE: NE_name, index: index.
Audit Message
AUD-126: Job# number is created for NE: NE_name.
Audit Message
use MGMS time.
AUD-127: Time offset (value sec) is too big on NE: NE_name, will
Audit Message
AUD-128: Alarm acknowledged for NE name alarm ID number.
Audit Message
AUD-129: Service service_name is started.
Audit Message
AUD-130: Service service_name is shut down.
Audit Message
AUD-130: Job cancelled.
Audit Message
AUD-131: NE name moved to In Service from present_state.
Audit Message
AUD-131: Task cancelled.
Audit Message
AUD-132: NE name moved to Out of Service from present_state.
Audit Message
AUD-132: Task modified.
Audit Message
AUD-134: NE name moved to In Maintenance from present_state.
Cisco Media Gateway Manager 5.0 User Guide
B-106
OL-5461-02
Appendix B
Error Messages
Cisco MGM Server Audit Messages
Audit Message
AUD-135: NE name Port port_number state changed to In Service.
Audit Message
AUD-136: NE name Port port_number state changed to Out of Service.
Audit Message
AUD-138: NE name Port port_number state changed to In Maintenance.
Audit Message
AUD-139: NE name property changed - New Sys ID value.
Audit Message
AUD-140: NE name property changed - New IP address value.
Audit Message
AUD-141: NE name property changed - New NSAP address value.
Audit Message
AUD-142: NE name property changed - New description value.
Audit Message
AUD-143: NE name property changed - New community string value.
Audit Message
AUD-144: NE name property changed - New CLLI code value.
Audit Message
AUD-145: NE name property changed - New NE type value.
Audit Message
AUD-146: NE name property changed - New model index value.
Audit Message
AUD-147: NE name property changed - New subnet ID value.
Audit Message
AUD-148: NE name property changed - New system title value.
Audit Message
AUD-150: NE name property changed - New user label value.
Audit Message
AUD-151: NE name property changed - New vendor name value.
Audit Message
AUD-152: NE name property changed - New version value.
Audit Message
AUD-153: NE name property changed - New GNE value.
Audit Message
AUD-154: NE name property changed - Config Mode number.
Audit Message
value.
AUD-155: NE name property changed - Family Seed Old value New
Audit Message
AUD-156: NE name property changed - PM collection is value.
Audit Message
AUD-157: Subnet value title changed.
Audit Message
AUD-158: Subnet value type changed.
Cisco Media Gateway Manager 5.0 User Guide
OL-5461-02
B-107
Appendix B
Error Messages
Cisco MGM Server Audit Messages
Audit Message
AUD-159: Subnet value topology changed.
Audit Message
AUD-160: Subnet value GNE changed.
Audit Message
AUD-161: Subnet value name changed.
Audit Message
AUD-162: Subnet value user label changed.
Audit Message
AUD-163: Topology changed - Group value added.
Audit Message
AUD-164: Topology changed - Group value deleted.
Audit Message
AUD-165: Topology changed - NE NE_ID added.
Audit Message
AUD-166: Topology changed - NE NE_ID deleted.
Audit Message
AUD-167: Topology changed - GNE NE_ID added.
Audit Message
AUD-168: Topology changed - GNE NE_ID deleted.
Audit Message
AUD-171: Topology changed - Node NE_ID added.
Audit Message
AUD-172: Topology changed - Node NE_ID deleted.
Audit Message
AUD-173: Topology changed - Node NE_ID modified.
Audit Message
AUD-174: MGM user username logged in.
Audit Message
AUD-175: MGM user username logged out.
Audit Message
AUD-176: MGM user username security violations.
Audit Message
AUD-177: MGM user username profile changed - User added.
Audit Message
AUD-178: MGM user username profile changed - User deleted.
Audit Message
AUD-179: MGM user username profile changed - User modified.
Audit Message
AUD-180: MGM user username profile changed - Domain name changed.
Audit Message
changed.
AUD-181: MGM user username profile changed - Node assignment
Cisco Media Gateway Manager 5.0 User Guide
B-108
OL-5461-02
Appendix B
Error Messages
Cisco MGM Server Audit Messages
Audit Message
changed.
AUD-182: MGM user username profile changed - Domain description
Audit Message
AUD-184: Failed login threshold exceeded for user username.
Audit Message
AUD-185: Password aged out for user username.
Audit Message
IP_address.
AUD-186: MediaGatewayManager user username forced to log out from
Audit Message
username.
AUD-187: MediaGatewayManager service service_name logged in from
Audit Message
username.
AUD-188: MediaGatewayManager service service_name logged out from
Audit Message
AUD-189: MediaGatewayManager service service_name logged out
unexpectedly from username.
Recommended Action Check the Service Monitor to see whether the server automatically started a
new instance of this service. If a new instance does not start within five minutes, start it manually
from the Control Panel window.
Audit Message
AUD-190: MediaGatewayManager service service_name failed to
contact server for 10 minutes. Stopping the service.
Audit Message
AUD-192: OSS with Profile Name value1, IP Address value2 is
successful. Value1: Profile name. Value2: IP Address.
Audit Message AUD-193: OSS with Profile Name value1, IP Address value2 is failed.
Value1: Profile name. Value2: IP Address.
Audit Message
AUD-194: OSS with Profile Name value1 is value2. Value1: Profile
name. Value2: IP Address.
Audit Message
AUD-195: The property value is changed. Value: Property name.
Audit Message
AUD-196: NE (value) Property changed - Audit Trail Collection is
Enabled/Disabled. Value: NE name.
Audit Message
AUD-204: Accepted a secure port open request to IP address
IP_address, port number.
Audit Message
AUD-205: Accepted a user port open request to IP address
IP_address, port number.
Audit Message
number.
AUD-206: User username logged in from IP address IP_address, port
Cisco Media Gateway Manager 5.0 User Guide
OL-5461-02
B-109
Appendix B
Error Messages
Cisco MGM Server Audit Messages
Audit Message
number.
AUD-207: Rejected a user login from IP address IP_address, port
Audit Message
number.
AUD-208: User username logged out from IP address IP_address, port
Audit Message
AUD-209: NE ID reported.
Audit Message
AUD-2000: Cisco MGM successfully contacted NE: name.
Audit Message
AUD-2001: Cisco MGM was unable to contact NE: name.
Recommended Action Check network connectivity. Log into the Cisco MGM client with SuperUser
privileges and choose Administration > Error Log. Use the Error Log to debug the problem.
Audit Message
AUD-2002: New node discovered and added to the database: Node IP:
IP_address Node ID: ID.
Audit Message
AUD-2005: New system ID: system_ID of NE: IP_address conflicts
with the system ID of an existing NE.
Explanation The new system ID configured on the NE is not unique. An existing NE already has this
ID, which was configured on the device side.
Recommended Action On the device side, change the host name of the misconfigured NE to a unique
host name.
Audit Message
AUD-2006: NE's IP address: IP_address has been reassigned to a
different NE. Identifiers_of_the_two_NEs.
Explanation The IP address of an existing NE was assigned to another NE. This can occur if you take
an existing NE offline and assign its IP address to another NE.
Recommended Action Delete the offline NE from Cisco MGM; then, add the other NE to
Cisco MGM.
Audit Message
AUD-2200: Active IP set to the primary IP.
Audit Message
AUD-2201: Active IP set to the secondary IP.
Audit Message
AUD-2202: Software download operation succeeded.
Audit Message
AUD-2203: Software revert operation succeeded.
Audit Message
AUD-2204: Software commit operation succeeded.
Audit Message
AUD-2205: Software download operation failed.
Cisco Media Gateway Manager 5.0