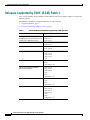
1
Release Notes for the Cisco WAN Manager,
Release 15.3.00 P1
August 2006
Rev. C0
These release notes are for use with the Cisco WAN Manager (CWM) 15.3.00 P1 software release that
supports MGX, BPX, and IGX switches. You can access the MGX switch documentation at this website.
At the site, see MGX Switches:
http://www.cisco.com/en/US/products/hw/switches/tsd_products_support_category_home.html
The first section describes all of the switch releases that CWM 15.3.00 P1 supports.
Contents
•
Releases Supported by CWM 15.3.00, Patch 1, page 2
•
System Requirements, page 3
•
CWM Packaging, page 8
•
Supported Hardware, page 9
•
Releases Certified for CWM 15.3.00 P1, page 22
•
New Features and Enhancements, page 23
•
CWM Feature Limitations, page 23
•
Installing and Uninstalling CWM 15.3.00 P1, page 33
•
Creating a CWM Auto-Restart Shell Script, page 43
•
Installing WANDEST 2.7.00, Patch 1, page 44
•
SNMP Service Agent Trap Limitation, page 46
•
Caveats, page 47
•
Related Documentation, page 48
•
Obtaining Documentation, Support, and Security Guidelines, page 49
Americas Headquarters:
Cisco Systems, Inc., 170 West Tasman Drive, San Jose, CA 95134-1706 USA
© 2006 Cisco Systems, Inc. All rights reserved.
Releases Supported by CWM 15.3.00, Patch 1
Releases Supported by CWM 15.3.00, Patch 1
Table 1 shows the BPX, IGX, and MGX switch platforms and releases that the CWM 15.3.00, Patch 1
software supports.
For additional information on supported products, see these sections:
•
Supported Hardware, page 9
•
Releases Certified for CWM 15.3.00 P1, page 22
Table 1
Switch Platforms and Releases Supported by CWM 15.3.00 P1
Switch Platform
Supported Software Release
Existing WAN switching products,
including the Cisco IGX 8400 series
and the Cisco BPX 8600 series
9.2.33–9.2.43
9.3.05–9.3.51
9.4.00–9.4.12
SES PNNI Controller
3.0.10–3.0.25
4.0.00–4.0.15
MGX 8220
4.1.07–4.1.12
5.0.12–5.0.20
MGX 8230, 8250 and 8850 (PXM1)
1.1.40–1.1.42
1.2.00–1.2.13
1.2.20–1.2.22
1.3.00–1.3.12
1.3.14
MGX8830/B (PXM45/C)
5.1.20
5.2.00
5.3.00 and 5.3.10
MGX 8830 and 8850 (PXM1E)
MGX 8850 (PXM45)
3.0.23–3.0.25
4.0.00–4.0.17
5.0.00–5.0.20
5.1.20
5.2.00
5.3.00 and 5.3.10
MGX 8880 (PXM45)
5.0.00–5.0.20
5.1.20
5.2.00
5.3.00 and 5.3.10
MGX 8950 (PXM45)
2.1.76–2.1.81
3.0.23–3.0.25
4.0.00–4.0.17
5.0.00–5.0.20
5.1.20
5.2.00
5.3.00 and 5.3.10
Release Notes for the Cisco WAN Manager, Release 15.3.00 P1
2
OL-11190-01, Rev. C0
System Requirements
System Requirements
This section describes the system requirements for using the CWM:
•
CWM Server Requirements, page 3
•
Java Client Requirements, page 4
•
Standalone Statistics Manager Requirements, page 4
•
Solaris Patch Requirements, page 6
•
HP OpenView Requirements, page 7
•
Informix Requirements, page 7
In addition to the CWM platform requirements listed in the Cisco WAN Manager Installation and
Configuration Guide, Release 15.3.00, consider also the following:
•
UltraSPARC II, UltraSPARC III, and UltraSPARCIIIi workstations—The CWM is compatible with
them. For system requirements, see Tables 2 through 5.
•
Ultra 60 and Enterprise 450 and 4500—They were certified with earlier CWM releases and can still
be used with this release. For the certified system requirements, see the CWM 11.0.10 release notes.
Cisco does not provide technical support for Sun configurations or products that Sun Microsystems
no longer supports.
•
Graphics card—A graphics card is required when using the Java Client to access to the CWM.
•
Video—Video on the CWM server is required only for user access or maintenance. It can be added
to Sun servers or workstations. For Ultra and Enterprise, a video adapter is required.
•
Firewalls—If you are using a firewall between the server and the clients, you must open a range of
ports for the CWM servers. For additional information about using firewalls, see the “Using
Firewalls” section in the CWM installation guide. You can access all CWM documentation at this
website:
http://www.cisco.com/en/US/products/sw/netmgtsw/ps2340/tsd_products_support_series_home.ht
ml
CWM Server Requirements
Table 2 lists the system requirements for the CWM server. Note also the following about the
CWM servers:
•
Other UltraSPARC III server models with equal or higher CPU speed and memory capacity can also
be used.
•
If UltraSPARC II servers are used, see the CWM 11.0.10 release notes for system requirements.
•
If you are using an Ultra 60 (low-end platform), it should have at least 2 GB of RAM.
Release Notes for the Cisco WAN Manager, Release 15.3.00 P1
OL-11190-01, Rev. C0
3
System Requirements
Table 2
CWM Server System Requirements
CWM
Platform
No.
of
CPUs
Min.
CPU
Speed
(MHz)
Min.
RAM
(GB)
Min.
Swap
Space
(GB)
Max No. of
PVC/SPVC
Connections
Min.
or
Disk
Connection
Space Segments
(GB)
for XPVC
Low - Medium #1
1
900
2
4
1 x 36
100K
10
100
Netra 20, Sun Fire 280R
Low - Medium #2
1
1000
2
4
2 x 36
100K
10
100
Sun Fire V210
Medium #1
2
900
4
8
1 x 36
200K
20
500
Netra 20, Sun Fire 280R
Medium #2
2
1280
4
8
2 x 72
200K
20
500
Sun Fire V240
High- Carrier Grade
4
900
8
16
2 x 36
1M
40
1000
Sun Fire V880
Carrier Grade
8
900
16
32
2 x 36
2M
100
2000
Sun Fire V880
Carrier Grade 2
8
900
40
88
5 x 68 3M
100
2000
Sun Fire V880
Max.
No. of
PC
Clients
Max.
No. of
Node
s
UltraSPARC III Server
Used for Network Scale
Testing by Cisco
Java Client Requirements
Table 3 lists the Java Client system requirements.
Table 3
Java Client System Requirements
CWM Java
Client
Operating System
PC
SPARC10
CPU
Speed RAM
(MHz) (MB)
Disk
Swap Free
Space Space
(GB)
(MB)
Web Browser
No. of CPUs
Windows 2000
Windows NT 4.0,
SP 6a
Windows XP, SP1
IE 6.0
Netscape 4.76
JRE 1.4.2_02
1: Pentium 3 750
512
N/A
130
Solaris 8
Netscape 4.76
1: 450 MHz
512
1
130
(CWM 15.3.00 P1
also supports JRE
1.4.2_10.)
450
Solaris 9
Standalone Statistics Manager Requirements
Table 4 lists the Standalone Statistics Collector (SSC) or Standalone Statistics Manager (SSM) system
requirements, which are the same. Note also the following:
•
The file size is 2 MB (typically holds statistics with peak enabled for 20-KB endpoints).
•
The number of files does not increase with smaller file size.
Release Notes for the Cisco WAN Manager, Release 15.3.00 P1
4
OL-11190-01, Rev. C0
System Requirements
Table 4
•
Average Network Transfer Rate is the required TFTP or FTP throughput to collect the maximum
number of files (combination of server performance and network bandwidth and traffic).
•
One SSM can control a maximum of 12 SSCs.
SSC or SSM System Requirements
RAM
Swap
Space
(GB)
Disk
Space
(GB)
Max. No. of
Stats Files
(15-min.
collection
Server Used
intervals)
in Cisco Testing
512 MB
2
2 x 18
350
U60
450
3.5 MB/sec 512 MB
2
2 x 18
700
U60
1
1002
4 MB/sec
1 GB
2
2 x 73
550
Sun Fire 210/240
Medium #3
1
900
1.7 MB/sec 1 GB
2
1 x 36
700
Netra 20 or
Sun Fire 280R
High #1
2
900
3.5 MB/sec 4 GB
8
1 x 36
900
Netra 20 or
Sun Fire 280R
High #2
2
1200
4 MB/sec
2
2 x 73
1200
Sun Fire 240
SSC Platform
No. of
CPUs
Min.
CPU
Speed
(MHz)
Average
Network
Transfer
Rate
Low
2
450
170 kBps
Medium #1
2
Medium #2
1 GB
Table 5 lists additional system requirements for the parser in the CWM server, SSC, or SSM. If the parser
is enabled, add the applicable system requirements in Table 5 to the CWM server requirements listed in
Table 2 or to the SSM or SSC requirements listed in Table 4.
Five statistics are collected from each connection segment endpoint in 15-minute file collection
intervals. Collecting statistics for 4 million endpoints with five statistics per endpoint requires 80 GB of
disk space per 24-hour period. You will need at least 3 x 36 GB of disk space.
Table 5
Parser System Requirements for the CWM Server, SSC, or SSM
Min.
CPU
Speed RAM
(MHz) (GB)
Max. No. of
Connection
Segment
Swap Min.
Endpoints
Space Disk Space (Statistics Server Used in Cisco
(GB)
(GB)
Enabled)
Testing
Low - Medium 2
450
1
2
2 x 18
300 KB
Ultra 60
Low - Medium 1
900
2
4
2 x 36
750 KB
Netra 20, Sun Fire 280R
Medium
2
900
4
8
2 x 36
2 MB
Netra 20, Sun Fire 280R
High - Carrier
Grade
4
900
8
16
2 x 36
4 MB
Sun Fire V880
SSM Platform
No. of
CPUs
Release Notes for the Cisco WAN Manager, Release 15.3.00 P1
OL-11190-01, Rev. C0
5
System Requirements
Solaris Patch Requirements
This section shows the Solaris patches that you must install for the CWM and those that we recommend
you install. You will install these patches after you install the Solaris 9 operating system.
Before You Begin Installing Patches
For best results, follow these Sun recommendations before you begin installing the patches:
•
After installing the Solaris 9 operating system, you must install the Solaris 9 Kernel Patch 12 or
later. After you have installed the patch, you will install the additional patches (see Table 6) if they
were not already installed as part of the cluster.
•
Use the single-user mode to install most patches.
•
Shut down CWM processes before installing the patches.
•
Avoid installing these patches that cause problems with Informix during startup.
– SPARC Platform—Solaris 9 with patches 112963-21 through 112963-24
– x86 Platform—Solaris 9 with patches 113986-17 through 113986-20
•
Not all Solaris patches or patch clusters require a reboot. If a reboot is not required, you can start
the CWM after the patch is installed.
Installing the Patches
Use this procedure and sequence to install the Solaris patches, which assumes that the Solaris operating
system is already installed.
Step 1
Verify the already installed patches. To do this, use the Solaris showrev –p command.
Step 2
Go to the SunSolve Patch Access website to access the patches:
http://sunsolve.Sun.COM/pub-cgi/show.pl?target=patches/patch-access
(If you have a SunSpectrum contract, you can also access patches from SunService.)
Install the Kernel Patch 12 for Solaris 9. See Table 6 for the correct version number.
Step 3
Install the rest of the required patches if they were not already installed as part of the cluster. Depending
on your situation, you may want to enter only the first 6 digits of the patch number in the Find Patch field
on the Sun Patch Access site and not the version extension to obtain the latest patch version.
Step 4
Install the recommended patches, as needed and desired. (Several of these recommended patches may
require a service contract with Sun.)
Release Notes for the Cisco WAN Manager, Release 15.3.00 P1
6
OL-11190-01, Rev. C0
System Requirements
Table 6
Required and Recommended Solaris Patches
Patches
Solaris 9
Required to be
installed first
Kernel Patch 12
(112233-12 or higher)
Required
112874-31
112785-42
112970-07
114716-01
113580-01
114224-02
112998-03
112811-01
Recommended
115336-02
112964-07
113575-05
112808-06
HP OpenView Requirements
HP OpenView is used only for viewing the event log and is not required for other CWM procedures.
The CWM works with HP OpenView 6.3 or 7.0.
HP OpenView is not bundled with the CWM CDs. You must order it directly from Hewlett-Packard and
follow the H-P installation requirements and procedures. (Refer to HP OpenView Network Node
Manager Products, Installation Guide, Part No. J1136-90000.)
Informix Requirements
The CWM uses Informix 9.4 for database operations. The Informix software is bundled with the CWM
and is included on the CWM Server CD in the CWM CD package. The Informix program is installed
automatically when the CWM is installed.
Release Notes for the Cisco WAN Manager, Release 15.3.00 P1
OL-11190-01, Rev. C0
7
CWM Packaging
CWM Packaging
This section describes the CWM and associated software and CDs. See Table 7 for software information
and CD contents.
The CWM Software Evaluation CD package includes all CWM CDs and functionality. All of the CWM
features are available until the 45-day evaluation period expires. As noted in Table 7, when you order
the CWM package, you receive the CWM Server and Documentation CDs.
Table 7
CWM and Associated Software
Software and
Documentation
CD
Notes
CWM Server
CWM Server: CD 1
Part of the CWM package.
CWM Documentation:
CD 2
Part of the CWM package.
CWM Service Agent
Service Agent CD
The CD must be ordered separately from the
CWM Client/Server package CD set.
Statistics Collection
Manager–Standalone
(SCMSA)
Standalone Statistics
Collection Manager CD
The CD must be ordered separately from the
CWM package CD set.
RTM Proxy for the
SCM application
RTM Proxy for SCM
Application CD
Informix 9.4
Orbix
Java Development Kit
(JDK)
CWM documentation
(PDFs)
Acrobat Reader
The gzip utility is used to decompress the gz
files. The command is gzip –d.
gzip
The Standalone SCM software includes the
WANDEST client software and the Informix
server software.
This application is included on a separate CD
with the Standalone Statistics Collection
Manager software only when you order that
software. It is meant to be installed only with
the SSM and not on systems using the Service
Agent. If you have already installed the Service
Agent software and you attempt to install this
application, you will see errors because the
~/config/process.conf file has duplicate entries
for the RTM Proxy.
To install the RTM Proxy for SCM application
from the CD, refer to the CWM
installation guide.
Cisco WAN Data
Extraction and
Synchronization Tool
(WANDEST)
WANDEST Server
Software CD
The CD must be ordered separately from the
CWM set.
WANDEST Client
Software CD
Release Notes for the Cisco WAN Manager, Release 15.3.00 P1
8
OL-11190-01, Rev. C0
Supported Hardware
Table 7
CWM and Associated Software (continued)
Software and
Documentation
CD
Notes
Automated Bulk
Provisioning
Automated Bulk
Provisioning Software CD
This CD must be ordered separately from the
CWM set.
Cisco WAN
Modeling Tools
Cisco WAN Modeling
Tools Software CD
This CD must be ordered separately from the
CWM set.
Supported Hardware
The following subsections list all of the hardware that CWM 15.3.00, Patch 1 supports. You can access
BPX, IGX, and MGX switch documentation at this website:
http://www.cisco.com/en/US/products/hw/switches/tsd_products_support_category_home.html
See also these sections:
•
Releases Supported by CWM 15.3.00, Patch 1, page 2
•
Releases Certified for CWM 15.3.00 P1, page 22
New Hardware Supported by CWM 15.3.00, Patch 1
No new hardware has been added in the CWM 15.3.00, Patch 1 release.
Existing Hardware Supported by CWM 15.3.00, Patch 1
The tables on the following pages list the hardware that CWM 15.3.00, Patch 1 supports. Table 8
provides an index of the table numbers that apply to particular platforms.
Table 8
Index of Hardware Tables
Platform Series
Table and Page No.
IGX 8400
Table 9 on page 10
BPX 8600
Table 10 on page 10
MGX 8220
Table 11 on page 11
MGX 8230 (PXM1)
Table 12 on page 12
MGX 8250 (PXM1)
Table 13 on page 13
MGX 8850 (PXM1)
Table 14 on page 14
PXM1E on MGX 8830, 8830/B, 8850, and 8850/B
Table 15 on page 15
MGX 8830/B (PXM 45/C)
Table 16 on page 17
PXM45 on MGX 8850 and 8850/B
Table 17 on page 18
MGX 8880 (PXM45/C)
Table 18 on page 20
MGX 8950 (PXM45)
Table 19 on page 20
SES PNNI Controller
Table 20 on page 21
Release Notes for the Cisco WAN Manager, Release 15.3.00 P1
OL-11190-01, Rev. C0
9
Supported Hardware
IGX 8400 Series
For IGX 8400 product details, refer to Table 10 in the release notes at this website:
http://www.cisco.com/univercd/cc/td/doc/product/wanbu/bpx8600/9_4/rnote/9412rn.pdf
Table 9
IGX 8400
Front Card
Back Card
IGX-HDM
—
IGX-NPM
SCM
IGX-NTM
BC-xxxxx-T1/E1/SR/Y1
IGX-UFM-4C
IGX-UFM-8C
BC-UFI-8T1/8E1-DB15
BC-UFI-8E1-BNC
IGX-UFM-U
BC-UFI-12V35
BC-UFI-12X21
BC-UFI-4HSSI
IGX-URM
BC-2FE2V
IGX-UVM
UVI-2T1EC/2E1EC
UVI-2J1EC
IGX-UXM
IGX-UXME
BC-UAI-4-155-MMF/SMF
BC-UAI-2-155-SMF
BC-UAI-2SMFXLR
BC-UAI-4SMFXLR
BC-UAI-3/6-T3/E3
BC-UAI-4/8-E1-BNC
BC-UAI-4/8-T1/E1-DB15
BC-UAI-4-STM1E
BPX 8600 Series
For BPX 8600 product details, refer to Table 9 in the release notes at this website:
http://www.cisco.com/univercd/cc/td/doc/product/wanbu/bpx8600/9_4/rnote/9412rn.pdf
Table 10
BPX 8600
Front Card
Back Card
ASI-2T3/E3
—
ASI-155E
—
ASM-LM
—
BNI-3-T3/C
BNI-3-E3/C
BNI-155E
BNI-2-155/B
BPX-E3-BC
BPX-MMF/SMF/SMFLR-2-BC
BPX-ASM
BPX-ASM-BC
BPX-BCC
BPX-BCC-BC
BPX-BCC-3
BCC-3BC
BPX-BCC4V
—
Release Notes for the Cisco WAN Manager, Release 15.3.00 P1
10
OL-11190-01, Rev. C0
Supported Hardware
Table 10
BPX 8600 (continued)
Front Card (continued)
Back Card
BPX-BCC-4V/B
—
BPX-BME
BPX-T3/E3-BC
BPX-BME-OC12
BPX-E3-BC
BPX-MMF/SMF/SMFLR-2-BC
BPX-BXM-155-8
BPX-MMF/SMF/SMFLR-8-155
BPX-BXM-155-4
BPX-BXM-E-155
BPX-MMF/SMF/SMFLR-4-155
BPX-BXM-622
BPX-BXM-E-622
BPX-622-2-BC
BPX-SMF/SMFLR-622-BC
BPX-SMF/SMFLR-622-2-BC
BPX-BXM-T3/E3
BPX-T3/E3-BC
BPX-STM1-EL-4
BPX-T3/E3
BPX-E3-BC
BPX-MMF/SMF/SMFLR-2-BC
BPX-XLR
BPX-E3-BC
BPX-MMF/SMF/SMFLR-2-BC
RDNT-SMF-155
RDNT-LR-155/622
RDNT-SMF-622
BPX-E3-BC
BPX-MMF/SMF/SMFLR-2-BC
MGX 8220 Series
For MGX 8220 product details, refer to Table 8 in the release notes at this website:
http://www.cisco.com/univercd/cc/td/doc/product/wanbu/bpx8600/9_4/rnote/9412rn.pdf
Table 11
MGX 8220
Front Card
Back Card
ASC
ASC-LM
AUSM-4T1E1
AUSM-8T1E1
AUSM--8T1E1/B
RJ-48-8E1/8T1
BNM-155
155-SMF
T3E3-B/D
T3E3-B/D
CESM-8T1E1
RJ-48-8E1/8T1
SMB-8E1
FRSM-4T1E1
FRSM-8T1E1
RJ-48-8T1/8E1
SMB-8E1
FRSM-HS1
HSI-4X21/3HSSI
FRSM-VHS
HS2
IMATM-8T1E1/B
RJ-48-T3T1/E3E11.3.12
SMB-E3E1
Release Notes for the Cisco WAN Manager, Release 15.3.00 P1
OL-11190-01, Rev. C0
11
Supported Hardware
Table 11
MGX 8220 (continued)
Front Card
Back Card
SRM
DB-15-T1/E1
LM-3T3
AUSM-4T1E1
AUSM-8T1E1
AUSM-8T1E1/B
8T1/E1
MGX 8230 Series
For MGX 8230 product details, refer to Tables 16 and 17 in the release notes at this website:
http://www.cisco.com/univercd/cc/td/doc/product/wanbu/mgx8230/13/rnotes/rn1312.pdf
Table 12
MGX 8230 (PXM1)
Front Card
Back Card
AX-CESM
RJ48-8T1/8E1
SMB-8E1
AX-FRSM
RJ48-8T1/8E1
SMB-8E1
MGX-AUSM
8T1/E1
MGX-CESM
MGX-RJ48-8T1
MGX-BNC-2E3/2E3A/2T3
MGX-FRSM-2CT3
MGX-FRSM-2T3E3
MGX-BNC-2E3/2T3/2E3A
MGX-FRSM-HS1/B
MGX-12IN1-4S
MGX-FRSM-HS2
MGX-HSSI
MGX-FRSM-HS2/B
MGX-HSSI
MGX-12IN1-8S
MGX-RPM-128M/B
MGX-RJ45-FE/4E
MGX-MMF-FE
MGX-MMF/SMF-FDDI
MGX-MMF/SMF-FDDI/FD
MGX-RPM-PR
MGX-MMF-FE
MGX-RJ45-4E/B (Ethernet)
MGX-RJ45-FE (Fast Ethernet)
5-port auto-sensing Fast and Gigabit Ethernet
MGX-SRME
MGX-SRME/B
MGX-SMFIR-1-155
MGX-STM1-EL1
T3
MGX-VISM-8T1/8E1
AX-SMB-8E1
AX-R-SMB-8E1
AX-RJ-48-8T1/8E1
AX-R-RJ-48-8T1/8E1
MGX-RJ48-8E1
Release Notes for the Cisco WAN Manager, Release 15.3.00 P1
12
OL-11190-01, Rev. C0
Supported Hardware
Table 12
MGX 8230 (PXM1) (continued)
MGX-VISM-PR
AX-SMB-8E1
AX-R-SMB-8E1
AX-RJ48-8T1/8E1
AX-R-RJ48-8T1/8E1
MGX-RJ48-8E1
PXM1
T3/E3/OC-3/OC-12
MGX 8250 Series
For MGX 8250 product details, refer to Tables 15 and 17 in the release notes at this website:
http://www.cisco.com/univercd/cc/td/doc/product/wanbu/mgx8230/13/rnotes/rn1312.pdf
Table 13
MGX 8250 (PXM1)
Front Card
Back Card
AX-CESM
AX-RJ48-8T1/8E1
AX-SMB-8E1
MGX-RPM-128M/B
MGX-RJ45-FE/4E
MGX-MMF-FE
MGX-MMF/SMF-FDDI
MGX-MMF-FDDI/FD
MGX-SMF-FDDI/FD
MGX-SRME
MGX-SMFIR-1-155
MGX-STM1-EL1
MGX-AUSM
AX-SMB-8E1
AX-R-SMB-8E1
AX-RJ48-8E1/8T1
AX-R-RJ48-8T1/8E1
MGX-RJ48-8E1
MGX-CESM
MGX-BNC-2E3/2E3A/2T3
MGX-FRSM-HS1/B
MGX-12IN1-4S
MGX-FRSM-HS2
MGX-HSSI
MGX-FRSM-HS2/B
MGX-HSSI
MGX-12IN1-8S
MGX-RPM-PR
MGX-MMF-FE
MGX-RJ45-4E/B (Ethernet)
MGX-RJ45-FE (Fast Ethernet)
5-port auto sensing Fast Ethernet and Gigabit-Ethernet
MGX-VISM-8T1
MGX-VISM-8E1
AX-SMB-8E1
AX-R-SMB-8E1
AX-RJ48-8T1/8E1
AX-R-RJ48-8T1/8E1
MGX-RJ48-8E1
MGX-VISM-PR
AX-RJ48-8T1
AX-R-RJ48-8T1
Release Notes for the Cisco WAN Manager, Release 15.3.00 P1
OL-11190-01, Rev. C0
13
Supported Hardware
Table 13
MGX 8250 (PXM1) (continued)
Front Card
Back Card
MPSM-8-T1E1
AX-RJ-48-8T1/8E1
AX-R-RJ-48-8T1/8E1
AX-SMB-8E1
AX-R-SMB-8E1
PXM1
T3/E3/OC-3/OC-12
SRM
LM-3T3
MGX 8850 Series
For MGX 8850 product details, refer to Tables 15 and 17 in the release notes at this website:
http://www.cisco.com/univercd/cc/td/doc/product/wanbu/mgx8230/13/rnotes/rn1312.pdf
Table 14
MGX 8850 (PXM1)
Front Card
Back Card
AX-CESM
AX-RJ48-8E1/8T1
AX-SMB-8E1
AX-FRSM
AX-SMB-8E1
AX-R-SMB-8E1
AX-RJ48-8E1/8T1
AX-R-RJ48-8E1/8T1
MGX-RJ48-8E1
MGX-AUSM
AX-SMB-8E1
AX-R-SMB-8E1
AX-RJ48-8T1/8E1
AX-R-RJ48-8T1/8E1
MGX-RJ48-8E1
MGX-CESM
RJ48-8T1
R-RJ48-8T1
MGX-BNC-2E3/2E3A/2T3
MGX-FRSM-2CT3
MGX-FRSM-2T3E3
MGX-BNC-2T3/2E3
MGX-BNC-2E3A
MGX-BNC-2T3
MGX-FRSM-HS1/B
MGX-12IN1-4S
MGX-SCSI2-2HSSI/B
MGX-FRSM-HS2
MGX-SCSI2-2HSSI/B
MGX-FRSM-HS2/B
MGX-12IN1-8S
MGX-RPM-PR
MGX-MMF-FE
MGX-RJ45-4E/B (Ethernet)
MGX-RJ45-FE (Fast Ethernet)
5-port auto sensing Fast and Gigabit Ethernet
Release Notes for the Cisco WAN Manager, Release 15.3.00 P1
14
OL-11190-01, Rev. C0
Supported Hardware
Table 14
MGX 8850 (PXM1) (continued)
Front Card
Back Card
MGX-RPM-128M/B
MGX-MMF-FE
MGX-RJ45-FE
MGX-RJ45-4E
MGX-MMF/SMF-FDDI
MGX-MMF/SMF-FDDI/FD
MGX-SRME
MGX-SMFIR-1-155
MGX-STM1-EL1
MGX-VISM-8T1
MGX-VISM-8E1
AX-SMB-8E1
AX-R-SMB-8E1
AX-RJ-48-8T1/8E1
AX-R-RJ48-8T1/8E1
MGX-RJ48-8E1
MGX-VISM-PR
AX-RJ48-8T1
AX-R-RJ48-8T1
MGX-VXSM-6T3
VXSM-BC-SMB-3T3E3
MPSM-8-T1E1
AX-RJ-48-8T1/8E1
AX-R-RJ-48-8T1/8E1
AX-SMB-8E1
AX-R-SMB-8E1
PXM1
T3/E3/OC-3/OC-12
SRM
LM-3T3
PXM1E on MGX 8830, 8830/B, 8850, and 8850/B Series
For product details, refer to Tables 4 through 8 in the release notes at this website:
http://www.cisco.com/univercd/cc/td/doc/product/wanbu/8850px45/relnote/52008xx0.pdf
Table 15
PXM1E on MGX 8830, 8830/B, 8850, and 8850/B
Front Card
Back Card
AX-FRSM
AX-SMB-8E1
AX-R-SMB-8E1
AX-RJ48-8T1/8E1
AX-R-RJ48-8T1/8E1
MGX-RJ48-8E1
AX-CESM
AX-RJ48-8E1/8T1
AX-SMB-8E1
MGX-AUSM
AX-SMB-8E1
AX-R-SMB-8E1
AX-RJ48-8T1/8E1
AX-R-RJ48-8T1/8E1
MGX-RJ48-8E1
MGX-FRSM-2T3E3
MGX-FRSM-2CT3
MGX-BNC-2T3/2E3
MGX-BNC-2E3A
MGX-FRSM-HS2/B
MGX-12IN1-8S
Release Notes for the Cisco WAN Manager, Release 15.3.00 P1
OL-11190-01, Rev. C0
15
Supported Hardware
Table 15
PXM1E on MGX 8830, 8830/B, 8850, and 8850/B (continued)
Front Card
Back Card
MGX-RPM-PR
MGX-MMF-FE
MGX-RJ45-4E/B (Ethernet)
MGX-RJ45-FE (Fast Ethernet)
5-port auto sensing Fast and Gigabit Ethernet
MGX-SRME/B
MGX-BNC-3T3-M
MGX-STM1-EL-1
MPSM-8-T1E1
AX-RJ48-8T1/E1
AX-R-RJ48-8T1/8E1
AX-SMB-8E1
AX-R-SMB-8E1
MPSM-16-T1E1
RBBN-16-T1E1-1N
MCC-16-E1-1N
RED-16-T1E1
(For the 1:N redundancy of the
MPSM-16-T1E1, MGX 8830/B supports the
RCON-1TO3-8830 back card and
MGX 8850/B supports the RCON-1TO3-8850
and RCON-1TO5-8850 back cards.)
MPSM-T3E3-155
SFP-2-155
BNC-3-T3E3
SMB-2-155-EL
PXM1E-8-155
MMF-4-155/C
MMF/SMFIR/SMFLR-1-155-SFP
PXM-UI-S3/B
PXM1E-8-T3E3
SMB-8-T3/E3
PXM-UI-S3/B
PXM1E-16-T1E1
MCC-16-E1
RBBN-16-T1E1
PXM-UI-S3/B
PXM1E-T3E3-155
(also referred to as
PXM1E-COMBO)
MGX-T3E3-155
MMF/SMFIR/SMFLR-1-155-SFP
PXM-UI-S3/B
MGX-SRME
MGX-SMFIR-1-155
MGX-STM1-EL1
MGX-SRME/B
MGX-SMFIR-1-155
MGX-VISM-PR
AX-SMB-8E1
AX-R-SMB-8E1
AX-RJ48-8T1/8E1
AX-R-RJ48-8T1/8E1
Release Notes for the Cisco WAN Manager, Release 15.3.00 P1
16
OL-11190-01, Rev. C0
Supported Hardware
MGX 8830/B (PXM 45/C) Series
For MGX 8830/B product details, refer to Tables 4 through 8 in the release notes at this website:
http://www.cisco.com/univercd/cc/td/doc/product/wanbu/8850px45/relnote/52008xx0.pdf
Table 16
MGX 8830/B (PXM 45/C)
Front Card
Back Cards
AXSM-2-622-E
SMFIR/SMFLR-1-622/C
AXSM-8-622-XG
SFP-4-622
AXSM-XG-OC12
SFP-4-622
AXSM-16-T3E3-E
SMB-8-T3/E3
AXSM-16-155-XG
SFP-8-155
MMF/SMFIRSMFLR-1-155-SFP
MCC-8-155
MGX-SRME/B
MGX-BNC-3T3-M
MGX-STM1-EL-1
MPSM-8-T1E1
AX-RJ48-8T1/8E1
AX-R-RJ48-8T1/8E1
AX-SMB-8E1
AX-R-SMB-8E1
MPSM-T3E3-155
SFP-2-155
BNC-3-T3E3
SMB-2-155-EL
MPSM-16-T1E1
RBBN-16-T1E1-1N
MCC-16-E1-1N
RED-16-T1E1
MCC-16-E1
RBBN-16-T1E1
(For the 1:N redundancy of the
MPSM-16-T1E1, MGX 8830/B
supports the RCON-1TO3-8830
back card.)
VISM-PR
AX-SMB-8E1
AX-R-SMB-8E1
AX-RJ48-8T1/8E1
AX-R-RJ48-8T1/8E1
Release Notes for the Cisco WAN Manager, Release 15.3.00 P1
OL-11190-01, Rev. C0
17
Supported Hardware
MGX 8850 and 8850/B (PXM 45) Series
For product details, refer to Tables 4 through 8 in the release notes at this website:
http://www.cisco.com/univercd/cc/td/doc/product/wanbu/8850px45/relnote/52008xx0.pdf
Table 17
PXM45 on MGX 8850 and 8850/B
Front Card
Back Card
AXSM-1-2488
AXSM-1-2488/B
SMFLR/SMFSR/SMFXLR-1-2488
SMFLR/SMFSR/SMFXLR-1-2488/B
AXSM-2-622-E
SMFIR/SMFLR-1-622/C
AXSM-4-622
AXSM-4-622/B
SMFIR/SMFLR-2-622
SMFIR/SMFLR-2-622/B
AXSM-8-155-E
SMB-4-155
MMF/SMFIR/SMFLR-4-155/C
AXSM-8-622-XG
SFP-4-622
AXSM-16-155
MMF-8-155-MT
SMFIR/SMFLR-8-155-LC
AXSM-16-T3E3
AXSM-16-T3E3/B
SMB-8-T3/E3
AXSM-16-155/B
MMF-8-155-MT/B
SMFIR/SMFLR-8-155-LC/B
AXSM-16-155-XG
SFP-8-155
MMF/SMFIR/SMFLR-1-155-SFP
MCC-8-155
AXSM-32-T1E1-E
MCC-16-E1
RBBN-16-T1E1
AX-CESM
AX-SMB-8E1
AX-R-SMB-8E1
AX-RJ48-8T1/8E1
AX-R-RJ48-8T1/8E1
MGX-RJ48-8E1
AX-FRSM-8T1/8E1
AX-SMB-8T1/8E1
AX-FRSM-8E1-C
AX-R-SMB-8E1
AX-RJ48-8E1
AX-R-RJ48-8E1
MGX-RJ48-8E1
MGX-CESM
AX-RJ48-8T1
AX-R-RJ48-8T1
MGX-FRSM-2CT3
MGX-BNC-2T3
MGX-FRSM-HS2/B
SCSI2-2HSSI/B
MGX-12IN1-8S
MGX-FRSM-2T3E3
MGX-BNC-2E3
MGX-BNC-2T3
Release Notes for the Cisco WAN Manager, Release 15.3.00 P1
18
OL-11190-01, Rev. C0
Supported Hardware
Table 17
PXM45 on MGX 8850 and 8850/B (continued)
Front Card
Back Card
MGX-RPM-PR
MGX-MMF-FE
MGX-RJ45-4E/B (Ethernet)
MGX-RJ45-FE (Fast Ethernet)
5-port auto sensing Fast and Gigabit Ethernet
MGX-RPM-XF
MGX-1GE/2GE
MGX-1OC12POS/2OC-12POS-IR
MGX-XF-UI/-UI/B
MGX-SRME
MGX-SMFIR-1-155
MGX-STM1-EL1
MGX-SRME/B
MGX-BNC-3T3-M
MGX-STM1-EL-1
MGX-VISM-PR
AX-SMB-8E1
AX-R-SMB-8E1
AX-RJ48-8T1/8E1
AX-R-RJ48-8E1/8T1
MGX-VXSM
VXSM-BC-4-155
VXSM-BC-24T1E1
MPSM-8-T1E1
AX-RJ-48-8T1/8E1
AX-R-RJ-48-8T1/8E1
AX-SMB-8E1
AX-R-SMB-8E1
MPSM-16-T1E1
RBBN-16-T1E1-1N
MCC-16-E1-1N
RED-16-T1E1
(For the 1:N redundancy of the
MPSM-16-T1E1, MGX 8830/B supports the
RCON-1TO3-8830 back card and
MGX 8850/B supports the RCON-1TO3-8850
and RCON-1TO5-8850 back cards.)
PXM45/B
PXM-HD
PXM-UI-S3
PXM45/C
PXM-HD
PXM-UI-S3/B
Release Notes for the Cisco WAN Manager, Release 15.3.00 P1
OL-11190-01, Rev. C0
19
Supported Hardware
MGX 8880 (PXM45/C) Series
For MGX 8880 product details, refer to Table 3 in the release notes at this website:
http://www.cisco.com/univercd/cc/td/doc/product/wanbu/mgx8880/relnote/528880.pdf
Table 18
MGX 8880 (PXM45/C)
Front Card
Back Card
AXSM-1-2488/B
SMFLR/SMFSR/SMFXLR-1-2488/B
AXSM-4-622/B
SMFIR/SMFLR-2-622/B
AXSM-32-T1E1-E
MCC-16-E1
RBBN-16-T1E1
PXM45/C
PXM-HD
PXM-UI-S3/B
MGX-RPM-XF-512
MGX-1GE/2GE
MGX-1OC12POS/2OC-12POS-IR
MGX-XF-UI/-UI/B
MGX-SRME/B
MGX-BNC-3T3-M
MGX-STM1-EL-1
MGX-VISM-PR
AX-SMB-8E1
AX-R-SMB-8T1/8E1
AX-RJ48-8T1/8E1
AX-R-RJ48-8E1
MGX-VXSM-155
VXSM-BC-4-155
MGX-VXSM-T1E1
VXSM-BC-24T1E1
MGX-VXSM-6T3
VXSM-BC-SMB-3T3E3
MGX 8950 (PXM 45) Series
For MGX 8950 product details, refer to Tables 4 through 8 in the release notes at this website:
http://www.cisco.com/univercd/cc/td/doc/product/wanbu/8850px45/relnote/52008xx0.pdf
Table 19
MGX 8950 (PXM45)
Front Card
Back Card
AXSM-1-2488/B
SMFLR/SMFSR/SMFXLR-1-2488/B
AXSM-1-9953-XG
SMFIR/SMFLR/SMFSR-1-9953
AXSM-4-622/B
SMFIR/SMFLR-2-622/B
AXSM-4-2488-XG
SMF-4-2488-SFP
SMFSR-1-2488-SFP
SMFLR-1-2488-SFP
AXSM-16-155/B
SMFLR-2-622/B
SMFIR/SMFLR-8-155-LC/B
Release Notes for the Cisco WAN Manager, Release 15.3.00 P1
20
OL-11190-01, Rev. C0
Supported Hardware
Table 19
MGX 8950 (PXM45) (continued)
Front Card
Back Card
AXSM-16-155-XG
SFP-8-155
MMF/SMFIR/SMFLR-1-155-SFP
MCC-8-155
AXSM-16-T3E3/B
SMB-8-T3/E3
MGX-RPM-PR
MGX-MMF-FE
MGX-RJ45-4E/B (Ethernet)
MGX-RJ45-FE (Fast Ethernet)
5-port auto-sensing Fast and Gigabit Ethernet
MGX-RPM-XF
MGX-1GE/2GE
MGX-1OC12POS/2OC-12POS-IR
MGX-XF-UI/-UI/B
MGX-XM60
—
PXM45/B
PXM45/C
PXM-HD
PXM-UI-S3
PXM-UI-S3/B
SES PNNI Controller
For product details, refer to Tables 1-1, 1-2, and 1-3 in the release notes at this website:
http://www.cisco.com/univercd/cc/td/doc/product/wanbu/bpx8600/pnni_ses/rel4/relnotes/ses4015.pdf
Table 20
SES PNNI Controller
Front Card
Back Card
PXM1
PXM-UI
PXM-UI-S3
PXM1-4-155
PXM-UI
PXM-UI-S3
MGX-MMF-4-155/B
MGX-SMFIR-4-155/B
MGX-SMFLR-4-155/B
PXM1-1-622
PXM-UI
PXM-UI-S3
MGX-SMFIR-1-622/B
MGX-SMFLR-1-622/B
PXM1-2-T3E3
PXM-UI
PXM-UI-S3
MGX-BNC-2E3
MGX-BNC-2E3A
MGX-BNC-2T3
Release Notes for the Cisco WAN Manager, Release 15.3.00 P1
OL-11190-01, Rev. C0
21
Releases Certified for CWM 15.3.00 P1
Releases Certified for CWM 15.3.00 P1
Table 21 lists the card, shelf, or switch software releases that were used to test the CWM 15.3.00 P1
software. Although CWM 15.3.00 P1 supports other releases, the releases listed in the table are the
specific releases that were tested for CWM 15.3.00 P1.
See also these sections:
•
Releases Supported by CWM 15.3.00, Patch 1, page 2
•
Supported Hardware, page 9
Table 21
Releases Tested with CWM 15.3.00 P1
Card, Shelf, or Switch
Tested Software Release
BPX/IGX switch software
9.3.51
9.4.10
9.4.12
BPX SES Shelf
3.0.25
4.0.15
MGX 8220 Shelf
4.0.06
4.1.12
5.0.20
MGX 8230, 8250, and 8850 (PXM1) switches
1.2.22
1.3.10
1.3.12
1.3.14
MGX 8830 and 8850 (PXM1E) switches
5.0.20
5.1.00
5.3.00
5.3.10
MGX 8830/B, 8850, 8880, 8950 (PXM45)
switches
5.2.00
5.3.00
5.3.10
RPM-PR and RPM-XF cards
Cisco IOS 12.3(2)T6
Cisco IOS 12.4(4th)
VISM-PR cards
3.3.10
3.3.20
3.3.25
3.3.30
VXSM cards
5.0.70
5.2.00
5.2.50
5.3.10
Release Notes for the Cisco WAN Manager, Release 15.3.00 P1
22
OL-11190-01, Rev. C0
New Features and Enhancements
New Features and Enhancements
This section describes the new features introduced in CWM 15.3.00 P1:
•
Multi-Time Zone Support for Object Finder—This feature enables you to specify the local or GMT
time zone when viewing and querying historical alarms. In the previous CWM releases, the
historical Alarms query from the Object Finder displayed the time only in the client machine
timestamp.
•
A new feature has been added to support CWM login without depending on UNIX user accounts.
To add and configure users with this feature, you use the Security Manager GUI. Because this
feature is configurable, you can use the new feature or use the previous CWM authentication process
that existed before this release.
•
CWM GUI login with no UNIX user account
•
VXSM 2.5 supports ATM trunking and VBD index filtering.
•
CALEA image support for VXSM 2.5 and VISM 3.3.20 and 3.3.25
CWM Feature Limitations
This section describes features that the CWM does not support or features for which CWM limitations
exist. See these sections:
•
Features Not Supported, page 23
•
Feature Limitations, page 24
•
Configuration Center Limitations, page 29
•
HP OpenView Limitations, page 29
•
SSM Issues, page 29
•
CWM-to-CWM Communication Limitations, page 30
•
Network Monitor Limitations, page 31
•
Chassis View Operation, page 31
•
CWM Notes and Cautions, page 33
Features Not Supported
These features are not supported by the CWM:
•
CID level traps are not sent to the CWM to prevent potential trap flooding.
•
CID level statistics are not available in bulk statistics file format from the VXSM modules.
•
The CWM does not support use of the Korn shell.
•
XPVC support on the FRSM T3E3 in PXM45-based switches has not been tested.
•
Several windows display fields that relate to the MPSM-T3E3-155 MultiLink Frame Relay (MLFR)
feature, which is not currently supported.
•
When managing VISM service modules that are running VISM 3.2.10, the CWM supports only the
Rel. 3.2 features.
Release Notes for the Cisco WAN Manager, Release 15.3.00 P1
OL-11190-01, Rev. C0
23
CWM Feature Limitations
•
These VISM 3.1 features introduced cannot be accessed from the CWM: TGCP, Dynamic Payload,
and T.38 Fax Relay.
•
The CWM database is not populated with the MPG configuration data. Instead, the Service Agent
accesses the configuration directly from the switch.
•
These cards are not supported by CWM 15.3.00 P1: the BME card and the FRSM12, URM, ARM,
FRM, BTM, ALM and CVM service modules. To take advantage of the GUI enhancements, you
must upgrade to the newer service modules supported in releases after CWM 12.0.
•
These are the Current Route feature limitations:
– P2MP calls and SVC/SVP connections are not supported.
– Only master-ended (not slave-ended) connections have current route information.
– The configuration upload file contains only a snapshot of the current route information at the
time the switch receives a CWM configuration upload request.
– If a node becomes congested, both of the connTrace messages that the command line interface
(CLI) and the Current Route feature send are dropped. The CWM does not distinguish between
the messages. This situation is also true for a connTrace ACK message received on a
congested node.
– When a node ID is changed, follow this procedure on each network node to flush out all existing
current route information and start collecting new information. Disable and re-enable the
current route feature by using the cnfndcurrte command. After disabling the feature, wait for
at least 9 seconds (the timeout period for a conntrace message) before re-enabling the feature
to avoid processing stale conn-trace messages.
– Because the path information for a connection traversing more than 20 nodes is not stored in
the current route path table, the connection does not have current route information.
•
While the CWM is running, if the remote display is stopped without properly shutting down the
CWM desktop, reopening it remotely may not succeed.
Feature Limitations
The following are known CWM feature limitations:
•
For a few of the latest Solaris patches and the Sun Fire E6900 server, the Informix engine may
generate a shared memory error as shown in this example:
"oninit: Fatal error in shared memory creation <machine name>"
When this error occurs, the Informix engine fails to come up and is not able to perform database
related operations.The error can be resolved by changing values in the /etc/system and
/usr/users/informix94/etc/onconfig files. The following shows the change to the /etc/system file:
forceload: sys/shmsys
forceload: sys/semsys
set shmsys:shminfo_shmmax=268435456
set semsys:seminfo_semaem=16384
set semsys:seminfo_semmap=64
set semsys:seminfo_semmni=4096
set semsys:seminfo_semmns=4096
set semsys:seminfo_semmnu=4096
set semsys:seminfo_semume=64
set semsys:seminfo_semvmx=32767
set shmsys:shminfo_shmmin=100
set shmsys:shminfo_shmmni=100
set shmsys:shminfo_shmseg=100
Release Notes for the Cisco WAN Manager, Release 15.3.00 P1
24
OL-11190-01, Rev. C0
CWM Feature Limitations
set semsys:seminfo_semmsl=100
set rlim_fd_max=1024
After you have made the above changes, edit and configure the “SHMBASE” value in
/usr/users/informix94/etc/onconfig as follows and reboot the machine:
SHMBASE
0x0A000000L
•
Because of a VISM image issue, the CWM cannot update fax_jitt_mode and fax_jitt_initdelay in
the vism_card table for a Fax jitter configuration change. This problem will be fixed in the next
VISM release.
•
Even though the VXSM T3 card is compatible with the MGX 8880 and 8850 PXM45 platform
releases, the CWM software does not discover it.
•
Cisco does not recommend pointing multiple CWMs at the same gateway node.
•
When /usr/users becomes completely full, the orbix processes cannot write to the disk and continue
operations. To correct the problem, free up disk space in /usr/users and then restart the orbix
processes and the CWM as follows: Stop the core and exit out of the CWM prompt, run the
stoporbix2000 script, type CWM (you should see “Starting Orbix...” in the
~svplus/log/.startStopOrbix.log file), and start the core.
•
When the SSM is installed with the SCM Gateway configuration, the SCM GUI does not open when
the primary SSM and secondary SSM are started simultaneously (or within a time gap of 30 seconds
to 1 minute). Avoid this problem by waiting 2 to 3 minutes after starting core in the primary SSM
before starting core in the secondary SSM in the SCM Gateway configuration.
•
When a shortage of shared memory exists on the workstation, the Informix engine may generate an
operating system error, as shown in this example:
shmat: [22]: operating system error
18:45:49 shmat: [22]: operating system error
18:45:57 Error writing '/tmp/shmem.1fd4555c.0' errno = 4
18:45:57 mt.c, line 10260, thread 7148, proc id 1008, errors occurred during
mt_notifyvp.
When this error occurs, the statsparser is not able to perform database-related operations. The error
can be resolved temporarily by changing the /etc/system configuration as follows:
forceload: sys/shmsys
forceload: sys/semsys
set shmsys:shminfo_shmmax=1073741824
set semsys:seminfo_semaem=16384
set semsys:seminfo_semmap=5000
set semsys:seminfo_semmni=8192
set semsys:seminfo_semmns=8192
set semsys:seminfo_semmnu=8192
set semsys:seminfo_semume=256
set semsys:seminfo_semvmx=50000
set shmsys:shminfo_shmmin=256
set shmsys:shminfo_shmmni=32000
set shmsys:shminfo_shmseg=256
set semsys:seminfo_semmsl=100
The long-term solution is to increase the amount of memory to support 2 million
connections consistently.
•
When using in-band management, only 50-KB connections are supported on the BPX-SES. To
manage 100-KB connections on the BPX-SES, set up the CWM for out-of-band management.
Release Notes for the Cisco WAN Manager, Release 15.3.00 P1
OL-11190-01, Rev. C0
25
CWM Feature Limitations
•
If an ATM IP interface (also called In-band interface) is being used to manage the switch from the
CWM, the CWM cannot receive all node bring-up traps. The ATM connections required for in-band
management can take time to get routed on node bring-up and therefore are not available for trap
delivery at the initialization time. If this initialization time is an issue, the workaround is to
configure the CWM for out-of-band management.
•
Allow a 2- to 3-minute period between enabling or disabling statistics operations on the same BPX
or IGX node. Whenever statistics are enabled or disabled on a BPX or IGX node and the switch is
configuring statistics, enabling or disabling statistics a second time fails.
•
If the Start Collection process on the SCM GUI is taking a long time, investigate whether or not
collection was started with an unreachable in-band or out-of-band IP address. Use a reachable
IP address to start collection with a reachable IP address, either in band or out of band.
•
The SSM statistics database can go out of sync with node_ids on the CWM after a coldstart –F is
executed on the server. To ensure that the node IDs remain consistent, stop and disable collection
before doing a coldstart –F. A CWM-to-CWM gateway must be enabled to ensure uninterrupted
statistics collection.
•
When the persistent topology feature is enabled, to decommission a node in the network and take it
out of the topology you must delete the node from the persistent topology data using the switch CLI.
To decommission a node or to delete a trunk from the PNNI network, you must delete the entry from
the persistent gateway nodes.
•
To ensure all CWM servers have the same XPVC Preferred data, the CWM-to-CWM gateway must
be enabled; otherwise, you must manually propagate the data to all CWM servers.
•
On MGX PXM1-based feeders in the BPX network, VISM or VISM-PR terminated XPVCs can
connect only to the AUSM service module. No such restriction exists for PXM1E-based or
PXM45-based nodes.
•
Manual node resync may appear to have failed due to the GUI timing out for PXM45/PXM1E-based
Cisco MGX nodes with many connections (for example, 400K DAX endpoints).
•
To correctly manage feeder nodes after they have been moved, you must first delete all trunks from
the old node by using the CLI before adding the feeder back onto the system.
•
When a back card is removed because the front card is not provisioned, the CWM reports a major
alarm with the description “Back Card; not present.” However, the switch may not show an alarm.
If the card is actually not provisioned, manually clear the major alarm after determining the alarm
condition is not real.
•
After executing a clrsmcnf command for AXSM from the switch CLI, Chassis View shows the
AXSM front card once the card is active, but no back card is found. To ensure that Chassis View
recognizes the back card again, you must execute a first level manual node resync.
•
RPM-PR and RPM ports/subinterfaces must be configured with a number less than 32767. If you
have configured any ports or subinterfaces with a number greater than 32767, you must delete them
and then re-add them using a number less than 32767.
Release Notes for the Cisco WAN Manager, Release 15.3.00 P1
26
OL-11190-01, Rev. C0
CWM Feature Limitations
•
Note the following in regard to receiving SNMP traps:
– If you register an SNMP Manager with the SNMP Agent without changing the bit-mask (if you
accept the default of FFFFFFFFFFFFFFFF), you receive all SNMP traps, including 25302
and 25303.
– If you register the SNMP Manager with a nondefault bit mask because you do not want certain
groups, such as FFFFFFFFF10701555, you do not receive trap 25302 and 25303, even though
you have registered for that group.
– If you deselect a currently undefined group such as Group 28 (a bit mask of
FFFFFFFFEFFFFFFF), you can then add traps 25302 and 25303 by editing the trap_filter.conf
file and adding these lines to Group 20 # network connectivity status change traps:
TRAP 25302 and TRAP 25303.
•
Performing a switchcc command on a controller card in an IGX or BPX node forces the CWM to
resync with the node again. This causes a delay in receiving status information.
•
Changing the line, payload, and medium types of VXSM-4OC3 causes the CWM to perform a whole
card resync when you change any of the following: the medium type between SONET and SDH for
SONET physical line, the payload type between T1 (VT 1.5 VC 11) and E1(VT 2 VC 12) for the
STS or STM (Au) path or between T1 (VT 1.5 VC 11) and DS3 for the STS path, or the tributary
path between Au4 and Au3 for the STM path in the SDH medium. (A whole card resync takes
several minutes to complete.)
•
If you remove and then immediately add back the same IGX feeder when the CWM is running, the
CWM establishes two LINK 0’s with the node. This is treated as a delete, and the node is deleted.
In this situation, Cisco recommends you either remove and add the feeder when the CWM is down,
or, after adding the feeder, restart the CWM.
•
Changes made to the node name through the Configuration Center are updated automatically in the
Tree and Inspector views. However, the node name in the title bar of the internal frame does not
update automatically. To make this change, close and reopen the internal frame. You can also update
the attribute values in the internal frame by using the Refresh button of that internal frame.
•
After the Line Send parameter LineSendCode is modified by using snmpset, the database is not
updating it, which shows the parameter as not applicable (shows the value as –1). For additional
information, refer to CSCin50480 online.
•
The “l_network_id” field in the connection segment or port tables may not be populated correctly.
To ensure collection of an accurate network ID, use the “netw_id” field from the “node” table.
•
Note the following in regard to the managing a PXM45-based MGX node and populating the
“peripheral” table: If you are running a release earlier than 4.0.10, CWM 15.0.00 does not populate
(update) the peripheral table. If you are running a 4.0.10 or later release, the status field in the
peripheral table gets updated only during node resync. (If you are managing a PXM1-based MGX
node, the peripheral table status field does not get updated.)
•
If the log level for the CWM EM module is set too high or set above the production default value
and many configurations are changed on the switch during a warm start, the sync-up performance is
impacted during the warm start.
•
SmartLogging is a special feature for CWM debugging available when the log level is set to Level 2.
It dumps a configurable number of detailed log messages to log files for each Level 2 log message.
For example, when SmartLogging is enabled, an SNMP failure that triggers a Level 2 log message
dumps log messages at all levels immediately before and after this event. Because the feature can
impact performance due to excessive log messages. it should be disabled in normal operation and
enabled only when needed for monitoring performance.
Release Notes for the Cisco WAN Manager, Release 15.3.00 P1
OL-11190-01, Rev. C0
27
CWM Feature Limitations
•
In regard to the The Forced Deletion feature, note that it does not support XPVC connections. They
cannot be force deleted. The feature removes only the unused connection descriptor from the
workstation on which it is performed. Other gateway workstations continue to show the descriptor.
To clear it completely, you must force delete the unused descriptor at each gateway workstation.
•
Occasionally, when you move linked nodes around in the Topology screen, the link does not
automatically follow the nodes. Then it looks like the link is not connected to the nodes. Either move
the affected nodes around within the window or refresh the Topology screen. When the screen
refreshes, the link automatically appears connected to the appropriate nodes again.
•
Using the Group Nodes feature affects only your view of the networks. Other users, even those who
log into your workstation, do not see the groups you have made.
•
After a previously saved configuration file is loaded by using the CWM Config Save & Restore
feature, the Tree View continues to show some ports that are not in the restored configuration file.
Attempting to configure these ports results in an error. In this case, perform a manual node resync.
•
When setting up VISM connections, the VPI value in the VPI/VCI Selector window is grayed out
with the VISM card slot number. If VISM is sitting in a feeder node, the VPI value in the VPI/VCI
selector is grayed out as zero.
•
Ports on PXM45-based nodes which are associated to a trunk display as Trunk Ports, however, ports
that are carrying signalling protocol information display as User Ports. Because they are carrying
information, you cannot provision connections on these ports. Attempting to do so results in an error
being displayed. Choose another port.
•
Virtual Ports on BPX are displayed in the Tree View application under the physical Line section
as physicalPort.virtualPort.
•
The PNNI ports on the PXM1 card of an SES node are not displayed in the Tree View.
•
The administrative state of the PNNI ports is not aggregated into the total administrative state of the
port. The Inspector View application shows both the total administrative state of the port and the
administrative state of the PNNI ports as two separate items.
•
The Loss of Cell Delineation alarm on the AXSME, AXSM-XG, or MPSM-OC3 cards may not
get propagated from the switch to the CWM. For the AXSM cards, a line or path alarm is present,
but the MPSM-OC-3 card could have an LOCD alarm triggered without any line or path alarm that
is present. The line would show in the CWM as clear, while it is actually in alarm.
•
With MPSM-OC3 cards, after you replace an OC-3 back card with a DS3 back card or vice versa,
you need to do a coldstart.
•
Occasionally, WANDEST fails to install immediately after a CWM and Service Agent installation
on a workstation running Solaris 9. This error message appears: “Informix is not in on-line mode.”
The workaround is to install WANDEST by using the C shell (csh).
•
In the Connection Manager, the Service Type field displays some nonapplicable service types for
SPVCs; however, the CWM displays an error if you select one of these nonapplicable service types.
•
If a valid network.conf file is not present, the CWM may not start properly and may cause a topod
core dump.
•
Because of a device limitation, an SCT greater than 255 cannot be associated with SCT manager.
•
An SSC can be added to only one SSM or CWM at a time.
Release Notes for the Cisco WAN Manager, Release 15.3.00 P1
28
OL-11190-01, Rev. C0
CWM Feature Limitations
Configuration Center Limitations
When the connection modify dialog box is already open, another user can delete the connection using
the CMGUI delete option.
The Connection Management section of the Configuration Center GUI for preferred route displays all
available trunks without considering the traffic class. As a result, it is possible to set a preferred route
for a CBR connection traversing trunks that do not support CBR traffic.
While adding connections originating and terminating on the same feeder nodes (MGX8220 only), the
CWM treats these connections as three segment connections and adds three segments (two on the same
feeder node, one on the routing node) to realize this connection. This is because the ASC cannot route
traffic. If you want to pass traffic between two cards in an MGX 8220 chassis, regardless of how
connectivity is added, the actual physical connectivity that has to be built is a connection from each
endpoint to the ASC and then a looping segment on a BPX.
The RPM card on the PXM1-based MGX 8850/8230/8250 platform is provisioned using Telnet because
the RPM does not support SNMP SETs. This should be transparent in daily operation. For more details,
please refer to the specific RPM switch CLI release notes.
Occasionally, when the databroker is busy deleting SPVC connections on a PXM1E-based node, this
error message appears: “can not delete connections. Failed to communicate with databroker.” The error
message can be ignored because the connections are correctly deleted on the switch.
HP OpenView Limitations
All event messages are displayed in the HP OpenView Event Browser window. There is a limit of 2000
pending messages on the Event Browser. If there are more than 2000 messages to be processed and
displayed by the Event Browser, it may exit.
The WAN network icon in the network node manager is no longer automatically created when running
the CWM. Use the Network Monitor map instead.
SSM Issues
Note these SSM issues:
•
To collect connection statistics, statistics need to be enabled on the individual connections by setting
the stats enable flag to true on each connection. If the user enables connections statistics only on
SCM but does not set the stats-enabled flag to true on the connection, the statistics are not collected
for that connection. Because no mechanism or warning to the user exists to have this enabled on the
connections, the CWM does not display an appropriate error message.
•
When enabling statistics by selecting multiple nodes at a time in the SCM, enabling statistics on all
the nodes only succeeds when either all of the nodes have the same card types or all of the nodes
only contain cards of the same family.
•
Occasionally, when high connection counts are enabled on the SES, and statistics collection is
enabled, the SES node is not getting synced up. The workaround is to disable statistics collection in
the SES. Refer to CSCdw32076 for more information.
•
The statistics collection manager retrieves SPVC connection statistics data from BPX-SES nodes,
however, only 15-minute collection buckets are supported on the SES.
•
The same limitation of only 15 minute collection buckets applies for MGX 8850 PXM45-based
nodes with AXSM. No such limitation exists for AXSM-E.
Release Notes for the Cisco WAN Manager, Release 15.3.00 P1
OL-11190-01, Rev. C0
29
CWM Feature Limitations
•
Only 15-minute collection buckets are supported for PNNI statistics.
•
Peak statistics are not supported for PNNI statistics.
•
If the PXM45 release is less than 4.0(0.0) PNNI historical statistics can not be enabled.
•
The BPX-SES does not support PNNI statistics collection.
•
The CWM does not support statistical alarms for lines on PXM45-based MGX nodes.
•
The following statistics for SRM and SRM/E T3 lines can be enabled on the switch, but are not
supported by SCM: 28 dsx3LCVCurrent, 29 dsx3LESCurrent, 30 dsx3LSESCurrent,
31 dsx3PCVCurrent, 32 dsx3PESCurrent, 33 dsx3PSESCurrent, and 34 dsx3CCVCurrent.
•
HP OpenView is supported on the SSM. The SSM processes generate CWM traps.
•
At least one CWM must be running, with the nodes synced up, for the SSM to work properly. The
SSM uses the CWM server to get traps while enabling statistics for cell bus service modules on the
MGX 8850 and PNNI statistics on the BPX.
•
The WANDEST server must be up and running on the CWM. The SSM gets the node, node_info,
card, network, rsc_part, and bis_object tables from the CWM by using WANDEST.
•
If the statsmaster SSM or CWM is down or unreachable in an SCM gateway setup, the statsmaster
must be changed on the switch to another CWM or SCM that is up. The statsmaster is needed for
SCM statistics enabling or disabling.
•
In an SCM Gateway setup with statistics collection in process, the old statistics data is not moved
to the new primary CWM or SSM machine after switchover.
•
The SSM does not receive traps on Node/Card deletion, so statistics collection must be stopped and
disabled before deleting a node or card from the network. Also the SSM does not receive traps on
node or card Add messages, so the WANDEST upload must be received before the node or card can
be seen in the SCM GUI on the SSM.
•
In the SSM, statistics collection must be stopped and restarted after changing the node name or
changing the node FTP password.
•
Statistics data is stored on in statsdb database.
•
Statistics parsing is only supported for the statsdb database on the SSM and the CWM. Statistics
parsing is not supported for the stratacom database on the SSM and the CWM.
•
Stop statistics collection before upgrading a node image.
CWM-to-CWM Communication Limitations
This section describes CWM-to-CWM communication limitations:
•
The secondary CWMs have to wait for the primary CWM to finish syncing up with the network.
Trap 28075 (svDatabaseInSync) is sent when the primary CWM has finished syncing up with
the network.
•
All the CWMs managing the same network must have seed nodes or gateway nodes that have IP
addresses within the same network. All the CWMs should not all point to the same gateway node,
but the gateway nodes they point to should be on the same network.
•
If an IP address is entered as gateway in the network.conf file and the DNS entry is missing for the
gateway node IP address, the Auto-Route network is not discovered.
Release Notes for the Cisco WAN Manager, Release 15.3.00 P1
30
OL-11190-01, Rev. C0
CWM Feature Limitations
•
The Configurator can be started on either the primary CWM or the secondary CWMs, but devices
can be added, modified, or deleted using the Configurator only on the primary CWM.
•
The CWM gateway role is undefined or unknown when links between the primary and
corresponding secondaries are unstable. When a CWM gateway is in an undefined or unknown role,
a core dump sometimes occurs.
All of the above CWM-to-CWM communication limitations listed also apply to the SCM gateway.
Network Monitor Limitations
Network nodes are managed differently depending on the network configuration. See the
following configurations:
•
In a single routing node PNNI network, the node is managed by using the IP address specified in the
network.conf file.
•
In the case of a PXM45-based or PXM1E-based MGX network, these PXM45-based or
PXM1E-based MGX nodes are managed by using the primary IP address, which is specified by
using the cnfndparms command and specifying Option 7 or 8 (depending on chassis type).
Configure the trap IP address with the primary IP address.
•
PXM1-based MGX nodes connected to PXM45-based MGX nodes are managed through the atm0
IP address. If atm0 is not set, the LAN IP address is used to manage the PXM1-based MGX nodes.
Use the cnftrapip command to configure the trap IP address accordingly.
As of CWM 15.0.00 and later, the SHOW_TOPO_VIEW flag in the CMSCClient.conf file is used to
configure if nodes and trunks are displayed in the topology display of the Network Monitor application
at CWM startup. Each flag determines what you see when the NWTopology opens:
•
SHOW_TOPO_VIEW 1 = You see nodes and trunks in the topology.
•
SHOW_TOPO_VIEW 0 = You cannot see nodes and trunks in the topology.
In releases prior to CWM 15.0.00, a flag named TOPO_SHOW_MAP in the
/usr/users/svplus/config/CwmGs.conf file was used to configure if nodes and trunks were displayed in
the topology display of the Network Monitor application at CWM startup. Because this flag is now
obsolete, you should use the SHOW_TOPO_VIEW flag in the CMSCClient.conf file instead.
Chassis View Operation
This section describes different aspects of the Chassis View operation in the CWM:
•
Chassis View Card Operation in a Redundant Setup, page 32
•
RPM Card Behavior based on the Chassis View Flag Value, page 32
•
Chassis View Operation after Card and Line Switchover, page 32
Release Notes for the Cisco WAN Manager, Release 15.3.00 P1
OL-11190-01, Rev. C0
31
CWM Feature Limitations
Chassis View Card Operation in a Redundant Setup
This section describes how the primary and secondary cards are shown in Chassis View when they are
in a redundant setup. The Chassis View behavior is changed based on the
CHASSIS_SHOW_PHYSICAL_MAPPING_AND_HIDE_UNMANAGED_ALARMS flag set in the
CMSCClient.conf file under the ~svplus/config directory.
When set to false
When two cards are in a redundant relationship, the primary card (also known as the logical slot)
displays the ports and lines for all provisioning activities even if the primary slot becomes standby. No
ports and lines are shown under the secondary slot even after it becomes active.
In Chassis View, the primary card displays the ports only if they are available in the active card. The
secondary slot does not display the ports even if it becomes active.
When set to true
•
For the controller and non–controller cards:
– When two cards are in a redundant relationship, the active card displays the ports and lines for
all provisioning and troubleshooting activities.
– In Chassis View, the active card displays the ports only if they are available in the active card.
In a redundant setup, Chassis View displays the lines and alarms under the active card.
However, this flag does not affect the tree view and other CWM applications. The logical slot
in the tree view of a CWM application and the physical slot in Chassis View are maintained
when you select an object in one application and drag it to another application.
•
For the controller card only:
– Chassis View does not show unmanaged or unsupported alarms for PXM and RPM cards and
unmanaged alarms for MGX nodes, such as the HIST and ACO alarms on the PXM cards.
– Chassis View does show the following in the active controller card: the shelfIntegrated alarm
for MGX nodes, physical mapping (alarms and ports or lines) for redundant cards, and alarms
that are similar to DCA, DCB, and ENET.
– Chassis View displays an Empty Reserved controller card as a blank card in the front view.
– If no back card or no secondary back card exists, Chassis View displays either card as a blank
back card in the rear view.
RPM Card Behavior based on the Chassis View Flag Value
When the CHASSIS_SHOW_PHYSICAL_MAPPING_AND_HIDE_UNMANAGED_ALARMS flag
value is set to true in the CMSCClient.conf file, unmanaged alarms, such as the CB_TX and CB_RX
alarms on the RPM cards, are not shown in the RPM card in Chassis View.
Chassis View Operation after Card and Line Switchover
For a card switchover in a redundant setup, Chassis View behavior depends on the
CHASSIS_SHOW_PHYSICAL_MAPPING_AND_HIDE_UNMANAGED_ALARMS flag value set in
the CMSCClient.conf file.
After line switchover, provisioning is allowed only on the working line of an automatic protection
switching (APS) pair, whether the line is currently active or not. However, both the working and
protection lines are monitored.
Release Notes for the Cisco WAN Manager, Release 15.3.00 P1
32
OL-11190-01, Rev. C0
Installing and Uninstalling CWM 15.3.00 P1
CWM Notes and Cautions
Because of the asynchronous behavior of the ILOG client and server interaction, the CWM client
requests may be sent before the CWM server is ready. In this case, this error message appears:
Ilb Error: Synchronous request to <unidentified actor failed by timeout>.
Note
If the ILOG timeout persists for more than 5 minutes and the CWM is not functioning normally, you
should call service.
Parameters that the Network Monitor or Configuration Center displays that do not apply to an element,
such as a line or a trunk, often contain the value –1. Consider this the same as Not Applicable.
Network Configurator displays an authentication failure under these circumstances:
•
Your password gets changed when you are logged into the CWM with any of these applications
open: Configuration Center, Network Monitor, or Chassis View.
•
You try to launch the Network Configurator, and the CWM does not prompt you to enter a password.
Instead, it displays an authentication failure.
In this case, exit the CWM and launch the Configuration Center again.
Caution
If you do not shut down Informix before rebooting, data will be lost. To shut down Informix properly
before you reboot the machine, execute /usr/users/svplus/scripts/kill_db as superuser (root).
If persistency is enabled in a PNNI network and you remove a node from the network, you must also
delete the node and the corresponding trunks and feeders manually from all the gateway nodes.
Otherwise, none of these will be cleared from the CWM.
Installing and Uninstalling CWM 15.3.00 P1
This section describes how to install or upgrade CWM 15.3.00 P1. It also provides important background
information about installing or upgrading the CWM server. To install or upgrade the server, refer to the
CWM 15.3.00 installation guide at this URL. You can access all CWM documentation at this website:
http://www.cisco.com/en/US/products/sw/netmgtsw/ps2340/tsd_products_support_series_home.html
The installation procedure assumes that you have already installed CWM 15.3.00.
See these sections:
•
Before You Start, page 34
•
Installing Patch 1, page 36
•
Uninstalling Patch 1, page 43
Release Notes for the Cisco WAN Manager, Release 15.3.00 P1
OL-11190-01, Rev. C0
33
Installing and Uninstalling CWM 15.3.00 P1
Before You Start
This section provides important background information that is provided to help you install the
patch successfully.
•
Naming Managed Nodes
The name of each node that the CWM manages must be unique. Duplicate node names are detected
if both node names are found in the PNNI networks. Duplicate node names are not detected if one
node is in the AutoRoute network and the other node is in the PNNI network.
•
Core File Management
In the past, core files were created without unique names and then overwritten. Now, for each core
dump, a unique directory is created under ~svplus/corefilesdir/. Each directory is named as
follows: <Core.<processName>.<pid>.mmddHrMinSec. These directories have these contents:
– Core file named <processName>.<pid>.mmddHrMinSec.core
– Information file with dmesg, onstat -d, pstack, and other details
named “<processName>.<pid>.mmddHrMinSec.info”
– Corresponding log file(s) named “<processName>.<pid>.log”
•
Cisco Info Center Version
The CWM integrates with the Cisco Info Center (CIC) by including a tar file that can be installed
using the CIC update utility (nco_update):
CIC36xPatch004CWM151.tar
The format of this tar file enables the update utility on the CWMAgent CD-ROM to process the file.
The CWM 15.3.00-P1_SNMPAgent.tar.gz file that contains the CIC36xPatch004CWM151.tar file
includes rule files that are compatible only with CIC 3.6.1 so you must install CIC 3.6 or 3.6.1 to
use this file.
For more information on CIC, refer to this URL:
http://www.cisco.com/univercd/cc/td/doc/product/rtrmgmt/info_ctr/3_6/index.htm
•
C-Note/CWM Configuration
The CWM supports C-Note version 3. Before the Orbix cmldomain services for C-Note are started,
the CWM core must be started and core processes should be running. Enter this command to add the
IP address of the C-Note workstation to the /opt/ssng/config/CMLLogin/SnmpPublisher.xml file:
vi /opt/ssng/config/CMLLogin/SnmpPublisher.xml
The line you add should look like this, substituting your C-Note workstation IP address:
<ipAddress>172.28.140.218</ipAddress>
•
Numbering for Release 9.4 IGX Feeder Nodes
When an IGX is added as a feeder to a SES-BPX or MGX node, it has a default node number that
may not be unique within the network. If it is not unique, it needs to be modified to a unique node
number by issuing the rnmnd <x> command, where x is unique with regard to all other
auto-route nodes.
To find the other node numbers, use the dspnds +n command. If you fail to do this, the
CWM Databroker may have an incorrectly formed hybrid connection database, and the CWM GUI
may show the connection as incomplete.
Release Notes for the Cisco WAN Manager, Release 15.3.00 P1
34
OL-11190-01, Rev. C0
Installing and Uninstalling CWM 15.3.00 P1
•
Security Profiles
Before CWM 15.3.00 P1, a CWM user had to have a valid UNIX user because the user was
authenticated against UNIX when he or she logged in to the CWM.
As of CWM 15.3.00 P1, a new feature has been added to support CWM login without depending on
UNIX user accounts. With the new procedure, you add and configure users using the Security
Manager. Because this feature is configurable, you can use the new feature or use the previous CWM
authentication process.
•
CWM Database
After creating a new database with the coldstart script, a database inconsistency will result if the
CWM is restarted (stop core and start core) before it is synchronized with the network. In this case,
rerun the coldstart script; do not use the SV+CreateDb tool. When a gateway node is upgraded or
rebuilt before the CWM has synced up with the network, the CWM must be cold-started (create the
CWM database and then restart the CWM) to ensure CWM database consistency. For the IGX ports,
the asi_line table is populated with the 1-based port number and not the 0-based port number.
•
RPM Management Limitations
The RPM-PR card is not supported on MGX PXM1-based nodes that Chassis View manages. The
applicable trap is missing so the CWM cannot monitor the back card. For the RPM and RPM-PR
cards in the standby state, the status displays as blue, not yellow as on other card types. For the RPM
and RPM-PR card types, hardware and firmware revisions are not populated in the database.
The RPM back card support feature is disabled by default. To enable the feature and obtain RPM
back card information, edit the emd.conf file before starting the CWM core. Note that when back
card support is enabled, back card information is polled from the switch only during a coldstart or
a manual resync. After that, any back card configuration or status changes are not updated until you
perform another coldstart or a manual resync.
The CWM does not distinguish between the Ethernet back card versions installed with the
MGX-RPM-128M/B or RPM-PR. No difference in functionality exists.
•
Equipment Management Configuration Notes
In the emd.conf file, the OORequest and OOStart parameters should be customized, depending on
network. The OORequest parameter defines the number of configuration files per node that can be
requested at one time, with a maximum of 32 configuration files concurrently per node. The range
is 1 through 32, and the default is 32. The OOStart parameter defines the number of OOEMC child
processes. The range is 1 through 25, and the default is 6.
All of the PNNI nodes that the CWM manages (PXM45-based 8950, 8880, and 8850 nodes;
PXM1E- based 8950, 8850, and 8830 nodes; and BPX nodes with SES shelves) are distributed
among OOEMC processes.
The number of nodes that a single process manages is computed by dividing the number of PNNI
network nodes by the number of processes that OOStart defines. Assume that the number of nodes
that one process manages is called MANAGED_NODE_COUNT. Then,
MANAGED_NODE_COUNT * OORequest must be less than or equal to 200, which can be
achieved by increasing the OOStart or reducing the OORequest. The normal range of OOStart is 5
to 20. If the OOStart value is increased beyond 10, the number of DMD processes has to be
increased or the shared memory overflows.
•
Network Monitor Server Configuration File (NMServer.conf)
Two parameters in the NMServer.conf configuration file—HELLO_EVENT_INTERVAL and
EVENT_REDELIVERY_COUNT—are tied to the NMSERVER_DISCONNECT_TIMEOUT
parameter in the CMSCClient.conf client configuration file. The
NMSERVER_DISCONNECT_TIMEOUT parameter value needs to be set to the same number as
Release Notes for the Cisco WAN Manager, Release 15.3.00 P1
OL-11190-01, Rev. C0
35
Installing and Uninstalling CWM 15.3.00 P1
the HELLO_EVENT_INTERVAL value times the EVENT_REDELIVERY_COUNT value. The
range for HELLO_EVENT_INTERVAL is 0 through 600, and the default is 60. The range for
EVENT_REDELIVERY_COUNT is 0 through 10, and the default is 3. The default for the
NMSERVER_DISCONNECT_TIMEOUT parameter is 60 times 3, or 180.
If you change any of these parameters, they must be adjusted so the HELLO_EVENT_INTERVAL
value times the EVENT_REDELIVERY_COUNT value continues to equal the
NMSERVER_DISCONNECT_TIMEOUT parameter value.
The Network Monitor Server configuration file (NMServer.conf) also contains the
PERIODIC_RESYNC_INTERVAL parameter. This parameter defines the interval in hours between
periodic resyncs. The range is 2 through 24, and the default is 8. You can also disable the periodic
resync feature by setting the PERIODIC_RESYNC_INTERVAL parameter to 0.
Installing Patch 1
This section describes how to install the CWM 15.3.00, Patch 1 (CWM 15.3.00 P1). Refer to
these sections:
•
Backing Up the Existing Database, page 37
•
Installing the CWM Server Patch, page 37
•
Verifying and Restoring Your Saved Database, page 39
•
Installing the CWM SNMPAgent (ServiceAgent) Patch, page 40
•
Installing the SSC Patch, page 41
•
Installing the SSM Patch, page 41
•
Installing the RTM Proxy Patch, page 42
Table 22 lists the contents of the Patch 1.
Table 22
CWM 15.3.00 Patch 1 Contents
Component
File
CWM
15.3.00-P1_CWM.tar.gz
SNMP Agent
15.3.00-P1_SNMPAgent.tar.gz
SSC
15.3.00-P1_SSC.tar.gz
SSM
15.3.00-P1_SSM.tar.gz
WANDEST Server 2.7.00, Patch 1
wandest2.7.00-P1_wdserver.tar.gz
WANDEST Client 2.7.00, Patch 1
wandest2.7.00-P1_wdclient.tar.gz
RTMProxy
15.3.00-P1_RTMProxy.tar.gz
Note
Install this on the CWM Server only
if you are using SSM, but not using
the SNMPAgent. See Installing the
RTM Proxy Patch, page 42.
Release Notes for the Cisco WAN Manager, Release 15.3.00 P1
36
OL-11190-01, Rev. C0
Installing and Uninstalling CWM 15.3.00 P1
Backing Up the Existing Database
Use this procedure to back up the existing database to preparation for installing the patch. You should
back up the database in case a problem exists with Informix.
Step 1
Find a location with enough space and create a directory at this location. In the examples below the
directory is called <dbexport-location>. In each command below, substitute the name you assigned.
# mkdir /usr/users/svplus/<dbexport-location>
For example,
# mkdir /usr/users/svplus/DBExports153
where <dbexport-location> is DBExports153.
Step 2
Use these steps to export the databases:
a.
Log in as svplus:
hostname# su
-u svplus
The system prompts you for the svplus password.
b.
Stop the core.
c.
Perform a coldstart (drops all network data so you will export only the user data in each database):
# coldstart
d.
Export the stratacom database:
# dbexport stratacom -o <dbexport-location>
e.
Export the scmdb database:
# dbexport scmdb -o <dbexport-location>
f.
Export the statsdb database:
# dbexport statsdb -o <dbexport-location>
Step 3
If you have a WANDEST server installed, export the WANDEST database:
# dbexport wandest -o <dbexport-location>
Step 4
Get the output of onstat –d
# onstat -d > <dbexport-location>/onstat.out
Installing the CWM Server Patch
Use this procedure to install the CWM Server Patch.
Step 1
Stop stats collection and disable stats on the VXSM.
Step 2
Log in to the CWM server as user root:
# su
Step 3
Stop the core.
Step 4
Download or copy the compressed tar files for the CWM server to a temporary location, such as /tmp:
# cp 15.3.00-P1_CWM.tar.gz /tmp
Step 5
Change to local directory that contains the compressed tar files:
# cd /tmp
Release Notes for the Cisco WAN Manager, Release 15.3.00 P1
OL-11190-01, Rev. C0
37
Installing and Uninstalling CWM 15.3.00 P1
Step 6
Remove the disk1 directory if it exists:
# rm -rf disk1
Step 7
Decompress the compressed tar files and
# gunzip 15.3.00-P1_CWM.tar.gz
# tar xvfp 15.3.00-P1_CWM.tar
Step 8
Execute the InstallCWM153Patch1.csh script:
# ./InstallCWM153Patch1.csh
After you press Enter, this message appears:
Console Mode Option is recommended when you cannot connect to X Server
from current terminal (See if you can open an xterm to check!)
Do you Want to Launch Installer in Console Mode? (Yes / No): [No]:
Step 9
To continue the installation using the InstallShield GUI, respond with No.
To continue the installation using Console Mode Install, respond with Yes.
(Console Mode Install is a command line script procedure that is a GUI alternative. It is intended for
users who do not have access to an X window device. By using the Console Mode Install, the user can
install the CWM with an alphanumeric terminal or a PC in terminal emulator mode.)
Step 10
If WANDEST Server Rel. 2.7 is installed on this machine, follow these steps to install WANDEST
Server 2.7.00, Patch 1:
a.
Stop the wdclient and exit root.
b.
Run the /usr/users/svplus/scripts/get_dbschema.ksh shell script, as follows:
cd /usr/users/svplus/scripts
/get_dbschema.ksh
A wd_dbschema_tmpl file is created in /usr/users/svplus/tmp directory. Edit this file to un-comment
any of the tables listed that you want triggers in.
c.
Download or copy the wandest2.7.00-P1_wdserver.tar.gz to the local directory, such as /tmp.
d.
Change to the local directory and uncompress the gzip file, for example as follows:
# gunzip wandest2.7.00-P1_wdserver.tar.gz
e.
Untar the tar file, for example:
# tar -xvfp wandest2.7.00-P1_wdserver.tar
f.
Switch to root.
g.
Run the installation script to install the patch, as follows:
# ./InstallWDS27Patch1.csh
Step 11
Exit from root.
Release Notes for the Cisco WAN Manager, Release 15.3.00 P1
38
OL-11190-01, Rev. C0
Installing and Uninstalling CWM 15.3.00 P1
Verifying and Restoring Your Saved Database
If Informix did not come back online after restarting the CWM, use this procedure to restore the database
you saved before you installed Patch 1.
(The output of onstat –d is in /usr/users/svplus/<dbexport-location>/onstat.out for reference. For
example, /usr/users/svplus/DBExports153/ where <dbexport-location> is DBExports153.)
Step 1
Log in to the workstation as root:
# su
Step 2
Go to the /usr/users/informix92/etc directory:
# cd /usr/users/informix92/etc
Step 3
Follow these steps only if you have configured a separate raw partition for the Informix physical log:
a.
Open the onconfig file for editing:
# vi onconfig
b.
Change this line:
PHYSDBS
phydbs
to this:
PHYSDBS
c.
rootdbs
Change this line:
PHYSFILE
<size>
to this:
PHYSFILE
d.
Step 4
20000
Save the onconfig file and exit from the editor.
Go the /usr/users/svplus/scripts/Install directory:
# cd /usr/users/svplus/scripts/Install
Step 5
Run these commands in the order shown below:
#
#
#
#
Step 6
./dbmode
./dbinit
./dbonmode
./dbonspace
If you have the file AddPhyLog in /usr/users/svplus/scripts/Install, do these steps:
# ./AddPhyLog
# ./RestartInf
Step 7
If you have the file dbaddchunk in /usr/users/svplus/scripts/Install, do these steps:
# ./dbaddchunk
Step 8
Exit from root.
Step 9
Check if you have configured separate partition for datadbs by using the onstat –d command:
# onstat -d
Step 10
If a separate partition exists, execute these commands to import the database. If no separate partition
exists for datadbs, go to Step 11:
# dbimport stratacom -d datadbs -i <dbexport-location>
Release Notes for the Cisco WAN Manager, Release 15.3.00 P1
OL-11190-01, Rev. C0
39
Installing and Uninstalling CWM 15.3.00 P1
# dbimport statsdb -d datadbs -i <dbexport-location>
# dbimport scmdb -d datadbs -i <dbexport-location>
Step 11
If no separate partition exists for datadbs, do these:
# dbimport stratacom -i <dbexport-location>
# dbimport statsdb -i <dbexport-location>
# dbimport scmdb -i <dbexport-location>
Step 12
If you had WANDEST server before, execute this command:
# dbimport wandest -i <dbexport-location>
Installing the CWM SNMPAgent (ServiceAgent) Patch
Use this procedure to install the CWM SNMPAgent (ServiceAgent) patch.
Step 1
Log in to the CWM server as user root:
# su
Step 2
Stop the core.
Step 3
Download or copy the compressed tar file for ServiceAgent to the local directory, such as /tmp:
# cp 15.3.00-P1_SNMPAgent.tar.gz /tmp
Step 4
Change to local directory that contains the compressed tar files:
# cd /tmp
Step 5
Remove the disk1 directory if it exists:
# rm -rf disk1
Step 6
Decompress the compressed tar file and untar the tar file:
# gunzip 15.3.00-P1_SNMPAgent.tar.gz
# tar xvfp 15.3.00-P1_SNMPAgent.tar
Step 7
Execute the installation patch script:
# ./InstallAgent153Patch1.csh
This message appears:
Console Mode Option is recommended when you cannot connect to X Server
from current terminal (See if you can open an xterm to check!)
Do you Want to Launch Installer in Console Mode? (Yes / No): [No]:
Step 8
To continue the installation using the InstallShield GUI, respond No.
To continue the installation using Console Mode Install, respond Yes.
Step 9
When prompted, follow the instructions that the application provides.
Step 10
When you have finished installing the SNMP Agent Patch software, exit from root.
Release Notes for the Cisco WAN Manager, Release 15.3.00 P1
40
OL-11190-01, Rev. C0
Installing and Uninstalling CWM 15.3.00 P1
Installing the SSC Patch
Use this procedure to install the SSC patch only if you are using the SSC machine. The patch must be
installed on an SSC machine.
Step 1
Log in to the SSC machine as user root:
# su
Step 2
Download or copy the compressed tar file to the local directory, such as /tmp:
# cp 15.3.00-P1_SSC.tar.gz /tmp
Step 3
Change to local directory that contains the compressed tar file:
# cd /tmp
Step 4
Remove the disk1 directory if it exists:
# rm -rf disk1
Step 5
Decompress the compressed tar file and untar the tar file:
# gunzip 15.3.00-P1_SSC.tar.gz
# tar xvfp 15.3.00-P1_SSC.tar
Step 6
Execute the InstallSSC153Patch1.csh script:
# ./InstallSSC153Patch1.csh
This message appears:
Console Mode Option is recommended when you cannot connect to X Server
from current terminal (See if you can open an xterm to check!)
Do you Want to Launch Installer in Console Mode? (Yes / No): [No]:
Step 7
To continue the installation using the InstallShield GUI, respond with No.
To continue the installation using Console Mode Install, respond with Yes.
(Console Mode Install is a command line script procedure that is a GUI alternative. It is intended for
users who do not have access to an X window device. By using the Console Mode Install, the user can
install the CWM with an alphanumeric terminal or a PC in terminal emulator mode.)
Step 8
When prompted, follow the instructions that the application provides.
Step 9
When you have finished installing the SSC Patch software, exit from root.
Installing the SSM Patch
Use this procedure to install the SSM Patch only if you are using the SSM machine. The patch must be
installed on a SSM machine.
Step 1
Stop stats collection and disable stats on VXSM.
Step 2
Log in to the SSM machine as user root:
# su
Step 3
Download or copy the compressed tar file to the local directory, such as /tmp:
# cp 15.3.00-P1_SSM.tar.gz /tmp
Step 4
Change to local directory that contains the compressed tar files:
# cd /tmp
Release Notes for the Cisco WAN Manager, Release 15.3.00 P1
OL-11190-01, Rev. C0
41
Installing and Uninstalling CWM 15.3.00 P1
Step 5
Remove the disk1 directory if it exists:
# rm -rf disk1
Step 6
Decompress the compressed tar file and untar the tar file:
# gunzip 15.3.00-P1_SSM.tar.gz
# tar xvfp 15.3.00-P1_SSM.tar
Step 7
Execute the InstallSSM153Patch1.csh script:
# ./InstallSSM153Patch1.csh
Step 8
Exit from root.
Installing the RTM Proxy Patch
Use this procedure to install the RTM Proxy Patch on the CWM machine. Install the patch only on a
CWM machine and only on a CWM machine that has no installed SNMP agent and that SSM has used
for statistics management.
The purpose of the RTM Proxy Patch tar file is to work only with the SSM. It is not required for
configuring a northbound interface. If the service agent is installed, do not install the RTM proxy patch.
It is not needed.
Step 1
Log in to the CWM as user root:
# su
Step 2
Stop the core.
Step 3
Download or copy the compressed tar file to the local directory, for example, /tmp:
# cp 15.3.00-P1_RTMProxy.tar.gz /tmp
Step 4
Change to local directory that contains the compressed tar files:
# cd /tmp
Step 5
Remove the disk1 directory:
# rm -rf disk1
Step 6
Decompress the compressed tar file and untar the tar file:
# gunzip 15.3.00-P1_RTMProxy.tar.gz
# tar xvfp 15.3.00-P1_RTMProxy.tar
Step 7
Execute the InstallRTM153Patch1.csh script:
# ./InstallRTM153Patch1.csh
This message appears:
Console Mode Option is recommended when you cannot connect to X Server
from current terminal (See if you can open an xterm to check!)
Do you Want to Launch Installer in Console Mode? (Yes / No): [No]:
Step 8
To continue the installation using the InstallShield GUI, respond with No.
To continue the installation using Console Mode Install, respond with Yes.
(Console Mode Install is a command line script procedure that is a GUI alternative. It is intended for
users who do not have access to an X window device. By using the Console Mode Install, the user can
install the CWM with an alphanumeric terminal or a PC in terminal emulator mode.)
Release Notes for the Cisco WAN Manager, Release 15.3.00 P1
42
OL-11190-01, Rev. C0
Creating a CWM Auto-Restart Shell Script
Step 9
When prompted, follow the application instructions.
Step 10
When you have finished installing the RTM Proxy Patch software, exit from root.
Uninstalling Patch 1
The patch installation process installs an uninstall script in the /usr/users/svplus directory for the CWM
and in the /usr/users/wandest directory for WANDEST.
When you access the uninstall wizard, you are asked for the backup file location that you provided when
you installed the CWM or WANDEST initially.
Creating a CWM Auto-Restart Shell Script
This section describes how to create and configure a shell script that automatically starts the CWM core
after a reboot. To create this shell script, you need to use a text editor to create a new file containing the
commands that you want the script to execute.
Use this procedure to create a script that uses the vi editor and shell commands to automatically restart
the CWM core after the workstation has been rebooted.
Note
Step 1
Several minor errors that existed in the past in the CWM Auto restart shell script have been corrected in
the script that follows.
Log in to the CWM as user root:
$ su
Step 2
Change to directory /etc/rc3.d:
# cd /etc/rc3.d
Step 3
Create a shell script of the form: Snn <filename>, where nn is the relative sequence number for starting
the job under /etc/rc3.d by entering this command:
# vi /etc/rc3.d/S99init_sv
Since this script does not currently exist, the vi editor will open on a blank line,
waiting for you to enter the script commands.
Step 4
Create the shell script by entering these lines:
******************************************************************
#!/bin/sh
# Check if Informix configuration is going on
while [ ! -z "`ps -ef | grep S98init_db | grep -v grep`" ]
do
echo "Informix initialization in progress...." >>
/usr/users/svplus/log/.start_stopCWM.log
sleep 5
done
# Start Orbix E2A ... as svplus
echo "Starting Orbix E2A ..." >> /usr/users/svplus/log/.start_stopCWM.log
su - svplus -c /usr/users/svplus/scripts/startorbix2000 >>
/usr/users/svplus/log/.start_stopCWM.log
sleep 5
Release Notes for the Cisco WAN Manager, Release 15.3.00 P1
OL-11190-01, Rev. C0
43
Installing WANDEST 2.7.00, Patch 1
# Running Guard process ... as svplus
echo "Running Guard process" >> /usr/users/svplus/log/.start_stopCWM.log
su - svplus -c /usr/users/svplus/scripts/Install/RunGuard &
# Start CWM core process ... as svplus
su - svplus -c /usr/users/svplus/scripts/start_SV+ &
******************************************************************
Note
Step 5
To save your changes while using the vi editor, press Esc, colon (:), then wq!.
Provide execute permissions for /etc/rc3.d/S99init_sv by executing this command:
# chmod 755 S99init_sv
To auto restart Informix after reboot, a shell script has been created automatically during the initial
CWM installation. This script is called /etc/rc3.d/S98init_db. You need to make sure that the
filename of your newly created autorestart shell script has a script number (the second and third
characters in the filename) greater than 98. Also, your newly created autorestart shell script cannot have
the same script number as any other script files in /etc/rc3.d.
For more information on configuring this feature, refer to the /etc/init.d/README file.
Installing WANDEST 2.7.00, Patch 1
If you have standalone WANDEST server and client workstations, follow the procedures in these
sections to install and uninstall the patches:
•
Installing the WANDEST Server Patch, page 45
•
Installing the WANDEST Client Patch, page 45
•
Uninstalling Patch 1, page 43
Table 22 lists the contents of WANDEST 2.7.00, Patch 1.
Table 23
WANDEST 2.7.00, Patch 1 Contents
Component
File
WANDEST Server
wandest2.7.00-P1_wdserver.tar.gz
WANDEST Client
wandest2.7.00-P1_wdclient.tar.gz
Release Notes for the Cisco WAN Manager, Release 15.3.00 P1
44
OL-11190-01, Rev. C0
Installing WANDEST 2.7.00, Patch 1
Installing the WANDEST Server Patch
Use this procedure to install the WANDEST Server patch.
Confirm that the WANDEST Client has been stopped before installing patches on the WANDEST server.
Step 1
Log in to the CWM as an “svplus” user.
Step 2
Stop the core.
Step 3
Run the /usr/users/svplus/scripts/get_dbschema.ksh:
# cd /usr/users/svplus/scripts
# ./get_dbschema.ksh
A wd_dbschema_tmpl file is created in the /usr/users/svplus/tmp directory. Edit this file and
un-comment out the tables that you want triggers in it.
Step 4
Switch to root (for example, su):
# su
Step 5
Download or copy the compressed tar file to the local directory, for example, /tmp:
# cp wandest2.7.00-P1.wdserver.tar.gz /tmp
Step 6
Change to the local directory that contains the compressed tar files:
# cd /tmp
Step 7
Remove the disk1 directory:
# rm -rf disk1
Step 8
Decompress the compressed tar file and untar the tar file:
# gunzip wandest2.7.00-P1_wdserver.tar.gz
# tar -xvfp wandest2.7.00-P1_wdserver.tar
Step 9
Run the installation script to install the patch:
# ./InstallWDS27Patch1.csh
Step 10
Exit from root.
Step 11
Perform a coldstart:
# coldstart
Step 12
Open a new terminal to start the core.
Installing the WANDEST Client Patch
Use this procedure to install the WANDEST Client patch.
Step 1
Log in to the WANDEST client as user root.
Step 2
Download or copy the compressed tar file for WANDEST client to a local directory; for example, /tmp:
# cp wandest2.7.00-P1_wdclient.tar.gz /tmp
Release Notes for the Cisco WAN Manager, Release 15.3.00 P1
OL-11190-01, Rev. C0
45
SNMP Service Agent Trap Limitation
Step 3
Change to the local directory that contains the compressed tar files:
# cd /tmp
Step 4
Remove the disk1 directory:
# rm -rf disk1
Step 5
Decompress the compressed tar file and untar the tar file:
# gunzip wandest2.7.00-P1_wdclient.tar.gz
# tar -xvfp wandest2.7.00-P1_wdclient.tar
Step 6
Run the installation script to install the patch:
# ./InstallWDC27Patch1.csh
Step 7
Exit from root.
SNMP Service Agent Trap Limitation
This section describes the SNMP Service Agent trap limitation with the PXM1-based MGX nodes.
The type of traps that the CWM collects from adding and modifying connections on Cisco MGX
PXM1-based nodes running release 1.3.00 and onward can be configured by using the cnfchantrapenbl
and dspchantrapenbl commands.
Use these commands to select either Default (the same legacy traps plus trap 50601 to be sent) or Enable
(only trap 50601 to be sent for every connection addition or modification).
If the dspchantrapenbl command is set to Default, you can use the cnfchantrapenbl Enable command to
change to collecting only trap 50601 when the CWM is running.
However, if you are currently collecting only trap 50601 (the dspchantrapenbl command is set to
Enable and you decide to configure the node to send legacy traps for every connection addition or
modification by executing the cnfchantrapenbl Default command, all CWMs monitoring the node must
be shut down (the core must be stopped) before you execute the command.
To determine which CWMs are managing the node, run the dsptrapmgr command.
Release Notes for the Cisco WAN Manager, Release 15.3.00 P1
46
OL-11190-01, Rev. C0
Caveats
Caveats
This section lists known and resolved issues in the CWM 15.3.00 P1 and WANDEST 2.7 software:
Known issues in the CWM 15.3.00 P1—Table 24 on page 47
Issues resolved in CWM 15.3.00 P1—Table 25 on page 47
Table 24
Known Issues in CWM 15.3.00 P1
Bug ID
Description
Details and Workaround
CSCek45023
Lines in list window are superimposed, The workaround is to use the Web client.
which causes a mixed image.
CSCek49830
SCTs cannot be deleted from the CWM. The workaround is to delete SCTs using
The operation times out.
the CLI.
CSCek51015
In the SCT GUI, when trying to produce The workaround is to edit the cloned SCT.
a clone of an SCT file by doing a “Save
As,” the cloned SCT file fails to
resemble the original SCT.
Discrepancies seem to exist in the VC
and Cosb parameters between the
original and cloned sct.
CSCek52079
Currently the CWM doe not support the No workaround exists.
svPhysicalToLogicalMapTable for
MPSM-16T1E1.
CSCek52518
The CAC treatment parameter defaults The workaround is to change the Cac
to “lncac” instead of the basic “cac” in treatment manually.
the SCT.
Issues Resolved in the CWM 15.3.00, Patch 1 Software
Table 25 lists issues resolved in the CWM 15.3.0, Patch 1 software.
Table 25
Issues Resolved in CWM 15.3.00 P1
Bug ID
Headline
CSCeg74091
emc reinitialized multiple times in a few minutes
CSCej28230
Network Monitor logging the close events infinitely
CSCek23619
Tool for reading MPSM enable file needs to be added to the CWM
CSCek26115
SRT should be accepting local time also
CSCek26774
CWM alarm mismatch with single PXM MGX nodes alarm
CSCek32048
DC-A and DC-B LEDs are still lit on Slot 7 in Chassis View, when Slot 8 is active
CSCek33527
Chassis View shows two PXM slot for 8830, while actually have one PXM
CSCek34189
Aggregate alarm on mgx1 with pri/sec control card
CSCek36571
emc dumps core after receiving the RTM_LINK_DOWN message
CSCek39107
Pnni_nodal and Pnni_port report case srt server throws exception err
Release Notes for the Cisco WAN Manager, Release 15.3.00 P1
OL-11190-01, Rev. C0
47
Related Documentation
Table 25
Issues Resolved in CWM 15.3.00 P1 (continued)
Bug ID
Headline
CSCek39663
pvc vp connections have incorrect VCI
CSCek41554
CWM: cmgrd process restarting
CSCek41761
Wrong handling of ifName for DS1 on DS3 line on MPSM-T3E3 card
CSCek42785
CWM does not update addcon configurations on the RPM
CSCek42815
ATM/IMA port addition fails for any card using ServiceAgent
CSCek43998
svCardTable does not support for Jupiter SW Module XM-60
CSCek44887
Add group trap feature to trap resiliency feature
CSCek45726
Audit trail logging everything as one user
CSCek45738
Connection string in 2511x traps change
CSCek46115
Missing images in software download for some cards on 8830/B
CSCek46164
SNMPGet on cwmDsx1VismCnfGrpTable fail for VISM 3.3.10 image
CSCek46536
EMEX core dump in snmp call back
CSCek48229
MR 010920 - Community string and FTP user name and password must be
configurable
CSCek48635
Custom default value(80) for LoCLP on BPX trunk for abr-fs conn
CSCek49086
Chassis View fails to display in MGX Rev1 for active non redundant slot2 SM
CSCek49105
MPSM-16T1E1 SCT operations not reflected properly
CSCek49127
DC GUI fails to display node list on network view
CSCek50679
SCT service category changes while saving SCT
CSCek50698
Improper error handling
CSCin99983
Routing node is being shown as feeder node in the tree view
CSCin99995
DB table missing in CWM due to which exceptions are thrown and login fails
Related Documentation
These documents comprise the CWM documentation set:
•
Release Notes for Cisco WAN Manager, 15.3.00 P1
•
Cisco WAN Manager Installation Guide, 15.3.00
•
Cisco WAN Manager User Guide, 15.3.00 P1
•
Cisco WAN Manager Database Interface Guide, 15.3.00
•
Cisco WAN Manager SNMP Service Agent Guide, 15.3.00
•
Cisco WANDEST Installation and Reference, 2.7
You can access all CWM documentation at this website:
http://www.cisco.com/en/US/products/sw/netmgtsw/ps2340/tsd_products_support_series_home.html
These documents are available on Cisco.com:
•
Release Notes for CWM Automated Bulk Provisioning, 15.3.00
Release Notes for the Cisco WAN Manager, Release 15.3.00 P1
48
OL-11190-01, Rev. C0
Obtaining Documentation, Support, and Security Guidelines
•
CWM Automated Bulk Provisioning Guide, 15.3.00
•
Release Notes for the Cisco WAN Modeling Tools, 15.3.00
•
Cisco WAN Modeling Tools User Guide, 15.3.00
The Cisco WAN Modeling Tools and Automated Bulk Provisioning user guides are also available on
their software CDs and ordered separately.
Refer to the current CWM release notes for information on all the switch products that the CWM
supports and that are certified in this release. In addition, a Guide to Cisco Multiservice Switch
Documentation ships with your product.
You can access the MGX switch documentation at this website. See MGX Switches:
http://www.cisco.com/en/US/products/hw/switches/tsd_products_support_category_home.html
You can also use Cisco.com to search for any product and topic by entering a word or phrase in the
Search window. For example, you can search for “configuring MGX 8850” or “PXMIE.” By using the
Advanced Search option, you can search the entire Cisco.com or Technical Support & Documentation.
Obtaining Documentation, Support, and Security Guidelines
For information on obtaining documentation and support, providing documentation feedback, security
guidelines, recommended aliases, and general Cisco documents, see the monthly What’s New in
Cisco Product Documentation, which also lists all new and revised Cisco technical documentation, at
this URL:
http://www.cisco.com/en/US/docs/general/whatsnew/whatsnew.html
CCVP, the Cisco Logo, and the Cisco Square Bridge logo are trademarks of Cisco Systems, Inc.; Changing the Way We Work, Live, Play, and Learn is a
service mark of Cisco Systems, Inc.; and Access Registrar, Aironet, BPX, Catalyst, CCDA, CCDP, CCIE, CCIP, CCNA, CCNP, CCSP, Cisco, the Cisco
Certified Internetwork Expert logo, Cisco IOS, Cisco Press, Cisco Systems, Cisco Systems Capital, the Cisco Systems logo, Cisco Unity,
Enterprise/Solver, EtherChannel, EtherFast, EtherSwitch, Fast Step, Follow Me Browsing, FormShare, GigaDrive, GigaStack, HomeLink, Internet
Quotient, IOS, iPhone, IP/TV, iQ Expertise, the iQ logo, iQ Net Readiness Scorecard, iQuick Study, LightStream, Linksys, MeetingPlace, MGX,
Networking Academy, Network Registrar, Packet, PIX, ProConnect, RateMUX, ScriptShare, SlideCast, SMARTnet, StackWise, The Fastest Way to
Increase Your Internet Quotient, and TransPath are registered trademarks of Cisco Systems, Inc. and/or its affiliates in the United States and certain other
countries.
All other trademarks mentioned in this document or Website are the property of their respective owners. The use of the word partner does not imply a
partnership relationship between Cisco and any other company. (0612R)
© 2006 Cisco Systems, Inc. All rights reserved.
Release Notes for the Cisco WAN Manager, Release 15.3.00 P1
OL-11190-01, Rev. C0
49
Obtaining Documentation, Support, and Security Guidelines
Release Notes for the Cisco WAN Manager, Release 15.3.00 P1
50
OL-11190-01, Rev. C0