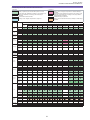
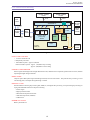
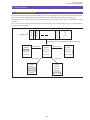
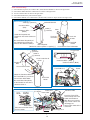
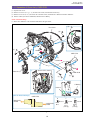
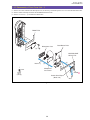
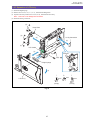
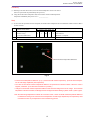
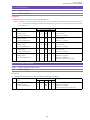
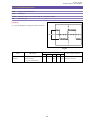
1
Video Product
DC10 E, DC20 E
No. D17-9213, 9313
c CANON INC. 2005
Digital Video Camera
iPAL
Canon Inc.
Digital Imaging Products Service
& Quality Assurance Dept.
First Edition : Sep. 2005
First Print : Sep. 2005
GENERAL DESCRIPTION OF PRODUCT
CONTENTS
1. Product Overview -------------------------------------------------------------------------------------------------------------------------------- 1
1-1 Development Concept ------------------------------------------------------------------------------------------------------------------- 1
1-2 List of Main Features -------------------------------------------------------------------------------------------------------------------- 2
1-2-1 High Image Quality ----------------------------------------------------------------------------------------------------------- 2
1-2-2 Advanced Functions and Comfortable Operation ------------------------------------------------------------------------- 2
1-3 Product Specifications Comparison Chart -------------------------------------------------------------------------------------------- 7
1-4 Function and Performance List --------------------------------------------------------------------------------------------------------- 8
2. Technical Explanation ------------------------------------------------------------------------------------------------------------------------- 13
2-1 Design Concept ------------------------------------------------------------------------------------------------------------------------- 13
2-2 TS Mech --------------------------------------------------------------------------------------------------------------------------------- 15
2-2-1 Overview of TS Mech ------------------------------------------------------------------------------------------------------ 15
2-2-2 Main Mechanical Parts ----------------------------------------------------------------------------------------------------- 16
3. Performance ------------------------------------------------------------------------------------------------------------------------------------- 17
4. System Diagram (Common to all Models) -------------------------------------------------------------------------------------------------- 35
DC10 E, DC20 E
GENERAL DESCRIPTION OF PRODUCT
1. Product Overview
1-1 Development Concept
Slim and stylish design
Compatibility with DVD players
Slim-line body
DVD-R/RW
High image quality for both movies
and still images
DIGIC DV
Direct Print
Easy Direct (Print/Share) button
that supports PictBridge
Megapixel CCD
1
DC10 E, DC20 E
GENERAL DESCRIPTION OF PRODUCT
1-2 List of Main Features
1-2-1 High Image Quality
(1) Total pixels/CCD size
DC10 E : approx. 1.33-megapixel, 1/4-inch CCD (color correction filter) featured
DC20 E : approx. 2.20-megapixel, 1/3.9-inch CCD (primary color filter) featured
(2) Effective pixels
DC10 E
Still image (CARD/DISC) :
Video (DISC only)
Approx. 1.23-megapixel (1280 [H] × 960 [V])
: 4:3
Widescreen TV (IS OFF)
→ Approx. 860,000 pixels (1072 [H] × 804 [V])
→ Approx. 920,000 pixels (1280 [H] × 720 [V])
Widescreen TV (IS ON)
→ Approx. 790,000 pixels (1184 [H] × 666 [V])
DC20 E
Still image (CARD/DISC) :
Video (DISC only)
: 4:3
Widescreen TV (IS OFF)
Widescreen TV (IS ON)
Approx. 2.00-megapixel (1632 [H] × 1224 [V])
→ Approx. 1.77-megapixel (1536 [H] × 1152 [V])
→ Approx. 1.50-megapixel (1632 [H] × 918 [V])
→ Approx. 1.38-megapixel (1568 [H] × 882 [V])
(3) High-performance, high-magnification zoom lens included
Optical magnification ----------------------- 10×
Nominal focal length ----------------------- 4.05 - 40.5 mm
35 mm film equivalent (at 4:3) -------------- DC10 E : Approx. 46.7 - 467 mm
----------------------- DC20 E : Approx. 40.6 - 406 mm
* Lens configuration (same as MVX1 Si E, MVX1 S E)
Lens configuration of 11 elements in nine groups with one aspherical lens used (double-sided aspherical lens), gradation ND
incorporated, F/1.8 to 2.8
(4) DIGIC DV video engine included
1-2-2 Advanced Functions and Comfortable Operation
Shooting Functions
(1) Camera mode
1) Disc movie mode, 2) disc still image mode , 3) card still image mode
Provided as options for the movie mode in 1) are the XP high-image-quality mode (approx. 20 minutes), SP normal mode (approx.
30 minutes), and LP long-play mode (approx. 60 minutes).
(2) Discs supported
8 cm DVD-R/-RW discs
(double-sided type: 2.8 GB/single-sided type : 1.4 GB)
(3) Video recording specification
Movie
DVD-RW : DVD Video Recording (VR mode) and DVD-VIDEO (VIDEO mode).
DVD-R : DVD-VIDEO (VIDEO mode) only.
Compression method / movie : MPEG2
Audio:Dolby Digital 2 channels (AC-3 2 channels) [
Still image
Exif Ver2.2 compliant( DPOF not supported by discs) , Compression method:JPEG
2
]
DC10 E, DC20 E
GENERAL DESCRIPTION OF PRODUCT
(4) Many program AE options (same as MVX1 Si E, MVX1 S E but a 3-position slide switch is featured)
1) AUTO, 2) P (P, Tv, Av mode), 3) SCN
SCN (special scene) mode can be selected to enable optimum shooting of the eight types of scenes below.
<1> Portrait : This is used to defocus the background to set off the subject to be shot.
<2> Sports
<3> Night
: This is used to shoot fast-moving subjects during tennis matches and games of golf, for instance.
: This enables subjects to appear lighter in color even at night time or when the scene is otherwise dark.
<4> Snow
: This prevents the subject from appearing too dark and enables it to be shot clearly on the ski slopes in winter
where the glare from the snow is strong.
<5> Beach
: This prevents the subject from appearing too dark and enables it to be shot clearly on the beach in summer where
the glare from the water is strong.
<6> Sunset
: This enables sunsets to be shot brightly and in vivid color.
<7> Spotlight : This enables sharper shooting of scenes lit by a spotlight or other light source.
<8> Fireworks : This enables the shooting of fireworks.
(5) In addition to the MENU button, a FUNC. button is now provided, which enables setting of the following functions.
Camera mode
* Program AE (P), shutter-priority AE (Tv), aperture-priority AE (Av), and the “special scene” settings <1> through <8>
described above.
* Photometry system settings (evaluative photometry, center-weighted average photometry and spot photometry ... P position
during still image shooting),
* White balance (Auto, Daylight, Shade, Cloudy, Tungsten, Fluorescent, Fluorescent H, Set),
* Image effects (Vivid, Neutral, Low sharpening, Soft skin detail, Custom),
* Drive mode settings (single shooting, continuous shooting, high-speed continuous shooting, AEB, stitch assist) --- in card
still image mode only,
* Image quality mode setting (XP, SP, LP)
* Faders (in movie recording mode only), * Effects (in camera mode only),
* Multi-screen settings (in movie recording mode only), * Card Mix, * Still image simultaneous recording settings,
* Image size settings, * Still image quality settings
During still image playback mode
* Erase image , * Image protect, * Slideshow, * Print selection (in card still image mode only),
* Transfer selection (in card still image mode only), * (Photo) movie conversion (in disc still image mode only)
During video playback
Original : * Divide, * Delete, * Add to playlist
Playlist : * Move, * Divide, * Delete,
(6) Mini-video light included (DC20 E only)
This light has about three times the lighting capability of the white LED used on previous models, enabling close-up subjects to be
shot even in the dark.
It can be turned on by pressing a button in any program mode. Furthermore, even in the night mode, it can light up (mini video light
priority) just as the conventional white LED could.
(7) Includes 2.5-inch, 123,000-pixel, TFT color LCD monitor
Includes BACKLIGHT button
Employing ultra-high-brightness LEDs (× 3) yields higher brightness levels, smaller dimensions, reduced power consumption, and
greater environmental friendliness.
An AG (anti-glare) + AR (anti-reflection) coating is provided to enable easy visibility of the subject even when viewing the LCD
screen under direct sunlight.
While keeping the gradient reproducibility the same for the white side, the black side was narrowed to improve the contrast, and the
LCD image quality is switched based on changes in camera image quality when switching modes for allowing smooth transition
between the image quality of movies and still images.
(8) Wind screen (WS) function (ON/OFF)
(9) Exposure compensation
Exposure locking by operating omni selector (top). Also, the exposure can be adjusted to a maximum of ±11 levels (±2.75EV) by
moving the omni selector to the left and right.
3
DC10 E, DC20 E
GENERAL DESCRIPTION OF PRODUCT
(10) Auto slow shutter function (set by the MENU button)
The slow-side shutter speeds for Auto mode were expanded.
During movie
: 1/50 sec → 1/25 sec
During still image : 1/25 sec → 1/12.5 sec
This enables shooting of subjects in low brightness.
(11) Widescreen TV (WIDE SCREEN) shooting (16:9)
Functions for Recording Still Images on Cards and Discs (Movie Cannot be Recorded on Cards)
(1) miniSD card used (same as MVX1 Si E, MVX1 S E)
(2) 9-point range-finding frame AiAF function
Includes Ai (Artificial intelligence) AF function where the camera automatically selects from 9 range-finding frames on the screen
in Disc/Card Camera mode.
The range-finding frame can be switched between the automatic selection function and center range-finding frame.
AUTO mode is AiAF only. (Selection of the range-finding frame is not possible.)
(3) Metering system (same as MVX1 Si E, MVX1 S E)
In P, Tv, and Av modes, the metering system can be selected from evaluative metering, center-weighted average metering, and spot
metering (spot metering is center frame only).
(4) Still image sizes (for both cards and discs)
1632 × 1224 (DC20 E only), 1280 × 960, 640 × 480, Super fine, Fine, Normal can be set.
(5) Continuous shooting function (in card still image mode only)
VGA : Up to 60 continuous frames can be shot at high-speed and normal continuous.
(6) AEB shooting (in card still image mode only)
Enables shooting of 3 frames with automatic changes in exposure (Normal, -0.5EV, +0.5EV).
This allows the user to select the optimal exposure from the 3 frames afterward.
The main differences between the disc still image mode and card still image mode are as follows.
Continuous
shooting
High-speed
continuous
AEB
DPOF
compatibility
Protect
Transfer order
Photo stitch
shooting
Disc still image mode
×
×
×
×
×
×
×
Card still image mode
●
●
●
●
●
●
●
(7) Built-in flash (light guide flash) included (DC20 E only)
(8) Still image check time setting (in card still image mode only)
After releasing the Photo button, the display time can be set (6 levels) for checking the still images.
(9) Still images (640 × 480) can be recorded on cards by operating the Photo button during disc movie shooting (this cannot be done
during playback).
4
DC10 E, DC20 E
GENERAL DESCRIPTION OF PRODUCT
Comfortable Operation/Miscellaneous
(1) New omni selector adopted
(2) Finalize button included
(3) Lens cover incorporated inside the body (same as MVX1 Si E, MVX1 S E)
(4) PRINT/SHARE button included
(1)
(2)
(4)
When connected to a Direct printer, pressing the button when it is lit blue will print the still image displayed on the LCD monitor.
When connected to a computer, files selected on the LCD monitor can be transferred.
Also, the contents of finalized 8 cm discs can be recorded onto 12 cm discs loaded inside the PC. (Refer to Roxio My DVD for
Canon.)
(5) Direct Print (supported in both card still image and disc still image modes)
PictBridge-compatible printers only
(6) DPOF print selection (image transfer is also possible)...in card still image mode only
(7) Exif 2.2 (Exif Print) compliant (supported in both card still image and disc still image modes)
(8) New compact remote control
Omni selector featured, lithium battery CR2025 used, remote control sensor settings not possible (ON/OFF only)
(9) Battery charging function
(10) Display of Digital Effects/Fade animation (only in disc movie recording mode; no display during playback)
When the Digital Effects/Fade function is to be selected, the function effects are displayed (previewed) using animations so the
special effects best suited to the scenes can be selected, and shooting (playback) can be performed with those effects added.
(11) Playback zoom: Max. 5× zoom (still image only )
(12) 10 languages supported :German, English, Spanish, Italian, Russian, French, Chinese (simplified), Chinese (traditional), Korean,
and Japanese
(13) Built-in rechargeable lithium backup battery
(14) Disc initialization function
Function that displays the disc initialization menu to enable the VR mode or VIDEO mode to be selected and used when an
unformatted disc is loaded. Only the VIDEO mode can be selected for DVD-R discs which are automatically initialized in the
VIDEO mode after they have been recognized.
(15) Function for copying still images from cards to discs and vice versa (function for copying all images provided)
(16) Disc editing functions :
1. Original image editing: Function for editing original images (scenes) in VR mode recording.
scenes can be deleted or divided or adding to Playlist.
Note : This technical document defines a scene as a single shot which extends from when the record button is initially pressed to
when it is pressed again to stop the recording.
2. Playlist editing (in VR mode recording ) / (* Refer to the technical description P.21)
A playlist is defined as a list of scenes which are arranged in the desired playback sequence and whose images are displayed as
thumbnails (6 thumbnails per screen).
All the editing functions of the original images and playlist images listed in the table below can be used.
The original images remain unaffected even when the playlist is edited.
Original image editing
Playlist editing
Delete scene (Note)
●
●
Divide scene
●
●
Move scene
-
●
Adding to playlist
●
-
Delete all playlist
-
●
Note : When images are recorded in the DVD-VIDEO mode (-RW disc), only the scene which has just been shot can be deleted.
3. Disc title : Function for giving each disc a name (consisting of alphanumerics and symbols); up to 20 characters can be input per
name. If the disc has not been finalized, titles can be added to all discs and in all recording modes.
4. Disc protection function: Function for protecting what has been recorded or edited on a disc by disabling further recording or
editing. However, discs can still be initialized.
5. Creating Photo movies: Function for converting still images (JPEG compressed) on discs into MPEG movies. Playlists can be edited, and
the movies can be played back on a DVD player. Function for creating collections of Photo movies provided.
5
DC10 E, DC20 E
GENERAL DESCRIPTION OF PRODUCT
(17) Execute/release finalizing (finalizing can be released only for DVD-RW discs)
(18) Accessories (same as MVX1 Si E, MVX1 S E)
Tele-Converter TL-H27, Wide Converter WD-H27, Filter Set FS-H27U
Battery Pack BP-208 (850 mAh), Battery Charger CG-300 (E), Multi Cable MTC-100
(19) “MY DVD software” (Roxio MyDVD for Canon)
This software makes it easy to burn original DVDs on home-use personal computers.
It makes it possible to import video and sound from a DVD camera and burn DVDs which can then be played back on a DVD player
purchased on the market.
For more details on these functions, visit the Japanese site at http://www.sonicjapan.co.jp/index.html or the U.S. site at http://
www.sonic.com/default.asp.
Also joining the ranks of above functions is another function (One-Touch Dubbing) for recording data on the DVD disc in a PC
simply by operating the Easy Direct (PRINT/SHARE) button on the body provided that the camcorder and PC are connected by the
USB interface (Hi-Speed class supported).
This function works only with the Windows XP and subsequently released PC operating systems. Furthermore, it operates on
condition that the disc inside the DC10 E, DC20 E has been finalized and that a blank disc has been loaded into the PC’s DVD
drive.
Blank Disc
User pushes Easy direct button (PRINT/SHARE button)
8cm
DVD-R/RW
1.4GB
Recorded and
finalized disc
Easy direct button lights up
Hi-speed USB2.0
DC10 E
DC20 E
6
12cm
DVD Disc
(4.7GB)
DC10 E, DC20 E
GENERAL DESCRIPTION OF PRODUCT
1-3 Product Specifications Comparison Chart
Specifications
Lens
DC10 E
DC20 E
Movie
Lens10× optical zoom
Still image
Lens10× optical zoom
CCD
Image stabilizer
1/4-inch,
1/3.9-inch,
1.33-megapixel color correction filter
2.2-megapixel RGB primary color filter
Electronic system
Electronic system
(number of effective pixels 850,000 pixels)
(number of effective pixels 1.77-megapixel)
Monitor
2.5-inch, 123,000-pixel LCD monitor
EVF
0.3-inch, 123,000-pixel color viewfinder
High-resolution 16:9
Wide-screen display
Flash unit built into body
-
White LED
-
Light-guide flash unit
Mini video light
DISC
8cm DVD-R/-RW
Still image recording
1280 × 960 (approx. 1.23-megapixel)
Movie recording
Memory card
Still image recording
1632 × 1224 (approx. 2.00-megapixel)
MPEG2 (3/6/9Mbps)
mini SD Card
1280 × 960 (approx. 1.23-megapixel)
Movie recording
1632 × 1224 (approx. 2.00-megapixel)
-
USB
USB2.0 High Speed
Streaming
-
Direct Print
PictBridge supported only
Headphone/
-
microphone terminal
AV/S input/output terminal
Multi Cable MTC-100 (no line input)
Battery included with unit
BP-208 (850mAh)
Functions deleted
No DV terminal, analog-to-digital conversion function, still image digital zoom function, audio
from past Video Cameras
dubbing, My Camera function or audio level display
7
DC10 E, DC20 E
GENERAL DESCRIPTION OF PRODUCT
1-4 Function and Performance List
Item
DC10 E
DC20 E
1/4-inch CCD
1/3.9-inch CCD
Interlacing
Interlacing
(Color correction filter)
(RGB primary color filter)
1.33-megapixel
2.20-megapixel
Approx. 850,000 pixels (4:3)
Approx. 1.77-megapixel (4:3)
Approx. 1.23-megapixel
Approx. 2.00-megapixel
Camera
Image sensor
Image size
System (filter)
Total pixels
Number of effective pixels
Movie
Still image
Lens
Nominal focal length
4.05 to 40.5 mm
Optical zoom magnification
10×
Digital zoom
Magni-
Movie
magnification
fication
Still image ×
System
CCD readout
F number
F1.8 to 2.8
Aperture leaves (Number of leaves)
2 leaves
Zoom speed
Continuously varying speed
Filter diameter
Noise reduction
40×/200× (selectable)
Camera
27mm P0.5
Movie
Either CCD-NR or Y/C-NR
Still image Chroma-only, median filter
Recorder
C-NR system
Minimum
Auto mode (with auto slow shutter selected)
illumination
Night mode
Image stabilizer
6 lx
14 lx
0.5 lx
1.3 lx
Image stabilization system
Electronic system
Sensing method
Angular velocity sensing
AE mode
Program AE
AUTO, P, Av, Tv, Portrait, Sports, Night, Snow, Beach, Sunset,
Photometric
Center weighted average
system
photometry
Shooting functions
Spotlight, Fireworks
Evaluation photometry (128-
Movie
AUTO, P, Av, Tv, Portrait, Sports, Night
Movie
Spotlight, Snow, Beach, Sunset
Movie/
Fireworks
segments) + All area photometry
No photometry
Still image
Evaluation photometry
Movie
AUTO, Portrait, Sports, Night
(128-segments)
Evaluation photometry (128-
Still image Spotlight, Snow, Beach, Sunset
segments) + All area photometry
Photometry options
Still image Av, Tv, P mode
(Selectable from evaluative photometry, center-weighted average
photometry, and spot photometry)
Exposure
AE lock
● Omni selector up button operation (Prohibited during AUTO mode)
adjustment
AE shift
×
Exposure correction
● Correction by right and left operation of the omni selector (± 11 steps)
Gain setting/Higher sensitivity
Auto
Backlight correction
×
8
DC10 E, DC20 E
GENERAL DESCRIPTION OF PRODUCT
Item
DC10 E
DC20 E
Shooting functions
Shutter speed
Shutter speed setting
Movie
9 levels (1/6, 1/12.5, 1/25, 1/50, 1/120, 1/250, 1/500, 1/1000, 1/2000)
(in Tv mode)
Still image 9 levels (1/2, 1/3, 1/6, 1/12.5, 1/25, 1/50, 1/120, 1/250, 1/500)
Auto mode
Movie
1/25 to 1/500 sec (with auto slow shutter ON),
1/50 to 1/500 sec (with auto slow shutter OFF)
Still image 1/12.5 to 1/500 sec (with auto slow shutter ON),
1/25 to 1/500 sec (with auto slow shutter OFF)
Low Light mode
None
Night mode
1/2 to 1/500 sec (Disc/Card)
Aperture value (in Av mode)
Auxiliary light
Auto iris (F1.8, 2.0, 2.4, 2.8, 3.4, 4.0, 4.8, 5.6, 6.7, 8.0, 9.5,11, 14, 16)
×
Flash
source
Built-in model,
accessory shoe not supported
Video light (external)
Not supported
×
Mini video light
Built-in (when flash is used,
Red-eye Reduction function
provided; low-luminance
AF auxiliary light)
Image effects functions
● (Vivid, Neutral, Low Sharpening, Soft Skin Detail)
adjustment
Custom functions
● (Brightness, Contrast, Sharpness, and Color Depth)
White balance
Auto
●
Image quality
Focus
Preset
Daylight, Shade, Cloudy, Tungsten, Fluorescent, Fluorescent H
Systems
TTL, 128 segments
Mode
AF/MF, forced infinity
Correction means
Right and left operation after pressing the omni selector down button
Range finding frame display
Movie
×
Still image ● (AiAF selection: 9-point range-finding frame display, center only
display when center selected)
Zoom
Speed
Widescreen TV
Recording system
Continuously variable speed (no levels) supported
Movie
● (High image quality 16:9)
Still image ×
(WIDESCREEN)
●
Letterbox display
Digital fade (Camera mode only)
Movie
Auto Fade, Wipe, Corner Wipe, Jump, Flip, Puzzle, Zigzag, Beam, Tide
Still image
×
Digital effects (Camera mode only)
Movie
Art, Black & White, Sepia, Mosaic, Ball, Cube, Wave, Color Mask, Mirror
Still image
Black & White
Card mix (Camera mode only)
Movie
Lumi. key/Chroma key/Camera Chroma key/Animation
(Corner Animation, Straight Animation and Random Animation)
Multi-screen (Camera mode only)
Capture speed
Still image
×
Movie
● (Disabled in Auto mode and Night mode)
Still image
×
Shutter speed
1/25sec Manual, Fast (4 fields), Normal (6 fields), Slow (8 fields)
Shutter speed < 1/25sec Manual, Fast (4 fields), Normal (8 fields), Slow (12 fields)
Multi-screen
Movie shooting
Mode
4 / 9 / 16
Disc
8 cm DVD-R/-RW disc
(double-sided type : 2.8 GB/single-sided type: 1.4 GB),
No-cartridge type
Card
Not possible
9
DC10 E, DC20 E
GENERAL DESCRIPTION OF PRODUCT
Item
DC10 E
DC20 E
Shooting functions
Still image
recording
Compression method
JPEG
Single image
●
Continuous shooting (card recording only)
●
AEB (card recording only)
● Exposure correction amount (steps of ±0, -0.5, +0.5)
Photo button
Dedicated still image button
Form
Pressed halfway down ● (Only during recording standby)
1280 × 960, 640 × 480
Recording image size
1632 × 1224, 1280 × 960
640 × 480
Image quality
Super Fine, Fine, Normal
External flash compatible
×
Frame processing
●
Negative-positive reversal
×
Zebra pattern
×
Color bar
×
Self-timer
10 sec
Interval timer
×
Clear scan
×
Memory card
miniSD memory card
REC Search
●
REC Review
●
Standby switch
×
Power saving function
ON/OFF setting possible
(after recording has been continuously paused for 5 minutes)
Displayed text recording
×
Audio
Movie
Dolby Digital 2 ch (AC-3 2 ch)
Size
0.33-inch (TFT color)
● ON/OFF setting (Built-in microphone only)
Wind screen
EVF
LCD monitor
Pixels
123,000 pixels
Brightness adjustment
×
Color adjustment
×
Movable
×
Size
2.5-inch
Pixels
123,000 pixels
Brightness adjustment
●
Movable
● Mirror shooting supported
Playback
Frame playback
×
system
Slow playback (VR mode only)
Forward / Reverse (±1/2, ±1/4, ±1/8, ±1/16 speed)
Forward direction scan
1.5× (with audio), 5×, 15×, 25× speed
PLAY mode
Search
Reverse direction scan
2.5×, 5×, 15×, 25× speed
1× SP playback
Forward / Reverse
Skip
●
Photo search
×
Date search
×
Index search
×
End search
×
10
DC10 E, DC20 E
GENERAL DESCRIPTION OF PRODUCT
Item
DC10 E
DC20 E
PLAY mode
Playback effects
● (Not possible during still image playback and movie playback)
Playback zoom (5× zoom)
D. effects
Movie
×
Still image ×
D. fade
Movie
×
Still image ×
Multi screen
Data code display
Card
×
Date display/Camera data display
Slide show
●
Playback frame jump
●
Audio dubbing
×
AV insert
×
×
Zero set memory
Original image editing (VR mode)
● (Adding to Playlist, Delete, Divide)
Playlist editing (VR mode)
● (Delete, Divide, Move, Delete All)
Enter disc title
●
Disc protect
●
Create photo movie
●
Interface
Microphone input
×
(terminal)
Headphone output
×
DV terminal
×
Editing functions
System
S-Video terminal
Output only, multi-jack
AV terminal
Output only, multi-jack
Editing terminal
×
USB terminal
mini-B Receptacle
Memory card file transfer
● (USB file transfer)
Analog signal → DV signal conversion
×
Direct print
● (PictBridge-compatible printers only)
Easy Direct (PRINT/SHARE) button
●
Microphone attenuation
×
Microphone level meter
×
World clock
●
Text titles
×
Speaker
●
Confirmation beep
●
Tally lamp
×
Remote control sensor
●
Accessory shoe
×
Video ID
×
Custom keys
×
Night mode key
×
DV control
×
My Camera
×
Internal battery charging
● (CA-570 connected)
Backup power supply
Built-in (rechargeable lithium battery)
Battery pack power
BP-208 lithium ion battery
11
DC10 E, DC20 E
GENERAL DESCRIPTION OF PRODUCT
● External View
Note : Figure shows DC 20 E.
External differences from DC10 E : Only the flash and the mini video light in the front.
Fig. 1
12
DC10 E, DC20 E
GENERAL DESCRIPTION OF PRODUCT
2. Technical Explanation
2-1 Design Concept
The photograph shows DC20 E.
* Circle grip styling for superior operability.
Circle grip with a key positioned at the arc of the disc area.
Fits snugly in the user’s hand to assure superior operability.
* Distinctive and attractive rounded rear shape.
Design where the cylindrical shape of the lens continues from the front right through to the rear panel along the arc of the disc area.
A sense that discs are used (which is distinctly different from tapes) felt when the semicircular rear cover is viewed from the LCD
(right) side.
13
DC10 E, DC20 E
GENERAL DESCRIPTION OF PRODUCT
Differences in external appearance between DC10 E and DC20 E
1. Paint color used for rear cover
2. Grip cover (DC20 E : painted; DC10 E : not painted)
Differences in appearance by market
The coloring of DC10 E and DC20 E is the reverse of the Japanese specification in overseas markets.
14
DC10 E, DC20 E
GENERAL DESCRIPTION OF PRODUCT
2-2 TS Mech
The TS Mech is the DVD drive newly developed for DVD cameras. It consists of a mechanical section and a control board.
TS Mech
Size
Depth
70 mm
Width
84 mm
Height
14.3 mm
Weight
100 g
2×
Playback/recording speed
Usable disc
DVD-R, DVD-RW (1.4 GB, 8 cm)
2-2-1 Overview of TS Mech
TS Mech
14.3mm
84mm
70mm
Fig. 2
15
DC10 E, DC20 E
GENERAL DESCRIPTION OF PRODUCT
2-2-2 Main Mechanical Parts
Spindle motor
Pick-up
Control board
Tracking motor
Closeup of Pick-up
Suspension
Coil wiring material
Material of lens
protection
Magnet
Cover
Magnet
Coil wiring material
Coil wiring material
Suspension
Fig. 3
16
DC10 E, DC20 E
GENERAL DESCRIPTION OF PRODUCT
3. Performance
DC10 E, DC20 E
DVD video camera
1 Type
2 DVD recording modes
2-1 Movie
Either DVD-Video Recording (VR mode) or DVD-VIDEO (VIDEO mode). DVD-R discs support DVD-VIDEO only.
Movie compression method: MPEG2, Audio compression method: Dolby Digital 2ch (AC-32ch)
[
2-2 Still Image
]/sampling frequency 48 KHz
Complies with Exif Ver 2.2 (disc does not support DPOF), compression method : JPEG
3 Recordable discs
8 cm DVD-R/-RW discs (double-sided type : 2.8 GB/single-sided type: 1.4 GB)
*After shooting is completed for one side of a double-sided DVD, it is turned over and used.
*1 : VBR stands for Variable Bit Rate.
Estimated movie recording time
Recording mode
Average bit rate
Movie recording time
(double-sided : 2.8 GB/single-sided : 1.4 GB)
XP (High image quality)
Approx. 9 Mbps (VBR *1)
Approx. 40 minutes / Approx. 20 minutes
SP (Standard)
Approx. 6 Mbps (VBR)
Approx. 60 minutes / Approx. 30 minutes
LP (Long play)
Approx. 3 Mbps (VBR)
Approx. 120 minutes / Approx. 60 minutes
4 Continuous battery shooting time/Actual shooting time, Continuous playback time
*1 : “Normal” refers to the LCD brightness at the Normal setting.
*2 : “Bright” refers to the LCD brightness at the Bright setting.
DC10 E
When viewfinder is used
Continuous
BP-208
XP
SP
LP
Actual
recording
recording
Approx.75min
Approx.35 min
Approx.80 min
Approx.95 min
Approx.40 min
Approx.45 min
When LCD monitor is used
Continuous recording
Actual recording
Approx. 70 min (Normal*1)
Approx. 35 min (Normal)
Approx. 70 min (Bright*2)
Approx. 35 min (Bright)
Approx. 80 min (Normal*1)
Approx. 40 min (Normal)
Approx. 75 min (Bright*2)
Approx. 40 min (Bright)
Approx. 90 min (Normal*1)
Approx. 45 min (Normal)
Approx. 85 min (Bright*2)
Approx. 40 min (Bright)
Continuous playback
Approx. 80 min (Normal)
Approx. 90 min (Normal)
Approx. 100 min (Normal)
DC20 E
When viewfinder is used
Continuous
BP-208
XP
SP
LP
Actual
recording
recording
Approx.65min
Approx.35 min
Approx.70 min
Approx.80 min
Approx.35 min
Approx.40 min
When LCD monitor is used
Continuous recording
Actual recording
Approx. 60 min (Normal*1)
Approx. 30 min (Normal)
Approx. 60 min (Bright*2)
Approx. 30 min (Bright)
Approx. 70 min (Normal*1)
Approx. 35 min (Normal)
Approx. 65 min (Bright*2)
Approx. 30 min (Bright)
Approx. 75 min (Normal*1)
Approx. 35 min (Normal)
Approx. 75 min (Bright*2)
Approx. 35 min (Bright)
17
Continuous playback
Approx. 75 min (Normal)
Approx. 80 min (Normal)
Approx. 90 min (Normal)
DC10 E, DC20 E
GENERAL DESCRIPTION OF PRODUCT
5 Camera
5-1 Image sensing device
DC10 E : 1/4-inch interlaced CCD
DC20 E : 1/3.9-inch interlaced CCD
DC10 E : Approx. 1.33-megapixel
DC20 E : Approx. 2.20-megapixel
5-1-1 Total pixels
5-1-2 Effective pixels
Still image (CARD/DISC)
Movie
4:3
16:9 (IS OFF)
16:9 (IS ON)
5-1-3 Filter
5-1-4 Signal configuration
5-1-5 Scanning system
5-1-6 Minimum subject illumination
Auto mode
Night mode
5-1-7 Subject illumination range
5-2 Photo lens
5-2-1 Nominal focal length
5-2-2 35 mm film equivalent
Still image
DC10 E : Approx. 1.23-megapixel (1280 [H] × 960 [V])
DC20 E : Approx. 2.00-megapixel (1632 [H] × 1224 [V])
DC10 E : Approx. 850,000 pixels (1067 [H] × 800 [V])
DC20 E : Approx. 1.77-megapixel (1536 [H] × 1152 [V])
DC10 E : Approx. 920,000 pixels (1280 [H] × 720 [V])
DC20 E : Approx. 1.50-megapixel (1632 [H] × 918 [V])
DC10 E : Approx. 790,000 pixels (1184 [H] × 666 [V])
DC20 E : Approx. 1.38-megapixel (1568 [H] × 882 [V])
DC10 E : Color correction filter
DC20 E : RGB primary color filter
PAL standard color TV signal
625 lines, 50 fields / 25 frames
DC10 E : Approx. 6 lx (Shutter speed 1/25 sec)
DC20 E : Approx. 14 lx (Shutter speed 1/25 sec)
DC10 E : Approx. 0.5 lx (Shutter speed 1/2 sec)
DC20 E : Approx. 1.3 lx (Shutter speed 1/2 sec)
DC10 E : Approx. 0.5 lx to approx. 100,000 lx
DC20 E : Approx. 1.3 lx to approx. 100,000 lx
4.05 - 40.5 mm Optical 10× zoom
DC10 E : Approx. 38.9 - 389 mm
DC20 E : Approx. 38.1 - 381 mm
Movie
4:3 mode
DC10 E : Approx. 46.9 - 469 mm
DC20 E : Approx. 40.6 - 406 mm
Widescreen TV (16:9)
IS-OFF
DC10 E : Approx. 42.6 - 426 mm
DC20 E : Approx. 41.6 - 416 mm
IS-ON
DC10 E : Approx. 46.1 - 461 mm
DC20 E : Approx. 43.3 - 433 mm
5-2-3 Nominal diametric ratio
F1.8-2.8
5-2-4 Lens configuration
11 elements in 9 groups including one aspherical lens (double-sided aspherical lens) and gradation ND featured
5-2-5 Focus adjustment
Inner focus type. Manually adjustable (adjusted by SET dial)
5-2-6 Minimum object distance
10 mm (AF linked ; wide end), 1 m for full zoom area (from lens tip)
5-2-7 Power zoom
Power zoom supporting continuously variable speed (no levels). Slide lever operation. Zoom
speed can be adjusted by moving slide lever.
Zoom speed (Tape recording)
Optical zoom
REC : Approx. 1.8 sec to approx. 30 sec, PAUSE : Approx. 1.1 sec to approx. 30 sec
Electronic zoom
REC : Approx. 2.6 sec to approx. 32 sec, PAUSE : Approx. 1.9 sec to approx. 32 sec
5-2-8 Focal length display
None. Includes simple zoom display in viewfinder.
5-2-9 Macro mechanism
Wide end macro
5-2-10 Macro shooting distance
10 mm (from lens front)
5-2-11 Filter diameter
27 mm P0.5
5-2-12 Accessory
The following can be used: WD-H27, TL-H27, FS-H27U
5-2-13 Lens hood
None
5-2-14 Lens cap
Built-in type
18
DC10 E, DC20 E
GENERAL DESCRIPTION OF PRODUCT
5-3 Digital zoom
Still image
Movie
None
DC10 E : - 40× / 200×
DC20 E : - 40× / 200×
35 mm equivalent (at 4:3)
DC10 E : Approx. 1868 mm/9340 mm
DC20 E : Approx. 1624 mm/8120 mm
5-4 Image stabilization function
Included (Movie mode only)
5-4-1 System
Electronic system
5-4-2 Camera shake detection system
Angular velocity sensing (using piezoelectric vibration sensor)
5-5 Shooting modes
5-5-1 Movie camera
Records movies in VIDEO mode or VR mode to 8 cm DVD-R/-RW discs (It is not possible to
record using two standards at the same time on one disc). However, -R discs can record in
VIDEO mode only, and still images (640 x 480) can be recorded while recording disc movies
when a miniSD card is installed.
5-5-2 Still image camera
Disc Still Image mode and Card Still Image mode can be selected using the MENU button.
a. Disc mode
Still images (JPEG compression) are recorded to a 8 cm DVD-R/-RW disc.
(See section 6, “DVD recorder unit”)
b. Card mode
Still images (JPEG compression) are recorded to an miniSD memory card. Movie recording is
not available.
(Refer to the “Memory Card System”)
Magnification
5-6 Exposure control
5-6-1 AE mode
AUTO, P (Program AE), Av (aperture priority AE), Tv (shutter priority AE), Portrait, Sports,
Night, Snow, Beach, Sunset, Spotlight, Fireworks
5-6-2 Photometry system
Movie
Still image
5-6-3 Exposure correction function
Exposure lock
Exposure correction amount
Center weighted average photometry
: AUTO, P, Av, Tv, Portrait, Sports, Night
All area average photometry + 128-segment (16H × 8V) evaluative photometry
: Spotlight, Snow, Beach, Sunset mode
No photometry : SCN (Fireworks) ... (Fixed exposure : 1/50 sec)
128-segment frame evaluative photometry
: AUTO, Portrait, Sports, Night
All area average photometry + 128-segment (16H × 8V) evaluative photometry
: Spotlight, Snow, Beach, Sunset mode
Selectable from 128-segment evaluative photometry, center-weighted average photometry, and
spot photometry (center frame)
: Av, Tv, and P (evaluative photometry is the default for these).
Spot photometry is photometry for the center frame only.
No photometry : SCN (Fireworks) ... (Fixed exposure : 2 sec)
Exposure is locked by pressing the cross key (up).After the exposure is locked, the cross key can
be used to move the right or left and correct the exposure (except in AUTO mode).
±11 levels (-11 to ±0 to +11, ±2.75 EV)
Indicated by exposure correction bar and number in the viewfinder.
19
DC10 E, DC20 E
GENERAL DESCRIPTION OF PRODUCT
5-6-4 Electronic shutter
5-6-4-1 In Auto mode
Movie
5-6-4-2
5-6-4-3
5-6-4-4
5-6-4-5
5-6-4-6
1/30 to 1/500 sec (with auto slow shutter OFF)
1/25 to 1/500 sec (with auto slow shutter ON)
Still image
1/25 to 1/500 sec (with auto slow shutter OFF)
1/12.5 to 1/500 sec (with auto slow shutter ON)
When the image stabilizer is ON
1/100
When the image stabilizer is OFF
1/50
Slow Shutter mode
None
Av mode (Both Movie and Still image)
Aperture setting F1.8, 2.0, 2.4, 2.8, 3.4, 4.0, 4.8, 5.6, 6.7, 8.0, 9.5, 11, 14, 16
Tv mode
Shutter setting
Movie
: 1/6, 1/12.5*, 1/25, 1/50, 1/120, 1/250, 1/500, 1/1000, 1/2000 sec
Still image : 1/2, 1/3, 1/6, 1/12.5*, 1/25, 1/50, 1/120, 1/250, 1/500 sec
*Display shows “12”
Night mode
Both Tape and Card : 1/2 - 1/500 sec
Other modes
P, Portrait, Sports, Snow, Beach and Sunset modes are same as Auto Slow Shutter Off in AUTO
mode.
Spotlight
Movie
: 1/50 sec only
Still image : 1/25 sec to 1/100 sec
Fireworks
Movie
: 1/50 sec only
Still image : 2 sec only
5-7 AF (Auto Focus)
5-7-1 System
5-7-2 AF range finding area
Movie
Still image
5-7-3 Range-finding frame display
Movie
Still image
5-7-4 AF operating range
5-7-5 AF operation illumination range
5-7-6 AF mode switching
5-7-7 Forced infinity setting
5-8 Viewfinder
5-8-1
5-8-2
5-8-3
5-8-4
Rotation
Detaching eyepiece
Diopter movement range
Lens configuration
TTL-video signal sensing system AF
Screen center
Includes Ai (Artificial intelligence) AF function where the camera automatically selects from 9
range-finding frames on the screen and screen center function where range-finding is fixed at the
center frame on the screen (not user selectable). Also, AiAF and fixed at center can be selected
only when Focus Priority ON is selected. AF is fixed at the screen center during Stitch assist.
None
Included. The AF frame (including multiple locations/center AF frame for center fixed) that has
come into focus is indicated by a green light. The AF frame appears with a yellow frame when
the subject cannot be brought into focus or for slow shutter states with a shutter speed of 1/2
second or more to less than 1/6 second.
10 mm to infinity (Wide end), Full zoom area: 1 m to infinity (from lens front), Fireworks mode:
Fixed at infinity.
Approx. 50 lx - 100,000 lx
Continuous AF/Manual focus. AF ON/OFF switching is possible in all except AUTO mode (manual
focus operation is possible by right and left operation after pressing the cross key down button).
During manual focus, the “
” indicator appears in the viewfinder.
Holding down the focus button (cross key down) for about three seconds sets to Infinity and
displays “ ” in the viewfinder.
0.33-inch color LCD (approx. 123,000 pixels)
ON when LCD monitor closed (panel facing inwards) and during mirror shooting
Not possible (fixed)
Not possible
+1.5 to -5.5 diopter (when eye is at eyepiece)
Single-lens configuration
20
DC10 E, DC20 E
GENERAL DESCRIPTION OF PRODUCT
2.5-inch color LCD Approx. 123,000 pixels (560 [H] × 220 [V])
TFT active-matrix drive. RGB delta arrangement; ON when LCD monitor not closed (when
panel faces inwards)
Angle adjustment
Possible. Monitoring is possible for high-angle, low-angle, and mirror shooting.
Information display
Color display of operating mode, simple zoom position, remaining battery charge, remaining
disc space, time code, warnings and other indications. 10 languages supported : Japanese, Chinese (traditional), Chinese (simplified), English, German, French, Italian, Spanish, Russian, Korean. A limited number of indicators are displayed during mirror shooting.
LCD backlight adjustment (BACKLIGHT)
Adjustment is possible using button operation. The setting switches between “Bright” to “Dark”
each time the button is pressed. The default setting during battery operation is “Dark”. The
default setting during compact power adapter (CA) operation is “Bright”. If the power supply is
switched from battery operation to CA operation while the power is on, the setting made during
CA operation is used (CA operation default setting is used if no setting was made). In the same
way, if the power supply is switched from CA operation to battery operation while the power is
on, the setting made during battery operation is used (battery operation default setting is used if
no setting was made).
Relationship between LCD monitor and viewfinder (CVF)
5-9 LCD panel
5-9-1
5-9-2
5-9-3
5-9-4
Camera mode/Card Camera mode
LCD panel position
LCD panel
Movie playback mode/
Still image playback mode
CVF
LCD panel
CVF
Panel closed (panel facing inwards)
OFF
ON
OFF
ON
Panel closed (panel facing outwards)
ON
OFF
ON
OFF
ON
OFF
ON
OFF
ON *2
ON
ON
OFF
Panel open
Mirror shooting *1
*1 : In mirror mode, only the disc and self-timer indicators are displayed.
*2 : Mirror mode possible by menu selection.
5-10 White balance adjustment
5-10-1 Adjustment range
5-11 Digital feature functions
5-11-1 Fader
5-11-1-1 Fade time
5-11-2 Effects
5-11-3 Multi-screen
5-11-3-1 Number of screens
5-11-3-2 Operation mode
5-11-4 Card Mix
5-11-4-1 Mix type
5-11-4-2 Mix level adjustment
5-11-4-3 Card animation
5-11-5 Operation mode
TTL 128-segments, new white extraction system FAWB.
Auto/Set/Preset. Presets are available : Daylight : 5400 K; Shade : 8000 - 8500 K; Cloudy : 6000
K; Tungsten (incandescent lamps and halogen bulbs) : 3000 K; Fluorescent H (3-wavelength
type fluorescent) : 6500 K; Fluorescent (white fluorescent) : 4000 K.
Presets are not possible in SNC and AUTO modes.
2,800K to 8,000K
The following modes are provided : Fader, Effects, Multi-screen
Fader
: Linked to Start/Stop button. Can be used 1 time when Fade mode displayed.
(Mode indication goes out when Fader ends.)
Effects
: Effect continues until mode is turned OFF.
Multi-screen : Loads and displays multiple screens at set interval or manually. Displayed until
mode is turned OFF.
Audio synchronized fader
Auto Fade (Japanese model : Fade to white, Overseas model: Fade to black), Wipe, Corner Wipe,
Jump, Flip, Puzzle, Zigzag, Beam, Tide
Approx. 4 sec
Black & White, Sepia, Art, Mosaic, Ball, Cube, Wave, Color Mask, Mirror (only Black & White
is available during Disc/Card Still Image Recording mode)
Except in Night mode, Auto mode
4 (2 × 2), 9 (3 × 3), 16 (4 × 4)
Manual, Fast (4 frames), Normal (6 frames), Slow (8 frames)
Card Chroma key, Card Lumi. key, Camera Chroma key, Card Animation
(Sample images are included in the supplied CD.)
32 levels
Corner Animation, Straight Animation, and Random Animation
See section 12, “Relationship between DC10 E, DC20 E functions and modes”.
21
DC10 E, DC20 E
GENERAL DESCRIPTION OF PRODUCT
5-12 Built-in microphone
5-12-1 Wind screen function
5-13 Built-in Flash Shooting (DC20 E only)
5-13-1 Flash modes
5-13-2 Shutter speed
5-13-3 Shooting distance
5-14 Auxiliary light source (DC20 E only)
5-14-1 Flash mode
5-15 Other additional functions
5-15-1 Disc counter
5-15-2 Data code
a. Time and date
Stereo (using electret condenser microphone)
Omni-directional microphone × 2 + Electric circuitry for stereo
Included. With ON/OFF switch (Menu selection. Available for built-in microphone only)
Pre-flash light adjustment system
Auto flash, auto flash with red-eye reduction, manual flash, flash off
Flash On : Flash at 1/1000 sec or less in Movie mode and at 1/500 sec or less in Still Image mode.
Wide end, approx. 80 cm to 2.5 m, Tele end, approx. 1 m to 1.3 m
The allowable shooting range is indicated as approx. 1 to 2 m in the Instruction Manual.
Includes mini video light (equipped with high-brightness white LED) with light button.
Enables shooting at distances of approx. 1.5 m in AUTO mode.
The AF auxiliary light is set to Auto when AF Auxiliary Auto is selected and when red-eye
reduction function is selected. The AF auxiliary light is OFF in Fireworks mode.
The total cumulative time for a recoding scene is indicated by hours: minutes: seconds.
The date and camera information during recording are automatically recorded and can be displayed during playback.
Automatic calendar range: January 1, 2005 through December 31, 2030 (the initial setting is
January 1, 2005)
The recording start (year/month/day) display can be selected from the three options below:
Supports world clock (Selecting the city name of your destination automatically adjusts to the
date and time of the destination. Supports daylight saving time), and records the recording start
time (hour/minute/second).
Shutter speed and aperture value information are recorded (but not displayed during recording),
and can be displayed during playback. During playback, time can be displayed in five different
modes (date only, time only, date and time, or date and time and camera data).
b. Camera data
5-15-3 Accessory shoe
5-15-4 REC Search function
5-15-5 REC Review function
5-15-6
5-15-7
5-15-8
5-15-9
Not supported
None
Supported. Accessed by operating the Recording Check button when camera recording is paused. Plays
back the movie from the beginning of the recorded scene and then returns to the state before playback
started. There is no sound.
Remote control reception ON/OFF Possible. This can be done in Camera mode and PLAY mode (by selecting from menu).
Headphone volume adjustment
Not available (Headphone terminal not included)
Widescreen TV (16:9)
When Widescreen TV mode is selected (button setting), the LCD panel screen changes to letterbox
display (top and bottom of the screen are masked with black bands). Setting is possible in
AUTO mode. Widescreen TV cannot be set under VIDEOmode and LP mode
AEB shooting
Recording is done in Card/Camera mode with exposure correction automatically changed to ±0
level, -0.5 level, and +0.5 level. (Continuous shooting mode: when AEB
is selected) Flash
shooting is not possible.
5-15-10 Still image check time setting
5-15-11 Microphone attenuation
5-15-12 Microphone level meter
5-15-13 Image effect settings
Vivid
Neutral
Low Sharpening
Soft Skin Detail
Custom
After releasing the Photo button, the display time can be set for checking the still images.
One of 6 settings; OFF (0 sec), 2, 4, 6, 8, or 10 seconds can be selected as the setting mode.
No function
No function
The available image effect settings in the FUNC. menu are Vivid, Neutral, Low Sharpening, Soft
Skin Detail, and Custom. These settings cannot be made in Special Scene mode.
Emphasizes contrast and color depth, and presents images with vibrant and striking colors.
Limits the contrast and color depth, and presents pure images without any enhancements.
Provides image with less distinct outlines and a softer touch.
Smoothes the outlines of skin sections, and presents skin sections with a softer tone.
Enables adjustment of the brightness, contrast, sharpness, and color depth.
22
DC10 E, DC20 E
GENERAL DESCRIPTION OF PRODUCT
6 DVD Recorder section
6-1 Recording functions
Camera shooting and recording only (analog line input recording is not possible), movie and
audio is recorded to 8 cm DVD-R/-RW disc.
When set to Disc Movie mode, movies are recorded in a 8 cm DVD-R/-RW disc in VR mode or
VIDEO mode. However, recording is only possible in VIDEO mode for 8 cm DVD-R discs
(automatic setting). The image quality setting mode can be selected from XP, SP, or LP (FUNC.
menu selection).
When set to Disc Still Image mode, still images are recorded to a 8 cm DVD-R/-RW disc (JPEG
compression).
The available recording pixels are 1632 × 1224 (DC20 E only), 1280 × 960, 640 × 480, and the
available image settings of Super Fine, Fine, and Normal. Still images cannot be recorded during
movie playback.
Based on the DCF (Design rule for Camera File system) and still image (Exif Ver 2.2) file management specifications/DPOF (Digital Print Order Format) file management specifications, the
following names are assigned to recorded discs after initializing in the Initialization menu.
6-1-1 Movie
6-1-2 Still image
a. File name and folder name
Types of files
Type
Folder name and file name
Still image (Exif 2.2) file
JPEG
//DCIM/xxxCANON/PIC_yyyy.JPG
ZoomBrowser
JPEG
//DCIM/xxxCANON/AUT_yyyy.JPG
xxx : Folder No., yyy : File No., z : A to Z
DCF folder and file name//DCIM/xxxCANON/AUT_yyyy.JPG xxx: Folder No.,
yyyy : File No., Internal management is performed based on folder number-file number.
Photographed images are assigned file numbers from 0001 to 9900, and are stored in folders
(100 files to a folder). Each folder is assigned numbers 100 to 998.
6-1-3 Estimated number of recordable still images on disc (single-sided type)
Image size
1632 × 1224
(DC20 E only)
1280 × 960
640 × 480
Image quality
mode
Number of recorded images (VIDEO mode)
Number of recorded images (VR mode)
Approx. 1025
Approx. 1025
S.Fine
Fine
Approx. 1585
Approx. 1590
Normal
Approx. 2910
Approx. 2915
S.Fine
Approx. 1630
Approx. 1635
Fine
Approx. 2495
Approx. 2500
Normal
Approx. 4595
Approx. 4600
S.Fine
Approx. 7945
Approx. 7960
Fine
9999
Approx.11680 (9999) *1
Normal
9999
Approx.19470 (9999) *1
* The number of recordable images depends on the usage (subject and shooting) conditions.
The number of images that can be recorded on a double-sided disc is twice that of a singlesided disc.
*1 : The maximum display is 9999.
6-2 Playback functions
6-2-1 Playback disc
6-2-2 Playback type
a. Standard Playback
b. Forward search
c. Reverse search
d. Slow playback in both directions
e. Scene search
8 cm DVD-R (DVD-VIDEO), 8 cm DVD-RW (DVD-VIDEO , DVD-VR)
Video and audio (Dolby Digital 2ch) recorded in XP, SP, and LP modes
4 levels : 1.5× speed (with audio), 5× speed, 15× speed, and 25× speed
4 levels : 2.5× speed, 5× speed, 15× speed, and 25× speed
±1/2×, ±1/4×, ±1/8×, ±1/16× speed, slow playback not possible in the DVD-VIDEO mode.
Function plays the beginning of the current scene or the beginning of the next scene
* The disc counter during playback displays the playback time from the beginning of the recorded scene only.
23
DC10 E, DC20 E
GENERAL DESCRIPTION OF PRODUCT
6-3 Editing functions
6-3-1 Original movie editing
6-3-2 Playlist editing
6-3-3 Disc title
6-3-4 Disc protect
6-3-5 Create photo movie
6-4 Finalize
DVD-R
This function edits movies or dics
This function edits original movies (scenes) recorded in VR mode. Deleting, dividing and adding to playlist is possible. When images are recorded in the DVD-VIDEO mode (-RW disc) only
the scene which has just been shot can be deleted. The dividing of one phot-movie is not possible.
This function enables editing of lists of the scene playback order in VR mode.
Delete, Divide, Move, Erase Entire Playlist are available. With thumbnail display (6 thumbnails
in 2 rows and 3 columns).
This function enters an original name for the disc. Alphanumeric characters and symbols can be
entered. The maximum number of input characters is 20 single-byte characters. The name can be
confirmed on standalone players (depending on the player). The disk title input is possible in all
disks and the recording modes in cases where they are not finalized.
This function protects the disc by disabling recording and editing. However, discs can still be
initialized.
This function converts Disc Still Images (JPEG compression) to MPEG movies.
Playlist editing and playback in a DVD player is possible for the still images. With single-operation photo movie creation function.The photo movie function is possible in all discs and the
recording modes in cases where they are not finalized.
This process enables playback in other players and recorders that support DVD-VIDEO and
DVD-VR. In this finalization process, the shorter the recording time, the more dummy data is
needed fill the remaining space, and this tends to result in a longer finalization time. Execute/
Cancel. When this finalization is performed, be aware that certain disc types and recording
systems have limitations on additional recording, editing, and initializations. Includes display of
finalization time and remaining finalization time.
Finalization is not possible when using a battery pack. Finalization is possible when the Compact Power Adapter is connected. Be especially careful during finalization since the data can be
corrupted if the Compact Power Adapter is disconnected during finalization.
Additional recording
Editing
Initialization
Not possible
Not possible
Not possible
Not possible (*)
Not possible (*)
Enabled
Enabled
Enabled
Enabled
(VIDEO mode only)
DVD-RW
(VIDEO mode)
DVD-RW
(VR mode)
* When the VIDEO mode (DVD-RW) is recorded, additional recording and editing become possible by releasing finalizing. The only
editing operations are the input of disc title and deleting of a scene.(Deleting a scene is possible only for the image that has just been
shot: it is not possible on a disc which has been removed from the body or played back.
6-5 Input signals
6-5-1 USB port only
mini-B
USB device class
Supports USB 2.0 Hi-Speed class
24
DC10 E, DC20 E
GENERAL DESCRIPTION OF PRODUCT
6-6 Output signals
6-6-1 DV terminal
6-6-2 Multi-pin
a. Video signals
Signal configuration
Output Impedance
Output Signal level
Horizontal resolution
Self recording/playback
Camera EE OUT
b. Audio signal
Types of signals
Output Impedance
Output Signal level
Frequency characteristics
Audio signal S/N
c. S-Video signal
Signal configuration
Video signals
Impedance
Signal level
Horizontal resolution
Self recording/playback
Camera EE OUT
6-6-3 Headphone terminal
6-6-4 USB terminal
USB device class
Compatible computer systems
PC operating system
6-7 Memory card system
6-7-1 Types of cards used
6-7-2 Recordable image types
a. Still image
Disc Camera mode
Card Camera mode
During video playback
b. Movie
None
Flat type Multi 10-pole
PAL standard color video signals
75 Ω
1 Vp-p (composite)
Approx. 530 TV lines (screen center)
Max. 530 TV lines (screen center)
Catalog value: Approx. 530 TV lines (screen center)
Stereo audio signal
Max. 75 KΩ
−10 dBv (with 47 KΩ load)
60 Hz to 16 KHz (Range between 1 KHz reference ± 3 dB)
Min. 48 dB
PAL Y/C separated video signal
1 Vp-p (luminance + sync signals)
75 KΩ
0.3 Vp-p (Color burst signal)
Approx. 530 TV lines (screen center)
Max. 530 TV lines (screen center)
Catalog value: Approx. 530 TV lines (screen center)
None
Supports USB 2.0 Hi-Speed class
PTP class, mass storage class
Windows : IBM PC/AT compatible, NEC PC98-NX Series
Macintosh : Power Macintosh, PowerBook, iMac, iBook
Windows : Windows 98 SE, Windows ME, Windows 2000, Windows XP
Macintosh : Mac OS X 10.1.5 or later
“MyDVD for Canon” Software operates only on Windows ME, Windows 2000 (SP4), and Windows XP.
miniSD memory card
JPEG compression recording
When [FINE] or [NORMAL] is selected in the FUNC. menu, still images (640 × 480) can be
recorded to the memory card by pressing the photo button while movie is being recorded to disc.
Still image is recorded using the Photo button (image size and image quality are selectable).
Writing in Progress warning is displayed in the EVF/LCD.
Not possible
Not possible
25
DC10 E, DC20 E
GENERAL DESCRIPTION OF PRODUCT
6-7-3 File names/folder names
Based on the DCF (Design rule for Camera File systems) and still image (Exif 2.2) file management specifications / DPOF (Digital Print Order Format) file management specifications, the
following names are assigned to recorded cards after initializing in the Initialization menu.
CANON DV
a. Card volume label
Types of files
Type
Folder name and file name
Still image (Exif 2.2) file
JPEG
//DCIM/xxxCANON/IMG_yyyy.JPG
PhotoStitch
JPEG
//DCIM/xxxCANON/STz_yyyy.JPG
ZoomBrowser
JPEG
//DCIM/xxxCANON/AUT_yyyy.JPG
DPOF file
TEXT
//MISC/AUTPRINT.MRK
DPOF automatic transmission file
TEXT
//MISC/AUTXFER.MRK
b. File number
xxx : Folder No., yyy: File No., z: A to Z
DCF folder and file name//DCIM/xxxCANON/AUT_yyyy.JPG xxx : Folder No.,
yyyy : File No., Internally managed by folder number-file number.
Photographed images are assigned file numbers from 0001 to 9900, and are stored in folders
(100 files to a folder). Each folder is assigned numbers 100 to 998.
Relationship between folder No. and file No.
Folder No.
File No.
Saved files
101
0101 0102 0103 ···· 0199 0200
102
0201 0202 0203 ···· 0299 0300
···
198
9801 9802 9803 ···· 9899 9900
200
0001 0002 0003 ···· 0099 0100
Recording area of photographed image
···
998
9801 9802 9803 ···· 9899 9900
Photographed images start from 101-0101, and are numbered to be greater than Directory No. File No. of files saved on Memory Cards.
6-7-4 Recorded image size/image quality
a. Still image recording
During simultaneous movie recording
640 × 480 (VGA) / Switchable between Fine and Normal
During still image recording
1632 × 1224 (DC20 E only), 1280 × 960, 640 × 480 / Switchable between Super Fine, Fine, and
Normal
During movie playback
Not possible
b. Movie recording
Not possible
6-7-5 Number of recorded images (miniSD card)
Image size
(Still image)
Image quality
Number of recorded images
16MB Card
32MB Card
64MB Card
Data size
128MB Card
256MB Card
/1 card
1632 × 1224
S.Fine
9
20
40
85
175
1360KB
(DC20 E only)
Fine
14
30
65
135
275
880KB
Normal
25
55
120
250
500
480KB
S.Fine
15
30
65
140
280
850KB
1280 × 960
640 × 480
Fine
20
50
105
215
430
560KB
Normal
40
90
195
395
795
300KB
S.Fine
75
165
340
690
1380
176KB
Fine
105
285
470
955
1900
120KB
Normal
170
365
750
1525
3040
72KB
* The given number of recorded images is for reference only. The number varies greatly depending on the subject and other conditions
when taking pictures.
6-7-6 Card initialization
Initialization using the Initialization command in the menu of the main unit. Operation is not
guaranteed with PC initializations as problems can occur with some OS.
26
DC10 E, DC20 E
GENERAL DESCRIPTION OF PRODUCT
6-7-7 Usable memory card
miniSD memory card
SanDisk
: 16MB, 32 MB, 64 MB, 128 MB, 256 MB
Matsushita Electric : 16MB, 32 MB, 64 MB, 128 MB, 256 MB
Toshiba
: 16MB, 32 MB, 64 MB, 128 MB, 256 MB
6-7-8 Number of continuous shots and number of stored continuous shots (card still image only)
DC20 E
Number of continuous shots recorded per second
Image size
Normal continuous
High-speed continuous
shooting
shooting
Flash recording
Maximum continuousness
number of recordable images
1632 × 1224
Approx. 2.1 images
Approx. 2.5 images
Approx. 1.8 images
10 images
1280 × 960
Approx. 2.5 images
Approx. 4.2 images
Approx. 2.1 images
10 images
640 × 480
Approx. 2.5 images
Approx. 4.2 images
Approx. 2.1 images
60 images
* The flash output is approx. 1/4 of the output when taking single shots. The number of recordable images when using the flash is identical to the Maximum continuousness number of
recordable images in the table above.
DC10 E
Number of continuous shots recorded per second
Image size
Maximum continuousness
Normal continuous
High-speed continuous
shooting
shooting
1280 × 960
Approx. 3.0 images
Approx. 5.0 images
10 images
640 × 480
Approx. 3.0 images
Approx. 5.0 images
60 images
6-8 Digital feature display
6-9 Direct print
6-9-1 Printable images
6-9-2 Print format
6-9-3 Trimming
6-9-4 Date printing
6-9-5 Number of print copies
number of recordable images
None
Still images recorded on memory cards or discs can be easily printed through controls on the
video camera by connecting to a CP-200/300 compact printer or PictBridge-compatible (
)
printer (sold separately), using the supplied IFC-300PCU interface cable.
Only the still images (JPEG compression) which have been recorded on the miniSD memory
cards or discs.
Single image/eight-image print (only when the card size paper tray has been installed in CP200/
300/220/330/400/500/600). Printing is not available from the index screen.
Possible
Possible (when connected to CP-220/330/400/500/600 or PictBridge-compatible printer)
Easy Print : 1 to 99 sheets
DPOF printing (miniSD memory card only) : Max. 998 images, 1 to 99 each
27
DC10 E, DC20 E
GENERAL DESCRIPTION OF PRODUCT
6-9-6 Print systems
Print
manufacturer
Printer
specifications
Suitable printer
Printer
specifications
when
connected to
DC10 E/
DC20 E
Other
manufacturer
Canon
CP specifications
CP-10/100
Not supported
CP specifications
+PictBridge
specifications
CP-200/3002nd/220/
330/400/500/600
BJ Photo
specifications
only
CP specifications
+PictBridge
specifications
BJ-895PD/535PD/F890PD,
PIXUS 50i/80i/450i/470PD
PIXUS 990i/900PD/
DS700
Not supported
PictBridge
specifications
PictBridge
specifications
PictBridge control
PictBridge control
PictBridge
specifications
PictBridge control
SET
101-0141
38/45
1280x960
SET
101-0141
38/45
1280x960
PictBridge
specifications
only
SET
101-0141
38/45
1280x960
When the printer
is connected
Paper setting
Paper size
Printing functions
Paper type
Borders/
no borders
8-of-1 screen
layout
(When using card paper)
Sectional printing
Image optimizing
Date printing
Trimming
( ) : When the printer is supported
The model names of supported printers are all Japanese model names.
28
DC10 E, DC20 E
GENERAL DESCRIPTION OF PRODUCT
6-10 Other functions
6-10-1 Automatic stop function
6-10-2 Power automatic stop function
6-10-3 Copy between media
6-10-4 World clock display
6-10-5 Speaker
6-10-6 Battery charging function
Charging time
6-10-7 File transfer
USB file transfer
When forward still image playback is continued for approx. 5 minutes, or reverse still image
playback is continued for approx. 5 minutes. When the disc end or beginning is reached.
When Recording Pause continues for approx. 5 minutes. When the battery voltage falls below a
specified value.
This function copies disc still images (JPEG compression) to a card or card still images (JPEG
compression) to a disc. With still image all copy function.
Set reference city (city of time clock setting) and select name of city when shooting. Date and
time are automatically adjusted to local date and time, and recorded in data code.
Built-in, volume adjustment provided
When the Canon Compact Power Adapter CA-570 is connected, the battery pack installed in the
battery pack compartment can be charged. (During charging, the charge lamp flashes [Charging
level : One flash per second for a charge level of 0% to approximately 50%, two flashes per
second for a charge level of 50% to 95%, and the lamp lights for a charge level of 95% or more]).
BP-208: Approx. 165 minutes
Still images recorded on memory cards and discs can be uploaded to a PC in the camcorder by
connecting the included IFC-300PCU interface cable between a USB port on the PC and the
USB port of the camcorder. Still images from a PC can be downloaded to memory cards in the
camcorder. However, writing to the disc is not possible.
6-10-8 Analog / Digital conversion
6-10-9 Playback zoom
Not possible
If the zoom lever is flipped to the Tele side during still image playback from the card or disc, the
image being played back can be enlarged up to 5 times its size (The initial setting of the playback
zoom switch is 2× playback zoom, and this can be changed to 1× to 5× using the zoom lever).
Playback zoom is cancelled by holding the zoom lever to the Wide side until the frame display no
longer appears. Zoom not possible during movie playback.
Position of the enlarged section during enlarged screen view can be changed by the cross key
(On the LCD monitor, a frame is displayed to show the zoom-in area, and this frame can be
moved using the four direction operations of the cross key).
6-10-10 PRINT/SHARE button
Supported. This button lights up when the camcorder is connected to a PictBridge-compatible
printer or PC (ZoomBrowser 4.6x or higher must be installed). The button can then be pressed to
send print images on the printer or send images to the PC.
When the supplied “MyDVD for Canon” software is installed (Windows XP only) and a 12 cm
DVD (-R/-RW) black disc is loaded in the PC, this button turns on. Pressing the button enables
burning of the 12 cm DVD in the PC (one-operation burning function). Discs in the DC10 E,
DC20 E need to be finalized. The 12 cm DVDs on the PC side are also finalized.
Built-in. When the battery is not used for about three months, the power may be discharged and
the date and time settings will be lost. The date and time need to be reset after either connecting
a power supply or installing batteries and charging. It takes approximately 24 hours for a full
charge.
6-10-11 Built-in lithium battery
7 Terminals
7-1 DV terminal
7-2 Multi-pin
7-3 External microphone input terminal
7-4 Headphone terminal
7-5 USB terminal
7-6 Memory card terminal
7-7 Battery terminal
7-8 DC input terminal
None
Multi 10-pin (AV, S), output only
None
None
mini-B Receptacle, (USB 2.0 Hi-Speed class compliant)
Special multi-pin
Special 3-pin
φ 3.4 mm jack
29
DC10 E, DC20 E
GENERAL DESCRIPTION OF PRODUCT
8 Power supply
8-1 Input power supply
8-2 Power consumption
DC10 E
DC20 E
7.4 V DC (battery pack), 8.4 V DC (DC IN)
Shooting
Playing
Shooting
Playing
9 Dimensions (W × H × D)
10 Weight
10-1 Main unit
10-2 Total equipped weight
XP : Approx. 5.1 W, SP : Approx. 4.6 W, LP : Approx. 4.2 W (CVF)
XP : Approx. 5.2 W, SP : Approx. 4.7 W, LP : Approx. 4.3 W (LCD Normal)
XP : Approx. 5.3 W, SP : Approx. 4.8 W, LP : Approx. 4.4 W (LCD Bright)
XP : Approx. 4.6 W, SP : Approx. 4.2 W, LP : Approx. 3.8 W (LCD Normal)
XP : Approx. 5.8 W, SP : Approx. 5.3 W, LP : Approx. 4.8 W (CVF)
XP : Approx. 5.9 W, SP : Approx. 5.4 W, LP : Approx. 4.9 W (LCD Normal)
XP : Approx. 6.0 W, SP : Approx. 5.5 W, LP : Approx. 5.1 W (LCD Bright)
XP : Approx. 4.9 W, SP : Approx. 4.4 W, LP : Approx. 4.1 W (LCD Normal)
* The power consumption during recording shows the data during recording and AF focusing.
Approx. 48 × 86 × 122 mm (1.9 × 3.4 × 4.8 in.) (Not including maximum protrusions)
Approx. 415 g (14.6 lb)
Approx. 465 g ( 1.0 lb)
(Including BP-208, DVD disc, and memory card)
11 Temperature and humidity requirements
11-1 Temperature and humidity requirements for performance
0 to 40°C, 85% (relative humidity)
11-2 Temperature and humidity requirements for operation
−5 to 45°C, 65% (relative humidity)
30
DC10 E, DC20 E
GENERAL DESCRIPTION OF PRODUCT
12 Relationship between DC10 E, DC20 E functions and modes
*:Initial setting
–: Cannot be set
Settings can be changed, but operations are disabled. Backup is
performed.
Enabled when card simultaneous recording is ON. Settings can be
made when card simultaneous recording is OFF, but operation is
disabled. Backup is performed.
Conditional backup is performed.
Settings can be made when AF and Focus Priority is ON. Backup is
performed.
Backup is performed (not cancelled when power is shut off).
Except when card simultaneous recording is OFF. Cannot be set
when card simultaneous recording is OFF. And backup is
performed.
Effect function is black and white.
Settings can be changed, but operation is single shot.
Disc Still Image
SCN
P
AUTO
Portrait
Sports
Night
Snow
Beach
Sunset
Spotlight
Fireworks
P
Tv
Av
Large
Recording
pixels
Medium
Small
Super Fine
Compression
ratio
Fine
Normal
Simultaneous
recording
640 x 480
OFF
–
–
–
–
–
–
–
–
–
–
–
–
Fine
–
–
–
–
–
–
–
–
–
–
–
–
Normal
–
–
–
–
–
–
–
–
–
–
–
–
Continuous
shooting
–
–
–
–
–
–
–
–
–
–
–
–
High-speed
continuous
shooting
–
–
–
–
–
–
–
–
–
–
–
–
AEB
–
–
–
–
–
–
–
–
–
–
–
–
Night
–
–
–
–
–
–
–
–
–
–
–
–
–
–
–
–
–
–
–
–
–
–
–
–
–
–
–
–
–
–
–
–
–
–
–
AUTO
–
–
–
–
–
–
–
–
–
Sun
–
–
–
–
–
–
–
–
–
Shade
–
–
–
–
–
–
–
–
–
Cloudy
–
–
–
–
–
–
–
–
–
Tungsten
–
–
–
–
–
–
–
–
–
–
–
–
Auto
Always On
Flash
(DC20 E only) OFF
Red-eye
Reduction
Single
shooting
Drive mode
Night
Mini video
OFF
light
(DC20 E only) ON
ON
Digital Zoom
OFF
White
balance
Color effects
Metering
system
Fluorescent H
–
–
–
–
–
–
–
–
–
Fluorescent
–
–
–
–
–
–
–
–
–
MANUAL
–
–
–
–
–
–
–
–
–
OFF
–
–
–
–
–
–
–
–
–
Vivid
–
–
–
–
–
–
–
–
–
Neutral
–
–
–
–
–
–
–
–
–
Low
Sharpening
–
–
–
–
–
–
–
–
–
Soft Skin
Detail
–
–
–
–
–
–
–
–
–
Custom
–
–
–
–
–
–
–
–
–
Evaluative
metering
–
–
–
–
–
–
–
–
–
Center
weighted
average
metering
–
–
–
–
–
–
–
–
–
Spot metering
(Center or AF
frame
continuous)
–
–
–
–
–
–
–
–
–
AF
–
MF
–
MF infinity
–
AiAF
–
–
Center fixed
–
–
AF auxiliary
light AUTO
(DC20 E only)
AF auxiliary
light OFF
(DC20 E only)
AF
Digital
Effects
–
–
Focus Priority ON
–
Focus Priority
OFF
–
Fader
–
Effects
–
–
–
–
–
–
–
–
–
–
–
Multi-screen
–
–
–
–
–
–
–
–
–
–
–
–
Card MIX
–
–
–
–
–
–
–
–
–
–
–
–
OFF
–
–
–
–
–
–
–
–
–
–
–
–
ON
–
–
–
–
–
–
–
–
–
–
–
–
EXP lock
–
Photo stitch
–
31
DC10 E, DC20 E
GENERAL DESCRIPTION OF PRODUCT
Card Still Image
P
SCN
AUTO
Portrait
Sports
Night
Snow
Beach
Sunset
Spotlight
Fireworks
P
Tv
Av
Large
Recording
pixels
Medium
Small
Super Fine
Compression
ratio
Fine
Normal
Simultaneous
recording
640 x 480
OFF
–
–
–
–
–
–
–
–
–
–
–
–
Fine
–
–
–
–
–
–
–
–
–
–
–
–
Normal
–
–
–
–
–
–
–
–
–
–
–
–
–
–
–
–
–
–
–
–
Auto
Always On
Flash
(DC20 E only) OFF
Red-eye
Reduction
Single
shooting
Drive mode
Night
Continuous
shooting
–
High-speed
continuous
shooting
–
AEB
–
Night
–
–
–
ON
–
–
–
–
–
–
–
–
–
–
–
–
OFF
–
–
–
–
–
–
–
–
–
–
–
–
AUTO
–
–
–
–
–
–
–
–
–
Sun
–
–
–
–
–
–
–
–
–
Shade
–
–
–
–
–
–
–
–
–
Cloudy
–
–
–
–
–
–
–
–
–
Tungsten
–
–
–
–
–
–
–
–
–
Fluorescent H
–
–
–
–
–
–
–
–
–
Fluorescent
–
–
–
–
–
–
–
–
–
MANUAL
–
–
–
–
–
–
–
–
–
OFF
–
–
–
–
–
–
–
–
–
Vivid
–
–
–
–
–
–
–
–
–
Neutral
–
–
–
–
–
–
–
–
–
Low
Sharpening
–
–
–
–
–
–
–
–
–
Soft Skin
Detail
–
–
–
–
–
–
–
–
–
Custom
–
–
–
–
–
–
–
–
–
Evaluative
metering
–
–
–
–
–
–
–
–
–
Center
weighted
average
metering
–
–
–
–
–
–
–
–
–
Spot metering
(Center or AF
frame
continuous)
–
–
–
–
–
–
–
–
–
AF
–
MF
–
MF infinity
–
AiAF
–
–
Center fixed
–
–
Mini video
OFF
light
(DC20 E only) ON
Digital Zoom
White
balance
Color effects
Metering
system
AF auxiliary
light AUTO
(DC20 E only)
AF auxiliary
light OFF
(DC20 E only)
AF
Digital
Effects
Photo stitch
–
–
Focus Priority ON
–
Focus Priority
OFF
–
Fader
–
Effects
–
Multi-screen
Card MIX
–
–
–
–
–
–
–
–
–
–
–
–
–
–
–
–
–
–
–
–
–
–
–
–
–
–
–
–
–
–
–
–
–
–
–
–
–
OFF
ON
EXP lock
–
–
32
DC10 E, DC20 E
GENERAL DESCRIPTION OF PRODUCT
Disc Movie
–
–
–
–
–
–
–
–
–
–
–
–
–
–
–
–
–
–
–
–
–
–
–
–
–
–
–
–
–
–
–
–
–
–
–
–
–
–
–
–
–
–
–
–
–
–
–
–
–
–
–
–
–
–
–
–
–
–
–
–
–
–
–
–
–
–
–
–
–
–
–
–
–
–
–
–
–
–
–
–
–
–
–
–
–
–
–
–
–
–
–
–
–
–
–
–
–
–
–
–
–
–
–
–
–
–
–
–
–
–
–
–
–
–
–
–
–
–
–
–
–
–
–
–
–
–
–
–
–
–
–
x
(DC20 E only)
(DC20 E only)
–
ON
–
OFF
Metering
–
–
–
–
–
–
–
–
–
–
–
–
–
–
–
–
–
–
–
–
–
–
–
–
–
–
–
–
–
–
–
–
–
–
–
–
–
–
–
–
–
–
–
–
–
–
–
–
–
–
–
–
–
–
–
–
–
–
–
–
–
–
–
–
–
–
–
–
–
–
–
–
–
–
–
–
–
–
–
–
–
–
–
–
–
–
–
–
–
–
–
–
–
–
–
–
–
–
–
–
–
–
–
–
–
–
–
–
–
–
–
–
–
–
–
–
–
–
–
–
–
–
–
–
–
–
–
–
–
–
–
–
–
–
–
–
–
–
–
–
–
–
–
–
–
–
–
–
–
–
–
–
–
–
–
–
–
–
–
–
–
–
–
–
–
–
–
–
–
–
–
–
–
–
–
–
–
–
–
–
–
–
–
–
–
–
–
–
–
–
(DC20 E only)
–
(DC20 E only)
–
–
–
–
–
–
–
–
–
–
–
–
–
–
–
–
–
–
–
–
–
–
–
–
–
–
–
–
–
–
–
–
–
–
–
–
–
–
–
–
–
–
–
–
–
–
–
–
–
–
–
–
–
–
–
33
DC10 E, DC20 E
GENERAL DESCRIPTION OF PRODUCT
Disc Movie
–
–
–
–
–
–
–
–
–
–
–
–
–
–
–
–
–
–
–
–
–
–
–
–
–
–
–
–
–
–
–
–
–
–
–
–
–
–
–
–
–
–
–
–
–
–
–
–
–
–
–
–
–
–
–
–
–
–
–
–
–
–
–
–
–
–
–
–
–
–
–
–
–
–
–
–
–
–
–
–
–
–
–
–
–
–
–
–
–
–
–
–
–
–
–
–
–
–
–
–
–
–
–
–
–
–
–
–
–
–
–
–
–
–
–
–
–
–
–
–
–
–
–
–
–
–
–
–
–
–
–
–
–
–
–
–
–
–
–
–
–
–
–
–
–
–
–
–
–
–
–
–
–
–
–
–
–
–
–
–
–
–
–
–
–
–
–
(DC20 E only)
(DC20 E only)
–
ON
–
OFF
–
–
–
–
–
–
–
–
–
–
–
–
–
–
–
–
–
–
–
–
–
–
–
–
–
–
–
–
–
–
–
–
–
–
–
–
–
–
–
–
–
–
–
–
–
–
–
–
–
–
–
–
–
–
–
–
–
–
–
–
–
–
–
–
–
–
–
–
–
–
–
–
–
–
–
–
–
–
–
–
–
–
–
–
–
–
–
–
–
–
–
–
–
–
–
–
–
–
–
–
–
–
–
–
–
–
–
–
–
–
–
–
–
–
–
–
–
–
–
–
–
–
–
–
–
–
–
–
–
–
–
–
–
–
–
–
–
–
–
–
–
–
–
–
–
–
–
–
–
–
–
–
–
–
–
–
–
–
–
–
–
–
–
–
–
–
–
–
–
–
–
–
–
–
–
–
–
–
–
–
–
–
–
–
–
–
–
–
–
–
–
–
–
–
–
–
–
–
–
–
–
–
–
–
–
–
–
–
–
–
–
–
–
–
–
–
–
–
–
–
–
–
–
–
–
–
–
–
–
–
–
–
–
–
–
–
–
(DC20 E only)
(DC20 E only)
–
–
–
–
–
–
–
–
–
–
–
–
–
–
–
–
–
–
–
–
–
–
–
–
–
–
–
–
–
–
–
34
DC10 E, DC20 E
GENERAL DESCRIPTION OF PRODUCT
4. System Diagram (Common to all Models)
WS-20 Wrist Strap
CG-300E
Battery Charger
Shoulder Strap
BP-208
Battery Pack
CA-570 Compact
Power Adapter
Mini DVD Disc
DVD-R/RW
WL-D86
Wireless Controller
WD-H27
Wide-converter
BP-208 Battery Pack
MTC-100 Multi Cable
PC-A10
SCART
Adapter
TV
VCR
TL-H27
Tele-converter
IFC-300PCU
USB Cable
Card Adapter
miniSD Card
FS-H27U
Filter Set
DVD Drive
Computer
Mini DVD Disc
DVD-R/RW
SC-2000 Soft
Carrying Case
Reader/Writer
PictBridge-compliant
printers
Fig. 4
35
DVD player/
recorder
TECHNICAL DESCRIPTON
CONTENTS
1. PCB Functions ------------------------------------------------------------------------------------------------------------------------------------ 1
2. Power Supply Circuit ---------------------------------------------------------------------------------------------------------------------------- 3
2-1 Startup of Power Supply ---------------------------------------------------------------------------------------------------------------- 3
2-2 Power Fuses ------------------------------------------------------------------------------------------------------------------------------- 5
2-3 Power Supply Circuits ------------------------------------------------------------------------------------------------------------------- 6
3. Built-in Charger Circuit ------------------------------------------------------------------------------------------------------------------------- 7
3-1 Outline ------------------------------------------------------------------------------------------------------------------------------------- 8
3-2 Operation at Charging ------------------------------------------------------------------------------------------------------------------- 8
3-2-1 Conditions to Start Charging ------------------------------------------------------------------------------------------------ 8
3-2-2 Progress of Charging --------------------------------------------------------------------------------------------------------- 9
4. Signal Processing Circuit ---------------------------------------------------------------------------------------------------------------------- 10
4-1 Outline of Signal Processing Circuit ------------------------------------------------------------------------------------------------ 10
4-1-1 DC10 E Outline of Signal Processing Circuit --------------------------------------------------------------------------- 10
4-1-2 DC10 E Outline of Signal Processing Circuit --------------------------------------------------------------------------- 11
4-2 Camera/Card Signal Processing (DC10 E) ----------------------------------------------------------------------------------------- 12
4-2-1 Camera Motion Picture Recording --------------------------------------------------------------------------------------- 12
4-2-2 Card Still Picture Recording ----------------------------------------------------------------------------------------------- 12
4-3 Camera/Card Signal Processing (DC20 E) ----------------------------------------------------------------------------------------- 14
4-3-1 2-Megapixel Camera System ---------------------------------------------------------------------------------------------- 14
4-3-2 Camera Motion Picture Recording --------------------------------------------------------------------------------------- 14
4-3-3 Card Still Picture Recording ----------------------------------------------------------------------------------------------- 15
4-4 Recorder Signal Processing ----------------------------------------------------------------------------------------------------------- 16
4-5 Audio Signal Flow --------------------------------------------------------------------------------------------------------------------- 17
5. System Control --------------------------------------------------------------------------------------------------------------------------------- 18
5-1 Outline of System Control ------------------------------------------------------------------------------------------------------------ 18
5-2 Major Functions of Each MI-COM -------------------------------------------------------------------------------------------------- 19
5-3 Personal Computer Connection Mode (USB) -------------------------------------------------------------------------------------- 20
6. Disk functions ----------------------------------------------------------------------------------------------------------------------------------- 21
6-1 Playlist editing Functions ------------------------------------------------------------------------------------------------------------- 21
6-2 Still Image Shooting and Direct Print ----------------------------------------------------------------------------------------------- 22
DC10 E, DC20 E
TECHNICAL DESCRIPTION
1. PCB Functions
(1) MAIN PCB
System-Control Section
• IC100
SUB MI-COM
Low-voltage system control (POWER KEY detection, memory backup,
internal clock, charging)
• IC101
• IC103
CCM MI-COM
FLASH
System control (Camera/Card/Mode)
Flash-ROM for CCM MI-COM (8Mbit)
• IC104
3.2V REGULATOR
Power source for the SUB MI-COM and rechargeable power source for
the lithium battery
• IC105
• IC106
RESET IC
AND GATE
SUB MI-COM resetting
Ready signal for serial communication between CCM MI-COM and LAP
AUDIO PLL
and DIGIC DV.
Master clock signal generation, audio signal output
• IC810
Camera/Card Section
• IC1000 (DC20 E)
CDS/AD
• IC1001 (DC10 E)
2ch CCD output signal sampling, A/D converter
INVERTER
• IC1001 (DC20 E)
Oscillation circuit inverter
TG
• IC1002 (DC10 E)
CCD horizontal transfer pulse generation
TG/CDS/AGC/AD/V-DRIVER
• IC1002 (DC20 E)
MPX2
2ch CCD output signal sampling, A/D converter,
CCD horizontal transfer pulse generation
AGC, image composition, flaw correction
• IC1004 (DC10 E)
2.8V REGULATOR
2.8V regulator
• IC1101
• IC1102
SDRAM
SDRAM
Memory for DIGIC DV (64Mbit)
Memory for DIGIC DV (64Mbit)
• IC1103
• IC1200
DIGIC DV
LENS DRIVER
Camera digital signal processing, card image processing
Zoom, focus motor driver, IRIS driver, and gyro output amp
• IC1400
• IC1401
LAP Lens actuator processor
1.8V REGULATOR
1.8V regulator
Shock Proof section
• IC1650
SHOCK SENSOR
• IC1651
• IC2102
SENSOR IC
75OHM DRIVER
BACK END section
• IC2300
BACK END
Shock sensor
Shock sensor IC
75Ω Video driver
DVD signal processing LSI, FRONT END control (ATAPI),
• IC2301
SRAM
BACK END MI-COM, LCD/CVF control
DVD control, DVD management data, DVD backup (16Mbit)
• IC2302
• IC2303
BUFFER
FLASH
Buffer for SRAM-CS
Flash-ROM for BACK END MI-COM (64Mbit)
• IC2304
• IC2305
DDR SDRAM
DDR SDRAM
Memory for BACK END (CODEC) (128Mbit)
Memory for BACK END (CODEC) (128Mbit)
• IC2306
PM section
DDR SDRAM
Memory for BACK END (ATAPI Communication) (512Mbit)
• IC3200 (DC20 E)
3.1V REGULATOR
3.1V regulator
• IC3201
• IC3203
Power PWM regulator controller
4.6V regulator
DC/DC CONVERTER CONTROL
4.6V REGULATOR
1
DC10 E, DC20 E
TECHNICAL DESCRIPTION
USB section
• IC3500
USB IC
USB I/F
(2) SUB PCB
• IC1501
• IC1502
CVF DRIVER
2.8V REGULATOR
CVF signal processing and drive
2.8V regulator
• IC801
AIF4
Analog input/output signal processing, speaker amplifier
(3) CCD PCB
• IC1050 (DC20 E) INVERTER
CCD horizontal transfer pulse inverter
• IC1051 (DC20 E) INVERTER
• IC1052 (DC20 E) INVERTER
CCD horizontal transfer pulse inverter
CCD horizontal transfer pulse inverter
• IC1053 (DC20 E) INVERTER
• IC1054 (DC20 E) CCD
CCD horizontal transfer pulse inverter
CCD image sensor
• IC1055 (DC20 E) OPE AMP
• IC1070 (DC10 E) CCD
CCD output amp
CCD image sensor
• IC1071 (DC10 E) BUFFER
• IC1072 (DC10 E) BUFFER
CCD horizontal transfer pulse buffer
CCD horizontal transfer pulse buffer
(4) LCD PCB
• IC901
• IC902
EEPROM
LCD DRIVER
EEPROM for LCD data
LCD signal processing and drive
• IC903
2.8V REGULATOR
2.8V regulator
(5) GYRO PCB
• IC1603
P SENSOR GYRO
Pitch-direction angular speed detection
• IC1604
Y SENSOR GYRO
YAW-direction angular speed detection
(6) FLASH PCB (DC20 E only)
• IC501
DC/DC CONVERTER CONTROL
Control for main capacitor charging
(7) CVF PCB
Signal transfer from the SUB PCB to the CVF, CVF Backlight LED
(8) DC JACK PCB
DC JACK
(9) CARD PCB
Memory card slot, lithium secondary battery
(10) AV FPC
Multi JACK
(11) USB FPC
USB JACK
(12) TS MACH
FRONT END (Pickup, spindle, control PCB)
2
DC10 E, DC20 E
TECHNICAL DESCRIPTION
2. Power Supply Circuit
2-1 Startup of Power Supply
SWITCH FPC ASS'Y
IC2300
BACK END
MI-COM.
SW13 OPEN DETECT SW
SW12 OPEN DETECT SW
IC1103
DIGIC
DV
V27
SW10 EJECT SW
DC JACK FPC
MAIN PCB
DC JACK
CN3200
+
2,3
−
4,5
2
CN102
8
9
IC101
CCM
MI-COM.
SERIAL
DATA
20
5
IC104
3.2V
REGULATOR
EJECT
SW
4
VCC
RIGHT COVER
BATTERY
TERMINAL
13 DC V DET
CN100
CN104
+
A15,B9-15
A15,B9-15
−
B1-B8
B1-B8
IC105
RESET
2
RESET
SW
TS MECH
48
1
8 RESET
41 VTR ON
23 E3 DET
48
VCC
IC3201
DC/DC
CONVERTER
CONTROL
CN105 1
IC100
SUB
MI-COM.
36
VTR
33
POW SW
CAM
32
POW SW
E3V 51
11 12
CN50 17
LITHUM
BATTERY
(2ND)
POWER SW
CARD PCB
ZOOM ASS'Y
Fig. 1
3
DC10 E, DC20 E
TECHNICAL DESCRIPTION
• Backup Lithium Battery
2.5V power from the lithium secondary battery is supplied to the SUB MI-COM. Thus, the SUB MI-COM performs data backup
and clock operation when the main power supply is not connected.
Charging time
(from empty state)
Charging capacity
Backup period
17.5 h
70%
2.7 months
24 h
80%
3.1 months
43 h
100%
3.9 months
• Main Power Supply
Main power (DC JACK/BATTERY) is supplied to IC3201 (DC/DC CONVERTER CONTROL). Through the internal regulator in
the IC3201, the main power thus supplied is converted 3V power, which is output as E3V from pin 51 of the IC3201.
On output of the E3V power, the SUB MI-COM recognizes that the main power supply has been connected, and then performs
initialization and is brought into the standby status. Then, the SUB MI-COM carries out initialization and sets up the standby state.
In this state, the SUB MI-COM performs detection of startup-related switches. When it detects that any one of the startup-related
switches has been turned on, the VTR ON (H) signal is output form pin 41. Upon output of the VTR ON (H) signal, power to each
circuit is turned on.
When power is fed from the main power supply, 3.2V power is output from pin 4 of the IC104. Instead of power from the lithium
secondary battery, the 3.2V power output from pin 4 of the IC104 is supplied to the SUB MI-COM. This 3.2V power is also used
for recharging the lithium secondary battery. Shown below is the relationship between the charging time and the charging capacity:
* The values indicated below are for reference only. The actual values will vary depending on the operating
environment.
4
DC10 E, DC20 E
TECHNICAL DESCRIPTION
2-2 Power Fuses
MAIN PCB
CN100
BATT.
TERNINAL
BATT +
FU3200
CN104
BATT. +
FU3201
RIGHT COVER
ST UNREG
4V, 2.7V, 2.5V
DC/DC CONVERTOR
FU3202
1.2V, 3.3V
CN3200
CN3200
DC JACK
DC +
FU3203
FRONT END UNREG
FU3204
DC JACK PCB
FU3205
5V, VTR UNREG,
CCD, LCD
FRONT END UNREG
FU1800
CHARGE UNREG
Fig. 2
The power supply from the battery DC JACK is supplied to seven fuses on the MAIN PCB, through which the following seven power
voltage are delivered.
(1) ST UNREG : FU3200
• Main capacitor charging power source for flash memory (DC20 E only)
(2) 1.4V + 2.7V + 2.5V + DC/DC : FU3201
• 1.4V power source (MACS1.4V, DVDD1.4V, AVDD1.4V)
• 2.7V power source (CAM2.7V [DC20 E only], DVDD2.7V, PLL2.7V, AVDD2.7V, AA2.7V, HTG2.7V [DC20 E only])
• 2.5V power source (DVDD2.5V, DDR2.5V, SDRAM2.5V)
• DC/DC CONVERTER power source
(3) 1.2V + 3.3V : FU3202
• 1.2V power source (PRISM1.2V)
• 3.3V power source (LCD3.3V, USB3.3V, FLASH SRAM3.3V, DVDD3.3V, AVDD3.3V)
• CCD drive IC power source (DC10 E:CAM3.3V, DC20 E:CAM3.5V)
(4) FRONT END UNREG : FU3203
• FRONT END power source
(5) 5V + VTR UNREG + CCD + LCD : FU3204
• 5V power source (P5V, LCD5V, AA4.7V)
• VTR UNREG
• CCD drive power source (CCD15V, CCD-7V)
• LCD drive power source (LCD8.5V, BL POW)
(6) FRONT END UNREG : FU3205
• FRONT END power source
(7) CHARGE UNREG : FU1800
• Battery Charge circuit power source
5
DC10 E, DC20 E
TECHNICAL DESCRIPTION
2-3 Power Supply Circuits
Figure 3 shows the power supply circuits.
The ON/OFF condition of each power supply voltage is controlled by the VTR ON signals output from the SUB MI-COM.
MAIN PCB
UNREG
48
VCC2
REG.
51
E3V
23
UNREG
PWM
62
LPF
REG.
63
DVDD 1.4V
20
UNREG
PWM
70
MACS 1.4V
LPF
REG.
71
Q3201
Q3211
CH-2
DC20 E ONLY
UNREG
72
USB 3.3V
FLASH SRAM 3.3V
REG.
IC3200
REG.
Q3204
CH-3
DVDD 3.3V
15
AVDD 3.3V
UNREG
PWM
73
LPF
REG.
IC3203
AA 4.7V
LPF
14
UNREG
76
DVDD 2.7V
DC20 E
ONLY
11
UNREG
PWM
3
PANEL BL CTRL
(LUMINANCE CONTROL)
From LENS DRIVER
77
REG.
Q1003, Q1004
CH-6
HTG 2.7V
LPF
CAM 2.7V
CONTROL
CCD 15V
LCD 8.5V
CCD -7V
Q3207, T3201
10
32 CLT
VTR ON
From SUB MI-COM.
CCD VL ON From CCM MI-COM.
UNREG
33 CLT3.4
34 CLT5
PWM
35 CLT6
78
REG.
Q3206
CH-7
36 CLT7
DDR 2.5V
DVDD 2.5V
SDRAM 2.5V
37 CLT8
LCD BL ON
From BACK END
Q1801
Q1803
LPF
CAM ON From CCM MI-COM.
CONTROL
Q1001, Q1002
4
LCD BL VFB
From LCD PCB
AA 2.7V
AVDD 2.7V
REG.
Q3202
CH-5
LCD 5V
P 5V
REG.
Q3213
CH-4
PWM
CAM 3.3V
LCD 3.3V
20
IC3201
DC/DC
CONVERTER
CONTROL
AVDD 1.4V
CAM 3.5V
DC10 E ONLY
PWM
PRISM 1.2V
Q3203
Q3205
CH-1
6
UNREG
ON/
OFF
CONTROL
PWM
CH-8
78
REG.
Q3200
L3213
Fig. 3
6
LCD BL POW
DC10 E, DC20 E
TECHNICAL DESCRIPTION
3. Built-in Charger Circuit
BATTERY
BATT. TERMINAL
+
CN100
BATT +
BATT+
B+
BATT INFO B+
BATT INFO B+
A14
D
BATT INFO D
BATT INFO D
A13
BATT TEMP
BATT TEMP
A12
THERMISTOR
−
A15,B9-15
BATT −
RIGHT COVER
PM SECTION
UNREG.
CN3200
DC JACK
+
2,3
−
4,5
DC−
DETECT
1
DETECT
CN3200
DC+
DC JACK PCB
CN104
A12
BATT TEMP
BATT INFO D
A13
BATT INFO B+
A14
BATT+
A15,B9-15
Q1803
FU1800
Q1802
31 BATT INFO D
27 BATT TEMP
13 DC V DET
12 DC J DET
34 E3V
65
62
VCC
OUTPUT
DRIVE
OSC
29
28
61
29 A/D V
60
IC3201
DC/DC
CONVERTER
CONTROL
28 A/D I
38 INIT CHARGE1
39 CHARGE
E3V 51
59
CONTROL
64
IC100
SUB
MI-COM
63
Q1801
MAIN PCB
Fig. 4
7
DC10 E, DC20 E
TECHNICAL DESCRIPTION
3-1 Outline
The main circuit elements and their functions are as follows.
(1) IC100 (SUB MI-COM)
• Control of IC3201
• Error discrimination and display
• Detection and display of charging progress
• Detection of DC JACK connection and voltage
• Detection of internal battery temperature
(2) IC3201 (DC/DC CONVERTER CONTROL)
• Charging voltage/current control
3-2 Operation at Charging
3-2-1 Conditions to Start Charging
When the following conditions are satisfied, the SUB MI-COM (IC100) controls the IC3201 and starts charging.
If the conditions shown in (4) and (5) above are not satisfied or if the type in (6) could not be confirmed, a charge error is indicated.
Conditions
1
2
3
4
5
6
Detection
Source of detection
Main unit power is turned OFF
DC jack is connected.
SUB MI-COM
SUB MI-COM pin 12
DC JACK
Power supplied from DC jack
DC J DET
SUB MI-COM pin 13
DC IN
UNREG voltage is 8.4 ±0.3 V.
DC V DET
SUB MI-COM pin 26
UNREG.
Battery temperature is within the range of
BATT.A/D
SUB MI-COM pin 27
Battery T terminal
-6.8°C to 49.3°C.
Confirmation of the type of the battery connected
BATT.TEMP
SUB MI-COM pin 31
Battery D terminal
BATT.INFO D
8
-
DC10 E, DC20 E
TECHNICAL DESCRIPTION
3-2-2 Progress of Charging
The IC3201 starts a trickle charge under control of the SUB MI-COM (IC100). The trickle charge continues until the battery voltage
reaches 6.17V. At the point when 6.17V is reached, the IC1800 starts a 808 mA quick charge. Then, the charge current decreases
gradually with the progress of charging (because of an increase in impedance of the battery). When the charge current becomes 70 mA
or less, the end-of-charging indication is provided. Thereafter, supplementary charging is performed for 90 minutes at maximum until
the charge current becomes 34 mA or less.
Charging current
LED flashes once
LED flashes twice
LED lights up steadily
Quick charge 808mA
When battery voltage
reaches 6.17V, quick
charge starts.
480mA
An error is indicated if the battery voltage becomes 5.5V or lower during quick
charging or constant-voltage charging.
An error is indicated if the battery temperature is not within the range of
−10 C to 52.5 C.
Trickle
81mA
70mA
When the battery voltage
reaches 5.2 V, the trickle
timer (2) is started.
34mA
Trickle1 Trickle2 Quick charge timer Timeout
timer
timer
error
6min.
max
10min.
max
Timeout
error
Timeout
error
90min.max
2-flash Full charge
timer indication
at timeout
258min.max
Total timer
336min.max
Full charge
indication
at timeout
Fig. 5
9
Supplementary charge timer
90min.max
Elapsed
time
DC10 E, DC20 E
TECHNICAL DESCRIPTION
4. Signal Processing Circuit
4-1 Outline of Signal Processing Circuit
4-1-1 DC10 E Outline of Signal Processing Circuit
Figure 6 shows the entire block diagram of the signal processing circuit and the flow of video and audio signals.
LENS
IC1070
CCD
CCD PCB
MEMORY
CARD
IC1002
TG/CDS/AGC
/AD/V-DRIVER
CARD PCB
IC1101
SDRAM
IC1102
SDRAM
IC810
AUDIO PLL
IC1103
DIGIC DV
IC801
AIF4
SPEAKER
IC1501
CVF DRIVER
MIC
SUB PCB
CVF LCD
CVF PCB
LCD PCB
IC902
LCD
DRIVER
IC3500
USB IC
IC2300
BACK END
IC2102
75Ω
DRIVER
Y
IC2304
DDR
SDRAM
LCD
IC2305
DDR
SDRAM
C
MAIN PCB
USB FPC
DVD
USB
TERMINAL
FRONT END
(DVD DRIVE)
AV FPC
AV
JACK
Fig. 6
10
DC10 E, DC20 E
TECHNICAL DESCRIPTION
4-1-2 DC10 E Outline of Signal Processing Circuit
Figure 7 shows the entire block diagram of the signal processing circuit and the flow of video and audio signals.
LENS
IC1054
CCD
CCD PCB
IC1001
TG
IC1000
CDS/AD
MEMORY
CARD
IC1002
MPX2
CARD PCB
IC1101
SDRAM
IC1102
SDRAM
IC810
AUDIO PLL
IC1103
DIGIC DV
IC801
AIF4
SPEAKER
IC1501
CVF DRIVER
MIC
SUB PCB
CVF LCD
CVF PCB
LCD PCB
IC902
LCD
DRIVER
IC3500
USB IC
IC2300
BACK END
IC2102
75Ω
DRIVER
Y
IC2304
DDR
SDRAM
LCD
IC2305
DDR
SDRAM
C
MAIN PCB
USB FPC
DVD
USB
TERMINAL
FRONT END
(DVD DRIVE)
AV FPC
AV
JACK
Fig. 7
11
DC10 E, DC20 E
TECHNICAL DESCRIPTION
4-2 Camera/Card Signal Processing (DC10 E)
4-2-1 Camera Motion Picture Recording
64 Mbit SDRAM
IC1101
64 Mbit SDRAM
IC1102
32 bit
32 bit
CCM
MI-COM
IC101
SDRAM IF
CCD
IC1070
36MHz
CDS/
AGC/
AD/
TG/
V-DRIVER
IC1002
proc
12bit
36MHz
resize
nr
Deformation,
Drawing
REND
Synthesis
COMP
JPEG
JPEG
CARD IF
Camera signal
processing
GRAB
BACK
END
IC2300
Audio
IC1103
DIGIC DV
Fig. 8
4-2-2 Card Still Picture Recording
64 Mbit SDRAM
IC1101
64 Mbit SDRAM
IC1102
32 bit
32 bit
SDRAM IF
RAW
CCD
IC1070
36MHz
CDS/
AGC/
AD/
TG/
V-DRIVER
IC1002
proc
12bit
36MHz
YCC 1
resize
CCM
MI-COM
IC101
DMA
YCC 2
Deformation,
Drawing
REND
nr
Camera signal
processing
GRAB
JPEG
Audio
IC1103
DIGIC DV
Fig. 9
12
Synthesis
COMP
CARD IF
FRONT
END
IC2300
MEMORY
CARD
DC10 E, DC20 E
TECHNICAL DESCRIPTION
<CCD> IC1070
• 1/4-inch interlaced CCD
• Complementary color filter
• Total number of pixels : Approx. 1,330,000
Effective number of pixels : Tape : Approx. 690,000
: Tape : Approx. 1,230,000
<CDS/AGC/AD/TG/V-DRIVER> IC1002
A signal read out of the CCD is extracted. Then, after the extracted signal is subjected to AGC processing and A/D conversion, it
is output as a digital signal.
<DIGIC DV> IC1103
This circuit carries out various camera signal processing operations (EIS, AWB, etc.) and digital effect processing. It also performs
multimedia-application signal processing mainly for still image recording.
• Feature engine
• High-speed card interface
• JPEG method compression/extension
• Audio data compression (ADPCM)
• USB function
<SDRAM> IC1101, IC1102
Field memory for camera signal processing and digital effect processing
Image data memory for Memory card write/read operation
13
DC10 E, DC20 E
TECHNICAL DESCRIPTION
4-3 Camera/Card Signal Processing (DC20 E)
4-3-1 2-Megapixel Camera System
IC1054
CCD
: Analog Signal
: Digital Signal
IC1002
MPX
IC1000
CDS/AD
CDS
AD
CDS
36MHz
2ch
Image
adjustment,
picture
composition
AD
Missing
pixel
compensation
14bit
36MHz
IC1103
DIGIC DV
12bit
72MHz
IC1001
TG
Fig. 10
This model handles the increased CCD picture element readout by splitting the CCD into right and left halves and having two circuit
systems for readout, as shown illustrated above.
The two systems of video signal are distinctly subjected to A/D conversion, are composed into a single image by MPX-IC, and are sent
to DIGIC DV for camera signal processing.
4-3-2 Camera Motion Picture Recording
64 Mbit SDRAM
IC1101
64 Mbit SDRAM
IC1102
32 bit
CCD
IC1054
32 bit
SDRAM IF
36MHz
2ch
MPX
IC1002
CDS/AD
IC1000
36MHz
14bit
proc
72MHz
12bit
AIF4
IC801
resize
nr
Deformation,
Drawing
REND
Synthesis
COMP
JPEG
JPEG
CARD IF
Camera signal
processing
GRAB
IC101
CCM
MI-COM
Audio
IC1103
DIGIC DV
USB
Fig. 11
14
BACK
END
IC2300
DC10 E, DC20 E
TECHNICAL DESCRIPTION
4-3-3 Card Still Picture Recording
64 Mbit SDRAM
IC1101
64 Mbit SDRAM
IC1102
32 bit
CCD
IC1054
32 bit
SDRAM IF
36MHz
2ch
RAW
MPX
IC1002
CDS/AD
IC1000
36MHz
14bit
proc
YCC 1
resize
YCC 2
Deformation,
Drawing
REND
nr
Camera signal
processing
GRAB
72MHz
12bit
CCM
MI-COM
IC101
DMA
JPEG
Synthesis
COMP
BACK
END
IC2300
CARD IF
Audio
IC1103
DIGIC DV
USB
MEMORY
CARD
Fig. 12
<CCD> IC1054 / CCD PCB
• 1/3.9-inch interlaced CCD
• RGB primary color filter
• Total number of pixels : Approx. 2,200,000
Effective number of pixels : Approx. 1,230,000 for tape recording
: Approx. 2,000,000 for card recording
<CDS/AD> IC1000 / MAIN PCB
Extracts signals read through 2 left and right channels from CCD, eliminates noise components, performs A/D conversion, and then
outputs digital signal through 2 channels.
<MPX2> IC1002
Composes picture data input through 2 left and right channels, and corrects the offsets. Then performs AGC processing, corrects
CCD missing pixels, and outputs the signal through 1 channel.
<DIGIC DV> IC1102
Performs different camera signal processing (EIS, AWB, etc.) and digital effect processing. Also performs signal processing for
coping with multimedia centered on still picture shooting.
• Feature engine
• High-speed card interface
• JPEG method compression/extension
• Audio data compression (ADPCM)
• USB function
<SDRAM> IC1101/1102
Memory for DIGIC DV
15
DC10 E, DC20 E
TECHNICAL DESCRIPTION
4-4 Recorder Signal Processing
DVD
IC2306
DDR
SDRAM
ATAPI
108MHz
IC1103
DIGIC DV
FRONT END
(DVD DRIVE)
A DATA
135MHz
IC2300
BACK END
IC2305
DDR
SDRAM
MI-COM
Y
IC2304
DDR
SDRAM
C
IC3500
USB IC
IC2102
75Ω
DRIVER
USB
TERMINAL
AV
JACK
Fig. 13
< BACK END >IC2300
• The DVD coding circuit and MI-COM circuit are integrated in a single chip.
• Video/audio data is coded through use of the IC2304 and 2305 (DDR SDRAM).
The internal MI-COM circuit carries out front-end (DVD drive) control.
The recorded signals to DVD (read-out) are handled by the front end through ATAPI communication for which the IC2306
(DDR SDRAM) is mainly used.
< FRONT END>DVD DRIVE
• At the time of recording, video/audio data fed from the back end is modulated to DVD recording data, and a DVD write control
operation is performed.
• At the time of playback, data is read out from DVD, and demodulation is performed together with error correction.
16
DC10 E, DC20 E
TECHNICAL DESCRIPTION
4-5 Audio Signal Flow
L
MIC
HEAD
PHONE
AV
JACK
IC1103
DIGIC DV
R
IC810
AUDIO
PLL
MEM IF
L
IC2300
BACK
END
FRONT
END
DVD
R
L
R
IC801
AIF4
SDRAM
Serial Control
SPEAKER
DRIVER
B EEP
IC101
CCM
MI-COM.
+
−
SPEAKER
Fig. 14
< AIF >IC801
Out ALC (Auto Level Control), fading, and amplification of various output signals. For the beep tone issued at ejection, etc., the
signal from the CCM MI-COM is generated in the circuit and changed over in the AIF.
The microphone amplifier, HPF, ALC, A/D, D/A, and digital I/F, SPEAKER DRIVER with ALC circuits are contained in this IC.
It is also used for changeover between ordinary voice sounds and beep sounds.
< BACK END >
At the time of recording, audio digital signals are compressed into a Dolby AC-3 form.
At the time of playback, demodulation processing is performed for inversion.
17
DC10 E, DC20 E
TECHNICAL DESCRIPTION
5. System Control
5-1 Outline of System Control
System control is performed by the CCM MI-COM (IC101), BACK END MI-COM, and SUB MI-COM on MAIN PCB.
LENS
FRONT FPC
REMOTE CONTROL
SIGNAL RECEIVER
ZOOM ASS'Y
MOTOR
DRIVE
IRIS
DRIVE
MAIN PCB
IC1200
LENS
DRIVER
IC1400
LAP
IC1103
DIGIC
DV
IC1001
TG
IC1000
CDS/AD
IC1002
MPX2
ZOOM SW
PHOTO SW
START/STOP
SW
SUB PCB
IC801
AIF4
IC103
FLASH
ROM
POWER SW
IC3500
USB IC
IC101
CCM
MI-COM
R COVER
IC1501
CVF
DRIVER
IC2301
S RAM
R-KEY
IC2303
FLASH
ROM
BATT INFO
BATT TEMP
AE FPC
MODE SW
LCD PCB
IC100
SUB
MI-COM
MI-COM
IC2300
BACK END
REAR KEY
FPC
CROSS SW
FUNC SW
MENU SW
E-DIRECT SW
TAPE/CARD
ATAPI
SW FPC
EJECT SW
FRONT END
DISC COVER
DET
Fig. 15
18
IC901
EEPROM
IC902
LCD
DRIVER
DC10 E, DC20 E
TECHNICAL DESCRIPTION
5-2 Major Functions of Each MI-COM
(1) CCM MI-COM (IC101)
The major functions of the CCM MI-COM are listed below.
• Key input
• Remote control input
• USB interface control (In Card mode)
• DIGIC DV control
• Card control
• CCD drive control
• AE, AF, AWB control
• EIS (Electric Image Stabilizer) control
• PRINTER control
(2) SUB MI-COM (IC100)
The major functions of the SUB MI-COM are listed below.
• Power ON/OFF control
• Built-in charge circuit control
• Built-in clock
(3) MI-COM in BACK END (IC2300)
The major functions of the MI-COM in BACK END are listed below.
• Front end (TS mech) control through ATAPI communication.
• USB interface control (In movie transmission)
• OSD (On Screen Display) Bitmap control
• LCD/EVF control
19
DC10 E, DC20 E
TECHNICAL DESCRIPTION
5-3 Personal Computer Connection Mode (USB)
IC1054
CCD
IC1000
CDS/AD
IC1002
MPX
Signal flow of Normal
IC1101
IC1102
SDRAM
Signal flow of USB connection
IC1103
DIGIC DV
Movie /
Still Picture
Signal
Processing
MEMORY
CARD
CCM
MI-COM
IC3500
USB IC
USB
TERMINAL
BACK END
Picture
Processing
IC2300
BACK END
MI-COM.
FRONT END
Fig. 16
In the normal status, the video signals generated by the camera section are sent to the memory card via the DIGIC DV and also to
the front end via the back end.
For USB connection, the USB terminal is connected to the memory card through the USB IC and DIGIC DV in the still picture
mode. In the movie mode, the USB terminal is connected to the front end through the USB IC and back end.
20
DC10 E, DC20 E
TECHNICAL DESCRIPTION
6. Disk functions
6-1 Playlist editing Functions
The DC10 E and DC20 E are equipped with disc-editing functions for making simple edits to original images and for editing playlists.
Below is the conceptual diagram showing the playlist-editing functions for deleting, moving, dividing, and adding scenes.
The playlist refers to a list prepared by selecting desired scenes from the original images (motion video). Only DVD-RW can be used
(VR mode).
Here, a scene refers to a single scene shot from the start of recording with a press of the record button to the stop of recording with the
second press of the same button.
Scene (n)
Scene (n-1)
Scene (3)
Scene (2)
Scene (1)
Original image
Creating playlists (the original images remain unaffected)
Playlist
Delete Scene
Playlist
Move Scene
Playlist
Scene (1)
Scene (1)
Scene (3)
Scene (3)
Scene (3)
Scene (4)
Scene (4)
Scene (4)
Scene (2)
Divide Scene
Add Scene
Playlist
Scene (1)
Scene (3)
Scene (4)
Scene (7)
Playlist
Scene (1)
Scene (3) a
Scene (3) b
Scene (4)
21
DC10 E, DC20 E
TECHNICAL DESCRIPTION
6-2 Still Image Shooting and Direct Print
The DC10 E and DC20 E have a function for recording still images on miniSD cards and DVD discs (both media are JPEG-compressed). It is possible to check the still images (JPEG-compressed) recorded by the DC10 E or DC20 E without finalizing the disc.
If the images recorded on the disc are to be played back on another DVD player or the like, they must be finalized. To enable still images
in addition to video to be played back on a DVD player or the like, the still images must be converted into an irreversible MPEG motion
video that is called "Photo movie". Only by making such conversion can still images be played back on a DVD player or the like. The
images are played back one after another at intervals of approx. 3 seconds in the form of a slideshow on a DVD player. If the still images
are to be edited using the playlist editing (VR mode) function provided for the DC10 E/DC20 E, the still images (JPEG-compressed)
must be converted into Photo movies.
Even when the still images on the disc have been converted into Photo movies, they remain stored on the disc as JPEG-compressed
images unless the original still images are erased. Using these still images, the DC10 E/DC20 E enables printout on a PictBridgecompliant printer. The DC10 E/DC20 E does not support non-PictBridge-compliant printers (with CP direct specification or Camera
direct specification).
The DC10 E/DC20 E is also capable of recording still images (JPEG-compressed) on both discs and cards (miniSD), and the same
image size and quality are featured by both of these media. The DC10 E/DC20 E also features a function to copy images from discs to
cards and vice versa. Thus, to play back images on a DVD player or perform playlist editing on the DC10 E/DC20 E the still images shot
and stored on the cards, these still images on the card must be copied to a disc and then converted into Photo movies.
Similarly, if DPOF-compliant printing is to be selected for the printing of the still images on the disc, the still images on the disc must
be copied to the card and then processed.
The diagram below shows the relationships between the still images on the discs and on the cards.
DC10 E, DC20 E
PC
Still images
(JPEG-compressed)
After finalization,
play back on
a DVD player.
(Irreversible
compression)
Photo movie
(MPEG)
DVD player
Copying of
still images
(JPEG-compressed)
possible
Disc
Still images
(JPEG-compressed)
Memory
card
PRINTER
Still images
(JPEG-compressed)
[DPOF supported]
Data transfer
Printout on a printer
22
DISASSEMBLING
CONTENTS
1. Disassembling and Reassembling -------------------------------------------------------------------------------------------------------------- 1
Notes ------------------------------------------------------------------------------------------------------------------------------------------- 1
Safety Precautions ----------------------------------------------------------------------------------------------------------------------------- 1
List of Supplies -------------------------------------------------------------------------------------------------------------------------------- 2
1-1 Disassembling / Reassembling Flowchart -------------------------------------------------------------------------------------------- 3
1-2 Separation of R Upper Cover ----------------------------------------------------------------------------------------------------------- 4
1-3 Separation of R-LCD Unit -------------------------------------------------------------------------------------------------------------- 6
1-4 Separation of Front Cover Unit -------------------------------------------------------------------------------------------------------- 8
1-5 Separation of Rear Cover Unit ------------------------------------------------------------------------------------------------------- 10
1-6 Separation of Flash PCB ASS'Y (DC20 E only) ----------------------------------------------------------------------------------- 12
1-7 Separation of CVF Unit, SUB PCB ------------------------------------------------------------------------------------------------- 14
1-8 Separation of GYRO PCB ------------------------------------------------------------------------------------------------------------ 15
1-9 Separation of Camera Unit ------------------------------------------------------------------------------------------------------------ 16
1-10 Separation of Center Cover --------------------------------------------------------------------------------------------------------- 17
1-11 Separation of Zoom Ass'y, CARD PCB ------------------------------------------------------------------------------------------- 19
1-12 Separation of MAIN PCB ----------------------------------------------------------------------------------------------------------- 20
1-13 Separation of TS Mech Section ----------------------------------------------------------------------------------------------------- 22
1-14 Separation of Main Frame ----------------------------------------------------------------------------------------------------------- 23
1-15 Disassembly of Front Cover Unit - 1 ---------------------------------------------------------------------------------------------- 26
1-16 Disassembly of Front Cover Unit - 2 ---------------------------------------------------------------------------------------------- 28
1-17 Disassembly of Front Cover Unit - 3 ---------------------------------------------------------------------------------------------- 30
1-18 Disassembly of L Cover Unit ------------------------------------------------------------------------------------------------------- 32
1-19 Disassembly of Lock Ass'y ---------------------------------------------------------------------------------------------------------- 34
1-20 Separation of LCD Ass'y ------------------------------------------------------------------------------------------------------------- 37
1-21 Disassembly of LCD Unit - 1 ------------------------------------------------------------------------------------------------------- 39
1-22 Disassembly of LCD Unit - 2 ------------------------------------------------------------------------------------------------------- 40
1-23 Disassembly of LCD Hinge Ass'y -------------------------------------------------------------------------------------------------- 42
1-24 Disassembly of CVF Unit - 1 ------------------------------------------------------------------------------------------------------- 43
1-25 Disassembly of CVF Unit - 2 ------------------------------------------------------------------------------------------------------- 45
1-26 Disassembly of Rear Cover Unit - 1 ----------------------------------------------------------------------------------------------- 47
1-27 Disassembly of Rear Cover Unit - 2 ----------------------------------------------------------------------------------------------- 49
1-28 Disassembly of Rear Cover Unit - 3 ----------------------------------------------------------------------------------------------- 51
1-29 Disassembly of Camera Unit -------------------------------------------------------------------------------------------------------- 52
1-30 Disassembly of Lens Unit ----------------------------------------------------------------------------------------------------------- 54
1-31 List of Screws Used ------------------------------------------------------------------------------------------------------------------ 56
1-32 List of Disassembly Photos ---------------------------------------------------------------------------------------------------------- 57
DC10 E, DC20 E
DISASSEMBLING
1. Disassembling and Reassembling
Notes
(1) When replacing the flat cable with a new one, allow it to remain folded the same as the original part.
(2) The flat cable has a contact orientation to be engaged with the connector. Refer to the instructions in the disassembly procedure
diagram and interconnection diagram for boards.
• Lateral engaging connector
( The instructions are given in the disassembly proce-
• Lengthwise engaging connector
( The instructions are given in the disassembly proce-
dure diagram and board interconnection diagram.)
: Contacts are positioned downward. (board side)
dure diagram and board interconnection diagram.)
Indicated by → Arrowheads indicate the contacts, and the
∗ : Contacts are positioned upward.
shafts indicate the noncontacts.
Metal contact (Pins face down)
Metal contact
:
Metal contact (Pins face up)
Metal contact
:
(3) To secure screws, apply the Three Bond 1401C (CY9-8011-000).
(4) If any part to be replaced has UL tape attached on it, be sure to reattach the UL tape at the same position when reassembling.
(5) After detaching the REAR COVER, be sure to discharge the Main Capacitor.
(Since a high voltage is applied to the Main Capacitor, take care not to receive electric shock or to shortcircuit other parts.)
Safety Precautions
(1) TS Mech safety
The laser beam is emitted in the TS Mech Recorder Ass'y.
If the laser beam gets in your eyes, it could cause eye damage, so never disassemble the TS Mech Recorder Ass'y.
(2) Precautions for handling TS Mech
This product's laser beam condenses light using an objective lens in the light pick up, so that it strikes a focal point on the disk's
recording surface. Therefore, make sure that your eyes are at least 30 cm away from the objective lens when the laser diode is
emitting light.
Note : In complete products, the laser beam is not normally emitted when the Disc Cover is open. The laser beam is
emitted when the two open/closed detection sensors near the Disc Cover are set to closed or when the Disc
Cover on a disassembled product is closed and the operation of the TS Mech Recorder Ass'y is being checked.
The laser diode wavelength of this product is from 652 to 662.5 nm, and the power consumption is below 1mW.
1
DC10 E, DC20 E
DISASSEMBLING
List of Supplies
Item Name
Hanarl KS-39M
Item Number
Purpose
Remarks
DY9-3053-000 Lubrication
Cover
T hree Bond 1401B
CY9-8012-000 Adhesive
Screw
Sponge (W × H × T : 300mm × 200mm × 6mm)
DY9-4001-000 General-purpose vibration-isolating
/sound-absorbing material
Adhesive T ape, No.354E
DY9-3032-000 General-purpose adhesive tape
(W × L × T : 9mm × 50m × 0.15mm, UL type)
Adhesive T ape, No. 501F
DY9-3034-000 General-purpose
(W × L × T : 10mm × 50m × 0.16mm, UL type)
double-side-coated adhesive tape
Kapton T ape (W × L × T : 9mm × 20m × 0.025mm)
DY9-3052-000 General-purpose adhesive tape
Sheet, Shield (W × H : 250mm × 250mm)
DY9-3036-000 General-purpose shield material
2
DC10 E, DC20 E
DISASSEMBLING
1-1 Disassembling / Reassembling Flowchart
(1) Find the replacement part on the chart, and disassemble it following the instruction on chart.
(2) Reassemble by reversing the disassembly procedures.
* DC20 E only
START
: MAIN FLOW
: SUB FLOW
: MAIN UNIT
1-3 R-LCD Unit
1-20 Right Cover Ass'y
1-21 LCD Hinge Ass'y
1-20 LCD Unit
1-22 LCD PCB
1-22 LCD Panel
1-22 LCD Back Light Ass'y
1-4 Front Cover Unit
1-16 Mic Ass'y
1-16 FRONT FPC
1-16 MICROPHONE RELAY FPC
1-5 Rear Cover Unit
1-26 Jack Ass'y
1-26 USB FPC Ass'y
1-27 Rear Key FPC Ass'y
1-27 Speaker
1-6 Flash PCB Ass'y *
1-7 SUB PCB
1-7 CVF Unit
1-25 CVF LCD
1-25 CVF PCB
1-8 GYRO PCB
1-9 Camera Recorder Unit
1-9 Camera Unit
1-29 CCD Ass'y
1-11 Zoom Ass'y
1-30 Lens Unit
1-11 CARD PCB
1-11 L Cover Unit
1-18 Lock Ass'y
1-18 Disc Cover Ass'y
1-18 Flash Ass'y *
1-11 Recorder Unit
END
1-12 MAIN PCB
1-14 TS Mech Recorder Ass'y
3
DC10 E, DC20 E
DISASSEMBLING
1-2 Separation of R Upper Cover
(1) Connect to the External Power Source, and open the Disc Cover.
Note1 : Never touch the Lens Section of TS Mech Recorder Ass'y.
(2) Insert a clip or the like into the part B from the inside of the camera, disengage two claws C, and then detach the Center Cover Lid.
Note2 : If the Disc Cover does not open because the fuse is blown or power is not supplied, break the Center Cover Lid
to detach the R Upper Cover. When detaching it, be careful not to damage the surrounding covers.
(3) Remove two screws (s × 2). Remove five claws D, and detach the R Upper Cover.
Note3 : When detaching the R Upper Cover, take care not to deform the claws part.
(2)
B
R Upper Cover
(3) - s
(3) - s
Clip
(1)
Claws D
Claws D
Disc Cover
(3)
Slide
(1)
Open the
Disc Cover
Open Knob
External
Power
Source Jack Cover
(2)
Claws C
Note 1
Lens part
Center Cover Lid
s
2.5mm
Metal
M1.7
Fig. 1
4
DC10 E, DC20 E
DISASSEMBLING
<Note on Reassembling>
(1) Attach the R Upper Cover as shown in the figure below.
(2) Attach the Center Cover Lid as shown in the figure below.
Note on Reassembling (1)
R Upper Cover
Insert two claws D first.
Claws D
Note on Reassembling (2)
Center Cover Lid
Claws C
Insert claw C on the lower side first.
Fig. 2
5
DC10 E, DC20 E
DISASSEMBLING
1-3 Separation of R-LCD Unit
(1) Open the LCD, and remove eight screws (c × 1, s × 3, t × 4).
(2) Disconnect the CN104, the CN100 (B to B) , and the CN901, and detach the R-LCD Unit.
Note : Take care not to damage the flexible cable.
(3) Detach the Lid Bottom and the Bottom Radiative Rubber.
CN104
(B to B)
CN901
(2)
CN100
(B to B)
(1) - s
(2)
(2)
(1) - t
(1) - c
Bottom Radiative
Rubber
(3)
(1) - s
Lid Bottom
(1)
(1) - s
(1) - t
(1) - s
(1) - c
(1) - t
c
s
6mm
Metal
M1.7
Fig. 3
6
t
2.5mm
Metal
M1.7
4.5mm
Metal
M1.7
DC10 E, DC20 E
DISASSEMBLING
<Note on Reassembling>
(1) Attach the R-LCD Unit as shown in the figure below.
Note on Reassembling (1)
2. After attaching the CN901, open the LCD and attach
it to the Main Unit.
1. Close the LCD and attach CN901.
LCD
LCD
Open
R-LCD Unit
CN100 (B to B)
CN901
Hinge Ass'y
Base Plate
R-LCD Unit
Front Cover
Insert between the bottom surface
of R-LCD Unit and the Base Plate
of Hinge Ass'y.
Fig. 4
7
CN901
CN104 (B to B)
DC10 E, DC20 E
DISASSEMBLING
1-4 Separation of Front Cover Unit
(1) Remove two screws (a × 1, u × 1), and disconnect the CN106 and the CN701.
(2) Disengage two claws A, and detach the Front Cover Unit and the Front Sponge.
(3) Detach the Lens Ring.
a
u
3mm
2.5mm
Metal
M1.7
Claws A
Front Cover Unit
Lens Ring
CN106
CN701
(3)
(1) - u
(2)
(1) - a
(2)
(1)
Front Sponge
(1)
Fig. 5
8
Metal
M1.7
DC10 E, DC20 E
DISASSEMBLING
<Note on Reassembling>
(1) Attach the Lens Ring as shown in the figure below.
(2) Attach the Front Cover Unit as shown in the figure below.
(3) Attach the Front Sponge as shown in the figure below.
(4) Treat the flexible part as shown in the figure below.
Note on Reassembling (1)
Note on Reassembling (2)
The openings should
not be covered.
Engage
Front
Sponge
Lens Ring
Fold at the center
Note on Reassembling (3)
Insert
Claws A
Adjust at the Lens Section and insert two claws A
while turning them in the arrow direction.
Note on Reassembling (4)
Insert the flexible cable to the depth of the Lens Holder and
MAIN PCB.
Lens Holder
CN701
CN106
SUB PCB
Preliminarily fold up the
flexible cable to fit it to
the step difference
between the SUB PCB
and the MAIN PCB.
Be careful not to
place it onto the
IC2300.
MAIN PCB
IC2300
Fig. 6
9
DC10 E, DC20 E
DISASSEMBLING
1-5 Separation of Rear Cover Unit
(1) Open the SD Memory Cover, and remove four screws (v × 4).
(2) Remove the CN801 and the CN3501 to ensure that Rear Cover Unit is pulled up.
(3) Disconnect the CN108, the CN3200, and detach the Rear Cover Unit.
v
3.5mm
Metal
M1.7
(1) - v
SUB PCB
CN801
CN801
(1) - v
CN3501
(3)
(2)
(2)
(3)
CN108
(3)
CN3200
(1) - v
SD Memory Cover
(1) - v
SUB PCB
Fig. 7
10
CN108
MAIN PCB
DC10 E, DC20 E
DISASSEMBLING
<Note on Reassembling>
(1) Attach the Rear Cover Unit as shown in the figure below.
Note on Reassembling (1)
Insert it downward.
Rear Cover
Unit
CVF L Cover
Plate of Zoom Ass'y
Rear Cover
Insert
Insert in between
Open the SD Memory
Cover in advance.
Fig. 8
11
DC10 E, DC20 E
DISASSEMBLING
1-6 Separation of Flash PCB ASS'Y (DC20 E only)
Note : After separating the Rear Cover Unit, be sure to discharge the Main Capacitor. (A high voltage is present on
the circuit. Be careful not to receive electric shock or cause accidental contact with other parts.)
(1) Peel off the UL Tape. Remove two screws (a × 2), disconnect the CN500, the CN501, and the CN502, and then detach the Flash
PCB Ass'y.
(2) Disengage three claws A and two claws B, and unsolder part α (two points) and part β (two points) , and detach the FLASH PCB,
the Flash PCB Holder, the Capacitor PCB, the Main Capacitor, and the Condenser Wire.
CN502
CN501
(1)
CN500
(1) - a
(1)
(1)
Solder α
Flash PCB Ass'y
UL Tape
(9 × 20mm)
FLASH PCB
(1) - a
Flash PCB
Holder
(2)
a
Claws A
Condenser
Wire −
(Black)
2.5mm
Metal
M1.7
Condenser
Wire +
(Red)
(2)
Claw A
Claws B
Note
Discharge point
FLASH PCB
Main Capacitor
Solder β
(2)
CAPACITOR PCB
Discharge resistance : Approx.1KΩSW
Fig. 9
12
Main Capacitor
(2)
DC10 E, DC20 E
DISASSEMBLING
<Note on Reassembling>
(1) Attach the Main Capacitor, the Condenser Wire, and the Flash PCB Holder as shown in the figure below.
(2) Attach the FLASH PCB and the Condenser Wire as shown in the figure below.
(3) Treat the Condenser Wire as shown in the figure below.
(4) Attach the Flash PCB Ass'y with its dowels aligned.
(5) Attach the FLASH FPC, the Condenser Wire, the Flash Cable, and the UL Tape as shown in the figure below.
Note on Reassembling (1)
Solder β ([+] terminal)
CAPACITOR PCB
Condenser Wire +
(Red)
Solder β
([−] terminal)
Condenser Wire −
(Black)
Solder the Capacitor and
Condenser wire to the Condenser
PCB.
Claws
Push into
the Claws.
Insert into
the hole.
Be careful about the polarity of
the Capacitor and Condenser
Wires at the soldered section β.
Main Capacitor
(White line side on cylinder is negative [−])
Note on Reassembling (2)
Solder α
([−] terminal)
Solder α
([+] terminal)
Flash PCB
Holder
Insert into the Flash PCB Holder.
Note on Reassembling (3)
FLASH PCB
1.Insert under the rib.
Condenser Wire + (Red)
Condenser Wire − (Black)
Claws
Condenser
Wire
Note on Reassembling (4)
Flash PCB Ass'y
2.Push into the Claws.
Solder the Condenser Wire to
the Flash PCB Ass'y and insert
it to the Flash PCB Holder.
Flash PCB
Holder
Be careful about the polarity
of the Condernser wire at the
soldered section α.
Note on Reassembling (5)
Lens
Holder
ST Wire
Protector
Dowel
UL Tape
(9 × 20mm)
FLASH FPC
Condenser Wire
Flash Cable
Attachment
reference
Flash Cable
Take care not to extend onto
the Lens Holder.
Dowel
CN500
Attachment
reference
Fig. 10
13
Discharge pad
Insert the FLASH FPC
so that it wraps the Flash
Cable and Condenser
Wire. Be sure to stick UL
Tape so that it covers the
discharge pad.
And fix Flash Cable at the
same time.
DC10 E, DC20 E
DISASSEMBLING
1-7 Separation of CVF Unit, SUB PCB
(1) Remove one screw (a × 1), disconnect the CN1501, and demount the CVF Unit.
(2) Remove one screw (a × 1), disconnect the CN2901 and the CN2905 (B to B), and detach the SUB PCB.
(3) Detach the SUB PCB Form.
<Note on Reassembling>
(1) Attach the SUB PCB Form to the position indicated in the figure below.
CVF Unit
(1)
(1) - a
CN1501
(2) - a
CN2901 (B to B)
(2)
(1)
Note on Reassembling (1)
(3)
SUB PCB
CN2905
(B to B)
SUB PCB Form
Attachment
reference
SUB PCB Form
a
2.5mm
Attachment
reference
Metal
M1.7
Fig. 11
14
DC10 E, DC20 E
DISASSEMBLING
1-8 Separation of GYRO PCB
(1) Remove one screw (a × 1), and detach the GYRO GND Plate.
(2) Remove two screws (a × 2), disconnect the CN1601, and detach the GYRO PCB Section.
(3) Remove two screws (a × 2), and detach the GYRO PCB.
(4) Detach the CCD Connector Sheet from the GYRO Holder.
<Note on Reassembling>
(1) Attach the CCD Connector Sheet as shown in the figure below.
(2) Attach the GYRO PCB Section as shown in the figure below.
Note on Reassembling (1)
GYRO Holder
CCD
Connecter
Sheet
Attachment
reference
Bend it and stick it so that the face
and the back have the same length.
GYRO GND Plate
(1) - a
(2) - a
(1)
(2)
(2)
CN1601
(2) - a
a
2.5mm
GYRO PCB
Section
Metal
M1.7
Note on Reassembling (2)
(3) - a
GYRO PCB
CCD FPC
(3)
GYRO PCB
GYRO Holder
GYRO Holder
Insert the CCD FPC
between the GYRO PCB
and the GYRO Holder.
(4)
CCD Connecter Sheet
Fig. 12
15
DC10 E, DC20 E
DISASSEMBLING
1-9 Separation of Camera Unit
(1) Remove the CN1000 and the CN1052 (CN1070 for DC10 E) (B to B), the CN1200, and two screws (a × 2) , and detach the Lens
Unit.
Note : Take care not to deform the CCD GND Plate.
<Note on Reassembling>
(1) Treat the Lens FPC and the Flash Cable as shown in the figure below.
a
CN1200
2.5mm
Metal
M1.7
CN1000
(B to B)
Flash Cable
Lens Unit
(1) - a
(1)
(1)
(1) - a
Note
CN1052 (DC20 E)
CN1070 (DC10 E)
(B to B)
Note on Reassembling (1)
CCD GND Plate
Flash Cable
ST Wire
Protector
Fold up the
Lens FPC.
CN1200
Fig. 13
16
DC10 E, DC20 E
DISASSEMBLING
1-10 Separation of Center Cover
(1) Open the Multi Jack Cover, and remove three screws (t × 1, u × 2).
(2) Remove three claws (five claws for DC10 E) , and detach the Center Cover, the Mode Switch, the Start/Stop Button, and the Multi
Jack Cover.
Note : When detaching the Center Cover, take care not to damage the claws part.
(3) Detach the LED window, the Grip Belt Pin, and the Rear Grip Belt from the Center Cover.
Mode Switch
(2)
Claws
(2)
LED Window
(1) - u
Claw
(2)
Grip Belt Pin
Multi Jack Cover
(3)
Start Stop
Button
(2)
(1) - u
(3)
Rear Grip Belt
Center Cover
(1) - t
Claws
Center Cover
t
u
4.5mm
Metal
M1.7
DC10 E only
Fig. 14
17
3mm
Metal
M1.7
DC10 E, DC20 E
DISASSEMBLING
<Note on Reassembling>
(1) Attach the Mode Switch as shown in the figure below.
(2) Attach the Center Cover as shown in the figure below.
(3) Insert the Multi Jack Cover after installing the Center Cover.
(4) Do not attach the Start/Stop Button at this time point.
Note : As long as the Start/Stop Button is not attached, the Disc Cover can be opened manually. Thus attach the Start/
Stop Button after all component parts are assembled.
Note on Reassembling (1)
Align with the Switch.
Note on Reassembling (4)
Note
Push it in.
Open the
Disc Cover
Fix Mode Switch
by sliding.
Insert into the
Main Frame
Start Stop Button
Be careful not to
remove the spring.
Note on Reassembling (2)
Flash Cable
Claw B
Claw A
Claw A
1
Rib
Rib
Flash Cable
2
1
Mode Switch
1. Fit the Mode Switch to the hole of the
Center Cover and attach two claws A.
ST Wire Protector
2. While exercising care not to pinch the
Flash Cable, insert two claws B.
Zoom Photo Unit
3. Insert the Center Cover Rib under
the Zoom Photo Unit.
End section of the Center Cover
Open Knob
4. While slightly lifting up the end
section of the Center Cover,
insert the Open Knob.
Fig. 15
18
DC10 E, DC20 E
DISASSEMBLING
1-11 Separation of Zoom Ass'y, CARD PCB
(1) Open the Disc Cover.
(2) Remove two screws (f × 1, g × 1) , disconnect the CN100, and detach the Zoom Ass'y.
(3) Remove two screws (a × 2) , disconnect the CN50 and CN105, and detach the CARD PCB and the CARD FPC.
(4) Remove solder (α) from the CARD PCB, and detach the LI Battery.
<Note on Reassembling>
(1) Mount the CARD FPC in the orientation indicated in the figure below.
(2) - f
Disc Cover
(2) - g
(2) - f
(2)
CN100
CARD FPC
(3)
(1)
CN105
(3)
(3)
(1)
Zoom Ass'y
CN50
Open the Disc Cover
CARD PCB
(3) - a
(3) - a
LI Battery
Solder α
(4)
Note on Reassembling (1)
CARD FPC
a
MAIN PCB
CN105
2.5mm
CARD PCB
CN50
Fig. 16
19
Metal
M1.7
g
f
4.5mm
Metal
M1.7
(self tap)
5.5mm
Metal
M1.7
(self tap)
DC10 E, DC20 E
DISASSEMBLING
1-12 Separation of MAIN PCB
(1) Detach the UL Tape. Remove three screws (a × 3), disconnect the CN102, the CN107, the CN2100, and the CN2300, and detach the
MAIN PCB.
(2) Detach the GYRO FPC, the FLASH FPC, and the Main Spacer from the MAIN PCB.
a
2.5mm
Metal
M1.7
GYRO FPC
UL Tape
(9 × 10mm)
(1)
CN107
CN1201
(1)
(2)
(1)
CN2100
(1) - a
Main
Spacer
(2)
(1) - a
CN103
(2)
MAIN PCB
(1)
CN102
CN2300
(1)
FLASH FPC
(1) - a
Fig. 17
20
DC10 E, DC20 E
DISASSEMBLING
<Note on Reassembling>
(1) Attach the Main Spacer to the position indicated in the figure below.
(2) Ensure that the GYRO FPC and the FLASH FPC are installed in the direction shown in the figure.
(3) Attach the UL Tape to the position indicated in the figure below.
Note on Reassembling (1)
MAIN PCB
IC100
Main Spacer
Attach the Main Spacer
to the IC100 in alignment
with the center position.
Allowable attachment
deviation: ±0.5 mm
Note on Reassembling (2)
Note on Reassembling (3)
GYRO PCB
CN1601
Screw hole should
not be covered.
UL Tape (9 × 10mm)
GYRO FPC
MAIN PCB
CN1201
CN107
MAIN PCB
CN103
FLASH FPC
FLASH PCB
CN 500
Fig. 18
21
DC10 E, DC20 E
DISASSEMBLING
1-13 Separation of TS Mech Section
(1) Open the Disc Cover.
(2) Remove four screws (b × 1, c × 1, f × 1, g × 1), and detach the TS Mech Section, the Tripod Base, and the Gap Sheet.
Note : After detaching the TS Mech Section, place it with its Lens part upward. Never touch the Lens part.
<Note on Reassembling>
(1) Attach the TS Mech Section as shown in the figure below.
(2) Attach the Gap Sheet to the position indicated in the figure below. (DC10 E only)
c
b
4.5mm
Metal
M1.7
f
6mm
Metal
M1.7
g
4.5mm
Metal
M1.7
(self tap)
5.5mm
Metal
M1.7
(self tap)
(1)
(2) - g
(2)
(2) - b
(2) - f
(2) - c
Note on Reassembling (2) DC10 E
only
Gap Sheet
Attachment
Tripod Base
reference
(2)
Tripod Base
(2)
DC10 E only
(2)
(2) - b
Attachment
reference
Gap Sheet
TS Mech Section
Note on Reassembling (1)
Adjust to
the notch.
Insert it in advance.
Attach the
Tripod Base.
Fig. 19
22
Attachment
reference
Note
Lens part
DC10 E, DC20 E
DISASSEMBLING
1-14 Separation of Main Frame
Note : After detaching the TS Mech Section, place it with its Lens part upward. Never touch the Lens part.
When cleaning the cover surface part, wipe it with a dry clock without using a solvent for protection of the
coating.
(1) Remove four screws (a × 4), and detach the Bottom Frame and the Card Holder.
(2) Remove five screws (a × 1, h × 4), and detach the Chassis Damper, the Main Frame, and the AE FPC Ass'y.
(3) Detach the Gasket and the ST Wire Protector (DC20 E only).
(4) Disconnect the CN201, and detach the MAIN FPC, the FE FPC Shield, the Shield Sheet, and the D Cover Supporter.
Note
Cover surface part
(2) - h
Chassis Damper
Lens part
Never touch.
Chassis
Damper
(2) - a
D Cover
Supporter
AE FPC Ass'y
(4)
(2) - h
DC20 E only
ST Wire
Protector
(2)
Gasket
Chassis
Damper
(3)
(2)
(3)
(3)
(4)
(3)
(4)
CN201
Gasket
(4)
MAIN FPC
Shield Sheet
Main Frame
(1)
FE FPC Shield
(1)
(3)
Gasket
Bottom Frame
(1) - a
Card Holder
a
Metal
M1.7
(1) - a
Fig. 20
23
h
2.5mm
5.3mm
Metal
M1.7
Stepped Screw
DC10 E, DC20 E
DISASSEMBLING
<Note on Reassembling>
(1) Mount the MAIN FPC in the orientation indicated in the figure below. And Attach the FE FPC Shield to the position indicated in
the figure below.
(2) Attach the D Cover Supporter to the position indicated in the figure below.
(3) Attach the Shield Sheet as shown in the figure below.
Note on Reassembling (2)
Note on Reassembling (1)
TS Mech section
MH PCB CN201
Attachment
reference
FE FPC
Shield
Attachment
reference
D Cover
Supporter
Attachment
reference Fold and
attach
MAIN PCB
CN2300
Note on Reassembling (3)
Flexible cable reinforcing board(Back Side)
Wrap around the flexible cable.
Overlapped attachment part:
More than 2/3 shall be attached.
Attachment reference
1mm ±1mm
Shield Sheet
Fig. 21
24
DC10 E, DC20 E
DISASSEMBLING
(4) Attach the Gasket and the ST Wire Protector (DC20 E only) to the position indicated in the figure below.
(5) Attach the Main Frame as shown in the figure below.
(6) Do not reuse the step screws (h × 4) securing the Main Frame, because its tip is applied with adhesive for the prevention of
loosening.
Note on Reassembling (4)
Gasket
Back side
DC20 E only
Attachment
reference
Gasket
Attachment
reference
ST Wire Protector
(DC20 E only)
Gasket
Gasket
Note on Reassembling (5)
TS Mech Recorder Ass'y
Press the gasket.
Gasket
Ensure that the four gaskets are securely
pinched between the TS Mech Recorder
Ass'y Frame and the Main Frame.
Press the gasket in the
arrow direction.
Main Frame
Press the gasket.
Gasket
Place the TS Mech Recorder Ass'y on the two gaskets other
than the one shown above, and pinch them between.
Fig. 22
25
DC10 E, DC20 E
DISASSEMBLING
1-15 Disassembly of Front Cover Unit - 1
(1) Detach the Blindfold Sheet.
(2) Remove five screws (i × 4, j × 1), and detach the GND Plate, the Back Barrier Plate section, and the GND Plate Spring.
Note : Take care not to deform the GND Plate Spring.
(3) Detach the Barrier Slide Holder, the Barrier Knob, and the LED Radiator Gum (DC20 E only).
Barrier Knob
(3)
DC20 E only
LED Radiator
Gum
(3)
Back Barrier Plate section
(3)
GND Plate
Spring
(1)
(2) - j
(2) - i
Barrier Slide Holder
GND Plate
(2)
Blindfold Sheet
(2) - i
(2)
Lift up
Tweezers
i
j
4mm
Metal
M1.7
(self tap)
3.5mm
Black
M1.7
(self tap)
Fig. 23
26
DC10 E, DC20 E
DISASSEMBLING
<Note on Reassembling>
(1) Attach the Barrier Slide Holder as shown in the figure below.
(2) Attach the LED Radiator Gum to the position indicated in the figure below. (DC20 E only)
(3) The Back Barrier Plate should be mounted as shown in the figure. After mounting it, slide the Barrier Slide Holder to check if the
Barrier opens/closes smoothly.
(4) Attach the Blindfold Sheet to the position indicated in the figure below.
Note on Reassembling (1)
Note on Reassembling (2)
LED Radiator Gum
FRONT FPC
Barrier Slide Holder
Barrier Arm Ass'y
Mount the Barrier Slide Holder with its convex
section inserted to the Barrier Arm Ass'y hole.
Note on Reassembling (3)
Adjust to
the dowel.
DC20 E only
Note on Reassembling (4)
The edge part of the
flexible cable should
be positioned on the
Blindfold Sheet.
Flexible cable
FRONT FPC
Pass the flexible
cable through it.
Fold the FRONT
FPC, and attach
the Blindfold Sheet.
Blindfold Sheet
Back Barrier Plate section
Fig. 24
27
Adjust to
the step
difference.
DC10 E, DC20 E
DISASSEMBLING
1-16 Disassembly of Front Cover Unit - 2
(1) Remove the CN899, and detach the Microphone Case, the Mic Ass'y, and the Microphone Case Cover from the Back Barrier Plate.
(2) Remove double-sided tape and detach the MICROPHONE RELAY FPC.
(3) Remove one screw (i × 1), and detach the FRONT FPC.
FRONT FPC
(3)
Microphone Case
Back Barrier Plate
(3) - i
MICROPHONE
RELAY FPC
(2)
Mic Ass'y
i
4mm
(1)
Microphone
Case Cover
Metal
M1.7
(self tap)
(1)
Double Sided Tape
(Back side)
Fig. 25
28
CN899
DC10 E, DC20 E
DISASSEMBLING
<Note on Reassembling>
(1) Attach the MICROPHONE RELAY FPC as shown in the figure below.
(2) Attach the Mic Ass'y as shown in the figure below.
(3) Attach the Microphone Case Cover as shown in the figure below.
(4) Attach the Mic Ass'y and the Microphone Case as shown in the figure below.
Note on Reassembling (1)
Note on Reassembling (3)
MICROPHONE RELAY FPC
Back Barrier Plate
Insert the convex
section into the
opening of the
Barrier Back Plate.
Adjust the
hole position.
Attachment
reference
Microphone Case Cover
Back Barrier Plate
Note on Reassembling (4)
Insert the flexible cable into the opening of
the Barrier Back Plate.
Flexible cable of
Mic Ass'y
CN899
Microphone
Case Cover
Microphone
Case Cover
Microphone Case
Note on Reassembling (2)
Mic Ass'y
Microphone Case
Fig. 26
29
DC10 E, DC20 E
DISASSEMBLING
1-17 Disassembly of Front Cover Unit - 3
(1) Detach the Spring.
(2) Detach the Barrier Bottom Holder, the Barrier Arm Ass'y, and the Lens Barrier.
Front Cover Ass'y
(2)
Barrier Bottom Holder
Lens Barrier
Spring
Barrier Arm Ass'y
Fig. 27
30
(1)
DC10 E, DC20 E
DISASSEMBLING
<Note on Reassembling>
(1) Attach the Lens Barrier, Barrier Arm Ass'y, and Barrier Bottom Holder as shown in the figure below.
(2) Attach the Spring as shown in the figure below.
<Instruction for Supply>
Front Cover Ass'y Rail section and side faces : Hanarl KS-39M (DY9-3053-000)
Note on Reassembling (1)
Barrier Bottom Holder
Dowel E
Dowel C
Dowel E
Dowel C
Dowel D
A
Dowel F
Dowel D
Mount the Lens Barrier and the
Barrier Arm Ass'y using the groove
of section A of the Front Cover Ass'y.
Insert dowels C, D, E and F into the
holes and grooves of the Barrier
Bottom Holder, respectively.
Lens Barrier
After mounting the Barrier Bottom
Front Cover Ass'y Holder, check if the dowels D and
E smoothly slide in the sliding
Barrier Arm Ass'y
range with dowel C used as
supporting point.
Note on Reassembling (2) Spring
Rib G
Rib G
Hook
Hang one side of the
spring on the hook.
Mount the spring by inserting its
tip into the hole of rib G.
Instruction for Supply
Front Cover Ass'y
Rail section and
side faces
Hanarl : KS-39M
Fig. 28
31
DC10 E, DC20 E
DISASSEMBLING
1-18 Disassembly of L Cover Unit
(1) Remove four screws (f × 2, g × 2), and detach the Flash Ass'y and the LC Cover. (DC20 E only)
(1) Remove four screws (f × 4), and detach the LC Cover. (DC10 E only)
(2) Slide the Lock Plate, open the Disc Cover, remove two screws (a × 2), and detach the Lock Ass'y and the Gap Sheet.
(3) Remove one screw (g × 1), and detach the Disc Cover Ass'y and the Front Grip Belt.
(4) Remove two screws (a × 2), and detach the Friction Plate.
Disc Cover Ass'y
Friction Plate
(4)
(4) - a
Front Grip Belt
Left Cover
(3)
LC Cover
(3)
(1)
(2)
(1) - g
(3) - g
(3)
Gap
Sheet
(1) - f
(1)
(2) - a
(1) - f
Flash Ass'y
(2)
DC20 E only
Lock Ass'y
(1) - f
Lock Plate
(2)
Slide
(1) - f
LC Cover
DC10 E only
Disc Cover Ass'y
a
f
2.5mm
Metal
M1.7
g
4.5mm
Metal
M1.7
(self tap)
5.5mm
Metal
M1.7
(self tap)
Fig. 29
32
DC10 E, DC20 E
DISASSEMBLING
<Note on Reassembling>
(1) Attach the Friction Plate as shown in the figure below.
(2) Attach the Disc Cover and the Front Grip Belt as shown in the figure below.
(3) Attach the Gap Sheet to the position indicated in the figure below.
(4) Incorporate the Flash Ass'y into the LC Cover and mount it into the Left Cover. Be sure to fasten two screws of the Flash Ass'y first
(DC20 E only).
<Instruction for Supply>
Disc Cover Ass'y sliding surface: Hanarl KS-39M (DY9-3053-000)
Note on Reassembling (1)
Disc Cover Ass'y
Base section
Open
Dowel
groove
For mounting the Left Cover, ensure that the
Disc Cover Ass'y base section should be open
as shown in the figure above.
Friction Plate
Mount the Friction Plate in the Disc Cover Ass'y with
its dowel and hole fit into the groove and dowel, respectively.
Note on Reassembling (2)
Note on Reassembling (4)
DC20 E only
Left Cover
Front Grip Belt
LC Cover
Flash Ass'y
Fasten the
screws.
Disc Cover
Ass'y Base
Insert the Disc Cover Ass'y Base
into the Front Grip Belt.
Note on Reassembling (3)
Attachment
reference
Instruction for Supply
Sliding part
Attachment
reference
Gap Sheet
Disc Cover Ass'y
Hanarl : KS-39M
Fig. 30
33
Sliding part
DC10 E, DC20 E
DISASSEMBLING
1-19 Disassembly of Lock Ass'y
(1) Detach the D Cover Switch, the D Cover Spring, and the Light Shield Sheet.
Note : Be careful not to miss the D Cover Spring and not to damage the Switch.
(2) Remove two screws (k × 2), and detach the AV Holder, the AV FPC Ass'y, and the Gap Sheet.
(3) Remove two screws (u × 2), and open the Gear Motor Ass'y.
(4) Remove five screws (k × 5) , and unsolder (α) at four places, and detach the Gear Motor Ass'y and the SW FPC Ass'y.
(5) Detach the Open Knob, the Open Knob Spring, and the Lock Base Sheet.
Note : Take care not to lose the Spring.
D Cover Spring
Detach by sliding rightward.
D Cover Switch
D Cover Switch
k
Light Shield Sheet
(1)
2mm
Metal
M1.7
(1)
u
AV FPC Ass'y
(2)
AV
Gap Holder
Sheet
3mm
Metal
M1.7
(2)
Be careful not to damage
the Switch.
(2)
Lock Ass'y
(3)
(2) - k
(3) - u
(4) - k
SW FPC Ass'y
Gear Motor Ass'y
(3)
(4) - k
(5)
(4)
Open
(3) - u
Lock Base Sheet
(4) - k
(5)
Open Knob
Spring
Detach by
sliding
downward.
(5)
Open Knob
Open Knob
(4) - k
Gear Motor Ass'y
Open Knob
Spring
(4)
Gear Motor Ass'y
Solder α
Solder α
SW FPC Ass'y
Fig. 31
34
Lock Ass'y
DC10 E, DC20 E
DISASSEMBLING
<Note on Reassembling>
(1) Attach the Open Knob and the Open Knob Spring as shown in the figure below.
(2) Attach the Lock Base Sheet to the position indicated in the figure below.
(3) Solder the SW FPC Ass'y to the Gear Motor and attach them as indicated in the figure below.
(4) Attach the Gap Sheet to the position indicated in the figure below.
Note on Reassembling (1)
Note on Reassembling (2)
Open Knob
Lock Base Sheet
A
B
Lock Ass'y
Lock Ass'y While compressing the Open
Mount the Open
Knob Spring, insert the Open
Knob Spring.
Knob sections A and B into
the slit of Lock Ass'y.
Note on Reassembling (3)
Attachment
reference
Make them hit by
the standing sections.
Lock Ass'y
Insert
D Cover Switch
Bend the
flexible cable.
Dowels
Align with the dowels at two places.
Dowel
Eject Switch
Dowels
Solder
Solder
Dowel
Align with the dowels at two places.
Align with the dowels at two places.
Note on Reassembling (4)
Gap Sheet
AV Holder
Attach to the center
on the wall surface
of the AV Holder.
Fig. 32
35
DC10 E, DC20 E
DISASSEMBLING
<Note on Reassembling>
(5) When using the AV FPC Ass'y supplied as a service part, fold it as shown in the figure below.
(6) Attach the AV FPC Ass'y and the AV Holder as shown in the figure below.
(7) Attach the D Cover SW and the D Cover Spring as shown in the figure below.
(8) Attach the Light Shield Sheet to the position indicated in the figure below.
Note on Reassembling (5)
Note on Reassembling (6)
Double Sided
Tape
(Back side)
Attachment
reference
AV FPC Ass'y
Attach it by making
it hit against the
end.
AV FPC Ass'y
Folding in a
crest form
AV Holder
Folding in a
trough form
AV Jack
Double Sided Tape
(3 × 13mm)
(Back side)
Note on Reassembling (7)
Insert the AV Jack
into the AV Holder
and attach it so that
the dowel is aligned
with.
Dowel
D Cover Switch
Be careful not
to damage
the switch at
the back side.
Insert into
the slit
Note on Reassembling (8)
AV FPC Ass'y
Attachment
reference
Attach the D Cover Spring.
Align with the
screw hole of
the Lock Ass'y.
D Cover SW
Light Shield
Sheet
Lock Ass'y
D Cover Spring
Fig. 33
36
Attachment
reference
DC10 E, DC20 E
DISASSEMBLING
1-20 Separation of LCD Ass'y
(1) Detach the Right Sponge.
(2) Remove four screws (i × 2, k × 1, l × 1), and detach the Hinge Plate.
(3) Open the LCD Ass'y. Remove two screws (k × 2), and detach the LCD Ass'y.
Note : Take care not to damage the LCD Switch.
(4) Detach the Lid Jig Connection.
(2) - i
Hinge Plate
(2) - l
Lid Jig Connection
(2)
(4)
(2) - k
LCD Switch
(3)
Tweezers
(1)
(3) - k
Right Sponge
(3)
i
LCD Ass'y
k
4mm
Metal
M1.7
(self tap)
Fig. 34
37
l
2mm
Metal
M1.7
5mm
Metal
M1.7
(self tap)
DC10 E, DC20 E
DISASSEMBLING
<Note on Reassembling>
(1) Attach the LCD Ass'y as shown in the figure below.
(2) Attach the Hinge Plate as shown in the figure below.
(3) Attach the Right Sponge as shown in the figure below.
Note on Reassembling (1)
Note on Reassembling (2)
Attach the LCD Ass'y and while
holding the upper section of the
Hinge, attach two screws (3) - k .
Hinge Plate
LCD Hinge
Cable
Battery Terminal
(3)
Close
Dowels
Hinge Gap Cover
(3)
Pass the flexible cable through
under the lower plate.
With the LCD Ass'y closed, pass the LCD
Hinge Cable through the Battery Terminal,
and attach the Hinge Plate so that its holes
are aligned with the dowels.
Note on Reassembling (3)
While folding the Right Sponge
as indicated in the figure, attach
it at the position shown in the
figure.
Right Sponge
Fig. 35
38
DC10 E, DC20 E
DISASSEMBLING
1-21 Disassembly of LCD Unit - 1
(1) Turn the LCD Hinge Ass'y in the direction indicated in the figure shown below, and then remove two screws (d × 2).
(2) Disengage claws A, B, C, D, E, and F (six positions), and detach the LCD Top Cover Ass'y.
(3) Disconnect the CN901 and the CN903, and detach the LCD Hinge Ass'y.
<Note on Reassembling>
(1) To attach the LCD Top Cover Ass'y, insert the Claws E and F first, and then the Claws D, B, C, and A in this order.
LCD Hinge Ass'y
(1)
(3)
CN903
(3)
(3)
(1) - d
Claw A
(2)
Claw B
CN901
Claw E
(1) - d
Claw C
Claw F
LCD Top Cover Ass'y
Claw D
Note on Reassembling (1)
LCD Top Cover Ass'y
Claw A
Claw B
d
3mm
Metal
M1.7
Claw E
Claw C
Claw D
Fig. 36
39
Claw F
DC10 E, DC20 E
DISASSEMBLING
1-22 Disassembly of LCD Unit - 2
(1) Remove LCD Sheet 2 (2 pcs.).
(2) Remove one screw (k × 1), unsolder part (α), and disconnect the CN902, and then demount the LCD PCB, the LCD Shield sheet,
the LCD Back Light Ass'y, the LCD Panel, and the LCD Frame.
(3) Detach the LCD Sheet 1.
LCD Bottom Cover
LCD Sheet 1
LCD Frame
(3)
LCD Panel
LCD Back Light Ass'y
LCD Shield Sheet
LCD PCB
(2)
(2) - k
(2)
Solder α
(1)
LCD Sheet 2 CN902
k
2mm
(1)
Metal
M1.7
(2)
LCD Sheet 2
Fig. 37
40
DC10 E, DC20 E
DISASSEMBLING
<Note on Reassembling>
(1) Attach the LCD Sheet 1 to the position indicated in the figure below.
(2) Attach the parts ranging from the LCD Frame to the LCD PCB as shown in the figure below.
(3) Attach the LCD Sheet 2 to the position indicated in the figure below.
Note on Reassembling (2)
A
GND Spring section
LCD Panel
Push in
LCD Frame
LCD Bottom Cover
A
B
1. Push the LCD Panel into the GND Spring
section and then into the sections A and B.
2. Attach it to the LCD Bottom Cover.
LCD Back Light Ass'y Attachment
reference
C
LCD Frame
Make it hit against
the end.
C
LCD Back Light Ass'y
LCD Shield Sheet
3. With the four sections C aligned with the LCD
Back Light Ass'y, stick the LCD Shield Sheet.
Push into the hole.
4. Attach the LCD Back Light Ass'y.
LCD PCB
Solder α
LCD BACK LIGHT FPC
Adjust them.
5. Attach the LCD PCB.
Note on Reassembling (1)
Note on Reassembling (3)
LCD Bottom Cover
LCD Sheet 1
Attachment
reference :
−1 mm
Align with the end
of the angle R.
6.Assemble the parts and solder (α) them.
Attachment
reference :
−2 mm
Wrinkle and slippage not allowed.
Align with the sheet LCD Sheet 2
metal of LCD Frame.
Attachment
reference :
Attachment
−1 mm
reference :
−1 mm
Attachment
Attachment
reference :
reference :
−1 mm
−1 mm
Align with the step difference.
Wrinkle and slippage not allowed.
Fig. 38
41
DC10 E, DC20 E
DISASSEMBLING
1-23 Disassembly of LCD Hinge Ass'y
(1) Disengage four claws A, and detach the Hinge Cover.
Note1 : When pulling the Connector section of the LCD Hinge Ass'y cable from the hole in the Hinge Cover, be careful
about damage.
(2) unsolder (α) at two places, and detach the LCD Hinge SW Wire.
(3) Remove two screws (m × 1, r × 1), and detach the Wire Protect and the LCD HINGE PCB.
Note2 : Take care not to damage the LCD Hinge SW.
<Note on Reassembling>
(1) Attach the LCD HINGE PCB as shown in the figure below.
(2) Soldering of the LCD Hinge SW Wire to the LCD HINGE PCB should be done after passing it through the rotating section of the
Hinge.
LCD Hinge SW Wire
(2)
LCD HINGE PCB
Solder α
(3)
(3) - m
Hinge Cover
(2)
Claws A
LCD Hinge Ass'y
(1)
(3)
(3) - r
m
Wire Protect
r
2.5mm
3mm
Metal
M1.4
Metal
M1.4
Claws A
Note 1
Note on Reassembling (1)
Note on Reassembling (2)
LCD Hinge SW Wire
Hinge Cover
Solder α
Dowel
Pull out
LCD Hinge SW
LCD HINGE
PCB
SW operation
section
Connecter
Attach it at the location where the
SW operating section does not
touch the LCD Hinge SW.
Fig. 39
42
DC10 E, DC20 E
DISASSEMBLING
1-24 Disassembly of CVF Unit - 1
(1) Detach the CVF Dust Cover, and remove one screw (i × 1), and then detach the CVF L Cover and CVF Eyecup.
(2) Peel of the UL Tape, and remove one screw (i × 1), and then detach the CVF GND Plate, the CVF Diop Plate, the CVF Diop Knob,
the CVF Diop Rubber, and the CVF Lens Holder.
(3) Disengage two claws A, and detach the CVF Lens.
CVF Eyecup
CVF Lens
CVF Lens Holder Claws A
CVF L Cover
(1)
CVF Dust Cover
(3)
(1)
(2)
(1)
CVF Dust Cover
Tweezers
CVF Diop Knob
(2)
(1) - i
(2)
CVF Diop Rubber
CVF Diop Plate
(2)
CVF GND Plate
(2) - i
i
4mm
UL Tape
(7 × 15mm)
Metal
M1.7
(self tap)
Fig. 40
43
DC10 E, DC20 E
DISASSEMBLING
<Note on Reassembling>
(1) Attach the CVF Lens as shown in the figure below.
(2) Attach the CVF Diop Plate, the CVF Diop Knob, and the CVF Diop Rubber as shown in the figure below.
(3) Attach the UL Tape to the position indicated in the figure below.
<Instruction for Supply>
CVF Diop Rubber sliding surface : Hanarl KS-39M (DY9-3053-000)
Note on Reassembling (1)
Note on Reassembling (1)
CVF Diop Plate
CVF Diop Knob
CVF Diop Rubber
CVF Lens Holder
Claws A
CVF Lens
CVF Lens Holder
With the angular section
aligned, push into the
claws A.
Note on Reassembling (3)
Attachment
reference
Instruction for Supply
CVF SUB FPC
CVF Diop Rubber sliding surface
Attachment
reference
CVF Diop Knob
UL Tape (7 × 15mm)
Hanarl : KS-39M
Fig. 41
44
DC10 E, DC20 E
DISASSEMBLING
1-25 Disassembly of CVF Unit - 2
(1) Peel of the UL Tape, disengage two claws A, and disconnect the CN4102, and then detach the CVF PCB, the CVF Reflector, the
CVF Diffuser, the CVF Cushion, and the CVF LCD section.
(2) Disconnect the CN4101, and detach the CVF SUB FPC.
(3) Disengage four claws B, and detach the CVF Panel Holder 2, the CVF LCD, and the CVF Panel Holder 1.
Note : Since the CVF LCD is made of glass alone, be careful of its handling.
CVF Panel Holder 1
CVF Inner Case
Claws B
Claws B
CVF LCD
(3)
CVF Panel Holder 2
CVF LCD section
CVF Cushion
CVF Diffuser
CVF Reflector
(1)
CVF PCB
(1)
CN4102
Claw A
Claw A
(1)
(2)
CN4101
UL Tape (9 × 20mm)
CVF SUB FPC
Fig. 42
45
DC10 E, DC20 E
DISASSEMBLING
<Note on Reassembling>
(1) Attach the CVF Panel Holder 2, the CVF LCD, and the CVF Panel Holder 1 as shown in the figure below.
(2) Attach the CVF Reflector as shown in the figure below.
(3) The CVF PCB should be attached with the CVF SUB FPC mounted, as indicated in the figure.
(4) Attach the UL Tape to the position indicated in the figure below.
(5) Before using the CVF SUB FPC supplied as a service part, provide preliminary folding at the position indicated in the figure below.
<Instruction for Supply>
Sliding Rail section of CVF Inner Case : Hanarl KS-39M (DY9-3053-000)
Note on Reassembling (1)
Note on Reassembling (2)
Pass the CVF
LCD through
the hole.
CVF Panel Holder 2
CVF Reflector
CVF LCD
CVF Cushion
The step difference side
should face the CVF Panel
Holder side.
CVF Panel Holder 1
Insert to the inside of the rib.
Note on Reassembling (3)
CVF PCB
Note on Reassembling (4)
Fold the Flexible cable of the CVF LCD.
C
Attachment
reference
D
CVF SUB FPC
Dowel
Dowel
CN4102
CVF PCB
Attachment
reference
Fix the flexible cable with
UL Tape (9 × 20mm)
Insert the claws and dowels at the section C,
and then push in the section D and fix it.
Note on Reassembling (5)
Instruction for Supply
SUB PCB
CN1501
Folding in a
trough form
Sliding Rail section
of CVF Inner Case,
8 points.
CVF PCB
CN4101
Hanarl : KS-39M
Fig. 43
46
DC10 E, DC20 E
DISASSEMBLING
1-26 Disassembly of Rear Cover Unit - 1
(1) Open the Jack Cover. Remove three screws (k × 1, l × 2), and detach the Jack Ass'y, the Jack Cover, and the Right Side Gasket.
(2) Remove one screw (l × 1), unsolder (α), and detach the DC JACK PCB and the DC Wire.
(3) Remove one screw (e × 1), and detach the USB FPC Ass'y and the USB Holder.
DC Jack Holder
(3) - e
(2)
DC JACK PCB
(3)
DC Wire
USB FPC Ass'y
USB Holder
(2)
Solder α
(2) - l
(Back side)
Right Side Gasket
(1) - l
(1)
(1) - k
(1) - l
(1)
(1)
Jack Ass'y
e
k
l
2mm
3.5mm
Metal
M1.7
Metal
M1.7
Jack Cover
5mm
Metal
M1.7
(self tap)
Fig. 44
47
DC10 E, DC20 E
DISASSEMBLING
<Note on Reassembling>
(1) Attach the DC Wire and the DC JACK PCB as shown in the figure below.
(2) Attach the Jack Cover as shown in the figure below.
(3) Before using the USB FPC supplied as a service part, provide preliminary folding at the position indicated in the figure below.
(4) Attach the Right Side Gasket onto the Key Flame.
Note on Reassembling (1)
DC JACK PCB
DC Wire
Hook
DC Wire
Solder α
Black Solder two
wires each
Red
together.
Yellow
Mount the DC Wire by passing it through the hook.
Note on Reassembling (2)
Note on Reassembling (3)
USB FPC
Insert into hole
Key Frame
Folding in a
crest form
Jack Cover
Note on Reassembling (4)
Right Side Gasket
Right Side Gasket
Key Frame
Fig. 45
48
DC10 E, DC20 E
DISASSEMBLING
1-27 Disassembly of Rear Cover Unit - 2
(1) Remove four screws (i × 3, k × 1), and detach the Key Frame, the Speaker, and the Rear Key FPC Ass'y.
(2) unsolder (α) at two places, and detach the Speaker Wire.
(3) Detach the Center SW Knob and the Center SW knob Dumper from the Rear Key FPC Ass'y.
(4) Detach the SD Cover.
(1)
Make the SD Cover
Hinge section escape.
Key Frame
(2)
(3)
Rear Key FPC Ass'y
Center SW
Knob Dumper
Solder α
(2)
Detach the Rear Key
FPC from the dowel
and make it escape.
(1) - i
(1) - i
Speaker
Center SW
Knob
Speaker Wire
(3)
A
Rear Key FPC Ass'y
(1) - i
Speaker
SD Cover
Speaker Wire
A
(4)
Key Frame
(1)
i
k
4mm
Metal
M1.7
(self tap)
(1) - k
2mm
Metal
M1.7
Fig. 46
49
DC10 E, DC20 E
DISASSEMBLING
<Note on Reassembling>
(1) Attach the SD Cover as shown in the figure below.
(2) Attach the Center SW Knob and the Center SW Knob Dumper as shown in the figure below.
(3) Attach the Rear Key FPC Ass'y as shown in the figure below.
(4) Treat the Speaker Wire as shown in the figure.
(5) Tighten the Key Frame together with the Rear Key FPC at one place.
Note on Reassembling (1)
Note on Reassembling (2)
Rear Key FPC Ass'y
Key Frame
Center SW Knob Dumper
The shiny face should be on the SW side.
SD Cover
Center SW Knob
Align the characters (SET) with the
horizontal direction.
Switch
Insert
Note on Reassembling (3)
Note on Reassembling (5)
Rear Key
FPC Ass'y
Check the Slide SW
Knob by looking
through the hole.
Lever of Slide SW
Key Frame
Dowel
Dowel
Insert the Slide SW
lever into the concave
section of the Slide
SW Knob. Check if it
operates.
Note on Reassembling (4)
Dowels
Place the REAR
KEY FPC and
fix it with screws.
Dowel
Key Frame
Speaker
The soldered
section on the
Speaker
should not
touch the
Key Frame.
The speaker
mounting
reference :
±1 mm
Rib
Pass through the slit
of the rib.
Pass through under
the rib.
Pass through the hook.
Fig. 47
50
DC10 E, DC20 E
DISASSEMBLING
1-28 Disassembly of Rear Cover Unit - 3
(1) Detach the Slide SW Knob, the Rear SW Knob, the DP Window, the Menu SW Knob, and the Card Access Window.
Menu SW Knob
Rear SW Knob
(1)
Card Access Window
(1)
(1)
(1)
DP Window
(1)
Slide SW Knob
Rear Cover
Fig. 48
51
DC10 E, DC20 E
DISASSEMBLING
1-29 Disassembly of Camera Unit
(1) Remove two screws (i × 2) , and detach the Lens Holder, the Right Side Gasket, the ST Wire Protector (DC20 E only), the CCD
PCB Absorber, the CCD GND Plate, and the Lens Sponge.
Note : Take care not to deform the CCD GND Plate.
(2) Remove one screw (a × 1) , and detach the CCD Heatsink Plate.
(3) Remove two screws (f × 2) , and detach the CCD Ass'y, the CCD Rubber, the Optical IR Filter, and the Shield Sheet.
(2) - a
CCD Heatsink Plate
Optical IR Filter
CCD GND Plate
(2)
(3)
(1)
(1)
(1)
Lens Sponge
(1) - i
DC20 E only
ST Wire Protector
(1)
(3) - f
CCD Rubber
(1)
(1)
(1)
(1)
CCD Ass'y
Right Side
Gasket
(3)
(3) - f
Lens Holder
CCD PCB Absorber
(1) - i
a
CCD Shield Sheet
f
2.5mm
Metal
M1.7
4.5mm
Lens
Face thick
side toward
CCD side
Metal
M1.7
(self tap)
i
CCD
4mm
IR Filter
Metal
M1.7
(self tap)
Fig. 49
52
DC10 E only
CCD Rubber
CCD Ass'y
CCD PCB
Absorber
DC10 E, DC20 E
DISASSEMBLING
<Note on Reassembling>
(1) Attach the CCD Shield Sheet as shown in the figure below.
(2) Attach the Right Side Gasket and the ST Wire Protector (DC20 E only) to the position indicated in the figure below.
(3) Attach the Lens Holder as shown in the figure below.
(4) Attach the Lens Sponge as shown in the figure below.
(5) Attach the CCD PCB Absorber as shown in the figure below.
Note on Reassembling (1)
Note on Reassembling (3)
CCD Ass'y
Fold and attach
CCD Shield Sheet
Lens Holder
Range of
attachment
reference
CCD FPC
Pass the CCD FPC through the openings of
Lens Holder and attach it.
Note on Reassembling (2)
Lens Holder
Lens Holder
ST Wire
Protector
DC20 E only
Note on Reassembling (5)
Adjust to the flange part
of ST Wire Protector
DC10 E only
Right Side Gasket
Attachment
reference
Note on Reassembling (4)
Attachment
reference
Attachment
reference
CCD PCB
Lens
Sponge
IG Meter
Ass'y
Attachment
reference
Bring attachment
to bear on the
edge of the IG Meter Ass'y.
CCD PCB
Absorber
Attachment
reference
Make attachment meet the outline of the PCB.
Fig. 50
53
DC10 E, DC20 E
DISASSEMBLING
1-30 Disassembly of Lens Unit
(1) Peel off the UL Tape.
(2) Remove eight screws (n × 5, o × 1, p × 1, q × 1), unsolder points α, and detach the IG Meter Ass'y, the PZ Motor, the Photo
Interrupter, the Guide Bar (× 3), and the SR Head, etc.
n
o
q
p
3mm
4mm
Metal
Metal
M1.4
M1.4
(self tap)
(self tap)
3mm
Metal
M1.7
(self tap)
4mm
Metal
M1.4
(self tap)
Dowels
(2) - o
UL Tape (9 × 20mm)
(2) - n
(2) - p
(2) - α
Guide Bar 31mm
(2) - α
(2) - n
Guide Bar 14mm
A
Guide Bar 40mm
(1)
(2)
Photo Interrupter
C
PZ Motor
(2)
(2) - α
(2) - α
(2) - n
(2)
A
B
C
IG Meter Ass'y
(2) - q
B
IG Meter Ass'y
PZ Motor
(2) - q
Fig. 51
54
(2) - n
DC10 E, DC20 E
DISASSEMBLING
<Note on Reassembling>
(1) After engaging the VCM FPC with the groove A and dowel B, provide soldering. Then, mount the IRIS MAIN FPC so that it is
secured with the rib C of the CCD Holder.
(2) Attach the UL Tape to the position indicated in the figure below.
Note on Reassembling (1)
IRIS MAIN FPC
Rib C
VCM FPC
Dowels B
Groove A
CCD Holder
Note on Reassembling (2)
Attachment
reference
UL Tape (9 × 20mm)
Fig. 52
55
DC10 E, DC20 E
DISASSEMBLING
PARTS NO.
a
XA1-7170-257
M1.7-2.5mm
Metal
2.5mm
b
XA1-7170-457
M1.7-4.5mm
Metal
4.5mm
m XA1-7140-307
c
XA9-1710-000
M1.7-6.0mm
Metal
6mm
n
XA4-9140-407
d
XA1-7170-307
M1.7-3.0mm
Metal
3mm
o
XA4-9140-307
e
XA1-7170-357
M1.7-3.5mm
Metal
3.5mm
p
YB1-0405-000
f
XA4-9170-457
4.5mm
q
YB1-0163-000
g
XA4-9170-557
5.5mm
r
h
XA9-1700-000
i
XA4-9170-407
j
XA4-9170-359
k
XA1-7170-207
REMARKS
ILLUST
Self Tap
M1.7-4.5mm
Metal
Self Tap
M1.7-5.5mm
Metal
Stepped Screw
M1.7-5.3mm
Metal
Self Tap
M1.7-4.0mm
Metal
Self Tap
M1.7-3.5mm
Black
M1.7-2.0mm
Metal
SYMBOL
SYMBOL
1-31 List of Screws Used
PARTS NO.
l
XA4-9170-507
REMARKS
Self Tap
M1.7-5.0mm
Metal
M1.4-3.0mm
Metal
Self Tap
M1.4-4.0mm
Metal
Self Tap
M1.4-3.0mm
Metal
ILLUST
5mm
3mm
4mm
3mm
Self Tap
M1.7-3.0mm
Metal
Self Tap
3mm
4mm
M1.4-4.0mm
Metal
XA1-7140-257
M1.4-2.5mm
Metal
2.5mm
5.3mm s
XA9-1705-000
M1.7-2.5mm
Metal
2.5mm
4mm
t
XA9-1709-000
M1.7-4.5mm
Metal
4.5mm
3.5mm
u
XA9-1706-000
M1.7-3.0mm
Metal
3mm
2mm
v
XA9-1707-000
M1.7-3.5mm
Metal
3.5mm
56
DC10 E, DC20 E
DISASSEMBLING
1-32 List of Disassembly Photos
Right Side (DC20 E)
Right Side (DC10 E)
R-LCD Unit
Front Cover Unit
Left Cover Unit (DC20 E)
Left Cover Unit (DC10 E)
57
DC10 E, DC20 E
DISASSEMBLING
Camera Recorder Unit
TS Mech Recorder Ass'y
Camera Unit (DC20 E)
Camera Unit (DC10 E)
Rear Cover Unit
LCD Unit
58
SERVICE MODE / ADJUSTMENT
CONTENTS
1. Maintenance Tools ------------------------------------------------------------------------------------------------------------------------------- 1
1-1 List of Maintenance Tools -------------------------------------------------------------------------------------------------------------- 1
2. Setting ------------------------------------------------------------------------------------------------------------------------------------------- 2
2-1 Using the Extension Connector -------------------------------------------------------------------------------------------------------- 2
3. Service Modes ------------------------------------------------------------------------------------------------------------------------------------ 3
3-1 Outline ------------------------------------------------------------------------------------------------------------------------------------- 3
3-2 How to Change Over to Service Mode ------------------------------------------------------------------------------------------------ 3
3-3 How to Operate Wireless Remote Controller in Service Mode -------------------------------------------------------------------- 4
3-4 Indication in Service Mode ------------------------------------------------------------------------------------------------------------- 5
3-5 Service Mode Transition Card (DY9-1406-000) ------------------------------------------------------------------------------------ 6
4. Description of Service Modes ------------------------------------------------------------------------------------------------------------------ 7
4-1 Error Rate --------------------------------------------------------------------------------------------------------------------------------- 7
4-2 Commands Particular to Camera ------------------------------------------------------------------------------------------------------- 8
4-3 Checking the Lens Resetting ----------------------------------------------------------------------------------------------------------- 9
4-4 Functional Check of Control Keys and Switches ---------------------------------------------------------------------------------- 10
4-4-1 CCM MI-COM Input Port ------------------------------------------------------------------------------------------------- 10
4-4-2 CCM MI-COM A/D Port -------------------------------------------------------------------------------------------------- 10
4-4-3 SUB MI-COM Input Port -------------------------------------------------------------------------------------------------- 10
4-4-4 SUB MI-COM A/D Port --------------------------------------------------------------------------------------------------- 10
4-4-5 BACK END MI-COM Input Port ---------------------------------------------------------------------------------------- 11
5. Adjustment Procedures ------------------------------------------------------------------------------------------------------------------------ 12
5-1 Adjustment Items in Part Replacement ---------------------------------------------------------------------------------------------- 12
5-2 CCD Section (1) - CCD Image Adjustment - (DC20 E only) -------------------------------------------------------------------- 14
5-2-1 Internal Camera Temperature Check (1) --------------------------------------------------------------------------------- 14
5-2-2 Iris Adjustment (Coarse Adjustment) ------------------------------------------------------------------------------------- 16
5-2-3 Preparation for CCD Image Adjustment (1) ----------------------------------------------------------------------------- 17
5-2-4 Preparation for CCD Image Adjustment (2) ----------------------------------------------------------------------------- 18
5-2-5 Internal Camera Temperature Check (2) --------------------------------------------------------------------------------- 19
5-2-6 CCD Image Adjustment (Low Temperature) ---------------------------------------------------------------------------- 20
5-2-7 CCD Image Adjustment Result Check (Low Temperature) ----------------------------------------------------------- 21
5-3 AF Section Adjustment ---------------------------------------------------------------------------------------------------------------- 22
5-3-1 VCM Adjustment ------------------------------------------------------------------------------------------------------------ 23
5-3-2 CZ Automatic Adjustment ------------------------------------------------------------------------------------------------- 24
5-3-3 Cam Correction (AUTO) --------------------------------------------------------------------------------------------------- 24
5-4 IS Section Adjustment ----------------------------------------------------------------------------------------------------------------- 25
5-4-1 Gyro Offset Adjustment ---------------------------------------------------------------------------------------------------- 25
5-4-2 Data Writing ----------------------------------------------------------------------------------------------------------------- 26
5-5 CCD Section (2) (DC20 E only) ----------------------------------------------------------------------------------------------------- 27
5-5-1 Internal Camera Temperature Check (3) --------------------------------------------------------------------------------- 27
5-5-2 CCD Image Adjustment (High Temperature) ---------------------------------------------------------------------------- 28
5-5-3 CCD Image Adjustment Result Check ----------------------------------------------------------------------------------- 29
5-6 Camera Section Adjustment ---------------------------------------------------------------------------------------------------------- 31
5-6-1 Iris Adjustment -------------------------------------------------------------------------------------------------------------- 31
5-6-2 WB Adjustment (1) --------------------------------------------------------------------------------------------------------- 32
5-6-3 Color Balance Adjustment ------------------------------------------------------------------------------------------------- 32
5-6-4 WB Adjustment (2) --------------------------------------------------------------------------------------------------------- 33
5-6-5 WB Adjustment (3) --------------------------------------------------------------------------------------------------------- 33
5-6-6 Data Writing ----------------------------------------------------------------------------------------------------------------- 33
5-6-7 CCD Pixel Missing Compensation --------------------------------------------------------------------------------------- 34
5-7 Recorder Section Adjustment --------------------------------------------------------------------------------------------------------- 36
5-7-1 Playback error rate check -------------------------------------------------------------------------------------------------- 36
5-7-2 Self-recording error rate check -------------------------------------------------------------------------------------------- 37
5-7-3 LCD PCB Setting Destination --------------------------------------------------------------------------------------------- 37
5-8 CVF Adjustment ------------------------------------------------------------------------------------------------------------------------ 38
5-8-1 Forced CVF ON, Adjustment Image (B/W) Setting -------------------------------------------------------------------- 38
5-8-2 CVF Frequency Adjustment ----------------------------------------------------------------------------------------------- 38
5-8-3 COM-DC Level Adjustment ----------------------------------------------------------------------------------------------- 39
5-8-4 COM Amplitude Adjustment ---------------------------------------------------------------------------------------------- 40
5-8-5 Brightness Adjustment ------------------------------------------------------------------------------------------------------ 41
5-8-6 Contrast Adjustment -------------------------------------------------------------------------------------------------------- 42
5-8-7 Release of Forced CVF ON ------------------------------------------------------------------------------------------------ 43
DC10 E, DC20 E
SERVICE MODE / ADJUSTMENT
1. Maintenance Tools
1-1 List of Maintenance Tools
Item Name
Item Number
Purpose
Color bar chart
DY9-2002-000 Camera electrical adjustment
Color Viewer 5600° K for 220V
DY9-2039-220 Camera electrical adjustment (for 220)
Color Viewer 5600° K for 240V
DY9-2039-240 Camera electrical adjustment (for 240)
Lamp for Color Viewer 5600K
DY9-2040-000 Replacement
Remarks
Filter, CCA W12ø46mm
DY9-2046-000 Camera electrical adjustment
Card, Mini SD, Service Mode
DY9-1406-000 Service mode, electrical adjustment, check With AD adapter
Extension connector (24pin)
DY9-1390-000 T est pin extended
CCD image adjustment tool
DY9-1391-000 Camera electrical adjustment
Mount, 27 mm
DY9-1403-000 Camera electrical adjustment
DVD-R reference DISC (PAL)
DY9-1408-000 Playback error rate check
CCD image adjustment tool modification kit
DY9-1404-000 CCD image adjustment tool modification
1
T S Mech
DC10 E, DC20 E
SERVICE MODE / ADJUSTMENT
2. Setting
(1) Carry out all the adjustment and check procedures in the product state.
2-1 Using the Extension Connector
When performing CVF adjustment (optional adjustment item), use the extension connector (DY9-1390-000).
For standard adjustment items, the extension connector is not necessary.
(1) Detach the LID JIG CONNECTION.
(2) Connect the extension connector to the CN2900.
<Signals used>
Pin No.
Signal
Designation
Pin No.
Signal
Designation
3
GND
15
EVF G
4
EVF HD
16
EVF B
13
EVF R
18
EVF COM DC
14
EVF COM AC
LID JIG CONNECTION
Fig. 1
Fig. 2
2
DC10 E, DC20 E
SERVICE MODE / ADJUSTMENT
3. Service Modes
3-1 Outline
(1) The service mode in this equipment uses the wireless remote controller. (To be used in remote control code 2)
* The remote controller furnished with the instrument cannot transfer to the service mode. For this purpose, use the
remote controller (ex. WL-D84) furnished with a conventional product.
(2) For changeover to the service mode, a dedicated tool (CARD, MINI SD, SERVICE MODE: DY9-1406-000) is required in addition
to the wireless remote controller.
(3) Mode changeover is available between the service mode and the normal mode using the “Audio dubbing” and “SLOW” keys of the
wireless remote controller.
As long as power is ON, the service mode is available even if the “CARD, MINI SD, SERVICE MODE” is removed.
(4) In the service mode, changeover of the main unit operation mode can be handle using the keys on the main unit and the attached
remote controller, but the usable keys are restricted.
(5) In the service mode, safety function such as for low voltage detection is canceled.
(6) On the Index screen in the motion picture playback mode, it is not possible to changeover to the service mode due to the system
mechanism. During playback, changeover to the service mode is available.
3-2 How to Change Over to Service Mode
(1) Set the Service Mode Card (DY9-1406-000) in the card slot
on the equipment and change over to the camera mode.
(2) Press the "Dubbing" key on the wireless remote controller
(WL-D84) that is set at Remote controller code 2.
* To changeover to Remote controller code 2, press
“Remote controller setting” and “Zoom T” keys simultaneously for 2 sec.
(3) Now the changeover to the service mode has been completed
and the SERVICE MODE appears on the screen.
DY9-1406-000
Fig. 3
* Pressing the “SLOW” key performs the changeover
to the normal mode from the service mode.
As long as the power supply is ON, the service mode
is available by setting the “Audio dubbing” key even
if the Service Mode Card is removed.
* After completion of repairing, press the Reset button to release the service mode completely.
Fig. 4
3
DC10 E, DC20 E
SERVICE MODE / ADJUSTMENT
3-3 How to Operate Wireless Remote Controller in Service Mode
(1) To use the wireless remote controller in the service mode, set it at Remote controller code 2.
* To changeover to Remote controller code 2, press the “Remote controller setting” and “Zoom T” keys simultaneously for 2 sec.
* The remote controller furnished with the instrument cannot transfer to the service mode. For this purpose, use the
remote controller (ex. WL-D84) furnished with a conventional product.
4. SEARCH +
3. START/STOP
11. PLAY
5. SEARCH -
8. FF
10. SEARCH SELECT
6. FRAME +
9. REW
Remote Controller
Code 2 setting
12. STOP
7. FRAME 2. SLOW
WL-D84
1. DUBBING
13. PAUSE
Fig. 5
No.
Key Designation (in Normal Mode)
Key Designation (in Service Mode)
Function
1
DUBBING
SERVICE MODE
Change over to service mode
2
SLOW
NORMAL MODE
Change over to normal mode
3
START/STOP
CS+
Increases CS by 1.
4
SEARCH +
FUNCTION +
Increases FUNCTION by 1.
5
SEARCH -
FUNCTION -
Decreases FUNCTION by 1.
6
FRAME +
HIGH ADDRESS +
Increases HIGH ADDRESS by 1.
7
FRAME -
HIGH ADDRESS -
Decreases HIGH ADDRESS by 1.
8
FF
ADDRESS +
Increases ADDRESS by 1.
9
REW
ADDRESS -
Decreases ADDRESS by 1.
10
SEARCH SELECT
MODE SELECT
Change over to RD/WR mode
11
PLAY
DATA +
Increases DATA by 1.
12
STOP
DATA -
Decreases DATA by 1.
13
PAUSE
STORE
Defines/w rites DATA.
4
DC10 E, DC20 E
SERVICE MODE / ADJUSTMENT
3-4 Indication in Service Mode
Shown below are the indications in the service mode.
4
5
13
6
1
2
3
12
7
8
9
14
10
11
Fig. 6
1.
Indicates that the service mode is currently selected. (“SERV”)
2.
3.
MODE : Indicates the MODE currently selected. (RD/WR/ST)
Indicates for which block the command is specified. (MA,MD, CA, CD, etc.)
4.
5.
CS : Indicates the Chip Select currently specified. (0~F)
Function : Indicates the Function currently selected. (00~FF)
6.
7.
ADDR : Indicates the ADDRESS currently selected. (0000~FFFF)
DT : Indicate, in hexadecimal representation, the DATA currently being read or set. (00~FF)
8.
9.
Indicates the version of the MAIN program in the BACK END MI-COM.
Indicates the version of the FRONT END.
10. Indicates the version of the CCM MI-COM.
11. Indicates the version of the flash memory program mounted outside the CCM MI-COM.
12. Indicates the error rate.
13. Data Write status (00: READ mode, 04 : Write preparation, OC : Write execution)
14. ST : Adjustment status (02: During adjustment, 05: OK in adjustment result, 09: NG in adjustment result)*
* A numeric value to be indicated varies depending on the adjustment item concerned.
5
DC10 E, DC20 E
SERVICE MODE / ADJUSTMENT
3-5 Service Mode Transition Card (DY9-1406-000)
Note)
(1) The Service Mode Card is applicable as a general-purpose mini SD card for the video camera (image writing/reading/erasing). No
functional problem will occur in this application.
Note, however, that a trouble may take place if initialization is made by using the video camera/PC. Do not perform initialization
with the video camera/PC.
(2) On the Service Mode Card, a tag and seal are attached for the purposes of discrimination from a general-purpose mini SD card and
for prevention of unintentional disinstallation mistake. Therefore, a clearance in the card slot is somewhat smaller. When inserting/
removing the service mode transition card, take care not to damage it.
DY9-1406-000
Fig. 7
6
DC10 E, DC20 E
SERVICE MODE / ADJUSTMENT
4. Description of Service Modes
4-1 Error Rate
<Outline>
(1) An error rate is calculated from an error correction factor of digital data read out of the disc concerned. The playback performance
can be checked of the sector corresponding to the calculated error rate.
(2) The error rate may vary depending on the disc condition, performance of pickup unit (tracking, focusing, laser), and performance
of the RF circuit, etc.
(3) The lower the error rate gets, the better the playback performance gets.
Poor image quality
Good image quality
−2
∗.∗ × 10
<
∗.∗ × 10−4
<How to output an error rate>
By the operation in step 1 below, an error rate can be output during playback.
ST EP
1
MONIT OR
PROCEDURE
Microcomputer operation
CS
Function
ADDR MODE
1) Make setting shown at right.
0
05
0001
ST
2) Perform storing.
↑
↑
↑
RD
DT
00 →01 Product setting.
00
Error rate indication.
(Press the PAUSE button.)
* It takes 7 to 20 seconds to indicate an error rate, because it is calculated from large amount of data.
* To measure an error rate again, it is once required to stop the playback.
* Unlike measurements of DVCs, an audio-only error rate is not available.
<How to read an error rate>
Example) ‘0324’ is indicated:
Error rate = 3.2×10 -4
0324
3.2 × 10
-4
Fig. 8
Error rate indication
Fig. 9
7
DC10 E, DC20 E
SERVICE MODE / ADJUSTMENT
4-2 Commands Particular to Camera
<Outline>
(1) The commands particular to camera are provided for checking the operation.
(2) Make preparation according to the table below and carry out the desired commands particular to camera.
(3) To restore any setting back to the original status, press the PAUSE key (STORE) for each item again in the “ST” mode.
Turning the power OFF/ON resets all the settings.
ST EP
PROCEDURE
CAM SPECIAL COMMAND
WB SET
1) Make setting shown at right.
2) Perform storing.
(Press the PAUSE button.)
WB
1) Make setting shown at right.
LOCK
2) Perform storing.
(Press the PAUSE button.)
WB
1) Make setting shown at right.
T URBO
2) Perform storing.
(Press the PAUSE button.)
WB
1) Make setting shown at right.
OUT DOOR 2) Perform storing.
(Press the PAUSE button.)
WB
1) Make setting shown at right.
INDOOR
2) Perform storing.
(Press the PAUSE button.)
IRIS
1) Make setting shown at right.
OPEN
2) Perform storing.
(Press the PAUSE button.)
IRIS
1) Make setting shown at right.
CLOSE
2) Perform storing.
(Press the PAUSE button.)
AGC
1) Make setting shown at right.
MAX
2) Perform storing.
(Press the PAUSE button.)
AGC
1) Make setting shown at right.
MIN
2) Perform storing.
(Press the PAUSE button.)
COLOR
1) Make setting shown at right.
BAR
2) Perform storing.
(Press the PAUSE button.)
White
1) Make setting shown at right.
100%
2) Perform storing.
(Press the PAUSE button.)
White
1) Make setting shown at right.
50%
2) Perform storing.
(Press the PAUSE button.)
BLACK & 1) Make setting shown at right.
WHIT E
2) Perform storing.
(Press the PAUSE button.)
GRAY
1) Make setting shown at right.
SCALE
2) Perform storing.
(Press the PAUSE button.)
WHIT E
1) Make setting shown at right.
LED ON
2) Perform storing.
(Press the PAUSE button.)
CS
2
Function
08
↑
↑
MONIT OR
ADDR MODE
3300
ST
RD
↑
2
08
3301
↑
↑
↑
2
08
3302
↑
↑
↑
2
08
3303
↑
↑
↑
2
08
3304
↑
↑
↑
2
08
3305
↑
↑
↑
2
08
3306
↑
↑
↑
2
08
3309
↑
↑
↑
2
08
330A
↑
↑
↑
2
08
330B
↑
↑
↑
2
08
330C
↑
↑
↑
2
08
330D
↑
↑
↑
2
08
330F
↑
↑
↑
2
08
3310
↑
↑
↑
2
08
331F
↑
↑
↑
8
Microcomputer operation
DT
---
WB is set.
ST
RD
---
WB is locked.
ST
RD
---
WB high-speed setting mode
ST
RD
---
WB outdoor mode
ST
RD
---
WB indoor mode
ST
RD
---
T he iris is opened forcibly.
ST
RD
---
T he iris is closed forcibly.
ST
RD
---
A value of AGC gain is maximized.
ST
RD
---
A value of AGC gain is minimized.
ST
RD
---
Outputs color bar from DIGIC DV.
ST
RD
---
Outputs white 100% from DIGIC DV.
ST
RD
---
Outputs white 50% from DIGIC DV.
ST
RD
---
Outputs white & black chart
from DIGIC DV.
ST
RD
---
Outputs gray scale from DIGIC DV.
ST
RD
---
Force the white LED to light.
DC10 E, DC20 E
SERVICE MODE / ADJUSTMENT
4-3 Checking the Lens Resetting
<Outline>
(1) Set up addresses according to the table shown below. Thus, using data marked with the arrows in the figure below, you can check
whether lens resetting has been completed or not.
* In case of 40 or 44, the zoom lens has not yet been reset.
* In case of 80 or 84, the focus lens has not yet been reset.
* In case of D4, the zoom lens and focus lens has been completion.
ST EP
1
MONIT OR
PROCEDURE
1) Make setting shown at right.
CS
Function
2
08
Microcomputer operation
ADDR MODE
312E
Fig. 10
9
RD
DT
--
RAM data indication
DC10 E, DC20 E
SERVICE MODE / ADJUSTMENT
4-4 Functional Check of Control Keys and Switches
<Outline>
(1) The CCM and SUB MI-COM terminals can be checked in the service mode. With this function, the key-related operations and the
connections between the keys and the MI-COM terminals can be checked in the product state.
(2) Perform the check in the RD mode.
4-4-1 CCM MI-COM Input Port
PIN
NAME
Description
CS Function ADDR
DATA
Description
BIT
5
"L" for memory card
loading
E13 CARD DET
Detection memory card loading
1
01
0014
U13 START STOP
T13 Half Photo Switch
Start / Stop SW
Halfway pressing of Photo SW
1
1
01
01
000E
000E
4
5
"L" at the ON time
"L" at the ON time
R13 Photo Switch
Full pressing of Photo SW
1
01
000E
6
"L" at the ON time
4-4-2 CCM MI-COM A/D Port
C6
KEY AD3
KEY AD 3
1
02
0005
AD DATA (00∼FF)
Low
High
UP(00) DOWN(40) SET(80) M ENU(C0)
B6
A6
KEY AD2
KEY AD1
KEY AD 2
KEY AD 1
1
1
02
02
0004
0003
RIGHT(00) LEFT (40) PRINT(80) FUNC(C0)
REW (00) FINAL(40) B.L (80) W.TV(C0)
C5
E8
KEY AD0
ZOOM KEY
KEY AD 0
Zoom key output
1
1
02
02
0002
0016
STOP (00) PLAY (40) FF (80) DISP(C0)
A8
B7
I ENC
Y GYRO
IRIS ENC output
Yaw GYRO output
1
1
02
02
0014
0011
Small diaphragm
A6
C3
P GYRO
M ODE DIAL 1
Pith GYRO output
AE M ode (SCN)
1
1
02
02
0010
000A
SCN (00)
A4
M ODE DIAL 0
AE M ode (P)
1
02
000B
P (00)
PIN
NAME
Description
CS Function ADDR
WIDE
CENTER
TELE
Open
4-4-3 SUB MI-COM Input Port
PIN
NAME
Description
CS Function ADDR
DATA
Description
BIT
4
"H" at M ovie
2
"H" at the setting
21
12
M ovie/Still SW
DC J DET
M ovie/Still SW
DC JACK detection
1
1
1E
1E
0005
0004
20
25
Eject Switch
Li3V Detect
EJECT SW detection
Detection of decrease in lithium
1
1
1E
1E
0005
0004
5
1
"L" at the ON time
"L" at thedecrease
32
CAM Power Switch
battery voltage
POWER SW detection
1
1E
0006
7
"L" at the ON time
33
Power Switch
POWER SW detection
1
1E
0006
6
"L" at the ON time
4-4-4 SUB MI-COM A/D Port
PIN
NAME
Description
CS Function ADDR
27
Batt Info A/D
Battery Temperature Detection
1
1E
26
Batt A/D
Battery Voltage Detection
1
1E
10
AD DATA (00 ∼FF)
0001
Low
High(FF)
High
Low(00)
0000
Low(00)
High(FF)
DC10 E, DC20 E
SERVICE MODE / ADJUSTMENT
4-4-5 BACK END MI-COM Input Port
PIN
NAME
Description
CS Function ADDR
T3
AV DET
M ulti terminal connection detect
0
01
000B
T5
PANEL Open Switch
LCD open detect
0
01
000A
11
DATA
DESCRIPTION
BIT
5
"H" at detect
2
"H" at the open
DC10 E, DC20 E
SERVICE MODE / ADJUSTMENT
5. Adjustment Procedures
5-1 Adjustment Items in Part Replacement
After replacement of major parts, carry out adjustment referring to the table shown below. Note that the following table shows minimum
required adjustments to be performed after replacing any major part. In case that two or more parts have been replaced or any faulty
condition has occurred, take a proper adjustment procedure accordingly.
NOTE)
(1) Before turning on power to the main unit, prepare the tools necessary for a series of adjustment steps and make setting as required.
Thus, you can perform the adjustment items in succession without having to make preparation before each adjustment item.
(2) After turning on power to the main unit, carry out the adjustment items in the order indicated in the Service Manual. Accomplish
the adjustment items successively wherever possible.
(3) Regarding item 5-5 "CCD Section (2)", determine a timing point of execution with priority given to the internal camera temperature
(for details, refer to the description of internal camera temperature check). Note, however, that 5-6 "Camera Section" should be
taken after carrying out item 5-5 "CCD Section (2)". (Item 5-5 may be carried out before items 5-3 and 5-4.)
○ : Adjustment required
Camera system
Part name
No.
Adjustment item
Lens
GYRO
PCB
CCD MAIN
PCB PCB
Adjustment setting
5-2 CCD Section (1) (DC20 E only)
5-2-1
Internal Camera T emperature Check (1)
○
○
Product condition
5-2-2
Iris Adjustment (Coarse Adjustment)
○
○
Product condition
5-2-3
Preparation for CCD Image Adjustment (1)
○
○
Product condition
5-2-4
Preparation for CCD Image Adjustment (2)
○
○
Product condition
5-2-5
Internal Camera T emperature Check (2)
○
○
Product condition
5-2-6
CCD Image Adjustment (Low T emperature)
○
○
Product condition
5-2-7
CCD Image Adjustment Result Check
(Low T emperature)
○
○
Product condition
5-3 AF Section
5-3-1
VCM Adjustment
○
○
○
Product condition
5-3-2
CZ Automatic Adjustment
○
○
○
Product condition
5-3-3
Cam Correction (AUT O)
○
○
○
Product condition
5-4 IS Section
5-4-1
Gyro Offset Auto Adjustment
○
○
Product condition
5-4-2
Data Writing
○
○
Product condition
5-5 CCD Section (2) (DC20 E only)
5-5-1
Internal Camera T emperature Check (3)
○
○
Product condition
5-5-2
CCD Image Adjustment (High T emperature)
○
○
Product condition
5-5-3
CCD Image Adjustment Result Check
○
○
Product condition
12
DC10 E, DC20 E
SERVICE MODE / ADJUSTMENT
○ : Adjustment required
Camera system
Part name
No.
Adjustment item
Lens
GYRO
PCB
CCD MAIN
PCB PCB
Adjustment setting
5-6 Camera Section
5-6-1
Iris Adjustment
5-6-2
WB Adjustment (1)
○
Product condition
○
○
Product condition
○
5-6-3
Color Balance Adjustment
○
○
○
Product condition
5-6-4
WB Adjustment (2)
○
○
○
Product condition
○
○
○
Product condition
○
○
Product condition
○
○
Product condition
○
5-6-5
WB Adjustment (3)
5-6-6
DAT A Writing
5-6-7
CCD Pixel Missing Compensation
○
○
Recorder system
No.
Adjustment item
Part name
TS
MAIN
LCD
mech
PCB
PCB
chassis
Adjustment setting
5-7 Recorder Section
5-7-1
Playback error rate check
5-7-2
Self-recording error rate check
5-7-3
LCD PCB Setting Destination
○
○
○
Product condition
○
Product condition
○
13
Product condition
DC10 E, DC20 E
SERVICE MODE / ADJUSTMENT
5-2 CCD Section (1) - CCD Image Adjustment - (DC20 E only)
This camcorder is provided with a primary-color-filter CCD having 2,000,000 pixels. Since the number of CCD pixels is increased, two signal processing circuits are provided for the left-side and right-side imaging areas. For eliminating a level difference
between signals on these two signal processing circuits, it is required to perform initial adjustment using a dedicated tool. The
characteristics of the CCD (sensitivity, void/stuck pixels) largely depend on its temperature, and there are subtle differences in the
CCD characteristics due to variations in production. Therefore, carry out CCD image adjustment twice in total, i.e., at low temperature (immediately after power-on) and at high temperature (in a lapse of certain time after power-on).
Note)
For CCD image adjustment of this camcorder, it is required to modify the CCD image adjusting tool DY9-1391-000 using the CCD
image adjusting tool modification kit DY9-1404-000.
5-2-1 Internal Camera Temperature Check (1)
Preparation)
(1) Connect the CCD image adjusting jig as shown in Fig. 11. (The LED light source should be removed until item 5-2-3.)
In this video camera, turn the TAPE/DISC select switch to DISC position.
(2) Before proceeding to adjustment, apply power to the CCD image adjusting tool for at least 15 minutes (in order to stabilize the light
source).
MOUNT
27mm
CA-570
LED
Light source
CA-570
(Power supply for tool)
TAPE
R
G
B
DISC
Light source adjusting knobs
S Terminal
Multi Cable
Main unit
Tool
Fig. 11
14
DC10 E, DC20 E
SERVICE MODE / ADJUSTMENT
Procedure)
(1) Referring to the table shown below, check the internal temperature sensor in the camera.
(Be sure to perform this step immediately after power-on.)
(2) Using the internal camera temperature data, and record the current internal temperature.
Temperature immediately after power-on T1 = ______________
Note)
(1) In cases where the procedure has been interrupted, the internal camera temperature data recorded will be usable as reference data at
the time of restart.
ST EP PROCEDURE
T EMPERAT URE CHECK
1
1) Make the setting shown at right.
2) Perform storing.
MONIT OR
CS Function MD ADDR DT
0
02
ST 00D0
08
RD
↑
↑
↑
↑
(press the PAUSE button.)
2
Microcomputer operation
Completion of internal camera temperature sensor
check indication.
Adjustment is completed.
Press SLOW KEY for transition to the normal mode.
Indication of internal camera temperature
Internal camera temperature difference
Fig. 12
• Internal camera temperature difference T [°C] = (Current internal camera temperature) - (Internal camera temperature at CCD image adjustment (low temperature)
• The value of the internal camera temperature difference is represented in decimal notation. When the value is
negative, it will blink. (The value does not blink if it is positive.)
• Changes in the internal camera temperature difference will cause the background color to change. As the internal
temperature of the lens increases, the background color changes as follows: blinking in yellow→white→ yellow→green.
Note: Until CCD image adjustment is carried out at a service center, a value of internal camera temperature difference
is indicated according to the "Internal camera temperature at CCD image adjustment (low temperature)" data
recorded at the time of pre-adjustment in the manufacturing process.
15
DC10 E, DC20 E
SERVICE MODE / ADJUSTMENT
5-2-2 Iris Adjustment (Coarse Adjustment)
(1) Adjustment Conditions
Movie/Still
: Movie
Shooting mode
AF
: Program AE
: Closest MF focus
ZOOM
Electronic zoom
: Telephoto-end
: OFF
Image stabilizer
: OFF
CHART
Not required
SPEC.
Automatic adjustment
Procedure)
(1) According to the table shown below, carry out iris adjustment (coarse adjustment).
MONIT OR
CS Function MD ADDR DT
2
08
ST 3000
00
RD
↑
↑
↑
↑
ST EP PROCEDURE
IRIS
1
1) Make the setting shown at right.
2) Perform storing.
(press the PAUSE button.)
2
1) Make the setting shown at right.
2) Perform storing.
(press the PAUSE button.)
2
08
↑
↑
ST
RD
3001
00
↑
↑
ST
Fig. 13
16
Microcomputer operation
Iris adjustment.
Adjustment is completed.
Completion with ST :05, NG with ST :09
Writing of iris adjustment data
Adjustment is completed.
Completion with ST :05, NG with ST :09
DC10 E, DC20 E
SERVICE MODE / ADJUSTMENT
5-2-3 Preparation for CCD Image Adjustment (1)
For this adjustment, use the same conditions as those specified in 5-2-2 Iris Adjustment (Coarse Adjustment)
SPEC.
Manual adjustment
Preparation)
(1) On the CCD image adjusting tool, mount its light source part. Turn on power to the CCD image adjusting tool.
Procedure)
(1) According to the table shown below, adjust the light quantity of the CCD image adjusting tool.
ST EP PROCEDURE
Microcomputer operation
MONIT OR
PREPARAT ION
CS Function MD ADDR DT
1
1) Make the setting shown at right.
0
7
ST 0000
01
2) Perform storing.
RD
01
V synchronization set
↑
↑
↑
(press the PAUSE button.)
(DT becomes 00 after storing.)
2
1) Make the setting shown at right.
2
08
ST 301A 01
2) Perform storing.
RD
↑
↑
↑
↑ T ool light intensity adjustment mode
(press the PAUSE button.)
3
T urn the light intensity adjusting knob of the tool so that each of the R, G and B data shown in Figure 14 will be 80±10.
4
1) Make the setting shown at right.
2
08
ST 301A 00
2) Perform storing.
RD
↑
↑
↑
↑ Move to normal mode.
(press the PAUSE button.)
Note)
If step 1 is not taken, the result of CCD image adjustment may become NG. To avoid this, be sure to carry out step 1.
R
G
B
Fig. 14
17
DC10 E, DC20 E
SERVICE MODE / ADJUSTMENT
5-2-4 Preparation for CCD Image Adjustment (2)
For this adjustment, use the same conditions as those specified in 5-2-2 Iris Adjustment (Coarse Adjustment)
(1) Be sure to take the correct sequence of procedural steps in CCD image adjustment. If you take any procedural step in an unspecified
sequence or skip it over, normal adjustment will not be accomplished.
Procedure)
(1) According to the table shown below, check the light source of the CCD image adjusting tool.
ST EP PROCEDURE
LIGHT SOURCE CHECK
1
1) Make the setting shown at right.
2) Perform storing.
(press the PAUSE button.)
2
1) Make the setting shown at right.
2) Perform storing.
(press the PAUSE button.)
MONIT OR
CS Function MD ADDR DT
2
08
ST 3011
-RD
↑
↑
↑
↑
2
08
↑
↑
ST
RD
18
3012
--
↑
↑
Microcomputer operation
LED light source (LED RGB) check (1)
Adjustment is completed.
Completion with ST :05, NG with ST :09
LED light source (LED Flatness) check (2)
Adjustment is completed.
Completion with ST :05, NG with ST :09
DC10 E, DC20 E
SERVICE MODE / ADJUSTMENT
5-2-5 Internal Camera Temperature Check (2)
For this adjustment, use the same conditions as those specified in 5-2-2 Iris Adjustment (Coarse Adjustment)
Procedure)
(1) Press the SLOW KEY, check the internal temperature sensor in the camera.
(Within about five minutes, perform this step as soon as power is turned on.)
(2) Record the current internal temperature.
Temperature about five minutes after power-on T2 = _________
(3) Calculate an increase in the internal camera temperature [°C], and check that it is less than 7 [°C].
Increase in internal camera temperature [°C] = T2 - T1 Example: Under the condition that T1 = -9 and T2 = -4, an increase in
temperature is calculated as follows: T2 - T1 = - 4 - (-9) = 5 [°C]
(4) If an increase in the internal camera temperature exceeds 7°C, turn power off and then wait until a temperature level of less than 7°C
is reached. Then, proceed to items 5-2-6 and subsequent.
Note) Remember that power cannot be disconnected just by turning off the POWER switch. Be sure to release the
service mode, and then turn off the POWER switch or unplug from the CA receptacle.
<Reference>
Internal camera temperature difference
Fig. 15
• Internal camera temperature difference T [°C] = (Current internal camera temperature) - (Internal camera temperature at CCD image adjustment (low temperature)
• A value of internal camera temperature difference is represented in decimal notation. When the value is negative, it
is indicated in blinking form. (When the value is positive, it is indicated in steadily turned-on form.)
19
DC10 E, DC20 E
SERVICE MODE / ADJUSTMENT
5-2-6 CCD Image Adjustment (Low Temperature)
For this adjustment, use the same conditions as those specified in 5-2-2 Iris Adjustment (Coarse Adjustment)
SPEC.
Automatic writing
Procedure)
(1) Carry out CCD image adjustment (low temperature) in the following procedure.
ST EP PROCEDURE
CCD IMAGE ADJUST MENT
1
1) Make the setting shown at right.
2) Perform storing.
(press the PAUSE button.)
2
1) Make the setting shown at right.
2) Perform storing.
(press the PAUSE button.)
MONIT OR
CS Function MD ADDR DT
2
08
ST 3013
-RD
↑
↑
↑
↑
2
08
↑
↑
ST
RD
20
3014
--
↑
↑
Microcomputer operation
Image adjustment (low temperature)
Adjustment is completed.
Completion with ST :05, NG with ST :09
Adjustment data writing.
Adjustment is completed.
Completion with ST :05, NG with ST :09
DC10 E, DC20 E
SERVICE MODE / ADJUSTMENT
5-2-7 CCD Image Adjustment Result Check (Low Temperature)
For this adjustment, use the same conditions as those specified in 5-2-2 Iris Adjustment (Coarse Adjustment)
SPEC.
Automatic writing
Procedure)
(1) Check and write the result data of CCD image adjustment.
ST EP PROCEDURE
RESULT CHECK
1
1) Make the setting shown at right.
2) Perform storing.
(press the PAUSE button.)
2
1) Make the setting shown at right.
2) Perform storing.
(press the PAUSE button.)
3
1) Make the setting shown at right.
2) Perform storing.
(press the PAUSE button.)
MONIT OR
CS Function MD ADDR DT
2
08
ST 3017
-RD
↑
↑
↑
↑
2
08
↑
↑
2
08
↑
↑
ST
RD
3018
--
↑
↑
ST
RD
3019
--
↑
↑
Microcomputer operation
Color difference check
Adjustment is completed.
Completion with ST :05, NG with ST :09
Noise check
Adjustment is completed.
Completion with ST :05, NG with ST :09
Check result writing
Adjustment is completed.
Completion with ST :05, NG with ST :09
Note)
If the result of any one of the above check steps is NG, carry out the adjustment procedures described in item 5-2 “CCD Section (1)”
again from the beginning while maintaining the internal camera temperature within the allowable range. If NG is indicated repeatedly, replace the CCD PCB with a new one.
STATUS
(ST)
ERROR No. TOTAL
CER
Fig. 16
Note)
For details of the error codes, refer to p.30.
21
NER
DC10 E, DC20 E
SERVICE MODE / ADJUSTMENT
5-3 AF Section Adjustment
Note)
(1) The sections 5-3-2 : CZ automatic adjustment and 5-3-3 : Cam correction (AUTO) must be executed consecutively. If they are
performed independently, the sufficient performance cannot be obtained.
Also, when section 5-3-2 : CZ automatic adjustment is completed, execute section 5-3-3 : Cam correction (AUTO) must be
executed immediately without elapse of time. If section 5-3-3 : Cam correction (AUTO) is executed after elapse of time upon
completion of section 5-3-2 : CZ automatic adjustment, the sufficient performance cannot be obtained.
Preparation)
(1) For AF section Adjustment, use the product state.
(2) CZ adjustment and cam correction conditions (initial state)
Movie/Still
Shooting mode
: Movie
: Program AE
ZOOM
: Telephoto-end
CZ adjustment chart : 2.4 ± 0.02 m from lens front
Chart luminance
Digital Zoom
: 500 lux or more (High illuminance should be avoided at the wide-angle end.)
: OFF
Auto slow shutter
: OFF
22
DC10 E, DC20 E
SERVICE MODE / ADJUSTMENT
5-3-1 VCM Adjustment
SPEC.
Automatic adjustment
Procedure)
(1) Referring to the table shown below, carry out VCM adjustment.
ST EP PROCEDURE
Preparation for VCM adjustment
1
1) Make the setting shown at right.
2) Perform storing.
(press the PAUSE button.)
2
1) Make the setting shown at right.
2) Perform storing.
(press the PAUSE button.)
MONIT OR
CS Function MD ADDR DT
2
08
ST 3119
00
RD
↑
↑
↑
↑
2
08
↑
↑
ST 311A
RD
↑
ST
Fig. 17
23
-AA
Microcomputer operation
It will take a period of ten seconds
OK with ST : 19
Correction value calculation.
OK with ST : AA, NG with ST : FE
DC10 E, DC20 E
SERVICE MODE / ADJUSTMENT
5-3-2 CZ Automatic Adjustment
CHART
CZ adjustment chart
SPEC.
At STEP 3, ST : AA should be attained.
Procedure)
(1) In the telephoto-end setting, bring the center of chart image to the center of monitor TV.
(2) Referring to the table shown below, carry out CZ automatic adjustment in the service mode.
(3) Perform the cam correction.
ST EP PROCEDURE
CZ
1
1) Make the setting shown at right.
2) Perform storing.
(press the PAUSE button.)
2
1) Make the setting shown at right.
2) Perform storing.
(press the PAUSE button.)
MONIT OR
CS Function MD ADDR DT
2
08
ST 3110
00
RD
10
↑
↑
↑
2
08
ST
3100
--
↑
↑
↑
↑
↑
3
2
08
RD
3100
AA
↑
↑
RD
↑
FF
Judgement on result of adjustment
Microcomputer operation
Move to adjustment mode.
Automatic adjustment is started. T hen, it is
completed in 30 seconds approximately. If any NG
condition is encountered in automatic adjustment,
check the parts inside the lens section.
Adjustment is completed (ST =AA : OK).
Perform the cam correction.
Adjustment is completed (ST =FF : NG).
T urn off the power then back on. T hen make
readjustment.
5-3-3 Cam Correction (AUTO)
CHART
CZ adjustment chart
SPEC.
Automatic adjustment
Procedure)
(1) Perform the cam correction by following the table below.
(2) Quit the service mode, turn power off/on, and then check that proper focusing can be attained in normal zooming operation (AF
OFF).
(3) If the result is NG, perform 5-3-2 : CZ automatic adjustment and 5-3-3 : Cam correction (AUTO).
ST EP PROCEDURE
MONIT OR
Microcomputer operation
CAM CORRECT ION
CS Function MD ADDR DT
1
1) Make the setting shown at right.
2
08
ST 3101
00
2) Perform storing.
RD
01
↑
↑
↑
(press the PAUSE button.)
2
Cancel the service mode, and set the zoom position to the telephoto end. After focus movement is stopped,
turn OFF the AF function.
3
1) Make the setting shown at right.
2
08
ST 3202
00
WR
↑
↑
↑
↑
2) Perform storing.
RD
02 Correction value measurement.
↑
↑
↑
(press the PAUSE button.)
Completion with ST :02.
4
1) Make the setting shown at right.
2
08
ST 3104
00
2) Perform storing.
RD
04 Correction value calculation.
↑
↑
↑
(press the PAUSE button.)
Completion with ST :04.
5
1) Make the setting shown at right.
2
08
ST 3105
00
2) Perform storing.
RD
AA Completion of correction value writing.
↑
↑
↑
(press the PAUSE button.)
Completion with ST :AA.
24
DC10 E, DC20 E
SERVICE MODE / ADJUSTMENT
5-4 IS Section Adjustment
Note)
(1) Perform the IS adjustment after machine is re-assembled to a product status.
(2) Prepare a tripod or stable work bench.
(3) Each of the adjustment data (5-4-1) becomes valid when 5-4-2 data writing is made. After completion of each adjustment, be sure
to carry out 5-4-2 before turning power OFF.
5-4-1 Gyro Offset Adjustment
SPEC.
Automatic adjustment
Procedure)
(1) Wait at least 10 seconds while being careful not to apply vibration to the camera.
(2) Referring to the table shown below, perform the automatic adjustment.
Note)
It will take approx. 25 seconds at maximum to complete adjustment (OK) after storing (pressing the pause button).
ST EP PROCEDURE
MONIT OR
GYRO OFFSET
CS Function MD ADDR DT
1
1) Make the setting shown at right. 2
08
ST 320D 00
2) Perform storing.
RD
↑
↑
↑
(press the PAUSE button.)
Microcomputer operation
ST
05
Adjustment is completed.
Completion with ST :05, NG with ST :09
After adjustment, data is indicated at IS3 and IS4.
B7 : Yaw Gyro gain
B6 : Pitch Gyro gain
77 : Yaw Gyro offset
79 : Pitch Gyro offset
ST
B7 B6
77 79
Fig. 18
25
DC10 E, DC20 E
SERVICE MODE / ADJUSTMENT
5-4-2 Data Writing
SPEC.
Automatic writing
Procedure)
(1) According to the table shown below, write adjustment data (5-4-1) into the flash memory.
ST EP PROCEDURE
MONIT OR
DAT A WRIT ING
CS Function MD ADDR DT
1
1) Make the setting shown at right. 2
08
ST 320F
00
2) Perform storing.
RD
↑
↑
↑
(press the PAUSE button.)
ST
Fig. 19
26
Microcomputer operation
ST
05
Completion of DAT A writing.
Completion with ST :05, NG with ST :09
DC10 E, DC20 E
SERVICE MODE / ADJUSTMENT
5-5 CCD Section (2) (DC20 E only)
5-5-1 Internal Camera Temperature Check (3)
(1) Adjustment Conditions
Movie/Still
: Movie
Shotting mode
AF
: Program AE
: Closest focus
ZOOM
Electronic zoom
: Telephoto-end
: OFF
Image stabilizer
: OFF
Preparation)
(1) For adjustment, provide the same tool and connections as in 5-2 “CCD Section (1)”. (The LED light source should be removed
until item 5-5-2.)
Procedure)
(1) Press the SLOW KEY, check the internal temperature sensor in the camera.
(Perform this step about 20 to 50 minutes after power-on.)
(2) Using the internal camera temperature data, calculate a value of the current internal temperature, and record the calculated value.
Temperature 20 to 50 minutes after power-on T3 = ____________
(3) Calculate an increase in the internal camera temperature [°C], and check that it is in the range of 15[°C] to 20[°C].
Increase in internal camera temperature [°C] = (T2 - T1) + T3
(4) If an increase in the internal camera temperature exceeds 20°C, turn power off and then wait until a temperature level of less than
20°C is reached. Then, proceed to items 5-5-2 and subsequent.
If an increase in the internal camera temperature is less than 15°C, wait until a temperature level exceeding 15°C is reached.
Then, proceed to items 5-5-2 and subsequent.
<Reference>
Internal camera temperature difference
Fig. 20
Note)
The internal camera temperature check procedures are complete at this step. After checking the internal camera temperature
difference, be sure to reset DATA to 00.
ST EP PROCEDURE
T EMPERAT URE CHECK
1
1) Make the setting shown at right.
2) Perform storing.
MONIT OR
CS Function MD ADDR DT
0
02
ST 00D0
00
RD
↑
↑
↑
↑
(press the PAUSE button.)
2
Microcomputer operation
Release of internal camera temperature sensor
check indication.
Release is completed.
Press SLOW KEY for transition to the normal mode.
Indication of internal camera temperature
27
DC10 E, DC20 E
SERVICE MODE / ADJUSTMENT
5-5-2 CCD Image Adjustment (High Temperature)
For this adjustment, use the same conditions as those specified in 5-5-1 Internal Camera Temperature Check (3)
SPEC.
Automatic writing
Procedure)
(1) Carry out CCD image adjustment (high temperature) in the following procedure.
ST EP PROCEDURE
1
1) Make the setting shown at right.
2) Perform storing.
(press the PAUSE button.)
1) Make the setting shown at right.
2) Perform storing.
(press the PAUSE button.)
1) Make the setting shown at right.
2) Perform storing.
(press the PAUSE button.)
2
3
MONIT OR
CS Function MD ADDR DT
0
7
ST 0000
01
RD
01
↑
↑
↑
2
08
↑
↑
2
08
↑
↑
ST
RD
3015
--
↑
↑
ST
RD
3016
--
↑
↑
Microcomputer operation
V synchronization set
(DT becomes 00 after storing.)
Image adjustment (high temperature)
Adjustment is completed.
Completion with ST :05, NG with ST :09
Writing of adjustment data
Adjustment is completed.
Completion with ST :05, NG with ST :09
Note)
• If the knob adjusted in 5-2-3 has been turned, readjust it before proceeding to CCD image adjustment (high temperature).
• If step 1 is not taken, the result of CCD image adjustment may become NG. To avoid this, be sure to carry out step 1.
28
DC10 E, DC20 E
SERVICE MODE / ADJUSTMENT
5-5-3 CCD Image Adjustment Result Check
For this adjustment, use the same conditions as those specified in 5-5-1 Internal Camera Temperature Check (3)
SPEC.
Automatic writing
Procedure)
(1) Check and write the result data of CCD image adjustment.
ST EP PROCEDURE
1
1) Make the setting shown at right.
2) Perform storing.
(press the PAUSE button.)
1) Make the setting shown at right.
2) Perform storing.
(press the PAUSE button.)
1) Make the setting shown at right.
2) Perform storing.
(press the PAUSE button.)
2
3
MONIT OR
CS Function MD ADDR DT
2
08
ST 3017
-RD
↑
↑
↑
↑
2
↑
2
↑
08
↑
ST
RD
3018
↑
-↑
08
↑
ST
RD
3019
↑
-↑
Microcomputer operation
Color difference check
Adjustment is completed.
Completion with ST :05, NG with ST :09
Noise check
Adjustment is completed.
Completion with ST :05, NG with ST :09
Check result writing
Adjustment is completed.
Completion with ST :05, NG with ST :09
Note)
If the result of any one of the above check steps is NG, carry out the adjustment procedures described in item 5-5 “CCD Section (2)
(DC20 E only)” again from the beginning while maintaining the internal camera temperature within the allowable range. If NG is
indicated repeatedly, replace the CCD PCB with a new one.
STATUS
(ST)
ERROR No. TOTAL
CER
Fig. 21
29
NER
DC10 E, DC20 E
SERVICE MODE / ADJUSTMENT
Error Code Table for CCD image Correction
Error No
Error Conditions
Error No
0B
Error Conditions
01
LED intensity low
02
LED AE time out
0C
Not used
03
Lc3 dummy leak too large
0D
Shading error (horizontal slope)
04
Lc3 dummy leak ch difference too large
0E
RGB absolute value insufficient
05
Not used
0F
RGB absolute value is too large
06
Lc4 residual err too large
10
Chroma error between 2channels is too large
07
Lc4 residual err ch difference too large
11
08
Lc3/lc4 slope too large
12
Noise level difference between 2channels is too large
time out
09
Gain correction ch difference too large
13
range over
0A
Measure abort
30
RGB difference error
DC10 E, DC20 E
SERVICE MODE / ADJUSTMENT
5-6 Camera Section Adjustment
Notes)
(1) Each adjustment data (5-6-1 to 5-6-5) becomes effective after it is written into the DATA as mentioned in 5-6-6. If power must be
turned OFF/ON during each adjustment, be sure to perform the DATA write procedure as mentioned in 5-6-6.
(2) Be sure to carry out adjustments 5-6-2 through 5-6-5 as sequenced in succession. Remember that satisfactory performance will not
be attained by performing just one of these adjustments.
Preparation)
(1) For camera section adjustment, take the product condition.
(2) Adjustment condition (initial condition)
Movie/Still
Shooting mode
: Movie
: Program AE
AF
Image stabilizer
: OFF
: OFF
Chart
AE
: Standard angle of view
: P mode
IMAGE EFFECT
: OFF
5-6-1 Iris Adjustment
CHART
Light box (5600°K) not required
SPEC.
Automatic adjustment.
Procedure)
(1) Referring to the table shown below, adjust the Iris.
ST EP PROCEDURE
IRIS
1
1) Make the setting shown at right.
2) Perform storing.
(press the PAUSE button.)
CS
2
↑
↑
MONIT OR
Function MD ADDR DT
08
ST 3000
-WR
↑
↑
↑
RD
↑
↑
↑
ST
Fig. 22
31
Microcomputer operation
Adjustment is in progress.
Adjustment is completed.
Completion with ST :00 (Others, NG)
DC10 E, DC20 E
SERVICE MODE / ADJUSTMENT
5-6-2 WB Adjustment (1)
CHART
Light box (5600°K)
SPEC.
Automatic adjustment
Procedure)
(1) Referring to the table shown below, carry out WB adjustment (1).
Note) In STEP5, color balance gain data is set to FF. Be sure to carry out color balance adjustment described in 56-3. In cases where the MAIN PCB has been replaced with a new one, it is not necessary to take the adjustment steps 1 to 4.
ST EP PROCEDURE
WB (1)
1
1) Make the setting shown at right.
2) Perform storing.
(press the PAUSE button.)
2
1) Make the setting shown at right.
2) Perform storing.
(press the PAUSE button.)
3
1) Make the setting shown at right.
2) Perform storing.
(press the PAUSE button.)
4
1) Make the setting shown at right.
2) Perform storing.
(press the PAUSE button.)
5
1) Make the setting shown at right.
2) Perform storing.
(press the PAUSE button.)
MONIT OR
CS Function MD ADDR DT
2
10
ST 1044
00
RD
↑
↑
↑
↑
2
10
↑
↑
2
10
↑
↑
2
10
↑
↑
2
08
↑
↑
↑
↑
ST
RD
1045
00
↑
↑
ST
RD
1046
00
↑
↑
ST
RD
1047
00
↑
↑
ST 3002
WR
↑
RD
↑
Microcomputer operation
T arget value reset.
Adjustment is completed.
T arget value reset.
Adjustment is completed.
T arget value reset.
Adjustment is completed.
T arget value reset.
Adjustment is completed.
-↑
--
Adjustment is in progress.
Adjustment is completed.
Completion with ST :05 (Others, NG)
5-6-3 Color Balance Adjustment
CHART
Lightbox (5600°K), and color bar chart
SPEC.
Automatic adjustment
Procedure)
(1) Referring to the table shown below, carry out automatic adjustment for color balance.
ST EP PROCEDURE
WB (2)
1
1) Make the setting shown at right.
2) Perform storing.
(press the PAUSE button.)
CS
2
↑
↑
MONIT OR
Function MD ADDR DT
08
ST 3003
-WR
↑
↑
↑
RD
↑
↑
↑
32
Microcomputer operation
Adjustment is in progress.
Adjustment is completed.
Completion with ST :05, NG with ST :09
DC10 E, DC20 E
SERVICE MODE / ADJUSTMENT
5-6-4 WB Adjustment (2)
CHART
Light box (5600°K), and CCA12 filter
SPEC.
Automatic adjustment
Procedure)
(1) Referring to the table shown below, carry out WB adjustment (2).
ST EP PROCEDURE
WB (2)
1
1) Make the setting shown at right.
2) Perform storing.
(press the PAUSE button.)
MONIT OR
CS Function MD ADDR DT
2
08
ST 3004
-WR
↑
↑
↑
↑
RD
↑
↑
↑
↑
Microcomputer operation
Adjustment is in progress.
Adjustment is completed.
Completion with ST :05, NG with ST :09
5-6-5 WB Adjustment (3)
CHART
Light box (5600°K)
SPEC.
Automatic adjustment
Procedure)
(1) Referring to the table shown below, carry out WB adjustment (3).
ST EP PROCEDURE
WB (3)
1
1) Make the setting shown at right.
2) Perform storing.
(press the PAUSE button.)
MONIT OR
CS Function MD ADDR DT
2
08
ST 3005
-WR
↑
↑
↑
↑
RD
↑
↑
↑
↑
Microcomputer operation
Adjustment is in progress.
Adjustment is completed.
Completion with ST :05, NG with ST :09
5-6-6 Data Writing
SPEC.
Data writing
Procedure)
(1) According to the table shown below, write adjustment data (5-6-1 to 5-6-5) into the Flash.
ST EP PROCEDURE
EEPROM WRIT ING
1
1) Make the setting shown at right.
2) Perform storing.
(press the PAUSE button.)
MONIT OR
CS Function MD ADDR DT
2
08
ST 3006
00
RD
-↑
↑
↑
33
Microcomputer operation
Completion of Flash writing.
Completion with ST :05, (NG with ST :09)
DC10 E, DC20 E
SERVICE MODE / ADJUSTMENT
5-6-7 CCD Pixel Missing Compensation
Note)
(1) If more than the above number are detected in adjustment, the result of adjustment is indicated as NG and the correction is not
performed. Further, if three consecutive missing pixels in a row are detected, the correction is not performed either.
(2) The number of white dot increases with the temperature of the CCD, causing a change in detectable level. If the adjustment is
performed after a lapse of time longer than the specified period of power-on, the temperature of the CCD becomes higher than a
preset temperature level to result in an increase in the number of white dots detected. In this situation, CCD Pixel Missing
Compensation cannot be made properly.
(3) In addition to the CCD Pixel Missing Compensation function mentioned above, this product is provided with a function for
automatically correcting pixel missing points each time power is turned on and a function for automatically correcting pixel missing
points at the time of shooting at a dark object (interlinked with AGC level adjustment).
CHART
Not required
SPEC.
Automatic writing
Preparation)
(1) Carry out compensation for CCD pixel missing in the product state.
(2) Adjustment condition
Shooting mode
: Program AE
AF
ZOOM
: OFF (Focus short range)
: Telephoto-end
Demo mode
Image stabilizer
: OFF
: OFF
Procedure)
(1) According to the table shown below, carry out CCD Pixel Missing Compensation. (Perform this step about 20 to 60 minutes after
power-on. For the DC20 E, be sure to conduct the CCD Pixel Missing Compensation after CCD image adjustment has been made.)
(2) If the result of adjustment is NG (status 09), refer to the error code table shown below.
Furthermore, by observing an actual image, check for stuck/void pixels. Then, judge whether the result of adjustment is OK or NG.
(In the case of NG, replace the CCD PCB with a new one.)
ST EP PROCEDURE
1
2
1) Make the setting shown at right.
2) Perform storing.
(press the PAUSE button.)
1) Make the setting shown at right.
2) Perform storing.
(press the PAUSE button.)
MONIT OR
CS Function MD ADDR DT
2
08
ST 300E
-RD
↑
↑
↑
↑
2
08
↑
↑
ST
RD
34
300F
--
↑
↑
Microcomputer operation
Blemish detected
Adjustment is completed.
Completion with ST :05, NG with ST :09
Blemish detection data writing
Adjustment is completed.
Completion with ST :05, NG with ST :09
DC10 E, DC20 E
SERVICE MODE / ADJUSTMENT
STATUS CODE
(ST)
Total of white dots
ERROR No
Fig. 23
Error Code Table for CCD Pixel Missing Compensation (DC20 E)
In the DC20 E, if a pixel missing is found on the CCD pixels, it is required to scan each of the RG and GB images. Therefore, white
dot detection is performed twice, and the result of the detection is indicated on a bit basis.
Error No
Error Conditions
00
Normal end
10
T he number of white dots has exceeded the upper limit in the first time of detection
20
T he number of white dots has exceeded the upper limit in the second time of detection
40
T he total number of white dots in the first time and second time of detection has exceeded the upper limit
80
In white dot detection, three consecutive missing pixels in a row are detected.
35
DC10 E, DC20 E
SERVICE MODE / ADJUSTMENT
5-7 Recorder Section Adjustment
Preparation)
(1) Carry out setup/check in the product state.
5-7-1 Playback error rate check
MODE
Playing back DVD-R Reference disc PAL (DY9-1408-000)
SPEC.
Error rate 3.3 × 10⁻³ or less
Procedure)
(1) While playing back the reference disc, carry out error rate check referring to the table shown below.
ST EP PROCEDURE
SWP (AUT O)
1
1) Make the setting shown at right.
2) Perform storing.
(press the PAUSE button.)
MONIT OR
CS Function MD ADDR DT
0
05
ST 0001
01
WR
↑
↑
↑
↑
RD
↑
↑
↑
00
Microcomputer operation
Error rate indication.
Note)
* It takes 7 to 20 seconds to indicate an error rate, because it is calculated from large amount of data.
* To measure an error rate again, it is once required to stop the playback.
If the result of the error rate check is NG, perform recheck according to 2-3-1 “Flowchart for Playback Image Error Check” in
Service Hint.
Error rate indication
Fig. 24
36
DC10 E, DC20 E
SERVICE MODE / ADJUSTMENT
5-7-2 Self-recording error rate check
MODE
Playing back the self-recording DVD-RW
SPEC.
Error rate 8.0 × 10⁻³ or less
Procedure)
(1) While playing back the self-recording DVD-RW disc, carry out error rate check referring to the table shown below.
ST EP PROCEDURE
C.FG(AUT O)
1
1) Recording for a period of approx. 10 to 30 sec.
2
1) Playing back the part recorded in ST EP 1.
3
1) Make the setting shown at right.
2) Perform storing.
(press the PAUSE button.)
MONIT OR
CS Function MD ADDR DT
0
05
↑
↑
↑
↑
ST 0001
WR
↑
RD
↑
Microcomputer operation
01
↑
00
Error rate indication.
Note)
(1) For self-recording error rate measurement, use a 8-cm DVD-RW disc manufactured by Maxell.
(2) Select the video recording mode.
(3) In principle, the same conditions are provided in use of any recording mode for error rate measurement. It is however advisable to
select the SP mode.
Note)
* It takes 7 to 20 seconds to indicate an error rate, because it is calculated from large amount of data.
* To measure an error rate again, it is once required to stop the playback.
If the result of the error rate check is NG, perform recheck according to 2-3-1 “Flowchart for Playback Image Error Check” in
Service Hint.
Error rate indication
Fig. 25
5-7-3 LCD PCB Setting Destination
When mounting the LCD PCB of service part, perform the following adjustment.
ST EP PROCEDURE
1
1) Make the setting shown at right.
2) Add "09" to the current value, and
store the result data.
Microcomputer operation
MONIT OR
CS Function MD ADDR DT
0
20
ST 0003
-RD
ADJ
↑
↑
↑
37
DC10 E, DC20 E
SERVICE MODE / ADJUSTMENT
5-8 CVF Adjustment
For this camcorder, CVF adjustment is optional. However, if malfunction is found in CVF image, picture quality or color after replacement of a CVF-related part, be sure to carry out the following adjustment.
Note)
(1) The adjustments from 5-8-3 through 5-8-5 must be carried out in sequence.
Remember that Satisfactory performance will not be attained unless all adjustments are performed.
Preparation)
(1) Carry out CVF adjustment in the camera mode in the product condition.
5-8-1 Forced CVF ON, Adjustment Image (B/W) Setting
Procedure)
(1) Referring to the table shown below, make the setting.
ST EP
Forced CVF ON
PROCEDURE
1) Make the setting shown at right.
2) Perform storing.
MONIT OR
CS
Function
0
↑
Adjustment points and range
MD
ADDR
DT
00
ST
0004
02
Start of setting
↑
RD
↑
↑
Completion of setting
(press the PAUSE button.)
Black and white image 1) Make the setting shown at right.
2) Perform storing.
2
08
ST
330F
--
↑
↑
RD
↑
↑
Completion of setting
(press the PAUSE button.)
5-8-2 CVF Frequency Adjustment
M. EQ.
Frequency counter
TP.
Extension connector - pin 4 (EVF HD)
SPEC.
15.734 ± 0.1kHz
Procedure)
(1) Carry out adjustment according to the table shown below.
Note) When the following adjustment is in progress (MD: ST), the LCD and CVF images are not synchronized, but it
is not malfunction.
ST EP
PROCEDURE
MONIT OR
CS
Function
ADDR
0003 "ADJ" Start of setting
ADJ Completion of setting
↑
CVF Frequency
1) Make the setting shown at right.
0
21
ST
Adjustment
2) Perform storing.
↑
↑
RD
(press the PAUSE button.)
38
DT
Adjustment points and range
MD
DC10 E, DC20 E
SERVICE MODE / ADJUSTMENT
5-8-3 COM-DC Level Adjustment
MODE
Display of monochrome master
M. EQ.
Oscilloscope
TP/TRIG.
Extension connector - pin 18 (EVF COM DC) / TP signal (self TRIG)
SPEC.
2.30 ± 0.05 [V] (DC. P-P center of EVF COM to GND level)
Procedure)
(1) Carry out adjustment according to the table shown below.
2.30V ± 0.05V
Fig. 26
ST EP
PROCEDURE
MONIT OR
CS
Function
ADDR
0004 "ADJ" Start of setting
COM-DC Level
1) Make the setting shown at right.
0
21
ST
Ajustment
2) Perform storing.
↑
↑
RD
(press the PAUSE button.)
39
↑
DT
Microcomputer operation
MD
ADJ Completion of setting
DC10 E, DC20 E
SERVICE MODE / ADJUSTMENT
5-8-4 COM Amplitude Adjustment
MODE
Display of monochrome master
M. EQ.
Oscilloscope
TP/TRIG.
Extension connector - pin 14 (EVF COM AC) / TP signal (self TRIG)
SPEC.
4.00 ± 0.05 [V]
Procedure)
(1) Carry out adjustment according to the table shown below.
4.00V ± 0.05V
Fig. 27
ST EP
PROCEDURE
MONIT OR
Function
MD
ADDR
000C "ADJ" Start of setting
COM Amplitude
1) Make the setting shown at right.
0
21
ST
Adjustment
2) Perform storing.
↑
↑
RD
(press the PAUSE button.)
40
↑
DT
Microcomputer operation
CS
ADJ Completion of setting
DC10 E, DC20 E
SERVICE MODE / ADJUSTMENT
5-8-5 Brightness Adjustment
MODE
Display of monochrome master
M. EQ.
Oscilloscope
TP/TRIG.
Extension connector - pin 15 (G), pin 13 (R), pin 16 (B), / TP signal (self TRIG)
SPEC.
2.80 ± 0.05 [V]
Procedure)
(1) Carry out adjustment according to the table shown below.
Service Mode
(2) After adjustment, make sure the contrast adjustment performed in 5-8-6 is not deteriorated. If deteriorated, repeatedly carry out the contrast adjustment in 5-8-6 and brightness adjustment in 5-8-5.
Note) In the service mode, the waveform observation
point is hard to locate. For locating the wave-
2.80V ± 0.05V
form observation point, transfer to the normal
mode beforehand.
Fig. 28
ST EP
PROCEDURE
Brightness Adjustment (G) 1) Make the setting shown at right.
2) Perform storing.
MONIT OR
CS
Function
ADDR
0006 "ADJ" Start of setting
ADJ Completion of setting
↑
0
21
ST
↑
↑
RD
0
21
ST
↑
RD
DT
Microcomputer operation
MD
(press the PAUSE button.)
Brightness Adjustment (R) 1) Make the setting shown at right.
2) Perform storing.
↑
0008 "ADJ" Start of setting
ADJ Completion of setting
↑
(press the PAUSE button.)
Brightness Adjustment (B) 1) Make the setting shown at right.
2) Perform storing.
0
21
ST
↑
↑
RD
000A "ADJ" Start of setting
ADJ Completion of setting
↑
(press the PAUSE button.)
Note) The adjustment sequence is important. Be sure to adjust (G) first, and then (R) and (B).
41
DC10 E, DC20 E
SERVICE MODE / ADJUSTMENT
5-8-6 Contrast Adjustment
MODE
Display of monochrome master
M. EQ.
Oscilloscope
TP/TRIG.
Extension connector - pin 15 (G), pin 13 (R), pin 16 (B), / TP signal (self TRIG)
SPEC.
2.30 ± 0.05 [V]
Procedure)
Service Mode
(1) Carry out adjustment according to the table shown below.
Note) In the service mode, the waveform observation
point is hard to locate. For locating the waveform observation point, transfer to the normal
mode beforehand.
2.30V ± 0.05V
Normal Mode
2.30V ± 0.05V
Fig. 29
ST EP
Contrast Adjustment (G)
PROCEDURE
MONIT OR
CS
Function
ADDR
0007 "ADJ" Start of setting
ADJ Completion of setting
↑
1) Make the setting shown at right.
0
21
ST
2) Perform storing.
↑
↑
RD
1) Make the setting shown at right.
0
21
ST
2) Perform storing.
↑
↑
RD
0
21
ST
↑
RD
DT
Microcomputer operation
MD
(press the PAUSE button.)
Contrast Adjustment (R)
0009 "ADJ" Start of setting
ADJ Completion of setting
↑
(press the PAUSE button.)
Contrast Adjustment (B)
1) Make the setting shown at right.
2) Perform storing.
↑
000B "ADJ" Start of setting
ADJ Completion of setting
↑
(press the PAUSE button.)
Note) The adjustment sequence indicated above should be observed.
If the ST mode has been selected at the time of contrast adjustment, the black limiter is released automatically.
Therefore, it is not required to make setting in this case.
Be sure to perform adjustment (G) first, and then adjustments (R) and (B).
42
DC10 E, DC20 E
SERVICE MODE / ADJUSTMENT
5-8-7 Release of Forced CVF ON
Procedure)
(1) Referring to the table shown below, make the setting.
ST EP
PROCEDURE
Release of Forced
1) Make the setting shown at right.
CVF ON
2) Perform storing.
MONIT OR
CS
Function
0
↑
ADDR
DT
00
ST
0004
00
Start of setting
↑
RD
↑
↑
Completion of setting
(press the PAUSE button.)
Note) The monochrome image display mode can be reset by turning power off/on.
43
Microcomputer operation
MD
SERVICE HINTS
CONTENTS
1. Service Hints -------------------------------------------------------------------------------------------------------------------------------------- 1
1-1 Arrangement of Circuit Boards --------------------------------------------------------------------------------------------------------- 1
1-2 Location of Main Elements ------------------------------------------------------------------------------------------------------------- 2
1-3 Current Consumption Check ----------------------------------------------------------------------------------------------------------- 5
2. Troubleshooting ---------------------------------------------------------------------------------------------------------------------------------- 6
2-1 Power Supply Malfunction ------------------------------------------------------------------------------------------------------------- 6
2-2 Camera Picture Malfunction ------------------------------------------------------------------------------------------------------------ 7
2-3 Malfunction of Playback Picture ------------------------------------------------------------------------------------------------------- 8
2-3-1 Flow Chart for Checking Malfunction of Playback Picture ------------------------------------------------------------- 8
2-3-2 Checking Method -------------------------------------------------------------------------------------------------------------- 9
2-4 Cautions on Handling TS Mech Unit ------------------------------------------------------------------------------------------------ 12
2-5 Periodic Checkup and Maintenance of TS Mech Unit ---------------------------------------------------------------------------- 16
2-5-1 Cleaning of Pickup Lens --------------------------------------------------------------------------------------------------- 16
2-6 Cleaning Inside of CVF Unit --------------------------------------------------------------------------------------------------------- 17
2-7 Disposing of the Lithium Battery ---------------------------------------------------------------------------------------------------- 18
2-7-1 How to Remove the Built-in Lithium Battery when Discarding the Video Camera ------------------------------- 18
2-8 Warning Displays ----------------------------------------------------------------------------------------------------------------------- 20
DC10 E, DC20 E
SERVICE HINTS
1. Service Hints
1-1 Arrangement of Circuit Boards
The printed circuit boards are arranged as shown below.
CVF PCB
AV FPC ASS'Y
SWITCH FPC ASS'Y
ZOOM ASS'Y
DC JACK PCB
REAR KEY FPC ASS'Y
USB FPC ASS'Y
SUB PCB
CARD PCB
CAPACITOR PCB
FLASH PCB
GYRO PCB
MAIN PCB
CCD PCB
LCD HINGE PCB
LCD PCB
Fig. 1
Note)
FLASH PCB and CAPACITOR PCB are only for DC20 E.
1
DC10 E, DC20 E
SERVICE HINTS
1-2 Location of Main Elements
MAIN PCB
IC1200
LENS DRIVER
DC20 E
IC1000
CDS/AD
IC3201
DC/DC CONVERTER
CONTROL
IC2304
DDR SDRAM
IC2305
DDR SDRAM
IC810
AUDIO PLL
IC2300
BACK END
IC2302
BUFFER
FU3203
FU3200
FU3205
FU1800
FU3202
IC1650
SHOCK SENSOR
FU3204
IC1001
TG
FU3201
IC104
3.2V REGULATOR
IC1651
SENSOR IC
IC105
RESET IC
IC100
SUB MI-COM
IC1002
MPX2
IC2306
DDR SDRAM
IC1400
LAP
IC2102
75OHM DRIVER
IC3203
4.6V REGULATOR
IC1103
DIGIC DV
IC101
CCM MI-COM
IC3200
3.1V REGULATOR
IC1102
SDRAM
IC103
FLASH
IC1101
SDRAM
IC106
AND GATE
IC3500
USB IC
IC2301
SRAM
IC1401
1.8V REGULATOR
Fig. 2
2
IC2303
FLASH
for DC20 E only
DC10 E, DC20 E
SERVICE HINTS
MAIN PCB
DC10 E
IC1004
2.8V REGULATOR
IC1001
INVERTER
IC1002
TG/CDS/AGC/AD/V-DRIVER
IC3201
DC/DC CONVERTER
CONTROL
IC2304
DDR SDRAM
IC1200
LENS DRIVER
IC2305
DDR SDRAM
IC810
AUDIO PLL
IC2300
BACK END
IC2302
BUFFER
FU3203
FU3205
FU1800
FU3202
FU3204
FU3201
IC1650
SHOCK SENSOR
IC104
3.2V REGULATOR
IC1651
SENSOR IC
IC105
RESET IC
IC2306
DDR SDRAM
IC100
SUB MI-COM
IC2102
75OHM DRIVER
IC1400
LAP
IC3203
4.6V REGULATOR
IC101
CCM MI-COM
IC1102
SDRAM
IC103
FLASH
IC1101
SDRAM
IC106
AND GATE
IC3500
USB IC
IC2301
SRAM
IC1401
1.8V REGULATOR
Fig. 3
3
IC2303
FLASH
for DC10 E only
DC10 E, DC20 E
SERVICE HINTS
SUB PCB
IC1502
2.8V REGULATOR
IC1501
CVF DRIVER
IC801
AIF 4
LCD PCB
GYRO PCB
IC1604
Y SENSOR GYRO
IC903
2.8V REGULATOR
IC1603
P SENSOR GYRO
IC901
EEPROM
CCD PCB
IC902
LCD DRIVER
DC20 E
IC1050
IC1053
INVERTER INVERTER
IC1051
INVERTER
DC10 E
IC1072
BUFFER
IC1054
CCD
IC1052
INVERTER
IC1055
OPE AMP
FLASH PCB
DC20 E
IC501
DC/DC CONVERTER CONTROL
Fig. 4
4
IC1071
BUFFER
IC1070
CCD
DC10 E, DC20 E
SERVICE HINTS
1-3 Current Consumption Check
The following table shows the specified value of current consumption in each status.
Measurement condition : Product status, DVD-RW (Video mode), recording mode : XP, camera auto mode (AF OFF), LCD ON
(Approx. 0.03A each smaller in the case of CVF)
Preset voltage
: 7.4V
DC10 E
POWER SW
CAMERA
PLAY
MODE
Current consumption (A)
REC PAUSE
0.47
REC
0.84
PLAY (DISC)
0.71
PLAY (CARD)
0.40
POWER OFF
0.79 (mA)
DC20 E
POWER SW
CAMERA
PLAY
MODE
Current consumption (A)
REC PAUSE
0.55
REC
0.93
PLAY (DISC)
0.76
PLAY (CARD)
0.45
POWER OFF
0.71 (mA)
5
DC10 E, DC20 E
SERVICE HINTS
2. Troubleshooting
To detect the defective parts for repair, if any, use the following hints and check points.
2-1 Power Supply Malfunction
<Hints>
When the power source is attached, the unit enters the standby mode in the following sequences.
Main power is connected. → UNREG is supplied to the MAIN PCB → SUB MI-COM starts up. → CCM MI-COM starts up. → SUB
MI-COM outputs VCR ON “H” signal. → PWM driver starts up and turns on each power supply. → Establishes communication with
the BACK END → The CCM MI-COM is brought into standby status with the VCR ON changed to VCR Low.
After that, the power supply is turned ON by the following procedures.
Power supply mode switch operation → After received by MODE MI-COM, VCR ON “H” is output. → The PWM driver is starts to
turns on various power supplies. → The MI-COM in the BACK END is started up to control the system.
<Check Points>
1)
Key Input
Check the key input at Power Switch in service mode.
2)
Check of microcomputer-to-microcomputer communication
If the microcomputer-to-microcomputer communication line is normal, the version number of each microcomputer will be dis-
3)
played in service mode. Otherwise, the communication line or microcomputer may be faulty.
Fuses on the power supply PCB
Check the continuity of the fuses FU3200, 3201, 3202, 3203, 3204, 3205 and 1800 on the MAIN PCB. If NG, replace the fuse and
check the power consumption. (FU3200 is for DC20 E only.)
4)
Replace the MAIN PCB with a service part and check the operation.
6
DC10 E, DC20 E
SERVICE HINTS
2-2 Camera Picture Malfunction
<Hints>
A flow of camera picture (EE) is as below.
CCD → CCD PCB → MAIN PCB (DIGIC DV) → FRONT END → AV FPC ASS’Y
<Check Points>
1)
Check lens reset (“SERVICE MODE / ADJUSTMENT” P.9)
If no camera picture appears, check in service mode if the lens has been reset. If NG, check the lens.
2)
Check index screen display
If the index screen is confirmed, the signal lines after FRONT END are considered to be OK.
3)
Check of DIGIC DV generation signal (white 100% or color bar) (“SERVICE MODE / ADJUSTMENT” P.8)
The white 100% or color bar signals are generated by the DIGIC DV on the MAIN PCB. In service mode, if the output of the white
4)
100% or color bar signal is attained, the signal lines after DIGIC DV are considered to be OK.
Check by commands particular to camera (“SERVICE MODE / ADJUSTMENT” P.8)
Check the operation of White balance, AGC, IRIS, etc. in service mode.
7
DC10 E, DC20 E
SERVICE HINTS
2-3 Malfunction of Playback Picture
2-3-1 Flow Chart for Checking Malfunction of Playback Picture
START
Preparation
for check
NO
Is reference disc
visual check OK?
Wipe the recording
surface with cloth.
Replace the disc.
YES
YES
Playback
system check
Is visual
check OK?
NO
NO
Error rate
3.3×10 ?
YES
Perform the cleaning of pickup lens (1)
using air blower.
Playback after
self-recording
YES
NO
Error rate
8×10 ?
Error rate
OK?
NO
YES
Recording/
playback
system check
Perform the cleaning of pickup lens (1)
using air blower.
Perform the cleaning of pickup lens (2)
using alcohol and lens-cleaning paper.
YES
YES
Error rate
OK?
NO
NO
Perform the cleaning of pickup lens (2)
using alcohol and lens-cleaning paper.
YES
Error rate
OK?
NO
END
Error rate
OK?
Replace the disc.
YES
Error rate
OK?
NO
Replace the
TS Mech.
Fig. 5
8
DC10 E, DC20 E
SERVICE HINTS
2-3-2 Checking Method
<Hints>
In the DVD, degradation of picture quality normally appears on the screen as block noise, as in the DV. This is because, if an error
occurs exceeding the ability of the error correction circuit, the block by block information of pictures is not played back properly and
thus complemented by the previous picture information. Normally, such block noise appears on the screen when the error rate has
considerably been degraded due to the contaminated disc or flaws, etc. Be sure to check the playback picture quality by the error rate.
<Check Points>
(1) Visual check of reference disc
Check the recording surface of the reference disc for contamination or flaws. If the recording surface is contaminated, softly wipe
the disc outward from its center using soft cloth.
* The reference disc is a DVD-R disc of 8 cm, and classified as NTSC or PAL specification. For NTSC specification,
use DY9-1407-000. The reference disc can be used, not only for checking an error rate, but also for checking the
playback picture on the monitor, because it also contains video images (4:3, 16:9).
* On the unit with different TV system, the reference disc cannot recognize the disc. This means that it cannot be used
for checking an error rate.
For NTSC
DY9-1407-000
For PAL
DY9-1408-000
Fig. 6
(2) Playback error rate check (“SERVICE MODE / ADJUSTMENT”, p.36)
While the reference disc is played back, check error rate in the service mode.
Playback position: Three positions: Inner, center and outer positions. By changing the disc chapter, the playback position can be
changed.(*)
Error rate standard : 3.3 × 10⁻³
In the case of NG, execute the steps from 1) shown below.
* Relationships between playback position and chapter
On the reference disc, data is recorded from the inner circumference to the outer circumference.
Example : In the case of a reference disc with scenes 1 to 8
Playback position
Scene
Inner circumference
Outer circumference
1
8
9
DC10 E, DC20 E
SERVICE HINTS
(3) Self-recording error rate check (“SERVICE MODE / ADJUSTMETN”, P. 37)
Using a new DVD-RW disk (Commercially available), check an error rate during self-recording playback.
Disc to be used
: Hitachi’s Maxell DVD-RW of 8 cm (If the procurement is difficult in an oversea location, SONY’s
Recording mode
DVD-RW of 8 cm is allowed to be used.)
: VIDEO mode
Recording mode
Recording time
: SP mode (Recommendation)
: Approx. 10 to 30 sec.
Recording position
: Not specifically designated. Write the record as a postscript without initializing.
Specified range of error rate : 8.0 × 10⁻³
1) Cleaning of pickup lens (1)
Open the Disc Cover and clean the pickup lens surface with a an air blower that is commercially available. After cleaning, check
the error rate again.
* Do not use an air blower of spray-can type because blowing power is too strong.
* Do not touch the lens with bare hand.
2) Cleaning of pickup lens (2)
If an error rate is out of the specified range, clean the pickup lens surface using Lens-cleaning paper and alcohol.
Using forceps whose ends are wound with lens-cleaning paper that is wet with alcohol, wipe the lens surface by moving the
forceps once in a single direction.
After cleaning, check the error rate again.
* Be sure to use ethyl alcohol (commercially available product). Never use other solvents.
* If you have spilled alcohol by mistake onto the cover, do not rub it for removal as its coating will come off. For
cleaning the surface of the cover, wipe it with a dry cloth without using alcohol.
Outline Description of Pickup Unit
Suspension
Do not touch it directly to
prevent it from being deformed.
Coil wiring material
Material of
lens protection
Do not rub it
strong to prevent
it from coming off.
Lens-cleaning paper
Wipe once
Magnet
Tweezers
Cover
Lens-cleaning
paper may catch
on the edge section.
Magnet
Coil wiring material
Coil wiring material
Lens-cleaning
paper may catch
on the edge section.
Do not use forceps made of magnetic
material. Otherwise, the magnet may
attract the tweezers to cause the
suspension to be deformed or the lens
to be damaged.
Suspension
Do not touch it directly to
prevent it from being deformed.
Fig. 7
10
DC10 E, DC20 E
SERVICE HINTS
3) Replacement with another reference disc
If an error rate is out of the specified range, replace the reference disc with another one. After replacement, check the error rate
again.
* In some cases, an error rate may appear in a worse state than the actual state depending on the conditions (lot and
recording surface condition) of the disk used.
4) Replacement of TS Mech unit
If an error rate is out of the specified range, replace the TS Mech unit.
11
DC10 E, DC20 E
SERVICE HINTS
2-4 Cautions on Handling TS Mech Unit
<Hints>
The TS mech unit is of a precision design. When handling it, exercise extreme care, with the full understanding of the following points.
<Check Points>
(1) Cautions on handling
• The Disc Cover cannot be opened unless the power for the main unit is turned on. Avoid trying to open the cover forcibly. First
turn on the power and then open the Disc Cover.
• It may require a longer time to take out the TS Mech depending on the disc condition and its recorded contents.
(2) Caution for antistatic protection
Since the TS mech unit contains a control circuit board, wear a static dissipative wrist band (commercially available) for antistatic
protection.
(3) Cautions about laser beam
• The laser beam is emitted in the TS Mech.
If the laser beam gets in your eyes, it could cause eye damage, so never disassemble the TS Mech.
• This product's laser beam condenses light using an objective lens in the light pick up, so that it strikes a focal point on the disk's
recording surface. Therefore, make sure that your eyes are at least 30 cm away from the objective lens when the laser diode is
emitting light.
Note : In complete products, the laser beam is not normally emitted when the Disc Cover is open. The laser beam is
emitted when the two open/closed detection sensors near the Disc Cover are set to closed or when the Disc
Cover on a disassembled product is closed and the operation of the TS Mech is being checked.
(4) How to take up the service parts
Since the white flexible cable bulges out of the control P.C.B., holding the left side of the TS Mech by hand means holding the
flexible cable by hand. In this way, the flexible cable may be excessively loaded to result in its wire breakage. Thus, when taking out
the TS Mech from the container, never hold its left side, but hold its right side, as shown in the figures below. (Fig. 8)
Caution: If the flexible cable is broken, it is required to replace the entire TS Mech unit, because there is no replacement part for the flexible cable alone.
Right way to take out the TS Mech
(First lift up its right side, and then take up the TS
Mech by holding its upper and lower sections.)
Wrong way to take out the TS Mech
Fig. 8
12
DC10 E, DC20 E
SERVICE HINTS
(5) How to hold the TS Mech
As instructed in step (2) above, do not hold the left section, that is, the flexible cable, of the TS Mech, but hold the upper and lower
sections. (Fig. 9)
Right way to hold the TS Mech
Wrong way to hold the TS Mech
Do not hold the section circled in red,
that is, the flexible cable.
Fig. 9
(6) How to place the TS Mech
Be sure to place the detached TS Mech with its pickup lens upward. At this time, do not leave the TS Mech for a long time without
covering its lens. Store it with its lens covered.
(7) Cautions on containing the TS Mech into the service parts box
Both the upper and lower halves of the black container for service parts have antistatic effect. Thus place the TS Mech in the
container as it is, without covering it.
Caution: Do not put the TS Mech in a vinyl bag before placing it in the container. Or the vinyl bag may touch and cause
damage to the pickup during transportation. The upper and lower halves of the container can fix the pickup
position without touching the pickup directly.
13
DC10 E, DC20 E
SERVICE HINTS
(8) How to move the pickup from the inner circumference to the outer circumference
<Hints>
The TS Mech has two different pickup (hereinafter referred to as “PU”) positions: the PU stop position after the power for the main unit
is turned off and the PU fixed position on the service parts. The former has its PU stopped on the inner circumference, and the latter has
its PU stopped on the outer circumference. Thus when placing the TS Mech detached form the product in the container for transportation, it is required to move the PU stop position from the inner circumference to the outer circumference manually.
The condition of TS Mech Pickup positioned at inner /outer circumference
PU stopped at inner circumference
(At main unit power OFF with Disc
Cover open)
PU stopped at the outer circumference
(Packed in the service part container)
Fig. 10
<Check Points>
1) Tool Reauired
Tweezers made of non-magnetic material whose ends are not sharp, or a bar-like article (made of plastic or wood)
2) Moving method
Slowly push the section shown in the figure (orange-colored section) outward. Pushing the other section may damage the pickup
section. When the pickup has reached the outer circumference, do not keep on pressing further.
14
DC10 E, DC20 E
SERVICE HINTS
(9) How to eject the disc if the Disc Cover cannot be opened (forced opening)
1) Insert tweezers into the part A, and disengage the claw on the upper side of the Center Cover Lid. Then, remove the Center Cover
Lid. (See Figure 11.)
Note : Since the Center Cover Lid is not to be reused, you may damage the cover or break its claw. Take care,
however, not to damage the R Upper Cover and the Center Cover located around it.
A
Fig. 11
2) Remove the R Upper Cover, R-LCD Unit, Front Cover Unit, Rear Cover Unit, CVF Unit, Camera Unit, and Center Cover.
3) The pin for opening the Disc Cover will appear. Open the Disc Cover by sliding the pin to the open position.
Pin
Fig. 12
15
DC10 E, DC20 E
SERVICE HINTS
2-5 Periodic Checkup and Maintenance of TS Mech Unit
Be sure to carry out the following maintenance and periodic inspection for ensuring full functional performance of the TS Mech unit.
After repairing the mech unit, it is advisable to perform the cleaning of the pickup lens regardless of how long the unit has been used.
2-5-1 Cleaning of Pickup Lens
Open the Disc Cover and clean the pickup lens surface with an air blower commercially available.
* Do not use an air blower of spray-can type because blowing power is too strong.
* Do not touch the lens with bare hand.
* Do not perform the cleaning using lens-cleaning paper and alcohol for normal maintenance and checkup.
Pickup Lens
Fig. 13
16
DC10 E, DC20 E
SERVICE HINTS
2-6 Cleaning Inside of CVF Unit
<Hints>
The Dust Cover for the CVF Unit cannot be seen from the outside of the camera. For cleaning the inside of the CVF Unit, it is therefore
required to remove its screws. After completion of repair, it is advisable to clean the inside of the CVF Unit regardless of the length of
cumulative use time of the camera.
<Procedure>
(1) Remove the R Upper Cover, R-LCD Unit, and Rear Cover Unit.
(2) Using tweezers, detach the CVF Dust Cover.
(3) Clean the inside of the CVF Unit.
CVF Dust Cover
Tweezers
Fig. 14
17
DC10 E, DC20 E
SERVICE HINTS
2-7 Disposing of the Lithium Battery
When disposing this product, take out the internal lithium battery as follows. Regarding the disposal of the
lithium battery, be sure to follow the industrial waste treatment regulations in your country.
2-7-1 How to Remove the Built-in Lithium Battery when Discarding the Video Camera
When discarding a video camera, remove the built-in lithium battery. Since there is a high-voltage generating section in the main unit,
the work should be carried out after the power for the main unit has been left OFF for one and half months. Since there is danger of
electrical shock from the DC20 E, read through the cautions in the procedure.
<Procedure>
1. Remove all the screws shown in the illustrations with a screwdriver.
* The Cover (Center Cover Lid) is removed with tweezers. [P15 (9) -1)]
<Left side>
<Top side>
<Bottom side>
Fig. 15
18
DC10 E, DC20 E
SERVICE HINTS
2-1. Remove the top cover
2-2. Remove the additional screws under it.
<Left side>
Fig. 16
3-1. Remove the LCD display cover and the back cover.
<Left side>
* Detach the cable connectors with a pair of long-nosed
pliers or simply cut them with a pair of scissors.
3-2. Being careful not to touch the part indicated in the illustration remove the additional screws.
DC20 E
Do not touch
the condenser!
Touching the condenser can present
a serious risk of electrical shock.
Fig. 17
4-1. Grab the battery firmly with an insulated pair of pliers
or a similar tool and twist it repeatedly to detach it from
<Left side>
the board (CARD PCB).
4-2. Be careful not to touch the part indicated in the illustra-
Do not touch
the condenser!
tion.
DC20 E
Touching the condenser can present
a serious risk of electrical shock.
Fig. 18
19
DC10 E, DC20 E
SERVICE HINTS
2-8 Warning Displays
TEMPERATURE TOO HIGH CANNOT RECORD
• The temperature is too high.
TEMPERATURE TOO HIGH CANNOT REMOVE DISC
• When trying to remove the disc when the temperature was too high.
CANNOT RECORD
• When an error occurred on the disc, and recording cannot be performed.
REACHED THE MAXIMUM NUMBER OF SCENES
• When trying to shoot or perform another operation increasing the number of titles or chapters after the maximum has already
been reached.
DISC FULL
• The disc has no free space, and movies and still images cannot be recorded.
CANNOT PLAY DISC
• When trying to play an incompatible disc in the player.
CANNOT EDIT DISC
• When trying to edit an unrecorded disc.
DISC IS FINALIZED
• When trying to finalize a disc that is already finalized.
DISC IS FINALIZED
CANNOT RECORD
• When trying to record to a finalized disc.
UNFINALIZE THE DISC
• When trying to copy with PC when a finalized disc was recognized by DVD-Video.
UNABLE TO RECOVER DATA
• When corrupted data cannot be recovered.
UNABLE TO RECOVER DATA
FORMAT THE DISC
• When corrupted data cannot be recovered.
DISC IS PROTECTED
• When trying to record to a write-protected disc.
20
DC10 E, DC20 E
SERVICE HINTS
DISC ERROR
• When a disc cannot be recognized.
ACCESS ERROR
• When an error occurred during reading process.
DISC COVER IS OPEN
• When the disc cover is open
NO DISC
• When no disc is loaded.
NO CARD
• When no card is loaded.
LOADING THE DISC
• Loading
DISC ERROR
• When an error occurred in the disc and recording cannot be performed.
OPENING THE DISC COVER
• Eject operation
COPYRIGHT PROTECTED DUBBING RESTRICTED
• When trying to record external input images recorded with copyright protection information to a card.
SET THE TIME ZONE, DATE AND TIME
• When the power has been turned on without setting the time zone and/or date and time.
CHANGE THE BATTERY PACK
• When the battery charge level has dropped.
CARD ERROR
• When an error occurred in the card and recording cannot be performed.
CARD FULL
• When the available space on the card is low.
NAMING ERROR
• When the file number and directory number have reached the maximum.
21
DC10 E, DC20 E
SERVICE HINTS
UNIDENTIFIABLE IMAGE
• When you tried to play an unplayable image type, incompatible JPEG image, or image with corrupted data.
PRINT ORDER ERROR
• When there are too many print marks (100 or more), or when a mark file cannot be edited.
NO CARD
• When the card is not inserted in the socket of the main unit.
NO IMAGES
• When the image that should be played in the card cannot be found.
IN CARD POSITION
• When pressing the Start/Stop button in Camera mode.
THIS IMAGE CANNOT BE RECORDED
• When analog input video that you are trying to record to a card cannot be recorded due to the signal condition.
PAPER ERROR
• When a paper error occurs.
NO PARER
• When the paper has not been inserted into the printer properly or there is no paper in the printer.
PAPER JAM
• When a paper jam occurs during printing.
NO INK
• When ink does not adhere properly or the ink has run out.
LOW INKLEVEL
• When the ink level is low.
WASTE TANK FULL
• When the waste ink tank is full.
CANNOT PRINT!
• When you tried to print a different type of still image or one recorded by another device, or a still image imported to and edited
on a computer.
COULD NOT PRINT * IMAGES
• When you tried to print a different type of still image or one recorded by another device, or a still image imported to and edited
on a computer using the DPOF setting for * images.
22
DC10 E, DC20 E
SERVICE HINTS
SET PRINT ORDER
• When you tried to print still images not designated for printing by using the Print command in the Card Playback menu.
CANNOT TRIM
• When you tried to trim still images with an image size of 160 × 120. Or, when you tried to trim a video where the aspect ratio
deviates significantly from 4:3.
READJUST TRIMMING
• When you tried to change the “STYLE” setting after making the trimming settings.
PRINTER ERROR
• When a problem occurs in the printer.
COMMUNICATION ERROR
• When an error has occurred during communication.
PRINTER IN USE
• When the printer is in use. Check the printer status.
PRINTER WARMING UP
• When the printer is warming up.
PAPER LEVER ERROR
• When the printer paper lever is in the improper position.
PRINTER COVER OPEN
• When the printer cover is open.
INCOMPATIBLE PAPER SIZE
• When an unavailable paper size was selected in the paper size menu after displaying the paper size menu and changing the
settings at the printer side.
CHECK PRINT SETTINGS
• When the printer setting status displays the current recording value and the PRINT/SHARE button was pressed even though this
value cannot be used by PictBridge when the printer is connected.
PRINT ERROR
• When an error due to some unspecified cause occurred in the printer.
TRANS ORDER ERROR
• When the image quantity that can be set was exceeded.
23
DC10 E, DC20 E
SERVICE HINTS
TOO MANY STILL IMAGES DISCONNECT CABLE
• Disconnect the USB cable, delete the still images from the memory card until there are 1800 or less, and then reconnect the USB
cable.
CANNOT TRANSFER!
• When “PC Background” is set, and then video is displayed (Setting icon and icon to its right are grayed out, and the PRINT/
SHARE button lights up), and the PRINT/SHARE button is pressed.
PAPER HAS BEEN CHANGED
• When the paper size was changed between the time of selecting the paper and starting printing.
MEDIA TYPE ERROR
• When a paper that cannot be used is selected.
INCOMPATIBLE PAPER SIZE
• When paper that is incompatible with this device was loaded into the printer.
RECHARGE THE PRINTER BATTERY
• When the printer battery is out of power.
PAPER AND INK DO NOT MATCH
• When the ink cannot be used on the designated paper.
INK CASSETTE ERROR
• When an error has occurred in the ink cassette.
OPERATION CANCELED
• Duaring one-touch dubbing(disc copy) : When the operation was canceled the from the computer
24
BLOCK DIAGRAMS
CONTENTS
INTERCONNECTION DIAGRAM
BLOCK DIAGRAMS
CAMERA SECTION-1 (DC10 A,DC10 E,DM-DC10 ONLY)
CAMERA SECTION-1 (DC20 A,DC20 E,DM-DC20 ONLY)
CAMERA SECTION-2
CAMERA SECTION-3
CAMERA SECTION-4
CAMERA SECTION-5
CAMERA SECTION-6
SYSTEM CONTROL SECTION
AUDIO-VIDEO SECTION
POWER SUPPLY SECTION
FLASH PCB SECTION (DC20 A,DC20 E,DM-DC20 ONLY)
LCD PCB SECTION
CARD/LI, DC JACK PCB SECTION
FPC SECTION
INTERCONNECTION DIAGRAM
DC10 E,DC20 E
CCD PCB
LENS
UNIT
CCD PCB
DC10 A
DC10 E
DM-DC10
ONLY
IC1054
TEMP SENS
IC1050
ZOOM SENS
IC1070
IC1053
IC1072 IC1071
IC1051 IC1052
ZOOM MOTOR
LCD
1
5 1
CN1601
AE FPC ASS'Y
CN4102
20
CN4101
2
22
1
23
IC1604
IC1055
LCD UNIT
20P
6P
5P
CVF PCB
23P
20P
IC1603
LCD
FOCUS MOTOR
A16
FOCUS SENS
B16
CN1052
IG METER
A1
B10
A10
CN1070
A1
32P
B1
GYRO PCB
20P
24P
B1
AV FPC ASS'Y
25P
CARD PCB
10P
17P
DC20 A,DC20 E,DM-DC20 ONLY
CAPACITOR PCB
CN501
CN502
1
1
6P
MICRO PHONE RELAY FPC
2
1
17
2
CN50
16
CN51
FLASH PCB
mini SD CARD
IC501
2
BACK LIGHT
2P
2P 12P
1
12
CN500
LCD HINGE PCB
2P
2P
2P
CN899
1 6
23
1
CN1501
22
2
23P
6P
3P
6P
CN701
1
6
6P
SUB PCB
1 2
CN801
LCD HINGE ASS'Y
IC801
2P
2
IC1502
23
23P
FLASH ASS'Y
2P
23P
60P
CN2905
MIC ASS'Y
CN903
IC1501
A1 B1
2P
LCD PCB
1
CN902
23P
CN901
1
A30 B30
24
IC901
FRONT FPC
6
1
6
CN107
6P
12P
5P
12
CN100
1
10
CN
2 10
IC1650
IC1001
3P
25P
24
25
IC3201
16 17
IC1200
ZOOM ASS'Y
11 12
IC1651
12P
CN103
1 2
IC105
IC3201
IC105
A1
A10
CN1000
B10
B1
IC100
32P
12P
10 P
0
1
IC1000
IC104
IC1651
C
10 N210
IC1650
IC1004
20P
1
IC1001
IC1002
IC104
CN100
12
5
CN1201
1
0
1
1
1
CN107
SPEAKER
5
CN1201
1
24P
IC902
MAIN PCB
IC2307
CN105
1
IC2306
3
2
1
CN1200
CN106
IC1200
A1 B1
DC10 A,DC10 E,DM-DC10 ONLY
IC2102
A15 B15
A1 B1
CN101
CN104
A1 B1
IC2300
CN2901
IC3203
IC103
30P
REAR KEY FPC ASS'Y
A12 B12
MAIN PCB
IC3500
CN901
1
60P
CN2900
IC106
IC2301
IC2302
12P
IC3200
23
23P
1
A1 B1
IC1103
IC2303
IC1101
R-LCD UNIT
12P
CN108
IC810
IC101
5P
1
12 11
IC1401
IC1102
5
2
A30 B30
CN3501
1
6
5 C N3
50
51
30P
A15 B15
CN102
A15 B15
IC1400
IC2305
CN104
2 1
IC100
IC1002
17P
CN105
2 1
IC2304
A1 B1
16 17
A1
A16
CN1000
B16
B1
CN2300
1
00
2
5P
2
1
Metal contact (Pins' face down)
51P
6P
Metal contact (Pins' face up)
:
:
5P
TS MECH RECORDER ASS'Y
6P
Metal contact
CN3200
DC JACK
Metal contact
5P
DC JACK PCB
51P
SWITCH FPC ASS'Y
USB UNIT FPC
01
Sep. 2005
C
CANON INC. 2005
INTERCONNECTION DIAGRAM
MAIN PCB
CN100
1 AVDD2.7V
2 ZOOM AD
3 GND
4 PHOTO SW
5 H PHOTO SW
6 DVDD3.3V
7 D ACC LED
8 GND
9 START/STOP SW
10 GND
11 CAM POW SW
12 VTR POW SW
CN101
A1 DVDD2.5/1.4V
A2 VTR ON
A3 SDI DINT
A4 SDAO TPC
A5 CCM RESET
A6 GND
A7 PCST3
A8 PCST2
A9 PCST1
A10 PCST0
A11 TRST
A12 TMS
A13 TDI
A14 TDO
A15 TCK
B1 DBGE
B2 DCLK
B3 DRESET
B4 SYSRDY
B5 DEBCLK
B6 GND
B7 DEBUD
B8 DEBDD
B9 XDEBEN
B10 TBUSY
B11 GND
B12 DVDD3.3V
B13 XRESET
B14 DBI
B15 PRI TDO
CN102
1 GND
2 EJECT SW
3 MOT POSI
4 MOTOR GND
5 MOTOR GND
6 MOTOR SIG
7 MOTOR SIG
8 OPEN Z
9 OPEN LOW
10 GND
CN103
1 ST UNREG
2 ST UNREG
3 ST UNREG
4 ST EFCHG
5 ST TMG(0)
6 ST VDHGL(0)
7 ST GND
8 ST GND
9 ST GND
10 ST GND
11 P5V
12 P5V
CN104
A1
A2
A3
A4 PANEL OPEN SW
A5 GND
A6 KEY AD1
A7 KEY AD0
A8 GND
A9 GND
A10
A11
A12 BATT TEMP
A13 BATT INFO D
A14 BATT INFO B+
A15 BATT+
B1 BATT−
B2 BATT−
B3 BATT−
B4 BATT−
B5 BATT−
B6 BATT−
B7 BATT−
B8 BATT−
B9 BATT+
B10 BATT+
B11 BATT+
B12 BATT+
B13 BATT+
B14 BATT+
B15 BATT+
CN105
1 LI POW
2 GND
3 GND
4 GND
5 CARD DAT2
6 CARD DAT3
7 CARD CMD
8 GND
9 CARD VSS
10 CARD CLK
11 GND
12 CARD DAT0
13 CARD DAT1
14 GND
15 CARD VDD
16 CARD DET
17 CARD DET
CN106
1 GND
2 WHITE LED
3 WHITE LED
4 P5V
5 P5V
6 RMC IN
CN107
1 GND
2 AUTO
3 P
4 SCN
5 DEW−
6 DEW+
CN108
1 CARD MODE SW
2 STILL MODE SW
3
4 KEY AD4
5 DIRECT P LED
6 P5V
7 VTR UNREG
8 CHAR CARD ACC LED
9 KEY AD3
10 KEY AD2
11 GND
12 GND
MAIN PCB
MAIN PCB
CN901
1 LCD BT SW
2 LCD BL VFB
3 LCD BL POW
4 LCD BL POW
5 GND
6 GND
7 R OUT(R−Y)
8 G OUT(Y)
9 B OUT(B−Y)
10 GND
11 GND
12 GND
13 NC
14 LCD3.3V
15 LCD3.3V
16 LCD5V
17 LCD8.5V
18 LCD CS
19 LCD EE CS
20 TX1 DAT
21 SCLK1
22 RX1 SIN
23 LCD ON
CN1000
A1 GND
A2 VOUT2
3 GND
A4 RG2
A5 GND
A6 LH2
A7 H2
A8 GND
A9 H1
A10 LH1
A11 GND
A12 RG1
A13 GND
A14 3.5V
A15 VOUT1
A16 GND
B1 GND
B2 S1
B3 S2
B4 V4B
B5 V4A
B6 V3B
B7 V3A
B8 V2B
B9 V2A
B10 V1B
B11 V1A
B12 SUB
B13 RC SUB
B14 CCD −7V
B15 CCD 15V
B16 GND
CN1200
1 FOCUS DRIVE−
2 FOCUS DRIVE+
3 CND
4 CND
5 IG HALL IN+
6 IG HALL OUT+
7 IG HALL IN−
8 IG HALL OUT−
9 GND
10 IG DRIVE−
11 IG DRIVE+
12 GND
13 L TEMP 2.7V
14 L TEMP
15 ZOOM LED
16 ZOOM SENS
17 ZOOM VCC
18 FOCUS GND
19 FOCUS ANAB
20 FOCUS ANAA
21 FOCUS VCC
22 ZOOM A
23 ZOOM B
24 ZOOM A
25 ZOOM B
CN1201
1 GY GND
2 Y GY OUT
3 GY GND
4 P GY OUT
5 AVDD2.7V
CN2100
1 AV GND
2 AV L I/O
3 AV R I/O
4 AV GND
5 AVS DET
6 V
7 YC GND
8 D
9 YC GND
10 Y
CN2300
1 DSW1
2 M/S
3 +UNREG
4 GND
5 +UNREG
6 POW ON
7 GND
8 GND
9 GND
10 GND
11 +UNREG
12 +UNREG
13 +UNREG
14 REMI
15 DASP−
16 CS3FX−
17 CS1FX−
18 HA2
19 HA0
20 PDIAG−
21 HA1
22 IOCS16−
23 INTRQ
24 DMACK−
25 IORDY
26 GND
27 DIOW−
28 DIOR−
29 GND
30 DMARQ
31 DD0
32 DD15
33 DD1
34 DD14
35 DD2
36 DD13
37 DD3
38 DD12
39 DD4
40 DD11
41 DD5
42 DD10
43 DD6
44 DD9
45 DD7
46 DD8
47 RESET−
48 OPEN Z
49 REMO
50 OPEN LOW
51 SHOCK
CN2900
A1 V I/O
A2 GND
A3 VTR POW SW
A4 SUB FCH
A5 CAM POW SW
A6 FCH 0
A7 EVF R
A8 EVF G
A9 N.C.
A10 GND
A11 REMI
A12 REMO
B1 V I/O
B2 EVF HD
B3 GND
B4 VTR UNREG
B5 MIC2
B6 MIC3
B7 EVF COM AC
B8 EVF B
B9 EVF COM DC
B10 GND
B11 RS232C RX2
B12 RS232C TX2
DC10 A
DC10 E
DM-DC10 ONLY
MAIN PCB
CN1000
A1 GND
A2 CCD OUT
A3 GND
A4 GND
A5 H1
A6 H2
A7 GND
A8 RESET
A9 GND
A10 VH(+15V)
B1 GND
B2 CAM3.3V
B3 VL(−7.5V)
B4 VBUS
B5 SUB SW
B6 GND
B7 V1
B8 V2
B9 V3
B10 V4
MAIN PCB
CN2901
A1 AA GND
A2 AV L I/O
A3 AA GND
A4 AV R I/O
A5 AV GND
A6 EXT DET
A7 SOUND
A8 GND
A9 G OUT(Y)
A10 R OUT(R−Y)
A11 B OUT(B−Y)
A12 GND
A13 GND
A14 A MUTE
A15 EVF COM DC
A16 EVF COM AC
A17 SCLK1
A18 GND
A19 WCK
A20 AMCK
A21 GND
A22 LRCK
A23 AUD PLL TO AIF
A24 AUD AIF TO MACS
A25 GND
A26 LCD8.5V
A27 LCD5V
A28 GND
A29 GND
A30 GND
B1 GND
B2 EVF G
B3 EVF R
B4 EVF B
B5 GND
B6 GND
B7 SOUND EN
B8 AIF CS
B9 PTOM/AIF DATA
B10 PTOM/AIF SCK
B11 REC MUTE
B12 GND
B13 XPDI
B14 EVF BL ON
B15 EVF ON
B16 EVF HD
B17 EVF CS
B18 TX1 DAT
B19 AA4.7
B20 AA2.7
B21 GND
B22 SP GND
B23 SP GND
B24 LCD3.3V
B25 LCD3.3V
B26 P5V
B27 P5V
B28 GND
B29 GND
B30 GND
CN3200
1 JACK DET
2 DC+
3 DC+
4 DC−
5 DC−
CN3501
1 VBUS
2 GND
3 D−
4 GND
5 D+
6 GND
CARD PCB
CN50
1 CARD DET
2 CARD VDD
3 GND
4 CARD DAT1
5 CARD DAT0
6 GND
7 CARD CLK
8 CARD VSS
9 GND
10 CARD CMD
11 CARD DAT3
12 CARD DAT2
13 GND
14
15 GND
16 LI POW(+)
17 LI POW(+)
CN51
1 CD/DAT3
2 CMD
3 VSS1
4 VDD
5 CLK
6 VSS2
7 DAT0
8 DAT1
9 DAT2
10 NC1
11 NC2
12 CARD DET
13 COM
14 G3
15 G4
16 G1
17 G2
GYRO PCB
CN1601
1 AVDD2.7V
2 P GY OUT
3 GY GND
4 Y GY OUT
5 GY GND
SUB PCB
CN701
1 MECHA GND
2 INT MIC L
3 INT MIC GND L
4 INT MIC R
5 INT MIC GND R
6 MECHA GND
CN801
1 SP−
2 SP+
CN1501
1 BL2.7V
2 P5V
3 COM
4 PSIG
5 CS
6 GREEN
7 RED
8 BLUE
9 PCG
10 ENB
11 VCK
12 VST
13 XSTB
14 REF
15 WIDE
16 SCAN
17 HCK1
18 HCK2
19 HST
20 VSSG
21 VSS
22 VDD
23 VDD
CN2905
A1 AA GND
A2 AV L I/O
A3 AA GND
A4 AV R I/O
A5 AV GND
A6 TX PORT PP6
A7 SOUND
A8 GND
A9 G OUT(Y)
A10 R OUT(R−Y)
A11 B OUT(B−Y)
A12 GND
A13 GND
A14 A MUTE
A15 EVF COM DC
A16 EVF COM AC
A17 SCLK1
A18 GND
A19 WCK
A20 AMCK
A21 GND
A22 LRCK
A23 AUD PLL TO AIF
A24 AUD AIF TO MACS
A25 GND
A26 LCD8.5V
A27 LCD5V
A28 GND
A29 GND
A30 GND
B1 GND
B2 EVF G
B3 EVF R
B4 EVF B
B5 GND
B6 GND
B7 SOUND EN
B8 AIF CS
B9 PTOM/AIF DATA
B10 AIF SCK
B11 REC MUTE
B12 GND
B13 XPDI
B14 EVF BL ON
B15 EVF ON
B16 EVF HD
B17 EVF CS
B18 TX1 DAT
B19 AA4.7
B20 AA2.7
B21 GND
B22 SP GND
B23 SP GND
B24 LCD3.3V
B25 LCD3.3V
B26 P5V
B27 P5V
B28 GND
B29 GND
B30 GND
LCD PCB
CN901
1 LCD ON
2 RX1 SIN
3 SCLK1
4 TX1 DAT
5 LCD EE CS
6 LCD CS
7 LCD8.5V
8 LCD5V
9 LCD3.3V
10 LCD3.3V
11 NC
12 GND
13 GND
14 GND
15 B OUT(B−Y)
16 G OUT(Y)
17 R OUT(R−Y)
18 GND
19 GND
20 LCD BL POW
21 LCD BL POW
22 LCD BL VFB
23 LCD BT SW
CN902
1 TEST
2 RGT
3 BLUE
4 RED
5 GREEN
6 PSIG
7 HCK1
8 HCK2
9 WIDE
10 TEST
11 REF
12 HST
13 PCG
14 XSTBY
15 VSSG
16 N.C.
17 VSS
18 VDD
19 DWN
20 EN
21 VCK
22 VST
23 CS
24 COM
CN903
1 LCD BT SW
2 GND
CCD PCB
CVF PCB
CN1052
A1 GND
A2 VOUT2
A3 GND
A4 RG2
A5 GND
A6 LH2
A7 H2
A8 GND
A9 H1
A10 LH1
A11 GND
A12 RG1
A13 GND
A14 3.5V
A15 VOUT1
A16 GND
B1 GND
B2 S1
B3 S2
B4 V4B
B5 V4A
B6 V3B
B7 V3A
B8 V2B
B9 V2A
B10 V1B
B11 V1A
B12 SUB
B13 RC SUB
B14 CCD −7V
B15 CCD 15V
B16 GND
CN4101
VDD
1
VSS
2
VSSG
3
HST
4
HCK2
5
HCK1
6
SCAN
7
WIDE
8
REF
9
10 XSTB
11 VST
12 VCK
13 ENB
14 PCG
15 BLUE
16 RED
17 GREEN
18 CS
19 PSIG
20 COM
21 P5V
22 BL2.7V
23 BL2.7V
CN4102
COM
1
CKV1
2
CKV2
3
STV
4
XSTV
5
XENB
6
ENB
7
CSV
8
VBB
9
10 DSD
11 XDSG
12 DSG
13 B
14 R
15 G
16 CSH
17 VDD
18 CKH2
19 CKH1
20 VSS
21 STH
22 XSTH
DC10 A
DC10 E
DM-DC10 ONLY
CCD PCB
CN1070
A1 GND
A2 CCD OUT
A3 GND
A4 GND
A5 H1
A6 H2
A7 GND
A8 RESET
A9 GND
A10 VH(+15V)
B1 GND
B2 CAM3.3V
B3 VL(−7.5V)
B4 VBUS
B5 SUB SW
B6 GND
B7 V1
B8 V2
B9 V3
B10 V4
DC20 A
DC20 E
DM-DC20 ONLY
FLASH PCB
CN500
1 P5V
2 P5V
3 ST GND
4 ST GND
5 ST GND
6 ST GND
7 ST VDHGL
8 ST TMG
9 ST EFCHG
10 ST UNREG
11 ST UNREG
12 ST UNREG
CN501
1 XE(+)
2 XE(−)
CN502
1 T(+)
2 T(−)
CAMERA SECTION-1 (DC10 A,DC10 E,DM-DC10 ONLY)
ANALOG VIDEO SIGNAL
DC10 E, DC20 E
DIGITAL VIDEO SIGNAL
CCD PCB
MAIN PCB (1/8)
IC1072
NL27WZ16DF
BUFFER
H2 12
SUB CONT
4
OUT Y2
IN A2
3
6
OUT Y1
IN A1
1
2
IC1071
NL27WZ16DF
BUFFER
H1 11
RG 10
4
OUT Y2
IN A2
3
6
OUT Y1
IN A1
1
J2 CLI
4
IC1001
SN74LVC1GU04DCK3
INVERTER
1
3
IC1070
ICX416AK
CCD
1
V3
2
V2
V1
3
4
6
Q1071
Q1073
VOUT
XTGVD
DCLK2/FD C1
TGCLK
SYNC/VGATE C9
VGATE
OUT CONT D9
AFE RST
SCK J10
CAM SCK
SDATA K9
X1001
Q1074
RCSUB
XTGHD
VD D1
SL K10
SUB 13
V4
HD D2
8
CAM 3.3V
CN1070
H2
H1
RESET
VSUB
V4
V3
V2
V1
SUB SW
CCD OUT
VL (−7.5)
VH(+15V)
CAM 3.3V
D11 A2
RAWDATA (11)
B2
RAWDATA (10)
A3
RAWDATA (9)
B3
RAWDATA (8)
A4
RAWDATA (7)
B5
RAWDATA (6)
E9 V2
B6
RAWDATA (5)
CN1000
A6
A5
A8
B4
B10
B9
B8
B7
B5
A2
B3
A10
B2
A2
B3
B2
B5
B7
B8
B9
B10
B4
A8
A5
A6
A10
CCD OUT
VL(−7.5V)
CAM3.3V
SUB SW
V1
V2
V3
V4
VSUB
RESET
H1
H2
VH(+15V)
K5 CCD IN
CCD−7V
CAM3.3V
H9 V4
G10 V3
CCD15V
IC1004
MM1612JN
2.8V REGULATOR
AFE CS
CAM TXD
IC1002
AD9929BBCZ
TG/CDS
/AGC/AD
/V-DRIVER
D10 V1
A6
RAWDATA (4)
VSUB
G9 SUBCK
B7
RAWDATA (3)
RESET
H1 RG
A7
RAWDATA (2)
G1 H1
A8
RAWDATA (1)
F1 H2
D0 B8
RAWDATA(0)
CAM SCK
CAM TXD
AFE CS
SUB CONT
AFE RST
TGCLK
XTGHD
XTGVD
VGATE
RAWDATA DATA 0 to 11
TO
SYSTEM CONTROL SECTION
MAIN PCB
TO
CAMERA SECTION-4
MAIN PCB
VL 14
VDD
7
CAM3.3V
5
V IN
V OUT
4
K2 TCVDD
A5 DRVDD
A10 DVDD
B10 VCC
K3 AVDD
01
Sep. 2005
C
CANON INC. 2005
CAMERA SECTION-1 (DC20 A,DC20 E,DM-DC20 ONLY)
DIGITAL VIDEO SIGNAL
CCD OUTPUT SERIAL DATA
DC10 E, DC20 E
CPU BUS SIGNAL
CCD PCB
B13
B12
B14
B2
B4
B5
B6
B7
B8
B9
B10
B11
A9
A7
A6
A10
A12
A4
B3
A2
A15
B15
A14
CN1052
RC SUB
SUB
CCD−7V
S1
V4B
V4A
V3B
V3A
V2B
V2A
V1B
V1A
H1
H2
LH2
LH1
RG1
RG2
S2
VOUT2
VOUT1
CCD 15V
3.5V
Q1050
CCD−7V
IC1052
SN74LVC2G04DCK3
INVERTER
H1
1
6
3
4
H1 O
IC1051
SN74LVC2G04DCK3
INVERTER
H2
4
V3A
6
V2B
7
V2A
8
V1B
RC SUB 11
IC1054
ICX487DQN
CCD
V1A
VDD2
1
CCD 15V
VDD1 12
VOUT1 13
VOUT2 24
21 LH1 2
RG1 O
15 RG1
LH1 O
H2 O
SUB 10
22 RG2
LH2 O
6
V3B
5
20 H2
RG2 O
3
V4A
4
17 H1
H2 O
1
V4B
3
9
H1 O
CCD 15V
3.5V
2
16 LH1 1
IC1050
NL27WZ16DF
INVERTER
RG2
LH2
1
6
3
4
RG2 O
CCD 15V
LH2 O
4
IC1053
NL27WZ16DF
INVERTER
LH1
10
2
RG1
RG1 O
4
3
IC1055
LD503S
OPE AMP
LH1 O
6
1
6
7
1
9
5
3.5V
MAIN PCB(1/8)
C10 CCDIN A
H10 CCDIN B
CN1000
A2
A15
B11
B10
B9
B8
B7
B6
B5
B4
B12
A9
A7
A6
A10
A12
A4
B14
B3
B15
A14
B13
B2
VOUT2
VOUT1
V1A
V1B
V2A
V2B
V3A
V3B
V4A
V4B
SUB
H1
H2
LH2
LH1
RG1
RG2
CCD−7V
S2
CCD 15V
3.5V
RC SUB
S1
XSHP
55 SUB
CLPDM 26
12 H1
CCD−7V
AVDD2.7V
CCD 15V
3.5V
14 H2
19 RG2
XTGVD
XTGHD
TGCLK
Q1002
CCD−7V
CCD 15V
Q1003
CCD−7V
XSHD
ADCCK
CLPDM
CLPOB
SHD 23
PBLK
ADCLK 27
IC1001
CXD3640ER
TG
CKI 33
SYNC 39
MCKO 36
CKO 35
B1 SHD A
J1 SHD B
SHP 22
17 RG1
RAWDATA DATA 0 to 11
TGCLK
XTGHD
XTGVD
Sep. 2005
50 V2A
46 V4B
CCD 15V
01
CLPOB 25
54 V3B
TG CS
TO
SYSTEM CONTROL SECTION
MAIN PCB
49 V1B
53 V3A
TG TXD
VSUB CONT
CCD TEMP
TG SCK
TG CS
TG TXD
CAM ON
CCD VL ON
TGCLK EN
MPX XRST
XERD M
MPX XCS
XEWRL M
TG XRST
XSG1
AFE STANDBY
PBLK 34
51 V2B
TG SCK
TO
CAMERA SECTION-4
MAIN PCB
J2 SHP B
47 V1A
45 V4A
A1 SHP A
1
3
TG C SYNC
MPX CLK MPX
TGCLK
D1 ADCC
F3 CLPD
G1 CLPO
G2 PBLK
E3 STB
X1000
IC1000
VSP2255GSJ
CDS/AD
B0 B K1
19 CH B(0)
DATA(0) 44
B1 B K2
20 CH B(1)
DATA(1) 45
B2 B H3
21 CH B(2)
DATA(2) 46
B3 B J3
22 CH B(3)
DATA(3) 47
B4 B K3
25 CH B(4)
DATA(4) 48
B5 B H4
26 CH B(5)
DATA(5) 49
B6 B J4
27 CH B(6)
DATA(6) 50
B7 B K4
28 CH B(7)
DATA(7) 51
B8 B H5
29 CH B(8)
DATA(8) 55
B9 B K5
30 CH B(9)
DATA(9) 56
B10 B J5
31 CH B(10)
DATA(10) 57
B11 B J6
32 CH B(11)
DATA(11) 58
B12 B K6
34 CH B(12)
DATA(12) 59
B13 B H6
35 CH B(13)
DATA(13) 60
B0 A B2
18 CH A(0)
DATA(14) 61
B1 A A2
17 CH A(1)
DATA(15) 62
B2 A B3
16 CH A(2)
9
LH2
B3 A A3
15 CH A(3)
ADDRESS 40
8
LH1
B4 A C4
14 CH A(4)
RAWDATA(0) 65
3
SCK
B5 A B4
11 CH A(5)
RAWDATA(1) 66
4
SEN
B6 A A4
10 CH A(6)
RAWDATA(2) 67
B7 A C5
9
CH A(7)
RAWDATA(3) 68
42 TGVD
B8 A A5
8
CH A(8)
RAWDATA(4) 69
41 TGHD
B9 A B5
7
CH A(9)
RAWDATA(5) 70
B10 A B6
6
CH A(10)
RAWDATA(6) 71
B11 A A6
1
CH A(11)
RAWDATA(7) 72
B12 A C6
80 CH A(12)
RAWDATA(8) 74
B13 A A7
79 CH A(13)
5
SSI
XSG 38
RST
1
TG C SYNC
TGCLK
Q1001
Q1004
MPX CLK MPX
MPX XRST
XERD M
MPX XCS
XEWRL M
36 C SYNC
EDATA M DATA 0 to 15
EADDR M ADD0
TO
SYSTEM CONTROL SECTION
MAIN PCB
EADDR M ADD0
RAWDATA(9) 75
RAWDATA(10) 76
RAWDATA(11) 77
3
TGCLK
5
MPXCLK
24 XRST
38 RD
37 CS
39 WE
IC1002
MB87M4483PFT
MPX2
C
CANON INC. 2005
CAMERA SECTION-2
DC10 E, DC20 E
CPU BUS SIGNAL
MAIN PCB(2/8)
GYRO PCB
CPU D0 D2
CPU D1 C3
CPU D2 C1
CN1601
AVDD2.7V
4
IC1603
VCC
ENC-03MA OUT
P SENSOR GYRO
AVDD2.7V
P GY OUT
Y GY OUT
AVDD2.7V
2
4
5
2
4
1
CN1201
Y GY OUT
P GY OUT
AVDD2.7V
Y GY OUT
P GY OUT
IC1604
ENC-03MB OUT
Y SENSOR GYRO
VCC
CPU D4 B2
CPU D5 A3
2
CPU D6 B3
CPU D7 A4
FOCUS DRIVE−
CN1200
4
CPU D3 B1
G4 GYRIN2
AVDD2.7V
FOCUS DRIVE+
AVDD2.7V
E5 GYRIN1
2
TO
LENS UNIT
2
1
23
25
22
24
11
10
5
6
7
8
19
20
16
14
15
21
13
17
FOCUS DRIVE+
FOCUS DRIVE−
ZOOM−B
ZOOM B
ZOOM−A
ZOOM A
IG DRIVE+
IG DRIVE−
IG HALL IN+
IG HALL OUT+
IG HALL IN−
IG HALL OUT−
FOCUS ANAB
FOCUS ANAA
ZOOM SENS
L TEMP
ZOOM LED
FOCUS VCC
L TEMP 2.7V
ZOOM VCC
ZOOM−B
ZOOM+B
ZOOM−A
ZOOM+A
B8 OUT 3
IN 1 E2
C8 OUT 3B
IN 3 C5
A4 OUT 5B
IN 4 C4
A3 OUT 5
IN 5 B3
IG DRIVE−
IG HALL IN(+)
IG HALL OUT(+)
AVDD 2.7V
IG HALL IN(−)
IG HALL OUT(−)
C1 OUT1B
IC1200
BH9970GU
LENS DRIVER
LD B4
PWM ZA
PWM ZA
PWM ZB
PWM ZB
CPU D8 C12
N8 PWM4
L8 PWM3
CPU D9 D13
L7 PWM1
CPU D10 E12
M6 PWM0
CPU D11 E11
CAM DRIVER TXD
CPU D13 F13
CAM DRIVER SCK
CPU D14 F11
CAM DRIVER LD
E6 HALL2+IN
CPU A3 J12
CPU A4 J13
CPU A5 J11
D6 HALL2−IN
B5 VM4.5
B7 VM3
D7 VM2
B2 VM1
DAC3 OUT D3
GAIN1.2 G2
GYRLEV1 H4
GYRLEV2 F4
AELEV2 F6
PANEL BL CTRL
IC1400
MB87R1220BGL-GE1
LAP
Z PSV
ND F PSV
IRIS CL
CPU A6 K12
CPU A7 L11
CPU A8 L13
CPU A9 M13
I SW
CPU A10 M12
Y GYRO
VDDI 1.8V
CPU AD11 N11
P GYRO
I ENC
I ENC
H3 AD6
4
VDDL1 L5
VOUT
IC1401
NJM2865F3
1.8V REGULATOR
MR ENC AD1
F2 AD3
F1 AD2
X IN C5
XRESET N5
CPU RDY B9
CPU INT A8
CPU XCS B8
DVDD2.7V
M11 VDDH1
C9 VDDH2
5
DVDD2.5V
CPU XWR C7
CPU XRD A7
VMCLK
LAP XRST
LAP RDY
LAP XINT
LAP XCS
XEWRL M
XERD M
VMCLK
LAP XRST
LAP RDY
LAP XINT
LAP XCS
XEWRL M
XERD M
DEBDD
XDEBEN
DEBCLK
DEBUD
CAM DRIVER TXD
CAM DRIVER SCK
CAM DRIVER LD
PANEL BL CTRL
Z PSV
ND F PSV
IRIS CL
I SW
Y GYRO
P GYRO
I ENC
Z RES SW
L TEMP
LED RET
B6 VDDH3
DEBDD C13
AVDD2.7V
H2 AVDD
XDEBEN B12
VDDI 1.8V
B10 VDDL2
DEBUD A11
DEBCK A12
Sep. 2005
VIN
F8 VC
MR ENC AD2
01
TO
SYSTEM CONTROL SECTION
MAIN PCB
CPU A1 H12
G7 HALL2+OUT
F7 HALL2−OUT
EDATA M DATA 0 to 15
EADDR M ADD0 to 10
CPU D15 G13
CPU A2 H13
IRIS CONT E3
AVDD2.7V
PWM VCM
B1 OUT1
EN 2.3 C6
P5V
PWM VCM
CPU D12 F12
DI D4
A6 OUT 4
EN 4.5 B6
Q1200
PWM IRIS
A5 OUT 4B
CLK A2
IG DRIVE+
PWM IRIS
C
TO SYSTEM CONTROL SECTION
MAIN PCB
TO CAMERA SECTION-4
MAIN PCB
TO
POWER SUPPLY SECTION
MAIN PCB
TO
SYSTEM CONTROL SECTION
MAIN PCB
CANON INC. 2005
CAMERA SECTION-3
DC10 E, DC20 E
CPU BUS SIGNAL
DQ14 N3
MDATA L14
A16
MDATA L(14)
DQ15 R2
MDATA L15
C16
MDATA L(15)
DQ16 E8
MDATA L16
D8
MDATA L(16)
DQ17 D7
MDATA L17
A7
MDATA L(17)
DQ18 D8
MDATA L18
B7
MDATA L(18)
DQ19 B9
MDATA L19
C7
MDATA L(19)
DQ20 C8
MDATA L20
D7
MDATA L(20)
DQ21 A9
MDATA L21
B6
MDATA L(21)
DQ22 C7
MDATA L22
C6
MDATA L(22)
DQ23 A8
MDATA L23
D6
MDATA L(23)
DQ24 A2
MDATA L24
A5
MDATA L(24)
DQ25 C3
MDATA L25
C5
MDATA L(25)
DQ26 A1
MDATA L26
D5
MDATA L(26)
DQ27 C2
MDATA L27
B4
MDATA L(27)
DQ28 B1
MDATA L28
C4
MDATA L(28)
DQ29 D2
MDATA L29
A3
MDATA L(29)
DQ30 D3
MDATA L30
B3
MDATA L(30)
DQ31 E2
MDATA L31
A2
MDATA L(31)
P4
P3
R1
XEINT S
K4
XECS S
P2
XEWR S
XERD S
P1
EADDR S(2)
EDATA 14
E DATA 8 to 15
E ADD 0 to 2
XEWR0
XERD
XECS3
XEINT S
TCK
TMS
TRST
PRI TDO
EDATA 15
EDATA 13
EDATA 12
EDATA 9
EDATA 10
EDATA 11
N4
A8
C8
MDQM L(2)
B15
MDQM L(3)
A15
XMCS L
MCLK L
A14
D15
XMRAS L
MCKE L
A13
C13
XMWE L
EADDR S(1)
MDATA L(13)
EADDR S(0)
D17
M4
MDATA L13
EDATA S(7)
DQ13 R1
M3
MDATA L(12)
EDATA S(6)
B17
M2
MDATA L12
EDATA S(5)
DQ12 N2
L4
MDATA L(11)
M1
A17
EDATA S(4)
MDATA L11
EDATA S(3)
DQ11 P1
L3
MDATA L(10)
EDATA S(2)
D18
XMCAS L
EDATA 8
MDATA L10
L2
DQ10 M2
L1
MDATA L(9)
EDATA S(1)
C18
EDATA S(0)
MDATA L9
B14
DQ9 M3
C14
MDATA L(8)
MDQM L(0)
B18
MDQM L(1)
MDATA L8
A12
DQ8 L2
D13
MDATA L(7)
MADDR L(14)
A18
MADDR L(13)
MDATA L7
A11
MDATA L(6)
DQ7 L8
D12
D19
MADDR L(10)
MDATA L6
B11
MDATA L(5)
DQ6 M7
MADDR L(9)
B19
C11
MDATA L5
MADDR L(8)
MDATA L(4)
DQ5 M8
MADDR L(7)
A19
A10
MDATA L4
D11
MDATA L(3)
DQ4 P9
MADDR L(6)
D20
MADDR L(5)
MDATA L3
A9
MDATA L(2)
DQ3 N8
C10
C20
MADDR L(4)
A9
MDATA L2
B9
A8
MDATA L(1)
DQ2 R9
MADDR L(3)
A7
A5
MDATA L(0)
B20
C9
A4
C21
MDATA L1
MADDR L(2)
A3
MDATA L0
DQ1 N7
D9
A2
IC1102
K4S64323LH-HN75
SDRAM
DQ0 R8
MADDR L(1)
H1
MADDR L(0)
MADDR L6
MADDR L7
G1 G2 G3
A0
MADDR L14
MADDR L4
F3
DQM0
MADDR L13
MADDR L2
MADDR L3
F7
DQM1
BA1
MADDR L0
MADDR L1
G8 G9
DQM2
MADDR L10
MDQM L(0)
K9
DQM3
A10
MDQM L(1)
K1
CKE
BA0
MDQM L(2)
F8
CLK
MADDR L8
MDQM L(3)
F2
A6
MCLK L
MCKE L
J2
MADDR L5
XMCS L
J1
A1
XMRAS L
J8
/CS
H8
J9
/RAS
J7
XMWE L
G7
XMCAS L
J3
K7
/WE
H2
K8
/CAS
MADDR L9
MAIN PCB(3/8)
EADDR M(0)
V22
EADDR M(1)
V23
EADDR M(2)
V24
EADDR M(3)
V25
EADDR M(4) W22
EADDR M(5) W23
EADDR M(6) W24
EADDR M(7) W25
EADDR M(8)
Y23
EADDR M(9)
Y24
EADDR M(10)
Y25
EADDR M(11) AA22
EADDR M(12) AA23
EADDR M(13) AA24
EADDR M(14) AA25
EADDR M(15) AB22
EADDR M(16) AB23
EADDR M(17) AB24
EADDR M(18) AB25
EADDR M(19) AC23
EADDR M(20) AC24
EADDR M(21) AC25
EADDR M(22) AD24
EADDR M ADD 0 to 22
EDATA M DATA 0 to 15
MACS RDY
MACS XCS
XEWRL M
XEWRU M
XERD M
MACS XINT1
MACS XINT0
TRST
TMS
TCK
MACS TDO
MACS XRST
PRI TDO
EDATA M(0) AD23
EDATA M(1) AE23
EDATA M(2) AD22
IC1103(1/2)
MB87M1982BGL-GE1
DIGIC DV
EDATA M(3) AE22
EDATA M(4) AC21
EDATA M(5) AD21
EDATA M(6) AE21
01
U25
MDATA U(0)
DQ1 N7
MDATA U1
U22
MDATA U(1)
DQ2 R9
MDATA U2
T25
MDATA U(2)
DQ3 N8
MDATA U3
T24
MDATA U(3)
EDATA M(7) AB20
EDATA M(8) AC20
TO
SYSTEM CONTROL SECTION
MAIN PCB
EDATA M(9) AD20
EDATA M(10) AB19
EDATA M(11) AC19
DQ4 P9
MDATA U4
T22
MDATA U(4)
DQ5 M8
MDATA U5
R25
MDATA U(5)
DQ6 M7
MDATA U6
R24
MDATA U(6)
DQ7 L8
MDATA U7
R23
MDATA U(7)
DQ8 L2
MDATA U8
R22
MDATA U(8)
DQ9 M3
MDATA U9
P25
MDATA U(9)
DQ10 M2
MDATA U10
P24
MDATA U(10)
XECS M AC17
DQ11 P1
MDATA U11
P23
MDATA U(11)
XEWRL M AB18
DQ12 N2
MDATA U12
N25
MDATA U(12)
XEWRU M AB17
DQ13 R1
MDATA U13
N24
MDATA U(13)
XERD M AC16
DQ14 N3
MDATA U14
M25
MDATA U(14)
XEINT (0) AD16
MACS XINT0
DQ15 R2
MDATA U15
M24
MDATA U(15)
XEINT (1) AE16
MACS XINT1
DQ16 E8
MDATA U16
B25
MDATA U(16)
TRST
T2
DQ17 D7
MDATA U17
C25
MDATA U(17)
TMS
T3
DQ18 D8
MDATA U18
D25
MDATA U(18)
TCK
T1
DQ19 B9
MDATA U19
A24
MDATA U(19)
TDO
T4
DQ20 C8
MDATA U20
B24
MDATA U(20)
XRESET AD1
MACS XRST
DQ21 A9
MDATA U21
C24
MDATA U(21)
TDI
R2
PRI TDO
DQ22 C7
MDATA U22
D24
MDATA U(22)
DQ23 A8
MDATA U23
A23
MDATA U(23)
MCCLK A
W1
CARD CLK
DQ24 A2
MDATA U24
B23
MDATA U(24)
MCDT A(3)
Y4
CARD DAT3
DQ25 C3
MDATA U25
C23
MDATA U(25)
MCDT A(2)
Y3
CARD DAT2
DQ26 A1
MDATA U26
D23
MDATA U(26)
MCDT A(1)
Y2
CARD DAT1
DQ27 C2
MDATA U27
A22
MDATA U(27)
MCDT A(0)
Y1
CARD DAT0
DQ28 B1
MDATA U28
B22
MDATA U(28)
MCCMD A
W2
CARD CMD
DQ29 D2
MDATA U29
C22
MDATA U(29)
DQ30 D3
MDATA U30
A21
MDATA U(30)
DQ31 E2
MDATA U31
B21
MDATA U(31)
STROBE TMG(0)
J3
EDATA M(12) AD19
EDATA M(13) AE19
EDATA M(14) AD18
EDATA M(15) AE18
MDQM U(1)
MDQM U(0)
M22
M23
MDQM U(3)
MDQM U(2)
E23
E24
MCKE U
K24
MCLK U
K25
XMRAS U
XMCS U
L24
L23
XMCAS U
XMWE U
L22
L25
MADDR U(14)
MADDR U(13)
J25
K23
MADDR U(9)
MADDR U(10)
J22
H24
MADDR U(8)
H22
MADDR U(7)
G25
MADDR U(5)
MADDR U(6)
G24
G23
MADDR U(4)
MADDR U(3)
F25
G22
MADDR U(2)
F24
F23
MADDR U(1)
RDY AB16
MADDR U(0)
BA1
MDATA U0
E25
BA0
MADDR U14
A10
MADDR U5
MADDR U13
A9
Sep. 2005
MADDR U10
A8
H8
MADDR U8
A7
J7
MADDR U9
A6
G7
MADDR U6
J3
MADDR U7
A4
H2
A5
A3
H1
MADDR U4
A2
G1 G2 G3
MADDR U2
A1
F3
MADDR U3
A0
F7
MADDR U1
DQM0
G8 G9
MADDR U0
DQM1
K9
MDQM U(0)
DQM2
K1
MDQM U(1)
DQM3
F8
MDQM U(2)
CKE
F2
MDQM U(3)
CLK
J2
MCKE U
/CS
J1
MCLK U
/RAS
J8
XMCS U
J9
XMRAS U
/CAS
K7
XMWE U
K8
XMCAS U
/WE
IC1101
K4S64323LH-HN75
SDRAM
DQ0 R8
TO
AUDIO-VIDEO SECTION
MAIN PCB
MACS XCS
MACS TDO
CARD CLK
CARD DAT3
CARD DAT2
CARD DAT1
CARD DAT0
CARD CMD
TO
SYSTEM CONTROL SECTION
MAIN PCB
ST TMG
TO
SYSTEM CONTROL SECTION
MAIN PCB
DC20 A
DC20 E
DM-DC20 ONLY
C
CANON INC. 2005
CAMERA SECTION-4
DC10 E, DC20 E
DIGITAL VIDEO SIGNAL
DIGITAL AUDIO SIGNAL
MAIN PCB(4/8)
DC10 A,DC10 E,DM-DC10 ONLY
H3
VGATE
G2
TGHD
G4
TGVD
E3
RAWDATA (0)
E2
RAWDATA (1)
E1
RAWDATA (2)
D4
RAWDATA (3)
D2
RAWDATA (4)
D1
RAWDATA (5)
C3
RAWDATA (6)
C2
RAWDATA (7)
AA2.7V
P5V
C1
RAWDATA (8)
B2
RAWDATA (9)
AA4.7V
LCD3.3V
B1
RAWDATA (10)
A1
RAWDATA (11)
LCD8.5V
LCD5V
F4
TGCLK
VGATE
TO
CAMERA SECTION-1
MAIN PCB
TO
CAMERA SECTION-5
SUB JUNCTION PCB
CN2905
XTGHD
XTGVD
RAWDATA DATA 0 to 11
TGCLK
A19
A22
A24
A23
A20
B20
B26
B27
B19
B24
B25
A26
A27
A11
A9
A10
B18
A17
TO
CAMERA SECTION-2
MAIN PCB
CN2901
WCK
LRCK
AUD AIF TO MACS
AUD PLL TO AIF
AMCK
AA2.7V
P5V
P5V
AA4.7V
LCD3.3V
LCD3.3V
LCD8.5V
LCD5V
B OUT(B-Y)
G OUT(Y)
R OUT(R-Y)
TX1 DAT
SCLK1
AUD PLL TO AIF
9
DA DATA
AMCK
18
256FS
PLL CONT0
4
REC PB
PLL CONT1
8
DELAY
BCK
13
WCK
LRCK
14
LRCK
DATA IN
7
AUD MACS TO PLL
IC810
ICS423G-01LF
AUDIO PLL
20
768FS
64FS 3.07M
17
64FS
VDD1
2
FS 48K
16
FS
VDD2
6
BCK PLL TO PRI
12
BCK0 IN
VDD3
15
LRCK PLL TO PRI
11
LRCK0 IN
VDD4
19
22
REF
VDD5
23
VMCLK
IC1103(2/2)
MB87M1982BGL-GE1
DIGIC DV
PLL2.7V
VMCLK
F4
TO
LCD PCB SECTION
LCD PCB
CN901
9
8
7
20
21
23
19
22
18
3
4
2
1
14
15
16
17
CN901
B OUT(B-Y)
G OUT(Y)
R OUT(R-Y)
TX1 DAT
SCLK1
LCD ON
LCD EE CS
RX1 SIN
LCD CS
LCD BL POW
LCD BL POW
LCD BL VFB
LCD BT SW
LCD3.3V
LCD3.3V
LCD5V
LCD8.5V
C16
VMCLK
C14
AMCLK1
64FS 3.07M
A26
BCKI
FS 48K
B26
LRCKI
BCK PLL TO PRI
B29
BCKO
LRCK PLL TO PRI
B25
LRCKO
PLL CONT0
T25
NSCLK (0)
V29
PLL CONT1
LCD ON
LCD EE CS
RX1 SIN
LCD CS
SCLK1
TX1 DAT
LCD3.3V
LCD5V
LCD8.5V
B OUT(B-Y)
G OUT(Y)
R OUT(R-Y)
TO
POWER SUPPLY SECTION
MAIN PCB
01
NSCL (0)
N29
HDACK(1)
AB27
CTS(1)
AB25
RX(1)
AC27
RTS(1)
Y29
SCLK(1)
AD27
TX(1)
AJ27
BOUT
AJ29
GOUT
AH28
ROUT
J25
TO
SYSTEN CONTROL SECTION
MAIN PCB
R656CLKI
HDREQ(1)
IC2300(1/3)
R8A34013BG
BACK END
AUD MACS TO PLL
AD2
AUDO2
AUD AIF TO MACS
AE3
AUDI1
AUD PRI TO MACS
AD3
AUDI2
ADATAO
D24
AUD PRI TO MACS
AUD MACS TO PRI
AE4
AUDO1
ADATAI
A27
AUD MACS TO PRI
LRCK
AE2
LPCLK
CXCLK
D27
PXCLK
WCK
AE1
WCLK
PXCLK
AE10
BDATACLK
VMCLK
AE11
VCLK
REC656I (0)
AH22
AE13
ADATA (0)
REC656I (1)
AF22
AE12
ADATA (1)
REC656I (2)
AJ23
AD12
ADATA (2)
REC656I (3)
AJ21
AC12
ADATA (3)
REC656I (4)
AH23
AD11
ADATA (4)
REC656I (5)
AG23
AC11
ADATA (5)
REC656I (6)
AF23
AB11
ADATA (6)
REC656I (7)
AE23
AD10
ADATA (7)
REC656O (0)
F1
AB10
BDATA (0)
REC656O (1)
F2
AE9
BDATA (1)
REC656O (2)
F3
AD9
BDATA (2)
REC656O (3)
E1
AC9
BDATA (3)
REC656O (4)
E2
AB9
BDATA (4)
REC656O (5)
E3
AE8
BDATA (5)
REC656O (6)
D1
AD8
BDATA (6)
REC656O (7)
D3
AC8
BDATA (7)
LCD BT SW
LCD BL POW
LCD BL VFB
LCD BL ON
Sep. 2005
C
CANON INC. 2005
CAMERA SECTION-5
DC10 E, DC20 E
ANALOG AUDIO SIGNAL
DIGITAL AUDIO SIGNAL
CVF PCB
SUB PCB
BACKLIGHT
Q4101
LCD
(CVF)
1
8
9
4
5
6
7
10
11
12
13
14
15
17
18
19
20
16
CN4102
VDD
WIDE
REF
HST
HCK2
HCK1
SCAN
XSTB
VST
VCK
ENB
PCG
BLUE
GREEN
CS
PSIG
COM
RED
CN4101
P5V
BL2.7V
BL2.7V
REF
HST
HCK2
HCK1
SCAN
WIDE
XSTB
VST
VCK
PCG
BLUE
RED
GREEN
CS
PSIG
COM
ENB
VDD
21
23
22
9
4
5
6
7
8
10
11
12
14
15
16
17
18
19
20
13
1
16
19
17
18
6
7
8
15
14
10
13
12
11
9
5
3
4
1
2
23
22
CN1501
SCAN
HST
HCK1
HCK2
GREEN
RED
BLUE
WIDE
REF
ENB
XSTB
VST
VCK
PCG
CS
COM
PSIG
BL2.7V
P5V
VDD
VDD
13 RGT
17 HST
HDO 27
14 HCK1
15 HCK2
EVF G
EVF R
EVF B
35 G OUT
34 R OUT
B/B-Y 46
33 B OUT
G/Y 44
16 WIDE
R/R-Y 45
42 REF
IC1501
CXM3009TQ
CVF DRIVER
22 EN
20 XSTB
24 VST
P5V
23 VCK
SCK
7
SDAT
8
SEN
6
SCLK1
TX1 DAT
Q1502
EVF CS
19 PCG
Q1503
38 COM-DC
EVF8.5V
VCC 5V
LCD 5V
39 COM
37 PSIG OUT
VCC1-1
39 VCCCOM
VCC1-2 43
5
47 VCC 2
VDD1 18
41 DA OUT
VDD2 29
26 POF
VCC2 36
4
VOUT
IC1502
NJM2865F3
2.8 REGULATOR
VIN
5
VCC5V
Q1504
LCD 8.5V
Q821
SPEAKER
TO MIC UNIT
2
1
CN801
SP+
SP−
4
2
CN701
INT MIC R
INT MIC L
AA4.7V
P5V
32
19
AA2.7V
47
34
41
AA2.7V
P5V
40
AA4.7V
LCD8.5V
LCD5V
45
42
LRCK
AMCK
WCK
AUD PLL TO AIF
AUD AIF TO MACS
MIC
POWER
3
5
AUDIO
I/F
CONTROLLER
HPF
FIL1
FIL2
EQ
FIL3
ALC1
6
+2db
to
−2db
−24db
+12db
0db
OFFSET
CANCEL
HPF
OVF
DETECT
OFFSET
CANCEL
HPF
TO
CAMERA SECTION-4
MAIN PCB
CN2901
26
ADC
44
Q803
39
PRE AMP
27
25
DAC
MIX
OPGA
36
12
Q804
31
HP AMP
29
LINE OUT
35
CONTROL
REGISTER
I/F
21
ALC2
SPK AMP
20
17
23
24
SP+
SP−
2
XPDI
16
REC MUTE
AIF CS
14
PTOM/AIF SCK
13
Sep. 2005
TO
AUDIO-VIDEO SECTION
MAIN PCB
CN2901
PRE AMP
7
IC801
AK4567
AIF4
01
B16
A15
B2
B3
B4
A16
A11
A9
A10
A17
B18
B17
B15
B24
B25
A14
A2
A4
A7
B13
B11
B9
B8
B10
A20
A19
A22
A23
A24
B20
B26
B27
B19
A26
A27
28
4
MIXER
&
DEM
PTOM/AIF DATA
CN2905
EVF HD
EVF COM DC
EVF G
EVF R
EVF B
EVF COM AC
B OUT(B-Y)
G OUT(Y)
R OUT(R-Y)
SCLK1
TX1 DAT
EVF CS
EVF ON
LCD3.3V
LDC3.3V
A MUTE
AV L I/O
AV R I/O
SOUND
XPDI
REC MUTE
PTOM/AIF DATA
AIF CS
AIF SCK
AMCK
WCK
LRCK
AUD PLL TO AIF
AUD AIF TO MACS
AA2.7V
P5V
P5V
AA4.7V
LCD8.5V
LCD5V
C
CANON INC. 2005
CAMERA SECTION-6
DC10 E,DC20 E
TO
TS MECH
CN2300
HA1
HA0
HA2
CS1FX−
CS3FX−
DIOR−
DIOW−
DMACK−
DMARQ
INTRQ
IORDY
RESET−
DD0
DD1
DD2
DD3
DD4
DD5
DD6
DD7
DD8
DD9
DD10
DD11
DD12
DD13
DD14
DD15
POW ON
SHOCK
+UNREG
+UNREG
+UNREG
+UNREG
+UNREG
REMI
REMO
OPEN LOW
DASP−
OPEN Z
21
19
18
17
16
28
27
24
30
23
25
47
31
33
35
37
39
41
43
45
46
44
42
40
38
36
34
32
6
51
3
5
11
12
13
14
49
50
15
48
AT1 ADD1
AT1 ADD0
AT1 ADD2
AT1 CS0
AT1 CS1
AT1 DIOR
AT1 DIOW
AT1 DMACK
AT1 DMARQ
AT1 INTRQ
AT1 IORDY
AT1 RESET
1
IC1650
PKGS-25NB
SHOCK SENSOR
AT1 DATA0
AT1 DATA1
2
AT1 DATA2
AT1 DATA3
AT1 DATA4
AT1 DATA5
AT1 DATA6
AT1 DATA7
FE UNREG 2
FE UNREG 1
7
CMO
DO 14
1
SIA
SIB 16
2
SOA
SOB 15
4
A3I
5
A3O
6
CMI
IC1651
TB6066FNG
SENSOR IC
AT1 DATA8
AT1 DATA9
AT1 DATA10
A2I 13
AT1 DATA11
A1I 11
AT1 DATA12
A1O 10
VCC
9
AT1 DATA13
AVDD3.3V
AT1 DATA14
AT1 DATA15
D8
C8
AT1CS(0)
B9
AT1DIOR
A10
AT1DIOW
B10
AT1DMACK
A14
AT1DMARQ
D13
AT1RESET
AT1DATA(0)
C9
AT1DATA(1)
A11
AT1DATA(2)
E10
AT1DATA(3)
B11
AT1DATA(4)
D10
AT1DATA(5)
C11
AT1DATA(6)
E11
AT1DATA(7)
D11
AT1DATA(8)
A12
AT1DATA(9)
B12
AT1DATA(10)
A13
D12
AJ4
AG4
AG5
AF5
AG6
DADRS(3)
DADRS(2)
DADRS(1)
DADRS(0)
DADRS(5)
DADRS(4)
AJ5
AH5
DADRS(6)
AJ7
AH6
DADRS(7)
AH8
DADRS(9)
DADRS(8)
AJ8
AT1IORDY
E9
AE10
DDATA(3)
AG9
DDATA(4)
AE11
DDATA(5)
AH10
DDATA(6)
AF11
DDATA(7)
AJ9
DDATA(8)
AH14
DDATA(9) AG11
AT1INTRQ
C10
C12
AF6
AT1ADR(2)
AT1CS(1)
C13
DADRS(11)
AT1ADR(0)
E8
AF10
DDATA(1)
DDATA(2) AG10
AT1ADR(1)
A8
DDATA(0)
DDATA(10)
AJ13
DDATA(11)
AE12
DDATA(12)
AF13
DDATA(13)
AF12
DDATA(14)
AE13
DDATA(15) AG12
B13
AT1DATA(14)
E13
AT1DATA(15)
OPEN LOW
MOT POSI
MTOP REQ
PTOM CS
MTOP/AIF DATA
MOT ON
NSCLK(1)
V28
NSCS(1)
V25
INT(1)
AB29
INT(6)
AD29
RX(0)
U28
ARADRS(9)
ARADRS(10)
ARADRS(11)
ARADRS(12)
AB2
AB1
ARADRS(8)
AC2
AC1
ARADRS(7)
AD1
AD3
ARADRS(6)
ARADRS(4)
AF2
ARADRS(5)
ARADRS(3)
AF3
AF1
ARADRS(2)
AE3
AE2
ARADRS(0)
ARADRS(1)
ARBA(1)
AE4
ARBA(0)
AD4
AE5
ARRAS
AB5
ARCAS
ARCS(0)
AB3
AC4
ARWE
AA3
D1 DQ8
D1 DQ9
D1 DQ10
D1 DQ11
D1 DQ12
D1 DQ13
D1 DQ14
D1 DQ15
D1 UDQS
A3 M8
C7 DQ4
A4 M2
D9 DQ5
A5 L3
D7 DQ6
A6 L2
E9 DQ7
A7 K3
E1 DQ8
A8 K2
D3 DQ9
A9 J3
D1 DQ10
A10 K8
C3 DQ11
A11 J2
C1 DQ12
/WE G7
B3 DQ13
/CAS G8
B1 DQ14
/CS H8
A2 DQ15
/RAS H7
E3 UDQS
BA0 J8
AH11
AH4
G2 CK
DCLKNO
AH3
G3 /CK
AE15
DDATA(18)
AF15
DDATA(19)
AE14
AJ15
DDATA(23)
AJ14
DDATA(24)
AJ19
DDATA(25)
AF16
DDATA(26)
AH18
DDATA(27)
AE16
DDATA(30)
AE17
DDATA(31)
AF17
DDQS(3)
AJ18
DDQS(2)
AH15
DDM(3)
AJ17
DDM(2)
AH16
DWE
AE9
DCAS
AF8
DCS
AG7
DRAS
AE8
DBA(0)
AE7
DBA(1)
AF7
ARDATA(0)
T4
ARDATA(1)
U5
ARDATA(2)
U4
ARDATA(3)
U3
D1 LDQS
D1 UDM
D1 LDM
D2 DQ0
D2 DQ1
D2 DQ2
D2 DQ3
D2 DQ4
D2 DQ5
D2 DQ6
D2 DQ7
D2 DQ8
D2 DQ9
D2 DQ10
D2 DQ11
D2 DQ12
D2 DQ13
D2 DQ14
D2 DQ15
D2 UDQS
D2 LDQS
D2 UDM
D2 LDM
AR DQ0
AR DQ1
AR DQ2
AR DQ3
AR DQ4
E7 LDQS
F3 UDM
IC2304
EDD1216AASE-6B-E
DDR SDRAM
BA1 J7
G2 CK
A0 K7
G3 /CK
A1 L8
A8 DQ0
A2 L7
B9 DQ1
A3 M8
B7 DQ2
A4 M2
C9 DQ3
A5 L3
C7 DQ4
A6 L2
D9 DQ5
A7 K3
D7 DQ6
A8 K2
E9 DQ7
A9 J3
E1 DQ8
A10 K8
D3 DQ9
A11 J2
D1 DQ10
/WE G7
C3 DQ11
/CAS G8
C1 DQ12
/CS H8
B3 DQ13
/RAS H7
B1 DQ14
A2 DQ15
E3 UDQS
IC2305
EDD1216AASE-6B-E
DDR SDRAM
BA0 J8
BA1 J7
F3
UDM
F7
LDM
2
DQ0
4
DQ1
5
DQ2
7
DQ3
/WE 21
8
DQ4
/CAS 22
10 DQ5
/CS 24
11 DQ6
/RAS 23
13 DQ7
BA0 26
54 DQ8
BA1 27
56 DQ9
A0 29
57 DQ10
A1 30
59 DQ11
A2 31
60 DQ12
A3 32
62 DQ13
A4 35
63 DQ14
A5 36
65 DQ15
A6 37
16 LDQS
A7 38
W5
ARDATA(7)
W4
ARDATA(8)
W1
ARDATA(9)
W2
ARDATA(10)
V1
ARDATA(11)
V2
ARDATA(12)
U2
ARDATA(13)
T1
ARDATA(14)
R1
ARDATA(15)
T3
ARDQS(0)
Y4
ARDQS(1)
Y1
ARDM(0)
Y3
ARDM(1)
AA2
ARCLKO
AG2
45 CK
A11 41
ARCLKNO
AG1
46 /CK
A12 42
AR DQ9
AR DQ10
AR DQ11
AR DQ12
AR DQ13
AR DQ14
AR DQ15
AR LDQS
AR UDQS
AR LDM
AR UDM
D A4
D A5
D A6
D A7
D A8
D A9
D A10
D A11
D WE
D CAS
D CS
D RAS
D BA 0
D BA1
D A0
D A1
D A2
D A3
D A4
D A5
D A6
D A7
D A8
D A9
D A10
D A11
D WE
D CAS
D CS
D RAS
D BA 0
D BA1
CKE 44
ARDATA(6)
AR DQ8
D A3
CKE H3
V3
AR DQ7
D A2
E7 LDQS
ARDATA(5)
AR DQ6
D A1
CKE H3
V5
AR DQ5
D A0
F7 LDM
ARDATA(4)
E15
AA4
NC
D1 DQ7
C9 DQ3
DCLKO
DDATA(29) AG17
A3
A5
A6
A12
A11
D1 DQ6
A2 L7
DDM(0)
DDATA(28) AG18
CN2900
VTR POW ON
CAM POW ON
FCH 0
REMO
REMI
D1 DQ5
B7 DQ2
AJ12
DDATA(22) AG16
NSDARX(1)
D1 DQ4
A1 L8
DDM(1)
DDATA(17) AG14
IC2300(2/3)
R8A34013BG
BACK END
D1 DQ3
A0 K7
B9 DQ1
AJ10
DDATA(21)
V27
D1 DQ2
A8 DQ0
DDQS(0)
DDATA(16)
AT1DATA(13)
D1 DQ1
AH13
AT1DATA(11)
AT1DATA(12)
D1 DQ0
DDQS(1)
DDATA(20) AG15
OPEN Z
DACCESS
OPEN LOW
MOT POSI
MTOP REQ
PTOM CS
MTOP/AIF DATA
MOT ON
FCH 0
CAM POW ON
VTR POW ON
TO
SYSTEM CONTROL SECTION
MAIN PCB
A9
DADRS(10)
MAIN PCB(5/8)
51 UDQS
20 LDM
IC2306
EDD5116ADTA-6B-E
DDR SDRAM
47 UDM
A8 39
A9 40
A10(AP) 28
AR WE
AR CAS
AR CS0
AR RAS
AR BA0
AR BA1
AR A0
AR A1
AR A2
AR A3
AR A4
AR A5
AR A6
AR A7
AR A8
AR A9
AR A10
AR A11
AR A12
Q2300
TO
AUDIO-VIDEO SECTION
MIAN PCB
01
XRESET
Sep. 2005
C
CANON INC. 2005
SYSTEM CONTROL SECTION
CPU BUS SIGNAL
Battery charge
DC10 E, DC20 E
Power for Battery
TO
CAMERA SECTION-6
MAIN PCB
CAM O
(SPORTSPACK POW SW) M2
A PWM T3
2
3
4
5
6
TO
FPC SECTION
REAR KEY FPC
2
1
4
9
10
5
8
7
6
TO
FPC SECTION
RKEY FPC
A4
A6
A7
A12
A13
A14
A15
B9
to
B15
B1
to
B8
TO
AUDIO-VIDEO SECTION
MAIN PCB
PTOM/AIF DATA R9
E8 ZOOM AD
CASSETTEMEMORY A/D1 D5
T13 HARF PHOTO SW
CASSETTEMEMORY A/D2 C4
R13 PHOTO SW
Q111
MIC3 U4
V3 FLASH LED
Z RES SW E11
I ENC A8
LED RET A13
B14 RMC PULSE IN
IRIS CL B9
ZD3702
Z PSV B10
ND F PSV A10
VTR UNREG
P5V
CARD DET1 E13
DEW B4
MODE DIAL A/D1 C3
MODE DIAL A/D0 A4
BATT+
EADDR MADD2 T14
EADDR MADD3 P15
B6 KEY AD2
EADDR MADD5 T15
N4 (TAPE/CARD SW)
EADDR MADD6 U15
EADDR MADD7 V15
IC101
TMP1962-D83
CCM MI-COM
C5 KEY AD0
Q106 (DM-DC20)
Q105 (DM-DC10)
Q115
K3 XPLLRESET
EADDR MADD8 R16
EADDR MADD9 T16
Q113
NC
A4
CN2900
SUB FCH
2
3
6
7
8
9
CN102
EJECT SW
MOT POSI
MOTOR SIG
MOTOR SIG
OPEN Z
OPEN LOW
01
4
DVDD2.7V
EADDR MADD17 R18
Q103
EADDR MADD18 P16
EADDR MADD19 P17
M1 DIRECT PRI LED
EADDR MADD20 P18
CHG LED
EADDR MADD21 N14
L5 PAL/IPAL
EADDR MADD22 N15
SP100
EDATA M DATA0 N16
EDATA M DATA1 N17
D3 SDI DINT
EDATA M DATA2 M14
D1 SDAO TPC
1
VOUT
IC105
NJU7700F4-18
RESET IC
EDATA M DATA3 M16
C2 PCST3
2
VDD
E 3+LI
D2 PCST2
D104
E2 PCST1
VTR UNREG
EDATA M DATA4 M17
EDATA M DATA5 M18
EDATA M DATA6 L14
C1 PCST0
EDATA M DATA7 L16
E3 DBGE
SW100
SUB MI-COM RESET SW
EDATA M DATA8 L17
E1 DCLK
EDATA M DATA9 L18
F2 DRESET
EDATA M DATA10 K14
F3 SYSRDY
8
B16 TBUSY
EDATA M DATA12 K16
37 P40
A/D V
A/D I
INIT CHG1
CHARGE
VTR ON
28 P32(AIN2)
38 P41
41 P44
IC100
TMP86C847UG
SUB MI-COM
P6 P10 T10 U10 H3
BUS RDY
U11 X CAM ON
L4 A14 T9 F15 C15 N3
29 P33(AIN3)
39 P42
VTR UNREG
TRST
P30(AIN0) 26
12 P02(RXD)
TDO
13 P03(TXD)
XEWRU M H15
TCK
K2 STOM DATA
TMS
K1 MTOS DATA
TDI
CCM RESET
MACS XCS
MTOS VUP
MACS XRST
P47 44
XERD M H17
MACS XINT0
P45 42
21 P14(PPG)
FM XRST R12
J1 STOM SCK
MACS XINT1
33 P37(AIN7/STOP5)
STOM CS
FCH0/DEBUG0
P10(PWM3/TC3/PD03) 25
EDATA M DATA1
EDATA M DATA2
EDATA M DATA3
EDATA M DATA4
EDATA M DATA5
EDATA M DATA6
EDATA M DATA7
EDATA M DATA8
EDATA M DATA9
EDATA M DATA10
EDATA M DATA11
EDATA M DATA12
EDATA M DATA13
EDATA M DATA14
EDATA M DATA15
E2 DQ0
H2 DQ1
E3 DQ2
H3 DQ3
H4 DQ4
E4 DQ5
H5 DQ6
E5 DQ7
F2 DQ8
G2 DQ9
F3 DQ10
G3 DQ11
F4 DQ12
G5 DQ13
F5 DQ14
G6 DQ15/A−1
FM XCS G15
G1 RESET
LAP XRST
32 P36(AIN6/STOP4)
MTOS REQ
EDATA M DATA15 J16
L6 MTOS VUP
CAM DR TXD
DC J DET
P11(INT1) 24
EDATA M DATA14 J14
G5 STOM CS
CAM DR SCK
DC V DET
27 P31(AIN1)
STOM SCK
EDATA M DATA13 K18
M4 MTOS REQ
CAM DR LD
CARD POW SW
P06(SCK) 16
MTOS DATA
(EJECT SW)
VTR POW SW
31 P35(AIN5/STOP3)
STOM DATA
EDATA M DATA0
XEWRL M H14
FM XCS
FM XRST
XEWRU M
XERD M
F1 CE
IC103
S29AL008D70BFI02
FLASH
B4 RESET
S e p . 2005
E1
A1
D1
A2
C1
A3
A1
A4
B1
A5
D2
A6
C2
A7
A2
A8
B5
A9
A5
A10
C5
A11
D5
A12
B6
A13
A6
A14
C6
A15
D6
A16
E6
A17
B2
A18
C3
NC4 D4
A4 WE
NC3 D3
G1 OE
EADDR M ADD0
EADDR M ADD1
CN107
P
SCN
DEW+
3
4
6
TO
FPC SECTION
AE FPC
CN105
CARD DET
CARD DET
LI POW
CARD VDD
CARD DAT2
CARD DAT3
CARD CMD
CARD CLK
CARD DAT0
CARD DAT1
16
17
1
15
5
6
7
10
12
13
TO
CARD/LI, DC JACK PCB SECTION
CARD/LI PCB
CN50
30 P34(AIN4/STOP2)
EADDR M ADD0
EDATA M DATA0 to 15
TO
CAMERA SECTION-1
MAIN PCB
EADDR M ADD4
EADDR M ADD5
EADDR M ADD6
EADDR M ADD7
EADDR M ADD8
EADDR M ADD9
EADDR M ADD10
EADDR M ADD11
EADDR M ADD12
EADDR M ADD13
EADDR M ADD14
EADDR M ADD15
EADDR M ADD16
EADDR M ADD17
Q100
EADDR M ADD18
Q101
EADDR M ADD0 to 10
EDATA M DATA0 to 15
XEWRL M
XERD M
LAP XCS
LAP XINT
CAM DRIVER LD
CAM DRIVER SCK
CAM DRIVER TXD
LAP XRST
LAP RDY
MTOP REQ
PTOM CS
MTOP/AIF DATA
FCH 0
CAM POW SW
VTR POW SW
MOT POSI
OPEN Z
OPEN LOW
MOT ON
TO
CAMERA SECTION-4
MAIN PCB
TO
CAMERA SECTION-2
MAIN PCB
TO
CAMERA SECTION-6
MAIN PCB
EADDR M ADD19
EADDR M ADD20
EDATA M DATA0 to 15
EADDR M ADD0 to 22
XEWRL M
XEWRU M
XERD M
TRST
TMS
TCK
MACS XINT0
MACS XINT1
MACS XCS
MACS XRST
MACS TDO
PRI TDO
MACS RDY
1
2
TO
CAMERA SECTION-3
MAIN PCB
LCD BT SW
EADDR M ADD3
IC106
TC7SH08FU(F)
AND GATE
23 P12(TC1/INT2)
CARD DAT2
CARD DAT3
CARD CMD
CARD CLK
CARD DAT0
CARD DAT1
EADDR M ADD2
A15 B15 P11 H18 D16 E15 C16 G13 D17 H16
34 VAREF
E3 DET
A0
LCD BT SW
CAM POW SW
P05(SI) 15
LAP XINT
BATT TEMP
P04(SO) 14
20 P15(INT3)
LAP XCS
BATT INFO D
22 P13(DVO)
MTOP/AIF DATA
STILL POW SW
EJECT SW
DC20 A
DC20 E
DM-DC20
ONLY
EDATA M DATA11 K15
PTOM/AIF EN
DVDD3.3V
RESET
TO
CAMERA SECTION-2
MAIN PCB
EADDR MADD16 R17
4
TO
FPC SECTION
SW PCB
VOUT
EADDR MADD15 T18
Q105 (DM-DC20)
Q104 (DM-DC10)
N2 CARD ACC CHG LED
BATT+
BATT−
VTR ON IC3201
DC J DET
DC V DET
A/D V
VTR ON
INIT CHG1
CHARGE
A/D I
E3V
E3DET CS
X CAM ON
TO
POWER SUPPLY SECTION
MAIN PCB
VIN
EADDR MADD14 V17
V2 ST EFCHG
MTOP/AIF EN
ST TMG
5
EADDR MADD13 U17
B5 ST VDHGL VL0
PTOM CS
TO
CAMERA SECTION-2
MAIN PCB
VTR UNREG
IC104
NJM2865F3-32
3.2V REGULATOR
EADDR MADD12 T17
ST UNREG
MTOP REQ
DEBCLK
DEBUD
DEBDD
XDEBEN
EADDR MADD11 V16
L3 XRESET
P5V
TO
AUDIO-VIDEO SECTION
MAIN PCB
EADDR MADD4 R15
D6 KEY AD4
BATT−
B14
A13
A2
A3
A4
A5
A7
A8
A9
A10
B1
B2
B3
B4
B10
B13
A11
A12
B15
A14
A15
B5
B7
B8
B9
B12
P
EADDR MADD1 R14
EADDR MADD10 U16
NC
SCN
EADDR MADD0 P14
C6 KEY AD3
CN101
DBI
TDI
VTR ON
SDI DINT
SDAO TPC
CCM RESET
PCST3
PCST2
PCST1
PCST0
DBGE
DCLK
DRESET
SYSRDY
TBUSY
XRESET
TRST
TMS
PRI TDO
TDO
TCK
DEBCLK
DEBUD
DEBDD
XDEBEN
DVDD3.3V
DC20 A
DC20 E
DM-DC20
ONLY
SOUND
SOUND EN
AV DET
PTOM/AIF SCK
PTOM/AIF DATA
MIC 2
MIC3
L TEMP
Z RES SW
I ENC
LED RET
IRIS CL
Z PSV
ND F PSV
Y GYRO
P GYRO
I SW
P GYRO A7
XPLLRESET
XRESET
DBI
TDI
DC20 A
DC20 E
DM-DC20
ONLY
TO
CAMERA SECTION-1
MAIN PCB
I SW B11
Y GYRO B7
CN104
PANEL OPEN SW
KEY AD1
KEY AD0
BATT TEMP
BATT INFO D
BATT INFO B+
BATT+
CN103
ST TMG(0)
ST UNREG
ST UNREG
ST UNREG
ST EFCHG
ST VDHGL(0)
P5V
P5V
MIC3
L TEMP E9
Q110
P5V
CN108
STILL MODE SW
CARD MODE SW
KEY AD4
KEY AD3
KEY AD2
DIRECT P LED
CHAR CARD ACC LED
VTR UNREG
P5V
5
1
2
3
4
6
12
11
DC10 A
DC10 E
DM-DC10
ONLY
CCD TEMP
XSG1
AFE STANDBY
MPX XRST
CCD VL ON
TGCLK EN
TG XRST
MPX XCS
CAM ON
XERD M
XEWRL M
TG SCK
TG TXD
TG CS
VSUB CONT
MIC2
MIC2 V4
U13 START/STOP SW
A6 KEY AD1
TO
FLASH PCB SECTION
FLASH PCB
CN500
SOUND
SOUND EN U2
Q107
CN106
WHITE LED
WHITE LED
P5V
P5V
RMC IN
AV DET
PTOM/AIF SCK P9
DACCESS
TO
FPC SECTION
FRONT PCB
TO
CAMERA SECTION-1
MAIN PCB
AFE RST
AFE CS
XERD M
XEWRL M
CAM SCK
CAM TXD
SUB CONT
R5
VSUB CONT
TG SCK
TG CS
TG TXD
TG XRST
TGCLK EN
MPX XRST
CCD VL ON
XSG1
AFE STANDBY
MPX XCS
CCD TEMP
AVDD2.7V
DVDD3.3V
CAM SCK
CN100
AVDD2.7V
DVDD3.3V
PHOTO SW
ZOOM AD
H PHOTO SW
START/STOP SW
CAM POW SW
VTR POW SW
D ACC LED
A3 F16 P3 R11 T11 D12 N8 V11 V10 V12 T12 L2
SUB CONT
1
6
4
2
5
9
11
12
7
T11 N8 V12 T12 R5
AFE CS
TO OPE
ZD3700
CAM TXD
ZD3701
AFE RST
MAIN PCB(6/8)
TO
CAMERA SECTION-3
MAIN PCB
LAP RDY
ST TMG
C
DC20 A
DC20 E
DM-DC20
ONLY
CANON INC. 2005
DC10 E, DC20 E
AUDIO-VIDEO SECTION
ANALOG AUDIO SIGNAL
ANALOG VIDEO SIGNAL
USB SIGNAL
MAIN PCB (7/8)
14 YOUT
13 YSAG
11 VOUT
10 VSAG
8
POWER SAVE
IC2102
NJM2567V
75OHM DRIVER
COUT
XPS
7
Y25 RTS(2)
INT(3)
W26
XEINT S
HCS(3)
R27
XECS3
CIN
5
AH26 COUT
TMS
J4
TCK
J3
YIN
3
AJ25 YOUT
TRST
J2
TDO
J1
E DATA (0)
J28
P5V
6
3
2
10
8
5
TO
FPC SECTION
AV FPC
CN2100
V
AV R I/O
AV L I/O
Y
C
AVS DET
Q2121
WIDE CONT
J29
AC28 CTS(3)
K26
K27
AVDD1.4V
Q2120
LET CONT
5
3
1
TO
FPC SECTION
USB FPC
K29
IC2300 (3/3)
R8A34013BG
BACK END
AC26 RTS(3)
N26
L27
N25
CN3501
D+
D−
VBUS
L28
L29
M27
M28
M29
H1
TDI
P26
N27
DBI
PLLRST
N.C
B4
B11
B12
B1
A1
A7
A8
B8
B7
B2
B9
B5
B6
TO
SYSTEM CONTROL SECTION
MAIN PCB
CN2900
VTR UNREG
RS232C RX2
RS232C TX2
VI/O
VI/O
EVF R
EVF G
EVF B
EVF COM AC
EVF HD
EVF COM DC
MIC2
MIC3
MIC2
MIC3
AV DET
TDI
DBI
XPLLRESET
XRESET
PTOM/AIF SCK
PTOM/AIF DATA
SOUND EN
SOUND
A15
B2
B3
B4
A16
B16
A4
A2
B8
B13
B11
B10
B9
B17
B14
B15
A14
A7
B7
E DATA 0 to 15
CN2901
EVF COM DC
EVF G
EVF R
EVF B
EVF COM AC
EVF HD
AV R I/O
AV L I/O
AIF CS
XPDI
REC MUTE
PTOM/AIF SCK
PTOM/AIF DATA
EVF CS
EVF BL ON
EVF ON
A MUTE
SOUND
SOUND EN
EADDR (22)
J27
J26
M26
H29
H27
H28
L25
H26
L26
G29
G27
G28
F29
G26
F27
F28
F25
F26
E28
E29
E26
K25
E25 EADDR (0)
HOE
HWS(0)
T29
P27
P28 HCS(0)
XECS0
XERD
XEWR0
RESET
G5
AE28 TX(2)
AA26 RX(2)
R26 HCS(2)
XECS2
XRESET
DEBUG RS232C TX2
DEBUG RS232C RX2
U29 NSDARX(0)
W28 SPIDATAI
W29 SPICS
AA25 TX(0)
AA27 INT(5)
AB28 INT(8)
A MUTE
EVF ON
EVF BL ON
EVF CS
PTOM/AIF DATA
AIF CS
V26 SPICLK
W27 SCLK(0)
PTOM/AIF SCK
REC MUTE
NSDATX(0)
AB26 CTS(0)
T26
PRI SOUND EN
E ADD 1
E1 A0
26
E ADD 2
D1
25
DQ0 31
E DATA 8
E ADD 3
C1
DQ0 E2
E DATA 0
E ADD 3
24
33
E DATA 9
E ADD 4
A1
H2
E DATA 1
C1 D1/AD1
DM H10
E ADD 4
23
35
E DATA 10
E ADD 5
B1
E3
E DATA 2
C2 D2/AD2
DP J10
E ADD 5
22
37
E DATA 11
E ADD 6
D2
H3
E DATA 3
D1 D3/AD3
RST N K8
E ADD 6
21
40
E DATA 12
E ADD 7
C2
H4
E DATA 4
D2 D4/AD4
DREQ1 N B3
E ADD 7
20
42
E DATA 13
E ADD 8
A2
E4
E DATA 5
D3 D5/AD5
INT N K7
E ADD 8
8
44
E DATA 14
E ADD 9
B5
H5
E DATA 6
E1 D6/AD6
RD N A3
E ADD 9
7
DQ7 46
E DATA 15
E ADD 10
A5
E5
E DATA 7
E ADD 10
6
E ADD 11
C5
F2
E DATA 8
E ADD 11
5
E ADD 12
D5
E ADD 12
4
E ADD 13
B6
E ADD 13
3
E ADD 14
A6
E ADD 14
2
E ADD 15
C6
E ADD 15
1
E ADD 16
VIFA2 E3
E ADD 16
52
VIFB1 C6
E ADD 17
VIFB2 F8
E ADD 18
WR1 N B2
WR0 N A2
F2 D9
CS N A1
G1 D10
DACK1 N A4
USB DREQ
USB INT
XERD
XEWR0
XEWR1
XECS4
USB DACK
G2 D11
G3 D12
H1 D13
H2 D14
J2 D15
IC3500
RBA01013LG
USB IC
VIFA1 H5
K2 A1
AFED33V−1 H9
J6 A2
AFED33V−2 K9
K6 A3
AFED33V−3 J4
J5 A4
AFEA15V J7
K5 A5
VDD1 F3
K3 A6/ALE
VDD2 C5
DVDD2.7V
USB VOLT
G2
E DATA 9
F3
E DATA 10
G3
E DATA 11
F4
E DATA 12
D6
G5
E DATA 13
E ADD 17
E6
F5
E DATA 14
19
E ADD 18
B2
DQ15 G6
E DATA 15
18
E ADD 19
C3
E ADD 20
D4
E ADD 21
D3
E ADD 22
C4 A21
IC2301
R1LV1616RSD-55I
SRAM
E ADD 19
9
E ADD 20
47 DQ15
A19
DVDD1.4V
IC2303
S29PL064J60BFI12
FLASH
F1 CE
30 OE
G1 OE
11 WE
PRI TDO
TRST
XEINT S
XECS3
TCK
TMS
E DATA 8 to 15
E ADD 0 to 2
XERD
XEWR0
A4 WE
10 CS1
E3+LI
01
XPDI
D29 HDREQ(0)
N28 HDACK(0)
USB DREQ
HWS(1)
T28
R29 HCS(4)
USB DACK
XECS4
27 A0
E ADD 1
E ADD 2
F1 D8
E ADD 1 to 6
E ADD 0
VBUS K10
B1 D0
VDD3 E8
TO
CAMERA SECTION-6
MAIN PCB
P25
VTR
UNREG
E2 D7
TO
CAMERA SECTION-5
SUB PCB
CN2905
E DATA (15)
XEWR1
USB INT
AA28 INT(4)
H5
G3
B4 RESET
4
OUTY
5
VCC
IC2302
TC7SZ126FU
BUFFER
G
1
INA
2
TO
CAMERA SECTION-3
MAIN PCB
XRESET
Sep. 2005
C
CANON INC. 2005
POWER SUPPLY SECTION
DC10 E, DC20 E
MAIN PCB(8/8)
DC20 A,DC20 E,DM-DC20 ONLY
FU3200
Power for Battery
ST UNREG
FU3205
FE UNREG 1
FU3203
Power for DC JACK
D1801
FE UNREG 2
FU3201
FU3202
Battery charge
FU3204
36 CTL 7
35 CTL 6
34
VTR UNREG
OSC
23
CH1
Q3203
1.2V (CH1)
33
TO
CARD/LI,DC JACK PCB SECTION
DC JACK PCB
2
3
4
5
1
CN3200
DC +
DC +
DC −
DC −
JACK DET
68
32 CTL
Q1802
FU1800
5
DVDD 1.4V
31 VCC1
1
48 VCC2
MACS1.4V
3
LPF
75 VCCO2
Q3205
DVDD 2.5V
69
62 VCC3
A/DI
TO
CAMERA SECTION-2
MAIN PCB
DC J DET
DC V DET
VTR ON
VTR ON IC3201
A/D I
CHARGE
INIT CHG1
ST TMG
E3DET CS
E3V
PANEL BL CTRL
LCD BL VFB
X CAM ON
A/D V
DDR2.5V
59 OUTC 9
SDRAM2.5V
CHARGE
4
3
2
INIT CHG1
1
DC20 A
DC20 E
DM-DC20
ONLYST TMG
Q1803
5
6
7
8
64 CHRG CTL1
22
63 CHRG CTL2
Q3201
1.4V (CH2)
CH2
5
LPF
AA 2.7V
LPF
HTG2.7V
LPF
CAM2.7V
4
2
70
1
47 CS OUT2
3
DC20 A
DC20 E
DM-DC20
ONLY
61 +INC9
DVDD2.7V
Q3211
60 −INC9
E3DET CS
LCD BL VFB
BATT +
BATT −
PANEL BL CTRL
E3V
PLL2.7V
71
AVDD2.7V
46 CS OUT 1
4
−INA
3
+INA
9
Q3206
2.5V (CH7)
CH7
51 VOUT 3
5
5
4
IC3203
NJM2865F3-46 V OUT
4.6V REGULATOR
V IN
2
78
4
AA4.7V
8
LCD BL POW
LCD BL ON
CHARGE
TO
CAMERA SECTION-4
MAIN PCB
AVDD1.4V
74 VCCO1
3
65 OUT 9
TO
SYSTEM CONTROL SECTION
MAIN PCB
PRISM 1.2V
4
4
2
1
LPF
5
2
Q3200
2
6
P 5V
3
LPF
80
LCD 5V
13
1
Q3202
2.7V (CH5)
CH5
5
3
1
CH8
4
Q1804
76
USB VOLT
5
4
LCD3.3V
2
29 RT
FLASH SRAM3.3V
1
37
3
5
Q1801
16
Q3213
P5V (CH4)
CH4
17
73
5
IC3200
NJM2881F31 V OUT
3.1V REGULATOR
V IN
DVDD3.3V
4
AVDD3.3V
CAM3.5V
4
2
1
USB VOLT
3
LCD3.3V
FLASH SRAM3.3V
19
CH3
18
72
DC20 A
DC20 E
DM-DC20
ONLY
Q3204
3.45V (CH3) (DM-DC20)
Q3204
3.3V (CH3) (DM-DC10) 5
2
DC10 A
DC10 E
DM-DC10
ONLY
DVDD3.3V
4
AVDD3.3V
CAM3.3V
IC3201
MB44A126
DC/DC
CONVERTER
CONTROL
1
12
T3201
CH6
4
77
DC20 A
DC20 E
DM-DC20
ONLY
3
Q3207
D3203
CCD −7V
5
3
6
2
7
1
8
D3202
Q3208
CCD 15V
D3201
LCD 8.5V
01
Sep. 2005
C
CANON INC. 2005
FLASH PCB SECTION (DC20 A,DC20 E,DM-DC20 ONLY)
DC10 E, DC20 E
FLASH PCB
CN501
Xe(+)
Xe(−)
Q502
2
1
TO XENON
TP501
TP502
CN502
T(+)
T(−)
T501
TO
SYSTEM CONTROL SECTION
MAIN PCB
CN103
1
2
7
10
11
12
8
9
CN500
P5V
P5V
ST VDHGL
ST UNREG
ST UNREG
ST UNREG
ST TMG
ST EFCHG
TO TRIGER COIL
16
Q504
P5V
2
1
VBAT
P5V
P5V
3 VCC
SW2
2
SW1
1
G IGBT
6
4 F ON
Q501
10 CHG
Q503
IC501
TPS65552RGT
DC/DC CONVERTER CONTROL
01
Sep. 2005
C
CANON INC. 2005
LCD PCB SECTION
DC10 E, DC20 E
DATA COMMUNICATION
LCD PCB
Q903
LCD 5V
VCC 5V
LCD 3.3V
5
Q901
V IN
IC903
NJM2865F3 V OUT
2.8V REGULATOR
4
WP4201
BACKLIGHT
LCD 8.5V
VCC 5V
TO
CAMERA SECTION-4
MAIN PCB
CN901
5
VCC1-1
18
29
36
VCC2
LCD 8.5V
LCD 5V
LCD 3.3V
LCD 3.3V
LCD ON
LCD BL POW
LCD BL POW
LCD BL VFB
R OUT(R-Y)
G OUT(Y)
B OUT(B-Y)
LCD CS
LCD EE CS
TX1 DAT
SCLK1
RX1 SIN
LCD BT SW
VDD2
LCD 3.3V
CN901
7
8
9
10
1
20
21
22
17
16
15
6
5
4
3
2
23
VDD1
LCD 5V
43 VCC1-2
R OUT 34
45 R/R-Y
G OUT 35
44 G/Y
B OUT
33
46 B/B-Y
LCS
ECS
SO
CLK
SO
VST 24
E CS
CLK
SO
SO
1
CS
2
SK
3
DI
4
DO
VCK 23
IC901
BR9010RFV-W
EEPROM
VCC
8
IC902
CXM3009TQ
LCD DRIVER
LCD 3.3V
EN
22
DWN 21
XSTB 20
PCG 19
HST 17
WIDE 16
HCK2 15
L CS
CLK
SO
1
CN903
LCD BT SW
SEN
HCK1 14
7
SCK
RGT 13
8
SDAT
REF 42
POF
TO
LCD DETECT FPC ASS'Y
6
COM-DC
38
PSIG OUT
37
CN902
VDD
RED
GREEN
BLUE
VST
VCK
EN
DWN
XSTBY
PCG
HST
WIDE
HCK2
HCK1
RGT
REF
COM
CS
PSIG
18
4
5
3
22
21
20
19
14
13
12
9
8
7
2
11
24
23
6
LCD UNIT
LCD
26
LCD 8.5V
Q904
01
Sep. 2005
C
CANON INC. 2005
CARD/LI, DC JACK PCB SECTION
Battery charge
DC10 E, DC20 E
Power for DC JACK
CARD/LI PCB
TO
SYSTEM CONTROL SECTION
MAIN PCB
CN105
12
11
10
7
5
4
1
2
16
17
CN50
CARD DAT2
CARD DAT3
CARD CMD
CARD CLK
CARD DAT0
CARD DAT1
CARD DET
CARD VDD
LI POW(+)
LI POW(+)
BAT50
CN51
DAT2
CD/DAT3
CMD
VDD
CLK
DAT0
DAT1
CARD DET
9
1
2
4
5
7
8
12
mini SD CARD
DC JACK PCB
TO
POWER SUPPLY SECTION
MAIN PCB
CN3200
DC−
DC−
JACK DET
DC+
DC+
DC JACK
CN3200
01
Sep. 2005
C
CANON INC. 2005
FPC SECTION
DC10 E, DC20 E
ANALOG VIDEO SIGNAL
ANALOG AUDIO SIGNAL
USB SIGNAL
RKEY FPC
TO
SYSTEM CONTROL SECTION
MAIN PCB
CN104
A7
A6
A4
B1
B2
B3
B4
B5
B6
B7
B8
B9
B10
B11
B12
B13
B14
B15
A12
A13
A14
Battery charge
Power for Battery
SW FPC
CN100
KEY AD0
KEY AD1
PANEL OPEN SW
BATT−
BATT−
BATT−
BATT−
BATT−
BATT−
BATT−
BATT−
BATT+
BATT+
BATT+
BATT+
BATT+
BATT+
BATT+
BATT TEMP
BATT INFO D
BATT INFO B+
SW103
STOP
TO
SYSTEM CONTROL SECTION
MAIN PCB
CN102
SW104
PLAY
AV FPC
MOTOR SIG
MOTOR SIG
EJECT SW
MOT POSI
OPEN Z
OPEN LOW
E10
SW10
TO
AUDIO-VIDEO SECTION
MAIN PCB
CN2100
SW105
FF
2
6
5
3
8
10
CN2
AV L I/O
V
AV DET
AV R I/O
C
Y
CN2100
L
V
SW
R
C
Y
1
6
5
3
8
10
AV JACK
ZD10
SW11
SW101
DISP
SW12
SW106
REW
SW13
FRONT FPC
SW107
FINA
SW108
B.C
SW102
W.TV
RU1
TO
SYSTEM CONTROL SECTION
MAIN PCB
CN106
SW100
REMOTE CONTROLLER
1
RMC IN
P5V
P5V
WHITE LED
WHITE LED
2
LED1
ZD3700
BATT−
BATT+
BATT TEMP
BATT INFO D
BATT INFO B+
BATTERY
TERMINAL
REAR KEY FPC
TO
SYSTEM CONTROL SECTION
MAIN PCB
CN108
CHAR CARD ACC LED
VTR UNREG
P5V
DIRECT P LED
KEY AD2
KEY AD3
CARD POW SW
STILL POW SW
USB FPC
LED101
LED100
TO
AUDIO-VIDEO SECTION
MAIN PCB
CN3501
CN30
VBUS (+5V)
D−
D+
VBUS
D−
D+
1
2
3
USB JACK
ZD101
SW101
DIRECT PRT
SW102
FUNC
AE FPC
SW104
CROSS SW RIGHT
TO
SYSTEM CONTROL SECTION
MAIN PCB
CN107
MODE D AD1(SCN)
MODE D AD0(P)
SW103
SW30
ZD30
SW100
MENU
01
S e p . 2005
C
CANON INC. 2005