1
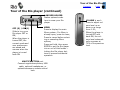
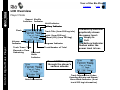
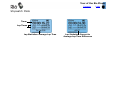
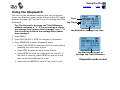
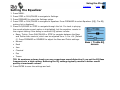
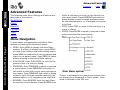
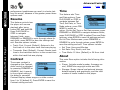
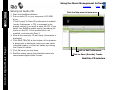
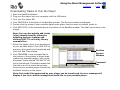
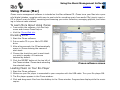
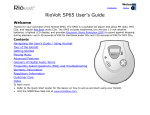
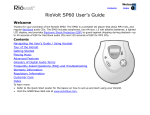
Welcome
Contents
Index
1
Rio S10 User’s Guide
Welcome
Thanks for your purchase of the Rio S10 digital music player. The S10 portable player provides up to 30
hours of MP3 and WMA playback with the included AA-size battery. With 64MB memory — expandable with
optional external memory cards — the S10 holds hours of your favorite music. Use the music management
software included on the software CDs to:
• Organize digital audio tracks on your computer
• Encode your audio CDs into compressed digital audio format
• Download tracks to your Rio player
• Search for tracks on your computer or on the Internet
• Create custom CDs — if you have CD burning hardware and your computer supports it
Contents
Navigating the User’s Guide / Using Acrobat
Tour of the Rio Player
Getting Started
Playing Music
Using the Stopwatch
Setting and Releasing Hold
Setting Shuffle and Repeat Play
Setting the Equalizer
Advanced Features
Using the Music Management Software
Glossary of Digital Audio Terms
Frequently Asked Questions (FAQ) and Troubleshooting
Welcome
Contents
Index
2
Warranty Information
Regulatory Information
Customer Care
Index
To learn more:
• Refer to the Quick Start poster for the basics on how to set up and start using your Rio player.
• Refer to the complete music management software online Help for step-by-step instructions on how to
use the software to convert CD tracks into compressed digital audio formats, download tracks to your
Rio player, or get audio files from the Internet.
• Visit the SONICblue Web site.
Navigating the User’s Guide
Rio S10 Digital Music Player
The User’s Guide is in Adobe Acrobat (.PDF) file format.
Important: We recommend that you use Adobe Acrobat Reader version 4.0 or higher to view
and print the Rio User’s Guide. Acrobat reader 4.0 is available on the software CDs.
Click blue, underlined text links to jump to another location in the document or to a location on the Internet.
Click the Contents link at the top of any page to go to the list of User’s Guide contents.
Click the Index link at the top of any page to go to the alphabetical Index of topics. Click page numbers in
the Index to jump to a topic.
Using Acrobat
Click the navigation buttons
in the Acrobat toolbar to go to the first page, previous page,
next page, or last page of the User’s Guide.
Click the print button
in the Acrobat toolbar to print the User’s Guide.
Click the show/hide navigation pane button
in the Acrobat toolbar to show a list of bookmarks. Bookmarks are links to the contents of the User’s Guide. Click any bookmark in the list to jump to the page in
the User’s Guide that contains the topic.
Legal Notices
Contents
Index
3
Legal Notices
© 2002 SONICblue Incorporated. All Rights Reserved.
SONICblue Incorporated shall not be liable for any errors contained herein or for any damages arising out
of or related to this document or the information contained herein, even if SONICblue has been advised of
the possibility of such damages.
This document is intended for informational and instructional purposes only. SONICblue reserves the right
to make changes in the specifications and other information contained in this document without prior notification. SONICblue disclaims any obligation to update the information contained herein.
Rio is a registered trademark of SONICblue Incorporated. SONICblue is a trademark of SONICblue Incorporated.
This product is iTunes ready. iTunes is provided by Apple Computer, Inc. © 2002 Apple
Computer, Inc. All rights reserved. iTunes is a trademark of Apple Computer, Inc. Mac
and the Mac logo are trademarks of Apple Computer, Inc. registered in the United States
and other countries.
Microsoft, Windows Media and the Windows Logo are trademarks or registered
trademarks of Microsoft Corporation in the United States and/or other countries.
All other product names may be trademarks of the companies with which they are
associated.
First edition, June 2002
S10 P/N 75510393-001
Tour of the Rio Player
Contents
Index
4
Tour of the Rio Player
PLAY/PAUSE
Press to play or pause playback;
In Menu mode, press to navigate to the previous Menu
option;
In Stopwatch mode, press to start and stop the timer;
Display (LCD)
REVERSE and FORWARD
Press to skip to the start of the current or next track —
if less than five seconds have elapsed, REVERSE skips
to the start of the previous track; Press and hold to
scan backward or forward within the current track;
Rio S10 Digital Music Player
ENTER
Press to cycle through
the player’s various
screens;
Press while pressing
and holding MENU to
put the Rio player into
or out of Hold mode;
Press and hold to set a bookmark;
In Menu mode, press to select
Menu options;
In Stopwatch mode, press to move
lap times down on the LCD; if the
timer is running, press to capture a
new lap time without stopping the
timer; press and hold to reset all
lap times to zero
In Menu mode, press FORWARD to select or execute a
Menu option
STOP
Press to stop playback;
In Menu mode, press to navigate
to the next Menu option;
In Stopwatch mode, press to
reset the timer to zero
Battery compartment cover
Remove cover and insert the supplied
battery and optional external memory
cards here. Insert external memory
cards before inserting the battery.
Tour of the Rio Player
Contents
Index
5
Tour of the Rio player (continued)
LANYARD HOLDER
Fasten optional cords
here to wear your Rio
player
OFF (0) / ON (1)
Slide to turn your
Rio player OFF or
ON;
When the player is
turned OFF, the
current mode and
user preferences
are saved and
resume when the
player is turned
back ON
MENU
Press to display the main
Menu system; If a Menu is
already open, press to close;
Press to cancel before selecting or executing Menu
options;
Press and hold, then press
ENTER to put the Rio player
into or out of Hold mode —
locking the Rio player buttons to prevent accidental
operation
MULTIFUNCTION port
Connect supplied earphones, USB
cable, optional headphones, or
optional accessory remote control
here
VOLUME + and Press to adjust volume level up or
down on a range
from 0-30;
When the player is
turned OFF and
back ON, the volume level automatically resumes at
70% of the previous
level
Tour of the Rio Player
Contents
Index
6
LCD Overview
Player Mode
Repeat Shuffle
Indicator Indicator
Hold Indicator
Battery Indicator
Clock
Track Title (from ID3 tag info)
Artist (from ID3 tag)
Album (CD) (from ID3 tag)
Rio S10 Digital Music Player
Volume
Indicator
Progress Indicator
Track Timer: Time
Elapsed or Time
Remaining
Playback
Mode
Indicator
Track Number of Total
The Battery Indicator
graphically shows
the power level:
Empty to
Full.
The Battery Indicator
flashes when the
power level is low.
Press ENTER to cycle
through the player’s
various screens
Date Information
Track Information: Codec,
Encoding Bitrate and Stereo/
Mono Mode Indicator (from
track ID3 tag information)
Tour of the Rio Player
Contents
Stopwatch Mode
Timer
Lap Times
Lap Statistics: Average Lap Time
Lap Statistics: Current to
Average Lap Time Difference
Index
7
Getting Started
Contents
Getting Started
8
Please refer to the Quick Start poster for complete
setup instructions, including information on connecting the Rio to your computer.
Step 3: Install Software
Step 1: Unpack
Follow these instructions to load the software that
enables your PC to recognize the Rio player. The
installation also loads the selected music management software.
1 Place the software CD label side up into your
computer’s CD-ROM drive. After a few seconds,
the install screen will display.
2 Click the “Install” link of the music management
software that you would like to install, then follow the on-screen instructions. The Rio Music
Manager application is required.
Make sure your package includes the following:
• Rio player
• One AA-size 1.5 volt alkaline battery
• Earphones
• Universal Serial Bus (USB) cable
• PC and Mac Software CDs
• Quick Start poster and other printed materials
• Carrying case
Rio S10 Digital Music Player
Index
Step 2: Insert Battery
1 Slide open the battery compartment cover on the
back of the Rio player.
PC
You can also choose to view the User’s Guide, get
support, or register your Rio player online.
3 Reboot your computer when the software installation is complete, or you are prompted to do so.
Tip: Insert optional external memory cards
into the memory card slot while the battery
cover is off — before you insert the battery.
Note: If the install screen does not display
automatically, follow these steps to begin
the installation manually:
2 Insert the supplied battery. Ensure the battery is
inserted properly by matching the + and - symbols on the battery with the symbols in the Rio
player battery compartment.
1 Click the START button in bottom-left corner of
your computer screen and choose RUN...
2 Type d:\install.exe in the field labeled OPEN. If
your computer’s CD-ROM drive uses a letter
other than “d”, substitute that letter for “d”.
3 Click the OK button, and follow the on-screen
instructions.
3 Replace the battery cover.
Getting Started
Contents
MAC
Follow these instructions to load the software that
enables your Macintosh computer to recognize the
Rio player. The installation also loads the iTunes
music management software.
1 Place the software CD label side up into your
computer’s CD-ROM drive.
2 The CD contents should display automatically. To
manually display the CD contents, double-click
the Rio icon on your computer’s desktop.
3 Double-click the Install icon.
4 After a few seconds, the Rio splash screen will
display.
5 Click the “Install iTunes” link, then follow the onscreen instructions to install the software, see
the User’s Guide, get support, or register your
Rio player online.
6 Reboot your computer when the installation is
complete.
OSX Users
The “Install” program on the software CD may not
run on some OSX systems, if you are having difficulty, follow these steps to install iTunes:
1 Double-click the CD icon to show the contents of
the software CD.
2 Open the “iTunes” folder.
3 Open the “OSX” folder.
4 Double-click the iTunes2.pkg file to begin the
installation.
Index
9
Step 4: Connect USB
1 Insert the USB cable into the MULTIFUNCTION
port on top of the Rio player. The Rio USB connection only fits one way. Do not try to force the
connection.
2 Connect the other end of the USB cable to your
computer’s USB port.
3 Turn your Rio player ON.
Note: The player automatically turns OFF
after being connected to USB for 30
minutes, if no USB commands are received
or no buttons are pressed.
4 PC ONLY: Follow these instructions if the Windows Device Driver wizard displays on the computer screen: Make sure that the software CD is
in your computer’s CD-ROM drive. When the wizard prompts you for the location of the Rio player
drivers, select the “CD-ROM Drives” check box,
then click the “Next” button, and follow the onscreen instructions.
Step 5: Rip/Load Music
Please see the Using the Music Management Software section in this manual for more information
about using the software to encode your audio CDs
into compressed digital audio format, organize your
digital audio collection on your computer, or download music to your Rio player. Please refer to the
complete software online Help for detailed information on using each software application.
Using the Player
Contents
Index
10
Using the Player
Playing Music
1 Connect the supplied earphones or optional headphones into the
MULTIFUNCTION port on top
of the Rio player.
2 Turn the player ON.
3 Press PLAY/PAUSE to begin
playback.
Rio S10 Digital Music Player
Switching Modes
Repeat Shuffle
Indicator Indicator
Hold Indicator
Battery Indicator
Clock
Track Title (from ID3 tag info)
Artist (from ID3 tag)
Album (CD) (from ID3 tag)
Volume
Indicator
Progress Indicator
Follow these steps to play
Track Number of Total
music without changing the
Track Timer: Time
display from Stopwatch
Elapsed or Time
mode, or to switch to Player
Remaining
Playback
In Player mode, press
mode.
Mode
ENTER to cycle through
1 Press MENU.
Indicator
the player’s various
2 Press PLAY/PAUSE or STOP to
screens
navigate between Play Music
and Player. Press FORWARD
to select an option.
• Play Music: Plays MP3/WMA tracks while remaining in the previous mode on the LCD. Press PLAY/
PAUSE or STOP to navigate between Play All or Play Track.
Play All: Press FORWARD to select and begin playback.
Play Track: Press FORWARD to select and display a list of tracks you can choose from. Press PLAY/
PAUSE or STOP to navigate through the track list; press FORWARD to select a track and begin
playback.
• Player: Switches to Player mode on the LCD. Press PLAY/PAUSE to begin playback.
Using the Player
Contents
Index
11
Using the Stopwatch
You can use the Stopwatch feature while you are playing
music. Lap Statistics shown at the bottom of the LCD toggle
Timer
between Average Lap Time and Current to Average Lap Time
Difference.
Lap Times
Tip: The Current to Average Lap Time Difference
statistic indicates a “+” if the current lap is above
the average time (slower than average), or a “-” if
the current lap is below the average time (faster
than average).
Lap Statistics: Average Lap Time
1 Press MENU.
2 Press PLAY/PAUSE or STOP to navigate to Stopwatch.
3 Press FORWARD to select Stopwatch mode.
• Press PLAY/PAUSE to start and stop the timer without
resetting the timer value to zero.
• Press STOP to reset the timer value to zero.
• Press ENTER to move lap times down on the LCD; if
the timer is running, press ENTER to capture a new
lap time without stopping the timer.
• Press and hold ENTER to reset all lap times to zero.
Lap Statistics: Current to
Average Lap Time Difference
Stopwatch mode screen
Using the Player
Contents
Index
12
Setting and Releasing Hold
Press and hold MENU, then press ENTER to put the Rio player into or out of Hold mode. Hold mode locks the
Rio player buttons — except the OFF/ON switch — preventing accidental operation. This is a useful feature,
for example, if you wish to prevent the player buttons from being bumped while you are exercising. When
the player is in Hold mode, a lock icon
is displayed on the LCD, and the player displays a message indicating that Hold mode is active if the player buttons are pressed.
Setting Shuffle and Repeat Play
These features control the track playback order.
1 Press MENU.
2 Press STOP or PLAY/PAUSE to navigate to Settings.
Rio S10 Digital Music Player
3 Press FORWARD to select the Settings option.
4 Press FORWARD to select Playback. The Shuffle/Repeat screen is displayed.
5 Press PLAY/PAUSE or STOP to navigate between Shuffle and Repeat. Press
FORWARD or REVERSE to cycle through these Shuffle/Repeat settings:
• Shuffle (random play): ON or OFF (Default); When Shuffle is ON, the
Shuffle icon
is displayed on the LCD.
• Repeat: ALL (repeats all tracks)
(repeats current track)
icon is displayed on the LCD, ONE
icon is displayed on the LCD, or OFF (Default).
6 Press ENTER to save the settings and exit.
Shuffle/Repeat
screen
Using the Player
Contents
Index
13
Setting the Equalizer
1
2
3
4
Press MENU.
Press STOP or PLAY/PAUSE to navigate to Settings.
Press FORWARD to select the Settings option.
Press STOP or PLAY/PAUSE to navigate to Equalizer. Press FORWARD to select Equalizer (EQ). The EQ
options list is displayed.
5 Press PLAY/PAUSE or STOP to navigate through the list. If a track is playing
the sound adjusts as each option is highlighted, but the equalizer reverts to
the original setting if the dialog is canceled. EQ options include:
• Bass / Treble: Press PLAY/PAUSE or STOP to navigate between the Bass
and Treble slider controls, which can be adjusted from -14 to +14 (Default
0). Press FORWARD or REVERSE to adjust the Bass and Treble settings.
• Normal
• Rock
Bass / Treble EQ
screen
• Jazz
• Classical
• Pop
• Trance
TIP: At maximum volume levels you may experience sound distortion if you set the EQ Bass
frequencies to a high setting. Reducing the EQ settings typically results in better sound
quality at maximum volume.
6 Press ENTER to save the settings and exit.
Advanced Features
Contents
Index
14
Advanced Features
The following main Menu Settings and options are
described in this section:
Bookmarks
Power
Resume
Contrast
Time
About
within a sub-menu to move up the hierarchy to
the parent menu. Press REVERSE from within a
dialog display to cycle through available values
for the selected option, or to navigate to the previous field.
• STOP: Press STOP to move to the next item in a
menu or dialog.
• ENTER: Press ENTER to select or execute a menu
option and close the menu system.
Rio S10 Digital Music Player
Menu Navigation
In most cases, navigate within and select Menu
options by pressing the following buttons:
• MENU: Press MENU to display the main Menu
system; If a Menu is already open, press MENU
to close. From within a sub-menu dialog screen,
press MENU to close without saving changes and
return to the parent menu. Press MENU to cancel
before selecting or executing Menu options.
• PLAY/PAUSE: Press PLAY/PAUSE to move to the
previous item in a menu or dialog.
• FORWARD: Press FORWARD to select or execute
a menu option; Press FORWARD from within a
sub-menu to close the current menu and open a
new menu; Press FORWARD from within a dialog
screen to cycle through available values for the
selected option, or to navigate to the next field.
• REVERSE: Press REVERSE from the main Menu
to close the current display; Press REVERSE from
Main Menu system
“Player” is displayed in the main menu system if you
are coming from Stopwatch or Tuner modes. Tuner
mode is included in the S50 only.
Advanced Features
Contents
Looking for information on the Playback (Shuffle
and Repeat) or Equalizer Menu options? Click the
links in the previous sentence to jump to the Playback or Equalizer sections in this manual.
Bookmarks
Bookmarks are electronic markers you can set in a
track to return to later. Bookmark options include:
• Set: Displays Bookmark list with a bookmark
number highlighted. Bookmarks already set are
shown in bold text. Press FORWARD to set bookmark and return to Player mode.
• Select: Displays Select Bookmark list. Press
PLAY/PAUSE and STOP to navigate through the
list; press FORWARD to select a bookmark and
begin playback.
• Delete: Displays Delete Bookmark list. Press
PLAY/PAUSE and STOP to navigate through the
list; press FORWARD to delete a highlighted
bookmark.
Power
Tip: If you install a replacement battery,
select the Battery type on the Power
Control screen, to ensure that the battery
icon accurately displays the power level.
Index
15
This feature sets power
saving and display
options. Press PLAY/
PAUSE and STOP to navigate between fields;
press FORWARD or
REVERSE to cycle
through values for each field; press ENTER to save
the settings and exit. Power Control options include:
• Backlight: Off, 2 seconds (s), 5s (Default), 10s,
20s, On
• Battery: Alkaline (Default S10 and S30S/S35S),
NiMH (Default S50)
• Pwr Save: This setting controls the amount of
time before the player will switch to Power Save
mode, indicated by “Power Saving” shown on the
LCD, if the player is not in use but turned ON.
Press any player button to exit Power Save
mode. Pwr Save options include: Never, 1 minute
(m), 5m (Default), 10m, 30m
Battery life
Power Control settings can effect the battery life.
For example, if you set the Backlight to ON, and Pwr
Save to NEVER, it will result in shorter battery life
than if you were to set the Backlight to OFF and Pwr
Save to 1 minute. In addition, leaving the player in
Power Save mode, instead of turning it OFF (O) with
the OFF/ON switch, uses battery power. Turn your
player OFF if you will not be using it instead of leaving it in Power Save mode for extended periods of
time. High playback volume level and using high
Advanced Features
Contents
performance headphones can result in shorter battery life as well, because of the greater power these
options need.
Rio S10 Digital Music Player
Resume
This feature controls how
the player will resume
playback after being
turned OFF and back ON.
Press PLAY/PAUSE or
STOP to navigate
between fields; press
FORWARD or REVERSE to cycle through values for
each field; press ENTER to save the settings and
exit. Resume options include:
• Track: First, Current (Default): Returns to the
first track or to the same track that was playing.
• Timecode: Start (Default), Current: Resets track
time to the track start time or to the current time
within the track that was playing.
Contrast
The screen contrast is
changed as the Contrast
slider control is adjusted
by pressing FORWARD or
REVERSE, but it reverts
to the original setting if
the dialog is canceled.
Contrast display values range on a slider control
from 0 to 15 (default 9). Press ENTER to save the
Contrast setting and exit.
Index
16
Time
This feature sets Time
and Date options. Press
PLAY/PAUSE or STOP to
navigate between Set
Time, Set Date, or Time
Mode options; press FORWARD to select an
option. On the Set Time or Set Date screens: press
FORWARD or REVERSE to navigate between fields;
press PLAY/PAUSE or STOP to adjust Time and Date
settings; press ENTER to save the settings and exit.
On the Time Mode screen: press FORWARD or
REVERSE to cycle through values; press ENTER to
save the setting and exit. Time options include:
• Set Time: Hours and Minutes
• Set Date: Day, Month, and Year
• Time Mode: 12 Hour (Default) or 24 Hour clock
About
This main Menu option includes the following information:
• Player: Includes model number, firmware version, SONICblue copyright notice and URL.
• Storage: Shows internal and external storage
details textually and graphically, and the total
number of tracks loaded on the player.
Using the Music Management Software
Contents
Index
17
Using the Music Management Software
This section is an introduction to the music management software included on the CDs. Please refer to the
complete online Help within each application for more information about the music management software.
Rio Music Manager (PC)
RealOne (PC)
Mood Logic (PC)
iTunes (Mac)
Using Rio Music Manager (PC)
Rio Music Manager is included on the PC software CD. Use Rio Music Manager to:
• Download music to your Rio player
• Play music on your computer
• Organize your digital audio collection
NOTE: If you are using Rio Music Manager on a PC running Windows 98 or 98SE operating
systems, you must download and install Windows Media Player if you wish to use the Rio
Music Manager playback feature.
To Learn More About Using Rio Music Manager
Please see the Rio Music Manager online help for detailed information on using the software.
Using the Music Management Software
Contents
Downloading Music to Your Rio Player
1 Start the Rio Music Manager software.
2 Connect the Rio player to your computer with the USB
cable.
3 Turn the Rio player ON.
Click check Select “Format
boxes to Portable” on the
select tracks Tools menu to
to download erase all tracks
from the player
Index
18
Use
Tabs to
search
for
music
4 Use the tabs located in the top part of the Rio Music
Manager software screen to locate music to transfer.
Search by Album, Artist, Genre, Song title, Playlist, or
search for tracks on your computer.
• Select music to download by clicking the check box
to the left of the artist/album/track title.
Rio S10 Digital Music Player
• Click the Clear All check box in the center of the
window to de-select all tracks.
By default, the software shows the player’s internal
memory in the bottom part of the screen. You can
choose internal or external memory (if an external
memory card is installed) from the drop-down list
located in the center part of the software screen.
5 Click Transfer in the center part of the screen to start
copying the selected music files to the Rio player.
Click “Transfer” to
download selected
tracks to the player
Rio Music Manager main window
Using the Music Management Software
Contents
Index
19
Using RealOne (PC)
RealOne music management software is included on the PC software CD. Use RealOne to:
• Save (encode) your audio CDs into compressed digital audio formats like MP3.
• Organize digital audio tracks on your computer.
• Copy tracks to your Rio player.
• Search for tracks on your computer or on the Internet.
• Create a custom CD—if you have CD burning hardware and your computer supports it.
To Learn More About Using RealOne
Please see the RealOne online Help for detailed information on using the software. To view the help:
1 Click the software Help menu.
2 Select Help Contents, Getting Started Guide, or Tutorial.
Setting Preferences
You can set Preferences to control settings such as the sample rate for encoded tracks, or if you wish RealOne to automatically save (encode) audio CDs while they play. Please
see the complete RealOne online Help for more information
about Preferences. To open the Preferences window you can
either:
• Click the Tools menu and select Preferences.
• Click Preferences at the bottom of the RealOne window.
RealOne Preferences window
Using the Music Management Software
Contents
Saving an Audio CD
Rio S10 Digital Music Player
1 Start the RealOne software.
2 Put an audio CD in your computer’s CD-ROM
drive.
If the Prompt To Save CD preference is enabled
(under Preferences > CD), a message is displayed, asking if you wish to save the CD. If you
select Yes, RealOne starts saving (encoding) all
tracks on the CD. If this preference is not
enabled, continue with Step 3.
3 After a few seconds, CD and track information is
displayed.
4 Click SAVE TRACKS at the bottom of the window.
A dialog box is displayed, where you can select
individual tracks, or select all tracks by clicking
the Check All button.
5 Click OK when you are done.
6 RealOne starts saving the selected tracks into
compressed digital audio format.
Index
20
Click the Help menu to learn more
Click to Set Preferences
Click to Save (Encode) Tracks
RealOne CD window
Using the Music Management Software
Contents
Index
21
Downloading Tracks to Your Rio Player
1
2
3
4
5
6
Start the RealOne software.
Plug your Rio player into your computer with the USB cable.
Turn your Rio player ON.
Click DEVICES at the bottom of the RealOne window. The Devices window is displayed.
Double-click the name of your portable digital audio player that you want to transfer tracks to.
Click ADD CLIPS in the command bar at the bottom of the RealOne window. The Add Clips window is displayed.
Note: You can also quickly add tracks
(clips) directly from My Library by
selecting tracks to transfer and
clicking COPY TO on the My Library
command bar.
7 Select the tracks (clips) to be transferred
to your portable player. Click ADD CLIP to
queue up the tracks to be transferred and
close the Add Clips window.
8 Click TRANSFER in the command bar at
the bottom of the window to begin downloading the selected tracks to your portable player. Tracks labeled “Will Not Fit” will
not be transferred. This status means that
the total size of the tracks being transferred to your portable player exceeds the
available memory on the player.
RealOne
Devices
Window
Command
Bar
Note: Only audio files supported by your player can be transferred. An error message will
display if you try to add an unsupported media file to your portable player.
Using the Music Management Software
Contents
Index
22
Using MoodLogic (PC)
Rio S10 Digital Music Player
MoodLogic software helps you manage your digital audio collection. Your Rio package includes a free 100
track trial version of MoodLogic client software. Use MoodLogic to:
• Identify your songs regardless of file names and tags.
• Auto-classify your songs by genre, mood, tempo, and more.
• Auto-correct your file tags.
• Build instant playlists filled with songs that match your mood.
• Explore and sample new songs that are similar to your favorites.
• Share song profiles with other users.
For more information about MoodLogic, including a tutorial, tips & tricks, and FAQ, visit the MoodLogic Web
site.
Using the Music Management Software
Contents
Index
23
Using iTunes (Mac)
iTunes music management software is included on the Mac software CD. iTunes turns your Mac into a powerful digital jukebox, complete with easy-to-use tools for recording music from audio CDs (simply insert a
CD to import music to MP3s), searching and browsing your entire collection, managing playlists, and listening to Internet radio stations.
To Learn More About Using iTunes
• From within the software, click the Help
menu and choose iTunes Help or
• Visit the iTunes Web site.
Encoding a CD
1 Start the iTunes software.
2 Put an audio CD in your Mac’s CD-ROM
drive.
3 After a few seconds, the CD automatically
opens in iTunes showing the names of
each track.
4 Choose the check box next to each track
you wish to encode. All tracks are
selected by default.
5 Click the IMPORT button at the top left of
the iTunes window. iTunes starts encoding
the selected tracks.
iTunes software screen
Loading Music on Your Rio Player
1
2
3
4
Start the iTunes software.
Make sure your Rio player is connected to your computer with the USB cable. Turn your Rio player ON.
The Rio player appears in the iTunes window.
Click and drag music files from the desktop to the iTunes window. Progress bars display while the music
copies.
Glossary of Digital Audio Terms
Contents
Index
24
Glossary of Digital Audio Terms
Bass
Bass is the particular low-range area of the sound
spectrum where low musical notes and sounds are
located. Increasing the bass value will make the low
vocals and drums more prominent in your music.
Adjusting this level too high can cause distortion at
high volumes in some music files.
Rio S10 Digital Music Player
Bitrate
Bitrate denotes the number of bits per second used
to represent a digital music file. The size and quality
of a compressed digital audio file is determined by
the bitrate used when encoding the file. The higher
the bitrate used, the higher the sound quality, and
the larger the file size. For example, with MP3, a
bitrate of 128kbps (128,000 bits per second) is generally thought of as “CD quality”, and takes up
about 1 megabyte (MB) per minute of music. At a
64kbps bitrate, the sound quality is similar to that
of an FM radio signal, but you can get around two
minutes of music in that same 1MB of storage
space. CD audio has a bitrate of 1.4Mbits per second (1,400,000 bits/second).
Codec
Depending on the context and kind of technology
involved, codec can be defined as a compressed
digital audio file format (like MP3, WMA, and so on),
a “coding/decoding” chip used to translate between
digital and analog transmissions (used in modems),
or a compression/decompression algorithm. Codecs
compress audio data into a file, often for efficient
transmission over a network, and then decode it for
playback. While all the codecs perform similar compression of digital audio, there are differences in the
technology.
The Rio player supports the following digital audio
codecs:
• MP3
• WMA
Encoding
Encoding, sometimes referred to as “ripping” and
encoding, refers to extracting audio from a music
CD (ripping) and converting it into a compressed
digital audio format (encoding), such as MP3 or
WMA, that can be played on your Rio player or on
the computer.
Firmware
Firmware is software — programs or data — that
has been written onto read-only memory (ROM).
Firmware is a combination of software and hardware that is comparable to an operating system on
a computer. The Rio player’s firmware controls
everything from the liquid crystal display and codec
support to the Rio player’s other functions.
How to update the Rio player firmware
Glossary of Digital Audio Terms
Contents
Index
25
ID3 tag
Skin
The ID3 tag is the part of the encoded MP3 file that
contains information about the digital music file
such as song title, artist, album title, encoding
bitrate, track time duration, and so on. ID3 Tag
information for each track appears on the Player
mode screens.
The skin is a software option that lets you change
how software applications appear on your computer
screen. Some software applications allow you to
customize the interface color and window design by
changing the skin. Some skins omit certain playback controls for simplicity.
MP3
Streaming
MP3 is short for Moving Pictures Experts Group
Audio Layer 3. MP3 is the most well known compressed digital audio file format. This format allows
for near “CD quality” sound, but at a fraction of the
size of normal audio files. MP3 conversion of an
audio track from CD-ROM reduces the file size by
approximately a 12:1 ratio with virtually no perceptible loss in quality. This digital sound encoding and
compression process was developed by the Fraunhofer Institut fur Integrierte Schaltungen and
Thomson Multimedia. MP3 compression removes
the redundant and irrelevant parts of a sound signal
that the human ear doesn't hear. The MP3 encoding
process is well suited for the transfer of high quality
audio files with small file size over the Internet.
Streaming technology lets you play audio or video
directly from the Internet without first saving it on
your computer. You can listen to or watch the file
right away, without waiting for it to completely
download.
Playlist
WMA
Playlists let you organize lists of tracks to play in the
order you choose. Playlists make it easier to manage large collections of music.
Treble
Treble is the high notes of the sound spectrum.
Increasing the treble value will raise the levels of
the high sounds in your music files.
VBR
Variable Bitrate (VBR) encoding converts tracks at a
variable rate, using higher bitrate encoding for complex portions and lower bitrate encoding for pauses
in songs.
Windows Media Audio (WMA) is the compressed
audio format created by Microsoft as an alternative
to MP3. WMA offers comparable quality at greater
file compression than MP3, enabling you to store
more music on your PC or Rio player.
Frequently Asked Questions (FAQ)
Contents
Index
26
Frequently Asked Questions (FAQ)
What size and type external memory cards will my Rio player hold?
The Rio players support current MMC memory sizes of 8, 16, 32, 64 and 128MB. Please visit the SONICblue
Support Web site at www.sonicblue.com/support for more information on external memory cards.
How do I install an external memory card?
1
2
3
4
Turn the Rio player OFF.
Remove the battery compartment cover on the back of the player.
Remove the battery.
Gently insert the external memory card with the label side up and the notch in the upper right corner
into the memory card slot above the battery compartment.
5 Replace the battery. Ensure the battery is inserted properly by matching the + symbol on the battery
with the symbols in the player battery compartment.
Rio S10 Digital Music Player
6 Replace the battery compartment cover.
How do I remove an external memory card?
1 Turn the Rio player OFF.
2 Remove the battery compartment cover on the back of the player.
3 Remove the battery.
4 Slide the memory card out using your fingernail in the groove at the bottom of the card.
What kind of batteries does the Rio player use?
The S10 uses one 1.5 volt AA-size alkaline battery.
If you install a replacement battery, follow these steps to choose the battery type on the Power Control
screen, to ensure that the battery icon on the LCD accurately displays the power level:
1 Press MENU.
2 Press STOP to navigate down to Settings. Press FORWARD to select Settings.
3 Press STOP to navigate down to Power. Press FORWARD to select Power.
Frequently Asked Questions (FAQ)
Contents
Index
27
4 Press STOP to navigate to the Battery field on the Power Control screen. Press
PLAY/PAUSE to navigate up the screen.
5 Press REVERSE and FORWARD to cycle through Battery options.
6 Press ENTER to save your choices and exit.
What does the Rio player Hold feature do?
The Hold feature locks the player buttons and controls except the OFF/ON
Power Control
switch. This is useful at times when the player may be bumped or jostled. To put
screen
the player into or out of Hold mode, press and hold MENU, then press ENTER.
When the player is in Hold mode, a lock icon appears on the LCD and the player
will display a message indicating that Hold mode is active if the player buttons are pressed.
How much music can I put in my Rio player?
The amount of music you can store in your player or on your computer depends on the amount of memory
you have available. The following table shows the amount of memory required to store one minute of stereo music for the given bitrate.
Table 1: Memory required to store digital audio
Bitrate (kbps)
Approximate
memory required
(MB) to store one
minute of digital
audio
64
0.5
96
0.75
128
1.0
164
1.25
192
1.5
Frequently Asked Questions (FAQ)
Contents
Index
28
Calculating Play Time
Note: Due to different software compression algorithms, the following information may vary
slightly depending on what software you are using and what program created the MP3.
To determine how much play time your Rio player actually has, use the following equation:
Rio player Play Time = M / (S x 0.439) where:
M = Rio player memory size in megabytes (MB): 64MB, 128MB, and so on.
S = Sampling Speed in kilobits per second (kbps): 128kbps, 80kbps, and so on.
The higher quality the MP3, the larger its size, causing it to take up more room in your Rio player's memory. For example, if you encode and transfer strictly 128 kbps MP3's to a player with 64MB flash memory,
the player would to hold approximately 64 minutes of audio. If you encode and transfer 64 kbps WMA files
to the player, it would hold approximately 128 minutes of audio.
Rio S10 Digital Music Player
What are the differences between MP3 and WMA?
If you use the WMA format instead of the MP3 format, you can have comparable quality at about one half
the size. Since WMA offers “CD quality” at a smaller file size than MP3, it enables you to store more music
on your PC or on your portable player. WMA files are exclusive to the PC.
How do I update the Rio player firmware?
Downloading the firmware update from the Web site
1 Go to the SONICblue Support Web site.
2 Navigate to the Rio Technical Support Updates page.
3 Select and download the latest Rio player PC or Mac firmware update file to your computer. Unzip the file
if necessary.
TIP: Please read the text file included with the firmware update for instructions and
additional assistance.
Updating the Rio player firmware (PC)
Important: Quit all other applications before running the firmware update. While running the
firmware update, do not close the program, turn off the Rio player or unplug the USB cable.
1 Connect the Rio player to the computer with the USB cable.
2 Turn the Rio player ON. “USB Connected” is displayed on the player screen.
Frequently Asked Questions (FAQ)
Contents
Index
29
3 Double-click the firmware update file that you downloaded from the Web site. The firmware update
should take approximately 30 seconds to load.
Upgrading the Rio player firmware (Mac)
Important: Do not close the program, turn off the Rio player or unplug the USB cable during
the update.
1
2
3
4
5
Connect the Rio player to the computer with the USB cable.
Turn the Rio player ON.
Double-click the iTunes icon.
Select the Rio player icon.
Click the Options button on the iTunes window. The Rio Settings window is displayed.
6 Click the Upgrade Firmware button on the Rio Settings window.
7 Choose the firmware update file that you downloaded from the Web site.
8 Click the Open button.
Recovery mode
Note: Performing a recovery mode firmware update erases all music content on the player.
If you can’t read the display, the player firmware may be corrupted. Corrupted firmware may be caused by
a failed firmware update. If the player firmware becomes corrupted for any reason, follow these steps to
restart the player in Recovery mode, then proceed with the firmware update.
1 Turn the player OFF.
2 Open the battery compartment cover and remove the battery.
3 After five seconds has elapsed, reinstall the battery, matching the “+” symbol on the battery with the
symbols in the battery compartment. Replace the battery compartment cover.
4 Connect the player to the computer with the supplied USB cable.
5 While holding down MENU, turn the player ON.
6 Keep holding MENU until “UPGRADER” is displayed on the screen.
7 Proceed with loading the firmware update.
Troubleshooting
Contents
Index
30
Troubleshooting
Problem
Solution
I can’t read the
display;
First make sure that the battery has power.
If the player firmware becomes corrupted for any reason, follow these steps to restart
the player in Recovery mode. After you restart the player in Recovery mode, proceed
with the firmware update.
The player
seems “dead”;
Rio S10 Digital Music Player
The player
firmware is corrupted
Note: Performing a recovery mode firmware update erases all content on the
player.
1 Turn the player OFF.
2 Open the battery compartment cover and remove the battery.
3 After five seconds has elapsed, reinstall the battery, matching the “+” symbol on the
battery with the symbols in the battery compartment. Replace the battery compartment cover.
4 Connect the player to the computer with the supplied USB cable.
5 While holding down MENU, turn the player ON.
6 Keep holding MENU until “UPGRADER” is displayed on the screen.
7 Proceed with loading the firmware update.
Rio player
doesn’t play
secure, timed,
(date dependent) content
after the battery is changed
We recommend that you reconnect to the secure service where the timed content came
from — with the Rio player connected to your computer with the USB cable and turned
on — after you change the battery. This should will reset the Rio player’s clock. After
the clock is reset, secure, timed content should play normally.
Troubleshooting
Contents
Index
31
Problem
Solution
Error message
is displayed on
the computer
screen when
CD encoding
begins
The following factors may interfere with the CD encoding process:
• Over-utilization of the CPU during the encoding process. Close all other software
before encoding.
• Insufficient RAM to cache the track properly. Generally, 64 MB is fine if no other
memory intensive application is running. Close all other software before encoding.
• CD-ROM firmware. Even if a CD-ROM drive is new, it may require a firmware update
from the manufacturer to correct audio extraction errors.
• Overclocking. Overclocking the system — running it faster than it is rated to run —
can have adverse effects on the peripheral components. If your system is overclocked, bring it back to its normal operating speed.
Limited Warranty
Contents
Index
32
Limited Warranty
Our warranty to you
SONICblue Incorporated warrants that your product will be free from defects in materials and workmanship for a period of one
year from the date of original retail purchase. SONICblue Incorporated warrants refurbished products, marked and sold as such,
for ninety (90) days from the original purchase date. This warranty is extended to the original end user purchaser only and is not
assignable or transferable to any other party.
Product failures not covered by this warranty
This warranty does not cover damage caused by abuse, misuse, unauthorized attempts to open, modify, or repair the product,
moisture, extreme heat or cold, corrosive environments, shipping, or high voltage surges from external sources such as power
line, telephone line, or connected equipment. This warranty does not cover wear and tear on covers, housing or wiring. This warranty also does not apply to any product with an altered or defaced serial number.
Rio S10 Digital Music Player
Remedies
If you discover a defect covered by this warranty, SONICblue Incorporated will repair or replace the product at our sole discretion
using new or remanufactured product or components. SONICblue Incorporated's liability is limited solely to the repair or replacement of the defective product. If SONICblue Incorporated cannot reasonably repair or replace the defective product then SONICblue Incorporated may, at its sole discretion, refund the purchase price paid for the product. SONICblue Incorporated warrants
any replaced or repaired product for a period of ninety (90) days from shipment, or through the end of the original warranty
period, whichever is longer.
How to obtain warranty service
To obtain service under this warranty, you must contact a SONICblue Incorporated Customer Care Center within the applicable
warranty period to receive a warranty service authorization. You will be required to provide a dated original proof of purchase.
Products shipped to SONICblue Incorporated must be shipped postage-paid and packaged appropriately for safe shipment. SONICblue Incorporated is not responsible for products received without a warranty service authorization and may be rejected.
Repaired or replacement products will be shipped to you at SONICblue Incorporated's expense. All products or parts that are
replaced become the property of SONICblue Incorporated.
Limits of liability
SONICblue Incorporated's liability is limited to the repair or replacement of this product. In no event will SONICblue Incorporated
be liable for any amount greater than the currently suggested retail price of this product. We will not be liable to you or anyone
else for any damages that result from the failure of this product or from the breach of any express or implied warranties. These
include damage to other equipment, lost data, lost profits, or any consequential, incidental, or punitive damages. This written
warranty represents the entire warranty agreement between SONICblue Incorporated and you. This warranty is given in lieu of
all other warranties, express or implied, including without limitation implied warranties of merchantability and fitness for a particular purpose. This warranty is limited to the term specified above. No warranties, either express or implied, will apply after this
period. This warranty may not be altered in any way other than in writing by an officer of SONICblue Incorporated. This warranty
gives you specific legal rights and you may also have other rights, which vary, from state to state. Some states limit what warranties may be excluded as well as how long an implied warranty lasts, so the above limitation may not apply to you.
Regulatory Information
Contents
Index
33
Regulatory Information
Federal Communications Commission (FCC)
This device complies with Part 15 of the FCC Rules. Operation is subject to the following two conditions:
1 This device may not cause harmful interference, and
2 This device must accept any interference received, including interference that may cause undesired
operation.
NOTE: This equipment has been tested and found to comply with the limits for a Class B digital device, pursuant to Part 15 of the FCC Rules. These limits are designed to provide reasonable protection against harmful interference in a residential installation. This equipment generates, uses and can radiate radio frequency
energy and, if not installed and used in accordance with the instructions, may cause harmful interference to
radio communications. However, there is no guarantee that interference will not occur in a particular installation. If this equipment does cause harmful interference to radio or television reception, which can be
determined by turning the equipment off and on, the user is encouraged to try to correct the interference
by one or more of the following measures:
• Reorient or relocate the receiving antenna.
• Increase the separation between the equipment and receiver.
• Connect the equipment into an outlet on a circuit different from that to which the receiver is connected.
• Consult the dealer or an experienced radio/TV technician for help.
Industry Canada
This Class B digital apparatus complies with Canadian ICES-003.
Cet appareil numérique de la classe B est conforme à la norme NMB-003 du Canada.
Customer Care
Contents
Index
34
Customer Care
Web site
http://www.sonicblue.com/support
E-mail
[email protected]
Technical Support Telephone
Call for answers to technical questions about
your product
(503) 453-1640
Customer Service Telephone
Call for SONICblue sales and general product
information
(800) 468-5846
Rio S10 Digital Music Player
Hours
Please check the support Web site for the current hours of operation
Rio Product Support
With every Rio product you receive the following support services:
• Unlimited access to the Rio web-based technical information resources, available 24 hours a day every
day at http://www.sonicblue.com/support. Here you will find FAQ files, product updates, and other useful information.
• Unlimited e-mail support for the duration of your Rio product hardware warranty period.
• Access to the latest software updates and enhancements for Rio products via our Web site.
Index
Contents
Index
A
about menu 16
audio file size 24
B
bass 24
battery cover 4
battery installation 8
battery life 15
bitrate 24
bookmarks menu 15
buttons and controls 4
C
changing the battery 26
codec
defined 24
MP3 25
WMA 25
common questions 26
contrast menu 16
copyright/trademark 3
corrupted display troubleshooting 30
customer care 34
D
dead player troubleshooting 30
display 6
downloading tracks (Mac) 23
downloading tracks (PC) 21
E
encoding
a CD (Mac) 23
a CD (PC) 20
defined 24
ENTER button 4
EQ 13
equalizer menu 13
external memory cards 26
F
MP3 25
MULTIFUNCTION port 5
music management software 17
FAQ 26
Federal Communications Commission (FCC) 33
firmware
defined 24
updating 28
FORWARD button 4
frequently asked questions 26
O
getting started 8
R
G
H
hold mode 12
I
ID3 tag
defined 25
Industry Canada 33
installing memory cards 26
installing the battery 8
installing the software 8
iTunes software 23
L
lanyard holder 5
lap times 11
LCD 6
legal notices 3
limited warranty 32
lock 12
M
Mac software 23
memory cards 26
MENU button 5
MoodLogic software 22
OFF/ON switch 5
P
PLAY/PAUSE button 4
playback mode 6
player mode 10
playing music 10
playlist 25
power menu 15
random play 12
RealOne software 19
recovery mode 29
regulatory information 33
removing memory cards 26
repeat 12
repeat/shuffle modes 17
resume menu 16
REVERSE button 4
Rio Music Manager software 17
ripping and encoding 24
S
setting/releasing hold 12
setup instructions 8
shuffle 12
skin 25
software installation 8
STOP button 4
stopwatch 11
streaming 25
35
Index
Contents
T
technical support 34
time menu 16
timer 11
treble 25
U
USB connection 9
V
variable bitrate (VBR) 25
VOLUME + and - buttons 5
W
Rio S10 Digital Music Player
warranty 32
WMA 25
36