1
Red Hat Enterprise Virtualization
for Desktops 2.2
User Guide
A guide to accessing and using virtual desktops.
Edition 2
Dani Coulson
David Jorm
Red Hat Enterprise Virtualization for Desktops 2.2 User Guide
A guide to accessing and using virtual desktops.
Edition 2
Dani Co ulso n
Red Hat Engineering Co ntent Services
David Jo rm
Red Hat Engineering Co ntent Services
Legal Notice
Copyright © 2011 Red Hat, Inc..
T his document is licensed by Red Hat under the Creative Commons Attribution-ShareAlike 3.0 Unported
License. If you distribute this document, or a modified version of it, you must provide attribution to Red
Hat, Inc. and provide a link to the original. If the document is modified, all Red Hat trademarks must be
removed.
Red Hat, as the licensor of this document, waives the right to enforce, and agrees not to assert, Section
4d of CC-BY-SA to the fullest extent permitted by applicable law.
Red Hat, Red Hat Enterprise Linux, the Shadowman logo, JBoss, MetaMatrix, Fedora, the Infinity Logo,
and RHCE are trademarks of Red Hat, Inc., registered in the United States and other countries.
Linux ® is the registered trademark of Linus T orvalds in the United States and other countries.
Java ® is a registered trademark of Oracle and/or its affiliates.
XFS ® is a trademark of Silicon Graphics International Corp. or its subsidiaries in the United States
and/or other countries.
MySQL ® is a registered trademark of MySQL AB in the United States, the European Union and other
countries.
Node.js ® is an official trademark of Joyent. Red Hat Software Collections is not formally related to or
endorsed by the official Joyent Node.js open source or commercial project.
T he OpenStack ® Word Mark and OpenStack Logo are either registered trademarks/service marks or
trademarks/service marks of the OpenStack Foundation, in the United States and other countries and
are used with the OpenStack Foundation's permission. We are not affiliated with, endorsed or
sponsored by the OpenStack Foundation, or the OpenStack community.
All other trademarks are the property of their respective owners.
Abstract
T his document is a reference guide for users of a Red Hat Enterprise Virtualization for Desktops
system.
Table of Contents
Table of Contents
.Preface
. . . . . . . . . . . . . . . . . . . . . . . . . . . . . . . . . . . . . . . . . . . . . . . . . . . . . . . . . . . . . . . . . . . . . . . . . . . . . . . . . . . . . . . . . . .3. . . . . . . . . .
1. Document Conventions
3
1.1. T ypographic Conventions
3
1.2. Pull-quote Conventions
4
1.3. Notes and Warnings
5
2. We Need Feedback!
5
. . . . . . . . . 1.
Chapter
. . .Introduction
. . . . . . . . . . . . . . . . . . . . . . . . . . . . . . . . . . . . . . . . . . . . . . . . . . . . . . . . . . . . . . . . . . . . . . . . . . . . . . . .7. . . . . . . . . .
. . . . . . . . . 2.
Chapter
. . .Requirements
. . . . . . . . . . . . . . . . . . . . . . . . . . . . . . . . . . . . . . . . . . . . . . . . . . . . . . . . . . . . . . . . . . . . . . . . . . . . . . . .8. . . . . . . . . .
.Chapter
. . . . . . . . 3.
. . .Getting
. . . . . . . . Started
. . . . . . . . . . . . . . . . . . . . . . . . . . . . . . . . . . . . . . . . . . . . . . . . . . . . . . . . . . . . . . . . . . . . . . . .9. . . . . . . . . .
3.1. Logging in
9
3.2. Logging out
11
3.3. ActiveX installation
11
3.4. Mozilla Firefox plugin installation
11
.Chapter
........4
. ...Understanding
. . . . . . . . . . . . . . . .the
. . . .User
. . . . .Portal
. . . . . . . . . . . . . . . . . . . . . . . . . . . . . . . . . . . . . . . . . . . . . . . . . . . . . .13
...........
4.1. Desktop symbol features
13
.Chapter
. . . . . . . . 5.
. . .Accessing
. . . . . . . . . . .Desktops
. . . . . . . . . . . . . . . . . . . . . . . . . . . . . . . . . . . . . . . . . . . . . . . . . . . . . . . . . . . . . . . . . . . 16
............
5.1. Accessing a desktop
16
5.1.1. T urning a desktop on
17
5.1.2. Selecting a connection protocol
18
5.1.2.1. Configuring connection protocol options
18
5.1.2.1.1. SPICE Options
18
5.1.2.1.2. RDP Options
19
5.1.3. Connecting to a desktop
20
5.1.3.1. Configuring remote access on Windows guests using RDP
21
5.1.4. Logging out of a desktop
21
.Chapter
. . . . . . . . 6.
. . .Using
. . . . . . Virtual
. . . . . . . Desktops
. . . . . . . . . . . . . . . . . . . . . . . . . . . . . . . . . . . . . . . . . . . . . . . . . . . . . . . . . . . . . . . . . 22
............
6.1. Desktops connected using SPICE
22
6.1.1. SPICE options
23
6.1.1.1. SPICE hotkeys
23
6.2. Desktops connected using RDP
23
6.2.1. Using local drives
23
6.3. Using Multiple CD-ROMs on a virtual machine
24
6.4. Using USB devices on a virtual desktop
24
6.4.1. Enabling USB redirection
24
6.4.2. Configuring USB filter policy
27
. . . . . . . . . .History
Revision
. . . . . . . . . . . . . . . . . . . . . . . . . . . . . . . . . . . . . . . . . . . . . . . . . . . . . . . . . . . . . . . . . . . . . . . . . . . . . . . . .30
...........
1
Red Hat Enterprise Virtualization for D esktops 2.2 User Guide
2
Preface
Preface
1. Document Conventions
T his manual uses several conventions to highlight certain words and phrases and draw attention to
specific pieces of information.
In PDF and paper editions, this manual uses typefaces drawn from the Liberation Fonts set. T he
Liberation Fonts set is also used in HT ML editions if the set is installed on your system. If not, alternative
but equivalent typefaces are displayed. Note: Red Hat Enterprise Linux 5 and later include the Liberation
Fonts set by default.
1.1. Typographic Conventions
Four typographic conventions are used to call attention to specific words and phrases. T hese
conventions, and the circumstances they apply to, are as follows.
Mono-spaced Bold
Used to highlight system input, including shell commands, file names and paths. Also used to highlight
keys and key combinations. For example:
T o see the contents of the file m y_next_bestselling_novel in your current working
directory, enter the cat m y_next_bestselling_novel command at the shell prompt
and press Enter to execute the command.
T he above includes a file name, a shell command and a key, all presented in mono-spaced bold and all
distinguishable thanks to context.
Key combinations can be distinguished from an individual key by the plus sign that connects each part of
a key combination. For example:
Press Enter to execute the command.
Press Ctrl+Alt+F2 to switch to a virtual terminal.
T he first example highlights a particular key to press. T he second example highlights a key combination:
a set of three keys pressed simultaneously.
If source code is discussed, class names, methods, functions, variable names and returned values
mentioned within a paragraph will be presented as above, in m ono-spaced bold. For example:
File-related classes include filesystem for file systems, file for files, and dir for
directories. Each class has its own associated set of permissions.
Proportional Bold
T his denotes words or phrases encountered on a system, including application names; dialog box text;
labeled buttons; check-box and radio button labels; menu titles and sub-menu titles. For example:
Choose System → Preferences → Mouse from the main menu bar to launch Mouse
Preferences. In the Buttons tab, select the Left-handed m ouse check box and click
Close to switch the primary mouse button from the left to the right (making the mouse
suitable for use in the left hand).
T o insert a special character into a gedit file, choose Applications → Accessories →
3
Red Hat Enterprise Virtualization for D esktops 2.2 User Guide
Character Map from the main menu bar. Next, choose Search → Find… from the
Character Map menu bar, type the name of the character in the Search field and click
Next. T he character you sought will be highlighted in the Character T able. Double-click
this highlighted character to place it in the T ext to copy field and then click the Copy
button. Now switch back to your document and choose Edit → Paste from the gedit menu
bar.
T he above text includes application names; system-wide menu names and items; application-specific
menu names; and buttons and text found within a GUI interface, all presented in proportional bold and all
distinguishable by context.
Mono-spaced Bold Italic or Proportional Bold Italic
Whether mono-spaced bold or proportional bold, the addition of italics indicates replaceable or variable
text. Italics denotes text you do not input literally or displayed text that changes depending on
circumstance. For example:
T o connect to a remote machine using ssh, type ssh username@ domain.name at a shell
prompt. If the remote machine is exam ple.com and your username on that machine is
john, type ssh john@ exam ple.com .
T he m ount -o rem ount file-system command remounts the named file system. For
example, to remount the /hom e file system, the command is m ount -o rem ount /hom e.
T o see the version of a currently installed package, use the rpm -q package command. It
will return a result as follows: package-version-release.
Note the words in bold italics above — username, domain.name, file-system, package, version and
release. Each word is a placeholder, either for text you enter when issuing a command or for text
displayed by the system.
Aside from standard usage for presenting the title of a work, italics denotes the first use of a new and
important term. For example:
Publican is a DocBook publishing system.
1.2. Pull-quote Conventions
T erminal output and source code listings are set off visually from the surrounding text.
Output sent to a terminal is set in m ono-spaced rom an and presented thus:
books
books_tests
Desktop
Desktop1
documentation
downloads
drafts
images
mss
notes
photos
scripts
stuff
svgs
svn
Source-code listings are also set in m ono-spaced rom an but add syntax highlighting as follows:
4
Preface
static int kvm_vm_ioctl_deassign_device(struct kvm *kvm,
struct kvm_assigned_pci_dev *assigned_dev)
{
int r = 0;
struct kvm_assigned_dev_kernel *match;
mutex_lock(&kvm->lock);
match = kvm_find_assigned_dev(&kvm->arch.assigned_dev_head,
assigned_dev->assigned_dev_id);
if (!match) {
printk(KERN_INFO "%s: device hasn't been assigned before, "
"so cannot be deassigned\n", __func__);
r = -EINVAL;
goto out;
}
kvm_deassign_device(kvm, match);
kvm_free_assigned_device(kvm, match);
out:
mutex_unlock(&kvm->lock);
return r;
}
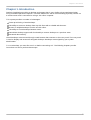
1.3. Notes and Warnings
Finally, we use three visual styles to draw attention to information that might otherwise be overlooked.
Note
Notes are tips, shortcuts or alternative approaches to the task at hand. Ignoring a note should
have no negative consequences, but you might miss out on a trick that makes your life easier.
Important
Important boxes detail things that are easily missed: configuration changes that only apply to the
current session, or services that need restarting before an update will apply. Ignoring a box
labeled 'Important' will not cause data loss but may cause irritation and frustration.
Warning
Warnings should not be ignored. Ignoring warnings will most likely cause data loss.
2. We Need Feedback!
If you find a typographical error in this manual, or if you have thought of a way to make this manual
better, we would love to hear from you! Please submit a report by email to the author of the manual,
David Jorm ([email protected] ). When submitting a bug report, be sure to mention the manual's
5
Red Hat Enterprise Virtualization for D esktops 2.2 User Guide
identifier: User_Guide.
If you have a suggestion for improving the documentation, try to be as specific as possible when
describing it. If you have found an error, include the section number and some of the surrounding text so
we can find it easily.
6
Chapter 1. Introduction
Chapter 1. Introduction
Desktop virtualization provides a desktop environment that is very similar to that experienced when
using a standard personal computer. T he main difference is that a virtual desktop physically resides on
a remote server and is connected to using a 'thin client' computer.
T his system provides a number of advantages:
Faster provisioning of new desktops.
T he ability to access a desktop from any thin client with a suitable web browser.
Access to multiple desktops from the one thin client.
T he ability to share desktops between users.
Centralized desktop support with functionality to restore desktops to a previous state.
Increased data security.
Virtual desktops are accessed through a web browser that connects to the user portal. T he user portal
is used to display and access all assigned desktops. Desktops are assigned by your system
administrator.
T o use a desktop, you must first turn it on before connecting to it. T he following chapters provide
instructions on how to perform these steps.
7
Red Hat Enterprise Virtualization for D esktops 2.2 User Guide
Chapter 2. Requirements
T o connect to a virtual desktop, you will need access to a thin client with a supported web browser
installed. T he following web browsers are supported:
Internet Explorer 7 or higher on Windows, with the SPICE ActiveX control installed.
Mozilla Firefox 3 on Red Hat Enterprise Linux, with the SPICE plugin installed
64-bit editions of Internet Explorer are not supported by SPICE
T he SPICE plugin for Internet Explorer is 32-bit only. 64-bit editions of Internet Explorer cannot be
used to connect to virtual desktops using SPICE.
You will also require the following information:
User portal web address.
Access credentials:
Username
Password
Domain details
Contact your system administrator if you do not have all of these requirements.
8
Chapter 3. Getting Started
Chapter 3. Getting Started
T his chapter provides instructions for accessing and using the Red Hat Enterprise Virtualization user
portal, which is used to access assigned desktops.
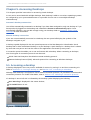
3.1. Logging in
1. Open the web browser and enter the provided user portal web address into the address bar.
A message is displayed, informing you that you are being redirected to the User Portal Login
Page. If the login page does not load, click here.
Figure 3.1. Login page
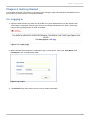
2. When the Red Hat Enterprise Virtualization login screen opens, enter your User Name and
Password in the corresponding fields.
Figure 3.2. Log in
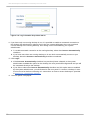
3. T he Domain drop-down menu can be used to select the domain.
9
Red Hat Enterprise Virtualization for D esktops 2.2 User Guide
Figure 3.3. Log in Domain drop-down menu
4. If you have only one running desktop in use, it is possible to enable an automatic connection to
the desktop. By selecting this option at log in time, the system will bypass the user portal and
connect directly to the running desktop. T his setting can be overridden by your system
administrator.
A. T o enable automatic connection to the running desktop, select the Connect Automatically
checkbox.
B. If you have more than one running desktop or do not wish to automatically connect to your
desktop, leave the Connect Automatically checkbox unselected.
5. Click Login.
A. If the Connect Automatically checkbox has previously been selected, or the system
administrator enabled this option for the desktop, the user portal will be bypassed and you will
be connected directly to the desktop.
B. If you did not select the Connect Automatically checkbox and this option was not enabled
by the system administrator, you will directed to the user portal. T o access a desktop, it must
first be turned on before connecting to it. Instructions on how to access desktops is provided
in Section 5.1, “Accessing a desktop”.
6. T he user portal is displayed.
10
Chapter 3. Getting Started
Figure 3.4 . User Portal
3.2. Logging out
It is recommended that you log out of the user portal once you have finished using it.
Procedure 3.1. T o log out of the user portal:
1. At the top left of the user portal, click Sign out.
2. You are logged out and returned to the user portal login screen.
3.3. ActiveX installation
T o access and use Red Hat Enterprise Virtualization desktops from a Windows computer running
Internet Explorer, you must first add the ActiveX component to your web browser. T he ActiveX
component is required to connect to desktops using the SPICE connection protocol. For further
information, refer to Section 5.1.3, “Connecting to a desktop”.
T he first time that a desktop client is used to connect to a desktop, the ActiveX component will
automatically be installed. As updates become available, these will be automatically installed at log in.
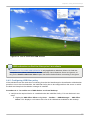
On many Windows systems, attempting to install the ActiveX component causes the web browser to
issue a security warning. You will need to confirm that you wish to proceed with the installation to
continue.
For example, when attempting to install the ActiveX component in Windows XP with Service Pack 2, the
add-on notification bar will appear within Internet Explorer. Click on the notification bar and accept the
installation. When the security warning appears asking if you wish to run the ActiveX control, click Run to
continue.
3.4. Mozilla Firefox plugin installation
11
Red Hat Enterprise Virtualization for D esktops 2.2 User Guide
T o access and use Red Hat Enterprise Virtualization desktops from a Red Hat Enterprise Linux
computer running Mozilla Firefox, you must first install the SPICE Firefox plugin. T he SPICE plugin is
required to connect to desktops using the SPICE connection protocol. For further information, refer to
Section 5.1.3, “Connecting to a desktop”.
T he Firefox plugin is provided by the package spice-xpi which is available on Red Hat Network in the
Red Hat Enterprise Linux and Red Hat Enterprise Linux Desktop channels. T o install the
package, ensure your system is subscribed to the Red Hat Enterprise Linux or Red Hat Enterprise
Linux Desktop channel and run the command:
yum install spice-xpi
T he next time you start Mozilla Firefox the plugin will be installed.
12
Chapter 4. Understanding the User Portal
Chapter 4. Understanding the User Portal
Once you are logged into the the user portal, desktop symbols will be displayed for each desktop
assigned to you.
T he desktop symbols provide the following functionality:
T urn the desktop on or off.
Connect or disconnect the desktop.
Select a connection protocol. T his option is only available if a protocol other than the default is
available for use with the particular desktop.
Configure the various protocol options for RDP or SPICE desktop connections.
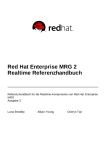
4.1. Desktop symbol features
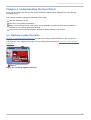
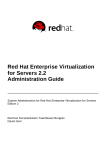
Figure 4.1, “Desktop Symbol Features” illustrates the desktop symbol features in the user portal.
T he numbers in the diagram correspond to the desktop features listed in T able 4.1, “Description of
Features”.
Figure 4 .1. Desktop Symbol Features
13
Red Hat Enterprise Virtualization for D esktops 2.2 User Guide
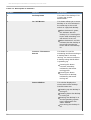
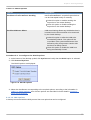
T able 4 .1. Description of Features
Number
Feature
Description
1
Desktop Name
T he name of the desktop. T his
is set by the system
administrator.
2
On / Off Button
T his button allows you to turn a
desktop on or off. It behaves in
the same way as the on/off
switch on a physical desktop.
When the button is green,
this indicates that the
desktop is on. Pressing this
button while a desktop is on
will cause it to turn off.
When the button is red, this
indicates that the desktop is
turned off. Pressing the
button will turn the desktop
on.
3
Connect / Disconnect
Button
T his button is used for
connecting and disconnecting to
a desktop that is currently
running. You cannot connect to
a desktop using SPICE while it
is powering up.
Pressing this button
connects a desktop,
indicated by the button
turning green.
Pressing this button
disconnects a desktop,
indicated by the button
turning red.
4
Status Window
T his window displays the
current state of the desktop.
Possible states are:
Powering up: the desktop is
turning on.
Powering down: the desktop
is turning off.
Running: the desktop is on
and the operating system
logo is displayed in the
status window.
Not running: the desktop is
off.
14
Chapter 4. Understanding the User Portal
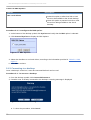
5
Options
Clicking on Options allows the
desktop connection protocol to
be selected. T he connection
protocol must be selected
before connecting to the
desktop. T he options available
depend on the desktop
configuration.
Available options are:
SPICE: Red Hat Enterprise
Virtualization protocol with
display acceleration
RDP: Microsoft Remote
Desktop Protocol
T he Options dialog box also
provides access to configuration
of the connection Protocol
Options. For further details,
refer to Section 5.1.2, “Selecting
a connection protocol”.
15
Red Hat Enterprise Virtualization for D esktops 2.2 User Guide
Chapter 5. Accessing Desktops
T his chapter provides instructions for accessing virtual desktops.
A user can be associated with multiple desktops. Each desktop is able to run various operating systems,
as configured by your system administrator. It is possible for one user to use multiple desktops
simultaneously.
Automatic desktop connection
You will be automatically connected to a desktop if you have been assigned to only one desktop or if you
have previously logged into the desktop and selected the Connect Automatically option. Once
automatically logged in, you are able to begin using your desktop. Refer to Chapter 6, Using Virtual
Desktops for more information.
Manual desktop connection
If you are not automatically connected to a desktop, the user portal will display the symbols of the
desktops assigned to you.
A desktop symbol displayed in the user portal represents a Red Hat Enterprise Virtualization virtual
desktop that is either a dedicated desktop or a pool desktop. A pool desktop is a desktop that is shared
by more than one person and can be used to host applications accessed by many users.
A connection protocol enables you to see and interact with a desktop. When connecting to desktops,
one of two types of connection protocols can be used:
SPICE: Red Hat Enterprise Virtualization remote rendering protocol.
Remote Desktop Protocol (RDP): Microsoft protocol for connecting to Windows desktops.
5.1. Accessing a desktop
A desktop displayed in the user portal is available for access by turning it on and then connecting to it.
Refer to Section 5.1.1, “T urning a desktop on” and Section 5.1.3, “Connecting to a desktop”.
Although each desktop is configured to use a default connection protocol, it is possible to use alternative
connection protocols. For further information, refer to Section 5.1.2, “Selecting a connection protocol”.
If a desktop is turned off, this is indicated by the desktop symbol displaying the following:
Not Running is displayed in the status window;
T he On/Off button is red.
Figure 5.1. Desktop turned off
16
Chapter 5. Accessing D esktops
5.1.1. Turning a desktop on
A desktop must be turned on before connecting to it.
Procedure 5.1. T o turn on a desktop:
1. From the desktop symbol, click On/Off.
2. T he desktop powers up.
Figure 5.2. Desktop powering up
3. T he On/Off button turns green.
Figure 5.3. Running desktop
4. Click on the Connect/Disconnect button to connect using the default protocol.
Once the desktop has connected to the operating system, the Connect/Disconnect button turns
green.
Figure 5.4 . Connected desktop
17
Red Hat Enterprise Virtualization for D esktops 2.2 User Guide
Connect only when guest is running
T he SPICE connection will only be established when the desktop is fully up and running. You will
not be able to connect to the guest when it is powering up.
5.1.2. Selecting a connection protocol
Each desktop is connected using a single protocol. Although the default protocol is automatically used,
some desktops provide the option of connecting with a protocol other than the default.
T o select the connection protocol for a desktop:
1. From the desktop symbol, click Options.
2. T he available protocols for the desktop are displayed, with the default connection protocol preselected.
Figure 5.5. Connection protocol options
3. Select the protocol that you wish to connect to the desktop with.
5.1.2.1. Configuring connection protocol options
Each desktop is connected using a single connection protocol, depending on the protocols available to
the particular desktop. Both SPICE and RDP are defined with a default set of options that can be
changed as required.
5.1.2.1.1. SPICE Options
A desktop that is connected with the SPICE protocol has two options that can be enabled or disabled.
T hese options handle sharing resources/signals between the client and the guest.
18
Chapter 5. Accessing D esktops
T able 5.1. SPICE Options
Option
Description
Enable Ctrl+Alt+Delete Sending
Ctrl+Alt+Delete is a special keystroke that
can be intercepted locally or remotely.
Select this option to enable sending the
keystroke to the remote desktop.
Clear this option to disable sending the
keystroke to the remote desktop.
Enable USB Auto-Share
USB Auto-Sharing allows any USB device that is
inserted into the client machine to be accessed
by the virtual desktop.
Select this option to allow the USB to be
automatically shared. T he option will be
overridden if the system administrator has
defined a policy that prevents certain USB
devices from being shared.
Clear this option to disable the USB from
being automatically shared.
Procedure 5.2. T o configure the SPICE options:
1. At the bottom of the desktop symbol, click Options and verify that the SPICE option is selected.
2. Click Protocol Options.
T he SPICE Options are displayed.
Figure 5.6. SPICE Options
3. Select the checkboxes corresponding to the required options, according to the information in
T able 5.1, “SPICE Options”. Use of these options are described in further detail in Chapter 6,
Using Virtual Desktops.
5.1.2.1.2. RDP Options
A desktop connected with the RDP protocol has one option that can be configured.
19
Red Hat Enterprise Virtualization for D esktops 2.2 User Guide
T able 5.2. RDP Options
Option
Use Local Drives
Description
Select this option to allow local CD or DVD
drives to be available to the virtual desktop.
Clear this option to prevent local CD or DVD
drives from being available to the virtual
desktop.
Procedure 5.3. T o configure the RDP option:
1. At the bottom of the desktop symbol, click Options and verify that the RDP option is selected.
2. Click Protocol Options to display the RDP Options.
Figure 5.7. RDP Options
3. Select the checkbox to use local drives, according to the information provided in T able 5.2, “RDP
Options”.
4. Click OK to continue.
5.1.3. Connecting to a desktop
Once a desktop is turned on, it must be connected before it can be used.
Procedure 5.4 . T o connect a desktop:
1. From the desktop symbol, click Connect/Disconnect.
2. If another user is already connected to the desktop, a warning message is displayed.
Figure 5.8. Disconnect warning
A. T o abort the procedure, click Cancel.
20
Chapter 5. Accessing D esktops
B. T o continue, causing the other user to be disconnected, click OK.
3. If it is the first time connecting with SPICE, you must install the appropriate SPICE component or
plugin. If you are connecting from a Windows computer, install the ActiveX component as in
Section 3.3, “ActiveX installation”. If you are connecting from a Red Hat Enterprise Linux computer,
install the Mozilla Firefox plugin as in Section 3.4, “Mozilla Firefox plugin installation”.
4. Enter your login details in the User Name and Password fields and click OK to continue.
Multiple desktop connection
It is possible to be connected to multiple desktops simultaneously.
5.1.3.1. Configuring remote access on Windows guests using RDP
If you are using the RDP connection protocol to log in to a Windows desktop, you have to enable remote
access on the desktop before connecting to it. T o do so, you need access to the Red Hat Enterprise
Virtualization administration portal. Contact your system administrator if you do not have the relevant
permissions.
Procedure 5.5. T o enable remote desktop connection on a Windows desktop
1. From the administration portal, use the Console button
to log in to a Windows desktop via
SPICE. Make sure you have administrative permissions for the virtual desktop.
2. Go to Start → Control Panel → System and Security → System → Allow remote access.
3. T he System Properties dialog box displays. On the Rem ote tab, select Allow connections
from computers running any version of Remote Desktop. Click OK.
4. You will now be able to access the Windows desktop using RDP from the user portal. Repeat this
procedure for every Windows guest which uses RDP.
5.1.4. Logging out of a desktop
Once you have finished using a desktop, you must first log out according to the instructions specific to
the operating system before logging out of the user portal.
T o log out from Windows, go to Start → Log Off
T o log out from Red Hat Enterprise Linux, go to System → Log Out
Confirm that the desktop is logged out before proceeding to sign out of the user portal, as described in
Section 3.2, “Logging out”.
21
Red Hat Enterprise Virtualization for D esktops 2.2 User Guide
Chapter 6. Using Virtual Desktops
T his chapter covers the use of virtual desktops. T he options available for use with virtual desktops
depend on the connection protocol and options used when connecting, as described in Section 5.1.2.1,
“Configuring connection protocol options”.
6.1. Desktops connected using SPICE
When using the SPICE protocol to connect to a desktop, it is possible to configure a number of
connection options. T he available options are dependent on the operating system installed on the
desktop.
Procedure 6.1. T o display the available protocol options:
Windows Only
T hese instructions are only relevant to the Windows SPICE client. T he Linux client allows for the
use of hotkeys listed in Section 6.1.1, “SPICE options”, but does not have a connection menu as
described below.
1. Once connected to the desktop, right-click on the desktop window title bar.
2. T he connection menu is displayed.
Figure 6.1. Connection menu
22
Chapter 6. Using Virtual D esktops
3. From the connection menu, you are able to select a range of options.
6.1.1. SPICE options
T able 6.1. Connection menu options
Option
Description
Hotkey
Send Ctrl+Alt+Del
Sends the Ctrl+Alt+Del key
combination to the virtual
desktop.
Ctrl+Alt+End
T oggle Full Screen
T oggles full screen mode on or
off. When enabled, full screen
mode expands the desktop to fill
the entire screen. When
disabled, the desktop is
displayed as a window.
SHIFT +F11
Special Keys
Shows a menu of special key
combinations which can be sent
to the virtual desktop
-
SHIFT +F11
Sends the key combination
SHIFT +F11 to the virtual
desktop
-
SHIFT +F12
Sends the key combination
SHIFT +F12 to the virtual
desktop
-
Ctrl+Alt+End
Sends the key combination
Ctrl+Alt+End to the virtual
desktop
-
6.1.1.1. SPICE hotkeys
In addition to accessing the connection options through the connection menu, it is possible to use the
hotkeys listed in Section 6.1.1, “SPICE options”, when using a desktop in full screen mode or from a
Linux client. For Windows clients, the menu can be accessed by clicking on the desktop window title bar
when not in full screen mode.
When the mouse is used inside a desktop, it becomes locked in the desktop window and cannot be
used elsewhere. T o unlock the mouse, press Shift+F12.
6.2. Desktops connected using RDP
A desktop connected with RDP has one configurable protocol option, which allows the use of local
drives.
6.2.1. Using local drives
T his protocol option allows a local CD or DVD drive on the client machine to be used on a virtual desktop
connected with RDP.
Procedure 6.2. T o enable use of local drives:
1. An the bottom of the desktop symbol, click Options and verify that the RDP option is selected.
23
Red Hat Enterprise Virtualization for D esktops 2.2 User Guide
2. Click Protocol Options to display the available options.
3. Select the Use Local Drives checkbox.
T he local CD/DVD drive can now be used with the desktop.
6.3. Using Multiple CD-ROMs on a virtual machine
T o use the CD-ROM drive on a local client machine, go to the user portal and use RDP as the
communication protocol. T hen select Use Local Drives from the Protocol Options.
When you use multiple CD-ROMs, you can change the CD-ROM using the SPICE menu (right click on the
title bar of the SPICE session). Alternatively, from the legacy GUI, use the VNC option in the Run Once
command and use Change CD-ROM button in the VNC window.
6.4. Using USB devices on a virtual desktop
A virtual desktop that is connected with the SPICE protocol can be configured to connect USB devices.
T o do so, the USB device has to be plugged into the client machine, then enabled to appear on the
guest machine. Red Hat Enterprise Virtualization presently supports USB redirection on the following
clients and guests:
Client
Red Hat Enterprise Linux 6.0
Red Hat Enterprise Linux 5.5 and higher
Windows XP
Windows 7
Guest
Windows XP
Windows 7
Understanding the difference between client and guest
It is important to note the distinction between the client machine and guest machine. T he client is
the machine you use to access a guest. T he guest is the virtual desktop which can be connected
through the User Portal.
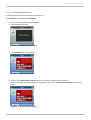
6.4.1. Enabling USB redirection
T o configure USB policies, you need to be able to access the Red Hat Enterprise Virtualization Manager
administration portal. If you do not have the permissions to do so, contact your system administrator.
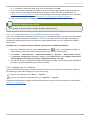
Procedure 6.3. T o enable USB redirection
1. On a Windows client machine, install the RHEV-USB_Client.exe package which can be
downloaded from the Red Hat Network.
2. On the guest machine, install RHEV-T oolsSetup.exe on the guest machine.
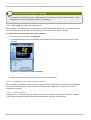
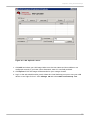
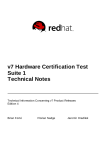
a. Download RHEV-toolsSetup.iso from the Red Hat Network onto the server where Red
Hat Enterprise Virtualization Manager is installed.
b. From the Red Hat Enterprise Virtualization Manager server run Start → All Programs →
Red Hat → RHEV Manager → ISO Uploader.
24
Chapter 6. Using Virtual D esktops
Figure 6.2. ISO Uploader menu
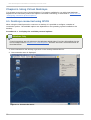
c. Click Add and select your ISO image. Make sure the Host Name and Host Address are
configured correctly. If you have a Host Password, enter it in text field provided.
d. Click Upload. T he ISO image will be attached to your storage domain.
e. Log in to the web administration portal. Select the virtual desktop you want to use your USB
device on and right click on it. Click Change CD and select RHEV-toolsSetup.iso.
25
Red Hat Enterprise Virtualization for D esktops 2.2 User Guide
Figure 6.3. Uploading RHEV-toolsSetup onto a virtual desktop
f. Connect to your virtual desktop. T he RHEV-T ools ISO can be accessed from the CD Drive.
Enter the CD directory and launch RHEV-T oolsSetup.exe to install the required tools.
g. Restart your desktop for changes to take effect.
3. Allow connections on T CP port 32023 on any firewalls between the virtual desktop and the client
machine.
4. T o enable your virtual desktop to accept USB devices, select the SPICE protocol option Enable
USB Auto-Share from the User Portal. For further information refer to Section 5.1.2.1.1, “SPICE
Options”.
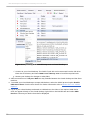
5. Log in to your virtual desktop and attach a USB device to the client. If the required USB device
does not appear directly on the virtual desktop, right click on the SPICE frame and select USB
Devices. Choose your device from the list displayed.
26
Chapter 6. Using Virtual D esktops
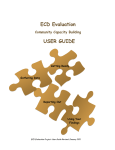
Figure 6.4 . List of connected USB devices
USB redirection on Red Hat Enterprise Linux clients
Procedure 6.3, “T o enable USB redirection” is only applicable to Windows clients. For Red Hat
Enterprise Linux clients, USB devices are automatically shared between clients and guests, as
long as the Enable USB Auto-Share option has been checked before connecting to the guest.
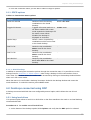
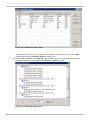
6.4.2. Configuring USB filter policy
If the USB device can be used when connecting from the Red Hat Enterprise Virtualization administration
portal but not on the virtual machine, the USB Filter Policy has to be configured from the server on which
the Red Hat Enterprise Virtualization manager is installed.
Procedure 6.4 . T o enable use of USB device on virtual desktop
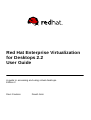
1. Verify that the required device is a enabled under the USB Filter Policy. T his can be done in two
ways:
a. Display the USB Filter Editor using Start → RedHat → RHEVManager → USB Filter
Editor. T his displays a sub-menu with a list of all USB devices available to the desktop.
27
Red Hat Enterprise Virtualization for D esktops 2.2 User Guide
Figure 6.5. USB Filter Editor menu
On the last line, it looks like "ANY-ANY-ANY-ANY-Block". Right click on it and select Edit.
Change the setting from Block to Allow and press OK.
b. On the USB Filter Editor, click Search. T his will bring up a list of connected USB devices.
Select the USB device required and click Allow to enable its usage.
Figure 6.6. Attached USB devices
28
Chapter 6. Using Virtual D esktops
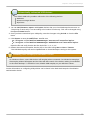
Automatically redirected USB devices
T he default USB Policy enables redirection of the following devices:
Webcams
All mass-storage devices
All printers
2. You can Add, Remove, Import and Export devices that your virtual desktops have access to.
T he priority of each entry is set according to its location from the top. T his can be changed using
the Up and Down buttons.
3. Once you have customized your USB policy, save the changes using Ctrl+S or from the File
menu.
4. Click Export to save the usbfilter.txt file onto
C:\Program Files\Redhat\RHEVManager\UserPortal\Consoles\Spice
C:\Program Files\Redhat\RHEVManager\WebAdm inPortal\Consoles\Spice
Open the file and verify that the last line looks like "-1,-1,-1,-1,1"
5. Restart the Internet Information Service (IIS) on the client using Start > Run > iisreset.
T he USB Device policy will now be implemented on virtual desktops running on the system.
Disabling USB Autoplay on Windows Clients
On Windows clients, some USB devices will autoplay when connected. If a USB device autoplays,
the autoplay window will appear and the client will take control of the device, making it unavailable
to the virtual desktop. T o avoid this issue, disable USB autoplay on your Windows clients.
Further information on configuring USB policies can be found in the Red Hat Enterprise Virtualization
Administration Guide.
29
Red Hat Enterprise Virtualization for D esktops 2.2 User Guide
Revision History
Revision 2-6.4 00
Rebuild with publican 4.0.0
2013-10-31
Rüdiger Landmann
Revision 2-6
Rebuild for Publican 3.0
2012-07-18
Anthony T owns
Revision 3-0
T uesday 15 March 2011
Cheryn T an
BZ #683678 - Change "Firefox" to "Mozilla Firefox" in line with word usage guide - fixed
BZ #683679 - Can't connect to a desktop while it's powering up - fixed
BZ #685002 - [Docs] user guide includes no info on usb redirector usage - fixed
Revision 2-0
T hu 1 July 2010
Remove keyboard layout limitation BZ #609751
David Jorm
Revision 1-0
RHEV 2.2
General Availability
David Jorm
30
T hu 10 June 2010