1
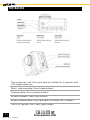
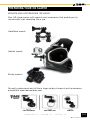
HD SLAYER
OWNERS MANUAL
Join the ever growing Reel Camera’s community and share
your footage at reelcameras.com/community
Share hints, tips, and skills, at the Reel Camera’s
community base at www.reelcameras.com/blog
capture it : share it : relive it
REELCAMERAS.COM
TABLE OF CONTENTS
THE BASICS
Picture of the HD Slayer highlights functions / buttons
1
1
PREPARING YOUR HD SLAYER
Mounts and accessories included
The HD slayer battery
Memory Cards
Accessing and using the menu
System settings
Screen Icons
RECORDING WITH YOUR HD SLAYER
Video recording / formating
Zoom
Photo recording
Waterproof housing and underwater use
RELIVING HD SLAYER FOOTAGE
View / playback video and photos
Copy / transfer video files (MS Windows / MAC)
Delete video and photo files
2
2
3
4
5
6
7
UPDATING YOUR HD SLAYER
Firmware updates
Exchanging the lens
FAQ AND CUSTOMER SUPPORT
8
9
9
10-11
12
13
13
14
14 & 16
15
15
15
17-18
TECHNICAL DATA
19
IMPORTANT WARNING MESSAGES AND SAFETY ADVICE
20
capture it : share it : relive it
THE BASICS
Turn camera on / off: Press and hold [on button] for 3 seconds until
LCD screen comes on
Start / stop recording: Press [video button]
Capture photo: Press [camera button]
Access playback: Press [play button}
Access camera menu: Press and hold [M button] for 3 seconds
Turn LED light on / off: Press [light button]
[1]
©2013 REEL CAMERAS
REELCAMERAS.COM
PREPARING YOUR HD SLAYER
MOUNTS AND ACCESSORIES INCLUDED
Your HD slayer comes with mounts and accessories that enable you to
immediately start recording like a pro.
Handlebar mount:
Helmet mount:
Sticky mounts:
Go really professional and utilize a huge variety of mounts and accessories
available at www.reelcameras.com
#RC301
RAM SUCTION CUP
#RC302
#RC303
RAM HANDLE BAR
RAM ROLL
capture it : share it : relive it
[2]
©2013 REEL CAMERAS
THE HD SLAYER BATTERY
The HD Slayer comes with a recyclable Li-Po battery. The battery is
designed to fit tightly inside the HD slayer.
The battery level is displayed in the top right corner of the screen. When
the battery is empty the camera will power off. If you are recording the
camera will save the current clip before powering off.
CHARGING THE BATTERY
The HD Slayer comes with a partially charged battery. To charge the
battery:
1. Use the USB charger to connect the camera to a computer or power
source.
2. The status LED light will turn red to indicate the camera is charging.
3. The status LED light will turn green once the camera is fully charged
From empty it requires three hours of charging to get a full battery.
While charging, you can use all the camera’s features and record video or
take photos.
REPLACING THE BATTERY
1. Remove the battery cover by using the switch
on the side of the camera
2. Pull out the battery and replace
[3]
©2013 REEL CAMERAS
REELCAMERAS.COM
MEMORY CARDS
The HD Slayer uses micro SD cards to store data. It is compatible with
both microSD and microSDHC cards with a capacity of 2GB, 4GB, 8GB,
16GB, and 32GB.
The HD Slayer is compatible with all speed class ratings, however we
recommend using a micro SD card with a speed class rating of 10 or
higher to ensure all the data is accurately captured. We recommend
branded SD cards.
One of the features of the HD Slayer is its dual micro SD slots. With two
32GB micro SD slots you have the potential of a 64GB capacity when
recording. Your HD Slayer will automatically switch to the 2nd card when
the 1st card is full.
INSERTING A MEMORY CARD
1. Lift the soft plastic cover on the side of the
camera
2. Insert micro SD or MicroSDHC into either
port with label facing the back of the camera.
The card will click into place when inserted.
3. Inserted memory cards will be displayed with
the card icons 1 and 2 at the bottom of the
LCD screen. The red screen icon indicates no card is correctly inserted.
The white card screen icon indicates a card correctly inserted.
4. A flashing card icon indicates which card is currently being used by the
HD Slayer for recording.
REMOVING A MEMORY CARD
Removing the memory card while the HD slayer is recording can result in
loss of data. To remove, press fingernail against the edge of the memory
card and it will come out far enough to be fully removed.
capture it : share it : relive it
[4]
©2013 REEL CAMERAS
ACCESSING AND USING THE MENU
To access the menu settings press and hold the [M button] for three
seconds.
The menu is divided into three different tabs, indicated at the top of the
screen (photo, video, and system settings).
By pressing the [M button] you can switch between the different tabs.
To exit the menu, press and hold the [M button] for three seconds.
When looking at the screen in the menu mode:
Press [ESC] to scroll between tabs
Press [directional arrows] to scroll between menu items
Press [double arrow] to select individual menu item
Press [directional arrows] to change item settings
Press and hold [ESC] to go back one step and to exit menu
SYSTEM SETTINGS
To access the system settings first press and hold [M button] for 2
seconds to access menu mode. Press [M button] twice more to access
system settings.
Language:English, French, German, Spanish, Italian, Dutch, Norwegian, Russian
Date / Time:Date and time can be manually changed
Auto Screen Off:Sets the screen to automatically switch off to save battery: Off, 30, 60 or 120 Sec after last button is pressed.
[5]
©2013 REEL CAMERAS
REELCAMERAS.COM
SYSTEM SETTINGS (CONT.)
Auto Screen Power Off:Sets the camera to automatically switch off: Off, 60 Sec., 120 Sec. or 300 Sec. after last button pressed.
Motion detection:Sets the camera to detect motion and assists with camera focusing:Off, low, medium or high
Image rotation:Flips the image for recording with the camera upside down: Regular or Rotation 180
Image mirror:Reverses the image as if looking in a mirror: Regular or mirror
Light Frequency:When filming indoors ensure light frequency is set correctly: 60Hz for North and Central Americas, 50Hz for rest of the world.
Video System:NTSC or PAL
OSD:Displays icons ON or OFF
LED Indication:Switches front LED ON or OFF.
Format Card:Formats the card in SLOT 1 or SLOT 2. All recorded data will be deleted.
Default Settings:Restores the camera to its original factory settings
Firmware Update:Update firmware when camera is connected to a computer and the update file is available
capture it : share it : relive it
[6]
©2013 REEL CAMERAS
SCREEN ICONS
Through a sequence of icons you can immediately check the current
status of your HD slayer. Across the top of the screen information on
battery life and current recording is displayed. Along the bottom of
the screen information about SD card use, time, storage capacity, and
recording settings are displayed.
ZOOM
The HD Slayer has a built in 4 x zoom that enables you to get closer to
the action.
To zoom in press and hold the [camera button]
for three seconds. You can zoom in either before
or during recording.
To zoom out press and hold the [video button] for
three seconds. You can zoom out either before or
during recording.
Note: that the zoom mode is not available when the video is set to 1080p
or in PAL mode.
[7]
©2013 REEL CAMERAS
REELCAMERAS.COM
RECORDING WITH YOUR HD SLAYER
VIDEO RECORDING
The HD Slayer captures stunning high definition video and uses a simple
one button recording system.
Start and stop recording
To start recording press and release the [video button]. While recording
the blue status LED will flash intermittently. On the top of the screen the
red video icon will be displayed and the duration of the recording will be
counted.
Note: it is not possible to start recording when the camera is in the menu
mode.
To stop recording press and release the [video button]. The blue status
LED will stop flashing and the red video icon will disappear.
Your HD Slayer will immediately stop recording when the battery is out of
power or the memory card(s) are full. Data will be saved before recording
stops.
DIFFERENT VIDEO MODES
Your HD Slayer has a range of video formats and options that allow
maximum flexibility over the size and quality of your footage.
To access the video menu press and hold the [M button] for two seconds
to access the main menu, and then press the [M button] once to access
the video menu.
Higher resolutions produce greater quality images and larger data files.
capture it : share it : relive it
[8]
©2013 REEL CAMERAS
VIDEO FORMAT
Video Format
Resolution
(Pixel)
480pH
720p
720pH
1080pS
1080p
720 x 480
1280 x 720
1280 x 720
1440 x 1080
1920 x 1080
Standard (in FPS)
NTSC
50
30
PAL
50
25
60
60
30
30
25
25
Note that the zoom setting is not available in 1080p modes. For the
majority of uses we recommend the 720pH as it combines excellent
image quality with relatively small files. It also has a frame per second
rate that is ideal for slow motion recording.
Quality: Set the data rate and quality of recording to Low, Medium, or High
Video Section:The HD Slayer will continue recording until recording is stopped. This option determines the maximum length of each data clip, enabling a long recording to be seamlessly stored as different clips. Set to 5 10, 15, 20, or 30 minutes
Timestamp:
Set the timestamp ON or OFF
Time lapse rec: Set time lapse recording settings to OFF, 1frame per second, 1 frame per minute (FPM), 2 FPM, or 6 FPM. This mode allows you to record at a very slow frame rate and create time lapse sequences.
Loop:
When the memory is full the camera will record over old footage. Set to ON or OFF
File Format:
Enables you to record data files in MPEG or MOV format.
Microphone:
Switches the in-built microphone ON or OFF
[9]
©2013 REEL CAMERAS
REELCAMERAS.COM
PHOTO RECORDING
Your HD Slayer is capable of capturing vividly clear still images with a
single click of a button. The separation of the photo and video buttons
enable you to immediately switch between photo and video mode.
TAKING A PHOTO
To take a photo press and release the [camera
button].
Note: You cannot take the photo while the
camera is recording video or the camera is in
the menu mode.
For ease of use photos are stored in a separate
sub-folder on the SD memory card.
DIFFERENT PHOTO MODES
In the photo menu you can select the following settings for photo
recordings.
Photo Size:
3, 5,or 8 MP
Photo Intervals:Use this function to capture a quick burst of photos immediately after each other. Set to 3 photos, 5 photos, or OFF
Auto shooting: Enables you to capture photos at specific time intervals and create timelapse videos (see below). Set to OFF, 3, 5, 10, 30, or 60 seconds.
Time stamp:
Sets the time stamp to ON or OFF
capture it : share it : relive it
[10]
©2013 REEL CAMERAS
PHOTO RECORDING (CONT.)
TIMELAPSE RECORDING
The HD Slayer has a built in two modes that enable you to create
stunning time lapse sequences. When the photo is set to autoshoot a
white stopwatch icon is displayed in the top left corner of the screen.
The time between shots will count down automatically.
By pressing the [camera button] the camera will start automatically taking
photos. To stop shooting press the [camera button].
The HD Slayer can be set to auto shoot at the following intervals: 3, 5,
10, 30, 60 seconds.
We recommend the following settings for creating timelapse videos:
3 seconds: Scenes when you’re physically moving
5 seconds: Cloud movement and landscapes
10 seconds:
Sunsets and slow moving landscapes
30 seconds
and 60 seconds: Slow moving scenes where the camera is fixed in
position
When recording for a long period of time select ‘auto screen off’ in the
system settings to be preserve battery life.
TIMELAPSE RECORDING IN VIDEO MODE
The HD Slayer can also record video footage with a very low frame rate.
In the video menu you can set the time lapse recording settings to OFF,
1frame per second, 1 frame per minute (FPM), 2 FPM, or 6 FPM. Press
the [video button] to start recording.
[11]
©2013 REEL CAMERAS
REELCAMERAS.COM
WATERPROOF HOUSING AND UNDERWATER USE
The HD Slayer comes with a shockproof and waterproof housing that
allows you to film in the toughest of conditions.
WATERPROOF HOUSING
All functions of the camera can be used when the camera is in the
waterproof housing.
Before use, ensure that the rubber seal is clean and undamaged. When
using the camera in wet or humid conditions it is recommended to use
anti-fog pads to ensure the inside remains clear of mist.
UNDERWATER USE
The waterproof housing can be used up to a depth of 40meters or
130feet. Use beyond this depth is not recommended.
For optical recording underwater turn the lens counterclockwide by 95
degrees. This function works with the light refraction of the water to
capture clear and vibrant footage.
Ensure the camera is in focus once underwater.
capture it : share it : relive it
[12]
©2013 REEL CAMERAS
RELIVING HD SLAYER FOOTAGE
VIEW / PLAYBACK VIDEOS AND PHOTOS
With the HD Slayers build in screen you can immediately relive your
footage and playback all your videos and photos on the camera.
PLAYBACK ON CAMERA
1. To access your recorded data press the [play button]. Select Card 1 or
Card 2 using the arrows and confirm your choice with the [play button].
You can choose between whether to access Video or Photo clips.
2. Use the arrows to select the video clip or to scroll through the photos.
3. To play a video clip press the [play button]. To pause playback press
the [play button] again.
4. You can rewind and fast forward through the video clips. Press the
[video button] to fast forward. By pressing the [video button] you can fast
forward at 2x, 4x, 8x, or play at normal speed. Press the [camera button]
to rewind the clip. Repeatedly pressing the [camera button] allows you to
rewind at 2x, 4x, or 8x.
PLAYBACK ON TV
1. Connect your HD Slayer to your TV using either the included USB-AV
wire or by using an HDMI cable.
2. Enter the playback mode on the camera to watch the videos and
photos on your television.
[13]
©2013 REEL CAMERAS
REELCAMERAS.COM
COPYING AND WATCHING FILES ON A COMPUTER
All data on the HD Slayer can be played, copied, and deleted, by
connecting the camera to your computer.
1. Connect the camera to your computer using the USB cable
2. Turn on the camera. You will be asked “Connect to PC.” Choose yes
using the arrow keys and the [play button] to confirm.
3. When connected the camera functions cannot be used.
Once connected the video and photo files can be played, copied, and
deleted.
COMPATIBILITY WITH WINDOWS AND MAC
The HD Slayer is compatible with both MS Windows and MAC operating
systems and there included editing software iMovie and Windows Live
Movie Maker.
Note: When using MS Windows it is recommended to record in MPEG
format as the MOV format is not supported by MS Windows Media Player.
The recommended media player for MOV files is Apple QuickTime Player.
DELETING VIDEO AND PHOTO DATA
Data can be deleted either by connecting the HD Slayer to a computer or
directly from the camera.
TO DELETE DATA FROM THE CAMERA:
1. Enter playback mode using the [play button]
2. In playback mode press the [m button]
3. Use the arrows to select either Delete this file or Delete all files.
4. To exit this menu press and hold [m button] for three seconds
capture it : share it : relive it
[14]
©2013 REEL CAMERAS
UPDATING YOUR HD SLAYER
FIRMWARE UPDATES
To get the best performance from your HD Slayer, Reel Cameras regularly
releases firmware updates. Check www.reelcameras.com/downloads to
access free firmware updates.
When updating the firmware do not turn off the camera. Once updated
restore the default settings to ensure the new firmware has taken affect.
EXCHANGING THE LENS
Reel Cameras have an easy to use interchangable lens system. This
gives you the ultimate flexibility with your filming and makes replacing a
scratched lens easy and cheap.
The standard HD Slayer has a 127° lens, providing a perfect blend of
width and depth. For ultra widescreen footage use a 170° lens. Or take
a 148° lens for an impressive widescreen field of view. The 96° lens
narrows the field of view and is used for doing justice to depth, like a
downhill run.
To change a lens, simply unscrew it from the camera and screw in the
new lens.
[15]
©2013 REEL CAMERAS
REELCAMERAS.COM
COPYING AND WATCHING FILES ON A COMPUTER
All data on the HD Slayer can be played, copied, and deleted, by
connecting the camera to your computer.
1. Connect the camera to your computer using the USB cable
2. Turn on the camera. You will be asked “Connect to PC.” Choose yes
using the arrow keys and the [play button] to confirm.
3. When connected the camera functions cannot be used.
Once connected the video and photo files can be played, copied, and
deleted.
COMPATIBILITY WITH WINDOWS AND MAC
The HD Slayer is compatible with both MS Windows and MAC operating
systems and there included editing software iMovie and Windows Live
Movie Maker.
Note: When using MS Windows it is recommended to record in MPEG
format as the MOV format is not supported by MS Windows Media Player.
The recommended media player for MOV files is Apple QuickTime Player.
DELETING VIDEO AND PHOTO DATA
Data can be deleted either by connecting the HD Slayer to a computer or
directly from the camera.
TO DELETE DATA FROM THE CAMERA:
1. Enter playback mode using the [play button]
2. In playback mode press the [m button]
3. Use the arrows to select either Delete this file or Delete all files.
4. To exit this menu press and hold [m button] for three seconds
capture it : share it : relive it
[16]
©2013 REEL CAMERAS
FAQ AND CUSTOMER SUPPORT
If there is a problem with your HD Slayer first consult the frequently
asked questions. This lists the most common problems.
If you can not find a solution then first visit the community section of the
website at www.reelcameras.com/blog This page is regularly updated with
the queries sent to our customer service team and is full of hints and tips
to improve your filming.
Er r o r
Re a s o n
S o lu t io n
BA S IC C A MERA F UN C T IO N S
The camera turns off after start
The battery is not charged
Charge the battery with USB until
the status light turns green
Unable to switch ON the camera
The battery has no charge
Charge the battery or connect the
camera to a power supply
The battery is not inserted correctly
Check the battery
The SD card is defective
Remove the SD card and turn on
the camera
The software has crashed
Remove the battery and wait for 10
seconds before turning on again
The camera does not react when
buttons are pressed
The software has crashed
Remove the battery for 10 seconds
and restart the camera
The camera regularly freezes and
doesn't react
Firmware is out of date
Update firmware by visiting
www.reelcameras.com/downloads
The camera will not charge
The charger you are using has an
incorrect voltage
Use the Reel Cameras charger or
connect the camera to a computer
to charge
The battery is
Reinsert the battery
The camera has turned itself OFF
incorrectly inserted
The camera is out of battery
Recharge the battery
The camera software has crashed
Wait 10 seconds and turn the
camera on. If this fails, remove and
reinsert the battery before
turning
on
The camera has overheated
Only use the camera in
temperatures below 122°F
Remove the battery and wait for
the camera to cool
The camera has frozen at a low
temperature
Only use the camera in
temperatures above 10°F
Do not subject the camera to
prolonged periods in snow or icy water
Allow the camera to warm up
before restarting
Displays shows “SD error”
Faulty memory card
Format or replace the memory card
Date and time are not displayed
correctly
Incorrect menu settings
Change date and time in the system
menu
The camera will not record
The memory card is full or faulty
REELCAMERAS.COM
Format the memory card, or insert a
new memory card, or set Loop
recording to ON.
No memory card is inserted
Insert a memory card
IS S U E S W IT H R E C O R D IN G
[17]
©2013 REEL CAMERAS
Allow the camera to warm up
before restarting
Displays shows “SD error”
Faulty memory card
Format or replace the memory card
Date and time are not displayed
correctly
Incorrect menu settings
Change date and time in the system
menu
The camera will not record
The memory card is full or faulty
Format the memory card, or insert a
new memory card, or set Loop
recording to ON.
No memory card is inserted
Insert a memory card
The zoom function does not work
Video is set to record at 1080p
Change video settings and record at
720p or lower
The video footage is out of focus
The lens is incorrectly positioned
Turn the lens until clockwise until it
fits snugly in position
The lens has been turned to
underwater mode
Turn the lens 95° clockwise
Artificial lights flicker during video
footage
The camera is set to the wrong light
frequency
Change the light frequency in the
system menu
The video is recording upside down
Image rotation is set to 180°
Set image rotation to regular in the
system menu
The video jerks during playback
The USB connection is too slow
Use a computer with a USB2
connection or higher
The memory card is not writing fast
enough
Use a branded memory card with a
write speed of 10 or higher
The computer is too slow to play
the video
Play the video through a TV
The data rate is too high for the
computer
Reduce the data rate to medium or
low in the video settings menu
Camera is set to record in MOV
format and the computer does not
have the correct software to play it
Set the camera to record in MPEG
format.
IS S U E S W IT H R E C O R D IN G
IS S U E S W IT H P L A Y B A C K
My Windows PC will not play video
files
Use Apple QuickTime to play the
video files
IS S U E S W IT H M O U N T S A N D A C C E S S O R IE S
The underwater housing is fogging
up during use
The temperature difference
between inside and outside the case
is causing fogging.
Use an anti-fog insert or silica gel
inside the housing
The video jerks when using a Reel
Camera mount
The mount is too loose
Tighten the mount so the camera
cannot move
There is too great a distance
between the mount and the camera
Remove other accessories so the
camera is next to the mount
The surface is dirty or greasy
Clean and dry the surface
thoroughly before affixing the
mount
The sticky mount does not stick to
a surface
If you’re question is not answered in the FAQ’s or on the Reel Camera
community section of the website, contact the Reel Camera customer
service.
Reel Cameras, Inc.
www.reelcameras.com
e-mail: [email protected]
E-fax: 1-888-575-3443
capture it : share it : relive it
[18]
©2013 REEL CAMERAS
TECHNICAL INFORMATION
Operating Voltage:
5 V (USB) / 3,7 V (LiPo-Battery, 800 mAh)
Consumption:
250 – 450 mAh (depending on camera settings)
Weight:
77 g, incl. battery
Battery:
3,7 V 900 mAh LiPo
Sensor:
CMOS, 5 MP
Lens (exchangeable):
170° > 720p
127° > 1080p
Zoom:
Digital 4times (only NTSC) Screen:1.5” (38 mm)
TFT
Ports:
10 Pin Mini USB 2.0
HDMI
Open Connector Board (OCB, bottom of the cam)
Operating/Storage temp: 10F-122F
White balance:
[19]
©2013 REEL CAMERAS
Automatically
REELCAMERAS.COM
IMPORTANT WARNING MESSAGES AND SAFETY ADVICE
OBSERVE THE FOLLOWING TO AVOID DAMAGE TO THE PRODUCT
– Before you start using the camera please read the manual carefully
– Do not record in temperatures greater than 122 deg. F or lower than 10 deg. F
– Use only recommended accessories
– Do not disassemble the device. There are no parts that can be serviced by the user.
– Maintenance work needs to be carried out by skilled customer service employees.
DISCLAIMER NOTICE
Reel cameras is not liable for any loss of recordings due to malfunction or
defects in the device, the storage device, or accessories.
WARNING: LI-PO BATTERY
Never charge a damaged Li-Po battery pack. Stop charging if the Li-Po battery
pack is deformed.
Charge and store the battery pack at a temperature of between 32 and 104 deg. F
This product uses Li-Po batteries. Li-Po batteries are recyclable and a valuable
resource. To dispose of the battery, remove it and take it to a resource recovery
favility.
Herewith we declare that this item is in accordance with the essential
requirements and other relevant regulations of the directive 2004/108/EC. A
copy of the original declaration of conformity can be obtained at the address
below.
Information for disposal of crossed Bin marked products
This symbol is marked on a product or packaging, it means that the
product including the batteries must not be disposed of with your
general household waste. Only discard electrical/electronic items
in separate collection schemes, which cater for the recovery and
recycling of materials contained within. Your co-operation is vital to
ensure the success of these schemes and for the protection of the
environment.
capture it : share it : relive it
[20]
©2013 REEL CAMERAS
REELCAMERAS.COM
capture it : share it : relive it
Reel Cameras, Inc.
www.reelcameras.com
e-mail: [email protected]
E-fax: 1-888-575-3443
©2013 REEL CAMERAS