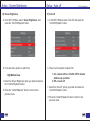
1
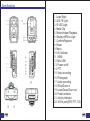
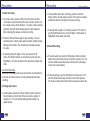
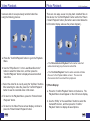
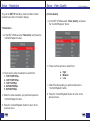
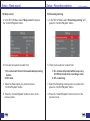
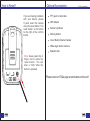
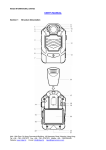
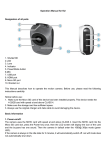
Specifications
1. Laser Sight
2. LED Fill Light
3. IR LED Light
4. Metal Clip
5. Return/Instant Playback
6. Display off/Fill-in Light
7. Confirm/Playback
8. Reset
9. Menu
10. AV In/Audio
11. HDMI
12. Mini USB
13. Power on/off
14. PTT
15. Video recording
16. Photograph
17. Audio recording
18. IR/Up/Zoom in
19. Laser/Down/Zoom out
20. Power Indicator
21. Activity Indicator
22. 30-Pin port(GPS, PTT, 3G)
01/30
02/30
Before Use
Getting Started
SC-DV1 User Manual
Basic Operation:
PLEASE REMOVE
PROTECTIVE FILM
BEFORE USE!
1)Press and hold the “Power” button (located on the bottom
of the right side of the device) for about 3 seconds, the user
will hear a “click” sound and feel the unit vibrate. A green
indicator light on top of the unit will turn on and remain green
while the unit is powered on. The camera and LCD monitor
will turn on and enter into a standby mode. The video
preview mode is displayed on the LCD monitor.
2)The video preview mode displays: recording time, battery
indicator, device ID, storage capacity, and camera view.
Wearing your body camera properly
On your chest (uniform)
·Slide the cameras clip behind, without actually
clipping it, to the top of your uniform.
·Rotate the cameras clip 45° and clip it to the top of
your uniform.
On your shoulder
·Using the optional epaulette mount, clip the camera to
the bracket on the epaulette mount.
On your waist
·Clip the camera to your belt. To aim the cameras lens
higher, simply wedge or shim a small piece of foam or
other material between the cameras clip and lcd and as
close to the base of the clips attachment.
03/30
3)Press and hold the “Power” button for about 3 seconds, the
camera will turn off. The user will hear a sound and feel the
unit vibrate before it powers off. The green indicator light will
also turn off.
How to View Files on Computer:
(Compatible with Windows XP, Vista, 7 & 8)
1)Connect the police camera to computer.
2)Open the related Removable Disk in “Computer”.
3)View and manage all the recordings and photos.
04/30
Recording
1) Video Recording:
a. To record a video, press the “Record” button on the left side
of the device (second button with a video recorder symbol on it)
the unit will give two short vibrations. The video camera recorder
symbol on the LCD monitor display will turn red and begin to
blink, indicating the camera is currently recording.
b. Press the “Record” button again to stop recording. The unit
will vibrate twice and the video camera recorder symbol will stop
blinking and turn white. The unit will stop recording and save
the video.
c. If recording during the night or in the dark, press the “IR”
button. The IR lights will turn on and the device will enter into
Night Mode. The video recorded in the dark will be in black and
white.
One Touch Recording
When the unit is powered off, press and hold the record button for
3 seconds, the device will turn on and automatically start video
recording.
Recording
SC-DV1 User Manual
b. To take photos while video recording, press the “Camera”
button and the unit will capture a photo of the picture recorded
at that time without interrupting the video recording.
c. To take photos at night or in the dark, press the “IR” button to
go into Night Mode and turn on the IR lights. Photos taken in
Night Mode will be black and white.
3) Sound Recording:
a. To record audio only, press the “Microphone” button (located
below the Camera button with a microphone symbol on it). The
unit will vibrate twice briefly and a recording timer will appear
on the LCD screen display.
b. To stop recording, press the “Microphone” button again. The
unit will vibrate twice briefly and return to the video preview.
The audio recording will end and will be saved as an audio file.
2) Photograph Feature:
a. To take photos, press the “Camera” button (located under the
Record button on the left side of the device with a symbol of
camera on it). The unit will start taking pictures similar to a
digital camera.
05/30
06/30
Video Playback
Photo Playback
Users are able to view previously recorded video files
using the following process:
There are two ways a user can play back recorded files on
this device; the “Confirm/Playback” button and/or the “Return
/ Instant Playback” button (the buttons are located below the
LCD monitor display, also see the picture diagram ).
a. Press the “Confirm/Playback” button to go to the Playback
Menu.
b. Use the “IR/Up/Zoom In” or the Laser/Down/Zoom Out”
button to select the Video Icon, and then press the
“Confirm/Playback” button to display all saved recorded
video files.
c. Select the video file to view by using the “Up/Down” buttons.
After selecting the video file, press the “Confirm/Playback”
button to see the recorded video in full screen.
d. To return to the Playback Menu, press the “Return/Instant
Playback” button.
e. To return to the Video Preview screen display, continue to
press the “Return/Instant Playback” button.
07/30
SC-DV1 User Manual
? The “Return/Instant Playback” button when selected
will automatically play the last recorded file.
? The “Confirm/Playback” button when selected will take
the user to the Playback Menu screen. The user can
then select which recorded file to playback.
1) Photo Display:
a. Press the “Confirm/Playback” button on the device. The
Playback Menu should appear on the LCD screen display.
b. Use the “IR/Up” or the Laser/Down” button to select the
Camera/Photo Icon, and then press the “Confirm/
Playback” button to display all saved photos.
08/30
Photo Playback
Audio Playback
c. Select the photo to view by using the “Up/Down” buttons.
After selecting the photo, press the “Confirm/Playback”
button to see the picture in full screen.
Users are able to listen to recorded audio files by following
these steps:
SC-DV1 User Manual
d. Users can alternate between photos using the “Up/Down”
buttons (in both slide mode and full screen mode).
e. To return from full screen mode to slide mode, press the
“Return/Instant Playback” button.
f. To return to the Playback Menu, press the “Return/Instant
Playback” button.
g. To return to the Video Preview screen display, continue to
press the “Return/Instant Playback” button.
a. Press the “Confirm/Playback” button to go to the Playback
Menu.
b. Use the “IR/Up/Zoom In” or the Laser/Down/Zoom Out”
button to select the Microphone/Audio Icon, and then press
the “Confirm/Playback” button to display all saved recorded
audio files.
c. Select the audio file by using the “Up/Down” buttons. After
selecting the audio file, press the “Confirm/Playback”
button to listen to the recorded audio file.
d. To return to the Playback Menu, press the “Return/Instant
Playback” button.
e. To return to the Video Preview screen display, continue to
press the “Return/Instant Playback” button.
09/30
10/30
Setup - Resolution
Setup - Video Quality
To go to the SET UP interface, press the “Menu” button
(located below the LCD monitor display).
2) Video Quality
SC-DV1 User Manual
a. In the SET UP Menu select “Video Quality” and press
the “Confirm/Playback” button.
1) Resolution
a. In the SET UP Menu select “Resolution” and press the
“Confirm/Playback” button.
b. There are three options to select from:
a. High
b. Medium
c. Low
b. There are five video resolutions to select from:
1. 1920*1080P/30fps
2. 1440*1080P/30fps
3. 1280*720/30fps
4. 848*480PH/60fps
5. 848*480P/30fps
c. Select the video quality you prefer and press the
“Confirm/Playback” button.
c. Select the video resolution you prefer and press the
“Confirm/Playback” button.
d. Press the “Instant/Playback” button to return to the
previous menu.
d. Press the “Instant/Playback” button to return to the
previous menu.
11/30
12/30
Setup - Video Duration
Setup - Photo Size
3) Video Duration
4) Photo Size
SC-DV1 User Manual
a. In the SET UP Menu select “Video Duration” and press
the Confirm/Playback” button.
a. In the SET UP Menu select “Photo Size” and press the
Confirm/Playback” button.
b. There are four time intervals to select from:
b. There are four photo resolutions to select from:
a.
b.
c.
d.
5 minutes
10 minutes
15 minutes
30 minutes
a.
b.
c.
d.
5 Megapixels
8 Megapixels
12 Megapixels
16 Megapixels
c. Select the time interval you prefer and press the
“Confirm/Playback” button.
c. Select the photo resolution you prefer and press the
“Confirm/Playback” button.
d. Press the “Instant/Playback” button to return to the
previous menu.
d. Press the “Instant/Playback” button to return to the
previous menu.
13/30
14/30
Setup - Capture
Setup - Volume
5) Capture
6) Volume
Capture means continuous photo shooting in a sequence.
a. In the SET UP Menu select “Capture” and press the
Confirm/Playback” button.
b. There are three options to select from:
a. Off-no continuous photo shooting
b. 3 Photos captured each time
c. 5 Photos captured each time
c. Select the capture mode you prefer and press the
“Confirm/Playback” button.
SC-DV1 User Manual
a. In the SET UP Menu select “Volume” and press the
“Confirm/Playback” button.
b. There are three options to select from:
a. High
b. Medium
c. Low
c. Select the volume setting you prefer and press the
“Confirm/Playback” button.
d. Press the “Instant/Playback” button to return to the
previous menu.
d. Press the “Instant/Playback” button to return to the
previous menu.
15/30
16/30
Setup - ID
Setup - Date&Time
7) ID
8) Date Setting
SC-DV1 User Manual
X300000_00000 is the ID format, “X3" stands for
Patroleyes, "00000" is for device #, "000000" is for
police #, every "0"means user can set from "0-9,A-Z".
a. In the SET UP Menu select “Date” and press the
“Confirm/Playback” button.
a. In the SET UP Menu select “ID” and press the
“Confirm/Playback” button.
b. Press “IR/Up/Zoom In” or the Laser/Down/Zoom Out”
button to move the cursor, then press “Confirm/Playback”
button, and press “IR/Up/Zoom In” or “Laser/Down/Zoom
Out” button again to change the digit.
b. Press “IR/Up/Zoom In” or the Laser/Down/Zoom Out”
button to change the date, then press “Confirm/Playback”
button to proceed.
9) Time Setting
c. Press the “Instant/Playback” button to return to the
previous menu.
Same operating method with “ 8)Date ”.
17/30
18/30
Setup - Pre Recording
Setup - Post Recording
10) Pre-Recording
11) Post Recording
SC-DV1 User Manual
a. In the SET UP Menu select “Pre-Recording” and press
the “Confirm/Playback” button.
a. In the SET UP Menu select “Post-Recording” and press
the “Confirm/Playback” button.
b. There are two options to select from:
b. There are four options to select from:
1. On- camera will pre-record 5~30 seconds prior to
pressing the “Record” button. (Depends on the
video resolution and quality)
2. Off- no pre-recording.
c. Select the Pre-Recording option you prefer and press
the “Confirm/Playback” button.
d. Press the “Instant/Playback” button to return to the
previous menu.
19/30
1. On- camera will record 10/20/30 seconds after
the end of recording.
2. Off- no post-recording.
c. Select the Last-Recording option you prefer and press
the “Confirm/Playback” button.
d. Press the “Instant/Playback” button to return to the
previous menu.
20/30
Setup - Beep sound
Setup - Recording warning
12) Beep sound
13) Recording warning
SC-DV1 User Manual
a. In the SET UP Menu select “Beep sound” and press
the “Confirm/Playback” button.
a. In the SET UP Menu select “Recording warning” and
press the “Confirm/Playback” button.
b. There are two options to select from:
b. There are four options to select from:
1. On- camera will turn on the sounds when pressing
button.
2. Off- mute.
1. On- camera will prompt with a beep every
10/15/30 seconds when recording a video.
2. Off- no warning.
c. Select the Beep option you prefer and press
“Confirm/Playback” button.
c. Select the Recording warning option you prefer and
press the “Confirm/Playback” button.
d. Press the “Instant/Playback” button to return to the
previous menu.
d. Press the “Instant/Playback” button to return to the
previous menu.
21/30
22/30
Setup - Infrared lamp
Setup - Filter
14) Infrared lamp
15) Filter
SC-DV1 User Manual
a. In the SET UP Menu select “Infrared lamp” and press
the “Confirm/Playback” button.
a. In the SET UP Menu select “Filter” and press the
“Confirm/Playback” button.
b. There are two options to select from:
b. There are two options to select from:
1. On- the infrared LEDs will be automatically
activated when the camera is powered on.
2. Off- the infrared LEDs will not be activated
automatically when the camera is powered on.
c. Select the Infrared lamp option you prefer and press
“Confirm/Playback” button.
d. Press the “Instant/Playback” button to return to the
previous menu.
1. On- the IR night vision filter will be automatically
activated when the camera is powered on. This
allows you to record in night vision mode without
the infrared LEDs being activated.
2. Off- the IR night vision filter will disabled when the
camera is powered on.
c. Select the Filter option you prefer and press the
“Confirm/Playback” button.
d. Press the “Instant/Playback” button to return to the
23/30
24/30
Setup - Screen Brightness
Setup - Auto off
16) Screen Brightness
17) Auto off
SC-DV1 User Manual
a. In the SET UP Menu select “Screen Brightness” and
press the “Confirm/Playback” button.
a. In the SET UP Menu select “Auto off” and press the
“Confirm/Playback” button.
b. There are three options to select from:
b. There are four options to select from:
High/Medium/Low
c. Select the Screen Brightness option you prefer and press
the “Confirm/Playback” button.
d. Press the “Instant/Playback” button to return to the
previous menu.
1. On- camera will turn off after 3/5/10 minutes
without any operation.
2. Off- no auto off.
c. Select the “Auto off” option you prefer and press the
“Confirm/Playback” button.
d. Press the “Instant/Playback” button to return to the
previous menu.
25/30
26/30
Setup - GPS
Setup - Firmware
18) GPS
19) Firmware Version
SC-DV1 User Manual
a. In the SET UP Menu select “GPS” and press the
“Confirm/Playback” button.
a. In the SET UP Menu select “Firmware Version”.
b. There are two options to select from: (External GPS
Module Required)
b. The current Firmware Version will display on the screen.
1. On- enables GPS function.
2. Off- disables GPS function.
c. Press the “Instant/Playback” button to return to the
previous menu.
c. Select the “GPS” option you prefer and press the
“Confirm/Playback” button.
d. Press the “Instant/Playback” button to return to the
previous menu.
27/30
28/30
How to Reset?
Optional Accessories
If you are having problems
with your device, please
try and reset the camera
using the reset button. The
reset button is the button
to the right of the confirm
button.
SC-DV1 User Manual
PTT (push to talk) Cable
GPS Adapter
Suction Cup Mount
Docking Station
Covert Button External Camera
Wide angle button camera
Epaulette Clip
Note: Use a paper clip or
finger nail to press the
reset button. You will
hear a "click" after the
button is pressed.
Please view our FAQs page at stuntcams.com/sc-dv1
29/30
30/30