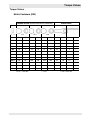
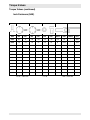
1
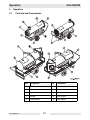
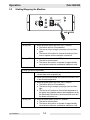
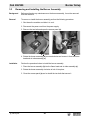
Repair Manual Indirect-Fired Air Heater Cub 200 Cub 300 0179422en 0 1 7 9 001 4 2 1009 2 E N Copyright notice © Copyright 2009 by Wacker Neuson Corporation. All rights, including copying and distribution rights, are reserved. This publication may be photocopied by the original purchaser of the machine. Any other type of reproduction is prohibited without express written permission from Wacker Neuson Corporation. Any type of reproduction or distribution not authorized by Wacker Neuson Corporation represents an infringement of valid copyrights. Violators will be prosecuted. Trademarks All trademarks referenced in this manual are the property of their respective owners. Manufacturer Wacker Neuson Corporation N92W15000 Anthony Avenue Menomonee Falls, WI 53051 U.S.A. Tel: (262) 255-0500 · Fax: (262) 255-0550 · Tel: (800) 770-0957 www.wackerneuson.com Cub 200/300 Foreword Foreword Machines covered by this manual Machine documentation Expectations for information in this manual Machine Item Number Machine Item Number Cub 200 0620204 Cub 300 0620233 Cub 200 0620262 — — Keep a copy of the Operator’s Manual with the machine at all times. Use the separate Parts Book supplied with the machine to order replacement parts. If you are missing any of these documents, please contact Wacker Neuson Corporation to order a replacement or visit www.wackerneuson.com. When ordering parts or requesting service information, be prepared to provide the machine model number, item number, revision number, and serial number. This manual provides information and procedures to safely operate and maintain the above Wacker Neuson model(s). For your own safety and to reduce the risk of injury, carefully read, understand, and observe all instructions described in this manual. Wacker Neuson Corporation expressly reserves the right to make technical modifications, even without notice, which improve the performance or safety standards of its machines. The information contained in this manual is based on machines manufactured up until the time of publication. Wacker Neuson Corporation reserves the right to change any portion of this information without notice. Manufacturer’s This manual contains several references to approved parts, attachments, and modapproval ifications. The following definitions apply: Approved parts or attachments are those either manufactured or provided by Wacker Neuson. Approved modifications are those performed by an authorized Wacker Neuson service center according to written instructions published by Wacker Neuson. Unapproved parts, attachments, and modifications are those that do not meet the approved criteria. Unapproved parts, attachments, or modifications may have the following consequences: Serious injury hazards to the operator and persons in the work area Permanent damage to the machine which will not be covered under warranty Contact your Wacker Neuson dealer immediately if you have questions about approved or unapproved parts, attachments, or modifications. ghi_tx001204gb.fm 3 Foreword ghi_tx001204gb.fm Cub 200/300 4 Cub 200/300 1 Safety Information 1.1 1.2 1.3 1.4 1.5 2 7 Signal Words Found in this Manual ...................................................... 7 Safety Guidelines for Operating the Machine ....................................... 8 Safety Guidelines for Lifting the Machine ............................................. 9 Safety Guidelines While Using Combustion Burners ......................... 10 Safety Guidelines for Maintaining the Machine .................................. 11 Operation 2.1 2.2 2.3 3 Table of Contents 12 Controls and Components .................................................................. 12 Control Panel ...................................................................................... 13 Starting/Stopping the Machine ........................................................... 14 Burner Setup 3.1 3.2 3.3 3.4 3.5 3.6 3.7 16 Control Board Sequence of Operation ............................................... 16 Setting Up the Burner ......................................................................... 18 Removing and Installing the Burner Assembly ................................... 21 Checking and Adjusting the Burner Electrodes .................................. 22 Checking and Replacing the Burner Nozzle ....................................... 23 Setting the Air Band ........................................................................... 24 Checking and Adjusting the Fuel Pressure ........................................ 25 4 Troubleshooting Basics 27 5 Troubleshooting the Blower 28 5.1 5.2 5.3 5.4 Checking the Fuse ............................................................................. 29 Checking Power to/from the Control Board ........................................ 31 Checking the ON-OFF Switch ............................................................ 33 Checking the Capacitor ...................................................................... 35 5 Table of Contents 6 Troubleshooting the Burner 6.1 6.2 6.3 6.4 6.5 6.6 6.7 6.8 6.9 6.10 7 Cub 200/300 37 Checking the Ignition Transformer ......................................................39 Checking the Cad Cell .........................................................................42 Checking the Fuel Filter Heater ...........................................................44 Checking Output Voltage from the Control Board ...............................46 Checking the Air Pressure Switch .......................................................48 Checking the Fuel Solenoid ................................................................51 Checking the Flame Head ...................................................................54 Checking the Fuel Flow from the Nozzle .............................................55 Checking the Fuel Lines ......................................................................57 Checking the Fuel Pump Adapter .......................................................58 Schematic 7.1 59 Cub 200/Cub 300 Schematic ..............................................................59 ghi_br0179422en_001TOC.fm 6 Cub 200/300 1 1.1 Safety Information Safety Information Signal Words Found in this Manual This is the safety alert symbol. It is used to alert you to potential personal hazards. f Obey all safety messages that follow this symbol. DANGER DANGER indicates a hazardous situation which, if not avoided, will result in death or serious injury. f To avoid death or serious injury from this type of hazard, obey all safety messages that follow this signal word. WARNING WARNING indicates a hazardous situation which, if not avoided, could result in death or serious injury. f To avoid possible death or serious injury from this type of hazard, obey all safety messages that follow this signal word. CAUTION CAUTION indicates a hazardous situation which, if not avoided, could result in minor or moderate injury. f To avoid possible minor or moderate injury from this type of hazard, obey all safety messages that follow this signal word. NOTICE: Used without the safety alert symbol, NOTICE indicates a situation which, if not avoided, could result in property damage. Note: A Note contains additional information important to a procedure. ghi_si000343gb.fm 7 Safety Information 1.2 Cub 200/300 Safety Guidelines for Operating the Machine Operator training Before operating the machine: Read and understand the operating instructions contained in all manuals delivered with the machine. Familiarize yourself with the location and proper use of all controls and safety devices. Contact Wacker Neuson Corporation for additional training if necessary. When operating this machine: Do not allow improperly trained people to operate the machine. People operating the machine must be familiar with the potential risks and hazards associated with it. Machine condition Only operate the machine when: All safety devices and guards are in place and in working order. All controls operate correctly. The machine is set up correctly according to the instructions in the Operator’s Manual. The machine is clean. The machine’s labels are legible. When operating the machine: Guidelines for operator Do not modify or defeat the safety devices. Do not use worn electrical cords. Do not use faulty fuel supplies. When operating the machine: Remain aware of the machine’s moving parts. Keep hands, feet, and loose clothing away from the machine’s moving parts. Wear protective clothing appropriate to the job site when operating the machine. Wear safety glasses. When operating the machine: Do not operate a machine in need of repair. Do not smoke near the machine. Work space When operating the machine: Position the machine on a firm, noncombustible, level surface. Keep the area immediately surrounding and underneath the machine clean, neat, and free of debris and combustible materials. Keep the area above the machine clear of debris that could fall on the machine. Store the machine properly when it is not being used. Keep unauthorized personnel, children, and pets away from the machine. 8 ghi_si000343gb.fm Cub 200/300 Safety Information When operating the machine: Do not connect ductwork between the exhaust outlet port and the supply air inlet port. Never operate the machine in areas that contain flammable objects, fuels, or products that produce flammable vapors. Do not position the electrical cords under the machine or over the top of the machine. 1.3 Safety Guidelines for Lifting the Machine Lifting/ transporting the machine When lifting/transporting the machine: Make sure all lifting devices are attached securely and have enough weightbearing capacity to lift or hold the machine safely. Remain aware of the location of other people when lifting the machine. Only use the lifting points and tie-downs described in the Operator’s Manual. Only use suitable transport vehicles with sufficient load-carrying capacity. When lifting the machine: Never walk or stand under a suspended machine. Never climb, sit, or stand on the machine while lifting it or transporting it. ghi_si000343gb.fm 9 Safety Information 1.4 Cub 200/300 Safety Guidelines While Using Combustion Burners When using the machine: Clean up any spilled fuel immediately. Replace the fuel tank cap after refueling the machine. Refill the fuel tank in a well-ventilated area. Shut down the generator, if equipped, when refueling. When using the machine: DANGER Exhaust gas from the burner contains carbon monoxide, a deadly poison. Exposure to carbon monoxide can kill you in minutes. f Never run the machine indoors or in an enclosed area unless the machine is vented properly. Do not fill or drain the fuel tank near an open flame or while the machine is running. Do not smoke when refueling the machine. 10 ghi_si000343gb.fm Cub 200/300 1.5 Safety Information Safety Guidelines for Maintaining the Machine Training Only trained personnel should troubleshoot or repair electrical problems occurring with the machine. Cleaning When cleaning and servicing the machine: Keep the area around the burner free of debris such as leaves, paper, cartons, etc. Keep the machine clean and labels legible. When cleaning the machine: Do not clean the machine while it is running. Never use gasoline or other types of fuels or flammable solvents to clean parts. Fumes from fuels and solvents can become explosive. Maintenance guidelines When maintaining the machine: Keep the fuel lines in good condition and properly connected. Allow the burner to cool before maintaining the machine. Reinstall the safety devices and guards after repairs and maintenance. Keep all electrical cords away from heat, oil, vibrating surfaces, and sharp edges. Inspect all electrical cords before each use and replace damaged cords. Replacing parts and labels When maintaining the machine: Replace worn or damaged components. Use only spare parts recommended by Wacker Neuson Corporation. Replace all missing and hard-to-read labels. Replace or repair electrical components with components that are identical in rating and performance as the original component. Accessories, When using the machine: safety devices Use only accessories/attachments that are recommended by Wacker Neuson and Corporation. modifications When using the machine: Never operate the machine if any safety devices or guards are missing or inoperative. Do not defeat safety devices. Do not modify the machine without the express written approval of the manufacturer. ghi_si000343gb.fm 11 Operation 2 2.1 Cub 200/300 Operation Controls and Components Ref ghi_tx001205gb.fm Component Ref Component 1 Fuel tank 2 Air outlet 3 Flue collar (vent) 4 Burner access panel 5 Handle (and base) 6 Control panel 7 Blower 8 Fuel oil filter 9 Lifting device 10 Duct adapter 12 Cub 200/300 2.2 Ref Operation Control Panel Component Function a Remote thermostat receptacle The remote thermostat receptacle (shown with protective cap installed) is used for connecting an optional remote thermostat. b Burner fault lamp and reset button (dual function) The dual function burner fault lamp and reset button: • illuminates red when the burner has faulted. • resets the machine when pressed. c Power switch The power switch provides power to the machine. d Power cord The power cord provides a means of connecting the machine to a 115V 60 Hz receptacle. e Power indicator lamp The power indicator lamp illuminates green when the power cord is connected to a 115V 60 Hz receptacle. ghi_tx001205gb.fm 13 Operation 2.3 Cub 200/300 Starting/Stopping the Machine If not using the remote thermostat Turning ON 1. Move the power switch (c) to the ON “I” position. The blower will turn on immediately. The burner will go through a prepurge cycle and then ignite. The burner will continue to fire and the blower will continue to operate until the machine is turned off. Turning OFF 2. Move the power switch to the OFF position. The burner will shut down. The blower will continue to operate for approximately two minutes to allow the combustion chamber to cool. If using the remote thermostat Turning ON 1. Connect the remote thermostat to the control panel at the remote thermostat receptacle (a). 2. Place the remote thermostat in the area to be heated. Set it to the desired temperature. 3. Move the power switch (c) to the ON “I” position. The blower will turn on immediately. The burner will go through a prepurge cycle and then light. The burner will continue to fire until the temperature of the space being heated reaches the temperature set by the thermostat. At that time, the burner shuts down but the blower will remain on. Turning OFF ghi_tx001205gb.fm 4. Move the power switch to the OFF position. The burner will shut down. The blower will continue to operate for approximately two minutes to allow the combustion chamber to cool. 14 Cub 200/300 Operation Notes ghi_tx001205gb.fm 15 Burner Setup 3 Cub 200/300 Burner Setup 3.1 Periods Control Board Sequence of Operation The burner controller has several periods it sequences through during normal operation. These periods are described below. . Period Action or Function Prepurge (T1) As soon as the control switch (SW) is turned ON, the prepurge period begins. It lasts approximately 10 seconds. During this period: The fan blows air into the combustion chamber to expel any residual exhaust gases. The ignition transformer (TR) turns ON and remains ON. It produces a continuous spark across the electrodes so that any residual fuel is ignited and burned off. The flame control unit (cad cell) (PH) checks for presence of a flame. If a consistent flame is detected, the ignition sequence is interrupted and the heater locks out. Ignition (T2) After the prepurge period, the ignition period begins. It lasts approximately 15 seconds. During this period: The fan runs. The ignition transformer (TR) is ON, producing a continuous spark across the electrodes. The fuel solenoid (SV) opens and the fuel is ignited. The fuel solenoid will remain open if the cad cell (PH) detects a flame within 1 second from the start of this period. If no flame is detected, the fuel solenoid closes and the heater locks out. 16 ghi_tx001317gb.fm Cub 200/300 Burner Setup Period Action or Function Operation (T3) After the ignition period, the operation period begins. It will last as long as there is flame or until the heater is turned off. During this period: The fan runs. The ignition transformer (TR) is OFF. There is no spark across the electrodes. The fuel solenoid (SV) is open and flame is self-sustaining. The cad cell (PH) monitors the flame. If the flame is interrupted through lack of fuel or lack of air, the machine will go through the prepurge and ignition period in an attempt to re-establish the flame. If the flame is not re-established, the aftercooling period begins. Aftercooling (T5) After the heater is turned OFF (or after flame re-establishment has failed), the aftercooling period begins. It lasts approximately 1 minute and 45 seconds. During this period: The power switch is OFF. The fan runs. After approximately 1 minute and 45 seconds, the fan stops. The ignition transformer (TR) turns ON and remains ON. It produces a continuous spark across the electrodes so that any residual fuel is ignited and burned off. Reset To reset the heater: 1. Wait 30 seconds after the lockout condition has occurred. 2. Push the reset button. ghi_tx001317gb.fm 17 Burner Setup 3.2 Cub 200/300 Setting Up the Burner Factory settings Background Fuel Machine Nozzle size Fuel pressure gph psi bar Air band setting Cub 200 1.0 x 60°A 175 12 2 Cub 300 1.5 x 80°W 175 12 3 Cub 300HD 1.35 x 80°H 218 15 5 The burner consists of several different components and subsystems. Each of these components or subsystems must be operating correctly for the burner to function properly. Low ambient temperatures cause diesel fuels to gel. Gelled fuels will cause burner ignition failure and/or burner fuel pump damage. Always use the proper fuel for the conditions. Fuel Blend Guide Lowest expected ambient temperature °F (°C) Generator powered Shore powered Below 5 (-15) 50-50 blend of #2 diesel and #1 diesel, plus additives OR 50-50 blend #2 diesel and K1 kerosene, plus additives 100% #1 diesel plus additives OR 100% K1 kerosene, plus additives 5 to 25 (-15 to -4) 70-30 blend of #2 diesel and #1 diesel, plus additives OR 70-30 blend of #2 diesel and K1 kerosene, plus additives Above 25 (-4) Winter-blend diesel Note: The burner on this machine was calibrated by test-firing for correct operation at Wacker Neuson Corporation located 180 m (600 ft.) above sea level using #2 diesel fuel combined with an anti-gelling additive. Tools required The following tools are required to adjust the burner: High-quality combustion analyzer Smoke spot tester Fuel pressure test gauge General hand tools Mandates Adjustments made shall be done so that the machine conforms to the requirements of local, state, and federal codes and authorities. Adjustments shall be made at the job site. This procedure continues on the next page. 18 ghi_tx001317gb.fm Cub 200/300 Burner Setup Continued from the previous page. When Adjust the burner: Before operating the machine at elevations 305 m (1,000 ft) above or below the location of where the last adjustments were made Before starting at a new job site After any burner maintenance or repair has been performed If burner performance is in question Procedure Follow the procedure below to set up the burner. 1. Shut down the machine. 2. Set the burner electrodes. (See Section 3.4 Checking and Adjusting the Burner Electrodes on page 22.) 3. Check the burner nozzle. (See Section 3.5 Checking and Replacing the Burner Nozzle on page 23.) 4. Set the air band. (See Section 3.6 Setting the Air Band on page 24.) 5. Start the machine and the burner. 6. Check/set the fuel pressure. (See Section 3.7 Checking and Adjusting the Fuel Pressure on page 25.) 7. Conduct a smoke spot test. Follow the smoke spot tester manufacturer’s instructions and the general guidelines below. Use the access hole in the exhaust stack. Several samples should be taken as the heater warms. The final sample should be taken just before the heater reaches 71°C (160°F). This procedure continues on the next page. ghi_tx001317gb.fm 19 Burner Setup Cub 200/300 Continued from the previous page. 8. Analyze the combustion. Follow the combustion analyzer manufacturer’s instructions and the general guidelines below. Use the access hole in the exhaust stack. Take several samples as the heater warms. Take the final sample just before the heater reaches 71°C (160°F). 9. Re-adjust the air band, if necessary, until the smoke spot test and combustion analysis are within the following parameters: Result O2 content: 3–5% Smoke spot: less than 1 The burner has now been set. 20 ghi_tx001317gb.fm Cub 200/300 3.3 Burner Setup Removing and Installing the Burner Assembly Background Before performing any maintenance on the burner assembly, it must be removed from the machine. Removal To remove or install the burner assembly perform the following procedure: 1. Shut down the machine and allow it to cool. 2. Disconnect the power cord from the power supply. 3. Remove the two bolts and open the access panel (a). 4. Rotate the burner assembly (b) counterclockwise and remove it from the flame head and air tube assembly (e). Installation Perform the procedure below to install the burner assembly. 1. Place the burner assembly (b) into the flame head and air tube assembly (e). 2. Rotate the burner assembly clockwise to lock it into place. 3. Close the access panel (a) and re-install the two bolts that secure it. ghi_tx001317gb.fm 21 Burner Setup 3.4 Cub 200/300 Checking and Adjusting the Burner Electrodes Requirements Burner assembly removed Background Inspect the electrodes for the following: Wear Be sure to inspect the ends of the electrodes for pitting. Replace any worn electrodes. Straightness Replace any bent or broken electrodes. Cleanliness Clean the electrodes with a soft dry cloth or replace if necessary. Correct alignment Align the electrodes as shown. Procedure Perform the procedure to replace or align the electrodes. 1. Remove the burner assembly from the machine. 2. Loosen the screw (1). 3. Align the electrode as shown or remove and install new electrodes if necessary. 4. Tighten the screw (1). 5. Reinstall the burner. Result The electrodes have now been adjusted. 22 ghi_tx001317gb.fm Cub 200/300 3.5 Burner Setup Checking and Replacing the Burner Nozzle Requirements Burner assembly removed Removal Perform the procedure to remove the nozzle. 1. Remove the burner assembly. See topic Removing and Installing the Burner Assembly. 2. Place an adjustable wrench on the large fitting (1) on the nozzle base (3). 3. Place another adjustable wrench on the nozzle (2). 4. Rotate the nozzle counter-clockwise and remove it from the assembly. Installation Perform the procedure to install the nozzle. 1. Install the new nozzle (2) onto the nozzle base (3). 2. Tighten the nozzle (2) using an adjustable wrench. Rotate the wrench clockwise. 3. Reinstall the burner assembly. Result ghi_tx001317gb.fm The nozzle has now been replaced. 23 Burner Setup 3.6 Cub 200/300 Setting the Air Band Requirements Procedure Machine shut down Power disconnected Perform the procedure below to set the air band. 1. Shut down the machine and allow it to cool. 2. Disconnect the power cord from the power source. 3. Remove the two bolts and open the access panel (a). 4. Loosen the wing nut (b) and slide the air band (c) as needed. The front edge should line up with the graduations (markings) on the flame head (d). 5. Tighten the wing nut. Result The air band has now been set. 24 ghi_tx001317gb.fm Cub 200/300 3.7 Burner Setup Checking and Adjusting the Fuel Pressure Requirements Procedure Pressure gauge British Parallel Thread (BPT) adapter To check and/or adjust the fuel pressure, carry out the following procedure: 1. Shut down the machine and allow it to cool. 2. Disconnect the power cord from the power source. 3. Open the access panel (a). b ghi_gr006919 4. Remove the threaded plug (b) from the pressure test port using an allen wrench. Set the plug in a safe location to be re-installed later. 5. Install a pressure gauge with BPT adapter (d) in the pressure test port. 6. Reconnect the power source. 7. Start the machine. With the machine running and access panel closed, observe the fuel pressure on the gauge (c). For the correct pressure, refer to the Technical Data charts in this manual. 8. Shut down the machine. This procedure continues on the next page. ghi_tx001317gb.fm 25 Burner Setup Cub 200/300 Continued from the previous page. 9. Adjust the fuel pressure, if necessary, using the adjusting screw (e). NOTICE: Do not adjust the fuel pressure outside of the parameters listed in the Technical Data charts. 10.Restart the machine and check the gauge. 11.Repeat steps 7–9 as necessary until the pressure is correct. 12.Remove the pressure gauge (d) from the pressure test port. 13.Reinstall the threaded plug (b) into the pressure test port. 14.Close the access panel and reinstall the two bolts that secure it. 26 ghi_tx001317gb.fm Cub 200/300 4 Troubleshooting Basics Troubleshooting Basics Where to Begin Procedure Perform the procedure below to determine where to begin. 1. Connect the power cord to a 120 VAC power supply. 2. Turn the machine on. If Then The blower runs, the problem is with the burner system. See Chapter 6 Troubleshooting the Burner. The blower does not run, the problem is with the blower system. See Chapter 5 Troubleshooting the Blower. The motor hums, the problem is with the starter capacitor. See Topic 5.4 Checking the Capacitor. 3. Turn the machine off. ghi_tx001207gb.fm 27 Troubleshooting the Blower 5 Cub 200/300 Troubleshooting the Blower Best practice The best practice when troubleshooting this system is to: 1. Isolate and check each component of this system individually. 2. When a malfunctioning component is found, repair or replace it. 3. After replacing a malfunctioning component, retry system operation. This chapter provides procedures to check the components. Sequence When troubleshooting the blower, do so in the following sequence. Step Task See Topic 1. Check the fuse. 5.1 2. Check power to/from the control board. 5.2 3. Check the ON-OFF switch. 5.3 4. Check the capacitor. 5.4 WARNING Electric shock hazard. Some tests require measuring live, high voltages. Electric shock can cause severe injury or death. f Use extreme care and appropriate arc flash avoidance techniques when measuring live, high voltages. 28 ghi_tx001207gb.fm Cub 200/300 5.1 Troubleshooting the Blower Checking the Fuse Requirements 120V power source Procedure Perform the procedure below to check the fuse. 1. Connect the power cord to a 120 VAC power supply. 2. Observe the green light (x). Does the green light illuminate? Yes ____ No ____ The fuse is OK. Continue. 3. Disconnect the power cord from the electric power supply. WARNING Electric shock hazard. High voltage exists inside the control panel when the power cord is plugged into a power supply. Electric shock can cause serious injury or death. f Disconnect the machine from the electric power supply before continuing this procedure. 4. Remove the screws that hold the control panel and pull the control panel from the machine. This procedure continues on the next page. ghi_tx001207gb.fm 29 Troubleshooting the Blower Cub 200/300 Continued from the previous page. 5. Remove the cover (b) from the control panel. 6. Locate the fuse (c) and check its condition. 7. Replace the fuse if it is blown with a fuse of the same size and rating. Result The fuse has now been checked. If the problem has not been resolved, leave the machine disassembled and continue with the next topic. Otherwise, reassemble the machine. 30 ghi_tx001207gb.fm Cub 200/300 5.2 Troubleshooting the Blower Checking Power to/from the Control Board Requirements Procedure 120 VAC power source Multimeter Machine’s fuse is OK Perform the procedure below to check power to/from the control board. WARNING Electric shock hazard. High voltage exists inside the control panel when the power cord is plugged into a power supply. Electric shock can cause serious injury or death. f Use extreme care and appropriate arc flash avoidance techniques when performing this procedure. 1. Remove the screws (a) that hold the control panel and pull the control panel from the machine. 2. Remove the cover (b) from the control panel. 3. Connect the power cord to a 120 VAC power supply. 4. Turn the machine on. This procedure continues on the next page. ghi_tx001207gb.fm 31 Troubleshooting the Blower Cub 200/300 Continued from the previous page. 5. Measure the voltage between terminal M8 and terminal M11 on the control board. Is 108–132 VAC measured? Yes ____ No ____ Continue. Disconnect the power supply. Check the function of the ON-OFF switch and the wiring to the ON-OFF switch. 6. Measure the voltage between terminal M15 and terminal M14. Is 108–132 VAC measured? Yes ____ No ____ The power to and from the control board is OK. Result The control board has failed. Disconnect the power supply and replace the control board. The power to and from the control board has now been checked. If the problem has not been resolved, leave the machine disassembled and continue with the next topic. Otherwise, reassemble the machine. 32 ghi_tx001207gb.fm Cub 200/300 5.3 Troubleshooting the Blower Checking the ON-OFF Switch Requirements Procedure Electric power disconnected from the machine Multimeter Perform the procedure below to check the ON-OFF switch. 1. Disconnect the power cord from the power supply. WARNING Electric shock hazard. High voltage exists inside the control panel when the power cord is plugged into a power supply. Electric shock can cause serious injury or death. f Disconnect the machine from the power supply before continuing this procedure. 2. Remove the screws (a) that hold the control panel and pull the control panel from the machine. 3. Remove the cover (b) from the control panel. 4. Locate the ON-OFF switch (c). 5. Check the wiring to the ON-OFF switch. Make sure it is correct—black to upper terminal, brown to center terminal. This procedure continues on the next page. ghi_tx001207gb.fm 33 Troubleshooting the Blower Cub 200/300 Continued from the previous page. 6. Check that there is continuity between the two terminals where the black and brown wires are connected. There should be continuity when in the ON position and no continuity in the OFF position. Does the ON-OFF switch perform as described above? Result Yes ____ No ____ The ON-OFF switch is OK. The ON-OFF switch has failed; replace it. The ON-OFF switch has now been checked. If the problem has not been resolved, leave the machine disassembled and continue with the next topic. Otherwise, reassemble the machine. 34 ghi_tx001207gb.fm Cub 200/300 5.4 Troubleshooting the Blower Checking the Capacitor Requirements Procedure Power disconnected Multimeter Perform the procedure below to check the capacitor. 1. Disconnect the power cord from the electric power supply. WARNING Electric shock hazard. High voltage exists inside the machine when the power cord is plugged into a power supply. Electric shock can cause serious injury or death. f Disconnect the machine from the electric power supply before continuing this procedure. 2. Remove the access cover (a). 3. Disconnect the wiring from the capacitor (b) and remove the capacitor from the machine. 4. Discharge the capacitor by placing an insulated screwdriver across its two terminals. 5. Check the capacitance of the capacitor. It should measure 45–55 µF. This procedure continues on the next page. ghi_tx001207gb.fm 35 Troubleshooting the Blower Cub 200/300 Continued from the previous page. Does the capacitor measure 45–55 µF? Yes ____ No ____ Continue. The capacitor has failed; replace it. 6. If the capacitor checks OK but the motor still hums, the problem is with the wiring from the motor to the capacitor. Check this wiring. 7. If the capacitor and the wiring check OK but the motor does not run, the motor has failed. Replace the motor. Result The capacitor has now been checked. Reassemble the machine. 36 ghi_tx001207gb.fm Cub 200/300 6 Troubleshooting the Burner Troubleshooting the Burner Background The two sources of flame problems are: Fuel Ignition Note: Make sure the blower runs before troubleshooting burner problems. If the blower does not run, the burner will not fire. See topic Troubleshooting the Blower. Procedure Perform the procedure below to determine if the problem is with the fuel system or with the ignition system. 1. Turn the machine on. If Then There is a puff of smoke from the exhaust stack when the burner attempts to fire, the problem is most likely with the fuel system. See fuel problems on the next page. There is no puff of smoke from the exhaust stack when the burner attempts to fire, the problem could be with the ignition system or the fuel system. Check both the ignition system and the fuel system. Start with diagnosing the ignition system. See ignition problems below. 2. Turn the machine off. Ignition problems For ignition system problems, check the following components in the sequence listed. Order Component See topic 1. Air band setting 3.6 2. Electrodes 3.4 3. Ignition transformer 6.1 4. Cad cell 6.2 This procedure continues on the next page. ghi_tx001207gb.fm 37 Troubleshooting the Burner Cub 200/300 Continued from the previous page. Fuel problems For fuel system problems, check the following items in the sequence listed. Order Component See topic 1. Fuel tank/supply n/a 2. Fuel filter n/a 3. Air band setting 3.6 3. Fuel filter heater 6.3 4. Fuel pressure 3.7 Depending on the results of the fuel pressure, continue with the appropriate sequence below. If fuel pressure is OK: If fuel pressure is low: See topic Order Check output voltage from the control board. 6.4 1. Check the fuel lines. 6.9 2. Check the air pressure switch. 6.5 2. Check the fuel pump adapter. 6.10 3. Check the fuel solenoid. 6.6 4. Check the flame head. 6.7 5. Check fuel flow from the nozzle. 6.8 Order Component 1. 38 Component See topic ghi_tx001207gb.fm Cub 200/300 6.1 Troubleshooting the Burner Checking the Ignition Transformer Requirements Fuel solenoid disconnected Procedure Perform the procedure below to check the ignition transformer. 1. Begin this procedure with the power supply disconnected. 2. Open the access panel (a). 3. Locate the fuel solenoid (b) and disconnect it. 4. Loosen the wingnut (e) and open the air lock as far as possible. 5. Connect the power supply. 6. Turn the machine on and observe the spark between the electrodes (f). Is a good, strong spark visible? Yes ____ No ____ The ignition transformer is OK. Continue. This procedure continues on the next page. ghi_tx001207gb.fm 39 Troubleshooting the Burner Cub 200/300 Continued from the previous page. 7. Turn the machine off. 8. Remove the screws (c) that hold the control panel and pull the control panel from the machine. 9. Remove the cover (d) from the control. WARNING Electric shock hazard. High voltage exists at the control panel when the machine is turned on. Electric shock can cause severe injury or death. f Use extreme care and appropriate arc flash protective measures when working inside the machine. 10.Turn the machine on. 11.Measure the voltage at terminals M17 and M16. Is 108–132 VAC measured? Yes ____ Continue. No ____ The control board has failed. Disconnect the power supply and replace the control board. This procedure continues on the next page. 40 ghi_tx001207gb.fm Cub 200/300 Troubleshooting the Burner Continued from the previous page. 12.Turn the machine off. 13.Check the condition of the ignition wires (g) between the transformer (h) and the flame head (i). If the ignition wires are damaged, replace them. 14.Check the resistance of the ignition wires. They should measure approximately 1000 ohms. If the ignition wires measure OL, replace them. Result ghi_tx001207gb.fm The procedure to check the ignition transformer is now complete. Reassemble the machine. If the problem has not been resolved, leave the machine disassembled and continue with the next topic. Otherwise, reassemble the machine. 41 Troubleshooting the Burner 6.2 Cub 200/300 Checking the Cad Cell Requirements Procedure Power disconnected from the machine Multimeter Perform the procedure below to check the cad cell. 1. Disconnect the power cord from the power supply. 2. Open the access panel (a). 3. Twist and pull the cad cell (b) from the flame head. 4. Remove the screws (c) that hold the control panel and pull the control panel from the machine. 5. Remove the cover (d) from the control panel. This procedure continues on the next page. 42 ghi_tx001207gb.fm Cub 200/300 Troubleshooting the Burner Continued from the previous page. 6. Disconnect the light green wires (e) from terminals M5 and M6 of the burner controller. 7. Measure the resistance of the cad cell by measuring across the light green wires. Be sure the cad cell is exposed to light. Note: The resistance value will vary depending on the amount of light the cad cell receives. Is 1000–5000 ohms measured? Yes ____ Continue. No ____ The cad cell is dirty or defective. First, clean the cad cell with alcohol, then re-measure the resistance. If the reading remains out of the range listed above, replace the cad cell. 8. Deprive the cad cell of light (cover the cad cell) and measure the resistance again. Note: With the cad cell covered, a much higher resistance should be measured. Again, the amount will vary depending on the amount of light the cad cell receives. Is 20,000–80,000+ ohms measured? Yes ____ The cad cell is OK. Result ghi_tx001207gb.fm No ____ The cad cell is dirty or defective. First, clean the cad cell with alcohol, then re-measure the resistance. If the reading remains out of the range listed above, replace the cad cell. The procedure to check the cad cell is now complete. Reconnect the cad cell. 43 Troubleshooting the Burner 6.3 Cub 200/300 Checking the Fuel Filter Heater Requirements Procedure Multimeter Electric power disconnected from the machine Perform the procedure below to check the fuel filter heater. 1. Turn on the machine. 2. Wait 10–15 minutes, then feel the outside of the fuel filter canister (c). Is the fuel filter canister warm to the touch? Yes ____ No ____ The fuel filter heater is working. No further testing is needed. Continue. 3. Disconnect the power cord from the power supply. 4. Remove the screws (a) that hold the control panel and pull the control panel from the machine. 5. Remove the cover (b) from the control panel. This procedure continues on the next page. 44 ghi_tx001207gb.fm Cub 200/300 Troubleshooting the Burner Continued from the previous page. 6. Check that the fuel heater is connected to terminals M7 and M12 of the control board. WARNING Electric shock hazard. High voltage exists inside the control panel when the power cord is plugged into a power supply. Electric shock can cause serious injury or death. f Use extreme care and appropriate arc flash avoidance techniques when performing this procedure. 7. Connect the power cord to the power supply. 8. Turn on the machine. 9. Measure the voltage between terminals M7 and M12 of the control board. Is 108–132 VAC measured? Yes ____ No ____ The fuel filter heater has failed. Disconnect the power supply and replace the fuel filter heater. Result ghi_tx001207gb.fm The control board has failed. Disconnect the power supply and replace the control board. Recheck the fuel filter heater after the new control board is installed. The fuel filter heater has now been checked. Reassemble the machine. 45 Troubleshooting the Burner 6.4 Cub 200/300 Checking Output Voltage from the Control Board Requirements Multimeter Procedure Perform the procedure below to check output voltage from the control board for the fuel system. 1. Start this procedure with the machine disconnected from the power supply. 2. Remove the screws (a) that hold the control panel and pull the control panel from the machine. 3. Remove the cover (b) from the control panel. WARNING Electric shock hazard. High voltage exists inside the control panel when the power cord is plugged into a power supply. Electric shock can cause serious injury or death. f Use extreme care and appropriate arc flash avoidance techniques when measuring live, high voltage. 4. Connect the machine to the power source. 5. Turn the machine on. If the machine is in a fault condition, press the RESET (c) button on the control panel. This procedure continues on the next page. 46 ghi_tx001207gb.fm Cub 200/300 Troubleshooting the Burner Continued from the previous page. 6. Measure the voltage between terminal M13 and terminal M18. To do so, you must wait through the 10-second prepurge cycle. Note: The voltage will only be present for approximately 1 second if the flame is not established. In such a case, the machine will go into a fault condition. It may take more than one attempt to measure the voltage. Is 108–132 VAC measured? Yes ____ No ____ The outgoing power from the control board is OK. The control board has failed. Disconnect the power supply and replace the control board. 7. Turn the machine off. Result ghi_tx001207gb.fm The output voltage from the control panel has now been checked. If the problem has not been resolved, leave the machine disassembled and continue with the next topic. Otherwise, reassemble the machine. 47 Troubleshooting the Burner 6.5 Cub 200/300 Checking the Air Pressure Switch Requirements Multimeter Procedure Perform the procedure below to check the air pressure switch. 1. Start this procedure with the machine disconnected from the power supply. 2. Remove the side access panel (a) from the machine. 3. Locate the air pressure switch (b) and check the air hose for binding, pinching, or damage. WARNING Electric shock hazard. High voltage exists inside the control panel when the power cord is plugged into a power supply. Electric shock can cause serious injury or death. f Use extreme care and appropriate arc flash avoidance techniques when measuring live, high voltage. 4. Connect the machine to the power source. 5. Turn the machine on and wait 10 seconds, then measure the voltage between the air pressure switch and terminal M18 of the control board. This procedure continues on the next page. 48 ghi_tx001207gb.fm Cub 200/300 Troubleshooting the Burner Continued from the previous page. Is 108–132 VAC measured? Yes ____ No ____ Continue. The wiring between the control board and the air pressure switch has failed. Shut down the machine and check this wiring. 6. Turn the machine off. 7. Disconnect the wiring from the air pressure switch. 8. With the machine off, check the continuity between the terminals of the air pressure switch as shown. Is there continuity? Yes ____ No ____ The air pressure switch has failed; replace it. Continue. 9. Turn the machine on. If the machine is in a fault condition, press the RESET (c) button on the control panel. This procedure continues on the next page. ghi_tx001207gb.fm 49 Troubleshooting the Burner Cub 200/300 Continued from the previous page. 10.With the machine on, check the continuity between the same terminals of the air pressure switch. Is there continuity? Yes ____ No ____ The air pressure switch is OK. The air pressure switch has failed. Shut down the machine and replace the air pressure switch. 11.Turn the machine off. 12.Reinstall the wires. Result The air pressure switch has now been checked. If the problem has not been resolved, leave the machine disassembled and continue with the next topic. Otherwise, reassemble the machine. 50 ghi_tx001207gb.fm Cub 200/300 6.6 Troubleshooting the Burner Checking the Fuel Solenoid Requirements Procedure Multimeter Air pressure switch checks OK Perform the procedure below to check the fuel solenoid. 1. Turn the machine off. 2. Open the access panel (a). 3. Locate the fuel solenoid (b) and disconnect it. WARNING Electric shock hazard. High voltage exists at the fuel solenoid and other components inside the machine when the machine is turned on. f Use extreme care and appropriate arc flash protective measures when working inside the machine. This procedure continues on the next page. ghi_tx001207gb.fm 51 Troubleshooting the Burner Cub 200/300 Continued from the previous page. 4. Turn the machine on. If the machine is in a fault condition, press the RESET (c) button on the control panel. 5. Measure the voltage at the connector (d). To do so, you must wait through the 10-second prepurge cycle. Note: The voltage will only be present for approximately 1 second after the prepurge cycle ends. It may take more than one attempt to measure the voltage. Is 108–132 VAC measured? 6. Turn the machine off and disconnect the power source. Yes ____ No ____ Continue. The wiring to the fuel solenoid has failed. Shut down the machine and repair this wiring. This procedure continues on the next page. 52 ghi_tx001207gb.fm Cub 200/300 Troubleshooting the Burner Continued from the previous page. 7. Measure the resistance across the coil of the solenoid as shown. Is 600–700 ohms measured? Result ghi_tx001207gb.fm Yes ____ No ____ The fuel solenoid is OK. The fuel solenoid has failed; replace it. The fuel solenoid has now been checked. If the problem has not been resolved, leave the machine disassembled and continue with the next topic. Otherwise, reassemble the machine. 53 Troubleshooting the Burner 6.7 Cub 200/300 Checking the Flame Head Requirements Procedure Power disconnected Hand tools Perform the procedure below to check the flame head. 1. Disconnect the power cord from the power supply. WARNING Electric shock hazard. High voltage exists inside the machine when the power cord is plugged into a power supply. Electric shock can cause serious injury or death. f Disconnect the machine from the electric power supply before continuing this procedure. 2. Remove the burner assembly. See topic Removing/Installing the Burner Assembly. 3. Loosen the four screws (a). 4. Turn the flame head (b) counterclockwise and pull it from the machine. 5. Clean the flame head if it is dirty or full of soot. 6. Replace the flame head if it is damaged. Result The flame head has now been checked. If the problem has not been resolved, continue with the next topic. 54 ghi_tx001207gb.fm Cub 200/300 6.8 Troubleshooting the Burner Checking the Fuel Flow from the Nozzle Requirements Container to catch fuel (5 gallon bucket) Procedure Perform the procedure below to check the fuel flow from the nozzle. 1. Disconnect the power cord from the power supply. WARNING Electric shock hazard. High voltage exists inside the machine when the power cord is plugged into a power supply. Electric shock can cause serious injury or death. f Disconnect the machine from the electric power supply before continuing this procedure. 2. Disarm the ignition function of the control board by removing the wires from terminals M16 and M17. 3. Remove the nozzle assembly (a) from the flame head. 4. Remove the cad cell (b). 5. Place the cad cell inside the flame head and cover it with a rag. This procedure continues on the next page. ghi_tx001207gb.fm 55 Troubleshooting the Burner Cub 200/300 Continued from the previous page. 6. Connect the machine to the power supply. WARNING Fire hazard. The fuel may ignite if there is an ignition source nearby. Fire can cause severe injury or death. f Continue this procedure only when all sources of ignition have been removed from the proximity of the machine. 7. Hold the nozzle assembly facing into a container to catch the fuel spray. 8. Turn the machine on. If the machine is in a fault condition, press the RESET (d) button on the control panel. 9. After the 10-second prepurge cycle, the nozzle will spray fuel for approximately 1 second. Observe the spray pattern (c). Does the fuel spray form a consistent cone pattern? Result Yes ____ No ____ The nozzle is OK. The nozzle is dirty or damaged. Clean or replace the nozzle. The nozzle now been checked. Reassemble the machine. If the problem has not been resolved, continue with the next topic. 56 ghi_tx001207gb.fm Cub 200/300 6.9 Troubleshooting the Burner Checking the Fuel Lines Requirements Procedure Machine turned off Power supply disconnected Perform the following procedure to check the fuel lines. 1. Turn the machine off. 2. Inspect the fuel lines (a) for leakage and loose fittings. 3. Repair or replace the fuel lines as needed. Result ghi_tx001207gb.fm The fuel lines have now been checked. If the problem has not been resolved, continue with the next topic. 57 Troubleshooting the Burner 6.10 Cub 200/300 Checking the Fuel Pump Adapter Requirements Procedure Machine turned off Power supply disconnected Perform the following procedure to check the fuel pump adapter. 1. Turn the machine off. 2. Open the access panel (a). 3. Locate the fuel pump (b). 4. Loosen the three set screws (c). 5. Remove the fuel pump (b) from the motor. 6. Check the fuel pump adapter (d) and replace the fuel pump adapter if it is damaged. Result The fuel pump adapter has now been checked. Reassemble the machine. 58 ghi_tx001207gb.fm Cub 200/300 7 7.1 Schematic Schematic Cub 200/Cub 300 Schematic ghi_tx001210gb.fm 59 Threadlockers and Sealants Threadlockers and Sealants Threadlocking adhesives and sealants are specified throughout this manual by a notation of “S” plus a number (S#) and should be used where indicated. Threadlocking compounds normally break down at temperatures above 175°C (350°F). If a screw or bolt is hard to remove, heat it using a small propane torch to break down the sealant. When applying sealants, follow instructions on container. The sealants listed are recommended for use on Wacker Neuson equipment. TYPE ( ) = Europe Loctite 222 Hernon 420 Omnifit 1150 (50M) COLOR USAGE Purple Low strength, for locking threads smaller than 6 mm (1/4”). Hand tool removable. Temp. range: -54 to 149°C (-65 to 300°F) Blue Medium strength, for locking threads Loctite 243 Hernon 423 larger than 6 mm (1/4”). Omnifit 1350 (100M) Hand tool removable. Temp. range: -54 to 149°C (-65 to 300°F) Loctite 271/277 Red High strength, for all threads up to 25 mm Hernon 427 (1”). Omnifit 1550 (220M) Heat parts before disassembly. Temp. range: -54 to 149°C (-65 to 300°F) Loctite 290 Green Medium to high strength, for locking Hernon 431 preassembled threads and for sealing Omnifit 1710 (230LL) weld porosity (wicking). Gaps up to 0.13 mm (0.005”) Temp. range: -54 to 149°C (-65 to 300°F) Loctite 609 Green Medium strength retaining compound for Hernon 822 slip or press fit of shafts, bearings, gears, Omnifit 1730 (230L) pulleys, etc. Gaps up to 0.13 mm (0.005”) Temp. range: -54 to 149°C (-65 to 300°F) Loctite 545 Brown Hydraulic sealant Hernon 947 Temp. range: -54 to 149°C (-65 to 300°F) Omnifit 1150 (50M) Loctite 592 White Pipe sealant with Teflon for moderate Hernon 920 pressures. Omnifit 790 Temp. range: -54 to 149°C (-65 to 300°F) Loctite 515 Purple Form-in-place gasket for flexible joints. Hernon 910 Fills gaps up to 1.3 mm (0.05”) Omnifit 10 Temp. range: -54 to 149°C (-65 to 300°F) PART NO. – SIZE 73287 - 10 ml 29311 - .5 ml 17380 - 50 ml 29312 - .5 ml 26685 - 10 ml 73285 - 50 ml 28824 - .5 ml 25316 - 10 ml 29314 - .5 ml 79356 - 50 ml 26695 - 6 ml 73289 - 50 ml 70735 - 50 ml Threadlockers and Sealants Threadlockers and Sealants (continued) Threadlocking adhesives and sealants are specified throughout this manual by a notation of “S” plus a number (S#) and should be used where indicated. Threadlocking compounds normally break down at temperatures above 175°C (350°F). If a screw or bolt is hard to remove, heat it using a small propane torch to break down the sealant. When applying sealants, follow instructions on container. The sealants listed are recommended for use on Wacker Neuson equipment. TYPE ( ) = Europe COLOR USAGE Loctite 496 Clear Instant adhesive for bonding rubber, Hernon 110 metal and plastics; general purpose. Omnifit Sicomet 7000 For gaps up to 0.15 mm (0.006”) Read caution instructions before using. Temp. range: -54 to 82°C (-65 to 180°F) Loctite Primer T Aerosol Fast curing primer for threadlocking, Hernon Primer 10 Spray retaining and sealing compounds. Must Omnifit VC Activator be used with stainless steel hardware. Recommended for use with gasket sealants. PART NO. – SIZE 52676 - 1oz. 2006124-6 oz. Torque Values Torque Values Metric Fasteners (DIN) TORQUE VALUES (Based on Bolt Size and Hardness) 8.8 10.9 WRENCH SIZE 12.9 Size Nm ft.lb. Nm ft.lb. Nm ft.lb. Metric Inch Metric Inch M3 1.2 *11 1.6 *14 2.1 *19 5.5 7/32 2.5 – M4 2.9 *26 4.1 *36 4.9 *43 7 9/32 3 – M5 6.0 *53 8.5 6 10 7 8 5/16 4 – M6 10 7 14 10 17 13 10 – 5 – M8 25 18 35 26 41 30 13 1/2 6 – M10 49 36 69 51 83 61 17 11/16 8 – M12 86 63 120 88 145 107 19 3/4 10 – M14 135 99 190 140 230 169 22 7/8 12 – M16 210 155 295 217 355 262 24 15/16 14 – M18 290 214 405 298 485 357 27 1-1/16 14 – M20 410 302 580 427 690 508 30 1-1/4 17 – 1 ft.lb. = 1.357 Nm * = in.lb. 1 inch = 25.4 mm Torque Values Torque Values (continued) Inch Fasteners (SAE) Size Nm ft.lb. Nm ft.lb. Nm ft.lb. Metric Inch Metric Inch No.4 0.7 *6 1.0 *14 1.4 *12 5.5 1/4 – 3/32 No.6 1.4 *12 1.9 *17 2.4 *21 8 5/16 – 7/64 No.8 2.5 *22 3.5 *31 4.7 *42 9 11/32 – 9/64 No.10 3.6 *32 5.1 *45 6.8 *60 – 3/8 – 5/32 1/4 8.1 6 12 9 16 12 – 7/16 – 3/32 5/16 18 13 26 19 33 24 13 1/2 – 1/4 3/8 31 23 45 33 58 43 – 9/16 – 5/16 7/16 50 37 71 52 94 69 16 5/8 – 3/8 1/2 77 57 109 80 142 105 19 3/4 – 3/8 9/16 111 82 156 115 214 158 – 13/16 – – 5/8 152 112 216 159 265 195 24 15/16 – 1/2 3/4 271 200 383 282 479 353 – 1-1/8 – 5/8 1 ft.lb. = 1.357 Nm * = in.lb. 1 inch = 25.4 mm Ground Heaters, Inc. · 1271 Judson Road · Spring Lake, MI 49456 · Tel: (231) 799-9600 · Fax: (231) 799-9500 · Tel: (877) 799-9600