1
Installation Guide
EAServer
5.5
[ Linux ]
DOCUMENT ID: DC32146-01-0550-01
LAST REVISED: December 2006
Copyright © 1997-2006 by Sybase, Inc. All rights reserved.
This publication pertains to Sybase software and to any subsequent release until otherwise indicated in new editions or technical notes.
Information in this document is subject to change without notice. The software described herein is furnished under a license agreement,
and it may be used or copied only in accordance with the terms of that agreement.
To order additional documents, U.S. and Canadian customers should call Customer Fulfillment at (800) 685-8225, fax (617) 229-9845.
Customers in other countries with a U.S. license agreement may contact Customer Fulfillment via the above fax number. All other
international customers should contact their Sybase subsidiary or local distributor. Upgrades are provided only at regularly scheduled
software release dates. No part of this publication may be reproduced, transmitted, or translated in any form or by any means, electronic,
mechanical, manual, optical, or otherwise, without the prior written permission of Sybase, Inc.
Sybase, SYBASE (logo), ADA Workbench, Adaptable Windowing Environment, Adaptive Component Architecture, Adaptive Server, Adaptive Server
Anywhere, Adaptive Server Enterprise, Adaptive Server Enterprise Monitor, Adaptive Server Enterprise Replication, Adaptive Server Everywhere, Advantage
Database Server, Afaria, Answers Anywhere, Applied Meta, Applied Metacomputing, AppModeler, APT Workbench, APT-Build, APT-Edit, APT-Execute,
APT-Translator, APT-Library, ASEP, Avaki, Avaki (Arrow Design), Avaki Data Grid, AvantGo, Backup Server, BayCam, Beyond Connected, Bit-Wise,
BizTracker, Certified PowerBuilder Developer, Certified SYBASE Professional, Certified SYBASE Professional Logo, ClearConnect, Client-Library, Client
Services, CodeBank, Column Design, ComponentPack, Connection Manager, Convoy/DM, Copernicus, CSP, Data Pipeline, Data Workbench, DataArchitect,
Database Analyzer, DataExpress, DataServer, DataWindow, DataWindow .NET, DB-Library, dbQueue, Dejima, Dejima Direct, Developers Workbench,
DirectConnect Anywhere, DirectConnect, Distribution Director, Dynamic Mobility Model, e-ADK, E-Anywhere, e-Biz Integrator, E-Whatever, EC Gateway,
ECMAP, ECRTP, eFulfillment Accelerator, EII Plus, Electronic Case Management, Embedded SQL, EMS, Enterprise Application Studio, Enterprise Client/
Server, Enterprise Connect, Enterprise Data Studio, Enterprise Manager, Enterprise Portal (logo), Enterprise SQL Server Manager, Enterprise Work
Architecture, Enterprise Work Designer, Enterprise Work Modeler, eProcurement Accelerator, eremote, Everything Works Better When Everything Works
Together, EWA, ExtendedAssist, Extended Systems, ExtendedView, Financial Fusion, Financial Fusion (and design), Financial Fusion Server, Formula One,
Fusion Powered e-Finance, Fusion Powered Financial Destinations, Fusion Powered STP, Gateway Manager, GeoPoint, GlobalFIX, iAnywhere, iAnywhere
Solutions, ImpactNow, Industry Warehouse Studio, InfoMaker, Information Anywhere, Information Everywhere, InformationConnect, InstaHelp, Intelligent
Self-Care, InternetBuilder, iremote, iScript, Jaguar CTS, jConnect for JDBC, KnowledgeBase, Legion, Logical Memory Manager, lrLite, M2M Anywhere,
Mach Desktop, Mail Anywhere Studio, Mainframe Connect, Maintenance Express, Manage Anywhere Studio, MAP, M-Business Anywhere, M-Business
Channel, M-Business Network, M-Business Suite, MDI Access Server, MDI Database Gateway, media.splash, Message Anywhere Server, MetaWorks,
MethodSet, mFolio, Mirror Activator, ML Query, MobiCATS, MobileQ, MySupport, Net-Gateway, Net-Library, New Era of Networks, Next Generation
Learning, Next Generation Learning Studio, O DEVICE, OASiS, OASiS logo, ObjectConnect, ObjectCycle, OmniConnect, OmniQ, OmniSQL Access
Module, OmniSQL Toolkit, OneBridge, Open Biz, Open Business Interchange, Open Client, Open ClientConnect, Open Client/Server, Open Client/Server
Interfaces, Open Gateway, Open Server, Open ServerConnect, Open Solutions, Optima++, Partnerships that Work, PB-Gen, PC APT Execute, PC DB-Net, PC
Net Library, Pharma Anywhere, PhysicalArchitect, Pocket PowerBuilder, PocketBuilder, Power++, Power Through Knowledge, power.stop, PowerAMC,
PowerBuilder, PowerBuilder Foundation Class Library, PowerDesigner, PowerDimensions, PowerDynamo, Powering the New Economy, PowerScript,
PowerSite, PowerSocket, Powersoft, PowerStage, PowerStudio, PowerTips, Powersoft Portfolio, Powersoft Professional, PowerWare Desktop, PowerWare
Enterprise, ProcessAnalyst, Pylon, Pylon Anywhere, Pylon Application Server, Pylon Conduit, Pylon PIM Server, Pylon Pro, QAnywhere, Rapport, Relational
Beans, RemoteWare, RepConnector, Report Workbench, Report-Execute, Replication Agent, Replication Driver, Replication Server, Replication Server
Manager, Replication Toolkit, Resource Manager, RFID Anywhere, RW-DisplayLib, RW-Library, SAFE, SAFE/PRO, Sales Anywhere, Search Anywhere,
SDF, Search Anywhere, Secure SQL Server, Secure SQL Toolset, Security Guardian, ShareLink, ShareSpool, SKILS, smart.partners, smart.parts, smart.script,
SOA Anywhere Trademark,SQL Advantage, SQL Anywhere, SQL Anywhere Studio, SQL Code Checker, SQL Debug, SQL Edit, SQL Edit/TPU, SQL
Everywhere, SQL Modeler, SQL Remote, SQL Server, SQL Server Manager, SQL SMART, SQL Toolset, SQL Server/CFT, SQL Server/DBM, SQL Server
SNMP SubAgent, SQL Station, SQLJ, Stage III Engineering, Startup.Com, STEP, SupportNow, S.W.I.F.T. Message Format Libraries, Sybase Central, Sybase
Client/Server Interfaces, Sybase Development Framework, Sybase Financial Server, Sybase Gateways, Sybase Learning Connection, Sybase MPP, Sybase SQL
Desktop, Sybase SQL Lifecycle, Sybase SQL Workgroup, Sybase Synergy Program, Sybase Virtual Server Architecture, Sybase User Workbench,
SybaseWare, Syber Financial, SyberAssist, SybFlex, SybMD, SyBooks, System 10, System 11, System XI (logo), SystemTools, Tabular Data Stream, The
Enterprise Client/Server Company, The Extensible Software Platform, The Future Is Wide Open, The Learning Connection, The Model For Client/Server
Solutions, The Online Information Center, The Power of One, TotalFix, TradeForce, Transact-SQL, Translation Toolkit, Turning Imagination Into Reality,
UltraLite, UltraLite.NET, UNIBOM, Unilib, Uninull, Unisep, Unistring, URK Runtime Kit for UniCode, Viafone, Viewer, VisualWriter, VQL,
WarehouseArchitect, Warehouse Control Center, Warehouse Studio, Warehouse WORKS, Watcom, Watcom SQL, Watcom SQL Server, Web Deployment Kit,
Web.PB, Web.SQL, WebSights, WebViewer, WorkGroup SQL Server, XA-Library, XA-Server, XcelleNet, XP Server, XTNDAccess and XTNDConnect are
trademarks of Sybase, Inc. or its subsidiaries. 07/06
Unicode and the Unicode Logo are registered trademarks of Unicode, Inc.
All other company and product names used herein may be trademarks or registered trademarks of their respective companies.
Use, duplication, or disclosure by the government is subject to the restrictions set forth in subparagraph (c)(1)(ii) of DFARS 52.227-7013
for the DOD and as set forth in FAR 52.227-19(a)-(d) for civilian agencies.
Sybase, Inc., One Sybase Drive, Dublin, CA 94568.
Contents
About This Book ............................................................................................................................ v
CHAPTER 1
Before You Install EAServer ..........................................................
What EAServer contains ..................................................................
EAServer documentation .................................................................
HTML documentation ................................................................
Documentation on the Web .......................................................
System requirements .......................................................................
JDK versions .............................................................................
What to install...................................................................................
1
1
2
2
2
2
3
4
CHAPTER 2
Installing EAServer ......................................................................... 7
Preinstallation tasks ......................................................................... 7
Installing EAServer........................................................................... 8
Upgrading, reinstalling or adding components ............................... 13
Upgrading the message service .............................................. 15
Preserving JDK customizations............................................... 15
Settings preserved during upgrade ......................................... 15
Systems Management options ................................................ 16
Installing ASA ................................................................................. 16
Starting EAServer, ASA, and EAServer Manager.......................... 16
Connecting to EAServer through a Web browser .......................... 18
Installing the CocoBase Enterprise O/R evaluation software......... 19
Uninstalling EAServer .................................................................... 19
CHAPTER 3
Creating Embedded EAServer Installations ...............................
Configuring and running the silent installer ....................................
Configuration and run files ......................................................
Silent uninstaller files...............................................................
Troubleshooting and cleanup of the silent installer .................
Post-installation configuration ........................................................
Installation Guide
21
21
23
32
33
34
iii
Contents
CHAPTER 4
Installing and Configuring a Web Server Redirector Plug-In .... 37
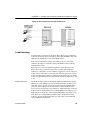
Overview ........................................................................................ 37
How the plug-in works ............................................................. 38
Load balancing ........................................................................ 39
Failover and detecting unavailable application servers........... 40
Binding to a specific application server ................................... 41
Debugging ............................................................................... 42
Defining a custom error page .................................................. 42
Configuring the data source for HTTPServletRequest methods 43
Installing and configuring an iPlanet Web server plug-in ............... 43
Edit the Web server configuration files.................................... 43
Edit the redirector configuration file......................................... 46
Copy libraries from EAServer to your Web server .................. 48
Installing and configuring an Apache Web server plug-in .............. 49
Edit the httpd.conf configuration file ........................................ 50
Edit the redirector configuration file......................................... 52
Copy libraries from EAServer to your Web server .................. 54
Make an entry for the Web host in the /etc/hosts file .............. 55
Start the Apache Web server .................................................. 55
Configuring EAServer to accept Web server requests................... 56
Set the EAServer HTTP listener properties............................. 57
Configuring HTTPS support for Web server plug-ins..................... 58
HTTPS installation instructions ............................................... 58
Enable HTTPS connections .................................................... 60
Manage certificates for HTTPS connections ........................... 62
Troubleshoot HTTPS connections .......................................... 64
Adding FIPS and TLS support to the Web server redirector plug-ins .
64
Enabling FIPS and TLS for an Apache plug-in........................ 68
Enabling FIPS and TLS for iPlanet plug-ins ............................ 69
Managing FIPS for the redirector plug-ins............................... 70
CHAPTER 5
Configuring Open Client and ODBC for EAServer ..................... 71
Overview ........................................................................................ 71
Installing FreeTDS ......................................................................... 72
Configuring ODBC ......................................................................... 72
Creating a unixODBC connection cache................................. 73
Using ODBC to connect to ASA .............................................. 73
Using ODBC to connect to ASE .............................................. 74
Using ODBC from other client applications ............................. 75
Configuring Open Client ................................................................. 75
Index ............................................................................................................................................. 79
iv
EAServer
About This Book
This book describes how to install EAServer, an application server, which
includes an integrated set of development tools that you use to deploy Web
applications that support high-volume traffic, dynamic content, and
intensive online transaction processing (OLTP).
Audience
This book is for anyone responsible for configuring the EAServer runtime
environment, or for creating and deploying packages and components on
EAServer.
How to use this book
Chapter 1, “Before You Install EAServer,” contains system requirements
and information about EAServer features and options.
Chapter 2, “Installing EAServer,” contains instructions for installing and
starting EAServer and Adaptive Server® Anywhere, upgrading an
existing installation, and installing other EAServer products and features.
Chapter 3, “Creating Embedded EAServer Installations,” explains how to
install EAServer silently and use EAServer’s automated configuration
tools to further configure the installation within your own installation
script or program.
Chapter 4, “Installing and Configuring a Web Server Redirector PlugIn,” describes how to set up a Web server redirector plug-in, which
enables communication between the Web server and the EAServer HTTP
and HTTPS protocol listeners.
Chapter 5, “Configuring Open Client and ODBC for EAServer,”
describes how to configure Open Client and ODBC drivers used with
EAServer.
Related documents
The core EAServer documents are
available in HTML format in your EAServer software installation, and in
PDF and HTML format on the SyBooks™ CD.
Core EAServer documentation
What’s New in EAServer summarizes new functionality in this version.
The EAServer Cookbook contains tutorials and explains how to use the
sample applications included with your EAServer software.
Installation Guide
v
The EAServer Feature Guide explains application server concepts and
architecture, such as supported component models, network protocols, servermanaged transactions, and Web applications.
The EAServer System Administration Guide explains how to:
•
Start the preconfigured Jaguar server and manage it with the EAServer
Manager plug-in for Sybase Central™
•
Create, configure, and start new application servers
•
Define connection caches
•
Create clusters of application servers to host load-balanced and highly
available components and Web applications
•
Monitor servers and application components
•
Automate administration and monitoring tasks with command line tools or
the Repository API
The EAServer Programmer’s Guide explains how to:
•
Create, deploy, and configure components and component-based
applications
•
Create, deploy, and configure Web applications, Java servlets, and
JavaServer Pages
•
Use the industry-standard CORBA and Java APIs supported by EAServer
The EAServer Web Services Toolkit User’s Guide describes Web services
support in EAServer, including:
•
Support for standard Web services protocols such as Simple Object Access
Protocol (SOAP), Web Services Description Language (WSDL), and
Uniform Description, Discovery, and Integration (UDDI)
•
Administration tools for deployment and creation of new Web services,
WSDL document creation, UDDI registration, and SOAP management
The EAServer Security Administration and Programming Guide explains how
to:
vi
•
Understand the EAServer security architecture
•
Configure role-based security for components and Web applications
•
Configure SSL certificate-based security for client connections using the
Security Manager plug-in for Sybase Central
EAServer
About This Book
•
Implement custom security services for authentication, authorization, and
role membership evaluation
•
Implement secure HTTP and IIOP client applications
•
Deploy client applications that connect through Internet proxies and
firewalls
The EAServer Performance and Tuning Guide describes how to tune your
server and application settings for best performance.
The EAServer API Reference Manual contains reference pages for proprietary
EAServer Java classes, ActiveX interfaces, and C routines.
The EAServer Troubleshooting Guide describes procedures for
troubleshooting problems that EAServer users may encounter. This document
is available only online; see the EAServer 5.2 Troubleshooting Guide at
http://sybooks.sybase.com/nav/base.do.
EAServer includes a limitedlicense version of Adaptive Server Anywhere for use in running the samples
and tutorials included with EAServer. Adaptive Server Anywhere documents
are available on the Sybase Web site at http://sybooks.sybase.com/nav/base.do.
Adaptive Server Anywhere documents
jConnect for JDBC documents EAServer includes the jConnect™ for
JDBC™ driver to allow JDBC access to Sybase database servers and gateways.
The Programmer’s Reference jConnect for JDBC is available on the Sybase
Web site at http://sybooks.sybase.com/nav/base.do.
Conventions
The formatting conventions used in this manual are:
Formatting example
To indicate
commands and methods
When used in descriptive text, this font indicates keywords such as:
• Command names used in descriptive text
• C++ and Java method or class names used in descriptive text
• Java package names used in descriptive text
• Property names in the raw format, as when using jagtool to configure applications
rather than EAServer Manager
variable, package, or
component
Italic font indicates:
• Program variables, such as myCounter
• Parts of input text that must be substituted, for example:
Server.log
• File names
• Names of components, EAServer packages, and other entities that are registered in
the EAServer naming service
Installation Guide
vii
Formatting example
To indicate
File | Save
Menu names and menu items are displayed in plain text. The vertical bar shows you how
to navigate menu selections. For example, File | Save indicates “select Save from the File
menu.”
Monospace font indicates:
package 1
• Information that you enter in EAServer Manager, a command line, or as program text
• Example program fragments
• Example output fragments
Other sources of
information
Use the Sybase Getting Started CD, the SyBooks CD, and the Sybase Product
Manuals Web site to learn more about your product:
•
The Getting Started CD contains release bulletins and installation guides
in PDF format, and may also contain other documents or updated
information not included on the SyBooks CD. It is included with your
software. To read or print documents on the Getting Started CD, you need
Adobe Acrobat Reader, which you can download at no charge from the
Adobe Web site using a link provided on the CD.
•
The SyBooks CD contains product manuals and is included with your
software. The Eclipse-based SyBooks browser allows you to access the
manuals in an easy-to-use, HTML-based format.
Some documentation may be provided in PDF format, which you can
access through the PDF directory on the SyBooks CD. To read or print the
PDF files, you need Adobe Acrobat Reader.
Refer to the SyBooks Installation Guide on the Getting Started CD, or the
README.txt file on the SyBooks CD for instructions on installing and
starting SyBooks.
•
The Sybase Product Manuals Web site is an online version of the SyBooks
CD that you can access using a standard Web browser. In addition to
product manuals, you will find links to EBFs/Maintenance, Technical
Documents, Case Management, Solved Cases, newsgroups, and the
Sybase Developer Network.
To access the Sybase Product Manuals Web site, go to Product Manuals at
http://www.sybase.com/support/manuals/.
Sybase certifications
on the Web
viii
Technical documentation at the Sybase Web site is updated frequently.
EAServer
About This Book
❖
❖
❖
Finding the latest information on product certifications
1
Point your Web browser to Technical Documents at
http://www.sybase.com/support/techdocs/.
2
Click Certification Report.
3
In the Certification Report filter select a product, platform, and timeframe
and then click Go.
4
Click a Certification Report title to display the report.
Finding the latest information on component certifications
1
Point your Web browser to Availability and Certification Reports at
http://certification.sybase.com/.
2
Either select the product family and product under Search by Base
Product; or select the platform and product under Search by Platform.
3
Select Search to display the availability and certification report for the
selection.
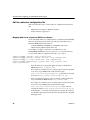
Creating a personalized view of the Sybase Web site (including support
pages)
Set up a MySybase profile. MySybase is a free service that allows you to create
a personalized view of Sybase Web pages.
1
Point your Web browser to Technical Documents at
http://www.sybase.com/support/techdocs/.
2
Click MySybase and create a MySybase profile.
Sybase EBFs and
software
maintenance
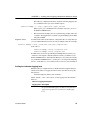
❖
Installation Guide
Finding the latest information on EBFs and software maintenance
1
Point your Web browser to the Sybase Support Page at
http://www.sybase.com/support.
2
Select EBFs/Maintenance. If prompted, enter your MySybase user name
and password.
3
Select a product.
4
Specify a time frame and click Go. A list of EBF/Maintenance releases is
displayed.
ix
Padlock icons indicate that you do not have download authorization for
certain EBF/Maintenance releases because you are not registered as a
Technical Support Contact. If you have not registered, but have valid
information provided by your Sybase representative or through your
support contract, click Edit Roles to add the “Technical Support Contact”
role to your MySybase profile.
5
Accessibility
features
Click the Info icon to display the EBF/Maintenance report, or click the
product description to download the software.
EAServer has been tested for compliance with U.S. government Section 508
Accessibility requirements. The online help for this product is also provided in
HTML, JavaHelp, and Eclipse help formats, which you can navigate using a
screen reader.
EAServer Manager supports working without a mouse. For more information,
see “Keyboard navigation” in Chapter 2, “Sybase Central Overview,” in the
EAServer System Administration Guide.
The Web Services Toolkit plug-in for Eclipse supports accessibility features for
those that cannot use a mouse, are visually impaired or have other special
needs. For information about these features, refer to Eclipse help:
1
Start Eclipse.
2
Select Help | Help Contents.
3
Enter Accessibility in the Search dialog box.
4
Select Accessible user interfaces or Accessibility features for Eclipse.
Note You may need to configure your accessibility tool for optimal use. Some
screen readers pronounce text based on its case; for example, they pronounce
ALL UPPERCASE TEXT as initials, and Mixed Case Text as words. You
might find it helpful to configure your tool to announce syntax conventions.
Consult the documentation for your tool.
For additional information about how Sybase supports accessibility, see
Sybase Accessibility at http://www.sybase.com/accessibility. The Sybase
Accessibility site includes links to information on Section 508 and W3C
standards.
x
EAServer
About This Book
If you need help
Each Sybase installation that has purchased a support contract has one or more
designated people who are authorized to contact Sybase Technical Support. If
you cannot resolve a problem using the manuals or online help, please have the
designated person contact Sybase Technical Support or the Sybase subsidiary
in your area.
Installation Guide
xi
xii
EAServer
CH A PTE R
1
Before You Install EAServer
This chapter contains information you need to know before you install or
upgrade EAServer.
Topic
What EAServer contains
Page
1
EAServer documentation
System requirements
2
2
What to install
4
What EAServer contains
Besides the EAServer software, the installation includes:
Installation Guide
•
Adaptive Server Anywhere 9.0.2 database server runtime files
•
jConnect™ for JDBC™ 5.5 and 6.0
•
PowerBuilder 10.2.1 virtual machine to host PowerBuilder
components
•
Web services toolkit (WST), which provides support for industry
standard Web services protocols and APIs such as SOAP, WSDL, and
UDDI
•
Plug-ins for popular Web servers, which allow you to integrate
EAServer Web applications with Web sites hosted on popular Web
servers
•
Various tools, management utilities, Java extensions, third-party JAR
files, and sample applications used to extend EAServer capabilities.
1
EAServer documentation
EAServer documentation
See the release bulletin for late-breaking installation information.
HTML documentation
Online HTML documentation is installed with EAServer in the docs
subdirectory within the html subdirectory. To view the documentation after
installation, use your Web browser to load html/docs/index.html. You can also
view the documentation by connecting to EAServer as described in “Starting
EAServer, ASA, and EAServer Manager” on page 16.
Documentation on the Web
You can also access the documentation at the Sybase Product Manuals Web site
at http://www.sybase.com/support/manuals. To print these manuals, download
the PDF version from the Web site.
System requirements
You can install EAServer 5.5 either as a new installation or as an update of an
exisiting EAServer 5.0 installation.
This section provides system requirements for each type of EAServer
installation. For information on what Linux distributions are supported, see the
EAServer Release Bulletin for Linux. The memory requirement for all
installation types is 512MB. The disk space requirements provided are
approximate; the actual disk space required varies depending on options
selected, cluster size, hard disk size, and partitioning. The installation program
verifies that you have enough disk space and displays an error message if you
do not have enough space to install the selected products and features.
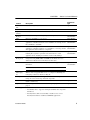
The installation program requires 150MB of temporary disk space. The disk
space for the installed software depends on the install type and the Linux
distributions. The following table depicts the minimum hard disk space
requirement on Red Hat Advanced Server 4.0 (RHAS) for the different
installation type.
2
EAServer
CHAPTER 1
Before You Install EAServer
Installation type
Minimum hard disk space
Full
Client Runtime Only
881MB
453MB
Typical
Custom
834MB
Depends on features selected
Note The hard disk space size may vary for different Linux distributions.
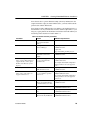
JDK versions
EAServer requires version 1.3.1 of the Java Development Kit (JDK) from Sun
Microsystems. You can optionally run servers with JDK 1.4.2 instead. By
default, JDK 1.3.1 and the optional JDK versions that you select are installed
with EAServer. You can also configure the installation to use an existing
version, as long as it is of the required patch level as listed in Table 1-1.
Table 1-1: JDK versions and required patch levels
JDK version
Patch level
Notes
1.3.1
18
1.4.2
13
This version is required to run EAServer
Manager, jagtool, and other tools. You can also
use it to run servers on Linux versions other
than Red Hat Advanced Server.
This version is required to run the Web Services
Toolkit. With JDK 1.4, the client and server
virtual machines (VMs) are supported; the
classic VM is not.
1.5.0
09
This version prevents possible security
vulnerability using password fields in J2EE or
Java GUI application.
To verify the version and patch level, change to the bin directory of the JDK
installation and run the following command:
java -version
To configure the installation to use an existing JDK installation, choose the
Custom installation type when running the installer. After you select the
desired JDK versions, the installer prompts you to specify whether to use an
existing JDK and for the location of the JDK.
Installation Guide
3
What to install
What to install
When you install EAServer, features are installed by default depending on the
type of installation you select. The types of installations are:
•
Typical – installs the typical files required for developing EAServer
applications. If you choose this option, the client runtime files are installed
on your machine in the easclient.jar file.
•
Client Runtime Only – installs only the client runtime files. Select this
option to run Java or C++ client applications, but not install the entire
product set.
You are not required to install the client runtime if you are developing
clients on a machine where the application server is installed. The server
installation includes the core server files.
•
Full – installs all features.
•
Custom – you define which features to install. By default, features that are
installed as part of a typical installation are installed as part of a custom
installation, but you can add or remove features.
If you customize your installation, be aware of the following:
•
JDK 1.3 – EAServer Manager, jagtool, jagant, JAAS, and the J2EE
Application Client require JDK 1.3 which is installed automatically.
If you select this option you have the choice of installing it, or using
an existing JDK1.3 installation.
•
C++ runtime files – SSL support requires C++ runtime libraries.
•
Client runtime files – to run Java and C++ client applications, you
must install the EAServer client runtime files.
•
When you select to install the server, you must also install the C++,
Java, and SSL runtimes.
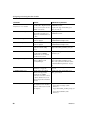
Table 1-2 describes EAServer features and lists the features that are installed
for each type of installation. Any feature can be optionally installed if you
select the Custom installation type, and a Full installation installs everything.
Table 1-2: EAServer features
Feature
Description
Server
Includes the application server and files required to manage the server and
develop clients and components.
4
Installation
type
Typical
EAServer
CHAPTER 1
Feature
Core server
files
Locales
Before You Install EAServer
Description
Installs files required by the server.
Installation
type
Typical
Allows you to install locale files in addition to English.
Optional
Charsets
EAServer
Manager
JDKs
Allows you to install additional character sets.
C++ runtime
Includes the files required to run standalone EAServer C++ client
applications on machines that lack a server installation; for example, header
files, link libraries, and DLLs.
Typical,
Client Runtime
Java runtime
Includes the files required to either run standalone EAServer Java client
applications on machines without a server installation, or to develop and run
Java applications that use EAServer components.
Typical,
Client Runtime
SSL runtime
Installs the SSL runtime to manage SSL certificates on client installations
including files required to open SSL connections from C++ or Java
application clients, including the standalone client Security Manager.
Installs the EAServer systems management components to support remote
management using JDMK, JMX, and SNMP. See the EAServer System
Administration Guide for more information on this feature.
Installs the ODBC drivers. See “Configuring ODBC” on page 72 for more
information.
Typical,
Client Runtime
System
Management
ODBC
Allows you to configure servers, packages, and components.
Options to install JDK 1.3, 1.4, and 1.5.
Typical,
Client Runtime
Client Runtime
Custom
Typical,
Client Runtime
Note You must install ODBC, or the server will not run.
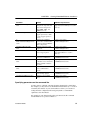
Apache and
iPlanet plugins
Installs Web server plug-ins to integrate EAServer Web applications with
Web sites hosted on popular Web servers—see Chapter 4, “Installing and
Configuring a Web Server Redirector Plug-In.”
Debug server
Includes the debug version of the application server and files required to
manage the server and develop clients and components.
Documentation
Installs online HTML documentation and tutorial files in the EAServer
html/docs subdirectory.
Installs the Open Client™ software—see “Configuring Open Client” on
page 75.
Installs:
Open Client
Tools Support
Typical
Typical
Custom
• PowerBuilder 10.2.1– support for running PowerBuilder 10.2 components
in EAServer.
• PowerDynamo to JSP conversion utility – installs a tool to convert
PowerDynamo Web sites to JSP-based J2EE Web applications.
Installation Guide
5
What to install
Feature
Samples
Web Services
support
Description
Installs the EAServer samples and the Adaptive Server Anywhere database
server and runtime files required by some of the samples, and the tutorials.
Installs Web Services Toolkit. You can choose which components are
installed:
Installation
type
Typical
Typical
• WST runtime installs the files required to run Web services in EAServer.
• WST client runtime installs only the files that are required to run Web
services clients.
• Administration console installs the Web-based Web services
administration tool.
• Eclipse-based development tool installs an Eclipse plug-in to create and
administer Web services, and optionally installs Eclipse.
• Private UDDI server installs the files required to run a private Uniform
Description, Discovery, and Integration (UDDI) server.
See the Web Services Toolkit User’s Guide for more information.
6
EAServer
CH A PTE R
2
Installing EAServer
This chapter explains how to install, upgrade, and uninstall EAServer,
which includes the EAServer application server, its various features, and
Adaptive Server Anywhere (ASA).
Topic
Preinstallation tasks
Page
7
Installing EAServer
Upgrading, reinstalling or adding components
8
13
Installing ASA
Starting EAServer, ASA, and EAServer Manager
16
16
Connecting to EAServer through a Web browser
Installing the CocoBase Enterprise O/R evaluation software
18
19
Uninstalling EAServer
19
Preinstallation tasks
Before you install EAServer:
1
If this is an update of an existing EAServer installation, verify
EAServer 5.x is installed. If you have an earlier version installed,
upgrade to 5.0 before installing 5.5, or install EAServer 5.5 in a
separate location.
2
Read the release bulletins for the latest information on the products
that you are installing. Pay close attention to the “Special Installation
Instructions” section.
Release bulletins are included on the Getting Started CD that is
included with your software. The most recent version is available at
the EAServer Product Manuals site at http://sybooks.sybase.com/.
3
Installation Guide
If you are performing any of the following tasks, review the
instructions in “Upgrading, reinstalling or adding components” on
page 13:
7
Installing EAServer
•
Upgrading your license, for example, from the Developer to the
Advanced Edition
•
Reinstalling EAServer 5.5 or adding components or features to your
installation
4
Verify that you have enough space to install the software. See “System
requirements” on page 2.
5
The installer requires a valid X-Windows configuration. Make sure you
can run the xterm command at the command prompt where you start the
installer.
6
Close any EAServer applications such as “Jaguar CTS” console server
windows, EAServer Manager, and other client applications.
7
Make sure you have at least 150MB of temporary disk space to run the
installation program.
8
(Optional) To view the HTML readme file displayed at the end of the
installation, Netscape must be installed. You can also view the readme file
after the installation completes—see html/docs/readme.htm in your
installation.
Installing EAServer
Installing EAServer takes 10 – 20 minutes, depending on the speed of your
computer.
The setup program installs software in default drives and directories unless you
specify otherwise. If a directory you specify does not exist, the setup program
creates it. The setup program:
8
•
Installs EAServer 5.5 or upgrades an EAServer 5.x installation at the
location you specify.
•
Sets the JAGUAR environment variable to represent the EAServer
installation directory.
•
Checks whether Sybase Central 4.3 has been installed with other Sybase
products or by an existing EAServer 5.5 installation. If the installer finds
a Sybase Central 4.3 installation, it configures the new EAServer
installation to use the existing Sybase Central installation. You cannot
modify this location.
EAServer
CHAPTER 2
❖
Installing EAServer
Installing EAServer
1
Exit any programs that are running. If you do not, the Sybase installer may
not be able to copy some files to the appropriate directories.
2
Insert the EAServer CD in your CD drive. On most machines, the installer
starts automatically. If you suspect that you do not have the required
150MB in your temp space, cancel the installation, and specify an
alternate temporary directory as described in the next step.
3
To start the installer from the command line, change to the CD drive and
enter:
./setup [-is:tempdir work_directory]
Specify the -is:tempdir option if you have less than 150MB in your temp
space. work_directory is the full path to a temporary directory to be used
by the installer.
The installer starts, and the Sybase EAServer 5.5 Install window appears.
4
Click Next in the Install window.
Note Use Back and Next to step backward and forward through the
installation process to modify specifications as necessary.
Select Cancel to halt the installation process.
Installation Guide
5
Select your country or region from the drop-down list to display the
license agreement. You must read and accept the terms of the license
agreement for your country before you can install any Sybase products.
Click Next.
6
The installer checks whether any EAServer processes are running on the
machine. If prompted, shut down EAServer and any EAServer
applications. Click Next.
7
Enter the full path to the directory in which to install EAServer. If this is
an upgrade, enter the full path to the directory in which EAServer 5.x is
installed. Select Upgrade Install to upgrade your installation to 5.5.
9
Installing EAServer
If you have already installed EAServer 5.5, you can select one of the other
options to upgrade your license, add components, or reinstall. For details,
see “Upgrading, reinstalling or adding components” on page 13.
Note The installer searches for a directory identified by the $JAGUAR
environment variable. If located, this is the default directory for upgrading
your installation or adding components.
8
Select the type of installation you want and click Next:
•
Typical – installs EAServer using the most common installation
options.
•
Client Runtime Only – installs the files required to run standalone
EAServer clients.
•
Full – installs everything.
•
Custom – allows you to select specific installation options for
EAServer. After choosing this option, select the server options to
install (for example, debug libraries and the files required to support
SSL clients).
Select the EAServer features to install by placing a check mark next
to the feature.
Note You must install ODBC, or the server will not run.
See “What to install” on page 4 for a list of features that are installed for
each installation type.
9
If you are installing the Advanced Edition, provide the product license
information:
•
Order Number
•
Feature Name
•
Authorization Code
The product license information is provided in your EAServer package on
a printed Sybase certificate. Click Next.
Note If you do not provide the product license information, the installer
will display the message to indicate that the EAServer is installed as the
Workgroup Edition.
10
EAServer
CHAPTER 2
Installing EAServer
10 If you select a custom installation, you can either select a JDK to install or
use a JDK that is already installed on your system. If the installer detects
an existing JDK of the appropriate version, it is displayed as the default
location. Existing JDKs must be of the correct version and patch level, as
described in “JDK versions” on page 3.
Click Next to continue.
11 If you are installing the Web services toolkit Eclipse plug-in, you must
have an Eclipse installation. Choose one of the following options:
•
Select Install New Eclipse and enter the path where to install it to. The
installer places Eclipse version 3.1.2 in an eclipse subdirectory in this
location.
•
Select Use Existing Eclipse to configure your EAServer installation
to use an existing Eclipse installation. Enter the path to the existing
installation, which is Eclipse version 3.1 or 3.1.2, installed in an
eclipse subdirectory in the specified location. Sybase recommends
that you use Eclipse 3.1.2.
Click Next to continue.
12 EAServer Manager and Security Manager require a Sybase Central 4.3
installation. You can share a single Sybase Central 4.3 installation between
multiple EAServer and Adaptive Server Anywhere installations on the
same machine. Choose one of the following options:
•
Select Install New sybcentral43, and enter the path in which to install
it. The installer places Sybase Central version 4.3 in a sybcentral43
subdirectory of this location.
•
Select Use Existing sybcentral43, and enter the path to the existing
installation, which must be Sybase Central version 4.3, installed in a
sybcentral43 subdirectory of the specified location.
Click Next to continue.
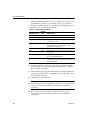
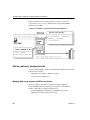
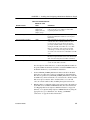
13 If you are creating a new installation, the installer displays port numbers
for the preconfigured EAServer network listeners, as displayed in Table 21. You can edit the ports or accept the default settings. Choose port
numbers that are not used by other servers running on your machine.
You can click “Suggest ports” to test whether any of the specified ports are
in use. The installer tests each port to see if it is used by a running process
or in known EAServer installations on the machine. If a port is in use, the
number is incremented by 100 and tried again.
Installation Guide
11
Installing EAServer
When you click Next, the installer also tests whether ports are in use. After
the installation completes, you can modify or remove preconfigured
listeners as described in Chapter 3, “Creating and Configuring Servers,” in
the EAServer System Administration Guide.
Table 2-1: Default listener settings
Listener name
Default
port
Description
http
https1
8080
8081
For HTTP (Web client connections).
HTTP with SSL security.
https2
8082
iiop
9000
HTTP with SSL security requiring client
certificates to connect.
For IIOP connections. EAServer Manager,
PowerBuilder®, and other standalone client
applications use this protocol.
IIOP with SSL security.
iiops1
9001
iiops2
9002
IIOP with SSL security requiring client certificates
to connect.
tds
7878
Used by clients that use the Methods as Stored
Procedures (MASP) interface.
OpenServer
7979
Used by clients that connect to legacy Sybase
Open Server™ applications that have been adapted
to run in EAServer.
14 The installer displays a summary of the features to be installed and the
installation directory. Review these entries and click Next to continue or
Back to modify your entries.
15 The installer begins copying files and informs you when the installation is
complete. Select Start Server to start EAServer or View Readme to view
the readme file. Click Next.
16 Click Finish to exit the installer.
Note If you started the installer by allowing it to launch automatically
after inserting the CD, or by clicking the setup icon in your graphical file
manager, close the terminal window labeled Run after exiting the
installation.
17 For each of the following products you choose to install, see the
corresponding section for additional installation and configuration
instructions:
12
EAServer
CHAPTER 2
Network installation
Installing EAServer
•
ASA support – “Installing ASA” on page 16. To run the sample
applications and tutorials, you must install ASA.
•
Any of the Web server redirector plug-ins (Apache or iPlanet) –
Chapter 4, “Installing and Configuring a Web Server Redirector
Plug-In.”
•
ODBC and Open Client – Chapter 5, “Configuring Open Client and
ODBC for EAServer.”
•
Web Services Toolkit – Web Services Toolkit is automatically
installed when the feature is selected.
If you are a system administrator, you may want to allow users to install
EAServer from a network drive rather than from the CD. To do this, copy the
files from each CD to a separate directory on a network drive and note the
location. During installation, the user is prompted to specify the directory
location for each CD.
Upgrading, reinstalling or adding components
This section describes how to upgrade your license and add or reinstall
components to a current version installation. If you are installing or upgrading
to the Advanced Edition of EAServer, make sure you have the EAServer 5.5
product license information available before you run the setup program. The
license management certificate is enclosed in an envelope in the shipping box.
If you do not enter any license information, the server defaults to the
Workgroup Edition. Incorrect license values are not supported; the installer
does not proceed with incorrect values.
To proceed, run the setup program as described in “Installing EAServer” on
page 8, and select an installation directory that contains an EAServer
installation. Depending on the version of the installation that is detected, you
are prompted with one or more of these options:
Installation Guide
•
Upgrade license – allows you to upgrade an existing EAServer 5.5
installation by providing different license information.
•
Add components – allows you to add components or features to an existing
EAServer 5.5 installation.
•
Reinstall – allows you to reinstall EAServer 5.5 over an existing EAServer
5.5 installation.
13
Upgrading, reinstalling or adding components
Each of these procedures is described below.
Installation directory You must select the EAServer installation directory,
and not the upper-level Sybase location to properly upgrade, add components,
or reinstall EAServer. For example, if you selected /work/sybase as your
original installation directory, the default EAServer installation directory is
/work/sybase/EAServer. When you upgrade, add components, or reinstall
EAServer, enter /work/sybase/EAServer as the installation directory you are
upgrading.
❖
❖
❖
Upgrading your license
1
Select the Upgrade License option to upgrade your license. Click Next.
2
Provide the order number, feature name, and authorization code, which are
located on the license management certificate enclosed in an envelope in
the shipping box. Click Next.
3
The installer displays a message stating the license has been successfully
upgraded. Click Finish.
Adding components
1
Select Add Components to add components to an existing EAServer 5.5
installation. Click Next.
2
The installer prompts you for the type of installation to which you will add
components: Client Runtime Only or Custom. Select Client Runtime Only
if you are adding components to a client installation. Select Custom for all
other types of installations. Click Next.
3
The installer indicates the components that are already installed by placing
(installed) next to those components. Select the components to add.
4
Verify that the EAServer directory is correct and that the features being
added are correct. Click Next.
5
The installer starts adding components to the installation. You may be
prompted to overwrite existing files. Click Yes to continue.
6
When the components have been added, the installer displays a message
that EAServer has been successfully installed. Click Finish.
Reinstalling EAServer
1
14
Select Reinstall to reinstall EAServer 5.5 over an existing EAServer 5.5
installation.
EAServer
CHAPTER 2
Installing EAServer
2
The installer prompts you for the type of reinstallation: Typical, Client
Runtime Only, Full, or Custom. If you select Typical or Full installation
type, a default set of features is reinstalled. Custom and Client Runtime
Only allow you to modify your selections. Click Next.
3
For Custom and Client Runtime Only reinstallations, place a check mark
next to the components to reinstall. The installer indicates the components
that are already installed by displaying “installed” next to those
components.
4
The installer displays a message when EAServer has been successfully
reinstalled. Select Start Server to start the server or View Readme to
display the readme file. Click Next.
5
Click Finish to exit the installer.
Upgrading the message service
See Chapter 8, “Setting Up the Message Service,” in the EAServer System
Administration Guide for information about upgrading the message service.
Preserving JDK customizations
When upgrading, if you have customized the JDK installation used by
EAServer, you may need to apply the customizations again. Your options are:
•
If the existing JDK is at the correct patch level, choose the Custom option
when installing. The installer prompts for the location of your existing
JDK and configures EAServer to use it. See “JDK versions” on page 3 for
more information.
•
If the existing JDK is not at the correct patch level, install a new JDK
version from the CD and reapply your customizations.
Settings preserved during upgrade
The following entity types are not modified by an upgrade installation:
Installation Guide
•
Connection caches
•
Listeners
15
Installing ASA
•
Instance pools
•
Servers
•
SSL certificates
To take advantage of new functionality, you may need to modify settings. For
example, for listeners you can use {$JAGUAR_HOST_NAME} to specify the host
value. This is the default value for new installs, but for upgrades, the existing
values are preserved.
Systems Management options
Systems Management version 5.5 is described in Chapter 13, “Using Systems
Management,” in the EAServer System Administration Guide.
Installing ASA
As part of the EAServer installation, ASA is automatically installed in the
shared/SYBSasa9 subdirectory of the installation.
To run ASA, see “Starting EAServer, ASA, and EAServer Manager” on page
16.
Changing the
setenv.sh file
If you have a separate ASA installation, you can use it by setting the SQLANY
environment variable. Make a copy of the /bin/setenv.sh file, located in the
EAServer directory. Edit and source this new file. Sybase recommends that you
do not modify the setenv.sh file directly.
In the “Set SQLAnywhere variables” section, change the setting of the
SQLANY environment variable to point to your ASA installation; for
example:
SQLANY=/work/share/SYBSasa9 export SQLANY
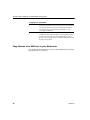
Starting EAServer, ASA, and EAServer Manager
This section describes how to start EAServer, EAServer Manager, and the ASA
database.
16
EAServer
CHAPTER 2
❖
Installing EAServer
Starting the server
•
Change to the EAServer bin directory, and run serverstart; for example:
cd /work/Sybase/EAServer/bin
serverstart.sh
The server starts and runs as a foreground process in the current console
window. To start the server in a separate window, use the -xterm option;
for example:
cd /work/Sybase/EAServer/bin
serverstart.sh -xterm
To use this option, you must have installed and configured X-Windows;
the xterm command must successfully launch a terminal window in the
shell where you start the server.
❖
Starting Adaptive Server Anywhere
After you have started EAServer, you must start ASA before you can run the
sample application.
1
Make sure the xterm utility runs in your environment.
2
To start the ASA database server in a new X-terminal window, run:
$JAGUAR/bin/start_sampledb
To run the database server in the same window, run:
$JAGUAR/bin/sampledb.sh
❖
Starting EAServer Manager
EAServer Manager allows you to configure servers, packages, and
components. EAServer Manager runs as a plug-in to Sybase Central. To start
Sybase Central and EAServer Manager:
1
Change to $JAGUAR/bin and enter:
jagmgr
Installation Guide
2
In the Sybase Central window, select Tools | Connect.
3
In the New Connection dialog box, select EAServer Manager, and click
OK.
4
On the connection screen, enter:
•
User Name – jagadmin
•
Password – leave blank
17
Connecting to EAServer through a Web browser
You need not provide a password for jagadmin unless one has been
established. See “Administration password and OS authentication” in
the EAServer Security Administration and Programming Guide for
information on establishing a jagadmin password.
•
Host Name: your machine name or the name of the proxy host if you
have selected the Use Proxy check box.
•
Port Number: your IIOP port number; the default is 9000. Or the
proxy port number if you have selected the Use Proxy check box.
•
Use Proxy – If you are connecting to an EAServer that is located
behind a firewall, and your EAServer Manager host is on the other
side of the firewall, select this option to use a proxy or Network
Address Translation (NAT) router to connect. If selected, supply
router or NAT information in the Host Name and Port Number fields.
5
Click Connect.
6
Double-click the EAServer Manager icon to view the property folders.
Note When you install EAServer, the default host name for all listeners is set
to the name of the host machine and the default IIOP port number to 9000.
After connecting to EAServer, you can use EAServer Manager to edit the
listener properties and change the default host name and port numbers. Some
of the sample programs use “localhost” as the host name when connecting to
EAServer. See “Configuring listeners” in Chapter 3, “Creating and
Configuring Servers,” in the EAServer System Administration Guide for more
information.
Connecting to EAServer through a Web browser
EAServer provides built-in HTTP (Web) server support, preconfigured to run
on port 8080.
❖
Connecting to EAServer through a Web browser
•
From your Web browser, open this URL:
http://host:http-port
Where:
18
EAServer
CHAPTER 2
Installing EAServer
•
host – is the name of your machine.
•
http-port – is the port number at which EAServer accepts HTTP
connections (the default is 8080).
After you connect to EAServer, you can view user documentation and run the
EAServer samples. ASA must be installed to run the samples.
Installing the CocoBase Enterprise O/R evaluation
software
EAServer 5.5 includes an evaluation version of CocoBase® Enterprise
Object/Relational mapping software from Thought Inc. To install CocoBase,
insert or mount the CD, then change to the CocoBaseEval directory on the CD.
Run the CocoBase Java installer with the Java interpreter, for example:
setenv CLASSPATH .
java install_cocobase4_0207
This directory also includes CocoBase tutorials for EAServer, provided by
Thought Inc. For additional CocoBase documentation and tutorials, see the
Thought Inc. Web site at http://www.thoughtinc.com/.
Uninstalling EAServer
When you install EAServer, the installer creates a $JAGUAR/_uninstall
directory that contains the EASuninstall executable used to uninstall EAServer.
❖
Running uninstall
1
Verify that EAServer is shut down before you run EASuninstall.
2
If you plan to reinstall EAServer, make backup copies of files you may
want to reuse, such as the DB, INI, PBL files.
3
From the $JAGUAR/_uninstall directory, enter:
./EASuninstall
This launches the Sybase uninstaller. Click Next.
Installation Guide
19
Uninstalling EAServer
4
To view the features you are uninstalling, select View the Uninstall
Summary Panel. Review your selections and click Next.
5
If the installation process created a new installation of Sybase Central 4.3,
you can remove it. Do not remove Sybase Central if it is used by other
EAServer 5.x installations or other Sybase products. To remove Sybase
Central, select this option. Click Next.
6
If you selected the View the Uninstall Summary Panel check box, the
features to be uninstalled are displayed. Review the list and click Next.
7
The uninstaller displays a message when it has uninstalled EAServer.
Click Finish.
Note The uninstall program does not remove any server- or user-created files
from an installation upgrade, such as log files, repository files, stubs, skeletons,
and temporary work files, or backup files created during the installation
process. You can manually remove these files after running the uninstaller.
20
EAServer
CH A PTE R
Creating Embedded EAServer
Installations
3
You can silently run the EAServer installer. If you are packaging
EAServer with your own software, you may want to create a scripted
EAServer installer that runs as a subinstall of your own installation
procedure, so your end users install EAServer without any installer
interaction.
Additionally, EAServer provides tools for scripted configuration of the
installation, including customization of server properties, and installation
of your own components and application files to EAServer.
Topic
Configuring and running the silent installer
Post-installation configuration
Page
21
34
Configuring and running the silent installer
The silent installer is a Java program. The installation CD contains a
sample batch file to run the install with the correct JRE and CLASSPATH
settings. An additional text file specifies the installation type and options.
These instructions assume that you will include the EAServer install files
and customized installer scripts with the install media for your own
software.
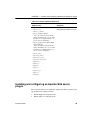
❖
Installation Guide
Configuring the silent installer
1
Create a directory for your install image.
2
Copy the following files from the EAServer installation CD to your
install image:
•
EAS550.jar.
•
readme.htm (optional; if you are installing the HTML
documentation, this file contains additional documentation).
21
Configuring and running the silent installer
•
libjinstaller.so.
•
The JRE_1_4 subdirectory and its contents. Sybase recommends that
you use this JRE to run the install. Other JRE versions may not work
as well.
•
If you have the Developer or Workgroup Edition, copy
SYBASE_EAS.lic from the root directory of the EAServer CD to the
root directory of your install image.
•
If your silent installation process is going to upgrade an earlier
EAServer installation, copy the following files and directories,
preserving the relative path structure:
•
SupportGeneric/Upgrade directory and contents
•
SupportLinux/Upgrade directory and contents
3
Create configuration and run files as described in “Configuration and run
files” on page 23. Copy any required additional files from the EAServer
CD to your install image, as described in that section.
4
To support the silent uninstallation process, create the files described in
“Silent uninstaller files” on page 32.
Preserving the vpd.properties file You may make a few errors when
creating and testing your silent installation. Cleanup of failed installations
requires that you delete the InstallShield vpd.properties file. This file may be
required by the installers for other applications. Before testing your
installation, back up the following file and restore it before installing or
upgrading other software: ~/vpd.properties.
❖
Testing and running the silent installer
1
22
Before running a silent installation, make sure you:
a
Have enough space in your temporary and product directories. See
“System requirements” on page 2. If necessary, you can edit the shell
script that runs the install and change the temporary directory location
specified for the -Dtemp.dir command line option.
b
If your home directory contains an InstallShield vpd.properties file,
make a backup copy. If you run the installer using a different user ID,
check for this file in the home directory of that user ID and back it up
if it exists.
EAServer
CHAPTER 3
c
Creating Embedded EAServer Installations
For all upgrades, stop EAServer applications such as “Jaguar CTS”
terminal windows, EAServer Manager, and server processes that you
have started in the background. You can shut down servers that are
running in the background using EAServer Manager or jagtool (after
connecting to the server to be shut down), or by killing the process ID
that is running the serverstart.sh or jagsrv command.
2
Test the silent installer using the run script that you created at the
command line or in your own product’s installation script. Running a silent
installation takes 10 – 20 minutes, depending on the speed of your
computer.
3
After each trial run, check for errors, and clean up your machine as
described in “Troubleshooting and cleanup of the silent installer” on page
33.
Configuration and run files
In a silent installation, users cannot input information or choices. You must
supply all required information in a configuration file or on the command line.
The EAServer installation script contains a sample configuration file,
SilentInstall_Unix.txt. The shell script SilentInstall_Unix.sh runs the install
with this configuration. Start with copies of these files and modify them to suit
your installation.
Place your configuration file and run script in the root directory of your install
image. Edit the run script to refer to the file name you are using for your
configuration file. You may need to change the temporary directory location
specified for the -Dtemp.dir command line option. This directory must have
enough space for the installer’s temporary work files, as described in “System
requirements” on page 2.
Edit the configuration file to customize the installation as described below.
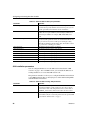
Installation logging parameters
For troubleshooting purposes, you can enable logging for the installer by
setting the parameters in Table 3-1.
Table 3-1: Parameters to enable logging of installation activity
Parameter
Specifies
-W EASInstallLog.active
Whether logging is enabled. Set to True to enable logging and False to
disable.
Installation Guide
23
Configuring and running the silent installer
Parameter
Specifies
-W EASInstallLog.logOutput
The directory and file name for the log file. The default is:
$D(temp)/EAS550Install.log
-W EASInstallLog.isLogAllEvents
This specifies eas550install.log in the /tmp directory.
Whether to log all messages or only errors and warnings. Specify True
to log all messages, and False to log only warnings and errors.
Installation types
Set the -W SilentInstallType.value parameter to specify the installation
scenario; that is, whether you are upgrading from EAServer 5.0 to 5.5, adding
additional features to an existing 5.5 installation, or installing a new version of
5.5. Table 3-2 lists allowable values.
Table 3-2: Installation types
Value
Scenario
InstallFull
Create a new installation, or install additional features to an existing EAServer 5.5
installation. The features you select are installed or reinstalled.
InstallUpgrade
Upgrade from an earlier version of EAServer. The features you select are installed or
reinstalled. Select the features that match the existing installation. For example, if the
debug server files are installed, you must select this option to upgrade those files.
InstallLicense
Update the EAServer 5.5 license with new license keys. Use this option to upgrade from
one edition of EAServer to another, for example, from the Developer Edition to the
Advanced Edition.
When running with this option, the installer creates or modifies the license file only. No
other files are installed.
Installation location
Set the -W SilentInstallLocation.value to specify the installation
location. For new installations (installation type is InstallFull), this
directory is created if it does not exist, and files are installed in the following
subdirectories of the specified directory:
•
EAServer contains EAServer runtime files.
•
shared contains files such as the JDK installations. These include files
used by EAServer that can be shared with other applications.
For installations that add features to an existing EAServer 5.5 installation
(installation type is InstallFull) and installations that upgrade the license
(installation type is InstallLicense), specify the location where EAServer is
installed; in other words, the value of the JAGUAR environment variable.
24
EAServer
CHAPTER 3
Creating Embedded EAServer Installations
For upgrade installations (installation type is InstallUpgrade), specify the
location of the previous installation, as specified by the JAGUAR environment
variable for the installation.
The default value is $D(install)/sybase, which specifies the directory
/opt/sybase.
License agreement
For the silent installation to run, change the value of
-W SybaseLicense.agreeToLicense from False to True, indicating that you
have read and agreed to the software license agreement. You can view the
license text by running the interactive installation or on the Sybase Web site at
http://www.sybase.com/softwarelicenses.
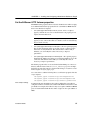
Listener ports
EAServer includes several preconfigured network listeners for the supported
protocols. For new installations, configure the listener ports by setting the
parameters listed in Table 3-3 on page 26. These settings are ignored if you are
upgrading an existing installation. You can also configure these settings after
the installation completes using EAServer Manager or jagtool as described in
the EAServer System Administration Guide.
The installer checks to see if the specified ports are already in use. You can
configure the installer to either ignore port conflicts or to scan for free ports.
For example, these settings configure the installer to not scan for free ports and
to ignore conflicts:
-W PortScan.silentResolvePortConflict=False
-W PortScan.silentIgnorePortConflict=True
To scan for free ports and write the port numbers to the log file
eas_install.props, use these settings:
-W InstallLogFilename.value="$W(SilentInstallLocation.value)\EAServer\eas_ins
tall.props"
-W PortScan.silentResolvePortConflict=True
-W PortScan.silentIgnorePortConflict=False
These settings create the log file as eas_install.props in the installation
location. You can modify the file name and location by editing the value of the
-W InstallLogFilename.value parameter.
Installation Guide
25
Configuring and running the silent installer
Table 3-3: Silent installer listener port parameters
Parameter
-W InstallLogFilename.value
-W PortScan.silentResolvePortConflict
Specifies
The name and path of a log file where the listener port numbers are
recorded. If you specify automatic detection of free ports, you can
read the port numbers from this file after the installation.
Whether to scan for unused ports if a specified port is in use. The
installer tries new port numbers by incrementing by 100 between
each tested port number, for example, 9000, 9100, 9200, and so
forth.
-W PortScan.silentIgnorePortConflict
Whether to allow the installation to continue if a specified port is in
use. If you set this parameter to False, the installer fails with an error
if a port is in use. If you have enabled port scanning by setting
-W PortScan.silentResolvePortConflict to True, the installer scans for
free ports before evaluating port conflicts.
-W PortScan.iiop
The initial port for the Jaguar_iiop listener.
The initial port for the Jaguar_iiops1 listener.
-W PortScan.iiops1
The initial port for the Jaguar_iiops2 listener.
The initial port for the Jaguar_http listener.
-W PortScan.iiops2
-W PortScan.http
The initial port for the Jaguar_https1 listener.
The initial port for the Jaguar_https2 listener.
-W PortScan.https1
-W PortScan.https2
The initial port for the Jaguar_tds listener.
The initial port for the Jaguar_OpenServer listener.
-W PortScan.tds
-W PortScan.OpenServer
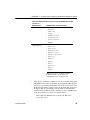
JDK installation parameters
You can configure EAServer to use the JDK versions described in “JDK
versions” on page 3. For each JDK version, you can install the JDK, use an
existing installation, or not use that JDK version at all.
The parameters in Table 3-4 allow you to configure the EAServer installation
to use JDK installations that are already in place, rather than installing JDKs
with the EAServer installation.
Table 3-4: Silent installer existing JDK parameters
Parameter
-W SilentEASJDK13installed.value
-W SilentEASJDK13Location.value
26
Specifies
Whether to use an existing JDK 1.3 installation to run servers. To use
an existing installation, set this parameter to Yes and specify the
location as the value of the next parameter. Also, set the value of
EASJDK13_server.active to False in the feature selection section.
If you are using an existing JDK 1.3 installation, the location where
it is installed. Verify the version and patch level of the specified JDK
as described in “JDK versions” on page 3.
EAServer
CHAPTER 3
Creating Embedded EAServer Installations
Parameter
Specifies
-W SilentEASJDK14installed.value
Whether to use an existing JDK 1.4 installation to run servers with.
To use an existing installation, set this parameter to Yes and specify
the location as the value of the next parameter. Also, set the value of
EASJDK14_server.active to False in the feature selection section.
If you are using an existing JDK 1.4 installation, the location where
it is installed. Verify the version and patch level of the specified JDK
as described in “JDK versions” on page 3.
-W SilentEASJDK14Location.value
-W SilentEASJDK15installed.value
-W SilentEASJDK15Location.value
Whether to use an existing JDK 1.5 installation to run servers with.
To use an existing installation, set this parameter to Yes and specify
the location as the value of the next parameter. Also, set the value of
EASJDK15_server.active to False in the feature selection section.
If you are using an existing JDK 1.5 installation, the location where
it is installed. Verify the version and patch level of the specified JDK
as described in “JDK versions” on page 3.
To install a JDK from your install image, enable the feature parameter for that
JDK and include the required files in your image, as listed in Table 3-5.
Table 3-5: Parameters to install JDKs
Parameter
Specifies
Comments
-P EASJDK.active
Whether to install any JDKs
from the install image
Must be set to True or the next three
parameters are ignored.
-P EASJDK13_server.active
Whether to install JDK 1.3
To install, your image must have the file
SupportLinux/EAS_jars/EAS_jdk13.jar.
-P EASJDK14_server.active
Whether to install JDK 1.4
-P EASJDK15_server.active
Whether to install JDK 1.5
To install, your image must have the file
SupportLinux/EAS_jars/EAS_jdk14.jar.
To install, your image must have the file
SupportLinux/EAS_jars/EAS_jdk15.jar.
License input parameters
Unless you are installing the Developer or Workgroup Edition, you must input
the license codes for the silent install. If you do not specify license codes, the
server is constrained to the feature set of the Workgroup Edition.
Set the parameters in Table 3-6 to define the license. These values are supplied
with the license certificate that comes with your software.
Table 3-6: License input parameters
Parameter
Installation Guide
-W LicenseOrderNumber.value
Set the value to
License order number
-W LicenseFeatureName.value
License feature name
27
Configuring and running the silent installer
Parameter
Set the value to
-W LicenseAuthorizationNumber.value
License authorization code
Sybase Central installation parameters
EAServer Manager and Security Manager require a Sybase Central 4.3
installation. You can share a single Sybase Central 4.3 installation between
multiple EAServer and Sybase Adaptive Server Anywhere installations on the
same machine. Configure the options in Table 3-7 to specify whether to install
a new copy of Sybase Central 4.3 and where the installation resides (or will
reside).
Table 3-7: Sybase Central installation parameters
Parameter
-W SilentInstallSybcent.value
-W SilentSybcentLocation.value
Set the value to
True to install a new copy of Sybase
Central 4.3, or False to use an existing
copy.
The full path where Sybase Central is or
will be installed, that is, the directory that
contains the sybcent43 subdirectory.
For example, to use an existing install located in /opt/sybase/sybcent43, set
these parameters to:
-W SilentInstallSybcent.value="false"
-W SilentSybcentLocation.value="/opt/sybase"
To install a new copy to /opt/Sybase/EAServer/sybcent43, set these parameters
to:
-W SilentInstallSybcent.value="true"
-W SilentSybcentLocation.value="/opt/Sybase/EAServer"
To install a new copy of Sybase Central 4.3, your installer must include the
directory SupportLinux/sybcent43 and its contents.
Feature selection parameters
These parameters specify which optional features should be installed. Table 38 lists the parameters that select which EAServer features are installed. Each
parameter requires a value. Specify True to install the feature or False to not
install the feature.
28
EAServer
CHAPTER 3
Creating Embedded EAServer Installations
Some features have a parent-child relationship (shown by indentation in the
sample installation script). To install child features, you must enable both the
parent feature and the child feature.
Some features require additional files to be added to your installation image, as
listed in Table 3-8. If you enable these features, add the required files to your
image by copying them from the EAServer installation CD. Paths within your
install image must match those listed in Table 3-8.
Table 3-8: Feature selection parameters
Parameter
-P EASServer.active
-P EASCoreServerFiles.active
Feature
Parent feature for several core
server and client install
features.
Files required to run servers and
EAServer Manager.
Additional requirements
Requires parent feature
-P EASServer.active.
Requires file
SupportLinux/EAS_jars/EAS_mgr.jar.
-P EASLocales.active
-P EASLocales_cn.active
where cn is the abbreviation for a
supported locale, such as ge for
German, fr for French, or ja for
Japanese.
-P EASOptionalCharsets.active
-P EAScharset.active
where charset is the name of a
supported character set.
-P EASRuntimeLibraries.active
-P EASCppRuntime.active
-P EASJavaRuntime.active
-P EASSSLRuntime.active
Installation Guide
Parent feature to install
additional locales besides
English.
-P EASServer.active.
Installs files to support running
the server and tools in the
specified locale.
-P EASLocales.active.
Parent feature to install
additional character sets.
Installs files to support running
the server with the specified
character set.
Parent feature for client runtime
libraries. No runtime libraries
are installed unless set to True.
Installs the C++ client runtime
files.
Installs the Java client runtime
files.
Installs files required to use
SSL in client-only installations.
Requires parent feature
Requires parent feature
The example silent install configuration
file lists parameters for each supported
locale.
Requires parent feature
-P EASServer.active.
Requires parent feature -P
EASOptionalCharsets.active.
The example silent install configuration
file lists parameters for each supported
character set.
Requires parent feature
-P EASServer.active.
Requires parent feature
-P EASRuntimeLibraries.active.
Requires parent feature
-P EASRuntimeLibraries.active.
Requires parent feature
-P EASRuntimeLibraries.active.
29
Configuring and running the silent installer
Parameter
Feature
Additional requirements
-P EASODBC.active
Installs ODBC driver manager
and driver files. Required to run
servers (even if you do not use
ODBC connections).
Requires parent feature
-P EASServer.active.
Required for server installs
Requires file SupportLinux/EAS_jars/
EAS_unixodbc.jar.
Requires parent feature
-P EASServer.active.
-P EASWebServerPlugins.active
Parent feature for Web server
plug-in files. No Web server
plug-ins are installed unless set
to True.
-P EASApachePlugin.active
The Apache Web server
redirector plug-in.
-P EASWebServerPlugins.active.
The iPlanet Web server
redirector plug-in.
-P EASWebServerPlugins.active.
-P EASiPlanetPlugin.active
Requires parent feature
Requires parent feature
-P EASDebugServer.active
Installs binaries and libraries
required to run the debug
server.
Requires file
SupportLinux/EAS_jars/EAS_debug.jar.
-P EASDocumentation.active
Installs EAServer
documentation in HTML
format in the server’s default
document root location.
Installs files required to run
EAServer Manager and
Security Manager.
Requires file SupportLinux/Linuxdocs/
eas5lnxdoc.jar.
-P EASJDK.active
See “JDK installation
parameters” on page 26.
See “JDK installation parameters” on
page 26.
-P EASOpenClient.active
Installs Sybase Open Client
libraries and support files
(required to use ODBC
connection caches that connect
to Sybase databases if you do
not have Open Client installed
already).
Installs sample programs and
the Adaptive Server Anywhere
database software (for use with
the samples).
Requires file SupportLinux/EAS_jars/
EAS_openclient.jar.
-P EASJaguarManager.active
-P EASSamples.active
Requires file
SupportLinux/EAS_jars/EAS_mgr.jar.
Also set the options described in “Sybase
Central installation parameters” on page
28.
Requires files:
• SupportGeneric/sample (entire
directory)
• SupportLinux/EAS_jars/EAS_sample.jar
• SupportLinux/ASA902 (entire
directory)
30
EAServer
CHAPTER 3
Creating Embedded EAServer Installations
Parameter
Feature
Additional requirements
-P EASSystemManagement.
active
Installs the EAServer systems
management components that
allow remote management
using JDMK-, JMX-, and
SNMP-based tools.
Requires directory
SupportLinux/SystemManagement (entire
directory).
-P EASToolsSupport.active
Parent option for the tools
support option. If set to False,
the tools support options are
ignored.
Installs the PowerBuilder
version 10.2.1 virtual machine
(required to run PowerBuilder
10.2.1 components).
-P
EASPowerBuilderv10SupportLinux
.active
Installs PowerDynamo2JSP
component.
Parent feature for the Web
services support options.
-P EASPowerDynamo2JSP.
active
-P EASWebServices.active
Installs files required to run
Web services in EAServer.
Installs only the files required
to run Web services clients. The
runtime installation includes
these files.
-P EASWSTRuntime.active
-P EASWSTClientRuntime.
active
-P EASAdministrationConsole.
active
-P EASEclipseDevTool.active
-P EASPrivateUDDIServer.active
Installs the Web-based Web
services administration
console.
Installs the Sybase Web
services Eclipse plug-in.
Installs the private UDDI
server.
Requires parent feature
-P EASToolsSupport.active.
Requires parent feature
-P EASToolsSupport.active.
Requires directory
SupportLinux/WebServices (entire
directory).
Requires parent feature
-P EASWebServices.active.
Requires parent feature
-P EASWebServices.active.
Requires parent feature
-P EASWebServices.active.
Requires parent feature
-P EASWebServices.active.
Requires parent feature
-P EASWebServices.active.
Specifying parameters on the command line
You may want to configure some install settings dynamically at install time.
For example, you may want to set the EAServer install directory to a location
selected by the end user of your own installer. To do this, you can remove
settings from the configuration file and specify them as command line
arguments to the silent install.
For example, if your silent install script is SilentInstall.sh, this command
installs EAServer to /opt/Sybase/EAServer:
Installation Guide
31
Configuring and running the silent installer
SilentInstall.sh -W "SilentInstallLocation.value=/opt/Sybase/EAServer"
You must also remove the equivalent settings from the silent install
configuration file.
Silent uninstaller files
You can configure the silent installer to support silent uninstallation, which
creates a script your users can run to silently remove the installation from their
system. The silent uninstaller requires:
•
The EASuninstall.jar and EASuninstall.dat files that are created when
users run the install. The JAR file contains the Java uninstallation
program, and the .dat file contains data about installed features. These files
are installed in the $JAGUAR/_uninstall directory.
•
A JRE installation of the same version as found on the EAServer install
CD. The installer installs a suitable JRE in the $JAGUAR/_jvm directory.
•
The files SilentUninstall_Unix.txt and SilentUninstall_Unix.sh. If these
are present in the root directory of your silent installer, they are copied to
the $JAGUAR/_uninstall directory when users run the install. You must
prepare these files as described below before you release your silent
installer to your users.
SilentUninstall_Unix.txt
A sample of this file is provided on the EAServer installation CD. However, it
does not run unless you edit the copy placed in your install image. This file
configures the features to uninstall, using syntax similar to the options
described in “Feature selection parameters” on page 28. To remove
everything, set all the feature options to True. For a partial uninstallation,
change the feature options to False for those features that you do not want to
remove.
Note Some feature options in SilentUninstall_Unix.txt have a parent-child
relationship, indicated by indentation in the sample file. To uninstall a parent
feature, the parent feature and all child features must be set to True in
SilentUninstall_Unix.txt.
32
EAServer
CHAPTER 3
Creating Embedded EAServer Installations
SilentUninstall_Unix.sh
Users of your installation run this file to remove the installation from their
system. A sample of this file is on the EAServer installation CD. Place a copy
in your install image, and verify the following, keeping in mind that the file is
run from the EAServer _uninstall directory:
•
The CLASSPATH includes EASuninstall.jar (located in the same
directory).
•
The java command line specifies the path to a java executable of the same
version as supplied on the EAServer software CD. You can run the
uninstall with the JRE that is installed in the _jvm subdirectory of the
installation, for example:
../_jvm/bin/java -classpath $CLASSPATH -Dtemp.dir=/tmp run \
-options SilentUninstall_Unix.txt
You may need to change the directory specified for temporary work files,
specified by the -D temp.dir command line option.
The uninstaller does not remove all files. Files created after the install was run
are not deleted, including log files, property and resource files updated at
runtime, and any application files that you have created in the EAServer
directory. After uninstalling, remove these files manually.
Troubleshooting and cleanup of the silent installer
After a trial run of your silent install, check for errors, verify the installation,
and clean up the machine before trying another run.
Checking for errors
Check for installer errors on the console and in the installer log file in the
specified install location. If you see ZipException errors, make sure you have
included all required files in the install image.
Testing the install
When testing your install results, start a server in the installation and verify that
the expected features are licensed by checking the licensed features listed in the
server log file. If not, verify that you have configured the license parameters
described in “License input parameters” on page 27.
Installation Guide
33
Post-installation configuration
Test any other features that you are installing, such as EAServer Manager, Web
Services, and so forth.
Cleaning up the machine
Before re-running the silent installation, uninstall the previous installation
using the graphical or silent uninstaller. For graphical uninstaller instructions,
see “Uninstalling EAServer” on page 19. For silent uninstaller instructions,
see “Silent uninstaller files” on page 32.
If your installer was not configured correctly, or you abort the install before it
completes, the uninstallation process may fail. In that case, clean the previous
installation from your machine as follows:
1
Delete the EAServer installation directory and subdirectories.
2
If you made a backup copy of the ~/vpd.properties file, restore it.
Otherwise, delete the ~/vpd.properties file that was generated during the
install.
3
Make sure the JAGUAR environment variable is not set in the shell where
you re-run the install.
Post-installation configuration
EAServer provides several options for scripted automated configuration of
server properties and application components:
•
jagtool is a command line configuration program that you can call from
install scripts or batch files.
•
jagant allows you to configure EAServer from Jakarta Ant scripts.
•
You can call the Jaguar::Management and Jaguar::Repository APIs from
Java or C++ programs to configure EAServer.
For information on jagtool and jagant, see “Using jagtool and jagant” in the
EAServer System Administration Guide. For information on the
Jaguar::Management and Jaguar::Repository APIs, see the generated HTML
reference documentation in the html/ir subdirectory of your installation.
34
EAServer
CHAPTER 3
Creating Embedded EAServer Installations
You can call these tools and APIs from your installation script or install
program to configure the server and install application components. For
example, you might install your own components by importing them as Jaguar
JAR files with the jagtool or jagant deploy command, then use the install
command to install the components to the preconfigured Jaguar server. You
might also use the create command to define connection caches.
EAServer allows you to run jagtool and jagant in standalone mode. This feature
allows you to configure your installation without starting a server. For details,
see What’s New in EAServer.
There are some jagtool and jagant commands that you cannot run in standalone
mode; they require a connection to a server process. You can make your
installer launch the preconfigured Jaguar server during installation. The
EAServer System Administration Guide describes the command line syntax for
starting the server.
Most tasks that you can accomplish manually in EAServer Manager can be
automated using jagtool, jagant, or the Jaguar::Management and
Jaguar::Repository APIs. The automated tools and APIs support an additional
feature that can be useful for configuring embedded EAServer installations:
entity collections.
An entity collection allows you to create a single JAR file that contains a server
configuration, connection cache configurations, components, Web
applications, and all other entities required to run your application. For
information on creating entity collections, see the “Entity collection
properties” reference pages in the EAServer System Administration Guide,
Appendix B, “Repository Properties Reference.”
To create a deployable JAR file containing the entity collection, use the jagtool
export command. At install time, you can use the jagtool deploy command to
install the entity collection into the EAServer repository.
You can install additional required files as part of the entity collection, such as
the shell script that runs your server (in the EAServer bin directory), and JAR
files that contain utility Java classes or JDBC drivers (in the EAServer java/lib
directory). To add files to an entity collection, list them in the
com.sybase.jaguar.entitycollection.files property; they are installed when you
deploy the entity collection JAR file.
To simplify listener configuration for embedded installations, use
${JAGUAR_HOST_NAME} as the host name property value for listeners. The
machine name is substituted for this value when you start the server. You can
also use ${JAGUAR_IP_ADDRESS}, which substitutes for the machine’s IP
address.
Installation Guide
35
Post-installation configuration
36
EAServer
CH A PTE R
4
Installing and Configuring a Web
Server Redirector Plug-In
The Web server redirector plug-in allows communication between the
Web server and the EAServer HTTP and HTTPS protocol listeners.
Topic
Overview
Installing and configuring an iPlanet Web server plug-in
Page
37
43
Installing and configuring an Apache Web server plug-in
Configuring EAServer to accept Web server requests
49
56
Configuring HTTPS support for Web server plug-ins
Adding FIPS and TLS support to the Web server redirector plug-ins
58
64
Overview
The EAServer application server hosts Web applications, and functions as
a Web server. The redirector plug-in is installed on the Web server host,
which allows you to send client requests directly to the Web server. The
Web server forwards requests that need to access EAServer servlets, JSPs,
and so on, to EAServer. EAServer processes the requests and returns the
results back to the Web server.
You can establish HTTPS (HTTP over SSL) connections between your
Web server redirector and EAServer. This provides an SSL
communication link, including data integrity and encryption services; it
does not support authentication services using client-side certificates.
The Web servers for which a redirector plug-in is available for HTTP and
HTTPS connections are:
Installation Guide
•
Apache 1.3.26 and 2.0
•
iPlanet 4.x
37
Overview
iPlanet 6.0 requires Red Hat 4.0 To use the redirector plug-in for either the
iPlanet 6.0, you must be running on Red Hat Advanced server 4.0. These Web
servers do not support either Red Hat Advanced server 3.0 or the SUSE Linux
Enterprise server.
Commonly used terms
Table 4-1 lists terms, which are used throughout this chapter.
Table 4-1: Local variables and expressions
Term
Description
Application server
WEB_SERVER_HOME
Refers to a single installation of EAServer
Represents the installation directory of your Web
server
How the plug-in works
As Figure 4-1 illustrates, the redirector plug-in forwards HTTP requests to
EAServer. For Web servers to forward requests, you must:
1
Install the redirector plug-in on the Web server.
2
Edit the Web server configuration file to:
3
•
Locate and load the redirector plug-in.
•
Configure context paths that define which requests (application server
hosted Web applications, JSPs, servlets, and so on) are forwarded to
EAServer.
Create and edit the redirector configuration file to define the application
servers to which the redirector sends requests.
Note Absolute path names containing spaces should be quoted. Use
forward slashes in path names, not backslashes.
4
Configure EAServer so it accepts requests from the redirector.
Configuration differs by Web server Although the procedure for installing
and configuring the redirector plug-in is similar for each Web server, the names
of the redirector plug-in file, the Web server configuration file, and the
redirector configuration file (which you create) vary. See the section for your
particular Web server when installing and configuring the redirector plug-in.
38
EAServer
CHAPTER 4
Installing and Configuring a Web Server Redirector Plug-In
Figure 4-1: HTTP request flow through the redirector
Load balancing
Load balancing is transparent to the client. The redirector detects and directs
requests from existing sessions to EAServer using either the J2EE cookie or the
J2EE session identifier that is part of the HTTP request.
If the cookie or identifier is missing, the client is treated as a new client,
otherwise, the redirector sends the request to the EAServer that originally
established the session.
New requests are directed to different application servers that share and
balance the load. Load balancing is based on a round-robin scheme. If a
redirector is configured to service n number of application servers, and a new
request arrives at the redirector, it is directed to the next application server in
its list (as defined by the redirector configuration file) that has not previously
serviced a request. The next new request is sent to the next available server, and
so on.
Apache Web server
Installation Guide
Apache Web servers handle load balancing differently than iPlanet. Apache
Web servers spawn multiple processes to handle the client load, whereas the
other Web servers use only a single process. Since Apache spawns multiple
processes, client request loads are balanced for each Apache Web server
process, not for all Apache processes. Therefore, while monitoring connection
requests from an Apache Web server to multiple EAServer installations, you
might initially see many new client requests from multiple Apache processes
being directed to a single EAServer. In time, and as the number of client
requests to the Apache Web server increases, the load is evenly distributed
across all EAServer installations.
39
Overview
In Figure 4-2, the Web server redirector has an entry in the redirector
configuration file that directs requests for the “examples” Web application to
three application servers: Jag1, Jag2, and Jag3. Requests for the Web
application are distributed evenly across all three servers.
Figure 4-2: redirector configuration file entry
Failover and detecting unavailable application servers
The redirector provides failover for Web applications. However, to achieve
transparent failover, you must mark your Web application as distributable in
EAServer using EAServer Manager. This allows the HttpSession object created
by the Web application to be visible to other application servers. See Chapter
21, “Creating Web Applications,” in the EAServer Programmer’s Guide for
information about distributable Web applications.
40
EAServer
CHAPTER 4
Installing and Configuring a Web Server Redirector Plug-In
When a request arrives from a client, the Web server redirector sends it to an
EAServer application server. The redirector selects the server based on a
round-robin scheme where each new request from a client is directed to the
next available application server that can service the request. If the application
server is not responding to a request from a client (for example, temporarily
down for administrative reasons), the redirector marks the application server
unavailable for a fixed period of time and sends the request to the next
application server that can service the request.
If a request arrives from a client and an application server has been unavailable
for more than the retry value, the redirector sends the request to this
unavailable server. If the server responds, it is marked as “available.”
The default retry value is 300 seconds (five minutes). You can change the
default by adding this directive to the redirector configuration file, where
seconds is the number of seconds the application server is unavailable:
Connector.RetryAfter <seconds>
If the redirector has connected successfully to an application server, and while
awaiting the response, the network connection is broken between the redirector
and EAServer, the redirector does not attempt to restore the connection. The
client must retry the request.
See “Editing the redirector configuration file” on page 46 (iPlanet) or 52
(Apache) for more information.
Binding to a specific application server
If you are using the Apache redirector plug-in, you can bind the redirector to a
specific server. If a redirector is bound to a server and the server fails to respond
to a request, the redirector returns immediately. By default, a request fails over
to another server when the initial server does not respond. If you are running
Web applications that are not marked as distributable, you must bind the
redirector to a specific server. If a bound server fails to respond to a request, the
redirector returns the error status to the client. To bind the redirector to a server,
add this line to the redirector configuration file; serverName is the name of the
server:
Connector.BindToServer /serverName
See “Editing the redirector configuration file” on page 46 (iPlanet), or 52
(Apache) for more information.
Installation Guide
41
Overview
Debugging
If you are using the Apache or iPlanet redirector plug-in, you can trace requests
by setting this directive in the redirector configuration file:
Connector.SessionId <ConnectorSessionId>
When this directive is set, the value of ConnectorSessionId is appended to the
URL that is forwarded to EAServer. EAServer writes the URL to the server’s
HTTP request log, which may be helpful for debugging. For example, if you
add this to the redirector configuration file:
Connector.SessionId ConnSID
EAServer writes this information to the HTTP request log:
10.22.85.66 - - [28/May/2002:12:11:09
/TestHTTPS/?ConnSID=2696_000000000000
10.22.85.66 - - [28/May/2002:12:11:24
/TestHTTPS/?ConnSID=2888_000000000000
10.22.85.66 - - [28/May/2002:12:11:40
/TestHTTPS/?ConnSID=2889_000000000000
10.22.85.66 - - [28/May/2002:12:11:40
/TestHTTPS/?ConnSID=2888_000000000001
10.22.85.66 - - [28/May/2002:12:11:40
/TestHTTPS/?ConnSID=2889_000000000001
-0800] “GET
HTTP/1.0” 200
-0800] “GET
HTTP/1.0” 304
-0800] “GET
HTTP/1.0” 304
-0800] “GET
HTTP/1.0” 304
-0800] “GET
HTTP/1.0” 304
51
0
0
0
0
In this example, the Apache Web server process 2696 sent one request, process
2888 sent two requests, and process 2889 sent two requests. The connector’s
session ID is computed as:
process identifier of the Web server’s process + request count
Defining a custom error page
You can specify a customized error page for the redirector to override the
default message. To do so, add this setting to the redirector configuration file:
Connector.ErrorPage path-to-file
Where path-to-file is the full path to a text file that contains the alternate error
message.
42
EAServer
CHAPTER 4
Installing and Configuring a Web Server Redirector Plug-In
Configuring the data source for HTTPServletRequest methods
When using a Web server redirector, you can configure the source for
information returned by the HTTPServletRequest methods getScheme,
getServerPort, and getServerName by setting the Web application property
com.sybase.jaguar.webapplication.get-serverinfo-from. Set this property for each
Web application used by your application, choosing a value from the following
table:
Value
source
server
proxy
Specifies
Return the server, host and scheme (protocol) for the Web server
that is running the redirector.
Return the server, host, and scheme (protocol) for the EAServer
listener that the redirector connects to.
Return the scheme (protocol), host and port from the HTTP proxy
settings on the HTTP Config tab in Server Properties. If these
settings are not present, use the EAServer listener values.
Installing and configuring an iPlanet Web server
plug-in
This section describes how to install and configure the redirector plug-in on an
iPlanet Web server. This process involves the following steps:
1
Edit the Web server configuration files.
2
Edit the redirector configuration file.
3
Copy libraries from EAServer to your Web server.
Edit the Web server configuration files
Your Web server installation includes an obj.conf file that contains
configuration information used by the Web server. For an iPlanet Web server
to redirect HTTP requests to EAServer, the obj.conf file must include the
following:
•
Installation Guide
Location information for the redirector plug-in and the redirector
configuration file. See “Adding location information” on page 44.
43
Installing and configuring an iPlanet Web server plug-in
•
Context paths that inform the Web server which client requests to forward
to the redirector. See “Defining context paths” on page 45.
•
An EASProxy object that specifies which HTTP methods are forwarded to
the redirector. See “Adding the EASProxy object” on page 45.
Adding location information
The redirector plug-in is a Netscape Application Programming Interface
(NSAPI) extension.
Table 4-2: Web server plug-in library names
Platform
iPlanet
File name
libjeas_httpd40.so
To load and initialize the plug-in, edit either the obj.conf file, and add the
locations of both the plug-in file, and the redirector configuration file, which is
used by the redirector to map incoming client requests to EAServer HTTP
listeners.
Warning! Make a backup of obj.conf, and when editing the file, do not include
any extra spaces, tabs, or return characters.
Add these lines at the top of the configuration file, obj.conf, located in the
config subdirectory of your Web server installation:
Init fn="load-modules" shlib="PLUGIN_PATH" funcs="conn_init,conn_service"
Init fn="conn_init" configfile="CONFIG_FILE_PATH"
Replace PLUGIN_PATH with the complete path and name of the NSAPI plugin you are creating and CONFIG_FILE_PATH with the complete path and
name of the redirector configuration file. The redirector configuration file can
be any name and location you choose, but must be defined by the configfile
attribute.
The following samples illustrate the correct syntax for each Web server type;
each example uses “neptune” as the name of the Web server, and
“conn_config” as the name of the configuration file.
iPlanet:
Init fn="load-modules"shlib="WEB_SERVER_HOME/bin/https/libjeas_httpd40.so"
funcs="conn_init,conn_service"
Init fn="conn_init" configfile="/webserver/https-neptune/config/conn_config"
44
EAServer
CHAPTER 4
Installing and Configuring a Web Server Redirector Plug-In
Defining context paths
Context paths inform the Web server which requests are directed to the
redirector. In the obj.conf file, search for this line:
<Object name=default>
Immediately after this line, add the lines that define the context paths. For
example, if you have two Web applications named “ws_test” and “examples,”
the lines that direct requests of the form http://host-name/examples/* and
http://host-name/ws_test/* to the redirector are:
NameTrans fn="assign-name" from="/ws_test/*" name="EASProxy"
NameTrans fn="assign-name" from="/examples/*" name="EASProxy"
Figure 4-3 illustrates how a client request for examples/test.jsp and
examples/images/welcome.gif to the Web server and port Web1:8020 are
redirected to jag1:8080.
Figure 4-3: “examples” requests are redirected to EAServer
Adding the EASProxy object
At the end of the obj.conf file, add the lines that add the EASProxy object and
specify which HTTP methods are forwarded to the redirector:
<Object name=EASProxy>
ObjectType fn="force-type" type="text/plain"
Service method="(GET|HEAD|POST)" fn="conn_service"
</Object>
Installation Guide
45
Installing and configuring an iPlanet Web server plug-in
Edit the redirector configuration file
This section describes how to set the redirector configuration file directives
that:
•
Map Web server requests to EAServer listeners
•
Set the redirector logging level
Mapping Web server requests to EAServer listeners
Create and edit the redirector configuration file to add the Connector.WebApp
directive, which maps requests sent to the redirector by the Web server to
EAServer HTTP listeners. The syntax is:
Connector.WebApp contextpath1 [, contextpath2, and so on] =
http://host:port [, http://host:port, and so on]
For example, if “neptune” is the name of your Web server, and
WEB_SERVER_HOME/https-neptune/config/conn_config is the name and
location of the redirector configuration file, edit conn_config to:
Connector.WebApp /testapp = http://jaghost1:8080
Connector.WebApp /estore1, /estore2, /estore3 = http://neptune:8080
Connector.WebApp /* = http://foobar:8080, http://neptune:8080
Connector.WebApp examples=http://jaghost1:8080, http://jaghost1:3080,
http://jaghost2:8080
•
In the first line, the “testapp” Web application maps to the EAServer
HTTP listener http://jaghost1:8080.
For example, if your Web server is accepting requests on the host machine
web_server on port 8020 and the client sends the request
http://web_server:8020/testapp/test.jsp, the redirector forwards
the request to http://jaghost1:8080/testapp/test.jsp.
•
In the second line, the /estore1, /estore2, and /estore3 Web applications
map to the EAServer HTTP listener http://neptune:8080.
For example, if your Web server is accepting requests on the host machine
web_server on port 8020 and the client sends the request
http://web_server:8020/estore1/sign_in.jsp, the redirector
forwards the request to http:/neptune:8080/estore1/sign_in.jsp.
•
46
In the third line, “/*” matches any request that is received by the connector,
provided the request did not match any of the other specifically configured
Web applications.
EAServer
CHAPTER 4
Installing and Configuring a Web Server Redirector Plug-In
The redirector configuration file must contain the following mapping rule
for each EAServer that you want to handle requests:
Connector.WebApp /* = http://jaguar_host:jaguar_listener
Where jaguar_host is the EAServer host machine and jaguar_listener is
the EAServer HTTP listener.
•
Single-line entries
The last line in the example above is a load-balancing example, where the
“examples” Web application is available at jaghost1:8080, jaghost1:3080,
and jaghost2:8080.
You must make entries in the redirector configuration file on a single line, but
you can combine EAServer hosts in one entry or multiple entries. For example:
Connector.WebApp /*=http://rainforest:8080,http://neptune:8080
Is the same as:
Connector.WebApp /*=http://rainforest:8080
Connector.WebApp /*=http://neptune:8080
In addition, the server hosts specified by the WebApp directive (in this case,
“rainforest” and “neptune”) must match the host names you define for your
EAServer HTTP listeners. Use EAServer Manager to view and set host names
for your EAServer HTTP listeners—see Chapter 3, “Creating and Configuring
Servers,” in the EAServer System Administration Guide for more information.
Setting the redirector logging level
Edit the redirector configuration file to add the Connector.LogLevel directive,
which sets the redirector logging level that is sent to the Web server log file.
The syntax is:
Connector.LogLevel [ inform | error | verbose ]
Where “inform,” “error,” and “verbose” are the logging levels described in
Table 4-3.
Table 4-3: Logging level options
Logging level
inform
Installation Guide
Description
Adding Connector.LogLevel inform to the redirector configuration
file provides minimum logging to the Web server log file and is
appropriate for production servers. This is the default logging
level.
47
Installing and configuring an iPlanet Web server plug-in
Logging level
Description
error
Adding Connector.LogLevel error to the redirector configuration
file is appropriate when you want to log error messages to the Web
server log file. Error messages provide additional information,
such as the Web server disconnecting from EAServer or not
connecting to an EAServer.
verbose
Adding Connector.LogLevel verbose to the redirector
configuration file provides the highest level of logging to the Web
server log file and can be used only with the EAServer debug
libraries to provide additional trace information that may be useful
for diagnosing problems.
Copy libraries from EAServer to your Web server
Copy the libraries listed in Table 4-4 from your $JAGUAR/lib directory into the
appropriate Web server directory.
48
EAServer
CHAPTER 4
Installing and Configuring a Web Server Redirector Plug-In
Table 4-4: Libraries required by Web server
EAServer files
Web server destination
directories
• libjcc.so
iPlanet:
• libjctssecct.so
WEB_SERVER_HOME/bin/https/lib
• libjctssecct_f140.so
• libjeas_httpd40.so (iPlanet)
– this is the redirector plug-in file that
must be identified in obj.conf. See “Edit
the Web server configuration files” on
page 43 for more information.
• libjeas_httpd40_f140.so (iPlanet FIPSsupported library)
– this is the redirector plug-in file that
must be identified in obj.conf. See “Edit
the Web server configuration files” on
page 43 for more information.
• libjeas_mod.so
• libjeaseapi_mod.so
• libjeasproxy_mod.so
• libjeasproxyeapi_mod.so
• libjinsck_r.so
• libjintl_r.so
• libjjnirt.so
• libjlog.so
• libjsybscl_r.so
• libjtli_r.so
• libjutils.so
Installing and configuring an Apache Web server
plug-in
This section describes how to install and configure the redirector plug-in on the
Apache Web server running on Linux.
Installation Guide
1
Edit the httpd.conf configuration file.
2
Edit the redirector configuration file.
49
Installing and configuring an Apache Web server plug-in
3
Copy libraries from EAServer to your Web server.
4
Make an entry for the Web host in the /etc/hosts file.
For information about the Apache Web server, see Apache Core Features at
http://httpd.apache.org/docs/mod/core.html.
Edit the httpd.conf configuration file
The httpd.conf file:
Sample httpd.conf file
•
Defines and loads the redirector module – the LoadModule directive
informs the Apache Web server of the name and location of the redirector
module to load when the Web server starts.
•
Identifies the redirector configuration file – the redirector configuration
file contains the mappings of incoming requests to the EAServer HTTP
listener to which they are redirected.
•
Defines the context paths – the LocationMatch directive defines the context
paths that inform the Web server which requests are directed to the
redirector. If no context path is provided, the request is serviced by the
Web server.
The following lines illustrate a sample httpd.conf file.
LoadModule easredirector_module libexec/libjeas_mod.so
EASConfigFile WEB_SERVER_HOME/conf/conn_config
ServerName www.myhost.com
<LocationMatch /examples/*|/estore/* >
SetHandler eas-handler
</LocationMatch>
At the end of the WEB_SERVER_HOME/conf/httpd.conf file, add the
directives defined in the sample above, where:
•
•
LoadModule defines and loads the redirector module.
EASConfigFile identifies the file that contains the redirector configuration
parameters.
•
ServerName identifies the host machine on which the Web server runs.
Specify the host using either the IP address or the fully qualified domain
name; for example, www.foo.com. If you do not set this directive, the
redirector continues to run, but you might see this warning in the
connector log file:
[Tue Jun 18 15:19:12 2002] [alert] httpd: Could not
50
EAServer
CHAPTER 4
Installing and Configuring a Web Server Redirector Plug-In
determine the server's fully qualified domain name,
using 1.2.3.4 for ServerName". However the following
is fatal and the redirector will not load.
"Unable to determine host name"
•
conn_config represents the redirector configuration file.
The redirector configuration file can be any name and location you choose, but
it must be identified by EASConfigFile. In this example, conn_config is the
name of the redirector configuration file. You must supply the full path to this
file. See “Edit the redirector configuration file” on page 52 for a description of
configuration parameters.
Warning! The Apache Web server must use the dynamic shared object (DSO)
to load redirector modules and files. See your Apache Web server
documentation for more information about building the Apache Web server
with DSO support.
This is an Apache Web server directive:
<LocationMatch contextpath1 | contextpath2 | contextpath3>
SetHandler eas-handler /
</LocationMatch>
When an HTTP request arrives and the starting path matches contextpath1,
contextpath2, or contextpath3, eas-handler is invoked. The contextpath
corresponds to the Web Application context path. If the path is set to “/*”, all
requests are sent to the redirector. See “Defining context paths” on page 51 for
more information.
Defining context paths
Context paths inform the Web server which requests are directed to the
redirector. At the end of the httpd.conf file, add the lines that define the context
paths. For example, if you have two Web applications named “ws_test” and
“examples”, the lines that direct requests of the form
http://host-name/examples/* and http://host-name/ws_test/* to
the redirector are:
<LocationMatch /examples/* | /ws_test/* >
SetHandler eas-handler
</LocationMatch>
Installation Guide
51
Installing and configuring an Apache Web server plug-in
Figure 4-4 illustrates how a client request for examples/test.jsp and
examples/images/welcome.gif to the Web server and port Web1:8020 is
redirected to jag1:8080.
Figure 4-4: “examples” requests are redirected to EAServer
Edit the redirector configuration file
You create and configure a redirector configuration file, which is used to set the
redirector directives that:
•
Map Web server requests to EAServer listeners
•
Set the redirector logging level
Mapping Web server requests to EAServer listeners
You must configure the redirector configuration file by adding the
Connector.WebApp directive which maps your requests to the EAServer
listener to which they are redirected. The syntax is:
Connector.WebApp contextpath1 [, contextpath2, and so on] = \
http://host:port [, http://host:port, and so on]
52
EAServer
CHAPTER 4
Installing and Configuring a Web Server Redirector Plug-In
For example, if “neptune” is the name of your Web server, and
WEB_SERVER_HOME/conf/conn_config is the name and location of the
redirector configuration file that you create, edit conn_config to set the
Connector.WebApp directive:
Connector.WebApp /testapp = http://jaghost1:8080
Connector.WebApp /estore1, /estore2, /estore3 = http://neptune:8080
Connector.WebApp /* = http://foobar:8080, http://neptune:8080
Connector.WebApp examples=http://jaghost1:8080, http://jaghost1:3080,
http://jaghost2:8080
•
In the first line, the “testapp” Web application maps to the EAServer
HTTP protocol listener http://jaghost1:8080.
For example, if your Web server is accepting requests on the host machine
web_server on port 8020 and the client sends the request
http://web_server:8020/testapp/test.jsp, the redirector forwards
the request to http://jaghost1:8080/testapp/test.jsp.
•
In the second, line the /estore1, /estore2, and /estore3 Web applications
map to the EAServer HTTP protocol listener http://neptune:8080.
For example, if your Web server is accepting requests on the host machine
web_server on port 8020 and the client sends the request
http://web_server:8020/estore1/sign_in.jsp, the redirector
forwards the request to http:/neptune:8080/estore1/sign_in.jsp.
•
In the third line, “/*” matches any request that is received by the connector,
provided the request did not match any of the other specifically configured
Web applications. However, you must still configure the Web server to tell
it which context paths should be serviced by this connector. For this
mapping, supply the following LocationMatch directive in the httpd.conf
file:
<LocationMatch /* >
SetHandler eas-handler
</LocationMatch>
•
Single-line entries
The last line of the example above provides load balancing. The
“examples” Web application is available at jaghost1:8080, jaghost1:3080,
and jaghost2:8080.
You must make entries in the redirector configuration file on a single line. You
can combine EAServer hosts in one entry or create multiple entries; for
example:
Connector.WebApp /*=http://rainforest:8080,http://neptune:8080
Is the same as:
Installation Guide
53
Installing and configuring an Apache Web server plug-in
Connector.WebApp /*=http://rainforest:8080
Connector.WebApp /*=http://neptune:8080
In addition, the server hosts specified for the WebApp directive (in this case,
“rainforest” and “neptune”) must match the host names you define for your
EAServer HTTP listeners. Use EAServer Manager to view and set host names
for your EAServer HTTP listeners—see Chapter 3, “Creating and Configuring
Servers,” in the EAServer System Administration Guide for more information.
Setting the redirector logging level
Edit the redirector configuration file to add the Connector.LogLevel directive,
which determines the amount of redirector logging that is sent to the Web
server log file. For a description of the logging level options, see Table 4-3 on
page 47.
For example, to set the redirector logging level to “inform”, add this line to the
redirector configuration file:
Connector.LogLevel inform
You must also set the logging level for the Apache Web server in the httpd.conf
file to either “info” or “error” for the redirector to produce any logging. The
syntax is:
LogLevel [ debug | info | notice | warn | error | crit ]
For example, add this line to the httpd.conf file:
LogLevel info
Copy libraries from EAServer to your Web server
Using WEB_SERVER_HOME as the location of the Apache Web server
software, copy the libraries listed below from your $JAGUAR/lib directory to
the WEB_SERVER_HOME/libexec directory:
54
•
libjcc.so
•
libjctssecct.so
•
libjctssecct_f140.so
•
libjeas_mod.so (for Apache version 1.3.26) or libjeas2_mod.so (for
Apache version 2.0)
•
libjeas2_mod_f140.so (Apache version 2.0 FIPS-supported library)
EAServer
CHAPTER 4
Installing and Configuring a Web Server Redirector Plug-In
•
libjeas_mod.so
•
libjeaseapi_mod.so
•
libjeasproxy_mod.so
•
libjeasproxyeapi_mod.so
•
libjinsck_r.so
•
libjintl_r.so
•
libjjnirt.so
•
libjlog.so
•
libjsybscl_r.so
•
libjtli_r.so
•
libjutils.so
Make an entry for the Web host in the /etc/hosts file
The Web server may not start if you do not have the fully qualified path name
to your Web server host in the /etc/hosts file. Verify that an entry for your host
exists; for example:
12.34.56.78 my_host.my_domain.com
Start the Apache Web server
1
Set the LD_LIBRARY_PATH environment variable in the shell used to
start the Apache Web Server to include APACHE_HOME/libexec.
2
Run:
./apachectl start
❖
Installation Guide
Verifying that the redirector plug-in works correctly
1
Verify that all the required libraries are copied to the libexec subdirectory
of the Apache installation directory.
2
Verify that the conn_config file exists in the Apache configuration
directory.
55
Configuring EAServer to accept Web server requests
3
Verify that the Connector.WebApp directive is set correctly in the
conn_config file. For example:
Connector.WebApp /* = http://hostname:8080
hostname is the machine name where EAServer is installed, and 8080 is
the EAServer HTTP port number, and “/*” appears immediately after
Connector.WebApp.
4
Edit the apachectl shell script, and set the LD_LIBRARY_PATH
environment variable to include APACHE_HOME/libexec, where
APACHE_HOME is the installation directory of your Apache Web server.
5
Start the Web server. If it starts successfully, a disclaimer similar to the
following is written to the log file (APACHE_HOME/logs/error_log):
Confidential property of Sybase, Inc.
(c) Copyright Sybase Inc. 1987, 2003
All rights reserved.
Use, duplication, or disclosure by the United States Government
is subject to restrictions as set forth in FAR subparagraphs
52.227-19 (a)-(d) for civilian agency contracts and DFARS 252.227-7013
(c)(1)(ii) for Department of Defense contracts. Sybase reserves all
unpublished rights under the copyright laws of the United States.
Sybase, Inc., 1 Sybase Drive, Dublin, CA 94608 USA.
6
Start EAServer on the host you specified in the conn_config file and from
a Web browser, connect to the Web server’s default page.
The redirector plug-in should redirect your request to EAServer’s home
page. This is the hostname:port_number set in the Connector.WebApp
directive in the conn_config file.
Configuring EAServer to accept Web server requests
This section lists the steps you must perform in your EAServer installation so
that it accepts requests from the Web server.
56
EAServer
CHAPTER 4
Installing and Configuring a Web Server Redirector Plug-In
Set the EAServer HTTP listener properties
The HTTP listener properties that are related to the Web server redirector plugin are defined in the listener properties file for each EAServer HTTP listener
that receives Web server requests:
•
com.sybase.jaguar.listener.http.connector_events – this is a required
property and must be set to true so that the listener can properly process
requests from the Web server.
Note If you do not set the com.sybase.jaguar.listener.http.connector_events
property to true, some of the redirector’s features, such as load balancing,
may not work correctly.
•
com.sybase.jaguar.listener.http.conn.keepalive – this is an optional property
that specifies the length of time, in seconds, to keep a connection alive
before it is closed by EAServer. The default value is 120 seconds (2
minutes); you can modify this value, if necessary, to improve
performance.
•
com.sybase.jaguar.listener.http.conn.maxrequests – this optional property
determines the number of requests processed before EAServer closes the
connection. The default value is 100; you can modify this value, if
necessary, to improve performance.
The listener properties files are located in the $JAGUAR/Repository/Listener
directory. The file name format is <server>_<listener>.props. For example,
the listener property file name for a listener named “http1” created for a server
named “Jaguar” is Jaguar_http1.props.
Use a text editor to add the following lines to each listener properties file that
accepts requests:
com.sybase.jaguar.listener.http.conn.keepalive=120
com.sybase.jaguar.listener.http.conn.maxrequests=100
com.sybase.jaguar.listener.http.connector_events=true
Host and port settings
Installation Guide
You must make sure the EAServer host and port defined in your redirector
configuration file has an identical host name in the EAServer listener host and
port fields. For example, this redirector entry also requires an EAServer HTTP
protocol listener defined with the host name of jaghost1 and a port number of
8080:
57
Configuring HTTPS support for Web server plug-ins
Connector.WebApp /*=http://jaghost1:8080
Note jaghost1 is not equivalent to jaghost.domain, where domain is the
domain in which EAServer is hosted.
Configuring HTTPS support for Web server plug-ins
You can establish HTTPS connections between your Web server redirector and
EAServer. You should be familiar with SSL and Security Manager before
establishing HTTPS connections. See Chapter 12, “Managing Keys and
Certificates,” in the EAServer Security Administration and Programming
Guide.
Note Verify that your Web server redirector successfully forwards HTTP
requests before you configure it for HTTPS.
HTTPS installation instructions
This section describes installation requirements for Web servers hosted on a
Linux machine, including environment variable settings, and which files to
copy from your EAServer installation to the Web server host.
1
On the Web server host, set the JAGUAR and JAGUAR_CLIENT_ROOT
environment variables to point to the EAServer installation directory.
When you copy files and subdirectories to this directory, you must
maintain the existing directory structure. In other words, you must copy
files that are located in $JAGUAR/db on the EAServer host to a
$JAGUAR/db subdirectory on the Web server host.
You may need to edit the $JAGUAR/bin/setenv.sh or setenv.bat file to set
the correct EAServer path.
2
58
Copy the subdirectories and files listed in Table 4-5 from the EAServer
host to the Web server host, maintaining the directory structure:
EAServer
CHAPTER 4
Installing and Configuring a Web Server Redirector Plug-In
Table 4-5: Subdirectories and files to copy from EAServer to Web
server host
Root directory
$JAGUAR
Subdirectories and files to copy
• db/*
• bin/setenv.sh
• bin/sasecmgr
• easmgr/*
• java/lib/easclient.jar
• java/lib/easj2ee.jar
• java/classes/easri.jar
$JAGUAR/lib or
$JAGUAR/devlib
• jdk/jdk1.3
• libjcc.so
• libjctssecct.so
• libjeas_mod.so
• libjeaseapi_mod.so
• libjeasproxy_mod.so
• libjeasproxyeapi_mod.so
• libjinsck_r.so
• libjintl_r.so
• libjjnirt.so
• libjlog.so
• libjsybscl_r.so
• libjtli_r.so
• libjutils.so
Note For production, copy libraries from the
$JAGUAR /lib directory. The libraries in
$JAGUAR/devlib are for debugging only.
3
Copy Apache-specific files. Whether or not you are running an Extended
API (EAPI) version of the Apache Web server determines which libraries
you need to copy from the $JAGUAR/lib or devlib directory to the location
the Web server normally searches for files. To determine which version of
the Apache Web server is running, enter the httpd -V command. If the
output from this command contains “-D EAPI,” you have an EAPI version
of Apache and must copy and use the appropriate files:
•
Files required for EAPI versions of the Apache Web server:
libjeaseapi_mod.so
Installation Guide
59
Configuring HTTPS support for Web server plug-ins
libjeasproxyeapi_mod.so
•
Files required for non-EAPI versions of the Apache Web server:
libjeas_mod.so (for Apache version 1.3.26) or
libjeas2_mod.so (for Apache version 2.0)
libjeasproxy_mod.so
In addition, for EAPI versions of Apache, modify the LoadModule
directive in the httpd.conf file as follows:
LoadModule easredirector_module libexec/libjeaseapi_mod.so
If you do not set this directive, the redirector may not run, and you may see
a warning similar to this on the screen and in the connector log file:
[warn] Loaded DSO libexec/libjeas_mod.so uses plain
Apache 1.3 API, this module might crash under EAPI!
(please recompile it with -DEAPI)
4
Copy iPlanet 4.x-specific files. Copy the following file from the
$JAGUAR/lib or devlib directory to the location the Web server normally
searches for files:
libjeas_httpd40.so
5
Append $JAGUAR_CLIENT_ROOT/lib to the LD_LIBRARY_PATH
environment variable.
See “Enable HTTPS connections” to enable your Web server redirector to
establish HTTPS connections with EAServer.
Enable HTTPS connections
To enable your Web server redirector to establish HTTPS connections with
EAServer:
60
1
Follow the same instructions as for establishing HTTP connections, for
your Web server and platform.
2
Define the redirector configuration directives listed in Table 4-6. See “Edit
the redirector configuration file” on page 46 (iPlanet), or 52 (Apache) for
more information.
EAServer
CHAPTER 4
Installing and Configuring a Web Server Redirector Plug-In
Table 4-6: HTTPS directives
Default or valid
value
Directive name
Connector.Https.pin
<sybpks_simple |
sybpks_intl |
sybpks_domestic |
sybpks_strong>
<sybase>
Connector.Https.cacheSize
<100>
Connector.Https.SessLingerTime
<28800> (8 hours)
Connector.Https.SessShareCount
<10>
Connector.Https.qop
Comments
Identifies the cipher suites the client (the Web server
redirector in this case) is willing to utilize while
negotiating an SSL connection.
Specifies the PKCS #11 token PIN. This is required for
logging in to PKCS#11 module for retrieving trust
information.
SSL session IDs are cached once a successful
connection has been established. When the client
reconnects to the server, the client can reuse the
previously established SSL session parameters by
sending the old SSL Session ID to the server. This
improves performance if the client is frequently
connecting to, and disconnecting from, the same
server. The cache size is the size of this SSL Session ID
cache.
Specifies in seconds the duration for which a session
ID entry is kept in the SSL session cache after the last
SSL connection using that session ID is terminated.
Specifies the number of concurrent SSL sessions that
can use the same SSL session ID.
For a description of these directives, see CtsSecurity/SSLSessionInfo in
the generated IDL documentation, which is available in HTML format in
the html/ir subdirectory of your EAServer installation.
Installation Guide
3
Set the JAGUAR_CLIENT_ROOT environment variable on the Web
Server host to point to the location of your EAServer client installation.
The directory pointed to by JAGUAR_CLIENT_ROOT must contain the
db subdirectory, which contains the sybcert.db and sybkey.db files, and the
Web server process must be able to read these files. sybcert.db and
sybkey.db contain certificate files, including the Jaguar User Test CA.
4
Edit the redirector configuration file to map requests sent to the redirector
by the Web server to EAServer HTTPS listeners. For more information,
see “Mapping Web server requests to EAServer listeners” on page 46
(iPlanet), or 52 (Apache). Map requests to HTTPS listeners by using the
appropriate host:port combination. See “Testing your HTTPS
connections” on page 62 for more information.
61
Configuring HTTPS support for Web server plug-ins
Testing your HTTPS connections
Once you have installed the required files and configured the Web server
redirector plug-in to use HTTPS, you can test your connection to EAServer by
sending HTTPS requests to a default HTTPS listener (for example, port 8081).
Port 8081 is an HTTPS port that uses the Sample1 user certificate, which is
signed by the Jaguar User Test CA. The Jaguar User Test CA is trusted by
EAServer and installed on the Web server host as part of the installation.
Sending HTTPS requests to port 8081ensures that your Web server redirector
is configured correctly. You can then define HTTPS connections for a
production environment following the steps described in “Manage certificates
for HTTPS connections.”
Manage certificates for HTTPS connections
To establish an HTTPS connection between your Web redirector and
EAServer, you must export the CA certificate (the signing authority’s
certificate) that signs the user certificate for the HTTPS listener to which you
want to connect. For example, if Verisign Class 1 Primary CA is the signer of
the web_redirector_certificate that is assigned to an EAServer listener at port
8085, then you must install the Verisign Class 1 Primary CA certificate on your
Web server host and mark it trusted for your redirector to connect to that
EAServer listener.
There are several ways to export and install certificates. This procedure
describes how to export a CA certificate from EAServer, install it on your Web
server host, and mark it trusted using Security Manager:
❖
Exporting and installing CA certificates
1
62
Use Security Manager on the EAServer host to export the root certificate
of the certificate associated with the HTTP protocol listener:
a
Select the CA Certificates folder.
b
Locate the CA certificate of the EAServer certificate associated with
the HTTP listener.
c
Highlight the certificate to export. This example uses Verisign Class
1 Primary CA.
d
Select File | Export Certificate.
EAServer
CHAPTER 4
Installing and Configuring a Web Server Redirector Plug-In
e
From the Export Certificate wizard, select the format type for the
exported certificate. Select Binary Encode X509 Certificate. Click
Next.
f
Select Save to File and enter the full path name to a file that will
contain the CA certificate.
Do not add any extension to the file name. A .crt extension is
automatically added to the exported certificate by Security Manager.
2
g
Click Finish to export the certificate to the file you specified.
h
Copy this file to the Web server host.
Manage the certificates (including trust information) on the Web server
host using the standalone Security Manager. To start the standalone
Security Manager and connect to the Sybase PKCS#11 module:
a
Change to the $JAGUAR_CLIENT_ROOT/bin directory.
b
Run the sasecmgr.sh command to start the standalone Security
Manager.
The standalone Security Manager manages keys and certificates on a
client installation without the overhead of an entire EAServer
installation. The PKCS#11 token installed as part of the standalone
Security Manager contains the same information (keys and
certificates) as a typical EAServer installation.
c
From Security Manager, enter Tools | Connect.
d
Enter the PKCS#11 PIN to connect to the PKCS#11 token. The
default value is sybase.
Any changes that you make modify the contents of the
$JAGUAR_CLIENT_ROOT/db directory.
3
Installation Guide
Use the standalone Security Manager to install certificates in the security
database (PKCS#11 module):
a
Select the CA Certificates folder.
b
Select File | Install Certificate.
c
Click the Import from File box. Use the browse feature to locate the
certificate you exported from EAServer and copied to the Web server
host.
d
Click Install. The certificate is installed in the CA folder.
e
Select the CA folder to see the certificate.
63
Adding FIPS and TLS support to the Web server redirector plug-ins
4
Mark the certificate trusted:
a
Select the CA folder
b
Select the certificate you just installed.
c
Select File | Certificate Info.
The Certificate Information dialog appears. Use the scroll bar to view
all of the information.
d
The Certificate dialog includes a Trusted Certificate check box. Mark
the certificate as trusted.
The certificate now appears in the Trusted folder.
e
Restart the Web server if it was running.
Follow the steps described in “Enable HTTPS connections” on page
60 to establish an HTTPS connection using the installed signer’s
certificate (on the Web server host) to connect to the EAServer
HTTPS listener (that uses the users certificate signed by the signer’s
certificate).
Troubleshoot HTTPS connections
If the redirector does not start, or the Web server appears to hang, after
configuring the HTTPS redirector, set the JAGUAR_RANDOMSEED
environment variable to point to a file, and restart the Web server redirector.
For more information, see “Setting the JAGUAR_RANDOMSEED variable”
in Chapter 3, “Creating and Configuring Servers,” in the EAServer System
Administration Guide.
Adding FIPS and TLS support to the Web server
redirector plug-ins
This section describes how to configure the Web server redirector plug-in to
use Transport Layer Security (TLS) and Federal Information Processing
Standards (FIPS) for each supported Web server. The redirector plug-ins that
support FIPS and TLS are:
•
64
Apache 2.0
EAServer
CHAPTER 4
•
Installing and Configuring a Web Server Redirector Plug-In
iPlanet 4.x
Note This procedure updates existing Web server redirector plug-ins that were
installed with an EAServer 5.x installation program. For new EAServer 5.5
installations, skip step 1 below and install all required files from the new
EAServer 5.5 installation.
Adding support for FIPS and TLS in your Web server redirector plug-ins
requires you to:
1
Run the EAServer installer to install the required EAServer and redirector
files on the same machine where the redirector runs, if it has not run
previously.
2
Run the EAServer 5.5 installation program on each machine that contains
a previously installed Web redirector plug-in to add additional and updated
FIPS-related files.
3
Copy libraries from the EAServer 5.5 installation to the appropriate Web
server directory. This assumes you are copying the files from the same
machine.
4
Make changes to the corresponding configuration files.
5
Use the newly installed standalone Security Manager to enable FIPS for
the redirector.
6
Select a FIPS-compatible cipher suite when setting the
Connector.Https.qop directive in the redirector configuration file.
7
❖
Restart the Web server for the changes to take effect.
Running the installation program
Run the setup program on each machine that contains a previously installed
Web redirector plug-in to which you want to add FIPS and TLS support.
Installation Guide
1
Check the “System requirements” on page 2.
2
Set the JAGUAR_CLIENT_ROOT environment variable to represent the
EAServer installation directory.
3
Exit any programs that are running. If you do not, the Sybase installer may
not be able to copy some files to the appropriate directories.
4
If you have downloaded EAServer, expand the installation software to a
temporary location. Otherwise, insert the software CD into your CD drive.
65
Adding FIPS and TLS support to the Web server redirector plug-ins
5
To start the installer from the command line, change to the location of the
installation software and enter:
./setup [-is:tempdir work_directory]
Specify the -is:tempdir option if you have less than 150MB in your temp
space. work_directory is the full path to a temporary directory to be used
by the installer.
The installer starts, and the Sybase EAServer Install window appears.
6
Click Next in the Install window. Use Back and Next to step backward and
forward through the installation process to modify specifications as
necessary. Select Cancel to halt the installation process.
7
Select your country or region from the drop-down list to display the
license agreement. You must read and accept the terms of the license
agreement for your country before you can install any Sybase products.
Click Next.
8
The installer checks whether any EAServer processes are running on the
machine. If prompted, shut down any EAServer applications, including
EAServer, and EAServer running as a Windows service. Click Next.
9
Select Upgrade Install.
Note The installer searches for a directory identified by the $JAGUAR
environment variable. If located, this is the default directory for upgrading
your installation.
10 Select Custom as the type of installation. This allows you to choose
specific installation options for each redirector plug-in. After choosing this
option, select the following options:
Server:
Runtime Libraries:
SSL Runtime
Web Server Plugins:
Plug-in name
EAServer Manager
JDK:
JDK1.3
JDK 1.4
JDK 1.5
66
EAServer
CHAPTER 4
Installing and Configuring a Web Server Redirector Plug-In
where Plug-in name is the plug-in for which you are adding FIPS and TLS
support.
11 If you are installing the Advanced Edition, provide the product license
information:
•
Order Number
•
Feature Name
•
Authorization Code
The product license information is provided in your EAServer package on
a printed Sybase certificate. Click Next.
Note If you do not provide the product license information, the installer
will display the message to indicate that the EAServer is installed as the
Workgroup Edition.
12 If you select to install any of the JDKs, you can either install the selected
JDK, or use a JDK that may already be installed on your system. If the
installer detects an existing JDK of the appropriate version, it displays as
the default location. Existing JDKs must be of the correct version and
patch level, as described in “JDK versions” on page 3.
Click Next to continue.
13 The installer displays a summary of the features to be installed and the
installation directory. Review these entries and click Next to continue or
Back to modify your entries.
14 The installer begins copying files and informs you when the installation is
complete.
15 Click Finish to exit the installer.
16 You can now configure and enable FIPS and TLS for the redirectors by
following the instructions for any of the supported Web servers:
Installation Guide
•
Apache – “Enabling FIPS and TLS for an Apache plug-in” on page
68.
•
iPlanet – “Enabling FIPS and TLS for iPlanet plug-ins” on page 69.
67
Adding FIPS and TLS support to the Web server redirector plug-ins
Enabling FIPS and TLS for an Apache plug-in
This section explains how to copy required files and configure the FIPSsupported redirector plug-in for Apache. It assumes you have already installed
and configured the plug-in for non-FIPS use and updated this installation by
following the instructions described in “Adding FIPS and TLS support to the
Web server redirector plug-ins” on page 64.
1
Edit the httpd.conf file to load the FIPS-supported redirector module. The
following lines illustrate a sample httpd.conf file that supports FIPS and
TLS. The only difference from a non-FIPS sample is that the file
libjeas2_mod.so is replaced with libjeas2_mod_f140.so. For example:
LoadModule easredirector_module libexec/libjeas2mod_f140.so
EASConfigFile WEB_SERVER_HOME/conf/conn_config
ServerName www.myhost.com
<LocationMatch /examples/*|/estore/* >
SetHandler eas-handler
</LocationMatch>
2
68
Copy the required libraries. When you initially installed the non-FIPSsupported Apache Web server plug-in, and used WEB_SERVER_HOME
as the location of the Apache Web server software, you copied the libraries
listed below from your $JAGUAR/lib directory to the
WEB_SERVER_HOME/libexec directory:
•
libjcc.so
•
libjctssecct.so
•
libjeas_mod.so (for Apache version 1.3.26) or libjeas2_mod.so (for
Apache version 2.0)
•
libjeaseapi_mod.so
•
libjeasproxy_mod.so
•
libjeasproxyeapi_mod.so
•
libjinsck_r.so
•
libjintl_r.so
•
libjjnirt.so
•
libjlog.so
•
libjsybscl_r.so
•
libjtli_r.so
EAServer
CHAPTER 4
•
3
Installing and Configuring a Web Server Redirector Plug-In
libjutils.so
To support FIPS and TLS, you must copy the following libraries from the
EAServer/lib subdirectory that was created when you ran the EAServer 5.5
installation program into the WEB_SERVER_HOME/libexec directory:
•
libjctssecct_f140.so
•
libjsbgpks_r.so
•
libjeas2_mod_f140.so (Apache version 2.0 FIPS-supported library)
•
libsbgse2.so
4
Verify that the Web redirector plug-in still works for your HTTP
connections.
5
Enable FIPS for the redirector plug-in and establish HTTPS connections.
See “Managing FIPS for the redirector plug-ins” on page 70
Enabling FIPS and TLS for iPlanet plug-ins
This section tells you how to copy required files and configure the FIPSsupported redirector plug-in for iPlanet 4.x. It assumes you have already
installed and configured the plug-in for non-FIPS use and updated this
installation by following the instructions described in “Adding FIPS and TLS
support to the Web server redirector plug-ins” on page 64.
1
Edit the obj.conf file to load the FIPS-supported redirector module. The
following lines illustrate a sample obj.conf file that supports FIPS and
TLS. The only difference from a non-FIPS sample is that the file
libjeas_httpd40.so is replaced with libjeas_httpd40_f140.so; for example:
iPlanet:
Init fn="loadmodules"shlib="WEB_SERVER_HOME/bin/https/libjeas_httpd40_f140.so"
funcs="conn_init,conn_service"
Init fn="conn_init" configfile="/webserver/httpsneptune/config/conn_config"
Installation Guide
69
Adding FIPS and TLS support to the Web server redirector plug-ins
2
Copy the required libraries. When you initially installed the non-FIPSsupported iPlanet Web server plug-ins, and used WEB_SERVER_HOME
as the location of the Web server software, you copied the libraries listed
in Table 4-4 on page 49 from your $JAGUAR/lib directory to the
appropriate subdirectory. To support FIPS, you must also copy the
following files to the same directory:
•
libjctssecct_f140.so
•
libjsbgpks_r.so
•
libjeas_httpd40_f140.so
•
libsbgse2.so
3
Verify that the Web redirector plug-in still works for your HTTP
connections.
4
Enable FIPS for the redirector plug-in and establish HTTPS connections.
See “Managing FIPS for the redirector plug-ins” on page 70
Managing FIPS for the redirector plug-ins
This procedure allows you to establish FIPS connections between a redirector
plug-in and a FIPS-enabled EAServer, and assumes you have already upgraded
the redirector plug-in. See “Adding FIPS and TLS support to the Web server
redirector plug-ins” on page 64.
❖
70
Managing FIPS for the redirector plug-ins
1
Enable FIPS by using the standalone Security Manager. You installed the
Security Manager on the machine that contains the redirector when you
ran the 5.5 installation program. To start the Security Manager, go to the
EAServer/bin subdirectory and execute sasecmgr.
2
To enable FIPS, follow the instructions described in Chapter 9, “Using
TLS and FIPS in EAServer” in the EAServer Security Administration and
Programming Guide.
EAServer
CH A PTE R
5
Configuring Open Client and
ODBC for EAServer
This chapter describes how to set up Open Client and unixODBC driver
to work with EAServer.
Topic
Overview
Installing FreeTDS
Page
71
72
Configuring ODBC
Configuring Open Client
72
75
Overview
The EAServer installation includes an option to install Open Client
version 11.1.1 but it no longer includes the Merant (formerly Intersolv)
DataDirect Connect ODBC Driver For Sybase Databases, Version 3.60.
However, you can either purchase a third-party ODBC driver or you can
use FreeTDS. The FreeTDS is an ODBC driver library based on TDS
protocol and it can communicate with Adaptive Server Anywhere (ASA)
and Adaptive Server Enterprise (ASE) databases.
Note unixODBC is the default ODBC driver manager in EAServer 5.5.
If you are going to define connection caches that use the ODBC drivers
included with EAServer, you must configure Open Client and ODBC for
use with EAServer. If you are not going to use ODBC connection caches,
or if Open Client and ODBC are already installed, you need not configure
Open Client and ODBC.
Installation Guide
71
Installing FreeTDS
Installing FreeTDS
Before you begin your installation, verify that unixODBC is not already
installed on your machine. If it is, uninstall the existing version of unixODBC.
❖
Installing and configuring FreeTDS
1
Obtain FreeTDS at http://www.freetds.org, download and unzip the source
code. Sybase recommends that you use the latest version of FreeTDS,
which is fully compatible with ODBC 3.0.
2
Go to the FreeTDS source code directory; for example, /usr/tmp, and
execute:
./configure --prefix=$JAGUAR/freetds \
--with-tdsver=5.0\
--with-unixodbc=$JAGUAR/unixodbc
3
Compile the source code by executing:
make
make install
The compilation process adds the library, libtdsodbc.so into
$JAGUAR/freetds/lib. The FreeTDS installation is complete.
Configuring ODBC
This section provides additional information on configuring ODBC data
sources using the drivers installed with EAServer.
Before you begin:
72
1
Ensure that TDSQUERY and DSQUERY environment variables are set to
null.
2
Remove .odbc.ini file from the user home directory, if it exists. Otherwise,
this may affect the attributes defined file in
$JAGUAR/unixODBC/odbc.ini.
EAServer
CHAPTER 5
Configuring Open Client and ODBC for EAServer
Creating a unixODBC connection cache
When you create a unixODBC connection cache, you must define the “Server
Name” with the ODBC data source name. You can obtain the data source name
from the odbc.ini file, which is located in $JAGUAR/unixodbc.
Using ODBC to connect to ASA
Adaptive Server Anywhere is installed as part of both a typical and a full
installation. The installation includes the ODBC driver to connect to ASA
databases. For example, to connect to the jagdemo sample database, specify the
absolute path to the ASA ODBC driver in the data source’s driver entry of the
$JAGUAR/unixodbc/odbcinist.ini file.
1
Use a text editor to modify the ODBC driver information in
$JAGUAR/unixodbc/odbcinst.ini.
For example:
[SYBASA]
Description = Sybase ASA9.0 ODBC Driver
Driver = $JAGUAR/SYBSasa9/lib/libdbodbc9.so
Setup = $JAGUAR/unixodbc/lib/libtdsS.so
TDS_Version = 5
UsageCount = 3
CPTimeout =
CPReuse =
2
Add ODBC data source information to $JAGUAR/unixodbc/odbc.ini. For
example:
[EAS Demo DB V10]
Driver = SYBASA
Trace = no
Tracefile = sql.log
Port = 2640
ServerName = easdemodb10
TDS_version = 5.0
The name of the driver must be the same as that defined in odbcinst.ini.
The server name is the database name without the extension.
To verify whether the connection is correct, go to
$JAGUAR/unixodbc/bin, and use the isql command-line tool to execute:
./isql -v “EAS Demo DB V10” user password
Installation Guide
73
Configuring ODBC
If isql shows a command prompt and not an error message, the connection
is successful.
Using ODBC to connect to ASE
If you are using ASE as a data source, and FreeTDS as the database driver, you
must configure the EAServer.
1
Add the data source information to $JAGUAR/freetds/etc/freetds.conf file.
For example, to connect to the MySybase sample database, enter:
[MySybase]
host = ASE hostname
port = 5000
tds version = 5.0
where:
•
host – is the server machine’s host name or IP address.
•
port – is the database server’s TDS listener port.
Test the connection to MySybase using the command-line tool in
$JAGUAR/freetds/bin/tsql.
./tsql -S MySybase -U dba -P dba
If the connection is successful, the data source name should be the same
as the ASE database name. This implies that FreeTDS is working
correctly.
2
Modify the odbcinst.ini file in $JAGUAR/unixodbc to include the ODBC
data source information. Add an ODBC driver item to include the
FreeTDS ODBC library. For example:
[SYBASE]
Description = Sybase ASE ODBC Driver
Driver = $JAGUAR/freetds/lib/libtdsodbc.so
Setup = $JAGUAR/unixodbc/lib/libtdsS.so
TDS_Version = 5
UsageCount = 3
CPTimeout =
CPReuse =
3
Add the ODBC data source information to $JAGUAR/unixodbc/odbc.ini.
For example:
[testase]
74
EAServer
CHAPTER 5
Configuring Open Client and ODBC for EAServer
Driver = SybaseASE
Trace = yes
Servername = ASE hostname
Port = 5000
Database = tempdb
uid = dba
The name of the driver must be the same as that defined in odbcinst.ini.
The server name is the database name without the extension.
To verify whether the connection is correct, go to
$JAGUAR/unixodbc/bin, and use the isql command-line tool to execute:
./isql testase user password
If isql shows a command prompt rather than an error message, the
connection is successful.
Using ODBC from other client applications
If you have an ODBC client that uses an ODBC driver manager from a third
party, edit the driver name in odbc.ini file, and modify the odbcinst.ini file to
specify that driver. Refer to the third-party documentation for more details.
Configuring Open Client
This section describes only the basic configuration steps to use Open Client
with EAServer. For complete information on configuring Open Client, see the
Open Client/Server Configuration Guide for UNIX on the Sybase Product
Manuals Web site at http://www.sybase.com/support/manuals.
The Open Client files are installed in the openclient subdirectory of your
EAServer installation.
❖
Installation Guide
Configuring the Open Client environment
1
“Set required environment variables” on page 76.
2
“Add server definitions to the interfaces file” on page 76.
3
“Verify connectivity using isql” on page 76.
75
Configuring Open Client
Set required
environment variables
To set the environment variables, edit the user_setenv.sh setup script located in
EAServer/bin. Create this file if it does not exist. Settings in this file are added
to the server environment when it starts.
After you run the setup script, set the SYBASE and LD_LIBRARY_PATH
environment variables manually.
1
Set the SYBASE environment variable to the full path of the EAServer
openclient subdirectory. For example:
setenv SYBASE /opt/Sybase/EAServer/openclient
2
Prefix the Open Client lib subdirectory to the LD_LIBRARY_PATH
environment variable. For example:
setenv LD_LIBRARY_PATH $SYBASE/lib:$LD_LIBRARY_PATH
Add server definitions
to the interfaces file
The interfaces file in the Open Client installation directory is a text file that
defines server names and addresses. You must add entries for each EAServer
or database server to which you intend to connect.
❖
Adding server entries to the file with a text editor
1
Create the file $JAGUAR/interfaces if it does not already exist.
2
Open the file in your text editor and add an entry in this format:
server_name
master tcp ether host tds_port
query tcp ether host tds_port
where:
•
server_name – is a logical name for the server, composed of letters,
digits, and the underscore character.
•
host – is the server machine’s host name or IP address.
•
tds_port – is the EAServer or database server’s TDS listener port
number.
Note The master and query lines must begin with a single tab and no
spaces.
Verify connectivity
using isql
Run the Open Client isql tool to verify the configuration:
$SYBASE/bin/isql -I $JAGUAR/interfaces -S server_name -U user -P password
Where:
76
EAServer
CHAPTER 5
Configuring Open Client and ODBC for EAServer
•
server_name – is the server you defined in the interfaces file.
•
user – is a valid user name for EAServer or the database server.
•
password – is the password that accompanies the user name.
If isql shows a command prompt rather than an error message, the connection
is successful.
Installation Guide
77
Configuring Open Client
78
EAServer
Index
Symbols
C
.odbc.ini file
CLASSPATH environment variable 19
client runtime
installation, defined 4
installing files 4
Java 5
CocoBase Enterprise software, installing 19
components, adding to EAServer 13
configuration files
obj.conf 43
setenv.sh 16
configuring
interfaces files 76
Open Client for EAServer 71
connecting
from a Web browser to EAServer 18
to EAServer Manager 17
connectivity, verifying with isql 73, 75, 76
context paths
defining for Apache Web servers 51
defining for iPlanet Web servers 45
conventions vii
custom installation, defined 4
customizations, preserving JDK 15
72
A
Adaptive Server Anywhere
installing 16
ODBC connection 73
ODBC driver, setting up 73
starting 17
Adaptive Server Enterprise
ODBC connection 74
adding
components, procedure for 14
location information for a redirector plug-in
Apache Web server
See also Web server redirector plug-in
configuration file, editing 52
copying libraries from EAServer 54
DSO requirement 51
FIPS and TLS support, configuring for 68
httpd.conf configuration file 50
redirector logging level, setting 54
redirector plug-in for 49
starting 55
Web host entry 55
application server
binding a redirector plug-in to 41
audience for this book v
B
before you install EAServer
Installation Guide
1
44
D
database connectivity, verifying with isql 73, 75, 76
debugging, redirector plug-ins 42
defining
context paths for Apache Web servers 51
context paths for iPlanet Web servers 45
directory, specifying where to install 14
documentation
core documents v
EAServer 2
HTML 2
on the Web 2
79
Index
DSQUERY environment variable
adding support for 64
configuring support for Apache 68
configuring support for iPlanet 69
full installation, defined 4
72
E
EAServer
before you install 1
configuring Open Client for 71
connecting through a Web browser 18
documentation 2
features 4
installing 8
JDK, supported versions 3
listeners, default settings 12
products 1
reinstalling or adding components to 13
starting 16
system requirements 2
uninstalling 19
upgrading a license 13
what to install 4
EAServer Manager
certificates and trust information 64
starting 17
EASProxy object, adding for redirector plug-in
EASuninstall executable 19
Edit 43, 46
environment variables
CLASSPATH 19
DSQUERY 72
JAGUAR 8
JAGUAR_HOST_NAME 16
LD_LIBRARY_PATH 76
setting for Open Client 76
SQLANY 16
SYBASE 76
TDSQUERY 72
error page, customizing for a redirector 42
H
how to use this book v
HTML documentation 2
httpd.conf Apache configuration file
editing 50
sample 50
HTTPServletRequest methods, defining the data source
for 43
I
45
F
failover provided by redirector plug-in 40
features, EAServer 4
Federal Information Processing Standards. See FIPS
FIPS
80
installation
directory, specifying 14
silent installer, configuring and running 21
system requirements 2
types 4
Installing 43
installing
ASA 16
client runtime files 4
CocoBase Enterprise software 19
EAServer 8
EAServer, procedure for 9
on a network 13
interfaces file, configuring 76
iPlanet Web server
See also Web server redirector plug-in
FIPS and TLS configuration for 69
FIPS and TLS support, configuring for 69
obj.conf file 43
plug-in file names 44
redirector plug-in configuration file, editing 46
redirector plug-in for 43
sample plug-in and redirector locations 44
isql, using to verify connectivity 73, 75, 76
EAServer
Index
J
jagadmin, default user name
jagmgr command 17
O
17
JAGUAR environment variable 8
Jaguar Manager. See EAServer Manager
JAGUAR_HOST_NAME environment variable
Java client runtime files 5
JDK
installation parameters for silent installations
preserving customizations 15
supported versions 3
16
26
P
L
products included with EAServer
LD_LIBRARY_PATH environment variable 76
libraries, copying from EAServer to a Web server 48
listeners
default settings 12
mapping Apache Web server requests to EAServer
52
mapping iPlanet requests to EAServer 46
ports for silent installations 25
load balancing
Web server redirector plug-in 39
logging level
setting for an Apache redirector plug-in 54
setting for an iPlanet redirector plug-in 47
M
mapping
Apache Web server requests to EAServer
iPlanet requests to EAServer 46
message service, upgrading 15
N
network installation of EAServer
Installation Guide
obj.conf, redirector configuration file 43
odbc.ini file, ODBC data source formation 73
odbcinst.ini file, ODBC driver information 73
Open Client
environment variables, setting 76
interfaces file, configuring 76
overview
Web server HTTPS redirector plug-in 37
Web server redirector plug-in 37
13
52
1
R
redirector plug-in. See Web server redirector plug-in
reinstalling EAServer 13
procedure for 14
requirements, system 2
S
sampledb.sh command 17
serverstart command 17
setenv.sh configuration file 16
settings preserved during upgrade 15
setup program
defined 8
running to reinstall or add components
silent installer
checking for errors 33
cleaning up the machine 34
configuration and run files 23
configuration, post-installation 34
configuring and running 21
feature selection parameters 28
installation locations 24
installation types 24
JDK installation parameters 26
license agreement 25
license input parameters 27
13
81
Index
U
listener ports 25
logging parameters 23
parameters, specifying on the command line 31
SilentInstall_Unix.sh script 23
SilentUninstall_Unix.sh script 33
SilentUninstall_Unix.txt configuration file 32
Sybase Central installation parameters 28
testing and running 22
testing the installation 33
troubleshooting and cleanup 33
uninstaller files 32
vpd.properties file, preserving 22
SilentInstall_Unix.sh script 23
SilentInstall_Unix.txt, sample configuration file 23
SQLANY environment variable 16
start_sampledb command 17
starting
Adaptive Server Anywhere 17
EAServer 16
EAServer Manager 17
Sybase Central
installing 8, 11
plug-ins for EAServer 17
starting 17
uninstalling 20
using an existing installation 8, 11
SYBASE environment variable 76
system requirements for EAServer 2
Systems Management options 16
uninstalling EAServer 19
silently 32
unixODBC 71
upgrading
EAServer license 13
license, procedure for 14
message service 15
settings preserved while 15
user name (default), jagadmin 17
V
verifying database connectivity 73, 74, 75, 76
vpd.properties file, preserving during silent installation
22
W
T
TDSQUERY environment variable 72
TLS
adding support for 64
configuring support for Apache 68
configuring support for iPlanet 69
Transport Layer Security. See TLS
trusted CA, EAServer Manager | Certificates folder
tsql, using to verify connectivity 74
typical installation, defined 4
typographical conventions vii
82
64
Web browser, using to connect to EAServer 18
Web documentation for EAServer 2
Web server redirector plug-in 37–57
adding location information 44
Apache configuration file 52
Apache Web server, starting 55
binding to a specific application server 41
configuring EAServer to accept Web server requests
56
configuring the data source for HTTPServletRequest
methods 43
copying libraries from EAServer to an Apache Web
server 54
copying libraries from EAServer to your Web server
48
debugging 42
defining context paths for Apache Web servers 51
defining context paths for iPlanet Web servers 45
DSO required for Apache 51
EASProxy object, adding 45
error pages, customizing 42
failover 40
FIPS and TLS configuration for iPlanet 69
FIPS support, adding 64
FIPS, configuring for Apache 68
EAServer
Index
FIPS, configuring for iPlanet 69
how it works 38
httpd.conf Apache sample configuration file 50
httpd.conf, Apache configuration file 50
HTTPS support 37
HttpSession object and failover 40
installing on your Web server 43, 49
iPlanet configuration file, editing 46
library names 44
load balancing 39
logging level, setting for Apache 54
logging level, setting for iPlanet 47
mapping iPlanet requests to EAServer 46
mapping requests to EAServer 52
obj.conf configuration file requirements 44
obj.conf file, for iPlanet 43
sample paths for iPlanet 44
sample redirector configuration file 40
setting the EAServer HTTP listener properties 57
TLS support, adding 64
TLS, configuring for Apache 68
TLS, configuring for iPlanet 69
Web host entry for Apache 55
Web servers supported 37
Web Services Toolkit, installation options 6
WEB_SERVER_HOME, defined 38
X
xterm command
installation requirement 8
starting the server with 17
Installation Guide
83
Index
84
EAServer