1
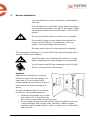
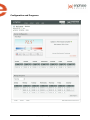
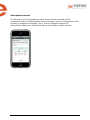
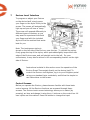
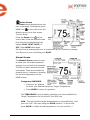
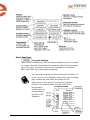
Installation and Operation Manual
EnvironTM Smart Thermostat
2
Copyright Enphase Energy Inc. 2010
141-00010 Rev 01
Contact Information
Enphase Energy Inc.
201 1St Street
Petaluma, CA 94952
Phone: 707-763-4784 TOLL FREE: 877-797-4743
Fax: 707-763-0784
www.enphaseenergy.com
[email protected]
FCC Compliance
This equipment has been tested and found to comply with the limits for a
Class B digital device, pursuant to part 15 of the FCC Rules. These limits are
designed to provide reasonable protection against harmful interference in a
residential installation. This equipment generates, uses and can radiate radio
frequency energy and, if not installed and used in accordance with the
instructions, may cause harmful interference to radio communications.
However, there is no guarantee that interference will not occur in a particular
installation. If this equipment does cause harmful interference to radio or
television reception, which can be determined by turning the equipment off
and on, the user is encouraged to try to correct the interference by one or
more of the following measures:
x Reorient or relocate the receiving antenna.
x
Increase the separation between the equipment and the receiver.
x
Connect the equipment into an outlet on a circuit different from that to
which the receiver is connected.
x
Consult the dealer or an experienced radio/TV technician for help.
Changes or modifications not expressly approved by the party responsible for
compliance may void the user’s authority to operate the equipment.
3
Copyright Enphase Energy Inc. 2010
141-00010 Rev 01
Table of Contents
Important Safety Information ......................................................................... 5
Read this First ..................................................................................................................................................... 5
Safety Instructions ............................................................................................................................................ 5
2 The Enphase Environ Smart Thermostat .......................................................... 6
Other Elements in the Enphase System .................................................................................................... 6
How the Environ Smart Thermostat Works with the Enphase System ......................................... 7
3 Environ Installation ......................................................................................... 8
Location.................................................................................................................................................................. 8
Remove the Old Unit ......................................................................................................................................... 9
What wires do you have? ..............................................................................................................................10
Prepare Wires .................................................................................................................................................... 10
Connect Wires ................................................................................................................................................... 11
Mount the Environ to Wall ............................................................................................................................ 12
HVAC Set-up on Screen Menu..................................................................................................................... 12
Set-up for Normal Heating Systems (not heat pump)....................................................................... 12
Set-up for Normal A/C Cooling Systems: ............................................................................................... 13
Set-Up for Heat Pump Systems: ................................................................................................................ 13
Check HVAC System ....................................................................................................................................... 14
4 Configuring the Environ ................................................................................. 16
5 Environ Interface to Envoy ............................................................................ 18
Install the Envoy .............................................................................................................................................. 18
Install Environ ................................................................................................................................................... 18
Connect Envoy to ZigBee Network ............................................................................................................ 18
Verify that the Envoy and Environs have Mated .................................................................................. 19
Troubleshooting ................................................................................................................................................ 19
6 Operating the Environ through Enlighten ...................................................... 20
Enlighten Monitoring System ....................................................................................................................... 20
Environ Summary on My System page.................................................................................................... 20
Configuration and Programs ........................................................................................................................ 22
Environ Configuration ..................................................................................................................................... 23
Smartphone Access ......................................................................................................................................... 25
7 Environ Local Interface ................................................................................. 26
Control Screens................................................................................................................................................. 26
Home Screen ..................................................................................................................................................... 27
Manual Screen .............................................................................................................................................. 27
Menu Screen.................................................................................................................................................. 28
Menu Functions ................................................................................................................................................. 29
Save Energy Button ........................................................................................................................................ 37
Fan control .......................................................................................................................................................... 37
Power Button and Mode selection .............................................................................................................. 37
HVAC Status ....................................................................................................................................................... 38
Reset Button ...................................................................................................................................................... 38
Zoned Systems Wire Reference Chart ..................................................................................................... 40
8 Appendix ....................................................................................................... 41
Limited Warranty.............................................................................................................................................. 41
1
4
Copyright Enphase Energy Inc. 2010
141-00010 Rev 01
1
Important Safety Information
Read this First
This manual contains important instructions to follow during installation
and maintenance of the Enphase Environ Smart Thermostat.
To reduce the risk of electrical shock, and to ensure the safe installation and
operation of the Environ, the following safety symbols appear throughout
this document to indicate hazardous conditions and important safety
instructions.
WARNING: This indicates a situation where failure to follow
instructions may cause a serious hardware failure. Use extreme
caution when performing this task.
NOTE: This indicates information particularly important for optimal
system operation. Follow these instructions closely.
Safety Instructions
Perform all electrical installations in accordance with all local electrical codes
and the National Electrical Code (NEC), ANSI/NFPA 70.
Be aware that only qualified personnel shall install or replace the Enphase
Environ Smart Thermostat.
Do not attempt to repair the Enphase Environ. It contains no userserviceable parts. If the Enphase Environ fails, please return the unit to
your distributor for maintenance. Tampering with or opening the Environ
will void the warranty.
Before installing or using the Enphase Environ, please read all instructions
and cautionary markings in the technical description and on the Enphase
Environ
NOTE: For Enphase Environ Warranty Terms and Conditions see the
Appendix on page 41 of this manual.
5
Copyright Enphase Energy Inc. 2010
141-00010 Rev 01
2
The Enphase Environ Smart Thermostat
The Enphase Environ™ is the world’s first solar-integrated, web-enabled,
smart thermostat. Using plug-and-play wireless technology, the Environ
connects to the Envoy Communications Gateway, and is integrated with the
Enlighten™ website. This allows you to monitor and control your heating and
cooling at the wall, on the web or from your smart phone.
The Environ Smart Thermostat is compatible with all popular residential
HVAC systems:
x 24VAC single, two, three stage conventional heating systems
(gas/oil/electric)
x heat pumps (single and two stage compression)
x single or two stage auxiliary heat (electric or fossil)
x zoned forced air and zoned hot water (2 or 3 wire) (Enphase Energy
recommends professional HVAC installation for zoned forced-air
systems due to additional equipment for baffles, etc.)
x millivolt systems (with 24VAC adapter)
x one or two stage cooling
x hybrid systems.
The Enphase Environ™ will control temperature to an accuracy of ± 1° F and
is designed to work with ambient temperatures from 35° F to 95° F
Heating or cooling temperatures can easily be set on the large touchscreen
with the +/- buttons. A minimum 4 minute off time protects heating and
cooling compressors from damage. This thermostat uses a new technique
called sequential staging for more comfort with faster reaction to requested
temperature changes.
This thermostat must be run on the HVAC system’s 24VAC (C wire) or
external 24VAC transformer connected to the C and RH terminals. The 24VAC
C wire is located on the other side of the 24VAC heating transformer, and
can be found where the other thermostat wires connect at the wall or at the
furnace.
Other Elements in the Enphase System
The Enphase Enlighten web-based monitoring and analysis system
analyzes the per-module data collected by each microinverter. Enlighten
automatically detects any shortfall in energy production, identifies possible
causes, and suggests solutions to correct the problem. The Enphase
Enlighten website is constantly monitoring every module on every
installation.
The Enphase Envoy communications gateway and the Enlighten Energy
Monitoring capability have been expanded to support additional smart energy
6
Copyright Enphase Energy Inc. 2010
141-00010 Rev 01
devices and services such as the Environ Smart Thermostat. This capability
enables Enphase Systems to not only generate clean energy, but also to
monitor and control energy usage.
Through Enlighten, you can manage your Environ Smart Thermostat from
anywhere through the Enphase Enlighten web-based portal. Enlighten
enables you to view and edit your programs and settings. It provides:
x ease of use of setting configurations and setting up 7-day programs
through a large web browser window rather than on the wall-mounted
unit.
x
the ability to access these settings online from any browser, as well as
smartphones.
x
visibility to solar production information and HVAC controls side-by-side
on the same portal.
The Enphase Envoy is an integral component of the Enphase Energy
Microinverter system. It operates between the Enphase Environ,
microinverters, and the Enphase Enlighten web-based monitoring and
analysis system. The Envoy functions as a gateway and monitors the
microinverters that are connected to the photovoltaic modules.
The Enphase Microinverter is a fully integrated device that converts the DC
output of a single solar module into grid-compliant AC power. In addition to
performing the DC to AC conversion, it maximizes the modules' energy
production by using a sophisticated Maximum Power Point Tracking (MPPT)
algorithm.
How the Environ Smart Thermostat Works with the Enphase System
The Environ programmable communicating thermostat interfaces to the
Enphase Envoy communications gateway using a ZigBee wireless interface.
This interface is designed to be plug and play.
Once mated, the Environ can be reached and programmed through the
Enlighten website from virtually any location.
7
Copyright Enphase Energy Inc. 2010
141-00010 Rev 01
3
Environ Installation
Your thermostat is a precise instrument; please handle it
with care.
Turn off electricity to the HVAC system before installing or
servicing the thermostat or any part of the system. Power
can be disconnected at the circuit breaker or at the HVAC
system.
Do not turn electricity back on until work is completed.
Do not short (jumper) across electric terminals at the
control on the furnace or air conditioner to test the
system. This may damage the thermostat.
All wiring must conform to local codes and ordinances.
This thermostat is designed for use with 24VAC and millivolt systems with a
separate 24VAC power adapter.
The thermostat relay load should be limited to 1.0 amp.
Higher amperage may cause damage to the thermostat.
You will need a small Phillips screwdriver and a drill with
3/16-in. (4.8mm) bit for wall mounts.
Location
Replacement installations: mount the
Environ in place of the thermostat. You
must have a C wire or other 24VAC
power available at the Environ location. A
new location will require moving your
wiring.
For new installations and for re-locating
the Environ, follow these guidelines:
x Locate the thermostat on an inside
wall, about 5 ft. (1.5m) above the
floor, and in a room that is frequently used.
x Do not install it where there are unusual heating conditions, such as:
in direct sunlight; near a lamp, radio, television, radiator register,
fireplace; near hot water pipes in a wall; or near a stove on the other
side of a wall.
8
Copyright Enphase Energy Inc. 2010
141-00010 Rev 01
x
x
x
x
Do not locate in unusual cooling conditions, such as: on a wall
separating an unheated room; or in a draft from a stairwell, door, or
window.
Do not locate in a damp area. This can lead to corrosion that will
shorten thermostat life.
Do not locate where air circulation is poor, such as: in a corner, an
alcove; behind an open door.
Do not install the Environ until all construction and painting has been
completed.
Note: The thermostat does not require leveling.
Remove the Old Unit
Read the instructions carefully before removing any
wiring from the existing thermostat. Wires must be
labeled before they are removed. THERE IS NO
STANDARD COLOR CODE. When removing wires from
their terminals, ignore the color of the wires and LABEL
THEM by the terminal where they were screwed.
Switch OFF electricity to the furnace and air conditioner,
then follow these steps.
1. Remove the cover from old thermostat. Most are snap-on types and
simply pull off. Some have locking screws on the side or front. These
must be loosened. DO NOT remove wires. Note the letters printed near
the terminals. Attach labels (enclosed) to each wire for identification.
2. Label the wires one at a time. You must label all the wires before you
proceed. With all wires labeled,
remove them from the old unit.
3. Make sure the wires do not fall back
inside the wall. You can wind them
around a pencil to keep them from
falling.
4. Loosen all screws on the old
thermostat and remove it from the
wall.
9
Copyright Enphase Energy Inc. 2010
141-00010 Rev 01
What wires do you have?
Make sure your wires are labeled. This may require you to find the other end
connection for each wire on your heating or air conditioning equipment and
read the label there. Refer to the Wire Reference on page 39 for better
understanding of wire labels from different HVAC system makers.
IMPORTANT: C wire or 24VAC power is required for the
Environ to operate. If you do not have a C wire, you can
run a new wire from the HVAC to the Environ or provide
24VAC power to operate the Environ using a standard
24VAC wall transformer.
IMPORTANT: If you have both RH and RC, remove the
metal jumper-clip between these 2 terminals.
IMPORTANT: If you have both O and B, refer to page
39 for wiring information.
Prepare Wires
Please follow these guidelines for safe and secure wire connections:
x You will need at least 2.6” (66 mm) of wire for each of your
connections to the Environ.
x If you do not have enough wire, splice additional wire to allow enough
slack.
x Fan out wires below the hole as shown.
x Remove insulation 1/8” (3 mm) from the tip of each wire.
x Take care not to damage the labels for each wire in handling.
Do not allow wires to touch each other or parts
on the thermostat.
10
Copyright Enphase Energy Inc. 2010
141-00010 Rev 01
1. Fan wires out as illustrated with the Environ below the wall opening.
As in the example, fan out the wires so that the C wire is above the C
terminal, the W above the W, and so forth. This allows the Environ to
fit snugly to the wall.
2. Wires will position behind the Environ and up over the terminal area.
3. Do not bunch wires behind the Environ. Feed any slack back into the
wall opening.
Connect Wires
1. Connect labeled wires only to a terminal with the
same letter label.
2. Insert the wire in the terminal well and tighten the
screw securely. Do not over-tighten, this will cut
the wire.
3. If you are using a 24VAC transformer (such as
Radio Shack PN273-1690), connect it to the C and
RH terminals (no polarity).
11
Copyright Enphase Energy Inc. 2010
141-00010 Rev 01
Mount the Environ to Wall
1. Hold the Environ against the wall with the wires coming over the top
above terminal block. The Environ will cover the hole in the wall.
2. Position the Environ for best appearance.
3. Attach the Environ to the wall with the screws provided.
4. If you are mounting the Environ to sheet rock, or if you are using the
old mounting holes, use the plastic anchors provided.
5. Mark first and drill a 3/16-in.(4.8mm) hole for the insert at each screw
location, then mount the Environ.
HVAC Set-up on Screen Menu
With all the wires connected (including the C wire), it is time to turn the AC
power back on. Do this at the breaker or HVAC system you used to switch it
off. The Environ will power-up in the control OFF mode. Your Environ is not
configured to operate your HVAC system yet. You must now use the menu
driven HVAC SET-UP function.
IMPORTANT: Make sure the Environ is powered up and
is in the OFF mode before set-up. To turn your
thermostat off, press the Power button
in the middle
of the control bar to the right of the display and press
OFF. Heating and cooling systems must be configured
separately.
Set-up for Normal Heating Systems (not heat pump)
1. After all the wires are connected, follow the following steps:
2. Remove the pull-tab for the battery located under the bottom
cover
12
Copyright Enphase Energy Inc. 2010
141-00010 Rev 01
3. Press the purple MENU button on the control bar and then press HVAC
SET-UP.
4. Press to highlight HEAT in the upper left corner of the display.
5. Press to highlight NORMAL.
6. Your heater can have up to 3 stages. Select the appropriate number of
stages by pressing STAGES (in brackets) to highlight, and using the
+/- buttons to increase or decrease.
7. Press the appropriate FAN CONTROL setting:
¾ Select HVAC if your heating system controls the fan
(appropriate for most gas, oil, propane and similar furnaces).
¾ Select TSTAT if you want the thermostat to control the fan (for
most electric heating systems).
8. Continue to configure COOL or press HOME to return to the Home
screen.
Set-up for Normal A/C Cooling Systems:
1. Press MENU and then press HVAC SET-UP.
2. Press and highlight COOL in the upper left corner of the display.
3. Select the number of stages of compression for your cooling system
(1 or 2) by pressing the number of STAGES and using +/- buttons to
increase or decrease.
4. Press to select the appropriate FAN CONTROL setting HVAC or
TSTAT. NOTE: Most cooling systems require that the thermostat
TSTAT control the fan.
Press HOME to return to the Home screen..
Set-Up for Heat Pump Systems:
1. Press MENU and then press HVAC SETUP.
2. Press HEAT in the upper left corner of the
display.
3. Press HEAT PUMP.
13
Copyright Enphase Energy Inc. 2010
141-00010 Rev 01
4. Select the number of stages of compression for your heat pump
system (1 or 2) by pressing the number of STAGES, and using the +/buttons to increase or decrease.
NOTE: Most heat pump systems have one stage of
compression.
5. If you have AUXILIARY heat, press the number of stages, use the +/buttons to select 1-2 stages. The default is [NONE]. NOTE: The
Environ controls up to 3 stages total between pump and AUX.
6. If you have AUX, select the type of auxiliary heat that you have,
Electric or Gas-Oil. NOTE: Most heat pump systems have electric heat
strips for auxiliary heat.
7. Fan Control is set by the Environ (TSTAT) for heat pumps.
8. Press the HOME icon to return to the Home screen.
NOTE: For heat pump system your cooling is already
configured since the heat pump unit provides both
heating and cooling.
Check HVAC System
Follow these procedures to verify you have correctly
installed the Environ.
To check Fan (If you connected the G wire - fan
relay):
1. Press the FAN icon on the HOME screen and
select ON.
2. Verify that air is blowing from the system.
Return fan to AUTO selection for normal
operation. Press HOME.
To check HEAT mode:
1. Press the mode control
and select HEAT.
o
2. Press the + button to raise the target temp to 90 F. Allow the
system 2 minutes to respond.
3. Verify that heat is blowing from the system.
4. Return the mode control
to OFF. Leave OFF for 4 minutes
before checking COOL.
14
Copyright Enphase Energy Inc. 2010
141-00010 Rev 01
To check COOL mode (do not operate the AC if outside temperature is
o
below 65 F):
1. Press the mode control
and select COOL.
2. Press the blue - button to lower the cool target temperature to
o
50 F. Allow the system five minutes to respond.
3. Verify that cool air is blowing from the system.
4. Return the mode control
to OFF.
Congratulations, you have successfully installed your unit. Please
continue to the next section to initialize the Environ.
IMPORTANT: After you have labeled and connected your wires, and
followed the correct HVAC set-up, if these check procedures do not operate
your system call Technical Support for the thermostat at 1-888-200-8514,
8am-midnight Eastern time.
15
Copyright Enphase Energy Inc. 2010
141-00010 Rev 01
4
Configuring the Environ
Calibration
Your thermostat was calibrated at
the factory. We recommend,
however, that you calibrate the
thermostat to match that of a
previous thermostat, or to match
another thermostat already in your
home.
To Change your
Thermostat Calibration:
1. Press MENU and then press CALIBRATE.
2. Use the +/- buttons to adjust the displayed temperature up or
down, as desired.
3. The DELTA FACTOR that appears on the screen will also
automatically increase or decrease for each 1° adjustment. The
large display will show the modified temperature reading that will
be displayed on the Home screen in normal operation.
4. Press HOME to return to the Home screen.
LCD Screen CONTRAST
Your thermostat LCD screen has variable contrast.
To change LCD Screen CONTRAST
1. From the CALIBRATE screen, select CONTRAST and adjust by
pressing the on-screen < and > controls for best viewing.
2. Press HOME to return to the Home screen.
16
Copyright Enphase Energy Inc. 2010
141-00010 Rev 01
Humidifier
To use the Environ internal humidistat to
control an external humidifier unit, connect
it as shown. Connect the H terminal to the
control leg of the humidifier relay. This
allows H to turn the humidifier ON and
OFF.
Dehumidifier
To use the Environ internal humidistat to
control an external dehumidifier unit,
connect it as shown. Connect the DH
terminal to the control leg of the
dehumidifier relay. This allows DH to turn
the dehumidifier ON and OFF.
Fresh Air
The Fresh Air feature uses the EX relay to
control a baffle on a fresh external air
source. Connect the 24VAC baffle to C and EX terminals.
17
Copyright Enphase Energy Inc. 2010
141-00010 Rev 01
5
Environ Interface to Envoy
The Environ programmable communicating thermostat interfaces to the
Enphase Envoy communications gateway using a ZigBee wireless interface.
This interface is designed to be plug and play. All that is required is that the
Environ and the Envoy be on the same network, and they will automatically
mate. Once mated, the Envoy and Environ will pass information between
each other once every 5 minutes.
Before setting up your Environ interface to Envoy, ensure that both the
Envoy and Environ are properly installed and configured:
Install the Envoy
Ensure the Envoy is installed and operating according to the Envoy
Installation & Operations Manual included with the Envoy.
Ensure that the firmware version on the Envoy is at least R2.2.0.
Ensure that the Envoy is connected to the Internet and that
subscription to the Enlighten web based service is active.
Install Environ
Ensure the Environ is installed and operating according to the
installation instructions in this document. Make sure the ZigBee radio
is already installed in a radio slot of the Environ.
If multiple zones are in use in the house (for example,
one Environ thermostat for downstairs, another for
upstairs), ensure that all Environs are in place and
operational before proceeding. Multiple Environs can mate
to the same Envoy.
Connect Envoy to ZigBee Network
The Envoy will automatically create a ZigBee network when it detects that its
radio is present. The Envoy has a Universal Serial Bus (USB) port near the
LAN cable connector. To add the radio to Envoy:
1. Find the ZigBee USB stick. This was shipped as part of the Environ kit.
2. Plug the ZigBee USB stick into the Envoy USB port.
3. The Envoy will be open to linking with Environs that are not yet mated
with another Envoy for 3 minutes.
18
Copyright Enphase Energy Inc. 2010
141-00010 Rev 01
Only unmated Environs will link to the Envoy. Once an Environ
links to the Envoy, the two will mate, and the Environ will not
mate with another Envoy. This prevents the Environ from linking
into a different network, e.g. if a neighbor happened to have an
Envoy and Environ as well, there will not be a possibility of
mating Envoys and Environs between neighbors.
Verify that the Envoy and Environs have Mated
View the LCD screen on the Envoy. As the screens scroll past, you will note
one screen titled ENVIRON THERMOSTATS. The second line will display
TOTAL: x ACTIVE: y, where x is the number of Environs mated to the Envoy
and y is the number of Environs that are in active communications with the
Envoy. If the number of connected and active Environs matches the number
of Environs installed, then the Environs have mated and you will be able to
see a message indicating the time of the "Last Enlighten report" on the
Environ touch screen. You can now continue to the next step, configuring the
Enlighten web page.
Troubleshooting
If the Environ was unable to find the Envoy during the 3 minutes after the
ZigBee USB radio is first installed into the Envoy, it may be necessary to
restart the mate process. On the Envoy, press and hold the menu button
until the display shows Scan ZigBee Network. Release the button before the
display scrolls to the next item. The Envoy will re-create a new ZigBee
network with the Environs. To restart mating on the Environ, press the
icon on the touchscreen, and then start a ZigBee scan.
The radio used in the Environ is designed to have a long range. However
some homes have either long distances or enough obstructions where the
Environ and the Envoy cannot reach each other. In this case, install a ZigBee
repeater (Enphase part number EVRN-RR-01)midway between the Environ
and the Envoy. The repeater will pass on any messages it receives. Plug it
into any AC wall outlet and press the Mate button. When mated and
operational, the LED on the repeater will turn green.
If these steps do not result in a successful mate, call Enphase Customer
Service at 1 877-797-4743.
19
Copyright Enphase Energy Inc. 2010
141-00010 Rev 01
6
Operating the Environ through Enlighten
You can control the Environ thermostat directly, or through the web-based
Enlighten portal from your personal computer or smartphone. For ease-ofuse, we recommend accessing the programming functions through Enlighten
rather than on the wall-mounted device.
Below are instructions for accessing the Environ controls through Enlighten.
Instructions for programming or adjusting settings on the Environ wallmounted device itself are provided in Appendix A.
Note: The homeowner may allow his/her installer to view Environ settings in
Enlighten, but only the system owner is allowed to change any settings.
Enlighten Monitoring System
There are two main screens for Environ within the Enlighten monitoring
system – the Environ Summary on the My System page and the
Configuration and Programs page.
Environ Summary on My System page
20
Copyright Enphase Energy Inc. 2010
141-00010 Rev 01
The Environ summary contains the following elements:
Current Temperature: This shows the ambient temperature where the
Environ is installed.
Settings: Displays the operating range of the Environ Smart Thermostat and
allows you to temporarily override your current program:
x
x
Grab and move the left control to set heater to heat your home to your
preferred temperature during cool weather.
Grab and move the right control to set the air conditioner to cool your
home to your preferred temperature during warm weather.
Mode: Displays the current operating mode of the thermostat and allows you
to change it.
x
x
x
x
AUTO – Choose this option to enable the Environ to switch
automatically between heat and cool throughout the year. The Environ
will switch from HEAT to COOL as needed.
COOL – Choose this option to operate only the cooling portion of your
HVAC system. Programmed time slot heat entries will be ignored.
HEAT – Choose this option to operate the heating portion of your
HVAC system. Programmed time slot cool entries will be ignored.
OFF - Choose this option to take your HVAC system “off-line.” In this
mode your thermostat will not control HVAC functions and your house
may experience extreme heat or cold.
More Details: Click this button to access further information and controls on
the Environ Configuration and Programs screen.
Configuration and Programs
22
Copyright Enphase Energy Inc. 2010
141-00010 Rev 01
The Environ Configuration and Programs screen lets you control your temperature
and mode using the same controls as the Environ Summary; see your current
programmed settings; see the status of your changes; and set, view, and edit
programs.
Changes made on the Environ thermostat and through Enlighten are synchronized
approximately every five minutes through the Enphase Envoy communications
gateway and the Enlighten portal.
Environ Configuration
Status of last update
The Environ Configuration screen displays the status of your last update. The
possible statuses are:
x
x
x
Pending: The operation has not yet been sent through the Envoy to the
thermostat.
Complete: The operation succeeded.
Unsuccessful: The operation failed.
You can click on “Last 10 Updates” to see the status of the last 10 messages for the
thermostat that were sent to the Envoy.
Manage Programs
In the Manage Programs section you can customize daily or weekly programs to
automate temperature settings for your thermostat. The screen includes the
following elements and functions:
x
Program: This lets you select a different program to view or modify. In
addition to the current thermostat program, there are three default programs
that you can customize and apply to your Environ thermostat: Normal, Work
at Home, and Vacation.
x
Calendar: Each day of the week is displayed along with the programmed
time slots for that day. Each time slot represents your comfort range for that
time. For instance, the screenshot above shows that the homeowner’s
current program has been created to suit the following schedule:
Weekdays:
23
Copyright Enphase Energy Inc. 2010
141-00010 Rev 01
Time
6:00 AM
10:00 PM
Comfort Range
70o – 78o F
62o – 82o F
Editing a Program
To edit a program, select the program you want to modify from the menu. This will
display that program’s schedule for each day of the week. Click the “edit” link next
to the day of the week that you would like to modify. This will take you to the Edit
Program screen.
Day: This lets you select the day or range of days that you wish to modify.
Schedule: This shows the programmed time slots for the current day. Each time
slot consists of a starting time and a comfort range defined by a heat and cool
point. Add a time slot to the schedule by clicking the “add time slot” link. You may
add up to seven programmed time slots per day.
To save your changes, click the “Save Changes” button.
Applying a Program
To change the current program for an Environ, go to the Configuration and
Programs screen and select the desired program in the program menu. Then click
the ‘Apply Program’ button to apply the program to the thermostat.
24
Copyright Enphase Energy Inc. 2010
141-00010 Rev 01
Smartphone Access
The Summary and Configuration function above may be accessed via the
smartphone version of the Enlighten Environ interface. Use your smartphone’s web
browser to navigate to Enlighten. Log in, and the Enlighten system will
automatically detect your smartphone device and display a mobile version.
25
Copyright Enphase Energy Inc. 2010
141-00010 Rev 01
7
Environ Local Interface
To program or adjust your Environ
on the device itself, simply press
your finger or the stylus firmly to the
screen. The screen will automatically
light up and you will hear a “beep.”
The screen will respond differently to
different types of touches, so you
may want to experiment with both
your finger and with the included
stylus to find the method that works
best for you.
Note: The touchscreen stylus is
stored on the left side of the Environ, near the top. To remove the stylus,
firmly grasp the top of the stylus, which protrudes slightly beyond the side
edge of the Environ case, and pull straight out to the left. For your
convenience, it may also be stored in the corresponding location on the right
side of Environ.
Instructions included in this section cover the operation of the
Environ Smart Thermostat directly on the device itself. To
control the Environ via Enlighten, log in to your Enlighten portal
using your standard login credentials, and follow the simple-touse instructions on the screen.
Control Screens
Before you operate the Environ, please become familiar with these basic
control screens. All the Environ functions are accessed through these
screens. The Environ touch screen technology allows you to select (by
pressing) an item and change it using the +/- buttons on the control bar. All
user inputs use this method. Press the button to change the input.
26
Copyright Enphase Energy Inc. 2010
141-00010 Rev 01
Home Screen
The Home screen displays when the
unit is operating. Pressing the green
HOME icon
on the control bar will
always return you to this screen.
To set a Mode:
Press the Power icon
on the
control bar. Press the desired mode
from the choices displayed at the
bottom COOL, HEAT, AUTO, or
OFF. Press HOME when done.
Set the time by pressing the hour or minute and the +/- buttons to change.
Your Environ is now controlling your HVAC.
Manual Screen
The Manual Screen control screen
is where you can make temporary
changes to your Environ’s operation.
The Environ has 6 manual override
commands. These are accessed by
pressing the +/- buttons or pressing
the current temperature on the
HOME screen.
Temporary OVERRIDE Ȉ Press the +/- buttons
to select your desired temporary Target Temperature.
Ȉ Press HOME to return to operation.
The TEMPORARY icon will display indicating you have modified the
Target Temperature for the current Time Slot only.
Hold - This will hold the target temperature you set indefinitely, until
you turn it off. Take care using the HOLD function. To set a hold,
press HOLD to initiate a hold temperature. You can use the +/-
27
Copyright Enphase Energy Inc. 2010
141-00010 Rev 01
buttons to select your hold temperature. The Hold icon will display on
the HOME screen indicating you have changed the Target
Temperature. The system will HOLD this temperature until you return
to this screen and de-select HOLD, by pressing it. HOLD is also
canceled when you set the mode to OFF.
Holiday Program – (This feature is not supported once Enlighten is
connected to the Environ – use the Enlighten interface for holiday
programming.) This is a single program that repeats day after day
until you turn it off. It supersedes the weekly program. To modify it
press PROGRAM on the MANUAL screen. It uses the Calendar method
for programming. Refer to page 30 for more information.
Vacation - (This feature is not supported once Enlighten is connected
to the Environ – use the Enlighten interface for vacation
programming.) This function will hold a pre-set temperature until you
turn it off. The preset is saved for next time.
Fresh Air - If you have a fresh air baffle connected to the EX terminal,
the Environ will use this outside air source as the 1st stage of heating
or cooling. This feature is useful in desert climates where outside air
temp can change very quickly or just to freshen indoor air quality.
Emer Heat - This is available if you have a heat pump with auxiliary
heat. When you select this, your heat pump is disabled and auxiliary
heat is your sole source of heat. This manual override setting stays
active until you turn it off. This command is not displayed if you do not
have a heat pump. Remember auxiliary heat is more expensive than
the heat pump.
Menu Screen
The Menu screen is the gateway to many functions of the Environ. It is
displayed when you press the purple MENU button on the control bar to the
right side of the screen.
28
Copyright Enphase Energy Inc. 2010
141-00010 Rev 01
Menu Functions
Program Settings
The Environ is designed for fast and easy programming with a simple,
on-screen interview. Just answer the questions and the Environ takes
care of the rest. A calendar option is also available for fine-tuning.
HEAT and COOL are programmed separately.
You may also program the Environ through Enlighten. To
do so, log in to your Enlighten portal using your standard
login credentials, and follow the simple-to-use
instructions on the screen to access the Programs
function. The method below may be useful if the
thermostat is
installed prior to
commissioning
the Envoy into
Enlighten.
29
Copyright Enphase Energy Inc. 2010
141-00010 Rev 01
Calendar Programming Method
You can use the Calendar screen to review your current Environ
schedule, or to make changes after programming in Interview mode.
To create a whole new program:
1. With the Environ in HEAT or COOL mode, press MENU and then
press PROGRAM in the upper left of the screen.
2. Press the CALENDAR icon
on the left side of the screen. A
schedule of time slots with temperatures for the day appears on
the screen.
3. Select a time period or temperature by pressing it, and use the
+/- buttons to adjust up or down. Press and hold down +/buttons for faster scrolling.
4. You can add up to seven additional time slots a day by pressing
a blank line, and then adjusting the time and temperature with
the +/- buttons. To delete a time slot, highlight and then press
the TRASH CAN icon in the lower left of the screen.
5. Press the left < or right > arrows next to the day of the week to
go to the next or previous day and continue programming. To
copy one day’s programming to the next day, press COPY> on
the bottom right of the screen. The information for the current
day will be copied to the next day and will appear on the screen.
6. Press HOME to return to the Home screen.
A/B program: The Environ can hold 2 complete weekly
programs in memory. These programs are designated ‘A’
and ‘B’.
Programs entered in through the Calendar Programming
Method are stored in Program ‘B’ and are available to be
uploaded to Enlighten. Enlighten can load and access
Program ‘B’ only. A programming method through an
interview is also available, but programs created this way
are stored in Program ‘A’ and are not available to
Enlighten
30
Copyright Enphase Energy Inc. 2010
141-00010 Rev 01
Comfort Settings
The Comfort Settings on the Environ allow you to maintain consistent
comfort with the highest levels of temperature control precision,
accuracy and energy efficiency.
HVAC CYCLING: This feature allows you to set the desired
variance in temperature between the Environ setting and the
room temperature required before the heating or cooling system
will turn on—from 0.5° to 2.0° F (.25° to 1° C).
For example, if HVAC CYCLING is set to 2.0° F and the Environ
is set to 70°F, the heat cycle will not activate until the room
temperature drops to 68°. Similarly, the cooling system will not
activate until the room temperature increases to 72°F. The
HVAC shuts off at the target.
To set/adjust HVAC CYCLING:
1. Press Menu and then press COMFORT.
2. Press the temp offset setting.
3. Use the +/- buttons to raise or lower the variance
setting—from 0.5° to 2.0° F.
4. Press HOME to return to the Home screen.
2ND STAGE ON AT: This feature allows you to adjust the
settings that control second stage heating and cooling
depending upon the climate you live in. This can be modified for
maximum efficiency or comfort. It is displayed if you have
configured a multistage system in HVAC SET-UP.
To set/adjust 2ND STAGE ON AT:
1. Press Menu and then press COMFORT.
2. Press and highlight the user setting (next to 2ND STAGE
ON AT).
3. Use the +/- buttons to raise or lower the setting from
2.0° to 4.5°F (1° to 2.5° C).
4. Press HOME to return to the Home screen.
31
Copyright Enphase Energy Inc. 2010
141-00010 Rev 01
Chirp set
Press this icon to turn the audible chirp sound on or off.
F/C Set
Press this icon to toggle the temperature display scale between °F and
°C.
Humidity
The Environ has a humidistat to control an external
humidifier for humidifying by the H terminal.
HUMIDIFIER: To set a minimum
humidity level with a humidifier
installed in the HVAC:
1. From the HOME screen, press
MENU, then press HUMIDITY.
2. Toggle HUMIDIFR from <OFF>
to <W/HEAT>.
3. Press MIN --% and use the +/buttons to set the desired
minimum humidity level.
4. The Environ can be toggled <ALWAYS> run the humidifier
when the humidistat calls for humidity (fan also runs) or can be
set to run only when the humidistat is calling for humidity and
the heat is also running <W/ HEAT>.
DE-HUMID BY A/C: The Environ’s humidistat can also control the Air
Conditioner for dehumidifying. To set a maximum humidity level (using
the air conditioner):
1. Press MENU, then press the HUMIDITY, then view DE-HUMID
by A/C.
2. Press MAX --% and use the +/- buttons to set the desired
maximum humidity level. Note: You cannot change MAX humid
% until you set it to ALWAYS or HST+TST.
3. The Environ can be toggled to <ALWAYS> run the air
conditioner when the humidistat calls to dehumidify or can be
set to run the air conditioner only when the humidistat calls to
32
Copyright Enphase Energy Inc. 2010
141-00010 Rev 01
dehumidify and the thermostat is also calling for COOL
<HTS+TST> (HST=humidistat, TST=thermostat).
EXTERNAL DE-HUMID: The Environ humidistat can also control an
external dehumidifier, if you have a dehumidifier unit installed in your
HVAC system. Connect it to the DH terminal.
To set a maximum humidity level:
1. Press MENU, then press the HUMIDITY.
2. Press MAX --% and use the +/- buttons to set the desired
maximum humidity level.
3. Press HOME to return to the Home screen.
Consumables
Consumables are the parts of
your HVAC system that must periodically be
replaced, such as filters and UV bulbs. The
Environ keeps monitors system run times, and
can be programmed to remind you when
consumables, such as air filters, humidifier
pads and UV bulbs, should be checked and/or
changed.
x HUM PAD: Run time of humidifier
x AIR FILTER: Run time of HEAT+COOL
x UV BULB: Real time
To set/adjust CHECK CONSUMABLES ALERTS:
1. Press Menu and press CONSUMABLES, and select a CHECK
ALERT to set.
2. Select the number of weeks in the CHECK ALERT column for that
item, and use the +/- buttons to raise or lower the setting.
- Alerts may be scheduled from 0 to 99 weeks.
3. Repeat for each item included in your system.
- If your system does not include a listed item, leave the
CHECK ALERT at 00wks.
4. Press HOME to return to the Home screen.
When the Run Time for a given item reaches the limit you have set, the
Environ will show you a reminder in the message area of the Home
screen.
33
Copyright Enphase Energy Inc. 2010
141-00010 Rev 01
HVAC Set-up
This function allows you to
configure the Environ to control your HVAC
system. The Environ will control most residential
systems. Take care to correctly set-up the
Environ. Incorrect set-up can result in damage to
your HVAC system.
IMPORTANT: Make sure the Environ is powered up and is in
the OFF mode before set-up. (To turn your thermostat OFF,
press the Power button
and select OFF.) Heating and cooling
systems must be configured separately.
Set-up for Normal Heat Systems (not a heat pump):
1. Press the purple MENU button on the control bar and then press
HVAC SET-UP.
2. Press to highlight HEAT in the upper left corner of the display.
3. Press to highlight NORMAL.
4. Select the appropriate number of stages for your heating system
(from 1 to 3) by pressing the number of STAGES to highlight, and
using the +/- buttons to increase or decrease.
5. Press the appropriate FAN CONTROL setting. Select HVAC if your
heating system controls the fan (appropriate for most gas, oil,
propane, and similar furnaces). Select TSTAT if you want the
thermostat to control the fan (for most electric heating systems).
6. Continue to configure COOL or press HOME to return to the Home
screen.
Set-Up for Normal A/C cooling systems:
1. Press MENU and then press HVAC SET-UP.
2. Press and highlight COOL in the upper left corner of the display.
3. Select the number of stages of compression for your cooling system
(1 or 2) by pressing the number of STAGES and using +/- buttons
to change. NOTE: If your system does not have A/C, select NONE
as your number of stages to discontinue on-screen cooling
messages.
4. Press to select the appropriate FAN CONTROL setting HVAC or
TSTAT. NOTE: Most cooling systems require that the thermostat
TSTAT control the fan.
34
Copyright Enphase Energy Inc. 2010
141-00010 Rev 01
5. Press HOME to return to the Home screen.
Set-Up for Heat Pump systems (up to 3 Stages):
1.
2.
3.
4.
Press MENU and then press HVAC SET-UP.
Press HEAT in the upper left corner of the display.
Press HEAT PUMP.
Select the number of stages of compression for your heat pump
system (1 or 2) by pressing the number of STAGES, and using the
+/- buttons to increase or decrease. NOTE: Most heat pump
systems have one stage of compression.
5. If you have auxiliary heat, press the number of AUX stages
(default is [NONE] ) use the +/- buttons to select the number of
AUX stages (1-2 stages) in your system.
6. (If you have AUX) Select the type of auxiliary heat that you have,
Electric or Gas-Oil.
NOTE: Most heat pump systems have electric heat strips for auxiliary
heat.
7. Fan Control is by the Environ (TSTAT) for heat pumps.
8. Press HOME to return to the Home screen. NOTE: For heat pump
system your cooling is already configured, the heat pump unit
provides both heating and cooling.
Lock
The Environ has two lock features. These control
the user’s ability to change the temperature and
other settings of the Environ.
To lock and/or control the ability to
change the Environ:
1. Press MENU and then press LOCK icon
in the lower right of the
screen.
2. Select the desired LOCK feature by pressing the function.
3. Press HOME to return to the Home screen.
Lock Functions:
Partial: Limits the user’s ability to temporarily override the Environ
target temperature. The override is limited to ±9°F (±5°C). To change
35
Copyright Enphase Energy Inc. 2010
141-00010 Rev 01
this range press RANGE +/- and use the +/- buttons to adjust up and
down.
FULL: No changes can be made.
Once locked, the Environ will respond to a limited set of manual commands.
To UNLOCK
1. Press MENU, press and hold the LOCK icon
2. Press LOCK OFF.
for 10 seconds.
3. Press HOME to return to the Home screen.
Calibrate
Your thermostat was
accurately calibrated at the factory to ±1° F
of the actual ambient temperature. You do
have the option, however, to change the
display temperature (from ±1 - 9°F) to
match that of a previous thermostat, or to
match another thermostat already in your
home.
To change your Thermostat Calibration:
1. Press MENU and then press CALIBRATE
2. Use the +/- buttons to adjust the displayed temperature up or down,
as desired.
3. The DELTA FACTOR that appears on the screen will also automatically
increase or decrease for each 1° F (or 0.5° C) adjustment. The large
display will show the modified temperature reading that will be
displayed on the HOME screen and used as the new room temp.
4. Press HOME to return to the Home screen.
LCD Screen CONTRAST
To change LCD Screen CONTRAST:
1. From the CALIBRATE screen, select CONTRAST and adjust by
pressing the on-screen < and > controls for best viewing.
2. Press HOME to return to the Home screen.
36
Copyright Enphase Energy Inc. 2010
141-00010 Rev 01
Save Energy Button
The Save Energy feature on the Environ provides a
simple, easy-to-use way to help you manage your
energy use. SAVE ENERGY automatically adjusts
your target temperature up (in COOL) or down (in
HEAT) by a specified value degrees. The default is
four degrees.
To use Save Energy:
1. Press the SAVE ENERGY button in the upper left corner of the unit.
The screen will now read Save Energy Ʃ 4° and the Target
Temperature will adjust by that offset.
2. Use the +/- buttons to change the offset. Range 2°-9°F [1°-5°C].
3. To return to normal operation, press the Save Energy button again,
and the TARGET TEMP will return to the programmed temperature.
Fan control
To view the fan status, press the FAN icon located at the
top center of the HOME screen.
AUTO: The fan control is normally set to AUTO
mode, meaning that the fan operates automatically,
only when the HVAC system is also running.
CIRC: The CIRC function allows your fan to automatically circulate air
for up to nine minutes per hour for better indoor air quality and
efficiency.
FRESH: If your HVAC system has a fresh air baffle, press FRESH to
use fresh air with HVAC. This works with AUTO or ON. The fresh air
baffle must be connected to the EX terminal on the Environ.
ON: To manually turn ON the fan, press the FAN icon and then press
ON.
The FAN icon will begin turning and the fan will run continuously until
switched to AUTO. The fan ON function is available in OFF mode to allow
simple ventilating.
Power Button and Mode selection
The power button brings up your mode selection options:
37
Copyright Enphase Energy Inc. 2010
141-00010 Rev 01
COOL: This will operate the cooling portion of your HVAC system until
it is turned off.
HEAT: This will operate the heating portion of your HVAC system until
it is turned off.
AUTO: The Environ TRUE AUTO mode switches automatically between
heat and cool throughout the year. The Environ will switch from HEAT
to COOL as needed.
OFF: This takes your HVAC system off-line, and it will not control
HVAC functions.
HVAC Status
The HVAC STATUS indicator shows what HVAC function is active. It glows
orange when the HEAT function is active, blue when the COOL function is
active, and green when the fan is active. These indicators can combine,
where orange-green indicates HEAT-FAN and BLUE-GREEN indicates COOLFAN.
Reset Button
The RESET button re-boots the Environ processor. It does not affect the user
programs that have been stored in permanent memory.
Network
The NETWORK button allows you to identify the network you
are connected with and further manage your settings. The Environ does not
require any manipulation of this page to mate with the Envoy and Enlighten.
RTM-1 Radio Module:
The Environ ships with a ZigBee radio module installed into
it. No additional manipulation should be required.
Information
This represents future capability on the Environ. This Menu function displays
information and interactive screens from a network source.
38
Copyright Enphase Energy Inc. 2010
141-00010 Rev 01
Wire Reference Chart
Your Wires
R or V or VR
RH or 4
RC
W
W2
W3
?
Y
Y2
G or F
C or X
E
L
39
Environ Terminal
RH and RC Single power for HEAT and COOL
RH Power for HEAT (RH not connected to RC jumper clip
removed)
RC Power for COOL (RH not connected to RC jumper clip
removed )
W Heat control
W2 2nd stage HEAT or heat pump auxiliary heat
W3 3rd stage HEAT or 2nd stage of 2 stage auxiliary heat
A 3rd wire for zoned hot water heat (see zoned systems pg 12)
Y COOL control or 1st stage compression for heat pump.
Y2 2nd stage COOL control or 2nd stage compression for a heat
pump
G FAN control
C Common 24VAC power (to power thermostat ) NOTE: TRANE
uses B for this connection
n/a Emergency heat (do not connect, tape off)
n/a System monitor (do not connect, tape off)
T
H
DH
EX
B or
O
B and O
n/a Outdoor sensor (do not connect, tape off)
External Humidifier
External Dehumidifier
External fresh air baffle
B Heat pump changeover (cool to heat, powered in heat)
O Heat pump changeover (heat to cool, powered in cool)
IMPORTANT: If there are both B and O wires (Trane pump
products) DO NOT CONNECT B to B terminal, connect B to C
terminal. If not a Trane product tape off B.
Lennox Heat
V or VR or R
M or Y
Y or W or W2
F or G
R or O
Pump
RH Power for HEAT
Y
W2
G
OX or X2 or C
Copyright Enphase Energy Inc. 2010
141-00010 Rev 01
Trane Products
B
W or W1 or X2
C
W2
Zoned Systems Wire Reference Chart
Your Wires
Environ Terminal
2 wire Zoned Hot Water
R
RH
W
W
40
3 wire Zoned Hot
R or 5
W or 4
Y or G or 6 (the
3rd wire)
Water, Motor Driven Valves
RH (power)
W (heat ON)
A (heat OFF)
3 wire Zoned Hot
R
W
Y or G (the 3rd
wire)
Water, Solenoid Driven Valves
RH (power)
A (heat ON)
W (heat OFF)
Copyright Enphase Energy Inc. 2010
141-00010 Rev 01
8
Appendix
Limited Warranty
Enphase Energy Inc. ("Enphase") has developed the Environ Smart Thermostat,
that is designed to withstand normal operating conditions when used for its
originally intended purpose in compliance with the Enphase User Manual supplied
with the originally shipped system. The Enphase limited warranty ("Limited
Warranty") covers defects in workmanship and materials of the Environ Smart
Thermostat ("Defective Product") for a period of one (1) year from the date of
original purchase of such Environ Smart Thermostat at point of sale to the
originally-installed end user location (the "Warranty Period"). During the
Warranty Period, the warranty is transferable to a different owner as long as the
Environ Smart Thermostat remains installed at the originally-installed end user
location.
During the Warranty Period, Enphase will, at its option, repair or replace the
Defective Product free of charge, provided that Enphase through inspection
establishes the existence of a defect that is covered by the Limited Warranty.
Enphase will, at its option, use new and/or reconditioned parts in repairing or
replacing the Defective Product. Enphase reserves the right to use parts or products
of original or improved design in the repair or replacement of Defective Product. If
Enphase repairs or replaces a Defective Product, the Limited Warranty continues on
the repaired or replacement product for the remainder of the original Warranty
Period or ninety (90) days from the date of Enphase’s return shipment of the
repaired or replacement product, whichever is later.
The Limited Warranty covers both parts and labor necessary to repair the Defective
Product, but does not include labor costs related to un-installing the Defective
Product or re-installing the repaired or replacement product. The Limited Warranty
also covers the costs of shipping repaired or replacement product from Enphase, via
a non-expedited freight carrier selected by Enphase, to locations within the United
States (including Alaska and Hawaii) and Canada, but not to other locations outside
the United States or Canada. The Limited Warranty does not cover, and Enphase
will not be responsible for, shipping damage or damage caused by mishandling by
the freight carrier and any such damage is the responsibility of the freight carrier.
To obtain repair or replacement service under this Limited Warranty, the customer
must comply with the following policy and procedure:
x
41
All Defective Product must be returned with a Return Merchandise
Authorization Number (RMA) which customer must request from Enphase.
Before requesting the RMA, however, the customer should contact an
Enphase technical support representative to evaluate and troubleshoot the
problem while the Environ Smart Thermostat is in the field, since many
problems can be solved in the field.
Copyright Enphase Energy Inc. 2010
141-00010 Rev 01
x
If in-field troubleshooting does not solve the problem, Customer may request
the RMA number, which request must include the following information:
x
x
x
x
x
x
x
Proof-of-purchase of the Defective Product in the form of (1) the dated
purchase receipt from the original purchase of the product at point of
sale to the end user, or (2) the dated dealer invoice or purchase
receipt showing original equipment manufacturer (OEM) status, or (3)
the dated invoice or purchase receipt showing the product exchanged
under warranty
Model number of the Defective Product.
Serial number of the Defective Product.
Detailed description of the defect.
Shipping address for return of the repaired or replacement product.
All Defective Product authorized for return must be returned in the original
shipping container or other packaging that is equally protective of the
product.
The returned Defective Product must not have been disassembled or
modified without the prior written authorization of Enphase.
The Limited Warranty does not cover normal wear and tear of Environ Smart
Thermostat or costs related to the removal, installation, or troubleshooting of the
customer's electrical systems. The Limited Warranty does not apply to, and
Enphase will not be responsible for, any defect in or damage to any Environ Smart
Thermostat: (1) that has been misused, neglected, tampered with, altered, or
otherwise damaged, either internally or externally; (2) that has been improperly
installed, operated, handled or used, including use under conditions for which the
product was not designed, use in an unsuitable environment, or use in a manner
contrary to the Enphase User Manual or applicable laws or regulations; (3) that has
been subjected to fire, water, generalized corrosion, biological infestations, acts of
God, or input voltage that creates operating conditions beyond the maximum or
minimum limits listed in the Environ Smart Thermostat specifications, including high
input voltage from generators or lightning strikes; (4) that has been subjected to
incidental or consequential damage caused by defects of other components of the
HVAC system; or (5) if the original identification markings (including trademark or
serial number) of such Environ Smart Thermostat have been defaced, altered, or
removed. The Limited Warranty does not extend beyond the original cost of the
Environ Smart Thermostat.
THE LIMITED WARRANTY IS THE SOLE AND EXCLUSIVE WARRANTY GIVEN BY
ENPHASE AND, WHERE PERMITTED BY LAW, IS MADE EXPRESSLY IN LIEU OF ALL
OTHER WARRANTIES, EXPRESS OR IMPLIED, STATUTORY OR OTHERWISE,
INCLUDING, WITHOUT LIMITATION, WARRANTIES OF TITLE, QUALITY,
MERCHANTABILITY, FITNESS FOR A PARTICULAR PURPOSE OR NONINFRINGEMENT OR WARRANTIES AS TO THE ACCURACY, SUFFICIENCY OR
SUITABILITY OF ANY TECHNICAL OR OTHER INFORMATION PROVIDED IN
42
Copyright Enphase Energy Inc. 2010
141-00010 Rev 01
MANUALS OR OTHER DOCUMENTATION. IN NO EVENT WILL ENPHASE BE LIABLE
FOR ANY SPECIAL, DIRECT, INDIRECT, INCIDENTAL OR CONSEQUENTIAL
DAMAGES, LOSSES, COSTS OR EXPENSES HOWEVER ARISING, WHETHER IN
CONTRACT OR TORT, INCLUDING WITHOUT LIMITATION ANY ECONOMIC LOSSES
OF ANY KIND, ANY LOSS OR DAMAGE TO PROPERTY, OR ANY PERSONAL INJURY.
To the extent any implied warranties are required under applicable law to apply to
the Environ Smart Thermostat, such implied warranties shall be limited in duration
to the Warranty Period, to the extent permitted by applicable law. Some states and
provinces do not allow limitations or exclusions on implied warranties or on the
duration of an implied warranty or on the limitation or exclusion of incidental or
consequential damages, so the above limitation(s) or exclusion(s) may not apply.
This Limited Warranty gives the customer specific legal rights, and the customer
may have other rights that may vary from state to state or province to province.
43
Copyright Enphase Energy Inc. 2010
141-00010 Rev 01
Enphase Energy Inc.
201 1St Street
Petaluma, CA 94952
Phone: 707-763-4784
TOLL FREE: 877-797-4743
Fax: 707-763-0784
www.enphaseenergy.com
[email protected]
44
Copyright Enphase Energy Inc. 2010
141-00010 Rev 01