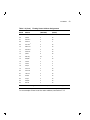
1
DECvoice DTC04 System
Technical Manual
Order Number EK-DTC04-TM-002
digital equipment corporation
maynard, massachusetts
2nd Edition, March 1989
The information in this document is subject to change without notice and should not
be construed as a commitment by Digital Equipment Corporation. Digital Equipment
Corporation assumes no responsibility for any errors that may appear in this document.
The software described in this document is furnished under a license and may be used or
copied only in accordance with the terms of such license.
No responsibility is assumed for the use or reliability of software on equipment that is not
supplied by Digital Equipment Corporation or its affiliated companies.
Copyright ©1989 by Digital Equipment Corporation.
All Rights Reserved.
Printed in U.S.A.
The following are trademarks of Digital Equipment Corporation:
DEC
DECwriter
Q-bus
DEC/CMS
DIBOL
RSTS
DEC/MMS
EduSystem
RSX
DECnet
IAS
DECsystem-10
MASSBUS
DECSYSTEM-20
MSCP
DECUS
PDP
DECvoice
PDT
dt
UNIBUS
VAX
VAXcluster
VMS
Intel and Subscriber Line Datalink are trademarks of the Intel Corporation.
AT&T and Touch-Tone are trademarks of the American Telephone & Telegraph Company.
FCC NOTICE: The equipment described in this manual generates, uses, and may emit
radio frequency energy. The equipment has been type tested and found to comply with
the limits for a Class A computing device pursuant to Subpart J of Part 15 of FCC
Rules, which are designed to provide reasonable protection against such radio frequency
interference when operated in a commercial environment. Operation of this equipment in
a residential area may cause interference, in which case the user at his own expense may
be required to take measures to correct the interference.
Contents
About This Manual
1
ix
Installation
1.1
Unpacking . . . . . . . . . . . . . . . . . . . . . . . . . . . . . . . . . . . . . .
1.2
Installation . . . . . . . . . . . . . . . . . . . . . . . . . . . . . . . . . . . . .
1.3
Device Addresses Assignments . . . . . . . . . . . . . . . . . . . . . .
1.3.1
Assignment Rules . . . . . . . . . . . . . . . . . . . . . . . . . . . . . .
1.3.2
Address Assignment Examples . . . . . . . . . . . . . . . . . . . .
1.3.2.1
Using SYSGEN to configure a system . . . . . . . . . . . . .
1.3.2.2
Setting the switches for a system configuration . . . . . .
1.4
Interrupt Vector Address Assignments . . . . . . . . . . . . . . . . .
1.4.1
Assignment Rules . . . . . . . . . . . . . . . . . . . . . . . . . . . . . .
1.5
Verifying the Installation . . . . . . . . . . . . . . . . . . . . . . . . . . .
2
1
3
13
16
17
17
18
19
19
24
System Overview
2.1
2.1.1
2.1.2
2.2
2.2.1
2.2.2
2.3
2.3.1
2.3.2
2.4
Features . . . . . . . . . . . . .
DTC04 Q-bus Module .
TLI Assembly . . . . . . .
Physical Description . . . .
DTC04 Module . . . . . .
TLI Assembly . . . . . . .
Functional Description . .
DTC04 Module . . . . . .
TLI Assembly . . . . . . .
Specifications . . . . . . . . .
.
.
.
.
.
.
.
.
.
.
.
.
.
.
.
.
.
.
.
.
.
.
.
.
.
.
.
.
.
.
.
.
.
.
.
.
.
.
.
.
.
.
.
.
.
.
.
.
.
.
.
.
.
.
.
.
.
.
.
.
.
.
.
.
.
.
.
.
.
.
.
.
.
.
.
.
.
.
.
.
.
.
.
.
.
.
.
.
.
.
.
.
.
.
.
.
.
.
.
.
.
.
.
.
.
.
.
.
.
.
.
.
.
.
.
.
.
.
.
.
.
.
.
.
.
.
.
.
.
.
.
.
.
.
.
.
.
.
.
.
.
.
.
.
.
.
.
.
.
.
.
.
.
.
.
.
.
.
.
.
.
.
.
.
.
.
.
.
.
.
.
.
.
.
.
.
.
.
.
.
.
.
.
.
.
.
.
.
.
.
.
.
.
.
.
.
.
.
.
.
.
.
.
.
.
.
.
.
.
.
.
.
.
.
.
.
.
.
.
.
.
.
.
.
.
.
.
.
.
.
.
.
.
.
.
.
.
.
.
.
.
.
.
.
.
.
.
.
.
.
.
.
.
.
.
.
.
.
.
.
.
.
.
.
.
.
.
.
.
.
26
26
27
27
27
27
28
28
29
30
Contents–iii
Contents–iv
3
Software Interface
3.1
Q-bus Interface . . . . . . . . . . . . .
3.1.1
Control and Status Register . .
3.2
Resetting the DECvoice Module .
3.3
Data Transfer Scheme . . . . . . . .
3.3.1
Rings . . . . . . . . . . . . . . . . . . .
3.3.1.1
Buffer Structure . . . . . . . . .
3.3.2
Interrupts . . . . . . . . . . . . . . .
3.3.2.1
Interrupt Scheme . . . . . . . .
3.3.3
Commands and Messages . . .
3.3.3.1
Command Format . . . . . . .
3.3.3.2
Message Format . . . . . . . . .
3.4
Initialization . . . . . . . . . . . . . . .
3.4.1
Stage 1 . . . . . . . . . . . . . . . . . .
3.4.2
Stage 2 . . . . . . . . . . . . . . . . . .
3.4.3
Stage 3 . . . . . . . . . . . . . . . . . .
3.5
Basic ROM Commands . . . . . . .
3.5.1
LOAD . . . . . . . . . . . . . . . . . . .
3.5.2
JUMP . . . . . . . . . . . . . . . . . . .
3.5.3
STATUS . . . . . . . . . . . . . . . . .
3.5.3.1
STATUS Command . . . . . .
3.5.3.2
Status Message . . . . . . . . .
.
.
.
.
.
.
.
.
.
.
.
.
.
.
.
.
.
.
.
.
.
.
.
.
.
.
.
.
.
.
.
.
.
.
.
.
.
.
.
.
.
.
.
.
.
.
.
.
.
.
.
.
.
.
.
.
.
.
.
.
.
.
.
.
.
.
.
.
.
.
.
.
.
.
.
.
.
.
.
.
.
.
.
.
.
.
.
.
.
.
.
.
.
.
.
.
.
.
.
.
.
.
.
.
.
.
.
.
.
.
.
.
.
.
.
.
.
.
.
.
.
.
.
.
.
.
32
32
36
37
37
39
42
42
43
43
45
46
46
47
47
48
48
50
51
51
52
4.1
SLD Interface . . . . . . . . . . . . . . . . . . . . . . . . . . . . . . .
4.1.1
SLD System . . . . . . . . . . . . . . . . . . . . . . . . . . . . . .
4.1.2
DECvoice Modifications to the Intel SLD Interface
4.1.2.1
SLD Data Lead . . . . . . . . . . . . . . . . . . . . . . . . .
4.1.2.2
Identification Data Byte . . . . . . . . . . . . . . . . . . .
4.1.2.3
Reset Line . . . . . . . . . . . . . . . . . . . . . . . . . . . . .
4.1.3
Connection Between the Module and TLI . . . . . . .
4.2
North American Telephone Line Interface . . . . . . . . .
4.2.1
TLI to Telephone Line Connection . . . . . . . . . . . . .
.
.
.
.
.
.
.
.
.
.
.
.
.
.
.
.
.
.
.
.
.
.
.
.
.
.
.
.
.
.
.
.
.
.
.
.
.
.
.
.
.
.
.
.
.
55
57
57
57
58
58
59
61
61
4
.
.
.
.
.
.
.
.
.
.
.
.
.
.
.
.
.
.
.
.
.
.
.
.
.
.
.
.
.
.
.
.
.
.
.
.
.
.
.
.
.
.
.
.
.
.
.
.
.
.
.
.
.
.
.
.
.
.
.
.
.
.
.
.
.
.
.
.
.
.
.
.
.
.
.
.
.
.
.
.
.
.
.
.
.
.
.
.
.
.
.
.
.
.
.
.
.
.
.
.
.
.
.
.
.
.
.
.
.
.
.
.
.
.
.
.
.
.
.
.
.
.
.
.
.
.
.
.
.
.
.
.
.
.
.
.
.
.
.
.
.
.
.
.
.
.
.
.
.
.
.
.
.
.
.
.
.
.
.
.
.
.
.
.
.
.
.
.
.
.
.
.
.
.
.
.
.
.
.
.
.
.
.
.
.
.
.
.
.
.
.
.
.
.
.
.
.
.
.
.
.
.
.
.
.
.
.
.
.
.
.
.
.
.
.
.
.
.
.
.
.
.
.
.
.
.
.
.
.
.
.
.
.
.
.
.
.
.
.
.
.
.
.
.
.
.
.
.
.
.
.
.
.
.
.
.
.
.
.
.
.
.
.
.
.
.
.
.
.
.
.
.
.
.
.
.
.
.
.
.
.
.
.
.
.
.
.
.
.
.
.
.
.
.
.
.
.
.
.
.
.
.
.
.
.
.
.
.
.
.
.
.
.
.
.
Telephone Interface
Contents–v
4.2.2
4.2.2.1
4.2.2.2
4.2.2.3
4.2.3
4.2.3.1
4.2.3.2
4.2.3.3
4.2.3.4
.
.
.
.
.
.
.
.
.
61
61
62
62
62
62
62
62
63
5.1
Troubleshooting . . . . . . . . . . . . . . . . . . . . . . . . . . . . . . . . . .
5.2
Diagnostic Procedures . . . . . . . . . . . . . . . . . . . . . . . . . . . . .
5.2.1
DECvoice Test Programs . . . . . . . . . . . . . . . . . . . . . . . . .
5.2.1.1
VOX$TEST.EXE . . . . . . . . . . . . . . . . . . . . . . . . . . . . . .
5.2.1.2
VOX$DIAL.EXE . . . . . . . . . . . . . . . . . . . . . . . . . . . . . .
5.2.1.3
VOX$DIAG.EXE . . . . . . . . . . . . . . . . . . . . . . . . . . . . .
5.2.2
MDM Diagnostics . . . . . . . . . . . . . . . . . . . . . . . . . . . . . . .
64
69
69
69
70
70
70
5
A
A.1
A.2
B
B.1
B.2
B.3
B.4
B.5
B.6
B.7
B.8
TLI to DTC04 Module Connection
Data Flow Control . . . . . . . . . .
Identification . . . . . . . . . . . . . .
Reset . . . . . . . . . . . . . . . . . . . .
Intel SLD Feature Control Chip .
Voice Byte . . . . . . . . . . . . . . . .
Data Byte . . . . . . . . . . . . . . . . .
Control Byte . . . . . . . . . . . . . . .
Signaling Byte . . . . . . . . . . . . .
.
.
.
.
.
.
.
.
.
.
.
.
.
.
.
.
.
.
.
.
.
.
.
.
.
.
.
.
.
.
.
.
.
.
.
.
.
.
.
.
.
.
.
.
.
.
.
.
.
.
.
.
.
.
.
.
.
.
.
.
.
.
.
.
.
.
.
.
.
.
.
.
.
.
.
.
.
.
.
.
.
.
.
.
.
.
.
.
.
.
.
.
.
.
.
.
.
.
.
.
.
.
.
.
.
.
.
.
.
.
.
.
.
.
.
.
.
.
.
.
.
.
.
.
.
.
.
.
.
.
.
.
.
.
.
.
.
.
.
.
.
.
.
.
.
.
.
.
.
.
.
.
.
Troubleshooting and Diagnostic Procedures
Connector Pinouts
Q-bus Connector . . . . . . . . . . . . . . . . . . . . . . . . . . . . . . . . . .
SLD Connector . . . . . . . . . . . . . . . . . . . . . . . . . . . . . . . . . . .
72
74
Telephonics
Connection . . . . . .
Certification . . . . .
Voice Signal Level
Ring Detection . . .
Tone Detection . . .
Wink Detection . .
DTMF Dialing . . .
Pulse Dialing . . . .
.
.
.
.
.
.
.
.
.
.
.
.
.
.
.
.
.
.
.
.
.
.
.
.
.
.
.
.
.
.
.
.
.
.
.
.
.
.
.
.
.
.
.
.
.
.
.
.
.
.
.
.
.
.
.
.
.
.
.
.
.
.
.
.
.
.
.
.
.
.
.
.
.
.
.
.
.
.
.
.
.
.
.
.
.
.
.
.
.
.
.
.
.
.
.
.
.
.
.
.
.
.
.
.
.
.
.
.
.
.
.
.
.
.
.
.
.
.
.
.
.
.
.
.
.
.
.
.
.
.
.
.
.
.
.
.
.
.
.
.
.
.
.
.
.
.
.
.
.
.
.
.
.
.
.
.
.
.
.
.
.
.
.
.
.
.
.
.
.
.
.
.
.
.
.
.
.
.
.
.
.
.
.
.
.
.
.
.
.
.
.
.
.
.
.
.
.
.
.
.
.
.
.
.
.
.
.
.
.
.
.
.
.
.
.
.
.
.
.
.
.
.
.
.
.
.
.
.
.
.
.
.
.
.
.
.
.
.
.
.
.
.
.
.
.
.
.
.
.
.
.
.
.
.
.
.
76
76
76
77
77
78
78
78
Contents–vi
C
C.1
C.2
C.3
Communication Requirements
FCC Requirements . . . . . . . . . . . . . . . . . . . . . . . . . . . . . . . .
Communication Requirements in Canada . . . . . . . . . . . . . .
Service Requirements . . . . . . . . . . . . . . . . . . . . . . . . . . . . .
79
80
81
Glossary
Index
Examples
1–1
Configuring a System with Two DECvoice Modules . . . . . . .
18
Figures
1–1
1–2
1–3
1–4
Switchpack Locations on the Module . . . . . . . . . . . . . . .
Setting the CSR Address Switches . . . . . . . . . . . . . . . . .
Setting the Interrupt Vector Address Switches . . . . . . .
Valid Locations for DECvoice in Q-bus Backplane (with
optional third BA23) . . . . . . . . . . . . . . . . . . . . . . . . . . .
1–5 Valid Locations for TLI Assembly on a Bulkhead Panel .
1–6 Cable Connector to Module . . . . . . . . . . . . . . . . . . . . . .
1–7 Cable Connector to TLI Assembly . . . . . . . . . . . . . . . . .
1–8 TLI Assembly and Module in a System . . . . . . . . . . . . .
2–1 The Complete DECvoice System . . . . . . . . . . . . . . . . . .
2–2 DECvoice DTC04 Module and TLI Assembly . . . . . . . . .
3–1 The Q-bus Control and Status Register . . . . . . . . . . . . .
3–2 Ring Structure . . . . . . . . . . . . . . . . . . . . . . . . . . . . . . . .
3–3 Buffer Structure . . . . . . . . . . . . . . . . . . . . . . . . . . . . . . .
3–4 Placing Commands into the Command Ring . . . . . . . . .
3–5 Command Format . . . . . . . . . . . . . . . . . . . . . . . . . . . . .
3–6 Message Format . . . . . . . . . . . . . . . . . . . . . . . . . . . . . . .
3–7 LOAD Command Format . . . . . . . . . . . . . . . . . . . . . . . .
3–8 JUMP Command Format . . . . . . . . . . . . . . . . . . . . . . . .
3–9 STATUS Command Format . . . . . . . . . . . . . . . . . . . . . .
3–10 Status Message Format . . . . . . . . . . . . . . . . . . . . . . . . .
...
...
...
.
.
.
.
.
.
.
.
.
.
.
.
.
.
.
.
.
.
.
.
.
.
.
.
.
.
.
.
.
.
.
.
.
.
.
.
.
.
.
.
.
.
.
.
.
.
.
.
.
.
.
4
5
6
7
10
11
12
12
25
26
33
38
39
41
43
45
48
50
51
52
Contents–vii
4–1
4–2
4–3
A–1
20-Pin Connector . . . . . . . . . . . .
Signaling Byte From the Module
Signaling Byte to the Module . . .
SLD 20-Pin Connector . . . . . . . .
.
.
.
.
.
.
.
.
.
.
.
.
.
.
.
.
.
.
.
.
.
.
.
.
.
.
.
.
.
.
.
.
.
.
.
.
.
.
.
.
.
.
.
.
.
.
.
.
.
.
.
.
.
.
.
.
.
.
.
.
.
.
.
.
.
.
.
.
.
.
.
.
.
.
.
.
.
.
.
.
.
.
.
.
59
63
63
74
DECvoice Components . . . . . . . . . . . .
Common CSR settings for DECvoice .
CSR Address Assignments . . . . . . . . .
Floating Vector Address Assignments
CSR Bit Assignments . . . . . . . . . . . . .
Module State Field Values . . . . . . . . .
Summary of Reset Operations . . . . . .
Flag Field Flags . . . . . . . . . . . . . . . . .
Pin Assignments . . . . . . . . . . . . . . . .
Troubleshooting Table . . . . . . . . . . . .
Q-bus Connector Pin Assignments . . .
SLD Connector Pin Assignments . . . .
.
.
.
.
.
.
.
.
.
.
.
.
.
.
.
.
.
.
.
.
.
.
.
.
.
.
.
.
.
.
.
.
.
.
.
.
.
.
.
.
.
.
.
.
.
.
.
.
.
.
.
.
.
.
.
.
.
.
.
.
.
.
.
.
.
.
.
.
.
.
.
.
.
.
.
.
.
.
.
.
.
.
.
.
.
.
.
.
.
.
.
.
.
.
.
.
.
.
.
.
.
.
.
.
.
.
.
.
.
.
.
.
.
.
.
.
.
.
.
.
.
.
.
.
.
.
.
.
.
.
.
.
.
.
.
.
.
.
.
.
.
.
.
.
.
.
.
.
.
.
.
.
.
.
.
.
.
.
.
.
.
.
.
.
.
.
.
.
.
.
.
.
.
.
.
.
.
.
.
.
.
.
.
.
.
.
.
.
.
.
.
.
.
.
.
.
.
.
.
.
.
.
.
.
2
6
13
20
33
36
36
40
59
64
72
74
Tables
1–1
1–2
1–3
1–4
3–1
3–2
3–3
3–4
4–1
5–1
A–1
A–2
About This Manual
This manual describes the DECvoice DTC04 system hardware, including
installation, system microcode, and maintenance. The system hardware
includes the DECvoice DTC04 Q-bus module, telephone line interface
assembly, and cables. Please read this document before you install the
system.
Intended Audience
This manual is for Digital Field Service personnel and technically
sophisticated users of the DECvoice system.
Organization
This manual is divided into five chapters and three appendixes.
Chapter 1, "Installation," describes how to install and set up the DECvoice
system hardware.
Chapter 2, "System Overview," provides a general description of DECvoice
components and features, and lists the technical specifications of the
system hardware.
Chapter 3, "Software Interface," describes the DECvoice microcode and
how it sends and receives data over the Q-bus.
Chapter 4, "Telephone Interfaces," describes the telephone line interface
microcode and how it communicates with the telephone network.
Chapter 5, "Troubleshooting and Diagnostic Procedures," describes basic
troubleshooting and how to run diagnostic tests to isolate problems with
the DECvoice system.
ix
x About This Manual
Appendix A, "Connector Pinouts," shows pin diagrams and signal names
for the Q-bus and telephone line interface connectors.
Appendix B, "Telephonics," lists and details the telephonic characteristics
of the DECvoice system.
Appendix C, "FCC Requirements," details the FCC requirements and
service requirements for the DECvoice system.
Conventions
The following conventions are used in this document:
Caution
Provides information to prevent damage to equipment.
Note
Provides general information about the current topic.
Ctrl Z
For sequences that use the Ctrl key, hold down Ctrl and
press the second key.
Bold text
Bold print identifies user input. This is particularly used in
examples and system displays.
Generic
printer queue
LN03
Examples of commands or other text you enter on the
keyboard are shown in monospace type.
Associated Documents
Document
Order Number
DECvoice DTC04 Software Reference
Manual
AA-LE86A-7E
MicroVAX Systems Maintenance Guide
EK-O01AA-MG
MDM User’s Guide
AA-FM7AB-DN
Digital personnel may order documents from:
Digital Equipment Corporation
444 Whitney Street
Northboro, MA 01532
Attn: Publishing and Circulation Services (NR03/W3) Order
Processing Section
About This Manual
United States customers may order documents from:
Digital Equipment Corporation
Peripherals and Supplies Group
P.O. Box CS2008
Nashua, NH 03061
Outside the United States, customers should contact their local Digital
sales office.
xi
1
Installation
This chapter describes how to unpack, install, and test the DECvoice
system hardware.
1.1 Unpacking
The DECvoice system hardware includes the DTC04 Q-bus module,
telephone line interface (TLI) assembly, and two 20-pin ribbon cables.
Unpack each box and check the equipment against the shipping list.
Carefully examine the module and TLI assembly for loose components,
breaks in the etch, or other signs of damage. Immediately report missing
or damaged items to the shipper and your Digital representative.
CAUTION
The DTC04 module comes in a protective sleeve. Do not remove
the sleeve until you are ready to install the module. Also, make
sure you protect the module from static during installation.
1
2 Installation
Table 1–1 lists the components included in the DECvoice system.
Table 1–1 DECvoice Components
Part Name
Description
Order Number
DECvoice
M7132
module
1 module
DTC04-AA
TLI assembly
1 TLI, 2 cables for
BA23 system
CK-DTC04-AB
TLI assembly
1 TLI, 2 cables for
BA123 system
CK-DTC04-AA
TLI assembly
1 TLI, 2 cables for
H9642 DECvoice
response system
CK-DTC04-AF
Bulkhead
Bulkhead panel
for use with
complete system
H3490-E
Complete
system
Dedicated
DECvoice response
system
DTCAA-AA
NOTE
Each TLI assembly can support two DTC04 modules.
Installation
3
1.2 Installation
NOTE
Please read Appendix C, FCC Requirements, before you connect
DECvoice modules to a telephone line.
Install the DECvoice hardware into the Q-bus backplane as follows:
1. Set the addresses for the control status register (CSR) and the device
interrupt vector as follows:
a. Set the switches on switchpacks E68, E67, and E59 (Figure 1–1)
so that the module responds to its assigned address.
If the switches are labeled ON and OFF (or ON with an arrow),
set the switch to:
OFF if the bit is a 1
ON if the bit is a 0
If the switches are labeled OPEN, set the switch to:
OPEN if the bit is a 1
CLOSED if the bit is a 0
b. Set the switches on switchpacks E68 and E67 to set the CSR
address.
c.
Set the switches on switchpack E59 to set the interrupt vector
address.
2. See Section 1.3 for details on how to set the device address
assignments. See Section 1.4 for details on how to set the interrupt
vector address assignments. Section 1.3.2 shows how to use VMS
SYSGEN (on VAX/VMS version 5.0 or higher) to configure the system
and determine the CSR and vector settings.
4 Installation
Figure 1–1 shows the locations of the switchpacks on the module.
MA-0545-88
Figure 1–1 Switchpack Locations on the Module
Installation
Figure 1–2 shows how to set the switches for the CSR address.
MA-0546-88
Figure 1–2 Setting the CSR Address Switches
5
6 Installation
Table 1–2 shows common CSR settings for DECvoice modules.
Table 1–2 Common CSR settings for DECvoice
E67
E68
S6
S5
S4
S3
S2
S1 S6
0
0
0
1
0
0
0
0
0
1
0
0
0
0
1
0
0
0
0
0
0
CSR SETTING
S5
S4
S3
S2
S1
1
1
0
0
0
1
761142
0
1
1
0
0
1
0
761144
0
0
1
1
0
0
1
1
761146
1
0
0
1
1
0
1
0
0
761150
0
1
0
1
0
1
0
0
0
1
761242
0
0
1
0
1
0
1
0
0
1
0
761244
0
0
0
1
0
1
0
1
0
0
1
1
761246
0
0
0
1
0
1
0
1
0
1
0
0
761250
Figure 1–3 shows how to set the switches for the interrupt vector.
MA-0547-88
Figure 1–3 Setting the Interrupt Vector Address Switches
Installation
7
Install the DTC04 module board into the Q-bus backplane. The module is
a quad-slot board that plugs into an AB/AB or AB/CD slot.
NOTE
When using an AB/CD slot, make sure there are no modules other
than DECvoice modules using the CD slot plugged in above or
below a DECvoice module. Figure 1–4 is a block diagram of a
Q-bus backplane that shows all the valid locations for a DECvoice
module.
MA-0548-88
Figure 1–4 Valid Locations for DECvoice in Q-bus Backplane (with
optional third BA23)
8 Installation
Verify The CSR and vector settings as follows:
If using the MicroVAX Diagnostic Monitor (MDM):
a. Refer to the "MDM Release Note" and the other documentation that
you received with your MDM kit for instructions on how to boot
MDM. You must use release 125 of MDM or greater to test DECvoice
modules. (For more troubleshooting and diagnosis information, see
Chapter 5 in this manual.)
b. If you set the DECvoice modules to the proper CSR setting,
they appear in the configuration display. The first DECvoice
module is named DTC04A, the second DTC04B, and so on. If any
DECvoice modules do not appear in the configuration, refer to the
troubleshooting section in Chapter 5.
c.
After MDM locates all the DECvoice modules, run the verification
tests. Initially, you should run the verification tests for one module
at a time. If the test reports a failure - "cannot generate Host alert"
then the vector settings may be incorrect for that module. (Refer to
Chapter 5.)
d. Verification is complete. You can now run the exercisor testing.
If using VMS:
a. Boot VMS by following the instructions given in the VAX/VMS system
documentation. You must be using VAX/VMS version 5.0 or greater
and you must have the VOX Run-Time Library installed.
b. After you boot VAX/VMS, log in to the system account and type:
$ SHOW DEVICE VX
c.
The DECvoice modules appear as VXA0:, VXB0:, ... , up to VXP0: (for
a 16 line system). If any of your DECvoice modules are missing, refer
to the troubleshooting information in Chapter 5.
d. Run the DECvoice tests on each module following the instructions
on the VOX Run-Time Library software release notes. If any of your
DECvoice modules return with a DEVICE TIMEOUT error, refer
to the troubleshooting information in Chapter 5. The tests should
(initially) be run one module at a time.
e.
Verification is complete. You can now run further testing.
Installation
9
Install the TLI assembly. You can install the TLI assembly in the holes
on a bulkhead panel. Usually, you install the TLI assembly in a pair of
B-size holes on the panel. These holes are normally labeled A and B.
Figure 1–5 shows where to install the TLI assembly for each system. The
following list describes where to install the TLI assembly for each system:
•
For systems with BA23 bulkhead panels (pedestal or single-box
rackmount), the TLI installs in an A + B pair of holes. This leaves
holes available for the console and other options. In this configuration,
you can install a maximum of one TLI assembly (CK-DTC04-AB) and
two modules (DTC04).
•
For systems with double BA23 panels (DECvoice DTCAA systems),
you can install the TLI in an E + I, F + J, or G + K pair of holes. In
this configuration, you can install a maximum of three TLI assemblies
(CK-DTC04-AF) and six modules (DTC04).
•
For systems with triple BA23 panels (DECvoice H9642 cabinets), you
can install the TLI assembly in an A + B, C + D, E + F, G + H, I + J,
K + L, M + N, or O + P pair of holes. In this configuration, you can
install a maximum of eight TLI assemblies (CK-DTC04-AF) and 16
modules (DTC04).
•
For BA123 systems, you can install the TLI in a C + D or E + F pair
of holes. In this configuration, you can install a maximum of two TLI
assemblies (CK-DTC04-AA) and four modules (DTC04).
10 Installation
MA-0549-88
Figure 1–5 Valid Locations for TLI Assembly on a Bulkhead Panel
Connect the cables. Each TLI assembly can support two DTC04 modules.
The 20-pin cable connectors on the module and TLI assembly are keyed.
Installation
Figure 1–6 shows how to plug the cable into the module.
MA-0550-88
Figure 1–6 Cable Connector to Module
11
12 Installation
Figure 1–7 shows how to plug the cable into the TLI assembly. Make sure
you plug the cable in with the ribbon away from the module surface.
MA-0551-88
Figure 1–7 Cable Connector to TLI Assembly
Figure 1–8 shows how the TLI assembly and module appear in a system.
MA-0552-88
Figure 1–8 TLI Assembly and Module in a System
Installation
13
1.3 Device Addresses Assignments
On Q-bus systems, a range of addresses in the top 4K words is reserved
as floating address space for options. The range of addresses is from
xxx600108 to xxx637768 . The xxx means all top address bits = 1.
The first part of the list of devices that you can assign floating address
space to is in Table 1–3. The rank represents the sequence of address
assignment for the devices.
If you assign device addresses according to VAX/VMS rules, you can run
configuration programs to check which devices are installed in the system.
Devices of the same type should have sequential addresses.
In Table 1–3, the size column shows how many words of address space
each device needs. The modulus column shows the modulus used for each
starting address. For example, devices with an octal modulus of 10 must
start at an address that is a multiple of 108 . Use the same rule to select
a gap address after a device, or an address for a nonexistent device.
Table 1–3 CSR Address Assignments
Rank
Device
Size (Decimal)
Modulus
(Octal)
1
DJ11
4
10
2
DH11
8
20
3
DQ11
4
10
4
DU11, DUV11
4
10
5
DUP11
4
10
6
LK11A
4
10
7
DMC11/DMR11
4
10
8
DZ11/DZV11,
DZS111
9
1 DZ11-E
(DMC
before
DMR)
(DFA before
DZx)
DZQ11,
DFA01, DZ32
4
10
KMC11
4
10
and DZ11-F are treated as two DZ11s.
(DZ11
before
DZ32)
14 Installation
Table 1–3 (Cont.) CSR Address Assignments
Rank
Device
Size (Decimal)
Modulus
(Octal)
10
LPP11
4
10
11
VMV21
4
10
12
VMV31
8
20
13
DWR70
4
10
4
10
14
2
RL11, RLV11
2
15
LPA11-K
8
20
16
KW11-C
4
10
17
Reserved
4
10
4
10
18
2
RX11/RX211,
RXV11/RXV21
(RX11
before
RX211)
19
DR11-W
4
10
20
3
DR11-B
4
10
21
DMP11
4
10
22
DPV11
4
10
23
ISB11
4
10
24
DMV11
8
20
2
25
DEUNA
4
10
26
2
UDA50
2
4
27
DMF32
16
40
28
KMS11
6
20
29
VS100
8
20
2
4
8
20
30
MSCP (tape)
31
KMV11
2 The
2
first device of the type has a fixed address. Any extra devices have floating devices.
first two devices of this type have fixed addresses. Any extra devices have floating
addresses.
3 The
Installation
15
Table 1–3 (Cont.) CSR Address Assignments
Rank
Device
Size (Decimal)
Modulus
(Octal)
32
DHV11,
DHU11
8
20
33
DMZ32, CPI
(asynch)
16
40
34
CPI32
(asynch)
16
40
35
QVSS2
32
100
36
VS31
4
10
37
QPSS
8
20
38
DTQNA
4
10
2
39
DSV11
4
10
40
CSAM
4
10
41
ADV11-C
4
10
42
AAV11-C
4
10
43
AXV11-C
4
10
44
KWV11-C
2
4
45
ADV11-D
4
10
46
AAV11-D
4
10
47
DRQ3B
8
20
48
VSV24
4
10
49
VSV21
4
10
50
IBQ01
2
10
51
IDV11-A
4
10
52
IDV11-B
4
10
53
IDV11-C
4
10
54
IDV11-D
4
10
55
IAV11-A
4
10
2 The
first device of the type has a fixed address. Any extra devices have floating devices.
16 Installation
Table 1–3 (Cont.) CSR Address Assignments
Rank
Device
Size (Decimal)
Modulus
(Octal)
56
IAV11-B
4
10
57
M7763
4
10
58
IEQ11
8
20
59
ADQ32
16
40
60
DTC04
1
2
1.3.1 Assignment Rules
The assignment rules for addresses and devices are as follows:
1. Assign addresses, starting at xxx60010, according to the sequence of
Table 1–3.
2. Assign device and gap addresses according to the octal modulus as
follows:
a. For devices with an octal modulus of 10, assign an address on a
108 boundary. (The three least significant address bits = 0.)
b. For devices with an octal modulus of 20, assign an address on a
208 boundary. (The four least significant address bits = 0.)
3. For each device connected to the bus, you must allow address space
that is equal to the modulus of the device.
4. After the last device of each type, you must allow a one-word gap
(assigned according to rule 2). This gap could be bigger when rule 2 is
applied to the following rank.
5. If a device with a higher address is used, you must allow a one-word
gap for each unused rank on the list (assigned according to rule 2).
This gap could be bigger when rule 2 is applied to the following rank.
Installation
17
1.3.2 Address Assignment Examples
This section provides two examples of device address assignment for
DECvoice. The first example shows how to use the VMS SYSGEN
utility to configure new Q-bus devices into the system. SYSGEN is a
utility available in the VMS operating system. Only VMS version V5.0
or later can recognize the DECvoice DTC04 Q-bus module. SYSGEN
automatically assigns device and vector addresses. The second example
shows the proper switch settings for a sample configuration.
1.3.2.1 Using SYSGEN to configure a system
To use SYSGEN, you must have system manager privileges. The
assignment process is automated. You enter device names, and SYSGEN
assigns the devices according to how the system is configured. Use
SYSGEN as follows:
1. Log into the system manager account.
2. Enter MCR SYSGEN to access the SYSGEN utility as follows:
$ MCR SYSGEN
3. At the SYSGEN> prompt, enter the CONFIGURE command.
SYSGEN responds by issuing the DEVICE> prompt.
SYSGEN>CONFIGURE
DEVICE>
4. At the DEVICE> prompt, enter all the devices currently in the system
and all the devices you want to add to the system. The following
example shows how to enter the RQDX3, TK50, DEQNA, and DTC04
devices:
DEVICE> RQDX3\ bold)
%SYSGEN-I-EQV_NOTICE, equivalent name - device RQDX3 will be output as UDA
DEVICE> TK50
%SYSGEN-I-EQV_NOTICE, equivalent name - device TK50 will be output as TU81
DEVICE> DEQNA
%SYSGEN-I-EQV_NOTICE, equivalent name - device DEQNA will be output as QNA
DEVICE> DTC04,4
18 Installation
5. To check how SYSGEN has configured the system, type CTRL Z at
the DEVICE> prompt. Then exit SYSGEN.
DEVICE>
Device:
Device:
Device:
Device:
Device:
Device:
Device:
CTRL Z
UDA Name: PUA
TU81 Name: PTA
QNA Name: XQA
DTC04 Name: VXA
DTC04 Name: VXB
DTC04 Name: VXC
DTC04 Name: VXD
CSR: 772150
Vector: 154
Support: yes
CSR: 774500
Vector: 260
Support: yes
CSR: 774440
Vector: 120
Support: yes
CSR: 761142*
Vector: 300* Support: no
CSR: 761144*
Vector: 310* Support: no
CSR: 761146*
Vector: 320* Support: no
CSR: 761150*
Vector: 330* Support: no
1.3.2.2 Setting the switches for a system configuration
This example show how to configure a system with an RQDX3, TK50,
DEQNA, two DHV11 modules, and two DTC04 modules.
$ MCR SYSGEN
SYSGEN> configure
DEVICE> rqdx3
%SYSGEN-I-EQV_NOTICE,
DEVICE> deqna
%SYSGEN-I-EQV_NOTICE,
DEVICE> tk50
%SYSGEN-I-EQV_NOTICE,
DEVICE> dhv11,2
DEVICE> dtc04,2
DEVICE> CTRL Z
Device: UDA
Name:
Device: TU81
Name:
Device: QNA
Name:
Device: DHV11
Name:
Device: DHV11
Name:
Device: DTC04
Name:
Device: DTC04
Name:
SYSGEN> CTRL Z
equivalent name - device RQDX3 will be output as UDA
equivalent name - device DEQNA will be output as QNA
equivalent name - device TK50 will be output as TU81
PUA
PTA
XQA
TXA
TXB
VXA
VXB
CSR:
CSR:
CSR:
CSR:
CSR:
CSR:
CSR:
772150
774500
774440
760440*
760460*
761242*
761244*
Vector:
Vector:
Vector:
Vector:
Vector:
Vector:
Vector:
154
260
120
300*
310*
320*
330*
Support:
Support:
Support:
Support:
Support:
Support:
Support:
Example 1–1 Configuring a System with Two DECvoice Modules
NOTE
See the tables in section 1.2 to find the correct switchpack settings
for CSRs and Vectors.
yes
yes
yes
yes
yes
no
no
Installation
19
The SYSGEN display in Example 1–1 shows that for the first DECvoice
the CSR is 761242, and the Vector is 320. The switchpack settings for the
first DECvoice are as follows:
The settings for switchpack E67 (moving from S6 to S1)
are 0 0 0 1 0 1.
The settings for switchpack E68 (moving from S6 to S1)
are 0 1 0 0 0 1.
The settings for switchpack E59 (moving from S6 to S1)
are 0 1 1 0 1 0.
For the second DECvoice the CSR is 761244, and the Vector is 330. The
switchpack settings for the second DECvoice are as follows:
The settings for switchpack E67 (moving from S6 to S1)
are 0 0 0 1 0 1.
The settings for switchpack E68 (moving from S6 to S1)
are 0 1 0 0 1 0.
The settings for switchpack E59 (moving from S6 to S1)
are 0 1 1 0 1 1.
1.4 Interrupt Vector Address Assignments
In a Q-bus system, the addresses between 3008 and 7748 are reserved
for floating vector space. Assign these addresses in sequence as listed in
Table 1–4.
Each device needs two 16-bit locations for each vector. For example, a
device with one receive and one transmit vector needs four words of vector
space.
1.4.1 Assignment Rules
The vector assignment rules are as follows:
1. Each device uses a vector address equal to n words, where n is the
Size listed in Table 1–4. For example, DECvoice uses four words of
vector space. If the device’s vector was 3008 , the next available vector
would be at 3108 .
2. There are no gaps between vectors, except those needed to align an
octal modulus.
20 Installation
Table 1–4 Floating Vector Address Assignments
Rank
Device
Size
(Decimal)
Modulus
(Octal)
1
DC11
4
10
1
TU58
4
10
2
KL111
4
10
2
DL11-A1
4
10
2
DL11-B1
4
10
2
DLV11-J
16
10
2
DLV11, DLV11-F
4
10
3
DP11
4
10
4
DM11-A
4
10
5
DN11
2
4
6
DM11-BB/AA
2
4
7
DH11 modem control
2
4
8
DR11-A, DRV11-B
4
10
9
DR11-C, DRV11
4
10
10
PA611 (reader +
punch)
8
10
11
LPD11
4
10
12
DI07
4
10
13
DX11
4
10
14
DL11-C to DLV11-F
4
10
15
DJ11
4
10
16
DH11
4
10
17
VT40
8
10
17
VSV11
8
10
18
LPS11
12
10
19
DQ11
4
10
20
KW11-W, KWV11
4
10
1A
KL11 or DL11 used as the console has a fixed vector.
Installation
21
Table 1–4 (Cont.) Floating Vector Address Assignments
Rank
Device
Size
(Decimal)
Modulus
(Octal)
21
DU11, DUV11
4
10
22
DUP11
4
10
23
DV11 + modem
control
6
10
24
LK11-A
4
10
25
DWUN
4
10
26
DMC11/DMR11
4
10
27
DZ11/DZS11/DZV11,
(DFA before
DZx)
DZQ11, DFA01, DZ32
4
10
28
KMC11
4
10
29
LPP11
4
10
30
VMV21
4
10
31
VMV31
4
10
32
VTV01
4
10
33
DWR70
4
10
34
RL11/RLV112
2
4
35
TS11,
TU802
2
4
36
LPA11-K
4
10
37
IP11/IP3002
2
4
38
KW11-C
4
10
39
RX11/RX2112
2
4
RXV11/RXV21
2 The
(DMC
before
DMR)
(DZ11
before
DZ32)
(RX11
before
RX211)
first device of this type has a fixed vector. Any extra devices have floating vectors.
22 Installation
Table 1–4 (Cont.) Floating Vector Address Assignments
Rank
Device
Size
(Decimal)
Modulus
(Octal)
40
DR11-W
2
4
41
DR11-B2
2
4
42
DMP11
4
10
43
DPV11
4
10
44
ML113
2
4
45
ISB11
4
10
46
DMV11
4
10
47
DEUNA/DEQNA/DELQA2
2
4
48
UDA502
2
4
49
DMF32
16
4
50
KMS11
6
10
51
PCL11-B
4
10
52
VS100
2
4
2
4
(tape)2
53
MSCP
54
KMV11
4
10
55
Reserved
4
10
56
IEX
4
10
57
DHV11, DHU11
4
10
58
DMZ32, CPI32
(asynch)
12
4
59
CPI32 (synch)
12
4
60
QVSS2
4
10
61
VS31
2
4
62
LNV11
2
4
63
QPSS (LNV21)
2
4
64
DTQNA
2
4
2 The
(MASSBUS
device)
first device of this type has a fixed vector. Any extra devices have floating vectors.
is a MASSBUS device that can connect to a UNIBUS through a bus adapter.
3 ML11
Installation
Table 1–4 (Cont.) Floating Vector Address Assignments
Rank
Device
Size
(Decimal)
Modulus
(Octal)
65
DSV11
2
4
66
QSAM
4
10
67
ADV11-C
4
10
68
AAV11-C
0
0
69
AXV11-C2
4
10
70
KWV11-C
4
10
71
ADV11-D
4
10
72
AAV11-D
4
10
73
QDSS
6
20
74
DRV11-J
32
4
75
DRQ3B
4
10
76
VSV24
2
4
77
VSV21
2
4
78
IBQ01
2
4
79
IDV11-A
2
10
80
IDV11-D
2
10
81
IAV11-A
4
10
82
M7763
4
10
83
IEQ11
4
10
84
ADQ32
4
10
85
DTC04
4
10
2 The
first device of this type has a fixed vector. Any extra devices have floating vectors.
For an example of how to set the vector address, see Section 1.3.2.
23
24 Installation
1.5 Verifying the Installation
Chapter 5 of this document describes the troubleshooting, testing and
diagnostic procedures available for DECvoice. For information on
verifying the installation, refer to Chapter 5.
2
System Overview
This chapter provides an overview of the the DECvoice DTC04 system.
The DECvoice system is an integrated hardware and software product
that provides a MicroVAX II computer with a voice application platform.
The complete system includes hardware and software components. Figure
2-1 is a functional block diagram of the system.
MA-0553-88
Figure 2–1 The Complete DECvoice System
25
26 System Overview
MA-0554-88
Figure 2–2 DECvoice DTC04 Module and TLI Assembly
The hardware components include the DECvoice DTC04 Q-bus module
and telephone line interface (TLI) assembly with cables. Figure 2-2 shows
the hardware components.
The software components include the DECvoice Run-Time Library (RTL),
ancilliary control process (ACP), device driver, and system firmware.
This document deals mainly with the hardware. For a detailed description
of the DECvoice software components, see the DECvoice Software
Reference Manual.
2.1 Features
This section describes the DTC04 Q-bus module and the TLI assembly
components.
2.1.1 DTC04 Q-bus Module
The DTC04 module is the heart of the DECvoice system. This module
provides the following capabilities:
•
Text-to-speech conversion capabilites of the DECtalk DTC03 system
•
Speaker-independent voice recognition of the numbers 0 through 9,
and the words "yes," "no," and "oh"
•
Speaker-dependent voice recognition of up to 50 words
System Overview
27
•
Digitized speech recording and playback, including full bandwidth and
low-bit-rate voice encoding
•
Control of the TLI that includes DTMF tone signal detection, call
progress detection, and outward pulse and DTMF dialing
2.1.2 TLI Assembly
The TLI assembly connects the DTC04 module to the telephone network.
The TLI has the following capabilities:
•
Standard tip and ring connection over analog telephone lines with
USOC RJ11 service
•
Incoming call (ring) detection
•
Line current interruption (wink) detection
•
Outward pulse dial and switchhook flash
The TLI meets the standards of FCC Part 68—U.S. Telephonics and
Canadian DOC Telecommunications.
2.2 Physical Description
This section describes the DTC04 module and TLI assembly hardware.
2.2.1 DTC04 Module
The DTC04 voice module is a quad-height, 25.8 x 20.6 centimeter (10.5 x
8.4 inch) Q-bus module. It contains all the voice processing circuitry for
the DECvoice system. The DTC04 module plugs into a Digital MicroVAX
II Q-bus processor. The module connects to the TLI assembly through a
20-pin ribbon cable connector.
2.2.2 TLI Assembly
The TLI assembly consists of a two-card stack and a metal plate. The
circuitry in the assembly is logically divided in half so that each TLI can
support two DECvoice DTC04 modules. One card contains all the TLI
circuitry. The other card contains the circuitry to communicate with the
DTC04 voice module. The assembly measures 13.3 cm x 8.6 cm x 3.18
cm (5.25 x 3.4 x 1.25 inches). The assembly can connect to two telephone
lines through two separate AT&T RJ11 connectors. The assembly can
connect to two DTC04 voice modules through two separate 20-pin ribbon
cable connectors.
28 System Overview
The assembly can install into any of the following components.
•
BA23 pedestal or single-box rack
•
BA123 world box
•
H9642 cabinets
2.3 Functional Description
This section describes how the DTC04 module and the TLI assembly
operate.
2.3.1 DTC04 Module
The DTC04 module consists of three functional blocks: the main
processor, signal processor, and Q-bus interface. These blocks
communicate through interrupts and 64 Kbyte windows into the main
processor’s 1 Mbyte memory space.
Main Processor
The main processor consists of an 8 MHz Intel 80186 microprocessor
coupled to the 1 Mbyte shared memory. The main processor performs the
following functions:
•
Controls communication with the host system.
•
Implements the text-to-vocal tract control portion of text-to-speech
translation.
•
Performs buffer management for speech recording and playback.
•
Processes that part of speech recognition that is not handled by the
signal processor.
Signal Processor
The signal processor consists of a Texas Instruments TMS320C25 or
TMS320 family digital signal processor, 64 Kbytes of high-speed static
random access memory, and a shared-memory interface. The sharedmemory interface provides communication between the main processor
and signal processor. The signal processor performs the following
functions:
•
Implements the vocal tract model that the text-to-speech system uses.
•
Compresses and expands stored speech.
System Overview
•
Performs the analysis half of the speech recognition system.
•
Performs the analysis half of call progress detection.
•
Controls the telephone line interface.
•
Generates tone dialing.
29
Q-bus Interface
The Q-bus interface consists of a slave section and a memory interface
section. The slave section contains the control and status register and
sends interrupts to the host. The memory interface section provides
communication between the Q-bus and module.
2.3.2 TLI Assembly
The TLI assembly is functionally divided into two halves. One half
controls communication with the telephone network. The other half
controls communication with the DTC04 voice module. The heart of the
TLI is the Intel 29C50 Subscriber Line Datalink chip. This chip uses the
Intel SLD protocol to control communication between the DTC04 module
and the telephone network.
Communication with the Telephone Network
The half of the TLI that controls communication with the telephone
network is divided into five functional blocks.
•
Protective circuitry that protects TLI from power surges over the
phone line and conforms to the specifications of FCC Part 68
•
Ring detection logic
•
Wink detection logic (detection of line current when the phone is off
the hook)
•
Hook control logic
•
Analog path
30 System Overview
Communication with the DTC04 Module
The TLI communicates with the DTC04 module through the Intel SLD
interconnect. The SLD interconnect is a serial bus that sends 32 bits in
each direction every 125 microseconds. The 32 bits are divided into four
8-bit bytes: the primary voice and data byte, the secondary voice and data
byte, the control byte, and the signalling byte. The voice and data bytes
contain the actual voice data sent and received over the telephone line.
DECvoice does not use both the primary and secondary bytes, only one or
the other. The control byte programs how the SLD components operate.
The signalling byte controls the reading and writing of network signalling.
2.4 Specifications
This sections lists the specifications for the DTC04 module.
DTC04 Voice Module Dimensions
Height
25.8 centimeters (10.5 inches)
Length
20.6 centimeters (8.4 inches)
Width
1.0 centimeters (0.4 inches)
TLI Assembly Dimensions
Height
12.9 centimeters (5.25 inches)
Length
8.3 centimeters (3.38 inches)
Width
3.1 centimeters (1.25 inches)
Electrical Power Requirements
Volts
Amperes
+5
3.80
+12
0.05
Bus Loading
AC
DC
3.2
0.5
System Overview
31
Storage Conditions
Temperature
5° C (41° F) to 50° C (122° F)
Relative
Humidity
10% to 95% with maximum wet bulb temperature 32° C (90°
F) and minimum dew point 2° C (36° F)
Operating Conditions
Temperature
10° C (50° F) to 40° C (104° F)
Relative
Humidity
10% to 90% with maximum wet bulb temperature 32° C (90°
F) and minimum dew point 2° C (36° F)
3
Software Interface
This chapter describes the software interface that the DECvoice hardware
uses with the host system. Specifically, this chapter describes:
•
communication between DECvoice and the host
•
data movement between DECvoice and the host
•
initialization of the DECvoice DTC04 module
•
DECvoice read-only memory commands
3.1 Q-bus Interface
The Q-bus interface controls communication between the DECvoice
DTC04 module and the host system. The Q-bus interface consists of the
control and status register (CSR) and a Q-bus memory window. The CSR
lets the host control data movement to and from the DTC04 module,
and checks the operation status of the module. The memory window
provides communication space between the host and module. This section
describes the CSR in detail.
3.1.1 Control and Status Register
The CSR is a read-write register with a width of one 16-bit word. The
host uses the CSR to reset the module, to determine the module’s status,
and to manage the alert interrupts that flow between the module and the
host.
You can set the address of the CSR to any location in I/O memory space
by setting switches on the module. Chapter 1 describes this procedure in
detail.
32
Software Interface 33
NOTE
DECvoice treats all write cycles to the CSR as complete word
cycles. DECvoice does not support the writing of individual bytes
to the CSR.
Figure 3-1 shows the CSR. Table 3-1 describes the bit assignments in the
CSR.
MA-0555-88
Figure 3–1 The Q-bus Control and Status Register
Table 3–1 CSR Bit Assignments
Bits
Name
Function
03:00
Module state
(MS)
This field passes the complete module state from
the main microprocessor microcode to the host.
When the main reset bit is set, this field is set to 0.
The microcode determines all other settings of this
field. Table 3-2 lists the settings that the MS field
can have.
04
Main reset (MR)
MR is a read-write bit. When MR is set, the main
microprocessor and most other components on the
module are held in the reset state. When MR is
reset, the module restarts. The MR bit is cleared
when the Q-bus is initialized (BINIT) or when the
module is powered up.
NOTE
The MR bit must be asserted for at least
500 nanoseconds to ensure that the reset
operation is complete.
34 Software Interface
Table 3–1 (Cont.) CSR Bit Assignments
Bits
Name
Function
05
Memory enable
(ME)
ME is a read-write bit. When ME is set, the Q-bus
can access the module memory. When ME is reset,
the Q-bus cannot access the module memory. The
ME bit is cleared when the Q-bus is initialized
(BINIT) or when the module is powered up.
NOTE
The ME bit prevents all the DECvoice
modules in a system from responding to
memory location 0 at power-up. This makes it
possible to control several DECvoice modules
using a single 64 Kbyte area in Q-bus address
space.
06
Alert interrupt
enable (AI)
AI is a read-write bit. An alert interrupt occurs in
one of two cases:
•
The host alert bit is set while the AI bit is set.
•
The AI bit is set while the host alert bit is set.
Generally, the host must acknowledge any alert
interrupt by explicitly clearing the host alert bit.
The AI bit is cleared when the Q-bus is initialized
(BINIT) or when the module is powered up.
07
Host alert (HA)
HA is a read-write bit. The module sets HA to
request a host alert interrupt. The host must clear
HA to acknowledge the request. Writing a 1 to the
HA bit clears it. Writing a 0 to the HA bit has no
effect. The HA bit is cleared when the Q-bus is
initialized (BINIT) or when the module is powered
up.
The module sets or clears this bit according to
certain guidelines. Basically, the module sets the
HA bit to alert the host that data movement has
occurred in the module’s shared memory. For
details on the DECvoice interrupt scheme, see
Section 3.3.2.1
Software Interface 35
Table 3–1 (Cont.) CSR Bit Assignments
Bits
Name
Function
13:08
Memory bank
(MB)
MB is a read-write field. The MB field provides the
bank selection bits (21 through 16) to the module
memory address decoder. For example, suppose the
memory bank field is set to 1216 and the memory
enable bit is set. In this case, the module responds
to Q-bus memory references for locations 12000016
through 12FFFF16 .
The addressing of the module memory is
programmable. The MB field is cleared when the
Q-bus is initialized (BINIT) or when the module is
powered up.
14
Timer interrupt
enable (TI)
TI is a read-write bit. TI is intended for real-time
applications that run the module using a polling
scheme.
The interval timer is a free-running clock with
a host-programmable rate. By default, the timer
rate is set to 125 microseconds. Soft-loaded module
firmware can change the rate.
The timer generates an interrupt whenever the
timer sends a clock signal while the TI bit is
set. The module automatically clears the timer
interrupt after it sends the interrupt to the host.
The TI bit is cleared when the Q-bus is initialized
(BINIT) or when the module is powered up.
15
Module alert
(MA)
MA is a read-write bit. Writing a 1 to the MA bit
sets it. Writing a 0 to MA has no effect. Setting
MA requests a module alert interrupt. The module
clears MA after it acknowledges the alert interrupt.
The MA bit is cleared when the Q-bus is initialized
(BINIT) or when the module is powered up.
The host sets or clears the MA bit according to
certain guidelines. Basically, the host must set the
MA bit to alert the module that the host has moved
data into the module’s shared memory. For details
on the DECvoice interrupt scheme, see Section
3.3.2.1
36 Software Interface
Table 3–2 Module State Field Values
Value
Name
Meaning
0
RESET
The module is held in the reset state.
1
READY
The module is ready for operation.
2
BROKEN
The module has a hardware problem.
3
PARITY
There is a parity error in the module’s RAM.
4
TRAP
The module hardware detected a microcode error.
5
BUG
The module microcode detected a microcode error.
6
RING
The module detected an error with the host
software.
7
ROM
The module detected a ROM checksum error.
8
RAML
The module detected an error in low bank RAM.
9
RAMH
The module detected an error in high bank RAM.
10
RAMA
The module has a RAM addressing error.
3.2 Resetting the DECvoice Module
There are three ways to reset the module: power it up, initialize the
Q-bus with a BINIT signal, or set the main reset bit in the CSR. Table 3-3
summarizes how each type of reset affects the module.
Table 3–3 Summary of Reset Operations
Type of Reset
What It Does
Power-up
Clears the CSR, resets the main processor, signal
processor, and TLI.
BINIT
Clears the CSR, resets the main processor, signal
processor, and TLI.
CSR main reset
Resets the main processor, signal processor, and TLI. Does
not clear the CSR.
Software Interface 37
3.3 Data Transfer Scheme
This section describes the shared-memory scheme used to move data
between the host system and the DTC04 module.
3.3.1 Rings
Data moves between the host and the module through two unidirectional
rings. These rings use a total of 64 Kbytes of memory in the module. This
memory is shared by the host and the module. Each ring uses 32 Kbytes
of the shared memory.
NOTE
The last 256 bytes of each 32 Kbyte area are reserved. Host device
handlers should consider each memory area to be 32K—256 bytes
long.
The first ring in the shared memory is called the command ring. The
command ring passes command data from the host to the module. The
host is the sender for the command ring.
The second ring is called the message ring. The message ring passes
status data from the module to the host. The module is the sender for the
message ring.
Each ring is an array of buffers. Each segment of data uses one or more
of the buffers. The host determines the size of each buffer when the host
initializes the shared memory space. Usually, all the buffers are the same
size.
Each ring has a load pointer that points to the next buffer to fill, and
an unload pointer that points to the next buffer to empty. The host and
module maintain these load pointers. The host keeps its pointers in data
structures handled by the module’s device driver. The module keeps
its pointers in private memory. On initialization, the host sets its load
pointer to the first buffer in the command ring, and its unload pointer to
the first buffer in the message ring. The module microcode sets its load
pointer to the first buffer in the message ring, and its unload pointer to
the first buffer in the command ring.
38 Software Interface
Figure 3-2 shows the structure of command and message rings in shared
memory.
MA-0556-88
Figure 3–2 Ring Structure
Software Interface 39
3.3.1.1 Buffer Structure
Figure 3-3 shows the structure of each buffer in the command and
message rings.
Figure 3–3 Buffer Structure
Flag
The flag field in the buffer determines whether the sender or the receiver
owns the buffer. When the host initializes the shared memory, all of the
buffers are marked as owned by the sender. A sender passes data to a
receiver as follows:
1. Waits until enough buffers are available to send the data, starting
with the buffer at the load pointer.
2. Copies data into the data area of the buffers.
3. Sets the used field in the buffers.
4. Changes ownership of the buffers to the receiver by changing the
owner bit in the flag field. The sender should change ownership of
the buffers in last-to-first order. (The last buffer to change ownership
should be the buffer at the load pointer.)
The receiver gets the data from the sender as follows:
1. Waits until the owner bit in the flag field at the unload pointer
indicates receiver ownership.
2. Copies the data out of the data area of the buffers.
3. Returns ownership of the buffers to the sender by changing the owner
bit in the flag field. The receiver should change ownership of the
buffers in last-to-first order.
40 Software Interface
The flag field contains four flags (bits 0 through 3). The rest of the bits
in the field must be 0 or the result is undefined. The sender can change
any flag in the field, except the LIR flag. The receiver can only change the
OWN flag. Table 3-4 describes each flag.
Table 3–4 Flag Field Flags
Flag
Name
Bit
Function
OWN
0
This flag indicates the current owner of the buffer.
If the flag is 0, the sender owns the buffer. If
the flag is 1, the receiver owns the buffer. On
initialization, the OWN flag in each buffer is set to
0.
FIB
1
This flag indicates that the buffer is the first in
a block of data. The sender sets or clears this bit
as required. This flag cannot be changed by the
receiver.
LIB
2
This flag indicates that the buffer is the last in a
block of data. The sender sets or clears this bit
as required. This flag cannot be changed by the
receiver.
LIR
3
This flag indicates that the buffer is the last in the
ring. This flag must always be valid. Senders and
receivers should be sure not to invalidate this flag
while changing the other flags.
Size
The size field indicates the exact size (in bytes) of the data section of the
buffer. The address of the next flag word in the next buffer is equal to
the value in the size field plus the address of the first data word in the
current buffer. However, if the current buffer is flagged by LIR as the
last in the ring, then a wraparound operation is needed. After module
initialization, the size field becomes a read-only field.
Used
The used field indicates the size of the used portion of the data buffer.
The sender sets this field before ownership of the buffer is given to the
receiver.
Software Interface 41
Data[ ]
The data field contains the actual data being sent or received.
Figure 3-4 summarizes how the host enters command data into the
command ring. (The module enters message data into the message ring
the same way.)
MA-0558-88
Figure 3–4 Placing Commands into the Command Ring
42 Software Interface
3.3.2 Interrupts
There are two ways to manage data flow between the host and the DTC04
module. One way is to use the fixed fields at the beginning of each data
buffer in the command and message rings. This method is described
in Section 3.3.1. Using these fixed fields, the host can perform all ring
management by polling each ring to find out when buffers are full or
empty.
The other way to manage data flow is to use interrupts. The DTC04
module implements interrupts. This lets the host manage the rings by
using interrupts instead of by polling. This is the recommended way to
manage data flow.
3.3.2.1 Interrupt Scheme
The interrupt scheme works as follows. The module sets the HA (host
alert interrupt) bit in the CSR to alert the host that data movement has
occurred in the rings. The host should check the flag fields of the buffers
at its load and unload pointers to determine the appropriate action.
Because the module microcode is interrupt driven, the host must set the
MA (module alert interrupt) bit in the CSR to alert the module that the
host made changes to the rings.
The interrupt handler on the interrupted device must acknowledge
(reset) the appropriate alert interrupt before checking the rings. The
interrupting device must request (set) the appropriate alert interrupt
after changing the rings.
Interrupt handlers must be able to handle extra interrupts. It is possible
for the interrupting device to request an interrupt after the interrupted
device has ackowledged the interrupt, but before the interrupted device
checks the rings. In this case, the first interrupt handles any changes to
the rings and the second interrupt is extra.
The module requests a host alert any time it changes the module status
(MS) field in the control and status register. This informs the host of a
change in module status and lets the host initialize the module in an
interrupt-driven manner. The module interrupts the host using BIRQ4,
which is VAX IPL 20.
Software Interface 43
3.3.3 Commands and Messages
This section describes the formats of commands and messages. The
host uses the command ring in shared memory to send commands to
the module. The module uses the message ring in shared memory to
send messages to the host. A message is a reply to a previous command.
Typically, a command can cause DECvoice to return many messages. The
module processes the commands in the order they enter the ring. Also,
the module sends messages to the host in the order that the messages
occur.
All command and message entries in the rings are prefixed with a
message tag. The message tag is a 32-bit longword at the top of each
command and message entry. The software driving DECvoice uses the
message tag to track messages and commands. Many commands cause
DECvoice to return a corresponding message to the host. The message
tag informs the driving software which message belongs with which
command. DECvoice does not interpret the message tag. The message
tag is only significant to the driving software.
3.3.3.1 Command Format
A command consists of a fixed-size command header, followed by a block
of command-specific data. Figure 3-5 shows the command format.
MA-0559-88
Figure 3–5 Command Format
MSGTAG
The message tag informs the driving software which messages belong
with which commands. DECvoice does not interpret the message tag. The
message tag is only significant to the driving software.
44 Software Interface
Slot
The DECvoice module provides an environment for the execution of
subsystems. A subsystem is a group of processes that performs a function.
For example, all the processes that translate text to speech are contained
in a subsystem. Each subsystem loaded into the module is associated with
a slot. The slot is used to locate and to identify a particular subsystem for
a particular task.
Each command has a slot field that informs the command processor which
subsystem should process the command. The DECvoice module has a
total of eight slots, 0 through 7. Slot 0 is reserved for the module ROM
and the module system code. Application software can establish which
subsystems are in slots 1 through 7, because the module does not require
any specific assignments for these slots.
If the host sends a command to a slot that is not associated with a
subsystem, the module returns the command with an error indicator in
the command status field. If the host sends a command that has faulty
data, the module returns the command with an error indicator in the
status field. In this case, it is unpredictable what will happen to the
command data.
OP
The OP field contains the subsystem firmware command code. The
command code represents specific firmware commands. Each command
code is specific to a particular subsystem.
For example, sending a code of 0 in the basic subsystem loads a block of
data into the command ring. Zero is the command code for the BASIC_
LOAD command. Sending a code of 0 in the text-to-speech subsystem
causes DECvoice to speak text. Zero is the command code for the SPEAK_
TEXT command.
Status
The status field informs the host whether or not the command was
completed successfully. The module sets this field. For example, if the
command was completed successfully, the module would return a status
code of 0. Any code other than 0 indicates an error.
Data[ ]
This field represents any data that the command operates on. Some
commands do not have a data field.
Software Interface 45
3.3.3.2 Message Format
A message consists of a fixed-size header, followed by a variable length
block of data. Figure 3-6 shows the format of messages.
MA-0560-88
Figure 3–6 Message Format
MSGTAG
The MSGTAG field holds a copy of the MSGTAG field in the command
that prompted DECvoice to return a message. The message tag informs
the driving software which messages belong with which commands.
DECvoice does not interpret the message tag. The message tag is only
significant to the driving software.
Slot
The slot field identifies the subsystem that produced the message. This
field in a message has the same value as the corresponding slot field in
the command that prompted the message.
Type
This field indicates the purpose of the message and defines the format of
the data portion of the message.
Status
This field provides further information about the message.
Data[ ]
There may be data fields in a message that contain special information
specific to that message.
46 Software Interface
3.4 Initialization
The host must initialize the module before using it. Initialization occurs
in three stages.
1. The host initializes the module’s data transport system.
2. The host loads the module microcode into the module’s private
memory, then starts executing the microcode.
3. The microcode synchronizes with the telephone line interface
hardware, then reads back that hardware’s identification code.
3.4.1 Stage 1
Initialization of the module’s data transport system executes as follows:
1. The module is reset. The reset can occur either from the host
initiating a Q-bus or a CSR reset, or from a module power-up.
2. After the reset, the module automatically begins to execute
initialization microcode. First, the module performs a series of
self-tests to verify that all its major circuits are in working order.
If the module fails these tests, it informs the host by entering an
appropriate error message in the module state field of the CSR (Table
3-2). If the module state field contains an error message, the first
longword in shared memory contains further information about the
message.
3. If the module passes the self-tests, it enters a ready message in the
module state field of the CSR. Also, the green LED on the back of the
module goes on and the module sets the host alert bit in the CSR. The
module waits for the host to ackowledge the host alert.
4. The host acknowledges the host alert by clearing the host alert bit in
the CSR. Then the host checks the module state field in the CSR to
make sure the module passed the self-tests.
If the module is ready, the host enables the module shared memory
by setting the memory enable bit and entering a bank selection value
into the memory bank field in the CSR. The host also initializes the
rings in shared memory.
5. The host requests a module alert by setting the module alert bit in
the CSR.
Software Interface 47
6. The module acknowledges the alert by clearing the module alert bit in
the CSR. Then the module begins to process commands received from
the host.
3.4.2 Stage 2
The host loads the microcode into the module’s private memory, then
executes the microcode as follows:
1. The host sends a STATUS command to the module to get the base
address and size of the block of shared memory that is available for
allocation.
2. The host allocates module memory based on the message the module
returns after receiving the STATUS command. The host copies the
module microcode into memory using the LOAD command, then
transfers control to the entry point of the resident microcode using a
JUMP command.
NOTE
The host maintains the module memory map and determines
which areas of memory to assign to each module subsystem.
3.4.3 Stage 3
The module microcode synchronizes with the TLI as follows:
1. The module tries to synchronize with the TLI hardware, and
determine its identity code. The host can request the outcome of
this attempt by sending a STATUS command to the module. If the
module cannot sychronize with the TLI hardware, the module disables
the TLI processor. If the module cannot synchronize with the TLI, the
TLI probably has a hardware problem that must be fixed. To enable
the TLI, the host must begin the initialization process over again.
The module can continue to operate with a broken TLI. However, the
module will not be able to communicate with the telephone network.
2. If the module synchronizes with the TLI hardware, the module writes
the telephone line identity code into a status message. Then the
module enables the TLI.
48 Software Interface
3.5 Basic ROM Commands
This section describes commands that the host can use to move data into
the module’s shared memory and check the module’s current status. This
section covers three basic commands: LOAD, JUMP, and STATUS.
3.5.1 LOAD
The LOAD command copies a block of data into the module’s main
memory. During initialization, the host uses this command to copy
the base microcode image into main memory. After the module is up and
running, the host uses the LOAD command to copy images of module
subsystems into main memory.
Figure 3-7 shows the structure of the LOAD command.
MA-0561-88
Figure 3–7 LOAD Command Format
MSGTAG
The message tag informs the driving software which messages belong
with which commands. DECvoice does not interpret the message tag. The
message tag is only significant to the driving software.
Slot
This field contains the slot code that identifies the module subsystem to
process the command. The slot code for the LOAD command is 0.
Software Interface 49
OP
This field contains the operation code that identifies the command as the
LOAD command. The OP code for the LOAD command is 0.
Status
This field contains status information about the execution of the
command. The module writes values into this field that indicate whether
or not the command executed successfully.
Offset
This field contains the offset half of the 80186 address where the
command data block is placed.
NOTE
The 80186 processor is a segmented device with the physical
address of a memory area equal to (16 x base) + offset.
The complete address for the command data is segmented into two halves,
offset and base. Only the offset half of the address is incremented during
a load operation. If the size of the data block is too large for the allocated
space at the address, the result of the LOAD command is undefined. If
a LOAD command writes data over memory that is part of the resident
subsystem, the result is also undefined.
Base
This field contains the base half of the 80186 address where the command
data block is placed.
Data[ ]
This field contains the data to be loaded. The LOAD command copies all
the data bytes into module memory starting at the location specified by
the base and offset values. The used field in the buffer header determines
the length of the data string.
50 Software Interface
3.5.2 JUMP
This command transfers control of execution from the resident ROM on
the module to the loaded microcode. Figure 3-8 shows the structure of the
JUMP command.
MA-0562-88
Figure 3–8 JUMP Command Format
MSGTAG
The message tag informs the driving software which messages belong
with which commands. DECvoice does not interpret the message tag. The
message tag is only significant to the driving software.
Slot
This field contains the slot code that identifies the module subsystem to
process the command. The slot code for the JUMP command is 0.
OP
This field contains the operation code that identifies the command as the
JUMP command. The OP code for the JUMP command is 1.
Status
This field contains status information about the execution of the
command. The module writes values into this field that indicate whether
or not the command executed successfully.
Software Interface 51
Offset
This field contains the offset half of the 80186 address where execution
begins. This value is copied into the module’s IP register.
The complete address for the command data is segmented into two halves,
offset and base. Only the offset half of the address is incremented during
a jump operation.
Base
This field contains the base half of the 80186 address where execution
begins. This value is copied into the module’s CS register.
3.5.3 STATUS
This command requests the module’s current status. The STATUS
command prompts a message reply from the module.
3.5.3.1 STATUS Command
Figure 3-9 shows the format of the STATUS command.
MA-0563-88
Figure 3–9 STATUS Command Format
MSGTAG
The message tag informs the driving software which messages belong
with which commands. DECvoice does not interpret the message tag. The
message tag is only significant to the driving software.
Slot
This field contains the slot code that identifies the module subsystem to
process the command. The slot code for the STATUS command is 0.
52 Software Interface
OP
This field contains the operation code that identifies the command as the
STATUS command. The code for the STATUS command is 4.
Status
This field contains status information about the execution of the
command. The module writes values into this field that indicate whether
or not the command executed successfully.
3.5.3.2 Status Message
Figure 3-10 shows the format of the STATUS message.
MA-0564-88
Figure 3–10 Status Message Format
MSGTAG
The message tag informs the driving software which messages belong
with which commands. DECvoice does not interpret the message tag. The
message tag is only significant to the driving software.
Slot
This field contains the slot code that identifies the module subsystem that
generates the message. The slot code for the status message is 0.
Software Interface 53
Type
This field contains the type code that identifies the message as a reply to
the STATUS command. The code for the message type is 4.
Status
This field contains status information about the generation of the
message. The module writes values into this field that indicate whether
or not the module successfully generated the message.
ROMID
This field contains the version number of the firmware in slot 0. If the
STATUS command is sent to the bootstrap and diagnostic ROM, this field
contains the version number of that ROM. If the STATUS command is
sent to the base microcode, this field contains the version number of the
microcode. The upper byte (bits 8 to 15) of the ROMID field contains the
major version number, the lower byte (bits 0 to 7) contains the minor
version number.
TLIID
This field contains the identity code and status of the TLI hardware.
The upper byte of the TLIID field (bits 8 to 15) contains the TLI status:
0 means normal, 1 means TLI not installed, 2 means TLI broken. The
lower byte (bits 0 to 7) contains the TLI identity code.
INDEX
If the STATUS command is sent to the bootstrap and diagnostic ROM,
this field is always 0. If the STATUS command is sent to the base
microcode, this field contains the last index value set by the text-tospeech or the stored voice subsystem. If no index values have been set
since the base microcode was loaded, this field is 0.
RAMBASE
If the STATUS command is sent to the bootstrap and diagnostic ROM,
this field contains the paragraph number of the base memory available
for the host to allocate. This feature lets the host initialize its memory
allocation map without knowing the location or size of the memory the
ROM is using. If the STATUS command is sent to the base microcode,
this field is always 0.
54 Software Interface
RAMSIZE
If the STATUS command is sent to the bootstrap and diagnostic ROM,
this field contains the number of paragraphs of memory available for the
host to allocate. This feature lets the host initialize its memory allocation
map without knowing the location or size of the memory the ROM is
using. If the STATUS command is sent to the base microcode, this field is
always 0.
4
Telephone Interface
This chapter describes the telephone line interface (TLI) that DECvoice
uses to connect to the telephone network. The chapter is divided into
two main sections: subscriber line datalink (SLD) interface and North
American TLI interface.
4.1 SLD Interface
DECvoice uses a modified version of the Intel SLD protocol to control
communication with the telephone network. The Intel SLD is a threewire interface for synchronous data transfer between a master and a
slave device. The master device is the controlling device. The master
controls the rate and direction of data movement by sending clock and
directional signals to the slave device. The SLD protocol supports four
full-duplex, time-multiplexed, 64 Kbits/s channels. Each channel transfers
a byte of data every 125 microseconds.
The three lines of the SLD interface are
•
SCL (data clock signal),
•
SDIR (data direction signal),
•
SLD (data lead).
The data clock and direction signals can be common to all slave devices
connected to the master device.
SCL
The SCL clock signal controls the rate of data transfer over the SLD line.
The clock supports a rate of 512 Kbits/s.
55
56 Telephone Interface
SDIR
The SDIR signal controls the direction of transmission over the SLD line.
When the SDIR line is asserted, the SLD line transfers data to the slave
device. When the SDIR line is not asserted, the SLD line transfers data
to the master device.
SLD
The SLD line is the data line for the system. The SLD line supports a
512 Kbits/s rate, as defined by the SCL clock signal. The data on the SLD
line is formatted as 32 bits of receive data (towards slave) followed by 32
bits of send data (from slave). This pattern repeats at an 8 kHz rate. The
transmit and receive data is further divided into eight bytes, four for each
direction with the most significant bit first. The devices connected to the
SLD line determine the exact use of it.
For analog subscriber lines, the four bytes of data per direction are the
following:
•
Primary voice—This byte contains the actual voice data transferred
between DECvoice and the telephone network. This byte is the
primary voice path.
•
Secondary voice—This byte can have various uses, depending on the
system. This byte is often used as an extra voice channel for threeway calling. This byte also lets one SLD line serve two telephone
lines. DECvoice can use either the primary voice byte or secondary
voice byte for data exchange, but not both.
•
Control—This byte is used to program the Intel SLD components,
specifically the Intel 29C50 chip.
•
Signaling— This byte controls network relays and reads the ring and
line current detection signals.
For digital subscriber lines, there are two voice (or data) bytes, a control
byte, and a signaling byte. The voice bytes can be used as one voice
stream and one data stream, two voice streams, or two data streams.
DECvoice only supports the use of one data byte as a channel to exchange
data.
Telephone Interface
57
4.1.1 SLD System
In an Intel SLD master-slave system, the master controls the rate and
direction of data flow by generating clock and directional signals. The
slave reads the clock and direction signals.
In the DECvoice system, the TLI assembly serves as the master and the
DTC04 module as the slave. The TLI controls the rate and direction of
data transfer between the telephone network and the module.
NOTE
Although the module is the slave device in a timing sense, it is
the master device in a logical sense. The module provides the
programming information to any interface device connected to
it. The module also provides the intelligence to run telephone
transactions.
4.1.2 DECvoice Modifications to the Intel SLD Interface
The SLD protocol is designed for systems where the master and slave
devices (chips) are on the same printed circuit board. In the DECvoice
system, the master and slave devices are on separate boards. The SLD
protocol has been modified in three ways to accommodate this separation.
•
The SLD data lead wire has been split into two unidirectional wires.
•
The telephone line interface sends an additional byte of identification
data to the DTC04 module.
•
A reset line has been added so the module can send a reset signal to
the TLI assembly.
4.1.2.1 SLD Data Lead
The SLD protocol was designed for use on a single board. When the SLD
master and slave devices are on one board, time delays are short for data
travel. On a single board, the SLD data lead can handle bidirectional
data travel with a minimal amount of time delay between the master and
slave devices.
In the DECvoice system, the master and slave devices are on separate
boards. Data must travel over a cable from the DTC04 module (slave) to
the TLI (master). The SLD data can be separated into two unidirectional
signals.
58 Telephone Interface
This separation makes it possible to have TLI assemblies that are not
mounted in the Q-bus IO connector panel. If there is any length of
cable between the TLI assembly and the module, it is necessary to have
separate send and receive data wires. The two wires are called TX DATA
H and RX DATA H (Table 4-1). The module sends data to the TLI over
the TX DATA H line. The TLI sends its identification code and other data
to the module over RX DATA H.
If the TLI assembly is mounted in the Q-bus IO connection panel, only
one wire is needed for moving data between the module and TLI. In this
case, the standard bidirectional SLD data is sent over the single TX DATA
H line. The module uses the ONE WIRE L signal to determine whether
one or two data wires are needed (Table 4-1).
4.1.2.2 Identification Data Byte
On a single board, the SLD chips that represent the master and the slave
devices are always the same. In this case, it is not necessary for the
master to identify itself to the slave.
In the DECvoice system, the master and slave devices are on separate
boards. It is possible that the master and slave devices could have
different programming requirements. Therefore, the TLI must send a
byte of identification data to inform the DTC04 module what is at the
other end of the cable. The identification byte informs the module of the
following:
•
What type of SLD chip the TLI is using (a 29C49, 29C50, 29C52, or
some other chip)
•
The exact meanings of the bytes in the data frames over the SLD
slave and SLD master lines
•
Any legal restrictions the microcode driving the interface must follow
The TLI sends the identification byte to the module when the module
sends its first byte of data to the TLI.
4.1.2.3 Reset Line
When all components are on the same board, the power-up voltages all
sequence at the same time. It is not necessary to synchronize a reset
operation between components on the board, since all components receive
power at the same time.
In the DECvoice system, the SLD master and slave devices are on
separate boards. In this case, it is necessary to synchronize reset
operations between the module and the TLI. A reset line has been added
between the module and TLI assembly called TLI RESET. When the
module resets, it asserts TLI RESET so that the TLI also resets.
Telephone Interface
59
4.1.3 Connection Between the Module and TLI
This section describes the actual connection between the DTC04 module
and the TLI assembly. The module and TLI are connected over a 20-pin
cable. Figure 4-1 is a diagram of the connector. Table 4-1 describes each
pin assignment.
MA-0565-88
Figure 4–1 20-Pin Connector
Table 4–1 Pin Assignments
Pin
Name
Function
1
+12 V
Supplies +12 V to TLI assembly.
2
+5 V
Supplies +5 V to TLI assembly.
3
TLI INSTALLED L
Indicates to the DTC04 module that the
Q-bus IO connector bulkhead is plugged
in. The module can use this signal to help
isolate faults. The bulkhead must ground
this signal.
4
GND
Ground.
5
ONE WIRE L
Indicates to the DTC04 module whether the
TLI is using a one-wire SLD data lead (on
the TX DATA H line) or a two-wire SLD
data lead. In either case, the TLI sends its
identification code over the RX DATA H line.
The TLI ONE WIRE line should be grounded
for a one-wire operation, and floated for
a two-wire operation. The TLI assembly
can use one-wire or two-wire operation.
The North American TLI uses a one-wire
operation.
6
GND
Ground.
60 Telephone Interface
Table 4–1 (Cont.) Pin Assignments
Pin
Name
Function
7
SCL H
This line is for the clock signal. The TLI
drives this line, controlling the rate of data
movement over the TX DATA H and RX
DATA H lines.
8
GND
Ground.
9
SDIR H
This line is for the direction signal. The TLI
drives this line, controlling the direction of
data movement over the TX DATA H and RX
DATA H lines.
10
GND
Ground.
11
TX DATA H (SLD H)
The module uses this line to send data to the
TLI assembly. Valid data only moves over
this line when the TLI asserts the SDIR H
signal.
12
GND
Ground.
13
RX DATA H (ID H)
The TLI assembly uses this line to send data
to the module. The TLI must turn off SDIR
H to send data over this line. Typically, the
TLI uses this line to send its identification
code to the module.
14
GND
Ground.
15
GO H
The module uses this line to reset the TLI.
This line carries the TLI RESET signal
described in Section 4.2.2.3. When GO H is
asserted, the TLI can make calls. When GO
H is not asserted, the TLI resets and cannot
make any calls until the module asserts GO
H again.
16
GND
Ground.
17
MODULE
INSTALLED L
This line informs the TLI that a DTC04
module is connected to it.
18
GND
Ground.
19
+5 V
Supplies +5 V to the TLI assembly.
20
+12 V
Supplies +12 V to the TLI assembly.
Telephone Interface
61
4.2 North American Telephone Line Interface
This section briefly describes the DECvoice TLI designed for use in North
America.
4.2.1 TLI to Telephone Line Connection
The circuit that connects the TLI to the telephone network must meet
certain North American telephone regulations, provide access to the
network, and protect the TLI circuitry. The TLI connects to the telephone
line through modular telephone jacks for RJ11 service.
The circuitry that connects the TLI to the telephone network provides the
following features.
•
Ring detection
•
Line current interruption (wink) detection
•
Hook control
•
A protected analogue path
•
Protection against surges in telephone line current
4.2.2 TLI to DTC04 Module Connection
The TLI connects to the module through a modification of the Intel
Subscriber Line Datalink protocol. This protocol is described in more
detail in Section 4.1. Make sure you read this section before you continue.
Briefly, the Intel SLD protocol is a master-slave system for connecting
a computer to the telephone network. The master half of the system
controls the rate and direction of data flow over the telephone network.
The master controls the flow of data by sending a clock signal (SCL) and
a directional signal (SDIR) to the slave. In the DECvoice system, the TLI
is the SLD master, the DTC04 module is the slave.
4.2.2.1 Data Flow Control
The TLI contains a circuit that provides the clock signals for all the
telephone lines in a DECvoice system. This circuit generates the 512 kHz
clock signal and SDIR signals for the DTC04 module and the 29C50 chips.
62 Telephone Interface
4.2.2.2 Identification
The TLI sends an identification code to the DTC04 module. If two
modules are connected to a TLI, the TLI sends the same identification
code to each module. This identification is factory set to identify the TLI
as a North American analog loop start interface.
4.2.2.3 Reset
When the module asserts the TLI RESET signal to the TLI, the TLI
cannot accept any calls. This prevents the TLI from connecting to the
telephone network while the module is resetting.
4.2.3 Intel SLD Feature Control Chip
The heart of the telephone line interface is the Intel 29C50 control chip.
This chip is a user-programmable, fully integrated PCM codec with
transmit and receive filters, parallel input, and parallel output. The
chip communicates with the telephone line and DTC04 module through
the SLD protocol. The SLD data lead channel sends four separate bytes
of information between the module and TLI: voice, data, control, and
signaling.
4.2.3.1 Voice Byte
The voice byte is the main data path into the 29C50 chip. The TLI
converts data it receives from this byte into audio signals. The module
receives audio signals from the telephone line through this byte. Voice
data from the telephone line that is sent to the chip can use either of two
encoding schemes: -law or A-law. The data stream to or from the 29C50
chip moves at a rate of 8 kHz in 8-bit compressed samples.
4.2.3.2 Data Byte
The DECvoice system does not use this byte.
4.2.3.3 Control Byte
The control byte programs the 29C50 chip. The SLD protocol uses a
sequence of six feature control bytes to program the chip. The most
significant bit of a control byte is used for framing. The first byte in the
6-byte sequence must have a framing bit value of 0. The rest of the bytes
should have a framing bit value of 1. The second most significant bit in a
control byte is a write-enable bit. When this bit is 0, writing is enabled.
The remaining bits in the control byte contain programming information.
For details on the use of the control byte, refer to the Intel
Microcommunications Handbook.
Telephone Interface
63
4.2.3.4 Signaling Byte
This section describes how DECvoice uses the signaling byte during a
module write operation (from module to TLI) and a module read operation
(from TLI to module).
Module Write Operation
The DTC04 module sends the signaling byte to the TLI to control the
output of the signaling pins on the 29C50 chip. Figure 4-2 shows how the
bits in the signaling byte correspond to the pins on the 29C50 chip.
MA-0566-88
Figure 4–2 Signaling Byte From the Module
The R1 signaling pin serves as a hook switch. When R1 is 0, the
telephone is off the hook. When R1 is 1, the telephone is on the hook.
R1 is used for answering the telephone and pulse dialing. DECvoice does
not use signaling pins R2, A, B, C, and D.
Module Read Operation
The TLI sends the signaling byte to the module to inform it of the state
of signaling pin X1 and which of pins A, B, C, and D are programmed to
transmit. Figure 4-3 shows how the bits in the signaling byte correspond
to the pins on the 29C50 chip.
MA-0567-88
Figure 4–3 Signaling Byte to the Module
Signaling pin A is used for ring detection. Signaling pin X1 is used for
line current detection. DECvoice does not use pins B, C, and D. Signaling
pins labeled with a Z are undefined.
5
Troubleshooting and Diagnostic
Procedures
This chapter contains two sections:
•
Section 5.1, Troubleshooting, contains a troubleshooting table to help
you find and solve hardware problems.
•
Section 5.2, Diagnostic Procedures, describes the diagnostic programs
available to check the operating status of the DECvoice module and
telephone line interface (TLI). There are two subsets of diagnostic
programs: DECvoice test programs and the MicroVAX diagnostic
monitor (MDM) program.
5.1 Troubleshooting
This section contains a troubleshooting table to help you find and solve
hardware problems.
Table 5–1 Troubleshooting Table
Problem
Possible Cause
Corrective Action
The DECvoice device
(VXA0:, VXB0:, and so
on) is not visible when
you issue the DCL
"SHOW DEVICE VX"
command.
DECvoice software is
not installed.
Review Chapter 1 of the DECvoice
DTC04 Software Reference Manual,
and verify the software installation
procedure. Check to make sure
the file SYS$LOADABLE_
IMAGES:VXDRIVER.EXE is
present.
64
Troubleshooting and Diagnostic Procedures
65
Table 5–1 (Cont.) Troubleshooting Table
Problem
Possible Cause
Corrective Action
On VAX/VMS V5.0 or
V5.0-1, the WINDOW_
SYSTEM is zero.
Change the WINDOW_SYSTEM
sysgen parameter to 1, and reboot
the system. Refer to the VAX/VMS
SYSGEN manual for information
on how to change this parameter.
Run AUTOGEN to reset the
SYSGEN parameters, and reboot
the system by typing the following:
$ @SYS$UPDATE:AUTOGEN
GETDATA REBOOT
FEEDBACK
SYSGEN parameter
STARTUP_P1 is set to
"MIN"
Set STARTUP_P1 to " " to allow
the DECvoice device to configure,
and reboot the system.
The DECvoice CSR is
set incorrectly.
Run VMS SYSGEN, and type:
SYSGEN> SHOW/UNIBUS
The show unibus command displays
the addresses and values of CSRs
that are seen on the Q-bus.
Remove the first module that is
not seen and verify the CSR switch
settings. For information on setting
the CSRs, see Chapter 1, Section
1.2. Check the module for wrong
switch settings and incomplete
switch closure. Toggle the switches
back and forth once to ensure
complete switch closure.
66 Troubleshooting and Diagnostic Procedures
Table 5–1 (Cont.) Troubleshooting Table
Problem
Possible Cause
Corrective Action
DECvoice device
(VXA0:, VXB0:, and
so on) is visible
when you issue a
"SHOW DEVICE VX"
command, but on
VAX/VMS, modules
fail with device
timeout errors, and
on MDM, modules fail
with "COULD NOT
GENERATE HOST
INTERRUPT" errors.
The DECvoice device
VECTOR is set
incorrectly.
Shutdown and power off the
system, remove the module(s) and
check the vector settings. Reset
and incorrect vector settings. For
information on setting the vectors,
see Chapter 1, Section 1.2. Toggle
the switches back and forth once to
ensure complete switch closure.
When you run VMS or
MDM diagnostics on
all installed modules
simultaneously, the
tests pass, but when
you test a module
separately, it fails with
a device timeout or
host interrupt error.
Vector settings have
been swapped on two
modules.
Run the diagnostics separately
for each module, and correct the
vector settings on the modules that
receive the timeout errors.
Troubleshooting and Diagnostic Procedures
67
Table 5–1 (Cont.) Troubleshooting Table
Problem
Possible Cause
Corrective Action
The DECvoice device
(VXA0:, VXB0:, and
so on) is visible when
you issue DCL "SHOW
DEVICE VX" command
but is marked as offline
Lack of system page
table entries ( SPTE )
for the driver buffers.
Do not attempt to access an offline
DECvoice. Each DECvoice requires
128 SPTEs to function. To raise
the number of SPTEs available in a
VMS system, perform the following:
Place the line "ADD_
SPTREQ=128" in the file
SYS$SYSTEM:MODPARAMS.DAT.
You must add 128 to the SPTREQ
SYSGEN parameter for each
DECvoice module. Run AUTOGEN
to reset the SYSGEN parameters,
and reboot the system by typing
the following:
$ @SYS$UPDATE:AUTOGEN
GETDATA REBOOT
FEEDBACK
The DECvoice module(s) should
now appear as on-line.
On VAX/VMS one
or more DECvoice
modules are not
mounted.
The VOX software
startup procedure is
not being run.
Verify that the following line has
been added to the system startup
procedure:
$ @SYS$STARTUP:VOX$STARTUP.COM
This procedure mounts the
DECvoice modules with the
telephone control ACP and defines
the necessary logical names that
point to the loadable microcode
files.
68 Troubleshooting and Diagnostic Procedures
Table 5–1 (Cont.) Troubleshooting Table
Problem
Possible Cause
Corrective Action
In a newly installed
system or in a system
that has just had the
Q22-bus hardware
reconfigured, the
system hangs or drops
off the VAXcluster
shortly after the
DECvoice ACP
OPCOM "starting"
message is displayed.
Invalid Q22-bus
configuration.
For information about configuring
the Q22-bus, see Section 1.3 in this
manual.
NOTE
The DECvoice device driver (VXDRIVER) currently supports only
the MicroVAX-II processor. Do not attempt to use the driver on
any other VAX processor.
Troubleshooting and Diagnostic Procedures
69
5.2 Diagnostic Procedures
This section describes the diagnostic programs available to check the
operating status of the DECvoice module and telephone line interface
(TLI).
5.2.1 DECvoice Test Programs
The DECvoice test programs let users check the operating status of
the DTC04 module and the TLI. These programs are included with the
DECvoice software package in the SYS$SYSROOT:[VOX$DTC.SYSTEM]
directory. There are three programs available: VOX$TEST.EXE,
VOX$DIAL.EXE, and VOX$DIAG.EXE.
5.2.1.1 VOX$TEST.EXE
This standalone test program runs the DTC04 module through various
self-tests and verifies the operation of the Q22-bus interface. To run this
test program, the user must have operator’s privileges.
Operators can run VOX$TEST.EXE from a terminal by typing the
following:
$ RUN VOX$TEST
In the previous case, VOX$TEST.EXE tests the first available DTC04
module in the Q-bus backplane.
Operators can also define a DCL foreign command to test individual
modules. For example, operators can include the following line in the
LOGIN.COM file or in the SYS$MANAGER:SYSLOGIN.COM file:
$ VOX$TEST :== $VOX$SYSTEM:VOX$TEST.EXE
70 Troubleshooting and Diagnostic Procedures
After the VOX$TEST symbol is declared, operators can test individual
modules by including the device in the command line. Operators can test
the DECvoice device VXB0: by typing the following:
$ VOX$TEST VXB0:
5.2.1.2 VOX$DIAL.EXE
This standalone test program runs the DTC04 module through a program
that verifies the TLI and telephone wiring. Users must have operator
privileges to run VOX$DIAL.EXE. VOX$DIAL.EXE is run the same way
as VOX$TEST.EXE. VOX$DIAL.EXE displays the line "Waiting for a call"
when it is ready to accept a phone call.
5.2.1.3 VOX$DIAG.EXE
This program is a test program sequencer. VOX$DIAG.EXE can
run versions of VOX$TEST and VOX$DIAL on DTC04 modules.
VOX$DIAG.EXE has a built-in help feature that users can access
with the HELP command. Users must have operator privileges to run
VOX$DIAG.EXE.
Operators can run VOX$DIAG.EXE by typing the following:
$ RUN VOX$DIAG
5.2.2 MDM Diagnostics
You need to have access to the system controls before you can run
the MDM system diagnostics. Refer to the system documentation for
procedures on accessing the system controls. Test the system as follows:
1. Insert the MDM tape cartridge or diskette into the drive.
2. Boot the MDM drive.
3. At the MDM prompt (MDM>>>), in command mode, type the
following:
MDM>>> SHOW BUS
In the SHOW BUS display, DECvoice modules appear with the
diagnostic name NADTA. The display shows the correct vector setting,
not the actual setting. If the vector settings are correct, type the
following:
MDM>>> CONFIG
MDM>>> SHOW CONFIG
Troubleshooting and Diagnostic Procedures
71
The configuration display shows the current ROM revisions and the
TLI type. In this display, DECvoice modules appear as DTC04.
4. Test the existing system to make sure it is running properly. For
information on testing and troubleshooting, see the MicroVAX Systems
Maintenance Guide
5. After the test runs successfully, remove the tape cartridge or diskette
and turn the I/O power switch off (0).
CAUTION
If you are using a tape cartridge, always remove it from the
drive before turning power off.
A
Connector Pinouts
A.1 Q-bus Connector
The module connects only to the AB row of the Q-bus. However, the
module does connect to the power pins in the CD row. The module also
reroutes the DMG(IO) and IAK(IO) signals in the CD rows, so that these
signals are passed to the next slot in the bus.
Table A-1 lists the pin assignments for the module plugged into the AB
row of the Q-bus.
Table A–1 Q-bus Connector Pin Assignments
Pin
Assignment
Pin
Assignment
AA1
-
AA2
+5 V
AB1
-
AB2
AC1
BDAL16 L
AC2
GND
AD1
BDAL17 L
AD2
+12 V
AE1
-
AE2
BDOUT L
AF1
-
AF2
BRPLY L
AH1
-
AH2
BDIN L
AJ1
GND
AJ2
BSYNC L
AK1
-
AK2
BWTBT L
AL1
-
AL2
BIRQ4 L
AM1
GND
AM2
BIAKI L
AN1
-
AN2
BIAKO L
72
Connector Pinouts 73
Table A–1 (Cont.) Q-bus Connector Pin Assignments
Pin
Assignment
Pin
Assignment
AP1
-
AP2
BBS7 L
AR1
BREF L
AR2
BDMGI L
AS1
-
AS2
BDMGO L
AT1
GND
AT2
BINIT L
AU1
-
AU2
BDAL00 L
AV1
-
AV2
BDAL01 L
BA1
-
BA2
+5 V
BB1
-
BB2
BC1
BDAL18 L
BC2
GND
BD1
BDAL19 L
BD2
+12 V
BE1
BDAL20 L
BE2
BDAL02 L
BF1
BDAL21 L
BF2
BDAL03 L
BH1
-
BH2
BDAL04 L
BJ1
GND
BJ2
BDAL05 L
BK1
-
BK2
BDAL06 L
BL1
-
BL2
BDAL07 L
BM1
GND
BM2
BDAL08 L
BN1
-
BN2
BDAL09 L
BP1
-
BP2
BDAL10 L
BR1
-
BR2
BDAL11 L
BS1
-
BS2
BDAL12 L
BT1
GND
BT2
BDAL13 L
BU1
-
BU2
BDAL14 L
BV1
+5 V
BV2
BDAL15 L
74 Connector Pinouts
A.2 SLD Connector
The SLD connector is a 20-pin, ribbon cable connector. Figure A-2 is a
diagram of the connector. Table A-2 lists the pin assignments for each pin
on the SLD connector.
connector diagram
Figure A–1 SLD 20-Pin Connector
Table A–2 SLD Connector Pin Assignments
Pin
Assignment
1
+12 V
2
+5 V
3
TLI INSTALLED L
4
GND
5
ONE WIRE TLI
6
GND
7
SCL H
8
GND
9
SDIR H
10
GND
11
TX DATA H
12
GND
13
RX DATA H
14
GND
15
TLI GO H
16
GND
Connector Pinouts 75
Table A–2 (Cont.) SLD Connector Pin Assignments
Pin
Assignment
17
MODULE INSTALLED L
18
GND
19
+5 V
20
+12 V
B
Telephonics
DECvoice works with standard analog loopstart telephone lines. Each
individual DECvoice system acts like a separate subscriber telephone
terminal on the telephone network.
This appendix describes the telephonic characteristics of the DECvoice
DTC04 system.
B.1 Connection
DECvoice telephone lines are connected using RJ11 telephone service in
the USA, and using CA11 telephone service in Canada.
B.2 Certification
DECvoice is certified to comply with Part 68 of the FCC rules. DECvoice
is also certified by the Canadian Department of Communications. See
Appendix C for more information.
B.3 Voice Signal Level
DECvoice provides a maximum voice level of -9 dBm to the telephone line,
as telephone regulations specify. This level is measured into a 600 ohm
load with a 3 second average. The level of DECvoice does not exceed -9
dBm. The level is dependent on the voice selected.
76
Telephonics 77
B.4 Ring Detection
Ringer Equivalence
The DECvoice ring detection circuit has a ringer equivalence of .3B, as
determined by FCC test methods. The ring detection circuit has a load
number of 10 by DOC test methods.
Ring Characteristics
DECvoice detects rings with frequencies between 15.3 Hz and 68.0 Hz
and voltages between 40 and 150 volts rms.
B.5 Tone Detection
DECvoice can detect DTMF signals. DTMF signals are the signals that
a Touch-Tone phone creates. DECvoice cannot detect digipulse signals.
Digipulse signals are the signals that a rotary phone creates. A digipulse
phone has keys like a Touch-Tone phone, but does not create DTMF
signals.
Tone Frequencies
DECvoice accepts DTMF tones that are within ±1.5% (±2 Hz) of the
nominal frequency. DECvoice rejects DTMF tones that are outside of 3.5%
of the nominal frequency. DTMF tones are a combination of two tones,
one from the row group, and one from the column group.
The row group tones are 697 Hz, 770 Hz, 852 Hz, and 941 Hz, moving
from the top row (containing 1) to the bottom row (containing 0). The
column group tones are 1209 Hz, 1336 Hz, 1477 Hz, and 1633 Hz, moving
from the leftmost row (containing 1) to the rightmost row (containing 3).
The column group also includes the extra row of keys that are occasionally
present in PBX installations (often labeled A, B, C, and D).
Tone Timing
DECvoice is designed to recognize a DTMF tone that is present for at least
55 ms. DECvoice ignores a tone burst of less than 35 ms, interpretting it
as a noise burst. A DTMF tone should be absent for at least 55 ms before
it can detect the next DTMF tone. DECvoice ignores a tone that is absent
for 40 ms or less, interpretting it as a dropout.
78 Telephonics
Tone Levels
The DTMF tones must typically be at least 12 dB louder than the noise
floor and 16 dB louder than any other tone within the DTMF detection
band. Each frequency of the DTMF tone must be between -5 dBm and -26
dBm when measured at the DECvoice telephone line connections.
B.6 Wink Detection
DECvoice can detect momentary losses in loop current. DECvoice can
use these losses to detect that the other end of the telephone call has
cleared down. The wink detector must see a current absence of 30 ms
or more. DECvoice detects the trailing edge of the current loss. In
other words, DECvoice detects the reestablishment of loop current. Not
all telephone systems generate winks to signal call disconnect. Some
telephone systems may generate winks at other times (the call waiting
beep is often accompanied by one or more winks).
B.7 DTMF Dialing
DECvoice can generate outgoing calls using DTMF tone dialing. DTMF
dialing uses the standard DTMF frequencies (see the Tone Frequencies
section). There is a 0.1% maximum frequency error. Country-specific
regulations determine the timing and power.
B.8 Pulse Dialing
DECvoice can generate outgoing calls using pulse (rotary) dialing. The
digits are pulse dialed at a rate of 10 pulses/s. The average make interval
is 40 ms. The average break interval is 60 ms. The interdigit interval
is 0.8 seconds. These characteristics may change as country-specific
regulations require.
C
Communication Requirements
C.1 FCC Requirements
1. The Federal Communications Commission (FCC) has established
rules that permit this device to be directly connected to the telephone
network. Standardized jacks are used for these connections. This
equipment should not be used on party lines or coin lines.
2. If this device is malfunctioning, it may also be causing harm to the
telephone network. This device should be disconnected until the
source of the problem can be determined and until repair has been
made. If this is not done, the telephone company may temporarily
disconnect service.
3. The telephone company may make changes in its technical operations
and procedures. If such changes affect the compatibility or use of this
device, the telephone company is required to give adequate notice of
the changes.
4. If the telephone company requests information on what equipment is
connected to their lines, inform them of:
a. The telephone number this unit connected to
b. The ringer equivalence (REN) number
c.
The USOC jack required
d. The FCC registration number
Items b and d are indicated on the label. The REN is used to determine
how many devices can be connected to your telephone line. In most areas,
the sum of RENs of all devices on any one line should not exceed five (5).
If too many devices are attached, they may not ring properly.
79
80 Communication Requirements
C.2 Communication Requirements in Canada
The Canadian Department of Communications (DOC) label on the
DECvoice CK-DTC04 identifies certified equipment. This certification
means that the equipment meets certain telecommunications network
protective, operational, and safety requirements. The DOC does not
guarantee the equipment will operate to the user’s satisfaction.
DOC regulations require that you provide the business office of your local
telecommunications company with the following information before you
install DECvoice.
Make:
DECvoice
Model:
DTC04-AA
DOC
certification:
192 2747 A
Load number:
10
Type of service:
CA11A
Cable:
17-00089 or equivalent approved cable
Before you install this equipment, make sure it is permissible to connect
it to the telecommunications company’s facilities. You must also install
the equipment by using an approved connection method. Be aware that
complying with the above conditions may not prevent degradation of
service in some situations. Telecommunications company requirements
do not allow you to connect their equipment to customer-provided jacks,
except where specified by individual telecommunications company tariffs.
Only authorized Canadian maintenance facilities, designated by the
supplier, should repair certified equipment. If you repair or alter
certified equipment yourself, or if the equipment malfunctions, the
telecommunications company has cause to ask you to disconnect the
equipment.
You should ensure (for your own protection) that the electrical ground
connections for the power utility, telephone lines, and internal metallic
water-pipe system, if present, are connected together. This precaution
may be particularly important in rural areas.
Communication Requirements
81
CAUTION
Do not try to make such connections yourself. Contact the
appropriate electric inspection authority or electrician.
C.3 Service Requirements
In the event of equipment malfunction, all repairs should be performed
by Digital or an authorized agent. It is the responsibility of the user
requiring service to report the need for service to Digital or to one of our
authorized agents.
To obtain service, contact:
Digital Equipment Corporation
146 Main Street
Maynard, MA 01754
(508) 493-5111
Glossary
Algorithm conversion
The conversion from one voice encoding algorithm to another. DECvoice
supports three voice encoding algorithms: full bandwidth 64 Kbits/s law, full bandwidth 64 Kbits/s A-law, and 16 Kbits/s subband compressed
encoding.
Ancilliary Control Process (ACP)
A software component of the DECvoice system.
Backplane
A connector block that printed circuit boards plug into. A printed circuit
board containing the bus.
Binary
A number system that uses only two digits: 0 and 1. These digits are
represented in system circuitry by two voltage levels.
Bit
A binary digit, the smallest unit of information in a binary system of
notation, designated as a 0 or a 1.
Boot
To use a bootstrap program for the purpose of bringing a system to a
defined state where the system can operate on its own.
Bug
An error in the design or implementation of hardware or software system
components.
Bus
A printed circuit board that is part of the backplane. The bus permits
communication among the MicroVAX printed circuit boards.
82
Glossary 83
Byte
A group of eight binary digits (bits).
Call progress detection
The monitoring of a call to determine if the call was answered, the line
was busy, or no one was home (the call timed out).
Computer system
A combination of hardware, software, and external devices that performs
specific operations or tasks.
Console terminal
The terminal that you use when installing software and running
diagnostic programs.
Data
A representation of facts, concepts, or instructions suitable for
communication, interpretation, or processing by humans or by machines.
Data transmission
The movement of data, in the form of electrical signals, along a
communication line.
Debug
To detect, locate, and correct errors (bugs) in system hardware or
software.
DECvoice message
Text and stored-voice data in the special internal format that DECvoice
uses. Once voice and text data is in the form of a DECvoice message,
DECvoice can perform many different types of operations on the message.
DECvoice microcode
All the soft-loadable voice functionality available on the DECvoice module.
Included in the microcode is the system, audio, text-to-speech, stored
voice, and word recognition subsystems. The microcode is down-loaded
from the host.
DECvoice RTL
The DECvoice Run-Time Library is a group of routines that lets
applications program the DECvoice features. The routines cover module
initialization, data manipulation, voice storage, playback, recognition, and
telephone line control.
84 Glossary
DECvoice system
An integrated hardware and software product that provides a computer
with a voice application platform.
Device
The general name for any entity connected to a system that can receive,
store, or transmit data.
Diagnostic program
A program that detects and identifies abnormal system hardware
operation. The MicroVAX Diagnostic Monitor software used to test a
system contains several diagnostic programs.
DTC04 module
The DECvoice module board that provides computers with voice
capability. The module is a Q-bus option that installs in the MicroVAX II
Q-bus backplane.
DTMF key
The telephone keys that produce the tone signals that a Touch-Tone phone
creates.
Encoding algorithm
The voice encoding algorithm that DECvoice uses to store voice data.
DECvoice supports three voice encoding algorithms: full bandwidth 64
Kbits/s -law, full bandwidth 64 Kbits/s A-law, and 16 Kbits/s subband
compressed encoding.
Event
A response to an RTL routine that DECvoice communicates to the
application. Applications can use the VOX$GET_EVENT routine to
retrieve events from DECvoice.
Formatted data
Data laid out in a particular pattern to conform to a predetermined
structure. The structure is dictated by the system software.
Hardware
The physical components—mechanical and electrical—that make up the
DECvoice system. (Compare Software.)
Glossary 85
Initialization
The process that the host performs on DECvoice at the beginning of
a working session. On initialization, the host allocates and assigns
a channel to the DECvoice module, sets up communciation between
the DECvoice module and device driver, runs the DECvoice on-board
diagnostics, and optionally loads all the default DECvoice subsystems.
Interface
A device or piece of software that lets the DECvoice system communicate
with the Q-bus or telephone network.
Interrupt
A break in the usual flow of a program to process an external request.
Load
To move software, usually from a peripheral device into memory. To place
a disk in a disk drive, or tape in a tape drive.
Longword
A group of 32 bits, equal to 2 words or 4 bytes.
M7132 module
The heart of the DECvoice system. Provides text-to-speech conversion,
voice recognition, digitized speech recording and playback, and control of
the telephone line interface. (See also DTC04 module.)
Main processor
The main processor is part of the DTC04 module. It is an 8 MHz Intel
80186 microprocessor used to control communication with the host
system.
Mbyte
Abbreviation for megabyte.
MDM
MicroVAX Diagnostic Monitor software used to isolate and identify system
faults.
Megabyte
1,048,576 bytes.
Memory
The area where the DECvoice system finds the instructions and data it
will process.
86 Glossary
Message handle
The identifier of a particular DECvoice message. Applications use the
message handle to access and reference a particular message. The
message handle contains specific information about a message including
the message size (in bytes), length (in milliseconds), endcoding algorithm,
reference count, language, RTL version number, creation date, and date of
last modification.
North American Telephone Line Interface
A telephone network interface designed for use in North America.
Offhook
A telephonic condition that signals that the telephone is currently off the
hook.
Onhook
A telephonic condition that signals that the telephone is currently on the
hook.
Protocol
A basic procedure, or set of rules, that governs and controls the flow
of messages between computers. Also, a set of conventions between
communicating processes regarding the format and content of messages to
be exchanged.
Pulse dialing
The kind of dialing that a rotary telephone creates. The telephone digits
are pulsed at a rate of 10 pulses per second.
Q-bus interface
An interface used to control communication between the DECvoice DTC04
module and the host system.
Real time
Pertaining to computer actions controlled by external conditions and
actual times.
Run
A single continuous execution of a program. To execute a program.
Run-Time Library (RTL)
A software component of the DECvoice system.
Glossary 87
Signal processor
A digital signal processor providing 64 Kbytes of high speed static
random access memory, and a shared-memory interface to perform speech
processing. A Texas Instruments TMS320C25 or TMS320 family chip that
is part of the DTC04 module.
SLD interconnect
A serial bus used to transmit voice, data and control information.
Software
Programs executed by the DECvoice system to perform a chosen or
required function. (Compare Hardware.)
Store
To enter information into a storage device, such as a disk, or into memory.
Subscriber Line Datalink (SLD) Interface
The SLD interface controls communication with the telephone network.
The Intel SLD is a three-wire interface used for synchronous data
transfer.
Subsystem
A section of microcode that performs certain DECvoice functions.
DECvoice has five default subsystems: system, audio, text-to-speech,
stored voice, and word recognition.
Switch hook flash
Any interruption in telephone line current caused by pressing the switch
hook on a phone.
System firmware
A combination of DECvoice hardware and software that performs specific
voice processing operations.
Telephone Line Interface (TLI)
That part of the DECvoice hardware and microcode that controls
communication between the DECvoice module and the telephone line.
Text to Speech
The act of converting written text into speech. The DECvoice text-tospeech subsystem performs all of the text-to-speech tasks.
88 Glossary
TLI to DTC04 module connection
The telephone line interface connects to the module through a
modification of the Intel Subscriber Line Datalink (SLD) protocol.
TLI to telephone line connection
The circuit that connects the telephone line interface to the telephone
network and meets certain North American telephone regulations. The
TLI connects to the telephone line through modular telephone jacks for
RJ11 service.
Tone dialing
The kind of dialing that a DTMF Touch-Tone phone uses in which each
phone digit is associated with a particular tone.
User dictionary
User-specified phonemic dictionary that DECvoice uses to pronounce
certain words. The user dictionary (1) ensures that DECvoice’s speech
synthesizer correctly pronounces words critical to the application and (2)
lets applications perform application-specific pronunciations of a word
that are different from the usual pronunciation.
VX$ACP
The DECvoice ancilliary control process. The ACP provides
communication between the Run-Time Library routines and the device
driver.
VXDRIVER
The DECvoice device driver. The device driver provides the low-level
support between the operating system and the DECvoice module.
Wink
A momentary interruption in line current on the telephone line that
indicates the calling party has hung up. Winks are not always present on
the line.
Wink detection
The detection of a momentary loss in line current. DECvoice can detect
winks in the line current and thereby inform the application that the
calling party has hung up.
Word
A word is 16 bits long.
Index
A
Address vector settings, 19
Associated documents, x
C
CA11 connection, 76
Certification, 76
Commands, 43
format, 43
JUMP, 50
LOAD, 48
STATUS, 50
Communication Requirements
Canadian, 80
U.S., 79
Connection to RJ11, CA11, 76
Connector between the Module and
TLI, 59
Control and Status Register (CSR),
32
Control byte, 62
Conventions, x
CSR address assignment
examples, 17
rules, 16
CSR Control and Status Register,
32
CSR settings, 13
D
Data byte, 62
Data flow control, 61
Data lead SLD, 57
Data transfer scheme, 37
DECvoice
telephonic characteristics, 76
DECvoice Test Programs, 64
Device addresses assignments, 13
Diagnostic procedures, 64
Digipulse signal, 77
DOC Requirements, 80
Documentation
related, x
DTC04 module
features, 26
functional description, 28
installation, 3
main processor, 28
physical description, 27
read operation, 63
resetting, 36
signal processor, 28
specifications, 30
write operation, 63
DTMF dialing, 78
F
FCC Requirements, 79
I
Identification data byte SLD, 58
Identification TLI, 62
Initialization, 46
Index–1
Index–2
Installation, 3
Intel SLD control chip, 62
Interface
North American TLI, 61
SLD, 55
Interrupts, 42
Interrupt scheme, 42
Interrupt vector address
assignments, 19
J
JUMP command, 50
L
LOAD command, 48
M
MDM diagnostics, 70
Messages, 43
format, 45
Module
connector, 59
initialization, 46
specifications, 30
N
North American TLI interface, 61
O
Order numbers, 2
Overview of system, 25
P
Part numbers, 2
Pin assignments for Q-bus
connector, 72
Pin assignments for SLD connector,
74
Pulse dialing, 78
Q
Q-bus connector, 72
Q-bus interface, 32
R
Reset line SLD, 58
Reset TLI, 62
Ring characteristics, 77
Ring detection, 77
Ringer equivalence, 77
Rings, 37
buffer structure, 39
RJ11 connection, 76
ROM commands, 48
JUMP, 50
LOAD, 48
STATUS, 50
Rotary phone, 77
S
Signaling byte, 63
Signal level of voice, 76
SLD
connector, 74
control chip, 62
data lead, 57
identification data byte, 58
interface, 55
modifications, 57
reset line, 58
system, 57
Software interface, 32
Specifications
module, 30
STATUS command, 50
Status message, 52
Switch pack settings, 6
SYSGEN, 17
System overview, 25
Index–3
T
Telephone interfaces, 55
Telephone Line Interface (TLI)
features, 27
functional description, 29
identification, 62
installation, 3
physical description, 27
reset, 62
Telephonic characteristics of
DECvoice, 76
TLI to DTC04 module connection,
61
TLI to telephone line connection, 61
Tone
detection, 77
frequencies, 77
levels, 78
timing, 77
Touch-tone, 77
Troubleshooting
procedure, 64
table, 64
Troubleshooting procedures, 64
U
Unpacking, 1
V
Vector address assignment, 19
Voice byte, 62
Voice signal level, 76
W
Wink detection, 78