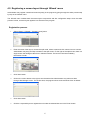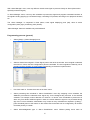
1
A brand that is integrated into Samsung’s network products,
stands for a convenient world (Polis)
made safe (Polis) through Samsung’s superior network performance (Internet protocol). With
products, clear digital images transmitted over the internet, real-time monitoring is possible anywhere with an
internet connection. Easy remote control functions and the use of existing networks minimize installation
costs. With
, experience a world of convenience connected anytime, anywhere.
Preface
The user who installs and operates the product should be aware of this manual and other manuals referred
to by this manual before installation and operation for proper use.
This manual and the software and hardware explained here are protected by copyright law.
Therefore, the copy, reprint and translation to other languages in parts or full of this user manual without the
express written consent of SamsungTechwin Co., LTD are not allowed aside for general use within the
scope of the copyright law.
Supported Products
Network Camera: SNC-550, SNP-3300/1000
Video Server: SNS-100/400
DVR: SVR-1630, SVR-1650/1640/950, SVR-940/450
Network Recorder: SNR-32A/16A/9A
Version 1.6 (2308. rev. 1)
2
Contents
Chapter1. Network Manager Standard/Professional Overview .........................................................6
1.1. Introduction.............................................................................................................................................. 6
1.2. Features .................................................................................................................................................. 6
Chapter2. Installation ............................................................................................................................7
2.1. System requirements............................................................................................................................... 7
2.2. Supported devices................................................................................................................................... 7
2.3. Software installation ................................................................................................................................ 7
Chapter3. Login ...................................................................................................................................10
Chapter4. For Beginner ....................................................................................................................... 11
4.1. Registering a device through ‘Wizard’ menu..........................................................................................11
4.1.1. Registration process ....................................................................................................................11
4.1.2. Utilizing ‘Device Search’ feature ................................................................................................. 13
4.2. Registering a screen-layout through ‘Wizard’ menu.............................................................................. 15
Registration process.............................................................................................................................. 15
4.3. View video easily ................................................................................................................................... 17
4.3.1. Viewing video by camera ............................................................................................................ 17
4.3.2. Viewing video by screen layout................................................................................................... 17
Chapter5. Menu ....................................................................................................................................18
5.1. View ....................................................................................................................................................... 18
5.2. Setup ..................................................................................................................................................... 18
5.2.1. Wizard ......................................................................................................................................... 20
5.2.2. Device Manager .......................................................................................................................... 24
5.2.3. Screen Layout Manager.............................................................................................................. 28
5.2.4. Site Manager............................................................................................................................... 29
5.2.5. Alarm Manager (SNM-64P)......................................................................................................... 29
5.2.6. Map Manager .............................................................................................................................. 36
5.2.7. User Group Manager .................................................................................................................. 42
5.2.8. View User Group Rights.............................................................................................................. 44
5.2.9. Change Password....................................................................................................................... 44
5.2.10. Event Reception........................................................................................................................ 44
5.3. Tools ...................................................................................................................................................... 46
5.3.1. Overview ..................................................................................................................................... 46
5.3.2. Player .......................................................................................................................................... 46
5.3.3. Map Viewer ................................................................................................................................. 46
5.3.4. Lock Program.............................................................................................................................. 46
5.3.5. Go Webpage ............................................................................................................................... 46
5.3.6. Device Setup ............................................................................................................................... 46
5.3.7. Log History .................................................................................................................................. 47
5.3.8. Options ........................................................................................................................................ 48
5.4. Toolbar ................................................................................................................................................... 52
Chapter6. Viewer..................................................................................................................................53
6.1. Overview................................................................................................................................................ 53
6.2. View Video............................................................................................................................................. 54
6.2.1. Overview ..................................................................................................................................... 54
6.2.2. Play video from the entire channels of a device at once ............................................................ 54
6.2.3. Play video from a certain camera................................................................................................ 54
6.2.4. Play video through pre-composed screen layout........................................................................ 55
6.2.5. Play video on the second screen ................................................................................................ 55
6.3. Controls ................................................................................................................................................. 57
6.3.1. Overview ..................................................................................................................................... 57
6.3.2. Play video in full-screen mode .................................................................................................... 58
6.3.3. Decide screen patterns ............................................................................................................... 58
6.3.4. Play video at original size (resolution) ........................................................................................ 58
6.3.5. Control PTZ ................................................................................................................................. 59
6.3.6. Snapshot an image ..................................................................................................................... 60
6.3.7. Print an image ............................................................................................................................. 60
6.3.8. Send an e-Mail (SNM-64P) ......................................................................................................... 60
6.3.9. Transmit an image to FTP server (SNM-64P)............................................................................. 61
6.3.10. Turn on relay output .................................................................................................................. 61
6.3.11. Turn on/off speaker.................................................................................................................... 62
3
6.3.12. Turn on/off microphone ............................................................................................................. 62
6.3.13. Flip video upside down.............................................................................................................. 62
6.3.14. Play video instantly (DVR/Network Recorder only)................................................................... 63
6.3.15. Record & Playback.................................................................................................................... 63
6.3.16. OSD information........................................................................................................................ 64
6.3.17. De-interlace video ..................................................................................................................... 64
6.3.18. Setup camera............................................................................................................................ 65
6.4. Pop up thumbnail image (SNM-64P)..................................................................................................... 66
6.4.1. Displaying thumbnail images ...................................................................................................... 66
6.4.2. Launching ‘Instant Viewer’ to play live video .............................................................................. 66
6.4.3. Launching ‘Instant Player’ to play recorded video ...................................................................... 67
6.4.4. Launching ‘Alarm Control Station’ to process alarm thoroughly ................................................. 67
6.5. Event List............................................................................................................................................... 68
6.5.1. Displaying event signals.............................................................................................................. 68
6.5.2. Filtering out certain event signals................................................................................................ 68
6.5.3. Launching ‘Instant Viewer’ to play live video .............................................................................. 68
6.5.4. Launching ‘Instant Player’ to play recorded video (DVR/Network Recorder only) ..................... 69
6.5.5. Reviewing event history .............................................................................................................. 69
6.6. Alarm List (SNM-64P)............................................................................................................................ 70
6.6.1. Displaying alarm signals ............................................................................................................. 70
6.6.2. Filtering out certain alarm signals ............................................................................................... 70
6.6.3. Marking an alarm acknowledgement status................................................................................ 70
6.6.4. Adding a comment to an alarm ................................................................................................... 71
6.6.5. Launching ‘Instant Viewer’ to play live video .............................................................................. 71
6.6.6. Launching ‘Instant Player’ to play recorded video (DVR/Network Recorder only) ..................... 71
6.6.7. Viewing a detailed information of an alarm ................................................................................. 71
6.6.8. Viewing a programmed actions against the alarm ...................................................................... 72
6.6.9. Launching ‘Alarm Control Station’ to process alarm thoroughly ................................................. 72
6.6.10. Reviewing alarm history ............................................................................................................ 72
6.7. Alarm Control Station (SNM-64P).......................................................................................................... 73
6.7.1. Launching the alarm control station window ............................................................................... 73
6.7.2. Verifying an alarm with video ...................................................................................................... 73
6.7.3. Making actions against an alarm ................................................................................................ 73
6.7.4. Making confirmation to an alarm ................................................................................................. 73
6.8. Instant Viewer........................................................................................................................................ 75
6.8.1. Launching from ‘Event List’ pane ................................................................................................ 75
6.8.2. Launching from ‘Alarm List’ pane................................................................................................ 75
6.8.3. Launching from ‘Pop-up Image’ pane ......................................................................................... 75
Chapter7. Player ..................................................................................................................................76
7.1. Overview................................................................................................................................................ 76
7.2. Search (DVR/Network Recorder only) .................................................................................................. 77
7.2.1. Overview ..................................................................................................................................... 77
7.2.2. Time Search ................................................................................................................................ 77
7.2.3. Timeline Search .......................................................................................................................... 77
7.3. Playback (DVR/Network Recorder only) ............................................................................................... 79
7.3.1. Overview ..................................................................................................................................... 79
7.3.2. Timeline ....................................................................................................................................... 79
7.3.3. Status information ....................................................................................................................... 79
7.3.4. Playback controls ........................................................................................................................ 80
7.4. Controls ................................................................................................................................................. 81
7.5. Remote (DVR/Network Recorder only) ................................................................................................. 83
Playing video from DVR/Network Recorder.......................................................................................... 83
7.6. Local ...................................................................................................................................................... 84
7.6.1. Play recorded video .................................................................................................................... 84
7.6.2. Play backup video ....................................................................................................................... 84
7.7. Backup (DVR/Network Recorder only).................................................................................................. 85
Making data backup .............................................................................................................................. 85
7.8. Export (Convert file format into AVI) ...................................................................................................... 86
7.8.1. Converting recorded video file format into AVI............................................................................ 86
7.8.2. Converting backup video file format into AVI .............................................................................. 86
7.9. Instant Player (DVR/Network Recorder only)........................................................................................ 87
7.9.1. Playing video with monitoring live video ..................................................................................... 87
7.9.2. Launching ‘Instant Player’ with event signal ............................................................................... 87
4
7.9.3. Launching ‘Instant Player’ with alarm signal (SNM-64P) ............................................................ 87
7.9.4. Launching ‘Instant Player’ with thumbnail image (SNM-64P)..................................................... 88
Chapter8. Map Viewer..........................................................................................................................89
8.1. Overview................................................................................................................................................ 89
Launching ‘Map Viewer’ program.......................................................................................................... 89
8.2. Controls ................................................................................................................................................. 90
8.2.1. Launching ‘Instant Viewer’ to play live video .............................................................................. 90
8.2.2. Launching ‘Instant Player’ to play recorded video (DVR/Network Recorder only) ..................... 90
8.2.3. Turning on relay output ............................................................................................................... 91
8.2.4. Turning off relay output ............................................................................................................... 91
8.2.5. Moving to linked daughter-map................................................................................................... 91
Chapter9. Troubleshooting .................................................................................................................92
Calling for Malfunctions......................................................................................................................... 92
SNM-64S/P Specifications...................................................................................................................94
5
Chapter1. Network Manager Standard/Professional Overview
1.1. Introduction
The SNM-64S/P (Network Manager Standard/Professional) is a central surveillance system solution that
monitors multiple sites with video, audio and alarm signals from DVR, IP video server, and network camera
over networks.
The software supports different windows of live viewer, recording data player, interactive map viewer, and
alarm signal monitoring panes.
1.2. Features
The SNM-64S/P does not limit the number of units to register and monitor. The program displays up to 128 live
videos; up to 64 channels on one screen and 64 channels on another screen. The program supports as many
monitors as a PC supports. User may open windows or panes of live video displaying, data playing, alarm
signal monitoring, event signal monitoring, map displaying, etc. User can compose the central management
system by choosing required widows or panes.
The SNM-64P does not limit the number of user of different rights. Administrator may assign rights to each user
in detail by unit or by feature. (SNM-64P)
The program displays event/alarm signals in real-time by receiving from devices over the network. With alarm
signals, administrator may configure the SNM-64P for automated response to the alarms with various actions.
(SNM-64P)
On the program, user may control PTZ cameras and relay outputs on the server or DVR. By attaching
microphone and speaker system to devices on site, user may make bi-directional audio communication over
the network.
The main player window provides user with various ways of searching data on DVR. User may back up data
from DVR to PC over the network and can convert the proprietary video format into AVI format in the player
software. With a single-channel instant player window, user can pull the latest recorded data from DVR with a
click to play the video instantly.
The map supports multi-layer structure, so that each map on different layers can respond interactively. On the
map, user may lay out icons of each device. Event/alarm signal triggers the icons on the map to blink, so that
user may monitor event/alarm signals on the map. With the event/alarm signal, user may open a live or
recorded video window instantly over the map.
6
Chapter2. Installation
2.1. System requirements
Network Manager software may not run properly if the PC does not meet minimum requirements. Other
programs should not run on the same PC where SNM-64S/P is running. Otherwise, SNM-64S/P may not
perform as designed.
Minimum
Recommended
Intel Pentium 4 / 3.0GHz
Core2duo E4300 or higher
1GB
2GB or higher
128MB
512MB or higher
1024ⅹ768 (with 32bit color) or higher
80GB or higher
Windows 2000 SP4 / Windows XP Professional
DirectX 9.0 or higher
CPU
Main Memory
Video Memory
Display Resolution
HDD Storage Space
Operating System
Others
SNM-64S/P is not compatible with Windows Vista.
Caution
2.2. Supported devices
For the compatible devices in the SNM-64S/P, please refer to below table.
Type
Network Camera
Network Camera
Network Camera
Video Server
Video Server
DVR
DVR
DVR
DVR
DVR
DVR
Network Recorder
Network Recorder
Network Recorder
Model
Firmware Version
SNC-550
SNP-3300
SNP-1000
SNS-100
SNS-400
SVR-1630
SVR-1650
SVR-1640
SVR-950
SVR-940
SVR-450
SNR-32A
SNR-16A
SNR-9A
2.8 or later
2.8 or later
2.8 or later
2.8 or later
2.8 or later
4.8.0 or later
2.8 or later
2.8 or later
2.8 or later
1.0.0 or later
1.0.0 or later
1.0.2 or later
1.0.2 or later
1.0.2 or later
2.3. Software installation
1.
Insert the provided CD in a PC.
2.
Click on the ‘SNM-64S/P Setup_Vxxx.exe’ file in the CD.
3.
Select a language to use.
7
Remark
4.
Click the ‘I Agree’ button in ‘License Agreement’ page. Otherwise, the installation is cancelled.
5.
Enter the provided serial number and license key in ‘Licensing’ page. (SNM-64P)
6.
Click the ‘Install’ button. The Default directory is ‘C:\Program Files\Samsung Techwin\SNM-64S/P’. To
install the software in a different directory, click the ‘Browse’ button and choose a different directory.
Caution
If the PC has a previously installed SNM-64S/P, the installer asks whether to
overwrite the existing DB or not. The DB contains setting values on the program.
If desired to maintain the existing values, click ‘No’ button.
USB dongle key driver installation (SNM-64P)
1.
Insert the provided CD in a PC.
2.
Click on the ‘Sentinel Protection Installer x.x.x.EXE’ file in the ‘USB Dongle Key Driver’ folder on the
CD.
3.
Click ‘Next’ to continue in the initial window.
4.
Click the ‘I Accept the terms in the license agreement.’ and ‘Next’ button in turn in ‘License Agreement’
page; otherwise, the installation is cancelled.
8
5.
Select ‘Complete’ option and ‘Next’ buttons in turn in ‘Setup Type’ page.
6.
Click ‘Install’ button in ‘Ready to Install Program’ page.
7.
Click ‘No’ button when asked whether to install ‘Sentinel Protection Server’ on the PC.
8.
Click ‘Finish’ button when the installation is completed.
Caution
Once the SNM-64P is installed, plug the provided USB dongle key to PC before
running the software. (SNM-64P)
9
Chapter3. Login
Login process
1.
Open the SNM-64S/P. User may open it by selecting the execution file through ‘Start’ menu [Start] –
[Samsung Techwin] – [SNM-64S/P] or by double-clicking the execution icon on the background.
2.
Select a user ID in the ‘Login’ window. User may see the entire list of IDs that are registered into the
program by clicking on the combo button to the right. Initially, only the Administrator is registered as
default.
3.
Enter the corresponding password to the selected ID. The default password of the ‘Administrator’ ID is
‘12345’. Administrator may change the password in the program.
Note
User may change the password in [Setup] – [Change Password] menu. For the
detailed information, please refer to the ‘5.2.9 Change Password’ page.
The SNM-64P supports multiple users with different rights, and all of the entire
users can configure the monitoring conditions differently based on their
privileges on a single PC. (SNM-64P)
The SNM-64S/P archives settings and layouts on the program by the current
user when the program is closed.
10
Chapter4. For Beginner
4.1. Registering a device through ‘Wizard’ menu
Administrator may register digital video device(s) (DVR, IP video server, and network camera) in the program
by going through the entire process step by step in the ‘Wizard’ menu.
The ‘Wizard’ menu includes both the device registration and site configuration steps. Once the entire process is
done, a device appears in a site tree on the program.
4.1.1. Registration process
1.
Select [Setup] – [Wizard] – [Device] menu.
2.
Enter values and click ‘Next button. The items in bold such as device name, model name, firmware
version, connection type, IP address, port number, user ID and password are mandatory information
to enter.
Item
Description
Name
Name the device to display in this program
Model
Select a model name of the device to register
Firmware
Select a proper firmware version of the device
Cameras
Program displays the number of supporting channels of the device
Select the connection type to device over network
Connection Type
(a)Static IP Address, (b)Dynamic IP Address-MAC, (c) Dynamic IP
Address-DDNS, (d)Domain Name
Enter IP address or domain name of the device
(a)Static IP Address: Enter IP address
IP Address/
(b)Dynamic IP Address-MAC: Enter MAC address of ‘MAC address’ item
Domain Name
(c)Dynamic IP Address-DDNS: Enter Server address of ‘Server address’
item and User ID of ‘User ID’.
(d)Domain Name: Enter domain name
Port
Enter the port number of the device
User ID
Enter user ID which is used to access the device over network
Password
Enter password that goes with the user ID
Confirm Password Re-enter the password to confirm
3.
Select a site to register the device and click ‘Next’ button.
11
12
4.
Click on the combo button to the right to see the entire list of sites. Administrator may add more sites
through ‘Site Manager’ menu. Initially, the program shows a site named as ‘Site’ as default.
5.
Click the unit to register the unit under the selected site and click ‘Finish’ button. User may register by
unit or by each channel.
6.
The registered unit appears in the site tree under the selected site.
4.1.2. Utilizing ‘Device Search’ feature
1.
Select [Setup] – [Wizard] – [Device] menu.
2.
Click ‘Search’ button on the ‘Device Wizard’ window. Then ‘Device Search’ window opens and displays
the list of the entire devices (Network Camera, Video Server, and DVR) on the LAN.
3.
Select a desired device in the list and click ‘Add’ button. Then the selected device’s network
information is displayed on the ‘Device Wizard’ window automatically.
13
4.
Name the device and enter user ID and password to the selected device.
5.
Click ‘Next’ button.
6.
Click on the combo button to the right to see the entire list of sites. Administrator may add more sites
through ‘Site Manager’ menu. Initially, the program shows a site named as ‘Site’ as default.
7.
Click ‘Next’ button.
8.
Click the unit to register the unit under the selected site and click ‘Finish’ button. User may register by
unit or by each channel.
9.
The registered unit appears in the site tree under the selected site.
To refresh and update the device list in ‘Device Search’ window, click Search
Note
Caution
button again.
‘Search Device’ feature does run on a single application at the same time. If you
run ‘Search Device’ menu on different applications, it performs in an application
properly.
14
4.2. Registering a screen-layout through ‘Wizard’ menu
Administrator may register customized screen-layout(s) in the program by going through the entire process step
by step in the ‘Wizard’ menu.
The ‘Wizard’ menu includes both the screen-layout composition and site configuration steps. Once the entire
process is done, a screen layout appears in a site tree on the program.
Registration process
1.
Select [Setup] – [Wizard] – [Screen Layout] menu.
2.
Enter the name of the layout, choose the split mode, select screen and click camera icons to connect.
Administrator may drag and drop cameras to the split-screen. To the right of the split-screen, there is a
single screen that enlarges video from a selected camera. The items in bold are mandatory
information to enter.
3.
Click ‘Next’ button.
4.
Click on the combo button to the right to see the entire sites. Administrator may add more sites
through ‘Site Manager’ menu. For the first time, the program shows a site named as ‘Site’ as default.
5.
Click ‘Next’ button.
6.
Click the composed layout to register the unit under the selected site and click ‘Finish’ button.
15
7.
The registered layout appears in the site tree under the selected site.
16
4.3. View video easily
After registering devices and screen layouts through Wizard menu, user may monitor live video by clicking on the icons of
device or screen layout in the site tree.
4.3.1. Viewing video by camera
1.
Click the camera icon
2.
The clicked channel connects to device and displays live video on the screen. The connected channel is marked
with a green dot
3.
or name of a desired channel in the site tree.
on the front of the camera icon.
Click again on the camera icon or name to disconnect the channel.
Note
The default mode is quad-split screen, and you may refer to ‘Screen Splitting’
chapter to choose other options.
4.3.2. Viewing video by screen layout
1.
Click the icon
2.
The program composes the screen layout as configured and connects the entire channels of the layout. The
or the name of a desired screen layout in the site tree.
connected layout marks with a green dot
3.
on the front of the layout icon.
Click again on the layout icon or name to disconnect.
Note
When user clicks on a screen layout to monitor video, the main screen is split
into the defined number by the registered screen layout automatically.
17
Chapter5. Menu
5.1. View
With sub-menus in the ‘View’ menu, user may open or close corresponding windows or panes.
Icon
Feature
No.
Menu
①
Login Display
②
Site Tree
Site tree displaying pane
③
Alarm List
Alarm list displaying pane
④
Event List
Event list displaying pane
⑤
Pop-up Image
Second Screen
Remark
Login status information displaying pane
SNM-64P
Thumbnail image displaying pane
SNM-64P
Second viewer window
5.2. Setup
Administrator should configure the program in ‘Setup’ menu to run the program properly. The ‘Setup’ menu
provides sub-menus as below table. Some of the menus are allowed for only the users who have
administrator’s rights.
No.
Menu
Feature
Rights
①
Wizard
Add, edit, delete device
Admin
②
Device Manager
Add, edit, delete device
Admin
③
Screen Layout Manager
④
Site Manager
⑤
⑥
Remark
Add, edit, delete screen layout
User
Compose site tree
User
Alarm Manager
Configure alarm signal and program
the response
User
SNM-64P
Map Manager
Register maps and layout the device
User
SNM-64S:
18
over the map
1 Group, 1 Layers
⑦
User Group Manager
Add, edit, delete user group and user
ID
Admin
⑧
View User Group Rights
View assigned rights and devices to
the user group
User
⑨
Change Password
Change the user password
User
⑩
Event Reception
Change event signal reception method
User
Note
Caution
SNM-64S:
2 Users
SNM-64P supports multiple user groups in a copy (PC). Each group has
different rights and registers unlimited users (ID). Each user may configure its
own settings on the program. (SNM-64P)
SNM-64S supports 2 Users (including Administrator).
During the configuration process, SNM-64S/P does disconnect from the listed
device and does not receive alarm/event signals from the devices. Therefore it is
recommended to configure the software properly prior to the main operation.
19
5.2.1. Wizard
Administrator may register digital video device(s) (DVR, IP video server, and network camera) in the program
by going through the entire process step by step in the ‘Wizard’ menu.
The ‘Wizard’ menu includes both the device registration and site configuration steps. Once the entire process is
done, a device appears in a site tree on the program.
Registration process
1.
Select [Setup] – [Wizard] – [Device] menu.
2.
Enter values and click ‘Next button. The items in bold such as device name, model name, firmware
version, connection type, IP address, port number, user ID and password are mandatory information
to enter.
3.
Select a site to register the device and click ‘Next’ button.
4.
Click on the combo button to the right to see the entire list of sites. Administrator may add more sites
through ‘Site Manager’ menu. Initially, the program shows a site named as ‘Site’ as default.
5.
Click the unit to register the unit under the selected site and click ‘Finish’ button. User may register by
unit or by each channel.
20
6.
The registered unit appears in the site tree under the selected site.
Registration process with using ‘Device Search’ feature
1.
Select [Setup] – [Wizard] – [Device] menu.
2.
Click ‘Search’ button on the ‘Device Wizard’ window. Then ‘Device Search’ window opens and displays
the list of the entire devices (Network Camera, Video Server, and DVR) on the LAN.
3.
Select a desired device in the list and click ‘Add’ button. Then the selected device’s network
information is displayed on the ‘Device Wizard’ window automatically.
4.
Name the device and enter user ID and password to the selected device.
5.
Click ‘Next’ button.
6.
Click on the combo button to the right to see the entire list of sites. Administrator may add more sites
through ‘Site Manager’ menu. Initially, the program shows a site named as ‘Site’ as default.
21
7.
Click ‘Next’ button.
8.
Click the unit to register the unit under the selected site and click ‘Finish’ button. User may register by
unit or by each channel.
9.
The registered unit appears in the site tree under the selected site.
To refresh and update the device list in ‘Device Search’ window, click Search
button again.
Note
Caution
‘ Search Device’ feature does run on a single application at the same time. If
you run ‘Search Device’ menu on different applications, it performs in an
application properly.
Registering screen-layout
1.
Select [Setup] – [Wizard] – [Screen Layout] menu.
2.
Enter the name of the layout, choose the split mode, select screen and click camera icons to connect.
Administrator may drag and drop cameras to the split-screen. To the right of the split-screen, there is a
single screen that enlarges video from a selected camera. The items in bold are mandatory
information to enter.
22
3.
Click ‘Next’ button.
4.
Click on the combo button to the right to see the entire sites. Administrator may add more sites
through ‘Site Manager’ menu. For the first time, the program shows a site named as ‘Site’ as default.
5.
Click ‘Next’ button.
6.
Click the composed layout to register the unit under the selected site and click ‘Finish’ button.
7.
The registered layout appears in the site tree under the selected site.
23
5.2.2. Device Manager
Administrator may add, edit or delete a digital video device (DVR, IP video server, and network camera) with
‘Device Manager’ menu. Administrator should register a digital video device, so that user can utilize the device
in viewing live video with ‘Viewer’ window or playing recorded data in ‘Player’ window.
Registration process
1.
Select [Setup] – [Device Manager] menu.
2.
Click ‘Add’ button to the right in the window.
3.
Enter values and click ‘Ok’ button. The items in bold such as device name, model name, firmware
version, connection type, IP address, port number, user ID and password are mandatory information
to enter.
4.
The registered unit appears in the list.
Note
A newly registered device does not appear on the site tree automatically. After
the administrator registers a new device to the program, a user should add the
device to its own site to utilize the device in monitoring video.
Registration process with using ‘Device Search’ feature
1.
Select [Setup] – [Device Manager] menu.
24
2.
Click ‘Add’ button to the right in the window.
3.
Click ‘Search’ button on the ‘Add Device’ window. Then ‘Device Search’ window opens and displays
the list of the entire devices (Network Camera, Video Server, and DVR) on the LAN.
4.
Select a desired device in the list and click ‘Add’ button. Then the selected device’s network
information is displayed on the ‘Add Device’ window automatically.
5.
Name the device and enter user ID and password to the selected device.
6.
The registered unit appears in the list.
To refresh and update the device list in ‘Device Search’ window, click Search
Note
Caution
button again.
‘Search Device’ feature does run on a single application at the same time. If you
run ‘Search Device’ menu on different applications, it performs in an application
properly.
Registration process with a device of dynamic IP address
1.
Select [Setup] – [Device Manager] menu.
25
2.
Click ‘Add’ button to the right in the window.
3.
Enter values and click ‘Ok’ button. The items in bold such as device name, model name, firmware
version, port number, user ID and password are mandatory information to enter. Different to a device
of fixed IP address, administrator should select the ‘Connection Type’ as ‘Dynamic IP Address-MAC or
Dynamic IP Address-DDNS’ and enter the ‘MAC address’, ‘Port’, ‘Server address’ and ‘User ID’.
4.
The registered unit appears in the list.
참고
If the ‘Dynamic IP Address-DDNS’ is selected, the default ‘Server address’ will
be entered www.samsungipolis.com. The ‘User ID’ item must be entered the
user ID that was registered in DDNS server.
Registration process with using ‘File Import’ feature
1.
Select [Setup] – [Device Manager] menu.
2.
Click ‘File Import’ button to the right in the window.
3.
Click ‘File …’ button. File open dialog appears. Click ‘Open’ button after selecting the old DB file.
4.
The unit that is stored in the old DB file appears in the import device list.
26
5.
Click ‘Import’ button after choosing the device.
Note
The ‘File Import’ feature imports the DB file that used in ‘SNM-64S/P’ or is
created by ‘File Export’ feature.
Backup process with using ‘File Export’ feature
1.
Select [Setup] – [Device Manager] menu.
2.
Click ‘File Export’ button to the right in the window. File export dialog appears. The registered unit
appears in the export device list.
3.
Click ‘File …’ button after choosing the device to export. File open dialog appears.
4.
Click ‘Open’ button after entering export file path and name.
5.
The export file path and name are displayed in the ‘Export File’.
27
6.
Click ‘Export’ button.
5.2.3. Screen Layout Manager
User may add, edit or delete a customized screen-layout(s) with ‘Screen Layout Manager’ menu. With a screen
layout, user may play live video from the composed channels by clicking on the icon or name in the site tree.
Composition process
1.
Select [Setup] – [Screen Layout Manager] menu.
2.
Click ‘Add’ button to the right in the window.
3.
Enter the name of the layout, choose the split mode, select screen and click camera icons to connect.
After composing the layout, click ‘Ok’ button.
4.
The composed layout appears in the list.
28
Note
A newly composed layout does not appear on the site tree automatically. After
composing a new layout, a user should add the layout to its own site to utilize
the layout in monitoring video.
User may utilize devices that are allowed for the user to monitor. With any
device that is not allowed to access, a user cannot compose a screen layout by
using any channel from the unit.
5.2.4. Site Manager
User may add, edit or delete a site with ‘Site Manager’ menu. In the ‘Site Manager’ menu, user may compose its own site
tree by listing devices and screen layouts. By adding multiple sites, user may manage the entire system by zone or site
easily.
Composition process
1.
Select [Setup] – [Site Manager] menu.
2.
Click ‘Add’ button to the right in the window. A site named as ‘Site’ is listed as default. If you want to
use the default site, select it and click ‘Edit’ button.
3.
Enter the name of the site and compose the site tree by choosing entire device or certain channels
from a device. With screen layout, user may add the layout as it was configured in the ‘Screen Layout
Manager’ menu. After composing the site, click ‘OK’ button.
4.
The composed site appears in the list.
Note
When a site is composed with ‘Site Manager’ menu, the result reflects in the site
tree automatically and appears devices and screen layouts on the site tree.
5.2.5. Alarm Manager (SNM-64P)
29
With ‘Alarm Manager’ menu, user may define a certain event signal to process closely as ‘Alarm (abnormal or
specially monitored signal).
In ‘Alarm Manager’ menu, user may also schedule to process the signal and program automated reactions to
the signal including popping up a thumbnail image, controlling PTZ presets, launching live or playback windows,
etc.
The ‘Alarm Manager’ is composed in three panes; event signal displaying pane (left), alarm & action
configuration pane (right), and library pane (bottom).
‘Alarm Manager’ feature is available only with SNM-64P.
Programming process (general)
1.
Select [Setup] – [Alarm Manager] menu.
2.
Select a desired event signal in ‘Event Signal’ pane to the left in the window. Once a signal is selected,
the menus in ‘Alarm & Action Configuration’ pane are activated. The event signals are listed by unit in
the pane, and the diversity of event signals is depending on the device’s performance.
3.
Put check mark on ‘Process the event as an alarm’ menu.
4.
Select processing time schedule in ‘Alarm Classification’ menu. By assigning a time schedule, the
SNM-64P processes the selected event signal only for the designed day and time in the selected
schedule. For example, motion detection on channel 1 of device A are scheduled to process as an
alarm only from 8PM to 6AM throughout a week, the motion detection signal is not processed during
day time. For time schedule, administrator may create as many schedules as required in [Library] –
[Time Schedule] menu to the bottom on the window. Each schedule can be configured by 30 minutes’
increment per day in a week
5.
Select acknowledgement type in ‘Alarm Classification’ menu. Without putting check mark on
30
‘automatic acknowledgement after (some) seconds’ menu, the program maintains the alarm as
unchecked status until a user check the signal manually.
6.
Select action(s) to react against the alarm automatically. (For the detailed setting process for actions,
please refer to following instructions.)
Note
The programmed actions practice only when the defined the time schedule.
Select ‘Always’ time schedule if the action should practice all the time.
5.2.5.1. Action programming – [Pop-up a thumbnail image]
‘Pop-up a thumbnail image’ action in the list.
1.
Select
2.
Click ‘Add’ button.
3.
Name the action, select a time schedule to perform, and select a device and a channel from which to
capture image.
4.
After configuring the action, click ‘OK’ button.
5.2.5.2. Action programming – [Pop-up an Instant Viewer]
‘Pop-up an Instant Viewer’ action in the list.
1.
Select
2.
Click ‘Add’ button.
3.
Name the action, select a time schedule to perform, and select a device and a channel from which to
play live video.
4.
After configuring the action, click ‘OK’ button.
5.2.5.3. Action Programming – [Pop-up an Instant Player]
‘Pop-up an Instant Player’ action in the list.
1.
Select
2.
Click ‘Add’ button.
31
3.
Name the action, select a time schedule to perform, and select a device (DVR) and a channel from
which to play recorded video. As default, ‘Instant Player’ window pulls 30 seconds’ video prior to the
alarm occurring time and 1 minute’s video after the alarm occurring time. User may change the
settings in [Tools] – [Options] menu.
4.
After configuring the action, click ‘OK’ button.
Caution
Instant playback feature is for DVR/Network Recorder only, and it is not
compatible with network camera or video server. ‘Instant Player’ menu is not
activated when user select event/alarm log in the even/alarm list pane.
5.2.5.4. Action programming – [Go to preset]
‘Go to preset’ action in the list.
1.
Select
2.
Click ‘Add’ button.
3.
Name the action, select a time schedule to perform, select a device and a channel to which a PTZ
device is attached, and a preset position number to move.
4.
After configuring the action, click ‘OK’ button.
5.2.5.5. Action programming – [Play a notification sound]
‘Play a notification sound’ action in the list
1.
Select
2.
Click ‘Add’ button.
3.
Name the action, select a time schedule to perform, select a sound file, and set dwell time. The sound
file can be either special sound or a voice message file.
4.
After configuring the action, click ‘OK’ button.
5.2.5.6. Action programming – [Send an e-Mail]
1.
‘Send an e-Mail’ action in the list. Without listing an e-mail account in the program, an error
Select
message appears telling the status. To perform this action, user should register at least an e-mail
account to the program in [Library] – [e-Mail] menu to the bottom in ‘Alarm Manager’ window.
2.
Click ‘Add’ button.
3.
Name the action, select a time schedule to perform, select an e-mail recipient address, select a
message, and decide whether to attach image file or not. To attach an image file, user should select a
device and a channel from which the program can capture an image.
4.
After configuring the action, click ‘OK’ button.
32
5.2.5.7. Action programming – [Send an image to FTP server]
1.
‘Send an image to FTP server’ action in the list. Without listing an FTP server in the
Select
program, an error message appears indicating the status. To perform this action, user should register
at least a FTP server to the program in [Library] – [FTP] menu on the bottom in ‘Alarm Manager’
window.
2.
Click ‘Add’ button.
3.
Name the action, select a time schedule to perform, select a FTP server, and a device and a channel
from which the program can capture an image.
4.
After configuring the action, click ‘OK’ button.
5.2.5.8. Library configuring – [Time Schedule]
1.
Click ‘Time Schedule’ button in ‘Library’ menu.
2.
Click ‘Add’ button in ‘Time Schedule’ window.
3.
Name the schedule, and select day and hour in a week. Click once on a square to select a time unit
and click once again to release the unit. A square is a time unit of 30 minutes.
4.
Click ‘OK’ button.
5.
The new schedule appears in the list.
5.2.5.9. Library configuring – [E-Mail Account & Message]
1.
Click ‘E-Mail’ button in ‘Library’ menu. Select ‘E-Mail Account’ option in the pull-down menu.
2.
Click ‘Add’ button in ‘E-Mail Account’ window.
3.
Name the account, enter the sender’s address, and enter the recipient’s address. The recipient can be
a group of e-mail accounts.
4.
Click ‘OK’ button. The new e-mail account appears in the list.
33
5.
Click ‘E-Mail’ button in ‘Library’ menu. Select ‘E-Mail Message’ option in the pull-down menu.
6.
Enter Message to each event
7.
If a necessary event is not listed as default value, go to ‘User defines’ tap. Enter customized message
up to 10 items.
8.
Click ‘OK’ button.
Note
When registering multiple e-Mail addresses to the software, administrator may
designate a certain e-mail address as a default one as below process. Select an
e-mail address in the list. Click the right button on the mouse. Select ‘Default’
option.
The default e-mail address is marked with an icon
to the left.
5.2.5.10. Library configuring – [FTP]
1.
Click ‘FTP’ button in ‘Library’ menu.
2.
Click ‘Add’ button in ‘FTP Server’ window.
3.
Name the FTP server, and enter the connection information including IP address, port number, user
name and password.
4.
Click ‘OK’ button. The new e-mail account appears in the list.
34
Note
When registering multiple FTP servers to the software, administrator may
designate a certain FTP server as a default one as below process. Select a FTP
server in the list. Click the right button on the mouse. Select ‘Default’ option.
The default FTP server is marked with an icon
35
to the left.
5.2.6. Map Manager
With ‘Map Manager’ menu, user may compose map by introducing BMP or JPEG image of floor plan or
drawing, and by laying out device icons over the images.
After configuring the map, user may monitor event/alarm signal and play live or record video over the map.
The configuration has three steps; map group configuration, map image composition, and component icon
layout. User may utilize this feature properly after accomplishing the entire process in turn.
Note
SNM-64S supports a map group and single layer.
SNM-64P supports multiple map groups.
5.2.6.1. Map group configuration
1.
Select [Setup] – [Map Manager] menu.
2.
Click ‘Add’ button to the right in ‘Map Group Manager’ window.
3.
Name the group in ‘Add Map Group’ window.
4.
Select the number of layers. A group is to be composed of up to 16 layers.
5.
Select the top layer in the list and click ‘Layer Settings’ button to the bottom of the window.
6.
Name the layer and select a layout size among 1x1, 2x2, 3x3, 4x4, 5x5, 6x6, 7x7, and 8x8 options.
The number is the total number of maps that are introduced into the selected layer. With 8x8, 64 maps
are introduced into the layer.
36
7.
Click ‘OK’ button after configuring ‘Layer Settings’ window.
8.
Repeat from steps 5 to 7 for the entire layers in the list.
Note
After configuring ‘Map Group’, it is necessary to compose map images to view
map image through Map Viewer window.
SNM-64P supports multiple groups while SNM-64S supports a single group.
A map group supports up to 16 layers, and each layer supports up to 64 maps. A
map group can have 1,024 maps in total.
5.2.6.2. Map image composition
1.
Select [Setup] – [Map Manager] menu.
2.
Select a map group in the list. Click ‘Map Image Settings’ button to the right in ‘Map Group Manager’
window.
3.
Select the top layer in the tree to the right of ‘Map Image Settings’ window.
4.
Select a square out of the squares in the layer. The selected square is outlined in blue.
5.
Name the map image. Click ‘Import’ button to introduce a map image to the square.
37
6.
Repeat steps 5 to 7 to import map images in other squares of the layer.
7.
Select next layer in the tree and import image images in the same manner.
8.
When finished importing map images for the entire layers, click ‘OK’ button.
Note
After configuring ‘Map Image Settings’, it is necessary to lay out component
icons over the map image to monitor event/alarm signals and launch
live/recorded video player windows over the map.
5.2.6.3. Component icon layout
1.
Select [Setup] – [Map Manager] menu.
2.
Select a map group in the list. Click ‘Component Icon Settings’ button to the right in ‘Map Group
Manager’ window.
38
3.
Select the top layer in the tree to the right of ‘Map Image Settings’ window. In the spitted screen, the
imported map images are displayed.
4.
Create hyperlink between. Select a map image in the screen. The selected map is outlined in blue.
Click ‘Hyperlink Icon’ button to create linkage between a parent map and a child map. Select a child
map from the maps in the child layer list of ‘Import Hyperlink Icon’ window.
5.
Inset component icon over the map. Click ‘Insert’ button to introduce a component icon over the map.
6.
Select a component in the list of ‘Inset Components’ window and click ‘OK’ button. The selected
components’ icon appears to the right top of the square. (A component that is used in a map is
marked as ‘Imported’ and cannot be used on the other map again.)
7.
Drag and drop the icon on the desired position over the map image. If the icon needs to change the
direction, click ‘Select’ button and set the angle.
39
8.
Create hyper link and inset component icons over the other maps by repeating 5 and 7 steps.
9.
When finished importing map images for the entire layers, click ‘OK’ button.
Note
When composing map group and laying out the component icons over the
maps, ‘Map Viewer’ displays the result.
5.2.6.4. Linkage creation among the maps
1.
Select [Setup] – [Map Manager] menu.
2.
Select a map group in the list and click ‘Component Settings’ button to the right.
3.
Select a layer in the map tree to the left. Then the selected layer displays all the registered maps in the
split-screen in the middle. This is a mother-layer to which a daughter-layer shall be linked.
4.
Select a map image among the entire maps in the split-screen. The selected map is out-lined with a
square in blue.
5.
Click ‘Linkage’ button to the bottom. Then a new window pops up. This window displays all the
registered maps in the daughter-layer.
40
6.
Select a map that is linked to the selected map in the mother-layer. (A daughter-map cannot be linked
to another mother-map again.) Click ‘Confirm’ button.
7.
A linkage icon appears on the selected map image.
8.
Drag and drop the linkage icon of the related position to the daughter-map. (To delete or rotate the
icon, firstly click ‘Select’ button, and click the linkage icon, then click ‘Delete’ or ‘Rotate’ button.)
9.
Click ‘Confirm button.
10. Add more linkage among the maps.
When creating linkage among the maps, ‘Map Viewer’ displays the result.
Note
41
5.2.7. User Group Manager
With ‘User Groups Manager’ menu, administrator may create user groups and assigns different right to each
group. Administrator may create as many users in a user group by assigning the same rights but with different
ID and password.
The default user group has administrator’s privilege. In the group, a administrator is listed as default. The
default ID and password are ‘Administrator’ and ‘12345’.
Note
SNM-64P supports multiple groups with multiple users while SNM-64S support
two user groups and users, including administrator user group and administrator.
5.2.7.1. Adding user group
1.
Select [Setup] – [User Group Manager] menu.
2.
Go to ‘User Group’ tab on the top of ‘User & User Group Manager’ window.
3.
Click ‘Add’ button to the right in the window.
4.
Name the group and assigns right by device, by channel and by control.
5.
After configuring the group right, click ‘OK’ button.
Only the user that belongs to administrator’s group can create a new group.
Note
5.2.7.2. Adding user ID
42
1.
Select [Setup] – [User Group Manager] menu.
2.
Go to ‘User’ tab on the top of ‘User & User Group Manager’ window.
3.
Click ‘Add’ button to the right in the window.
4.
Enter user name, password, and assign the right by selecting a user group.
5.
Click ‘OK’ button.
Note
Only the user that belongs to administrator’s group can create a new user.
The entire users in the same group have the same rights.
43
5.2.8. View User Group Rights
A user may view the rights to the user group where the login ID belongs.
Viewing user group rights
Select [Setup] – [View User Group Rights] menu. The assigned control and device are checked.
User group rights are configured through ‘User Group Manager’ menu.
Note
5.2.9. Change Password
User can change the password in this menu.
Changing password
1.
Select [Setup] – [Change Password] menu. Enter current password, new password, and confirm
password in the setup window.
2.
Click ‘OK’ button.
5.2.10. Event Reception
User may decide a method to receive event signal from remote devices to central software. There are two
options; one is to receive signals form the entire devices that are registered to the software, and the other is to
receive signals form the devices that are displaying video on the screen at the moment. SNM-64S/P occupies
system resource of the computer to receive event signals from the device. With this feature, user may modify
the software to fit into the provided system resource.
Receiving event from the selected devices
SNM-64S/P receives and displays event logs only from the devices that are displaying video on the screen at
the moment. Under this mode, ‘Alarm Manager’ stops operating regardless its settings.
Receiving event from the entire devices
SNM-64S/P receives and displays event logs from the entire devices that are registered to the software.
44
Changing event receiving mode
1.
Select ‘Setup’ – ‘Event Reception’ menu. In the configuration window, select a desired mode.
2.
Click ‘Confirm’ button.
Note
Caution
SNM-64S is set to run under ‘Receiving event from the selected devices’ mode
as default, while SNM-64P is set ‘Receiving event from the entire devices’ mode
as default.
Under ‘Receiving event from the selected devices’ mode in SNM-64P, the
program stops operating ‘Alarm Manager’ feature. However, the selected events
are displays the logs in the ‘Alarm List’ pane.
45
5.3. Tools
5.3.1. Overview
Tools are to launch ‘Player’ window, ‘Map Viewer’ window, and ‘Options’ window that runs separately from
‘Viewer’ window. The ‘Viewer’ is the main window through which user may view live video, event/alarm signal,
and thumbnail image.
Menu
Icon
Feature
Remark
Player
Launch ‘Player’ window in which recorded data is played.
Map Viewer
Launch ‘Map Viewer’ window in which event/alarm/video is
monitoring over the map images.
Lock Program
Minimize the program
unauthorized people
Go Webpage
Access the device’s homepage through Web browser program
Device Setup
Launch ‘Device Setup’ window.
Log History
Launch ‘Log History’ window.
Options
Launch ‘Options’ window user configures options of video
quality, data duration of instant player, lock program
parameters, fonts, etc.
to
prevent
SNM-64S/P
from
5.3.2. Player
User opens ‘Player’ window that plays the recorded data.
5.3.3. Map Viewer
User launches ‘May Viewer’ window that displays maps and device layouts.
5.3.4. Lock Program
User locks and minimizes the program, so that unauthorized people cannot monitor video or control devices on
the software while the user is away from the desk. To re-open the window, user should click program icon on
the ‘Taskbar’ to the bottom and enter the password.
5.3.5. Go Webpage
User accesses the device’s internet homepage in which user may configure the device as well as monitor live
video.
5.3.6. Device Setup
User launches ‘Device Setup’ window that configures the device.
46
5.3.7. Log History
User reviews program logs of user-login, event, and alarm that occur during the operation.
5.3.7.1. Login history
Login history is reviewed by user and by time.
1.
Select ‘Tools’ – ‘History’. Then ‘History’ window pops up.
2.
Click ‘Login’ tab in the ‘History’ window.
3.
Select user group and user ID whose login history to view.
4.
Define ‘Time Period’ menu. User may view log of the entire time or a certain time. There are three
methods to define time period; one is to set a day with ‘Day’ menu, the other is to go to a certain time
with ‘Go to’ menu, and the last is to go to the latest time with ‘Latest’ menu. With ‘Go to’ type, set the
starting data/time and duration. With ‘Latest’ type, set the duration of the last time duration from the
current time.
5.
Select item in ‘Filter’ menu. User may narrow down the type of log to review with this menu.
6.
Click ‘Search’ button
7.
To reset the parameters, click ‘Initialize’ button
. The result displays to the right.
.
5.3.7.2. Event history
Event log history is reviewed by event and by time.
1.
Select ‘Tools’ – ‘History’. Then ‘History’ window pops up.
2.
Click ‘Event’ tab in the ‘History’ window.
3.
Select event type to search.
4.
Define ‘Time Period’ menu. It is the same to define time as in ‘Login’ tab. However, user may search
log based on two different time information; one is device operation time and one is PC operation time.
To run the query based on device operation time, it is necessary to select a certain device in the below
‘Device’ menu.
5.
Select a device.
6.
Select a user group and a user to narrow down the search result. Program displays the selected
user’s log only when a user selected.
7.
Click ‘Search’ button
8.
Select an event in the list and click ‘Instant Viewer’ button
. The result displays to the right.
channel or click ‘Instant Player’ button
refer to ‘6.5. Event List’.)
to view live video of the selected
to play the recorded video. (For more information, please
47
9.
To reset the parameters, click ‘Initialize’ button
Note
.
With selecting ‘All’ in ‘Device’ menu, SNM-64S/P runs the query based on PC
operation time automatically.
5.3.7.3. Alarm history (SNM-64P)
Alarm log history is reviewed by alarm and by time.
1.
Select ‘Tools’ – ‘History’. Then ‘History’ window pops up.
2.
Click ‘Alarm’ tab in the ‘History’ window.
3.
Select alarm type to search.
4.
Define ‘Time Period’ menu. It is the same to define time as in ‘Event’ tab.
5.
Select a device.
6.
Select a user group and a user to narrow down the search result. Program displays the selected
user’s log only when a user selected.
7.
Enter a comment to search.
8.
Click ‘Search’ button
9.
Select an alarm in the list and click ‘Instant Viewer’ button
. The result displays to the right.
channel or click ‘Instant Player’ button
to view live video of the selected
to play the recorded video. Select an alarm in the list and
click ‘Delete’ button
to delete the selected alarm or click ‘Delete All’ button
to delete the
all alarms in the list. (For more information about other buttons, please refer to ‘6.6. Alarm List’.)
10. To reset the parameters, click ‘Initialize’ button
Note
.
With selecting ‘All’ in ‘Device’ menu, SNM-64S/P runs the query based on PC
operation time automatically.
Alarm(s) in the ‘Alarm List’ pane of Viewer will not be deleted when the selected
alarm(s) is deleted.
Related image file(s) stored on the PC will be deleted when the selected
alarm(s) is deleted. The deleted image file(s) will no longer be available.
5.3.8. Options
User may customize the settings for Viewer, Instant Player, and Lock Program. For the main ‘Viewer’ window,
user may customize the features with below options.
48
5.3.8.1. Adjusting audio volume
1.
Select [Tools] – [Options] menu.
2.
Click on ‘Audio’ item in the tree to the left of ‘Options’ window.
3.
Select a device.
4.
Adjust volume by moving slide bar.
5.
Click ‘OK’ button.
Note
‘Audio Input’ is the audio received from a remote device to user’s PC. The
received audio is output through the PC’s speaker system.
‘Audio Output’ is the audio transmitted from PC to a remote device. The
transmitted audio is output through the attached speaker system to the remote
device.
5.3.8.2. Filtering out event/alarm signal
1.
Select [Tools] – [Options] menu.
2.
Click on ‘[Filter] – [Normal Event]/[Alarm Event] – [Device]/[Event]’ item in the tree to the left of
‘Options’ window.
3.
Uncheck a device or type of signal to filter out the entire signal from the device or the type of signal
and does not display on ‘Event List’ and ‘Alarm List’ panes.
4.
Click ‘OK’ button.
5.3.8.3. Configuring snapshot feature
1.
Select [Tools] – [Options] menu.
2.
Click on ‘Snapshot’ item in the tree to the left of ‘Options’ window.
3.
Define the folder where to archive snapshot image files.
4.
Define image file format between Bitmap and JPEG.
5.
Click ‘OK’ button.
5.3.8.4. Configuring data range
For the ‘Instant Player’ window, user may customize the features as below instructions.
1.
Select [Tools] – [Options] menu.
49
2.
Click on ‘Instant Player’ item in the tree to the left of ‘Options’ window.
3.
Define video data range with pre- and post-alarm duration when ‘Instant Player’ window is launched
through ‘Event/Alarm List’ panes. (base on event/alarm occurrence time information)
4.
Define time duration prior to the current time when ‘Instant Player’ window is launched through the
main ‘Viewer’ screen. (based on the current time information)
5.
Click ‘OK’ button.
Note
SNM-64S/P does record video by receiving live video from network camera or
video server. However, it is not dedicated recording software and its
performance may vary a lot by network speed and PC performance.
5.3.8.5. Configuring lock program
User may activate ‘Lock Program’ feature that minimizes the SNM-64S/P on the PC after the defined idle
time.
1.
Select [Tools] – [Options] menu.
2.
Click on ‘Lock Program’ item in the tree to the left of ‘Options’ window.
3.
Check ‘Lock your display’ to activate the feature.
4.
Define the idle time duration after which SNM-64S/P is minimized.
Note
User should enter the password in the pop-up window to maximize the
SNM-64S/P.
5.3.8.6. Configuring text information display format
User may change the text display format including text and background color.
1.
Select [Tools] – [Options] menu.
2.
Click on ‘Text Display’ item in the tree to the left of ‘Options’ window.
3.
Configure the information display format as desired.
4.
Click ‘OK’ button.
5.3.8.7. Configuring video display format
50
User may select a method to display video on the screen whether to fit into the screen regardless the
original video’s width and height ratio or to maintain the original ratio with leaving marginal space between
the split-screens.
1.
Select [Tools] – [Options] menu.
2.
Click on ‘Video Display’ item in the tree to the left of ‘Options’ window.
3.
Select a format to display video between two options. ‘Full’ option is to change the ratio between width
and height of the original video and fit the video into the selected screen. ‘Ratio’ option is to maintain
the original ratio of the video and leaves the marginal space between the split-screens.
You can also change the color mode (RGB, YUV) to display video from the ‘Color Mode’ combo box.
4.
Click ‘OK’ button.
Caution
Selecting RGB mode can increase video quality but will result in increased
requirements for system resources during displaying.
5.3.8.8. Configuring recording duration time
User may define the time duration for which SNM-64S/P continues recording video on a PC. After the time
duration, SNM-64S/P stops recording video and archives the file in the PC automatically.
1.
Select [Tools] – [Options] menu.
2.
Click on ‘Record’ item in the tree to the left of ‘Options’ window.
3.
Select a time-duration.
4.
Click ‘OK’ button.
51
5.4. Toolbar
The major features are listed in the toolbar as below. User may launch the corresponding window by clicking on
the icon.
Icon
Feature
Remark
Launching ‘Player’ window
Launching ‘Map Viewer’ window
Displaying ‘Login Display’ pane
Displaying ‘Site Tree’ pane
Displaying ‘Alarm List’ pane
SNM-64P
Displaying ‘Event List’ pane
Displaying ‘Pop-up Image’ pane
Launching ‘Second Viewer Screen’ window
Lock program
Go Webpage
Launching ‘Device Setup’ window
Launching ‘Log History’ window
52
SNM-64P
Chapter6. Viewer
6.1. Overview
The ‘Viewer’ program is to display live video from multiple channels in customized screen format.
The ‘Viewer’ is the main user-interface of the SNM-64S/P; user may configure the entire program. The ‘Viewer’
consists of several sub-windows and panes including the primary and secondary live screens, event list pane,
alarm list pane, thumbnail image pane, site tree pane, and login display pane. User may open or close the
panes and screens in the Viewer program.
‘Login Display’ pane is to display the current user ID, authority group, data and time information. ‘Site Tree’
pane is to list the entire sites and device under the sites, through which user may connect device and play
video on the program. ‘Event List’ pane is to display event signals that are received from the registered device
on the program. ‘Alarm List’ pane is to display alarm signals that are configured as special signal out of the
entire event signals. User may verity alarm with video and document the situation on this pane. (SNM-64P)
‘Pop-up Image’ pane is to display thumbnail images that are captured automatically from alarm-triggered
channels. (SNM-64P) The primary and second ‘Viewer’ windows are is to play live video from multiple devices.
User may control PTZ and relay outputs on remote devices. Also user may capture or print image on the
screens.
Monitoring live video in ‘Viewer’ program
1.
Open ‘SNM-64S/P’ program. Select ID and enter password in login window.
2.
Click a camera icon
3.
Once the camera or device is connected, video is displayed on the screen automatically. The
or device icon in the site tree.
connected channel or device is marked with a green dot
53
in the front of the icon.
6.2. View Video
6.2.1. Overview
There are three ways to play live video on the main ‘Viewer’ program. Click camera icon or camera name on
the site tree. Click device icon or device name on the site tree. Click screen layout icon or screen layout name
on the site tree.
Note
If the device or screen layout icon or name is clicked, the Viewer splits screen
into the proper number that matches with the entire number of channels of the
selected device or screen layout.
After connecting channels, user may drag and drop the video on any other
available screen in the Viewer program.
6.2.2. Play video from the entire channels of a device at once
User may connect the entire channels of a device and play video from all the channels at once.
Operation process
1.
Select a device in the site tree pane to the left of the Viewer program.
2.
Click on device icon or name in the site tree.
3.
The connected device is marked with green dot
Note
in the front of the icon.
Click on the device icon or name again to disconnect.
The Viewer program splits the screen into proper numbers that match with the
number of channels.
6.2.3. Play video from a certain camera
Operation process
1.
. The program
Split the Viewer screen into a desired number with ‘Screen Patterns’ button
provides various split options including 1, 4, 6, 8, 9, 16, 25, 36, 49, and 64-split mode.
2.
Click on a certain screen in which to play video.
3.
Select a camera in the site tree pane to the left of the Viewer program.
4.
Click on camera icon
5.
The connected camera is marked with green dot
selected screen.
or name in the site tree.
54
in the front of the icon. Video plays in the
Note
Click on the camera icon or name again to disconnect.
Quad-split mode is a default setting, and user may choose among 1, 4, 6, 8, 9,
16, 25, 36, 49, 64 numbers to split
6.2.4. Play video through pre-composed screen layout
Operation process
1.
Select a screen layout in the site tree pane to the left of the Viewer program.
2.
Click on screen layout icon
3.
The connected camera is marked with green dot
Note
or name in the site tree.
in the front of the icon.
Click on the camera icon or name again to disconnect.
Viewer program connects channels as pre-defined and plays videos in
pre-defined layout.
6.2.5. Play video on the second screen
User may play video on the ‘Second Screen’ window. With the ‘Second Screen’, user may monitor up to 128
channels’ of video in two monitors. To run the ‘Second Screen’, it is necessary to attach two monitor screens to
a PC.
Operation process
in tool bar on the top of
1.
Select [View] – [Second Screen] menu or click the ‘Second Screen’ icon
the Viewer program.
2.
Drag and drop the Second Screen on to the second monitor.
3.
Split the Viewer screen into a desired number with ‘Screen Patterns’ button
. The program
provides various split options including 1, 4, 6, 8, 9, 16, 25, 36, 49, and 64-split mode.
4.
Click on camera, device or screen layout icon or name in the site tree.
5.
The connected camera, device, or screen layout is marked with green dot
Viewer plays videos on the Second Screen.
6.
Click on the camera, device or screen layout icon or name again to disconnect.
in the front of the icon.
Click on the camera, device or screen layout icon or name again to disconnect.
Note
55
Caution
It is necessary to attach a video card that supports two or more monitors a PC if
user wants to run two or more monitors in the PC.
56
6.3. Controls
6.3.1. Overview
User may control PTZ and relay outputs on remote devices. User may also capture or print image on the
screens.
Icon
Feature
Remark
Go to full-screen mode
Selects screen split pattern (1,4,6,8,9,16,25,36,49, and 64)
Display video at the original size (resolution)
Pans and tilts dome camera
Goes to PTZ home position
Controls focus (Far/Near)
Controls zoom (In/out)
Controls preset
Makes a snapshot image (JPEG or Bitmap file)
Prints image
Sends an e-Mail
SNM-64P
Transmits an image to FTP server
SNM-64P
Controls relay outputs
Turns on speaker to hear sound from device
Turns off the speaker
Turns on microphone to send voice message to device
Turns off the microphone
Flips image upside down
Launches ‘Instant Player’ window
Recording Start/Stop
Displays camera information on the screen
Turns on / off ‘Deinterlace’ feature
Pops up the OSD menu to set up a camera
57
Note
Caution
Some of the menus are supported through context menu over the video. Click
the right button on the mouse to see the menu.
The entire menus are not supported in every device. Some menus are not
supported in certain devices.
6.3.2. Play video in full-screen mode
User may play live or recorded video in full-screen mode with this menu. This menu is supported in the main
‘Viewer’ and ‘Player’ programs.
Operation process
on the screen.
1.
Click ‘Full Screen’ icon
2.
Press ‘Esc’ button on the keyboard to go back to normal screen mode.
6.3.3. Decide screen patterns
User may split screens (Primary Screen or Second Screen) into different patterns among 1, 4, 6, 8, 9, 16, 25,
36, 49, and 64-split options.
Operation process
1.
Click ‘Screen Patterns’ icon
2.
Select a number to split.
on the screen.
6.3.4. Play video at original size (resolution)
User may play video at the original size in the single-screen mode. This feature is available in main viewer
program.
Operation process
1.
Double click on a video screen, then the selected video plays at the original size (resolution) in a
single-screen mode.
58
2.
To expand the video and fit into the screen size, click ‘Original size/ Expanded size’ button
again.
‘Original size’ menu is activated only in single-screen mode.
Note
6.3.5. Control PTZ
User may control the attached camera PTZ mechanism to DVR or video server. With a PTZ integrated network
camera, user may also control the mechanism remotely. The controls are provided in Main Viewer and Instant
Viewer windows.
Panning & Tilting
1.
Click on a camera in the screen.
2.
Click left, right, up and down arrow button to move the camera to the corresponding direction.
3.
To change the PTZ camera moving speed, drag up or down the slide bar to the right of the arrow
buttons. The bar is dragged up and PTZ moves fast.
Focusing
1.
Click on a camera in the screen.
2.
Click near or far button
.
Zooming
1.
Click on a camera in the screen.
59
2.
Click zoom in or out button
.
Controlling preset
1.
Click on a camera in the screen.
2.
Select a desired preset number in the pull-down list
.
6.3.6. Snapshot an image
User may snapshot an image and save it as JPEG or Bitmap image file. The feature is available in main Viewer,
main Player, Instant Viewer, and Instant Player.
Operation process
1.
Select a video by clicking on the screen.
2.
Click ‘Snapshot’ icon
3.
A snapshot image is stored into the default directory in pre-defined file format. When the snapshot file
is stored, the corresponding notification message appears to the right bottom on the monitor.
on the screen.
Archiving directory of the snapshot image is defined in [Tools] - [Options] menu.
Note
6.3.7. Print an image
User may print an image on a paper. The feature is available in main Viewer, main Player, Instant Viewer, and
Instant Player.
Operation process
1.
Select a video by clicking on the screen.
2.
Click ‘Print’ icon
out on a paper.
on the screen. The program captures an image from the screen and prints it
6.3.8. Send an e-Mail (SNM-64P)
User may send an e-mail with attaching an image file. The feature is available in main Viewer, main Player, and
Instant Viewer.
Operation process
60
1.
Select a video by clicking on the screen.
2.
3.
on the screen.
Click ‘E-Mail’ icon
The program captures an image and sends it through an e-mail. The e-mail is sent to the default
recipient account.
When e-mail sent successfully, the corresponding notification message appears to the right bottom on
the monitor.
4.
Note
Without listing an e-mail account in the program, an error message appears
telling the status.
To perform this action, user should register at least an e-mail account to the
program in [Library] – [e-Mail] menu to the bottom in ‘Alarm Manager’ window.
6.3.9. Transmit an image to FTP server (SNM-64P)
User may transmit an image file to a FTP server. The feature is available in main Viewer, main Player, and
Instant Viewer.
Operation process
1.
Select a video by clicking on the screen.
2.
Click ‘FTP’ icon
3.
The program captures an image and transmits it to a FTP server. The file is transmitted to the default
server in the list.
4.
When a file is transmitted successfully, the corresponding notification message appears to the right
bottom on the monitor.
Note
on the screen.
Without listing an FTP server in the program, an error message appears telling
the status.
To perform this action, user should register at least an FTP server to the
program in [Library] – [FTP] menu to the bottom in ‘Alarm Manager’ window.
6.3.10. Turn on relay output
User may control relay outputs on a device manually over the network. The feature is available in main Viewer
and Instant Viewer.
Operation process
Relay output control is to turn on and off the attached device to the reply output port in a device. The controls
are provided in Main Viewer and Instant Viewer windows.
1.
Select a device to which the target device is attached. User may select a device by clicking any video
channel which belongs to the device on the screen.
61
2.
Click the relay control button
3.
Click a relay port button to activate the attached device. The device is activated for the moment when
user presses and holds the button.
, then a control window pops up.
6.3.11. Turn on/off speaker
User may turn on and off the speaker which plays live sound from a remote device over the network. The
feature is available in main Viewer and Instant Viewer.
Operation process
1.
Select a video channel that carries live audio data.
2.
Click speaker-on icon
to play audio.
3.
Click speaker-off icon
to stop playing audio.
The volume can be adjusted in [Tools] – [Options] menu.
Note
6.3.12. Turn on/off microphone
User may turn on and off the microphone which transmits voice message to a remote device over the network.
The feature is available in main Viewer and Instant Viewer.
Operation process
1.
Select a video channel that belongs to a device which is attached with an external speaker system.
2.
Click microphone-on icon
3.
Speak on a microphone that is attached to a PC.
4.
Click speaker-off icon
to play audio.
to stop sending audio to a device.
The volume can be adjusted in [Tools] – [Options] menu.
Note
6.3.13. Flip video upside down
User may flip video upside down especially when the camera is installed upside down. The feature is available
in main Viewer, main Player and Instant Viewer.
62
Operation process
1.
Select a video channel to flip.
2.
Click ‘Flip’ icon
to flip live video upside down.
6.3.14. Play video instantly (DVR/Network Recorder only)
User may play video of the selected channel instantly by launching ‘Instant Viewer’ windows from the live video
screen. Instant Viewer windows opens and plays video for the latest moment. User defines the duration in
‘Options’ menu.
Operation process
1.
Select a video channel by clicking on the live viewer screen.
2.
Click ‘Instant Player’ icon
Caution
.
‘Instant Player’ feature is compatible only with DVR devices. By selecting a
video channel of network camera and video server, this menu is de-activated.
6.3.15. Record & Playback
User may record live video from network cameras and video servers on the PC instantly. User may start
recording video by selecting a channel and clicking on the recording button. SNM-64S/P records video as
received for resolution, quality and speed. Each channel records video independently and multiple channels
may record video concurrently.
The recorded file is archived on a PC, and user may play the file with SNM-64S/P Player software. Archived
files are found by each camera, and user may need to click on ‘Local’ tab in player software.
Recording feature is available with main viewer and instant viewer.
Recording video instantly
1.
Select a video channel by clicking on the live viewer screen.
2.
. Then SNM-64S/P starts recording video on a PC. The channel
Click ‘Start Recording’ icon
marks ‘REC’ on the video screen. At the moment, the button turns into ‘Stop Recording’ button.
3.
to stop recording manually. Otherwise, SNM-64S/P stops recording
Click ‘Stop Recording’ icon
video in the pre-defined time duration.
Playing video
1.
Execute ‘player’ software and click on ‘Local’ tab.
2.
Click ‘Camera Select’ button
in search pane.
63
3.
Select a device and a channel (camera) of which video to play and click ‘Open’ button.
4.
Set date and time. There are four options including all, day, go to, and latest. User may choose one of
the options to set the data and time.
5.
Click query button
6.
Select a file in the list and click play button
the right.
Caution
Note
. The result displays in the below pane.
. Then the selected video plays in the screen to
SNM-64S/P records video at the same resolution, quality and speed as is
received from network camera or video server.
Recording duration time can be adjusted in [Tools] – [Options] men. The default
duration is 5 minutes.
Recorded video is archived under ‘\\NMRecordignXX’ (XX stands for version
(Standard and Pro) and language.
‘SNM-64S/P’ program does record video by receiving live video from network
camera or video server. However, it is not dedicated recording software and its
performance may vary a lot by network speed and PC performance.
6.3.16. OSD information
User may display or hide camera information on the screen.
Operation process
1.
Select a video channel by clicking on the live viewer screen.
2.
Click OSD icon
, then camera information is displayed on the selected screen.
6.3.17. De-interlace video
User may apply de-interlacing feature to a screen.
Operation process
1.
Select a video channel by clicking on the live viewer screen.
2.
Click Deinterlace icon
click again the icon.
Note
, then the selected video display with de-interlaced. To stop the feature,
‘De-interlace’ is to make D1 or Full resolution image natural by smoothing the
interlaced lines of even and odd images.
64
6.3.18. Setup camera
User may setup the attached analog camera to DVR and video server. User can make the attached camera to
display the OSD setup menu over the screen with this menu.
Operation process
1.
Select a video channel by clicking on the live viewer screen.
2.
Click camera setup icon
, then the setup menu appears on the screen.
Camera setup OSD buttons
Button
Feature
Remark
Move selection up and down on the OSD menu
Move selection left and right on the OSD menu
Make OSD menu appear on the screen, or process
selection to upper/lower level menu.
Exit the OSD menu
Caution
Caution
‘Setup Camera’ menu is available on when the camera is wired to DVR or server
for the communication.
For the detailed information on camera settings, please refer to the camera
manual.
65
6.4. Pop up thumbnail image (SNM-64P)
User may configure the SNM-64P to capture image and display the thumbnail image in ‘Pop-up Image’ pane
automatically when an alarm occur.
The latest image places on the top in the list. User may launch Instant Viewer or Instantly Player window from
the image.
Note
User should configure the action in [Setup] – [Alarm Manager] menu. For more
information, please refer to ‘5.2.4.1 Action programming – [Pop-up a thumbnail
image]’
6.4.1. Displaying thumbnail images
1.
Select [View] – [Pop-up Image] menu or click the ‘Pop-up Image’ icon
Viewer program.
2.
Thumbnail image are displayed in the pane automatically.
in tool bar on the top of the
User should configure the action per alarm signal in ‘Alarm Manager’ menu.
Note
6.4.2. Launching ‘Instant Viewer’ to play live video
1.
Select a thumbnail image in the pane.
2.
Click ‘Instant Viewer’ icon
. Live video plays in a single-channel viewer window.
66
Note
Instant Viewer feature is supported with all the devices including DVR, video
server and network.
By clicking on ‘Start Recording’ button in the window, the live video is recorded
instantly and archived on the PC automatically.
6.4.3. Launching ‘Instant Player’ to play recorded video
1.
Select a thumbnail image in the pane.
2.
Click ‘Instant Player’ icon
Note
Caution
. Recorded video plays in a single-channel player window.
User may change the settings in [Tools] – [Options] menu. As default, ‘Instant
Player’ window pulls 30 seconds’ video prior to the alarm occurring time and 1
minute’s video after the alarm occurring time.
‘Instant Player’ feature is compatible only with DVR devices. By selecting a
video channel of network camera and video server, this menu is de-activated.
6.4.4. Launching ‘Alarm Control Station’ to process alarm thoroughly
1.
Click twice a thumbnail image in the pane.
2.
‘Alarm Control Station’ window pops up. Verify alarm with video, perform reaction against alarm, and
document the situation. (For more information, please refer to ‘Alarm Control Station’ chapter in the
following pages.)
67
6.5. Event List
User may monitor event signals that is generated by devices and transmitted to SNM-64S/P in real-time.
User may launch ‘Instant Viewer’ to play live video or ‘Instant Player’ to play recorded video based on event
signals. With ‘Filter’ menu, it is possible to filter out unnecessary event signals out of the pane.
6.5.1. Displaying event signals
1.
Select [View] – [Event List] menu or click the ‘Event List’ icon
program.
2.
Event signals are displayed in the pane automatically. (User does not need to configure to receive
event signals from device, and the SNM-64S/P receives and displays event signal from the registered
devices automatically.)
Note
in tool bar on the top of the Viewer
Event List pane has docking-window feature, and fits into any location on the
‘Primary Screen’ window.
6.5.2. Filtering out certain event signals
to the bottom of the Event List pane.
1.
Click ‘Filter’ icon
2.
‘Options’ window appears.
3.
Click on ‘[Filter] – [Normal Event] – [Device]/[Event]’ item in the tree to the left of ‘Options’ window.
4.
Uncheck a device or type of signal to filter out the entire signal from the device or the type of signal
and does not display on ‘Event List’ panes.
5.
Click ‘OK’ button.
6.5.3. Launching ‘Instant Viewer’ to play live video
1.
Select an event log in the pane.
2.
Click ‘Instant Viewer’ icon
. Live video plays in a single-channel viewer window.
68
Note
Instant Viewer supports ‘Snapshot’ and ‘Print’ features, and user may use them
at the same manner in the main viewer. (For more information, please refer to
‘6.8. Instant Viewer’.)
6.5.4. Launching ‘Instant Player’ to play recorded video (DVR/Network Recorder only)
1.
Select an event log in the pane.
2.
Click ‘Instant Player’ icon
Note
Caution
. Recorded video plays in a single-channel player window.
User may change the settings in [Tools] – [Options] menu. As default, ‘Instant
Player’ window pulls 30 seconds’ video prior to the alarm occurring time and 1
minute’s video after the alarm occurring time.
‘Instant Player’ feature is compatible only with DVR devices. By selecting a
video channel of network camera and video server, this menu is de-activated.
6.5.5. Reviewing event history
1.
Click ‘Log History’ button
pops up.
2.
Set parameters in the window and click ‘Search’ button
to ‘5.3.6. History’.)
to the bottom of the ‘Event List’ pane. Then the history search window
69
. (For more information, please refer
6.6. Alarm List (SNM-64P)
User may monitor alarm signals that are selected out of event signals and processed with special care in
SNM-64S/P.
User may launch ‘Instant Viewer’ to play live video or ‘Instant Player’ to play recorded video based on event
signals. With ‘Filter’ menu, it is possible to filter out some alarm signals out of the pane if desired. User can
change the listing status of each alarm signal and leave a comment to alarm log.
6.6.1. Displaying alarm signals
1.
Select [View] – [Alarm List] menu or click the ‘Alarm List’ icon
program.
2.
Alarm signals are displayed in the pane automatically.
Note
in tool bar on the top of the Viewer
Alarm List pane has docking-window feature, and fits into any location on the
‘Primary Screen’ window.
6.6.2. Filtering out certain alarm signals
1.
Click ‘Filter’ icon
2.
‘Options’ window appears.
3.
Click on ‘[Filter] – [Alarm Event] – [Device]/[Event]’ item in the tree to the left of ‘Options’ window.
4.
Uncheck a device or type of signal to filter out the entire signal from the device or the type of signal
and does not display on ‘Alarm List’ panes.
5.
Click ‘OK’ button.
to the bottom of the Alarm List pane.
6.6.3. Marking an alarm acknowledgement status
1.
Select an alarm log in the pane.
2.
Click ‘Acknowledgement’ icon
to the bottom of the Alarm List pane.
70
3.
The selected alarm log changes its status remark as from unchecked to checked.
6.6.4. Adding a comment to an alarm
1.
Select an alarm log in the pane.
2.
Click ‘Comment’ icon
3.
Enter a comment in the pop-up window.
4.
Click ‘OK’ button.
to the bottom of the Alarm List pane.
6.6.5. Launching ‘Instant Viewer’ to play live video
1.
Select an alarm log in the pane.
2.
Click ‘Instant Viewer’ icon
. Live video plays in a single-channel viewer window.
6.6.6. Launching ‘Instant Player’ to play recorded video (DVR/Network Recorder only)
1.
Select an alarm log in the pane.
2.
Click ‘Instant Player’ icon
Note
Caution
. Recorded video plays in a single-channel player window.
User may change the settings in [Tools] – [Options] menu. As default, ‘Instant
Player’ window pulls 30 seconds’ video prior to the alarm occurring time and 1
minute’s video after the alarm occurring time.
‘Instant Player’ feature is compatible only with DVR devices. By selecting a
video channel of network camera and video server, this menu is de-activated.
6.6.7. Viewing a detailed information of an alarm
1.
Select an alarm log in the pane.
2.
Click ‘Details’ icon
3.
In the pop-up window, detailed information is displayed with captured image if available. Information
includes alarm type, occurrence time, alarm source (device and channel), comment, ACK user, and
ACK time.
to the bottom of the Alarm List pane.
71
6.6.8. Viewing a programmed actions against the alarm
1.
Select an alarm log in the pane.
2.
Click ‘Action’ icon
3.
In the pop-up window, programmed actions are displayed in the list.
to the bottom of the Alarm List pane.
6.6.9. Launching ‘Alarm Control Station’ to process alarm thoroughly
1.
Select an alarm log in the pane.
2.
Click ‘Alarm Control Station’ icon
3.
Verify alarm with video, perform reaction against alarm, and document the situation. (For more
information, please refer to ‘Alarm Control Station’ chapter in the following pages.)
to the bottom of the Alarm List pane.
6.6.10. Reviewing alarm history
1.
Click ‘Log History’ button
pops up.
2.
Set parameters in the window and click ‘Search’ button
to ‘5.3.6. History’.)
to the bottom of the ‘Alarm List’ pane. Then the history search window
72
. (For more information, please refer
6.7. Alarm Control Station (SNM-64P)
User may verify alarm with live/record video or captured image, do actions, and make documentation manually
in ‘Alarm Control Station’ window.
‘Alarm Control Station’ window has three tabs of ‘Video verification’, ‘Action’, and ‘Confirmation’.
6.7.1. Launching the alarm control station window
1.
Click twice an alarm log in the list on ‘Alarm Log’ pane.
2.
Or, select an alarm log in the pane and click ‘Alarm control station’ icon
Or, click twice a
thumbnail image in ‘Pop-up Image’ pane. In this case, the selected alarm always displays the captured
image.
6.7.2. Verifying an alarm with video
1.
Click ‘Video verification’ tab in ‘Alarm Control Station’ window.
2.
If ‘Pop-up Image’ action is programmed against the alarm, captured image appears to the right side of
the window.
3.
Select ‘Instant Player’ or ‘Instant Viewer’ to play recorded or live video from the channel that generates
the event signal.
4.
Click ‘Instant Player’ icon or ‘Instant Viewer’ icon to launch the respective window.
6.7.3. Making actions against an alarm
1.
Click ‘Action’ tab in ‘Alarm Control Station’ window.
2.
Select a desired action in the list to the left of the window. It lists sending an e-Mail, transmitting an
image, printing an image, and capturing an image.
3.
Click ‘e-Mail’ icon, ‘FTP’ icon, ‘Print’ icon, and ‘Snapshot’ icon for the corresponding actions.
6.7.4. Making confirmation to an alarm
1.
Click ‘Confirmation’ tab in ‘Alarm Control Station’ window.
73
2.
Select a desired action in the list to the left of the window. It lists ‘Acknowledge’ and ‘Comments’.
3.
Click ‘Comment’ icon to enter a short comment into the log.
4.
Click ‘Acknowledge’ icon to mark the status as checked.
74
6.8. Instant Viewer
User may play live video from a video channel instantly through ‘Event List’ pane, ‘Alarm List’ pane, and
‘Pop-up Image’ pane.
6.8.1. Launching from ‘Event List’ pane
1.
Select an event log in the pane.
2.
Click ‘Instant Viewer’ icon
. Live video plays in a single-channel viewer window.
6.8.2. Launching from ‘Alarm List’ pane
1.
Select an alarm log in the pane.
2.
Click ‘Instant Viewer’ icon. Live video plays in a single-channel viewer window.
6.8.3. Launching from ‘Pop-up Image’ pane
1.
Select a thumbnail image in the pane.
2.
Click ‘Instant Viewer’ icon. Live video plays in a single-channel viewer window.
Note
Last command overrides the previous command. If ‘Instant Viewer’ is already
open and plays live video and user clicks the icon on another alarm/event, the
former channel is disconnected and the later channel is connected to play video.
75
Chapter7. Player
7.1. Overview
The ‘Player’ program is to play recorded video from a DVR/Network Recorder. The program provides easy
ways of searching data including data & time search and timeline search. User may back up data from
DVR/Network Recorder to PC and convert the data into AVI format.
Playing recorded video in ‘Player’ program
1.
Open ‘SNM-64S/P’ program.
2.
Select [Tools] – [Player] menu or click ‘Player’ icon
3.
Select DVR and camera(s) in ‘Camera/DVR’ list.
4.
Define approach type, and time duration of the data.
5.
Click ‘Play’ icon
in tool bar on the top of the Viewer program.
.
The ‘Player’ supports up to 16 screens to play video from a single DVR unit.
Note
76
7.2. Search (DVR/Network Recorder only)
7.2.1. Overview
There are two ways to search data; ‘Time Search’ and ‘Timeline Search’.
‘Time Search’ is to access data directly with data and time information.
‘Timeline Search’ is access data through timeline graph of the selected time duration.
Note
The process to play video that is recorded by SNM-64S/P on a PC is slightly
different to the process to play video from DVR. (For more information to play
PC recorded video, please refer to ‘7.6.1 Play video recorded on a PC’)
7.2.2. Time Search
Playing video by searching ‘Time Search’ menu
1.
Click Camera/DVR search icon
2.
Select DVR and camera(s) and click ‘OK’ button.
3.
Select type to define time duration. There are two types; one is to go to a certain time with ‘Go to’
menu, and the other is to go to the latest time with ‘Latest’ menu. With ‘Go to’ type, set the starting
data/time and duration. With ‘Latest’ type, set the duration of the last time duration from the current
time.
4.
Click ‘Play’ icon
5.
To define the search conditions again, click ‘New Query’ icon
.
.
.
The ‘Player’ supports up to 16 screens to play video from a single DVR unit.
Note
7.2.3. Timeline Search
Playing video by searching ‘Timeline Search’ menu
in the Player program.
1.
Click ‘Timeline Search’ icon
2.
Click Camera/DVR search icon
3.
Select DVR and camera(s) and click ‘OK’ button.
in the ‘Timeline Search’ window.
77
4.
Select type to define time duration. There are two types; one is to go to a certain time with ‘Go to’
menu, and the other is to go to the latest time with ‘Latest’ menu. With ‘Go to’ type, set the starting
data/time and duration. With ‘Latest’ type, set the duration of the last time duration from the current
time.
5.
Click ‘Query’ icon
6.
The search result displays in graph on the timeline.
7.
Drag the slide bar to a desired position on the timeline. The exact position is displayed with time on
the bottom of the graph.
8.
Click ‘Play’ icon
9.
A ‘Timeline Search’ window closes and video plays from the designated time point in ‘Play’ window.
.
.
10. To define the search conditions again, click ‘New Query’ icon
.
The ‘Player’ supports up to 16 screens to play video from a single DVR unit.
Note
78
7.3. Playback (DVR/Network Recorder only)
7.3.1. Overview
The ‘Player’ plays the searched data by dividing the screen properly to the total number of channels.
Below each video screen, camera name, data/time information, and event information are display in the caption
bar. The screen border turns into red when event-triggered video is played.
User may play a certain channel in single-screen mode by double-clicking on a desired video. The screen
returns to original model by double-clicking on the screen again.
With timeline and play status panes, user can view information on the video. The play control buttons allow use
move playing point or change play direction or speed. User may capture or print an image with utility icons.
7.3.2. Timeline
The timeline displays data existence (whether to exist or not) and type (normal or event) inside the searched
duration.
The green graph on the line signifies video data recorded in normal situation and the red graph tells the data
was recorded under event situation. The starting and ending time are marked on left and right ends. If there are
no recorded data in the duration, the duration is marked in black on the line.
Note
When multiple channels are played, the timeline merges data information from
individual camera and displays it into a single line
7.3.3. Status information
Below the timeline, play status information is displayed.
To the left, the current play control type is displayed. In the middle, play speed is displayed. To the right,
recorded data/time information is displayed.
79
7.3.4. Playback controls
User may play video with changing data duration, play speed, play direction, and speaker volume with below
controls.
Button
Feature
Remark
Go to previous duration. The same length of time duration is
applied as the current data in pulling data from DVR with this
button. (For example, if current video data is of
12:00:00~12:09:59, this button brings and plays video of
11:50:00~11:59:59)
Step backward
Reverse play
Pause
Play video
Step forward
Go to next duration. The same length of time duration is applied
as the current data in pulling data from DVR with this button.
(For example, if current video data is of 12:00:00~12:09:59, this
button brings and plays video of 12:10:00~12:19:59)
Adjust play speed
Adjust speaker volume
Caution
The entire menus are not supported in every device. Some menus are not
supported in certain devices.
80
7.4. Controls
User may capture image or print image from the recorded video with below controls.
Button
Feature
Remark
Plays video in full-screen mode
Refreshes the current connection by disconnecting and
reconnecting to the current device and channel.
Snapshots an image in JPEG or Bitmap format
Send an image to the printer
Sends out an e-Mail by attaching an image file
SNM-64P
Transmits an image file to FTP server
SNM-64P
Zooms in /out on the image digitally
Launching ‘Instant Viewer’ to play live video
Controls function as the same way as do in Viewer window.
Note
Caution
The entire list of menus is not supported in every device. Some menus are not
supported in certain devices.
Utilizing digital zoom feature
1.
Open ‘Digital Zoom’ window by clicking on the icon
2.
In the window, a blue box appears over the image in the center of the screen. The image inside the
blue box is displayed in the player screen.
3.
Zoom in a certain part with plus (+) button. User may enlarge the image by 200%, 400%, 800%, and
1600%. User may adjust the box size manually by dragging horizontal or vertical lines on the box with
a mouse.
4.
Move the selection area by dragging the box with a mouse.
81
.
5.
Click ‘Close’ button to return to original size.
Image is magnified up to 16 times (1600%).
Note
82
7.5. Remote (DVR/Network Recorder only)
User may access DVR/Network Recorder in remote location and plays data on SNM-64S/P in the central
location.
Playing video from DVR/Network Recorder
1.
Select ‘Remote’ tab.
2.
Click ‘Camera/DVR’ selection button
3.
Select DVR and desired cameras. Then click ‘Ok’ button.
4.
Define time duration.
5.
Click ‘Play’ button
.
. Video data of selected camera(s) and defined time plays on the screen.
The ‘Player’ supports up to 16 screens to play video from a single DVR unit.
Note
83
7.6. Local
User may play video that is backed up from DVR/Network Recorder to a PC or recorded on a PC by
SNM-64S/P locally.
7.6.1. Play recorded video
1.
Select ‘Local’ tab.
2.
Click ‘Network Camera/Video Server’ selection button
3.
Select desired device and camera. Then click ‘Ok’ button.
4.
Define time duration. It is possible to see the entire data or by a day.
5.
Click ‘Query’ button
file in the list.
6.
Click ‘Play’ button
.
. Then the recorded video file lists up in the result pane. Select a video
. Video data of selected camera(s) and defined time plays on the screen.
7.6.2. Play backup video
1.
Select ‘Local’ tab.
2.
Click ‘File Open’ button
3.
In the query window, select a file and click ‘Open’ button. The select file plays video on the screen.
.
84
7.7. Backup (DVR/Network Recorder only)
User may back up data from a DVR/Network Recorder to a PC remotely.
Making data backup
1.
Click ‘Backup’ tab in the Player program.
2.
Click Camera search icon
3.
Select a DVR and a camera and click ‘OK’ button.
4.
Select type to define time duration.
5.
Click ‘Play’ icon
. Backup status displays in the below progress bar. When finished,
‘Completed’ message appear on the screen.
Note
in the window.
A data file is copied in the default folder on the PC. The default folder is
\Program Files\Samsung Techwin\SNM-64S/P\Backup
85
7.8. Export (Convert file format into AVI)
User may convert backup file format from the propriety of the DVR to AVI format.
7.8.1. Converting recorded video file format into AVI
1.
Select ‘Local’ tab.
2.
Click ‘Network Camera/Video Server’ selection button
3.
Select desired device and camera. Then click ‘Ok’ button.
4.
Define time duration. It is possible to see the entire data or by a day.
5.
Click ‘Query’ button
file in the list.
6.
Click ‘Play’ button
7.
When finished, ‘Completed’ message appear on the screen.
.
. Then the recorded video file lists up in the result pane. Select a video
. Conversion status displays in the below progress bar.
7.8.2. Converting backup video file format into AVI
1.
Click ‘Local’ tab in the Player program.
2.
Click ‘Open’ icon
3.
Click ‘Open’ button after selecting a file. The entire channels in the selected video file are listed in
‘Source’ menu.
4.
Click ‘Play’ icon
5.
When finished, ‘Completed’ message appear on the screen.
Note
. Search backup file in the window.
. Conversion status displays in the below progress bar.
The converted AVI file is archived in \Program Files\Samsung
Techwin\SNM-64S/P\Backup folder.
The converted AVI file is compatible with a standard video player software that
supports XviD MPEG-4 Video Codec.
86
7.9. Instant Player (DVR/Network Recorder only)
Instant Player allows user to play a single-channel video instantly through the main ‘Viewer’, ‘Event List’ pane,
or ‘Alarm List’ pane.
Note
Caution
Last command overrides the previous command. If ‘Instant Player’ is already
open and plays live video and user clicks the icon on another alarm/event, the
former channel is disconnected and the later channel is connected to play video.
‘Instant Player’ feature is compatible only with DVR devices. By selecting a
video channel of network camera and video server, this menu is de-activated.
7.9.1. Playing video with monitoring live video
1.
Select a live video channel by clicking on the screen
2.
Click ‘Instant Player’ icon
window.
Note
in the below. Recorded video plays in a single-channel player
As default, ‘Instant Player’ window pulls 1 minute’s video prior to the current
time.
7.9.2. Launching ‘Instant Player’ with event signal
1.
Select an event log in the pane.
2.
Click ‘Instant Player’ icon. Recorded video plays in a single-channel player window.
Note
As default, ‘Instant Player’ window pulls 30 seconds’ video prior to the alarm
occurring time and 1 minute’s video after the alarm occurring time.
7.9.3. Launching ‘Instant Player’ with alarm signal (SNM-64P)
1.
Select an alarm log in the pane.
2.
Click ‘Instant Player’ icon. Recorded video plays in a single-channel player window.
87
Note
As default, ‘Instant Player’ window pulls 30 seconds’ video prior to the alarm
occurring time and 1 minute’s video after the alarm occurring time.
7.9.4. Launching ‘Instant Player’ with thumbnail image (SNM-64P)
1.
Select a thumbnail image in the pane.
2.
Click ‘Instant Player’ icon. Recorded video plays in a single-channel player window.
Note
As default, ‘Instant Player’ window pulls 30 seconds’ video prior to the alarm
occurring time and 1 minute’s video after the alarm occurring time.
88
Chapter8. Map Viewer
8.1. Overview
The ‘Map Viewer’ program is to display alarm or event signals over map images so that user may acknowledge
alarm/event status with geographical information.
User may perceive alarm/event occurrence status with visual notifications on icons over map images and
audible notifications on speaker system of a PC. By clicking on the camera icons on maps, user may launch
‘Instant Viewer’ or ‘Instant Player’ window.
The entire map supports up to 16 layers in vertical structure and 64 maps in horizontal structure.
To utilize ‘Map Viewer’ properly, user should configure map before running ‘Map Viewer’ program.
The configuration has three steps; map group configuration, map image composition, and component icon
layout. User may utilize this feature properly after accomplishing the entire process in turn.
Launching ‘Map Viewer’ program
1.
Select [Tools] – [May Viewer] menu or click ‘Map Viewer’ icon
program.
2.
Click a map in the map tree to the left and the selected map displays on the screen to the right.
3.
Click a layer in the map tree to the left and the entire maps in the selected layer display on the screen
to the right.
4.
With receiving event/alarm signal, the related device (camera, sensor, etc) icon blinks on the map.
Note
in tool bar on the top of the Viewer
The same rules of event/alarm processing in ‘Viewer’ program applies in ‘Map
Viewer’ program.
SNM-64P utilizes alarm signal in ‘Map Viewer’ program while SNM-64S utilizes.
89
8.2. Controls
User may monitor live video, play recorded video, and control device over map images.
Button
Feature
Remark
Go to full-screen mode
Move around among maps in the same layer with arrow
buttons. The center button displays the entire maps in the layer
on a screen.
Move up / down among layers
Move up / down among linked maps
Launches ‘Instant Viewer window
Launches ‘Instant Player’ window
Turns on relay output
Turns off relay output
Move down to a child map
Note
Caution
Some of the menus are supported through context menu over the video. Click
the right button on the mouse to see the menu.
The entire menus are not supported in every device. Some menus are not
supported in certain devices.
8.2.1. Launching ‘Instant Viewer’ to play live video
1.
Select a camera component icon on a map.
2.
Click ‘Instant Viewer’ icon
. Live video plays in a single-channel viewer window.
8.2.2. Launching ‘Instant Player’ to play recorded video (DVR/Network Recorder
only)
1.
Select a camera component icon on a map.
2.
Click ‘Instant Player’ icon
. Recorded video plays in a single-channel player window.
90
Pre-alarm video duration is to be set [Tools] - [Options] menu.
Note
Caution
‘Instant Player’ feature is compatible only with DVR devices. By selecting a
video channel of network camera and video server, this menu is de-activated.
8.2.3. Turning on relay output
1.
Select a relay component icon on a map.
2.
Click relay-on icon
.
8.2.4. Turning off relay output
1.
Select a relay component icon on a map.
2.
Click relay-off icon
.
8.2.5. Moving to linked daughter-map
1.
Select ‘Linkage’ button on the current map (mother-map).
2.
Click ‘View linked image’ button
, then the linked map (daughter-map) appears.
91
Chapter9. Troubleshooting
Calling for Malfunctions
If there are problems in operation, please refer to the items below. If the problem persists, please contact the
agent you purchased this product from.
Problem
Nothing appears on the
screen.
Solution
Please check the power connections.
Please check the video signal line connection.
Check if there is anything wrong with the video signals entered to the network
server.
Open MS-DOS window to check whether device (Network Camera, Video
Server, and DVR) is connected to the network.
※ In case of ping 192.168.0.100, replace it with IP address set up at server.
The video image is not
clear.
The screen is dark.
Back stripes appear on
the screen.
The screen flickers too
much.
The MOTION DETECTION
function is not working.
Audio is not working
Video is stopped
No network connection
When camera cannot be
controlled for Pan/ Tilt/
Please check if the lens is clean. Please clean the lens with a clean cloth or
brush.
Please make sure that the screen is not exposed directly to bright light. Please
move the angle or location of the image if necessary.
Please readjust the back focus of the connected camera.
Please adjust the contrast feature of the monitor.
Check if the terminals are properly set between the systems.
Please check if an auto iris lens is being used and adjust the brightness level.
Dose the power supplied to the server sway away from standards or change
depending oh the time?
Check if the connected camera faces directly into the sun or lights.
Check if the cables are properly connected.
Please check if ‘MOTION DETECTION’ made is turned on.
Please check if the MD LEVEL is too low.
Please check the setting of the MD AREA.
Please check the audio is selected from admin page.
Please check speaker volume from the viewer.
In case input sound through microphone at Viewer is not outputted through
Audio Out of server, please check whether Audio Out channel is selected at
admin page. Or check whether microphone is available at Viewer.
Please check audio driver is working in user’s PC.
Please check whether network cable of device is correctly connected.
In case user uses hub or IP router, check whether these network equipments
are working properly.
Open MS-DOS window and check whether device is connected to the network.
Please check MAC address and IP address of device.
Check whether network cable is properly connected (Note: User ping
command)
Check whether connecting to Admin page is available.
Check the camera / speed done protocol.
See if the proper model and manufacturer is selected at the mode.
Inspect the cables connected to the device.
Zoom
When program or drive is
not installed
Check if the OS is installed properly. Windows 2000 (SP 4) or Windows XP
Professional (SP 2) is recommended.
When installing USB dongle key drive, check if the dongle key is removed. After
installing the drive, USB dongle key should be attached.
92
Problem
Program does not run
Previous settings
disappear when re-install
the program
‘Site Tree’ does not
display camera list after
registering a device
'Instant Player’ button is
not activated or does not
Solution
Check if the PC (or server) runs other application programs. By running
multiple programs on the same a PC (or server), they may affect PC
performance. It is recommended to close all other application programs and run
SNM-64S/P only.
Check if USB dongle key is attached to the PC when you are running
SNM-64P.
Confirm if the DB files are overwritten during the installation process. If
overwrite option is selected during the process, it is necessary to recover the
original DB files.
※ In the SNM-64S/P folder, there are MSetup(old)~.mdb files. Remove ‘(old)’
out of the name, and the previous settings are recovered.
Check if the camera is selected in ‘Device Manager’ after registering login
information. It is necessary to compose the site tree after registering device.
Only the selected camera(s) in the ‘Site Manager’ appear under site tree when
the program runs.
Check if you logged in the program with other user ID. SNM-64S/P brings up
the corresponding settings for each user.
Check if the selected event or alarm is from DVR. ‘Instant Player’ is compatible
with DVR/Network Recorder only, and it is not supported with network camera
or video server.
function
Camera OSD button does
not function
‘Original Size’ button is
Camera can be controlled only when connected to the RS-485’s configuration
communication terminal.
‘Original Size’ menu is available only in single-channel mode.
not activated
Device is not listed in the
search list during device
registration
‘Record’ button
activated
is
not
Programmed ‘Action’
does not perform against
alarm
Image transferred to FTP
or by E-mail cannot be
viewed
Check if the device is powered properly.
Open MS-DOS window to check whether device is connected to the network.
Check if you run ‘SNM-64S’ and ‘SNM-64P’ at the same time. If so, a device
responds to a program that runs earlier.
Check if you selected a video screen from DVR. Record menu is compatible
with network camera and video server and is not compatible with DVR.
Check the time schedule of the alarm processing. Alarm is processed only for
the scheduled time and the same signal is disregarded for the other time.
Check the time schedule of the action. Action does perform only for the
scheduled time.
Check if ‘For video-displayed devices mode’ in ‘Event Reception’ menu. Under
‘For video-displayed devices’ mode, actions cannot perform even during the
scheduled time. Only the logs are displayed in the list pane.
Check if an image is captured properly with ‘Snapshot’ menu. Check if the
stored snapshot image is proper or not. The snapshot image is firstly archived
and then transmitted to FTP server or e-mailed.
93
SNM-64S/P Specifications
Item
SNM-64S
Network Camera, Video Server,
DVR, Network Recorder
Type of device
Number of devices to register to the program
Device to
use
No limit
SNC-550, SNP-3300/1000
SNS-100/400
SVR-1630, SVR-1650/1640/950,
SVR-940/450
SNR-32A/16A/9A
Supported devices
User
Account
User Group
2
No limit
User
2
No limit
Primary and secondary video monitoring screen
Supported
Screen-split modes
1 ~ 64
Full-screen mode
Live
monitoring
Control menu
Supported
Launches Instant Player window
manually (DVR/Network Recorder
only)
Controls PTZ function (Pan, Tilt,
Zoom, Focus, Preset)
Supported
Supported
Sends out e-Mail
-
Supported
Transmits image files to a FTP
server
-
Supported
Takes snapshot / Prints image
Playback
SNM-64P
Supported
Remote playback
Supported
Remote backup
Supported
Local playback
Supported
Converts video file format to AVI
Supported
Search
Control menu
Go to a certain time
Supported
Latest data search
Supported
Timeline index search
Supported
Zooms in/out on the recorded
image
Supported
Sends out e-Mail
-
Supported
Transmits image files to a FTP
server
-
Supported
Takes snapshot / Prints image
94
Supported
Display current event log on the list
Supported
Changes border of live video channel to red
Supported
Event
signal
monitoring
Filters out unnecessary signal
Launches Instant Viewer window
manually
Launches Instant Player window
manually
Specifies a certain types of alarms to monitor
Specifies a certain period of time of a day to
monitor alarms
Defines automated notifications to user
Defines actions against alarms
Schedules actions against alarms
Displays current alarm log on the
list
Plays warning sound or message
automatically
Displays thumbnail image
automatically
Alarm
Launches Instant Viewer window
Alarm
signal
automatically
monitoring notification &
Launches Instant Player window
Actions
automatically
Supported
Supported
Control menu
Library
-
Supported
-
Supported
-
Supported
Supported
Supported
-
Supported
-
Supported
-
Supported
-
Supported
-
Supported
Controls preset on PTZ camera
-
Supported
Sends out e-Mail
-
Supported
Transmits image files to a FTP
server
-
Supported
Creates time schedules to use
-
Supported
Registers e-Mail accounts to use
-
Supported
Registers FTP servers to use
-
Supported
-
Supported
-
Supported
-
Supported
Sends out e-Mail
-
Supported
Transmits image files to a FTP
server
-
Supported
Marks an alarm as confirmed
-
Supported
Provides space to write comments
-
Supported
Provides integrated window of easy to use
Verification
Alarm
Control
Station
Actions
Supported
Launches Instant Viewer window
manually
Launches Instant Player window
manually
Confirmation
Interactive communication among maps in different
layers
Event
monitoring Composition
on a map
Supported
Number of map group(s)
1
No limit
Number of layers per map group
1
16
Number of maps per layer
64
64
Supports JPEG image
Supported
※ The entire items are not supported in every device. Some items are not supported in certain devices.
95
96