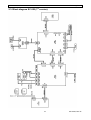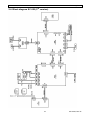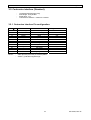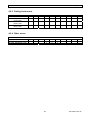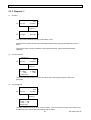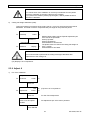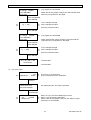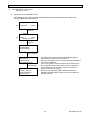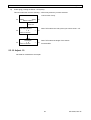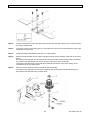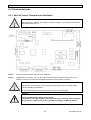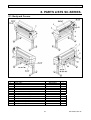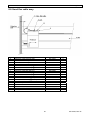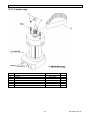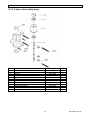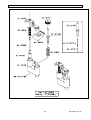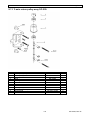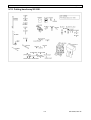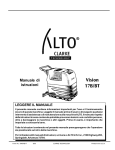
1
Maintenance Manual SC CUTTING PLOTTER MUTOH EUROPE N.V. AP-74030, Rev./ B 2 AP-74030, Rev / B COPYRIGHT NOTICE COPYRIGHT © 2001 Mutoh Europe N.V. all rights reserved. This document may not be reproduced by means, in whole or in part, without written permission of the copyright owner. This document is furnished to support the Mutoh SC-series cutting plotter. In consideration of the furnishing of the information contained in this document, the party to whom it is given assumes its custody and control and agrees to the following : 1) The information herein contained is given in confidence, and any part thereof shall not be copied or reproduced without written consent of Mutoh Europe N.V. 2) This document or the contents herein under no circumstances, shall be used in the manufacture or reproduction of the article shown and delivery of this document shall not constitute any right or license to do so. FCC WARNING This equipment complies with the requirements for a class A computing device in the FCC rules, part 15, subpart J. Operation of this device in a residential area may interfere with television or operating utilities. Cutters generate weak radio signals and may interfere with television reception and utilities. If the cutter does interfere with radio or TV reception, try the following : . · · · · Change the direction of your radio and TV reception antenna or feeder. Change the direction of the cutter. Move either the cutter or the receiving antenna so that there is more distance between them. Be sure the cutter and the receiving antenna are on separate power lines. 3 AP-74030, Rev / B 4 AP-74030, Rev / B TABLE OF CONTENTS Maintenance Manual................................................................................................1 1. SPECIFICATIONS. ................................................................................................9 1.1. Mutoh SC-series Cutting Plotter ...............................................................................................9 1.2. SC cutting plotter, environment. .............................................................................................10 1.3. Function keys. .........................................................................................................................11 2. SYSTEM BLOCKst DIAGRAM. ...............................................................13 2.1. Block diagram SC-series (1 version). ...................................................................................13 2.2. Block diagram SC-series (2nd version)....................................................................................14 2.3. Block diagram SC-550 (1st version)........................................................................................15 2.4. Block diagram SC-550 (2nd version).......................................................................................16 3. INTERFACES. ...........................................................................................................17 3.1. Serial interface RS-323C (standard). ......................................................................................17 3.1.1. RS-232C pin configuration. .............................................................................................18 3.1.2. Serial cable configuration. ...............................................................................................18 3.2. Centronics interface (Standard). .............................................................................................19 3.2.1. Centronics interface Pin configuration. ...........................................................................19 4. TROUBLESHOOTING. ..................................................................................21 4.1. Recoverable errors. .................................................................................................................21 4.1.1. RECOVERABLE SYSTEM ERRORS ...........................................................................21 4.1.2. COMMUNICATION ERRORS ......................................................................................22 4.1.3. LANGUAGE ERRORS...................................................................................................23 4.2. Unrecoverable errors...............................................................................................................24 4.2.1. Processor errors................................................................................................................24 4.2.2. X – Y Servo errors. ..........................................................................................................24 4.2.3. Cutting head errors...........................................................................................................25 4.2.4. Other errors. .....................................................................................................................25 4.3. Problem symptoms and suggested actions..............................................................................26 4.3.1. Processor errors................................................................................................................26 4.3.2. X- Y Servo errors.............................................................................................................26 4.3.3. Cutting head errors...........................................................................................................27 4.3.4. Other errors. .....................................................................................................................27 5. SPECIALIZED DIAGNOSTICS. ...........................................................29 5.1. Diagnostics overview..............................................................................................................29 5.1.1. Diagnostics with SC-keyboard.........................................................................................29 5.1.2. Diagnostics with optional LCD keyboard........................................................................30 5.2. Diagnostics with SC-keyboard................................................................................................32 5.2.1. Initialising the EEPROM. ................................................................................................32 5.2.2. Aging................................................................................................................................33 5.2.3. Drawings for quality check. .............................................................................................33 5.2.4. Measuring the CUTTING MAT height. ..........................................................................34 5 AP-74030, Rev / B 5.2.5. Adjusting the SHEET OFF system. .................................................................................34 5.2.6. Backup plots (on paper only). ..........................................................................................35 5.3. Diagnostics with optional LCD keyboard...............................................................................36 5.3.1. Diagnost 1. .......................................................................................................................37 5.3.2. Diagnost. 2 .......................................................................................................................38 5.3.3. Diagnost. 3 .......................................................................................................................39 5.3.4. Diagnost. 4 .......................................................................................................................40 5.3.5. Diagnost. 5 .......................................................................................................................40 5.3.6. Diagnost. 6 .......................................................................................................................42 5.3.7. Adjust. 7 ...........................................................................................................................42 5.3.8. Adjust. 8 ...........................................................................................................................42 5.3.9. Adjust. 9 ...........................................................................................................................43 5.3.10. Adjust. 10 .......................................................................................................................46 6. PARTS REPLACEMENT AND ADJUSTMENT. ...............47 6.1. Maintenance access table for parts replacement. ....................................................................47 6.2. Mechanical parts. ....................................................................................................................48 6.2.1. Covers Left and Right : removal and installation. ...........................................................48 6.2.2. Transparent cover : Removal and installation..................................................................49 6.2.3. PCB box :open and close. ................................................................................................50 6.2.4. Y-rail cover : Removal and installation. ..........................................................................51 6.2.5. Grid cover : Removal and installation. ............................................................................51 6.2.6. Cutting head : Removal and installation. .........................................................................53 6.2.7. Grid rollers : removal and installation. ............................................................................54 6.2.8. Y-drive belt (long) : removal and installation..................................................................55 6.2.9. Pressure roller pressure adjustment..................................................................................58 6.2.10. Sheeting off mechanism : mechanical alignment. .........................................................59 6.3. Electronical parts.....................................................................................................................60 6.3.1. Main PC board : Removal and installation. .....................................................................60 6.3.2. Main and terminal PCB SC-550 : Removal and installation. ..........................................61 6.3.3. Dip switch settings on Main PC board.............................................................................62 6.3.4. EEPROM initialisation and replacement. ........................................................................63 6.3.5. Power supply board : removal and installation................................................................64 6.3.6. Power supply board SC-550 : removal and installation...................................................65 6.3.7. Power supply output connections. ...................................................................................65 6.3.8. Terminal Board : removal and installation. .....................................................................66 6.3.9. Keyboard : removal and installation. ...............................................................................67 6.3.10. X-motor and drive belt : removal and installation. ........................................................68 6.3.11. Y-motor and drive belt : removal and installation. ........................................................68 6.3.12. Head flex cable : removal and installation.....................................................................69 6.3.13. Paper sensors : removal and installation. .......................................................................70 6.3.14 Transparent cover sensor : removal and installation.......................................................70 6.3.15. Pressure roller UP/DOWN sensor : removal and installation........................................71 6.3.16. Pressure roller UP/DOWN sensor SC-550 : removal and installation...........................71 6.3.17. Fan motors : removal and installation............................................................................72 7. JIG TOOL LIST. ......................................................................................................73 7.1. Jig tool list...............................................................................................................................73 7.2. Special glue. ............................................................................................................................73 6 AP-74030, Rev / B 8. PARTS LISTS SC-SERIES. .........................................................................75 8.1. Body and Covers.....................................................................................................................75 8.2. Cover right + keyboard assy. ..................................................................................................77 8.3. Cover left assy.........................................................................................................................78 8.4. Transparent cover assy............................................................................................................79 8.5. PCB box. .................................................................................................................................80 8.6. Head flex cable assy................................................................................................................81 8.7. Pressure roller UP/DOWN mechanism...................................................................................82 8.8. X-motor assy. ..........................................................................................................................84 8.9. X-rail assy. ..............................................................................................................................85 8.10. Y-motor assy. ........................................................................................................................87 8.11. Y-rail assy. ............................................................................................................................88 8.12. Y-axis drive belt assy............................................................................................................89 8.13. Y-drive pulley assy + mounting bracket. ..............................................................................90 8.14. Y-axis return pulley assy.......................................................................................................91 8.15. Pressure roller assy................................................................................................................92 8.16. Cutting head assy. .................................................................................................................94 8.17. Sideplate left (ME-20599). ...................................................................................................99 8.18. Sideplate right (ME-20600). ...............................................................................................100 9. PARTS LISTS SC-550. ...................................................................................101 9.1. Body and covers SC-550.......................................................................................................101 9.2. Cover right + keyboard assy SC-550. ...................................................................................102 9.3. Cover left assy SC-550. ........................................................................................................103 9.4. PCB box left and right SC-550. ............................................................................................104 9.5. Penhead flex cable assy SC-550. ..........................................................................................106 9.6. X-motor Assy SC-550...........................................................................................................107 9.7. X-rail assy SC-550. ...............................................................................................................108 9.8. Y-MOTOR Assy SC-550......................................................................................................109 9.9. Y-axis drive belt assy SC-550...............................................................................................110 9.10. Y-drive pulley assy + mounting bracket SC-550................................................................111 9.11. Y-axis return pulley assy SC-550. ......................................................................................112 9.12. Y-rail assy SC-550. .............................................................................................................113 9.13. Pressure roller UP/DOWN mechanism SC-550. ................................................................114 9.14. Pressure roller assy SC-550. ...............................................................................................115 9.15. Cutting head assy SC-550. ..................................................................................................117 7 AP-74030, Rev / B 8 AP-74030, Rev / B Maintenance Manual – SC Cutting Plotter 1. SPECIFICATIONS. 1.1. Mutoh SC-series Cutting Plotter Cutting area SC-550 : 100 – 540 mm x 4 m SC-650 : 100 – 630 mm x 12 m SC-750 : 100 – 780 mm x 12 m SC-1000 : 100 – 1030 mm x 12 m SC-1300 : 100 – 1200 mm x 12 m 50 meter 1.2 mm (1 mm for SC-550) Friction Drag 0.005 mm 0.15 % (0.20 % for SC-550) 0.15 mm / m 30°, 45° 60° Offset 0.3 & 0.5 mm 1000 mm / s (600 mm / s for SC-550) 4G (pen UP), 3G (pen DOWN) 2G for SC-550 40 / sec. 20 – 500 g RS – 232 / centronics 1 Mb standard / 4 Mb optional No optional buffer on SC-550 MHGL, MHGL/2, HGL/2 compatible & MCGL (Calcomp compatible) Yes 0 ® 1 mm Fuzzy logic / Vector look-ahead / Curve & Arc smoothing Yes (not on SC-550) Up to 100 copies 100 to 120 VAC 50/60 Hz 200 to 240 VAC 50/60 HZ Max. addressable cut length Maximum media thickness Drive mechanism Knife / Cut type / principle Mechanical resolution Accuracy Repeatability Knife types Speed Acceleration PEN UP / DOWN cycles Pressure range Interface (standard) Input buffer Graphic languages Configurable origin Offset adjustment range Integrated intelligence Auto sheet off function Replot function Power requirements 9 AP-74030, Rev / B Maintenance Manual – SC Cutting Plotter 1.2. SC cutting plotter, environment. The location where you set up your equipment is very important. Please see to it that it meets following conditions : q Power supply of 100 to 120 VAC 50/60 Hz or 200 to 240 VAC 50/60 Hz. q Ambient conditions : o Operating environment § Temperature : 5°C to 40°C (41°F to 104°F) § Humidity : 35% - 75% non-condensation o Recommended environment § Temperature : room temperature 16°C to 32°C (61°F to 90°F) § Humidity : 50% to 65% non-condensation o Variation rate § Temperature : 2°C per hour § Humidity : 5% per hour o Storage environment § Temperature : 0°C to 50°C (32°F to 122°F) q Please protect your cutter from moisture, dust, draughts and direct sunlight. It is best to keep your machine away from open windows and air-conditioners. q See to it that there is an adequate space around the cutter so that ventilation is not obstructed. q Avoid unnecessary vibrations and set up your cutter on a level surface. q When selecting a place for your cutter, leave at least 90 cm in front and 90 cm at the rear. 10 AP-74030, Rev / B Maintenance Manual – SC Cutting Plotter 1.3. Function keys. Using the control panel, you can access different modes and alter several settings, in order to fine-tune the cutter to match all your needs. 1) 2) 3) 4) 5) 6) 7) 8) 9) 10) JOG – keys ON-LINE ORIGIN : : : Keys for manual movement of the tool head. Key to switch between OFF-LINE and ON-LINE mode. When this key is pressed, a new origin is set at the present location of the tool head. Using the ORIGIN key, you can also activate the alignment function. PAGE : Performs media pre-feed cycle and gives access to the replot / copy function and starts the automatic sheet-off function. ENTER : To confirm changes and accept settings. The enter key, marked with a blue dot, also gives access to special functions indicated by the blue text on the control panel. MENU Selection Keys : To select the parameter you want to alter. Value + & - Keys : To change a parameter’s value or setting. LED indicator for plotter parameters and tool selection indication. LED bar for value indicators, error messages and function confirmation. ONLINE-LED indicator 11 AP-74030, Rev / B Maintenance Manual – SC Cutting Plotter 12 AP-74030, Rev / B Maintenance Manual – SC Cutting Plotter 2. SYSTEM BLOCK DIAGRAM. 2.1. Block diagram SC-series (1st version). 13 AP-74030, Rev / B Maintenance Manual – SC Cutting Plotter 2.2. Block diagram SC-series (2nd version). 14 AP-74030, Rev / B Maintenance Manual – SC Cutting Plotter 2.3. Block diagram SC-550 (1st version). 15 AP-74030, Rev / B Maintenance Manual – SC Cutting Plotter 2.4. Block diagram SC-550 (2nd version). 16 AP-74030, Rev / B Maintenance Manual – SC Cutting Plotter 3. INTERFACES. 3.1. Serial interface RS-323C (standard). 1) Baud rate (software selectable). - 19200 bps 9600 bps 4800 bps 2400 bps 1200 bps 2) Data length (software selectable). - 7 bits 8 bits 3) Stop bits (software selectable). - 1 bit 2 bits 4) Parity (software selectable). - Odd Even None 5) Error detection. - Parity error Framing error Overrun error 6) External connector. - DB-25S (equivalent) 7) RS-232C driver / receiver IC. - driver : 75188 (TI, ± 12V power supply) receiver : 75189A 17 AP-74030, Rev / B Maintenance Manual – SC Cutting Plotter 3.1.1. RS-232C pin configuration. PIN # 1 2 3 4 5 6 7 8 9 ® 14 15 16 17 18 19 20 21 ® 25 SIGNAL Frame ground Transmit data Receive date Request to send Clear to send Data set ready Signal ground Carrier detect Not used Transmitter signal Element timing Not used Receiver signal Element timing Data terminal ready Not used Data terminal ready Not used Abbr. FG TXD RXD RTS CTS DSR SG CD Signal direction OUT IN OUT IN IN IN ST IN RT IN DTR OUT DTR OUT 3.1.2. Serial cable configuration. 1) 9 pins ® 25 pins connector. 2) 25 pins ® 25 pins connector. 18 AP-74030, Rev / B Maintenance Manual – SC Cutting Plotter 3.2. Centronics interface (Standard). - Uni-directional (Receiving only) Data length : 8 bit parallel Signal level : TTL Transmission distance : maximum 5 meters 3.2.1. Centronics interface Pin configuration. SIGNAL Strobe (*) DATA 1 ® 8 ACK (*) BUSY PAPER END SELECTED SG FG HIGH SG FAULT SG PIN # 1 2®9 10 11 12 13 16 17 18 19 ® 30 31 32 33 NOTE : - SIGNAL Strobe input Parallel Data input Acknowledge Output Busy Paper end Selected Signal ground Frame ground High level Signal ground Not used Error Signal ground Signal direction In In Out Out Out Out Out Out - Other pins are put in NC (no contact) status. Asterix (*) indicates negative logic. 19 AP-74030, Rev / B Maintenance Manual – SC Cutting Plotter 20 AP-74030, Rev / B Maintenance Manual – SC Cutting Plotter 4. TROUBLESHOOTING. When errors occurring during cutting or after powering on the machine, some LED code may appear on the LED bar to inform you about the kind of error. In general 2 different types of error messages may occur : 4.1. Recoverable errors. Recoverable errors can be recognized by some flashing LED’s on the LED bar. Sometimes the machine continue to work while LED’s are flashing. Sometimes it stops but continue again after correction of the error. Recoverable errors are mostly related to communication problems or user mistakes. 4.1.1. RECOVERABLE SYSTEM ERRORS ERROR CODE 10% 20% 30% 40% 50% 60% 70% 80% 90% 100% IMPOSSIBLE AUTOON-LINE RECOG (S02) G. LANGUAGE NOT CORRESPONDING (S03) MEDIA DETECT ERROR (S05) ROLL MEDIA END (S06) CANNOT AUTO-CONNECT (S07) AUTO CUT ERROR (S08) CHANGE MEDIA (S28) KANJI ROM SUM ERROR (S29) POSSIBLE CAUSE & SUGGESTED ACTION S02 Communication difficulties – Check cables. S03 Select other graphics language. (Chapter 3 - Language Settings ) S05 Media detection impossible. Too much or too little light, incorrect pressure roll position. S06 Load a new sheet or roll. S07 Communication difficulties – Check cables. S08 Error during auto-sheet-off sequence. Check media and auto-cut knife. S28 Change or reload media. 21 AP-74030, Rev / B Maintenance Manual – SC Cutting Plotter 4.1.2. COMMUNICATION ERRORS Communication errors are caused by a problem in the communication between the cutter and the host computer. They can be caused by errors related to the communication conditions, errors due to a defective handshake or command format errors in the ESCAPE sequences. ERROR CODE 10% 20% 30% 40% ERROR ON-LINE FRAME (C01) ERROR ON-LINE OVERRUN (C02) ERROR ON-LINE PARITY (C03) ERROR DATA BLOCK (C06) FEW PARAMETER ESC (C07) FEW PARAMETER ESC (C08) COMMUNICATION BUSY (C09) UNDEFINED ESC (C10) ILLEGAL ESC (C11) ERROR VALUE ESC (C12) MANY PARAMETERS ESC (C13) COMMUNICATION ERROR (C14) 70% 80% 90% 100% ERROR BIAS VALUE (C04) ERROR SUM CHECK (C05) 50% 60% BUFFER OVERFLOW (C15) POSSIBLE CAUSE & SUGGESTED ACTION C01 A framing error occurred. Check the communication settings. Chapter 3. C02 Overrun error. Check the communication settings. Chapter 3. C03 Parity error. Check the communication settings. Chapter 3. C04 Bias is less than EOB code. Check the communication settings. Chapter 3. C05 Check-sum difference cutter vs. host. Check the communication settings. Chapter 3. C06 Data between bias and EOB too large. Check the communication settings. Chapter 3. C07 Not enough ESC-parameters. Check the communication settings. Chapter 3. C08 Not enough ESC-parameters. Check the communication settings. Chapter 3. C09 Change the computer program to prevent the cutter from returning double data. C10 Undefined ESCAPE sequence. Check the ESCAPE command setup. C11 Illegal character used for MH-GL ESC-sequence. Check the ESCAPE command setup. C12 Illegal character in ESC-sequence parameter. Check the ESCAPE command setup. C13 Too many ESC-sequence parameters. Check the ESCAPE command setup. C14 Communication error. Restart the cutter. C15 Buffer overflow. Restart the cutter. 22 AP-74030, Rev / B Maintenance Manual – SC Cutting Plotter 4.1.3. LANGUAGE ERRORS Language errors occur when command data entered from the host computer does not match the data format of the command mode currently activated on the cutter’s side. The error can be caused by a difference in command type or by a syntax error. ERROR CODE 10% 20% 30% 40% UNDEFINED XX (E01) 50% 60% 70% 80% ERROR PARAMETER (E02) ERROR VALUE (E03) UNKNOWN CHAR (E05) BUFFER OVERFLOW (E07) 90% 100% POSSIBLE CAUSE & SUGGESTED ACTION E01 Undefined MH-GL command. Verify computer and cutter language settings. E02 Incorrect number of parameters was transmitted. E03 Parameter out of range was transmitted. Verify computer and cutter language settings. E05 Character unknown to MH-GL was sent. Verify computer and cutter language settings. E07 Polygon and character buffer overflow. Verify computer and cutter language settings. 23 AP-74030, Rev / B Maintenance Manual – SC Cutting Plotter 4.2. Unrecoverable errors. Unrecoverable errors can be recognized when all LED’s are flashing and the machine has stopped working. After pressing the [ENTER] key VERY SHORT (just touch it ones) the error code appears on the LED bar (NOT flashing). To clear the error message, the machine needs to be powered OFF and ON again. (Wait ± 7 seconds between power OFF/ON). Refer to the following chart for error code explanation : 4.2.1. Processor errors. Error Code 0 Watch dog time out Bus trap error Address trap error Illegal instruction (MC68020) Zero divide General processor failure EPROM check-sum error Interrupt failure 1010 CPU failure 1111 CPU failure DRAM error SRAM error Extended RAM error EEPROM error EEPROM error 10% X X 20% X X X X X 60% 70% 80% 90% 100% 80% 90% 100% X X X X X X ERROR CODE 30% 40% 50% X X X X X X X X X X X X X X X X X X X X X X X 4.2.2. X – Y Servo errors. OUT of SYNC X OUT of SYNC Y X POSITION timeout Y POSITION timeout X Over current Y Over current X Encoder fail Y Encoder fail X Overload Y Overload Driver failure Encoder failure 10% X X 20% X X X X X X X X X X X ERROR CODE 30% 40% 50% X X X X X X X X X X X X X X X X X X X X X 24 60% 70% X X X X AP-74030, Rev / B Maintenance Manual – SC Cutting Plotter 4.2.3. Cutting head errors. POSITION Timeout MC OVER CURRENT Moving Coil A/D failure Moving Coil ERROR CODE 30% 40% 50% X X 10% X 20% X X X X X 10% X 20% X ERROR CODE 30% 40% 50% X X X X X 60% 70% 80% 90% 100% 60% X X 70% 80% 90% 100% X X 4.2.4. Other errors. ILLEGAL Mainboard rev. ILLEGAL Mainboard TYPE 25 AP-74030, Rev / B Maintenance Manual – SC Cutting Plotter 4.3. Problem symptoms and suggested actions. 4.3.1. Processor errors. - PROBLEM SYMPTOM Error code 0 Watch dog timeout Bus trap error Address trap error Illegal instruction (MC68020) Zero divide General processor failure Interrupt failure 1010 CPU failure 1111 CPU failure DRAM error SRAM error - SUGGESTED ACTIONS Check cable and connection Check pins and position of EPROM and EEPROM. Reinstall EPROM and EEPROM. Replace Mainboard - EPROM checksum error - EPROM data is changed - Replace EPROM set - EEPROM error - EEPROM data is changed Perform INIT 1 Perform INIT 2 Replace EEPROM - Poor extended RAM connection Bad extended RAM - - Extended RAM error - - POSSIBLE CAUSE Poor connection between main and terminal board. Bad EPROM’s Bad EEPROM Mainboard failure - Check connection Replace extended RAM 4.3.2. X- Y Servo errors. - PROBLEM SYMPTOM OUT of SYNC X OUT of SYNC Y X position Timeout Y position Timeout X over current Y over current X overload Y overload X Encoder fail Y Encoder fail Encoder failure Driver failure - POSSIBLE CAUSE Defective motor / encoder Loose drive pulley Failure in drive circuit Poor connection of motor/ encoder Too much friction in X or Y axis 26 - SUGGESTED ACTIONS Replace motor / encoder Fix pulley or replace motor / encoder Replace main PC board Check cables and connections Check X and Y movement AP-74030, Rev / B Maintenance Manual – SC Cutting Plotter 4.3.3. Cutting head errors. - PROBLEM SYMPTOM Position Timeout Moving Coil (MC) OVER CURRENT Moving Coil (MC) A/D failure Moving Coil (MC) - POSSIBLE CAUSE Nose piece of knife holder (XPC model) not fixed Blade is too far out Sheet off mechanism blocks UP/DOWN movement (Not on SC-550) Head flex cable bad or poor connection Bad cutting head Failure in drive circuit - SUGGESTED ACTIONS Check knife holder Check blade depth Check sheet off mechanism (Not in SC-550) Check connections or replace head flex cable Replace cutting head Replace main PC board - SUGGESTED ACTIONS Check power cord Check wall outlet Check fuse on P/S Check LEDs on P/S Replace P/S Replace mainboard - 4.3.4. Other errors. PROBLEM SYMPTOM System is dead : - No movement - No LED’s lighted Some LED’s lighted but no movement of the motors and cutting head. - Plotter powers on, head UP/DOWN initialises but no movement of motors. Plotter does not shuffle media. - POSSIBLE CAUSE Power failure Defective Power supply (P/S) Defective Mainboard - Defective EPROM’s Defective EEPROM Defective mainboard Poor connection between main and terminal board - Replace EPROM’s Replace EEPROM Replace mainboard Check cable connections - Transparent cover is not closed Transparent cover switch defective - Close the cover Check or replace cover switch Pressure roller lever is not DOWN Bad lever sensor Both media sensors are not covered Media sensors dusty or bad - Lower the lever Check the lever sensor Load media properly Clean or replace media sensors - Illegal mainboard revision (LED code on LED bar) - Mainboard version is not compatible - Use correct mainboard Wrong mainboard (LED code on LED bar) - Mainboard from SC-550 is used in SC-series or vice versa - Use correct mainboard 27 AP-74030, Rev / B Maintenance Manual – SC Cutting Plotter PROBLEM SYMPTOM Plotter has shuffled media but does not respond to data - POSSIBLE CAUSE Plotter is OFF-line Interface cable not connected or bad Wrong plotter driver Wrong interface parameters Bad interface port Plotter is responding to data, but error messages appear on the LED bar (See User’s guide) - Wrong interface parameters Wrong cable configuration Plotter is cutting but quality is not acceptable - Blade worn or broken Blade is not turning smooth Offset is not correct Blade is too far out Cutting force is too high Cutting mat worn Wrong plotter driver Play on cutting head Drive belt tension not correct X or Y motor defective - - Media is not loaded straight in the machine Grid rollers dirty Grid rollers or pressure rollers worn Speed or acceleration too high Pressure roller pressure not correct Media backing is very slippery (Teflon based) - Media tracking problems Media skews during cutting or loading.. - - - - - - 28 SUGGESTED ACTIONS Put plotter in ON-line Check interface cable Check plotter driver Check interface parameters Check port or replace main PC board Check interface parameters (See User’s Guide) Check interface cable Replace blade Check or replace knife holder Perform offset procedure (See User’s Guide) Adjust knife depth Reduce cutting force Replace cutting mat Select correct plotter driver Check or replace cutting head Check or adjust belt tensions Replace X or Y motor Load media as described in the User’s Guide Clean grid rollers Replace grid rollers or pressure rollers Decrease o Cutting speed o Pen/UP speed o Cutting acceleration o Pen/UP acceleration Adjust pressure roller pressure Change media type or decrease speed acceleration AP-74030, Rev / B Maintenance Manual – SC Cutting Plotter 5. SPECIALIZED DIAGNOSTICS. 5.1. Diagnostics overview. Two different types of specialized diagnostics are available on the SC-series cutting plotter : Þ Þ Diagnostics with normal SC-keyboard Diagnostics with optional keyboard with LCD display. (Keyboard from XP-C cutting plotter). The most important adjustments can be performed with the standard SC-series keyboard. However to take advantage of all the features of the complete diagnostics menu, an optional XP-C keyboard (Partnumber EY6200-50010) is required. Caution : The specialized diagnostics built into the SC-series cutting plotters are designed only for maintenance purposes and may only be used by authorized MUTOH technicians. Entering the Diagnostics Menu’s by non qualified people may result in damage of the machine. 5.1.1. Diagnostics with SC-keyboard. The following diagnostics are available with normal SC-keyboard : q Initialising EEPROM Ø INIT 1 Ø INIT 2 q Aging q Drawing for Quality check q Measuring the CUTTING MAT height q Adjusting the SHEET OFF system (Not on SC-550) q Backup plot User parameters q Backup plot Adjustment values Ø Ø Ø X axis Y axis X & Y axes simultaneously 29 AP-74030, Rev / B Maintenance Manual – SC Cutting Plotter 5.1.2. Diagnostics with optional LCD keyboard. By using the optional keyboard with LCD, you can access all the existing diagnostics. Ten diagnostics pages as follows : DIAGNOST 1 DIAGNOST 2 DIAGNOST 3 DIAGNOST 4 30 AP-74030, Rev / B Maintenance Manual – SC Cutting Plotter DIAGNOST 5 DIAGNOST 6 Reserved for future use. ADJUST 7 Reserved for future use. ADJUST 8 ADJUST 9 ADJUST 10 31 AP-74030, Rev / B Maintenance Manual – SC Cutting Plotter 5.2. Diagnostics with SC-keyboard. While pressing and holding the [MENU ], [VALUE ¯] and [VALUE ] keys simultaneously, turn the machine on. Now all LED’s, except the ONLINE MLED, are on. If you have pressed a wrong key, or other LED’s are on or off, switch off the machine and try again. 5.2.1. Initialising the EEPROM. Caution : Before initialising the EEPROM, perform the · Backup plot with user parameters · Backup plot with adjustment parameters (Please refer to 5.2.6.Backup plots (on paper only)) This will give you a hard copy with all the current settings and adjustment values. 1) INIT 1 : Caution : INIT 1 initialises the USER PARAMETERS back to DEFAULT VALUES. Step 1 : Power on the unit in diagnostics mode. Step 2 : Press : · · Step 3 : 2) ORIGIN until 10 % LED is on. [VALUE ¯], [VALUE ], [VALUE ¯], [VALUE ] Power OFF. INIT 2 : Caution : INIT 2 initialises all adjustment values back to DEFAULT VALUES. After INIT 2 the unit needs to be RECALIBRATED, and this requires a LCD keyboard and can only be performed by MUTOH qualified people. NEVER start this procedure unless you are sure it is really necessary and you have the tools to recalibrate the unit. Step 4 : Power on the unit in diagnostics mode. Step 5 : Press : · · Step 6 : ORIGIN until 10 % LED is on. [VALUE ¯], [VALUE ], [VALUE], [VALUE ¯] Power OFF. 32 AP-74030, Rev / B Maintenance Manual – SC Cutting Plotter 5.2.2. Aging. This test makes the plotter continuously moving in the X-/Y- axis. This test can be performed without media or with media loaded. Step 1 : Power on the plotter in diagnostics mode. Step 2 : Press the [ORIGIN] key until 50 % LED is on. Step 3 : Press the [VALUE ¯] key. (Unit starts initialising, wait until finished) Step 4 : Press [MENU ] key. Step 5 : The [NEXT/+] or [LAST/-] key keys will determine what axis is to be aging. · · · [MENU ] will continuous move the X and Y axis. [VALUE ¯] will continuous move the X axis only. VALUE ] will continuous move the Y axis only. Note : Press the [VALUE ¯] key to start / pause aging. Press the [VALUE ] key to end aging and select another axis to be aged if desired. Step 6 : Power OFF. 5.2.3. Drawings for quality check. Step 1 : Power on the unit in Diagnostics mode. Step 2 : Put a pen in the head and load some paper. Step 3 : Press the [ORIGIN] key until 50% LED is on. Step 4 : Press the [VALUE ¯] key (Unit starts initialising and loads medium if lever is down. Wait until finished) Step 5 : Press the [VALUE ] key. Step 6 : The next key will determine the kind of drawing to be made. · · · · [MENU ¯] for ZIG ZAG test [MENU ] for 45° test [VALUE ¯] for DASH LINE test [VALUE] for circles test Now you have to position the tool (pen) on the desired place on the medium by using the JOG keys (arrow keys). Note : Press the [VALUE ¯] key to start / pause the test drawing. Press the [VALUE ] key to end and select another drawing 33 AP-74030, Rev / B Maintenance Manual – SC Cutting Plotter Step 7 : When finished power off the machine. 5.2.4. Measuring the CUTTING MAT height. Caution : This adjustment routine requires a special tool! DO NEVER start this routine without this tool. Step 1 : Place TOOL JD-44140 (adjustment pen) in head. Step 2 : Power on the unit in diagnostic mode. (No medium loaded) Step 3 : Press the [ORIGIN] key until 80% LED is on. Step 4 : Press the [VALUE ] key. (Unit starts initialising, wait until finished) Step 5 : Press the [VALUE ¯] and [ENTER] key. (Unit starts measuring the cutting mat height on several places, wait until finished.) Step 6 : Press the [ENTER] key. (The values are now stored in EEPROM) Step 7 : Power off. 5.2.5. Adjusting the SHEET OFF system. (NOT for SC-550) Step 1 : Power on the unit in diagnostic mode (No medium loaded). Step 2 : Press the [ORIGIN] key until 90% LED is on. Step 3 : Press the [VALUE ] (Unit starts initialising, wait until finished). Step 4 : Press the [VALUE ¯] and [ENTER] key. The head moves to the left hand side and stops approximately 60 mm before the left hand side of the machine. Open the transparent caver and move the head manually to the utmost left position. The correct position is that the head is at the left as much as possible but that the knife catch bracket is still free to move UP/DOWN. Check that the head can catch the bracket and hold it firmly. Step 5 : With the cover still open (!!! IMPORTANT !!!), press the [ENTER] key twice. The value is stored now in the EEPROM. Step 6 : After closing the cover, the head will move to the right. Step 7 : Power off. 34 AP-74030, Rev / B Maintenance Manual – SC Cutting Plotter 5.2.6. Backup plots (on paper only). Step 1 : Power on the unit in diagnostic mode. Step 2 : Press the [ORIGIN] key until 50% LED is on. Step 3 : Put a pen in the head and load some paper (Min. A3 size). Step 4 : Press the [VALUE ] key (Unit will start initialising, wait until finished). Step 5 : Pres the [VALUE ] key. Step 6 : The next key will determine the kind of plot. · · · Step 7 : When finished 1 of the 2 plots, you can change the sheet and select the other one without powering off the machine. Þ Þ Þ Step 8 : [VALUE ¯] selects USER PARAMETERS backup. [VALUE ] selects ADJUSTMENT VALUES backup. [VALUE ¯] (Unit will start plotting, wait until finished.) Press the [VALUE ] key Select with the [VALUE ¯] and [VALUE ] key the desired plot. Press the [VALUE ¯] key (Unit will start plotting, wait until finished). Power off. 35 AP-74030, Rev / B Maintenance Manual – SC Cutting Plotter 5.3. Diagnostics with optional LCD keyboard. To have access to the complete range of specialised diagnostics, an optional keyboard With LCD from the MUTOH XP-C series is required. The partnumber for the keyboard is EY-6200-50010. To enter the specialised diagnostics mode, proceed as follows : Step 1 : Open the PC-board box from the back of the machine. (On SC-550 remove the right cover.) Step 2 : On the terminal board (board to the left in the box when you are behind the machine) you must plug in the optional keyboard in connector J513. (On SC-550 terminal board is board on top of mainboard.) Step 3 : Depending on the type of keyboard, power ON the machine with the following buttons pressed simultaneously : Step 4 : · New style keyboard : [PAGE] and [ORIGIN] (P/Nr : EY-6200-50100) · Old style keyboard : 0 and Decimal (.) and Minus (-) (P/Nr : EY-5005-50100) The following screen appears on the display : ** DIAGNOSTICS ** ** MODE ** TYPE : SC - xxx Step 5 : If you are planning to make a lot of tests and / or adjustments in the diagnostic mode, you can avoid above ‘power on’ procedure as follows : · On the Main PC board (board in the middle), look for the DIP switches (in front of LED’s) and put switch 1 in the ON position. · Now the unit will always power on in diagnostic mode until you change switch 1 to the OFF position again. 36 AP-74030, Rev / B Maintenance Manual – SC Cutting Plotter 5.3.1. Diagnost 1. Caution : Before running these diagnostics, be sure to perform the · Backup plot user parameters (Please refer to 5.2.6. Backup plots) · Backup plot adjustment values (Please refer to 5.2.6. Backup plots) This will give you a hard copy of all the current settings and adjustment values. 1) Memory : * Diagnost –1 * Memory Sensor Press F3 MEMORY CHECK SUM CHECK SRAM DRAM EEPROM Press F1 * SUM * F3 EPROM EEPROM KROM F2 F4 Press F2 : Checksum EEPROM (Version EEPROM) Press F3 : Checksum EPROM set Press F4 : Checksum KanjiROM The Checksum and Version value of EEPROM is of no importance. The Checksum of EPROM is related to the version. The calculated sum should be equal to the programmed one. If this is not the case, EPROM set has to be replaced. The STATIC RAM test (F2) and DYNAMIC RAM test (F3) are of no importance for maintenance and repair. MEMORY CHECK SUM CHECK SRAM DRAM EEPROM F4 Press F4 EEPROM F1 F3 Read Init1 TEST Write Init2 F2 F4 Read (F1) and Write (F2) are of no importance for maintenance and repair. 37 AP-74030, Rev / B Maintenance Manual – SC Cutting Plotter Init1 (F3) initialises all user parameters to default values. Init2 (F4) initialises all adjustment values to default values. Caution : After INIT, the following adjustments need to be performed · · · · 2) X axis length adjustment (ADJ.08) Cutting Mat height adjustment (ADJ.-08) Pen force calibration (ADJ.-09) Sheet-off system adjustment (ADJ.09) (Not for SC-550) Sensor * Diagnostic-1 * Memory Sensor Press F4 Press F1/F3 Lever : Up Cover : Closed Y Org : Front : Open Middle : Open Rear : Open Sensors ‘Front’, Middle’ and ‘Rear’ are paper sensors located on the plotter bed. ‘Lever’ sensor detects if pressure rollers are UP/DOWN. ‘Cover’ sensor detects if safety cover is OPEN/CLOSED. (Not for SC-550) ‘Y Org’ sensor is the sensor on the back of the penhead that detects the position of the pressure rollers. 5.3.2. Diagnost. 2 1) Panel test. * Diagnost-2 * F3 Panel Actuator F4 Press F3 F1 LED and KEY test < Key : Press EXIT > F2 Pressing F1/F2 actuates the LED’s on the SC-keypad and shows the corresponding position on the LCD. Keys pressed on the SC-keypad are indicated on the LCD. 38 AP-74030, Rev / B Maintenance Manual – SC Cutting Plotter 5.3.3. Diagnost. 3 1) Actuator. * Diagnost – 3 * F3 Pen XY-polar XY-enc F2 F4 Press F2 * PEN TEST * F3 Torque Encoder F4 Test (F3) Torque tests the moving coil and drive circuit. Pressing F2/F4 makes the MC move UP/DOWN step by step and puts more/less force on the head. Test (F4) Encoder shows the readout of the penhead encoder. (Move the head manually up/down). 2) XY-encoder test. * Diagnost-3 * F3 Pen XY-polar XY-enc F2 F4 Press F3 * XY Encoder * X : 0000 Y :0000 0.00 0.00 Press EXIT This test shows the readout of the X/Y encoders when manually moving the head or the gridrollers. 3) XY-polarity test * Diagnost-3 * F3 Pen XY-polar XY-enc F2 F4 Press F4 * XY-Polarity * X axis : OK Y axis : Ok Press EXIT This test checks the drive circuit of X and Y motors. One current pulse is sent to the motors and the direction of the movement is checked by the encoders. 39 AP-74030, Rev / B Maintenance Manual – SC Cutting Plotter 5.3.4. Diagnost. 4 1) Toolset F1 * Diagnost-4 * TOOLSET Paper F2 Press F1 * Select TOOL * F3 < Pen1 > Press ENTER/EXIT F4 This diagnostic allows you to change from tool to pen or the reserve by pressing F3/F4. 2) Paper. This test / adjustment is of no importance. 5.3.5. Diagnost. 5 1) Time and Distance. F1 F3 * Diagnost – 5 * TIME DISTANCE XY-move General F2 F4 (F1) TIME displays the actual working time of the machine. (F2) DISTANCE displays the actual distance that the machine has been cut. 40 AP-74030, Rev / B Maintenance Manual – SC Cutting Plotter 2) X-Y Move. * Diagnost – 5 * TIME DISTANCE XY-move General Press F3 * XY MOVE * F3 Aging Quality Shift F2 F4 Press F2 * Aging * F3 X XY Y F2 F4 With this test you can make the plotter continuously moving in the X-/Y- axis or both axes together and the time of operation is displayed Press F3 * Paper shift * F3 Start Finish F4 Line45 Circle F2 F4 For this test a SHEET of paper need to be loaded. This test checks the if the tracking of the media remains correct during operation Press F4 F1 F3 * Quality * Blocks Dashline For this test a SHEET of paper and a pen need to be loaded. This test is used to check the overall plot quality of the machine Before you press (F3) ‘START’, you have to position the pen to the desired place on the paper by using the jog keys. Press (F1) to activate the ZIG ZAG test. Press (F2) to activate the 45° test. Press (F3) to activate the Dash line test. Press (F4) to activate the Circles test. 3) General (Backup plots). F1 F3 * Diagnost – 5 * TIME DISTANCE XY-move General F2 F4 Press F4 This plot requires Min A3 size paper and a pen. * Total Plot * F3 Backup Adjust F4 (F3) ‘Backup’ plots the USER parameters. (F4) ‘Adjust’ plots the adjustment values. 41 AP-74030, Rev / B Maintenance Manual – SC Cutting Plotter 5.3.6. Diagnost. 6 Reserved for future use. 5.3.7. Adjust. 7 Reserved for future use. 5.3.8. Adjust. 8 1) X-axis Length Adjustment. Caution : The MUTOH SC-series plotters are calibrated before shipping from the factory. Do not perform this adjustment except when obviously worsens. An accurate reference scale is required to perform this calibration. * Adjust – 08 * F3 Xaxis adj Roller F4 Press F3 F1 F3 Axis correction 500mm Robot1 20inch Robot2 F2 F4 The X-axis length calibration compensates tolerance on the GRID roller diameters causing incorrect length of the X-axis movement. F4 Load a A1-size paper or a larger and a pen. Select (F1) or (F2) depending if you want to calibrate metric or imperial. Press F1 Axis F3 Plot 500mm Input Press (F3) Plot then (F3) start : The plotter will draw a square of 500mm (or 20 Inch). Remove the paper from the machine and measure the length of the X-axis lines as accurate as possible. Press (F4) Input : Now you can enter the real (measured) value. F1/F3 selects the digit that you want to change. F2/F4 changes the value. Press ENTER to confirm. Press exit. 42 AP-74030, Rev / B Maintenance Manual – SC Cutting Plotter Caution : You cannot check if the calibration is correct by internal test from the plotter. Check the calibration by sending a file from the computer. If you perform the 500mm (20Inch) square again, it will be plotted as before WITHOUT calibration. 2) Cutting mat height calibration (roller). This test measures unevenness of the cutting mat on ± every 40 mm and stores this data in EEPROM. This data is used to compensate the pen height on this particular places. * Adjust – 08 * F3 Xaxisadj Roller F4 Press F4 * Roll height * F3 Measure Display F4 Without paper loaded, put the Special Adjustment pen JD-41440 in the penholder. Press (F4) Roller. Press (F3) Measure. Press ENTER to start the test. The plotter starts to measure the cutting mat height on every ± 40mm. Press ENTER to save data. Note : It is recommended to performed the cutting mat height calibration after replacement of the cutting mat. (F4) Display is of no importance. 5.3.9. Adjust. 9 1) Pen force calibration. * Adjust – 09 * F3 PenForce Cutter F4 Press F3 * Pen Force * F3 Adjustment Plot Check Press F3 Put Pen in the head Close cover and press ENTER. F2 F4 (F2) Plot is of no importance. For Pen Force adjustment Put Adjustment pen JD-41440 in penhead. Press ENTER 43 AP-74030, Rev / B Maintenance Manual – SC Cutting Plotter Pen Force : 40 g F2 change : DOWN Press ENTER to Input value F2 (F2) toggles pen UP/DOWN. Attach bar tension gauge of 50g to pen and read the value when the pen tip lifts from the paper. Press F2 (DOWN) Press ENTER F1 F3 * Pen Force Input * 1g ® 40g F2 F4 F1/F3 changes the digit F2/F4 changes the value. Enter the measured value Press ENTER Pen Force : 450g F2 change : DOWN Press ENTER to Input value F2 (F2) toggles pen UP/DOWN Attach a bar tension gauge of 500 g to pen and read the value when the pen tip lifts from the paper. Press F2down Press ENTER F1 F3 Pen Force Input 1g ® 450g F2 F4 F1/F3 changes the digit F2/F4 changes the value. Enter the measured value Press ENTER Confirm Input 40 ® 40 , 450 ® 450 Press Enter 2) Press ENTER Press ENTER Pen force Verify. * Pen Force * F3 Adjustment Plot Check F2 F4 (F2) Plot is of no importance (F4) to verify the pen force calibration. Press F4 Put Pen in the Head Close cover and press ENTER Put adjustment pen JD-41440 in penhead. Press ENTER F1 F3 Pen Force : 10g : DOWN DOWN / UP F2 F4 With F1/F3 you can select different pen forces. With F4 you can toggle UP/DOWN. Attach a bar tension gauge to the pen and verify the value. Press EXIT, Press ENTER. 44 AP-74030, Rev / B Maintenance Manual – SC Cutting Plotter 3) CUTTER (Sheet – Off system). (Not for SC-550) A) Adjustment of the Sheet-Off system. This calibration stores the position in the EEPROM where the penhead makes the knife catch bracket grabbing the sheet-off knife. * Adjust – 09 * F3 PenForce Cutter F4 Press F4 Cutter F3 Adjust Aging Select or EXIT F4 Press F3 Wait until Finished then Press ENTER Press ENTER Place Pen head so that it can take the knife and press ENTER Press ENTER The adjusted value = -XX.XX Press ENTER to save or EXIT The head moves to the left hand side and stops approx. 60mm before the left side of the machine. Open the transparent cover and move the head manually to the utmost left position. The correct position is that the head is at the left as much as possible but that the knife catch bracket is still free to move UP/DOWN. Check that the head can catch the Bracket and can hold it firmly. With the cover still open (VERY IMPORTANT) press ENTER and ENTER after closing the cover the head will travel to the right. 45 AP-74030, Rev / B Maintenance Manual – SC Cutting Plotter B) Cutter aging (Testing the Sheet – Off system). This test makes the machine sheeting – off as many times as you have selected. Load a sheet of vinyl. Cutter F3 Adjust Aging Select or EXIT F4 Press F4 F3 F3 Aging How many times ? < 1 X Enter to confirm Aging Cut length < 1 X Enter to confirm With F3/F4 select how many times you want to sheet – off. > F4 > F4 With F3/F4 select the length of the sheets. Press ENTER. 5.3.10. Adjust. 10 Not used for maintenance and repair. 46 AP-74030, Rev / B Maintenance Manual – SC Cutting Plotter 6. PARTS REPLACEMENT AND ADJUSTMENT. 6.1. Maintenance access table for parts replacement. Removal of the following cover gives access to the following part or mechanical adjustment : COVER Transparent Cover (Not on SC-550) Gives access to Cutting head Auto sheet-off system (Not on SC-550) Pressure rollers Cutting mat Left cover Y-axis return pulley assy Y-axis drive belt tension adjustment Power supply board (SC-550 only) Right cover Y-motor Y-drive pulley assy Y-drive belt (short) tension adjustment Pressure roller UP/DOWN sensor Pressure roller UP/DOWN mechanism Keyboard assy X-drive belt Main/driver board (SC-550 only) EPROM set (SC-550 only) EEPROM (SC-550 only) Terminal board (SC-550 only) Y-rail cover Pressure roller assy Acrylic cover switch (Not on SC-550) Y-rail assy Penhead flex cable assy Pressure roller pressure adjustment PCB-box (Not on SC-550) Main/driver board assy EPROM set EEPROM Power supply board assy Terminal board assy X-motor assy X-drive belt tension adjustment Fan motor X-motor cover (SC-550 only) Grid cover Grid rollers Paper sensors 47 AP-74030, Rev / B Maintenance Manual – SC Cutting Plotter 6.2. Mechanical parts. 6.2.1. Covers Left and Right : removal and installation. Step 1 : Remove screw 9 (6X) (Please refer to the figure mentioned below). Step 2 : Remove screw 8 (3X) (please refer to the picture mentioned below) and screw 7 (1X) (Cover right only) and remove the cover. Step 3 : (Cover right only) Be careful with the flat cable. If the cover need to be removed completely, pull the flat cable out of the connector on the side of the keyboard PC board. (Please refer to nr 3 and 4 in the picture mentioned below.) Note : To reinstall covers left and right perform above steps in reversed order. 48 AP-74030, Rev / B Maintenance Manual – SC Cutting Plotter 6.2.2. Transparent cover : Removal and installation. Note : Transparent cover does not exist on SC-550. Step 1 : Open the transparent cover assy. Step 2 : On the left side of the cover unscrew screws 7 (2) one (1) turn and slide the shaft 3 inside the rail while holding the cover. (Please refer to picture mentioned below.) Step 3 : Remove the cover and fix the 2 screws temporary to avoid falling out of the rail. Note : To reinstall the transparent cover perform above steps in reversed order. 49 AP-74030, Rev / B Maintenance Manual – SC Cutting Plotter 6.2.3. PCB box :open and close. Note : PCB box does not exist on SC-550. Step 1 : If the unit is on a stand skip to step 2. If the unit is on a table remove the pressure roller (UP/DOWN knob first with one screw. Turn the unit with the front side on the table. It is recommended to put some soft material (foam, cloth) on the table first to avoid scratches on the machine or the table. Step 2 : On the back of the machine remove screws #19 (Please refer to the picture mentioned below.) while holding the PCB box. Step 3 : Turn open the PCB box gently and be careful not to harm any cables or wires. Note : Close the PCB box by performing the above steps in reversed order. 50 AP-74030, Rev / B Maintenance Manual – SC Cutting Plotter 6.2.4. Y-rail cover : Removal and installation. Step 1 : Remove the transparent cover (Please refer to 6.2.2. Transparent cover). Step 2 : Remove 2 screws on top of the cover and 2 screws at the back. Step 3 : Remove the Y-rail cover. Note : To reinstall the Y-rail cover perform above steps in reversed order. 6.2.5. Grid cover : Removal and installation. Step 1 : Remove covers left and right (Please refer to 6.2.1. Covers left and right). Step 2 : Remove the transparent cover (Please refer to 6.2.2. Transparent cover). Step 3 : Remove the Y-rail cover (Please refer to 6.2.4.Y-rail cover). Step 4 : Open the PCB box (Please refer to 6.2.3. PCB box). Step 5 : Remove the rear paper guide with 4 screws. 2 screws on each side of the machine (Please refer to #30 and #31 on the picture mentioned below). Lift the platen a little and pull it straight out between the side plates. Step 6 : Remove the small hexagon screws that fix the gridcover. Use L-shaped hex-key of 1.27 / 1/20”. Push the gridcover about 3mm to the back, lift the cover and remove it to the rear side of the machine. 51 AP-74030, Rev / B Maintenance Manual – SC Cutting Plotter Note : To reinstall the grid cover perform above steps in reversed order. 52 AP-74030, Rev / B Maintenance Manual – SC Cutting Plotter 6.2.6. Cutting head : Removal and installation. Step 1 : Remove the transparent cover (Please refer to 6.2.2. transparent cover). Step 2 : Remove the Y-rail cover (Please refer to 6.2.4. Y-rail cover). Step 3 : Remove the head cover by removing the screw in the middle of the cover and unscrew the bottom screw a few turns. The head cover can be removed by sliding upwards. Step 4 : Open the 2 white connectors by sliding them to the front and pull away the 2 flex cables from the connectors. Remove the head PCB on top of the head by 2 screws ‘C’ (Please refer to picture mentioned below) and lay it somewhere on the Y-rail where the flex cable cannot be damaged. Step 5 : Remove the ‘A’ that fix the cutting head to the drive belt. It is strongly recommended to use a magnetised –screwdriver in order not to drop the screw inside the head. Step 6 : Remove the screw ‘B’ on the top of the head and slide away the blade spring. Step 7 : Move the head manually to the utmost right position, turn over the top rollers to the front, lower the head a little and remove it in the front direction. Caution : It is really important to move the head to the utmost right position as on another position it is impossible to remove the head from the Y-rail. Note : To reinstall the cutting head perform above steps in reversed order. 53 AP-74030, Rev / B Maintenance Manual – SC Cutting Plotter Caution : After replacement of the cutting head the following electronically adjustments have to be performed : · · · Cutting mat height measurement (Please refer to 5. Diagnostic menu with SC-board or with optional LCD keyboard). Adjusting the sheeting off system (Please refer to 5. Diagnostic menu with SC-keyboard or with optional LCD keyboard) (Not for SC-550) Pen force calibration (Please refer to 5.3. Diagnostic menu with optional LCD keyboard). 6.2.7. Grid rollers : removal and installation. Step 1 : Remove the grid cover (Please refer to 6.2.5. Grid cover). Step 2 : Unscrew the two screws from the X-motor a few turns and remove the X-drive belt. Step 3 : Unscrew all the grid rollers (with 1.5mm hex-key) and pull out gently the shaft out of the machine. In this way every grid roller can be removed from the shaft. Caution : q q q Never replace only one grid roller but always the whole set. Replacement of only one grid roller may result in noticeable deviation of media tracking! Before unscrewing the grid rollers, mark the position of every roller on the shaft. This will simplify the reinstallation. NEVER unscrew or change the position of the bearing blocks on the X-rail as this will result in misalignment of the grid roller shaft! Note : To reinstall the grid rollers perform above steps in reversed order. Caution : After reinstallation of the grid rollers, the X-drive belt tension should be adjusted (lease refer to the adjustment of the X-drive belt). 54 AP-74030, Rev / B Maintenance Manual – SC Cutting Plotter 6.2.8. Y-drive belt (long) : removal and installation. Step 1 : Remove the cutting head (Please refer to 6.2.6. Cutting head). Step 2 : Remove covers left and right (Please refer to 6.2.1. Covers left and right). Step 3 : On the left hand side of the machine, unscrew both screws #5 (2) ± 5 turns in order to get the tension of the belt (Please refer to picture mentioned below). Step 4 : Remove two screws #4 and one plate #3 from the belt connection assy and pull the belt complete out of the Y-rail. 1) Y-drive belt (long) : Installation and adjustment. Step 1 : Hold the belt in front of the machine and push one end trough the slit of the right side plate. Turn the belt around the pulley and push it in the second slit to enter the at the back of the Y-rail. Turn the belt around the pulley and push it in the second slit to enter the at the back of the Y-rail. Push it as far as it goes and then use a flash light and look into the slit at the left side of the machine. With a pair of tweezers try to grab the belt and pull it through the slit. Turn the belt around the return pulley and push it through the front slit to arrive at the starting point of the belt again. 55 AP-74030, Rev / B Maintenance Manual – SC Cutting Plotter Step 2 : Close the belt with the connection plate assy and be sure that all the teeth of the connection plate are used to hold the belt. Step 3 : Turn the 2 screws on the return pulley an equal amount of turns in CW (Clockwise) in order to get a little tension on the belt. Step 4 : Install the cutting head (Please refer to 6.2.6. Cutting head). Step 5 : Move the head manually from the left to the right and look for the tracking of the belt on the return pulley. If the belt moves upwards, turn the top screw CW or the bottom screw CCW (counter-clockwise). If the belt moves downwards, turn the top screw CCW or the bottom screw CW. The target is that the tension of the belt stays stable at the surface of the return pulley on the complete range of the cutting head. Step 6 : Similar to step 5 check the track of the belt on the drive pulley. If the belt moves upwards turn the screw 9 (Please refer to the picture mentioned below) CW. If the belt moves downward turn screw 9 CCW. 56 AP-74030, Rev / B Maintenance Manual – SC Cutting Plotter Caution : Pay attention to the tension on the belt during this alignment. The tension should stay between acceptable values (Please refer to step 7). Step 7 : Move the head to the right end of the Y-rail and measure with a bar tension gauge (range : 500g, MUTOH Part# JD-41446B) the tension of the belt in the middle of the Y-rail (Please refer to picture mentioned below). Push the belt with the bar tension gauge (with steel belt tension attachment MUTOH part# JD41565) to touch the rail and release gently the pressure on the gauge. The movement that the belt starts to release from the rail is the moment of reading the value on the bar tension gauge. The values are different for each size machine : SC-550 205 ± 5 g SC-650 205 ± 5 g SC-750 180 ± 5 g SC-1000 150 ± 5 g SC-1300 125 ± 5 g The tension can be adjusted by turning the screws on the return pulley CW for more tension and CCW for less tension. Caution : While adjusting the tension, keep on checking the track of the belt on the return pulley (Please refer to step 5). 57 AP-74030, Rev / B Maintenance Manual – SC Cutting Plotter 6.2.9. Pressure roller pressure adjustment. Step 1 : Switch off the machine and place the pressure rollers on top of a grid roller. Step 2 : Remove the transparent cover (Please refer to 6.2.2. Transparent cover). Step 3 : Remove the Y-rail cover (Please refer to 6.2.4. Y-rail cover). Step 4 : Take a piece of polyester film of ± 300 cm long, 2.5 mm wide (12” X 1”) and put it between the grid roller and the pressure roller (Please refer to the picture mentioned below). Attach the bar tension gauge (range 5 kg, MUTOH Part# JD-41446C) to the pressure roller shaft with a piece of rope or with the pressure measurement attachment JD-41563 and pull simultaneously the film and the tension gauge under 90° angle. The moment that the film is slipping between the rollers, is the moment to read the value on the tension gage. The value should be 3.5 kg ± 0.1 kg. To adjust the pressure, change the spring tension by turning the nuts A (Please refer to the figure mentioned below) CW to increase or CCW to decrease the pressure on the rollers. 58 AP-74030, Rev / B Maintenance Manual – SC Cutting Plotter 6.2.10. Sheeting off mechanism : mechanical alignment. (Not for SC-550) Note : It is recommended to check the mechanical alignment of the sheeting off mechanism before running the electronic adjustment procedure. Step 1 : Make sure the machine is powered off. Step 2 : Open the transparent cover and remove the head cover. Step 3 : Check if lever #2 (Please refer to picture mentioned below) can move freely up/down and front/backwards. The lever should return always to the Up position and to the backwards position by the spring tension. Also check if the blade moves up and down freely and returns in the up position by the spring tension. Step 4 : With your right hand move the tool holder to the most up position, with your left hand push the lever (#2) inside and check the clearance between bracket #3 and lever “2. (Please refer to the picture mentioned below) This distance should be 1 mm –0.5 mm. If this is not the case, use a small pair of pliers and bend the bracket #3 until the correct clearance is obtained. Step 5 : Install the head cover and make the electronic alignment in diagnostic mode. 59 AP-74030, Rev / B Maintenance Manual – SC Cutting Plotter 6.3. Electronical parts. 6.3.1. Main PC board : Removal and installation. Note : This procedure is valid for all SC-series except for SC-550. For the Main PC board SC550, please refer to 6.3.2. Step 1 : Open the PCB box (Please refer to 6.2.3. PCB box). Step 2 : Unplug all the connectors, remove all screws from the board and remove the board. Do not forget to remove the screws from the parallel and serial communication connector. Note : Pay attention to the position of all connectors and the proper place of all the cables. This will simplify the installation. To reinstall the Main PC board perform above steps in reversed order. Warning : Check the DIP Switch settings on the board. The position of the DIP switches determines the type of machine where the board will be used in. (Please refer to 6.3.3. Dip Switch settings on Main PC board) 60 AP-74030, Rev / B Maintenance Manual – SC Cutting Plotter 6.3.2. Main and terminal PCB SC-550 : Removal and installation. Step 1 : Remove the right side cover (Please refer to 6.2.1. Right and left cover). Step 2 : Remove all the cables connected to the Terminal board. Note : Pay attention to the position of all connectors and the proper place of all the cables. This will simplify the installation. Step 3 : Remove the Terminal board assy (including fixing brackets) by removing the 4 screws on the side of the PCB box. Step 4 : Remove all cable connected to the Main PC board. Step 5 : Remove the power switch (just press it to the outside, no need to disconnect the wires). Remove the power inlet connector with 2 screws on the back. (No need to disconnect the wires). Step 6 : Remove the screws from the board and from the communication connectors (also remove the 2 clips from the centronics connector) and take out the board. Note : To reinstall the Main PC board perform above steps in reversed order. Warning : Check the DIP switch setting on the board. The position of the DIP switches determines the type of machine where the board will be used in. (Please refer to 6.3.3. Dip Switch settings on Main PC board) 61 AP-74030, Rev / B Maintenance Manual – SC Cutting Plotter 6.3.3. Dip switch settings on Main PC board. MODEL SC-550 SC-650 SC-750 SC-1000 SC-1300 POS OFF ON OFF ON OFF ON OFF ON OFF ON 8 * 7 * 6 * 5 * 4 * 3 * 2 * 1 * * * * * * * * * * * * * * * * * * * * * * * * * * * * * * * * * Warning : The main PC board for SC-550 looks similar to the other ones, but can not be used in other SC-series. (and vice versa) The boards are labelled were they not can be used. Warning : After Main PC board replacement put the EEPROM (U3) from the initial board in the new one. In this way no other adjustments or user parameters have to be reinstalled. If for one or other reason the EEPROM (U3) need to be replaced, the following data must be checked and if necessary readjusted. (Please refer to 3.1.1. RS-232C Pin configuration.) 62 AP-74030, Rev / B Maintenance Manual – SC Cutting Plotter 6.3.4. EEPROM initialisation and replacement. Note : For EEPROM initialisation see ‘Diagnostics with optional LCD keyboard’ Diagnostic 1, memory, EEPROM. After initialisation or replacement of the EEPROM the following data may be changed and need to be reinstalled. Þ INIT 1 = Settings in normal operation mode = USER parameters such as : - Speed - Acceleration - Force - Offset - Shuffle length - Tool selection - Page mode - Replot factor - Smoothing - Communication parameters - Command set (language) Þ INIT 2 = Adjustments in Diagnostic mode. - X axis length adjustment - Cutting mat height measurement - Knife force calibration - Sheet-off system adjustment (Not for SC-550) 63 AP-74030, Rev / B Maintenance Manual – SC Cutting Plotter 6.3.5. Power supply board : removal and installation. Note : This procedure is valid for all SC-series except for SC-550. For the SC-550, please refer to 6.3.6. Power supply board SC-550. Step 1 : Open the PCB box (Please refer to 6.2.3.PCB box). Step 2 : Remove the connectors and the screw from the grounding wire and remove the board. Note : To reinstall the board perform above steps in reversed order. 64 AP-74030, Rev / B Maintenance Manual – SC Cutting Plotter 6.3.6. Power supply board SC-550 : removal and installation. Step 1 : Remove the left cover (Please refer to 6.2.1. Covers left and right). Step 2 : Unplug the 2 cables from the power supply board. Step 3 : Remove the 4 screws (2 on both sides) and lift the power supply with the metal brackets out of the left bottom cover. Step 4 : Remove the 2 metal brackets from the power supply board. Note : To reinstall the power supply board perform above steps in reversed order. 6.3.7. Power supply output connections. PIN 1 2 3 4 5 6 SIGNAL + 5V + 5V SG SG + 12Va + 40V COLOUR Red Red Black Black Orange Yellow PIN 7 8 9 10 11 12 65 SIGNAL FG - 12V AG + 12Vb PG1 PG2 COLOUR Green Blue Black Orange Black Black AP-74030, Rev / B Maintenance Manual – SC Cutting Plotter 6.3.8. Terminal Board : removal and installation. Note : This procedure is valid for all SC-series except for SC-550. For SC-550 please refer to 6.3.2. Main and terminal PCB SC-550. Step 1 : Open the PCB box (Please refer to 6.2.3. PCB box). Step 2 : Unplug all connectors, remove all screws from the board and remove the board. Note : Pay attention to the position of all connectors and proper place of all the cables. This will simplify the installation. 66 AP-74030, Rev / B Maintenance Manual – SC Cutting Plotter Note : To reinstall the board perform above steps in reversed order. 6.3.9. Keyboard : removal and installation. Step 1 : Remove the right cover (Please refer to 6.2.1. Covers left and right). Step 2 : Remove the flat cable from the keyboard PC board. (Please refer to he picture mentioned below.) Step 3 : Remove screws 6(4X) from the right cover and remove the keyboard. Note : To reinstall the keyboard perform above steps in reversed order. 67 AP-74030, Rev / B Maintenance Manual – SC Cutting Plotter 6.3.10. X-motor and drive belt : removal and installation. Step 1 : Remove the right cover (Please refer to 6.2.1. Covers right and left). Step 2 : Open the PCB box (Please refer to 6.2.3.PCB box). Step 3 : Remove the X-motor connector and the X-encoder connector from the Main PCB. Step 4 : Remove the screws from the X-motor and remove the belt and the motor. Note : To reinstall the x-motor perform above steps in reversed order. 1) X-drive belt : Tension adjustment. Step 1 : From the side of the PCB box (X-motor cover for SC-550), attach a piece of rope (or the pressure measurement attachment JD-41563) around the motor body as close as possible to the side plate. Step 2 : Be sure that the motor screws are not fixed and pull the bar tension gauge (range 5kg, MUTOH part# JD-41446C) downwards for 3.75 kg ± 0.05 kg). Turn manually the grid shaft a few turns and fix the motor screws. Note : X-drive belt tension for SC-550 = 2.65 kg ± 0.05 kg. 6.3.11. Y-motor and drive belt : removal and installation. Step 1 : Remove the right cover (Please refer to 6.2.1. Covers right and left) and open the PCB box (Please refer to 6.2.3.PCB box). If the drive belt need to be removed, remove the left cover too (Please refer to 6.2.1. Covers right and left). Step 2 : Remove the Y-motor connector and the Y-encoder connector from the mainboard and pull the cables out of the PCB box. Step 3 : Remove the 2 screws from the Y-motor and remove the motor. Note : To reinstall the Y-motor perform above steps in reversed order and perform the belt tension adjustment. (Please refer to point 1) Y-motor and drive belt mentioned below). Step 4 : (Drive belt removal only) Release the tension on the Y-drive belt (long) (Please refer to 6.2.8 Y-drive belt (long) step 3). 68 AP-74030, Rev / B Maintenance Manual – SC Cutting Plotter Remove the screw on top of the pulley shaft (Please refer to screw 9 on figure 6.2.8. Y-drive belt (long) 1) Y-drive belt (long) step 3) and remove the pulley assy from the bracket. If not possible, the Y-drive belt (long) need to get more play by turning the screws of the return pulley CCW. Now the Y-belt (short) can be removed. 1) Y-motor and drive belt : installation and adjustment. Step 1 : Install the Y-drive belt (short) by performing the above steps in reverse order. Step 2 : Turn in the screws from the Y-motor a few turns, but do not fix them. Step 3 : Attach the bar tension gauge (range 5 kg, MUTOH part# JD-41446C) to the motor shaft (use a piece of rope or pressure measurement attachment JD-41563) and pull for 3.5 kg ± 0.05 kg. Note : Y-drive belt tension for SC-550 = 2.5 kg ± 0.05 kg. While pulling the gauge, move the cutting head manually left and right a few times before fixing the motor screws. 6.3.12. Head flex cable : removal and installation. Step 1 : Remove the transparent cover (Please refer to 6.2.2. transparent cover) (Not on SC-550). Step 2 : Remove the Y-rail cover (Please refer to 6.2.4 Y-rail cover). Step 3 : Remove the head cover by removing the screw in the middle of the cover and unscrew the bottom screw a few turns. The head cover can be removed by sliding upwards. Step 4 : Open the 2 white connectors by sliding them to the front and pull away the 2 flex cables from the connectors. Remove the head PCB on top of the head by 2 screws and lay it somewhere on the Y-rail where the flex cable cannot be harmed. Step 5 : Open the PCB box (Please refer to 6.2.3. PCB box). For the SC-550 remove the right cover (Please refer to 6.2.1. Covers left and right). Step 6 : Remove the flex cable from the terminal board. Step 7 : Remove the right cover (Please refer to 6.2.1. Covers left and right) and open the cable guides that holding the flex cable. Step 8 : Remove the flex cable. Note : Pay attention to the position of the cable in the way that it is guided all through the machine. This will simplify the installation. Note : To reinstall the head flex cable perform above steps in reversed order. 69 AP-74030, Rev / B Maintenance Manual – SC Cutting Plotter 6.3.13. Paper sensors : removal and installation. Step 1 : Remove the grid cover (Please refer to 6.2.5. Grid cover). Step 2 : Remove the cables from the sensors and remove the sensors. Note : To reinstall the paper sensors perform above steps in reversed order. 6.3.14 Transparent cover sensor : removal and installation. (Not for SC-550) Step 1 : Remove the transparent cover (Please refer to 6.2.2.Transparent cover). Step 2 : Remove the Y–rail cover (Please refer to 6.2.4.Y-rail cover). Step 3 : Remove the right cover (Please refer to 6.2.1. Covers left and right). Step 4 : Open the CB box (Please refer to 6.2.3. PCB box). Step 5 : Remove the connector J508 from the terminal board (black/yellow cable). Remove the 2screws #10(2X) (Please refer to the picture mentioned below) and remove the switch. Note : Pay attention to the position of the cable in the way that it is guided all through the machine. This will simplify the installation. Note : To reinstall the transparent cover sensor perform above steps in reversed order. 1) Transparent cover sensor : adjustment. (Not for SC-550) Step 1 : Unscrew the setscrew #6 (Please refer to the picture mentioned below). Step 2 : Open the cover and adjust the position of shaft screw #5 (Please refer to the picture mentioned below). Turning CW makes the detection of the closing position of the transparent cover later (= more closed). Turning CCW makes the detection of the closing position of the transparent cover sooner (= more open). 70 AP-74030, Rev / B Maintenance Manual – SC Cutting Plotter Step 3 : Tighten screw #6 and check the detection position again. 6.3.15. Pressure roller UP/DOWN sensor : removal and installation. Note : This procedure is valid for all SC-series except for SC-550. For the SC-550 please refer to 6.3.16. Pressure roller UP/DOWN sensor SC-550. Step 1 : Remove the right cover (Please refer to 6.2.1. Covers left and right). Step 2 : Open the PCB box (Please refer to 6.2.3. PCB box). Step 3 : Remove the sensor. Note : To reinstall the pressure roller UP/DOWN sensor perform above steps in reversed order. 6.3.16. Pressure roller UP/DOWN sensor SC-550 : removal and installation. Step 1 : Remove the right cover (please refer to 6.2.1. Covers left and right). Step 2 : Remove the Up/DOWN lever knob and the Y-rail. Step 3 : Unplug the sensor cable connector from the terminal board. Step 4 : Remove the sensor by unscrewing 2 screws. Note : To reinstall the pressure roller UP/DOWN sensor perform above steps in reversed order. 71 AP-74030, Rev / B Maintenance Manual – SC Cutting Plotter 6.3.17. Fan motors : removal and installation. Step 1 : Open the PCB box (Please refer to 6.2.3. PCB box). (Not for SC-550) Step 2 : Remove the fan motor cable(s) (red, black, brown) from the main PC board. Step 3 : Remove the fan motors from the X-rail with 2 screws. Note : To reinstall the fan motors perform above steps in reversed order. 72 AP-74030, Rev / B Maintenance Manual – SC Cutting Plotter 7. JIG TOOL LIST. 7.1. Jig tool list. PART NAME PART# Adjustment Pen 10 g Bar tension gauge 50 g Bar tension gauge 500 g Bar tension gauge 5 kg Pressure measurement attachment Steel belt tension attachment L shaped Allen key 1.27 mm (1/20”) + Screw driver (Philips) #1 + Screw driver (Philips) #2 - Screw driver Open wrench 13 mm Box wrench 13 mm JD-41440 JD-41446A JD-41446B JD-41446C JD41563 JD-41565 7.2. Special glue. External screw locking glue Screw thread locking glue Glue for fixing Y)motor pulley : LOCTITE 7400 (VERNISTOP) : LOCTITE 243 : LOCTITE 406 73 AP-74030, Rev / B Maintenance Manual – SC Cutting Plotter 74 AP-74030, Rev / B Maintenance Manual – SC Cutting Plotter 8. PARTS LISTS SC-SERIES. (For SC-550 parts, please refer to chapter 9. Parts Lists SC-550.) 8.1. Body and Covers. Ref. 1 2 2 2 2 3 3 3 3 4 4 4 4 Description Cover right Cover left SC-650 Cover left SC-750 Cover left SC-1000 Cover left SC-1300 Transparent cover assy SC-650 Transparent cover assy SC-750 Transparent cover assy SC-1000 Transparent cover assy SC-1300 Front platen assy SC-650 Front platen assy SC-750 Front platen assy SC-1000 Front platen assy SC-1300 Partnumber ZME-20654 ZME-20665 ZME-20755 ZME-21005 ZME-21305 MY-20631 MY-20731 MY-21630 MY-21252 MY-20602 MY-20702 MY-21602 MY-21250 75 Qty 1 1 1 1 1 1 1 1 1 1 1 1 1 AP-74030, Rev / B Maintenance Manual – SC Cutting Plotter 5 5 5 5 6 6 6 6 7 7 7 7 7’ 8 8’ 8” 9 10 11 11’ 12 12’ 13 14 14’ 15 15 15 15 16 17 18 18’ 19 19’ 19” 20 20’ 21 22 Grid cover SC-650 Grid cover SC-750 Grid cover SC-1000 Grid cover SC-1300 Rear platen SC-650 Rear platen SC-750 Rear platen SC-1000 Rear platen SC-1300 Y-rail cover SC-650 Y-rail cover SC-750 Y-rail cover SC-1000 Y-rail cover SC-1300 Screw 2.9 X 9.5 Head cover Screw M2x4 Screw M2x10 Side plate left Side plate right Cover switch assy Screw M2x8 Rubber Screw M4x6 black Alignment sticker Sheet off knock piece Screw M4x6 black Conveyor roll SC-650 Conveyor roll SC-750 Conveyor roll SC-1000 Conveyor roll SC-1300 Roll flange assy Slip-ring Hex bolt M4x6 Plastic spacer (d = 4.2) Hex bolt M8x25 Brass spacer Plastic plain washer Hex bolt M8x20 Plastic spacer (d = 8.2) Bottom cover left Bottom cover right ME-20650 ME-20750 ME-21650 ME-21251 ME-20602 ME-20702 ME-21602 ME-21250 ME-20630 ME-20730 ME-21630 ME-21612 BM-2102-129905 ME-20662 DR-4004-45105 DR-4004-45100 ME-20599 ME-20600 EY-41761 BM-1400-002008 BR-40040 DR-4008-41838 LB-10017 ME-20640 DR-4008-41838 ME-20610 ME-20710 ME-21610 ME-21710 MY-10056 ME-20700 BM-6000-604008 BR-40108 BM-6200-608025 BR-10845 BR-40842 BM-6200-608020 BR-40812 ME-20652 ME-20656 76 1 1 1 1 1 1 1 1 1 1 1 1 4 1 1 1 1 1 1 2 2 2 2 1 1 2 2 2 2 2 1 1 1 2 2 4 2 1 1 1 AP-74030, Rev / B Maintenance Manual – SC Cutting Plotter 8.2. Cover right + keyboard assy. Ref. # 1 2 3 # 4 5 6 7 8 9 10 11 Description Cover + keyboard assy Cover right Keyboard panel PCB keyboard Keyboard assy (complete) Cable term ® keyboard Screw 3.0x8 plastite Screw M3x6 Screw M3x25 Screw M3x8 Screw 3.0x10 Cover plate Screw M3x4 Partnumber MY-20654 ZME-20654 MY-20621 EY-20574 EY-20654 MK-60866 BM-200-103008 DR-4001-43331 DR-4005-44614 DR-4001-43329 BM-2301-503010 ME-20658 DR-4001-43993 77 Qty 1 1 1 1 1 1 4 4 1 3 6 1 2 AP-74030, Rev / B Maintenance Manual – SC Cutting Plotter 8.3. Cover left assy. Ref. 1 1 1 1 2 3 4 4 4 4 Description Cover left SC-650 Cover left SC-750 Cover left SC-1000 Cover left SC-1300 Screw M3x8 Screw 3.0x10 Label SC-650 Label SC-750 Label SC-1000 Label SC-1300 Partnumber ZME-20655 ZME-20755 ZME-21005 ZME-21305 DR-4001-43329 BM-2301-503010 LB-20650 LB-20750 LB-20100 LB-20125 78 Qty 1 1 1 1 3 6 1 1 1 1 AP-74030, Rev / B Maintenance Manual – SC Cutting Plotter 8.4. Transparent cover assy. Ref. # # # # 1 1 1 1 2 2 2 2 3 4 5 6 7 8 9 10 Description Transparent cover assy SC-650 Transparent cover assy SC-750 Transparent cover assy SC-1000 Transparent cover assy SC-1300 Cover guide SC-650 Cover guide SC-750 Cover guide SC-1000 Cover guide SC-1300 Transparent cover SC-650 Transparent cover SC-750 Transparent cover SC-1000 Transparent cover SC-1300 Shaft left Shaft right Switch activator shaft Set screw M3x3 Screw M2x5 Washer M2 Cover switch Screw M2x8 Partnumber MY-20631 MY-20731 MY-21631 MY-21252 ME-20632 ME-20732 ME-21632 ME-21253 ME-20631 ME-20731 ME-21631 ME-21252 ME-20635 ME-20648 ME-20633 DR-4007-44579 BM-1400-002005 BR-11252 EY-41761 BM-1400-002008 79 Qty 1 1 1 1 1 1 1 1 1 1 1 1 1 1 1 6 4 4 1 2 AP-74030, Rev / B Maintenance Manual – SC Cutting Plotter 8.5. PCB box. Ref. 1 1 1 1 2 3 3 4 4 5 6 7 8 8 9 10 11 12 13 14 15 16 17 18 19 Description PCB box SC-650 PCB box SC-750 PCB box SC-1000 PCB box SC-1300 Power supply board st Main PC board 1 version nd Main PC board 2 version st Terminal PCB 1 version nd Terminal PCB 2 version Power ON/OFF switch Power inlet Cable P/S ® Mainboard st Cable J113 ® J500 (1 ) nd Cable J130 ® J500 (2 ) Cable J102 ® J515 st Cable J101 ® J512 (1 ) Cable switch ® P/S Cable guide Screw M3x6 black Cap screw M3x6 Cap screw M3x4 Screw M3x10 (Interf.) ---------------------------------------------------------Hinge PCB box Screw M4x8 Screw M4x10 Taptite 80 Partnumber ME-20601 ME-20701 ME-21601 ME-21613 DE-31396 EY-20570 EY-21570 EY-20573 EY-21573S DE-43074 DE-44745 DE-44750 MK-60627 MK-41200 MK-60865 MK-60864 MK-81650 AE-91065 DP-4002-40217 DR-4001-43923 DR-4001-43993 DR-4007-44129 --------------------------DE-44113 DR-4001-43396 BM-1400-104010 Qty 1 1 1 1 1 1 1 1 1 1 1 1 1 1 1 1 1 3 2 15 3 2 2 8 4-5 AP-74030, Rev / B Maintenance Manual – SC Cutting Plotter 8.6. Head flex cable assy. Ref. # # # # 1 1 1 1 1 1 1 1 2 2 3 4 5 6 Description Head FFC cable assy SC-650 Head FFC cable assy SC-750 Head FFC cable assy SC-1000 Head FFC cable assy SC-1300 st Head FFC cable SC-650 (1 ) nd Head FFC cable SC-650 (2 ) st Head FFC cable SC-650 (1 ) nd Head FFC cable SC-650 (2 ) st Head FFC cable SC-650 (1 ) nd Head FFC cable SC-650 (2 ) st Head FFC cable SC-650 (1 ) nd Head FFC cable SC-650 (2 ) st Head cable PCboard (1 version) nd Head cable PCboard (2 version) Strain relief plate Strain relief rubber Screw M3x6 strain relief ---------------------------------------------------------Screw M3x4 81 Partnumber MY-20571 MY-20572 MY-573 MY-20574 MK-60867 MK-60806 MK-60868 MK-60807 MK-60869 MK-60810 MK-60863 MK-60813 EY-20571 EY-21571T ME-20665 ME-20666 BM-1400-003006 -------------------------DR-4001-43993 Qty 1 1 1 1 1 1 1 1 1 1 1 1 1 1 1 1 2 2 AP-74030, Rev / B Maintenance Manual – SC Cutting Plotter 8.7. Pressure roller UP/DOWN mechanism. 82 AP-74030, Rev / B Maintenance Manual – SC Cutting Plotter Ref. 1 2 3 4 5 6 7 8 9 10 11 12 13 14 15 16 17 17 17 17 18 19 Description Turn over plate Transmission plate Handle plate Transmission shaft long Transmission shaft short Spring Knob UP/DOWN Sensor UP/DOWN Sensor bracket Clamp shaft Spacer Spring washer Screw M4x16 Screw M4x30 Screw M3x8 Screw M3x6 Hex. Shaft SC-650 Hex. Shaft SC-750 Hex. Shaft SC-1000 Hex. Shaft SC-1300 Plastic bearing E-ring Partnumber ME-20625 ME-20626 ME-20624 ME-20663 ME-20664 DE-45673 DE-32254 EY-41760 ME-20622 DE-44782 BR-10010 BR-24650 DR-4001-44611 DR-4001-43920 DR-4001-43329 DR-4005-43728 ME-20777 ME-20778 ME-20779 ME-21277 BR-40010 BR-31070 83 Qty 1 1 1 1 1 1 1 1 1 4 2 1 2 1 4 1 1 1 1 1 2 2 AP-74030, Rev / B Maintenance Manual – SC Cutting Plotter 8.8. X-motor assy. Ref. # 1 2 3 4 5 Description X-motor assy X-motor Drive pulley Setscrew ---------------------------------------------------------Screw M3x10 X-drive belt 84 Partnumber EY-10000 EE-10000 DE-46568 DR-4007-43352 --------------------------DR-4001-43395 DE-44157 Qty 1 1 1 2 2 1 AP-74030, Rev / B Maintenance Manual – SC Cutting Plotter 8.9. X-rail assy. Ref. # # # # 1 1 1 1 2 2 2 2 3 3’ 4 5 6 6’ 6” 6”’ 7 8 9 10 11 11’ 12 13 14 14 14 14 Description X-rail assy SC-650 X-rail assy SC-750 X-rail assy SC-1000 X-rail assy SC-1300 X-rail SC-650 X-rail SC-750 X-rail SC-1000 X-rail SC-1300 Drive shaft SC-650 Drive shaft SC-750 Drive shaft SC-1000 Drive shaft SC-1300 Bearing holder Screw M4x8 Grid roll 136 mm Grid roll 14 mm Paper sensor Paper sensor bracket Screw M3x8.5 sensor Screw M4x6 bracket Cable sensor front Cable sensor rear Dust filter Cable guide Earth plate Screw M4x8 Screwplate Plastic spacer Grid cover SC-650 Grid cover SC-750 Grid cover SC-1000 Grid cover SC-1300 Partnumber MY-6500-10400 MY-7500-10400 MY-1000-10400 MY-1300-10400 ME-10400 ME-10407 ME-10409 ME-10415 ME-20609 ME-20709 ME-21609 ME-21611 MY-32227 DR-4008-44543 DE-46550 DE-44142 E-PS-R50LA ME-20629 DS-1054-40883 DR-4008-41838 MK-41702 MK-41703 DE-45903 AE-91025 DE-45118 DR-4001-43396 DR-2164-41836 BR-40710 ME-20650 ME-20750 ME-21650 ME-21251 85 Qty 1 1 1 1 1 1 1 1 1 1 1 1 7-8-10 14-16-20 1 5-6-7 2 2 2 2 1 1 1-2-3 3 1 1 17-19-23 2 1 1 1 1 AP-74030, Rev / B Maintenance Manual – SC Cutting Plotter 15 15 15 15 16 -17 17 17 17’ 18 18’ 19 19’ Cutting mat SC-650 Cutting mat SC-750 Cutting mat SC-1000 Cutting mat SC-1300 Screw M2x5 ---------------------------------------------------------Fan 650, 750, 1000, 1300 Fan SC-1000, 1300 Fan SC-1300 Screw 3.5x32 Gear grid shaft Set screw M3x3 Bearing grid shaft Screw M3x4 86 ZME-20645 ZME-20745 ZME-21645 ZME-21745 BM-6301-302005 --------------------------EE-50760 EE-50761 DE-44761 BM-2100-135032 DE-46555 DR-4007-43352 DE-46563 DR-4001-43993 3 3 3 3 7-7-10 1 1 1 2-4 1 2 1 2 AP-74030, Rev / B Maintenance Manual – SC Cutting Plotter 8.10. Y-motor assy. Ref. # 1 2 3 4 5 Description Y-motor assy Y-motor Drive pulley Set ring + screws ---------------------------------------------------------Screw M3x10 Y-transfer belt 87 Partnumber EY-10010 EE-10010 DE-47077 BR-32002 --------------------------DR-4001-43395 DE-47079 Qty 1 1 1 1 2 1 AP-74030, Rev / B Maintenance Manual – SC Cutting Plotter 8.11. Y-rail assy. Ref. 1 1 1 1 2 2 2 2 3 3 3 3 4 5 6 7 Description Y-rail SC-650 Y-rail SC-750 Y-rail SC-1000 Y-rail SC-1300 Grid indication rail SC-650 Grid indication rail SC-750 Grid indication rail SC-1000 Grid indication rail SC-1300 FCC cable guide SC-650 FCC cable guide SC-750 FCC cable guide SC-1000 FCC cable guide SC-1300 Screw M4x6 black Set screw M3x3 Screwplate Screw M4x6 Partnumber ME-10401 ME-10408 ME-10410 ME-10416 ME-20646 ME-20746 ME-21646 ME-21255 MY-20050 MY-20051 MY-20052 MY-21254 DR-4008-41838 DR-4007-41200 DR-2164-41836 BM-6200-604006 88 Qty 1 1 1 1 1 1 1 1 1 1 1 1 4-3 1-3-4 5-6 3-4 AP-74030, Rev / B Maintenance Manual – SC Cutting Plotter 8.12. Y-axis drive belt assy. Ref. # # # # 1 1 1 1 2 3 4 Description Y-drive belt assy SC-650 Y-drive belt assy SC-750 Y-drive belt assy SC-1000 Y-drive belt assy SC-1300 Y-drive belt SC-650 Y-drive belt SC-750 Y-drive belt SC-1000 Y-drive belt SC-1300 Belt connection plate Pressure plate Screw M3x6 Partnumber MY-20661 MY-20761 MY-21661 MY-21761 ME-20661 ME-20761 ME-21661 ME-21761 ME-10107 ME-10108 DR-6210-303006 89 Qty 1 1 1 1 1 1 1 1 1 2 4 AP-74030, Rev / B Maintenance Manual – SC Cutting Plotter 8.13. Y-drive pulley assy + mounting bracket. Ref. # 1 2 3 4 5 6 7 8 9 10 Description Y-drive pulley assy Y-drive pulley Shaft Bearing E-ring ---------------------------------------------------------Screw M3x10 Y-motor bracket Screw 3.5x25 Cable holder Screw M3x25 Cable support plate 90 Partnumber MY-47657 DE-47057 ME-20059 DE-47095 BR-31050 --------------------------DR-4001-43395 ME-20607 BM-2100-135025 AE-91025 DR-4005-44614 ME-10109 Qty 1 1 1 2 3 (2) 4 (5) 1 2 1 1 (0) 1 AP-74030, Rev / B Maintenance Manual – SC Cutting Plotter 8.14. Y-axis return pulley assy. Ref. # 1 2 3 4 5 6 # 7 8 9 Description Return pulley assy Return pulley Bearing Shaft Set-ring and screw Screw M3x30 E-ring ---------------------------------------------------------Return pulley bracket Screw foot (plastic) Screw M3x8 Screw 3.5x25 91 Partnumber MY-47675 DE-47075 DE-47095 ME-20058 BR-32000 DR-4001-45094 BR-31050 --------------------------ME-20607 DE-47091 DR-4001-43329 BM-2100-135025 Qty 1 1 2 1 1 2 3 2 2 2 2 AP-74030, Rev / B Maintenance Manual – SC Cutting Plotter 8.15. Pressure roller assy. 92 AP-74030, Rev / B Maintenance Manual – SC Cutting Plotter # Pressure roller assy without position indication # Pressure roller assy with position indication Ref. # 1 2 3 4 5 6 7 8 9 10 11 12 13 # 14 15 16 17 18 : : Description Pressure roller assy without position indication Pressure base Pressure arm Pressure roller Spring shaft Spring Pivot shaft Roller shaft Connection shaft Hex nut M8 Washer E-ring 3.2 E-ring 2.3 Plastic washer Pressure roller assy with position indication Pressure roller assy Hex nut M4 Ballspring screw M4x9 ---------------------------------------------------------UP/DOWN cam Cam bracket Screw M3x4 93 MY-10402 MY-10403 Partnumber MY-10402 ME-10402 ME-10095 DE-44190 ME-20611 ME-20611 ME-20613 ME-20614 ME-20612 BM-9104-108004 BR-14338 BR-31032 BR-31023 DE-44192 MY-10403 MY-10402 DR-4010-41280 ME-10029 --------------------------ME-10403 ME-20647 DR-4001-43993 Qty 1 1 1 1 1 1 1 1 1 2 2 4 2 2 1 1 1 1 1 1 1 AP-74030, Rev / B Maintenance Manual – SC Cutting Plotter 8.16. Cutting head assy. 94 AP-74030, Rev / B Maintenance Manual – SC Cutting Plotter Ref. 1 2 3 4 5 6 7 8 9 10 11 12 13 14 15 16 17 18 19 20 21 22 23 24 25 26 27 28 29 30 31 32 33 34 35 Part Number DE-46622 / MP-90650 DE-46608 DE-46611 DE-46609 DE-46874 DE-46781 DE-45203 DE-45204 DE-20865 DE-46613 DE-32215 ME-20021 DE-10587 / MP-90651 DE-44208 DE-32308 DE-46791 DE-45994 DE-40270 DE-46795 DR-4014-41609 DR-7032-41990 / BR-31023 BR-31032 DE-42051 BR-50250 DE-46614 DE-47523 DE-47011 DE-47012 DE-47013 DE-47014 BM-5007-026008 BM-1400-002008 BM-1400-002005 DR-4001-43327 DR-4004-45100 Ref. 36 37 38 39 40 41 42 43 44 45 46 47 48 49 50 51 52 53 54 55 56 57 58 59 60 61 62 63 64 65 66 67 68 69 70 95 Part Number DR-4004-45105 DR-4001-43993 DR-4001-45056 DR-4001-45057 DR-4001-43457 DR-4001-43396 DR-4001-43317 DR-4005-44675 DR-4001-43923 DR-4019-43442 BR-35002 ME-10078 ME-20637 ME-20638 ME-20639 DE-45897 / ME-20642 MY-20643 BR-40005 DE-43130 ME-20644 ME-20616 ME-20615 ME-20619 ME-10075 BR-60015 ME-20659 DE-46793 ME-20000 ME-20617 ME-20618 ME-20620 ME-20100 ME-20101 ME-20864 ME-20662 AP-74030, Rev / B Maintenance Manual – SC Cutting Plotter 96 AP-74030, Rev / B Maintenance Manual – SC Cutting Plotter 97 AP-74030, Rev / B Maintenance Manual – SC Cutting Plotter 98 AP-74030, Rev / B Maintenance Manual – SC Cutting Plotter 8.17. Sideplate left (ME-20599). 1–6 7 – 12 13 – 16 17 – 18 19 – 22 23 24 – 27 28 – 31 32 33 34 35 36 37 – 42 43 44 45 46 47 : : : : : : : : : : : : : : : : X-rail Y-rail Bracket Return Pulley Y-belt L-bracket Hex shaft Left metal box Platen Front & Rear Slip-ring block screw Fixed conveyor roll Adjustable conveyor roll Transparent Cover shaft Lip Cover Left Cover Left Sheet off knock piece Rubber tap Left pinch roller block screw M4x20 Position indication rail removal Screw plate removal 99 AP-74030, Rev / B Maintenance Manual – SC Cutting Plotter 8.18. Sideplate right (ME-20600). 1–6 7 – 12 13 14 15 – 19 20 – 21 22 – 24 25 – 28 29 30 31 32 – 35 36 37 38 39 – 40 41 – 42 43 – 44 45 – 48 49 50 51 52 53 54 – 59 60 61 – 62 : : : : : : : : : : : : : : : : : : : : : : : : X-rail Y-rail Grid shaft Cables paper sensors Y-motor bracket Y-belt X-motor L-brackets Hex shaft Spacer Hinge point UP/DOWN mech. Right metal box Hinge point UP/DOWN mech. Attachment screw for spring Rubber Cable guide UP/DOWN sensor bracket Cover sensor Platen front & rear Cables ® PCB box Fixed conveyor roll Adjustable conveyor roll Transparent cover shaft Cover right Cover right Cables FFC & cover sensor Screws for bearing 100 AP-74030, Rev / B Maintenance Manual – SC Cutting Plotter 9. PARTS LISTS SC-550. 9.1. Body and covers SC-550. Ref. 1 2 3 4 5 6 6’ 7 7’ 7” 8 9 10 11 12 Description Cover right Cover left SC-550 Front platen assy SC-550 Grid cover SC-550 Rear platen SC-550 Y-rail cover SC-550 Screw 2.9 x 9.5 Head cover Screw M2x4 Screw M2x10 Side plate left Side plate right Alignment sticker Bottom cover left Bottom cover right Partnumber ZME-20654 ZME-20555 MY-20502 ME-20550 ME-20502 ME-20530 BM-2102-129905 DE-20911A DR-4004-45105 DR-4004-45100 ME-20554 ME-20555 LB-10017 ME-20552 ME-20556 101 Qty 1 1 1 1 1 1 4 1 1 1 1 1 2 1 1 AP-74030, Rev / B Maintenance Manual – SC Cutting Plotter 9.2. Cover right + keyboard assy SC-550. Ref. # 1 2 3 # 4 5 6 7 8 9 10 11 Description Cover + keyboard assy Cover right Keyboard panel PCB keyboard Keyboard assy (complete) Cable term ® keyboard Screw 3.0x8 plastite Screw M3x6 Screw M3x25 Screw M3x8 Screw 3.0x10 Cover plate Screw M3x4 Partnumber MY-20654 ZME-20654 MY-20621 EY-20574 EY-20654 MK-60866 BM-2400-103008 DR-4001-43331 DR-4005-44614 DR-4001-43329 BM-2301-503010 ME-20658 DR-4001-43993 102 Qty 1 1 1 1 1 1 4 4 1 3 6 1 2 AP-74030, Rev / B Maintenance Manual – SC Cutting Plotter 9.3. Cover left assy SC-550. Ref. 1 2 3 4 Description Cover left SC-550 Screw M3x8 Screw 3.0x10 Label SC-550 Partnumber ZME-20555 DR-4001-43329 BM-2301-503010 LB-20550 103 Qty 1 3 6 1 AP-74030, Rev / B Maintenance Manual – SC Cutting Plotter 9.4. PCB box left and right SC-550. 104 AP-74030, Rev / B Maintenance Manual – SC Cutting Plotter PCB box right parts list Ref. 1 2 2 3 3 4 5 6 7 8 8 9 10 11 12 13 14 15 16 17 18 19 20 21 22 23 24 24’ Description Right PCB box st Main PCB SC-550 1 version nd Main PCB SC-550 2 version st Terminal PCB SC 1 version nd Terminal PCB SC 2 version Power ON/OFF switch Power inlet Head FCC cable Cable j102 ® J515 st Cable J113 ® J500 1 version nd Cable J130 ® J500 2 version st Cable J101 ® J512 1 version Cable P/S ® mainboard Cable switch ® P/S Extens. Cable X-encoder Extens. Cable Y-encoder Bracket Terminal board Plate cover right Screw M3x4 Screw M3x25 Screw M3x6 Screw M3x10 (Interf.) Screw hex M3x8 Rubber floot Screw hex M4x8 Cable bracket Cable guide Cable guide Partnumber ME-20556 EY-22570 EY-23570 EY-20573 EY-21573S DE-43074 DE-44745 MK-60867 MK-60865 MK-60627 MK-41200 MK-60864 MK-51550 MK-81550 MK-41500 MK-41501 ME-20508 ME-20658 DR-4001-43993 DR-4005-44614 DR-4001-43923 DR-4007-44129 BM-6301-603008 BR-40040 BM-6200-604008 ME-20634 AE-91025 AE-92788N Qty 1 1 1 1 1 1 1 1 1 1 1 1 1 1 1 1 2 1 3 1 14 2 5 2 2 1 7 1 Partnumber ME-20552 DE-31396 ME-20510L ME-20510R DR-4001-43923 DR-4001-43993 BR-40040 BM-6200-604008 BM-6301-603008 Qty 1 1 1 1 5 4 2 2 5 PCB box left parts list. Ref. 1 2 3 4 5 5 6 7 8 Description Left PCB box Power supply board Bracket P/S left Bracket P/S right Screw M3x6 Screw M3x4 Rubber foot Screw hex M4x8 Screw hex M3x8 105 AP-74030, Rev / B Maintenance Manual – SC Cutting Plotter 9.5. Penhead flex cable assy SC-550. Ref. # 1 2 3 4 5 6 Description Head FCC cable assy Head FCC cable SC Head cable PCboard Strain relief plate Strain relief rubber Screw M3x6 strain relief ---------------------------------------------------------Screw M3x4 Partnumber MY-20571 MK-60867 EY-20571 ME-20665 ME-20666 BM-1400-003006 --------------------------DR-4001-43993 106 Qty 1 1 1 1 1 2 2 AP-74030, Rev / B Maintenance Manual – SC Cutting Plotter 9.6. X-motor Assy SC-550. Ref. # 1 2 3 4 5 6 7 8 8’ Description X-motor assy X-motor Drive pulley Set screw X-motorplate Screw M4x8 ---------------------------------------------------------Screw M4x10 X-drive belt X-motor cover Screw M4x8 Partnumber EY-10002 EE-10002 DE-46568 DR-4007-43352 ME-20505 DR-4001-43396 --------------------------DR-4001-43317 DE-44157 ME-20501 DR-4001-43396 107 Qty 1 1 1 2 1 2 2 1 1 4 AP-74030, Rev / B Maintenance Manual – SC Cutting Plotter 9.7. X-rail assy SC-550. Ref. # 1 2 3 3’ 4 5 6 6’ 6” 6“’ 7 8 9 10 11 11’ 12 13 14 15 16 -17 17’ 17” 18 18’ 19 19’ Description X-rail assy SC-550 X-rail SC-550 Grid shaft Bearing holder Screw M4x8 Grid roll 95 mm Grid roll 14 mm Paper sensor Paper sensor bracket Screw M3x8.5 sensor Screw M4x6 bracket Cable sensor front Cable sensor rear Dust filter Cable guide Earth plate Screw M4x8 Screwplate Plastic spacer Grid cover Cutting mat Screw M2x5 -------------------------------------------------------Fan Screw 3.5x32 Fan cover Gear grid shaft Set screw M3x3 Bearing grid shaft Screw M3x4 Partnumber MY-5500-10400 ME-10405 ME-20509 MY-32227 DR-4008-44543 DE-44800 DE-44142 E-PS-R50LA ME-20629 DS-1054-40883 DR-4008-41838 MK-41702 MK-41703 DE45-903 AE-91025 DE-45118 DR-4001-43396 DR-2164-41836 BR-40710 ME-20550 ZME-10129 BM-6301-602005 -------------------------EE-50761 BM-2100-135032 ME-20668 DE-46555 DR-4007-43352 DE-46563 DR-4001-43993 108 Qty 1 1 1 6 12 1 4 2 2 2 2 1 1 1 3 1 1 15 2 1 3 6 1 2 1 1 2 1 2 AP-74030, Rev / B Maintenance Manual – SC Cutting Plotter 9.8. Y-MOTOR Assy SC-550. Ref. # 1 2 3 4 Description Y-motor assy Y-motor Drive pulley ---------------------------------------------------------Screw M4x10 Y-reduction belt Partnumber EY-1012 DE-32442 DE-4707 --------------------------DR-4001-43317 DE-47079 109 Qty 1 1 1 2 1 AP-74030, Rev / B Maintenance Manual – SC Cutting Plotter 9.9. Y-axis drive belt assy SC-550. Ref. # 1 2 3 4 Description Y-drive belt assy Y-drive belt SC-550 Belt connection plate Pressure plate Screw M3x6 Partnumber MY-20561 ME-20561 ME-10107 ME-10108 DR-6210-303006 110 Qty 1 1 1 2 4 AP-74030, Rev / B Maintenance Manual – SC Cutting Plotter 9.10. Y-drive pulley assy + mounting bracket SC-550. Ref. # 1 2 3 4 5 6 7 8 9 10 Description Y-drive pulley assy Y-drive pulley Shaft Bearing E-ring ---------------------------------------------------------Screw M3x8 Y-motor bracket Screw 3.5x25 Cable holder Screw M3x25 Cable support plate Partnumber MY-47557 DE-47057 ME-20057 DE-47095 BR-41040 --------------------------DR-4001-43329 ME-20507 BM-2100-13505 AE-91025 DR-4005-44614 ME-10109 111 Qty 1 1 1 2 4 (3) 2 1 2 1 1 1 AP-74030, Rev / B Maintenance Manual – SC Cutting Plotter 9.11. Y-axis return pulley assy SC-550. Ref. # 1 2 3 4 5 6 # 7 8 9 Description Return pulley assy Return pulley Bearing Shaft Set-ring and screw Screw M3x30 E-ring ---------------------------------------------------------Return pulley bracket Screw foot (plastic) Screw M3x8 Screw 3.5x25 Partnumber MY-47675 DE-47075 DE-47095 ME-20058 BR-32000 DR-4001-45094 BR-31040 --------------------------ME-20607 DE-47091 DR-4001-43329 BM-2100-135025 112 Qty 1 1 2 1 1 2 3 1 2 2 2 AP-74030, Rev / B Maintenance Manual – SC Cutting Plotter 9.12. Y-rail assy SC-550. Ref. 1 2 3 4 5 Description Y-rail SC-550 FCC cable guide SC-550 Screw M4x6 black Screwplate Screw M4x6 Partnumber ME-10406 MY-20507 DR-4008-41838 DR-2164-41836 BM-6200-60400 113 Qty 1 1 4 7 3 AP-74030, Rev / B Maintenance Manual – SC Cutting Plotter 9.13. Pressure roller UP/DOWN mechanism SC-550. Ref. 1 2 3 4 5 6 7 8 9 10 11 12 13 14 15 16 17 Description Partnumber ME-20503 ME-20524 ME-20504 DE-45673 ME-20640 DR-4008-41834 E-41761 BM-5000-002014 BR-40301 BR-10011 BR-24650 DR-4001-44611 DE-44782 DR-4001-43329 ME-20776 BR-40010 BR-31070 Turn over plate Pressure lever Transmission shaft Spring Knob UP/DOWN Hex screw M4x6 µ Switch UP/DOWN Screw M2x14 Plastic spacer Spacer Spring washer Screw M4x16 Clamp shaft Screw M3x8 Hex. Shaft Plastic bearing E-ring 114 Qty 1 1 1 1 1 1 1 2 2 1 1 1 2 2 1 2 2 AP-74030, Rev / B Maintenance Manual – SC Cutting Plotter 9.14. Pressure roller assy SC-550. 115 AP-74030, Rev / B Maintenance Manual – SC Cutting Plotter Ref. # 1 2 3 4 5 6 7 8 9 10 11 12 13 14 15 16 Description Pressure roller assy Pressure base Pressure arm Pressure roller Spring shaft Spring Pivot shaft Roller shaft Connection shaft Hex nut M8 Washer E-ring 3.2 E-ring 2.3 Plastic washer ---------------------------------------------------------UP/DOWN cam Cam bracket Screw M3x4 Partnumber MY-10402 ME-10402 ME-10095 DE-44190 ME-20611 ME-20611 ME-20613 ME-20614 ME-20612 BM-9104-108004 BR-14338 BR-31032 BR-31023 DE-44192 --------------------------ME-10403 ME-20647 DR-4001-43993 116 Qty 1 1 1 1 1 1 1 1 1 2 2 4 2 2 1 1 1 AP-74030, Rev / B Maintenance Manual – SC Cutting Plotter 9.15. Cutting head assy SC-550. 117 AP-74030, Rev / B Maintenance Manual – SC Cutting Plotter 118 AP-74030, Rev / B Maintenance Manual – SC Cutting Plotter 119 AP-74030, Rev / B Maintenance Manual – SC Cutting Plotter 120 AP-74030, Rev / B