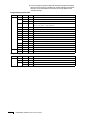
1
© 2007 - 2009 Active Voice, LLC.
All rights reserved.
First edition 2009.
Active Voice and UNIVERGE UM8500 are trademarks of Active Voice, LLC. Other brands and product names
used in this document are trademarks of their respective owners.
Licensed under one or more of the following patents: U.S. Nos. 4,994,926; 5,291,302; 5,459,584; 4,696,028;
4,809,321; 4,850,012; 4,922,526; 4,935,958; 4,955,047; 4,972,469; 4,975,941; 5,020,095; 5,027,384;
5,029,196; 5,099,509; 5,109,405; 5,148,478; 5,166,974; 5,168,519; 5,249,219; 5,303,298; 5,309,504;
5,347,574; 5,666,401; 5,181,243; 5,724,408; and Canadian No. 1329852.
NEC Unified Solutions, Inc.
Irving, Texas
U.S.A.
ii
UNIVERGE UM8500 INTEGRATION GUIDE
■ CONTENTS
■
Avaya D82
1
Integration overview ............................................................. 2
Integration steps .............................................................. 2
Requirements ................................................................... 3
Integration description........................................................... 4
Integration features .......................................................... 4
Configuring UNIVERGE UM8500 for the integration .................... 5
Connecting the systems ......................................................... 6
Programming the phone system.............................................. 9
Avaya Definity G3 or System 75 phone system setup steps .... 9
Avaya System 85 phone system setup steps........................ 15
Troubleshooting ................................................................... 17
■
Centrex/SMDI
19
Integration overview ............................................................
Integration steps .............................................................
Requirements ..................................................................
Integration description..........................................................
How the integration works.................................................
Integration features .........................................................
Configuring UNIVERGE UM8500 for the integration ...................
Programming the phone system.............................................
Testing the Centrex connection ..............................................
■
Cisco Call Manager
20
20
20
21
21
21
22
23
24
25
Integration overview ............................................................
Integration steps .............................................................
Requirements ..................................................................
Integration description..........................................................
How the integration works.................................................
Integration features .........................................................
Setting up Cisco CallManager.................................................
Installing and configuring the TAPI service provider ..................
Configuring UNIVERGE UM8500 for the integration ...................
Changing the TAPI service provider settings ............................
Upgrading from Cisco 2.4......................................................
Changing the number of uOne ports .......................................
Converting from analog lines to IP lines ..................................
Troubleshooting ...................................................................
Message waiting indicators are not working properly .............
UNIVERGE UM8500 does not start after software is installed
and integration is configured .........................................
The default earpiece and speaker volume on Cisco 7960
phones is too loud ........................................................
Integrating with CallManager and traditional phone systems ......
Requirements ..................................................................
Setting up UNIVERGE UM8500 Administrator .......................
Changing the number of installed ports ...............................
CONTENTS
26
26
26
27
28
29
30
36
39
40
42
43
44
45
45
45
45
46
46
46
50
iii
■
Fujitsu 9600/SMDI
Integration overview ...........................................................
Integration steps ............................................................
Requirements .................................................................
Integration description.........................................................
How the integration works................................................
Integration features ........................................................
Configuring UNIVERGE UM8500 for the integration ..................
Programming the phone system............................................
■
Mitel SX200, SX2000, 3300ICP, and 200ICP
Integration overview ...........................................................
Integration steps ............................................................
Requirements .................................................................
Integration description.........................................................
Integration features ........................................................
Configuring UNIVERGE UM8500 for the integration ..................
Connecting the systems .......................................................
Programming the phone system............................................
Mitel SX-200 ML..............................................................
Mitel SX-2000.................................................................
Troubleshooting ..................................................................
■
Mitel SX-2000 T1
Integration overview ...........................................................
Integration steps ............................................................
Requirements .................................................................
Integration description.........................................................
How the integration works................................................
Integration features ........................................................
Configuring UNIVERGE UM8500 for the integration ..................
Programming the phone system............................................
Steps to change the phone system settings ........................
■
Mitel 3300 ICP T1 with Digital E&M
53
54
54
54
55
55
55
56
57
59
60
60
60
61
61
62
63
65
65
66
68
69
70
70
70
71
71
71
72
73
73
85
Integration overview ........................................................... 86
Integration steps ............................................................ 86
Requirements ................................................................. 86
Integration description......................................................... 87
Integration features ........................................................ 87
Configuring UNIVERGE UM8500 for integration........................ 88
Connecting the systems ....................................................... 89
Programming the Mitel 3300/SX-3200 for digital E&M integration 90
Setting up UNIVERGE UM8500 for integration ......................... 93
Configuring phone answering............................................ 93
Configuring message waiting ............................................ 93
Configuring message retrieval........................................... 93
Configuring Auto Attendant .............................................. 93
iv
UNIVERGE UM8500 INTEGRATION GUIDE
■
Mitel 3300 ICP with IP integration
95
Integration overview ............................................................ 96
Integration steps ............................................................. 96
Requirements .................................................................. 96
Integration description.......................................................... 97
How the integration works................................................. 97
Integration features ......................................................... 97
Programming the phone system............................................. 98
Steps for changing the phone system settings...................... 98
Configuring UNIVERGE UM8500 for the integration ................. 102
■
NEC NEAX 2000 with Direct Digital (D82)
105
Integration overview ..........................................................
Integration steps ...........................................................
Requirements ................................................................
Integration description........................................................
How the integration works...............................................
Integration features .......................................................
Configuring UNIVERGE UM8500 for the integration .................
Programming the phone system...........................................
■
NEC NEAX 2000 with IP Protims
111
Integration overview ..........................................................
Integration steps ...........................................................
Requirements ................................................................
Integration description........................................................
How the integration works...............................................
Integration features .......................................................
Programming the phone system...........................................
Configuring UNIVERGE UM8500 for the integration .................
■
106
106
106
107
107
107
108
109
NEC NEAX 2000 with OAI
112
112
112
113
113
113
114
115
117
Integration overview ..........................................................
Integration steps ...........................................................
Requirements ................................................................
Integration description........................................................
How the integration works...............................................
Integration features .......................................................
Programming the phone system...........................................
Setting up the NEAX 2000 IVS or IVS 2.............................
Setting up the NEAX 2000 IPS .........................................
Configuring UNIVERGE UM8500 for the integration .................
Installing the OAI Integration Server software .......................
Configuring the OAI Integration Server .................................
Installing and starting the OAI service ..................................
Testing the OAI integration .............................................
CONTENTS
118
118
119
120
120
120
121
121
124
128
130
131
134
134
v
■
NEC NEAX 2400 with Direct Digital
137
Integration overview ..........................................................
Integration steps ...........................................................
Requirements ................................................................
Integration description........................................................
How the integration works...............................................
Integration features .......................................................
Configuring UNIVERGE UM8500 for the integration .................
Programming the phone system...........................................
■
NEC NEAX 2400 with IP Protims
143
Integration overview ..........................................................
Integration steps ...........................................................
Requirements ................................................................
Integration description........................................................
How the integration works...............................................
Integration features .......................................................
Programming the phone system...........................................
Configuring UNIVERGE UM8500 for the integration .................
■
NEC NEAX 2400 with serial MCI
NEC NEAX 2400 with OAI
UNIVERGE UM8500 INTEGRATION GUIDE
150
150
150
152
152
152
153
155
155
159
159
161
163
Integration overview ..........................................................
Integration steps ...........................................................
Requirements ................................................................
Integration description........................................................
How the integration works...............................................
Integration features .......................................................
Programming the phone system...........................................
Configuring UNIVERGE UM8500 for the integration .................
Installing the OAI Integration Server software .......................
Configuring the OAI Integration Server .................................
Installing and starting the OAI service ..................................
Testing the OAI integration..............................................
vi
144
144
144
145
145
145
146
147
149
Integration overview ..........................................................
Integration steps ...........................................................
Requirements ................................................................
Integration description........................................................
How the integration works...............................................
Integration features .......................................................
Setting up the trunk board ..................................................
Programming the phone system...........................................
Programming the phone system steps...............................
Configuring UNIVERGE UM8500 for the integration .................
Configuring UNIVERGE UM8500 ports ...............................
Transferring calls on phone systems without blind transfer ......
■
138
138
138
139
139
139
140
141
164
164
164
166
166
166
167
170
172
173
176
176
■
NEC NEAX 2400 or NEC SV7000 with LAN MCI
179
Integration overview ..........................................................
Integration steps ...........................................................
Requirements ................................................................
Integration description........................................................
How the integration works...............................................
Integration features .......................................................
Setting up the trunk board ..................................................
Programming the phone system...........................................
Programming the phone system steps ..............................
Configuring the UNIVERGE UM8500 for integration .................
Configuring UNIVERGE UM8500 ports ...............................
■
NEC UNIVERGE SV7000/SV7000MPS with IP Protims
191
Integration overview ..........................................................
Integration steps ...........................................................
Requirements ................................................................
Integration description........................................................
How the integration works...............................................
Integration features .......................................................
Programming the phone system...........................................
Configuring UNIVERGE UM8500 for the integration .................
■
NEC UNIVERGE SV7000 with OAI
192
192
192
193
193
193
194
195
197
Integration overview ..........................................................
Integration steps ...........................................................
Requirements ................................................................
Integration description........................................................
How the integration works...............................................
Integration features .......................................................
Programming the phone system...........................................
Configuring UNIVERGE UM8500 for the integration .................
Installing the OAI Integration Server software .......................
Configuring the OAI Integration Server .................................
Installing and starting the OAI service ..................................
Testing the OAI integration .............................................
■
180
180
180
181
181
181
182
184
184
188
189
NEC UNIVERGE SV8300 with IP Protims
198
198
199
200
200
200
201
204
206
207
210
210
213
Integration overview ..........................................................
Integration steps ...........................................................
Requirements ................................................................
Integration description........................................................
How the integration works...............................................
Integration features .......................................................
Programming the phone system...........................................
Configuring UNIVERGE UM8500 for the integration .................
CONTENTS
214
214
214
215
215
215
216
219
vii
■
NEC UNIVERGE SV8300 using OAI
221
Integration overview ..........................................................
Integration steps ...........................................................
Requirements ................................................................
Integration description........................................................
How the integration works...............................................
Integration features .......................................................
Programming the phone system...........................................
Configuring UNIVERGE UM8500 for the integration .................
Installing the OAI Integration Server software .......................
Configuring the OAI Integration Server .................................
Installing and starting the OAI service ..................................
Testing the OAI integration..............................................
■
NEC UNIVERGE SV8500 with Direct Digital
235
Integration overview ..........................................................
Integration steps ...........................................................
Requirements ................................................................
Integration description........................................................
How the integration works...............................................
Integration features .......................................................
Configuring UNIVERGE UM8500 for the integration .................
Programming the phone system...........................................
■
NEC UNIVERGE SV8500 with IP Protims
NEC UNIVERGE SV8500 with LAN MCI
UNIVERGE UM8500 INTEGRATION GUIDE
242
242
242
243
243
243
244
245
247
Integration overview ..........................................................
Integration steps ...........................................................
Requirements ................................................................
Integration description........................................................
How the integration works...............................................
Integration features .......................................................
Programming the phone system...........................................
Programming the phone system steps...............................
Configuring the UNIVERGE UM8500 for integration .................
Configuring UNIVERGE UM8500 ports ...............................
viii
236
236
236
237
237
237
238
239
241
Integration overview ..........................................................
Integration steps ...........................................................
Requirements ................................................................
Integration description........................................................
How the integration works...............................................
Integration features .......................................................
Programming the phone system...........................................
Configuring UNIVERGE UM8500 for the integration .................
■
222
222
223
224
224
224
225
228
229
230
233
233
248
248
248
249
249
249
250
250
254
255
■
NEC UNIVERGE SV8500 with serial MCI
257
Integration overview ..........................................................
Integration steps ...........................................................
Requirements ................................................................
Integration description........................................................
How the integration works...............................................
Integration features .......................................................
Programming the phone system...........................................
Programming the phone system steps ..............................
Configuring UNIVERGE UM8500 for the integration .................
Configuring UNIVERGE UM8500 ports ...............................
■
NEC UNIVERGE SV8500 using OAI
267
Integration overview ..........................................................
Integration steps ...........................................................
Requirements ................................................................
Integration description........................................................
How the integration works...............................................
Integration features .......................................................
Programming the phone system...........................................
Configuring UNIVERGE UM8500 for the integration .................
Installing the OAI Integration Server software .......................
Configuring the OAI Integration Server .................................
Installing and starting the OAI service ..................................
Testing the OAI integration .............................................
■
Nortel Meridian-1 with D82
268
268
268
269
269
269
270
273
274
275
278
278
281
Integration overview ..........................................................
Integration steps ...........................................................
Requirements ................................................................
Integration description........................................................
Integration features .......................................................
Configuring UNIVERGE UM8500 for the integration .................
Connecting the systems ......................................................
Programming the phone system...........................................
Troubleshooting .................................................................
■
258
258
258
259
259
259
260
260
264
264
Siemens 9751 CBX with D42 or D82
282
282
282
283
283
284
285
286
291
293
Integration overview ..........................................................
Integration steps ...........................................................
Requirements ................................................................
Integration description........................................................
Integration features .......................................................
Configuring UNIVERGE UM8500 for the integration .................
Connecting the systems ......................................................
Programming the phone system...........................................
Programming ROLMphone 400 digital station sets...............
Troubleshooting .................................................................
CONTENTS
294
294
294
295
295
296
297
298
298
301
ix
■
Sphere System
303
Integration steps ...........................................................
Requirements ................................................................
Integration description........................................................
How the integration works...............................................
Integration features .......................................................
Setting up the Sphere system ..............................................
Configuring UNIVERGE UM8500 for integration.......................
Changing the number of voicemail ports................................
Troubleshooting .................................................................
Message waiting indicators are not working properly ...........
Dual integration with the Sphere system through SIP trunks
and traditional analog ports .............................................
Requirements ................................................................
Setting up a UNIVERGE UM8500 with dual integration .........
■
Standard SIP Integration
317
317
317
319
Integration overview ..........................................................
Integration steps ...........................................................
Requirements ................................................................
Integration description........................................................
How the integration works...............................................
Integration features .......................................................
Programming the phone system...........................................
Configuring UNIVERGE UM8500 for the integration .................
■
304
304
305
305
305
307
313
315
316
316
320
320
321
322
322
322
323
324
Toshiba CIX100/200/670, CTX 100/670, and StrataDK series 327
Integration overview ..........................................................
Integration steps ...........................................................
Requirements ................................................................
Integration description........................................................
How the integration works...............................................
Integration features .......................................................
Configuring UNIVERGE UM8500 for the integration .................
Programming the phone system...........................................
Appendix A
Shutting down and starting the messaging server
328
328
328
329
329
329
330
331
333
Shutting down and starting UNIVERGE UM8500...................... 334
Appendix B
Testing the extensions
337
Testing the extensions ........................................................ 338
What is needed for the test ............................................. 338
Steps to test the extensions ............................................ 338
Appendix C
Learning the phone system tones
339
Learning phone system tones .............................................. 340
Troubleshooting the Learn Tones utility ............................. 341
x
UNIVERGE UM8500 INTEGRATION GUIDE
■ Avaya D82
In this integration...
Integration overview .............................................................................. 2
Integration steps ............................................................................... 2
Requirements ................................................................................... 3
Integration description ........................................................................... 4
Integration features ........................................................................... 4
Configuring UNIVERGE UM8500 for the integration ..................................... 5
Connecting the systems.......................................................................... 6
Programming the phone system............................................................... 9
Avaya Definity G3 or System 75 phone system setup steps ..................... 9
Avaya System 85 phone system setup steps ........................................15
Troubleshooting ....................................................................................17
AVAYA D82
1
Integration
overview
Use this section of the Integration Guide with the Installation Guide.
Integration steps
Follow these steps to set up the integration.
1 Review the system and equipment requirements
Verify that all phone system and messaging system requirements have been
met. See “Requirements” on page 3.
2 Set up UNIVERGE UM8500 for the integration.
See “Configuring UNIVERGE UM8500 for the integration” on page 5.
3 Connect the systems.
See “Connecting the systems” on page 6.
4 Set up the phone system for the integration.
See “Programming the phone system” on page 9 for instructions on how to
program the Avaya Definity G3, System 75, or System 85 G2 phone system.
5 Test the phone extensions
Test the phone extensions that are set up for the integration. See Appendix B,
“Testing the extensions” on page 338.
6 Run the Learn Tones utility
Run the Learn Tones utility to teach the messaging system the tones
associated with the phone system. See Appendix C, “Learning the phone
system tones” on page 339.
2
UNIVERGE UM8500 INTEGRATION GUIDE
Requirements
Before setting up the Avaya with D82 integration, confirm that the site meets the
following requirements and that all of the necessary components are available:
Phone system
●
Avaya Definity G3, System 75, or System 85 G2.
●
For each voice messaging port, one Digital Network Interface Circuit (DNIC)
port which emulates a 7434D or 8434D digital phone, installed and set up as a
voice messaging port.
●
The phone system ready for the integration as described in the phone system
manufacturer’s documentation.
●
A type 66 interconnect block for each PBX station interface cable.
UNIVERGE UM8500 server
●
The Dialogic® D82™ voice boards installed; see the Installation Guide for
installation details.
NOTE
For the latest information on supported voice boards for UM8500,
contact a sale representative.
●
An 18-pair PBX station interface cable for each voice board.
●
UNIVERGE UM8500 installed and ready for the integration as described in
the Installation Guide.
●
A system key that enables the integration with the appropriate number of
voice messaging ports.
AVAYA D82
3
Integration
description
The Avaya with D82 integration uses digital lines to connect the phone system and
the messaging system. The phone system digital voice messaging ports connect to
D82 voice boards in the UM8500 server. A D82 voice board emulates up to eight
digital phones.
Integration features
The Avaya with D82 integration with UM8500 provides the following features:
Call forward to personal greeting. When an incoming call is routed to an
unanswered or busy extension, the call is forwarded to the subscriber’s voice
mail. The caller then hears the subscriber’s personal greeting and can leave a
message.
Caller ID. UM8500 receives caller ID information from the phone system, if
available. This information is displayed in the message’s subject line in
Microsoft Office Outlook® or other desktop messaging application.
Easy message access. A subscriber can retrieve messages without entering
an ID. UM8500 identifies a subscriber based on the extension from which the
call originated. A password might be required.
Identified subscriber messaging. UM8500 automatically identifies a
subscriber who leaves a message during a forwarded internal call based on
the extension from which the call originated.
Message waiting indication (MWI). When a message is waiting for a
subscriber, UM8500 notifies the phone system to activate the message
waiting indicator on the subscriber’s extension, if it is equipped with one, or
to activate a stutter dial tone.
4
UNIVERGE UM8500 INTEGRATION GUIDE
Configuring
UNIVERGE
UM8500 for the
integration
After ensuring that the UM8500 server is ready for the integration by completing
all appropriate tasks in the Installation Guide, perform the following procedure to
confirm that the integration is enabled.
To confirm that the integration is enabled
1 Click Start > All Programs > UNIVERGE UM8500 > Edit Switch.
2 If prompted for logon credentials, type the administrator extension and
password, then click OK.
On a new install the logon credentials are:
Extension = 99995
Password = 12345
3 Confirm that the settings match those in the following table.
Phone system settings
Parameter
Required setting
Manufacturer
Lucent
Model
Definity G3
Switch software version
All with digital 7434D emulation
Integration
Direct Digital
4 If the settings are incorrect, select the correct settings and click Update
Voice Mail Now.
AVAYA D82
5
Connecting the
systems
After installing all of the required hardware on the messaging system, perform the
following procedure to connect the phone system to the messaging system.
To install required messaging system hardware, such as D82 boards, see the
Installation Guide.
System connections
6
UNIVERGE UM8500 INTEGRATION GUIDE
To connect the phone system and UM8500 server
1 Connect the phone system digital lines 1-8 (or 1-4 on a 4-port system) to a
type 66 interconnect block. See the following tables for cabling requirements.
2 Connect an 18-pair PBX station interface cable to an Amphenol connection
on the type 66 interconnect block.
3 Connect the other end of the PBX station interface cable to a telco cable.
4 Connect the other end of the telco cable to a D82 board installed in the
UM8500 server.
5 Repeat steps 1 through 4 for each additional D82 board installed.
D82 Two-wire pinouts
Phone line
number
Type 66
Block pair
1
2
2
3
4
5
6
7
8
4
6
8
10
12
14
16
Pin number Pair color
Lead
designation
27
white-orange T1
2
orange-white R1
29
white-brown
T2
4
brown-white
R2
31
red-blue
T3
6
blue-red
R3
33
red-green
T4
8
green-red
R4
35
red-slate
T5
10
slate-red
R5
37
black-orange
T6
12
orange-black R6
39
black-brown
T7
14
brown-black
R7
41
yellow-blue
T8
16
blue-yellow
R8
D82 Four-wire pinouts
Phone line number Pin number Pair color
Lead designation
1
2
3
4
26
white-blue
TXR1
1
blue-white
TXT1
27
white-orange
PXR1
2
orange-white
PXT1
28
white-green
TXR2
3
green-white
TXT2
29
white-brown
PXR2
4
brown-white
PXT2
30
white-slate
TXR3
5
slate-white
TXT3
31
red-blue
PXR3
6
blue-red
PXT3
32
red-orange
TXR4
7
orange-red
TXT4
33
red-green
PXR4
8
green-red
PXT4
AVAYA D82
7
D82 Four-wire pinouts, continued
Phone line number Pin number Pair color
Lead designation
5
6
7
8
8
UNIVERGE UM8500 INTEGRATION GUIDE
34
red-brown
TXR5
9
brown-red
TXT5
35
red-slate
PXR5
10
slate-red
PXT5
36
black-blue
TXR6
11
blue-black
TXT6
37
black-orange
PXR6
12
orange-black
PXT6
38
black-green
TXR7
13
green-black
TXT7
39
black-brown
PXR7
14
brown-black
PXT7
40
black-slate
TXR8
15
slate-black
TXT8
41
yellow-blue
PXR8
16
blue-yellow
PXT8
Programming
the phone
system
After connecting the phone system to the UM8500 server, perform the procedures
to set up the phone system for the integration. Refer to the phone manufacturer’s
documentation for details.
●
For the Avaya Definity G3 or System 75 phone system, see the setup steps
below.
●
For the Avaya System 85, see the setup steps on page 15.
Avaya Definity G3 or System 75 phone system setup
steps
1 Set up the voice messaging extensions.
For the Definity G3, the D82 board emulates the Avaya 8434D digital phone.
For the System 75, the D82 board emulates the Avaya 7434D phone. See “To
set up the voice messaging extensions as digital phones” on page 10.
2 Set up the hunt group.
Set up a hunt group to include all of the voice messaging ports. See “To set up
a hunt group” on page 11.
3 Set up message waiting indication.
Dedicate one of the voice messaging ports to control the phone system
message waiting indication. See “To set up message waiting indication for a
port” on page 12.
4 Set up a coverage path.
The phone system uses a coverage path to forward unanswered or busy calls.
See “To set up a coverage path” on page 13.
5 Set up subscribers.
Assign the voice messaging coverage path to all subscribers. See “To set up
subscribers” on page 14.
AVAYA D82
9
To set up the voice messaging extensions as digital
phones
1 At the phone system programming terminal, type add station followed
by a voice messaging extension, then press ENTER. For example, extension:
501 is used in the following example screen.
2 On page 1 of the Station screen, in the Name field, type a name that includes
the voice messaging extension number, the maximum is 16 characters. For
example, Voice Mail 501 is used in the following example screen.
3 For the 7434D emulation, set the Type field to 7434D. For the 8434D
emulation, set the Type field to 7405ND. If the Type field is set to 8434D,
voice mail will not integrate with the phone system.
NOTE
7405ND is not a phone type. It only enables numeric display. To
use 7405ND, enable it in the System-parameter Features screen
when programming the phone system.
■
At the programming screen type,
change system-parameter features.
■
On page 5, set 7405ND Numeric Terminal Display to y.
4 In the Feature Options section, type the field settings as shown in the
following example screen. Refer to the phone system manufacturer’s
documentation for setting up the other fields left blank in the example screen.
5 Go to page 2 of the Station screen.
6 In the Button Assignments section, type call-appr in fields 1 and 2.
7 Go to page 4 and in the Display Button Assignments section, confirm
that the value for field 1 is Normal.
8 Press ENTER to complete the setup.
9 Repeat steps 1 through 8 for each voice messaging port extension.
NOTE
The example above shows completed fields for the 7434D digital
phone emulation.
10
UNIVERGE UM8500 INTEGRATION GUIDE
To set up a hunt group
1 At the phone system programming terminal, type add hunt next then
press ENTER.
2 On page 1 of the Hunt Group screen, set up a hunt group number, extension,
and name.
For example, the group number 1, the group extension 500, and the group
name Voice Mail are used in the example screen.
3 In Group Type, type ucd or circ. In Queue?, type n. Refer to the phone
system manufacturer’s documentation for setting up the other fields.
NOTE
The ACD field should be set to No. UM8500 does not support voice
messaging ports set up for ACD.
4 Go to page 3 and in the Group Member Assignments section, type all of
the voice messaging extensions that answer hunt group calls.
NOTE
Do not add ports that are set up on the voice messaging system
with Dial, Lamp, or Msg port status codes.
5 Press ENTER to complete the setup.
AVAYA D82
11
To set up message waiting indication for a port
NOTE
The extension must be set up as a 7434D with message waiting
indication.
1 At the phone system programming terminal, type change station
followed by the voice messaging extension that will control message waiting
indication, then press ENTER. For example, extension 501 is used in the
following example screen.
2 On page 1 of the Station screen, set up the Port field according to the phone
system requirements.
3 In the Feature Options section, type the field settings as shown in the screen
below. Refer to the phone system manufacturer’s documentation for setting
up the other fields left blank in the following example screen.
4 Go to page 2 and in the Button Assignments section, type call-appr
in fields 1 and 2.
5 Go to page 3 and in the Feature Button Assignments section, type the
following field settings:
Field
33
34
Setting
lwc-store
lwc-cancel
6 Go to page 4 and in the Display Button Assignments section, confirm
that the value for field 1 is Normal.
7 Press ENTER to complete the setup.
NOTE
The example above shows completed fields for the 8434D digital
phone emulation.
12
UNIVERGE UM8500 INTEGRATION GUIDE
To set up a coverage path
1 At the phone system programming terminal, type add coverage path
followed by a new coverage path number, such as number 1, then press
ENTER.
In the Coverage Criteria section of the Coverage Path screen, set the field
settings based on the transfer options chosen. The table below describes how
the system uses the setting when it is set to Yes.
Field
Description
Active
If any call appearance is in use, the call
forwards.
If all call appearances are in use, the call
forwards
If the call is unanswered, the call forwards
after the specified number of rings.
All calls immediately forward.
Busy
Don’t Answer
All
Refer to the phone system manufacturer’s documentation for more details on
setting up the coverage path fields.
2 Press ENTER to exit this screen.
AVAYA D82
13
To set up subscribers
1 At the phone system programming terminal, type change station
followed by the subscriber’s extension number, then press ENTER. For
example, extension 555 is used in the screen below.
2 For the 7434D emulation only; in the Name field, confirm that the name
includes the subscriber’s extension number, the maximum is 15 characters.
This restriction does not apply to the 8434D (7405ND) emulation.
NOTE
The Name field must be set up correctly for the integration to
work. For more details on how to set up these fields, refer to the
phone system manufacturer’s documentation.
3 In the Coverage Path field, type the coverage path number created in step 1
of the “To set up the coverage path” procedure on the previous page, then
press ENTER. For example, the number 1 is used in the screen below.
4 Repeat steps 1 through 3 for each subscriber extension.
Next step
Test the extensions. See Appendix B, “Testing the extensions” on page 338.
14
UNIVERGE UM8500 INTEGRATION GUIDE
Avaya System 85 phone system setup steps
Perform the following steps to set up the Avaya System 85 for the integration.
Refer to the phone manufacturer’s documentation for more details on these steps.
1 Set up the voice messaging ports.
The D/82 board emulates the Avaya 7434D phone. See “To set up voice
messaging ports” on page 15.
2 Set up the message waiting indication.
Set up one of the voice messaging extensions to control the phone system
message waiting indication. Refer to the manufacturer’s documentation for
more detailed instructions.
3 Set up subscribers for the integration.
Assign the voice messaging coverage path to each subscriber. See “To set up
voice messaging ports” on page 15.
4 Set up a coverage path.
Set up a basic coverage path to the first voice messaging extension number.
See “To set up a coverage path” on page 15.
Before connecting the UM8500 server to the phone system, perform the following
steps to set up the phone system for the integration. For detailed phone system
procedures, refer to the manufacturer’s documentation.
To set up voice messaging ports
1 Set up the system to detect hardware.
The phone system must detect the boards and other special phone system
hardware that has been added or enabled.
2 Assign the extension numbers that the phone system will use to access the
messaging system. Program extensions as digital 7374D phones. To set up the
voice messaging extensions as 7434D digital phones, see “To set up
subscriber extensions” on page 16.
3 Set up a hunt group to include all of the voice messaging ports.
If the phone system supports hunt group access codes, assign a hunt group
access code for the messaging system. This code is the number that
subscribers dial internally to connect to the messaging system.
Some phone systems do not have hunt groups. A hunt group can be
simulated by forwarding each messaging system extension to the next
extension when the extension is busy.
To set up a coverage path
1 Go to Proc 011 and set up a coverage path to the extension number of the first
voice messaging port.
2 In the Word 1 section, complete fields 1 through 9. Below is an example of
these field settings. There are no restrictions on coverage paths. Several
coverage paths can be created to address specific situations. Refer to the
phone manufacturer’s documentation for the field setting options and
descriptions.
Field
Setting Call coverage paths
1
2
3
4
5
6
xxxx
3
3
0
3
3
Coverage path group number
Cover on active — all types of calls
Cover on busy — all types of calls
Do not cover on all calls
Cover on did not answer — all types of calls.
Cover on third ring
AVAYA D82
15
Field
Setting Call coverage paths
7
8
9
8
1
xxxx
Coverage point is an extension
Coverage point number (1-3)
7405 D extension
To set up subscriber extensions
1 Go to the Word 1 section of Proc 012.
2 In the Name field, type a subscriber’s name and extension number. The full
extension number must appear in the first 16 characters of the subscriber’s
name.
3 Go to the Word 2 section of Proc 000.
4 In field 6, type the coverage path group number.
5 Go to Proc 063 and set up the automatic message waiting lamp.
6 Repeat steps 1 through 5 for each subscriber.
Next step
Test the extensions. See Appendix B, “Testing the extensions” on page 338.
16
UNIVERGE UM8500 INTEGRATION GUIDE
Troubleshooting
If one of the problems listed below is encountered, try the corrective actions listed
for the problem. If these actions do not correct the problem, or if the problem is
not described here, contact Technical Support.
Problems
Corrective actions
Calls to the messaging system do
not connect.
Perform the following for the problems listed:
●
Calls to the messaging system
connect, but no prompts play.
Callers entering an extension are
always answered with the opening
greeting instead of the personal
greeting.
●
●
Calls are not integrating with the
phone system.
Easy message access is not
functioning: subscribers access their
mailboxes and hear the opening
greeting instead of personal options.
●
●
Calls are forwarded to the opening
greeting instead of a subscriber’s
mailbox.
Confirm that expansion boards are firmly seated in the computer
expansion slots, and that each board is properly configured. See “Installing
or reseating voice boards” in the appendix titled “Adding or changing voice
boards” in the Installation Guide.
See the Installation Guide and check the voice board settings. Confirm that
easy message access is set up correctly.
Confirm that the PBX station interface cables between the systems are
connected and functioning correctly. Try testing each cable or replacing
each with a different cable.
Confirm that the correct phone system model is set up on the messaging
system. On the UM8500 Administrator, select Switch and confirm that the
correct phone system manufacturer and model type are displayed.
To get stable caller information:
●
In the integration file, modify the value of the “StableDisplayPause” key
in the Configuration section. The value is specified in milliseconds.
Initially increase it by 100 ms, then restart the messaging system.
In the integration file, modify the value of the “CallInfoTimeout” key.
The default value is 5000 ms.
Typically this happens because the messaging system is set up to use the
Callers are asked to hold or
complain that they are on hold for await-answer transfer type and call holding for that extension. Call holding
too long when calling an extension must be turned off when using the “Do not disturb” mode on the phone.
that is using “Do not disturb” mode.
The phone system might be overloaded due to an increase in polling traffic
The phone system cabinet that
between the D/82 boards and the system. Spread out the load by distributing
contains the voice messaging
the voice messaging extensions among multiple station cards on the phone
station cards sporadically resets
system. For example, distribute three or fewer voice messaging extensions per
itself.
station card.
Confirm that the subscriber’s phone is set up on the phone system to forward
Subscriber’s phones are not
forwarding calls on ring-no-answer calls to the voice messaging hunt group pilot number on ring-no-answer and on
busy.
or on busy.
Perform the following for the problems listed:
Subscriber message waiting
indication fails.
●
On the UM8500 Administrator, on the Ports page verify that at least one of
●
Message waiting indicators are not
activated after messages are left.
the voice messaging ports is set for MWI dialout.
●
On the UM8500 Administrator, confirm that MWI is enabled for the
subscriber.
Message waiting indicators are not
turned off after messages are
retrieved.
Await-answer calls are released
See “To run the Learn Tones utility” on page 340.
before the personal greeting is
played.
AVAYA D82
17
18
UNIVERGE UM8500 INTEGRATION GUIDE
■ Centrex/SMDI
In this integration...
Integration overview .............................................................................20
Integration steps ..............................................................................20
Requirements ..................................................................................20
Integration description ..........................................................................21
How the integration works .................................................................21
Integration features ..........................................................................21
Configuring UNIVERGE UM8500 for the integration ....................................22
Programming the phone system..............................................................23
Testing the Centrex connection ...............................................................24
CENTREX/SMDI
19
Integration
overview
Use this section of the Integration Guide with the Installation Guide.
Integration steps
Follow these steps to set up this integration.
1 Review the system and equipment requirements.
Verify that all phone system and UM8500 server requirements have been met.
See “Requirements,” below.
2 Configure UNIVERGE UM8500 for the integration.
See “Configuring UNIVERGE UM8500 for the integration” on page 22.
3 Program the phone system and extensions.
See “Programming the phone system” on page 23.
4 Test the connection to the central office.
See “Testing the Centrex connection” on page 24.
5 Test the phone extensions that are set up for the integration.
Test the phone extensions that are set up for the integration. See “Testing the
extensions” on page 338.
6 Run the Learn Tones utility.
Run the Learn Tones utility to teach the messaging system the tones
associated with the phone system. See “Learning phone system tones” on
page 340.
Requirements
The steps to set up the Centrex Simplified Message Desk Interface (SMDI)
integration require the following:
Phone system
●
Centrex 1AESS, 5ESS or DMS100 service.
●
A Centrex service SMDI package with one SMDI 4-wire private data link
connected to the external modem.
●
A type 202T or 212T external modem set to 1200 baud.
●
The data link of the external modem connected with an RS-232 serial cable to
a serial port on the UM8500 server, COM1 is the default.
●
The central office voice messaging lines must be connected to the voice
boards in the UM8500 server.
UNIVERGE UM8500 server
●
The Dialogic analog voice boards installed; see the Installation Guide for
installation details.
NOTE
For the latest information on supported voice boards for UM8500,
contact a sale representative.
20
●
UM8500 installed and ready for the integration as described in the
Installation Guide.
●
A system key that enables the integration and the appropriate number of
voice messaging ports.
●
An available serial port, COM1 is the default.
UNIVERGE UM8500 INTEGRATION GUIDE
Integration
description
How the integration works
The Centrex/SMDI integration uses a data link, which consists of an RS-232 serial
cable, a central office leased line, and an external integration modem. The
integration modem provides the data link connection between the Centrex
system at the central office and the messaging system server. This modem, which
is connected to the messaging system server through the RS-232 serial cable, must
be compatible with the type of modem at the central office, type 202T or 212T. The
integration modem is separate from the modem in the messaging system server,
which is used for remote maintenance. The Centrex system voice messaging lines
connect to the analog voice boards in the messaging system server. The following
illustration shows the required connections.
The central office system sends the following information through the data link:
●
The called party’s extension
●
The reason for the forward, for example: the extension is busy, does not
answer, or is set to forward all calls
●
The calling party’s extension, for internal calls
uses this information to answer the call appropriately. For example, a call
forwarded from a subscriber extension to UM8500 is answered with the
subscriber’s personal greeting. If the phone system routes the call to UM8500
without this information, UM8500 answers with the opening greeting.
Integration features
The Centrex/SMDI integration with UM8500 provides the following features:
●
Call forward to personal greeting. When an incoming call is routed to an
unanswered or busy extension, the call is forwarded to the subscriber’s voice
mail. The caller then hears the subscriber’s personal greeting and can leave a
message.
●
●
●
●
Caller ID. UM8500 receives caller ID information from the phone system, if
available. This information is displayed in the message’s subject line in
Microsoft Office Outlook® or other desktop messaging application.
Easy message access. A subscriber can retrieve messages without entering
an ID. UM8500 identifies a subscriber based on the extension from which the
call originated. A password might be required.
Identified subscriber messaging. UM8500 automatically identifies a
subscriber who leaves a message during a forwarded internal call based on
the extension from which the call originated.
Message waiting indication (MWI). When a message is waiting for a
subscriber, UM8500 notifies the phone system to activate the message
waiting indicator on the subscriber’s extension, if it is equipped with one, or
to activate a stutter dial tone.
CENTREX/SMDI
21
Configuring
UNIVERGE
UM8500 for the
integration
After ensuring that the messaging system server is ready for the integration by
completing all appropriate tasks in the Installation Guide, perform the following
procedure to confirm that the integration is enabled.
To confirm that the integration is enabled
1 Click Start > All Programs > UNIVERGE UM8500 > Edit Switch.
2 If prompted for logon credentials, type the administrator extension and
password, then click OK.
On a new install the logon credentials are:
Extension = 99995
Password = 12345
3 Confirm that the settings match those in the following table.
Phone system settings
Parameter
Required setting
Manufacturer
Centrex
Model
1AESS, 5ESS, DMS100
Switch software version
All
Integration
Serial
4 If the settings are incorrect, select the correct settings and click Update
Voice Mail Now.
22
UNIVERGE UM8500 INTEGRATION GUIDE
Programming
the phone
system
Perform the procedure to program the phone system for the integration. Using
programming options other than those described in the following procedure can
affect system performance.
To program the phone system
Instruct the Centrex service provider to set up the phone system in the following
manner:
1 Program the message desk lines as a multiline hunt group.
2 Enable switchhook flash transfer capability on each message desk line.
3 Enable SMDI caller ID on each subscriber extension.
4 For each subscriber extension, set the call forwarding options to: unrestricted
source; forward when the extension is not answered; and forward when the
extension is busy.
CENTREX/SMDI
23
Testing the
Centrex
connection
Perform the following procedures before testing the integration as instructed in
the Installation Guide.
To confirm that there is a data link connection to the
central office
❚
Confirm that the carrier detect (CD) light on the integration modem is lit
when the modem is connected to the data link. This indicates that there is a
carrier tone from the central office.
To confirm that there is a connection between the
integration modem and the messaging system server
1 Confirm that the request-to-send (RTS) light is lit when UM8500 is running
with the SMDI option enabled.
2 If the RTS light is not lit, perform one or more of the following corrective
actions:
■
24
In the UM8500 Administrator, go to System > Switch, then confirm
that the Model box shows a Centrex SMDI model.
■
Confirm that the modem is connected to the correct COM port.
■
Replace the RS-232 serial cable that connects the messaging system
server to the integration modem.
■
Confirm that the integration modem is set up according to the
manufacturer’s requirements.
UNIVERGE UM8500 INTEGRATION GUIDE
■ Cisco Call Manager
In this integration...
Integration overview...................................................................................26
Integration steps ..................................................................................26
Requirements.......................................................................................26
Integration description ................................................................................27
How the integration works .....................................................................28
Integration features ..............................................................................29
Setting up Cisco CallManager .......................................................................30
Installing and configuring the TAPI service provider ........................................36
Configuring UNIVERGE UM8500 for the integration .........................................39
Changing the TAPI service provider settings ...................................................40
Upgrading from Cisco 2.4 ............................................................................42
Changing the number of uOne ports .............................................................43
Converting from analog lines to IP lines.........................................................44
Troubleshooting .........................................................................................45
Message waiting indicators are not working properly..................................45
UNIVERGE UM8500 does not start after software is installed and integration is
configured ...........................................................................................45
The default earpiece and speaker volume on Cisco 7960 phones is too loud ..45
Integrating with CallManager and traditional phone systems ............................46
Requirements.......................................................................................46
Setting up UNIVERGE UM8500 Administrator ............................................46
Changing the number of installed ports....................................................50
CISCO CALL MANAGER
25
Integration
overview
Use this section of the Integration Guide with the Installation Guide.
Integration steps
Follow these steps to set up this integration.
1 Review the system and equipment requirements.
Verify that all Cisco CallManager and UNIVERGE UM8500 system
requirements have been met. See “Requirements,” below.
2 Set up Cisco CallManager.
See “Setting up Cisco CallManager” on page 30.
3 Install and configure the TAPI service provider on the
UNIVERGE UM8500 server.
See “Installing and configuring the TAPI service provider” on page 36.
Requirements
26
●
UNIVERGE UM8500 installed and ready for the integration as described in
the Installation Guide.
●
A system key with the integration type set to “TAPI” or “Multiple,” with the
appropriate number of voice messaging ports enabled.
●
Cisco CallManager software version 3.05 or later.
●
Cisco Unity-CM TSP version 6.0(2) or later.
●
A gateway compatible with Cisco CallManager.
●
Cisco licenses for all phone lines, IP phones, and other H.323 compliant
devices or software that will be connected to the network, as well as one
license for each port.
●
IP phones.
●
A LAN connection at each location where an IP phone will be plugged into the
network.
UNIVERGE UM8500 INTEGRATION GUIDE
Integration
description
The following illustration shows a full-featured UM8500 installation integrating
with the Cisco Architecture for Voice, Video and Integrated Data (AVVID) network.
CISCO
CALLMANAGER
SERVER
• CallManager
• Windows
Server
CISCO GATEWAY
PUBLIC
PHONE
NETWORK
UNIFIED
MESSAGING
SERVER
• UNIVERGE
UM8500
• Exchange
• Internet
Information
Server
• Windows
Server
SUBSCRIBER
DID line
• E-mail client
E-MAIL
SERVER
• Exchange
• Windows
Server
IP Phone
Mobile
Phone
NETWORK
OFF-SITE
SUBSCRIBER
Phone
Fax
• E-mail client
FAX SERVER
• Fax server
software
• Windows
INTERNET
ADMINISTRATOR
CISCO CALL MANAGER
27
How the integration works
The following is an overview of the path an external call takes through the Cisco
AVVID network. The call travels from the Cisco gateway or router and CallManager
software, through UM8500, and on to a subscriber’s extension.
When an external call arrives, the Cisco gateway sends the call over the
LAN to the machine where the Cisco CallManager is installed.
For CallManager lines that are configured to route calls to UM8500,
CallManager tells the gateway to send the call to an available UM8500
extension.
UM8500 answers the call and plays the opening greeting.
During the opening greeting, the caller enters a subscriber’s name or
extension number, for example 1234.
UM8500 notifies CallManager that it has a call for extension 1234.
From this point, the path of the call depends on whether UM8500 is set
up to perform supervised transfers or release transfers.
Supervised Transfers
Release Transfers
While UM8500 holds the call, the
CallManager attempts to
establish a connection with
extension 1234:
UM8500 passes the call to
CallManager and CallManager
sends the call to extension 1234
without waiting to determine if
the line is available. CallManager
and UM8500 drop out of the call
loop.
●
●
28
If the line is available,
CallManager connects the
call from UM8500 to
extension 1234. CallManager
and UM8500 drop out of the
loop and the call is
connected directly from the
Cisco gateway to extension
1234.
If the line is busy or
unanswered, CallManager
gives that information to
UM8500 and UM8500
performs the specified
operation, for example, it
takes a message.
UNIVERGE UM8500 INTEGRATION GUIDE
If UM8500 is set up to perform
release transfer, and if UM8500
takes messages when a line is
busy or unanswered, configure
each phone to forward calls back
to UM8500 when the line is busy
or unanswered.
Integration features
The Cisco CallManager integration offers the following features:
Call forward to personal greeting. When an incoming call is routed to an
unanswered or busy extension, the call is forwarded to the subscriber’s
messaging system. The caller then hears the subscriber’s personal greeting
and can leave a message.
Caller ID. receives caller ID information from Cisco CallManager, if
available. This information is displayed in the message subject line in
Microsoft Outlook® or other desktop messaging applications.
Easy message access. A subscriber can retrieve messages without entering
an ID. UM8500 identifies a subscriber based on the extension from which the
call originated. A password might be required.
Identified subscriber messaging. automatically identifies a subscriber
who leaves a message during a forwarded internal call based on the extension
that the call originated from.
Message waiting indication (MWI). When a message is waiting for a
subscriber, UM8500 notifies the phone system to activate the message
waiting indicator on the subscriber’s extension.
CISCO CALL MANAGER
29
Setting up
Cisco
CallManager
Follow the procedures in this section to set up CallManager to work with UM8500.
To install Cisco CallManager
NOTE
The Cisco CallManager Installation disc is not shipped with
UM8500. If you do not have the installation disc, contact the Cisco
reseller.
1 Insert the Cisco CallManager Installation disc into the disc drive on the
CallManager server.
2 If the startup program starts automatically, follow the screen prompts.
Otherwise, run Setup.exe from the disc.
3 After the installation is complete, open Cisco online Help. Click Start, then
select Programs > Cisco CallManager 3.2 > Cisco Help > System
Guide. The Cisco Help appears in Internet Explorer.
4 In the left frame, select Getting Started > Installing.
5 Follow the procedures for installing and configuring Cisco CallManager. Do
not perform the last step until the following procedures have been
performed:
■
The “To disable call waiting” procedure, below
■
The “To add TAPI phone lines to Cisco CallManager” procedure, below.
CAUTION
Do not install the Cisco Messaging interface. It can cause UM8500
to malfunction.
To disable call waiting
1 On the Cisco CallManager server, click Start, then select Programs > Cisco
CallManager 3.2 > CallManager Administration.
2 On the Cisco CallManager Administration toolbar, click Configuration. The
System screen appears.
3 Scroll down to the System Parameters area, and click Configure.
4 Confirm that Call Waiting Enable is set to Off. If not, click Off, then click
Update to save the change.
NOTE
Call waiting must be disabled for UM8500 TAPI ports, but call
waiting can be enabled for other devices if required.
To add TAPI phone lines to Cisco CallManager
1 On the Cisco CallManager server, click Start, then select Programs > Cisco
CallManager 3.0 > CallManager Administration.
2 On the Cisco CallManager Administration toolbar, click Configuration. The
System screen appears.
3 Click Device Wizard. The Device Wizard–New screen appears.
4 Follow the screen prompts, and enter the values shown in the table on the
following page.
NOTE
If it is expected that the system will need more TAPI lines, and
there are enough licenses available, add the additional lines now.
30
UNIVERGE UM8500 INTEGRATION GUIDE
5 After the values are entered, the Device Wizard–Confirmation screen appears.
Click Finish. The Device Wizard–Finish screen appears.
6 On the Device Wizard–Finish screen, click OK, reset now.
7 Click Continue to confirm that the system should reset the TAPI port now.
8 After receiving confirmation that the device was reset, click Continue.
9 Repeat steps 4 through 8 for each TAPI line.
10 On the Cisco CallManager Administration toolbar, click Configuration,
then click Cisco IP Phone. The Phone list shows the TAPI lines that have
been added, as well as any new IP phones and other devices.
11 Click the name of the added TAPI line. A Device Information screen appears,
showing the values entered for that line. Use the Device Information screen to
correct any errors.
12 Write down the number of TAPI lines that were added and the assigned TAPI
prefix name. This information will be needed when the Cisco TAPI service
provider (TSP) telephony driver is configured on the messaging system
server.
13 Close the Cisco CallManager Administration program, then go to the
appropriate procedure:
Field
■
If the site is using a version of CallManager at least 3.05 but prior to 3.2,
go to “To add uOne ports to CallManager version 3.05” on page 32.
■
If the site is using CallManager 3.2 or later, go to “To add voice mail ports
to CallManager version 3.2 and later” on page 34.
Value
Device type
Click TAPI port.
Device name
Type a name for the TAPI port, for example, tapi_01.
Description
Optional. Type a brief description of the purpose, for example,
Customer Service.
Device pool
Click Default pool.
Location
Click Hub.
How many lines do you want to
assign to the device?
Type 1.
Directory number
Type the extension that will be connected to UM8500.
Display
Type the number that appears in a phone display when an external call
arrives on this line.
Forward all
Leave this field blank.
CAUTION!
Forward busy
Do not set a value for this field. If information
appears in this field, the messaging system might
operate improperly.
Type the extension of the next TAPI port in sequence. If this extension is
the last TAPI port, then type the extension of the first TAPI port.
If the directory number for this TAPI port is busy, calls are forwarded to
the extension shown in this field.
Forward no answer
Type the extension of the next TAPI port in sequence. If this extension is
the last TAPI port, then type the extension of the first TAPI port.
If the directory number for this TAPI port is not answered, calls are
forwarded to the extension shown in this field.
The Forward no answer setting is used when the port is disabled or out
of service.
CISCO CALL MANAGER
31
To add uOne ports to CallManager version 3.05
Add one uOne port to CallManager for each port that is being connected to the
messaging system.
NOTE
uOne ports and phones must be in the same calling search space,
or the integration will not work.
1 In the Cisco CallManager Administration program, click Device > Add a
New Device.
2 On the Add a New Device page, under Device type, click Cisco uOne Port.
3 Click Next, and the Cisco uOnePort Configuration page appears.
4 Enter values as shown in the table below.
Field
Value
Device name
A name for the voice mail port, for example, “UM8500-1.” Follow these instructions:
●
In general, use the same prefix for every port, for example, “UM8500-.”
However, if CallManager is sending calls to more than one UNIVERGE UM8500
server, use a different prefix for the CallManager ports that are being connected
to each UNIVERGE UM8500 server, for example,”UM85001-” and “UM85002-.”
●
Use prefixes that are 12 characters or less.
●
Number the ports beginning with 1 and continuing in sequence.
●
Do not begin port numbers with 0. For example, “UM8500-1” is a valid value;
“UM8500-0” is not.
CAUTION!
If a uOne port is given a device name that does not
conform to these conventions, UM8500 can not receive calls
from that port.
Description
This field is automatically filled in with the name typed in the Device name field.
These characters can be deleted and a new description can be typed.
Device pool
Click Default pool.
Location
Accept the default value of None.
Directory number
The extension that will be connected to UM8500.
Forward all
This field should be left blank.
CAUTION!
Do not set a value for this field. If information appears in this
field, UM8500 might operate improperly.
Forward busy
The extension of the next uOne port in sequence. If this extension is the last uOne
port, then type the extension of the first uOne port. Alternatively, the last uOne port
can be forwarded to the operator’s extension. If the directory number for this uOne
port is busy, calls are forwarded to the extension shown in this field.
Forward no answer
The extension of the next uOne port in sequence. If this extension is the last uOne
port, then type the extension of the first uOne port. Alternatively, the last uOne port
can be forwarded to the operator’s extension.
If the directory number for this uOne port is not answered, calls are forwarded to the
extension shown in this field.
Forward no answer is set in the event the port is disabled or out of service.
5 Click Insert.
6 To add another uOne port, click New. When all the ports have been added,
skip to step 8.
7 Repeat steps 4 through 6 for each additional port.
8 Close the CallManager Administration program, then continue with the
following procedure,“To specify MWI and voice mail extensions in
CallManager version 3.05” on page 33
32
UNIVERGE UM8500 INTEGRATION GUIDE
To specify MWI and voice mail extensions in CallManager
version 3.05
1 In the CallManager Administration program, select Service > Service
Parameters.
2 In the list of servers on the left side of the Service Parameters Configuration
page, click the server that CallManager is installed on.
3 In the Configured Services list, click Cisco CallManager.
4 In the Configured Services Parameters list, click one of the four
parameters shown in the following table.
5 Change or enter a value, as appropriate.
6 Click Update to save the change.
7 Repeat steps 4 through 6 to specify values for the other parameters, as
appropriate.
8 Shut down and restart the CallManager server.
Field
Value
ForwardMaximumHopCount
The maximum number of times a call can be forwarded. Specify a value
that is 6 greater than the number of CallManager ports that are connected
to the UNIVERGE UM8500 server. This ensures that a call reaches the last
port in the hunt group even if the call is forwarded by UM8500 several
times, for example, if the system is a 72-port UM8500 system, specify
“78” for ForwardMaximumHopCount.
MessageWaitingOffDN
The extension that turns MWIs off.
MessageWaitingOnDN
The extension that turns MWIs on.
VoiceMail
The extension that users call to access UM8500. This is typically the
extension number, the Directory number in the Cisco CallManager
Administration program, of the first uOne port. If an extension is specified
for VoiceMail, then users can call UM8500 simply by pressing the
message waiting indicator button on their Cisco phones.
CISCO CALL MANAGER
33
To add voice mail ports to CallManager version 3.2 and
later
Add one voice mail port to CallManager for each port being connecting to
UM8500.
CAUTION
Voice mail ports and phones must be in the same calling search
space, or the integration will not work.
1 In the Cisco CallManager Administration program, select Features > Voice
Mail > Cisco Voice Mail Ports.
2 Click <Add new port>.
3 At the Configuration screen, enter values as shown in the table below.
Field
Value
Port name
A name for the voice mail port, for example, “UM8500-1.” Follow these instructions:
●
In general, use the same prefix for every port, for example, “UM8500-.” However, if
CallManager is sending calls to more than one UNIVERGE UM8500 server, use a
different prefix for the CallManager ports that are being connected to each
UNIVERGE UM8500 server, for example, “UM85001-” and “UM85002-.”
●
Use prefixes that are 12 characters or less.
●
Number the ports beginning with 1 and continuing in sequence.
●
Do not begin port numbers with 0. For example, “UM8500-1” is a valid value;
“UM8500-0” is not.
CAUTION!
If a uOne port is given a device name that does not conform to
these conventions, UM8500 can not receive calls from that port.
Description
This field is automatically filled in with the name typed in the Device name field. These
characters can be deleted and a new description can be typed.
Device pool
Click Default.
Location
Accept the default value of None.
Directory number
The extension that will be connected to UM8500.
Forward all
This field should be left blank.
CAUTION!
Forward busy
Do not set a value for this field. If information appears in this field,
UM8500 might operate improperly.
The extension of the next voice mail port in sequence. If this extension is the last voice
mail port, then type the extension of the first voice mail port. Alternatively, the last voice
mail port can be forwarded to the operator’s extension.
If the directory number for this voice mail port is busy, calls are forwarded to the
extension shown in this field.
Forward no answer The extension of the next voice mail port in sequence. If this extension is the last voice
mail port, then type the extension of the first voice mail port. Alternatively, the last voice
mail port can be forwarded to the operator’s extension.
If the directory number for this voice mail port is not answered, calls are forwarded to the
extension shown in this field.
Forward no answer is set in the event the port is disabled or out of service.
4 Click Insert to save the changes.
5 Repeat steps 2 through 4 to specify values for each additional port.
6 Close the CallManager Administration program, then continue with the
following procedure, “To specify MWI extensions in CallManager version 3.2
and later.”
34
UNIVERGE UM8500 INTEGRATION GUIDE
To specify MWI extensions in CallManager version 3.2
and later
1 In the CallManager Administration program, select Feature > Voice Mail >
Message Waiting.
2 Click <Add a New Directory Number>.
3 In the Directory Number field, type the extension that turns MWIs on, select
On, then click Insert.
4 In the Directory Number field, type the extension that turns MWIs off, select
Off, then click Insert.
5 Shut down and restart the CallManager server.
CISCO CALL MANAGER
35
Installing and
configuring the
TAPI service
provider
Perform the following procedures to install and configure the TAPI service
provider.
If upgrading from Cisco CallManager version 2.4, the old TAPI server provider
must be removed before the new one is installed. See “Upgrading from Cisco 2.4”
on page 42.
To install the TAPI service provider
NOTE
UM8500 must be installed before the TAPI service provider and
wave driver are installed.
1 Obtain a copy of the TAPI service provider software from a Cisco reseller.
2 On the messaging system server, shut down UM8500.
3 Run the TAPI service provider setup program.
4 Follow the on-screen instructions.
5 When prompted, restart the server.
Continue with the next procedure.
36
UNIVERGE UM8500 INTEGRATION GUIDE
To configure the TAPI service provider
1 Log on to Windows. The Cisco Unity-CM TSP dialog appears.
NOTE
The Cisco Unity-CM TSP dialog box appears automatically the first
time you log on after installing the TAPI server provider. To change
the settings later, perform steps 2–6 of the following
procedure,“ To test the TAPI service provider” on page 38.
2 Click Add and the Add CallManager IP Address dialog box appears.
3 Type the IP address of the Cisco CallManager server that is connected to
UM8500, then click OK.
4 In the Cisco Unity-CM TSP Settings dialog box, enter the values shown in the
following table.
Field
Value
Primary CallManager IP address
The IP address of the Cisco CallManager server from which UM8500
receives calls.
Number of voice ports
The number of Cisco CallManager uOne or voice mail ports that are
connected to UM8500.
Device name prefix
The prefix used for the Device name when uOne or voice mail ports
were created in the Cisco CallManager Administration program. See “To
add uOne ports to CallManager version 3.05” on page 32 or “To add voice
mail ports to CallManager version 3.2 and later” on page 34.
MessageWaitingOnDN
The extension specified, in the Cisco CallManager Administration
program, for turning MWIs on. See “To specify MWI and voice mail
extensions in CallManager version 3.05” on page 33 or ““To specify MWI
extensions in CallManager version 3.2 and later” on page 35.
MessageWaitingOffDN
The extension specified, in the Cisco CallManager Administration
program, for turning MWIs off. See “To specify MWI and voice mail
extensions in CallManager version 3.05” on page 33 or ““To specify MWI
extensions in CallManager version 3.2 and later” on page 35.
5 Click OK to close the Cisco Unity-CM TSP Settings dialog box.
6 Continue with the next procedure.
CISCO CALL MANAGER
37
To test the TAPI service provider
1 If the Cisco Unity-CM TSP dialog box is already displayed, skip to step 7.
Otherwise, continue with step 2.
2 On the messaging system server, log on to Windows as an administrator.
3 On the Windows taskbar, click Start > Control Panel.
4 Double-click Phone and Modem Options. The Phone and Modem
Options dialog box appears.
5 Click the Advanced tab.
6 Click Cisco Unity-CM TSP, and click Configure. The Cisco Unity-CM TSP
dialog box appears.
7 Click Test, and the settings specified in step 4 of the procedure “To configure
the TAPI service provider” on page 37 are checked against the current settings
in Cisco CallManager Administrator.
If the test succeeds, a message box displays the message “Test completed
successfully.” If the test fails, one of the error messages shown in the following
table appears. Troubleshoot the problems as described in the “Comments”
column, then repeat this step until the test is successful. Continue with step 8.
Error message
Comments
Pinging CallManager server
<IP address> failed. Make sure
the IP address is valid, the server
is running, and the network
connection is working.
No computers on the network have the IP address that specified in
“Primary CallManager IP address.” Confirm that this address is valid. If
the value is correct, or if the problem persists after the value is changed,
troubleshoot the problem as a network connectivity problem.
The voice device named <device
name> does not respond to
registration requests. Ensure that
the device is created in the
CallManager database and that the
device name prefix is correct.
Confirm that the values in CallManager Device List, see step 4 of the
procedure “To configure the TAPI service provider” on page 37, matches
the names of the uOne or voice mail ports created, see “To add uOne
ports to CallManager version 3.05” on page 32 or “To add voice mail ports
to CallManager version 3.2 and later” on page 34. If not, change the
Device name prefix of the names of the ports, as necessary.
Could not connect to the
CallManager. Verify that all Cisco
services are started on the
CallManager server.
The IP address specified in Primary CallManager IP address is a
valid address, but CallManager services are not running on that computer,
possibly because CallManager is not installed on the server with that IP
address. Confirm that this address is correct and that the CallManager
services are running.
8 Click OK to close the Cisco Unity-CM TSP dialog box. The following message
appears:
This computer needs to be rebooted to update the wave driver.
9 Click OK.
10 click Close to close the Phone and Modem Options dialog box.
11 Shut down and restart the messaging system server.
38
UNIVERGE UM8500 INTEGRATION GUIDE
Configuring
UNIVERGE
UM8500 for the
integration
After ensuring that the messaging system server is ready for the integration by
completing all appropriate tasks in the Installation Guide, perform the following
procedure to confirm that the integration is enabled.
To confirm that the integration is enabled
1 Click Start > All Programs > UNIVERGE UM8500 > Edit Switch.
2 If prompted for logon credentials, type the administrator extension and
password, then click OK.
On a new install the logon credentials are:
Extension = 99995
Password = 12345
3 Confirm that the settings match those in the following table.
Phone system settings
Parameter
Required setting
Manufacturer
Cisco
Model
CallManager
Switch PBX software version
3.05 or later
Integration
TAPI
4 If the settings are incorrect, select the correct settings and click Update
Voice Mail Now.
CISCO CALL MANAGER
39
Changing the
TAPI service
provider
settings
To change the values that were specified when the TAPI service provider was
installed and configured, perform the following procedure.
To change and test TAPI service provider settings
1 On the messaging system server, log on to Windows as an administrator.
2 On the Windows taskbar, click Start > Control Panel.
3 Double-click Phone and Modem Options. The Phone and Modem
Options dialog box appears.
4 Click the Advanced tab.
5 Click Cisco Unity-CM TSP, then click Configure. The Cisco Unity-CM TSP
dialog box appears.
6 In the Select CallManager list, click the IP address of the CallManager
server that is connected to UM8500, then click Settings.
If the Select CallManager list does not contain the desired IP address, click
Add, type the IP address, then click OK.
7 In the Cisco Unity-CM TSP Settings dialog box, enter the values shown in the
following table.
Field
Value
Primary CallManager IP address
The IP address of the Cisco CallManager server that UM8500 will usually
receive calls from.
Number of voice ports
The number of Cisco CallManager uOne ports or voice mail ports that are
connected to UM8500.
Device name prefix
The prefix used for Device name when the uOne ports or voice mail
ports were created in the Cisco CallManager Administration program. See
“To add uOne ports to CallManager version 3.05” on page 32 or “To add
voice mail ports to CallManager version 3.2 and later” on page 34.
MessageWaitingOnDN
The extension specified, in the Cisco CallManager Administration program,
for turning MWIs on. See “To specify MWI and voice mail extensions in
CallManager version 3.05” on page 33 or ““To specify MWI extensions in
CallManager version 3.2 and later” on page 35.
MessageWaitingOffDN
The extension specified, in the Cisco CallManager Administration program,
for turning MWIs off. See “To specify MWI and voice mail extensions in
CallManager version 3.05” on page 33 or ““To specify MWI extensions in
CallManager version 3.2 and later” on page 35.
8 Click OK.
9 In the Cisco Unity-CM TSP dialog box, click Test. The settings specified in
step 7 are checked against the current settings in Cisco CallManager
Administrator.
If the test succeeds, a message box displays the message “Test completed
successfully.” If the test fails, one of the error messages shown in the following
table appears. Troubleshoot the problems as described in the “Comments”
column, then repeat this step until the test succeeds. Continue with step 10.
40
Error message
Comments
Pinging CallManager server
<IP address> failed. Make sure
the IP address is valid, the server
is running, and the network
connection is working.
No computers on the network have the IP address that specified in
“Primary CallManager IP address.” Confirm that this address is valid.
If the value is correct, or if the problem persists after the value is
changed, troubleshoot the problem as a network connectivity
problem.
UNIVERGE UM8500 INTEGRATION GUIDE
Error message
Comments
The voice device named <device
name> does not respond to
registration requests. Ensure that
the device has been created in the
CallManager database and that the
device name prefix is correct.
Confirm that the values in CallManager Device List, see step 4 of
the procedure “To configure the TAPI service provider” on page 37 to
match the names of the uOne ports created, see “To add uOne ports
to CallManager version 3.05” on page 32. If not, change the “Device
name prefix” of the names of the uOne ports, as necessary.
Could not connect to the
CallManager. Verify that all Cisco
services are started on the
CallManager server.
The IP address specified in Primary CallManager IP address is a
valid address, but CallManager services are not running on that
computer, possibly because CallManager is not installed on the server
with that IP address. Confirm that this address is correct and that the
CallManager services are running.
10 Click OK to close the Cisco Unity-CM TSP dialog box. The following message
appears:
“This computer needs to be rebooted to update the wave driver.”
11 Click OK.
12 Click Close to close the Phone and Modem Options dialog box.
13 Shut down and restart the messaging system server.
CISCO CALL MANAGER
41
Upgrading from
Cisco 2.4
Before installing the Cisco Unity-CM TAPI Service Provider on the messaging
system server, remove the CallManager 2.4 TAPI service provider.
To remove the CallManager version 2.4 TAPI service
provider
1 On the messaging system server, log on to Windows as an administrator.
2 On the Windows taskbar, click Start > Control Panel.
3 Double-click Phone and Modem Options. The Phone and Modem
Options dialog box appears.
4 Click the Advanced tab.
5 Click Cisco IP PBX Service Provider, then click Remove.
6 Click Yes to remove the selected telephony driver.
7 Click Close to close the Phone and Modem Options dialog box.
42
UNIVERGE UM8500 INTEGRATION GUIDE
Changing the
number of
uOne ports
To change the number of uOne ports after the CallManager is installed and set up,
perform the following procedures.
To change the number of uOne ports in CallManager
1 On the CallManager server, use the Cisco CallManager Administration
program to add or remove uOne lines, as appropriate.
For information on adding uOne ports, see “To add uOne ports to
CallManager version 3.05” on page 32. For information on removing uOne
ports, see the Cisco CallManager Administration online Help.
2 Shut down and restart the CallManager server.
3 Continue with the next procedure.
To change the number of uOne ports for the Cisco UnityCM TAPI Service Provider
1 On the messaging system server, log on to Windows as an administrator.
2 On the Windows taskbar click Start> Control Panel.
3 Double-click Phone and Modem Options. The Phone and Modem
Options dialog box appears.
4 Click the Advanced tab.
5 Click Cisco Unity-CM TSP, then click Configure. The Cisco Unity-CM TSP
dialog box appears.
6 Select the IP address of the CallManager server on which uOne ports were
added.
7 Click Settings. The Cisco Unity-CM TSP Settings dialog box appears.
8 Change the Number of voice ports to the number of uOne ports currently
configured in the Cisco CallManager Administration program.
9 Click OK to close the Cisco Unity-CM TSP Settings dialog box.
10 Click Close to close the Phone and Modem Options dialog box.
11 Shut down and restart the messaging system server.
CISCO CALL MANAGER
43
Converting
from analog
lines to IP lines
To convert an existing UM8500 system from analog lines to IP lines, it is necessary
to upgrade the system key to enable the integration. Contact a sales representative
for the necessary key upgrade. To confirm that the integration is enabled, perform
the procedure “To confirm that the integration is enabled” on page 39.
After upgrading the system key, perform all the procedures under “Installing and
configuring the TAPI service provider” on page 36. Then remove the software for
the voice boards that are installed in the messaging system server:
●
44
Follow the procedure in the Installation Guide to remove software for the
Dialogic voice board installed in the messaging system server.
UNIVERGE UM8500 INTEGRATION GUIDE
Troubleshooting
If one of the problems listed below is encountered, try the corrective actions
listed. If these actions do not correct the problem or if the problem is not
described here, contact Technical Support.
Message waiting indicators are not working properly
To confirm that the message waiting indicator settings
are correct
1 At a phone at which the message waiting indicator is off, dial the extension
that turns message waiting indicators on. The indicator on the phone should
turn on. If it does not, the problem is with the CallManager settings.
2 At a phone at which the message waiting indicator is on, dial the extension
that turns message waiting indicators off. The indicator on the phone should
turn off. If it does not, check the CallManager settings.
3 Confirm that the ports specified for turning message waiting indicators on
and off in CallManager are the same as the ports specified in the Cisco UnityCM TAPI service provider.
■
For information on specifying values in CallManager, see “To specify
MWI and voice mail extensions in CallManager version 3.05” on page 33,
or “To specify MWI extensions in CallManager version 3.2 and later” on
page 35. The parameters that control message waiting indicators are
MessageWaitingOnDn and MessageWaitingOffDN.
■
For information on specifying values in Cisco Unity-CM TSP, see “To
configure the TAPI service provider” on page 37.
4 Stop and start the Cisco CallManager service.
5 Shut down and restart the messaging system server.
6 If the problem persists, contact Technical Support.
UNIVERGE UM8500 does not start after software is
installed and integration is configured
In some cases, UM8500 does not start after the Cisco Unity-CM TAPI service
provider is installed and all necessary configuration steps performed. If this
happens, perform the following procedure.
To start UNIVERGE UM8500 after installing and
configuring the integration
1 Test the TAPI service provider. See “To change and test TAPI service provider
settings” on page 40.
2 Shut down and restart the messaging system server.
3 If the problem persists, contact Technical Support.
The default earpiece and speaker volume on Cisco
7960 phones is too loud
To change the volume on Cisco 7960 phones
1 On the 7960 phone, press Speaker.
2 Press Volume to change the volume.
3 Press Settings.
4 Press the Save soft key.
CISCO CALL MANAGER
45
Integrating
with
CallManager
and traditional
phone systems
UM8500 can be integrated with both a traditional, circuit-switched phone system
and CallManager at the same time. Any traditional phone system that UM8500
integrates with can be used in a dual-switch integration.
However, only Internet Protocol (IP) phone systems such as Cisco CallManager,
which provides UM8500 with call information directly from the TAPI service
provider, will work as the IP phone system in a dual-switch integration. In a dualswitch integration, UM8500 does not support IP phone systems that send call
information by using serial packets.
All extensions for subscribers and call handlers must be unique regardless of
which phone system a subscriber, or call handler, uses. To transfer calls from one
phone system to another, UM8500 must dial the same access codes that a
subscriber dials when calling someone on the other phone system.
Requirements
●
A UNIVERGE UM8500 system key with the integration type set to “Multiple
integrations,” with the appropriate number of voice messaging ports enabled.
●
The messaging system server set up and UM8500 installed as described in the
Installation Guide.
NOTE
When prompted to select the phone system, select the traditional
phone system that UM8500 will integrate with, not Cisco
CallManager.
●
A traditional phone system installed and integrated with UM8500.
See the Installation Guide and this guide for details. The traditional phone
system, including the voice board software used in the integration, must be
installed and integrated with UM8500 before Cisco CallManager is integrated.
●
Cisco CallManager and the appropriate Telephony Service Provider (TSP)
installed and configured.
See “Integration overview” on page 26 for information about integrating
UM8500 with CallManager.
Setting up UNIVERGE UM8500 Administrator
After UM8500 is installed and each of the phone systems have been integrated,
adjust settings in the UM8500 Administrator to enable UM8500 to work with both
phone systems. See “Dual-switch integration settings,” on page 63, for
information on UNIVERGE UM8500 Administrator settings related to dual-switch
integrations.
Follow these steps to set up the dual-switch integration.
1 Specify settings for the traditional phone system on the
Switch page.
See “To specify phone system settings for the traditional phone system” on
page 47.
CAUTION
Specify settings for the traditional phone system before specifying
settings for the IP phone system. You must proceed in this order
or the integration might not work.
2 Specify settings for Cisco CallManager on the IP Switch page.
See “To specify phone system settings for Cisco CallManager” on page 47.
3 Assign port ranges to each phone system, then modify the
settings for the ports assigned to each phone system.
See “To modify voice port settings” on page 48.
46
UNIVERGE UM8500 INTEGRATION GUIDE
4 Select the phone system that subscribers and call handlers
use.
See “To select which phone system subscribers and call handlers use” on
page 48.
5 Select the phone system that UM8500 uses when dialing out
to send message notifications.
See “To select which phone system UNIVERGE UM8500 uses for message
notification and MWI” on page 49.
CAUTION
If you need to add or remove voice boards or uninstall the voice
board software after the dual-switch integration is set up, you
must also remove the Cisco TAPI service provider. Do not reinstall
the Cisco TAPI service provider until after the voice boards have
been set up or the voice board software is reinstalled. See
“Changing the number of uOne ports” on page 43, for more
information.
To specify phone system settings for the traditional
phone system
1 Go to System > Switch > Switch. The settings for the traditional phone
system selected during the UM8500 setup program are displayed.
2 In the Access Code field, type the trunk access code that UM8500 must dial
to transfer calls to Cisco CallManager from the traditional phone system.
3 Adjust other settings as appropriate. See the System Management Help for
more information about the other settings on the Switch page.
4 Click Save, then click OK in the Warning dialog box.
To specify phone system settings for Cisco CallManager
1 Go to System > Switch > IP Switch.
2 In the Set Active Switch Type section, enter values as shown in the
following table:
Phone system settings
Parameter
Required setting
Manufacturer
Cisco
Model
CallManager
Switch PBX software version
3.0.5 or later
Integration
Multiple
3 Click Set As Active, then click OK in the Warning dialog box.
4 In the Access Code field, type the trunk access code that UM8500 must dial
to transfer calls to the traditional phone system from CallManager.
5 Specify the settings in Resynch All Message Waiting Indicators section
as needed. See the System Management Help.
6 Click Save, then click OK in the Warning dialog box.
CISCO CALL MANAGER
47
To modify voice port settings
1 Go to System > Ports.
2 In the Port Assignments section, indicate the range of ports to be assigned
to each phone system. The port range for the traditional phone system is port
1 through x, where x is the number of ports on the installed voice board. The
port range for CallManager is x + 1 through y, where y is the number of TAPI
ports installed on the server or the number of licensed voice ports on the
system key, whichever is lower.
3 Type an extension for each port.
4 Specify other settings as appropriate. For each phone system, verify that an
appropriate number of ports are used to answer calls and to dial out for
message waiting indicators (MWIs), message notifications, and Media Master
recordings by phone.
5 Click Save.
CAUTION
The port range for each phone system must be set as specified in
step 2 above. If there is a port range mismatch, UM8500 is unable
to answer incoming calls and dial out.
To select which phone system subscribers and call
handlers use
For existing subscriber templates, subscriber accounts, and call handlers,
UM8500 defaults to the traditional phone system. During the initial setup of the
dual-switch integration, you will modify only those pages that will use
CallManager. Note that changes made to subscriber templates do not affect
existing subscribers.
1 As appropriate, go to:
Subscribers > Subscriber Template > Profile
Subscribers > Subscribers > Profile
Call Management > Call Handlers > Profile
2 In the Switch list, select the phone system.
3 Adjust other settings as appropriate. See the System Management Help for
more information.
CAUTION
If the Switch setting on the subscriber’s or call handler’s Profile
page does not match the phone system actually used by a
subscriber or call handler, UM8500 is not able to transfer calls to
or from the subscriber or call handler. Additionally, UM8500 is
unable to turn the subscriber’s MWIs on or off and unable to reach
the subscriber’s extension for Media Master recording by phone.
48
UNIVERGE UM8500 INTEGRATION GUIDE
To select which phone system UNIVERGE UM8500 uses
for message notification and MWI
If subscribers use message notification, you can select which phone system
UM8500 uses to dial out when notifying subscribers of new messages. Note that
the changes made to subscriber templates do not affect existing subscribers.
Subscribers with access to the UM8500 Assistant can also change the phone
system used for their message notification.
1 As appropriate, go to:
Subscribers > Subscriber Template > Devices
Subscribers > Subscribers > Devices
Subscribers > Subscriber Template > MWI
Subscribers > Subscribers > MWI
2 For each device in the Switch list, select the phone system that UM8500 uses
to dial out when notifying subscribers of new messages.
3 Adjust other settings as appropriate. See the System Management Help for
more information.
CAUTION
The selected phone system must have at least one port set to dial
out for message notifications on the System > Ports page. If the
selected phone system does not have any ports set for this
function, notifications will fail.
Dual-switch integration settings
Page
Field
Description
System > Switch >
Switch
Access code
Type the access code that UM8500 uses when transferring calls
to the IP phone system from the traditional phone system. This
is the same number that subscribers on the traditional phone
system dial to reach someone on the IP phone system.
System > Ports
Port assignments
Type the range of ports that each phone system uses. The number of
ports available for use by the traditional phone system is determined
by the number of ports on the installed voice boards. The number of
ports available to CallManager is the difference between the number
of licensed voice ports on the system key and the number of ports
assigned to the traditional phone system. Never assign more ports to
the traditional phone system than the number of ports on the voice
boards.
The range of ports for the phone systems cannot overlap and
must be contiguous, which creates a lower and an upper range.
Assign the lower range to the traditional phone system (port 1
through x, where x is the number of ports on the installed voice
boards), and assign the upper range to CallManager (port x + 1
through y, where y is the number of TAPI ports installed on the
server or the number of licensed voice ports on the system key,
whichever is lower).
Switch
Subscribers >
Subscriber Template
> Profile
Select the phone system that the subscribers based on this
template will use for their work phones. If this setting is
incorrect, UM8500 will not be able to:
●
●
Switch
Subscribers >
Subscriber Template
> Devices
Transfer calls to or from the subscriber.
Dial the subscriber’s extension for Media Master recording by
phone.
Select the phone system that UM8500 dials out on when notifying
the subscriber of new messages. Each notification device can be
associated with a specific phone system, except for text pagers.
UM8500 defaults to the phone system specified on the subscriber
template Profile page. On the System > Ports page, the selected
phone system must have at least one port set to dial out for message
notification.
CISCO CALL MANAGER
49
Dual-switch integration settings
Page
Field
Switch
Subscribers >
Subscribers > Profile
Description
Select the phone system that the subscriber uses as a work
phone. If this setting is incorrect, UM8500 will not be able to:
●
●
Transfer calls to or from the subscriber.
Dial the subscriber’s extension for Media Master recording by
phone.
On the System > Ports page, the selected phone system must
have an appropriate number of ports set to answer calls and to
dial out for MWIs and Media Master recording by phone.
Call Handlers >
Profile
Switch
Select the phone system that the call handler uses. If this setting
is incorrect, UM8500 can not transfer calls to or from the call
handler.
Switch
Subscribers >
Subscriber Template
> MWI
Select the phone system the subscriber’s MWI extension belongs
to. If this setting is incorrect, UM8500 will not be able to turn
MWIs on or off. On the System > Ports page, the selected phone
system must have at least one port set to dial out for MWIs.
Subscribers >
Subscribers > MWI
Select the phone system the subscriber’s MWI extension belongs
to. If this setting is incorrect, UM8500 will not be able to turn
MWIs on or off. On the System > Ports page, the selected phone
system must have at least one port set to dial out for MWIs.
Switch
Changing the number of installed ports
After the dual-switch integration is set up, follow these steps to add or remove
voice boards or uninstall voice board software, follow these steps:
1 Remove the Cisco TAPI service provider.
See “To remove the TAPI service provider” below.
2 As appropriate, remove or add voice boards, or uninstall and
reinstall the voice board software.
See the System Management Help for information about removing Dialogic or
NMS voice board software.
3 Reinstall the TAPI service provider after setting up the voice
boards or reinstalling the voice board software.
See “To reinstall the TAPI service provider” on page 50.
4 Adjust the port assignments on the System > Ports page.
If the traditional phone system is completely removed, the port assignments
for CallManager on the System > Ports page must be adjusted, after the
voice boards and voice board software used in the integration with the
traditional phone system are removed.
To remove the TAPI service provider
1 On the messaging system server, log on to Windows as an administrator.
2 On the Windows taskbar, click Start > Control Panel.
3 Double-click Phone and Modem Options. The Phone and Modem
Options dialog box appears.
4 Click the Advanced tab.
5 Depending on which TAPI service provider is installed, click either Cisco
Unity-CM TSP or Cisco IP PBX Service Provider, then click Remove.
6 Click Yes to remove the selected telephony driver.
7 Click Close to close the Phone and Modem Options dialog box.
To reinstall the TAPI service provider
1 On the messaging system server, log on to Windows as an administrator.
50
UNIVERGE UM8500 INTEGRATION GUIDE
2 On the Windows taskbar, click Start > Control Panel.
3 Double-click Phone and Modem Options. The Phone and Modem
Options dialog box appears.
4 Click the Advanced tab.
5 Click Add. The Add Driver dialog box appears.
6 Click either Cisco Unity-CM TSP or Cisco IP PBX Service Provider,
then click Add.
7 Click OK to close the Cisco Unity-CM TSP dialog box.
8 Click Close to close the Phone and Modem Options dialog box.
CISCO CALL MANAGER
51
52
UNIVERGE UM8500 INTEGRATION GUIDE
■ Fujitsu 9600/SMDI
In this integration...
Integration overview .............................................................................54
Integration steps ..............................................................................54
Requirements ..................................................................................54
Integration description ..........................................................................55
How the integration works .................................................................55
Integration features ..........................................................................55
Configuring UNIVERGE UM8500 for the integration ....................................56
Programming the phone system..............................................................57
FUJITSU 9600/SMDI
53
Integration
overview
Use this section of the Integration Guide with the Installation Guide.
Integration steps
Follow these steps to set up this integration.
1 Review the system and equipment requirements.
Verify that all phone system and messaging system server requirements have
been met. See “Requirements,” below.
2 Configure UNIVERGE UM8500 for the integration.
See “Configuring UNIVERGE UM8500 for the integration” on page 56.
3 Program the phone system and extensions.
See “Programming the phone system” on page 57.
4 Test the phone extensions.
Test the phone extensions that are set up for the integration. See Appendix B,
“Testing the extensions” on page 338.
5 Run the Learn Tones utility.
Run the Learn Tones utility to teach the messaging system the tones
associated with the phone system. See Appendix C, “Learning phone system
tones” on page 340.
Requirements
The steps to set up the Fujitsu Simplified Message Desk Interface (SMDI)
integration require the following:
Phone system
●
Fujitsu 9600 with an SMDI port installed.
●
The phone system SMDI port must be connected to a serial port, COM1 is the
default, on the messaging system server with an RS-232 serial cable.
●
The phone system voice messaging ports must be connected to the voice
boards in the messaging system server.
●
The phone system ready for the integration as described in the phone system
installation guide.
UNIVERGE UM8500 server
●
The Dialogic analog voice boards installed; see the Installation Guide for
installation details.
NOTE
For the latest information on supported voice boards for UM8500,
contact a sale representative.
54
●
UM8500 installed and ready for the integration as described in the
Installation Guide.
●
A system key that enables the integration and the appropriate number of
voice messaging ports.
●
An available serial port, COM1 is the default.
UNIVERGE UM8500 INTEGRATION GUIDE
Integration
description
How the integration works
The Fujitsu 9600/SMDI integration uses a data link, which consists of an RS-232
serial cable connecting the phone system and the messaging system server. The
phone system voice messaging lines connect to the analog voice boards in the
messaging system server. The following illustration shows the required
connections.
NOTE
Serial cables longer than 50 feet require a modem.
The phone system sends the following information through the data link:
●
The called party’s extension
●
The reason for the forward (the extension is busy, does not answer, or is set to
forward all calls)
●
The calling party’s extension (for internal calls)
UM8500 uses this information to answer the call appropriately. For example, a call
forwarded from a subscriber extension to UM8500 is answered with the
subscriber’s personal greeting. If the phone system routes the call to UM8500
without this information, UM8500 answers with the opening greeting.
Integration features
The Fujitsu 9600/SMDI integration with UNIVERGE UM8500 provides the
following features:
●
Call forward to personal greeting. When an incoming call is routed to an
unanswered or busy extension, the call is forwarded to the subscriber’s voice
mail. The caller then hears the subscriber’s personal greeting and can leave a
message.
●
●
●
●
Caller ID. UM8500 receives caller ID information from the phone system, if
available. This information is displayed in the message’s subject line in
Microsoft Office Outlook® or other desktop messaging application.
Easy message access. A subscriber can retrieve messages without entering
an ID. UM8500 identifies a subscriber based on the extension from which the
call originated. A password might be required.
Identified subscriber messaging. UM8500 automatically identifies a
subscriber who leaves a message during a forwarded internal call based on
the extension from which the call originated.
Message waiting indication (MWI). When a message is waiting for a
subscriber, UM8500 notifies the phone system to activate the message
waiting indicator on the subscriber’s extension, if it is equipped with one, or
to activate a stutter dial tone.
FUJITSU 9600/SMDI
55
Configuring
UNIVERGE
UM8500 for the
integration
After ensuring that the messaging system server is ready for the integration
by completing all appropriate tasks in the Installation Guide, perform the
following procedure to confirm that the integration is enabled.
To confirm that the integration is enabled
1 Click Start > All Programs > UNIVERGE UM8500 > Edit Switch.
2 If prompted for logon credentials, type the administrator extension and
password, then click OK.
On a new install the logon credentials are:
Extension = 99995
Password = 12345
3 Confirm that the settings match those in the following table.
Phone system settings
Parameter
Required setting
Manufacturer
Fujitsu
Model
9600
Switch software version
All
Integration
Serial
4 If the settings are incorrect, select the correct settings and click Update
Voice Mail Now.
56
UNIVERGE UM8500 INTEGRATION GUIDE
Programming
the phone
system
If you use programming options other than those described in the following
procedure, the integration’s performance may be affected.
To program the phone system
1 Assign a DCC port for integration with UNIVERGE UM8500.
2 On the phone system, in Assign single line phone, set Type to 1 for the
Fujitsu 9600 phone lines used as voice messaging ports.
3 In Change service parameter, set Type to 2 and ID:01 to 01 for the
Fujitsu 9600 phone lines used as voice messaging ports.
NOTE
The settings in step 3 disable the immediate ring feature.
FUJITSU 9600/SMDI
57
58
UNIVERGE UM8500 INTEGRATION GUIDE
■ Mitel SX200, SX2000, 3300ICP,
and 200ICP
In this integration...
Integration overview .............................................................................60
Integration steps ..............................................................................60
Requirements ..................................................................................60
Integration description ..........................................................................61
Integration features ..........................................................................61
Configuring UNIVERGE UM8500 for the integration ....................................62
Connecting the systems.........................................................................63
Programming the phone system..............................................................65
Mitel SX-200 ML ...............................................................................65
Mitel SX-2000 ..................................................................................66
Troubleshooting ....................................................................................68
MITEL SX200, SX2000, 3300ICP, AND 200ICP
59
Integration
overview
Use this section of the Integration Guide with the Installation Guide.
Integration steps
Follow these steps to set up this integration.
1 Review the system and equipment requirements.
Verify that all phone system and messaging system server requirements have
been met. See “Requirements” below.
2 Set up UNIVERGE UM8500 for the integration.
See “Configuring UNIVERGE UM8500 for the integration” on page 62.
3 Connect the systems.
See “Connecting the systems” on page 63.
4 Set up the phone system for the integration.
See “Programming the phone system” on page 65.
5 Test the phone extensions.
Test the phone extensions that are set up for the integration. See Appendix B,
“Testing the extensions” on page 338.
6 Run the Learn Tones utility.
Run the Learn Tones utility to teach the messaging system the tones
associated with the phone system. See Appendix C, “Learning phone system
tones” on page 340.
Requirements
Before setting up the Mitel with D82 integration, confirm that the site meets the
following requirements and that all of the necessary components are available:
Phone system
●
One of the following Mitel phone systems:
Phone system
Software version
SX-200 ML
Superset 420, 430
SX-2000
Superset 430
●
For each voice messaging port, one Digital Network Interface Circuit (DNIC)
port, which emulates a Superset 430 digital phone, installed and set up as a
voice messaging port.
●
The phone system ready for the integration as described in the phone system
manufacturer’s documentation.
●
A type 66 interconnect block for each PBX station interface cable.
●
The phone system voice messaging ports must be connected to the D/82
voice boards installed in the messaging system server with a PBX station
interface cable for each group of eight voice messaging ports.
UNIVERGE UM8500 server
●
The Dialogic D82 voice boards installed; see the Installation Guide for
installation details.
NOTE
For the latest information on supported voice boards for UM8500,
contact a sale representative.
●
●
●
60
A PBX station interface cable for each voice board.
UM8500 installed and ready for the integration as described in the
Installation Guide.
A system key that enables the integration and the appropriate number of
voice messaging ports.
UNIVERGE UM8500 INTEGRATION GUIDE
Integration
description
The integration uses digital lines to connect the phone system and the messaging
system server. Each D82 voice board in the messaging system connects to the
phone system through a PBX station interface cable. A D82 voice board emulates
up to eight Mitel Superset digital phones.
Integration features
The integration with UM8500 provides the following features:
●
Call forward to personal greeting. When an incoming call is routed to an
unanswered or busy extension, the call is forwarded to the subscriber’s voice
mail. The caller then hears the subscriber’s personal greeting and can leave a
message.
●
●
●
●
Caller ID. UM8500 receives caller ID information from the phone system, if
available. This information is displayed in the message’s subject line in
Microsoft Office Outlook® or other desktop messaging application.
Easy message access. A subscriber can retrieve messages without entering
an ID. UM8500 identifies a subscriber based on the extension from which the
call originated. A password might be required.
Identified subscriber messaging. UM8500 automatically identifies a
subscriber who leaves a message during a forwarded internal call based on
the extension from which the call originated.
Message waiting indication (MWI). When a message is waiting for a
subscriber, UM8500 notifies the phone system to activate the message
waiting indicator on the subscriber’s extension, if it is equipped with one, or
to activate a stutter dial tone.
MITEL SX200, SX2000, 3300ICP, AND 200ICP
61
Configuring
UNIVERGE
UM8500 for the
integration
After ensuring that the messaging system server is ready for the integration by
completing all appropriate tasks in the Installation Guide, perform the following
procedure to confirm that the integration is enabled.
To confirm that the integration is enabled
1 Click Start > All Programs > UNIVERGE UM8500 > Edit Switch.
2 If prompted for logon credentials, type the administrator extension and
password, then click OK.
On a new install the logon credentials are:
Extension = 99995
Password = 12345
3 Confirm that the settings match those in the following table.
Phone system settings
Parameter
Required setting
Manufacturer
Mitel
Model
SX-200D ML/EL
Switch software version
All with digital 430 emulation
Integration
Direct Digital
4 If the settings are incorrect, select the correct settings and click Update
Voice Mail Now.
62
UNIVERGE UM8500 INTEGRATION GUIDE
Connecting the
systems
After installing all of the required hardware on the voice messaging system,
perform the following procedure to connect the phone system to the messaging
system.
To install required messaging system hardware, such as D82 boards, see the
Installation Guide.
System connections
MITEL SX200, SX2000, 3300ICP, AND 200ICP
63
To connect the phone system and
1 Connect the phone system digital lines 1-8 (or 1-4 on a 4-port system) to a
type 66 interconnect block. See the following “D82 two-wire pinouts” table for
cabling requirements.
2 Connect an 18-pair PBX station interface cable to an Amphenol connection
on the type 66 interconnect block.
3 Connect the other end of the PBX station interface cable to a telco cable.
4 Connect the other end of the telco cable to a D82 board installed in the
messaging system server.
5 Repeat steps 1 through 4 for each additional D82 board installed.
D82 Two-wire pinouts
64
Phone line
number
Type 66
Block pair
Pin number
Pair color
Lead designation
1
2
27
white-orange
T1
2
4
3
6
4
8
5
10
6
12
7
14
8
16
2
orange-white
R1
29
white-brown
T2
4
brown-white
R2
31
red-blue
T3
6
blue-red
R3
33
red-green
T4
8
green-red
R4
35
red-slate
T5
10
slate-red
R5
37
black-orange
T6
12
orange-black
R6
39
black-brown
T7
14
brown-black
R7
41
yellow-blue
T8
16
blue-yellow
R8
UNIVERGE UM8500 INTEGRATION GUIDE
Programming
the phone
system
After confirming that the integration is enabled, perform the procedures for the
appropriate phone system model:
●
For the Mitel SX-200 ML, see the procedures below.
●
For the Mitel SX-2000, see procedures on page 66.
Mitel SX-200 ML
Perform the following to set up the voice messaging extensions and the hunt
group for the Mitel SX-200 ML integration.
To set up the voice messaging extensions on the Mitel SX200 ML
1 On the phone system Main menu, select option 9, Station/Supersets.
2 Type 430 in each voice messaging extension TYP field.
3 Select a voice messaging extension field, then press ESC+3 to change the
screen to expanded settings for the extension.
4 Set the first key type to Prime, and set the rest of the key types to Speed
Dial.
5 Repeat steps 3 through 4 for each voice messaging extension.
To set up the hunt group on the Mitel SX-200 ML
1 On the phone system Main menu, select option 17, Hunt Groups.
2 Create a hunt group with a pilot number, which is the published voice
messaging number for all direct and forwarded calls. Include all of the voice
messaging extensions in the hunt group.
MITEL SX200, SX2000, 3300ICP, AND 200ICP
65
To enable the Last Party Clear Dial Tone
❚
On the phone system, enable the Last Party Clear Dial Tone option.
Otherwise, the voice messaging system detection is delayed when internal
calls are disconnected.
Mitel SX-2000
Perform the following to set up the voice messaging extensions, to assign key
numbers, and to set up the hunt group for the Mitel SX-2000 integration.
To set up the voice messaging extensions on the Mitel SX2000
1 From the Main menu on the phone system console, select System forms.
2 On the Systems Forms screen, select DNI circuit assignment.
3 On the DNI Circuit Assignment screen, set the Device type channel #1
field to Superset 430 for each voice messaging extension.
To assign key numbers on the Mitel SX-2000
1 From the Main menu on the phone system console, select Multiline set
forms.
2 On the Multiline Set Forms screen, select Multiline key set assignment.
3 On the Multiline Key Set Assignment screen, type a voice messaging
extension in the Prime directory number field.
4 Set the Key numbers field for the extension to Not assigned.
5 Repeat steps 3 through 4 for each voice messaging system port extension
number.
To set up the hunt group on the Mitel SX-2000
1 From the Main Menu on the phone system console, select Group forms.
2 On the Group Forms screen, select Hunt group assignment.
3 On the Hunt Group Assignment screen, in the Pilot number field, type the
published voice messaging number for all direct and forwarded calls, then
press ESC+1.
66
UNIVERGE UM8500 INTEGRATION GUIDE
4 Type a group name, such as D/82 Hunt, in the Name field,
5 In the Hunt mode field, type circular.
6 In a Directory number field, type a voice messaging extension.
7 In the Directory Name fields, type a name for the voice messaging
extension.
8 Repeat steps 6 through 7 for each voice messaging extension that must be set
up for the integration.
Next step…
◆
Test the phone extensions that are set up for the integration.
See Appendix B, “Testing the extensions” on page 338.
MITEL SX200, SX2000, 3300ICP, AND 200ICP
67
Troubleshooting
If one of these problems listed below is encountered, try the corrective actions
listed for the problem. If these actions do not correct the problem, or if the
problem is not described here, contact Technical Support.
Problems
Corrective actions
Calls to the voice messaging
system do not connect.
Perform the following for the problems listed:
●
Calls to the voice messaging
system connect, but no prompts
play.
Callers entering an extension are
always answered with the opening
greeting instead of the personal
greeting.
Calls are not integrating with the
phone system.
●
●
●
Easy message access is not
functioning: subscribers access
their voice mailboxes and hear the
opening greeting instead of
personal options.
Confirm that expansion boards are firmly seated in the computer
expansion slots and that each board is properly configured. See
“Installing or reseating voice boards” in the appendix titled “Adding or
changing the voice boards” in the Installation Guide.
See the Installation Guide and check the voice board settings.
Confirm that the PBX station interface cables between the systems are
connected and functioning correctly. Try testing each cable or replacing
each with a different cable.
Confirm that the correct phone system model is set up on the voice
messaging system. On the UM8500 Administrator, go to Switch >
Switch Information and check that the correct phone system
manufacturer and model type are displayed.
Calls are forwarded to the opening
greeting instead of a subscriber’s
mailbox.
The voice messaging system takes Confirm that the Last Party Clear Dial option is set up on the phone system.
a long time detecting disconnected
calls.
Typically this happens because the voice messaging system is set up to use
Callers are asked to hold or
complain that they are on hold for the await-answer transfer type and call holding for that extension. Call holding
too long when calling an extension must be turned off when using the “Do not disturb” mode on the phone.
that is using “Do not disturb”
mode.
The phone system cabinet that
contains the voice messaging
station cards sporadically resets
itself.
The phone system might be overloaded due to an increase in polling traffic
between the D82 boards and the system. Spread out the load by distributing
the voice messaging extensions among multiple station cards on the phone
system. For example, distribute three or fewer voice messaging extensions
per station card.
Confirm that the subscriber’s phone is set up on the phone system to forward
Subscriber’s phones are not
forwarding calls on ring-no-answer calls to the voice messaging hunt group pilot number on ring-no-answer and
on busy.
or on busy.
Subscribers are not being identified Confirm that identified subscriber messaging is set up correctly on the voice
messaging system.
by the system, using identified
subscriber messaging, when
leaving messages for other
subscribers.
Subscriber message waiting
indication fails.
Message waiting indicators are not
activated after messages are left.
Message waiting indicators are not
turned off after messages are
retrieved.
Await-answer calls release before
the personal greeting is played.
68
Perform the following for the problems listed:
●
●
On the UM8500 Administrator, on the Ports page verify that at least one
of the voice messaging ports is set for MWI dialout.
On the UM8500 Administrator, confirm that MWI is enabled for the
subscriber.
See “Learning phone system tones” on page 340.
UNIVERGE UM8500 INTEGRATION GUIDE
■ Mitel SX-2000 T1
In this integration...
Integration overview .............................................................................70
Integration steps ..............................................................................70
Requirements ..................................................................................70
Integration description ..........................................................................71
How the integration works .................................................................71
Integration features ..........................................................................71
Configuring UNIVERGE UM8500 for the integration ....................................72
Programming the phone system..............................................................73
Steps to change the phone system settings..........................................73
MITEL SX-2000 T1
69
Integration
overview
Use this section of the Integration Guide with the Installation Guide.
Integration steps
Follow these steps to set up this integration.
1 Review the system and equipment requirements
Verify that all phone system and messaging system server requirements have
been met. See “Requirements” on page 70.
2 Configure UNIVERGE UM8500 for the integration.
See “Configuring UNIVERGE UM8500 for the integration” on page 72.
3 Program the phone system and extensions.
See “Programming the phone system” on page 73.
4 Test the phone extensions.
Test the phone extensions that are set up for the integration. See Appendix B,
“Testing the extensions” on page 338.
5 Run the Learn Tones utility.
Run the Learn Tones utility to teach the messaging system the tones
associated with the phone system. See Appendix C, “Learning phone system
tones” on page 340.
Requirements
The steps to set up the Mitel SX-2000 T1 integration require the following:
Phone system
●
Mitel SX-2000 with release N16 or later installed.
●
Mitel Advanced Analog Networking installed.
●
The phone system voice messaging ports must be connected to the voice
boards in the messaging system server.
CAUTION
The T1 lines from the phone system must be functioning and
connected to the voice boards before starting UM8500. Failure to
do so can cause initialization problems between the messaging
system server and the T1 cards in the phone system.
●
The phone system ready for the integration as described in the phone system
installation guide.
UNIVERGE UM8500 server
●
The Dialogic T1 voice boards installed; see the Installation Guide for
installation details.
NOTE
For the latest information on supported voice boards for UM8500,
contact a sales representative.
70
●
UM8500 installed and ready for the integration as described in the
Installation Guide.
●
A system key that enables the integration and the appropriate number of
voice messaging ports.
UNIVERGE UM8500 INTEGRATION GUIDE
Integration
description
How the integration works
The Mitel SX-2000 T1 integration uses a T1 line to connect the phone system and
the messaging system server. Each T1 line connects 24 voice messaging ports
from the phone system DS1 Formatter board to a T1 voice board in the messaging
system server. The following illustration shows the required connections.
The phone system sends the following information with forwarded calls:
●
The called party’s extension
●
The calling party’s extension, for internal calls, or the calling party’s phone
number, if it is an external call and the system uses caller ID
The messaging system uses this information to answer the call appropriately. For
example, a call forwarded to UM8500 is answered with the subscriber’s personal
greeting. If the phone system routes the call to UM8500 without this information,
UM8500 answers with the opening greeting.
Integration features
The Mitel SX-2000 T1 integration with UNIVERGE UM8500 provides the following
features:
●
Call forward to personal greeting. When an incoming call is routed to an
unanswered or busy extension, the call is forwarded to the subscriber’s voice
mail. The caller then hears the subscriber’s personal greeting and can leave a
message.
●
●
●
●
Caller ID. UM8500 receives caller ID information from the phone system, if
available. This information is displayed in the message’s subject line in
Microsoft Office Outlook® or other desktop messaging application.
Easy message access. A subscriber can retrieve messages without entering
an ID. UM8500 identifies a subscriber based on the extension from which the
call originated. A password might be required.
Identified subscriber messaging. UM8500 automatically identifies a
subscriber who leaves a message during a forwarded internal call based on
the extension from which the call originated.
Message waiting indication (MWI). When a message is waiting for a
subscriber, UM8500 notifies the phone system to activate the message
waiting indicator on the subscriber’s extension, if it is equipped with one, or
to activate a stutter dial tone.
MITEL SX-2000 T1
71
Configuring
UNIVERGE
UM8500 for the
integration
After ensuring that the messaging system server is ready for the integration by
completing all appropriate tasks in the Installation Guide, perform the following
procedure to confirm that the integration is enabled.
To confirm that the integration is enabled
1 Click Start > All Programs > UNIVERGE UM8500 > Edit Switch.
2 If prompted for logon credentials, type the administrator extension and
password, then click OK.
On a new install the logon credentials are:
Extension = 99995
Password = 12345
3 Confirm that the settings match those in the following table.
Phone system settings
Parameter
Required setting
Manufacturer
Mitel
Model
SX-2000
Switch software version
Release N16 or later with T1
ports
Integration
Analog
4 If the settings are incorrect, select the correct settings and click Update
Voice Mail Now.
72
UNIVERGE UM8500 INTEGRATION GUIDE
Programming
the phone
system
Perform the following procedures to program the phone system for the
integration. Using programming options other than those described in the
following procedures can affect system performance.
After connecting the systems, change the default settings for the phone system, as
shown in the following procedures. Refer to the phone manufacturer’s
documentation for more details regarding these steps.
The phone system displays these settings as a series of forms that are available
after selecting “Customer data entry” on the console. The following pages show
representations of the forms. Change only the settings listed in each form.
CAUTION
Change the settings for each form in the exact sequence shown in
the following steps. Changing the settings for each form out of
sequence can result in error messages.
Steps to change the phone system settings
1 Change the settings for the class of service options assignment
form.
See “To change the class of service options assignment form” on page 75.
2 Change the settings for the link descriptor assignment form.
See “To change the link descriptor assignment form” on page 77.
3 Change the settings for the digital E and M trunk circuit
descriptor assignment form.
See “To change the digital E and M trunk circuit descriptor assignment form”
on page 78.
4 Change the settings for the digital link assignment form.
See “To change the digital link assignment form” on page 78.
5 Change the settings for the trunk service assignment form.
See “To change the trunk service assignment form” on page 79.
6 Change the settings for the trunk assignment form.
See “To change the trunk assignment form” on page 79.
7 Change the settings for the trunk group assignment form.
See “To change the trunk group assignment form” on page 80.
8 Change the settings for the route assignment form.
See “To change the route assignment form” on page 80.
9 Change the settings for the feature access code assignment form.
See “To change the feature access code assignment form” on page 81.
10 Change the settings for the call progress tone detection plan
assignment form.
See “To change the call progress tone detection plan assignment” on page 81.
11 Change the settings for the digit modification assignment form.
See “To change the digit modification assignment form” on page 82.
12 Change the settings for the system speed call (speed dialing)
assignment form.
See “To change the system speed call (speed dialing) assignment form” on
page 82.
13 Change the settings for the automatic route selection assignment
form.
See “To change the automatic route selection assignment form” on page 82.
MITEL SX-2000 T1
73
14 Change the settings for the call rerouting first alternative
assignment form.
See “To change the call rerouting first alternative assignment form” on
page 83.
74
UNIVERGE UM8500 INTEGRATION GUIDE
To change the class of service options assignment form
1 On the phone system Form Groups menu, select System forms, then select
Class of service options assignment.
2 Change only those settings listed in the form below.
NOTE
Highlighted fields are user defined. The form shows only those
settings that require changing.
MITEL SX-2000 T1
75
NOTE
Highlighted fields are user defined. The form shows only those
settings that require changing.
76
UNIVERGE UM8500 INTEGRATION GUIDE
To change the link descriptor assignment form
1 On the phone system Form Groups menu, select Digital link forms, then
select Link descriptor assignment.
2 Change only those settings listed in the form below.
NOTE
Highlighted fields are user defined. The form shows only those
settings that require changing.
MITEL SX-2000 T1
77
To change the digital E and M trunk circuit descriptor
assignment form
1 On the phone system Form Groups menu, select Trunk forms, then select
Digital E and M trunk circuit descriptor assignment.
2 Change only those settings listed in the form below.
NOTE
Highlighted fields are user defined. The form shows only those
settings that require changing.
To change the digital link assignment form
1 On the phone system Form Groups menu, select Digital link forms, then
select Digital link assignment.
2 Change only those settings listed in the form below.
NOTE
Highlighted fields are user defined. The form shows only those
settings that require changing.
78
UNIVERGE UM8500 INTEGRATION GUIDE
To change the trunk service assignment form
1 On the phone system Form Groups menu, select Trunk forms, then select
Trunk service assignment.
2 Change only those settings listed in the form below.
NOTE
Highlighted fields are user defined. The form shows only those
settings that require changing.
To change the trunk assignment form
1 On the phone system Form Groups menu, select Trunk forms, then select
Trunk assignment.
2 Change only those settings listed in the form below.
NOTE
Highlighted fields are user defined. The form shows only those
settings that require changing.
MITEL SX-2000 T1
79
To change the trunk group assignment form
1 On the phone system Form Groups menu, select Trunk forms, then select
Trunk group assignment.
2 Change those settings listed in the form below, including the “Trunk number”
field for all members.
NOTE
Highlighted fields are user defined. The form shows only those
settings that require changing.
To change the route assignment form
1 On the phone system Form Groups menu, select Automatic route
selection forms, then select Route assignment.
2 Change only those settings listed in the form below.
NOTE
Highlighted fields are user defined. The form shows only those
settings that require changing.
80
UNIVERGE UM8500 INTEGRATION GUIDE
To change the feature access code assignment form
1 On the phone system Form Groups menu, select System forms, then select
Feature access code assignment.
2 Change only those settings listed in the form below.
NOTE
The form shows only those settings that require changing.
To change the call progress tone detection plan
assignment
1 On the phone system Form Groups menu, select Automatic route
selection forms, then select Call progress tone detection plan
assignment.
2 Assign Tone plan number 1 a maximum wait for a tone of two seconds.
NOTE
The form shows only those settings that require changing.
MITEL SX-2000 T1
81
To change the digit modification assignment form
1 On the phone system Form Groups menu, select Automatic route
selection forms, then select Digit modification assignment.
2 Change only those settings listed in the form below.
NOTE
Highlighted fields are user defined. The form shows only those
settings that require changing.
To change the system speed call (speed dialing)
assignment form
1 On the phone system Form Groups menu, select System forms, then select
System speed call assignment.
2 Change only those settings listed in the form below.
NOTE
Highlighted fields are user defined. The form shows only those
settings that require changing.
To change the automatic route selection assignment form
1 On the phone system Form Groups menu, select Automatic route
selection forms, then select Automatic route select assignment.
2 Change only those settings listed in the form below.
NOTE
The form shows only those settings that require changing.
82
UNIVERGE UM8500 INTEGRATION GUIDE
To change the call rerouting first alternative assignment
form
1 On the phone system Form Groups menu, select Call rerouting forms,
then select Call rerouting first alternative assignment.
2 Change only those settings listed in the form below.
NOTE
Highlighted fields are user defined. The form shows only those
settings that require changing.
In this example, with the form showing “6800” as a directory number, the
following conditions are true:
■
Calls forward to “6800.”
■
Users dial “6700” to retrieve messages.
■
Trunks are directed to “6900” for automated attendant.
MITEL SX-2000 T1
83
84
UNIVERGE UM8500 INTEGRATION GUIDE
■ Mitel 3300 ICP T1 with Digital
E&M
In this integration...
Integration overview .............................................................................86
Integration steps ..............................................................................86
Requirements ..................................................................................86
Integration description ..........................................................................87
Integration features ..........................................................................87
Configuring UNIVERGE UM8500 for integration .........................................88
Connecting the systems.........................................................................89
Programming the Mitel 3300/SX-3200 for digital E&M integration ................90
Setting up UNIVERGE UM8500 for integration ...........................................93
Configuring phone answering .............................................................93
Configuring message waiting..............................................................93
Configuring message retrieval ............................................................93
Configuring Auto Attendant................................................................93
MITEL 3300 ICP T1 WITH DIGITAL E&M
85
Integration
overview
The following steps describe how to set up a UNIVERGE UM8500 integration
using a digital E&M interface with a Mitel 3300 ICP over T1 lines.
Use this section of the Integration Guide with the Installation Guide.
Integration steps
Follow these steps to set up the integration.
1 Review the system and equipment requirements.
Verify that all phone system and messaging system server requirements have
been met. See “Requirements” below.
2 Confirm that the integration is enabled.
See “Configuring UNIVERGE UM8500 for integration” on page 88.
3 Connect the phone system to the voice messaging server.
See “Connecting the systems” on page 89.
4 Program the phone system for digital E&M integration.
See “Programming the Mitel 3300/SX-3200 for digital E&M integration” on
page 90.
5 Set up the phone system for the integration.
See “Setting up UNIVERGE UM8500 for integration” on page 93.
Requirements
Before setting up the digital E&M integration, confirm that the site meets the
following requirements and that all of the necessary components are available:
Phone system
●
Digital E&M on a Mitel 3300 or Mitel SX-3200 IP phone system.
UNIVERGE UM8500 server
●
The Dialogic T1voice boards installed; see the Installation Guide for
installation details.
NOTE
For the latest information on supported voice boards for UM8500,
contact a sales representative.
86
●
RJ-45 connector for the T1 line connection to the server.
●
15-pin connector for the T1 line connection to the phone system.
UNIVERGE UM8500 INTEGRATION GUIDE
Integration
description
Digital E&M voice mail functionality provides voice processors with the ability to
transfer calls through the digital E&M interface by flashing on the E-lead. Calls
rerouted to the voice messaging system can only be identified by making use of
Automatic Route Selection (ARS) and digit modification.
Type I or V E&M trunks can be used. T1-E&M type trunks also have the flash
ability for call transfer.
Integration features
The T1 E&M integration with UM8500 provides the following features:
●
Call forward to personal greeting. When an incoming call is routed to an
unanswered or busy extension, the call is forwarded to the subscriber’s voice
mail. The caller then hears the subscriber’s personal greeting and can leave a
message.
●
●
●
●
Caller ID. UM8500 receives caller ID information from the phone system, if
available. This information is displayed in the message’s subject line in
Microsoft Office Outlook® or other desktop messaging application.
Easy message access. A subscriber can retrieve messages without entering
an ID. UM8500 identifies a subscriber based on the extension from which the
call originated. A password might be required.
Identified subscriber messaging. UM8500 automatically identifies a
subscriber who leaves a message during a forwarded internal call based on
the extension from which the call originated.
Message waiting indication (MWI). When a message is waiting for a
subscriber, UM8500 notifies the phone system to activate the message
waiting indicator on the subscriber’s extension, if it is equipped with one, or
to activate a stutter dial tone.
MITEL 3300 ICP T1 WITH DIGITAL E&M
87
Configuring
UNIVERGE
UM8500 for
integration
After ensuring that the messaging system server is ready for the integration by
completing all appropriate tasks in the Installation Guide, perform the following
procedure to confirm that the integration is enabled.
To confirm that the integration is enabled
1 Click Start > All Programs > UNIVERGE UM8500 > Edit Switch.
2 If prompted for logon credentials, type the administrator extension and
password, then click OK.
On a new install the logon credentials are:
Extension = 99995
Password = 12345
3 Confirm that the settings match those in the following table.
Phone system settings
Parameter
Required setting
Manufacturer
Mitel
Model
SX 2000 or newer
Switch software version
N16 or later
Integration
T1 E&M
4 If the settings are incorrect, select the correct settings and click Update
Voice Mail Now.
88
UNIVERGE UM8500 INTEGRATION GUIDE
Connecting the
systems
After installing all of the required hardware on the voice messaging system,
perform the following procedure to connect the phone system to the voice
messaging system.
To install required voice messaging system hardware, see the Installation Guide.
System connections
To connect the phone system and UM8500
1 Connect the 15-pin connector to the T1 board on the phone system.
2 Connect the RJ-45 connector to the voice messaging voice/fax board
dedicated to the voice messaging system T1 connection.
MITEL 3300 ICP T1 WITH DIGITAL E&M
89
Programming
the Mitel 3300/
SX-3200 for
digital E&M
integration
After connecting the systems, program the Mitel 3300/SX-3200 for digital E&M
integration.
NOTES
●
●
●
●
●
●
Voice mail ports within a voice mail-type hunt group can be
dedicated to message activation/deactivation by assigning and
applying a separate Class of Service option.
Class of Service option ONS/COV/E&M voice mail ports must be
enabled for members of a voice mail-type hunt group.
Attendant consoles are unable to receive a message waiting
indication.
Single line sets without message waiting lamps require the
Message Waiting Audible Tone Notification COS option enabled.
MWIs activated from an E&M voice mail port are considered to
be dialed message waiting type messages. These messages can
be deactivated from any E&M voice mail port or any system port
that is not in a voice mail-type hunt group.
Voice mail ports can be assigned to multiple voice mail hunt
groups.
To program the Mitel 3300/SX-3200 for digital E&M
integration
1 In the E&M Trunk Circuity Descriptor Assignment form, program the
parameters as shown in the following table:
E&M Trunk Circuit Descriptor Assignment settings
Setting
Value
Address Signaling
DTMF
Incoming Start Type
Wink or IMM
Minimum Flash Timer (100-250ms)
100
Maximum Flash Timer (200-250 ms)
250
Outgoing Start Type
Wink or IMM
Fake Answer Supervision after Outpulsing
Yes
Ignore Answer Supervision
Yes
Release Supervision Expected
Yes
Audio Inhibit Until Answer Supervision
No
Drop Digit Rcvr for Outgoing Audio Before Ans
Sup
No
NOTE
The Immediate (IMM) incoming and outgoing start type is the
preferred method of E&M signaling as it performs faster than
Wink.
2 In the Class of Service Options Assignment form for the E&M voice mail ports,
program the parameters as shown in the following table:
Class of Service Options Assignment settings
Setting
90
Value
ONS/COV/E&M Voice Mail Port
Yes
Dialed Night Service
Yes (optional)
Message Waiting
Yes
Dialing Conflict Timer (2-5s)
2 (optional)
Allow Trunk Flash
Yes
UNIVERGE UM8500 INTEGRATION GUIDE
3 Program the Trunk Service Assignment form to apply the relevant Class of
Service (COS) and Class of Restriction (COR) to the E&M voice mail ports.
Enter 0 in the Absorb field.
NOTE
Toll fraud should be considered when assigning a COR to the voice
mail ports. External dialing may be required for pager notification
or message forwarding.
4 Program the E&M trunks in the Trunk Assignment and Trunk Group
Assignment forms using circular hunting.
5 In the Call Progress Tone Detection Assignment form, program the
parameters as shown in the following table:
Call Progress Tone Detection Plan Assignment settings
Setting
Value
Maximum Wait for Dial Tone (0-99)
5
Tone Plan Number
01
Action on Timeout
outpulse default
6 In the Digit Modification Assignment form, program the parameters as
shown in the following table:
Digital Modification Assignment settings
Number of Digits to Absorb
Digits to be Inserted
1
<T01>*
1
<T01>*<E>
This is optional for message retrieval and
analog networking.
NOTE
It may be necessary to insert a tone, for example, * or #, after
the tone plan if the voice mail ports are configured to provide
automated attendant functionality. The tone required will put the
processor into telephone answering mode.
7 In the Route Assignment form, program the route assignments then reference
the relevant trunk group and digit modification numbers. Digits before
outpulsing can be set to eliminate overlap outpulsing. However, this is not
required.
8 In the ARS Leading Digits Assignment form, program the parameters as
shown in the following table:
ARS Leading Digits Assignment settings
Setting
Value
Leading digits
8
Second Dial tone
No
COR Group Number
MITEL 3300 ICP T1 WITH DIGITAL E&M
91
9 In the ARS Digits Dialed Assignment form, program the following three sets of
parameters as shown in the following table:
ARS Digits Dialed Assignment settings
Setting
Value
Digits Dialed
*
*
Number of digits to follow
4
4
0
Terminated Type Route
Route
Route
Route
Termination Number
01
01
01
NOTES
●
●
●
The first ARS entry is used for call rerouting.
The second ARS entry defines the message retrieval route, if
required. The * is also sent, assuming the voice mail will
respond by prompting the subscriber to enter his or her mailbox
number.
“Digits to follow” is defined by the extension number’s digit
length.
10 In the Feature Access Code Assignment form, assign message waiting activate
and deactivate codes.
Optionally, assign access codes to Dialed Day/Night Service Inquire and
Message Waiting Inquire if these are used by the voice processor.
11 In the Class of Service Options form, enter the following customer extension
parameters, as shown in the following table:
Class of Service Options settings
Setting
Call Forwarding (External Destination)
Value
Yes
Message Waiting Audible Tone Notification
Yes (optional)
Multiline Set Voice Mail Callback Message Erasure
Allowed
No (optional)
Call Forward No Answer Timer (0-125 s)
15 (default)
Subscribers will call forward to the ARS leading digit followed by the user’s
extension number; for example, a subscriber would dial 8 for the ARS
Leading Digit, then 5000 if the user’s extension number is 5000.
System call rerouting can also be used. To reroute a system call, reroute
extensions to a system speed call number containing the ARS leading digit,
for example, 8 as used in the previous example, and the user’s extension
number.
92
UNIVERGE UM8500 INTEGRATION GUIDE
Setting up
UNIVERGE
UM8500 for
integration
After connecting the systems and programing the Mitel 3300/SX-3200 for digital
E&M integration, set up the UNIVERGE UM8500 for integration.
Configuring phone answering
Using E&M trunk circuits for voice mail applications requires that the subscriber
be identified to the voice processor through ARS using digit modification. Calls
are rerouted externally through ARS where the leading digit is absorbed, and
pauses and any necessary tones are inserted. The subscriber’s mailbox is then
outpulsed to the voice processor providing the appropriate personal greeting for
message taking.
If the voice processor ports are configured as auto attendant, insert another tone
in front of the subscriber’s mailbox number to place the voice processor into
phone answering mode.
Configuring message waiting
Message waiting indications can be set from the E&M voice processor circuits by
dialing the message waiting activate/deactivate feature access codes assigned on
the system, followed by the subscriber’s extension number.
Configuring message retrieval
Subscribers retrieve messages by accessing an ARS route and dialing their
extension number. Digit modification absorbs the leading digit, inserting a pause
and any other necessary tones, followed by the extension number dialed. The
subscriber is then prompted for his or her password.
Messages can be retrieved external to the system dependent upon the incoming
trunk access to the voice processor. Subscribers normally have to manually enter
one or two digits, followed by their mailbox number, to log on to their mailbox.
Configuring Auto Attendant
Voice processors can perform auto attendant functions by flashing the E&M trunk
on the system E-lead. Incoming trunks can be directed to a system speed call
number containing the ARS digits required to access the voice processor. This
allows users to transfer to valid destinations throughout the system.
Since most subscriber extensions typically reroute the caller to the messaging
system when the extension is busy or there is no answer, program the voice
processor to perform an unscreened transfer to provide the most efficient use of
the voice mail ports.
MITEL 3300 ICP T1 WITH DIGITAL E&M
93
94
UNIVERGE UM8500 INTEGRATION GUIDE
■ Mitel 3300 ICP with IP
integration
In this integration...
Integration overview .............................................................................96
Integration steps ..............................................................................96
Requirements ..................................................................................96
Integration description ..........................................................................97
How the integration works .................................................................97
Integration features ..........................................................................97
Programming the phone system..............................................................98
Steps for changing the phone system settings ......................................98
Configuring UNIVERGE UM8500 for the integration .................................. 102
MITEL 3300 ICP WITH IP INTEGRATION
95
Integration
overview
Use this section of the Integration Guide with the Installation Guide to set up the
messaging system for an IP integration with a Mitel 3300 ICP.
Integration steps
Follow these steps to set up this integration.
1 Review the system and equipment requirements.
Verify that all phone system and UM8500 server requirements have been met.
See “Requirements,” below.
2 Program the phone system and extensions.
See “Programming the phone system” on page 98.
3 Configure UM8500 for the integration.
See “Configuring UNIVERGE UM8500 for the integration” on page 102.
Requirements
The steps to set up the Mitel 3300 ICP with IP integration require the following:
Phone system
●
Mitel 3300 ICP with software version 5.2.6.8-1 or later installed.
●
Mitai/Tapi Computer integration.
●
One 3300ICP IP user license for each messaging port.
●
One 3300ICP IP user license for each IP phone.
●
The phone system ready for voice over IP integration as described in the
phone system installation guide.
●
All messaging ports and IP phones configured to use the G711 audio codec.
●
A network switch with enough ports to handle all IP phones, the voice server
and the phone system.
UNIVERGE UM8500 server
96
●
UNIVERGE UM8500 installed and ready for the integration as described in
the Installation Guide.
●
A system key that enables the integration and the appropriate number of
voice messaging ports.
●
A network cable to connect the voice server to the network containing the
phone system.
UNIVERGE UM8500 INTEGRATION GUIDE
Integration
description
How the integration works
The Mitel 3300 ICP with IP integration uses an Ethernet line to connect the phone
system and UM8500.
The phone system sends the following information with forwarded calls:
●
The called party's extension.
●
The calling party extension (for internal calls) or the calling party's phone
number (if it is an external call and the system uses caller ID)
UM8500 uses this information to answer the call appropriately. For example, a call
forwarded to UM8500 is answered with the subscriber's personal greeting. If the
phone system routes the call to UM8500 without this information, UM8500
answers with the opening greeting.
Integration features
The Mitel 3300 ICP with IP integration with UM8500 provides the following
features:
Call forward to personal greeting. When an incoming call is routed to an
unanswered or busy extension, the call is forwarded to the subscriber's voice
mail. The caller then hears the subscriber's personal greeting and can leave a
message.
Caller ID. UM8500 receives caller ID information from the phone system, if
available. This information displays in the message's subject line in Microsoft
Outlook® (or other desktop messaging application).
Easy message access. A subscriber can retrieve messages without entering
an ID. UM8500 identifies a subscriber based on the extension from which the
call originated. A password may be required.
Identified subscriber messaging. UM8500 automatically identifies a
subscriber who leaves a message during a forwarded internal call, based on
the extension from which the call originated.
Message waiting indication (MWI). When a message is waiting for a
subscriber, UM8500 notifies the phone system to activate the message
waiting indicator on the subscriber's extension.
MITEL 3300 ICP WITH IP INTEGRATION
97
Programming
the phone
system
Do the following procedures to configure the Mitel 3300 ICP with IP integration.
Programming the phone system or extension options other than those supplied in
the following procedures may affect performance.
IMPORTANT
The IP integration with Mitel 3300 ICP requires all phones and
voice mail ports to use the G711 audio codec. The integration does
not support the G729 audio codec.
Steps for changing the phone system settings
The phone system displays these settings as a series of forms that are available
after selecting Customer data entry on the console. The following pages show
representations of the forms. Change only the settings listed in each form.
Change the settings for each form in the exact sequence shown in the following
steps. Changing the settings for each form out of sequence may cause error
messages.
NOTE
These procedures should only be performed by a qualified phone
system technician.
Follow these steps to change the phone system settings.
1 Set up the DHCP settings.
See “To configure DHCP settings” on page 99.
2 Set up the IP voice mail extensions.
See “To configure IP voice mail extensions” on page 99.
3 Set up class of service options for voice mail extensions.
See “To configure class of service options” on page 100.
4 Assign the class of service to the voice mail extensions.
See “To assign the new class of service to the voice mail extensions” on
page 100.
5 Set up a hunt group containing the voice mail extensions.
See “To set up the hunt group” on page 100.
98
UNIVERGE UM8500 INTEGRATION GUIDE
To configure DHCP settings
1 On the phone system System Configuration menus, select System
Capacity > License and Option Selection.
2 Confirm that the number of IP User Licenses and IP Device Licenses
are equal to or greater than the number of voice mail extensions and IP
phones.
3 Confirm that IP Networking, Networking Option, and Mitai/Tapi
Computer Integration are each set to Yes.
4 Click System Administration > DHCP.
5 Confirm that DHCP Server is enabled.
6 Click System Administration > DHCP > DHCP Static IP, to specify the
Address and Subnet. Consult your system administrator for this
information.
7 Click System Administration > DHCP > DHCP IP Address Range, to
specify the Start and End of the range of IP address of the voice mail
extensions. Also specify the Subnet and Lease Time.
8 Click System Administration > DHCP > DHCP Options, then change
the settings listed in the form below.
To configure IP voice mail extensions
Voice mail extensions must be added one at a time, because the MAC addresses
are not incremental and must be manually added.
1 On the phone system System Configuration menu, click Devices > IP
Telephones > Multiline IP Sets > Multiline IP Set Configuration.
2 Click Add.
3 Select 5020 IP from the Device Type list.
4 Type the voice mail extension number in the Number field.
5 Type 1 In the Interconnect Number field
MITEL 3300 ICP WITH IP INTEGRATION
99
6 Type the address for the voice mail extension in the MAC Address field in
the form A1:21:00:00:<nn>:<nn>, where <nn>:<nn> represents the
extension number in MAC format.
In MAC addresses the digits 1-9 represent the numbers of 1-9 while A
represents the number 0. For example, extension number 101 would be
represented 01:A1. The MAC address for a the voice mail extension 101 would
be A1:21:00:00:01:A1, extension 102 would be A1:21:00:00:01:A2, extension
210 would be A1:21:00:00:02:1A, while extension 1001 would be
A1:21:00:00:1A:A1.
7 Click Save.
8 Repeat steps 2 through 7 for each voice mail extension.
To configure class of service options
1 On the phone system System Configuration menu, click Devices > Class of
Service Option Assignment.
2 Select an unused Class of Service, then click Change.
3 Select Yes for the options listed below:
■
ACD Silent Monitor Accept
■
ACD Silent Monitor Allowed
■
ACD Silent Monitor Notification
■
Call Announce Line
■
COV/ONS/E&M Voice Mail Port
■
Execute Busy Override
■
HCI/CTI/TAPI Call Control Allowed
■
HCI/CTI/TAPI Monitor Allowed
■
Public Network Access via DPNSS
■
Public Network To Public Network Connection Allowed
4 Click Save.
To assign the new class of service to the voice mail
extensions
1 On the phone system System Configuration menu, click Devices > Station
Service Assignment.
2 Select the first IP voice mail extension.
3 Click Change.
4 Set the Class of Service - Day to the new class of service.
5 Set the Class of Service - Night1 to the new class of service.
6 Set the Class of Service - Night2 to the new class of service.
7 Click Save.
8 Repeat steps 3 through 7 for each IP voice mail extension.
To set up the hunt group
1 On the phone system System Administration menu, click Call Handling >
Hunt Groups > Hunt Group Assignment.
2 Click Add.
100
UNIVERGE UM8500 INTEGRATION GUIDE
3 In Hunt Group, type the number for the hunt group. This number should be
one less than the first voice mail extension.
For example, if the first voice mail extension is 101, the hunt group number
should be 100.
4 For Hunt Group Mode select Circular.
5 Set Hunt Group Type to Voice.
6 Click Save.
7 Click Add Member.
8 In the Enter the number of records to add field, type the number of
voice mail extensions.
9 In the Define the Add Range Programming Pattern section, in the
Number field, type the extension of the first voice mail extension. In
Increment by field type 1.
10 Click Save.
MITEL 3300 ICP WITH IP INTEGRATION
101
Configuring
UNIVERGE
UM8500 for the
integration
After ensuring that the UM8500 server is ready for the integration by completing
all appropriate tasks in the Installation Guide, perform the following procedure to
confirm that the integration is enabled.
To configure the UM8500 server for integration
1 Click Start > All Programs > UNIVERGE UM8500 > Key Dump.
2 Verify the Integration setting is MITELIP or Multiple Integrations.
3 Click Start > All Programs > UNIVERGE UM8500 > Edit Switch.
4 If prompted for logon credentials, type the administrator extension and
password, then click OK.
On a new install the logon credentials are:
■
Extension = 99995
■
Password = 12345
5 Confirm that the settings match those in the following table. If the settings are
incorrect, the integration features may not be enabled.
Phone system setting
Parameter
Required settings
Manufacturer
MITEL
Model
3300 ICP
Specific Version or Country 5020 IP PHONE EMULATION
Integrations
IP
6 Stop UNIVERGE UM8500 if it is running.
7 Go to Start > Control Panel > IP Phone Emulation. The Mitel
Networks IP Phone Emulation Settings dialog box appears.
8 Click the Adapter Settings tab for the adapter used to connect the Mitel IP
switch.
The Selected Network Card field should display the name of the network card;
for example, Intel(R) Pro/100 Desktop Adapter, and the IP
Address assigned to the card.
Leave the Current IP Address field blank if the IP is assigned automatically
by the DHCP Server. Type the IP address only if the messaging system server
has a static IP address.
9 On the Switch 0 tab, type a Name for the Switch. For example, type Mitel
SX3300 Switch.
10 Type the IP address of the switch in the IP Address field.
The IP Address must belong to the same domain as the network adapter. For
example, if the IP Address of the network adapter connecting to the
messaging system server is 172.20.18100, the IP Address of the switch
may be 172.10.18.90.
11 Right click in the white box with the columns headings Prime DN and
Phone ID and select Insert.
The Insert Phone Entry dialog box appears.
12 Type a voice mail port number in the PrimeDN field.
13 Click Apply, then repeat step 12 to add all voice mail port numbers.
To delete a port, right click on the port and select Delete.
To edit a port, right click on the port and select Edit.
14 Click Close when you are finished adding the voice mail port numbers.
102
UNIVERGE UM8500 INTEGRATION GUIDE
15 Start UNIVERGE UM8500.
16 In your Internet browser, go to UM8500 Administrator
(http://<server name>/saweb).
17 Go to System > Ports and check the extensions of each port displayed in
the Port Table section of the page.
Type the extension for each port. The ports must appear in the same order as
in the Mitel Networks IP Phone Emulation Settings dialog box.
MITEL 3300 ICP WITH IP INTEGRATION
103
104
UNIVERGE UM8500 INTEGRATION GUIDE
■ NEC NEAX 2000 with Direct
Digital (D82)
In this integration...
Integration overview ........................................................................... 106
Integration steps ............................................................................ 106
Requirements ................................................................................ 106
Integration description ........................................................................ 107
How the integration works ............................................................... 107
Integration features ........................................................................ 107
Configuring UNIVERGE UM8500 for the integration .................................. 108
Programming the phone system............................................................ 109
NEC NEAX 2000 WITH DIRECT DIGITAL (D82)
105
Integration
overview
Use this section of the Integration Guide with the Installation Guide.
Integration steps
Follow these steps to set up this integration.
1 Review the system and equipment requirements.
Verify that all phone system and messaging system server requirements have
been met. See “Requirements,” below.
2 Configure UNIVERGE UM8500 for the integration.
See “Configuring UNIVERGE UM8500 for the integration” on page 108.
3 Program the phone system and extensions.
See “Programming the phone system” on page 109.
Requirements
The steps to set up the NEC NEAX® 2000 direct digital integration require the
following:
Phone system
●
NEAX 2000 IVS, 1300 series, revision NJ 4.04 or later, installed and ready for
the integration as described in the phone system documentation.
●
One or more of the following digital line cards set up as voice messaging ports
connected to the voice boards in the messaging system:
Card name
Description
PN-2DLCB
Digital line card, 2 ports
PN-2DLCN
Digital line card, 2 ports
PN-4DLCA
Digital line card, 4 ports
PN-4DLCD
Digital line card, 4 ports
PN-4DLCM
Digital line card, 4 ports
PN-4DLCQ
Digital line card, 4 ports
PN-8DLCP
Digital line card, 8 ports
CAUTION
Use only the black and yellow pair of wires. The RJ-14 connectors
on the Dialogic D42-NE2 voice board use only a single pair of
wires.
UNIVERGE UM8500 server
●
The Dialogic digital voice boards installed; see the Installation Guide for
installation details.
NOTE
For the latest information on supported voice boards for UM8500,
contact a sale representative.
106
●
UM8500 installed and ready for the integration as described in the
Installation Guide.
●
A system key that enables the integration and the appropriate number of
voice messaging ports.
UNIVERGE UM8500 INTEGRATION GUIDE
Integration
description
How the integration works
The NEAX 2000 direct digital integration uses digital lines to connect the phone
system and messaging system server. The phone system digital voice messaging
ports connect to the D82 boards in the messaging system server. Each D82 voice
board emulates up to four Dterm® digital phones. The following illustration
shows the required connections.
NEAX 2000
UNIVERGE
UM8500 SERVER
The phone system sends the following information with forwarded calls:
●
The called party’s extension
●
The reason for the forward (the extension is busy, does not answer, or is set to
forward all calls)
●
The calling party’s extension (for internal calls)
UM8500 uses this information to answer the call appropriately. For example, a call
forwarded to UM8500 is answered with the subscriber’s personal greeting. If the
phone system routes the call to UM8500 without this information, UM8500
answers with the opening greeting.
Integration features
The NEAX 2000 digital integration with UNIVERGE UM8500 provides the
following features:
●
Call forward to personal greeting. When an incoming call is routed to an
unanswered or busy extension, the call is forwarded to the subscriber’s voice
mail. The caller then hears the subscriber’s personal greeting and can leave a
message.
●
●
Caller ID. UM8500 receives caller ID information from the phone system.
This information displays in the message’s subject line in Microsoft Office
Outlook® or other desktop messaging application.
Constant message count. The number of new messages is displayed on a
subscriber’s Dterm phone while the phone is on hook.
●
●
●
●
Easy message access. A subscriber can retrieve messages without entering
an ID. UM8500 identifies a subscriber based on the extension from which the
call originated. A password might be required.
Identified subscriber messaging. UM8500 automatically identifies a
subscriber who leaves a message during a forwarded internal call based on
the extension from which the call originated.
Live Record. A subscriber can record a phone conversation by pressing the
Live Record button on the Dterm phone. The recording can be saved in the
subscriber’s mailbox for later reference, or forwarded to another subscriber or
group of subscribers.
Message waiting indication (MWI). When a message is waiting for a
subscriber, UM8500 notifies the phone system to activate the message
waiting indicator on the subscriber’s extension.
NEC NEAX 2000 WITH DIRECT DIGITAL (D82)
107
Configuring
UNIVERGE
UM8500 for the
integration
After ensuring that the messaging system server is ready for the integration by
completing all appropriate tasks in the Installation Guide, perform the following
procedure to confirm that the integration is enabled.
To confirm that the integration is enabled
1 Click Start > All Programs > UNIVERGE UM8500 > Edit Switch.
2 If prompted for logon credentials, type the administrator extension and
password, then click OK.
On a new install the logon credentials are:
Extension = 99995
Password = 12345
3 Confirm that the settings match those in the following table.
Phone system settings
Parameter
Required setting
Manufacturer
NEC
Model
NEAX2000 IVS
Switch software version
1300 Series and above without
MCI
Integration
Direct Digital
4 If the settings are incorrect, select the correct settings and click Update
Voice Mail Now.
108
UNIVERGE UM8500 INTEGRATION GUIDE
Programming
the phone
system
If programming options other than those supplied in the following procedures are
used, the integration’s performance can be affected.
NOTE
The following procedures are written with the assumption that you
will use a Customer Administration Terminal (CAT) or Maintenance
Administration Terminal (MAT) to program the phone system.
To program the digital voice messaging ports in the
phone system
1 Assign each voice messaging port to a Line Equipment Number (LEN) by
using command code 10.
2 Set or clear the function key assignments for each voice messaging port by
using command code 90, YY = 00:
3 Enable tone ringer on function key number 16 for each voice messaging port
by using command code 90, YY = 01.
4 For each voice messaging port, assign the prime line number to the voice
messaging port by using command code 93.
5 Assign all the voice messaging ports to a Uniform Call Distribution (UCD)
group by using command code 17, Y = 0.
6 Designate the pilot number for the UCD group that contains the voice
See also
ETI-164, NEAXMail AD-40 Installation
and Programming, Volume 5, Issue 4
(March 1998)
NEAX 2000 IVS System Manual,
Volume II, Command Manual
messaging ports by using command code 17, Y = 1.
NOTE
The pilot number must be a phantom single line extension. A
phantom single line extension is an analog extension assigned, by
using command code 10, to a LEN with no card in the slot.
7 Assign the UCD pilot number of the voice messaging ports to a UCD group
number by using command code 17, Y = 2.
8 Designate each voice messaging port as a digital voice messaging port by
using command code 13, YY = 24.
9 Assign the UCD pilot number of the voice messaging ports to a tenant
number by using command code 51, YY = 15.
10 Enable a periodic recording tone to be sent out from the phone system on
Live Record by using command code 08. Set basic feature number 109 to to
be sent.
11 Enable the message waiting service on each phone that is using UM8500 by
using command code 13, YY = 03.
To program the Dterm phones that use Live Record
For each Dterm phone that uses the UM8500 Live Record feature, perform the
following steps:
1 Designate the following function key assignments by using command code
90, YY = 00:
2 Assign the prime line number to the UCD pilot number of the voice
messaging ports by using command code 93.
NEC NEAX 2000 WITH DIRECT DIGITAL (D82)
109
110
UNIVERGE UM8500 INTEGRATION GUIDE
■ NEC NEAX 2000 with IP Protims
In this integration...
Integration overview ........................................................................... 112
Integration steps ............................................................................ 112
Requirements ................................................................................ 112
Integration description ........................................................................ 113
How the integration works ............................................................... 113
Integration features ........................................................................ 113
Programming the phone system............................................................ 114
Configuring UNIVERGE UM8500 for the integration .................................. 115
NEC NEAX 2000 WITH IP PROTIMS
111
Integration
overview
Use this section of the Integration Guide with the Installation Guide.
Integration steps
Follow these steps to set up this integration.
1 Review the system and equipment requirements
Verify that all equipment, phone system, and messaging system server
requirements have been met. See “Requirements,” below.
2 Program the phone system.
See “Programming the phone system” on page 114.
3 Configure UNIVERGE UM8500 for the integration.
See “Configuring UNIVERGE UM8500 for the integration” on page 115.
Requirements
The steps to set up the NEC NEAX 2000 IP Protims integration require the
following:
Equipment
●
All Dterm® IP phones that will be used with UNIVERGE UM8500 must have
software version 1.2 or newer.
NEAX 2000 phone system
●
NEAX 2000 IPS software release 8 or newer installed and ready for the
integration as described in the phone system documentation.
●
Password encryption type for IP extensions is MD5, see command CM08
YY=517 on 0.
●
Fully functional IP PAD cards with VCTI sub-boards.
NOTE
IP PAD cards provide interface function between IP telephony,
terminals or other devices on LAN, and non-IP telephony,
conventional networks such as PSTN, ISDN, and private networks.
UNIVERGE UM8500 server
112
●
If the phone system uses G729 codec, the Sipro Lab G729A codec driver must
be installed on the messaging system server. The installation file for this
driver is named sl_g729a_setup.exe and can be found in the Voice
Mail\Utilities folder on the Installation disc.
●
A system key that enables the integration and the appropriate number of
voice messaging ports.
UNIVERGE UM8500 INTEGRATION GUIDE
Integration
description
How the integration works
NEAX 2000 IP Protims integration uses a network connection to connect
messaging system server with the phone system. Each voice messaging port
emulates an IP Terminal extension. The communication between the parties is
facilitated by a series of Voice Over IP (VOIP) protocols, such as DRS, Protims, RTP,
H245, Voice control, used for call signaling and voice streaming, some of them
being NEC proprietary protocols.
Integration features
The NEAX 2000 IP Protims integration with UM8500 provides the following
features:
●
Call forward to personal greeting. When an incoming call is routed to an
unanswered or busy extension, the call is forwarded to the subscriber’s voice
mail. The caller then hears the subscriber’s personal greeting and can leave a
message.
●
●
●
●
Caller ID. UM8500 receives caller ID information from the phone system.
This information displays in the message’s subject line in Microsoft Office
Outlook® or other desktop messaging application.
Easy message access. A subscriber can retrieve messages without entering
an ID. UM8500 identifies a subscriber based on the extension from which the
call originated. A password might be required.
Identified subscriber messaging. UM8500 automatically identifies a
subscriber who leaves a message during a forwarded internal call based on
the extension from which the call originated.
Message waiting indication (MWI). When a message is waiting for a
subscriber, UM8500 notifies the phone system to activate the message
waiting indicator on the subscriber’s extension.
NEC NEAX 2000 WITH IP PROTIMS
113
Programming
the phone
system
If programming options other than those supplied in the following procedures are
used, the integration’s performance can be affected.
NOTE
The following procedures are written with the assumption that you
will use a Customer Administration Terminal (CAT) or Maintenance
Administration Terminal (MAT) to program the phone system.
To program the IP voice messaging ports in the phone
system
1 Make sure that the NEAX 2000 phone system has licenses for using IP
extensions using command F88>12>.
2 Configure the voice messaging ports as IP Terminal extensions, the default IP
extensions type.
3 Write down the MWI analog codes that the NEAX 2000 phone system uses for
turning the phones lamps on and off. These codes are needed when
configuring UM8500 to work with the integration.
NOTE
The NEAX 2000 phone system may not have any settings to use
codes for MWI analog operations. If this is the case, use command
CM 20 Y = 0/1/2/3 > set code > A040, CM 20 Y = 0/1/2/3 >
cancel code > A041, CM 13 Y = 03 > station > 0 - for providing
each station with Message Waiting capability.
4 Make sure that the following service features are enabled in the phone
system:
■
Call hold
■
Assignment of no answer timer for blind transfer to station or blind
transfer attendant
■
Blind transfer
5 Assign all of the voice messaging ports to a Uniform Call Distribution (UCD)
group, use commands CM 17 Y=0 /1 /2.
6 Set the same location ID for all voice messaging ports and set either or both of
the codecs G711, U-Law or A-Law, and G729A with payload size equal to 40
milliseconds for that location ID using commands CM12 YY=39, CM67 YY=00,
and CM42 YY=100 ~ 177.
114
UNIVERGE UM8500 INTEGRATION GUIDE
Configuring
UNIVERGE
UM8500 for the
integration
After ensuring that the messaging system server is ready for the integration by
completing all appropriate tasks in the Installation Guide, perform the following
procedure to confirm that the integration is enabled.
To confirm that the integration is enabled
1 In Internet Explorer, go to the UM8500 Administrator
(http://<server name>/saweb).
2 Go to System > Licensing > Licensed Features.
3 In the Integration box, confirm that the setting is IP Protims.
4 If the setting is not IP Protims, contact a sales representative for the
necessary system key.
5 Go to System > Switch. Confirm that the settings match those in the
following table.
If the settings are incorrect, integration features might not be enabled.
Phone system settings
Parameter
Required setting
Manufacturer
NEC
Model
NEAX 2000 IPS
Switch Software Version
Software Release 8 or newer
with IP ports
Integration
VOIP-PROTIMS
6 Enter the MWI analog codes that the NEAX 2000 phone system uses for
turning the phones lamps on and off. Save the changes.
7 Stop UNIVERGE UM8500.
8 Run VOIPAdmin.exe from Commserver\Utilities folder.
The VoipAdmin Tool appears.
9 Enter IP address of the phone system.
10 Set the general functionality for the ports as Terminal.
11 Under Manage ports, click Add to add a new port.
Enter the Extension and Password for each port.
12 If the system uses one or more IP PADs, under Manage Gateways click Add.
Enter the IP Address and set the Has DSP to 0 for each gateway.
13 Click OK to save the changes and then close VOIPAdmin.
14 Start UNIVERGE UM8500.
15 In Internet Explorer, go to the UM8500 Administrator
(http://<server name>/saweb).
16 Go to System > Ports and check the extension of each port displayed in the
Port Table section of the page. If the extensions are incorrect, stop UNIVERGE
UM8500, verify the phone system settings made for the voice messaging
ports, see “To program the IP voice messaging ports in the phone system” on
page 114, and use the VOIPAdmin tool to make the necessary adjustments.
NEC NEAX 2000 WITH IP PROTIMS
115
116
UNIVERGE UM8500 INTEGRATION GUIDE
■ NEC NEAX 2000 with OAI
In this integration...
Integration overview ........................................................................... 118
Integration steps ............................................................................ 118
Requirements ................................................................................ 119
Integration description ........................................................................ 120
How the integration works ............................................................... 120
Integration features ........................................................................ 120
Programming the phone system............................................................ 121
Setting up the NEAX 2000 IVS or IVS 2 ............................................. 121
Setting up the NEAX 2000 IPS.......................................................... 124
Configuring UNIVERGE UM8500 for the integration .................................. 128
Installing the OAI Integration Server software ........................................ 130
Configuring the OAI Integration Server .................................................. 131
Installing and starting the OAI service ................................................... 134
Testing the OAI integration .............................................................. 134
NEC NEAX 2000 WITH OAI
117
Integration
overview
UNIVERGE UM8500 uses the Open Application Interface (OAI) to integrate with
NEC phone systems using a TCP/IP link between the messaging system server and
the phone system. OAI Integration can be used with IP lines and requires that the
OAI Integration server is installed.
Integration steps
Follow these steps to set up this integration.
1 Review the system and equipment requirements.
Verify that all phone systems and messaging system server requirements have
been met. See “Requirements” on page 119.
2 Program the phone system and extensions.
See “Programming the phone system” on page 121.
3 Configure UNIVERGE UM8500 for the integration.
See “Configuring UNIVERGE UM8500 for the integration” on page 128.
4 Install the OAI Integration Server software.
See “Installing the OAI Integration Server software” on page 130.
5 Configure the OAI Integration Server.
See “Configuring the OAI Integration Server” on page 131.
6 Install and start the OAI service.
See “Installing and starting the OAI service” on page 134.
118
UNIVERGE UM8500 INTEGRATION GUIDE
Requirements
The steps to set up the NEC NEAX 2000 with OAI integration require the following:
Phone System
●
A NEAX 2000 IVS, IVS 2, or IPS phone system
●
A network connection to the messaging system server.
●
One or more of the following station ports set up as voice messaging ports:
Port type
Description
Analog
One analog station port for each voice messaging
port.
T1
One digital line interface card for each group of
24 voice messaging ports.
Digital
One digital station port for each voice messaging
port.
IP Terminal
One IP Terminal port for each voice messaging
port.
UNIVERGE UM8500 server
●
A network connection with the phone system. A second network card on the
messaging system server to connect directly to the phone system is
recommended.
●
The Dialogic voice boards installed; see the Installation Guide for installation
details.
NOTE
For the latest information on supported voice boards for UM8500,
contact a sale representative.
●
UM8500 installed and ready for the integration as described in the
Installation Guide.
●
OAI Integration server installed.
●
A system key that enables the integration and the appropriate number of
voice messaging ports.
NEC NEAX 2000 WITH OAI
119
Integration
description
The UNIVERGE UM8500 unified messaging solution can use the Open
Application Interface (OAI) to integrate with NEC phone systems including NEAX
2000 IVS/IVS2 and NEAX 2000 IPS. The OAI integration is established over a TCP/
IP link between the messaging system server and the NEC phone system.
How the integration works
There are two basic types of OAI integrations:
●
OAI pure integration . This type of integration uses only the TCP/IP link to
connect to the phone system. It has an OAI monitoring slot opened with the
phone system and dispatches calls to the enabled voice messaging systems.
This type of OAI Integration provides the most efficient load balancing
capability by dispatching new incoming calls from a monitored number, the
voice mail pilot, to free voice mail ports.
●
OAI UCD - Serial MCI integration . The OAI Integration Server uses
complementary Message Center Interface (MCI) integration capabilities
through the serial interface. The complementary MCI integration feature of
the OAI Integration Server is not a genuine OAI integration. The integration
does work in Common Channel Interoffice Signaling (CCIS) networked
environments between multiple NEC phone systems when the remote phone
systems do not have OAI or their software revision does not feature callforwarding information in the OAI layer. The MCI link is used as
complementary integration support for situations where the OAI layer does
not provide full integration, such as in older, legacy phone system
environments.
Integration features
The NEAX 2000 OAI integration with UNIVERGE UM8500 provides the following
features:
●
Call forward to personal greeting. When an incoming call is routed to an
unanswered or busy extension, the call is forwarded to the subscriber’s voice
mail. The caller then hears the subscriber’s personal greeting and can leave a
message.
●
●
●
Caller ID. UM8500 receives caller ID information from the phone system, if
available. This information is displayed in the message’s subject line in
Microsoft Office Outlook® or other desktop messaging application.
Easy message access. A subscriber can retrieve messages without entering
an ID. UM8500 identifies a subscriber based on the extension from which the
call originated. A password might be required.
Identified subscriber messaging. UM8500 automatically identifies a
subscriber who leaves a message during a forwarded internal call based on
the extension from which the call originated.
●
Message waiting indication (MWI). When a message is waiting for a
subscriber, UM8500 notifies the phone system to activate the message
waiting indicator on the subscriber’s extension, if it is equipped with one, or
to activate a stutter dial tone.
●
120
Live Record. A subscriber can record a phone conversation by pressing the
Live Record button on the Dterm phone. The recording can be saved in the
subscriber’s mailbox for later reference, or forwarded to another subscriber or
group of subscribers.
UNIVERGE UM8500 INTEGRATION GUIDE
Programming
the phone
system
If programming options other than those supplied in the following procedures are
used, the integration’s performance might be affected.
The steps used to program the phone system depends on the phone system being
used.
●
For NEAX 2000 IVS or IVS 2 systems, use the procedure below.
●
For NEAX 2000 IPS systems, see the procedure on page 124.
Setting up the NEAX 2000 IVS or IVS 2
NOTE
The following procedures are written with the assumption that you
will use a digital NEC Dterm Series E phone, using the Customer
Administration Terminal (CAT) mode, to enter the settings
presented in the procedures.
To set the B-Load and C-Load
1 Set the sense wheel on CP14 to B and press SW1.
2 Wait for minor alarm to occur.
3 Set the sense wheel back to 0.
4 After minor alarm clears, set the sense wheel to C and press SW1.
5 Wait for minor alarm to occur.
6 Set the sense wheel back to 0.
CAT-MODE key usage
To accomplish certain tasks, use the following keys on Dterm phone.
Task
Key(s)
Initiate
Transfer + Conf + * + Transfer + Conf + #
Data Entry
Recall
Execute
Conf
Command Prompt
Redial
Step
Speaker
Clear Data
CCC
To set the Message Center Interface (MCI) configuration
IMPORTANT
Only adjust the MCI settings if the OAI UCD with Serial MCI
integration is being used.
Verify the following configurations and settings.
1 Verify the CP14 card is plugged in to MP12/FP12 slot.
2 Verify the RS=0 to MCI connection, RS 0 is the lower socket on the CP14 card.
3 Verify the 9800,8,n,1 serial communication parameter settings are set as
described in the table below. If a parameter is not the same, change it to the
setting in the table.
Command
Description
0401>01>0
Connection port for MCI = 0
08>708>0
MCI extension length = 6 (!)
08>025>0
Message indication = MESSAGE
NEC NEAX 2000 WITH OAI
121
Command
Description
08>443:1-0
Set the type of VMS integration: MCI (0) instead of
DTMF (1) (!)
4000>0>10
Function = MCI
4001>0>1
Data length = 8 bit
4002>0>1
Parity check = Ineffective
4004>0>0
Stop bit = 1
4008>0>4
Data speed = 9600 bps
To set the OAI configuration
Verify the following configurations and settings.
1 Verify the AP01 card (OAI) is plugged in to LT09/AP09.
2 Verify the CC01 card (LAN) is plugged in to LT10/AP10.
3 Verify the AP01 & CC01 cards are connected with NR-553876-001 cable.
4 Verify the AP01 chipset = 2931.
5 Verify the CC01 chipset = 2932 (!).
6 Verify the IP Address is set per the phone system configuration, for example
172.16.19.60.
7 Verify the Subnet mask is set per the phone system configuration, for example
255.255.255.0.
8 Verify the OAI pilot is set per the phone system configuration, for example
299.
9 Verify the monitored extensions, voice ports, are set per the phone system
configuration, for example 209-212.
10 Verify the monitored DTerm Function Keys on extension 201 are set per the
phone system configuration, Example 09-12 (function codes F1032-F1035;
Terminal Mode Facility codes 192-195).
11 Verify the OAI monitoring slots 1024-1039, in the OAI server configuration
according to the OAI XML template chosen, are set to:
Command
Description
B-load, C-load
Reset PBX memory
F83>0>…
IVR # (need to restart system to take effect)
Reset CP14 (SW1)
Update changes
F83>2>0
0 = IVR code is good
050>
Hardware initialization for AP01
AP01 sense wheel on 04
Set the OAI slot 4 (hardware)
Reset CP14 (SW1)
Update changes
050>04:07
Set the OAI slot 4 (software)
D79>00>172
Assign IP address: 172.16.19.60
D79>01>016
D79>02>019
D79>03>060
D79>04>255
Assign subnet mask: 255.255.255.0
D79>05>255
D79>06>255
D79>07>000
Reset CP14 (SW1)
Update changes
NOTE:
Do not run the following command if the OAI UCD Serial MCI integration method is used.
122
UNIVERGE UM8500 INTEGRATION GUIDE
Command
Description
11>000>299
Assign subline 299 (OAI pilot) to LEN 000
NOTE
Do not run the following command if the OAI UCD Serial MCI integration method is used.
171>299:3
Program the OAI pilot (299) and the voice ports
(211 - 214) as monitored numbers.
171>209:3
171>210:3
171>211:3
171>212:3
NOTE
Do not run the following command if the OAI UCD Serial MCI integration method is used.
172>299:NONE-00
Set the 299 as member of the Group 00 (other
than any other UCD group - 01)
D70>F1032>NONE-192
Assign Terminal Mode Facility (TMF) codes to
OAI monitored function keys; the available OAI
monitored function keys are in the range of
F1032-F1047 (16 keys); the available TMF codes
are in the range of 192-255;
D70>F1033>NONE-193
D70>F1034>NONE-194
D70>F1035>NONE-195
9000>201,09>F1032
9000>201,10>F1033
Assign the function codes F1032-F1035 to
DTerm function keys 09-12, for extension 201;
9000>201,11>F1034
9000>201,12>F1035
08>045>0
Executive Override beep:
0 = play only one beep on initiation
1 = beep every 4 seconds
08>046>0
Executive Override beep:
0 = disable Executive Override beep
1 = enable Executive Override beep
To set the UCD hunt group configuration
IMPORTANT
Only adjust the UCD hunt group settings if the OAI UCD with Serial
MCI integration is being used.
Verify the following configurations and settings.
1 Verify that the UCD group is set to: 220-223.
2 Verify that the UCD pilot is set to: 220.
Command
Description
170>220:NONE-221
Set up the 220-223 range as a UCD hunt group.
170>221:NONE-222
170>222:NONE-223
170>223:NONE-220
172>220:NONE-01
172>221:NONE-01
172>222:NONE-01
Set the 220-223 range as part of Group 01, other
than the OAI group (00) of the monitored
number(s).
172>223:NONE-01
171>220:0-1
Set extension 220 to be the UCD pilot (master).
1310>220:0
Set the 220-223 range as messaging system (VMS)
stations (for MCI / J-records appearance).
1310>221:0
1310>222:0
1310>223:0
NEC NEAX 2000 WITH OAI
123
To set OAI monitored function keys for Live Record
If the Live Record feature will be used in the phone system, verify that the system
has the following settings or that the configuration files are updated.
1 The OAI LiveRecord feature uses the following settings by default.
WARNING!
If these defaults are changed, the corresponding settings in the
OAI Integration Server must be set up accordingly by editing the
XML configuration file.
Dterm
Function
Key
Function
Code
Terminal Mode
Facility (TMF)
Code
LiveRecord
Function
09
F1032
192
Record
10
F1033
193
Pause/Resume
11
F1034
194
Re-record
12
F1035
195
End
2 When using LiveRecord, the monitored extensions or voice ports are allowed
to use Executive-Override with the LiveRecord feature. Normally, the OAI
monitoring is set by CMD17,Y=1, Extension>3, but this value will
automatically activate the Off-Hook Suppress bit. Instead, the
UNDOCUMENTED value of 4 that will take the Off-Hook Suppress OFF is
used.
3 The Executive Override code programmed on the phone system command
200>A4>A006, for example, should match the BargeInCode parameter setting
in the UNIVERGE UM8500 integration file. In this case the code is *4 and the
UM8500 entry is BargeInCode = X,&,*4
Setting up the NEAX 2000 IPS
NOTE
The following procedures are written with the assumption that you
will use a digital NEC Dterm Series E phone, using the Customer
Administration Terminal (CAT) mode, to enter the settings
presented in the procedures.
To set the B-Load and C-Load
1 Set the sense wheel on CP14 to B and press SW1.
2 Wait for minor alarm to occur.
3 Set the sense wheel back to 0.
4 After minor alarm clears, set the sense wheel to C and press SW1.
5 Wait for minor alarm to occur.
6 Set the sense wheel back to 0.
CAT-MODE key usage
To accomplish certain tasks, use the following keys on Dterm phone.
124
Task
Key(s)
Initiate
Transfer + Conf + * + Transfer + Conf + #
Data Entry
Recall
Execute
Conf
Command Prompt
Redial
Step
Speaker
UNIVERGE UM8500 INTEGRATION GUIDE
Task
Key(s)
Clear Data
CCC
Backup/Save
EC6>0> 3 = idle; 0 = start backup
To set the Message Center Interface (MCI) configuration
IMPORTANT
Only adjust the MCI settings if the OAI UCD with Serial MCI
integration is being used.
Verify the following configurations and settings.
1 Verify that the CP14 card is plugged in to MP12/FP12 slot.
2 Verify that the RS=0 to MCI (RS 0 is the lower socket on the CP14 card)
connection.
3 Verify that the 9800,8,n,1 serial communication parameter settings are set
as described in the table below. If a parameter is not the same, change it to the
setting in the table.
Command
Description
0401>01>0
Connection port for MCI = 0
08>708>0
MCI extension length = 6 (!)
08>025>0
Message indication = MESSAGE
08>443:1-0
Set the type of VMS integration: MCI (0) instead of
DTMF (1) (!)
4000>0>10
Function = MCI
4001>0>1
Data length = 8 bit
4002>0>1
Parity check = Ineffective
4004>0>0
Stop bit = 1
4008>0>4
Data speed = 9600 bps
To set the OAI configuration
Verify the following configurations and settings.
1 Verify that the CP14 card is plugged in to MP12/FP12 slot.
2 Verify that the IP Address is set per the phone system configuration,
Example 172.16.19.61.
3 Verify that the Subnet mask is set per the phone system configuration,
Example 255.255.255.0.
4 Add the non-default extensions lines (non-default hardware LENS): 224-239.
5 Verify that the OAI pilot is set per the phone system configuration, for
example 299.
6 Verify that the monitored extensions or voice ports are set per the phone
system configuration, for example 208-231.
7 Verify that the monitored DTerm Function Keys on extension 201 set per
the phone system configuration, for example 09-12 (function codes F1032F1035; Terminal Mode Facility codes 192-195).
8 Verify that the OAI monitoring slot 60030, in the OAI server configuration
according to the OAI XML template chosen, is set to:
Command
Description
B-load, C-load
Reset PBX memory
F83>0>…
IVR # (need to save and restart system to take
effect)
NEC NEAX 2000 WITH OAI
125
Command
Description
F83>2>0
0 = IVR code is good
0B00>00>172016019061 Assign IP address: 172.16.19.61
0B00>01>255255255000 Assign subnet mask: 255.255.255.0
10>024>224
Add non-default hardware LENS for the range
224-239
10>025>225
10>026>226
through
10>039>239
NOTE
Do not run the following command if the OAI UCD Serial MCI integration method is used.
11>000>299
NOTE
Assign subline 299 (OAI pilot) to LEN 000
Do not run the following command if the OAI UCD Serial MCI integration method is used.
171>299:3
Program the OAI pilot (299) and the voice ports
(208 - 231) as monitored numbers.
171>208:3
171>209:3
171>210:3
through
171>231:3
NOTE
Do not run the following command if the OAI UCD Serial MCI integration method is used.
172>299:NONE-00
Set the 299 as member of the Group 00 (other
than any other UCD group - 01)
D70>F1032>NONE-192
Assign Terminal Mode Facility (TMF) codes to
OAI monitored function keys; the available OAI
monitored function keys are in the range of
F1032-F1047 (16 keys); the available TMF
codes are in the range of 192-255;
D70>F1033>NONE-193
D70>F1034>NONE-194
D70>F1035>NONE-195
9000>201,09>F1032
9000>201,10>F1033
9000>201,11>F1034
9000>201,12>F1035
08>045>0
Assign the function codes F1032-F1035 to
DTerm function keys 09-12, for extension 201;
For the ',' (comma) press the <Transfer>
button;
Executive Override beep:
0 = play only one beep on initiation
1 = beep every 4 seconds
08>046>0
Executive Override beep:
0 = disable Executive Override beep
1 = enable Executive Override beep
Backup/Save
EC6>0>3 = idle
0 = start backup (and wait for flashing to
complete)
Reset CP24 (SW1)
126
UNIVERGE UM8500 INTEGRATION GUIDE
Update changes
To set the UCD hunt group configuration
IMPORTANT
Only adjust the UCD hunt group settings if the OAI UCD with Serial
MCI integration is being used.
Verify the following configurations and settings.
1 Verify that the UCD group is set to: 220-223.
2 Verify that the UCD pilot is set to: 220.
Command
Description
170>220:NONE-221
Set up the 220-223 range as a UCD hunt group.
170>221:NONE-222
170>222:NONE-223
170>223:NONE-220
172>220:NONE-01
172>221:NONE-01
172>222:NONE-01
Set the 220-223 range as part of Group 01, other
than the OAI group (00) of the monitored
number(s).
172>223:NONE-01
171>220:0-1
Set extension 220 to be the UCD pilot (master).
1310>220:0
Set the 220-223 range as messaging system (VMS)
stations (for MCI / J-records appearance).
1310>221:0
1310>222:0
1310>223:0
To set OAI monitored function keys for Live Record
If the Live Record feature will be used in the phone system, verify that the system
has the following settings or that the configuration files are updated.
1 The OAI LiveRecord feature uses the following settings by default.
WARNING!
If these defaults are changed, the corresponding settings in the
OAI Integration Server must be set up accordingly by editing the
XML configuration file.
Dterm
Function
Key
Function
Code
Terminal Mode
Facility (TMF)
Code
LiveRecord
Function
09
F1032
192
Record
10
F1033
193
Pause/Resume
11
F1034
194
Re-record
12
F1035
195
End
2 When using LiveRecord, the monitored extensions or voice ports are allowed
to use Executive-Override with the LiveRecord feature. Normally, the OAI
monitoring is set by CMD17,Y=1, Extension>3, but this value will
automatically activate the Off-Hook Suppress bit. Instead, the
UNDOCUMENTED value of 4 that will take the Off-Hook Suppress OFF is
used.
3 The Executive Override code programmed on the command 200>A4>A006,
for example, should match the BargeInCode parameter setting in the
UNIVERGE UM8500 integration file. In this case the code is *4 and the
UM8500 entry is BargeInCode = X,&,*4.
NEC NEAX 2000 WITH OAI
127
Configuring
UNIVERGE
UM8500 for the
integration
After ensuring that the messaging system server is ready for the integration by
completing all appropriate tasks in the Installation Guide, perform the following
procedure to confirm that the integration is enabled.
To select the INI file
1 Shut down UNIVERGE UM8500 before setting the following parameters.
2 Click Start > Programs > UNIVERGE UM8500 group > Edit Switch
Utility.
Ensure that the current phone system settings are correct according to the
phone system version and port types.
NOTE
The settings below apply to NEAX 2000 IVS/IVS2 or IPS.
Phone settings for OAI integrations with analog or T1 ports
Parameter
Required setting
Manufacturer
NEC
Model
NEAX2000 IVS
Specific version or
country
All with analog boards and OAI
Integration method
OAI
Phone settings for OAI integrations with digital ports
Parameter
Required setting
Manufacturer
NEC
Model
NEAX2000 IVS
Specific version or
country
1300 series and above with digital
boards and OAI
Integration method
OAI
Phone settings for OAI integrations with IP ports
Parameter
Required setting
Manufacturer
NEC
Model
NEAX2000 IPS
Specific version or
country
Software release 8 or newer with OP
ports
Integration method
OAI
3 If the current settings are not correct, select the correct ones and then click
Edit this switch configuration. Write down the name of the ini file that is
listed in the title bar. Click OK to close this window.
4 Click Update Voice Mail Now to apply the changes and close Edit Switch
utility.
To update the INI file
1 Using Windows Explorer on the UNIVERGE UM8500 server, go to the
CommServer\IntLib directory.
2 Use a text editor to open the corresponding configuration INI file noted in the
previous procedure.
3 In the [Configuration] section, modify the NetIP1 value:
■
128
Replace the NetIPI with the exact IP address that the computer is using to
access the same LAN as the phone system. For example:
NetIP1=172.16.19.191.
UNIVERGE UM8500 INTEGRATION GUIDE
■
The NetIP1 = the IP address of the computer where UNIVERGE UM8500
is installed; the default value is set to "localhost" but it should be
changed because it is possible for the server machine to have more than
one network interface.
4 Click File > Save, and then close the configuration INI file.
NEC NEAX 2000 WITH OAI
129
Installing the
OAI
Integration
Server
software
Before configuring the OAI integration, the OAI integration software must be
installed on the computer where the messaging system is installed.
To install the OAI Integration Server
1 Insert the Installation disc into the disc drive.
2 From the Windows taskbar, click Start > Run.
3 Click Browse, then in the Browse dialog box, open the Voice
Mail\OAIIntegration folder on the disc.
4 Click setup.exe, then click Open.
5 In the Run dialog box, click OK. The installation wizard begins.
6 On the Welcome page, click Next.
7 On the Customer Information page; if the User Name and Customer
Name fields do not have your information, enter your information into the
fields. Select an option indicating whether or not you or anyone else who uses
the computer has access to the program. Click Next.
8 On the Setup Type page, confirm that Typical is selected, then click Next.
9 On the Start Copying Files page, click Next.
10 When setup is complete, click Finish.
A new Program Group, Active Voice, is added to the program list. Two new
applications are added to this program group: AvOAIGear and AvOAITray.
These applications are used to set up the OAI integration parameters.
To choose a predefined template for the integration in the
OAI Integration Server
1 Insert the Installation disc into the disc drive.
2 From the Windows taskbar, click Start > Run.
3 Click Browse, then in the Browse dialog box, open the Voice
Mail\OAIIntegration\OAI Server XML Templates\Single Server folder on the
disc. This will show a group of folders that contain predefined sets of XML
configuration files meant to help choose the best OAI configuration.
Open the appropriate folder for the integration.
■
For NEAX 2000 IVS/IVS2 phone systems using OAI pure integration, open
the NEC 2000 IVS - OAI Pure - No CCIS folder.
■
For NEAX 2000 IPS phone systems using OAI pure integration, open the
NEC IPS 2000 - OAI Pure - No CCIS folder.
■
For NEAX 2000 IVS/IVS2 phone systems using OAI UCD - Serial MCI
integration, open the NEC 2000 IVS - OAI-UCD - MCI folder.
■
For NEAX 2000 IPS phone systems using OAI UCD - Serial MCI
integration, open the NEC IPS 2000 - OAI-UCD - MCI folder.
4 From the selected folder, copy and replace the existing AvOAISvr.xml file to
the Program Files\Active Voice\OAIIntegration folder on the
UM8500 server.
The Program Files folder is usually found on the partition where Microsoft
Windows was first installed, for example: C:\Program Files\Active
Voice\OAIIntegration.
130
UNIVERGE UM8500 INTEGRATION GUIDE
Configuring the
OAI
Integration
Server
Modify the configuration file to set how calls are handled in the integration.
To configure the OAI Integration Server
1 From the Windows taskbar, click Start > All Programs > Active Voice >
OAI Integration > AVOAITray.
The OAIS icon appears in the notification area of the system tray.
2 Right-click the OAIS icon, then click Advanced.
The OAIGear page appears.
WARNING!
If an error message appears indicating the service is not installed,
close the error dialog box and continue with this procedure. The
AV OAI Integration service will automatically install after the
procedure is completed.
3 On the OAIGear toolbar, click the Configuration File icon.
The configuration file for the OAIS parameters appears in an XML editor.
4 In the navigation pane of the configuration file, expand CallPilot1 to
configure the CallPilot.
In the navigation pane, under the CallPilot object, there are some predefined
values for all parameters. Depending on the template chosen, set the
following values:
PBX-IP: Enter the IP address of the phone system, or if the phone system is
connected to the same LAN as the UM8500 server through a different
network interface card, enter the IP address of the network interface card.
The default value is only an example.
PBX-Port: Enter the OAI monitoring port of the phone system. Depending
on the template previously chosen, the default value will be 1024 for a NEC
2000 IVS or IVS2 or 60030 for a NEC IPS 2000 phone system. Modify the
default value only if you know that the phone system is set to a different
value.
Tenant: PBX Tenant where the OAI pilot or AMNO number is defined
physically. If the integration is MCI based, this will be the tenant number
where the UCD is configured. This value should match the one in the phone
system configuration. The default value is 1.
Extension: If one of the templates that enables an OAI UCD - MCI Serial
integration, such as NEC IPS 2000 - OAI-UCD - MCI or NEC 2000 IVS - OAIUCD - MCI, was selected, this field can be left blank according to the
predefined settings.
If one of the templates that enables an OAI pure integration, such as NEC
2000 IVS - OAI Pure - No CCIS or NEC IPS 2000 - OAI Pure - No CCIS, was
selected, then enter the CallPilot's OAI monitored extension. If the extension
is a virtual number associated with the auto attendant, this will be the
monitored number that is called to access the voice messaging system. The
default value is just an example.
Leave all other parameters on their default values.
5 If the system is using the Live Record feature, in the navigation pane of the
configuration file, expand the LiveRecord node, and set the following
parameters:
NOTE
Skip this step if the system is not using the Live Record feature.
NEC NEAX 2000 WITH OAI
131
The OAI Live Record feature allows users to make real-time recordings of their
own conversations. The values under this section must be configured to
match the phone system settings of the phones used.
Enabled: This Enables/Disables the Live Record functionality. The default
value is True.
TMFC-Record: Enter the Terminal Mode Function Code for the Record
command for Live Record. The default value is 192 as this is the predefined
function in the phone system, but can be changed if needed.
TMFC-Pause: Enter the Terminal Mode Function Code for the Pause
command for the Live Record. The default value is 193 as this is the
predefined function in the phone system, but can be changed if needed.
TMFC-ReRecord: Enter the Terminal Mode Function Code for the ReRecord
command for Live Record. The default value is 194 as this is the predefined
function in the phone system, but can be changed if needed.
TMFC-End: Enter the Terminal Mode Function Code for the End command
for Live Record. The default value is 195 as this is the predefined function in
the phone system, but can be changed if needed.
KC-Record: Enter the OAI Key Code used for the Record command on a
Dterm function key. To disable monitoring of the key, enter 0 or a negative
number. The default value is 1.
KC-Pause: Enter the OAI Key Code used for the Pause/Resume command
on a Dterm function key. To disable monitoring of the key, enter 0 or a
negative number. The default value is 2.
KC-Rerecord: Enter the OAI Key Code used for the ReRecord command on
a Dterm function key. To disable monitoring of the key, enter 0 or a negative
number. The default value is 3.
KC-End: Enter the OAI Key Code used for the End command on a Dterm
function key. To disable monitoring of the key, enter 0 or a negative number.
The default value is 4.
ToggleStartStop: This feature allows the user to press a single key to start,
stop, or restart a Live Record session. To enable the feature, enter True. To
disable the feature, enter False. The default value is True.
6 If using a template that enables the OAI UCD-MCI serial integration, in the
navigation panel of the configuration file, expand the MCI-Serial node.
NOTE
Do not complete this step if a template other than the NEC IPS
2000 OAI-UCD-MCI template or the NEC 2000 IVS-OAI-UCD-MCI
template was selected.
The settings must match the settings of the phone system for the MCI Serial
connection.
Format: Set the format of the MCI-Serial packets expected from the phone
system. Enter ICS for regular (ICS/IVS) serial packets, or IMX for expanded
(IMX) packets. The default is ICS.
COMPort: Enter the COM number of the serial port. This is the voice server
serial port that is connected by the RS-232 cable to the MCI link on the phone
system. Accepted values are COM1 or COM2. The default is COM1.
BaudRate: Enter the baud rate used by the serial (RS-232/MCI)
communication. The value must be identical to the phone system setting.
Accepted values are 1200, 2400, 4800, 9600, or the specially defined
phone system setting. The default value is 9600.
DataBits: Enter the default phone system data bits. Accepted values are 4,
5, 6, 7, or 8. The default value is 8.
132
UNIVERGE UM8500 INTEGRATION GUIDE
Parity: Enter the parity used by the serial (RS-232/MCI) communication
with the phone system. Accepted values are N for NONE, E for EVEN, or O for
ODD. The default value is N.
StopBits: Enter the stop bits used by the serial (RS-232/MCI)
communication with the phone system. Accepted values are 1, 1.5, 2, or the
specially defined phone system setting. The default value is 1.
Leave all other parameters not listed above at their default values.
7 In the navigation pane of the configuration file, expand VMSystem1 node.
Set the following parameters to configure the VMSystem1 node:
Host: Enter the IP address of the monitored UM8500 server. This will be the
same IP address entered previously in the configuration ini file. The default
value is just an IP example.
PortRange: Enter the port or range of ports for the phone system tenant
hosting the voice mail ports. Ports can be set by entering a single port
number, for example xxxx; a range of numbers, for example xxxx-xxxx;
or a combination or both, for example xxxx-xxxx,x. The default ports are
just an example.
Tenant: Enter the phone system tenant number where the voice mail ports
are set. The default value is 1.
Leave all other parameters not listed above at their default values.
8 Click File > Save to save the XML configuration file.
9 Install the OAI service and test the integration. See “Installing and starting the
OAI service” on page 134.
NEC NEAX 2000 WITH OAI
133
Installing and
starting the
OAI service
After saving the configuration file, install the OAI service then test the service to
ensure a successful integration.
To install the OAI Service
1 On the OAIGear page, click the Install Service icon, or from the Service menu,
click Install Service.
2 On the AV OAI Voice Mail Integration Server - Install Service dialog box, select
the This account option.
3 Enter the domain Administrator name, type and confirm the domain
Administrator password for the domain, then click OK.
NOTE
It is recommended that the same domain administrator account
that was used to install the messaging system software is
entered. The Administrator name might need to be prefaced with
the domain. For example, <domain name>\Administrator.
You can also choose to install the OAI Service under a Local
System account, or even a different domain account, but this can
cause difficulties when troubleshooting any subsequent
integration problems.
4 From the Windows taskbar, click Start > All Programs > Administrative
Tools > Services.
The Services MMC snap-in appears.
5 In the details pane, confirm that the AV OAI Integration Server service is
listed.
6 Right-click AV OAI Integration Server, then click Properties.
7 On the General tab, ensure that the Startup type is Automatic.
8 Click the Recovery tab and then do the following:
■
Ensure that Restart the Service is selected for each failure attempt.
■
Enter 1 in the Restart service after field.
9 Click OK to exit the AV OAI Voice Mail Integration Server Properties dialog
box.
10 Start the OAI Integration server using either of the following methods:
■
■
In the Services MMC snap-in, right-click AV OAI Integration
Server, then click Start, or
Right-click the AV OAI Server in the notification area, and then click
Start service.
The icon changes from stop to start.
Testing the OAI integration
After installing the service and setting up the parameters, test the integration to
ensure that it works correctly.
To test the OAI Integration Server
1 Place a direct call to the voice mail pilot number and confirm that is
answering. Use a voice mail subscriber extension with a valid phone
extension to place a call to the voice mail pilot number. You should hear:
“Please Enter Your Password.”
2 Leave a voice message for a test user that has an actual phone extension.
■
134
Confirm that the message indicator for the extension is on. This verifies
that the MWI section of the configuration file was set properly.
UNIVERGE UM8500 INTEGRATION GUIDE
■
If the Message Count field in the MWI-OAI node of the configuration file
was set to True, confirm that the message count is listed.
3 Retrieve the voice message and confirm that the message waiting indicator
turns off and the phone display clears.
NEC NEAX 2000 WITH OAI
135
136
UNIVERGE UM8500 INTEGRATION GUIDE
■ NEC NEAX 2400 with Direct
Digital
In this integration...
Integration overview ........................................................................... 138
Integration steps ............................................................................ 138
Requirements ................................................................................ 138
Integration description ........................................................................ 139
How the integration works ............................................................... 139
Integration features ........................................................................ 139
Configuring UNIVERGE UM8500 for the integration .................................. 140
Programming the phone system............................................................ 141
NEC NEAX 2400 WITH DIRECT DIGITAL
137
Integration
overview
Use this section of the Integration Guide with the Installation Guide.
Integration steps
Follow these steps to set up this integration.
1 Review the system and equipment requirements.
Verify that all phone system and messaging system server requirements have
been met. See “Requirements,” below.
2 Configure UNIVERGE UM8500 for the integration.
See “Configuring UNIVERGE UM8500 for the integration” on page 140.
3 Program the phone system and extensions.
See “Programming the phone system” on page 141.
Requirements
The steps to set up the NEC NEAX®2400 direct digital integration require the
following:
Phone system
●
NEAX 2400 IMS, revision HDS 5200 R4 or later, installed and ready for the
integration as described in the phone system documentation.
●
One or more of the following digital line cards set up as voice messaging ports
connected to the voice boards in the messaging system server:
Card name
Description
16ELCH (with SP-3125)
Digital line card, 16 ports
16ELCJ
Digital line card, 16 ports
16ELCJ-B
Digital line card, 16 ports
16ELCJB-A
Digital line card, 16 ports
CAUTION
Use only the black and yellow pair of wires. The RJ-14
connectors on the Dialogic D42-NE2 voice board use only
a single pair of wires.
UNIVERGE UM8500 server
●
The Dialogic digital voice boards installed; see the Installation Guide for
installation details.
NOTE
For the latest information on supported voice boards for UM8500,
contact a sale representative.
138
●
UM8500 installed and ready for the integration as described in the
Installation Guide.
●
A system key that enables the integration and the appropriate number of
voice messaging ports.
UNIVERGE UM8500 INTEGRATION GUIDE
Integration
description
How the integration works
The NEAX 2400 direct digital integration uses digital lines to connect the phone
system and messaging system server. The phone system digital voice messaging
ports connect to the D42-NE2 boards in the messaging system server. Each D42NE2 voice board emulates up to four Dterm® digital phones. The following
illustration shows the required connections.
The phone system sends the following information with forwarded calls:
●
The called party’s extension
●
The reason for the forward (the extension is busy, does not answer, or is set to
forward all calls)
●
The calling party’s extension (for internal calls)
UM8500 uses this information to answer the call appropriately. For example, a call
forwarded to UM8500 is answered with the subscriber’s personal greeting. If the
phone system routes the call to UM8500 without this information, UM8500
answers with the opening greeting.
Integration features
The NEAX 2400 direct digital integration with UNIVERGE UM8500 provides the
following features:
●
Call forward to personal greeting. When an incoming call is routed to an
unanswered or busy extension, the call is forwarded to the subscriber’s voice
mail. The caller then hears the subscriber’s personal greeting and can leave a
message.
●
●
Caller ID. UM8500 receives caller ID information from the phone system.
This information displays in the message’s subject line in Microsoft Office
Outlook® or other desktop messaging application.
Constant message count. The number of new messages is displayed on a
subscriber’s Dterm phone while the phone is on hook.
●
●
●
●
Easy message access. A subscriber can retrieve messages without entering
an ID. UM8500 identifies a subscriber based on the extension from which the
call originated. A password might be required.
Identified subscriber messaging. UM8500 automatically identifies a
subscriber who leaves a message during a forwarded internal call based on
the extension from which the call originated.
Live Record. A subscriber can record a phone conversation by pressing the
Live Record button on the Dterm phone. The recording can be saved in the
subscriber’s mailbox for later reference, or forwarded to another subscriber or
group of subscribers.
Message waiting indication (MWI). When a message is waiting for a
subscriber, UM8500 notifies the phone system to activate the message
waiting indicator on the subscriber’s extension.
NEC NEAX 2400 WITH DIRECT DIGITAL
139
Configuring
UNIVERGE
UM8500 for the
integration
After ensuring that the messaging system server is ready for the integration by
completing all appropriate tasks in the Installation Guide, perform the following
procedure to confirm that the integration is enabled.
To confirm that the integration is enabled
1 Click Start > All Programs > UNIVERGE UM8500 > Edit Switch.
2 If prompted for logon credentials, type the administrator extension and
password, then click OK.
On a new install the logon credentials are:
Extension = 99995
Password = 12345
3 Confirm that the settings match those in the following table.
Phone system settings
Parameter
Required setting
Manufacturer
NEC
Model
NEAX2400 IMS
Switch software version
HDS R4 and later without MCI
Integration
Direct Digital
4 If the settings are incorrect, select the correct settings and click Update
Voice Mail Now.
140
UNIVERGE UM8500 INTEGRATION GUIDE
Programming
the phone
system
If programming options other than those described in the following procedures
are used, the integration’s performance can be affected.
NOTE
The following procedures are written on the assumption that you
will use a Maintenance Administration Terminal (MAT) to program
the phone system.
To program the digital voice messaging ports in the
phone system
1 Specify a Service Feature Restriction Class (SFC) for the voice messaging ports
by using the ASFC command. It is recommended that all of the voice
messaging ports be placed in a single SFC not used for any other purpose.
The following Service Feature Indexes (SFIs) are needed in the SFC:
SFI
Service feature
10
Call hold
103
Assignment of no answer timer for blind transfer
to station or blind transfer to attendant
104
Blind transfer
2 Assign a value of 26 to the Telephone Equipment Class (TEC) for each voice
messaging port by using the ASDT command. Use the SFC created for the
voice messaging ports in step 1.
3 Assign all of the voice messaging ports to a Uniform Call Distribution (UCD)
group.
If the number of voice messaging system ports exceeds the number of
supported ports in a UCD group, specify additional UCD groups, then link
them together using the AUOG command.
NOTE
Software versions 7200 or later support up to 100 ports in a UCD
group while software versions earlier than 7200 support up to 20
ports in a UCD group.
4 Program each phone to forward calls to the UCD pilot number assigned to
the voice messaging ports, based on the UM8500 call transfer type:
Release to switch transfer. Program the phone to forward calls to the
UCD pilot number when:
■
The extension is busy; or,
■
The call is not answered.
Supervised transfer. Program the phone to forward calls to the UCD pilot
number only when the call is not answered. Confirm that call forwarding is
disabled when the extension is busy.
CAUTION
Do not use a phantom single line extension for the UCD pilot
number.
NEC NEAX 2400 WITH DIRECT DIGITAL
141
5 Use the programming system data table to program the ASYD settings. Each
bit is part of a hexadecimal number displayed in the ASYD settings. Convert
the hexadecimal number to binary to determine the individual settings. For
more information, refer to the NEAX 2400 Office Data Specification.
Programming system data
System
1
Index
Bit
Value
Description
17
b4
28
b0–4
60
b3
0 UCD queuing required
63
b0
1 Blind transfer for stations in
service
69
b0
1 No recall, execute call forwarding
on no answer
70
b0
1 Called number display, when
forwarding to attendant console
77
b2
0 MWI refresh required
78
238
1 Blind transfer to attendant
console
0 Guard timer not required
b0
1 Calling number display enabled
b1
1 Calling station status display
enabled
b0–7
0 Lamp flash rate
To program the Dterm phones that use Live Record
For each Dterm phone that uses the UNIVERGE UM8500 Live Record feature,
perform the following steps:
1 Assign an SFI of 118 by using the ASFC command.
2 Assign the extension to the UCD pilot number of the voice messaging ports by
using the AVPS command.
3 Designate the following function key assignments by using the AKYD
command:
Function key number
142
Function
66
Record
67
Re-record
68
Pause
69
End
UNIVERGE UM8500 INTEGRATION GUIDE
■ NEC NEAX 2400 with IP Protims
In this integration...
Integration overview ........................................................................... 144
Integration steps ............................................................................ 144
Requirements ................................................................................ 144
Integration description ........................................................................ 145
How the integration works ............................................................... 145
Integration features ........................................................................ 145
Programming the phone system............................................................ 146
Configuring UNIVERGE UM8500 for the integration .................................. 147
NEC NEAX 2400 WITH IP PROTIMS
143
Integration
overview
Use this section of the Integration Guide with the Installation Guide.
Integration steps
Follow these steps to set up this integration.
1 Review the system and equipment requirements.
Verify that all equipment, phone system and messaging system server
requirements have been met. See “Requirements,” below.
2 Program the phone system and extensions.
See “Programming the phone system” on page 146.
3 Configure UNIVERGE UM8500 for the integration.
See “Configuring UNIVERGE UM8500 for the integration” on page 147.
Requirements
The steps to set up the NEC NEAX 2400 IP Protims integration require the
following:
Equipment
●
All Dterm® IP phones that will be used with UNIVERGE UM8500 must have
software version 1.2 or newer.
NEAX 2400 phone system
●
A NEAX 2400 IMX software version 16 or newer or SV7000, model T10 or T20,
installed and ready for the integration as described in the phone system
documentation.
●
Password encryption type for IP extensions is MD5, see command ASYDL,
index 848, b7=0.
●
Fully functional IP PAD cards with VCTI sub-boards.
NOTE
IP PAD cards provide interface function between IP telephony,
terminals or other devices on LAN, and non-IP telephony,
conventional networks such as PSTN, ISDN, and private networks.
If the telephony network is 100% IP, the IP PAD cards are not
mandatory.
UNIVERGE UM8500 server
144
●
If the G729 codec is used, the Sipro Lab G729 codec driver must be installed in
the voice mail server. The installation file for this driver is named
sl_g729a_setup.exe and can be found in the Voice Mail\Utilities folder on the
Installation disc.
●
A system key that enables the integration and the appropriate number of
voice messaging ports.
UNIVERGE UM8500 INTEGRATION GUIDE
Integration
description
How the integration works
NEAX 2400 IP Protims integration uses a network connection to connect
messaging system server with the phone system. Each voice messaging port
emulates an IP-VPS extension. The communication between the parties is
facilitated by a series of Voice over IP (VOIP) protocols, such as DRS, Protims, RTP,
H245, Voice control, used for call signaling and voice streaming, some of them
being NEC proprietary protocols.
Integration features
The NEAX 2400 IP Protims integration with UNIVERGE UM8500 provides the
following features:
●
Call forward to personal greeting. When an incoming call is routed to an
unanswered or busy extension, the call is forwarded to the subscriber’s voice
mail. The caller then hears the subscriber’s personal greeting and can leave a
message.
●
●
●
●
Caller ID. UM8500 receives caller ID information from the phone system.
This information displays in the message’s subject line in Microsoft Office
Outlook® or other desktop messaging application.
Easy message access. A subscriber can retrieve messages without entering
an ID. UM8500 identifies a subscriber based on the extension from which the
call originated. A password might be required.
Identified subscriber messaging. UM8500 automatically identifies a
subscriber who leaves a message during a forwarded internal call based on
the extension from which the call originated.
Message waiting indication (MWI). When a message is waiting for a
subscriber, UM8500 notifies the phone system to activate the message
waiting indicator on the subscriber’s extension.
NEC NEAX 2400 WITH IP PROTIMS
145
Programming
the phone
system
If programming options other than those described in the following procedures
are used, the integration’s performance might be affected.
NOTE
The following procedures are written on the assumption that you
will use a Maintenance Administration Terminal (MAT) to program
the phone system.
To program the IP voice messaging ports in the phone
system
1 Make sure that the NEAX 2400 phone system has licenses for using IP
extensions by using the DPTR command.
2 Configure the voice messaging ports as IP-VPS extensions by using the AISTL
command to set “KIND = IP VPS” and “TEC = 26.”
Assign the ports successive VPS channels, starting with “IP VPS CH = 0.”
3 Write down the VPS ID value of the voice messaging ports, for use during the
UM8500 installation. Enter the value when the UNIVERGE UM8500
installation wizard asks for this value.
CAUTION
All voice messaging ports must have the same value assigned for
VPS ID.
4 Write down the MWI analog codes that the NEAX 2400 phone system uses for
turning the phones lamps on and off. These codes are needed when
configuring UM8500 to work with the integration.
NOTE
The NEAX 2400 phone system may not have any settings made to
use codes for MWI analog operations. If this is the case, use the
ANPD and ASPA commands to set “SRV=SSCA” and “SIDA=54 /
55.”
5 Specify a Service Feature Restriction Class (SFC) for the voice messaging ports
by using the ASFC command. It is recommended that all of the voice
messaging ports be placed in their own SFC. The following Service Feature
Indexes (SFIs) are needed in the SFC:
SFI
Service feature
10
Call hold
103
Assignment of no answer timer for blind transfer
to station or blind transfer to attendant
104
Blind transfer
6 Assign all of the voice messaging ports to a Uniform Call Distribution (UCD)
group using the ASHU command.
7 Set the same location ID for all voice messaging ports and set either or both of
the codecs G711, U-Law or A-Law, and G729A with payload size equal to 40
milliseconds for that location ID using the commands ALOCL and AIVCL.
NOTE
To associate the voice messaging ports with a specific location,
add the IP address of the messaging system server to that
location.
146
UNIVERGE UM8500 INTEGRATION GUIDE
Configuring
UNIVERGE
UM8500 for the
integration
After ensuring that the messaging system server is ready for the integration by
completing all appropriate tasks in the Installation Guide, perform the following
procedure to confirm that the integration is enabled.
To confirm that the integration is enabled
1 In Internet Explorer, go to the UM8500 Administrator
(http://<server name>/saweb).
2 Go to System > Licensing > Licensed Features.
3 In the Integration box, confirm that the setting is IP Protims.
4 If the setting is not IP Protims, contact a sales representative for the
necessary system key.
5 Go to System > Switch. Confirm that the settings match those in the
following table.
If the settings are incorrect, integration features might not be enabled.
Phone system settings
Parameter
Required setting
Manufacturer
NEC
Model
NEAX2400 IMS
Switch Software Version
Software Release 16 or newer
with IP ports and display like
DTERM_E
Software Release 16 or newer
with IP ports and display like
DTERM_III
Integration
VOIP-Protims
NOTE
The software version used depends on the phone system settings.
Check the parameter ASYDL 672. If bit b1=1, the software version
must be "Software Release 16 or newer with IP ports and display
like DTERM_E". Otherwise, the software version must be
"Software Release 16 or newer with IP ports and display like
DTERM_III".
6 Enter the MWI analog codes that the NEAX 2400 phone system uses for
turning the phones lamps on and off. Save the changes.
7 Stop UNIVERGE UM8500.
8 Run VOIPAdmin.exe from Commserver\Utilities folder.
The VoipAdmin Tool appears.
9 Enter IP address of the phone system.
10 Set the general functionality for the ports as VPS and enter the VPS number.
11 Under Manage ports, click Add to add a new port.
■
Enter the Extension, Password, and VPS channel for each port.
12 If the system uses one or more IP PADs, under Manage Gateways click Add.
■
Enter the IP Address and set the Has DSP to 0 for each gateway.
13 Click OK to save the changes and then close VOIPAdmin.
14 Start UNIVERGE UM8500.
15 In Internet Explorer, go to the UM8500 Administrator
(http://<server name>/saweb).
NEC NEAX 2400 WITH IP PROTIMS
147
16 Go to System > Ports and check the extension of each port displayed in the
Port Table section of the page. If the extensions are incorrect, stop UM8500,
verify the PBX settings made for the voice messaging ports, see “To program
the IP voice messaging ports in the phone system” on page 146, and use the
VOIPAdmin tool to make the necessary adjustments.
148
UNIVERGE UM8500 INTEGRATION GUIDE
■ NEC NEAX 2400 with serial MCI
In this integration...
Integration overview ........................................................................... 150
Integration steps ............................................................................ 150
Requirements ................................................................................ 150
Integration description ........................................................................ 152
How the integration works ............................................................... 152
Integration features ........................................................................ 152
Setting up the trunk board ................................................................... 153
Programming the phone system............................................................ 155
Programming the phone system steps ............................................... 155
Configuring UNIVERGE UM8500 for the integration .................................. 159
Configuring UNIVERGE UM8500 ports................................................ 159
Transferring calls on phone systems without blind transfer........................ 161
NEC NEAX 2400 WITH SERIAL MCI
149
Integration
overview
Use this section of the Integration Guide with the Installation Guide.
Integration steps
Follow these steps to set up this integration.
1 Review the system and equipment requirements.
Verify that all phone system and messaging system server requirements have
been met. See “Requirements,” below.
2 If the system uses T1 voice messaging ports, set up the
digital trunk interface board.
See “Setting up the trunk board” on page 153.
3 Program the phone system and extensions.
See “Programming the phone system” on page 155.
4 Configure UNIVERGE UM8500 for the integration.
See “Configuring UNIVERGE UM8500 for the integration” on page 159.
5 Test the phone extensions.
Test the phone extensions that are set up for the integration. See Appendix B,
“Testing the extensions” on page 338.
6 Run the Learn Tones utility.
Run the Learn Tones utility to teach the messaging system the tones
associated with the phone system. See Appendix C, “Learning phone system
tones” on page 340.
Requirements
The steps to set up the NEC NEAX®2400 Message Center Interface (MCI)
integration with a serial interface require the following:
Phone system
●
One of the following NEAX 2400 phone systems with MCI:
Port system
Software version
IMX
All software version
IMG and SIM
5200 or later
MMG and UMG
4200 version 5 or later
T1
One digital trunk interface board (card
number PA-24DTR/DLI) with program version
SP3298 3A 001 or later for each group of 24
voice messaging ports.
NOTE
IMG and SIM phone systems might require upgrading to a highdensity system to support MCI.
●
One IOC serial port for the MCI data link connected to a serial port, COM1 is
the default, on the voice mail server with a PH-68 two-port cable and an RS232C CA-1 cable.
●
MCI feature II installed according to NEC document ETI No. 121A (October
1998) and the NEAX 2400 IMX Message Center Interface (MCI) Specifications,
ND-70428(E) Issue 1 (January 1999), NEC #200892.
●
One or more of the following station ports set up as voice messaging ports:
Port type
150
Description
Analog
One analog station port for each voice messaging port.
T1
One digital trunk interface board (card number PA-24DTR/
DLI) with program version SP3298 3A 001 or later for
each group of 24 voice messaging ports.
UNIVERGE UM8500 INTEGRATION GUIDE
●
Port type
Description
Digital
One digital station port for each voice messaging port.
IP-VPS
One IP-VPS port for each voice messaging port.
IP Terminal
One IP Terminal port for each voice messaging port.
For the UM8500 release-to-switch call transfer type, one of the following
versions of the NEAX 2400 phone system software:
Port system
Software version
IMX
All versions, with blind transfer to the attendant and to
the station
IMG and SIM
5200 or later, with blind transfer to the attendant and
to the station
MMG and UMG
5200 or later, with blind transfer to the attendant and
to the station
T1
One digital trunk interface board (card number PA24DTR/DLI) with program version SP3298 3A 001 or
later for each group of 24 voice messaging ports.
NOTE
If the phone system does not support the release-to-switch
transfer type, see “ Transferring calls on phone systems without blind
transfer” on page 161.
UNIVERGE UM8500 server
●
The Dialogic voice boards installed; see the Installation Guide for installation
details.
NOTE
For the latest information on supported voice boards for UM8500,
contact a sale representative.
●
UM8500 installed and ready for the integration as described in the
Installation Guide.
●
A system key that enables the integration and the appropriate number of
voice messaging ports.
●
An available serial port, COM1 is the default.
NEC NEAX 2400 WITH SERIAL MCI
151
Integration
description
How the integration works
The NEAX 2400 serial MCI integration uses a data link, which consists of an
RS-232 serial cable connecting the phone system IOC port to the voice mail server.
The phone system voice messaging lines connect to the analog, digital, or T1 voice
boards in the voice mail server or using the LAN in case of IP-VPS or IP terminal
ports. The following illustration shows the required connections.
The phone system sends the following information through the data link:
●
The called party’s extension
●
The reason for the forward (the extension is busy, does not answer, or is set to
forward all calls)
●
The calling party’s extension (for internal calls)
UM8500 uses this information to answer the call appropriately. For example, a call
forwarded from a subscriber extension to UM8500 is answered with the
subscriber’s personal greeting. If the phone system routes the call to UM8500
without this information, UM8500 answers with the opening greeting.
Integration features
The NEC NEAX 2400 serial MCI integration with UM8500 provides the following
features:
Call forward to personal greeting. When an incoming call is routed to an
unanswered or busy extension, the call is forwarded to the subscriber’s voice
mail. The caller then hears the subscriber’s personal greeting and can leave a
message.
Caller ID. UM8500 receives caller ID information from the phone system, if
available. This information is displayed in the message’s subject line in
Microsoft Office Outlook® or other desktop messaging application.
Easy message access. A subscriber can retrieve messages without entering
an ID. UM8500 identifies a subscriber based on the extension from which the
call originated. A password might be required.
Identified subscriber messaging. UM8500 automatically identifies a sub-
scriber who leaves a message during a forwarded internal call based on the
extension from which the call originated.
Message waiting indication (MWI). When a message is waiting for a
subscriber, UM8500 notifies the phone system to activate the message
waiting indicator on the subscriber’s extension.
152
UNIVERGE UM8500 INTEGRATION GUIDE
Setting up the
trunk board
If the phone system uses a T1 line to connect to UM8500, confirm that the trunk
board firmware version is correct, and set the DIP switches before programming
the phone system.
To confirm the trunk board firmware version
1 Remove the trunk board from the phone system.
2 Locate the removable, integrated circuit (PROM) with a white label. This
PROM contains the trunk board program, or firmware. The relative location
of the PROM may vary, but it is the only PROM with a white label on the trunk
board.
3 Confirm that the firmware version printed on the label is “SP-3298 3A 001” or
later. If the version is incorrect, update the firmware by replacing the PROM
or the trunk board.
To set the trunk board switches
1 Set the switches for the trunk board as shown below:
■
For a 24DTR/DLI trunk board.
See also
NEAX 2400 IMX Circuit Card Manual
NEC NEAX 2400 WITH SERIAL MCI
153
■
154
For a SPADLIC A trunk board.
UNIVERGE UM8500 INTEGRATION GUIDE
Programming
the phone
system
Perform the following procedure to program the phone system for the integration.
Using programming options other than those described in the following
procedure can affect system performance.
NOTE
The following procedure is written on the assumption that you will
use a Maintenance Administration Terminal (MAT) to program the
phone system.
Programming the phone system steps
1 Program the voice messaging ports. The procedure used
depends on the port type the system is using.
■ For analog ports, see “To program the analog ports” on page 155.
■
For T1 ports, see “To program the T1 ports” on page 155.
■
For digital ports, see “To program the digital ports” on page 155.
■
For IP-VPS ports, see “To program the IP-VPS ports” on page 156.
■
For IP Terminal ports, see “To program the IP Terminal ports” on
page 156.
2 Program the phone system
Complete programming the phone system. See “To complete programming
the phone system” on page 157.
To program the analog ports
1 Assign all voice messaging ports to a UCD group.
2 Complete programming the phone system. See “To complete programming
the phone system” on page 157.
To program the T1 ports
1 Assign each line circuit an extension number, then add each of the numbers
to the UCD group.
2 Complete programming the phone system. See “To complete programming
the phone system” on page 157.
To program the digital ports
1 Specify a Service Feature Restriction Class (SFC) for all voice messaging ports
using the ASFC command.
The following Service Feature Indexes (SFIs) are needed in the SFC:
SFI
Service feature
10
Call hold
103
Assignment of no answer timer for blind transfer
to station or blind transfer to attendant
104
Blind transfer
2 Assign a value of 26 to the Telephony Equipment Class (TEC) for each voice
messaging port using the ASDT command. Use the SFC previously created.
3 Assign all voice messaging ports to a UCD group.
4 Complete programming the phone system. See “To complete programming
the phone system” on page 157.
NEC NEAX 2400 WITH SERIAL MCI
155
To program the IP-VPS ports
1 Make sure that the NEAX 2400 system has enough IP licenses using the DPTR
command.
2 Configure the voice messaging ports as IP-VPS extensions using AISTL
command, KIND=IP VPS, TEC = 26.
3 Assign them successive VPS channels, starting with IP VPS CH= 0.
4 Write down the VPS ID value of the voice messaging ports, so the value is
available when the UNIVERGE UM8500 installation wizard asks for it.
CAUTION
●
●
All voice messaging ports must have the same value assigned for
VPS ID.
Make sure the phone system is using the Protected Login Mode for
the voice mail IP ports registration and set the password of each port
to be the same with the port extension.
5 Specify a Service Feature Restriction Class (SFC) for the voice messaging
ports, see the ASFC command. It is recommended that all voice messaging
ports be placed in their own SFC. The following Service Feature Indexes (SFIs)
are needed in the SFC:
SFI
Service feature
10
Call hold
103
Assignment of no answer timer for blind transfer
to station or blind transfer to attendant
104
Blind transfer
6 Assign all of the voice messaging ports to a Uniform Call Distribution (UCD)
group using ASHU command.
NOTE
If the phone system that hosts the voice messaging ports
extensions is part of a NEC Fusion network and those ports need
to be accessible from the other Fusion nodes, then the UCD must
be configured to contain the logical numbers corresponding with
the ports extensions, see the ALGSN, ASHUN commands.
CAUTION
Do not use a phantom single line extension for the UCD pilot
number.
7 Complete programming the phone system. See “To complete programming
the phone system” on page 157.
To program the IP Terminal ports
1 Make sure that the NEAX 2400 system has enough IP licenses using the DPTR
command.
2 Configure the voice messaging ports as IP Terminal extensions using the
AISTL command, KIND=IP DTERM, TEC = 12.
3 Make sure the phone system is using the Protected Login Mode for the voice
mail IP ports registration and set the password of each port to be the same
with the port extension.
156
UNIVERGE UM8500 INTEGRATION GUIDE
4 Specify a Service Feature Restriction Class (SFC) for the voice messaging
ports, see the ASFC command. It is recommended that all voice messaging
ports be placed in their own SFC. The following Service Feature Indexes (SFIs)
are needed in the SFC:
SFI
Service feature
10
Call hold
103
Assignment of no answer timer for blind transfer
to station or blind transfer to attendant
104
Blind transfer
5 Assign all of the voice messaging ports to a Uniform Call Distribution (UCD)
group (see command ASHU).
NOTES
●
●
Logical numbers appear only in a NEC Fusion network and are used
to uniquely identify all the extensions in the network.
If the phone system that hosts the voice messaging ports extensions
is part of a NEC Fusion network and those ports need to be accessible
from the other Fusion nodes, then the UCD must be configured to
contain the logical numbers corresponding with the ports extensions,
see the commands ALGSN, ASHUN.
CAUTION
Do not use a phantom single line extension for the UCD pilot
number.
6 Complete programming the phone system. See “To complete programming
the phone system” on page 157.
To complete programming the phone system
1 Program each phone to forward calls to the UCD pilot number assigned to
the voice messaging system ports, based on the UM8500 call transfer type:
Release to switch transfer. Program the phone to forward calls to the
UCD pilot number when:
■
The extension is busy;
or,
■
The call is not answered.
Supervised transfer. Program the phone to forward calls to the UCD pilot
number only when the call is not answered. Confirm that call forwarding is
disabled when the extension is busy.
2 Set up the RS-232 serial data port for AIOC settings as follows:
■
9600 baud
■
8 data bits
■
1 stop bit
■
No parity
3 If a remote maintenance modem is used, program the modem line for data
line security.
4 Use the AUCD command to program the phone system to send UCD call
information to MCI. Assign a value of 0 to the MCI Data Transfer field for
the appropriate tenant and UCD pilot numbers.
5 Use the programming system data table to program the ASYD settings. Each
bit is part of a hexadecimal number displayed in the ASYD settings. Convert
the hexadecimal number to binary to determine the individual settings.
NEC NEAX 2400 WITH SERIAL MCI
157
6 Use the programming system data local data table to program the ASYDL
settings. Each bit is part of a hexadecimal number displayed in the ASYDL
settings. Convert the hexadecimal number to binary to determine the
individual settings.
Programming system data
System
1
Index
Bit
Value
Description
17
b4
1
Blind transfer to attendant console
28
b0–4
0
Guard timer not required
b5
1
MWI controlled by MCI
29
b1–7
0/1
No/Yes: Assign I/O port for MCI output
34
b1–4
0
Set output to no parity and 1 stop bit
60
b3
0
UCD queuing required
63
b0
1
Blind transfer for stations in service
Port 1 = b1, port 2 = b2, and so on
2
69
b0
1
No recall, execute call forwarding on no answer
70
b0
1
Called number display, when forwarding to attendant console
77
b2
0
MWI refresh required
78
b0
1
Calling number display enabled
b1
1
Called station status display enabled
238
b0–7
0
Lamp flash rate
246
b3
0
MCI expansion set to normal
400
b2
1
Calling number information sent to MCI
6
b0
1
MCI in service when terminating to a UCD group
7
b1
0
MCI out of service when terminating to attendant console
Programming system data local data
System
1
158
Index
Bit
Value
Description
641
b1
0/1
0/1: MCI/IMX station number/phone number
832
b0–7
00–FD
Assign the FPC of the node connected to MC
833
b0
0
IOC serial interface enabled for MCI
b1
0
0/1: ICS/IMX format
UNIVERGE UM8500 INTEGRATION GUIDE
Configuring
UNIVERGE
UM8500 for the
integration
After ensuring that the voice mail server is ready for the integration by completing
all appropriate tasks in the Installation Guide, perform the following procedure to
confirm that the integration is enabled.
To confirm that the integration is enabled
1 Click Start > All Programs > UNIVERGE UM8500 > Edit Switch.
2 If prompted for logon credentials, type the administrator extension and
password, then click OK.
On a new install the logon credentials are:
Extension = 99995
Password = 12345
3 Confirm that the settings match those in the following tables.
Phone system settings for integrations with analog ports
Parameter
Required setting
Manufacturer
NEC
Model
NEAX2400 IMS
Switch PBX software version 4203 and later with analog
boards and MCI
Integration
Serial
Phone system settings for integrations with digital ports
Parameter
Required setting
Manufacturer
NEC
Integration
NEAX2400 IMS
Switch PBX software version 4203 and later with digital boards
and MCI
Integration
Serial
Phone system settings with T1 ports
Parameter
Required setting
Manufacturer
NEC
Integration
NEAX2400 IMS
Switch PBX software version 4203 and later with T1 boards and
MCI
Integration
Serial
Phone system settings with IP Terminal or IP-VPS ports
Parameter
Required setting
Manufacturer
NEC
Integration
NEAX2400 IMS
Switch PBX software version Software release 16 or later with
IP ports
Integration
Serial
4 If the settings are incorrect, select the correct settings and click Update
Voice Mail Now.
Configuring UNIVERGE UM8500 ports
Configure the UM8500 voice ports. The procedure used depends on the port type
the system is using.
●
For IP-VPS or IP Terminal ports, see “To configure IP-VPS or IP Terminal
ports” on page 160.
NEC NEAX 2400 WITH SERIAL MCI
159
●
For analog, T1, or digital ports, see “To configure Analog, T1 or Digital ports”
on page 160.
To configure IP-VPS or IP Terminal ports
1 Stop the UNIVERGE UM8500.
2 Run VOIPAdmin.exe from Commserver\Utilities folder.
The VoipAdmin Tool appears.
3 Enter the PBX IP address.
4 Set the general functionality for the ports (VPS or Terminal.)
If the system has VPS ports, enter the VPS Number.
5 Under Manage ports, click Add to add a new port.
Enter the Extension and Password for each port.
If the system has VPS ports, enter the VPS Channel for each port.
6 If the system uses one or more IP PADs, under Manage Gateways, click Add.
Enter the IP Address and set the Has DSP to 0 for each gateway.
7 Click OK to save the changes and then close VOIPAdmin.
8 Restart UNIVERGE UM8500.
To configure Analog, T1 or Digital ports
1 Make sure that UNIVERGE UM8500 is running.
2 In Internet Explorer, go to the UM8500 Administrator
http://<server name>/saweb
3 Go to System > Ports. Type the extension of each port. These extensions
must be introduced as station numbers, not logical numbers and without the
office codes, if they have any. Save the changes.
160
UNIVERGE UM8500 INTEGRATION GUIDE
Transferring
calls on phone
systems
without blind
transfer
Phone systems without blind transfer do not support the UM8500 release-toswitch call transfer type. Because of this, the phone system will not forward calls
to UM8500 when certain conditions are met, instead the phone system returns
the call to the extension originally called. Calls that the operator transferred
appear on the console as “Recall” when they return.
The phone system will not forward calls to UM8500 when all of the following
conditions are met:
●
The phone system does not support blind transfers to the attendant console
and blind transfers to the stations.
●
The phone system is set to forward unanswered calls.
●
A call is transferred from an extension to another that does not answer.
NEC NEAX 2400 WITH SERIAL MCI
161
162
UNIVERGE UM8500 INTEGRATION GUIDE
■ NEC NEAX 2400 with OAI
In this integration...
Integration overview ........................................................................... 164
Integration steps ............................................................................ 164
Requirements ................................................................................ 164
Integration description ........................................................................ 166
How the integration works ............................................................... 166
Integration features ........................................................................ 166
Programming the phone system............................................................ 167
Configuring UNIVERGE UM8500 for the integration .................................. 170
Installing the OAI Integration Server software ........................................ 172
Configuring the OAI Integration Server .................................................. 173
Installing and starting the OAI service ................................................... 176
Testing the OAI integration .............................................................. 176
NEC NEAX 2400 WITH OAI
163
Integration
overview
UNIVERGE UM8500 uses the Open Application Interface (OAI) to integrate with
NEC phone systems using a TCP/IP link between the messaging system server and
the phone system. OAI Integration can be used with digital, analog, T1, or IP lines
and requires that the OAI Integration server is installed.
Integration steps
Follow these steps to set up this integration.
1 Review the system and equipment requirements.
Verify that all phone system and messaging system server requirements have
been met. See “Requirements,” below.
2 Program the phone system and extensions.
See “Programming the phone system” on page 167.
3 Configure UNIVERGE UM8500 for the integration.
See “Configuring UNIVERGE UM8500 for the integration” on page 170.
4 Install the OAI Integration Server software.
See “Installing the OAI Integration Server software” on page 172.
5 Configure the OAI Integration Server.
See “Configuring the OAI Integration Server” on page 173.
6 Install and start the OAI service.
See “Configuring the OAI Integration Server” on page 173.
Requirements
The steps to set up the NEC NEAX 2400 with OAI integration require the following:
Phone System
●
A NEAX 2400 IMX or IPX phone system.
●
A network connection to the voice mail server.
●
One or more of the following station ports set up as voice messaging ports:
Port type
Description
Analog
One analog station port for each voice messaging
port.
T1
One digital line interface card for each group of
24 voice messaging ports.
Digital
One digital station port for each voice messaging
port.
IP Terminal
One IP Terminal port for each voice messaging
port (TEC12).
IP-VPS
One IP-VPS port for each voice messaging port
(TEC26).
UNIVERGE UM8500 server
●
A network connection with the phone system. A second network card on the
messaging system server to connect directly to the phone system is
recommended.
●
The Dialogic voice boards installed; see the Installation Guide for installation
details.
NOTE
●
●
164
For the latest information on supported voice boards for UM8500,
contact a sales representative.
No voice boards are required if IP-VPS or IP Terminal ports are used.
UNIVERGE UM8500 INTEGRATION GUIDE
●
UM8500 installed and ready for the integration as described in the
Installation Guide.
●
OAI Integration server installed.
●
A system key that enables the integration and the appropriate number of
voice messaging ports.
NEC NEAX 2400 WITH OAI
165
Integration
description
The UNIVERGE UM8500 unified messaging solution can use the Open
Application Interface (OAI) to integrate with the NEC phone system, such as the
NEAX 2400 IMX/ICS/IPX. The OAI integration is established over a TCP/IP link
between the UNIVERGE UM8500 and the NEC phone system.
How the integration works
There are two basic types of OAI integrations:
●
●
OAI pure integration. This type of integration uses only the TCP/IP link to
connect to the phone system. It has an OAI monitoring slot opened with the
phone system and dispatches calls to the enabled voice messaging systems.
This type of OAI Integration provides the most efficient load balancing
capability by dispatching new incoming calls from a monitored number or
the voice mail pilot to free voice mail ports.
OAI UCD - LAN/Serial MCI integration. The OAI Integration Server uses
complementary Message Center Interface (MCI) integration capabilities
using either the serial or TCP/IP interface. The complementary MCI
integration feature of the OAI Integration Server is not a genuine OAI
integration. The integration does work in Common Channel Interoffice
Signaling (CCIS) networked environments between multiple NEC phone
systems, when the remote phone systems do not have OAI or their software
revision does not feature call-forwarding information in the OAI layer. The
MCI link is used as complementary integration support for situations where
the OAI layer does not provide full integration, such as in older, legacy phone
system environments.
Integration features
The NEAX 2400 OAI integration with UNIVERGE UM8500 provides the following
features:
●
Call forward to personal greeting. When an incoming call is routed to an
unanswered or busy extension, the call is forwarded to the subscriber’s voice
mail. The caller then hears the subscriber’s personal greeting and can leave a
message.
●
●
●
Caller ID. UM8500 receives caller ID information from the phone system, if
available. This information is displayed in the message’s subject line in
Microsoft Office Outlook® or other desktop messaging application.
Easy message access. A subscriber can retrieve messages without entering
an ID. UM8500 identifies a subscriber based on the extension from which the
call originated. A password might be required.
Identified subscriber messaging. UM8500 automatically identifies a
subscriber who leaves a message during a forwarded internal call based on
the extension from which the call originated.
●
Message waiting indication (MWI). When a message is waiting for a
subscriber, UM8500 notifies the phone system to activate the message
waiting indicator on the subscriber’s extension, if it is equipped with one, or
to activate a stutter dial tone.
●
166
Live Record. A subscriber can record a phone conversation by pressing the
Live Record button on the Dterm phone. The recording can be saved in the
subscriber’s mailbox for later reference, or forwarded to another subscriber or
group of subscribers.
UNIVERGE UM8500 INTEGRATION GUIDE
Programming
the phone
system
If programming options other than those supplied in the following procedures are
used, the integration performance might be affected.
The steps used to program the phone system depends on the phone system being
used.
NOTE
The following procedures are written on the assumption that you
will use a Maintenance Administration Terminal (MAT) to program
the phone system.
To set up the NEAX 2400 IMX, ICS or IPX
1 Use the following table to configure the phone system OAI settings for
integration.
Cmd
Sys
Index
Bit
ASYD
1
4
4
1
59
Enable RCS Check from
OAI
1
17
0
1
15
Enable switch while ringing
1
19
5
1
20
0 = Enable ETF, 1 =
Disable ETF
1
27
4
0
00
0 = Enable MCI, CCIS,
ISDN, MW, 1 = Disable
MCI, CCIS, ISDN, MW
1
27
6
0
00
0 = Enable OAI, 1 =
Enable OAI
1
31
2
1
06
CM Page (Name Display)
1
63
6
1
C1
Enable Call Fwd detail in
STS SMFN
1
63
7
0/1
C1
0 = External OAI, 1 =
Internal OAI
1
79
6
0
00
0 = Enable OAI/ACD
services, 1 = Disable OAI/
ACD services
1
80
2
1
04
0 = Clear OAI display, 1 =
Leave OAI display
1
86
6
0
93
0 = English, 1 = Japan
1
186
0
1
61
Enable CCIS link-reconnect
1
241
2
1
0E
LP sends SMFNs to IP
1
241
3
1
00
Enable detail error codes
1
299
2
0
00
Must be 0
1
370
0
1
01
Enable expanded SMFN
1
439
0
1
01
Enable Call Fwd info over
CCIS
1
449
3
1
08
0 = Hex ANI data for ISDN
trunk, 1 = /ASCII data for
ISDN trunk
2
2
5
1
2B
Enable loop release
1
864
0
1
11
Internal IP/ACDP in
Service (SVI 1758)
1
864
4
1
11
ASYDL
Value
Sample
Description
0 = No, 1 = Yes
Maximum number of SMFN
Output port (SVI 1792)
0 = 2 Ports, 1= * Ports
(normal)
NEC NEAX 2400 WITH OAI
167
Cmd
Sys
RSVI
Index
Bit
Value
Sample
Description
SVI 1650
1
1
Call Fwd status for answer
SMFN
SVI 1755
1
1
Call Fwd reason
enhancement (over CCIS)
SVI 1760
1
1
Release SMFN
enhancement
2 Use the following table to configure the OAI pilot number. The OAI pilot
number is used to dispatch calls to the voice mail ports, similar to the voice
mail pilot number.
NOTE
This setting is not required for the OAI UCD-LAN/Serial MCI
integration.
Command
(Description)
Parameter
AMNO (Assignment of
Monitored Number)
A/G
Value
A
TN
1
MNO
299
NMI
1
MFC
0
UCD
0
3 If using the OAI UCD-LAN/Serial MCI integration, use the following table to
configure the Message Center Interface (MCI). If using an OAI pure
integration, skip this step.
NOTES
●
MCI cannot be active on both serial and LAN interfaces at the same
time. If possible, enable MCI over LAN for the best system
performance.
●
The same settings must be enabled in the OAI Server software.
●
Do not adjust MCI settings if using an OAI pure integration.
Cmd
Sys
Index
Bit
ASYDL
1
833
0
Value
1
Sample
03
Description
MCI type:
0 = IOC (Input-Output
Card) serial
1 = LAN
1
833
1
1
03
MCI text format:
0 = ICS
1 = IMX
1
834
0
1
03
MCI 0 LAN Interface in
service:
0 = No
1 = Yes
1
834
1
1
03
MCI 1 LAN Interface in
service:
0 = No
1 = Yes
ASYD
1
246
3
1
08
MCI Expansion:
0 = Normal
1 = Expanded
1
400
2
1
04
Expanded MCI with ANI
Data:
0 = No
1 = Yes
168
UNIVERGE UM8500 INTEGRATION GUIDE
4 If using the OAI UCD-LAN/Serial MCI integration, use the following table to
set up the UCD hunt group. In this instance, the UCD group is extensions
220-223, with 220 as the pilot.
NOTE
Do not adjust UCD hunt group settings if using an OAI pure
integration.
Cmd
Tenant
ASHU
1
Value
Description
220
Pilot and Port number
221
Port number
222
Port number
223
Port number
To set OAI monitored function keys for Live Record
If the Live Record feature will be used in the phone system, verify that the system
has the following default settings or that the configuration files are updated.
WARNING
If the default settings below are not used, the corresponding
settings in the OAI Integration software must be set up
accordingly by editing the XML configuration file.
1 Type the AOKC command in the Windows MAT application. The AOKC (OAI
Key Code Data) dialog box appears.
2 Assign the OAI key code data:
The OAI key codes 1 through 14 correspond to AKYD key codes FKY 34
through 47 respectively. By default, the OAI Integration server uses the TMF
codes 192-195 for the Live Record commands Record, Pause/Resume, ReRecord and End, respectively.
■
Set F-KIND to 2.
■
Set C-TONE to 1.
3 Save the AOKC key code information.
4 Type AKYD command in the Windows MAT application. The AKYD (Dterm
Key Data) dialog box appears.
Assign the function key data for the desired Dterm station;
■
Assign FKY 34 through 47 to any positions of FKY 1 through 16.
■
The OAI key codes for the NEAX 2400 are FKY 34-47 and by default are
assigned to the third row from the top of function keys on the Dterm
station. This row contains the function keys with ID 9 to 12.
■
Confirm that the my-line is assigned in order to successfully complete
the AKYD command.
5 Click Exit to save the AKYD information.
NEC NEAX 2400 WITH OAI
169
Configuring
UNIVERGE
UM8500 for the
integration
After ensuring that the voice mail server is ready for the integration by completing
all appropriate tasks in the Installation Guide, perform the following procedure to
confirm that the integration is enabled.
To select the INI file
1 Click Start > All Programs > UNIVERGE UM8500 > Edit Switch.
2 If prompted for logon credentials, type the administrator extension and
password, then click OK.
On a new install the logon credentials are:
Extension = 99995
Password = 12345
3 Confirm that the settings match those in the following tables.
NOTE
The settings below apply to all NEC NEAX 2400 phone systems.
Phone settings for OAI integrations with analog ports
Parameter
Required setting
Manufacturer
NEC
Model
NEAX2400 IMS
Specific version or
country
4203 and later analog boards and
OAI
Integration method
OAI
Phone settings for OAI integrations with T1 ports
Parameter
Required setting
Manufacturer
NEC
Model
NEAX2400 IMS
Specific version or
country
4203 and later T1 boards and OAI
Integration method
OAI
Phone settings for OAI integrations with digital ports
Parameter
Required setting
Manufacturer
NEC
Model
NEAX2400 IMS
Specific version or
country
HDS R4 and later digital board with
OAI
Integration method
OAI
Phone settings for OAI integrations with IP ports
Parameter
Required setting
Manufacturer
NEC
Model
NEAX2400 IMS
Specific version or
country
Software release 16 or newer with IP
ports
Integration method
OAI
4 If the settings are incorrect, select the correct settings and click Update
Voice Mail Now.
170
UNIVERGE UM8500 INTEGRATION GUIDE
To update the INI file
1 Using Windows Explorer on the UM8500 server, go to the
CommServer\IntLib directory.
2 Use a text editor to open the corresponding configuration INI file noted in the
previous procedure.
3 In the [Configuration] section, modify the NetIP1 value:
■
Replace the NetIPI with the exact IP address that the computer is using to
access the same LAN as the phone system. For example:
NetIP1=172.16.19.191.
■
The NetIP1 = the IP address of the computer where UM8500 is installed;
the default value is set to "localhost" but it should be changed because it
is possible for the server machine to have more than one network
interface.
4 If using the OAI UCD - LAN MCI integration, under [Configuration], locate
UseInternalParser=no. Change this to UseInternalParser=yes.
5 Click File > Save, and then close the configuration INI file.
NEC NEAX 2400 WITH OAI
171
Installing the
OAI
Integration
Server
software
Before configuring the OAI integration, the OAI integration software must be
installed on the computer where UNIVERGE UM8500 is installed.
To install the OAI Integration Server
1 Insert the Installation disc into the disc drive.
2 From the Windows taskbar, click Start > Run.
3 Click Browse, then in the Browse dialog box, open the Voice
Mail\OAIIntegration folder on the disc.
4 Click setup.exe, then click Open.
5 On the Run dialog box, click OK. The installation wizard begins.
6 On the Welcome page, click Next.
7 On the Customer Information page; if the User Name and Customer
Name fields do not have your information, enter your information into the
fields. Select an option indicating whether or not you or anyone else who uses
the computer has access to the program. Click Next.
8 On the Setup Type page, confirm that Typical is selected, then click Next.
9 On the Start Copying Files page, click Next.
10 When setup is complete, click Finish.
A new Program Group, Active Voice, is added to the program list. Two new
applications are added to this program group: AvOAIGear and AvOAITray.
These applications are used to set up the OAI integration parameters.
To select a predefined template for the integration in the
OAI Integration Server
1 Insert the Installation disc into the disc drive.
2 From the Windows taskbar, click Start > Run.
3 Click Browse, then in the Browse dialog box, open the Voice
Mail\OAIIntegration\OAI Server XML Templates\Single Server folder on the
compact disc. This will show a group of folders that contain predefined sets of
XML configuration files meant to help select the best OAI configuration.
Open the appropriate folder for the integration.
■ For an OAI pure integration, open the NEC NEAX 2400 - OAI Pure No CCIS folder.
■
For an OAI UCD - Serial MCI integration, open the NEC NEAX 2400 OAI-UCD - MCI Serial folder.
■
For an OAI UCD - LAN MCI integration, open the NEC NEAX 2400 OAI-UCD - MCI LAN folder.
4 From the selected folder, copy and replace the existing AvOAISvr.xml file to
the Program Files\Active Voice\OAIIntegration folder on the UNIVERGE
UM8500 server.
The Program Files folder is usually found on the partition where Microsoft
Windows was first installed, for example: C:\Program Files\Active
Voice\OAIIntegration.
172
UNIVERGE UM8500 INTEGRATION GUIDE
Configuring the
OAI
Integration
Server
Modify the configuration file to set how calls are handled in the integration.
To configure the OAI Integration Server
1 From the Windows taskbar, click Start > All Programs > Active Voice >
OAI Integration > AVOAITray.
The OAIS icon appears in the notification area of the system tray.
2 Right-click the OAIS icon, then click Advanced.
The OAIGear page appears.
WARNING
If an error message appears indicating the service is not installed,
close the error dialog box and continue with this procedure. The
AV OAI Integration Service will automatically install after the
procedure is completed.
3 On the OAIGear toolbar, click the Configuration File icon.
The configuration file for the OAIS parameters appears in an XML editor.
4 In the navigation pane of the configuration file, expand CallPilot1 to
configure the CallPilot.
In the navigation pane, under the CallPilot object, there are some predefined
values for all parameters. Depending on the template chosen, set the
following values:
PBX-IP: Enter the IP address of the phone system or, if the UM8500 server is
connected to the LAN through a different network interface card, enter the IP
address of the network interface card. The default value is only an example.
PBX-Port: Enter the OAI monitoring port of the phone system. The default
value is 60030 for newer phone systems. Modify the default value only if you
know that the phone system is set to a different value.
Tenant: PBX Tenant where the OAI pilot (AMNO number) is defined
physically. In case the integration is MCI based, this will be the tenant
number where the UCD is configured. This value should match the setting in
the phone system configuration. The default value is 1.
Extension: If the template that enables an OAI pure integration (NEC 2400 OAI Pure - No CCIS) was selected, enter the CallPilot OAI monitored
extension (AMNO number). This extension is usually associated with the auto
attendant and is a virtual number. In this case, this will be the monitored
number that is called to access the voice messaging system. The default value
is just an example.
If one of the templates that enables an OAI UCD - MCI Serial integration
(NEC NEAX 2400 - OAI-UCD - MCI Serial or NEC NEAX 2400 - OAI-UCD MCI LAN) was selected, leave this field blank.
Leave all other parameters not listed above at their default values.
5 If the system is using the Live Record feature, in the navigation pane of the
configuration file, expand the LiveRecord node, and set the following
parameters:
NOTE
Skip this step if the system is not using the Live Record
feature.
The OAI Live Record feature allows users to make real-time recordings of their
own conversations. The values in this section must be configured to match
the phone system settings.
NEC NEAX 2400 WITH OAI
173
Enabled: This Enables/Disables the Live Record functionality. The default
value is True.
TMFC-Record: Enter the Terminal Mode Function Code for the Record
command for Live Record. The default value is 192 as this is the predefined
function in the phone system, but can be changed if needed.
TMFC-Pause: Enter the Terminal Mode Function Code for the Pause
command for Live Record. The default value is 193 as this is the predefined
function in the phone system, but can be changed if needed.
TMFC-ReRecord: Enter the Terminal Mode Function Code for the ReRecord
command for Live Record. The default value is 194 as this is the predefined
function in the phone system, but can be changed if needed.
TMFC-End: Enter the Terminal Mode Function Code for the End command
for Live Record. The default value is 195 as this is the predefined function in
the phone system, but can be changed if needed.
KC-Record: Enter the OAI Key Code used for the Record command on a
Dterm function key. To disable monitoring of the key, enter 0 or a negative
number. The default value is 1.
KC-Pause: Enter the OAI Key Code used for the Pause/Resume command
on a Dterm function key. To disable monitoring of the key, enter 0 or a
negative number. The default value is 2.
KC-Rerecord: Enter the OAI Key Code used for the ReRecord command on
a Dterm function key. To disable monitoring of the key, enter 0 or a negative
number. The default value is 3.
KC-End: Enter the OAI Key Code used for the End command on a Dterm
function key. To disable monitoring of the key, enter 0 or a negative number.
The default value is 4.
ToggleStartStop: This feature allows the user to press a single key to start,
stop, or restart a Live Record session. To enable the feature, enter True. To
disable the feature, enter False. The default value is True.
6 If using a template that enables the OAI UCD-MCI serial integration, in the
navigation panel of the configuration file, expand the MCI-Serial node.
NOTE
Do not complete this step if a template other than the NEC NEAX
2400 - OAI-UCD - MCI Serial template, where the phone system
cmd ASYDL Sys 1 Index 833 Bit 0 value is 0, was selected.
The settings must match the settings of the phone system for the MCI Serial
connection.
Format. Enter the format of the MCI-serial packets expected from the
phone system. Enter ICS for regular (ICS/IVS) serial packets, or IMX for
expanded (IMX) packets. The default is ICS.
COMPort. Enter the COM number of the serial port. This is the voice server
serial port that is connected by the RS-232 cable to the MCI link on the phone
system. Accepted values are COM1 or COM2. The default is COM1.
BaudRate. Enter the baud rate used by the serial (RS-232/MCI)
communication. The value must be identical to the phone system setting.
Accepted values are 1200, 2400, 4800, 9600, or the specially defined
phone system setting. The default value is 9600.
DataBits. Enter the default phone system data bits. Accepted values are 4,
5, 6, 7, or 8. The default value is 8.
Parity. Enter the parity used by the serial (RS-232/MCI) communication
with the phone system. Accepted values are N for NONE, E for EVEN, or O for
ODD. The default value is N.
174
UNIVERGE UM8500 INTEGRATION GUIDE
StopBits. Enter the stop bits used by the serial (RS-232/MCI)
communication with the phone system. Accepted values are 1, 1.5, 2, or the
specially defined phone system setting. The default value is 1.
Leave all other parameters not listed above at their default values.
7 If using a template that enables the MCI-LAN integration, in the navigation
panel of the configuration file, expand the MCI-LAN node.
NOTE
Do not complete this step if a template other than the NEC NEAX
2400 - OAI-UCD-MCI LAN template, where the PBX cmd ASYDL
Sys 1 Index 833 Bit 0 value is 1, was selected.
The settings must match the phone system settings for the MCI LAN
connection.
LAN-IP. Enter the IP address of the LAN-MCI port on the phone system.
The default value is just an example and must be changed depending on the
phone system.
NOTE
In older revisions of phone systems, the IP address of the LANMCI interface is sometimes different from the IP address of the
OAI, used in the CallPilot1 section.
Format. Enter the format of the MCI-LAN packets expected from the phone
system. Enter ICS for regular (ICS/IVS) packets, or IMX for expanded (IMX)
packets. The default is IMX.
Parity. Enter the parity or checksum used by the phone system to process
the MCI-LAN packets. Accepted values are None, Even, or Odd. The default
is Odd.
LocalPort. Enter the local port used by the MCI-LAN integration module for
a TCP/IP connection to the phone system. Accepted values are any valid
TCP/IP port. The default is 60120. Do not change this value unless you know
that this port is already taken by other applications on the UM8500 server.
DeviceID. Enter the device ID used by the MCI-LAN integration module to
identify itself to the MCI interface on the phone system. Accepted values are 0
and 1. The default is 1.
Leave all other parameters not listed above at their default values.
8 In the navigation pane of the configuration file, expand VMSystem1 node.
Set the following parameters to configure the VMSystem1 node:
Host. Enter the IP address of the monitored voice mail server. This will be the
same IP address entered previously in the configuration ini file. The default
value is just an example.
PortRange. Enter the port or range of ports for the phone system tenant
hosting the voice mail ports. Ports can be set by entering a single port
number, for example xxxx; a range of numbers, for example xxxx-xxxx;
or a combination or both, for example xxxx-xxxx,x. The default ports are
just an example.
Tenant. Enter the PBX tenant number where the voice mail ports are set.
The default value is 1.
Leave all other parameters not listed above at their default values.
9 Click File > Save to save the XML configuration file.
10 Install the OAI service and test the integration.
See “Installing and starting the OAI service” on page 176.
NEC NEAX 2400 WITH OAI
175
Installing and
starting the
OAI service
After saving the configuration file, install the OAI service then test the service to
ensure a successful integration.
To install the OAI Service
1 On the OAIGear page, click the Install Service icon, or from the Service
menu, click Install Service.
2 On the AV OAI Voice Mail Integration Server - Install Service dialog box, select
the This account option.
3 Enter the domain Administrator name, type and confirm the domain
Administrator password for the domain, then click OK.
NOTE
It is recommended that the same domain administrator account
that was used to install the UM8500 software is entered. The
Administrator name might need to be prefaced with the domain.
For example, <domain name>\Administrator.
You can also select to install the OAI Service under a Local System
account, or even a different domain account, but this can cause
difficulties when troubleshooting any subsequent integration
problems.
4 From the Windows taskbar, click Start > All Programs > Administrative
Tools > Services.
The Services MMC snap-in appears.
5 In the details pane, confirm that the AV OAI Integration Server service is
listed.
6 Right-click AV OAI Integration Server, then click Properties.
7 On the General tab, ensure that the Startup type is Automatic.
8 Click the Recovery tab and then do the following:
■
Confirm that Restart the Service is selected for each failure attempt.
■
Type 1 in the Restart service after field.
9 Click OK to exit the AV OAI Voice Mail Integration Server Properties dialog
box.
10 Start the OAI Integration server using either of the following methods:
■
■
In the Services MMC snap-in, right-click AV OAI Integration
Server, then click Start, or
Right-click the AV OAI Server in the notification area, and then click
Start service.
The icon changes from stop to start.
Testing the OAI integration
After installing the service and setting up the parameters, test the integration to
ensure that it works correctly.
To test the OAI Integration Server
1 Place a direct call to the voice mail pilot number and confirm that is
answering. Use a voice mail subscriber extension with a valid phone
extension to place a call to the voice mail pilot number. You should hear:
“Please Enter Your Password.”
2 Leave a voice message for a test user that has an actual phone extension.
176
UNIVERGE UM8500 INTEGRATION GUIDE
■
Confirm that the message indicator for the extension is on. This verifies
that the MWI section of the configuration file was set properly.
■
If the Message Count field in the MWI-OAI node of the configuration file
was set to True, confirm that the message count is listed.
3 Retrieve the voice message and confirm that the message waiting indicator
turns off and the phone display clears.
NEC NEAX 2400 WITH OAI
177
178
UNIVERGE UM8500 INTEGRATION GUIDE
■ NEC NEAX 2400 or NEC SV7000
with LAN MCI
In this integration...
Integration overview ........................................................................... 180
Integration steps ............................................................................ 180
Requirements ................................................................................ 180
Integration description ........................................................................ 181
How the integration works ............................................................... 181
Integration features ........................................................................ 181
Setting up the trunk board ................................................................... 182
Programming the phone system............................................................ 184
Programming the phone system steps ............................................... 184
Configuring the UNIVERGE UM8500 for integration .................................. 188
Configuring UNIVERGE UM8500 ports................................................ 189
NEC NEAX 2400 OR NEC SV7000 WITH LAN MCI
179
Integration
overview
Use this section of the Integration Guide with the Installation Guide.
Integration steps
Follow these steps to set up this integration.
1 Review the system and equipment requirements.
Verify that all phone system and messaging system server requirements have
been met. See “Requirements,” below.
2 If the system uses T1 voice messaging ports, set up the
digital trunk interface board.
See “Setting up the trunk board” on page 182.
3 Program the phone system and extensions.
See “Programming the phone system” on page 184.
4 Configure UNIVERGE UM8500 for the integration.
See “Configuring the UNIVERGE UM8500 for integration” on page 188.
Requirements
The steps to set up the NEC NEAX 2400 or SV7000 Message Center Interface (MCI)
integration with a LAN interface require the following:
Phone System
●
A NEAX 2400 IMX or SV7000 (model T10 or T20) phone system with LAN MCI.
●
A network connection to the UNIVERGE UM8500 server.
●
One or more of the following station ports set up as voice messaging ports:
Port type
Description
Analog
One analog station port for each voice messaging
port.
T1
One digital line interface card for each group of
24 voice messaging ports.
Digital
One digital station port for each voice messaging
port.
IP-VPS
One IP-VPS port for each voice messaging port.
IP Terminal
One IP Terminal port for each voice messaging
port.
UNIVERGE UM8500 server
●
A network connection with the phone system.
●
The Dialogic voice boards installed; see the Installation Guide for installation
details.
NOTE
●
●
180
For the latest information on supported voice boards for UM8500,
contact a sales representative.
No voice boards are required if IP-VPS or IP Terminal ports are used.
●
UNIVERGE UM8500 installed and ready for the integration as described in
the Installation Guide.
●
A system key that enables the integration and the appropriate number of
voice messaging ports.
UNIVERGE UM8500 INTEGRATION GUIDE
Integration
description
How the integration works
The LAN MCI integration uses a network connection to transmit the integration
information between UNIVERGE UM8500 server and the phone system.
The phone system sends the following information through the LAN connection:
●
The extension of the called party
●
The extension of the calling party, for internal calls, or the phone number of
the calling party if it is an external call and the system uses caller ID
●
The reason for the forward, for example the extension is busy, does not
answer, or is set to forward all calls
UM8500 uses this information to answer the call appropriately. For example, a call
forwarded from a subscriber extension to UM8500 is answered with the personal
greeting of the subscriber. If the phone system routes the call to UM8500 without
this information, UM8500 answers with the opening greeting.
The UM8500 systems controls message indications by sending on and off codes to
the phone system through the LAN connection.
Integration features
The LAN MCI integration with UNIVERGE UM8500 provides the following
features:
●
Call forward to personal greeting. When an incoming call is routed to an
unanswered or busy extension, the call is forwarded to the subscriber’s voice
mail. The caller then hears the subscriber’s personal greeting and can leave a
message.
●
●
●
●
Caller ID. UM8500 receives caller ID information from the phone system, if
available. This information is displayed in the message’s subject line in
Microsoft Office Outlook® or other desktop messaging application.
Easy message access. A subscriber can retrieve messages without entering
an ID. UM8500 identifies a subscriber based on the extension from which the
call originated. A password might be required.
Identified subscriber messaging. UM8500 automatically identifies a
subscriber who leaves a message during a forwarded internal call based on
the extension from which the call originated.
Message waiting indication (MWI). When a message is waiting for a
subscriber, UM8500 notifies the phone system to activate the message
waiting indicator on the subscriber’s extension, if it is equipped with one, or
to activate a stutter dial tone.
NOTE
The MWI over CCIS through LANMCI integration only works if a
closed numbering plan is used.
NEC NEAX 2400 OR NEC SV7000 WITH LAN MCI
181
Setting up the
trunk board
If the phone system uses a T1 line to connect to UNIVERGE UM8500, confirm that
the trunk board firmware version is correct, and set the DIP switches before
programming the phone system.
To confirm the trunk board firmware version
1 Remove the trunk board from the phone system.
2 Locate the removable, integrated circuit (PROM) with a white label. This
PROM contains the trunk board program, or firmware. The relative location
of the PROM may vary, but it is the only PROM with a white label on the trunk
board.
3 Confirm that the firmware version printed on the label is “SP-3298 3A 001” or
later. If the version is incorrect, update the firmware by replacing the PROM
or the trunk board
To set the trunk board switches
❚
Set the switches for the trunk board as shown below:
■
182
For a 24DTR/DLI trunk board.
UNIVERGE UM8500 INTEGRATION GUIDE
■
For a SPADLIC A trunk board.
NEC NEAX 2400 OR NEC SV7000 WITH LAN MCI
183
Programming
the phone
system
If programming options other than those specified in the following procedure are
used, the integration performance might be affected.
NOTE
The following procedures are written on the assumption that you
will use a Maintenance Administration Terminal (MAT) to program
the phone system.
Programming the phone system steps
1 Program the voice messaging ports. The procedure used
depends on the port type the system is using.
■ For analog ports, see “To program the analog ports” on page 184.
■
For T1 ports, see “To program the T1 ports” on page 184.
■
For digital ports, see “To program the digital ports” on page 184.
■
For IP-VPS ports, see “To program the IP-VPS ports” on page 184.
■
For IP Terminal ports, see “To program the IP Terminal ports” on
page 185.
2 Program the phone system
Complete programming the phone system. See “To complete programming
the phone system” on page 186.
To program the analog ports
1 Assign all voice messaging ports to a UCD group.
2 Complete programming the phone system. See “To complete programming
the phone system” on page 186.
To program the T1 ports
1 Assign each line circuit an extension number, then add each of the numbers
to the UCD group.
2 Complete programming the phone system. See “To complete programming
the phone system” on page 186.
To program the digital ports
1 Specify a Service Feature Restriction Class (SFC) for all voice messaging ports
using the ASFC command.
The following Service Feature Indexes (SFIs) are needed in the SFC:
SFI
Service feature
10
Call hold
103
Assignment of no answer timer for blind transfer
to station or blind transfer to attendant
104
Blind transfer
2 Assign a value of 26 to the Telephony Equipment Class (TEC) for each voice
messaging port using the ASDT command. Use the SFC previously created.
3 Assign all voice messaging ports to a UCD group.
4 Complete programming the phone system. See “To complete programming
the phone system” on page 186.
To program the IP-VPS ports
1 Make sure that the NEAX 2400 system has enough IP licenses using the DPTR
command.
184
UNIVERGE UM8500 INTEGRATION GUIDE
2 Configure the voice messaging ports as IP-VPS extensions using AISTL
command, KIND=IP VPS, TEC = 26.
3 Assign them successive VPS channels, starting with IP VPS CH= 0.
4 Write down the VPS ID value of the voice messaging ports, so the value is
available when the UNIVERGE UM8500 installation wizard asks for it.
CAUTION
●
●
All voice messaging ports must have the same value assigned for
VPS ID.
Make sure the phone system is using the Protected Login Mode for
the voice mail IP ports registration and set the password of each port
to be the same with the port extension.
5 Specify a Service Feature Restriction Class (SFC) for the voice messaging
ports, see the ASFC command. It is recommended that all voice messaging
ports be placed in their own SFC. The following Service Feature Indexes (SFIs)
are needed in the SFC:
SFI
Service feature
10
Call hold
103
Assignment of no answer timer for blind transfer
to station or blind transfer to attendant
104
Blind transfer
6 Assign all of the voice messaging ports to a Uniform Call Distribution (UCD)
group using ASHU command.
NOTE
If the phone system that hosts the voice messaging ports
extensions is part of a NEC Fusion network and those ports need
to be accessible from the other Fusion nodes, then the UCD must
be configured to contain the logical numbers corresponding with
the ports extensions, see the ALGSN, ASHUN commands.
CAUTION
Do not use a phantom single line extension for the UCD pilot
number.
7 Complete programming the phone system. See “To complete programming
the phone system” on page 186.
To program the IP Terminal ports
1 Make sure that the NEAX 2400 system has enough IP licenses using the DPTR
command.
2 Configure the voice messaging ports as IP Terminal extensions using the
AISTL command, KIND=IP DTERM, TEC = 12.
3 Make sure the phone system is using the Protected Login Mode for the voice
mail IP ports registration and set the password of each port to be the same
with the port extension.
4 Specify a Service Feature Restriction Class (SFC) for the voice messaging
ports, see the ASFC command. It is recommended that all voice messaging
ports be placed in their own SFC. The following Service Feature Indexes (SFIs)
are needed in the SFC:
SFI
Service feature
10
Call hold
103
Assignment of no answer timer for blind transfer
to station or blind transfer to attendant
NEC NEAX 2400 OR NEC SV7000 WITH LAN MCI
185
SFI
Service feature
104
Blind transfer
5 Assign all of the voice messaging ports to a Uniform Call Distribution (UCD)
group (see command ASHU).
NOTES
●
●
Logical numbers appear only in a NEC Fusion network and are used
to uniquely identify all the extensions in the network.
If the phone system that hosts the voice messaging ports extensions
is part of a NEC Fusion network and those ports need to be accessible
from the other Fusion nodes, then the UCD must be configured to
contain the logical numbers corresponding with the ports extensions,
see the commands ALGSN, ASHUN.
CAUTION
Do not use a phantom single line extension for the UCD pilot
number.
6 Complete programming the phone system. See “To complete programming
the phone system” on page 186.
To complete programming the phone system
1 Set the interface type for MCI to LAN using command ASYDL, index 833, bit
b0 and b1 must be set to 1.
NOTE
In a NEC Fusion network, the phone system that contains
the extensions of the voice messaging ports must be the
one that also sends the integration data to the UNIVERGE
UM8500 through the LAN MCI module.
2 Program each phone to forward calls to the UCD pilot number assigned to the
voice messaging ports based on the UM8500 call transfer type:
Release to switch transfer. Program the phone to forward calls to the
UCD pilot number when:
■
The extension is busy or,
■
The call is not answered.
Supervised transfer. Program the phone to forward calls to the UCD pilot
number only when the call is not answered. Confirm that call forwarding is
disabled when extension is busy.
Programming system data
System
1
Index
Value
Description
17
b4
1
Blind transfer to attendant console
28
b0–4
0
Guard timer not required
b5
1
MWI controlled by MCI
34
b1–4
0
Set output to no parity and 1 stop bit
60
b3
0
UCD queuing required
63
b0
1
Blind transfer for stations in service
69
b0
1
No recall, execute call forwarding on
no answer
70
b0
1
Called number display, when
forwarding to attendant console
77
b2
0
MWI refresh required
b0
1
Calling number display enabled
b1
1
Called station status display enabled
78
186
Bit
UNIVERGE UM8500 INTEGRATION GUIDE
Programming system data
System
Index
238
2
Bit
Value
b0–7
0
Description
Lamp flash rate
246
b3
0
MCI expansion set to normal
400
b2
1
Calling number information sent to
MCI
6
b0
1
MCI in service when terminating to a
UCD group
7
b1
0
MCI out of service when terminating to
attendant console
Programming system data local data
System
Index
Bit
Value
Description
1
641
b1
0/1
0/1: MCI/IMX station number/phone
number
832
b0–7
00–FD
Assign the FPC of the node connected
to MC
833
b0
1
Interface type for MCI:
b1
1
0/1 = RS-232C interface/LAN interface
0/1: ICS/IMX format
NEC NEAX 2400 OR NEC SV7000 WITH LAN MCI
187
Configuring the
UNIVERGE
UM8500 for
integration
After ensuring that the messaging system server is ready for the integration by
completing all appropriate tasks in the Installation Guide, perform the following
procedures to confirm that the integration is enabled, to configure the LAN MCI
parameters, and to configure the UNIVERGE UM8500 ports.
To confirm that the integration is enabled
1 Click Start > All Programs > UNIVERGE UM8500 > Edit Switch.
2 If prompted for logon credentials, type the administrator extension and
password, then click OK.
On a new install the logon credentials are:
Extension = 99995
Password = 12345
3 Confirm that the settings match those in the following tables.
Phone settings for integrations with analog ports
Parameter
Required setting
Manufacturer
NEC
Model
NEAX 2400 IMS
Switch PBX software
version
4203 and later with analog boards
and LANMCI
Integration
LANMCI
Phone settings for integrations with digital ports
Parameter
Required setting
Manufacturer
NEC
Model
NEAX 2400 IMS
Switch PBX software
version
4203 and later with digital boards
and LANMCI
Integration
LANMCI
Phone settings for integrations with T1 ports
Parameter
Required setting
Manufacturer
NEC
Model
NEAX 2400 IMS
Switch PBX software
version
4203 and later with T1 boards and
LANMCI
Integration
LANMCI
Phone settings for integrations with IP Terminal or IP-VPS
ports
Parameter
Required setting
Manufacturer
NEC
Model
NEAX2400 IMS
Switch PBX software
version
Software Release 16 or later with
IP ports
Integration
LANMCI
4 If the settings are incorrect, select the correct settings and click Update
Voice Mail Now.
188
UNIVERGE UM8500 INTEGRATION GUIDE
To configure LAN MCI parameters
1 Shut down UNIVERGE UM8500 before setting the following parameters.
2 Click Start > Programs > UNIVERGE UM8500 group > Edit Switch
Utility.
3 Ensure the current phone system file is correct and then click Edit this
Switch Configuration.
4 In the Switch Configuration window, click the Integration tab.
5 In the PBX Connection Settings section, enter the IP address of the phone
system that provides UNIVERGE UM8500 server with the integration data.
6 Enter the type of parity check used for LANMCI module in phone system, this
can be odd or even, in Parity field. See the command ASYD, index 34, b1
through b4.
7 Enter the ID number of a free LANMCI device in Device ID field. NEC NEAX
2400 and SV7000 offer 2 devices (0 and 1) and UM8500 can connect and
receive MCI (Message Center Interface) data from either.
8 If the phone system is configured to use office codes for internal extensions,
the office code must be entered in the Ignored Prefixes and Ignored VM
Prefixes fields of the Edit Switch Utility > Integration tab. To check
whether the phone system uses office codes:
■
Use command ASYD, confirm that index 240, bit b4 is set to 0.
■
Write down the office code that the phone system uses for internal calls.
■
Check to see if the phone system is not set to remove the office code from
MCI packets, see the ASYD command, index 370, bit b1 is set to 0.
■
Return to Edit Switch Utility > Integration tab. Enter the office code
recorded above in the Ignored Prefixes field and Ignored VM
Prefixes field. Otherwise, leave the two edit boxes blank (ASYD, index
240, bit b4 is not set to 0 or ASYD, index 370, bit b1 is not set to 0).
NOTE
An office code is usually introduced to distinguish the extensions
of different phone systems that communicate through a CCIS
connection. This office code can not be dialed; it appears only in
the integration data and on the screen display of the phones for
calls over CCIS.
9 Leave the other settings at the default values and then click OK to save the
changes and close Edit Switch utility.
Configuring UNIVERGE UM8500 ports
Configure the UM8500 voice ports. The procedure used depends on the port type
the system is using.
●
For IP-VPS or IP Terminal ports, see “To configure IP-VPS or IP Terminal
ports” on page 190.
●
For analog, T1, or digital ports, see “To configure Analog, T1 or Digital ports”
on page 190.
NEC NEAX 2400 OR NEC SV7000 WITH LAN MCI
189
To configure IP-VPS or IP Terminal ports
1 Stop the UNIVERGE UM8500.
2 Run VOIPAdmin.exe from Commserver\Utilities folder.
The VoipAdmin Tool appears.
3 Enter the PBX IP address.
4 Set the general functionality for the ports (VPS or Terminal.)
If the system has VPS ports, enter the VPS Number.
5 Under Manage ports, click Add to add a new port.
Enter the Extension and Password for each port.
If the system has VPS ports, enter the VPS Channel for each port.
6 If the system uses one or more IP PADs, under Manage Gateways, click Add.
Enter the IP Address and set the Has DSP to 0 for each gateway.
7 Click OK to save the changes and then close VOIPAdmin.
8 Restart UNIVERGE UM8500.
To configure Analog, T1 or Digital ports
1 Make sure that UNIVERGE UM8500 is running.
2 In Internet Explorer, go to the UM8500 Administrator
http://<server name>/saweb
3 Go to System > Ports. Type the extension of each port. These extensions
must be introduced as station numbers, not logical numbers and without the
office codes, if they have any. Save the changes.
190
UNIVERGE UM8500 INTEGRATION GUIDE
■ NEC UNIVERGE SV7000/
SV7000MPS with IP Protims
In this integration...
Integration overview ........................................................................... 192
Integration steps ............................................................................ 192
Requirements ................................................................................ 192
Integration description ........................................................................ 193
How the integration works ............................................................... 193
Integration features ........................................................................ 193
Programming the phone system............................................................ 194
Configuring UNIVERGE UM8500 for the integration .................................. 195
NEC UNIVERGE SV7000/SV7000MPS WITH IP PROTIMS
191
Integration
overview
Use this section of the Integration Guide with the Installation Guide.
Integration steps
Follow these steps to set up this integration.
1 Review the system and equipment requirements.
Verify that all equipment, phone system and messaging system server
requirements have been met. See “Requirements,” below.
2 Program the phone system and extensions.
See “Programming the phone system” on page 194.
3 Configure UNIVERGE UM8500 for the integration.
See “Configuring UNIVERGE UM8500 for the integration” on page 195.
Requirements
The steps to set up the NEC SV7000/SV7000MPS IP Protims integration require
the following:
Equipment
●
All Dterm® IP phones that will be used with UNIVERGE UM8500 must have
software version 1.2 or newer.
SV7000/SV7000MPS phone system
●
UNIVERGE SV7000/SV7000MPS installed and ready for the integration as
described in the phone system documentation.
●
Password encryption type for IP extensions is MD5, see command ASYDL,
index 848, b7=0.
●
Fully functional IP PAD cards with VCTI sub-boards.
NOTE
IP PAD cards provide interface function between IP telephony,
terminals or other devices on LAN, and non-IP telephony,
conventional networks such as PSTN, ISDN, and private networks.
If the telephony network is 100% IP, the IP PAD cards are not
mandatory.
UNIVERGE UM8500 server
192
●
If the G729 codec is used, the Sipro Lab G729 codec driver must be installed in
the voice mail server. The installation file for this driver is named
sl_g729a_setup.exe and can be found in the Voice Mail\Utilities folder on the
Installation disc.
●
A system key that enables the integration and the appropriate number of
voice messaging ports.
UNIVERGE UM8500 INTEGRATION GUIDE
Integration
description
How the integration works
SV7000/SV7000MPS IP Protims integration uses a network connection to connect
messaging system server with the phone system. Each voice messaging port
emulates an IP-VPS extension. The communication between the parties is
facilitated by a series of Voice over IP (VOIP) protocols, such as DRS, Protims, RTP,
H245, Voice control, used for call signaling and voice streaming, some of them
being NEC proprietary protocols.
Integration features
The SV7000/SV7000MPS IP Protims integration with UNIVERGE UM8500
provides the following features:
●
Call forward to personal greeting. When an incoming call is routed to an
unanswered or busy extension, the call is forwarded to the subscriber’s voice
mail. The caller then hears the subscriber’s personal greeting and can leave a
message.
●
●
●
●
Caller ID. UM8500 receives caller ID information from the phone system.
This information displays in the message’s subject line in Microsoft Office
Outlook® or other desktop messaging application.
Easy message access. A subscriber can retrieve messages without entering
an ID. UM8500 identifies a subscriber based on the extension from which the
call originated. A password might be required.
Identified subscriber messaging. UM8500 automatically identifies a
subscriber who leaves a message during a forwarded internal call based on
the extension from which the call originated.
Message waiting indication (MWI). When a message is waiting for a
subscriber, UM8500 notifies the phone system to activate the message
waiting indicator on the subscriber’s extension.
NEC UNIVERGE SV7000/SV7000MPS WITH IP PROTIMS
193
Programming
the phone
system
If programming options other than those described in the following procedures
are used, the integration’s performance might be affected.
NOTE
The following procedures are written on the assumption that you
will use the SV7000/SV7000MPS PCPro Software to program the
phone system.
To program the IP voice messaging ports in the phone
system
1 Make sure that the SV7000/SV7000MPS phone system has licenses for using
IP extensions by using the DPTR command.
2 Configure the voice messaging ports as IP-VPS extensions by using the AISTL
command to set “KIND = IP VPS” and “TEC = 26.”
Assign the ports successive VPS channels, starting with “IP VPS CH = 0.”
3 Write down the VPS ID value of the voice messaging ports, for use during the
UM8500 installation. Enter the value when the UNIVERGE UM8500
installation wizard asks for this value.
CAUTION
All voice messaging ports must have the same value assigned for
VPS ID.
4 Write down the MWI analog codes that the SV7000/SV7000MPS phone
system uses for turning the phones lamps on and off. These codes are needed
when configuring UM8500 to work with the integration.
NOTE
The SV7000/SV7000MPS phone system may not have any settings
made to use codes for MWI analog operations. If this is the case,
use the ANPD and ASPA commands to set “SRV=SSCA” and
“SIDA=54 / 55.”
5 Specify a Service Feature Restriction Class (SFC) for the voice messaging ports
by using the ASFC command. It is recommended that all of the voice
messaging ports be placed in their own SFC. The following Service Feature
Indexes (SFIs) are needed in the SFC:
SFI
Service feature
10
Call hold
103
Assignment of no answer timer for blind transfer
to station or blind transfer to attendant
104
Blind transfer
6 Assign all of the voice messaging ports to a Uniform Call Distribution (UCD)
group using the ASHU command.
7 Set the same location ID for all voice messaging ports and set either or both of
the codecs G711, U-Law or A-Law, and G729A with payload size equal to 40
milliseconds for that location ID using the commands ALOCL and AIVCL.
NOTE
To associate the voice messaging ports with a specific location,
add the IP address of the messaging system server to that
location.
194
UNIVERGE UM8500 INTEGRATION GUIDE
Configuring
UNIVERGE
UM8500 for the
integration
After ensuring that the messaging system server is ready for the integration by
completing all appropriate tasks in the Installation Guide, perform the following
procedure to confirm that the integration is enabled.
To confirm that the integration is enabled
1 In Internet Explorer, go to the UM8500 Administrator
(http://<server name>/saweb).
2 Go to System > Licensing > Licensed Features.
3 In the Integration box, confirm that the setting is IP Protims.
4 If the setting is not IP Protims, contact a sales representative for the
necessary system key.
5 Go to System > Switch. Confirm that the settings match those in the
following table.
If the settings are incorrect, integration features might not be enabled.
Phone system settings
Parameter
Required setting
Manufacturer
NEC
Model
UNIVERGE SV7000/
SV7000MPS
Switch Software Version
IP Protims ports display like
DTERM_E
IP Protims ports display like
DTERM_III
Integration
VOIP-Protims
NOTE
The software version used depends on the phone system settings.
Check the parameter ASYDL 672. If bit b1=1, the software version
must be “IP Protims ports display like DTERM_E". Otherwise, the
software version must be "IP Protims ports display like
DTERM_III".
6 Enter the MWI analog codes that the SV7000/SV7000MPS phone system uses
for turning the phones lamps on and off. Save the changes.
7 Stop UNIVERGE UM8500.
8 Run VOIPAdmin.exe from Commserver\Utilities folder.
The VoipAdmin Tool appears.
9 Enter IP address of the phone system.
10 Set the general functionality for the ports as VPS and enter the VPS number.
11 Under Manage ports, click Add to add a new port.
■
Enter the Extension, Password, and VPS channel for each port.
12 If the system uses one or more IP PADs, under Manage Gateways click Add.
■
Enter the IP Address and set the Has DSP to 0 for each gateway.
13 Click OK to save the changes and then close VOIPAdmin.
14 Start UNIVERGE UM8500.
15 In Internet Explorer, go to the UM8500 Administrator
(http://<server name>/saweb).
NEC UNIVERGE SV7000/SV7000MPS WITH IP PROTIMS
195
16 Go to System > Ports and check the extension of each port displayed in the
Port Table section of the page. If the extensions are incorrect, stop UM8500,
verify the PBX settings made for the voice messaging ports, see “To program
the IP voice messaging ports in the phone system” on page 194, and use the
VOIPAdmin tool to make the necessary adjustments.
196
UNIVERGE UM8500 INTEGRATION GUIDE
■ NEC UNIVERGE SV7000 with
OAI
In this integration...
Integration overview ........................................................................... 198
Integration steps ............................................................................ 198
Requirements ................................................................................ 199
Integration description ........................................................................ 200
How the integration works ............................................................... 200
Integration features ........................................................................ 200
Programming the phone system............................................................ 201
Configuring UNIVERGE UM8500 for the integration .................................. 204
Installing the OAI Integration Server software ........................................ 206
Configuring the OAI Integration Server .................................................. 207
Installing and starting the OAI service ................................................... 210
Testing the OAI integration .............................................................. 210
NEC UNIVERGE SV7000 WITH OAI
197
Integration
overview
UNIVERGE UM8500 uses the Open Application Interface (OAI) to integrate with
NEC PBX systems using a TCP/IP link between the UNIVERGE UM8500 server and
the PBX. OAI Integration can be used with digital, analog, T1, or IP lines and
requires that the OAI Integration server is installed.
Integration steps
Follow these steps to set up this integration.
1 Review the system and equipment requirements
Verify that all phone system and messaging system server requirements have
been met. See “Requirements” on page 199.
2 Program the phone system and extensions.
See “Programming the phone system” on page 201.
3 Configure UNIVERGE UM8500 for the integration.
See “Configuring UNIVERGE UM8500 for the integration” on page 204.
4 Install the OAI Integration Server software.
See “Installing the OAI Integration Server software” on page 206.
5 Configure the OAI Integration Server.
See “Configuring the OAI Integration Server” on page 207.
6 Install and start the OAI service.
See “Installing and starting the OAI service” on page 210.
198
UNIVERGE UM8500 INTEGRATION GUIDE
Requirements
The steps to set up the UNIVERGE SV7000 with OAI integration require the
following:
Phone System
●
A UNIVERGE SV7000 phone system.
●
A network connection to the voice mail server.
●
One or more of the following station ports set up as voice messaging ports:
Port type
Description
Analog
One analog station port for each voice messaging
port.
T1
One digital line interface card for each group of
24 voice messaging ports.
Digital
One digital station port for each voice messaging
port.
IP Terminal
One IP Terminal port for each voice messaging
port (TEC12).
IP-VPS
One IP-VPS port for each voice messaging port
(TEC26).
UNIVERGE UM8500 server
●
A network connection with the phone system. A second network card on the
messaging system server to connect directly to the phone system is
recommended.
●
The Dialogic voice boards installed; see the Installation Guide for installation
details.
NOTE
●
●
For the latest information on supported voice boards for UM8500,
contact a sales representative.
No voice boards are required if IP-VPS or IP Terminal ports are used.
●
UM8500 installed and ready for the integration as described in the
Installation Guide.
●
OAI Integration server installed.
●
A system key that enables the integration and the appropriate number of
voice messaging ports.
NEC UNIVERGE SV7000 WITH OAI
199
Integration
description
The UNIVERGE UM8500 unified messaging solution can use the Open
Application Interface (OAI) to integrate with the NEC UNIVERGE SV7000 or
SV7000 MPS phone systems. The OAI integration is established over a TCP/IP link
between the messaging system and the NEC phone system.
How the integration works
There are two basic types of OAI integrations:
●
●
OAI pure integration. This type of integration uses only the TCP/IP link to
connect to the phone system. It has an OAI monitoring slot opened with the
phone system and dispatches calls to enabled voice messaging systems. This
type of OAI Integration provides the most efficient load balancing capability
by dispatching new incoming calls from a monitored number or the voice
mail pilot to free voice mail ports.
OAI UCD - LAN MCI integration. The OAI Integration server uses
complementary Message Center Interface (MCI) integration capabilities
through the TCP/IP interface. The complementary MCI integration feature of
the OAI Integration server is not a genuine OAI integration. The integration
does work in Common Channel Interoffice Signaling (CCIS) networked
environments between multiple NEC phone systems when the remote phone
systems do not have OAI or their software revision does not feature callforwarding information in the OAI layer. The MCI link is used as
complementary integration support for situations where the OAI layer does
not provide full integration, such as in older, legacy phone system
environments.
Integration features
The UNIVERGE SV7000 OAI integration with UNIVERGE UM8500 provides the
following features:
●
Call forward to personal greeting. When an incoming call is routed to an
unanswered or busy extension, the call is forwarded to the subscriber’s voice
mail. The caller then hears the subscriber’s personal greeting and can leave a
message.
●
●
●
Caller ID. UM8500 receives caller ID information from the phone system, if
available. This information is displayed in the message’s subject line in
Microsoft Office Outlook® or other desktop messaging application.
Easy message access. A subscriber can retrieve messages without entering
an ID. UM8500 identifies a subscriber based on the extension from which the
call originated. A password might be required.
Identified subscriber messaging. UM8500 automatically identifies a
subscriber who leaves a message during a forwarded internal call based on
the extension from which the call originated.
●
Message waiting indication (MWI). When a message is waiting for a
subscriber, UM8500 notifies the phone system to activate the message
waiting indicator on the subscriber’s extension, if it is equipped with one, or
to activate a stutter dial tone.
●
200
Live Record. A subscriber can record a phone conversation by pressing the
Live Record button on the Dterm phone. The recording can be saved in the
subscriber’s mailbox for later reference, or forwarded to another subscriber or
group of subscribers.
UNIVERGE UM8500 INTEGRATION GUIDE
Programming
the phone
system
If programming options other than those supplied in the following procedures are
used, the integration performance might be affected.
The steps used to program the phone system depends on the phone system being
used.
NOTE
The following procedures are written on the assumption that you
will use a Maintenance Administration Terminal (MAT) to program
the phone system.
To set up the UNIVERGE SV7000
1 Use the following table to configure the phone system OAI settings for
integration:
Cmd
Sys Index Bit Value Sample Description
ASYD
1
4
4
1
59
1
17
0
1
15
Enable switch while ringing
1
19
5
1
20
0 = Enable ETF, 1 = Disable
ETF
1
27
4
0
00
0 = Enable MCI, CCIS, ISDN,
MW, 1 = Disable MCI, CCIS,
ISDN, MW
1
27
6
0
00
0 = Enable OAI, 1 = Enable
OAI
1
31
2
1
06
CM Page (Name Display)
1
63
6
1
C1
Enable Call Fwd detail in STS
SMFN
1
63
7
0/1
C1
0 = External OAI, 1 =
Internal OAI
1
79
6
0
00
0 = Enable OAI/ACD services,
1 = Disable OAI/ACD services
1
80
2
1
04
0 = Clear OAI display, 1 =
Leave OAI display
1
86
6
0
93
0 = English, 1 = Japan
1
186
0
1
61
Enable CCIS link-reconnect
1
241
2
1
0E
LP sends SMFNs to IP
1
241
3
1
00
Enable detail error codes
1
299
2
0
00
Must be 0
1
370
0
1
01
Enable expanded SMFN
1
439
0
1
01
Enable Call Fwd info over
CCIS
1
449
3
1
08
0 = Hex ANI data for ISDN
trunk, 1 = /ASCII data for
ISDN trunk
2
2
5
1
2B
Enable loop release
864
0
1
11
Internal IP/ACDP in Service
(SVI 1758)
ASYDL 1
Enable RCS Check from OAI
0 = No, 1 = Yes
1
864
4
1
11
Maximum number of SMFN
Output port (SVI 1792)
0 = 2 Ports, 1= * Ports
(normal)
RSVI
SVI 1650
1
1
Call Fwd status for answer
SMFN
SVI 1755
1
1
Call Fwd reason enhancement
(over CCIS)
SVI 1760
1
1
Release SMFN enhancement
NEC UNIVERGE SV7000 WITH OAI
201
2 If using an OAI pure integration, use the following table to configure the OAI
pilot number. In the example below, extension 299 is the voice mail pilot
number:
Command (Description)
Parameter
AMNO (Assignment of Monitored Number) A/G
Value
A
TN
1
MNO
299
NMI
1
MFC
0
UCD
0
3 If using the OAI UCD-LAN MCI integration, use the following table to
configure Message Center Interface (MCI). If using an OAI pure integration,
skip this step. The following commands enable MCI over LAN. The settings
made here also need to be enabled in the OAI Server software.
Cmd
Sys Index Bit Value Sample Description
ASYDL 1
833
0
1
03
MCI type:
0 = IOC (Input-Output Card)
this means no MCI
1 = LAN
1
833
1
1
03
MCI text format:
0 = ICS
1 = IMX
1
834
0
1
03
MCI 0 LAN Interface in
service:
0 = No
1 = Yes
1
834
1
1
03
MCI 1 LAN Interface in
service:
0 = No
1 = Yes
ASYD
1
246
3
1
08
MCI Expansion:
0 = Normal
1 = Expanded
1
400
2
1
04
Expanded MCI with ANI Data:
0 = No
1 = Yes
4 If using the OAI UCD-LAN/Serial MCI integration, use the following table to
set up the UCD hunt group. In the example below, the UCD group is
extensions 220-223, with 220 as the pilot.
NOTE
Do not adjust UCD hunt group settings if using an OAI pure
integration.
202
Cmd
Tenant
ASHU
1
UNIVERGE UM8500 INTEGRATION GUIDE
Value
Description
220
Pilot and Port number
221
Port number
222
Port number
223
Port number
To set OAI monitored function keys for Live Record
If the Live Record feature will be used in the phone system, verify that the system
has the following settings or that the configuration files are updated. The settings
presented below are the default settings that the OAI server can use.
WARNING
If the default settings below are not used, the corresponding
settings in the OAI Integration software must be set up
accordingly by editing the XML configuration file.
1 Type the AOKC command in the Windows MAT application. The AOKC (OAI
Key Code Data) dialog box appears.
2 Assign the OAI key code data:
The OAI key codes 1 through 14 correspond to AKYD key codes FKY 34
through 47 respectively. By default the OAI Integration server uses the TMF
codes 192-195 for the Live Record commands Record, Pause/Resume, ReRecord and End, respectively.
■
Set F-KIND to 2.
■
Set C-TONE to 1.
3 Save the AOKC key code information.
4 Type the AKYD command in the Windows MAT application. The AKYD
(Dterm Key Data) dialog box appears.
Assign the function key data for the desired Dterm station:
■
Assign FKY 34 through 47 to any positions of FKY 1through 16.
■
The OAI key codes for the NEAX 2400 are FKY 34-47 and by default are
assigned to the third row from the top of function keys on the Dterm
station. This row contains the function keys with ID 9 to 12.
■
Confirm that the my-line is assigned in order to successfully complete
the AKYD command.
5 Click Exit to save the AKYD information.
NEC UNIVERGE SV7000 WITH OAI
203
Configuring
UNIVERGE
UM8500 for the
integration
After ensuring that the UNIVERGE UM8500 server is ready for the integration by
completing all appropriate tasks in the Installation Guide, perform the following
procedure to confirm that the integration is enabled.
To confirm the integration is enabled
1 Click Start > All Programs > UNIVERGE UM8500 > Edit Switch.
2 If prompted for logon credentials, type the administrator extension and
password, then click OK.
On a new install the logon credentials are:
Extension = 99995
Password = 12345
3 Confirm that the settings match those in the following tables.
NOTE
The settings below apply to all NEC UNIVERGE SV7000 phone
systems.
Phone settings for OAI integrations with analog ports
Parameter
Required setting
Manufacturer
NEC
Model
NEAX2400 IMS
Specific version or country 4203 and later analog boards and OAI
Integration method
OAI
Phone settings for OAI integrations with T1 ports
Parameter
Required setting
Manufacturer
NEC
Model
NEAX2400 IMS
Specific version or country 4203 and later T1 boards and OAI
Integration method
OAI
Phone settings for OAI integrations with digital ports
Parameter
Required setting
Manufacturer
NEC
Model
NEAX2400 IMS
Specific version or country HDS R4 and later digital board with OAI
Integration method
OAI
Phone settings for OAI integrations with IP ports
Parameter
Required setting
Manufacturer
NEC
Model
NEAX2400 IMS
Specific version or country Software release 16 or newer with IP ports
Integration method
OAI
4 If the settings are incorrect, select the correct settings and click Update
Voice Mail Now.
To update the INI file
1 Using Windows Explorer on the UNIVERGE UM8500 server, go to the
CommServer\IntLib directory.
2 Use a text editor to open the corresponding configuration INI file noted in the
previous procedure.
204
UNIVERGE UM8500 INTEGRATION GUIDE
3 In the [Configuration] section, modify the NetIP1 value:
■
Replace the NetIPI with the exact IP address that the computer is using to
access the same LAN as the phone system.
Example: NetIP1=172.16.19.191.
■
The NetIP1 = the IP address of the computer where UM8500 is installed;
the default value is set to "localhost" but it should be changed because it
is possible for the server machine to have more than one network
interfaces.
4 If using the OAI UCD - LAN MCI integration, under [Configuration], locate
UseInternalParser=no. Change this to
UseInternalParser=yes.
5 Click File > Save, and then close the configuration INI file.
NEC UNIVERGE SV7000 WITH OAI
205
Installing the
OAI
Integration
Server
software
Before configuring the OAI integration, the OAI integration software must be
installed on the computer where the UNIVERGE UM8500 is installed.
To install the OAI Integration Server
1 Insert the Installation disc into the disc drive.
2 Click Start > Run.
3 Click Browse, then in the Browse dialog box, open the Voice
Mail\OAIIntegration folder on the disc.
4 Click setup.exe, then click Open.
5 In the Run dialog box, click OK. The installation wizard begins.
6 On the Welcome page, click Next.
7 On the Customer Information page; if the User Name and Customer
Name fields do not have your information, enter your information into the
fields. Select an option indicating whether or not you or anyone else who uses
the computer has access to the program. Click Next.
8 On the Setup Type page, confirm that Typical is selected, then click Next.
9 On the Start Copying Files page, click Next.
10 When setup is complete, click Finish.
A new Program Group, Active Voice, is added to the program list. Two new
applications are added to this program group: AvOAIGear and AvOAITray.
These applications are used to set up the OAI integration parameters.
To choose a predefined template for the integration in the
OAI Integration Server
1 Insert the Installation disc into the disc drive.
2 From the Windows taskbar, click Start > Run.
3 Click Browse, then in the Browse dialog box, open the Voice
Mail\OAIIntegration\OAI Server XML Templates\Single Server folder on the
disc. This will show a group of folders that contain predefined sets of XML
configuration files meant to help choose the best OAI configuration.
Open the appropriate folder for the integration.
■
If using the OAI pure integration, open the NEC SV7000 - OAI Pure No CCIS folder.
■
If using the OAI UCD - LAN MCI integration, open the NEC SV7000 OAI-UCD - MCI LAN folder.
4 From the selected folder, copy and replace the existing AvOAISvr.xml file to
the Program Files\Active Voice\OAIIntegration folder on the UNIVERGE
UM8500 server.
The Program Files folder is usually found on the partition where the Microsoft
Windows was first installed, for example: C:\Program Files\Active
Voice\OAIIntegration.
206
UNIVERGE UM8500 INTEGRATION GUIDE
Configuring the
OAI
Integration
Server
Modify the configuration file to set how calls are handled in the integration.
To configure the OAI Integration Server
1 From the Windows taskbar, click Start > All Programs > Active Voice >
OAI Integration > AVOAITray.
The OAIS icon appears in the notification area, the system tray.
2 Right-click the OAIS icon, then click Advanced.
The OAIGear page appears.
WARNING
If an error message appears indicating the service is not installed,
close the error dialog box and continue with this procedure. The
AV OAI Integration service will automatically install after the
procedure is completed.
3 On the OAIGear toolbar, click the Configuration File icon.
The configuration file for the OAIS parameters appears in an XML editor.
4 In the navigation pane of the configuration file, expand CallPilot1 to
configure the CallPilot.
In the navigation pane, under the CallPilot object, there are some predefined
values for all parameters. Depending on the template chosen, set the
following values:
PBX-IP. Enter the IP address of the phone system. The default value is only
an example.
PBX-Port. Enter the OAI monitoring port of the phone system. The default
value is 60030 for newer phone systems. Modify the default value only if you
know that the phone system is set to a different value.
Tenant. PBX Tenant where the OAI pilot or AMNO number is defined
physically. If using the OAI-UCD MCI LAN integration, this will be the tenant
number where the UCD is configured. This value should match the setting in
the phone system configuration. The default value is 1.
Extension. If the template that enable an OAI pure integration (NEC
SV7000 - OAI Pure - No CCIS) was selected, enter the CallPilot OAI monitored
extension or AMNO number. This extension is usually associated with the
auto attendant and is a virtual number. In this case, this will be the monitored
number that is called to access the voice messaging system. The default value
is just an example.
If the template that enables an OAI UCD - MCI LAN integration (NEC SV7000
- OAI-UCD - MCI LAN) was selected, leave this field blank.
Leave all other parameters not listed above at their default values.
5 If the system uses Live Record, in the navigation pane of the configuration
file, expand the LiveRecord node, and set the following parameters:
NOTE
Skip this step if the system is not using the Live Record feature.
The OAI Live Record feature allows users to make real-time recordings of their
own conversations. The values under this section must be configured to
match the phone system settings of the phones used.
Enabled. This Enables/Disables the Live Record functionality. The default
value is True.
NEC UNIVERGE SV7000 WITH OAI
207
TMFC-Record. Enter the Terminal Mode Function Code for the Record
command for Live Record. The default value is 192 as this is the predefined
function in the phone system, but can be changed if needed.
TMFC-Pause. Enter the Terminal Mode Function Code for the Pause
command for Live Record. The default value is 193 as this is the predefined
function in the phone system, but can be changed if needed.
TMFC-ReRecord. Enter the Terminal Mode Function Code for the ReRecord
command for Live Record. The default value is 194 as this is the predefined
function in the phone system, but can be changed if needed.
TMFC-End. Enter the Terminal Mode Function Code for the End command
for Live Record. The default value is 195 as this is the predefined function in
the phone system, but can be changed if needed.
KC-Record. Enter the OAI Key Code used for the Record command on a
Dterm function key. To disable monitoring of the key, enter 0 or a negative
number. The default value is 1.
KC-Pause. Enter the OAI Key Code used for the Pause/Resume command on
a Dterm function key. To disable monitoring of the key, enter 0 or a negative
number. The default value is 2.
KC-Rerecord. Enter the OAI Key Code used for the ReRecord command on a
Dterm function key. To disable monitoring of the key, enter 0 or a negative
number. The default value is 3.
KC-End:. Enter the OAI Key Code used for the End command on a Dterm
function key. To disable monitoring of the key, enter 0 or a negative number.
The default value is 4.
ToggleStartStop. This feature allows the user to press a single key to start,
stop, or restart a Live Record session. To enable the feature, enter True. To
disable the feature, enter False. The default value is True.
6 If using a template that enables the MCI-LAN integration, in the navigation
panel of the configuration file, expand the MCI-LAN node.
NOTE
Do not complete this step if a template other than the NEC
SV7000 - OAI-UCD-MCI LAN template, where the PBX cmd ASYDL
Sys 1 Index 833 Bit 0 value = 1, was selected.
The settings must match the settings for the phone system for the MCI LAN
connection.
LAN-IP. Enter the IP address of the phone system. This should be the same
as the address entered in the CallPilot1 section under the PBX-IP. The default
value is just an example and must be changed to match the phone system
setting.
Format. Enter the format of the MCI-LAN packets expected from the phone
system. Enter ICS for regular (ICS/IVS) packets, or IMX for expanded (IMX)
packets. The default is IMX.
Parity. Enter the parity or checksum used by the phone system to process
the MCI-LAN packets. Accepted values are None, Even, or Odd. The default
is Odd.
LocalPort. Enter the local port used by the MCI-LAN integration module for
a TCP/IP connection to the phone system. Accepted values are any valid TCP/
IP port. The default is 60120. Do not change this value unless you know that
this port is already taken by other applications on the UNIVERGE UM8500
server.
DeviceID. Enter the device ID used by the MCI-LAN integration module to
identify itself to the MCI interface on the phone system. Accepted values are 0
and 1. The default is 1.
208
UNIVERGE UM8500 INTEGRATION GUIDE
Leave all other parameters not listed above at their default values.
7 In the navigation pane of the configuration file, expand VMSystem1 node.
Set the following parameters to configure the VMSystem1 node:
Host. Enter the IP address of the monitored UNIVERGE UM8500 server. This
will be the same IP address entered previously in the configuration ini file.
The default value is just an example.
PortRange. Enter the port or range of ports for the PBX tenant hosting the
voice mail ports. Ports can be set by entering a single port number, for
example xxxx; a range of numbers, for example xxxx-xxxx; or a
combination or both, for example xxxx-xxxx,x. The default ports are just
an example.
Tenant. Enter the PBX tenant number where the voice mail ports are set.
The default value is 1.
Leave all other parameters not listed above at their default values.
8 Click File > Save to save the XML configuration file.
9 Install the OAI service and test the integration.
See “Installing and starting the OAI service” on page 210.
NEC UNIVERGE SV7000 WITH OAI
209
Installing and
starting the
OAI service
After saving the configuration file, install the OAI service then test the service to
ensure a successful integration.
To install the OAI Service
1 On the OAIGear page, click the Install Service icon, or from the Service
menu, click Install Service.
2 On the AV OAI Voice Mail Integration Server - Install Service dialog box, select
the This account option.
3 Enter the domain Administrator name, type and confirm the domain
Administrator password for the domain, then click OK.
NOTE
It is recommended that the same domain administrator account
that was used to install the UNIVERGE UM8500 software is
entered. The Administrator name might need to be prefaced with
the domain. For example, <domain name>\Administrator.
You can also choose to install the OAI Service under a Local
System account, or even a different domain account, but this can
cause difficulties when troubleshooting any subsequent
integration problems.
4 Click Start > All Programs > Administrative Tools > Services.
The Services MMC snap-in appears.
5 In the details pane, confirm that the AV OAI Integration Server service is
listed.
6 Right-click AV OAI Integration Server, then click Properties.
7 On the General tab, ensure that the Startup type is Automatic.
8 Click the Recovery tab, then do the following:
■
Confirm that Restart the Service is selected for each failure attempt.
■
Enter 1 in the Restart service after field.
9 Click OK to exit the AV OAI Voice Mail Integration Server Properties dialog
box.
10 Start the OAI Integration server using either of the following methods:
■
■
In the Services MMC snap-in, right-click AV OAI Integration
Server, then click Start, or
Right-click AV OAI Server in the notification area, and then click Start
service.
The icon changes from stop to start.
Testing the OAI integration
After installing the service and setting up the parameters, test the integration to
ensure that it works correctly.
To test the OAI Integration Server
1 Place a direct call to the voice mail pilot number and confirm that is
answering. Use a voice mail subscriber extension with a valid phone
extension to place a call to the voice mail pilot number. You should hear:
“Please Enter Your Password.”
2 Leave a voice message for a test user that has an actual phone extension.
■
210
Confirm that the message indicator for the extension is on. This verifies
that the MWI section of the configuration file was set properly.
UNIVERGE UM8500 INTEGRATION GUIDE
■
If the Message Count field in the MWI-OAI node of the configuration file
was set to True, confirm that the message count is listed.
3 Retrieve the voice message and confirm that the message waiting indicator
turns off and the phone display clears.
NEC UNIVERGE SV7000 WITH OAI
211
212
UNIVERGE UM8500 INTEGRATION GUIDE
■ NEC UNIVERGE SV8300 with IP
Protims
In this integration...
Integration overview ........................................................................... 214
Integration steps ............................................................................ 214
Requirements ................................................................................ 214
Integration description ........................................................................ 215
How the integration works ............................................................... 215
Integration features ........................................................................ 215
Programming the phone system............................................................ 216
Configuring UNIVERGE UM8500 for the integration .................................. 219
NEC UNIVERGE SV8300 WITH IP PROTIMS
213
Integration
overview
Use this section of the Integration Guide with the Installation Guide.
Integration steps
Follow these steps to set up this integration.
1 Review the system and equipment requirements
Verify that all equipment, phone system, and messaging system server
requirements have been met. See “Requirements,” below.
2 Program the phone system.
See “Programming the phone system” on page 216.
3 Configure UNIVERGE UM8500 for the integration.
See “Configuring UNIVERGE UM8500 for the integration” on page 219.
Requirements
The steps to set up the NEC SV8300 IP Protims integration require the following:
Equipment
●
All Dterm® IP phones that will be used with UNIVERGE UM8500 must have
software version 1.2 or newer.
SV8300 phone system
●
UNIVERGE SV8300 software release 4.0 or newer installed and ready for the
integration as described in the phone system documentation.
●
Password encryption type for IP extensions is MD5, see command CM08
YY=517 on 0.
●
Fully functional IP PAD cards with VCTI sub-boards.
NOTE
IP PAD cards provide interface function between IP telephony,
terminals or other devices on LAN, and non-IP telephony,
conventional networks such as PSTN, ISDN, and private networks.
UNIVERGE UM8500 server
214
●
If the phone system uses G729 codec, the Sipro Lab G729A codec driver must
be installed on the messaging system server. The installation file for this
driver is named sl_g729a_setup.exe and can be found in the Voice
Mail\Utilities folder on the Installation disc.
●
A system key that enables the integration and the appropriate number of
voice messaging ports.
UNIVERGE UM8500 INTEGRATION GUIDE
Integration
description
How the integration works
SV8300 IP Protims integration uses a network connection to connect messaging
system server with the phone system. Each voice messaging port emulates an IP
Terminal extension. The communication between the parties is facilitated by a
series of Voice Over IP (VOIP) protocols, such as DRS, Protims, RTP, H245, Voice
control, used for call signaling and voice streaming, some of them being NEC
proprietary protocols.
Integration features
The SV8300 IP Protims integration with UM8500 provides the following features:
●
Call forward to personal greeting. When an incoming call is routed to an
unanswered or busy extension, the call is forwarded to the subscriber’s voice
mail. The caller then hears the subscriber’s personal greeting and can leave a
message.
●
●
●
●
Caller ID. UM8500 receives caller ID information from the phone system.
This information displays in the message’s subject line in Microsoft Office
Outlook® or other desktop messaging application.
Easy message access. A subscriber can retrieve messages without entering
an ID. UM8500 identifies a subscriber based on the extension from which the
call originated. A password might be required.
Identified subscriber messaging. UM8500 automatically identifies a
subscriber who leaves a message during a forwarded internal call based on
the extension from which the call originated.
Message waiting indication (MWI). When a message is waiting for a
subscriber, UM8500 notifies the phone system to activate the message
waiting indicator on the subscriber’s extension.
NEC UNIVERGE SV8300 WITH IP PROTIMS
215
Programming
the phone
system
If programming options other than those supplied in the following procedures are
used, the integration’s performance can be affected.
NOTE
The following procedures are written with the assumption that you
will use the SV8300 PCPro Software to program the phone system.
To program the IP voice messaging ports in the phone
system
1 Make sure that the SV8300 phone system has licenses for using IP extensions
using command F88 and the information in the following table:
For
Use
VoIP Channels
F88>010
IP Trunk
F88>011
IP Ports
F88>012
SIP TRK Channels (if used)
F88>017
STD SIP Phone (if used)
F88>024
SIP Trunk (if used)
F87>173
The following example can be used as a guideline for setting up IP or
passwords:
CM 08>516>x sets whether or not you want to use a password for IP station
login (usually same as extension)
CM 0B00>00>ip address of VOIP
CM 0B00>01>voip subnet
CM 0B00>02>voip gateway
CM 0B2xx>00>IPLA addresses (where xx is the unit number)
CM1290>ip_ext>CCC clears the MAC address of phones so a different
phone can log on to that extension.
2 Configure the voice messaging ports as IP Terminal extensions, the default IP
extensions type.
The following example reflects programming eight ports, 3901-3907, and the
VM pilot, 3999. Use this example as guide for programming the PBX:
a CM 10-01>F3900-F3907 Assigns station numbers (VM Ports)
b CM 11>0000>3999 Assigns the VM pilot as a virtual number
c CM E50>3999>0 Makes Busy the VM Pilot number
d CM 1324>Sta#(3900-3907)>0 DTMF passing SIP to IP DTerm
e CM 1359>Sta#(3900-3907)>0 DTMF passing SIP to IP DTerm
f CM 1303>(all stations - not the voicemail
ports)>0 Allows MWI
g CM 08>517>0 MD5 encryption
CM 08>702>0
h CM 08>703>0
CM 08>704>0
CM 08>706>0
CM 08>710>0
i
Build UCD Group:
CM 170>3999>3900 Create a loop pointing Pilot to first Port
216
UNIVERGE UM8500 INTEGRATION GUIDE
CM 170>3900>3901 Point each port to the next.
CM 170>3901>3902CM 170>3902>3903
CM 170>3903>3904CM 170>3904>3905
CM 170>3905>3906CM 170>3906>3907
CM 170>3907>3999 Finally point last port back to pilot.
j CM 171>3999>1 Assigns Pilot number as a UCD Pilot
k Assign Pilot and ports to a UCD group number:
CM 172>3999>00
CM 172>3900>00
CM 172>3901>00
CM 172>3902>00
CM 172>3903>00
CM 172>3904>00
CM 172>3905>00
CM 172>3906>00
CM 172>3907>00
l
CM 5115>01>3999 Assigns the UCD Pilot number to the tenant
number
m CM 5110>01>3999
n CM 5118>01>3999
o CM 200>*9>A040 Allows MWI lamp ON (example of code)
p CM 200>#9>A041 Allows MWI lamp OFF (example of code)
q CM 200>*4>A006 Allows executive override for Live Record - If
needed (example of code)
r CM 9000>xxxx,01>xxxx Sets the prime line on button 1, where
xxxx is the IP extension numbers (3901-3907 in this example)
s Enable VM Softkeys:
CM 1337>3900>0 Enables VM Softkey feature for VM Ports only
CM 1337>3901>0
CM 1337>3902>0
CM 1337>3903>0
CM 1337>3904>0
CM 1337>3905>0
CM 1337>3906>0
CM 1337>3907>0
t CM 08>715>0 Enable Softkey call screening system wide
3 Make sure that the following service features are enabled in the phone
system:
■
Call hold
■
Assignment of no answer timer for blind transfer to station or blind
transfer attendant
■
Blind transfer
4 Set the same location ID for all voice messaging ports and set either or both of
the codecs G711, U-Law or A-Law, and G729A with any payload your system
may need (10, 20, 30, or 40).
NEC UNIVERGE SV8300 WITH IP PROTIMS
217
Use the following example:
Priority Codec List
CM 42>100>priority codec 1 for codec list 0 (G.711u,
G.711a, G.722 (wide band), G.723.1, G.729a)
CM 42>101>priority codec 2 for codec list 0 (G.711u,
G.711a, G.722 (wide band), G.723.1, G.729a)
CM 42>102>priority codec 3 for codec list 0 (G.711u,
G.711a, G.722 (wide band), G.723.1, G.729a)
CM 42>103>priority codec 4 for codec list 0 (G.711u,
G.711a, G.722 (wide band), G.723.1, G.729a)
CM 42>110>priority payload 1 for codec list 0 (10ms,
20ms, 30ms, 40ms)
CM 42>111>priority payload 2 for codec list 0 (10ms,
20ms, 30ms, 40ms)
CM 42>112>priority payload 3 for codec list 0 (10ms,
20ms, 30ms, 40ms)
CM 42>113>priority payload 4 for codec list 0 (10ms,
20ms, 30ms, 40ms)
218
UNIVERGE UM8500 INTEGRATION GUIDE
Configuring
UNIVERGE
UM8500 for the
integration
After ensuring that the messaging system server is ready for the integration by
completing all appropriate tasks in the Installation Guide, perform the following
procedure to confirm that the integration is enabled.
To confirm that the integration is enabled
1 In Internet Explorer, go to the UM8500 Administrator
(http://<server name>/saweb).
2 Go to System > Licensing > Licensed Features.
3 In the Integration box, confirm that the setting is IP Protims.
4 If the setting is not IP Protims, contact a sales representative for the
necessary system key.
5 Go to System > Switch. Confirm that the settings match those in the
following table.
If the settings are incorrect, integration features might not be enabled.
Phone system settings
Parameter
Required setting
Manufacturer
NEC
Model
UNIVERGE SV8300
Switch Software Version
DTERM-IP Ports
Integration
VOIP-PROTIMS
6 Enter the MWI analog codes that the SV8300 phone system uses for turning
the phones lamps on and off. Save the changes.
7 Stop UNIVERGE UM8500.
8 Run VOIPAdmin.exe from Commserver\Utilities folder.
The VoipAdmin Tool appears.
9 Enter IP address of the phone system.
10 Set the general functionality for the ports as Terminal.
11 Under Manage ports, click Add to add a new port.
Enter the Extension and Password for each port.
12 If the system uses one or more IP PADs, under Manage Gateways click Add.
Enter the IP Address and set the Has DSP to 0 for each gateway.
13 Click OK to save the changes and then close VOIPAdmin.
14 Start UNIVERGE UM8500.
15 In Internet Explorer, go to the UM8500 Administrator
(http://<server name>/saweb).
16 Go to System > Ports and check the extension of each port displayed in the
Port Table section of the page. If the extensions are incorrect, stop UNIVERGE
UM8500, verify the phone system settings made for the voice messaging
ports, see “To program the IP voice messaging ports in the phone system” on
page 216, and use the VOIPAdmin tool to make the necessary adjustments.
NEC UNIVERGE SV8300 WITH IP PROTIMS
219
220
UNIVERGE UM8500 INTEGRATION GUIDE
■ NEC UNIVERGE SV8300 using
OAI
In this integration...
Integration overview ........................................................................... 222
Integration steps ............................................................................ 222
Requirements ................................................................................ 223
Integration description ........................................................................ 224
How the integration works ............................................................... 224
Integration features ........................................................................ 224
Programming the phone system............................................................ 225
Configuring UNIVERGE UM8500 for the integration .................................. 228
Installing the OAI Integration Server software ........................................ 229
Configuring the OAI Integration Server .................................................. 230
Installing and starting the OAI service ................................................... 233
Testing the OAI integration .............................................................. 233
NEC UNIVERGE SV8300 USING OAI
221
Integration
overview
UNIVERGE UM8500 uses the Open Application Interface (OAI) to integrate with
NEC phone systems using a TCP/IP link between the messaging system server and
the phone system. OAI Integration can be used with IP lines and requires that the
OAI Integration server is installed.
Integration steps
Follow these steps to set up this integration.
1 Review the system and equipment requirements.
Verify that all phone systems and messaging system server requirements have
been met. See “Requirements” on page 223.
2 Program the phone system and extensions.
See “Programming the phone system” on page 225.
3 Configure UNIVERGE UM8500 for the integration.
See “Configuring UNIVERGE UM8500 for the integration” on page 228.
4 Install the OAI Integration Server software.
See “Installing the OAI Integration Server software” on page 229.
5 Configure the OAI Integration Server.
See “Configuring the OAI Integration Server” on page 230.
6 Install and start the OAI service.
See “Installing and starting the OAI service” on page 233.
222
UNIVERGE UM8500 INTEGRATION GUIDE
Requirements
The steps to set up the NEC UNIVERGE SV8300 using OAI integration require the
following:
Phone System
●
A UNIVERGE SV8300 phone system
●
A network connection to the messaging system server.
●
One IP terminal port for each voice messaging port.
UNIVERGE UM8500 server
●
A network connection with the phone system. A second network card on the
messaging system server to connect directly to the phone system is
recommended.
●
UM8500 installed and ready for the integration as described in the
Installation Guide.
●
OAI Integration server installed.
●
A system key that enables the integration and the appropriate number of
voice messaging ports.
NEC UNIVERGE SV8300 USING OAI
223
Integration
description
The UNIVERGE UM8500 unified messaging solution can use the Open
Application Interface (OAI) to integrate with NEC phone systems including
UNIVERGE SV8300. The OAI integration is established over a TCP/IP link between
the messaging system server and the NEC phone system.
How the integration works
There are two basic types of OAI integrations:
●
OAI pure integration . This type of integration uses only the TCP/IP link to
connect to the phone system. It has an OAI monitoring slot opened with the
phone system and dispatches calls to the enabled voice messaging systems.
This type of OAI Integration provides the most efficient load balancing
capability by dispatching new incoming calls from a monitored number, the
voice mail pilot, to free voice mail ports.
●
OAI UCD - Serial MCI integration . The OAI Integration Server uses
complementary Message Center Interface (MCI) integration capabilities
through the serial interface. The complementary MCI integration feature of
the OAI Integration Server is not a genuine OAI integration. The integration
does work in Common Channel Interoffice Signaling (CCIS) networked
environments between multiple NEC phone systems when the remote phone
systems do not have OAI or their software revision does not feature callforwarding information in the OAI layer. The MCI link is used as
complementary integration support for situations where the OAI layer does
not provide full integration, such as in older, legacy phone system
environments.
Integration features
The SV8300 OAI integration with UNIVERGE UM8500 provides the following
features:
●
Call forward to personal greeting. When an incoming call is routed to an
unanswered or busy extension, the call is forwarded to the subscriber’s voice
mail. The caller then hears the subscriber’s personal greeting and can leave a
message.
●
●
●
Caller ID. UM8500 receives caller ID information from the phone system, if
available. This information is displayed in the message’s subject line in
Microsoft Office Outlook® or other desktop messaging application.
Easy message access. A subscriber can retrieve messages without entering
an ID. UM8500 identifies a subscriber based on the extension from which the
call originated. A password might be required.
Identified subscriber messaging. UM8500 automatically identifies a
subscriber who leaves a message during a forwarded internal call based on
the extension from which the call originated.
●
Message waiting indication (MWI). When a message is waiting for a
subscriber, UM8500 notifies the phone system to activate the message
waiting indicator on the subscriber’s extension, if it is equipped with one, or
to activate a stutter dial tone.
●
224
Live Record. A subscriber can record a phone conversation by pressing the
Live Record button on the Dterm phone. The recording can be saved in the
subscriber’s mailbox for later reference, or forwarded to another subscriber or
group of subscribers.
UNIVERGE UM8500 INTEGRATION GUIDE
Programming
the phone
system
If programming options other than those supplied in the following procedures are
used, the integration’s performance might be affected.
NOTE
The following procedures are written with the assumption that you
will use the SV8300 PCPro software to enter the settings presented
in the procedures.
To set the Message Center Interface (MCI) configuration
IMPORTANT
Only adjust the MCI settings if the OAI UCD with Serial MCI
integration is being used.
Verify the following configurations and settings.
1 Verify that the 9800,8,n,1 serial communication parameter settings are set
as described in the table below. If a parameter is not the same, change it to the
setting in the table.
Command
Description
0401>01>0
Connection port for MCI = 0
08>708>0
MCI extension length = 6 (!)
08>025>0
Message indication = MESSAGE
08>443:1-0
Set the type of VMS integration: MCI (0) instead of
DTMF (1) (!)
4000>0>10
Function = MCI
4001>0>1
Data length = 8 bit
4002>0>1
Parity check = Ineffective
4004>0>0
Stop bit = 1
4008>0>4
Data speed = 9600 bps
To set the OAI configuration
Verify the following configurations and settings.
1 Verify that the IP Address is set per the phone system configuration,
Example 172.16.19.61.
2 Verify that the Subnet mask is set per the phone system configuration,
Example 255.255.255.0.
3 Add the non-default extensions lines (non-default hardware LENS): 224-239.
4 Verify that the OAI pilot is set per the phone system configuration, for
example 299.
5 Verify that the monitored extensions or voice ports are set per the phone
system configuration, for example 208-231.
6 Verify that the monitored DTerm Function Keys on extension 201 set per
the phone system configuration, for example 09-12 (function codes F1032F1035; Terminal Mode Facility codes 192-195).
NEC UNIVERGE SV8300 USING OAI
225
7 Verify that the OAI monitoring slot 60030, in the OAI server configuration
according to the OAI XML template chosen, is set to:
Command
Description
0B00>00>172016019061 Assign IP address: 172.16.19.61
0B00>01>255255255000 Assign subnet mask: 255.255.255.0
10>024>224
Add non-default hardware LENS for the range
224-239
10>025>225
10>026>226
through
10>039>239
NOTE
Do not run the following command if the OAI UCD Serial MCI integration method is used.
11>000>299
NOTE
Assign subline 299 (OAI pilot) to LEN 000
Do not run the following command if the OAI UCD Serial MCI integration method is used.
171>299:3
Program the OAI pilot (299) and the voice ports
(208 - 231) as monitored numbers.
171>208:3
171>209:3
171>210:3
through
171>231:3
NOTE
Do not run the following command if the OAI UCD Serial MCI integration method is used.
172>299:NONE-00
Set the 299 as member of the Group 00 (other
than any other UCD group - 01)
D70>F1032>NONE-192
Assign Terminal Mode Facility (TMF) codes to
OAI monitored function keys; the available OAI
monitored function keys are in the range of
F1032-F1047 (16 keys); the available TMF
codes are in the range of 192-255;
D70>F1033>NONE-193
D70>F1034>NONE-194
D70>F1035>NONE-195
9000>201,09>F1032
9000>201,10>F1033
9000>201,11>F1034
9000>201,12>F1035
08>045>0
Assign the function codes F1032-F1035 to
DTerm function keys 09-12, for extension 201;
For the ',' (comma) press the <Transfer>
button;
Executive Override beep:
0 = play only one beep on initiation
1 = beep every 4 seconds
08>046>0
Executive Override beep:
0 = disable Executive Override beep
1 = enable Executive Override beep
226
UNIVERGE UM8500 INTEGRATION GUIDE
To set the UCD hunt group configuration
IMPORTANT
Only adjust the UCD hunt group settings if the OAI UCD with Serial
MCI integration is being used.
Verify the following configurations and settings.
1 Verify that the UCD group is set to: 220-223.
2 Verify that the UCD pilot is set to: 220.
Command
Description
170>220:NONE-221
Set up the 220-223 range as a UCD hunt group.
170>221:NONE-222
170>222:NONE-223
170>223:NONE-220
172>220:NONE-01
172>221:NONE-01
172>222:NONE-01
Set the 220-223 range as part of Group 01, other
than the OAI group (00) of the monitored
number(s).
172>223:NONE-01
171>220:0-1
Set extension 220 to be the UCD pilot (master).
1310>220:0
Set the 220-223 range as messaging system (VMS)
stations (for MCI / J-records appearance).
1310>221:0
1310>222:0
1310>223:0
To set OAI monitored function keys for Live Record
If the Live Record feature will be used in the phone system, verify that the system
has the following settings or that the configuration files are updated.
1 The OAI LiveRecord feature uses the following settings by default.
WARNING!
If these defaults are changed, the corresponding settings in the
OAI Integration Server must be set up accordingly by editing the
XML configuration file.
Dterm
Function
Key
Function
Code
Terminal Mode
Facility (TMF)
Code
LiveRecord
Function
09
F1032
192
Record
10
F1033
193
Pause/Resume
11
F1034
194
Re-record
12
F1035
195
End
2 When using LiveRecord, the monitored extensions or voice ports are allowed
to use Executive-Override with the LiveRecord feature. Normally, the OAI
monitoring is set by CMD17,Y=1, Extension>3, but this value will
automatically activate the Off-Hook Suppress bit. Instead, the
UNDOCUMENTED value of 4 that will take the Off-Hook Suppress OFF is
used.
3 The Executive Override code programmed on the command 200>A4>A006,
for example, should match the BargeInCode parameter setting in the
UNIVERGE UM8500 integration file. In this case the code is *4 and the
UM8500 entry is BargeInCode = X,&,*4.
NEC UNIVERGE SV8300 USING OAI
227
Configuring
UNIVERGE
UM8500 for the
integration
After ensuring that the messaging system server is ready for the integration by
completing all appropriate tasks in the Installation Guide, perform the following
procedure to confirm that the integration is enabled.
To select the INI file
1 Shut down UNIVERGE UM8500 before setting the following parameters.
2 Click Start > Programs > UNIVERGE UM8500 group > Edit Switch
Utility.
Ensure that the current phone system settings are correct according to the
phone system version and port types.
Phone settings for OAI integrations with IP ports
Parameter
Required setting
Manufacturer
NEC
Model
UNIVERGE SV8300
Specific version or
country
DTERM IP Ports
Integration method
OAI
3 If the current settings are not correct, select the correct ones and then click
Edit this switch configuration. Write down the name of the ini file that is
listed in the title bar. Click OK to close this window.
4 Click Update Voice Mail Now to apply the changes and close Edit Switch
utility.
To update the INI file
1 Using Windows Explorer on the UNIVERGE UM8500 server, go to the
CommServer\IntLib directory.
2 Use a text editor to open the corresponding configuration INI file noted in the
previous procedure.
3 In the [Configuration] section, modify the NetIP1 value:
■
Replace the NetIPI with the exact IP address that the computer is using to
access the same LAN as the phone system. For example:
NetIP1=172.16.19.191.
■
The NetIP1 = the IP address of the computer where UNIVERGE UM8500
is installed; the default value is set to "localhost" but it should be changed
because it is possible for the server machine to have more than one
network interface.
4 Click File > Save, and then close the configuration INI file.
228
UNIVERGE UM8500 INTEGRATION GUIDE
Installing the
OAI
Integration
Server
software
Before configuring the OAI integration, the OAI integration software must be
installed on the computer where the messaging system is installed.
To install the OAI Integration Server
1 Insert the Installation disc into the disc drive.
2 From the Windows taskbar, click Start > Run.
3 Click Browse, then in the Browse dialog box, open the Voice
Mail\OAIIntegration folder on the disc.
4 Click setup.exe, then click Open.
5 In the Run dialog box, click OK. The installation wizard begins.
6 On the Welcome page, click Next.
7 On the Customer Information page; if the User Name and Customer
Name fields do not have your information, enter your information into the
fields. Select an option indicating whether or not you or anyone else who uses
the computer has access to the program. Click Next.
8 On the Setup Type page, confirm that Typical is selected, then click Next.
9 On the Start Copying Files page, click Next.
10 When setup is complete, click Finish.
A new Program Group, Active Voice, is added to the program list. Two new
applications are added to this program group: AvOAIGear and AvOAITray.
These applications are used to set up the OAI integration parameters.
To choose a predefined template for the integration in the
OAI Integration Server
1 Insert the Installation disc into the disc drive.
2 From the Windows taskbar, click Start > Run.
3 Click Browse, then in the Browse dialog box, open the Voice
Mail\OAIIntegration\OAI Server XML Templates\Single Server folder on the
disc. This will show a group of folders that contain predefined sets of XML
configuration files meant to help choose the best OAI configuration.
Open the appropriate folder for the integration.
■
For UNIVERGE SV8300 phone systems using OAI pure integration, open
the NEC IPS 2000 - OAI Pure - No CCIS folder.
■
For UNIVERGE SV8300 phone systems using OAI UCD - Serial MCI
integration, open the NEC IPS 2000 - OAI-UCD - MCI folder.
NOTE
The files used for the UNIVERGE SV8300 OAI integration are
the same as those used for the NEC IPS 2000 OAI integration.
4 From the selected folder, copy and replace the existing AvOAISvr.xml file to
the Program Files\Active Voice\OAIIntegration folder on the
UM8500 server.
The Program Files folder is usually found on the partition where Microsoft
Windows was first installed, for example: C:\Program Files\Active
Voice\OAIIntegration.
NEC UNIVERGE SV8300 USING OAI
229
Configuring the
OAI
Integration
Server
Modify the configuration file to set how calls are handled in the integration.
To configure the OAI Integration Server
1 From the Windows taskbar, click Start > All Programs > Active Voice >
OAI Integration > AVOAITray.
The OAIS icon appears in the notification area of the system tray.
2 Right-click the OAIS icon, then click Advanced.
The OAIGear page appears.
WARNING!
If an error message appears indicating the service is not installed,
close the error dialog box and continue with this procedure. The
AV OAI Integration service will automatically install after the
procedure is completed.
3 On the OAIGear toolbar, click the Configuration File icon.
The configuration file for the OAIS parameters appears in an XML editor.
4 In the navigation pane of the configuration file, expand CallPilot1 to
configure the CallPilot.
In the navigation pane, under the CallPilot object, there are some predefined
values for all parameters. Depending on the template chosen, set the
following values:
PBX-IP: Enter the IP address of the phone system, or if the phone system is
connected to the same LAN as the UM8500 server through a different network
interface card, enter the IP address of the network interface card. The default
value is only an example.
PBX-Port: Enter the OAI monitoring port of the phone system. The default
value will be 60030 for a UNIVERGE SV8300 phone system. Modify the default
value only if you know that the phone system is set to a different value.
Tenant: PBX Tenant where the OAI pilot or AMNO number is defined
physically. If the integration is MCI based, this will be the tenant number
where the UCD is configured. This value should match the one in the phone
system configuration. The default value is 1.
Extension: If one of the templates that enables an OAI UCD - MCI Serial
integration, such as NEC IPS 2000 - OAI-UCD - MCI was selected, this field
can be left blank according to the predefined settings.
If one of the templates that enables an OAI pure integration, such as NEC IPS
2000 - OAI Pure - No CCIS, was selected, then enter the CallPilot's OAI
monitored extension. If the extension is a virtual number associated with the
auto attendant, this will be the monitored number that is called to access the
voice messaging system. The default value is just an example.
Leave all other parameters on their default values.
5 If the system is using the Live Record feature, in the navigation pane of the
configuration file, expand the LiveRecord node, and set the following
parameters:
NOTE
Skip this step if the system is not using the Live Record feature.
The OAI Live Record feature allows users to make real-time recordings of their
own conversations. The values under this section must be configured to
match the phone system settings of the phones used.
Enabled: This Enables/Disables the Live Record functionality. The default
value is True.
230
UNIVERGE UM8500 INTEGRATION GUIDE
TMFC-Record: Enter the Terminal Mode Function Code for the Record
command for Live Record. The default value is 192 as this is the predefined
function in the phone system, but can be changed if needed.
TMFC-Pause: Enter the Terminal Mode Function Code for the Pause
command for the Live Record. The default value is 193 as this is the
predefined function in the phone system, but can be changed if needed.
TMFC-ReRecord: Enter the Terminal Mode Function Code for the
ReRecord command for Live Record. The default value is 194 as this is the
predefined function in the phone system, but can be changed if needed.
TMFC-End: Enter the Terminal Mode Function Code for the End command
for Live Record. The default value is 195 as this is the predefined function in
the phone system, but can be changed if needed.
KC-Record: Enter the OAI Key Code used for the Record command on a
Dterm function key. To disable monitoring of the key, enter 0 or a negative
number. The default value is 1.
KC-Pause: Enter the OAI Key Code used for the Pause/Resume command
on a Dterm function key. To disable monitoring of the key, enter 0 or a
negative number. The default value is 2.
KC-Rerecord: Enter the OAI Key Code used for the ReRecord command on
a Dterm function key. To disable monitoring of the key, enter 0 or a negative
number. The default value is 3.
KC-End: Enter the OAI Key Code used for the End command on a Dterm
function key. To disable monitoring of the key, enter 0 or a negative number.
The default value is 4.
ToggleStartStop: This feature allows the user to press a single key to start,
stop, or restart a Live Record session. To enable the feature, enter True. To
disable the feature, enter False. The default value is True.
6 If using a template that enables the OAI UCD-MCI serial integration, in the
navigation panel of the configuration file, expand the MCI-Serial node.
NOTE
Do not complete this step if a template other than the NEC IPS
2000 OAI-UCD-MCI template or the NEC 2000 IVS-OAI-UCD-MCI
template was selected.
The settings must match the settings of the phone system for the MCI Serial
connection.
Format: Set the format of the MCI-Serial packets expected from the phone
system. Enter ICS for regular (ICS/IVS) serial packets, or IMX for expanded
(IMX) packets. The default is ICS.
COMPort: Enter the COM number of the serial port. This is the voice server
serial port that is connected by the RS-232 cable to the MCI link on the phone
system. Accepted values are COM1 or COM2. The default is COM1.
BaudRate: Enter the baud rate used by the serial (RS-232/MCI)
communication. The value must be identical to the phone system setting.
Accepted values are 1200, 2400, 4800, 9600, or the specially defined
phone system setting. The default value is 9600.
DataBits: Enter the default phone system data bits. Accepted values are 4,
5, 6, 7, or 8. The default value is 8.
Parity: Enter the parity used by the serial (RS-232/MCI) communication
with the phone system. Accepted values are N for NONE, E for EVEN, or O for
ODD. The default value is N.
StopBits: Enter the stop bits used by the serial (RS-232/MCI)
communication with the phone system. Accepted values are 1, 1.5, 2, or the
specially defined phone system setting. The default value is 1.
NEC UNIVERGE SV8300 USING OAI
231
Leave all other parameters not listed above at their default values.
7 In the navigation pane of the configuration file, expand VMSystem1 node.
Set the following parameters to configure the VMSystem1 node:
Host: Enter the IP address of the monitored UM8500 server. This will be the
same IP address entered previously in the configuration ini file. The default
value is just an IP example.
PortRange: Enter the port or range of ports for the phone system tenant
hosting the voice mail ports. Ports can be set by entering a single port
number, for example xxxx; a range of numbers, for example xxxx-xxxx;
or a combination or both, for example xxxx-xxxx,x. The default ports are
just an example.
Tenant: Enter the phone system tenant number where the voice mail ports
are set. The default value is 1.
Leave all other parameters not listed above at their default values.
8 Click File > Save to save the XML configuration file.
9 Install the OAI service and test the integration. See “Installing and starting the
OAI service” on page 233.
232
UNIVERGE UM8500 INTEGRATION GUIDE
Installing and
starting the
OAI service
After saving the configuration file, install the OAI service then test the service to
ensure a successful integration.
To install the OAI Service
1 On the OAIGear page, click the Install Service icon, or from the Service menu,
click Install Service.
2 On the AV OAI Voice Mail Integration Server - Install Service dialog box, select
the This account option.
3 Enter the domain Administrator name, type and confirm the domain
Administrator password for the domain, then click OK.
NOTE
It is recommended that the same domain administrator account
that was used to install the messaging system software is
entered. The Administrator name might need to be prefaced with
the domain. For example, <domain name>\Administrator.
You can also choose to install the OAI Service under a Local
System account, or even a different domain account, but this can
cause difficulties when troubleshooting any subsequent
integration problems.
4 From the Windows taskbar, click Start > All Programs > Administrative
Tools > Services.
The Services MMC snap-in appears.
5 In the details pane, confirm that the AV OAI Integration Server service is
listed.
6 Right-click AV OAI Integration Server, then click Properties.
7 On the General tab, ensure that the Startup type is Automatic.
8 Click the Recovery tab and then do the following:
■
Ensure that Restart the Service is selected for each failure attempt.
■
Enter 1 in the Restart service after field.
9 Click OK to exit the AV OAI Voice Mail Integration Server Properties dialog
box.
10 Start the OAI Integration server using either of the following methods:
■
■
In the Services MMC snap-in, right-click AV OAI Integration
Server, then click Start, or
Right-click the AV OAI Server in the notification area, and then click
Start service.
The icon changes from stop to start.
Testing the OAI integration
After installing the service and setting up the parameters, test the integration to
ensure that it works correctly.
To test the OAI Integration Server
1 Place a direct call to the voice mail pilot number and confirm that is
answering. Use a voice mail subscriber extension with a valid phone
extension to place a call to the voice mail pilot number. You should hear:
“Please Enter Your Password.”
2 Leave a voice message for a test user that has an actual phone extension.
■
Confirm that the message indicator for the extension is on. This verifies
that the MWI section of the configuration file was set properly.
NEC UNIVERGE SV8300 USING OAI
233
■
If the Message Count field in the MWI-OAI node of the configuration file
was set to True, confirm that the message count is listed.
3 Retrieve the voice message and confirm that the message waiting indicator
turns off and the phone display clears.
234
UNIVERGE UM8500 INTEGRATION GUIDE
■ NEC UNIVERGE SV8500 with
Direct Digital
In this integration...
Integration overview ........................................................................... 236
Integration steps ............................................................................ 236
Requirements ................................................................................ 236
Integration description ........................................................................ 237
How the integration works ............................................................... 237
Integration features ........................................................................ 237
Configuring UNIVERGE UM8500 for the integration .................................. 238
Programming the phone system............................................................ 239
NEC UNIVERGE SV8500 WITH DIRECT DIGITAL
235
Integration
overview
Use this section of the Integration Guide with the Installation Guide.
Integration steps
Follow these steps to set up this integration.
1 Review the system and equipment requirements.
Verify that all phone system and messaging system server requirements have
been met. See “Requirements,” below.
2 Configure UNIVERGE UM8500 for the integration.
See “Configuring UNIVERGE UM8500 for the integration” on page 238.
3 Program the phone system and extensions.
See “Programming the phone system” on page 239.
Requirements
The steps to set up the NEC UNIVERGE USV8500 direct digital integration require
the following:
Phone system
●
NEC UNIVERGE SV8500, revision S01 or later, installed and ready for the
integration as described in the phone system documentation.
●
One or more of the following digital line cards set up as voice messaging ports
connected to the voice boards in the messaging system server:
Card name
Description
16ELCH (with SP-3125)
Digital line card, 16 ports
16ELCJ
Digital line card, 16 ports
16ELCJ-B
Digital line card, 16 ports
16ELCJB-A
Digital line card, 16 ports
16ELCNA
Digital line card, 16 ports
CAUTION
Use only the black and yellow pair of wires. The RJ-14
connectors on the Dialogic D42-NE2 voice board use only
a single pair of wires.
UNIVERGE UM8500 server
●
The Dialogic digital voice boards installed; see the Installation Guide for
installation details.
NOTE
For the latest information on supported voice boards for UM8500,
contact a sale representative.
236
●
UM8500 installed and ready for the integration as described in the
Installation Guide.
●
A system key that enables the integration and the appropriate number of
voice messaging ports.
UNIVERGE UM8500 INTEGRATION GUIDE
Integration
description
How the integration works
The SV8500 direct digital integration uses digital lines to connect the phone
system and messaging system server. The phone system digital voice messaging
ports connect to the D42-NE2 boards in the messaging system server. Each D42NE2 voice board emulates up to four Dterm® digital phones. The following
illustration shows the required connections.
The phone system sends the following information with forwarded calls:
●
The called party’s extension
●
The reason for the forward (the extension is busy, does not answer, or is set to
forward all calls)
●
The calling party’s extension (for internal calls)
UM8500 uses this information to answer the call appropriately. For example, a call
forwarded to UM8500 is answered with the subscriber’s personal greeting. If the
phone system routes the call to UM8500 without this information, UM8500
answers with the opening greeting.
Integration features
The SV8500 direct digital integration with UNIVERGE UM8500 provides the
following features:
●
Call forward to personal greeting. When an incoming call is routed to an
unanswered or busy extension, the call is forwarded to the subscriber’s voice
mail. The caller then hears the subscriber’s personal greeting and can leave a
message.
●
●
Caller ID. UM8500 receives caller ID information from the phone system.
This information displays in the message’s subject line in Microsoft Office
Outlook® or other desktop messaging application.
Constant message count. The number of new messages is displayed on a
subscriber’s Dterm phone while the phone is on hook.
●
●
●
●
Easy message access. A subscriber can retrieve messages without entering
an ID. UM8500 identifies a subscriber based on the extension from which the
call originated. A password might be required.
Identified subscriber messaging. UM8500 automatically identifies a
subscriber who leaves a message during a forwarded internal call based on
the extension from which the call originated.
Live Record. A subscriber can record a phone conversation by pressing the
Live Record button on the Dterm phone. The recording can be saved in the
subscriber’s mailbox for later reference, or forwarded to another subscriber or
group of subscribers.
Message waiting indication (MWI). When a message is waiting for a
subscriber, UM8500 notifies the phone system to activate the message
waiting indicator on the subscriber’s extension.
NEC UNIVERGE SV8500 WITH DIRECT DIGITAL
237
Configuring
UNIVERGE
UM8500 for the
integration
After ensuring that the messaging system server is ready for the integration by
completing all appropriate tasks in the Installation Guide, perform the following
procedure to confirm that the integration is enabled.
To confirm that the integration is enabled
1 Click Start > All Programs > UNIVERGE UM8500 > Edit Switch.
2 If prompted for logon credentials, type the administrator extension and
password, then click OK.
On a new install the logon credentials are:
Extension = 99995
Password = 12345
3 Confirm that the settings match those in the following table.
Phone system settings
Parameter
Required setting
Manufacturer
NEC
Model
NEAX2400 IMS
Switch software version
HDS R4 and later without MCI
Integration
Direct Digital
4 If the settings are incorrect, select the correct settings and click Update
Voice Mail Now.
238
UNIVERGE UM8500 INTEGRATION GUIDE
Programming
the phone
system
If programming options other than those described in the following procedures
are used, the integration’s performance can be affected.
NOTE
The following procedures are written on the assumption that you
will use the SV8500 PCPro software to program the phone system.
To program the digital voice messaging ports in the
phone system
1 Specify a Service Feature Restriction Class (SFC) for the voice messaging ports
by using the ASFC command. It is recommended that all of the voice
messaging ports be placed in a single SFC not used for any other purpose.
The following Service Feature Indexes (SFIs) are needed in the SFC:
SFI
Service feature
10
Call hold
103
Assignment of no answer timer for blind transfer
to station or blind transfer to attendant
104
Blind transfer
2 Assign a value of 26 to the Telephone Equipment Class (TEC) for each voice
messaging port by using the ASDT command. Use the SFC created for the
voice messaging ports in step 1.
3 Assign all of the voice messaging ports to a Uniform Call Distribution (UCD)
group.
If the number of voice messaging system ports exceeds the number of
supported ports in a UCD group, specify additional UCD groups, then link
them together using the AUOG command.
4 Program each phone to forward calls to the UCD pilot number assigned to
the voice messaging ports, based on the UM8500 call transfer type:
Release to switch transfer. Program the phone to forward calls to the
UCD pilot number when:
■
The extension is busy; or,
■
The call is not answered.
Supervised transfer. Program the phone to forward calls to the UCD pilot
number only when the call is not answered. Confirm that call forwarding is
disabled when the extension is busy.
CAUTION
Do not use a phantom single line extension for the UCD pilot
number.
NEC UNIVERGE SV8500 WITH DIRECT DIGITAL
239
5 Use the programming system data table to program the ASYD settings. Each
bit is part of a hexadecimal number displayed in the ASYD settings. Convert
the hexadecimal number to binary to determine the individual settings. For
more information, refer to the SV8500 Office Data Specification.
Programming system data
System
1
Index
Bit
Value
Description
17
b4
28
b0–4
60
b3
0 UCD queuing required
63
b0
1 Blind transfer for stations in
service
69
b0
1 No recall, execute call forwarding
on no answer
70
b0
1 Called number display, when
forwarding to attendant console
77
b2
0 MWI refresh required
78
238
1 Blind transfer to attendant
console
0 Guard timer not required
b0
1 Calling number display enabled
b1
1 Calling station status display
enabled
b0–7
0 Lamp flash rate
To program the Dterm phones that use Live Record
For each Dterm phone that uses the UNIVERGE UM8500 Live Record feature,
perform the following steps:
1 Assign an SFI of 118 by using the ASFC command.
2 Assign the extension to the UCD pilot number of the voice messaging ports by
using the AVPS command. Enter the UCD pilot number for the VPS STN.
3 Designate the following function key assignments by using the AKYD
command:
Function key number
240
Function
66
Record
67
Re-record
68
Pause
69
End
UNIVERGE UM8500 INTEGRATION GUIDE
■ NEC UNIVERGE SV8500 with IP
Protims
In this integration...
Integration overview ........................................................................... 242
Integration steps ............................................................................ 242
Requirements ................................................................................ 242
Integration description ........................................................................ 243
How the integration works ............................................................... 243
Integration features ........................................................................ 243
Programming the phone system............................................................ 244
Configuring UNIVERGE UM8500 for the integration .................................. 245
NEC UNIVERGE SV8500 WITH IP PROTIMS
241
Integration
overview
Use this section of the Integration Guide with the Installation Guide.
Integration steps
Follow these steps to set up this integration.
1 Review the system and equipment requirements.
Verify that all equipment, phone system and messaging system server
requirements have been met. See “Requirements,” below.
2 Program the phone system and extensions.
See “Programming the phone system” on page 244.
3 Configure UNIVERGE UM8500 for the integration.
See “Configuring UNIVERGE UM8500 for the integration” on page 245.
Requirements
The steps to set up the NEC SV8500 IP Protims integration require the following:
Equipment
●
All Dterm® IP phones that will be used with UNIVERGE UM8500 must have
software version 1.2 or newer.
SV8500 phone system
●
UNIVERGE SV8500 installed and ready for the integration as described in the
phone system documentation.
●
Password encryption type for IP extensions is MD5, see command ASYDL,
index 848, b7=0.
●
Fully functional IP PAD cards with VCTI sub-boards.
NOTE
IP PAD cards provide interface function between IP telephony,
terminals or other devices on LAN, and non-IP telephony,
conventional networks such as PSTN, ISDN, and private networks.
If the telephony network is 100% IP, the IP PAD cards are not
mandatory.
UNIVERGE UM8500 server
242
●
If the G729 codec is used, the Sipro Lab G729 codec driver must be installed in
the voice mail server. The installation file for this driver is named
sl_g729a_setup.exe and can be found in the Voice Mail\Utilities folder on the
Installation disc.
●
A system key that enables the integration and the appropriate number of
voice messaging ports.
UNIVERGE UM8500 INTEGRATION GUIDE
Integration
description
How the integration works
SV8500 IP Protims integration uses a network connection to connect messaging
system server with the phone system. Each voice messaging port emulates an
IP-VPS extension. The communication between the parties is facilitated by a
series of Voice over IP (VOIP) protocols, such as DRS, Protims, RTP, H245, Voice
control, used for call signaling and voice streaming, some of them being NEC
proprietary protocols.
Integration features
The SV8500 IP Protims integration with UNIVERGE UM8500 provides the
following features:
●
Call forward to personal greeting. When an incoming call is routed to an
unanswered or busy extension, the call is forwarded to the subscriber’s voice
mail. The caller then hears the subscriber’s personal greeting and can leave a
message.
●
●
●
●
Caller ID. UM8500 receives caller ID information from the phone system.
This information displays in the message’s subject line in Microsoft Office
Outlook® or other desktop messaging application.
Easy message access. A subscriber can retrieve messages without entering
an ID. UM8500 identifies a subscriber based on the extension from which the
call originated. A password might be required.
Identified subscriber messaging. UM8500 automatically identifies a
subscriber who leaves a message during a forwarded internal call based on
the extension from which the call originated.
Message waiting indication (MWI). When a message is waiting for a
subscriber, UM8500 notifies the phone system to activate the message
waiting indicator on the subscriber’s extension.
NEC UNIVERGE SV8500 WITH IP PROTIMS
243
Programming
the phone
system
If programming options other than those described in the following procedures
are used, the integration’s performance might be affected.
NOTE
The following procedures are written on the assumption that you
will use the SV8500 PCPro Software to program the phone system.
To program the IP voice messaging ports in the phone
system
1 Make sure that the SV8500 phone system has licenses for using IP extensions
by using the DPTR command.
2 Configure the voice messaging ports as IP-VPS extensions by using the AISTL
command to set “KIND = IP VPS” and “TEC = 26.”
Assign the ports successive VPS channels, starting with “IP VPS CH = 0.”
3 Write down the VPS ID value of the voice messaging ports, for use during the
UM8500 installation. Enter the value when the UNIVERGE UM8500
installation wizard asks for this value.
CAUTION
All voice messaging ports must have the same value assigned for
VPS ID.
4 Write down the MWI analog codes that the SV8500 phone system uses for
turning the phones lamps on and off. These codes are needed when
configuring UM8500 to work with the integration.
NOTE
The SV8500 phone system may not have any settings made to use
codes for MWI analog operations. If this is the case, use the ANPD
and ASPA commands to set “SRV=SSCA” and “SIDA=54 / 55.”
5 Specify a Service Feature Restriction Class (SFC) for the voice messaging ports
by using the ASFC command. It is recommended that all of the voice
messaging ports be placed in their own SFC. The following Service Feature
Indexes (SFIs) are needed in the SFC:
SFI
Service feature
10
Call hold
103
Assignment of no answer timer for blind transfer
to station or blind transfer to attendant
104
Blind transfer
6 Assign all of the voice messaging ports to a Uniform Call Distribution (UCD)
group using the ASHU command.
7 Set the same location ID for all voice messaging ports and set either or both of
the codecs G711, U-Law or A-Law, and G729A with payload size equal to 40
milliseconds for that location ID using the commands ALOCL and AIVCL.
NOTE
To associate the voice messaging ports with a specific location,
add the IP address of the messaging system server to that
location.
244
UNIVERGE UM8500 INTEGRATION GUIDE
Configuring
UNIVERGE
UM8500 for the
integration
After ensuring that the messaging system server is ready for the integration by
completing all appropriate tasks in the Installation Guide, perform the following
procedure to confirm that the integration is enabled.
To confirm that the integration is enabled
1 In Internet Explorer, go to the UM8500 Administrator
(http://<server name>/saweb).
2 Go to System > Licensing > Licensed Features.
3 In the Integration box, confirm that the setting is IP Protims.
4 If the setting is not IP Protims, contact a sales representative for the
necessary system key.
5 Go to System > Switch. Confirm that the settings match those in the
following table.
If the settings are incorrect, integration features might not be enabled.
Phone system settings
Parameter
Required setting
Manufacturer
NEC
Model
UNIVERGE SV8500
Switch Software Version
IP Protims ports display like
DTERM_E
IP Protims ports display like
DTERM_III
Integration
VOIP-Protims
NOTE
The software version used depends on the phone system settings.
Check the parameter ASYDL 672. If bit b1=1, the software version
must be “IP Protims ports display like DTERM_E". Otherwise, the
software version must be "IP Protims ports display like
DTERM_III".
6 Enter the MWI analog codes that the SV8500 phone system uses for turning
the phones lamps on and off. Save the changes.
7 Stop UNIVERGE UM8500.
8 Run VOIPAdmin.exe from Commserver\Utilities folder.
The VoipAdmin Tool appears.
9 Enter IP address of the phone system.
10 Set the general functionality for the ports as VPS and enter the VPS number.
11 Under Manage ports, click Add to add a new port.
■
Enter the Extension, Password, and VPS channel for each port.
12 If the system uses one or more IP PADs, under Manage Gateways click Add.
■
Enter the IP Address and set the Has DSP to 0 for each gateway.
13 Click OK to save the changes and then close VOIPAdmin.
14 Start UNIVERGE UM8500.
15 In Internet Explorer, go to the UM8500 Administrator
(http://<server name>/saweb).
NEC UNIVERGE SV8500 WITH IP PROTIMS
245
16 Go to System > Ports and check the extension of each port displayed in the
Port Table section of the page. If the extensions are incorrect, stop UM8500,
verify the PBX settings made for the voice messaging ports, see “To program
the IP voice messaging ports in the phone system” on page 244, and use the
VOIPAdmin tool to make the necessary adjustments.
246
UNIVERGE UM8500 INTEGRATION GUIDE
■ NEC UNIVERGE SV8500 with
LAN MCI
In this integration...
Integration overview ........................................................................... 248
Integration steps ............................................................................ 248
Requirements ................................................................................ 248
Integration description ........................................................................ 249
How the integration works ............................................................... 249
Integration features ........................................................................ 249
Programming the phone system............................................................ 250
Programming the phone system steps ............................................... 250
Configuring the UNIVERGE UM8500 for integration .................................. 254
Configuring UNIVERGE UM8500 ports................................................ 255
NEC UNIVERGE SV8500 WITH LAN MCI
247
Integration
overview
Use this section of the Integration Guide with the Installation Guide.
Integration steps
Follow these steps to set up this integration.
1 Review the system and equipment requirements.
Verify that all phone system and messaging system server requirements have
been met. See “Requirements,” below.
2 Program the phone system and extensions.
See “Programming the phone system” on page 250.
3 Configure UNIVERGE UM8500 for the integration.
See “Configuring the UNIVERGE UM8500 for integration” on page 254.
Requirements
The steps to set up the NEC UNIVERGE SV8500 Message Center Interface (MCI)
integration with a LAN interface require the following:
Phone System
●
A SV8500 phone system with LAN MCI.
●
A network connection to the UNIVERGE UM8500 server.
●
One or more of the following station ports set up as voice messaging ports:
Port type
Description
Digital
One digital station port for each voice messaging
port.
IP-VPS
One IP-VPS port for each voice messaging port.
IP Terminal
One IP Terminal port for each voice messaging
port.
UNIVERGE UM8500 server
●
A network connection with the phone system.
●
The Dialogic voice boards installed; see the Installation Guide for installation
details.
NOTE
●
●
248
For the latest information on supported voice boards for UM8500,
contact a sales representative.
No voice boards are required if IP-VPS or IP Terminal ports are used.
●
UNIVERGE UM8500 installed and ready for the integration as described in
the Installation Guide.
●
A system key that enables the integration and the appropriate number of
voice messaging ports.
UNIVERGE UM8500 INTEGRATION GUIDE
Integration
description
How the integration works
The LAN MCI integration uses a network connection to transmit the integration
information between UNIVERGE UM8500 server and the phone system.
The phone system sends the following information through the LAN connection:
●
The extension of the called party
●
The extension of the calling party, for internal calls, or the phone number of
the calling party if it is an external call and the system uses caller ID
●
The reason for the forward, for example the extension is busy, does not
answer, or is set to forward all calls
UM8500 uses this information to answer the call appropriately. For example, a call
forwarded from a subscriber extension to UM8500 is answered with the personal
greeting of the subscriber. If the phone system routes the call to UM8500 without
this information, UM8500 answers with the opening greeting.
The UM8500 systems controls message indications by sending on and off codes to
the phone system through the LAN connection.
Integration features
The LAN MCI integration with UNIVERGE UM8500 provides the following
features:
●
Call forward to personal greeting. When an incoming call is routed to an
unanswered or busy extension, the call is forwarded to the subscriber’s voice
mail. The caller then hears the subscriber’s personal greeting and can leave a
message.
●
●
●
●
Caller ID. UM8500 receives caller ID information from the phone system, if
available. This information is displayed in the message’s subject line in
Microsoft Office Outlook® or other desktop messaging application.
Easy message access. A subscriber can retrieve messages without entering
an ID. UM8500 identifies a subscriber based on the extension from which the
call originated. A password might be required.
Identified subscriber messaging. UM8500 automatically identifies a
subscriber who leaves a message during a forwarded internal call based on
the extension from which the call originated.
Message waiting indication (MWI). When a message is waiting for a
subscriber, UM8500 notifies the phone system to activate the message
waiting indicator on the subscriber’s extension, if it is equipped with one, or
to activate a stutter dial tone.
NOTE
The MWI over CCIS through LANMCI integration only works if a
closed numbering plan is used.
NEC UNIVERGE SV8500 WITH LAN MCI
249
Programming
the phone
system
If programming options other than those specified in the following procedure are
used, the integration performance might be affected.
NOTE
The following procedures are written on the assumption that you
will use the SV8500 PCPro software to program the phone system.
Programming the phone system steps
1 Program the voice messaging ports. The procedure used
depends on the port type the system is using.
■ For digital ports, see “To program the digital ports” on page 250.
■
For IP-VPS ports, see “To program the IP-VPS ports” on page 250.
■
For IP Terminal ports, see “To program the IP Terminal ports” on
page 251.
2 Program the phone system
Complete programming the phone system. See “To complete programming
the phone system” on page 252.
To program the digital ports
1 Specify a Service Feature Restriction Class (SFC) for all voice messaging ports
using the ASFC command.
The following Service Feature Indexes (SFIs) are needed in the SFC:
SFI
Service feature
10
Call hold
103
Assignment of no answer timer for blind transfer
to station or blind transfer to attendant
104
Blind transfer
2 Assign a value of 26 to the Telephony Equipment Class (TEC) for each voice
messaging port using the ASDT command. Use the SFC previously created.
3 Assign all voice messaging ports to a UCD group.
4 Complete programming the phone system. See “To complete programming
the phone system” on page 252.
To program the IP-VPS ports
1 Make sure that the SV8500 system has enough IP licenses using the DPTR
command.
2 Configure the voice messaging ports as IP-VPS extensions using AISTL
command, KIND=IP VPS, TEC = 26.
3 Assign the IP-VPS NO. and assign successive IP-VPS channels, starting with
IP-VPS CH= 0.
4 Write down the IP-VPS NO. and IP-VPS CH value of the voice messaging ports,
so the value is available when the UNIVERGE UM8500 installation wizard
asks for it.
CAUTION
●
●
250
All voice messaging ports must have the same value assigned for
IP-VPS NO.
Make sure the phone system is using the Protected Login Mode for
the voice mail IP ports registration and set the password of each port
to be the same with the port extension.
UNIVERGE UM8500 INTEGRATION GUIDE
5 Specify a Service Feature Restriction Class (SFC) for the voice messaging
ports, see the ASFC command. It is recommended that all voice messaging
ports be placed in their own SFC. The following Service Feature Indexes (SFIs)
are needed in the SFC:
SFI
Service feature
10
Call hold
103
Assignment of no answer timer for blind transfer
to station or blind transfer to attendant
104
Blind transfer
6 Assign all of the voice messaging ports to a Uniform Call Distribution (UCD)
group using ASHU command.
NOTE
If the phone system that hosts the voice messaging ports
extensions is part of a NEC Fusion network and those ports need
to be accessible from the other Fusion nodes, then the UCD must
be configured to contain the logical numbers corresponding with
the ports extensions, see the ALGSN, ASHUN commands.
CAUTION
Do not use a phantom single line extension for the UCD pilot
number.
7 Complete programming the phone system. See “To complete programming
the phone system” on page 252.
To program the IP Terminal ports
1 Make sure that the SV8500 system has enough IP licenses using the DPTR
command.
2 Configure the voice messaging ports as IP Terminal extensions using the
AISTL command, KIND=IP DTERM, TEC = 12.
3 Make sure the phone system is using the Protected Login Mode for the voice
mail IP ports registration and set the password of each port to be the same
with the port extension.
4 Specify a Service Feature Restriction Class (SFC) for the voice messaging
ports, see the ASFC command. It is recommended that all voice messaging
ports be placed in their own SFC. The following Service Feature Indexes (SFIs)
are needed in the SFC:
SFI
Service feature
10
Call hold
103
Assignment of no answer timer for blind transfer
to station or blind transfer to attendant
104
Blind transfer
5 Assign all of the voice messaging ports to a Uniform Call Distribution (UCD)
group (see command ASHU).
NOTES
●
●
Logical numbers appear only in a NEC Fusion network and are used
to uniquely identify all the extensions in the network.
If the phone system that hosts the voice messaging ports extensions
is part of a NEC Fusion network and those ports need to be accessible
from the other Fusion nodes, then the UCD must be configured to
contain the logical numbers corresponding with the ports extensions,
see the commands ALGSN, ASHUN.
NEC UNIVERGE SV8500 WITH LAN MCI
251
CAUTION
Do not use a phantom single line extension for the UCD pilot
number.
6 Complete programming the phone system. See “To complete programming
the phone system” on page 252.
To complete programming the phone system
1 Set the interface type for MCI to LAN using command ASYDL, index 833, bit
b0 and b1 must be set to 1.
NOTE
In a NEC Fusion network, the phone system that contains
the extensions of the voice messaging ports must be the
one that also sends the integration data to the UNIVERGE
UM8500 through the LAN MCI module.
2 Program each phone to forward calls to the UCD pilot number assigned to the
voice messaging ports based on the UM8500 call transfer type:
Release to switch transfer. Program the phone to forward calls to the
UCD pilot number when:
■
The extension is busy or,
■
The call is not answered.
Supervised transfer. Program the phone to forward calls to the UCD pilot
number only when the call is not answered. Confirm that call forwarding is
disabled when extension is busy.
Programming system data ASYD
System
1
Index
Bit
Description
17
b4
1
Blind transfer to attendant console
28
b0–4
0
Guard timer not required
b5
1
MWI controlled by MCI
34
b1–4
0
Set output to no parity and 1 stop bit
60
b3
0
UCD queuing required
63
b0
1
Blind transfer for stations in service
69
b0
1
No recall, execute call forwarding on
no answer
70
b0
1
Called number display, when
forwarding to attendant console
77
b2
0
MWI refresh required
78
2
Value
b0
1
Calling number display enabled
b1
1
Called station status display enabled
238
b0–7
0
Lamp flash rate
246
b3
0
MCI expansion set to normal
400
b2
1
Calling number information sent to
MCI
6
b0
1
MCI in service when terminating to a
UCD group
7
b1
0
MCI out of service when terminating to
attendant console
Programming system data local data ASYDL
252
System
Index
Bit
Value
Description
1
641
b1
0/1
0/1: MCI/IMX station number/phone
number
UNIVERGE UM8500 INTEGRATION GUIDE
Programming system data local data ASYDL
System
Index
Bit
Value
Description
832
b0–7
00–FD
Assign the FPC of the node connected
to MC
833
b0
1
Interface type for MCI:
b1
1
0/1 = RS-232C interface/LAN interface
0/1: ICS/IMX format
NEC UNIVERGE SV8500 WITH LAN MCI
253
Configuring the
UNIVERGE
UM8500 for
integration
After ensuring that the messaging system server is ready for the integration by
completing all appropriate tasks in the Installation Guide, perform the following
procedures to confirm that the integration is enabled, to configure the LAN MCI
parameters, and to configure the UNIVERGE UM8500 ports.
To confirm that the integration is enabled
1 Click Start > All Programs > UNIVERGE UM8500 > Edit Switch.
2 If prompted for logon credentials, type the administrator extension and
password, then click OK.
On a new install the logon credentials are:
Extension = 99995
Password = 12345
3 Confirm that the settings match those in the following tables.
Phone settings for integrations with digital ports
Parameter
Required setting
Manufacturer
NEC
Model
NEAX 2400 IMS
Switch PBX software
version
4203 and later with digital boards
and LANMCI
Integration
LANMCI
Phone settings for integrations with IP Terminal or IP-VPS
ports
Parameter
Required setting
Manufacturer
NEC
Model
NEAX2400 IMS
Switch PBX software
version
Software Release 16 or later with
IP ports
Integration
LANMCI
4 If the settings are incorrect, select the correct settings and click Update
Voice Mail Now.
254
UNIVERGE UM8500 INTEGRATION GUIDE
To configure LAN MCI parameters
1 Shut down UNIVERGE UM8500 before setting the following parameters.
2 Click Start > Programs > UNIVERGE UM8500 group > Edit Switch
Utility.
3 Ensure the current phone system file is correct and then click Edit this
Switch Configuration.
4 In the Switch Configuration window, click the Integration tab.
5 In the PBX Connection Settings section, enter the IP address of the phone
system that provides UNIVERGE UM8500 server with the integration data.
6 Enter the type of parity check used for LANMCI module in phone system, this
can be odd or even, in Parity field. See the command ASYD, index 34, b1
through b4.
7 Enter the ID number of a free LANMCI device in Device ID field. NEC
UNIVERGE SV8500 offers 2 devices (0 and 1) and UM8500 can connect and
receive MCI (Message Center Interface) data from either.
8 If the phone system is configured to use office codes for internal extensions,
the office code must be entered in the Ignored Prefixes and Ignored VM
Prefixes fields of the Edit Switch Utility > Integration tab. To check
whether the phone system uses office codes:
■
Use command ASYD, confirm that index 240, bit b4 is set to 0.
■
Write down the office code that the phone system uses for internal calls.
■
Check to see if the phone system is not set to remove the office code from
MCI packets, see the ASYD command, index 370, bit b1 is set to 0.
■
Return to Edit Switch Utility > Integration tab. Enter the office code
recorded above in the Ignored Prefixes field and Ignored VM
Prefixes field. Otherwise, leave the two edit boxes blank (ASYD, index
240, bit b4 is not set to 0 or ASYD, index 370, bit b1 is not set to 0).
NOTE
An office code is usually introduced to distinguish the extensions
of different phone systems that communicate through a CCIS
connection. This office code can not be dialed; it appears only in
the integration data and on the screen display of the phones for
calls over CCIS.
9 Leave the other settings at the default values and then click OK to save the
changes and close Edit Switch utility.
Configuring UNIVERGE UM8500 ports
Configure the UM8500 voice ports. The procedure used depends on the port type
the system is using.
●
For IP-VPS or IP Terminal ports, see “To configure IP-VPS or IP Terminal
ports” on page 256.
●
For digital ports, see “To configure Digital ports” on page 256.
NEC UNIVERGE SV8500 WITH LAN MCI
255
To configure IP-VPS or IP Terminal ports
1 Stop the UNIVERGE UM8500.
2 Run VOIPAdmin.exe from Commserver\Utilities folder.
The VoipAdmin Tool appears.
3 Enter the PBX IP address.
4 Set the general functionality for the ports (VPS or Terminal.)
If the system has VPS ports, enter the VPS Number.
5 Under Manage ports, click Add to add a new port.
Enter the Extension and Password for each port.
If the system has VPS ports, enter the VPS Channel for each port.
6 If the system uses one or more IP PADs, under Manage Gateways, click Add.
Enter the IP Address and set the Has DSP to 0 for each gateway.
7 Click OK to save the changes and then close VOIPAdmin.
8 Restart UNIVERGE UM8500.
To configure Digital ports
1 Make sure that UNIVERGE UM8500 is running.
2 In Internet Explorer, go to the UM8500 Administrator
http://<server name>/saweb
3 Go to System > Ports. Type the extension of each port. These extensions
must be introduced as station numbers, not logical numbers and without the
office codes, if they have any. Save the changes.
256
UNIVERGE UM8500 INTEGRATION GUIDE
■ NEC UNIVERGE SV8500 with
serial MCI
In this integration...
Integration overview ........................................................................... 258
Integration steps ............................................................................ 258
Requirements ................................................................................ 258
Integration description ........................................................................ 259
How the integration works ............................................................... 259
Integration features ........................................................................ 259
Programming the phone system............................................................ 260
Programming the phone system steps ............................................... 260
Configuring UNIVERGE UM8500 for the integration .................................. 264
Configuring UNIVERGE UM8500 ports................................................ 264
NEC UNIVERGE SV8500 WITH SERIAL MCI
257
Integration
overview
Use this section of the Integration Guide with the Installation Guide.
Integration steps
Follow these steps to set up this integration.
1 Review the system and equipment requirements.
Verify that all phone system and messaging system server requirements have
been met. See “Requirements,” below.
2 Program the phone system and extensions.
See “Programming the phone system” on page 260.
3 Configure UNIVERGE UM8500 for the integration.
See “Configuring UNIVERGE UM8500 for the integration” on page 264.
4 Test the phone extensions.
Test the phone extensions that are set up for the integration. See Appendix B,
“Testing the extensions” on page 338.
5 Run the Learn Tones utility.
Run the Learn Tones utility to teach the messaging system the tones
associated with the phone system. See Appendix C, “Learning phone system
tones” on page 340.
Requirements
The steps to set up the NEC SV8500 with Message Center Interface (MCI)
integration with a serial interface require the following:
Phone system
●
A UNIVERGE SV8500 phone systems with MCI:
●
One IOC serial port for the MCI data link connected to a serial port, COM1 is
the default, on the voice mail server with a PH-68 two-port cable and an RS232C CA-1 cable.
●
One or more of the following station ports set up as voice messaging ports:
Port type
Description
Digital
One digital station port for each voice messaging port.
IP-VPS
One IP-VPS port for each voice messaging port.
IP Terminal
One IP Terminal port for each voice messaging port.
UNIVERGE UM8500 server
●
The Dialogic voice boards installed; see the Installation Guide for installation
details.
NOTE
For the latest information on supported voice boards for UM8500,
contact a sale representative.
258
●
UM8500 installed and ready for the integration as described in the
Installation Guide.
●
A system key that enables the integration and the appropriate number of
voice messaging ports.
●
An available serial port, COM1 is the default.
UNIVERGE UM8500 INTEGRATION GUIDE
Integration
description
How the integration works
The SV8500 serial MCI integration uses a data link, which consists of an RS-232
serial cable connecting the phone system IOC port to the voice mail server. The
phone system voice messaging lines connect to the digital voice boards in the
voice mail server or using the LAN in case of IP-VPS or IP terminal ports.
The phone system sends the following information through the data link:
●
The called party’s extension
●
The reason for the forward (the extension is busy, does not answer, or is set to
forward all calls)
●
The calling party’s extension (for internal calls)
UM8500 uses this information to answer the call appropriately. For example, a call
forwarded from a subscriber extension to UM8500 is answered with the
subscriber’s personal greeting. If the phone system routes the call to UM8500
without this information, UM8500 answers with the opening greeting.
Integration features
The UNIVERGE SV8500 serial MCI integration with UM8500 provides the
following features:
Call forward to personal greeting. When an incoming call is routed to an
unanswered or busy extension, the call is forwarded to the subscriber’s voice
mail. The caller then hears the subscriber’s personal greeting and can leave a
message.
Caller ID. UM8500 receives caller ID information from the phone system, if
available. This information is displayed in the message’s subject line in
Microsoft Office Outlook® or other desktop messaging application.
Easy message access. A subscriber can retrieve messages without entering
an ID. UM8500 identifies a subscriber based on the extension from which the
call originated. A password might be required.
Identified subscriber messaging. UM8500 automatically identifies a sub-
scriber who leaves a message during a forwarded internal call based on the
extension from which the call originated.
Message waiting indication (MWI). When a message is waiting for a
subscriber, UM8500 notifies the phone system to activate the message
waiting indicator on the subscriber’s extension.
NEC UNIVERGE SV8500 WITH SERIAL MCI
259
Programming
the phone
system
Perform the following procedure to program the phone system for the integration.
Using programming options other than those described in the following
procedure can affect system performance.
NOTE
The following procedure is written on the assumption that you will
use the SV8500 PCPro software to program the phone system.
Programming the phone system steps
1 Program the voice messaging ports. The procedure used
depends on the port type the system is using.
■ For digital ports, see “To program the digital ports” on page 260.
■
For IP-VPS ports, see “To program the IP-VPS ports” on page 260.
■
For IP Terminal ports, see “To program the IP Terminal ports” on
page 261.
2 Program the phone system
Complete programming the phone system. See “To complete programming
the phone system” on page 262.
To program the digital ports
1 Specify a Service Feature Restriction Class (SFC) for all voice messaging ports
using the ASFC command.
The following Service Feature Indexes (SFIs) are needed in the SFC:
SFI
Service feature
10
Call hold
103
Assignment of no answer timer for blind transfer
to station or blind transfer to attendant
104
Blind transfer
2 Assign a value of 26 to the Telephony Equipment Class (TEC) for each voice
messaging port using the ASDT command. Use the SFC previously created.
3 Assign all voice messaging ports to a UCD group.
4 Complete programming the phone system. See “To complete programming
the phone system” on page 262.
To program the IP-VPS ports
1 Make sure that the SV8500 system has enough IP licenses using the DPTR
command.
2 Configure the voice messaging ports as IP-VPS extensions using AISTL
command, KIND=IP VPS, TEC = 26.
3 Assign the IP-VPS NO. and assign successive IP-VPS channels, starting with
IP-VPS CH= 0.
4 Write down the IP-VPS NO. and IP-VPS CH value of the voice messaging ports,
so the value is available when the UNIVERGE UM8500 installation wizard
asks for it.
CAUTION
●
●
260
All voice messaging ports must have the same value assigned for
IP-VPS NO.
Make sure the phone system is using the Protected Login Mode for
the voice mail IP ports registration and set the password of each port
to be the same with the port extension.
UNIVERGE UM8500 INTEGRATION GUIDE
5 Specify a Service Feature Restriction Class (SFC) for the voice messaging
ports, see the ASFC command. It is recommended that all voice messaging
ports be placed in their own SFC. The following Service Feature Indexes (SFIs)
are needed in the SFC:
SFI
Service feature
10
Call hold
103
Assignment of no answer timer for blind transfer
to station or blind transfer to attendant
104
Blind transfer
6 Assign all of the voice messaging ports to a Uniform Call Distribution (UCD)
group using ASHU command.
NOTE
If the phone system that hosts the voice messaging ports
extensions is part of a NEC Fusion network and those ports need
to be accessible from the other Fusion nodes, then the UCD must
be configured to contain the logical numbers corresponding with
the ports extensions, see the ALGSN, ASHUN commands.
CAUTION
Do not use a phantom single line extension for the UCD pilot
number.
7 Complete programming the phone system. See “To complete programming
the phone system” on page 262.
To program the IP Terminal ports
1 Make sure that the SV8500 system has enough IP licenses using the DPTR
command.
2 Configure the voice messaging ports as IP Terminal extensions using the
AISTL command, KIND=IP DTERM, TEC = 12.
3 Make sure the phone system is using the Protected Login Mode for the voice
mail IP ports registration and set the password of each port to be the same
with the port extension.
4 Specify a Service Feature Restriction Class (SFC) for the voice messaging
ports, see the ASFC command. It is recommended that all voice messaging
ports be placed in their own SFC. The following Service Feature Indexes (SFIs)
are needed in the SFC:
SFI
Service feature
10
Call hold
103
Assignment of no answer timer for blind transfer
to station or blind transfer to attendant
104
Blind transfer
5 Assign all of the voice messaging ports to a Uniform Call Distribution (UCD)
group (see command ASHU).
NOTES
●
●
Logical numbers appear only in a NEC Fusion network and are used
to uniquely identify all the extensions in the network.
If the phone system that hosts the voice messaging ports extensions
is part of a NEC Fusion network and those ports need to be accessible
from the other Fusion nodes, then the UCD must be configured to
contain the logical numbers corresponding with the ports extensions,
see the commands ALGSN, ASHUN.
NEC UNIVERGE SV8500 WITH SERIAL MCI
261
CAUTION
Do not use a phantom single line extension for the UCD pilot
number.
6 Complete programming the phone system. See “To complete programming
the phone system” on page 262.
To complete programming the phone system
1 Program each phone to forward calls to the UCD pilot number assigned to the
voice messaging system ports, based on the UM8500 call transfer type:
Release to switch transfer. Program the phone to forward calls to the
UCD pilot number when:
■
The extension is busy;
or,
■
The call is not answered.
Supervised transfer. Program the phone to forward calls to the UCD pilot
number only when the call is not answered. Confirm that call forwarding is
disabled when the extension is busy.
2 Set up the RS-232 serial data port for AIOC settings as follows:
■
9600 baud
■
8 data bits
■
1 stop bit
■
No parity
3 If a remote maintenance modem is used, program the modem line for data
line security.
4 Use the AUCD command to program the phone system to send UCD call
information to MCI. Assign a value of 0 to the MCI Data Transfer field for
the appropriate tenant and UCD pilot numbers.
5 Use the programming system data table to program the ASYD settings. Each
bit is part of a hexadecimal number displayed in the ASYD settings. Convert
the hexadecimal number to binary to determine the individual settings.
6 Use the programming system data local data table to program the ASYDL
settings. Each bit is part of a hexadecimal number displayed in the ASYDL
settings. Convert the hexadecimal number to binary to determine the
individual settings.
Programming system data ASYD
System
Index
Bit
Value
Description
1
17
b4
1
Blind transfer to attendant console
28
b0–4
0
Guard timer not required
b5
1
MWI controlled by MCI
29
b1–7
0/1
No/Yes: Assign I/O port for MCI output
34
b1–4
0
Set output to no parity and 1 stop bit
60
b3
0
UCD queuing required
63
b0
1
Blind transfer for stations in service
69
b0
1
No recall, execute call forwarding on no answer
70
b0
1
Called number display, when forwarding to attendant console
77
b2
0
MWI refresh required
78
b0
1
Calling number display enabled
b1
1
Called station status display enabled
Port 1 = b1, port 2 = b2, and so on
262
UNIVERGE UM8500 INTEGRATION GUIDE
Programming system data ASYD
System
2
Index
Bit
Value
Description
238
b0–7
0
Lamp flash rate
246
b3
0
MCI expansion set to normal
400
b2
1
Calling number information sent to MCI
6
b0
1
MCI in service when terminating to a UCD group
7
b1
0
MCI out of service when terminating to attendant console
Programming system data local data ASYDL
System
Index
Bit
Value
Description
1
641
b1
0/1
0/1: MCI/IMX station number/phone number
832
b0–7
00–FD
Assign the FPC of the node connected to MC
833
b0
0
IOC serial interface enabled for MCI
b1
0
0/1: ICS/IMX format
NEC UNIVERGE SV8500 WITH SERIAL MCI
263
Configuring
UNIVERGE
UM8500 for the
integration
After ensuring that the voice mail server is ready for the integration by completing
all appropriate tasks in the Installation Guide, perform the following procedure to
confirm that the integration is enabled.
To confirm that the integration is enabled
1 Click Start > All Programs > UNIVERGE UM8500 > Edit Switch.
2 If prompted for logon credentials, type the administrator extension and
password, then click OK.
On a new install the logon credentials are:
Extension = 99995
Password = 12345
3 Confirm that the settings match those in the following tables.
Phone system settings for integrations with digital ports
Parameter
Required setting
Manufacturer
NEC
Integration
NEAX2400 IMS
Switch PBX software version 4203 and later with digital boards
and MCI
Integration
Serial
Phone system settings with IP Terminal or IP-VPS ports
Parameter
Required setting
Manufacturer
NEC
Integration
NEAX2400 IMS
Switch PBX software version Software release 16 or later with
IP ports
Integration
Serial
4 If the settings are incorrect, select the correct settings and click Update
Voice Mail Now.
Configuring UNIVERGE UM8500 ports
Configure the UM8500 voice ports. The procedure used depends on the port type
the system is using.
●
For IP-VPS or IP Terminal ports, see “To configure IP-VPS or IP Terminal
ports” on page 264.
●
For digital ports, see “To configure Digital ports” on page 265.
To configure IP-VPS or IP Terminal ports
1 Stop the UNIVERGE UM8500.
2 Run VOIPAdmin.exe from Commserver\Utilities folder.
The VoipAdmin Tool appears.
3 Enter the PBX IP address.
4 Set the general functionality for the ports (VPS or Terminal.)
If the system has VPS ports, enter the VPS Number.
5 Under Manage ports, click Add to add a new port.
Enter the Extension and Password for each port.
If the system has VPS ports, enter the VPS Channel for each port.
6 If the system uses one or more IP PADs, under Manage Gateways, click Add.
264
UNIVERGE UM8500 INTEGRATION GUIDE
Enter the IP Address and set the Has DSP to 0 for each gateway.
7 Click OK to save the changes and then close VOIPAdmin.
8 Restart UNIVERGE UM8500.
To configure Digital ports
1 Make sure that UNIVERGE UM8500 is running.
2 In Internet Explorer, go to the UM8500 Administrator
http://<server name>/saweb
3 Go to System > Ports. Type the extension of each port. These extensions
must be introduced as station numbers, not logical numbers and without the
office codes, if they have any. Save the changes.
NEC UNIVERGE SV8500 WITH SERIAL MCI
265
266
UNIVERGE UM8500 INTEGRATION GUIDE
■ NEC UNIVERGE SV8500 using
OAI
In this integration...
Integration overview ........................................................................... 268
Integration steps ............................................................................ 268
Requirements ................................................................................ 268
Integration description ........................................................................ 269
How the integration works ............................................................... 269
Integration features ........................................................................ 269
Programming the phone system............................................................ 270
Configuring UNIVERGE UM8500 for the integration .................................. 273
Installing the OAI Integration Server software ........................................ 274
Configuring the OAI Integration Server .................................................. 275
Installing and starting the OAI service ................................................... 278
Testing the OAI integration .............................................................. 278
NEC UNIVERGE SV8500 USING OAI
267
Integration
overview
UNIVERGE UM8500 uses the Open Application Interface (OAI) to integrate with
NEC PBX systems using a TCP/IP link between the UNIVERGE UM8500 server and
the PBX. OAI Integration can be used with IP lines and requires that the OAI
Integration server is installed.
Integration steps
Follow these steps to set up this integration.
1 Review the system and equipment requirements
Verify that all phone system and messaging system server requirements have
been met. See “Requirements” on page 268.
2 Program the phone system and extensions.
See “Programming the phone system” on page 270.
3 Configure UNIVERGE UM8500 for the integration.
See “Configuring UNIVERGE UM8500 for the integration” on page 273.
4 Install the OAI Integration Server software.
See “Installing the OAI Integration Server software” on page 274.
5 Configure the OAI Integration Server.
See “Configuring the OAI Integration Server” on page 275.
6 Install and start the OAI service.
See “Installing and starting the OAI service” on page 278.
Requirements
The steps to set up the UNIVERGE SV8500 using OAI integration require the
following:
Phone System
●
A UNIVERGE SV8500 phone system.
●
A network connection to the voice mail server.
●
One IP-VPS port for each voice messaging port (TEC26) or one digital station
port for each voice messaging port.
UNIVERGE UM8500 server
●
A network connection with the phone system. A second network card on the
messaging system server to connect directly to the phone system is
recommended.
●
The Dialogic voice boards installed; see the Installation Guide for installation
details.
NOTE
●
●
268
For the latest information on supported voice boards for UM8500,
contact a sales representative.
No voice boards are required if IP-VPS or IP Terminal ports are used.
●
UM8500 installed and ready for the integration as described in the
Installation Guide.
●
OAI Integration server installed.
●
A system key that enables the integration and the appropriate number of
voice messaging ports.
UNIVERGE UM8500 INTEGRATION GUIDE
Integration
description
The UNIVERGE UM8500 unified messaging solution can use the Open
Application Interface (OAI) to integrate with the NEC UNIVERGE SV8500 phone
systems. The OAI integration is established over a TCP/IP link between the
messaging system and the NEC phone system.
How the integration works
There are two basic types of OAI integrations:
●
OAI pure integration. This type of integration uses only the TCP/IP link to
connect to the phone system. It has an OAI monitoring slot opened with the
phone system and dispatches calls to enabled voice messaging systems. This
type of OAI Integration provides the most efficient load balancing capability
by dispatching new incoming calls from a monitored number or the voice
mail pilot to free voice mail ports.
●
OAI UCD - LAN/Serial MCI integration. The OAI Integration server uses
complementary Message Center Interface (MCI) integration capabilities
using either the serial or TCP/IP interface. The complementary MCI
integration feature of the OAI Integration server is not a genuine OAI
integration. The integration does work in Common Channel Interoffice
Signaling (CCIS) networked environments between multiple NEC phone
systems when the remote phone systems do not have OAI or their software
revision does not feature call-forwarding information in the OAI layer. The
MCI link is used as complementary integration support for situations where
the OAI layer does not provide full integration, such as in older, legacy phone
system environments.
Integration features
The UNIVERGE SV8500 OAI integration with UNIVERGE UM8500 provides the
following features:
●
Call forward to personal greeting. When an incoming call is routed to an
unanswered or busy extension, the call is forwarded to the subscriber’s voice
mail. The caller then hears the subscriber’s personal greeting and can leave a
message.
●
●
●
●
Caller ID. UM8500 receives caller ID information from the phone system, if
available. This information is displayed in the message’s subject line in
Microsoft Office Outlook® or other desktop messaging application.
Easy message access. A subscriber can retrieve messages without entering
an ID. UM8500 identifies a subscriber based on the extension from which the
call originated. A password might be required.
Identified subscriber messaging. UM8500 automatically identifies a
subscriber who leaves a message during a forwarded internal call based on
the extension from which the call originated.
Message waiting indication (MWI). When a message is waiting for a
subscriber, UM8500 notifies the phone system to activate the message
waiting indicator on the subscriber’s extension, if it is equipped with one, or
to activate a stutter dial tone.
●
Live Record. A subscriber can record a phone conversation by pressing the
Live Record button on the Dterm phone. The recording can be saved in the
subscriber’s mailbox for later reference, or forwarded to another subscriber or
group of subscribers.
NEC UNIVERGE SV8500 USING OAI
269
Programming
the phone
system
If programming options other than those supplied in the following procedures are
used, the integration performance might be affected.
The steps used to program the phone system depends on the phone system being
used.
NOTE
The following procedures are written on the assumption that you
will use a SV8500 PCPro software application to program the
phone system.
To set up the UNIVERGE SV8500
1 Use the following table to configure the phone system OAI settings for
integration:
Cmd
Sys Index Bit Value Sample Description
ASYD
1
4
4
1
59
Enable RCS Check from OAI
1
17
0
1
15
Enable switch while ringing
1
19
5
1
20
0 = Enable ETF, 1 = Disable
ETF
1
27
4
0
00
0 = Enable MCI, CCIS, ISDN,
MW, 1 = Disable MCI, CCIS,
ISDN, MW
1
27
6
0
00
0 = Enable OAI, 1 = Enable
OAI
1
31
2
1
06
CM Page (Name Display)
1
63
6
1
C1
Enable Call Fwd detail in STS
SMFN
1
63
7
0/1
C1
0 = External OAI, 1 =
Internal OAI
1
79
6
0
00
0 = Enable OAI/ACD services,
1 = Disable OAI/ACD services
1
80
2
1
04
0 = Clear OAI display, 1 =
Leave OAI display
1
86
6
0
93
0 = English, 1 = Japan
1
186
0
1
61
Enable CCIS link-reconnect
1
241
2
1
0E
LP sends SMFNs to IP
1
241
3
1
0E
Enable detail error codes
1
299
2
0
00
Must be 0
1
370
0
1
01
Enable expanded SMFN
1
439
0
1
01
Enable Call Fwd info over
CCIS
1
449
3
1
08
0 = Hex ANI data for ISDN
trunk, 1 = /ASCII data for
ISDN trunk
2
2
5
1
2B
Enable loop release
864
0
1
11
Internal IP/ACDP in Service
(SVI 1758)
ASYDL 1
0 = No, 1 = Yes
1
864
4
1
11
Maximum number of SMFN
Output port (SVI 1792)
0 = 2 Ports, 1= * Ports
(normal)
RSVI
270
SVI 1650
1
1
Call Fwd status for answer
SMFN
SVI 1755
1
1
Call Fwd reason enhancement
(over CCIS)
SVI 1760
1
1
Release SMFN enhancement
UNIVERGE UM8500 INTEGRATION GUIDE
2 If using an OAI pure integration, use the following table to configure the OAI
pilot number. In the example below, extension 299 is the voice mail pilot
number:
Command (Description)
Parameter
AMNO (Assignment of Monitored Number) A/G
Value
A
TN
1
MNO
299
NMI
1
MFC
0
UCD
0
3 If using the OAI UCD-LAN MCI integration, use the following table to
configure Message Center Interface (MCI). If using an OAI pure integration,
skip this step. The following commands enable MCI over LAN. The settings
made here also need to be enabled in the OAI Server software.
Cmd
Sys Index Bit Value Sample Description
ASYDL 1
833
0
1
03
MCI type:
0 = IOC (Input-Output Card)
this means no MCI
1 = LAN
1
833
1
1
03
MCI text format:
0 = ICS
1 = IMX
1
834
0
1
03
MCI 0 LAN Interface in
service:
0 = No
1 = Yes
1
834
1
1
03
MCI 1 LAN Interface in
service:
0 = No
1 = Yes
ASYD
1
246
3
1
08
MCI Expansion:
0 = Normal
1 = Expanded
1
400
2
1
04
Expanded MCI with ANI Data:
0 = No
1 = Yes
4 If using the OAI UCD-LAN/Serial MCI integration, use the following table to
set up the UCD hunt group. In the example below, the UCD group is
extensions 220-223, with 220 as the pilot.
NOTE
Do not adjust UCD hunt group settings if using an OAI pure
integration.
Cmd
Tenant
ASHU
1
Value
Description
220
Pilot and Port number
221
Port number
222
Port number
223
Port number
NEC UNIVERGE SV8500 USING OAI
271
To set OAI monitored function keys for Live Record
If the Live Record feature will be used in the phone system, verify that the system
has the following settings or that the configuration files are updated. The settings
presented below are the default settings that the OAI server can use.
WARNING
If the default settings below are not used, the corresponding
settings in the OAI Integration software must be set up
accordingly by editing the XML configuration file.
1 Type the AOKC command in the SV8500 PCPro application. The AOKC (OAI
Key Code Data) dialog box appears.
2 Assign the OAI key code data:
The OAI key codes 1 through 14 correspond to AKYD key codes FKY 34
through 47 respectively. By default the OAI Integration server uses the TMF
codes 192-195 for the Live Record commands Record, Pause/Resume, ReRecord and End, respectively.
■
Set F-KIND to 2.
■
Set C-TONE to 1.
3 Save the AOKC key code information.
4 Type the AKYD command in the SV8500 PCPro application. The AKYD
(Dterm Key Data) dialog box appears.
Assign the function key data for the desired Dterm station:
■
Assign FKY 34 through 47 to any positions of KYN 1through 16.
■
The OAI key codes for the SV8500 are FKY 34-47 and by default are
assigned to the third row from the top of function keys on the Dterm
station. This row contains the function keys with ID 9 to 12.
■
Confirm that the my-line is assigned in order to successfully complete
the AKYD command.
5 Click SET or MODIFY to save the information, and then EXIT to close the
SV8500 PCPro application.
272
UNIVERGE UM8500 INTEGRATION GUIDE
Configuring
UNIVERGE
UM8500 for the
integration
After ensuring that the UNIVERGE UM8500 server is ready for the integration by
completing all appropriate tasks in the Installation Guide, perform the following
procedure to confirm that the integration is enabled.
To confirm the integration is enabled
1 Click Start > All Programs > UNIVERGE UM8500 > Edit Switch.
2 If prompted for logon credentials, type the administrator extension and
password, then click OK.
On a new install the logon credentials are:
Extension = 99995
Password = 12345
3 Confirm that the settings match those in the following table.
Phone settings for OAI integrations with digital ports
Parameter
Required setting
Manufacturer
NEC
Model
NEAX2400 IMS
Specific version or
country
HDS R4 and later digital board with
OAI
Integration method
OAI
4 If the settings are incorrect, select the correct settings and click Update
Voice Mail Now.
To update the INI file
1 Using Windows Explorer on the UNIVERGE UM8500 server, go to the
CommServer\IntLib directory.
2 Use a text editor to open the corresponding configuration INI file noted in the
previous procedure.
3 In the [Configuration] section, modify the NetIP1 value:
■
Replace the NetIPI with the exact IP address that the computer is using to
access the same LAN as the phone system.
Example: NetIP1=172.16.19.191.
■
The NetIP1 = the IP address of the computer where UM8500 is installed;
the default value is set to "localhost" but it should be changed because it
is possible for the server machine to have more than one network
interfaces.
4 If using the OAI UCD - LAN MCI integration, under [Configuration], locate
UseInternalParser=no. Change this to
UseInternalParser=yes.
5 Click File > Save, and then close the configuration INI file.
NEC UNIVERGE SV8500 USING OAI
273
Installing the
OAI
Integration
Server
software
Before configuring the OAI integration, the OAI integration software must be
installed on the computer where the UNIVERGE UM8500 is installed.
To install the OAI Integration Server
1 Insert the Installation disc into the disc drive.
2 Click Start > Run.
3 Click Browse, then in the Browse dialog box, open the Voice
Mail\OAIIntegration folder on the disc.
4 Click setup.exe, then click Open.
5 In the Run dialog box, click OK. The installation wizard begins.
6 On the Welcome page, click Next.
7 On the Customer Information page; if the User Name and Customer
Name fields do not have your information, enter your information into the
fields. Select an option indicating whether or not you or anyone else who uses
the computer has access to the program. Click Next.
8 On the Setup Type page, confirm that Typical is selected, then click Next.
9 On the Start Copying Files page, click Next.
10 When setup is complete, click Finish.
A new Program Group, Active Voice, is added to the program list. Two new
applications are added to this program group: AvOAIGear and AvOAITray.
These applications are used to set up the OAI integration parameters.
To choose a predefined template for the integration in the
OAI Integration Server
1 Insert the Installation disc into the disc drive.
2 From the Windows taskbar, click Start > Run.
3 Click Browse, then in the Browse dialog box, open the Voice
Mail\OAIIntegration\OAI Server XML Templates\Single Server folder on the
disc. This will show a group of folders that contain predefined sets of XML
configuration files meant to help choose the best OAI configuration.
Open the appropriate folder for the integration.
■
If using the OAI pure integration, open the NEC SV7000 - OAI Pure No CCIS folder.
■
For an OAI UCD - Serial MCI integration, open the NEC NEAX 2400 OAI-UCD - MCI Serial folder.
■
If using the OAI UCD - LAN MCI integration, open the NEC SV7000 OAI-UCD - MCI LAN folder.
NOTE
The files used for the UNIVERGE SV8500 OAI integration are
the same as those used for the NEC SV7000 OAI integration.
4 From the selected folder, copy and replace the existing AvOAISvr.xml file to
the Program Files\Active Voice\OAIIntegration folder on the UNIVERGE
UM8500 server.
The Program Files folder is usually found on the partition where the Microsoft
Windows was first installed, for example: C:\Program Files\Active
Voice\OAIIntegration.
274
UNIVERGE UM8500 INTEGRATION GUIDE
Configuring the
OAI
Integration
Server
Modify the configuration file to set how calls are handled in the integration.
To configure the OAI Integration Server
1 From the Windows taskbar, click Start > All Programs > Active Voice >
OAI Integration > AVOAITray.
The OAIS icon appears in the notification area, the system tray.
2 Right-click the OAIS icon, then click Advanced.
The OAIGear page appears.
WARNING
If an error message appears indicating the service is not installed,
close the error dialog box and continue with this procedure. The
AV OAI Integration service will automatically install after the
procedure is completed.
3 On the OAIGear toolbar, click the Configuration File icon.
The configuration file for the OAIS parameters appears in an XML editor.
4 In the navigation pane of the configuration file, expand CallPilot1 to
configure the CallPilot.
In the navigation pane, under the CallPilot object, there are some predefined
values for all parameters. Depending on the template chosen, set the
following values:
PBX-IP. Enter the IP address of the phone system. The default value is only
an example.
PBX-Port. Enter the OAI monitoring port of the phone system. The default
value is 60030 for newer phone systems. Modify the default value only if you
know that the phone system is set to a different value.
Tenant. PBX Tenant where the OAI pilot or AMNO number is defined
physically. If using the OAI-UCD MCI LAN integration, this will be the tenant
number where the UCD is configured. This value should match the setting in
the phone system configuration. The default value is 1.
Extension. If the template that enable an OAI pure integration (NEC
SV7000 - OAI Pure - No CCIS) was selected, enter the CallPilot OAI monitored
extension or AMNO number. This extension is usually associated with the
auto attendant and is a virtual number. In this case, this will be the monitored
number that is called to access the voice messaging system. The default value
is just an example.
If the template that enables an OAI UCD - MCI LAN integration (NEC SV7000
- OAI-UCD - MCI LAN) was selected, leave this field blank.
Leave all other parameters not listed above at their default values.
5 If the system uses Live Record, in the navigation pane of the configuration
file, expand the LiveRecord node, and set the following parameters:
NOTE
Skip this step if the system is not using the Live Record feature.
The OAI Live Record feature allows users to make real-time recordings of their
own conversations. The values under this section must be configured to
match the phone system settings of the phones used.
Enabled. This Enables/Disables the Live Record functionality. The default
value is True.
NEC UNIVERGE SV8500 USING OAI
275
TMFC-Record. Enter the Terminal Mode Function Code for the Record
command for Live Record. The default value is 192 as this is the predefined
function in the phone system, but can be changed if needed.
TMFC-Pause. Enter the Terminal Mode Function Code for the Pause
command for Live Record. The default value is 193 as this is the predefined
function in the phone system, but can be changed if needed.
TMFC-ReRecord. Enter the Terminal Mode Function Code for the ReRecord
command for Live Record. The default value is 194 as this is the predefined
function in the phone system, but can be changed if needed.
TMFC-End. Enter the Terminal Mode Function Code for the End command
for Live Record. The default value is 195 as this is the predefined function in
the phone system, but can be changed if needed.
KC-Record. Enter the OAI Key Code used for the Record command on a
Dterm function key. To disable monitoring of the key, enter 0 or a negative
number. The default value is 1.
KC-Pause. Enter the OAI Key Code used for the Pause/Resume command on
a Dterm function key. To disable monitoring of the key, enter 0 or a negative
number. The default value is 2.
KC-Rerecord. Enter the OAI Key Code used for the ReRecord command on a
Dterm function key. To disable monitoring of the key, enter 0 or a negative
number. The default value is 3.
KC-End:. Enter the OAI Key Code used for the End command on a Dterm
function key. To disable monitoring of the key, enter 0 or a negative number.
The default value is 4.
ToggleStartStop. This feature allows the user to press a single key to start,
stop, or restart a Live Record session. To enable the feature, enter True. To
disable the feature, enter False. The default value is True.
6 If using a template that enables the OAI UCD-MCI serial integration, in the
navigation panel of the configuration file, expand the MCI-Serial node.
NOTE
Do not complete this step if a template other than the NEC NEAX
2400 - OAI-UCD - MCI Serial template, where the phone system
cmd ASYDL Sys 1 Index 833 Bit 0 value is 0, was selected.
The settings must match the settings of the phone system for the MCI Serial
connection.
Format. Enter the format of the MCI-serial packets expected from the
phone system. Enter ICS for regular (ICS/IVS) serial packets, or IMX for
expanded (IMX) packets. The default is ICS.
COMPort. Enter the COM number of the serial port. This is the voice server
serial port that is connected by the RS-232 cable to the MCI link on the phone
system. Accepted values are COM1 or COM2. The default is COM1.
BaudRate. Enter the baud rate used by the serial (RS-232/MCI)
communication. The value must be identical to the phone system setting.
Accepted values are 1200, 2400, 4800, 9600, or the specially defined
phone system setting. The default value is 9600.
DataBits. Enter the default phone system data bits. Accepted values are 4,
5, 6, 7, or 8. The default value is 8.
Parity. Enter the parity used by the serial (RS-232/MCI) communication
with the phone system. Accepted values are N for NONE, E for EVEN, or O for
ODD. The default value is N.
StopBits. Enter the stop bits used by the serial (RS-232/MCI)
communication with the phone system. Accepted values are 1, 1.5, 2, or the
specially defined phone system setting. The default value is 1.
276
UNIVERGE UM8500 INTEGRATION GUIDE
Leave all other parameters not listed above at their default values.
7 If using a template that enables the MCI-LAN integration, in the navigation
panel of the configuration file, expand the MCI-LAN node.
NOTE
Do not complete this step if a template other than the NEC
SV7000 - OAI-UCD-MCI LAN template, where the PBX cmd ASYDL
Sys 1 Index 833 Bit 0 value = 1, was selected.
The settings must match the settings for the phone system for the MCI LAN
connection.
LAN-IP. Enter the IP address of the phone system. This should be the same
as the address entered in the CallPilot1 section under the PBX-IP. The default
value is just an example and must be changed to match the phone system
setting.
Format. Enter the format of the MCI-LAN packets expected from the phone
system. Enter ICS for regular (ICS/IVS) packets, or IMX for expanded (IMX)
packets. The default is IMX.
Parity. Enter the parity or checksum used by the phone system to process
the MCI-LAN packets. Accepted values are None, Even, or Odd. The default
is Odd.
LocalPort. Enter the local port used by the MCI-LAN integration module for
a TCP/IP connection to the phone system. Accepted values are any valid
TCP/IP port. The default is 60120. Do not change this value unless you know
that this port is already taken by other applications on the UNIVERGE
UM8500 server.
DeviceID. Enter the device ID used by the MCI-LAN integration module to
identify itself to the MCI interface on the phone system. Accepted values are 0
and 1. The default is 1.
Leave all other parameters not listed above at their default values.
8 In the navigation pane of the configuration file, expand VMSystem1 node.
Set the following parameters to configure the VMSystem1 node:
Host. Enter the IP address of the monitored UNIVERGE UM8500 server. This
will be the same IP address entered previously in the configuration ini file.
The default value is just an example.
PortRange. Enter the port or range of ports for the PBX tenant hosting the
voice mail ports. Ports can be set by entering a single port number, for
example xxxx; a range of numbers, for example xxxx-xxxx; or a
combination or both, for example xxxx-xxxx,x. The default ports are just
an example.
Tenant. Enter the PBX tenant number where the voice mail ports are set.
The default value is 1.
Leave all other parameters not listed above at their default values.
9 Click File > Save to save the XML configuration file.
10 Install the OAI service and test the integration.
See “Installing and starting the OAI service” on page 278.
NEC UNIVERGE SV8500 USING OAI
277
Installing and
starting the
OAI service
After saving the configuration file, install the OAI service then test the service to
ensure a successful integration.
To install the OAI Service
1 On the OAIGear page, click the Install Service icon, or from the Service
menu, click Install Service.
2 On the AV OAI Voice Mail Integration Server - Install Service dialog box, select
the This account option.
3 Enter the domain Administrator name, type and confirm the domain
Administrator password for the domain, then click OK.
NOTE
It is recommended that the same domain administrator account
that was used to install the UNIVERGE UM8500 software is
entered. The Administrator name might need to be prefaced with
the domain. For example, <domain name>\Administrator.
You can also choose to install the OAI Service under a Local
System account, or even a different domain account, but this can
cause difficulties when troubleshooting any subsequent
integration problems.
4 Click Start > All Programs > Administrative Tools > Services.
The Services MMC snap-in appears.
5 In the details pane, confirm that the AV OAI Integration Server service is
listed.
6 Right-click AV OAI Integration Server, then click Properties.
7 On the General tab, ensure that the Startup type is Automatic.
8 Click the Recovery tab, then do the following:
■
Confirm that Restart the Service is selected for each failure attempt.
■
Enter 1 in the Restart service after field.
9 Click OK to exit the AV OAI Voice Mail Integration Server Properties dialog
box.
10 Start the OAI Integration server using either of the following methods:
■
■
In the Services MMC snap-in, right-click AV OAI Integration
Server, then click Start, or
Right-click AV OAI Server in the notification area, and then click Start
service.
The icon changes from stop to start.
Testing the OAI integration
After installing the service and setting up the parameters, test the integration to
ensure that it works correctly.
To test the OAI Integration Server
1 Place a direct call to the voice mail pilot number and confirm that is
answering. Use a voice mail subscriber extension with a valid phone
extension to place a call to the voice mail pilot number. You should hear:
“Please Enter Your Password.”
2 Leave a voice message for a test user that has an actual phone extension.
■
278
Confirm that the message indicator for the extension is on. This verifies
that the MWI section of the configuration file was set properly.
UNIVERGE UM8500 INTEGRATION GUIDE
■
If the Message Count field in the MWI-OAI node of the configuration file
was set to True, confirm that the message count is listed.
3 Retrieve the voice message and confirm that the message waiting indicator
turns off and the phone display clears.
NEC UNIVERGE SV8500 USING OAI
279
280
UNIVERGE UM8500 INTEGRATION GUIDE
■ Nortel Meridian-1 with D82
In this integration...
Integration overview ........................................................................... 282
Integration steps ............................................................................ 282
Requirements ................................................................................ 282
Integration description ........................................................................ 283
Integration features ........................................................................ 283
Configuring UNIVERGE UM8500 for the integration .................................. 284
Connecting the systems....................................................................... 285
Programming the phone system............................................................ 286
Troubleshooting .................................................................................. 291
NORTEL MERIDIAN-1 WITH D82
281
Integration
overview
Use this section of the Integration Guide with the Installation Guide.
Integration steps
Follow these steps to set up this integration.
1 Review the system and equipment requirements
Verify that all phone system and messaging system server requirements have
been met. See “Requirements,” below.
2 Set up UNIVERGE UM8500 for the integration.
See “Configuring UNIVERGE UM8500 for the integration” on page 284.
3 Connect the systems.
See “Connecting the systems” on page 285.
4 Set up the phone system for the integration.
See “Programming the phone system” on page 286.
5 Test the phone extensions.
Test the phone extensions that are set up for the integration. See Appendix B,
“Testing the extensions” on page 338.
6 Run the Learn Tones utility.
Run the Learn Tones utility to teach the messaging system the tones
associated with the phone system.See Appendix C, “Learning phone system
tones” on page 340.
Requirements
The steps to set up the Nortel Meridian-1 with D82 integration require the
following:
Phone system
●
A Nortel Meridian-1, generic release 15 or later phone system.
●
The following phone system packages:
■
Package 19, Digit Display software (DDSP)
■
Package 46, Message Waiting Center (MWC)
●
For each voice messaging port, one Digital Network Interface Circuit (DNIC)
port, which emulates a digital phone, installed and set up as a voice
messaging port.
●
The phone system ready for the integration as described in the phone system
manufacturer’s documentation.
●
A digital connection cable for each voice board.
●
A type 66 interconnect block for each 25-pair PBX station interface cable.
UNIVERGE UM8500 server
●
The Dialogic D82 voice boards installed; see the Installation Guide for
installation details.
NOTE
For the latest information on supported voice boards for UM8500,
contact a sale representative.
282
●
A PBX station interface cable for each voice board.
●
UM8500 installed and ready for the integration as described in the
Installation Guide.
●
A system key that enables the integration and the appropriate number of
voice messaging ports.
UNIVERGE UM8500 INTEGRATION GUIDE
Integration
description
The Nortel Meridian-1 with D82 integration uses digital lines to connect the
phone system and the UNIVERGE UM8500 server. Each D82 voice board in
UM8500 connects to the phone system through a PBX station interface cable. A
D82 voice board emulates up to eight digital phones.
Integration features
The Nortel Meridian-1 with D82 integration with UM8500 provides the following
features:
●
Call forward to personal greeting. When an incoming call is routed to an
unanswered or busy extension, the call is forwarded to the subscriber’s voice
mail. The caller then hears the subscriber’s personal greeting and can leave a
message.
●
●
●
●
Caller ID. UM8500 receives caller ID information from the phone system, if
available. This information is displayed in the message’s subject line in
Microsoft Office Outlook® or other desktop messaging application.
Easy message access. A subscriber can retrieve messages without entering
an ID. UM8500 identifies a subscriber based on the extension from which the
call originated. A password might be required.
Identified subscriber messaging. UM8500 automatically identifies a
subscriber who leaves a message during a forwarded internal call based on
the extension from which the call originated.
Message waiting indication (MWI). When a message is waiting for a
subscriber, UM8500 notifies the phone system to activate the message
waiting indicator on the subscriber’s extension, if it is equipped with one, or
to activate a stutter dial tone.
NORTEL MERIDIAN-1 WITH D82
283
Configuring
UNIVERGE
UM8500 for the
integration
After ensuring that the UNIVERGE UM8500 server is ready for the integration by
completing all appropriate tasks in the Installation Guide, perform the following
procedure to confirm that the integration is enabled.
To confirm that the integration is enabled
1 Click Start > All Programs > UNIVERGE UM8500 > Edit Switch.
2 If prompted for logon credentials, type the administrator extension and
password, then click OK.
On a new install the logon credentials are:
Extension = 99995
Password = 12345
3 Confirm that the settings match those in the following table.
Phone system settings
Parameter
Required setting
Manufacturer
NORTEL
Model
MERIDIAN 1
Switch software version
M2616 phone emulation
Integration
Direct Digital
4 If the settings are incorrect, select the correct settings and click Update
Voice Mail Now.
284
UNIVERGE UM8500 INTEGRATION GUIDE
Connecting the
systems
After installing all of the required hardware on the voice messaging system,
perform the following procedure to connect the phone system to the messaging
system.
To install required voice messaging system hardware, such as D/82 boards, see the
Installation Guide.
System connections
To connect the phone system and
1 Connect the phone system digital lines 1-8 (or 1-4 on a 4-port system) to a
type 66 interconnect block. See the “D82 two-wire pinouts” table below for
cabling requirements.
2 Connect an 25-pair PBX station interface cable to an amphenol connection
on the type 66 interconnect block.
3 Connect the other end of the PBX station interface cable to a digital cable.
4 Connect the other end of the digital cable to a D82 board installed in the
UM8500 server.
5 Repeat steps 1 through 4 for each additional D82 board installed.
D82 Two-wire pinouts
Phone line
number
Type 66
Pin
Block pair number
1
2
2
3
4
5
6
7
8
4
6
8
10
12
14
16
Pair color
Lead
designation
27 white-orange
T1
2 orange-white
R1
29 white-brown
T2
4 brown-white
R2
31 red-blue
T3
6 blue-red
R3
33 red-green
T4
8 green-red
R4
35 red-slate
T5
10 slate-red
R5
37 black-orange
T6
12 orange-black
R6
39 black-brown
T7
14 brown-black
R7
41 yellow-blue
T8
16 blue-yellow
R8
NORTEL MERIDIAN-1 WITH D82
285
Programming
the phone
system
After connecting the systems, perform the following procedures to set up the
phone system for the integration. Refer to the phone system documentation for
details.
●
On the LD16 screen for each extension, confirm that the CPDC prompt is set
to No, which is the default setting. Otherwise, the dialing ports might be
disabled.
●
Programming other phone system or extension options might create a
conflict with voice messaging functions.
To decide on an extension numbering plan
❚
Before setting up the voice messaging extensions, decide on an extension
numbering plan in accordance with the organization’s requirements.
NOTE
The phone system does not recognize extension numbers that
begin with zero.
To confirm that the DDSP and MWC packages are installed
1 On the phone system, go to the LD22 screen.
2 Set the REQ prompt to PRT.
3 Set the TYPE prompt to PKG.
4 Confirm that both of the following are displayed:
■
DDSP (for Package 19, Digit Display Software)
■
MWC (for Package 46, Message Waiting Center)
To set up the voice messaging extensions to use a hunt
group
1 On the phone system, find the extensions assigned to the voice messaging
system (circuit board types QPC578 or NT8D02).
2 On the phone system, go to an LD11 screen.
3 Set up a terminal number, the TN prompt, for the first voice messaging
extension. The screen sample on the next page uses TN 0 0 6 2 as an example.
4 Set Key 00 to SCR (ring call appearance key). The screen sample on the next
page uses extension 500 as an example.
5 Set Keys 3 through 5 as shown on the next page.
6 Set the HUNT prompt to the next extension that the phone system will hunt
to when this voice messaging extension is busy. The screen sample uses
extension 501. Set the last port to hunt back to the first extension in the group.
NOTE
When the hunt group is set up as described, all of the subscriber
extensions are forwarded to the first voice messaging extension.
If the first extension is busy, the system hunts for the next
available extension. The system hunts in sequence up to the last
extension, then starts over until a voice messaging extension
becomes available.
286
UNIVERGE UM8500 INTEGRATION GUIDE
7 Repeat steps 2 through 5 for each voice messaging extension.
NOTES
●
●
Some releases of the Meridian-1 phone system require setting the
CLS prompt to DDS instead of ADD.
Only the prompts needed for this integration appear on this screen.
For details on other prompt settings, refer to the phone system
documentation.
LD11 screen sample
To set the call party name display
1 On the phone system, go to the LD95 screen.
2 Accept the default settings, except for the HUNT prompt, which should be
changed to CFNA. Also, verify that the CFNA prompt is set to CFNA. The
settings should be as follows:
Prompt
Setting
REQ
PRT
TYPE
CPND
CUST
0
TYPE
CPND
CUST
0
CNFG
ALON
MXLN
27
STAL
YES
DFLN
27
DES
NO
RESN
YES
CFWD
FWD
CFNA
CFNA
HUNT
CFNA
PKUP
PICK
XFER
T
AAA
A
NITC
NI
NORTEL MERIDIAN-1 WITH D82
287
To program a 2008 phone
1 On the phone system, go to the LD11 screen to set up the digital 2008 phone.
NOTE
If the system is equipped with audible message waiting (AMW),
set the CLS prompt to LPD to enable a stutter dial tone. If the
phones have LEDs or neon lamps, set the CLS prompt to LPA to
allow the activation of visual message waiting indicators.
2 Set the REQ, TYPE and CLS prompts as shown in the screen sample.
3 Set the other prompts as applicable.
LD11 settings for digital 2008 phones
NOTE
Only the prompts needed for this integration appear in this
screen. For details on other prompt settings, refer to the phone
system documentation.
To program SL-1 phones
1 On the phone system, go to the LD11 screen to set up the SL-1 phones.
NOTE
If the system is equipped with audible message waiting (AMW),
set the CLS prompt to LPD to enable a stutter dial tone. If the
phones have LEDs or neon lamps, set the CLS prompt to LPA to
allow the activation of visual message waiting indicators.
2 Set the REQ, Type, CLS, and KEY prompts as shown in the following screen.
3 Set the other prompts as applicable.
288
UNIVERGE UM8500 INTEGRATION GUIDE
LD11 settings for SL-1 phones
NOTE
Only the prompts needed for this integration appear in this
screen. For details on other prompt settings, refer to the phone
system documentation.
To program analog 2500 type phones
1 On the phone system, go to the LD10 screen to set up the analog 2500 type
phone.
NOTE
Analog phones require special interface boards for QPC789 and
NT8D09AB neon lamps. Without these boards, the neon lamp is
disabled.
2 Set the REQ, Type, CLS, and FTR prompts as shown in the sample screen.
3 Set the other prompts as applicable. The other prompts shown in the screen
sample are examples. Different settings might be required, depending on the
site. For details on the other prompt settings, refer to the phone system
documentation.
NORTEL MERIDIAN-1 WITH D82
289
LD10 settings for analog 2500 phones
NOTES
●
●
290
The CLS prompt setting for call forwarding (FNA) can be
different depending on the transfer type selected for
individual subscriber extensions.
Only the prompts needed for this integration appear in this
screen. For details on other prompt settings, refer to the
phone system documentation.
UNIVERGE UM8500 INTEGRATION GUIDE
Troubleshooting
If one of these problems is encountered, try the corrective actions listed for the
problem. If these actions do not correct the problem, or if the problem is not
described here, contact Technical Support.
Problems
Corrective actions
Calls to the messaging system do
not connect.
Perform the following for the problems listed:
Calls to the voice messaging
system connect, but no prompts
play.
Callers entering an extension are
always answered with the opening
greeting instead of the personal
greeting.
●
●
●
●
Calls are not integrating with the
phone system.
Confirm that expansion boards are firmly seated in the computer
expansion slots, and that each board is properly configured.
See the Installation Guide to check the voice board settings.
Confirm that the PBX station interface cables between the systems
are connected and functioning correctly. Try testing each cable or
replacing each with a different cable.
Confirm that the correct phone system model is set up on the voice
messaging system. On the UM8500 Administrator, go to Switch>
Switch Information and check that the correct phone system
manufacturer and model type are displayed.
Easy message access is not
functioning: subscribers access
their voice mailboxes and hear the
opening greeting instead of
personal options.
Calls are forwarded to the opening
greeting instead of a subscriber’s
mailbox.
Callers are asked to hold or
complain that they are on hold for
too long when calling an extension
that is using “Do not disturb”
mode.
Typically this happens because the voice messaging system is set up to
use the await-answer transfer type and call holding for that extension.
Call holding must be turned off when using the “Do not disturb” mode on
the phone.
The phone system cabinet that
contains the voice messaging
station cards sporadically resets
itself.
The phone system might be overloaded due to an increase in polling
traffic between the D82 boards and the system. Spread out the load by
distributing the voice messaging extensions among multiple station cards
on the phone system. For example, distribute three or fewer voice
messaging extensions per station card.
Subscriber’s phones are not
forwarding calls on ring-no-answer
or on busy.
Confirm that the subscriber’s phone is set up on the phone system to
forward calls to the voice messaging hunt group pilot number on ring-noanswer and on busy.
Subscriber message waiting
indication fails.
Perform the following for the problems listed:
Message waiting indicators are not
activated after messages are left.
Message waiting indicators are not
turned off after messages are
retrieved.
Await-answer calls release before
the personal greeting is played.
●
●
On the UM8500 Administrator, on the Ports page verify that at least
one of the voice messaging ports is set for MWI dialout.
On the UM8500 Administrator, confirm that MWI is enabled for the
subscriber.
See “Learning phone system tones” on page 340.
NORTEL MERIDIAN-1 WITH D82
291
292
UNIVERGE UM8500 INTEGRATION GUIDE
■ Siemens 9751 CBX with D42 or
D82
In this integration...
Integration overview ........................................................................... 294
Integration steps ............................................................................ 294
Requirements ................................................................................ 294
Integration description ........................................................................ 295
Integration features ........................................................................ 295
Configuring UNIVERGE UM8500 for the integration .................................. 296
Connecting the systems....................................................................... 297
Programming the phone system............................................................ 298
Programming ROLMphone 400 digital station sets ............................... 298
Troubleshooting .................................................................................. 301
SIEMENS 9751 CBX WITH D42 OR D82
293
Integration
overview
Use this section of the Integration Guide with the Installation Guide.
Integration steps
Follow these steps to set up this integration.
1 Review the system and equipment requirements
Verify that all phone system and messaging system server requirements have
been met. See “Requirements,” below.
2 Set up UNIVERGE UM8500 for the integration.
See “Configuring UNIVERGE UM8500 for the integration” on page 296.
3 Connect the systems.
See “Connecting the systems” on page 297.
4 Set up the phone system for the integration.
See “Programming the phone system” on page 298.
5 Test the phone extensions.
Test the phone extensions that are set up for the integration. See Appendix B,
“Testing the extensions” on page 338.
6 Run the Learn Tones utility.
Run the Learn Tones utility to teach the messaging system the tones
associated with the phone system. See Appendix C, “Learning phone system
tones” on page 340.
Requirements
Before setting up the Siemens 9751 CBX with D42 or D82 integration, confirm that
the site meets the following requirements and that all of the necessary
components are available:
Phone system
●
Siemens 9751 CBX phone system, version 9005.6.84.
●
The phone system ready for the integration as described in the phone system
manufacturer’s documentation.
●
A type 66 interconnect block for each PBX station interface cable.
UNIVERGE UM8500 server
294
●
The Dialogic D42 or D82 voice boards installed as described in the
Installation Guide.
●
A PBX station interface cable for each voice board
●
UM8500 installed and ready for the integration as described in the
Installation Guide.
●
A system key that enables the integration and the appropriate number of
voice messaging ports
UNIVERGE UM8500 INTEGRATION GUIDE
Integration
description
The Siemens 9751 CBX with D42 or D82 integration uses digital lines to connect
the phone system and the UNIVERGE UM8500 server. A D42 voice board
emulates up to four digital phones. A D82 voice board emulates up to eight digital
phones.
Integration features
The Siemens 9751 CBX with D42 or D82 integration provides the following
features:
●
Call forward to personal greeting. When an incoming call is routed to an
unanswered or busy extension, the call is forwarded to the subscriber’s voice
mail. The caller then hears the subscriber’s personal greeting and can leave a
message.
●
●
●
●
Caller ID. UM8500 receives caller ID information from the phone system, if
available. This information is displayed in the message’s subject line in
Microsoft Office Outlook® or other desktop messaging application.
Easy message access. A subscriber can retrieve messages without entering
an ID. UM8500 identifies a subscriber based on the extension from which the
call originated. A password might be required.
Identified subscriber messaging. UM8500 automatically identifies a
subscriber who leaves a message during a forwarded internal call based on
the extension from which the call originated.
Message waiting indication (MWI). When a message is waiting for a
subscriber, UM8500 notifies the phone system to activate the message
waiting indicator on the subscriber’s extension, if it is equipped with one, or
to activate a stutter dial tone.
SIEMENS 9751 CBX WITH D42 OR D82
295
Configuring
UNIVERGE
UM8500 for the
integration
After ensuring that the UNIVERGE UM8500 server is ready for the integration by
completing all appropriate tasks in the Installation Guide, perform the following
procedure to confirm that the integration is enabled.
To confirm that the integration is enabled
1 Click Start > All Programs > UNIVERGE UM8500 > Edit Switch.
2 If prompted for logon credentials, type the administrator extension and
password, then click OK.
On a new install the logon credentials are:
Extension = 99995
Password = 12345
3 Confirm that the settings match those in the following table.
Phone system settings
Parameter
Required setting
Manufacturer
Siemens Rolm
Model
CBX 9000
Switch PBX software
version
Rolm 9751, Rolmphone 400
emulation
Integration
Direct Digital
4 If the settings are incorrect, select the correct settings and click Update
Voice Mail Now.
296
UNIVERGE UM8500 INTEGRATION GUIDE
Connecting the
systems
After installing all of the required hardware on the voice messaging system,
perform the following procedure to connect the phone system to the UM8500
system.
To install required voice messaging system hardware, see the Installation Guide.
System connections
To connect the phone system
1 Connect the phone system digital lines 1-8 (or 1-4 on a 4-port system) to a
type 66 interconnect block. See the table on the next page for cabling
requirements.
2 Connect a telco cable to an amphenol connection on the type 66
interconnect block.
3 Connect the other end of the telco cable to a PBX station interface cable.
4 Connect the other end of the PBX cable to a voice board installed in the
UM8500 server.
5 Repeat steps 1 through 4 for each additional voice board installed.
D82 Two-wire pinouts
Phone line
number
Type 66
Pin number Pair color
Block pair
Lead
designation
1
2
white-orange
T1
2
orange-white
R1
2
4
29
white-brown
T2
4
brown-white
R2
31
red-blue
T3
6
blue-red
R3
33
red-green
T4
8
green-red
R4
35
red-slate
T5
10
slate-red
R5
37
black-orange
T6
12
orange-black
R6
39
black-brown
T7
14
brown-black
R7
41
yellow-blue
T8
16
blue-yellow
R8
3
6
4
8
5
10
6
12
7
14
8
16
27
SIEMENS 9751 CBX WITH D42 OR D82
297
Programming
the phone
system
After connecting the system, perform the following steps to set up the Siemens
9751 CBX phone system for the integration. Refer to the phone system
documentation for details.
1 Program the ROLMphone 400 digital station sets.
Create a feature button table and extensions, and assign line appearances to
feature buttons. See “Programming ROLMphone 400 digital station sets” on
page 298.
2 Program the hunt group.
Set up a hunt group to include all of the voice mail ports. See “To set up the
hunt group” on page 299.
3 Program subscriber stations.
Set subscriber stations to call forward to the hunt group. See “To program
subscriber stations” on page 300.
Programming ROLMphone 400 digital station sets
Each extension on the Siemens 9751 CBX is assigned a class of service (COS)
which determines features available to that extension. The default COS, 00, might
not have the necessary features for the voice mail ports or the ROLMphone 400
extensions. This section describes how to enable or disable features within a COS.
To set the class of service
❚
Assign COS 15 settings to meet ROLMphone 400 digital station set
requirements. Refer to the following table for the required setting for each
feature.
Feature
Setting
APV (always in privacy)
Yes
NFL (no flash allowed)
No
NOH (no howler)
Yes
DND (do not disturb)
No
For example, if the NOH (no howler) feature is disabled, to enable it, at the
command prompt type MODIFY COS_FEAT NOH then press ENTER.
To program the ROLMphone 400 digital stations
1 Before setting up the ROLMphone 400 feature button table, locate an
available ROLMphone Interface channel in the Siemens 9751 CBX. An RPI
channel is the basic digital port used by ROLMphone digital sets.
After locating an available channel, change its configuration to indicate
ROLMphone 400s will be attached. We recommend sequentially numbering
these extensions. These extensions will be placed in a hunt group later.
2 Create an unused feature button table. For example, at the command prompt,
type CRE BUTTON 400 9 then press ENTER.
In the example, 400 indicates the phone type and 9 indicates the feature
button table number. The system displays the current key assignments.
Program the buttons on the phone according to the feature settings listed in
the following table.
298
Button on phone
Feature setting
10
HOLD
30
CNCT (Connect)
37
MWCTR (Message waiting center)
38
XFER (Transfer)
UNIVERGE UM8500 INTEGRATION GUIDE
Verify that at least one line appearance key is programmed (for example,
Line 1).
These are the minimum programming requirements for the integration.
3 Before continuing, verify that any changes made to the feature button table
are correct. For example, at the command prompt, type LI BUTTON 400
9 then press ENTER. Refer to the screen example below.
COMMAND: CRE BUTTON 400 9
PHONE TYPE
----------400
BTN
--1
2
3
4
5
6
7
8
9
10
TABLE #
------9
FEAT IDX
----- ---
BTN FEAT IDX
--- ----- --11
12
13
14
15
BTN FEAT IDX
--- ----- --16
17
18
19
20
LINE 1
HOLD
BTN FEAT IDX
--- ----- --21
22
23
24
25
26
27
28
29
30 CNCT
BTN FEAT IDX
--- ----- --31
32
33
34
35
36
37
38
MWCTR
XFER
4 Create one extension number to be used as the ringing line appearance for
each voice mail port.
For example, to use extension 501, at the command prompt, enter CRE
EXTEN 501 then press ENTER.
Repeat this command for each extension used for a voice mail port.
5 Assign the feature button table to the port address number (PAD #), then
verify that message waiting indication is turned off.
For example, at the command prompt, type CRE RP 010402 then press
ENTER. In this example, the selected RPI channel is 010402, where 01
indicates the phone system number, 04 is the slot in the phone system, and
02 is the number of the voice mail port.
Verify that message waiting indication is turned off for the voice mail port.
Message waiting indication cannot be used on a voice mail port.
Before continuing, verify the ROLMphone 400 programming. For example, at
the command prompt, type LI RP 010402 then press ENTER.
Repeat this step for each voice mail port.
To set up the hunt group
The integration uses only one hunt group. The pilot number for this group is the
published voice mail number for all direct and forwarded calls. Choose a number
that is easy to remember, for example, 500 rather than 527.
Programming a name for the voice port hunt group increases the amount of
information sent between the Siemens 9751 CBX and the voice mail system
during each call, thereby slowing the overall process. It is strongly recommended
that a name not be programmed for the voice port hunt group.
1 Place the extensions from all the ROLMphone 400 digital station sets in a
hunt group using extension 500 as the pilot number. For example, at the
command prompt, type HD_GROUP 500 then press ENTER.
2 Verify that the hunt group is correct. For example, at the command prompt,
type LI HD_GROUP 500 then press ENTER.
SIEMENS 9751 CBX WITH D42 OR D82
299
To program subscriber stations
The remaining Siemens 9751 CBX programming involves individual subscriber
extensions. By forwarding a subscriber to the integration pilot number, integrated
call answering is provided.
Some phone system software versions allow two forwarding paths. Program call
forwarding for internal, external, busy, and ring-no-answer conditions to suit
subscriber needs.
Generally, subscribers with ROLMphone 400 digital station sets have a message
waiting button defined on their phone. If not, the phone system administrator can
add this feature. If the pilot number of the integration hunt group is assigned to
the message waiting button, messages are retrieved by pressing the button
whenever the light is flashing.
1 Enable forward-on-busy, forward on ring-no-answer, and forward on do-not-
disturb as desired for each subscriber. For example, for a subscriber assigned
to extension 201, at the command prompt, type MOD EXTEN 201 then
press ENTER.
2 Before continuing, verify that the forwarding path is assigned correctly. For
example, at the command prompt, type LI EXTEN 201 then press ENTER.
300
UNIVERGE UM8500 INTEGRATION GUIDE
Troubleshooting
If one of these problems is encountered, try the corrective actions listed for the
problem. If these actions do not correct the problem, or if the problem is not
described here, contact Technical Support.
Problems
Corrective actions
Calls to the voice messaging system do Perform the following for the problems listed:
not connect.
●
Confirm that expansion boards are firmly seated in the computer
expansion slots and that each board is properly configured.
Calls to the voice messaging system
connect, but no prompts play.
●
See the Installation Guide to check the voice board settings.
Callers entering an extension are
always answered with the opening
greeting instead of the personal
greeting.
●
●
Calls are not integrating with the phone
system.
Easy message access is not functioning:
subscribers access their voice
mailboxes and hear the opening
greeting instead of personal options.
Confirm that the PBX station interface cables between the systems
are connected and functioning correctly. Try testing each cable or
replacing each with a different cable.
Confirm that the correct phone system model is set up on the voice
messaging system. On the UM8500 Administrator, go to Switch >
Switch Information and check that the correct phone system
manufacturer and model type are displayed.
Calls are forwarded to the opening
greeting instead of a subscriber’s
mailbox.
Callers are asked to hold or complain
that they are on hold for too long when
calling an extension that is using “Do
not disturb” mode.
Typically this happens because the voice messaging system is set up to
use the await-answer transfer type and call holding for that extension.
Call holding must be turned off when using the “Do not disturb” mode on
the phone.
The phone system cabinet that contains The phone system might be overloaded due to an increase in polling
traffic between the D82 boards and the system. Spread out the load by
the voice messaging station cards
distributing the voice messaging extensions among multiple station cards
sporadically resets itself.
on the phone system. For example, distribute three or fewer voice
messaging extensions per station card.
Subscriber’s phones are not forwarding Confirm that the subscriber’s phone is set up on the phone system to
calls on ring-no-answer or on busy.
forward calls to the voice messaging hunt group pilot number on ring-noanswer and on busy.
Subscriber message waiting indication
fails.
Message waiting indicators are not
activated after messages are left.
Message waiting indicators are not
turned off after messages are retrieved.
Await-answer calls release before the
personal greeting is played.
Perform the following for the problems listed:
●
●
On the UM8500 Administrator, on the Ports page verify that at least
one of the voice messaging ports is set for MWI dialout.
On the UM8500 Administrator, confirm that MWI is enabled for the
subscriber.
See “Learning phone system tones” on page 340.
SIEMENS 9751 CBX WITH D42 OR D82
301
302
UNIVERGE UM8500 INTEGRATION GUIDE
■ Sphere System
In this integration...
Integration overview ........................................................................... 304
Integration steps ............................................................................ 304
Requirements ................................................................................ 304
Integration description ........................................................................ 305
How the integration works ............................................................... 305
Integration features ........................................................................ 305
Setting up the Sphere system............................................................... 307
Configuring UNIVERGE UM8500 for integration ....................................... 313
Changing the number of voicemail ports ................................................ 315
Troubleshooting .................................................................................. 316
Message waiting indicators are not working properly ........................... 316
Dual integration with the Sphere system through SIP trunks and traditional analog
ports................................................................................................. 317
Requirements ................................................................................ 317
Setting up a UNIVERGE UM8500 with dual integration ......................... 317
SPHERE SYSTEM
303
Integration
overview
Use this section of the Integration Guide with the Installation Guide to set up the
messaging system for use with a Sphere system.
Integration steps
Follow these steps to set up this integration.
1 Review the system and equipment requirements.
See “Requirements” on page 304.
2 Set up the Sphere system.
See “Setting up the Sphere system” on page 307.
3 Configure the Standard SIP integration on the UNIVERGE
UM8500 server.
See “Configuring UNIVERGE UM8500 for integration” on page 313.
Requirements
Before setting up the Sphere integration, confirm that the following requirements
are met and that all the necessary components are available:
Phone system
●
A media gateway compatible with the Sphere system is needed if UM8500
users use the fax feature.
●
Sphere system software version 6.1 or later.
●
Licenses for all phone lines, IP phones, and other compliant devices or
software that is be connected to the network, as well as one license for each
port.
●
IP phones.
●
A LAN connection at each location where an IP phone will be connected to
the network.
UNIVERGE UM8500 server
304
●
UNIVERGE UM8500 installed and ready for integration as described in the
Installation Guide.
●
A system key with the integration type set to SIP Standard with the Feature
Sphere enabled and with the appropriate number of voice messaging ports
enabled.
UNIVERGE UM8500 INTEGRATION GUIDE
Integration
description
The following illustration shows a full-featured UNIVERGE UM8500 installation
integrating with the Sphere system network.
UNIFIED
MESSAGING
SERVER
SPHERE SERVER
• Sphere Manager
• Windows Server
• UNIVERGE
UM8500
• Internet
Information
Server
• Windows
Server
MEDIA GATEWAY
PUBLIC
PHONE
NETWORK
SUBSCRIBER
DID line
• E-mail client
E-MAIL
SERVER
• Exchange
• Windows
Server
IP Phone
Mobile
Phone
NETWORK
OFF-SITE
SUBSCRIBER
Phone
• E-mail client
• Soft Phone
FAX SERVER
• Fax server
software
• Windows
INTERNET
ADMINISTRATOR
Fax
How the integration works
NEC Sphere integration uses a network connection to connect the messaging
system server with the phone system. Voice messaging ports emulate standard IP
trunk connections. The communication between the parties is facilitated by a
series of Voice over IP (VOIP) protocols, such as SIP, RTP, and RTCP, used for call
signaling and voice streaming.
Integration features
The Sphere system integration offers the following features:
Call forward to personal greeting. When an incoming call is routed to an
unanswered or busy extension, the call is forwarded to the subscriber's
messaging system. The caller then hears the subscriber's personal greeting
and can leave a message.
Caller ID. The messaging system receives caller ID information from the
Sphere system, if available. This information is displayed in the message
subject line in Microsoft Outlook® or other desktop messaging applications.
Easy message access. A subscriber can retrieve messages without entering
an ID. The messaging system identifies a subscriber based on the extension
from which the call originated. A password might be required.
Identified subscriber messaging. The messaging system automatically
identifies a subscriber who leaves a message during a forwarded internal call
based on the extension from which the call originated.
Message waiting indication (MWI). When a message is waiting for a
subscriber, the messaging system notifies the phone system to activate the
message waiting indicator on the subscriber's extension.
Notification to phone and pager devices. When a subscriber has phone
or pager notification devices enabled, the messaging system calls the device
to deliver the voicemail, fax, or e-mail notification. When the call is received
SPHERE SYSTEM
305
the subscriber is required to enter an ID and password to authenticate the
subscriber.
Greetings and voice names recording over the phone. When using the
UM8500 Administrator or UM8500 Assistant to change greetings or recorded
names, the messaging system calls the phone specified in the settings section
of the Media Master Control to play or record the selected file.
Playing voicemail messages over the phone when using the Outlook
VMO client. When using ViewMail® for Microsoft Outlook (VMO) to record
or play voicemail messages, if the multimedia device is set to a phone, the
messaging system calls the phone to facilitate subscriber interaction with the
messaging system for creating and listening to voicemail messages.
TDM fax integration simultaneously with the Sphere SIP
integration. The voicemail system supports native fax integration, using
Dialogic fax boards, at the same time as the Sphere SIP integration.
CallerID based callback. The messaging system allows the subscriber to
call back the originator of a message when the caller ID information is
present. The messaging system executes a release transfer to the recorded
Caller ID.
306
UNIVERGE UM8500 INTEGRATION GUIDE
Setting up the
Sphere system
Follow the procedures in this section to set up the Sphere System to work with
UM8500.
NOTE
Verify that the User Agent Generic-SIP-Trunk, your Voice
Mail SIP user agent, appears in the SIP tab in the
Sphericall System Properties. If it is missing, add the user
agent and restart the UM8500 system in order to be
recognized by the Sphere system.
To configure the Sphere system and add voicemail ports.
NOTE
The Sphere System Installation discs are not shipped with
UM8500. If you do not have the installation discs, contact
the NEC reseller. Follow NEC Sphere procedures for initial
installation and configuration of the Sphere system.
1 Open the Sphericall Administrator:
■
Click Start > All Programs > Sphericall > Administrator.
or
■
Double-click the Sphericall Administrator icon on the desktop.
2 Click the General tab.
3 Double click System - NEC - NOT for resale to open the System
Properties window.
The System Properties window appears
4 On the System Properties window, click the SIP tab.
SPHERE SYSTEM
307
5 Scroll down to the Sphere SIP Phone entry.
If Sphere SIP Phone is not listed:
a Click Add and to add a new blank entry.
b Type the following:
System Properties
Field name
Type or Select
Agent Name
Sphere SIP Phone
Version
All
Endpoint
Trunk
Agent Description
ActiveVoice Voicemail
If Sphere SIP Phone entry is listed, skip this step.
6 Double-click the Default column entry.
The User Agent Profile-Active Voice Voicemail window appears.
7 Select Unsupported from the Value list.
8 Click OK.
308
UNIVERGE UM8500 INTEGRATION GUIDE
9 On the Sphericall Administrator, click the Number Plan tab. Add all
voicemail extensions as follows:
a For each extension. right-click a Number Plan, select Add, then select
Add Extensions.
The Properties for New Extension window appears.
b On the Properties for New Extension window:
◆
Type the extension number in the Number field.
◆
Select the Round Robin Group from the Hunt Order list.
◆
Type the port number in the First Name field.
◆
Type UM8500 in the Last Name field.
◆
◆
Select the Allow Transfers from Sphericall Auto Attendant
check box.
Select the Allow Sphericall AA Directory Lookup by last
name check box.
◆
Select Voice Mail in the Type list.
◆
Do not select the Enable Queuing check box.
SPHERE SYSTEM
309
10 Use the VoipAdmin Tool to configure the messaging system.
See “Configuring UNIVERGE UM8500 for integration” on page 313.
Start the messaging system. Sphere creates a SIP trunk, but you cannot use
the extensions at this time.
11 On the Sphericall Administrator you should see the messaging system listed
on the Trunks tab.
Press F5 to refresh the data displayed in the Trunks tab.
12 Click + to expand the messaging system hub entry.
13 Right-click Port 1 and select View Properties.
The Properties window port appears.
14 Click the General tab.
Depending on your licenses, type the appropriate values in the Total
Capacity, Inbound Capacity, and Outbound Capacity fields.
If you do not know these values, type an Inbound and Outbound value that
is equal or greater than the total number of ports that you are using on the
messaging system.
In the Total Capacity field, type the sum of the Inbound and Outbound
values. For example, you have 12 licensed voicemail ports. Type at least 12 in
both Inbound and Outbound fields, in the Total Capacity field, type at
least the sum 24.
15 Select the In Service check box.
310
UNIVERGE UM8500 INTEGRATION GUIDE
16 Click the Outward Routing tab and click Add Extension. Select your
extension, this must be a Voice Mail type extension.
17 Select the first extension that you added earlier, in step 9 a then click OK.
Repeat this step for all Voice Mail type extensions that you added in step 9 a
and click Apply.
18 Click the Settings tab and click Add.
19 Select Set As Voice Mail as Name and true as Value.
20 Click OK.
21 Verify that the extension is allocated to the trunk. If not, press F5 to refresh
the window.
22 In the Spherical Administrator click the General tab.
SPHERE SYSTEM
311
23 Right-click the + and select View Properties.
24 In the System Properties Window, click the System Initialization
Settings tab.
a Click Add.
b Select the messaging system server IP Address from the SIP > MWI
Service Provider Address followed by :6060. For example,
192.168.0.116:6060.
This setting is used by the Sphere and the messaging system to send
Message Waiting Indicator requests throughout the system.
c Click OK to close the System Properties window.
d Configure the Sphere system MWI using the Sphere system
documentation.
25 Close the Sphericall Administrator.
26 Restart the messaging system.
312
UNIVERGE UM8500 INTEGRATION GUIDE
Configuring
UNIVERGE
UM8500 for
integration
After ensuring that the messaging system server is ready for the integration by
completing installation and configuring the Sphere SIP integration procedures in
the Installation Guide, complete the following procedure to confirm that the
integration is enabled.
To configure the extension numbers and the IP address of
the PBX
1 If the messaging system is running, stop it.
2 Browse to the \Commserver\Utilities directory.
3 Double-click VoipAdmin.exe.
The VoipAdmin Tool appears
4 In the IP Protocol field, select Standard SIP.
5 In the Network Adapter field specifiy the network card that is connecting
the messaging system server to the Sphere phone system.
6 In the Extension Type list select Sphere.
7 Type the <IP address> for the phone system in the SIP Server IP
Address field
8 Type the <Sphere domain name> in the SIP Server Domain Name
field.
9 Select Use Authentication if the SIP trunks are using authentication. If the
SIP Trunks are not using authentication (if the Sphere was configured
otherwise), clear this check box
10 Under Manage ports,
a click Add to add a new port.
b Type the extension number for each port. This information is available in
the UM8500 Administrator and is used to integrate calls.
c If the Sphere administrator assigned passwords, type the password in the
Password field. If passwords have not been assigned, leave the
Password field blank.
11 Click OK to save the changes and then close VOIPAdmin.
12 Start UNIVERGE UM8500.
SPHERE SYSTEM
313
13 In Internet Explorer, go to the UM8500 Administrator
(http://<server name>/saweb).
14 Go to System > Ports and check the extension of each port displayed in the
Port Table section of the page.
If the extensions are not correctly shown, stop the messaging system, verify
the PBX settings made for the voice messaging ports. Use the VOIPAdmin Tool
to make any necessary adjustments, see “To configure the Sphere system and
add voicemail ports.” on page 307.
To confirm that the integration is enabled
1 In Internet Explorer, go to the UM8500 Administrator:
http://<server name>/saweb
2 Go to System > Licensing > Licensed Features.
3 In the Integration box, confirm that the setting is Standard SIP or
Multiple.
4 If the setting is not Standard SIP or Multiple, contact a sales representative
for the system key.
5 Go to System > Switch. Confirm that the settings match those in the
following table.
If the settings are incorrect, the integration features cannot be enabled.
Phone system settings
Parameter
Manufacturer
NEC
Model
Sphere
Switch PBX software version
Sphericall v6.01 or later
Integration
Standard SIP
6 Close the UM8500 Administrator.
7 Shut down and restart the server.
314
Required setting
UNIVERGE UM8500 INTEGRATION GUIDE
Changing the
number of
voicemail ports
To change the number of UM8500 ports after the Sphere system is installed and
configured, complete the following procedures.
To change the number of voicemail ports in Sphere
System
1 On the UNIVERGE UM8500 system:
a Click Start > Programs > UNIVERGE UM8500 > Applications >
License Synchronizer.
b Specify the path to the new license file.
c Restart the UM8500 system.
2 On the Sphericall system server:
a Open the Sphericall Administrator and add or remove voicemail lines, as
appropriate.
To add voicemail ports, See “To configure the Sphere system and add
voicemail ports.” on page 307.
For information on removing voicemail ports, see the Sphere System
administration online help.
b Shut down and restart the Sphere system server.
SPHERE SYSTEM
315
Troubleshooting
If one of the problems listed below is encountered, try the corrective actions listed
for the problem. If these actions do not correct the problem, or if the problem is
not described here, contact Technical Support.
Message waiting indicators are not working properly
If the message waiting indicators are not being turned on or off properly, perform
the following procedure.
To confirm that the message waiting indicator settings
are correct
1 Make sure the settings from Sphere Administrator console are properly
configured. See “Configuring UNIVERGE UM8500 for integration” on
page 313.
2 Restart the IP Phone. Phone switch settings are periodically renewed in SIP
integrations and this might cause the message waiting indicator lamp to stop
working. Restarting the phone sends all information to the switch and tells
the messaging system to send the MWI settings.
3 From the phone where the message waiting indicator is not working properly,
dial the extension that turns message waiting indicators on. The indicator on
the phone should turn on. If it does not, the problem is with the Sphere
system settings.
4 From the phone where the message waiting indicator is not working properly,
dial the extension that turns message waiting indicators off. The indicator on
the phone should turn off. If it does not, the problem is with the Sphere
system settings.
5 Confirm that the ports specified for turning message waiting indicators on
and off in Sphere system are the same as the ports specified in the Sphericall
Administrator.
Refer to the Sphere system documentation for information about setting
values in Sphere system. The parameters that control message waiting
indicators are MessageWaitingOn and MessageWaitingOff.
6 Stop and start the Sphere system service.
7 Shut down and restart the messaging system server.
8 Contact Technical Support if the problem persists.
316
UNIVERGE UM8500 INTEGRATION GUIDE
Dual
integration
with the
Sphere system
through SIP
trunks and
traditional
analog ports
UNIVERGE UM8500 can be integrated to the Sphere system simultaneously using
SIP trunks and traditional Single Line Analog ports using the appropriate Media
Gateway device. In a dual integration, UM8500 does not support receiving call
information by using serial packets.
To transfer calls from the SIP Trunks to Single Line Analog ports, UM8500 must be
configured to dial the same access codes that a subscriber must dial when calling
the Media Gateway.
Requirements
●
A UNIVERGE UM8500 system key with the integration type set to "Multiple
integrations," with the appropriate number of voice messaging ports
enabled.
●
The messaging system server is set up, UNIVERGE UM8500 is installed, and
the Dialogic drivers are installed as described in the Installation Guide.
●
When prompted to select the phone system, select Sphere.
●
A Media Gateway device installed and configured on the Sphere system.
●
Refer to the Installation Guide and this guide for details. See “Integration
overview” on page 304 for information about integrating UM8500 with
Sphere system.
Setting up a UNIVERGE UM8500 with dual
integration
To set up a UNIVERGE UM8500 with dual integration
1 Verify that your system key allows Multiple integrations and has Sphere as a
feature programmed on it.
2 Verify that the Dialogic drivers are installed as described in the Installation
Guide. If not, install them.
3 Install UNIVERGE UM8500 with Dialogic by selecting the following
integration settings:
Phone system settings
Parameter
Required setting
Manufacturer
NEC
Model
Sphere
Switch PBX software version
Sphericall 6.01 or later
Integration
Dual
4 After the messaging system running, only the dialogic ports are recognized.
5 Stop the Voicemail services.
6 Run the MIUConfig.exe tool from \Commserver\Utilities folder.
Set it to Miu VOIP.
7 Click Start > Programs > UNIVERGE UM8500 > Edit Switch Utility.
8 In the Edit Switch Utility, select:
Phone system settings
Parameter
Required setting
Manufacturer
NEC
Model
Sphere
Switch PBX software version
Sphericall 6.01 or later
Integration
SIP Standard
SPHERE SYSTEM
317
9 Run VoipAdmin.exe from \Commserver\Utilities folder and make the
necessary settings. See “To configure the extension numbers and the IP
address of the PBX” on page 313
10 Run MIUConfig.exe tool from Commserver\Utilities folder.
Set it to VOIP and Dialogic.
11 Your system is now configured for both integrations.
To modify voice port settings
❚
Use the following settings for the voice port settings:
Dual-switch integration settings
Page
Field
Description
System > Switch >
Switch
Access code
Type the access code that UM8500 uses
when transferring calls to the media
gateway
System >Ports
Port assignments
Type the range of ports.
Subscribers > Subscriber
Template > Profile
Switch
Select the Sphere system. If this setting is
incorrect, UM8500 will not be able to:
●
●
Transfer calls to or from the
subscriber.
Turn MWIs on or off.
Dial the subscriber's extension for Media
Master recording by phone.
Subscribers > Subscriber
Template > Message
Notification
Switch
Subscribers >
Subscribers > Profile
Switch
Select the Sphere system. On the System
> Ports page, you must configure at least
one port to dial out for message
notification.
Select the Sphere system. If this setting is
incorrect, UM8500 system will not be able
to:
●
●
●
Transfer calls to or from the
subscriber.
Turn MWIs on or off.
Dial the subscriber's extension for
Media Master recording by phone.
On the System > Ports page, the system
must have an appropriate number of ports
set to answer calls and to dial out for MWIs
and Media Master recording by phone.
Call Handlers > Profile
318
Switch
UNIVERGE UM8500 INTEGRATION GUIDE
Select the Sphere system. If this setting is
incorrect, UM8500 system can not transfer
calls to or from the call handler.
■ Standard SIP Integration
In this integration...
Integration overview ........................................................................... 320
Integration steps ............................................................................ 320
Requirements ................................................................................ 321
Integration description ........................................................................ 322
How the integration works ............................................................... 322
Integration features ........................................................................ 322
Programming the phone system............................................................ 323
Configuring UNIVERGE UM8500 for the integration .................................. 324
STANDARD SIP INTEGRATION
319
Integration
overview
Use this section of the Integration Guide with the Installation Guide to set up a SIP
integration.
Integration steps
Follow these steps to set up this integration.
1 Review the system and equipment requirements.
Verify that all phone system and UNIVERGE UM8500 server requirements
have been met. See “Requirements” on page 321.
2 Program the phone system and extensions.
See “Programming the phone system” on page 323.
3 Configure UNIVERGE UM8500 for the integration.
See “Configuring UNIVERGE UM8500 for the integration” on page 324.
320
UNIVERGE UM8500 INTEGRATION GUIDE
Requirements
The steps to set up the Standard SIP integration require the following:
Phone system
●
Any phone system that supports the following RFCs:
Standard or Reference
Title or Description
RFC 3261
SIP: Session Initiation Protocol
Offers the main support for the SIP integration.
RFC 3264
An Offer/Answer Model with the Session Description
Protocol (SDP)
Used by UM8500 for multimedia session initiations (codec
negotiation) for both incoming and outgoing calls.
RFC 3265
Session Initiation Protocol (SIP) - Specific Event
Notification
Used by UM8500 for message waiting indication (MWI).
RFC 3515
The Session Initiation Protocol (SIP) Refer Method
Used by UM8500 for transferring calls. Used with both supervised
and blind transfer.
RFC 3891
The Session Initiation Protocol (SIP) 'Replaces' Header
Used by UM8500 for transferring calls. Used with supervised
transfer only.
RFC 3842
A Message Summary and Message Waiting Indication Event
Package for the Session Initiation Protocol (SIP)
Used by UM8500 for message waiting indication (MWI).
Draft-levy-sip-diversion-08.txt Diversion Indication in SIP
Used by UM8500 for receiving incoming calls information data
such as call reason or forwarding station.
●
The phone system ready for SIP integration as described in the phone system
documentation.
●
A network switch with enough ports to handle all IP phones, the voice server
and the phone system.
UNIVERGE UM8500 server
●
UNIVERGE UM8500 installed and ready for the integration as described in
the Installation Guide.
●
A system key that enables the integration and the appropriate number of
voice messaging ports.
●
A network cable to connect the voice server to the network containing the
phone system.
STANDARD SIP INTEGRATION
321
Integration
description
How the integration works
The standard SIP integration uses an Ethernet line to connect the phone system
and UNIVERGE UM8500.
The phone system sends the following information with forwarded calls:
●
The called party's extension.
●
The calling party extension (for internal calls) or the calling party's phone
number (if it is an external call and the system uses caller ID).
UM8500 uses this information to answer the call appropriately. For example, a call
forwarded to UM8500 is answered with the subscriber's personal greeting. If the
phone system routes the call to UM8500 without this information, UM8500
answers with the opening greeting.
Integration features
The Standard SIP integration provides the following features:
Call forward to personal greeting. When an incoming call is routed to an
unanswered or busy extension, the call is forwarded to the subscriber's voice
mail. The caller then hears the subscriber's personal greeting and can leave a
message.
Caller ID. UM8500 receives caller ID information from the phone system, if
available. This information displays in the message's subject line in Microsoft
Outlook® (or other desktop messaging application).
Easy message access. A subscriber can retrieve messages without entering
an ID. UM8500 identifies a subscriber based on the extension from which the
call originated. A password may be required.
Identified subscriber messaging. UM8500 automatically identifies a
subscriber who leaves a message during a forwarded internal call, based on
the extension from which the call originated.
Message waiting indication (MWI). When a message is waiting for a
subscriber, UM8500 notifies the phone system to activate the message
waiting indicator on the subscriber's extension.
322
UNIVERGE UM8500 INTEGRATION GUIDE
Programming
the phone
system
Use the phone system documentation to program the phone switch for the SIP
integration. This includes defining the voice mail port extensions.
STANDARD SIP INTEGRATION
323
Configuring
UNIVERGE
UM8500 for the
integration
After ensuring that the UM8500 server is ready for the integration by completing
all appropriate tasks in the Installation Guide, perform the following procedure to
confirm that the integration is enabled.
To configure the UM8500 server for integration
1 Click Start > All Programs > UNIVERGE UM8500 > Key Dump.
2 Verify the Integration setting is Standard SIP or Multiple Integrations.
3 Click Start > All Programs > UNIVERGE UM8500 > Edit Switch.
4 If prompted for logon credentials, type the administrator extension and
password, then click OK.
On a new install the logon credentials are:
■
Extension = 99995
■
Password = 12345
5 Confirm that the settings match those in the following table. If the settings are
incorrect, integration features may not be enabled.
Phone system setting
Parameter
Required settings
Manufacturer
Defaults
Model
Default Parameters
Specific Version or Country ALL
Integrations
Standard SIP
6 Stop UNIVERGE UM8500 if it is running.
7 Run VOIPAdmin.exe from Commserver\Utilities folder.
The VoipAdmin Tool appears.
8 In the IP Protocol field, select Standard SIP.
9 Type the <name> or <IP address> of phone switch in the PBX Name or
IP Address field.
10 The server name can be left blank.
11 Type the <IP address> of the SIP proxy in the SIP Proxy IP Address
field.
12 Select the Peer-to-Peer or User Authentication check box as follows:
●
Peer-to-Peer. Select only if the port authentication does not required a
password.
●
●
Use Authentication. Select only if the port authentication requires an
authenticated username and password.
Select neither. Leave both selections unchecked if the port
authentication requires a password.
13 Under Manage Ports,
a Click Add to add a new port.
b Type the information for each port.
Type the Extension of each port as long as Password and Authname
as required.
14 Click OK to save the changes and then close the VoipAdmin Tool.
15 Start UNIVERGE UM8500.
16 In your Internet browser, go to UM8500 Administrator
(http://<server name>/saweb).
324
UNIVERGE UM8500 INTEGRATION GUIDE
17 Go to System > Ports and check the extensions of each port displayed in
the Port Table section of the page.
Type the extension for each port. The ports must appear in the same order as
in VOIPAdmin Tool.
STANDARD SIP INTEGRATION
325
326
UNIVERGE UM8500 INTEGRATION GUIDE
■ Toshiba CIX100/200/670, CTX
100/670, and StrataDK series
In this integration...
Integration overview ........................................................................... 328
Integration steps ............................................................................ 328
Requirements ................................................................................ 328
Integration description ........................................................................ 329
How the integration works ............................................................... 329
Integration features ........................................................................ 329
Configuring UNIVERGE UM8500 for the integration .................................. 330
Programming the phone system............................................................ 331
TOSHIBA CIX100/200/670, CTX 100/670, AND STRATADK SERIES
327
Integration
overview
Use this section of the Integration Guide with the Installation Guide.
Integration steps
Follow these steps to set up this integration.
1 Review the system and equipment requirements.
Verify that all phone system and messaging system server requirements have
been met. See “Requirements,” below.
2 Configure UNIVERGE UM8500 for the integration.
See “Configuring UNIVERGE UM8500 for the integration” on page 330.
3 Program the phone system and extensions.
See “Programming the phone system” on page 331.
4 Test the phone extensions.
Test the phone extensions that are set up for the integration. See Appendix B,
“Testing the extensions” on page 338.
5 Run the Learn Tones utility.
Run the Learn Tones utility to teach the messaging system the tones
associated with the phone system. See Appendix C, “Learning phone system
tones” on page 340.
Requirements
The steps to set up the Toshiba DK280/424 Simplified Message Desk Interface
(SMDI) integration require the following:
Phone system
●
Toshiba DK280 or DK424 with an SMDI port installed.
●
The phone system SMDI port must be connected to a serial port, COM1 is the
default, on the UM8500 server with an RS-232 serial cable.
●
The phone system voice messaging ports must be connected to the voice
boards in the UM8500 server.
●
The phone system ready for the integration as described in the phone system
installation guide.
UNIVERGE UM8500 server
●
The Dialogic voice boards installed; see the Installation Guide for installation
details.
NOTE
For the latest information on supported voice boards for UM8500,
contact a sale representative.
●
UM8500 installed and ready for the integration as described in the
Installation Guide.
NOTE
To ensure that Windows does not mistake the serial connection for
a serial mouse when restarting the UM8500 server, confirm that
the boot.ini file is set according to instructions. See the Installation
Guide for more information.
328
●
A system key that enables the integration and the appropriate number of
voice messaging ports.
●
An available serial port, COM1 is the default.
UNIVERGE UM8500 INTEGRATION GUIDE
Integration
description
How the integration works
The Toshiba DK280/424 SMDI integration uses a data link, which consists of an
RS-232 serial cable connecting the phone system and the UNIVERGE UM8500
server. The phone system voice messaging lines connect to the analog voice
boards in the UNIVERGE UM8500 server. The following illustration shows the
required connections.
The phone system sends the following information through the data link:
●
The called party’s extension
●
The reason for the forward, for example the extension is busy, does not
answer, or is set to forward all calls
●
The calling party’s extension, for internal calls
uses this information to answer the call appropriately. For example, a call
forwarded from a subscriber extension to UM8500 is answered with the
subscriber’s personal greeting. If the phone system routes the call to UM8500
without this information, UM8500 answers with the opening greeting.
Integration features
The Toshiba DK280/424 SMDI integration with UNIVERGE UM8500 provides the
following features:
●
Call forward to personal greeting. When an incoming call is routed to an
unanswered or busy extension, the call is forwarded to the subscriber’s voice
mail. The caller then hears the subscriber’s personal greeting and can leave a
message.
●
●
●
●
Caller ID. UM8500 receives caller ID information from the phone system, if
available. This information is displayed in the message’s subject line in
Microsoft Office Outlook® or other desktop messaging application.
Easy message access. A subscriber can retrieve messages without entering
an ID. UM8500 identifies a subscriber based on the extension from which the
call originated. A password might be required.
Identified subscriber messaging. UM8500 automatically identifies a
subscriber who leaves a message during a forwarded internal call based on
the extension from which the call originated.
Message waiting indication (MWI). When a message is waiting for a
subscriber, UM8500 notifies the phone system to activate the message
waiting indicator on the subscriber’s extension, if it is equipped with one, or
to activate a stutter dial tone.
TOSHIBA CIX100/200/670, CTX 100/670, AND STRATADK SERIES
329
Configuring
UNIVERGE
UM8500 for the
integration
After ensuring that the UNIVERGE UM8500 server is ready for the integration by completing all appropriate tasks in the Installation Guide, perform
the following procedure to confirm that the integration is enabled.
To confirm that the integration is enabled
1 Click Start > All Programs > UNIVERGE UM8500 > Edit Switch.
2 If prompted for logon credentials, type the administrator extension and
password, then click OK.
On a new install the logon credentials are:
Extension = 99995
Password = 12345
3 Confirm that the settings match those in the following table.
Phone system settings
Parameter
Required setting
Manufacturer
Toshiba
Model
DK 280
DK 424
Switch PBX software version
CPU A, B, C/D
All
Integration
Serial
4 If the settings are incorrect, select the correct settings and click Update
Voice Mail Now.
330
UNIVERGE UM8500 INTEGRATION GUIDE
Programming
the phone
system
If you use programming options other than those described in the following
procedure, the integration’s performance may be affected.
NOTE
Always use an antistatic wrist strap or grounding device when
handling boards or other components. Static electricity can
damage the components in phone system equipment.
To program the phone system
1 Select specific voice messaging system ports to be used for the integration,
and the remaining ports to be used for the automated attendant, if
appropriate.
2 On the phone system, activate the SMDI port.
3 In “System assignments,” set the following:
■
Program 10-2 = LED 4 should be turned on for the voice messaging
system to turn off message waiting indication.
■
Program 10-3 = LED 8, 9, 11, 13, 14, and 20 should be turned on for
correct spacing and digit length. LED 8 allows the phone system to pass
caller ID information to the voice messaging system.
4 In Program 13-1, enter the lowest standard phone port connected to the voice
messaging system.
5 Set Program 31 = LED 4, 5, 9, 15-18 should be turned on.
6 For Toshiba DK280 release 3 or higher and DK424 systems, assign all phones
connected to voice mail to the lowest standard phone port connected to the
voice messaging system.
NOTE
The PPTC connector is a special adapter that converts the sixconductor line cord to a DB 25 connection. The default pinouts
from Toshiba will not work. Use the following pinouts so the
packet data is able to transmit and receive all information
correctly.
Modular to PPTC 25 Pinout
1 to 7
2 to 8
3 to 20
4 to 6
5 to 2
6 to 3
Short pins 4 and 5 on the PPTC connector
Modular to PPTC 9 Pinout
1 to 5
2 to 1
3 to 4
4 to 6
5 to 3
6 to 2
Short pins 7 and 8 on the PPTC connector
TOSHIBA CIX100/200/670, CTX 100/670, AND STRATADK SERIES
331
332
UNIVERGE UM8500 INTEGRATION GUIDE
APPENDIX
A
Shutting down and starting
the messaging server
In this integration...
Shutting down and starting UNIVERGE UM8500 ...................................... 334
To shut down the messaging system ................................................. 334
To start the messaging system ......................................................... 334
333
Shutting down
and starting
UNIVERGE
UM8500
The messaging system is configured to start automatically whenever the server starts.
However, the Status Monitor can start and stop the messaging system without a system
shutdown. The Status Monitor also provides information about ports, licenses, and
reports.
When the messaging system has started successfully, three tones play and a check mark
appears on the UM8500 icon in the taskbar notification area.
If for any reason, the messaging system does not start successfully, two tones play and an
“X” appears on the UM8500 icon in the taskbar notification area.
To shut down the messaging system
1 Use one of the following procedures to log on to the Status Monitor:
■
On the messaging server, log on to Windows as an UNIVERGE UM8500
administrator.
Double-click the desktop shortcut to the Status Monitor or right-click the
UM8500 icon in the taskbar notification area, then click Launch Status
Monitor.
■
If you are at another computer:
Start Internet Explorer, in the Internet Explorer address bar type:
http://<server name>/status
Where <server name> is the name of the voice messaging server.
2 On the Startup/Shutdown page of the Status Monitor, select a shutdown option:
❆
Wait until all calls are finished. The messaging system shuts down after all
calls are finished.
❆
Send voice message before terminating all calls. The messaging system
interrupts calls in progress, notifying users that calls are being disconnected.
Calls are disconnected then the server shuts down.
3 Click Shut down.
On the messaging system server, an “X” appears on the UM8500 icon in the taskbar
notification area when the messaging system is shut down.
To start the messaging system
The messaging system starts automatically when the server is turned on or restarted. Use
this procedure to start the messaging system only if the messaging system was shut down
and the server was not restarted.
1 Use one of the following procedures to log on to the Status Monitor:
■
On the messaging server, log on to Windows as an UNIVERGE UM8500
administrator.
Double-click the desktop shortcut to the Status Monitor or right-click the
UM8500 icon in the taskbar notification area, then click Launch Status
Monitor.
■
If you are at another computer:
Start Internet Explorer, in the Internet Explorer address bar type:
http://<server name>/status
Where <server name> is the name of the voice messaging server.
2 Click the UM8500 icon in the taskbar notification area.
3 Click Start.
When the messaging system starts successfully, three tones play and a check mark
appears on the UM8500 icon in the taskbar notification area.
334
UNIVERGE UM8500 INTEGRATION GUIDE
If the messaging system does not start successfully, two tones play and an “X” appears
on the UM8500 icon in the taskbar notification area.
4 If you are at the messaging system server, press CTRL+ALT+DELETE, then lock or log
off Windows to prevent access by unauthorized users.
335
336
UNIVERGE UM8500 INTEGRATION GUIDE
APPENDIX
B
Testing the extensions
In this integration...
Testing the extensions ......................................................................... 338
What is needed for the test.............................................................. 338
Steps to test the extensions............................................................. 338
337
Testing the
extensions
Test each extension to confirm that the phone system is programmed correctly.
What is needed for the test
●
A standard analog phone set with a ringer to use as a test set. If the messaging system
uses feature phone sets, use a feature set for the tests.
●
If using an analog test phone, and if the voice boards use RJ-14 connectors with two
extensions per connector, then a line splitter might be needed to separate the two
extensions carried by each phone line.
●
A system manager phone set.
Steps to test the extensions
1 Connect the phone system to the test phone set using a line designated as a
messaging system extension.
2 Confirm that the phone system identifies DTMF dialing through the test extension.
Dial a station phone from the test phone. The station phone should ring.
3 Confirm that the phone system transmits DTMF tones to the test extension.
Dial a station phone from the test phone. Have someone answer the station phone
and enter a digit. You should hear the tone on the test phone. Repeat this test for each
type of station connected to the phone system, for example, analog, feature set, or
operator.
4 Confirm that the test phone can access outside lines.
Dial a number outside of the phone system from the test phone. You should reach the
number.
5 Confirm that the phone system generates rings on the test extension.
From a station phone, dial the extension for the test phone. The test phone should
ring.
6 Confirm that trunk routing is set up correctly for extensions that answer trunk calls.
From a line outside the phone system, dial the number designated for the messaging
system. Answer the test phone, perform a hookflash (timed break recall), then dial a
station phone. Listen for ringing, then hang up the test phone. The call should be
transferred to the station you dialed.
7 Check that trunk routing is set up correctly for extensions that only answer calls from
stations, for phone systems that support trunk routing.
Dial the test phone extension from a station phone. Answer the test phone, perform a
hookflash (timed break recall), then dial a station phone. Listen for ringing, then hang
up the test phone. The call should be transferred to the station you dialed.
338
UNIVERGE UM8500 INTEGRATION GUIDE
APPENDIX
C
Learning the phone system
tones
In this integration...
Learning phone system tones ............................................................... 340
Troubleshooting the Learn Tones utility .............................................. 341
339
Learning phone
system tones
UNIVERGE UM8500 comes with template files for a variety of phone systems. These
template files should work with most phone systems without modification. However,
problems with transfers, message waiting indication, and message notification can arise if
UM8500 does not understand the phone system tones. If any of these problems occur, run
the Learn Tones utility to modify the phone system template file.
The Learn Tones utility learns the frequency and cadence of the phone system tones, such
as busy and ringback, and teaches them to UM8500. It also learns the central office dial
tone. Once the utility is started, the process is automatic. One messaging port calls other
ports to generate the tones. The utility then adds the tone information to the phone
system template file.
The Learn Tones utility requires exclusive access to the ports. Therefore, run it when
UNIVERGE UM8500 is not taking calls.
To run the Learn Tones utility
1 In the UM8500 Administrator, go to System > Switch.
2 In the Set Active Switch Type section, verify all values.
3 Correct any incorrect values for the phone system.
4 If values in step 3 were changed, click Save.
5 Shut down UM8500. For more information, see “To shut down the messaging system”
on page 334.
6 Click Start > Programs > UNIVERGE UM8500 > Learn Tones.
7 Confirm that all ports and extensions are correct. Do not use a hunt group for the
helper extensions.
Use manual mode when you want the primary port to call a specified extension rather
than a helper port. You will be prompted to answer the extension and busy it. You also
use manual mode when some aspect of the phone system programming, such as
forwarding when a line is busy, conflicts with the tone-learning process.
8 Type 1000 in the Delay between calls box.
9 Type 25 in the Deviation threshold box. Values outside the Deviation threshold
are discarded.
10 In the Dialtone section, click Learn, and the utility begins learning the phone system
dial tones. This can take a few minutes.
If a “Success” message appears, go to step 11.
If a “Failure” message appears, resolve the problem and repeat this step. For more
information, see “Troubleshooting the Learn Tones utility” on page 341.
11 In the Busy section, click Learn, and the utility begins learning the phone system
busy tones. This can take a few minutes.
If a “Success” message appears, continue with step 12.
If a “Failure” message appears, resolve the problem and repeat this step. For more
information, see “Troubleshooting the Learn Tones utility” on page 341.
12 In the Ringback section, click Learn, and the utility begins learning the phone system
ringback tones. This can take a few minutes.
If a “Success” message appears, continue with step 13.
If a “Failure” message appears, resolve the problem and repeat this step. For more
information, see “Troubleshooting the Learn Tones utility” on page 341.
Click Save. The Learn Tones utility automatically verifies tones after it learns them,
so there is no need to click Verify all before saving the learned tones.
13 In the dialog box that appears, select the Dialtone, Busy, and Ringback check
boxes, then click OK.
340
UNIVERGE UM8500 INTEGRATION GUIDE
14 Accept the default file name, and click Open. Changes to the phone system template
file are saved.
15 Click Done to exit the Learn Tones utility.
Restart UM8500. For more information see “To start the messaging system” on
page 334.
Troubleshooting the Learn Tones utility
If the learn tones process fails, the phone system might not be generating a tone for a
sufficient length of time. To adjust the length of the tone that Learn Tones expects, in the
Learn Tones window change the number in the Frames column. For continuous tones, one
sample is one second; for tones with cadence, one sample is one cycle.
The process might also fail if the first few seconds of the tone varies from the rest of the
tone. To accommodate this situation, in the Learn Tones window change the number in the
Delay column.
If you need assistance resolving these or other problems, call Technical Support.
341
342
UNIVERGE UM8500 INTEGRATION GUIDE