1
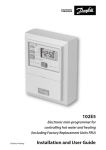
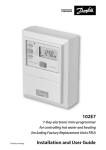
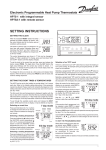
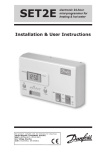
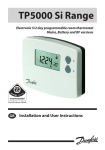
MAKING MODERN LIVING POSSIBLE
FP735Si
Electronic 3-Channel Full Programmer for
Heating and Hot Water with Service Interval Timer
Danfoss Heating
User Guide
FP735Si
Electronic 3-Channel Full Programmer for
Heating and Hot Water with
Service Interval Timer
For a large print version of these instructions
please call Marketing on 0845 121 7400.
®
Certification Mark
Danfoss can accept no responsibility for possible errors in catalogues, brochures, and other
printed material. All trademarks in this material are property of the respective companies.
Danfoss and the Danfoss logotype are trademarks of Danfoss A/S. All rights reserved.
2
FP735SI
GB
GB
Thank you for buying a Danfoss product
Danfoss Heating
3
User Instructions
FP735Si
Electronic 3-Channel Full Programmer
GB
Index
1.0 User Instructions .......................................................................................6
1.1
Display ...............................................................................................6
1.2
Preset programmes .......................................................................7
1.3
Before you start ..............................................................................7
1.4
Display preferences .......................................................................8
1.5
Setting the date and time ...........................................................8
1.6
Accepting the preset programmes ...................................... 10
1.7
Before you change the preset programmes ..................... 10
1.7.1 Changing Zones .......................................................................... 11
1.7.2 Programming in 7-day mode ................................................. 12
1.7.3 Programming in 5+2 day mode ............................................ 13
1.7.4 Programming in 24 hour mode ............................................. 14
1.7.5 Programming in A+B mode .................................................... 14
2.0 Advanced Functions ............................................................................. 17
2.1
Mode ............................................................................................... 17
2.2
Holiday mode ............................................................................... 17
2.3
User overrides .............................................................................. 18
2.3.1 Move to next event .................................................................... 18
2.3.2 Extend by 1, 2 or 3 hours .......................................................... 19
2.3.3 Changing clock forwards and backward ............................ 19
3.0 Advanced Programming..................................................................... 20
3.1
Overview of installer selectable features ........................... 20
3.1.1 Keyboard lock............................................................................... 20
4.0 Service Interval Timer .......................................................................... 20
5.0 Resetting the Unit .................................................................................. 21
6.0 INFO Button (COPY/i)............................................................................ 22
4
FP735SI
GB
The text below has been edited and approved by the
Plain English Campaign, who has issued a Crystal Mark
to be displayed with it.
What is a Programmer?
... an explanation for householders.
Programmers allow you to set ‘On’ and ‘Off ’ time periods. Some
models switch the central heating and domestic hot water on and
off at the same time, while others allow the domestic hot water and
heating to come on and go off at different times. Set the ‘On’ and
‘Off ’ time periods to suit your own lifestyle. On some programmers
you must also set whether you want the heating and hot water
to run continuously, run under the chosen ‘On’ and ‘Off ’ heating
periods, or be permanently off.
The time on the programmer must be correct. Some types have
to be adjusted in spring and autumn at the changes between
Greenwich Mean Time and British Summer Time.
This programmer works together with the room thermostats and
the hot water thermostat. When the room and/or the hot water
has reached its set temperature, the heating will go off. Even if the
programmer has set it on.
Danfoss Heating
5
1.0 User Instructions
1.1 Display
GB
Channel Status
(Event number when programming)
Channel Number
TIME
Days of Week (Numbers or Text)
KEY TO SYMBOLS
Flame: shows when heating is on
Hourglass: shows during programming delays
Padlock: indicates keyboard is locked
Suitcase: indicates Holiday Mode is set
Clock: Timed Modes
Hand: Manual Modes
Alarm: Indicates alarm is active.
Also used for service due
3 on and 3 off events per day
2 on and 2 off events per day
1 on and 1 off event per day. All Day Mode
Timer (OFF) Mode
+ HRS: Extends function by 1, 2 or 3 hours
Timer (ON) Mode
6
FP735SI
1.2 Preset Programmes
Your FP735Si comes ready programmed with a set of operating times
which often suit most people.
Weekdays (Mon-Fri)
Event
Time Hot Water
and
Heating
1
06:30
1st ON
2
08:30
1st OFF
3
11:30
2nd ON
4
13:30
2nd OFF
5
16:30
3rd ON
6
22:30
3rd OFF
Weekend (Sat-Sun)
Event
Time Hot Water
and
Heating
1
07:30
1st ON
2
09:30
1st OFF
3
11:30
2nd ON
4
13:30
2nd OFF
5
16:30
3rd ON
6
22:30
3rd OFF
GB
If you want, you can change any of these settings by following the
instructions on pages 12 to 17. First follow the steps on page 9 to set
your display preferences.
1.3 Before you start
Open the flap on the front of your
FP735Si. Using a non-metallic object,
press and release the recessed RESET
button (R/S).
NOTE: Your FP735Si features a backlight
on it’s display. Unless this has been
disabled or set to be on all the time, the
first press of any button will cause the
backlight to come on. In order to action a
function, a repeat press of the button will
be required. All buttons will then operate
as normal until the unit is left untouched
for 2 minutes and then the next button
press will activate the backlight again.
Danfoss Heating
7
1.4 Display Preferences
Clock display (12 or 24 hr)
Press and hold Λ and + buttons for 2-3
seconds until display changes.
(AM or PM will appear in 12 hr mode)
GB
Days of the week (numbers or text)
Press Λ and – to toggle between day
numbers and text
1.5 Setting the Time and Date
Setting the correct date and time
Your FP735Si incorporates a real time clock with calendar function
that automatically changes time in both Spring and Autumn. The
time and date is set in the factory, and does not normally require
adjustment. However, should it be found necessary to adjust time or
date for any other reason refer to the following instructions.
Date
Month
Year
8
FP735SI
Setting the date
Press and hold Λ and PROG buttons for 3
seconds, to display date.
GB
The YEAR number will flash, use Λ or V to
correct the year (Fig 1).
Use - or + to move to MONTH, then use Λ
or V to correct month (Fig 2).
Fig. 1
Fig. 2
Fig. 3
Fig. 4
Use - or + to move to DATE in month,
then use Λ or V to correct day in month
(Fig 3).
If you attempt to select an invalid date
the unit will reject it and apply the nearest
valid date. It is recommended that date is
set in the order, yy/mm/dd.
Setting the correct time
After setting the date press PROG to
display the time. The time display will
flash on and off. Use the + and - buttons
to set the correct time (press and hold to
change in 10 minute increments). (Fig. 4)
Danfoss Heating
9
Setting the correct day
The day of the week is set automatically
from the date. Press PROG button to
return to normal operation (RUN).
(Fig. 5)
GB
Fig. 5
Fig. 6
1.6 Accepting the preset programmes
If you are happy to use the preset programmes on page 7, you do
not need to do anything else. To accept these settings just close the
front cover.
The unit is now in RUN mode (colon flashes in display) and the
heating will operate according to the preset programmes.
1.7 Before you change the preset programmes
Your installer will have set your unit to operate in either 7-day mode,
5+2 day mode or 24 hour mode. To tell which mode your unit is set
press PROG until Event 1 flashes in the display. The list of week days
at the bottom af the display indicates the chosen mode.
In 7-day mode (Fig. 7) you can
programme different settings for each
day of the week (see page 12).
Note: Only one day of the week is shown
in the display.
In 5+2 day mode (Fig. 8) you can enter
one set of programmes for weekdays and
another set for weekends (see page 13).
Note: Either weekdays or weekend days
are shown in the display.
10
Fig. 7
Fig. 8
FP735SI
In 24 hour mode (Fig. 9) you can enter
one set of programmes which repeats
every day (see page 14).
Note: No days of the week are shown in
the display.
GB
Fig. 9
Note:
Event times cannot be set out of sequence.
To return to RUN mode at any time, press and hold PROG.
Alternatively, do not press any buttons and the unit will automatically
return to RUN after 2 minutes.
Your installer will have set your unit to operate with either 2, 4 or
6 events per day. This will determine the number of events per day
that you are able to programme.
1.7.1 Changing Zones
The FP735Si is a 3 Zone timer and can schedule individual times to
switch each Zone of your Central Heating and Hot Water system. To
view or set the on/off schedule for each Zone the corresponding
Channel number must be showing on the display.
a) Press the CH button to change the currently
viewed Zone identified by the channel number
in the display (Fig 10).
b) Press the CH button again to scroll through the
Zone channels 1 to 3
Fig. 10
Note:
Each Zone will correspond to a different area of your heating
system and / or hot water. Which Zone belongs to which Channel
of the FP735Si depends on the installation wiring, details of which
can be obtained from your installer. It is recommended that this is
noted in the supplied Quick Guide for future reference.
Danfoss Heating
11
1.7.2 Programming in 7-day mode
(Separate programmes for each day of the week)
a) Press PROG until Event 1 flashes (Fig.
11).
b) Change the time as follows:
i) Use the + or – buttons to alter the
time (press and hold to change in
10 minute increments).
ii) Press NEXT to advance to next
Event for that day.
iii) Repeat steps i and ii above for the
Fig. 12
Fig. 11
remaining events (Fig. 12).
c) When all events are correct, press DAY to programme events for
the next day. (If a day’s event times are to be repeated in another
day of the week then the COPY function can be used - see below).
d) Repeat steps b and c to programme
(or COPY) events for the rest of the
week.
GB
To return to RUN mode, press and
release the PROG button. The display
will change to show the current time
(Fig. 13).
Fig. 13
Normal Copy Function
1. At step d press the COPY button and the previous day’s events
will be copied into the currently displayed day.
Advanced Copy Function
1. When all 6 events are correct, press the COPY button.
2. Press the DAY button to select which day to copy to.
3. When day is selected press the COPY button.
4. Continue steps 2 and 3 until all the days you would like to copy to
have been copied.
5. To exit advanced copy mode press the DAY button until the day
copied from is selected and press the COPY button.
Note: Advanced Copy can only be used if the Advanced
12
FP735SI
Copy Function has been enabled in option 2 in Advanced
Programming (see page 20).
1.7.3 Programming in 5+2 day mode
GB
(One set of programmes for weekdays, another for weekends)
a) Press PROG button until Event 1 flashes, then press the DAY
button until display shows weekdays (Fig. 14).
b) Follow steps b and c on page 11 to programme times for
weekdays (Fig. 15).
c) Press the DAY button to programme events for weekend (Day
6-7) or press the COPY button to repeat weekday programme.
To return to RUN mode, press and release the PROG button. The
display will change to show the current time (Fig. 16).
Fig. 14
Danfoss Heating
Fig. 15
Fig. 16
13
1.7.4 Programming in 24 hour mode
(Every day of the week uses the same programme)
a) Press the PROG button until event 1 flashes (Fig. 17).
b) Amend the time as follows:
i) Press the + and – buttons to alter the time (press and hold to
move in 10 minute increments).
ii) Press the NEXT button to advance to the next event (Fig. 18).
iii) Repeat the steps above for the remaining events.
GB
c) When all events are programmed press the PROG button to
return to RUN mode (Fig. 19).
Fig. 17
Fig. 18
Fig. 19
1.7.5 Programming in A+B mode
(The Advanced Programming parameter 6
must be set to 5+2 days)
Press and hold the PROG and V buttons for 3 seconds.
The display will change to that shown in Fig. 20. This
will take you into Advanced Programming Mode
option 1.
Use the Λ or V buttons to enable or disable the
function (1=enabled, 0=disabled).
Fig. 20
14
FP735SI
Press and hold the PROG button for 5 seconds until the display
returns to previous RUN mode (Fig. 21).
Press the PROG button, the display will change to show the default
days assigned to “A” days (MON, TUE, WED, THU, FRI) (Fig. 22).
GB
Use the + or - buttons to scroll forwards or backwards through the
days of the week.
To deselect a day press the V button, (for example TUE). To select a
day press the Λ button (for example SUN).
Any deselected days are automatically assigned to “B” days.
Fig. 21
Fig. 22
Programming “A” days and events
a) Press the PROG button, the first preset time. (Event 1 for
Programme A) appears in display (Fig. 23).
b) Use the + or - buttons to adjust the TIME (press and hold to
change in 10 minute increments).
Fig. 23
Danfoss Heating
15
c) Press the NEXT button to move to the next preset time (Event 2)
(Fig. 24).
d) Repeat steps b, c, and d to programme the remaining events.
GBGB
Programming “B” days and events
a) Press the DAY button until the first preset time (Event 1 for
Programme B) appears in display (Fig. 25).
b) Use the + or - buttons to adjust the TIME (press and hold to
change in 10 minute increments).
c) Press the PROG button to move to the next preset time (Event 2)
(Fig. 26).
d) Repeat steps b, c, and d to programme the remaining events.
Running the programme
Press the PROG button to return to previous RUN mode. The
heating will now follow the times programmed (Fig. 27).
Fig. 24
Fig. 25
Fig. 26
Fig. 27
Note: Advanced copy function is only available in 7 day mode.
16
FP735SI
2.0 Advanced Functions
2.1 Mode
The MODE button allows the operation of the programmed events
to be altered between:
1. Auto mode
a.
6 events
b.
4 events
GB
2. Allday mode
a.
Only the first and last programmed events run
3. “ON” mode
In the “ON” mode the heating is permanently turned on.
4. “OFF” mode
In the “OFF” mode, the heating is permanently turned off.
Note: When in Auto or Allday modes, the clock symbol is displayed
to indicate the programmed events will be followed.
2.2 Holiday Mode
The FP735Si can temporarily switch off all programmed on events while you
are away on holiday, returning to your programmed settings at a specified
date.
Press and hold the DAY button for at least 3 seconds (the display will
show a suitcase and a date with the year flashing - Fig 28). Now you
can set the date of your return.
The YEAR number will flash, use the Λ or V buttons to set the year
of your return.
Use the - or + buttons to move to MONTH. The MONTH number will
flash (Fig 29). Then use Λ or V to set the month of your return.
Danfoss Heating
17
Use the - or + buttons to move to DAY in month of your return. The
DAY number will flash (Fig 30). Then use the Λ or V button to set on
which day in month you will return.
GB
Fig. 28
Fig. 29
Fig. 30
Once the date of return is set correctly, press the DAY button to start
holiday mode and then no more – the display will change to show a
flashing suitcase.
The modes (auto, all day, or on or off ) of operation to return to can be
selected using the MODE button.
To cancel Holiday Mode, or if returning early from holiday, simply
press the DAY button to resume normal operation.
When in Holiday Mode, a hand symbol is shown to indicate this is a
manual setting mode.
2.3 User Overrides
Sometimes you may need to change the way you use your heating
temporarily, e.g. due to unusually cold or warm weather. The FP735Si
has several user overrides, which can be selected without affecting
the set programmes. When user overrides are active, the hand
symbol will be flashing to indicate a manual change is active.
2.3.1 Move to next event
Press the V button to move forward to the next event. Press V button
again to return to programmed operation.
18
FP735SI
GB GB
Fig. 31
2.3.2 Extend the current set time by 1, 2 or 3 hours
(Fig. 31).
Press the Λ button once for 1 extra hour, twice for 2 extra hours, 3
times for 3 extra hours, and press 4 times to remove override.
The display will indicate the number of extended hours have been
set. A fourth press will cancel the override.
2.3.3 Changing the clock forwards and backwards
This is handled automatically, however, if the manual changeover has
been selected (in Advanced Programming) follow the instructions
below.
To change from Summer to Winter (turn clocks back)
With clock display showing, press and hold the - button until time
moves back.
To change from Winter to Summer (move clocks forward)
With clock display showing, press and hold the + button until time
moves forward.
Danfoss Heating
19
3.0 Advanced Programming
3.1 Overview of installer selectable features
which may affect the operation of your timer
Settings References
GB
Installer Settings
Parameter Function
1
A+B Days (Enabled/Disabled)
2
Copy functions
(Standard/Advanced)
3
Summer/Winter
(Automatic/Manual/Disabled)
4
Backlight (On/Off/On for 15s)
5
4 Events/6 Events per day (4/6)
6
Programming Mode
(7-day/24 hour/5+2 A+B days)
7
Keyboard Lock (Locked/unlocked)
Installer Set Value
3.1.1 Keyboard lock
This allows the installer to limit or lock the keyboard to prevent
unauthorised changes to programme values and limits overrides.
Note:
Partial keyboard - Padlock symbol will flash
Full keyboard - Steady Padlock symbol
4.0 Service Interval Timer
If the property is owned by a landlord he may, for gas safety reasons,
have instructed the installer to set the service interval timer.
z WARNING: If set, 28 days prior to the service due date, a visual and
audible warning will start each day at noon. The audible warning
will last for 10 seconds and will be repeated every hour. The
display will show SEr and the service due date. The visual and
audible warnings will remain until a button is pressed to cancel
them. If cancelled the alarm will recommence the following day at
noon. The alarm symbol will flash as a constant reminder.
20
FP735SI
z SERVICE OVERDUE: If the boiler is not serviced before the due date, a
visual and audible warning will start each day at noon. The audible
warning will last for 1 minute and will be repeated every hour.
The display will show SEr and the service due date. The visual and
audible warnings will remain until a button is pressed to cancel
them. If cancelled the alarm will recommence the following day at
noon. The alarm symbol will flash as a constant reminder.
z In addition, all overrides and programming buttons will be
disabled and the heating may operate for a limited amount of
time each hour or not come on at all depending on the installer
settings.
z The installer may cancel or reset the service interval timer as part
of the boiler service.
z This is a gas safety feature that can only be accessed by an installer.
GB
5.0 Resetting the unit
Reset
Press and release the RESET button (R/S) if display freezes for any
reason. This does not reset any programme, clock or date but will
reset any manually selected overrides. It is recommended that this is
done at time of installation.
Full reset
Press and hold the PROG and V buttons for 5 seconds to go to
Advanced Programming. Press and release RESET button (R/S)
whilst holding down the PROG button. This resets event times to
their defaults (see 1.2). Any ADVance overrides and +HRS overrides
are cancelled. Pre-programmed parameters (Installation Guide) are
reset to default values. Clock and date are not changed.
Danfoss Heating
21
6.0 INFO Button (COPY/i)
The INFO button will allow various information to be accessed and
displayed, although the information available will depend on how
the unit is set up. The information elements are shown in sequence
as the info key is pressed repeatedly.
GB
Model number
The Danfoss model number is displayed at the top of the display.
Software version
The user application software version of the programmer is
displayed.
Next event time
The next event time of the currently displayed channel is displayed.
Service Due Date (if applicable)
The Service Due date is displayed if set by the installer.
In holiday mode, the info key provides the information.
Holiday End Date
If the holiday mode has been set, a press of the INFO button will
display the holiday end date.
22
FP735SI
GB
Danfoss Heating
23
Danfoss Ltd.
Ampthill Road
Bedford MK42 9ER
Tel: 0845 1217 400
Fax: 0845 1217 515
Email: [email protected]
Website: www.heating.danfoss.co.uk
Part No. 013R9578/VUHVG102 - 04/2013