1
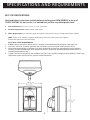
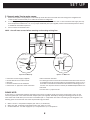
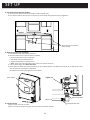
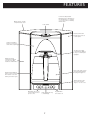
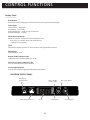
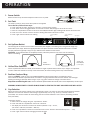
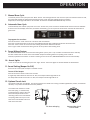
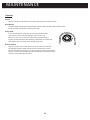
SET UP / OPERATION GUIDE model no. BEC-110
:
E
T
ess.com.
r
O
p
x
N
E
w
T
e
r
N
IMPORTA eo online at www.B ization.
t author
tional vid
c
u
u
o
r
h
t
s
it
in
w
r
e
u
s
a
o
ce of purch
mation see
r
la
o
p
f
o
.268.5953
in
t
6
e
t
6
r
c
8
o
u
ll
d
a
o
c
r
p
e
For m
ic
urn this
ion or serv
t
a
iz
r
o
Do not ret
h
t
u
a
For return
CON T EN TS
1. Safety 1-2
2. Specifications & Requirements
3
3.Hardware/Tools/Parts
4
4. Set Up
4 -6
5.Features
7
6. Control Functions
8
7. Start Up
9
8.Operation
9.Maintenance
10.Troubleshooting
11.Parts & Service
12.Warranty Information
10-11
12
13-15
15
16-17
SAFETY
IMPORTANT SAFEGUARDS
When using electrical appliances, basic safety precautions should always be followed, including the following:
1. Read all Instructions.
2. Do not touch hot surfaces. Use handles or knobs.
3. The voltage and frequency of the supply connections should conform to those of the rating label.
4. Close supervision is necessary when any appliance is used by or near children.
5. Allow to cool before putting on or taking off parts, and before cleaning the appliance.
6. Do not operate any appliance after the appliance malfunctions, or has been damaged in any manner.
Call and discuss problem with customer service.
7. The use of accessory attachments not recommended by the appliance manufacturer may result in fire,
electric shock or injury to persons.
8. Do not use outdoors.
9. Do not place on or near a hot gas or electric burner, or in a heated oven.
10. The appliance should be installed in a place not easily reached by children.
11. Do not use appliance for other than intended use.
12. To reduce the risk of shock, discontinue use of the appliance if water leakage occurs.
13. To reduce the risk of fire, do not place any heating or cooking appliance beneath the appliance.
14. To reduce the risk of fire, do not mount unit over or near any portion of a heating or cooking appliance.
15. To reduce the risk of electric shock, do not mount over a sink.
16. To reduce the risk of fire, do not store anything directly on top of the appliance surface when the appliance
is in operation.
SAVE THESE INSTRUCTIONS
1
SAFETY
IMPORTANT:
Please read and follow instructions carefully before starting your BREW EXPRESS COFFEE
SYSTEM.
The BREW EXPRESS dispenses extremely hot water. Hot liquids may cause severe burns if it contacts skin. Use
extreme caution when handling hot liquids dispensed by the BREW EXPRESS. KEEP HANDS AWAY FROM SPRAY
HEAD, BREW BASKET, CARAFE OR MUG DURING BREW CYCLE.
•
DO NOT use carafe or mug that is cracked or damaged.
•
DO NOT remove the brew basket while brewer is in operation.
•
DO NOT place carafe in microwave or place on stove top.
2
SPECIFICATIONS AND REQUIREMENTS
BEC-110 SPECIFICATIONS:
Read and follow instructions carefully before installing your BREW EXPRESS in-the-wall
COFFEE SYSTEM. For best results, it is advised that you hire a qualified professional.
1. Overall Dimensions 12 1/4” X 13 1/2” X 7 3/4” (see below).
2. Electrical Requirements 120VAC, 60HZ. (1400 watts).
3. Water Requirements 1/4” OD water supply line (copper or poly) 30 psi to 90 psi. Potable COLD water is required.
NOTE: If water is not available, a 5 gallon dispensing jug can be used with a pump (not supplied).
Contact Brew Express for more information.
1.
2.
3.
4.
Please Note: FILTER REQUIREMENTS
A filter and shut off valve at water source is strongly recommended and required for hard-water use.
The filter, such as an ice maker type filter (for soft-water use) can easily be installed at the source
Hard-water designed filter is required if you have hard-water, and must be maintained to ensure product
warranty and to avoid blockage from hard-water particles. (Please see recommended hard-water filters at
www.brewexpressdirect.com .)
If water lines are not purged or clear of debris or a filter is not installed, foreign particles (debris) in water may
clog brewer system causing failure, and will void all warranties.
3
HARDWARE/TOOLS/PARTS
BREW EXPRESS comes with the following items to ensure a successful setup.
Check to be certain all items have been included with your brewer.
• Brewer
• Carafe and lid (Lid is located on side of foam packaging or in brew basket)
• Brew baskets (1 basket style, 1 cone style)
• Setup/Operation guide
• Hardware kit (includes quick connector)
• 10’ water line
• Under sink faucet connection
• “T” connection for refrigerator TOOLS
•
•
•
•
tape measure
wrench
knife (for cutting polyethylene tubing)
drill and 3/8” bit (optional)
PARTS RECOMMENDED / REQUIRED
•
water filter (recommended)
HARD-WATER NOTICE:
A filter is required for ALL hard-water supplied water sources. Filter must be suitable for calcium carbonate and lime scale- most
major brands for commercial coffee filter systems are available. Brew Express has a hard-water filter available at
www.brewexpressdirect.com.
SET UP
IMPORTANT:
Read and follow instructions carefully before installing your BREW EXPRESS COFFEE SYSTEM.
1. Unpack Product
Carefully remove Brew Express from packaging.
Remove hardware kit from inside brew basket.
Remove carafe LID from outside of foam packaging / inside of brew-basket.
2. Select Location
Find a location with close proximity to a power outlet and water supply.
4
SET UP
3. Connect water line to water source.
A. Water source options are typically the cold water tap under the sink or the water line connecting to the refrigerator ice
maker. DO NOT connect directly to ice maker line located on refrigerator.
B. If connecting to refrigerator supply Brew Express provides a ¼” T to connect to the ¼” line. Sometimes this supply line may
be a compression braided line. If so, it may require additional parts (not supplied). Please contact Brew Express for advice,
or additional notes below Option #2.
C. Do not connect to dishwasher line.
NOTE – shut off water sources before removing or alternating existing lines.
!
!
water line to sink
water line
to ice maker
¼” poly water line
to coffee maker
angle stop
valve
adaptor
!
cold water
valve
!
¼” poly water line
to coffee maker
cold water line
Option 1: Cold Water Tap
• connection to water supply (supplied)
• remove water line from valve to facet
• add valve
• reconnect facet line to tee hardware
• connect new ¼” poly line to valve connection
Option 2: Ice Maker Line
•Valve connection included
•cut existing line from house interior wall where water line starts and runs
to refrigerator. Do Not cut line located on the refrigerator. If line is not ¼”,
then refer to note below for additional information on obtaining parts to
connect. You may also contact us directly at [email protected]
•add valve
•connect new ¼” poly line to tee
PLEASE NOTE:
If you have a ¼” compression waterline connection and you are not able to simply cut and use the enclosed T part, you can
use the supplied 3/8” John Guest Valve with adapter parts (not supplied). Basically by adding the following parts to the 3/8”
John Guest valve it will allow you to connect to a braided style ¼” compression line that is connecting to your refrigerator. The
following parts can be found at most home improvement big box stores.
1. Watts: LFA-157 - Compression adapter (3/8” OD x 1/4” female OD)
2. Watts: LFA-109 - Ander-lign Compression Union (3/8” OD by 1/4” OD)
3. Anderson-Barrows 12” Filter supply line 1/4’ compression to 1/4” compression
5
SET UP
4. Run water line to brewer location.
A. Run water line behind cabinets through the wall to brewer area.
B. Run water line direct from source to counter top (for example along the side of the refrigerator).
!
!
water filter recomended
Water filter recommended
(not
(not included)
included)
5. Waterline connection to brewer
A. Cut waterline near final location of brewer.
B. Attached water line to quick connector (supplied).
• place compression nut onto water line
• slide water line onto barbed feature
• tighten compression nut (with wrench)
• note - quick connector has built in valve, water can now be turned on
C. Turn on water supply and check for leaks.
D. Snap quick connector into mating connector on rear of Brew Express unit. Make sure to listen for a “click/snap” noise.
This ensures the connection is completed.
•To release connection, press grey tab on connector.
cord recess
grey tab
recess
!
!
water line
6. Connect Power
Plug the power cord into an outlet.
Excess cord can be stored in the grey tab on the back of the Brew Express.
6
quick connector
compression nut
FEATURES
Convenient and practical.
Brew Express™ is plumbed into
the wall and fills on command
so you never have to manually
fill with water.
Handsome Euro design
compliments any decor.
Power Switch
Patented in-the-wall
design saves precious
counter space.
Unique brew basket
allows for removal of
carafe without spilling.
The blue accent light
is an attractive addition
to any room and helpful
nightlight.
Stylish and sturdy
construction designed
for years of use and
trouble-free maintenance.
Easy clean carafe is both
functional and beautiful,
keeping beverages hot.
Exclusive Pause-N-Brew
detection sensor knows
when carafe is removed
and stops the brew cycle.
Carafe pad never gets
hot so it won't burn
fingers or scorch coffee.
Adjustable cup selector
for the exact amount of
perfect coffee.
Large, bright and easy
to read display.
7
Programmable
timer and clock.
CONTROL FUNCTIONS
Display Panel
Brew Button
Starts brew cycle. Brewing stops automatically or by pressing the brew button again.
Status Light
Green (steady) – wait mode
Red (steady) – brew mode
Red (slow blinking) – carafe or mug not detected
Red (fast blinking) – no water
Adjustable Cup Selector
Selects the amount of water to be used during brew cycle:
2 cup (8 oz), 1/2 carafe (23 oz), full carafe (50 oz)*
* volumes my vary slightly
Clock
Continuously displays current time and is used for setting automatic brew time.
PM Indicator
Indicates PM for clock.
Beeper On/Off Indicator Light
Indicates if brew complete beeper is on or off.
Auto Timer Switch & Indicator Light
Turns on automatic brew cycle at set time.
Accent Lighting Button
Turns on and off accent lighting located behind brew basket.
PROGRAM DISPLAY PANEL
Brew Button
& Status Light
BREW
Auto Timer Button
Beeper On/Off
Indicator Light
CUP SELECTOR
AM
TIMER
LIGHT
2
PM
Adjustable Cup Selector
Clock
PM Indicator
8
Accent Lighting
START UP
IMPORTANT:
Please read and follow instructions carefully before starting your BREW EXPRESS COFFEE SYSTEM.
Did you purge water lines during installation to remove any foreign particles (debris) in lines?
Debris in water lines can clog brewer system causing failure, and VOID ALL WARRANTIES.
The BREW EXPRESS dispenses extremely hot water. Hot liquids may cause severe burns if it contacts skin. Use
extreme caution when handling hot liquids dispensed by the BREW EXPRESS. KEEP HANDS AWAY FROM SPRAY
HEAD, BREW BASKET, CARAFE OR MUG DURING BREW CYCLE.
1.
Make sure water supply is turned on prior to starting BREW EXPRESS.
The BREW EXPRESS will not operate if there is no water.
2.
Make sure power is supplied to the BREW EXPRESS.
3. Turn on power switch, depress button on top of unit located just above the brew basket.. Brew button and LED display will illuminate.
4. Flush brewing system by running two cycles of water through the brewer. Place brew basket under spray head without coffee
or filter, place empty carafe under brew basket and press the brew cycle button. After brewing cycle is complete, empty carafe
and repeat.
5. Wash carafe and brew basket with warm soapy water.
IMPORTANT REMINDERS
• Always empty carafe prior to starting the unit, otherwise overfilling can occur.
• Use appropriate brew basket with carafe and mug.
9
OPERATION
1. Power Switch
Switch located on top of brewer. Depress button to turn on power
2. Set Clock
The clock is preset to 12:00 noon when power is first applied.
To set the time, follow these steps:
a. Press and hold the “light” button for 5 seconds, or wait for clock to flash.
b. Press “Brew” button to toggle between 12 and 24 hour clock. AM/PM light is off for 24 hour clock.
c. Press the “Cup Selector” button to set hours. Note AM/PM indicator light. Holding down button advances hours.
d. Press the “Timer” button to set the minutes. Holding down button advances minutes.
e. Press “Light” button to finish time setting.
Clock Set Mode
Clock Set Mode
Hour
BREW
CUP SELECTOR
Minute
AM
Set Clock
TIMER
LIGHT
2
PM
3. Set Up Brew Basket
For brewing into the carafe use the carafe brew basket (with stopper). For brewing into a mug use the single cup
brew basket (cone style). Select the appropriate filter and place into brew basket. Add desired amount of coffee
for taste preference (typically 1 tbsp per cup). Slide the brew basket into the brewer.
CAUTION – Ensure brew basket is completely inserted, otherwise problems may occur such as excessive
steam or overfilling.
Carafe
Brew Basket
Single Cup
Brew Basket
(cone style)
4. Coffee Filter Selection
10-12 cup flat bottom filter for carafe, #4 cone filter for single cup brew basket. Filters vary in height. It is important
to select a filter that extends to the top of the brew basket, otherwise coffee grounds may overfill the filter.
5. Position Carafe or Mug
Position an EMPTY carafe or mug in the BREW EXPRESS under the brew basket. The detection sensor
will not allow the brewer to operate unless the carafe or mug is positioned under the brew basket. The brew light
will blink if nothing is detected. When using a cup or mug, place it back far enough to activate sensor.
Keep lid on carafe during ALL uses. The lever should be placed towards the handle, and must be depressed by thumb to pour.
WARNING: ALWAYS EMPTY CARAFE OR MUG PRIOR TO STARTING THE UNIT OR OVERFILLING WILL OCCUR.
6. Cup Selection
Select the amount of water by pressing the “Cup Selector” button. The icons on the button will illuminate to indicate
selection. The volume of water for each setting is approximately 8 oz (2 cup), 23 oz (1/2 carafe) and 50 oz
(full carafe). The volume of water for each setting can be increased if desired. This is done by increasing the brew
time (see below).
To increase volume:
a. Select volume to change using the “Cup Selector” button.
b. Press and hold the “Cup Selector” button for 5 seconds.
c. The display now shows the current time duration (default: 2 cup = 70 sec,
1/2 carafe = 180 sec, full carafe = 350 sec).
d. Press the “Cup Selector” button to increase time and “Timer” button to decrease time (8 sec = ~ 1 oz).
e. Press “Light” button to finish changing the brew duration.
10
OPERATION
7. Manual Brew Cycle
T o manually start a brew cycle press the “Brew” button. The brew light will turn red once the cycle has started. If brewer is cold,
the heater will preheat the water before starting the brew cycle. After the selected amount of water is
dispensed, the brew light will blink for 40 seconds. At that time the BREW EXPRESS will beep 4 times.
8. Automatic Brew Cycle
To automatically start a brew cycle press the “Timer” button every time. The button will illuminate and the start time will blink
5 times on the clock display. Each time you desire auto-brewing, you must push the timer button to illuminate the button to
green color.
To program the start time:
Press and hold the “Timer” button for 5 seconds until clock flashes.
Press the cup selector button to set hours. Note AM/PM indicator light. Holding down button advances hours.
Press the “Timer” button to set the minutes. Holding down button advances minutes.
Press “Light” button to finish time setting to lock memory before clock flashing ends.
9. Pause-N-Brew Feature
The BREW EXPRESS carafe can be removed during brew cycle to pour a cup of coffee. The detection sensor will stop
the flow of water and the valve on the brew basket will prevent existing water from spilling. Once carafe is
returned, operation will continue. If carafe is missing for over 5 minutes, BREW EXPRESS will shut off automatically.
10. Accent Lights
To turn on and off the accent lights press the “Light” button. The accent lights are located behind the brew basket.
11. Sound Setting (Beeper On/Off)
At the end of a brew cycle a beeper is sounded 4 times.
To turn off the beeper:
Press and hold the “Brew” button for 5 seconds.
A single beep will indicate the sound is off. Also, the beeper indicator light will be off.
Two beeps will indicate the sound is on. Also, the beeper indicator light will be on.
12.Optional Carafe Lock
An optional carafe lock is available. This device prevents the carafe from moving in mobile applications (marine, recreational
vehicles), or it prevents accidental removal by children.
The carafe locks consists of a lock
lever and spring. It installs easily
by depressing the sides of the lock
lever until the pins slide into the
mounting holes on the brew basket.
The spring slides over a pin on the
back of the brew basket and into a
hole on the lock lever.
lock lever and spring
11
depress sides of lock
lever to install
MAINTENANCE
Cleaning
Carafe
Clean the carafe and lid after each use with warm water and a mild dish soap.
Brew Basket
The brew basket should also be cleaned after each use with mild dish soap and warm water.
The brew basket is dishwasher safe (top rack only).
Spray Head
It is recommended the spray head be cleaned occasionally with
mild soap and warm water depending on the amount of use.
When the unit is cool, remove the spray head by gently rotating it
by hand counter clockwise. After cleaning, reinstall the spray head and
hand tighten only. Be careful not to damage spray head.
Brewer Exterior
Clean the exterior of the brewer with a soft damp cloth and mild soap.
Avoid getting excessive water around buttons and detection sensors.
DO NOT use abrasive cleansers, they will damage the surface of the brewer.
Also, do not use ammonia (Windex), denatured alcohol or chlorinated based
cleaners. They will damage the plastic.
12
TROUBLESHOOTING
No power or display is not illuminated
•
•
•
Press power button (on top of brewer).
Confirm the power to unit is “on”. Make sure power is “on” at the outlet
Check by using another outlet. If power switch is not working and power is
available call for service, send email to [email protected], or submit
for repair at www.brewexpressdirect.com then select service options – RRA.
Water does not flow from spray head
•
•
•
•
•
•
•
•
•
The BREW EXPRESS preheats the water before starting the brew cycle. You may be waiting for the preheat
cycle to end.
Confirm the carafe or mug is centered under the brew basket. BREW EXPRESS will not start if the detection
sensor does not see a carafe or mug. Brew light will blink slowly. If using a mug, one may need to move it further inside brewer.
The BREW EXPRESS will not operate if there is no water. LED display will flash EEEE if there is no water.
Confirm the water is connected to brewer and is turned on.
Confirm the water line is properly connected inside the rough-in box. Remove the two mounting screws from behind
the brew basket and carafe and pull out brewer. The water line quick connectors must be pressed together firmly.
Also, check for a pinched or kinked water line.
Check quick connections to insure they are snapped together and that water is on.
Check the water filter (if present) at the supply. If filter is clogged replace filter.
If problem persists, then brewer maybe clogged by debris. Call customer service.
If outside air temp is below freezing then check to see if water line is frozen.
Water overflow from carafe
• Carafe was not emptied before brew cycle started (empty carafe).
• Flow rate too high, confirm by running 2-3 pots of water, if flow rate is still too high call for customer service.
Water volume in carafe is too low
• Increase brewing time. See procedure on page 6.
• Check spray head for blockage.
13
TROUBLESHOOTING
Excessive Steam
•
•
•
Remove spray-head and check for calcium blockage. Unit may be plugging up from debris or calcium
IF newer unit, check the temperature program bypass switch located on rear of machine by the cord storage. If “OFF” then
turn to “ON” position. This will cool unit down slightly.
Call or email for service.
bypass switch
Taste Not Acceptable
•
•
•
•
Quality or quantity of coffee placed in brew basket is not sufficient (purchase better quality coffee).
Adjust coarseness of coffee grind.
Spray head is plugged and water is boring hole in grounds (clean or replace spray head).
Check temperature inside of a full carafe of water. It is possible heating system is not working properly.
Coffee temperature cold or lukewarm
•
•
•
Carafe not keeping coffee hot enough. If using 2 cup or 1/2 carafe setting, consider pre-heating it
with hot water before brewing.
Water flow rate too high or heater failed, call customer service.
If still not hot enough, look on rear of machine inside the cord storage area. A button is available to push that will provide
a temperature bypass of the standard temperature programming. This will increase temperature slightly. If there is too
much steam, please remember to turn off switch otherwise.
Cup or mug not detected (flashing brew light)
• Mug not close enough to detect sensor (move further into brewer).
14
PARTS & SERVICE
Water dripping from spray head
• Normally some water will drip from the spray head shortly after brewing.
• Debris may be inside valve. Disconnect water and reconnect, then run 1-2 full cycles of water in carafe. If problem persists, contact customer service.
Programmed start time not working properly
• Review instructions on page 6 (Automatic Brew Cycle).
Spare parts are available from Brew Express (866) 268-5953 or at [email protected].
Contact Brew Express for all service and warranty issues.
• Spray head
•
Brew Baskets (flat bottom and cone)
•
Carafe and lid
•
Mounting screws
•
Auxiliary water pump (for installation in areas without water supply)
15
WARRANTY
1 YEAR LIMITED WARRANTY
This limited warranty is the only one that applies to this product, and sets forth all the responsibilities of Brew Express regarding
this product. There is no other warranty, other than that described herein.
BREW EXPRESS is warranted, to the original purchaser only, to be free of defects for parts and labor for a period of 1 year from
the date of purchase. This warranty does not extend to subsequent purchasers, or purchases through a
non-authorized dealer or auction site. Brew Express will not be held responsible for any amount of damage in excess of the
retail purchase price of the BREW EXPRESS coffee system under any circumstances. Incidental and consequential damages are
specifically excluded from coverage from this warranty.
The BREW EXPRESS coffee system is not intended for commercial food service use. This warranty does not apply to accessories
or damage to unit from misuse or incorrect installation. It is further noted that using the brewer without a water filter or filtered
water system (entire house filter) may void the warranty. This applies to areas where the water is not treated for sediment, high
mineral content or hard-water characteristics.
RETURN/REPAIR POLICY: Any BREW EXPRESS unit found to be defective may be returned to Brew Express after proper
authorization. Defective units returned to Brew Express within 1 year from the original date of purchase will be replaced or
repaired. The repaired or replaced unit will then be warranted under the terms of the remainder of the warranty period. The
customer is responsible for all shipping charges of returned units. During the warranty period Brew Express will be responsible
for shipping charges back to the customer.
LIMITATIONS: This warranty does not cover accessories (brew baskets, carafes, etc) and defects resulting from normal everyday
use, such as but not limited to chips, scratches, abrasions, and discoloration. Also, this warranty does not cover defects
due to failure to follow installation or operation instructions, improper care, abuse, accidents, damage during shipping and
unauthorized repair or alterations. All or any acts of nature or abnormal conditions causing malfunction or product failure are
considered not to be the responsibility of Brew Express and this warranty. Any damage resulting from this condition will be
sustained solely by purchaser.
STATE LAW RIGHTS: This warranty gives you specific legal rights. Some states do not allow limitations on how long an implied
warranty lasts or the exclusions or limitations of incidental or consequential damages, so the inclusions or limitations stated
herein may not apply. This warranty gives the purchaser specific rights; other rights which vary from state to state may also apply.
REQUEST FOR WARRANTY SERVICE: Contact Brew Express technical support by telephone, fax or mail. We suggest that you keep
the original packaging in case it may be necessary to ship the unit. When returning the unit, include you name, address, phone
number, dated sales receipt (or copy) with product serial number, problem description and repair/return authorization form.
WARRANTY ACTIVATION: Register warranty by mail, see information on following page.
16
WARRANTY
Warra n ty R e g istration Ca rd
Register for warranty Fill out the form below, cut out and send to: Brew Express PO Box 1726 Longview,
WA 98632 Please Register 30 days after purchase. Retain receipt for proof of purchase.
Name:
Address:
Phone:
Model #:
BE-104R
Email (Optional):
BE-104C
Serial #:
see back of unit or box
BE-110
BEC-110
Product #
Date Of Purchase:
Place Of Purchase:
Application: Residential
Office
Installed By:
Self
Rv
Contractor
MBE-112
Plumber
Other
Electrician
On a scale of 1-5 Satisfaction With Product: (1 Dissatisfied - 5 Very Satisfied )
Suggestions:
17
Other
www.brewexpressdirect.com
for customer service or technical service please call (866)-268-5953
Printed in CHINA.
BEC110 OG / 123108
© Brew Express 2014