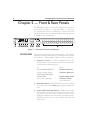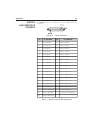
1
English Video Multiplexer with Video Alarm Detection Installation and Operation Manual RV1309, RV1316, RV2204, RV2209, RV2216 ® Part Number 8000-2101-01 REV A Sensormatic THE WORLD LEADER IN LOSS PREVENTION English Video Multiplexer with Video Alarm Detection Notice The information in this manual was current when published. The manufacturer reserves the right to revise and improve its products. All specifications are therefore subject to change without notice. Copyright Under copyright laws, the contents of this manual may not be copied, photocopied, reproduced, translated or reduced to any electronic medium or machine-readable form, in whole or in part, without prior written consent. © Copyright 1997, 1998 Trademarks Sensormatic Video Products Division Trademarked names are used throughout this manual. Rather than place a symbol at each occurrence, trademarked names are designated with initial capitalization. Inclusion or exclusion is not a judgment on the validity or legal status of the term. ii Installation and Operation Manual WARNING: TO REDUCE RISK OF FIRE OR ELECTRIC SHOCK, DO NOT EXPOSE THIS APPLIANCE TO RAIN OR MOISTURE. WARNING: DO NOT REMOVE COVER! NO USER SERVICEABLE PARTS INSIDE. REFER SERVICING TO QUALIFIED SERVICE PERSONNEL. THE LIGHTNING FLASH WITH AN ARROWHEAD SYMBOL, WITHIN AN EQUILATERAL TRIANGLE, INDICATES THE PRESENCE OF A SHOCK HAZARD WITHIN THE PRODUCTS ENCLOSURE. Lithium Battery: CAUTION: Danger of explosion if battery is incorrectly replaced. Replace only with the same or equivalent type recommended by the manufacturer. Dispose of used batteries according to the manufacturer's instructions. Lithium Batterie VORSICHT: Explosionsgefahr! Batterie nur mit einem vom Hersteller empfohlenen gleichwertigen Typ ersetzen. Entsorgung muß nach Anweisungen des Herstellers erfolgen. WARNING: This equipment has been tested and found to comply with the limits for a Class A digital device, pursuant to part 15 of the FCC Rules. These limits are designed to provide reasonable protection against harmful interference when the equipment is operated in a commercial environment. This equipment generates, uses and can radiate radio frequency energy and, if not installed and used in accordance with the instruction manual, may cause interference to radio communications. Operation of this equipment in a residential area is likely to cause harmful interference in which case the user will be required to correct the interference at their own expense. Changes or modifications not expressly approved by the party responsible for compliance could void the users authority to operate the equipment. This Class A digital apparatus meets all requirements of the Canadian Interference Causing Equipment Regulations. Cet appareil numérique de la classe A respecte toutes les exigences du Règlement sur le matériel brouilleur du Canada. iii Video Multiplexer with Video Alarm Detection CONGRATULATIONS You now own one of the many fine products manufactured by Sensormatic. This product has been carefully inspected to rigid quality standards before shipment. With reasonable care, it will provide years of reliable performance. Considering the investment, we know that you will want to obtain the full performance capabilities engineered into your new Sensormatic product. We recommend that you read this installation and operation manual thoroughly before attempting to operate this product. IMPORTANT INFORMATION Before proceeding, please read and observe all instructions and warnings contained in this manual. Retain this manual with the original bill of sale for future reference and, if necessary, warranty service. When unpacking your new Sensormatic product, check for missing or damaged items. If any item is missing, or if damage is evident, DO NOT INSTALL OR OPERATE THIS PRODUCT. Contact your Sensormatic dealer for assistance. FOR YOUR PROTECTION Complete the following product purchase information. The factory requests this information when contacted for technical support. It is also valuable in case of loss or theft. Purchase Date: _______________________________________ Serial Number: _______________________________________ iv Installation and Operation Manual TABLE OF CONTENTS CHAPTER 1 FEATURES MULTIPLEXER FEATURES .................................. 1 TECHNICAL OVERVIEW ................................... 2 Video Input and Output ...................................... 2 Motion Detection ............................................... 2 Video Display ..................................................... 2 Encoder Output ................................................. 3 Decoder Output ................................................. 3 CHAPTER 2 FRONT & REAR PANELS THE FRONT PANEL .......................................... 6 THE REAR PANEL ............................................. 8 CHAPTER 3 INSTALLATION REQUIRED CONNECTIONS ........................... 10 Cameras 116 ................................................. 10 Main Mon ........................................................ 10 Power .............................................................. 10 OPTIONAL CONNECTIONS .......................... 10 Call Mon ......................................................... 10 VCR In ............................................................. 10 VCR Out .......................................................... 11 S-VHS In .......................................................... 11 S-VHS Out ....................................................... 11 Alarm .............................................................. 11 Alarm Inputs ....................................................... 11 Alarm Hold Input ................................................. 12 Alarm Output ...................................................... 12 Motion Alarm Outputs ......................................... 12 Autodetect VCR Speed ......................................... 12 Remote ............................................................ 12 Remote Control Panel Option .............................. 12 SYSTEM CHECKOUT...................................... 13 Monitor Calibration .......................................... 13 Camera Check ................................................. 14 Making a Test Tape .......................................... 15 v Video Multiplexer with Video Alarm Detection Table of Contents (continued) CHAPTER 4 SETUP SETUP MENU SYSTEM .................................... 16 Selecting a Menu ............................................. 16 Positioning the Highlight .................................. 16 Setting an Option ............................................ 16 SETUP MENUS .............................................. 17 Menu 1 System Time/Date ........................... 17 Menu 2 Day/Night Start Time ....................... 18 Menu 3 Toggle Options ............................... 18 Alarm Message Display ........................................ 18 Alarm Message Latch ........................................... 19 Video Loss Alarm ................................................. 19 Audible Alarm ..................................................... 20 Alarm Input Polarity ............................................. 20 Alarm Output Polarity .......................................... 20 Pass-Thru Extrnl Alrms ......................................... 21 Image Tenderizer ................................................ 21 Menu 4 VCR Record Time ............................. 21 Menu 5 Alarm Duration ............................... 22 Menu 6 Global Dwell ................................... 22 Menu 7 Camera Titles .................................. 22 Motion Setup Screen ............................................ 23 Motion Options ................................................... 24 ALRM (Alarm) ...................................................... 24 SENSE (Sensitivity) ............................................... 25 SIZE .................................................................... 25 DELAY ................................................................. 26 Working with Motion Targets ................................ 26 Menu 8 Security Lock ................................... 27 CHAPTER 5 OPERATION LIVE MODE ................................................... 28 TAPE MODE .................................................. 28 Tape Playback With Two VCRs .......................... 29 Tape Preview ................................................... 29 SETUP MODE ................................................ 30 Viewing One Camera ....................................... 30 Main Monitor ...................................................... 30 Full Screen .......................................................... 30 vi Installation and Operation Manual Table of Contents (continued) The 2x Zoom ....................................................... 30 Zoom Control ...................................................... 30 Call Monitor ........................................................ 31 Viewing Multiple Cameras ................................ 31 Picture in Picture (PIP) .......................................... 31 2x2 Format ......................................................... 32 3x3 Format ......................................................... 32 4x4 Format ......................................................... 32 Sequencing Cameras ....................................... 33 Videotape Operations ...................................... 33 VCR Setup ....................................................... 33 Autodetect VCR Speed ......................................... 34 Tape Recording ................................................... 34 Multicamera Recording ........................................ 34 One Camera Recording ....................................... 34 Tape Playback ..................................................... 35 VCR Special Effects .............................................. 35 CHAPTER 6 ALARMS MECHANICAL ALARMS .................................. 36 MOTION ALARMS ......................................... 36 Motion Alarm Status Table ............................... 37 Alarm Counter ................................................. 38 Live Mode Alarm Response ............................... 39 Tape Mode Live Alarm Response ...................... 40 RECORDED ALARMS ...................................... 41 VIDEO LOSS ALARMS .................................... 42 CHAPTER 7 SPECIAL APPLICATIONS SIMULTANEOUS RECORD AND PLAY ............. 43 MULTIPLEXED VIDEO TRANSMISSION ............ 44 One-Way Video Transmission ........................... 44 Two-Way Video Transmission ........................... 44 vii Video Multiplexer with Video Alarm Detection Table of Contents (continued) APPENDIX A ALARM CONNECTOR PIN ASSIGNMENTS .......................................... 45 APPENDIX B ALARM RECORDING CONTROL ................................................. 46 Uncontrolled Alarm Recording .......................... 46 Controlled Alarm Recording ............................. 47 APPENDIX C IN CASE OF TROUBLE ........... 48 APPENDIX D TECHNICAL SPECIFICATIONS ....................................... 51 Operating Defaults .......................................... 51 Video Format ................................................... 51 Video Level ...................................................... 52 Alarm .............................................................. 52 Display ............................................................ 52 Resolution ........................................................ 52 Controls .......................................................... 53 Connectors ...................................................... 54 Electrical .......................................................... 55 Physical Characteristics .................................... 55 Options ........................................................... 55 FIGURES Figure 1 Basic Multiplexer System ................................ 4 Figure 2 Multiplexer System with Two VCRs ................ 4 Figure 3 One-Way Multiplexed Video Transmission ..... 5 Figure 4 Multiplexer System with Remote Control Panel ................................................ 5 Figure 5 Front Panel Controls and Indicators ............... 6 Figure 6 Rear Panel Connectors .................................. 8 Figure 7 Motion Setup Screen ................................... 23 Figure 8 Motion Alarm Status Table .......................... 37 Figure 9 Alarm Counter ........................................... 38 Figure 10 Alarm Connector ...................................... 45 TABLES Table 1 Alarm Connector Pin Assignments ................. 45 Table 2 Troubleshooting Guide ................................. 49 viii Installation and Operation Manual SECURITY MEASURES NOTE: This page describes how to access security sensitive features. You may wish to remove this page from the manual and place it in a secure place. Accessing Setup Menus The setup menu system is accessed from live mode. Press and hold the Function button and press the Zoom button (Function+Zoom). The first setup menu appears on screen. Use the Zoom and arrow buttons to navigate through the menu system. See Chapter 4 Setup for details. To exit the setup menu system, press Function+Zoom again. The menu disappears and the multiplexer resumes normal operation. To Engage or Release Security Lock # (Cut along this line) The Security Lock Feature NOTE: Security Lock protects the multiplexer against unauthorized use by disabling all front panel controls except the FUNCTION and ZOOM buttons. Once engaged, Security Lock can be released only after placing the multiplexer in setup mode. 1. Select the operating mode in which the unit is to be locked. 2. Press and hold the Function button and press the Zoom button. The multiplexer enters setup mode and displays the first setup menu. 3. Press the Zoom button repeatedly until the SECURITY LOCK menu appears. 4. Press the up or down arrow to engage (ON) or release (OFF) SECURITY LOCK. 5. Press Function+Zoom to exit setup mode. The multiplexer resumes normal operation. Resetting the Multiplexer The multiplexer can be reset to the factory default state. Upon reset, all programmable features return to the factory settings. The reset feature is normally used for diagnostic purposes but may be used to start from scratch during system setup. To Reset the Multiplexer Press and hold the Function button and press the up arrow button. A warning appears, asking if you want to reset the unit to factory defaults. Press Live to cancel the reset. To continue the reset, press Function+up arrow. The multiplexer resets and returns to the factory default state. ix Chapter 1 Features 1 Chapter 1 Features MULTIPLEXER FEATURES High speed switching rate while recording. Automatic VCR speed detection feature lets the multiplexer match the VCRs current recording speed. Full duplex operation allows video recording while viewing live video or playing back a tape. Simultaneous digital video motion detection using two 16 x 12 target motion detection grids for each video channel to set different options for day and night. Selectable target placement, object size, target sensitivity and alarm delay. Independent main and call monitor outputs allow simultaneous multicamera and full screen viewing. Dynamic Time Division (DTD) multiplexing allocates camera recording time based on picture motion content. Contact and TTL/CMOS alarm signals for VCR or other equipment. Alarm event counter with on-screen summary by camera. Motion alarm status table lists settings on-screen by camera for both day and night. Easy on-screen system setup. On-screen display includes date, time, alarm status, video loss and 10-character camera titles. Image Tenderizer dramatically reduces jitter associated with high resolution compressed multicamera images. Improved Remote Control Panel option permits daisy chaining up to 16 multiplexers and changing the controlled multiplexer. Live or tape playback views include: full-screen, 2x zoom from full screen view, Picture-In-Picture (PIP), 2x2, 3x3 and 4x4. High resolution digital images enhanced by proprietary sharpening technique. Outstanding quality with a 512x464 (512x512 PAL) pixel display, 256 grays and 16 million colors. Rear panel termination switches can be set for each camera. Compatible with color and B&W video cameras or other NTSC/EIA (PAL/CCIR) standard video sources. Video synchronization is not required. Video inputs and outputs provided for both standard and Super VHS video cassette recorders (except B&W units). Nonvolatile program memory protects all programmable features against power loss. 2 Video Multiplexer with Video Motion Detection TECHNICAL OVERVIEW The multiplexer series includes the RV2204, RV2209 and RV2216 color recording and display multiplexers and the RV1309 and RV1316 B&W multiplexers. Video Input and Output The multiplexer is available configured for either NTSC/EIA or PAL/CCIR video standard. The unit features video camera inputs with a passive looping output for each. Camera input impedance termination is set independently for each camera using switches on the back panel. Synchronizing or phasing cameras is not required. Video recording and playback is supported by VCR connections for both composite and S-Video signal formats (color units only). The multiplexer automatically determines the format used during tape playback. Two monitor outputs allow viewing live camera or videotaped pictures on standard monitors. The main monitor displays selected cameras in any available display format. The call monitor displays any alarm images or any live camera image full screen. Motion Detection The multiplexer continuously monitors all camera inputs for motion. When motion is detected, the multiplexer increases how often that camera is recorded and displayed. If the motion alarm feature is ON, the multiplexer also alerts the operator with blinking panel LEDs. It also sounds an alarm tone and encodes camera images as ALARM if those setup menu options are ON. Motion detection options for day and for night can be set for each camera input using a 192-target (16 wide by 12 high) graphic overlay. This allows using more effective settings for alarm delay, object size, sensitivity and target position for the two time periods. You can also set motion alarms ON for night and OFF for day, or vice-versa. Video Display The main monitor displays either live camera pictures or pictures from tape. The display is based on a 512x464x16 NTSC/EIA (512x512x16 PAL/CCIR) bit digital video memory containing two interlaced video fields. As many as 256 gray shades and 16 million colors can be displayed in six screen formats: full screen, 2x zoom, Picture-In-Picture (PIP), 2x2, 3x3 (9-camera and 16camera models only) and 4x4 (16-camera models only). Chapter 1 Features 3 The call monitor displays full screen images of cameras associated with alarms or images from any selected camera. It is based on switched analog camera video. Color demodulation is based on luminance and color difference processing. Demodulation circuitry operates on a line by line basis and will correctly demodulate chroma information conforming to the NTSC (PAL) video standard. A graphic generator with two interlaced bit mapped pages provides the alphanumeric and graphic overlays required for on-screen menus, camera titles and system messages. Encoder Output The multiplexer video encoder produces a single video signal containing field by field samples from all camera inputs. The signal is provided in both composite and S-Video formats (color models only) for connection to a video recorder. Encoder operation is continuous and independent of display and decoder functions. All inputs are sampled in camera number order until motion is detected, when active cameras are sampled more often. The encoder uses Vertical Interval Signaling (VIS) techniques to encode system information onto video output to the VCR. Time, date, camera title, camera number and alarm status information are placed on the 16 horizontal lines preceding the first active video line. This technique improves vertical synchronization recovery and improves graphics degraded by poor tape recorder performance. Decoder Output The multiplexer decoder processes the video output by the VCR during playback, recovering the video from each camera originally recorded. The decoder digitizes the playback video and recovers the VIS information encoded onto each field. The recovered field is written to the video display memory if required for display. 4 Video Multiplexer with Video Motion Detection Figure 1 Basic Multiplexer System Figure 2 Multiplexer System with Two VCRs Chapter 1 Features Figure 3 One-Way Multiplexed Video Transmission Figure 4 Multiplexer System with Remote Control Panel 5 6 Video Multiplexer with Video Motion Detection Chapter 2 Front & Rear Panels The following is a brief overview of the multiplexer front and rear panels. Refer to Chapter 4 Setup and Chapter 5 Operation for a detailed discussion of multiplexer features and panel functions. Panel controls are illustrated below and each button is described by name and function. Figure 5 Front Panel Controls and Indicators THE FRONT PANEL Some front panel buttons have dual functions. The primary function is listed first, followed by the secondary function (shown in parentheses). Indicator lights (LEDs) are above each button. 1. Function (1 Cam) Used in combination with other buttons, it allows access to the system setup menus and other special functions described below. To: Display ALARM COUNTER Toggle time/date display Display MOTION ALARM STATUS TABLE Start 1 camera recording Press: Function+left arrow Function+right arrow Function+down arrow Function (1 Cam)+ a Camera button 2. Zoom (full screen) Press this button to view a 2x zoom of the selected camera. Press Zoom again to go back to full screen view. 3. up arrow (PIPPicture-In-Picture) Displays the currently selected camera in the full screen format, inset with a 1/16 size picture of one other camera. The inset picture can be changed to a different camera or used for sequencing cameras. This button functions as an up control in the zoom and setup modes. Chapter 2 Front & Rear Panels 7 4. down arrow (2x2) Displays up to four cameras in the 2x2 format. Cameras not already displayed can be sequenced in the lower right window. This button functions as a down control in the zoom and setup modes. Press Function+down arrow to display the MOTION ALARM STATUS TABLE. 5. left arrow (3x3) Displays up to nine cameras in the 3x3 format (9-camera and 16-camera models only). Cameras not already displayed can be sequenced in the lower right window. This button functions as a left control in the zoom and setup modes. Press Function+left arrow to display the ALARM COUNTER. 6. right arrow (4x4) Displays up to 16 cameras in the 4x4 format (16-camera models only). This button functions as a right control in the zoom and setup modes. Press Function+right arrow to toggle the time/date display. 7. Live Displays the camera inputs in the selected format. It also turns on a row of motion targets in motion detection setup. 8. Tape Selects the VCR input for viewing. During tape playback, pressing the Tape button displays recorded video in the selected format. During tape recording, this button permits monitoring images sent to the VCR. This button also turns off a row of motion targets during motion detection setup. 9. Sequence Starts automatic switching of cameras in the lower right corner of the screen (except in the full screen mode when it sequences full screen images). It also turns on all motion targets during motion detection setup. 10. Call Used before pressing a Camera (116) button to select a camera for full screen display on the call monitor. This button also turns off all targets in motion detection setup. 11. Camera (116) Used to display cameras in the full screen format. Used with the Call button to select a camera for fullscreen display on the call monitor. During motion detection setup each Camera button turns the corresponding motion target on the cursor line either off or on. 8 Video Multiplexer with Video Motion Detection Figure 6 Rear Panel Connectors (16-camera color model shown) THE REAR PANEL 1. gnd (ground) Use this ground post when connecting contact or TTL/CMOS compatible alarm devices. See Alarms for details. 2. power This 2.1 mm pin jack accepts the multiplexer power module plug or other center positive source of 12 VDC at 1.5 amperes. 3. remote in This RJ11 connector allows remote control of the multiplexer using an optional remote control panel. If daisychaining either additional remote panels or multiplexers, remote out of the first unit is connected to remote in of the next unit. 4. remote out This RJ11 connector allows daisychaining to another multiplexer. Up to 16 multiplexers can be connected to a remote panel, but only one multiplexer at a time can be addressed and controlled by the remote control panel. 5. alarms This DB37-S connector allows alarm activation via contact closure or TTL/CMOS alarm inputs (up to 16). It includes the alarm hold input and alarm output relay contacts. There are also 16 motion alarm outputs, and an Autodetect VCR Speed feature which changes the rate the multiplexer sends images to match the VCR recording speed. 6. s-vhs out This S-type connector provides an S-Video signal to an S-VHS video recorder (color models only). 7. s-vhs in This S-type connector accepts the S-Video playback signal from an S-VHS video recorder (color models only). Chapter 2 Front & Rear Panels 9 8. vcr in This BNC connector accepts the composite video playback signal from a VCR. 9. vcr out This BNC connector provides a composite video signal to the record input of a VCR. 10. call mon This BNC connector provides a composite video signal to the call monitor for the display of any alarm cameras (one at a time) or one live camera in the full screen format. 11. main mon This BNC connector provides a composite video signal to the main monitor to display cameras in currently selected format. 12. cam in These BNC connectors accept the composite video output of color or B&W cameras. Camera input impedance termination is selectable for each camera, using the small switch on the back panel. Use 75 Ω for termination, or use ∞ if looping to other equipment. 13. cam out These BNC connectors provide looping camera video from the corresponding camera input. 14. ∞ or 75 Ω switch These switches allow you to set impedance for each camera input. Set the switch to 75 Ω to terminate it, or set it to ∞ if looping to other equipment. 10 Video Multiplexer with Video Motion Detection Chapter 3 Installation Select a location for the product that is clean, dry and has AC power. Find an environment where temperature and humidity extremes do not exceed product specifications (see Appendix D Technical Specifications). Failure to do so can result in equipment failure and loss of warranty protection. REQUIRED CONNECTIONS Cameras 116 Connect the video output from a camera or other composite video source to each cam in. Multiplexer camera input impedance termination is selectable for each camera using the back panel switches between the rows of BNC connectors. If looping through to other equipment, set the switch to ∞. Main Mon Connect main mon to the video input of an NTSC/EIA (PAL/CCIR) compatible video monitor. This monitor displays selected live or recorded cameras in any available format. This output must be terminated. Power Connect power to the multiplexer power module or other center positive source of 12 VDC at 1.5 Amperes. OPTIONAL CONNECTIONS Call Mon Connect call mon output to the video input of an NTSC/EIA (PAL/CCIR) compatible video monitor. This monitor displays the selected or alarm camera in the full screen format. This output must be terminated. VCR In NOTE: Do NOT connect both VCR IN and S-VHS IN at the same time. The multiplexer will not function properly. Connect vcr in to the composite video output (play) of an NTSC/EIA (PAL/CCIR) compatible VCR. This input is terminated. Chapter 3 Installation 11 VCR Out NOTE: Do NOT connect both S-VHS OUT and VCR OUT at the same time. Connect vcr out to the composite video input (record) of an NTSC/EIA (PAL/CCIR) compatible VCR. This output must be terminated. S-VHS In NOTE: Do NOT connect both S-VHS IN and VCR IN at the same time. The multiplexer will not function properly. Connect s-vhs in to the S-Video output (play) of an NTSC/EIA (PAL/CCIR) compatible Super VHS video recorder. This input is terminated. S-VHS Out NOTE: Do NOT connect both S-VHS OUT and VCR OUT at the same time. Connect s-vhs out to the S-Video input (record) of an NTSC/EIA (PAL/CCIR) compatible Super VHS video recorder. This output must be terminated. Alarm The alarms connector includes pins for mechanical or TTL/CMOS standard alarm inputs, the alarm hold input, motion alarm outputs and the Autodetect VCR Speed pin. These connections allow the multiplexer to be completely integrated with security systems. See Chapter 6 Alarms for details. Alarm Inputs Multiplexer alarm inputs accept a contact type or TTL/CMOS alarm signal. Connect alarm input pins 1 through 16, to one side of a contact type or TTL/CMOS compatible alarm device. Connect the remaining side of each device to ground (post labeled gnd on multiplexer back panel). Multiplexer alarm input polarity is menu selectable and defaults to normally open (NO) or TTL/CMOS active low. 12 Video Multiplexer with Video Motion Detection Alarm Hold Input NOTE: The Alarm Hold Input is not normally used and is only provided for compatibility purposes. Alarm duration control is better managed by the multiplexer. See Alarm Recording Control for more details. The alarm hold input accepts a normally closed contact type or active high TTL/CMOS alarm signal. Connect alarms pin 36 to the alarm hold output of the VCR or other device. Connect the remaining side of the output to ground (post labeled gnd on back panel). Alarm Output The alarm output is a contact type signal between alarms pin 17 (common) and pin 18 (normally closed) or pin 19 (normally open). Connect the appropriate pins to the alarm input of the VCR or other device. See Appendix D Technical Specifications for details. Motion Alarm Outputs The motion alarm outputs use a TTL/CMOS type signal. Connect each motion alarms pin (pins 2035) to a TTL/CMOS compatible alarm input on the VCR or other device. Connect the remaining side of the output to ground (post labeled gnd on back panel). Motion alarm output polarity is menu selectable and defaults to active high. Autodetect VCR Speed Pin 37 connects to the VCR to get the timing signal (it may be named clock or trigger) so the multiplexer can switch to use the same recording speed as the VCR. If the VCR changes the recording speed, the multiplexer will automatically adjust the speed to match. Check your VCR manual to see if the VCR provides a timing signal. Remote The two RJ11 connectors are for the multiplexer remote control panel option or remote control commands. Remote Control Panel Option Connect the cable provided with the remote control panel to the remote in connector. If daisychaining to another multiplexer, connect the remote out of this multiplexer to the remote in of the next multiplexer in the chain. The remote control panel and the multiplexer front panel operate identically and may be used at the same time. See Remote Control Panel manual for details. Chapter 3 Installation SYSTEM CHECKOUT 13 Multiplexer system operation can be checked immediately after installation with the multiplexer in the factory default state. While the multiplexer itself requires no adjustment, system components such as the monitor, cameras and video recorder should be checked for proper operation and adjustment. The system checkout procedure involves three steps: monitor calibration, camera check, and video recorder check. At least two video cameras are required to check system operation. Refer to Figure 1 Basic Multiplexer System. Make certain that all required connections are in place. Apply power to all system equipment. Monitor Calibration This process involves adjusting monitor display brightness, contrast, hue and saturation based on the standard color bar pattern generated by the multiplexer. The procedure is as follows. 1. Press Function+Zoom. The first setup menu appears over internally generated color bars (gray bars on B&W units). 2. Turn off any automatic color control features on the monitor that might interfere with manual adjustment (except B&W units). 3. Turn the monitors color level (saturation) control all the way down. The display is now black and white. 4. Adjust the monitors contrast and brightness controls so that the bar pattern starts with white, darkens evenly through shades of gray and ends with black. 5. Turn the monitors color level control to its midpoint (except B&W units). 6. Adjust the monitors tint (hue) control until the colors are correct. The correct sequence of colors from left to right is white, yellow, cyan, green, magenta, red, blue and black. 7. Press Function+Zoom to exit the setup menu system. The main monitor is now correctly calibrated to the output of the multiplexer. To calibrate the call monitor, temporarily connect its video cable to the main mon output and perform monitor calibration again. While monitor adjustments can be changed to suit the viewer, the above procedure should be performed before attempting to adjust cameras or working on display or video quality problems. 14 Video Multiplexer with Video Motion Detection Camera Check The multiplexer multicamera display capability makes checking camera performance as simple as comparing two pictures on one screen. This method is preferable to the direct camera to monitor technique because it allows precise adjustment of each camera against a chosen reference camera. This minimizes differences between cameras, and picture quality is optimized. NOTE: Before performing a camera check, complete the monitor calibration procedure described in the previous section. Adjusting camera picture quality is more effective on a monitor which is already calibrated. The camera check procedure is as follows: 1. Complete the monitor calibration procedure. 2. Connect all system cameras directly to the multiplexer camera inputs. Remove all connections to the looping (lower) camera outputs. 3. Make sure that the multiplexer is set up for 75 ohm termination (the default state). The switches on the back panel should be down. 4. Select the format (2x2, 3x3 or 4x4) which displays all of the attached cameras. 5. Pick the best looking picture and use that camera as a reference. If necessary, adjust the camera for an optimum picture. Do NOT adjust the monitor. 6. Adjust each remaining camera, in turn, for an optimum picture. Try to obtain the same picture quality as the reference camera. The cameras are now correctly adjusted with respect to the calibrated monitor and each other. You may now adjust the monitor for the best overall display. If you choose to make further monitor adjustments, it is best to do so with all cameras displayed. Chapter 3 Installation Making a Test Tape 15 The easiest way to verify multiplexer system operation is to make a test recording and play it back. This process effectively tests every piece of equipment in the system. Before proceeding with the test tape, it is recommended that you complete both the monitor calibration and camera check procedures. Make certain that the multiplexer monitor and all system cameras are correctly adjusted. Doing so will help to ensure the best results during the tape test. The tape test procedure is as follows: 1. Place the VCR in the record mode at the 24-hour speed (this is the multiplexer default VCR record speed and can be changed). The VCR begins recording multiplexed camera video. You may select any viewing mode or display format while recording. Doing so will not affect the tape since camera recording and display are completely independent multiplexer functions. 2. After several minutes, stop the VCR and rewind the tape. 3. Place the VCR in the play mode. 4. Press the Tape button on the multiplexer. When the multiplexer detects the encoded VCR signal, it configures itself for tape playback and displays all recorded cameras in the multicamera format. To view one camera full screen, press the corresponding Camera (116) button. To view multiple cameras, press the desired display format (PIP, 2x2, 3x3 or 4x4) button. If the camera or cameras do not appear, check VCR operation and review all video connections. This completes the tape test. If it is not successful, repeat the steps outlined above. If you continue to have difficulties, turn to Appendix C In Case of Trouble for assistance. 16 Video Multiplexer with Video Motion Detection Chapter 4 Setup SETUP MENU SYSTEM The on-screen menus allow you to set up key features such as system time and date, day and night start times for motion detection, alarm message display, alarm message latch, video loss alarm, audible alarm, alarm input polarity, alarm output polarity, VCR record time, VCR alarm record time, alarm duration, global dwell time, camera titles, motion detection, and system security. All setup data is stored in nonvolatile memory where it is protected against loss due to power failure. NOTE: To perform multiplexer setup, you must first gain access to the on-screen menu system. Refer to Security Measures in the front of this manual. Once inside the menu system, multiplexer setup involves three basic operations: 1. Selecting the menu. 2. Positioning the flashing highlight. 3. Setting the option. Selecting a Menu Press the Zoom button to go to the next setup menu. The next menu appears with the flashing highlight at the first option. If you press the Zoom at the last menu (SECURITY LOCK), the unit exits the setup mode and returns to normal operation. Positioning the Highlight Use the left and right arrow buttons to position the menu highlight. Press the right arrow to move the highlight to the next character or option. Press the left arrow to move the highlight to the previous character or option. When you reach one end of the menu, the highlight appears at the other. Setting an Option Press the up arrow or down arrow to scroll through the available settings or characters: 09 AZ _(represents a space) / : = - + .(period) When you reach the first or last setting or character, the sequence begins again. Chapter 4 Setup 17 SETUP MENUS There are eight menus in the setup menu system. The following paragraphs take you through the menu system step-by-step, describing each menus purpose and options. Menu 1 System Time/Date Menu 1 displays the system time and date (maintained by the multiplexer internal clock/calendar), the product firmware revision number and revision date. By default, the multiplexer displays the time and date at the top of the main monitor. In live mode, it displays the system (current) time and date. In tape mode, it displays the time and date of the recording (encoded on the tape). You can turn the time/date display off or on at any time by pressing Function+right arrow. To set the time and date, use the arrow buttons to position the flashing highlight over each character and set it. Enter the time in HH:MM:SS 24-hour format. Enter the date in MM/DD/YY format (DD.MM.YY format in the PAL version). The clock starts running when you move the highlight into the date field. NOTE: Be sure to turn off the VCRs time/date display feature. If it is turned on, it may interfere with tape playback. Multicamera display during playback will have time and date over each image and at the top of the screen. If the time/date is too high on the screen, it overlaps the vertical interval. When finished, press the Zoom button to go to menu 2 or Function+Zoom to save all changes and leave the setup system. 18 Video Multiplexer with Video Motion Detection Menu 2 Day/Night Start Time Menu 2 allows you to divide the multiplexer work day into two independent periods, based on start times. If the start times are the same, the day settings will be used for motion detection. Using different start times for day and night allows you to use different motion detection settings for each time span. Motion alarms (ALRM) can be set either ON or OFF, and SENSE, SIZE and DELAY settings can be different for each time as well. To set the day start time or night start time, use the arrow buttons to position the flashing highlight over each character and set it. Enter the time in HH:MM 24-hour format. In the example below: day is from 8 am to 5 pm, and night is from 5 pm to 8 am. DAY START TIME = 08:00 NIGHT START TIME = 17:00 NOTE: When day and night start times differ, you should set up both motion screens for each camera. When finished, press the Zoom button to go to menu 3 or Function+Zoom to save all changes and leave the menu system. Menu 3 Toggle Options Menu 3 allows you to set each menu item to one of two settings. To change a setting, position the highlight over it and press the up or down arrow. The alternate setting appears. To move to the next toggle option, press the right arrow; to go back to the previous toggle option, press the left arrow. The toggle options include the following: Alarm Message Display The ALARM MESSAGE DISPLAY option controls the ALARM or VIDLOSS graphic. It toggles as follows: ON The multiplexer displays the ALARM or VIDLOSS graphic on both the main and call monitors. The multiplexer also switches to multicamera display on the main monitor to show all cameras with alarms. OFF The ALARM or VIDLOSS graphic does not display on the main monitor, it only displays on the call monitor. The multiplexer does not change the display on the main monitor. The default ALARM MESSAGE DISPLAY setting is ON. Chapter 4 Setup Alarm Message Latch 19 The ALARM MESSAGE LATCH option determines how long the ALARM and VIDLOSS (video loss) messages remain on screen. It toggles as follows: ON ALARM messages remain on screen until you press Function to clear them. Pressing Function removes all video loss messages and messages for expired alarm events. Messages for current alarm events remain on screen. NOTE: If video is not restored before the VIDLOSS message is cleared, the monitor displays the last image received until the display format changes, or video is restored. OFF Each message remains on screen until the Alarm Duration time expires (the default is 4 seconds) or the corresponding alarm event clears. The default ALARM MESSAGE LATCH setting is OFF. Video Loss Alarm The VIDEO LOSS ALARM option controls the multiplexer video loss detection feature. It toggles as follows: ON The multiplexer responds to camera video loss as an alarm event and displays the message VIDLOSS in place of the cameras picture on both monitors. If ALARM MESSAGE DISPLAY is set OFF, the message only displays on the call monitor. The alarm counter counts a video loss as an alarm for that camera input. OFF Camera video loss is not treated as an alarm event, and a VIDLOSS message is not displayed on either monitor. The alarm counter does not count the video loss as an alarm. The only sign of video loss is that the monitor displays the last image received from that camera until you change the display format, when a blank window with the camera number displays. Refer to Video Loss Alarms for more details. The default video loss setting is ON. 20 Video Multiplexer with Video Motion Detection Audible Alarm The AUDIBLE ALARM option controls the multiplexer alarm tone. It toggles as follows: ON The multiplexer sounds an alarm tone when it detects a mechanical alarm, motion alarm or video loss. Press any button to turn the alarm tone off. OFF The multiplexer is silent when it detects a mechanical alarm, motion alarm or video loss. The default AUDIBLE ALARM setting is OFF. Alarm Input Polarity The ALARM INPUT POLARITY option allows you to set the polarity of all multiplexer alarm inputs. It toggles as follows: ACT LOW Active alarm inputs are low. The multiplexer recognizes a contact closure or TTL/CMOS logic low as an alarm event. ACT HI Active alarm inputs are high. The multiplexer recognizes a contact opening or TTL/CMOS logic high as an alarm event. The default ALARM INPUT POLARITY setting is ACT LOW. Alarm Output Polarity The ALARM OUTPUT POLARITY option allows you to set the active polarity of the TTL/CMOS alarm signal for pins 2035 (motion outputs 116) on the alarms connector. It toggles as follows: ACT LOW The alarm output signal goes low when a motion alarm occurs or for an alarm input or vidloss when PASS-THRU EXTRNL ALRMS is set to YES. ACT HI The alarm output signal goes high when a motion alarm occurs. NOTE: The duration of the alarm output signal is determined by the ALARM DURATION setting. The default ALARM OUTPUT POLARITY setting is ACT LOW. Chapter 4 Setup Pass-Thru Extrnl Alrms 21 This menu option lets you loop (pass-thru) the external alarm inputs to the alarm outputs. YES Alarm outputs represent all alarms for a particular camera; motion alarms, mechanical alarms and video loss alarms. NO Alarm outputs are for motion alarms only. External alarms are not included (not passed-thru). The default PASS-THRU EXTRNL ALRMS setting is YES. Image Tenderizer This option reduces the shakiness and jitter associated with high resolution compressed multicamera images. ON Uses the special filtering circuit when the multiplexer displays a multicamera image on the main monitor. OFF Turns off the special filtering circuit. The default IMAGE TENDERIZER setting is ON. When finished, press the Zoom button to go to menu 4 or press Function+Zoom to save all changes and leave the setup system. Menu 4 VCR Record Time Menu 4 allows you to enter the VCRs normal and alarm recording speeds. With autodetect VCR speed, these settings are used if that signal is lost. Use the up and down arrow buttons to set each speed as follows: VCR RECORD TIME The VCRs normal (nonalarm) operating speed (2999 hours). The default VCR RECORD TIME is 024 HRS. VCR ALARM RECORD TIME The VCRs recording speed for alarms (2999 hours). The default VCR ALARM RECORD TIME is 002 HRS. NOTE: If the multiplexer alarm output is not connected to the VCRs alarm input, the VCR RECORD TIME and the VCR ALARM RECORD TIME should be set to the same value. When finished, press the Zoom button to go to menu 5 or Function+Zoom to save all changes and leave the setup system. 22 Video Multiplexer with Video Motion Detection Menu 5 Alarm Duration Menu 5 allows you to set the minimum multiplexer alarm time. The ALARM DURATION setting determines how many seconds the multiplexer remains in the alarm state after an alarm event occurs. Set the ALARM DURATION time using the up and down arrow buttons. You may use any setting between 2 and 999 seconds. The default ALARM DURATION setting is 4 seconds. When finished, press the Zoom button to go to menu 6 or Function+Zoom to save all changes and leave the setup system. Menu 6 Global Dwell The GLOBAL DWELL setting determines the rate at which the multiplexer sequences cameras on the main monitor (either full screen or in the lower right window) when Sequence is selected. It also determines the rate at which the call monitor switches cameras during multiple alarm events. Set the GLOBAL DWELL time in seconds using the up and down arrow buttons. You may enter any setting between 1 and 99 seconds. This setting applies to all cameras. NOTE: The GLOBAL DWELL setting affects on-screen camera display only. It does NOT affect the rate at which the multiplexer sends images to the VCR. The default GLOBAL DWELL time is 2 seconds. When finished, press the Zoom button to go to menu 7 or Function+Zoom to save all changes and leave the menu system. Menu 7 Camera Titles Menu 7 allows you to assign a title to each camera input. It also provides access to the MOTION SETUP SCREENS described below. Initially each title is the cameras number. To change a title, use the arrow buttons to position the flashing highlight and select characters. A title can contain up to 10 characters selected from the following: 09 AZ _(represents a space) / : = - + .(period) When you are finished setting a title, do one of the following: press Function to display the DAY MOTION SETUP SCREEN (described below) for the current camera. Chapter 4 Setup Motion Setup Screen 23 press Zoom to set the next camera title, or press a specific Camera (116) button to set that camera title. press Function+Zoom to save all changes and leave the setup system. Press Function+Zoom again if the first press does not get you out of the menu setup system. To access the motion setup screen, press Function while the Camera Titles menu is displayed. The day motion screen appears. Press Function again to view the night motion setup screen for that camera. Each screen displays the current camera picture overlaid with the motion targets, camera number, motion setup options and help text. You can adjust whether motion detection (ALRM) is ON or OFF, sensitivity (SENSE), object size (SIZE), DELAY and turn targets on or off on the motion setup screen. The default multiplexer motion setup screen looks like this: Figure 7 Motion Setup Screen The highlight is initially positioned at the first option. You can: use the arrow buttons to select and set motion detection options. press Zoom to display the target cursor and select motion targets. press Function to display the night motion setup screen. 24 Video Multiplexer with Video Motion Detection Motion Options The Day and Night Motion Setup screens display a status line containing the four multiplexer motion detection options. Use the arrow buttons to position the flashing highlight on each option and choose the value that best suits your needs. If the highlight is not visible, press Zoom to activate it. Option setting applies only to the time period covered by the screen (determined by the current DAY START TIME and NIGHT START TIME settings). ALRM (Alarm) The alarm option selects the motion alarm operating mode for the current camera. NOTE: Cameras with ALRM set to OFF still function as activity detectors. Active cameras are given recording priority, but motion alarms are NOT triggered. OFF The multiplexer does not initiate a motion alarm when it detects activity at this camera. TST Select this setting to test the current motion setup. When it detects motion, the multiplexer freezes the scene and marks all triggered targets with an X. This helps you see the effects of changing which targets are on, and which are off, and the effects of different SENSE, SIZE or DELAY settings. To repeat the test, press right arrow. To cancel the test, press left arrow. NOTE: After cancelling the test, the ALRM setting returns to OFF (the default). Make sure you change the setting to ON or AND if you want either type of alarm. AND The multiplexer initiates a motion alarm only when it detects both activity and a contact alarm at this camera. ON The multiplexer initiates a motion alarm when it detects activity at this camera. The default alarm option setting is OFF. Chapter 4 Setup 25 SENSE (Sensitivity) The SENSE option is based on the degree of contrast between the moving object and background for the current camera. The motion test can help you pick the most effective SENSE setting. It toggles as follows: XLO Extra low sensitivity. LO Low sensitivity. MED Medium sensitivity. HI High sensitivity. XHI Extra high sensitivity. The default sensitivity setting is MED. SIZE The SIZE option determines the minimum object size detected at the current camera. You set the object size by selecting its height and width in targets. For example, a 2Wx4H setting is an object two targets wide and four targets high. A 1Wx1H object is a single target. The largest possible object setting is 9Wx9H. A smaller object size makes motion detection more likely, and a larger size means fewer objects will be large enough to trigger a motion alarm. To set the object size, use the arrow buttons to move the flashing highlight to W (width) or H (height). Use the up and down arrow buttons to set the value (19). NOTE: To be detected, an object must trigger at least one row and one column of targets covered by the SIZE setting. For example, a 2Wx5H setting requires an object to trigger at least 2 targets horizontally and 5 targets vertically within a 2Wx5H active target area. The object may trigger additional targets. The default SIZE setting is 1Wx1H. 26 Video Multiplexer with Video Motion Detection DELAY The DELAY option determines how long the multiplexer must detect motion at the current camera before initiating a motion alarm. Motion of shorter duration does not trigger a motion alarm. DELAY is useful in preventing sudden changes (like those caused by lights or shadows) from triggering a motion alarm. The DELAY setting has no affect on activity detection (priority-based camera recording). To set the DELAY in seconds, use the arrow buttons to move the flashing highlight to the DELAY option and select a value: OFF, 0.5S, 1SEC, 1.5S, 2SEC, 3SEC or 5SEC. The default DELAY option setting is OFF. Working with Motion Targets The targets on each motion setup screen can be turned on or off individually, by row or by screen. Active targets are circled (this is the default). Inactive targets are not circled. To set up targets, use the following front panel buttons: Zoom turns the target cursor on or off. up arrow moves the target cursor up one row at a time. down arrow moves the target cursor down one row at a time. left arrow moves the target cursor to the left (4-camera and 9-camera models only). right arrow moves the target cursor to the right (4-camera and 9-camera models only). Live turns all targets in the current row ON. Tape turns all targets in the current row OFF. Sequence turns all targets on the screen ON. Call turns all targets on the screen OFF. Camera (116) toggles the corresponding target on the cursor line off or on. Move left or right (16-camera models only) by pressing Camera buttons to the left or right of the current target. Function saves current motion target setting and displays the next screen. Chapter 4 Setup 27 Use the buttons to make sure targets are active (circled) where motion is to be detected. When you finish, press the Function button to save the target setting and display the next screen. A motion bar appears at the top center of the motion setup screen when the multiplexer detects motion. You can see the effect of your motion settings by watching the motion bar during setup. When finished with motion setup, press Function to return to the camera titles menu. Then press Zoom to go to menu 8 or press Function+Zoom to save all changes and leave the menu system. (Press Function+Zoom again if necessary.) Menu 8 Security Lock Menu 8 controls the multiplexer front panel security lock feature. When this feature is on, the multiplexer locks all front panel buttons except those required to re-enter the setup mode. Press the up or down arrow button to change this option. The new security lock setting takes effect when you exit the setup system. When you finish, press the Zoom button or Function+Zoom to save all changes and leave the setup system. 28 Video Multiplexer with Video Motion Detection Chapter 5 Operation The multiplexer is flexible and very easy to use. No setup is required to use the basic features, yet the product can be adapted to meet the display and recording requirements of most multicamera security systems. This section describes how to operate the multiplexer. It is organized by operating task and product feature. The multiplexer has three basic operating modes: live, tape and setup. LIVE MODE Press the Live button to view live camera video. Live mode allows you to view any combination of connected cameras on the main monitor in any display format. The call monitor displays either one selected camera full screen, or displays full screen images from cameras with alarms. Live camera viewing does not affect camera video output to the VCR. Recording camera video via the multiplexer vcr out connector is completely independent and is not affected by operator actions at the front panel. The live multicamera display updates a new camera every 1/60 of a second (PAL every 1/50 of a second). The final update rate for each camera depends on how many cameras are displayed and whether the camera has activity. Live updates are weighted according to activity much like updates sent to the VCR. TAPE MODE Tape mode allows you to view the video recorded by the VCR. If you only have one VCR connected, recording stops while you review a tape. The call monitor is the only source of live images. The call monitor displays either one selected camera full screen, or full screen images from any cameras with alarms. Chapter 5 Operation 29 To view what has been recorded, place the VCR in the play mode and press the Tape button on the multiplexer. When the multiplexer detects the encoded video signal, it starts tape playback and displays all recorded cameras in the multicamera format. To view one camera in the full screen format, press the corresponding Camera button. To view multiple cameras, press the appropriate format button (PIP, 2x2, 3x3 or 4x4). Cameras may be displayed in any order in any of the available views. The multiplexer detects recorded alarm events during tape playback by monitoring the VIS information returned from tape. Each field of recorded video is encoded with alarm status information, camera number, camera title, time and date. The multiplexer uses this information to identify camera related alarm events. When the multiplexer detects an alarm event on tape, it displays that camera image overlaid with an alarm message. Recorded alarms do not interfere with the detection of mechanical alarms, so the multiplexer can process both types of alarm event at the same time. The front panel LEDs blink for cameras with recorded alarms, but not for live motion or mechanical alarms. Live alarm images only display on the call monitor since the main monitor is used for tape playback. See Recorded Alarms for details. Tape Playback With Two VCRs Tape mode allows you to view previously recorded video from the first VCR. It does not affect camera video output to the second VCR for recording. Recording of camera video at the multiplexer vcr out connector is a completely independent operation. This allows full duplex operation with two VCRs connected to the multiplexer. Without this capability, camera video recording must stop while a previously recorded tape is viewed. See Simultaneous Record and Play for details. Tape Preview To view what is being sent to the VCR, place the VCR in any mode other than playback and press the Tape button on the multiplexer. The Live and Tape lights indicate that the multiplexer is displaying encoded video full screen camera pictures sequenced in camera number order at the rate set on the VCR RECORD TIME menu. 30 Video Multiplexer with Video Motion Detection SETUP MODE Viewing One Camera Setup mode allows you to customize multiplexer operation to suit a specific application. To enter the setup mode, press the buttons required to access system setup menus (see Security Measures in the front of this manual for instructions). See Chapter 4 Setup for a description of the setup menu system. Main Monitor The main monitor can display any live or recorded camera in the full screen format. It can also display a movable 2x zoom of any camera. Full Screen Press any Camera (116) button when the Call light is not lit. The multiplexer displays the selected camera full screen. You can also press the full screen button to switch to the full screen format. The main monitor displays the last camera selected in this format. The 2x Zoom Press the Zoom button while viewing full screen to zoom the main monitor display. The multiplexer displays a 2x zoom picture with a zoom window insert. The zoom window contains a one quarter sized view of the current camera, overlaid with a movable zoom pointer. The pointer marks the part of the picture on display. Zoom Control 1. Display the desired camera in the full screen format. 2. Press the Zoom button to display the zoom window. 3. Press the up, down, left and right arrow buttons to move the zoom pointer. The multiplexer moves the 2x display accordingly. To move diagonally, press the up or down arrow button and the right or left arrow button simultaneously; for example, press the up arrow button and the left arrow button to move the zoom window diagonally to the upper left of the display. The zoom window disappears two seconds after the last button press to provide a clear view. Press any arrow button to recall it. To return to the full screen format, press the Zoom button again or press any Camera button. The multiplexer remembers the selected camera and the position of the zoom window between zoom operations. Chapter 5 Operation Call Monitor 31 The call monitor can display any live camera in the full screen format. To select a camera for display on the call monitor: 1. Press the Call button. The Call light comes on, indicating the multiplexer is in the call select mode. If the light does not come on, the multiplexer is in the main select mode. Press Call again to start over. 2. Press any Camera button. The call monitor displays the selected camera. To exit the call select mode, press the Call button. The multiplexer resumes normal operation. Viewing Multiple Cameras The main monitor can display multiple cameras in any available format: Picture-In-Picture (PIP), 2x2, 3x3 (9-camera and 16camera models only) and 4x4 (16-camera models only). Each format can be composed by selecting the cameras and their location on screen. Cameras not already displayed can be sequenced in the lower right window of any multiple camera format. See Sequencing Cameras for details. Picture in Picture (PIP) The Picture-In-Picture format displays a full screen background picture with a 1/16 size picture insert. A camera can be selected for display and can be swapped instantly between the background and the insert. The insert can also be sequenced. 1. Press the PIP button. The multiplexer displays the current camera and the last selected PIP insert camera. 2. Press the Camera (116) button for the desired PIP insert camera. The selected camera appears full screen. 3. Press the PIP button again. The multiplexer swaps the two cameras and puts the selected camera in the PIP insert. 4. Press the Camera (116) button to view full screen. You can swap the background and insert cameras at any time by pressing the PIP button. The multiplexer remembers the PIP camera selection and will recall it the next time the PIP format is displayed. 32 Video Multiplexer with Video Motion Detection 2x2 Format The 2x2 format is the familiar quad display. It displays four pictures at one time. Any camera can be selected for display in any window. Cameras not already displayed can be sequenced in the lower right window. Press and hold the 2x2 button. The multiplexer displays the 2x2 format with the cameras last selected for 2x2 display. While holding the 2x2 button, press the Camera (116) button for the upper left window on the monitor (window #1). Continue pressing Camera buttons until each window contains the desired camera. Release the 2x2 button when you have finished selecting cameras. The multiplexer remembers the 2x2 camera selection and will recall it the next time the 2x2 format is displayed. 3x3 Format (9 and 16-camera models only) The 3x3 format displays nine pictures at one time. Any camera can be selected for display in any window. Cameras not already displayed can be sequenced in the lower right window. Press and hold the 3x3 button. The multiplexer displays the 3x3 format with the cameras last selected for 3x3 display. While holding the 3x3 button, press the Camera button you want displayed in the upper left (window #1). Continue pressing Camera buttons until each window contains the desired camera. Release the 3x3 button when you have finished selecting cameras. The multiplexer remembers the 3x3 camera selection and will recall it the next time the 3x3 format is displayed. 4x4 Format (16-camera models only) The 4x4 format displays 16 pictures at one time. Any camera can be selected for display in any of the 16 windows. Press the 4x4 button. The multiplexer displays the 4x4 format showing all the cameras in the previously selected order. While holding the 4x4 button, press the Camera button for the camera desired in window #1. Continue pressing Camera buttons until each window contains the desired camera. Release the 4x4 button when you have finished selecting cameras. The multiplexer remembers the 4x4 camera selection and will recall it the next time the 4x4 format is displayed. Chapter 5 Operation Sequencing Cameras 33 The multiplexer allows sequential display of cameras on the main monitor in any available format. In the Full Screen format, all cameras can be sequenced full screen. In multicamera formats, cameras not already displayed can be sequenced in the lower right window. Cameras sequence in camera number order at a rate determined by the GLOBAL DWELL setting (see Chapter 4 Setup). To start camera sequencing: 1. Select the desired format. 2. Press the Sequence button. The Sequence light comes on and the multiplexer switches cameras in the lower right window of the display (or full screen) at the current Global Dwell rate. To stop camera sequencing: Press the Sequence button again. The Sequence light goes out. Sequencing stops with the current camera displayed in the lower right window (or full screen). Videotape Operations The multiplexer allows recording of multiple cameras onto a single videotape. This encoding function is performed in the background and does not interfere with other operations. All multiplexer features remain available while recording. If two VCRs are connected, tape playback does not affect recording. It is possible to review a previously recorded tape while recording continues on a second VCR. See Simultaneous Record and Play for details. VCR Setup For optimum tape recording and playback, the multiplexer must be correctly set up for use with the VCR. This is done by changing settings in the setup menu system. Two setup options affect camera recording: VCR RECORD TIME VCR ALARM RECORD TIME Refer to Chapter 4 Setup for a description of these VCR menu options and their use. 34 Video Multiplexer with Video Motion Detection Autodetect VCR Speed If pin 37 on the alarms connector is connected to the VCR for the timing signal (it may be named clock or trigger) the multiplexer can switch to the same recording speed as the VCR. Not all VCRs send a signal when switching to an alarm recording rate. See your VCR manual for details about whether this feature is supported by your VCR. If the VCR does NOT send a signal, be sure you enter the settings you want in the multiplexer menu for VCR RECORD TIME and VCR ALARM RECORD TIME. Tape Recording Refer to Figure 1 Basic Multiplexer System. Make certain that the video input of the VCR is connected to the vcr out or s-vhs out connector on the multiplexer. Multicamera Recording Multiple camera recording involves simply placing the VCR in record mode. All cameras connected to the multiplexer are encoded on tape. No action is required at the multiplexer. NOTE: Several factors affect the order and rate at which cameras are recorded. These include the number of connected cameras, the number of cameras with motion, and the number of alarms generated during recording. One Camera Recording The multiplexer can be directed to record a single priority camera exclusively. This feature can be turned on or off at any time. To start one camera recording: 1. Press and hold the 1 Cam (Function) button. 2. Press the Camera (116) button for the camera to be recorded. The indicator light above that Camera button comes on. The multiplexer displays the selected camera on the main monitor and flashes the 1 Cam light to indicate that the system is in one camera record mode. Chapter 5 Operation 35 To end one camera recording: 1. Press and hold the 1 Cam button. 2. Press the Live button. The 1 Cam light stops flashing and the multiplexer resumes multicamera recording. NOTE: When the 1 CAM light is flashing, only the selected camera is recorded. You must end one camera recording to resume recording all cameras. Tape Playback To review a videotape with the multiplexer, press the Tape button and place the VCR in the play mode. The multiplexer decodes the recorded video signal and displays it in the current format. Cameras appear in the order they were recorded. Multiplexer operation during videotape playback is the same as when viewing live cameras. All front panel buttons have the same effect. The difference is that the VCR is the source of video. VCR Special Effects Most special video playback features can be used while reviewing a multiplexer recording. Field-oriented features such as field advance or still field should work, provided the VCR reproduces each video field accurately. 36 Video Multiplexer with Video Motion Detection Chapter 6 Alarms This chapter describes how the multiplexer responds to alarms and what can be done when an alarm occurs. The multiplexer detects and responds to four types of alarm events: mechanical alarms, motion alarms, recorded alarms and video loss. A mechanical alarm occurs when there is a contact closure at any multiplexer alarm input. A motion alarm occurs when motion is detected at a camera with motion detection (ALRM) ON. A recorded alarm occurs when the multiplexer detects an alarm encoded field during tape playback. A video loss alarm occurs when the multiplexer detects video loss at an active camera input. MECHANICAL ALARMS The alarms connector provides one mechanical alarm input for each camera input. These inputs can be connected to any security device equipped with either a contact closure or TTL/CMOS standard alarm output. Each alarm input requires two wires. One wire connects to the desired alarm input pin. The second wire connects to the multiplexer ground post (gnd). See Table 1 Alarm Connector Pin Assignments for details. Alarm polarity is selectable via multiplexer setup menus. See Menu 3 Toggle Options for details. The multiplexer always responds to mechanical alarms. The type of alarm response depends upon whether it is in live or tape mode. MOTION ALARMS The multiplexer can initiate an alarm when motion is detected at a camera if this feature is selected during setup. Motion alarms can be turned ON or OFF for each camera using the motion setup screen in the camera titles menu. For motion alarms, set the ALRM option to ON for each camera and time period you want (see Motion Setup Screen for details). If you want an alarm only when you have both a mechanical alarm and motion for a particular camera, set the ALRM option to AND. The multiplexer initiates a motion alarm when a predetermined number or arrangement of targets are triggered. Each of the 192 targets is sensitive to changes in picture content. When a motion alarm occurs, the multiplexer alerts the operator, displays the alarm camera, toggles TTL/CMOS and contact alarm outputs and sends images to the VCR on a priority basis. Multiplexer response to motion alarms is similar to mechanical alarms and depends on whether it is in live or tape mode when the alarm occurs. Chapter 6 Alarms Motion Alarm Status Table 37 The MOTION ALARM STATUS TABLE displays the current day and night motion alarm option settings for each camera. In the example below, camera 5 is set for motion alarms between 8 AM and 5 PM for objects at least 2 targets wide by 3 targets high. Motion alarms will not be generated for camera 5 between 5 PM and 8 AM. The table allows you to quickly review the motion alarm settings for the multiplexer. To view the table during normal operation (outside the menu system), press Function+down arrow. The table appears (over the color bars) as shown below. The MOTION ALARM STATUS TABLE has two pages. Each page displays the Day and Night option settings of eight cameras (01 through 08 or 09 through 16). Press Call to toggle between the pages. The MOTION ALARM STATUS TABLE is for display only. You cannot change multiplexer motion option settings using this screen. To make changes, press Live to exit the table and get into the setup menu system to change settings. Figure 8 Motion Alarm Status Table 38 Video Multiplexer with Video Motion Detection Alarm Counter The multiplexer counts the number of mechanical alarm events that occur at each camera input. The alarm counter maintains a total count for each camera until the alarm counter is cleared. Motion alarms are counted for any cameras with the ALRM option ON. If during motion setup you set the ALRM option to AND, an alarm is generated only when motion and a mechanical alarm happen at the same time for that camera. If the menu option for VIDEO LOSS ALARM is set ON, video loss alarms will also be included in the alarm count. If set to OFF, video loss will not be counted as an alarm. To view these totals during normal operation, press Function+left arrow. The count will update if an alarm occurs with the alarm counter on screen. The multiplexer displays the alarm count for each camera input and the time and date the count was last cleared. Press Live to exit the alarm counter. The multiplexer removes the alarm counter from the screen and resumes normal operation. Alarm counts are NOT cleared and counting alarms continues. Press Call to clear the alarm counter. The multiplexer resets the alarm counter (all counts return to 000) and updates the ALARM COUNT SINCE date and time. Alarm counting begins immediately. Alarm counters stop at 999. That count remains until cleared. Figure 9 Alarm Counter Chapter 6 Alarms Live Mode Alarm Response 39 When a mechanical and/or motion alarm occurs in the live mode, the multiplexer alerts the operator and performs tasks required to record the alarm event on videotape. When it detects the initial alarm in live mode, the multiplexer does the following: 1. Flashes the associated Camera (116) light. 2. Sounds the audible alarm (if ON in setup menu). 3. Toggles the alarm relay. 4. Activates the alarm output (only motion alarms unless PASSTHRU EXTRNL ALRMS is YES). 5. Displays the alarm camera on the call monitor, overlaid with the ALARM message. 6. Switches the main monitor to the highest multicamera format if the alarm camera is not already on display (unless the ALARM MESSAGE DISPLAY option is set to OFF). 7. Overlays the alarm camera on the main monitor with the ALARM message (unless the ALARM MESSAGE DISPLAY option is set to OFF). 8. Switches to the VCR ALARM RECORD TIME encoding rate. 9. Encodes the camera as alarm and sends it to the VCR on a priority basis. The multiplexer remains in the alarm state until ALL of the following occur: All contact alarms are released. No motion is detected at cameras set for motion alarm. The ALARM DURATION time elapses. The alarm hold input is released. Multiple alarms are processed in the order they occur. 40 Tape Mode Live Alarm Response Video Multiplexer with Video Motion Detection When a mechanical and/or motion alarm occurs in the tape mode, the multiplexer processes the event in the background. If two VCRs are connected, it records the alarm event on videotape but does not indicate the alarm to the user. This allows alarm recording during tape playback. See Simultaneous Record and Play. When the multiplexer detects the initial live alarm in tape mode, it does the following: 1. Toggles the alarm relay. 2. Activates the alarm output (only motion alarms unless PASSTHRU EXTRNL ALRMS is YES). 3. Switches to the VCR ALARM RECORD TIME encoding rate. 4. Encodes the camera as alarm and sends it to the VCR on a priority basis. The multiplexer remains in the alarm state until ALL of the following occur: All mechanical alarms are released. No motion detected at cameras set for motion alarms. The ALARM DURATION time elapses. The alarm hold input is released. Multiple alarms are processed in the order they occur. Chapter 6 Alarms RECORDED ALARMS 41 The multiplexer detects recorded alarm events by monitoring the VIS information returned from tape. Each field of recorded video is encoded with alarm status information, camera number, camera title, time and date. The multiplexer uses this information to identify camera related alarm events. The multiplexer must be in tape mode to display and process recorded alarms. The processing of recorded alarms is completely independent from live alarm processing. The multiplexer can perform both tasks at the same time. In tape mode, live alarm events process in the background and display on the call monitor. The multiplexer does the following when it detects a recorded alarm while in tape mode: Flashes the associated Camera (116) light. Overlays the alarm camera with the ALARM message on the main monitor. The multiplexer remains in the alarm state until both of the following occur: The recorded alarm event ends. The ALARM DURATION time elapses (the default is 4 seconds). Multiple alarms are processed in the order in which they occur. The multiplexer detects recorded alarm events at any playback speed (including forward and reverse search on many VCRs). When a tape plays at the speed it was recorded, the duration of each alarm is the same as the original event. Other tape speeds slow down or speed up alarm playback; however the default alarm time remains 4 seconds. 42 Video Multiplexer with Video Motion Detection VIDEO LOSS ALARMS The multiplexer detects loss of video at any connected camera input by monitoring the cameras video sync signal. The VIDEO LOSS ALARM option controls this feature. When this option is ON (the default), the multiplexer responds to loss of camera video by alerting the operator and recording the alarm event on videotape. When the VIDEO LOSS ALARM option is OFF, video loss is NOT treated as an alarm, and no message displays. The multiplexer does the following when it detects loss of camera video: 1. Flashes the associated Camera (116) light. 2. Toggles the alarm relay. 3. Switches the call monitor to the lost camera input and displays the VIDLOSS message. 4. Switches the main monitor to the multicamera format (if ALARM MESSAGE DISPLAY is ON and the alarm camera is not already displayed) and displays the VIDLOSS message. 5. Switches to the VCR ALARM RECORD TIME encoding rate. 6. Encodes the camera as video lost and sends it to the VCR. Multiple video loss alarms are processed in the order they occur. The multiplexer remains in the alarm state until ALL of the following occur: The ALARM DURATION time elapses. The alarm hold input is released. Chapter 7 Special Applications 43 Chapter 7 Special Applications The features and flexibility of the multiplexer make it a powerful tool in special applications where unique capabilities are required. This section describes several ways to use the multiplexer. SIMULTANEOUS RECORD AND PLAY The multiplexer circuits simultaneously encode and decode video. This is referred to as full duplex operation, which uses two VCRs. The unit can encode camera video to one VCR while it decodes and displays video played on a second VCR. The two operations do not interfere with each other. Without this capability, camera video recording must stop while a previously recorded tape is viewed. Full duplex capability is most important in applications that demand continuous video recording of multiple cameras. It allows an operator equipped with a second video recorder to review multiplexer tapes without interrupting the recording process. Refer to Figure 2 Multiplexer System with Two VCRs. To add a second VCR to a standard multiplexer installation: 1. Connect a cable to video in on the VCR and connect the other end of this cable to the multiplexer vcr out connector. This VCR is now dedicated for tape recording. 2. Connect another cable to the video out of the second VCR and the multiplexer vcr in connector. This VCR is now dedicated for tape playback. Multiplexer operation is similar when connected to two VCRs. The difference is that recording and playback are performed by separate VCRs. 44 Video Multiplexer with Video Motion Detection MULTIPLEXED VIDEO TRANSMISSION Two multiplexers can be employed to transmit video from multiple cameras over a single video communication link. The link may be coaxial cable, a microwave channel, or any other medium that supports real-time video. Where two communications links are available, simultaneous two-way video communication is possible. Multiplexed video transmission requires that one multiplexer be installed at each location. See Figure 3 One-Way Multiplexed Video Transmission, for details. A multiplexed video link allows users at one or both ends to display local or remote cameras. Multiplexer operation is normal except that you press Function+Tape to display the remote cameras. One-Way Video Transmission One-way multiplexed video transmission requires two multiplexers and one video quality communication link. The link joins the vcr out connector at Site A to the vcr in connector at Site B. Both Site A and Site B can view the cameras located at Site A. Site B can view either local cameras (press Live) or the cameras located at Site A (press Function+Tape). Two-Way Video Transmission Two-way multiplexed video transmission requires two multiplexers and two video quality communication links. The communication links cross connect the multiplexer VCR connectors at these sites: vcr out at Site A connects to vcr in at Site B and vice versa. Both sites can view either local cameras (press Live) or the cameras located at the other site (press Function+ Tape). To establish a multiplexed video transmission link: 1. Connect two multiplexer units as described above. 2. Set VCR RECORD TIME on both multiplexer units to 001 HRS for NTSC/EIA units, or 002 HRS for PAL/CCIR. 3. Press Function+Tape on each multiplexer. The multiplexer enters the video transmission mode and displays all remote cameras. If you get a MISSING TAPE INPUT message, check the connections and make sure that vcr in is connected to vcr out on the other unit. Once the link is established, press the Live button to view local cameras, or press Function+Tape to view remote cameras. Appendixes APPENDIX A ALARM CONNECTOR PIN ASSIGNMENTS 45 The alarms connector is a DB37-S. It accepts a DB37-P mating connector. Figure 10 Alarm Connector PIN PIN ASSIGNMENT PIN PIN ASSIGNMENT 1 Alarm input 1 20 Alarm output 1 2 Alarm input 2 21 Alarm output 2 3 Alarm input 3 22 Alarm output 3 4 Alarm input 4 23 Alarm output 4 5 Alarm input 5 24 Alarm output 5 6 Alarm input 6 25 Alarm output 6 7 Alarm input 7 26 Alarm output 7 8 Alarm input 8 27 Alarm output 8 9 Alarm input 9 28 Alarm output 9 10 Alarm input 10 29 Alarm output 10 11 Alarm input 11 30 Alarm output 11 12 Alarm input 12 31 Alarm output 12 13 Alarm input 13 32 Alarm output 13 14 Alarm input 14 33 Alarm output 14 15 Alarm input 15 34 Alarm output 15 16 Alarm input 16 35 Alarm output 16 17 Alarm output com 36 Alarm hold input 18 Alarm output NC 37 Autodetect VCR Speed 19 Alarm output NO Table 1 Alarm Connector Pin Assignments 46 Video Multiplexer with Video Motion Detection APPENDIX B ALARM RECORDING CONTROL Most multiplexer installations require that alarm events be documented on videotape. The multiplexer provides all of the necessary connectors and signals to accomplish this and is flexible enough to satisfy most video documentation requirements. A multiplexer alarm event begins when the unit detects an alarm signal at the alarms connector, or motion at a camera set up for motion alarms. The sequence of events following alarm detection is determined by one or more of the following: Uncontrolled Alarm Recording Multiplexer option settings. VCR programming. Connections between the multiplexer and the VCR. When alarm recording is not controlled, the VCR records alarm cameras as normal video. Recorder operation is not affected by alarm events. The VCR simply records alarm video output by the multiplexer at the set time-lapse speed. Uncontrolled alarm recording requires only video connections between the multiplexer and the VCR. Alarm connections at the VCR are not required. To set up the system for uncontrolled alarm recording: Connect the multiplexer vcr in and vcr out connectors to the VCRs video output and video input respectively. Set the multiplexer ALARM DURATION option to the minimum number of seconds you wish each alarm event to be recorded. Set the VCRs time-lapse speed as desired. Set both the multiplexer VCR RECORD TIME and VCR ALARM RECORD TIME options to match the speed set at the VCR. Appendixes Controlled Alarm Recording 47 When alarm recording is controlled by the multiplexer, the VCR responds to the alarm signal provided by the multiplexer. The recorder goes into the alarm recording mode and records at the alarm record speed. It remains in the alarm mode until released by the multiplexer. Controlled alarm recording requires both video and alarm connections between the multiplexer and the VCR. System setup for multiplexer controlled alarm recording: 1. Connect the multiplexer vcr in and vcr out connectors to the VCRs video output and video input respectively. 2. Connect the VCRs ground to the multiplexer alarms connector pin 17 (alarm output common). 3. Connect the VCRs alarm input to multiplexer alarms connector pin 19 if VCR alarm input polarity is active low or pin 18 if VCR alarm input polarity is active high. 4. Set the multiplexer ALARM DURATION option to the minimum number of seconds you wish each alarm event to be recorded. 5. Set the VCRs alarm duration option to manual. 6. Set the multiplexer VCR ALARM RECORD TIME option to match the VCRs alarm recording speed. If using the Autodetect VCR Speed feature (pin 37 on alarms connector), the connections between the multiplexer and VCR permit each unit to change recording speed as needed. See Alarm Output and Autodetect VCR Speed for details. 7. Set the multiplexer VCR RECORD TIME option to match the VCRs normal recording speed. 48 Video Multiplexer with Video Motion Detection APPENDIX C IN CASE OF TROUBLE If you experience difficulties during the installation or operation of the multiplexer, review the section of this manual which explains the related feature or task. If necessary, consult the troubleshooting table on the following pages. If the problem cannot be resolved, you may have to contact Technical Support. When you call, the representative will ask you to provide specific information about the installation. To save time, spend a few minutes getting organized before you pick up the telephone. Before calling, have the following information ready: The serial number of your multiplexer. The make and model of each piece of hardware connected to the multiplexer. Approximate date of purchase and of installation. A specific description of the problem. NOTE: Please do NOT return any product to the Factory without first obtaining a Return Authorization (RA) number. Failure to do so can result in a significant delay in processing your repair. Contact Technical Support to obtain an authorization number. Appendixes 49 TROUBLESHOOTING GUIDE PROBLEM POSSIBLE CAUSES SUGGESTED ACTION Video Problems in Live Mode Live pictures too bright, too dark, bad color or gray tones. Monitor not correctly adjusted. Adjust monitor using gray or color bars, as applicable. Termination not set correctly. Check termination switches on back panel for each camera output. Some live pictures too dark. Camera iris is not correctly adjusted. Adjust camera iris using calibrated monitor. Some live pictures too light. Some cameras are not terminated. Check rear panel switches for each camera, set for 75-ohms. Camera iris is not correctly adjusted. Adjust camera iris using calibrated monitor. Black horizontal lines in picture, picture unstable. Faulty camera sync or video output. Replace affected camera with a known good camera. One or more camera images do not change. VIDEO LOSS ALARM set to OFF, or VIDLOSS message cleared before video loss is fixed. Change display format, if camera window is blank, check video connections and camera. Video Problems in Tape Mode Poor pictures, bad color, image unstable. VCR faulty or requires maintenance. Perform periodic maintenance and test VCR performance. RECORDER STOPPED message on monitor. Operator changing operating mode of unit. For tape playback, press play on the VCR. Motion Detection Problems No alarm when motion is detected at some or all cameras. Camera ALRM option set OFF, no motion detection for those cameras. Set ALRM option to ON for each camera needing motion detection. ALARM MESSAGE DISPLAY set to AND , both contact alarm and motion needed for alarm. Check contact alarm device and connection to alarm input pin. Use TST to check motion settings. Table 2 Troubleshooting Guide 50 Video Multiplexer with Video Motion Detection TROUBLESHOOTING GUIDE PROBLEM POSSIBLE CAUSES SUGGESTED ACTION Motion Detection Problems Important motion not detected. Motion targets turned off, SENSE (sensitivity) too low or DELAY too long. Turn on motion targets where needed, check SENSE and DELAY settings. Unimportant motion detected. Unnecessary motion targets turned on, SENSE too high or DELAY too short. Turn off unneeded motion targets, check SENSE and DELAY settings. Motion detected when no motion occurred. Camera is random interlace type, video is not stable or camera mounting is loose. Replace camera or substitute another model to test. Check camera mounting. Alarm Detection Problems No alarm message. ALARM MESSAGE DISPLAY set OFF. Set ALARM MESSAGE DISPLAY ON. No alarm tone heard. AUDIBLE ALARM set OFF. Set AUDIBLE ALARM ON. No response to a contact alarm input or continuous alarm when alarm input is connected. Alarm not connected properly. Check connections and correctly connect alarm. Alarm device polarity and multiplexer alarm input polarity do not match. Change alarm device polarity or multiplexer alarm input polarity. Remote Control Problems No response to remote Remote panel data cable plugged control panel. Remote into remote out connector. control panel LEDs off, remote panel Remote panel data cable loose. beeping. Plug remote panel data cable into remote in connector. Reconnect remote panel cable. No response to remote Remote panel power cable loose or control panel. Remote not connected. control panel LEDs off. Check remote panel power cable connection. No response to remote Serial communications protocol not input. correct. Configure remote device for 1200 bps, 1 start bit, 8 data bits, 1 stop bit, no parity. Appendixes 51 APPENDIX D TECHNICAL SPECIFICATIONS Operating Defaults Video Format The following specifications apply to Sensormatic multiplexer series products only. Sensormatic reserves the right to revise and improve its products. All specifications are therefore subject to change without notice. Format Displays all cameras Display Live Switcher Sequence off VCR Record Time 24 hours VCR Alarm Record Time 02 hours Alarm Duration 4 seconds Alarm Message Display On Global Dwell 2 seconds Alarm Message Latch Off Video Loss Alarm On Audible Alarm Off Alarm Input Polarity Active low Alarm Output Polarity Active high Pass-Thru Extrnl Alrms Yes Image Tenderizer On Camera Titles Camera number Motion Setup Screen All targets selected Motion Alarm (ALRM) Off Sensitivity (SENSE) Medium (MED) Object Size (SIZE) 1 Wide by 1 High (1Wx1H) Alarm Delay (DELAY) Off Security Lock Off NTSC/EIA or PAL/CCIR 52 Video Multiplexer with Video Motion Detection Video Level Alarm Camera Inputs 1.0 V p-p, 75 ohms Camera Outputs 1.0 V p-p, 75 ohms VCR Inputs: Composite 1.0 V p-p, 75 ohms VCR Inputs: S Video Luma 1.0 V p-p, 75 ohms Chroma(burst)285mV p-p, 75 ohms VCR Outputs: Composite 1.0 V p-p, 75 ohms VCR Outputs: S Video Luma 1.0 V p-p, 75 ohms Chroma (burst) 285mV p-p, 75 ohms Camera Alarm Input One input per camera. Contact or TTL/CMOS signal. Polarity selectable. Alarm Hold Input +5 to +15 VDC or TTL/CMOS active high signal. Alarm Duration 4 second default. Menu selectable from 2 to 999 seconds. Alarm Output Normally open (NO) and normally closed (NC) contacts with shared common; 2.0 A at 30 VDC (resistive only) 1.0 A at 125 VAC (resistive only) Display Resolution Alarm Outputs One output per camera, TTL/CMOS (selectable polarity). Color Palette 16,777,216 colors (24 bits) Gray Shades 256 (8 bits) Full Screen Format 512x464 pixels (512x512 PAL) 2x2 Format 256x232 (256x256 PAL) 3x3 Format 170x154 (170x170 PAL) 4x4 Format 128x116 (128x128 PAL) PIP Insert 128x116 (128x128 PAL) Zoom Display Interpolated 512x464 (512x512 PAL) Appendixes 53 Controls General Soft touch, rubberized push buttons with indicator lights. Function (1 Cam) Used in combination with other buttons to access special functions. Full Screen (Zoom) Selects full screen, 2x zoom display or program menu. PIP (Up) Selects Picture-In-Picture display or UP function. 2x2 (Down) Selects 2x2 picture display or DOWN function. 3x3 (Left) Selects 3x3 picture display or LEFT function. 4x4 (Right) Selects 4x4 picture display or RIGHT function. Live Selects camera inputs for viewing. Tape Selects VCR input for viewing. Sequence Selects sequential camera display, either full screen or in lower right window of multicamera display. Call To change display on call monitor. Camera Selects camera for viewing or single camera record. 54 Video Multiplexer with Video Motion Detection Connectors Power 2.1 mm pin-type female. Power input. Remote RJ11. Remote control via remote panel option or ASCII commands. Alarms DB37-S. Alarm control via contact or TTL/CMOS signal. Call Mon BNC. Video signal output to call monitor. Main Mon BNC. Video signal output to main monitor. S-VHS In S-Connector. S-Video input from VCR (color models only). S-VHS Out S-Connector. S-Video output to VCR (color models only). VCR In BNC. Composite video input from VCR. VCR Out BNC. Composite video output to VCR. Cam In BNC. Composite video input from camera. Cam Out BNC. Composite video output from camera (passive loop through). Termination switches 75 ohms input impedance (75 Ω) or ∞ for looping to other equipment. Appendixes 55 Electrical Physical Characteristics Power Requirement 18 Watts (center positive 12 VDC) Dimensions 17 in (432mm) Wide 12.2 in (311mm) Deep 1.75 in (44mm) High Unit Weight 9 lbs. (4 kg) Shipping Weight 11 lbs. (5 kg) Environmental Requirements Temperature, 40104° F (540° C) Humidity, 595%RH Noncondensing Operating altitude, 010,000 feet (3048 meters) Options Remote control panel Kit includes: remote control panel, 50 ft. cable, desktop stand and rack mount bracket