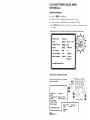
1
+ TABLE
OF CONTENTS
important Safety Tips
..
.. 2-3
Safety Precautions
..4
Guide to Using this Manual . .
. . . . ...5
@ ESPANOL
Importances Medidas
de Seguridad, . . . . . . . . . . . . . . . ...3-4
Indite . . . . . . . . . . . . . . . . . . . . . . . . . . . . . .16
Specifications .,,........,5....,.,,.5
Features, , .,, ,,, . ., . ., .,,,,...
,,.,5
Basic Setup , .,, ,, ., . . . . . . . . . . . . ...6
Basic Hookup . . . . . . . . . . . . . . . . . . . . ..6
Front /Rear Panel,,,
,...,,,,.7,
. . . . . ...7
OFRAN~AIS
Universal Remote Control . . . . . . . . ...7-9
Mesuresdesecurite
On-Screen Feature Setup . . . . . . . ...10-11
Table des Matieres28
UsingAudio/Video(A/V)Jacks
Closed-Captioning
,,, .,,
,, ...,.,,...,,,,.4
... ,,,,12
, . .,,
,. .,..13
Setting the Sleep Timer..,,,.,.,,,
,.,13
Troubleshooting . . . . . . . . . . . ...14-15
Care and Cleaning.,.....,,.,,,,..
OWNER’S
.,15
RECORD
For your convenience, record the model number
and serial number (you will find them on the rear
or your set) in the space provided below. Please
refer to them when you contact your AIWAdealer
in case of difficulty.
For assistance
Model No.
EEEl
Serial No.
~~
and information
call toll free I-800-BUY-AIWA
(United States and Puerto Rico)
CAUTION
CAUTION: TO REDUCE THE RISK OF ELECTRIC SHOCK, DO NOT
REMOVE COVER (OR BACK). NO USER.SERVICEABLE
PARTS
fNSIDE. REFER SERVICING TO QUALIFIED SERVICE PERSONNEL.
THIS SYMBOL INDICATES THAT DANGEROUS VOLTAGE
CONSTITUTING
A RISK OF ELECTRIC
SHOCK
IS
PRESENT WITHIN THIS UNIT
THIS SYMBOL INOICATES THAT THERE ARE IMPOR.
TANT OPERATING
AND MAINTENANCE
lNSTRUCTIONS IN THE LITERATURE ACCOMPANYING
THIS UNIT
WARNING:
EXPOSE
TO REDUCE THE RISK OF FIRE OR ELECTRIC
THIS APPLIANCE
TO RAIN OR MOISTURE.
SHOCK,
A
A
DO NOT
IMPORTANT SAFETY TIPS
CAUTION: PLEASE ADHERE TO ALL WARNINGS ON THE PROOUCT ANO IN THE OPERATING INSTRUCTIONS,
BEFORE
OPERATING THE PROOUCT, PLEASE REAO ALL OF THE SAFETY ANO OPERATING INSTRUCTIONS.
RETAIN THIS
LITERATURE FOR REFERENCE.
Electrical energy can perform many useful functions. This unit has been engineered and manufactured
to assure your
personal safety. However, improper use can result in potential electrical shock or fire hazards. in order not to defeat the
safeguards incorporated
in this unit, observe the following basic rules for its installation, use and servicing. Your
appliance is fully transistorized and does not contain any user serviceable components.
Removal of the cabinet cover may expose you to dangerous voltages. Refer all servicing to qualified service
oersonnel.
1. This appliance should be operated only from the type
of power source indicated on the unit or as indicated
in this Owner’s Manual. If you are not sure of the type
of power supply in your home, consult your salesperson or your local power company. For appliances
designed to operate from battery power, refer to the
operating instructions.
2, The design of many appliances does not require a
polarized AC line plug (one blade wider than the
other). However, if your appllance is equipped with a
polatized AC line plug, it is a safety feature which
prevents the plug being inserted incorrectly. If you
have difficulty
inserting the plug, try
reversing it. If the plug still does not fit
fully into the outlet, contact your electrician &y
to replace your obsolete outlet. Do not de- &
Q
feat the safety purpose of this polarized plug.
/
.
3. Do not drop or push objects into cabinet slots or
open ings. Some internal parts carry hazardous voltages
and contact may result m electrical shock hazard. Never
spill liquid of any hnd on the appliance.
6
Do not exoose the a~oliance to rain or use near
water
‘for examp(e~ near a bathtub, swimming
pool, kitchen sink, in a wet basement, etc. Before
cleaning, unplug the unit from the wall outlet. Do not
apply liquid cleaners or aerosol cleaners directly to
the unit. Use a damp cloth for cleaning.
7
An outside antenna system should not be located in
the vicinity of overhead power lines or other electric
light or power circuits, or where it can fall into such
power lines or circuits. When installing an outside
antenna system extreme care should be taken to
keep from touching such power lines or circuits as
contact with them might be fatal,
8
For added protection during a lightning
the set is left unattended and unused
of time, unplug it from the wall outlet
the antenna, This will prevent damage
lightning or power line surges.
9
Oo not place your appliance on an unstable cart,
stand, shelf or table. Serious injury to an individual,
and damage to the appliance, may result if it should
fall. Your salesperson
can recommend
approved
carts and stands or shelf and wall mounting instructions,
An appliance
and
cart
combination should be moved with
care, Quick stops, excessive force,
and uneven surfaces may cause the
appliance and cart combination
to
overturn.
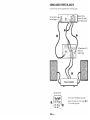
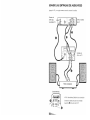
LIGHTNING PROTECTION FOR YOUR ANTENNA AND
SET AS PER NATIONAL ELECTRICAL COOE INSTRUCTIONS.
4. If an outside antenna IS connected to the receiver, be
sure the antenna system is grounded so as to
provide some protection against voltage surges and
built up static charges. Article 810 of the National
Electrical Code, ANS1/NFPA 70, provides information
with respect to proper grounding of the mast and
supporting structure, grounding of the lead-in wire
to an antenna discharge unit, size of grounding
conductors,
location of antenna discharge
unit,
connection to grounding
electrodes, and requirements for the grounding electrode,
5. Slots and openings in the cabinet and in the back or
bottom are provided for ventilation. To ensure reliable operation of the appliance and to protect it from
overheating, these openings must not be blocked or
covered. The openings should never be covered with
a cloth or other material, and the bottom openings
should not be blocked by placing the unit on a bed,
sofa, rug, or other similar surface. This appliance
should never be placed near or over a radiator or heat
register. This appliance should not be placed in a built.
in installation such as a bookcase unless proper
ventilation is Drovided.
to
Never add accessories
specifically designed for
EXAMPLE OF ANTENNA GROUNDING
ELECTRICAL CODE. ANS1/NFPA 70
storm, or when
for long pefiods
and disconnect
to the set due to
A&
(!!!!
that
have not been
use with this appliance.
ACCORDING
TO NATIONAL
0,s,”,,,,
I./v
..,”,,.,
=~
--
>.
@
*
,O.,,,,,”,,,,,O
”,,,,,
a,,,..,,
SYSTEM
[N,, ,,, ,s0,
,,,, H,
,Note to CATV system Installer.
Th,s mnndw ,s mo,,ded to call the
AM.
82040 of the NEC that prrwdes
m parfwlar,
spe’afms that the cable
gro.ndmg system of the bulld(ng, as
practl.al,
W.
“m
SECTION810-201
\
‘ROu”O’NG -cro’$
{WC Smno. *30.? ,
N EC .,,,,0..,,,,.,,,,,,,,0,
CATV s“stem m,talle,,s Wten!lon to
gudelks
for proper gro”.d!ng and,
ground shall be connected to the
close to the potnt of cable entry as
11.
DO not allow anything
tO rest on the power
cord. Do
not locate the appliance
where the cord will be
abused by persons waiting on it
12.
Do not olver~~~~ lw~!~ ~Qt!ets W. d ex.”trw<inn
,...,
this can resulf in fire or electric shock.
13.
Unplug the appliance
servicing t’o qualified
following conditions:
CQ@
F. If the appliance does not operate normally by following the operating instructions, adjust only those
controls that are covered in the operating instructions Improper adjustment of other controls may
result in damage arm wiii often require extensive
work by a qualifitd
techmciim to restore the
appliance to normal operation.
ZS
the wall outlet and refer
service personnel under the
from
f 4. Upon completion of any service or repair, request the
service technician’s
assurance that only Factory
Authorized Replacement Parts that have the same
characteristics as the original parts were used, and
that routloe safety checks have been performed to
determine that the appliance is in safe operating
conctnion. unauinorized
Suosiiiuilut”[s may rmtik in
fire, electticai shock, or other hazards.
A. If the power cord or plug is damaged or frayed
6. If liquid has been spilled into the appliance,
C. If the appliance has been exposed to rain or water,
D. If the appliance has been dropped
has been damaged.
E. If the appliance
performance.
exhibits
or the cabinet
a distinct
change
in
ESTE SIMBOLO
PRECAUTION
PRECAuclON: pARAREDUCIR EL RIEsGODETOQUE
ELEcTRtCO, N0
QUITE LA CUBIERTA (O LA TAPA TRASERA).
NO HAY PARTES
ADENTRO QUE LAS PUEDA REPARAR EL USUARIO. REFIERASE A
D.cI.nkl A, r.., ,.,P.,,,,,O,.
DA m.m. mfimc, AmAn&T”
ADVERTENCIA:
PARA REDUCIR
EL
TRICO, NO EXPONGA
ESTE APARATO
INDICA OUEVOLTAJES
PELIGROSOS
QUE CONSTITUYEN
UN RIESGO DE TOQUE ELEC
TRICO ESTAN PRESENTES DENTRO DE ESTA UNIDAD
ESTE SIMBOLO INDICA QUE HAY INSTRUCC10NE5
fMPORTANTES OEOPERACION
yMANTEN,MIENTOEN
LA LITERATURE
OUE
SE
ANEXA
A ESTA
UNIDAD
RIESGO
DE FLIEGO O TOQUE
A LLUWA O I-NJMEDAD.
A
Al
ELEC-
IMPORTANTESMEDIDASDE SEGURIDAD
PRECAUTION: POR FAVOR SIGA TOOAS LAS ADVERTENCIAS EN EL PRODUCTO Y EN LAS INSTRUCCIONES DE OPERACION, ANTES DE OPERAR EL PRODUCTO, POR FAVOR LEA TODAS LAS INSTRUCCIONES DE OPERACIDN Y SEGURIOAD.
GUAROE ESTA LITERATURE PARA SU REFERENCIA.
La energia electtica puede Hevar a cabo muchas funciones utiles. Esta unidad a sido diseilada y manufacturada para
asegurar su seguridad personal. Sin embargo, uso impropio puede resrdtar un toque electrlco o riesgos de fuego. Para
no deshabilitar Ias medidas de seguridad incorporadas en esta unidad, observe Ias siguientes reglas basicas para Su instalacion, uso y servlcio, Su aparato esta totalmente transistorizado y no contiene ninguna parte al que el usuano Ie pueda
dar serviclo.
Remover la cubierta del gabinete puede exponerlo a voltajes peligrosos. Refiera todo setvicio a personal de
servicio calificado.
1.Este
aparato debera de ser operado solamente por el tipo
de fuente de poder indicado en la Iinea o como es indicado
en el manual del propietarlo. Si usted no esta seguro del
tipo de fuente de porler en su casa, consulte a su vendedor
o a la Comision Federal de Electricldad. Para aparatos que
operen de potencla de bateria, refierase a Ias instrucciones
de operacibn
2
3
El diserio de muchos aparatos electrlcos no requiere un
conector de Iinea A.C. polarlzado (una ho}a mas grande
que la otra).Sln embargo, si su aparato esta equipado
con un conector de Iinea A.C. polarizado, esta es una
medida de seguridad que previene que el conector sea
insertado incorrectamente.
Si usted tiene dificulfades al
insertar el conector de A. C., trate de mvertlrlo. S[ el
conector todavia no se puede msertar en el
receptaculo de A. C., pongase en contacto
R
con un tecrvco
electricista
para que fir~~:
reemplaze 5U receptaculo obsoleto. No
&/Y ~~ !~
trate de elimlnarel proposito de seguridad de
,/
\J
este conector polatizado.
No deje caer o empuje obietos dentro de Ias ranuras y
aperturas del gabinete. Algunas pactes interiors
Ilevan
voltajes pehg rosos Y contacio con ellas puede resultar en
peligro de toque electtico. Nunca vierta cualquier clase de
Iiquido en el aparato.
PROTECTION EN CONTRA DE RAYOS ELECTRICOS PARA SU
ANTENA Y APARATO DE ACUERDD A LAS INSTRUCCIONES OEL
CODIGO KtACIONAL ELECTRICO (EUA).
4. Si una antena exterior es conectada al receptor,
asegtirese que el sisterna de antena este aterrizado para
proveer alguna protecclon en contra de impulses de
voltaje y la acumulacih
de cargas estiticas. El art!culo
810 del codigo national electrico de Ios Estados Unidos
de Ametica (National Electrical Code, ANWNFPA 70),
provee mformacion
con respecto al aterrizamlento
correcto del mastll y la estructura de soporte, el
aterrizamiento del alambre a la antena en una umdad de
descarga, el tamafio de Ios conductors
de aterrizamiento, la Iocalizaclon de la unidad de descarga,
conexion
a Ios electrodes
de aterrizamiento,
y
requerlmlentos
para Ios electrodes de aterrizamiento,
EJEMPLO OE ATERRIZAMIENTO
DE ANTENA DE ACUUERDO AL
CODIGO
NACiONAL
ELECTRICO
(Natjonal
Ele.tr,cal
Code,
ANS1/NFPA70]
—
.
0.
,.,
,
Las ramrras y aperruras en el gamne[e y en ia parte
trasera e inferior fueron provistas para ventilation del
aparato. Para asegurar una operation confiable del
aparato y protejedo de sobrecalentamiento,
estas apefi
turas no deberan de ser tapadas o cubiertas. Las
aperturas nunca deberan de ser cubiertas con un trapo
u otro material, y Ias aperturas de la parte inferior no
deberan de ser tapadas poniendo la unidad en una
cama, sofa, alfombra, u otra superlicie similar. Este
aparato nunca debera de ser puesto cerca o sobre radi.
adores de calor. Este aparato nunca debera de ser
puesto en instalaciones tales como Iibreros a no ser que
haya una adequada ventilation en tales instalaciones
6.
No exponga el aparato a Iluvia o a uso cerca de
agrra
por ejemplo, cerca a una baifera, una alberca,
un Iavabo, en un sotano htimedo, etc. Antes de Iimpiar,
desconecte la unidad del receptaculo de la pared. No
aplique Iimpiadores I[quidos o de aerosol directamente
a la unidad. Use un trapo htimedo para Iimpiar.
7.
Una antena exterior no debera de ser Iocalizada en la
vecindad de Iineas de potencia qlle pasen por encima
de otros circuitos de Iuz electrica o de potencia, o en
donde pueda caer sobre tales Ikreas de potencia o
circuitos. Cuando se instale un sistema de antena
externa, se debe de tener cuidado extremo en no tocar
tales Iineas de potencia o circuitos ya que contacto con
ellos puede Ilegar a ser fatal.
8.
Para proteccifm adicional durante una torments electrica, o
cuando el aparato es dejado sin atencion ni uso du rante
Iargos petiodos de tiempo, desconictelo del receptaculo
de la pared y desconecte la antena. Esto evitara dafros al
aparato debido a rayos o a cambios bruscos en el voltaje
de Iinea
9.
No coloque su aparato en carrito, pedestal, anaquel o
mesa que scan inestables.
Hetidas serias a un
indlviduo, y averia al aparato, pueden resultar si este
cae. Su vendedor puede recomendar cartitos
y pedestaled o anaqueles e instrucciones
para montaje en la pared.
●L
Una combination
de aparato y cartito debera
@
~
de ser movida con cuidado. Paradas rapidas, fuerza
exceswa, y superficies irregulars
pueda causar que la
combination
de aparato y cartito se volteen y caigan,
10. Nunca adicione
accesorlos
que no han sido
especificamente diseitados para uso con este aparato,
11. No deje que nada descanse sobre el cordon de
potencia. No coloque el aparato en donde el cordon de
potencia pueda ser abusado por personas caminando
sobre el.
12, No sobrecarge receptaculos de pared o extensions
electrical ya que esto puede resultar en fuegD o toques
e16ctricos
13, Desconecte el aparato del receptaculo
de pared y
refiera servicio a personal
de servicio
electrico
caliticado bajo Ias siguientes condiciones
A Si el cordon de potencia o el conector
est~n
averiados o raidos.
B. Si Iiquido ha sido derramado en el aparato,
C. Si el aparato ha sido expuesto a Iluvia o agua,
D. N el aparato ha sido tirado o el gabinete a sido
averiado.
E. Si el aparato exhibe un cambio perceptible en
funcionamiento.
F. S el aparato no opera normalmente
siguiendo Ias
instrucciones
de operation,
ajuste solamente
aquellos controles que han sido cubiertos en Ias
instrucciones
de operation,
Ajuste impropio
de
otros controles puede resultar en averia al aparato y
posiblemente requiera de trabajo extensivo por un
tecnico califlcado para restaurar el aparato a su
operation normal.
14. Cuando se termine cualquier servicio o reparation,
requiera del tecnico de sewicio confirmation de que solo
Parles Autorizadas de Remplazo de Fabrice que tengan Ias
mismas caractedsticas que Ias partes originals
hayan
sido usadas, y que vetificaciones de seguridad rutinatias
hayan sido Ilevadas a cabo para determiner que el aparato
se encuentra en condiciones seguras de operation,
Substituciones
no autorizadas
pueden resultar en
fuego, toque electrico u otros peligros,
IVIESURES DE SECURITE
SAFETY PRECAUTIONS
Afin d’eviter tout risque d’[ocendie ou de choc electrique,
n’exposez pas I’apparell a la pluie ni a I’humidite.
To reduce the risk of fire or electrical shDck, do not expose
this appliance to rain or other moisture.
Afin d’eviter tout risque de choc electrique, n’enlevez pas Ie
panneau artiere. Lappareil est entierement transistorize et ne
contlent aucune piece rempla~able ou reparable par I’usager.
En cas de probleme, confiez I’appareil a un reparateur qualifie.
Le b%couleur est muni d’un cordon d’alimentation
CA a
fiche polarisee dent une lame est plus large que I’autre. Ce
dispositif de securite permet de brancher la fiche d’une
seule fa$on sur une prise de courant.
To prevent electrical shock, do not remove the back cover This
unit is fully transistorized and does not contain user-serviceable
components. Report any problems to qualified sewlce personnel,
This TV set is equipped with a polatized AC line plug. One
blade of the plug is wider than the other. CAUTION: To
prevent electrical shock, match wide blade of plug to
wide slot, Iully insert. This is a safety feature to ensure
that the plug fits only one way into an electrical outlet.
Lorsque vous utilisez Ie te16couleur avec des jeux video, ne
saturez pas la Iuminosite ni Ie contraste. Avec Ie temps, ceci
pourrait causer I’impression
permanerle
de I’image du
chamo,. de ieu sur I’ecran.
When playing TV video games, do not use intense brightness
and)or contrast sefiings. Over an extended pedod of time, this
may leave a permanent image of the playing field on the picture
screen
Ne placez pas cet apparell sur un chariot,
support ou table instable. II risquerait de
tomber et ainsl d’~tre endommage; cela pourrait aussi vous causer de graves blessures.
Do not place this product on an unstable cafl,
stand, tripod, bracket, or table, The product
●L
may fall, causing setious personal injury and
A
setious damage to the product.
@
m
.L
h>
N’utihsez qu’un chariot, support ou table recommafii
par
Iefabricant ouvendu avecl’appareil.
Lorsdeson
installatiOn, SuivezIes instructions du fabricant et utlhsez Ies
accessoires
d’installation
recommandes.
Prenez garde
Iorsque vous deplacez Ie televiseur se trorrvant sur un
chariot,
Des arr?ts brutaux, une force excessive et des
surfaces inegales peuvent renverser Ie chariot et I’apparell.
Lisez aitentivement
Ie present manuel et conservez-le.
Useonly with acart, stand, tripod, bracket, ortablerecommended by the manufacturer, or sold with the product. Follow
the manufacturer’s instructions when installing the product
and use mounting accessories recommended by the manofacturer. Aproduct andcart combination should be moved
with care. Quick stops, excessive force, and uneven surfaces
may cause the product and earl combination to overturn,
Please read and keep these instructions.
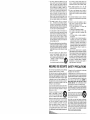
GUIDE TO USING THIS MANUAL
The setcrp procedures provided in this
manual
supplement
the
on-screen
instructi mrs. ‘Together they provide com plete
setup information, Remember fo look
fo1’ (rTzd
follozl, on-screen instructions as you
wfld and use this mn?nm[.
Symbols used throughout this manual
‘nave the foiiowing meanings:
~
CMNimdl Womils represent highlighted
menu items.
[
AV keys
- + keys
Arudla
Stereo
MWlmo
Sap
UPPER CASE WORDS OR SYMBOLS
indicate the status or setting of a control,
for example: ON or OFF.
Solid Lines represent
Numbered bullets indicate steps.
or primary
BOLD
UPPER
CASE
WORDS
SYMBOLS
indicate keys pressed
1
first step
connection.
or
to
Pb.aRtern. Lines
addi~!terna~e
represent
,9~
tioL-Lal steps
cormection.
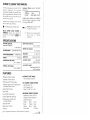
SPECIFICATIONS
PICTURE TUBE
(ivieasureci
SIZE
DEPTH
19.8 in. (5 G3mrii)
27-inch
ANTENNA
POWER
DIM. (Thickness)
Diagonaiiy)
INPUT
UH F/VHF/CATV
REQUIREMENT
screen
120VAC 60Hz
POWER
98 watts
HORIZONTAL
WEIGHT
(LB.)
(fApprOX.)
75Q
DIM. (Width)
73.1 (33.2 Kg.)
SPEAKERS
2—Size:
AMPLIFIER
Built-in with 1W/ch
A/V INPUT JACKS
Audio
26.1 in. (664mm)
VERTICAL
DIM. (Height)
24.8 in. (629mm)
Video
Input
Input
(R/L)
A/V OUTPUT JACKS
Rxed Audio Output (R/L)
(RCA
Connectors)
FEATURES
Trilingual On-screen
Menu
Automatic Ch armel Search
MTS stereo/ clbx~l Sap decoder
Automatic picture/sound adjustments
for Sports/ Movie/ News
Audio/Video
In Jacks
FINE TUNING
VHF and Cable Channels
AUTOMATIC
181 CHANNEL
TUNING
SYSTEM
VHF Channels 2-13
UHF Channels 14-69
Cable TV (CATV) 1, 14-125
Bass /Treble
Fixed Audio Output Jacks
Closed-Captioning
/QuikCap
Digital picture controls with
on-screen display
Auto Flesh Tone
Sleep Timer (3 hours)
TV Reset
8 cm
UNIVERSAL
REMOTE
CONTROL
Multi-Brand: Cable/ VCR/TV
Numbered Channel Selection
Channel Scanning
Mute
Power
Volume
Display
Sleep
Recall
Caption
Reset
Menu
Video Mode
VCR Keys
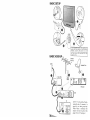
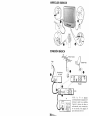
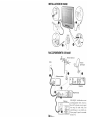
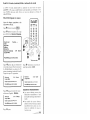
BASIC SETUP
-
“r
CATV FRANCHISE
NOTE
Cable companies, Iikc
public utilitms, arc franchised by local govwnnwnt
10 rectvw cable programs.
even wtth
equipment ,vhlch is capable of reccivmg cable than.
nels, the consumm
must subscribe
to tho cabl<~
NOTE; TV will switch off autcx
matically after 15 minutes i f a
signal is not being received,
When Video is selected, this
feature will not be active. (See
page 12 for A/ V hookups.)
;@;*F.w
*;3,+#3T;
/&
>q..
... $.=,,*>,*<*
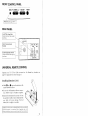
FRONT CONTROL
PANEL
li4~14i.1
~ U-IAWU%A
= VOLUME+
aMiimiBaiiili
POWER
B6)
/
/
Menu
Key
(See pages
10-11.)
I
I
REAR PANEL
c
Connect external video equip-
lCable/ Antenna Input
Terminal
Jacks (Fixed)
Audio Output
Connect external aucho equ]pment here.
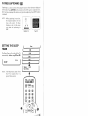
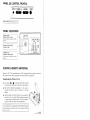
UNIVERSAL
I
I
( (
~m
I
‘
II
II
@~
0
REMOTE CONTROL
your TV, VCR or Cable converter
page 8. To-program this remote see page 9.
Operates
Installing Batteries
*
\
(2 AA)
Match ~ and @ signs on the batteries with
marks inside the remote.
* Do not mix old batteries with new ones or
mlx different types of batteries together.
* Remove the batteries if the remote will not
be used for a month or more. Weak batteries
may leak and cause damage. (Normal
battery life is roughly six months.)
/<q
●
,/.!)
..\
*1
box. For Remote key functions
‘ .,
“’.._/’i-
‘\
.,,
..
.,3”.
. .
‘N.
,,
.. . .,
\\
Ihl POR’1’AN’l’ NOI”E Spent
=.
‘%
c)@/’
:.’ . . /
/
\
or cllscharged battenw must be recycled or
cflsposed of pr[~perl~ III cLmlplIancc
\\ith
all applicab[c
tnf0rn2Llti0n.
co17t.3ct your IOCJI County
%lld iVastc
dct.lild
see
la~t% For
4ut11m1ty
?
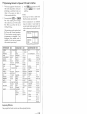
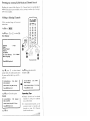
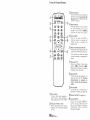
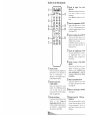
Remote Control Keys
/ ------------—
, -------------–0
–-+
–@
–@
@Number
Keys
Two keys must be pressed to select
a channel.
For cable channels 100
throu~h 125, press and hold the 1
key until 1–– appears. Then press
the other two numbers.
@Recall
Key
Select a channel; then select another
channel using the Number keys.
Press Recall to switch between the
channels.
@Menu
Key
Use this key with the ~/w
and
~/@ keys to adjust features of the
menu
system
(see
on-screen
pages 10-11).
@lMute
Key
Press once to turn off the volume.
Press again to restore.
NOTE: When using the audio out
jacks this key will not mute the
sound.
@VCR
Keys
These keys control
Fast Forward
( ➤F), Rewind (<<), Play, Record
(REC), Stop and Pause functions of
your VCR.
@Reset
Key
Press this key twice to restore
factory
settings.
The TV will
automatically start Channel Search
and clear all customized settings.
@
@Mode
Keys
Use these keys to program the
remote and to”select the ‘operating
mode (l”V/VCR, or CABLE).
@Video
Mode Key
Press to select program source: TV
or VIDEO (A/V input jacks). In
VCR mode, functions as TV/VCR
key on VCRs remote.
%%~’”$$%%.,
,..$@&
-$%!S$3*%
~~
*,~,
Sleep Key
Use thk key with the “O” key to set
the Sleep T~mer (see page 13).
@) Caption Key (See page 13.)
@
Display Key
Press once to display the Channel
number. Press twice to display the
continuous 1y.
channel
number
Press again to remove the display.
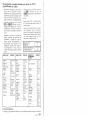
programming
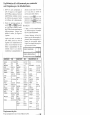
1.
2.
Remote
to Operate
Find your equipment’s
brand name
code in the chart below. After programming is confirmed write your
codes in the spaces on back of
remote contro] and below.
Press and hold ~
or (C~E)
key while entering the two-digit
--A- -<,
-L-. ,r-.
-. Pablo
U“uu
,, U,,LUCL
“, ,ra,,.
y“u L ll~l?
. . . . “L
“L.box. When you
release the key it
will flash 5 times.
After entering a code number check
the Power and Channel operations.
rf +Loso
A,mf14;Gn~
ALL,,Q
L LLL,
LL-L, ~peraie ~roper~y,
programming is completed. If not,
reprogram using another code, if
available. If you enter an incorrect
code number, repeat step 2.
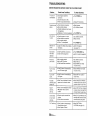
VCR BRAND NAME
CODE
ADMIRAL
,.
.20,21 .27,29,38
AIWA .....
....08.22
BROKSONIC .............20.21
CRAIG ..,.,,,.,.,..,., ........02.05 .07.31
CURTIS MATHES ..,...19,22,27
DAEWOO
...... .....04.37
EMERSON,,...,,,,.06,08,13,6,O8,I3,
14,20,21,22
FISHER ..,,,,,,.,..,,.., .....00.01.02,09,10
FUNAl .,..,., ,,.,...,..,,,.,,22
GE ............... .......... ...19.27 .33.39.40
GOLDSTAR .,..............08
HITACHI
.....03.22.33,39
J.C. PENNY ................03.05 .07.19.31
JVC
.........11 .12.28.33
KENWOOD ........ .. ....00.28 .33
MAGNAVOX
...... .18.19.26
MARTA
...08
MEMOREX
........00.02.05.07.08.
19,22,29,31
MITSUBISHI
............32.34.35.
36,41,42
M.WARD ........... .. ....02.03 .19.22.29
Replacing
VCR BRAND NAME
VCR
3.
and Cable
Press @key
to operate your VCR
or press ~CAB LEj key to operate
cable box.
NOTES:
There may be VCRs or cable boxes
that this remote cannot operate.
–
Some manufacturers
use different
types of remotes. If your brand has
several codes listed, repeat step z with
each number until vou find the correct
code.
VCR Code: [~1
L--i_.i
Cable Box
code:
CODE
MTC
.05,0722 ,31
NECK.,,...,..,..,. .............11.12 .28.33
ORION .... .......13.15
PANASONIC . ....... . ..16.17 .19
PHILCO .,.,,,..,.,.
., ,,,18,19,26
PHILIPS
18,19,26
PIONEER .,..,
,,.,,,.,26,28
PROSCAN
03,19,27,
33,39,40
QUASAR
,.....16.17 .19
RCA,. . .. ....... .... ....03.19.27.
33,39,40
REALISTIC
.00,05,07,08,
19,22,29,31
SAMSUNG .........
,,04,05,07,31
SANSUI
............28.33
SANYO
.
.00,01,02,09,10
SCOTT,.., .................04.20 .21
SEARS ........... ... ..,.00,02,03,08,19
SHARP
..............29.30
SONY . ............... . ...19.23 .24.25
SYLVANIA,., ......... .,.19 ,32
SYMPHONIC
.,.....22
TEAC ..........................22>23
TOSHIBA .... .... . .. .....04.32 .40
ZENITH
...23.24,38
l--L.-!
CABLE BOX BRAND NAME CODE
A8C
..14,15 ,16,
21.24
GEN INSTRUMENTS.
.13,14,15,
16,17,18,
19,20,25
HAMLIN
...............12.26 .27.28
JERROLD. .... . . ..... ....13.14.15.
16,17,18,
19,20,25
MACOM
. ...03
MEMOREX., ......... ....11
OAK
...... ...... .02.23.24
PANASONIC
....04.05,09
PARAGON
. ...........11
PIONEER
.....01.10
RCA
..04,05 ,09
REGAL
....06.26,27,28
SAMSUNG
.............01
SCI. ATLANTA
. . ........06.07>08
SIGNATURE
14,15,16
SPRUCER
.......... . . ....04.05 .09
STARCOM
............14.15 .16.17
18>19,20
STARGATE
14,15,16,17
18,19,20
TOCOM
............ ...21.22
TOSHIBA
. ............... ...00.11.17.
18,19,20
ZENITH.
., ...................00.11.17.
18,19,20
Batteries:
The programmed
BOX
codes must be reset after replacing batteries
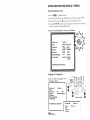
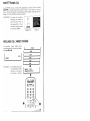
FEATURES
ON-SCREEN
Basic Operation
* Press (MENU) (see o below).
* Highlight the featuze (see @ below) using the ~/@
keys.
+ Change the selection (see@
keys.
* Steps @, @ and @
additional steps.
Preview
are for submenu
of On-Screen
AT
below) using the D / ~
Features
that reWi ‘c’
keys
Audio
$Stereo
Mono
Picture/Sound
~.sports
Movie
$
.9
Antenna
9Cable
VHF/UHF
~’
CH. Search
*NO
Start
CH. Scan Memory
c 34
Added
Menu Language
$English
Francais
I
and features
with Selections
-+
keys
adjustments
SAP
E.wanol
Adjusting the Picture/Sound
Follow numbered
instructions.
steps and on-screen
.
r
‘“\.
AT7 keys
Aucfio
~~@M~
/@IQum~
Antenna
CH. Search
– + keys
Sports
News
Movie
}~8moMaIl
CH. Scan Memory
Menu Language
\
t
AV
Press MENU key for adjustments
keys
Emkm’
Tint
Contrast
Brightness
- + keys
lllllllilk-=---
-
Resetting
the Antenna/Cable
Mock
and
Search
Channel
Resetting ~ tho
/ ~a~le
IVTO~.e or CH
(~halnrl~l)
search is required only if
...- ,A. .~+omm.
.. . ..- ,=
“1 b~e, such as, ~,oviRg to another city or having a
additional ch,anncls become ava~.a
cable service installed.
Adding
Or Deleting
Channels
%1 low nl.]rn.bered c~eps and
On-screen
instructions.
“c~ Qpr”s @E!!D
Step @ press
@or
@
to select Gil.
scamMemory
.
(J
MENU
$--=3
–+
AV keys
Audio
Picture/Sound
Antenna
CH. Search
MENU
keys
‘k-.
#J_/
G)
C 34
ccl.
%Xtml UllemloTy/
Menu
Language
Press
A
Added
key to exit
k
Step
@
Step @ select channel number
press
@
to select channel
number entry. For cable channels above
(example): CX!E5.
99, press and hold the 1 key until Cl-–
appears.
CH. Scan Memory
Menu Language
C WI
Select
AT,
Press
channel
MENU
using
Added
O-9 keys
key to exit
CH. Scan Memory
Menu Language
I
IHI*
Sek!dl
I
Press
mmmd
MENU
C @)5 Added
Wrhg
Av,
&~
kaya
key to exit
Step @ press @to select option:
Operating
mdlete.
* Deleted channels can bc selected
manually by using the numbered
Select channelUsingAW,O-9 keys
c
step
@
exit.
*
lips:
restore deleted channels, use i!w
on-screen menu to manually add
‘cyso’’theremote”
(Channel)
channels
or start CH.
Search from the menu.
To
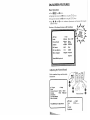
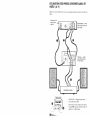
USING AUDIO/VIDEO
IN JACKS
Turn off TV and external equipment before connecting cables.
Back of VCR—
Audio (R/L) Jacks
and Video Out Jack
P
—
—
Jacks
and
Video
In Jack
J
Remote Control
VCR
:
@:,,,..y
,.,,.,..- m
X&Q
..,’
...?.”’&
TV CABLE
&,,, y~
‘p
‘s
NOTE: Mono VCR (Single Audio Jack)
Connect the audio from VCR output (@) to
TV’S left audio input jack.
@(
%\@
my
->
—
❑
CLOSED-CAPTIONING
is selected).
NOTE:
When captioning is turned on,
the channel display will not
-.
=.. “IL
. .. .l_.
.-.--OLCI~
LILC DLL
CCLL.
~,-i. ~~ke-e
displays to stay on the screen
you must set captioning
to
OFF.
Caption
SETTING
TIMER
THE SLEEP
I
c 34
SLEEP
I
I
3:00
J
!
2:30
I
I
2:00
I
1
1:30
1
I
NOTE:
Clear
1
The Sleep Timer will switch off the TV
automatically. Follow steps 6) and ~.
I
Text 112
l/2
1:00
Sleep
: 0:30
Use O key
The S[eep Timer cancels when
the TV is turned off or if a
power failure occurs.
Q.....-.
I
J
J
I
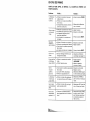
TROUBLESHOOTING
BEFORE REQUESTING
Problem:
TV turns
Check these Conditions:
off
o Check
automatically.
No picture,
SERVICE CHECK THE FOLLOWING
signal
(Cable/Ant.
CHART.
Try these Solutions:
)
. Press POWER
key,
connection,
poor
picture.
Poor color or
no color.
o
Check if sleep timer is ON.
●
Power
surge
protection
. Unplug TV momentarily.
feature,
Check antenna connections.
May be station trouble,
● Possible interference
from household appliance.
. Brightness or Contrast misadjusted.
o
●
●
●
Adjust antenna,
Try a different channel,
●
Press RESET key.
Check if program is in color,
Check antenna connections.
. May be station trouble,
● Color or Tint misadjusted.
. Try a different channel
. Adjust antenna,
●
●
Black box on
screen.
●
Blue Screen
with Video
. Check Audio/Video connections.
. Check external equipment,
●
Caption Text Mode without display
information.
Press RESET key.
. Switch off Captions
(see page 13).
. Press VIDEO MODE key.
●
Switch on external
equipment,
displayed
May be station trouble.
o May be MUTE function.
. Check Audio/Video connections.
No sound,
poor sound.
●
No TV stereo
sound.
●
. Try a different channel,
Adjust Volume.
. Select MONO from Audio
on-screen menu.
●
Check if station is broadcasting
true MTS stereo signal,
a
. Select STEREO from Audio
on-screen menu,
No TV SAP
sound.
. Check if station is broadcasting
SAP signal.
a
. Select SAP from audio onscreen menu,
No Cable
channels above
number 13,
. Cable Channel Indicator C should
appear next to channel number.
No UHF
channels,
●
Cable Channel Indicator C should
not appear next to channel
number,
. Select VHF/UHF from Antenna
on-screen menu; then start CH.
(channel) Search using menu.
●
●
●
Channel may be removed from
memory.
Check antenna connections,
Select CH. Scan Memory and
manually add channels or start
channel search using menu.
●
Check if station is broadcasting
●
Select CAPTION1 or
CAPTION2 (see page 13).
●
Closed-Caption signal.
Check Caption Channel.
VHF OK.
Cannot select
or scan some
channels.
No Captioning.
a
o
Select CABLE from Antenna
on-screen menu; then start CH,
(channel) Search using menu.
Problem:
Try these Solutions:
Check these Conditions:
Menu System
words seem
misspelled.
. Maybe a foreign language
selected.
is
~ Reselect your menu language
choice using the on-screen
menu.
, ,._.._..,__
UdiiGJIG>.
I
F?emoie
0 ~he~~
Control will
not work.
e Check if TV set is plugged in.
0 Press TV kev.
. Aim remote towards
Remote
.
D Re-enter
brand
(see
9).
control
Press
VCFI
or CAf3LE
.
L.,.++,.”:nUQ, LC, IG>,
Replace
I
front of
TV.
key.
will not operate
ij~~
and Cable
Box.
page
code
I
Cabinet makes
popping sound.
e This is a normal condition during
warm-up and cool down of the
plastic cabinet parts.
CARE AND CLEANING
The surface
of the cabinet
can be damaged
if not properly
common
household
aerosol sprays, cleaning agents,
will cause .~ermanent
damaze to the fine surface.
1. Unplug
2. Clean
the power cord before
the
cleaner
screen
with
a soft
cleaning
cloth
maintained.
solvents
Many
and polishes
the television.
dampened
with
glass
{
c
or warm water.
3. Clean the cabinet with a soft cloth dalmpened with a mild
household
detergent
and warm water.
Dry thoroughly
NOTE: NEVER spray liquids on the screen because they can
run down and drip onto the chassis. This may cause component failure not covered under Warranty.
o
lu~
LB
LISTED
e
~,
L._.
r
@
This symbot on the nameplate
means the product
is Listed by
Underwriters’ Laboratories Inc. it is designed and manufacture
to meet
rigid U. L. safety standards against risk of fire, casualty and electrical
hazards.
Instrucciones
de Manejo
INDICE
Las Caracteristicas del
menu en Pantalla . . . . . . . . . . ..22N23
Guia para el uso de este manual ., ., .16
Especificaciones .,, . . . . . . . . ..17 ..l7
Caracterkticas
Usando Ias Entradas de
Audio/Video (A/ V) . . . . . . . . .24....24
, . . . . . . . . . . . . . . ...17
Arreglos Basicos ... ,.. ,,, ,., . . . ..l8
Transmision Captada ., .,, ,, .,.,.,.25
Conexion Basica. , . . . . . . . . . . . . . ..l8
Ajustando el Cronometro de
Tiempopara Dormir . ...,.,,,.,,25
Panel decontrols Frontal . .,.,.,,..,19
Panel Posterior, ,, ., .,, ...,.,..,
.19
Solucion de problemas
Control Remoto Universal , . . . . ...19-21
Cuidado yMantenimiento
. . . . . . . 26-27
., . .,.,.,.27
GUIA PARA EL USO DE ESTE MANUAL
Los procedimientos de ajuste provistos
en este manual complemental
Ias
instrucciones
del menfi en pantalla,
Juntos prove6ndeuna
completa informacitm para Ios ajustes. Recuerde de
obsemaryseguirla sinstrucciones
de[rnenti
en pantalla, asi corno lee~ y usar este
manual.
La simbolos usados en este manual tiene
10S siguientes significados:
IIas
I
Circulos numerados
irrdican pasos.
LAS PALABRAS EN MAYUSCULAS
SIMBOLOS
RESALTALDOS,
O
indican 10S
botones presionados Para operar la TV,
por ejemplo; my ~i~.
representan
Botones
AY
AurQlfl@
LAS PALABRAS
Botones
Stereo
– +
Wt@m@
SAP
EN MAY@X’ULAS
I
o
S~MBOLOS indican el estado del ajust(’
de un control, por ejemplo; ON o OFF.
_
~
I%lalbR’aN3 lle]tieadl~
Ias funciones resaltadas en el menti.
Las Lin eas solidas representan
el primer
paso o prirnera
conexi6n.
ESPECIFICACKINES
~~ ~~p”q~~~~
rir
WE
, .
L-
DAml-rAl
.-,.
,--~-
I
nlr.n=~lclhkl
“1!.. -,.”.-,.
A
CM
-!. DDnFl
, . .. . ~,INlllll
.-.-r.- Ail
(Grnsnr)
,-. ---.,
19.8 puigadas (503mIM)
(Meciido Diagonaimente)
27-pulgadas
de pantalla
PESO (Lbs.) (APROKIMADO)
ENTRADA DE ANTENA
REQUERIMIENTOS
UHF/VHF/CATV 75Q
DE CONSUMO
73.1 (33.2 Kg.)
2 Tamaiio: 8 cm
BOCINAS
120VAC 60Hz
AMPLIFICADOR
POTENCIA
(Watts)
FRENTE
DiMSi@i&4
iiOFliZCW4TAL
26.1
iXvlENSIGN
Interconstruido con 1 W/canal
98 watts
(AfiChO)
pulgadas
(664mm)
VERTICAL (A!tura)
24.8 pulgadas (629mm)
ENTRADAS
Entrada
SALIDAS
DE AN
de Video
/ Entrada
de Audio
(R/L)
DE AUDIO
Salida de Audio Fijo (R/L)
(RCA Connectors)
CARACTERISTICAS
Menu Trilingue en Pantalla
Busqueda Automatic
de Canales
SINTONIZAC!ON
MTS sonido estereofonico/dbx@/
sonido SAP
Automatic
lmagen/Sonido
ajustes
AUTOMATICA
DE CANALES
Canales de VHF y Cable
CONTROL
para deportelclinelnoticia
REMOTO UNIVERSAL
Multimarcas:
Bajos/Agudos
Entradas de Audio/Video
CABLE/VCR/TV
Seleccion
por Teclas Numeradas
Btisqueda
de Canales
Salidas Fijas de Audio
Transmission Captada / QuickCap
Volumen
Control de Imagen Digital con
Enmudecimiento
desplegado en pantalla
Tonos de piel por ajuste Automatic
Encendido
Cronometro de Apagado
Reajuste de TV
Desplegado
Llamado de Canales
(3 hrs)
Reajuste
Menu
DE SINTONIZACION DE
181 CANALES
SISTEMA
Modos de Video
Cronometro
VHF Canales 2-13
UHF Canales
de Apagado
Transm ision Captada
14-69
Teclas para VCR
Cable (CATV) 1, 14-125
NOTAFRANQUICIADE CATV Las compafiicis de
Cable CCIInC wrvicios ptiblicos, >017 fra nqui cia~ otorautori clacics local,,. P2.rC]rwibir cl wrvic(c) dc
~rqyamas
de cable, cl consu)nid(x debt de sLlllscribirsc a la cotmpafi ia de cable.
gada.
dbx@
M una
marca regi$trada de Carill[~llElectronics c~~rp~~rati~n
q~
ARREGLOS
BASICOS
CONEXION BASICA
PANEL DE CONTROL FRONTAL
MENU V CHANNELA
-VOLUME+
POWHl
/
~TecIade Menti(Vea
~Aginas 22-23.) 1
PANEL POSTERIOR
r,
Conectores
de
Entrada
Audio /Video
Conecte aqui el equipo de video
externo,
Entrada de Terminal
Antena/Cable
de
Conectores de
Salidas de Audio (Fijo)
Conecte
aqui el equipo
externo.
CONTROL
de audio
I
REMOTO UNIVERSAL
Operar su TV, VCR y decodificador de Cable. Vea pagina 20 para teclas de fonciones
del control remoto. Para programar este control remoto vea pagina 21.
Instalaci6n
de Pilas (2 AA)
e
Los signos ~ y @ de Ias pilas deben de coincidir
con Ias marcas dentro de la caja del control remoto.
e
No mezclar bateri’as descargadas y con carga o
mezclar diferentes
ti~os de baterfas el mismo
tiempo.
o
Quite Ias pilas si el control remoto no sera usado por 80[&f”
m~s de un roes. Las pilas d~biles puden derramarse
y causar dafios al control remoto. (La viola normal de
*!
Ias pilas es de seis meses aproximadamente.)
\ltX~ lMJ’OR?ANT~:Las pilas usaclas o descargadas pueden ser recicladas o dcslwcharw correctam?nte de acuerdo a las Ieyes aplicablcs.
Para informaci6c IIICiS detallada, contacte a sus autoridades locales dc
dc<l>cdx>s s[jli do>.
h
\\
\\
v
e
%
->>
<e
‘L
‘ a ~,/
\..__:\
[
Teclas del Control Remoto
@TecLls
Nunleractas
Dos teclas deben de ser presionadas
para
seleccionar
un canal. Para canales de cabk~
100 al 125 presione y mantenga el 1 hasta
que el Cl –– aparezca.
@
@Tec~a deRECALL
Seleccione primero un canal; usando
las teclas numeradas para el para
Segundo
canal. Presione
RECALL
para hater e] cambio entre canales,
@
%:’ ‘eMENU
r
–@
ACH V
o
v
PLAY ----
-m
STOP
mm
-----
las
teclas
con
@/@
y
pi$ginas 22-23),
+
L_
DISPL,
s
con
~/@ para ajustar Ias funciones d~l
(vea
sistema de mend en pantalla
“o
@Tecla
de Enrnudecimiento
(MUTE)
Presione una vez para apagar el volumen
y presione nuevamente para restaurarlo.
NOTA: Cuando este usando las salidas
de audio, esta tecla no enmudecera en
sonido,
PAUSI
---
para VCR
@TecLx9
Estas teclas controlan el Avarice hacia
adelante ( ›~),
Rebobinado
(<<
),
Reproduction,
Grabaci6n, y la funciones
de Detener y Pausa de su VCR.
@Tecla
de RESET
Presione esta tecla para
ajustes de f~brica. La
autom&ticamente
la
can ales y borrara todos
sonages.
regreasar a 10s
TV inicializara
bisqueda
de
10S aj ustes per-
@TeclacleSLEEl?
Use esta tecla con el ‘(0” para activar el
Interruptor de Tiempo (vea p~gina 25).
@)Teclas de Modo
Use estas teclas
para programar el
control remoto y para seleccionar el
modo de operacitm (TU VCR o CABLE).
@Teclas
para e, Modo de Video
Presione para seleccionar la fuente de
programas: TV o Video (frente entradas
de A /V).
@Teclade
@
CAPTION
@’eap4gina
2.5)
Teclade131SE’LAY
Presione
una vez para desplegar
el
Nfimero del canal. Presione dos vecm
para que e] desplegado del apaeresca
continuamente,
Presione
nuevmente
eliminar el desplegado,
Programndo
d control mnoto
~ecod~ficador de cable
1
1.
pm
Cm,.<, anka,. l
AA-J...
3. 1- -------2. -LJLLLIGLLLLL GJ LUUI
U (,le Id llldlLd UC b(-1
8
3.
siguientes
Iisiacios.
Despu& de que la prcrgramaci6n este
confirmada, escriba sus c6digos en 10S
espacim
inferiors
localizados en 1a
parte posterior de el Control Remoto.
eCl”tiipG
e~L
10S
2B~{ZWWa
- CAg~E,
ADMIRAL
.... ... .20.21 .27.29.38
08,22
8ROKSONIC,,,
20,21
CRAIG
CURTIS
MATHES
DAEWOO
..,,
..,,. ,.
EMERSON
FUNAI
.,,,.
GE
.,,.,,,..
HITACHI
.,.,. .,
.18,19,26
,,, ..19,27,33,39,40
.,,,. ,,, ,.,.,..OO,28,33
,...
. ..18.19,26
..,,...,,, .,08
,. ,,
..00,02,05,07,08,
,. ,,,,,.,.,,.32 ,34,35,
36,41,42
M.WARO
18,19,26
PHILIPS
PIONEER
:
PROSCAN
..,,.,
..,,, . 02,03,19,22,29
ABC, ..,,.....
14,15,16.
.:.26,28
21,24
GEN INSTRUMENTS
13.14.15,
16,17,18,
19,20,25
HAMLIN
12,26,27,28
. 13,14,15.
JERROLD
,..........-03,19,27,
16,17,18.
33,39,40
..00,01,02,09,10
19,22,29,31
MITSUBISHI
13,15
ORION..
PHILCO .,,. ,,
04,37
.,,,,.:. -11,12,28,33
.,
.05.07 .22.31
MARCADE VCR
C6DIG0NO.
DECODFICADOR
DECABLE
11,12,28,33
19,20,25
QUASAR
16,17,19
MACOM
RCA
03>19,27,
MEMOREX
11
33,39,40
OAK.
02,2324
REALISTIC
,,,,
.00,05,07> 08,
19,22,29,31
03,05,07,19,31
MAGNAVOX,.
MEMOREX..
.
.19,22,27
,.,,,,,, ,,03,22,33,39
JVC
MARTA.
....
,.,
08
J C PENNY
KENWOOO
MTC.
.16,17,19
..22
GOLOSTAR
CODIGONO.
PANASONIC,.
14,20,21,22
.,,,,,.,.,.
Marca del Decodificador
de Cable Codigo No:
.02,05,07,31
....06.08,13,
FISHER
Marca de VCR
Codigo No:
MARCADEVCR
NEC.
Presione la Eecia cie ‘v’CR pdra uperar
su @’&& o presione ia tecia de
~m~para
operar w decodific.dor
de Cable.
pueden
– Algunos manufacturadores
usar diferentes
tipos de controles
remoto. Si la marca de su equipo, tienc
listados varies c6digos, repita el paso 2
con cada nfimero, hasta que Ud.
encuentre el c6digo correcto.
Despu&k de accesar un numero de
codigo confirme
[as funciones
de
Encendido y Canales, Si estas funciones operan adecuadamente,
la
programaci6n
esta completa. Si no
reprogram
usando otro c6digo, si
esta disponible.
Si Ud. accesa un
numero de codigo incorrect,
repita el
paso 2.
AlWA.
VCR. y
Puede haber VCR o Decodificadores
- de Cable que este control rcmoto no
pueda operar.
asi la tecla de
mientras accese ei
CODIGONO.
su
NOTAS:
codigo de dos digitos de su VCR o
decodificador de Cable. Cuando Ud.
suelte la tecla, esta debe de destellar 5
veces.
MARCADEVCR
operar
SAMSUNG
. ....04. 05.07
SANSUI
,..
SANYO...
SCOTT
.04,20,21
SAMSUNG
. 19,23,24,25
,..
SYMPHONIC
TEAC
., .,,
TOSHIBA
ZENITH
,,
04,05,09
.. .06.26,27 .28
01
SCI ATLANTA
06,07,08
SIGNATURE
..14,15,16
SPRUCER
04,05.09
19,32
STARCOM
22
18,19,20
,,,..14,15,16,17,
18,19,20
TOCOM ... . . ... . . . .
21,22
TOSH18A .,
.
00,11,17,
18,19,20
ZENITH
00,11,17,
.,,22,23
...,.
01,10
REGAL.
.29,30
SYLVANIA
11
PIONEER
RCA.
SHARP
.04,05,09
PARAGON
28,33
..,,,,,..,,00,02,0308,19
SONY...
PANASONIC
00,01,02,09,10
SEARS.
,03
.,,04,32,40
.23,24,38
STARGATE.
.14,15,16,17,
,, ,,.
18,1920
Cambio
de J3aterias:
El c6digo de programacid
debe de ser reajustado dcspu&
de cambiar Ias batcrias.
21
LAS CARACTERISTICAS
EN PANTALLA
Operation
DEL MENU
Basicos
@Ei@
e
Presi.ne
e
Resalte la funci6n (vea@abajo)
o
Cambiela
@
Pasos ~, 6 y @ son para ajustes de funci ones, en submemk
adicionales.
(v,.
O
.b.j.).
usandolosbotones
selection (vea@abajo)
Demostracion
@/@.
usandolosbotonesde
~/@.
que requieren pasos
de Ias Caracteristicas del Memi en Pantalla con Selecciones
Botones AV
Botones – +
Audio
lmagen/Sonido
9Stereo
$ O&r:
Mono
SAP
;$”a,
Antena
OCable
VHF/UHF
Lot. Canales
St
Buscar Canales
*NO
c 34
Menu Lenguaje
English
Anadido
Francais
$ Espanol
Use MENU para salirse
b.
<,.
, f,,~ ,.,.,,
,.,~,
.,”.,,,
,,.,
.,:,
,,,,
Ajustando la Imagen/Sonido
Siga 10S pasos numerados y las instrucciones en pantalla.
Botones AV
Audio
Rrmalgwmmlkb
Antena
Lot. Canales
Buscar Canales
Menu Lenguaje
Botones - +
I
Deporte
Cline
Noticia bMmIuI@
I Use MENU rxwa aiustar’
I
I
Botones AV
mow
Tinte
Botones - Q
!mRQm
------
I
Reaj~stando
Canales
la Antena/Modo
Reajustalldo
,Antena /IYfocio
de
de
de Cable y Btisqueda de
Cab]e
o
D.<.
Z...-J.
w
DU..[U.
~. de ~~~~]~~
solamente si se han agregen canales siendo disponibles
ciudad o instalando e: servicio de cable.
rwuicrc
como en el cambio de
Agregando/ Bowando Canales
Siga 10s paws nwmxwlos
ciones en pantalla.
Paso
@
y h
imtruc-
presione G@@
Paso Q presione
@
o @
para selech
Botones AV
Audio
imagen/Sonido
Antena
Lot. Canales
E3MSG~Ff&~akas
Menu Lenguaje
Botones - +
‘\--
C 34
Anadido
@
Use MENU para salirse
Control
Remoto
w
.
Paso @ presione @ para accesar e] canal
seleccionado.
Para canales arriba del
canal 99, presione y mantenga el boton
del ntimero 1 hasta que Cl –– aparezca.
Buscar Canales
Menu Lenguaje
C W
Paso @
(eiem~lo):
JL
Anadido
Seleccione canales con AV 00-9
1111$
~-. para seleccione la
c @s
MENU para salirse
Paso @ salirse.
Sugerencias
Q @5 Anadido
de 0peraci6n:
●
Los Canales Borrados pueden ser
seleccionados manualrnente, usando
10S botones numerados en el control
remoto.
●
Para restaurar 10S canales borrados
use las funciones
en pantal la y
agreguelos manual mente o initialize
la funci6n de Btisqueda de Canales
(Channel Search) usando el menii.
S%mMk7
Seleccione canales con AT 00-9
Use
Buscar Canales
Menu Lenguaje
Use MENU para salirse
opci6n : &flNMIO.
Buscar Canales
Menu Lenguaje
(205.
s@wxmmle Csml’ms cmn &v a @l-s
Use MENU para salirse
Paso @ presione
seleccione el ntimero del canal
USANDO LAS ENTRADAS DE AUDIO/VIDEO
Apague la TV y su equipo externo antes de conectar les cables.
Conecte
seiial
la
aqui,
vea pagina
VCR-con salidas
18.
de AN
Entradas
de
A/V en la TV
][
&=+”
#JD!O
OUTPUT
AJJ
.
Parte
. =
de estereo
q
Control
VCR
P
Remoto
TV
CABLE
NOTA: Monofonica
(Salida Unica de Audio)
Connecte la salida de audio a la entrada
izquierda (@) de audio de la TV.
~Zp\
m
“
@
La transrnisi6n
Captada es una versi6n escrita del programa de audio u otra inforen el control remoto para
maci6n desplegada en. la pantalla. Presione CAPTION
seleccionar NO, Captionl, Caption2, Textol, Texto2 o Quikcap (Est4 selecci6n provee
Transmisi6n
Captada mientras la funci6n de ENIWJDECIMIENTO
[MUTE] se
encuentra seleccionada),
NOTA:
Cuando la transmission captada
este activada, el desplegado del
canal no aparecer~ en la pantalla.
Para que estos desplegados esten
en la pantalla Ud. debe ajustar el
modo de apagado (NO) la
funci6n de caption.
‘d,
,, ~
,,/$+9
->
....,,
Caption l/2
AJUSTANDO EL CRONOMETRO
PARA DORMIR
(
1
El Cron6metro de Tiempo para Dormir
debe de apagar automaticamente
la
TV. Siga 10S pasos @ y@.
[
C34
Dorm.
0
NOTA:
El crondnometro de tiempo se
cancela
cuando
la TV se
a~awe u ocurra una falla en
el suministro e16ctrico
1“
,
>p~
1
\
I
\
Textol/2
DE TIEMPO
Cancel
)
3:00
J
2:30
J
2:00
J
1:30
)
1:00
Dorm. :0:30
Use tecla O
I
J
i
)
@
SOLLJCION DE PROBLEMAS
ANTES DE RECNJERIR SERVICIO VERIFIQLJE LA SIGUIENTE
Problems:
El
TV
se
Confirme Ias Siauientes Condiciones:
apaga
automaticamente.
No imagen o
imagen pobre.
Color pobre o
no color.
TABLA.
Trate estas Soluciones:
Cheque la conexion de sefial
(Cable / Antena).
Cheque si el cronometro para dormir
esta activado.
Funcion de protection contra
fallas de sumistro de energfa.
I Presione la tecla de POWER.
Cheque la conexion de antena.
La difusora de TV puede tener
problemas.
I Ajuste la antena.
I Trate un canal diferente.
Brillo y contraste mal ajustado.
Posible interferencia por electrodomesticos.
~ Presione la tecla de RESET.
Cheque que el programa sea en Color.
Cheque la conexion de la antena.
Color y tinte mal ajustado.
I Trate un canal diferente.
I Desenchufe
el TV por
un
memento.
I Ajuste la antena.
I Presione la tecla de RESET.
La difusora de TV puede tener
problemas.
Un cuadro negro
en la pantella.
Caption Modo Texto sin information
en la pantella.
I Seleccione NO “Captions”
(vea pagina 25).
Imagen Azul con
funcion de VIDEO
desplegado.
Cheque Ias conexiones de A/V.
Cheque equipo externo.
I Presione la tecla de
MODO VIDEO.
~ Encendiendo la equipo externo.
No
La difusora de TV puede tener
problemas.
Posible activation de la funcion de
enmudecimiento.
~ Trate
sonido
sonido
o
pobre.
Cheque Ias conexiones
de A/V.
No sonido o
Cheque si la estacion esta transmit-
estereofonico.
tiendo con verdadera
setial
un canal diferente.
I Ajuste el Volumen.
~ Seleccione MONO del menu en
~antalla Audio.
~ Seleccione STEREO del menu
en pantalla Audio.
estereofonica.
No sonido SAP.
Cheque si la estacion esta transmittiendo con verdadera
No
canales
de
Cable
o canales
arriba
del
nfimero
VHF
de
OK.
E Seleccione SAP del mend en
pantalla Audio.
El indicador de cable C debe de
aparecer junto al ntimero del canal.
B Seleccione CABLE del menu
en pantalla Antena: entonces
initialize la busqueda de canales (CH.Search) usando el menu.
El indicador de Cable C no debera
de aparecer junto al numero del
canal.
D Seleccione VHF/UHF del men~
en pantalla Antena: entonces
inicie la busqueda de canales
(CH.Search) usando el menu.
13.
No canales
UHF,
sehal SAP.
Confirme ias Siguientes Condiciones:
No puede
registrar
o seleccionar
algunos
s El canal puedeestar eliminadoen
la memoria,
. Cheque Iaconexionde antena.
canales
Trate estas Soiuciones:
o Seleccione en Iafuncionde
Buscar Canales en Memoria y
agregar Ios canales manualmente, o initialize Iafuncion
de Buscar Canales usando el
menu.
No Transmission
Captada.
. Cheque que Iadifusora transmita la
sefial de Transmision Captada,
● Cheque
Iatransmision
captadaen
el canal.
Palabras mal
deletreadas en
el Sistema de
Menu.
●
Posiblemente una Ienjuaje
extranjero este seleccionado.
e Seleccione
Caption2
Captionl
(vea
o Reseleccione
o
pagina
25).
el Ianguajede
su menu, usandoel
pantalla
menu en
. Cheque Iaspilas.
Cheque que la TVesteconectada.
● Presione lateclade
TV.
@ Reemplace Ias pilas,
Q Coloque el control remoto
frente al TV.
El Control
Remoto no el
VCR o la Caja
de Cable.
o Presione lasteclasde
CABLE.
. Re-instale el Codigo de Marca
(vea pagina 21 ).
El gabinete
hater sonidos,
●
El Control
Remoto
no funciona.
●
CUIDADOS
VCRo
Estacondicion
es normal duranteel
calentamiento y enfriamiento de Ias
partes de plastico del gabinete.
Y LIMPIEZA
La superficie del gabinete puede ser daiiada si no recibe un apropiado mantenimiento. Varies productos usados en el hogar como aerosoles, agentes de limpieza,
solventes y ceras pueden causar daiios en el terminado de la superficie del gabinete.
1. Desconecte
el cord6n de Potencia antes de Iimpiar el televisor.
2. Limpie lapantalla con un pafio suave humedecido
para vidrios o agua tibia.
con limpiador
NOTA: Nunca aplique liquidos en aerosol en la pantallar este puede
escu rrirse y gotear dentro del chassis. Este puede causar fal las en 10S
components
no cubi ertos por la garantia.
UL
@
LISTED
;%-
@
3. Limpie el gabinete con un paiio suave humedecido con detergente
suave para uso en e] hogar y agua tibia. Sequc perfectamente.
o
. ~
a
e
8
~&
Y
U.L. Este simbolo significa que este producto esta Iistado por Underwriters’
Laboratories Inc. Esta disefiado Y rnanufacturado para cumplir con Ios esttictos
estandares de LJL. Contra riewos de incendio, accidents Y riesgos electficos.
,
,.
““: ‘‘ “%??
:,’; >! ..; 4..
.,
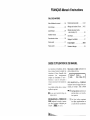
FRAN~AIS
TABLE
Manuel d’instructions
DES MAT[ERES
.28
Guide d’utilisation de ce manuel
.
Caracteristiques
. . . . . . . . . . . . . . . ...29
Installation
debase
.
..
.
Fiche technique
29
. . . . . . . . . . . . ...30
Raccordements
debase
. . . . . . . . . ...30
Panneau avant
. . . . . . . . . . . . . . . . . . .31
Panneau arriere
. . . . . . . . . . . . . . . . ..31
Telkomrnand
Affichage
euntverselle
desfonctions
. . . . ...31-33
~l’6cran
. ..34-35
Utilisation des prises d’entree
audio etvid60(A/V)
. . . . . . . . . ...36
Sous-titrage
R6gfagede
. . . . . . . . . . . . . . . . . . . . . 37
f’arr&diff6r6
Encastiepanne
Entretien
‘
. . . . . . . . . ...37
. . . . . . . . . ...38-39
etnettoyage
. . . . . . . . . . ...39
GUIDE D’UTILISATION DE CE MANUEL
Les instructions d’installation ddcrites
clans ce manuel viennent compldter les
instructions ~ l’6cran. Ensemble, elles
renseignements
des
constituent
complets sur l’installation. A reterzir :
Recke~chez et suivez les instructions d
[’{c~an 10YSde la lectwe ef de 1‘utilisation du
manuel.
Les symboles utilis6s clans ce manuel
signifient ce qui suit:
~
JDes mobs w m%ieff repr~sentent des
points sudigrv% du menu.
I
Awml
Touches – +
Stereo WWiI@I SAP
I
DES
MAJUSCULES
OU
SYMBOLES
indiquent l’etat ou Ie reglage d’une commande, par exemple : OUI ou NON.
zmUne
Le gros point nurm%otd indique Ies
&apes a suivre.
DES MAJUSCULES OU SYMBOLES EN
GRAS indiquent les touches ~ presser
pour faire fonctionner le t~leviseur, par
exemple : @@
et~f~
Touches AT
,,.
Iignepleine repr&entc une
premii%e &apeou un raccordement primaire.
,,~..,i,<,
“’”f@+~TRe
ligne
k?t&??e
repr&+ente
des @tapes supplementaires
ou
un autre choix de raccordement.
FICHE TECHNIQUE
——.
.—
PF40F0NDElJR
GRANDEUR DE L’ECRAN
27 pouces (en diagonale)
19,8 PO (503 mm)
ENTREE 13’ANTENNE
UHF/VHF/c~blodistribution
AIJMENTATION
(epaisseur)
CA de 120 V, 60 Hz
98 watts
PUISSANCE
73,1 (33,2
F’OIDS (lb) Environ
75 ohms
2de8cm
ENCEINTES
lnt6gr6, 1 W/canal
AMFILIFICATEUR
PRISES D’ENTREE
A/V
Entree video
Dlk!. HORIZONTALE (Iargeur)
26,1
Kg.)
pO
Entree audio (D/G)
(664 mm)
DIM. VERTICALE (hauteur)
24,8 PO (629 mm)
PRISES DE SORTIE
AUKW3
Sortie de Audio Fixes (D/G)
\
;ARACT~RISTIQUES
lenus
a I’ecran
Iecherche
SYNTONISATEUR A SYNTHETISEUR
DE FREQUENCIES CAPTANT JUSQU’A
multilingues
de canaux
automatique
avec
181 CANAIJX
effacement/ajout
VHF 2-13
Canaux UHF 14-69
Cable (CATV) 1, 14-125
Canaux
manuels
)@codeur de son stereo
(MTS/dbxMD)
signal
multi-canaux
audio
(SAP)
secondaire
iraves/aigues
leglages
automatiques
de I’image
et
du son pour Jeu/Film/Nouvelle
‘rises d’entree
audio/video
‘rises de sortie audio
Sous-titrage
TELkCOMMANDE
UNWERSELLE,
ECLAIRkE (te16viseur/magnetoscope/
cablodistritwtion)
Touches numeriques
Touche de volume
Touche de coupure du son
et mode QuikCap
Touche d’alimentation
Commandes numeriques pour I’image
avec affichage a I’ecran
Rappel du canal
Reglage automatique
naturelle
Touche d’arr6t differe
Arr& diff&-@ (jusqu’a
de couleur
Rappel de I’affichage
Mise hors circuit automatique
3 heures)
Remise a I’@tat initial du tel~couleur
Remise a I’etat initial du telecouleur
Touche de Menu
Touche de Mode video
SYNTHk’TISEUR DE FRl%NJENCES
Canaux VHF et Cable
Touche de sous-titrage
Touches de magnetoscope
INSTALLATION
RACCORDEIWIENTS DE BASE
j$i$i<.
Antenne exterieure
Cable
~“
Antenne
par:abolique
%“
m
=:.-,
(Q
C~bloconvertisseur
REMARQUE:
Le t~ldcou Ieur se met
automatiquement
hors
circuil
au
bout de 15 minutes si aucun signal
n’est re~u. En mode vid60, cckte
caract&istique
ne se produit pas.
(Voyez page 36pourlcs
raccordements A/ V.)
PANNEAU AVANT
MENU
V CHANNEL A
..-.
- VL!LUh’i~ +
FW”WER
PANNEAU ARRIERE
\
~~
Raccordez ici un appareil vid40
IPrise d’antenne/de cable
(UHF/VHF/CATV)
I
1’
Raccordez ici un appareil audio
~
[
J[
[~
AUDID OUTPUT
J.
1
TELECOMMANDE
UNIVERSELLE
Fait fonctionner le te16viseur, ma~nstoscope ou c~bloconvertisseur. Pour les touches
de fonction de la t~ldcommande~ voyez ia page 32. Pour la programmation de la
t~lecommande, voyez la page 33.
Insertion
des piles (2 AA)
Faites correspondre les polarit6s
l’int6rieur de la te14commande.
~
Ne melangez pas de vieilles piles avec des
neuves; ne mc$langez pas non plus diff~rents
types de piles.
Retirez les piles de la t616commande si vous
pr6voyez ne pas l’uti Iiser pendant un mois ou
plus. Des piles faibles peuvent fuir et endomlmager la tc!ldcommande. (La durde norlmale
cf’une pile est d’environ six mois.)
L
REIVf AR~LJE
dlimim+,s
~euiilc.,
IMPORIAN’rE
d>UIW
mani<. re qui
i(>i17drc
[es ,~utoritds
: [k
piles
est co11fon12c
Iocalcs
usag4es
ou
ci+clwrg&3
aLIX Jois applicabks.
m? matitvv
d’elimination
Pot!r
des
doivcnt
plus
ttrc
de d@tails,
ddchcts
soiid es.
Touches de la t616commande
.--— .--— —--- .
$~
.——
—
--——
——
.-—
@
–-a
–c)
–@
@Tcmchede
dun
canal
S@Iectionnez un canal, puis sdlrc[ionnrzen un autre au moyen c{(, Itluclles
numiiriques.
Pressez Recall pour passer d‘i1t) (.I tn,ll h
I’autre.
@Touche
de programmation (MENU)
Utilisez cette touche avec I(,; f(~uches
@/0
et D/@ pour pro~ri,l),l,cv Ies
fonctions du syst?me de men, is ;i l’~crm
(voyez pages 34-35).
@Touches
–(I
rappel
(RECALL)
de cor.qxme du SOI,(MUTE)
une fois pour COLI
p~,r k, son.
Appuyez de nouveau sur 1a tL)LIcl IL) pc)ur
r4tabtir le niveau du volume.
REMARQUE : Lorsque vous ulili*.(,~ Ies
prises de sortie audio, cette toucllr ne
coupera pas le son.
Pressez
@Touches
de rnagn6toscop,
(VCR)
Ces touches commandant 1(.!. I,)ll(tii}ils
--J
(iJTmlches
de mock
Utilisez ces touches pour programmer la
t414commande et pour s+lectionner le
mode
de
fonctionnement
:
TV
(tel&iseur),
VCR (magn6toscope)
ou
CABLE (c~bloconvertisseur).
@Touche
de mode
vid6
(VIDEO MODE)
Pressez pour sc!lectionner
la source
d’entree : TV ou VIDEO (prises d’entrc!e
A/V). En mode VCR, elle s’utilise
comme touche TV/ VCR sur la t6lecommande du magn~toscope.
@Touches
nwdriques
11 faut presser deux chiffres pour selectionner
un
canal.
Canaux
de
c~blodistribution
100 21 125, pressez la
touche I et gardez-la enfonc6e jusqu’~ ce
que I’indication 1-- apparaisse. Entrez
ensuite les deux autres chiffres.
du
magn&oscope
: avanlt,
t ii 1~i,le,
rebobinage,
lecture,
enregistrt,l I l{,llt,
arr& et pause,
@Tcmche
de remise
(RESET)
i 16tat
initial
pressez deux fois cette t[)ll(ll{
pour
remettre
1e t61eviseur
au x r+fila]; rs
effectu& en usine. Le tt$k%i+mur mmmence automatiquement
la Wchv rche
de canaux et efface tous Ies rf~logw
personnalist%.
@Touched’.mri2tc
liff6r6 (SLEI{IJ)
Utilisez cette touche avec Iii tfli[{ Ii{, O
pour r6gler la minuterie d’arre[ (1ifldr~
(voyez page 37).
@) Touche de sous-titmge (CAP’! ’ION)
(Voyez page 37.)
@Touche
de rappel de
(DISPLAY)
Iaffkhagc
Pressez une fois pour affichcr IV nl(II] $ro
du canal. Pressez deux fois p~)(11-,Illi<]lcr
de fagon permanence
Ie nil nldr( ) d u
canal. Pressez de nouveau pt~(it ~f[ acer
I’affichage.
Programmation de la t616commande pour commander
Votre magn6toscope et la c~blodistribution
1. Trouvez [e code correspondent
au
nom de marque de votre appareil
clans Ie tableau ci-dessous. Une fois la
programmation
confirm~e, inscrivez
les codes clans les espaces ii l’arri&e
et en-dessous de la tWcommande.
2.
Pressez et maintenez
en foncke la
tou che ~
ou (C=E)
pendant
qu e vous entrez le num@ro de code a
deux chiffres de votre magn&oscope ou
c2bloconvertisseu
r. Lorsque
vous
re]~chez la toucher e]le clignote a
5 reprises.
Apr& avoir entr~ un num&o de
code, vdrifiez la mise en circuit de
l’appareil et le fonctionnement
des
canaux. Si ceci fonctionne saris probl?me, la programmation
est alors
termin~e.
Dans Ie cas contraire,
recommence
la programm ation en
uti Iisant un autre code s’ii en existe
un. Si vous entrez un num&o
de
code incorrect,
3.
I’etape
2.
Pressez la touche m
pour faire
fonctionner votre rnagn&oscope ou
pressez la touche@~Ejpour
faire
fonctionner
le cilbloconvertisseur.
REMARQUES
–
rep&ez
:
11 peut y avoir des rnagndtoscopes
ou cilbloconverti sseurs incompatibles avec cette t~l~commande.
— Certains
fabricants
utilisent
diff6rents types de t@lecommandes. Si
plusieurs codes correspondent 5 la
marque de votre appareil, rdp~tez
l’&ape 2 avec chaque code jusqu’a ce
que vous trouviez Ie bon.
Code du cabloconvertisseur
:
=
MAGNETOSCOPE CODE
MAGNETOSCOPE COOE
ABLOCOMvERTISSEUR
coDE
ABC...
14,15,16,21,24
MTC ...,............05
.07.22.31
NEC ......
..........11
.12.28.33 GEN.
INSTRUMENTS.........13,14,15.16,
BROKSONIC
. ... ... .. .....20.21
ORION.....................13.15
17,18,19,20,25
CRAIG .,..
.. ...........02.05
.07.31
PANASONIC ...........16.17
.19
HAMLIN
......12.26
.27.28
CURTIS MATHES ......19.22
.27
PHILCO .............. ...18.19
.26
JERROLO ................13.14.15.16.
DAEWOO .,,
............ ...04.37
PHILIPS
..18,19
,26
17,18,19,20,25
EMERSON ..................
O6.O8.I3.
PIONEER...................26.28
MACOM
...............03
PROSCAN
..............03.19.27.
14,20,21,22
MEMOREX ..............11
FISHER,..,..,,,.,..,
.....00.01.02,09,10
33)39,40
OAK ....
.02,23
,24
FUNAl,.
,22
QUASAR ..................16.17
.19
PANASONIC ............04.05
.09
GE. .,.,
...,.
...............19.27
.33.39.40 RCA .........................03.19.27.
PARAGON ................11
GOLDSTAR ,...,
...........08
33,39,40
HITACHI...................03.22
.33.39
REALISTIC
.........00.05.07.08.PIONEER.................01.10
.04,05
,09
J.C.PENNY
..,.,.,
......03.05,07,19,31
19,22,29,31 RCA ............
REGAL
.........06.26
>27.28
JVC.,,.,,,..,..,
..............ll.l
2.28.33
SAMSUNG, .............. .04,05
,07,31
KENWOOD ,..,,.,..,,....00,28,33
SAMSUNG ...... ......01
SANSUI .................28.33
.08
MAGNAVOX ..,..,.,..,...18,19,26
SANYO ....................00.01
.02.09.10 SC!.ATLANTA... ......06.07
SIGNATURE.............14.15.16
MARTA ..................08
SCOTT.....................04.20
.21
MEMOREX ...............00.02.05.07.08.
.09
SEARS.... ................00.02
.03.08.19 SPRUCER ................04.05
STARCOM.
...14.15,16,17,
SHARP
............29.30
19,22,29,31
MITSUBISHI.,,..,
........32.34.35.
18,19,20
SONY ......................19.23
.24.25
STARGATE
..........14.15.16.17.
SYLVANIA.................
I9.32
36,41,42
M.WARO. ..,..,.,,,.,.,,02,03.19,22,29
18,19,20
SYMPHONIC ..............22
TOCOM .........
.....21.22
TEAC ..........................22.23
TOSHIBA.................00.11.17.
TOSHIBA...................04,32
,40
18,19,20
ZENITH....................23.24
.38
ZENITH
00,11,17,
18,19,20
ADMIRAL
.. ...20.21.27,29,38
AIWA,, . . ... ... .. . . .. ... .. ..,.08 ,22
Replacement
ctes piles :
—,
AFFICHAGE
Fonctionnement
Pressez (~U)
DES FONCTIONS A L’ECRAN
de base
(voyez O ci-dessous).
Accentuez la caract&-istique (voyez @ ci-dessous) & I’aide des touches @/@.
Changez la s61ection (voyez @ ci-dessous)
a I’aide
d=
touches
~ / @.
Les @tapes0, @ et @ s’utilisent pour le reglage de sous-menus
tiques qui exigent des &apes supp16mentaires.
Aper$u
des caracti%istiques
et les ca r;lc&ris-
ii l’6cran avec selections
Y
Touches – +
W3tereo
Jeu
Nouvelle
Mono SAP
A
Film
Manuel
Prss MENU pour sortir du menu
R6glage de l’image/son
Suivez les dtapes numt%otdes
instructions k 1’6cran.
et les
,
f
Touches - +
Audio
Film
Jeu
Bmagw son
Nowe\le WkIm@
Anienne
Recherche
Memoire Balayage
Langue Menu
~a;g~.~,
, - -,-
Touches AV
o
,0,---““”’
;;4<:,
~:t, :,.;
‘;e,:co:mande
.---.
\
~
fp:’1
‘(
\
, l,)
,@
@
Touches - +
Prss MENU pour ajustement
‘.:
=
@
citblodistri-bu tion.
Effacement/ajout
de canaux
Suivez les @tapes num&ot6es
instructions b l’6cran.
et Ies
Etape @ pressez la touche (=).
Etape
@ pressez la touche
pour sdectionner
@
ou @
N@lirimim Bt~l&y/8tg@
+
Touches - +
AV
Audio
lrnage/Son
Antenne
Recherche
C 34
Ajoute
Mfwmobe Ekaoayage
Langue Menu
Touches
‘-x-.
G)
Prss MENU pour sortir du menu
d
,
Etape @ pressez @ pour sdectionner
un num~ro de canal. Pour les canaux de
la
c&rlodistribution
au-dessus
de
@
s~lectionnez
un num~ro de
canal (par exemple : (XS).
Etape
99,
pressez et maintenez enfonc~e la touche
1 jusqu’~ ce que C 1-- apparaisse.
Recherche
Langue Menu
Choisir canal avec AY
C WI
Ajoute
I
Recherche
Langue Menu
G 05
Ajoute
1111+
ou 0.9
Prss MENU pour sortir du menu
cmwr Mm51n6N?@c2Av
@ml0-9
Prss MENU pour sortir du menu
#
\
EtaPe
@ pressez la touche
+lectionner
I’option
Recherche
Langue Menu
@
Enhf’nb
Choisir canal avec AY ou O-9
Prss MENU pour sortir du menu
Etape
@ sortez.
pour
: Hi~hil@.
e 05
I
Conseils
de fonctionnement:
Les canaux elimin~s peuvent dtre
s~lectionn~s manuellement 5 l’aide
des touches num&-iques de la tel6commande.
Pour r+tablir des canaux 61imin&,
utilisez Ie menu .5I’dcran pour ajouter
manuellement des canaux ou conl mencer la recherche de canaux 5
I’aide du menu,
UTILISATION DES PRISES D’ENTREE AUDIO ET
VIDEO (A/V)
Mettez hors circuit Ie t@l&iseur ou tout autre appareil externe avant de raccorcier les
cables.
RaccorcIez ici Ie
Televiseur — prises
audio (D/G) et prise
d’entree video
Telecommande
VCR
TV
CABLE
{I:- ~~~~~~E*,T
@~
.......-.-+~ T
m
,,+
~,,,
.J,
.T
q
..,’~~ V&ta
&\@
,.-,’
\
..............
=.
REMARQUE : Magn6toscope
(une seule prise audio)
mono
Raccordez la sortie audio sur le magn6toscope (Q) a la prise d’entr~e audio de
gauche sur le t~l~couleur.
SOUS-TITRAGE
(CC)
Les sous-titres sent une version @trite apparaissant A I“@cran. Pressez la touche
Captior12,
CAPTION Sur la t&clcommande pour choisir -le mode : NCIN,,, Ca~tionl,
TexteI, Texte2 ~IJ Qu-ikcaP (Le mode QUikQp
perrnet
d’utiliser k fonction de soustitrage Si la touche MUTE [sourdine]
REMARQUE
: En
mode
l’affichage
de
est pre&ee).
)
sous-titres,
du num6ro
F:JJ
r-.,
\;
de
canal est annul@. Pour le
faire apparaftre a l’ecran,
,,[:
vous devez r6gler le mode
de sous-titres
.
n
5 NON.
J
Captionl
REGLAGE
c 34
Somm.
1
1
(
L
1
—.——_
/ 2
Textel / 2
DE L’ARRET DIFFERk
La minuterie
d’arr&
diff6re
&eint
au tomatiquement le tc%+couleur. Suivez
les 6tapes 0 et 9.
REMARQUE
~
: L’arr& differ~ s’annule si
vous debranchez le teldcouleur ou si une panne
de courant se produit.
I
Annuler
!
3:00
2:30
2:00
1:30
Somm. : 0:30
Appuyer touche O
J
J
J
J
I
EN CAS DE PANNE
AVANT DE FAIRE APPEL
AU SERVICE
A LA CLIENTELE,
VERIFIEZ
LES
POINTS SUIVANTS.
Probleme :
Le telecouleur
s’eteint de
lui-m6me.
Aucune image
ou mauvaise
image.
Mauvaises
couleurs ou
aucune couleur.
Verifiez :
Essayez :
Verifiez Ie raccordementdu
signal
(cable/antenne).
. Verifiez si la minuterie d’arret differe
est en circuit.
● Le dispositif de protection contre Ies
surtensions a ete active.
●
Verifiez Ies raccordements de I’antenne.
. Le probleme peut provenirde Ia station.
. Lesappareils menagers peuvent
causer des interferences.
● La Iuminositb ou Ie contraste sent
mal regles.
●
●
●
●
●
Verifiez si I’emission est en couleurs.
Verifiez Ies raccordementsde I’antenne.
Ii peuts’agird’un
probleme provenant
de la station,
Lacouleurou Iateintesont malreglees.
●
Service d’affichage detexte
renseignement affiche),
L’ecran est bieu
et I’affichage
indique VIDEO,
●
Verifiez Ies raccordements
video.
Verifiez I’appareil externe.
Son de
Ilpeuts’agir
d’unprobleme
provenant
de la station.
. La touche MUTE a .Wpressee.
● Verifiez Ies raccordements
A/V.
Carre
noir
a
I’ecran.
mauvaise
qualiteou
aucun
son,
●
(aucun
audioet
●
. Pressez Iatouche
●
POWER.
Debranchez Ietelecouleur
pour un moment,
● Reglez I’antenne.
. Essayez un autre canal.
RESET.
●
Pressez Iatouche
●
●
Essayez un autre canal.
Reglez I’antenne,
●
Pressez Iatouche
●
D&activez Iafonction de
sous-titrage (voyez page 37).
RESET.
Pressezlatouche
VIDEO MODE,
c Mettez Ies appareils
externes en circuit.
●
●
●
●
Essayez un autre canal,
Reglezle volume.
Selectionnez MONO A partir
du menu a I’ecran pour ~audio.
Le telecouleur
ne donne pas
un son stereo.
●
Verifiez si la station offre reellement
un signal multi-canaux (MTS) stereo.
●
Selectionnez STEREO A
partir du menu a I’ecran pour
I’audio.
Aucun signal
audio secondaire
(SAP).
●
Verifiez si Ia station offre un signal
audio secondaire (SAP),
●
Selectionnez SAP A.partir dL
menu a I’ecran pour I’audio.
Aucun canal
cablodistribue
superieur a 13.
●
L’indicateur dec&blodistribution
C
devrait appara~tre avec Ie numero du
canal.
●
Selectionnez I’option CABLE
a partir du menu a l’ecran
pour I’antenne; puis activez
la recherche de canaux a
I’aide du menu.
probieme
:
Verifiez :
~
,Au~~n canal
Impossible
Aucu
(C)
e Le canal peut &re efface de la
memoire.
● Vetifiez Ies raccordements de
I’antenne.
de
ou
de balayer
certains
Essayez :
dec~.hlndistfihu?i~n
canaux.
n
●
sous-titre.
●
Les roots des
menus semblent
mal epeles.
●
e Selectionnez M6moire
balayage et ajoutez manuelIement des canaux ou commencezlarecherche
de
canauxa
I’aide du menu.
Selectionnez I’option
CAPTION1 OU CAPT10N2
(voyez page 37).
Lechoix de Iangue est peut-dre
mal selectionne.
* Selectionnez de nouveau la
Iangue des menus a I’aide du
menu a I’ecran.
Verifiez Ies piles.
. Vetifiez si Ie telecouleur est branche.
. Pressez la touche TV.
Impossible
d’utiliser Ie magnetoscope ou
Ie c~bloconvertisseur avec la
telecommande.
. Pressez la touche VCR ou
CABLE.
Le bo~tier emet
des bruits sees.
●
e Remplacez Ies piles.
. Pointez la telecommande
Ie devant du telecouleur.
. Entrez de nouveau Ie code
correspondent au nom de
marque (voyez page 33).
ET NETTOYAGE
peut s’endommager
si vous ne la nettoyez
pas de faqon
De nombreuses bombes aerosols et de nombreux agents de nettoyage,
produits de polissage domestiques peuvent causer
a la surface.
Ie cordon
d’alimentation
avant
de nettoyer
Ie
t616couleur.
Nettoyez
vers
C’est un phenomene normal durant Ie rechauffement et
Ie refroidissement des pieces en plastique du bo~tier.
du boitier
1. D&ranchez
2.
l’nntinn\j~F/~HF
-r .,-,,
apartirdu
menu a I’ecran pour
I’antenne;
puis a.ctivez la.
.— ..recherchedecanaux
al’aide
du menu.
●
●
ENTRETIEN
~~!~C~~QRn~~
Verifiez si I’emission est diffusee
avec des sous-titres.
Verifiez Ie canal de sous-titrage.
La telecommande ne
fonctionne pas.
La surface
..
approprlee.
solvants et
permanents
=
ne devrait pas appara~tre avec Ie
n~rn.sro ~~ ~~n~[.
UHF; canal VHF
O.K.
selectionner
bin~icateur
l’~cran
avec
un linge
doux
humect6
d’un nettoyant
pour verre ou d’eau ti?de.
3. Nettoyez le boftier avec un Iinge doux humectd d’un detergent
domestique doux et d’eau ti@de, puis s~chez-le compl~tement.
JAMAIS
de liquides sur i’~cran car ils
REAIARQUE : NE vaporisez
peuvent couler et d6gouliner ~ I’interieur du ch%sis. Ceci peut
entrafner des dornmages qui ne sent pas couverts par la garantie.
For
iissista~c~
and
information
call tolj free I-80D-BUY-AIWA
(United
Printed in U.S.A.
States
AIWA CO.,LTll
and
Puerto
Rico)
88-JBA-901
-01
980305ATN-YX