1
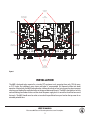
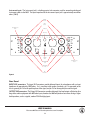
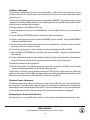
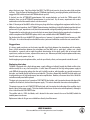
USER’S MANUAL
SERIOUSLY!
Read this entire manual before plugging in and turning on the M63, or removing the top cover.
Refer servicing to qualified personnel only!
To prevent electric shock, do not operate the M63 near water or moisture!
E L E C T R O N AU T C O M PA N Y
Helvetica neue condensed black
tracked like crazy, like 400 or something.
Usual logo is without concentric circles.
Website has the concentric circles.
USER’S MANUAL
Electronaut M63 Vacuum Tube Microphone/Instrument Preamplifier
1
ELE C T R O NAUT COMPANY
Helvetica neue condensed black
tracked like crazy, like 400 or something.
Usual logo is without concentric circles.
Website has the concentric circles.
USER’S MANUAL
Electronaut M63 Vacuum Tube Microphone/Instrument Preamplifier
2
TABLE OF CONTENTS
CONTACT INFORMATION
4
CE DECLARATION OF CONFORMITY
5
INTRODUCTION
6
INITIAL INSPECTION
6
INSTALLATION
7
MAINS CONNECTIONS
8
OPERATION NOTES
8
FRONT PANEL
8
REAR PANEL
9
INTERNAL SETTINGS AND ADJUSTMENTS
10
CONFIGURING THE M63 FOR 115 OR 230 VOLT OPERATION
10
VU METER CALIBRATION
11
PHANTOM POWER ADJUSTMENT
11
CONFIGURING THE GROUND LIFT SWITCHES
11
OPERATION
12
POWERING UP THE M63
12
SETTING THE GAIN
12
SUGGESTIONS
13
REPLACING THE TUBES
13
REPLACING THE FUSE
14
REPLACING THE PILOT LAMP BULB
14
REPLACING THE VU METER BULBS
14
A NOTE ABOUT POWERING DOWN THE M63 WHEN THE PAD IS ON
14
WARRANTY & REGISTRATION
15
SERVICING
15
SPECIFICATIONS
16
E L E C T R O N AU T C O M PA N Y
Helvetica neue condensed black
tracked like crazy, like 400 or something.
Usual logo is without concentric circles.
Website has the concentric circles.
USER’S MANUAL
Electronaut M63 Vacuum Tube Microphone/Instrument Preamplifier
3
CONTACT INFORMATION
Electronaut Company
333 N Oakley Blvd
Suite #100
Chicago, IL 60612
U.S.A.
[email protected]
(312) 212-3983
All information provided in this manual is thought to be accurate and free of errors at the time of printing;
however, Electronaut Company shall not be held liable for any errors or omissions in this manual, nor any
subsequent damage resulting from the use of the information in this manual. This manual and any future
updates can be downloaded from the Electronaut website, at:
www.electronaut.info/manuals/
This user’s manual contains information protected by copyright. No part of this manual may be
reproduced in any form without prior written consent from Electronaut Company.
© 2002-2012 Electronaut Company
M63_UsersManual.pdf
Revision 5, February 2012
ELE C T R O NAUT COMPANY
Helvetica neue condensed black
tracked like crazy, like 400 or something.
Usual logo is without concentric circles.
Website has the concentric circles.
USER’S MANUAL
Electronaut M63 Vacuum Tube Microphone/Instrument Preamplifier
4
CONFORMITY
Name of Manufacturer: Electronaut Company
Address of Manufacturer: 333 N. Oakley Blvd
Chicago, IL 60612
U.S.A.
Product: M63 Vacuum Tube Microphone & Instrument Preamplifier
Declaration: The product described above complies with the requirements of the Low
Voltage Directive (73/23/EEC) and the protection requirements of the EMC
Directive (89/336/EEC) issued by the Commission of the European Community.
Compliance with these directives implies conformity to the following
European Standards:
EN 60065:1993 S
afety requirements for mains operated electronic and related apparatus for
house hold and similar general use
EN 55103-1:1997Electromagnetic compatibility - Product family standard for audio, video,
audiovisual and entertainment lighting control apparatus for professional use
(emissions - environmental categories E1 to E5)
EN 55103-2:1997Electromagnetic compatibility - Product family standard for audio, video,
audiovisual and entertainment lighting control apparatus for professional use
(immunity - environmental categories E1 to E5)
The M63 Microphone and Instrument Preamplifier is also made with entirely lead-free components and is assembled with lead-free solder. The M63 conforms to the RoHS Directive.
E L E C T R O N AU T C O M PA N Y
Helvetica neue condensed black
tracked like crazy, like 400 or something.
Usual logo is without concentric circles.
Website has the concentric circles.
USER’S MANUAL
Electronaut M63 Vacuum Tube Microphone/Instrument Preamplifier
5
INTRODUCTION
First of all, THANK YOU for adding the M63 Microphone and Instrument Amplifier to your recording system.
This preamplifier has been through close to a dozen incarnations since the orginal prototype was first built back
in 1999, and every version along the way improved upon some aspect of the previous one. A lot of obstacles have
been overcome and a lot of unexpected skills have been learned and mastered in order to produce this final design,
and I sincerely hope that you will enjoy the sound and performance of this preamplifier as much as I do, and for
many, many years to come. Thanks!
Rob Roy M. Campbell
ELECTRONAUT COMPANY
Initial inspection
The box and/or case includes three items: The M63 preamplifier, the User’s Manual, and the Line Cord. Check the
packaging to be sure you have everything.
Electronaut recommends that the M63 be inspected before use. To inspect the M63, remove the top cover and
make sure that all five tubes are properly seated in the tube sockets, to make sure nothing became loosened
during shipping. Check the four amplifier tubes and the rectifier tube.
This is a good time to get familiar with the inside of the M63. Using Figure 1 as a reference, locate the following:
• Meter calibration potentiometers – See page 11 for instructions on how to calibrate the VU meters to the
reference level of your choice.
• VU meter bulbs – See page 14 for instructions on replacing the VU meter bulbs.
• Pilot Lamp – There is no reason to pay any attention to the lamp socket since the bulb is accessed from the
front panel of the M63, but it might be worthwhile to take note of the type of base the pilot bulb has so that
you know what to expect when you remove and replace the bulb eventually. See page page 14 for instructions
on replacing the pilot lamp bulb.
• AC Mains Voltage Select Switch – See page 10 for instructions on configuring the AC MAINS voltage setting.
• Phantom Power Voltage Calibration Potentiometer
• Ground Lift Switches – See page 11 for instructions on configuring the various ground connection alternatives.
hen the inspection is complete, put the cover back on. Do not tighten the top cover screws with a screwdriver
W
until all the screws have been inserted and lightly tightened by hand. Do not over-tighten the screws.
ELE C T R O NAUT COMPANY
Helvetica neue condensed black
tracked like crazy, like 400 or something.
Usual logo is without concentric circles.
Website has the concentric circles.
USER’S MANUAL
Electronaut M63 Vacuum Tube Microphone/Instrument Preamplifier
6
Ground Lift
Switches
Phantom Power
Voltage Adjuster
L i n e
R i g h t
O u t p u t
M i c
R i g h t
C 1 6
C 3
0 V
R 3
D 1
D 1
R 4
R 6
R
R I G H T
D 1
R 7
C 4
M C
1 2 V D C
P O W E R
L I N E
V O L T A G E
T L 0 7 2
R 2 4
M C
C 5
R 2 3
R 2 0
C 9
R 1 9
C 1 0
R 2 2
R 2 1
C 1 0
C 9
R 2 1
R 2 2
D 5
R 1 9
R 2 3
R 2 0
D 5
C 1 1
R 2 4
H e a d e r - 1 2
C 4
C 1 1
T L 0 7 2
C 1
R 1 3
R 1 2
R 1 4
C 8
C 3
H e a d e r - 1 2
R 1 5
C 1 4
1 2 A Y 7
R 2 8
C 1 0
Q 2
C 8
C 3
C 5
R 1 1
R 2 6
C 9
D 5
R 6
R 2 8
1 2 A U 7
C 1 5
R 2 7
R 1 3
C 1 2
R 1 4
C 6
Q 1
C 1 4
R 1 6
C 1
R 2 6
C 1 2
R 1 2
R 1 6
C 1 5
R 1 8
R 2 7
R 9
R 1 5
R 1 0
1 2 A U 7
D 8
D 6
T C
R 8
D 3
R 5
Q 4
1 2 A Y 7
R 1 0
C 1 3
R 1 7
C 1 1
C 1 3
R 1 7
C 7
D 7
D 4
R 9
C 6
C 1 2
12AY7/6072A
Vacuum Tube
C 2
Q 3
C 8
R 1 8
R 3 2
R 7
R T
R T
C 7
C 7
C 6
12AU7/ECC82
Vacuum Tube
S W 6
R 2 5
R 2 5
R 9
D 3
S W 6
D 3
C 1
R 8
C 2
R 8
H e a d e r - 4
R 6
L L 1 6 7 6
L E F T
L L 1 6 7 6
L L 1 6 3 6
R 1 1
R 5
L L 1 6 3 6
R 1
1 2 X 4
R 7
S W 5
R 2 9
B l e e d e r
R 2 9
H e a d e r - 4
12AY7/6072A
Vacuum Tube
D 4
D 4
S W 4
D 2
S W 4
D 2
R 3 0
R 4
C 2
R 3 0
C 5
R 3
R 4
R 2
R 5
S W 7
S W 7
S W 5
R i g h t
R 1
R 2
D 2
I n p u t
R 3
O u t p u t
C 1 6
R 1
L i n e
R 2
R i g h t
C 4
I n p u t
0 V
M i c
12X4
Vacuum Tube
12AU7/ECC82
Vacuum Tube
R 3 2
S E L E C T
AC Mains
Voltage Selector
Meter
Calibration
Potentiometers
Figure 1
INSTALLATION
The M63 is designed to be mounted in a standard 19” equipment rack, occupying three units (3U) of space,
or 5.25 inches, but additional space above and below is recommended for improved airflow and cooler
operation. Alternatively, the M63 can be placed on a table or other level surface, but care must be given to prevent
covering up or blocking the ventilation holes on the top and bottom of the unit. The M63 is designed to run fairly
cool considering the number of tubes and the size of the power supply, but it is normal for the unit to be warm to
the touch. The M63 should never be so hot as to make it impossible to leave your hand on the top cover for an
extended period of time.
E L E C T R O N AU T C O M PA N Y
Helvetica neue condensed black
tracked like crazy, like 400 or something.
Usual logo is without concentric circles.
Website has the concentric circles.
USER’S MANUAL
Electronaut M63 Vacuum Tube Microphone/Instrument Preamplifier
7
Mains Connections
The AC MAINS voltage select switch is set at the factory prior to shipping based on the shipping address or upon
special request at the time of order, and is indicated on the original packaging. The standard M63 accommodates
120 volt, 60 Hz operation, as well as 230V, 50 Hz operation. DO NOT OPERATE THE M63 WITH THE LINE
VOLTAGE SELECT SWITCH IN THE WRONG POSITION. For instructions on changing the line voltage setting,
see page 10.
OPERATION NOTES
Front Panel
Power Switch: The POWER switch turns on the M63 by applying the mains voltage to the power transformer.
Make sure the M63 is configured for the proper line voltage before plugging it in and turning it on. See page 10 to
configure the line voltage of the M63.
Pilot light: The pilot light shines when the M63 is powered on. See page 14 for instructions on replacing the pilot
light bulbs.
48V Toggle Switch: The 48V switch is a heavy-duty locking toggle switch that controls a high-quality,
small-signal relay which applies phantom power to pins 2 and 3 of the input XLR connector. To turn on the
phantom power, pull and lift the toggle into the ON position. Do not use phantom power unless a condenser
microphone that requires phantom power has been connected to the corresponding input XLR connector.
Although the M63 has been designed with a slow-start, slow-stop phantom power supply, it is good practice to
turn the TRIM and ATTENUATE potentiometers fully counterclockwise before flipping the 48V toggle switch.
Input Mode Switch: The input mode switch is a heavy-duty toggle switch that controls two high-quality,
small-signal relays which in turn provide three options. INSTRUMENT mode disconnects the input XLR and
the input transformer, and connects the unbalanced INSTRUMENT jack on the front panel of the M63 to the
input amplifier. The 0 dB setting disconnects the INSTRUMENT jack and connects the input XLR and input
transformer to the input amplifier. The -20 dB setting inserts a 20 dB PAD between the input XLR and the input
transformer.
Polarity Switch: The Polarity switch is a heavy-duty toggle switch that controls a high-quality, small-signal
relay which inverts the polarity of the signal at the output XLR.
Trim Control: The Trim control is a conductive plastic type potentiometer wired as an attenuator and placed after
the input amplifier. This is the main level control.
H
Attenuate Control: The attenuate control is a conductive plastic type potentiometer wired as an
attenuator and placed after the output amplifier. This potentiometer is useful to keep level under control when
deliberately overdriving the input amplifier. For normal operation, and especially in cases where the M63 is set
up to drive very long cables or equipment with an input impedance of 600 ohms, the ATTENUATE control should
be set fully clockwise (cranked!).
ELE C T R O NAUT COMPANY
Helvetica neue condensed black
tracked like crazy, like 400 or something.
Usual logo is without concentric circles.
Website has the concentric circles.
USER’S MANUAL
Electronaut M63 Vacuum Tube Microphone/Instrument Preamplifier
8
Instrument input: The instrument jack is a locking quarter-inch connector used for connecting unbalanced
instrument cables to the M63. The input impedance of the instrument input jack is approximately one million
ohms. (1 MΩ)
POLARITY
Switches
TRIM
Controls
Input Mode Select
Switch
VU Meters
Pilot Lamp
POWER
switch
INSTRUMENT
Jacks
Input Mode Select
Switch
ATTENUATE
Controls
48V
Switches
Figure 2
Rear Panel
INPUT XLR connectors: The Input XLR connectors provide balanced inputs for microphones with an input
impedance of approximately 1800 ohms. As is consistent with modern standards, pin 1 is connected to the
chassis ground, pin 2 is for the positive phase of the signal, and pin 3 is for the negative phase of the signal.
OUTPUT XLR connectors: The Output XLR connectors provide a balanced, line-level output sufficient to drive
long cables and/or equipment with 600 ohm inputs, however the M63 will perform best when driving a higher
load impedance, such as a typical, modern 20 kΩ bridging input.
E L E C T R O N AU T C O M PA N Y
Helvetica neue condensed black
tracked like crazy, like 400 or something.
Usual logo is without concentric circles.
Website has the concentric circles.
USER’S MANUAL
Electronaut M63 Vacuum Tube Microphone/Instrument Preamplifier
9
AC MAINS (IEC) connector: The IEC line voltage connector provides a means for connecting the AC mains
supply voltage to the M63. Make sure the M63 is properly configured for the mains voltage you intend to use.
(See page 10 to configure the M63 for proper line voltages.) The IEC connector also houses the fuse, as well as a
tiny little drawer with a spare fuse. See page 14 for instructions on replacing the fuse.
IEC Power Inlet
Figure 3
INTERNAL SETTINGS AND ADJUSTMENTS
Configuring the M63 for 115 or 230 volt operation
The AC mains voltage select switch is set at the factory prior to shipping based on the shipping address or upon
special request at the time of order. The standard M63 accommodates 120 volt, 60 Hz operation, as well as
230V, 50 Hz operation. DO NOT OPERATE THE M63 WITH THE LINE VOLTAGE SELECT SWITCH IN THE
WRONG POSITION.
To change the AC mains voltage configuration, make sure the M63 is unplugged, then remove the top cover. With
a flathead screwdriver or your fingernail, slide the voltage select switch to the appropriate position. (See figure 1
for the location of the voltage select switch.)
ELE C T R O NAUT COMPANY
Helvetica neue condensed black
tracked like crazy, like 400 or something.
Usual logo is without concentric circles.
Website has the concentric circles.
USER’S MANUAL
Electronaut M63 Vacuum Tube Microphone/Instrument Preamplifier
10
VU Meter calibration
The VU meters in the M63 can be set to the old standard of 0VU = +4 dBu. Alternatively, the meters can be set
to a higher reference level so that the meters reach full deflection at or near the maximum level of modern digital
recording systems.
To set the desired reference level, follow the procedure shown below. WARNING: This procedure requires setting
an internal control while the M63 is powered on, and should only be done by a qualified technician who is familiar
with the hazards of working with high voltages!
1) Remove the top cover of the M63 and set it aside.
2) A
ttach the power cord, plug it into an AC MAINS outlet, turn on the M63, and let it warm up for about five
minutes.
3) Turn the TRIM and ATTENUATE controls on both channels fully counterclockwise.
4) C onnect a signal generator to the left channel INSTRUMENT input on the M63. Select the INSTRUMENT
mode on the Input Mode Switch.
5) C onnect the output of the left channel to the input of the recording device. Set up the recorder so that the
metering system on the recorder is activated.
6) C onfigure the signal generator so that it produces a sine wave of approximately 1kHz at -30 dBu.
7) A
djust the TRIM and ATTENUATE controls until the VU meters reach 0VU. Compare this to the level shown
on the recorder.
8) U
sing a small flathead screwdriver, adjust the Meter Calibrate (see Figure 1) potentiometer for the appropriate
channel until the level shown on the VU meter better matches the level shown on the recorder.
9) Repeat this procedure for the right channel.
10) P
ut the cover back on. Do not tighten the top cover screws with a screwdriver until all the screws have been
inserted and lightly tightened by hand. Do not over-tighten the screws.
The VU meters are driven by separate amplifiers built around TL072 op-amps, which present a very high input
impedance to the output of the the M63, providing isolation and avoiding the additional load the meters would
otherwise present to the outputs. (No, those little ICs are not in the signal path!)
Phantom Power adjustment
The Phantom power voltage adjuster has been preset at the factory to 48.0 volts, and is not intended for enduser adjustment. It has been included merely for the sake of maintaining accuracy between the actual phantom
power voltage and the faceplate designation of 48 volts. In general, phantom power is a very loose specification,
and the absolute value of the DC voltage has no effect on the performance of condenser microphones.
Configuring the Ground Lift Switches
Each channel has its own ground lift switch which is set at the factory and should not need adjustment. HowE L E C T R O N AU T C O M PA N Y
Helvetica neue condensed black
tracked like crazy, like 400 or something.
Usual logo is without concentric circles.
Website has the concentric circles.
USER’S MANUAL
Electronaut M63 Vacuum Tube Microphone/Instrument Preamplifier
11
ever, in the event that you experience a ground loop in your system, you can try the various connection
alternatives to see if they help to eliminate the problem. To make an adjustment to the Ground Lift switches,
follow the procedure below:
1) Turn off the M63, unplug the AC mains cable, and wait about five minutes.
2) Remove the top cover and set it aside.
3) Slide the #1 switch to the ON position.
4) P
ut the cover back on. Do not tighten the top cover screws with a screwdriver until all the screws have been
inserted and lightly tightened by hand. Do not over-tighten the screws.
5) P
lug the M63 back in and turn it on. See if it helps. If not, repeat the above instructions and try a different
setting. It is safe to try any combination of settings.
The M63 is shipped with #1 and #2 switches in the OFF position.
Incase you’re wondering what the various connection alternatives provide, here’s the deal:
Switch 1: In the ON position, pin 1 of the output XLR is connected to the ground plane of the amplifier’s circuit
board. In the OFF position, pin 1 of the output XLR is lifted.
Switch 2: In the ON position, the ground plane of the amplifier’s circuit board is connected to the ground plane of
the power supply circuit board. In the OFF position, the ground plane of the amplifier’s circuit board is connected
solely to the chassis through the input XLR.
OPERATION
Powering up the M63
Once the M63 has been inspected, installed, and properly set-up, power the unit on by lifting the POWER toggle
switch to the ON position. Turn on the phantom power switch if necessary, and allow at least thirty seconds before attempting to pass audio. Since vacuum tubes will sometimes make audible noises while they’re coming up
to operating temperature, it is a good idea to let the M63 warm up for fifteen to twenty minutes before recording
any critical performances.
Setting the GAIN
Set the INPUT MODE switch to the 0 dB setting.
Connect a microphone or instrument using a good quality cable that is known to be free from defects. NOTE:
If you connect a condenser microphone to the M63 using a shorted microphone cable and apply phantom
power, there is a good chance you will damage the input transformer! Make sure your microphone cables are good
quality and free from defects.
The normal procedure for setting the GAIN is to start by turning the TRIM control fully counterclockwise, and the
ATTENUATE control fully clockwise. Then, slowly bring up the TRIM control until the desired level is set. If the
level coming from the microphone is very loud, it may be necessary to switch in the 20 dB PAD to prevent clip-
ELE C T R O NAUT COMPANY
Helvetica neue condensed black
tracked like crazy, like 400 or something.
Usual logo is without concentric circles.
Website has the concentric circles.
USER’S MANUAL
Electronaut M63 Vacuum Tube Microphone/Instrument Preamplifier
12
ping at the input stage. Don’t be afraid of the PAD! The PAD circuit consists of very low noise, high-precision
resistors. If you find yourself backing off on the TRIM knob significantly, you might get better performance if you
engage the PAD switch and crank the TRIM knob back up a bit.
If desired, turn the ATTENUATE potentiometer fully counterclockwise and crank the TRIM control fully
clockwise, then use the ATTENUATE potentiometer to set the level. By all means, experiment with various
combinations to find the sound that best suits the material.
H
Note: If the output of the M63 is either driving very long cable lines or plugged into equipment with a low (i.e.
600 ohms) input impedance, the ATTENUATE potentiometer should be set in the fully clockwise position for best
performance. Again, experiment at will, but the recommended setting will probably produce the best result.
The procedure for setting the gain structure for the instrument input is identical to the procedure for microphones
with the exception of the 20 dB PAD option, which is not available while in INSTRUMENT mode.
For the best tube life, turn the M63 OFF when not in use; however, it is good to avoid a lot of unnecessary ON/
OFF cycles. As a rule of thumb, leave the M63 on unless you know it will not be used for the next several hours.
Suggestions
It is always good practice to use the shortest possible signal chain between the microphone and the recorder.
Excess in-line connections between the microphone and the M63 such as patch bays, splitters, etc. should
be avoided as a general rule to avoid the gradual deterioration of the signal quality due to increased cable
capacitances, contact resistances, adjacent noise sources, etc. Whenever possible, keep microphone cables away
from AC mains cords, power strips, etc.
Avoid stepping on your microphone cables, and train your friends, clients, and everyone else to do the same!
Replacing the tubes
The M63 is designed with a high voltage power supply utilizing an indirectly heated dual diode rectifier tube,
which naturally has a very slow startup time. It takes about 30 seconds for the high voltage power supply to
reach 98% of the operating voltage after the unit is initially turned on, which provides very gentle treatment to
the tubes, and should directly lead to increased tube life. The tubes shipped with the M63 are high quality and
should provide years of high performance, low-noise amplification. However, all vacuum tubes have a finite life
and will eventually need to be replaced.
The input gain stage consists of a premium 12AY7/6072A dual triode, and is located on the outside edge of the
amplifier circuit boards, furthest from the power supply. This tube is selected for low noise and microphonics.
The output stage consists of a 12AU7/ECC82 dual triode, and is located on the inside edge of the amplifier circuit
boards, closer to the power supply. This tube should also be chosen for low noise and microphonics, although it
is less critical than the 12AY7/6072 tube.
The rectifier tube is a 12X4 dual diode, and is located in the center towards the rear of the M63, behind the
toroidal power transformer.
Replacement tubes of all types are available from directly from Electronaut.
E L E C T R O N AU T C O M PA N Y
Helvetica neue condensed black
tracked like crazy, like 400 or something.
Usual logo is without concentric circles.
Website has the concentric circles.
USER’S MANUAL
Electronaut M63 Vacuum Tube Microphone/Instrument Preamplifier
13
Replacing the fuse
To check and/or replace the fuse, unplug the M63 from the line voltage outlet and remove the power cord from the
IEC power connector. Using a small flathead screwdriver, pluck the fuse drawer out of the IEC connector. Replace
the fuse if necessary with a 240V, 1A 5mm fuse (there’s a spare in the little drawer!) and re-insert the drawer into
the IEC connector. In the unlikely event that the fuse blows twice in a row, a fault should be suspected and the M63
should be given to a qualified technician for service.
Replacing the Pilot Lamp Bulb
Replacement pilot-light bulbs can be obtained from Electronaut. This bulb has a finite life and will occasionally
need to be replaced. It is an 18 volt, 80 mA “bantam” type bulb. DO NOT USE A REPLACEMENT BULB RATED
FOR MORE THAN 80 mA.
To replace the bulb, remove the amber jewel on the front of the faceplate by turning it counterclockwise. Then,
place your thumb and index finger on the top of the bulb and press inward while turning counterclockwise one half
turn. The bulb should release from the socket. Pull it out, then put the replacement bulb in there and press while
turning clockwise one half turn. The bulb should lock into the lamp socket. Replace the amber jewel.
Replacing the VU Meter Bulbs
The VU meter bulbs have a finite life and will occassionally need to be replaced. To replace the VU meter bulbs,
follow the procedure below:
1) Turn off the M63, unplug the AC mains cable, and wait about five minutes.
2) Remove the top cover and set it aside.
3) Pluck out the burned out bulb from the meter, and replace it with a new one.
4) P
ut the cover back on. Do not tighten the top cover screws with a screwdriver until all the screws have been
inserted and lightly tightened by hand. Do not over-tighten the screws.
NOTE: The VU meter bulbs are 12 volt, 1.5 watt “Festoon” type bulbs. Replacement bulbs are available from
Electronaut. DO NOT USE A BULB RATED FOR MORE THAN 1.5 WATTS, OR 125 mA!
A note about powering down the M63 when the PAD is on
The heavy-duty toggle switches on the front panel of the M63 do not actually carry any audio. Instead, the
switches are used as remote controls for several high-quality, sealed relays with gold plated contacts that are
mounted on the ampliers’ circuit boards. This avoids routing the audio up to the front panel and back several
times, reduces the length of the signal path and associated stray capacitances, and reduces noise. It should be
noted, however, that because these relays require a small amount of power to remain in position, they will reset
themselves to their default, unenergized positions when the power to the M63 is turned off. If you are putting a
HOT signal into the M63 and have the -20 dB PAD engaged, then suddenly turn off the power to the M63, the
PAD will become disengaged and you will have 20 dB more level coming out of the preamplifier until the reserve
power drains away from the power supply! Please keep this in mind before randomly switching off the M63 while
in use!
ELE C T R O NAUT COMPANY
Helvetica neue condensed black
tracked like crazy, like 400 or something.
Usual logo is without concentric circles.
Website has the concentric circles.
USER’S MANUAL
Electronaut M63 Vacuum Tube Microphone/Instrument Preamplifier
14
WARRANTY & REGISTRATION
An initial warranty is granted to the original purchaser for a period of ninety (90) days, which warrants the M63
against defects in parts and craftsmanship, excepting vacuum tubes. An additional five (5) year warranty will be
granted to the original purchaser upon registration of ownership within 30 days of purchase.
The original purchaser may register ownership by mailing a letter to Electronaut, at the address shown on page
page 4. Please include the following:
• A copy of the original sales receipt/invoice, showing the dealer’s name, date of purchase, and price paid.
• The name, address, and email address of the purchaser.
• The date of purchase.
• The serial number of the M63. (The serial number is indicated by the metal plate on the back of the unit.)
Be sure to include everything listed above! Alternatively, the materials can be scanned and emailed to:
[email protected]
Under the terms of the initial and extended warranties, all defects in parts, materials, and craftsmanship will be
repaired or replaced free of charge.
In the unlikely event of a defect, the original purchaser shall contact Electronaut to arrange a return of the M63
to the factory where it will be repaired without charge for parts and labour. The M63 will then be returned to the
customer via prepaid freight and insurance through a carrier of Electronaut’s choice.
All warranties shall become null and void in the event of damage caused by misuse, accident, neglect,
unauthorized modification, or tampering.
Electronaut Company assumes no liability for property damage or any other incidental or consequential damage
whatsoever which may result from failure of this product.
Electronaut makes no other warranties, expressed or implied, including any implied warranty of merchantability
and fitness for a particular purpose.
SERVICING
In the unlikely event that the M63 develops a problem, follow the instructions below:
For North American users, contact Electronaut by email at the address shown on page 4. If it is determined that
the M63 requires servicing, you will need to return the unit to Electronaut. Contact Electronaut for instructions.
For users outside of North America, contact the dealer from which you purchased the M63 for instructions on
returning your M63 for service. Alternatively, you can contact Electronaut at the email shown on page 4.
E L E C T R O N AU T C O M PA N Y
Helvetica neue condensed black
tracked like crazy, like 400 or something.
Usual logo is without concentric circles.
Website has the concentric circles.
USER’S MANUAL
Electronaut M63 Vacuum Tube Microphone/Instrument Preamplifier
15
SPECIFICATIONS
All specifications measured with the Attenuate potentiometer fully clockwise, 1 kHz tone at -40 dBu,
Trim control set to produce +4 dBu output, driving a 20 kΩ load.
Maximum Gain:
Frequency Response:
Microphone Input impedance:
1800 Ω
Instrument Input Impedance:
1 MΩ
Output Impedance:
Recommended Load Impedance:
Minimum Recommended Load Impedance:
600 Ω
Signal to Noise Ratio:
> 75 dB
63 dB
20 Hz to 20 kHz +/- 1 dB
600 Ω
10 kΩ or higher
Max. Microphone Input Level for 1% THD at 100 Hz:
-15 dBu (with PAD engaged)
Max. Microphone Input Level for 1% THD at 1kHz:
-2 dBu (with PAD engaged)
THD + Noise:
Power Requirements:
.3% (almost purely 2nd Harmonic)
120V or 230V, 50 or 60 Hz, 45 Watts
Dimensions: 19” (483 mm) width
11.5” (292 mm) depth
5.25” (133 mm) height
Weight:
16 lbs (7.25 kg)
ELE C T R O NAUT COMPANY
Helvetica neue condensed black
tracked like crazy, like 400 or something.
Usual logo is without concentric circles.
Website has the concentric circles.
USER’S MANUAL
Electronaut M63 Vacuum Tube Microphone/Instrument Preamplifier
16