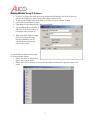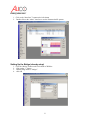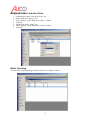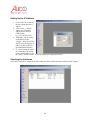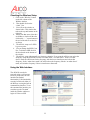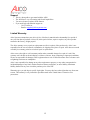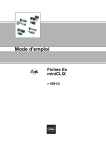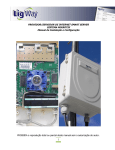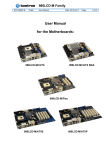
1
Wireless Network Equipment Optima Series: Models AP24, BR24, CP24 Configuration Type: 24-AE-19F Optima Series: Models AP58, BR58, CP58 Configuration Types: 58-AE-26F Instruction Manual (v3) Alico Systems Inc 2461 W. 205th Street, Suite B105 Torrance, California 90501-1464 Telephone: 310-781-9500 www.alicosystems.com 1 Notices FCC Notice: Part 15 Notice: This device complies with Part 15 of the FCC Rules. Operation is subject to the following two conditions: (1) this device may not cause harmful interference, and (2) this device must accept any interference received, including interference that may cause undesired operation. Any changes or modifications not expressly approved by the party responsible for compliance could void the user's authority to operate the equipment. Class B Digital Device: This equipment has been tested and found to comply with the limits for a Class B digital device, pursuant to Part 15 of the FCC Rules. These limits are designed to provide reasonable protection against harmful interference in a residential installation. This equipment generates, uses and can radiate radio frequency energy and, if not installed and used in accordance with the instructions, may cause harmful interference to radio communications. However, there is no guarantee that interference will not occur in a particular installation. If this equipment does cause harmful interference to radio or television reception, which can be determined by turning the equipment off and on, the user is encouraged to try to correct the interference by one or more of the following measures: Reorient or relocate the receiving antenna. Increase the separation between the equipment and receiver. Connect the equipment into an outlet on a circuit different from that to which the receiver is connected. Consult the dealer or an experienced radio/TV technician for help. 2 Scope: This equipment is intended to be installed by professional trained installers familiar with the appropriate FCC Regulations and Local Building Codes. The equipment is designed to be installed on a pole or as a wall mount unit. While the unit is in operation the WNE antenna shall be at least 20 cms away from all persons. Setup Instructions: Package Contains: 1. 2. 3. 4. 5. 6. AP24/58 Access Point-Bridge Power over Ethernet Injector 48VDC Power Supply AC power cord RJ45 Feed-Through Assembly CD Containing the “WinBox” application software to provision the AP24/58 Access Point Bridge and a PDF version of this Instruction Manual. What You Need to Get Started: • • • • • • • You need to provide 2 straight patch segments of CAT-5e Ethernet cable with RJ45 connectors on each end. You may also need a crossover cable to configure the AP24/58 if you are connecting directly to a PC. The first CAT-5e patch cable will be used to connect the AP24/58 to the POE Injector module. This cable needs to have RJ45 connectors preferably with no boots. Having a boot on the RJ45 cable on the AP24/58 side may prevent you to properly install the Feed-Through Assembly. See instructions on the next slide. CAUTION DO NOT USE A CROSS OVER CABLE BETWEEN THE AP24/58 AND THE POE MODULE. YOU WILL PERMANENTLY DAMAGE THE AP24/58. The second CAT-5e patch cable will be used to connect the POE module to your Switch/Router. If you are connecting the POE module directly to your PC for setup you need to use a crossover cable. The total length for both CAT-5e cable segments must not exceed 300 feet (~90 meters). The options to setup the AP24/AP58 would be to connect your PC directly to the POE module (using a crossover cable), through a switch (using a patch cable) or wireless. To connect using the wireless interface set your PC/Laptop SSID to AP24 (or AP58) and click on connect. Once connected you can follow the instructions shown on following pages using the WinBox. The AP24/AP58 is shipped with a default private address 192.168.0.239. You can change this IP address or setup multiple IP addresses for the AP. In order to get started quickly the AP is shipped with an internal bridge setup (called “bridge1”) between the Wireless LAN Interface and the Ethernet Interface. This “bridge1 is setup with the default IP address 192.168.0.239. You can also setup the unit in the router mode if needed to get full routing, DHCP server, capabilities etc. The Wireless LAN is setup in the infrastructure AP (AP-bridge) mode with a SSID of “AP24” (or AP58). 3 WNE Wiring Diagram The wireless network equipment is powered by a 48 VDC Power over Ethernet power supply/injector module. The following steps should be accomplished to power the WNE: 1. Install the WNE Antenna Enclosure either on a pole or to a wall. 2. Follow the instructions in the next section to assemble the Ethernet weatherproof cable feed through assembly. 3. Connect one end of a patch (straight through) CAT 5e Ethernet cable to the AP24/58 through the Feed through assembly. 4. Connect the other end of the CAT5e cable to the power and data port of the Power Over Ethernet Module. 5. Locate the LAN Switch in your wiring closet and connect a patch (straight through) CAT 5e cable from the IN/DATA port of the Power over Ethernet module to a LAN Switch port. 6. Last connect the 48VDC power supply to the Power Over Ethernet injector. Using the supplied AC power cord connect the power supply to the AC. The unit operates on 110/240 VAC, 50/60 Hz. Figure 1 Connection Diagram 4 Cable Feed-through Assembly Step 1: Use a Cat 5/6 cable with a open RJ45 connector without a boot. • • Do not tighten compression gasket until you are finalizing the installation. The gasket should only be fully tightened once. Thorough inspection of the compression fitting should be done if it is reused. After assembly, we recommend completely wrapping the Feed-Through-Assembly using waterproof outdoor electrical tape as a secondary water barrier. 5 Starting Winbox Using the MAC Address Note: In order to connect using the MAC address your PC must be on different subnet than the default AP24 IP address 192.168.0.239 1. 2. 3. 4. Copy the WinBox application from the CD to a convenient folder on your PC Double click on the WinBox application The WinBox screen shown below will appear Click on the square “…” button to the left of the “Connect” button. 5. 6. 7. 8. Select the AP24 line. Press the Connect button. Login as “admin” Password: (blank) CAUTION DO NOT SET A PASSWORD AND LOSE IT AS IT WILL REQUIRE SHIPMENT OF UNIT BACK TO THE FACTORY FOR PASSWORD RESET; PASSWORD SHOULD BE SET AFTER SETUP IS COMPLETE AND PROPERLY LOGGED INTO YOUR RECORDS 6 Starting Winbox Using IP Address 1. If your PC is setup on the same subnet as the default AP24 IP address 192.168.0.239 then you must use the IP address to login. Using a MAC address will not work. 2. To log in to the WinBox enter the IP address 192.168.0.239 in the Connect To field 3. Click on the connect button to log in. 4. Used admin as login name and leave the password blank. 5. You can change this as you wish or add your own to the list if these do not conflict with your network. 6. When using the IP address to login make sure you only have one interface enabled on your PC which is the one being used to connect to the AP24. Try out the different buttons on the left to see all the available options; • Ether1 and wlan1 are the interfaces that are active for the AP24. • Ether2, ether3 and serial ports are not used on the AP24 even though they appear on some of the menus. 7 Looking at Interfaces 1. Click on the “Interfaces”’ button on the left column 2. Double click on the “ether1” interface to see the illustrated traffic pattern Setting Up the Bridge (already setup) 1. Click the “Bridge” button on the left column of WinBox 2. Click on the “+” button 3. Default bridge name is “bridge1” 4. click OK 8 Bridging the ether1 and wlan1 Ports 1. On the Bridge window click on the “Ports” tab 2. Double click on the “ether1” line 3. Select “bridge1” on the Bridge Port <ether1> window 4. Click OK 5. Double click on the “wlan1” line 6. Select “bridge1” on the Bridge Port <wlan1> window 7. Click OK Bride1 Operating You now have an operating bridge inside the AP24, close “Bridge” window. 9 Setting Up the IP Address 1. Click on the “IP” button on the left column and select address. 2. Click on the “+” button 3. Setup your network IP address for the AP24 in CIDR format (e.g.”192.168.0.239/24”) 4. Remember you are setting an IP address for the “bridge1”. Since the AP24 is factory set as a bridge the IP address is only needed for the management interface. 5. If you are setting the AP24 as a router then you would need to add IP addresses for the “ether1” and the “wlan1” as well as setting up the appropriate routes. Checking the Interfaces Click on the “Interfaces” button on the left column now shows all the interfaces and the logical “bridge1” 10 Checking the Wireless Setup 1. Click on the “Wireless” button on the left column of the WinBox window 2. Then double click on the “wlan1” line 3. You will see the window as shown below. This window has tabs on the top and buttons on the right side. 4. Please note that some of the tabs are hidden, to look at all the tabs click on the “…” square button at the end of the tabs to see the list as shown. 5. The AP24 is setup as a 2.4GHz b/g access point 6. You can change the SSID if you like. To hide the SSID click on the check mark at the bottom of the window 7. The AP24 is setup with manually set frequency channels. If you want the AP24 to auto select the frequency setup the DFS mode to either “no radar detect” or “radar detect”. In the “no radar detect” mode the AP24 scans for the frequency with the lowest interference and selects that frequency. In the “radar detect mode” the AP24 selects the frequency like the “no radar detect” mode, and switches frequency if there is interference afterwards. Using the Web Interface The AP24/58 can also be accessed using a web browser. However please note the web interface has limited functionality. Full functionality can only be achieved either via the Winbox or using the built in command line interface. To use the command line interface you can either use the Terminal inside the Winbox window or login via Telnet or SSH. 11 Support • • • • This is a short guide to get started with the AP24 The AP24 has a very rich routing and firewall capabilities You are welcome to explore all the features If you need help call technical support at: – 310-781-9500, or – Email to [email protected] Limited Warranty: Alico Systems warrants that your device is free of defects in material and workmanship for a period of one year from date of purchase. Alico will, in this period of time, repair or replace, any Alico product returned to the factory, freight prepaid. The Alico warranty covers repairs or replacement (at Alico’s option) of the product only. Alico is not responsible for the cost of removal, reinstallation, or shipping to the place of repair. Alico does not extend or modify its warranty period as a result of repair or replacement. Alico reserves the right to void a warranty and/or make reasonable charges for repair of a unit if the warranty seal is broken or the unit displays evidence of misuse, abuse, tampering or improper installation. We are not responsible for damage to this equipment due to acts of God and extreme forces of nature such as lightning, hurricanes or earthquakes. Alico is not responsible for damage to any other equipment or property, or any other consequential or incidental damages of any kind, whether based on contract, negligence, or strict liability. Maximum liability shall not in any case exceed the purchase price of the unit. Warranties give you (the buyer) specific legal rights. You may also have other rights that vary from state to state. This warranty is only extended to purchases made in the United States of America or its possessions. 12