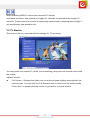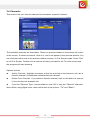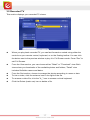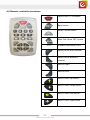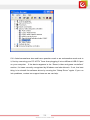
1
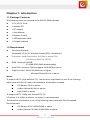
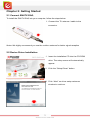
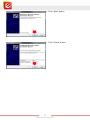
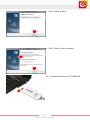
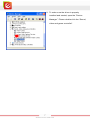
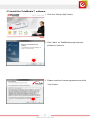
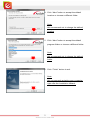
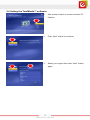
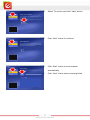
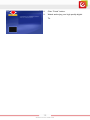
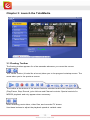
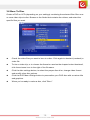
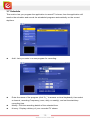
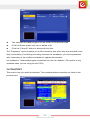
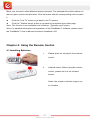
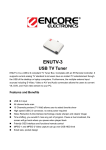
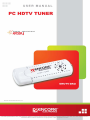
© 2010 Encore Electronics, Inc. All rights reserved. COVER © 2011 Encore Electronics, Inc. Product specifications, size, and shape are subject to change without notice, and actual product appearance may differ from that depicted herein. All trademarks and brand names are the properties of their respective holders. TABLE OF CONTENTS CHAPTER 1: INTRODUCTION ........................................................................... 2 1.1 PACKAGE CONTENTS ........................................................................................ 2 1.2 REQUIREMENT ................................................................................................. 2 CHAPTER 2: GETTING STARTED ..................................................................... 3 2.1 CONNECT ENUTV-DAQ ................................................................................. 3 2.2 DEVICE DRIVER INSTALLATION ........................................................................ 3 2.3 INSTALL THE TOTALMEDIA™ SOFTWARE. ........................................................ 8 2.4 SETTING THE TOTALMEDIA™ SOFTWARE. ..................................................... 10 CHAPTER 3: LAUNCH THE TOTALMEDIA .................................................. 13 3.1 FLOATING TOOLBAR ...................................................................................... 13 3.2 TV MODULE .................................................................................................. 14 3.3 EPG ............................................................................................................... 15 3.4 CHANNELS ..................................................................................................... 16 3.5 RECORDED TV ............................................................................................... 17 3.6 BURN TO DISC ............................................................................................... 18 3.7 SCHEDULE...................................................................................................... 19 3.8 TELETEXT ................................................................................................... 20 CHAPTER 4: USING THE REMOTE CONTROL ........................................... 21 4.1 INSTALLING BATTERIES .................................................................................. 21 4.2 REMOTE CONTROLLER FUNCTIONS................................................................. 22 CHAPTER 5: TIPS AND TROUBLESHOOTING ............................................ 23 Product specifications, size, and shape are subject to change without notice, and actual product appearance may differ from that depicted herein. All trademarks and brand names are the properties of their respective holders. © 2011 Encore Electronics, Inc. All rights reserved. 1 www.encore-usa.com Chapter 1: Introduction 1.1 Package Contents The following items are included in the ENUTV-DAQ package. 1 PC HDTV Tuner 1 Installer CD 1 RF adapter 1 User Manual 1 Remote Control 1 USB extension cable 1 Portable antenna 1.2 Requirement Operating Systems: Processor: Intel® Pentium® 4 2.0 GHz or above CPU Windows® XP (SP3) / Windows Vista® (SP2) / Windows® 7 (2.8 GHz or above for HDTV) RAM: minimum 256 MB Hard Disk: minimum 1GB free space, 5400 RPM or above Graphics Card: 1024x768 resolution or higher, (512 MB DDR RAM recommended) Microsoft DirectX® 9.0c or above Notes: To support HDTV (High definition TV), the minimum requirement is one of the following video cards with DX-VA (video card hardware acceleration) enabled: ATI Radeon 7200 or above nVidia Geforce MX 440 or above Intel 82865 or above To support HDTV 1080p with subtitle/DTV CC: A Pentium IV 2.8 GHz processor (or higher) is recommended. The minimum requirement is one of the following video cards with DX-VA enabled: Recommended: ATI Radeon X700 (256M RAM) or above nVidia Geforce FX 6200 (256M RAM) or above 2 www.encore-usa.com Chapter 2: Getting Started 2.1 Connect ENUTV-DAQ To install the ENUTV-DAQ into your computer, follow the steps below: 1. Connect the TV antenna / cable to the connector. Notes: We highly recommend you use the outdoor antenna for better signal reception 2.2 Device Driver Installation 1. Insert the installation CD into the CD-ROM drive. The setup screen will automatically appear. 2. Click the “Setup Driver” button. 3. Click “Next” on driver setup welcome window to continue. 3 www.encore-usa.com 4. Make sure the “Complete” radio button is selected then click “Next” 5. Click “Install” button 4 www.encore-usa.com 6. Click “Next” button 7. Click “Finish” button 5 www.encore-usa.com 8. Click “Finish” button. 9. Click “Finish” button to restart. 10. Connect the Device to PC USB Hub. 6 www.encore-usa.com 11. To make sure the driver is properly installed and started, open the “Device Manager”. Please double-click the “Sound, video and game controller”. 7 www.encore-usa.com 2.3 Install the TotalMedia™ software. 1. Click the “Setup Utility” button. 2. Click “Next” on TotalMedia setup welcome window to continue. 3. Please read the License Agreement and click “Yes” button. 8 www.encore-usa.com 4. Click “Next” button to accept the default location or choose a different folder. Note: We recommend not to change the default location 5. Click “Next” button to accept the default program folder or choose a different folder. Note: We recommend not to change the default folder 6. Click “Finish” button to exit. Note: We recommend restarting your computer right after the Installation Wizard. 9 www.encore-usa.com 2.4 Setting the TotalMedia™ software. 1. Use remote control or mouse to select TV function. 2. Click “Next” button to continue. 3. Select your region then click “Next” button again. 10 www.encore-usa.com 4. Select TV service and click “Next” button. 5. Click “Next” button to continue. 6. Click “Start” button to scan channel automatically. 7. 11 Click “Next” button when scanning finish. www.encore-usa.com 8. Click “Finish” button. 9. Watch and enjoy your high quality digital TV. 12 www.encore-usa.com Chapter 3: Launch the TotalMedia 3.1 Floating Toolbar The floating toolbar appears for a few seconds whenever you move the mouse: The "Home" button (it looks like a house) takes you to the program's startup screen. The arrow takes you to the previous screen. The toolbar at the bottom of the screen features standard audio/video playback controls (Play/Pause, Stop, Record,) plus Volume and Channel controls. Special controls for MPEG2 playback and only appear when necessary. When watching movie discs, video files, and recorded TV shows: Use these buttons to adjust the playback speed at variable rates. 13 www.encore-usa.com When watching MPEG-2 videos and recorded TV shows: Use these buttons to skip forward by roughly 27 seconds, or backwards by roughly 27 seconds. These buttons are useful for bypassing commercials or skipping back slightly if you accidentally skip ahead too far. 3.2 TV Module This section lets you view and edit the settings for TV recording. You may pause and rewind TV (while you’re watching) using both the remote control and the toolbar. Options include: Full Screen - Displays the video over the entire program display area-typically the entire screen. You can click the Full Screen button to switch into full screen mode. Press "Esc" or double-click the mouse to go back to a normal window. 14 www.encore-usa.com Note: You should check the "Time Shift" option in TV Settings to display the time bar. EPG - Display the electronic programming guide. Channels - View the program channel list. Click a channel to learn more about it. Recorded TV - Burn the recorded TV shows to a disc. Schedule - Program the application to record TV shows. Capture Frame - Take a screen capture of the current video screen. The captured Teletext - Watch teletext (if available). Settings - View and edit the settings for the TV module. image will be saved in the "My Documents | My Pictures" folder by default. 3.3 EPG This section lets you view the channel program lists. If you are using a digital TV system, please select to access EPG or network EPG to view the program lists. While using analog TV system, the program will take you to the network EPG directly. Note: This option is only available if you are using an EPG service. The Internet EPG may not be available in all countries and the EPG on some digital services may not be supported. 15 www.encore-usa.com 3.4 Channels This section lets you view the channel list and select a specific channel. The available channels are listed here. There is a preview window in the bottom left corner of the screen. To watch a channel, click on it, and it will appear in the preview window. You can click the button next to the preview window to play it in Full Screen mode. Press "Esc" to exit Full Screen. Double click a channel will take you back to the TV main screen and the program will start showing. Options include: Add to Favorite - Highlight a channel on the list and click on the button to set it as a Delete From Favorite - If you select a favorite channel, click on this button to remove favorite channel. A checkmark indicates favorite channel. it from the favorite channels list. From the "Channel Type", choose either to view "All" or only the "Favorite" channels. Note: When using digital tuner, there will be two more options: "TV" and "Radio". 16 www.encore-usa.com 3.5 Recorded TV This section displays your recorded TV shows. When you play back recorded TV, you can fast forward or rewind using either the controls on your remote control, keyboard, or on the floating toolbar. You can click the button next to the preview window to play it in Full Screen mode. Press "Esc" to exit Full Screen. From the View section, you can choose either "Detail" or "Thumbnail" view. Both views show you thumbnails of the available photos and folders; "Detail" view includes file/folder names and dates. From the Sort section, choose to arrange the photos according to name or date. To trim a video, click the scissors icon to the right of the file. To rename a video file, click the "A_" icon to access a virtual keyboard. Click the Delete (trash can) icon to delete a file. 17 www.encore-usa.com 3.6 Burn To Disc Create a DVD or VCD (depending on your settings) containing the selected files. Burn one or more video clips to disc. Browse to the folder that contains the videos, and select the specific files you want. Check the video files you want to burn to a disc. Click again to deselect (uncheck) a video file. To trim a video clip, or to choose the frame be used as the chapter button thumbnail, click the scissors icon to the right of the file name. Click the disc settings button, to select the proper disc drive, change video format and modify other disc options. Click the DVD Menu Design button to personalize your DVD disc with a custom title and graphics. When you’re ready to make a disc, click "Burn." 18 www.encore-usa.com 3.7 Schedule This section lets you program the application to record TV shows, then the application will monitor the schedule and record the scheduled programs automatically on the correct day/time. Add - Lets you enter in a new program for recording: Enter the name of the program (click "A_" to access a virtual keyboard), then select a channel, recording Frequency (once, daily, or weekly), and set the start/stop recording time. Modify - Edit the recording details of the selected item. History - Display a history of your recorded TV shows. 19 www.encore-usa.com The selected recorded program can be shown in the preview area. Click the Delete (trash can) icon to delete a file. Click the "Clear All" button to discard all the files. The "Frequency" option enables you to filter shows by how often they are recorded (once, daily, and weekly).If conflicting recording sessions are scheduled, you will be presented with a summary of the conflicts and asked to update the schedule. tvtv schedules - Download program schedules from the tvtv website. (The option is only available when you are using the tvtv EPG.) 3.8 TELETEXT This section lets you watch the teletext. The available teletext channels are listed in the preview area. 20 www.encore-usa.com Move your mouse to select different teletext channels. The selected titles will be shown on the red, green, yellow and blue area. Click the button with the corresponding color to watch it. Click the "Live TV" button to go back to the TV screen. Click the "Teletext Home" button to go back to the teletext main index page. Note: This function is not available in all countries. (Typically only Europe.) Note: For detailed information and operations of the TotalMedia™ software, please check the TotalMedia™ User’s Manual included in installation CD. Chapter 4: Using the Remote Control 4.1 Installing Batteries 1. Please draw out the plastic from remote control. 2. Infrared sensor. When using the remote control, please aim it at the infrared sensor. Notes: the remote controller range is up to 6 meters 21 www.encore-usa.com 4.2 Remote controller functions Open/Close TV Software Back button Select / Enter button Mute ON / Mute OFF button 0~9 Number Selections 0 to 9 Switch to the next channel Switch to the previous channel Volume High Volume Low Move Cursor Up button Move Cursor Down button Move Cursor Left button Move Cursor right button 22 www.encore-usa.com Chapter 5: Tips and Troubleshooting Q1: I’ve installed the PC HDTV Tuner and can see it in Windows Device Manager. But I just can’t get it to work. What’s wrong? A1: Check that you’re connected directly to a USB 2.0 port on your computer - if not, that may be the problem. You need a free USB 2.0 port for the HDTV tuner to work properly; connecting through a hub can cause problems (particularly if the hub’s not powered or has several devices plugged into it). In some cases even an extension cord can cause problems, particularly if it’s longer than 10 feet. If that doesn’t solve it, try restarting your machine and make sure no other applications are running — video requires a lot of computer horsepower and additional apps may be just enough to cause a problem. Sometime even an intense virus scan or indexing software like Google Desktop Search, Yahoo Desktop Search can be enough to cause quality or reliability problems. The only way to be sure is to trying to turning off the software long enough to check whether the problem stops. Q2: TotalMedia is giving me a “device cannot be detected” message even though my HDTV tuner’s plugged in properly - how do I fix this? A2: This probably means your device didn’t install properly for some reason - it’s easy to check, here’s what to do: •Windows XP: right click “My Computer”, click on “Properties”, click the “Hardware” tab, then click “Device Manager”. •Windows Vista and Windows 7: right click “Computer”, click on “Properties”, then click “Device Manager”. If all’s well, you should see an item called “UDC TV BOX” under the section for “Sound, video and game controllers”. 23 www.encore-usa.com If it’s listed somewhere else and has a question mark or an exclamation mark next to it, first try removing your PC HDTV Tuner then plugging it into a different USB 2.0 port on your computer. If the device appears in the “Sound, video and game controllers” section, it’s been correctly recognized by Windows and should work. If not, the best thing is to reinstall the software driver by running the “Setup Driver” again. If you run into problems, contact our support team so we can help. 24 www.encore-usa.com * Local tech-support numbers are provided in selectively countries. Service may change without prior notice. Please visit www.encore-usa.com for more details. 25 Product specifications, size, and shape are subject to change without notice, and actual product appearance may differ from that depicted herein. www.encore-usa.com All trademarks and brand names are the properties of their respective holders.