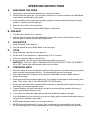
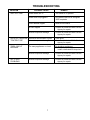
1
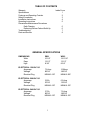
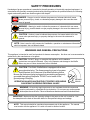
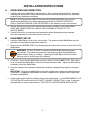
212
WELLS MANUFACTURING COMPANY
2 ERIK CIRCLE, P. O. Box 280
Verdi, NV 89439
Customer Service (775) 345-0444 Ext.502
fax: (775) 345-8238
www.wellsbloomfield.com
OPERATION
MANUAL
for
WAFFLE
BAKER
Models
WB-1
WB-2
includes:
INSTALLATION,
OPERATION AND
PREVENTATIVE
MAINTENANCE
IMPORTANT: DO NOT DISCARD THIS MANUAL
This manual is considered to be part of the WAFFLE BAKER and is to be
given to the OWNER or MANAGER of the restaurant, or to the
person responsible for TRAINING OPERATORS of this WAFFLE BAKER.
Additional manuals are available from your Wells Dealer.
THIS MANUAL MUST BE READ AND UNDERSTOOD BY ALL PERSONS
USING OR INSTALLING THIS WAFFLE BAKER. Contact your Wells
Dealer if you have any questions concerning installation, operation or
maintenance of this appliance.
P/N 37055 Rev. (C)
M212 121102 cps
LIMITED WARRANTY STATEMENT
The prices charged by Wells Mfg. Co.for its products are based upon the limitations in this warranty.
Seller’s obligation under this warranty is limited to
the repair of defects without charge by a Wells Mfg.
Co. factory authorized service agency or one of its
sub-service agencies. This service will be provided
on customer’s premises for non-portable models.
Portable models (a device with a cord and plug) must
be taken or shipped to the closest authorized service agency, transportation charges prepaid, for service. In addition to restrictions contained in this warranty, specific limitations are shown in the Service
Policy and Procedure Guide. Wells Mfg. Co. authorized service agencies are located in principal cities.
This warranty is valid in the United States and
Canada and void elsewhere. Please consult your
classified telephone directory, your food service
equipment dealer or write the Factory Service Department, Wells Manufacturing Company, P.O. Box
280, Verdi, Nevada 89439, phone (775) 345-0444
or (888) 492-2782, for information and other details
concerning warranty.
All commercial cooking equipment manufactured by
WELLS MFG. CO. is warranted against defects in
materials and workmanship for a period of one year
from the date of original installation or 18 months
from the date of shipment from our factory, whichever comes first, and is for the benefit of the original purchaser only.
THIS WARRANTY IS THE COMPLETE AND ONLY
WARRANTY, EXPRESSED OR IMPLIED IN LAW
OR IN FACT, INCLUDING BUT NOT LIMITED TO,
WARRANTIES OF MERCHANTABILITY OR FITNESS FOR ANY PARTICULAR PURPOSE, AND/
OR FOR DIRECT, INDIRECT OR CONSEQUENTIAL DAMAGES IN CONNECTION WITH WELLS
MFG. CO. PRODUCTS. This warranty is void if it is
determined that, upon inspection by an authorized
service agency, the equipment has been modified,
misused, misapplied, improperly installed, or damaged in transit or by fire, flood or act of God. It also
does not apply if the serial nameplate has been removed, or if service is performed by unauthorized
personnel.
SERVICE POLICY AND PROCEDURE GUIDE
ADDITIONAL WARRANTY EXCLUSIONS
1. Resetting of safety thermostats, circuit breakers, overload protectors, and/or fuse replacements are not covered by this warranty unless
warranted conditions are the cause.
2. All problems due to operation at voltages or phase other than specified on equipment nameplates are not covered by this warranty.
Conversion to correct voltage and/or phase must be the customers responsibility.
3. All problems due to electrical connections not made in accordance with electrical code requirements and wiring diagrams
supplied with the equipment are not covered by this warranty.
4. Calibration of heat controls after the first sixty (60) days on original equipment; replacement of items subject to normal wear, to include
such items as knobs, light bulbs; and, normal maintenance functions including adjustments of thermostats, adjustment of micro switches
and replacement of fuses and indicating lights are not covered by warranty.
5. All welding of components in the field is not covered by warranty.
6. Deterioration of aluminum components due to the insertion of metal implements or use of abrasive cleaners is not covered by warranty.
7. Full use, care, and maintenance instructions are supplied with each machine. Noted maintenance and preventative maintenance items,
such as servicing and cleaning schedules, are customer responsibility. Those miscellaneous adjustments noted are customer
responsibility. Proper attention to preventatve maintenance and scheduled maintenance procedures will prolong the life of the machine.
8. Travel mileage is limited to sixty (60) miles from an Authorized Service Agency or one of its sub-service agencies.
9. All labor shall be performed during regular working hours. Overtime premium will be charged to the buyer.
10. All genuine Wells replacement parts are warranted for ninety (90) days from date of purchase on non-warranty equipment. This parts
warranty is limited only to replacement of the defective part(s). Any use of non-genuine Wells parts completely voids any warranty.
11. Installation, labor, and job check-outs are not considered warranty and are thus not covered by this warranty.
12. Charges incurred by delays, waiting time or operating restrictions that hinder the service technician’s ability to perform service are not
covered by warranty. This includes institutional and correctional facilities.
SHIPPING DAMAGE CLAIM PROCEDURE
NOTE: For your protection, please note that equipment in this shipment was carefully inspected and packaged by skilled personnel before
leaving the factory. Upon acceptance of this shipment, the transportation company assumes full responsibility for its safe delivery.
IF SHIPMENT ARRIVES DAMAGED:
1. VISIBLE LOSS OR DAMAGE: Be certain that any visible loss or damage is noted on the freight bill or express receipt, and that
the note of loss or damage is signed by the delivery person.
2. FILE CLAIM FOR DAMAGE IMMEDIATELY: Regardless of the extent of the damage.
3. CONCEALED LOSS OR DAMAGE: if damage is unnoticed until the merchandise is unpacked, notify the transportation company
or carrier immediately, and file “CONCEALED DAMAGE” claim with them. This should be done within fifteen(15) days from the
date the delivery was made to you. Be sure to retain the container for inspection.
Wells Manufacturing cannot assume liability for damage or loss incurred in transit. We will, however, at your request, supply you with the
necessary documents to support your claim.
xi
TABLE OF CONTENTS
Warranty
Specifications
Features and Operating Controls
Safety Procedures
Installation Instructions
Operating Instructions
Preventative Maintenance Procedures
Daily Cleaning
Removing Excess Carbon Build-Up
Troubleshooting
Parts and Service
Inside Cover
1
2
3
4
5
6
6
7
8
GENERAL SPECIFICATIONS
DIMENSIONS
Wide
Deep
High
WB-1
10-1/8”
13-1/2”
8-3/4”
WB-2
19-13/16”
13-1/2”
8-3/4”
ELECTRICAL 120 VAC 1Ø
Amperage
Wattage
Electrical Plug
7.5 Amp
900 W
NEMA 5-15P
15.0Amp
1800 W
NEMA 5-20P
ELECTRICAL 208 VAC 1Ø
Amperage
Wattage
Electrical Plug
3.25A
676 W
NEMA 6-15P
6.5 Amp
1352 W
NEMA 6-15P
ELECTRICAL 240 VAC 1Ø
Amperage
Wattage
Electrical Plug
3.75A
900 W
NEMA 6-15P
7.5 Amp
1800 W
NEMA 6-15P
1
FEATURES & OPERATING CONTROLS
a12.
LOWER GRID ASSEMBLY
Cooking element (grid); contains temperature control ‘stat.
a18.
UPPER GRID ASSEMBLY
Cooking element (grid).
19.
HANDLE
Used to raise/lower top grid.
23.
DRIP TRAY
Catches batter drippings for easier clean-up.
24.
POWER SWITCH
Energizes/de-energizes the Waffle Baker heating elements.
a28.
HINGE ASSEMBLY
Supports top grid, allows grid to raise/lower for cooking.
33.
DATA PLATE
Identifies Manufacturer, Model & Serial numbers;
gives voltage rating.
a37.
TIMER ASSEMBLY
Sets length of “cook” cycle.
44.
RUBBER FOOT
Non-skid support for baker; allows adjustments for levelling.
50.
POWER CORD
See specifications for NEMA plug type
2
SAFETY PROCEDURES
Knowledge of proper procedures is essential to the safe operation of electrically energized equipment. In
accordance with generally accepted product safety labeling guidelines for potential hazards, the following
signal words and symbols are used throughout this chapter.
DANGER
DANGER - Danger is used to indicate the presence of a hazard which will cause
severe personal injury, death, or substantial property damage in the event the statement is ignored.
WARNING - Warning is used to indicate the presence of a hazard which can cause
personal injury, possible death or major property damage in the event the statement is
ignored.
CAUTION - Caution is used to indicate the presence of a hazard which will or can
cause minor personal injury, or property damage in the event the statement is
ignored.
NOTE - Note is used to notify personnel of installation, operation or maintenance information
which is important, but not hazard related.
WARNINGS AND GENERAL PRECAUTIONS
This appliance is intended to cook food products for human consumption. No other use is recommended or
authorized by the manufacturer or its agents.
CAUTION: DO NOT plug in or energize this appliance until Installation
Instructions are read and followed. Injury to the operator and damage to the Waffle
Baker may occur if these instructions are not followed.
CAUTION: This Wells Waffle Baker is equipped with a threeprong electrical plug. The three-prong plug is part of a system
that will protect you in the event of an electrical wiring failure.
Be sure the three-prong plug is plugged into a matching and properly
grounded three-prong receptacle. DO NOT cut or break off the
ground prong of this plug.
OPERATING AN APPLIANCE WITHOUT PROPER GROUNDING
CAN RESULT IN SERIOUS PERSONAL INJURY
GROUND
PRONG
WARNING: All servicing requiring access to non-insulated electrical components
must be performed by a qualified service technician. Do not open any access panels
which require the use of tools. Failure to follow these directions can result in electrical shock.
IMPORTANT: Make sure that the incoming voltage is the same as the unit is rated for. See
the data plate on the back of the waffle baker for the specified voltage and wattage.
NOTE: This manual should be considered a permanant part of this appliance. The manual
must remain with the appliance if it is sold or moved to another location.
3
INSTALLATION INSTRUCTIONS
A.
UNPACKING AND INSPECTION
1. Carefully remove the Waffle Baker from the carton. Remove all protective plastic film, packaging
materials and accessories from the Waffle Baker before connecting electrical power or otherwise
performing any installation procedures.
NOTE: DO NOT discard the CARTON and other PACKAGING MATERIAL until you have
inspected the Waffle Baker for hidden damage and tested it for PROPER OPERATION.
Refer to SHIPPING DAMAGE CLAIM PROCEDURE on the inside front cover of this manual.
2. Read all instructions in this manual carefully before starting installation of this Waffle Baker.
READ AND UNDERSTAND ALL LABELS AND DIAGRAMS ATTACHED TO THE
WAFFLE BAKER.
3. Carefully account for all components and accessories before discarding packing materials.
Store the accessories in a convenient place for later use:
B.
EQUIPMENT SET-UP
1. Setup the Waffle Baker only on a firm, level surface. The area around the Waffle Baker must be
kept clear of combustible and flammable materials.
2.
Remove the four RUBBER FEET from the packaging and screw them in place on the bottom of the
Waffle Baker.
WARNING: DO NOT ATTEMPT to operate this Waffle Maker without the rubber
feet installed. The rubber feet provide non-skid support to allow the Waffle Baker to
operate without shifting or “walking”. Operating the Waffle Baker without the rubber
feet may result in serious injury to the operator.
3. LEVELING: Verify that the Waffle Baker sits firmly ON ALL FOUR RUBBER FEET. With a spirit
level, check that the Waffle Baker is level front-to-back and side-to-side. Adjust the rubber feet as
necessary to level the Waffle Baker.
4. Verify the voltage of the receptacle matches the nameplate voltage before plugging in the power
cord.
IMPORTANT: Plugging the Waffle Baker into greater voltage than its rating may damage internal
components. Plugging the Waffle Baker into lesser voltage than its rating will cause a significant
decrease in performance.
5. Certain codes require specific ventilation and access requirements. It is the RESPONSIBILITY OF
THE INSTALLER to check with the AUTHORITY HAVING JURISDICTION, in order to ascertain
the applicability of these requirements to THIS SPECIFIC WAFFLE BAKER INSTALLATION.
4
OPERATING INSTRUCTIONS
A.
SEASONING THE GRIDS
1. Lightly spray commercial waffle baker spray on both grid surfaces.
2. Carefully close the upper grid. Turn the power switch to the ON position and allow the Waffle Baker
to pre-heat for at least twenty (20) minutes.
3. Using the handle, lift the upper grid and lightly re-apply commercial waffle baker spray to the grid
surfaces. Carefully lower the upper grid.
4. Allow the unit to heat for five (5) minutes.
5. The grids are now seasoned, and the Waffle Baker is ready to use.
B. PRE-HEAT
1. Turn the power switch to the ON position.
2. With the upper lid closed, allow the Waffle Baker to pre-heat for twenty (20) minutes in order to
allow the grids to reach the proper baking temperature.
C.
ADD BATTER
1. Using the handle, lift the upper lid.
2. Pour the desired amount of Waffle Batter on the lower grid.
D.
COOK
1. Using the handle, carefully close the upper lid.
2. Set the timer for the desired time - approximately 2-1/2 to 3 minutes.
3. At the end of the time delay the bell will ring.
4. Using the handle, raise the upper lid and remove the waffle from the grid.
IMPORTANT: The timer is ONLY A WARNING DEVICE and DOES NOT TURN THE ELEMENT
ON or OFF. Remove the waffle promptly when the bell sounds.
D.
OPERATING HINTS
1. Return the upper lid to the closed position between baking periods for optimum baking performance
and to minimize carbon deposit build-up. The thermostat will prevent over-heating.
2. Use a soft-bristle brush to lightly brush and clean the Waffle Baker whenever waffle residue is
present on the grids.
3. Waffle grids should be re-seasoned after every 3 to 4 waffles to guard against waffles sticking to the
grids. Follow steps 3 thru 5 in the SEASONING THE GRID section.
4. Always use fresh batter which contains sufficient shortening. Add shortening if required and do not
store batter over prolonged periods of time.
5. Frequent cleaning with a soft-bristle brush, and grid re-seasoning during operation will ensure a
perfect, great-tasting Waffle every time.
6.
Every second or third waffle, lightly spray commercial waffle baker spray on the grids.
7. If the Waffle Baker is left on but idle for over an hour, lightly spray commercial waffle baker spray on
the grids prior to baking the next waffle.
8. NEVER apply beeswax, parafin, etc. to the grid surfaces.
9. NEVER use metal implements (i.e. knives, forks, metal tongs) to remove waffles from the grid.
On Silverstone grids, use of metal implements will result in chipping and flaking of the grid finish.
5
PREVENTATIVE MAINTENANCE PROCEDURES
A.
DAILY CLEANING PROCEDURE
CAUTION - ELECTRICAL SHOCK HAZARD
DO NOT SUBMERGE THE WAFFLE BAKER IN WATER.
If internal components become wet, the operator may suffer electrical shock,
and the Waffle Baker will be damaged.
1. Allow the Waffle Baker to cool to room temperature.
2. Clean grids by using a soft-bristle brush to remove all excess waffle residue.
3. Clean the outside of the Waffle Baker by wiping it down with a clean cloth, warm water and a mild
detergent or soap. NEVER USE AN ABRASIVE CLEANSER.
4. Always re-season the grids after cleaning.
B.
REMOVING EXCESS CARBONIZATION
Use this procedure to clean any black residue (carbonization) remaining on the grids after the daily
cleaning. Grids must be cleaned to remove the black residue, then re-seasoned, to ensure maximum
Waffle Baker performance.
CAUTION:
CHEMICAL BURN HAZARD
WAFFLE IRON CLEANER CAN CAUSE SERIOUS BURNS ON CONTACT.
WEAR PROTECTIVE CLOTHING AND SAFETY GLASSES WHEN USING
WAFFLE IRON CLEANER.
Carefully read and follow directions and warnings on the label.
1. Allow the Waffle Baker to cool to room temperature.
2. Liberally apply a commercial carbon cleaning solution to the grids with a new 1” paint brush. Be
extremely careful when applying the carbon cleaning solution on the grid surfaces. DO NOT spill
any carbon cleaning solution or other caustic cleaning product on yourself or on the area in which
you are working.
3. Close the upper lid and allow the Waffle Baker to stand for several hours, or overnight, depending
upon the extent of the carbonization.
4. Thoroughly remove the carbon cleaning solution and black residue using a fiber brush. Wipe down
the grid surfaces carefully and thoroughly with water. It is important that all carbon cleaning solution
is removed.
IMPORTANT: Make certain water and cleaner are not allowed to get into internal parts. The Waffle
Baker will be damaged if internal components are allowed to get wet.
CAUTION - ELECTRICAL SHOCK HAZARD
DO NOT SUBMERGE THE WAFFLE BAKER IN WATER.
If internal components become wet, the operator may suffer electrical shock,
and the Waffle Baker will be damaged.
5. Clean the outside of the Waffle Baker by wiping it down with a clean cloth, warm water and a mild
detergent or soap. NEVER USE AN ABRASIVE CLEANSER.
6. Dry the Waffle Baker with a clean, dry cloth. Always re-season the grids after de-carbonizing.
6
TROUBLESHOOTING
PROBLEM
WILL NOT HEAT
POSSIBLE CAUSE
Power switch not
REMEDY
Turn switch to ON position
ON
Power cord not plugged in
Plug power cord into an energized
120V receptacle
Circuit breaker tripped
Reset circuit breaker
Hi-Limit tripped
Contact an Authorized Wells Service
Agency for repairs
Internal component damage
Contact an Authorized Wells Service
Agency for repairs
DOES NOT MAINTAIN
TEMPERATURE
Excessive carbonization of grids
Internal component damage
Clean grids
Contact an Authorized Wells Service
Agency for repairs
TRIPS CIRCUIT
BREAKER
Too many appliances on circuit
Re-distribute appliances
Have a licensed electrician
install a dedicated 20 Amp circuit
Internal component damage
Contact an Authorized Wells Service
Agency for repairs
Internal component damage
Contact an Authorized Wells Service
Agency for repairs
ALL OTHER
PROBLEMS
7
PARTS and SERVICE
NOTE: Accessory Parts, as well as factory authorized service, are available from your WELLS
AUTHORIZED SERVICE AGENCY.
Wells Manufacturing Co., Service Parts Dept.
2 Erik Circle, P.O.Box 280
Verdi, NV 89439
phone: (775) 345-0444 Ext. 504 fax: (888) 492-2783
Service parts Department can supply you with the name / telephone number of the WELLS
AUTHORIZED SERVICE AGENCY nearest you.
ACCESSORIES
DESCRIPTION
PART #
STAND (Holds 2 units)
DRIP TRAY, REPLACEMENT
20931
21489
CUSTOMER SERVICE DATA
please have this information available if calling for service
RESTAURANT _____________________________ LOCATION _______________
INSTALLATION DATE ________________________ TECHNICIAN _____________
SERVICE COMPANY __________________________________________________
ADDRESS ___________________________ STATE ______ ZIP__________
TELEPHONE NUMBER (_____)_____-_________
EQUIPMENT MODEL NO. ______________________________________________
EQUIPMENT SERIAL NO. ______________________________________________
VOLTAGE: (check one)
120V
208V
240V
8
NOTES
9
WELLS MANUFACTURING COMPANY
2 ERIK CIRCLE, P. O. Box 280
Verdi, NV 89439
Customer Service (775) 345-0444 Ext. 502
fax: (775) 345-8238
www.wellsbloomfield.com